

Roland TrueVIS VG-640, TrueVIS VG-540 Supplemental Manual
Supplemental Explanations
(Corresponds to rmware version 1.60 or later)
Read This before Starting to Assemble the Product
Thank you very much for purchasing the VG-640/VG-540.
There are a number of supplemental points that need to be added and corrections that need to be made to the
instruction manuals included with the product. We ask that you read the information in this manual and use it in
place of the corresponding locations in the instruction manuals.
Manual name Aected page Title
P. 4 2. Included Items
Setup Guide
USER’S MANUAL
P. 15
P. 19 to P. 25 Step 8 : Ink Filling
P. 83, etc. (Precaution When Detaching the Drain Bottle)
P. 15 Main Menu
P. 57 Step 6 : Starting Output
P. 67 Out-of-ink Warnings
P. 86 Timing of Print Head Care and Maintenance
P. 89 Manual Cleaning
New addition Damper Cleaning
P. 97 Super Cleaning
P. 170 to P. 175 Procedure from Preparing to Move to Reinstallation
P. 191 to P. 192 A Message Appears
P. 193 to P. 196 An Error Message Appears
P. 202 Specications
Step 5 : Adjusting the Ink Tube and Axing a Label
(Only When Using Four Colors)
Page in this
manual
P. 2
P. 2
P. 3
P. 11
P. 11
P. 12
P. 13
P. 13, P. 15
P. 14
P. 16
P. 19
P. 21
P. 22
P. 22
P. 24
R2-160617

Thank you very much for purchasing this product.
• To ensure correct and safe usage with a full understanding of this product's performance, please be sure to read
through this manual completely and store it in a safe location.
• Unauthorized copying or transferral, in whole or in part, of this manual is prohibited.
• The specications of this product and the contents of this manual are subject to change without notice.
• This manual and the product have been prepared and tested as much as possible. If you nd any misprints or
errors, please inform Roland DG Corp.
• Roland DG Corp. assumes no responsibility for any direct or indirect loss or damage that may occur through use
of this product, regardless of any failure to perform on the part of this product.
• Roland DG Corp. assumes no responsibility for any direct or indirect loss or damage that may occur with respect
to any article made using this product.
Company names and product names are trademarks or registered trademarks
of their respective holders.
Copyright © 2016 Roland DG Corporation
http://www.rolanddg.com/

Contents
Contents ........................................................................................................1
Additions and Changes to the Setup Guide ..................................................2
Addition: 2. Included Items (P. 4).................................................................................................2
Change: Adjusting the Ink Tube and Axing a Label (P. 15) ............................................ 2
Change: Ink Filling (P. 19 to P. 25) ................................................................................................ 3
Additions and Changes to the User's Manual ............................................. 11
Addition: Precaution When Detaching the Drain Bottle (P. 83, etc.) ............................ 11
Addition: Main Menu (P. 14 to P. 17) .........................................................................................11
Addition: Starting Output (P. 57) ...............................................................................................12
Addition: Out-of-ink Warnings (P. 67) ......................................................................................13
Change: When to Perform Manual Cleaning (P. 86 and P. 89) .........................................13
Addition and Change: Damper Cleaning (P. 86, P. 96, and P. 97) ................................... 15
Addition: Procedure from Preparing to Move to Reinstallation (P. 170 to P. 175) ...21
Addition: A Message Appears (P. 191 to P. 192) ...................................................................22
Addition: An Error Message Appears (P. 193 to P. 196) ......................................................22
Addition and Correction: Specications (P. 202) ................................................................. 24
1

Additions and Changes to the Setup Guide
Addition: 2. Included Items (P. 4)
The following included item has been added.
Included item
Cartridge-slot label (for white; 1)
* With the factory default settings, this label is axed to the platen at the location where the
front cover opens.
Change: Adjusting the Ink Tube and Afxing a Label (P. 15)
The title on P. 15 has been changed from "Step 5: Adjusting the Ink Tube and Afxing a Label
(Only When Using Four Colors)" to "Step 5: Adjusting the Ink Tube and Afxing a Label (When
Using Eight or Four Colors)" and the details have been changed as shown below.
Step 5:
Adjusting the ink tube
This work is required when using the machine with four colors (CMYK). This work must be performed by a suitably qualied service technician. Never attempt to perform this work yourself.
* If you are using this machine with eight colors (CMYKLcLmLkW), only perform the work
* If you are using the machine with seven colors (CMYKLcLmLk), proceed to "Step 6: Con-
Afxing a label
This work is required when using the machine with eight colors (CMYKLcLmLkW) or with four
colors (CMYK).
Items used in this procedure
Included
Adjusting the Ink Tube and Afxing a Label (When Using Eight or Four Colors)
under "Axing a label."
necting the Cables."
CAUTION
item
Leave this work to a suitably qualied worker.
This procedure includes work near sources of electrical danger and
complex assembly work. Incorrect work may result in injury and
mechanical malfunction.
CMYKLcLmLkW Cartridge-slot label (for white)
CMYK Cartridge-slot label (for four colors)
2

Additions and Changes to the Setup Guide
Change: Ink Filling (P. 19 to P. 25)
Details have been changed for the procedure on P. 19 to P. 25 so that eight colors (CMYKLcLmLkW) can be selected. Replace the information on P. 19 to P. 25 with that shown below.
Step 8: Ink Filling
IMPORTANT
First use cleaning liquid to clean the print heads, and then ll the printer with each color of ink.
• Be sure to use new TR cleaning liquid pouches and ink pouches.
• Never, under any circumstances, use anything other than the specied type of ink or cleaning liquid.
• The TR cleaning liquid pouches (2) that are included with the machine are used on P. 20, "2.
Clean the print heads using TR cleaning liquid."
• You must purchase the TR cleaning liquid pouch to be used on P. 24, "4. Fill the machine with TR
cleaning liquid."
Items used in this procedure
separately. Purchase them from your authorized Roland DG Corp. dealer.
Included item TR cleaning liquid pouches (2)
Items purchased separately Ink pouches (each color), TR cleaning liquid pouch (1)
1. Select the ink type.
Press [ ] or [ ] to select the ink type, and then press [ENTER].
A
SELECT INK TYPE
TrueVIS LkW
Name to select
TrueVIS LkW
TrueVIS 7C
TrueVIS 4C
Press [ ] or [ ] to select [YES], and then press [ENTER].
B
SELECT INK TYPE
TrueVIS 7C
Cyan (C)
Magenta (M)
Yellow (Y)
Black (K)
Light cyan (Lc)
Light magenta (Lm)
Light black (Lk)
SELECT INK TYPE
TrueVIS 4C
White (W)
TrueVIS LkW
[YES] NO
If the ink type is incorrect, select [NO], and then press [ENTER] to start again from step A.
TrueVIS 7C
[YES] NO
TrueVIS 4C
[YES] NO
3

Additions and Changes to the Setup Guide
Make sure the drain bottle is installed, and then press [ENTER].
C
P. 13, "Step 3: Installing the Drain Bottle"
INSTALL
DRAIN BOTTLE
The screen shown below appears, and then the machine starts the preparations for
the ink lling. The (approximate) remaining time for the procedure is displayed on the
screen. (The display shown below is an example. "20:00" = "20 minutes and 00 seconds")
FILLING INK...
>>>>> 20:00
MEMO
If the screen shown below appears here, pouch trays remain in the ink slots or in the
cleaning liquid slot. Remove all the pouch trays.
REMOVE CARTRIDGE
12345678
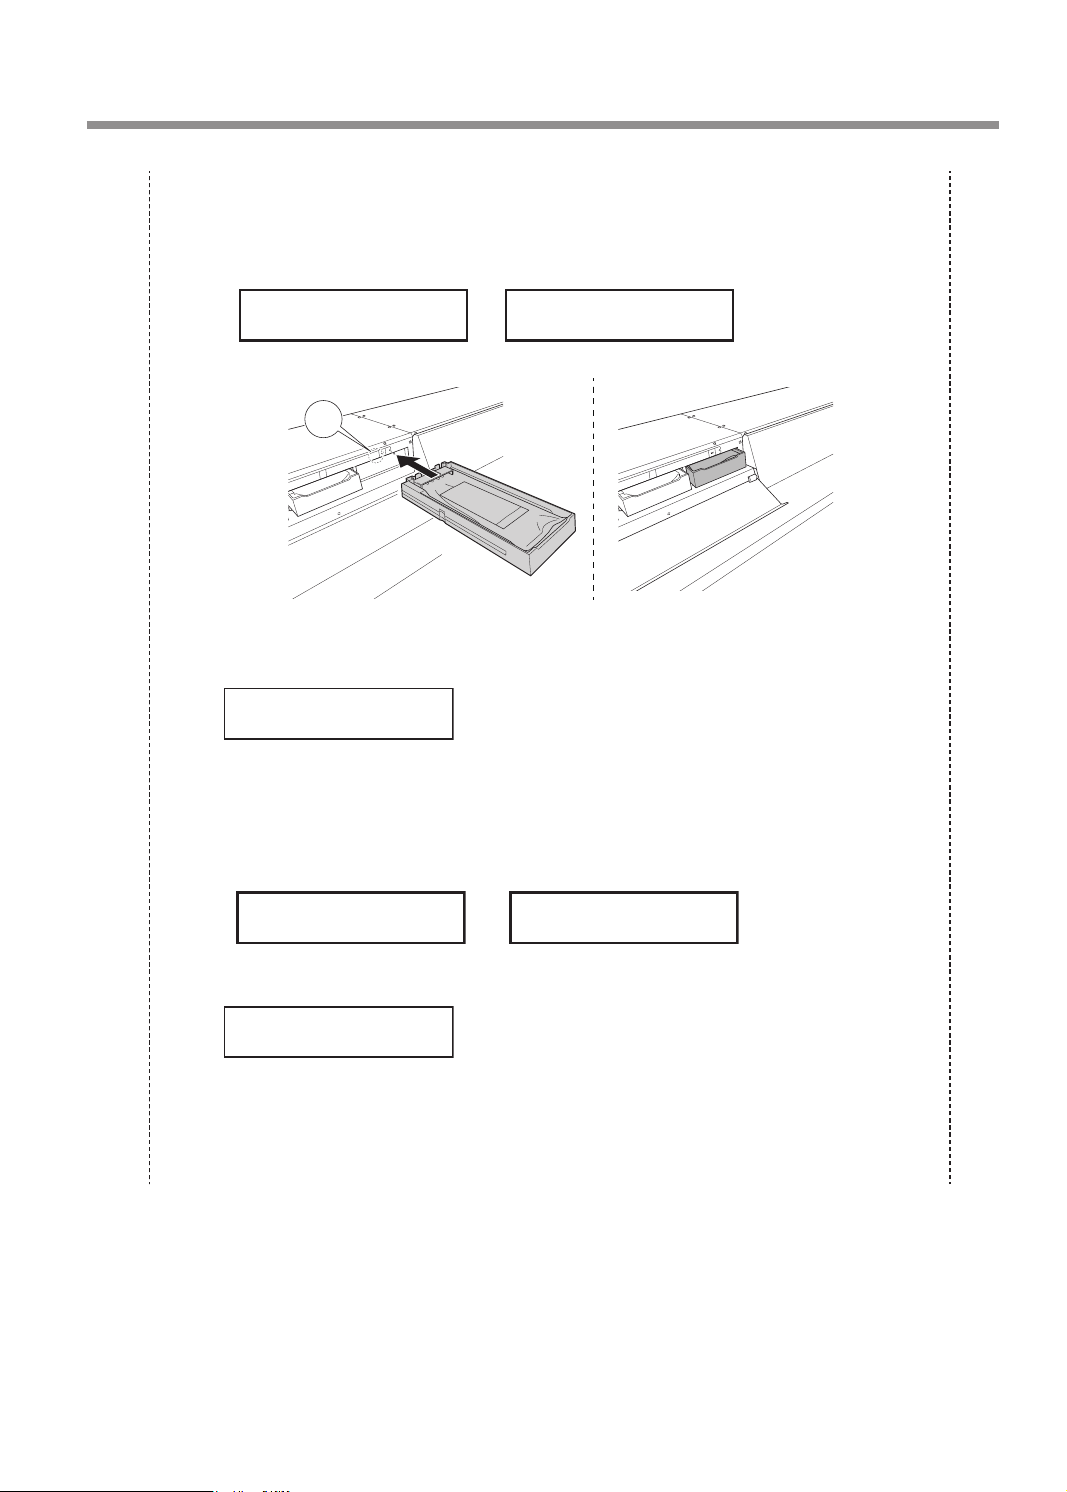
2. Clean the print heads using TR cleaning liquid.
Set the TR cleaning liquid pouch in the pouch tray.
A
CL
CL
Check that the hook has caught.
Hook
4
Additions and Changes to the Setup Guide
When the screen shown below appears, set the pouch tray in which you have
B
set the TR cleaning liquid pouch in the slot whose number is displayed.
8 colors (CMYKLcLmLkW)
7 colors (CMYKLcLmLk)
4 colors (CMYK)
SET CL-LIQUID
34
4
4
YE
3
SET CL-LIQUID
1 3
YE
3
CL
4
* The illustration shows the setting of the pouch tray when eight or seven colors are used.
The screen shown below appears.
FILLING INK...
>>>>> XX:XX
When the screen shown below appears, remove the pouch tray from the slot
C
whose number is displayed.
8 colors (CMYKLcLmLkW)
7 colors (CMYKLcLmLk)
4 colors (CMYK)
REMOVE CL-LIQUID
34
REMOVE CL-LIQUID
1 3
The screen shown below appears.
FILLING INK...
>>>>> XX:XX
Hereafter, the screens shown in steps B and C are repeated.
When you repeat the "SET" and "REMOVE" operations multiple times, the ashing slot
number changes. Follow the instructions on the screen to repeat the "SET" and "REMOVE"
operations for the pouch tray whose slot number is ashing.
5

Additions and Changes to the Setup Guide
MEMO
• When setting the pouch tray: When the pouch tray is set correctly, the
number stops ashing and remains lit.
SET CL-LIQUID
34
SET CL-LIQUID
34
Flashing Lit
• When removing the pouch tray: When the pouch tray is removed correctly,
the number stops ashing and turns off.
SET CL-LIQUID
34
SET CL-LIQUID
4
Flashing Off
If the following message is displayed partway through the operation, remove
D
the drain bottle and discard the discharged uid.
EMPTY
DRAIN BOTTLE
IMPORTANT
When you remove the drain bottle, a few drops of discharged uid may come out of the machine.
Exercise caution to prevent this uid from soiling your hands or the oor.
CAUTION
WARNING
CAUTION
Dispose of discharged uid properly, in accordance with the laws in effect in your locale.
Discharged uid is ammable and contains toxic ingredients. Never attempt to incinerate discharged uid or discard it with ordinary trash. Also, do not dispose of uid in sewer systems, rivers,
or streams. Doing so may have an adverse impact on the environment.
Before you detach the drain bottle, be sure to wait for the screen
to display [EMPTY DRAIN BOTTLE]. After discarding the dis
charged uid, promptly attach the drain bottle to the machine.
Failing to follow this procedure may cause discharged uid to ow
out of the machine and spill, soiling your hands or the oor.
Never place discharged uid or ink near an open ame.
Doing so may cause a re.
To store discharged uid temporarily, place it in the included
drain bottle or in a durable sealed container such as a metal
can or polyethylene tank, and cap the container tightly.
Any spillage or vapor leakage may cause a re, an odor, or physical distress.
-
6

Additions and Changes to the Setup Guide
Quickly attach the emptied drain bottle to the machine once more.
E
Press [ENTER].
F
Follow the instructions on the screen to repeat the "SET" and "REMOVE"
G
operations for the pouch tray whose slot number is ashing.
3. Fill the machine with ink.
When the screen shown below appears, remove the drain bottle and discard
A
the discharged uid.
EMPTY
DRAIN BOTTLE
IMPORTANT
When you remove the drain bottle, a few drops of discharged uid may come out of the machine.
Exercise caution to prevent this uid from soiling your hands or the oor.
CAUTION
WARNING
CAUTION
Quickly attach the emptied drain bottle to the machine once more.
B
Press [ENTER].
C
Before you detach the drain bottle, be sure to wait for the screen
to display [EMPTY DRAIN BOTTLE]. After discarding the dis
charged uid, promptly attach the drain bottle to the machine.
Failing to follow this procedure may cause discharged uid to ow
out of the machine and spill, soiling your hands or the oor.
Never place discharged uid or ink near an open ame.
Doing so may cause a re.
To store discharged uid temporarily, place it in the included
drain bottle or in a durable sealed container such as a metal
can or polyethylene tank, and cap the container tightly.
Any spillage or vapor leakage may cause a re, an odor, or physical
distress.
-
7
 Loading...