

Roland TM-2 Owner’s Manual
English
Deutsch
Français
Italiano
Español
Português
Nederlands
Look what you can do with the TM-2
By using the TM-2 in conjunction with separately sold pads or acoustic drum triggers, you can easily play the
internal sounds or your own audio les.
• Use with acoustic drums to play electronic sounds or percussion
• Enhance an acoustic kick, or layer claps onto a snare
• Play songs or loops
• Connect the TM-2 via MIDI with your V-Drums, and play your favorite drum sounds (WAV les)
Owner’s Manual (this document)
Read this rst. It explains the basic things you need to
know in order to use the TM-2.
PDF Manual (download from the Web)
• Sound List
This lists the TM-2’s internal sounds and the eect
parameters.
To obtain the PDF manual
Enter the following URL in your computer.
1.
http://www.roland.com/manuals/
Choose “TM-2” as the product name.
2.

Contents
Main Features . . . . . . . . . . . . . . . . . . . . . . . . . . . . . . . . . . .2
Quick Start . . . . . . . . . . . . . . . . . . . . . . . . . . . . . . . . . . . . . . 3
Preparations
Installing Batteries . . . . . . . . . . . . . . . . . . . . . . . . . . . . . .4
Using the Mounting Plate . . . . . . . . . . . . . . . . . . . . . . . 4
Panel Descriptions . . . . . . . . . . . . . . . . . . . . . . . . . . . . . . 5
Connecting Your Equipment . . . . . . . . . . . . . . . . . . . . . 6
Turning the Power On/O . . . . . . . . . . . . . . . . . . . . . . .6
Connecting Pads . . . . . . . . . . . . . . . . . . . . . . . . . . . . . . . .7
Basics
Selecting a Kit . . . . . . . . . . . . . . . . . . . . . . . . . . . . . . . . . . . 8
Playing Sounds (Instruments) . . . . . . . . . . . . . . . . . . . . 9
Playing Audio Files . . . . . . . . . . . . . . . . . . . . . . . . . . . . .10
Advanced
Editing the Instruments . . . . . . . . . . . . . . . . . . . . . . . .11
Using a Kit Eect . . . . . . . . . . . . . . . . . . . . . . . . . . . . . . .12
Naming a Kit . . . . . . . . . . . . . . . . . . . . . . . . . . . . . . . . . . .13
Copying a Kit/Instrument Settings . . . . . . . . . . . . . .13
Overall Settings for the TM-2 . . . . . . . . . . . . . . . . . . .14
Main Features
Others
Restoring the Factory Settings . . . . . . . . . . . . . . . . . .14
Saving a Backup to the SD Card . . . . . . . . . . . . . . . . . 15
Adjusting the Connected Pads . . . . . . . . . . . . . . . . . .16
Formatting an SD Card . . . . . . . . . . . . . . . . . . . . . . . . .17
Troubleshooting . . . . . . . . . . . . . . . . . . . . . . . . . . . . . . .18
Error Messages . . . . . . . . . . . . . . . . . . . . . . . . . . . . . . . . . 18
Main Specications . . . . . . . . . . . . . . . . . . . . . . . . . . . .19
USING THE UNIT SAFELY . . . . . . . . . . . . . . . . . . . . . . . .20
IMPORTANT NOTES . . . . . . . . . . . . . . . . . . . . . . . . . . . . .20
Before using this unit, carefully read the sections entitled “USING
THE UNIT SAFELY” and “IMPORTANT NOTES” (leaet “USING THE
UNIT SAFELY” and Owner’s Manual p. 20). These sections provide
important information concerning the proper operation of
the unit. Additionally, in order to feel assured that you have
gained a good grasp of every feature of your new unit, read the
Owner’s Manual in its entirety. This manual should be saved
and kept on hand as a convenient reference.
Copyright © 2014 ROLAND CORPORATION
All rights reserved. No part of this publication may be
reproduced in any form without the written permission of
ROLAND CORPORATION.
Play WAV les
In addition to the internal sounds, you can insert an SD card containing audio les (WAV) and play your favorite
drum sounds, sound eects, songs, or loop phrases.
A wide variety of pads are supported
Use the RT series to trigger the TM-2 from acoustic drums, or the KD series to play it with a kick pedal. Use a
V-pad with a mesh head for a second snare, or connect a BT-1 bar trigger pad. You can connect the pads that are
appropriate for your needs.
Battery operation
The unit can be powered on batteries, reducing troublesome cabling and allowing quick setup.
2
Quick Start
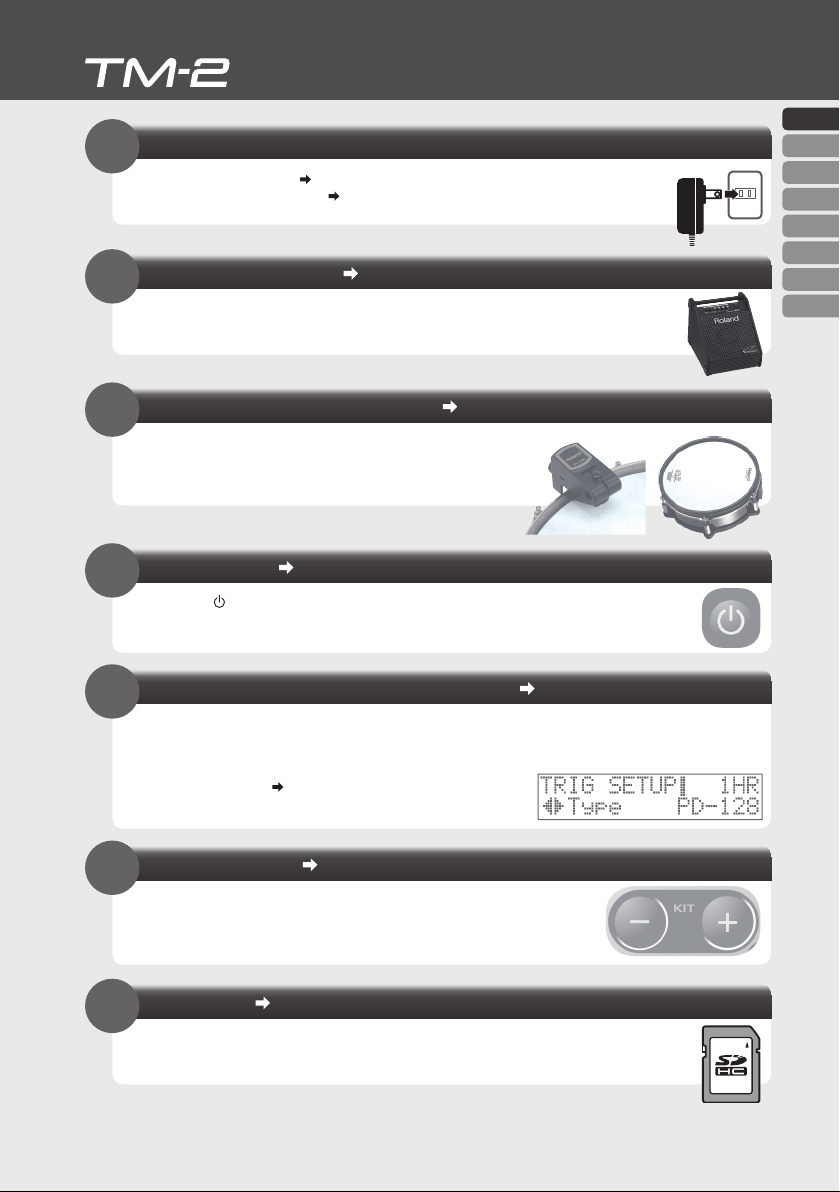
Connect the AC adaptor/Install batteries
1
Connect the AC adaptor. p. 6
Alternatively, install batteries. p. 4
Connect amplied speakers p. 6
2
Connect your amplied speakers or mixer to the OUTPUT jacks.
You can also listen to the sound by connecting headphones to the PHONES jack.
Connect your pads/acoustic drum triggers p. 7
3
Connect your pads or acoustic drum triggers to the TRIG IN
jacks.
To make connections, use the cables included with your
pads.
Turn the power on p. 6
4
Press the [ ] (Power) button.
ENG
JPN
DEU
FRA
ITA
ESL
POR
NLD
Make settings for your pads or acoustic drum triggers p. 7
5
Press the [SHIFT] + [INST] button and specify the type of pads or acoustic drum triggers that you’ve
connected.
* If you’ve connected an acoustic drum trigger, adjust parameters such as “Threshold”, “Curve”, and “RetrgCancel” as
appropriate for the way in which your drum trigger is attached and how
the head is stretched.
Select a kit and play it p. 8
6
Use the [-][+] buttons to select a kit.
Strike the pads to play the kit.
Play audio les p. 10
7
Copy your audio les (WAV, 44.1 kHz) to the Roland/TM-2/WAVE folder of an SD/SDHC card,
and assign them to pads so that they can be played.
p. 16
3
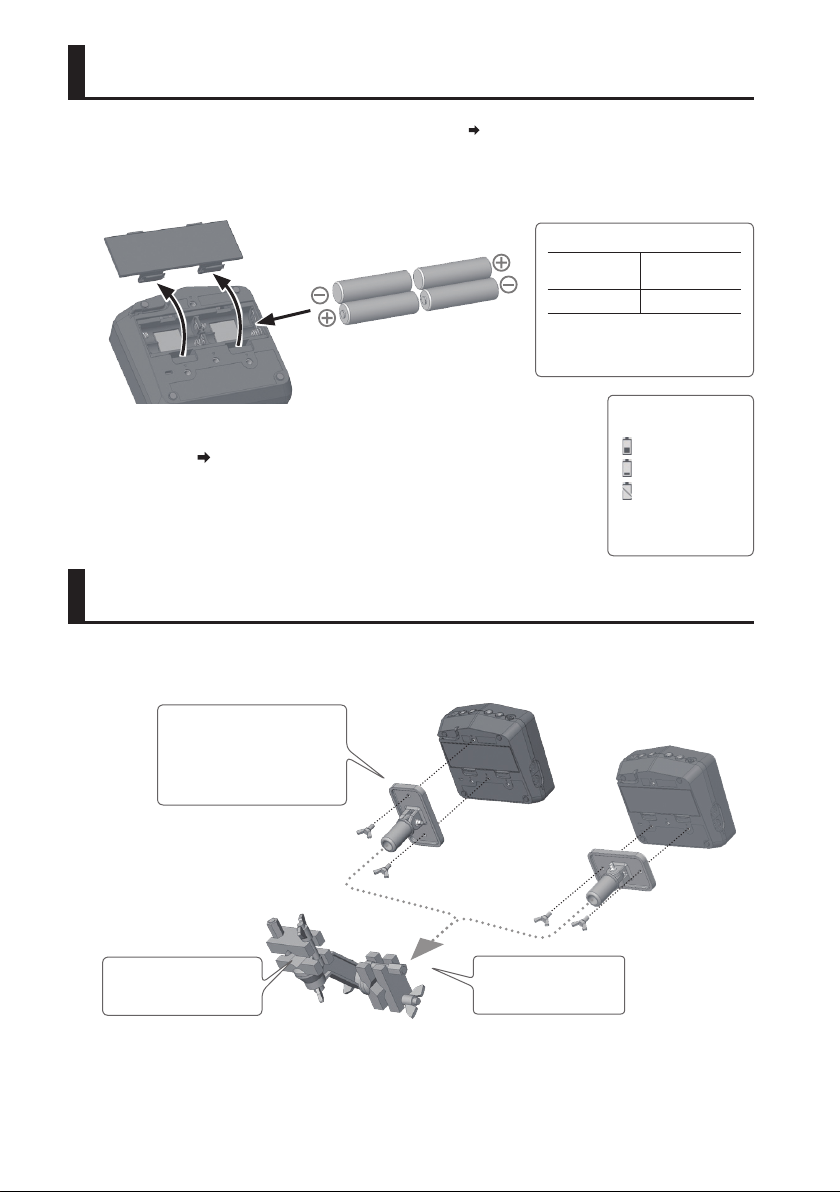
Installing Batteries
* You must turn o the power before installing or removing the batteries.
* If you’re using the unit on battery power, disconnect the AC adaptor from the DC IN jack.
Open the battery compartment cover located on the bottom panel.
1.
Install rechargeable Ni-MH batteries or alkaline batteries (four AA batteries).
2.
1
2
Change the “BATTERY Type” setting to match the type of batteries that
3.
* Take care to observe the
correct polarity.
you installed. p. 14
The approximate remaining battery life is shown in the kit screen.
* If you handle batteries improperly, you risk explosion and uid leakage. Make sure that you
carefully observe all of the items related to batteries that are listed in “USING THE UNIT SAFELY ”
and “IMPORTANT NOTES” (leaet “USING THE UNIT SAFELY” and Owner’s Manual p. 20).
p. 6
Battery life (under continuous use)
Rechargeable
Ni-MH battery
Alkaline battery Approx. 4.5 hours
* The time may vary according to
usage conditions, batteries used, and
type of SD memory card used.
Approx. 6 hours
Remaining battery
amount (approximate)
Half
Nearly empty
Replace the batteries
* The indicator is not
shown if there is plenty
of remaining capacity.
Using the Mounting Plate
By using the mounting plate (included) and the all-purpose clamp (APC-33: sold separately), you can attach the
TM-2 to a hi-hat stand or cymbal stand.
1. Use the included screws to
attach the included mounting
plate.
You can attach the mounting
plate in either vertical or
horizontal orientation.
Vertical
3. Attach to a cymbal stand
or hi-hat stand.
Remove the mounting plate when installing or removing batteries.
* Use only the screws that are included with the TM-2. Using any other screws may cause malfunctions.
* When turning the unit over, be careful so as to protect the knobs from damage.
2. Attach the TM-2 to the
all-purpose clamp.
4
Horizontal
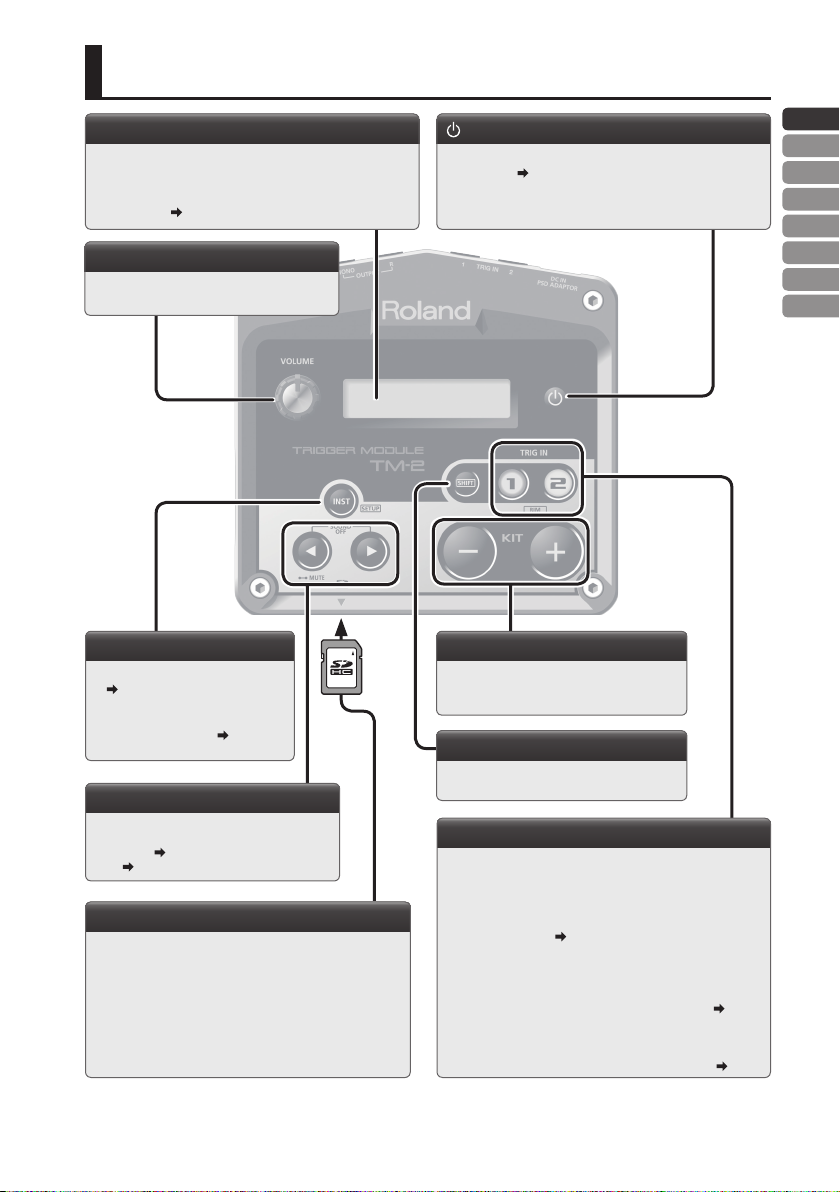
Panel Descriptions
Display
When you turn on the power, the display shows the kit number
and name. If you press the [INST] button, the display shows
parameters and values.
Display settings p. 14
[ ] (Power) button
Turns the power on/o. Hold down the button until the power
turns on or o. p. 6
[VOLUME] knob
Adjusts the volume of the OUTPUT jacks and
PHONES jack.
[INST] button
• Displays the instrument edit screen.
p. 11
• If you hold down the [SHIFT ] button
and press the [INST] button, the
setup screen appears.
p. 14
[<] [>] buttons
Use these buttons to switch parameters or pages.
SOUND OFF p. 8
MUTE p. 8
SD card slot
You can insert an SD card into this slot.
Push the SD card once again to eject.
* Never insert or remove an SD card while this unit is turned
on. Doing so may corrupt the data on the SD card.
* Carefully insert the SD card all the way in—until it is rmly in
place.
* The explanations in this manual include illustrations that depict what should typically be shown by the display. Note, however, that your
unit may incorporate a newer, enhanced version of the system (e.g., includes newer sounds), so what you actually see in the display may
not always match what appears in the manual.
[-] [+] buttons
Use these buttons to switch kits.
In screens such as the edit screen, use these
buttons to edit parameter values.
[SHIFT] button
You can access a variety of functions by using
this in conjunction with other buttons.
TRIG IN [1] [2] buttons
• When you strike a pad, the corresponding TRIG IN [1] [2]
button lights.
• When editing an instrument, use the TRIG IN [1] [2] buttons to
select the pad whose settings you want to change. To select
the rim, hold down the [SHIFT] button and press a TRIG IN
button. (Head, Rim
Preview
When you press a TRIG IN button, the instrument will sound,
allowing you to audition the tone. You can also change a setting
so that sound is not heard when you press the button. p. 14
Trigger lock on/o
If you long-press the TRIG IN [1] or [2] button, the target for
editing will not change even when you strike the pads. p. 14
p. 8)
ENG
JPN
DEU
FRA
ITA
ESL
POR
NLD
5
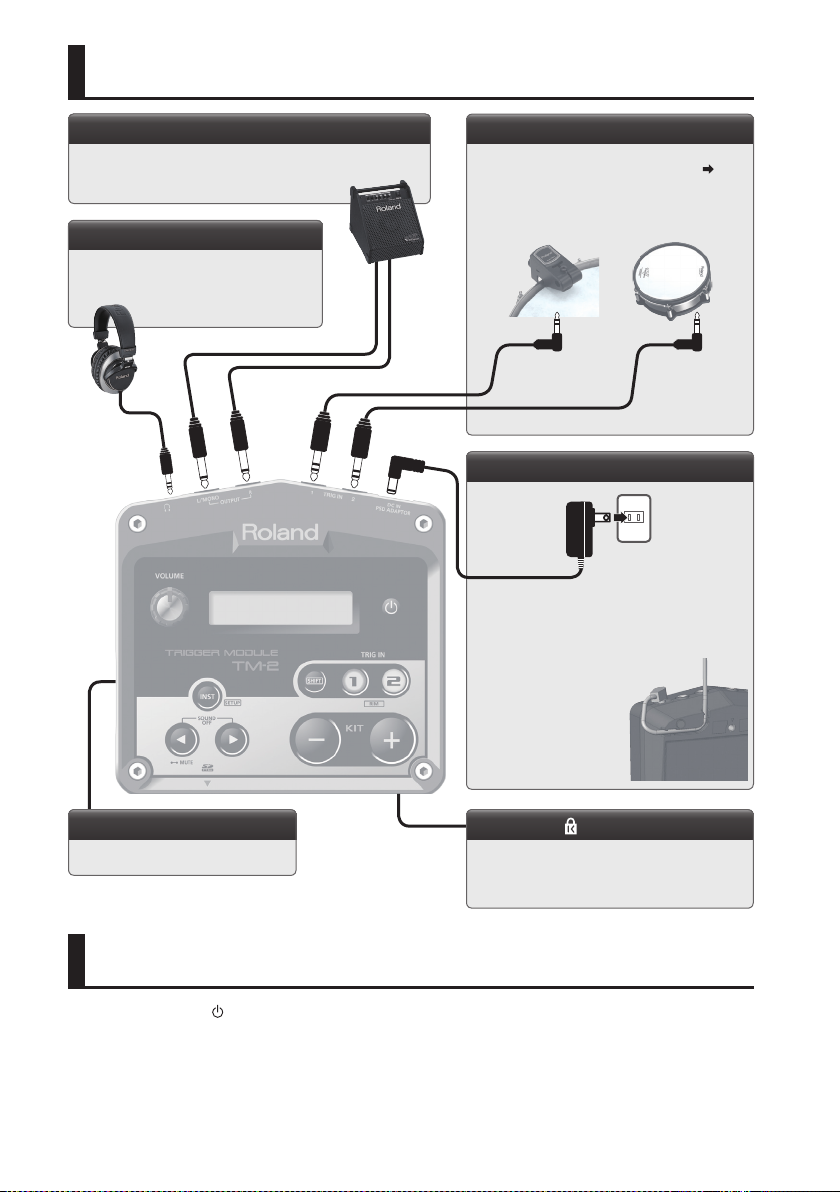
Connecting Your Equipment
OUTPUT jacks
These jacks output the sound. Connect them to amplied speakers,
mixers etc. If you’re outputting in monaural, connect only the L/MONO
jack.
PHONES jack
Connect headphones here.
Even if headphones are connected, sound will
still be output from the OUTPUT jacks.
Stereo miniature
phone plug
TRIG IN 1, 2 jacks
Connect pads (PD series: sold separately) or acoustic
drum triggers (RT series: sold separately) here.
Connection examples
RT-10S
Cables included
with the pad
PD-128S
p. 7
DC IN jack
Connect the included AC adaptor here.
If you’re using the unit on battery power, disconnect
the AC adaptor from the DC IN jack.
To prevent the inadvertent
disruption of power to your
unit (should the plug be
pulled out accidentally), and
to avoid applying undue
stress to the DC IN jack,
anchor the power cord using
the cord hook, as shown in
the illustration.
MIDI (IN, OUT) connectors
Use these to connect MIDI devices such as
V-Drums.
* To prevent malfunction and equipment failure, always turn down the
volume, and turn o all the units before making any connections.
(Bottom)
Security slot ( )
http://www.kensington.com/
Turning the Power On/O
Hold down the [ ] (power) button until the power turns on or o.
1.
* After you’ve made connections correctly, be sure to turn on the power in the order of the TM-2 rst, and then the connected
system. Powering-on in the incorrect order may cause malfunctions or damage. When turning the power o, power-o the
connected system rst, and then the TM-2.
* This unit is equipped with a protection circuit. A brief interval (a few seconds) after turning the unit on is required before it will
operate normally.
* Before turning the unit on/o, always be sure to turn the volume down. Even with the volume turned down, you might hear some
sound when switching the unit on/o. However, this is normal and does not indicate a malfunction.
6
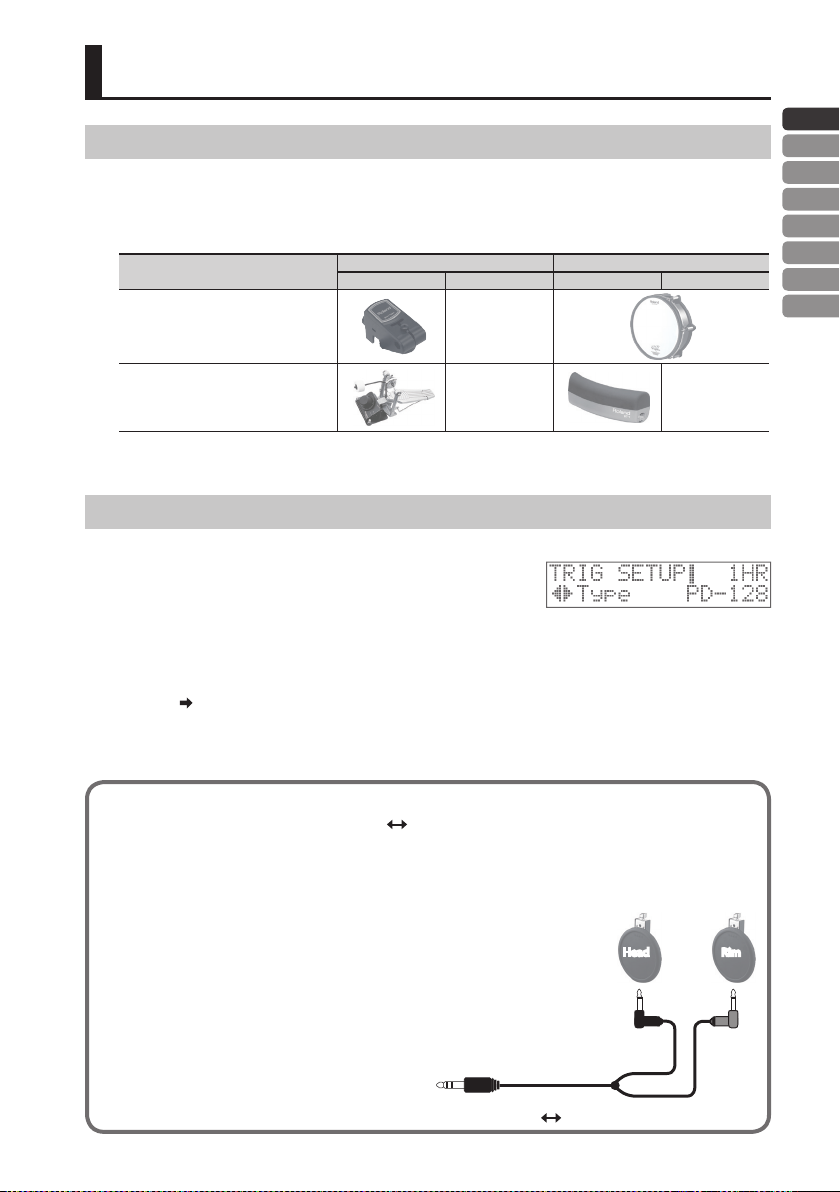
Connecting Pads
Connecting Pads
To make connections, use the cables included with the pad or acoustic drum trigger.
* Subsequently, acoustic drum triggers are called “drum triggers.” We use the term “pads” to include drum triggers.
Connecting examples
Example
Use an RT-10K to enhance an acoustic
kick, and add a PD-128S electronic second
snare
RT-10K
TRIG IN 1 TRIG IN 2
HEAD RIM HEAD RIM
—
PD-128S
ENG
JPN
DEU
FRA
ITA
ESL
POR
NLD
Add a KD-7 kick trigger, and a BT-1 to start
phrases
* Choke play is not supported.
* 3-way trigger for CY-15R, CY-13R are not supported.
KD-7
— —
BT-1
Pad Settings
Hold down the [SHIFT] button and press the [INST] button.
1.
Press the [+] button, and then press the [>] button.
2.
The TRIG SETUP–Type screen will appear.
Press the TRIG IN [1] or [2] button to select the pad for which you want to make settings.
3.
You can also select a pad by striking it.
Use the [-] [+] buttons to select the type of the pad that’s connected.
4.
If you connect a drum trigger, adjust the parameters as appropriate for how it’s attached and how the head is
stretched. p. 16
Press the [INST] button several times to return to the kit screen.
5.
The changes you’ve made will be saved automatically.
Connecting two pads to one TRIG IN jack
By using a connection cable (1/4” stereo phone plug 1/4” phone plug x 2: sold separately) you can connect two pads to
one TRIG IN jack. This lets you use separate pads to play the head and rim of one TRIG IN jack.
* With this connection, strik ing the rim of the pad won’t produce sound.
Hold down the [SHIFT] button and press the [INST] button.
1.
Press the [+] button.
2.
The TRIG SETUP–Input screen will appear.
Use the TRIG IN [1] [2] buttons to select the TRIG IN jack to
3.
which you connected the two pads.
Use the [-] [+] buttons to select “PADx2.”
4.
Press the [>] button.
5.
Strike the two pads to select them, and specify the
type of each pad.
* Satisfac tory operation cannot be obtained if “BT-1” is
selected as the type. When using a BT-1, select “BT-1
SENS” as the type.
Connection cable
(1/4” stereo phone 1/4” phone x 2: sold separately)
To TRIG IN 1 or 2
Head Rim
7
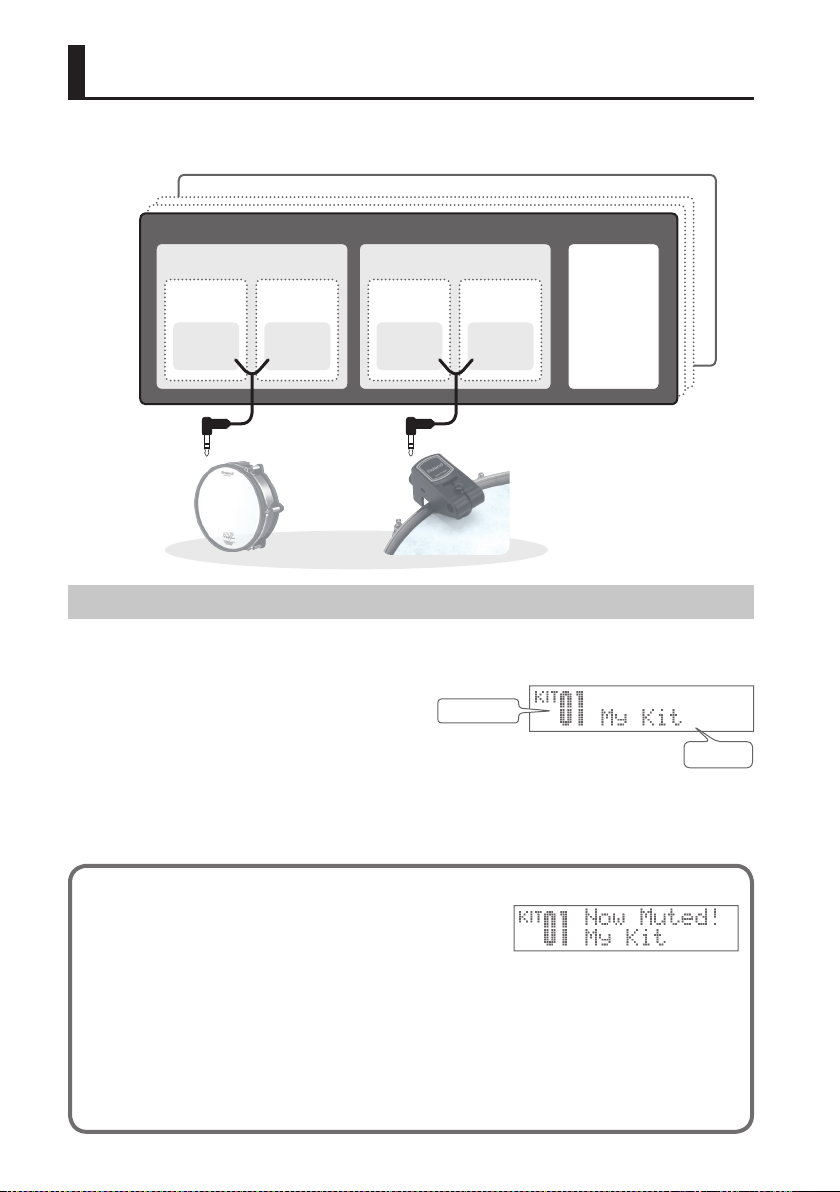
Selecting a Kit
Your choice of sounds (instruments) assigned to the connected pads are saved as a “kit.”
The TM-2 lets you easily select and play 99 dierent kits.
KIT 99
KIT 01
TRIG IN 1
TRIG IN 2
EFFECT
HEAD
INST INST
Rim
RIM HEAD
Head
Pads
RIM
INST INST
Rim
Head
Selecting a Kit
Immediately after the power is turned on, the display shows the “kit screen.”
* If any other screen is shown, press the [INST ] button several times to make the kit screen appear.
Press the [-] [+] buttons.
1.
The selected kit will change.
When you strike the pads, you hear the instruments of that kit.
Kit number
Kit name
Mute
In the kit screen, you can hold down the [<] button to turn on
the mute function, so that striking a pad won’t produce sound.
This lets you prevent sound from being produced inadvertently.
Press the [<] button once again to turn the mute function o.
Sound o
By pressing the [<][>] buttons simultaneously you can stop the sounds that are being heard. This is a
convenient way to stop a song or a loop. The sound of reverb or delay will continue.
Preview
By pressing the TRIG IN [1] or [2] button, you can play the instruments. To play the sound of the rim, hold
down the [SHIFT] button and press the TRIG IN [1] or [2] button.
8
 Loading...