

* 5 1 0 0 0 7 3 1 5 3 - 0 1 *
1
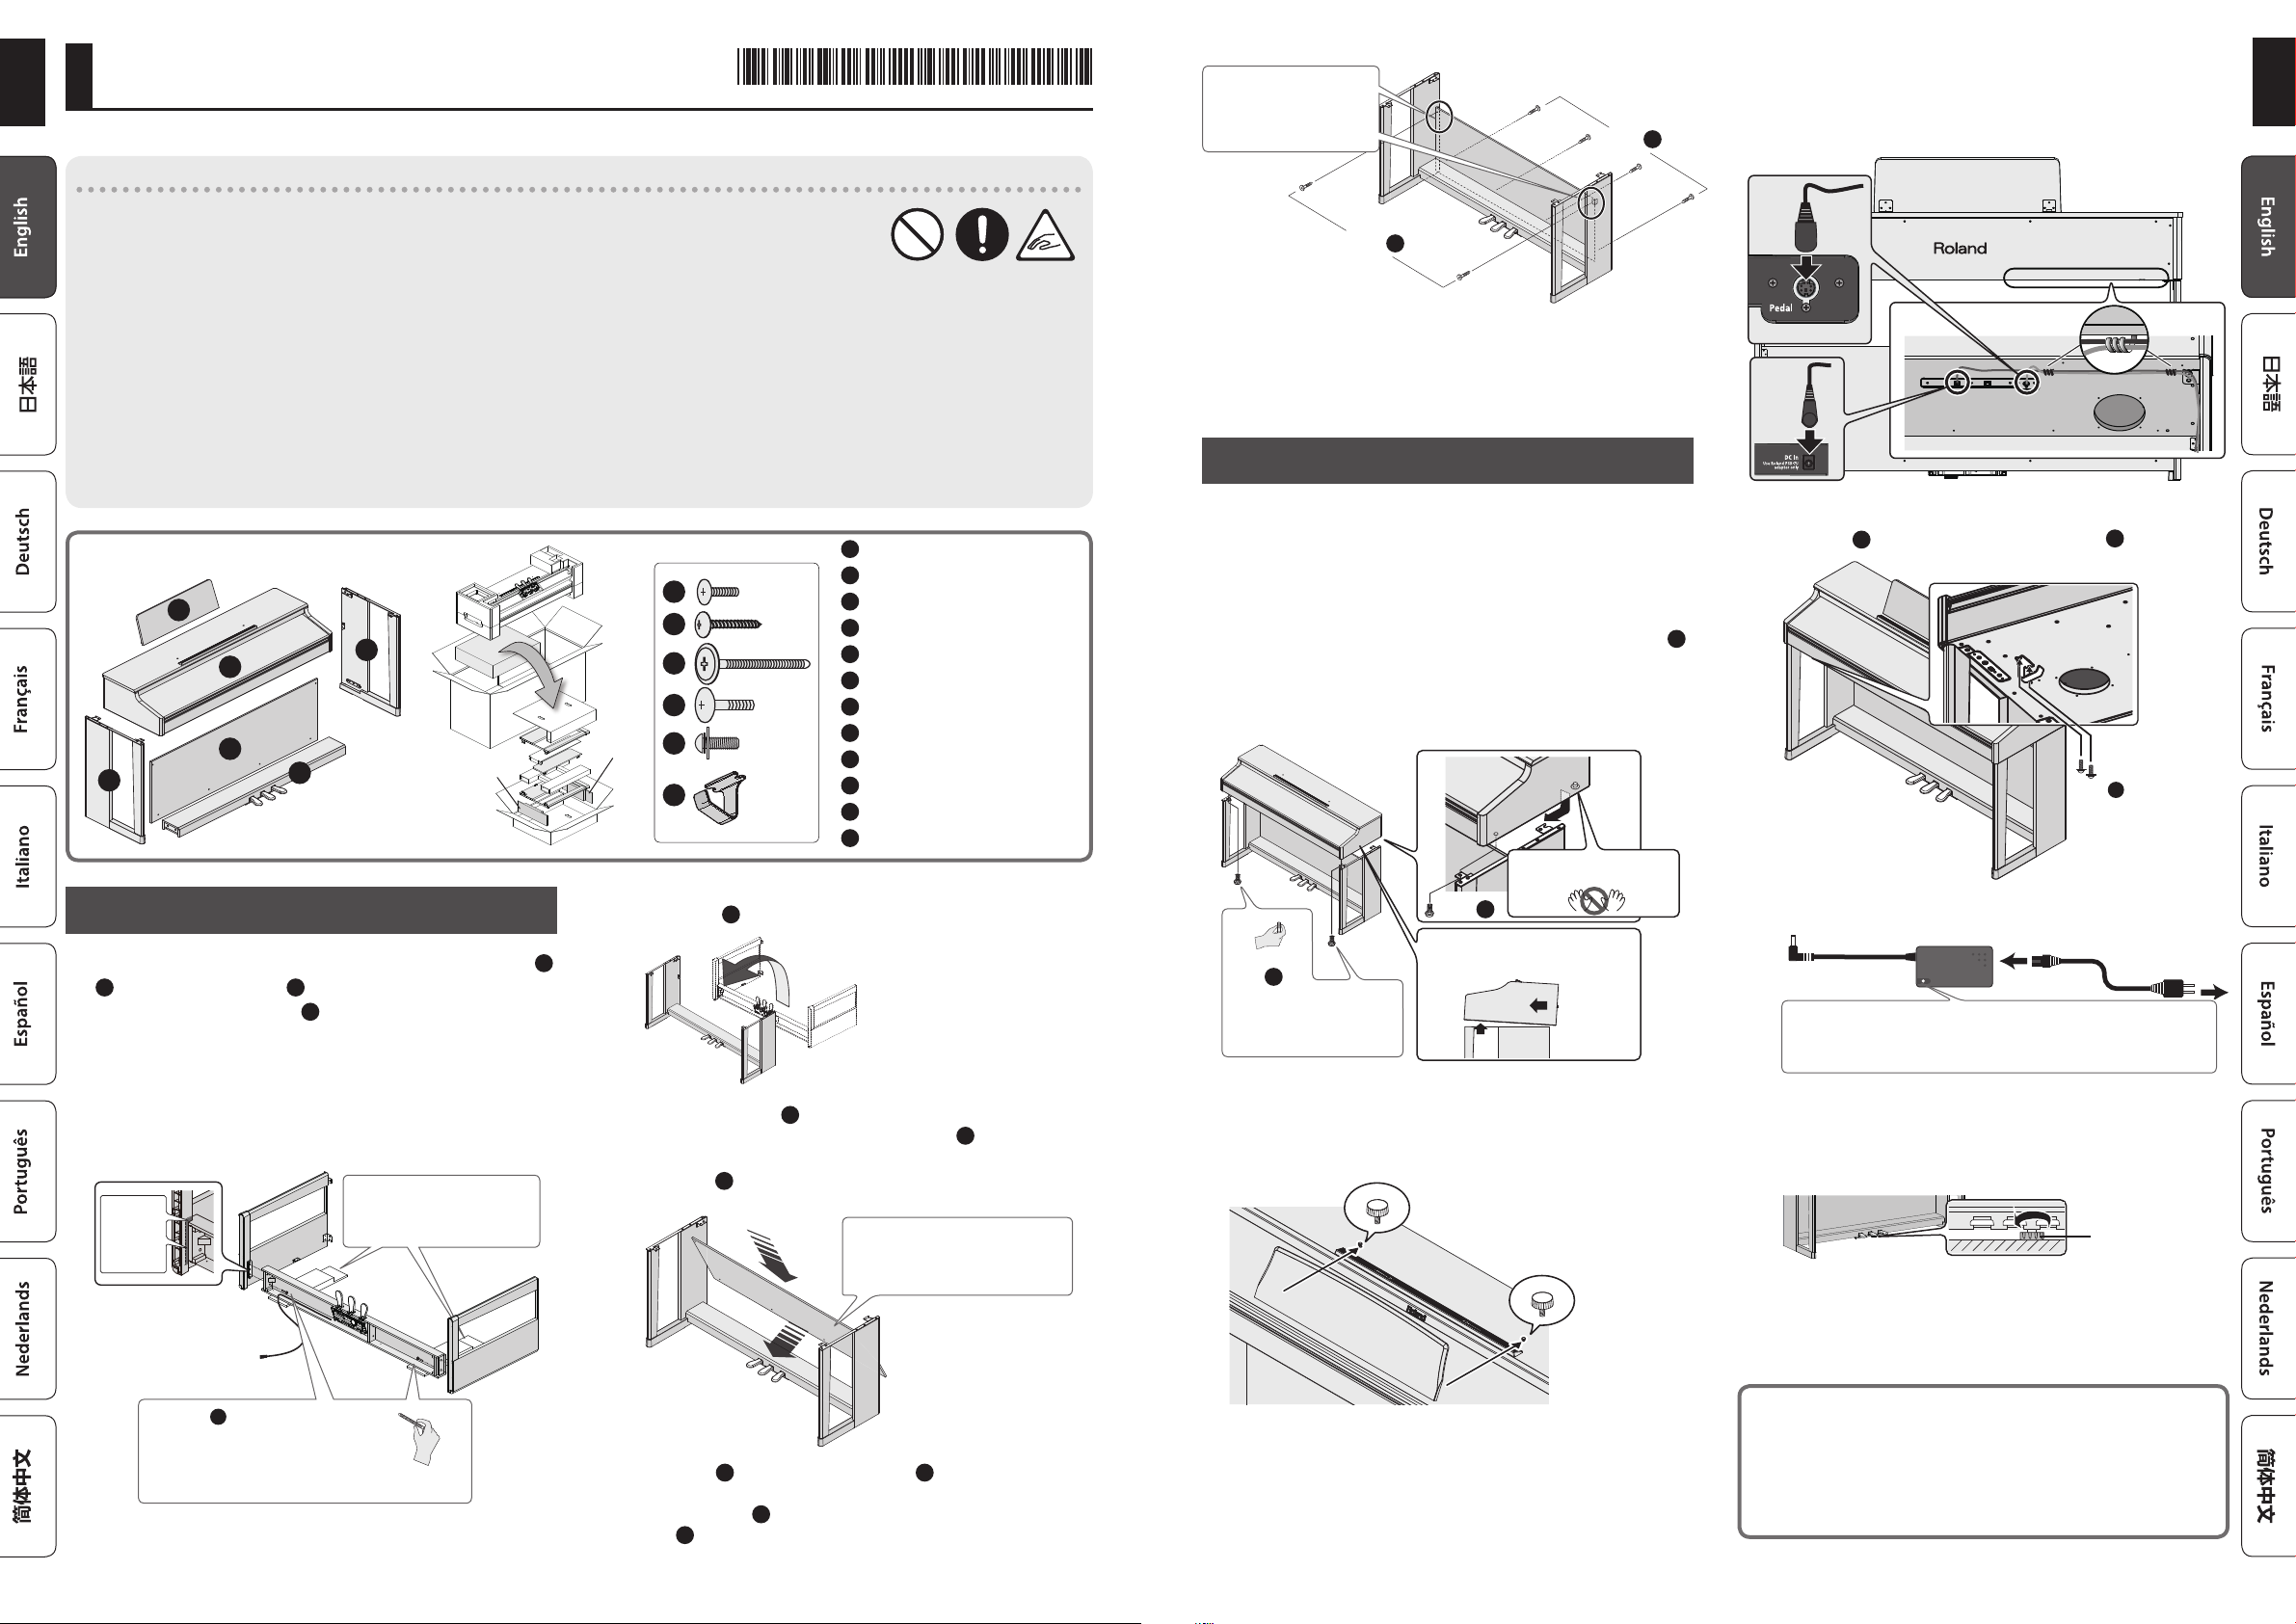
Assembling the RP701
To assemble this product correctly, carefully read these instructions before assembly. Keep these instructions nearby so that you can immediately refer
to them when necessary.
Caution when assembling the unit
• Make sure that another person is on hand to help with the assembly and setup.
• Lift the piano carefully—all the while keeping it level.
• Prepare an area in which you can perform the assembly safely.
• If necessary, spread out a blanket or similar material to prevent the piano or oor from being scratched during assembly.
• Place the unit at a location that is level and sure to remain stable. The unit must never be placed on top of deep-pile carpet. Otherwise, you risk causing
damage to the pedals due to instability and unnecessary movement.
• Make sure to keep screws and any other small parts in a safe location that is out of the reach of small children, so such small parts won’t accidentally get
swallowed.
• Be very careful, when you assemble and move the piano, to make sure that you do not drop it on your hands or feet.
• Do not use a power tool (e.g., an electric screwdriver) to assemble the piano. You risk damaging or stripping the screws.
• All screws should be tightened provisionally rst, then tightened later. To tighten a screw provisionally, screw it in until about half of its length is no longer
visible. For a successful assembly, compensate for any warping while you tighten the screws.
• Be careful not to pinch the pedal cord during assembly.
• Do not place the piano main unit directly on the oor. Doing so will damage the bottom panel case and the connectors on the bottom of the piano main
unit.
Music rest
Check the Parts
1
3
7
8
2
5
6
4
Packing
material
Packing
material
9
10
11
12
1
Piano main unit
2
Side board (left)
3
Side board (right)
4
Rear board
5
Pedal board
6
Screw (4 x 14 mm): 2 pcs.
7
8
Screw (4 x 20 mm): 4 pcs.
9
Screw (5 x 40 mm): 4 pcs.
10
Screw (5 x 20 mm): 2 pcs.
11
Screw (4 x 16 mm): 2 pcs.
12
Headphone hook: 1 pc.
2. Holding the left and right side boards, raise them so that the
1. Assembling the Stand
1. As shown in the illustration, place the left and right side boards
4
next to the pedal board6 so that the metal brackets are on
3
pedal board6 is not twisted.
the inside. Tighten the screws9 (4 locations) two or three turns
by hand, and then use a screwdriver to tighten them rmly.
* If you don’t begin by hand-tightening the screws, the screw threads
might become damaged, making assembly impossible.
* Place the side boards rmly in contact with the side and bottom of
the pedal board, and fasten with the screws.
It will be easier to work if you
Firm
contact!
place packing material under
the pedal board.
3. Place the rear board5 as shown below and adjust the screw
holes of the rear board and the pedal board6.
* If the rear board is dicult to place in position, slightly loosening
the screws9 will let it t more easily. Retighten the screws that you
loosened.
Orient the rear board so that the
woodgrain is toward yourself
(the front). (If there is woodgrain on
both sides, both sides are the same.)
Ensure that there is no gap
between the rear board
and the side boards.
8
Screw
7
Screw
5. Tighten the screws while correcting any skew in the overall
assembly.
* When attaching the rear board, before tightening the screws, adjust
things as necessary at all the points where there are screws so as to
assure that the rear board is aligned in parallel with the pedal board.
2. Install the Piano Unit onto the Stand
1. Align the screws on the bottom of the piano main unit (one each
at left and right) with the metal brackets on the side boards, and
while keeping the front of the piano slightly raised, pull it toward
yourself to engage the screws in the metal brackets.
* When handling the piano, rmly grasp it. Be careful, so you do not get
your ngers pinched.
2. Place the piano unit on the stand, hand-tighten the screws10
(2 locations) two or three turns, and then use a screwdriver to
tighten them rmly.
* If you don’t begin by hand-tightening the screws, the screw threads
or the insert nut might be damaged, making assembly impossible.
Please don’t get your
ngers pinched.
10
Screw
Pull the piano toward yourself
while keeping the front slightly
10
Screw
Start by tightening the screws
two or three turns by hand, and
then use a screwdriver to tighten
them rmly.
3. Loosen the music rest screws slightly (2–3 mm), insert the
music rest brackets between the screws and the body of the
piano, and turn the screws to secure the music rest while
using one hand to support the music rest.
raised.
4. Connect the AC adaptor to the DC In jack on the back of the
unit, and connect the pedal cord to the Pedal jack. Use the
cable fasteners on the bottom of the unit to secure the power
cord and pedal cord.
Cable
fastener
Cord
5. Use screws 11 to fasten the headphone hook12.
11
Screw
(2 pcs.)
6. Connect the supplied AC adaptor and power cord.
Power cord
Place the AC adaptor so the side with the indicator faces upwards and
the side with textual information faces downwards. The indicator will
light when you plug the AC adaptor into an AC outlet.
To AC outlet
7. Adjust the Adjuster under the pedal.
Turn the adjuster to lower it until the adjuster is in rm contact with
the oor. In particular, when you’ve placed the piano on carpet, you
must turn the adjuster until it is pressing rmly against the oor.
Adjuster
* The pedal may be damaged if there is a gap between the adjuster and
the oor.
1
Leave the pedal cord extended
Two screws9 on each side
Start by tightening the screws two or
three turns by hand, and then use a
screwdriver to tighten them rmly.
4. Use screws 7to fasten the rear board5 from the front to
the metal brackets on the inside of the side boards.
Then use screws8 to fasten the rear board to the pedal
board6 from behind.
When attaching the music rest, make sure that it is rmly inserted all
the way toward the back, and use your hand to support the music
rest so that it does not fall. Also take care not to pinch your hand.
* Do not apply excessive force to the music rest.
* If you need to remove the music rest, loosen the screws while using
one hand to support the music rest. Detach the music rest, and then
rmly retighten the screws.
When moving or transporting
Before moving this unit, close the keyboard cover and remove the music rest. Next,
disconnect the AC adaptor and rotate the adjuster under the pedals to raise it.
With the assistance of another person, lift the unit horizontally, and carry it with
care to avoid pinching your hand or dropping the unit on your foot.
When you have decided where to place the unit, rotate the adjuster so that it
contacts the oor.
© 2020 Roland Corporation
 Loading...