

Page 1
Owner’s Manual
Bedienungsanleitung • Mode d’emploi • Manuale di Istruzioni
Manual del Usuario • Handleiding
r
Page 2
WARNING
– To reduce the risk of fire or electric shock, do not expose this device to rain or moisture.
This product complies with the requirements of EMCD 2004/108/EC and LVD 2006/95/EC.
Dieses Produkt erfüllt die Anforderungen von EMCD 2004/108/EC und LVD 2006/95/EC.
Ce produit est conforme aux exigences de EMCD 2004/108/EC et LVD 2006/95/EC.
Questo prodotto è conforme alle esigenze di EMCD 2004/108/EC e LVD 2006/95/EC.
Este producto cumple con las directrices EMCD 2004/108/EC y LVD 2006/95/EC.
Dit product beantwoordt aan de vereisten van EMCD 2004/108/EC en LVD 2006/95/EC.
For EU countries
For EU Countries
For the USA
For the USA
FEDERAL COMMUNICATIONS COMMISSION
RADIO FREQUENCY INTERFERENCE STATEMENT
This equipment has been tested and found to comply with the limits for a Class B digital device, pursuant to Part 15 of the
FCC Rules. These limits are designed to provide reasonable protection against harmful interference in a residential
installation. This equipment generates, uses, and can radiate radio frequency energy and, if not installed and used in
accordance with the instructions, may cause harmful interference to radio communications. However, there is no guarantee
that interference will not occur in a particular installation. If this equipment does cause harmful interference to radio or
television reception, which can be determined by turning the equipment off and on, the user is encouraged to try to correct the
interference by one or more of the following measures:
– Reorient or relocate the receiving antenna.
– Increase the separation between the equipment and receiver.
– Connect the equipment into an outlet on a circuit different from that to which the receiver is connected.
– Consult the dealer or an experienced radio/TV technician for help.
This device complies with Part 15 of the FCC Rules. Operation is subject to the following two conditions:
(1) This device may not cause harmful interference, and
(2) This device must accept any interference received, including interference that may cause undesired operation.
This equipment requires shielded interface cables in order to meet FCC class B limit.
Any unauthorized changes or modifications not expressly approved by the party responsible for compliance could void the
user's authority to operate the unit.
For Canada
For Canada
NOTICE
This Class B digital apparatus meets all requirements of the Canadian Interference-Causing Equipment Regulations.
AVIS
For C.A. US (Proposition 65)
For C.A. US (Proposition 65
WARNING
This product contains chemicals known to cause cancer, birth defects and other reproductive harm, including lead.
For the UK
For the U.K.
IMPORTANT: THE WIRES IN THIS MAINS LEAD ARE COLOURED IN ACCORDANCE WITH THE FOLLOWING CODE.
BLUE:
BROWN:
As the colours of the wires in the mains lead of this apparatus may not correspond with the coloured markings identifying
the terminals in your plug, proceed as follows:
The wire which is coloured BLUE must be connected to the terminal which is marked with the letter N or coloured BLACK.
The wire which is coloured BROWN must be connected to the terminal which is marked with the letter L or coloured RED.
Under no circumstances must either of the above wires be connected to the earth terminal of a three pin plug.
NEUTRAL
LIVE
)
Page 3

r
Copyright © 2012 ROLAND EUROPE. All rights reserved. No part of this publication may be reproduced in any form without the written permission of Roland Europe S.p.a.
Roland and GS are either registered trademarks or trademarks of Roland Corporation in the United States and/or other countries.
Owner’s Manual
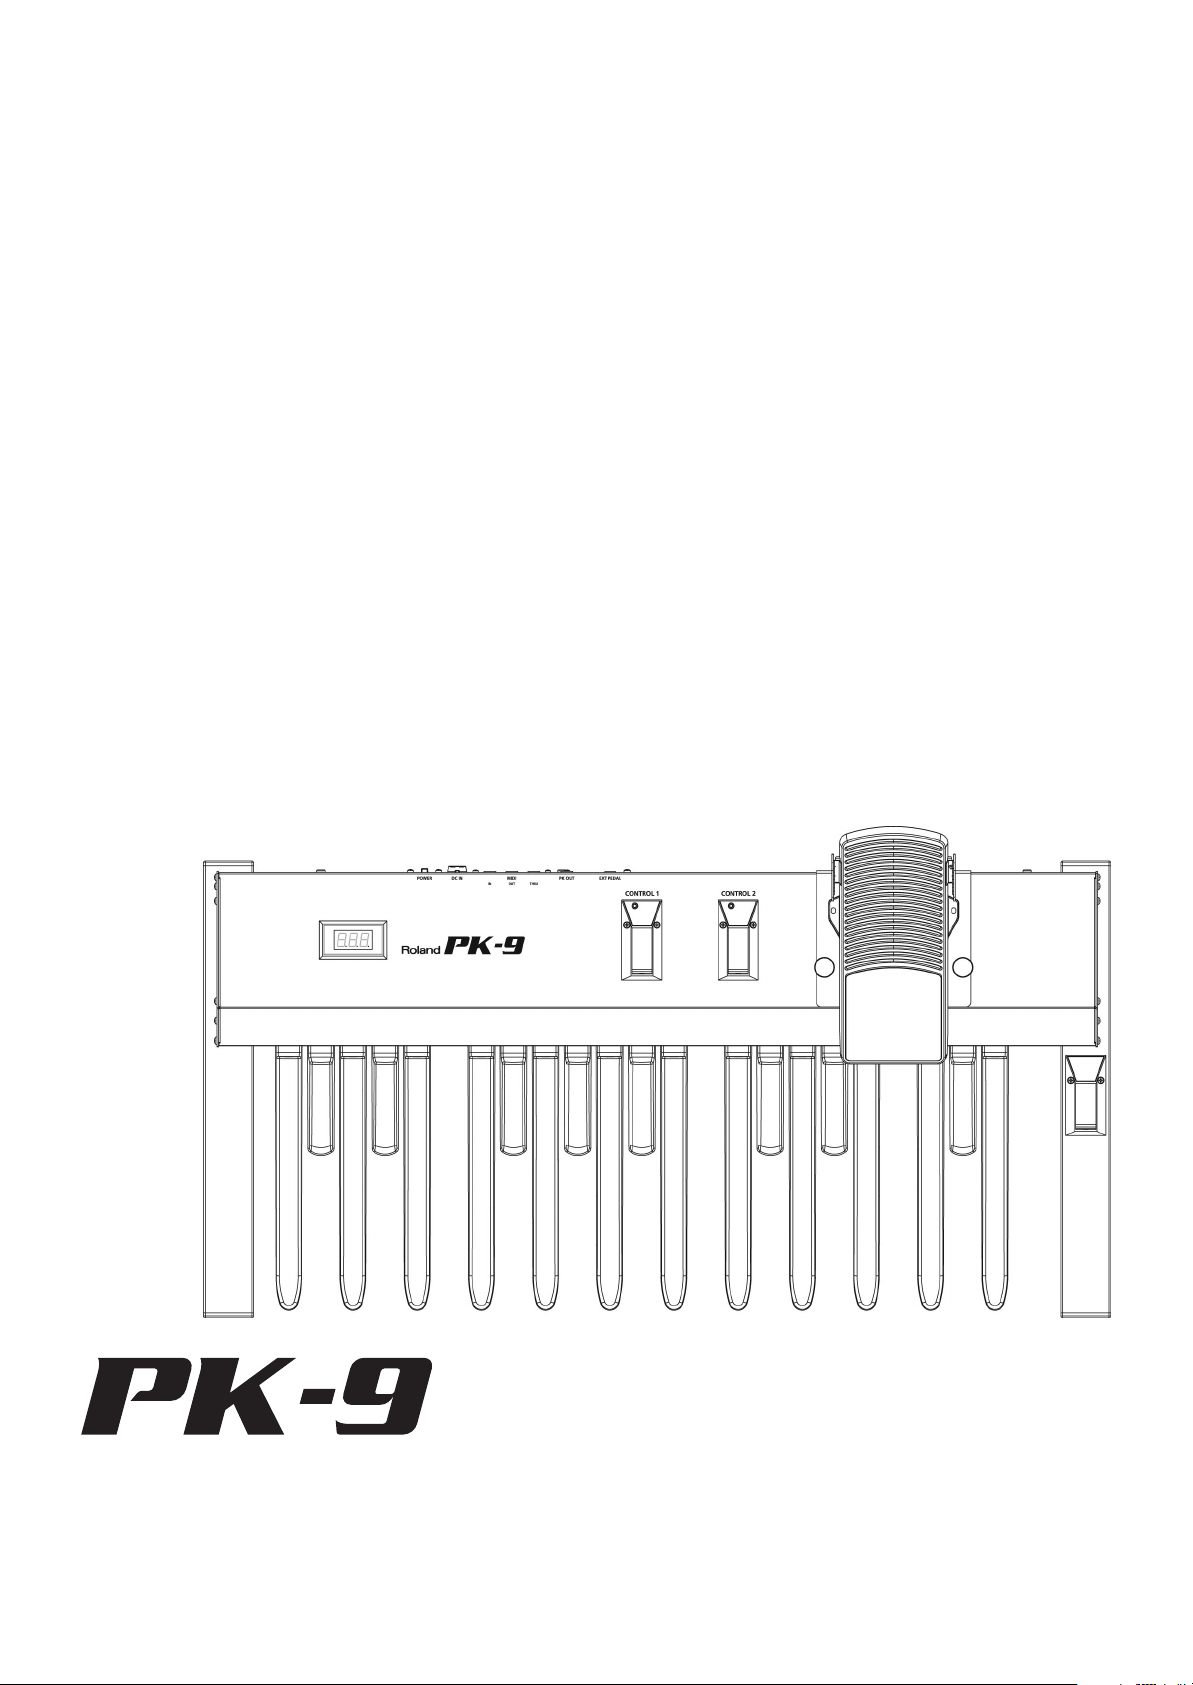
Thank you, and congratulations on your choice of the Roland PK-9 MIDI Pedalboard.
In addition to the pedalboard, which greatly enhances your enjoyment in playing the organ, the PK-9 also features an
expression pedal that lends precise and dynamic volume expression to performances, two footswitches that enable pedal
control over a variety of Roland organ functions, and a hold pedal for sustaining notes.
Features
• Easy to use and to set up, thanks to its display.
• 20-note pedalboard and removable expression pedal
The PK-9 features a twenty-note pedalboard for maximum enjoyment of organ playing. The built-in expression pedal can be
removed from the unit to make the unit more compact for transportation.
•Two footswitches on the sides of the expression pedal.
You can assign different functions to these switches to control aspects like the slow and fast Rotary effect speeds, Rotary
Break Speed and Portamento.
•Two CONTROL pedals on the top panel.
These pedals can be assigned the functions you wish to control on the connected instrument (Octaver Bass, Portamento,
Monophonic mode, etc.).
• Hold pedal
A Hold pedal is located where it can be easily operated with your right foot, for additional expressive possibilities when playing sustain-type sounds.
• Adjustable transposition interval, octave and MIDI channel.
The PK-9’s Parameter mode allows you to transpose the pedalboard, to select a different octave and to match the MIDI
channel setting with other equipment.
• You can decide to control parameters like expression, filter cutoff frequency, resonance, etc., with and external foot switch
(EXTERNAL PEDAL jack) by connecting an optional pedal switch (Roland DP-series), an optional foot switch (BOSS FS-5U) or
an optional expression pedal (Roland EV-5).
•The MIDI Merge function (MIDI IN to MIDI OUT) combines MIDI messages the PK-9 receives from an external MIDI device
with the ones you generate by playing it and transmits all MIDI data to a receiving MIDI device.
•Single-cable connection to Roland organ (AT-350C, AT-900C, C-200, etc.)
When connecting the PK-9 to a Roland organ (equipped with a PK-IN socket), the PK cable is the only connection
required—no need for MIDI cables, analog cables, or an AC adaptor. This makes setup quick and easy.
ENGLISH ENGLISH ENGLISH ENGLISH ENGLISH ENGLISH
The explanations in this manual include illustrations that depict what should typically be shown by the display. Note, however, that your unit may incorporate a newer, enhanced version of the system (e.g., include newer sounds), so what you
actually see in the display may not always match what appears in the manual.
Before using this instrument, carefully read “Using the unit safely” on p. 4 and “Important notes” on p. 6. Those sections provide information concerning the proper operation of the PK-9. Additionally, in order to feel assured that you have gained a good grasp of every
feature provided by your new unit, the manual should be read in its entirety. The manual should be saved and kept on hand as a convenient reference.
Page 4
MIDI Pedalboard
Using the unit safely
PK-9
Used for instructions intended to alert
the user to the risk of death or severe
injury should the unit be used
improperly.
Used for instructions intended to alert
the user to the risk of injury or material
damage should the unit be used
improperly.
* Material damage refers to damage or
other adverse effects caused with
respect to the home and all its
furnishings, as well to domestic
animals or pets.
Do not disassemble or modify by yourself
• Do not open (or modify in any way) the unit or its AC
adaptor.
.................................................................................................
Do not repair or replace parts by yourself
• Do not attempt to repair the unit, or replace parts within
it (except when this manual provides specific instructions
directing you to do so). Refer all servicing to your retailer,
the nearest Roland Service Center, or an authorized
Roland distributor, as listed on the “Information” page
.................................................................................................
.
Don’t use or store in locations that are
• Subject to temperature extremes (e.g., direct sunlight
in an enclosed vehicle, near a heating duct, on top of
heat-generating equipment); or are
• Damp (e.g., baths, washrooms, on wet floors); or are
• Exposed to steam or smoke; or are
• Subject to salt exposure; or are
• Humid; or are
• Exposed to rain; or are
• Dusty or sandy; or are
• Subject to high levels of vibration and shakiness.
.................................................................................................
Don’t place in an unstable location
•Make sure you always have the unit placed so it is level
and sure to remain stable. Never place it on stands that
could wobble, or on inclined surfaces.
.................................................................................................
Use only the supplied adaptor and the correct voltage
• Be sure to use only the PSB-1U AC adaptor supplied with
the PK-9, and make sure the line voltage at the installation matches the input voltage specified on the AC adaptor's body. Other AC adaptors may use a different polarity, or be designed for a different voltage, so their use
could result in damage, malfunction, or electric shock.
.................................................................................................
The symbol alerts the user to important instructions
or warnings.The specific meaning of the symbol is
determined by the design contained within the
triangle. In the case of the symbol at left, it is used for
general cautions, warnings, or alerts to danger.
The symbol alerts the user to items that must never
be carried out (are forbidden). The specific thing that
must not be done is indicated by the design contained
within the circle. In the case of the symbol at left, it
means that the unit must never be disassembled.
The ● symbol alerts the user to things that must be
carried out. The specific thing that must be done is
indicated by the design contained within the circle. In
the case of the symbol at left, it means that the powercord plug must be unplugged from the outlet.
Use only the PSB-1U AC adaptor power
cord
• Use only the PSB-1U power-supply cord. Also, the supplied power cord must not be used with any other device.
................................................................................................
Do not bend the power cord or place heavy
objects on it
• Do not excessively twist or bend the power cord, nor
place heavy objects on it. Doing so can damage the cord,
producing severed elements and short circuits. Damaged
cords are fire and shock hazards!
................................................................................................
Don’t allow foreign objects or liquids to
enter the unit; never place containers with
liquid on the unit
• Never allow foreign objects (e.g., flammable material,
coins, pins) or liquids (e.g., water or juice) to enter this
unit. Doing so may cause short circuits, faulty operation,
or other malfunctions.
................................................................................................
Turn off the unit if an abnormality or malfunction occurs
•Immediately turn the unit off, remove the AC adaptor
from the outlet, and request servicing by your retailer,
the nearest Roland Service Center, or an authorized
Roland distributor, as listed on the “Information” page
when:
• The AC adaptor, the power-supply cord, or the plug
has been damaged; or
• If smoke or unusual odor occurs
• Objects have fallen into, or liquid has been spilled onto
the unit; or
• The unit has been exposed to rain (or otherwise has
become wet); or
• The unit does not appear to operate normally or exhibits a
marked change in performance.
................................................................................................
r
4
Page 5
MIDI Pedalboard PK-9
Using the unit safely
r
Adults must provide supervision in places
where children are present
•When using the unit in locations where children are
present, be careful so no mishandling of the unit can
take place. An adult should always be on hand to provide
supervision and guidance.
.................................................................................................
Do not drop or subject to strong impact
• Protect the unit from strong impact.
(Do not drop it!)
.................................................................................................
Do not share an outlet with an unreasonable number of other devices
• Do not force the unit's power-supply cord to share an
outlet with an unreasonable number of other devices. Be
especially careful when using extension cords—the total
power used by all devices you have connected to the
extension cord's outlet must never exceed the power rating (watts/amperes) for the extension cord. Excessive
loads can cause the insulation on the cord to heat up and
eventually melt through.
.................................................................................................
Do not use overseas
• Before using the unit in a foreign country, consult with
your retailer, the nearest Roland Service Center, or an
authorized Roland distributor, as listed on the “Information” page.
.................................................................................................
Place in a well ventilated location
• The unit and the AC adaptor should be located so their
location or position does not interfere with their proper
ventilation.
................................................................................................
Grasp the plug when connecting or disconnecting the AC adaptor
•Always grasp only the plug on the AC adaptor cord when
plugging into, or unplugging from, an outlet or this unit.
................................................................................................
Periodically clean the AC adaptor’s plug
• At regular intervals, you should unplug the AC adaptor
and clean it by using a dry cloth to wipe all dust and
other accumulations away from its prongs. Also, disconnect the power plug from the power outlet whenever the
unit is to remain unused for an extended period of time.
Any accumulation of dust between the power plug and
the power outlet can result in poor insulation and lead to
fire.
................................................................................................
Manage cables for safety
• Try to prevent cords and cables from becoming entangled. Also, all cords and cables should be placed so they
are out of the reach of children.
................................................................................................
.
Avoid climbing on top of the unit, or placing heavy objects on it
• Never climb on top of, nor place heavy objects on the
unit.
ENGLISH ENGLISH ENGLISH ENGLISH ENGLISH ENGLISH
................................................................................................
Do not connect or disconnect the AC
adaptor with wet hands
• Never handle the AC adaptor or its plugs with wet hands
when plugging into, or unplugging from, an outlet or
this unit.
................................................................................................
Disconnect everything before moving the
unit
• Before moving the unit, disconnect the AC adaptor and
all cords coming from external devices.
................................................................................................
Unplug the AC adaptor from the outlet
before cleaning
• Before cleaning the unit, turn it off and unplug the AC
adaptor from the outlet (page 11).
................................................................................................
If there is a possibility of lightning strike,
disconnect the AC adaptor from the outlet
•Whenever you suspect the possibility of lightning in your
area, disconnect the AC adaptor from the outlet.
................................................................................................
Keep small items out of reach of children
• To prevent accidental ingestion of the parts listed below,
always keep them out of the reach of small children.
• Included parts: Extra rubber feet (spare parts).
• Removable parts: knob bolts (page 10).
................................................................................................
5
Page 6

MIDI Pedalboard
PK-9
Important notes
1. Important notes
In addition to the items listed under “Using the unit safely” on p. 4, please read and observe the following:
Power supply
• Do not connect this unit to same electrical outlet that is being
used by an electrical appliance that is controlled by an inverter or
a motor (such as a refrigerator, washing machine, microwave
oven, or air conditioner). Depending on the way in which the electrical appliance is used, power supply noise may cause this unit to
malfunction or may produce audible noise. If it is not practical to
use a separate electrical outlet, connect a power supply noise filter
between this unit and the electrical outlet.
• The AC adaptor will begin to generate heat after long hours of
consecutive use. This is normal, and is not a cause for concern.
• To prevent malfunction and equipment failure, always make sure
to turn off the power on all your equipment before you make any
connections.
•With the factory settings, the PK-9 will automatically be switched
off 240 minutes (4 hours) after you stop playing or operating the
unit. If you don't want the unit to turn off automatically, change
the “Auto Off” setting to “Off” as described on p. 16.
Note:
The settings you were editing will be lost when the
unit is turned off. If you want to keep your settings, you
must save your settings before turning the unit off.
Placement
• This device may interfere with radio and television reception. Do
not use it in the vicinity of such receivers.
• Noise may be produced if wireless communications devices, such
as cell phones, are operated in the vicinity of this unit. Such noise
could occur when receiving or initiating a call, or while conversing.
Should you experience such problems, you should relocate such
wireless devices so they are at a greater distance from this unit, or
switch them off.
• Do not expose the unit to direct sunlight, place it near devices that
radiate heat, leave it inside an enclosed vehicle, or otherwise subject it to temperature extremes. Excessive heat can deform or discolor the unit.
•When moved from one location to another where the temperature
and/or humidity is very different, water droplets (condensation)
may form inside the PK-9. Damage or malfunction may result if
you attempt to use the unit in this condition. Therefore, before
using the unit, you must allow it to stand for several hours, until
the condensation has completely evaporated.
• Do not allow objects to remain on top of the pedalboard. This can
be the cause of malfunction, such as keys ceasing to produce
sound.
• Depending on the material and temperature of the surface on
which you place the unit, its rubber feet may discolor or mar the
surface.
You can place a piece of felt or cloth under the rubber feet to prevent this from happening. If you do so, please make sure that the
unit will not slip or move accidentally.
• Do not put anything that contains water on the PK-9. Also, avoid
the use of insecticides, perfumes, alcohol, nail polish, spray cans,
etc., near the unit. Swiftly wipe away any liquid that spills on the
unit using a dry, soft cloth.
• Never use benzene, thinner, alcohol or solvents of any kind, to
avoid the possibility of discoloration and/or deformation.
Repairs and Data
•Please be aware that all data contained in the unit's memory may
be lost when the unit is sent for repairs. Important data should
always be backed up in another MIDI device (e.g., a sequencer), or
written down on paper (when possible). During repairs, due care is
taken to avoid the loss of data. However, in certain cases (such as
when circuitry related to memory itself is out of order), we regret
that it may not be possible to restore the data, and Roland
assumes no liability concerning such loss of data.
Additional precautions
•Please be aware that the contents of memory can be irretrievably
lost as a result of a malfunction, or the improper operation of the
unit. To protect yourself against the risk of loosing important data,
we recommend that you periodically save a backup copy of important data you have stored in the unit's memory, in another MIDI
device (e.g., a sequencer).
• Unfortunately, it may be impossible to restore the contents of data
that was stored in the unit’s memory once it has been lost. Roland
Corporation assumes no liability concerning such loss of data.
• Use a reasonable amount of care when using the PK-9’s buttons,
other controls and jacks/connectors. Rough handling can lead to
malfunctions.
• Never strike or apply strong pressure to the display.
•When disconnecting all cables, grasp the connector itself—never
pull on the cable. This way you will avoid causing shorts, or damage to the cable’s internal elements.
• The sound of pedals being struck and vibrations produced by playing an instrument can be transmitted through a floor or wall to an
unexpected extent. Please take care not to cause annoyance to
others nearby.
•When you need to transport the unit, package it in the box
(including padding) that it came in, if possible. Otherwise, you will
need to use equivalent packaging materials.
• Use only the specified expression pedal (Roland EV-series, sold
separately) or pedal switch (Roland DP-series, BOSS FS-5U). By
connecting any other expression pedal or footswitch, you risk
causing malfunction and/or damage the unit.
•When you operate the pedals, please be careful not to get your
fingers pinched between the movable part and the panel. In places
where small children are present, make sure that an adult provides
supervision and guidance.
Maintenance
• For everyday cleaning wipe the unit with a soft, dry cloth or one
that has been slightly dampened with water. To remove stubborn
dirt, use a cloth impregnated with a mild, non abrasive detergent.
Afterwards, be sure to wipe the unit thoroughly with a soft, dry
cloth.
r
6
Page 7

MIDI Pedalboard PK-9
Important notes
r
Contents
1. Important notes. . . . . . . . . . . . . . . . . . . . . . . . . . . . . . . . . . . . . . . . . . . . . . . . . . . . . . . . . . . . . . . . . . . .6
2. Panel description . . . . . . . . . . . . . . . . . . . . . . . . . . . . . . . . . . . . . . . . . . . . . . . . . . . . . . . . . . . . . . . . . . .8
Front panel. . . . . . . . . . . . . . . . . . . . . . . . . . . . . . . . . . . . . . . . . . . . . . . . . . . . . . . . . . . . . . . . . . . . . . . . . . . . . .8
Rear panel . . . . . . . . . . . . . . . . . . . . . . . . . . . . . . . . . . . . . . . . . . . . . . . . . . . . . . . . . . . . . . . . . . . . . . . . . . . . . .9
3. Preparations before using the PK-9. . . . . . . . . . . . . . . . . . . . . . . . . . . . . . . . . . . . . . . . . . . . . . . . . . .10
Attaching the expression pedal . . . . . . . . . . . . . . . . . . . . . . . . . . . . . . . . . . . . . . . . . . . . . . . . . . . . . . . . . . .10
Connecting the PK-9 to an external instrument with its PK cable. . . . . . . . . . . . . . . . . . . . . . . . . . . . . .11
Connecting the supplied AC adaptor. . . . . . . . . . . . . . . . . . . . . . . . . . . . . . . . . . . . . . . . . . . . . . . . . . . . . . .11
Connecting the PK-9 to an external MIDI device . . . . . . . . . . . . . . . . . . . . . . . . . . . . . . . . . . . . . . . . . . . .12
Using both the PK-9 and a MIDI keyboard controller. . . . . . . . . . . . . . . . . . . . . . . . . . . . . . . . . . . . . . . . .12
Connecting an optional external pedal or footswitch to PK-9 . . . . . . . . . . . . . . . . . . . . . . . . . . . . . . . . .13
4. Parameter mode. . . . . . . . . . . . . . . . . . . . . . . . . . . . . . . . . . . . . . . . . . . . . . . . . . . . . . . . . . . . . . . . . . .14
Basic operation in Parameter mode. . . . . . . . . . . . . . . . . . . . . . . . . . . . . . . . . . . . . . . . . . . . . . . . . . . . . . . .14
Saving the settings (Save function). . . . . . . . . . . . . . . . . . . . . . . . . . . . . . . . . . . . . . . . . . . . . . . . . . . . . . . .14
Parameter settings . . . . . . . . . . . . . . . . . . . . . . . . . . . . . . . . . . . . . . . . . . . . . . . . . . . . . . . . . . . . . . . . . . . . . .15
Transpose. . . . . . . . . . . . . . . . . . . . . . . . . . . . . . . . . . . . . . . . . . . . . . . . . . . . . . . . . . . . . . . . . . . . . . . . . . . . . . . . . . . . . 15
Octave . . . . . . . . . . . . . . . . . . . . . . . . . . . . . . . . . . . . . . . . . . . . . . . . . . . . . . . . . . . . . . . . . . . . . . . . . . . . . . . . . . . . . . . 15
MIDI Transmit Channel . . . . . . . . . . . . . . . . . . . . . . . . . . . . . . . . . . . . . . . . . . . . . . . . . . . . . . . . . . . . . . . . . . . . . . . . . 15
CONTROL 1 Assign . . . . . . . . . . . . . . . . . . . . . . . . . . . . . . . . . . . . . . . . . . . . . . . . . . . . . . . . . . . . . . . . . . . . . . . . . . . . . 15
CONTROL 2 Assign . . . . . . . . . . . . . . . . . . . . . . . . . . . . . . . . . . . . . . . . . . . . . . . . . . . . . . . . . . . . . . . . . . . . . . . . . . . . . 15
Foot Switch Left Assign. . . . . . . . . . . . . . . . . . . . . . . . . . . . . . . . . . . . . . . . . . . . . . . . . . . . . . . . . . . . . . . . . . . . . . . . . 15
Foot Switch Right Assign . . . . . . . . . . . . . . . . . . . . . . . . . . . . . . . . . . . . . . . . . . . . . . . . . . . . . . . . . . . . . . . . . . . . . . . 16
Retrigger . . . . . . . . . . . . . . . . . . . . . . . . . . . . . . . . . . . . . . . . . . . . . . . . . . . . . . . . . . . . . . . . . . . . . . . . . . . . . . . . . . . . . 16
Velocity . . . . . . . . . . . . . . . . . . . . . . . . . . . . . . . . . . . . . . . . . . . . . . . . . . . . . . . . . . . . . . . . . . . . . . . . . . . . . . . . . . . . . . 16
Touch (velocity curve) . . . . . . . . . . . . . . . . . . . . . . . . . . . . . . . . . . . . . . . . . . . . . . . . . . . . . . . . . . . . . . . . . . . . . . . . . . 16
Portamento Time . . . . . . . . . . . . . . . . . . . . . . . . . . . . . . . . . . . . . . . . . . . . . . . . . . . . . . . . . . . . . . . . . . . . . . . . . . . . . . 16
Octaver value . . . . . . . . . . . . . . . . . . . . . . . . . . . . . . . . . . . . . . . . . . . . . . . . . . . . . . . . . . . . . . . . . . . . . . . . . . . . . . . . . 16
Pedal Assign . . . . . . . . . . . . . . . . . . . . . . . . . . . . . . . . . . . . . . . . . . . . . . . . . . . . . . . . . . . . . . . . . . . . . . . . . . . . . . . . . . 16
Auto Off. . . . . . . . . . . . . . . . . . . . . . . . . . . . . . . . . . . . . . . . . . . . . . . . . . . . . . . . . . . . . . . . . . . . . . . . . . . . . . . . . . . . . . 16
Factory Reset . . . . . . . . . . . . . . . . . . . . . . . . . . . . . . . . . . . . . . . . . . . . . . . . . . . . . . . . . . . . . . . . . . . . . . . . . . . . . . . . . 17
MIDI Dump . . . . . . . . . . . . . . . . . . . . . . . . . . . . . . . . . . . . . . . . . . . . . . . . . . . . . . . . . . . . . . . . . . . . . . . . . . . . . . . . . . . 17
Save . . . . . . . . . . . . . . . . . . . . . . . . . . . . . . . . . . . . . . . . . . . . . . . . . . . . . . . . . . . . . . . . . . . . . . . . . . . . . . . . . . . . . . . . . 17
Restoring the settings to the factory condition (Factory Reset). . . . . . . . . . . . . . . . . . . . . . . . . . . . . . . .17
Archiving and restoring your settings (MIDI Dump). . . . . . . . . . . . . . . . . . . . . . . . . . . . . . . . . . . . . . . . . .17
Getting ready to archive/restore . . . . . . . . . . . . . . . . . . . . . . . . . . . . . . . . . . . . . . . . . . . . . . . . . . . . . . . . . . . . . . . . . . 17
Archiving your settings to the external sequencer . . . . . . . . . . . . . . . . . . . . . . . . . . . . . . . . . . . . . . . . . . . . . . . . . . . 17
Transmitting your settings back to the PK-9 . . . . . . . . . . . . . . . . . . . . . . . . . . . . . . . . . . . . . . . . . . . . . . . . . . . . . . . . 18
5. Appendix. . . . . . . . . . . . . . . . . . . . . . . . . . . . . . . . . . . . . . . . . . . . . . . . . . . . . . . . . . . . . . . . . . . . . . . . .19
Troubleshooting. . . . . . . . . . . . . . . . . . . . . . . . . . . . . . . . . . . . . . . . . . . . . . . . . . . . . . . . . . . . . . . . . . . . . . . . .19
Specifications. . . . . . . . . . . . . . . . . . . . . . . . . . . . . . . . . . . . . . . . . . . . . . . . . . . . . . . . . . . . . . . . . . . . . . . . . . .20
ENGLISH ENGLISH ENGLISH ENGLISH ENGLISH ENGLISH
7
Page 8

MIDI Pedalboard
Panel description
PK-9
2. Panel description
Front panel
A
Display
A
This three-character display keeps you informed
about the current function, or parameter value you
set.
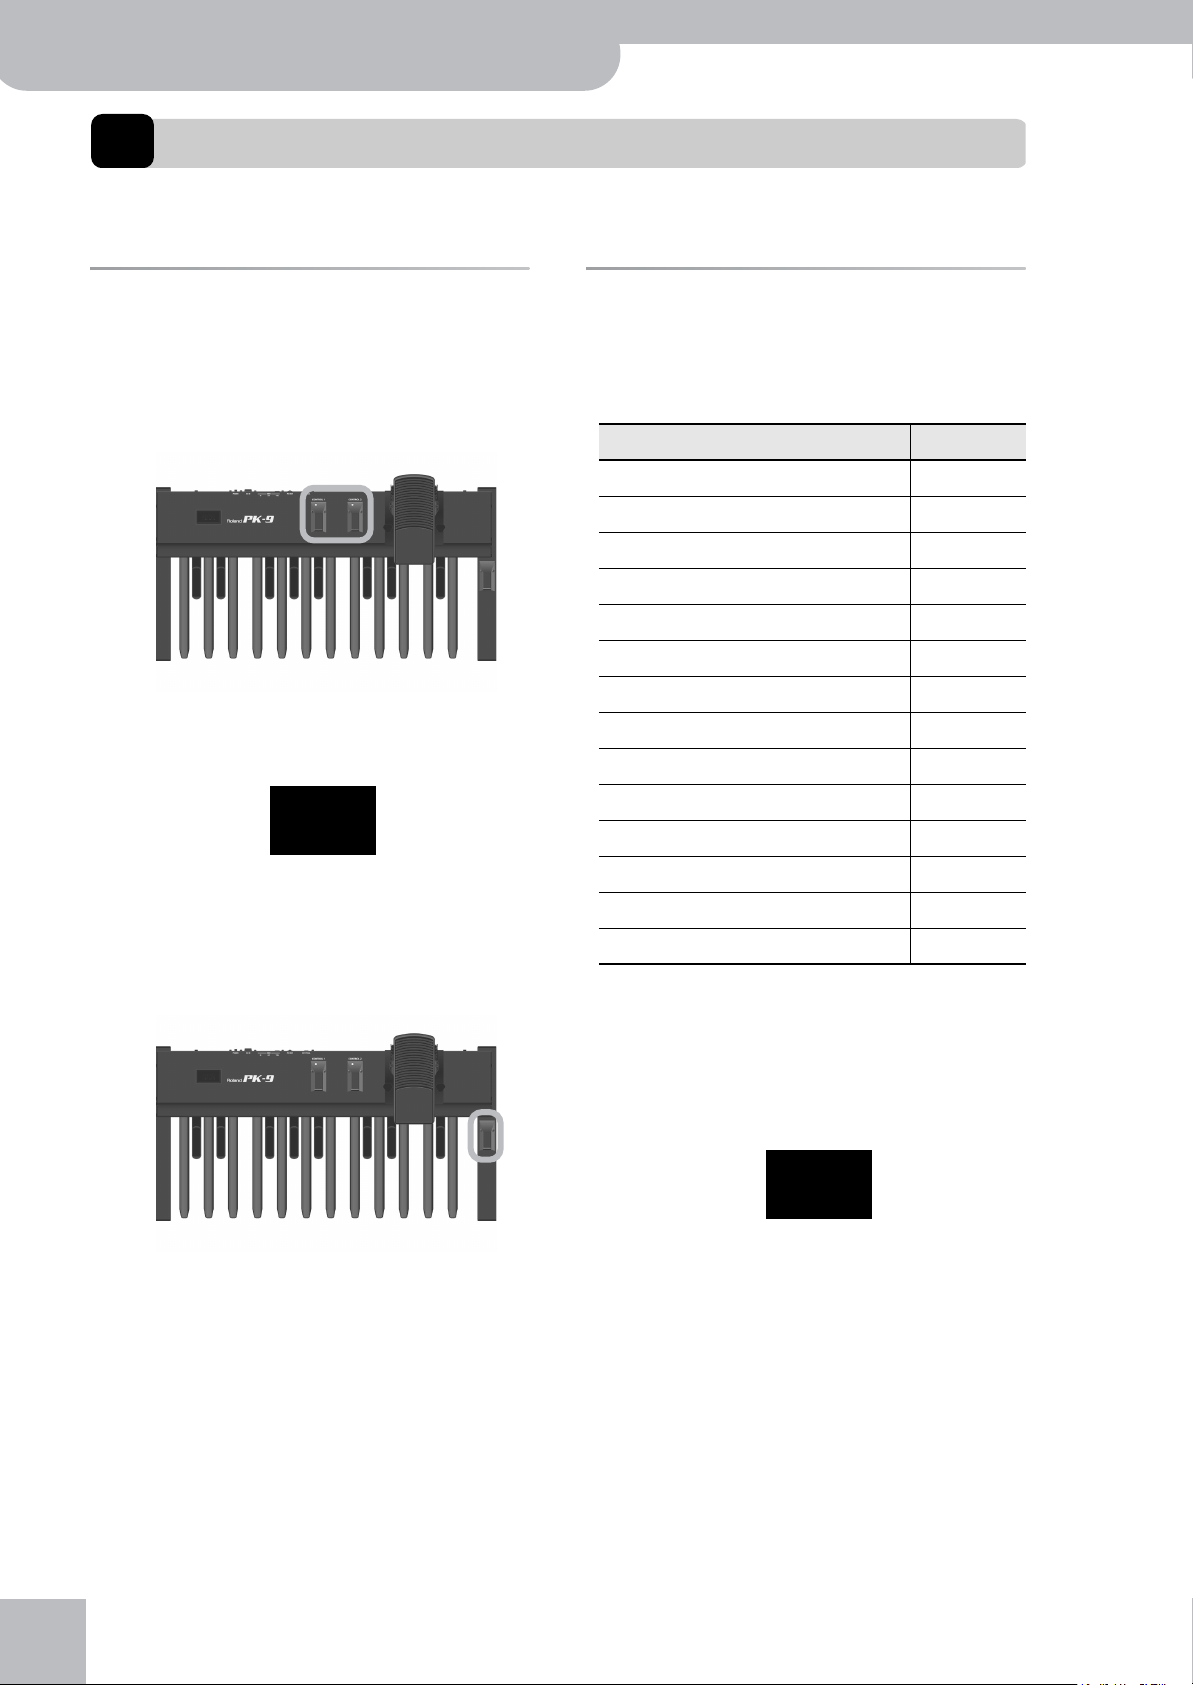
B
CONTROL 1 and CONTROL 2 pedals
These pedals allow you to control the device connected via MIDI. Their functions can be set in Parameter mode (page 14). By default, the CONTROL 1
pedal transmits control change CC16 messages, while
CONTROL 2 transmits CC17 messages.
Pressing these pedals simultaneously calls up Parameter mode (page 14).
Expression pedal
C
Advancing the pedal will increase the volume, and
returning the pedal toward yourself will decrease the
volume. For instructions on mounting it, refer to
page 10.
D
C
D
B
Footswitches
D
Two footswitches on either side of the expression
pedal allow you to control the connected device. By
default, the left footswitch transmits CC18 messages,
while the right footswitch transmits CC19 messages.
The functions of these footswitches can be changed
in Parameter mode.
E
Hold pedal
Pressing this pedal allows you to hold the note you
are currently playing even after releasing the MIDI
pedal in question. When the PK-9 is in Parameter
mode, this pedal is used to confirm settings.
E
r
8
Page 9

Rear panel
MIDI Pedalboard PK-9
r
Rear panel
ENGLISH ENGLISH ENGLISH ENGLISH ENGLISH ENGLISH
EXTERNAL PEDAL socket
A
Allows you to connect an optional pedal switch
(Roland DP-series), an optional footswitch (BOSS
FS-5U) or another (optional) expression pedal
(Roland EV-5). See page 16 for how to assign the
desired function to the pedal or footswitch.
B
PK OUT connector
Use the PK cable supplied with the PK-9 to connect
this socket to an external instrument’s PK IN socket
(page 11).
C
MIDI connectors
They allow you to connect the PK-9 to external MIDI
devices (page 12).
A
E
D
C
B
DC IN jack
D
Allows you to connect the supplied AC adaptor
(page 11).
E
POWER switch
This turns the power on/off (page 12).
With the factory settings, the PK-9’s power will
automatically be switched off 240 minutes (4
hours) after you stop playing or operating the
PK-9.
If the PK-9’s power has been turned off automatically, you can use the [POWER] switch to turn it back
on again.
If you don’t want the power to turn off automatically, change the “Auto Off” setting to “OFF”
(page 16).
9
Page 10
MIDI Pedalboard PK-9
Preparations before using the PK-9
3. Preparations before using the PK-9
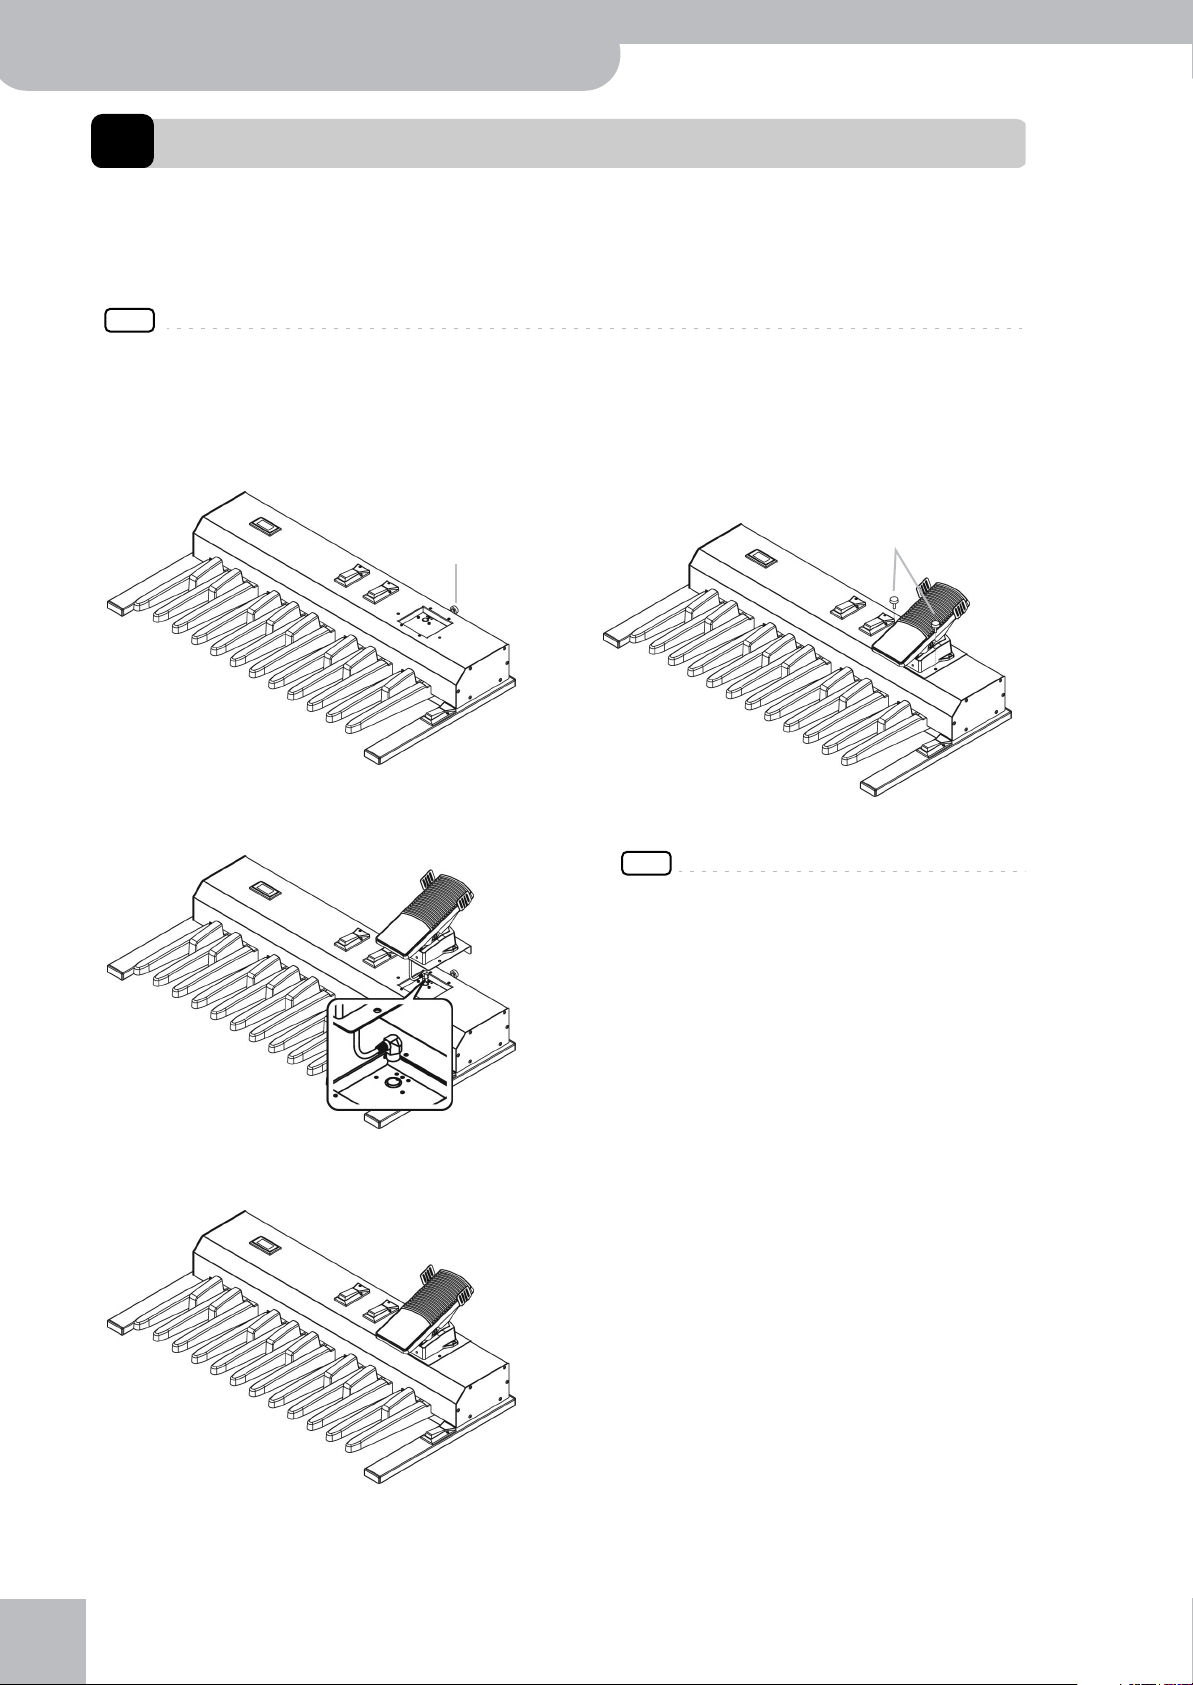
Attaching the expression pedal
The PK-9 is shipped with the expression pedal detached. Before connecting the PK-9 to an external device, please attach
the expression pedal.
NOTE
When attaching or detaching the expression pedal, be careful not to step on a knob bolt. When removing the knob bolts, to prevent
accidental ingestion, always keep them out of the reach of small children.
To prevent malfunction and/or damage to other devices, always turn off the power on all devices before making any connections.
1.
Loosen the knob bolt on the rear panel of
the PK-9.
Knob bolt on rear
panel
4.
Use the two supplied knob bolts to fasten
the expression pedal, making sure that the
bolt holes are aligned.
Supplied knob bolts
(two places)
2.
Connect the expression pedal cable to the
connector in the upper part of the PK-9.
3.
While being careful not to pinch the cable,
place the expression pedal on the PK-9.
5.
Retighten the knob bolt on the rear panel.
NOTE
The connector in the upper part of the PK-9 is only
intended for connecting the supplied expression pedal.
Connecting any other device than the PK-9’s expression
pedal could result in malfunction.
r
10
Page 11
Connecting the PK-9 to an external instrument with its PK cable
To the PK-9’s DC IN connector
AC adaptor
Power cord
To an AC outlet
Indicator
MIDI Pedalboard PK-9
r
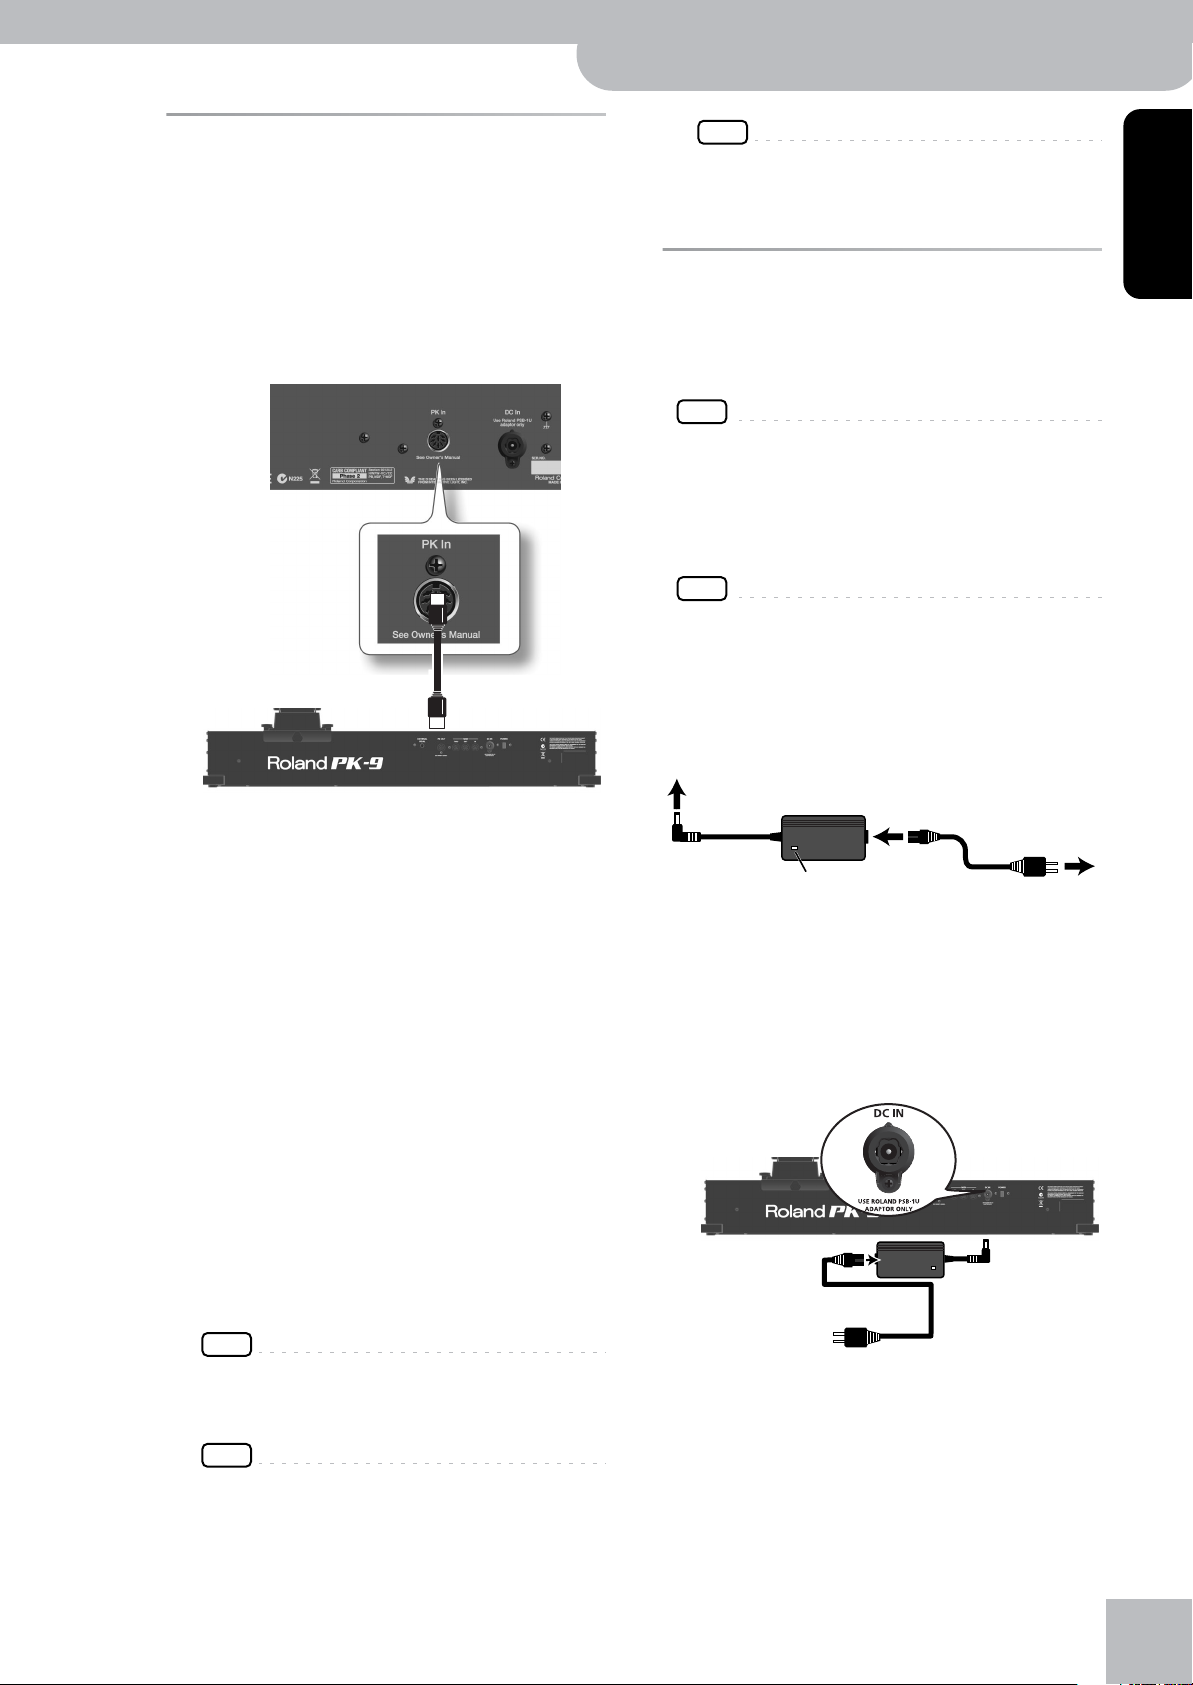
Connecting the PK-9 to an external
instrument with its PK cable
Use the PK cable that is supplied with the PK-9 to connect the external instrument and PK-9. This connection
system will allow the external instrument to power the
PK-9 (so that you don’t need the supplied AC adaptor).
The PK-9 will be turned on/off by the power switch of
the external instrument, regardless of the position of
the PK-9’s own power switch.
AT-350C
(Other compatible instruments are: Roland AT-900C,
C-200 etc.)
PK OUT
NOTE
This unit is equipped with a protection circuit. A brief interval (a few seconds) after turning the unit on is requested
before it will operate normally.
Connecting the supplied AC
adaptor
The PK-9 can be powered with the supplied PSB-1U
adapter.
NOTE
Be sure to use only the AC adaptor supplied with the PK-9
(PSB-1U). Also, make sure the line voltage at the installation
matches the input voltage specified on the AC adaptor’s body.
Other AC adaptors may use a different polarity, or be designed
for a different voltage, so their use could result in damage,
malfunction, or electric shock.
NOTE
To prevent malfunction and/or damage to speakers or other
devices, always turn down the volume and turn off the power
on all devices before making any connections.
1.
Connect the power cord to the AC adaptor.
ENGLISH ENGLISH ENGLISH ENGLISH ENGLISH ENGLISH
1.
Make sure that the external instrument’s
power is turned off and the volume is minimized.
2.
Use the PK cable that is supplied with the
PK-9 to connect the external instrument’s
PK IN connector to the PK-9’s PK OUT connector.
Once everything is properly connected, be sure to follow the procedure below to turn on their power. If
you turn on equipment in the wrong order, you risk
causing malfunction or equipment failure.
3.
Turn on the power of the external instrument and adjust the volume as explained in
the its owner’s manual.
4.
Check whether the PK-9 is on as well.
5.
Play the pedalboard. If you hear the pedal
part of external instrument, connections are
complete.
NOTE
If the external instrument’s Pedal part sounds in the wrong
octave, you can transpose the note numbers the PK-9
transmits (see “Octave” on p. 15).
Place the AC adaptor so the side with the indicator
faces upwards and the side with textual information
faces downwards.
The indicator will light once you plug the AC adaptor
into a wall outlet.
2.
Connect the AC adaptor to the PK-9’s DC IN
socket.
To a wall outlet
3.
Plug the power cord into a power outlet.
NOTE
To prevent malfunction and equipment failure, always turn
down the volume, and turn off all the units before making
any connections.
11
Page 12

MIDI Pedalboard PK-9
Preparations before using the PK-9
Connecting the PK-9 to an external
MIDI device
You can use your PK-9 as a MIDI controller for a MIDI
tone generator.
1.
Make sure that the external MIDI device is
turned off and its volume is minimized.
NOTE
To prevent malfunction and equipment failure, always turn
down the volume, and turn off all the units before making
any connections.
2.
Use a MIDI cable (commercially available) to
connect the PK-9’s MIDI OUT socket to the
MIDI IN connector of MIDI external device.
Any MIDI-compatible instrument
with an internal tone generator that
doesn’t have a PK IN connector.
MIDI IN
MIDI OUT
NOTE
This unit is equipped with a protection circuit. A brief interval (a few seconds) after turning the unit on is requested
before it will operate normally.
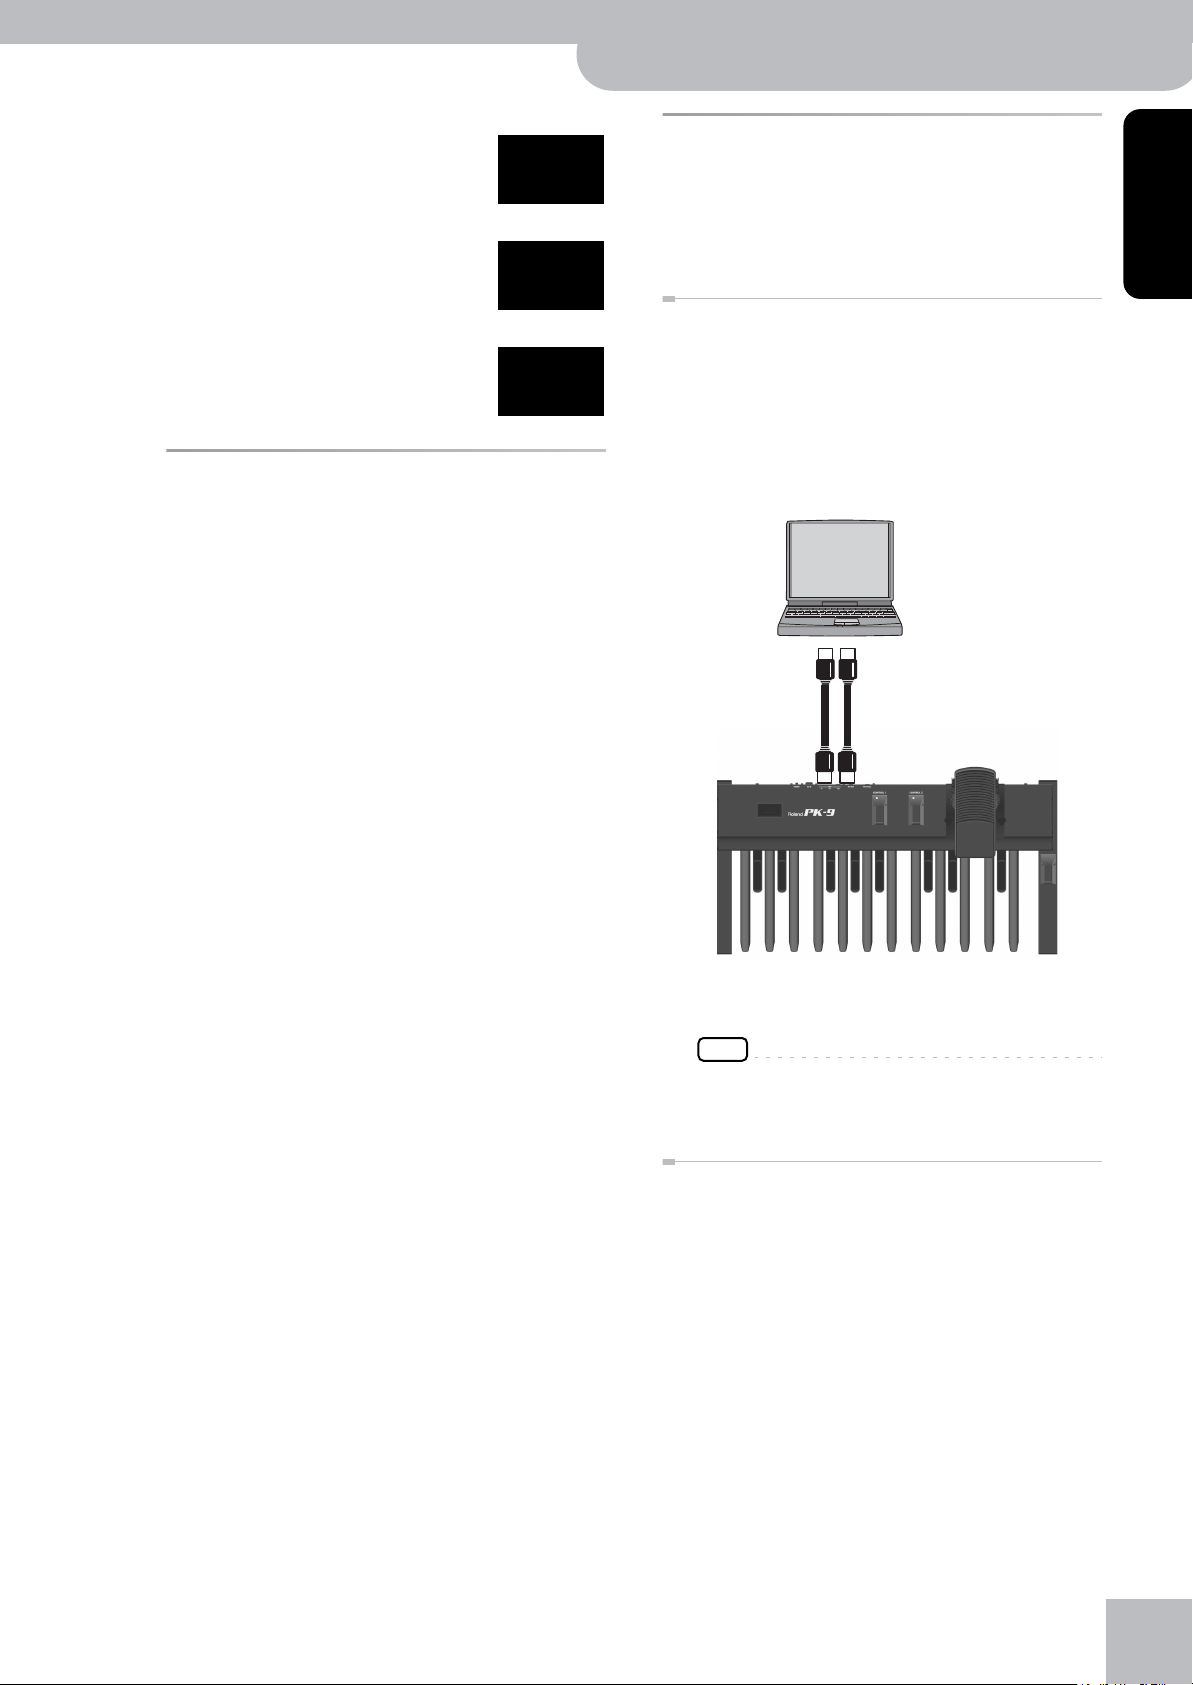
Using both the PK-9 and a MIDI
keyboard controller
You can also control an external MIDI module using
both a MIDI keyboard and the PK-9.
This allows you to use both your hands and your feet to
control either the same part or two different parts of
the external module.
1.
Make sure that the external MIDI device is
turned off and its volume is minimized.
NOTE
To prevent malfunction and equipment failure, always turn
down the volume, and turn off all the units before making
any connections.
2.
Use a MIDI cable (commercially available) to
connect the PK-9’s MIDI OUT socket to the
MIDI IN connector of MIDI external device.
Use another MIDI cable to connect the keyboard’s MIDI OUT socket to the PK-9’s MIDI
IN socket.
3.
Connect the PSB-1U adaptor to the DC IN
socket (page 11).
Once everything is properly connected, be sure to follow the procedure below to turn on their power. If
you turn on equipment in the wrong order, you risk
causing malfunction or equipment failure.
4.
Turn on the power of the external MIDI
device and adjust the volume as explained
in the its owner’s manual.
5.
Press the PK-9’s [POWER] switch positioned
in the rear panel.
On Off
6.
Set the PK-9’s MIDI channel (page 15).
7.
Set the MIDI channel on the external MIDI
device to match the channel set for the
PK-9.
8.
Play the PK-9’s pedalboard.
If the external instrument plays the notes, connections are complete.
r
MIDI IN
Data sent by the PK-9
MIDI OUT
MIDI IN
Data sent by the
keyboard
In this scenario, the messages the PK-9 receives via
its MIDI IN socket are mixed (“merged”) with the
PK-9’s MIDI messages and transmitted via its MIDI
OUT socket to the external MIDI module (“Soft Thru”
function).
NOTE
The exact copy of the MIDI data received via the PK-9’s
MIDI IN socket is also sent out from its MIDI THRU socket.
Though you could also use this connection scenario, be
aware that it only works if your MIDI module has two MIDI
IN sockets. Therefore, the “merge” approach is usually more
practical.
MIDI OUT
12
Page 13
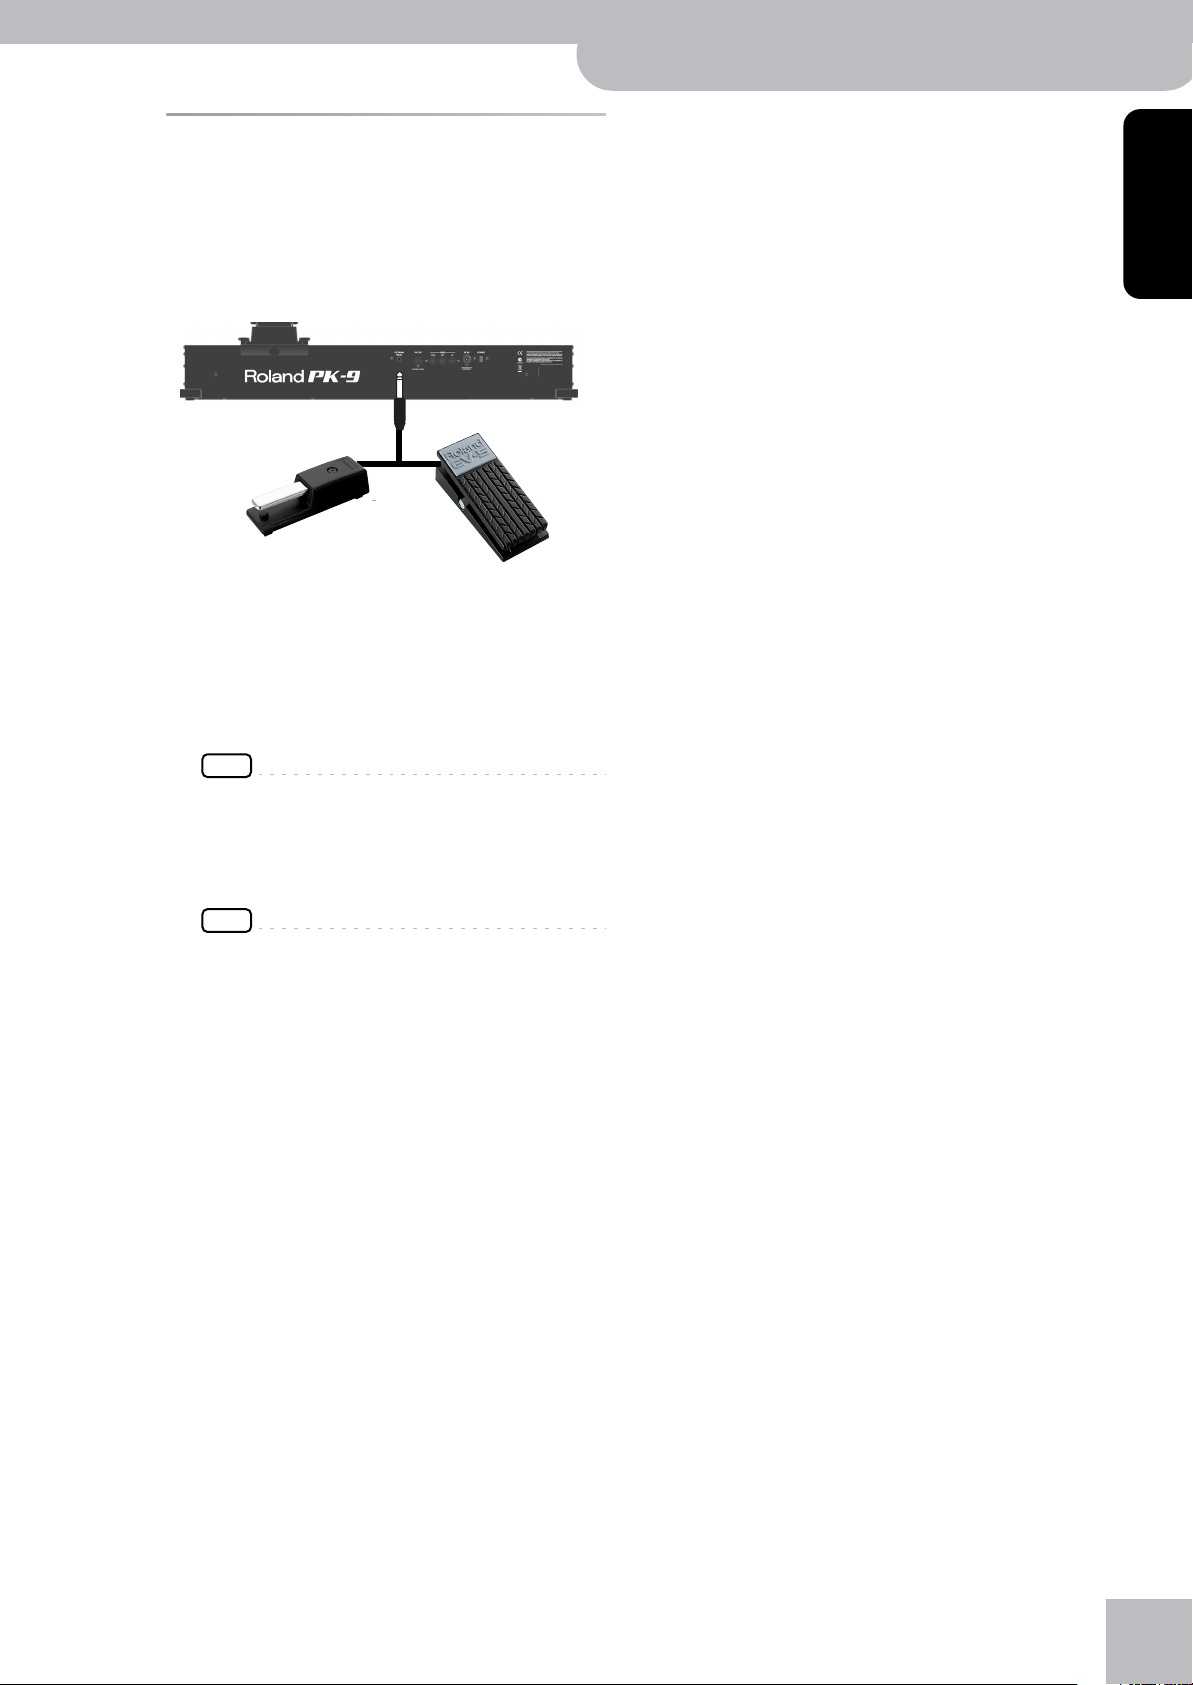
Connecting an optional external
pedal or footswitch to PK-9
The PK-9 provides an EXTERNAL PEDAL socket to which
you can connect an optional footswitch (Roland DPseries or BOSS FS-5U) or an additional expression pedal
(Roland EV-series).
Optional footswitch
(Roland DP-series,
BOSS FS-5U)
—or—
Optional expression pedal
(Roland EV-series)
Connecting an optional external pedal or footswitch to PK-9
MIDI Pedalboard PK-9
r
ENGLISH ENGLISH ENGLISH ENGLISH ENGLISH ENGLISH
If you connect an optional footswitch or an optional
expression pedal, you can select the function it
should perform (page 16). By default, the external
pedal will control the “Hold” function.
NOTE
Use only the specified expression pedal (Roland EV-series,
sold separately) or pedal switch (Roland DP-series, BOSS
FS-5U). By connecting any other expression pedal or footswitch, you risk causing malfunction and/or damage the
unit.
NOTE
Never connect or disconnect an optional footswitch or
expression pedal while the PK-9 is switched on. Always
switch off the PK-9 before changing the connection to the
EXTERNAL PEDAL socket.
13
Page 14
MIDI Pedalboard PK-9
Parameter mode
4. Parameter mode
Parameter mode lets you make various settings for this unit.
Basic operation in Parameter mode
Here’s the basic procedure for making settings in
Parameter mode.
1.
Simultaneously press the [CONTROL 1] and
[CONTROL 2] pedals.
The [CONTROL 1] and [CONTROL 2] indicators flash.
The PK-9 is now in Parameter mode. The abbreviation
of the first parameter (or of the last parameter you
selected since switching on the PK-9) flashes.
trn
2.
Press the [CONTROL 1] or [CONTROL 2]
pedal to select the desired parameter.
For details on each parameter, refer to “Parameter
settings” on p. 15.
3.
Press the Hold pedal to confirm.
Saving the settings (Save function)
When the PK-9’s power is turned off, it will return to its
default settings. However, if desired, you can save the
following settings so that they will be remembered even
after the power is off.
Parameter settings that are saved Page
Transpose 15
Octave 15
Control 1 Assign 15
Control 2 Assign 15
Foot Switch Left Assign 15
Foot Switch Right Assign 16
Retrigger 16
Velocity 16
Touch 16
Portamento Time 16
Octaver Value 16
Pedal Assign 16
Auto Off 16
MIDI Transmit Channel 15
1.
Simultaneously press the [CONTROL 1] and
[CONTROL 2] pedals.
The [CONTROL 1] and [CONTROL 2] indicators flash.
The PK-9 is now in Parameter mode.
2.
Press the [CONTROL 1] or [CONTROL 2]
pedal to select the “SAv” parameter.
The display shows the value.
4.
Press the [CONTROL 1] or [CONTROL 2]
pedal to change the value.
5.
Press the Hold pedal to confirm the value
and leave Parameter mode.
r
14
SAv
3.
Press the Hold pedal to confirm.
The display shows “ok” and the PK-9 leaves Parameter mode.
Page 15
Parameter settings
Below please find a list of the PK-9 parameters you can
set.
●
Transpose
Display Value Default
–5~6 0
trn
This parameter allows you to transpose the note
pitches of the pedals in semi-tone steps.
●
Octave
Display Value Default
0~8 2
oCt
This parameter allows you to transpose the note
pitches of the pedals in octave steps.
NOTE
The default setting “2” means that the leftmost MIDI pedal
transmits a “C2” (MIDI note number 36).
●
MIDI Transmit Channel
Display Value Default
1~16 2
Ch
MIDI Pedalboard PK-9
When this function is on, a note is added to the lowest note you play. The added note can be 1~4 octaves
lower than the lowest note you played (by default
–1). Please see “Octaver value” on p. 16 for how to set
the octave value.
Por (Portamento): The pedal allows you to switch
the Portamento function on and off. When this function is on, the note pitches no longer change in
clearly defined steps: they produce glides from one
note to the next. Use the “Portamento Time” parameter (page 16) to specify the speed at which those
glides are carried out. The higher the value, the
slower the transitions.
Mon (Mono): The pedal allows you to switch Mono
mode on and off. This mode enables the PK-9 to play
in monophonic mode. This means that only one note
message is transmitted at any one time. At power on,
the PK-9 reverts to Poly mode.
●
CONTROL 2 Assign
Display Value Default
C16, C17, oCb, Por, Mon C17
r
Parameter settings
Ct2
This parameter allows you to assign a function to the
[CONTROL 2] pedal. See “CONTROL 1 Assign” for the
available settings. Do note, however, that the default
setting for the [CONTROL 2] pedal is “C17”.
●
Foot Switch Left Assign
Display Value Default
ENGLISH ENGLISH ENGLISH ENGLISH ENGLISH ENGLISH
This setting specifies the MIDI channel on which the
PK-9 will transmit. MIDI uses sixteen “MIDI channels,”
which are numbered 1 through 16. By connecting
MIDI devices and specifying the appropriate MIDI
channel for each device, you can play and/or select
sounds on those devices.
●
CONTROL 1 Assign
Display Value Default
C16, C17, oCb, Por, Mon C16
Ct1
This parameter allows you to assign a function to the
[CONTROL 1] pedal:
C16 (Control Change CC16) or C17 (CC17):
Pressing the [CONTROL 1] pedal will transmit the
selected control change number with the value 0 or
127.
oCb (Octaver Bass): Pressing [CONTROL 1] switches
the “Octaver Bass” function on an off.
C18, C19, Por C18
S L
This parameter allows you to assign a function to the
footswitch on the left side of the expression pedal.
C18 (control change CC18) or C19 (CC19): The
footswitch alternately transmits the selected control
change number with the value “0” or “127”.
NOTE
If you connect the PK-9 to an instrument of the Roland
VK-series, the CC18 message controls the “Rotary Slow/
Fast” parameter, while the CC19 message controls the
“Rotary Break Speed” parameter.
Por (Portamento): The footswitch allows you to
switch the Portamento function on and off. When
this function is on, the note pitches no longer change
in clearly defined steps: they produce glides from one
note to the next. Use the “Portamento Time” parameter (page 16) to specify the speed at which those
glides are carried out. The higher the value, the
slower the transitions.
15
Page 16
MIDI Pedalboard PK-9
Por
oCv
Ped
Aof
Parameter mode
●
Foot Switch Right Assign
Display Value Default
C18, C19, Por C19
S r
NOTE
The “Touch” setting is ignored while “Velocity” is set to a
value (1~127).
●
Portamento Time
Display Value Default
This parameter allows you to assign a function to the
footswitch on the right side of the expression pedal.
See “Foot Switch Left Assign” for an explanation of
the available settings.
NOTE
If you connect the PK-9 to an instrument of the Roland
VK-series, the CC18 message controls the “Rotary Slow/
Fast” parameter, while the CC19 message controls the
“Rotary Break Speed” parameter.
●
Retrigger
Display Value Default
Off, On Off
rEt
This parameter is only available while the PK-9 is in
Mono mode. To select that mode, you first need to
assign the “Mon” function the [CONTROL 1] or
[CONTROL 2] pedal and then activate that pedal. See
also “CONTROL 1 Assign” and “CONTROL 2 Assign” on
p. 15.
When “Retrigger” is on, some special effects can be
obtained. In Mono mode, the pedalboard is monophonic: if you press two pedals simultaneously, only
the last note played will sound. When that note is
released, the previous note will sound, so a pleasant
alternating effect can be obtained.
Velocity
●
Display Value Default
On, 1~127 On
vEl
If this parameter is on, your playing dynamics are
translated into MIDI velocity values (1~127). If you
choose a fixed value (1~127), the PK-9 transmits all
notes with that value.
●
Touch (velocity curve)
Display Value Default
tCh
SFt (soft), Med (Medium),
hrd (hard)
Med
0~127 50
“Portamento” means that the pitch doesn’t change in
clearly defined steps: it produces glides from one
note to the next. Use this parameter to specify the
speed at which those glides are carried out. The
higher the value, the slower the transitions.
NOTE
If the receiving MIDI instrument doesn’t support this
parameter, this setting will have no effect.
●
Octaver value
Display Value Default
–4~–1 –1
This parameter allows you to specify the pitch of the
note that is added while the “oCb” function is active.
See “CONTROL 1 Assign” on p. 15 for details.
●
Pedal Assign
Display Value Default
“CUt” (Cutoff), “rES”
(Resonance),
“Pbd” (Pitch Bend Down),
“PbU” (Pitch Bender Up),
“Mod” (Modulation),
“hLd” (Hold),
“voL” (Volume),
“PAn” (Panpot),
“C16” (Control Change
16), “C17” (Control
Change 17),
“C18” (Control Change
18), “C19” (Control
Change 19)
This parameter allows you to assign a function to the
pedal you connect to the EXTERNAL PEDAL socket.
Auto Off
●
0ff, 10, 30, 240 240
“hLd”
(Hold)
r
16
The PK-9’s pedals are velocity sensitive. If necessary,
you can select a different velocity curve to suit your
playing style.
This parameter allows you to specify how long the
PK-9 should wait before switching itself off while
you are not using it. If you don’t want the power to
turn off automatically, select “Off”.
Page 17
●
Note: Your computer may have to
be connected to a MIDI interface.
The PK-9 needs to be connected
to the MIDI interface.
MIDI OUT
MIDI IN
MIDI IN
MIDI OUT
Factory Reset
Refer to “Restoring the settings to
the factory condition (Factory Reset)”
on p. 17.
●
MIDI Dump
Refer to “Archiving and restoring
your settings (MIDI Dump)” on p. 17.
FAC
dmp
Restoring the settings to the factory condition (Factory Reset)
MIDI Pedalboard PK-9
r
Archiving and restoring your
settings (MIDI Dump)
You can archive and restore your settings using a computer (with a MIDI interface, commercially available) or
an external sequencer.
ENGLISH ENGLISH ENGLISH ENGLISH ENGLISH ENGLISH
●
Save
Refer to “Saving the settings (Save
function)” on p. 14.
SAv
Restoring the settings to the
factory condition (Factory Reset)
The settings you’ve changed in Parameter mode
(page 14) can be restored to their factory-set condition.
This operation is called “Factory Reset.”
1.
Simultaneously press the [CONTROL 1] and
[CONTROL 2] pedals.
The [CONTROL 1] and [CONTROL 2] indicators flash.
2.
Press the [CONTROL 1] or [CONTROL 2]
pedal to select the “FAC” parameter.
3.
Press the Hold pedal to confirm.
When the Factory Reset has been completed, the display will indicate “ok” and the PK-9 will leave Parameter mode.
Getting ready to archive/restore
1.
Use a MIDI cable (commercially available) to
connect the MIDI IN socket of external
sequencer to the PK-9’s MIDI OUT socket.
2.
Use another MIDI cable to connect the MIDI
OUT socket of the external sequencer to the
PK-9’s MIDI IN socket.
3.
Switch on the external sequencer and the
PK-9.
NOTE
To prevent malfunction and/or damage to speakers or
other devices, always turn down the volume, and turn off
the power on all devices before making any connections.
Archiving your settings to the external sequencer
1.
Simultaneously press the [CONTROL 1] and
[CONTROL 2] pedals.
The [CONTROL 1] and [CONTROL 2] indicators flash.
2.
Press the [CONTROL 1] or [CONTROL 2]
pedal to select the “dMP” parameter.
3.
Activate data reception or recording on the
external device.
4.
Wait until the sequencer’s count-in (if
applicable) is finished and press Hold pedal
to start the MIDI Dump.
When the MIDI Dump has been completed, the display will indicate “ok” and the PK-9 will leave Parameter mode.
17
Page 18

MIDI Pedalboard PK-9
Parameter mode
5.
Stop recording on the external sequencer
and save the data.
Transmitting your settings back to the PK-9
1.
Start the playback of the data you saved
(and loaded).
All of the PK-9’s indicators light and the display
shows “dMP” (Dump).
When the data dump has been received, the display
briefly indicates “ok”.
r
18
Page 19

MIDI Pedalboard PK-9
r
Appendix
5. Appendix
Troubleshooting
If the PK-9 does not function as you expect, please
check the following points first. If this does not resolve
the problem, contact your dealer or a nearby Roland
service center.
■
The PK-9 suddenly went off
When 240 minutes have elapsed since you last played
or operated this unit, the power will turn off automatically. (This is the factory setting). If you don’t
need the power to turn off automatically, turn the
“Auto Off” setting “Off.” Refer to page 16.
■
No power
If the PK-9 is supposed to be powered using the
adaptor
Did you press the PK-9’s [POWER] switch (rear
panel)?
→ Press the PK-9’s [POWER] switch.
Did you connect the supplied AC adapter?
→ Connect the adapter.
If the PK-9 is supposed to be powered via its PK
OUT socket
Did you connect the supplied PK cable to the external
instrument’s PK IN connector and the PK-9’s PK OUT
socket?
→ Please see “Connecting the PK-9 to an external
instrument with its PK cable” on p. 11.
Did you switch on the external instrument?
→ Switch on the external instrument. The PK-9’s
power is switched on/off in tandem with the
external instrument when it is connected via PK
cable.
■
The external pedal or footswitch doesn’t operate correctly
Is the external pedal or footswitch connected correctly?
→ Please check the connection. See “Connecting an
optional external pedal or footswitch to PK-9” on
p. 13.
Are you using an EV-series expression pedal or a
Roland DP-series or BOSS FS-5U footswitch?
→ Use only the specified expression pedal (Roland
EV-series, sold separately) or pedal switch (Roland
DP-series, BOSS FS-5U). By connecting any other
expression pedal or footswitch, you risk causing
malfunction and/or damage the unit.
Did you assign a function to “Pedal Assign” parameter that is supported by the receiving device?
→ Please see “Pedal Assign” on p. 16 and the owner’s
manual of the external MIDI instrument.
Did you connect the MIDI cable correctly?
→ Please see “Connecting the PK-9 to an external
MIDI device” on p. 12.
ENGLISH ENGLISH ENGLISH ENGLISH ENGLISH ENGLISH
■
No sound plays
Does the external instrument’s MIDI channel match
the PK-9’s MIDI channel?
→ When connecting to any external MIDI device, you
must match the PK-9’s MIDI channel to the MIDI
channel set on the connected device. See “MIDI
Transmit Channel” on p. 15 for how to set the
PK-9’s transmit channel.
■
Sounds are not playing correctly
Confirm whether or not the Octave function is set
correctly (page 15).
19
Page 20

MIDI Pedalboard PK-9
Appendix
Specifications
Roland PK-9 MIDI Pedalboard
Pedalboard: 20 velocity sensitive keys
Functions: Hold
Octaver Bass On/Off, Octaver value
Portamento On/Off, Portamento Time
Transpose
Octave
Poly/Mono
Velocity on/off (programmable fixed value)
Key Touch (Light, Medium, Heavy)
External pedal assign
MIDI Merge
Controls: Expression pedal
Footswitch L, Footswitch R (to the left and right of the expression pedal)
CONTROL 1 pedal
CONTROL 2 pedal
Hold pedal (damper)
POWER switch
Connectors: EXTERNAL PEDAL jack (Switch/Expression, programmable)
PK OUT Jack
MIDI connectors (IN, OUT, THRU)
DC IN Jack
Power supply: AC adaptor (PSB-1U)
Via PK cable
Current Draw: 130 mA (DC 9 V)
Dimensions: 905 (W) x 456 (D) x 273 (H) mm
35-11/16 (W) x 18 (D) x 10-3/4 (H) inches
Weight: 13.4 kg / 29 lbs 9 oz
Accessories: Owner’s Manual
AC adaptor (PSB-1U)
PK cable
MIDI cable
2 extra rubber feet (spare parts)
Options: DP-series/ BOSS FS-5U foot switch, Roland EV-series expression pedal
NOTE
In the interest of product improvement, the specifications and/or appearance of this unit are subject to change without prior notice.
r
20
Page 21

r
Copyright © 2012 ROLAND EUROPE. Alle Rechte vorbehalten. Diese Bedienungsanleitung darf ohne die schriftliche Genehmigung der Roland Europe S.p.a. weder auszugsweise, noch
vollständig kopiert werden. Roland und GS sind in den USA und anderen Ländern eingetragene Warenzeichen oder Warenzeichen der Roland Corporation.
Bedienungsanleitung
Vielen Dank für Ihre Entscheidung zu einer MIDI-Pedaleinheit PK-9.
Außer den Pedalen, die Ihr Orgelspiel noch interessanter gestalten, bietet das PK-9 ein Schwellpedal für expressive Lautstär-
kevariationen, zwei Fußtaster für die Steuerung bestimmter Orgelfunktionen und ein Pedal zum Halten der gespielten Noten.
Funktionsübersicht
• Ausgestattet mit einem Display für einen maximalen Bedienkomfort.
• 20 Basspedale und entnehmbares Schwellpedal
Das PK-9 bietet 20 Pedale zum Spielen von Bassparts. Das eingebaute Schwellpedal kann entfernt werden, um den Transport
zu erleichtern.
• Zwei Fußtaster an den Seiten des Schwellpedals.
Diesen Fußtastern können die gewünschten Funktionen zugeordnet werden, so z.B. die Geschwindigkeitsumschaltung des
Rotary-Effekts, die Bremsgeschwindigkeit oder Portamento.
• Zwei CONTROL-Pedale im Bedienfeld.
Mit diesen Pedalen können bestimmte Funktionen des externen Instruments (Bassoktave, Portamento, monophoner Modus
usw.) gesteuert werden.
• Haltepedal
Das Haltepedal befindet sich an einem mit dem rechten Fuß bequem erreichbaren Ort. Hiermit lassen sich die gespielten
Noten länger halten.
• Transposition, Oktavierung und einstellbarer MIDI-Kanal.
Der Parameter-Modus des PK-9 erlaubt u.a. die Wahl des Transpositionsintervalls, der Oktave und des MIDI-Kanals.
•Mit einem externen Fußtaster (EXTERNAL PEDAL-Buchse) können Sie Parameter wie Expression, die Filterfrequenz, Resonanz
usw. ansteuern. Es kann wahlweise ein Fußtaster (Roland DP-Serie bzw. BOSS FS-5U) oder ein optionales Schwellpedal (EV-5)
verwendet werden.
•Die “MIDI Merge”-Funktion (MIDI IN zu MIDI OUT) kombiniert die MIDI-Befehle, die das PK-9 von einem externen MIDI-Gerät
empfängt, mit den intern generierten und gibt diese Befehle gemeinsam aus.
•Schnelle Verbindung mit einer Roland-Orgel (AT-350C, AT-900C, C-200 usw.)
Das PK-9 kann über das PK-Kabel mit der PK-IN-Buchse einer Roland-Orgel verbunden werden. Dann benötigen Sie keine
weiteren Kabel (MIDI, Netzteil usw.). Das erleichtert den übersichtlichen Betrieb.
DEUTSCH DEUTSCH DEUTSCH DEUTSCH DEUTSCH DEUTSCH
Die Abbildungen und Beschreibungen in dieser Anleitung entsprechen in der Regel dem, was Sie auf Ihrem Instrument sehen.
Beachten Sie jedoch, dass Ihr Instrument u.U. ein neueres Betriebssystem verwendet, so dass bestimmte Abbildungen nicht
exakt dem entsprechen, was Sie im Display sehen.
Lesen Sie sich vor der Verwendung des Instruments “Hinweise für eine sichere Handhabung” auf S. 22 und “Wichtige Hinweise” auf S. 24
durch. Dort finden Sie nämlich wichtige Informationen über die richtige Bedienung des PK-9. Außerdem müssen Sie sich natürlich die
gesamte Bedienungsanleitung durchlesen, um alle Funktionen kennen zu lernen und bei der Bedienung alles richtig zu machen. Bewahren Sie die Bedienungsanleitung für die spätere Bezugnahme an einem sicheren Ort auf.
Page 22
MIDI-Pedaleinheit PK-9
Hinweise für eine sichere Handhabung
HINWEISE FÜR EINE SICHERE HANDHABUNG
MASSNAHMEN FÜR DIE VERMEIDUNG VON BRÄNDEN, STROMSCHLÄGEN UND VERLETZUNGEN
Über die WARNUNG und VORSICHT Hinweise Über die Symbole
Das Symbol weist auf wichtige Instruktionen oder Warnungen hin. Die genaue Bedeutung des Symbols richtet sich
nach dem Zeichen in dem Dreieck. Das hier gezeigte Symbol
bedeutet beispielsweise, daß es sich um einen allgemeinen
Hinweis auf mögliche Gefahren handelt.
Das Symbol verweist auf Handlungen hin, die Sie niemals
ausführen dürfen (welche verboten sind). Was genau verboten ist, können Sie an dem Symbol in dem Kreis ablesen.
Das hier gezeigte Symbol bedeutet beispielsweise, daß das
Gehäuse nicht geöffnet werden darf.
Das ● Symbol bezeichnet Dinge, die Sie unbedingt
ausführen müssen. Auch hier richtet sich die genaue Bedeutung nach dem Symbol in dem schwarzen Kreis. Das hier gezeigte Symbol bedeutet beispielsweise, daß der Netzanschluß
gelöst werden muß.
WARNUNG
VORSICHT
Dieses Symbol signalisiert Dinge, welche
den Anwender bei unsachgemäßer Behandlung auf die Gefahr schwerer Verletzungen
(eventuell mit Todesfolge) hinweisen.
Weist auf Verletzungsgefahr oder mögliche
Sachschäden hin, die sich aus einer unsachgemäßen Bedienung ergeben können.
* Mit "Sachschäden" sind hier Schäden an
den Möbeln oder Verletzungen von
Haustieren gemeint.
BITTE FOLGENDE PUNKTE BEACHTEN
WARNUNG WARNUNG
Niemals öffnen oder modifizieren
• Versuchen Sie niemals, das Instrument (oder sein Netzteil) zu öffnen.
.................................................................................................
Niemals reparieren bzw. Bauteile ersetzen
• Versuchen Sie niemals, das Instrument zu öffnen oder
selbst defekte Teile zu erneuern (es sei denn, die Bedienungsanleitung enthält ausdrückliche Anweisungen hierfür).
Überlassen Sie alle Wartungs- und Reparaturarbeiten Ihrem
Roland-Händler, einer qualifizierten Kundendienststelle oder dem
offiziellen Roland-Vertrieb (siehe die Adressen auf der “Information”-Seite).
.................................................................................................
Lagern bzw. verwenden Sie das Instrument
niemals an folgenden Orten
• Orte, die extremen Temperaturen ausgesetzt sind (z.B.
in der prallen Sonne, in einem geschlossenen Fahrzeug, in der Nähe eines Heizkörpers, Herdes usw.);
• Feuchte Orte (Bad, Waschküche, nasser Fußboden
usw.);
• In der Nähe von Wasserdampf oder Rauch;
• In der Nähe von Salzwasser;
• Nasse Orte;
• Draußen im Regen;
• Staubige oder sandige Orte;
• Orte, die starken Vibrationen oder Erschütterungen ausgesetzt
sind.
.................................................................................................
Niemals auf einen wackligen Untergrund
stellen
• Stellen Sie das Instrument immer auf eine ebene und stabile Oberfläche. Verwenden Sie niemals ein wackliges Stativ bzw. einen
Ständer, auf dem es geneigt aufgestellt würde.
.................................................................................................
Verwenden Sie nur ein geeignetes Netzteil
• Verwenden Sie ausschließlich das PSB-1U Netzteil des
PK-9. Die Netzspannung der verwendeten Steckdose
muss zudem den Angaben auf dem Typenschild entsprechen.
Andere Netzteile verwenden eventuell eine andere Polarität oder
eignen sich nur für eine andere Netzspannung. Bei ihrer Verwendung bestehen Brand- und Stromschlaggefahr.
r
.................................................................................................
Verwenden Sie nur das Netzkabel des
PSB-1U
• Verwenden Sie ausschließlich das Netzkabel des PSB-1U
Netzteils. Umgekehrt eignet sich das beiliegende Kabel
jedoch nicht für andere Geräte.
................................................................................................
Beschädigen Sie niemals das Netzkabel
• Beschädigen Sie niemals das Netzkabel und stellen Sie
keine schweren Gegenstände darauf. Verlegen Sie es so,
dass es weder gequetscht, noch anderweitig abgeklemmt
wird. Bei Verwendung eines beschädigten Kabels besteht Stromschlag- bzw. Brandgefahr.
................................................................................................
Verhindern Sie, dass Fremdkörper oder
Flüssigkeiten ins Geräteinnere gelangen
• Achten Sie darauf, dass niemals Fremdkörper (brennbare
Stoffe, Münzen, Büroklammern usw.) oder Flüssigkeiten
(Wasser, Getränke usw.) in das Geräteinnere gelangen.
Das kann zu einem Kurzschluss oder Fehlfunktionen führen.
................................................................................................
Schalten Sie das Gerät bei einem abnormalen Verhalten sofort aus
• Schalten Sie dieses Instrument sofort aus, lösen Sie den
Netzanschluss und wenden Sie sich an Ihren RolandHändler oder den Vertrieb (siehe die “Information”-Seite),
wenn:
• Das Netzteil, sein Stromkabel oder der Stecker sicht-
bare Schäden aufweist
• Rauch aus dem Gerät kommt bzw. wenn es nach Feuer
riecht;
• Fremdkörper oder Flüssigkeiten ins Geräteinnere
gelangt sind;
• Das Gerät im Regen gestanden hat (oder nass gewor-
den ist);
•Sich das Instrument nicht erwartungsgemäß verhält oder in sei-
ner Leistung merklich nachgelassen hat.
................................................................................................
22
Page 23
WARNUNG
VORSICHT
Kinder dürfen das Instrument niemals
alleine bedienen
•Wenn sich das Instrument an einem Ort befindet, wo
Kinder spielen, müssen Sie darauf achten, dass sie nicht
unbeaufsichtigt das Instrument zu verwenden versuchen.
Kinder dürfen das Instrument nur unter Aufsicht eines
Erwachsenen bedienen.
.................................................................................................
Umsichtig behandeln
• Setzen Sie das Produkt niemals schweren
Erschütterungen aus.
(Lassen Sie es niemals fallen!)
.................................................................................................
Netzkabel an separaten Stromkreis
anschließen
• Schließen Sie das Netzkabel niemals an einen Stromkreis
an, der bereits mehrere andere Geräte speist. Seien Sie
besonders vorsichtig mit Verlängerungskabeln: die
Gesamtleistungsaufnahme aller daran angeschlossenen
Geräte darf niemals größer sein als die Angaben auf dem
Kabel, weil sonst die Adern schmelzen, was zu Kurzschlüssen führt.
Nicht ohne Weiteres im Ausland verwenden
• Vor dem Einsatz dieses Geräts im Ausland wenden Sie
sich mit eventuellen Fragen bezüglich der Stromversorgung bitte an Ihren Händler oder den Vertrieb (siehe die
“Information”-Seite).
.................................................................................................
MIDI-Pedaleinheit PK-9
Hinweise für eine sichere Handhabung
r
Auf ausreichende Lüftung achten
• Das Produkt und das Netzteil müssen immer so aufgestellt bzw. verlegt werden, dass eine ausreichende Lüftung gewährleistet ist.
................................................................................................
Beim Lösen des Netzanschlusses am Stecker ziehen
•Ziehen Sie beim Lösen des Netzanschlusses immer am Stecker des
Netzteils und niemals am Kabel, um das Reißen der Adern zu vermeiden.
................................................................................................
Säubern Sie den Stecker des Netzkabels ab
und zu
• Lösen Sie den Netzanschluss in regelmäßigen Zeitabständen und
reinigen Sie das Netzteil mit einem trockenen Tuch, um die Steckerstifte von Staub und anderem Schmutz zu befreien. Außerdem
sollten Sie den Netzanschluss lösen, wenn Sie das Gerät längere
Zeit nicht verwenden möchten. Bedenken Sie, dass Staub zwischen
dem Netzstecker und der Anschlussbuchse zu einer mangelhaften
Isolierung führen und einen Brand verursachen kann.
................................................................................................
Achten Sie auf sichere Verlegung der
Kabel
• Netz- und Signalkabel sollten niemals miteinander verdreht werden. Verlegen Sie alle Kabel außerdem immer außerhalb der Reichweite von Kindern.
................................................................................................
Stellen Sie sich niemals auf das Instrument und legen Sie keine schweren
Gegenstände darauf
• Setzen Sie sich niemals auf das Gerät und stellen Sie
keine schweren Gegenstände darauf.
DEUTSCH DEUTSCH DEUTSCH DEUTSCH DEUTSCH DEUTSCH
................................................................................................
Netzverbindung niemals mit feuchten
Händen herstellen/lösen
• Fassen Sie das Netzteil und seine Stecker niemals mit
feuchten oder nassen Händen an.
................................................................................................
Vor dem Transport müssen alle Verbindungen gelöst werden
• Vor dem Transport des Geräts müssen Sie den Netzanschluss und
alle Signalkabel lösen.
................................................................................................
Vor dem Reinigen den Netzanschluss des
Netzteils lösen
• Schalten Sie das Instrument vor dem Reinigen aus und ziehen Sie
das Netzteil aus der Steckdose (S. 29).
................................................................................................
Im Falle eines Gewitters den Netzanschluss lösen
•Im Falle eines Gewitters lösen Sie am besten den Netzanschluss
des Netzteils.
................................................................................................
Kleine Gegenstände außerhalb der Reichweite von Kindern aufbewahren
•Um zu verhindern, dass nachfolgende Gegenstände verschluckt werden, müssen Sie sie außerhalb der Reichweite von
Kindern aufbewahren.
• Beiliegende Teile: Gummifüße (Reserve).
• Entfernbare Gegenstände: Handschrauben (S. 28).
................................................................................................
23
Page 24

MIDI-Pedaleinheit PK-9
Wichtige Hinweise
1. Wichtige Hinweise
Bitte lesen Sie sich außer “Hinweise für eine sichere Handhabung” auf S. 22 auch folgende Punkte durch:
Stromversorgung
• Schließen Sie das Instrument niemals an eine Steckdose an, die
auch Geräte speist, die mit einem Wechselrichter arbeiten (z.B.
Kühlschrank, Waschmaschine, Mikrowellenherd oder Klimaanlage)
oder einen Motor enthalten. Solche Geräte können nämlich Funktionsstörungen und Störgeräusche verursachen. Wenn Sie keine
andere Möglichkeit haben, sollten Sie ein Netzfilter zwischen dem
Instrument und jener Steckdose verwenden.
• Nach längerer Verwendung wird das Netzteil heiß. Das ist normal
und also kein Grund zur Besorgnis.
•Um Funktionsstörungen und/oder Schäden zu vermeiden, sollten
Sie alle beteiligten Geräte ausschalten, bevor Sie Verbindungen
herstellen/lösen.
• Laut Vorgabe schaltet sich das PK-9 automatisch aus, wenn Sie es
länger als 240 Minuten (4 Stunden) nicht bedienen. Um zu verhindern, dass sich das Instrument automatisch ausschaltet, müssen
Sie den “Auto Off”-Parameter auf “Off” stellen (siehe p. 35).
Anmerkung: Noch nicht gespeicherte Einstellungen werden beim Ausschalten des Instruments gelöscht. Wenn Sie
sie behalten möchten, müssen Sie sie vor dem Ausschalten
speichern.
Aufstellung
•Dieses Gerät könnte den Empfang von Radios oder Fernsehgeräten
stören. Betreiben Sie es also niemals in der Nähe solcher Empfänger.
•Wenn Sie in der Nähe dieses Instruments ein drahtloses Telefon
bzw. Handy verwenden, können Brummgeräusche entstehen. Das
ist vor allem bei Erhalt oder Beginn eines Anrufs der Fall. Daher
raten wir, niemals in unmittelbarer Nähe des Instruments zu telefonieren bzw. das Handy lieber gleich auszuschalten.
• Setzen Sie das Instrument keinen extremen Temperaturen (z.B.
direkter Sonneneinstrahlung) aus und lassen Sie es nicht in einem
geschlossenen Auto liegen, das in der Sonne steht. Nur so ist
sichergestellt, dass sich das Gehäuse weder verfärbt, noch verformt.
•Wenn das PK-9 von einem kälteren/feuchteren an einen wärmeren/trockeneren Ort (oder umgekehrt) gebracht wird, könnte es
zu Kondensbildung kommen. Im Extremfall führt dies beim Einschalten zu Schäden oder Funktionsstörungen. Warten Sie nach
dem Transport also mehrere Stunden, bevor Sie das Gerät einschalten, damit das Kondenswasser verdampfen kann.
• Legen Sie niemals (schwere) Gegenstände auf die Tastatur. Das
könnte nämlich die Tastaturansprache beeinträchtigen.
• Je nach dem Material und der Temperatur der Oberfläche, auf welche Sie dieses Instrument stellen, kann es vorkommen, dass die
Gummifüße Streifen auf jener Oberfläche hinterlassen oder sich
verfärben.
Das kann durch Verwendung von Filz oder eines Tuchs verhindert
werden. Achten Sie dann aber darauf, dass das Instrument nicht
verrutscht.
• Stellen Sie niemals Flüssigkeitsbehälter (Vasen usw.) auf das PK-9.
Vermeiden Sie ferner die Verwendung von Insektensprays, Parfüm,
Alkohol, Nagellack, Spraydosen usw. in unmittelbarer Nähe des
Geräts. Falls das Gehäuse trotzdem Spritzer abbekommt, müssen
Sie diese sofort wegwischen.
• Verwenden Sie niemals Benzin, Verdünner, Alkohol o.ä., um Schäden oder Verfärbung des Gehäuses zu vermeiden.
Reparaturen und Datenspeicher
•Bitte beachten Sie, dass der Speicherinhalt verloren gehen kann,
wenn das Instrument zur Reparatur eingereicht wird. Archivieren
Sie alle wichtigen Daten via MIDI oder notieren Sie sie, bevor Sie
das Instrument zur Reparatur einreichen. Zwar geben wir uns bei
Reparaturen große Mühe, den Speicherinhalt zu erhalten, jedoch
können wir das nicht garantieren. Bei bestimmten Reparaturen
(z.B. wenn eine Schaltung oder der Speicherbereich selbst beschädigt ist) können die intern gespeicherten Daten nicht wiederhergestellt werden. Roland haftet nicht für den Verlust solcher Daten.
Weitere Vorsichtsmaßnahmen
• Beachten Sie, dass der Speicherinhalt im Falle einer Störung bzw.
bei unsachgemäßer Behandlung gelöscht werden kann. Roland
kann nicht garantieren, dass diese Daten auch wieder in den internen Speicher geladen werden können. Daher raten wir, Ihre Einstellungen in regelmäßigen Zeitabständen via MIDI (z.B. mit einem
Sequenzer) extern zu archivieren.
•Im Regelfall muss davon ausgegangen werden, dass der Speicherinhalt des Geräts nicht wiederhergestellt werden kann, wenn er
einmal gelöscht worden ist. Roland Corporation haftet nicht für
Schäden, die sich aus dem Verlust Ihrer Daten ergeben könnten.
• Behandeln Sie die Bedienelemente und Anschlüsse des PK-9 mit
der gebührenden Umsicht. Eine etwas zu forsche Handhabung
kann nämlich zu Schäden führen.
• Schlagen Sie niemals auf das Display und stellen Sie keine schweren Gegenstände darauf.
•Ziehen Sie beim Herstellen bzw. Lösen der Anschlüsse nur an den
Steckern – niemals an den Kabeln. Nur so vermeiden Sie das Reißen der Adern bzw. Schäden an den internen Komponenten.
•Um die Nachbarn usw. nicht zu stören, sollten Sie die Lautstärke
immer in vertretbaren Grenzen halten.
• Das Geräusch beim Drücken der Pedale und die dabei entstehenden Schwingungen sind bisweilen an unerwarteten Orten hörbar.
Deshalb sollten Sie bei Verwendung eines Kopfhörers darauf achten, dass Sie Ihre Mitmenschen nicht auf andere Art belästigen.
• Packen Sie das Instrument vor dem Transport wieder in den Lieferkarton (und verwenden Sie die dazugehörigen Polster). Es darf
aber auch anderes stabiles Verpackungsmaterial bzw. ein Koffer
verwendet werden.
• Verwenden Sie nur das empfohlene Expression-Pedal (EV-Serie
von Roland) und einen empfohlenen Fußtaster (DP-Serie von
Roland, BOSS FS-5U). Die Verwendung anderer Schwellpedale oder
Fußtaster könnte nämlich zu Fehlfunktionen führen oder das
Instrument beschädigen.
• Achten Sie beim Drücken der Pedale darauf, dass niemand die Finger darunter hält, um Verletzungen zu vermeiden. Kleine Kinder
sollten dieses Produkt prinzipiell nur unter Aufsicht eines Erwachsenen verwenden.
Wartung und Pflege
• Verwenden Sie für die Reinigung ein weiches, trockenes Tuch, das
bei Bedarf auch leicht mit Wasser angefeuchtet werden kann. Bei
stärkerer Verschmutzung darf auch ein mildes, neutrales Reinigungsmittel verwendet werden. Wischen Sie die Geräteoberfläche
danach mit einem weichen Tuch wieder trocken.
r
24
Page 25

MIDI-Pedaleinheit PK-9
Wichtige Hinweise
r
Inhaltsübersicht
1. Wichtige Hinweise . . . . . . . . . . . . . . . . . . . . . . . . . . . . . . . . . . . . . . . . . . . . . . . . . . . . . . . . . . . . . . . . .24
2. Beschreibung der Bedienelemente. . . . . . . . . . . . . . . . . . . . . . . . . . . . . . . . . . . . . . . . . . . . . . . . . . . .26
Bedienfeld. . . . . . . . . . . . . . . . . . . . . . . . . . . . . . . . . . . . . . . . . . . . . . . . . . . . . . . . . . . . . . . . . . . . . . . . . . . . . .26
Rückseite. . . . . . . . . . . . . . . . . . . . . . . . . . . . . . . . . . . . . . . . . . . . . . . . . . . . . . . . . . . . . . . . . . . . . . . . . . . . . . .27
3. Vor dem Einsatz des PK-9 . . . . . . . . . . . . . . . . . . . . . . . . . . . . . . . . . . . . . . . . . . . . . . . . . . . . . . . . . . .28
Anbringen des Schwellpedals . . . . . . . . . . . . . . . . . . . . . . . . . . . . . . . . . . . . . . . . . . . . . . . . . . . . . . . . . . . . .28
Anschließen des PK-9 mit dem PK-Kabel . . . . . . . . . . . . . . . . . . . . . . . . . . . . . . . . . . . . . . . . . . . . . . . . . . .29
Anschließen des beiliegenden Netzteils . . . . . . . . . . . . . . . . . . . . . . . . . . . . . . . . . . . . . . . . . . . . . . . . . . . .29
Anschließen eines externen MIDI-Geräts an das PK-9 . . . . . . . . . . . . . . . . . . . . . . . . . . . . . . . . . . . . . . . .30
Verwendung des PK-9 und eines MIDI-Keyboards . . . . . . . . . . . . . . . . . . . . . . . . . . . . . . . . . . . . . . . . . . .30
Anschließen eines optionalen Schwellpedals oder Fußtasters . . . . . . . . . . . . . . . . . . . . . . . . . . . . . . . . .31
4. Parametermodus . . . . . . . . . . . . . . . . . . . . . . . . . . . . . . . . . . . . . . . . . . . . . . . . . . . . . . . . . . . . . . . . . .32
Arbeitsweise im Parametermodus . . . . . . . . . . . . . . . . . . . . . . . . . . . . . . . . . . . . . . . . . . . . . . . . . . . . . . . . .32
Speichern der Einstellungen (Save) . . . . . . . . . . . . . . . . . . . . . . . . . . . . . . . . . . . . . . . . . . . . . . . . . . . . . . . .32
‘Parameter’-Einstellungen . . . . . . . . . . . . . . . . . . . . . . . . . . . . . . . . . . . . . . . . . . . . . . . . . . . . . . . . . . . . . . . .33
Transpose. . . . . . . . . . . . . . . . . . . . . . . . . . . . . . . . . . . . . . . . . . . . . . . . . . . . . . . . . . . . . . . . . . . . . . . . . . . . . . . . . . . . . 33
Octave . . . . . . . . . . . . . . . . . . . . . . . . . . . . . . . . . . . . . . . . . . . . . . . . . . . . . . . . . . . . . . . . . . . . . . . . . . . . . . . . . . . . . . . 33
MIDI Transmit Channel . . . . . . . . . . . . . . . . . . . . . . . . . . . . . . . . . . . . . . . . . . . . . . . . . . . . . . . . . . . . . . . . . . . . . . . . . 33
CONTROL 1 Assign . . . . . . . . . . . . . . . . . . . . . . . . . . . . . . . . . . . . . . . . . . . . . . . . . . . . . . . . . . . . . . . . . . . . . . . . . . . . . 33
CONTROL 2 Assign . . . . . . . . . . . . . . . . . . . . . . . . . . . . . . . . . . . . . . . . . . . . . . . . . . . . . . . . . . . . . . . . . . . . . . . . . . . . . 33
Funktion des linken Fußtasters . . . . . . . . . . . . . . . . . . . . . . . . . . . . . . . . . . . . . . . . . . . . . . . . . . . . . . . . . . . . . . . . . . 33
Funktion des rechten Fußtasters . . . . . . . . . . . . . . . . . . . . . . . . . . . . . . . . . . . . . . . . . . . . . . . . . . . . . . . . . . . . . . . . . 34
Retrigger . . . . . . . . . . . . . . . . . . . . . . . . . . . . . . . . . . . . . . . . . . . . . . . . . . . . . . . . . . . . . . . . . . . . . . . . . . . . . . . . . . . . . 34
Velocity . . . . . . . . . . . . . . . . . . . . . . . . . . . . . . . . . . . . . . . . . . . . . . . . . . . . . . . . . . . . . . . . . . . . . . . . . . . . . . . . . . . . . . 34
Touch (Anschlagkurve) . . . . . . . . . . . . . . . . . . . . . . . . . . . . . . . . . . . . . . . . . . . . . . . . . . . . . . . . . . . . . . . . . . . . . . . . . 34
Portamento Time . . . . . . . . . . . . . . . . . . . . . . . . . . . . . . . . . . . . . . . . . . . . . . . . . . . . . . . . . . . . . . . . . . . . . . . . . . . . . . 34
Octaver value . . . . . . . . . . . . . . . . . . . . . . . . . . . . . . . . . . . . . . . . . . . . . . . . . . . . . . . . . . . . . . . . . . . . . . . . . . . . . . . . . 34
Pedal Assign . . . . . . . . . . . . . . . . . . . . . . . . . . . . . . . . . . . . . . . . . . . . . . . . . . . . . . . . . . . . . . . . . . . . . . . . . . . . . . . . . . 35
Auto Off. . . . . . . . . . . . . . . . . . . . . . . . . . . . . . . . . . . . . . . . . . . . . . . . . . . . . . . . . . . . . . . . . . . . . . . . . . . . . . . . . . . . . . 35
Factory Reset . . . . . . . . . . . . . . . . . . . . . . . . . . . . . . . . . . . . . . . . . . . . . . . . . . . . . . . . . . . . . . . . . . . . . . . . . . . . . . . . . 35
MIDI Dump . . . . . . . . . . . . . . . . . . . . . . . . . . . . . . . . . . . . . . . . . . . . . . . . . . . . . . . . . . . . . . . . . . . . . . . . . . . . . . . . . . . 35
Save . . . . . . . . . . . . . . . . . . . . . . . . . . . . . . . . . . . . . . . . . . . . . . . . . . . . . . . . . . . . . . . . . . . . . . . . . . . . . . . . . . . . . . . . . 35
Laden der Werksvorgaben (Factory Reset) . . . . . . . . . . . . . . . . . . . . . . . . . . . . . . . . . . . . . . . . . . . . . . . . . .35
Archivieren Ihrer Einstellungen (MIDI Dump) . . . . . . . . . . . . . . . . . . . . . . . . . . . . . . . . . . . . . . . . . . . . . . .35
Vorbereitung für die Datenarchivierung. . . . . . . . . . . . . . . . . . . . . . . . . . . . . . . . . . . . . . . . . . . . . . . . . . . . . . . . . . . . 35
Archivieren der Einstellungen mit einem Sequenzer . . . . . . . . . . . . . . . . . . . . . . . . . . . . . . . . . . . . . . . . . . . . . . . . . 35
Rückübertragung der Daten zum PK-9. . . . . . . . . . . . . . . . . . . . . . . . . . . . . . . . . . . . . . . . . . . . . . . . . . . . . . . . . . . . . 36
5. Anhang . . . . . . . . . . . . . . . . . . . . . . . . . . . . . . . . . . . . . . . . . . . . . . . . . . . . . . . . . . . . . . . . . . . . . . . . . .37
Fehlersuche . . . . . . . . . . . . . . . . . . . . . . . . . . . . . . . . . . . . . . . . . . . . . . . . . . . . . . . . . . . . . . . . . . . . . . . . . . . .37
Technische Daten . . . . . . . . . . . . . . . . . . . . . . . . . . . . . . . . . . . . . . . . . . . . . . . . . . . . . . . . . . . . . . . . . . . . . . .38
DEUTSCH DEUTSCH DEUTSCH DEUTSCH DEUTSCH DEUTSCH
25
Page 26
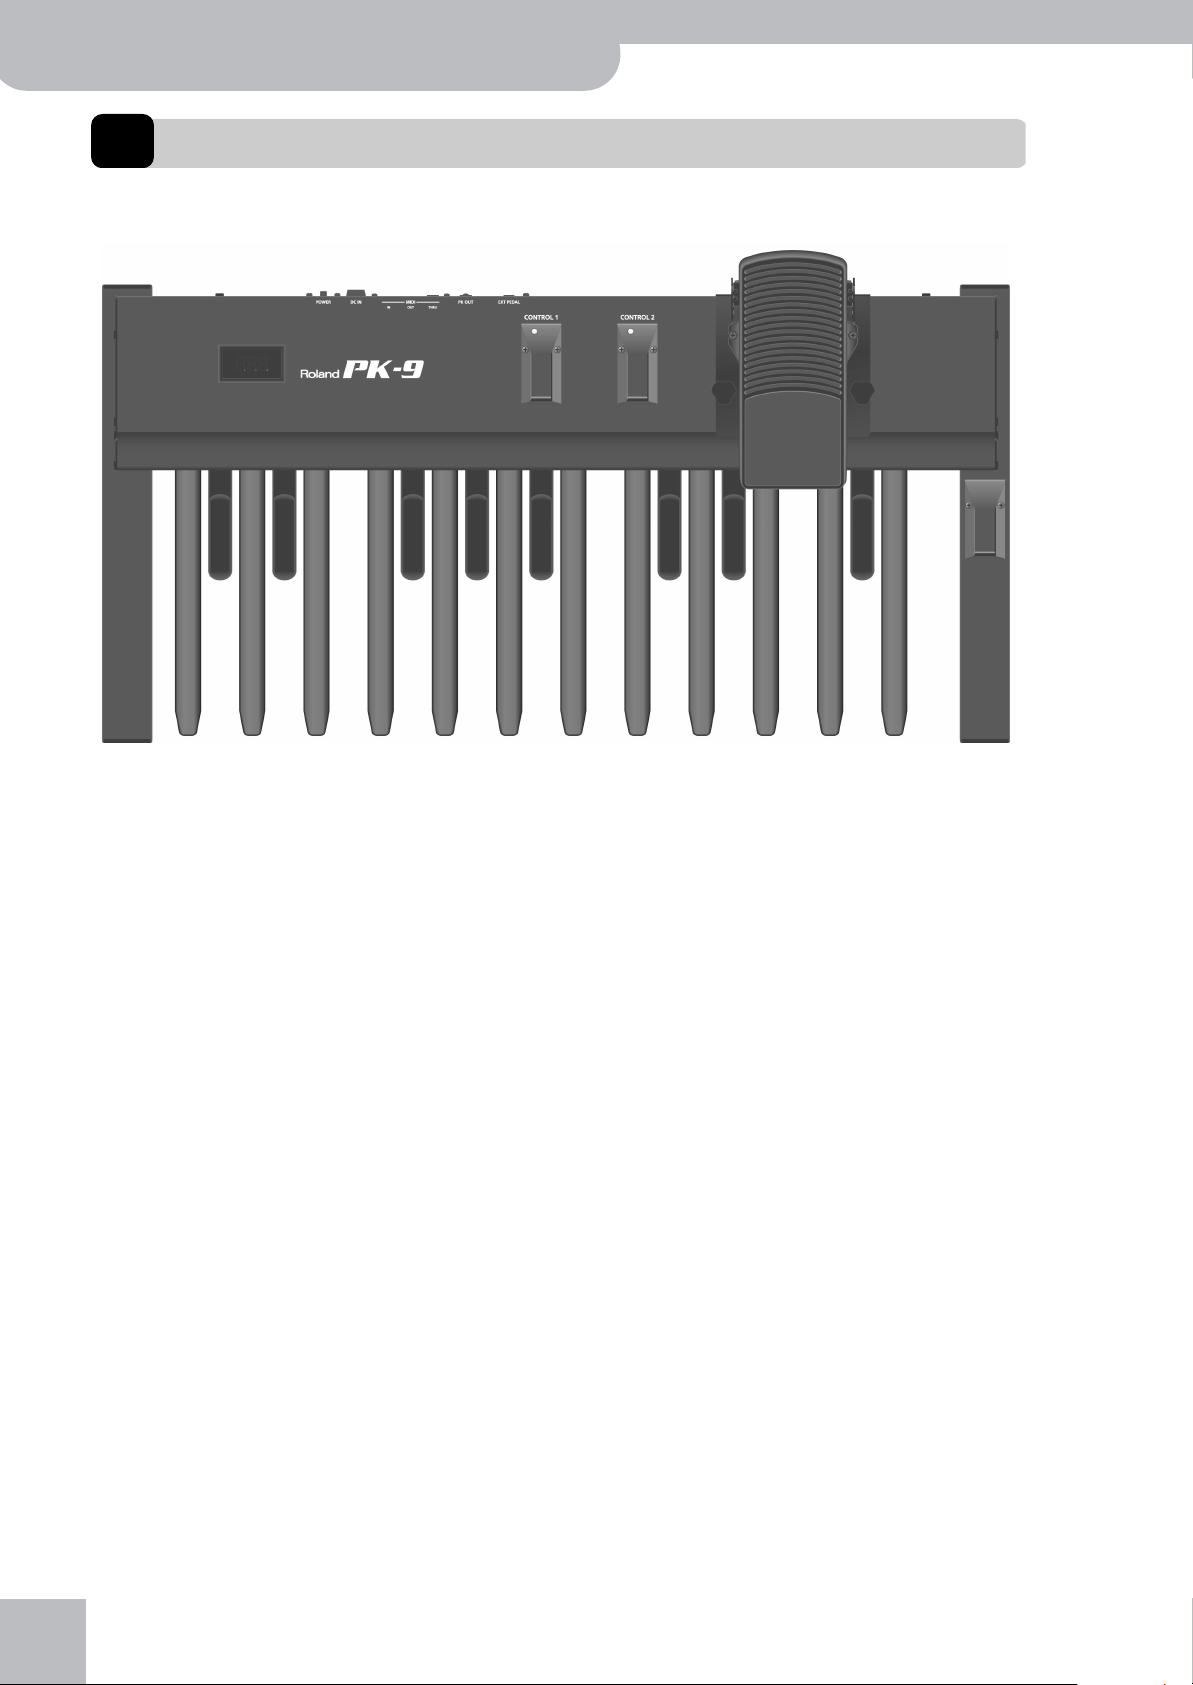
MIDI-Pedaleinheit PK-9
Beschreibung der Bedienelemente
2. Beschreibung der Bedienelemente
Bedienfeld
A
A
Display
Dieses dreistellige Display informiert Sie über die
gewählte Funktion oder den eingestellten Parameterwert.
B
CONTROL 1- und CONTROL 2-Pedal
Diese Pedale senden MIDI-Befehle. Ihre Funktion
kann im Parametermodus gewählt werden (S. 32).
Laut Vorgabe sendet das CONTROL 1-Pedal Steuerbefehl CC16 und das CONTROL 2-Pedal Steuerbefehl
CC17.
Drücken Sie diese Pedale gemeinsam, um den Parametermodus zu wählen (S. 32).
C
Schwellpedal
Drücken Sie das Pedal, um die Lautstärke zu erhöhen
und ziehen Sie es hoch, um die Lautstärke zu verringern. Auf Seite 28 wird erklärt, wie man es installiert.
D
C
D
B
D
Fußtaster
Zwei Fußtaster an den Seiten des Schwellpedals
erlauben die Steuerung eines externen Geräts. Laut
Vorgabe sendet der linke Fußtaster Steuerbefehl
CC18 und der rechte CC19.
Die Funktion dieser Fußtaster kann im Parametermodus geändert werden.
E
Haltepedal
Drücken Sie dieses Pedal, um die momentan gespielte
Noten auch nach Freigabe des MIDI-Pedals zu halten.
Wenn sich das PK-9 im Parametermodus befindet,
bestätigt man hiermit Einstellungen.
E
r
26
Page 27

MIDI-Pedaleinheit PK-9
r
Rückseite
Rückseite
A
EXTERNAL PEDAL-Buchse
Hier können Sie einen optionalen Fußtaster (DP-Serie
von Roland, BOSS FS-5U) oder ein optionales
Schwellpedal (Roland EV-5) anschließen. Auf Seite 35
wird gezeigt, wie Sie dem Fußtaster oder Pedal die
gewünschte Funktion zuordnen.
B
PK OUT-Buchse
Verbinden Sie das PK-9 über das beiliegende PKKabel mit der PK IN-Buchse eines externen Instruments (S. 29).
C
MIDI-Buchsen
Hiermit können Sie das PK-9 an externe MIDI-Geräte
anschließen (S. 30).
A
E
D
C
B
D
DC IN-Buchse
Schließen Sie hier das beiliegende Netzteil an (S. 29).
E
POWER-Taster
Hiermit schalten Sie das Instrument ein und aus
(S. 30).
Laut Vorgabe schaltet sich das PK-9 automatisch
aus, wenn Sie es länger als 240 Minuten (4
Stunden) nicht bedienen.
Wenn das PK-9 automatisch ausgeschaltet wurde,
können Sie es mit dem [POWER]-Taster wieder einschalten.
Um zu verhindern, dass sich das Instrument automatisch ausschaltet, müssen Sie “Auto Off” auf “OFF”
stellen (S. 35).
DEUTSCH DEUTSCH DEUTSCH DEUTSCH DEUTSCH DEUTSCH
27
Page 28
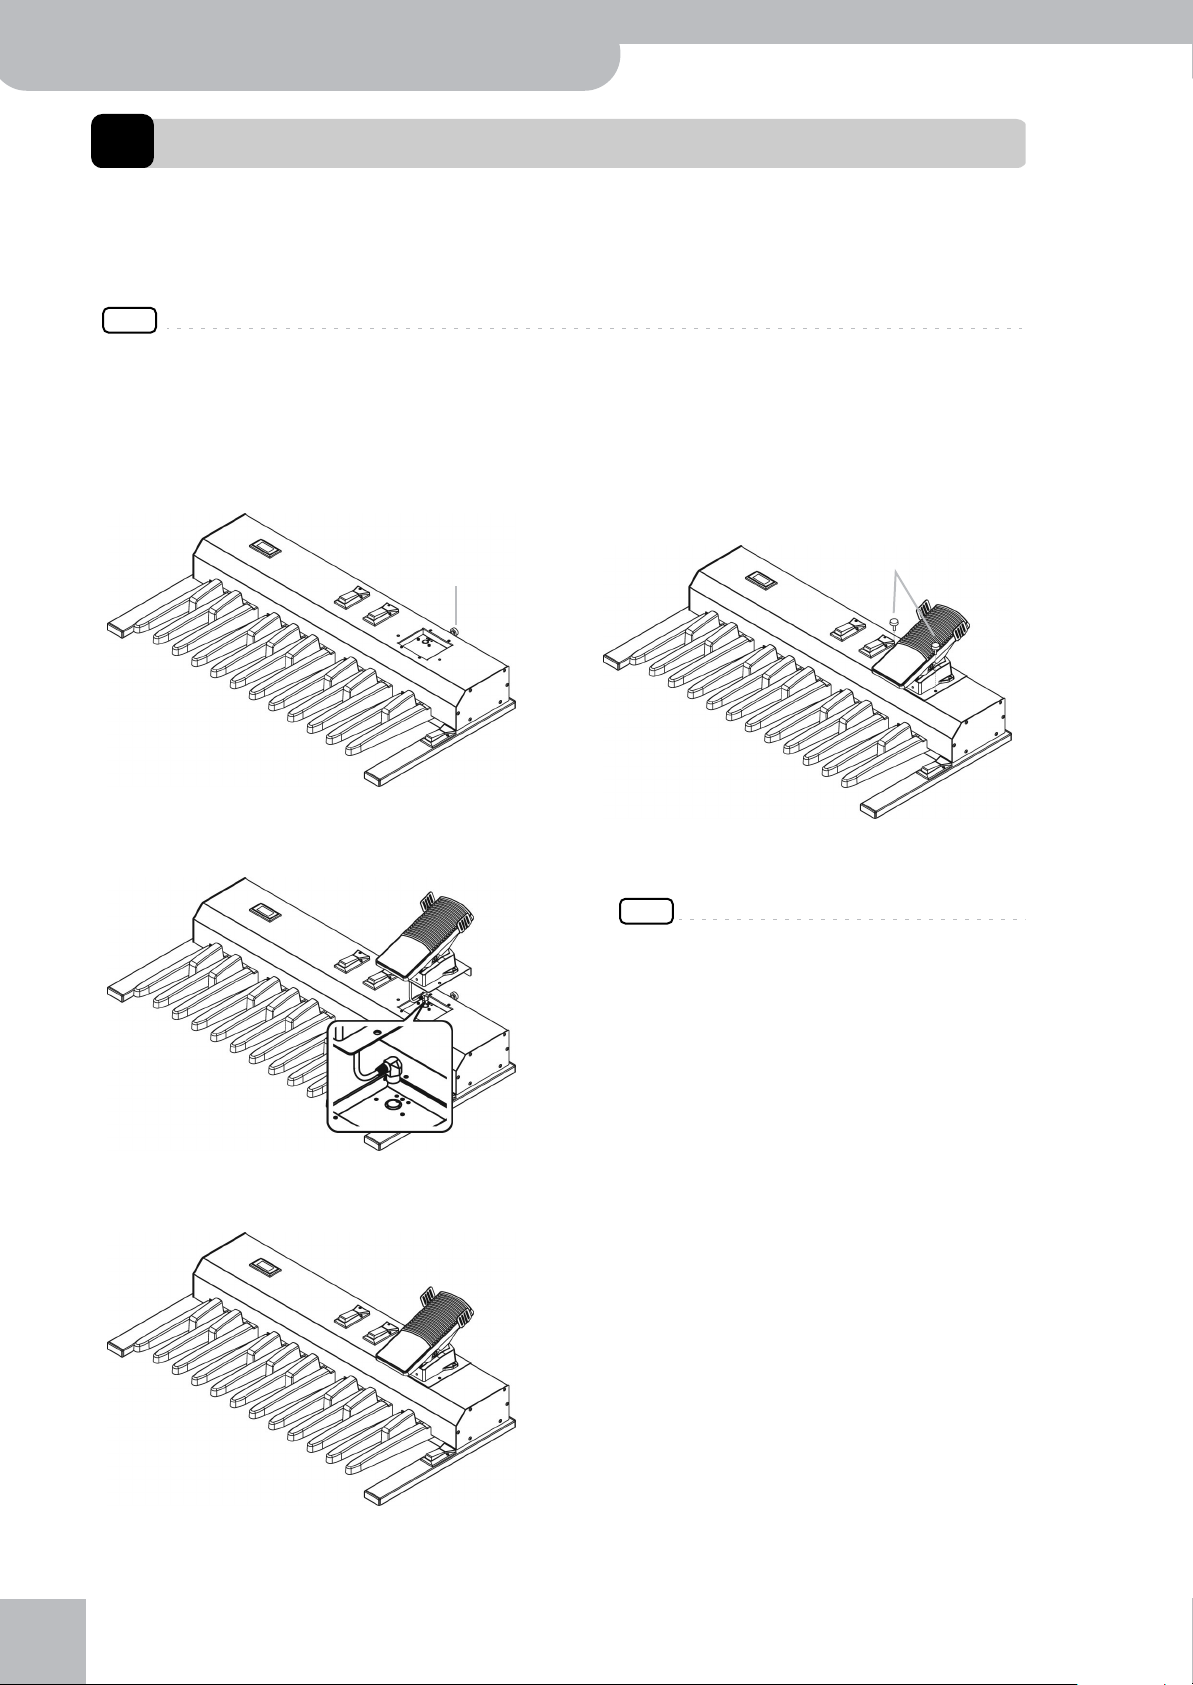
MIDI-Pedaleinheit PK-9
Vor dem Einsatz des PK-9
3. Vor dem Einsatz des PK-9
Anbringen des Schwellpedals
Das Schwellpedal ist ab Werk nicht auf dem PK-9 installiert. Installieren Sie das Schwellpedal, bevor Sie das PK-9 mit
einem externen Gerät verbinden.
Anm.
Seien Sie beim Anbringen/Entfernen des Schwellpedals vorsichtig, dass Sie nicht auf die Handschrauben treten. Um zu verhindern, dass
die Handschrauben verschluckt werden, müssen Sie sie außerhalb der Reichweite von Kindern aufbewahren.
Um Schäden und/oder Funktionsstörungen zu vermeiden, müssen Sie alle betroffenen Geräte vor Herstellen/Lösen von Verbindungen
ausschalten.
1.
Lösen Sie die Handschraube auf der Rückseite des PK-9.
Handschraube auf der
Rückseite
4.
Arretieren Sie das Schwellpedal mit den beiden beiliegenden Handschrauben, die in die
richtigen Gewinde gedreht werden müssen.
Beiliegende Handschrau-
ben (zwei Stellen)
2.
Schließen Sie das Kabel des Schwellpedal an
die Buchse auf der Oberseite des PK-9 an.
3.
Bringen Sie das Pedal auf dem PK-9 an,
ohne das Verbindungskabel abzuklemmen.
5.
Drehen Sie die Handschraube auf der Rückseite wieder fest.
Anm.
Die Buchse auf der Oberseite des PK-9 ist ausschließlich für
das beiliegende Schwellpedal gedacht. Schließen Sie hier
nur das Schwellpedal des PK-9 an, um Funktionsstörungen
zu vermeiden.
r
28
Page 29
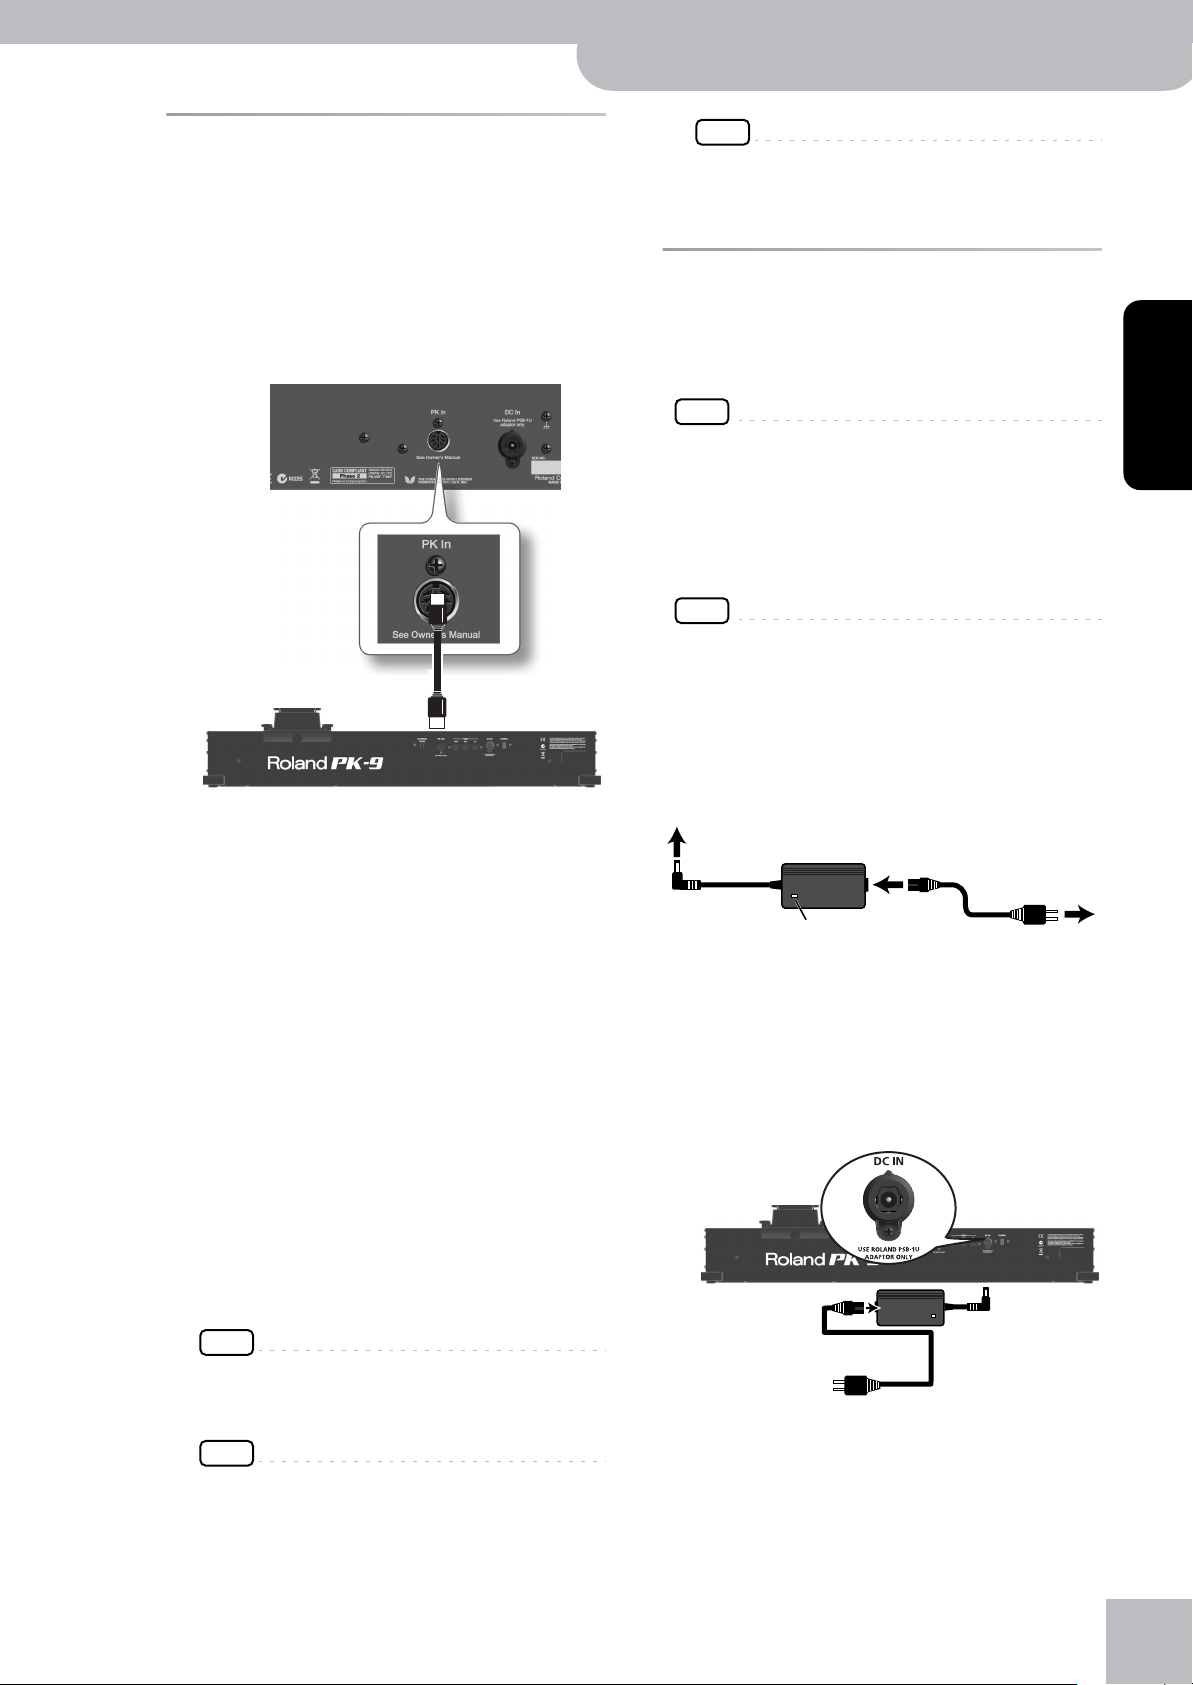
MIDI-Pedaleinheit PK-9
Zur DC IN-Buchse des PK-9
Netzteil
Netzkabel
Zu einer Steckdose
Anzeige
Anschließen des PK-9 mit dem PK-Kabel
r
Anschließen des PK-9 mit dem PKKabel
Verbinden Sie das PK-9 über das beiliegende PK-Kabel
mit dem externen Instrument. Bei Herstellen dieser Verbindung wird das PK-9 vom externen Gerät gespeist (Sie
benötigen also kein optionales Netzteil).
Wenn Sie das externe Instrument ausschalten, wird auch
das PK-9 ausgeschaltet (ganz gleich, wie der Netzschalter des PK-9 eingestellt ist).
AT-350C
(Andere kompatible Instrumente sind: Roland AT-900C,
C-200 usw.)
PK OUT
Anm.
Dieses Produkt ist mit einer Schutzschaltung versehen.
Daher dauert es nach dem Einschalten ein paar Sekunden,
bevor Sie etwas hören.
Anschließen des beiliegenden
Netzteils
Das PK-9 kann auch mit dem beiliegenden PSB-1U
Netzteil betrieben werden.
Anm.
Verwenden Sie ausschließlich das zum Lieferumfang des PK-9
gehörige Netzteil (PSB-1U). Die Netzspannung der verwendeten Steckdose muss zudem den Angaben auf dem Typenschild
entsprechen. Andere Netzteile verwenden eventuell eine
andere Polarität oder eignen sich nur für eine andere Netzspannung. Bei ihrer Verwendung bestehen Brand- und Stromschlaggefahr.
Anm.
Um Schäden und/oder Funktionsstörungen der Lautsprecher
zu vermeiden, müssen Sie vor Herstellen/Lösen von Verbindungen die Lautstärke aller Geräte auf den Mindestwert stellen.
1.
Schließen Sie das Stromkabel an das Netzteil an.
DEUTSCH DEUTSCH DEUTSCH DEUTSCH DEUTSCH DEUTSCH
1.
Schalten Sie das externe Instrument aus und
stellen Sie seine Lautstärke auf den Mindestwert.
2.
Verbinden Sie die PK OUT-Buchse des PK-9
über das beiliegende PK-Kabel mit der PK
IN-Buchse des externen Instruments.
Nach Herstellen aller notwendigen Verbindungen
können Sie das Instrument mit folgendem Verfahren
einschalten. Wenn Sie die Geräte in der falschen Reihenfolge anschließen, können Funktionsstörungen
oder schwere Schäden auftreten.
3.
Schalten Sie das externe Instrument ein und
stellen Sie die gewünschte Lautstärke ein
(siehe die Bedienungsanleitung).
4.
Schauen Sie nach, ob jetzt auch das PK-9 an
ist.
5.
Spielen Sie auf den Pedalen. Wenn das
externe Instrument die Noten ausgibt, stimmen die Verbindungen.
Anm.
Wenn das externe Instrument die Noten in der falschen
Oktave ausgibt, können Sie die vom PK-9 gesendeten
Notennummern transponieren (siehe “Octave” auf S. 33).
Anm.
Um Funktionsstörungen und/oder Schäden zu vermeiden,
sollten Sie alle beteiligten Geräte ausschalten, bevor Sie
Verbindungen herstellen/lösen.
Verlegen Sie das Netzteil so, dass die Seite mit der
Diode nach oben zeigt, während sich das Etikett an
der Unterseite befindet.
Wenn Sie das Netzteil mit einer Steckdose verbinden,
leuchtet seine Diode.
2.
Verbinden Sie das Netzteil mit der DC INBuchse des PK-9.
Zu einer Steckdose
3.
Verbinden Sie das Netzkabel mit einer
Steckdose.
29
Page 30
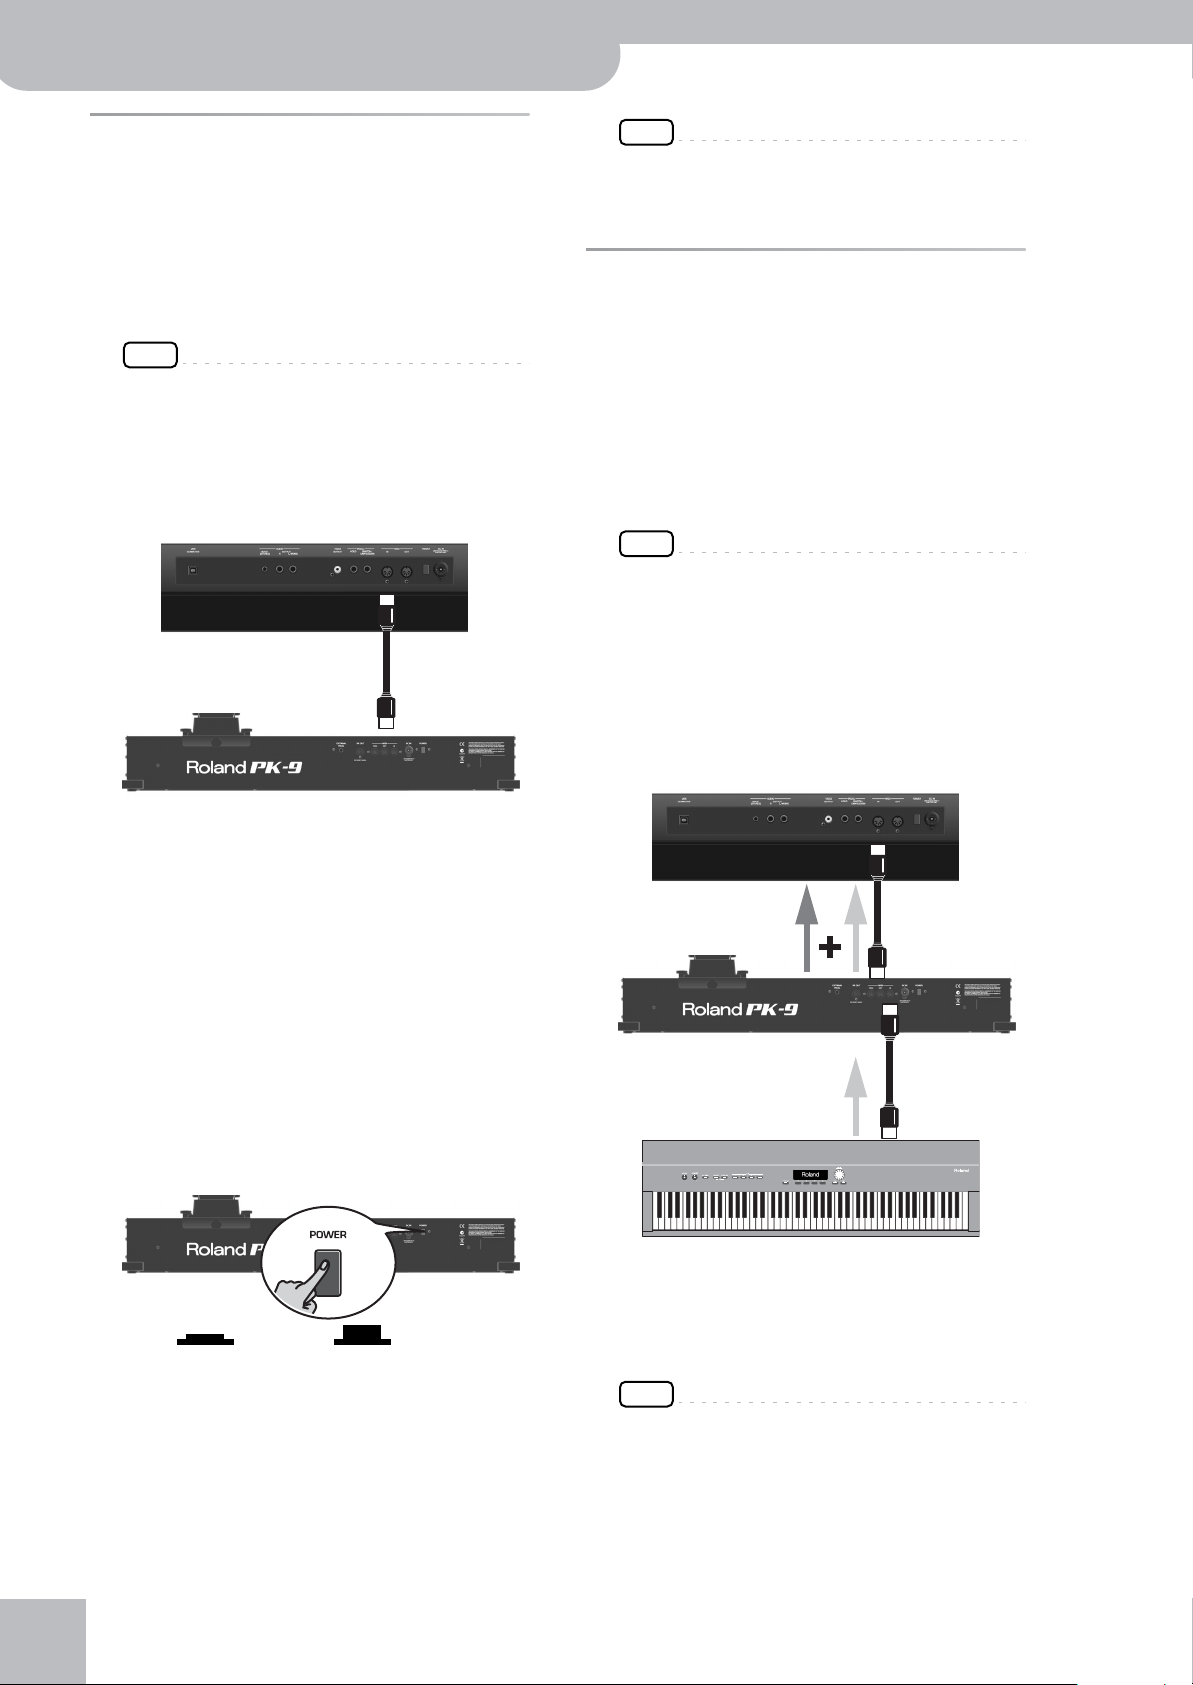
MIDI-Pedaleinheit PK-9
Vor dem Einsatz des PK-9
Anschließen eines externen MIDIGeräts an das PK-9
Das PK-9 kann auch als MIDI-Steuerquelle für externe
Geräte verwendet werden.
1.
Schalten Sie das externe Instrument aus und
stellen Sie seine Lautstärke auf den Mindestwert.
Anm.
Um Funktionsstörungen und/oder Schäden zu vermeiden,
sollten Sie alle beteiligten Geräte ausschalten, bevor Sie
Verbindungen herstellen/lösen.
2.
Verbinden Sie die MIDI OUT-Buchse des
PK-9 mit der MIDI IN-Buchse des externen
Instruments.
Ein beliebiges MIDI-Instrument mit
interner Klangerzeugung, aber ohne
PK IN-Anschluss.
MIDI IN
MIDI OUT
Anm.
Dieses Produkt ist mit einer Schutzschaltung versehen.
Daher dauert es nach dem Einschalten ein paar Sekunden,
bevor Sie etwas hören.
Verwendung des PK-9 und eines
MIDI-Keyboards
Bei Bedarf können Sie ein externes MIDI-Modul sowohl
mit einem Keyboard als auch mit dem PK-9 ansteuern.
Somit können Sie mit den Händen und Füßen unterschiedliche Parts ansteuern.
1.
Schalten Sie das externe Instrument aus und
stellen Sie seine Lautstärke auf den Mindestwert.
Anm.
Um Funktionsstörungen und/oder Schäden zu vermeiden,
sollten Sie alle beteiligten Geräte ausschalten, bevor Sie
Verbindungen herstellen/lösen.
2.
Verbinden Sie die MIDI OUT-Buchse des
PK-9 mit der MIDI IN-Buchse des externen
Instruments. Schließen Sie die MIDI OUTBuchse des Keyboards an die MIDI INBuchse des PK-9 an.
3.
Verbinden Sie das PSB-1U Netzteil mit der
DC IN-Buchse (S. 29).
Nach Herstellen aller notwendigen Verbindungen
können Sie das Instrument mit folgendem Verfahren
einschalten. Wenn Sie die Geräte in der falschen Reihenfolge anschließen, können Funktionsstörungen
oder schwere Schäden auftreten.
4.
Schalten Sie das externe MIDI-Instrument
ein und stellen Sie die gewünschte Lautstärke ein (siehe die Bedienungsanleitung).
5.
Drücken Sie den [POWER]-Taster auf der
Rückseite des PK-9.
An Aus
6.
Stellen Sie den MIDI-Kanal des PK-9 ein
(S. 33).
7.
Wählen Sie auf dem externen Instrument
denselben MIDI-Kanal wie auf dem PK-9.
8.
Spielen Sie auf den Pedalen des PK-9.
Wenn das externe Instrument die Noten wiedergibt,
stimmen die Einstellungen.
r
MIDI IN
Vom PK-9 gesendete Daten
MIDI OUT
MIDI IN
Vom Keyboard gesendete
Hier werden die MIDI-Befehle, die das PK-9 über
seine MIDI IN-Buchse empfängt, mit den intern
erzeugten MIDI-Daten kombiniert (“Merge”) und
gemeinsam an die MIDI OUT-Buchse ausgegeben
(“Soft Thru”).
Anm.
Die MIDI THRU-Buchse gibt außerdem eine exakte Kopie
der über die MIDI IN-Buchse eingehenden Signale aus.
Obwohl man auch dieses Anschlussverfahren verwenden
könnte, funktioniert es nur, wenn das MIDI-Modul zwei
MIDI IN-Buchsen aufweist. Der “Merge”-Ansatz ist in der
Regel praktischer.
Daten
MIDI OUT
30
Page 31

Anschließen eines optionalen Schwellpedals oder Fußtasters
MIDI-Pedaleinheit PK-9
r
Anschließen eines optionalen
Schwellpedals oder Fußtasters
An die EXTERNAL PEDAL-Buchse des PK-9 kann ein optionaler Fußtaster (DP-Serie von Roland oder BOSS
FS-5U) bzw. ein weiteres Expression-Pedal (EV-Serie von
Roland) angeschlossen werden.
Optionaler Fußtaster
(DP-Serie von Roland,
BOSS FS-5U)
Wenn Sie einen Fußtaster oder ein Schwellpedal
anschließen, müssen Sie ihm eine Funktion zuordnen
(S. 35). Laut Vorgabe ist nämlich die “Hold”-Funktion
gewählt.
—oder—
Optionales Schwellpedal (EV-
Serie von Roland)
DEUTSCH DEUTSCH DEUTSCH DEUTSCH DEUTSCH DEUTSCH
Anm.
Verwenden Sie nur das empfohlene Schwellpedal (EV-Serie
von Roland) oder einen empfohlenen Fußtaster (DP-Serie
von Roland, BOSS FS-5U). Die Verwendung anderer
Schwellpedale oder Fußtaster könnte nämlich zu Fehlfunktionen führen oder das Instrument beschädigen.
Anm.
Schalten Sie das PK-9 immer aus, bevor Sie einen Fußtaster
oder ein Schwellpedal anschließen bzw. die Verbindung
lösen. Die Verbindung mit der EXTERNAL PEDAL-Buchse
darf nur bei ausgeschaltetem PK-9 geändert werden.
31
Page 32

MIDI-Pedaleinheit PK-9
Parametermodus
4. Parametermodus
Im Parametermodus haben Sie Zugriff auf zahlreiche praktische Funktionen.
Arbeitsweise im Parametermodus
Die Einstellungen des Parametermodus’ können folgendermaßen geändert werden.
1.
Drücken Sie das [CONTROL 1]- und
[CONTROL 2]-Pedal gleichzeitig.
Die [CONTROL 1]- und [CONTROL 2]-Diode blinken.
Das PK-9 befindet sich jetzt im Parametermodus. Die
Abkürzung des ersten Parameters (oder des nach Einschalten des PK-9 zuletzt gewählten Parameters)
blinkt.
trn
Speichern der Einstellungen (Save)
Alle Änderungen, die Sie vornehmen, werden beim Ausschalten des PK-9 wieder gelöscht. Sie können aber von
Hand gespeichert werden und werden dann beim
nächsten Einschalten wieder geladen.
Parametereinstellungen, die gespeichert
werden
Transpose 33
Octave 33
Control 1 Assign 33
Control 2 Assign 33
Funktion des linken Fußtasters 33
Funktion des rechten Fußtasters 34
Retrigger 34
Velocity 34
Touch 34
Portamento Time 34
Octaver Value 34
Seite
2.
Wählen Sie mit dem [CONTROL 1]- oder
[CONTROL 2]-Pedal den gewünschten Parameter.
Siehe auch “‘Parameter’-Einstellungen” auf S. 33.
3.
Bestätigen Sie mit dem Haltepedal.
Das Display zeigt die aktuelle Einstellung an.
4.
Verwenden Sie das [CONTROL 1]- und
[CONTROL 2]-Pedal zum Ändern des Werts.
5.
Drücken Sie das Haltepedal, um zu bestätigen und den Parametermodus zu verlassen.
Pedal Assign 35
Auto Off 35
MIDI Transmit Channel 33
1.
Drücken Sie das [CONTROL 1]- und
[CONTROL 2]-Pedal gleichzeitig.
Die [CONTROL 1]- und [CONTROL 2]-Diode blinken.
Das PK-9 befindet sich jetzt im Parametermodus.
2.
Wählen Sie mit dem [CONTROL 1]- oder
[CONTROL 2]-Pedal den “SAv”-Parameter.
SAv
3.
Bestätigen Sie mit dem Haltepedal.
Das Display zeigt “ok” an und das PK-9 verlässt den
Parametermodus.
r
32
Page 33

‘Parameter’-Einstellungen
Nachstehend finden Sie eine Übersicht der verfügbaren
Parameter.
●
Transpose
Display Wert Vorgabe
–5~6 0
trn
Mit dieser Funktion kann die Tonhöhe der Pedale in
Halbtonschritten geändert werden.
●
Octave
Display Wert Vorgabe
0~8 2
oCt
Mit dieser Funktion kann die Tonhöhe der Pedale in
Oktavschritten geändert werden.
Anm.
Die Vorgabe (“2”) bedeutet, dass das Pedal ganz links ein
“C2” (MIDI-Notennummer 36) sendet.
●
MIDI Transmit Channel
Display Wert Vorgabe
1~16 2
Ch
MIDI-Pedaleinheit PK-9
Wenn diese Funktion eingeschaltet ist, wird zu jeder
gespielten Note eine weitere Note hinzugefügt, die
1~4 Oktaven unter der gespielten Note liegt (Vorgabe: –1). Auf “Octaver value” auf S. 34 wird erklärt,
wie man die Oktave wählt.
Por (Portamento): Das Pedal kann zum Ein-/Ausschalten der “Portamento”-Funktion verwendet werden. Wenn Sie diese Funktion aktivieren, ändert sich
die Tonhöhe der gespielten Noten nicht mehr schrittweise: die Noten gehen vielmehr ineinander über. Mit
“Portamento Time” (S. 34) stellen Sie ein, wie schnell
diese Übergänge erfolgen sollen. Je größer der Wert,
desto träger sind die Übergänge.
Mon (Mono): Hiermit kann der Mono-Modus einund ausgeschaltet werden. In diesem Modus ist das
PK-9 monophon. Das bedeutet, dass nur jeweils ein
Notenbefehl gesendet wird. Nach dem Einschalten
befindet sich das PK-9 im Poly-Modus.
●
CONTROL 2 Assign
Display Wert Vorgabe
C16, C17, oCb, Por, Mon C17
‘Parameter’-Einstellungen
r
Ct2
Mit diesem Parameter können Sie dem an die
[CONTROL 2]-Buchse angeschlossenen Pedal eine
Funktion zuordnen. Auf “CONTROL 1 Assign” finden
Sie eine Übersicht der Möglichkeiten. Beachten Sie
jedoch, dass die Vorgabe für das [CONTROL 2]-Pedal
“C17” lautet.
●
Funktion des linken Fußtasters
DEUTSCH DEUTSCH DEUTSCH DEUTSCH DEUTSCH DEUTSCH
Hier können Sie einstellen, auf welchem MIDI-Kanal
das PK-9 senden soll. Der MIDI-Standard unterstützt
sechzehn Kanäle (1~16). Die MIDI-Kommunikation
funktioniert nur ordnungsgemäß, wenn man die
beteiligten Instrumente einerseits richtig miteinander
verbindet und andererseits die richtigen Kanäle
wählt.
●
CONTROL 1 Assign
Display Wert Vorgabe
C16, C17, oCb, Por, Mon C16
Ct1
Mit diesem Parameter können Sie dem an die
[CONTROL 1]-Buchse angeschlossenen Pedal eine
Funktion zuordnen.
C16 (Control Change CC16) oder C17 (CC17): Bei
Drücken des [CONTROL 1]-Pedals wird der gewählte
Steuerbefehl abwechselnd mit dem Wert “0” und
“127” gesendet.
oCb (Octaver Bass): Bei Drücken von [CONTROL 1]
wird die “Octaver Bass”-Funktion ein-/ausgeschaltet.
Display Wert Vorgabe
C18, C19, Por C18
S L
Mit diesem Parameter können Sie dem Fußtaster links
neben dem Schwellpedal eine Funktion zuordnen.
C18 (Steuerbefehl CC18) oder C19 (CC19): Bei
Drücken des Fußtasters wird der gewählte Steuerbefehl abwechselnd mit dem Wert “0” und “127” gesendet.
Anm.
Wenn Sie das PK-9 an eine Orgel der VK-Serie anschließen,
beeinflusst der CC18-Befehl den “Rotary Slow/Fast”-Parameter und der CC19-Befehl den “Rotary Break Speed”Parameter.
Por (Portamento): Hiermit kann die “Portamento”Funktion ein- und ausgeschaltet werden. Wenn Sie
diese Funktion aktivieren, ändert sich die Tonhöhe der
gespielten Noten nicht mehr schrittweise: die Noten
gehen vielmehr ineinander über. Mit “Portamento
Time” (S. 34) stellen Sie ein, wie schnell diese Übergänge erfolgen sollen. Je größer der Wert, desto träger sind die Übergänge.
33
Page 34

MIDI-Pedaleinheit PK-9
tCh
Por
oCv
Parametermodus
●
Funktion des rechten Fußtasters
●
Touch (Anschlagkurve)
Display Wert Vorgabe
C18, C19, Por C19
S r
Mit diesem Parameter können Sie dem Fußtaster
rechts neben dem Schwellpedal eine Funktion zuordnen. Unter “Funktion des linken Fußtasters” finden Sie
eine Übersicht der Möglichkeiten.
Anm.
Wenn Sie das PK-9 an eine Orgel der VK-Serie anschließen,
beeinflusst der CC18-Befehl den “Rotary Slow/Fast”-Parameter und der CC19-Befehl den “Rotary Break Speed”Parameter.
●
Retrigger
Display Wert Vorgabe
Off, On Off
rEt
Dieser Parameter ist nur verfügbar, wenn sich das
PK-9 im Mono-Modus befindet. Um jenen Modus zu
wählen, müssen Sie dem [CONTROL 1]- oder
[CONTROL 2]-Pedal zuerst die “Mon”-Funktion zuordnen und das Pedal anschließend aktivieren. Siehe
auch “CONTROL 1 Assign” und “CONTROL 2 Assign”
auf S. 33.
Mit dem “Retrigger”-Parameter erzielen Sie Spezialeffekte. Im Mono-Modus ist die Pedaleinheit monophon: Selbst wenn Sie zwei Pedale ungefähr gleichzeitig drücken, wird nur die Note des zuletzt betätigten Pedals gesendet. Beim Loslassen dieses Pedals
erklingt die davor gespielte Note, wodurch ein interessanter Wechseleffekt erzeugt wird.
●
Velocity
Display Wert Vorgabe
On, 1~127 On
Display Wert Vorgabe
SFt (leicht), Med (mittel),
hrd (hart)
Die Pedale des PK-9 sind anschlagdynamisch. Bei
Bedarf können Sie eine andere Anschlagkurve wählen, die besser für Ihr Spiel geeignet ist.
Anm.
Wenn Sie für “Velocity” einen Wert (1~127) wählen, wird
die “Touch”-Einstellung ignoriert.
●
Portamento Time
Display Wert Vorgabe
0~127 50
“Portamento” bedeutet, dass sich die Tonhöhe nicht
stufenweise ändert, sondern dass die Noten ineinander übergehen. Mit diesem Parameter bestimmen Sie
die Geschwindigkeit der Übergänge. Je größer der
Wert, desto träger sind die Übergänge.
Anm.
Wenn das Empfängerinstrument diesen Parameter nicht
unterstützt, hat dieser Parameter keine Funktion.
●
Octaver value
Display Wert Vorgabe
–4~–1 –1
Mit diesem Parameter wählen Sie die Tonhöhe der
Note, die jeweils hinzugefügt wird, wenn die “oCb”Funktion aktiv ist. Siehe auch “CONTROL 1 Assign” auf
S. 33.
Med
vEl
Wenn dieser Parameter eingeschaltet ist, werden die
gespielten Noten mit den entsprechenden MIDIAnschlagwerten (1~127) gesendet. Wenn Sie einen
festen Wert (1~127) wählen, sendet das PK-9 alle
Noten mit jenem Wert.
r
34
Page 35

●
Anmerkung: Bei Verwendung
eines Computers benötigen Sie
zudem eine MIDI-Schnittstelle. Das
PK-9 muss dann an die Schnittstelle
angeschlossen werden.
MIDI OUT
MIDI IN
MIDI IN
MIDI OUT
Pedal Assign
Display Wert Vorgabe
“CUt” (Cutoff), “rES”
Ped
Mit diesem Parameter können Sie dem an die EXTERNAL PEDAL-Buchse angeschlossenen Pedal eine
andere Funktion zuordnen.
●
Auto Off
(Resonance),
“Pbd” (Pitch Bend Down),
“PbU” (Pitch Bender Up),
“Mod” (Modulation),
“hLd” (Hold),
“voL” (Volume),
“PAn” (Panpot),
“C16” (Control Change
16), “C17” (Control
Change 17),
“C18” (Control Change
18), “C19” (Control
Change 19)
0ff, 10, 30, 240 240
“hLd”
(Hold)
MIDI-Pedaleinheit PK-9
Laden der Werksvorgaben (Factory Reset)
Sobald die Werksvorgaben geladen sind, zeigt das
Display “ok” an und das PK-9 verlässt automatisch
den Parameter-Modus.
r
Archivieren Ihrer Einstellungen
(MIDI Dump)
Bei Bedarf können Sie die Einstellungen auf Ihrem Computer (hierfür benötigen Sie eine MIDI-Schnittstelle)
oder mit einem externen Sequenzer archivieren.
Vorbereitung für die Datenarchivierung
1.
Verbinden Sie die MIDI IN-Buchse des externen Sequenzers mit der MIDI OUT-Buchse
des PK-9.
2.
Verbinden Sie die MIDI OUT-Buchse des
externen Sequenzers über ein zweites MIDIKabel mit der MIDI IN-Buchse des PK-9.
DEUTSCH DEUTSCH DEUTSCH DEUTSCH DEUTSCH DEUTSCH
Aof
Mit diesem Parameter können Sie einstellen, wie
lange das PK-9 warten soll, bevor es sich selbsttätig
ausschaltet, wenn Sie es nicht benutzen. Um zu verhindern, dass sich das Gerät automatisch ausschaltet,
müssen Sie “Off” wählen.
●
Factory Reset
Siehe “Laden der Werksvorgaben
(Factory Reset)” auf S. 35.
●
MIDI Dump
Siehe “Archivieren Ihrer Einstellungen (MIDI Dump)” auf S. 35.
●
Save
Siehe “Speichern der Einstellungen
(Save)” auf S. 32.
Laden der Werksvorgaben
(Factory Reset)
Bei Bedarf können Sie die Einstellungen des ParameterModus (S. 32) auf die Werksvorgaben zurückstellen.
Diese Funktion nennt man “Factory Reset”.
1.
2.
3.
Drücken Sie das [CONTROL 1]- und
[CONTROL 2]-Pedal gleichzeitig.
Die [CONTROL 1]- und [CONTROL 2]-Diode blinken.
Wählen Sie mit dem [CONTROL 1]- oder
[CONTROL 2]-Pedal den “FAC”-Parameter.
Bestätigen Sie mit dem Haltepedal.
FAC
dmp
SAv
3.
Schalten Sie den externen Sequenzer und
das PK-9 ein.
Anm.
Um Schäden und/oder Funktionsstörungen der Lautsprecher zu vermeiden, müssen Sie vor Herstellen/Lösen von
Verbindungen die Lautstärke aller Geräte auf den Mindestwert stellen.
Archivieren der Einstellungen mit einem
Sequenzer
1.
Drücken Sie das [CONTROL 1]- und
[CONTROL 2]-Pedal gleichzeitig.
Die [CONTROL 1]- und [CONTROL 2]-Diode blinken.
2.
Wählen Sie mit dem [CONTROL 1]- oder
[CONTROL 2]-Pedal den “dMP”-Parameter.
3.
Aktivieren Sie den Datenempfang oder die
Aufnahme des externen Geräts.
35
Page 36

MIDI-Pedaleinheit PK-9
Parametermodus
4.
Warten Sie, bis der eventuell vorhandene
Einzähler des Sequenzers beendet ist und
drücken Sie dann das Haltepedal, um die
Datenübertragung zu starten.
Sobald die Datenübertragung beendet ist, zeigt das
Display “ok” an und das PK-9 verlässt automatisch
den Parameter-Modus.
5.
Halten Sie die Aufnahme des Sequenzers/
Computers an und speichern Sie die Daten.
Rückübertragung der Daten zum PK-9
1.
Starten Sie die Wiedergabe der zuvor
gespeicherten Datei.
Alle Dioden des PK-9 leuchten und das Display zeigt
“dMP” (Dump) an.
Wenn die Daten ordnungsgemäß empfangen wurden, zeigt das Display “ok” an.
r
36
Page 37

MIDI-Pedaleinheit PK-9
r
Anhang
5. Anhang
Fehlersuche
Wenn sich das PK-9 nicht erwartungsgemäß verhält,
müssen Sie zunächst folgende Punkte überprüfen. Wenn
sich das Problem so nicht beheben lässt, wenden Sie
sich bitte an Ihren Roland-Händler.
■
Das PK-9 ist plötzlich ausgegangen
Wenn Sie das Instrument länger als 240 Minuten
nicht verwenden, schaltet es sich automatisch aus.
(Dies ist die Werksvorgabe.) Um zu verhindern, dass
sich das Instrument automatisch ausschaltet, müssen
Sie “Auto Off” auf “Off” stellen. Siehe Seite 35.
■
Das Instrument lässt sich nicht einschalten
Wenn das PK-9 mit dem Netzteil gespeist wird
Haben Sie den rückseitigen [POWER]-Taster des PK-9
gedrückt?
→ Drücken Sie den [POWER]-Taster des PK-9.
Haben Sie das beiliegende Netzteil angeschlossen?
→ Schließen Sie das Netzteil an.
DEUTSCH DEUTSCH DEUTSCH DEUTSCH DEUTSCH DEUTSCH
Verwenden Sie ein Schwellpedal (EV-serie) oder einen
optionalen Fußtaster (DP-Serie von Roland, BOSS
FS-5U)?
→ Verwenden Sie nur das empfohlene Schwellpedal
(EV-Serie von Roland) oder einen empfohlenen
Fußtaster (DP-Serie von Roland, BOSS FS-5U). Die
Verwendung anderer Schwellpedale oder Fußtaster könnte nämlich zu Fehlfunktionen führen oder
das Instrument beschädigen.
Haben Sie für den “Pedal Assign”-Parameter eine
Funktion gewählt, die das Empfängergerät unterstützt?
→ Siehe “Pedal Assign” auf S. 35 und die Bedie-
nungsanleitung des externen MIDI-Instruments.
Stimmen die MIDI-Verbindungen?
→ Siehe “Anschließen eines externen MIDI-Geräts an
das PK-9” auf S. 30.
Wenn das PK-9 über seine PK OUT-Buchse
gespeist wird
Ist die PK OUT-Buchse des PK-9 mit dem PK INAnschluss des externen Instruments verbunden?
→ Siehe “Anschließen des PK-9 mit dem PK-Kabel”
auf S. 29.
Haben Sie das externe Instrument eingeschaltet?
→ Schalten Sie das externe Instrument ein. Im Falle
einer PK-Verbindung wird das PK-9 jeweils zeit-
gleich mit dem externen Instrument ein- und aus-
geschaltet.
■
Das Instrument gibt keinen Ton von sich
Haben Sie auf dem externen Instrument denselben
MIDI-Kanal gewählt wie auf dem PK-9?
→ Wählen Sie auf dem externen Instrument densel-
ben MIDI-Kanal wie auf dem PK-9. Unter “MIDI
Transmit Channel” auf S. 33 wird erklärt, wie man
auf dem PK-9 einen MIDI-Kanal wählt.
■
Die Noten klingen eigenartig
Haben Sie die “Octave”-Funktion richtig eingestellt
(S. 33)?
■
Das externe Pedal bzw. der Fußtaster funktioniert nicht erwartungsgemäß
Haben Sie das Schwellpedal bzw. den Fußtaster richtig angeschlossen?
→ Überprüfen Sie die Verbindung. Siehe “Anschlie-
ßen eines optionalen Schwellpedals oder Fußtas-
ters” auf S. 31.
37
Page 38

MIDI-Pedaleinheit PK-9
Anhang
Technische Daten
Roland PK-9 MIDI-Pedaleinheit
Pedaleinheit: 20 Tasten, anschlagdynamisch
Funktionen: Hold
Octaver Bass On/Off, “Octaver”-Wert
Portamento On/Off, Portamento Time
Transpose
Octave
Poly/Mono
“Velocity” an/aus (programmierbarer Festwert)
Anschlagdynamik (Light, Medium, Heavy)
Funktionswahl für ein externes Pedal
MIDI Merge
Bedienelemente: Schwellpedal
Linker Fußtaster, Rechter Fußtaster (an den Seiten des Schwellpedals)
CONTROL 1-Pedal
CONTROL 2-Pedal
Haltepedal (Dämpfer)
POWER-Taster
Anschlüsse: EXTERNAL PEDAL-Buchse (Fußtaster/Schwellpedal, programmierbar)
PK OUT-Buchse
MIDI-Buchsen (IN, OUT, THRU)
DC IN-Buchse
Stromversorgung: Netzteil (PSB-1U)
Über PK-Kabel
Leistungsaufnahme: 130 mA (DC 9 V)
Abmessungen: 905 (B) x 456 (T) x 273 (H) mm
Gewicht: 13,4kg
Lieferumfang: Bedienungsanleitung
Netzteil (PSB-1U)
PK-Kabel
MIDI-Kabel
2 extra Gummifüße (Reserve)
Sonderzubehör: Fußtaster der DP-Serie/BOSS FS-5U, Schwellpedal der Roland EV-Serie
Anm.
Änderungen der technischen Daten und des Designs ohne vorherige Ankündigung vorbehalten. Für Druckfehler wird keine Haftung
übernommen.
r
38
Page 39

r
Copyright © 2012 ROLAND EUROPE. Tous droits réservés. Toute reproduction intégrale ou partielle de cette publication est interdite sous quelque forme que ce soit sans l’autorisation
écrite de Roland Europe S.p.a. Roland et GS sont des marques déposées ou des marques commerciales de Roland Corporation aux Etats-Unis et/ou dans d’autres pays.
Mode d’emploi
Félicitations et merci d’avoir opté pour le Pédalier MIDI PK-9.
Outre les pédales qui vous aideront à rendre vos parties d’orgue d’autant plus intéressantes, le PK-9 propose une pédale
d’expression pour des changements dynamiques du volume, deux commutateurs permettant de piloter certaines fonctions
d’orgue et une pédale pour le maintien des notes jouées.
Caractéristiques
• Ecran facilitant l’utilisation et les réglages.
• 20 pédales basses et 1 pédale d’expression amovible
Le PK-9 est muni de 20 pédales permettant de jouer des parties de basse. En vue d’un transport plus facile, la pédale
d’expression peut être retirée.
• Deux commutateurs au pied de part et d’autre de la pédale d’expression.
Vous pouvez assigner les fonctions voulues à ces pédales, notamment la commutation de vitesse de l’effet rotary, la vitesse
de freinage ou le portamento.
• Deux pédales CONTROL en façade.
Ces pédales permettent de piloter certaines fonctions de l’instrument externe (octave basse, portamento, mode monophonique etc.).
• Pédale de maintien
La pédale de maintien se trouve à une endroit facilement accessible par votre pied droit et permet de maintenir les notes
jouées.
• Transposition, choix de l’octave et canal MIDI.
Le mode Parameter du PK-9 permet, entre autres, de choisir l’intervalle de transposition, l’octave et le canal MIDI.
• Une pédale externe branchée à la prise EXTERNAL PEDAL permet de piloter des paramètres comme l’expression, la fréquence
du filtre, la résonance etc. Vous pouvez y brancher un commutateur au pied (série Roland DP ou BOSS FS-5U) ou une pédale
d’expression (EV-5 Roland).
•La fonction “MIDI Merge” (MIDI IN vers MIDI OUT) combine les commandes MIDI reçues par le PK-9 d’un appareil MIDI
externe avec les commandes générées en interne et transmet l’ensemble de ces commandes au dispositif MIDI récepteur.
• Connexion rapide à un orgue Roland (AT-350C, AT-900C, C-200 etc.)
En utilisant le câble PK, vous pouvez brancher le PK-9 à la prise PK-IN d’un orgue Roland, ce qui vous évite de brancher
d’autres câbles (MIDI, adaptateur secteur etc.). Cela facilite l’utilisation du pédalier.
FRANÇAIS FRANÇAIS FRANÇAIS FRANÇAIS FRANÇAIS FRANÇAIS
Les explications fournies dans ce manuel sont accompagnées d’illustrations indiquant ce qui apparaît à l’écran. Notez toutefois que votre instrument peut contenir une version plus récente du système (proposant de nouveaux sons, par exemple);
dans ce cas, ce que vous voyez à l’écran peut différer de ce qui apparaît dans ce manuel.
Avant d’utiliser cet instrument, lisez attentivement les sections “Consignes de sécurité” à la p. 40 et “Remarques importantes” à la p. 42.
Elles contiennent des informations importantes pour une utilisation correcte du PK-9. Pour maîtriser correctement chaque fonction de
votre nouvelle acquisition, veuillez lire entièrement le mode d’emploi. Conservez ensuite le mode d’emploi à portée de main pour toute
référence ultérieure.
Page 40

Pédalier MIDI PK-9
É
Consignes de sécurité
CONSIGNES DE SECURIT
INSTRUCTIONS POUR LA PREVENTION D'INCENDIE, CHOC ÉLECTRIQUE OU BLESSURE
A propos des symboles Avertissement et Précaution
Sert aux instructions destin es alerter
l’utilisateur d’un risque mortel ou de
AVERTISSEMENT
PRUDENCE
blessure grave en cas d’utilisation
incorrecte de l’unit .
Sert aux instructions destin es alerter
l’utilisateur d’un risque de blessure ou
de dommage mat riel en cas d’emploi
incorrect de l’unit .
* Les dommages mat riels se r f rent
aux dommages ou autres effets
n gatifs caus s au lieu d’utilisation et
tous ses l ments, ainsi qu’aux
animaux domestiques.
OBSERVEZ TOUJOURS CE QUI SUIT
AVERTISSEMENT AVERTISSEMENT
Ni démontage ni modification
•N’ouvrez pas (ni ne modifiez d’aucune façon) le produit
ou son adaptateur secteur.
.................................................................................................
Ni réparations ni remplacement de pièces
par l’utilisateur
•N’essayez pas de réparer ce produit ou d’en remplacer
des éléments (sauf si ce manuel vous donne des instructions spécifiques pour le faire). Confiez tout entretien ou réparation à votre revendeur, au centre de service après-vente Roland
le plus proche ou à un distributeur Roland agréé (vous en trouverez la liste à la page “Information”).
.................................................................................................
Evitez d’utiliser ou de conserver le produit
dans des endroits
• soumis à des température extrêmes (en plein soleil
dans un véhicule fermé, à proximité d’une conduite de
chauffage, au-dessus de matériel générateur de chaleur),
• humides (salles de bain, douches, sols humides),
• exposés à de la vapeur ou de la fumée,
• exposés au sel,
• favorisant la condensation,
• exposés aux précipitations,
• poussiéreux ou sablonneux,
• soumis à de fortes vibrations ou une grande instabilité.
.................................................................................................
Evitez les endroits instables
• Veillez à placer ce produit sur une surface plane afin de
lui assurer une stabilité optimale. Évitez les supports qui
vacillent ou les surfaces inclinées.
.................................................................................................
Utilisez l’adaptateur fourni et la tension
spécifiée
• Utilisez exclusivement l’adaptateur secteur PSB-1U fourni avec le
PK-9. La tension de la prise secteur doit correspondre à la tension
d’entrée mentionnée sur le boîtier de l’adaptateur. D’autres adaptateurs peuvent utiliser une polarité différente ou être conçus
pour une autre tension; leur utilisation peut provoquer des dommages, des pannes ou des électrocutions.
.................................................................................................
r
A propos des symboles
Le symbole alerte l’utilisateur d’instructions importantes
ou de mise en garde. La signification du symbole est
d termin e par ce que contient le triangle. Dans le cas du
symbole de gauche, il sert pour des pr cautions g n rales,
des mises en garde ou alertes vis- -vis d’un danger.
Le symbole pr vient l’utilisateur des interdits. Ce
qui ne doit sp cifiquement pas tre fait est indiqu
dans le cercle. Dans le cas du symbole de gauche, cela
signifie que l’unit ne doit jamais tre d mont e.
Le symbole ● alerte l’utilisateur de ce qui doit tre
fait. Ce qui doit tre fait est indiqu par l’ic ne
contenue dans le cercle. Dans le cas du symbole de
gauche, cela signifie que le cordon d’alimentation doit
tre d branch de la prise murale.
Utilisez exclusivement le câble de l’adaptateur secteur PSB-1U
• Utilisez exclusivement le câble d’alimentation du PSB-1U.
N’utilisez jamais le câble d’alimentation fourni avec un
autre appareil.
................................................................................................
Ne pliez pas le cordon d’alimentation et ne placez
pas d’objets lourds dessus
• Evitez de tordre ou de plier excessivement le câble d’alimentation ainsi que de placer des objets lourds dessus.
Cela risque d’endommager le câble et de provoquer un
court-circuit. Un câble endommagé peut provoquer une électrocution ou un incendie!
................................................................................................
Evitez que des objets étrangers ou des
liquides ne pénètrent dans ce produit; ne
placez jamais de récipient contenant un
liquide sur le produit.
• Evitez que des objets (du matériel inflammable, de la
monnaie, des trombones) ou des liquides (eau, limonades,
etc.) ne pénètrent à l’intérieur du produit. Cela peut causer un court-circuit, une panne ou d’autres dysfonctionnements.
................................................................................................
Coupez l’unité en cas de problème ou
d’anomalie
• Coupez immédiatement l’alimentation de l’appareil,
débranchez le cordon d’alimentation de la prise et ramenez l’appareil chez votre revendeur, au service aprèsvente Roland le plus proche ou chez un distributeur
Roland agréé (vous en trouverez la liste à la page “Information”) quand:
• l’adaptateur, le cordon d’alimentation ou la fiche est
endommagé(e)
• il y a de la fumée ou une odeur inhabituelle
• des objets ou du liquide ont pénétré dans le produit
• Le produit a été exposé à la pluie (ou a été mouillé
d’une autre façon)
•le produit semble ne pas fonctionner normalement ou affiche
un changement de performance marqué.
................................................................................................
40
Page 41

AVERTISSEMENT
PRUDENCE
En présence d’enfants, la surveillance d’un
adulte est indispensable
• Lorsque vous placez l’instrument dans des endroits
accessibles à des enfants, veillez à ce que l’instrument ne
soit pas malmené. La présence d’un adulte est impérative
pour veiller à une utilisation correcte du produit.
.................................................................................................
Ni chute ni heurts violents
• Protégez ce produit contre tout coup ou impact important.
(Ne le laissez pas tomber!)
.................................................................................................
Ne branchez pas un nombre excessif
d’autres appareils à la prise secteur
• Ne branchez pas le câble d’alimentation de ce produit à
une prise murale utilisée par un nombre excessif d’autres
appareils. Soyez particulièrement vigilant avec les multiprises: la puissance totale utilisée par tous les appareils
connectés ne doit jamais excéder la puissance (watts/
ampères) de la rallonge. Des charges excessives risquent
de faire chauffer puis fondre l’isolation du câble.
N’utilisez pas le produit à l’étranger
• Avant d’utiliser ce produit dans un pays étranger, contactez votre revendeur, le service de maintenance Roland le
plus proche ou un distributeur Roland agréé (voyez la
liste “Information”).
.................................................................................................
Pédalier MIDI PK-9
r
Consignes de sécurité
Placez le produit dans un lieu aéré
•Placez l’appareil et l’adaptateur secteur de sorte à leur
assurer une ventilation appropriée.
................................................................................................
Tenez la fiche pour brancher ou
débrancher l’adaptateur secteur
• Saisissez toujours la fiche de l’adaptateur secteur lors du
branchement (débranchement) au secteur ou au produit.
................................................................................................
Nettoyez régulièrement la fiche de l’adaptateur secteur
• Débranchez régulièrement l’adaptateur secteur et nettoyez-le avec un chiffon sec pour enlever la poussière et
autres résidus accumulés sur ses broches. Si vous ne
comptez pas utiliser le produit durant une période prolongée, débranchez le cordon d’alimentation. Toute accumulation de poussière entre la fiche et la prise secteur
peut nuire à l’isolation et provoquer un incendie.
................................................................................................
Gestion prudente des câbles
• Évitez que les cordons d’alimentation et les câbles ne
s’emmêlent. Placez tous les câbles et cordons hors de
portée des enfants.
................................................................................................
Ne montez jamais sur le produit et évitez
d’y déposer des objets lourds
• Ne grimpez jamais sur ce produit et évitez d’y déposer
des objets lourds.
................................................................................................
Evitez de brancher/débrancher l’adaptateur avec des mains mouillées
• Ne saisissez jamais l’adaptateur ou les fiches avec des
mains humides lorsque vous le branchez ou débranchez
d’une prise murale ou de l’unité.
................................................................................................
Avant le transport débranchez toutes les
connexions
• Avant de déplacer le produit, débranchez d’abord l’adaptateur secteur ainsi que tous les câbles le reliant à des
périphériques.
FRANÇAIS FRANÇAIS FRANÇAIS FRANÇAIS FRANÇAIS FRANÇAIS
................................................................................................
Avant de nettoyer l’appareil, débranchez
l’adaptateur secteur
• Avant de nettoyer ce produit, éteignez-le et débranchez
l’adaptateur secteur de la prise murale (page 47).
................................................................................................
S’il y a risque d’orage, débranchez l’adaptateur de la prise secteur
•S’il y a risque d’orage, débranchez l’adaptateur de la prise
secteur.
................................................................................................
Conservez les petits objets hors de portée
des enfants
• Pour empêcher toute ingestion accidentelle des éléments
repris ci-dessous, conservez-les hors de portée des bébés
et des jeunes enfants.
•Pièces fournies: Pieds en caoutchouc (de rechange).
•Pièces pouvant être enlevées: vis à bouton (page 46).
................................................................................................
41
Page 42

Pédalier MIDI PK-9
Remarques importantes
1. Remarques importantes
En plus des informations de la section “Consignes de sécurité” à la p. 40, veuillez lire et suivre les conseils suivants:
Alimentation
• Ne branchez jamais ce produit à une prise faisant partie d’un circuit auquel vous avez branché un appareil contenant un inverseur
(frigo, machine à lessiver, four à micro-ondes ou climatisation),
voire un moteur. Selon la façon dont l’autre appareil électrique est
utilisé, les bruits de secteur peuvent générer des dysfonctionnements ou des bruits parasites. S’il est difficile d’utiliser une autre
prise de courant, branchez un filtre anti-bruit entre ce produit et
la prise de courant.
•L’adaptateur secteur commence à dégager de la chaleur après
quelques heures d’utilisation. C’est normal et cela ne doit pas vous
inquiéter.
• Pour éviter tout dysfonctionnement ou dommage, coupez l’alimentation de tous les appareils avant d’effectuer les connexions.
• Avec les réglages d’usine, l’alimentation du PK-9 est automatiquement coupée après 240 minutes (4 heures) d’inactivité. Pour
désactiver la coupure automatique de l’alimentation, réglez “Auto
Off” sur “Off” (voyez p. 53).
Anmerkung: Les changements de réglages sont perdus à la
mise hors tension. Pour conserver vos réglages, il faut les
sauvegarder avant la mise hors tension de l’appareil.
Emplacement
• Cet appareil peut interférer dans la réception radio ou télévision.
Ne l’utilisez pas à proximité de tels appareils.
•Il peut y avoir des interférences si vous utilisez des téléphones
mobiles ou autre appareil sans fil à proximité de cet appareil. Des
bruits parasites peuvent être audibles au moment de la réception
ou de l’activation d’un appel voire durant la conversation. Si vous
avez de tels problèmes, éloignez l’appareil sans fil de ce produit ou
coupez-le.
•N’exposez pas ce produit directement au soleil, ne le laissez pas
près d’appareils irradiant de la chaleur, dans un véhicule fermé ou
dans un endroit le soumettant à des températures extrêmes. Une
chaleur excessive peut déformer ou décolorer l’instrument.
• Lorsque vous déplacez le PK-9 en le soumettant à une forte différence de température et/ou d’humidité, il peut y avoir formation
de condensation à l’intérieur. Cela peut être source de dysfonctionnement ou de panne. Avant d’utiliser l’appareil, attendez quelques heures pour que la condensation s’évapore.
• Ne posez jamais d’objet sur le clavier. Cela pourrait provoquer des
dysfonctionnements (certaines touches ne produisant plus de son,
par exemple).
• Selon la matière et la température de la surface sur laquelle vous
déposez le produit, les parties en caoutchouc peuvent décolorer ou
laisser des traces sur la surface.
Vous pouvez placer un morceau de feutre ou de tissu sous les
pieds en caoutchouc pour y remédier. Dans ce cas, veillez à ce que
le produit ne glisse ou ne se déplace pas accidentellement.
• Ne placez aucun récipient contenant de l’eau (un vase, par
exemple) sur le PK-9. Évitez en outre l’usage d’insecticides, de parfum, d’alcool, de vernis à ongles, de vaporisateurs ou de sprays à
proximité de ce produit. Essuyez rapidement tout liquide renversé
sur ce produit avec un chiffon sec et doux.
Réparations et données
• Songez que toutes les données contenues dans la mémoire de
l’instrument sont perdues s’il doit subir une réparation. Sauvegardez donc toujours vos données importantes dans un autre appareil
MIDI (un séquenceur, par exemple) ou notez-les sur papier (si possible). Durant les réparations, toutes les précautions sont prises
afin d’éviter la perte des données. Cependant, il peut se révéler
impossible de récupérer des données dans certains cas (notamment lorsque les circuits touchant à la mémoire elle-même sont
endommagés). Roland décline toute responsabilité concernant la
perte de ces données.
Précautions supplémentaires
• Songez que le contenu de la mémoire peut être irrémédiablement
perdu suite à un mauvais fonctionnement ou un mauvais maniement de ce produit. Pour vous prémunir contre un tel risque, nous
vous conseillons de faire régulièrement des copies de secours des
données importantes se trouvant en mémoire interne avec un
appareil MIDI externe (tel un séquenceur).
•Malheureusement, il est parfois impossible de récupérer des données sauvegardées dans la mémoire interne si celles-ci ont été perdues. Roland Corporation décline toute responsabilité concernant
la perte de ces données.
•Maniez les boutons, les autres commandes et les prises du PK-9
avec un minimum d’attention. Une manipulation trop brutale peut
entraîner des dysfonctionnements.
• Évitez les coups ou les pressions trop fortes sur l’écran.
• Lorsque vous branchez/débranchez des câbles, prenez la fiche en
main, jamais le câble. Vous évitez ainsi de provoquer un court-circuit ou d’endommager les composants internes du câble.
• Pour ne pas déranger vos voisins, maintenez le volume à un niveau
raisonnable.
• Le son des pédales et les vibrations engendrées par un instrument
peuvent passer à travers le sol ou un mur avec une ampleur inattendue. Veillez donc à ne pas gêner votre entourage.
•Si vous devez transporter l’appareil, rangez-le dans son emballage
d’origine (avec ses protections). Sinon, utilisez un emballage équivalent.
• Utilisez exclusivement la pédale d’expression (série EV Roland) ou
le commutateur au pied indiqué (série DP Roland, BOSS FS-5U). En
utilisant une autre pédale d’expression ou commutateur au pied,
vous risquez de provoquer des dysfonctionnements et/ou
d’endommager le produit.
• Veillez à ne pas vous coincer les doigts entre les parties mobiles et
la partie fixe du pédalier. En présence de jeunes enfants, la surveillance d’un adulte est indispensable.
Entretien
• Pour le nettoyage quotidien, utilisez un chiffon doux et sec ou un
chiffon légèrement humide. Pour ôter les saletés plus tenaces, utilisez un chiffon imprégné d’un détergent léger, non abrasif.
Essuyez ensuite soigneusement l’appareil à l’aide d’un chiffon
doux et sec.
•N’utilisez jamais de benzène, de diluant, de solvant ou d’alcool
d’aucune sorte pour éviter le risque de décoloration et/ou de
r
déformation.
42
Page 43

Pédalier MIDI PK-9
Remarques importantes
r
Sommaire
1. Remarques importantes . . . . . . . . . . . . . . . . . . . . . . . . . . . . . . . . . . . . . . . . . . . . . . . . . . . . . . . . . . . .42
2. Description . . . . . . . . . . . . . . . . . . . . . . . . . . . . . . . . . . . . . . . . . . . . . . . . . . . . . . . . . . . . . . . . . . . . . . .44
Panneau avant. . . . . . . . . . . . . . . . . . . . . . . . . . . . . . . . . . . . . . . . . . . . . . . . . . . . . . . . . . . . . . . . . . . . . . . . . .44
Panneau arrière . . . . . . . . . . . . . . . . . . . . . . . . . . . . . . . . . . . . . . . . . . . . . . . . . . . . . . . . . . . . . . . . . . . . . . . . .45
3. Préparatifs avant l’utilisation du PK-9 . . . . . . . . . . . . . . . . . . . . . . . . . . . . . . . . . . . . . . . . . . . . . . . .46
Installation de la pédale d’expression . . . . . . . . . . . . . . . . . . . . . . . . . . . . . . . . . . . . . . . . . . . . . . . . . . . . . .46
Connexion du PK-9 avec un câble PK . . . . . . . . . . . . . . . . . . . . . . . . . . . . . . . . . . . . . . . . . . . . . . . . . . . . . .47
Connexion de l’adaptateur secteur fourni . . . . . . . . . . . . . . . . . . . . . . . . . . . . . . . . . . . . . . . . . . . . . . . . . .47
Connexion d’un appareil MIDI externe au PK-9. . . . . . . . . . . . . . . . . . . . . . . . . . . . . . . . . . . . . . . . . . . . . .48
Utilisation du PK-9 et d’un clavier MIDI . . . . . . . . . . . . . . . . . . . . . . . . . . . . . . . . . . . . . . . . . . . . . . . . . . . .48
Connexion d’une pédale d’expression/d’un commutateur au pied en option au PK-9. . . . . . . . . . . . .49
4. Mode paramètre . . . . . . . . . . . . . . . . . . . . . . . . . . . . . . . . . . . . . . . . . . . . . . . . . . . . . . . . . . . . . . . . . .50
Opérations élémentaires en mode paramètre . . . . . . . . . . . . . . . . . . . . . . . . . . . . . . . . . . . . . . . . . . . . . . .50
Sauvegarder les réglages (‘Save’) . . . . . . . . . . . . . . . . . . . . . . . . . . . . . . . . . . . . . . . . . . . . . . . . . . . . . . . . . .50
Paramètres disponibles. . . . . . . . . . . . . . . . . . . . . . . . . . . . . . . . . . . . . . . . . . . . . . . . . . . . . . . . . . . . . . . . . . .51
Transpose. . . . . . . . . . . . . . . . . . . . . . . . . . . . . . . . . . . . . . . . . . . . . . . . . . . . . . . . . . . . . . . . . . . . . . . . . . . . . . . . . . . . . 51
Octave . . . . . . . . . . . . . . . . . . . . . . . . . . . . . . . . . . . . . . . . . . . . . . . . . . . . . . . . . . . . . . . . . . . . . . . . . . . . . . . . . . . . . . . 51
MIDI Transmit Channel . . . . . . . . . . . . . . . . . . . . . . . . . . . . . . . . . . . . . . . . . . . . . . . . . . . . . . . . . . . . . . . . . . . . . . . . . 51
CONTROL 1 Assign . . . . . . . . . . . . . . . . . . . . . . . . . . . . . . . . . . . . . . . . . . . . . . . . . . . . . . . . . . . . . . . . . . . . . . . . . . . . . 51
CONTROL 2 Assign . . . . . . . . . . . . . . . . . . . . . . . . . . . . . . . . . . . . . . . . . . . . . . . . . . . . . . . . . . . . . . . . . . . . . . . . . . . . . 51
Fonction du commutateur au pied gauche. . . . . . . . . . . . . . . . . . . . . . . . . . . . . . . . . . . . . . . . . . . . . . . . . . . . . . . . 51
Fonction du commutateur au pied droit . . . . . . . . . . . . . . . . . . . . . . . . . . . . . . . . . . . . . . . . . . . . . . . . . . . . . . . . . . 52
Retrigger . . . . . . . . . . . . . . . . . . . . . . . . . . . . . . . . . . . . . . . . . . . . . . . . . . . . . . . . . . . . . . . . . . . . . . . . . . . . . . . . . . . . . 52
Velocity . . . . . . . . . . . . . . . . . . . . . . . . . . . . . . . . . . . . . . . . . . . . . . . . . . . . . . . . . . . . . . . . . . . . . . . . . . . . . . . . . . . . . . 52
Touch (courbe de toucher) . . . . . . . . . . . . . . . . . . . . . . . . . . . . . . . . . . . . . . . . . . . . . . . . . . . . . . . . . . . . . . . . . . . . . . 52
Portamento Time . . . . . . . . . . . . . . . . . . . . . . . . . . . . . . . . . . . . . . . . . . . . . . . . . . . . . . . . . . . . . . . . . . . . . . . . . . . . . . 52
Octaver value . . . . . . . . . . . . . . . . . . . . . . . . . . . . . . . . . . . . . . . . . . . . . . . . . . . . . . . . . . . . . . . . . . . . . . . . . . . . . . . . . 52
Pedal Assign . . . . . . . . . . . . . . . . . . . . . . . . . . . . . . . . . . . . . . . . . . . . . . . . . . . . . . . . . . . . . . . . . . . . . . . . . . . . . . . . . . 52
Auto Off. . . . . . . . . . . . . . . . . . . . . . . . . . . . . . . . . . . . . . . . . . . . . . . . . . . . . . . . . . . . . . . . . . . . . . . . . . . . . . . . . . . . . . 53
Factory Reset . . . . . . . . . . . . . . . . . . . . . . . . . . . . . . . . . . . . . . . . . . . . . . . . . . . . . . . . . . . . . . . . . . . . . . . . . . . . . . . . . 53
MIDI Dump . . . . . . . . . . . . . . . . . . . . . . . . . . . . . . . . . . . . . . . . . . . . . . . . . . . . . . . . . . . . . . . . . . . . . . . . . . . . . . . . . . . 53
Save . . . . . . . . . . . . . . . . . . . . . . . . . . . . . . . . . . . . . . . . . . . . . . . . . . . . . . . . . . . . . . . . . . . . . . . . . . . . . . . . . . . . . . . . . 53
Rétablissement des réglages d’usine (Factory Reset) . . . . . . . . . . . . . . . . . . . . . . . . . . . . . . . . . . . . . . . . .53
Archiver vos réglages (MIDI Dump) . . . . . . . . . . . . . . . . . . . . . . . . . . . . . . . . . . . . . . . . . . . . . . . . . . . . . . . .53
Préparations pour l’archivage. . . . . . . . . . . . . . . . . . . . . . . . . . . . . . . . . . . . . . . . . . . . . . . . . . . . . . . . . . . . . . . . . . . . . 53
Archiver vos réglages avec un séquenceur externe. . . . . . . . . . . . . . . . . . . . . . . . . . . . . . . . . . . . . . . . . . . . . . . . . . . 53
Renvoi des données archivées au PK-9. . . . . . . . . . . . . . . . . . . . . . . . . . . . . . . . . . . . . . . . . . . . . . . . . . . . . . . . . . . . . 54
5. Appendice. . . . . . . . . . . . . . . . . . . . . . . . . . . . . . . . . . . . . . . . . . . . . . . . . . . . . . . . . . . . . . . . . . . . . . . .55
Dépannage . . . . . . . . . . . . . . . . . . . . . . . . . . . . . . . . . . . . . . . . . . . . . . . . . . . . . . . . . . . . . . . . . . . . . . . . . . . . .55
Fiche technique . . . . . . . . . . . . . . . . . . . . . . . . . . . . . . . . . . . . . . . . . . . . . . . . . . . . . . . . . . . . . . . . . . . . . . . . .56
FRANÇAIS FRANÇAIS FRANÇAIS FRANÇAIS FRANÇAIS FRANÇAIS
43
Page 44

Pédalier MIDI PK-9
Description
2. Description
Panneau avant
A
A
Ecran
Cet écran à trois caractères indique la fonction en
vigueur ou le réglage du paramètre choisi.
B
Pédales CONTROL 1 et CONTROL 2
Ces pédales transmettent des commandes MIDI. Leurs
fonctions peuvent être choisies en mode paramètre
(page 50). Par défaut, la pédale CONTROL 1 transmet
la commande de contrôle CC16, tandis que la pédale
CONTROL 2 transmet la commande CC17.
Enfoncez simultanément les deux pédales pour passer en mode paramètre (page 50).
C
Pédale d’expression
Enfoncez cette pédale pour augmenter le volume et
relevez-la pour diminuer le volume. Voyez la page 46
pour l’installation.
D
C
D
B
D
Commutateurs au pied
Deux commutateurs de part et d’autre de la pédale
d’expression permettent de piloter l’instrument
externe branché. Par défaut, le commutateur au pied
gauche transmet la commande de contrôle CC18 et
le droit la commande CC19.
La fonction des commutateurs au pied peut être
définie en mode paramètre.
E
Pédale de maintien
Appuyez sur cette pédale pour maintenir la note que
vous jouez même après avoir relâché la pédale MIDI
en question. Lorsque le PK-9 se trouve en mode paramètre, elle sert à confirmer des réglages.
E
r
44
Page 45

Pédalier MIDI PK-9
Panneau arrière
r
Panneau arrière
A
Prise EXTERNAL PEDAL
Vous pouvez y brancher un commutateur au pied en
option (série DP Roland, BOSS FS-5U) ou une
deuxième pédale d’expression (Roland EV-5, en
option). Voyez la page 52 pour la procédure d’assignation d’une fonction à ce commutateur/à la
pédale.
B
Prise PK OUT
Utilisez le câble PK fourni avec le PK-9 pour relier
cette prise à la prise PK IN d’un instrument externe
(page 47).
C
Prises MIDI
Elles permettent de brancher le PK-9 à des appareils
MIDI externes (page 48).
A
E
D
C
B
D
Prise DC IN
C’est ici que vous pouvez brancher l’adaptateur secteur fourni (page 47).
E
Commutateur POWER
Met le produit sous/hors tension (page 48).
Avec les réglages d’usine, l’alimentation du PK-9
est automatiquement coupée après 240 minutes
(4 heures) d’inactivité.
Si l’alimentation du PK-9 a été coupée automatiquement, utilisez l’interrupteur [POWER] pour remettre
l’instrument sous tension.
Pour désactiver la coupure automatique de l’alimentation, réglez le paramètre “Auto Off” sur “OFF”
(page 53).
FRANÇAIS FRANÇAIS FRANÇAIS FRANÇAIS FRANÇAIS FRANÇAIS
45
Page 46

Pédalier MIDI PK-9
Préparatifs avant l’utilisation du PK-9
3. Préparatifs avant l’utilisation du PK-9
Installation de la pédale d’expression
A la livraison, la pédale d’expression n’est pas encore installée sur le PK-9. Il convient d’installer cette pédale avant de
brancher le PK-9 à d’autres appareils.
Pendant l’installation ou la dépose de la pédale d’expression, ne marchez pas sur les vis à bouton. Pour empêcher toute ingestion accidentelle des vis à bouton, conservez-les hors de portée des bébés et des jeunes enfants.
Pour éviter tout dysfonctionnement et pour ne pas endommager les autres périphériques, coupez l’alimentation de tous les appareils
avant d’effectuer les connexions.
1.
Dévissez la vis à bouton en face arrière du
PK-9.
Vis à bouton en face
arrière
4.
Attachez la pédale d’expression en insérant
les deux vis à bouton fournies dans les trous
prévus à cet effet.
Vis à bouton fournies
(deux endroits)
2.
Reliez le câble de la pédale d’expression à la
prise en façade du PK-9.
3.
Installez la pédale sur le PK-9 sans coincer
le câble de connexion.
5.
Resserrez la vis à bouton en face arrière.
La prise en façade du PK-9 convient uniquement pour la
pédale d’expression fournie. N’y branchez aucun autre dispositif pour éviter d’endommager le PK-9.
r
46
Page 47

Pédalier MIDI PK-9
A la prise DC IN du PK-9
Adaptateur secteur
Câble d’alimentation
A une prise secteur
Témoin
Connexion du PK-9 avec un câble PK
r
Connexion du PK-9 avec un câble
PK
Branchez le PK-9 avec le câble PK à un instrument
externe. Cette connexion permet d’alimenter le PK-9 à
partir d’un appareil externe (vous n’avez donc pas
besoin de l’adaptateur).
Quand vous coupez l’alimentation de l’instrument
externe, le PK-9 est également mis hors tension (quel
que soit le réglage de l’interrupteur du PK-9).
AT-350C
(Autres instruments compatibles: Roland AT-900C,
C-200 etc.)
PK OUT
Cet appareil est doté d’un circuit de protection. Il faut
attendre un bref laps de temps (quelques secondes) après la
mise sous tension pour qu’il fonctionne normalement.
Connexion de l’adaptateur secteur
fourni
Le PK-9 peut aussi être alimenté par l’adaptateur
PSB-1U fourni.
Servez-vous exclusivement de l’adaptateur fourni avec le PK-9
(PSB-1U). Vérifiez également que la tension de ligne de l’installation correspond à la tension d’entrée spécifiée sur le boîtier de l’adaptateur. D’autres adaptateurs peuvent utiliser une
polarité différente ou être conçus pour une autre tension; leur
utilisation peut provoquer des dommages, des pannes ou des
électrocutions.
Pour éviter tout dysfonctionnement et pour ne pas endommager les enceintes ou les autres périphériques, diminuez le
volume et coupez l’alimentation de tous les appareils avant
d’effectuer les connexions.
FRANÇAIS FRANÇAIS FRANÇAIS FRANÇAIS FRANÇAIS FRANÇAIS
1.
Vérifiez que l’instrument externe est hors
tension et que le volume est réglé au minimum.
2.
Utilisez le câble PK fourni avec le PK-9 pour
brancher la prise PK IN de l’instrument
externe à la prise PK OUT du PK-9.
Quand les connexions sont effectuées, procédez de la
façon suivante pour mettre votre matériel sous tension. Si vous ne respectez pas l’ordre préconisé lors de
la mise sous tension, il y a risque de dysfonctionnements ou de panne.
3.
Mettez l’instrument externe sous tension et
réglez le volume (voyez son mode d’emploi).
4.
Vérifiez si le PK-9 est également sous tension.
5.
Jouez sur le clavier à pédales. Si l’instrument
externe produit les notes que vous jouez, les
connexions sont correctes.
1.
Branchez le cordon d’alimentation à l’adaptateur secteur.
Placez l’adaptateur secteur en orientant la face avec
témoin vers le haut et la face avec texte vers le bas.
Quand vous branchez l’adaptateur secteur à une prise
de courant, le témoin s’allume.
2.
Reliez l’adaptateur à la prise DC IN du PK-9.
A une prise secteur
Si l’instrument externe produit les notes dans la mauvaise
octave, vous pouvez transposer les numéros de note transmis par le PK-9 (voyez “Octave” à la p. 51).
Pour éviter tout dysfonctionnement ou dommage, coupez
l’alimentation de tous les appareils avant d’effectuer les
connexions.
3.
Branchez le câble d’alimentation à une prise
secteur.
47
Page 48

Pédalier MIDI PK-9
Préparatifs avant l’utilisation du PK-9
Connexion d’un appareil MIDI
externe au PK-9
Le PK-9 convient aussi comme contrôleur MIDI pour
piloter un instrument externe.
1.
Vérifiez que l’instrument MIDI externe est
hors tension et que son volume est réglé au
minimum.
Pour éviter tout dysfonctionnement ou dommage, coupez
l’alimentation de tous les appareils avant d’effectuer les
connexions.
2.
Branchez la prise MIDI OUT du PK-9 à la
prise MIDI IN de l’instrument externe avec
un câble MIDI disponible dans le commerce.
Tout autre instrument MIDI avec
générateur de sons interne mais sans
prise PK IN.
MIDI IN
MIDI OUT
Cet appareil est doté d’un circuit de protection. Il faut
attendre un bref laps de temps (quelques secondes) après la
mise sous tension pour qu’il fonctionne normalement.
Utilisation du PK-9 et d’un clavier
MIDI
Vous pouvez aussi piloter un module MIDI à l’aide d’un
clavier MIDI et du PK-9.
Cela vous permet de piloter différentes parties avec les
mains et les pieds.
1.
Vérifiez que l’instrument MIDI externe est
hors tension et que son volume est réglé au
minimum.
Pour éviter tout dysfonctionnement ou dommage, coupez
l’alimentation de tous les appareils avant d’effectuer les
connexions.
2.
Branchez la prise MIDI OUT du PK-9 à la
prise MIDI IN de l’instrument externe avec
un câble MIDI disponible dans le commerce.
Branchez ensuite la prise MIDI OUT du clavier à la prise MIDI IN du PK-9 avec un autre
câble MIDI.
3.
Branchez l’adaptateur PSB-1U à la prise DC
IN (page 47).
Quand les connexions sont effectuées, procédez de la
façon suivante pour mettre votre matériel sous tension. Si vous ne respectez pas l’ordre préconisé lors de
la mise sous tension, il y a risque de dysfonctionnements ou de panne.
4.
Mettez l’instrument MIDI externe sous tension et réglez le volume (voyez son mode
d’emploi).
5.
Appuyez sur l’interrupteur [POWER] en face
arrière du PK-9.
Activé Coupé
6.
Réglez le canal MIDI du PK-9 (page 51).
7.
Sélectionnez le même canal MIDI sur l’instrument externe et sur le PK-9.
8.
Jouez sur les pédales du PK-9.
Si l’instrument externe produit les notes, les connexions sont terminées.
MIDI IN
Données transmises par le PK-9
MIDI OUT
MIDI IN
Données transmises par le clavier
Ici, les messages MIDI que le PK-9 reçoit via MIDI IN
sont combinés avec ses propres données MIDI
(“Merge”) et le tout est transmis au module via MIDI
OUT (fonction “Soft Thru”).
Les messages que le PK-9 reçoit par la prise MIDI IN sont
retransmis par sa prise MIDI THRU. Vous pourriez donc
aussi utiliser cette connexion mais elle ne fonctionne que si
le module MIDI dispose de deux prises MIDI IN. La fusion
des données (“Merge”) est en général plus pratique.
MIDI OUT
r
48
Page 49

Connexion d’une pédale d’expression/d’un commutateur au pied en option au PK- 9
Pédalier MIDI PK-9
r
Connexion d’une pédale
d’expression/d’un commutateur au
pied en option au PK-9
Le PK-9 est doté d’une prise EXTERNAL PEDAL permettant de brancher un commutateur au pied en option
(série Roland DP ou BOSS FS-5U) ou une pédale
d’expression (série Roland EV).
Commutateur au pied en
option
(série Roland DP, BOSS FS-5U)
Si vous branchez un commutateur au pied ou une
deuxième pédale d’expression en option, vous pouvez
sélectionner sa fonction (page 52). Par défaut, la prise
est assignée à la fonction “Hold”.
Pédale d’expression en option
—ou—
(série Roland EV)
FRANÇAIS FRANÇAIS FRANÇAIS FRANÇAIS FRANÇAIS FRANÇAIS
Utilisez exclusivement la pédale d’expression (série EV
Roland) ou le commutateur au pied indiqué (série DP
Roland, BOSS FS-5U). En utilisant une autre pédale
d’expression ou commutateur au pied, vous risquez de provoquer des dysfonctionnements et/ou d’endommager le
produit.
Veillez à éteindre le PK-9 avant de brancher/débrancher un
commutateur au pied ou une pédale d’expression. Il faut
mettre le PK-9 hors tension avant de modifier la connexion
à la prise EXTERNAL PEDAL.
49
Page 50

Pédalier MIDI PK-9
Mode paramètre
4. Mode paramètre
Le mode paramètre vous donne accès à divers réglages.
Opérations élémentaires en mode
paramètre
Cette section décrit la procédure de base pour effectuer
des réglages en mode paramètre.
1.
Appuyez simultanément sur les pédales
[CONTROL 1] et [CONTROL 2].
Les témoins [CONTROL 1] et [CONTROL 2] clignotent.
Le PK-9 est en mode paramètre. L’abréviation du premier paramètre (ou du dernier paramètre choisi
depuis la mise sous tension du PK-9) clignote.
trn
Sauvegarder les réglages (‘Save’)
A la mise hors tension du PK-9, toutes vos modifications
sont effacées. Cependant, vous pouvez sauvegarder les
réglages suivants pour les retrouver lors de la prochaine
mise sous tension.
Réglages de paramètres sauvegardés Page
Transpose 51
Octave 51
Control 1 Assign 51
Control 2 Assign 51
Fonction du commutateur au pied gauche 51
Fonction du commutateur au pied droit 52
Retrigger 52
Velocity 52
Touch 52
Portamento Time 52
Octaver Value 52
Pedal Assign 52
2.
Choisissez le paramètre voulu avec la pédale
[CONTROL 1] ou [CONTROL 2].
Pour en savoir plus sur chaque paramètre, voyez
“Paramètres disponibles” à la p. 51.
3.
Confirmez avec la pédale de maintien.
L’écran affiche le réglage en vigueur.
4.
Utilisez la pédale [CONTROL 1] ou
[CONTROL 2] pour changer la valeur.
5.
Appuyez sur la pédale de maintien pour
confirmer et quitter le mode paramètre.
Auto Off 53
MIDI Transmit Channel 51
1.
Appuyez simultanément sur les pédales
[CONTROL 1] et [CONTROL 2].
Les témoins [CONTROL 1] et [CONTROL 2] clignotent.
Le PK-9 est en mode paramètre.
2.
Choisissez le paramètre “SAv” avec la pédale
[CONTROL 1] ou [CONTROL 2].
SAv
3.
Confirmez avec la pédale de maintien.
L’écran affiche “ok” et le PK-9 quitte le mode paramètre.
r
50
Page 51

Paramètres disponibles
Vous trouverez ci-dessous une liste des paramètres du
PK-9.
●
Transpose
Ecran Valeur
–5~6 0
Par défaut
trn
Cette fonction vous permet de transposer la hauteur
des pédales par demi-tons.
●
Octave
Ecran Valeur
0~8 2
Par défaut
oCt
Pédalier MIDI PK-9
jouée (par défaut: –1). Voyez “Octaver value” à la
p. 52 pour savoir comment régler l’intervalle en octaves.
Por (Portamento): La pédale active/coupe la fonction “Portamento”. Quand cette fonction est activée,
les notes jouées ne produisent plus des paliers clairement définis mais glissent d’une note à la suivante. Le
paramètre “Portamento Time” permet de définir la
vitesse à laquelle ces glissements s’opèrent (page 52).
Plus cette valeur est élevée, plus les transitions sont
lentes.
Mon (Mono): La pédale sert à activer/couper le
mode Mono. Avec ce mode, le PK-9 est monophonique. Cela signifie qu’il ne transmet qu’un seul message de note à la fois. A la mise sous tension, le PK-9
passe en mode Poly.
●
CONTROL 2 Assign
Ecran Valeur
C16, C17, oCb, Por, Mon C17
Paramètres disponibles
r
Par défaut
FRANÇAIS FRANÇAIS FRANÇAIS FRANÇAIS FRANÇAIS FRANÇAIS
Cette fonction vous permet de transposer la hauteur
des pédales par octaves.
La valeur par défaut (“2”) signifie que la pédale basse à
l’extrême gauche transmet la note “Do2” (numéro de note
MIDI 36).
●
MIDI Transmit Channel
Ecran Valeur
1~16 2
Par défaut
Ch
Ce réglage détermine le canal MIDI sur lequel le PK-9
transmet. La norme MIDI utilise 16 canaux MIDI (1~
16). Si vous branchez des appareils MIDI et attribuez
un canal MIDI à chaque appareil, vous pouvez jouer à
distance et sélectionner des sons sur ces dispositifs.
●
CONTROL 1 Assign
Ecran Valeur
C16, C17, oCb, Por, Mon C16
Par défaut
Ct2
Ce paramètre permet d’assigner une autre fonction à
la pédale [CONTROL 2]. Voyez les réglages disponibles
sous “CONTROL 1 Assign”. Notez toutefois que le
réglage par défaut pour la pédale [CONTROL 2] est
“C17”.
Fonction du commutateur au pied gauche
●
Ecran Valeur
C18, C19, Por C18
Par défaut
S L
Ce paramètre permet d’assigner la fonction voulue au
commutateur au pied à gauche de la pédale d’expression.
C18 (commande de contrôle CC18) ou C19
(CC19): A chaque pression, le commutateur alterne
entre les valeurs “0” et “127” pour la commande de
contrôle choisie.
Ct1
Ce paramètre permet d’assigner une autre fonction à
la pédale [CONTROL 1]:
C16 (Control Change CC16) ou C17 (CC17): Chaque pression sur la pédale [CONTROL 1] vous permet
d’alterner entre les valeurs “0” et “127” pour la commande de contrôle choisie.
oCb (Octaver Bass): Chaque pression sur
[CONTROL 1] active/coupe la fonction “Octaver Bass”.
Quand cette fonction est activée, elle ajoute une note
à la note la plus grave que vous jouez. La note ajoutée peut être 1~4 octaves plus grave que la note
Si vous branchez le PK-9 sur un orgue de la série VK, la
commande CC18 pilote le paramètre “Rotary Slow/Fast”,
tandis que la commande CC19 pilote le paramètre “Rotary
Break Speed”.
Por (Portamento): Le commutateur permet d’activer/couper la fonction “Portamento”. Quand cette
fonction est activée, les notes jouées ne produisent
plus des paliers clairement définis mais glissent d’une
note à la suivante. Le paramètre “Portamento Time”
permet de définir la vitesse à laquelle ces glissements
s’opèrent (page 52). Plus cette valeur est élevée, plus
les transitions sont lentes.
51
Page 52

Pédalier MIDI PK-9
Por
oCv
Ped
Mode paramètre
●
Fonction du commutateur au pied droit
Ecran Valeur
C18, C19, Por C19
Par défaut
S r
Ce paramètre permet d’assigner la fonction voulue au
commutateur au pied à droite de la pédale d’expression. Voyez “Fonction du commutateur au pied gauche” pour les réglages disponibles.
Si vous branchez le PK-9 sur un orgue de la série VK, la
commande CC18 pilote le paramètre “Rotary Slow/Fast”,
tandis que la commande CC19 pilote le paramètre “Rotary
Break Speed”.
●
Retrigger
Ecran Valeur
Off, On Off
Par défaut
rEt
Ce paramètre n’est disponible que lorsque le PK-9 est
en mode Mono. Pour sélectionner ce mode, assignez
d’abord la fonction “Mon” à la pédale [CONTROL 1] ou
[CONTROL 2] puis activez-la. Voyez aussi “CONTROL 1
Assign” et “CONTROL 2 Assign” à la p. 51
Le paramètre “Retrigger” vous permet d’obtenir des
effets spéciaux. En mode Mono, le pédalier est monophonique: même si vous enfoncez simultanément
deux pédales, seule la dernière note jouée est produite. Quand cette note est relâchée, la note précédente devient audible, produisant un effet d’alternance agréable.
●
Velocity
Ecran Valeur
On, 1~127 On
Par défaut
vEl
Quand ce paramètre est actif, la dynamique de votre
jeu est traduite en valeurs de toucher MIDI (1~127).
Si vous choisissez une valeur fixe (1~127), le PK-9
transmet toutes les notes avec cette valeur.
●
Touch (courbe de toucher)
Si vous choisissez une valeur (1~127) pour “Velocity”, le
réglage “Touch” est ignoré.
●
Portamento Time
Ecran Valeur
0~127 50
“Portamento” signifie que la hauteur ne change pas
par paliers clairement définis: elle glisse d’une note à
la suivante. Ce paramètre permet de définir la vitesse
à laquelle ces glissements s’opèrent. Plus cette valeur
est élevée, plus les transitions sont lentes.
Si l’instrument MIDI récepteur ne dispose pas de ce paramètre, ce réglage n’a aucun effet.
●
Octaver value
Ecran Valeur
–4~–1 –1
Ce paramètre permet de choisir la hauteur de la note
ajoutée tant que la fonction “oCb” est active. Voyez
“CONTROL 1 Assign” à la p. 51.
●
Pedal Assign
Ecran Valeur
“CUt” (Cutoff), “rES”
(Resonance),
“Pbd” (Pitch Bend Down),
“PbU” (Pitch Bender Up),
“Mod” (Modulation),
“hLd” (Hold),
“voL” (Volume),
“PAn” (Panpot),
“C16” (Control Change
16), “C17” (Control
Change 17),
“C18” (Control Change
18), “C19” (Control
Change 19)
Ce paramètre permet d’assigner une fonction à la
pédale branchée à la prise EXTERNAL PEDAL.
Par défaut
Par défaut
Par défaut
“hLd”
(Hold)
Ecran Valeur
tCh
Les pédales du PK-9 sont sensibles au toucher. Si
vous le voulez, vous pouvez choisir une autre courbe
de toucher plus adaptée à votre style de jeu.
r
52
SFt (léger), Med (moyen),
hrd (fort)
Par défaut
Med
Page 53

●
Remarque: Votre ordinateur doit
peut-être être branché à une
interface MIDI. Dans ce cas, le
PK-9 doit être branché à l’interface MIDI.
MIDI OUT
MIDI IN
MIDI IN
MIDI OUT
Auto Off
0ff, 10, 30, 240 240
Aof
Ce paramètre permet de déterminer le temps que
patiente le PK-9 avant de conclure que vous n’avez
plus besoin de ses services. Pour éviter la coupure
automatique de l’alimentation, choisissez le réglage
“Off”.
●
Factory Reset
Voyez “Rétablissement des réglages
d’usine (Factory Reset)” à la p. 53.
MIDI Dump
●
Voyez “Archiver vos réglages (MIDI
Dump)” à la p. 53.
●
Save
Voyez “Sauvegarder les réglages
(‘Save’)” à la p. 50.
FAC
dmp
SAv
Rétablissement des réglages d’usine (Factory Reset)
Pédalier MIDI PK-9
r
Archiver vos réglages (MIDI Dump)
Vous pouvez archiver vos réglages sur ordinateur
(moyennant une interface MIDI disponible dans le commerce) ou sur séquenceur externe.
Préparations pour l’archivage
1.
Utilisez un câble MIDI (disponible dans le
commerce) pour brancher la prise MIDI OUT
du PK-9 à la prise MIDI IN du séquenceur
externe.
2.
Utilisez un deuxième câble MIDI pour brancher la prise MIDI IN du PK-9 à la prise MIDI
OUT du séquenceur externe.
FRANÇAIS FRANÇAIS FRANÇAIS FRANÇAIS FRANÇAIS FRANÇAIS
Rétablissement des réglages d’usine
(Factory Reset)
Vous pouvez rétablir le réglage d’usine des paramètres
modifiés en mode Parameter (page 50). Cette opération
s’appelle “Factory Reset”.
1.
Appuyez simultanément sur les pédales
[CONTROL 1] et [CONTROL 2].
Les témoins [CONTROL 1] et [CONTROL 2] clignotent.
2.
Choisissez le paramètre “FAC” avec la pédale
[CONTROL 1] ou [CONTROL 2].
3.
Confirmez avec la pédale de maintien.
Quand le rétablissement des réglages d’usine est terminé, l’écran affiche “ok” et le PK-9 quitte automatiquement le mode Parameter.
3.
Mettez le séquenceur externe et le PK-9
sous tension.
Pour éviter tout dysfonctionnement et pour ne pas endommager les enceintes ou les autres périphériques, diminuez
le volume et coupez l’alimentation de tous les appareils
avant d’effectuer les connexions.
Archiver vos réglages avec un séquenceur externe
1.
Appuyez simultanément sur les pédales
[CONTROL 1] et [CONTROL 2].
Les témoins [CONTROL 1] et [CONTROL 2] clignotent.
2.
Choisissez le paramètre “dMP” avec la
pédale [CONTROL 1] ou [CONTROL 2].
3.
Activez la réception des données ou lancez
l’enregistrement sur le dispositif externe.
4.
Attendez que le séquenceur ait fini le
décompte (le cas échéant) puis appuyez sur
la pédale de maintien pour lancer le transfert de blocs de données MIDI.
53
Page 54

Pédalier MIDI PK-9
Mode paramètre
Quand le transfert MIDI est terminé, l’écran affiche
“ok” et le PK-9 quitte automatiquement le mode
Parameter.
5.
Arrêtez l’enregistrement sur le séquenceur
externe et sauvegardez les données.
Renvoi des données archivées au PK-9
1.
Lancez la reproduction des données
sauvegardées (et chargées).
Tous les témoins du PK-9 s’allument et l’écran affiche
“dMP” (Dump).
L’écran affiche brièvement “ok” quand le chargement
de bloc de données est terminé.
r
54
Page 55

Pédalier MIDI PK-9
r
Appendice
5. Appendice
Dépannage
Si le PK-9 ne fonctionne pas selon vos attentes, commencez par vérifier les points suivants. Si cela ne résout
pas votre problème, contactez votre revendeur ou un
centre de service après-vente Roland.
■
Le PK-9 s’est éteint tout seul
L’alimentation de l’instrument est automatiquement
coupée après 240 minutes d’inactivité. (C’est le
réglage par défaut.) Pour désactiver la coupure automatique de l’alimentation, réglez “Auto Off” sur “Off”.
Voyez page 53.
■
Pas d’alimentation
Lorsque le PK-9 est alimenté par l’adaptateur
Avez-vous actionné l’interrupteur [POWER] du PK-9
en face arrière?
→ Appuyez sur le bouton [POWER] du PK-9.
Avez-vous branché l’adaptateur fourni?
→ Branchez l’adaptateur secteur.
FRANÇAIS FRANÇAIS FRANÇAIS FRANÇAIS FRANÇAIS FRANÇAIS
Utilisez-vous une pédale d’expression Roland de la
série EV, un commutateur au pied Roland de la série
DP ou un BOSS FS-5U?
→ Utilisez exclusivement la pédale d’expression (série
EV Roland) ou le commutateur au pied indiqué
(série DP Roland, BOSS FS-5U). En utilisant une
autre pédale d’expression ou commutateur au
pied, vous risquez de provoquer des dysfonctionnements et/ou d’endommager le produit.
La fonction choisie avec le paramètre “Pedal Assign”
est-elle reconnue par l’instrument récepteur?
→ Voyez “Pedal Assign” à la p. 52 et le mode d’emploi
de l’instrument MIDI externe.
Avez-vous branché le câble MIDI correctement?
→ Voyez la section “Connexion d’un appareil MIDI
externe au PK-9” à la p. 48.
Lorsque le PK-9 est alimenté via sa prise PK OUT
Avez-vous branché le câble PK à la prise PK IN de
l’appareil externe et à la prise PK OUT du PK-9?
→ Voyez la section “Connexion du PK-9 avec un
câble PK” à la p. 47.
L’instrument externe est-il sous tension?
→ Mettez l’instrument externe sous tension. Le PK-9
est mis sous/hors tension en même temps que
l’instrument externe auquel il est branché avec le
câble PK.
■
Pas de son
Le canal MIDI de l’appareil externe correspond-il à
celui du PK-9?
→ Quand un dispositif MIDI externe est branché,
réglez le canal MIDI du PK-9 sur le même canal
que celui choisi sur le dispositif MIDI externe.
Voyez “MIDI Transmit Channel” à la p. 51 pour
savoir comment régler le canal de transmission du
PK-9.
■
Les notes ne sont pas justes
Avez-vous réglé la fonction “Octave” correctement
(page 51)?
■
La pédale externe ou le commutateur au pied
ne fonctionne pas correctement
La connexion de la pédale d’expression externe ou du
commutateur est-elle correcte?
→ Vérifiez la connexion. Voyez “Connexion d’une
pédale d’expression/d’un commutateur au pied en
option au PK-9” à la p. 49.
55
Page 56

Pédalier MIDI PK-9
Appendice
Fiche technique
Roland PK-9 Pédalier MIDI
Pédalier: 20 pédales sensibles au toucher
Fonctions: Hold
Octaver Bass On/Off, Valeur “Octaver”
Portamento On/Off, Portamento Time
Transpose
Octave
Poly/Mono
“Velocity” actif/coupé (valeur fixe réglable)
Courbe de dynamique (Light, Medium, Heavy)
Fonction de la pédale externe
MIDI Merge
Commandes: Pédale d’expression
Commutateur au pied gauche, Commutateur au pied droit (de part et d’autre de la pédale
d’expression)
Pédale CONTROL 1
Pédale CONTROL 2
Pédale de maintien (pédale forte)
Commutateur POWER
Connecteurs: Prise EXTERNAL PEDAL (commutateur au pied/pédale d’expression, programmable)
Prise PK OUT
Prises MIDI (IN, OUT, THRU)
Prise DC IN
Alimentation: Adaptateur secteur (PSB-1U)
Par le câble PK
Consommation: 130 mA (DC 9 V)
Dimensions: 905 (L) x 456 (P) x 905 (H) mm
Poids: 13,4kg
Accessoires: Mode d’emploi
Adaptateur secteur (PSB-1U)
Câble PK
Câble MIDI
2 pieds en caoutchouc de rechange
Options: Commutateur au pied de la série DP/BOSS FS-5U, Pédale d’expression de la série Roland
EV
En vue d’améliorer le produit, ses caractéristiques techniques et/ou son aspect peuvent être modifiés sans avis préalable.
r
56
Page 57

r
Copyright © 2012 ROLAND EUROPE. Tutti i diritti sono riservati. Nessuna parte di questa pubblicazione può essere riprodotta in qualsiasi forma senza autorizzazione scritta di Roland
Europe S.p.a. Roland e GS sono marchi di fabbrica o marchi registrati di Roland Corporation negli Stati Uniti e/o in altri paesi.
Manuale di Istruzioni
Grazie e congratulazioni per avere scelto la PK-9 Pedaliera MIDI Roland.
Oltre alla pedaliera, che aumenta notevolmente il vostro divertimento nel suonare l’organo, la PK-9 dispone anche di un
pedale di espressione che permette una precisa e dinamica espressività del volume nelle vostre esecuzioni, due interruttori a
pedale che permettono il controllo di varie funzioni per gli organi Roland e un pedale Hold per il sustain delle note.
Caratteristiche
•Facilità d’uso e di impostazione grazie al suo schermo.
• Pedaliera a 20 note e pedale di espressione rimovibile
La PK-9 dispone di una pedaliera con venti note per il massimo divertimento nel suonare l’organo. Il pedale di espressione
incorporato può essere rimoso dalla pedaliera per rendere lo strumento più compatto per il trasporto.
• Due interruttori ai lati del pedale di espressione.
A questi interruttori potete assegnare diversi compiti per controllare funzioni quali la velocità di rotazione lenta o veloce
dell’effetto Rotary, Rotary Break Speed e Portamento.
• Due pedali CONTROL sul pannello frontale.
A questi pedali potete assegnare la funzione desiderata per controllare lo strumento collegato (Octaver Bass, Portamento,
modo Monofonico ecc.).
• Pedale Hold
Dove lo potete facilmente usare con il piede destro, trovate un pedale di Hold, per allargare le possibilità espressive quando
usate suoni cui giovi il sustain.
•Intervallo di trasposizione regolabile, ottava e canale MIDI.
Il modo Parameter della PK-9 vi permette di trasporre la pedaliera, di scegliere un’ottava diversa e di far coincidere l’impostazione del canale MIDI con quello di altri strumenti.
• Con un pedale esterno (connettore EXTERNAL PEDAL) potete decidere di controllare parametri come l’espressione, la frequenza di taglio del filtro, la risonanza, ecc., collegando un pedale interruttore opzionale (Roland serie DP, BOSS FS-5U), o un
pedale di espressione opzionale (Roland EV-5).
•La funzione MIDI Merge (MIDI IN verso MIDI OUT) combina i messaggi MIDI che la PK-9 riceve da uno strumento MIDI
esterno con quelli che voi generate suonandola, e trasmette tutti i dati MIDI allo strumento MIDI ricevente.
• Connessione con un unico cavo agli organi Roland (AT-350C, AT-900C, C-200 ecc.)
Quando collegate la PK-9 ad un organo Roland (che disponga di un connettore PK-IN), il cavo PK è l’unica connessione
necessaria—nessun bisogno di cavi MIDI, cavi analogici o di un alimentatore. Questo rende semplice e veloce l’installazione.
ITALIANO ITALIANO ITALIANO ITALIANO ITALIANO ITALIANO
Le spiegazioni in questo manuale comprendono illustrazioni che mostrano ciò che normalmente viene visualizzato sullo
schermo. Ricordate, comunque, che il vostro strumento potrebbe contenere una versione più recente e migliorata del
sistema operativo (p.es., comprendere nuovi suoni), cosicché ciò che vedete sullo schermo potrebbe non sempre corrispondere con ciò che appare sul manuale.
Prima di usare questo strumento, leggete attentamente “Usare lo strumento in sicurezza” a p. 58 e “Note importanti” a p. 60. Queste
sezioni contengono importanti informazioni riguardanti il corretto utilizzo della PK-9. Inoltre, per essere sicuri di avere ben chiara ogni
funzione del vostro nuovo strumento, leggete interamente questo manuale, che dovrebbe poi essere tenuto e conservato a portata di
mano per consultazioni future.
Page 58

Pedaliera MIDI PK-9
Usare lo strumento in sicurezza
Viene usato per istruzioni che avvisano
l'utente del rischio di morte o ferite
gravi nel caso in cui l'unità venisse
utilizzata impropriamente.
Viene usato per istruzioni che avvisano
l'utente del rischio di ferite o danni a
materiali nel caso in cui l'unità venisse
usata impropriamente.
* Danni a materiali viene inteso come
danneggiamenti o altri effetti
sconvenienti causati alla casa, ai
mobili o ad animali domestici e
cuccioli.
Non smontatelo e non modificatelo
• Non aprite (né modificate in nessun modo) lo strumento
o il suo alimentatore di corrente.
.................................................................................................
Non riparatelo né sostituitene parti
• Non cercate di riparare lo strumento o di sostituire parti
in esso contenute (tranne nei casi in cui questo manuale
fornisca istruzioni specifiche). Commissionate tutti gli
interventi al vostro rivenditore, al Centro Servizi Roland
più vicino o ad un distributore autorizzato, come elencato nella
pagina “Information”.
.................................................................................................
Non usatelo o conservatelo in luoghi che
siano
• Soggetti a temperature estreme, (per es. esposto diret-
tamente alla luce del sole in un veicolo chiuso, vicino a
un condotto di riscaldamento o sopra apparecchiature
che generino calore); oppure
• Bagnati (per es. bagni, lavanderie, pavimenti bagnati);
oppure
• Esposti a vapore o fumo; oppure
• Soggetti ad esposizione salina; oppure
•Umidi; oppure
• Esposti alla pioggia; oppure
• Polverosi o sabbiosi; oppure
• Soggetti a forti vibrazioni.
.................................................................................................
Non mettetelo in un posto instabile
• Posizionate sempre la pedaliera orizzontalmente ed in
posizione stabile. Non mettetela mai su supporti che
potrebbero oscillare o su superfici inclinate.
.................................................................................................
Usate solo l’alimentatore fornito e con la
tensione corretta
• Accertatevi di usare solo l’alimentatore PSB-1U fornito con la PK-9
ed assicuratevi che la tensione di rete locale corrisponda alla tensione d’ingresso indicata sull’alimentatore. Altri alimentatori possono avere polarità differente o essere progettati per tensioni
diverse, perciò il loro uso può provocare danni, malfunzionamenti
o causare scosse elettriche.
.................................................................................................
r
Il simbolo avvisa l'utente di istruzioni importanti o di
punti di attenzione. Il significato del simbolo è determinato
dal disegno contenuto nel triangolo. Il simbolo disegnato qui
a sinistra indica avvisi generali o avvertimenti di pericolo.
Il simbolo avvisa l'utente di azioni da non eseguire
(vietate). L'azione specifica è indicata dal disegno
contenuto all'interno del cerchio. Il simbolo disegnato
qui a sinistra avvisa che l'unità non deve mai essere
disassemblata.
Il simbolo ● avvisa l'utente delle azioni che deve
eseguire. L'azione specifica è indicata dal disegno
contenuto all'interno del cerchio. Il simbolo disegnato
qui a sinistra indica che il cavo di alimentazione deve
essere scollegato dalla presa di corrente.
Usate solo il cavo di alimentazione dell’alimentatore PSB-1U
• Utilizzate solo il cavo di alimentazione del PSB-1U. Inoltre, il cavo di alimentazione fornito, non deve essere
usato per altri apparecchi.
................................................................................................
Non piegate il cavo di alimentazione, né appoggiategli sopra oggetti pesanti.
• Non piegate o torcete eccessivamente il cavo di alimentazione, né appoggiate oggetti pesanti sul cavo. Così
facendo potreste danneggiare il cavo e rischiare dei cortocircuiti. I cavi danneggiati sono pericolosi e possono provocare
incendi e scosse elettriche!
................................................................................................
Non fate entrare nella pedaliera nessun
oggetto estraneo o liquido; non appoggiate sulla pedaliera contenitori di liquidi
• Non fate entrare nella pedaliera nessun oggetto estraneo
(p.es., oggetti infiammabili, monete, cavi) o liquidi (acqua,
bibite ecc.). In tal caso potreste provocare corto circuiti,
funzionamento improprio o altri malfunzionamenti.
................................................................................................
Se notate malfunzionamenti o anormalità
spegnete lo strumento
• Spegnete immediatamente lo strumento, staccate l’alimentatore dalla presa e richiedete l’intervento del vostro
rivenditore, del più vicino Centro Assistenza Roland o del
distributore autorizzato Roland elencato nella pagina
“Information” nel caso in cui:
•L’alimentatore, il cavo di alimentazione o la spina
siano danneggiati; oppure
• notiate del fumo o sentiate un odore strano; oppure
• cadesse qualche oggetto dentro lo strumento o vi
venisse versato qualche liquido sopra; oppure
•lo strumento sia stato esposto alla pioggia (o si sia
bagnato in altro modo); oppure
•lo strumento sembri non funzionare correttamente o notiate
cambiamenti nelle prestazioni.
................................................................................................
58
Page 59

Pedaliera MIDI PK-9
Usare lo strumento in sicurezza
r
In presenza di bambini un adulto deve
sempre sorvegliarli
• Quando usate lo strumento in presenza di bambini, fate
attenzione a che lo strumento non venga maltrattato. Un
adulto dovrebbe sempre essere presente per sorvegliare.
Non fatelo cadere né fategli subire forti
impatti.
• Proteggetelo da urti violenti.
(Non fatelo cadere!)
.................................................................................................
Non condividete la stessa presa di corrente
con troppe apparecchiature
• Evitate di condividere la stessa presa di corrente cui è
collegato il cavo di alimentazione della pedaliera con
troppe apparecchiature. Prestate particolare attenzione
quando usate delle prolunghe—la potenza totale impiegata da tutti gli apparecchi non deve mai superare il
limite massimo (Watt/Ampere) della prolunga. Carichi
eccessivi possono provocare un surriscaldamento del
cavo con conseguente pericolo di fusione dell’isolante.
.................................................................................................
Non utilizzatela all’estero
• Prima di utilizzare la pedaliera in un’altra nazione, contattate il vostro rivenditore o uno dei Centri Assistenza
Roland o il distributore autorizzato Roland elencati nella
pagina “Information“.
.................................................................................................
Posizionatela in un posto ben ventilato
• La pedaliera e l’alimentatore devono essere posizionati in
modo tale da non interferire con la loro ventilazione.
................................................................................................
Afferrare la spina quando collegate o scollegate l’alimentatore
• Afferrate solo la spina del cavo dell’alimentatore per collegarlo o scollegarlo da una presa di corrente o dalla
pedaliera.
................................................................................................
Pulite periodicamente la spina dell’alimentatore
• Ad intervalli regolari scollegate l’alimentatore e togliete
la polvere o altri accumuli di sporco eventualmente presenti sui contatti della spina, utilizzando un panno
asciutto. Inoltre, scollegate la spina del cavo di alimentazione dalla presa di corrente quando la pedaliera deve
rimanere inutilizzata per un periodo di tempo prolungato. L’accumulo di polvere tra la spina e la presa di corrente può
ridurre l’azione isolante e provocare incendi.
................................................................................................
Trattate i cavi in modo sicuro
• Evitate di aggrovigliare i cavi. Tutti i cavi, inoltre, dovrebbero essere tenuti fuori dalla portata dei bambini.
................................................................................................
Non appoggiate oggetti pesanti e non
salite mai sullo strumento
• Non salite mai, né appoggiate oggetti pesanti, sullo strumento.
ITALIANO ITALIANO ITALIANO ITALIANO ITALIANO ITALIANO
................................................................................................
Non collegate o scollegate l’alimentatore
con le mani bagnate
• Non maneggiate mai l’alimentatore o la sua spina con le
mani bagnate quando lo collegate o scollegate da una
presa di corrente o dallo strumento.
................................................................................................
Prima di spostare la pedaliera scollegate
tutti i cavi
• Prima di spostare la pedaliera scollegate l’alimentatore e
tutti i cavi provenienti da dispositivi esterni.
................................................................................................
Prima di pulirla, scollegare l’alimentatore
dalla presa di corrente
• Prima di pulire la pedaliera, spegnetela e scollegate l’alimentatore dalla presa di corrente (pagina 65).
................................................................................................
In previsione di fulmini, scollegate l’alimentatore dalla presa di corrente
• In caso di temporale, scollegate l’alimentatore dalla presa
di corrente.
................................................................................................
Tenete le piccole parti al di fuori della portata dei bambini
• Per evitare l’ingestione accidentale delle parti elencate
qui di seguito, tenetele sempre al di fuori della portata
dei bambini piccoli.
• Parti incluse: Piedini in gomma extra (di scorta).
• Parti rimovibili: Viti a pomello (pagina 64)
................................................................................................
59
Page 60

Pedaliera MIDI PK-9
Note importanti
1. Note importanti
Oltre a quanto esposto nella sezione “Usare lo strumento in sicurezza” a p. 58, leggete e osservate le seguenti precauzioni:
Alimentazione
• Non collegate questo strumento alla stessa presa di corrente utilizzata da altri apparecchi controllati da un inverter (per es. un frigorifero, una lavatrice, un forno a microonde o un condizionatore)
o che contengano un motore. A seconda di come l’apparecchio
elettrico viene usato, possono verificarsi malfunzionamenti a questo strumento o può generarsi del rumore fastidioso. Se non riuscite ad utilizzare una presa di corrente separata, collegate un filtro per il rumore di alimentazione tra l’apparecchio e la presa elettrica.
• Dopo molte ore di uso consecutivo l’alimentatore inizierà a generare calore. Ciò è normale e non deve destare preoccupazione.
• Per evitare malfunzionamenti e rotture alle apparecchiature, spegnete sempre tutti gli apparecchi prima di eseguire qualsiasi collegamento.
• Con le impostazioni di fabbrica, la PK-9 si spegnerà automaticamente 240 minuti (4 ore) dopo che avete smesso di suonarla o di
usarla. Se non volete che si spenga automaticamente, cambiate
l’impostazione “Auto Off” in “Off” come descritto a p. 70.
Nota: Quando spegnete la pedaliera le impostazioni che
avete modificato verranno perdute. Se volete conservare le
vostre impostazioni, dovete salvarle prima di spegnere lo
strumento.
Posizionamento
• Questo apparecchio può interferire con la ricezione di apparecchi
radio e televisori. Non utilizzatelo nelle vicinanze di tali ricevitori.
• Se nelle vicinanze dell’apparecchio utilizzate dispositivi di comunicazione senza fili, come telefoni cellulari, potrebbe prodursi del
rumore. Tale rumore può avvertirsi durante la ricezione o l’inoltro
di una chiamata, oppure durante la conversazione. Se dovesse succedervi, allontanate tali dispositivi dallo strumento oppure spegneteli.
• Non esponete la pedaliera alla luce diretta del sole, non mettetela
vicino a dispositivi che emettano calore, non lasciatela all’interno
di un veicolo chiuso o soggetta a temperature elevate. L’eccessivo
calore può deformarla o scolorirla.
• Quando la spostate da un luogo a un altro con temperatura e/o
grado di umidità diverso, all’interno della PK-9 può crearsi della
condensa. Se cercate di utilizzarla in queste condizioni potreste
provocare danni o malfunzionamenti. Perciò, prima di usare la
pedaliera, aspettate alcune ore, fino a che la condensa sia completamente evaporata.
• Non lasciate oggetti appoggiati sulla pedaliera. Facendolo potreste
causare malfunzionamenti, per esempio i pedali potrebbero non
produrre più suoni.
•A seconda del materiale e della temperatura della superficie sulla
quale appoggiate la pedaliera, i suoi piedini in gomma potrebbero
scolorire o danneggiare la superficie.
Per evitare che ciò accada potete mettere sotto i piedini un pezzo
di feltro o di tessuto. In tal caso, fate attenzione a che la pedaliera
non scivoli o si sposti accidentalmente.
• Non appoggiate alcun oggetto che contenga acqua (per esempio,
vasi di fiori) sulla PK-9. Evitate l’utilizzo di insetticidi, profumi,
alcol, smalto per unghie, bombolette spray, ecc. vicino alla pedaliera. Asciugate rapidamente con un panno morbido ed asciutto
qualsiasi liquido versato sulla pedaliera.
Manutenzione
• Per la pulizia quotidiana utilizzate un panno morbido e asciutto o
leggermente inumidito con acqua. Per togliere lo sporco più persistente, utilizzate un panno impregnato con un detergente neutro
e non abrasivo. Successivamente accertatevi di asciugare completamente la pedaliera con un panno morbido e asciutto.
• Per evitare scolorimenti o deformazioni, non utilizzate mai benzina
alcool o solventi di qualsiasi tipo.
Riparazioni e Dati
• Tenete in considerazione il fatto che tutti i dati contenuti nella
memoria dello strumento potrebbero andare perduti in caso di
riparazione. I dati importanti dovrebbero essere salvati in un altro
dispositivo MIDI (per es. un sequencer) o annotati su un foglio di
carta (se possibile). Durante la riparazione viene prestata la massima attenzione affinché i dati non vengano perduti. Tuttavia, in
certi casi (come quando sono danneggiati i circuiti di memoria) è
impossibile ripristinare i dati e Roland non si assume nessuna
responsabilità riguardo alla perdita di tali dati.
Ulteriori precauzioni
•Ricordate che il contenuto della memoria potrebbe andare irrimediabilmente perso a causa di malfunzionamenti o di un uso scorretto dello strumento. Per evitare di perdere dati importanti vi
consigliamo di fare periodicamente un backup dei dati più importanti presenti nella memoria della pedaliera in un altro dispositivo
MIDI (per es. un sequencer).
• Sfortunatamente potrebbe essere impossibile recuperare i dati salvati nella memoria dello strumento una volta che siano andati
perduti. Roland Corporation non si assume nessuna responsabilità
riguardo la perdita di tali dati.
•Maneggiate con cura i pulsanti, i controlli e i connettori della
PK-9. Non facendolo potreste provocare malfunzionamenti.
• Non colpite né premete mai forte sullo schermo.
• Quando collegate o scollegate i cavi, afferrate solo i connettori;
non tirate mai il cavo stesso. In questo modo eviterete cortocircuiti
o rotture interne ai cavi.
• Per evitare di disturbare i vicini, cercate di tenere il volume degli
strumenti ad un livello ragionevole.
• Il rumore dei pedali premuti e le vibrazioni prodotte suonando lo
strumento potrebbero essere trasmesse attraverso il pavimento o i
muri fino ad una distanza sorprendente. Abbiate cura di non
disturbare le persone che vi circondano.
• Se dovete trasportare lo strumento, utilizzate se possibile l’imballo
originale (comprese le imbottiture). Altrimenti, utilizzate materiale
da imballo equivalente.
• Utilizzate solo un pedale di espressione (Roland serie EV, venduto
separatamente) o un interruttore a pedale (Roland serie DP, BOSS
FS-5U) specifico. Collegando un altro pedale di espressione o
interruttore a pedale, potete provocare malfunzionamenti e/o
danni alla pedaliera.
• Quando usate i pedali, fate attenzione a non incastrarvi le dita tra
le parti mobili ed il pannello. Nei luoghi in cui siano presenti dei
bambini piccoli, assicuratevi che un adulto li sorvegli e li guidi.
r
60
Page 61

Pedaliera MIDI PK-9
Note importanti
r
Indice
1. Note importanti . . . . . . . . . . . . . . . . . . . . . . . . . . . . . . . . . . . . . . . . . . . . . . . . . . . . . . . . . . . . . . . . . . .60
2. Descrizione dei pannelli . . . . . . . . . . . . . . . . . . . . . . . . . . . . . . . . . . . . . . . . . . . . . . . . . . . . . . . . . . . .62
Pannello frontale. . . . . . . . . . . . . . . . . . . . . . . . . . . . . . . . . . . . . . . . . . . . . . . . . . . . . . . . . . . . . . . . . . . . . . . .62
Pannello posteriore. . . . . . . . . . . . . . . . . . . . . . . . . . . . . . . . . . . . . . . . . . . . . . . . . . . . . . . . . . . . . . . . . . . . . .63
3. Preparativi prima di usare la PK-9. . . . . . . . . . . . . . . . . . . . . . . . . . . . . . . . . . . . . . . . . . . . . . . . . . . .64
Montare il pedale di espressione . . . . . . . . . . . . . . . . . . . . . . . . . . . . . . . . . . . . . . . . . . . . . . . . . . . . . . . . . .64
Collegare la PK-9 ad uno strumento esterno con il suo cavo PK . . . . . . . . . . . . . . . . . . . . . . . . . . . . . . .65
Collegare l’alimentatore fornito in dotazione . . . . . . . . . . . . . . . . . . . . . . . . . . . . . . . . . . . . . . . . . . . . . . .65
Collegare la PK-9 ad uno strumento MIDI esterno . . . . . . . . . . . . . . . . . . . . . . . . . . . . . . . . . . . . . . . . . . .66
Usare sia la PK-9 che un controllo a tastiera MIDI . . . . . . . . . . . . . . . . . . . . . . . . . . . . . . . . . . . . . . . . . . .66
Collegare alla PK-9 un pedale esterno o un interruttore a pedale opzionali . . . . . . . . . . . . . . . . . . . . .67
4. Modo Parameter . . . . . . . . . . . . . . . . . . . . . . . . . . . . . . . . . . . . . . . . . . . . . . . . . . . . . . . . . . . . . . . . . .68
Operazioni basilari nel modo Parameter. . . . . . . . . . . . . . . . . . . . . . . . . . . . . . . . . . . . . . . . . . . . . . . . . . . .68
Salvare le impostazioni (funzione ‘Save’) . . . . . . . . . . . . . . . . . . . . . . . . . . . . . . . . . . . . . . . . . . . . . . . . . . .68
Impostazioni Parameter. . . . . . . . . . . . . . . . . . . . . . . . . . . . . . . . . . . . . . . . . . . . . . . . . . . . . . . . . . . . . . . . . .69
Transpose. . . . . . . . . . . . . . . . . . . . . . . . . . . . . . . . . . . . . . . . . . . . . . . . . . . . . . . . . . . . . . . . . . . . . . . . . . . . . . . . . . . . . 69
Octave . . . . . . . . . . . . . . . . . . . . . . . . . . . . . . . . . . . . . . . . . . . . . . . . . . . . . . . . . . . . . . . . . . . . . . . . . . . . . . . . . . . . . . . 69
MIDI Transmit Channel . . . . . . . . . . . . . . . . . . . . . . . . . . . . . . . . . . . . . . . . . . . . . . . . . . . . . . . . . . . . . . . . . . . . . . . . . 69
CONTROL 1 Assign . . . . . . . . . . . . . . . . . . . . . . . . . . . . . . . . . . . . . . . . . . . . . . . . . . . . . . . . . . . . . . . . . . . . . . . . . . . . . 69
CONTROL 2 Assign . . . . . . . . . . . . . . . . . . . . . . . . . . . . . . . . . . . . . . . . . . . . . . . . . . . . . . . . . . . . . . . . . . . . . . . . . . . . . 69
Assegnazione Interruttore Sinistro del Pedale . . . . . . . . . . . . . . . . . . . . . . . . . . . . . . . . . . . . . . . . . . . . . . . . . . . . . 69
Assegnazione Interruttore Destro del Pedale . . . . . . . . . . . . . . . . . . . . . . . . . . . . . . . . . . . . . . . . . . . . . . . . . . . . . . 70
Retrigger . . . . . . . . . . . . . . . . . . . . . . . . . . . . . . . . . . . . . . . . . . . . . . . . . . . . . . . . . . . . . . . . . . . . . . . . . . . . . . . . . . . . . 70
Velocity . . . . . . . . . . . . . . . . . . . . . . . . . . . . . . . . . . . . . . . . . . . . . . . . . . . . . . . . . . . . . . . . . . . . . . . . . . . . . . . . . . . . . . 70
Touch (curva della velocity) . . . . . . . . . . . . . . . . . . . . . . . . . . . . . . . . . . . . . . . . . . . . . . . . . . . . . . . . . . . . . . . . . . . . . 70
Portamento Time . . . . . . . . . . . . . . . . . . . . . . . . . . . . . . . . . . . . . . . . . . . . . . . . . . . . . . . . . . . . . . . . . . . . . . . . . . . . . . 70
Octaver value . . . . . . . . . . . . . . . . . . . . . . . . . . . . . . . . . . . . . . . . . . . . . . . . . . . . . . . . . . . . . . . . . . . . . . . . . . . . . . . . . 70
Pedal Assign . . . . . . . . . . . . . . . . . . . . . . . . . . . . . . . . . . . . . . . . . . . . . . . . . . . . . . . . . . . . . . . . . . . . . . . . . . . . . . . . . . 70
Auto Off. . . . . . . . . . . . . . . . . . . . . . . . . . . . . . . . . . . . . . . . . . . . . . . . . . . . . . . . . . . . . . . . . . . . . . . . . . . . . . . . . . . . . . 70
Factory Reset . . . . . . . . . . . . . . . . . . . . . . . . . . . . . . . . . . . . . . . . . . . . . . . . . . . . . . . . . . . . . . . . . . . . . . . . . . . . . . . . . 71
MIDI Dump . . . . . . . . . . . . . . . . . . . . . . . . . . . . . . . . . . . . . . . . . . . . . . . . . . . . . . . . . . . . . . . . . . . . . . . . . . . . . . . . . . . 71
Save . . . . . . . . . . . . . . . . . . . . . . . . . . . . . . . . . . . . . . . . . . . . . . . . . . . . . . . . . . . . . . . . . . . . . . . . . . . . . . . . . . . . . . . . . 71
Ripristinare le impostazioni alle condizioni di fabbrica (Factory Reset) . . . . . . . . . . . . . . . . . . . . . . . . .71
Archiviare e ripristinare le vostre impostazioni (MIDI Dump) . . . . . . . . . . . . . . . . . . . . . . . . . . . . . . . . . .71
Preparativi per l’archiviazione/ripristino . . . . . . . . . . . . . . . . . . . . . . . . . . . . . . . . . . . . . . . . . . . . . . . . . . . . . . . . . . . . 71
Archiviare le vostre impostazioni nel sequencer esterno. . . . . . . . . . . . . . . . . . . . . . . . . . . . . . . . . . . . . . . . . . . . . . 71
Ritrasmettere le vostre impostazioni alla PK-9 . . . . . . . . . . . . . . . . . . . . . . . . . . . . . . . . . . . . . . . . . . . . . . . . . . . . . . 72
5. Appendice. . . . . . . . . . . . . . . . . . . . . . . . . . . . . . . . . . . . . . . . . . . . . . . . . . . . . . . . . . . . . . . . . . . . . . . .73
Problemi & Soluzioni . . . . . . . . . . . . . . . . . . . . . . . . . . . . . . . . . . . . . . . . . . . . . . . . . . . . . . . . . . . . . . . . . . . .73
Caratteristiche Tecniche. . . . . . . . . . . . . . . . . . . . . . . . . . . . . . . . . . . . . . . . . . . . . . . . . . . . . . . . . . . . . . . . . .74
ITALIANO ITALIANO ITALIANO ITALIANO ITALIANO ITALIANO
61
Page 62

Pedaliera MIDI PK-9
Descrizione dei pannelli
2. Descrizione dei pannelli
Pannello frontale
A
A
Schermo
Questo schermo a tre caratteri vi tiene informati sulle
funzioni e i valori dei parametri attuali che avete
impostato.
B
Pedali CONTROL 1 e CONTROL 2.
Questi pedali vi permettono di controllare il dispositivo collegato via MIDI. La loro funzione può essere
impostata nel modo Parameter (pagina 68). Di
default, il pedale CONTROL 1 trasmette i messaggi di
control change numero CC16, mentre CONTROL 2
trasmette i messaggi CC17.
Premendo contemporaneamente questi pedali si
entra nel modo Parameter (pagina 68).
C
Pedale di espressione
Premendo il pedale aumenterete il volume, e riportandolo verso di voi diminuirete il volume. Per le
istruzioni su come montarlo, consultate pagina 64.
D
C
D
B
D
Interruttori del Pedale
I due interruttori che si trovano ai lati del pedale di
espressione vi permettono di controllare il dispositivo
collegato. Di default, l’interruttore a sinistra del
pedale trasmette i messaggi CC18, mentre quello di
destra trasmette i messaggi CC19.
Le funzioni di questi due interruttori possono essere
cambiate nel modo Parameter.
E
Pedale Hold
Premendo questo pedale potete sostenere le note
attualmente suonate anche dopo aver rilasciato il
relativo pedale MIDI. Quando la PK-9 si trova nel
modo Parameter, questo pedale serve per confermare
le impostazioni.
E
r
62
Page 63

Pedaliera MIDI PK-9
Pannello posteriore
r
Pannello posteriore
A
Connettore EXTERNAL PEDAL
Vi permette di collegare un interruttore a pedale
(Roland serie DP, BOSS FS-5U) opzionale o un altro
pedale di espressione (Roland EV-5) anch’esso opzionale. Per come assegnare la funzione desiderata al
pedale o agli interruttori a pedale vedi pagina 70.
B
Connettore PK OUT
Con il cavo PK fornito con la PK-9 collegate questo
connettore al connettore PK IN di uno strumento
esterno (pagina 65).
C
Connettori MIDI
Permettono di collegare la PK-9 ad un dispositivo
MIDI esterno (pagina 66).
A
E
D
C
B
D
Connettore DC IN
Vi permette di collegare l’alimentatore fornito in
dotazione (pagina 65).
E
Interruttore POWER
Accende e spegne lo strumento (pagina 66).
Con le impostazioni di fabbrica, la PK-9 si spegne automaticamente 240 minuti (4 ore) dopo
aver smesso di suonarla o di usarla.
Se la PK-9 si è spenta automaticamente, potete riaccenderla con l’interruttore [POWER].
Se non volete che si spenga automaticamente, cambiate l’impostazione “Auto Off” in “OFF” (pagina 70).
ITALIANO ITALIANO ITALIANO ITALIANO ITALIANO ITALIANO
63
Page 64

Pedaliera MIDI PK-9
Preparativi prima di usare la PK-9
3. Preparativi prima di usare la PK-9
Montare il pedale di espressione
La PK-9 viene fornita con il pedale di espressione smontato. Prima di collegare la PK-9 ad un dispositivo esterno, vi preghiamo di montare il pedale di espressione.
Nota
Quando montate o smontate il pedale di espressione, fate attenzione a non pestare le viti a pomello. Quando togliete le viti a pomello,
per evitare l’ingestione accidentale, teneteli sempre al di fuori della portata dei bambini piccoli.
Per evitare malfunzionamenti e/o danneggiare altri dispositivi, prima di eseguire qualsiasi collegamento spegnete tutti gli apparecchi.
1.
Allentate la vite a pomello che si trova nel
pannello posteriore della PK-9.
Vite a pomello nel
pannello posteriore
4.
Fissate il pedale di espressione con le due
viti a pomello fornite con lo strumento,
facendo attenzione a che i due fori delle viti
siano allineati.
Viti a pomello fornite
(due)
2.
Collegate il cavo del pedale di espressione al
connettore che si trova nella parte superiore
della PK-9.
3.
Facendo attenzione a non schiacciare il cavo,
mettete il pedale di espressione sulla PK-9.
5.
Stringete la vite a pomello nel pannello
posteriore.
Nota
Il connettore che si trova nella parte superiore della PK-9
serve solo per collegare il pedale di espressione fornito con
lo strumento. Collegando qualsiasi altro dispositivo che
non sia il pedale di espressione della PK-9 potreste provocare dei malfunzionamenti.
r
64
Page 65

Collegare la PK-9 ad uno strumento esterno con il suo cavo PK
Al connettore DC IN della PK-9
Alimentatore
Cavo di alimentazione
Ad una presa di corrente
Indicatore
Pedaliera MIDI PK-9
r
Collegare la PK-9 ad uno strumento
esterno con il suo cavo PK
Con il cavo PK, fornito con la PK-9, collegate lo strumento esterno e la PK-9. Questo sistema di connessione
consente di alimentare la PK-9 dallo strumento esterno
(così non avete bisogno dell’alimentatore fornito in
dotazione).
La PK-9 verrà accesa e spenta dall’interruttore di accensione dello strumento esterno, a prescindere dalla posizione del proprio interruttore di accensione.
AT-350C
(Altri strumenti compatibili
sono: Roland AT-900C, C-200
ecc.)
PK OUT
Nota
Questo strumento dispone di un circuito di protezione.
Dopo l’accensione, è necessario un breve intervallo di
tempo (pochi secondi) prima che l’apparecchio funzioni
normalmente.
Collegare l’alimentatore fornito in
dotazione
La PK-9 può anche essere alimentata dall’alimentatore
PSB-1U fornito in dotazione.
Nota
Usate solo l’alimentatore di corrente fornito in dotazione con
la PK-9 (PSB-1U). Accertatevi, inoltre, che la tensione di rete
locale corrisponda alla tensione d’ingresso indicata sull’alimentatore. Altri alimentatori possono avere polarità differente
o essere progettati per tensioni diverse, perciò il loro uso può
provocare danni, malfunzionamenti o causare scosse elettriche.
Nota
Per evitare malfunzionamenti e/o danni agli altoparlanti o ad
altri dispositivi, abbassate il volume e spegnete tutti i dispositivi prima di eseguire qualsiasi collegamento.
1.
Collegate il cavo di alimentazione all’alimentatore.
ITALIANO ITALIANO ITALIANO ITALIANO ITALIANO ITALIANO
1.
Assicuratevi che lo strumento esterno sia
spento ed il volume abbassato.
2.
Con il cavo PK, fornito con la PK-9, collegate
il connettore PK IN dello strumento esterno
al connettore PK OUT della PK-9.
Quando tutto è collegato correttamente, assicuratevi
di seguire la procedura indicata per accendere gli
strumenti. Se li accendete con la sequenza sbagliata,
rischiate di provocare malfunzionamenti o rotture
agli strumenti.
3.
Accendete lo strumento esterno e regolate il
volume come spiegato nel suo manuale di
istruzioni.
4.
Verificate che anche la PK-9 sia accesa.
5.
Suonate la pedaliera. Se sentite suonare
dallo strumento esterno la parte eseguita
sulla pedaliera, il collegamento è terminato.
Nota
Se la parte della pedaliera suona nell’ottava sbagliata sullo
strumento esterno, potete trasporre i numeri delle note
trasmesse dalla PK-9 (vedi “Octave” a p. 69).
Posizionate l’alimentatore in modo che il lato con
l’indicatore sia rivolto verso l’alto ed il lato con le
informazioni scritte rivolto verso il basso.
Quando collegate l’alimentatore alla presa di corrente
l’indicatore si illumina.
2.
Collegate l’alimentatore al connettore DC IN
della PK-9.
Ad una presa di corrente
Nota
Per prevenire malfunzionamenti e rotture agli apparecchi,
abbassate sempre il volume e spegnete tutti gli strumenti
prima di eseguire qualsiasi collegamento.
3.
Collegate il cavo di alimentazione ad una
presa di corrente.
65
Page 66

Pedaliera MIDI PK-9
Preparativi prima di usare la PK-9
Collegare la PK-9 ad uno strumento
MIDI esterno
Potete usare la vostra PK-9 come controllo MIDI per un
generatore sonoro MIDI.
1.
Assicuratevi che lo strumento MIDI esterno
sia spento ed il suo volume abbassato.
Nota
Per prevenire malfunzionamenti e rotture agli apparecchi,
abbassate sempre il volume e spegnete tutti gli strumenti
prima di eseguire qualsiasi collegamento.
2.
Usate un cavo MIDI (acquistabile in negozio)
per collegare il connettore MIDI OUT della
PK-9 al connettore MIDI IN dello strumento
MIDI esterno.
Qualsiasi strumento compatibile MIDI
con un generatore sonoro interno che
non disponga del connettore PK IN.
3.
Collegate l’alimentatore PSB-1U al connettore DC IN (pagina 65).
Quando tutto è collegato correttamente, assicuratevi
di seguire la procedura indicata per accendere gli
strumenti. Se li accendete con la sequenza sbagliata,
rischiate di provocare malfunzionamenti o rotture
agli strumenti.
MIDI IN
MIDI OUT
Se lo strumento esterno suona le note, il collegamento è completo.
Nota
Questo strumento dispone di un circuito di protezione.
Dopo l’accensione, è necessario un breve intervallo di
tempo (pochi secondi) prima che l’apparecchio funzioni
normalmente.
Usare sia la PK-9 che un controllo a
tastiera MIDI
Potete anche controllare un modulo MIDI esterno utilizzando sia una tastiera MIDI che la PK-9.
Questo vi permette di usare sia le mani che i piedi per
suonare o la stessa parte o due parti diverse del modulo
esterno.
1.
Assicuratevi che lo strumento MIDI esterno
sia spento ed il suo volume abbassato.
Nota
Per prevenire malfunzionamenti e rotture agli apparecchi,
abbassate sempre il volume e spegnete tutti gli strumenti
prima di eseguire qualsiasi collegamento.
2.
Usate un cavo MIDI (acquistabile in negozio)
per collegare il connettore MIDI OUT della
PK-9 al connettore MIDI IN dello strumento
MIDI esterno. Usate un altro cavo MIDI per
collegare il connettore MIDI OUT della
tastiera al connettore MIDI IN della PK-9.
MIDI IN
4.
Accendete lo strumento MIDI esterno e
regolate il volume come spiegato nel suo
manuale di istruzioni.
5.
Premete l’interruttore [POWER] della PK-9,
che si trova nel pannello posteriore.
Acceso Spento
6.
Impostate il canale MIDI della PK-9
(pagina 69).
7.
Impostate il canale MIDI dello strumento
MIDI esterno in modo che corrisponda con
quello della PK-9.
8.
Suonate la pedaliera della PK-9.
r
Dati inviati dalla PK-9
MIDI OUT
MIDI IN
Dati inviati dalla tastiera
MIDI OUT
Con questa configurazione, i messaggi che la PK-9
riceve dal connettore MIDI IN vengono sommati ai
messaggi MIDI della PK-9 e trasmessi, tramite il suo
connettore MIDI OUT, al modulo esterno MIDI (funzione “Soft Thru”).
66
Page 67

Nota
La copia esatta dei segnali ricevuti dal connettore MIDI IN
della PK-9 viene inviata anche al connettore MIDI THRU.
Potete usare anche questa configurazione, ma ricordate
che funzionerà solo se il vostro modulo MIDI ha due connettori MIDI IN. Per cui l’approccio della “somma” è in
genere più pratico.
Collegare alla PK-9 un pedale
esterno o un interruttore a pedale
opzionali
La PK-9 dispone di un connettore EXTERNAL PEDAL al
quale potete collegare un interruttore a pedale opzionale (Roland serie DP o BOSS FS-5U) oppure un pedale
di espressione aggiuntivo (Roland serie EV).
Collegare alla PK-9 un pedale esterno o un interruttore a pedale opzionali
Pedaliera MIDI PK-9
r
ITALIANO ITALIANO ITALIANO ITALIANO ITALIANO ITALIANO
Interruttore a pedale opzio-
(Roland serie DP, BOSS FS-5U)
nale
—oppure—
Pedale di espressione opzio-
nale (Roland serie EV)
Se collegate un interruttore a pedale o un pedale di
espressione opzionali, potete scegliere la funzione
che dovrà eseguire (pagina 70). Di default, il pedale
esterno controlla la funzione “Hold”.
Nota
Utilizzate solo un pedale di espressione (Roland serie EV
venduto separatamente) o un interruttore a pedale (Roland
serie DP, BOSS FS-5U) specifico. Collegando un altro pedale
di espressione o interruttore a pedale, potete provocare
malfunzionamenti e/o danni alla pedaliera.
Nota
Non collegate o scollegate un interruttore a pedale o un
pedale di espressione opzionali mentre la PK-9 è accesa.
Spegnete sempre la PK-9 prima di cambiare un collegamento al connettore EXTERNAL PEDAL.
67
Page 68

Pedaliera MIDI PK-9
Modo Parameter
4. Modo Parameter
Il modo Parameter vi permette di eseguire varie impostazioni della pedaliera.
Operazioni basilari nel modo
Parameter
Ecco la procedura di base per eseguire le impostazioni
nel modo Parameter.
1.
Premete simultaneamente i pedali
[CONTROL 1] e [CONTROL 2].
Gli indicatori [CONTROL 1] e [CONTROL 2] lampeggiano.
La PK-9 ora si trova nel modo Parameter. Sullo
schermo lampeggia l’abbreviazione del primo parametro (o dell’ultimo parametro scelto da quando
avete acceso la PK-9).
Salvare le impostazioni (funzione
‘Save’)
Quando la PK-9 viene spenta, le impostazioni tornano ai
loro valori di default. Comunque, se preferite, potete
salvare le seguenti impostazioni in modo che vengano
ricordate anche dopo lo spegnimento.
Impostazioni che vengono salvate Pagina
Transpose 69
Octave 69
Control 1 Assign 69
Control 2 Assign 69
Assegnazione Interruttore Sinistro del
Pedale
Assegnazione Interruttore Destro del Pedale 70
Retrigger 70
Velocity 70
Touch 70
Portamento Time 70
69
trn
2.
Premete il pedale [CONTROL 1] o
[CONTROL 2] per scegliere il parametro
desiderato.
Per i dettagli riguardo ogni parametro, consultate
“Impostazioni Parameter” a p. 69.
3.
Per confermare premete il pedale Hold.
Lo schermo visualizza il valore.
4.
Per cambiare il valore premete il pedale
[CONTROL 1] o [CONTROL 2].
5.
Per confermare il valore ed uscire dal modo
Parameter premete il pedale Hold.
Octaver Value 70
Pedal Assign 70
Auto Off 70
MIDI Transmit Channel 69
1.
Premete simultaneamente i pedali
[CONTROL 1] e [CONTROL 2].
Gli indicatori [CONTROL 1] e [CONTROL 2] lampeggiano. La PK-9 ora si trova nel modo Parameter.
2.
Premete il pedale [CONTROL 1] o
[CONTROL 2] per scegliere il parametro
“SAv”.
SAv
3.
Per confermare premete il pedale Hold.
Lo schermo indica “ok” e la PK-9 esce dal modo Parameter.
r
68
Page 69

Impostazioni Parameter
Qui di seguito trovate una lista dei parametri della PK-9
che potete impostare.
●
Transpose
Schermo Valore Default
–5~6 0
trn
Questo parametro vi permette di trasporre l’intonazione delle note dei pedali ad intervalli di semitono.
●
Octave
Schermo Valore Default
0~8 2
oCt
Questo parametro vi permette di trasporre l’intonazione delle note dei pedali ad intervalli di ottava.
Nota
L’impostazione di default “2” significa che il primo pedale
MIDI a sinistra trasmette un “Do2” (numero di nota MIDI
36).
●
MIDI Transmit Channel
Schermo Valore Default
1~16 2
Ch
Pedaliera MIDI PK-9
aggiunta può essere di 1~4 ottave più bassa della
nota più bassa che suonate (di default –1). Per come
impostare il valore dell’ottava consultate “Octaver
value” a p. 70.
Por (Portamento): Il pedale vi permette di attivare e
disattivare la funzione Portamento. Quando questa
funzione è attiva, l’intonazione delle note non cambia
più a scalini chiaramente definiti: ogni nota scivola
dolcemente verso la successiva. Usate il parametro
“Portamento Time” (pagina 70) per impostare la velocità con cui ogni nota scivola nella successiva. Più
alto è il valore e più lenta sarà la transizione.
Mon (Mono): Il pedale vi permette di attivare e
disattivare il modo Mono. Questo modo abilita la
PK-9 a suonare in modalità monofonica. Questo
significa che viene trasmesso solo un messaggio di
nota per volta. All’accensione, la PK-9 ritorna al
modo Poly.
●
CONTROL 2 Assign
Schermo Valore Default
C16, C17, oCb, Por, Mon C17
Impostazioni Parameter
r
Ct2
Questo parametro vi permette di assegnare una funzione al pedale [CONTROL 2]. Per le impostazioni
disponibili vedi “CONTROL 1 Assign”. Ricordate,
comunque, che l’impostazione di default per il pedale
[CONTROL 2] è “C17”.
●
Assegnazione Interruttore Sinistro del Pedale
Schermo Valore Default
ITALIANO ITALIANO ITALIANO ITALIANO ITALIANO ITALIANO
Questa impostazione determina il canale MIDI sul
quale trasmetterà la PK-9. Il MIDI sfrutta sedici
“canali MIDI” che sono numerati 1~16. Collegando
apparecchi MIDI e specificando il canale MIDI appropriato per ogni apparecchio, potete suonare e/o
richiamare suoni per quegli apparecchi.
●
CONTROL 1 Assign
Schermo Valore Default
C16, C17, oCb, Por, Mon C16
Ct1
Questo parametro vi permette di assegnare una funzione al pedale [CONTROL 1]:
C16 (Control Change CC16) o C17 (CC17): Premendo il pedale [CONTROL 1] verrà trasmesso il
numero di control change indicato, con valore 0 o
127.
oCb (Octaver Bass): Premendo [CONTROL 1] viene
attivata/disattivata la funzione “Octaver Bass”.
Quando è attiva questa funzione, alla nota più bassa
che suonate viene aggiunta un’altra nota. La nota
C18, C19, Por C18
S L
Questo parametro vi permette di assegnare una funzione all’interruttore che si trova sul lato sinistro del
pedale di espressione.
C18 (control change CC18) o C19 (CC19): L’interruttore del pedale trasmette il numero di control
change indicato, alternando i valori “0” e “127”.
Nota
Se collegate la PK-9 ad uno strumento Roland della serie
VK, il messaggio CC18 controlla il parametro “Rotary Slow/
Fast”, mentre il messaggio CC19 controlla il parametro
“Rotary Break Speed”.
Por (Portamento): L’interruttore del pedale vi permette di attivare e disattivare la funzione Portamento. Quando questa funzione è attiva, l’intonazione delle note non cambia più a scalini chiaramente
definiti: ogni nota scivola dolcemente verso la successiva. Usate il parametro “Portamento Time”
(pagina 70) per impostare la velocità con cui ogni
nota scivola nella successiva. Più alto è il valore e più
lenta sarà la transizione.
69
Page 70

Pedaliera MIDI PK-9
Por
oCv
Ped
Aof
Modo Parameter
●
Assegnazione Interruttore Destro del Pedale
Schermo Valore Default
C18, C19, Por C19
S r
Nota
L’impostazione “Touch” viene ignorata se “Velocity” è impostato su un valore (1~127).
●
Portamento Time
Schermo Valore Default
Questo parametro vi permette di assegnare una funzione all’interruttore che si trova sul lato destro del
pedale di espressione. Per la spiegazione delle impostazioni disponibili vedi “Assegnazione Interruttore
Sinistro del Pedale”.
Nota
Se collegate la PK-9 ad uno strumento Roland della serie
VK, il messaggio CC18 controlla il parametro “Rotary Slow/
Fast”, mentre il messaggio CC19 controlla il parametro
“Rotary Break Speed”.
●
Retrigger
Schermo Valore Default
Off, On Off
rEt
Questo parametro è disponibile solo quando la PK-9
si trova nel modo Mono. Per attivare tale modo,
dovete prima assegnare la funzione “Mon” al pedale
[CONTROL 1] o [CONTROL 2] e poi premere quel
pedale. Vedi anche “CONTROL 1 Assign” e “CONTROL
2 Assign” a p. 69.
Quando “Retrigger” è attivo potete ottenere degli
effetti speciali. Nel modo Mono la pedaliera è monofonica: premendo due pedali contemporaneamente,
suonerà solo l’ultima nota premuta. Al rilascio di questa nota suonerà la nota premuta in precedenza creando un piacevole effetto di alternanza.
●
Velocity
Schermo Valore Default
On, 1~127 On
vEl
Se questo parametro è attivo, la dinamica con cui
suonate viene tradotta in valori di velocity (1~127).
Se avete impostato un valore fisso (1~127), la PK-9
trasmette tutte le note con quel valore.
●
Touch (curva della velocity)
Schermo Valore Default
tCh
SFt (morbida), Med
(media), hrd (pesante)
Med
0~127 50
“Portamento” significa che l’intonazione non cambia
a scalini chiaramente definiti: ogni nota scivolerà
dolcemente verso la successiva. Usate questo parametro per impostare la velocità con cui ogni nota scivola nella successiva. Più alto è il valore e più lenta
sarà la transizione.
Nota
Se lo strumento MIDI ricevente non supporta questo parametro, questa impostazione non avrà effetto.
●
Octaver value
Schermo Valore Default
–4~–1 –1
Questo parametro specifica l’intonazione della nota
che viene aggiunta quando la funzione oCb è attiva.
Per i dettagli vedi “CONTROL 1 Assign” a p. 69.
●
Pedal Assign
Schermo Valore Default
“CUt” (Cutoff), “rES”
(Resonance),
“Pbd” (Pitch Bend Down),
“PbU” (Pitch Bender Up),
“Mod” (Modulation),
“hLd” (Hold),
“voL” (Volume),
“PAn” (Panpot),
“C16” (Control Change
16), “C17” (Control
Change 17),
“C18” (Control Change
18), “C19” (Control
Change 19)
Questo parametro vi permette di assegnare la funzione del pedale collegato al connettore EXTERNAL
PEDAL.
Auto Off
●
0ff, 10, 30, 240 240
“hLd”
(Hold)
I pedali della PK-9 sono sensibili alla dinamica. Se
necessario, potete scegliere una curva diversa della
velocity in modo che si adatti al vostro stile esecutivo.
r
70
Questo parametro vi permette di specificare quanto
tempo aspetterà la PK-9 prima di spegnersi da sola
quando non la usate. Se non volete che si spenga
automaticamente, impostate “Off”.
Page 71

●
Nota: Il vostro computer deve
essere collegato ad una interfaccia MIDI. La PK-9 deve essere collegata all’interfaccia MIDI.
MIDI OUT
MIDI IN
MIDI IN
MIDI OUT
Factory Reset
Consultate “Ripristinare le impostazioni alle condizioni di fabbrica
(Factory Reset)” a p. 71.
●
MIDI Dump
Consultate “Archiviare e ripristinare
le vostre impostazioni (MIDI Dump)”
a p. 71.
●
Save
Consultate “Salvare le impostazioni
(funzione ‘Save’)” a p. 68.
FAC
dmp
SAv
Ripristinare le impostazioni alle
condizioni di fabbrica (Factory
Reset)
Le impostazioni che avete cambiato nel modo Parameter (pagina 68) possono essere riportate alle loro condizioni di fabbrica. Questa operazione viene chiamata
“Factory Reset”.
Ripristinare le impostazioni alle condizioni di fabbrica (Factory Reset)
Pedaliera MIDI PK-9
r
Archiviare e ripristinare le vostre
impostazioni (MIDI Dump)
Con un computer (dotato di interfaccia MIDI, acquistabile in negozio) o con un sequencer esterno potete
archiviare e ripristinare le vostre impostazioni.
Preparativi per l’archiviazione/ripristino
1.
Usate un cavo MIDI (acquistabile in negozio)
per collegare il connettore MIDI IN del
sequencer esterno al connettore MIDI OUT
della PK-9.
2.
Usate un altro cavo MIDI per collegare il
connettore MIDI OUT del sequencer esterno
al connettore MIDI IN della PK-9.
ITALIANO ITALIANO ITALIANO ITALIANO ITALIANO ITALIANO
1.
Premete simultaneamente i pedali
[CONTROL 1] e [CONTROL 2].
Gli indicatori [CONTROL 1] e [CONTROL 2] lampeggiano.
2.
Premete il pedale [CONTROL 1] o
[CONTROL 2] per scegliere il parametro
“FAC”.
3.
Per confermare premete il pedale Hold.
Quando il Factory Reset è stato completato, lo
schermo visualizza “ok” e la PK-9 esce dal modo Parameter.
3.
Accendete il sequencer esterno e la PK-9.
Nota
Per evitare malfunzionamenti e/o danni agli altoparlanti o
ad altri dispositivi, abbassate il volume e spegnete tutti i
dispositivi prima di eseguire qualsiasi collegamento.
Archiviare le vostre impostazioni nel sequencer
esterno
1.
Premete simultaneamente i pedali
[CONTROL 1] e [CONTROL 2].
Gli indicatori [CONTROL 1] e [CONTROL 2] lampeggiano.
2.
Premete il pedale [CONTROL 1] o
[CONTROL 2] per scegliere il parametro
“dMP”.
3.
Attivate nel sequencer esterno la ricezione
dei dati o la registrazione.
4.
Attendete che il sequencer termini il conteggio (se previsto), poi premete il pedale
Hold per avviare il MIDI Dump.
71
Page 72

Pedaliera MIDI PK-9
Modo Parameter
Quando il MIDI Dump è stato completato, lo schermo
visualizza “ok” e la PK-9 esce dal modo Parameter.
5.
Interrompete la registrazione sul sequencer
esterno e salvate i dati.
Ritrasmettere le vostre impostazioni alla PK-9
1.
Fate partire la riproduzione dei dati che
avete salvato (e caricato).
Tutti gli indicatori della PK-9 si illuminano e lo
schermo visualizza “dMP” (Dump).
Quando il dump dei dati è stato ricevuto, lo schermo
per qualche istante indica “ok”.
r
72
Page 73

Pedaliera MIDI PK-9
r
Appendice
5. Appendice
Problemi & Soluzioni
Se la PK-9 non funziona come dovrebbe, per prima cosa
controllate i seguenti punti. Se il problema non dovesse
risolversi, contattate il vostro rivenditore o il più vicino
centro assistenza Roland.
■
La PK-9 si è spenta improvvisamente
Lo strumento si spegne automaticamente trascorsi
240 minuti durante i quali non lo avete suonato o
usato. (Questa è l’impostazione di fabbrica). Se non
volete che lo strumento si spenga automaticamente,
cambiate l’impostazione “Auto Off” in “Off”. Consultate pagina 70.
■
Non c’è alimentazione
Se la PK-9 è alimentata dall’alimentatore.
Avete premuto l’interruttore [POWER] della PK-9
(pannello posteriore)?
→ Premete l’interruttore [POWER] della PK-9.
Avete collegato l’alimentatore fornito in dotazione?
→ Collegate l’alimentatore.
Se la PK-9 è alimentata tramite il connettore PK
OUT
Avete collegato il cavo PK fornito in dotazione al
connettore PK IN dello strumento esterno e al connettore PK OUT della PK-9?
→ Per favore consultate “Collegare la PK-9 ad uno
strumento esterno con il suo cavo PK” a p. 65.
Avete acceso lo strumento esterno?
→ Accendete lo strumento esterno. Quando è colle-
gata via cavo PK, la PK-9 si accende/spegne
insieme allo strumento esterno.
■
Il pedale esterno o l’interruttore a pedale non
funziona correttamente
Il pedale esterno o l’interruttore a pedale sono collegati correttamente?
→ Per favore controllate i collegamenti. Vedi “Colle-
gare alla PK-9 un pedale esterno o un interruttore
a pedale opzionali” a p. 67.
State usando un pedale di espressione della serie EV o
un interruttore a pedale Roland serie DP o BOSS FS5U?
→ Utilizzate solo un pedale di espressione (Roland
serie EV, venduto separatamente) o un interruttore a pedale (Roland serie DP, BOSS FS-5U) specifico. Collegando un altro pedale di espressione o
interruttore a pedale, potete provocare malfunzionamenti e/o danni alla pedaliera.
Al parametro “Pedal Assign” avete assegnato una
funzione che è supportata dallo strumento ricevente?
→ Per favore consultate “Pedal Assign” a p. 70 ed il
manuale di istruzioni dello strumento MIDI
esterno.
Avete collegato correttamente il cavo MIDI?
→ Per favore consultate “Collegare la PK-9 ad uno
strumento MIDI esterno” a p. 66.
ITALIANO ITALIANO ITALIANO ITALIANO ITALIANO ITALIANO
■
Nessun suono
Il canale MIDI dello strumento esterno corrisponde al
canale MIDI della PK-9?
→ Quando collegate uno strumento MIDI esterno,
dovete far corrispondere il canale MIDI della PK-9
con il canale MIDI impostato per lo strumento col-
legato. Per come impostare il canale di trasmis-
sione della PK-9 consultate “MIDI Transmit Chan-
nel” a p. 69.
■
I suoni non suonano correttamente.
Verificate se la funzione Octave è impostata correttamente oppure no (pagina 69).
73
Page 74

Pedaliera MIDI PK-9
Appendice
Caratteristiche Tecniche
Roland PK-9 Pedaliera MIDI
Pedaliera: 20 pedali sensibili alla dinamica (velocity)
Funzioni: Hold
Octaver Bass On/Off, Valore Octaver
Portamento On/Off, Portamento Time
Transpose
Octave
Poly/Mono
Velocity on/off (valore fisso programmabile)
Tocco della Tastiera (Light, Medium, Heavy)
Assegnazione pedale esterno
MIDI Merge
Controlli: Pedale di espressione
Interruttore sinistro del pedale, Interruttore destro del pedale (a sinistra e a destra del
pedale di espressione)
Pedale CONTROL 1
Pedale CONTROL 2
Pedale Hold (sustain)
Interruttore POWER
Connettori: Connettore EXTERNAL PEDAL (Interruttore/Espressione, programmabile)
Connettore PK OUT
Connettori MIDI (IN, OUT, THRU)
Connettore DC IN
Alimentazione: Alimentatore (PSB-1U)
Tramite cavo PK
Assorbimento di corrente: 130 mA (DC 9 V)
Dimensioni: 905 (L) x 456 (P) x 273 (A) mm
Peso: 13,4kg
Accessori: Manuale di Istruzioni
Alimentatore (PSB-1U)
Cavo PK
Cavo MIDI
2 piedini in gomma extra (di scorta)
Opzioni: Interruttore a pedale serie DP/BOSS FS-5U, Pedale di espressione Roland serie EV
Nota
Per eventuali migliorie al prodotto, le caratteristiche tecniche e/o l’aspetto di questo strumento potrebbero subire modifiche senza preavviso.
r
74
Page 75

r
Copyright © 2012 ROLAND EUROPE. Todos los derechos reservados. Ninguna parte de esta publicación podrá reproducirse de ninguna forma sin el permiso escrito de Roland Europe
S.p.a.. Roland y GS son marcas comerciales registradas o marcas comerciales de Roland Corporation en los Estados Unidos y/o en otros países.
Manual del Usuario
Gracias y enhorabuena por adquirir la Pedalera MIDI Roland PK-9 .
Además de la pedalera, que mejora considerablemente la experiencia de tocar el órgano, el PK-9 también cuenta con un
pedal de expresión que transfiere a las interpretaciones una expresión de volumen precisa y dinámica, dos conmutadores de
pedal que permiten el control mediante pedal de una amplia variedad de funciones de órgano de Roland y un pedal hold
para sostener las notas.
Características
•Fácil de utilizar y de configurar, gracias a su pantalla.
• Pedalera de 20 notas y pedal de expresión extraíble
El PK-9 dispone de una pedalera de veinte notas para conseguir una fantástica interpretación de órgano. El pedal de expresión integrado puede extraerse para que el equipo sea más fácil de transportar.
• Dos conmutadores de pedal en los laterales del pedal de expresión.
Puede asignar distintas funciones a estos conmutadores de pedal para controlar varios aspectos, como por ejemplo, las velocidades lenta y rápida del efecto Rotary, la velocidad Rotary Break y el Portamento.
• Dos pedales CONTROL en el panel superior.
Puede asignar a estos pedales cualquier función que desee controlar en el instrumento conectado (“Octaver Bass”, “Portamento”, el modo monofónico, etc.).
• Pedal Hold
El pedal Hold se encuentra en una posición de fácil acceso con el pie derecho, que añade todavía más posibilidades expresivas al tocar sonidos tipo sostenidos.
•Intervalo de transposición ajustable, octava y canal MIDI.
El modo “Parameter” del PK-9 permite transponer la pedalera, para seleccionar una octava diferente, que coincida con el
ajuste del canal MIDI de otro equipo.
• Puede decidir controlar parámetros como la expresión, la frecuencia de corte de filtro, la resonancia etc., con un conmutador
de pedal externo (jack EXTERNAL PEDAL), conectando una pedalera opcional (serie DP de Roland), un conmutador de pedal
opcional (serie BOSS FS-5U de Roland) o un pedal de expresión opcional (EV-5 de Roland).
•La función MIDI Merge (MIDI IN a MIDI OUT) combina los mensajes MIDI que el PK-9 recibe de un dispositivo MIDI externo
con los que usted genere tocándolo y transmitiendo todos los datos MIDI a un dispositivo MIDI de recepción.
• Conexión a un órgano de Roland mediante un solo cable (AT-350C, AT-900C, C-200, etc.)
Al conectar el PK-9 a un órgano de Roland (equipado con un zócalo PK-IN), el cable PK es la única conexión requerida (no se
necesitan cables MIDI, cables analógicos, ni adaptador de CA). Esto facilita y agiliza la configuración.
ESPAÑOL ESPAÑOL ESPAÑOL ESPAÑOL ESPAÑOL ESPAÑOL
Las explicaciones de este manual incluyen ilustraciones en las que aparece lo que se debería visualizar en la pantalla. Sin
embargo, tenga en cuenta que es posible que el equipo incorpore una versión mejorada del sistema (por ejemplo, que incluya
nuevos sonidos), por lo que es posible que lo que aparezca en la pantalla no siempre coincida con lo que se muestra en este
manual.
Antes de utilizar este instrumento, lea con atención las secciones tituladas “Utilizar el equipo de forma segura” en la pág. 76 y “Notas
importantes” en la pág. 78. Dichas secciones ofrecen información referente al funcionamiento correcto del PK-9. Además, para familiarizarse con todas las funciones que ofrece este nuevo equipo, lea con atención y por completo este manual. Guarde este manual y téngalo a mano para futuras consultas.
Page 76

Pedal MIDI dinámico PK-6
Utilizar el equipo de forma segura
ATENCIÓN ATENCIÓN
No desmonte ni modifique el equipo usted mismo
• No abra (ni modifique de ningún modo) el equipo o el
adaptador de CA.
.................................................................................................
No repare ni sustituya las piezas usted
mismo
• No intente reparar el equipo ni reemplazar sus elementos
internos (excepto donde el manual lo indique específicamente). Para cualquier reparación, contacte con el establecimiento
donde adquirió el equipo, el Centro de Servicio Roland más cercano, o un distribuidor Roland autorizado, que aparecen listados
en la página “Information”.
.................................................................................................
No use este equipo en sitios que estén
• Sujeto a temperaturas extremas (por ejemplo, bajo la
luz directa del sol dentro de un vehículo cerrado, cerca
de calefactores o encima de aparatos generadores de
calor); ni
• En lugares húmedos (por ejemplo, baños, servicios, suelos moja-
dos); ni
• Expuesto a vapor o humo; ni
• En lugares expuestos a ambientes salinos; ni
• En lugares húmedos; ni
• Expuesto a la lluvia; ni
• En lugares con polvo o arena; ni
• En lugares sujetos a altos niveles de vibración e inestabilidad.
.................................................................................................
No lo sitúe en una ubicación inestable
• Coloque siempre el equipo en posición horizontal y sobre
una superficie estable. No lo coloque nunca sobre soportes que puedan tambalearse ni sobre superficies inclinadas.
.................................................................................................
Utilice sólo el adaptador incluido y el voltaje correcto
• Utilice sólo el adaptador de CA PSB-1U incluido con el PK-9 y
compruebe que el voltaje de línea de la instalación coincide con el
voltaje de entrada especificado en la unidad del adaptador de CA.
Es posible que otros adaptadores de CA utilicen polaridades diferentes, o que estén diseñados para un voltaje distinto, de modo
que al utilizarlos podría causar daños, un funcionamiento anómalo, o descargas eléctricas.
r
.................................................................................................
Use sólo el cable de alimentación del
adaptador de CA PSB-1U
• Utilice sólo el cable de alimentación incluido PSB-1U.
Además, el cable de alimentación incluido no debería utilizarse en otros dispositivos.
................................................................................................
No doble el cable de alimentación ni coloque
objetos pesados sobre el mismo
• No doble ni retuerza excesivamente el cable de alimentación, ni coloque objetos pesados encima de él. Podría
dañar el cable y causar desperfectos y cortocircuitos. ¡Un
cable dañado puede provocar incendios y descargas eléctricas!
................................................................................................
No permita que penetren en el equipo ningún objeto ni ningún tipo de líquidos; no
coloque nunca encima del equipo ningún
recipiente con líquido
• No deje que entren objetos extraños (p.ej., objetos inflamables, monedas, alambres) ni líquidos (p.ej., agua o
zumo) en este producto. Si lo hiciera podrían producirse
cortocircuitos, funcionamientos defectuosos u otro tipo de operaciones erróneas.
................................................................................................
Desactive el equipo si se producen irregularidades o un funcionamiento incorrecto
• Desactive el equipo inmediatamente, extraiga el adaptador de CA de la toma y solicite asistencia al establecimiento donde adquirió el equipo, al Centro de Servicio
Roland más cercano o a un distribuidor Roland autorizado, que aparecen listados en la página “Information”,
en caso de que:
•El adaptador de CA, el cable de alimentación o el
conector se hayan dañado; o
•El equipo emita humo o un olor extraño
• Haya penetrado algún objeto o algún líquido dentro del equipo;
o
•El equipo se haya expuesto a la lluvia (o se haya mojado de otra
forma); o
•El equipo no funcione con normalidad o muestre un cambio
significativo en su funcionamiento.
................................................................................................
76
Page 77

ATENCIÓN
ATENCIÓN
Un adulto debe supervisar siempre el uso
del equipo en lugares concurridos por
niños
•Si utiliza el equipo en lugares donde suela haber niños,
asegúrese de que no puedan hacer un mal uso del
equipo. Debería haber siempre un adulto para supervisar
el uso y ayudar.
.................................................................................................
No lo deje caer ni lo someta a impactos
fuertes
• Evite que el equipo sufra golpes fuertes.
(¡No lo deje caer!)
.................................................................................................
No comparta una toma de corriente con
un número elevado de dispositivos
• No conecte el equipo a una toma de corriente donde
haya conectados un número excesivo de dispositivos.
Tenga un cuidado especial cuando utilice cables alargadores; el consumo total de todos los dispositivos conectados a la toma de corriente del alargador no debe sobrepasar la capacidad (vatios/amperios) de la misma. Una
carga excesiva puede provocar un sobrecalentamiento
del aislamiento del cable, el cual incluso puede llegar a
fundirse.
.................................................................................................
No lo utilice en el extranjero
• Antes de utilizar el equipo en un país extranjero, consulte
con la tienda donde adquirió el equipo, con el Centro de
Servicio Roland más cercano, o con un distribuidor
Roland autorizado, que aparecen listados en la página “Information”.
.................................................................................................
Pedal MIDI dinámico PK-6
Utilizar el equipo de forma segura
r
Colóquelo en un lugar bien ventilado
• Coloque el equipo y el adaptador de CA sin obstruir su
ventilación.
................................................................................................
Sujete el conector al conectar o desconectar el adaptador de CA
• Sujete siempre el conector del adaptador de CA al conectarlo o al desconectarlo de una toma de corriente o del
equipo.
................................................................................................
Limpie periódicamente el conector del
adaptador de CA
• De vez en cuando, debería desconectar el adaptador de CA y limpiarlo utilizando un paño seco para eliminar el polvo y otras acumulaciones de las clavijas. Si no va a utilizar el equipo durante un
largo periodo de tiempo, desconecte el conector de alimentación
de la toma de corriente. Si se acumula suciedad entre el conector y
la toma de corriente se puede debilitar el aislamiento y provocar
un incendio.
................................................................................................
Organice los cables de forma segura
• No deje que los cables se enreden. Además, todos los
cables deben colocarse fuera del alcance de los niños.
................................................................................................
No se suba nunca sobre el equipo ni coloque objetos pesados encima del mismo
• No se suba nunca sobre el equipo, ni deposite objetos
pesados sobre el mismo.
................................................................................................
No conecte ni desconecte el adaptador de
CA con las manos mojadas
• Nunca debe manipular el adaptador de CA ni sus conectores con las manos mojadas al conectarlos o desconectarlos de la toma de corriente o del equipo.
................................................................................................
Desconecte todos los cables antes de
mover el equipo
• Antes de mover el equipo, desconecte el adaptador de CA
y todos los cables de los dispositivos externos.
ESPAÑOL ESPAÑOL ESPAÑOL ESPAÑOL ESPAÑOL ESPAÑOL
................................................................................................
Desconecte el adaptador de CA de la toma
de corriente antes de limpiar el equipo
• Antes de limpiar el equipo, desactívelo y desconecte el
adaptador de CA de la toma de corriente (página 83).
................................................................................................
En caso de tormenta eléctrica, desconecte
el adaptador de CA de la toma de corriente
•Si existe el riesgo de una tormenta eléctrica en la zona,
desconecte el adaptador de CA de la toma de corriente.
................................................................................................
Mantenga los elementos pequeños fuera
del alcance de los niños
• Para evitar que los niños puedan ingerir accidentalmente
las piezas listadas a continuación, guárdelas siempre
fuera de su alcance.
• Partes incluidas: Tacos de goma adicionales (de recambio).
• Partes extraíbles: tornillos con pomo (página 82).
................................................................................................
77
Page 78

Pedal MIDI dinámico PK-6
Notas importantes
1. Notas importantes
Además de los puntos indicados en la sección “Utilizar el equipo de forma segura” en la pág. 76, lea y tenga en cuenta lo
siguiente:
Alimentación
• No conecte este equipo a la misma toma de corriente que esté utilizando un dispositivo eléctrico controlado por un inversor (como
por ejemplo, una nevera, una lavadora, un microondas o un aparato de aire acondicionado), o que contenga un motor. Según la
forma en que se utiliza el dispositivo eléctrico, las interferencias de
la fuente de alimentación pueden dañar el equipo o producir
interferencias audibles. Si no resulta práctico utilizar una toma de
corriente distinta, conecte un filtro para las interferencias de la
fuente de alimentación entre este equipo y la toma de corriente.
•El adaptador de CA empezará a generar calor después de unas
horas de uso continuado. Es normal y no es motivo de preocupación.
• Para evitar un funcionamiento anómalo o un fallo del equipo, desactive siempre todos los dispositivos antes de realizar ninguna
conexión.
• Con los ajustes originales, el PK-9 se desactivará automáticamente
si pasan 240 minutos (4 horas) sin que toque ni utilice el equipo. Si
no desea que el equipo se desactive automáticamente, cambie el
ajuste “Auto Off” a “Off”, tal y como se describe en p. 89.
Nota: Los ajustes editados se perderán al desactivar el
equipo. Si desea conservar los ajustes, debe guardarlos antes
de desactivar el equipo.
Ubicación
• Este dispositivo puede producir interferencias en la recepción de
televisión y radio. No lo utilice cerca de este tipo de receptores.
• Es posible que se produzcan interferencias si se utilizan dispositivos de comunicación inalámbrica, como teléfonos móviles, cerca
de este equipo. Estas interferencias podrían producirse al recibir o
iniciar una llamada, o durante la conversación. Si percibe este tipo
de problemas, coloque los dispositivos inalámbricos a mayor distancia del equipo o desactívelos.
• No exponga el equipo a la luz solar directa, ni lo coloque cerca de
dispositivos que desprendan calor, ni lo deje dentro de un vehículo
cerrado, ni lo someta a temperaturas extremas. El calor excesivo
puede deformar o decolorar el equipo.
•Si traslada el equipo de una ubicación a otra donde la temperatura
y/o la humedad sean muy diferentes, podrían formarse gotas de
agua (condensación) dentro del PK-9. Si intenta utilizar el equipo
en estas circunstancias, podría causar daños o un funcionamiento
incorrecto. Por lo tanto, antes de utilizar el equipo, déjelo reposar
durante varias horas hasta que la condensación se haya evaporado
por completo.
• No deje objetos encima del teclado. Esto podría causar un funcionamiento incorrecto, como por ejemplo que las teclas dejaran de
sonar.
• Según el material y la temperatura de la superficie en la que ponga
el equipo, es posible que los tacos de goma decoloren o estropeen
la superficie.
Para evitarlo, puede colocar un trozo de fieltro o ropa debajo de
los tacos de goma. Si lo hace, asegúrese de que el equipo no pueda
deslizarse ni moverse accidentalmente.
• No ponga nada que contenga agua (por ejemplo, floreros) sobre el
PK-9. Evite también el uso de insecticidas, perfumes, alcohol, laca
de uñas, aerosoles, etc., cerca del equipo. Limpie rápidamente cualquier líquido que se vierta sobre el equipo utilizando un paño seco
y suave.
Mantenimiento
• En la limpieza cotidiana del equipo, utilice un paño suave y seco o
ligeramente humedecido en agua. Para eliminar la suciedad adherida, utilice una gamuza impregnada con un detergente suave y no
abrasivo. Después, asegúrese de limpiar concienzudamente el
equipo con un paño seco y suave.
• No utilice nunca bencina, diluyentes, alcohol ni disolventes de ningún tipo, para evitar la posibilidad de deformación y/o decoloración.
Reparaciones y datos
• Tenga en cuenta que todos los datos contenidos en la memoria del
equipo pueden perderse al enviarlo para una reparación. La información importante debe guardarse siempre en otro dispositivo
MIDI (por ejemplo, un secuenciador) o escribirse en un papel
(cuando sea posible). Durante las reparaciones, se toman las precauciones necesarias para evitar la pérdida de datos. No obstante,
en ciertos casos (como cuando los circuitos relacionados con la
propia memoria no funcionan), no será posible recuperar la información, y Roland no asumirá ninguna responsabilidad concerniente a la pérdida de memoria.
Precauciones adicionales
• Tenga en cuenta que el contenido de la memoria se puede perder
irreparablemente como resultado de un funcionamiento incorrecto o de la utilización inadecuada del equipo. Para evitar el
riesgo de perder información importante, recomendamos que realice periódicamente una copia de seguridad de la información
importante guardada en la memoria del equipo, en otro equipo
MIDI (por ejemplo, un secuenciador).
• Lamentablemente, puede que resulte imposible recuperar los datos
guardados en la memoria del equipo una vez perdidos. Roland
Corporation no asume ninguna responsabilidad por estas pérdidas
de datos.
• Utilice con cuidado los botones del PK-9 así como el resto de controles y conectores/jacks. Un uso poco cuidadoso puede provocar
funcionamientos incorrectos.
• No golpee la pantalla ni la presione con fuerza.
• Cuando conecte y desconecte los cables, tire del conector, nunca
del cable. De este modo evitará cortocircuitos o daños en los elementos internos del cable.
• Para no molestar a los que se encuentran cerca, trate de mantener
el volumen del equipo a unos niveles razonables.
•El sonido que se produce al pisar los pedales y las vibraciones producidas al tocar un instrumento se puede transmitir al suelo o a
las paredes, de forma inesperada. Procure no molestar a los demás.
• Cuando necesite transportar el equipo, guárdelo en la caja original
(incluyendo las protecciones), siempre que sea posible. En caso de
no ser posible, utilice otros materiales de embalaje equivalentes.
• Utilice sólo el pedal de expresión (serie EV de Roland, se vende por
separado), o el conmutador de pedal (serie DP de Roland, BOSS
FS-5U) especificados. Si conecta cualquier otro pedal de expresión
o conmutador de pedal, corre el riesgo de provocar un funcionamiento incorrecto del equipo o averiarlo.
•Al utilizar los pedales, tenga cuidado de no pillarse los dedos entre
la parte móvil y el panel. En lugares concurridos por niños pequeños, asegúrese de que un adulto ofrezca supervisión y guía.
r
78
Page 79

Pedal MIDI dinámico PK-6
Notas importantes
r
Contenido
1. Notas importantes . . . . . . . . . . . . . . . . . . . . . . . . . . . . . . . . . . . . . . . . . . . . . . . . . . . . . . . . . . . . . . . . .78
2. Descripciones del panel. . . . . . . . . . . . . . . . . . . . . . . . . . . . . . . . . . . . . . . . . . . . . . . . . . . . . . . . . . . . .80
Panel frontal . . . . . . . . . . . . . . . . . . . . . . . . . . . . . . . . . . . . . . . . . . . . . . . . . . . . . . . . . . . . . . . . . . . . . . . . . . .80
Panel posterior. . . . . . . . . . . . . . . . . . . . . . . . . . . . . . . . . . . . . . . . . . . . . . . . . . . . . . . . . . . . . . . . . . . . . . . . . .81
3. Pasos previos al uso del PK-9 . . . . . . . . . . . . . . . . . . . . . . . . . . . . . . . . . . . . . . . . . . . . . . . . . . . . . . . .82
Instalar el pedal de expresión . . . . . . . . . . . . . . . . . . . . . . . . . . . . . . . . . . . . . . . . . . . . . . . . . . . . . . . . . . . . .82
Conectar el PK-9 a un instrumento externo con el cable PK . . . . . . . . . . . . . . . . . . . . . . . . . . . . . . . . . .83
Conectar el adaptador de CA incluido. . . . . . . . . . . . . . . . . . . . . . . . . . . . . . . . . . . . . . . . . . . . . . . . . . . . . .83
Conectar el PK-9 a un dispositivo MIDI externo . . . . . . . . . . . . . . . . . . . . . . . . . . . . . . . . . . . . . . . . . . . . .84
Utilizar el PK-9 y un controlador de teclado MIDI . . . . . . . . . . . . . . . . . . . . . . . . . . . . . . . . . . . . . . . . . . .84
Conectar un pedal externo o un conmutador de pedal opcional al PK-9. . . . . . . . . . . . . . . . . . . . . . . .85
4. Modo Parameter . . . . . . . . . . . . . . . . . . . . . . . . . . . . . . . . . . . . . . . . . . . . . . . . . . . . . . . . . . . . . . . . . .86
Operaciones básicas en el modo Parameter . . . . . . . . . . . . . . . . . . . . . . . . . . . . . . . . . . . . . . . . . . . . . . . . .86
Guardar los ajustes (función Save). . . . . . . . . . . . . . . . . . . . . . . . . . . . . . . . . . . . . . . . . . . . . . . . . . . . . . . . .86
Ajustes ‘Parameter’ . . . . . . . . . . . . . . . . . . . . . . . . . . . . . . . . . . . . . . . . . . . . . . . . . . . . . . . . . . . . . . . . . . . . . .87
Transpose. . . . . . . . . . . . . . . . . . . . . . . . . . . . . . . . . . . . . . . . . . . . . . . . . . . . . . . . . . . . . . . . . . . . . . . . . . . . . . . . . . . . . 87
Octave . . . . . . . . . . . . . . . . . . . . . . . . . . . . . . . . . . . . . . . . . . . . . . . . . . . . . . . . . . . . . . . . . . . . . . . . . . . . . . . . . . . . . . . 87
MIDI Transmit Channel . . . . . . . . . . . . . . . . . . . . . . . . . . . . . . . . . . . . . . . . . . . . . . . . . . . . . . . . . . . . . . . . . . . . . . . . . 87
CONTROL 1 Assign . . . . . . . . . . . . . . . . . . . . . . . . . . . . . . . . . . . . . . . . . . . . . . . . . . . . . . . . . . . . . . . . . . . . . . . . . . . . . 87
CONTROL 2 Assign . . . . . . . . . . . . . . . . . . . . . . . . . . . . . . . . . . . . . . . . . . . . . . . . . . . . . . . . . . . . . . . . . . . . . . . . . . . . . 87
Foot Switch Left Assign. . . . . . . . . . . . . . . . . . . . . . . . . . . . . . . . . . . . . . . . . . . . . . . . . . . . . . . . . . . . . . . . . . . . . . . . . 87
Foot Switch Right Assign . . . . . . . . . . . . . . . . . . . . . . . . . . . . . . . . . . . . . . . . . . . . . . . . . . . . . . . . . . . . . . . . . . . . . . . 88
Retrigger . . . . . . . . . . . . . . . . . . . . . . . . . . . . . . . . . . . . . . . . . . . . . . . . . . . . . . . . . . . . . . . . . . . . . . . . . . . . . . . . . . . . . 88
Velocity . . . . . . . . . . . . . . . . . . . . . . . . . . . . . . . . . . . . . . . . . . . . . . . . . . . . . . . . . . . . . . . . . . . . . . . . . . . . . . . . . . . . . . 88
Touch (curva de velocidad). . . . . . . . . . . . . . . . . . . . . . . . . . . . . . . . . . . . . . . . . . . . . . . . . . . . . . . . . . . . . . . . . . . . . . 88
Portamento Time . . . . . . . . . . . . . . . . . . . . . . . . . . . . . . . . . . . . . . . . . . . . . . . . . . . . . . . . . . . . . . . . . . . . . . . . . . . . . . 88
Octaver value . . . . . . . . . . . . . . . . . . . . . . . . . . . . . . . . . . . . . . . . . . . . . . . . . . . . . . . . . . . . . . . . . . . . . . . . . . . . . . . . . 88
Pedal Assign . . . . . . . . . . . . . . . . . . . . . . . . . . . . . . . . . . . . . . . . . . . . . . . . . . . . . . . . . . . . . . . . . . . . . . . . . . . . . . . . . . 89
Auto Off. . . . . . . . . . . . . . . . . . . . . . . . . . . . . . . . . . . . . . . . . . . . . . . . . . . . . . . . . . . . . . . . . . . . . . . . . . . . . . . . . . . . . . 89
Factory Reset . . . . . . . . . . . . . . . . . . . . . . . . . . . . . . . . . . . . . . . . . . . . . . . . . . . . . . . . . . . . . . . . . . . . . . . . . . . . . . . . . 89
MIDI Dump . . . . . . . . . . . . . . . . . . . . . . . . . . . . . . . . . . . . . . . . . . . . . . . . . . . . . . . . . . . . . . . . . . . . . . . . . . . . . . . . . . . 89
Save . . . . . . . . . . . . . . . . . . . . . . . . . . . . . . . . . . . . . . . . . . . . . . . . . . . . . . . . . . . . . . . . . . . . . . . . . . . . . . . . . . . . . . . . . 89
Restaurar los ajustes originales (Factory Reset). . . . . . . . . . . . . . . . . . . . . . . . . . . . . . . . . . . . . . . . . . . . . .89
Archivar y restaurar los ajustes (MIDI Dump). . . . . . . . . . . . . . . . . . . . . . . . . . . . . . . . . . . . . . . . . . . . . . . .89
Prepararse para archivar/restaurar . . . . . . . . . . . . . . . . . . . . . . . . . . . . . . . . . . . . . . . . . . . . . . . . . . . . . . . . . . . . . . . . 89
Archivar los ajustes en el secuenciador externo . . . . . . . . . . . . . . . . . . . . . . . . . . . . . . . . . . . . . . . . . . . . . . . . . . . . . 89
Volver a transmitir los ajustes al PK-9. . . . . . . . . . . . . . . . . . . . . . . . . . . . . . . . . . . . . . . . . . . . . . . . . . . . . . . . . . . . . . 90
5. Apéndice . . . . . . . . . . . . . . . . . . . . . . . . . . . . . . . . . . . . . . . . . . . . . . . . . . . . . . . . . . . . . . . . . . . . . . . . .91
Solucionar problemas. . . . . . . . . . . . . . . . . . . . . . . . . . . . . . . . . . . . . . . . . . . . . . . . . . . . . . . . . . . . . . . . . . . .91
Especificaciones. . . . . . . . . . . . . . . . . . . . . . . . . . . . . . . . . . . . . . . . . . . . . . . . . . . . . . . . . . . . . . . . . . . . . . . . .92
ESPAÑOL ESPAÑOL ESPAÑOL ESPAÑOL ESPAÑOL ESPAÑOL
79
Page 80

Pedal MIDI dinámico PK-6
Descripciones del panel
2. Descripciones del panel
Panel frontal
A
A
Pantalla
Esta pantalla de tres caracteres le mantiene informado sobre la función actual, o el valor del parámetro que ha ajustado.
B
Pedales CONTROL 1 y CONTROL 2
Estos pedales le permiten controlar el dispositivo
conectado a través de MIDI. Sus funciones se pueden
ajustar en el modo Parameter (página 86). Por
defecto, el pedal CONTROL 1 transmite mensajes de
cambio de control CC16, mientras que CONTROL 2
transmite mensajes CC17.
Al pisar estos pedales simultáneamente, se recupera
el modo Parameter (página 86).
C
Pedal de expresión
Cuando el pedal avance, aumentará el volumen y
cuando el pedal vuelva hacia usted, disminuirá. Para
más información sobre su montaje, consulte la
página 82.
D
C
D
B
D
Conmutadores de pedal
Los dos conmutadores de pedal a cada lado del pedal
de expresión permiten controlar el dispositivo conectado. Por defecto, el conmutador de pedal izquierdo
transmite mensajes CC18, mientras que el derecho
transmite mensajes CC19.
Las funciones de estos conmutadores de pedal se
pueden cambiar en el modo Parameter.
E
Pedal Hold
Al pisar este pedal, es posible sostener las notas que
está tocando, incluso después de soltar el pedal MIDI
en cuestión. Cuando el PK-9 se encuentra en el modo
Parameter, este pedal se utiliza para confirmar los
ajustes.
E
r
80
Page 81

Pedal MIDI dinámico PK-6
r
Panel posterior
Panel posterior
A
Zócalo EXTERNAL PEDAL
Permite conectar una pedalera opcional (serie DP de
Roland), un conmutador de pedal opcional (BOSS
FS-5U) u otro pedal de expresión (opcional) (Roland
EV-5). Para más detalles sobre cómo asignar la función deseada al pedal o al conmutador de pedal, consulte la página 89.
B
Conector PK OUT
Utilice el cable PK incluido con el PK-9 para conectar
este zócalo al zócalo PK IN de un instrumento
externo (página 83).
C
Conectores MIDI
Permiten conectar el PK-9 a dispositivos MIDI externos (página 84).
A
E
D
C
B
D
Jack DC IN
Permite conectar el adaptador de CA incluido
(página 83).
E
Conmutador POWER
Activa y desactiva el equipo (página 84).
Con los ajustes originales, el PK-9 se desactivará
automáticamente si pasan 240 minutos (4 horas)
sin que toque ni utilice el PK-9.
Si el PK-9 se ha desactivado automáticamente, puede
utilizar el conmutador [POWER] para volver a activarlo.
Si no desea que el equipo se desactive automáticamente, cambie el ajuste “Auto Off” a “OFF”
(página 89).
ESPAÑOL ESPAÑOL ESPAÑOL ESPAÑOL ESPAÑOL ESPAÑOL
81
Page 82

Pedal MIDI dinámico PK-6
Pasos previos al uso del PK-9
3. Pasos previos al uso del PK-9
Instalar el pedal de expresión
El PK-9 se entrega con el pedal de expresión extraído. Antes de conectar el PK-9 a un dispositivo externo, instale el pedal
de expresión.
Nota
Al instalar o extraer el pedal de expresión, procure no pisar ningún tornillo con pomo. Al retirar los tornillos con pomo, para evitar la
ingestión accidental, siempre manténgalos fuera del alcance de los niños.
Para evitar un funcionamiento anómalo y/o causar daños en otros dispositivos, desactive siempre todos los dispositivos antes de realizar
ninguna conexión.
1.
Afloje el tornillo con pomo del panel posterior del PK-9.
Tornillo con pomo del
panel posterior
4.
Utilice los dos tornillos con pomo incluidos
para sujetar el pedal de expresión, asegurándose de que los orificios de los tornillos
estén alineados.
Tornillos con pomo inclui-
dos (dos posiciones)
2.
Conecte el cable del pedal de expresión al
conector de la parte superior del PK-9.
3.
Coloque el pedal de expresión en el PK-9,
procurando no pinzar el cable.
5.
Vuelva a apretar el tornillo con pomo del
panel posterior.
Nota
El conector de la parte superior del PK-9 está diseñado para
conectar sólo el pedal de expresión incluido. Si conecta
cualquier otro dispositivo que no sea el pedal de expresión
del PK-9, puede provocar un funcionamiento incorrecto.
r
82
Page 83

Pedal MIDI dinámico PK-6
Al conector DC IN del PK-9
Adaptador de CA
Cable de alimentación
A una toma de CA
Indicador
Conectar el PK-9 a un instrumento externo con el cable PK
r
Conectar el PK-9 a un instrumento
externo con el cable PK
Utilice el cable PK suministrado con el PK-9 para conectar el instrumento externo y el PK-9. Con este sistema
de conexión, el instrumento externo suministrará alimentación al PK-9 (con lo cual no será necesario utilizar
el adaptador de CA incluido).
El PK-9 se activará y se desactivará según el conmutador
de alimentación del instrumento externo, independientemente de la posición del conmutador de alimentación
del propio PK-9.
AT-350C
(Otros instrumentos compatibles: Roland AT-900C,
C-200, etc.)
Nota
Para evitar funcionamientos incorrectos y fallos de los
equipos, baje siempre el volumen y desactive todas las unidades antes de realizar cualquier conexión.
Nota
Este equipo incorpora un circuito de protección. Se
requiere un breve espacio de tiempo (unos segundos) después de activar el equipo para que funcione con total normalidad.
Conectar el adaptador de CA incluido
El PK-9 puede activarse utilizando el adaptador PSB-1U
incluido.
Nota
Asegúrese de utilizar únicamente el adaptador de CA incluido
con el PK-9. Además, compruebe que el voltaje de línea en la
instalación coincide con el voltaje de entrada que se especifica
en la carcasa del adaptador de CA. Es posible que otros adaptadores de CA utilicen polaridades diferentes, o que estén diseñados para un voltaje distinto, de modo que al utilizarlos
podría causar daños, un funcionamiento anómalo, o descargas
eléctricas.
ESPAÑOL ESPAÑOL ESPAÑOL ESPAÑOL ESPAÑOL ESPAÑOL
PK OUT
1.
Asegúrese de que el instrumento externo
está desactivado y de que el volumen está al
mínimo.
2.
Utilice el cable PK suministrado con el PK-9
para conectar el conector PK IN del instrumento externo al conector PK OUT del PK-9.
Una vez todo esté correctamente conectado, asegúrese de seguir el procedimiento siguiente para activar
los dispositivos. Si los activa en un orden incorrecto,
puede provocar un funcionamiento anómalo o fallos
de los dispositivos.
3.
Active el instrumento externo y ajuste el
volumen, tal y como se explica en su manual
del usuario.
4.
Compruebe si el PK-9 también está activado.
5.
Toque la pedalera. Si oye la parte de pedal
del instrumento externo, las conexiones se
han completado correctamente.
Nota
Para evitar un funcionamiento anómalo y/o causar daños en
los altavoces u otros dispositivos, baje el volumen, y desactive
todos los dispositivos antes de realizar ninguna conexión.
1.
Conecte el cable de alimentación al adaptador de CA.
Coloque el adaptador de CA de forma que la parte del
indicador quede boca arriba y la parte de la información textual quede boca abajo.
El indicador se iluminará cuando conecte el adaptador de CA a una toma de corriente.
2.
Conecte el adaptador de CA al zócalo DC IN
del PK-9.
Nota
Si la parte de pedal del instrumento externo suena en una
octava incorrecta, puede transponer los número de nota
que transmite el PK-9 (see “Octave” on p. 87).
A una toma de corriente
83
Page 84

Pedal MIDI dinámico PK-6
Pasos previos al uso del PK-9
3.
Conecte el cable de alimentación a una toma
de corriente.
Conectar el PK-9 a un dispositivo
MIDI externo
Puede utilizar el PK-9 como un controlador MIDI para
un generador de tonos MIDI.
1.
Asegúrese de que el dispositivo MIDI
externo está desactivado y de que el volumen está al mínimo.
Nota
Para evitar funcionamientos incorrectos y fallos de los
equipos, baje siempre el volumen y desactive todas las unidades antes de realizar cualquier conexión.
2.
Utilice un cable MIDI (disponible en comercios) para conectar el zócalo MIDI OUT del
PK-9 al conector MIDI IN de un dispositivo
externo MIDI.
7.
Ajuste el canal MIDI en el dispositivo MIDI
externo para que coincida con el canal ajustado para el PK-9.
8.
Toque la pedalera del PK-9.
Si el instrumento externo reproduce las notas, las
conexiones se han completado correctamente.
Nota
Este equipo incorpora un circuito de protección. Se
requiere un breve espacio de tiempo (unos segundos) después de activar el equipo para que funcione con total normalidad.
Utilizar el PK-9 y un controlador de
teclado MIDI
También puede controlar un módulo MIDI externo utilizando al mismo tiempo un teclado MIDI y el PK-9.
Esto permite utilizar tanto las manos como los pies para
controlar la misma parte o bien dos partes diferentes del
módulo externo.
1.
Asegúrese de que el dispositivo MIDI
externo está desactivado y de que el volumen está al mínimo.
Cualquier instrumento compatible
con MIDI que disponga de un generador de tonos interno sin conector
PK IN.
3.
Conecte el adaptador PSB-1U al zócalo DC
MIDI IN
MIDI OUT
IN (página 83).
Una vez todo esté correctamente conectado, asegúrese de seguir el procedimiento siguiente para activar
los dispositivos. Si los activa en un orden incorrecto,
puede provocar un funcionamiento anómalo o fallos
de los dispositivos.
4.
Active el dispositivo MIDI externo y ajuste el
volumen, tal y como se explica en su manual
del usuario.
5.
Pulse el conmutador [POWER] del PK-9
situado en el panel posterior.
Nota
Para evitar funcionamientos incorrectos y fallos de los
equipos, baje siempre el volumen y desactive todas las unidades antes de realizar cualquier conexión.
2.
Utilice un cable MIDI (disponible en comercios) para conectar el zócalo MIDI OUT del
PK-9 al conector MIDI IN de un dispositivo
externo MIDI. Utilice otro cable MIDI para
conectar el zócalo MIDI OUT del teclado al
zócalo MIDI IN del PK-9.
MIDI IN
Datos enviados por el PK-9
MIDI OUT
MIDI IN
6.
Ajuste el canal MIDI del PK-9 (página 87).
r
84
Activado Desactivado
Datos enviados por el teclado
MIDI OUT
Page 85

En este caso, los mensajes que recibe el PK-9 a través
del zócalo MIDI IN se mezclan (“fusionan”) con los
mensajes MIDI del PK-9 y se transmiten a través del
zócalo MIDI OUT a un módulo MIDI externo (función
“Soft Thru”).
Nota
La copia exacta de los datos MIDI recibidos a través del
zócalo MIDI IN del PK-9 también se envía desde el zócalo
MIDI THRU. Aunque puede utilizar este ejemplo de
conexión, tenga en cuenta que sólo funciona si el módulo
MIDI dispone de dos zócalos MIDI IN. Por lo tanto, la función de “fusión” suele ser más práctica.
Conectar un pedal externo o un
conmutador de pedal opcional al
PK-9
El PK-9 dispone de un zócalo EXTERNAL PEDAL al que
puede conectar un conmutador de pedal opcional (serie
DP de Roland o BOSS FS-5U) o un pedal de expresión
adicional (serie EV de Roland).
Conectar un pedal externo o un conmutador de pedal opcional al PK-9
Pedal MIDI dinámico PK-6
r
ESPAÑOL ESPAÑOL ESPAÑOL ESPAÑOL ESPAÑOL ESPAÑOL
Conmutador de pedal opcional
(Serie DP de Roland, BOSS
FS-5U)
—o—
Pedal de expresión opcional
(serie EV de Roland)
Si conecta un conmutador de pedal opcional o un
pedal de expresión opcional, puede seleccionar la
función que debe realizar (página 89). Por defecto, el
pedal externo controlará la función “Hold”.
Nota
Utilice sólo el pedal de expresión (serie EV de Roland, se
vende por separado), o el conmutador de pedal (serie DP de
Roland, BOSS FS-5U) especificados. Si conecta cualquier
otro pedal de expresión o conmutador de pedal, corre el
riesgo de provocar un funcionamiento incorrecto de la unidad o averiarla.
Nota
Nunca conecte ni desconecte un conmutador de pedal ni
un pedal de expresión opcional, mientras el PK-9 esté activado. Desactive siempre el PK-9 antes de cambiar la
conexión al zócalo EXTERNAL PEDAL.
85
Page 86

Pedal MIDI dinámico PK-6
Modo Parameter
4. Modo Parameter
El modo Parameter permite definir varios ajustes para este equipo.
Operaciones básicas en el modo
Parameter
Éste es el procedimiento básico para definir ajustes en el
modo Parameter.
1.
Pise simultáneamente los pedales
[CONTROL 1] y [CONTROL 2].
Los indicadores [CONTROL 1] y [CONTROL 2] parpadearán.
El PK-9 se encuentra ahora en modo Parameter. La
abreviatura del primer parámetro (o del último parámetro que haya seleccionado desde que activó el
PK-9) parpadeará.
Guardar los ajustes (función Save)
Cuando desactive el PK-9, volverá a los ajustes predeterminados. Sin embargo, si lo desea, puede guardar los
siguientes ajustes para conservarlos incluso después de
desactivar el equipo.
Ajustes del parámetro guardados Página
Transpose 87
Octave 87
Control 1 Assign 87
Control 2 Assign 87
Foot Switch Left Assign 87
Foot Switch Right Assign 88
Retrigger 88
Velocity 88
Touch 88
Portamento Time 88
Octaver Value 88
Pedal Assign 89
trn
2.
Pise el pedal [CONTROL 1] o [CONTROL 2]
para seleccionar el parámetro deseado.
Para más detalles sobre cada parámetro, consulte
“Ajustes ‘Parameter’” en la pág. 87.
3.
Pise el pedal Hold para confirmar.
La pantalla muestra el valor.
4.
Pise el pedal [CONTROL 1] o [CONTROL 2]
para cambiar el valor.
5.
Pise el pedal Hold para confirmar el valor y
salir del modo Parameter.
Auto Off 89
MIDI Transmit Channel 87
1.
Pise simultáneamente los pedales
[CONTROL 1] y [CONTROL 2].
Los indicadores [CONTROL 1] y [CONTROL 2] parpadearán. El PK-9 se encuentra ahora en modo Parameter.
2.
Pise el pedal [CONTROL 1] o [CONTROL 2]
para seleccionar el parámetro “SAv”.
SAv
3.
Pise el pedal Hold para confirmar.
La pantalla muestra “ok” y el PK-9 sale del modo
Parameter.
r
86
Page 87

Ajustes ‘Parameter’
A continuación encontrará una lista de los parámetros
del PK-9 que puede ajustar.
●
Transpose
Pantalla Valor
–5~6 0
Por defecto
trn
Este parámetro permite transponer la afinación de las
notas de los pedales en intervalos de semitono.
●
Octave
Pantalla Valor
0~8 2
Por defecto
oCt
Este parámetro permite transponer la afinación de las
notas de los pedales en intervalos de una octava.
Pedal MIDI dinámico PK-6
Cuando esta función esté activada, se añadirá una
nota a la nota más baja que toque. Las notas añadidas pueden ser de 1~4 octavas más bajas que la
nota más baja que haya tocado (por defecto, –1).
Consulte “Octaver value” en la pág. 88 para saber
cómo ajustar el valor de la octava.
Por (Portamento): Este pedal permite activar y desactivar la función “Portamento”. Cuando esta función
esté activada, ya no cambia la afinación de las notas
en pasos claramente definidos: producen deslizamientos de una nota a la siguiente. Utilice el parámetro “Portamento Time” (página 88) para especificar la
velocidad a la que se realizan dichos deslizamientos.
Cuanto mayor sea el valor, más lentas serán las transiciones.
Mon (Mono): Este pedal permite activar y desactivar
el modo “Mono”. Este modo permite al PK-9 sonar en
modo monofónico. Esto significa que sólo se transmite un mensaje de nota cada vez. Al activar el
equipo, el PK-9 pasa al modo “Poly”.
●
CONTROL 2 Assign
Pantalla Valor
r
Ajustes ‘Parameter’
Por defecto
ESPAÑOL ESPAÑOL ESPAÑOL ESPAÑOL ESPAÑOL ESPAÑOL
Nota
El ajuste predeterminado “2” significa que el pedal MIDI de
más a la izquierda transmite un “C2” (número de nota MIDI
36).
●
MIDI Transmit Channel
Pantalla Valor
1~16 2
Por defecto
Ch
Este ajuste especifica el canal MIDI en el que transmitirá el PK-9. MIDI utiliza dieciséis “canales MIDI”,
numerados de 1~16. Conectando dispositivos MIDI y
especificando el canal MIDI adecuado para cada dispositivo, puede reproducir y/o seleccionar sonidos en
dichos dispositivos.
●
CONTROL 1 Assign
Pantalla Valor
C16, C17, oCb, Por, Mon C16
Por defecto
Ct1
C16, C17, oCb, Por, Mon C17
Ct2
Este parámetro permite asignar una función al pedal
[CONTROL 2]. Consulte en “CONTROL 1 Assign”, los
ajustes disponibles. Tenga en cuenta, sin embargo,
que el ajuste predeterminado para el pedal
[CONTROL 2] es “C17”.
●
Foot Switch Left Assign
Pantalla Valor
C18, C19, Por C18
Por defecto
S L
Este parámetro permite asignar una función al conmutador de pedal del lado izquierdo del pedal de
expresión.
C18 (cambio de control CC18) o C19 (CC19): El
conmutador de pedal transmite alternativamente el
número de cambio de control seleccionado con el
valor “0” o “127”.
Este parámetro permite asignar una función al pedal
[CONTROL 1]:
C16 (cambio de control CC16) o C17 (CC17): Si
pisa el pedal [CONTROL 1] se transmitirá el número
de cambio de control seleccionado con el valor 0 o
127.
oCb (Octaver Bass): Si pisa [CONTROL 1] activará y
desactivará la función “Octaver Bass”.
Nota
Si conecta el PK-9 a un instrumento de la serie VK de
Roland, el mensaje CC18 controla el parámetro “Rotary
Slow/Fast”, mientras que el mensaje CC19 controla el parámetro “Rotary Break Speed”.
Por (Portamento): Este conmutador de pedal permite activar y desactivar la función “Portamento”.
Cuando esta función esté activada, ya no cambia la
afinación de las notas en pasos claramente definidos:
producen deslizamientos de una nota a la siguiente.
Utilice el parámetro “Portamento Time” (página 88)
87
Page 88

Pedal MIDI dinámico PK-6
tCh
Por
oCv
Modo Parameter
para especificar la velocidad a la que se realizan
dichos deslizamientos. Cuanto mayor sea el valor,
más lentas serán las transiciones.
●
Foot Switch Right Assign
Pantalla Valor
C18, C19, Por C19
Por defecto
S r
Este parámetro permite asignar una función al conmutador de pedal del lado derecho del pedal de
expresión. Consulte en la sección “Foot Switch Left
Assign” una descripción de los ajustes disponibles.
Nota
Si conecta el PK-9 a un instrumento de la serie VK de
Roland, el mensaje CC18 controla el parámetro “Rotary
Slow/Fast”, mientras que el mensaje CC19 controla el parámetro “Rotary Break Speed”.
●
Retrigger
Pantalla Valor
Off, On Off
Por defecto
rEt
Este parámetro sólo está disponible mientras el PK-9
está en modo “Mono”. Para seleccionar este modo,
primero tiene que asignar a la función “Mon” el pedal
[CONTROL 1] o [CONTROL 2] y, a continuación, activar
ese pedal. Consulte también las secciones “CONTROL
1 Assign” y “CONTROL 2 Assign” en la pág. 87.
Cuando “Retrigger” esté activado, podrán obtenerse
algunos efectos especiales. En el modo “Mono”, la
pedalera es monofónica: si pulsa dos pedales a la vez,
sólo sonará la última nota interpretada. Cuando deje
de pulsar esta nota, sonará la nota anterior, por lo
que podrá obtener un agradable efecto alterno.
●
Velocity
Pantalla Valor
On, 1~127 On
Por defecto
●
Touch (curva de velocidad)
Pantalla Valor
SFt (suave), Med (medio),
hrd (fuerte)
Los pedales del PK-9 son sensibles a la velocidad. Si es
necesario, puede seleccionar una curva de velocidad
diferente para que se ajuste a su estilo de reproducción.
Nota
El ajuste “Touch” se ignora mientras “Velocity” está ajustado al valor (1~127).
●
Portamento Time
Pantalla Valor
0~127 50
“Portamento” significa que la afinación no cambia en
pasos claramente definidos: produce deslizamientos
de una nota a la siguiente. Utilice este parámetro
para especificar la velocidad a la que se realizan
dichos deslizamientos. Cuanto mayor sea el valor,
más lentas serán las transiciones.
Nota
Si el instrumento MIDI receptor no es compatible con este
parámetro, este ajuste no tendrá ningún efecto.
●
Octaver value
Pantalla Valor
–4~–1 –1
Este parámetro permite especificar la afinación de la
nota que se añade mientras la función “oCb” está
activa. Para más información, consulte la “CONTROL 1
Assign” en la pág. 87.
Por defecto
Med
Por defecto
Por defecto
vEl
Si este parámetro está activado, las dinámicas de
interpretación se traducen en valores de velocidad
MIDI (1~127). Si selecciona un valor fijo (1~127), el
PK-9 transmite todas las notas con dicho valor.
r
88
Page 89

●
Nota: El ordenador debe estar
conectado a un interface MIDI. El
PK-9 debe conectarse al interface
MIDI.
MIDI OUT
MIDI IN
MIDI IN
MIDI OUT
Pedal Assign
Pantalla Valor
“CUt” (Cutoff), “rES”
Ped
Este parámetro permite asignar una función al pedal
que conecte al zócalo EXTERNAL PEDAL.
●
Auto Off
(Resonance),
“Pbd” (Pitch Bend Down),
“PbU” (Pitch Bender Up),
“Mod” (Modulation),
“hLd” (Hold),
“voL” (Volume),
“PAn” (Panpot),
“C16” (Control Change
16), “C17” (Control
Change 17),
“C18” (Control Change
18), “C19” (Control
Change 19)
0ff, 10, 30, 240 240
Por defecto
“hLd”
(Hold)
Pedal MIDI dinámico PK-6
Restaurar los ajustes originales (Factory Reset)
r
Archivar y restaurar los ajustes
(MIDI Dump)
Puede archivar y restaurar sus ajustes utilizando un
ordenador (con un interface MIDI comercial) o un
secuenciador externo.
Prepararse para archivar/restaurar
1.
Utilice un cable MIDI (comercial) para
conectar el zócalo MIDI IN del secuenciador
externo al zócalo MIDI OUT del PK-9.
2.
Utilice otro cable MIDI para conectar el
zócalo MIDI OUT del secuenciador externo al
zócalo MIDI IN del PK-9.
ESPAÑOL ESPAÑOL ESPAÑOL ESPAÑOL ESPAÑOL ESPAÑOL
Aof
Este parámetro permite especificar el tiempo que tardará el PK-9 en desactivarse automáticamente
cuando no se utilice. Si no desea que el equipo se
desactive automáticamente, seleccione “Off”.
●
Factory Reset
Consulte “Restaurar los ajustes originales (Factory Reset)” en la pág. 89.
●
MIDI Dump
Consulte “Archivar y restaurar los
ajustes (MIDI Dump)” en la pág. 89.
●
Save
Consulte “Guardar los ajustes (función Save)” en la pág. 86.
Restaurar los ajustes originales
(Factory Reset)
Los ajustes que ha cambiado en el modo Parameter
(página 86) pueden volver a su estado original. Esta
función se denomina “Factory Reset”.
1.
2.
3.
Pise simultáneamente los pedales
[CONTROL 1] y [CONTROL 2].
Los indicadores [CONTROL 1] y [CONTROL 2] parpadearán.
Pise el pedal [CONTROL 1] o [CONTROL 2]
para seleccionar el parámetro “FAC”.
Pise el pedal Hold para confirmar.
Una vez completado Factory Reset, la pantalla indicará “ok” y el PK-9 saldrá del modo Parameter.
FAC
dmp
SAv
3.
Active el secuenciador externo y el PK-9.
Nota
Para evitar un funcionamiento anómalo y/o causar daños
en los altavoces u otros dispositivos, baje el volumen, y desactive todos los dispositivos antes de realizar ninguna
conexión.
Archivar los ajustes en el secuenciador externo
1.
Pise simultáneamente los pedales
[CONTROL 1] y [CONTROL 2].
Los indicadores [CONTROL 1] y [CONTROL 2] parpadearán.
2.
Pise el pedal [CONTROL 1] o [CONTROL 2]
para seleccionar el parámetro “dMP”.
3.
Active la grabación o recepción de datos en
el dispositivo externo.
4.
Espere a que haya finalizado la claqueta del
secuenciador (en su caso) y pise el pedal
Hold para iniciar el volcado MIDI.
Una vez completado el volcado MIDI, la pantalla indicará “ok” y el PK-9 saldrá del modo Parameter.
89
Page 90

Pedal MIDI dinámico PK-6
Modo Parameter
5.
Detenga la grabación en el secuenciador
externo y guarde los datos.
Volver a transmitir los ajustes al PK-9
1.
Inicie la reproducción de los datos que ha
guardado (y cargado).
Todos los indicadores del PK-9 se iluminan y la pantalla muestra “dMP” (Dump).
Una vez recibido el volcado de datos, la pantalla
indica brevemente “ok”.
r
90
Page 91

Pedal MIDI dinámico PK-6
r
Apéndice
5. Apéndice
Solucionar problemas
Si el PK-9 no funciona de la forma deseada, compruebe
primero los siguientes puntos. Si con esto no se resuelve
el problema, consulte a su distribuidor o al distribuidor
Roland más cercano.
■
El PK-9 se ha desactivado repentinamente
Si han transcurrido 240 minutos desde la última vez
que interpretó o utilizó el equipo, éste se desconectará automáticamente. (Se trata del ajuste por
defecto). Si no es necesario que el equipo se desactive
automáticamente, ajuste “Auto Off” a “Off”. Consulte
página 89.
■
No se activa
Si el PK-9 debe activarse mediante el adaptador
¿Ha pulsado el conmutador [POWER] del PK-9 (panel
posterior)?
→ Pulse el conmutador [POWER] del PK-9.
¿Ha conectado el adaptador de CA incluido?
→ Conectar el adaptador:
ESPAÑOL ESPAÑOL ESPAÑOL ESPAÑOL ESPAÑOL ESPAÑOL
¿Está utilizando un pedal de expression de la serie EV
o un conmutador de pedal de la serie Roland DP o
BOSS FS-5U?
→ Utilice sólo el pedal de expresión (serie EV de
Roland, se vende por separado), o el conmutador
de pedal (serie DP de Roland, BOSS FS-5U) especificados. Si conecta cualquier otro pedal de expresión o conmutador de pedal, corre el riesgo de
provocar un funcionamiento incorrecto de la unidad o averiarla.
¿Ha asignado una función al parámetro “Pedal
Assign” compatible con el dispositivo receptor?
→ Consulte la sección “Pedal Assign” en la pág. 89 y
el manual del usuario del instrumento MIDI
externo.
¿Ha conectado correctamente el cable MIDI?
→ Consulte la sección “Conectar el PK-9 a un dispo-
sitivo MIDI externo” en la pág. 84.
Si el PK-9 debe activarse mediante el zócalo PK
OUT
¿Ha conectado el cable PK incluido al conector PK IN
del instrumento externo y al zócalo PK OUT del PK-9?
→ Consulte la sección “Conectar el PK-9 a un instru-
mento externo con el cable PK” en la pág. 83.
¿Ha activado el instrumento externo?
→ Active el instrumento externo. El PK-9 se activa/
desactiva conjuntamente con el instrumento
externo cuando se conecta mediante un cable PK.
■
No se reproduce ningún sonido
¿El canal MIDI del instrumento externo coincide con
el canal MIDI del PK-9?
→ Cuando conecte el PK-9 a un dispositivo MIDI
externo, ambos canales MIDI deben coincidir. Con-
sulte la sección “MIDI Transmit Channel” en la
pág. 87 para saber cómo ajustar el canal de trans-
misión del PK-9.
■
Los sonidos no se reproducen correctamente
Confirme si la función “Octave” está ajustada correctamente (página 87).
■
El pedal externo o el conmutador de pedal no
funcionan correctamente
¿El pedal externo o el conmutador de pedal están
conectados correctamente?
→ Compruebe la conexión. Consulte la sección
“Conectar un pedal externo o un conmutador de
pedal opcional al PK-9” en la pág. 85.
91
Page 92

Pedal MIDI dinámico PK-6
Apéndice
Especificaciones
Roland PK-9 Pedalera MIDI
Pedalera: 20 teclas sensibles a la velocidad
Funciones: Hold
Octaver Bass On/Off, Valor de Octaver
Portamento On/Off, Portamento Time
Transpose
Octave
Poly/Mono
Velocity activado/desactivado (valor fijo programable)
Key Touch (Light, Medium, Heavy)
Asignación de pedal externo
MIDI Merge
Controles: Pedal de expresión
Conmutador de pedal I, Conmutador de pedal D (a la izquierda y derecha del pedal de
expresión)
Pedal CONTROL 1
Pedal CONTROL 2
Pedal Hold (damper)
Conmutador POWER
Conectores: Jack EXTERNAL PEDAL (Conmutador/Expresión, programable)
Jack PK OUT
Conectores MIDI (IN, OUT, THRU)
Jack DC IN
Alimentación: Adaptador de CA (PSB-1U)
Mediante el cable PK
Intensidad nominal: 130 mA (DC 9 V)
Dimensiones: 905 (anchura) x 456 (profundidad) x 273 (altura) mm
Peso: 13,4kg
Accesorios: Manual del Usuario
Adaptador de CA (PSB-1U)
Cable PK
Cable MIDI
2 tacos de goma adicionales (de recambio)
Opciones: Conmutador de pedal de la serie DP/BOSS FS-5U, Pedal de expresión de la serie Roland EV
Nota
Con el objetivo de mejorar el producto, las especificaciones y/o el acabado del equipo están sujetos a cambios sin previo aviso.
r
92
Page 93

r
Copyright © 2012 ROLAND EUROPE. Alle rechten voorbehouden. Het kopiëren, verveelvoudigen of openbaar maken van dit document, hetzij gedeeltelijk, hetzij in z’n geheel, is zonder de schriftelijke
toestemming van Roland Europe S.p.a. verboden. Roland en GS zijn in de VS en andere landen geregistreerde handelsmerken of handelsmerken van Roland Corporation.
Handleiding
Bedankt voor en gefeliciteerd met uw aankoop van de MIDI-pedaaleinheid PK-9.
Naast de pedalen, die uw orgelspel nog een flink stuk interessanter maken, biedt de PK-9 een zwelpedaal voor het toevoegen
van de nodige expressiviteit, twee voetschakelaars voor de controle van bepaalde orgelfuncties en een pedaal voor het aanhouden van de noten.
Functies
• Voorzien van een display voor een gebruiksvriendelijke bediening.
• 20 baspedalen en een verwijderbaar zwelpedaal
De PK-9 biedt 20 pedalen voor het spelen van de orgelbaspartij. Met het oog op een eenvoudiger transport kan het ingebouwde zwelpedaal worden verwijderd.
•Twee voetschakelaars aan weerskanten van het expressiepedaal.
Aan deze voetschakelaars kunt u de gewenste functies toewijzen, zo bv. de snelheidsomschakeling van het Rotary-effect, de
remsnelheid ervan of het portamento.
•Twee CONTROL-pedalen op het bedieningspaneel.
Met deze pedalen kunt u bepaalde functies van het externe instrument (basoctaaf, portamento, monofone mode enz.) aansturen.
• Hold-pedaal
Het Hold-pedaal bevindt zich op een met de rechter voet gemakkelijk bereikbare plaats. Hiermee kunt u de gespeelde noten
aanhouden.
• Transpositie, octavering en instelbaar MIDI-kanaal.
De Parameter-mode van de PK-9 laat o.m. de keuze van het transpositie-interval, het octaaf en het MIDI-kanaal toe.
• Met een optionele externe voetschakelaar (DP-serie van Roland of BOSS FS-5U) of een optioneel zwelpedaal (Roland EV-5)
kunt u parameters, zoals expressie, de filterfrequentie, resonantie enz. beïnvloeden (EXTERNAL PEDAL-aansluiting).
• De “MIDI Merge”-functie (MIDI IN naar MIDI OUT) combineert de MIDI-commando’s, die de PK-9 van een extern MIDI-apparaat ontvangt, met de intern gegenereerde en stuurt deze commando’s samen uit.
• Snelle verbinding met een Roland-orgel (AT-350C, AT-900C, C-200 enz.)
De PK-9 kan via een PK-kabel op de PK-IN-connector van een Roland-orgel worden aangesloten. Hiervoor zijn geen bijkomende kabels (MIDI, adapter enz.) noodzakelijk. Dit vereenvoudigt de bediening.
NEDERLANDS NEDERLANDS NEDERLANDS NEDERLANDS NEDERLANDS NEDERLANDS
De afbeeldingen in deze handleiding tonen wat u in de regel zou moeten zien. Misschien bevat uw instrument echter een
nieuwere systeemversie (eventueel met andere klanken), zodat de afbeeldingen niet stroken met wat u op uw instrument
ziet.
Lees, alvorens dit instrument te gebruiken, “Veilig gebruik van dit product” op blz. 94 en “Belangrijke opmerkingen” op blz. 96 door. Daar
vindt u belangrijke tips en een opsomming van wat u wel en niet met de PK-9 mag doen. Bovendien verdient het aanbeveling ook de
rest van de handleiding door te nemen om kennis te maken met alle functies van dit product. Bewaar de handleiding op een veilige
plaats, omdat u ze later beslist nog eens nodig hebt.
Page 94

MIDI-pedaaleinheid PK-9
Veilig gebruik van dit product
INSTRUCTIES VOOR HET VOORKOMEN VAN BRAND, ELEKTRISCHE SCHOKKEN EN VERWONDINGEN
VEILIG GEBRUIK VAN DIT APPARAAT
Over de en labels Over de symbolen
WAARSCHUWING
Wijst de gebruiker op het risico op
WAARSCHUWING
LET OP!
dodelijke ongevallen of zware verwondingen als gevolg van een fout
gebruik van dit apparaat.
Het foute gebruik van dit apparaat kan
leiden tot verwondingen en of materi le
schade.
* "Materi le" schade heeft betrekking op
het beschadigen van het meubilair of
andere huishoudelijke voorwerpen
evenals huisdieren enz.
LET OP
Een driehoek maakt de gebruiker attent op belangrijke
instructies of waarschuwingen. De juiste betekenis van het
symbool wordt bepaald door de tekening in de driehoek. Het
links getoonde symbool wordt gebruikt voor algemene
waarschuwingen of om de aandacht te vestigen op gevaar.
Dit symbool maakt de gebruiker attent op dingen die nooit
mogen worden uitgevoerd. Wat nooit mag worden gedaan
wordt aangegeven door de tekening in de cirkel. Het links
getoonde symbool wordt gebruikt om aan te geven dat het
toestel nooit uit elkaar mag worden gehaald.
Dit symbool maakt de gebruiker attent op dingen die moeten
worden uitgevoerd. Wat er moet worden gedaan wordt
aangegeven door de tekening in de cirkel. Het links getoonde
symbool betekent dat de stekker van het stroomsnoer van de
uitgang moet worden losgekoppeld.
HOUD ALTIJD HET VOLGENDE IN DE GATEN
WAARSCHUWING WAARSCHUWING
Probeer nooit het instrument te openen of te
modificeren
• Open nooit de behuizing van het instrument of de adapter en breng vooral geen wijzigingen aan.
.................................................................................................
Voer nooit zelf herstellingen uit
• Probeer het instrument niet te herstellen of interne
onderdelen te vervangen (behalve wanneer deze handleiding specifieke instructies geeft). Laat alle herstellingen
en onderhoudswerken over aan uw Roland-dealer, een
erkende herstellingsdienst of de distributeur (zie de adressen op de
“Information”-pagina).
.................................................................................................
Bewaar c.q. gebruik het instrument nooit
op de volgende plaatsen:
•Plaatsen, die onderhevig zijn aan extreme temperatu-
ren (bv. direct zonlicht in een gesloten voertuig, bij
een verwarming, op apparatuur die warmte genereert;
of
•Klamme plaatsen (bv. badkuip, wasruimten, natte vloeren); of
•Plaatsen, die blootgesteld zijn aan stoom of rook; of
•Plaatsen blootgesteld aan zout; of
• Vochtige plaatsen; of
•Plaatsen die blootgesteld zijn aan regen; of
• Stoffige of zandige plaatsen; of
•Plaatsen die blootgesteld zijn aan sterke trillingen.
.................................................................................................
Nooit op een wankel oppervlak zetten
• Zet het instrument altijd op een stevig en effen oppervlak. Zet het nooit op een sterk trillende of hellende
plaats.
.................................................................................................
Gebruik alleen de bijgeleverde adapter en
het juiste voltage
• Gebruik uitsluitend de bij de PK-9 geleverde PSB-1U
adapter. De netspanning van het stopcontact moet bovendien
overeenkomen met de indicaties op het merkplaatje. Het gebruik
van een beschadigde adapter kan leiden tot brand of elektrocutie.
.................................................................................................
Gebruik alleen het netsnoer van de
PSB-1U
• Gebruik uitsluitend het netsnoer van de PSB-1U adapter.
Dit netsnoer is niet geschikt voor gebruik met andere
apparaten.
................................................................................................
Beschadig nooit het netsnoer en zet er geen
zware voorwerpen op
• Draai of buig de stroomkabel niet teveel. Zet er nooit
zware voorwerpen op. Dit kan de kabel beschadigen, wat
defecten en een kortsluiting kan veroorzaken. Beschadigde kabels kunnen brand en elektrocutie veroorzaken!
................................................................................................
Voorkom dat kleine voorwerpen of vloeistoffen in het inwendige belanden
• Zorg dat er geen voorwerpen (brandbare voorwerpen,
muntstukken, draad) of vloeistoffen (bv. water of sap) in
het instrument belanden. Dit zou namelijk kunnen leiden
tot een kortsluiting, functiestoringen en defecten.
................................................................................................
Schakel het instrument uit, wanneer het
niet naar behoren lijkt te werken
•In de volgende gevallen moet u het instrument meteen
uitschakelen, de aansluiting van de adapter op het lichtnet verbreken en contact opnemen met een door Roland
erkende herstellingsdienst (zie de “Information”-pagina):
•Wanneer de adapter of zijn kabel zichtbaar beschadigd
is;
•Als er rook of een vreemde geur uit het apparaat komt.
•Wanneer een voorwerp of vloeistof in het inwendige
terecht is gekomen.
•Wanneer het instrument in de regen heeft gestaan of
op een andere manier nat is geworden;
•Wanneer het instrument niet naar behoren lijkt te
werken.
................................................................................................
r
94
Page 95

MIDI-pedaaleinheid PK-9
LET OP!
Veilig gebruik van dit product
r
WAARSCHUWING
Volwassenen moeten toezicht houden,
wanneer kinderen in de buurt zijn
•Als het instrument zich op een plaats bevindt waar vaak
kinderen spelen, moet u erop letten dat ze niet proberen
het instrument te bedienen, wanneer u er niet bent. Kinderen mogen het instrument alleen onder toezicht van
een volwassene bedienen.
.................................................................................................
Voorkom vervormingen van het instrument en laat het nooit vallen. Stel het verder nooit bloot aan sterke schokken.
• Bescherm het instrument tegen hevige schokken.
(Laat het niet vallen!)
.................................................................................................
Sluit de adapter nooit aan op een stroomcircuit waar al talrijke andere apparaten
op zijn aangesloten.
• Forceer de stroomkabel van het product niet door hem
met een onredelijk aantal andere apparaten een stopcontact te laten delen. Wees extra voorzichtig met het
gebruik van verlengsnoeren – de totale hoeveelheid
stroom, die wordt gebruikt door alle apparaten, die u op
het stopcontact van het verlengsnoer hebt aangesloten,
mag nooit het stroomniveau (watt/ampères) van het verlengsnoer
overschrijden. Overmatige lading kan het isolatiemateriaal van de
kabel doen verhitten en uiteindelijk doorsmelten.
.................................................................................................
Nooit onvoorbereid in het buitenland gebruiken
• Vóór het gebruik van dit instrument in het buitenland
neemt u het best contact op met uw dealer of de verdeler
om te zorgen dat u de juiste voeding gebruikt (zie ook de
adressen onder “Information”).
.................................................................................................
Gebruik op een goed verluchte plaats
NEDERLANDS NEDERLANDS NEDERLANDS NEDERLANDS NEDERLANDS NEDERLANDS
• Zet dit instrument en de adapter altijd op een goed verluchte plaats.
................................................................................................
Trek, bij het verbreken van de aansluiting
van de adapter, alleen aan de stekkers
• Trek, bij het verbreken van de aansluiting op het lichtnet,
altijd aan de stekker van de adapter – nooit aan de kabel.
................................................................................................
Maak de stekker van de adapter regelmatig schoon
• Trek de stekker van de adapter op regelmatige tijdstippen
uit het stopcontact en maak de pennen schoon (als er
stof op zit). Als u het instrument langere tijd niet wilt
gebruiken, verbreekt u het best de aansluiting op het
lichtnet. Zorg dat er nooit stof tussen de stekker en het
stopcontact belandt, omdat dit tot een kortsluiting of
brand kan leiden.
................................................................................................
Hanteer de kabels met de nodige zorg
• Probeer te voorkomen dat snoeren en kabels in de knoop
raken. Tevens dienen alle snoeren en kabels zo te worden
geplaatst dat ze buiten het bereik van kinderen liggen.
................................................................................................
Ga nooit op het instrument staan en
plaats er geen zware voorwerpen op
•Klim nooit op het instrument en plaats er nooit zware
voorwerpen op.
................................................................................................
Raak de adapter nooit met natte handen
aan
• Raak de adapter en de overige kabels nooit met natte
handen aan. Anders bestaat er kans op elektrocutie.
................................................................................................
Vóór het transport alle aansluitingen verbreken
•Alvorens dit instrument te verplaatsen moet u de aansluiting op het lichtnet en de overige apparaten verbreken.
................................................................................................
Uitschakelen vóór de schoonmaak en
netaansluiting verbreken
• Schakel het instrument altijd uit voordat u het schoonmaakt. Bovendien verbreekt u het best de aansluiting op
het lichtnet (blz. 101).
................................................................................................
In geval van een onweer de aansluiting op
het lichtnet verbreken
• Verbreek, tijdens een onweer, de aansluiting van de
adapter op het lichtnet.
................................................................................................
Kleine voorwerpen buiten het bereik van
kinderen
•Om te voorkomen dat de hierna vermelde voorwerpen
worden ingeslikt moet u ze buiten het bereik van kinderen bewaren.
•Bijgeleverde onderdelen: Gummipoten (reserve).
• Verwijderbare voorwerpen: knopschroeven (blz. 100).
................................................................................................
95
Page 96

MIDI-pedaaleinheid PK-9
Belangrijke opmerkingen
1. Belangrijke opmerkingen
Lees, naast “Veilig gebruik van dit product” op blz. 94, ook de volgende punten even door:
Voeding
•Sluit dit instrument nooit aan op een stopcontact waarmee u al
een apparaat met invertor (koelkast, wasmachine, magnetron of
air conditioning) of motor hebt aangesloten. Het andere apparaat
zou namelijk storingen of op z’n minst een hoorbare brom kunnen
veroorzaken. Als u geen apart stopcontact kunt gebruiken, moet u
een ruisfilter tussen het instrument en het stopcontact plaatsen.
•Bij langdurig gebruik wordt de adapter warm of zelfs heet. Dit is
volkomen normaal en dus geen reden om u ongerust te maken.
•Om functiestoringen te voorkomen, moet u alle apparaten uitschakelen alvorens ze op elkaar aan te sluiten.
•Bij levering staat de PK-9 zo ingesteld dat hij automatisch wordt
uitgeschakeld, wanneer u hem langer dan 240 minuten (4 uur)
niet bedient. Om te voorkomen dat het instrument automatisch
uitgaat moet u de “Auto Off”-parameter op “Off” zetten (zie
p. 107).
Opgelet: Wanneer het instrument uitgaat, worden de laatst
doorgevoerde wijzigingen weer gewist. Om uw instellingen
te bewaren moet u ze opslaan voordat het instrument uitgaat.
Plaatsing
•Dit instrument kan de radio- of TV-ontvangst storen. Plaats het
dus nooit te dicht bij dergelijke ontvangers.
•Als u in de buurt van het instrument een draadloze telefoon,
afstandsbediening e.d. gebruikt, zou er een bromgeluid kunnen
optreden. Dergelijke storingen zijn het meest waarschijnlijk bij de
ontvangst of het begin van een oproep. Mocht u problemen
ondervinden, leg dergelijke draadloze apparaten dan verder van
het instrument vandaan of zet ze uit.
•Om problemen te voorkomen dient u het instrument te beschermen tegen direct zonlicht, hitte, vochtigheid en stof. Overdreven
warmte kan ervoor zorgen dat de ombouw vervormt of verkleurt.
• Er kunnen zich waterdruppels (condensatie) in de PK-9 vormen,
wanneer hij naar een locatie wordt gebracht waarvan de temperatuur en/of vochtigheidsgraad sterk verschilt. Als u het instrument
in deze toestand tracht te gebruiken, kan dit leiden tot schade en/
of storing. Vóór de ingebruikname van het instrument dient u het
daarom enkele uren te laten staan tot de condens volledig is verdampt.
• Leg nooit zware voorwerpen op de het klavier. Dat kan er namelijk
toe leiden dat de betreffende toetsen na verloop van tijd niet meer
naar behoren werken.
• Naar gelang het materiaal en de temperatuur van de oppervlakte
waarop u het instrument zet kan het gebeuren dat de gummipoten verkleuren of plekken op de oppervlakte achterlaten.
Om dit te voorkomen kunt u wat vilt of een doek onder de poten
leggen. Let er dan echter op dat het instrument niet kan wegschuiven.
• Zet nooit een vaas, glas e.d. op de PK-9. Vermijd bovendien het
gebruik van verstuivers en sprays, parfum, alcohol, nagellak e.d. in
de buurt van het product. Indien de bewuste stof toch op de
behuizing terechtkomt, dient u hem onmiddellijk te verwijderen.
Herstellingen en uw data
• Houd er rekening mee dat alle data in het interne geheugen van
dit instrument tijdens een herstelling gewist kunnen worden.
Maak dus altijd een veiligheidskopie van uw data via MIDI of
noteer de instellingen (indien mogelijk). Tijdens herstellingswerken
wordt er getracht de geheugeninhoud te bewaren. In bepaalde
gevallen (bv. wanneer de geheugencircuits zelf beschadigd zijn) is
een dataherstel eventueel onmogelijk. Roland wijst elke aansprakelijkheid m.b.t. dataverlies tijdens herstellingswerken af.
Andere voorzorgsmaatregelen
• Houd in de gaten dat de inhoud van het geheugen onherstelbaar
verloren kan gaan als gevolg van een storing of oneigenlijk gebruik
van het instrument. We adviseren van belangrijke gegevens, die u
in het geheugen van het instrument hebt opgeslagen, regelmatig
een veiligheidskopie via MIDI (bv. met een sequencer) te maken om
dataverlies te voorkomen.
• Eens de geheugeninhoud gewist is, bestaat er geen mogelijkheid
meer om die instellingen te herstellen. Roland Corporation kan
niet aansprakelijk worden gesteld voor het verlies van dergelijke
data.
• Behandel de knoppen, regelaars, aansluitingen enz. van de PK-9
met de nodige zorg. Hardhandig gebruik kan tot storingen leiden.
•Sla nooit op het display en oefen er geen grote druk op uit.
• Trek, voor het verbreken van eender welk soort aansluitingen,
alleen aan de stekker en nooit aan de daaraan vastzittende kabel.
Zo vermijdt u een kortsluiting of schade aan de interne elementen
van de kabel.
• Probeer het volume op een redelijk niveau te houden om te voorkomen dat u uw buren overlast bezorgt.
• Het geluid tijdens het indrukken van de pedalen en de daarbij
optredende trillingen zijn soms op verrassende plaatsen te horen.
Wees dus voorzichtig dat u uw buren en gezinsleden niet stoort.
• Voor het transport van het instrument gebruikt u het best de originele verpakking of een speciaal hiervoor gemaakte koffer. Zo niet,
dient u gelijksoortig verpakkingsmateriaal te gebruiken.
• Gebruik uitsluitend het vermelde zwelpedaal (Roland EV-serie,
optie) of voetschakelaar (Roland DP-serie, BOSS FS-5U). Bij gebruik
van andere zwelpedalen of voetschakelaars zou u het instrument
namelijk kunnen beschadigen.
• Let er tijdens het bespelen van de pedalen op dat u geen vingers
van wie dan ook kneust. Volwassenen moeten toezicht houden,
wanneer kinderen in de buurt zijn.
Onderhoud
• Gebruik, voor het schoonmaken van het instrument, alleen een
zachte, droge of lichtjes bevochtigde doek. Om hardnekkig vuil te
verwijderen gebruikt u het best een neutraal reinigingsmiddel.
Wrijf het instrument daarna droog met een zachte en droge doek.
• Gebruik nooit oplosmiddelen zoals bv. verfverdunners want die
kunnen de behuizing beschadigen.
r
96
Page 97

MIDI-pedaaleinheid PK-9
Belangrijke opmerkingen
r
Inhoud
1. Belangrijke opmerkingen . . . . . . . . . . . . . . . . . . . . . . . . . . . . . . . . . . . . . . . . . . . . . . . . . . . . . . . . . . .96
2. Voorzieningen op de panelen. . . . . . . . . . . . . . . . . . . . . . . . . . . . . . . . . . . . . . . . . . . . . . . . . . . . . . . .98
Frontpaneel . . . . . . . . . . . . . . . . . . . . . . . . . . . . . . . . . . . . . . . . . . . . . . . . . . . . . . . . . . . . . . . . . . . . . . . . . . . .98
Achterpaneel . . . . . . . . . . . . . . . . . . . . . . . . . . . . . . . . . . . . . . . . . . . . . . . . . . . . . . . . . . . . . . . . . . . . . . . . . . .99
3. Voorbereiding van de PK-9. . . . . . . . . . . . . . . . . . . . . . . . . . . . . . . . . . . . . . . . . . . . . . . . . . . . . . . . 100
Installeren van het zwelpedaal . . . . . . . . . . . . . . . . . . . . . . . . . . . . . . . . . . . . . . . . . . . . . . . . . . . . . . . . . . .100
Aansluiten van de PK-9 via de PK-kabel . . . . . . . . . . . . . . . . . . . . . . . . . . . . . . . . . . . . . . . . . . . . . . . . . . .101
Aansluiten van de bijgeleverde adapter . . . . . . . . . . . . . . . . . . . . . . . . . . . . . . . . . . . . . . . . . . . . . . . . . . .101
Extern MIDI-instrument op de PK-9 aansluiten . . . . . . . . . . . . . . . . . . . . . . . . . . . . . . . . . . . . . . . . . . . .102
Gebruik van de PK-9 en een MIDI-klavier. . . . . . . . . . . . . . . . . . . . . . . . . . . . . . . . . . . . . . . . . . . . . . . . . .102
Aansluiten van een optioneel extern expressiepedaal of een voetschakelaar . . . . . . . . . . . . . . . . . . .103
4. Parametermode . . . . . . . . . . . . . . . . . . . . . . . . . . . . . . . . . . . . . . . . . . . . . . . . . . . . . . . . . . . . . . . . . 104
Basisbediening in de parametermode . . . . . . . . . . . . . . . . . . . . . . . . . . . . . . . . . . . . . . . . . . . . . . . . . . . . .104
Opslaan van uw instellingen (Save) . . . . . . . . . . . . . . . . . . . . . . . . . . . . . . . . . . . . . . . . . . . . . . . . . . . . . . .104
‘Parameter’-instellingen. . . . . . . . . . . . . . . . . . . . . . . . . . . . . . . . . . . . . . . . . . . . . . . . . . . . . . . . . . . . . . . . .105
Transpose. . . . . . . . . . . . . . . . . . . . . . . . . . . . . . . . . . . . . . . . . . . . . . . . . . . . . . . . . . . . . . . . . . . . . . . . . . . . . . . . . . . . 105
Octave . . . . . . . . . . . . . . . . . . . . . . . . . . . . . . . . . . . . . . . . . . . . . . . . . . . . . . . . . . . . . . . . . . . . . . . . . . . . . . . . . . . . . . 105
MIDI Transmit Channel . . . . . . . . . . . . . . . . . . . . . . . . . . . . . . . . . . . . . . . . . . . . . . . . . . . . . . . . . . . . . . . . . . . . . . . . 105
CONTROL 1 Assign . . . . . . . . . . . . . . . . . . . . . . . . . . . . . . . . . . . . . . . . . . . . . . . . . . . . . . . . . . . . . . . . . . . . . . . . . . . .105
CONTROL 2 Assign . . . . . . . . . . . . . . . . . . . . . . . . . . . . . . . . . . . . . . . . . . . . . . . . . . . . . . . . . . . . . . . . . . . . . . . . . . . .105
Functie van de linker voetschakelaar . . . . . . . . . . . . . . . . . . . . . . . . . . . . . . . . . . . . . . . . . . . . . . . . . . . . . . . . . . . . 105
Functie van de rechter voetschakelaar. . . . . . . . . . . . . . . . . . . . . . . . . . . . . . . . . . . . . . . . . . . . . . . . . . . . . . . . . . . 106
Retrigger . . . . . . . . . . . . . . . . . . . . . . . . . . . . . . . . . . . . . . . . . . . . . . . . . . . . . . . . . . . . . . . . . . . . . . . . . . . . . . . . . . . . 106
Velocity . . . . . . . . . . . . . . . . . . . . . . . . . . . . . . . . . . . . . . . . . . . . . . . . . . . . . . . . . . . . . . . . . . . . . . . . . . . . . . . . . . . . . 106
Touch (aanslagcurve). . . . . . . . . . . . . . . . . . . . . . . . . . . . . . . . . . . . . . . . . . . . . . . . . . . . . . . . . . . . . . . . . . . . . . . . . . 106
Portamento Time . . . . . . . . . . . . . . . . . . . . . . . . . . . . . . . . . . . . . . . . . . . . . . . . . . . . . . . . . . . . . . . . . . . . . . . . . . . . . 106
Octaver value . . . . . . . . . . . . . . . . . . . . . . . . . . . . . . . . . . . . . . . . . . . . . . . . . . . . . . . . . . . . . . . . . . . . . . . . . . . . . . . . 106
Pedal Assign . . . . . . . . . . . . . . . . . . . . . . . . . . . . . . . . . . . . . . . . . . . . . . . . . . . . . . . . . . . . . . . . . . . . . . . . . . . . . . . . . 107
Auto Off. . . . . . . . . . . . . . . . . . . . . . . . . . . . . . . . . . . . . . . . . . . . . . . . . . . . . . . . . . . . . . . . . . . . . . . . . . . . . . . . . . . . . 107
Factory Reset . . . . . . . . . . . . . . . . . . . . . . . . . . . . . . . . . . . . . . . . . . . . . . . . . . . . . . . . . . . . . . . . . . . . . . . . . . . . . . . .107
MIDI Dump . . . . . . . . . . . . . . . . . . . . . . . . . . . . . . . . . . . . . . . . . . . . . . . . . . . . . . . . . . . . . . . . . . . . . . . . . . . . . . . . . . 107
Save . . . . . . . . . . . . . . . . . . . . . . . . . . . . . . . . . . . . . . . . . . . . . . . . . . . . . . . . . . . . . . . . . . . . . . . . . . . . . . . . . . . . . . . . 107
Laden van de fabrieksinstellingen (Factory Reset). . . . . . . . . . . . . . . . . . . . . . . . . . . . . . . . . . . . . . . . . . .107
Archiveren van uw instellingen (MIDI Dump) . . . . . . . . . . . . . . . . . . . . . . . . . . . . . . . . . . . . . . . . . . . . . .107
Voorbereiding voor het archiveren . . . . . . . . . . . . . . . . . . . . . . . . . . . . . . . . . . . . . . . . . . . . . . . . . . . . . . . . . . . . . . .107
Instellingen naar de sequencer doorseinen . . . . . . . . . . . . . . . . . . . . . . . . . . . . . . . . . . . . . . . . . . . . . . . . . . . . . . . . 107
Terugzenden van de instellingen naar de PK-9 . . . . . . . . . . . . . . . . . . . . . . . . . . . . . . . . . . . . . . . . . . . . . . . . . . . . .108
5. Appendix. . . . . . . . . . . . . . . . . . . . . . . . . . . . . . . . . . . . . . . . . . . . . . . . . . . . . . . . . . . . . . . . . . . . . . . 109
Verhelpen van storingen . . . . . . . . . . . . . . . . . . . . . . . . . . . . . . . . . . . . . . . . . . . . . . . . . . . . . . . . . . . . . . . .109
Specificaties . . . . . . . . . . . . . . . . . . . . . . . . . . . . . . . . . . . . . . . . . . . . . . . . . . . . . . . . . . . . . . . . . . . . . . . . . . .110
NEDERLANDS NEDERLANDS NEDERLANDS NEDERLANDS NEDERLANDS NEDERLANDS
97
Page 98

MIDI-pedaaleinheid PK-9
Voorzieningen op de panelen
2. Voorzieningen op de panelen
Frontpaneel
A
A
Display
Dit display met drie posities houdt u op de hoogte
van de gekozen functie of parameterinstelling.
B
CONTROL 1- en CONTROL 2-pedaal
Deze pedalen zenden MIDI-commando’s. Hun functie
kan in de parametermode worden gekozen (blz. 104).
Aanvankelijk zendt het CONTROL 1-pedaal controlecommando CC16 en het CONTROL 2-pedaal controlecommando CC17.
Druk deze pedalen samen in om de parametermode
te selecteren (blz. 104).
C
Expressiepedaal
Trap dit pedaal in om het volume te verhogen en trek
het naar u toe om het volume te verminderen. Op
blz. 100 komt u te weten hoe u het installeert.
D
C
D
B
D
Voetschakelaars
Twee voetschakelaars aan weerskanten van het zwelpedaal kunnen voor het aansturen van het externe
apparaat worden gebruikt. Aanvankelijk zendt de linker voetschakelaar controlecommando CC18 en de
rechter het commando CC19.
De functie van deze voetschakelaars kan in de parametermode worden gewijzigd.
E
Hold-pedaal
Trap dit pedaal in om de momenteel gespeelde noot
zelfs na het loslaten van het pedaal nog aan te houden. Wanneer de PK-9 zich in de parametermode
bevindt, bevestigt u hiermee instellingen.
E
r
98
Page 99

MIDI-pedaaleinheid PK-9
r
Achterpaneel
Achterpaneel
A
EXTERNAL PEDAL-connector
Hier kunt u een optionele voetschakelaar (DP-serie
van Roland of BOSS FS-5U) of een tweede zwelpedaal (Roland EV-5, optie) aansluiten. Op blz. 107
komt u te weten hoe u de gewenste functie aan het
pedaal of de voetschakelaar toewijst.
B
PK OUT-connector
Verbind de PK-9, met behulp van de bijgeleverde PKkabel, met de PK IN-connector van een extern instrument (blz. 101).
C
MIDI-connectors
Hiermee kunt u de PK-9 op een extern MIDI-apparaat
aansluiten (blz. 102).
A
E
D
C
B
D
DC IN-connector
Sluit hier de bijgeleverde adapter aan (blz. 101).
E
POWER-schakelaar
Hiermee schakelt u het instrument in/uit (blz. 102).
Bij levering staat de PK-9 zo ingesteld dat hij
automatisch wordt uitgeschakeld, wanneer u
hem meer dan 240 minuten (4 uur) niet
gebruikt.
Nadat de PK-9 automatisch werd uitgeschakeld kunt
u hem opnieuw inschakelen door op de [POWER]knop te drukken.
Om te voorkomen dat het instrument automatisch
uitgaat moet u de “Auto Off”-parameter op “OFF”
zetten (zie (blz. 107)).
NEDERLANDS NEDERLANDS NEDERLANDS NEDERLANDS NEDERLANDS NEDERLANDS
99
Page 100

MIDI-pedaaleinheid PK-9
Voorbereiding van de PK-9
3. Voorbereiding van de PK-9
Installeren van het zwelpedaal
Bij levering is het zwelpedaal niet op de PK-9 geïnstalleerd. Installeer het zwelpedaal alvorens de PK-9 op een ander
apparaat aan te sluiten.
Wees tijdens de installatie/het verwijderen van het zwelpedaal voorzichtig dat u niet op de knopschroeven trapt. Om te voorkomen dat
de handschroeven worden ingeslikt moet u ze buiten het bereik van kinderen bewaren.
Om schade aan de andere apparaten te voorkomen moet u alle apparaten uitschakelen alvorens ze op elkaar aan te sluiten.
1.
Draai de knopschroef aan de achterkant van
de PK-9 los.
Knopschroef aan de
achterkant
4.
Zet het zwelpedaal klem door de twee bijgeleverde knopschroeven in de juiste boorgaten te draaien.
Bijgeleverde knopschroe-
ven (twee plaatsen)
2.
Sluit de kabel van het zwelpedaal aan op de
connector aan de bovenkant van de PK-9.
3.
Plaats het pedaal op de PK-9 zonder de verbindingskabel af te klemmen.
5.
Draai de knopschroef aan de achterkant
weer aan.
De connector aan de bovenkant van de PK-9 is uitsluitend
voor het bijgeleverde zwelpedaal bedoeld. Sluit hier dus
enkel het zwelpedaal van de PK-9 aan om functiestoringen
te voorkomen.
r
100
 Loading...