

Page 1
Owner’s Manual
Thank you, and congratulations on your choice of the BOSS
JS-5 JamStation.
Before using this unit, carefully read the sections entitled:
• USING THE UNIT SAFELY (page 2–3)
• IMPORTANT NOTES (page 10–11)
These sections provide important information concerning
the proper operation of the unit.
Additionally, in order to feel assured that you have gained a
good grasp of every feature provided by your new unit,
Owner’s manual should be read in its entirety. The manual
should be saved and kept on hand as a convenient reference.
Copyright © 2000 BOSS CORPORATION
All rights reserved. No part of this publication may be reproduced in any form
without the written permission of BOSS CORPORATION.
Page 2
USING THE UNIT SAFELY
Used for instructions intended to alert
the user to the risk of death or severe
injury should the unit be used
improperly.
Used for instructions intended to alert
the user to the risk of injury or material
damage should the unit be used
improperly.
* Material damage refers to damage or
other adverse effects caused with
respect to the home and all its
furnishings, as well to domestic
animals or pets.
001
• Before using this unit, make sure to read the
instructions below, and the Owner’s Manual.
..........................................................................................................
002c
• Do not open (or modify in any way) the unit or its
AC adaptor.
..........................................................................................................
003
• Do not attempt to repair the unit, or replace parts
within it (except when this manual provides
specific instructions directing you to do so). Refer
all servicing to your retailer, the nearest Roland
Service Center, or an authorized Roland
distributor, as listed on the "Information" page.
..........................................................................................................
004
• Never use or store the unit in places that are:
• Subject to temperature extremes (e.g., direct
sunlight in an enclosed vehicle, near a heating
duct, on top of heat-generating equipment); or
are
• Damp (e.g., baths, washrooms, on wet floors);
or are
• Humid; or are
• Exposed to rain; or are
• Dusty; or are
• Subject to high levels of vibration.
..........................................................................................................
007
• Make sure you always have the unit placed so it is
level and sure to remain stable. Never place it on
stands that could wobble, or on inclined surfaces.
..........................................................................................................
008c
• Be sure to use only the AC adaptor supplied with
the unit. Also, make sure the line voltage at the
installation matches the input voltage specified on
the AC adaptor’s body. Other AC adaptors may
use a different polarity, or be designed for a
different voltage, so their use could result in
damage, malfunction, or electric shock.
..........................................................................................................
The symbol alerts the user to important instructions
or warnings.The specific meaning of the symbol is
determined by the design contained within the
triangle. In the case of the symbol at left, it is used for
general cautions, warnings, or alerts to danger.
The symbol alerts the user to items that must never
be carried out (are forbidden). The specific thing that
must not be done is indicated by the design contained
within the circle. In the case of the symbol at left, it
means that the unit must never be disassembled.
The ● symbol alerts the user to things that must be
carried out. The specific thing that must be done is
indicated by the design contained within the circle. In
the case of the symbol at left, it means that the powercord plug must be unplugged from the outlet.
009
• Do not excessively twist or bend the power cord,
nor place heavy objects on it. Doing so can
damage the cord, producing severed elements and
short circuits. Damaged cords are fire and shock
hazards!
..........................................................................................................
010
• This unit, either alone or in combination with an
amplifier and headphones or speakers, may be
capable of producing sound levels that could
cause permanent hearing loss. Do not operate for
a long period of time at a high volume level, or at
a level that is uncomfortable. If you experience
any hearing loss or ringing in the ears, you should
immediately stop using the unit, and consult an
audiologist.
..........................................................................................................
011
• Do not allow any objects (e.g., flammable material,
coins, pins); or liquids of any kind (water, soft
drinks, etc.) to penetrate the unit.
..........................................................................................................
012b
• Immediately turn the power off, remove the AC
adaptor from the outlet, and request servicing by
your retailer, the nearest Roland Service Center, or
an authorized Roland distributor, as listed on the
"Information" page when:
• The AC adaptor, the power-supply cord, or the
plug has been damaged; or
• Objects have fallen into, or liquid has been
spilled onto the unit; or
• The unit has been exposed to rain (or otherwise
has become wet); or
• The unit does not appear to operate normally or
exhibits a marked change in performance.
..........................................................................................................
2
Page 3
013
• In households with small children, an adult
should provide supervision until the child is
capable of following all the rules essential for the
safe operation of the unit.
..........................................................................................................
014
• Protect the unit from strong impact.
(Do not drop it!)
..........................................................................................................
015
• Do not force the unit’s power-supply cord to share
an outlet with an unreasonable number of other
devices. Be especially careful when using
extension cords—the total power used by all
devices you have connected to the extension
cord’s outlet must never exceed the power rating
(watts/amperes) for the extension cord. Excessive
loads can cause the insulation on the cord to heat
up and eventually melt through.
..........................................................................................................
016
• Before using the unit in a foreign country, consult
with your retailer, the nearest Roland Service
Center, or an authorized Roland distributor, as
listed on the "Information" page.
..........................................................................................................
101b
• The unit and the AC adaptor should be located so
their location or position does not interfere with
their proper ventilation.
..........................................................................................................
102c
• Always grasp only the plug on the AC adaptor
cord when plugging into, or unplugging from, an
outlet or this unit.
..........................................................................................................
103b
• Whenever the unit is to remain unused for an
extended period of time, disconnect the AC
adaptor.
..........................................................................................................
104
• Try to prevent cords and cables from becoming
entangled. Also, all cords and cables should be
placed so they are out of the reach of children.
..........................................................................................................
106
• Never climb on top of, nor place heavy objects on
the unit.
..........................................................................................................
107c
• Never handle the AC adaptor or its plugs with
wet hands when plugging into, or unplugging
from, an outlet or this unit.
..........................................................................................................
108b
• Before moving the unit, disconnect the AC
adaptor and all cords coming from external
devices.
..........................................................................................................
109b
• Before cleaning the unit, turn off the power and
unplug the AC adaptor from the outlet.
..........................................................................................................
110b
• Whenever you suspect the possibility of lightning
in your area, disconnect the AC adaptor from the
outlet.
..........................................................................................................
3
Page 4

Contents
■ Main Features......................................................................................9
■ IMPORTANT NOTES .........................................................................10
■ Part Names and Functions...............................................................12
Front Panel................................................................................................................................................12
Rear Panel ................................................................................................................................................. 14
Some Conventions This Manual Uses ................................................................................................ 15
Quick Start
■ Getting Ready to Play.......................................................................16
■ Let’s Try Playing Some Sounds ......................................................20
■ Let’s Create a Song...........................................................................33
■ Changing How a Song Plays............................................................44
■ Let’s Record Guitar Play ..................................................................49
---------------------------------------------------------------------------
■ Chapter 1 Overview of the JS-5 .......................................................55
About Songs ............................................................................................................................................. 55
About Styles ............................................................................................................................. 55
About Parts............................................................................................................................... 55
About Tracks............................................................................................................................ 55
About Forms.............................................................................................................................55
About Styles and Chord Conversions.................................................................................. 56
About Creating User Songs...................................................................................................................56
About Creating User Styles.................................................................................................... 56
4
About Memory.........................................................................................................................................57
About Changing Data............................................................................................................................. 57
About Procedures for Changing Settings........................................................................................... 58
Switching Pages....................................................................................................................... 58
How to Use [CURSOR] and [VALUE] ................................................................................. 58
Page 5

Contents
■ Chapter 2 Playing a Song.................................................................59
To save the modified settings................................................................................................59
Playing a Song..........................................................................................................................................59
Changing the Tempo .............................................................................................................................. 60
Changing the Key....................................................................................................................................60
Adding a Count-in...................................................................................................................................60
Displaying the Chord Progression.......................................................................................................61
Playing with a Different Chord Progression ..................................................................................... 61
Playing with a Different Style..............................................................................................................61
Playing with Forms You Select Yourself ............................................................................................62
Playing with Chords You Enter Yourself............................................................................................62
Muting Out the Sound of a Specific Part............................................................................................63
Muting Out a Specific Percussion Sound........................................................................................... 63
Playing More Than One Song Continuously (Song Chain) ........................................................... 64
Jumping to the last measure of the song.............................................................................................64
■ Chapter 3 Composing Songs Using EZ Compose.........................65
■ Chapter 4 Creating User Songs.......................................................66
Selecting the Recording Destination...................................................................................................66
Selecting a Style....................................................................................................................................... 66
Selecting a recording track ....................................................................................................................66
When There is No Data in the Recording Destination....................................................... 66
Recording Forms...................................................................................................................................... 67
Realtime Recording................................................................................................................. 67
Step Recording......................................................................................................................... 68
Adding Fill-ins and Breaks .................................................................................................... 69
Erasing Forms .......................................................................................................................... 69
Copying Forms ........................................................................................................................ 69
Recording the Chord Progression........................................................................................................70
Realtime Recording................................................................................................................. 70
Step Recording......................................................................................................................... 71
Erasing Chords ........................................................................................................................73
Copying Chords.......................................................................................................................73
Using a Preset Song as a Base for Creating a New Song ................................................................. 74
Naming the Song..................................................................................................................................... 74
5
Page 6

Contents
■ Chapter 5 Editing Songs ..................................................................75
Erasing Forms...........................................................................................................................................75
Erasing Chords.........................................................................................................................................75
Erasing Forms Together with Chords..................................................................................................76
Copying Forms.........................................................................................................................................77
Copying Chord Progression..................................................................................................................78
Copying Forms Together with Chords................................................................................................79
Deleting Measures ..................................................................................................................................80
Inserting Measures.................................................................................................................................. 80
Deleting an Entire Song/Deleting the Data on a Specified Track................................................. 81
Copying an Entire Song ......................................................................................................................... 82
■ Chapter 6 Adjusting the Balance Between Parts...........................83
To save the modified settings................................................................................................83
Adjusting the Volume for Each Part.................................................................................................... 83
Changing the Pan for Each Part............................................................................................................ 84
Changing the Amount of Chorus and Reverb Applied to Each Part ............................................ 84
■ Chapter 7 Changing Effect Settings................................................86
To save the modified settings................................................................................................86
Changing the Reverb Settings..............................................................................................................86
Changing the Chorus Settings.............................................................................................................. 87
Using the Insert Effects..........................................................................................................................88
Selecting the Part to Use with the Insert Effects ................................................................. 88
Selecting the Type....................................................................................................................88
Changing the Settings for Each Type ................................................................................... 89
■ Chapter 8 Changing Performance Instruments ...........................109
To save the modified settings..............................................................................................109
Changing Drum Part Instruments......................................................................................................109
Changing Bass Part Instruments........................................................................................................110
Changing INST Part Instruments ......................................................................................................110
■ Chapter 9 Recording Your Own Performances............................111
Notes ........................................................................................................................................................ 111
Before Recording...................................................................................................................................111
About Recording Time ......................................................................................................... 111
Selecting the Recording Input .............................................................................................111
Selecting Between Audio Quality.......................................................................................112
6
Page 7

Contents
Checking the available recording time............................................................................... 112
Count-In Settings...................................................................................................................112
Recording Operations (New Recordings)......................................................................................... 112
Playback.................................................................................................................................. 113
Redoing a Recording (Rerecording) ..................................................................................................113
Deleting the Recorded Data................................................................................................................114
Using the JS-5 as a Phrase Trainer .....................................................................................................115
Confirming the Tempo Used for Recording....................................................................................115
■ Chapter 10 Various Performance Techniques .............................116
Repeatedly Playing Back a Song (Loop Play)..................................................................................116
How to Play Loops................................................................................................................ 116
Using the Foot Switch to Start/Stop Playback................................................................................117
How to Connect the Foot Switch ........................................................................................ 117
Setting Foot Switch Functions ............................................................................................. 117
■ Chapter 11 Creating User Styles ...................................................119
Points to Note When Creating User Styles....................................................................................... 119
About Arrange Mode............................................................................................................ 119
Preparing to Record...............................................................................................................................120
Recording Operation ............................................................................................................................120
Deleting a User Style/Deleting Data of the Specified Form......................................................... 122
Copying Forms.......................................................................................................................................123
Erasing Parts...........................................................................................................................................123
Copying Styles.......................................................................................................................................124
Naming the Style................................................................................................................................... 124
■ Chapter 12 Using Memory Cards...................................................125
Handling Memory Cards.....................................................................................................................125
Initializing the Memory Card.............................................................................................................125
Saving All the JS-5’s Settings to the Card ........................................................................................126
Returning Backup Files Saved on a Card to the JS-5......................................................................127
Deleting Data on a Card....................................................................................................................... 127
■ Chapter 13 Changing the Usage Environment.............................128
Adjusting the Contrast of the Display..............................................................................................128
Tuning the JS-5’s sound generator..................................................................................................... 128
Changing the Metronome Settings.................................................................................................... 128
7
Page 8

Contents
Copying Groups of User Songs and Styles Between the JS-5 and Memory Cards..................129
Deleting Data in a Batch ...................................................................................................................... 129
Returning to the Factory-default Settings ........................................................................................ 130
Displaying Remaining Memory......................................................................................................... 130
■ Chapter 14 Controlling the JS-5 with MIDI....................................131
What Is MIDI?........................................................................................................................................131
MIDI Connectors ................................................................................................................... 131
MIDI Channels.......................................................................................................................131
MIDI Information Handled by the JS-5.............................................................................. 131
About the MIDI Implementation Chart.............................................................................132
Using the JS-5 As a MIDI Sound Module........................................................................................132
Synchronizing a Performance............................................................................................................. 133
Saving Data to an External MIDI Instrument (Bulk Dump) ........................................................ 134
Returning Data from an External MIDI Instrument (Bulk Load)................................................ 135
---------------------------------------------------------------------------
■ Troubleshooting..............................................................................136
■ Error Messages ...............................................................................139
■ Preset Song List..............................................................................141
■ Preset Style List ..............................................................................142
■ Instrument List ................................................................................143
■ Drum Kit List....................................................................................144
■ Chord Type Chart............................................................................146
■ MIDI Implemantation.......................................................................147
■ MIDI Implementation Chart.............................................................152
■ Specifications..................................................................................153
■ Index.................................................................................................154
8
Page 9

Main Features
The JS-5 is a backing machine equipped with a backing generator offering new features that make it easy to
create four-part backing data (accompaniment data), even for people with no knowledge of sequencers or music.
It’s also equipped with a digital recorder feature, so you can record guitar solos and vocals.
This means you can complete an entire song using nothing other than the JS-5.
Backing Generator
High-quality four-part backing data is created by selecting
and combining preset songs and styles according to the
desired use.
200 Preset Songs
Some 200 songs are provided in a wide variety of genres,
including rock and jazz. You can start practicing guitar right
away, just by choosing a song. You can also copy preset
songs for use when creating your own original songs.
It’s also possible to mute out an accompaniment part for use
as a rhythm machine with bass.
Button Input for 15 Types of
Chords
This supports even complex chords, and lets you enter chord
progressions just as they are written.
Digital Recorder Function
You can record about two minutes of guitar play, vocals, or
other sounds. You can also use a memory card (SmartMedia).
For instance, with 64-megabyte (MB) smart media, it’s
possible to record about 68 minutes.
Time stretching is performed automatically for recording
data, depending on the backing tempo, to synchronize it
with the backing.
Loop Function
You can set a loop point for each individual song. This
setting enables recording or loop play within a particular
passage.
Control Using Foot Switches
If you connect a foot switch (sold separately), you can use the
foot switch to start and stop play, or to switch forms.
Creating User Songs
You can compose songs (User Songs) by specifying a Style
and recording the Form and Chord Progression. You can
save maximum 100 User Songs in the unit. If you use a
memory card (SmartMedia), you can save up to maximum
100 songs on the card.
EZ Compose Function
This interactive feature lets you complete song data simply
and easily, making only a minimum of settings.
Playing in Sync with MIDI
Instruments
The unit is compatible with MIDI Song Position Pointer, so
you can play in sync with a MIDI instrument, such as the BR8 or a sequencer.
* SmartMedia is a trademark of Toshiba Corporation.
9
Page 10

IMPORTANT NOTES
291a
In addition to the items listed under “USING THE UNIT SAFELY” on page 2–3, please read and observe the following:
Power Supply
301
• Do not use this unit on the same power circuit with any
device that will generate line noise (such as an electric
motor or variable lighting system).
302
• The AC adaptor will begin to generate heat after long
hours of consecutive use. This is normal, and is not a
cause for concern.
307
• Before connecting this unit to other devices, turn off the
power to all units. This will help prevent malfunctions
and/or damage to speakers or other devices.
Placement
351
• Using the unit near power amplifiers (or other equipment
containing large power transformers) may induce hum.
To alleviate the problem, change the orientation of this
unit; or move it farther away from the source of interference.
352
• This device may interfere with radio and television
reception. Do not use this device in the vicinity of such
receivers.
354a
• Do not expose the unit to direct sunlight, place it near
devices that radiate heat, leave it inside an enclosed
vehicle, or otherwise subject it to temperature extremes.
Excessive heat can deform or discolor the unit.
355
• To avoid possible breakdown, do not use the unit in a wet
area, such as an area exposed to rain or other moisture.
Maintenance
401a
• For everyday cleaning wipe the unit with a soft, dry cloth
or one that has been slightly dampened with water. To
remove stubborn dirt, use a cloth impregnated with a
mild, non-abrasive detergent. Afterwards, be sure to wipe
the unit thoroughly with a soft, dry cloth.
402
• Never use benzine, thinners, alcohol or solvents of any
kind, to avoid the possibility of discoloration and/or
deformation.
Repairs and Data
452
• Please be aware that all data contained in the unit’s
memory may be lost when the unit is sent for repairs.
Important data should always be backed up on a Memory
card (SmartMedia), or written down on paper (when
possible). During repairs, due care is taken to avoid the
loss of data. However, in certain cases (such as when
circuitry related to memory itself is out of order), we
regret that it may not be possible to restore the data, and
Roland assumes no liability concerning such loss of data.
Memory Backup
501b
• This unit contains a battery which powers the unit’s
memory circuits while the main power is off. When this
battery becomes weak, the message shown below will
appear in the display. Once you see this message, have the
battery replaced with a fresh one as soon as possible to
avoid the loss of all data in memory. To have the battery
replaced, consult with your retailer, the nearest Roland
Service Center, or an authorized Roland distributor, as
listed on the “Information” sheet.
“Battery Low !”
Additional Precautions
551
• Please be aware that the contents of memory can be
irretrievably lost as a result of a malfunction, or the
improper operation of the unit. To protect yourself against
the risk of loosing important data, we recommend that
you periodically save a backup copy of important data
you have stored in the unit’s memory on a Memory card
(SmartMedia).
552
• Unfortunately, it may be impossible to restore the contents
of data that was stored Memory card (SmartMedia) once it
has been lost. Roland Corporation assumes no liability
concerning such loss of data.
553
• Use a reasonable amount of care when using the unit’s
buttons, sliders, or other controls; and when using its jacks
and connectors. Rough handling can lead to malfunctions.
554
• Never strike or apply strong pressure to the display.
556
• When connecting / disconnecting all cables, grasp the
connector itself—never pull on the cable. This way you
will avoid causing shorts, or damage to the cable’s
internal elements.
558a
• To avoid disturbing your neighbors, try to keep the unit’s
volume at reasonable levels. You may prefer to use
headphones, so you do not need to be concerned about
those around you (especially when it is late at night).
559a
• When you need to transport the unit, package it in the box
(including padding) that it came in, if possible. Otherwise,
you will need to use equivalent packaging materials.
562
• Use a cable from Roland to make the connection. If using
some other make of connection cable, please note the
following precautions.
• Some connection cables contain resistors. Do not use
cables that incorporate resistors for connecting to this
unit. The use of such cables can cause the sound level
to be extremely low, or impossible to hear. For information on cable specifications, contact the manufacturer of the cable.
10
Page 11
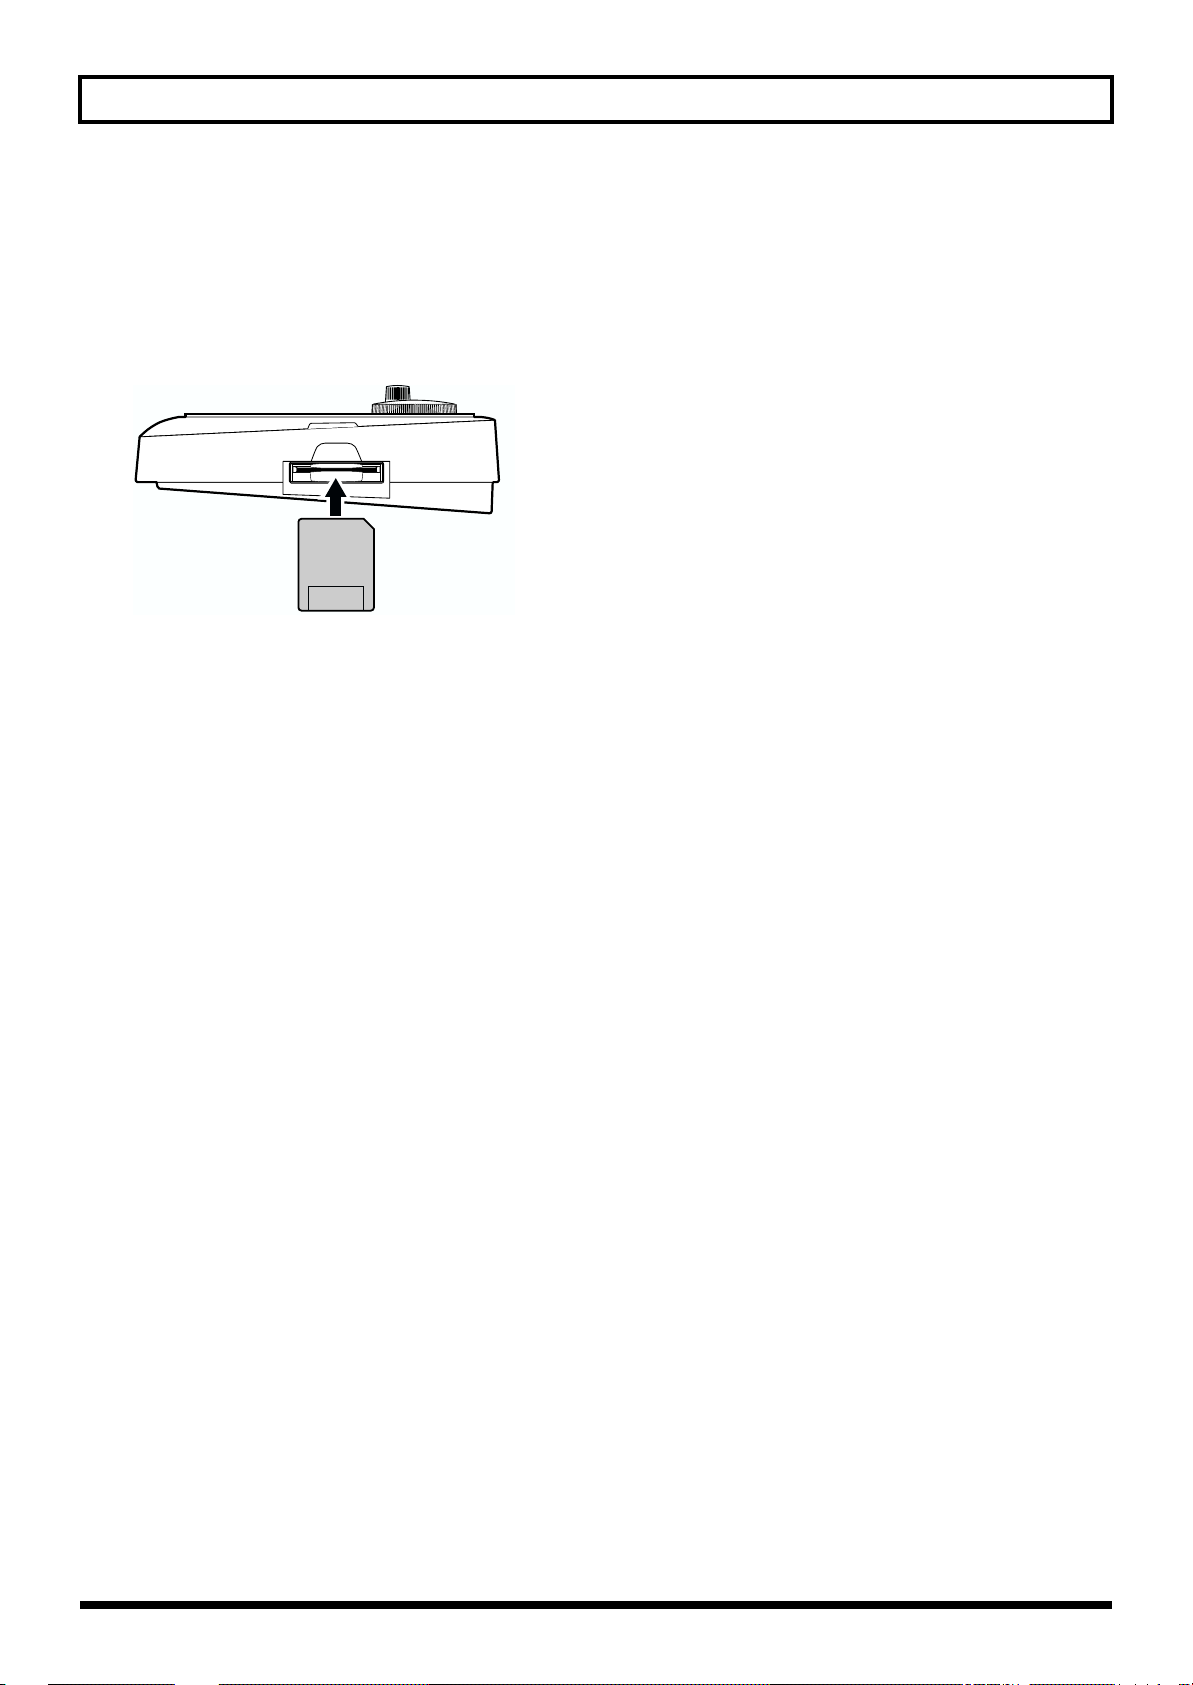
Before Using Memory Cards
Using Memory Cards
704
• Carefully insert the memory card all the way in—until it is
firmly in place.
fig.RE12-01
The surface without
gold contacts
must be upward
705
• Never touch the terminals of the memory card. Also,
avoid getting the terminals dirty.
IMPORTANT NOTES
Copyright
851
• Unauthorized recording, distribution, sale, lending, public
performance, broadcasting, or the like, in whole or in part,
of a work (musical composition, video, broadcast, public
performance, or the like) whose copyright is held by a
third party is prohibited by law.
853
• Do not use this unit for purposes that could infringe on a
copyright held by a third party. BOSS/Roland assumes no
responsibility whatsoever with regard to any infringements of third-party copyrights arising through your use
of this unit.
11
Page 12
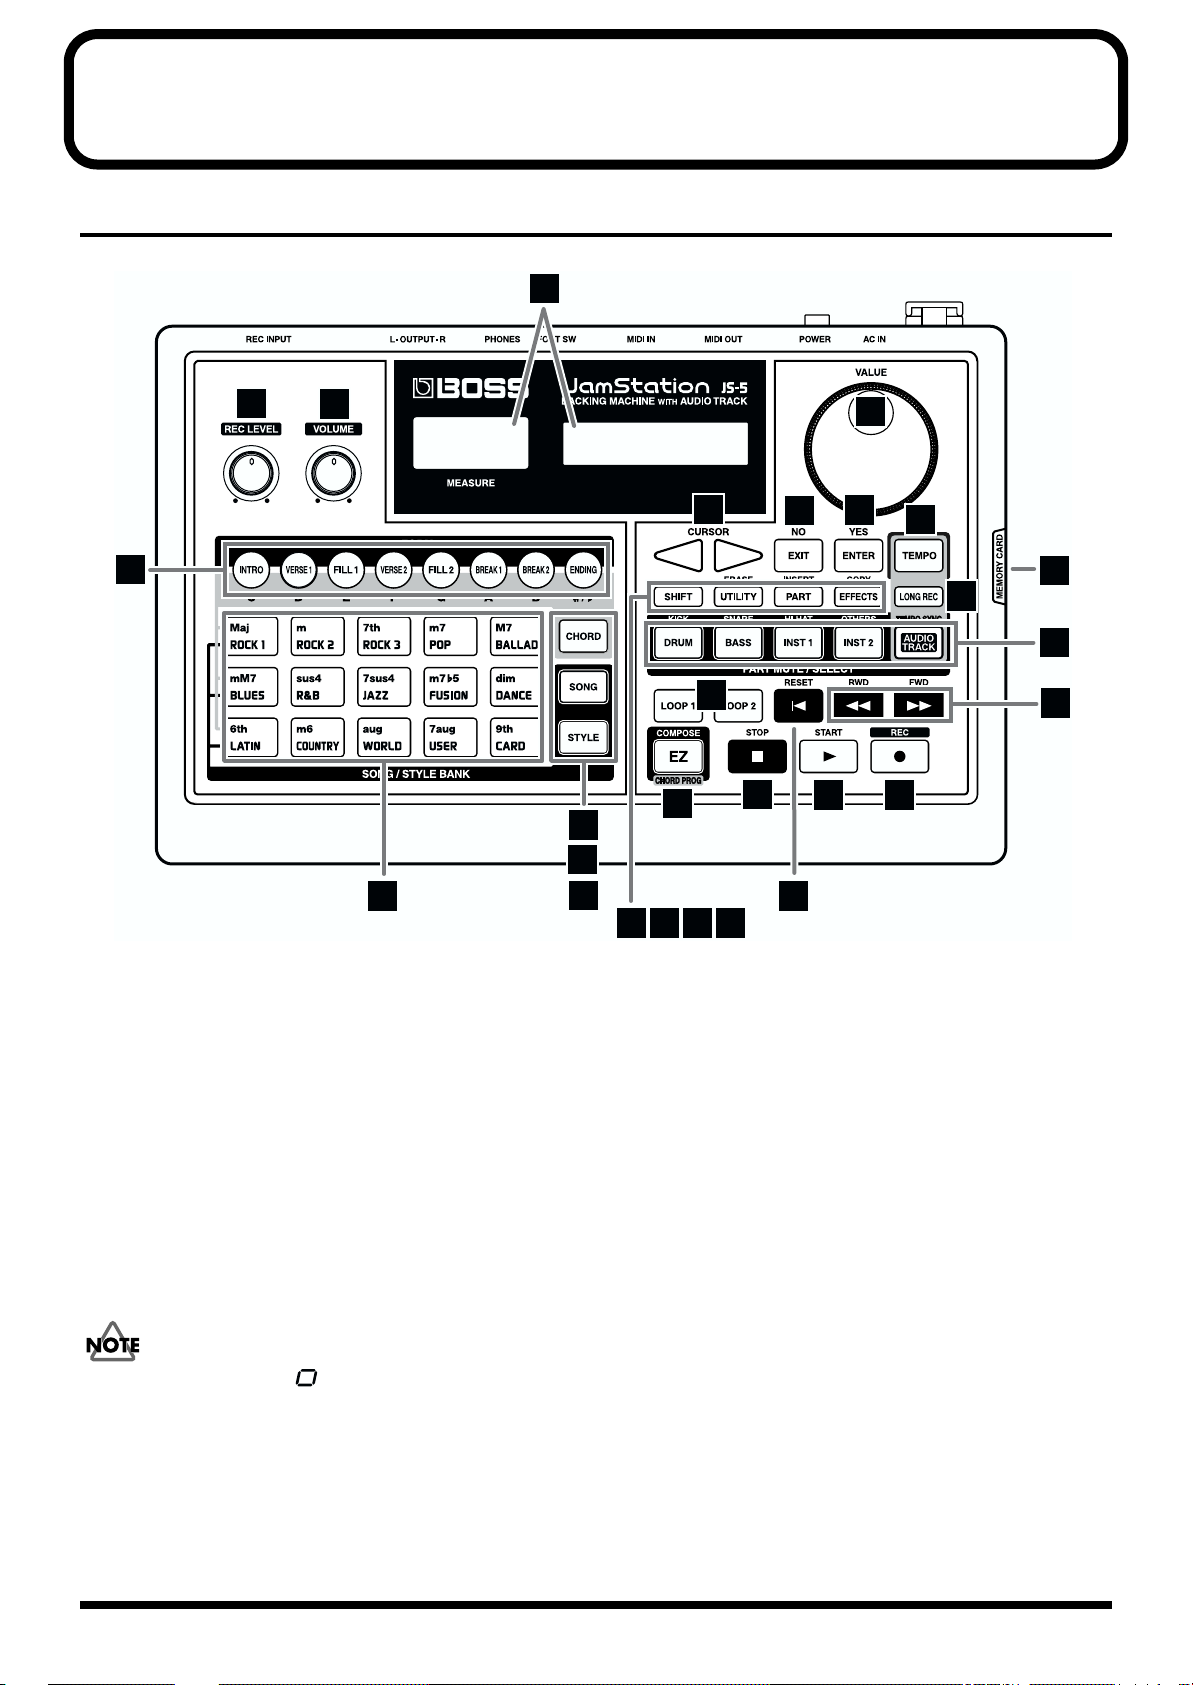
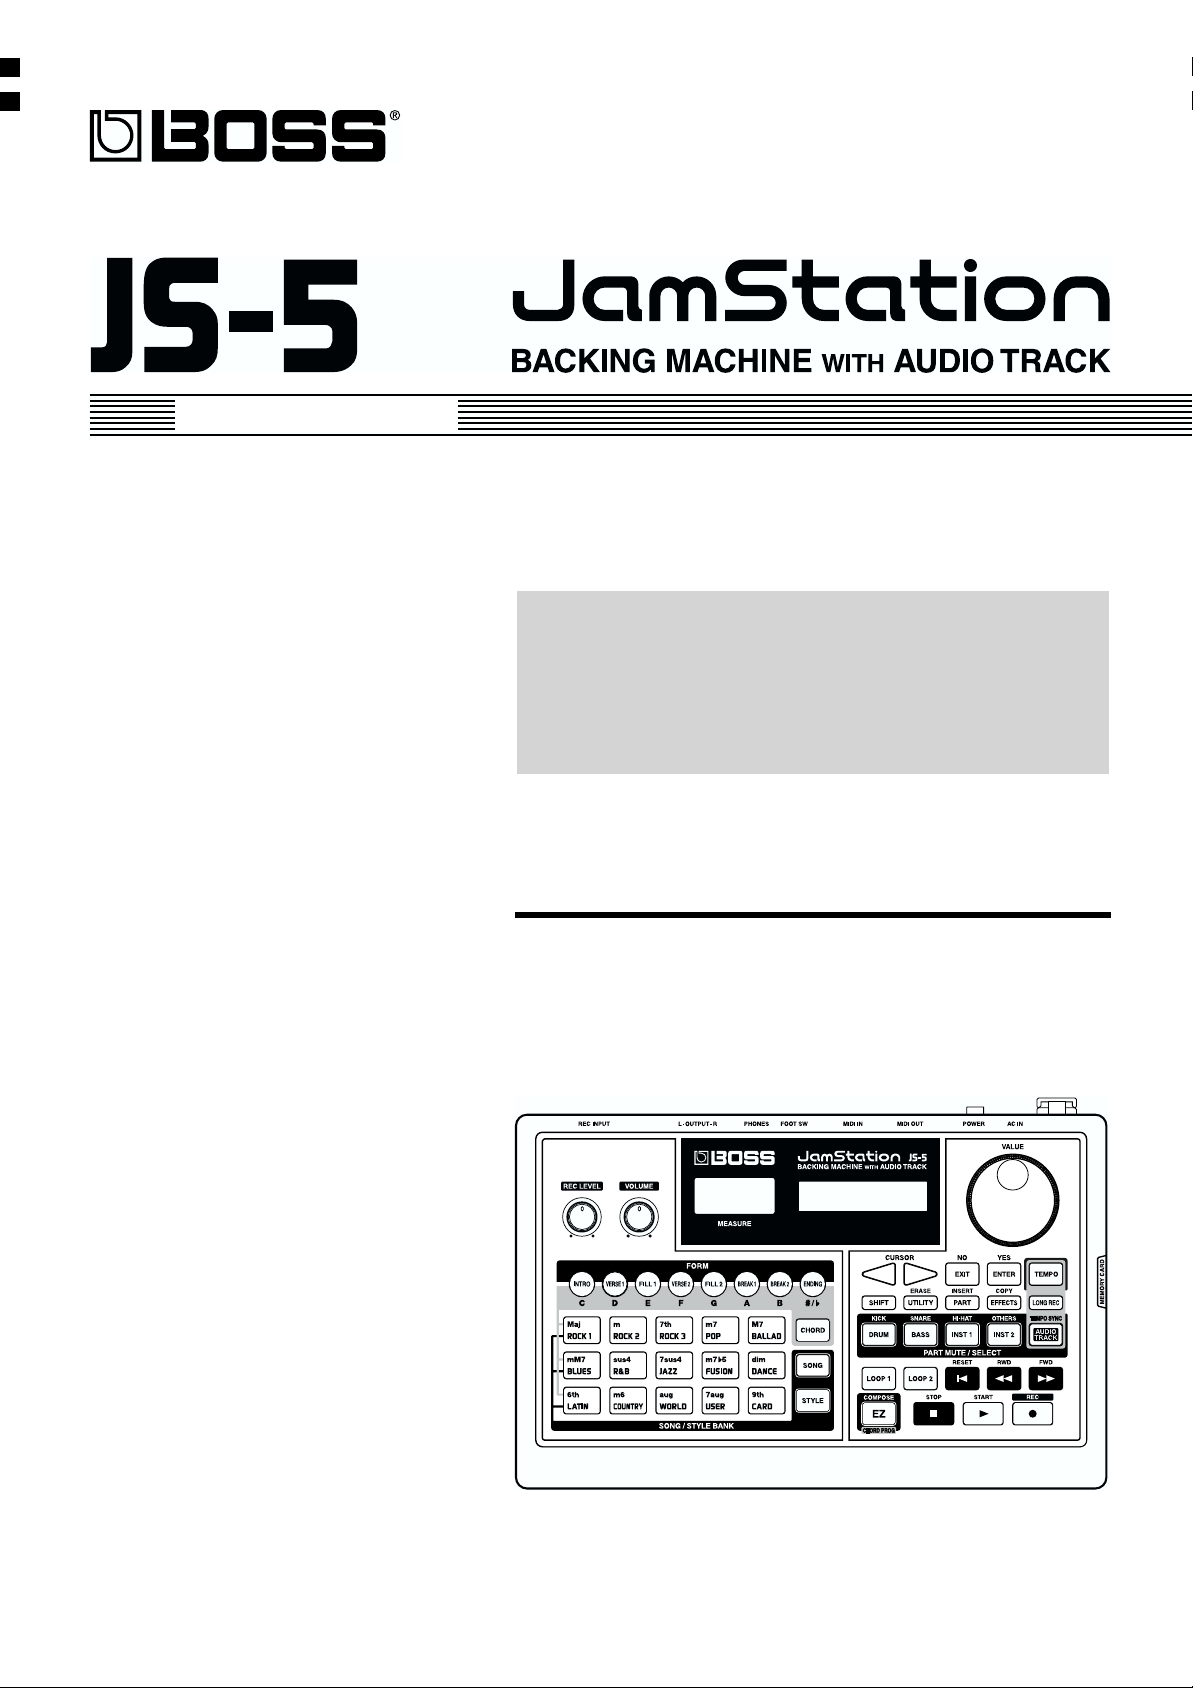
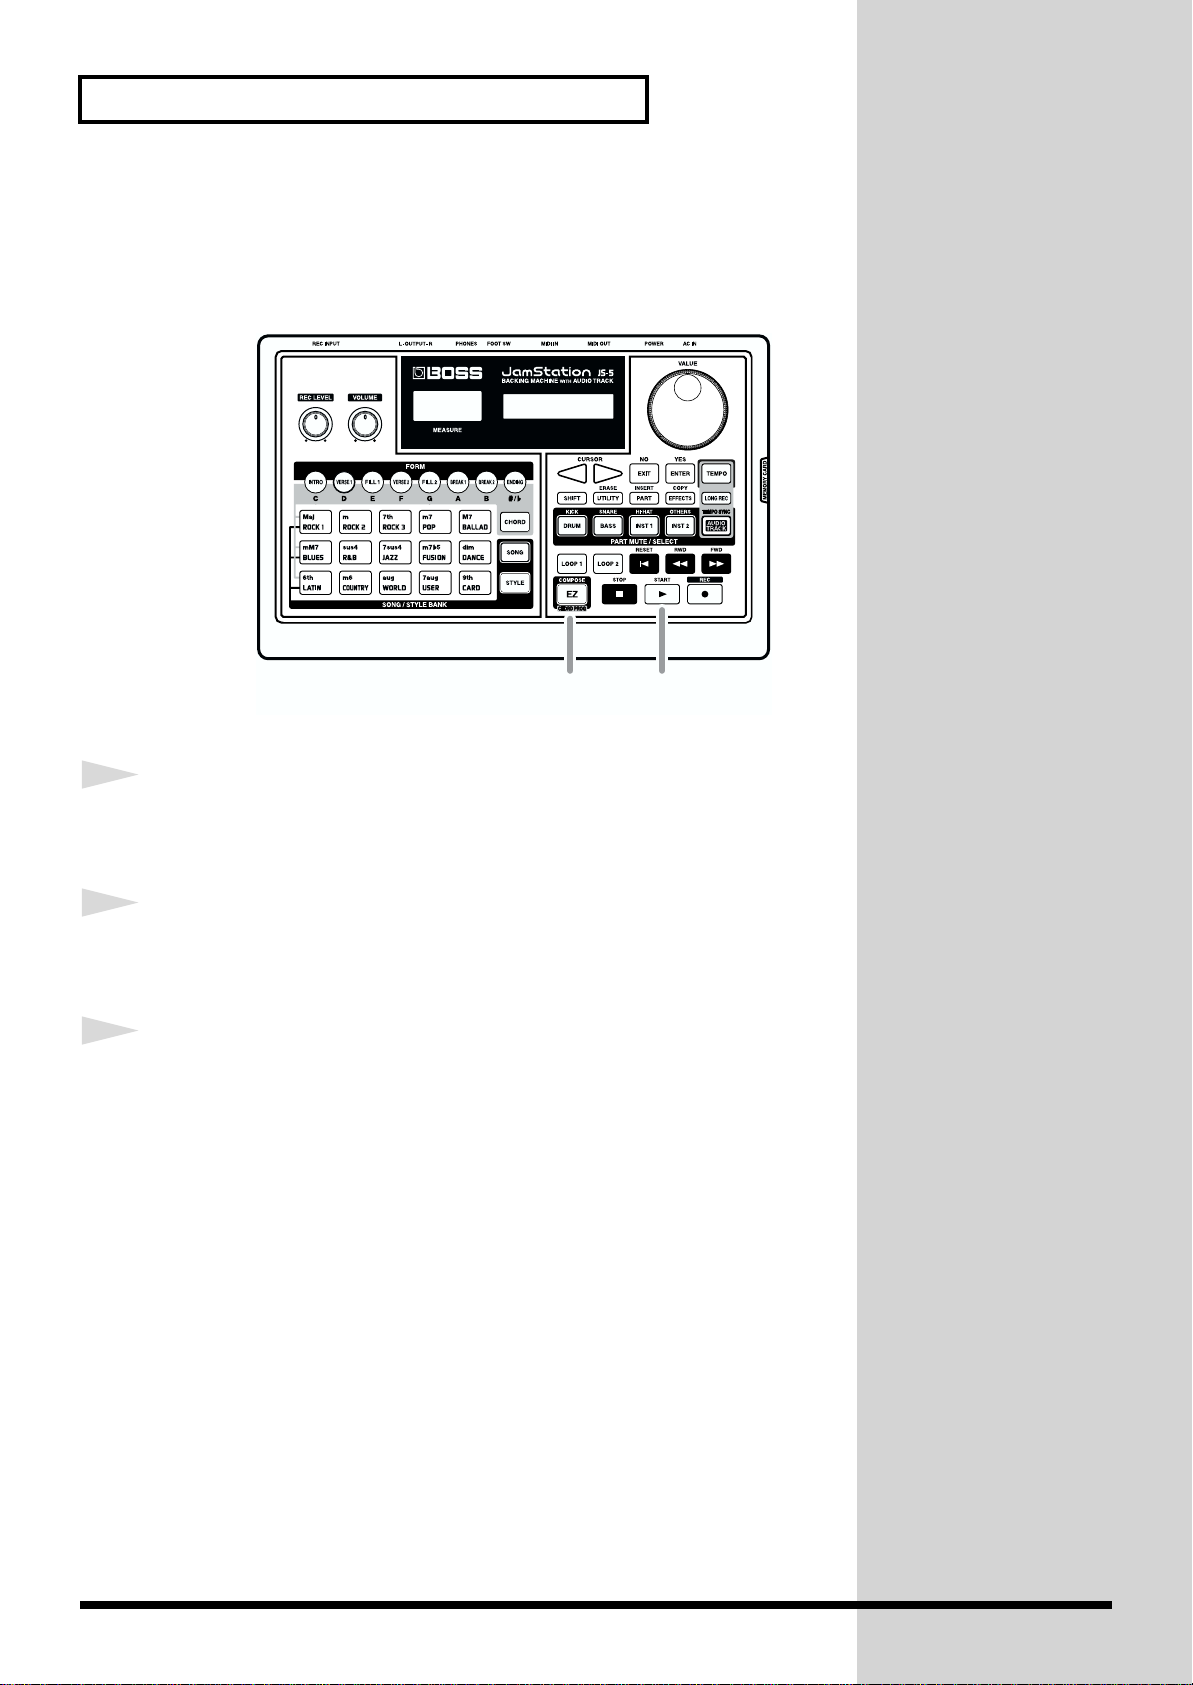
Part Names and Functions
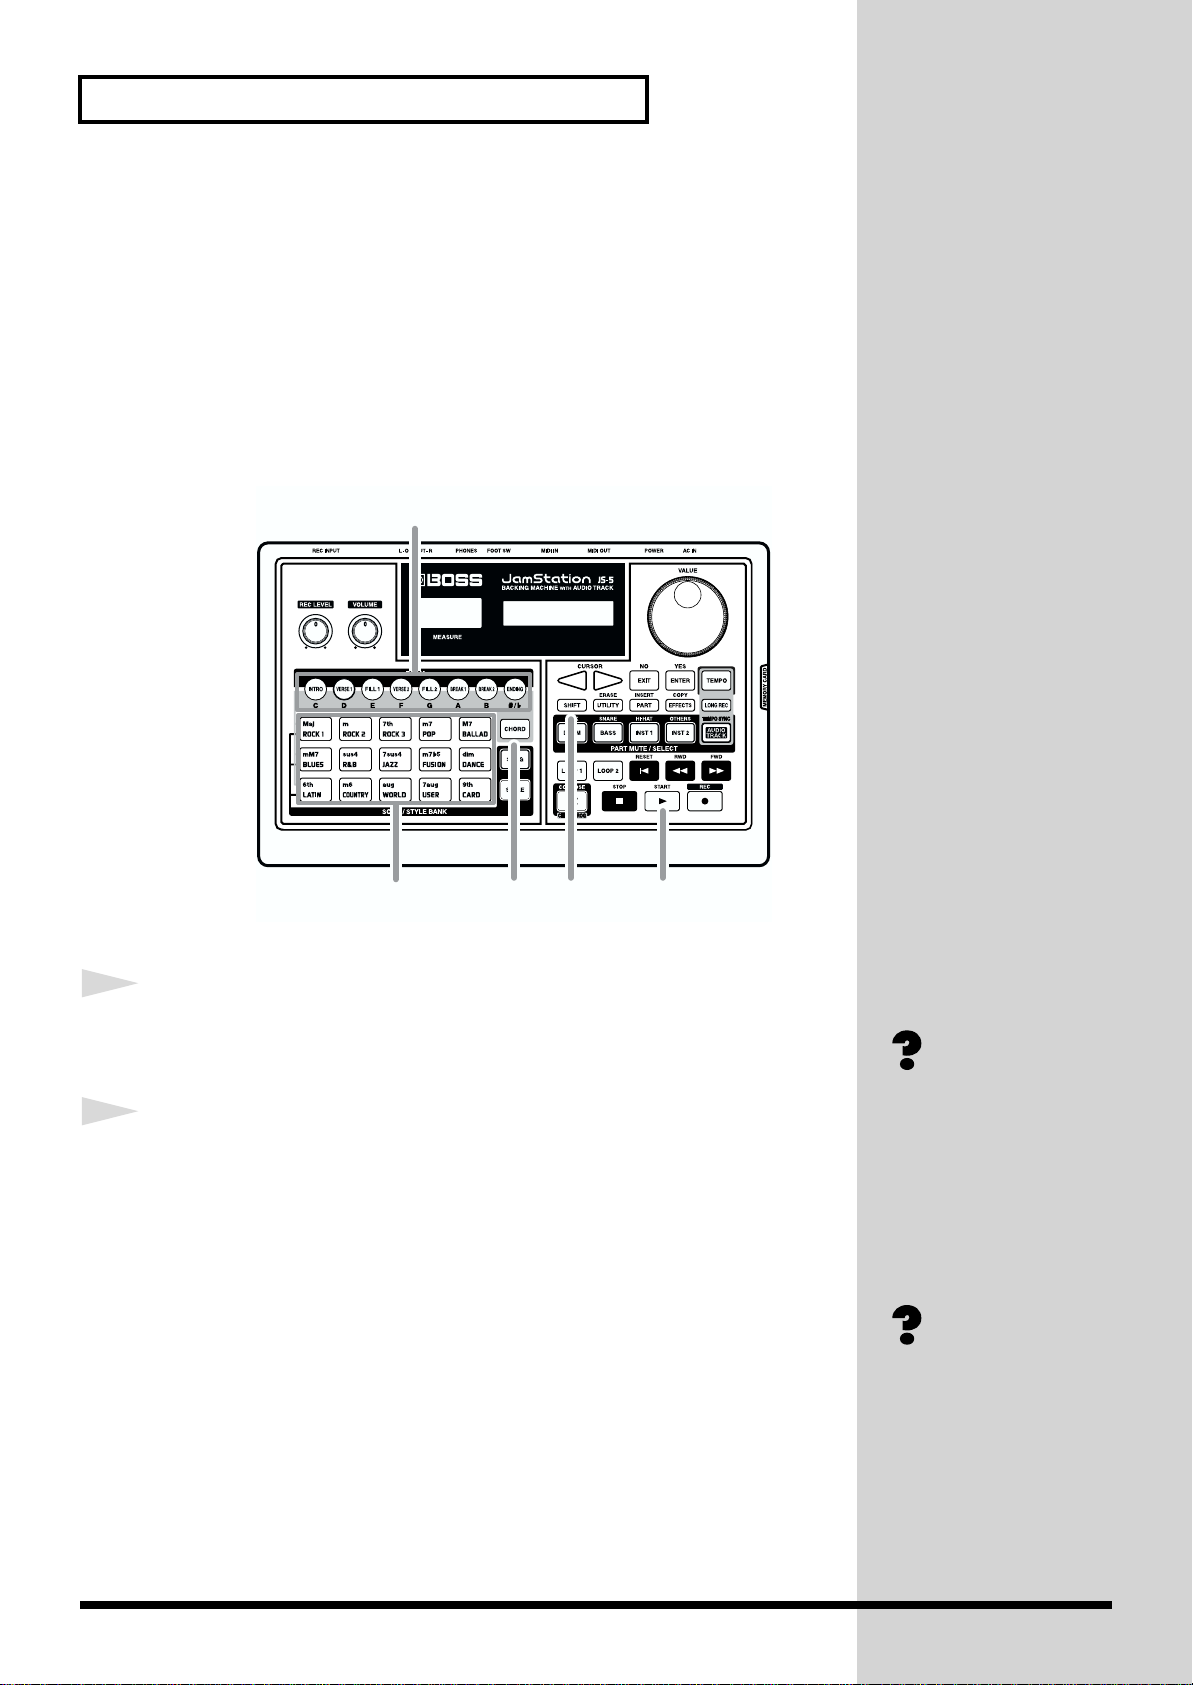
Front Panel
fig.IN02-01
3
1
5
2
10
11
12
4
13
27
18
19
21
20
24
25 26
23
6
7
9
8
14 15
16 17
22
1. REC LEVEL Knob
This adjusts the input sound of a device connected to the
REC INPUT jack.
2. VOLUME Knob
This adjusts the overall volume level of the JS-5.
3. Display
Left side: This displays the measure and count-in.
Right side: This displays a variety of information
according to the state of the operation.
If the left display shows “ ,” be very sure not to switch
off the power or pull out a memory card (SmartMedia).
4. VALUE Dial
This changes the setting values for parameters. Holding
down the SHIFT button while turning the dial makes the
values change in larger increments.
5. FORM Buttons
These select a Form for playing or recording from among
the eight types of Forms (performance patterns) ranging
from Intro to Ending.
When the CHORD button is lit up, this selects the root of
the chord.
6. CHORD Button
Press this to make chord-related settings, such as chord
entry or chord-progression display.
7. SONG Button
Use this to make song-related settings, such as song
selection and recording.
12
Page 13

Part Names and Functions
8. STYLE Button
Use this to make style-related settings, such as style
selection and recording.
9. SONG/STYLE BANK
(Song Bank/Style Bank) Buttons
SONG button illuminated:
These select a song category (ROCK 1 through CARD).
STYLE button illuminated:
These select a style category (ROCK 1 through CARD).
CHORD button illuminated:
These select a chord type (Maj through 9th).
10.
CURSOR Buttons
These are used to select parameters and change screens
(pages).
* If you continue holding the button, the change will be
continuous.
* If you hold down one button and press the other button, the
change will become more rapid.
11.
EXIT Button
Press this to stop an operation.
12.
ENTER Button
Use this to “lock in” a value you’ve set or to execute an
operation.
13.
TEMPO Button
Use this to adjust the tempo.
INSERT Button:
Holding down the SHIFT button and pressing the PART
button makes this function as the INSERT button,
allowing you to insert data.
17.
EFFECTS Button
Use this when making settings for reverb, chorus, or
insert effect.
COPY Button:
Holding down the SHIFT button and pressing the
EFFECTS button makes this function as the COPY
button, allowing you to copy data.
18.
LONG REC (Long Recording) Button
When you’re recording your own performance, this
switches you between high-quality recording and
longer-time recording.
19.
PART MUTE/SELECT Button
This mutes out (silences) a part when playing a song.
When making the settings for a part, select the target
part.
20.
LOOP 1 and 2 Buttons
Use these for loop play.
21.
EZ (EZ Compose) Button
Use this when using the EZ Compose feature. This
button is also used when changing the chord progression
temporarily during performance of a song.
14.
SHIFT Button
This is used in combination with other buttons.
15.
UTILITY Button
Use this when making settings related to the usage
environment for the JS-5.
ERASE Button:
Holding down the SHIFT button and pressing the
UTILITY button makes this function as the ERASE
button, allowing you to erase or delete data.
16.
PART Button
Use this to make part-related settings.
22.
RESET Button
When you have stopped play partway through a song,
this returns you to the beginning of the song.
23.
RWD (Rewind) and
FWD (Forward) Buttons
RWD: Each press of this button moves the play
position of the song back one measure.
FWD: Each press of this button moves the play
position of the song ahead one measure.
* If you continue holding the button, the change will be
continuous.
* If you hold down one button and press the other button, the
change will become more rapid.
13
Page 14
Part Names and Functions
24.
STOP Button
This stops performance.
25.
START Button
This starts performance.
Side Panel
27.
MEMORY CARD Slot
This is for inserting a memory card (smart media).
26.
REC (Record) Button
This puts the JS-5 in a state where recording is possible.
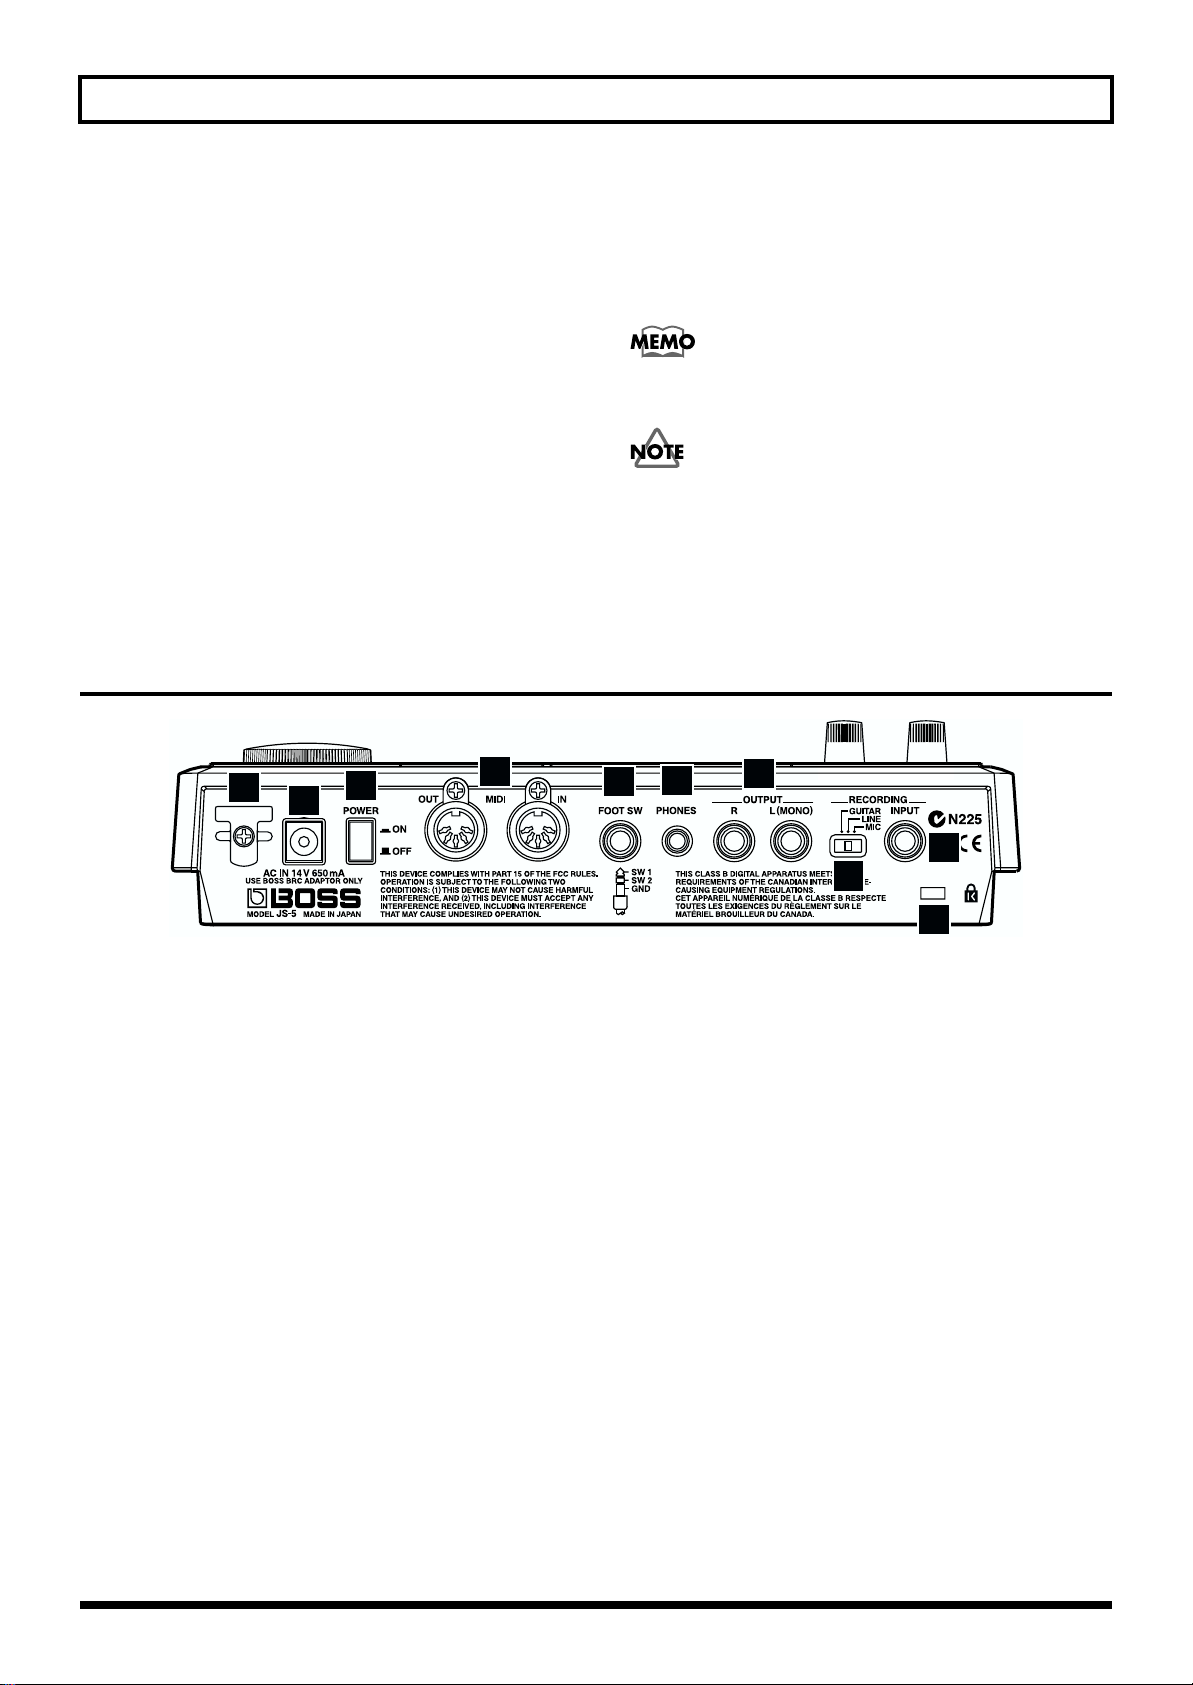
Rear Panel
fig.IN02-02
29
30
28
31
Purchase smartmedia at your local computer dealer or digital
camera vendor.
The JS-5 can use 8 to 64 MB SmartMedia with a powersource voltage of 3.3 V.
Inserting SmartMedia other than those described here
may result in corruption of data in the JS-5. Be sure
never to use anything other than the specified media.
* Roland S2M-5/S4M-5 SmartMedia cannot be used.
32
33
34
36
35
37
28.
Cord Hook
This is for fastening the cord from the supplied AC
adapter. This can help prevent power loss due to the
plug being pulled out, or excessive force being applied to
the AC adapter jack if the cord is accidentally yanked.
29.
AC Adapter Jack
This is for connecting the included AC adapter (BRC
series).
30.
POWER Switch
This switches the power on and off.
31.
MIDI IN and OUT Connectors
These are for connecting external MIDI instruments. Use
MIDI cables (sold separately) to make the connections.
32.
FOOT SW (Foot Switch) Jack
This is for connecting a foot switch such as the FS-5U
(sold separately). By using the PCS-31 connection cord
sold separately, you can connect and use two foot
switches.
33.
PHONES (Headphones) Jack
This is for connecting headphones.
34.
OUTPUT Jacks R and L (MONO)
These are output jacks for audio signals. They are used
to connect an amplifier, audio set, or the like.
Use an audio cable (sold separately) to make the
connection.
35.
REC INPUT Selector Switch
This makes the input sound of a device connected to the
REC INPUT jack compatible with the JS-5.
36.
REC INPUT Jack
This is for connecting an instrument you play yourself,
such as an electric guitar or microphone.
14
Page 15

37.
MicroSaver Security Slot ( )
MicroSaver and Kensington are registered trademarks of
Kensington Microware Limited.
© 1997 Kensington Microware Limited
Kensington Microware Limited
2855 Campus Drive
San Mateo, CA 94403 U.S.A.
Web:www.kensington.com
Part Names and Functions
Some Conventions This Manual Uses
This manual uses the typographical conventions shown below in order to explain methods of operation in a concise way.
● Text enclosed in “[ ]” indicates buttons, knobs, and other controls on the panel.
[SONG]: Song button
[VOLUME]: Volume knob
[VALUE]: Value dial
● [SHIFT] + [***] means “while holding down the Shift button, press the *** button.”
15
Page 16
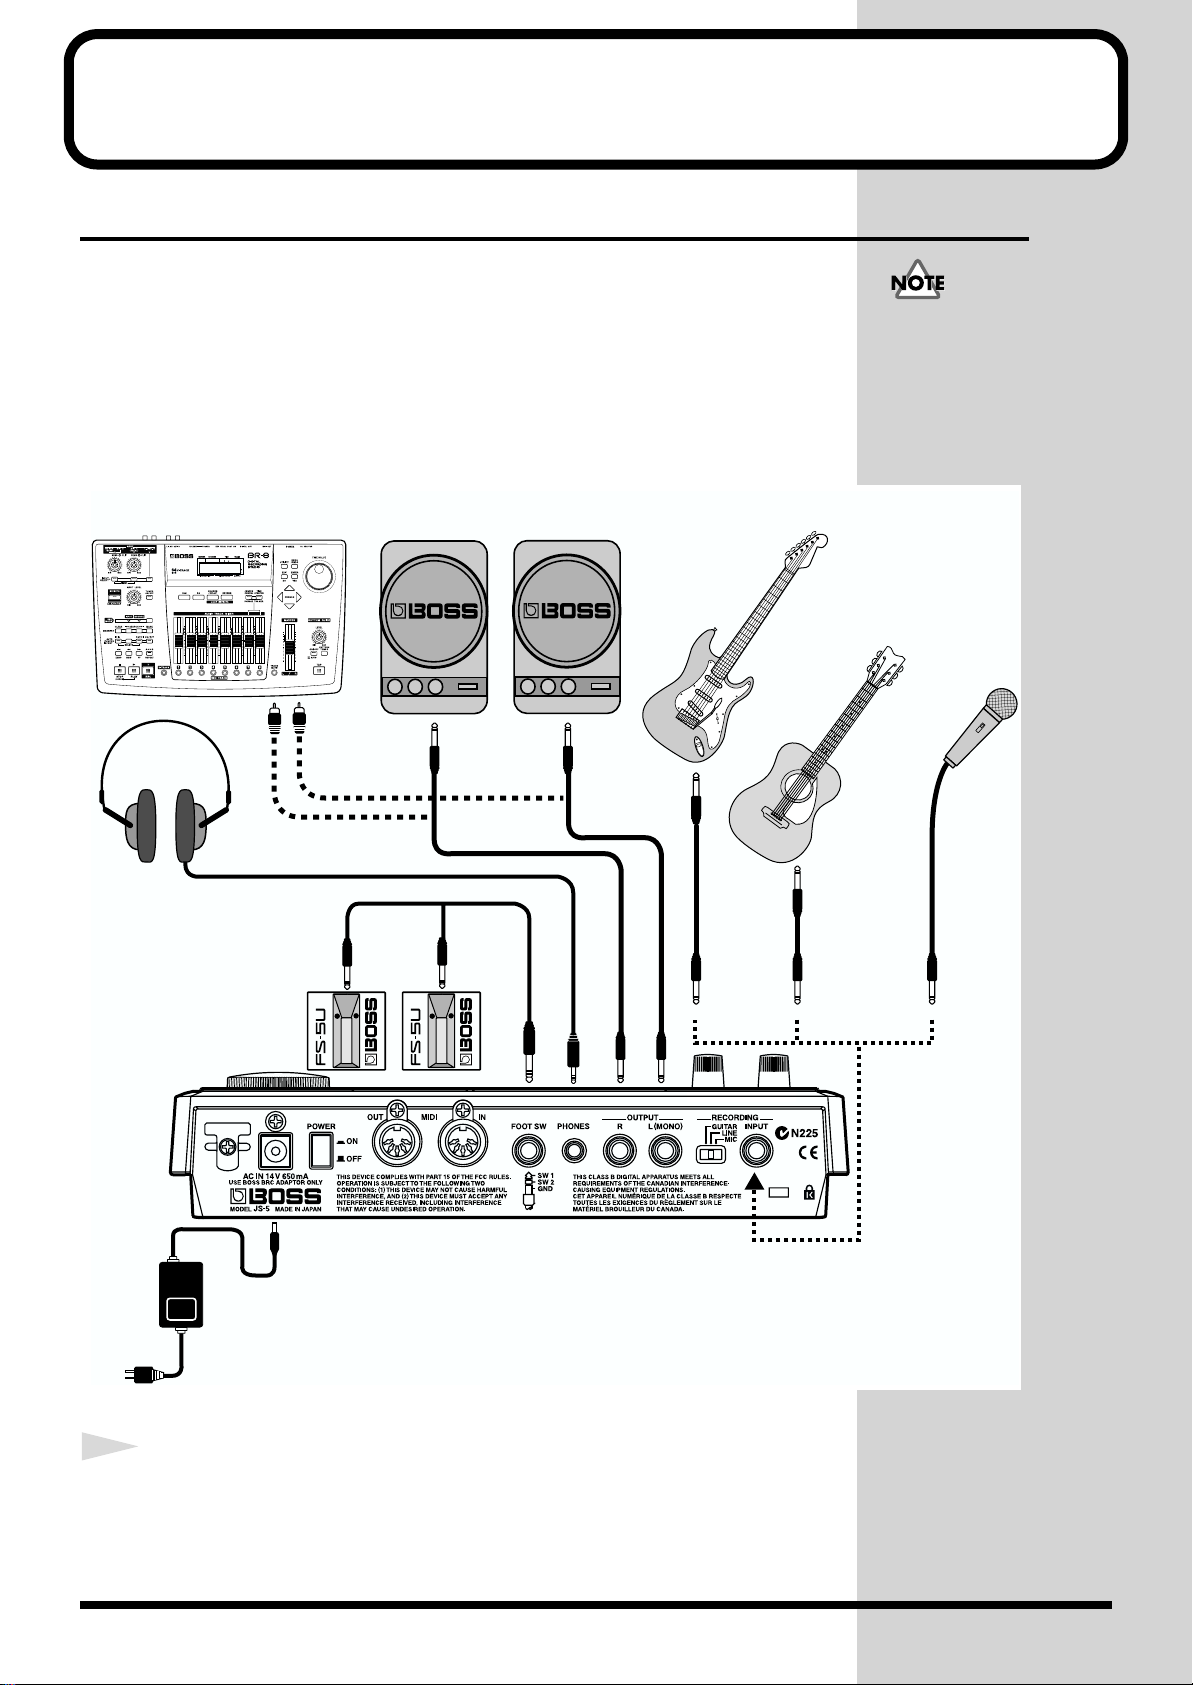
Getting Ready to Play
Making the Connections
The JS-5 does not have a built-in amp or speakers. To play sounds, you need
to have on hand an amp or audio set, or some stereo headphones.
* Audio cables, MIDI cables, stereo headphones, and foot switch are not included.
They must be purchased separately.
fig.QS01-01a
Monitor Speaker,
Digital Recorder (BR-8 etc.)
Audio Set, etc.
To prevent malfunction and/
or damage to speakers or other
devices, always turn down the
volume, and turn off the
power on all devices before
making any connections.
Electric Guitar
(with effector)
Electric Acoustic Guitar,
Keyboard, etc.
Microphone
Stereo
Headphones
Foot Switch
PCS-31
GUIT AR LINE MIC
(FS-5U)
AC Adaptor
(BRC series)
1
16
Before making the connections, check the following.
Is the volume level of the unit and the connected amp or other device turned
down all the way?
Is the power to the unit and the connected amp or other device switched off?
Page 17
Getting Ready to Play
2
3
Connect the included AC adapter to the JS-5, then plug the
AC adapter into a power outlet.
* To prevent the inadvertent disruption of power to your unit (should the plug be
pulled out accidentally), and to avoid applying undue stress to the AC adaptor jack,
anchor the power cord using the cord hook, as shown in the illustration.
fig.QS01-01b
Connect the amp or audio set as shown in the figure.
If necessary, connect stereo headphones.
* To get the best performance out of the JS-5, we recommend stereo use.
Quick Start
For monaural use, make the connection to the OUTPUT L (MONO) jack.
■ For making connections to the MIDI connectors, see (p. 131).
■ For making a connection to the FOOT SW jack, see (p. 117).
17
Page 18

Getting Ready to Play
Switching On the Power
Once the connections have been completed, turn on power to your various
devices in the order specified. By turning on devices in the wrong order, you
risk causing malfunction and/or damage to speakers and other devices.
1
2
3
Before you switch on the power, check the following.
Are the external devices connected correctly?
Is the volume level of the unit and the connected amp or other device turned
down all the way?
Turn on the POWER switch on the rear panel of the JS-5.
fig.QS01-02
On
Off
* This unit is equipped with a protection circuit. A brief interval (a few seconds) after
power up is required before the unit will operate normally.
Switch on the power to the amp or other device.
4
5
6
18
Adjust the volume level on the JS-5.
Press [START] to start playing. Use [VOLUME] to adjust the volume to the
appropriate level.
fig.QS01-03
Also adjust the volume of the connected amp or other device
to an appropriate level.
After adjusting the volume, press [STOP] to stop playing.
Page 19
Switching Off the Power
Getting Ready to Play
1
2
3
Before you switch off the power, check the following.
Is the volume level of the unit and the connected amp or other device turned
down all the way?
Switch off the power to the amp or other device.
Switch off the power to the JS-5.
Quick Start
19
Page 20
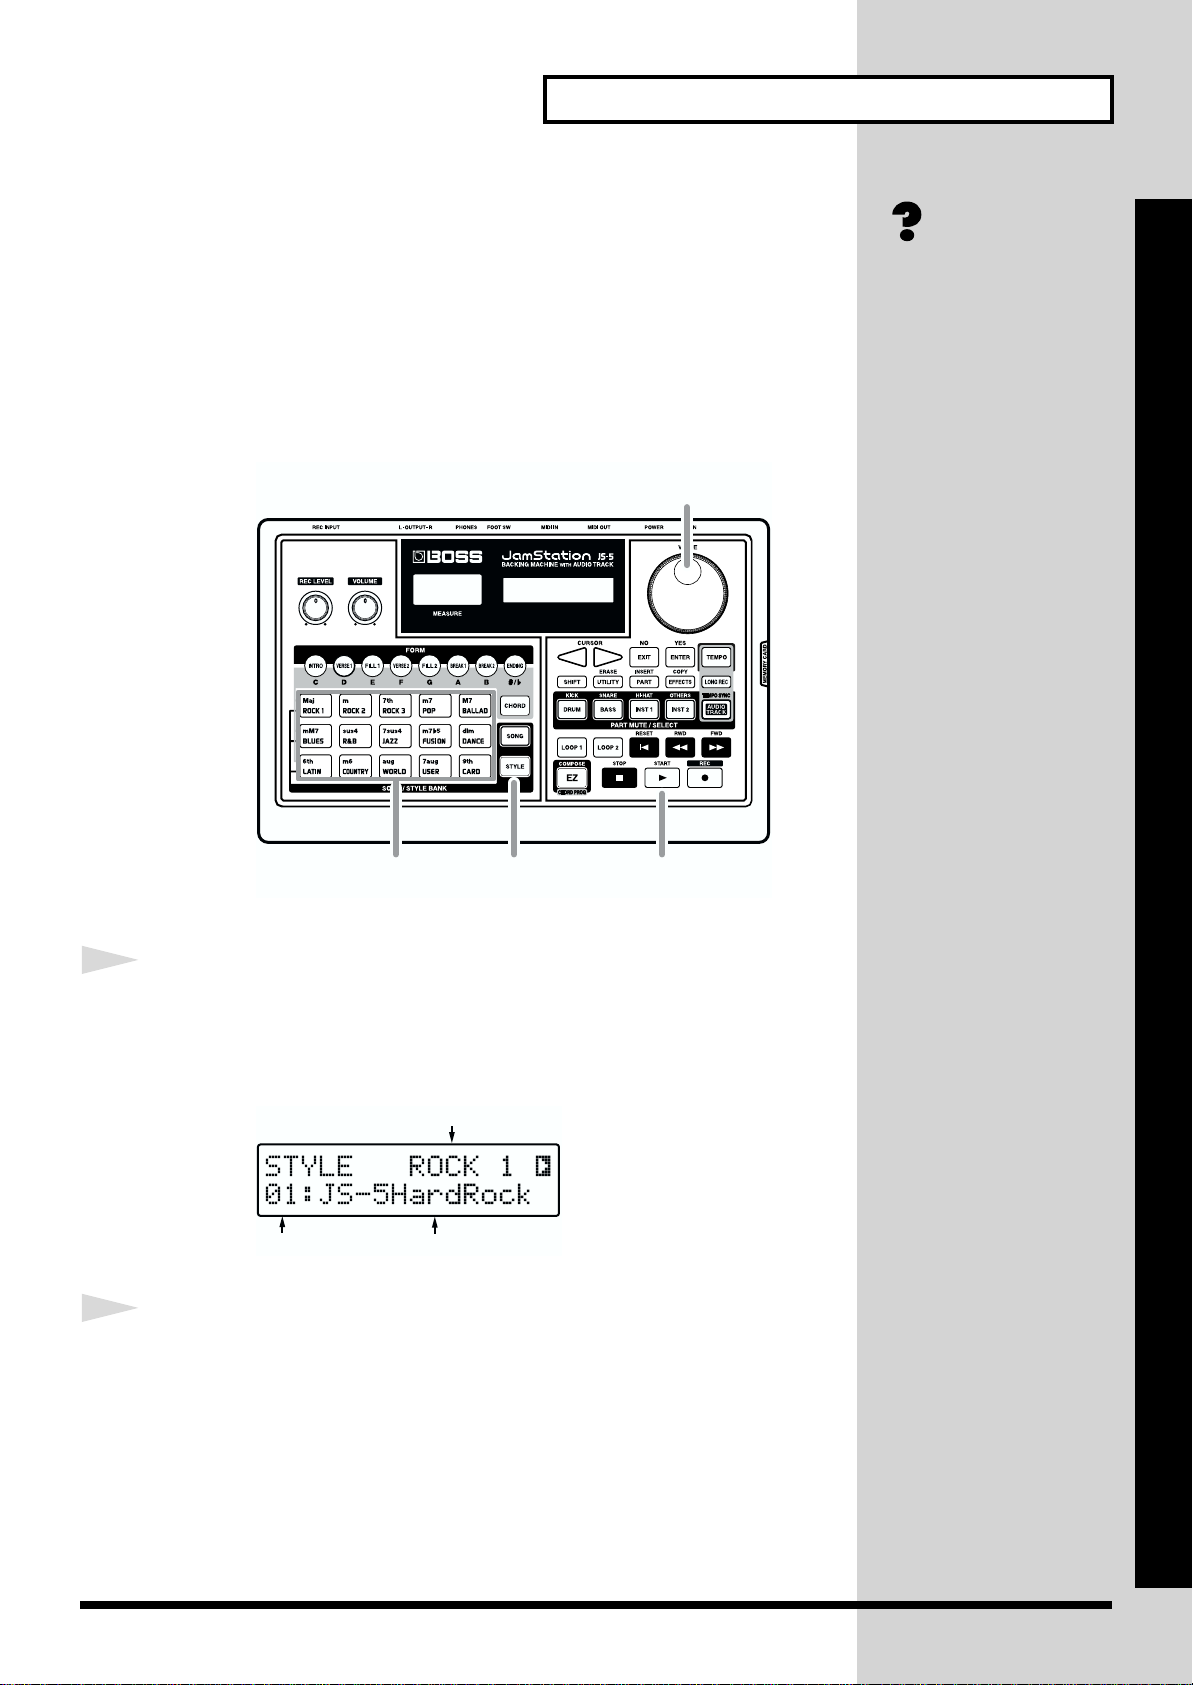
Let’s Try Playing Some Sounds
b
Listening to the Preset Songs
The JS-5 has 200 Preset (onboard) songs. Try choosing and playing a variety
of songs.
The 200 Preset Songs are classified by category, such as rock or jazz.
fig.QS02-02
Preset Song List (p. 141)
1
12 5 4
Press [SONG], getting the button to light.
The Song screen appears.
fig.QS02-03
Category
3
On the JS-5, each such
composition is called a
song.
The songs that were put on
oard the unit at the
factory are called Preset
Songs, while the songs
you create yourself are
called User Songs.
5
Song number Song name
2
Press [SONG/STYLE BANK] and select a category.
The category you selected appears.
ROCK 1. . . . . . . . . . . . Hard rock, Heavy metal
ROCK 2. . . . . . . . . . . . Typical Rock of the sixties through nineties
ROCK 3. . . . . . . . . . . . Basic Rock
POP . . . . . . . . . . . . . . . Pops, 8-beat, and 16-beat
BALLAD. . . . . . . . . . . Ballad
BLUES. . . . . . . . . . . . . Blues
R&B . . . . . . . . . . . . . . . Rhythm and blues, funk, and soul
JAZZ . . . . . . . . . . . . . . Jazz
20
Page 21

Let’s Try Playing Some Sounds
FUSION . . . . . . . . . . . Fusion
DANCE. . . . . . . . . . . . Hip hop, techno, etc.
LATIN. . . . . . . . . . . . . Salsa, bossa nova and samba, etc.
COUNTRY . . . . . . . . . Country
WORLD . . . . . . . . . . . World music
USER . . . . . . . . . . . . . . User Songs 1 through 100
CARD . . . . . . . . . . . . . Card User Songs 1 through 100
* If no memory card is inserted, you can’t select “CARD” even if [CARD] is pressed.
3
4
Turn [VALUE] to select a song.
The name of the song you select (the song name) appears.
fig.QS02-04
* The number of songs varies from one category to another.
Press [START] to start playing the song.
[START] flashes in time to the beat set in the selected Style.
* If you’ve made the setting for count-in (p.60), the count-in appears on the left-hand
display, and the count sound is played at the same time. After the count-in display,
the sound starts to play.
The lighted [FORM] buttons ([INTRO] through [ENDING]) change along
with what is played, showing the present performance pattern (form).
Quick Start
What Is a Form? (p. 27)
5
Press [STOP] to stop playing.
Press [FWD] to move to the next measure.
Press [RWD] to go back one measure.
Press [RESET] to go back to the beginning of the song.
* When the performance reaches the end, it stops automatically.
■ You can play specified measures over and over.
→ “Repeatedly Playing Back a Song (Loop Play)” (p. 116)
21
Page 22
Let’s Try Playing Some Sounds
Changing the Tempo of a Performance
Next, try changing the tempo of the song being played.
fig.QS02-05
2
1,3
1
2
3
Press [TEMPO], getting the button to light.
The present tempo appears on the display.
fig.QS02-06
Turn [VALUE] to adjust the tempo.
Settings values: 40–250
Once you’ve decided on the tempo, press [TEMPO],
extinguishing the button’s light.
22
Page 23
Displaying the Chord Progression
You can switch to a screen (Chord screen) where the chord progression is
displayed, and check the chord progression.
fig.QS02-07
1
Let’s Try Playing Some Sounds
1
2
3 2
Press [CHORD], getting the button to light.
The Chord screen appears.
fig.QS02-08
Category
Song number
Chord root
Press [START] to start playing the song.
When the chord changes, the display of the next chord.
fig.QS02-11
On-Bass chord
Chord type
Quick Start
The root specifies the basic
note of a chord. All chords
are structured with the root
as the base, and the name
of the root tone also
appears in upper case in
the chord name.
An on-bass chord is a chord
that uses bass for a note
other than the root, such as
an “F (Maj)” chord with
“G” as the bass note. This is
usually expressed as “F/G”
or “F on G.”
3
To go back to the Song screen, press [SONG], getting the
button to light.
23
Page 24
Let’s Try Playing Some Sounds
Listening with a Different Chord Progression
The Preset Songs feature one additional Chord Progression. Let’s try
playing a Preset Song after switching to this Chord Progression.
fig.QS02-12
1
2
3
1,3 2
While play is stopped, hold down [SHIFT] and press [EZ],
getting the button to light.
When [START] is pressed, the performance begins with
different chord progression.
To return to the original Chord Progression, hold down
[SHIFT] and press [EZ] while play is stopped, extinguishing
the button’s light.
* You cannot switch the Chord Progression if [SHIFT] + [EZ] is pressed while a song
is playing.
24
Page 25
Changing the Style of a Preset Song
Let’s Try Playing Some Sounds
You may want to try changing the Style of a Preset Song. The JS-5 has 200
types of Preset (built-in) Style. Let’s try choosing and play a variety of Styles.
The 200 Preset Styles are classified by category, such as rock or jazz.
When you change the Style, the song plays in a manner that matches the
chosen Style, even when the chord progression set for the Preset Song
remains the same.
fig.QS02-14
3
2
1 4
About Styles
Music includes songs in a
wide variety categories
(musical styles), such as
rock and jazz. Songs in the
same category use more or
less the same performance
patterns (phrasing) and
instruments, or the tempo
and the like are more or
less the same, and this
makes it possible to
recognize the category’s
distinctive ambience.
The JS-5 has built-in Preset
Styles that group together
the accompaniment
performance patterns,
instruments (parts), and
tempos for each category,
so you can easily create
songs with distinctive
ambience using these
Styles.
Quick Start
1
2
While play is stopped, press [STYLE], getting the button to
light.
The Style screen appears.
fig.QS02-15
Category
Style number Style name
Press [SONG/STYLE BANK] and select a category.
The category you select appears.
25
Page 26
Let’s Try Playing Some Sounds
ROCK 1. . . . . . . . . . . . Hard rock, Heavy metal
ROCK 2. . . . . . . . . . . . Typical Rock of the sixties through nineties
ROCK 3. . . . . . . . . . . . Basic Rock
POP . . . . . . . . . . . . . . . Pops, 8-beat, and 16-beat
BALLAD. . . . . . . . . . . Ballad
BLUES. . . . . . . . . . . . . Blues
R&B . . . . . . . . . . . . . . . Rhythm and blues, funk, and soul
JAZZ . . . . . . . . . . . . . . Jazz
FUSION . . . . . . . . . . . Fusion
DANCE. . . . . . . . . . . . Hip hop, techno, etc.
LATIN. . . . . . . . . . . . . Salsa, bossa nova and samba, etc.
COUNTRY . . . . . . . . . Country
WORLD . . . . . . . . . . . World music
USER . . . . . . . . . . . . . . User Styles 1 through 20
3
4
CARD . . . . . . . . . . . . . Card User Styles 1 through 20
* If no memory card is inserted, then you can’t select “CARD” even when you press
[CARD].
Turn [VALUE] to select a Style.
The name of the Style you chose (Style name) appears.
fig.QS02-16
* The number of Styles varies from one category to another.
Press [START] to start playing the song.
■ You can create your own original Style.
→ “Creating User Styles” (p. 119)
26
Page 27
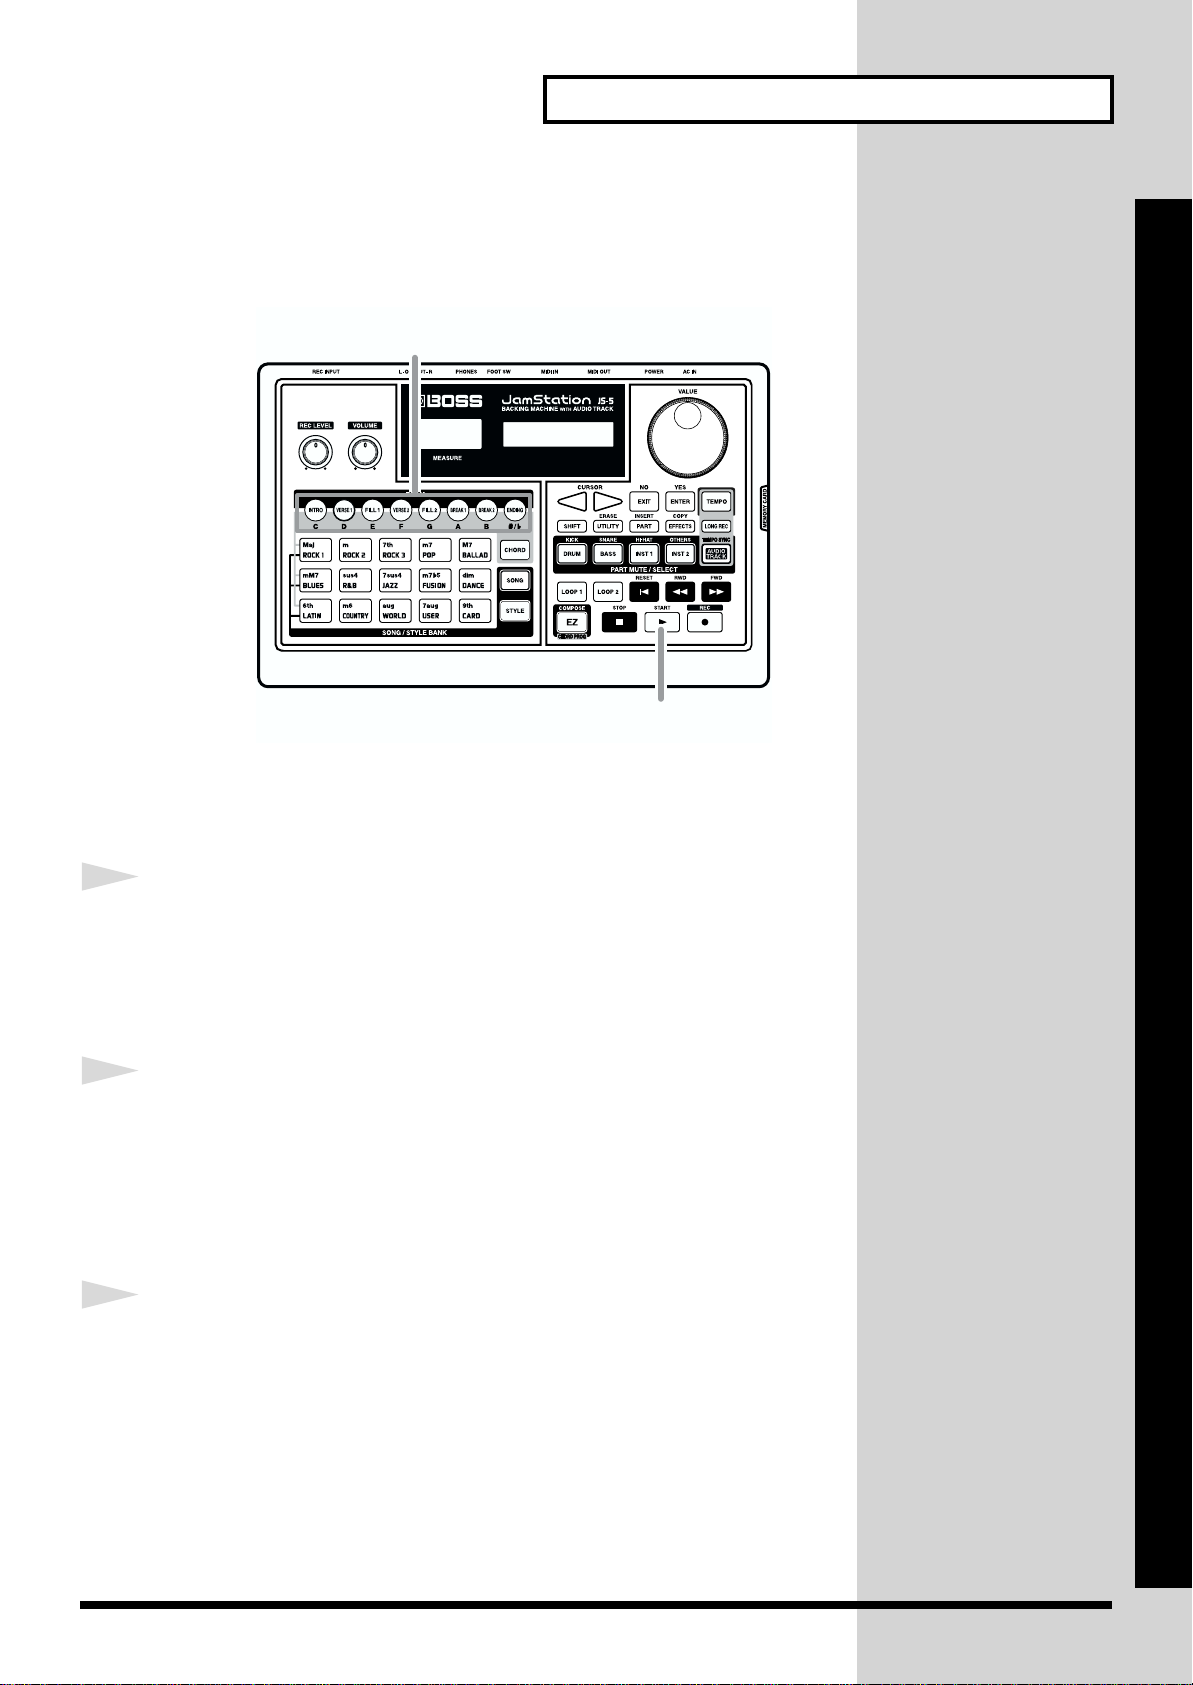
Let’s Try Playing Some Sounds
What i
?
Switching Forms
Let’s try playing a Preset Song using Forms you select yourself.
fig.QS02-30
* When a Form is switched, the entire sequence of forms set for the Song is disabled.
When [RESET] is pressed, the sequence of forms set for the Song is restored.
1,3
2
s a Form
Forms are the performance
patterns from which a song
is put together.
The JS-5 has eight types of
Forms available for
selection for each Style.
INTRO:
Intro
VERSE 1, 2:
The main performance
patterns. 1 is the basic
pattern, and 2 is a
variation.
FILL (Fill-In) 1, 2:
Ornamental performance
patterns that are inserted at
appropriate points, such as
where one Phrase goes into
another. Select 1 or 2
depending on the form that
follows the fill-in.
Quick Start
1
2
3
Press [FORM] ([INTRO] through [ENDING]) to select the
first Form to be played.
If you select a form other than the currently selected form (for which the
button is lit), the button will blink, and playback will pause.
Press [START], and playback will begin with the currently
selected form.
When the first-selected form finishes playing, playback will switch to the
form that had been paused. The button will change from blinking (paused)
to lit (playing).
Press [FORM] (INTRO–ENDING) to switch the Form.
The form will change at the measure following the point where you pressed
the button, and the button will change from blinking to lit.
■ In the case of VERSE 1 and VERSE 2, the performance will continue
repeating until playback switches to the next form.
BREAK 1, 2:
Blank sections that
temporarily stop a melody
or rhythm. Two different
Breaks can be prepared.
ENDING:
Performance patterns that
serves as the concluding
portion of a musical
composition.
■ If you switch to either FILL 1, FILL 2, BREAK 1, or BREAK 2, playback
will automatically switch to the previously-selected VERSE 1 or VERSE
2 when the performance ends.
27
Page 28
Let’s Try Playing Some Sounds
■ In the case of ENDING, you will return to the beginning of the song when
playback ends.
* When playback reaches the number of measures specified for the song, playback will
stop and you will return to the beginning of the song.
Entering a Chord
Let’s try playing a Preset Song with chords you enter yourself.
* When you enter a chord, all the set chords in the song are deactivated. With
performance halted, pressing [RESET] enables the song's set chord progression.
fig.QS02-17
2,4
1
2
1,4 2,42,4
3
Press [CHORD], getting the button to light.
The Chord screen appears.
Use the following buttons to enter a chord.
■ Use [C] through [B] and [#/b] to specify the root of the chord.
Pressing [#/b] repeatedly cycles through the selections of “#,” “b,” and
“none.”
■ Use [Maj] through [9th] to specify the chord type.
■ To specify an On-Bass chord, hold down [SHIFT] and use [C] through
[B] and [#/b] to specify the bass tone.
* To eliminate an On-Bass chord, press [CURSOR] to get the On-Bass Chord
indication to begin flashing, then turn [VALUE] so that “–” is selected.
The root specifies the basic
note of a chord. All chords
are structured with the root
as the base, and the name
of the root tone also
appears in upper case in
the chord name.
An on-bass chord is a chord
that uses bass for a note
other than the root, such as
an “F (Maj)” chord with
“G” as the bass note. This is
usually expressed as “F/G”
or “F on G.”
28
Page 29
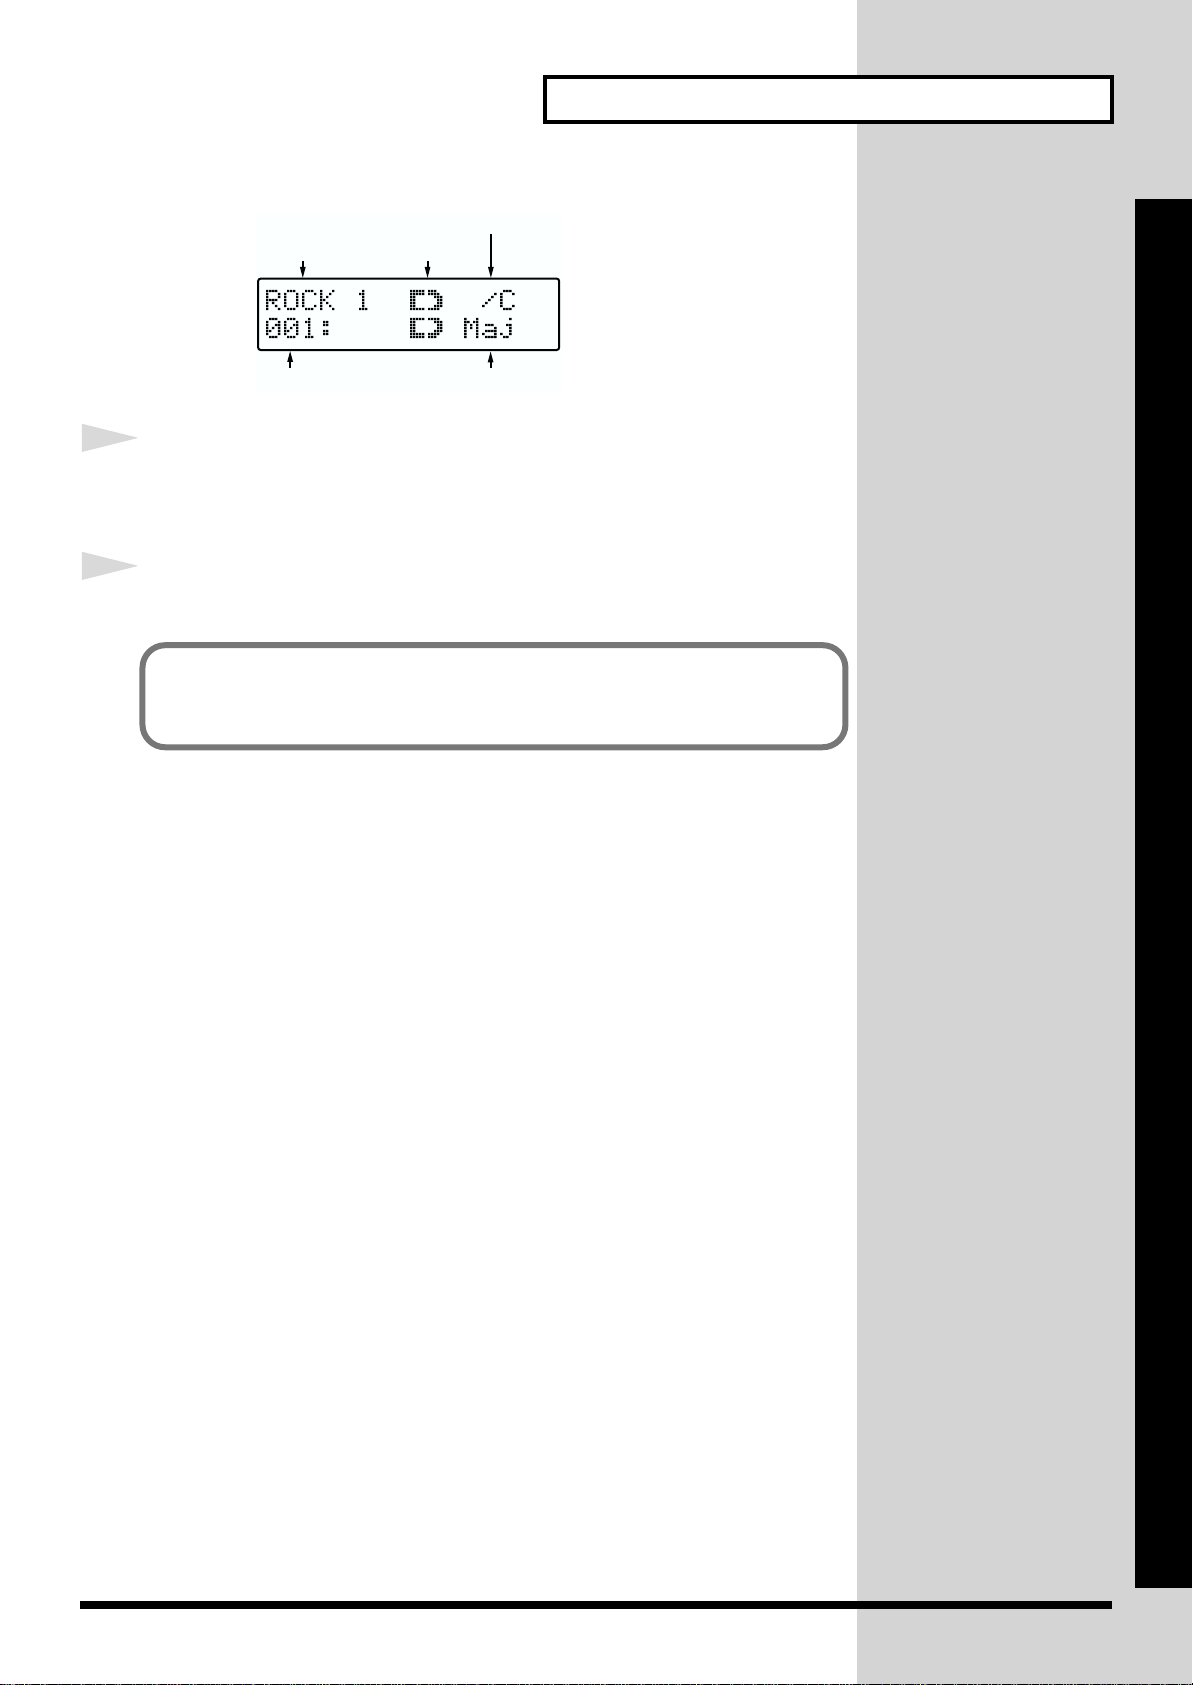
fig.QS02-18
On-Bass chord
Category
Song number Chord type
Chord root
Let’s Try Playing Some Sounds
3
4
When [START] is pressed, the performance begins with the
input chord.
Input the chords as needed.
■ You can input chord types unavailable with [Maj]–[9th].
→ “Playing with Chords You Enter Yourself” (p. 62)
Quick Start
29
Page 30
Let’s Try Playing Some Sounds
Using As a Rhythm Machine
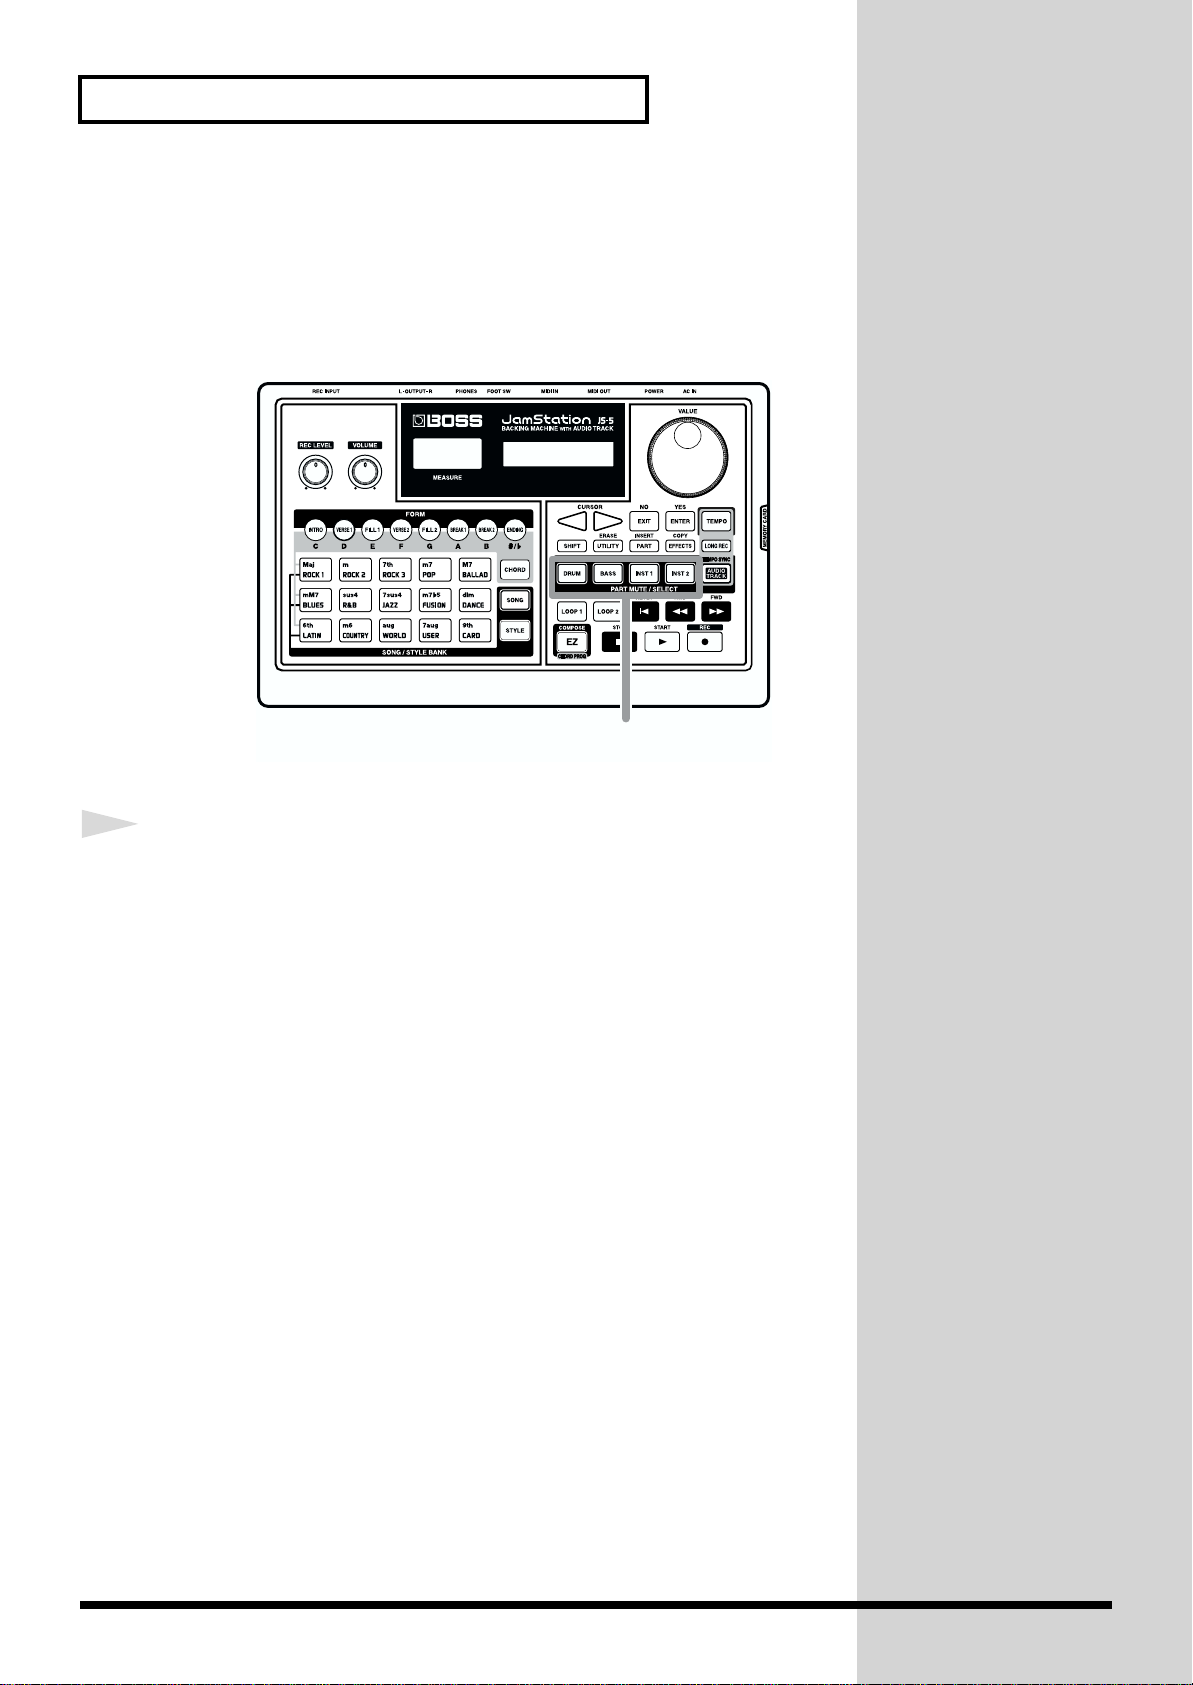
A song’s performance pattern is played using these four parts: “Inst
(instrument) 1,” “Inst (instrument) 2,” “Drum,” and “Bass.”
By playing just the drum part of a song, you can use the JS-5 as a rhythm
machine.
fig.QS02-19
1
1
Press the [PART MUTE] [BASS], [INST 1], and [INST 2]
buttons to make the button lights go dark.
When a button is not lighted, its corresponding part is muted out (silent).
30
Page 31

Let’s Try Playing Some Sounds
Playing Along with a Song on Guitar
Let’s try connecting an electric guitar to the JS-5 and play along with a song
on the guitar.
fig.QS02-20
1
1,4
2,3
5
Turn [REC LEVEL] counterclockwise all the way.
fig.QS02-21
Quick Start
2
Connect the electric guitar to the REC INPUT jack.
31
Page 32

Let’s Try Playing Some Sounds
3
4
Set the REC INPUT selector switch appropriately.
GUITAR: When an electric guitar (or bass) is connected, or when an
electric guitar (or bass) and an effects processor are connected
(The Guitar Amp Simulator is working.)
LINE: When an electric acoustic guitar is connected, or when a
keyboard is connected
MIC: When a microphone is connected
fig.QS02-23
Turn [REC LEVEL] to adjust the volume level of the
connected equipment.
* Howling could be produced depending on the location of microphones relative to
speakers. This can be remedied by:
5
1) Changing the orientation of the microphone(s).
2) Relocating microphone(s) at a greater distance from speakers.
3) Lowering volume levels.
Select a song, then press [START] to start playing the song.
32
Page 33

Let’s Create a Song
With the JS-5, you can create maximum 100 original songs (User Songs).
Let’s try creating an actual song.
Before we create a song, let’s take a quick look at how a song is put together.
fig.QS03-01
Song
Style
• Preset
• User
Part
Effect
Form
Track
Code
Track
Audio
Track
Verse 1 Ending
Intro
E7th E7th
B7th
Style:
This selects a Style in a category that matches your concept for the song.
Form track:
This specifies the sequence for playing the Forms such as intro, fill-in, and
ending corresponding to the Style you chose.
Chord track:
This specifies the chord progression for playing the Forms.
Audio track (User Song only):
Quick Start
The Form track and Chord
track together are referred
to as the Sequence tracks.
This records guitar play, vocals, or other sounds input to REC INPUT.
33
Page 34

Let’s Create a Song
b
Composing Your Own Original Song
(EZ Compose)
Using EZ Compose makes it easy to create your own original songs.
fig.QS03-02
1-3
,4,6,8,
10
1
2
3
Select a User Song to be recorded.
1-1 Press [SONG], getting the button to light.
1-2 Press [USER].
1-3 Turn [VALUE] to select a song.
A User Song where no data is recorded will have an “*” next to the song
number.
Press [EZ], getting the button to light.
The Start screen for EZ Compose appears for about one second, and then the
Style Selection screen appears.
fig.QS03-03
1-2
1-1
2
5,7,9,11,
12
Category
To cancel EZ Compose,
press [EZ] to make the
utton go dark.
Style number Style name
34
Page 35

Let’s Create a Song
3
4
5
6
Press [SONG/STYLE BANK] and select a category.
Turn [VALUE] to select a Style.
* When you press [START], the Style is played using the Forms selected at that
time.(A chord progression will not be added.)
Once you’ve decided on the Style, press [ENTER].
The Chord template Selection screen appears.
fig.QS03-04
Turn [VALUE] to select a Chord template.
A Chord template groups the Form sequences and chord progressions
together into a single set.
BluesChord 1–9: Selected when creating songs with blues chord
progressions.
MajorChord 1–24: Selected when creating songs consisting of major
melodies.
MinorChord 1–17: Selected when creating songs consisting of minor
melodies.
Quick Start
7
8
9
Once you’ve decided on a Chord template, press [ENTER].
The Tempo Setting screen appears.
fig.QS03-05
Turn [VALUE] to set the tempo.
Settings values: 40–250
Once you’ve decided on the tempo, press [ENTER].
The Key Setting screen appears.
fig.QS03-06
35
Page 36

Let’s Create a Song
10
11
12
Turn [VALUE] to specify the key (root) of the song.
You can specify a key from C to B, in semitone steps.
Once you’ve decided on the key of the song, press [ENTER].
A screen asking you to confirm that you want to proceed with EZ Compose
appears.
fig.QS03-40
* To cancel, press [EXIT].
Press [ENTER] to carry out EZ Compose.
Generation of the song data starts.
fig.QS03-07
When the generation of the song data finishes, the screen shown below
appears. After that, the Song screen appears.
fig.QS03-08
* The song that is generated will automatically be given a song name that is the same
as the Chord template.
■ The name of the song can be changed.
→ “Naming the Song” (p. 74)
36
Page 37

Creating a Song from a Score
You can compose a song by choosing a Style and recording the Forms and
Chord Progression.
This section uses examples to describe the steps for composing a song like
the one below.
This records a song that combines a Rock Style with a Blues Chord
Progression.
fig.QS03-09
STYLE: ROCK 1
1234
INTRO ------ ------ ------
EN.C ------ ------ ------
5678
VERSE 1
7th A7th E7th E7th
E
9 101112
-----A7th A7th E7th E7th
13 14 15 16
------ ------ -----B7th A7th E7th B7th
17 18 19 20
ENDING
N.C ------ ------ ------
E
21 22
------
------
04: 80’sHardRock
------ ------
------ ------ ------
------ ------
------
------
------
FILL 1
------
Let’s Create a Song
Quick Start
N.C. (Non-Chord Type)
Select this type when you want to have the original performance data
played as is, with no conversion of the chords.
Since the “Intro” and “Ending” Chord Progressions are included in the
original performance data, you can have the Chord Progressions in the
performance data played as is by specifying Non-Chord Type.
Normally, when the Chord Type with a root of “C” is changed to “N.C.,” the
performance data is played with no conversion of the chords.
If the root is a note other than “C,” the original performance data is played
based on that root. For example, when “D” is selected with Non-Chord
Type, the original performance data is played a whole step up from the
original data.
37
Page 38

Let’s Create a Song
fig.QS03-10
3,6
7
5
1,8
42
(1) Select the destination for recording.
Select the destination for recording the User Song.
1
Press [SONG], getting the button to light.
2
3
Press [USER].
Turn [VALUE] to select a song.
A User Song where no data is recorded will have an “*” next to the song
number.
(2) Select a Style.
4
5
6
Press [STYLE], getting the button to light.
Press [SONG/STYLE BANK] and select a category.
In this example, select “ROCK 1.”
Turn [VALUE] to select a Style.
38
In this example, select “04: 80'sHardRock.”
Page 39

(3) Select a recording track.
Let’s Create a Song
7
8
Press [REC], getting the button to light.
[SONG], [CHORD], and [AUDIO TRACK] flash, and the Recording Track
Selection screen appears.
fig.QS03-30
Recording T rac k
* To cancel, press [EXIT].
First, record the Form.
Press [SONG] to select the Form Track.
The Recording Standby screen for the Form appears. [SONG] lights up.
fig.QS03-12
Quick Start
(4) Record the Forms.
Record the Forms on the Form Track. In this example, let’s try using
Realtime recording.
fig.QS03-19
1310
14
11
Realtime recording is a
method for recording
selected Forms on the Form
Track while pressing
[FORM] and playing the
Forms one after another.
Another recording method
is Step recording, where
you specify a Form for each
measure or beat.
For more information, see
“About Creating User
Songs” (p. 56).
9
39
Page 40

Let’s Create a Song
9
10
11
Press [REC] to display “REAL.”
Realtime recording is now selected.
fig.QS03-13
Press [FORM] to select the Form to be recorded first.
Here, press [INTRO], getting the button to light or flash.
Press [START].
The Realtime Recording screen for the Form appears, and recording first
begins from the intro selected.
fig.QS03-14
12
13
14
When the intro finishes playing, the JS-5 automatically changes to playback
of Verse 1. In this case, the JS-5 changes to Verse 1 in the second measure,
and [VERSE 1] lights up.
Continue by playing Verse 1 in measures 5 through 15.
While playing the last beat of measure 15, press [FILL1].
The button flashes.
At the beginning of measure 16, performance of Fill 1 starts, and the button
changes from flashing to steadily lit.
While measure 16 is playing, Press [ENDING].
The button flashes.
At the beginning of measure 17, performance of the ending starts, and the
button changes from flashing to steadily lit.
When the edited portion of the performance is over, the performance is
stopped, and recording is finished.
40
[REC] goes dark, and the Song screen reappears.
Page 41

(5) Record the chords.
b
Let’s Create a Song
Record the chord progression on the Chord Track. In this example, let’s try
using Step recording.
fig.QS03-20
16
18, 20
18, 20
15, 17
20, 22
21
22 24
19, 26
Step recording is a method
for recording where you
specify a chord for each
individual measure or beat.
Another recording method
is Realtime recording,
where you specify chords
matched to the Forms
eing played. For more
information, see “About
Creating User Songs”
(p. 56).
25
21
Quick Start
15
16
Press [REC], getting the button to light.
[SONG], [STYLE], [CHORD], and [AUDIO TRACK] flash, and the
Recording Track Selection screen appears.
fig.QS03-32
Recording T rac k
* To cancel, press [EXIT].
Press [CHORD] to select a Chord Track.
The Recording Standby screen for the Chord appears. [CHORD] lights up.
fig.QS03-15
Quantize
41
Page 42

Let’s Create a Song
b
17
18
19
20
Press [REC] to display “STEP.”
Step recording is now selected.
Press [CURSOR] to make the Quantize display flash, then
turn [VALUE] to make the setting for quantizing.
In this example, set this to “” (whole note).
Press [START].
The Step Recording screen for chords appears, and recording begins.
fig.QS03-16
Beat
Clock
Quantize
Record the chord (Non-Chord Type “E”) for the first
Quantizing when using
step recording sets the
resolution of the steps that
proceed when you press
[FWD] or [RWD] in later
operations.
The resolution with which
a measure is divided is set
y notes, and increasing
the resolution of the notes
increases the number of
steps (the recording timing
for the Form).
A clock is an even smaller
division of a beat. One beat
is equal to 96 clocks.
21
22
measure.
Press [E].
Next, press [CURSOR ], making the Chord Type display flash, then turn
[VALUE] to select “- -” (Non-Chord Type).
fig.QS03-17
Press [FWD] several times.
The operation proceeds with the timing (steps) for recording the next chord
(E7th). In this example, it advances to measure 5.
Record the next chord.
Press [E] [7th].
42
Page 43

fig.QS03-18
Let’s Create a Song
23
24
Repeat steps 21–22 to record all the chords in the score on
p. 37.
* If the same chord continues, you can record the first chord and then omit the
remainder of the recording for that chord. Move to the timing at which you wish to
record a different chord.
When you’ve finished recording the chords, press [STOP].
[REC] goes dark, and the Chord screen appears.
* Press [SONG] to display the song screen.
(6) Listen to the song you composed.
25
Press [RESET].
Quick Start
26
Press [START].
The song starts to play.
■ You can have chords recorded at pitches one octave higher or lower
than played.
→ “Step Recording” (p. 71)
■ You can give a name to the song you created.
→ “Naming the Song” (p. 74)
■ If you use a memory card (SmartMedia), you can save up to maximum
100 original songs (User Songs) on the card.
→ “Chapter 4 Creating User Songs” (p. 66)
43
Page 44

Changing How a Song Plays
Changing the Key
You can use Key Transpose to change (transpose) the key of a song.
* Although the keys of chords that are actually played are transposed when Key
Transpose is set, the keys shown in the screen during performances or when
recording do not change.
1
fig.QS04-01
1-11-2
Select a song.
1-1 Press [SONG], getting the button to light.
2
1-3
3
,4
Key transposition involves
shifting the overall pitch of
the notes that are played.
5
2
3
4
1-2 Press [SONG/STYLE BANK] and select a category.
1-3 Turn [VALUE] to select a song.
Press [CURSOR ] to select “1 KEY TRANSPOSE.”
fig.QS04-02
Press [START].
The song starts to play.
Turn [VALUE] to set the key.
Setting values: -24– +24
You can set the key in semitone steps within a range of two octaves up or
down.
44
Page 45

Changing How a Song Plays
* If you modify the settings of a preset song, these settings cannot be stored. If you
wish to store the settings, copy them to a user song. (p. 82)
5
When you’ve finished making the settings, press [EXIT].
The display returns to the original screen.
Adjusting the Volume of Each Part
You can adjust the volume level of each of the parts that make up a Style:
Inst 1, Inst 2, Drum, and Bass.
* When a performance is recorded on the Audio Track, you can also adjust the volume
level for this track.
fig.QS04-03
8
1-3
,63
Quick Start
2,8
1
2
3
1-11-2
Select a song.
1-1 Press [SONG], getting the button to light.
1-2 Press [SONG/STYLE BANK] and select a category.
1-3 Turn [VALUE] to select a song.
Press [PART].
Press [CURSOR] to select “1 VOLUME.”
4
5
45
Page 46

Changing How a Song Plays
fig.QS04-04
Selected Part
4
5
6
Drum
Press [PART MUTE/SELECT] and select the part whose
volume level you want to change.
* When a User Song to which audio data is recorded is selected, the following screen
appears when [AUDIO TRACK] is pressed.
fig.RE06-02
Press [START].
The song starts to play.
Turn [VALUE] to change the volume.
Settings values: 0–127
Bass Inst 1 Inst 2
Volume level of each Part
7
8
Repeat steps 4 and 5 as necessary.
* If you modify the settings of a preset song, these settings cannot be stored. If you
wish to store the settings, copy them to a user song. (p.82)
When you’ve finished making the settings, press [PART]
again, or press [EXIT].
The display returns to the original screen.
46
Page 47

Using Effects
b
The JS-5 is provided effects such as Reverb and Chorus.
In this example, let’s change the settings for Reverb to check out what the
effect does.
* It is not possible to use effects on the sound input from REC INPUT.
fig.QS04-05
6
Changing How a Song Plays
An effect modifies and
produces a sound, such as
y adding reverberations to
1-3
,53
a sound to express depth or
delaying the sound to
obtain a special effect.
2,6
1
2
3
1-11-2
Select a song.
1-1 Press [SONG], getting the button to light.
1-2 Press [SONG/STYLE BANK] and select a category.
1-3 Turn [VALUE] to select a song.
Press [EFFECTS].
Press [CURSOR] and select “1 REVERB TYPE.”
This is the screen for setting the type of Reverb.
fig.QS04-06
Quick Start
4
4
Press [START].
The song starts to play.
47
Page 48

Changing How a Song Plays
5
6
Turn [VALUE] to select the type.
Try changing to a variety of types and check out the different effects.
* If you modify the settings of a preset song, these settings cannot be stored. If you
wish to store the settings, copy them to a user song. (p. 82)
When you’ve finished making the settings, press [EFFECTS]
again, or press [EXIT].
The display returns to the original screen.
■ You can vary the amount of reverb applied to each Part.
→ “Changing the Amount of Chorus and Reverb Applied to Each Part”
(p. 84)
■ You can change the settings for effects in a variety of ways.
→ “Changing Settings for Effects” (p. 86)
48
Page 49

Let’s Record Guitar Play
You can record your own performances to a song’s (Preset/User) Audio
track.
Here, select a Preset that appeals to you, copy it to the JS-5’s User Songs,
then record the performance of the guitar (or vocal, or other instrument)
along with this song.
* The following shows the recording time available using the JS-5.
Hi-Fi: 1 minute, 35 seconds
LONG: 1 minute, 58 seconds
Copying a Preset Song
fig.QS05-30
1-3
,
Performance data recorded
on the Audio Track is
called “audio data.”
3-1, 3-23-1, 3-2
Quick Start
4,5
1
2
1-11-2
Select the Preset Song to be used as the copy source.
1-1 Press [SONG], getting the button to light.
1-2 Press [ROCK 1] through [WORLD] and select a category.
1-3 Turn [VALUE] to select a song.
Press [COPY] ([SHIFT] + [EFFECTS]).
The copy-source designation screen appears.
fig.QS05-31
Destination Song
category / number
2
49
Page 50

Let’s Record Guitar Play
b
3
4
Select the User Song to be used as the copy destination.
Here, select one of the JS-5’s User Songs.
3-1 Press [CURSOR], and the Category indication will begin blinking.
Then, turn [VALUE] to select “USER” (the JS-5).
3-2 Press [CURSOR], and the Song Number indication will begin blinking.
Then, turn [VALUE] to select the song number.
* User Songs with no data recorded in them are indicated by an "*" in the display.
When you have decided on the copy destination, press
[ENTER].
The copy confirmation screen appears.
fig.QS05-32
5
Press [ENTER] when you want to execute the copy.
The copying begins. After it's been completed, the following screen appears,
after which the copy-destination Song screen is displayed.
fig.QS05-33
* To cancel, press [EXIT]. The Copy screen reappears.
Each press of the [EXIT]
utton takes you back one
screen.
50
Page 51

Recording
fig.QS05-01
Let’s Record Guitar Play
1
5
1-11-2
Select the User Song to record.
Use the procedure previously described to select the copied song.
1-1 Press [SONG], getting the button to light.
7
8
6,9 2
1-3
4
3
Quick Start
2
3
1-2 Press [USER].
1-3 Turn [VALUE] to select a song number.
Press [REC], getting the button to light.
[SONG], [CHORD], and [AUDIO TRACK] flash, and the Recording Track
Selection screen appears.
fig.QS05-20
Recording T rac k
Press [AUDIO TRACK] to select the Audio Track.
The Recording Standby screen for the Audio Track appears.
fig.QS05-22
* When there is no audio data, a “*” appears on the screen.
51
Page 52

Let’s Record Guitar Play
4
5
6
Press [LONG REC] and select the recording quality.
Hi-Fi: Select this when you want to perform high-quality recording.
LONG: Select this when you want to make the recording time longer.
When you select “LONG,” [LONG REC] lights up.
Adjust the recording level.
Play your guitar, and turn [REC LEVEL] to adjust the recording level of the
sound that is input to REC INPUT so that the “■” at the far right of the level
meter is displayed within the appropriate range of levels (see diagram
below).
fig.QS05-04
Final measure
Beginning measure
Recording level
Appropriate range
Press [START], getting the button to light, and start recording.
If you’ve made the setting for count-in (p. 60), the count-in appears on the
left-hand display, and the count sound is played at the same time.
After the count-in display, recording starts.
fig.QS05-05
The count-in is a count
(metronome) sound of one
or two bars inserted before
the measure where
recording starts. Using the
count-in lets you make sure
of the tempo and the
timing for starting
recording.
7
When recording is finished, press [STOP].
[REC] goes dark, and the Song screen reappears.
Playback
8
9
52
Press [RESET].
Press [START].
The audio data is played back in time with the performance.
Page 53

Deleting Recorded Data
To delete all audio data for the presently selected User Song, follow the steps
below.
fig.QS05-06
Let’s Record Guitar Play
2
1
2
3
1
At the Song screen, press [ERASE] ([SHIFT] + [UTILITY]).
The Delete screen for Song appears.
fig.QS05-07
Data to be deleted
Turn [VALUE] to select “AUDIO.”
fig.QS05-40
Press [ENTER].
3,4
Quick Start
A screen prompting you to confirm deletion of the audio data appears.
* To cancel the operation, press [EXIT]. This returns you to step 2.
fig.QS05-08
53
Page 54

Let’s Record Guitar Play
4
To delete the data, press [ENTER].
The audio data is deleted.
The following screen appears.
fig.QS05-41
When the delete is completed, the Song screen reappears.
fig.QS05-42
■ Would you like to know more about recording on the Audio Track?
→ “Chapter 9 Recording Your Own Performance” (p. 111)
■ Using a memory card (smart media) makes it possible to record for
longer times.
→ “About Recording Time” (p. 111)
■ You can re-record only the measures in a specified portion.
→ “Redoing a Recording (Rerecording)” (p. 113)
54
Page 55

Chapter 1 Overview of the JS-5
About Songs
A single song on the JS-5 is called a Song. The JS-5’s 200
internal Songs are referred to as Preset Songs, whereas
Songs created by the user are called User Songs.
The JS-5 can hold maximum 100 User Songs, and you can
store up to maximum 100 songs on optional memory cards
(SmartMedia).
The 200 Preset Songs are classified by category, such as
“Rock” and “Jazz.”
fig.QS03-01
Song
Style
• Preset
• User
Part
Effect
About Styles
Styles comprise groupings of tempos and performance
patterns and instruments (Parts) in the accompaniment
sections in each category. You can create a song in a certain
genre by basing the song on a Style.
Each of the JS-5’s 200 built-in Styles is called a Preset Style,
whereas any Style created by the user is called a User Style.
You can create twenty types of User Styles.
The JS-5 can hold maximum 20 User Styles, and you can
store up to maximum 20 styles on optional memory cards
(SmartMedia).
Furthermore, even with Styles in the same category, slightly
different performance patterns are needed for a Song’s
different sections (intro, fill-ins, and so on). A performance
patterns of this type called a Form, and up to eight different
Forms may be used in one Style.
Form
Track
Code
Track
Audio
Track
Verse 1 Ending
Intro
E7th E7th
B7th
About Tracks
1
Songs feature the following three tracks.
Form Track:
Specifies the order in which the intro, fill-ins, endings, and
other Forms for the selected Style are to be played.
Chord Track:
Specifies the chord progression, which causes the Forms to
be played.
* The Form track and Chord track together are referred to as the
Sequence tracks.
Audio Track:
Records guitar performances, vocals, and other sounds input
to the REC INPUT.
* Performance data recorded on the Audio Track is called “audio
data.”
About Forms
Here are the eight different types of Forms that can be set up
in each Style.
fig.RE01-03
INTRO:
Intro
VERSE 1, 2:
The main performance patterns. 1 is the basic pattern, and 2
is a variation.
FILL (Fill-In) 1, 2:
Ornamental performance patterns that are inserted at
appropriate points, such as where one Phrase goes into
another. Select 1 or 2 depending on the form that follows the
fill-in.
About Parts
Style performance patterns are played using four parts:
“INST 1”; “INST 2”; DRUM; and BASS.
fig.RE01-02
Style
Drum
Drum Kit
Bass
Instrument
Inst 1
Instrument
Inst 2
Instrument
BREAK 1, 2:
Blank sections that temporarily stop a melody or rhythm.
Two different Breaks can be prepared.
ENDING:
Performance patterns that serves as the concluding portion
of a musical composition.
55
Page 56

Chapter 1 Overview of the JS-5
About Styles and Chord
Conversions
With the JS-5, Style performance data is converted according
to the “Chord Name” recorded on the Chord Track. Preset
Style performance data is created based on the conversion of
the chords, and the data is converted and performed just by
designating the chords.
fig.RE01-04
Original Performance Data
Arranger
C m7 D M7
When there is
no change to
the Chord
C -- (N.C)
Performed with the
original performance
data unchanged
(4) Record your own performance (sounds
input to the REC INPUT) to the Audio Track.
(5) Adjust the volume balance and make the
effect settings.
fig.RE01-05
Select a Style
Recording the Forms
Realtime
Recording
Recording the Chords
Realtime
Recording
Recording to the Audio Track
Step
Recording
Step
Recording
* Performances may change depending on the Arrange mode
settings at the time the chords are converted (p. 119).
By recording “N.C (Non-Chord Type) to the Chord Track,
you can play performance data without any changes made to
it.
About Creating User Songs
The following shows the main steps in creating User Songs.
(1) Select a Style to use from the Preset Styles
or User Styles.
(2) Record the sequence of Forms to the Form
Track.
There are two methods used for recording the Forms,
Realtime Recording, in which each selected Form is
recorded to the Form Track just as performed, by pressing
the [FORM] button; and Step Recording, where Forms are
specified one measure at a time.
(3) Record the chords played in the Forms to
the Chord Track.
There are two methods for recording the Forms, Realtime
Recording, in which the Chords are recorded while
synchronized with the performance of the Forms, and Step
Recording, where Chords are specified one at a time for
each measure or beat.
Adjust the volume balance
Make the effect settings
About Creating User Styles
You can create up to maximum 20 different Styles of your
own. Just as with the Preset Styles, each User Style can be
created using up to eight different Forms.
Performance patterns are made by designating the tones
(instruments) for each part.
Recording of User Styles can also be done using Realtime
Recording.
Although you can record performances just as they are
played using Realtime Recording, you cannot conduct
Realtime Recording using the JS-5 by itself.
Record performance patterns by playing a MIDI keyboard
connected to the JS-5’s MIDI IN connector.
* Editing of both Forms and Chords is carried out in Step
Recording mode.
56
Page 57

Chapter 1 Overview of the JS-5
About Memory
“Memory” refers to the places where settings, such as those
for “Songs” and “Styles,” are stored. The JS-5 features three
types of memory: System Memory, User Memory, and Preset
Memory. You can also use optional memory cards
(SmartMedia).
fig.RE01-06
JS-5
System
Preset User
Song
200
Style
200
Data editing
Song
100
Style
20
Audio
Data
Memory Card
Backup
10
Song
100
Style
20
Audio
Data
Memory Cards (SmartMedia)
These are read/write cards to which data can be written. Just
as with the User Memory, memory cards can store maximum
100 User Songs and maximum 20 different User Styles.
User Songs and User Styles stored on memory cards can be
handled exactly the same way as User Songs and User Styles
stored in the User Memory.
About Changing Data
When Changing Data in User Memory
Data is written to the User Memory during a number of
different operations, such as when switching pages or
pressing [ENTER], [EXIT], or [STOP]. At this time, “ ”
will appear in the left display, and during execution the
“ ” will rotate clockwise.
fig.RE01-07
1
System Memory
System Memory is where settings for the parameters that
determine the JS-5’s operating environment (such as Master
Tune and MIDI parameters) are stored.
User Memory
User Memory is memory that holds rewritable data, allowing
you to save settings that you create yourself. User Memory
can be used to store maximum 100 User Songs and up to
maximum 20 different User Styles.
Audio data is also stored here.
Preset Memory
Preset Memory holds settings that cannot be overwritten. 200
Preset Songs and 200 different Preset Styles are stored in the
Preset Memory.
* When recording to the Audio track of a Preset Song, the audio
data is saved to the User Memory or a memory card.
Never turn off the power to the JS-5 or remove the memory
card from the JS-5 while the “ ” still appears at the left of
the display (when data is being written), as this can prevent
the data from being written properly, and may adversely
affect later operations.
When Changing Data in Preset
Memory
Data in the Preset Memory is lost when a different operation
is carried out, or when the power to the JS-5 is turned off.
When you want to save data, you must first copy the data to
the User Memory or a memory card.
When Changing Settings Stored in
System Memory
In System Memory, since settings are changed and data
created directly, the data is updated at all times.
57
Page 58

Chapter 1 Overview of the JS-5
About Procedures for
Changing Settings
This section explains those of the JS-5’s operations that are
shared by the different functions.
Switching Pages
When a page appears in the display, a “ ” is displayed at
the right of the page.
In this case, pressing [CURSOR ] a number of times
switches the display to the next page. To return to previous
pages, press [CURSOR ] a number of times.
* You can reduce the number of times you need to press the
buttons by holding down [SHIFT] while pressing [CURSOR].
fig.RE01-08
How to Use [CURSOR] and [VALUE]
You can use [CURSOR] and [VALUE] when changing the
settings appearing in the display.
[CURSOR]
Press these buttons to move to the position that shows the
setting you want to change. Settings that can be changed
flash in the display.
* If you continue holding the button, the change will be
continuous.
* If you hold down one button and press the other button, the
change will become more rapid.
[VALUE]
Rotate the [VALUE] dial to change the settings value.
Changes in values are made continuously.
Holding down [SHIFT] while rotating the dial increases the
rate at which the value changes.
58
Page 59

Chapter 2 Playing a Song
Song number Song name
Category
To save the modified settings
If you modify the settings of a user song, the modified
content will be lost when you switch to another song/style.
If you wish to keep the settings, use the following procedure.
1. Press [REC], getting the button to light.
* To cancel, press [EXIT].
2. Press [STOP].
The following screen will appear, and the settings will be
saved.
fig.RE06-50
When the settings have been saved, you will return to
the previous screen.
Never turn off the power to the JS-5 or remove the memory
card from the JS-5 while the “ ” still appears at the left of
the display (when data is being written), as this can prevent
the data from being written properly, and may adversely
affect later operations.
R&B . . . . . . . . . . Rhythm and blues, funk, and soul
JAZZ. . . . . . . . . . Jazz
FUSION. . . . . . . Fusion
DANCE . . . . . . . Hip hop, techno, etc.
LATIN . . . . . . . . Salsa, bossa nova and samba, etc.
COUNTRY . . . . Country
WORLD. . . . . . . World music
USER . . . . . . . . . User Songs 1 through 100
CARD. . . . . . . . . Card User Songs 1 through 100
* If no memory card is inserted, then you can’t select “CARD”
even when you press [CARD].
3. Turn [VALUE] to select a song.
The name of the song you select (the song name) appear.
fig.RE02-01
* The number of songs varies from one category to another.
* A User Song where no data is recorded will have an “*” next
to the song number.
2
If you have changed the settings for the Preset Songs, then if
you want to save the settings, copy them to a User Song (p. 82).
If you press [SHIFT] + [REC], the settings will be saved
immediately.
Playing a Song
Here we’ll select and play a song from among the 200 Preset
Songs and the User Songs (in the unit or on a memory card).
1. Press [SONG], getting the button to light.
The Song screen appears.
2. Press [SONG/STYLE BANK] and select a category.
The category you selected appears.
ROCK 1. . . . . . . .Hard rock, Heavy metal
ROCK 2
ROCK 3. . . . . . . .Basic Rock
POP . . . . . . . . . . .Pops, 8-beat, and 16-beat
BALLAD. . . . . . .Ballad
BLUES. . . . . . . . .Blues
. . . . . . . .Typical Rock of the sixties through nineties
4. Press [START] to start playing the song.
[START] flashes in time to the beat set in the selected
Style.
* If you’ve made the setting for count-in (p. 60), the count-in
appears on the left-hand display, and the count sound is played
at the same time. After the count-in display, the sound starts
to play.
The lighted [FORM] buttons ([INTRO] through
[ENDING]) change along with what is played, showing
the present performance pattern (form).
Also, pressing a button while play is in progress changes
what is playing to the Form of the pressed button.
5. Press [STOP] to stop playing.
Press [FWD] to move to the next measure.
Press [RWD] to go back one measure.
Press [RESET] to go back to the beginning of the song.
* When the performance reaches the end, it stops automatically.
You can start playing in the middle of a song by using [FWD]
and [RWD] to specify the measure, then pressing [START].
* If you play in the middle of a song, the count-in will not be
available.
59
Page 60

Chapter 2 Playing a Song
Changing the Tempo
Now we’ll change the tempo for playing the song.
1. Press [TEMPO], getting the button to light.
The present tempo appears on the left-hand display.
fig.RE02-02
2. Turn [VALUE] to adjust the tempo.
3. Once you’ve decided on the tempo, press [TEMPO] to
make the button go dark.
If the selected song contains any audio data, the tempo
used when the audio data was recorded (the original
tempo) appears at the left of the screen.
fig.RE02-22
* If you wish to save the settings, execute the Save procedure
(p. 59).
* If you record a User Style before saving the Key settings, these
settings are then deleted.
Adding a Count-in
You can add a count-in of one or two measures when playing
the song.
When you add a count-in, it appears on the left-hand
display. Pressing [START] starts the count sound (the countin), and after the count-in the song starts to play.
* The count-in is sounded when you begin play or recording
from the top of the song (the first measure). The count-in is not
sounded when you begin play or recording from somewhere
later in the song, even if you’ve set it so a count-in is to be
played.
* The count-in you set here also remains in effect during
realtime recording for Forms or chords (p. 67, 70), or when
recording on the Audio Track (p. 112).
Original tempo
When [ENTER] is pressed, the current tempo is set to the
same value as that of the original tempo.
* You cannot change the original tempo.
* If you wish to save the settings, execute the Save procedure
(p. 59).
Changing the Key
You can use Key Transpose to change (transpose) the key of
a song.
* Although the keys of chords that are actually played are
transposed when Key Transpose is set, the keys shown in the
screen during performances or when recording do not change.
1. At the Song screen, press [CURSOR ] and select “1
KEY TRANSPOSE.”
fig.RE02-03
1. At the Song screen, press [CURSOR ] to select “2
COUNT IN.”
fig.RE02-04
2. Turn [VALUE] and make the setting for the count-in.
Settings values: OFF, 1meas, or 2meas
To add a count-in, set this to “1meas” (measure) or
“2meas” (measures).
If you don’t want to add a count-in, set this to “OFF.”
* If you wish to save the settings, execute the Save procedure
(p. 59).
2. Turn [VALUE] to change the setting value.
Settings values: -24– +24
You can make the setting in semitone steps within a
range of two octaves up or down.
60
Page 61

Chapter 2 Playing a Song
Displaying the Chord
Progression
TThis changes the Song screen to a screen displaying the
chord progression (Chord screen).
1. Press [CHORD], getting the button to light.
The Chord screen appears.
fig.RE02-05
Category
Song number
* You can switch to the Chord screen even while a song is
playing.
2. Press [START] to start playing the song.
When the chord changes, the display of the next chord.
fig.RE02-20
3. To go back to the Song screen, press [SONG], getting
the button to light.
Chord root
Chord type
Playing with a Different
Chord Progression
Playing with a Different Style
You can select a Style from among the 200 types of Preset
Styles and the maximum 20 types of User Styles, and switch
to that Style.
When you change the Style, the song plays in the chosen
Style, with the chord progression set for the Preset Song
remaining the same.
1. While play is stopped, press [STYLE], getting the
button to light.
2. Press [SONG/STYLE BANK] and select a category.
The category you chose appears.
ROCK 1 . . . . . . . Hard rock, Heavy metal
ROCK 2
ROCK 3 . . . . . . . Basic Rock
POP . . . . . . . . . . Pops, 8-beat, and 16-beat
BALLAD . . . . . . Ballad
BLUES . . . . . . . . Blues
R&B . . . . . . . . . . Rhythm and blues, funk, and soul
JAZZ. . . . . . . . . . Jazz
FUSION. . . . . . . Fusion
DANCE . . . . . . . Hip hop, techno, etc.
LATIN . . . . . . . . Salsa, bossa nova and samba, etc.
COUNTRY . . . . Country
WORLD. . . . . . . World music
USER . . . . . . . . . User Styles 1 through 20
CARD. . . . . . . . . Card User Styles 1 through 20
* If no memory card is inserted, then you can’t select “CARD”
even when you press [CARD].
. . . . . . . . Typical Rock of the sixties through nineties
2
The Preset Songs feature an additional Chord Progression.
You can play a Preset Song after switching to this Chord
Progression.
1. While play is stopped, press [SHIFT] + [EZ], getting the
button to flash.
2. When [START] is pressed, the performance begins
with different chord progression.
3. To return to the original Chord Progression, press
[SHIFT] + [EZ] while play is stopped, extinguishing the
button’s light.
* You cannot switch the Chord Progression if [SHIFT] + [EZ] is
pressed while a song is playing.
When copying a song (p. 82), the Chord Progression selected
at that time is copied.
3. Turn [VALUE] to select a Style.
The name of the Style you chose (Style name) appears.
fig.RE02-09
Category
Style number Style name
* The number of Styles varies from one category to another.
4. Press [START] to start playing the song.
* If you wish to save the settings, execute the Save procedure (p.
59).
61
Page 62

Chapter 2 Playing a Song
Song number Chord type
On-Bass chord
Chord root
* When switching to User Styles (USER or CARD) that use a
lot of memory, the message “No More Memory!” may be
displayed, and in some cases, the data may not be played, even
though it is recorded in the Form. In such situations, you can
either switch to a Preset Song or a User Song that uses less
memory, or you can enable play of all Forms by reducing Song
or Style data.
Furthermore, be careful to note that in situations such as
mentioned above, where you are unable to play previously
recorded Forms, if you attempt a Style recording all the Forms
could get overwritten.
Playing with Forms You
Select Yourself
You can have a song played using Forms that you have
selected.
* When a Form is switched, the entire sequence of forms set for
the Song is disabled. When [RESET] is pressed, the sequence
of forms set for the Song is restored.
1. Press [FORM] ([INTRO] through [ENDING]) to select
the first Form to be played.
If you select a form other than the currently selected
form (for which the button is lit), the button will blink,
and playback will pause.
2. Press [START], and playback will begin with the
currently selected form.
When the first-selected form finishes playing, playback
will switch to the form that had been paused. The button
will change from blinking (paused) to lit (playing).
3. Press [FORM] (INTRO–ENDING) to switch the Form.
The form will change at the measure following the point
where you pressed the button, and the button will
change from blinking to lit.
■ In the case of VERSE 1 and VERSE 2, the performance
will continue repeating until playback switches to the next
form.
■ If you switch to either FILL 1, FILL 2, BREAK 1, or
BREAK 2, playback will automatically switch to the
previously-selected VERSE 1 or VERSE 2 when the
performance ends.
■ In the case of ENDING, you will return to the beginning
of the song when playback ends.
* When playback reaches the number of measures specified for
the song, playback will stop and you will return to the
beginning of the song.
Playing with Chords You
Enter Yourself
You can play a song using chords you enter yourself.
* When you enter a chord, all the set chords in the song are
deactivated. With performance halted, pressing [RESET]
enables the song’s set chord progression.
While the Performance is Stopped
* Pressing [RESET] returns you to the first measure; press
[RWD] or [FWD] to move to the previous or following
measure.
1. Press [CHORD], getting the button to light.
2. Use the following buttons to enter a chord.
■
Use [C] through [B] and [#/b] to specify the root of the chord.
Pressing [#/b] repeatedly cycles through the selections of
“#,” “
b
,” and “none.”
* Depending on the root of the chord, the symbols that can be
selected may differ.
■ Use [Maj] through [9th] to specify the chord type.
When selecting a Chord Type other than [Maj] through
[9th], press [CURSOR], making the display flash, then
turn [VALUE] to select the chord type.
fig.RE02-30
- - (N.C) Maj M7 M9
7 7(13)7
7#9 6 69 m6
m69 add99 madd9
mM9 m mM7 m7
m7
7sus4 aug aug7
■ To specify an On-Bass chord, hold down [SHIFT] and
use [C] through [B] and [#/b] to specify the bass tone.
* To eliminate an On-Bass chord, press [CURSOR] to get the
On-Bass Chord indication to begin flashing, then turn
[VALUE] so that “–” is selected.
fig.RE02-10
3. When [START] is pressed, the performance begins
with the input chord.
4. Input the chords as needed.
* You cannot select a chord type other than [Maj] through [9th]
while the song is being played.
b
5
b
5
dimm9 sus4
7b9
62
Page 63

Chapter 2 Playing a Song
When the Performance is in Progress
1. Press [CHORD], getting the button to light.
2. Use the following buttons to enter a chord.
■ Use [C] through [B] and [#/
chord.
Pressing [#/b] repeatedly cycles through the selections of
b
,” and “none.”
“#,” “
* Depending on the root of the chord, the symbols that can be
selected may differ.
■ Use [Maj] through [9th] to specify the chord type.
* You cannot select a chord type other than [Maj] through [9th]
while the song is being played.
■ To specify an On-Bass chord, hold down [SHIFT] and
use [C] through [B] and [#/b] to specify the bass tone.
fig.RE02-10
Song number Chord type
3. Repeat step 2 as necessary.
b
] to specify the root of the
Chord root
On-Bass chord
Muting Out a Specific
Percussion Sound
You can mute out just the sound of a specific percussion
instrument (such as snare) among the drum sounds used for
the Drum Part.
* This feature cannot be used when the Drum Part is muted
(that is, when the button is dark).
1. Hold down [SHIFT] and press the button
corresponding to the percussion sound you want to
mute out ([DRUM] through [INST 2]) to make the
button go dark.
When the button is dark, the sound is muted. When the
button is lighted, the sound plays.
fig.RE02-12
[SHIFT] + [DRUM]: Kick (KICK)
[SHIFT] + [BASS]: Snare (SNARE)
[SHIFT] + [INST 1]: Hi-hat (HI-HAT)
[SHIFT] + [INST 2]: Everything other than kick,
snare, and hi-hat (OTHERS)
2
Muting Out the Sound of a
Specific Part
You can mute out any of the parts (Drum, Base, Inst 1, or Inst
2) or the Audio Track when playing a song.
1. Press one of the PART MUTE/SELECT buttons
([DRUM] through [INST 2]) to make the button go
dark.
When the button is dark, the sound is muted. When the
button is lighted, the sound plays.
fig.RE02-11
played played muted played muted
2. To cancel muting, press the corresponding button to
make it light up.
* If you wish to save the settings, execute the Save procedure
(p. 59).
You can check which percussion sounds are muted out by
holding down [SHIFT] to see which buttons are lighted or
dark.
2. To cancel muting, hold down [SHIFT] and press the
corresponding button to make it light up.
* If you wish to save the settings, execute the Save procedure
(p. 59).
63
Page 64

Chapter 2 Playing a Song
Playing More Than One Song
Continuously (Song Chain)
You can have up to ten songs played back to back in a
performance. This function is called Song Chain.
* You can combine User Songs in the unit and on a memory
card for continuous play.
fig.RE02-13
12 10
ROCK 1
No. 001
1. At the Song screen, press [CURSOR ] to select “5
SONG CHAIN MODE.”
fig.RE02-14
2. Press [ENTER].
The Song Chain Setting screen appears.
fig.RE02-21
Order
USER
No. 002
ROCK 3
No. 003
Category
4. When you’ve finished making the settings, press
[CURSOR ] to return the orderof songs to “1,” then
press [RESET].
5. Press [START].
The Song Chain plays in the set order, beginning with
the initial song selection. The display will change,
showing the next song, as each successive song in the
chain begins playing.
* When a screen other than the Song Chain settings screen is
displayed, the Song Chain function is disabled, and a
consecutive performance cannot be played.
* Then may be a slight pause until the next song starts.
By pressing [SHIFT] + [SONG] in the Song screen, you can
jump to the Song Chain setting screen.
Jumping to the last measure
of the song
You can jump to the last measure of the currently selected
song.
Song nameSong number
3. Select the songs to be played consecutively, and the
order in which you want them to play.
■ Press [CURSOR] to set the order of the songs (from 1 up
to 10).
■ Press [SONG/STYLE BANK] and select a category.
■
Turn [VALUE] to select the Song Number.
■ If you press [ERASE] ([SHIFT] + [UTILITY]), the
currently-displayed song will be canceled, and will
become a blank. If you press [ERASE] while a blank is
shown, the subsequent songs will be moved forward to
fill the gap.
■ If you press [INSERT] ([SHIFT] + [PART]), a blank will be
inserted. If you insert a blank when ten songs are
already specified, the tenth song will be canceled.
* To cancel, press [EXIT].
* The following appears when no song is selected.
fig.RE02-23
1. With song playback stopped, press [SHIFT] + [FWD].
The last measure will appear in the left display.
64
Page 65

Chapter 3 Composing Songs Using EZ Compose
Using EZ Compose makes it easy to create your own original
songs.
1. Select a User Song to be recorded (p. 59).
* If no card is inserted, you can’t select a User Song on a card.
2. Press [EZ], getting the button to light.
The Start screen for EZ Compose appears for about one
second, and then the Style Selection screen appears.
fig.RE03-01
Category
Style number Style name
To cancel EZ Compose, press [EZ] to make the button go
dark.
3. Press [SONG/STYLE BANK] and select a category.
7. Once you’ve decided on a Chord template, press
[ENTER].
The Tempo Setting screen appears.
fig.RE03-04
8. Turn [VALUE] to set the tempo.
Settings values: 40–250
9. Once you’ve decided on the tempo, press [ENTER].
The Key Setting screen appears.
fig.RE03-05
10.Turn [VALUE] to specify the key (root) of the song.
You can specify a key from C to B, in semitone steps.
11.Once you’ve decided on the key of the song, press
[ENTER].
A screen asking you to confirm that you want to proceed
with EZ Compose appears.
fig.QS03-40
3
4. Turn [VALUE] to select a Style.
* When you press [START], the Style is played using the Forms
selected at that time.
5. Once you’ve decided on the Style, press [ENTER].
The Chord template Selection screen appears.
fig.RE03-03
6. Turn [VALUE] to select a Chord template.
A Chord template groups the chord progressions and
Form sequences together into a single set.
BluesChord 1–9: Selected when creating songs with
blues chord progressions.
MajorChord 1–24: Selected when creating songs
consisting of major melodies.
MinorChord 1–17: Selected when creating songs
consisting of minor melodies.
* To cancel, press [EXIT].
12.Press [ENTER] to carry out EZ Compose.
Generation of the song data starts.
fig.RE03-06
When the song data has been generated, the display will
indicate “Completed!”
* The song that is generated will automatically be given a song
name that is the same as the Chord template.
65
Page 66

Chapter 4 Creating User Songs
Recording T rac k
When select the Form Track
When select the Chord Track
2) Turn [VALUE] to set the tempo.
3) Once you’ve decided on the tempo, press [TEMPO]
Never turn off the power to the JS-5 or remove the memory
card from the JS-5 while the “ ” still appears at the left of
the display (when data is being written), as this can prevent
the data from being written properly, and may adversely
affect later operations.
Selecting the Recording
Destination
Select the User Song to be used as the recording destination.
1. Press [SONG], getting the button to light.
2. Press [USER] or [CARD], to switch to “USER” (the JS-5)
or “CARD” (memory card).
* If no memory card is inserted, then you can’t select “CARD”
even when you press [CARD].
Selecting a recording track
When There is No Data in the
Recording Destination
1. Press [REC], getting the button to light.
fig.RE04-40
once more, extinguishing the button’s light.
[SONG], [CHORD], and [AUDIO TRACK] flash, and the
Recording Track Selection screen appears.
3. Turn [VALUE] to select a song.
fig.RE04-01
* A User Song where no data is recorded will have an “*” next
to the song number.
Selecting a Style
1. Press [STYLE], getting the button to light.
fig.RE04-50
2. Press [SONG/STYLE BANK] and select a category.
* You can't select User Styles stored on memory cards if no card
is inserted.
3. Turn [VALUE] to select a Style.
■ When you press [START], the Style is played using the
Forms selected at that time.
You can check the tempo for the selected Style as well as
during recording.
When you have finished checking the tempo, press
[STOP] to stop the performance, then press [RESET].
■ If the tempo is too fast (or slow), use the following
procedure to change the tempo.
1) Press [TEMPO], getting the button to light.
* When a User Style is selected, [STYLE] flashes.
2. Press [SONG] or [CHORD] to select a recording track.
[SONG]: Form track
[CHORD]: Chord track
3. Press [ENTER].
The Recording Standby screen for the selected track
appears.
fig.RE04-03
Use the following procedure when changing
Styles.
1. Press [CURSOR ] to display the Style Selection
screen.
fig.RE04-04
2. Press [SONG/STYLE BANK] and select a category.
* You can't select User Styles stored on memory cards if no card
is inserted.
66
Page 67

Chapter 4 Creating User Songs
VERSE 1
------ ------ ------
VERSE 1
------
VERSE 1
------
VERSE 1 VERSE 1 VERSE 1 VERSE 1
1234
1234
1234
1212
1234
1111
Recording Performance
3. Turn [VALUE] to select a Style.
* While you are taking these procedures, you cannot play the
Style you select.
4. Press [SONG] or [CHORD] to return to Recording
Standby screen.
Recording Forms
Record Forms to the Form Track. There are two methods for
this, Realtime Recording and Step Recording.
Realtime Recording
Form is recorded in units of one measure.
1. Display the Form’s Recording Standby screen (p. 66).
[REC] and [SONG] lights up.
2. Press [REC] to display “REAL.”
Realtime Recording is selected.
fig.RE04-05
5. Press [FORM] in the sequence of the Forms.
■ The current Form continues to play until you switch to
the next form. If a Form is already recorded, that Form
will be played.
■
When you press [ENDING], then the recording stops
automatically when the ending is finished playing, and you’re
returned to the Song screen.
You can change the content of a performance, even in the
same Forms, by using different recording methods.
For example, when recording a Form consisting of four
measures, you can have the content change with the
recording method as shown below.
fig.RE04-70
4
If you press [CURSOR ] to select “1 COUNT IN,”
you can make count-in settings. (p. 60)
3. Press [FORM] to select the first Form to be recorded.
The button for the selected Form lights up.
4. Press [START].
The Form’s Realtime Recording screen is displayed, and
recording begins. [REC] lights up.
* When the count-in is selected, the count-in is indicated in the
left display while the count sound plays simultaneously. After
the count-in is displayed, recording begins.
ig.RE04-08
6. Once you have finished recording, press [STOP].
[REC] goes dark, and the Song screen reappears.
Timing of Pressing the Buttons
If you press the button for the subsequent Form slightly
before the currently selected Form is through playing, the
button flashes (for standby). The next Form starts playing at
the same time performance of the current Form stops, and
the button changes from flashing to lit.
If you wish to create a silent portion, record [BREAK 2].
* If the next form is not selected when the “Intro” is first
recorded, verse 1 will automatically play when the intro
finishes, and [VERSE 1] will light.
67
Page 68

Chapter 4 Creating User Songs
VERSE 1
------ ------ ------
VERSE 1
------
VERSE 1
------
VERSE 1 VERSE 1 VERSE 1 VERSE 1
1234
1234
1234
1212
1234
1111
Recording Performance
Step Recording
Form is recorded in units of one measure.
You can have a recorded data play by pressing [START]
while Step Recording is in progress. The measure
currently being played appears in the left display.
1. Display the Form’s Recording Standby screen (p. 66).
[REC] and [SONG] lights up.
2. Press [REC] to display “STEP.”
Step Recording is selected.
fig.RE04-09
3. Press [START].
The Form’s Step Recording screen is displayed, and
recording begins.
fig.RE04-10
Beat
Clock
Form
When “- - - - - -” is indicated for the Form, it means that the
Form is not being recorded with that timing. When the song
is played, the preceding Form that was recorded is carried
over.
ig.RE04-11
* You cannot proceed with recording while the data is being
played.
When the last Form is played, the performance stops,
and performance returns to the beginning position, and
then is enabled for recording.
* To stop a performance in progress, press [STOP]. The
performance returns to the beginning position, then is
enabled for recording.
6. Move to the timing (measure/beat/clock) to be used in
recording the next Form.
7. Repeat Steps 5 and 6 as needed.
■ Press [FWD] while holding down [SHIFT] to move to the
recording Quantize value used in the subsequent Form;
press [RWD] while holding down [SHIFT] to move to the
recording Quantize value used in the previous Form.
You can change the content of a performance, even in the
same Forms, by using different recording methods.
For example, when recording a Form consisting of four
measures, you can have the content change with the
recording method as shown below.
fig.RE04-70
4. Move to the measure to be used in recording the Form.
■ Press [FWD] to move to the next measure, Press [RWD]
to move to the previous measure.
5. Press [FORM] to record the Forms.
The Form screen for the Form being recorded appears.
The number of measures comprising the Form being
recorded is displayed in the parentheses at the lower
right of the screen.
For example, when "4meas" is displayed, it indicates that
the current Form is made up of four measures.
fig.RE04-41
68
If the form is displayed as “Song End,” no form has been
recorded after this measure.
If you move to a measure that comes after this measure
and press [STOP], then even without any Form being
recorded, the measures up to the one in which [STOP]
has been pressed become the measures to be recorded,
and “Song End” appears for the measure following this.
fig.RE04-41a
Page 69

Chapter 4 Creating User Songs
VERSE 1 VERSE 2
INTRO
FILL 1
001 002 003 004
VERSE 1 VERSE 2
FILL 1
008 009 010 011
Copy
Relevant Tr ack
For measures earlier than this measure, a “ ” will be
displayed in the upper right of the screen.
8. Once you have finished recording, press [STOP].
[REC] goes dark, and the Song screen reappears.
Adding Fill-ins and Breaks
Use the following procedure to add fill-ins and breaks after
recording.
1. Display the Form’s Recording Standby screen (p. 66).
[REC] and [SONG] lights up.
2. Press [REC] to display “REAL.”
Realtime Recording is selected.
fig.RE04-05
Erasing Forms
You can erase the recorded Form in the current screen.
After the Form is erased, “------” is displayed for the Form,
and the previous Form is carried forward (p. 68).
1. Display the Form’s Step Recording screen (p. 66).
fig.RE04-12
2. Press [FWD] or [RWD] to show the Form you want to
erase.
3. Press [ERASE] ([SHIFT] + [UTILITY]).
Copying Forms
This copies the Forms in a specified range of measures and
copies them to other measures on the same track.
fig.RE04-13
4
3. Press [START].
The Form’s Realtime Recording screen is displayed, and
recorded Form is played.
4. Press [FILL 1] or [FILL 2], or [BREAK 1] or [BREAK 2]
in time with the recording.
5. Once you have finished recording, press [STOP].
[REC] goes dark, and the Song screen reappears.
1. At the Form’s Step Recording screen, press [COPY]
([SHIFT] + [EFFECTS]).
The screen for selecting the track to copy appears.
fig.RE04-46
2.Turn [VALUE] to select “FORM.”
3. Press [ENTER].
The copy-destination designation screen appears.
fig.RE04-14
Starting measure
Final measure
4. Specify the range of measures in the copy source.
Use [CURSOR] and [VALUE] to specify the starting
measure and final measure.
69
Page 70

Chapter 4 Creating User Songs
5. Press [ENTER].
The copy-destination designation screen appears.
fig.RE04-15
Beginning measure
* To cancel, press [EXIT]. The Form’s Step Recording screen
reappears.
6. Specify the measure for the copy destination.
Turn [VALUE] to specify the starting measure. The final
measure is determined automatically by the number of
measures in the copy source.
7. Press [ENTER].
The copy confirmation screen appears.
fig.RE04-16
* To cancel, press [EXIT]. The copy-destination screen
reappears.
8. Press [ENTER] when you want to execute the copy.
The copy will be executed, and when it is finished the
display will indicate “Completed!”
Recording the Chord
Progression
Record chord progressions to the Chord Track. There are two
methods for this, Realtime Recording and Step Recording.
* Use Step Recording to input Octave Shift (p. 72) and on-bass
chords.
Realtime Recording
1. Display the Chord’s Record Standby screen (p. 66).
[REC] and [CHORD] lights up.
2. Press [REC] to display “REAL.”
Realtime Recording is selected.
fig.RE04-42
3. Use [CURSOR] and [VALUE] to set Quantize.
The Quantize here corrects discrepancies in the timing
during recording of fill-ins and breaks, with the timing
set to the selected note length.
fig.RE04-60
Display
Quantize
Whole note
Half note
Half note triplets
Quarter note
(Clock)
(384)
(192)
(128)
(96)
Display
Quantize
Quarter note triplets
8th note
8th note triplets
16th note
(Clock)
(64)
(48)
(32)
(24)
70
4. Before you start, input the first chord that you wish to
record.
When you input the chord, the following screen will
appear.
fig.RE04-18a
* When you press [EXIT], you will return to the record standby
screen. However if this screen is not displayed, it is not
possible to begin recording from the chord you input.
■ Use [C] through [B] and [#/
b
] to specify the root of the
chord.
Pressing [#/b] repeatedly cycles through the selections of
“#,” “
b
,” and “none.”
* Depending on the root of the chord, the symbols that can be
selected may differ.
Page 71

Chapter 4 Creating User Songs
Quantize
Clock
Beat
Octave Shift
■ Use [Maj] through [9th] to specify the chord type.
* You cannot select a chord type other than [Maj] through [9th].
■ To specify an On-Bass chord, hold down [SHIFT] and
use [C] through [B] and [#/b] to specify the bass tone.
If you press [CURSOR ] to select “1 COUNT IN,”
you can make count-in settings. (p. 60)
5. Press [START].
The Chord’s Realtime Recording screen is displayed. The
Form being recorded begins to play, and recording
begins with the Chord input at Step 4.
* When the count-in is selected, the count-in is indicated in the
left of the display while the count sound plays. After the countin is displayed, recording begins.
fig.RE04-18
6. Record the next Chord.
■ Use [C] through [B] and [#/
b
] to specify the root of the
chord.
■ Use [Maj] through [9th] to specify the chord type.
To input both the chord root and type, press both buttons
simultaneously.
For example if you wish to record “CMaj” after “E7th,” press
[C] and then press [Maj] to record “C7th” and “CMaj.”
Step Recording
1. Display the Chord’s Record Standby screen (p. 66).
[REC] and [CHORD] lights up.
2. Press [REC] to display “STEP.”
Step Recording is selected.
fig.RE04-43
3. Use [CURSOR] and [VALUE] to set the Quantize.
The Quantize here sets the timing to the selected note
length of the subsequent step when [FWD] or [RWD] is
pressed in later operations.
fig.RE04-06
Display
4. Press [START].
The Chord’s Step Recording screen is displayed, and
recording begins. [REC] lights up.
fig.RE04-20
Quantize
Whole note
Half note
Half note triplets
Quarter note
Display
Quantize
Quarter note triplets
8th note
8th note triplets
16th note
4
* You cannot select a chord type other than [Maj] through [9th]
while the song is being played.
7. Repeat Step 6 as needed.
8. Once you have finished recording the Chord, press
[STOP].
[REC] goes dark, and the Chord screen appears.
* Press [SONG] to display the song screen.
5. Move to the timing (measure/beat/clock) to be used in
recording the Chord.
■ Press [FWD] to set the Quantize so that the timing is
synchronized to the subsequent step; Press [RWD] to
synchronize the timing to the previous step.
* You can change the Quantize value by pressing [CURSOR]
and then turning [VALUE] to make the Quantize display
flash.
6. Record the Chord.
■ Use [C] through [B] and [#/
b
] to specify the root of the
chord.
Pressing [#/b] repeatedly cycles through the selections of
“#,” “
b
,” and “none.”
* Depending on the root of the chord, the symbols that can be
selected may differ.
71
Page 72

Chapter 4 Creating User Songs
■ Use [Maj] through [9th] to specify the chord type.
When selecting a Chord Type other than [Maj] through
[9th], press [CURSOR], making the display flash, then
turn [VALUE] to select the chord type.
fig.RE02-30
- - (N.C) Maj M7 M9
7 7(13)7
7#9 6 69 m6
m69 add99 madd9
mM9 m mM7 m7
m7
7sus4 aug aug7
b
5
b
5
dimm9 sus4
7b9
■ To specify an On-Bass chord, hold down [SHIFT] and
use [C] through [B] and [#/b] to specify the bass tone.
* To eliminate an On-Bass chord, press [CURSOR] to get the
On-Bass Chord indication to begin flashing, then turn
[VALUE] so that “–” is selected.
■ When recording Non-Chord Types, press [CURSOR] to
make the Chord Type display flash, and turn [VALUE] to
select “- -.”
fig.RE04-21
Non-chord type
* Chord Octave Shift can be set only in the Step Recording
screen.
8. Move to the timing (measure/beat/clock) to be used in
recording the next Chord.
fig.RE04-23
When the Chord root is displayed in a smaller size, it indicates
that a previously recorded chord has been carried forward.
9. Repeat Steps 5–8 as needed.
■ Press [FWD] while holding [SHIFT] down to move to the
measure where the next chord is recorded, and press
[RWD] while holding [SHIFT] down to move to the
measure where the previous chord is recorded.
If the “ ” is no longer displayed in the upper right of
the screen, this means that chords are not recorded in
subsequent measures.
N.C. (Non-Chord Type)
Select this type when you want to have the original
performance data played as is, with no conversion of the
chords.
Since the “Intro” and “Ending” Chord Progressions are
included in the original performance data, you can have
the Chord Progressions in the performance data played as
is by specifying Non-Chord Type.
Normally, when the Chord Type with a root of “C” is
changed to “N.C.,” the performance data is played with no
conversion of the chords.
If the root is a note other than “C,” the original performance
data is played based on that root. For example, when “D” is
selected with Non-Chord Type, the original performance
data is played a whole step up from the original data.
7. Set the chord’s Octave Shift as needed.
When setting the Octave Shift, you can have the sound
of the chord play one octave higher or lower.
Use [CURSOR] and [VALUE] to display the symbols
below.
▲: Up to the next higher inversion.
•••: Basic chord (root at bottom).
▼: Down to the next lower inversion.
You can have a recorded data play by pressing [START]
while Step Recording is in progress. The measure
currently being played appears in the left display.
* You cannot proceed with recording while the data is being
played.
When the last Form is played, the performance stops,
and performance returns to the beginning position, and
then is enabled for recording.
* To stop a performance in progress, press [STOP]. The
performance returns to the beginning position, then is
enabled for recording.
10.Once you have finished recording the Chord, press
[STOP].
[REC] goes dark, and the Chord screen reappears.
* Press [SONG] to display the song screen.
72
Page 73

Chapter 4 Creating User Songs
Starting measure
Erasing Chords
You can erase the recorded Chord in the current screen.
After the Chord is erased, the previous Chord is carried
forward.
1. Display the Chord’s Step Recording screen (p. 66).
fig.RE04-24
2. Use [FWD] or [RWD] to show the Chord you want to
erase.
3. Press [ERASE] ([SHIFT] + [UTILITY]).
Copying Chords
This copies the Chords in a specified range of measures and
copies them to other measures on the same track.
fig.RE04-25
001 002 003 004
B7th
008 009 010 011
E7th E7th
E7th E7th
B7th
Copy
B7th
4. Specify the range of measures in the copy source.
Use [CURSOR] and [VALUE] to specify the starting
measure and final measure.
5. Press [ENTER].
The copy-destination designation screen appears.
fig.RE04-27
4
6. Specify the measure for the copy destination.
Turn [VALUE] to specify the starting measure. The final
measure is determined automatically by the number of
measures in the copy source.
7. Press [ENTER].
The copy confirmation screen appears.
fig.RE04-16
* To cancel, press [EXIT]. The copy-destination screen
reappears.
8. Press [ENTER] when you want to execute the copy.
The copy will be executed, and when it is finished the
display will indicate “Completed!”
1. At the Chord’s Step Recording screen, press [COPY]
([SHIFT] + [EFFECTS]).
The screen for selecting the track to copy appears.
fig.RE04-47
Relevant Tr ack
2. Turn [VALUE] to select “CHORD.”
3. Press [ENTER].
The copy-source designation screen appears.
fig.RE04-26
Starting measure
Final measure
73
Page 74

Chapter 4 Creating User Songs
When select the Form Track
When select the Chord Track
Using a Preset Song as a Base
for Creating a New Song
When creating a User Song by editing a Preset Song, since
you cannot edit the Preset Song itself, copy the Preset Song to
the User Songs.
1. Select the Preset Song to be used as the copy source.
2. Press [COPY] ([SHIFT] + [EFFECTS]).
The copy-source designation screen appears.
fig.RE04-29
Destination Song
category / number
3. Select the User Song to be used as the copy destination.
■ Use [CURSOR] and [VALUE] to select “USER” (the JS-
5) or “CARD” (memory card).
* If no memory card is inserted, then you can’t select “CARD”
even when you press [CARD].
Naming the Song
You can give the song a song name.
1. Select the User Song to be named.
2. Press [REC].
The Recording Track Selection screen is displayed.
3. Press [SONG] or [CHORD].
The Form or Chord Record Standby screen appears.
fig.RE04-03
4. Press [CURSOR ] to select “2 EDIT NAME.”
The Song Name input screen appears.
fig.RE04-33
■ Use [CURSOR] and [VALUE] to select the Song number.
* User Songs with no data recorded in them are indicated by an
“*” in the display.
4. Press [ENTER].
The copy confirmation screen appears.
fig.RE04-32
* To cancel, press [EXIT]. The copy-source designation
screen reappears.
5. When you have decided on the copy destination, press
[ENTER].
The copy will be executed, and when it is finished the
display will indicate “Completed!”
Song nameCursor
5. Use [CURSOR] and [VALUE] to input the characters.
■ If you press [SHIFT] + [ ], the cursor will move to the
beginning of the name.
■ If you press [SHIFT] + [ ] , the cursor will move to the
end of the name.
■ If you press [INSERT] ([SHIFT] + [PART]), a space will
be inserted at the cursor location.
■ If you press [ERASE] ([SHIFT] + [UTILITY]), the
character at the cursor location will be deleted, and
subsequent characters will be moved toward the left to
fill the gap.
■ If you hold down [SHIFT] and turn [VALUE], uppercase /
lowercase / symbols / (space) / numerals will be
displayed.
6. Repeat Step 5 as needed.
* Press [EXIT] to return to the Form or Chord Record Standby
screen.
74
7. To end the procedure, press [STOP].
Page 75

Chapter 5 Editing Songs
E7th B7th
B7th
A7th
001 002 003 004
Erase
E7th
E7th (A7th)
B7th
A7th
001 002 003 004
(A7th)
005
005
6. Specify the range of measures to be erased.
Never turn off the power to the JS-5 or remove the memory
card from the JS-5 while the “ ” still appears at the left of
the display (when data is being written), as this can prevent
the data from being written properly, and may adversely
affect later operations.
Erasing Forms
You can erase Forms in a specified range of measures. This
erases only the data, leaving the measures intact.
After the Form is erased, “- - - - - -” is displayed for the Form,
and the previous Form is carried forward (p. 68).
fig.RE05-01
001 002 003 004
INTRO
VERSE 1 FILL 1
VERSE 1
005
VERSE 2
7. Once you’ve decided on the measures to be erased,
fig.RE05-04
8. Press [ENTER] to erase the Form.
Use [CURSOR] and [VALUE] to specify the starting
measure and final measure.
* The specified final measure cannot come before the starting
measure.
press [ENTER].
The Form erase confirmation screen appears.
* To cancel, press [EXIT]. The Form erase screen reappears.
5
The erase will be executed, and when it is finished the
display will indicate “Completed!”
Erase
001 002 003 004
INTRO
VERSE 1 (VERSE 1)
VERSE 1
005
(VERSE 1)
1. Select the User Song whose Form you wish to erase.
2. While play is stopped, press [ERASE] ([SHIFT] +
[UTILITY]).
The Song Delete screen appears.
ig.RE05-23
Data to be deleted
3. Press [CURSOR ] to select “ERASE MEASURE?”
The screen for selecting the track to erase appears.
fig.RE05-43
Relevant Tr ack
Erasing Chords
You can erase the recorded Chord in a specified range of
measures. This erases only the data, leaving the measures
intact.
After the Form is erased, the previous Chord is carried
forward (p. 72).
fig.RE05-05
1. Select the User Song whose Chord you wish to erase.
2. While play is stopped, press [ERASE] ([SHIFT] +
[UTILITY]).
The Song Delete screen appears.
ig.RE05-23
4. Turn [VALUE] to select “FORM.”
5. Press [ENTER].
The Form erase screen appears.
fig.RE05-03
start measure
Range of measures to be erased
Data to be deleted
3. Press [CURSOR ] to select “ERASE MEASURE?”
The screen for selecting the track to erase appears.
final mesure
75
Page 76

Chapter 5 Editing Songs
E7th B7th
B7th
A7th
Erase
E7th
E7th (A7th)
B7th
A7th
(A7th)
VERSE 1 FILL 1
INTRO
VERSE 1
001 002 003 004
VERSE 2
VERSE 1 (VERSE 1)
INTRO
VERSE 1
001 002 003 004
(VERSE 1)
005
005
fig.RE05-44
Relevant Tr ack
4. Turn [VALUE] to select “CHORD.”
5. Press [ENTER].
The Chord erase screen appears.
fig.RE05-06
starting measure
Range of measures to be erased
final measure
6. Specify the range of measures to be erased.
Use [CURSOR] and [VALUE] to specify the starting
measure and final measure.
* The specified final measure cannot come before the starting
measure.
7. Once you’ve decided on the measures to be erased,
press [ENTER].
The Chord erase confirmation screen appears.
fig.RE05-04
Erasing Forms Together with
Chords
You can erase both the Forms and the Chords in a specified
range of measures. This erases only the data, leaving the
measures intact.
fig.RE05-09a
1. Select the User Song whose Form and Chord you wish to
erase.
2. While play is stopped, press [ERASE] ([SHIFT] +
[UTILITY]).
The Song Delete screen appears.
ig.RE05-23
* To cancel, press [EXIT]. The Chord erase screen screen
reappears.
8. Press [ENTER] to erase the Chord.
The erase will be executed, and when it is finished the
display will indicate “Completed!”
Data to be deleted
3. Press [CURSOR ] to select “ERASE MEASURE?”
The screen for selecting the track to erase appears.
fig.RE05-44
Relevant Tr ack
4. Turn [VALUE] to select “CHD&FORM.”
5. Press [ENTER].
The screen for simultaneously erasing Forms and Chords
appears.
fig.RE05-09c
starting measure
Range of measures to be erased
final measure
76
Page 77

Chapter 5 Editing Songs
Destination Song
category / number
6. Specify the range of measures to be erased.
Use [CURSOR] and [VALUE] to specify the starting
measure and final measure.
* The specified final measure cannot come before the starting
measure.
7. Once you’ve decided on the measures to be erased,
press [ENTER].
The erase confirmation screen appears.
fig.RE05-04
* To cancel, press [EXIT]. The screen for simultaneously erasing
Forms and Chords appears.
8. Press [ENTER] to erase the data.
The erase will be executed, and when it is finished the
display will indicate “Completed!”
Copying Forms
This copies the Forms in a specified range of measures and
copies them to other measures on the same track.
fig.RE04-13
001 002 003 004
INTRO
VERSE 1 VERSE 2
008 009 010 011
VERSE 1 VERSE 2
* By copying measures in which no Form has been recorded
(measures in which a Form recorded in even earlier measures
are passed on), you can make blank measures in the copy
destination.
1. Select the User Song whose Form you wish to copy.
2. While play is stopped, press [COPY] ([SHIFT] +
[EFFECTS]).
The Song copy screen appears.
fig.RE05-25
FILL 1
Copy
FILL 1
5
3. Press [CURSOR ] to select “COPY MEASURE?”
The screen for selecting the track to copy appears.
fig.RE05-45
Relevant Tr ack
4. Turn [VALUE] to select “FORM.”
5. Press [ENTER].
The copy-source designation screen appears.
fig.RE04-14
Starting measure
Final measure
6. Specify the range of measures in the copy source.
Use [CURSOR] and [VALUE] to specify the starting
measure and final measure.
77
Page 78

Chapter 5 Editing Songs
Destination Song
category / number
Relevant Tr ack
Starting measure
Final measure
Starting measure
* When attempting to copy many measures at one time, the
message “No More Memory!” may be displayed, and you may
not be able to copy the data. In this case, you can copy the data
by dividing the measures to be copied into smaller sections,
and repeating the copy procedure as many times as is needed.
7. Press [ENTER].
The copy-destination designation screen appears.
fig.RE04-15
Beginning measure
8. Specify the measure for the copy destination.
Turn [VALUE] to specify the starting measure. The final
measure is determined automatically by the number of
measures in the copy source.
9. Press [ENTER].
The copy confirmation screen appears.
fig.RE04-16
2. While play is stopped, press [COPY] ([SHIFT] +
[EFFECTS]).
The Song copy screen appears.
fig.RE05-25
3. Press [CURSOR ] to select “COPY MEASURE?”
The screen for selecting the track to copy appears.
fig.RE05-46
4. Turn [VALUE] to select “CHORD.”
5. Press [ENTER].
The copy-source designation screen appears.
fig.RE04-26
* To cancel, press [EXIT]. The copy-destination designation
screen reappears.
10.Press [ENTER] when you want to execute the copy.
The copy will be executed, and when it is finished the
display will indicate “Completed!”
Copying Chord Progression
This copies the Chords in a specified range of measures and
copies them to other measures on the same track.
fig.RE04-25
001 002 003 004
B7th
008 009 010 011
E7th E7th
E7th E7th
* By copying measures in which no Chord has been recorded
(measures in which a Chord recorded in even earlier measures
are passed on), you can make blank measures in the copy
destination.
1. Select the User Song whose chord progression you
wish to copy.
B7th
Copy
B7th
6. Use [CURSOR] and [VALUE] to specify the starting
measure and final measure of the copy source.
* When attempting to copy many measures at one time, the
message “No More Memory!” may be displayed, and you may
not be able to copy the data. In this case, you can copy the data
by dividing the measures to be copied into smaller sections,
and repeating the copy procedure as many times as is needed.
7. Press [ENTER].
The copy-destination designation screen appears.
fig.RE04-27
8. Specify the measure for the copy destination.
Turn [VALUE] to specify the starting measure. The final
measure is determined automatically by the number of
measures in the copy source.
9. Press [ENTER].
The copy confirmation screen appears.
78
Page 79

Chapter 5 Editing Songs
Relevant Tr ack
fig.RE04-16
* To cancel, press [EXIT]. The copy-destination designation
screen reappears.
10.Press [ENTER] to execute the copy.
The copy will be executed, and when it is finished the
display will indicate “Completed!”
Copying Forms Together
with Chords
This copies the both the Forms along with the Chords in a
specified range of measures and copies them to other
measures on the same track.
fig.RE05-10
001 002 003 004
INTRO
VERSE 1 VERSE 2
B7th
008 009 010 011
E7th E7th
VERSE 1 VERSE 2
E7th E7th
FILL 1
B7th
Copy
FILL 1
B7th
fig.RE05-46
4. Turn [VALUE] to select “CHD&FORM.”
5. Press [ENTER].
The screen for simultaneously copying Forms and
Chords appears.
fig.RE05-12
Starting measure
Final measure
6. Specify the range of measures in the copy source.
Use [CURSOR] and [VALUE] to specify the starting
measure and final measure.
* When attempting to copy many measures at one time, the
message “No More Memory!” may be displayed, and you may
not be able to copy the data. In this case, you can copy the data
by dividing the measures to be copied into smaller sections,
and repeating the copy procedure as many times as is needed.
7. Press [ENTER].
The copy-destination designation screen appears.
fig.RE05-13
5
* By copying measures in which no Form/Chord has been
recorded (measures in which a Form/Chord recorded in even
earlier measures are passed on), you can make blank measures
in the copy destination.
1. Select the User Song whose Form and Chord you wish to
copy.
2. While play is stopped, press [COPY] ([SHIFT] +
[EFFECTS]).
The Song copy screen appears.
fig.RE05-25
Destination Song
category / number
3. Press [CURSOR ] to select “COPY MEASURE?”
The screen for selecting the track to copy appears.
Starting measure
8. Specify the measure for the copy destination.
Turn [VALUE] to specify the starting measure. The final
measure is determined automatically by the number of
measures in the copy source.
9. Press [ENTER].
The copy confirmation screen appears.
fig.RE05-14
* To cancel, press [EXIT]. The copy-destination screen
reappears.
10.Press [ENTER] to execute the copy.
The copy will be executed, and when it is finished the
display will indicate “Completed!”
79
Page 80

Chapter 5 Editing Songs
001 002 003 004 005 006 007 008 009 010
Insert
001 002 003 004 005 006 007
Deleting Measures
This deletes the actual measures themselves, along with the
Forms and Chords they contain, for a specified range of
measures.
After the Measures are removed, subsequent measures are
brought forward to close the gap created.
* Even if you delete a measure of the Song where Audio data is
recorded, there will be no change caused in the Audio data.
* The Loop Point which has been set in a Song will remain
unchangedbe even after a measure is deleted. Set a new Loop
Point as needed.
fig.RE05-16
001 002 003 004 005 006 007 008 009 010
1 2 3
001 002 003 004 005 006 007
1 2 3
1. Select the User Song whose measure you wish to
delete.
fig.RE05-41
2. While play is stopped, press [ERASE] ([SHIFT] +
[UTILITY]).
The Song Delete screen appears.
ig.RE05-23
5 6
4
Delete
7
8 9
7
10
8 9
10
5. Once you’ve decided on the measures to be deleted,
press [ENTER].
The delete confirmation screen appears.
fig.RE05-18
* To cancel, press [EXIT]. The Measure delete screen reappears.
6. Press [ENTER] to delete the data.
The delete will be executed, and when it is finished the
display will indicate “Completed!”
Inserting Measures
This inserts empty measures in the Form track and Chord
track.
* Even if you insert empty measures into the Song where Audio
data is recorded, the Audio data will remain unchanged.
* The Loop Point which has been set in a Song will remain
unchanged even after empty measures are inserted. Set a new
Loop Point as needed.
fig.RE05-19
Data to be deleted
3. Press [CURSOR ] to select “DELETE MEASURE?”
The Measure delete screen appears.
fig.RE05-17
starting measure
Range of measures to be deleted
4. Specify the range of measures to be deleted.
Use [CURSOR] and [VALUE] to specify the starting
measure and final measure.
* The specified final measure cannot come before the starting
measure.
final measure
80
1. Select the User Song whose empty measure you wish to
insert.
2. While play is stopped, press [INSERT] ([SHIFT] +
[PART]).
The confirmation screen for inserting measures appears.
fig.RE05-20
Measure where the new measures are
to be inserted
3. Turn [VALUE] to select the measure where the new
measures are to be inserted.
Page 81

Chapter 5 Editing Songs
4. Once you’ve decided on the insertion point, press
[ENTER].
The Measure insert designation screen appears.
fig.RE05-21
Number of measures to be inserted
5. Turn [VALUE] to specify the number of measures to be
inserted.
6. Once you’ve decided on the number of measures, press
[ENTER].
The confirmation screen for inserting measures appears.
fig.RE05-50
* To cancel, press[EXIT]. The Measure insert designation
screen reappears.
7. To insert the measures, press [ENTER].
The insert will be executed, and when it is finished the
display will indicate “Completed!”
Deleting an Entire Song/Deleting the
Data on a Specified Track
This deletes an entire User Song. The data on the Audio track
(the audio data) and Song name are also deleted.
You can also delete data only from the “Form track,” “Chord
track,” or “Audio track.”
1. Select the User Song to be deleted).
* You cannot select User Songs stored on memory cards if no
card is inserted.
2. While play is stopped, press [ERASE] ([SHIFT] +
[UTILITY]).
The Song Delete screen appears.
fig.RE05-23
Data to be deleted
3. Turn [VALUE] to select the data to be deleted.
ALL: All data in the selected song is deleted.
CHD&FORM: All Form track and Chord track data is
deleted.
FORM: The Form track data is deleted.
CHORD: The Chord track data is deleted.
AUDIO: The Audio track data (audio data) is
deleted.
5
4. Once you’ve decided on the data to delete, press
[ENTER].
The data delete confirmation screen appears.
g.RE05-24
* To cancel, press [EXIT]. The Data Delete Selection screen
reappears.
5. Press [ENTER] to delete the Song.
The delete will be executed, and when it is finished the
display will indicate “Completed!”
81
Page 82

Chapter 5 Editing Songs
Copying an Entire Song
This copies an entire Preset Song or User Song to the User
Songs. If copying a User Song, the audio data can also be
copied along with the rest of the data.
1. Select the Song to be copied.
* You cannot select User Songs stored on memory cards if no
card is inserted.
2. While play is stopped, press [COPY] ([SHIFT] +
[EFFECTS]).
The Song copy screen appears.
fig.RE05-25
Destination Song
category / number
If there is not enough free memory at the copy
destination, the following appears in the display.
* After this appears, the Song screen returns to the display.
fig.RE05-30
6. Press [ENTER] to copy the data.
The copy will be executed, and when it is finished the
display will indicate “Completed!”
3. Select the User Song to be used as the copy destination.
■ Use [CURSOR] and [VALUE] to select “USER” (the JS-
5) or “CARD” (memory card).
* If no memory card is inserted, then you can’t select “CARD”
even when you press [CARD].
■ Use [CURSOR] and [VALUE] to select the Song number.
* User Songs with no data recorded in them are indicated by an
“*” in the display.
4. Press [ENTER].
If the copy-source Song contains audio data, the audio
data copy confirmation screen appears.
fig.RE05-28
5. Specify whether or not you wish to copy audio data as
well.
■ If you wish to copy audio data as well, use [CURSOR] to
make “YES” blink, and press [ENTER].
■ If you do not wish to copy audio data, use [CURSOR] to
make “NO” blink, and press [ENTER].
The Song copy confirmation screen appears.
fig.RE05-29
* Press [EXIT] to cancel. The audio data copy confirmation
screen reappears.
82
Page 83

Chapter 6 Adjusting the Balance Between Parts
Drum
Selected Part
Bass Inst 1 Inst 2
Volume level of each Part
To save the modified settings
If you modify the settings of a user song, the modified
content will be lost when you switch to another song/style.
If you wish to keep the settings, use the following procedure.
1. Press [REC], getting the button to light.
* To cancel, press [EXIT].
2. Press [STOP].
The following screen will appear, and the settings will be
saved.
fig.RE06-50
When the settings have been saved, you will return to
the previous screen.
Never turn off the power to the JS-5 or remove the memory
card from the JS-5 while the “ ” still appears at the left of
the display (when data is being written), as this can prevent
the data from being written properly, and may adversely
affect later operations.
Adjusting the Volume for
Each Part
You can adjust the volume of each of the Parts, “INST 1,”
“INST 2,” “DRUM,” and “BASS,” and for the “Audio track.”
1. Select a Song.
2. Press [PART].
3. Press [CURSOR] to display “1 VOLUME.”
fig.RE06-01
4. Press [PART MUTE/SELECT] to select the Part on
which you want to change the volume (or the Audio
track).
* When a User Song to which audio data is recorded is selected,
the following screen appears when [AUDIO TRACK] is
pressed.
fig.RE06-02
6
If you have changed the settings for the Preset Songs, then if
you want to save the settings, copy them to a User Song (p. 82).
If you press [SHIFT] + [REC], the settings will be saved
immediately.
5. Turn [VALUE] to change the volume.
Settings values: 0–127
* If you press [START], you can making the settings while
listening to the performance.
* When changing the volume of a part that uses Insert effects (p.
88), then depending on the instrument used in that part, the
amount of the effect may also change when the volume is
changed.
6. Repeat Steps 4 and 5 as needed.
7. Once you have finished making the settings, press
[PART] once more, or press [EXIT].
The original screen reappears.
* If you wish to save the settings, execute the Save procedure.
83
Page 84

Chapter 6 Adjusting the Balance Between Parts
Reverb send level
OUT
Reverb
Chorus
Direct
sound
(Original sound)
Chorus send level
Direct level
IN
Direct level
Selected Part
Chorus send level
Reverb send level
Changing the Pan for Each Part
You can adjust the Pan (placement of the sonic image) for
each of the Parts, “INST 1,” “INST 2,” “DRUM,” and “BASS.”
* The Audio track Pan is fixed at center.
1. Select a Song.
2. Press [PART].
3. Press [CURSOR] to display “2 PAN.”
fig.RE06-03
4. Press [PART MUTE/SELECT] to select the Part for
which the Pan is to be changed.
5. Turn [VALUE] to change the value.
Setting: L64-0-R63
A setting of “L64” puts the sound all the way to the left,
“C” places the sound in the center, and “R63” puts the
sound completely to the right.
* In some cases, the sound may be heard from the right (left)
even though you set this to the far left (right).
fig.RE06-04
Changing the Amount of Chorus
and Reverb Applied to Each Part
You can change the amount of chorus and reverb applied to
each of the Parts, “INST 1,” “INST 2,” “DRUM,” and “BASS.”
Furthermore, you can simultaneously adjust the volume of
the direct (dry) sound to get the proper balance between the
reverb/chorus sound and the direct sound.
fig.RE06-05
To change the amount of reverb applied, adjust the Reverb
Send Level. To change the amount of chorus, adjust the
Chorus Send Level.
To change the volume of the direct sound, adjust the Direct
Level.
* You cannot apply chorus and reverb to the Audio track.
0 R63L64 L1 R1
* If you press [START], you can making the settings while
listening to the performance.
6. Repeat Steps 4 and 5 as needed.
7. Once you have finished making the settings, press
[PART] once more, or press [EXIT].
The original screen reappears.
* If you wish to save the settings, execute the Save procedure
(p. 83).
1. Select a Song .
2. Press [PART].
3. Press [CURSOR] to select “3 FX BALANCE.”
fig.RE06-06
4. Press [PART MUTE/SELECT] to select the Part for
which the settings are to be changed.
5. Use [CURSOR] and [VALUE] to adjust the each level.
Settings values: 0–127
The higher the value set, the more the reverb or chorus
effect is applied. If you do not want any reverb or chorus
effect applied, set this to “0.”
84
Page 85

Chapter 6 Adjusting the Balance Between Parts
* For Parts in which Insert Effects (p. 88) are used, Direct Level
adjusts the level of the sound after the Insert Effects are added.
In this case, the following appears in the screen.
fig.RE06-07
* If you press [START], you can making the settings while
listening to the performance.
* When “0” is selected for all levels, no sound is produced for the
selected Part.
6. Repeat Steps 4 and 5 as needed.
7. Once you have finished making the settings, press
[PART] once more, or press [EXIT].
The original screen reappears.
* If you wish to save the settings, execute the Save procedure
(p. 83).
6
85
Page 86

Chapter 7 Changing Effect Settings
The JS-5 features “Reverb,” “Chorus,” and “Insert Effects” as
internal effects. This chapter explains the procedures used to
change the settings for these effects.
* You cannot apply effects to the Audio track.
To save the modified settings
If you modify the settings of a user song, the modified
content will be lost when you switch to another song/style.
If you wish to keep the settings, use the following procedure.
1. Press [REC], getting the button to light.
* To cancel, press [EXIT].
2. Press [STOP].
The following screen will appear, and the settings will be
saved.
fig.RE06-50
When the settings have been saved, you will return to
the previous screen.
Changing the Reverb Settings
Select and change the reverb-related settings (parameters).
1. Select a Song.
2. Press [EFFECTS].
3. Press [CURSOR] to select the parameter you want to
change.
fig.RE07-01
1 REVERB TYPE
Settings values: ROOM1, ROOM2, STAGE1, STAGE2,
HALL1, HALL2, DELAY, PAN-DELAY
fig.RE07-02
2 REVERB TIME
Settings values: 0–127
fig.RE07-03a
Never turn off the power to the JS-5 or remove the memory
card from the JS-5 while the “ ” still appears at the left of
the display (when data is being written), as this can prevent
the data from being written properly, and may adversely
affect later operations.
If you have changed the settings for the Preset Songs, then if
you want to save the settings, copy them to a User Song (p. 82).
If you press [SHIFT] + [REC], the settings will be saved
immediately.
3 REVERB LEVEL
Settings values: 0–127
fig.RE07-03b
4 REVERB FEEDBACK
Settings values: 0–127
fig.RE07-03c
5 REVERB HF DAMP
Settings values: 0/250/315/400/500/630/800/1000/
1250/1600/2000/2500/3150/4000/
5000/6300/8000 Hz, BYPASS
4. Turn [VALUE] to change the settings value.
* If you wish to save the settings, execute the Save procedure.
86
Page 87

Chapter 7 Changing Effect Settings
Functions of Each Parameter
1 REVERB TYPE
This selects the type of reverb effect.
ROOM1: Dense, short reverb
ROOM2: Thin, short reverb
STAGE1: Reverb with many later reflections
STAGE2: Reverb with strong first reflections
HALL1: Bright, clear reverb
HALL2: Rich reverb
DELAY: Basic, general delay
PAN-DELAY
2 REVERB TIME
When the TYPE is set to ROOM1-HALL2, this parameter sets
the Reverb Time (the time the reverberation is allowed to
continue); when TYPE is set to DELAY or PAN-DELAY, this
sets the Delay Time. The higher the value set, the broader
and fuller the sound appears.
3 REVERB LEVEL
This sets the amount of reverberation.
: Delay sound alternately panned left and right
Changing the Chorus Settings
Select and change the chorus-related settings (parameters).
1. Select a Song.
2. Press [EFFECTS].
3. Press [CURSOR] to select the parameter you want to
change.
fig.RE07-04
6 CHORUS RATE
Settings values: 0–127
fig.RE07-05a
7 CHORUS DEPTH
Settings values: 0–127
7
fig.RE07-05b
4 REVERB DELAY FB (Reverb delay feedback)
When TYPE is set to DELAY or PAN-DELAY, this sets the
amount of the delayed sound that is returned to the Delay
(Feedback). The higher the value set, the more continuous
the delay sound becomes.
5 REVERB HF DAMP
This sets the cutoff frequency for the reverb sound’s highend component.
The amount of attenuation (cut) in the reverb’s high
frequencies changes according to the wall material. HF
Damp (High Frequency Damp) is a parameter that simulates
these conditions by cutting the high-frequency components
of the sound.
Setting this to a lower frequency creates a darker sound;
when set to a higher frequency, the sound appears brighter.
When set to BYPASS, none of the high-frequency component
is cut.
8 CHORUS PRE DELAY
Settings values: 0–127
fig.RE07-06a
9 CHORUS FEEDBACK
Settings values: 0–127
fig.RE07-06b
10 CHORUS LEVEL
Settings values: 0–127
4. Turn [VALUE] to change the settings value.
* If you wish to save the settings, execute the Save procedure
(p. 86).
87
Page 88

Chapter 7 Changing Effect Settings
Functions of Each Parameter
6 CHORUS RATE
This sets the rate of the wavering chorus sound.
7 CHORUS DEPTH
This sets the depth of the chorus’s undulating effect.
8 CHORUS PRE DELAY
This sets the elapsed time after the source sound is played
before the chorus sound is produced. The higher the value
set, the more breadth the sound appears to have.
9 CHORUS FEEDBACK
This sets the amount of the chorus sound that is returned to
the chorus effect (Feedback). The higher the value set, the
more complex the chorus sound becomes.
10 CHORUS LEVEL
This sets the amount of the chorus sound.
Using the Insert Effects
Insert Effects is the name for effects that can be applied
directly to specific Parts. You can use the Insert Effects to
change the tone of that Part.
There are forty types of Insert Effects, including “Overdrive”
and “Distortion.” You could think of each one of these effect
as the equivalent of a separate effects device.
Some of these effect types include compound effects
comprising two effects connected in sequence or in parallel.
* You can select any one of the Parts, either “Drum,” “Bass,”
“Inst 1,” or Inst 2” with which to use the Insert Effects.
* In some cases, sound may be heard even if the output level of
the insert effect is set to “0.”
Selecting the Part to Use with the
Insert Effects
Select the Part, either “Drum,” “Bass,” “Inst 1,” or Inst 2,”
which is to use the Insert Effects.
1. Select a Song.
2. Press [EFFECTS].
3. Press [CURSOR] to select “11 INSERT FX PART.”
fig.RE07-07
4. Turn [VALUE] to to select the Part.
If you do not want the effect applied, select to “OFF.”
* If you wish to save the settings, execute the Save procedure
(p. 86).
Selecting the Type
Select an effect from the forty types available.
1. Press [EFFECTS].
2. Press [CURSOR] to select “12 INSERT FX TYPE.”
fig.RE07-08
88
3. Turn [VALUE] to set to select the type.
* If you wish to save the settings, execute the Save procedure
(p. 86).
Page 89

Chapter 7 Changing Effect Settings
* Refer to the Reference pages for more on the effects of each
type.
STEREO-EQ (p. 90)
OVERDRIVE (p. 90)
DISTORTION (p. 91)
PHASER (p. 91)
SPECTRUM (p. 91)
ENHANCER (p. 92)
AUTO-WAH (p. 92)
ROTARY (p. 92)
COMPRESSOR (p. 93)
LIMITER (p. 93)
HEX-CHORUS (p. 94)
TREMOLO-CHO (p. 94)
SPACE-D (p. 95)
STEREO-CHO (p. 95)
STEREO-FL (p. 96)
STEP-FL (p. 96)
STEREO-DLY (p. 97)
MOD-DELAY (p. 98)
3-TAP-DLY (p. 99)
4-TAP-DLY (p. 100)
TIMECTL-DLY (p. 101)
2-P.SHIFT (p. 101)
FB-P.SFT (p. 102)
REVERB (p. 102)
GATE-REVERB (p. 103)
OD→CHO (p. 103)
OD→FL (p. 104)
OD→DLY (p. 104)
DS→CHO (p. 105)
DS→FL (p. 105)
DS→DLY (p.105)
EH→CHO (p. 105)
EH→FL (p. 106)
EH→DLY (p. 106)
CHO→DLY (p. 107)
FL→DLY (p. 107)
CHO→FL (p. 108)
CHO / DLT (p. 108)
FL / DLY (p. 108)
CHO / FL (p. 108)
Changing the Settings for Each
Type
This changes the settings (parameters) for the selected effect
type.
* The parameters that can be changed vary from one type to
another.
1. Press [EFFECTS].
2. Press [CURSOR] to select “13 INSERT-FX TYPE.”
3. Turn [VALUE] to set to select the type.
4. Press [CURSOR ] to select the parameter you want
to change.
fig.RE07-10
Type
Parameter Value
5. Turn [VALUE] to change the settings value.
* If you wish to save the settings, execute the Save procedure
(p. 86).
7
89
Page 90

Chapter 7 Changing Effect Settings
STEREO-EQ (Stereo Equalizer)
This is a stereo equalizer which allows you to adjust the tone quality
using a low range, two mid-range, and a high range control.
fig.RE07-101
L in
R in
4-Band EQ
4-Band EQ
LOW FREQ (Low Frequency) 200/400 Hz
Select the frequency at which the low frequency range will be
adjusted.
LOW GAIN -15–+15 dB
Specify the low frequency gain (amount of boost or cut).
Positive (+) settings will emphasize (boost) the low range.
HI FREQ (High Frequency) 4000/8000 Hz
Select the frequency at which the high range will be adjusted.
HI GAIN (High Gain) -15–+15 dB
Specify the high frequency gain (amount of boost or cut).
Positive (+) settings will emphasize (boost) the high range.
P1 FREQ (Peaking 1 Frequency) 200–8000 Hz
Specify the center frequency of the region in which the boost
or cut will take place.
P1 Q (Peaking 1 Q) 0.5/1.0/2.0/4.0/8.0
Specify the width of the region centered on the P1 FREQ
setting.
Higher settings will cause the region affected by P1 GAIN to
be narrower.
P1 GAIN (Peaking 1 Gain) -15–+15 dB
Specify the gain (amount of boost or cut) that will take place
in the region specified by P1 FREQ and P1 Q.
Positive (+) settings will emphasize (boost) the region
specified by P1 FREQ and P1Q.
P2 FREQ (Peaking 2 Frequency) 200–8000 Hz
Specify the center frequency of the region in which the boost
or cut will take place.
P2 Q (Peaking 2 Q) 0.5/1.0/2.0/4.0/8.0
Specify the width of the region centered on the P2 FREQ setting.
Higher settings will cause the region affected by P2 GAIN to
be narrower.
L out
R out
P2 GAIN (Peaking 2 Gain) -15–+15 dB
Specify the gain (amount of boost or cut) that will take place
in the region specified by P2 FREQ and P2 Q.
Positive (+) settings will emphasize (boost) the region
specified by P2 FREQ and P2Q.
LEVEL (Output Level) 0–127
Specify the output volume.
OVERDRIVE
Overdrive produces a natural-sounding distortion similar to
that produced by a vacuum tube amplifier.
fig.RE07-102
L in
R in
Over
drive
Amp
Simulator
2-Band
EQ
DRIVE 0–127
Specify the depth of distortion. The volume will change
together with the depth of distortion.
LEVEL (Output Level) 0–127
Specify the output volume.
You can use the Output Level setting to even out the volume
difference between the sound with and without Overdrive.
LOW GAIN -15–+15 dB
Adjust the low frequency gain (amount of boost or cut).
Positive (+) settings will emphasize (boost) the low
frequency range.
HI GAIN (High Gain) -15–+15 dB
Adjust the high frequency gain (amount of boost or cut).
Positive (+) settings will emphasize (boost) the high
frequency range.
AMP (Amp Type)
SMALL/BUILT-IN/2-STACK/3-STACK
Select the type of guitar amp.
SMALL: This simulates a compact amp.
BUILT-IN: This simulates a built-in amp.
2-STACK: This simulates a large two-stack amp.
3-STACK: This simulates a large three-stack amp.
L out
R out
90
Page 91

Chapter 7 Changing Effect Settings
Phaser
Resonance
Mix
L in
R in
L out
R out
DISTORTION
Distortion produces a more intense distortion than the
Overdrive effect.
fig.RE07-103
L in
R in
Distortion
Amp
Simulator
2-Band
EQ
DRIVE 0–127
Adjust the amount of distortion. The volume will change
together with the amount of distortion.
LEVEL (Output Level) 0–127
Specify the output volume.
You can use the Output Level setting to even out the volume
difference between the sound with and without Distortion.
LOW GAIN -15–+15 dB
Specify the low range gain (amount of boost or cut).
Positive (+) settings will emphasize (boost) the low
frequency range.
HI GAIN (High Gain) -15–+15 dB
Specify the high range gain (amount of boost or cut).
Positive (+) settings will emphasize (boost) the high
frequency range.
AMP (Amp Type)
SMALL/BUILT-IN/2-STACK/3-STACK
Specify the type of guitar amp.
SMALL: This simulates a compact amp.
BUILT-IN: This simulates a built-in amp.
2-STACK: This simulates a large two-stack amp.
3-STACK: This simulates a large three-stack amp.
L out
R out
PHASER
Phaser is an effect that adds a phase-shifted sound to the
original sound to create time-varying change, modulating
the sound.
fig.RE07-104
MANUAL 100 Hz–8 kHz
Specify the center frequency at which the sound is
modulated.
RATE (Phaser Rate) 0.05–10.0 Hz
Specify the frequency of modulation.
DEPTH (Phaser Depth) 0–127
Specify the depth of modulation.
RESONANCE 0–127
Specify the amount of feedback for the phaser. Higher
settings will give the sound a stronger character.
MIX (Mix Level) 0–127
Specify the volume of the phase-shifted sound, relative to the
direct sound.
LEVEL (Output Level) 0–127
Specify the output volume.
SPECTRUM
Spectrum is a type of filter which boosts or cuts the level at
specific frequencies to modify the tone.
It functions similarly to the equalizer, but since the eight
frequencies are fixed at positions ideal for giving the sound
more character, more distinctive sounds can be created.
fig.RE07-105
L in
Spectrum
L out
7
R in
The sounds are set with BANDs 1 to 6.
R out
BAND 1 (Band 1 Level) -15–+15 dB
Specify the gain (amount of boost or cut) at 250 Hz.
BAND 2 (Band 2 Level) -15–+15 dB
Specify the gain (amount of boost or cut) at 500 Hz.
BAND 3 (Band 3 Level) -15–+15 dB
Specify the gain (amount of boost or cut) at 1000 Hz.
91
Page 92

Chapter 7 Changing Effect Settings
BAND 4 (Band 4 Level) -15–+15 dB
Specify the gain (amount of boost or cut) at 1250 Hz.
BAND 5 (Band 5 Level) -15–+15 dB
Specify the gain (amount of boost or cut) at 2000 Hz.
BAND 6 (Band 6 Level) -15–+15 dB
Specify the gain (amount of boost or cut) at 3150 Hz.
BAND 7 (Band 7 Level) -15–+15 dB
Specify the gain (amount of boost or cut) at 4000 Hz.
BAND 8 (Band 8 Level) -15–+15 dB
Specify the gain (amount of boost or cut) at 8000 Hz.
WIDTH (Bandwidth) 0.5–8.0
This setting, which is common for each Band, sets the width
of the frequency band which is raised and lowered by the
Level value.
LEVEL (Output Level) 0–127
Specify the output volume.
ENHANCER
Enhancer controls the overtone structure of the high
frequency range, adding sparkle to the sound and improving
the definition.
fig.RE07-106
L in
R in
Enhancer
Enhancer
Mix
Mix
SENS (Sensitivity) 0–127
Specify the depth of the Enhancer effect.
MIX (Mix Level) 0–127
Specify the proportion by which the overtones generated by
the enhancer will be mixed with the original sound.
LOW GAIN -15–+15 dB
Specify the low frequency gain (amount of boost or cut).
Positive (+) settings will emphasize (boost) the low
frequency range.
HI GAIN (High Gain) -15–+15 dB
Specify the high frequency gain (amount of boost or cut).
Positive (+) settings will emphasize (boost) the high
frequency range.
LEVEL (Output Level) 0–127
Specify the output volume.
2-Band
EQ
2-Band
EQ
L out
R out
AUTO-WAH
Auto Wah cyclically moves the frequency of a filter to
produce a wah effect (cyclic modulation of the tone).
fig.RE07-107
L in
Auto Wah
R in
L out
R out
FILTER TYPE LPF/BPF
Specify the type of filter.
LPF (Low-pass Filter):
The wah effect will be produced over a wide frequency
range.
BPF (Bandpass Filter):
The wah effect will be produced over a narrow frequency
range.
SENS (Sensitivity) 0–127
Specify the sensitivity with which the filter will be affected.
MANUAL 0–127
Specify the center frequency at which the wah effect will be
produced.
PEAK 0–127
Specify how the wah effect will affect the region around the
center frequency.
Lower settings will produce a wah effect in a broad area
around the center frequency. Higher settings will produce a
wah effect in a narrow area around the center frequency.
LFO RATE 0.05–10.0 Hz
Specify the modulation frequency of the wah effect.
LFO DEPTH 0–127
Specify the modulation depth of the wah effect.
LEVEL (Output Level) 0–127
Specify the output volume.
ROTARY
This simulates an old-fashioned rotary speaker, which adds
undulations to the sound by rotating the speaker as it plays.
This has the greatest effect when used with an organ sound.
The horn (the treble-range speaker) and the rotor (the bassrange speaker) can be combined to re-create these subtle
effects.
fig.RE07-108
L in
Rotary
R in
L out
R out
92
Page 93

Chapter 7 Changing Effect Settings
LOW SLOW
Specify the low-speed (SLOW) rotational speed of the lowrange rotor.
LOW FAST (Low Frequency Fast Rate)
Specify the high-speed (FAST) rotational speed of the lowrange rotor.
LOW ACCL
Specify the time required for the rotational speed of the lowrange rotor to change from the low speed to the high speed
(or from the high speed to the low speed). More time will be
required as the value of this parameter is decreased.
(Low Frequency Slow Rate)
0.05–10.0 Hz
0.05–10.0 Hz
(Low Frequency Acceleration)
0–15
LOW LEVEL (Low Frequency Level) 0–127
Specify the volume of the low-range rotor.
HI SLOW
Specify the low-speed (SLOW) rotational speed of the highrange rotor.
HI FAST
Specify the high-speed (FAST) rotational speed of the highrange rotor.
(High Frequency Slow Rate)
(High Frequency Fast Rate)
0.05–10.0 Hz
0.05–10.0 Hz
HI ACCL (High Frequency Acceleration) 0–15
Specify the time required for the rotational speed of the highrange rotor to change from the low speed to the high speed
(or from the high speed to the low speed). More time will be
required as the value of this parameter is decreased.
HI LEVEL (High Frequency Level) 0–127
Specify the volume of the high-range rotor.
SEPARATE 0–127
Specify the spaciousness of the sound.
COMPRESSOR
Compressor is an effect which restricts high sound levels and
boosts low sound levels, thus smoothing out variations in
volume.
fig.RE07-109
L in
R in
Compressor
2-Band
EQ
L out
R out
ATTACK (Attack Time) 0–127
Specify the attack time of the input sound.
SUSTAIN (Sustain Level) 0–127
Specify the time over which low-level sounds are boosted to
a constant volume level.
POST GAIN 0/+6/+12/+18
Specify the output level.
LOW GAIN -15–+15 dB
Specify the low frequency range gain (amount of boost or
cut).
Positive (+) settings will emphasize (boost) the low
frequency range.
HI GAIN (High Gain) -15–+15 dB
Specify the high frequency range gain (amount of boost or
cut).
Positive (+) settings will emphasize (boost) the high
frequency range.
LEVEL (Output Level) 0–127
Specify the output volume.
LIMITER
7
SPEED SLOW/FAST
Select the rotational speed of the low-range rotor and highrange rotor.
SLOW:
The specified rotational speeds (the LOW SLOW RATE/HI
SLOW RATE values) will take effect.
FAST:
The specified rotational speeds (the LOW FAST RATE/HI
FAST RATE values) will take effect.
LEVEL (Output Level) 0–127
Specify the output volume.
Limiter is an effect which compresses sounds that are louder
than a specified volume level, preventing distortion from
occurring.
fig.RE07-110
L in
R in
Limiter
2-Band
EQ
L out
R out
THRESHOLD (Threshold Level) 0–127
Specify the volume level at which compression will begin.
RATIO
Specify the compression ratio.
(Compression Ratio)
1.5:1/2:1/4:1/100:1
RELEASE (Release Time) 0–127
Specify the time from when the volume falls below the
threshold level until the limiter effect no longer applies.
93
Page 94

Chapter 7 Changing Effect Settings
POST GAIN 0/+6/+12/+18
Specify the level of the output sound.
LOW GAIN -15–+15 dB
Specify the gain (amount of boost or cut) for the low
frequency range. Positive (+) settings will emphasize (boost)
the low frequency range.
HI GAIN (High Gain) -15–+15 dB
Specify the gain (amount of boost or cut) for the high
frequency range. Positive (+) settings will emphasize (boost)
the high frequency range.
LEVEL (Output Level) 0–127
Specify the output volume.
HEX-CHORUS (Hexa Chorus)
Hexa-chorus is a six-stage chorus which adds depth and
spaciousness to the sound. (Six chorus sounds with different
delay times are overlaid.)
fig.RE07-111
L in
R in
Balance D
Hexa Chorus
Balance D
PRE DELAY (Pre Delay Time) 0.0–100 ms
Specify the delay time from the original sound until when
the chorus sound is heard.
L out
Balance E
Balance E
R out
BALANCE (Effect Balance) D100:0E–D0:100E
Specify the volume balance between the original sound and
the chorus sound.
With a setting of D100:0E only the original sound will be
output, and with a setting of D0:100E only the chorus sound
will be output.
LEVEL (Output Level) 0–127
Specify the output volume.
TREMOLO-CHO (Tremolo Chorus)
Tremolo-chorus is a chorus with a tremolo effect (cyclic
modulation of volume).
fig.RE07-112
L in
Tremolo Chorus
R in
Balance D
Balance D
PRE DELAY (Pre delay Time) 0.0–100 ms
Specify the delay time from the original sound until when
the chorus sound is heard.
CHO RATE (Chorus Rate) 0.05–10.0 Hz
Specify the modulation frequency of the chorus sound.
CHO DEPTH (Chorus Depth) 0–127
Specify the modulation depth of the chorus sound.
L out
Balance E
Balance E
R out
RATE (Chorus Rate) 0.05–10.0 Hz
Specify the modulation frequency of the chorus sound.
DEPTH (Chorus Depth) 0–127
Specify the modulation depth of the chorus sound.
PRE DLY DEV (Pre Delay Deviation) 0–20
The Pre Delay parameter explained above specified the delay time
from the original sound until when the chorus sound is heard.
This Pre Delay Deviation parameter specifies the differences in Pre
Delay time for each of the chorus sounds. Higher settings will
cause each of the chorus sounds to be spread further apart.
DEPTH DEV (Depth Deviation) -20–+20
Specify the difference in modulation depth between each of
the chorus sounds.
PAN DEV (Pan Deviation) 0–20
Specify the difference in stereo position between each of the
chorus sounds.
With a setting of 0, all of the chorus sounds will be panned to
the center. With a setting of 20, each chorus sound will be
panned at 60 degree intervals relative to the center.
TREM PHASE (Tremolo Phase) 0–180
Specify the phase of the tremolo sound.
TREM RATE (Tremolo Rate) 0.05–10.0 Hz
Specify the modulation frequency of the tremolo effect.
TREM DEPTH (Tremolo Depth) 0–127
Specify the depth of the tremolo effect.
BALANCE (Effect Balance) D100:0E–D0:100E
Specify the volume balance between the original sound and
the tremolo-chorus sound.
With a setting of D100:0E only the original sound will be
output, and with a setting of D0:100E only the tremolochorus sound will be output.
LEVEL (Output Level) 0–127
Specify the output volume.
94
Page 95

You can use the Tremolo Chorus as an Auto Pan by using the
following settings for the Tremolo Chorus.
PRE DELAY: 0 ms
CHO DEPTH: 0
TREM PHASE: 180
TREM DEPTH: 127
BALANCE: D0:100E
SPACE-D
Space-D is a multiple chorus that applies two-stage
modulation in stereo. Provides a truly lucent chorus sound.
fig.RE07-113
L in
Balance D
Space D
Space D
R in
Balance D
PRE DELAY (Pre Delay Time) 0.0–100 ms
Specify the delay time from the original sound until the
chorus sound is heard.
RATE (Chorus Rate) 0.05–10.0 Hz
Specify the modulation frequency of the chorus sound.
DEPTH (Chorus Depth) 0–127
Specify the modulation depth of the chorus sound.
PHASE 0–180
Specify the spaciousness of the chorus sound.
LOW GAIN -15–+15 dB
Specify the gain (amount of boost or cut) for the low
frequency range. Positive (+) settings will emphasize (boost)
the low frequency range.
HI GAIN (High Gain) -15–+15 dB
Specify the gain (amount of boost or cut) for the high
frequency range. Positive (+) settings will emphasize (boost)
the high frequency range.
BALANCE (Effect Balance) D100:0E–D0:100E
Specify the volume balance between the original sound and
the chorus sound.
With a setting of D100:0E only the original sound will be
output, and with a setting of D0:100E only the chorus sound
will be output.
2-Band
Balance E
Balance E
2-Band
EQ
EQ
L out
R out
Chapter 7 Changing Effect Settings
LEVEL (Output Level) 0–127
Specify the output volume.
STEREO-CHO (Stereo Chorus)
This is a stereo chorus. A filter allows you to adjust the tone
of the chorus sound.
fig.RE07-114
L in
Balance D
Chorus
Chorus
R in
Balance D
PRE DELAY (Pre Delay Time) 0.0–100 ms
Specify the time delay from the original sound until the
chorus sound is heard.
RATE (Chorus Rate) 0.05–10.0 Hz
Specify the modulation frequency of the chorus sound.
DEPTH (Chorus Depth) 0–127
Specify the modulation depth of the chorus sound.
PHASE 0–180
Specify the spaciousness of the chorus sound.
FILTER TYPE OFF/LPF/HPF
Select the type of filter.
OFF:
A filter will not be used.
LPF (Low-pass Filter):
The frequency region above the Cutoff Freq setting will be
cut.
HPF (High-pass Filter):
The frequency region below the Cutoff Freq setting will be
cut.
CUTOFF (Cutoff Frequency) 200–8000 Hz
Specify the frequency at which the filter will begin cutting.
LOW GAIN -15–+15 dB
Specify the gain (amount of boost or cut) for the low
frequency range. Positive (+) settings will emphasize (boost)
the low frequency range.
HI GAIN (High Gain) -15–+15 dB
Specify the gain (amount of boost or cut) for the high
frequency range. Positive (+) settings will emphasize (boost)
the high frequency range.
2-Band
Balance E
Balance E
2-Band
EQ
EQ
L out
R out
7
95
Page 96

Chapter 7 Changing Effect Settings
BALANCE (Effect Balance) D100:0E–D0:100E
Specify the volume balance between the original sound and
the chorus sound.
With a setting of D100:0E only the original sound will be
output, and with a setting of D0:100E only the chorus sound
will be output.
LEVEL (Output Level) 0–127
Specify the output volume.
STEREO-FL (Stereo Flanger)
This is a stereo flanger (the LFO has the same phase for left
and right). This produces a metallic resonance reminiscent of
a jet airplane taking off and landing. A filter is provided so
that you can adjust the tone of the flanger sound.
fig.RE07-115
L in
Balance D
Flanger
Feedback
Feedback
Flanger
R in
Balance D
PRE DELAY (Pre Delay Time) 0.0–100 ms
Specify the time delay from the original sound until the
flanger sound is heard.
2-Band
EQ
Balance E
Balance E
2-Band
EQ
L out
R out
HPF (High-pass Filter):
Cut the frequency region below the Cutoff Freq setting.
CUTOFF (Cutoff Frequency) 200–8000 Hz
Specify the frequency at which the filter will begin cutting.
LOW GAIN -15–+15 dB
Specify the gain (amount of boost or cut) for the low
frequency range.
Positive (+) settings will emphasize (boost) the low
frequency range.
HI GAIN (High Gain) -15–+15 dB
Specify the gain (amount of boost or cut) for the high
frequency range.
Positive (+) settings will emphasize (boost) the high
frequency range.
BALANCE (Effect Balance) D100:0E–D0:100E
Specify the volume balance between the original sound and
the flanger sound.
With a setting of D100:0E only the original sound will be
output, and with a setting of D0:100E only the flanger sound
will be output.
LEVEL (Output Level) 0–127
Specify the output volume.
STEP-FL (Step Flanger)
RATE (LFO Rate) 0.05–10.0 Hz
Specify the modulation frequency of the flanger sound.
DEPTH (LFO Depth) 0–127
Specify the modulation depth of the flanger sound.
FFEDBACK -98–+98%
Specify the proportion (%) of the flanger sound that is to be
returned to the input.
Positive (+) settings will return the signal to the input with
the original phase, while negative (-) settings produce an
inverted phase.
Higher settings will produce a more distinctive sound.
PHASE 0–180
Specify the spaciousness of the flanger sound.
FILTER TYPE OFF/LPF/HPF
Specify the type of filter.
OFF:
A filter will not be used.
LPF (Low-pass Filter):
Cut the frequency region above the Cutoff Freq setting.
Step flanger is a flanger in which the pitch of the flanger
sound changes in steps. The frequency of the pitch change
can be specified as a note length of a specific tempo.
fig.RE07-116
L in
Balance D
Step Flanger
Feedback
Feedback
Step Flanger
R in
Balance D
2-Band
EQ
Balance E
Balance E
2-Band
EQ
L out
R out
PRE DELAY (Pre Delay Time) 0.0–100 ms
Specify the time delay from the original sound until the
flanger sound is heard.
RATE (LFO Rate) 0.05–10.0 Hz
Specify the modulation frequency of the flanger sound.
DEPTH (LFO Depth) 0–127
Specify the modulation depth of the flanger sound.
96
Page 97

Chapter 7 Changing Effect Settings
FEEDBACK -98–+98%
Specify the proportion (%) of the flanger sound that is to be
returned to the input.
Positive (+) settings will return the signal to the input with
the original phase, while negative (-) settings produce an
inverted phase.
Higher settings will produce a more distinctive sound.
PHASE 0–180
Specify the spaciousness of the flanger sound.
STEP RATE
0.05–10.0 Hz/ / / // / / / / /
Specify the frequency of pitch change.
* When set with a note, the Step Rate is synchronized to the
MIDI clock of the JS-5 or an external device. Use Clock
Source (p. 133), a system parameter, to select whether the
MIDI clock of the JS-5 or the external device is to be used for
synchronization.
* When a numerical setting is made, the MIDI clock is ignored.
If the setting is made with a note but no external MIDI clock is
received, the changes in pitch are synchronized with the JS-5’s
built-in default tempo (p. 133).
STEREO-DLY (Stereo Delay)
This is a stereo delay.
When FB MODE parameter is NORMAL:
fig.RE07-117a
Delay
Feedback
Feedback
Delay
Delay
Feedback
Feedback
Delay
Balance D
Balance E
Balance E
Balance D
Balance D
Balance E
Balance E
Balance D
L in
R in
When FB MODE parameter is CROSS:
fig.RE07-117b
L in
R in
2-Band
EQ
2-Band
EQ
2-Band
EQ
2-Band
EQ
L out
R out
L out
7
R out
LOW GAIN -15–+15 dB
Specify the gain (amount of boost or cut) for the low
frequency range.
Positive (+) settings will emphasize (boost) the low
frequency range.
HI GAIN (High Gain) -15–+15 dB
Specify the gain (amount of boost or cut) for the high
frequency range.
Positive (+) settings will emphasize (boost) the high
frequency range.
BALANCE (Effect Balance) D100:0E–D0:100E
Specify the volume balance between the original sound and
the flanger sound.
With a setting of D100:0E only the original sound will be
output, and with a setting of D0:100E only the flanger sound
will be output.
LEVEL (Output Level) 0–127
Specify the output volume.
DELAY L (Delay Time Left) 0.0–500 ms
Specify the delay time from the original sound until the left
delay sound is heard.
DELAY R (Delay Time Right) 0.0–500 ms
Specify the delay time from the original sound until the right
delay sound is heard.
FEEDBACK -98–+98%
Specify the proportion (%) of the delay sound that is to be
returned to the input.
Positive (+) settings will return the sound to the input with
the original phase, while negative (-) settings produce an
inverted phase.
FB MODE (Feedback Mode) NORMAL/CROSS
Specify the input destination to which the delay sound will
be returned.
NORMAL:
The left delay sound will be returned to the left input, and
the right delay sound to the right input.
CROSS:
The left delay sound will be returned to the right input, and
the right delay sound to the left input.
97
Page 98

Chapter 7 Changing Effect Settings
PHASE L (Phase Left) NORMAL/INVERT
Specify the phase of the left delay sound.
NORMAL: The phase will not change.
INVERT: The phase will be inverted.
PHASE R (Phase Right) NORMAL/INVERT
Specify the phase of the right delay sound.
NORMAL: The phase will not change.
INVERT: The phase will be inverted.
HF DAMP (High-Frequency Damp)
200–8000 Hz, BYPASS
Specify the frequency at which the high frequency range of
the delayed sound returned to the input will be cut.
If you do not want the sound to be cut, select BYPASS.
LOW GAIN -15–+15 dB
Specify the gain (amount of boost or cut) for the low
frequency range.
Positive (+) settings will emphasize (boost) the low
frequency range.
HI GAIN (High Gain) -15–+15 dB
Specify the gain (amount of boost or cut) for the high
frequency range.
Positive (+) settings will emphasize (boost) the high
frequency range.
BALANCE (Effect Balance) D100:0E–D0:100E
Specify the volume balance between the original sound and
the delay sound.
With a setting of D100:0E only the original sound will be
output, and with a setting of D0:100E only the delay sound
will be output.
LEVEL (Output Level) 0–127
Specify the output volume.
MOD-DELAY (Modulation Delay)
Modulation-delay is an effect which adds modulation to the
delay sound. It produces a flanger-like effect.
When FB MODE parameter is NORMAL:
fig.RE07-118a
L in L out
Delay
Feedback
Feedback
Delay
R in R out
Balance D
Modulation
Modulation
Balance D
When FB MODE parameter is CROSS:
fig.RE07-118b
L in
Delay
Feedback
Feedback
Delay
R in
Balance D
Modulation
Modulation
Balance D
DELAY L (Delay Time Left) 0.0–500 ms
Specify the delay time from the original sound until the left
delay sound is heard.
DELAY R (Delay Time Right) 0.0–500 ms
Specify the delay time from the original sound until the right
delay sound is heard.
FEEDBACK -98–+98%
Specify the proportion (%) of the delay sound that is to be
returned to the input.
Positive (+) settings will return the sound to the input with
the original phase, while negative (-) settings produce an
inverted phase.
2-Band
EQ
Balance E
Balance E
2-Band
EQ
2-Band
EQ
Balance E
Balance E
2-Band
EQ
L out
R out
98
FB MODE (Feedback Mode) NORMAL/CROSS
Specify the input destination to which the delay sound will
be returned.
NORMAL:
The left delay sound will be returned to the left input, and
the right delay sound to the right input.
CROSS:
The left delay sound will be returned to the right input, and
the right delay sound to the left input.
RATE (Modulation Rate) 0.05–10.0 Hz
Specify the modulation frequency of the modulation effect.
Page 99

Chapter 7 Changing Effect Settings
L in
R in
L out
R out
Left Tap
Right Tap
Triple Tap Delay
2-Band
EQ
2-Band
EQ
Balance E
Balance D
Balance E
Balance D
Feedback
Center Tap
DEPTH (Modulation Depth) 0–127
Specify the modulation depth of the modulation effect.
PHASE 0–180
Specify the spaciousness of the modulation sound.
HF DAMP
(High-Frequency Damp)
200–8000 Hz, BYPASS
Specify the frequency at which the high frequency range of
the delay sound returned to the input will be cut.
If you do not want the sound to be cut, select BYPASS.
LOW GAIN -15–+15 dB
Specify the gain (amount of boost or cut) of the low
frequency range.
Positive (+) settings will emphasize (boost) the low
frequency range.
HI GAIN (High Gain) -15–+15 dB
Specify the gain (amount of boost or cut) of the high
frequency range.
Positive (+) settings will emphasize (boost) the high
frequency range.
3-TAP-DLY (Triple Tap Delay)
Triple-tap-delay is an effect that produces delays in three
directions: center, left and right. The delay time can also be
specified as a note length relative to a specific tempo.
fig.RE07-119
DELAY C (Delay Time Center)
200–1000 ms/ / / /// / / / /
Specify the delay time from the original sound until the
center delay sound is heard.
* When set with a note, the Step Rate is synchronized to the
MIDI clock of the JS-5 or an external device. Use Clock
Source (p. 133), a system parameter, to select whether the
MIDI clock of the JS-5 or the external device is to be used for
synchronization.
7
BALANCE (Effect Balance) D100:0E–D0:100E
Specify the volume balance between the original sound and
the modulation-delay sound.
With a setting of D100:0E only the original sound will be
output, and with a setting of D0:100E only the modulationdelay sound will be output.
LEVEL (Output Level) 0–127
Specify the output volume.
* When a note value has been selected as the setting, and the
tempo is slowed so much that the resulting delay time exceeds
the permissible range, the actual delay time will be 1/2, 1/4,
1/8... of the selected note values, in keeping with the tempo in
use at that time.
* When a numerical setting is made, the MIDI clock is ignored.
If the setting is made with a note but no external MIDI clock is
received, the changes in pitch are synchronized with the JS-5’s
built-in default tempo (p. 133).
DELAY L (Delay Time Left)
200–1000 ms/ / / /// / / / /
Specify the delay time from the original sound until the left
delay sound is heard.
DELAY R (Delay Time Right)
200–1000 ms/ / / /// / / / /
Specify the delay time from the original sound until the right
delay sound is heard.
FEEDBACK -98–+98%
Specify the proportion (%) of the delay sound that is to be
returned to the input.
Positive (+) settings will return the sound to the input with
the original phase, while negative (-) settings produce an
inverted phase.
LEVEL C (Center Level) 0–127
Specify the volume of the center delay sound.
99
Page 100

Chapter 7 Changing Effect Settings
LEVEL L (Left Level) 0–127
Specify the volume of the left delay sound.
LEVEL R (Right Level) 0–127
Specify the volume of the right delay sound.
HF DAMP (High-Frequency Damp)
200–8000 Hz, BYPASS
Specify the frequency at which the high frequency range of
the delayed sound returned to the input will be cut.
If you do not want the sound to be cut, select BYPASS.
LOW GAIN -15–+15 dB
Specify the gain (amount of boost or cut) for the low
frequency range.
Positive (+) settings will emphasize (boost) the low
frequency range.
HI GAIN (High Gain) -15–+15 dB
Specify the gain (amount of boost or cut) for the high
frequency range.
Positive (+) settings will emphasize (boost) the high
frequency range.
DELAY 1 (Delay Time 1)
200–1000 ms/ / / // / / / / /
Specify the delay time from the original sound until the delay
1 sound is heard.
* When set as a note value, the Delay Time can be synchronized
with the module’s internal clock or the MIDI clock arriving
from an external device. For details, refer to “3-TAP-DLY.”
* When a note value has been selected as the setting, and the
tempo is slowed so much that the resulting delay time exceeds
the permissible range, the actual delay time will be 1/2, 1/4,
1/8... of the selected note values, in keeping with the tempo in
use at that time.
DELAY 2 (Delay Time 2)
200–1000 ms/ / / // / / / / /
Specify the delay time from the original sound until the delay
2 sound is heard.
DELAY 3 (Delay Time 3)
200–1000 ms/ / / // / / / / /
Specify the delay time from the original sound until the delay
3 sound is heard.
BALANCE (Effect Balance) D100:0E–D0:100E
Specify the volume balance between the original sound and
the delay sound.
With a setting of D100:0E only the original sound will be
output, and with a setting of D0:100E only the delay sound
will be output.
LEVEL (Output Level) 0–127
Specify the output volume.
4-TAP-DLY (Quadruple Tap Delay)
Quadruple-tap-delay provides four delays. The delay time
for each delay can be specified as a note length relative to a
specific tempo.
fig.RE07-120a
Balance D
L in
Quadruple Tap Delay
Feedback
R in
Delay 1
Delay 2
Delay 3
Delay 4
Balance D
The stereo location of each delay sound is as follows.
fig.RE07-120b
23
1
L
4
R
L out
Balance E
Balance E
R out
DELAY 4 (Delay Time 4)
200–1000 ms/ / / // / / / / /
Specify the delay time from the original sound until the delay
4 sound is heard.
LEVEL 1 (Level 1) 0–127
Specify the volume level of delay 1.
LEVEL 2 (Level 2) 0–127
Specify the volume level of delay 2.
LEVEL 3 (Level 3) 0–127
Specify the volume level of delay 3.
LEVEL 4 (Level 4) 0–127
Specify the volume level of delay 4.
FEEDBACK -98–+98%
Specify the proportion (%) of the delay sound that is to be
returned to the input.
Positive (+) settings will return the sound to the input with
the original phase, while negative (-) settings produce an
inverted phase.
HF DAMP (High-Frequency Damp)
200–8000 Hz, BYPASS
Specify the frequency at which the high frequency range of
the delayed sound returned to the input will be cut.
If you do not want the sound to be cut, select BYPASS.
100
 Loading...