


Owner’s Manual
Contents
Panel Descriptions . . . . . . . . . . . . . . . . . . . . . . . . . . . . . 2
Top/Side Panel . . . . . . . . . . . . . . . . . . . . . . . . . . . . . . . 2
Rear Panel . . . . . . . . . . . . . . . . . . . . . . . . . . . . . . . . . . . 2
Using the HS-5 . . . . . . . . . . . . . . . . . . . . . . . . . . . . . . . . . 3
Making Connections . . . . . . . . . . . . . . . . . . . . . . . . . . 3
Basic Operation . . . . . . . . . . . . . . . . . . . . . . . . . . . . . . 4
Selecting the Input Type. . . . . . . . . . . . . . . . . . . . . . . 5
Switching the Input Type . . . . . . . . . . . . . . . . . 5
Switching the Eect (Amp Simulator /
Eect) and Editing the Parameters . . . . . . . . 5
Adjusting the Headphone Output . . . . . . . . . . . . . . 6
Adjusting the Volume Balance Between
Your Performance and the Other
Performances (MY MIX) . . . . . . . . . . . . . . . . . . 6
Adjusting the Headphone Output Volume . 6
Sounding a Click . . . . . . . . . . . . . . . . . . . . . . . . . . . . . 6
Switching the Click On/O and Setting the
Tempo . . . . . . . . . . . . . . . . . . . . . . . . . . . . . . . . . 6
Adjusting the click tone volume. . . . . . . . . . . 6
Applying Eects . . . . . . . . . . . . . . . . . . . . . . . . . . . . . . 7
Applying Reverb . . . . . . . . . . . . . . . . . . . . . . . . 7
Switching the Reverb Type and Editing the
Parameters . . . . . . . . . . . . . . . . . . . . . . . . . . . . . 7
Recording and Playing Back a Performance . . . . . . 8
Recording a Performance . . . . . . . . . . . . . . . . 8
Playing Back the Performance . . . . . . . . . . . . 8
Making Detailed Settings . . . . . . . . . . . . . . . . . . . . . . 9
Sub-Mixer Settings . . . . . . . . . . . . . . . . . . . . . . 9
Sharing Sub-Mixer Settings . . . . . . . . . . . . . . . 9
Solo Function . . . . . . . . . . . . . . . . . . . . . . . . . . . 9
Saving and Loading Settings (Snapshot) . . . 10
Volume Limiter Settings . . . . . . . . . . . . . . . . . 10
Connecting Two HS-5 Units . . . . . . . . . . . . . . . . . . . . 11
Mounting on a Stand . . . . . . . . . . . . . . . . . . . . . . . . . 11
Connecting to a Computer . . . . . . . . . . . . . . . . . . . . 11
USING THE UNIT SAFELY . . . . . . . . . . . . . . . . . . . . . . . 12
Changing the AUTO OFF setting . . . . . . . . . . 12
IMPORTANT NOTES . . . . . . . . . . . . . . . . . . . . . . . . . . . . 12
Returns the HS-5 to the factory-set
condition (Factory Reset) . . . . . . . . . . . . . . . . . 12
Specications . . . . . . . . . . . . . . . . . . . . . . . . . . . . . . . . . . 14
* 5 1 0 0 0 4 1 9 9 5 - 0 3 *
Before using this unit, carefully read the sections entitled “USING THE UNIT SAFELY” and “IMPORTANT NOTES” (leaet “USING THE UNIT SAFELY” and Owner’s Manual (p. 12)).
These sections provide important information concerning the proper operation of the unit. Additionally, in order to feel assured that you have gained a good grasp of every
feature of your new unit, read Owner’s Manual in its entirety. This manual should be saved and kept on hand as a convenient reference.
Copyright © 2014 ROLAND CORPORATION
All rights reserved. No part of this publication may be reproduced in any form without the written permission of ROLAND CORPORATION.

Panel Descriptions
3: COLD
1: GND 2: HOT
3: COLD
Top/Side Panel
Ground terminal
Refer to “Ground terminal” (p. 12).
[CLICK/TAP] button
This turns the click on/o and
species its tempo.
DC IN jack
Connect the included AC adaptor
here.
COMPUTER port
Use this when connecting the HS-5
to your computer via a USB cable.
MEMORY port
Connect a USB ash drive here.
[A]–[E] knobs
These knobs adjust the mix balance of sections A–E. These knobs are
also used to adjust the depth of the eect that's selected for the input
type, and to adjust the tempo and volume of the click.
Section A–D
You can connect headphones to each section, and adjust the volume
balance between your own performance and the performances of the
other musicians. You can also apply reverb or another suitable eect to
your performance.
button
This turns the power of the
HS-5 on/o.
Mic gain adjustment knobs
These adjust the mic gain (sensitivity)
of sections A–D.
buttons
Use these buttons to record your
performance onto a USB ash drive, or
to play back a recorded performance.
[MAIN MIX OUT] knob
This adjusts the output volume of the
MAIN MIX OUT L, R/headphone jacks.
LINE IN L, R/STEREO jacks
Connect a line output device such as a
keyboard or an audio player here.
MAIN MIX OUT L, R/
headphone jacks
The sound of sections A–E is mixed and
output here.
[MAIN MIX] button
Press this when you want to adjust the
volume balance of the main mixer.
[MIX A–D] buttons
These buttons turn on the sub-mixer,
allowing you to adjust the volume
balance between your own performance
and the performances of the other
musicians.
Rear Panel
Guitar(L/MONO)/R jacks
Here you can connect guitars, electronic drums,
or other instruments. If you are connecting a
guitar, turn the HS-5 on its back and turn on the
[Hi-Z] switch (A–D) of your own section.
2
MIC jacks
Here you can connect dynamic mics.
* This instrument is equipped with balanced (XLR) type jacks.
Wiring diagrams for these jacks are shown below. Make
connections after rst checking the wiring diagrams of other
equipment you intend to connect.
1: GND2: HOT

Using the HS-5
Making Connections
Connect the HS-5, the AC adaptor, mics, guitars, and other devices as shown in the connection examples.
Section E
Turning the Power On/O
Section D
To PA
Connecting Your Equipment
1. Connect the included AC adaptor to the
DC IN jack.
Place the AC adaptor so the side with the
indicator (see illustration) faces upwards and the
side with textual information faces downwards.
The indicator will light when you plug the AC
adaptor into an AC outlet.
2. Make sure that the volume of all
connected devices is at the minimum
setting.
3. Connect your mics, guitars, and other
equipment that you use when performing.
4. Hold down the
power of the HS-5.
5. Turn on the power of the connected
devices.
* This unit is equipped with a protection circuit.
A brief interval (a few seconds) after turning
the unit on is required before it will operate
normally.
* This device will automatically power-o (Auto
O function) if there is no USB connection
and 600 minutes have elapsed since the last
operation.
&“About the Auto O function” (p. 12)
To turn the power off, turn off the power of
your equipment in the order of steps 5, 4, and 3.
* To prevent malfunction and equipment failure, always turn down the volume, and turn o all the units before making any connections.
* Once everything is properly connected, be sure to follow the procedure above to turn on their power. If you turn on equipment in the wrong
order, you risk causing malfunction or equipment failure.
* Before turning the unit on/o, always be sure to turn the volume down. Even with the volume turned down, you might hear some sound when
switching the unit on/o. However, this is normal and does not indicate a malfunction.
button to turn on the
About plugs in gures
Stereo 1/4”phone
1/4”phone
XLR
Stereo miniature phone
Section A
The jacks and settings depend on the
instruments you're using. Refer to the following
instructions, and make the correct connections.
Connecting headphones
5 Sections A–D have both 1/4” and stereo-
mini headphone jacks. Use the jack that’s
appropriate for the type of connector of your
headphones.
5 For section E, you can connect headphones
to the stereo-mini
OUT section.
jack in the MAIN MIX
Connecting a dynamic mic
1. Turn the mic gain adjustment knob
Section C
toward the left to the minimum setting.
2. Connect your dynamic mic to the mic
input jack.
Connecting a guitar
1. On the bottom of the HS-5,
turn the [Hi-Z] switch on.
2. Connect your instrument to
the guitar (L/MONO) jack.
Connecting electronic drums or a synthesizer
1. On the bottom of the HS-5,
turn the [Hi-Z] switch o.
2. Connect your instrument
to the guitar (L/MONO) jack
and R jack.
Section B
* When connection cables with resistors are used, the volume level of equipment connected to the inputs (MIC jacks Guitar (L/MONO)/R jack, LINE
IN L, R/STEREO jacks) may be low. If this happens, use connection cables that do not contain resistors.
* Acoustic feedback could be produced depending on the location of microphones relative to speakers. This can be remedied by:
• Relocating microphone(s) at a greater distance from speakers. • Lowering volume levels.• Changing the orientation of the microphone(s).
3
Using the HS-5
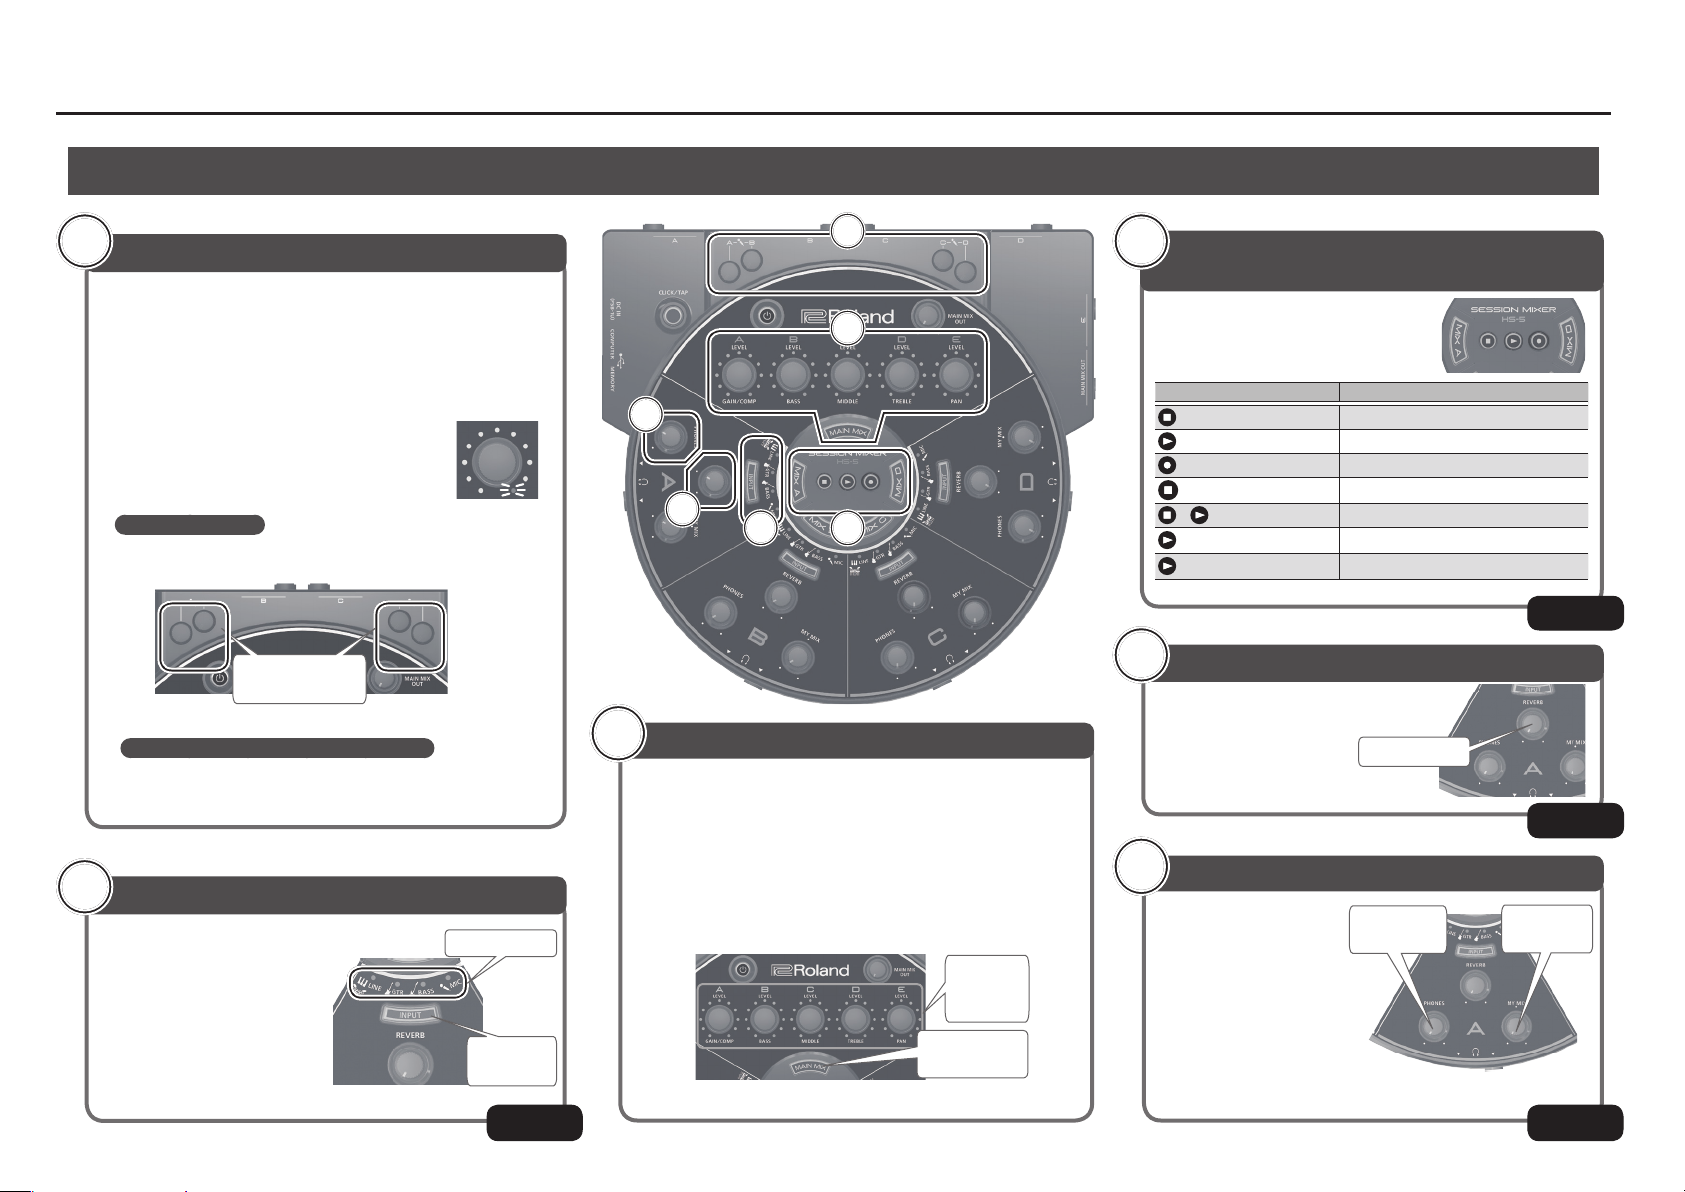
Basic Operation
1
Adjusting the Input Level
Here's how to adjust the input level appropriately so that the vocal
or instrumental sound is not distorted.
1. Set the [PHONES] knob and the [MY MIX] knob to the center
position.
2. Adjust the input level so that the vocal or instrumental is not
distorted
* Adjust the knob so that the [LEVEL] knob
(A–E) indicator of your section does not light
red when you vocalize into the mic or play
your instrument.
Adjusting your mic
While vocalizing into the mic, adjust the mic gain knob of your
own section.
Mic gain
adjustment knobs
Adjusting your guitar, keyboard, or drums
Increase or decrease the output volume of the instrument you're
playing.
%
2
Selecting the Input Type
Use the [INPUT] button to select
the input type.
This lets you apply an eect
that's suitable for each type.
* If you don’t want to apply an eect,
choose “LINE.”
4
Input Type
[INPUT]
button
&
1
3
4
5
62
3
Adjusting the Overall Volume Balance
Here's how to adjust the volume balance between all of the
performers.
1. Press the [MAIN MIX] button to make it light.
2. Set the [A]–[E] knobs to the center position.
3. Turn the [A]–[E] knobs to adjust the volume of each section.
* It is easier to adjust the overall volume if all performers are producing sound while
you turn the knobs.
[A]–[E]
(LEVEL)
knob
& &
[MAIN MIX]
button
p. 5
6
Performing and Recording Your
Performance
The HS-5 can record your performance on
a USB ash drive that's connected to the
MEMORY port.
Button Operation
Stops playback or recording.
Starts playback.
Starts recording
Rapidly press (tap) twice
+
+ [MIX A]
+ [MIX D]
Selects the preceding data.
Selects the next data.
Rewind.
Fast-forward.
$
5
Applying Reverb
Use the [REVERB] knob to
add reverb to the sound of
the vocal or performance.
[REVERB] knob
$
4
Adjusting the Headphone Output
Use the [MY MIX] knob of
each section to adjust the
volume balance between
your own performance
and the performances of
the other musicians, and
use the [PHONES] knob to
adjust the volume of the
headphones.
* The HS-5 is capable of producing high-volume output. Adjust the volume with
care to avoid damaging your hearing
[PHONES]
knob
&
&
[MY MIX]
knob
&
p. 8
p. 7
p. 6
Using the HS-5
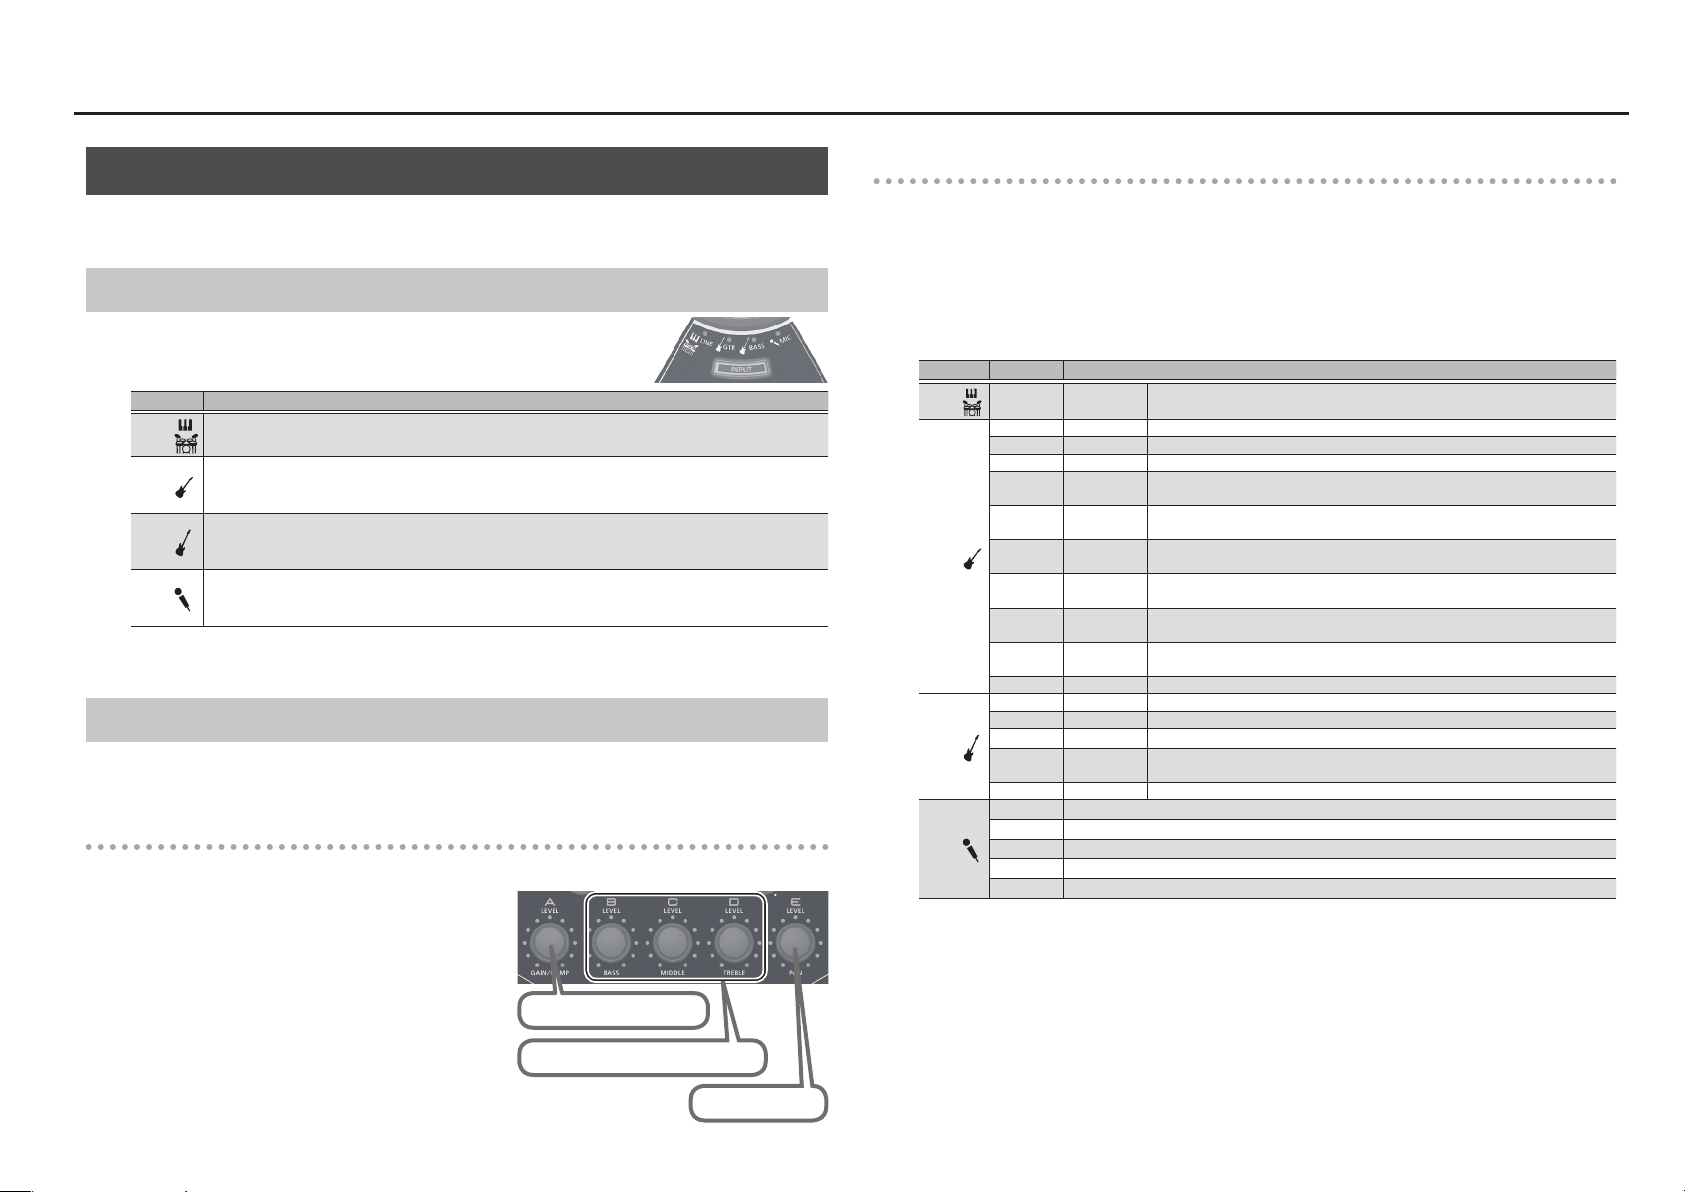
Selecting the Input Type
For each section, you can apply an amp simulator or eect that is suitable for guitar, bass, or vocal.
You can also switch the eect as appropriate for your performance.
Switching the Input Type
Press the [INPUT] button to switch the input type.
Type Explanation
LINE
GTR
BASS
MIC
If you don’t want to apply an eect to your guitar, bass, or vocal, choose “LINE.”
You can also change the eect that’s applied. For details, refer to the following section.
Switching the Eect (Amp Simulator / Eect) and Editing the Parameters
The HS-5 provides several amp simulators or eects for guitar, bass, and vocal.
You can switch the eect as appropriate for your performance.
Editing the parameters
Turn the [A]–[E] knobs to adjust the parameters of the selected amp simulator/eect. The parameters
adjusted by each knob are printed below the knob.
Lets you hear the unmodied sound of the instrument, without applying any eect.
Applies an amp simulator eect for guitar.
Provides a natural resonance and fat distortion sound.
The eect applies to the input signal from the (L/MONO)/R jacks.
Applies an amp simulator eect for bass.
Boosts and fattens the low-frequency region.
The eect applies to the input signal from the (L/MONO)/R jacks.
Applies an eect that’s designed for vocals.
Raises the loudness and improves the presence of the vocal.
The eect applies to the input signal from the mic jack.
Switching the eect (amp simulator/eect)
You can switch the Input type eect as appropriate for your performance.
1. Press the [INPUT] button to switch the input type.
2. Long-press the [INPUT] button of your own section.
3. Hold down the [INPUT] button and turn knob [A] to switch the eect (amp simulator/
eect) that’s applied.
Type indicators Eect (amp simulator/eect)
LINE
GTR
BASS
MIC
– LINE
1 JC-120 This models the sound of the Roland JC-120.
2 CLEAN TWIN This models a Fender Twin Reverb.
3 TWEED This models a Fender Bassman 4 x 10” Combo.
DELUXE
4
CRUNCH
5 VO DRIVE
6 MS HIGAIN
7 BG LEAD
8 MS1959 I+II
9 R FIER VNT
10 T AMP This models a Hughes & Kettner Triamp AMP3.
1 COMP BASS Compressor for bass.
2 COMP SLAP Compressor for slap bass.
3 AMP CLEAN Clean sound suitable for bass.
AMP
4
CRUNCH
5 AMP HIGAIN High-gain sound suitable for bass.
1 Compressor
2 Compressor + echo
3 Compressor + delay 1
4 Compressor + delay 2
5 Compressor + short delay
Lets you hear the unmodied sound of the instrument, without applying any
eect.
This models a Fender Deluxe Reverb.
This models the drive sound of a VOX AC-30TB. This is a sound that it suited to
sixties-style British rock.
High-gain sound of a vintage Marshall specially revamped in a way that is
possible only with COSM modeling technology.
This models the lead sound of the MESA/ Boogie combo amp. The sound of a
tube amp typical of the late ‘70s to ‘80s.
This models a Marshall 1959. The sound of connecting inputs I and II of the
guitar amp in parallel.
This models the sound of the Channel 2 VINTAGE Mode on the Mesa/Boogie
DUAL Rectier.
Crunch sound with a natural distortion, suitable for bass.
1. Long-press the [INPUT] button of your own
section.
The [INPUT] button blinks.
2. Use the [A]–[D] knob to edit the eect
parameters.
Eect depth
Low, mid, and high frequency volume
Stereo position
5

Using the HS-5
Adjusting the Headphone Output
To adjust the headphone output, use the [PHONE] knob and [MY MIX] knob of each section.
Adjusting the Volume Balance Between Your Performance and the Other Performances (MY MIX)
The headphones that are connected to sections A–D provide a mix of your own performance and the
performances of the other musicians. Use the [MY MIX] knob to adjust the volume balance so that your
own playing is easy to hear.
Turning the [MY MIX] knob toward the right decreases the volume of the others’ performances; turning it
toward the left decreases the volume of your own performance.
Your own volume
decreases
Adjusting the Headphone Output Volume
When you’ve nished adjusting the volume balance, use the [PHONES] knob to adjust the output volume
of the headphones.
* The [PHONES] knob adjusts the volume while preserving the balance adjusted by the [MY MIX] knob.
Others’ volume
decreases
Sounding a Click
The HS-5 can sound a click tone while you perform. The volume of the click tone can be adjusted
individually for each section. By default, the tempo is set to 120 BPM.
Switching the Click On/O and Setting the Tempo
1. Press the [CLICK/TAP] button.
The [CLICK/TAP] button blinks, and the click begins to sound.
2. Repeatedly tap (press) the [CLICK/TAP] button in time with the tempo of your song.
The click tone sounds at the tempo interval at which you tap the button.
* The specied tempo is remembered even after you power-o the HS-5.
Checking the tempo
The specied tempo is shown by how the indicators of the [A]
1. Long-press the [CLICK/TAP] button.
The [A]–[C] knob indicators light to indicate the current tempo. You can also change the tempo by
turning knobs [A]–[C].
(Example) Tempo 120.0 BPM
1 2 0
Knob Value indicated
[A] 100s place
[B] 10s place
[C] 1s place
3. Press any button other than [CLICK/TAP] to exit the tempo setting.
The indicators of the [A]–[E] knobs return to their normal indication.
4. To stop the click tone, press the [CLICK/TAP] button.
The [CLICK/TAP] button goes dark.
– [C] knobs are lit.
Adjusting the click tone volume
To adjust the volume of the click tone, hold down the [CLICK/TAP] button and turn your own section’s
([A]–[E]) knob.
6

Using the HS-5
Applying Eects
Each section of the HS-5 provides reverb to add reverberation to your vocal or performance, as well as
eects for guitar, bass, and vocal.
Applying Reverb
Adding reverb to your vocal or instrumental performance makes the sound smoother and improves the
overall balance of your performance.
* If you add excessive reverb, your vocal or instrumental performance can become buried in the
reverberation, making it indistinct.
Start by applying only a small amount of reverberation, and make adjustments as needed.
Less
reverberation
More
reverberation
Switching the Reverb Type and Editing the Parameters
The HS-5 lets you change the type of reverb and how it sounds.
1. Long-press the section B and section C [INPUT] buttons.
The [INPUT] button blinks.
2. Use the [A]–[D] knob to change the type and parameters.
Reverb type Pre-delay time
Reverb time
Number of
indicators
Reverb Type Character
1 ECHO Simulates an echo-like eect.
2 ROOM Simulates the reverberation of a performance in a room.
3 SMALL HALL Simulates the reverberation of a performance in a small hall.
4 LARGE HALL Simulates the reverberation of a performance in a large hall.
5 PLATE Simulates a plate echo (a reverb unit that uses the vibration of a metal plate).
Reverb level
7

Using the HS-5
Recording and Playing Back a Performance
The HS-5 can record your performance on a USB ash drive connected to the MEMORY port.
Button Operation
Stops playback or recording.
Starts playback.
Starts recording
Rapidly press (tap) twice
+
+ [MIX A]
+ [MIX D]
NOTE
The output of the main mixer is recorded.
The recording is not aected by the settings of each section’s [PHONES] knob and [MY MIX] knob, nor
by the setting of the [MAIN MIX OUT] knob.
Recording a Performance
Here’s how to record your performance onto a USB ash drive.
1. Connect your USB ash drive (sold separately) to the MEMORY port.
* You must rst use your computer to format the USB ash drive (FAT format).
All data on the USB ash drive is erased when you format it. If the USB ash drive contains data that
you want to keep, make a backup before you proceed.
2. Press the button to start recording your performance.
Selects the preceding data.
Selects the next data.
Rewind.
Fast-forward.
Playing Back the Performance
Here’s how to play back a performance that you recorded on a USB ash drive, to listen to it or practice
along with it.
1. Connect your USB ash drive (sold separately) to the MEMORY connector.
2. Select the data that you want to play back, and press the button.
3. To stop playback, press the button.
5 If a click tone is sounding during playback, the click tone also stops.
5 By holding down the [CLICK/TAP] button and pressing the
tone.
Adjusting the recording level and playback level
* Normally there is no need to make these adjustments.
Adjusting the recording level
1. Check the recording level.
If the sound distorts during recording, the
Adjust the recording level.
2. Adjust the recording level.
Hold down the
button and turn LEVEL knob [A] to adjust the level.
Adjusting the playback level
If the playback volume is too high, you can adjust the playback level as follows.
1. Adjust the playback level.
Hold down the
button and turn LEVEL knob [A] to adjust the level.
button blinks.
button you can stop just the click
Factory-set value
3. When you nish your performance, press the button to stop recording.
About the recorded data
The data is recorded in 16-bit 44.1 kHz stereo WAV format. A single
recording can contain up to 200 minutes.
The recorded data is stored on the USB ash drive in a folder named
“HS-5” with the le name HS5_****.wav (**** is the order in which the
recording is created).
8
/Root
HS-5
HS5_0001.WAV
HS5_0002.WAV
HS5_0003.WAV

Making Detailed Settings
Using the HS-5
Signal Flow
Here are some more advanced ways to use the HS-5.
Sub-Mixer Settings
The HS-5 has a main mixer and four sub-mixers (MIX A–D). The sub-mixers are independent of the main
mixer; each performer can individually adjust their own sub-mixer for more comfortable performing.
Examples of using the sub-mixers
Suppose that you are a bassist using section B, and the drummer is using section D. If you (section B) want
the drums (section D) to be louder, but the drummer doesn’t want to change the main mixer settings
(balance), you can use the sub-mixer to keep both sides happy.
1. Press the [MIX A–D] button of the section whose sub-mixer you’re adjusting, making the
button light.
If there is a section whose sub-mixer settings you’ve already adjusted, the [MIX A–D] button is lit dimly.
2. Use the [A]–[E] knobs to adjust the
volume balance of each section.
To stop using the sub-mixer, make the [MIX
A–D] button light and then press the button
once again to make it go dark.
Input
sound
Input sound of sections A–E
Sound adjusted by main mixer
Main mixer
Sub-mixer A–D
MAIN MIX OUT
MIX A–D button
OFF (Unlit)
ON (Lit)
Section A–D
Sound adjusted by sub-mixers
Sound adjusted by each section
Sharing Sub-Mixer Settings
Multiple sections can share a single sub-mixer. By sharing a sub-mixer, the sub-mixer settings of section
A can be used by sections B and C as well.
About the [MIX A–D] button illumination
When you're adjusting the sub-mixer settings, the [MIX A–D] buttons are illuminated to indicate the status
of the sub-mixer settings.
[MIX A–D] button status Explanation
Lit The sub-mixer is on, and can be adjusted by the [A]–[E] knobs.
Dimly lit
Unlit The sub-mixer is o.
Blinking The solo function is active.
The sub-mixer is on, and can not be adjusted by the [A]–[E] knobs.
* If the sub-mixer settings are being shared, this can be made the share-source.
1. Hold down the [MIX A–D] button of your own section, and press the [MIX A–D] button
(dimly lit) of the share-source section.
The sub-mixer of the share-source is assigned to your own section.
* You can’t share settings from an unlit [MIX A–D] button.
* To cancel sharing, press the [MIX A–D] button of the section that you want to cancel, making that
button light; then press the button once again to make it go dark.
Solo Function
This function lets you hear only the performance of your own section. While you are using the solo
function, your sound is no longer output to the other sections. This function is useful when you want to
tune your instrument or to practice individually.
To activate the solo function, long-press the [MIX A–D] button of your own section to make the button
blink.
9

Using the HS-5
Saving and Loading Settings (Snapshot)
You can use the snapshot function to save the current settings on a USB ash drive. This is a useful way to
easily save your settings for later reuse if you practice in dierent locations or at dierent times.
* Snapshot function can save one current settings on a USB ash drive.
Saving your settings
1. Connect your USB ash drive (sold separately) to the MEMORY port.
2. Long-press the section C and section D [INPUT] buttons.
3. Press the button to save/overwrite-save the settings.
When the button stops blinking, the settings have been saved. The HS-5 then returns to its normal state.
* If you decide to return to the normal state without saving/overwrite-saving, press the
Loading your settings
1. Connect your USB ash drive (sold separately) to the MEMORY port.
2. Press the section C and section D [INPUT] buttons.
3. button to loading the settings.
When the button stops blinking, the settings have been loaded. The HS-5 then returns to its normal state.
* If you want to return to the normal state without loading, press the
button
button.
Volume Limiter Settings
The HS-5 lets you limit the maximum volume that can be output.
* By default, the output volume is not limited, allowing you to hear the performance at high volume
(volume limiter: o 00 dBFS).
1. Long-press the section B and section D [INPUT] buttons.
The [INPUT] buttons blink.
2. Use the [A] knob to specify the maximum volume (-30 dBFS–0 dBFS).
-30 dBFS
OFF (0 dBFS)
10

Using the HS-5
Connecting Two HS-5 Units
You can connect two HS-5 units so that up to eight people can perform simultaneously.
1. On the bottom of each HS-5 unit, turn the [LINK] switch ON.
* When the [LINK] switch is ON, the [MAIN MIX OUT] knob is disabled.
* When the [LINK] switch is OFF, the [MAIN MIX OUT] knob is enabled. Since high volumes may occur
depending on the settings of the knobs, you should turn down the [MAIN MIX OUT] knob before you
turn the [LINK] switch OFF.
2. Using two stereo-mini cables, connect the section E STEREO jack (input) of each unit to
the MAIN MIX OUT
* The output from the second HS-5 is input by mixing it into section E.
[MAIN MIX OUT] knob
headphone jack (output) of the other unit.
Mounting on a Stand
You can mount the HS-5 on a stand (sold separately: PDS-10) for use.
1. Use the screws on the bottom of the HS-5 to
attach it to the PDS-10 stand holder as shown
in the illustration.
2. Attach the stand holder to the PDS-10, and
fasten it.
* For details on how to assemble the PDS-10 and
how to attach the stand holder, refer to the PDS-10
owner’s manual.
* Do not use the screws that are included with the
pad stand.
Stand holder
Connecting to a Computer
You can use a commercially available USB 2.0 cable to connect the HS-5 to your computer, and use
recording/playback software (DAW) on your computer to record your performance. This allows you to
record sections A–E as individual tracks (multi-track recording), or to record the mixed sound of sections
A–E (MAIN MIX).
In addition to recording, you can also use the HS-5 to hear stereo songs or audio that’s played back from
your computer.
[MAIN MIX OUT] knob
* You must install the USB driver before connecting the HS-5 to your computer. Download the USB
driver from the Roland website. For details, refer to Readme.htm which is included in the download.
Roland website : http://www.roland.com/support/
* For details on DAW settings and recording procedure, refer to the owner’s manual of your DAW.
11

USING THE UNIT SAFELY IMPORTANT NOTES
WARNING
To completely turn o power to the unit, pull out the plug
from the outlet
Even with the power switch turned o, this unit is
not completely separated from its main source of
power. When the power needs to be completely
turned o, turn o the power switch on the unit,
then pull out the plug from the outlet. For this
reason, the outlet into which you choose to connect the power
cord’s plug should be one that is within easy reach and readily
accessible.
About the Auto O function
This device will automatically power-o (Auto O
function) if there is no USB connection and 600
minutes have elapsed since the last operation.
If you don’t want the power to turn o
automatically, you can disable the Auto O
function.
Changing the AUTO OFF setting
1. Long-press the section B and section D
[EFFECT] buttons.
The [EFFECT] buttons blink.
2. Use the [B] knob to turn AUTO OFF on (all
indicators lit) or o (only the left indicator
lit).
NOTE
• Any settings that you are in the process of editing will
be lost when the power is turned o. If you have any
settings that you want to keep, you should save them
beforehand.
• To restore power, turn the power on again(p. 3).
Use only the stand that is recommended
This unit should be used only with a stand that is
recommended by Roland.
Do not place in a location that is unstable
When using the unit with a stand recommended
by Roland, the stand must be carefully placed so
it is level and sure to remain stable. If not using
a stand, you still need to make sure that any
location you choose for placing the unit provides
a level surface that will properly support the unit, and keep it
from wobbling.
WARNING
Precautions regarding placement of this unit on a stand
Be sure to follow the instructions in the Owner’s
Manual carefully when placing this unit on a stand
(p. 11).
If it is not set up properly, you risk creating an
unstable situation which could lead to the unit
falling or the stand toppling, and may result in injury.
Use only the supplied AC adaptor and the correct voltage
Be sure to use only the AC adaptor supplied with
the unit. Also, make sure the line voltage at the
installation matches the input voltage specied
on the AC adaptor’s body. Other AC adaptors
may use a dierent polarity, or be designed
for a dierent voltage, so their use could result in damage,
malfunction, or electric shock.
Use only the supplied power cord
Use only the attached power cord. Also, the
supplied power cord must not be used with any
other device.
CAUTION
Use only the specied stand(s)
This unit is designed to be used in combination with
specic stands (PDS-10) manufactured by Roland.
If used in combination with other stands, you risk
sustaining injuries as the result of this product dropping
down or toppling over due to a lack of stability.
Evaluate safety issues before using stands
Even if you observe the cautions given in the owner’s
manual, certain types of handling may allow this
product to fall from the stand, or cause the stand to
overturn. Please be mindful of any safety issues before
using this product.
Keep small items out of the reach of children
To prevent accidental ingestion of the parts listed
below, always keep them out of the reach of small
children.
• Removable Parts
Screw for attaching the PDS-10 (p. 11)
Handle the ground terminal carefully
If you remove the screw from the ground terminal, be
sure to replace it; don’t leave it lying around where it
could accidently be swallowed by small children. When
refastening the screw, make that it is rmly fastened, so
it won’t come loose.
Placement
• Depending on the material and temperature of the surface on which
you place the unit, its rubber feet may discolor or mar the surface.
You can place a piece of felt or cloth under the rubber feet to prevent
this from happening. If you do so, please make sure that the unit will
not slip or move accidentally.
Ground terminal
• Depending on the circumstances of a particular setup, you may
experience a discomforting sensation, or perceive that the surface
feels gritty to the touch when you touch this device, microphones
connected to it, or the metal portions of other objects, such as
guitars. This is due to an innitesimal electrical charge, which is
absolutely harmless. However, if you are concerned about this,
connect the ground terminal (see gure) with an external ground.
When the unit is grounded, a slight hum may occur, depending
on the particulars of your installation. If you are unsure of the
connection method, contact the nearest Roland Service Center, or
an authorized Roland distributor, as listed on the “Information” page.
Unsuitable places for connection
• Water pipes (may result in shock or electrocution)
• Gas pipes (may result in re or explosion)
• Telephone-line ground or lightning rod (may be dangerous in the
event of lightning)
Maintenance
• For everyday cleaning wipe the unit with a soft, dry cloth or one
that has been slightly dampened with water. To remove stubborn
dirt, use a cloth impregnated with a mild, non-abrasive detergent.
Afterwards, be sure to wipe the unit thoroughly with a soft, dry cloth.
Additional Precautions
• When turning the unit over, be careful so as to protect the buttons
and knobs from damage. Also, handle the unit carefully; do not
drop it.
• Never turn o the power or disconnect a USB ash drive or USB cable
during recording or while the HS-5 is connected to a computer.
• Roland assumes no liability concerning the restoration of any stored
content that has been lost.
Using External Memories
• Please observe the following precautions when handling external
memory devices. Also, make sure to carefully observe all the
precautions that were supplied with the external memory device.
• Do not remove the device while reading/writing is in progress.
• To prevent damage from static electricity, discharge all static
electricity from your person before handling the device.
• Carefully insert the USB ash drives all the way in—until it is rmly
in place.
Copyright
• It is forbidden by law to make an audio recording, video recording,
copy or revision of a third party’s copyrighted work (musical work,
video work, broadcast, live performance, or other work), whether in
whole or in part, and distribute, sell, lease, perform, or broadcast it
without the permission of the copyright owner.
• Do not use this product for purposes that could infringe on a
copyright held by a third party. We assume no responsibility
whatsoever with regard to any infringements of third-party
copyrights arising through your use of this product.
Licenses/Trademarks
• MMP (Moore Microprocessor Portfolio) refers to a patent portfolio
concerned with microprocessor architecture, which was developed
by Technology Properties Limited ( TPL). Roland has licensed this
technology from the TPL Group.
• ASIO is a trademark and software of Steinberg Media Technologies
GmbH.
• This product contains eCROS integrated software platform of eSOL
Co.,Ltd. eCROS is a trademark of eSOL Co., Ltd. in Japan.
• Roland is an either registered trademark or trademark of Roland
Corporation in the United States and/or other countries.
• Company names and product names appearing in this document are
registered trademarks or trademarks of their respective owners.
Returns the HS-5 to the factory-set condition
(Factory Reset)
You can reset the HS-5 to its factory-set condition by turning the
power on with holding down the section A and B [EFFECT] buttons
simultaneously.
NOTE
When you execute this factory reset, all settings of the HS-5 are
initialized. If you want to keep your settings, you must rst save them
as described in “Saving and Loading Settings (Snapshot)” (p. 10).
12

IMPORTANT: THE WIRES IN THIS MAINS LEAD ARE COLOURED IN ACCORDANCE WITH THE FOLLOWING CODE.
For the USA
BLUE:
NEUTRAL
BROWN:
LIVE
As the colours of the wires in the mains lead of this apparatus may not correspond with the coloured markings identifying
the terminals in your plug, proceed as follows:
The wire which is coloured BLUE must be connected to the terminal which is marked with the letter N or coloured BLACK.
The wire which is coloured BROWN must be connected to the terminal which is marked with the letter L or coloured RED.
Under no circumstances must either of the above wires be connected to the earth terminal of a three pin plug.
For the U.K.
DECLARATION OF CONFORMITY
Compliance Information Statement
Model Name :
Type of Equipment :
Responsible Party :
Telephone :
HS-5
AUDIO MIXER
Roland Corporation U.S.
5100 S. Eastern Avenue Los Angeles, CA 90040-2938
Address :
(323) 890-3700
For the USA
FEDERAL COMMUNICATIONS COMMISSION
RADIO FREQUENCY INTERFERENCE STATEMENT
This equipment has been tested and found to comply with the limits for a Class B digital device, pursuant to Part 15 of the
FCC Rules. These limits are designed to provide reasonable protection against harmful interference in a residential
installation. This equipment generates, uses, and can radiate radio frequency energy and, if not installed and used in
accordance with the instructions, may cause harmful interference to radio communications. However, there is no guarantee
that interference will not occur in a particular installation. If this equipment does cause harmful interference to radio or
television reception, which can be determined by turning the equipment off and on, the user is encouraged to try to correct the
interference by one or more of the following measures:
– Reorient or relocate the receiving antenna.
– Increase the separation between the equipment and receiver.
– Connect the equipment into an outlet on a circuit different from that to which the receiver is connected.
– Consult the dealer or an experienced radio/TV technician for help.
This device complies with Part 15 of the FCC Rules. Operation is subject to the following two conditions:
(1) this device may not cause harmful interference, and
(2) this device must accept any interference received, including interference that may cause undesired operation.
This equipment requires shielded interface cables in order to meet FCC class B limit.
Any unauthorized changes or modifications not expressly approved by the party responsible for compliance could void the user’s
authority to operate the equipment.
For EU Countries
For China
For Canada
CAN ICES-3 (B)/NMB-3 (B)
For Korea
For C.A. US (Proposition 65
WARNING
This product contains chemicals known to cause cancer, birth defects and other reproductive harm, including lead.
)
13

Specications
Roland HS-5: AUDIO MIXER
[Processing]
- Sampling Frequency
44.1 kHz
- Signal Processing
AD/DA conversion: 24 bits
[Recorder]
- Tracks
2 tracks (stereo)
- Recording Mode
USB ash drive: WAV (44.1 kHz, 16 bits)
- Recording Media
USB ash drive (512 MB–32 GB)
- Recording Time (unit: hour)
2 GB: 3
4 GB: 6
8 GB: 12
16 GB: 24
32 GB: 48
* Each recording time is approximate. The times may change depending on the
card specications.
* In case that there are plural les, the sum of recording time would be shorter
than above.
* Maximum recording time of one song is 200 minutes.
- Recording Songs
Up to 512 songs on a single USB ash drive
[Eects]
- Guitar
Amp: 10 types
- Bass
Amp: 5 types
- Vocal
Compressor, Equalizer, Delay
Reverb: 5 types
[Input/Output]
- Audio Input
Section A-D = MIC jacks: XLR type (balanced), INPUT L/R jacks: 1/4-inch phone type
(unbalanced) *1
Section E = INPUT L/R jacks: 1/4-inch phone type (unbalanced), Stereo miniature
phone type
*1 INPUT L jack supports high impedance
- Audio Output
Section A-D = PHONES jacks: Stereo 1/4-inch phone type, Stereo miniature phone
type
MAIN MIX OUT = PHONES jacks: Stereo miniature phone type, OUTPUT L/R jacks:
1/4-inch phone type (unbalanced)
- Frequency Response
20 Hz-20 kHz (+0 dB/-2 dB)
[Other]
- Dimensions
257 (W) x 248 (D) x 68 (H) mm
10-1/8 (W) x 9-13/16 (D) x 2-11/16 (H) inches
- Weight (excluding AC Adaptor)
1.1 kg
2 lbs 7 oz
- Power Supply
AC adaptor
- Current Draw
1.2 A
- Accessories
Owner’s manual
Leaet “USING THE UNIT SAFELY”
AC adaptor
Power Cord
- Options (sold separately)
Stand: Roland PDS-10
* 0 dBu = 0.775 Vrms
14
* In the interest of product improvement, the specications and/or appearance of this unit are subject to change without prior notice.

15
 Loading...