

Roland HPI-7S User Manual [ja]
KSC-38
2
3
7
5
1
4
3
2
6
STAND ASSEMBLY
- Make sure that another person is on hand to help with the assembly and setup.
- Be very careful, when you assemble and move the piano, to make sure that you do not drop it on
your hands or feet.
- To move the piano, lift it carefully—all the while keeping it level.
- Be sure to keep any screws, caps, and other small components out of the reach of small children so as
to prevent any child from accidentally swallowing these items.
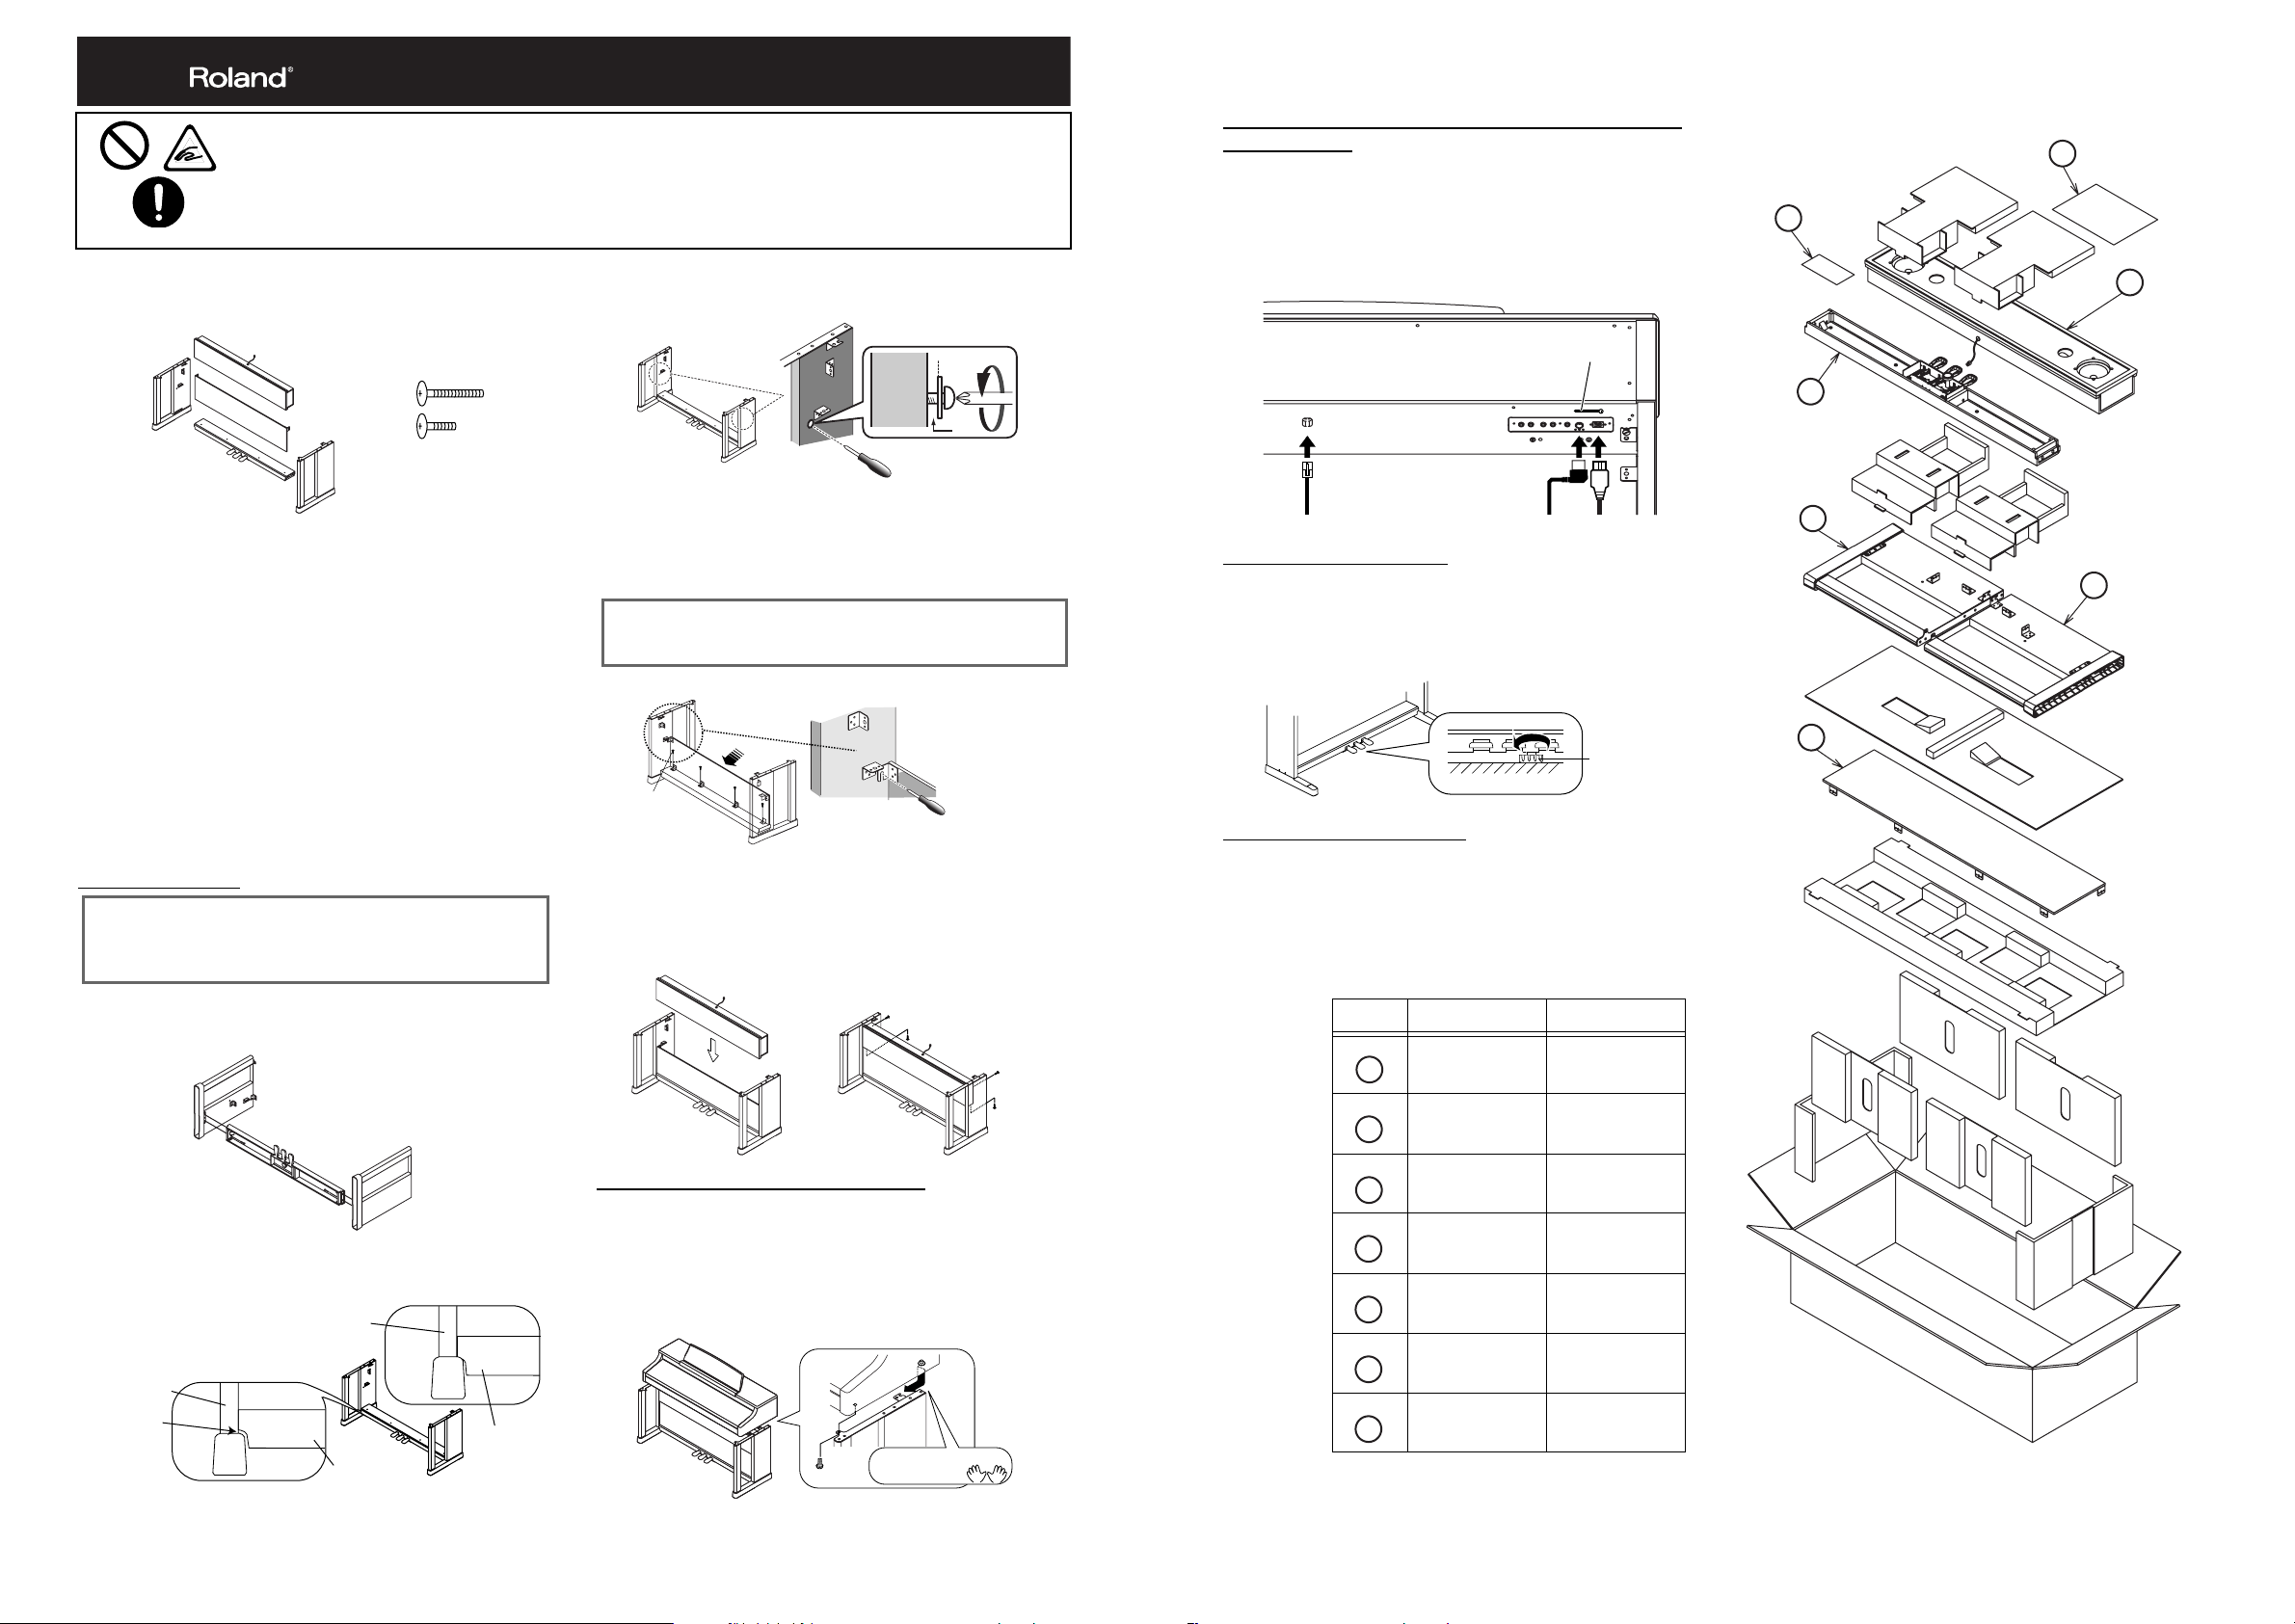
■ Parts Check
Before you begin assembling the stand, check that all the parts
were supplied. You will also need to have a Phillips screwdriver.
fig-01.eps
E
A
D
C
A: Side Board (left) 1: Screw “a” (M5 x 40 mm) x 4
B: Side Board (right) 2: Screw “b” (M5 x 20 mm) x 10
C: Pedal Board
D: Rear Board
E: Speaker Box
1
2
B
b
Assembly Procedure
* Fasten each screw tightly, then place the stand in a stable and horizontal place.
Also, carry out assembly of the instrument on an even surface.
* Do not allow the pedal cord or power cable to get twisted or pinched while
assembling the stand.
* Do not set up the instrument on long-piled carpeting. This can cause instability in
the stand and unsteadiness in the pedals, possibly resulting in damage to the unit.
* Note that if a power tool is used, excessive torque may cause the tool to rotate idly.
* Lay a soft cloth or similar material on the floor, and assemble the stand atop this
surface.
Stand Assembly
At first, assemble the entire stand in a temporary fashion, without
really tightening the screws. Then, after checking the overall
alignment of the boards (and gently shifting certain parts where
necessary), go around and tightly fasten each of the screws.
Connecting the Speaker cable, the Pedal and
Power Cords
10. Connect the speaker cable to the speaker connector.
11. Connect the pedal cord to the Pedal connector.
12. Connect the power cord to the AC Inlet on the piano, then
plug the other end into AC Outlet.
Loosen the screws attached to the left and right side boards
approximately three turns, so that they protrude about 3 mm
as shown in the illustration.
13. Secure the pedal cord and power cord in place with the
coated clip at the lower rear of the piano.
fig-05.eps
2
3mm
coated clip
a
c
Hook the metal brackets of the rear board over the screws
you loosened (c), as shown in the illustration.
Use the four screws “b” (M5 x 20 mm) to provisionally fasten
the pedal board.
Securely tighten the two side board screws and four pedal
board screws.
When attaching the rear board, before tightening the screws, adjust
things as necessary at all the points where there are screws so as to
assure that the rear board is aligned in parallel with the pedal board.
fig-02-e.eps
Adjusting the Adjuster
14. Lower the adjuster at the bottom of the pedal board (by
rotating it), so that the adjuster touches the floor. If you have
the piano placed on a carpet, lower it until it pushes into the
carpet.
1110
12
Rear View
3
Adjuster
4, 5
Screw b
(4pcs)
5
Screws you loosened
in step 2 (two screws)
Set the speaker box so that the speaker cable is above it, and
align the holes in the metal parts on the inner side of the side
boards with the holes in the speaker box.
Attach the speaker box to the metal parts on the inside of the
side boards from underneath using screws “b” (M5 x 20 mm).
Then fasten the rear with screws “b” (M5 x 20 mm) as well.
fig-03-e.eps
When Moving the Piano
Disconnect the power cord , cables, and raise the stand’s
adjuster. Then lift the piano while keeping it level, and move
it with care, so that you do not drop it on your feet, or get
your hands caught.
List of Contents
14
Attach the side boards for the right and left sides to the
pedal board (so that the metal parts face inside) using
screws “a” (M5 x 40 mm).
6
Screw “b” 4pcs
7
Screw “a” 2pcs
1
Screw “a” 2pcs
* When attaching the pedalboard, do not allow any gap to remain between the side
board and pedalboard when the pieces are assembled.
Correct
Sideboard
Improper
Installing the Piano on the Stand
Align the protruding screws (one each at right and left) on the
bottom of the piano with the openings in the metal fittings on
the side board, then slide the piano forward until the screws
are held in place.
* When handling the piano, firmly grasp it. Be careful, so you do not get your
fingers pinched.
Fasten the piano to the stand with the screw “b” (M5 x 20 mm).
fig-04-e.eps
8
Sideboard
Space
Pedal
board
Pedalboard
9
Screw “b”
Please don’t get your
fingers pinched.
Copyright © 2006 ROLAND CORPORATION
All rights reserved. No part of this publication may be reproduced in any form without the written permission of ROLAND CORPORATION.
40677290 4ASTKSC-38
No. Name Quantity
1
2
Pedal Board 1
Rear board 1
3
Side Board L 1
4
4
5
5
6
6
7
7
Side Board R 1
Speaker Box 1
Screw Set 1
Leaflet 1
※ 和文は、裏面を参照ください。
■
1.
2.
3.
4.
5.
6.
7.
8.
9.
■
KSC-38
アジャスター
14
5
6
7
7
A
A
A
A
A
A
5
B
1
C
4
C
3
C
2
B
A
6
C
A
スタンドの組み立て方
組立作業は、必ず 2 人以上で行ってください。
•
本機を組み立てたり、移動したりする際は、手をはさんだり、足の上に落とさないよう、十分に注意してください。
•
本機を移動する際は、水平に持ち上げるようにしてください。
•
ネジやキャップなどの小さな部品は、小さなお子様が誤って飲み込んだりすることのないようお子様の手の届かない
•
ところへ保管してください。
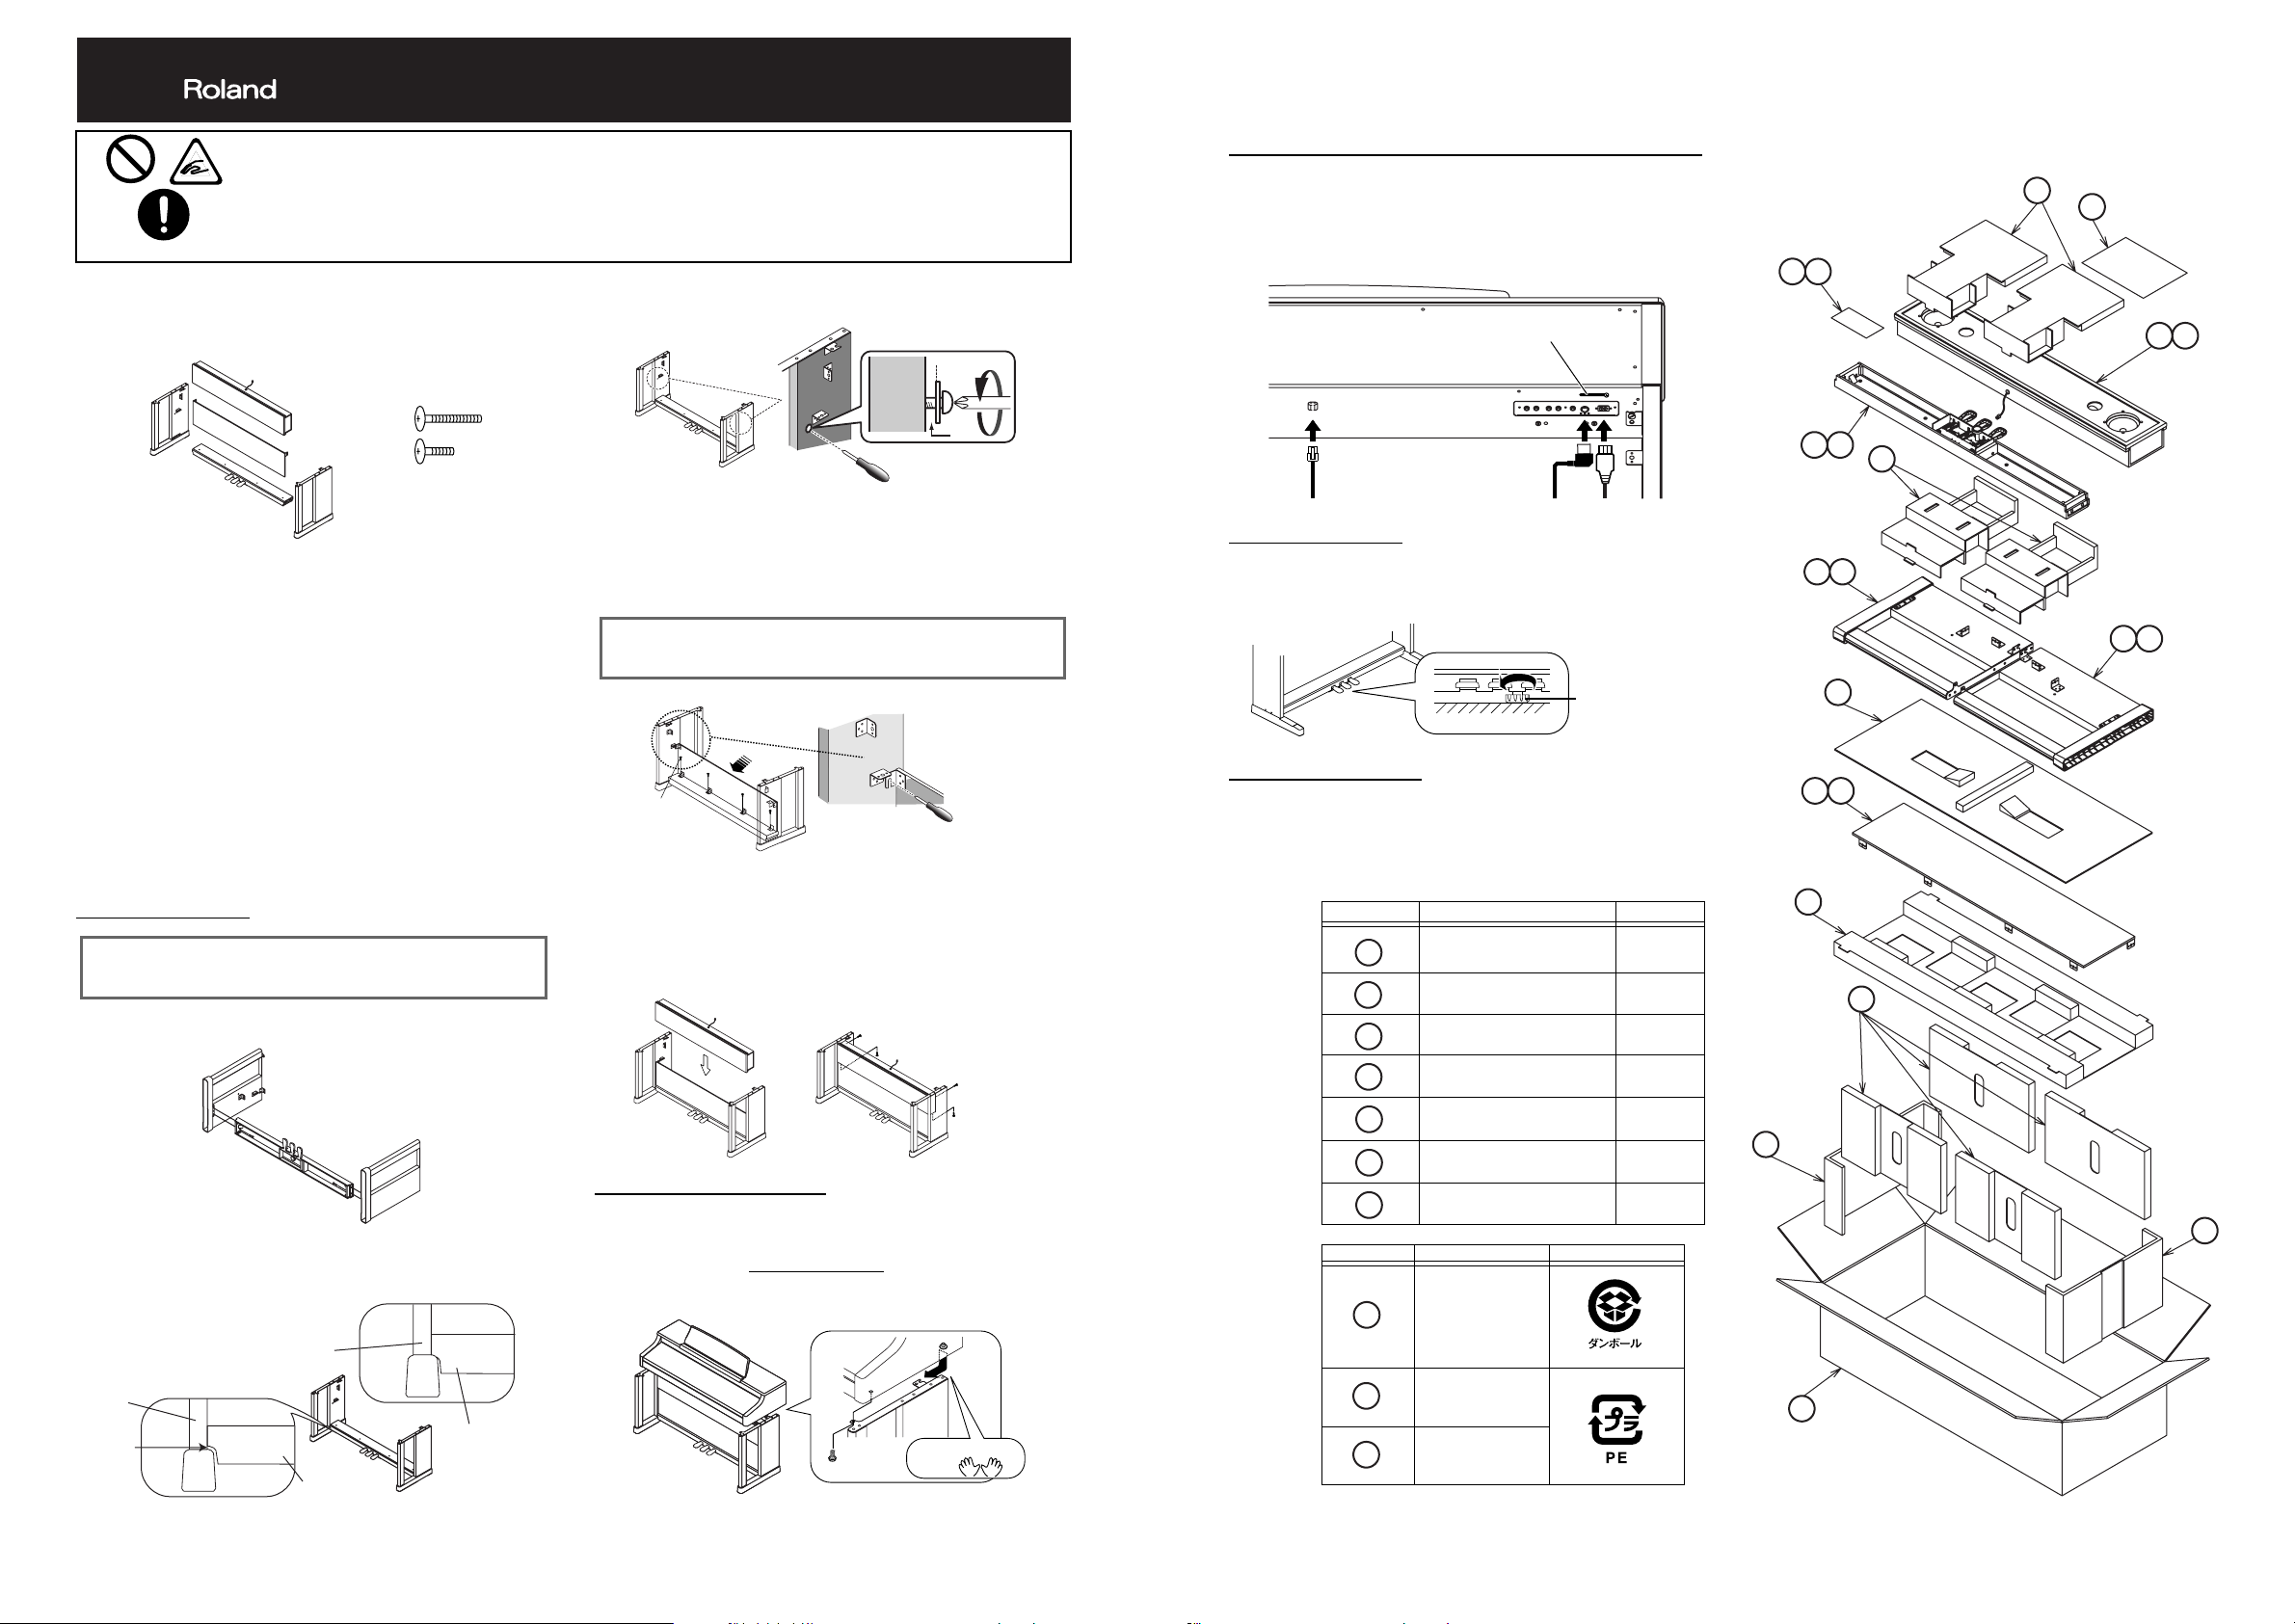
● 部品の確認
組み立てる前に、部品が揃っていることを確認してください。
また、プラス・ドライバーをご用意ください。
A:サイド・ボード(左) 1:ネジ a(M5 × 40mm).......4 個
B:サイド・ボード(右) 2:ネジ b(M5 × 20mm).... 10 個
C:ペダル・ボード
D:リア・ボード
E:スピーカー・ボックス
● 組み立て手順
※ 各ネジはし っかり締め付け、安 定した水平な場 所に設置して ください。ま
た、組み立てるときも水平な場所で行ってください。
※ 作業中、ペダル・コードや電源コードをはさまないように注意してください。
※ 毛足の長いカーペットの上には、絶対に設置しないでください。スタンドが
不安定になり、ペダルがぐらついて破損する恐れがあります。
※ 電動工具をご使用の場合、締め付けトルクが大きすぎると空回りするおそれ
があります。
※ 床に柔らかい布などを敷いて組み立てを行ってください。
スタンドの組み立て
最初はネジを緩めに締めて全体を組みます。そして、ゆがみを補
正しながら締め付けるとうまく組み上げることができます。
1.
左右のサイド・ボードを金具が内側になるように、ネジ a(M5
× 40mm)でペダル・ボードを固定します。
E
A
D
C
1
2
B
b
スピーカー・ケーブル、ペダル・コードと電源コードの接続
スピーカー・ケーブルをスピーカー端子に接続します。
10.
ペダル・コードを Pedal 端子に接続します。
11.
電源コードを AC インレ Cットにつなぎコンセントに接続します。
12.
本体裏側の底面にあるコーチング・クリップで、ペダル・コー
13.
ドと電源コードを固定します。
左右それぞれのサイド・ボードに取り付いているネジを 3 回転ほ
2.
ど緩め、図のような 3mm 程度の隙間を作ります。
2
fig-05.eps
コーチング・クリップ
3mm
a
c
1110
リア・ボードの金具を、ネジの隙間(c)に引っ掛けながら図の
3.
ようにセットします。
4 本のネジ b(M5X20mm)でペダルボードに仮止めします。
4.
サイド・ボード(2 本)とペダルボード(4 本)に仮止めしたネ
5.
ジをしっかり締めて固定します。
fig-02-j.eps
リア・ボードを固定するときは、ペダル・ボードとリア・ボード
が平行になるように各ネジの締め付け位置を調整してください。
アジャスターの調節
ペダル・ボードの下にあるアジャスターを下げて、床に当るよ
14.
うに調節します。ジュウタンの上などに設置する場合は、床面
を少し強く押しつけるぐらいに下げてください。
12
背面からの図
3
本機を移動される場合
4, 5
ネジb
(4本)
スピーカー・ボックスをスピーカー・ケーブルが上になるよう
6.
にセットし、サイド・ボード内側の金具のネジ穴とスピー
カー・ボックスのネジ穴を合わせます。
スピーカー・ボックスをネジ b(M5 × 20mm)でサイド・ボー
7.
ド内側の金具に下から固定します。さらに、ネジ b(M5 ×
20mm)で後方から固定します。
fig-03-j.eps
6
5
2で緩めたネジ(2本)
ネジb
(4本)
7
電源コードやケーブルを外し、スタンドのアジャスターを上げま
す。そして、水平に持ち上げ、手を挟んだり、足の上に落とさな
いように注意して運んでください。
● 内容物一覧
番号 品名 数量
1
2
3
4
ペダルボード 1
リアボード 1
サイドボード L 1
サイドボード R 1
ネジa
(2本)
※ ペダル・ボードを取り付けるときは、サイド・ボードとペダル・ボードの間
に隙間ができないように組み立ててください。
1
(2本)
ネジa
Good
サイド
サイド
・ボード
隙間
KSC-38
NG
©
2006 ローランド株式会社 本書の一部、もしくは全部を無断で複写・転載することを禁じます。
・ボード
ペダル
・ボード
ペダル
・ボード
本体とスタンドの組み立て
ピアノ本体の底面にあるネジ(左右各 1 本)をサイド・ボードの
8.
金具に合わせ、本体を手前に引いてネジを金具に引っ掛けます。
※ 本体を持つときは、手をはさまないように注意してください。
ネジ b(M5 × 20mm)で本体とスタンドを固定します。
9.
fig-04-j.eps
8
9
手を挟まないように
ネジb
注意!
40677290 4AST
記号 名前 材質
A
B
C
スピーカーボックス 1
ネジセット 1
組立てチラシ 1
各種梱包材
保護シート
各種袋
※ See reverse side for English version.
 Loading...