

Roland HP504 Owner’s Manual

Look What You Can Do!
Play the Piano
Practice Songs
Sound a metronome
Play various sounds
The unit contains a wide variety of tones (sounds).
You can freely select and perform using these tones.
Play two layered tones
You can layer two tones on a single key.
Play dierent tones with your left and right hands
You can divide the keyboard into left and right zones, and select a dierent tone for each zone.
Play duets
You can divide the keyboard into left and right halves, playing it as though it were two pianos.
page 24
page 16
page 17
page 18
page 22
You can sound a metronome.
Practice along with the built-in songs
The unit contains numerous built-in songs.
For the song titles, refer to “Internal Song List” (p. 59).
Practice each hand separately
You can practice along with a song while listening to only the right-hand or left-hand
part play back.
Record Songs
page 26
page 28
Record your performances
You can record your own playing.
Use your computer to create a CD of a song you recorded
A song you’ve recorded can be copied to your computer, and written to a CD.
2
page 31
page 38
Adjust Your Piano
Operation Guide Panel Descriptions Before You Play Performing Practicing
Adjust the keyboard touch
You can adjust the touch sensitivity of the keyboard to match your own playing style.
Add reverberation to the sound
You can add reverberation (ambience) to create the sensation of performing in a
concert hall.
Adjust the brightness of the sound
You can adjust the tone quality of the sound, ranging from a brilliant timbre to a
mellow tone.
Convenient Functions
Transpose the pitch of the keyboard or song
The Transpose function lets you shift the pitch of the keyboard or a song so that you
can perform more conveniently.
page 21
page 20
page 20
page 23
Disable the buttons
The Panel Lock function lets you prevent sounds or settings from being changed when
buttons are pressed inadvertently.
Adjust the resonance of chords
You can modify the resonance of chords by changing the way in which the piano’s
soundboard vibrates.
Switch the temperament
You can switch between various temperaments, such as historic temperaments used
during the Baroque era.
Connect to a Wireless LAN
You can use a WNA1100-RL wireless USB adapter (sold separately) to connect to a
wireless LAN and use wireless applications, such as the iPad app.
Environmentally Friendly Energy-Ecient Design
The power will turn o after a specied time has elapsed
page 41
page 44
page 50
page 48
page 45
Convenient Functions
Function Mode
Appendix
When thirty minutes have elapsed since you last played or operated the unit, the power will turn o automatically.
* If you don’t want the power to turn o automatically, change the “Auto O” setting (p. 41).
3

Before using this unit, carefully read the sections entitled: “USING THE UNIT SAFELY” (p. 62), and “IMPORTANT NOTES” (p. 64). These
sections provide important information concerning the proper operation of the unit. Additionally, in order to feel assured that
you have gained a good grasp of every feature provided by your new unit, Owner’s Manual should be read in its entirety. The
manual should be saved and kept on hand as a convenient reference.
Copyright © 2013 ROLAND CORPORATION
All rights reserved. No part of this publication may be reproduced in any form without the written permission of ROLAND CORPORATION.
4
1
2
Contents
Look What You Can Do! . . . . . . . . . . . . . . . . . . . . . . . . . . . . . . . . . . . . . . . . . . . . . .2
Operation Guide . . . . . . . . . . . . . . . . . . . . . . . . . . . . . . . . . . . . . . . . . . . . . . . . . . . .6
Panel Descriptions . . . . . . . . . . . . . . . . . . . . . . . . . . . . . . . . . . . . . . . . . . . . . . . . 10
Rear Panel and Bottom Panel (HP506) . . . . . . . . . . . . . . . . . . . . . . . . . . . . . . . . .11
Rear Panel and Bottom Panel (HP504) . . . . . . . . . . . . . . . . . . . . . . . . . . . . . . . . .12
Before You Play . . . . . . . . . . . . . . . . . . . . . . . . . . . . . . . . . . . . . . . . . . . . . . . . . . . 13
Setting Up the Music Rest . . . . . . . . . . . . . . . . . . . . . . . . . . . . . . . . . . . . . . . . . . . . .13
Opening/Closing the Lid . . . . . . . . . . . . . . . . . . . . . . . . . . . . . . . . . . . . . . . . . . . . . .13
Turning the Power On/O . . . . . . . . . . . . . . . . . . . . . . . . . . . . . . . . . . . . . . . . . . . . .14
Performing . . . . . . . . . . . . . . . . . . . . . . . . . . . . . . . . . . . . . . . . . . . . . . . . . . . . . . . 16
Performing with Various Sounds . . . . . . . . . . . . . . . . . . . . . . . . . . . . . . . . . . . . . . .16
Switching Tones . . . . . . . . . . . . . . . . . . . . . . . . . . . . . . . . . . . . . . . . . . . . . . . . . . . . . . . . .16
Performing with Two Layered Tones (Dual Play) . . . . . . . . . . . . . . . . . . . . . . . . . . .17
Playing Dierent Tones with the Right and Left Hands (Split Play) . . . . . . . . . .18
Adjusting the Sound to Your Taste . . . . . . . . . . . . . . . . . . . . . . . . . . . . . . . . . . . . .20
Adding Reverberation to the Sound (Ambience) . . . . . . . . . . . . . . . . . . . . . . . . . .20
Adjusting the Brightness of the Sound (Brilliance) . . . . . . . . . . . . . . . . . . . . . . . . .20
Adjusting the Keyboard Response (Key Touch) . . . . . . . . . . . . . . . . . . . . . . . . . . . .21
Dividing the Keyboard for Two-Person Performance (Twin Piano) . . . . . . .22
Shifting the Pitch (Transpose) . . . . . . . . . . . . . . . . . . . . . . . . . . . . . . . . . . . . . . . . .23
Practicing . . . . . . . . . . . . . . . . . . . . . . . . . . . . . . . . . . . . . . . . . . . . . . . . . . . . . . . . 24
Practicing with the Metronome . . . . . . . . . . . . . . . . . . . . . . . . . . . . . . . . . . . . . . .24
Changing the Tempo . . . . . . . . . . . . . . . . . . . . . . . . . . . . . . . . . . . . . . . . . . . . . . . . . . . .24
Changing the Time Signature . . . . . . . . . . . . . . . . . . . . . . . . . . . . . . . . . . . . . . . . . . . .24
Adjusting the Metronome’s Volume . . . . . . . . . . . . . . . . . . . . . . . . . . . . . . . . . . . . . .25
Adding a Count-in to Synchronize Your Performance . . . . . . . . . . . . . . . . . . . . . .25
Practicing with a Song . . . . . . . . . . . . . . . . . . . . . . . . . . . . . . . . . . . . . . . . . . . . . . . .26
Selecting and Playing a Song . . . . . . . . . . . . . . . . . . . . . . . . . . . . . . . . . . . . . . . . . . . . .26
Playing Songs Consecutively (All Songs Play) . . . . . . . . . . . . . . . . . . . . . . . . . . . . .27
Adjusting the Volume Balance of the Song and the Keyboard
Performance (Song Balance) . . . . . . . . . . . . . . . . . . . . . . . . . . . . . . . . . . . . . . . . . . . . .
Adjusting a Song’s Tempo for Easier Practicing . . . . . . . . . . . . . . . . . . . . . . . . . . . .28
Practicing One Hand at a Time (Part Mute) . . . . . . . . . . . . . . . . . . . . . . . . . . . . . . . .28
Repeatedly Practicing a Portion of a Song (AB Repeat) . . . . . . . . . . . . . . . . . . . .30
27
Recording the Song You’re Practicing . . . . . . . . . . . . . . . . . . . . . . . . . . . . . . . . . .31
SMF Recording . . . . . . . . . . . . . . . . . . . . . . . . . . . . . . . . . . . . . . . . . . . . . . . . . . . . . . . . . .31
Overdubbing a Recorded Song . . . . . . . . . . . . . . . . . . . . . . . . . . . . . . . . . . . . . . . . . . .32
Converting a Song Recorded as an SMF to Audio . . . . . . . . . . . . . . . . . . . . . . . . .35
Audio Recording . . . . . . . . . . . . . . . . . . . . . . . . . . . . . . . . . . . . . . . . . . . . . . . . . . . . . . . . .36
Transposing a Song for Easier Performance (Audio Transpose) . . . . . . . . . . . . .37
Enjoying Karaoke with an Audio File (Center Cancel) . . . . . . . . . . . . . . . . . . . . . .37
Burning an Audio Recording of a Song (WAV le) to a CD . . . . . . . . . . . . . . . . . .38
Saving a Song with the Name You Specify . . . . . . . . . . . . . . . . . . . . . . . . . . . . . . . .39
Renaming a Song . . . . . . . . . . . . . . . . . . . . . . . . . . . . . . . . . . . . . . . . . . . . . . . . . . . . . . . .40
Convenient Functions . . . . . . . . . . . . . . . . . . . . . . . . . . . . . . . . . . . . . . . . . . . . . 41
Making the Power Automatically Turn O After a Time (Auto O) . . . . . . .41
Retaining the Settings Even After Power-o (Memory Backup) . . . . . . . . .41
Restoring the Factory Settings (Factory Reset) . . . . . . . . . . . . . . . . . . . . . . . . .42
Copying a Saved Song (Copy Song) . . . . . . . . . . . . . . . . . . . . . . . . . . . . . . . . . . . .42
Deleting a Saved Song (Delete Song) . . . . . . . . . . . . . . . . . . . . . . . . . . . . . . . . . .43
Initializing the Memory (Format Media) . . . . . . . . . . . . . . . . . . . . . . . . . . . . . . . .43
Disabling the Buttons (Panel Lock) . . . . . . . . . . . . . . . . . . . . . . . . . . . . . . . . . . . . .44
About the Wireless LAN Function . . . . . . . . . . . . . . . . . . . . . . . . . . . . . . . . . . . . . .45
Basic Connection Method (Connect by WPS) . . . . . . . . . . . . . . . . . . . . . . . . . . .45
Wireless LAN Function Settings . . . . . . . . . . . . . . . . . . . . . . . . . . . . . . . . . . . . . . . .46
Status Indication . . . . . . . . . . . . . . . . . . . . . . . . . . . . . . . . . . . . . . . . . . . . . . . . . . . . . . . . .46
Connecting to a Wireless LAN Access Point That You Select (Select AP) . . . . .46
Other Settings (Option) . . . . . . . . . . . . . . . . . . . . . . . . . . . . . . . . . . . . . . . . . . . . . . . . . .47
Various Settings (Function Mode) . . . . . . . . . . . . . . . . . . . . . . . . . . . . . . . . . . 48
Applying a Headphones 3D Ambience Eect to the Piano Sound
(Headphones 3D Ambience) . . . . . . . . . . . . . . . . . . . . . . . . . . . . . . . . . . . . . . . . . . . . .
Adjusting the Dual Play Volume Balance (Dual Balance) . . . . . . . . . . . . . . . . . . .48
Matching the Pitch with Other Instruments (Master Tuning) . . . . . . . . . . . . . . .48
Changing the Tuning Method (Temperament) . . . . . . . . . . . . . . . . . . . . . . . . . . . .48
Specifying a Song’s Tonic (Temperament Key) . . . . . . . . . . . . . . . . . . . . . . . . . . . . .49
Producing Sympathetic Resonance When You Press the Damper Pedal
(Damper Resonance) . . . . . . . . . . . . . . . . . . . . . . . . . . . . . . . . . . . . . . . . . . . . . . . . . . . . .
Producing the Resonance of the Strings When the Keys Are Played
(String Resonance) . . . . . . . . . . . . . . . . . . . . . . . . . . . . . . . . . . . . . . . . . . . . . . . . . . . . . . .
Playing Sounds When the Keys Are Released (Key O Resonance) . . . . . . . . .49
Adjusting the Metallic Sound That Occurs When You Play a Note
(Dynamic Harmonic) . . . . . . . . . . . . . . . . . . . . . . . . . . . . . . . . . . . . . . . . . . . . . . . . . . . . .
Adjusting the Sympathetic Resonance of the Grand Piano Body
(Cabinet Resonance) . . . . . . . . . . . . . . . . . . . . . . . . . . . . . . . . . . . . . . . . . . . . . . . . . . . . .
Adjusting the Clarity of Individual Notes in a Chord
(Soundboard Behavior) . . . . . . . . . . . . . . . . . . . . . . . . . . . . . . . . . . . . . . . . . . . . . . . . . .
Using a Piano’s Unique Tuning (Stretch Tuning) . . . . . . . . . . . . . . . . . . . . . . . . . . .50
Adjusting the volume of each individual key (Note Volume) . . . . . . . . . . . . . . .50
Adjusting the tonal character of each individual key (Note Character) . . . . .50
Adjusting the Volume of an Audio Playback Device (Input Volume) . . . . . . . .50
Playing Back an Audio File with Its Central Sound Minimized (Center
Cancel) . . . . . . . . . . . . . . . . . . . . . . . . . . . . . . . . . . . . . . . . . . . . . . . . . . . . . . . . . . . . . . . . . .
Transposing an Audio File (Audio Transpose). . . . . . . . . . . . . . . . . . . . . . . . . . . . . .51
Specifying What the Transpose Will Aect (Transpose Mode) . . . . . . . . . . . . . .51
Changing the Pitch of the Tone in Octave Steps (Octave Shift) . . . . . . . . . . . . .51
Selecting the Format for Recording (Recording Mode) . . . . . . . . . . . . . . . . . . . .51
Changing How the Pedal Eects Are Applied (Damper Pedal Part) . . . . . . . . .51
Changing How the Pedals Work (Center Pedal) . . . . . . . . . . . . . . . . . . . . . . . . . . . .51
Preventing Doubled Notes When Connected to a Sequencer (Local
Control) . . . . . . . . . . . . . . . . . . . . . . . . . . . . . . . . . . . . . . . . . . . . . . . . . . . . . . . . . . . . . . . . .
MIDI Transmit Channel Settings (MIDI Transmit Channel) . . . . . . . . . . . . . . . . . .52
Saving an Internal Song (Save Song) . . . . . . . . . . . . . . . . . . . . . . . . . . . . . . . . . . . . . .52
Copying a Saved Song (Copy Song) . . . . . . . . . . . . . . . . . . . . . . . . . . . . . . . . . . . . . .52
Deleting a Saved Song (Delete Song) . . . . . . . . . . . . . . . . . . . . . . . . . . . . . . . . . . . . .52
Initializing the Memory (Format Media) . . . . . . . . . . . . . . . . . . . . . . . . . . . . . . . . . . .52
Changing the USB Driver Settings (USB Driver) . . . . . . . . . . . . . . . . . . . . . . . . . . . .52
Changing the USB Flash Drive Setting (USB Memory Mode) . . . . . . . . . . . . . . .53
Controlling Video Equipment (Visual Control Mode) . . . . . . . . . . . . . . . . . . . . . .53
Specifying the Visual Control Channel (Visual Control Channel) . . . . . . . . . . . .53
Wireless LAN Function Settings. . . . . . . . . . . . . . . . . . . . . . . . . . . . . . . . . . . . . . . . . . .54
Specifying the Maximum Volume (Volume Limit) . . . . . . . . . . . . . . . . . . . . . . . . .54
Changing the Language Displayed in the Screen (Language) . . . . . . . . . . . . . .54
Making the Power Automatically Turn O After a Time (Auto O) . . . . . . . . . .54
Storing Your Settings (Memory Backup) . . . . . . . . . . . . . . . . . . . . . . . . . . . . . . . . . .54
Restoring the Factory Settings (Factory Reset) . . . . . . . . . . . . . . . . . . . . . . . . . . . .54
48
49
49
49
49
50
50
52
Troubleshooting . . . . . . . . . . . . . . . . . . . . . . . . . . . . . . . . . . . . . . . . . . . . . . . . . . 55
Error Messages . . . . . . . . . . . . . . . . . . . . . . . . . . . . . . . . . . . . . . . . . . . . . . . . . . . 57
Tone List . . . . . . . . . . . . . . . . . . . . . . . . . . . . . . . . . . . . . . . . . . . . . . . . . . . . . . . . . 58
Internal Song List . . . . . . . . . . . . . . . . . . . . . . . . . . . . . . . . . . . . . . . . . . . . . . . . . 59
Main Specications . . . . . . . . . . . . . . . . . . . . . . . . . . . . . . . . . . . . . . . . . . . . . . . 60
USING THE UNIT SAFELY . . . . . . . . . . . . . . . . . . . . . . . . . . . . . . . . . . . . . . . . . . . 62
IMPORTANT NOTES . . . . . . . . . . . . . . . . . . . . . . . . . . . . . . . . . . . . . . . . . . . . . . . 64
About the Ivory Feel Keyboard. . . . . . . . . . . . . . . . . . . . . . . . . . . . . . . . . . . . . 65
Assembling . . . . . . . . . . . . . . . . . . . . . . . . . . . . . . . . . . . . . . . . . . . . . . . . . . . . . . . 66
Index . . . . . . . . . . . . . . . . . . . . . . . . . . . . . . . . . . . . . . . . . . . . . . . . . . . . . . . . . . . . . 68
Operation Guide Panel Descriptions Before You Play Performing Practicing
Convenient Functions
Function Mode
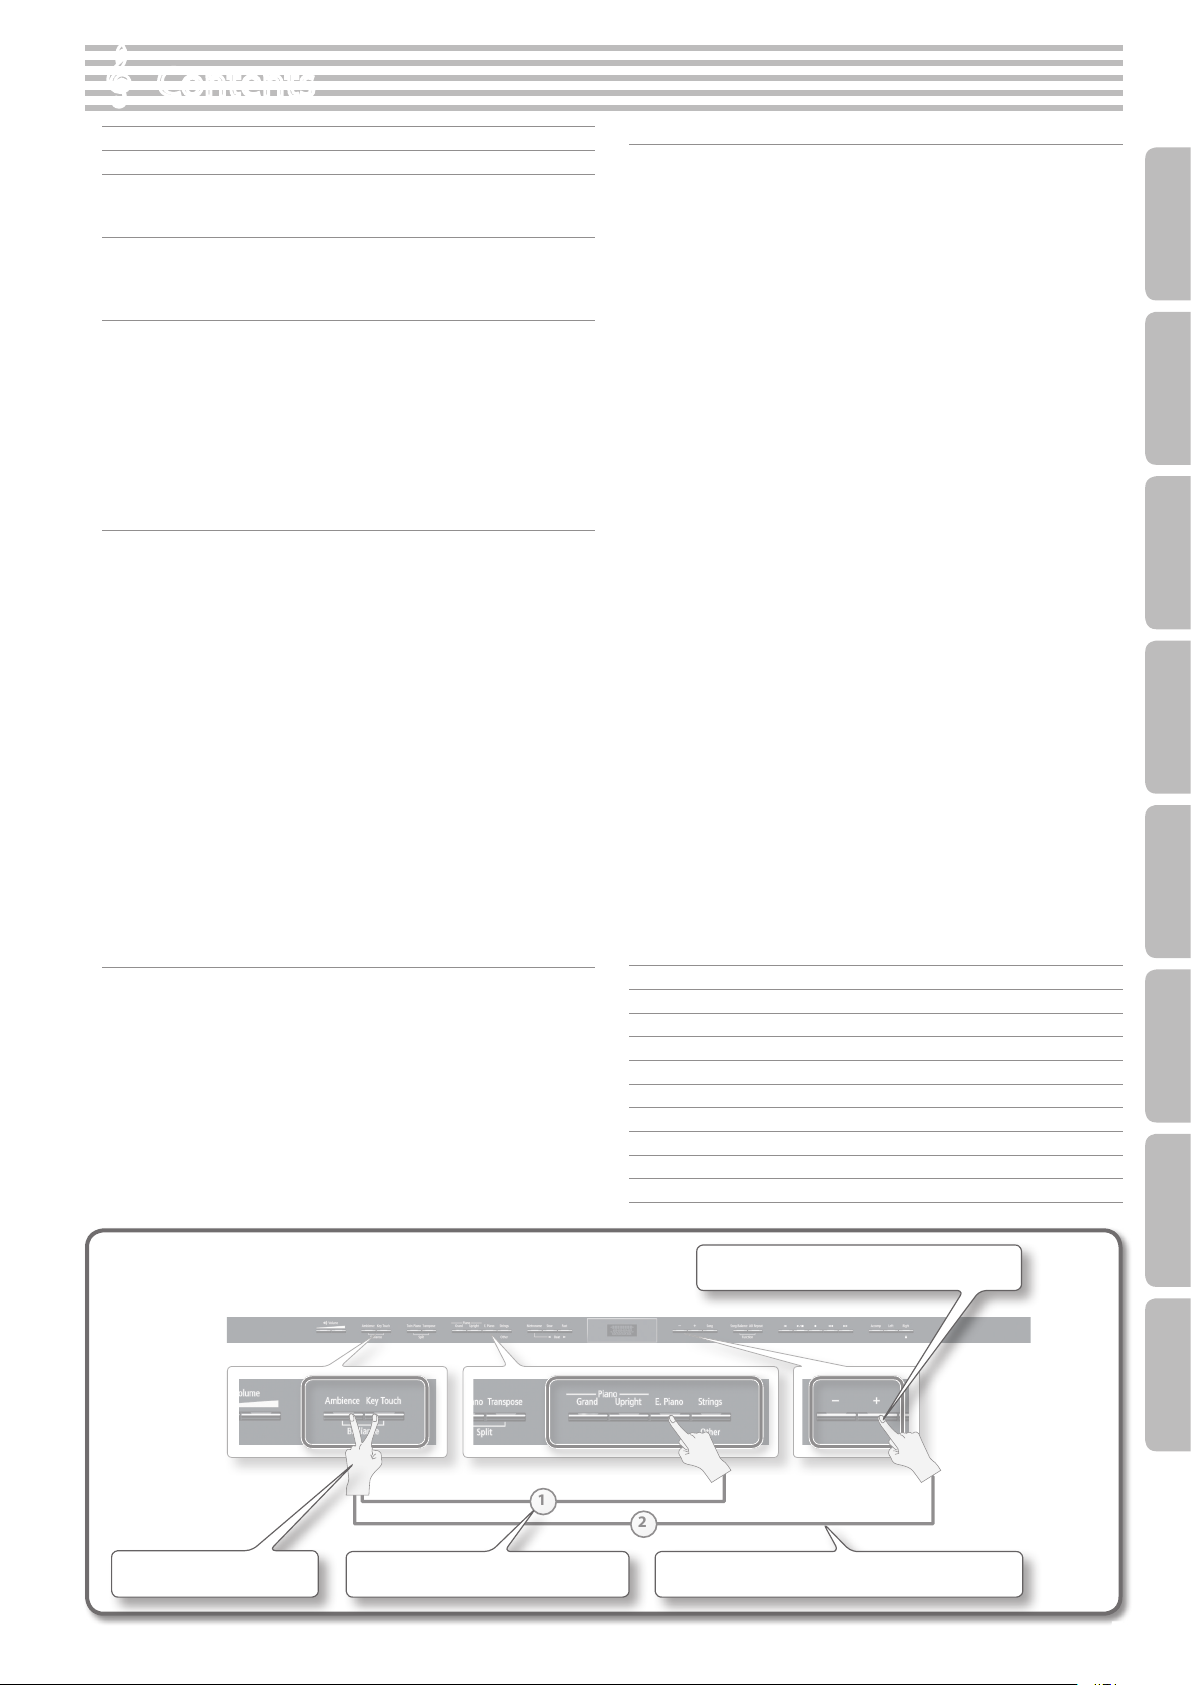
How to read the explanatory illustrations
Press two buttons.
Numerals indicate the sequence of steps.
Press one of the enclosed buttons.
Appendix
While holding down a button, press another button.
5
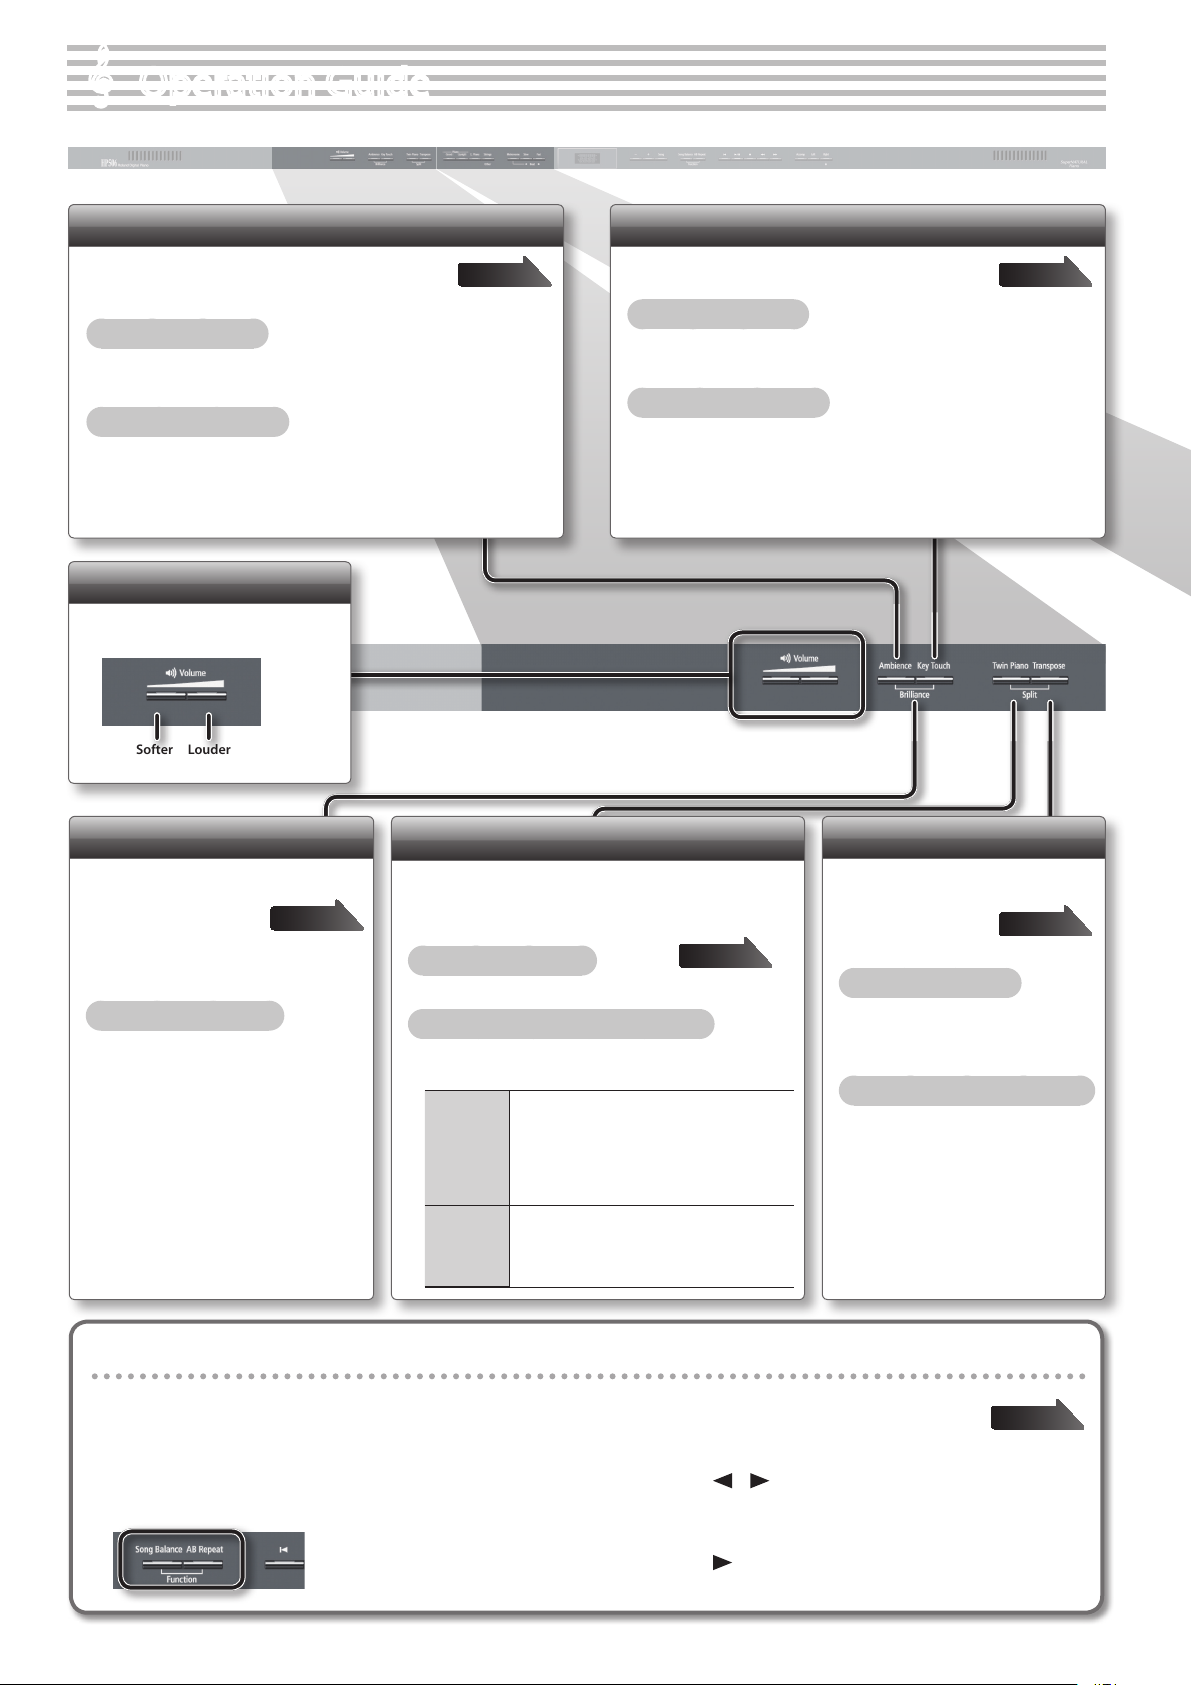
Operation Guide
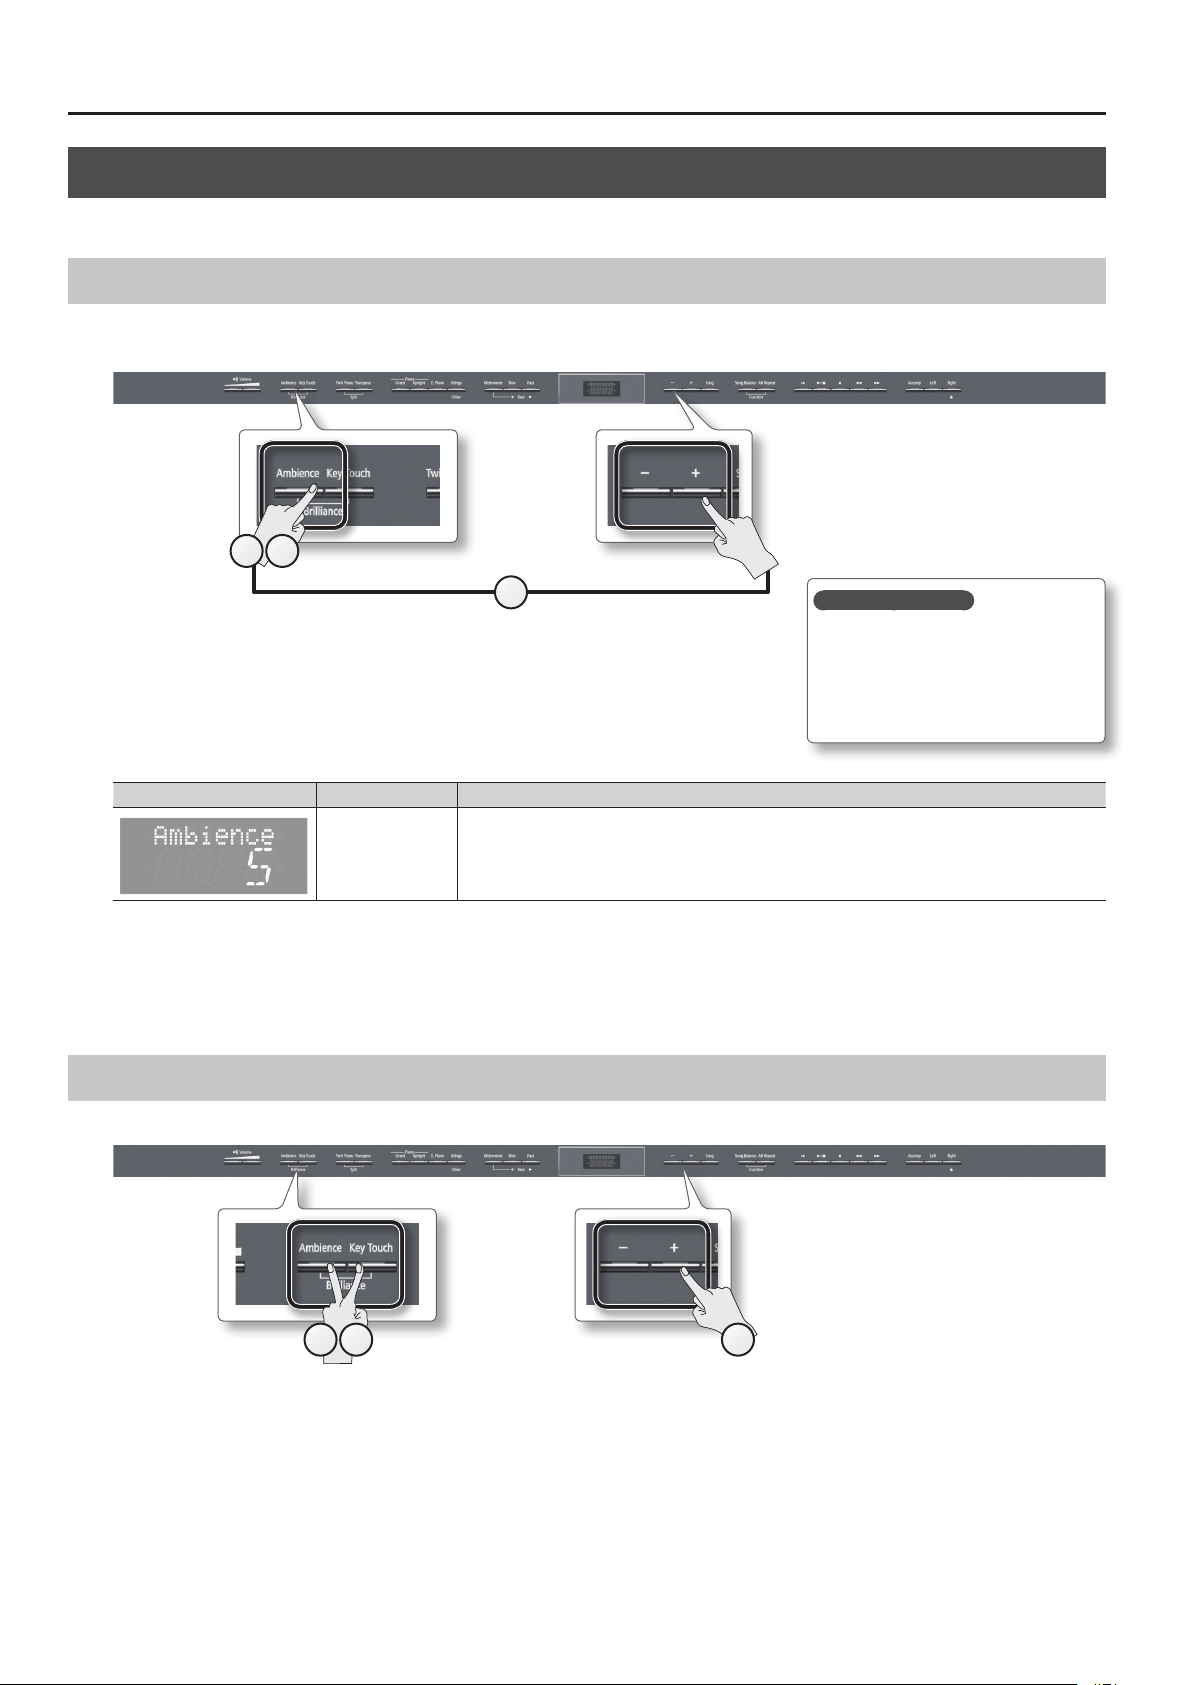
Adding Reverberation (Ambience)
You can add a pleasant reverberation to the sounds,
producing the impression that you are performing in
a concert hall.
To turn ambience on
Press the [Ambience] button so it’s lit.
To adjust the ambience
While holding down the [Ambience] button, press the [–] [+]
buttons.
Adjusting the Overall Volume
Adjust the volume by pressing the
Volume buttons.
Softer Louder
page 20
Adjusting the Keyboard Touch (Key Touch)
You can adjust the way in which the keyboard
responds to your playing.
To turn key touch on
Press the [Key Touch] button so it’s lit.
To adjust the key touch
While holding down the [Key Touch] button, press the [–] [+]
buttons.
page 21
Adjusting the Brightness of the Sound
(Brilliance)
You can adjust the
brightness of the sound
you play from the
keyboard or the sounds
of a song you play back.
To adjust the brilliance
Hold down the [Ambience] button and
press the [Key Touch] button to see the
value; then use the [–][+] buttons to
adjust it.
page 20
Dividing the Keyboard for Two-person Performance
(Twin Piano)
This function divides the keyboard into left and right,
allowing two people to play the same range of pitches.
To turn twin piano on
Press the [Twin Piano] button so it’s lit.
To change how the sounds are heard
While holding down the [Twin Piano] button, press the
[–] [+] buttons.
The sound of the right-hand keyboard zone
will be heard more loudly from the right
1 (Pair)
2
(Individual)
speaker than from the left speaker.
The sound of the left-hand keyboard zone will
be heard more loudly from the left speaker
than from the right speaker.
The sound of the right-hand keyboard zone
will be heard only from the right speaker.
The sound of the left-hand keyboard zone will
be heard only from the left speaker.
page 22
Transposing Your Performance
Transposes the
keyboard and/or
song.
To turn transpose on
Press the [Transpose] button so
it’s lit.
To adjust the amount of transposition
While holding down the
[Transpose] button, press the [–]
[+] buttons.
Retaining the settings even after power-o (memory backup)
The unit allows you to adjust numerous settings, but these settings will return to their default values as soon as you turn o the
power.
However, by using the Memory Backup feature, you can have the changes you’ve made in settings be retained.
(Transpose)
page 23
page 41
1. While holding down the [Song Balance]
button, press the [AB Repeat] button.
6
2. Use the [ ] [ ] (Slow/Fast) buttons to select
“Backup.”
3. Press the [Song] button.
4. Use the [ ] (Fast) button to select “Y” (Yes.)
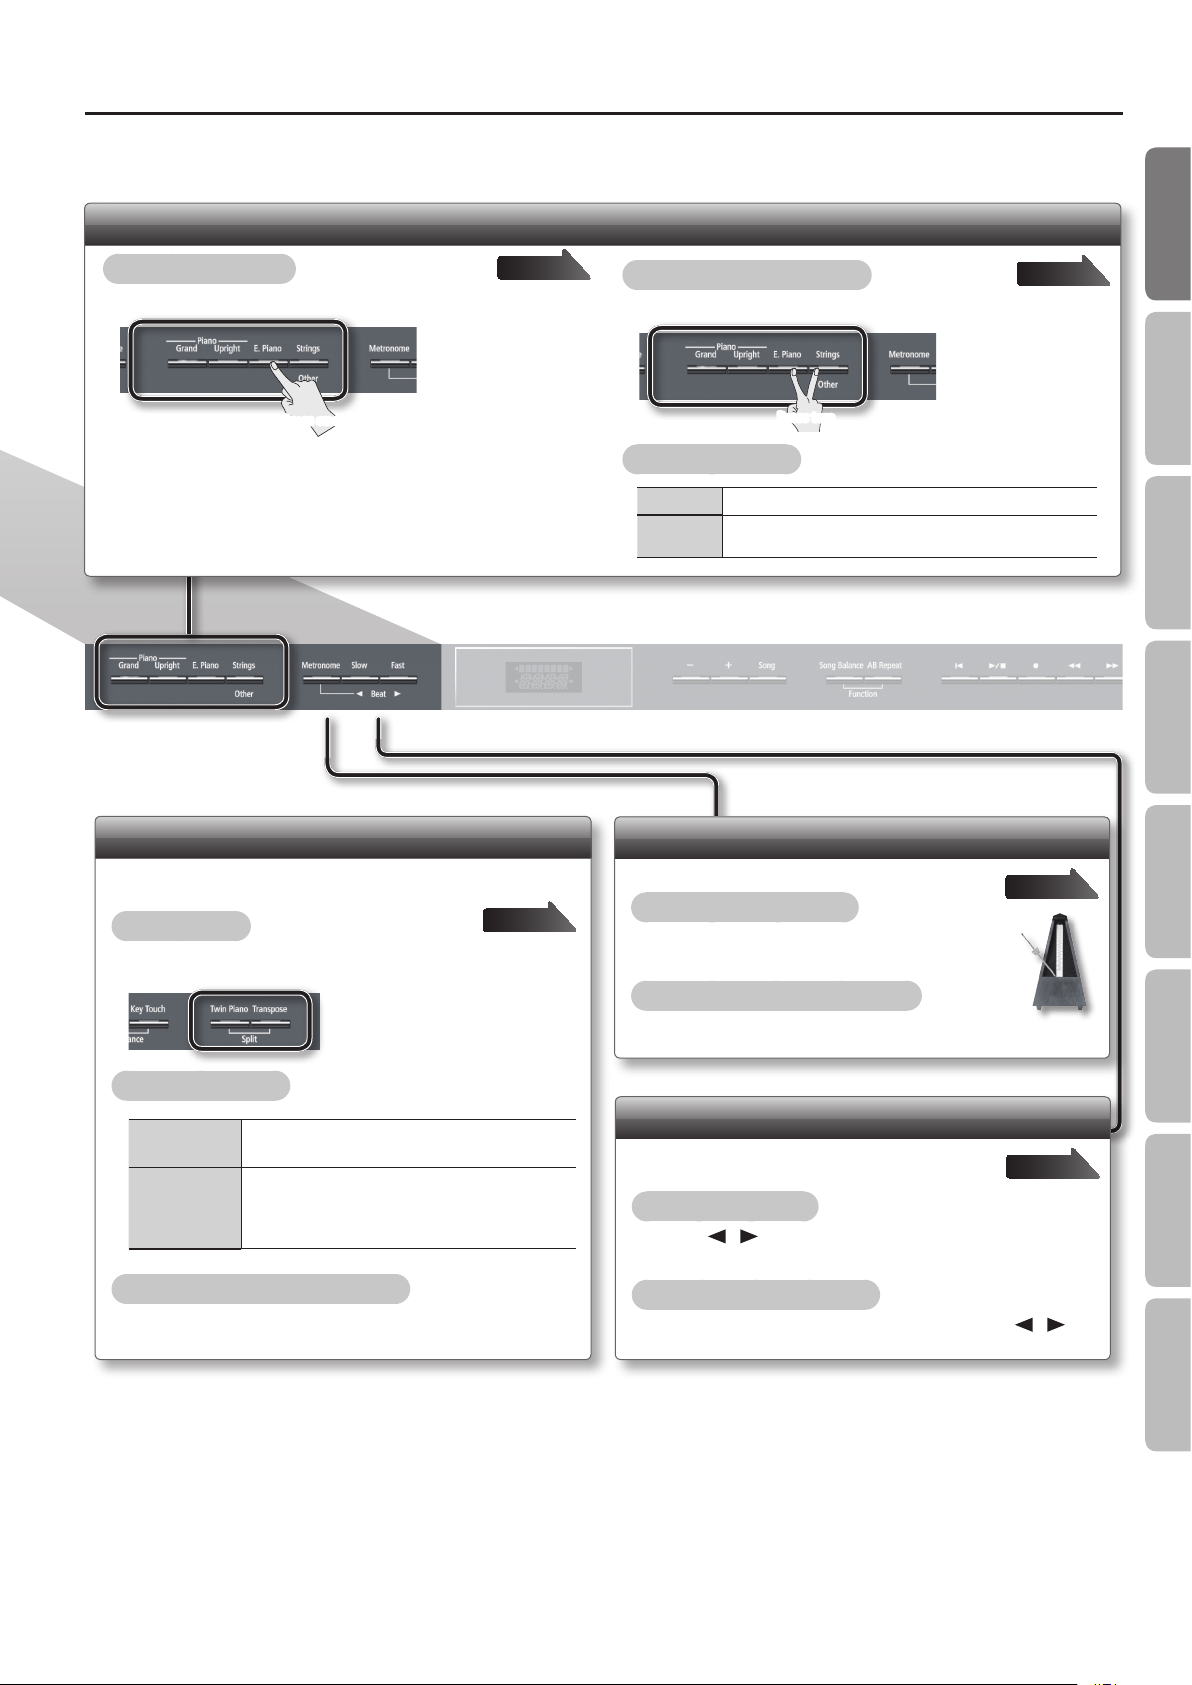
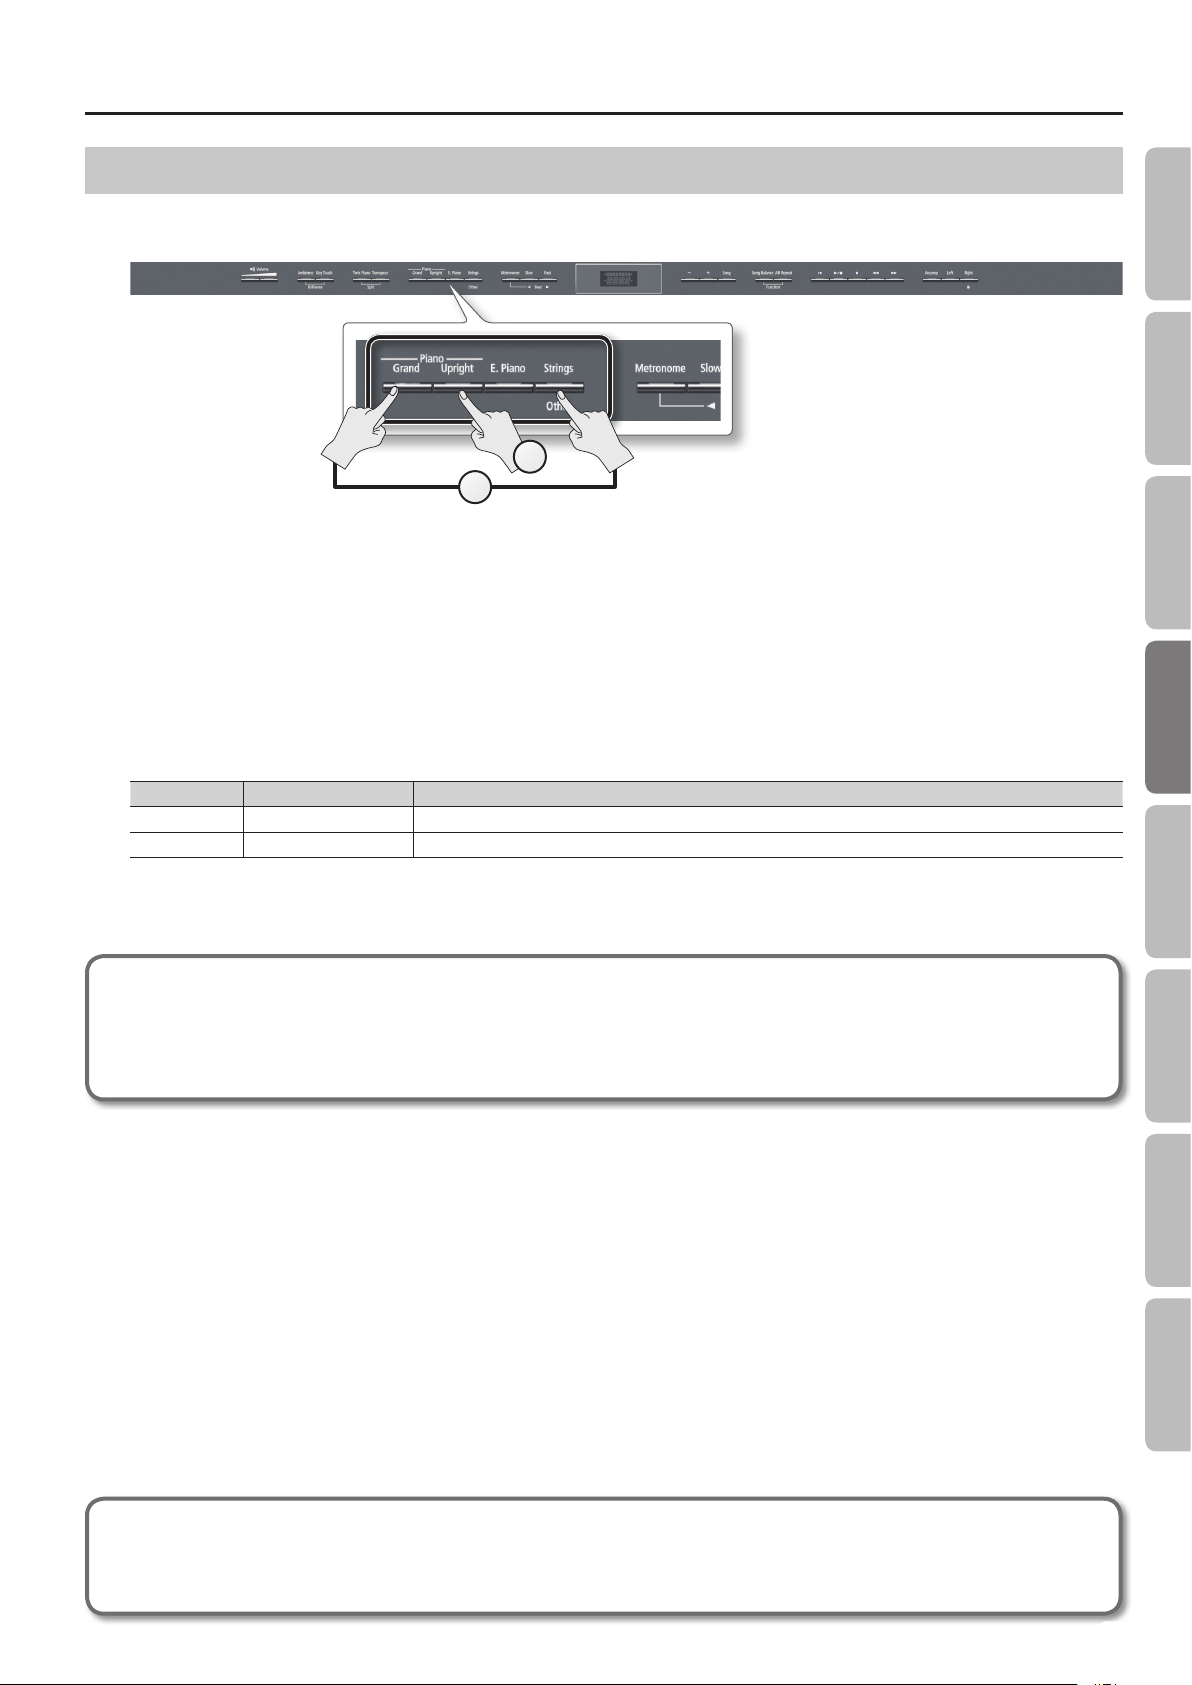
Tone Buttons
Operation Guide
Operation Guide Panel Descriptions Before You Play Performing Practicing
To select a single tone
Press one of the tone buttons, and then use the [–] [+] buttons.
Press one
page 16
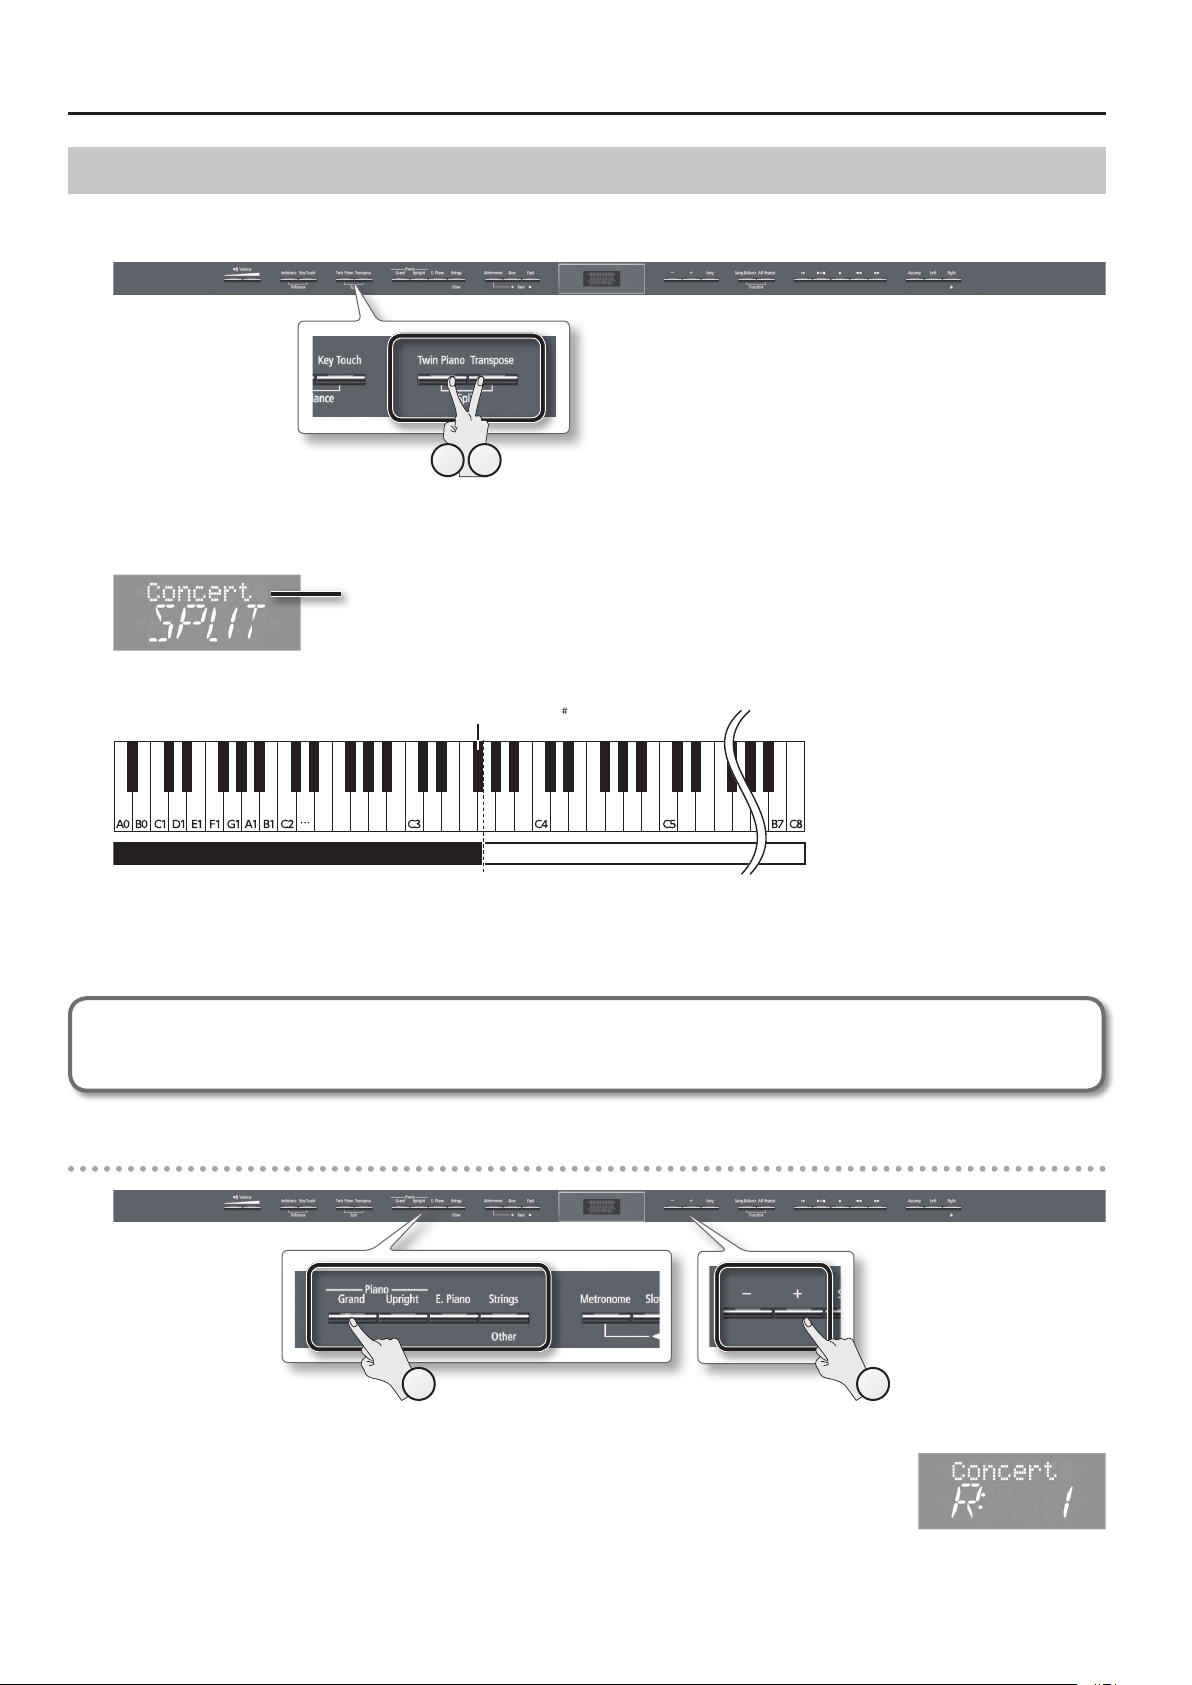
Playing Dierent Tones with the Right and Left Hands (Split Play)
This function divides the keyboard into left and right zones,
allowing you to play a dierent tone in each zone.
To turn split on
While holding down the [Transpose] button, press the [Twin Piano]
button.
page 18
To layer two tones (dual play)
Press two tone buttons.
Press two
To change the tones
Tone 1 Press the [–] [+] buttons.
Tone 2
Hold down the right-most of the lit tone button, and then use
the [–] [+] buttons.
Using the Metronome
Here’s how to sound the metronome.
To turn the metronome on
Press the [Metronome] button so it’s lit.
To adjust the metronome’s volume
While holding down the [Metronome] button, use the [–] [+]
buttons.
page 17
page 24
Convenient Functions
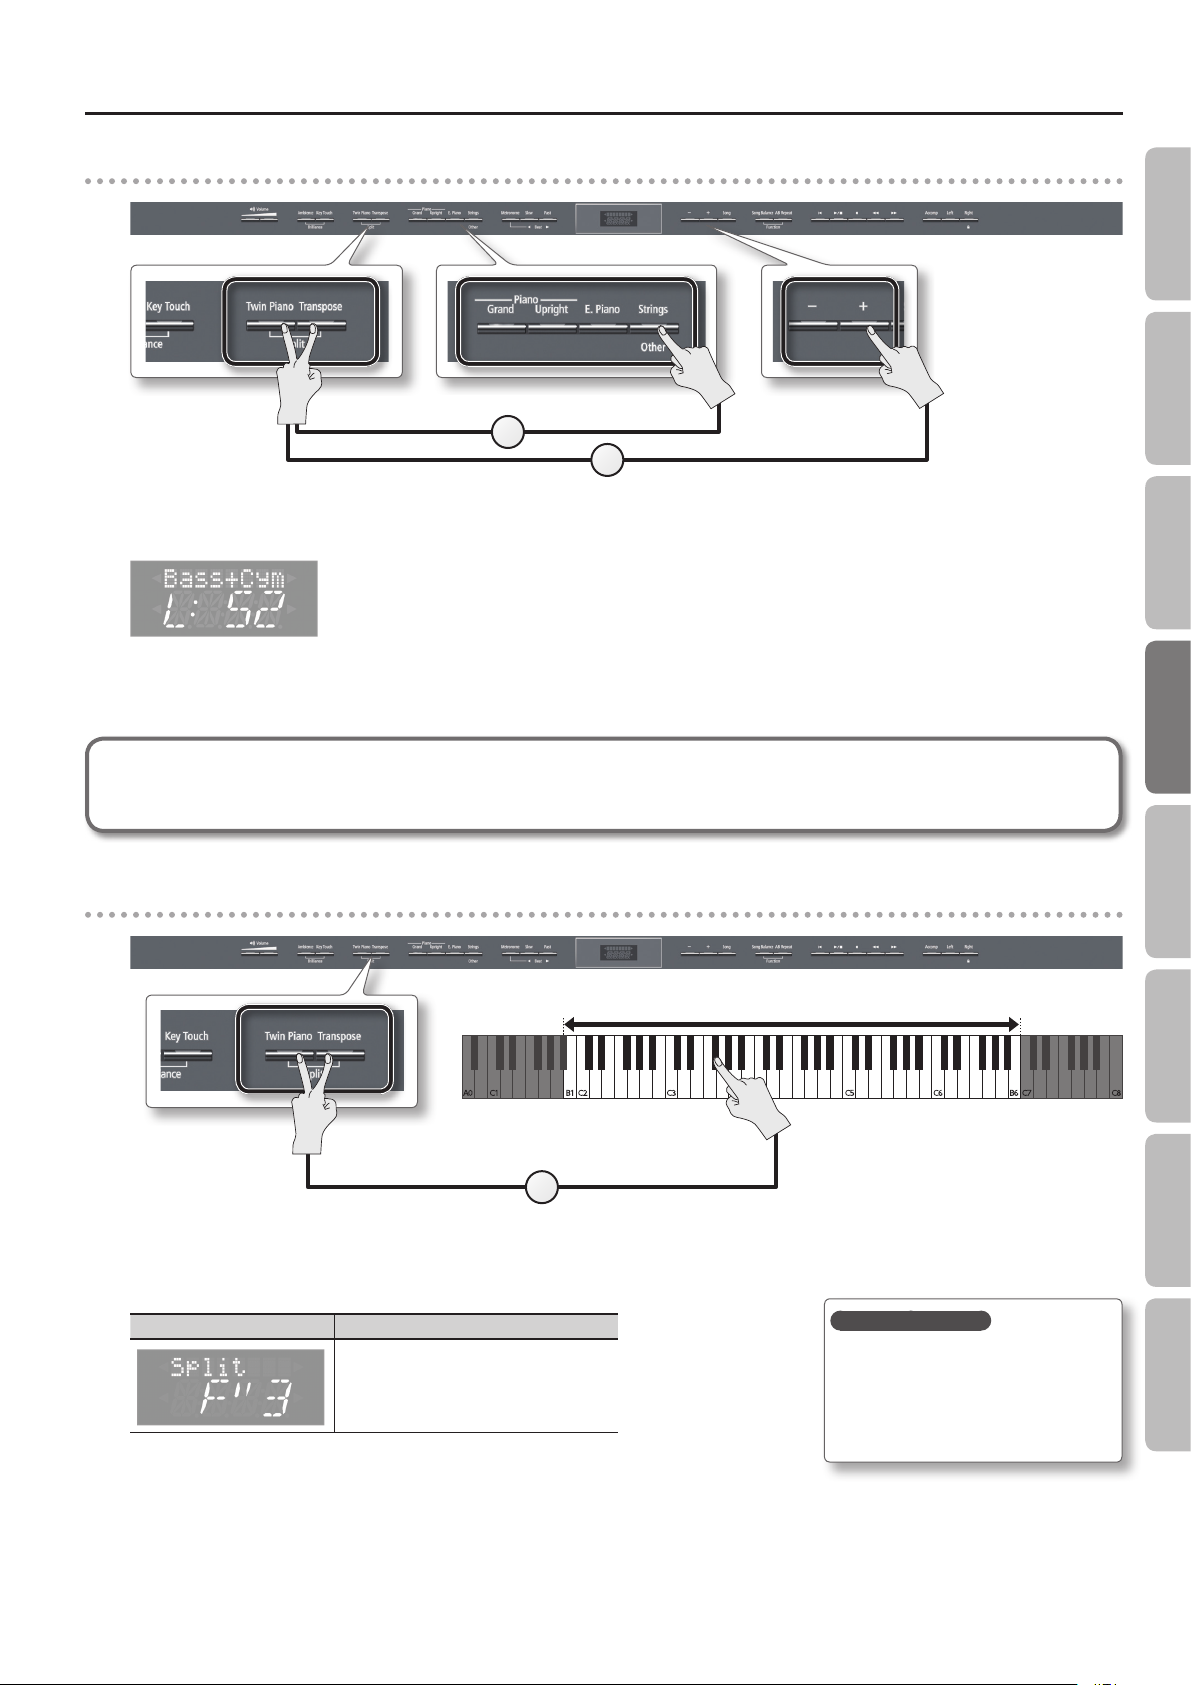
To change the tones
Right-hand Tone
Left-hand Tone
1. Press a tone button.
2. Press the [–] [+] buttons.
1. While holding down the [Transpose] button and
[Twin Piano] button, press a tone button.
2. While holding down the [Transpose] button and
[Twin Piano] button, use the [–] [+] buttons.
Changing the keyboard’s split point
While holding down the [Transpose] button and [Twin Piano]
button, play the key that you want to specify as the split point.
Changing the Tempo or Time Signature
You can adjust the tempo of the metronome or
song.
To change the tempo
Use the [ ] [ ] (Slow/Fast) buttons.
To change the time signature
While holding down the [Metronome] button, use the [ ] [ ]
(Slow/Fast) buttons.
page 24
Function Mode
Appendix
7
Operation Guide
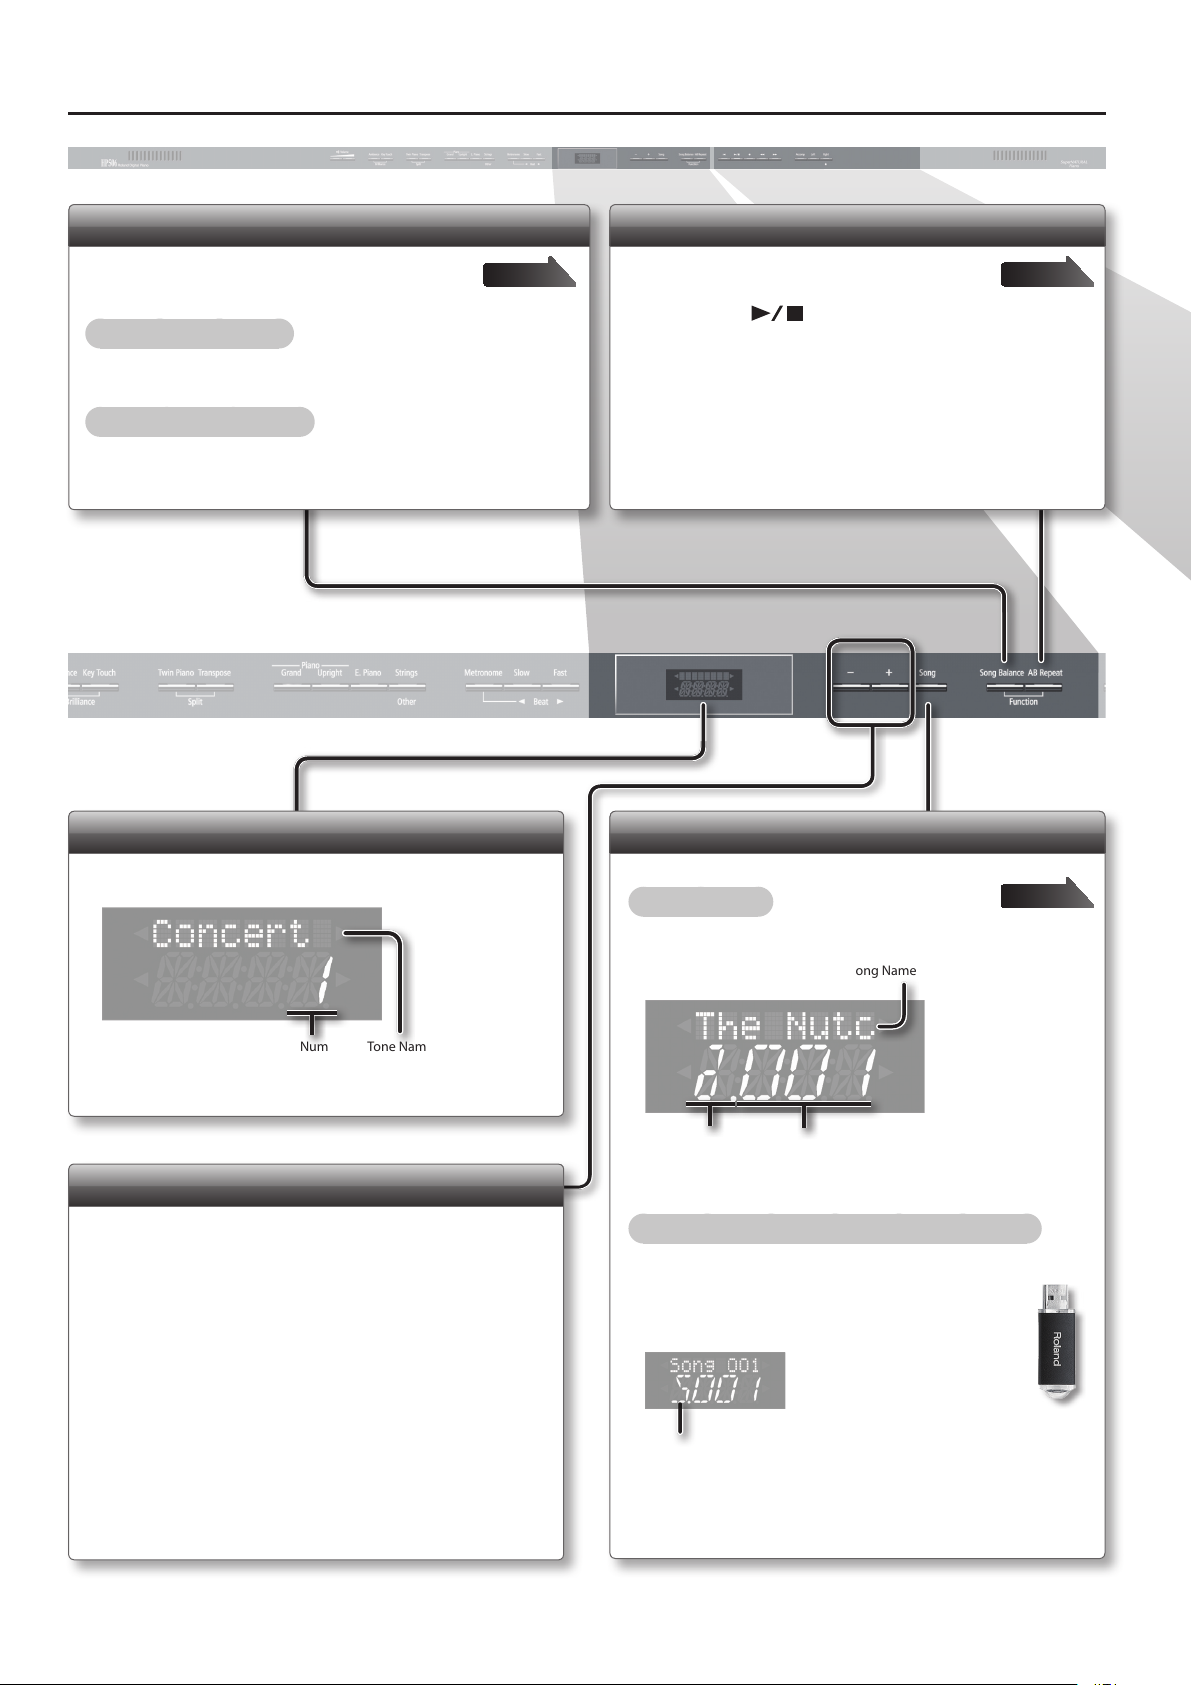
Adjusting the Song Volume (Song Balance)
By modifying the playback volume of the song, you
can adjust the balance between the song and your
keyboard performance.
To turn song balance on
Press the [Song Balance] button so it’s lit.
To adjust the song balance
While holding down the [Song Balance] button, press the [–] [+]
buttons.
page 27
Repeatedly Practicing a Portion of a Song (AB Repeat)
Here’s how you can make a specic portion of a
song play back repeatedly.
page 30
1. Press the [ ] (Play/Stop) button to play back the
song.
2. At the beginning of the portion to be repeated, press
the [AB Repeat] button.
3. At the end of the portion to be repeated, press the [AB
Repeat] button once again.
Display
This shows various information such as tone names, song names,
and the values of settings.
Tone NameTone Number
Selecting Variation Tones/Adjusting the Settings
You can select tone variations or songs, and adjust various settings.
• Holding down the [–] [+] buttons will make the value change
continuously.
• To rapidly increase the value, hold down the [+] button and press
the [–] button.
• To rapidly decrease the value, hold down the [–] button and press
the [+] button.
• To return the value to its default setting, press the [+] and [–] buttons
simultaneously.
Selecting a Song
You can select songs.
To select a song
1. Press the [Song] button.
Song Name
Category
Song Number
2. Use the [–] [+] buttons to select a song.
To select a song that’s saved on the USB ash drive
1. Press the [Song] button.
2. While holding down the [Song] button, use
the [–] [+] buttons to select “S.”
USB ash drive
page 26
3. Use the [–] [+] buttons to select a song.
8
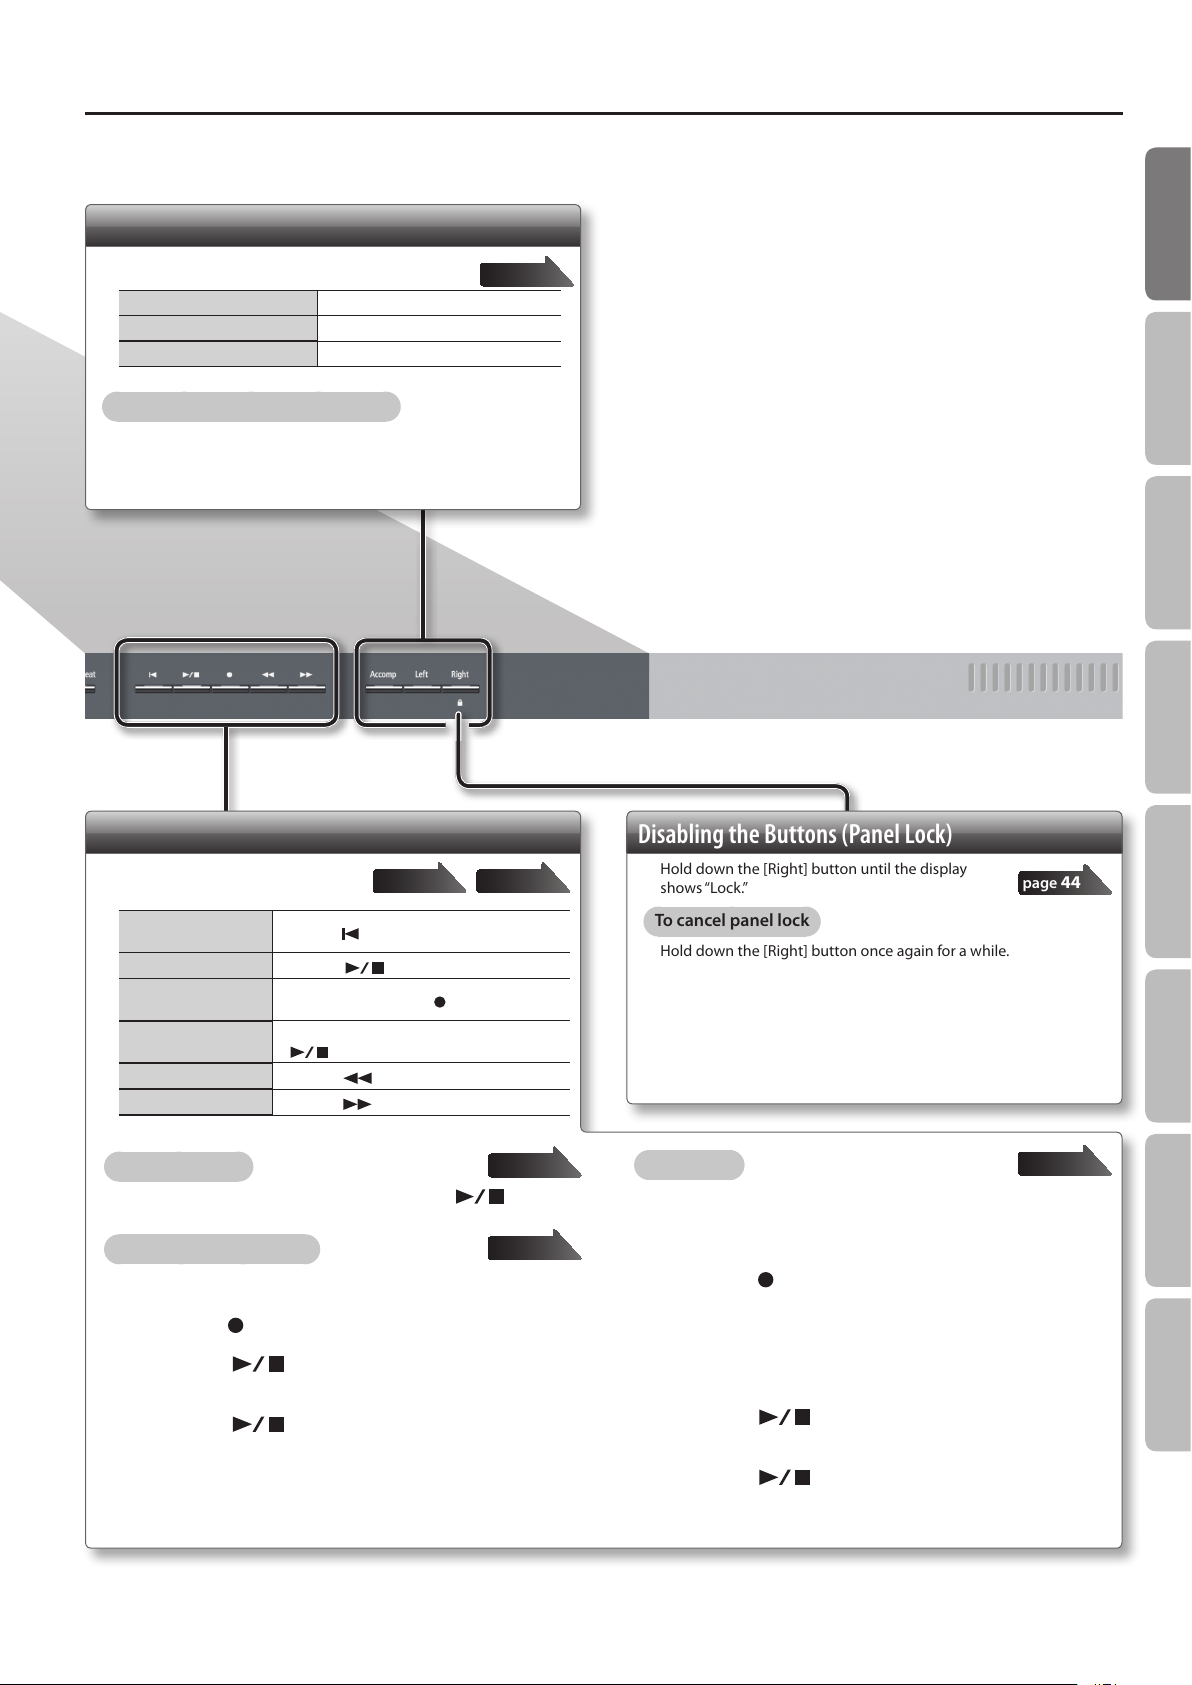
Selecting the Parts that will Play
Here’s how to select the parts that will play.
To select the right-hand part Press the [Right] button so it’s lit.
To select the left-hand part Press the [Left] button so it’s lit.
To select the other parts Press the [Accomp] button so it’s lit.
To adjust the mute volume of a part
Hold down the button of the part whose volume you want to adjust,
and use the [–] [+] buttons.
page 28
Operation Guide
Operation Guide Panel Descriptions Before You Play Performing Practicing
Recording/Playback
Here’s how to play back or record a
song.
Return to the beginning of the song
Play/Stop
Enter recordingstandby mode
Record
Rewind
Fast-forward
To play all songs
While holding down the [Song] button, press the [ ] (Play/
Stop) button.
To make a new recording
Press the [
Press the [
While stopped, press the [
While in recording-standby mode, press the
[
Press the [
Press the [
] (Reset) button.
] (Play/Stop) button.
] (Play/Stop) button.
] (Bwd) button.
] (Fwd) button.
page 31page 26
] (Rec) button.
1. Select the tone that you want to play.
2. Press the [ ] (Rec) button.
3. Press the [ ] (Play/Stop) button to start
recording.
4. Press the [ ] (Play/Stop) button to stop
recording.
page 27
page 31
Disabling the Buttons (Panel Lock)
Hold down the [Right] button until the display
shows “Lock.”
To cancel panel lock
Hold down the [Right] button once again for a while.
To overdub
page 44
page 34
1. Select the tone to be played.
2. Select the song to be dubbed.
3. Press the [ ] (Rec) button.
4. Press the [+] button.
5. Press the button of the part that you want to record,
making it blink.
6. Press the [ ] (Play/Stop) button to start
recording.
7. Press the [ ] (Play/Stop) button to stop
recording.
Convenient Functions
Function Mode
Appendix
9

Panel Descriptions
[Power] Switch
This turns the power on/o.
* The power to this unit will be turned o automatically after
a predetermined amount of time has passed since it was
last used for playing music, or its buttons or controls were
operated (Auto O function).
If you do not want the power to be turned o automatically, disengage the
Auto O function (p. 41).
* Any settings that you are in the process of editing will be lost when the power
is turned o. If you have any settings that you want to keep, you should refer to
“Retaining the Settings Even After Power-o (Memory Backup)” (p. 41) and save
your settings.
* To restore power, turn the power on again.
* When turning the power on again, you must allow at least ve seconds after
power-o before you once again turn the power on.
If you fail to allow enough time, the Auto O function might not be reset,
preventing the power from turning on correctly.
page 14
USB Memory Port
If a USB ash drive is
connected, you can
use it to save or play back songs.
You can do the following things using a USB ash
drive.
• WAVE les or MIDI les (SMF) data copied from your computer
can be played back by the unit.
• You can make audio recordings of your performances on the unit.
• The audio recordings of songs that you’ve made can be played on your
computer, or burned to a CD.
* Carefully insert the USB ash drives all the way in-until it is rmly in place.
* Use a USB ash drive sold by Roland. We cannot guarantee operation if any
other USB ash drive is used.
page 26 page 40
USB Computer Port
If you use a commercially available USB
cable to connect the unit’s USB computer
port to your computer’s USB port, you’ll be
able to do the following things.
• SMF data played back by MIDI-compatible
software can be sounded by the unit.
• MIDI data can be transferred between the unit
and your sequencer software (sold separately),
opening up a wide range of possibilities for
music production and editing.
Front Panel
These buttons are used to operate the unit.
“Operation Guide” page 6–9
Pedals
Headphone Hook
Whenever you are not using the headphones, you can hang them
on the headphone hook.
* Don’t hang anything other than headphones on this hook, and don’t apply
excessive force to it.
Doing so may damage the headphone hook.
Damper Pedal
Use this pedal to sustain the sound. While this pedal is held down, notes will be sustained for an extended time even if you
release your ngers from the keyboard.
With the damper pedal on an acoustic piano, when you step on the pedal it will at rst oer only a slight amount of resistance,
but as you press down further it will start to feel much heavier. On the unit, this change in the feeling of resistance is simulated.
On an acoustic piano, when you step on the damper pedal, you’ll rst hear the sound of the dampers releasing the strings. Then,
you should also be able to hear the sound of strings adjacent to the ones for the notes actually played resonate sympathetically,
resulting in a rich, resounding tone. Additionally, when using half-pedaling techniques, the core of the sound disappears rapidly
while a rich, spacious resonance remains, producing a unique form of reverberation. On the unit, the unique, lingering tones
produced by the half-pedaling technique are reproduced in addition to released-string sounds (Damper Noise) and resonating
sounds (Damper Resonance).
10
Sostenuto Pedal
The notes you are pressing when this pedal is depressed will be sustained.
Soft Pedal
This pedal is used to make the sound softer.
Playing with the soft pedal depressed produces a sound that is not as strong as when otherwise played with the equivalent
strength. This is the same function as the left pedal of an acoustic piano.
The softness of the tone can be varied subtly by the depth to which you press the pedal.
Panel Descriptions
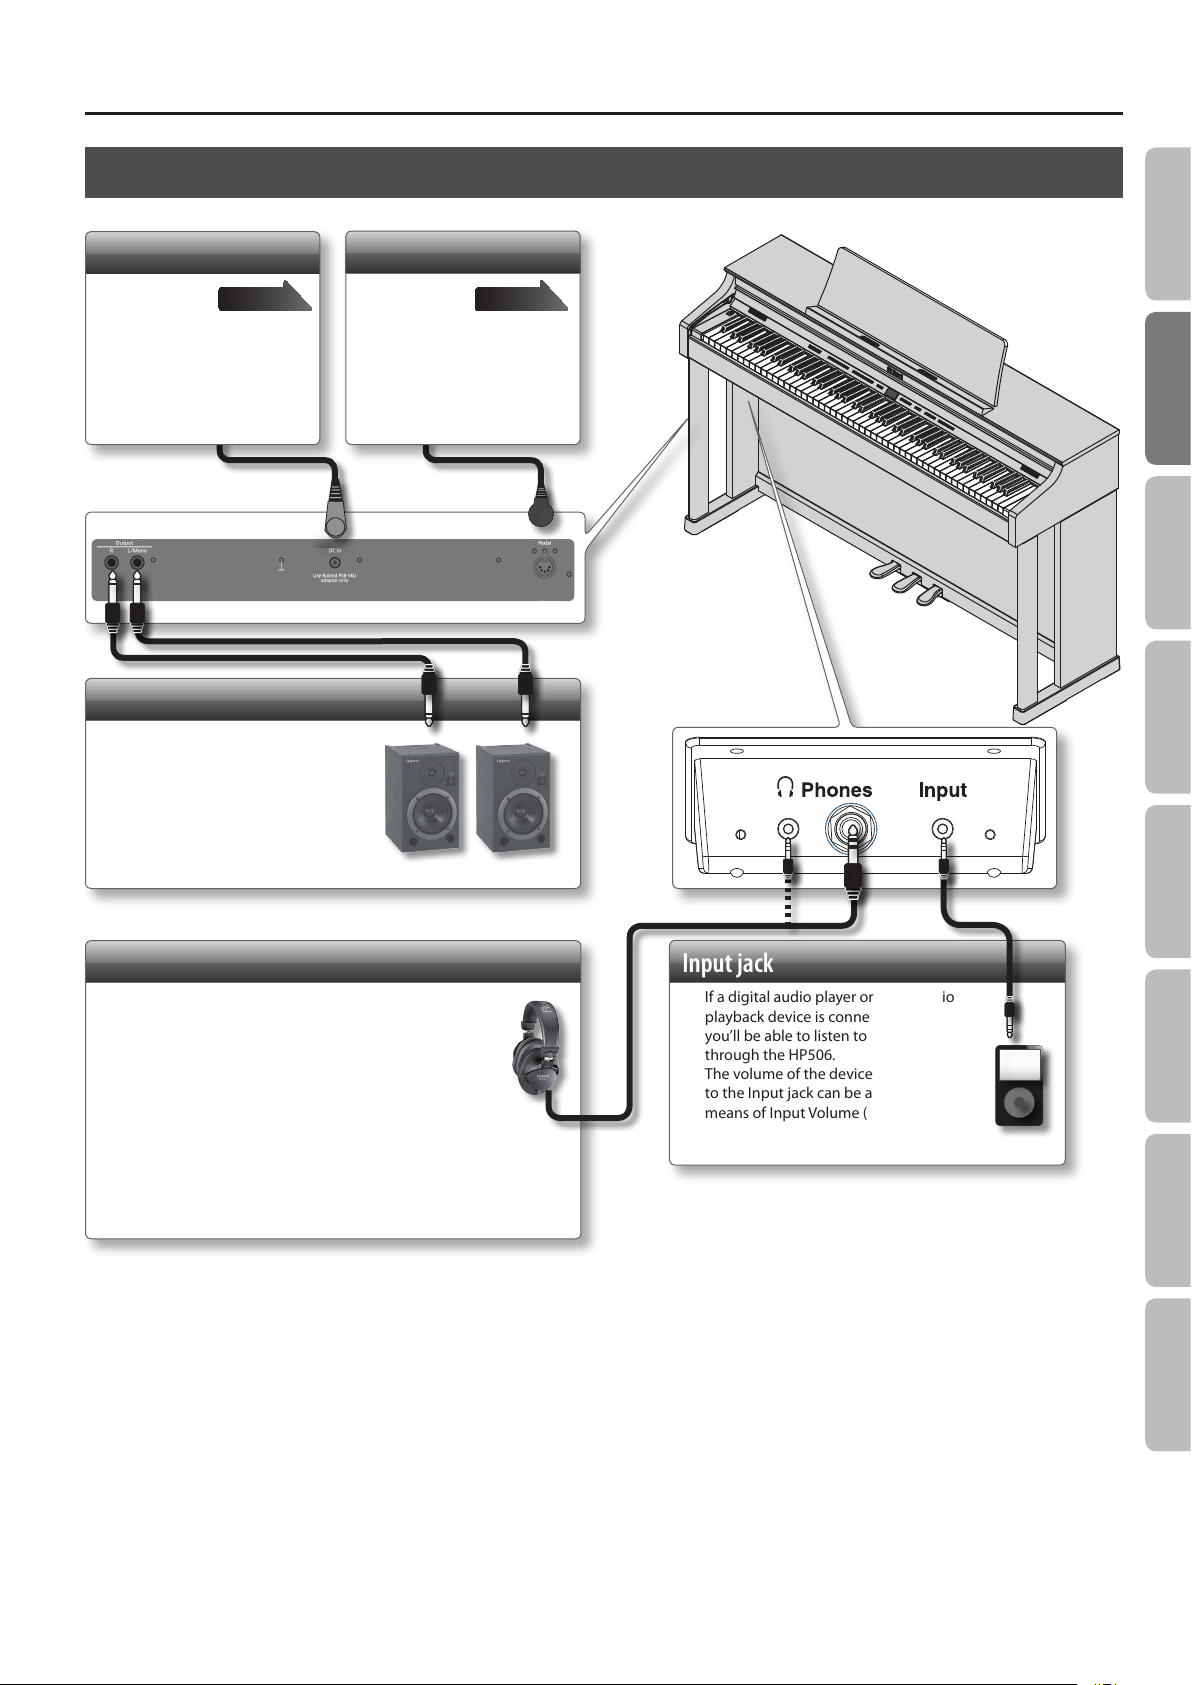
Rear Panel and Bottom Panel (HP506)
DC In Jack
Connect the
included AC
adaptor here.
* Before making this connection,
you must make sure that the
[Power] switch is o.
page 66
Output Jacks
If you connect these jacks to
amplied speakers, the sound of
HP506 will be heard through them.
* Before turning o the power of the
unit, you must rst turn o the power
of the devices that are connected to the
Output jacks.
Pedal Connector
Connect the
pedal cord
of the dedicated stand to
this connector.
page 66
Operation Guide Panel Descriptions Before You Play Performing Practicing
Rear side
Phones Jacks
Here you can connect stereo headphones.
The HP506 has two headphone jacks, two people can
also use headphones simultaneously.
A Headphones 3D Ambience eect will be applied,
producing the sensation that the sound is emanating
from the piano itself even when using headphones.
* The Headphones 3D Ambience eect applies only to piano sounds; it does
not apply to other sounds.
* You can also turn the Headphones 3D Ambience eect o (p. 48).
* You can use the [Ambience] button to adjust the Headphones 3D Ambience
eect.
Input jack
If a digital audio player or other audio
playback device is connected here,
you’ll be able to listen to its playback
through the HP506.
The volume of the device connected
to the Input jack can be adjusted by
means of Input Volume (p. 50).
Convenient Functions
Function Mode
Appendix
* To prevent malfunction and equipment failure, always turn down the volume, and turn o all the units before making any connections.
* When connection cables with resistors are used, the volume level of equipment connected to the Input jack may be low. If this happens, use connection cables that do
not contain resistors.
11
Panel Descriptions
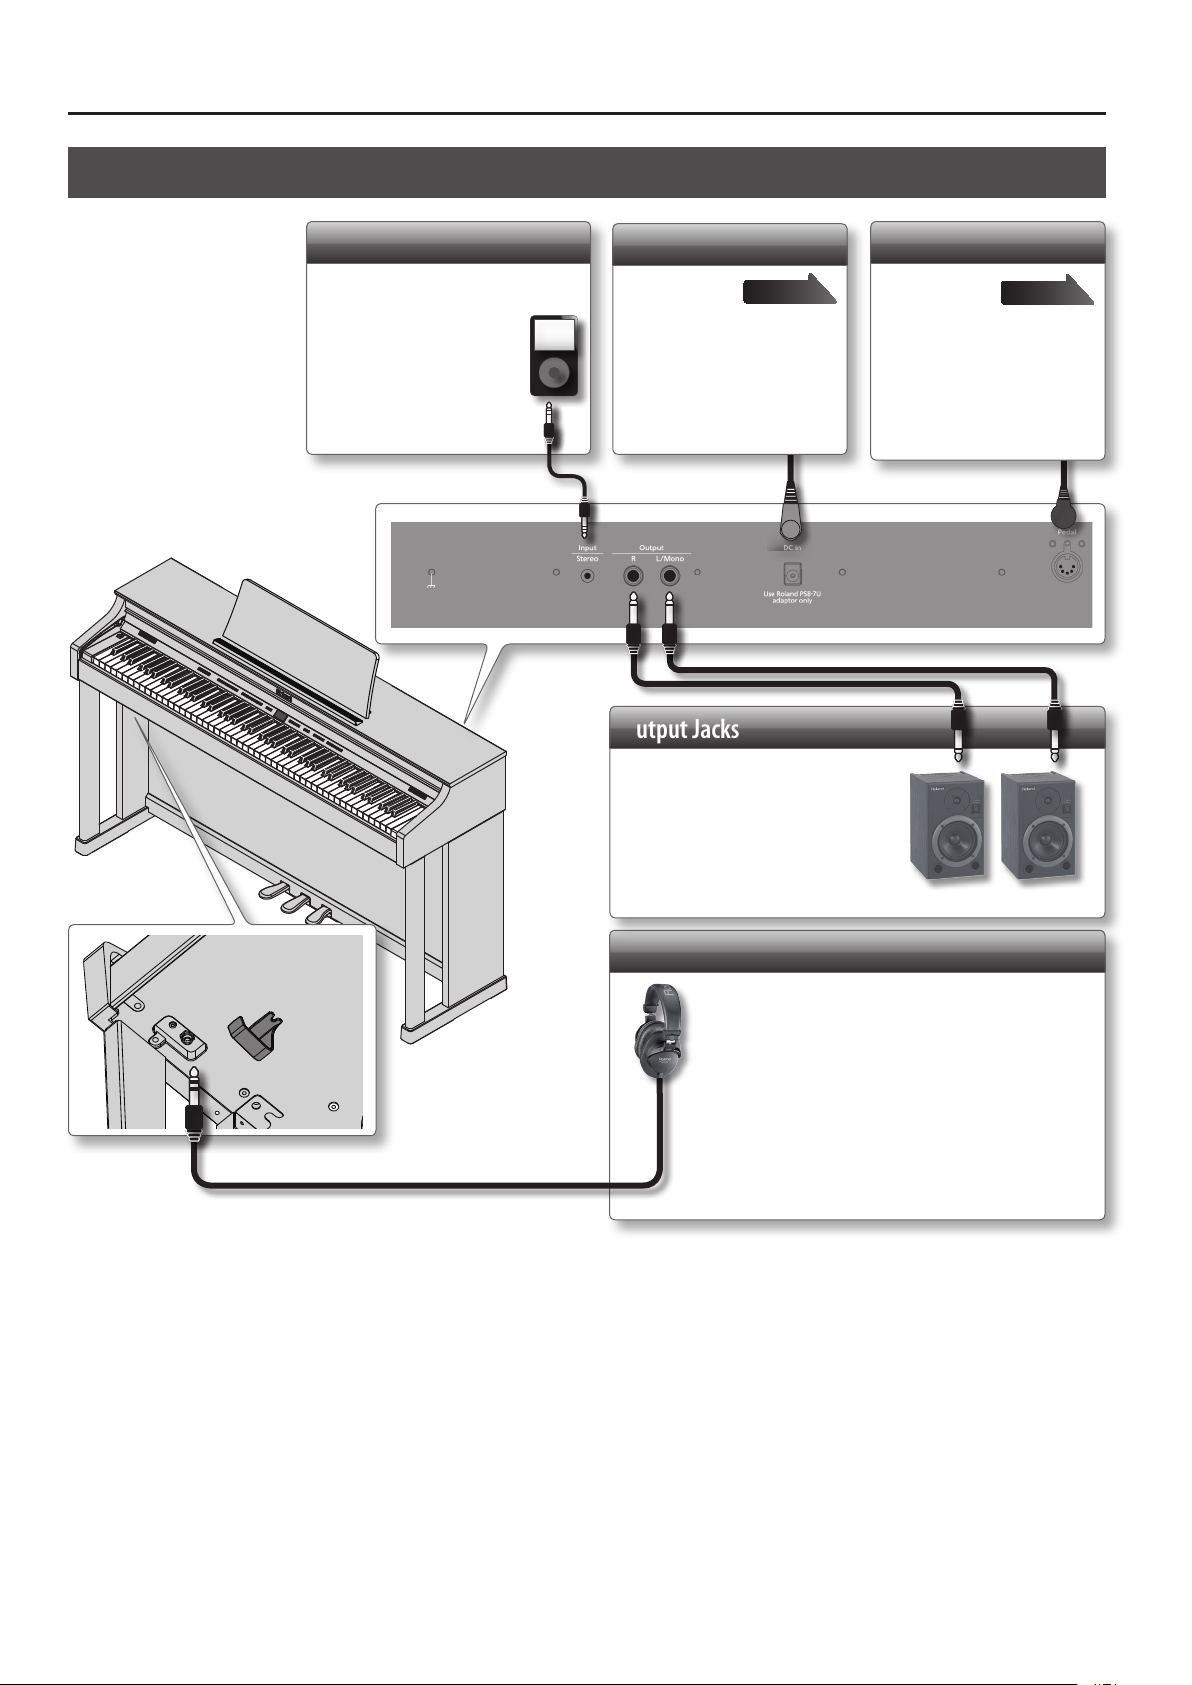
Rear Panel and Bottom Panel (HP504)
Input jack
If a digital audio player
or other audio playback
device is connected here,
you’ll be able to listen to
its playback through the
HP504.
Use the controls of your
audio playback device to
adjust the volume.
Rear side
DC In Jack
Connect the
included AC
adaptor here.
* Before making this connection,
you must make sure that the
[Power] switch is o.
page 66
Output Jacks
If you connect these jacks to
amplied speakers, the sound
of HP504 will be heard through
them.
* Before turning o the power of the
unit, you must rst turn o the power
of the devices that are connected to the
Output jacks.
Pedal Connector
Connect
the pedal
cord of the
dedicated stand to this
connector.
page 66
Phones Jacks
Here you can connect stereo headphones.
The HP504 has two headphone jacks, two people can
also use headphones simultaneously.
A Headphones 3D Ambience eect will be applied,
producing the sensation that the sound is emanating
from the piano itself even when using headphones.
* The Headphones 3D Ambience eect applies only to piano
sounds; it does not apply to other sounds.
* You can also turn the Headphones 3D Ambience eect o (p. 48).
* You can use the [Ambience] button to adjust the Headphones 3D
Ambience eect.
* To prevent malfunction and equipment failure, always turn down the volume, and turn o all the units before making any connections.
* When connection cables with resistors are used, the volume level of equipment connected to the Input jack may be low. If this happens, use connection cables that do
not contain resistors.
12
Before You Play
* When opening/closing the lid or raising/folding down the music rest, please be careful not to get your ngers pinched between the movable part
and the panel. In places where small children are present, make sure that an adult provides supervision and guidance.
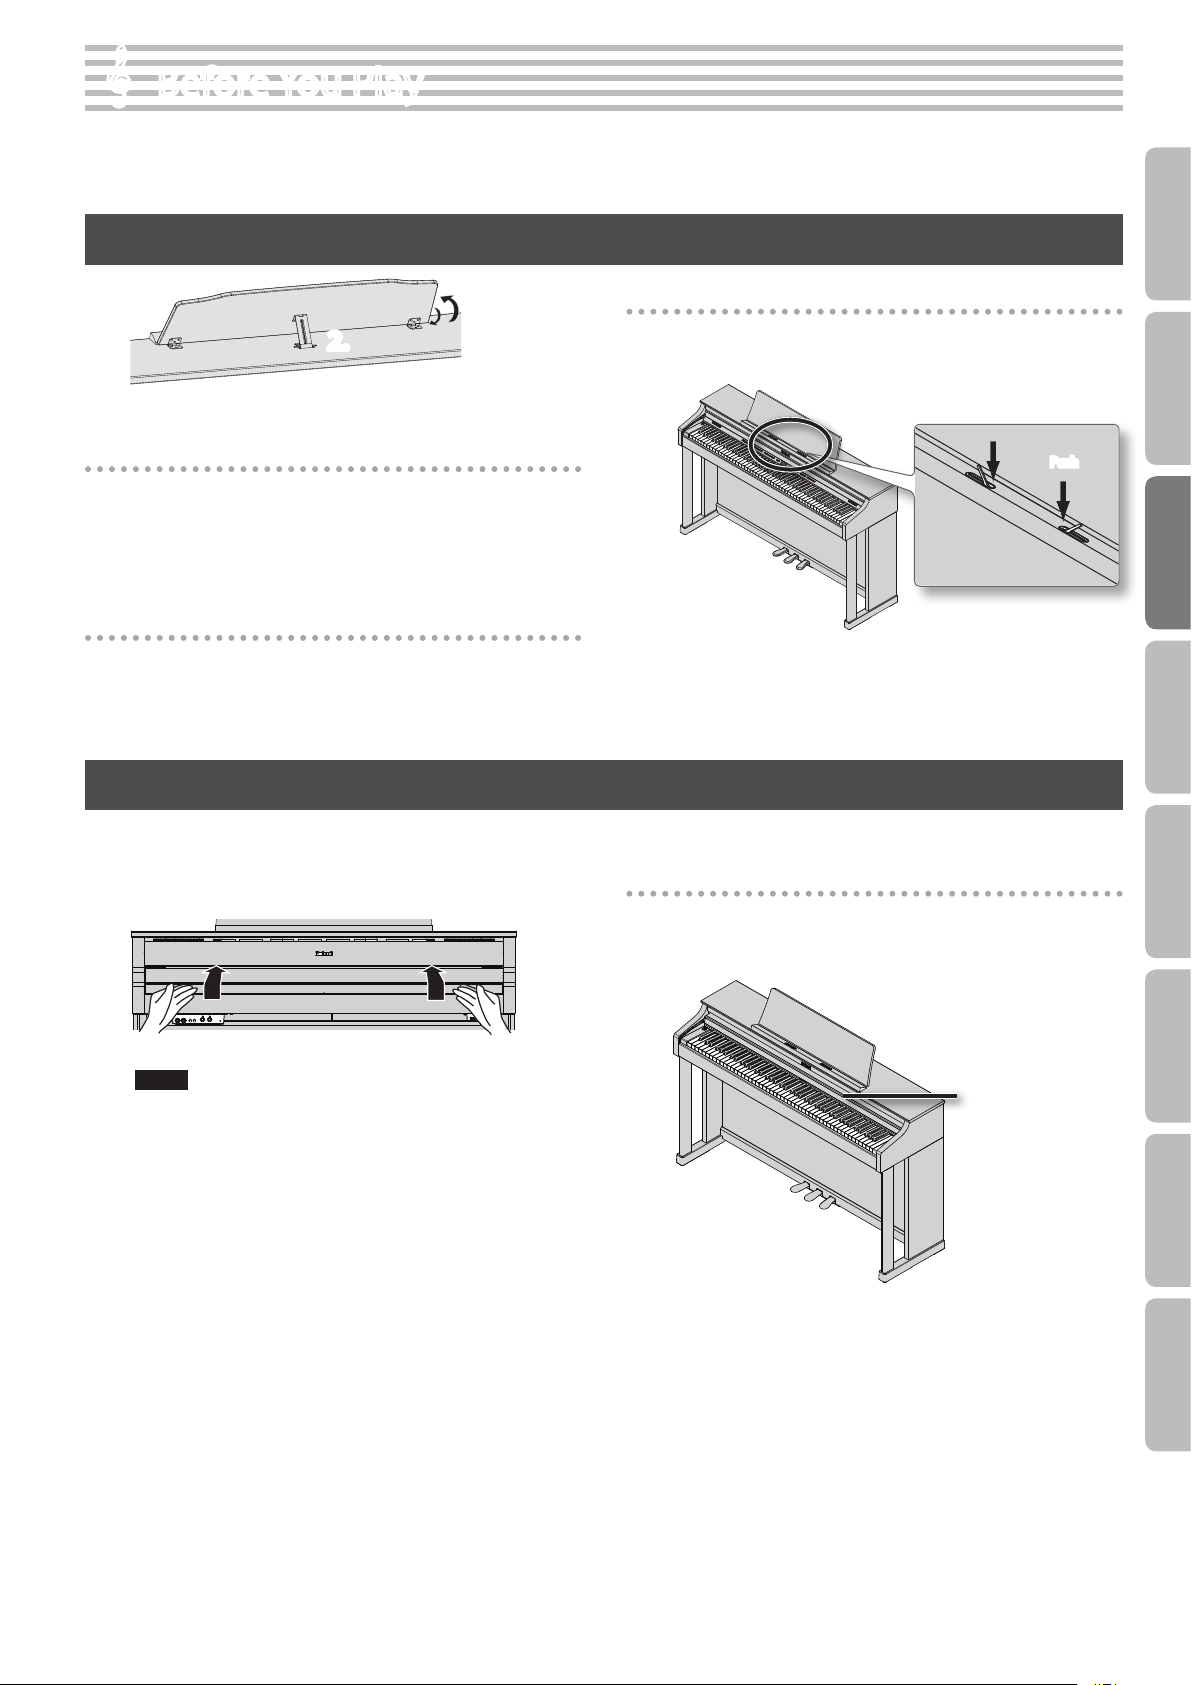
Setting Up the Music Rest
1.
2.
Raising the music rest
1. Gently raise the music rest.
2. Fit the latch into one of the slots so that the music rest is
at the desired angle.
Folding down the music rest
1. While using one hand to support the music rest, raise the
latches located on the back of the music rest, then gently
fold down the music rest.
Using the music holders
You can use the holders to hold pages in place.
When not using the holders, leave them folded down.
Operation Guide Panel Descriptions Before You Play Performing Practicing
Push
Opening/Closing the Lid
To open the lid, use both hands to lift it lightly, and slide it away
from yourself.
To close the lid, pull it gently toward yourself, and lower it softly
after it has been fully extended.
NOTE
When opening and closing the lid, be careful not to let your
ngers get caught. If small children will be using the unit, adult
supervision should be provided.
If you need to move the piano, make sure the lid is closed rst to
prevent accidents.
Using the lid to conceal the buttons and display
(Classic Position)
You can use the lid to conceal the buttons and the display. This
allows you to concentrate on performing without being distracted
by the buttons or the display.
Lid
Convenient Functions
Function Mode
Appendix
13
Before You Play
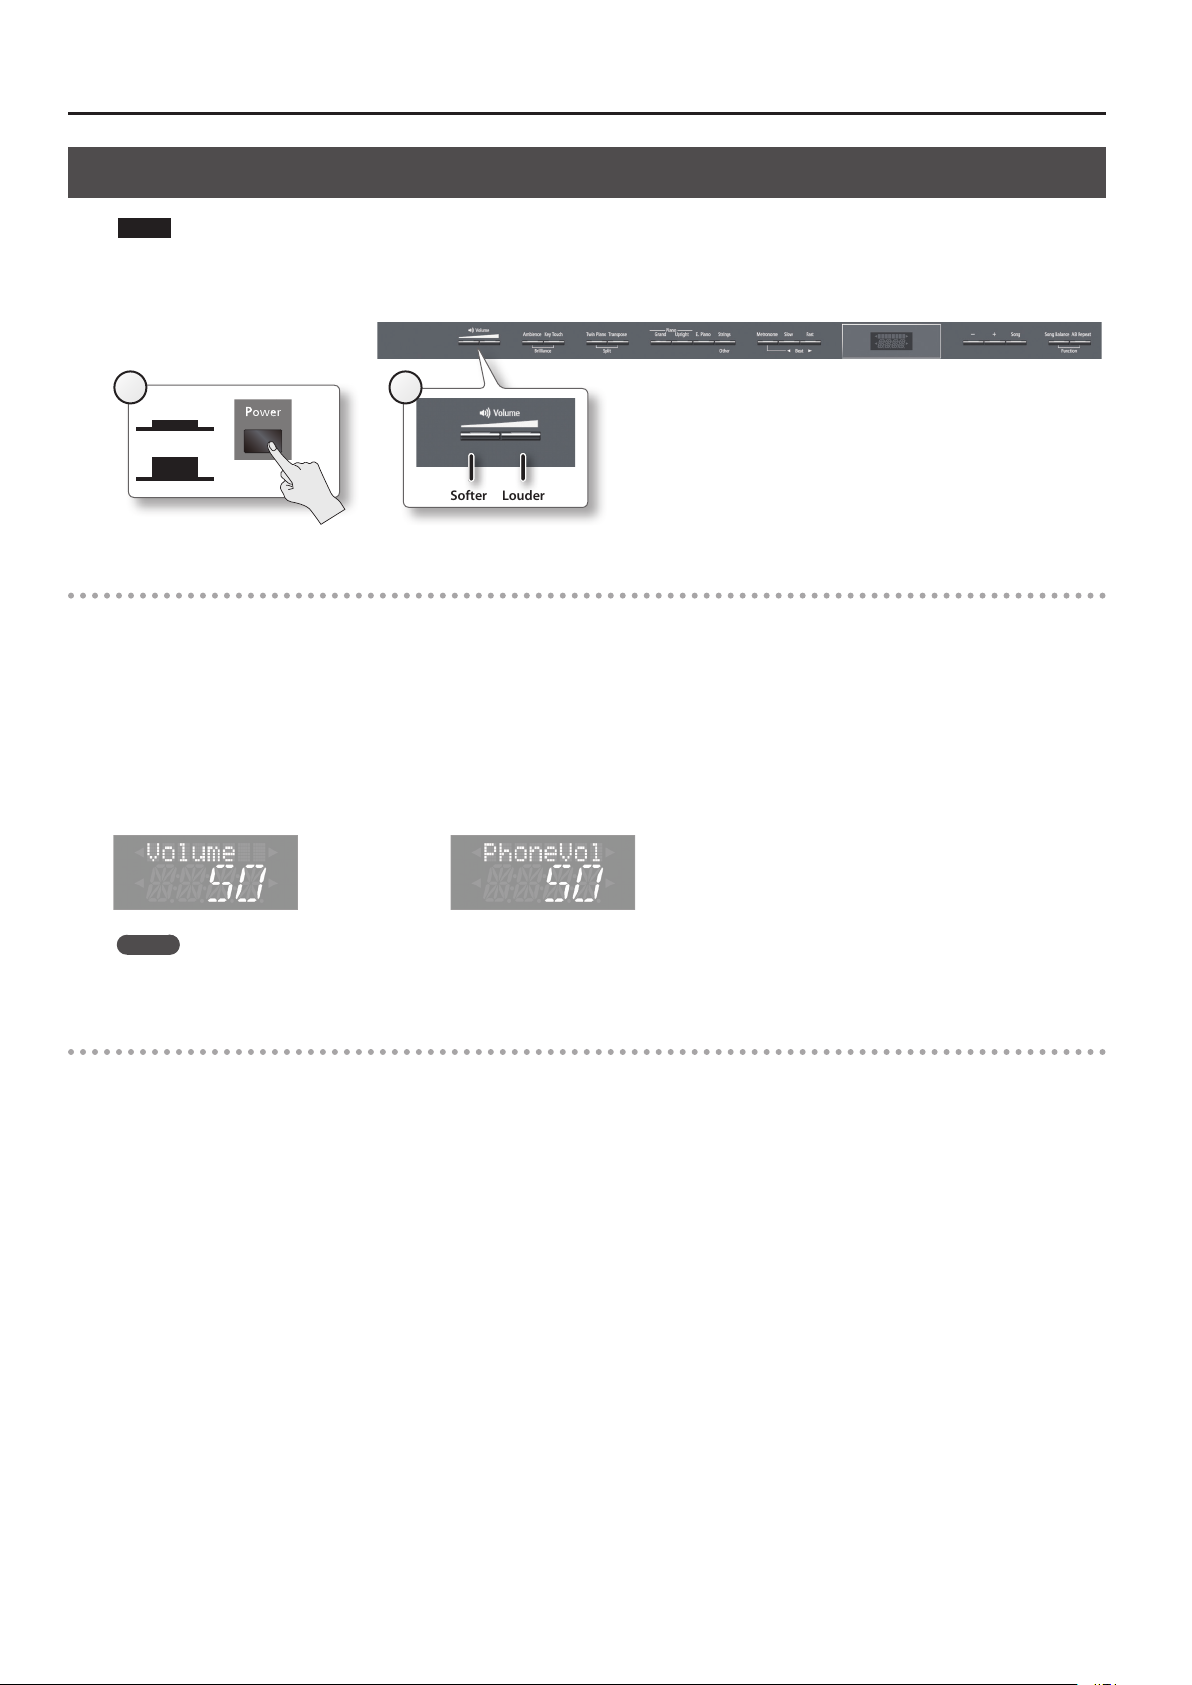
Turning the Power On/O
NOTE
Once everything is properly connected (p. 11), be sure to follow the procedure below to turn on their power. If you turn on equipment in the wrong
order, you risk causing malfunction or equipment failure.
1
On
O
2
Softer Louder
Turning the power on
1. Press the [Power] switch.
After a brief interval, you’ll be able to produce sounds by playing the keyboard.
* This unit is equipped with a protection circuit. A brief interval (a few seconds) after turning the unit on is required before it will operate normally.
2. Use the [Volume] buttons to adjust the volume.
The volume increases when you press the button on the right, and decreases when you press the button on the left.
This will adjust the volume of the speakers if you’re using the speakers of the unit, or the volume of the headphones if headphones are connected.
Each volume setting (for speaker or headphone) is saved automatically.
Volume adjustment screen when using speakers Volume adjustment screen when using headphones
MEMO
The unit is designed so that nuances in the dynamics of your playing will be clearly heard even at low volume, and that the sound will remain clear
even at high volume.
Turning the power o
1. Press the [Power] switch.
The power is turned o.
14

Before You Play
Operation Guide Panel Descriptions Before You Play Performing Practicing
If you don’t want the power to turn o automatically, change the “Auto O” setting to “OFF”!
The power to this unit will be turned o automatically after a predetermined amount of time has passed since it was last used for
playing music, or its buttons or controls were operated (Auto O function).
If you do not want the power to be turned o automatically, disengage the Auto O function (p. 41).
NOTE
• Any settings that you are in the process of editing will be lost when the power is turned o. If you have any settings that you want to keep,
you should refer to “Retaining the Settings Even After Power-o (Memory Backup)” (p. 41) and save your settings.
• To restore power, turn the power on again (p. 10).
• When turning the power on again, you must allow at least ve seconds after power-o before you once again turn the power on. If you fail
to allow enough time, the Auto O function might not be reset, preventing the power from turning on correctly.
Convenient Functions
Function Mode
Appendix
15
Performing
Performing with Various Sounds
In addition to piano sounds, the unit lets you enjoy performing with many other sounds (350 types).
These sounds are called “Tones.” The Tones are categorized into four groups, each of which is assigned to a dierent Tone button.
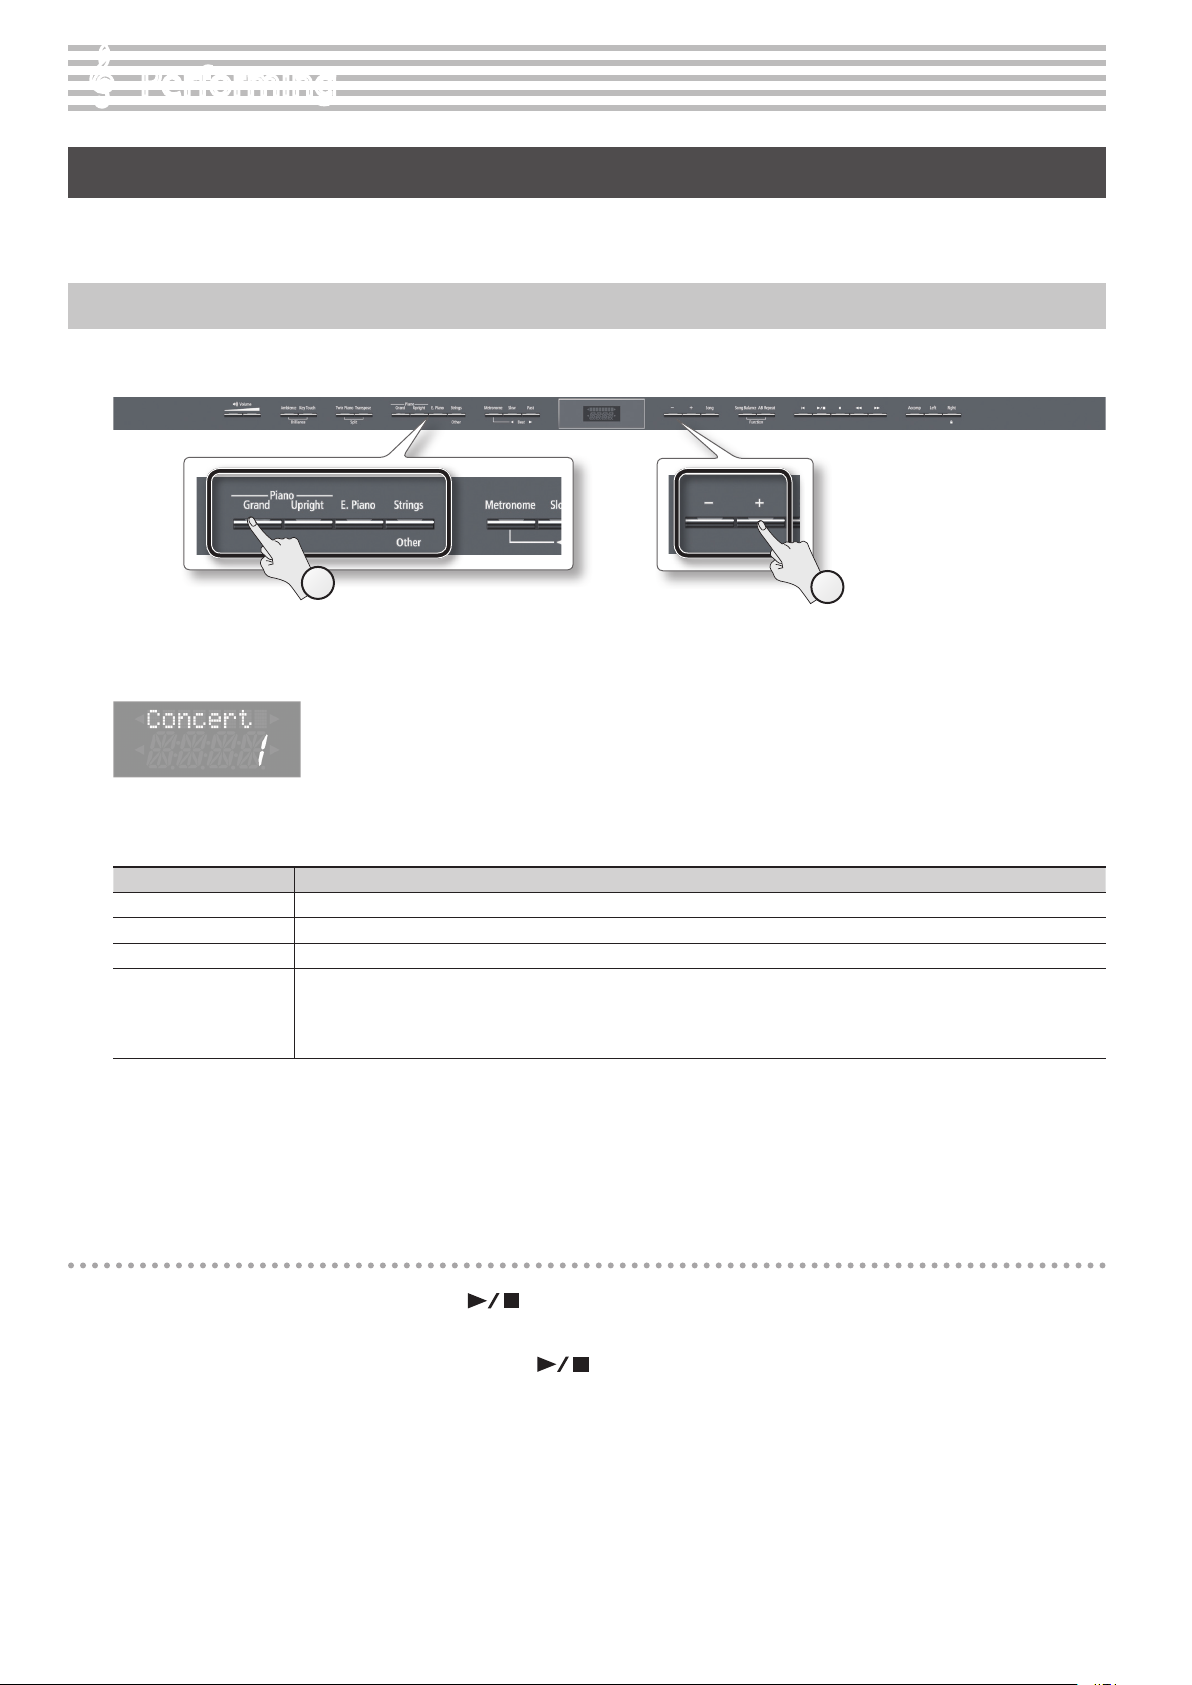
Switching Tones
Let’s start by performing with a piano tone.
When you turn on the power, the “Concert” (Concert Piano) tone is selected.
1
1. Press a tone button to select the tone group.
The currently selected tone number and tone name are displayed.
* The explanations in this manual include illustrations that depict what should typically be
shown by the display.
Note, however, that your unit may incorporate a newer, enhanced version of the system (e.g.,
includes newer sounds), so what you actually see in the display may not always match what
appears in the manual.
Tone groups
Tone button Description
Piano [Grand] button Selects grand piano sounds.
Piano [Upright] button Selects upright piano sounds.
[E. Piano] button Selects various electric piano sounds used in pop or rock.
Selects a variety of sounds such as string instruments, organ, bass, or accompaniment sounds.
[Strings] button
For details on the tones, refer to “Tone List” (p. 58).
*1 Rotary eect:
Rotary is an eect which simulates the sound of rotating speakers. There is a choice of two settings: Fast and Slow.
* If you select tone numbers 57–65, you’ll be able to use the keyboard to play the sounds of a drum set or SFX.
* If you’ve selected an organ sound that provides a rotary eect (*1), such as a “Jazz Org” or a “Balad Or,” pressing the [Strings] button will
switch the speed of the rotary eect.
2
2. Use the [–] [+] buttons to select a variation within the tone group.
* If you’ve selected a drum set tone or an SFX set tone, some notes of the keyboard will not produce sound.
Auditioning tones (tone demo)
1. While holding down a tone button, press the [ ] (Play/Stop) button.
A tone demo that uses the rst tone of each tone group will begin playing back.
2. To stop the tone demo, press the [Song] button or the [ ] (Play/Stop) button.
16
Performing
Performing with Two Layered Tones (Dual Play)
You can play two tones simultaneously from each note of the keyboard. This feature is called “Dual Play.”
As an example, here’s how to layer piano and strings tones.
2
1
1. While holding down the Piano [Grand] button, press the [Strings] button.
Both buttons will light.
When you play the keyboard, you’ll hear both the piano and the strings tones.
* Dual play is not available if Split Play (p. 18) or Twin Piano (p. 22) are turned on.
* For some combinations of sounds, the eect is not applied to tone 2, and this may aect how the tone sounds.
* It’s not possible to layer Piano [Grand] and Piano [Upright] tones together.
Operation Guide Panel Descriptions Before You Play Performing Practicing
Selecting tones for dual play
Tone name Corresponding button How to select tones
Tone 1 Left tone button Press the [–] [+] buttons.
Tone 2 Right tone button While holding down the tone button for Tone 2 (the right-most of the lit Tone buttons), and press the [–] [+] buttons.
2. To exit Dual Play, press one of the tone buttons.
Advanced techniques
Changing the pitch of tone 2 in steps of an octave: “Octave Shift” (p. 51)
Specifying the part(s) aected by the damper pedal: “Damper Pedal Part” (p. 51)
Adjusting the volume balance of the two tones: “Dual Balance” (p. 48)
Convenient Functions
Function Mode
What are eects?
Some of the tones provide a wide variety of other “eects” that can modify the sound in various ways.
The rotary eect is one of these eects.
Appendix
17
Performing
Playing Dierent Tones with the Right and Left Hands (Split Play)
You can play dierent tones in the left and right sides of the keyboard, divided at a certain key.
This feature is called “Split Play,” and the key at which the keyboard is divided is called the “Split Point.”
21
1. While holding down the [Transpose] button, press the [Twin Piano] button.
The display will indicate “SPLIT.”
Name of the right-hand tone
When Split is turned on, the keyboard settings will be as follows.
Split Point (Power-up default: F 3)
Left-hand Tone Right-hand Tone
2. To exit Split Play, hold down the [Transpose] button and press the [Twin Piano] button once again.
* Depending on which tones are being used together, the tones might sound dierent because no eect is applied to the left-hand tone.
Advanced technique
Specifying the part(s) aected by the damper pedal: “Damper Pedal Part” (p. 51)
Changing the right-hand tone
1
1. Press a tone button.
The number and name of tone currently selected for the right-hand zone are shown.
2. Press the [–] [+] buttons.
A dierent tone is selected.
18
2
Performing
Changing the left-hand tone
1
2
1. While holding down the [Transpose] button and [Twin Piano] button, press a tone button.
The number and name of the tone currently selected for the left-hand zone are shown.
2. While holding down the [Transpose] button and [Twin Piano] button, press the [–] [+] buttons.
A dierent tone is selected.
Operation Guide Panel Descriptions Before You Play Performing Practicing
Advanced technique
Changing the pitch of the left-hand tone in steps of an octave: “Octave Shift” (p. 51)
Changing the keyboard’s split point
Range in which you can specify the split point (B1–B6)
Split Point
Power-up default: F#3
The Split Point belongs to the
1
1. While holding down the [Transpose] button and [Twin Piano] button, press the key that you want to assign as the split point.
The key you pressed becomes the new split point, and that key will be shown in the display.
Screen Value
B1–B6
(default: F#3)
* In the display, a quotation mark (“) signies a sharp (#).
left-hand section of the keyboard.
Saving your settings
The unit’s settings will revert to the
default values when you turn o the
power, but you can save them as
described in “Retaining the Settings
Even After Power-o (Memory Backup)”
(p. 41).
Convenient Functions
Function Mode
Appendix
19
Performing
Adjusting the Sound to Your Taste
The unit lets you add reverberation or modify the brightness of the sound.
Adding Reverberation to the Sound (Ambience)
You can add a pleasant reverberation to the sounds of the unit, producing the impression that you are performing in a concert hall.
This eect is called “Ambience.”
1 3
2
1. Press the [Ambience] button.
The [Ambience] button will light.
2. While holding down the [Ambience] button, press the [–] [+] buttons.
The display will indicate the depth of the ambience eect values.
Screen Value Explanation
1–10
(default: 2)
Higher values apply deeper ambience.
* If you’re using headphones and the Headphones 3D Ambience eect (p. 48) is set to “On,” this lets you adjust
the depth of the Headphones 3D Ambience eect.
Saving your settings
The unit’s settings will revert to the
default values when you turn o the
power, but you can save them as
described in “Retaining the Settings
Even After Power-o (Memory Backup)”
(p. 41).
3. To turn o the ambience eect, press the [Ambience] button once again.
The [Ambience] button will go out.
* It’s not possible to specify the depth of ambience individually for each tone. The eect will be applied in the same way to each tone.
Adjusting the Brightness of the Sound (Brilliance)
You can adjust the brightness of the sounds played on the keyboard or played back by a song.
20
1 3 2
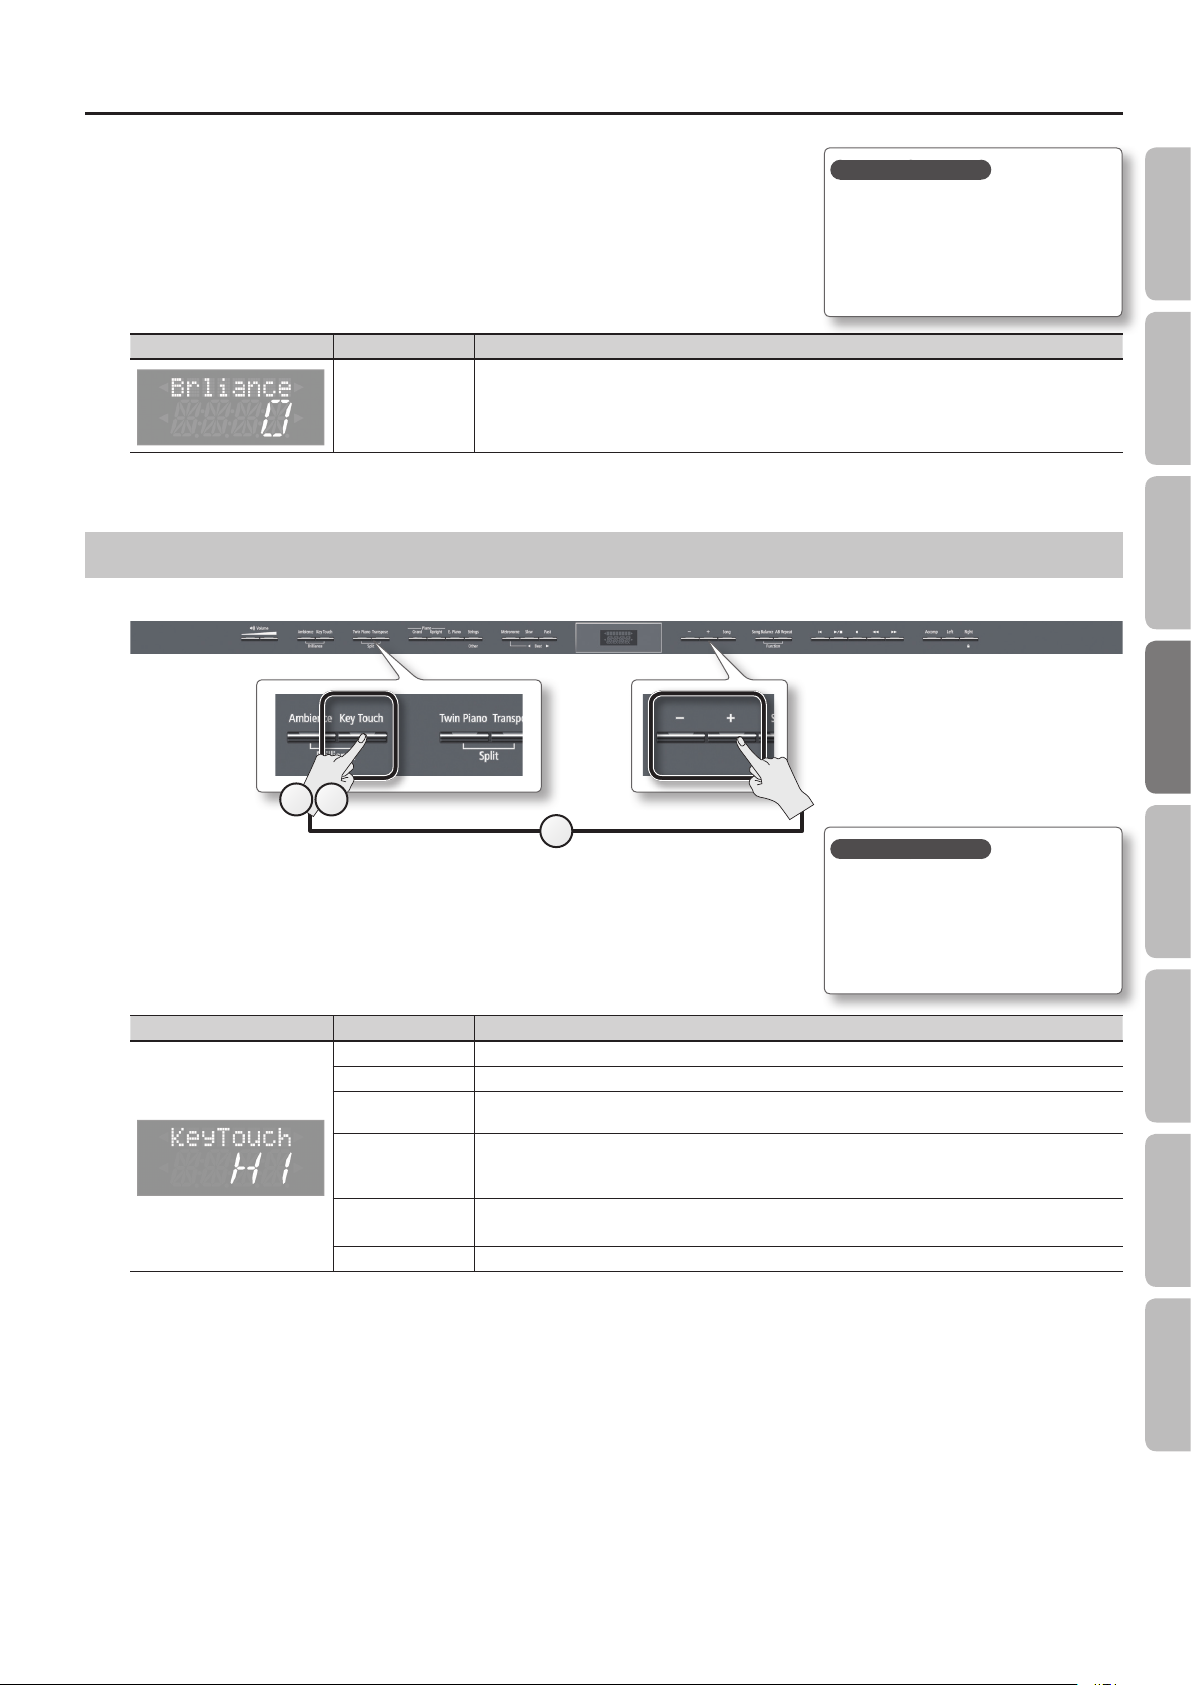
Performing
1. While holding down the [Ambience] button, press the [Key Touch] button.
The display will indicate the depth of the brilliance eect values.
2. Press the [–] [+] buttons.
Screen Value Explanation
-10–0–10
(default: 0)
Positive (+) values make the sound brighter; negative (-) values make the sound more mellow.
3. Press [Ambience] button or [Key Touch] button to return to the previous screen.
Adjusting the Keyboard Response (Key Touch)
The way in which the keyboard responds to your playing strength can be adjusted to your personal taste.
Saving your settings
The unit’s settings will revert to the
default values when you turn o the
power, but you can save them as
described in “Retaining the Settings
Even After Power-o (Memory Backup)”
(p. 41).
Operation Guide Panel Descriptions Before You Play Performing Practicing
1 3
2
1. Press the [Key Touch] button.
The [Key Touch] button will light.
2. While holding down the [Key Touch] button, press the [–] [+] buttons.
The display will indicate the key touch setting.
Screen Value Explanation
FIX The sound plays at one set volume, regardless of the force used to play the keys.
L2 This setting produces the lightest keyboard touch.
L1
M
H1
(default)
H2 This setting produces the heaviest keyboard touch.
You can achieve fortissimo ( ) play with a less forceful touch than “M,” so the keyboard feels lighter. This
setting makes it easy to play, even for children.
This sets the standard keyboard touch. You can play with the most natural touch. This is the closest to the
touch of an acoustic piano.
This setting is used if the [Key Touch] button is unlit.
You have to nger the keyboard more forcefully than “M” in order to play fortissimo (), so the keyboard touch
feels heavier. Dynamic ngering adds even more feeling to what you play.
3. To cancel key touch, press the [Key Touch] button once again.
The [Key Touch] button will go out.
Saving your settings
The unit’s settings will revert to the
default values when you turn o the
power, but you can save them as
described in “Retaining the Settings
Even After Power-o (Memory Backup)”
(p. 41).
Convenient Functions
Function Mode
Appendix
21
Performing
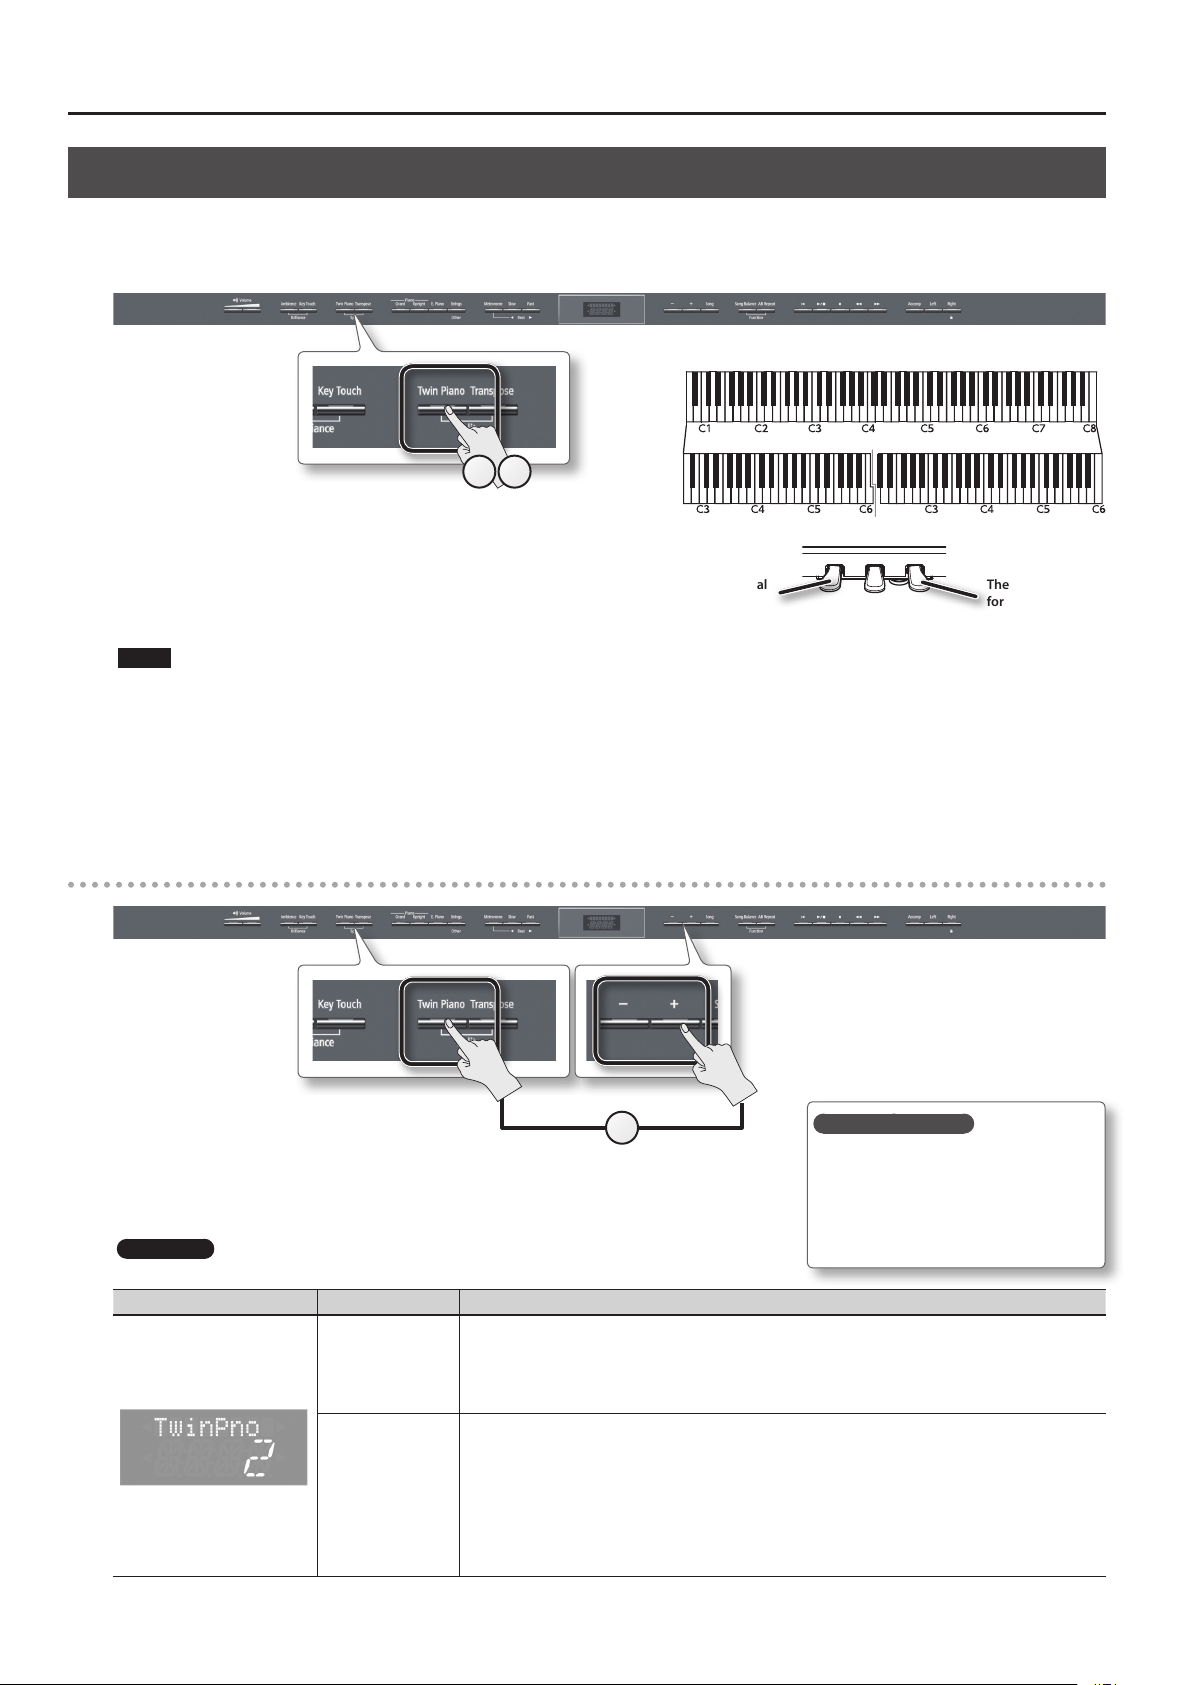
Dividing the Keyboard for Two-Person Performance (Twin Piano)
You can divide the keyboard into left and right zones so that two people can play the same range of pitches, just as though there were two pianos.
This function is called “Twin Piano.”
For example, you could use Twin Piano to allow a student to play along with their teacher.
Conventional
keyboard
31
Twin Piano
1. Press the [Twin Piano] button.
The [Twin Piano] button will light, and the “Concert” (Concert Piano)
tone will be selected.
When you turn Twin Piano on, the keyboard and pedal settings will be as
shown in the illustration.
NOTE
If Twin Piano is on, damper resonance will not be applied; this may cause the piano to sound dierent.
The damper pedal
for the left area
2. Select the tone to be played (p. 16).
The left and right sections will have the same tone.
3. To cancel Twin Piano, press the [Twin Piano] button once again.
The [Twin Piano] button will go out.
Changing the way in which the sound is heard (Twin Piano mode)
divide point
The damper pedal
for the right area
1. While holding down the [Twin Piano] button, press the [–] [+] buttons.
The display will indicate Twin Piano mode.
HP506 only
Screen Value Explanation
The sound of the right-hand keyboard zone will be heard more loudly from the right speaker than from the
1
2
(default)
22
left speaker.
The sound of the left-hand keyboard zone will be heard more loudly from the left speaker than from the right
speaker.
When using headphones, you’ll be able to hear the other person’s playing.
The sound of the right-hand keyboard zone will be heard only from the right speaker.
The sound of the left-hand keyboard zone will be heard only from the left speaker.
When using headphones, you won’t be able to hear the other person’s playing.
* Ambience will turn o.
* For some tones, the sound might not be divided to left and right.
* If using headphones, connect them to the left Phones jack if playing the left keyboard zone; connect them
to the right Phones jack if playing the right keyboard zone.
* If you record while this is set to “2,” the playback might not be the same as what you heard during recording.
1
Saving your settings
The unit’s settings will revert to the
default values when you turn o the
power, but you can save them as
described in “Retaining the Settings
Even After Power-o (Memory Backup)”
(p. 41).
 Loading...