

Page 1
Before using this unit, carefully read “USING THE UNIT SAFELY.”
GO:LIVECAST
Owner’s Manual
After reading, keep the document(s) where it will be available for
immediate reference.
© 2020 Roland Corporation
01
Page 2
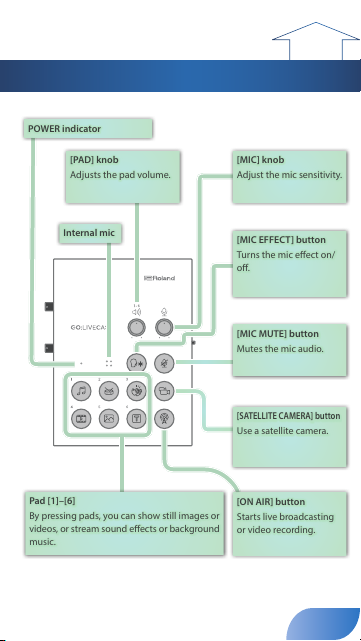
Panel Descriptions
[MIC MUTE] button
Mutes the mic audio.
POWER indicator
[PAD] knob
Adjusts the pad volume.
[MIC] knob
Adjust the mic sensitivity.
[MIC EFFECT] button
Turns the mic eect on/
o.
Internal mic
[SATELLITE CAMERA] button
Use a satellite camera.
[ON AIR] button
Starts live broadcasting
or video recording.
Pad [1]–[6]
By pressing pads, you can show still images or
videos, or stream sound eects or background
music.
to
beginning
2
Page 3
to
5
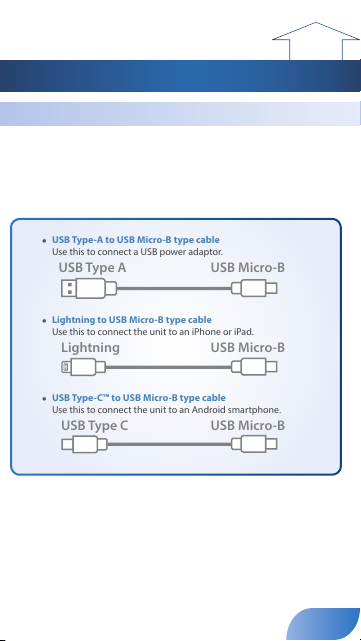
USB Type-A to USB Micro-B type cable
Use this to connect a USB power adaptor.
USB Type A USB Micro-B
5
Lightning to USB Micro-B type cable
Use this to connect the unit to an iPhone or iPad.
USB Type A USB Micro-B
USB Micro-B
Lightning
5
USB Type-C™ to USB Micro-B type cable
Use this to connect the unit to an Android smartphone.
USB Type C
USB Type A USB Micro-B
USB Micro-B
USB Micro-B
Lightning
beginning
Connecting the Equipment
About the Included USB Cables
The following USB cables are included with this unit.
Use only the included USB cables to connect a USB power adaptor
or a smartphone. Do not use the included USB cables to connect
anything other than this unit.
3
Page 4

Connecting a USB Power Adaptor (Turning the Power On)
USB power
adaptor
Use the included USB Type-A to USB Micro-B type cable to connect
a USB power adaptor (sold separately) to the USB POWER port.
Connect the USB power adaptor to an electrical outlet.
* Use a commercially available USB power adaptor.
* Before turning the unit on/o, always be sure to turn the volume down. Even with the
volume turned down, you might hear some sound when switching the unit on/o.
However, this is normal and does not indicate a malfunction.
Outdoor Use
When using the unit outdoor, you can supply power from a mobile
battery (sold separately) instead of an AC outlet.
Mobile battery
* Use a commercially available mobile battery.
4
Page 5
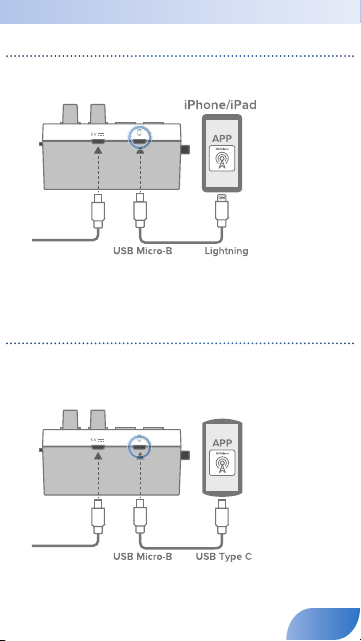
Connecting a Smartphone
Connecting an iPhone or iPad
1.
Using the included Lightning to USB Micro-B type cable,
connect your iPhone or iPad to the USB SMARTPHONE port.
If this unit is powered-on when you connect a smartphone to it, this unit’s
POWER indicator will light.
2.
Start the GO:LIVECAST app.
* You must make connections before you start the app.
Connecting an Android Smartphone
1.
Using the included USB Type-C™ to USB Micro-B type cable,
connect your Android smartphone to the USB SMARTPHONE
port.
If this unit is powered-on when you connect a smartphone to it, this unit’s
POWER indicator will light.
2.
Start the GO:LIVECAST app.
* You must make connections before you start the app.
Android smartphone
* If you’re using
an Android
smartphone, rst use
the smartphone’s
volume buttons to
adjust the volume,
and then adjust the
[HEADPHONE] knob.
5
Page 6

Connecting a Headphones
1.
Connect your headphones, headset, or monitor speakers to the
HEADPHONE/HEADSET jack.
MIN
MAX
Headsets Headphones Monitor
2.
Use the [HEADPHONE] knob to adjust the overall volume.
* This unit supports headphones that are equipped with a 3.5 mm mini-plug.
*
This unit supports headsets that are equipped with a CTIA-type 3.5 mm mini-plug (4-pole).
* The mono-mixed audio is output from the HEADPHONE/HEADSET jack.
* If you connect speakers, take care that the mic does not cause feedback. If a dynamic mic
or condenser mic are connected, turning o the reverb might decrease feedback.
* If speakers are connected, the internal mic cannot be used.
speakers
6
Page 7
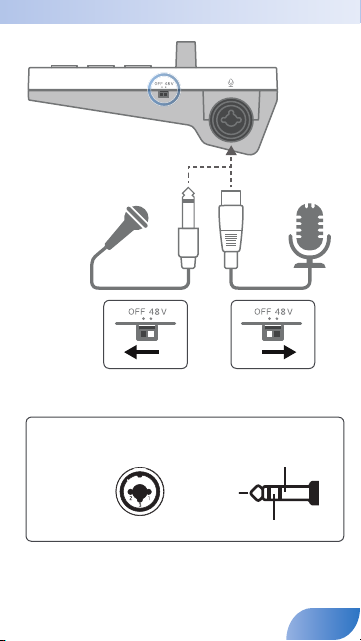
Connecting a Mic
Dynamic
microphone
Pin assignment of MIC connector (XLR, TRS).
1: GND
2: HOT
3: COLD
Tip: HOT
Sleeve: GND
Ring: COLD
Condenser
microphone
7
Page 8
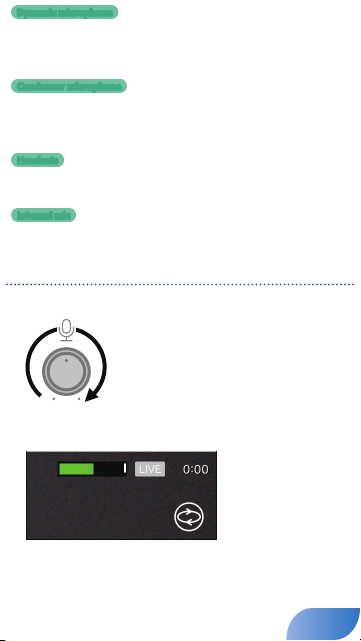
Dynamic microphone
You can connect a dynamic mic here. Set the [PHANTOM] switch
“OFF.” Connect it to the MIC jack via an XLR type, TRS type, or TS type
plug.
Condenser microphone
You can connect a phantom-powered condenser mic here. Set the
[PHANTOM] switch to “48V.” (Phantom power: DC48 V, 6 mA Max)
Connect it to the MIC jack via an XLR type plug.
Headsets
If a headset is connected, the headset’s mic is used (p. 6).
* Headsets equipped with a CTIA-type 3.5 mm mini-plug (4-pole) are supported.
Internal mic
If a mic (including a headset mic) is not connected, the internal mic
is used (p. 2).
Adjusting the mic sensitivity
Use the [MIC] knob to adjust the mic’s sensitivity.
While watching the level meter in the app, adjust the level so that
it does reach the maximum.
8
Page 9
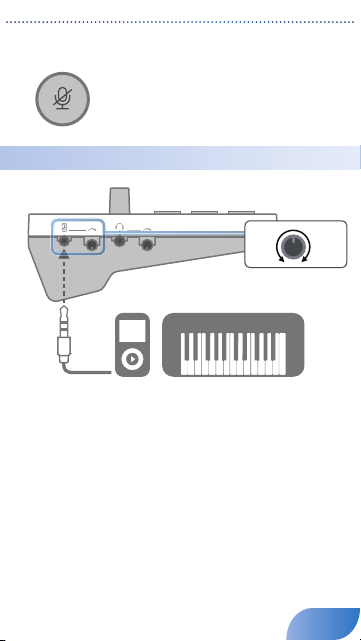
Muting the mic
When you’re not using the mic, you can mute the mic audio by
pressing the [MIC MUTE] button to make it light.
Connecting an Audio Player or Keyboard
MIN
MAX
Audio player Keyboard
1.
You can use a separately sold audio cable to connect an audio
player or keyboard to the LINE IN jack.
Make the connection via a 3.5 mm stereo mini-plug.
2.
Use the [LINE IN] knob to adjust the volume of the connected
device.
* To prevent malfunctions or damage, be sure to minimize the volume of all devices and
turn o their power before making connections.
* The sound that’s input at LINE IN is mixed to mono.
9
Page 10

Supplying Power to Your Smartphone During Use
By using a separately sold cable and accessory, you can use this unit
while it supplies power to your smartphone.
Supplying power to your iPhone or iPad during use
Separately required items
Apple Lightning to USB 3 Camera Adapter
5
USB Type-A to USB Micro-B type cable
5
Lightning to USB Type-A cable
5
USB power adaptor
5
* Do not use a USB cable that is designed only for charging a device. Charge-only cables
cannot transmit data.
Connect the items to your iPhone or iPad as shown in the illustration.
Lightning
Lightning to USB 3 Camera Adapter
Lightning to USB 3 Camera Adapter
USB power
adaptor
USB power
adaptor
10
Page 11
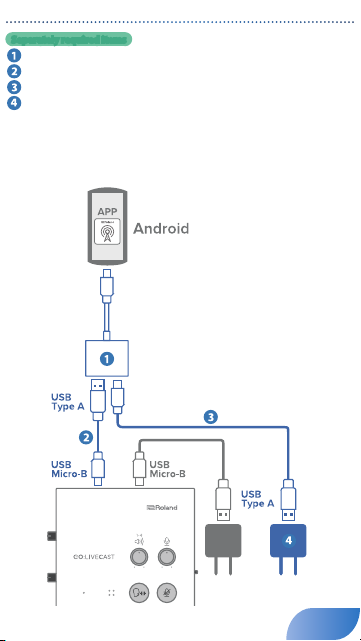
Supplying power to your Android smartphone during use
Separately required items
Apple USB-C Digital AV Multiport Adapter
5
USB Type-A to USB Micro-B type cable
5
USB Type-C™ to USB Type-A cable
5
USB power adaptor
5
* Do not use a USB cable that is designed only for charging a device. Charge-only cables
cannot transmit data.
* Some Android smartphones cannot be used while being charged.
Refer to http://roland.cm/golivecastcp for information on supported models.
Connect the items to your Android smartphone as shown in the illustration.
USB Type C
USB-C Digital AV Multiport Adapter
USB-C Digital AV Multiport Adapter
USB Type C
USB power
adaptor
USB power
adaptor
11
Page 12
to
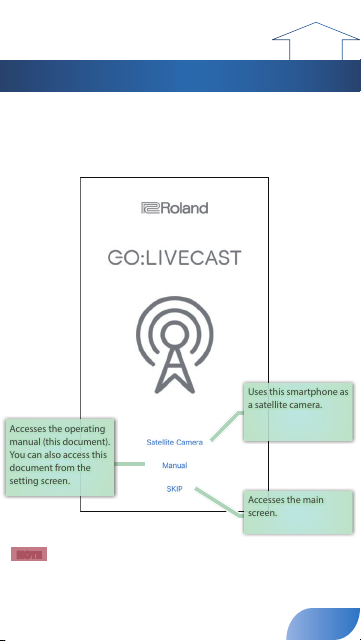
Accesses the operating
manual (this document).
You can also access this
document from the
setting screen.
Uses this smartphone as
a satellite camera.
Accesses the main
screen.
beginning
Opening Screen
When you start the GO:LIVECAST app without connecting the
GO:LIVECAST, the opening screen appears.
If the GO:LIVECAST is connected, the opening screen is automatically skipped, and the main screen appears (p. 13).
NOTE
Even if your equipment is connected, you can’t play or hear sound from the
5
GO:LIVECAST unless the GO:LIVECAST app is running.
You can’t live-broadcast or record video using just the GO:LIVECAST app by
5
itself.
12
Page 13

to
LIVE/REC indication
Elapsed time
Camera switch
Switch the camera that’s used. By
default, this is the front camera.
*
On Android, you can’t switch the camera
while streaming or recording video.
Level meter
Beauty lter
Uses the beauty lter.
Live set
Save and recall
frequently-used settings.
Setting
Make various settings for
the GO:LIVECAST app.
Comment
Show comments during
live broadcasting.
BROADCAST
Select the broadcast
destination.
Mic eect
Specify the eect applied
to the mic.
Satellite camera
Use as a satellite camera.
Pad assign
Assign clips to pads [1]–
[6].
beginning
Main Screen
This is the main screen of the GO:LIVECAST app. Use the buttons in
the screen to switch the functions.
* On Android, use the [Back] button provided by Android OS to return
from each setting screen to the main screen.
13
Page 14

to
beginning
Using the Pads
You can use the pads of the GO:LIVECAST to play background music
or sound eects, or to show video or text in the screen.
Playing Background Music or Sound Eects
With the default settings of the app, sound clips (such as background music and sound eects) are assigned to pads [1]–[3].
Press pads [1]–[3] one at a time to hear the sounds.
1.
Press the pad that you want to hear.
BGM Drum roll Applause
The pad is lit and you hear the sound.
2.
Use the [PAD] knob to adjust the volume.
3.
To stop the sound, press the pad once again to make it go dark.
MEMO
You can freely change the pad assignments (p. 24).
14
Page 15

Showing Video or Photos in the Screen
With the default settings of the app, a video clip is assigned to pad [4]
and a still image is assigned to pad [5].
Press pads [4] and [5] one at a time to see what they do.
1.
Press pad [4] or [5].
Movie Photo
The pad is lit, and a video or still image is shown layered onto the camera
image.
2.
Use the [PAD] knob to adjust the volume.
If the video includes audio, you hear the sound during playback.
3.
To stop showing this, press the pad once again to make it go
dark.
MEMO
You can freely change the pad assignments and the position at
which the clip is shown (p. 20).
15
Page 16

Showing Text in the Screen
With the default settings of the app, text is assigned to pad [6].
Press pad [6] to see what it does.
1.
Press pad [6].
Tex t
The pad is lit, and a caption is shown layered onto the camera image.
To stop showing this, press the pad once again to make it go
2.
dark.
MEMO
You can freely change the text that is shown, as well as its font, size,
position, and color (p. 22).
16
Page 17

to
beginning
Changing the Clip Assigned to a Pad
For example, if a sound eect is assigned to a pad, you can assign a
dierent sound eect to that pad.
1.
Tap [Pad Assign].
The assign screen appears.
Music (BGM) Sound eect
Photo, Movie
Thumbnails are shown to indicate the type of clip that is currently assigned
to each pad. When you tap a thumbnail 1–6 in this screen, the assigned clip is
reected in the screen or the sound.
2.
Tap the […] icon shown at the upper right of the thumbnail for
the pad that you want to reassign.
A setting screen for each clip appears.
3.
Select the desired clip, and tap [Done].
4.
Tap [Pad Assign] to return to the main screen.
Tex t
17
Page 18

to
beginning
Changing the Type of Clip Assigned to a Pad
You can freely assign clips to the pads of the GO:LIVECAST. For
example, you could assign photos to all of the pads.
Selecting the Type of Clip
For each pad, you can select the type of clip that’s assigned.
1.
Tap [Pad Assign].
The assign screen appears.
Music (BGM) Sound eect
Photo, Movie
Thumbnails are shown to indicate the type of clip that is currently assigned
to each pad. When you tap a thumbnail 1–6 in this screen, the assigned clip is
reected in the screen or the sound.
Tex t
18
Page 19

2.
Tap the pin icon shown in the upper right of the assignment
screen.
The color of the pin icon changes to red.
In this example, you’ll temporarily clear the assignment of pad [3] and then
assign a dierent type of clip.
3.
Tap the [-] icon located at the upper right of the pad [3]
thumbnail.
You can do the same thing by long-pressing the thumbnail.
4.
When the conrmation screen appears, tap [Clear].
The pad [3] thumbnail changes to the “No clip assigned” state.
5.
Tap the pin icon located in the upper right of the assignment
screen, returning it to its previous state.
6.
Tap the pad [3] thumbnail.
iOS only
19
Page 20

The clip select screen appears.
Clips
Shows clips to assign.
Edit
You can delete a loaded le. On Android, directly
swipe the clip to the right.
Library
Import a clip from the camera roll of your
smartphone.
7.
Tap the type of clip that you want to assign.
The screen for the selected type of clip appears.
Assigning Photos or Videos
1.
In the clip select screen, tap “PHOTO/MOVIE.”
The “Photo/Movie” select screen appears.
iOS only
20
Page 21

2.
Layout switching button
Tap this to switch the position of the
clip.
(Top, bottom, full-screen)
Tap the thumbnail of the photo or video that you want to
assign.
The LAYOUT screen appears.
3.
When you’ve specied the layout, tap [Done].
The selected clip is assigned to pad [2].
4.
Tap [Pad Assign] to return to the main screen.
21
Page 22

Assigning Text
Text list
A list of previously-entered texts.
Edit
You can delete previously-entered text. On
Android, directly swipe the text list to the right.
NEW+
Enter the new text.
1.
In the clip select screen, tap “TEXT.”
The “Text” setting screen appears.
2.
Tap to select the text that you want to assign. To enter next
text, tap [NEW+].
iOS only
22
Page 23

The edit screen appears.
Adjust the horizontal
position
Adjust the vertical
position
Turn the background on/
o
Adjust the font size
Tap to enter characters
Select the color.
If the background is o: The selected color is the text color.
If the background is on: The selected color is the background color.
3.
Adjust the character size, position, and color as necessary.
4.
When you’ve specied the layout, tap [Done].
The selected text is assigned to pad [2].
5.
Tap [Pad Assign] to return to the main screen.
23
Page 24

Assigning a Sound Eect
Sound eect list
Lists the sound eects
that you can assign.
Volume
Species the volume of
the sound eect.
1.
In the clip select screen, tap “SOUND EFFECT.”
The “Sound Eect” select screen appears.
2.
Tap the sound eect that you want to assign.
When you tap, the selected sound eect is heard.
3.
When you’ve adjusted the volume, tap [Done].
The selected sound eect is assigned to pad [2].
4.
Tap [Pad Assign] to return to the main screen.
24
Page 25

Assigning Background Music
Music list
Lists the songs that you
want to assign.
Library
Import a song from the
smartphone’s library.
Volume
Set the volume of the
song.
Edit
You can delete a loaded song. On Android, directly
swipe the song list to the right.
1.
In the clip select screen, tap “MUSIC.”
The “Music” select screen appears.
iOS only
2.
Tap the song that you want to assign.
You can tap to audition the selected song.
3.
When you’ve adjusted the volume, tap [Done].
The selected song is assigned to pad [2].
4.
Tap [Pad Assign] to return to the main screen.
25
Page 26

to
beginning
Using the Mic Eect
You can apply reverb (reverberation) to the sound of the mic.
1.
Tap [Mic Eect].
The eect slider appears.
2.
Drag the slider to adjust the amount of reverb.
3.
Tap [Mic Eect] to return to the main screen.
Using the Beauty Filter
When you use the beauty lter, the image shown by the camera is
given skin tones similar to the results of cosmetic treatment.
1.
Tap [Beauty Filter].
The beauty lter turns on.
The eect is applied only to the image shown by the camera.
2.
To turn it o, tap [Beauty Filter] once again.
26
Page 27

to
beginning
Live Broadcasting
Now let’s try actually live broadcasting.
MEMO
You can also record the video content on your smartphone (p. 36).
Specifying the Screen Orientation
In this document, we explain the various screens of the GO:LIVECAST
app in vertical orientation (portrait mode), but you can also use and
broadcast the GO:LIVECAST app in horizontal orientation (landscape
mode). The live broadcast video is also broadcast as a vertical screen
when using portrait mode or as a horizontal screen when using
landscape mode.
Portrait mode Landscape mode
iOS only
27
Page 28

Selecting the Broadcast Destination
Platform list
A list of the broadcast
destination platforms.
STREAMING START
Start live broadcasting.
You’ll need to make some settings before you broadcast.
In order to broadcast, your smartphone must be able to connect to
the internet.
1.
Tap [Broadcast].
The broadcast setting screen appears.
2.
Tap the platform on which you want to broadcast.
Each platform has a dierent screen for broadcast settings. Make the settings
that are required for each platform.
28
Page 29

Broadcasting on Facebook Live
Login
Log in.
Title
Enter the broadcast title.
Scope
Select the scope.
In advance, create a Facebook account.
1.
In the platform list, select Facebook Live.
The setting screen appears.
2.
Tap [Log in] and log in to your Facebook account.
3.
Tap [Title] and enter a title for your broadcast.
4.
Select Scope.
Scope refers to the range of viewers to whom the broadcast is available. For
example, you could specify that only your friends can watch it, or that only you
yourself can watch it.
Value Explanation
EVERYONE
ALL FRIEND
SELF
* If you are streaming only to your friends, comments from your friends are not shown.
* The rst time you log in, you will be asked to specify the extent that you want to make
your stream available; in this case, select Public. Each time you stream, you can specify the
extent of availability.
Anyone can nd and watch
Only people who know the link can watch
Only you can watch
29
Page 30

5.
When you nish making settings, tap [<] to return to the
previous screen (iOS only).
* On Android, use the [Back] button provided by Android OS.
6.
Tap [STREAMING START] or the [ON AIR] button to start
broadcasting.
30
Page 31

Broadcasting on YouTube
Login
Log in.
Title
Enter the broadcast title.
Scope
Select the scope.
In advance, create a Google account.
* An account must have at least 1,000 channel subscribers in order to broadcast (as of
September 2019). For details, refer to YouTube’s support information.
1.
In the platform list, select YouTube.
The setting screen appears.
2.
Tap [Log in] and log in to your Google account.
3.
Tap [Title] and enter a title for your broadcast.
4.
Select Scope.
Scope refers to the range of viewers to whom the broadcast is available. For
example, you could specify that only your friends can watch it, or that only you
yourself can watch it.
Value Explanation
Public
Unlisted
Private
5.
When you nish making settings, tap [<] to return to the
previous screen (iOS only).
* On Android, use the [Back] button provided by Android OS.
6.
Tap [STREAMING START] or the [ON AIR] button to start
broadcasting.
Anyone can nd and watch
Only people who know the link can watch
Only you can watch
31
Page 32

Broadcasting on Twitch
Streaming-destination server
Login
Log in.
In advance, create a Twitch account.
* In order to stream, two-step authentication must be enabled in the Twitch settings (as of
September 2019). For details, refer to Twitch support information.
1.
In the platform list, select Twitch.
The setting screen appears.
2.
Select the streaming-destination server.
3.
In the log-in screen, enter your user name and password to log
in.
4.
When you nish making settings, tap [<] to return to the
previous screen (iOS only).
* Tap [<] to return to the previous screen . On Android, use the [Back] button provided by
Android OS.
5.
Tap [STREAMING START] or the [ON AIR] button to start
broadcasting.
32
Page 33

Broadcasting on TwitCasting
Log in using an SNS account.
Log in using a TwitCasting
account.
In advance, create a TwitCasting account (a unique account for
TwitCasting).
1.
In the platform list, select TwitCasting.
The setting screen appears.
2.
Tap [TwitCasting Login] to log in.
If you have a social networking service (SNS) account such as on Twitter,
Facebook, or Instagram, you can also use that account to log in.
3.
When you nish making settings, tap [<] to return to the
previous screen (iOS only).
* Tap [<] to return to the previous screen . On Android, use the [Back] button provided by
Android OS.
4.
Tap [STREAMING START] or the [ON AIR] button to start
broadcasting.
33
Page 34

Manually Specifying the Broadcast Destination
You can manually specify the broadcast destination without using
an existing platform.
* Checking that streaming to Periscope or SHOWROOM is being done in landscape mode.
1.
In the platform list, select Custom RTMP.
The setting screen appears.
2.
Enter the necessary information.
3.
When you nish making settings, tap [<] to return to the
previous screen (iOS only).
* Tap [<] to return to the previous screen . On Android, use the [Back] button provided by
Android OS.
4.
Tap [STREAMING START] or the [ON AIR] button to start
broadcasting.
34
Page 35

Viewing Comments
While broadcasting, you can view SNS comments.
1.
Tap [Comments].
The comment screen appears.
When a comment is input, it appears in the screen.
You cannot enter a comment yourself.
2.
Tap [Comment] to return to the main screen.
Stopping a Broadcast
1.
In the broadcast settings screen, tap [Stop Broadcasting] or
press the [ON AIR] button to stop broadcasting.
35
Page 36

to
beginning
Recording Video
The video content that you capture using the GO:LIVECAST can be
video-recorded on your smartphone instead of being broadcast.
1.
Tap [Settings].
The SETTINGS screen appears.
2.
Turn [Record Mode] on.
3.
Tap [<] to return to the main screen (iOS only).
* Tap [<] to return to the previous screen . On Android, use the [Back] button provided by
Android OS.
4.
In the broadcast settings screen, tap [RECORD START] or press
the [ON AIR] button to start video-recording.
5.
In the broadcast settings screen, tap [RECORD STOP] or press
the [ON AIR] button to stop video-recording.
MEMO
The recorded video is saved in the camera roll of your smartphone.
NOTE
You can’t broadcast while recording video.
36
Page 37

Making Settings for the App
Here’s how to make settings for the entire GO:LIVECAST app.
1.
Tap [Settings].
The SETTINGS screen appears.
2.
Specify the desired item.
Setting item Value Explanation
Manual
Record Mode
Streaming
Volume
In Camera
Mirroring
Monitor Buer
Size
Information
3.
Tap [<] to return to the main screen (iOS only).
* Tap [<] to return to the previous screen . On Android, use the [Back]
button provided by Android OS.
– Shows this document.
O, On Video-records instead of broadcasting.
1–10 Species the volume of the broadcast.
O, On Flips the front camera image left-to-right.
Adjusts the sound that is heard from the
HEADPHONE/HEADSET jack. If you’re using a
low-spec smartphone, increasing this value
–
might decrease audio dropouts. This will not
aect the sound of the broadcast or the video
recording.
– Shows the version of the GO:LIVECAST app.
to
beginning
37
Page 38

to
Operation on the main smartphone.
Operation on the satellite smartphone.
beginning
Using as a Satellite Camera
By using the satellite camera function, the image from the camera
of another smartphone can be shown in the GO:LIVECAST app. You
can alternately switch between the images from the two cameras, or
show the video from both in a split screen, and live-broadcast that
video.
NOTE
The GO:LIVECAST app must be installed both on the main smartphone (the
5
one that’s connected to the GO:LIVECAST unit) and on the satellite smartphone.
Both the main and the satellite smartphone must be connected to the same
5
Wi-Fi.
MEMO
When using this outdoors, you can use your smartphone’s Personal Hot Spot
5
function to connect the main and satellite phones so that the satellite camera
can be used even when there’s no Wi-Fi router (iOS only).
1.
Connect the main smartphone to the GO:LIVECAST, and
start the GO:LIVECAST app.
2.
Tap [Satellite Camera].
38
Page 39

The satellite camera setting screen appears.
Satellite screen position
Select the display position of
the satellite camera.
Pairing
Shows the name of the
paired smartphone.
3.
4.
On the satellite smartphone, start the GO:LIVECAST
app.
The opening screen appears.
Tap [Satellite Camera].
The screen waits to connect.
Pairing begins automatically.
When pairing is successful, the name of the satellite smartphone appears in
the pairing eld of the main smartphone’s satellite camera setting screen.
Now you can use the satellite camera.
39
Page 40

5.
Pinch to adjust zoom
Switch between rear/
front cameras
Switch camera ash on/
o
Tap the satellite screen position icon to specify the
display position of the satellite camera.
Satellite
Satellite
lower right
display
Satellite
full display
upper left
O
display
You can also switch the satellite camera’s display position during the broadcast.
6.
7.
On the satellite smartphone, adjust the satellite
camera’s video.
Satellite camera’s screen
Tap [Satellite Camera] to return to the main screen.
40
Page 41

to
Live set list
Lists the live sets that you
created.
Edit
Deletes a live set that
you created. On Android,
directly swipe the text list to
the right.
Create new
Creates a new live set.
beginning
Using Live Sets
Live set is a function that collectively saves the assignments of each
pad as a set, letting you use dierent sets as appropriate for the
content that you’re streaming. Live sets that you created can be
freely recalled.
Recalling a Live Set
1.
Tap [Live Set].
The live set screen appears.
iOS only
2.
Tap the name of the live set that you want to recall.
3.
When the conrmation screen appears, tap [Load].
The live set is loaded, and you return to the main screen.
41
Page 42

Creating a Live Set
1.
Tap [Live Set].
The live set screen appears.
2.
Tap [Create New].
3.
Enter a name for the live set.
4.
Tap [Done] (iOS only).
The current settings are saved as a new live set, and added to the list.
5.
Tap [<] to return to the main screen (iOS only).
* Tap [<] to return to the previous screen . On Android, use the [Back] button provided by
Android OS.
42
Page 43

Main Specications
Roland GO:LIVECAST: Live Streaming Studio for Smartphones
to
beginning
MIC jack
Connectors
Controller
Indicator
Current Draw
Dimensions
Weight (excluding
cables)
Accessories
* This document explains the specications of the product at the time that the document
was issued. For the latest information, refer to the Roland website.
https://www.roland.com/
* For information about smartphone compatibility, access the following link.
http://roland.cm/golivecastcp
LINE IN jack Stereo miniature phone type
HEADPHONE/HEADSET
jack
USB POWER port USB Micro-B type
USB SMARTPHONE port USB Micro-B type
MIC knob
PAD knob
LINE IN knob
HEADPHONE knob
POWER indicator
330 mA
107 (W) x 138 (D) x 53 (H) mm
4-1/5 (W) x 5-2/5 (D) x 2 (H) inches
180 g
6 oz
Leaet “Quick Start”
Leaet “USING THE UNIT SAFELY”
Lightning to USB micro-B type cable
USB Type-C™ to USB micro-B type cable
USB Type-A to USB micro-B type cable
Registration Card (Only US)
Combo type (XLR, 1/4-inch TRS
phone, phantom power DC 48
V, 6 mA max.)
Stereo miniature phone type
(Stereo, CTIA)
43
Page 44

Roland Corporation
 Loading...