

Page 1
Owner’s Manual
Look What You Can Do with the FP-90X/FP-60X
Play the Piano
˙
Play various sounds
This unit contains a wide variety of tones (sounds).
You can freely select and perform using these tones.
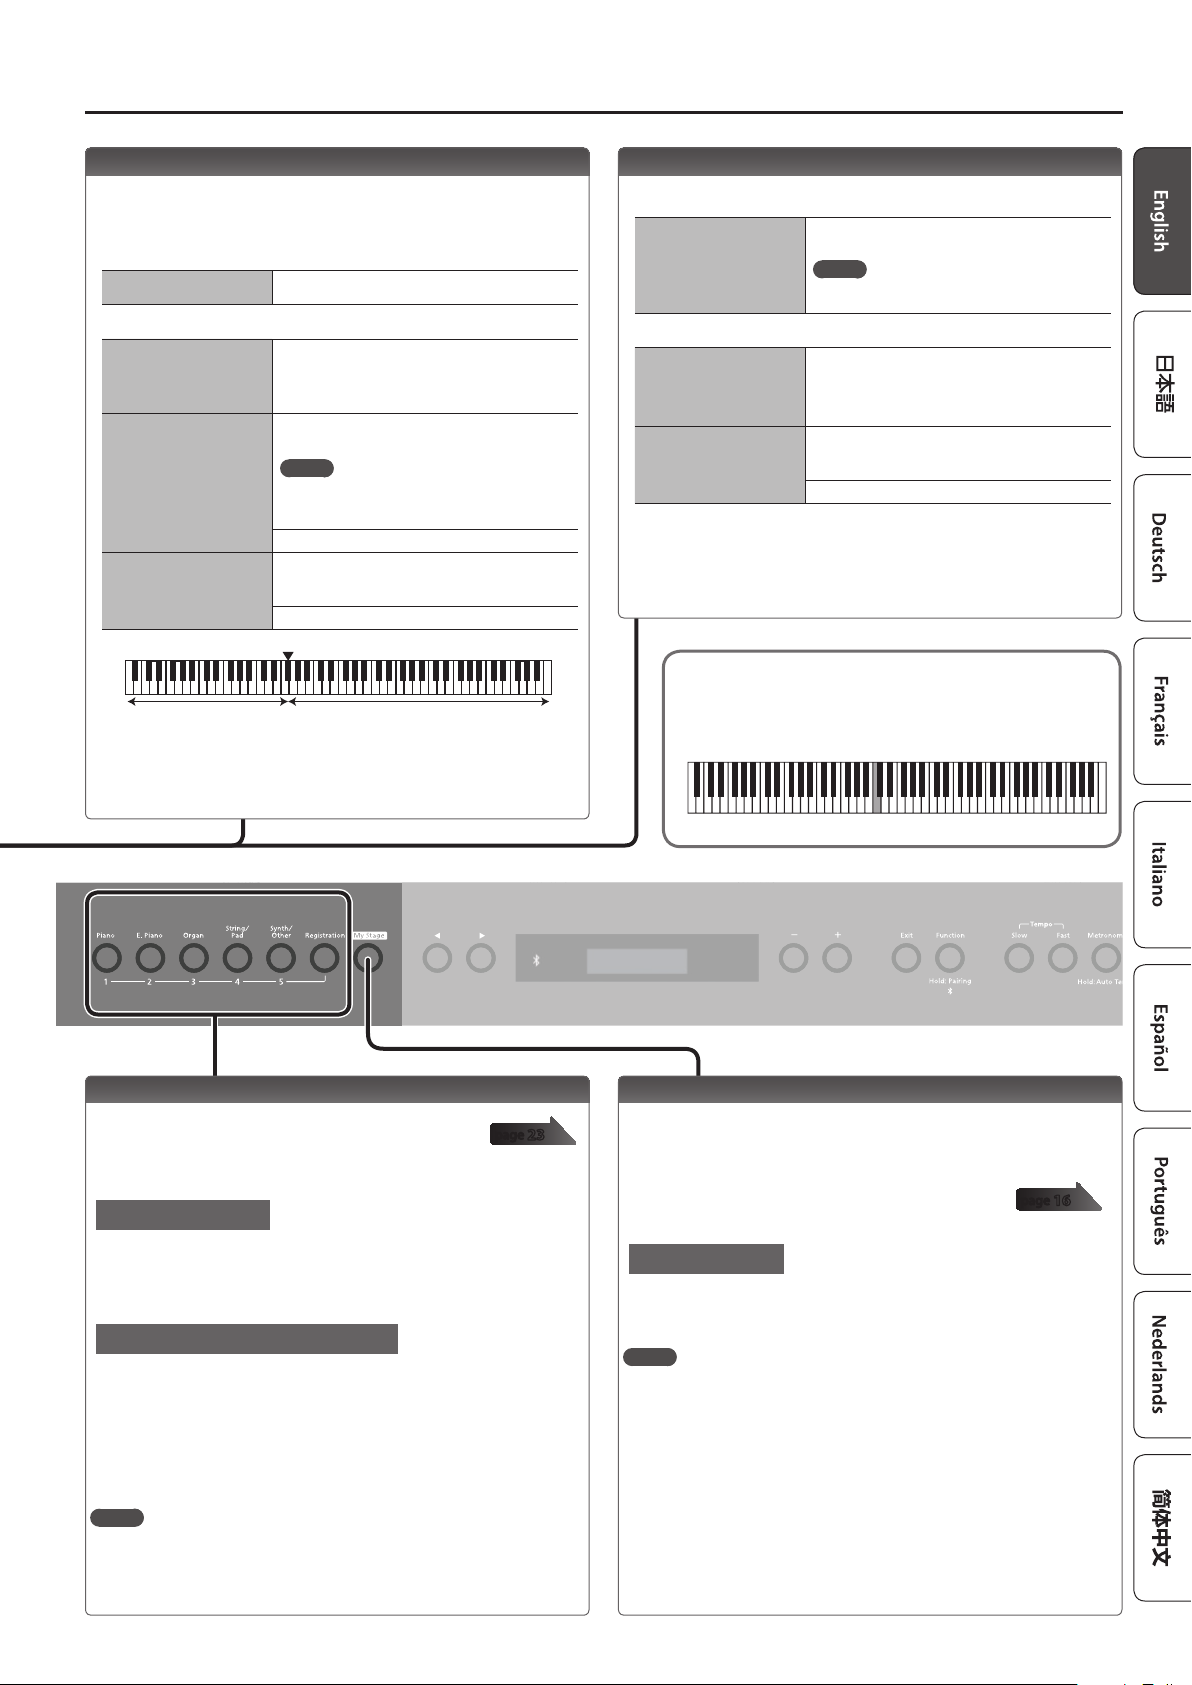
˙
Play two layered tones (Dual Play)
You can layer two tones on a single key.
˙
Play dierent tones with your left and right hands (Split Play)
You can divide the keyboard into left and right zones, and select a dierent tone for each zone.
Live Performance Features
˙
Adjust the tone color (Equalizer)
You can adjust the character of the sound as appropriate for the location where you’re playing the instrument.
˙
Recall performance settings (Registration)
You can save the settings related to your performance and recall them up anytime, easily.
˙
Add vocals to your performance
You can connect a microphone (sold separately) to the this unit and add your voice to your performance.
You can even add eects to your vocals.
Convenient Functions
˙
Record your performances
You can record your own keyboard performance, and then play back to check it.
˙
Bluetooth function
You can use the Bluetooth-compatible app “Piano Every Day” or play back audio from your smartphone.
˙
Personalize your piano (Piano Designer)
You can customize the individual sound characteristics of the piano sound to create the perfect tone for your performances.
page
page
page
page
page
page
page
page
page
8
9
9
8
23
22
18
12
21
Download the apps
Download these smartphone/tablet apps and use them with your piano.
Piano Every Day Piano Designer
This app lets you download musical scores and practice songs. This app lets you customize the piano sound to your taste.
Before using this unit, carefully read “USING THE UNIT SAFELY” and “IMPORTANT NOTES” (leaet “USING THE UNIT SAFELY” and Owner’s Manual (p. 32)). After
reading, keep the document(s) including those sections where it will be available for immediate reference.
© 2020 Roland Corporation
Page 2
Placing This Unit on a Stand
°
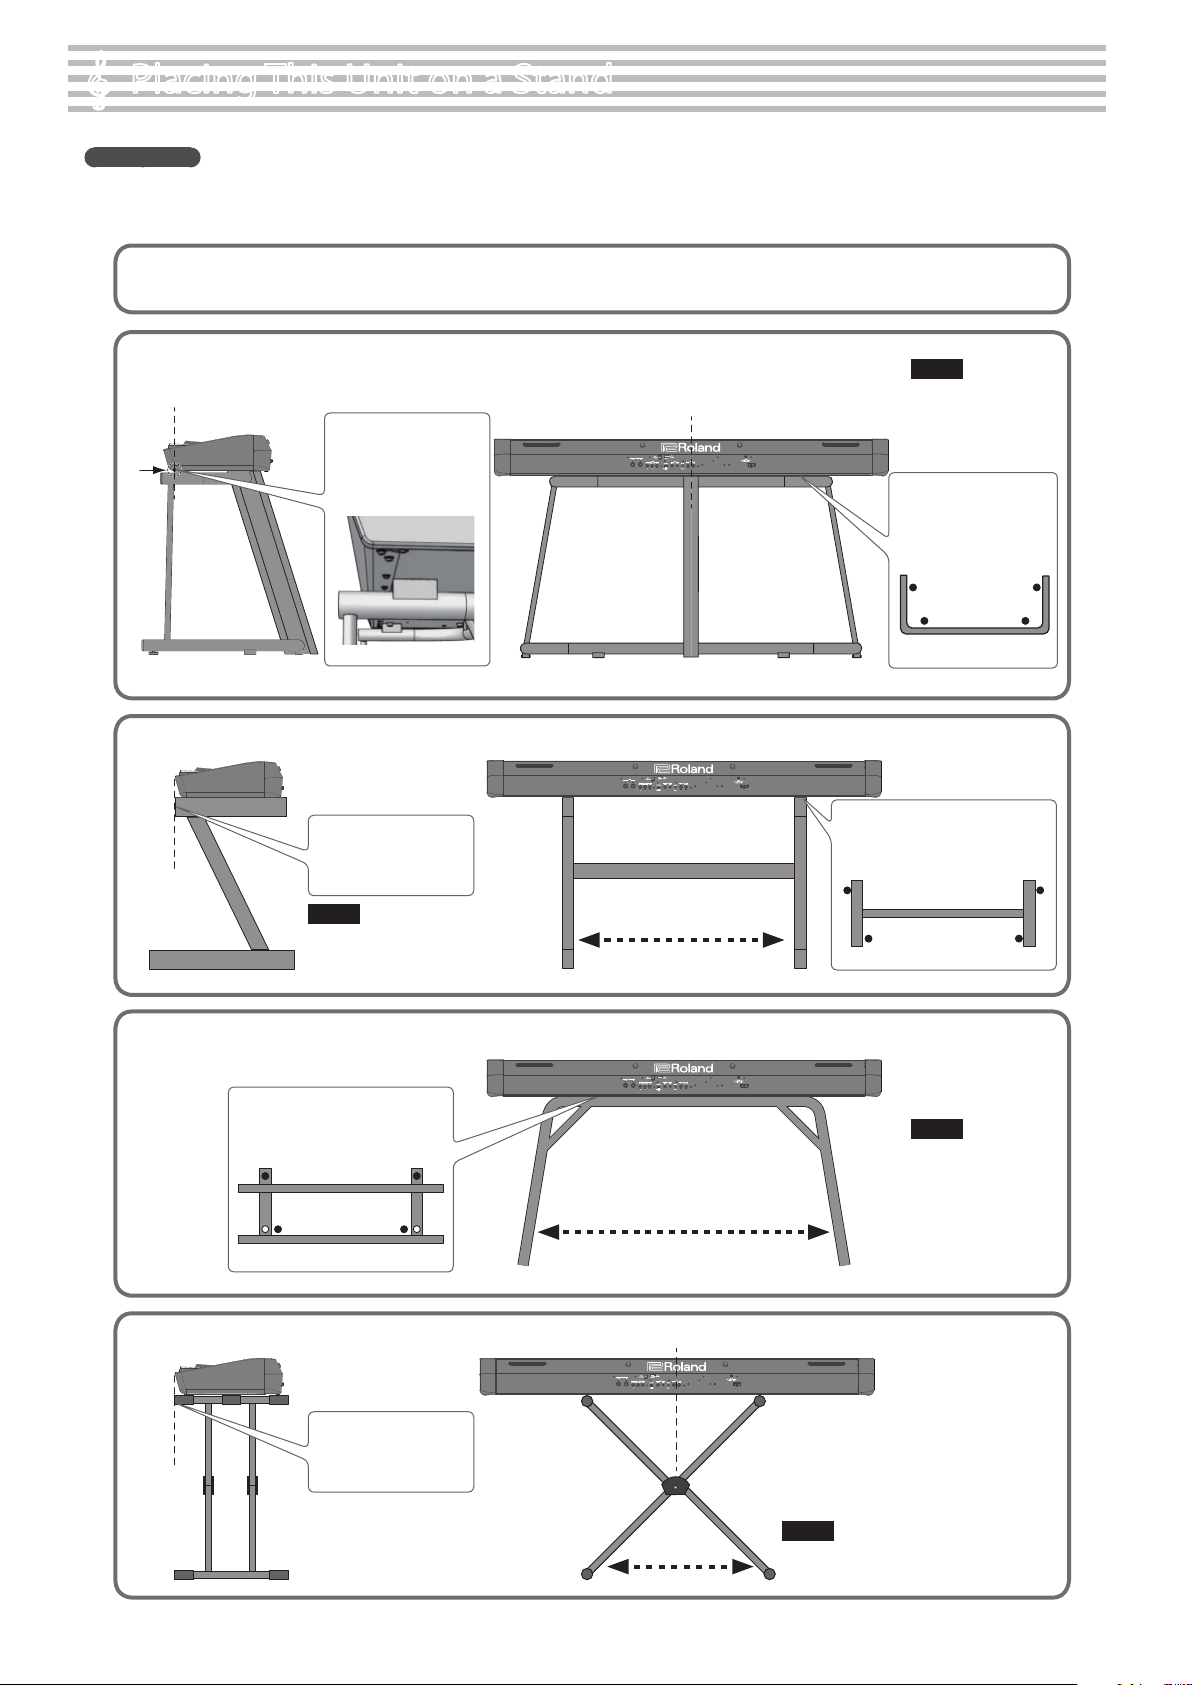
For the FP-90X
Be careful not to pinch your ngers when setting up the stand.
Please use one of the following Roland stands to support your FP-90X: KSC-90, KS-G8B, KS-10Z, KS-12 or KS-20X.
Refer to the following when using a stand.
KSC-90
Refer to the KSC-90 Owner’s Manual.
KS-G8B
KS-10Z
Align the seam in the
Piano’s panel (on the
bottom, near the front)
with the corners of the
stand’s rubber feet
Align the front of the
Piano with the front of
the stand
NOTE
For safety, do not use the
stand in its very highest
adjustment position.
Align the center of the Piano with the center of the stand.
Adjust the horizontal width
NOTE
For safety, do not use the
stand in its very highest
adjustment position.
Place the Piano so that
its rubber feet are on the
inner side of the stand
Top view
Adjust the width of the stand so
that the rubber feet of the Piano
straddle the stand
Top view
KS-12
KS-20X
Adjust the width of the stand so
that the rubber feet on the front of
the piano t into the corresponding
openings of the stand
Top view
Align the front of the
Piano with the front of
the stand
NOTE
For safety, do not use the
stand in its very highest
adjustment position.
Adjust the horizontal width
Align the center of the Piano with the center of the stand.
NOTE
Adjust the stand so that its width
is not less than 700 mm.
2
Page 3
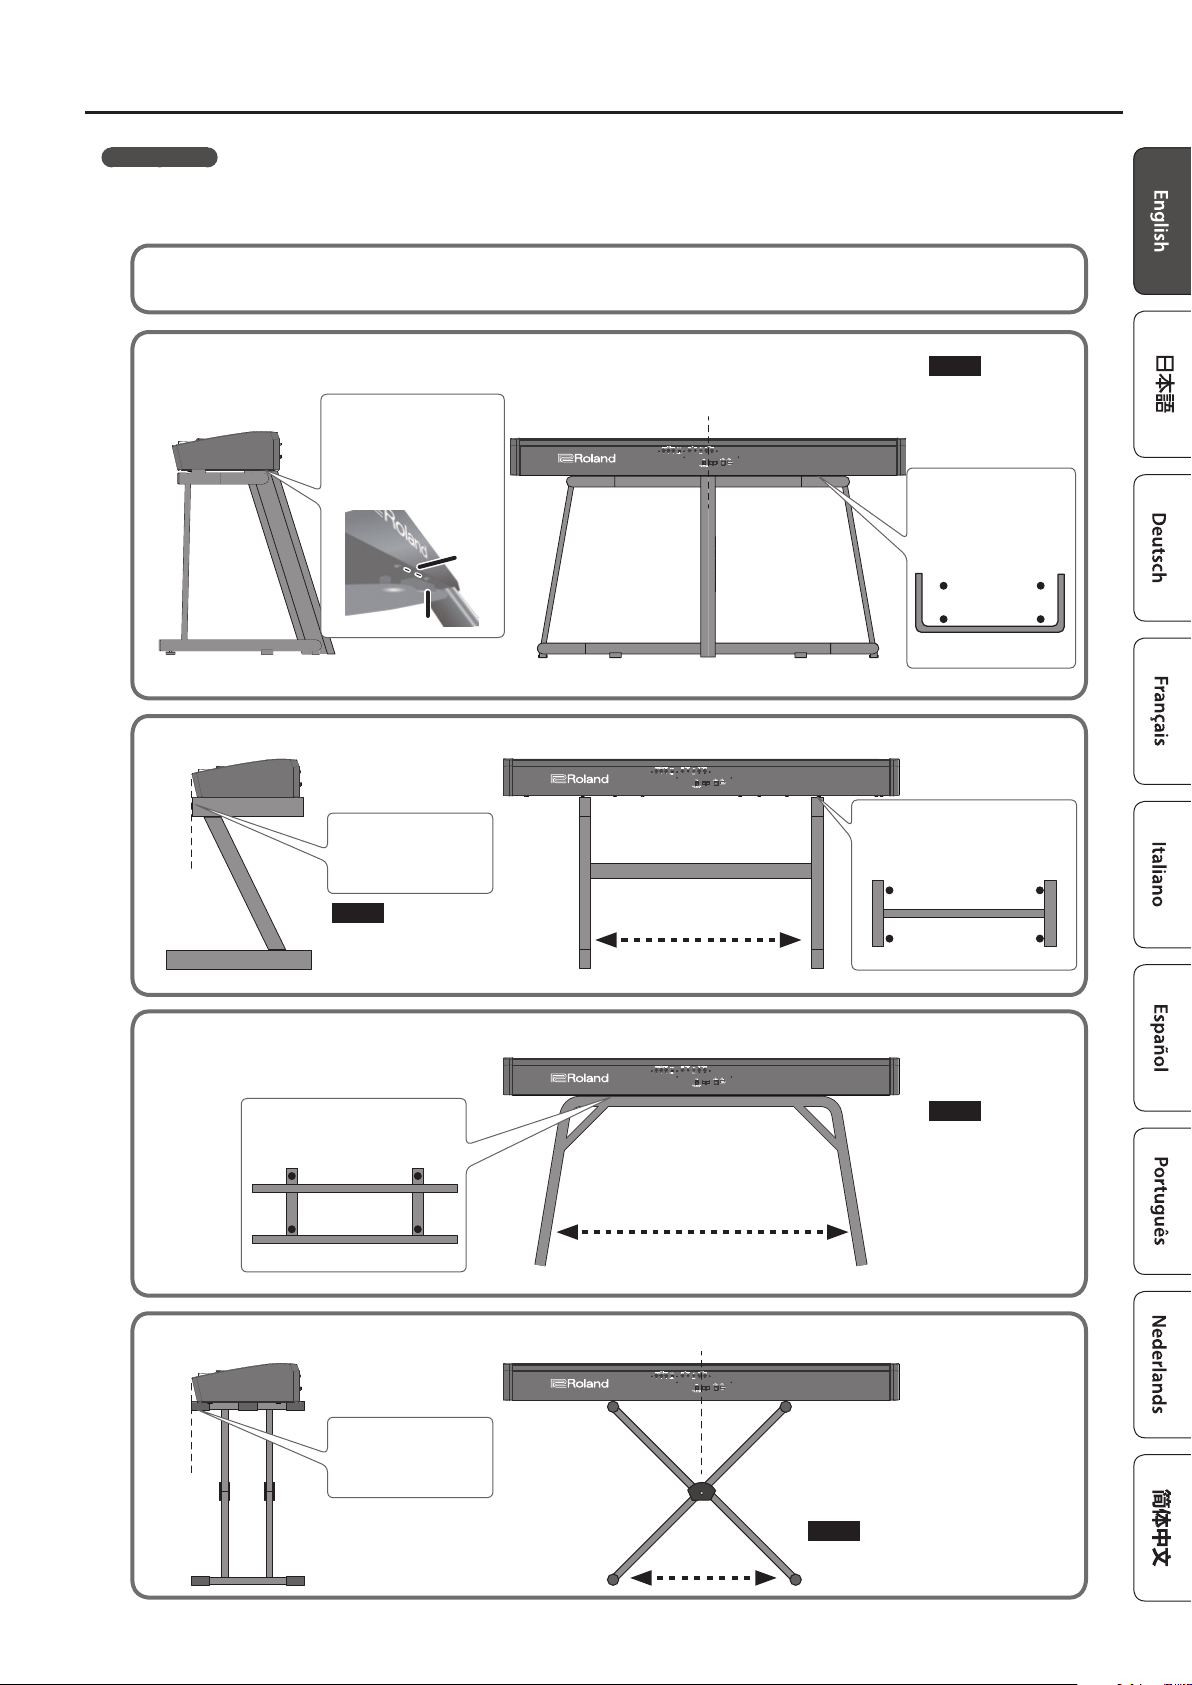
For the FP-60X
Be careful not to pinch your ngers when setting up the stand.
Please use one of the following Roland stands to support your FP-60X: KSC-72, KS-G8B, KS-10Z, KS-12 or KS-20X.
Refer to the following when using a stand.
KSC-72
Refer to the KSC-72 Owner’s Manual.
Placing This Unit on a Stand
KS-G8B
KS-10Z
Position the piano so that
the pad at the rear of the
stand is immediately in
front of the row of screws
on the bottom of the
piano
row of
screws
Pad
Align the front of the
Piano with the front of
the stand
NOTE
For safety, do not use the
stand in its very highest
adjustment position.
Align the center of the Piano with the center of the stand.
Adjust the horizontal width
NOTE
For safety, do not use the
stand in its very highest
adjustment position.
Place the Piano so that
its rubber feet are on the
inner side of the stand
Top view
Place the Piano so that its rubber
feet are on the inner side of the
stand
Top view
KS-12
KS-20X
Adjust the horizontal width so that
the rubber feet on the bottom of
the piano t into the depressions
(four locations) of the stand.
Top view
Align the front of the
Piano with the front of
the stand
NOTE
For safety, do not use the
stand in its very highest
adjustment position.
Adjust the horizontal width
Align the center of the Piano with the center of the stand.
NOTE
Adjust the stand so that its width
is not less than 700 mm.
3
Page 4
Contents
°
Placing This Unit on a Stand . . . . . . . . . . . . . . . . . . . . . . . . . . . . . . 2
Main Specications . . . . . . . . . . . . . . . . . . . . . . . . . . . . . . . . . . . . . . . 4
Panel Descriptions . . . . . . . . . . . . . . . . . . . . . . . . . . . . . . . . . . . . . . . . 5
Rear Panel . . . . . . . . . . . . . . . . . . . . . . . . . . . . . . . . . . . . . . . . . . . . . . 6
Basic Operations . . . . . . . . . . . . . . . . . . . . . . . . . . . . . . . . . . . . . . . . 7
Operation Guide . . . . . . . . . . . . . . . . . . . . . . . . . . . . . . . . . . . . . . . . . . 8
Connecting the Piano and a Mobile Device via Bluetooth 12
Here’s What You Can Do . . . . . . . . . . . . . . . . . . . . . . . . . . . . . 12
Listening to Music Through the Piano’s Speakers . . . . . . . 13
Making Initial Settings (Pairing) . . . . . . . . . . . . . . . . . . . . . . 13
Connecting an Already-Paired Mobile Device . . . . . . . . . . 13
Playing Back Audio . . . . . . . . . . . . . . . . . . . . . . . . . . . . . . . . . 13
Using the Piano with an App . . . . . . . . . . . . . . . . . . . . . . . . 14
Apps You Can Use with This Piano . . . . . . . . . . . . . . . . . . . . 14
Making Settings (Pairing) . . . . . . . . . . . . . . . . . . . . . . . . . . . 14
If Pairing Does Not Succeed in “Using the Piano with an
App” . . . . . . . . . . . . . . . . . . . . . . . . . . . . . . . . . . . . . . . . . . . . . . 15
Advanced Operation . . . . . . . . . . . . . . . . . . . . . . . . . . . . . . . . . . . . . 16
Playing Various Tones . . . . . . . . . . . . . . . . . . . . . . . . . . . . . . . . . . . . 16
Selecting Your Preferred Performance Environment
(My Stage) . . . . . . . . . . . . . . . . . . . . . . . . . . . . . . . . . . . . . . . . 16
Selecting the Type and Depth of Ambience . . . . . . . . . . . 16
Practicing with the Metronome . . . . . . . . . . . . . . . . . . . . . . 16
Changing the Settings for Metronome . . . . . . . . . . . . . . . . 17
Sounding a Click Tone in Synchronization with the Song
Tempo (Auto Tempo) . . . . . . . . . . . . . . . . . . . . . . . . . . . . . . . 17
Detecting the Tempo of Your Own Performance
(Tempo Coach) . . . . . . . . . . . . . . . . . . . . . . . . . . . . . . . . . . . . 17
Dividing the Keyboard for Two People (Twin Piano) . . . . 17
Recording Your Per formance . . . . . . . . . . . . . . . . . . . . . . . . . . . . . . 18
SMF Recording . . . . . . . . . . . . . . . . . . . . . . . . . . . . . . . . . . . . 18
Recording a New Song . . . . . . . . . . . . . . . . . . . . . . . . . . . . . . 18
Recording Audio . . . . . . . . . . . . . . . . . . . . . . . . . . . . . . . . . . . 18
Convenient Functions for Song Playback . . . . . . . . . . . . . . 19
Renaming a Song (Rename Song) . . . . . . . . . . . . . . . . . . . . 19
Copying a Saved Song (Copy Song) . . . . . . . . . . . . . . . . . . 20
Deleting a Saved Song (Delete Song) . . . . . . . . . . . . . . . . . 20
Personalizing Your Piano Sound (Piano Designer) . . . . . . . . . . . . 21
Using the Microphone . . . . . . . . . . . . . . . . . . . . . . . . . . . . . . . . . . . 22
Connecting a Microphone . . . . . . . . . . . . . . . . . . . . . . . . . . 22
Applying an Eect to the Mic (Mic Eects) . . . . . . . . . . . . . 22
Adjusting the Mic Eect . . . . . . . . . . . . . . . . . . . . . . . . . . . . . 22
Saving Performance Settings (Registrations) . . . . . . . . . . . . . . . . 23
What Is a Registration? . . . . . . . . . . . . . . . . . . . . . . . . . . . . . . 23
Recalling a Registration . . . . . . . . . . . . . . . . . . . . . . . . . . . . . 23
Saving Current Settings into a Registration . . . . . . . . . . . . 23
Convenient Functions . . . . . . . . . . . . . . . . . . . . . . . . . . . . . . . . . . . . 25
Initializing the Memory (Format Media) . . . . . . . . . . . . . . . 25
Returning to the Factory Settings (Factory Reset). . . . . . . 25
Retaining Settings After Power-O (Memory Backup) . . . 25
Using USB . . . . . . . . . . . . . . . . . . . . . . . . . . . . . . . . . . . . . . . . . 25
Various Settings (Function Mode) . . . . . . . . . . . . . . . . . . . . . . . . . . 26
Adjusting the Keyboard Response (Key Touch) . . . . . . . . . 26
Matching the Pitch with Other Instruments
(Master Tuning) . . . . . . . . . . . . . . . . . . . . . . . . . . . . . . . . . . . . 26
Changing the Tuning Method (Temperament) . . . . . . . . . 26
Specifying a Song’s Tonic (Temperament Key) . . . . . . . . . 26
Editing the Equalizer Settings . . . . . . . . . . . . . . . . . . . . . . . . 26
Transposing the Pitch of the Song Playback
(Song Transpose) . . . . . . . . . . . . . . . . . . . . . . . . . . . . . . . . . . . 26
Adjusting the Song Volume (Song Volume) . . . . . . . . . . . . 27
Adjusting the Volume of an Audio Playback Device
(Input/Bluetooth Vol.) . . . . . . . . . . . . . . . . . . . . . . . . . . . . . . . 27
Adjusting the Volume from the Computer
(USB Audio Input Volume) . . . . . . . . . . . . . . . . . . . . . . . . . . . 27
Setting the Song (SMF) Playback Mode (SMF Play Mode) 27
Selecting the Format for Recording (Recording Mode) . . 27
Changing How the Pedal Eects Are Applied
(Damper Pedal Part) . . . . . . . . . . . . . . . . . . . . . . . . . . . . . . . . 27
Changing the Function of the Center Pedal
(Center Pedal) . . . . . . . . . . . . . . . . . . . . . . . . . . . . . . . . . . . . . 27
Changing How the Pedal Eects Are Applied
(Center Pedal Part) . . . . . . . . . . . . . . . . . . . . . . . . . . . . . . . . . 28
Sending Tone-Change Information
(Transmit MIDI Information) . . . . . . . . . . . . . . . . . . . . . . . . . 28
Preventing Doubled Notes When Connected to a
Sequencer (Local Control) . . . . . . . . . . . . . . . . . . . . . . . . . . . 28
MIDI Transmit Channel Settings (MIDI Transmit Ch.) . . . . 28
Adjusting the Brightness of the Display
(Display Contrast) . . . . . . . . . . . . . . . . . . . . . . . . . . . . . . . . . . 28
Adjusting the Brightness of the Buttons
(Panel Brightness) . . . . . . . . . . . . . . . . . . . . . . . . . . . . . . . . . . 28
Outputting Sound Both from Headphones and Internal
Speakers (Speaker Auto Mute) . . . . . . . . . . . . . . . . . . . . . . . 28
Making the Power Automatically Turn O After a Time
(Auto O) . . . . . . . . . . . . . . . . . . . . . . . . . . . . . . . . . . . . . . . . . 28
Troubleshooting . . . . . . . . . . . . . . . . . . . . . . . . . . . . . . . . . . . . . . . . . . 29
Error Messages . . . . . . . . . . . . . . . . . . . . . . . . . . . . . . . . . . . . . . . . . . . 30
Saved Settings . . . . . . . . . . . . . . . . . . . . . . . . . . . . . . . . . . . . . . . . . . . . 30
Tone List . . . . . . . . . . . . . . . . . . . . . . . . . . . . . . . . . . . . . . . . . . . . . . . . . . 31
Internal Song List . . . . . . . . . . . . . . . . . . . . . . . . . . . . . . . . . . . . . . . . . 31
USING THE UNIT SAFELY . . . . . . . . . . . . . . . . . . . . . . . . . . . . . . . . . . 32
IMPORTANT NOTES . . . . . . . . . . . . . . . . . . . . . . . . . . . . . . . . . . . . . . . 32
Main Specications
FP-90X FP-60X
Sound generator
Keyboard
Bluetooth function
Power Supply AC adaptor
Power consumption
Dimensions
4
Piano Sound: PureAcoustic Piano
Modeling
PHA-50 Keyboard: Wood and Plastic
Hybrid Structure, with Escapement
and Ebony/Ivory Feel (88 keys)
Audio: Bluetooth Ver. 3.0 (Supports SCMS-T content protection)
MIDI: Bluetooth Ver. 4.0
40 W (When using the included AC
adaptor)
* Approximate power consumption when playing the piano at medium
volume:
14 W (FP-90X), 5W (FP-60X)
* Power consumption when sound has not been played after power-on:
12 W (FP-90X), 4W (FP-60X)
Detached music rest:
1,340 (W) x 390 (D) x 136 (H) mm
52-13/16 (W) x 15-3/8 (D) x 5-3/8 (H) inches
FP-90X with KSC-90 and music rest:
1,340 (W) x 418 (D) x 932 (H) mm
52-13/16 (W) x 16-1/2 (D) x 36-3/4 (H) inches
Piano Sound: SuperNATURAL Piano
PHA-4 Standard Keyboard: with
Escapement and Ivory Feel (88 keys)
25 W (When using the included AC
adaptor)
Detached music rest:
1,291 (W) x 344 (D) x 126 (H) mm
50-7/8 (W) x 13-9/16 (D) x 5 (H) inches
FP-60X with KSC-72 and music rest:
1,291 (W) x 382 (D) x 939 (H) mm
50-7/8 (W) x 15-1/16 (D) x 37 (H) inches
Roland FP-90X, FP-60X: Digital Piano
FP-90X FP-60X
23.6 kg, 52 lbs 1 oz
Weight
Accessories
Options
This document explains the specications of the product at the time that the
document was issued. For the latest information, refer to the Roland website.
(FP-90X with music rest)
37.8 kg, 83 lbs 6 oz (FP-90X with KSC90, KPD-90, and music rest)
Owner’s Manual, Leaet “USING THE UNIT SAFELY,” AC adaptor, Power cord,
Music rest, Damper pedal (DP-10, capable of continuous detection)
Dedicated stand: KSC-90 Dedicated stand: KSC-72
Dedicated pedal board: KPD-90
Keyboard stand: KS-G8B, KS-10Z, KS-12, KS-20X
Pedal unit: RPU-3
Damper pedal: DP series
Pedal switch: DP-2 (Cannot use for Damper/R.)
Expression pedal: EV-5
Carrying Bag: CB-88RL
Headphones
19.3 kg, 42 lbs 9 oz
(FP-60X with music rest)
33.0 kg, 72 lbs 13 oz (FP-60X with KSC72, KPD-90, and music rest)
Page 5
Panel Descriptions
°
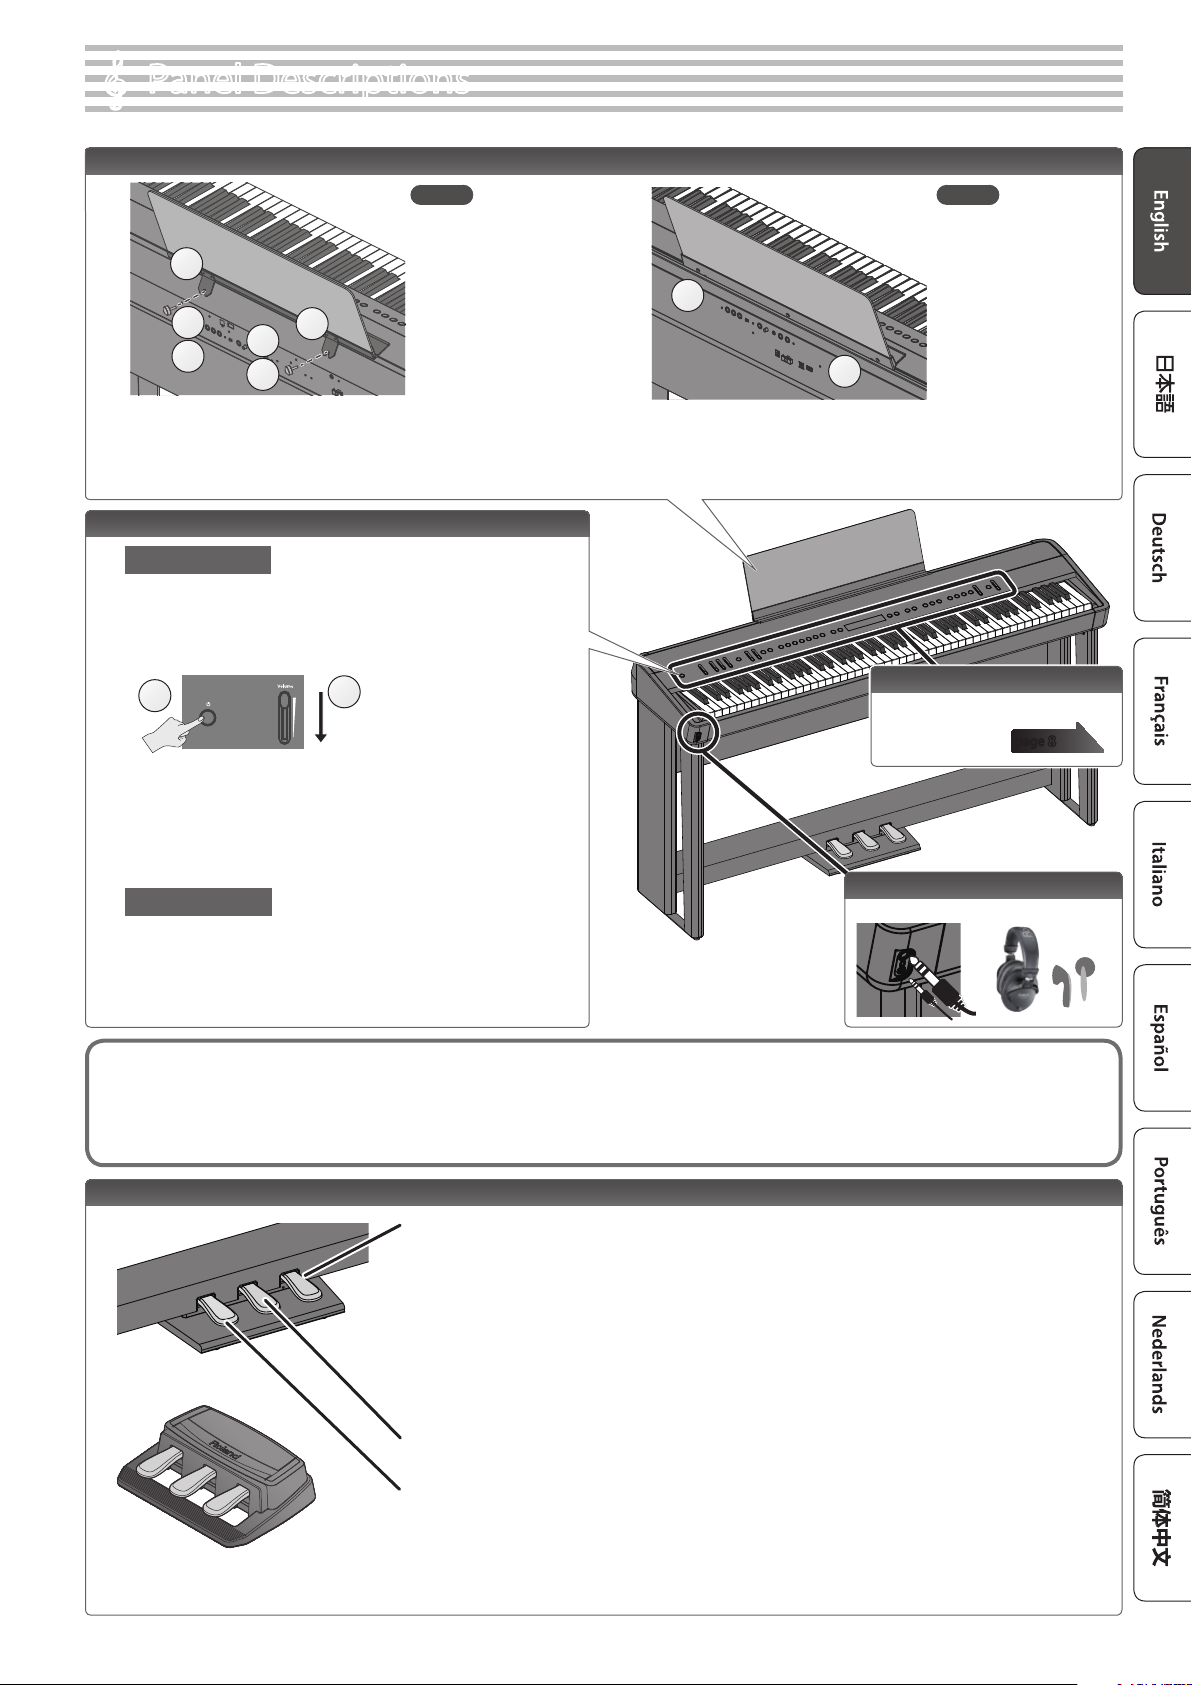
Attaching the Music Rest
2
1
3
2
1
3
FP-90X FP-60X
1
1
1. Loosen the attachment screws.
2. Fit the cut-outs of the music rest onto the attachment screws.
3. Firmly tighten the attachment screws.
[L] button
Turning On the Power
*
Before turning the unit on/o, always be sure to turn the volume down. Even
with the volume turned down, you might hear some sound when switching
the unit on/o. However, this is normal and does not indicate a malfunction.
1. Move the [Volume] slider all the way down to minimize the
volume.
2
2. Hold down the [L] button until the display shows “Roland Digital
Piano.”
The power turns on, and the tone buttons and other buttons
illuminate.
3. Move the [Volume] slider to adjust the volume.
Turning O the Power
1. Move the [Volume] slider all the way down to minimize the
volume.
2. Hold down the [L] button until the display shows “Don’t
disconnect the power.”
The unit is turned o.
1
Minimize the volume.
1. Insert the music rest into the slit on the top of the piano.
Front Panel
This is where you operate the unit.
page
Headphone Jacks
Connect headphones (sold separately) here.
* The illustration
shows the FP-90X.
8
Concerning the Auto O function
The power to this unit will be turned o automatically after a predetermined amount of time has passed since it was last used for playing music, or its buttons or controls
were operated (Auto O function). If you do not want the power to be turned o automatically, disengage the Auto O function (p. 28).
5 Any settings that you are in the process of editing will be lost when the power is turned o. If you have any settings that you want to keep, you should save them beforehand.
5 To restore power, turn the power on again.
Pedals (KPD-90/RPU-3: sold separately)
Damper Pedal
Use this pedal to sustain the sound. While this pedal is held down, notes will be sustained for an extended time even if you release your
ngers from the keyboard.
On an acoustic piano, when you step on the damper pedal, you’ll rst hear the sound of the dampers releasing the strings.
Then, you should also be able to hear the sound of strings adjacent to the ones for the notes actually played resonate sympathetically,
resulting in a rich, resounding tone.
Additionally, when using half-pedaling techniques, the core of the sound disappears rapidly while a rich, spacious resonance remains,
producing a unique form of reverberation. On the unit, the unique, lingering tones produced by the half-pedaling technique are
KPD-90 (sold separately)
RPU-3 (sold separately)
* When operating the pedal, take care not to pinch your ngers between the moving part and the body of the unit. Pay special attention to this when using the unit where
children are present.
reproduced in addition to released-string sounds (Damper Noise) and resonating sounds (Damper Resonance).
With the damper pedal on an acoustic piano, when you step on the pedal it will at rst oer only a slight amount of resistance, but as
you press down further it will start to feel much heavier. On KPD-90, this change in the feeling of resistance is simulated.
Sostenuto Pedal
The notes you are pressing when this pedal is depressed will be sustained.
Soft Pedal
This pedal is used to make the sound softer. Playing with the soft pedal depressed produces a sound that is not as strong
as when otherwise played with the equivalent strength. This is the same function as the left pedal of a grand piano. The
softness of the tone can be varied subtly by the depth to which you press the pedal.
5
Page 6
Panel Descriptions
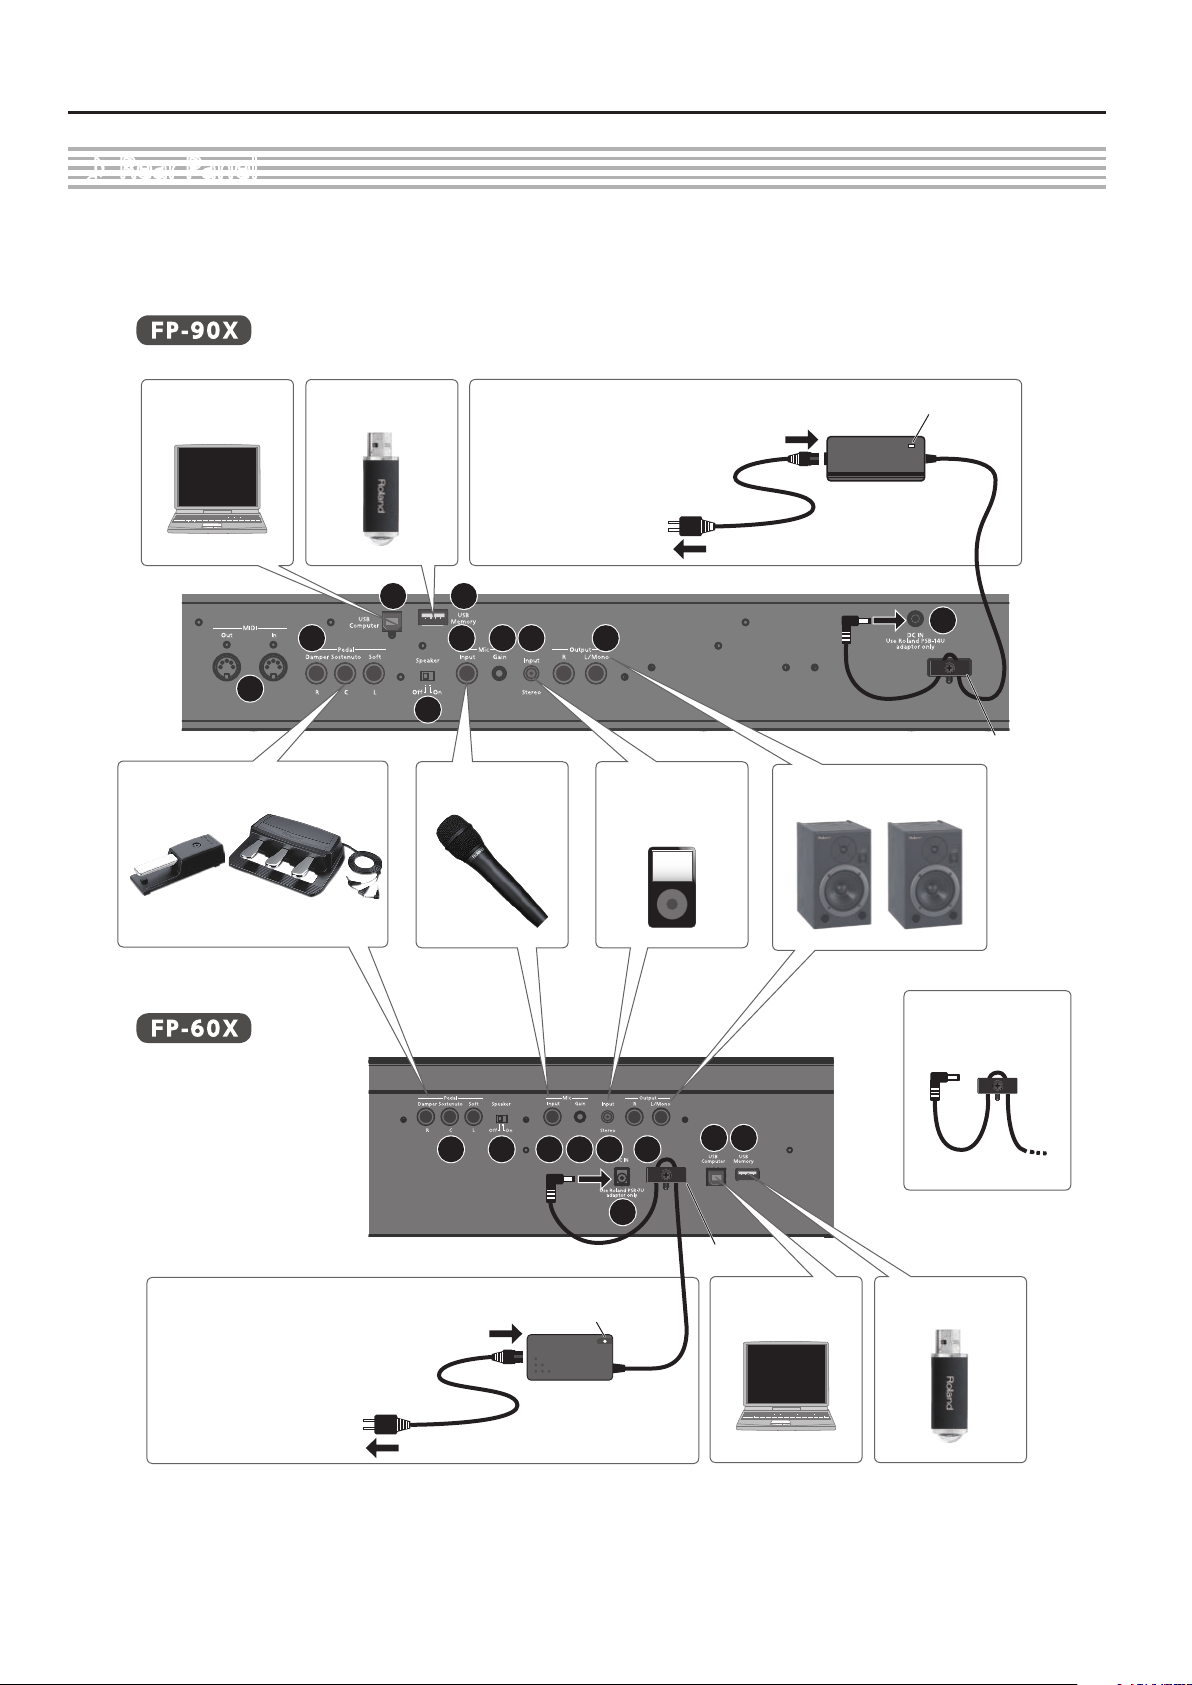
Rear Panel
˙
Connect pedals and USB ash drive.
* To prevent malfunction and equipment failure, always turn down the volume, and turn o all the units before making any connections.
Computer USB ash drive
4
10
Pedal
DP-10 (*1)
Sold separately: KPD-90, RPU-3, EV-5
1 2
6 7 8 9
5
Dynamic microphone
Place the AC adaptor so
the side with the indicator
(see illustration) faces
upwards.The indicator will
light when you plug the AC
adaptor into an AC outlet.
Audio player
AC outlet
Power cord
AC adaptor
Amplied speakers
Indicator
3
Cord hook
Place the AC adaptor so the side
with the indicator (see illustration)
faces upwards. The indicator will
light when you plug the AC adaptor
into an AC outlet.
AC outlet
4 5 6 7 8 9
Indicator
AC adaptor
Power cord
Use the cord hook to
secure the cord of the
AC adaptor as shown in
the illustration.
1 2
3
Cord hook
Computer USB ash drive
*1 When operating the pedal, take care not to pinch your ngers between the moving part and the body of the unit. Pay special attention to this when using the unit where
children are present.
6
Page 7
Panel Descriptions
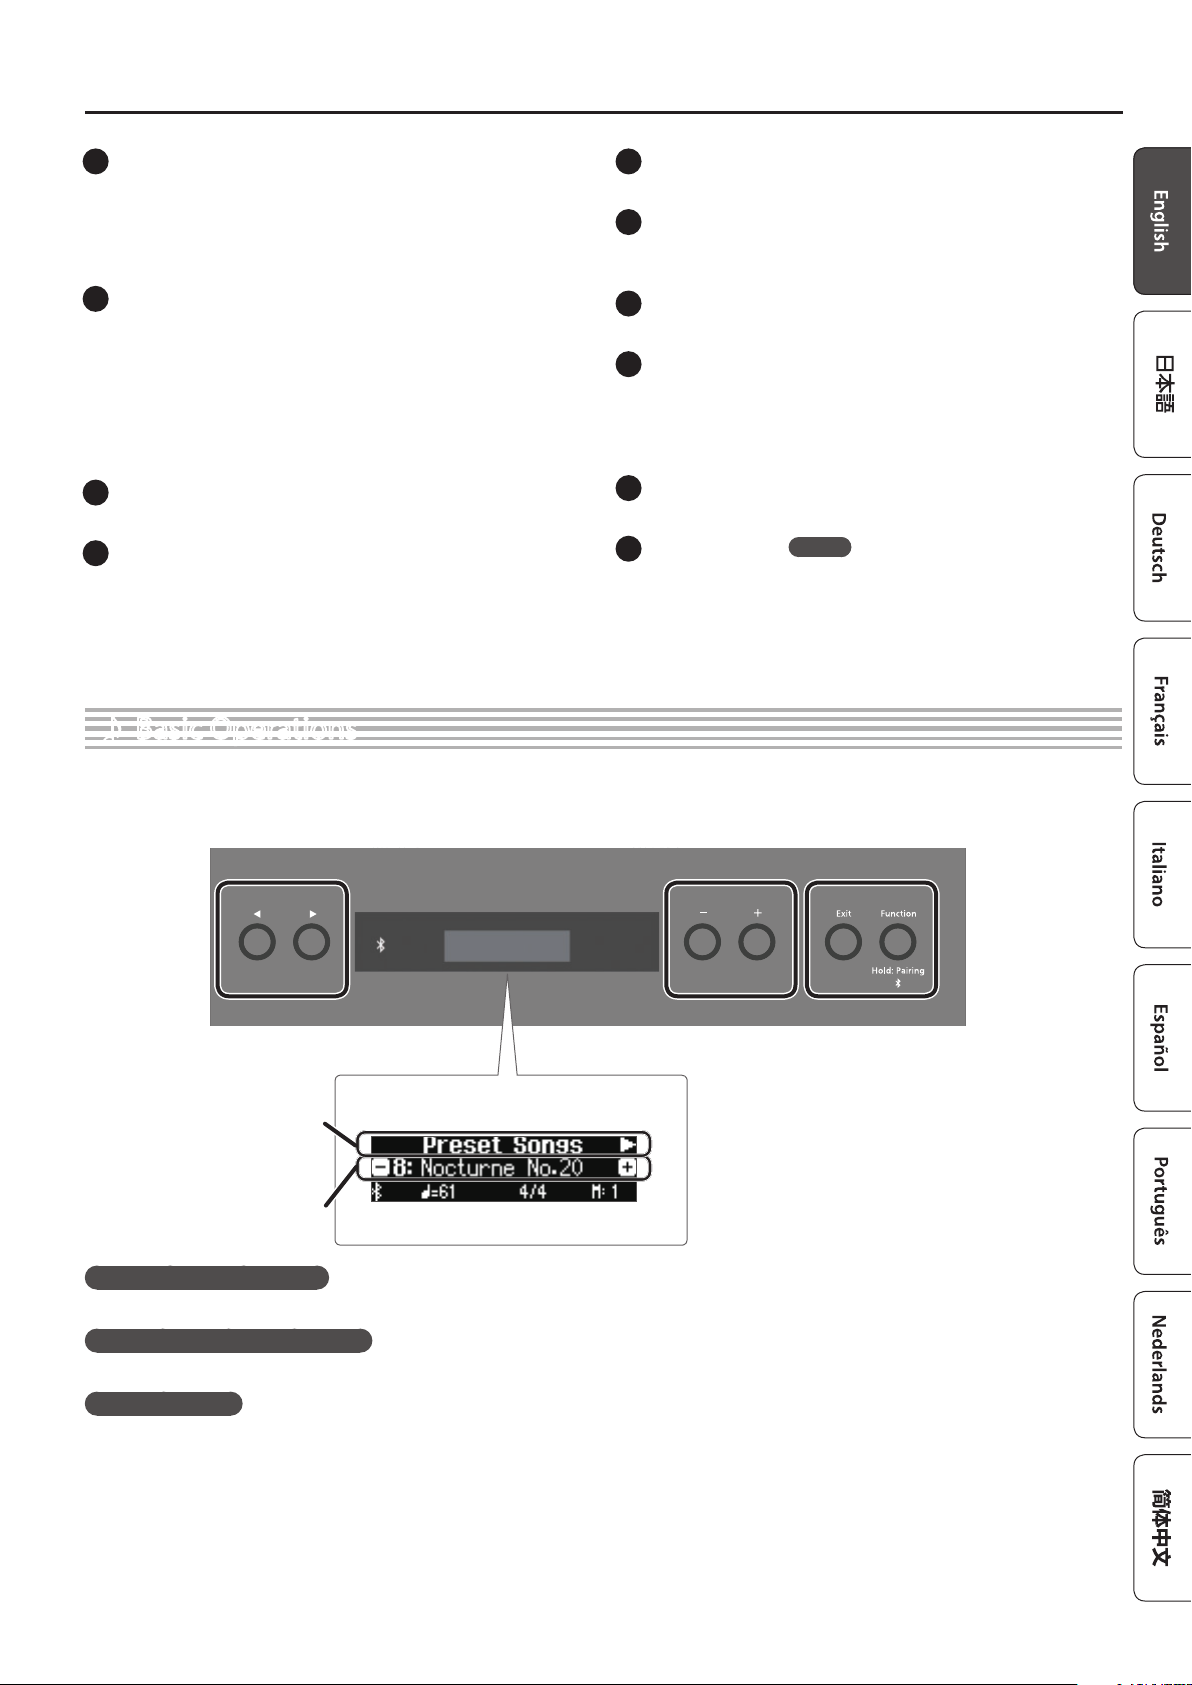
USB Computer port
1
Here you can connect your computer via a USB cable
(sold separately). If your computer is connected, performance
data and audio signals can be transferred between the piano and
sequencer software (sold separately) on your computer, allowing
you to produce or edit music.
USB Memory port
2
You can use USB ash drives (sold separately) to do the following.
5 Play WAV les, MP3 les, and standard MIDI les (SMF les) copied from
your computer.
5 Make audio recordings of your Piano
5 Export/Import a registration set.
* Never turn o the power or disconnect a USB ash drive or the power
cord while the screen indicates “Executing …”
DC In jack
3
Connect the included AC adaptor here.
Pedal Damper/Sostenuto/Soft jacks
4
Connect pedals to these jacks.
* Do not connect any pedal other than the specied pedal to the Pedal
Damper jack.
* The EV-5 is compatible only with the Pedal Sostenuto/Soft jack.
Basic Operations
˙
Speaker [O/On] switch
5
Turns the piano’s speakers on or o.
Mic Input jack
6
Connect the dynamic microphone (sold separately) here.
This is a 1/4” phone (unbalanced) jack.
Mic [Gain] knob
7
Adjust the microphone’s gain.
Input Stereo jack
8
Connect an audio player here.
* If you use a cable that contains a built-in resistor, the volume of the
device connected to the Input Stereo jack might be decreased. Use a
connection cable that does not contain a resistor.
Output R, L/Mono jacks
9
You can output the sound of piano to amplied speakers.
MIDI Out/In jacks
10
Connect MIDI devices here. You can record your piano performance
as MIDI data on a MIDI device, or use MIDI data from a MIDI device
to play the piano.
FP-90X
On this piano, you can use the buttons of the operating panel to make various function settings.
The “K” “J,” “-” “+,” “Enter (Func),” and “Exit” indications shown in the screen indicate the buttons used to operate the various functions.
Upper line: shows the category to
specify
(you can use the [K] [J] buttons to
change this)
Lower line: shows the value within
the category
(you can use the [-] [+] buttons to
change this)
Screen display
Selecting the category to set
Use the [K] [J] buttons to select the category that you want to set.
Selecting values within a category
Use the [-] [+] buttons to change a value within the category.
“Enter” and “Exit”
Use the [Function] (Enter) button to conrm the selected category or value.
Use the [Exit] button to go back to the previous operation.
7
Page 8
Operation Guide
°
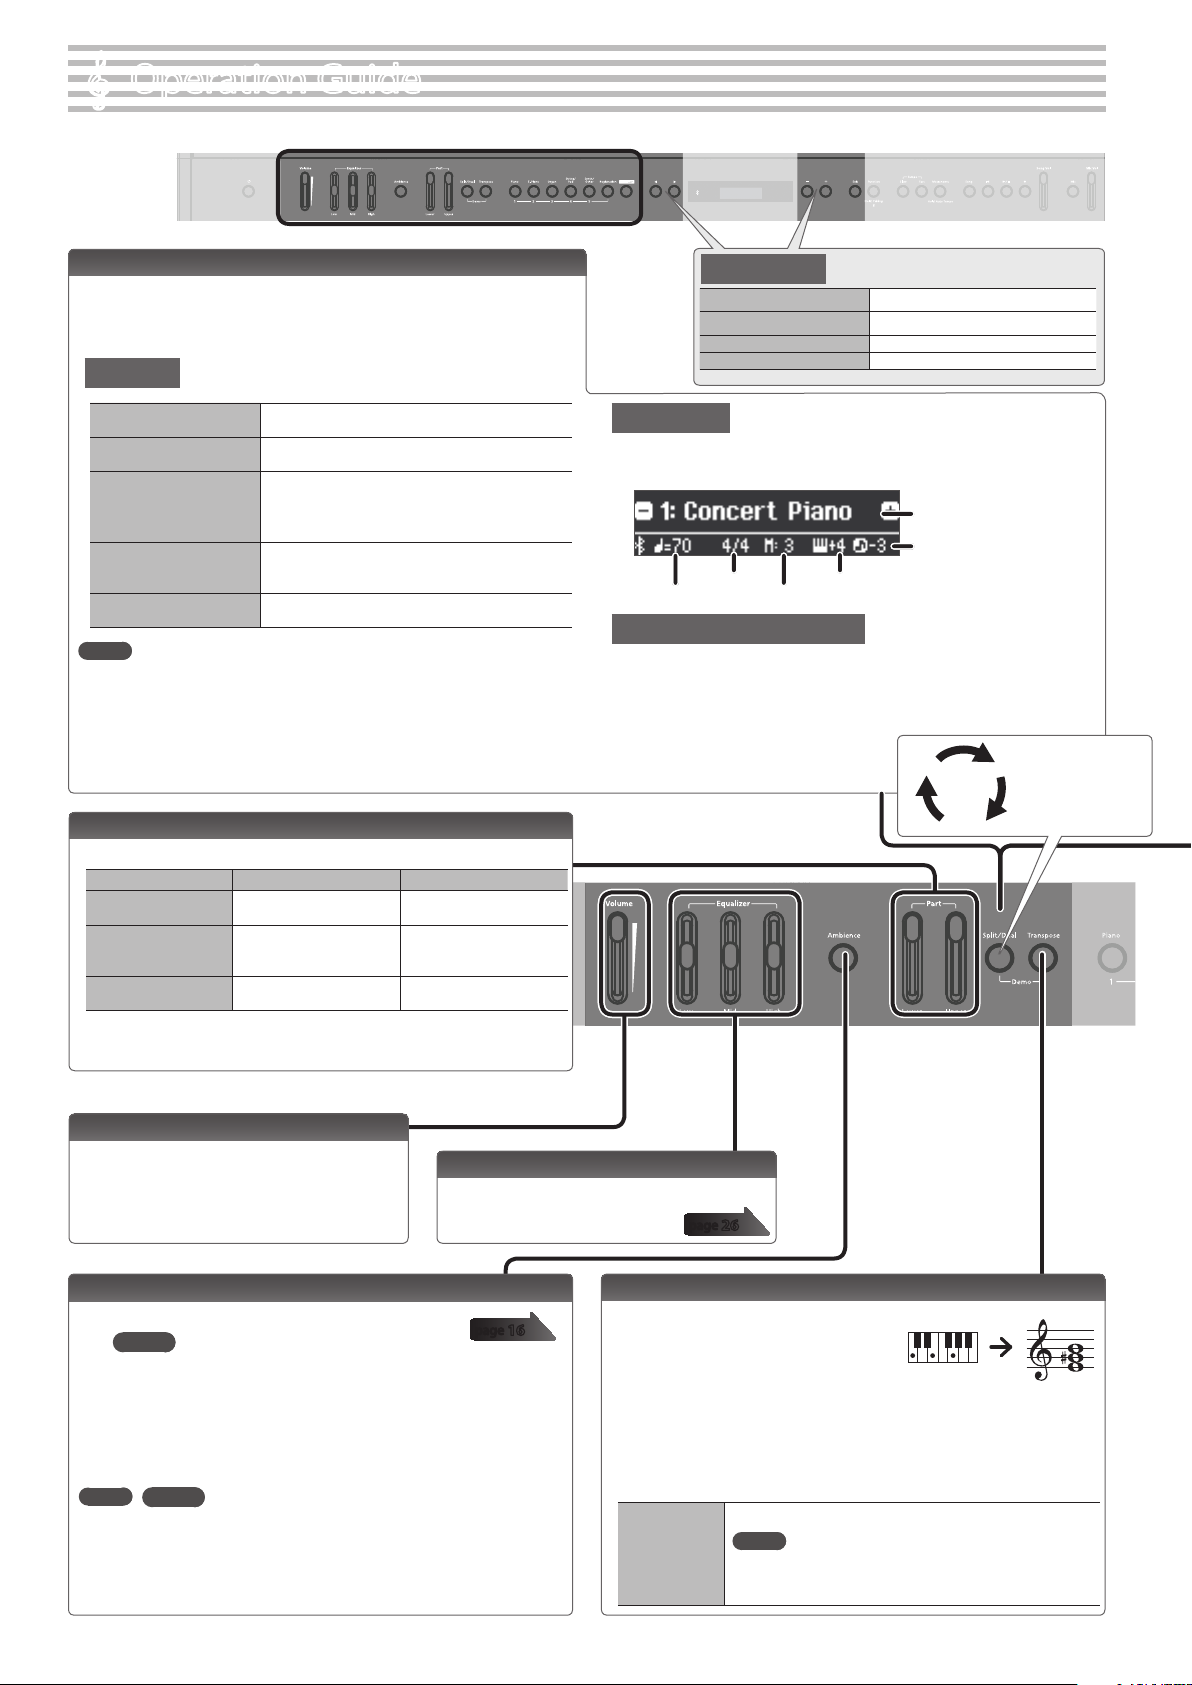
Selecting a Tone (Single)
In addition to piano sounds, the unit lets you enjoy performing with many other
sounds.
These sounds are called “Tones.” The Tones are divided into ve groups, each of
which is assigned to a dierent Tone button.
Tone groups
[Piano] button
[E. Piano] button
[Organ] button
[Strings/Pad] button
[Synth/Other] button
MEMO
When playing a tone that uses tremolo or has a vibrating quality,
you can adjust the speed of the modulation by holding down the
current Tone button and pressing the Tempo [Slow] [Fast] buttons.
Allows you to select various historical instruments,
including grand pianos, or harpsichords.
Allows you to select various electric piano sounds
used in pop or rock.
Allows you to select organ tones.
If you’ve selected a tone to which the rotary eect is
applied, pressing the [Organ] button will switch the
speed of the rotary eect.
Allows you to select sounds of instruments used
in an orchestra, mainly string instruments such as
violins, as well as synth pad sounds.
Allows you to select sounds that are unique to
synthesizers, as well as vocal and GM2 sounds.
Changing the Keyboard Volume Balance (Part Volume)
When using Split Play or Dual Play, you can adjust the keyboard’s volume balance.
When using Normal
(Single) Play
When using Split Play
When using Dual Play
[Lower] slider [Upper] slider
Not used
Adjusts the volume of
the region below the split
point.
Adjusts the volume of
tone 2.
Adjusts the volume of the
keyboard.
Adjusts the volume of
the region above the split
point.
Adjusts the volume of
tone 1.
Basic operations
Select a setting item
Edit a value Press the [-] [+] buttons.
Restore the default value
Cancel an operation Press the [Exit] button.
Press the [K] [J] buttons.
Press the [–] [+] buttons simultaneously.
To select a tone
1. Press a tone button (e.g., [Piano]) and then use the [–] [+] buttons.
Viewing the display
Tone name
Song transposition
Tempo
Time signature
Keyboard transposition
Measure
Auditioning the tones (Tone Demo)
1. Hold down the [Split/Dual] button and press the [Transpose]
button.
2. Press one of the Tone buttons.
The tone used for the demo song depends on which
Tone button you press.
Single Split
Dual
By pressing the [Dual/
Split] button, you can
sequentially cycle
between “Single,” “Split,”
and “Dual.”
Adjusting the Overall Volume
You can adjust the speaker volume when using the
internal speakers, or the headphone volume when
headphones are connected.
Adjusting the Tone Color (Equalizer)
Adjusting the Ambience (Ambience)
1. Press the [Ambience] button.
FP-60X
1-2. Press the [Function] (Enter) button.
2. Use the [K] [J] buttons to select the “ambience type.”
This lets you change the acoustical character of the sound.
3. Use the [–][+] buttons to specify the “ambience depth.”
This lets you adjust the acoustical character (ambience) of the
sound.
MEMO
8
FP-60X
You can select whether to add the acoustical character of the
sound heard in headphones (Headphones 3D Ambience) (p. 16).
Use these sliders to boost or cut the sound in the Low,
Mid, and High frequency ranges.
page
26
Transposing Your Performance (Transpose)
The keyboard can be transposed in
page
16
semitone steps.
For example if a song is in the key of E
major but you want to play it using the
ngering of the C major scale, you would
set the keyboard transpose setting to “4.”
1. While holding down the [Transpose] button, press the [–] [+] buttons.
The display will indicate the amount of transposition.
2. To cancel the transposition, press the [Transpose] button once again.
The [Transpose] button will go out.
-6–0–+5 (default value: 0)
Kbd Transpose
MEMO
You can also change the keyboard transpose setting by
holding down the [Transpose] button and pressing the note
that will be the tonic (root note) of the transposed key.
If you play C E G0It will sound E G# B
Page 9
Operation Guide
Playing Dierent Tones with the Right and Left Hands (Split)
You can play dierent tones in the areas at the left and right of a specied key. For
example, you can use your left hand to play a bass tone and use your right hand to
play a piano tone.
This feature is called “Split Play,” and the point at which the keyboard is divided is
called the “split point.”
Turning Split Play on
The following settings can be operated when the Split screen is shown.
Changing the right-hand
tone and left-hand tone
(Right Tone/Left Tone)
Changing the sprit point
(Split Point)
Changing the octave of
the right-hand tone and
left-hand tone
(Right Shift/Left Shift)
Left-hand tone Right-hand tone
* Depending on the combination of tones, the eect might not apply to the left-
hand tone, causing the sound to appear dierently than usual.
* If you select a sound from the [Piano] button as the left-hand tone, it might sound
dierent than usual.
Press the [Split/Dual] button several times to access
the Split screen.
1. Use the [K] [J] buttons to select “right-hand
tone” or “left-hand tone.”
2. Press a tone button.
3. Use the [–] [+] buttons.
1. Use the [K] [J] buttons to select “Split Point.”
2. Use the [–][+] buttons to specify the value.
MEMO
You can also specify the split point by holding
down the [Split/Dual] button and pressing the key
where you want to split the keyboard.
B1–B6 (default value: F#3)
1. Use the [K] [J] buttons to select “Right Shift” or
“Left Shift.”
2. Use the [–][+] buttons to specify the value.
-3–0–+3 (default value: 0)
F#3
Layering two tones (Dual)
You can play two tones simultaneously from a single key. This function is called
“Dual Play.”
Press the [Split/Dual] button several times to access
the Dual screen.
Turning Dual Play on
The following settings can be operated when the Dual screen is shown.
Changing tone 1 and
tone 2
(Tone 1/Tone 2)
Changing the octave of
tone 1 or tone 2
(Tone 1 Shift/Tone 2 Shift)
* Depending on the combination of tones, the eect might not apply to tone 2,
causing the sound to appear dierently than usual.
* If you select a sound from the [Piano] button as tone 2, it might sound dierent
than usual.
Reading the note name (e.g., C4)
The alphabetical indication for settings such as Split Point shows the
name of the note. In solfege, A = la, B = ti, C = do … G = so.
For example, the indication “C4” means “the fourth ‘C’ from the left edge
of the keyboard.”
MEMO
You can also use Dual Play by pressing two tone
buttons simultaneously.
1. Use the [K] [J] buttons to select “tone 1” or
“tone 2.”
2. Press a tone button.
3. Use the [–] [+] buttons.
1. Use the [K] [J] buttons to select “Tone 1 Shift” or
“Tone 2 Shift.”
2. Use the [–][+] buttons to specify the value.
-3–0–+3 (default value: 0)
C4 C5 C6 C7 C8C3C2C1
Recalling Performance Settings (Registration)
You can use the registration feature to save the current
performance settings into a “registration” that you can recall
whenever you wish.
By switching the registration, you can instantly recall saved settings.
Recalling a registration
1. Press the [Registration] button.
2. Press one of the number buttons, from [1] to [5], to select the
registration.
3. Press the [–] [+] buttons to select the registration variation.
Saving current settings into a registration
1. Set the desired performance settings.
2. While holding down the [Registration] button, press a button from
[1] to [5] to select a registration and then press the [–] [+] buttons to
select a registration variation.
3. Use the [–] [+] buttons and the [K] [J] buttons to give a name to the
registration.
4. Press the [Function] button to save.
MEMO
For details on the settings that can be stored, refer to “Saved Settings” (page 30).
page
23
Selecting a Favorite Performance Environment (My Stage)
By selecting My Stage, you can enjoy your favorite piano and performance
environment in your own home. This function reproduces the sound and resonance
that you would experience when playing an ideally-matched grand piano in various
environments such as a concert hall, church, or rehearsal studio.
page
16
Selecting a My Stage
1. Press the [My Stage] button.
2. Use the [–][+] buttons to select the desired performance
environment.
MEMO
You can save your favorite My Stage settings in a registration (p. 23).
9
Page 10
Operation Guide
Display
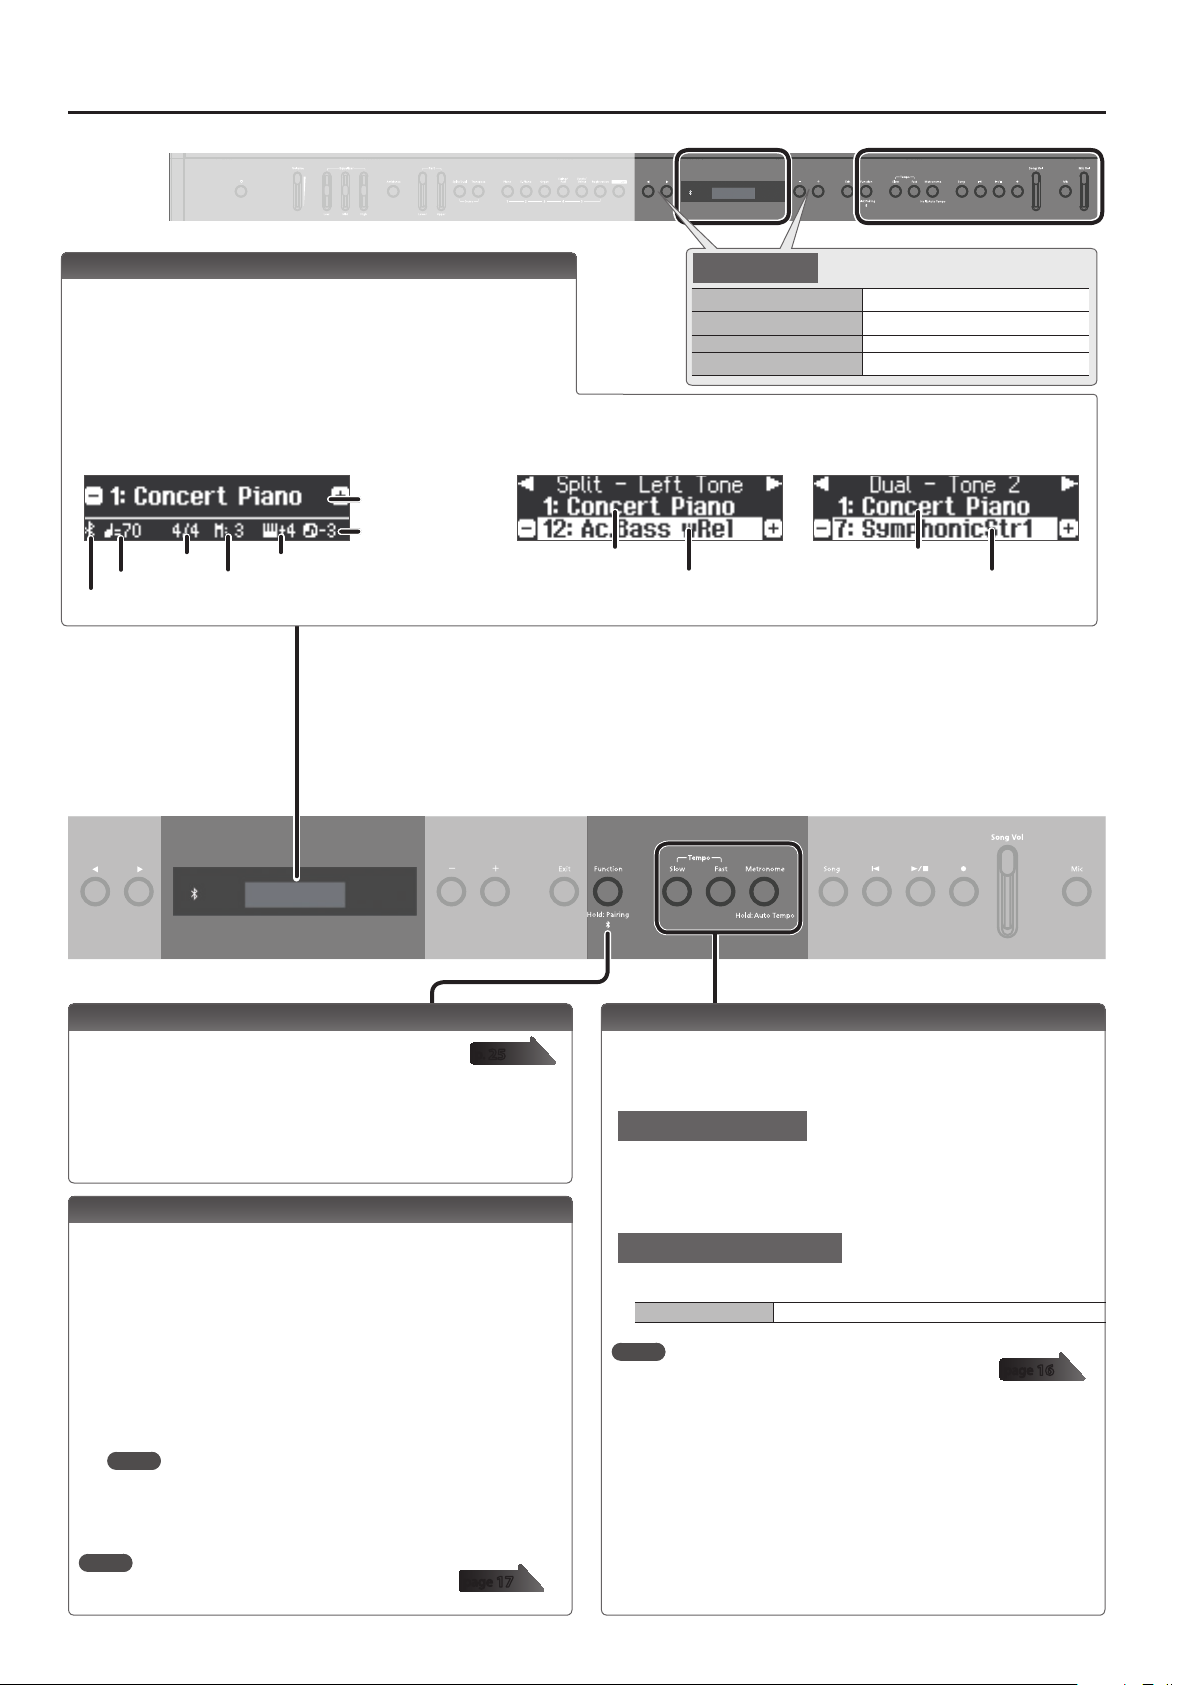
The display shows information such as the tone name, song name, tempo, and time
signature.
Single
Time signature
Tempo
Bluetooth connection status
Measure
Tone name
Song transposition
Keyboard transposition
Split
Right-hand Tone
Basic operations
Select a setting item
Edit a value Press the [-] [+] buttons.
Restore the default value
Cancel an operation Press the [Exit] button.
Press the [K] [J] buttons.
Press the [–] [+] buttons simultaneously.
Dual
Tone 1
Left-hand Tone
Tone 2
Various Settings (Function Mode)
You can make detailed settings for the unit.
1. Press the [Function] button.
2. Use the [K] [J] buttons to select the item that you want to adjust.
3. Use the [-] [+] buttons to adjust the value.
* By long-pressing the [Function] button, you can begin pairing with a
Bluetooth device.
p.
25
Sounding a Click at the Song’s Tempo (Auto Tempo)
You can sound a click tone in synchronization with the tempo of a song that is
input from an external audio source (Bluetooth audio, the Input Stereo jack, or
USB audio).
In this example, we’ll sound a click tone in synchronization with the tempo of a
song played from an audio player connected to the Input Stereo jack.
1. Connect your audio player to the Input Stereo jack.
2. Play back a song on your audio player.
The song is heard from the piano’s speakers.
3. While the song is playing, long-press the [Metronome] button.
Auto tempo turns on, and the click tone is sounded in synchronization with the
tempo of the song.
MEMO
Even in the middle of the song, you can update the tempo as many times as
you like by long-pressing the [Metronome] button once again.
4. To stop using auto tempo, press the [Metronome] button to make
it go dark.
MEMO
For details on the auto tempo setting, see the following.
page
17
Using the Metronome
You can sound a metronome while you perform. You can also change the tempo
and time signature of the metronome.
If a song is playing, the metronome sounds at the tempo and time signature of
that song.
Sounding the Metronome
1. Press the [Metronome] button so it’s lit.
The metronome is sounded.
2. To stop the metronome, press the [Metronome] button once again
to make it go dark.
Change the Metronome tempo
1. Use the Tempo [Slow] [Fast] buttons to change the tempo.
Tempo range 10–500
MEMO
For details on the metronome settings, see the following.
page
16
10
Page 11
Selecting a Song
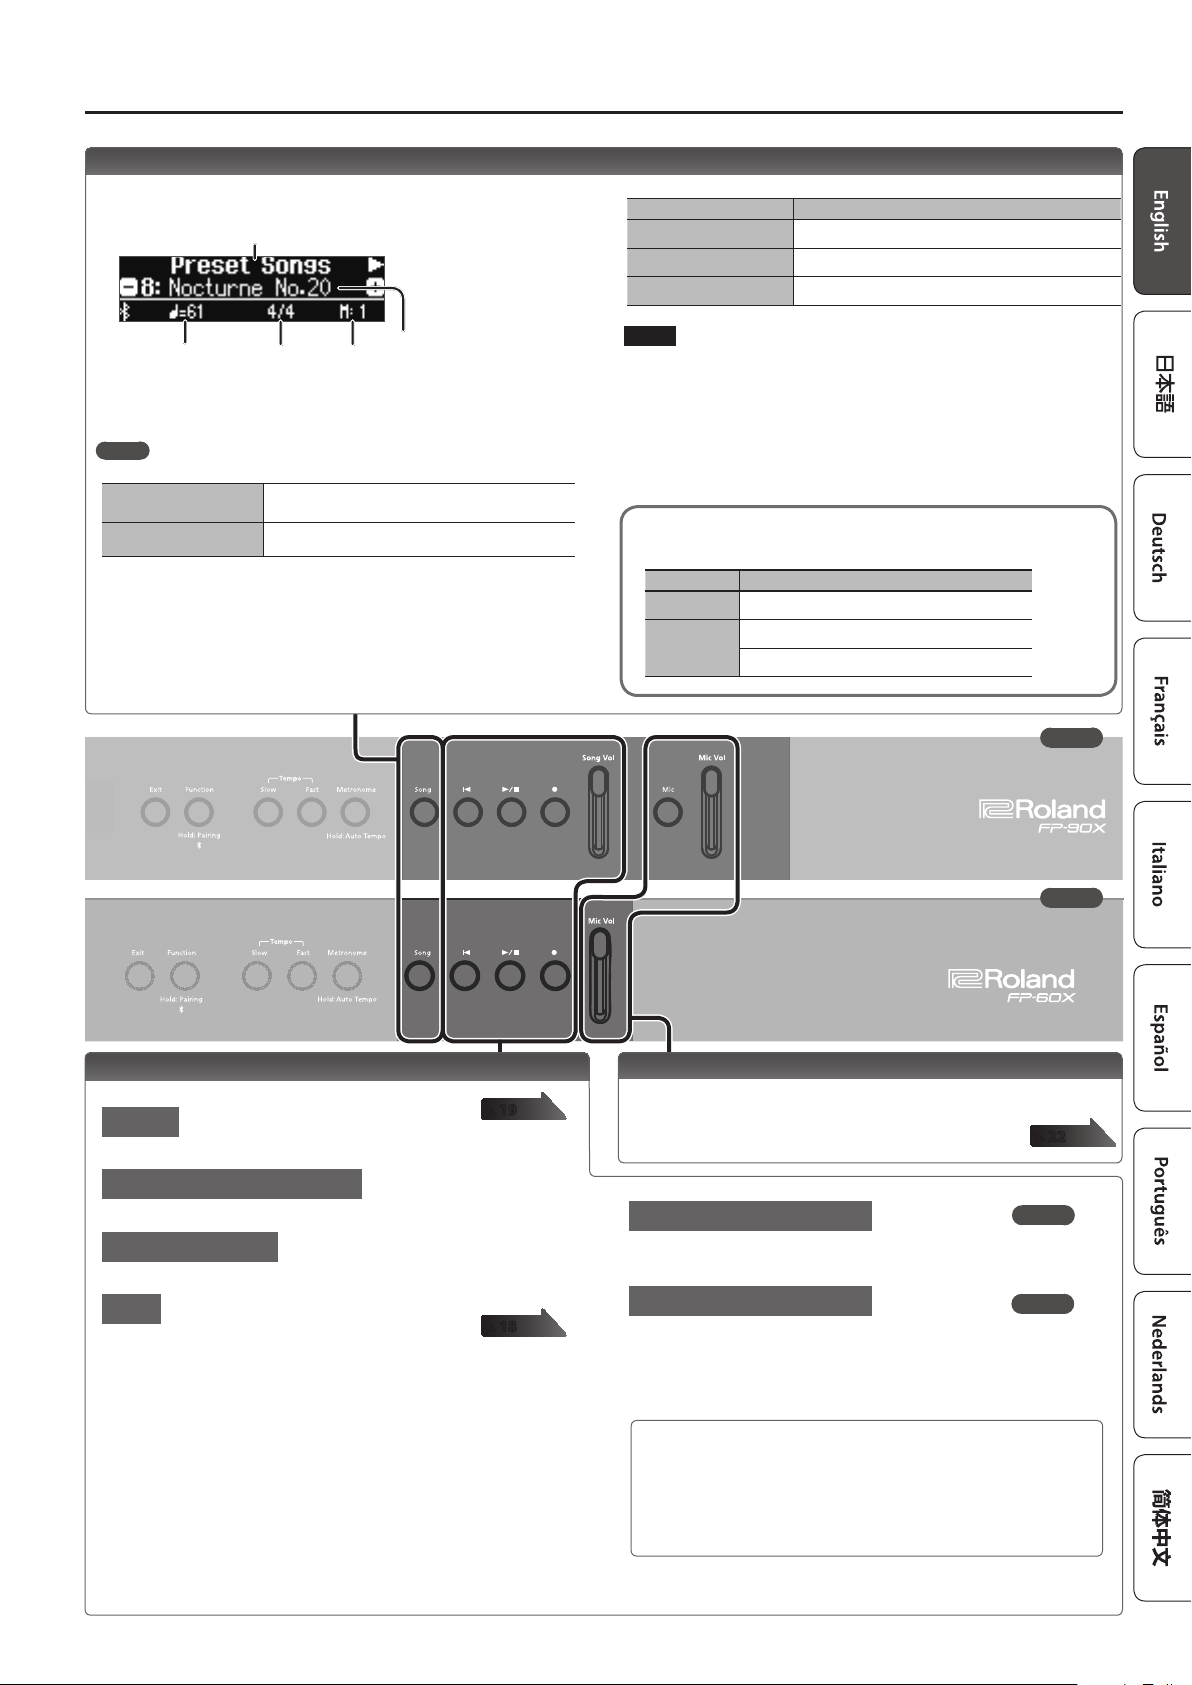
Access the song screen, and select a song.
1. Press the [Song] button to access the song screen.
Category
Operation Guide
Category list
Category Explanation
Preset Songs Songs built into the piano
USB Memory Songs saved on a USB ash drive
Internal Memory Songs saved in internal memory
Tempo Time signature Measure
Song name
2. Press the [K] [J] buttons to select a category.
3. Press [–] [+] buttons to select a song.
4. Press the [s] button to play the song.
MEMO
To select a song from a folder on a USB ash drive, proceed as follows.
To open a folder
To close a folder
Use the [–] [+] buttons to select the folder, and
press the [s] button.
Use the [–] button to select “ (up)” and then press
the [s] button.
NOTE
* When the SMF Play Mode (p. 27) is set to “Auto-Select” or “Internal,” there are some
parts whose volume is not aected by the [Song Vol.] slider (on the FP-60X, the
function mode setting “Song Vol.”). If the SMF Play Mode is set to “External,” the
volume of all parts will change.
Song formats that can be played by the unit
The unit can play back data in the following formats.
Song format Explanation
MIDI les SMF format 0/1
Audio les
WAV format, 44.1 kHz, 16-bit linear
MP3 format, 44.1 kHz, 64 kbps–320 kbps
FP-90X
FP-60X
Playing Back or Recording
Here’s how to play back or record a song.
Play/stop
1. Press the [s] button.
Return to the beginning of the song
1. Press the [u] button.
Change the song tempo
1. Use the Tempo [Slow] [Fast] buttons to change the tempo.
Record
1. Select the tone that you want to play.
2. You can sound the metronome if you like.
You can specify the tempo and time signature of the metronome. The
metronome’s tempo and time signature settings are stored in the song, so that
the metronome plays correctly even when you play back the song.
3. Press the [t] button.
The [t] button lights, the [s] button blinks, and the unit enters record-
standby mode.
If you decide to cancel recording, press the [t] button once again.
4. Press the [s] button to start recording.
5. Press the [s] button to stop recording.
p.
p.
19
18
Using a Mic (Mic)
You can connect a mic to the this unit and mix the sound of its performance with
the sound from the mic.
p.
22
Adjusting the Volume of the Song
1. Use the [Song Vol.] slider to adjust the volume of the song.
This adjusts the volume of the song (SMF/audio).
Adjusting the Volume of the Song
This adjusts the volume of the song (SMF/audio).
1. Press the [Function] button.
2. Use the [K] [J] buttons to select Song Vol.
3. Use the [–][+] buttons to adjust the volume.
* Some of the tones used in the tone demo are set to be
adjusted by the Part [Upper] [Lower] slider. If you want to use
the [Song Vol.] slider (on the FP-60X, the function mode setting
“Song Vol.”) to adjust all of the parts, change SMF Play Mode
(p. 27) to “External.”
FP-90X
FP-60X
11
Page 12
Connecting the Piano and a Mobile Device via Bluetooth
°
Here’s What You Can Do
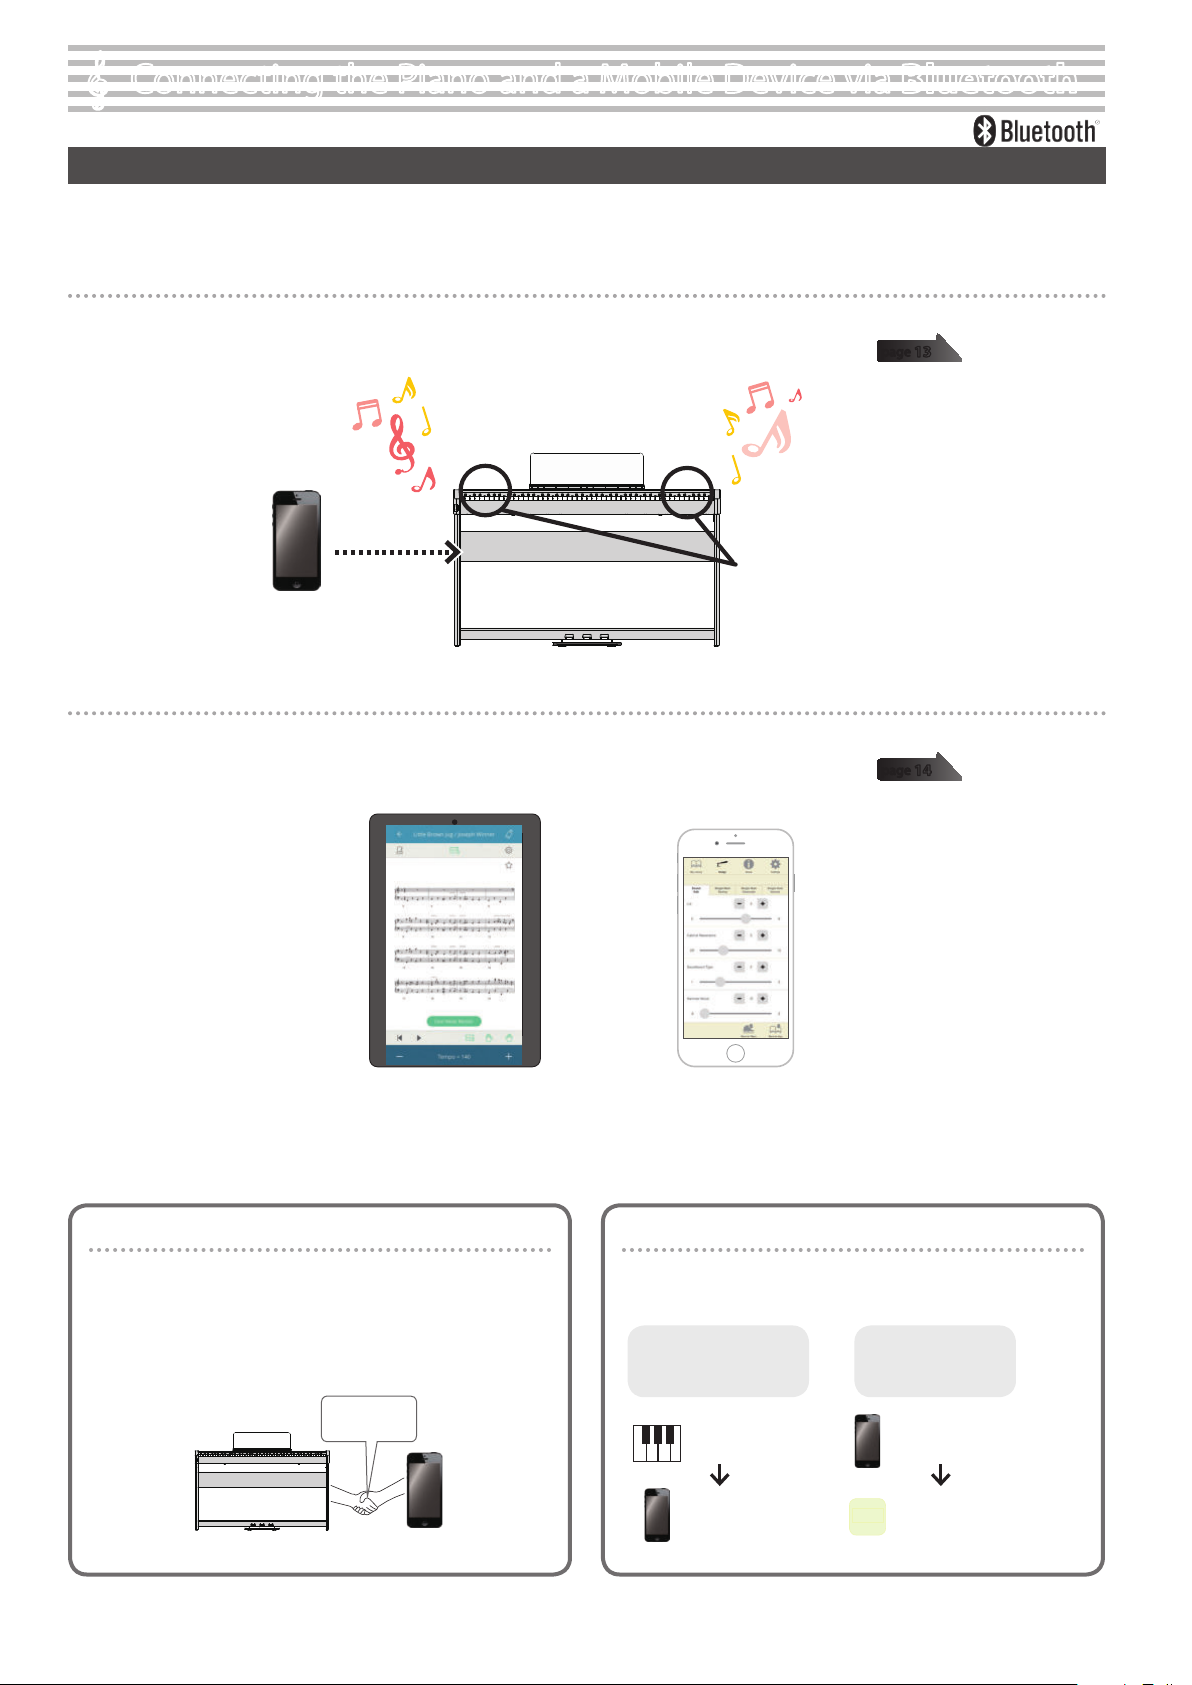
By using the Bluetooth function, you can wirelessly connect the piano with a mobile device such as your smartphone or tablet, allowing you to do the
following things.
Music played back by the mobile device can be heard through the piano’s speakers.
You can play back music data that’s saved on your iPhone or other mobile device, and wirelessly listen to it through the piano’s speakers.
page
0 “Listening to Music Through the Piano’s Speakers”
Speakers
13
You can use apps to expand your piano enjoyment.
You can install apps (such as Roland’s “Piano Every Day” or “Piano Designer”) on your mobile device, and use them in conjunction with the piano.
page
0 “Using the Piano with an App”
Pairing
To wirelessly connect the piano with your mobile device, you must
rst perform “pairing” to create a one-to-one connection between
the piano and your mobile device.
“Pairing” is the procedure of registering (mutually authenticating)
your mobile device with the piano.
Pair your device as described in the procedure for each function.
App [Piano Designer]App [Piano Every Day]
The pairing process
Separate pairing is required for “playing music through the piano’s
speakers” and for “using the piano with an app.” Note that these
processes are dierent.
Playing music through
the piano’s speakers
14
Using the piano with
an app
Pairing
Settings on the piano
Settings on the mobile
device
* If pairing is not successful, refer to If Pairing Does Not Succeed in “Using the Piano with an App” (p. 15).
12
Settings on the mobile
device
Settings on the App
App
Page 13
Connecting the Piano and a Mobile Device via Bluetooth
Listening to Music Through the Piano’s Speakers
Here’s how to make settings so that music data saved on your mobile
device can be wirelessly played back through the piano’s speakers.
* If your mobile device is already paired with the piano, there is no need
to perform pairing again. Refer to “Connecting an Already-Paired
Mobile Device” (p. 13).
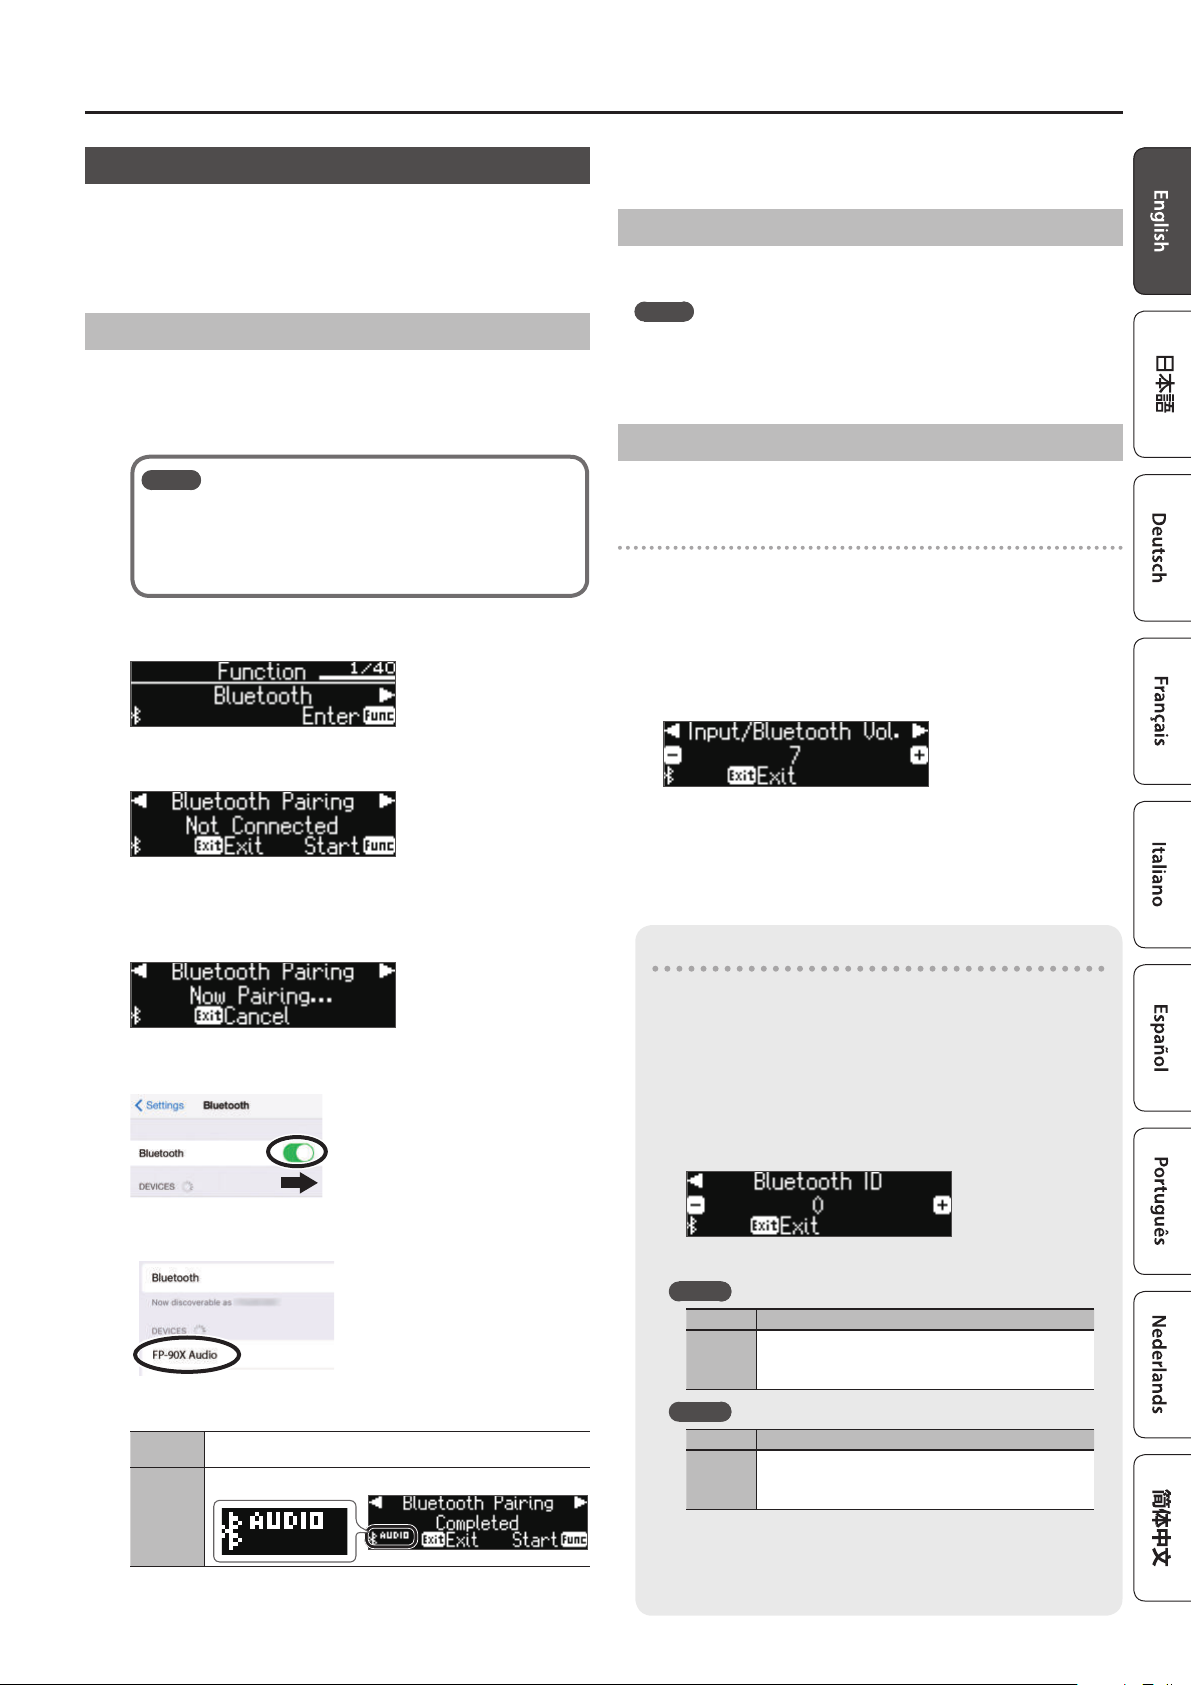
Making Initial Settings (Pairing)
As an example, we explain how to make settings for an iPad. If you’re using
an Android device, refer to the owner’s manual of the mobile device you’re
using.
1. Place the mobile device that you want to connect near the piano.
MEMO
You can also initiate pairing by long-pressing the [Function]
button instead of performing steps 2–4.
2. Long-press the [Function] button.
When the display indicates “Now Pairing...,” proceed to step 5.
2. Press the [Function] button, and then use the [K] [J]
buttons to select “Bluetooth.”
7. Press the [Exit] button several times to exit Function mode.
This completes initial settings.
Connecting an Already-Paired Mobile Device
1. Turn on the Bluetooth function of the mobile device.
The piano and the mobile device are wirelessly connected.
MEMO
If you were unable to establish a connection using the procedure
above, tap “FP-90X Audio” or “FP-60X Audio” that is displayed in the
Bluetooth device screen of the mobile device.
Playing Back Audio
When you play back music data on the mobile device, the sound is heard
from the piano’s speakers.
Adjusting the volume of Bluetooth audio
Normally you’ll adjust the volume on your mobile device. If this does not
provide the volume adjustment you want, you can adjust the volume as
follows.
1. Proceed with steps 2–3 of “Making Initial Settings
(Pairing)” (p. 13).
2. Use the [K] [J] buttons to select “Input/Bluetooth Vol.,” and
use the [–] [+] buttons to adjust the volume.
3. Press the [Function] (Enter) button.
The Bluetooth screen appears.
4. Use the [K][J] buttons to select “Bluetooth Pairing,” and
then press the [Function] (Enter) button.
The display indicates “Now pairing…,” and the piano waits for a
response from the mobile device (pairing start).
* If you decide to cancel pairing, press the [Exit] button.
5. Turn on the Bluetooth function of the mobile device.
6. Tap “FP-90X Audio” or “FP-60X Audio” that is shown in the
Bluetooth device screen of your mobile device.
* If the mobile device’s
screen asks you to enter
a “Pass Key,” enter “0000”
(four zeros).
The piano and mobile device are paired. When pairing is completed,
a display like the following appears.
Mobile
device
Piano
“FP-90X Audio” or “FP-60X Audio” are added in the “My Devices”
eld
The “AUDIO” is shown beside the Bluetooth symbol
To pair your device with multiple pianos
For example, if you want to pair your mobile device with multiple
pianos located in a music school, you can specify an Bluetooth ID
for each piano to pair your mobile device with the desired pianos.
* When you make this setting, an ID number is added to
the end of the device name shown on the mobile device
(e.g., FP-90X Audio1).
1. Perform steps 2–3 of “Making Initial Settings (Pairing)”
(p. 13).
2. Use the [K] [J] buttons to select “Bluetooth ID.”
3. Use the [–] [+] buttons to edit the value of the setting.
FP-90X
Value Explanation
0–99
FP-60X
Value Explanation
0–99
* If you are pairing in an environment where there are multiple
pianos, we recommend that you turn on the power of the
mobile device and only those pianos that you want to pair
(turn o the power of other devices).
Set to “0”: “FP-90X Audio” “FP-90X MIDI” (default value)
Set to “1”: “FP-90X Audio 1” “FP-90X MIDI 1”
Set to “0”: “FP-60X Audio” “FP-60X MIDI” (default value)
Set to “1”: “FP-60X Audio 1” “FP-60X MIDI 1”
13
Page 14
Connecting the Piano and a Mobile Device via Bluetooth
Using the Piano with an App
Here’s how to make settings so that you can use the piano with an app
that’s installed on your mobile device.
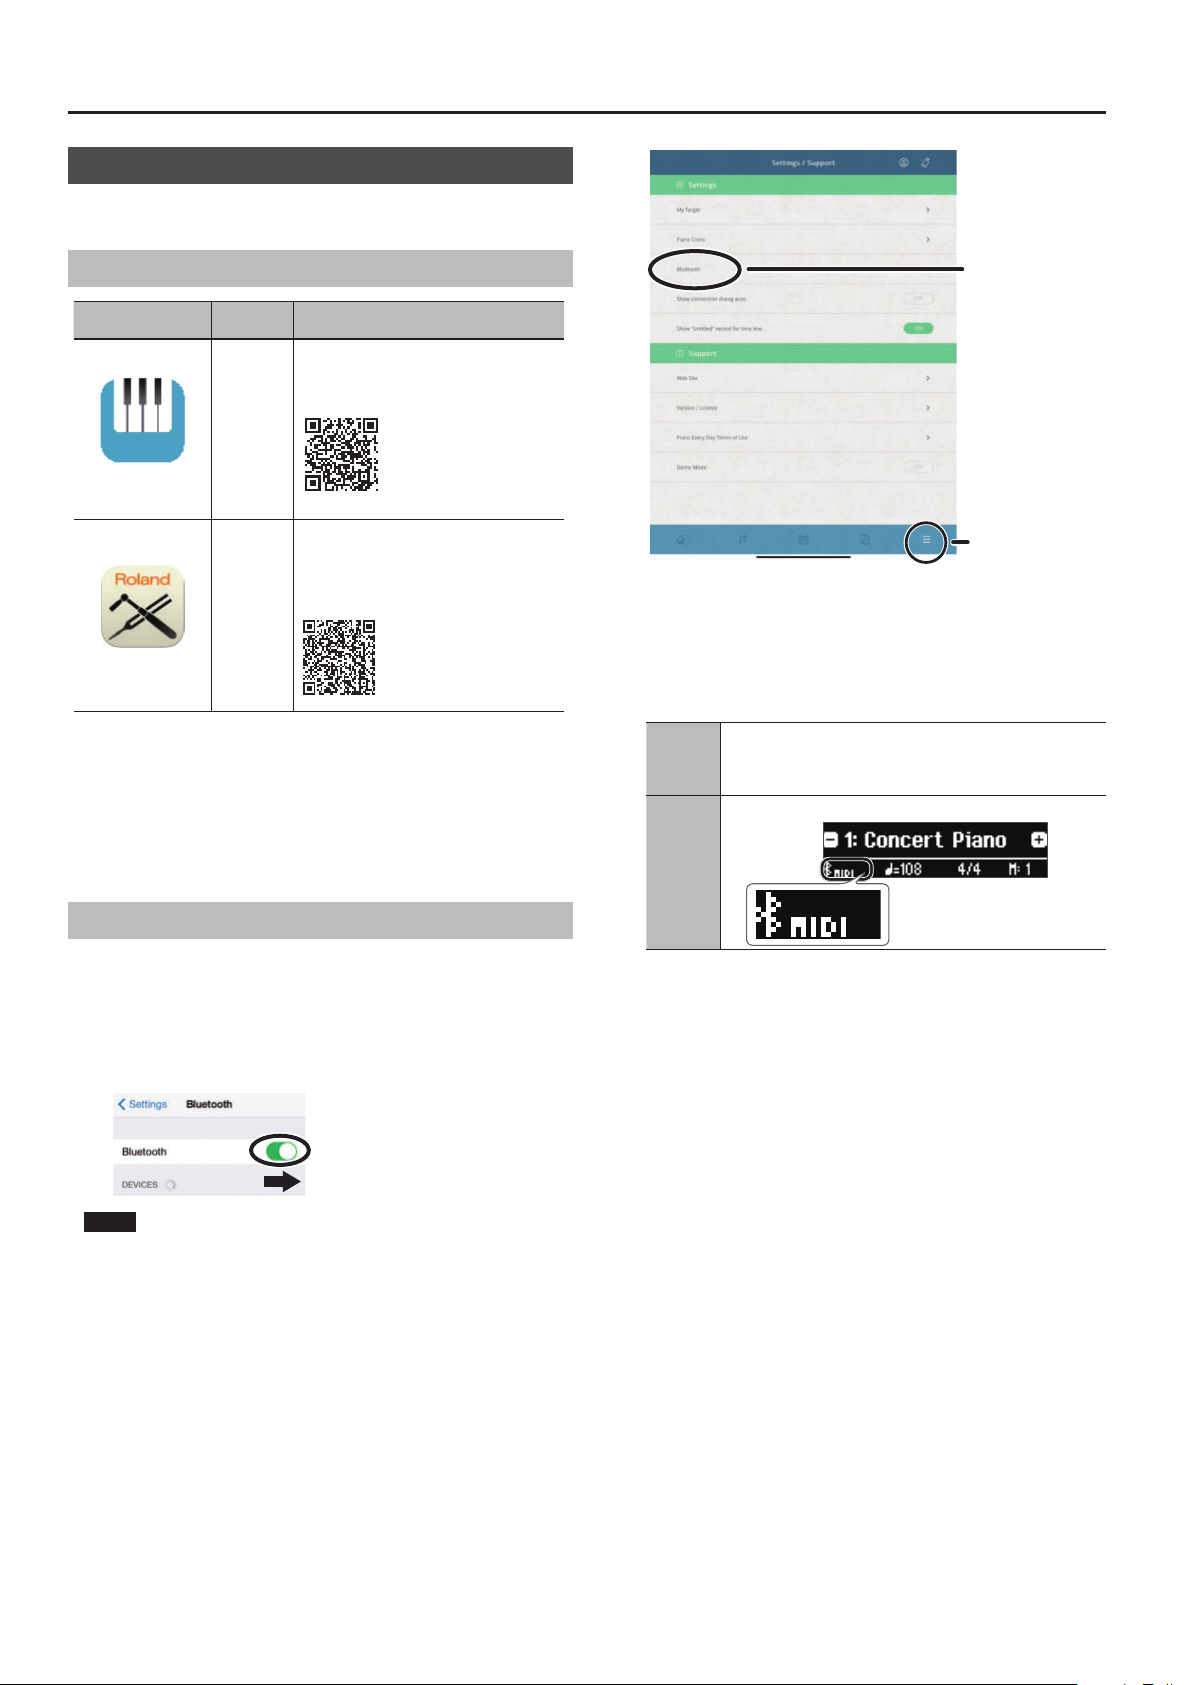
Apps You Can Use with This Piano
App name
Piano Every Day
Piano Designer
* Apps can be downloaded from the App Store or Google Play
(free of charge).
* In addition to the above, you can also use music apps (such as Garage
Band) that are compatible with Bluetooth MIDI.
* The information provided about apps made by Roland was current
when this manual was published. For the latest information, refer to the
Roland website.
Supported
OS
iOS
Android
iOS
Android
Explanation
This app lets you download electronic scores,
practice songs as if you were playing a game,
or keep a record of your practicing.
This app lets you customize the piano sound
to your taste. It provides touch-based editing
within the app for the various elements of
the sound in “Creating Your Own Piano Tone
(Piano Designer)” (p. 21).
Bluetooth
Menu
The screen of your mobile device shows “FP-90X MIDI” or “FP-60X
MIDI.”
4. Tap either “FP-90X MIDI” or “FP-60X MIDI” depending on
the unit that you’re using.
The piano and mobile device are paired. When pairing is completed,
a display like the following appears.
Mobile
device
Piano
“FP-90X MIDI” or “FP-60X MIDI” are added in the “My Devices” eld
The “MIDI” is shown beside the Bluetooth symbol
Making Settings (Pairing)
You can make settings for using the piano together with an app that’s
installed on your mobile device. As an example, we’ll explain the procedure
for using an iPad with the “Piano Every Day” app.
* In the case of “using the piano with an app,” settings on the piano are
not necessary. Perform operations in the app to pair it with the piano.
1. Turn on the Bluetooth function of the mobile device.
NOTE
Even if the “DEVICES” eld shows the name of the device you’re using
(such as “FP-90X MIDI”), do not tap it.
2. Start the app that you installed on your mobile device.
3. Tap the menu located in the lower right of the app screen,
and then in the menu screen tap “Bluetooth.”
Settings are now complete.
14
Page 15
Connecting the Piano and a Mobile Device via Bluetooth
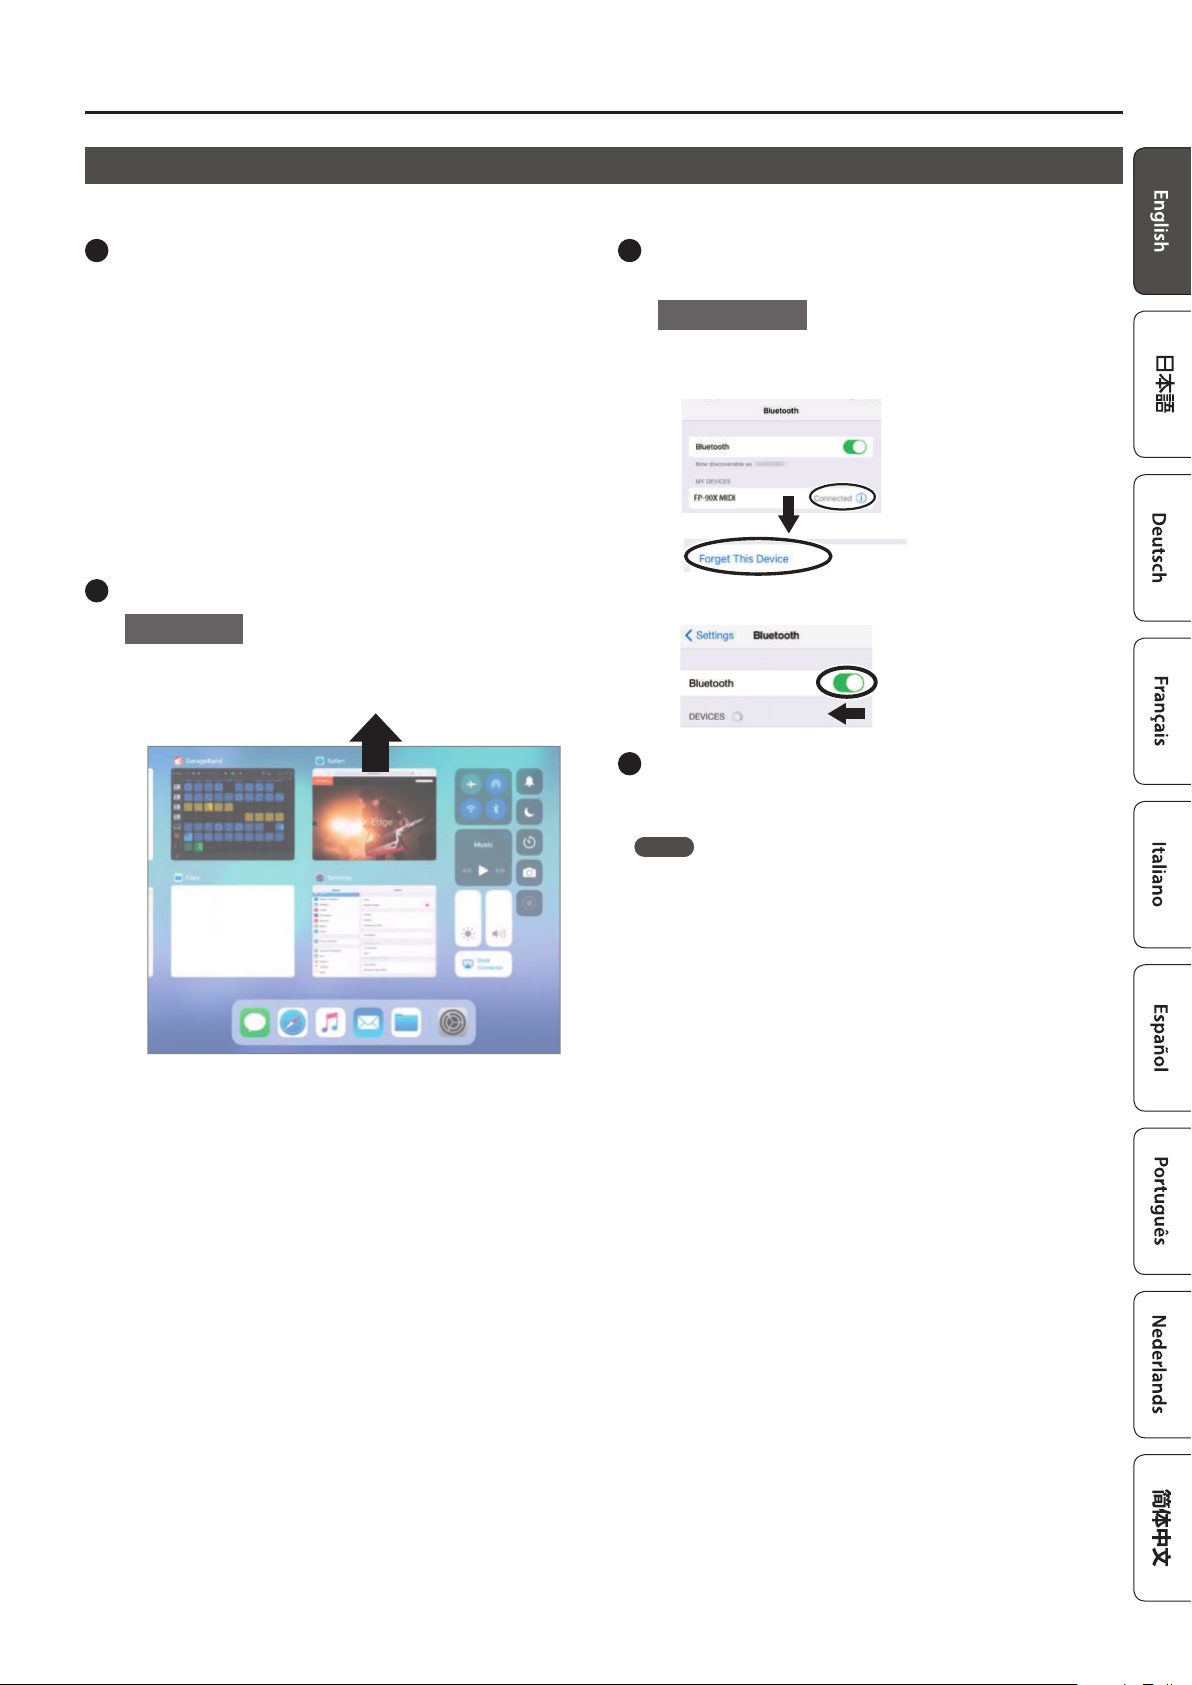
If Pairing Does Not Succeed in “Using the Piano with an App”
If pairing is not successful in “Using the Piano with an App” (p. 14), try steps 1–4 below.
1
Make sure that the piano’s Bluetooth function is
“ O n .”
1. Press the piano’s [Function] button.
Use the [K] [J] buttons to select “Bluetooth.”
2.
3. Press the [Function] (Enter) button.
The Bluetooth setting screen appears.
4.
Use the [K] [J] buttons to select “Bluetooth On/O,” and
then use the [–] [+] buttons to turn it “On.”
The piano’s Bluetooth function turns on.
5.
Press the [Function] button.
You exit function mode.
2
Exit all apps on your mobile device.
Closing the app
1. Double-click the home button, and swipe up on the app
screen.
3
If already paired, cancel pairing, and turn o the
Bluetooth function.
Clearing the pairing
1. In the mobile device’s screen, tap the “i” located beside
”Connected,” and tap “Forget This Device.”
2. Turn the Bluetooth switch o.
4
Perform the pairing procedure of p. 14 from step
1.
MEMO
If checking these points does not solve the problem, please refer to the
Roland support website.
https://www.roland.com/support/
15
Page 16
Advanced Operation
°
Playing Various Tones
˙
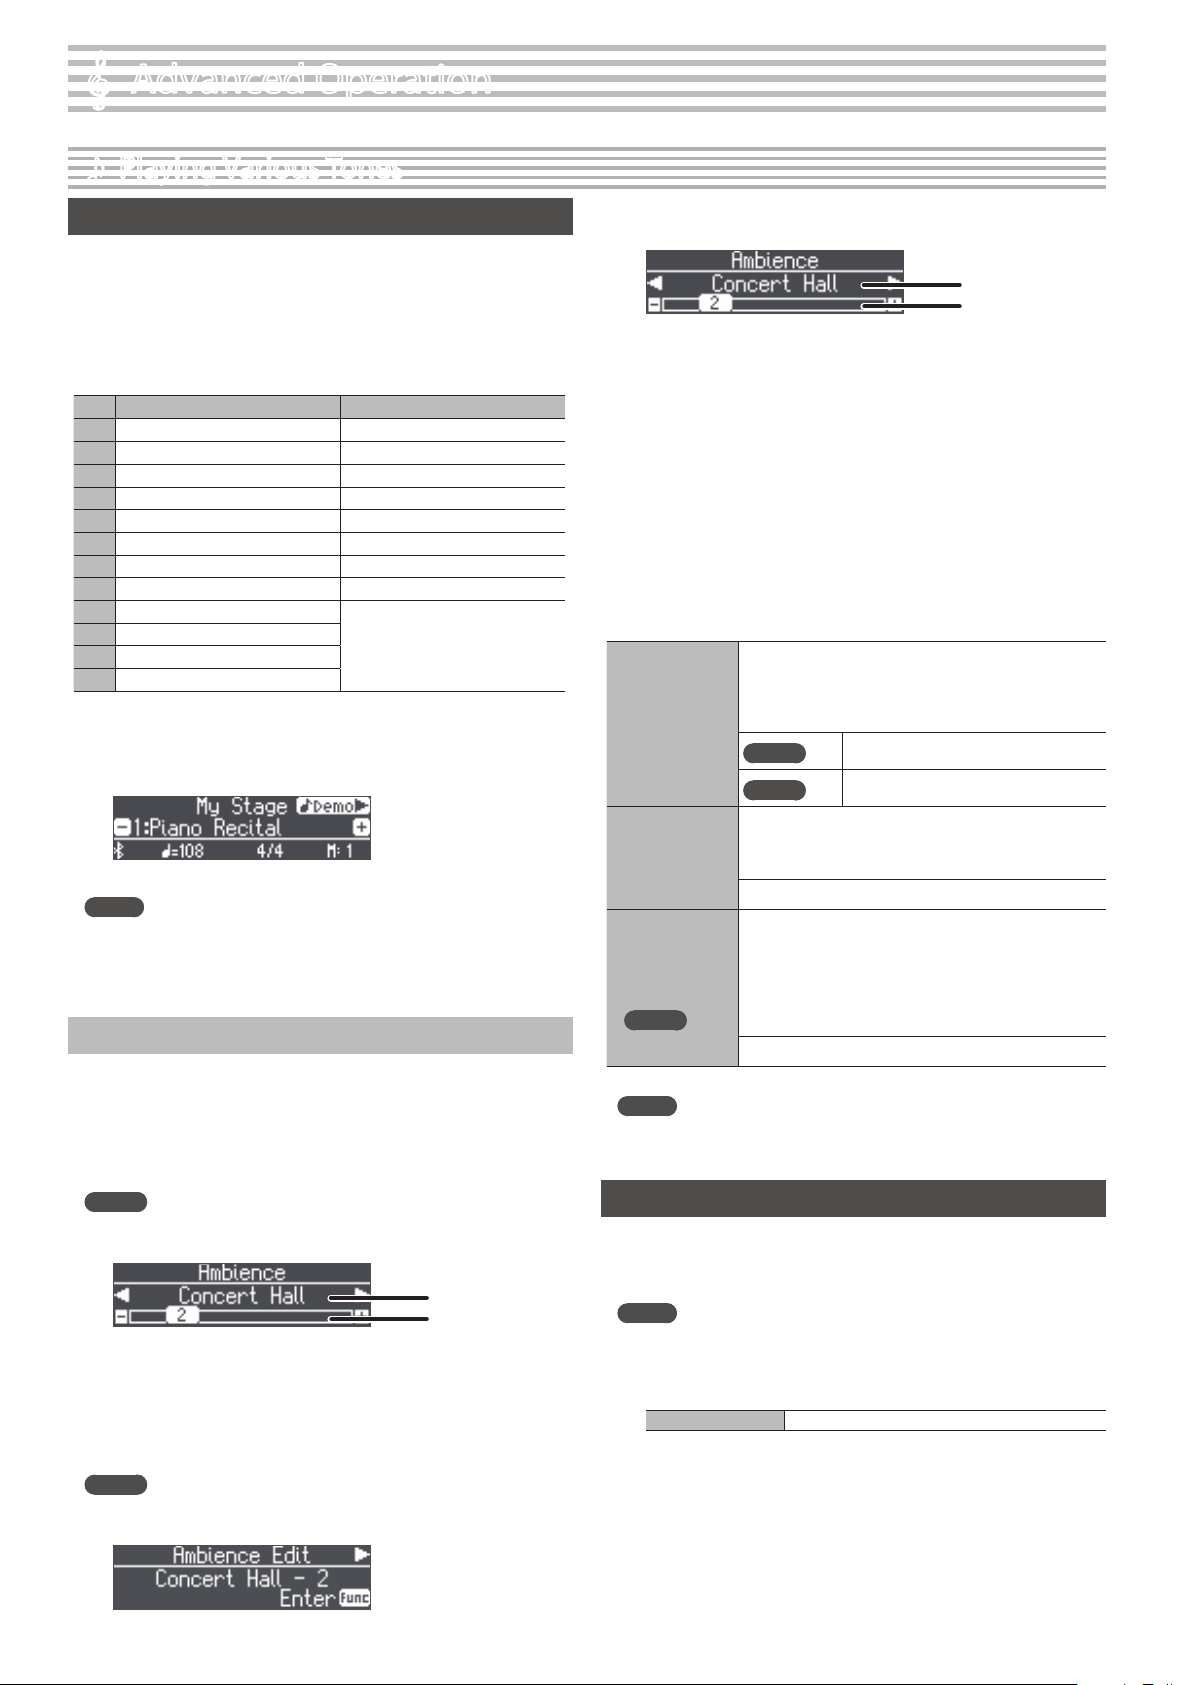
Selecting Your Preferred Performance Environment (My Stage)
“My Stage” is a function that lets you select your preferred piano and
performance environment while at home. This function reproduces the
sound and resonance that you would experience when playing in locations
such as a concert hall, church, or rehearsal studio on a grand piano that’s
ideally matched for that location.
* The My Stage settings consist of the combination of “grand piano tone,”
“ambience (acoustics) type,” and “ambience (acoustics) depth.”
No. FP-90X FP-60X
1 Piano Recital Piano Recital
2 At Hall Stage At Hall Stage
3 Lakeside Studio Lakeside Studio
4 Impressionists Heritage Hall
5 Heritage Hall Lounge Concert
6 Lounge Concert Church Concert
7 Church Concert Jazz Club
8 Jazz Club Recording Studio
9 Medieval Salon
10 Recording Studio
11 Trad Opera House
12 East Coast Hall
1. Press the [My Stage] button to make it light.
2. Use the [–][+] buttons to select your preferred performance
environment.
Play the keyboard to perform with the selected “My Stage” settings.
MEMO
You can press the [J] button to hear a “My Stage” demo performance.
3. To exit the My Stage function, press the [My Stage] button
to make it go dark.
Selecting the Type and Depth of Ambience
You can add acoustical ambience that is characteristic of a performance
in a concert hall or cathedral. By changing the “Ambience Type” you can
simulate the acoustics of a piano being played in a variety of locations.
When using headphones, the FP-60X lets you apply a headphone 3D
ambience eect. The FP-90X features headphone acoustic projection
technology that lets you experience a more three-dimensional sound eld.
FP-90X
1. Press the [Ambience] button to make it light.
The ambience screen appears.
Ambience type
Ambience depth
2. Use the [K] [J] buttons to select the “Ambience Type.”
3. Use the [–][+] buttons to specify the “Ambience Depth.”
4. When you are nished making settings, press the
[Ambience] button once again to make it go dark.
FP-60X
1. Press the [Ambience] button to make it light.
The ambience edit screen appears.
2. Press the [Function] (Enter) button.
The ambience screen appears.
Ambience type
Ambience depth
3. Use the [K] [J] buttons to select the “Ambience Type.”
4. Use the [–][+] buttons to specify the “Ambience Depth.”
If you want to change the headphone 3D ambience, proceed as
follows.
5. Press the [Exit] button to return to the ambience edit
screen.
6. Use the [J] button to select “Headphones 3D Ambience,”
and then use the [–][+] buttons to specify the “On/O”
setting.
7. When you are nished making settings, press the
[Ambience] button once again to make it go dark.
Selects the ambience that is characteristic of playing a piano
in various locations.
* If you’re using the FP-90X, you can choose the type of
ambience when a tone of the PureAcoustic Piano sound
Ambience Type
Ambience Depth
Headphones 3D
Ambience
FP-60X
MEMO
If you store your preferred My Stage settings as a “registration,” you’ll be
able to recall them any time you like (p. 23).
engine is selected (p. 31).
FP-90X
FP-60X
Adjusts the depth of the sound’s ambience. Higher settings
produce deeper ambience, and lower settings produce less
ambience.
* The reverberation eect is not applied to audio les.
0–10
You can apply a Headphones 3D Ambience eect that creates
the impression that the sound is being heard from the piano
itself even when you’re using headphones.
* The eect is applied if “Concert Hall” is selected as the
ambience type and a tone of the “SuperNATURAL Piano
sound engine” is selected (p. 31).
* The reverberation eect is not applied to audio les.
O, On (default value: On)
Studio, Lounge, Concert Hall, Wooden Hall,
Stone Hall, Cathedral
Studio, Lounge, Concert Hall, Cathedral
Practicing with the Metronome
You can practice while hearing a metronome.
1. Press the [Metronome] button to make it light.
The metronome sounds.
MEMO
If a song is playing, the metronome sounds at the tempo and time
signature of that song.
2. To change the tempo, use the Tempo [Slow] [Fast] buttons.
Tempo range 10–500
3. To stop the metronome, press the [Metronome] button
once again to make it go dark.
16
Page 17
Advanced Operation
Changing the Settings for Metronome
Change the following settings while the [Metronome] button is on.
1. Use the [K] [J] buttons to access the parameter that you
want to edit.
2. Use the [–][+] buttons to specify the value.
Tempo Coach Uses the Tempo Coach function (p. 17).
Metronome Volume
Metronome Tone
Beat
Metronome Down Beat
Metronome Pattern
Changing the metronome’s volume
O, 1–10 (default value: 5)
Changes the tone of the metronome.
Click, Electronic, Voice (Japanese), Voice (English)
(default value: Click)
Changes the time signature of the metronome.
2/2, 3/2, 2/4, 3/4, 4/4, 5/4, 6/4, 7/4, 3/8, 6/8, 8/8,
9/8, 12/8 (default value: 4/4)
Sounds a downbeat.
O, On (default value: On)
Changes the pattern of the metronome.
O, Eighth note, Eighth-note triplet, Shue,
Sixteenth note, Quarter-note triplet, Quarter
note, Dotted eighth (default value: O)
Sounding a Click Tone in Synchronization with the Song Tempo (Auto Tempo)
The auto tempo function sounds a click tone (metronome sound) in
synchronization with the tempo of an audio song being input from an
external source. This is very convenient when you want to practice along
with an audio song while also hearing a click.
5 Even if you don’t know the tempo of the original song, the tempo is
automatically detected and the click is synchronized.
5 Even if the original song does not contain drums or other rhythm
instruments, the tempo can be detected, and the click used instead of a
rhythm performance.
The auto tempo function can be used with a song that is being played in
the following three situations.
5 A song played back by a Bluetooth-connected mobile device (p. 13)
5 A song played back by an audio player connected to the Input Stereo jack
(p. 6)
5 A song played back by player software on a computer that’s connected to
the USB Computer port (p. 6)
In advance, connect your mobile device or computer to the piano using
the appropriate connection for your situation (via Bluetooth, an audio
cable, or a USB cable).
1. Play back a song from your external device.
The song is heard from the piano’s speakers.
2. While the song plays, long-press the [Metronome] button.
Auto tempo turns on, and a click tone is heard in synchronization
with the tempo of the song.
Go ahead and perform in time with the song and the click tone.
MEMO
Even in the middle of the song, you can once again long-press the
[Metronome] button and update the tempo as many times as you
like.
3. To stop using auto tempo, press the [Metronome] button
to make it go dark.
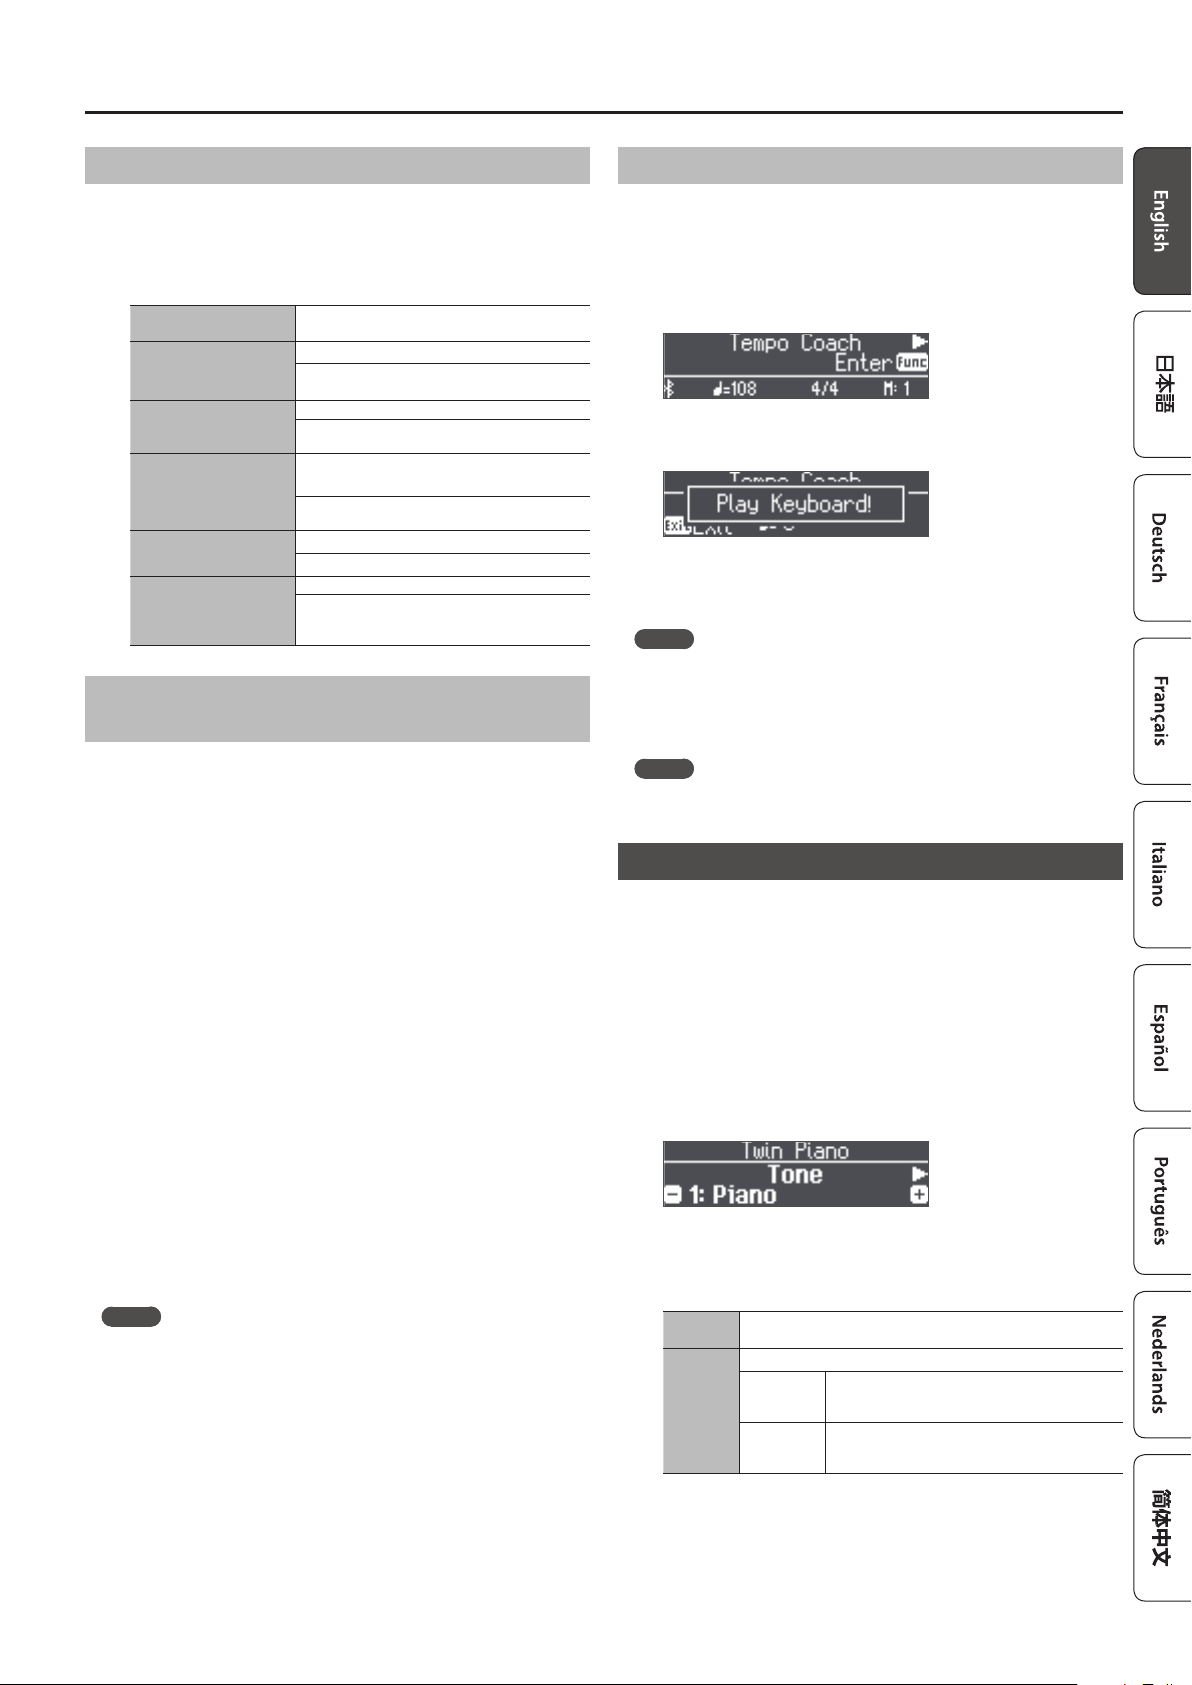
Detecting the Tempo of Your Own Performance (Tempo Coach)
By using the tempo coach function, you can ascertain the tempo of the
current keyboard performance.
You can operate the tempo coach setting when the [Metronome] button is
on.
1. Use the [K] [J] buttons to make the display indicate
“Tempo Coach.”
2. Press the [Function] (Enter) button.
The tempo coach screen appears, and the metronome stops.
3. Play a song on the piano.
The tempo of the played song is detected, and the performance
tempo is displayed.
MEMO
When you play a song, the tempo can be detected more accurately if
you play using both hands than if you play using one hand.
4. Press the [Exit] button.
You exit the tempo coach screen.
MEMO
By pressing the [Metronome] button you can sound the metronome at
the detected tempo.
Dividing the Keyboard for Two People (Twin Piano)
You can divide the keyboard into left and right areas so that two people can
play the same range of pitches. One person can play a model performance,
and the other person can practice along with that model performance. You
can also change the way (Mode) in which notes are sounded in Twin Piano.
* If you select some tones, it sounds dierent than usual.
1. Press the [Function] button, and then use the [K][J]
buttons to select “Twin Piano.”
2. Use the [–][+] buttons to turn twin piano “On.”
3. Press the [Exit] button.
The Twin Piano screen appears.
4. Use the [K] [J] buttons to access the parameter that you
want to edit.
5. Use the [–][+] buttons to specify the value.
Tone Selects the tone used when playing Twin Piano.
Selects how notes are heard when playing Twin Piano.
The sound will be heard from the right as you play
toward the right of the keyboard, and from the
left as you play toward the left.
Notes played in the right area will be heard from
the right speaker, and notes played in the left area
will be heard from the left speaker.
Mode
Pair
Individual
6. When you are nished using Twin Piano, press
the [Function] button to return to the “Twin Piano
(On/O screen),” and return it to “O.”
7. Press the [Exit] button several times to exit function mode.
17
Page 18
Advanced Operation
Recording Your Performance
˙
It’s easy to record your own performances. You can play back a recorded
performance to check your playing, or play along with a recorded
performance.
Type of recording
SMF recording
Audio recording
5 The performance is recorded as MIDI data.
SMF format 0
5 Your performance will be recorded as audio data.
WAV format, 44.1 kHz, 16-bit linear
* In order to use audio recording, you must connect a USB
ash drive (sold separately) to the USB Memory port.
MEMO
5 You can change the name of the song (p. 19).
5 You can delete the song (p. 20).
NOTE
Never turn o the power while “Saving...” is shown in the display.
Listening to the recorded performance
After you record, the newly recorded song is selected.
1. Press the [s] button.
Playback starts from the beginning of your recorded performance.
SMF Recording
Recording a New Song
Preparing to Record
1. Select the tone that you want to play (p. 8).
2. You can sound the metronome if you like (p. 16).
You can specify the tempo and time signature of the metronome.
MEMO
The metronome’s tempo and time signature settings are stored in
the song, so that the metronome plays correctly even when you play
back the song.
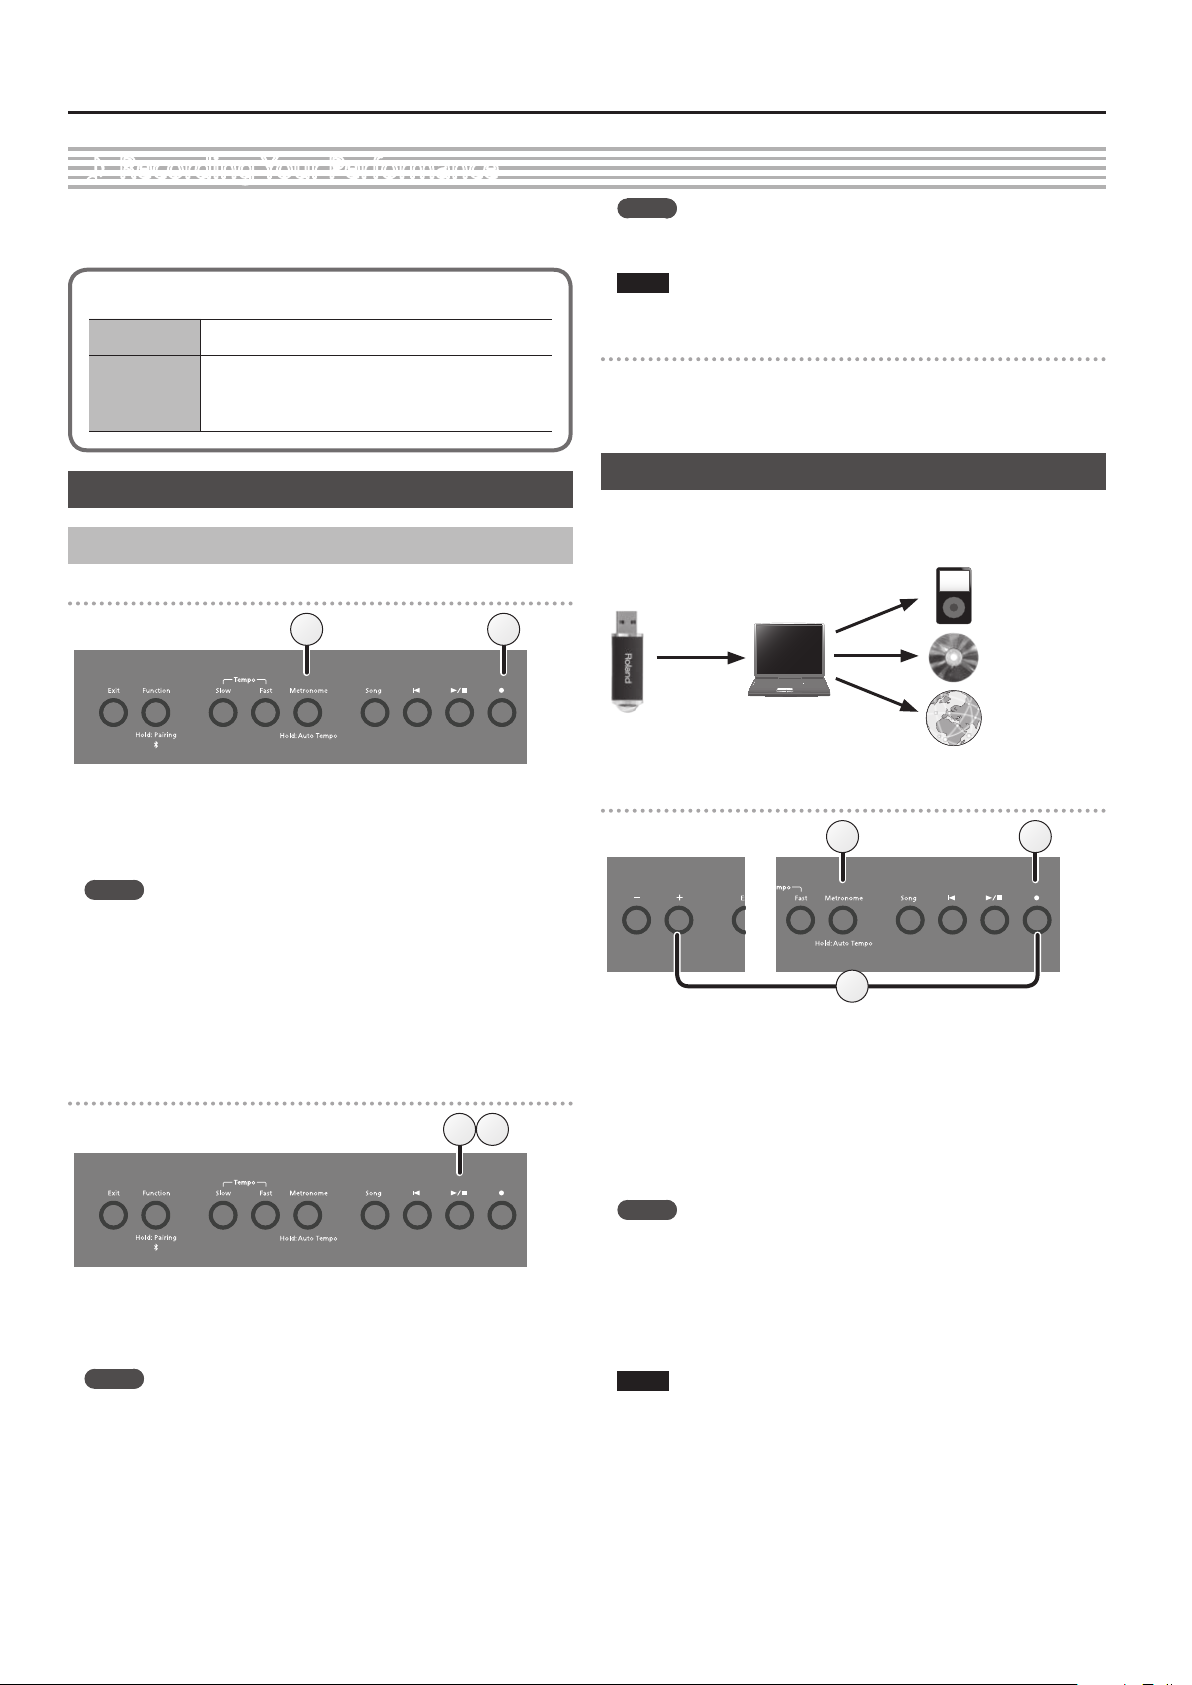
3. Press the [t] button.
The [t] button lights, the [s] button blinks, and the unit enters
record-standby mode.
If you decide to cancel recording, press the [t] button once again.
Starting your recording and saving it
1. Press the [s] button.
Recording starts after a one-measure count sounds.
When recording starts, the [t] button and [s] button light.
MEMO
You can also start recording by playing the keyboard. In this case, a
count is not sounded.
2. Press the [s] button.
Recording stops, and your performance is automatically saved.
Recording Audio
If you audio-record your performance, you’ll be able to listen to it on your
computer or audio player, use it to create a music CD, or publish it on the
Internet.
32
Preparing to Record
5 4
3
1. Connect your USB ash drive to the USB Memory port
(p. 6).
* Audio data can’t be stored in internal memory.
31 2
2. Select the tone that you want to play (p. 8).
3. Hold down the [t] button and press the [+] button to
select “Audio.”
MEMO
You can also specify this via the Function mode “Recording Mode”
setting (p. 27).
4. Press the [t] button.
The [t] button lights, the [s] button blinks, and the unit enters
record-standby mode.
If you decide to cancel recording, press the [t] button once again.
NOTE
Never turn o the power or disconnect the USB ash drive during
recording.
5. You can sound the metronome if you like (p. 16).
18
Page 19
Advanced Operation
Starting your recording and saving it
1 2
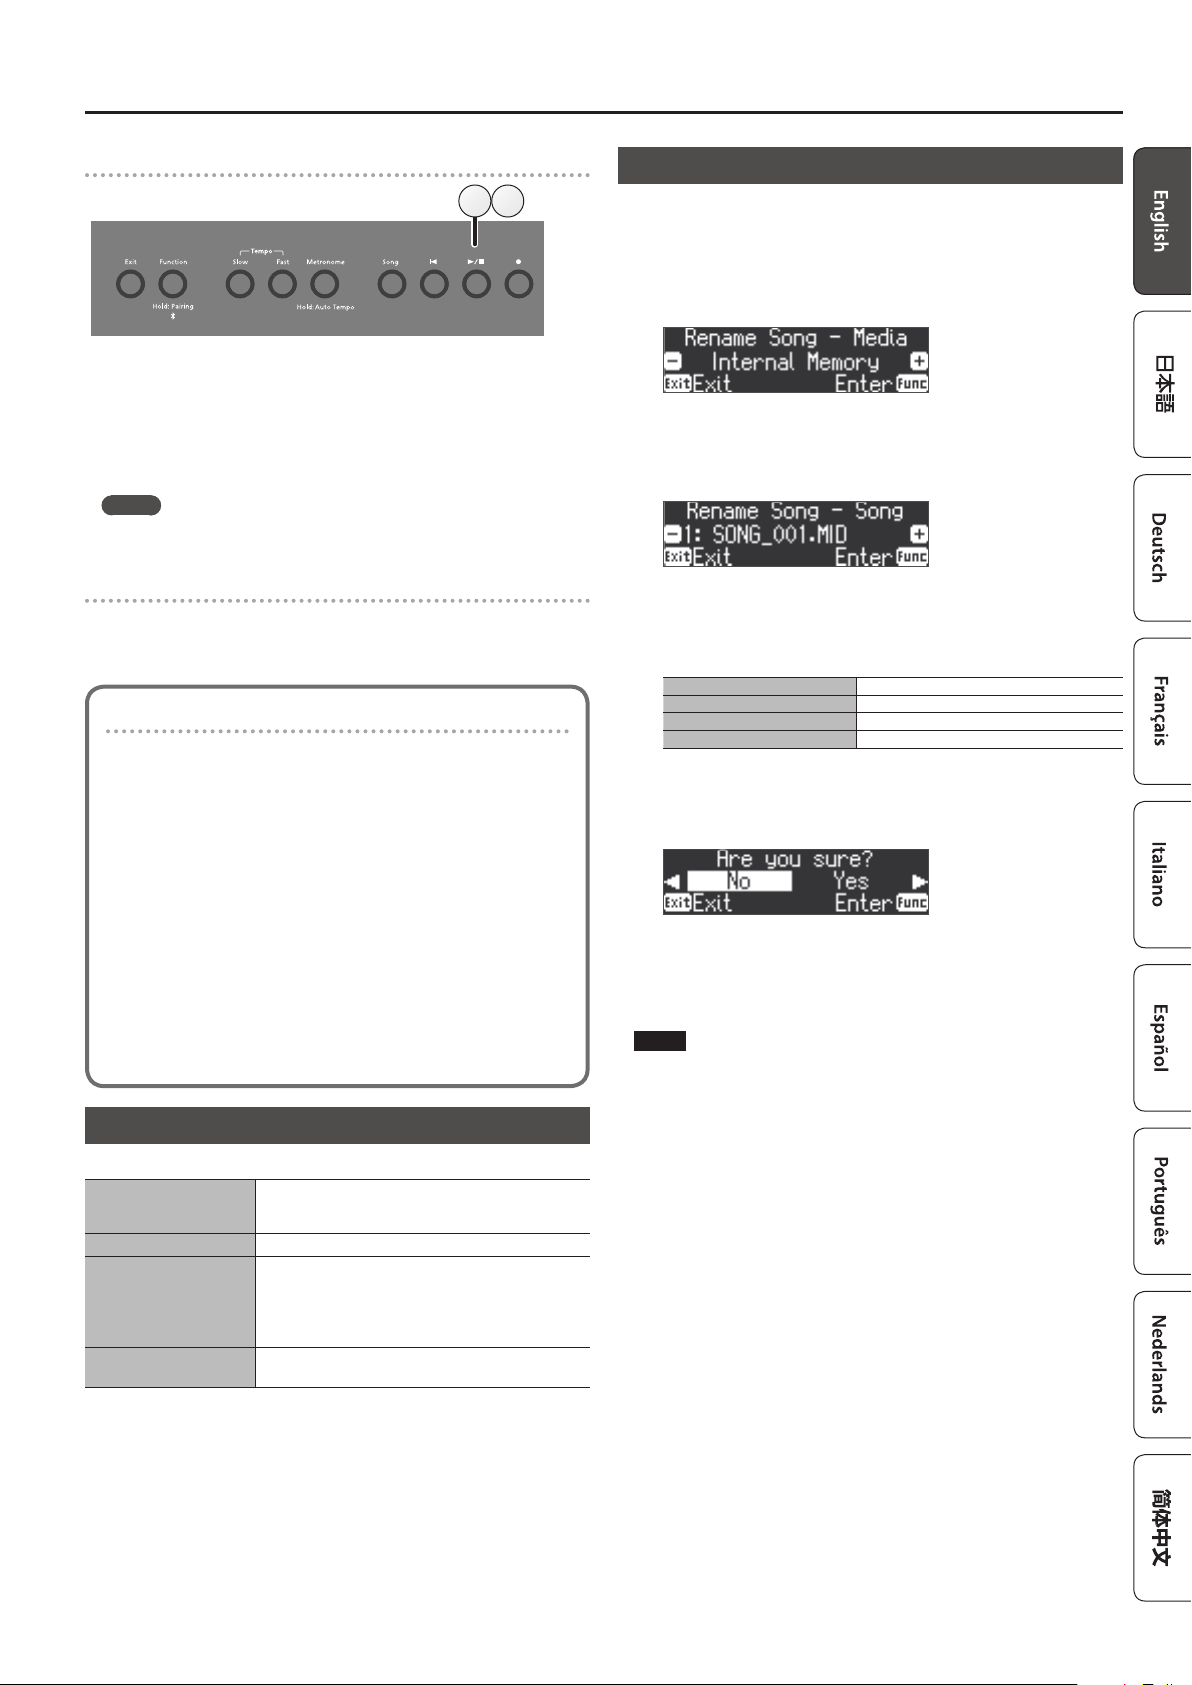
1. Press the [s] button.
Recording starts.
When recording starts, the [t] button and [s] button light.
2. Press the [s] button.
Recording stops, and your performance is automatically saved.
MEMO
5 You can change the name of the song (p. 19).
5 You can delete the song (p. 20).
Listening to the recorded performance
After you record, the newly recorded song is selected.
1. Press the [s] button.
Playback starts from the beginning of your recorded performance.
Converting an SMF-recorded song to audio
A song recorded as SMF can be re-recorded as audio so that you can play it
back on your computer.
1. Select the song that you want to convert to audio (p. 11).
2. Prepare for audio recording (“Preparing to Record” (p. 18)).
1. Connect your USB ash drive.
2. Hold down the [t] button and use the [+] button to select
“Audio.”
3. Press the [t] button.
3. Press the cursor [J] button to select the song of step 1.
4. Press the [s] button to start audio recording (“Starting your
recording and saving it” (p. 19)).
* During recording, any sounds that you produce by playing the keyboard
or that are input to the unit via the Mic Input jack, the USB port, the Input
Stereo jack, or Bluetooth audio are included in the audio that is recorded
during this conversion.
* Depending on the SMF, it might not be possible to convert it into the
identical audio as when the song was recorded.
Convenient Functions for Song Playback
When playing back a song, you can use the following functions.
Play all songs in the
selected category
(All Song Play)
Change the song tempo Press the Tempo [Slow] [Fast] button.
Play back the song at a
constant tempo
(Tempo Mute)
Sound a count-in (*1)
*1 A series of sounds rhythmically played to indicate the tempo before a song starts
is called a “count-in.” If you sound a count-in, it will be easier for you to synchronize
your own performance to the tempo of the playback
You can change the number of measures that are sounded as a count (p. 27).
.
Hold down the [Song] button and press the [s]
button.
Hold down the [s] button and press the Tempo
[Slow] or [Fast] button.
To clear the tempo mute function, hold down the [s]
button once again and press the Tempo [Slow] or [Fast]
button.
Hold down the [Metronome] button and press the
[s] button.
Renaming a Song (Rename Song)
Here’s how to rename a previously-saved song.
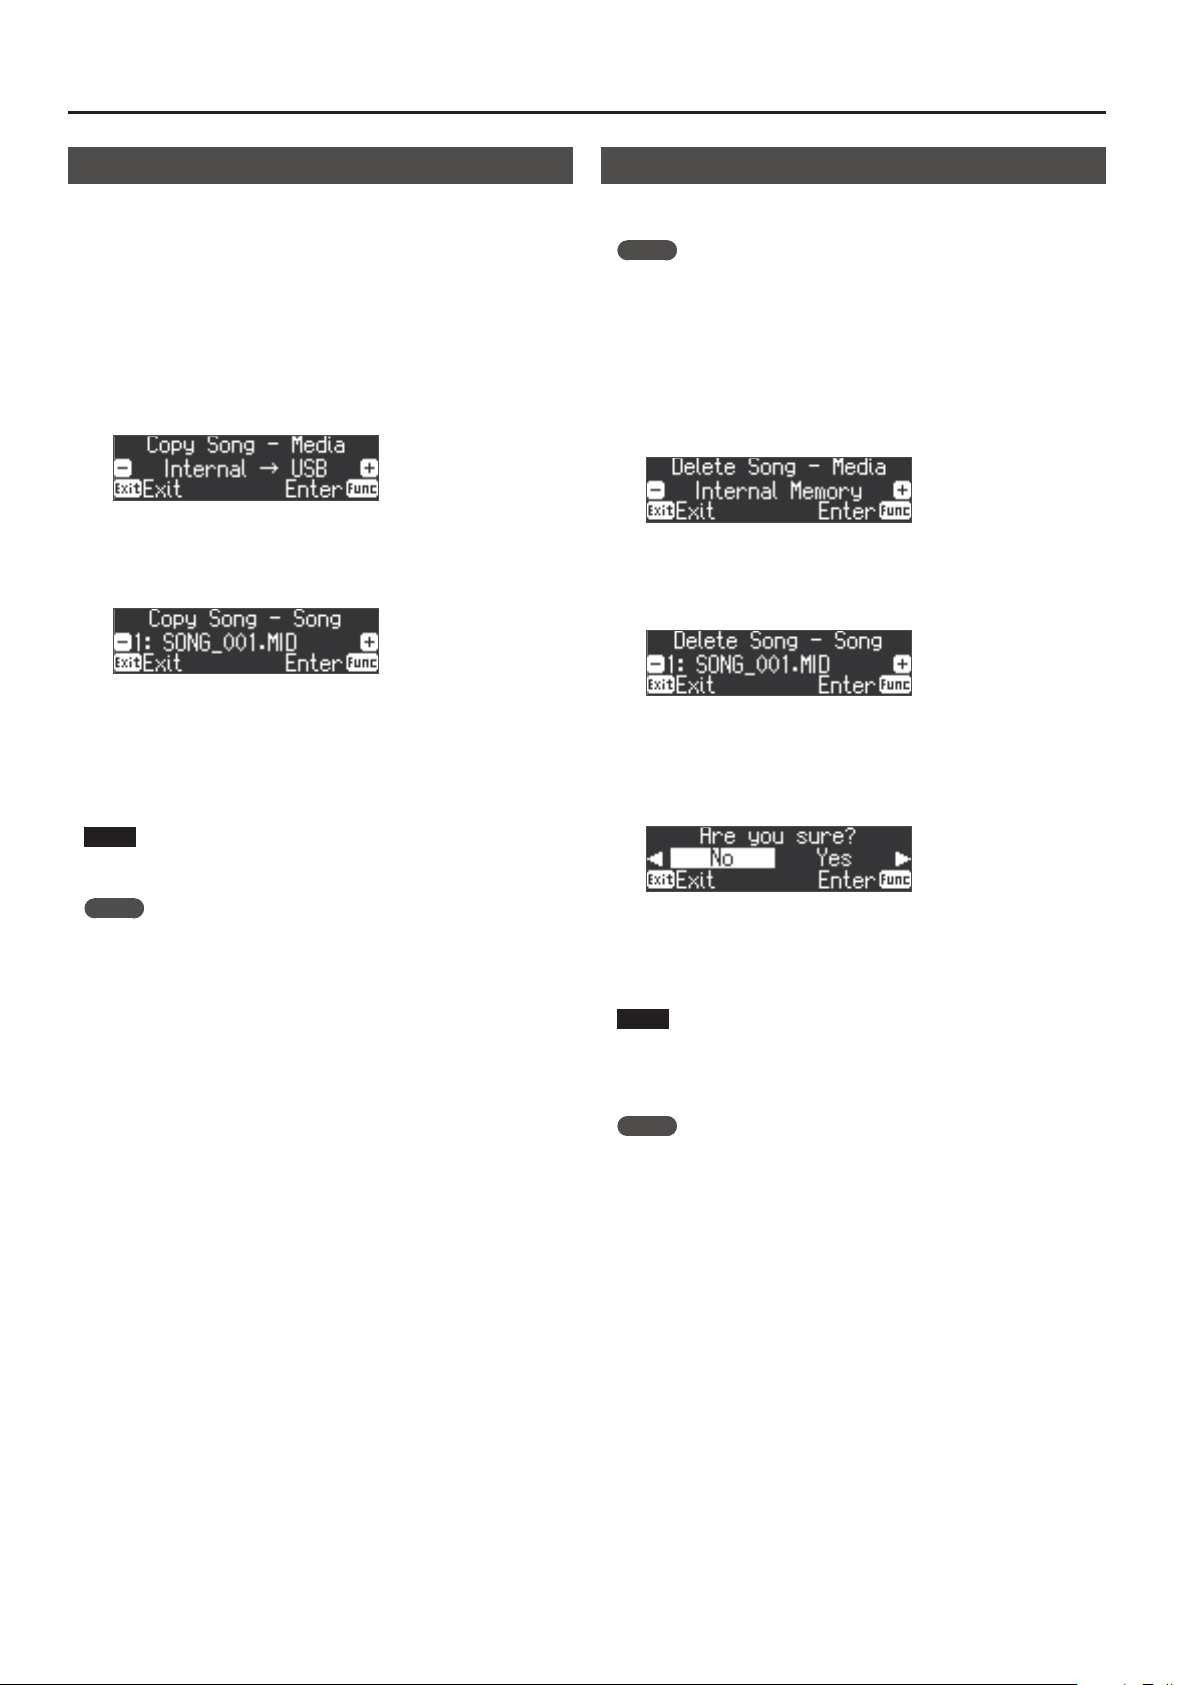
1. Press the [Function] button, and then use the [K] [J]
buttons to select “Rename Song.”
2. Press the [Function] (Enter) button.
The Rename Song screen appears.
3. Use the [–] [+] buttons to select the media that contains the
song that you want to rename.
4. Press the [Function] (Enter) button.
5. Use the [–] [+] buttons to select the song that you want to
rename, and then press the [Function] (Enter) button.
6. Rename the song.
Select the character to change
Change the character Press the [-] [+] buttons.
Insert one character
Delete one character
If you decide to cancel, press the [Exit] (Exit) button.
7. Press the [Function] (Enter) button.
A conrmation message appears.
If you decide to cancel, press the [Exit] (Exit) button.
8. Use the [J] button to select “Yes,” and then press the
[Function] (Enter) button.
The song is renamed.
NOTE
Never turn o the power or remove the USB ash drives while the
screen indicates “Executing....”
9. Press the [Exit] button several times to exit Function mode.
Press the [K] [J] buttons.
Press the [s] button.
Press the [t] button.
19
Page 20
Advanced Operation
Copying a Saved Song (Copy Song)
Songs that have been saved in internal memory can be copied to USB ash
drive. Alternatively, songs stored on a USB ash drive can be copied to
internal memory.
* Audio les cannot be copied.
* If a USB ash drive is not connected, you won’t be able to perform this
operation.
1. Press the [Function] button, and then use the [K] [J]
buttons to select “Copy Song.”
2. Press the [Function] (Enter) button.
The Copy Song screen appears.
3. Use the [–] [+] buttons to select the copy-source and copy
destination memory locations.
4. Press the [Function] (Enter) button.
5. Use the [–] [+] buttons to select the song that you want to
copy.
If you decide to cancel, press the [Exit] (Exit) button.
6. Press the [Function] (Enter) button.
The copy is executed.
NOTE
Never turn o the power or remove the USB ash drives while the
screen indicates “Executing....”
MEMO
If a song with the same le name has already been saved, the
conrmation message “Overwrite?” appears. To overwrite the song,
use the [J] button to select “Yes,” and then press the [Function]
(Enter) button.
7. Press the [Exit] button several times to exit Function mode.
Deleting a Saved Song (Delete Song)
Here’s how to delete a song that you saved on an internal memory or USB
ash drive.
MEMO
5 If you want to delete all songs that have been saved to internal
memory or USB ash drive, initialize the memory (p. 25).
5 If you want to delete a song on the USB ash drive, connect your USB
ash drive to the USB Memory port before you continue.
1. Press the [Function] button, and then use the [K] [J]
buttons to select “Delete Song.”
2. Press the [Function] (Enter) button.
The Delete Song screen appears.
3. Use the [–] [+] buttons to select the memory location that
contains the song you want to delete.
4. Press the [Function] (Enter) button.
5. Use the [–] [+] buttons to select the song that you want to
delete.
6. Press the [Function] (Enter) button.
A conrmation message appears.
If you decide to cancel, press the [Exit] (Exit) button.
7. Use the [J] button to select “Yes,” and then press the
[Function] (Enter) button.
The deletion is executed.
NOTE
Never turn o the power or remove the USB ash drives while the
screen indicates “Executing....”
8. Press the [Exit] button several times to exit Function mode.
MEMO
You can also delete a song by holding down the [t] button and pressing
the [Exit] button.
20
Page 21
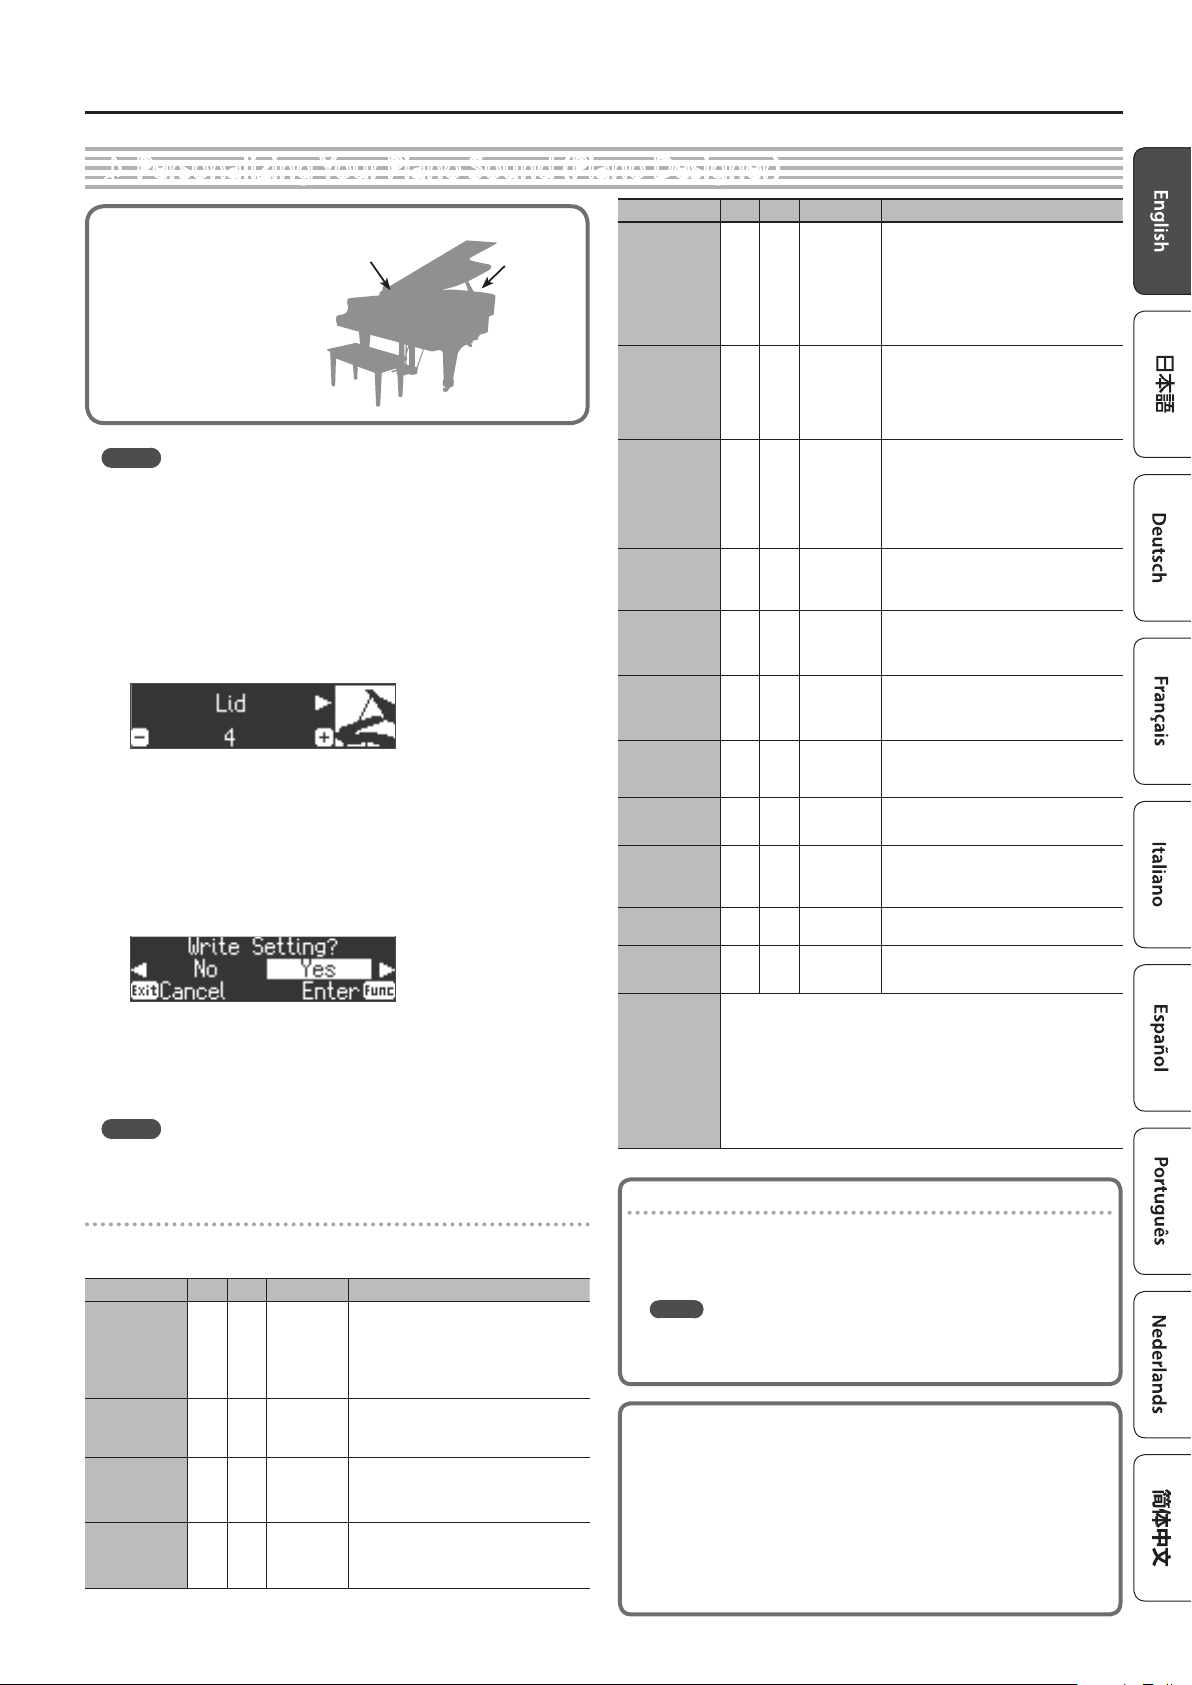
Personalizing Your Piano Sound (Piano Designer)
˙
Parameter 90X 60X Value Explanation
What is Piano Designer?
This unit allows you to personalize
your piano sound by adjusting
various factors that aect the
sound, such as the piano’s strings,
the resonance produced using
the pedals, and the sound of the
hammers striking the strings.
This function is called “Piano
Designer.”
Hammer Noise
Adjusting the piano
sound to your taste
String
Resonance
Full Scale String
Res.
String
Resonance
MEMO
5 The Piano Designer function can be used to personalize the sound
only with “PureAcoustic Piano sound engine” tones on the FP-90X,
Damper
Resonance
and only with “SuperNATURAL Piano sound engine” tones on the
FP-60X.
5 The settings are saved for each tone.
1. Press the [Function] button, and then use the [K] [J]
Key O
Resonance
buttons to select “Piano Designer.”
2. Press the [Function] (Enter) button.
The Piano Designer screen appears.
3. Use the [K] [J] buttons to select the item that you want to
Cabinet
Resonance
Soundboard
Type
Damper Noise
edit.
4. Use the [–] [+] buttons to adjust the value.
5. When you’re nished using Piano Designer, press the [Exit]
button.
A conrmation message appears.
If you decide to cancel, press the [Exit] (Exit) button.
Soft Pedal
Single Note
Tuning
Single Note
Volume
Single Note
Character
6. Use the [J] button to select “Yes,” and then press the
[Function] (Enter) button.
The Piano Designer settings are saved.
MEMO
If you decide to exit without saving the settings, use the [K] button
to select “No” and then press the [Function] (Enter) button.
Piano designer parameters
* The parameters that can be edited dier between the FP-90X and the
FP-60X.
Parameter 90X 60X Value Explanation
Adjusts the extent to which the lid of the grand
piano is open.
Lid
Key O Noise
Hammer Noise
Duplex Scale
t t
t
t
t
–
–
–
0–6
O, 1–10
-5–0–+5
O, 1–10
The sound will become more mellow as you
close the lid of the piano in the screen. The
sound will become brighter as you open the lid
of the piano in the screen.
Adjusts the action noise that is heard when
you release a key.
Higher settings produce a louder action noise.
Adjusts the sound produced when the
hammer of an acoustic piano strikes the string.
Higher settings will produce a louder sound of
the hammer striking the string.
Adjusts the sympathetic vibrations of an
acoustic piano’s Duplex Scale.
Higher settings will make the sympathetic
vibration louder.
Reset Setting
88-key settings
1. Select the Single Note Tuning, Single Note Volume, or Single
Note Character, and press the [Function] (Enter) button.
2. Play the key that you want to edit, and use the [–] [+] buttons to
adjust the settings for that key.
MEMO
You can use the [K] [J] buttons to move to a dierent 88-key
parameter.
3. Press the [Exit] button to return to the previous screen.
What is the duplex scale?
The Duplex Scale is a system of sympathetically vibrating strings sometimes
included in grand pianos.
These sympathetically vibrating strings are not struck directly with hammers,
but sound by vibrating in sympathy with the vibrations of other strings. By
resonating with the overtones, these strings add richness and brilliance to the
sound. These sympathetic strings are added only to the high register above
approximately C4. Since they do not have a damper (a mechanism that stops
them from sounding), they will continue
then release it to stop the sound of the string that was actually struck.
Advanced Operation
Adjusts the resonant sound of an acoustic
piano (the sound produced by the strings of
previously-pressed keys vibrating in sympathy
O, 1–10
–
t
t
t
–
–
–
–
O, 1–10
O, 1–10
O, 1–10
O, 1–10
1–5
O, 1–10
1–10
-50–0–+50
-50–0
-5–0–+5
–
–
t t
t
t
t
t
t t
t t
t t
Here’s how the Piano Designer settings of the selected sound can be
returned to their factory-set state.
1. Press the [Function] (Enter) button.
If you decide to cancel, press the [Exit] button.
2. Use the [J] button to select “Yes,” and then press the
[Function] (Enter) button.
The settings return to their factory-set state.
with newly played notes, or the sound of other
strings vibrating in sympathy with the notes
you play while pressing the damper pedal).
Higher settings produce louder sympathetic
resonance.
This adjusts the string resonance of the
acoustic piano sound (the sympathetic
vibrations of strings for previously played
notes that occur when you play another note).
Higher settings will make the sympathetic
vibration louder.
Adjusts the overall resonance of the acoustic
piano when its damper pedal is pressed (the
sound of other strings vibrating in sympathy
when you press the damper pedal, and the
resonance of the entire instrument).
Higher settings make the sympathetic
vibration louder.
Adjusts the resonance of the subtle sounds
that occur when a key of an acoustic piano
is released. A higher value produces a larger
tonal change during the decay.
Adjusts the body resonance of the grand
piano itself.
Higher values will produce a larger body
resonance.
Selects how the soundboard of the acoustic
piano will resonate.
You can choose from ve dierent types of
resonance.
Adjusts the damper noise of the acoustic piano
sound (the sound of the damper releasing the
strings when you press the damper pedal).
Adjusts the depth of the eect that occurs
when you press the soft pedal. With higher
values, the change will be greater.
Species a method of tuning (stretch tuning)
that is distinctive to the piano, in which the
high register is tuned slightly sharper and the
low register is tuned slightly atter.
Adjusts the volume of each key. Higher
settings increase the volume.
Adjusts the tonal character of each key. Higher
settings produce a harder tone, and lower
settings produce a softer tone.
sounding even after you play a note and
21
Page 22
Advanced Operation
Using the Microphone
˙
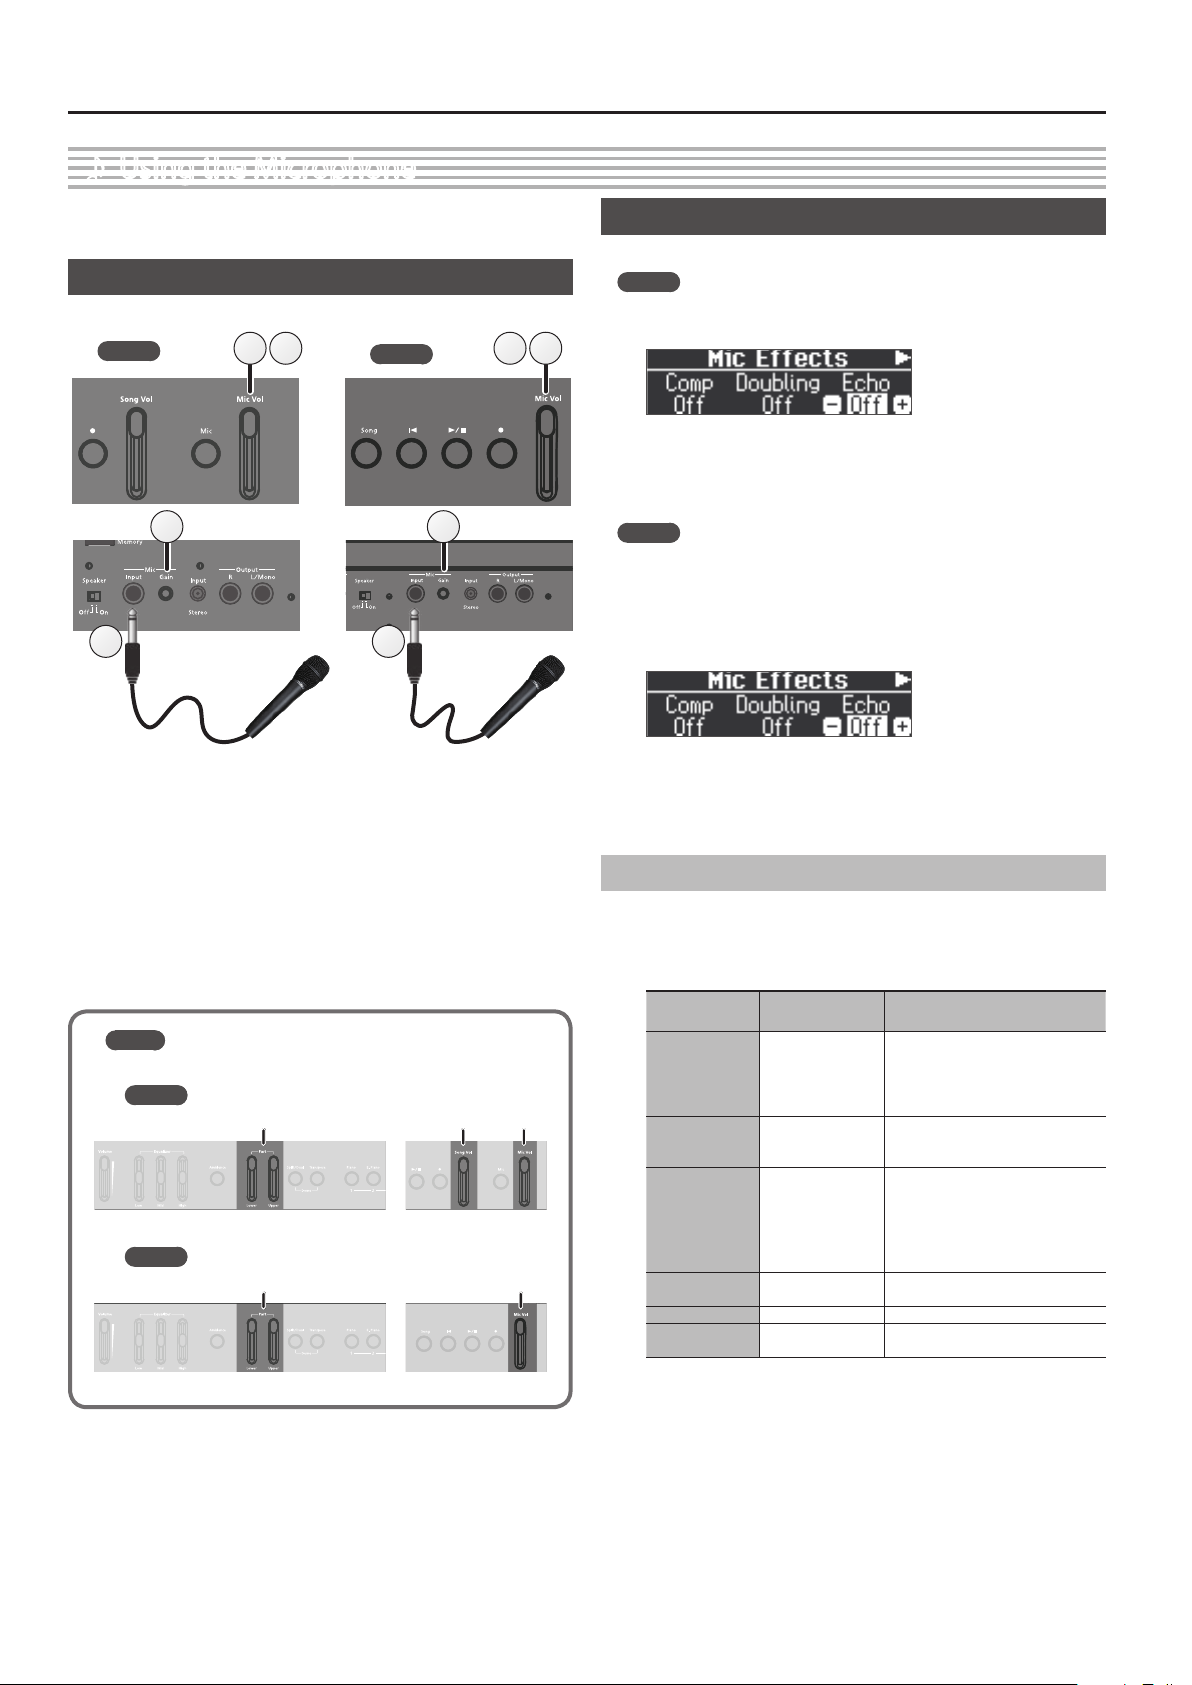
You can connect a dynamic microphone (sold separately) to the Mic Input
jack and sing while playing.
Connecting a Microphone
Here’s how to connect a microphone to the Mic Input jack.
FP-90X
3 3
1 14 4
FP-60X
Applying an Eect to the Mic (Mic Eects)
Here’s how to apply an eect to the sound of the mic.
FP-90X
1. Press the [Mic] button.
The Mic Eects screen appears.
2. Use the [K] [J] buttons to select the eect that you want to
apply.
3. Use the [-] [+] buttons to switch the setting on/o.
FP-60X
1. Press the [Function] button to make it light.
2. Use the [K] [J] buttons to select “Mic Eects.”
2 2
Microphone Microphone
1. Move the [Mic Vol.] slider all the way down to minimize the
volume.
2. Connect the microphone to the Mic Input jack.
The microphone input will turn on.
3. If the sound of the mic is too weak or is distorted, turn the
rear panel Mic [Gain] knob to adjust the volume of the mic.
4. Move the [Mic Vol.] slider to adjust the volume of the mic.
* If the volume is excessive, you may hear noise from the speakers.
MEMO
You can adjust the volume balance as with an audio mixer.
FP-90X
Piano (Part) volume Song volume Mic volume
FP-60X
Piano (Part) volume Mic volume
3. Press the [Function] (Enter) button.
The Mic Eects screen appears.
4. Use the [K] [J] buttons to select the eect that you want to
apply.
5. Use the [-] [+] buttons to switch the setting on/o.
Adjusting the Mic Eect
Here’s how to adjust how the eect is applied.
1. In the Mic Eects screen, press the [J] button.
2. Adjust the eect.
Indication
[K] [J] button
Compressor Type Soft, Normal, Hard
Doubling Type
Doubling Width Light, Normal, Deep
Doubling Level 0–10
Echo Type 1–7 Selects the type of echo.
Echo Level 0–10
Value
[-] [+] buttons
One Voice, Two
Voice
Explanation
Species the amount of the eect
that restrains the level in response
to the audio input. Soft, Normal,
and Hard settings produce a
progressively greater eect.
Produces an eect as though a
singing voice is layered multiple
times.
Species the pitch dierence
between the layered voice and the
original sound.
Light, Normal, and Deep settings
produce progressively greater pitch
dierence.
Species the volume of the doubling
eect.
Higher values produce greater
reverberance.
22
Page 23
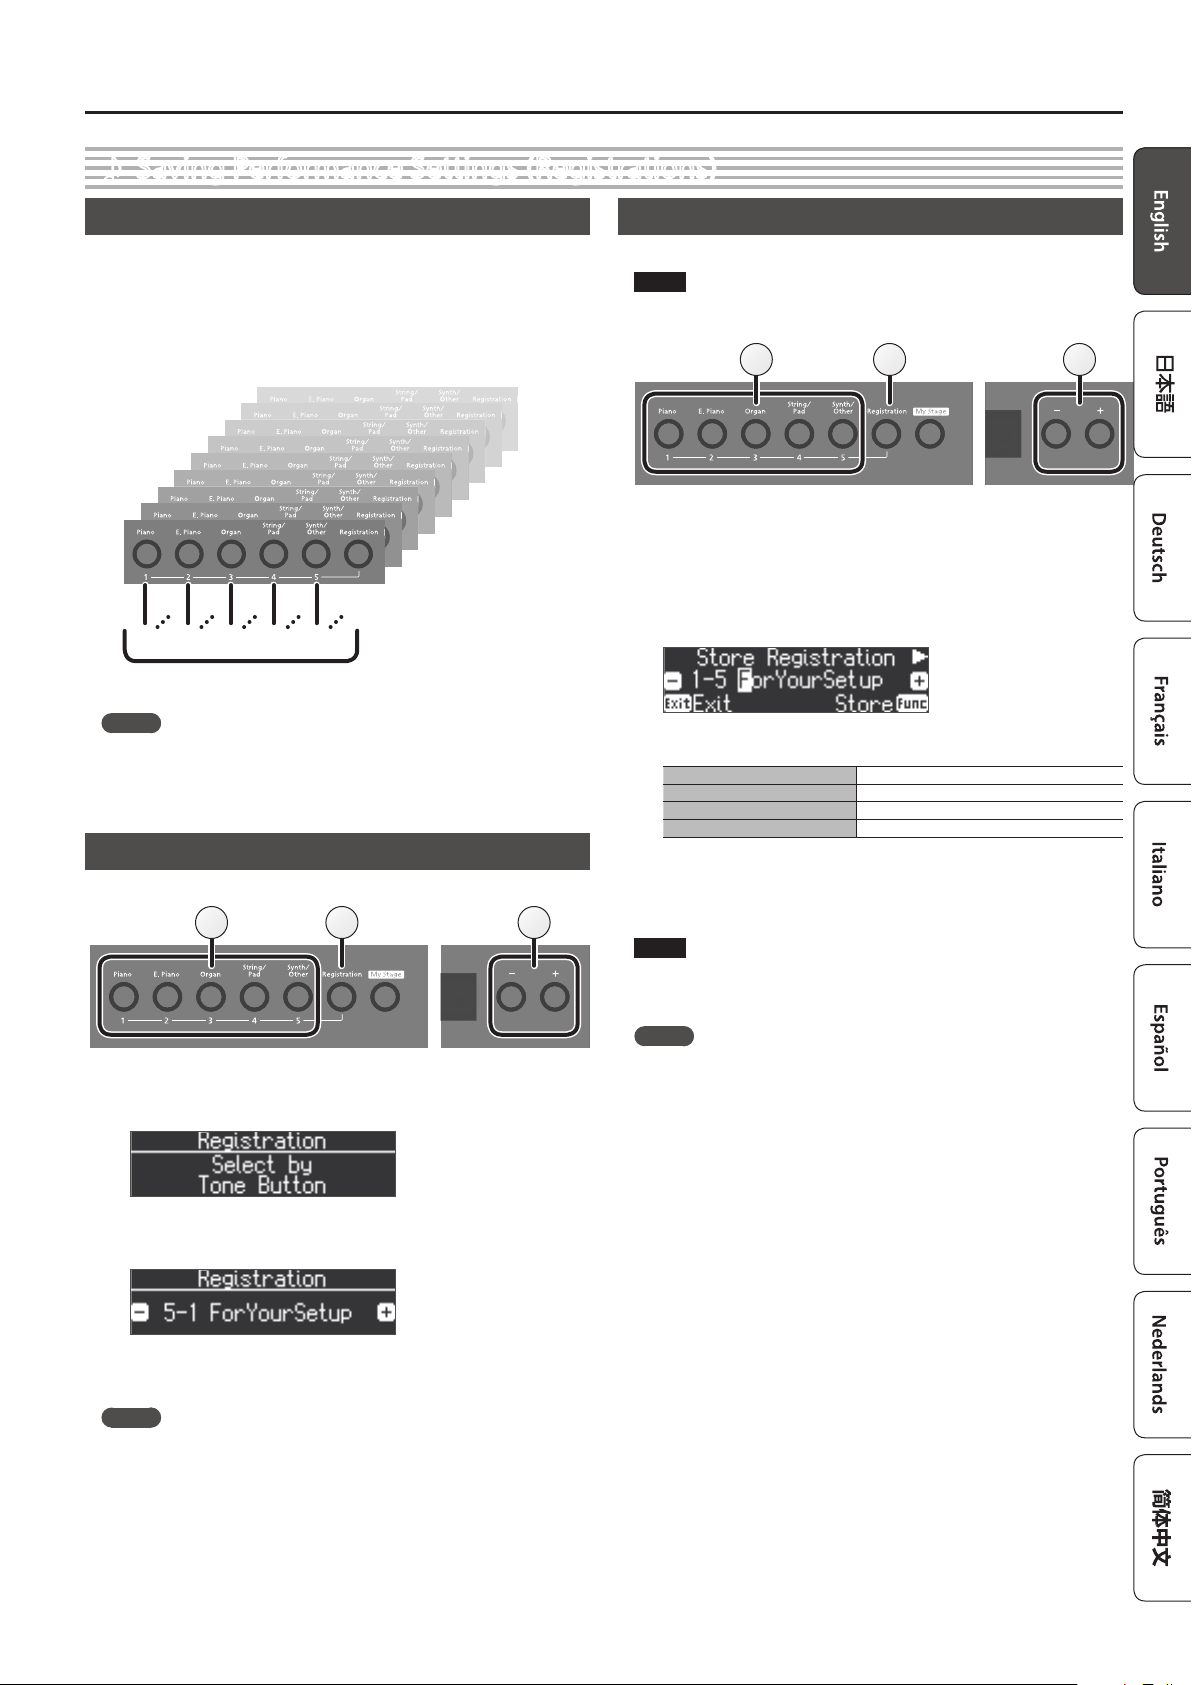
Saving Performance Settings (Registrations)
˙
Advanced Operation
What Is a Registration?
Tone settings and performance settings such as Dual Play or Split Play can
be saved as a “registration” and recalled whenever you like.
This unit has ve registration buttons ([1]–[5]), and you can save nine
dierent registrations under each button. This means that you can save as
many as 45 registrations.
An entire group of 45 registrations is called a “Registration Set.”
9
8
Variation
3
2
1
1-1
MEMO
5 For more about the settings saved in a registration, refer to “Saved
Settings” (p. 30).
5 You can save registration sets to a USB ash drive (sold separately;
p. 6).
7
6
5
4
4-9
3-9
2-9
1-9
5-1
4-1
3-1
2-1
45 registrations=Registration set
5-9
Recalling a Registration
Here’s how to recall settings that you’ve saved in a registration.
1 32
1. Press the [Registration] button.
The rst time you press the [Registration] button after turning on the
power, a screen like the following will appear.
Saving Current Settings into a Registration
Here’s how to save the performance settings to a registration.
NOTE
When you save a registration into a location, it will overwrite any
registration already stored at that location.
2 2 2
1. Make the desired performance settings.
2. Hold down the [Registration] button and press one of the
[1]–[5] buttons, then press the [-] [+] buttons to which you
want to assign the settings.
When you release the [Registration] button, you will see a screen like
the one shown below.
3. Rename the registration.
Select the character to change
Change the character Press the [-] [+] buttons.
Insert one character
Delete one character
If you decide to cancel, press the [Exit] (Exit) button.
4. Press the [Function] (Store) button.
The performance settings are saved.
NOTE
Do not turn o the power while “Executing...” is displayed.
5. Press the [Exit] button.
MEMO
You can reset all registrations to their factory defaults. For details, refer to
“Returning the Factory Settings (Factory Reset)” (p. 25).
Press the [K] [J] buttons.
Press the [s] button.
Press the [t] button.
2. Press a number button ([1] to [5]) to choose the location
where the desired registration is saved.
3. Press the [–] [+] buttons to select the registration variation.
The settings change accordingly.
MEMO
5 You can also use a pedal to recall registrations (p. 28).
5 You can reload registration sets that you’ve saved to a USB ash
drive (p. 24).
4. Press the [Exit] button.
23
Page 24
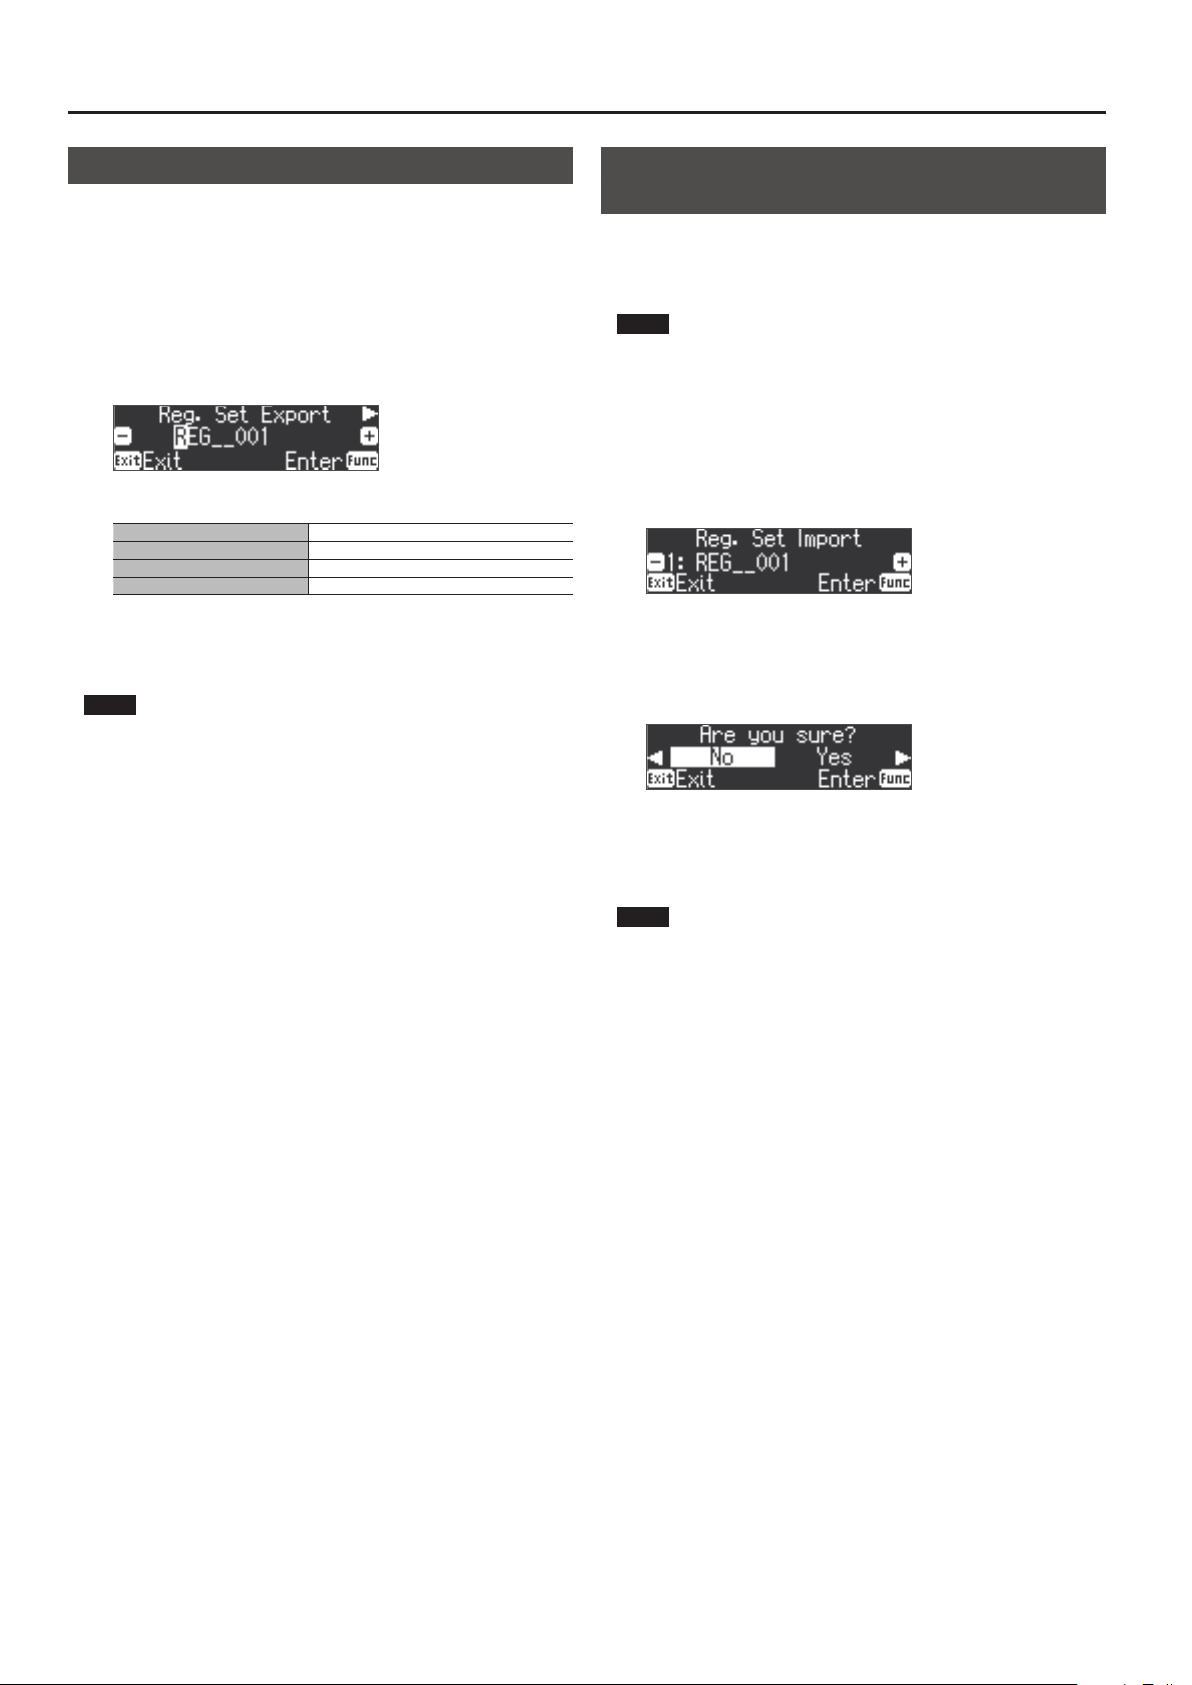
Advanced Operation
Saving a Registration Set (Registration Set Export)
Here’s how the registration set that’s saved in this unit can be saved to a
USB ash drive.
* If you’re saving to a USB ash drive, connect your USB ash drive to the
USB Memory port before proceeding.
1. Press the [Function] button.
2. Use the [K] [J] buttons to select “Reg. Set Export.”
3. Press the [Function] (Enter) button.
The Reg. Set Export screen appears.
4. Renaming the registration set.
Select the character to change
Change the character Press the [-] [+] buttons.
Insert one character
Delete one character
If you decide to cancel, press the [Exit] (Exit) button.
5. Press the [Function] (Enter) button.
The registration set is saved.
NOTE
Never turn o the power or remove the USB ash drives while the
screen indicates “Executing....”
6. Press the [Exit] button several times to exit Function mode.
Press the [K] [J] buttons.
Press the [s] button.
Press the [t] button.
Loading a Saved Registration Set (Registration Set
Import)
Here’s how a registration set saved on a USB ash drive can be loaded into
the registrations of this unit.
* If you want to load a registration set from a USB ash drive, connect
your USB ash drive to the USB Memory port before proceeding.
NOTE
Note that when you load a registration set, it will overwrite (and erase) all
of the registrations already in registration memory. If you wish to retain
your existing registrations, save them to a USB ash drive.
1. Press the [Function] button.
2. Use the [K] [J] buttons to select “Reg. Set Import.”
3. Press the [Function] (Enter) button.
The Reg. Set Import screen appears.
4. Use the [–] [+] buttons to select the registration set you
want to load.
5. Press the [Function] (Enter) button.
A conrmation message appears.
If you decide to cancel, press the [Exit] (Exit) button.
6. Use the [J] button to select “Yes,” and then press the
[Function] (Enter) button.
The registration set will be loaded.
NOTE
Never turn o the power or remove the USB ash drives while the
screen indicates “Executing....”
7. Press the [Exit] button several times to exit Function mode.
24
Page 25
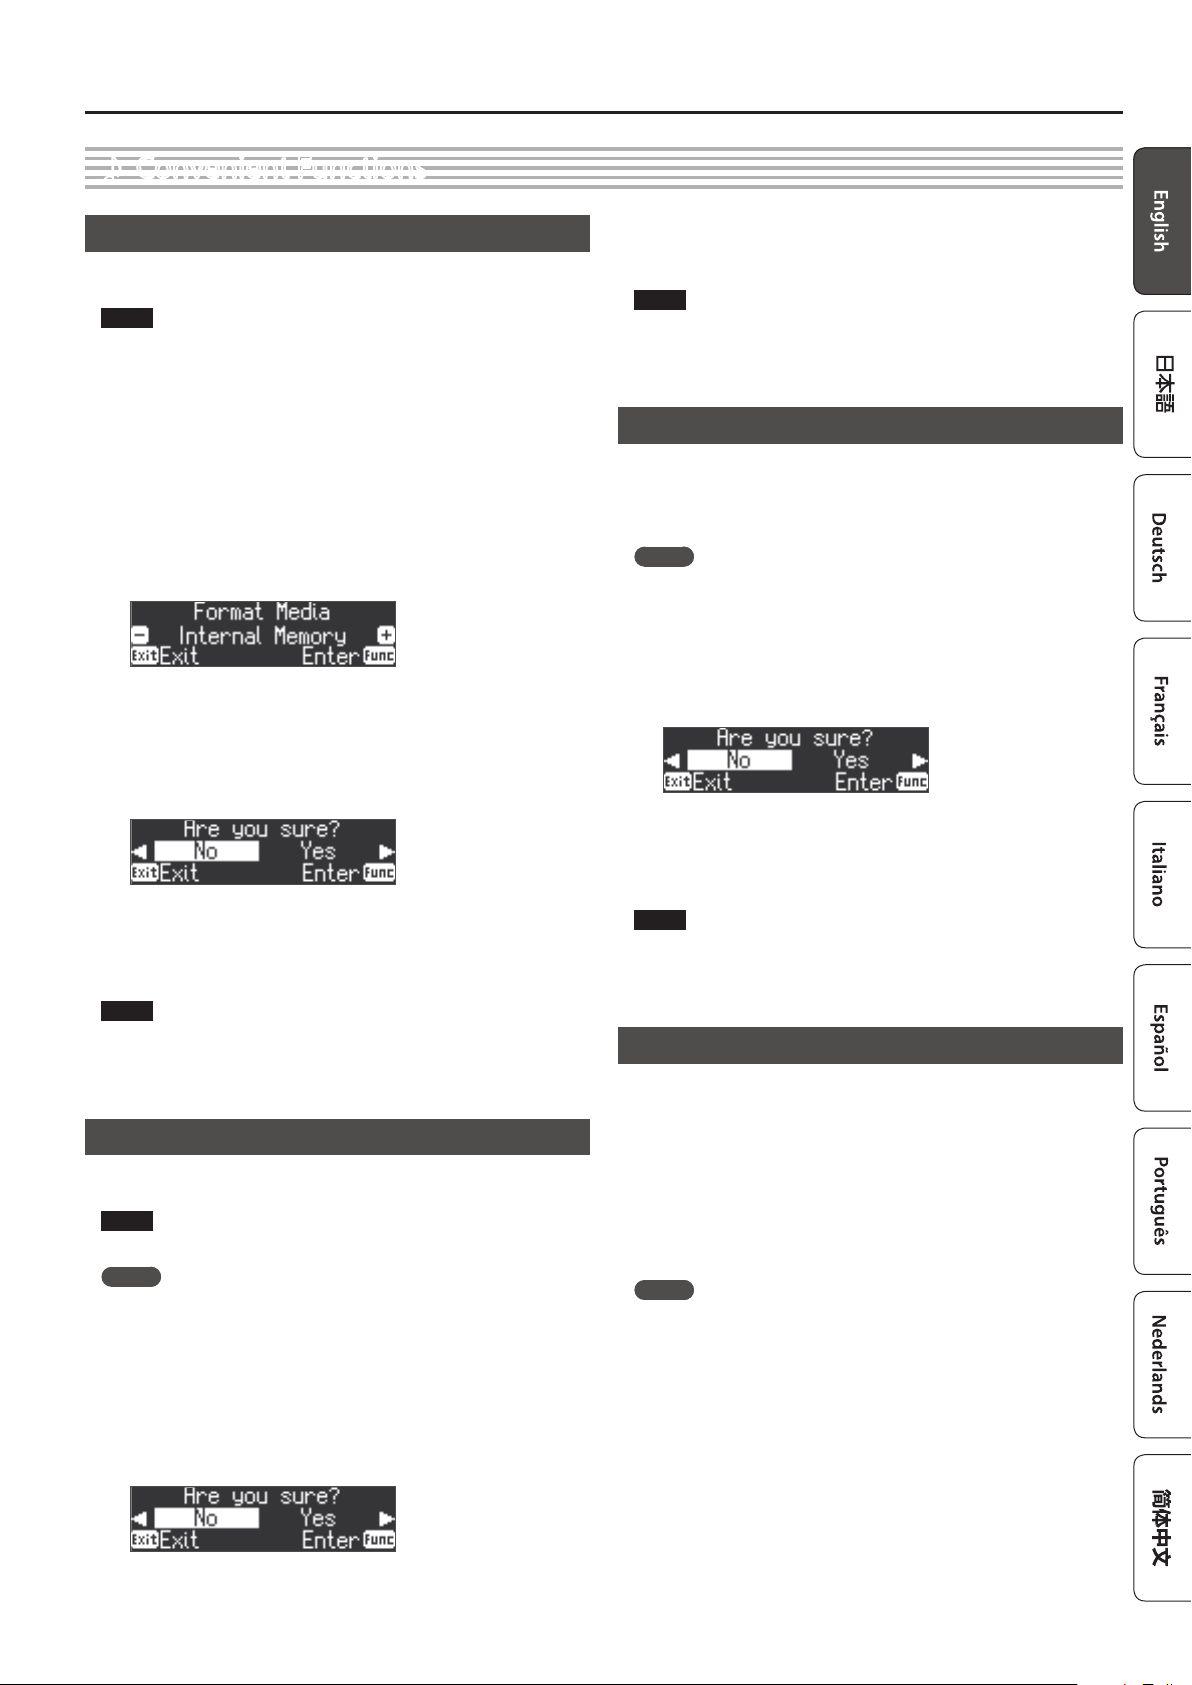
Convenient Functions
˙
Advanced Operation
Initializing the Memory (Format Media)
You can completely erase all data that were saved in internal memory or on
a USB ash drive.
NOTE
5 All data saved in internal memory or on the USB ash drive will be
erased when you initialize the media.
5 If you want settings other than the internal memory and USB ash
drive songs to be returned to their factory-set state, execute a
Factory Reset (p. 25).
1. If you want to initialize a USB ash drive, connect the USB
ash drive to the USB Memory port (p. 6).
2. Press the [Function] button, and then use the [K] [J]
buttons to select “Format Media.”
3. Press the [Function] (Enter) button.
The Format Media screen appears.
If you decide to cancel, press the [Exit] (Exit) button.
4. Use the [–] [+] buttons to select the media that you want to
format.
5. Press the [Function] (Enter) button.
A conrmation message appears.
If you decide to cancel, press the [Exit] (Exit) button.
6. Use the [J] button to select “Yes,” and then press the
[Function] (Enter) button.
The memory is formatted.
NOTE
Never turn o the power or remove the USB ash drives while the
screen indicates “Executing....”
7. Press the [Exit] button several times to exit Function mode.
Returning to the Factory Settings (Factory Reset)
Here’s how to restore all registrations and internally saved settings to the
factory-set condition. This function is called “Factory Reset.”
NOTE
A factory reset returns all of your saved settings to their factory values.
MEMO
Executing this function does not erase the songs in internal memory or
on a USB ash drive (sold separately). If you want to erase all songs from
internal memory or from a USB ash drive, refer to “Reformatting Memory
(Format Media)” (p. 25).
3. Use the [J] button to select “Yes,” and then press the
[Function] (Enter) button.
The memory is reset to its factory values.
NOTE
Never turn o the power or remove the USB ash drives while the
screen indicates “Executing....”
4. Turn the power o, then on again (p. 5).
Retaining Settings After Power-O (Memory Backup)
Temperament settings, equalizer settings, and other settings are reset to
their default values when this unit is turned o.
You can automatically restore the desired settings if you save them in
internal memory.
MEMO
For a list of settings saved by Memory Backup, see “Saved Settings” (p.
30).
1. Press the [Function] button, and then use the [K] [J]
buttons to select “Memory Backup.”
2. Press the [Function] (Enter) button.
A conrmation message appears.
If you decide to cancel, press the [Exit] (Exit) button.
3. Use the [J] button to select “Yes,” and then press the
[Function] (Enter) button.
Memory Backup will be carried out.
NOTE
Never turn o the power or remove the USB ash drives while the
screen indicates “Executing....”
4. Press the [Exit] button several times to exit Function mode.
Using USB
This unit can be USB-connected to a computer or similar device so that
performance data (USB MIDI) and audio signals (USB Audio) can be
transferred, allowing you to do the following things.
5 A performance played on this unit can be recorded as MIDI data into
sequencer software (sold separately).
5 MIDI data sent from sequencer software can played by this unit.
5 A performance played on this unit can be recorded as an audio signal into
sequencer software.
5 Music played back on your computer can be heard through the
speakers of this unit.
MEMO
Since this unit’s USB functionality uses the default USB driver of your
computer, you don’t need to install a dedicated USB driver.
1. Press the [Function] button, and then press the [K] [J]
buttons to select “Factory Reset.”
2. Press the [Function] (Enter) button.
A conrmation message appears.
If you decide to cancel, press the [Exit] (Exit) button.
25
Page 26
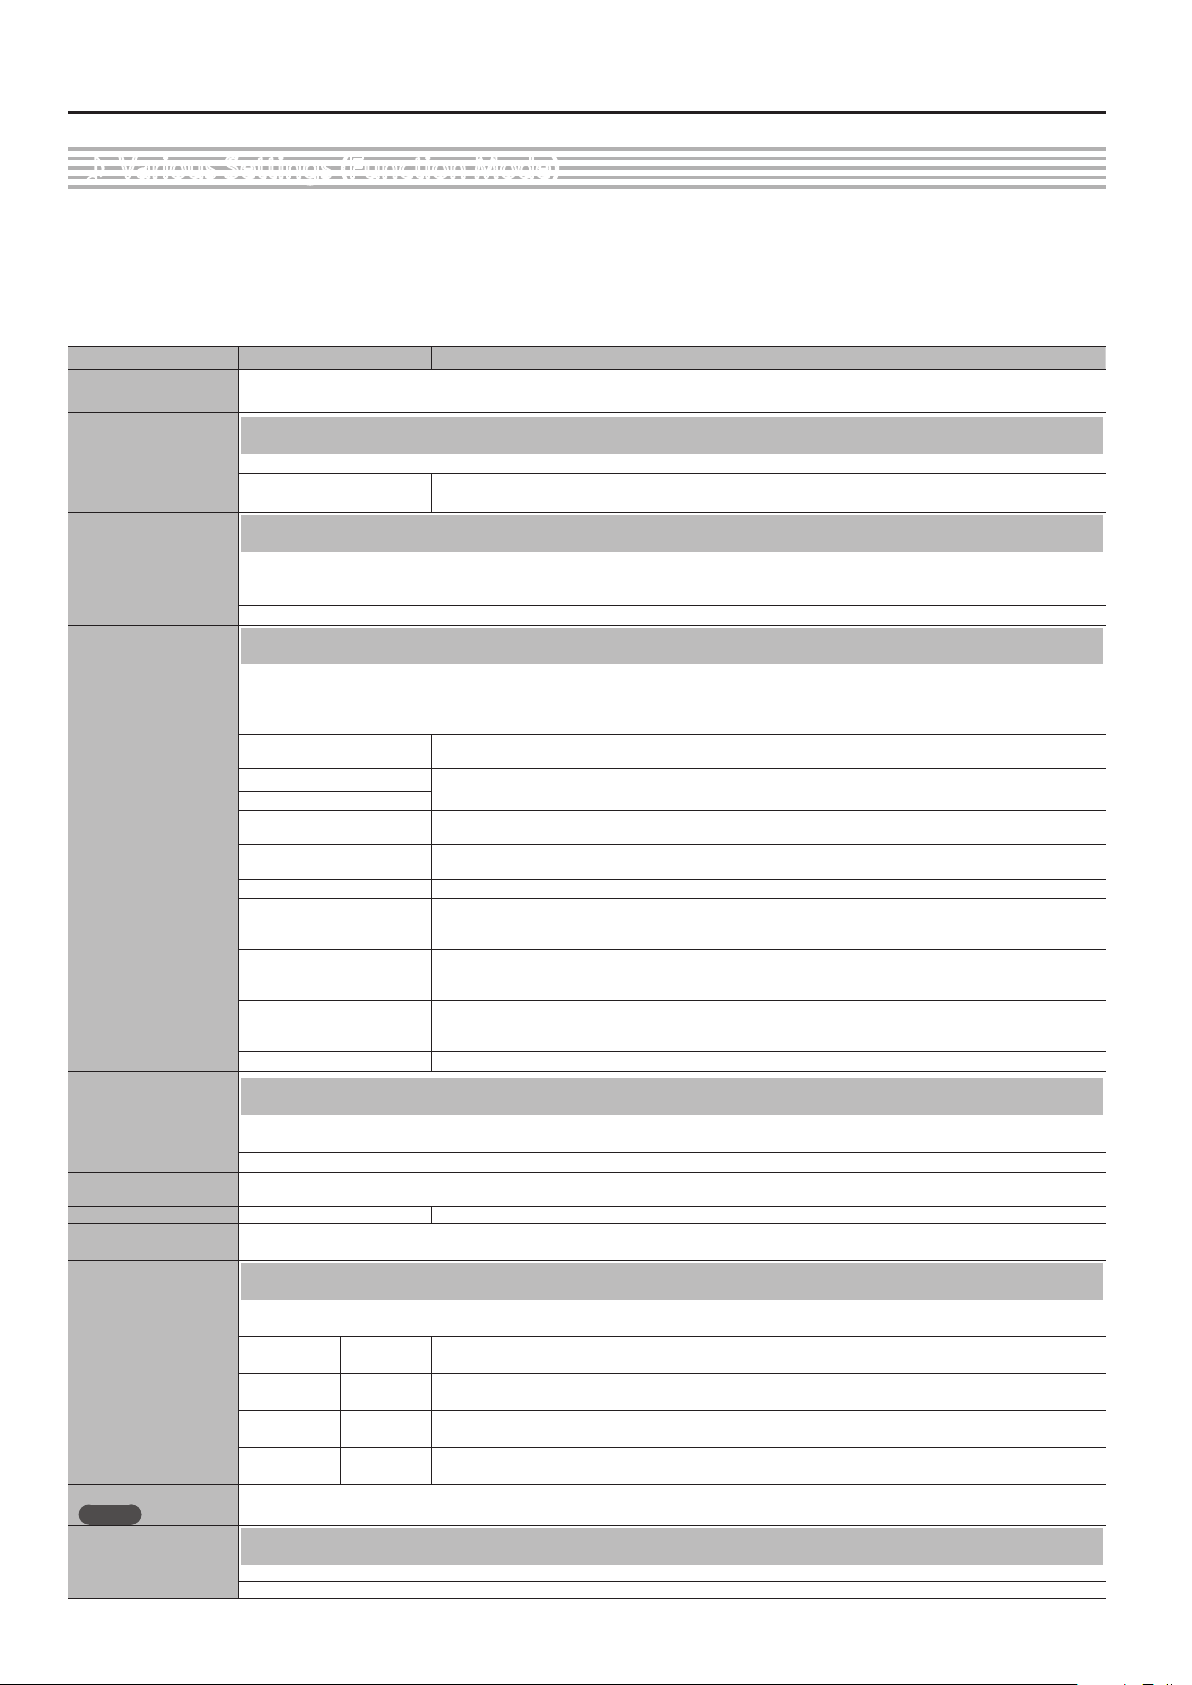
Advanced Operation
Various Settings (Function Mode)
˙
1. Press the [Function] button.
The [Function] button lights, and the unit is in Function mode.
2. Press the [K] [J] buttons to select the setting you want to
change.
* Depending on the item you select, an additional screen may be
displayed.
Indication [K] [J] buttons
Bluetooth
Parameter [-] [+] buttons Explanation
You can use a smartphone app via Bluetooth, or play back audio from your smartphone.
Refer to “Connecting the Piano and a Mobile Device via Bluetooth” (p. 12).
Adjusting the Keyboard Response (Key Touch)
Key Touch
The way in which the keyboard responds to your playing strength can be adjusted to your personal taste.
Fix, 1–100
Higher values will make the keyboard feel heavier.
If you’ve specied “Fix,” notes will sound at the same volume regardless of how strongly you play the keyboard.
Matching the Pitch with Other Instruments (Master Tuning)
Master Tuning
When playing ensemble with other instruments and in other such instances, you can match the standard pitch to another instrument.
The reference pitch generally refers to the pitch of the note that’s played when you nger the middle A key. For a cleaner ensemble sound while
performing with one or more other instruments, ensure that each instrument’s standard pitch is in tune with that of the other instruments.
415.3 Hz–440.0 Hz–466.2 Hz
Changing the Tuning Method (Temperament)
You can play classical styles such as Baroque using historic temperaments (tuning methods).
Most modern songs are composed and played with the assumption that equal temperament (the most common tuning in use today) will be used,
but when classical music was composed, there were a wide variety of other tuning systems in existence. Playing a composition with its original
Temperament
tuning lets you enjoy the sonorities of the chords that the composer originally intended.
Equal
Just Major
Just Minor
Pythagorean
Kirnberger I
Kirnberger II This is a revision of Kirnberger I that reduces the limitations on the usable keys.
Kirnberger III
Meantone
Werckmeister
Arabic This scale is suitable for Arabic music.
This temperament divides the octave into twelve equal steps. It is the temperament that is most commonly used
on today’s pianos. Every interval has the same slight amount of dissonance.
In these temperaments, the primary triads are perfectly consonant. It is unsuited to playing melodies and cannot
be transposed, but is capable of beautiful sonorities. The Just tunings dier from major and minor keys.
This tuning, devised by the philosopher Pythagoras, eliminates dissonance in fourths and fths. Although third
chord is slightly dissonant, this tuning is suitable for songs that have a simple melody.
As in the Just temperaments, the primary triads are consonant in this tuning. Beautiful sonorities are obtained
when playing songs that are written in keys appropriate for this tuning.
This is an improvement of the Meantone and Just tunings that provides a high degree of freedom of modulation.
Performances are possible in all keys. Since the resonance diers depending on the key, chords played in this
temperament resonate in diverse ways when compared to equal temperament.
This temperament slightly narrows the fth relative to Just temperaments. While the Just temperaments contains
two types of whole tone (major whole tone and minor whole tone), meantone temperament uses only one type of
whole tone (mean whole tone). Transposition within a limited range of keys is possible.
This temperament consists of eight perfect fths and four narrowed fths. Performance in all keys is possible.
Since dierent keys produce dierent sonorities, chords will resonate in diverse ways when compared to equal
temperament (Werckmeister I (III)).
3. Press the [–] [+] buttons to adjust the value.
4. Press the [Exit] button to nish.
Specifying a Song’s Tonic (Temperament Key)
Temperament Key
Piano Designer
Hammer Response O, 1–10 Adjusts the time from when you play the key until the piano sound is heard. Higher values produce a greater delay.
Twin Piano
When playing with tuning other than equal temperament, you need to specify the temperament key for tuning the song to be performed (that is, the note that
corresponds to C for a major key or to A for a minor key). If you choose an equal temperament, there’s no need to select a temperament key.
C–B
Lets you personalize your piano sound by adjusting various elements that aect the sound: the piano’s physical strings, the resonances produced by
the pedals, the sound of hammers striking the strings, and more. Refer to “Personalizing Your Piano Sound (Piano Designer)” (p. 21).
You can divide the keyboard into left and right areas so that two people can play the same range of pitches.
Refer to “Dividing the Keyboard for Two People (Twin Piano)” (p. 17).
Editing the Equalizer Settings
You can use the equalizer to modify the tone color by boosting or reducing just the low-frequency or high-frequency range of the sound.
Equalizer
Mic Eects
FP-60X
Song Transpose
26
To edit the equalizer settings, use the [K] [J] buttons to select “Equalizer,” and then press the [Function] (Enter) button.
EQ Low Freq 20–400 (Hz)
EQ Mid Freq 200–8000 (Hz)
EQ Mid Q
EQ High Freq
Access the Mic Eects screen. Refer to “Applying Eects to the Mic (Mic Eect)” (p. 22).
* On the FP-90X, you can make these settings from the [Mic.] button (p. 22).
0.5, 1.0, 2.0,
4.0, 8.0
2000–16000
(Hz)
Transposing the Pitch of the Song Playback (Song Transpose)
You can transpose the song playback in semitone steps.
-12–0–+12
Frequency point in the low-frequency range.
This changes the level at and under the specied bandwidth.
Frequency point in the mid-frequency range.
This changes the level of the specied bandwidth centered on this frequency.
Changes the bandwidth of the mid-frequency range.
The bandwidth aected narrows as the value increases.
Frequency point in the high-frequency range.
This changes the level at and over the specied bandwidth.
Page 27
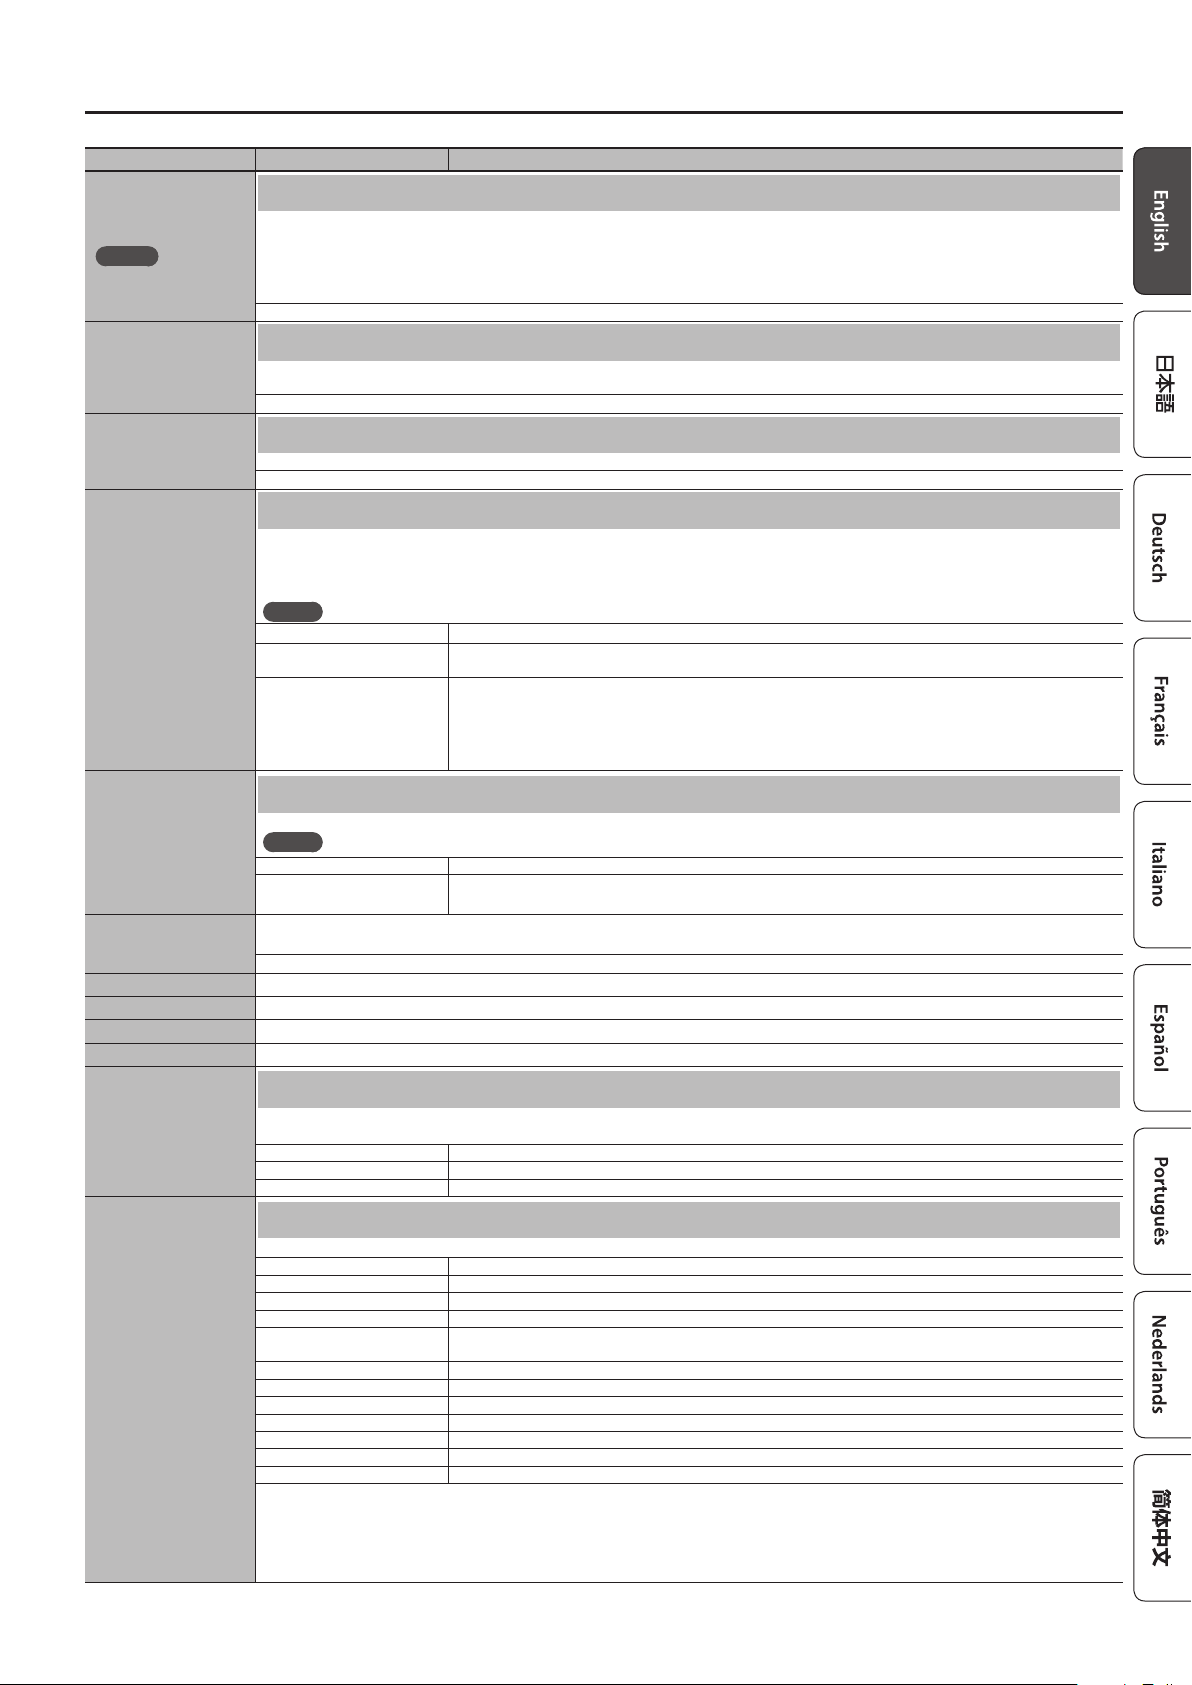
Advanced Operation
Indication [K] [J] buttons
Song Vol.
FP-60X
Input/Bluetooth Vol.
USB Audio Input Vol.
SMF Play Mode
Parameter [-] [+] buttons Explanation
Adjusting the Song Volume (Song Volume)
This setting adjusts the volume of your keyboard performance while a song plays back. This adjusts the volume of the song (SMF data / audio data)
that is played back.
* On the FP-90X, the [Song Vol.] slider simultaneously adjusts the volume of the SMF and the audio.
* If the SMF playback mode (p. 27) is set to “Auto-Select” or “Internal,” there will be some parts whose volume is not changed by the [Song Vol.]. If
you set the SMF playback mode to “External,” the volume of all parts will change.
0–10
Adjusting the Volume of an Audio Playback Device (Input/Bluetooth Vol.)
This setting adjusts the volume of your keyboard performance while a song plays back. You can adjust the volume of an audio playback device that’s
connected to the Input jacks.
0–10
Adjusting the Volume from the Computer (USB Audio Input Volume)
This setting adjusts the volume from the computer when you’re playing back audio from a computer connected to the USB Computer port.
0–10
Setting the Song (SMF) Playback Mode (SMF Play Mode)
This setting species the tone that you play on the keyboard while a song is playing back. Normally you will use the “Auto-Select” setting. This
determines whether the setting that is most suitable for the internal song or most suitable for external data is selected when you play back a song
whose le format is SMF.
Changing this setting does not aect the sound character of tone that you play from the keyboard.
MEMO
You can also switch the SMF Play Mode by holding down the [s] button and using the [–] [+] button.
Auto-Select
Internal
External
Automatically switches the SMF Play Mode to either “Internal” or “External” depending on the song that is being played.
When you play back a song, the tone that you play from the keyboard changes to the tone that is saved in the song.
This is recommended when you play back an internal song or a song that you recorded on this piano.
The tone that you play from the keyboard does not change when you play back a song.
This is recommended when you play back external data such as commercially available music data.
* With this setting, some eects might not apply to the song playback sound.
For this reason, the character of the sound during playback might be dierent than the sound while you were
recording.
Selecting the Format for Recording (Recording Mode)
You can choose whether to record as SMF or as audio.
Recording Mode
Count In Measure
Delete Song Refer to ”Deleting a Saved Song (Delete Song)” (p. 20).
Rename Song Refer to ”Renaming a Song (Rename Song)” (p. 19).
Copy Song Refer to ”Copying a Saved Song (Copy Song)” (p. 20).
Format Media Refer to “Reformatting Memory (Format Media)” (p. 25).
MEMO
You can also switch the Recording Mode by holding down the [t] button and using the [–] [+] button.
SMF The performance is recorded as MIDI data. (SMF format 0)
Audio
You can change the number of measures that are sounded as a count before song playback or recording begins.
* For details on the count in, see the following (p. 18) (p. 19).
1 Measure, 2 Measures
The recording will be made as audio data. (WAV format, 44.1 kHz, 16-bit linear)
* If a USB ash drive is not inserted, “Audio” cannot be selected.
Changing How the Pedal Eects Are Applied (Damper Pedal Part)
Damper Pedal Part
When you press the pedal connected to the Pedal Damper jack during Dual Play or Split Play, the pedal eect is normally applied to both tones, but
you can also select the tone to which the eect is to be applied.
Right & Left All enabled
Right Applied only to the Tone 1 (in Dual Play)/Right-hand tone (in Split Play)
Left Applied only to the Tone 2 (in Dual Play)/Left-hand tone (in Split Play)
Changing the Function of the Center Pedal (Center Pedal)
Use this feature to change the function of the pedal connected to the Pedal Sostenuto jack.
Sostenuto *1 Sets function to sostenuto pedal.
Soft *2 Sets function to soft pedal.
Center Pedal
Play/Stop
Layer In Dual Play, you can control of the Tone 2 volume.
Expression *3
Master Expression Controls the overall volume of this unit.
Bend Up *3 *4 Pitch rises when pedal is depressed.
Bend Down *3 *4 Pitch is lowered when pedal is depressed.
Modulation *3 *4 Vibrato is added when pedal is depressed.
Mic Doubling Sw The pedal will turn Mic eect “Doubling” on/o.
Mic Echo Sw The pedal will turn Mic eect “Echo” on/o.
Rotary Sw When using the rotary eect, switches the rotary eect between slow and fast.
*1 Only works on the Center Pedal Function.
*2 Only works on the Left Pedal Function.
*3 Works only on the tone set as the corresponding pedal part (Center Pedal Part or Left Pedal Part).
*4 For some tones, this setting might not apply an eect.
* Use only the specied expression pedal. By connecting any other expression pedals, you risk causing malfunction and/or damage to the unit.
The pedal will have the same function as the [s] button.
Allows control of the volume. You may nd it convenient to connect an expression pedal (EV-5: sold separately).
Does not change the recorded performance play.
27
Page 28
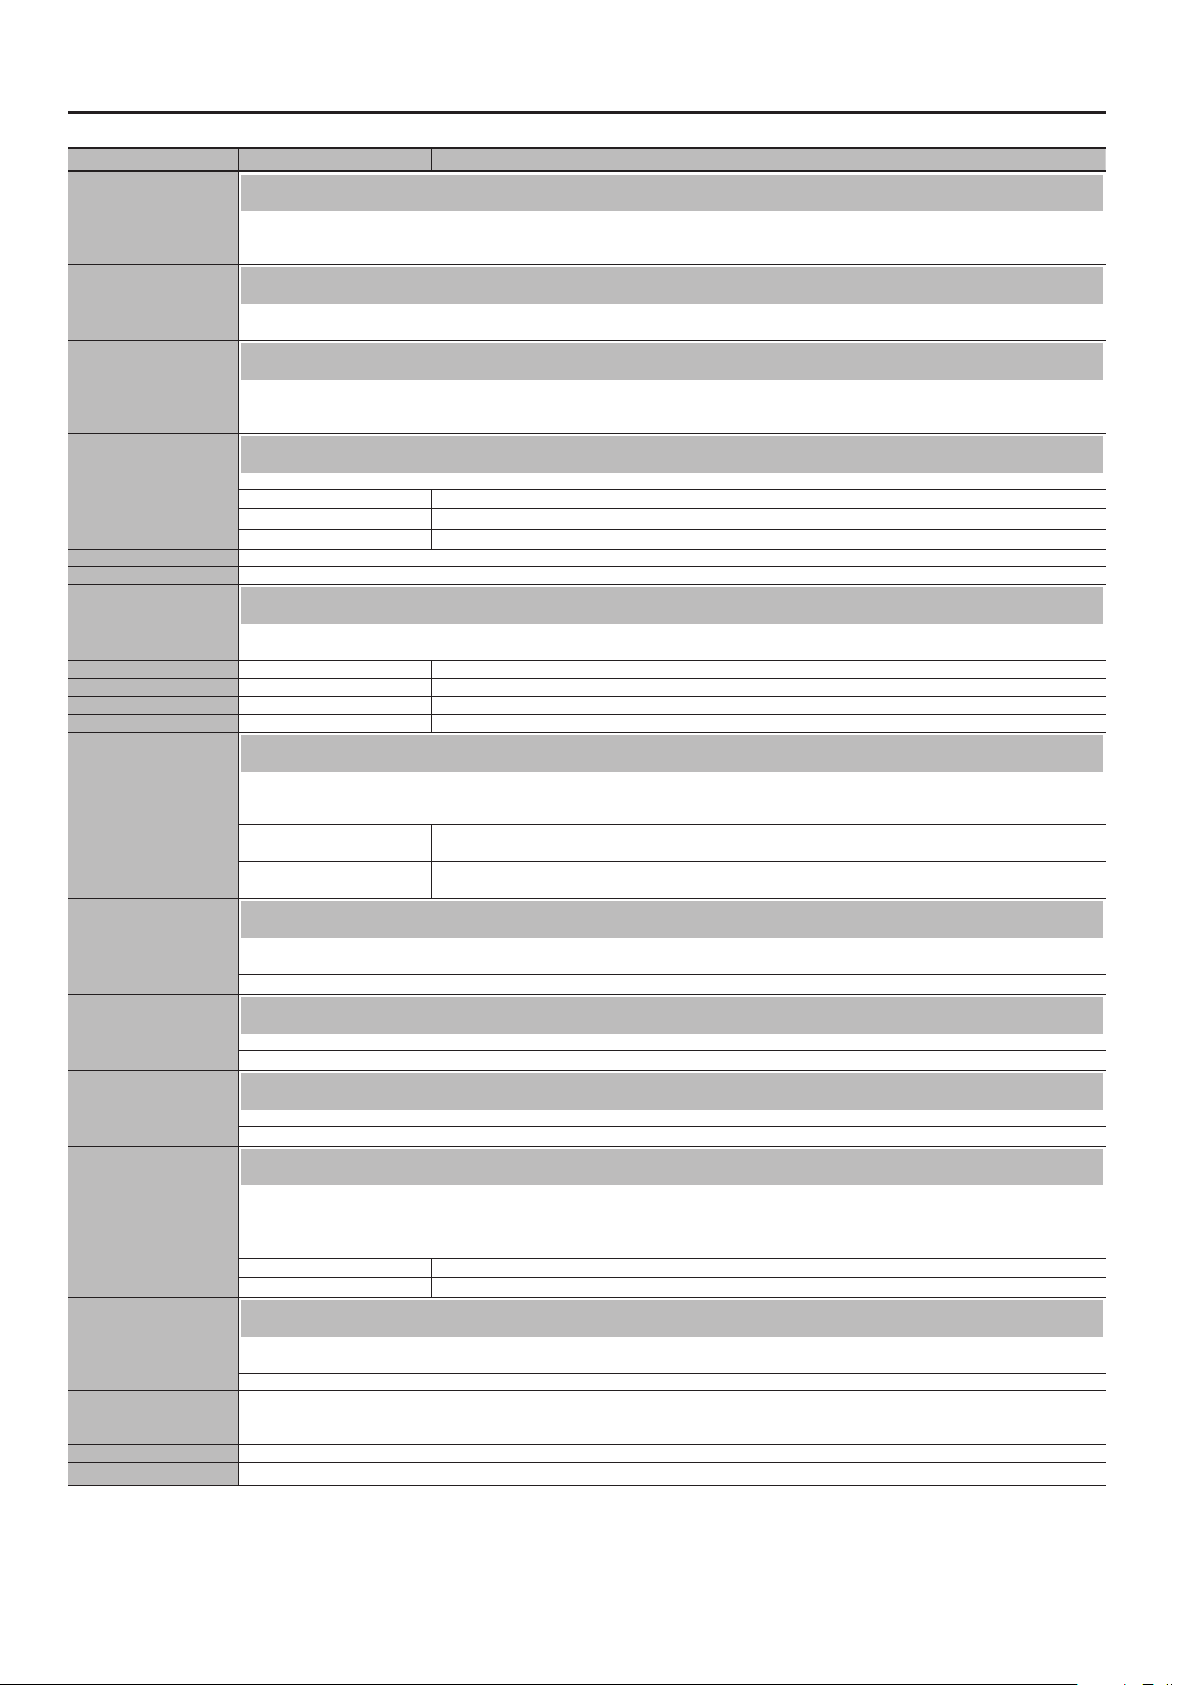
Advanced Operation
Indication [K] [J] buttons
Parameter [-] [+] buttons Explanation
Changing How the Pedal Eects Are Applied (Center Pedal Part)
Center Pedal Part
Left Pedal
When you press the pedal connected to the Pedal Sostenuto jack during Dual Play or Split Play, the pedal eect is normally applied to both tones,
but you can also select the tone to which the eect is to be applied.
Refer to “Changing How the Pedal Eects Are Applied (Damper Pedal Part)” (p. 27).
Changing the Function of the Left Pedal (Left Pedal)
Use this feature to change the function of the pedal connected to the Pedal Soft jack.
Refer to “Changing the Function of the Center Pedal (Center Pedal)” (p. 27).
Changing How the Pedal Eects Are Applied (Left Pedal Part)
Left Pedal Part
When you press the pedal connected to the Pedal Soft jack during Dual Play or Split Play, the pedal eect is normally applied to both tones, but you
can also select the tone to which the eect is to be applied.
Refer to “Changing How the Pedal Eects Are Applied (Damper Pedal Part)” (p. 27).
Using a Pedal to Switch Registrations (Reg. Pedal Shift)
Reg. Pedal Shift
Reg. Set Export Refer to “Saving a Registration Set (Registration Set Export)” (p. 24).
Reg. Set Import Refer to “Loading a Saved Registration Set (Registration Set Import)” (p. 24).
You can assign a pedal to successively switch registrations. Each time you press the pedal, you will switch to the next registration.
O The functions assigned to the Pedal Soft jack and Pedal Sostenuto jack will be available for use.
Left Pedal The pedal connected to the Pedal Soft jack can be used only for switching registrations.
Center Pedal The pedal connected to the Pedal Sostenuto jack can be used only for switching registrations.
Sending Tone-Change Information (Transmit MIDI Information)
When you switch registrations, this unit simultaneously transmits the following: Program Change, Bank Select MSB, and Bank Select LSB.
Reg. Transmit Ch. O, 1–16 Sets the Program Change transmit channel.
Reg. Bank MSB 0 (00) –127 (7F) Sets the Bank Select MSB.
Reg. Bank LSB 0 (00) –127 (7F) Sets the Bank Select LSB.
Reg. PC 1 (00) –128 (7F) Sets the Program Change number.
You can also set the transmit channel.
Preventing Doubled Notes When Connected to a Sequencer (Local Control)
When you have a MIDI sequencer connected, set this parameter to Local O.
Local Control
Since most sequencers have their Thru function turned on, notes you play on the keyboard may be sounded in duplicate, or get dropped. To prevent
this, you can enable the “Local O” setting so that the keyboard and internal sound generator will be disconnected.
O
On
Local Control is o.
The keyboard is disconnected from the internal sound generator. Playing the keyboard will not produce sound.
Local Control is on.
The keyboard is connected to the internal sound generator.
MIDI Transmit Channel Settings (MIDI Transmit Ch.)
MIDI Transmit Ch.
Display Contrast
Panel Brightness
This setting species the MIDI channel on which the unit will transmit.
This unit will receive all sixteen channels (1–16).
O, 1–16
Adjusting the Brightness of the Display (Display Contrast)
Adjusts the brightness of this unit display.
1–10
Adjusting the Brightness of the Buttons (Panel Brightness)
You can adjust the brightness of this unit’s buttons.
Dim, Bright
Outputting Sound Both from Headphones and Internal Speakers (Speaker Auto Mute)
With the factory settings, sound is no longer output from the internal speaker when you connect headphones to the PHONES jack. However, you can
Speaker Auto Mute
change this setting so that sound is output both from the headphones and from the internal speakers.
* If this is “O,” the sound that is output from the headphones will have a dierent character.
* If this is “O,” sound is heard from the internal speakers even if the Speaker [O/On] switch is “O.”
O Sound is heard both from headphones and the internal speakers.
On Sound is heard only from the headphones (default value).
Making the Power Automatically Turn O After a Time (Auto O)
Auto O
Memory Backup
Factory Reset Refer to “Restoring the Factory Settings (Factory Reset)” (p. 25).
Version Displays the version of the unit’s system program.
With the factory settings, the unit’s power will automatically be switched o 240 minutes after you stop playing or operating the unit.
If you don’t want the power to turn o automatically, change the “Auto O” setting to “O.”
O, 10, 30, 240 (min.)
This unit settings return to their factory defaults when you turn o the power. But if you backup the current settings into internal memory, they will
be restored the next time the power comes on.
Refer to “Retaining Settings After Power-O (Memory Backup)” (p. 25).
* This unit settings return to their factory defaults when you turn o the power. But if you backup the current settings into internal memory, they will be
restored the next time the power comes on. Refer to “Retaining Settings After Power-O (Memory Backup)” (p. 25).
28
Page 29
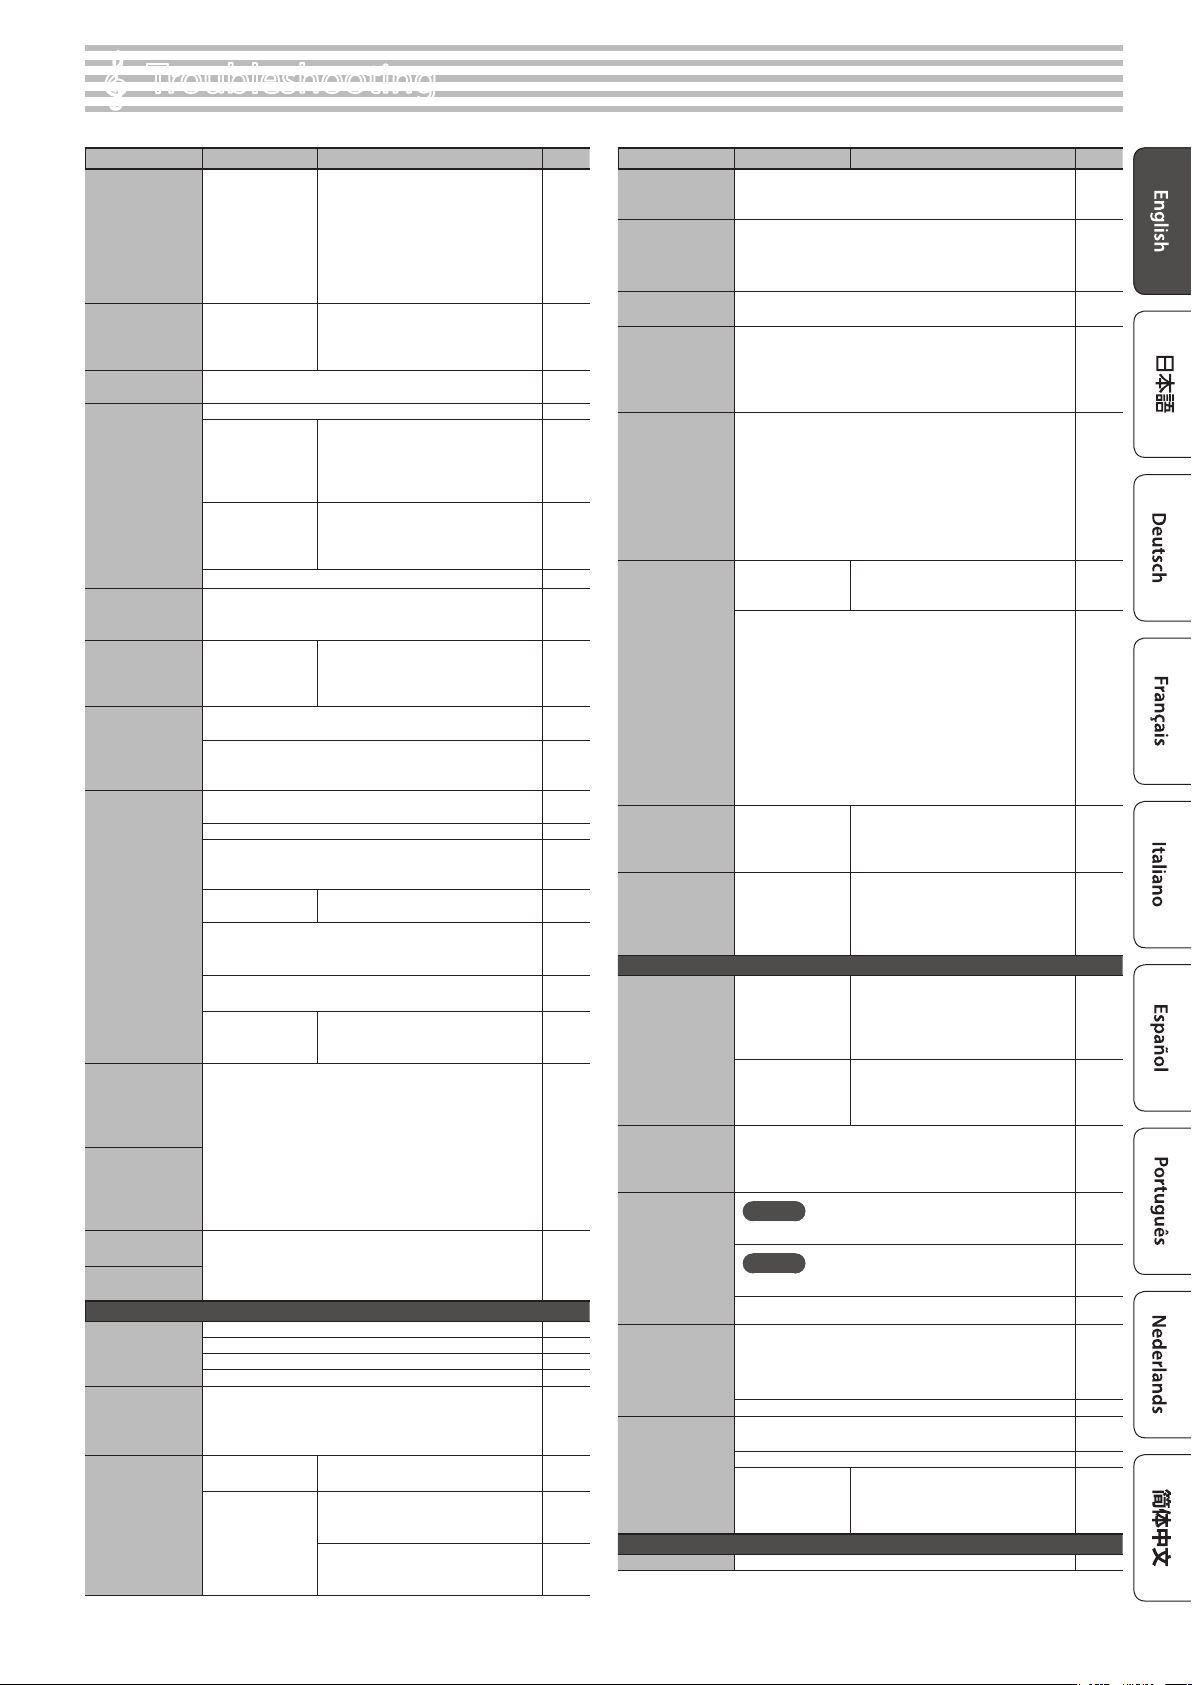
Troubleshooting
°
Problem Items to Check Action Page
Even though
you’re using
headphones
and the sound
is muted, a
thumping sound
is heard when you
play the keyboard
Power turns o on
its own
Power turns on
unexpectedly
Pedal does not
work, or is “stuck”
Unable to read
from/write to USB
ash drive
“Buzz” is heard
from external
devices
The volume
level of the unit
connected to
Input Stereo jack
is too low
No sound
Sound is heard
from the internal
speakers even when
headphones are
connected
Sound is output
from the internal
speakers even when
the Speaker [O/
On] switch is “O”
No sound from
the microphone
Mic sound is not
loud enough
Notes don’t sound right
Pitch of the
keyboard or song is
incorrect
Notes are
interrupted
Sounds are
heard twice
(doubled) when
the keyboard is
played
Could you be
hearing the
sound of the
hammers inside
the keyboard, or
vibrations in the
oor or walls?
Could the autoo setting be
something other
than “O”?
Is the AC adaptor connected correctly? –
Is the pedal connected correctly? –
Could you have
disconnected or
connected the
pedal cord while
the power was on?
Could you have
changed the
function of the
pedal?
Could you be using the Reg. Pedal Shift function? p. 28
Is the USB ash drive connected to the USB Memory
port?
Are the external
devices connected
to more than one
AC power outlet?
Could the Input/Bluetooth Vol. be turned down? p. 27
Could the volume of the connected device be turned
down?
Are your amp, speakers, headphones, etc., connected
correctly?
Is the volume turned down? p. 8
Could headphones or an adaptor plug be inserted in the
Phones jacks? The speakers will not produce sound if
headphones or plug are connected to the Phones jacks.
Has Local Control
been set to “O ”?
Could the Speaker [O/On] switch be “O”?
If the Speaker [O/On] switch is “O,” sound is not output
from the internal speakers.
Could the Part [Upper] [Lower] sliders both be lowered?
If the Part sliders are lowered, no sound is heard.
Could you
be using an
expression pedal?
Could Speaker Auto Mute be “O”?
If Speaker Auto Mute is “O,” sound is output from the
internal speakers even if headphones are connected or if
the Speaker [O/On] switch is “O.”
Is the [Mic Vol.] slider raised? p. 22
Could you have made Transpose settings? p. 8
Is the Master Tune setting appropriate? p. 26
Is the setting for the Temperament correct? p. 26
Is the Single Note Tuning setting appropriate? p. 21
Could you be holding down the damper pedal and
sounding a large number of notes?
Could you be using Dual Play or playing along with a
song?
Is the unit in Dual
Play?
Could the unit
be connected
to an external
sequencer?
Playing the keyboard causes internal
hammers to operate, and the
vibrations may be transmitted to
the oor or walls. To minimize such
vibrations, you can move the piano
away from the wall, or lay down a
commercially available anti-vibration
mat designed for use with pianos.
If you don’t need the power to turn
o automatically, turn the Auto O
setting “O.”
Power-o the unit before you
connect or disconnect the pedal
cord.
Return the pedal function (Center
Pedal, Left Pedal) to its previous
setting.
If you connect external devices, be
sure to connect them to the same
AC outlet.
Set Local Control to “On.” p. 28
Use an expression pedal to adjust the
volume.
Press the [Split/Dual] button to turn
o Dual Play.
If you don’t want the other sound
module to produce sound, turn your
DAW’s soft thru function “o.”
If Local Control is turned “On,” set
Local Control to “O.”
p. 28
p. 27
p. 6
p. 5
p. 6
p. 8
p. 28
p. 28
Problem Items to Check Action Page
Eect does not
apply
Reverberation
–
remains even if
you defeat the
Ambience eect
Only high or low
sound is heard
The sound of
the higher notes
suddenly changes
from a certain key
–
High-pitched
ringing is heard
–
Low notes sound
–
wrong, or are
buzzy
–
The selected
sound changes
when you play
back a song
Loud “damper
noise” is heard.
Song does not play correctly
The piano’s tonal
–
character changes
when you record
Only the sound
of a particular
instrument in a
song does not play
Song volume is
too low /
Volume diers
between
recording and
playback
Can’t play back a
song saved in USB
ash drive
–
Song name in USB
–
ash drive is not
shown
–
Can’t record
Can’t record audio Is a USB ash drive connected to the USB Memory port? –
For some combinations of tones, the eect does not
apply to Dual Play tone 2 or to the left-hand tone of Split
Pla y.
Even if the Ambience eect is o, the acoustic piano’s
own resonance remains.
You can reduce this reverberation by adjusting the
Cabinet Resonance (FP-90X only).
Could you have adjusted the equalizer? p. 26
This simulates the characteristics of an acoustic piano,
and is not a malfunction.
The sound will change where there is a change in the
number of strings per key or a transition from wound
strings to unwound strings.
If you don’t hear it through headphones: It may be that
the unit has malfunctioned. Please contact your dealer or
a Roland customer service center.
If you also hear it through headphones: To decrease the
metallic ringing, adjust the following settings.
•Duplex Scale (FP-90X only)
•Full Scale String Res. (FP-90X only)
•Ambience
Could the
volume be set to
maximum?
If you also hear it through headphones: It may be that the
unit has malfunctioned. Please contact your dealer or a
Roland customer service center.
If you don’t hear it through headphones: Objects near the
unit are resonating because of the high volume of sound
coming from the speakers. You can take the following
measures to minimize resonances.
•Locate the speakers 10–15 cm (4–6 inch) away from
walls or other surfaces.
•Keep the volume down.
•Move away from the objects that are resonating.
Could the SMF
Play Mode be set
to “Auto-Select” or
“Internal”?
Could you be
using a damper
pedal other than
the specied
model?
Could you be
recording with
a tone that you
created in Piano
Designer?
Could you be
playing back the
audiorecorded
sound?
Could the Part [Upper] [Lower] sliders both be lowered?
If the Part sliders are lowered, no sound is heard.
Lower the volume. p. 8
Set the SMF Play Mode to “External.” p. 27
Use a damper pedal that supports
continuous detection, such as the
DP-10 or KPD-90. If you’re using the
DP-10, set the DP-10’s switch to the
“Continuous” position.
The Piano Designer settings might
not be reproduced when you play
back a song.
Record as SMF. p. 18
FP-90X
Could the [Song Vol.] slider be set too low?
FP-60X
Could the Song Vol. settings be too low?
Could the Part [Upper] [Lower] sliders be set to “0”? p. 8
Could the Audio les of the format be played? (WAV or MP3)
Audio les of the following format can be played back.
• WAV format, 44.1 kHz, 16-bit linear, File extension “.wav”
• MP3 format, 44.1
Is the lename extension “.MID”? –
Could the song name information in the le be blank or
consist of only spaces?
Is the lename extension “.MID”? –
Could the le
name contain
two-byte characters
(such as Japanese)?
Rename the le so that it consists
only of single-byte alphanumeric
characters.
–
p. 21
–
p. 21
–
p. 6
–
p. 8
p. 8
p. 27
–
–
–
29
Page 30
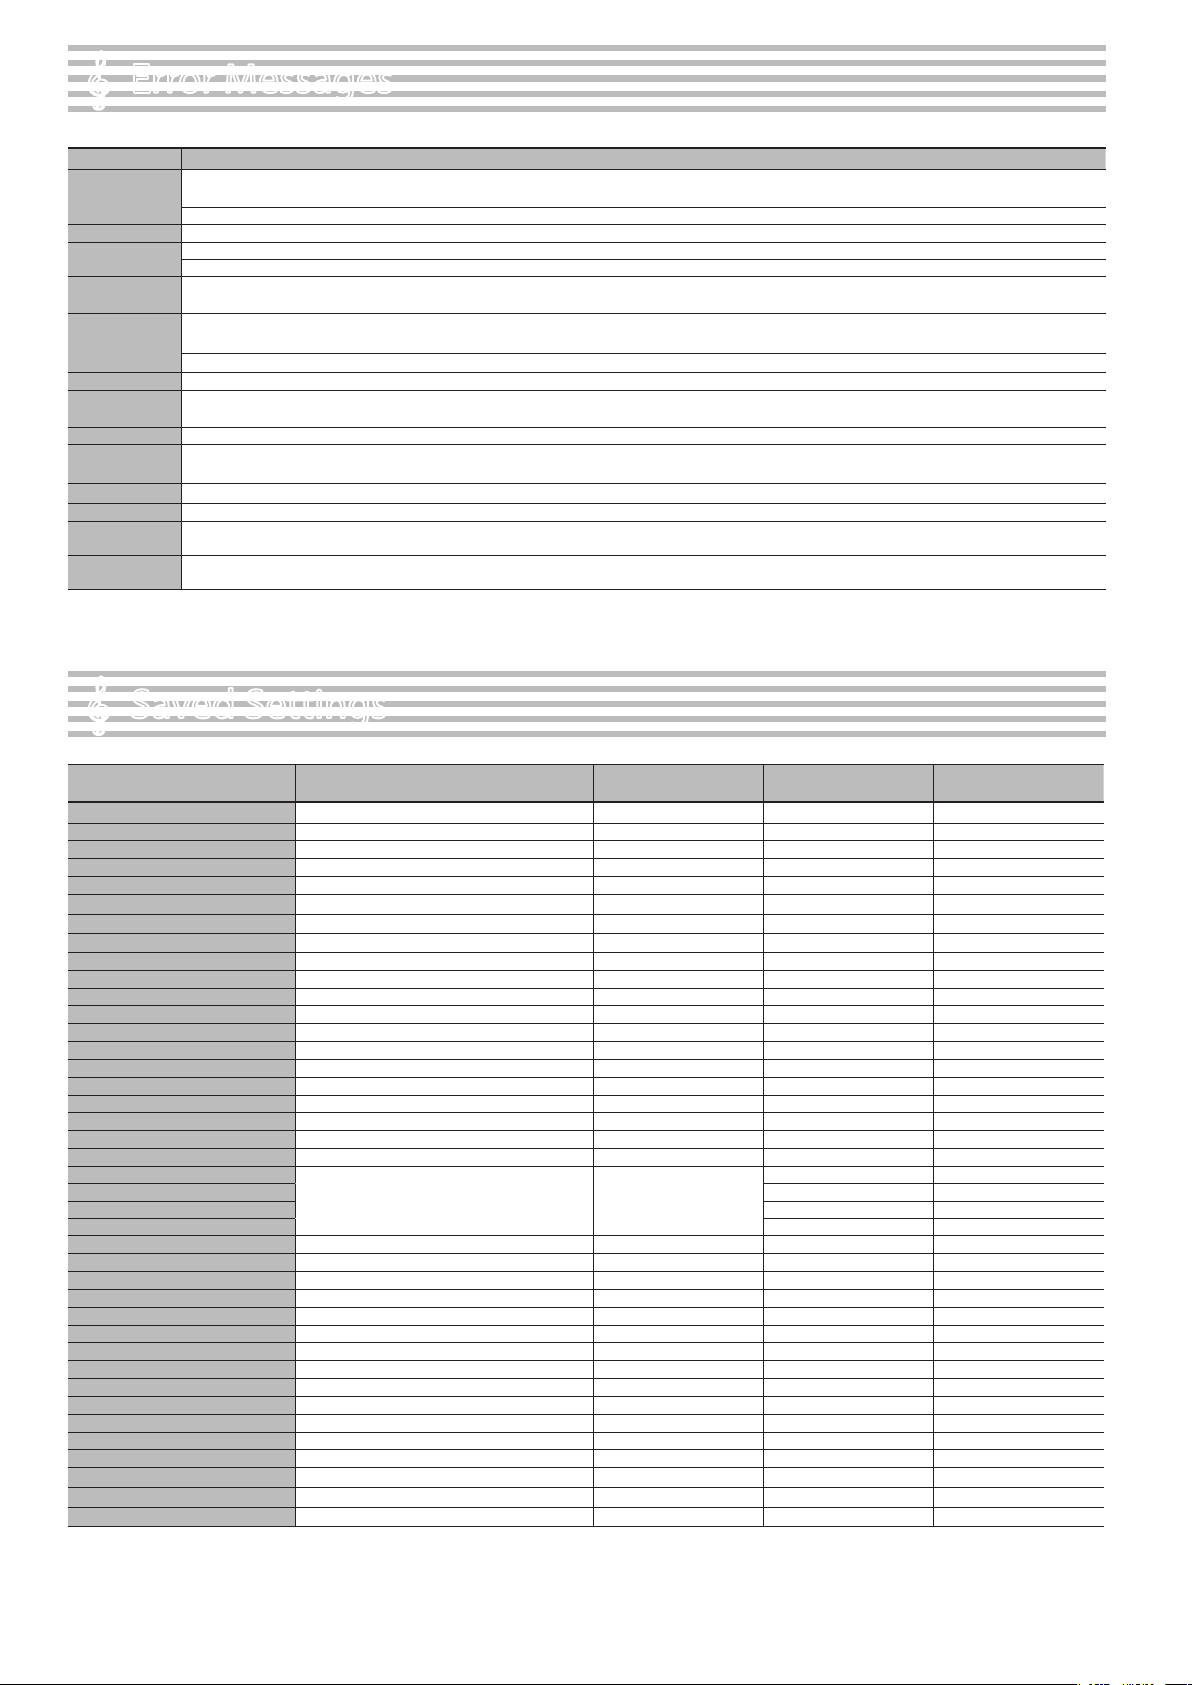
Error Messages
°
Indication Meaning
Error 2
Error 3 The same le already exists.
Error 10
Error 11
Error 14
Error 15 The le is unreadable. The data format is not compatible with the unit.
Error 18
Error 30 Internal memory capacity of the unit is full.
Error 40
Error 41 A MIDI cable was disconnected. Connect the MIDI cable correctly.
Error 43 A MIDI transmission error has occurred. Check the MIDI cable and connected MIDI device.
Error 51
Error 65
°
An error occurred during writing. The external media may be corrupted.
Insert other external media and try again. Alternatively, you can initialize the external media (p. 25).
The internal memory might be damaged. Format the internal memory (p. 25).
No external media is inserted. Insert the external media and try again.
The internal memory might be damaged. Format the internal memory (p. 25).
There is not sucient free memory in the save destination.
Either insert other external media or delete unneeded les and try again.
An error occurred during reading. The external media may be corrupted.
Insert other external media and try again. Alternatively, you can initialize the external media (p. 25).
The internal memory might be damaged. Format the internal memory (p. 25).
This audio format is not supported.
Please use 44.1 kHz 16-bit linear WAV format or 44.1 kHz 64 kbps–320 kbps MP3 format audio les.
The unit cannot deal with the excessive MIDI data sent from the external MIDI device.
Reduce the amount of MIDI data sent to the unit.
There may be a problem with the system. Repeat the procedure from the beginning. If it is not solved after you have tried several times, contact the Roland
service center.
The USB ash drive connector was subjected to excessive current. Make sure that there is no problem with the external media, then turn the power o, then
on again.
Saved Settings
Parameter Explanation
Selected tone (including Split or Dual tones)
Dual Play On/O
Split Play On/O
Split Point Split Point
Right Shift/Left Shift Octave shift of the right-hand and left-hand tone
Tone 1 Shift/Tone 2 Shift Octave shift of tone 1 and tone 2
Transpose Transpose on/o and transpose value
Ambience Type Ambience type
Ambience Depth Depth of the ambience eect
Rotary Speed Modulation speed of the rotary eect
Modulation Speed Speed at which the sound is modulated
Key Touch Key Touch
Damper Pedal Part Damper pedal part setting
Center Pedal Part Center pedal part setting
Center Pedal Function of the center pedal
Left Pedal Part Left pedal part setting
Left Pedal Function of the left pedal
Reg. Pedal Shift Registration pedal shift setting
MIDI Transmit Ch. MIDI transmit channel
Reg. Transmit Ch.
Reg. PC
Reg. Bank MSB
Reg. Bank LSB
Mic Eects Mic eects setting
Headphones 3D Ambience Headphones 3D Ambience
Hammer Response Hammer response
Metronome Metronome (volume, sound, downbeat)
Master Tuning Master Tuning
Temperament Tuning method
Temperament Key Base note for the tuning method
Input/Bluetooth Vol. Input/Bluetooth volume
USB Audio Input Vol. USB Audio input volume
SMF Play Mode SMF playback mode
Display Contrast Display contrast
Panel Brightness Brightness of the buttons
Speaker Auto Mute Settings of the Speaker Auto Mute function
Auto O Auto o
Equalizer Equalizer settings
*1 Saved in registrations only for the FP-90X.
*2 The “Reg. Pedal Shift” setting is saved on the USB ash drive when you execute Registration Set Export.
Part Volume
Tone switching information
All settings of the Bluetooth function
Settings Saved in
Registrations
Items Stored by Memory
Backup
t
t
t
t
t
t
t
t
t*1 t
t t
t
t
t t
t
t
t
t
t
t*2 t
t t
t
t t
Settings Stored
Immediately When Edited
t
t
t
t
t
t
t
t
t
t
t
t
t
t
t
30
Page 31
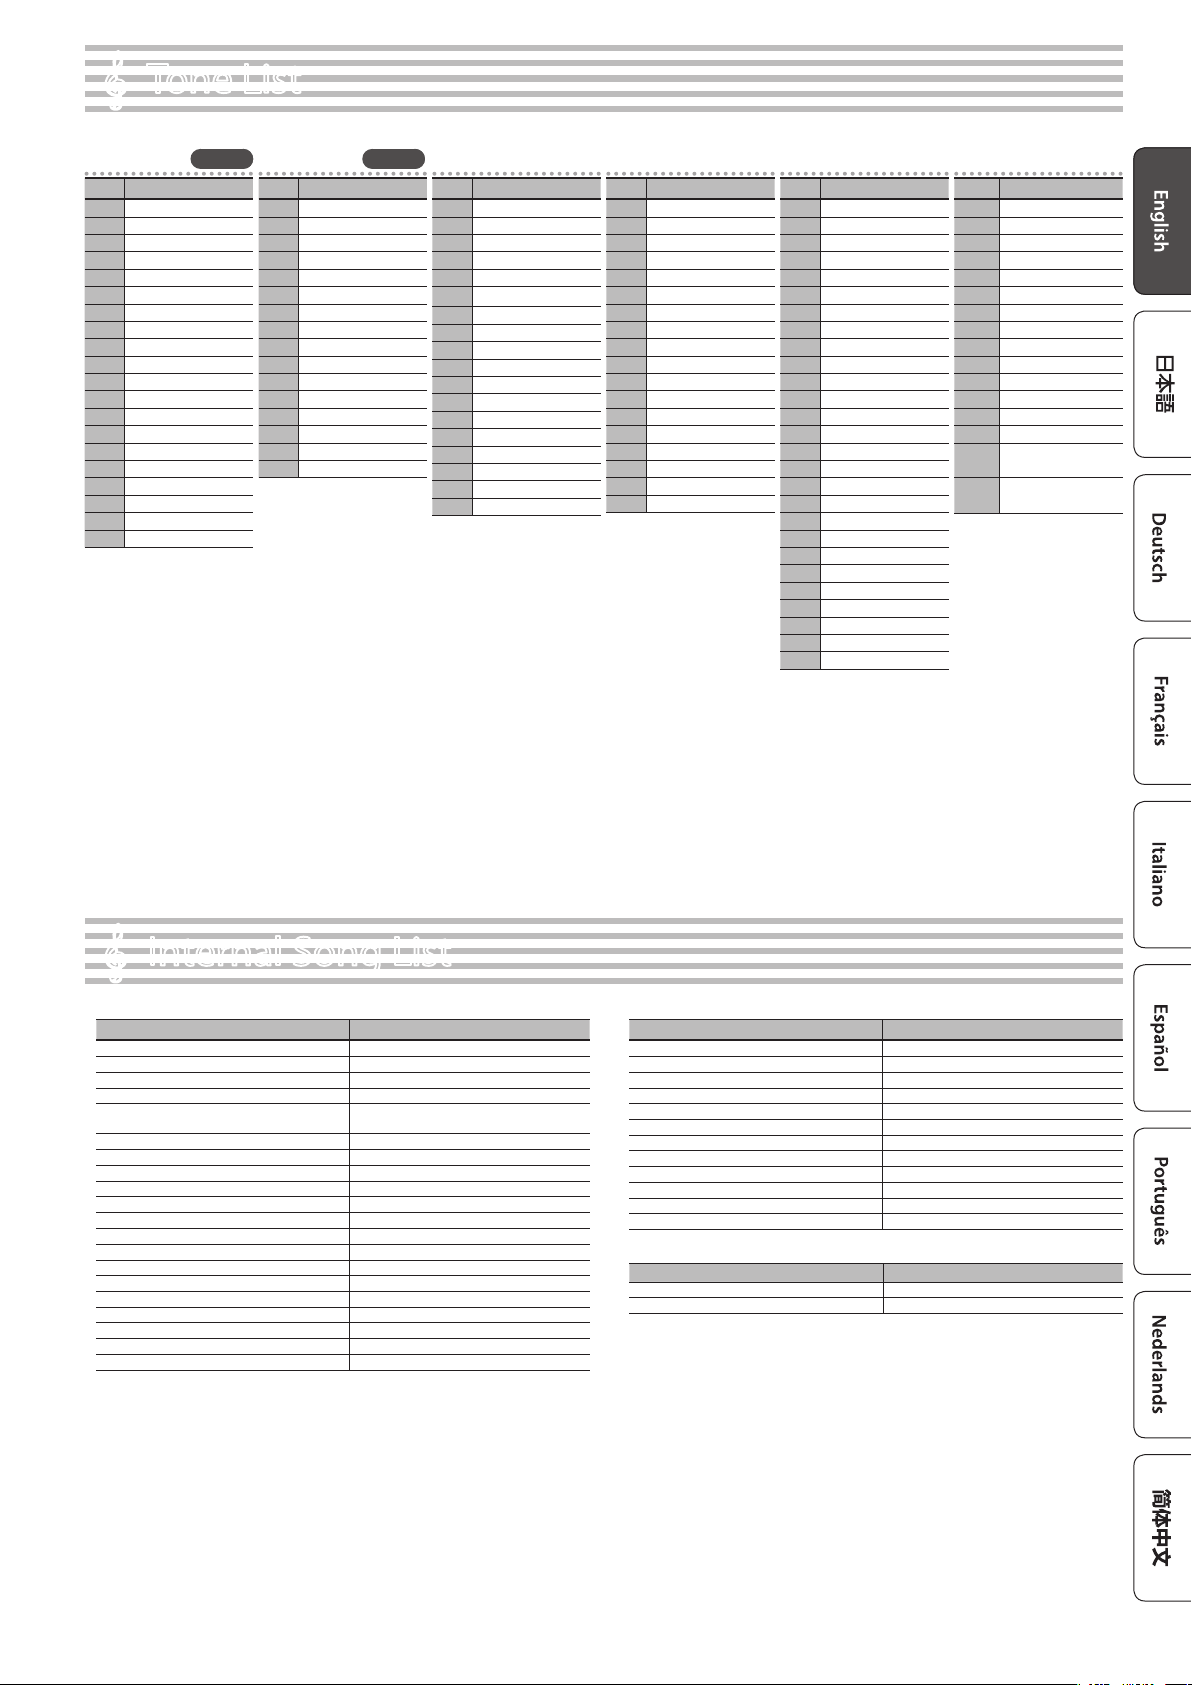
Tone List
°
Piano
# Tone Name
1 Concert Piano *
2 Stage Grand *
3 Concert Ballad *
4 Concert Mellow *
5 Concert Bright *
6 Concert Brilliance *
7 Stage Mellow *
8 Stage Bright *
9 Upright Piano
10 Mellow Upright
11 Bright Upright
12 Rock Piano
13 Ragtime Piano
14 Bright Forte
15 SA Piano
16 JD Piano
17 70’s E.Grand
18 Magical Piano
19 Harpsichord
20 Harpsi 8’+4’
* Tones with the (*) symbol
are “PureAcoustic Piano
sound engine” tones.
FP-90X FP-60X
Piano
# Tone Name
1 Concert Piano *
2 Ballad Piano *
3 Mellow Piano *
4 Bright Piano *
5 Upright Piano
6 Mellow Upright
7 Bright Upright
8 Rock Piano
9 Ragtime Piano
10 Bright Forte
11 SA Piano
12 JD Piano
13 70’s E.Grand
14 Magical Piano
15 Harpsichord
16 Harpsi 8’+4’
* Tones with the (*) symbol
are “SuperNATURAL Piano
sound engine” tones.
E. Piano
# Tone Name
1 1976SuitCase
2 Tine EP Lite
3 ModiedDyno
4 VR EP 1
5 Wurly 200
6 Pure Wurly
7 Phase EP Mix
8 80’s FM EP
9 MetalicEP Ex
10 SA E.Piano 1
11 SA EP1 Stack
12 SA E.Piano 2
13 JD8 CrystlEP
14 Glassy EP 1
15 Tremolo EP
16 EP Belle
17 BrillClav DB
18 BrillClavWah
Organ
# Tone Name
1 B.Organ Slow
2 Combo Jz.Org
3 Ballad Organ
4 Gospel Spin
5 Full Stops
6 Mellow Bars
7 Lower Organ
8 Light Organ
9 Pipe Organ
10 Nason t 8’
11 ChurchOrgan1
12 ChurchOrgan2
13 Accordion
14 Acd Musette
15 Acd Harmonm
16 Animal Mod
17 Surf Monkeys
18 Rising Sun
Strings/Pad
# Tone Name
1 Chamber Str
2 String Exp
3 Full Strings
4 Strings forI
5 Epic Strings
6 Rich Strings
7 SymphonicStr1
8 SymphonicStr2
9 Orchestra
10 String Trio
11 Harpiness
12 OrchestraBrs
13 Super SynPad
14 Choir Aahs 1
15 Choir Aahs 2
16 D50 StackPad
17 Legend Pad
18 Voice of Hvn
19 New Jupiter
20 ChordofCnada
21 JP8 Strings
22 Air Pad
23 Boreal Pad
24 JP8 Hollow
25 Soft Pad
26 Solina
27 Tron Strings
Synth/Other
# Tone Name
1 Super Saw
2 Trancy Synth
3 Flip Pad
4 D50 Fantasia
5 D50 Stac Hvn
6 D50 FuturePd
7 D50 DigiNDnc
8 EQ Lead
9 DelyResoSaws
10 StrawberyFlt
11 Jazz Scat
12 Ac.Bass wRel
13 Comp’d JBass
14 A.Bass+Cymbl
(8-drum sets and 1
15–23
SFX set)
24–
(GM2 Tones)
279
Internal Song List
°
Common to FP-90X/FP-60X
Song Name Composer
Elevations * Original
Reection * Original
Fly day * marasy
Barcarolle * Fryderyk Franciszek Chopin
Zhavoronok *
Valse, op.34-1 * Fryderyk Franciszek Chopin
Polonaise op.53 * Fryderyk Franciszek Chopin
Nocturne No.20 * Fryderyk Franciszek Chopin
Die Forelle * Franz Peter Schubert, Arranged by Franz Liszt
Reets dans l’Eau * Claude Achille Debussy
Polovtsian Dances Alexander Borodin
Ombra mai fù George Frideric Handel
Lascia ch’io pianga George Frideric Handel
Twinkle Twinkle Little Star French Folk Song
Mary Had a Little Lamb Traditional
Bear Song American Folk Song
Ich Bin Ein Musikante German Folk Song
Grand Father’s Clock Henr y Work
Jingle Bells James Pierpont
We Wish You a Merry Christmas Carol
* All rights reserved. Unauthorized use of this material for purposes other than private, personal enjoyment is a violation of applicable laws.
* Performance data of the tone demos and the built-in songs is not output from the USB Computer port or from Bluetooth (MIDI).
* If the SMF playback mode (p. 27) is set to “Auto-Select” or “Internal,” there will be some parts whose volume is not changed by the [Song Vol.]. If you set the SMF playback mode
to “External,” the volume of all parts will change.
* Songs marked by an asterisk (*) are piano solo songs. They have no accompaniment.
* “Fly day” are played by marasy
“Mikhail Ivanovich Glinka, Arranged by
Mily Alexeyevich Balakirev”
Song Name Composer
Silent Night Franz Gruber
Amazing Grace Hymn
Lavender’s Blue Traditional
Aura Lee George R. Poulton
Auld Lang Syne Traditional
Greensleeves Traditional
Maple Leaf Rag Scott Joplin
The Entertainer Scott Joplin
When The Saints Go Marching In Traditional
Little Brown Jug Joseph Winner
Singing Winds Original
City Lights Original
FP-90X only
Song Name Composer
Amazing Grace * Hymn
Nocturne, op.9-2 * Fryderyk Franciszek Chopin
31
Page 32
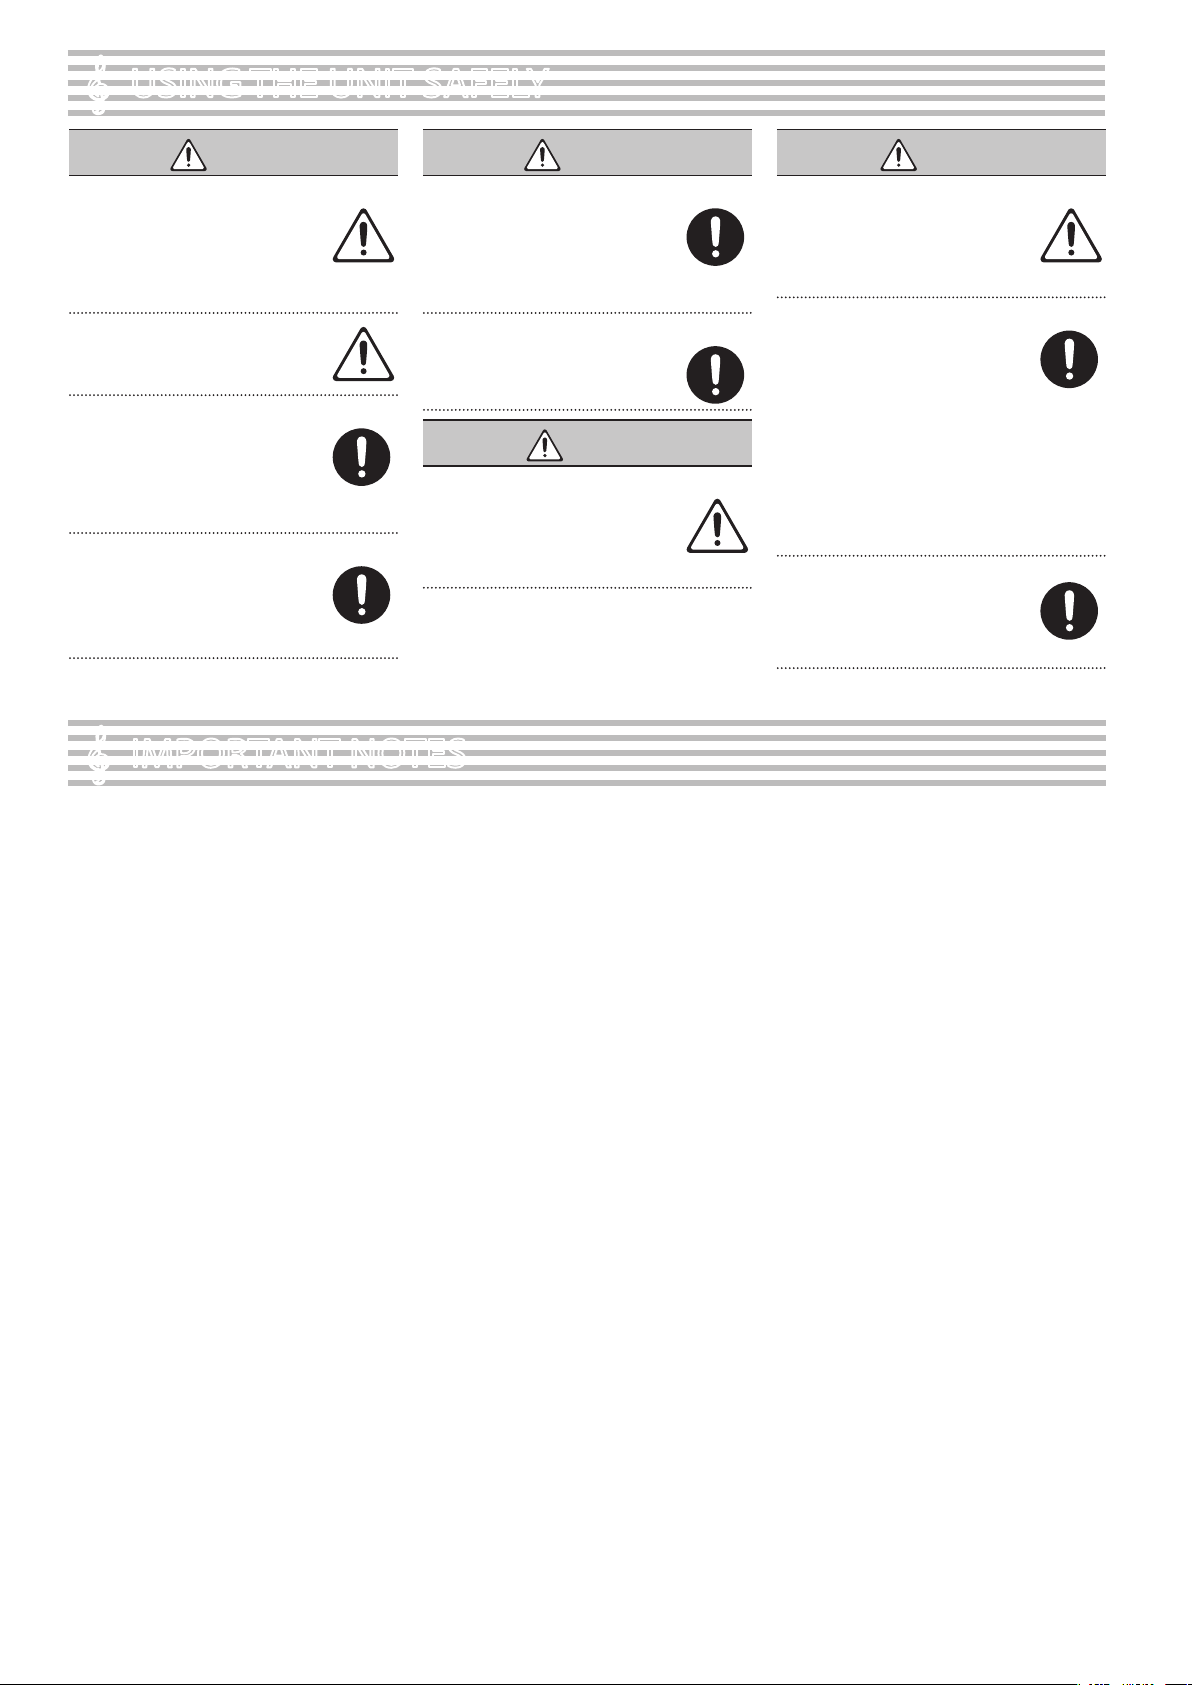
USING THE UNIT SAFELY
°
WARNING
Concerning the Auto O function
The power to this unit will be turned o
automatically after a predetermined amount
of time has passed since it was last used for
playing music, or its buttons or controls were
operated (Auto O function). If you do not
want the power to be turned o automatically, disengage
the Auto O function (p. 28).
Use only the stand that is recommended
This unit should be used only with a stand
that is recommended by Roland.
Do not place in a location that is unstable
When using the unit with a stand
recommended by Roland, the stand must
be carefully placed so it is level and sure to
remain stable. If not using a stand, you still
need to make sure that any location you
choose for placing the unit provides a level surface that
will properly support the unit, and keep it from wobbling.
Precautions regarding placement of this unit on a stand
Be sure to follow the instructions in the
Owner’s Manual carefully when placing this
unit on a stand (p. 2).
If it is not set up properly, you risk creating
an unstable situation which could lead to the
unit falling or the stand toppling, and may result in injury.
WARNING
Use only the supplied AC adaptor and the correct voltage
Be sure to use only the AC adaptor supplied
with the unit. Also, make sure the line voltage
at the installation matches the input voltage
specied on the AC adaptor’s body. Other AC
adaptors may use a dierent polarity, or be
designed for a dierent voltage, so their use could result in
damage, malfunction, or electric shock.
Use only the supplied power cord
Use only the attached power cord. Also, the
supplied power cord must not be used with
any other device.
CAUTION
Use only the specied stand(s)
This unit is designed to be used in
combination with specic stands (*1)
manufactured by Roland. If used in
combination with other stands, you risk
sustaining injuries as the result of this product
dropping down or toppling over due to a lack of stability.
*1 FP-90X: KSC-90, KS-G8B, KS-10Z, KS-12, KS-20X
FP-60X: KSC-72, KS-G8B, KS-10Z, KS-12, KS-20X
CAUTION
Evaluate safety issues before using stands
Even if you observe the cautions given in the
owner’s manual, certain types of handling
may allow this product to fall from the stand,
or cause the stand to overturn. Please be
mindful of any safety issues before using this
product.
Cautions when moving this unit
Since this product is very heavy, you must
make sure that a sucient number of people
are on hand to help, so you can lift and move
it safely, without causing strain. Make sure
to have a rm grip, to protect yourself from
injury and the instrument from damage. If you need to
move the instrument, take note of the precautions listed
below.
• Check to make sure the Knob Bolt securing the unit to
the stand have not become loose. Fasten them again
securely whenever you notice any loosening.
• Disconnect the power cord.
• Disconnect all cords coming from external devices.
• Remove the music stand.
Keep small items out of the reach of children
To prevent accidental ingestion of the parts
listed below, always keep them out of the
reach of small children.
• Removable Parts
Music rest attachment screws (FP-90X only) (p. 5)
IMPORTANT NOTES
°
Placement
• Do not allow objects to remain on top of the keyboard.
This can be the cause of malfunction, such as keys
ceasing to produce sound.
• Depending on the material and temperature of the
surface on which you place the unit, its rubber feet may
discolor or mar the surface.
Care of the Keyboard
• Do not write on the keyboard with any pen or other
implement, and do not stamp or place any marking on
the instrument. Ink will seep into the surface lines and
become unremovable.
• Do not ax stickers on the keyboard. You may be
unable to remove stickers that use strong adhesives,
and the adhesive may cause discoloration.
• To remove stubborn dirt, use a commercially available
keyboard cleaner that does not contain abrasives. Start
by wiping lightly. If the dirt does not come o, wipe
using gradually increasing amounts of pressure while
taking care not to scratch the keys.
Repairs and Data
• Before sending the unit away for repairs, be sure to
make a backup of the data stored within it; or you may
prefer to write down the needed information. Although
we will do our utmost to preserve the data stored in
your unit when we carry out repairs, in some cases, such
as when the memory section is physically damaged,
restoration of the stored content may be impossible.
Roland assumes no liability concerning the restoration
of any stored content that has been lost.
Additional Precautions
• Any data stored within the unit can be lost as the result
of equipment failure, incorrect operation, etc. To protect
yourself against the irretrievable loss of data, try to
make a habit of creating regular backups of the data
you’ve stored in the unit.
• Roland assumes no liability concerning the restoration
of any stored content that has been lost.
• Never strike or apply strong pressure to the display.
• The sound of keys being struck and vibrations produced
by playing an instrument can be transmitted through a
oor or wall to an unexpected extent. Please take care
not to cause annoyance to others nearby.
• Do not apply undue force to the music stand while it
is in use.
• Use only the specied expression pedal. By connecting
any other expression pedals, you risk causing
malfunction and/or damage to the unit.
• Do not use connection cables that contain a built-in
resistor.
Using External Memories
• Please observe the following precautions when
handling external memory devices. Also, make sure to
carefully observe all the precautions that were supplied
with the external memory device.
• Do not remove the device while reading/writing is
in progress.
• To prevent damage from static electricity, discharge
all static electricity from your person before
handling the device.
Caution Regarding Radio Frequency Emissions
• The following actions may subject you to penalty of law.
• Disassembling or modifying this device.
• Removing the certication label axed to the back
of this device.
• Using this device in a country other than where it
was purchased
Intellectual Property Right
• It is forbidden by law to make an audio recording, video
recording, copy or revision of a third party’s copyrighted
work (musical work, video work, broadcast, live
performance, or other work), whether in whole or in part,
and distribute, sell, lease, perform or broadcast it without
the permission of the copyright owner.
• Do not use this product for purposes that could infringe on a
copyright held by a third party. We assume no responsibility
whatsoever with regard to any infringements of third-party
copyrights arising through your use of this product.
• The copyright of content in this product (the sound
waveform data, style data, accompaniment patterns, phrase
data, audio loops and image data) is reserved by Roland
Corporation.
• Purchasers of this product are permitted to utilize said
content (except song data such as Demo Songs) for the
creating, performing, recording and distributing original
musical works.
• Purchasers of this product are NOT permitted to extract
said content in original or modied form, for the purpose
of distributing recorded medium of said content or making
them available on a computer network.
• This product contains eParts integrated software platform of
eSOL Co.,Ltd. eParts is a trademark of eSOL Co., Ltd. in Japan.
• The Bluetooth® word mark and logos are registered
trademarks owned by Bluetooth SIG, Inc. and any use of
such marks by Roland is under license.
• This Product uses the Source Code of μT-Kernel under
T-License 2.0 granted by the T-Engine Forum (www.tron.org).
• This product includes third party open source software.
Copyright © 2009-2018 Arm Limited. All rights reserved.
Copyright © 2018 STMicroelectronics. All rights reserved.
Licensed under the Apache License, Version 2.0 (the “License”);
You may obtain a copy of the License at
http://www.apache.org/licenses/LICENSE-2.0
Copyright © 2018 STMicroelectronics. All rights reserved.
This software component is licensed by ST under BSD 3-Clause
license, the “License”;
You may obtain a copy of the License at
https://opensource.org/licenses/BSD-3-Clause
This product is using the Jansson (http://www.digip.org/
jansson/) source code.
Copyright © 2009-2016 Petri Lehtinen <[email protected]>
Released under the MIT license
http://opensource.org/licenses/mit-license.php
• Roland, SuperNATURAL, PureAcoustic, Piano Every Day
are either registered trademarks or trademarks of Roland
Corporation in the United States and/or other countries.
• Company names and product names appearing in this
document are registered trademarks or trademarks of their
respective owners.
32
Page 33

Internal Song Music Book
内蔵曲楽譜集
1 : Elevations
2 : Reection
Page 34
&
?
Allegro (oca.140)
C
3
&?4
œ
œ
F
playful
Œ
3
4
.
ú
j
A m
œ œ
œ
œ
œ
œ
œ
œ
Elevations
Original
C 6
œ œ
œ
œ œ
œ
œ
œ
ú
ú
ú
œ
œ
œ
œ
.
.
.
G 7/C
œ œ
œ
œ
Œ
œ
œ
œ œ
œ
.ú
°
C/G
œ
œ
œ
œ
œ
œ
œ
œ
œ
F
œ
œ
œ
rit.
œ
œ
œ
œ
œ
œ
œ
œ
œ
œ
D m G9
œ
œ
œ
œ
œ
.
ú
°
C/G G
œ
œ
œ
œ
œ
œ
œ
œ
œ
œ
œ
œ
œ
œ
œ
&
?
&
?
°
C
a tempo
œ
.
œ
°
C
œ
Œ
.
ú
j
°
œ œ
œ
œ
.
œ
.
œ
F/A
œ
œ
œ
œ
œ
œ
œ
.
ú
.
ú
°
G
C/G F 6
œ
œ
œ
œ
œ
œ
.
.
.
°
C
a tempo
œ œ
œ
œ
œ
°
.
.
.
j
œ œ
œ
œ
œjœ
œ
œ
œ
œ
œ
poco rit.
œ
œ
œ œ œ
œ
P
‰
œ
ú
°
ú
°
.
°
D m7
œ
œ
œ
œ
œ
œ
œ
.
ú
.
ú
.
ú
°
j
œ
œ œ œ
ú
.
œ
Page 35
&
C
j
œ œ œjœ
œ œ œ
œ
Cmaj7
j
œ œ œjœ
œ œ
Am
œ
J
œ œ œJœ
œ
œ
œ
œ
?
&
?
&
?
.
ú
j
C/B
j
œ œ œjœ
.
ú
.
ú
j
œ
œ
œœœœœ
œ
.
ú
œ
œ
.
ú
.
ú
.
ú
.
ú
C
.
œ
ú
œjœ œJœ
.
ú
ú
.
ú œ
œ œ œ
ú
ú
j
.
.
œ
œ
J
j
Am
ú
œ
œ
œ
œœœ
œ
J
œ
œ
œ
œ
œ
œ
œœœœœ
œ
œ
J
œ
C/B
.
ú
œ
J
œœœ
œ
ú
œ
œ
œ
œ
J
ú
ú
Cmaj7
.
ú
œ
œœœ
J
ú
.
.
ú
œ
œ
Poco
slower
œ
œ
œ
J
&
?
&
?
Fmaj7
.
ú
Ó
F
expressivo
Œ
ú
.
j
.
œ
.
ú
.
ú
.
úúú
.
j
C/G
.
œ
.
œ
œ œ
œ
j
œ
œ
ú
.
ú
.
ú
ú
.
Gsus4
œ
ú
.
Œ
.
ú
j
œ
œ
œ
ú
œ
ú
.
ú
Œ
‰
œ œjœ
.
ú
j
G
ú
.ú
.
ú
.
ú
œ
œ
œ
œ
j
G
œ
œ
œ
‰
œ œ
ú œ œ
C
Più mosso
ú
ú
Œ
.
ú
œ
œ
Fmaj7
.
œ
œ
œ
œ
œ
ú
Ó
Œ
‰
j
œ
œ
œ
œ
ú
.
œ
Dm/A
œ
œ
œ œ
œ
œ œ
œ
œ
maj7
F
œ
œ
œ
œ
j
j
Page 36
&
ú
C/E
ú
ú
F/A
F6 Am7
œ
œ
œ
œ
œ
œ
œ
œ
œ
ú
œ
ú
œ
œ
‰
œ
J
Œ
œ
œ
œ
œ
œ
œ
œ
œ
œ
?
&
?
œ
j
A
ú
ú
ú
f
‰
j
b
maj7
.
.
.
rit.
œ
.úb
œ
œ
œ
œ
œ
œ
œ
Fm6
œ
œ
b
œ
œ
œ
œ
‰jœ
œ
ú
j
C/G
a tempo
œ
œ
ú
ú
œ
.
œ
œ
ú œ
..ú
ú
œ
‰
.ú
œ
œ
œ
œ
j
G
ú
ú
œ
œ
œ
F
j
œ
œb
œb
œ
œœbœ
œ
œ
Œ
.
ú
j
œ
œ
œ
.
ú
œ
œ
Œ
ú
j
.
œ
œ
&
?
C
&
?
G
ú
ú
œ
j
œ
.œ
.
ú
Tempo I
œ
œ œ œJœ
J
playful
.
ú
Fmaj7
œ
œ
œ
Œ
ú
j
œ œ œ
ú
G
œ
œ
œ
œ
œ
œ
œ
œ
œ
œ
œ
.
œ
œ
ú
.
Cmaj7
œ œ œJœ
J
.
.
ú
.
ú
ú
.
œ
œ
œ
œ
.
ú
.
ú
.
ú
ú
œ
.
œ
‰
J
Œ
.
ú
j
œ
œ
œ
rit.
œ
œ
œ
Am
.
œ .
.
ú
.
ú
.
ú
œ
œ
œ
œ
ú
ú Œ
ú
.
ú
.
ú
œ
œ
.
ú
.
ú
.
ú
œ
œ
j
j
Page 37
&
?
Fm6
ú
b
ú
poco rit.
ú
.
ú
.
ú
b
.
ú
.
j
œ
b
œ
ú
b
œ
œ
ú
ú
ú
.
.
.
.
a tempo
œ
œ
C/G
ú
expressivo
Œ
ú
.
ú
j
ú
œ
ú
.
ú
.
ú
œ
Gsus4
œ
ú
Œ
œ
œ
ú
.
ú
j
&
?
&
?
G
ú
ú
ú
.
ú
.
ú
.
ú
b
maj7
A
Più mosso
œ
j
œ œ œ
Œ ‰
úb
.
j
Fmaj7
ú
œ
ú
Œ
ú
.
j
œ
j
œ
œb
.
ú
ú
ú
.ú
.
.
œ
œ
œ œ
ú
ú
.
ú
.
ú
.
ú
œ
œ
b
6
B
j
œ œ œ
Œ ‰
.
úb
j
C/G
ú
œ
ú
Œ
.
ú
j
œ
œ
œ
ú
j
œ
.
œ
G
ú
ú
œ
.
ú
.
ú
.
ú
œ
œ
.ú .
ú
ú
œ œ
.
A
&
œ œ œ
?
Œ
úb
j
C
&
ú œ
?
œ
j
b
maj7
j
.
b
6
B
œ
j
œ
œb
úb
ú
ú
ú
ú
œ
œ
œ
œ
œ
.
.
.
.
œ œ
œ
∑
œ
œ
œ
ú
œ
j
œ œ œ
Œ
.
úb
j
.
∑
œ
œ
úb
.
ú
œ
j
œ œ
poco rit.
.ú .
ú
.
ú
ú
.
.
ú
ú
œ
.
œ
.
ú
.
ú
.
ú
Page 38
Moderate (oca.112)
&
c
C
.œ
j
œ
Reflection
Original
.
j
.
œ
œ j
œ
œ
œ
œ
œ
œ
œ
.
.
j
œ
œ
j
œ
œ j
.
œ
œ
œ
œ
œ
&
?
&
?
Am
Œ
j
C
Ó
œ
?
F
c
.œ
j
œ
ú
.œ
œ
.ú
œ
Œ
j
œ
j
œ
Œ œ
ú
œ
œ.ú
ú
œ
œ.ú
Œ
j
Dm7
j
œ
.
œ
œ
.
.
œ.ú
j
œ j
œ
.
œ
œ
j
œ
œ
œ
œ
œ
œ
œ.ú
F F6
œ
œ
Œ
j
œ
œ
Ó
j
.
.
.
œ
œ
ú
œ
.
j
œ
œ
Œ œ
.ú
Fmaj7
j
.œ
œ
œ
j
j
œ
.
ú
œ j
.
œ
œ
j
œ
œ
œ
œ
œ
œ
œ
œ
œ.ú
œ
œ
j
F G
&
?
œ
œ
œ
œ
œ
œ
j
j
F/A G7/B
œ
œ
œ
œ
œ
œ
œ
œ
j
œ
œ
j
œ
œ
œ
œ
œ
œ
œ
œ
œ
j
œ
œ
œ
Page 39
&
C
.œ
.
j
œ
œ
œ
j
œ j
.
œ
œ
œ
œ
œ
œ
.
.
j
œ
œ
j
œ
œ j
.
œ
œ
œ
œ
œ
ú œ
?
&
?
œ
œ
j
A m G/B
œ
œ
œ
œ
j
C
&
.
œ
œ
.
ú
ú
œ
œ.ú
Œ
j
#m7b
5
F
œ
œ
œ
œ
œ
j
œ
j
.
œ
œ
œ
œ
j
.
œ
j
.
œ
œ
j
œ
œ
œ
œ
œ
.
j
œ#
œ
j
œ
œ
œ
œ
F
œ
poco rit.
Œ
ún
j
b
6
E
.
œ
a tempo
œ
œ
.
œ
ú œ œ
w
œ
œ
w
j
œ
œ
j
.
.
œb
œ
j
œ
œ
œ
œ
œ
?
&
?
&
œ
j
C
œ
œ
j
C
w
ú
œ
.
j
œ
ú
œ
œ
œ .ú
œb
j
E
j
.
.
œ
œ
œ
œ
œ .ú
œ
j
œ
œ
œ
œ
œ
œb
j
ú œ
œb
b
6
.
ú œ
œb
j
.
œ
œ
w
œ.ú
j
.
œb
œ
j
œ
œ
œ
œ
œ
poco rit.
œ.ú
w
?
œ
j
œ
œ
œ
ú
ú
w
w
w
w
w
w
Page 40

© 2020 Roland Corporation
 Loading...