

Page 1
Digital Piano
Deutsch Français Italiano Español Português NederlandsEnglish
Page 2

Page 3
Digital Piano
Contents
Easy Operation Guide (Front Panel) 2
Turning the Power On/O . . . . . . . . . . . . . . . . . . . . . . . . . . . . . . . . . . . . . . .2
Adjusting the Volume . . . . . . . . . . . . . . . . . . . . . . . . . . . . . . . . . . . . . . . . . . . 2
Selecting a Sound . . . . . . . . . . . . . . . . . . . . . . . . . . . . . . . . . . . . . . . . . . . . . . .2
Layering Two Sounds (Dual) . . . . . . . . . . . . . . . . . . . . . . . . . . . . . . . . . . . . .2
Playing Dierent Sounds with Left and Right Hands (Split) . . . . . . .2
Changing the Keyboard Response (Key Touch) . . . . . . . . . . . . . . . . . . .2
Using the Metronome . . . . . . . . . . . . . . . . . . . . . . . . . . . . . . . . . . . . . . . . . . .3
Playing Back Songs/Rhythms (Automatic Accompaniment for
Chords) . . . . . . . . . . . . . . . . . . . . . . . . . . . . . . . . . . . . . . . . . . . . . . . . . . . . . . . . .3
Recording Your Performance . . . . . . . . . . . . . . . . . . . . . . . . . . . . . . . . . . . . 3
Before You Play 4
Placing the F-20 on a Stand . . . . . . . . . . . . . . . . . . . . . . . . . . . . . . . . . . . . .4
Rear Panel Connections . . . . . . . . . . . . . . . . . . . . . . . . . . . . . . . . . . . . . . . . .4
Attaching the Music Rest . . . . . . . . . . . . . . . . . . . . . . . . . . . . . . . . . . . . . . . . 5
Turning the Power On/O . . . . . . . . . . . . . . . . . . . . . . . . . . . . . . . . . . . . . . . 5
Making the Power Automatically Turn O After a Time (Auto O ) . 5
Listening to the Demo Songs . . . . . . . . . . . . . . . . . . . . . . . . . . . . . . . . . . . . 5
Environmentally Friendly Energy-Ecient Design
When 30 minutes have elapsed since you last played or operated the F-20, the power will
turn o automatically.
* If you don’t want the power to turn o automatically, change the “Auto O”
setting (p. 5).
Advanced Features 6
About the Wireless LAN Function 8
Troubleshooting 9
Adjusting the Brilliance (Brilliance) . . . . . . . . . . . . . . . . . . . . . . . . . . . . . . . 6
Adjusting the Reverberation (Ambience). . . . . . . . . . . . . . . . . . . . . . . . .6
Dividing the Keyboard in Two (Twin Piano) . . . . . . . . . . . . . . . . . . . . . .6
Disabling the Buttons (Panel Lock) . . . . . . . . . . . . . . . . . . . . . . . . . . . . . . .6
Saving the Settings (Memory Backup) . . . . . . . . . . . . . . . . . . . . . . . . . . . 6
Restoring the Factory Settings (Factory Reset) . . . . . . . . . . . . . . . . . . .6
Formatting a USB Flash Drive . . . . . . . . . . . . . . . . . . . . . . . . . . . . . . . . . . . . 6
Various Function Settings (Function Mode) . . . . . . . . . . . . . . . . . . . . . . 7
Matching the Pitch with Other Instruments (Master Tuning) 7
Changing the Key of the Keyboard (Transpose) . . . . . . . . . . . .7
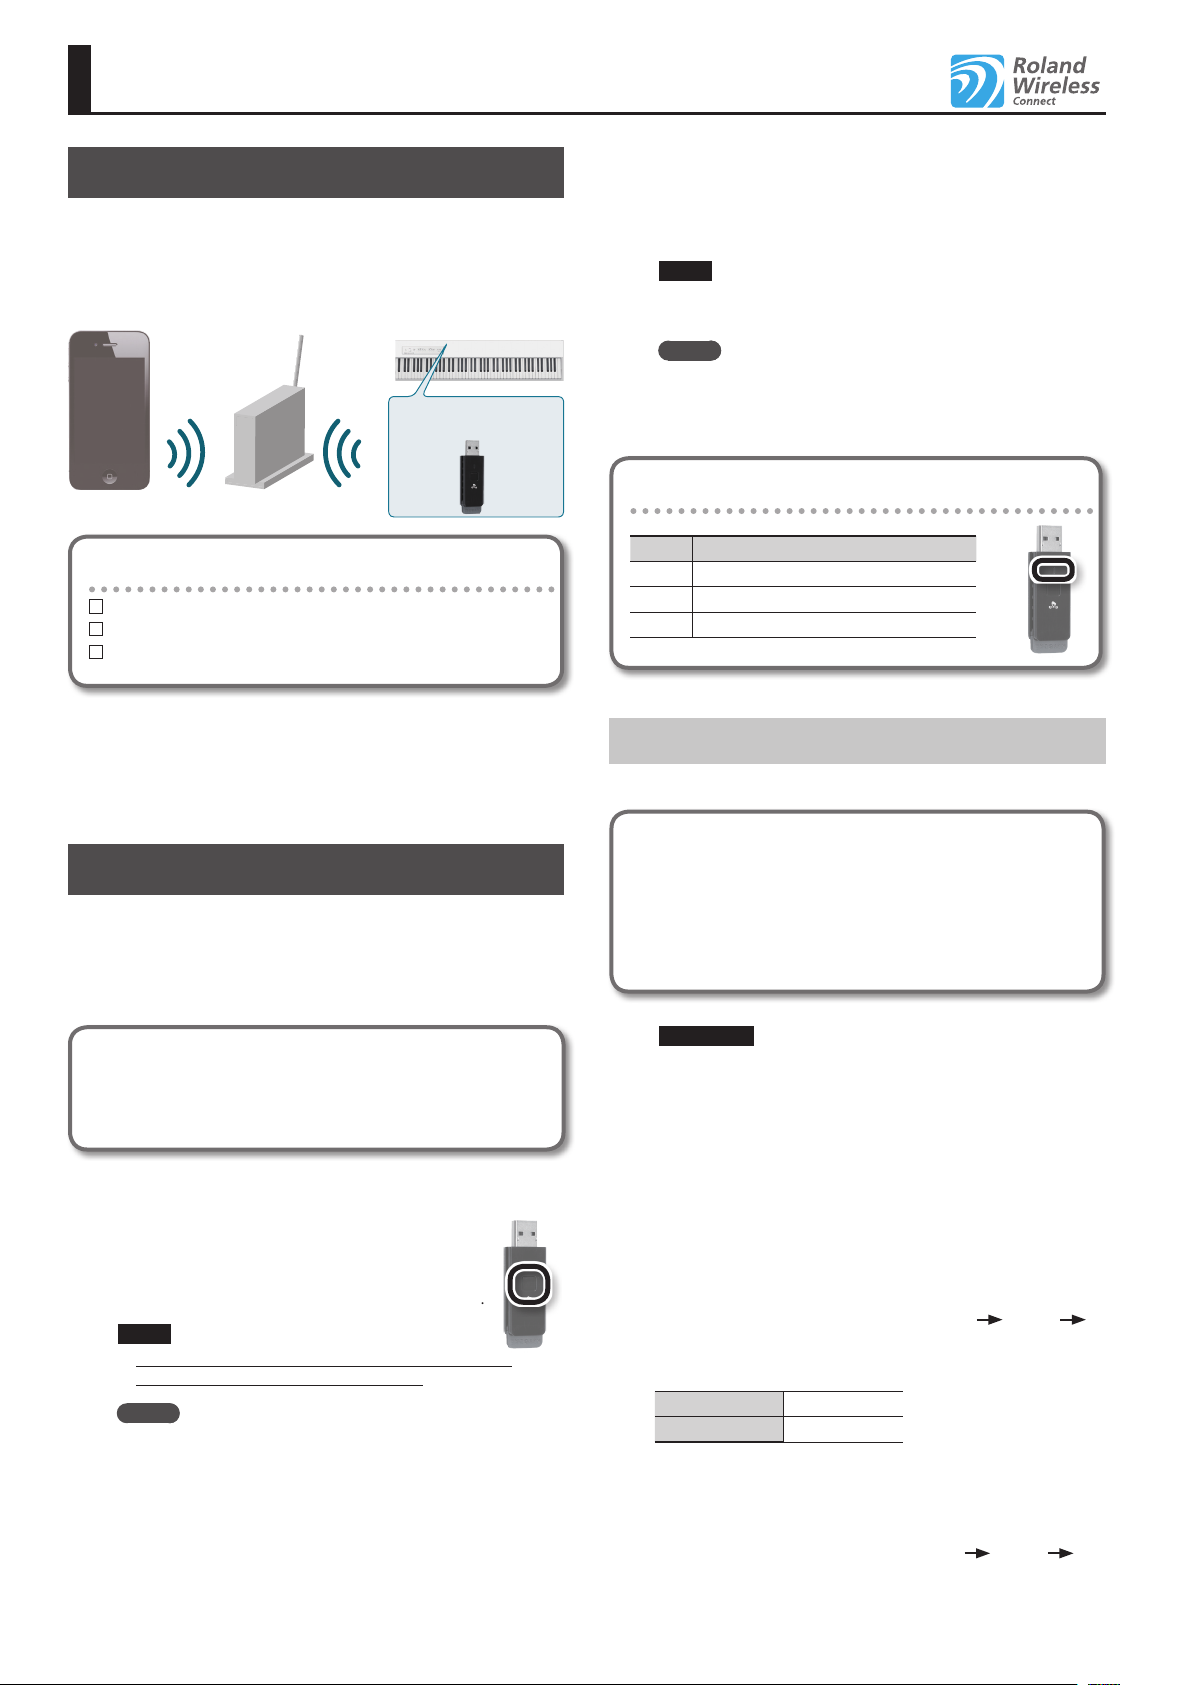
What Is Wireless LAN Function? . . . . . . . . . . . . . . . . . . . . . . . . . . . . . . . . . . 8
Basic Connection Method (Connect by WPS) . . . . . . . . . . . . . . . . . . . . . 8
Connecting in Ad-Hoc mode . . . . . . . . . . . . . . . . . . . . . . . . . . . . . . 8
Deutsch Français Italiano Español Português NederlandsEnglish
Main Specications
Keyboard 88 keys (Ivory Feel-G keyboard with escapement)
Power Supply AC adaptor
9 W (2 W–18 W)
9 W: Average power consumption while piano is
Power Consumption
Dimensions
Weight
Before using this unit, carefully read the sections entitled “USING THE UNIT SAFELY” and “IMPORTANT NOTES” (leaet “USING THE UNIT SAFELY” and
Owner’s Manual p. 10). These sections provide important information concerning the proper operation of the unit. Additionally, in order to feel assured
that you have gained a good grasp of every feature of your new unit, read leaet “USING THE UNIT SAFELY” and Owner’s Manual in its entirety. This
manual should be saved and kept on hand as a convenient reference.
Copyright © 2013 ROLAND CORPORATION
All rights reserved. No part of this publication may be reproduced in any form without the written permission of ROLAND CORPORATION.
played with volume at center position
2 W: Power consumption immediately after
power-up; nothing being played
18 W: Rated power consumption
1,282 (W) x 296 (D) x 132 (H) mm
50-1/2 (W) x 11-11/16 (D) x 5-1/4 (H) inches
20 kg
44 lbs 2 oz
Accessories
Options
(Sold Separately)
* In the interest of product improvement, the specications and/or
appearance of this unit are subject to change without prior notice.
Owner’s manual, Leaet “USING THE UNIT SAFELY,”
Music rest, AC adaptor, Power cord (for connecting
AC adaptor), Damper pedal (capable of continuous
detection)
Dedicated Stand (KSC-68), Keyboard Stand (KS-18Z,
KS-12), Damper Pedal (DP-10), USB Flash Memory (*1),
Wireless USB Adapter (WNA1100-RL) (*1)
*1: Use USB Flash Memory and Wireless USB Adapter
sold by Roland. We cannot guarantee operation if
other products are used.
Page 4
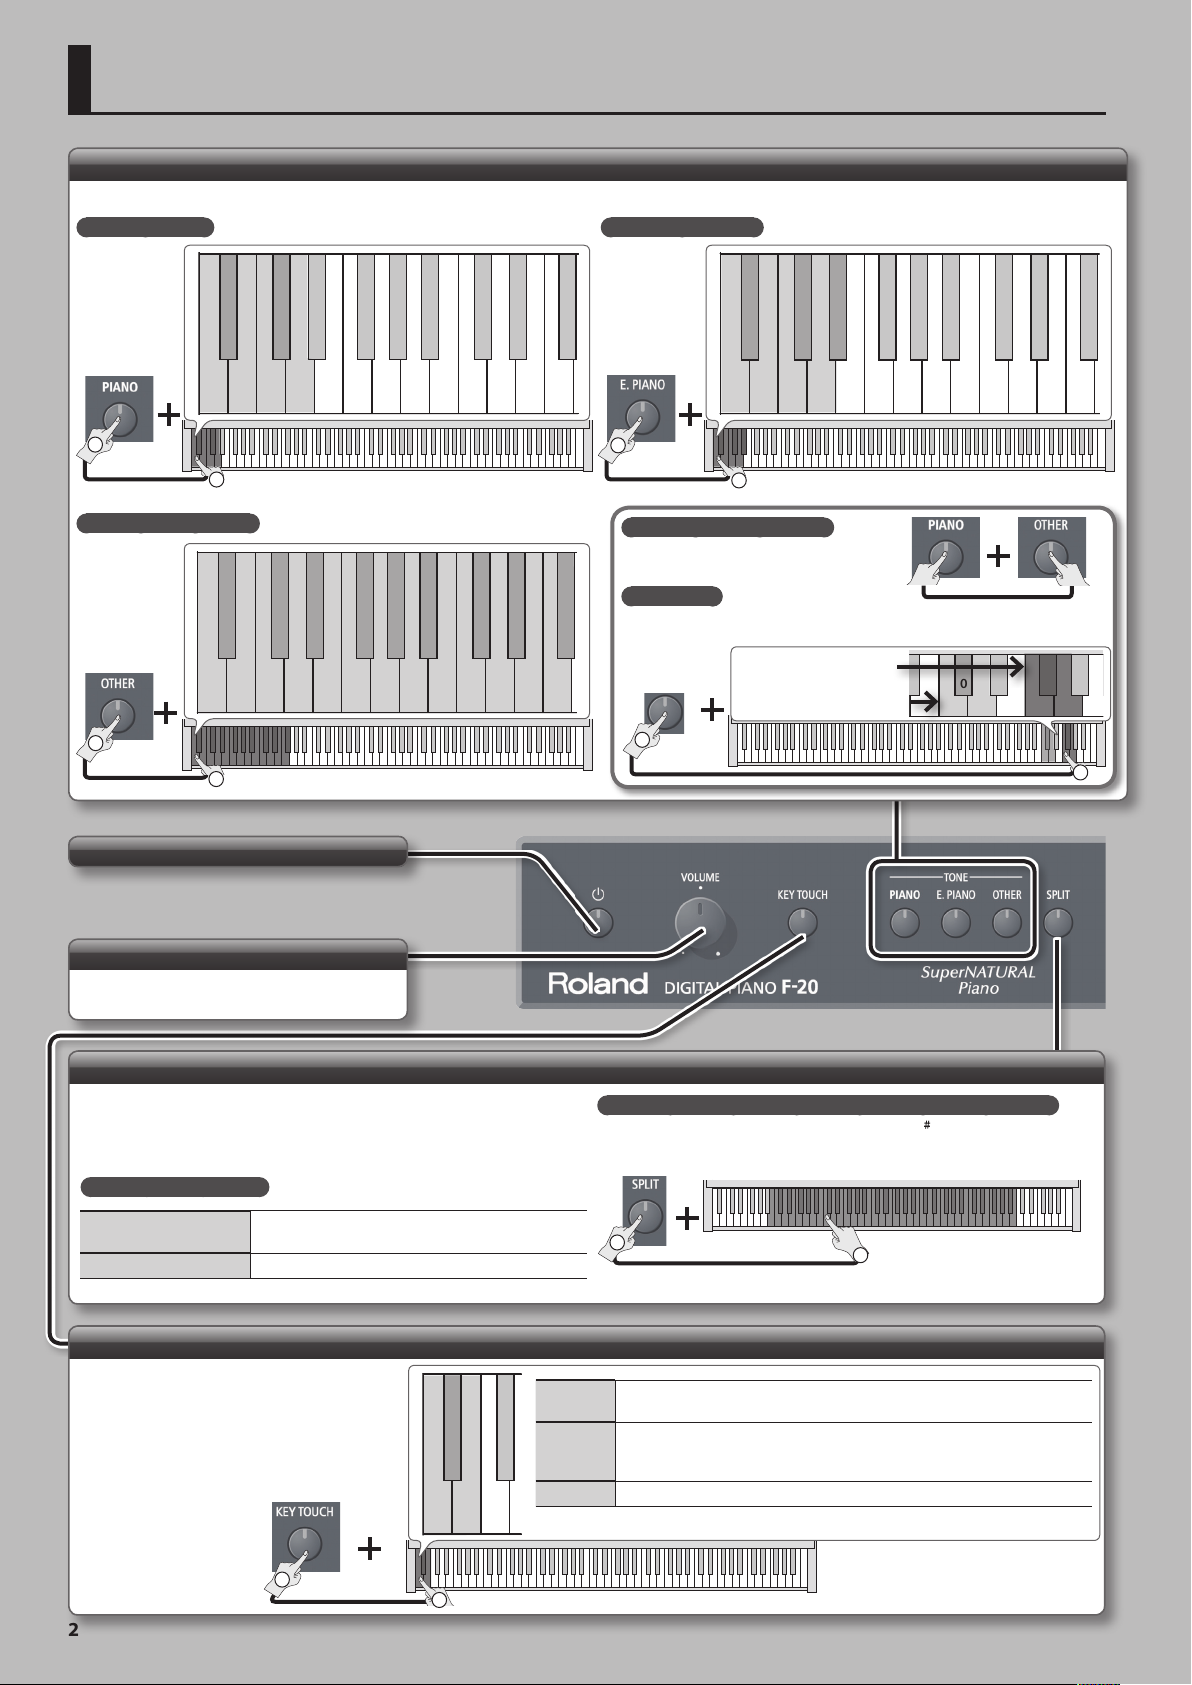
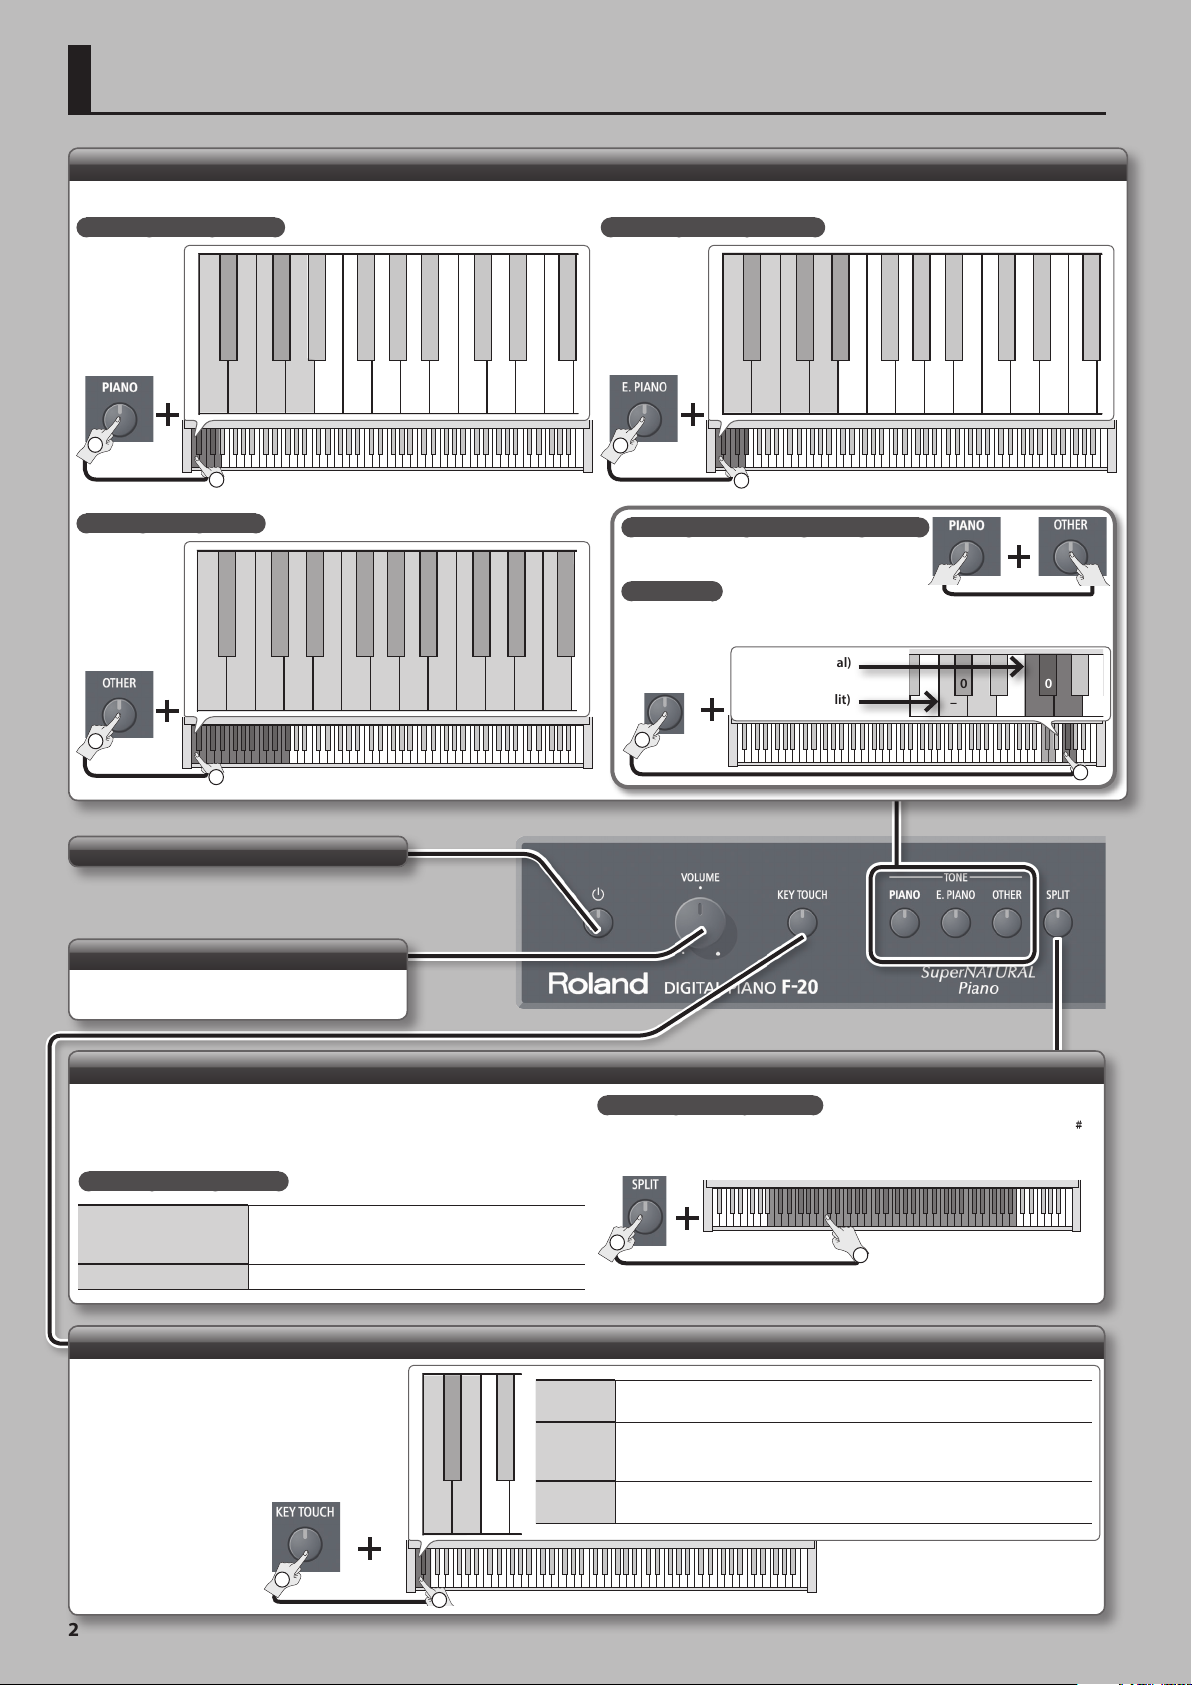
Easy Operation Guide (Front Panel)
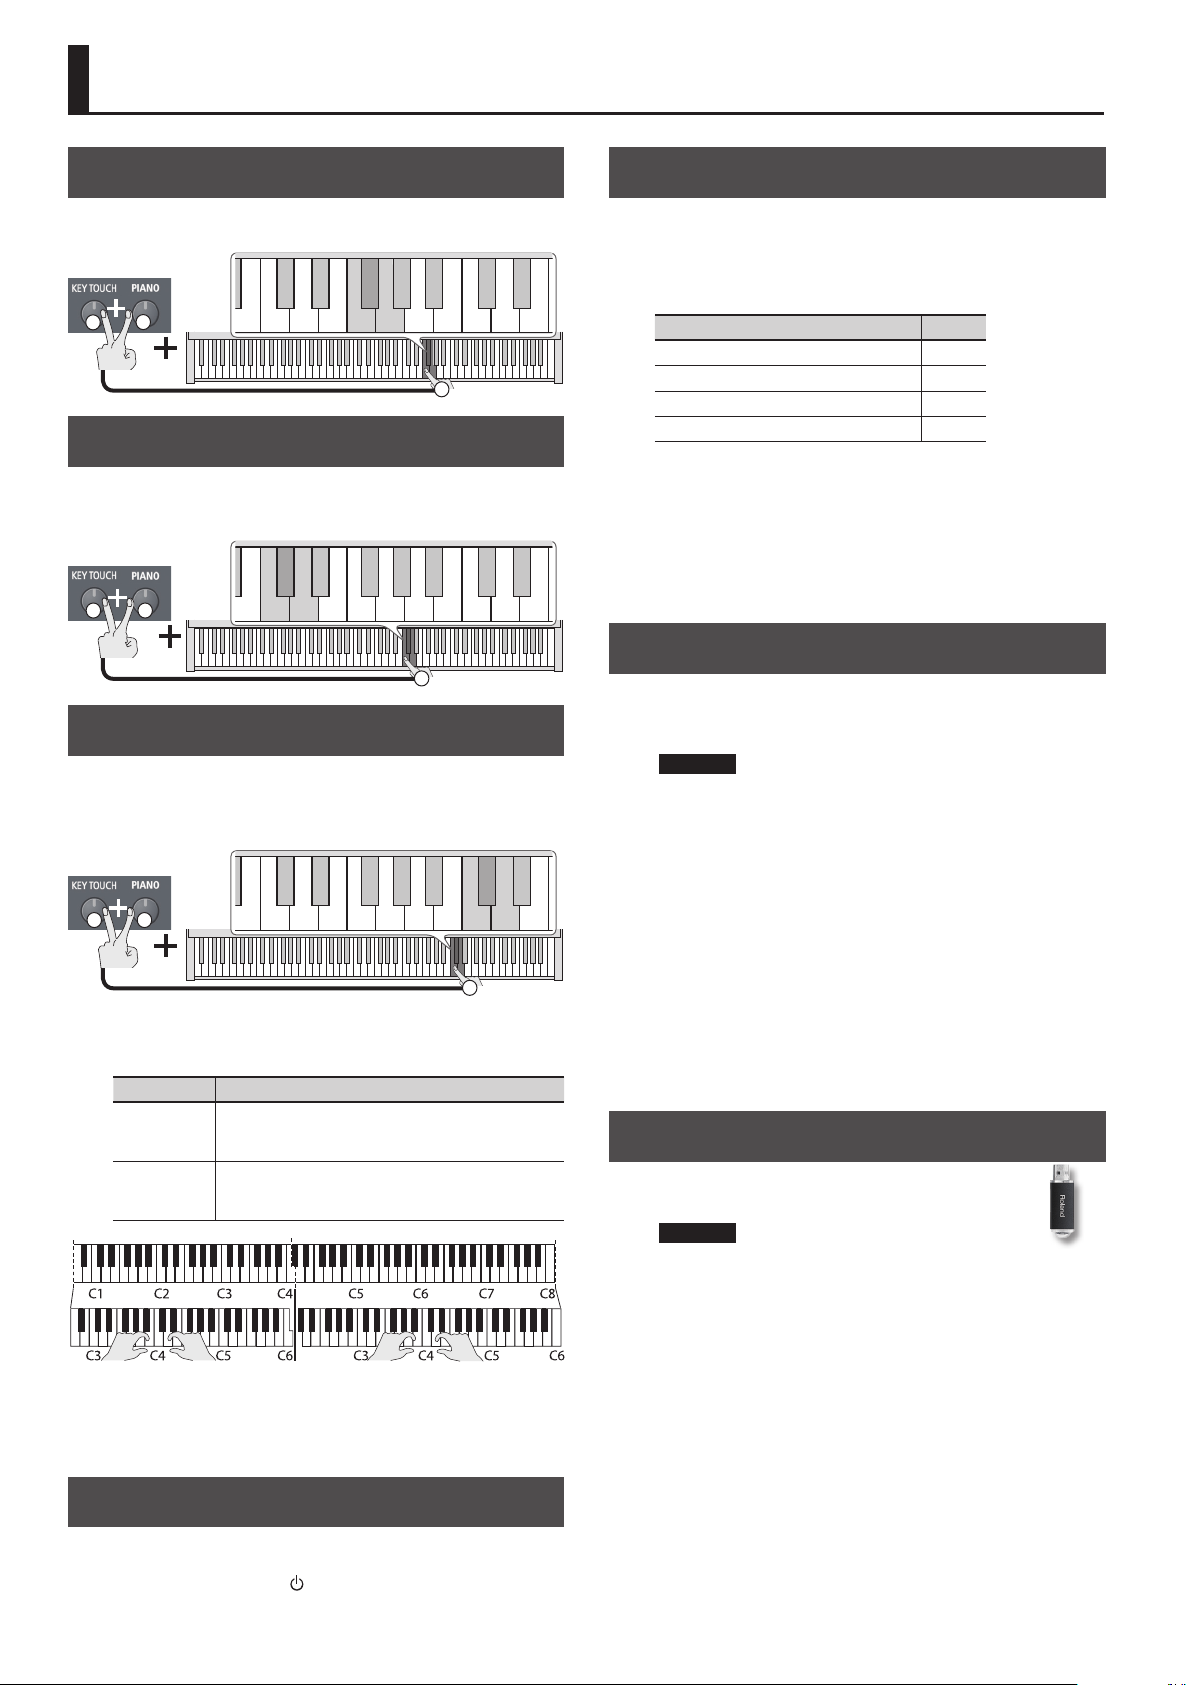
Selecting a Sound
Hold down the TONE button and press one of the following keys; the sound changes.
Selecting a Piano
Grand Piano 2
Grand Piano 1
1
Hold down
2
Selecting Other Sounds
Strings 2
Strings 1
1
Hold down
2
Grand Piano 3
Jazz Organ 1
Harp
Ragtime Piano
Harpsichord 1
Harpsichord 2
Jazz Organ 2
Church Organ 1
Church Organ 2
Accordion
Jazz Scat
Choir 1
Choir 3
Choir 2
Selecting an E. Piano
Vibraphone
1
Hold down
E. Piano 1
2
E. Piano 2
E. Piano 3
Synth Bell
Celesta
Clav.
Layering Two Sounds (Dual)
By pressing two TONE buttons simultaneously,
you can layer two sounds.
Mix Balance
You can adjust the mix balance of the two sounds (ve steps, 0 = default value).
Acoustic Bass
A.Bass + Cymbal
Fingered Bass
Thum Voice
TONE button
that’s lit
1
Hold down
Mix balance for Dual
Mix balance for Split
Decay Choir
Nylon-str.Gt
Synth Pad
Steel-str.Gt
Decay Strings
Decay Choir Pad
Hold down
+ ––
00
+
2
Turning the Power On/O
(p. 5)
Adjusting the Volume
Use the [VOLUME] knob to adjust the volume.
Playing Dierent Sounds with Left and Right Hands (Split)
Turn the [SPLIT] button on, and the keyboard is divided into left and right sections,
allowing you to play a dierent sound in each section.
If you hold down the [SPLIT] button, the TONE button assigned to the left section will
light.
Switching Sounds (Split)
Switching the left sound
Switching the right sound Use the same operation as in “Selecting a Sound,” above.
While pressing the [SPLIT] button, hold down one of the
TONE buttons, and press a key.
Changing the Keyboard Response (Key Touch)
If you turn the [KEY TOUCH] button on, you can
change the responsiveness of the keyboard (key
touch).
When the [KEY TOUCH] button is o, the “MEDIUM”
touch (equivalent to an acoustic piano) is selected.
LIGHT
HEAVY
FIX
LIGHT
HEAVY
FIX The sound plays at one set volume, regardless of the force used to play the keys.
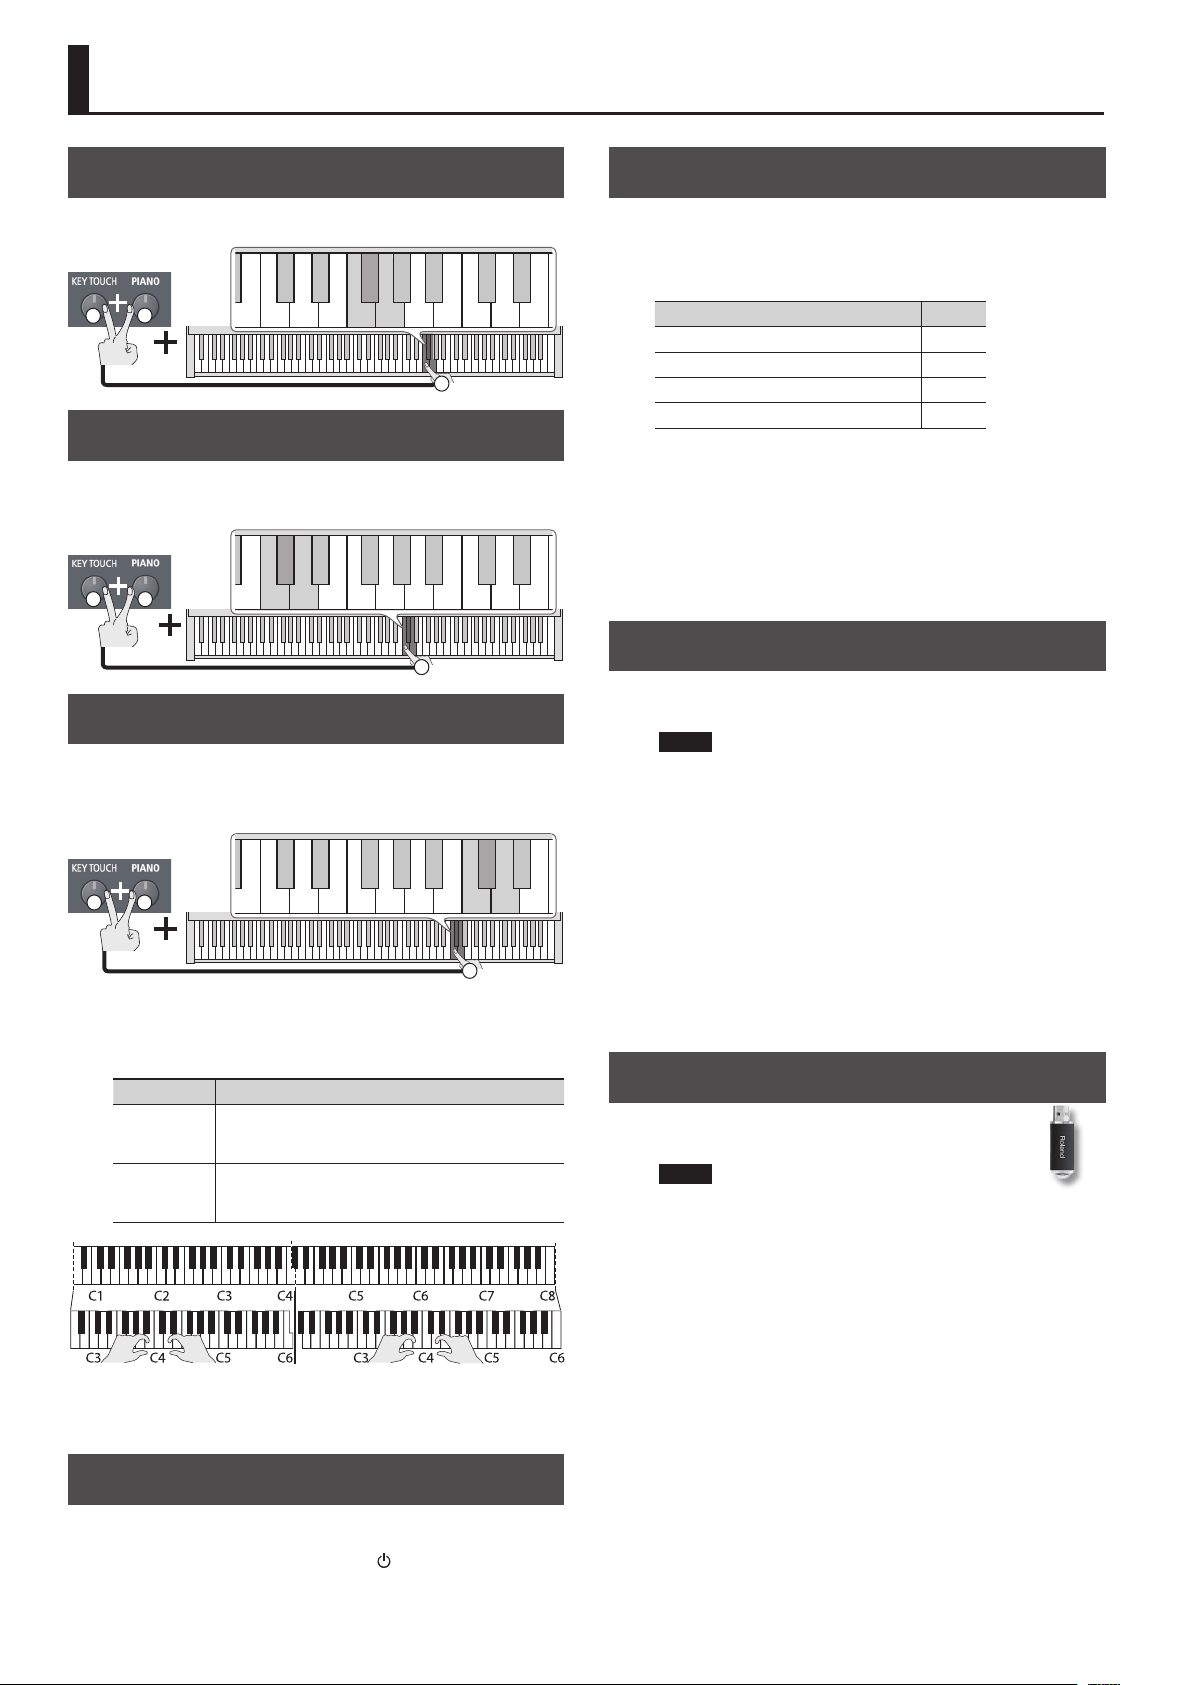
Changing the Point Where the Keyboard Is Divided (Split Point)
Hold down the [SPLIT] button and press a key (Default: F 3).
B1 B6
1
Hold down
You can achieve fortissimo ( ) play with a less forceful touch than “MEDIUM,” so
the keyboard feels lighter. This setting makes it easy to play, even for children.
You have to nger the keyboard more forcefully than “MEDIUM” in order to play
fortissimo (), so the keyboard feels heavier. Dynamic ngering adds even more
feeling to what you play.
2
1
Hold down
2
2
Page 5
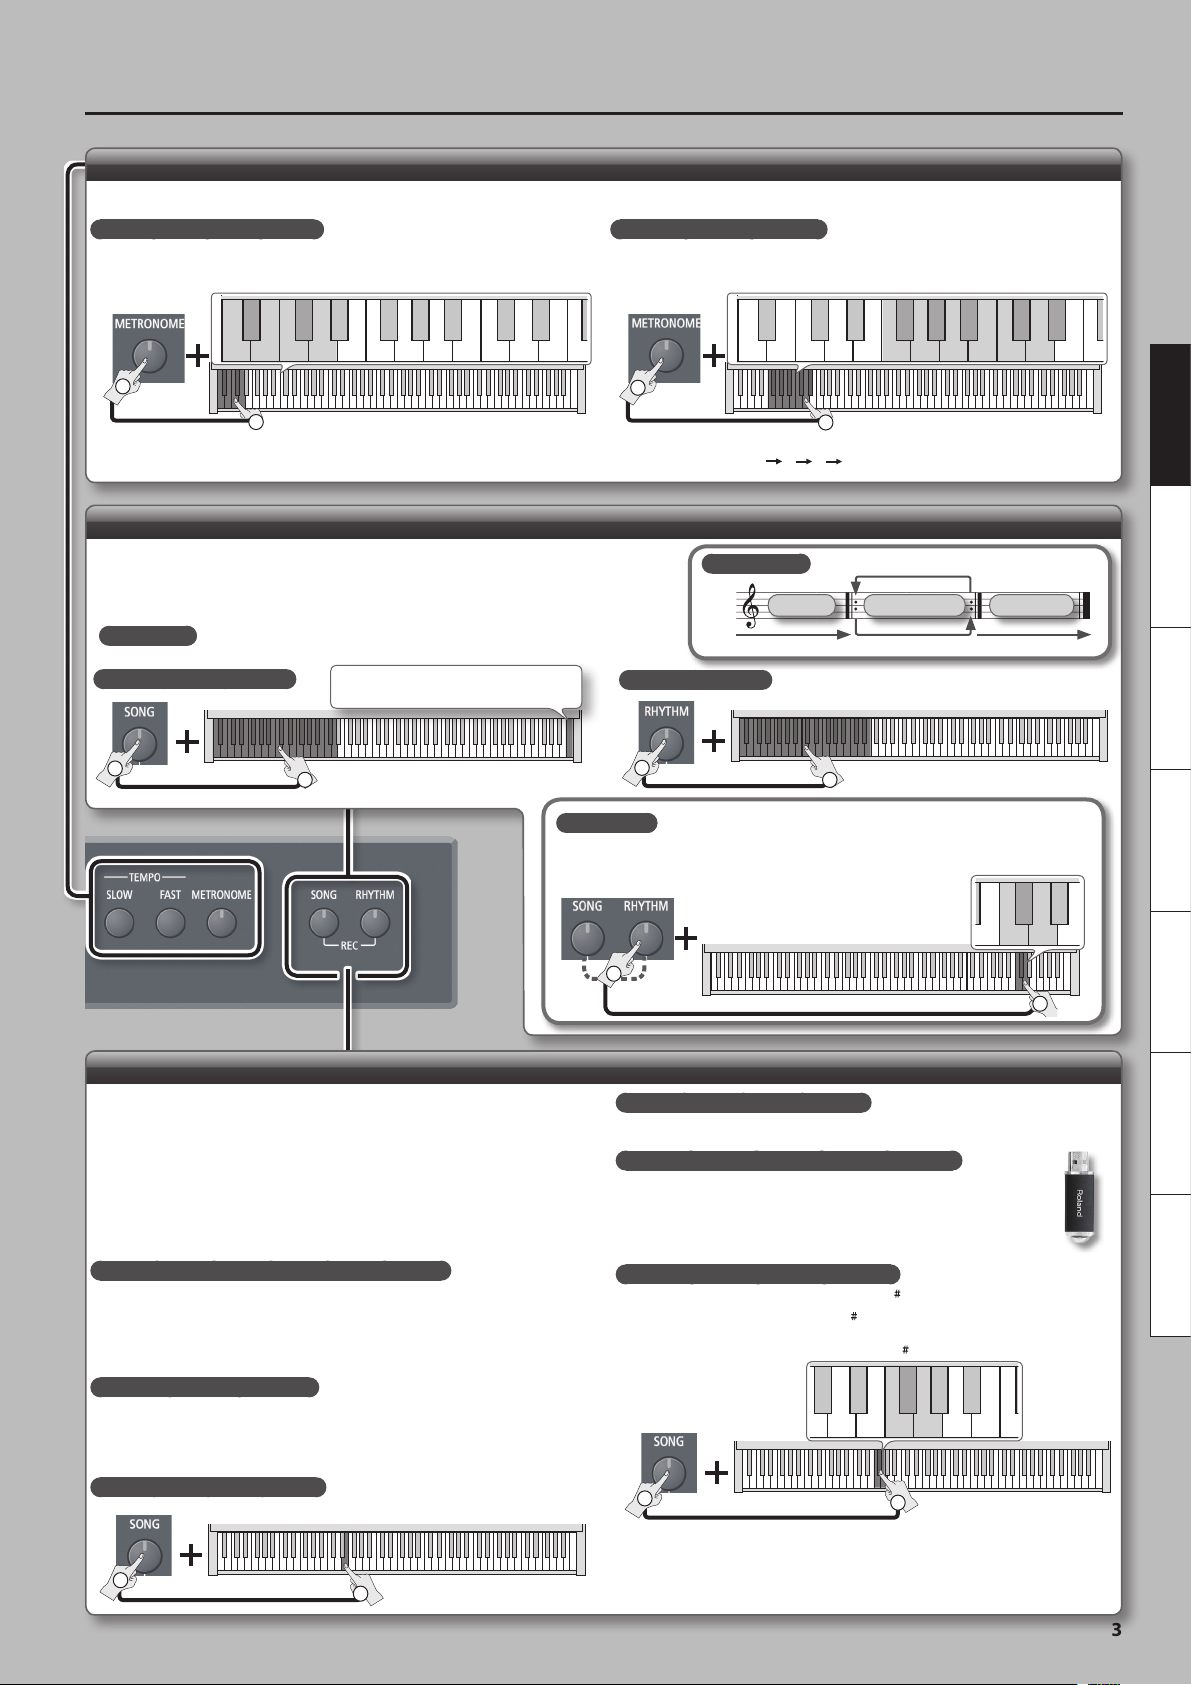
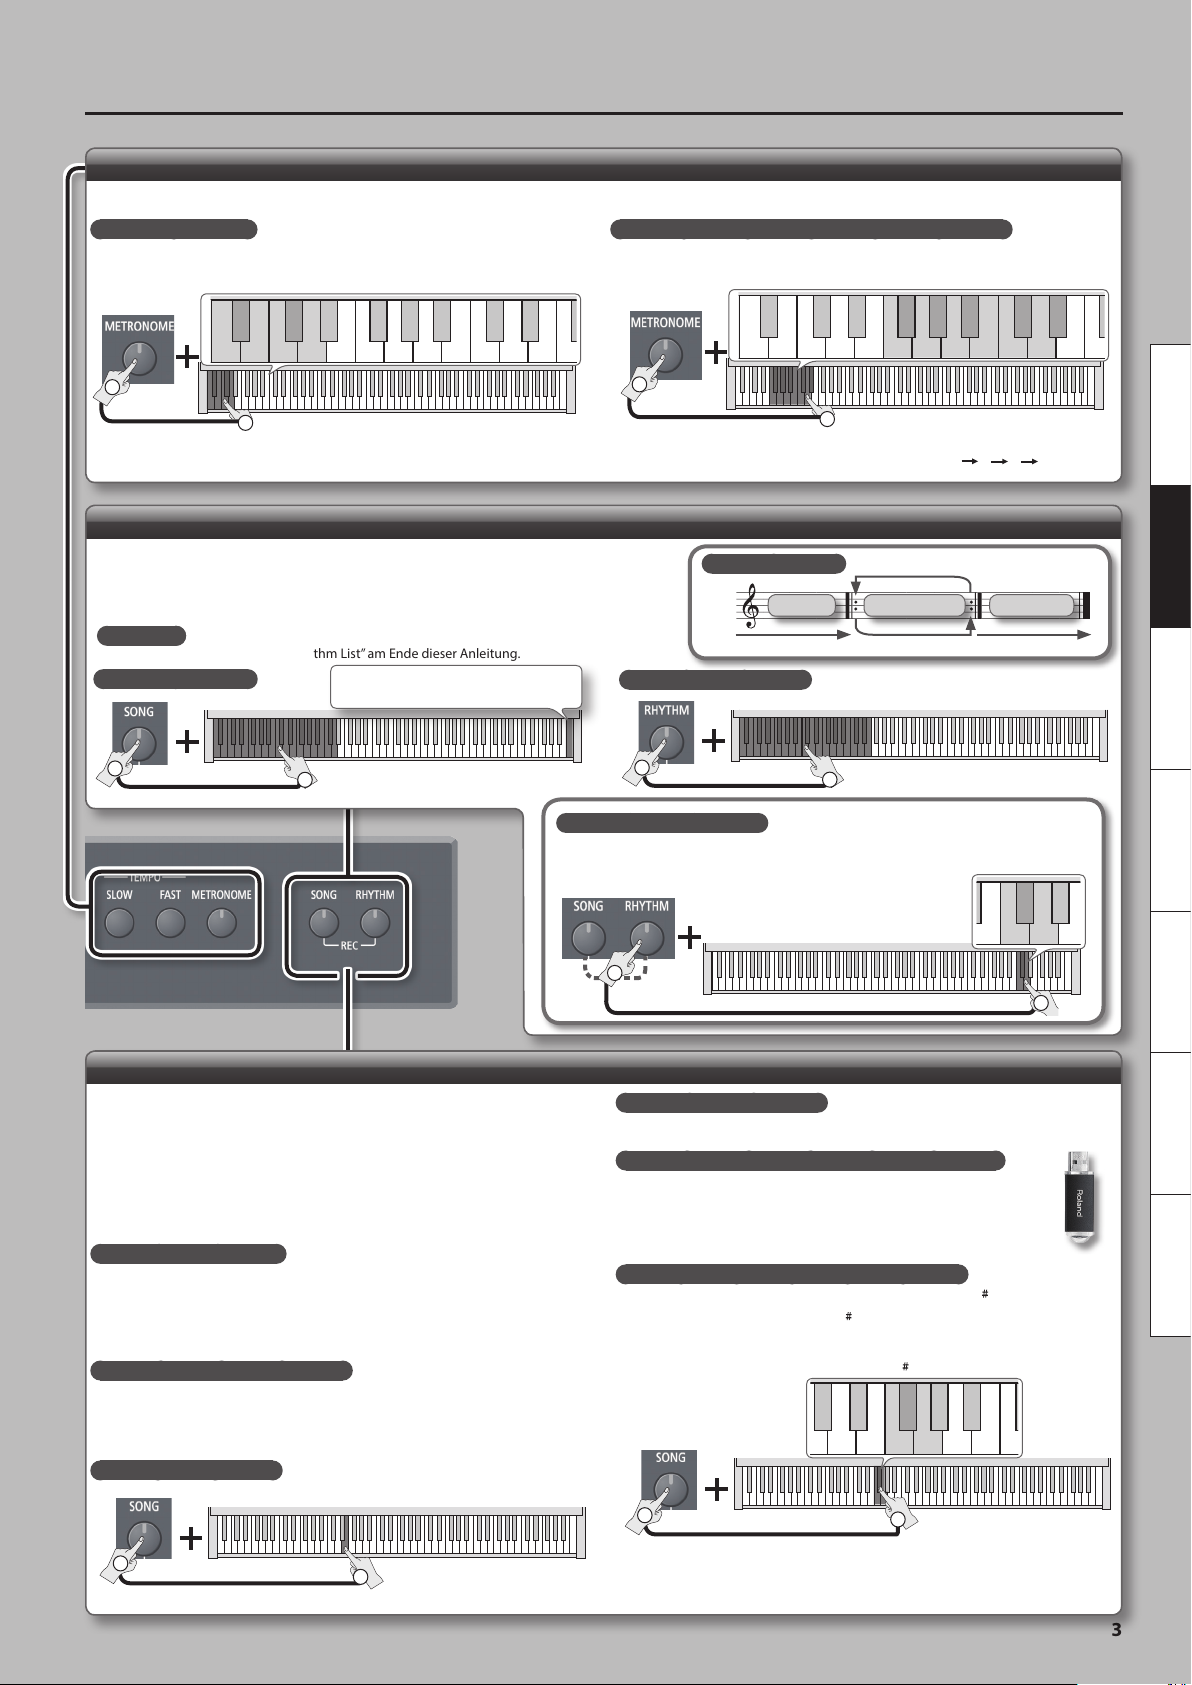
Using the Metronome
Turn the [METRONOME] button on; the metronome will sound. Use the [SLOW]/[FAST] buttons to adjust the tempo.
Easy Operation Guide (Front Panel)
Changing the Number of Beats
You can choose from 0 (weak beats only), 2 (2 beats), 3 (3 beats), 4 (4 beats), 5 (5
beats), or 6 (6 beats).
52
0 3 4 6
1
Hold down
You can also change the number of beats by holding down the [METRONOME]
button and using the [SLOW]/[FAST] buttons.
2
Specifying a Numeric Tempo
A numeric value can also be specied for the tempo (20–250) (default: 108).
1
Hold down
Example: To enter 120, hold down the [METRONOME] button and press the keys in
Playing Back Songs/Rhythms (Automatic Accompaniment for Chords)
To play or stop a song, press the [SONG] button. To play or stop the rhythm (automatic accompaniment based on the chords you play), press the [RHYTHM] button.
You can select an internal song or rhythm by holding down the [SONG] or [RHYTHM] button and
pressing one of the following keys.
REFERENCE
Selecting an Internal Song
1
Hold down
For details on the song names and rhythm names, refer to “Internal Song List”
and “Rhythm List” at the end of this manual.
Press the right end key; all songs play
consecutively.
2
Selecting a Rhythm
1
this order: 1
Hold down
1 3 5 8
0 2 4 6 7 9
2
2 0 ENTER.
Rhythm Flow
Intro
[RHYTHM] on [RHYTHM] o
Accompaniment
2
ENTER
Deutsch Français Italiano Español Português NederlandsEnglish
Ending
Recording Your Performance
Here’s how to record a song.
* Before you begin, select the sound that you want to record.
1. Press the [SONG] button and [RHYTHM] button simultaneously.
* To cancel recording, press the [SONG] button and [RHYTHM] button
simultaneously once again.
2. Play the keyboard to start recording.
3. Press the [SONG] button to stop recording.
If You Want to Record Along with the Metronome
* Sound the metronome and set the number of beats and tempo, before
recording.
If you press the [SONG] button in step 2, recording starts after a two-measure
count.
Recording Along with Rhythm
* Select a rhythm before recording.
If you press the [RHYTHM] button in step 2, recording starts after a two-measure
count.
Mix Balance
You can adjust the mix balance between the song/rhythm and the keyboard (ve levels,
0 = default).
+0–
1
While holding
either
2
If You Want to Redo the Recording
Start recording again from step 1.
Saving the Recorded Song to a USB Flash Drive
* Connect your USB ash drive before you continue.
Hold down the [KEY TOUCH] button and press the [SONG] button.
Once all the LEDs on the buttons are lit, the data has been saved (up
to 99 songs).
Playing a Song from a USB Flash Drive
Hold down the [SONG] button and press the “F 3” key.
You can use the two keys adjacent to “F
3” to select a song on the USB ash drive.
F
3
Play
Prev.
Next
Playing the Song You Recorded
1
Hold down
1
E3
2
Hold down
* You can also copy a WAV le or MIDI le from your computer to a USB ash drive,
and play it back on the F-20. For details on the formats that can be played, refer
to the end of this manual.
2
3
Page 6
Before You Play
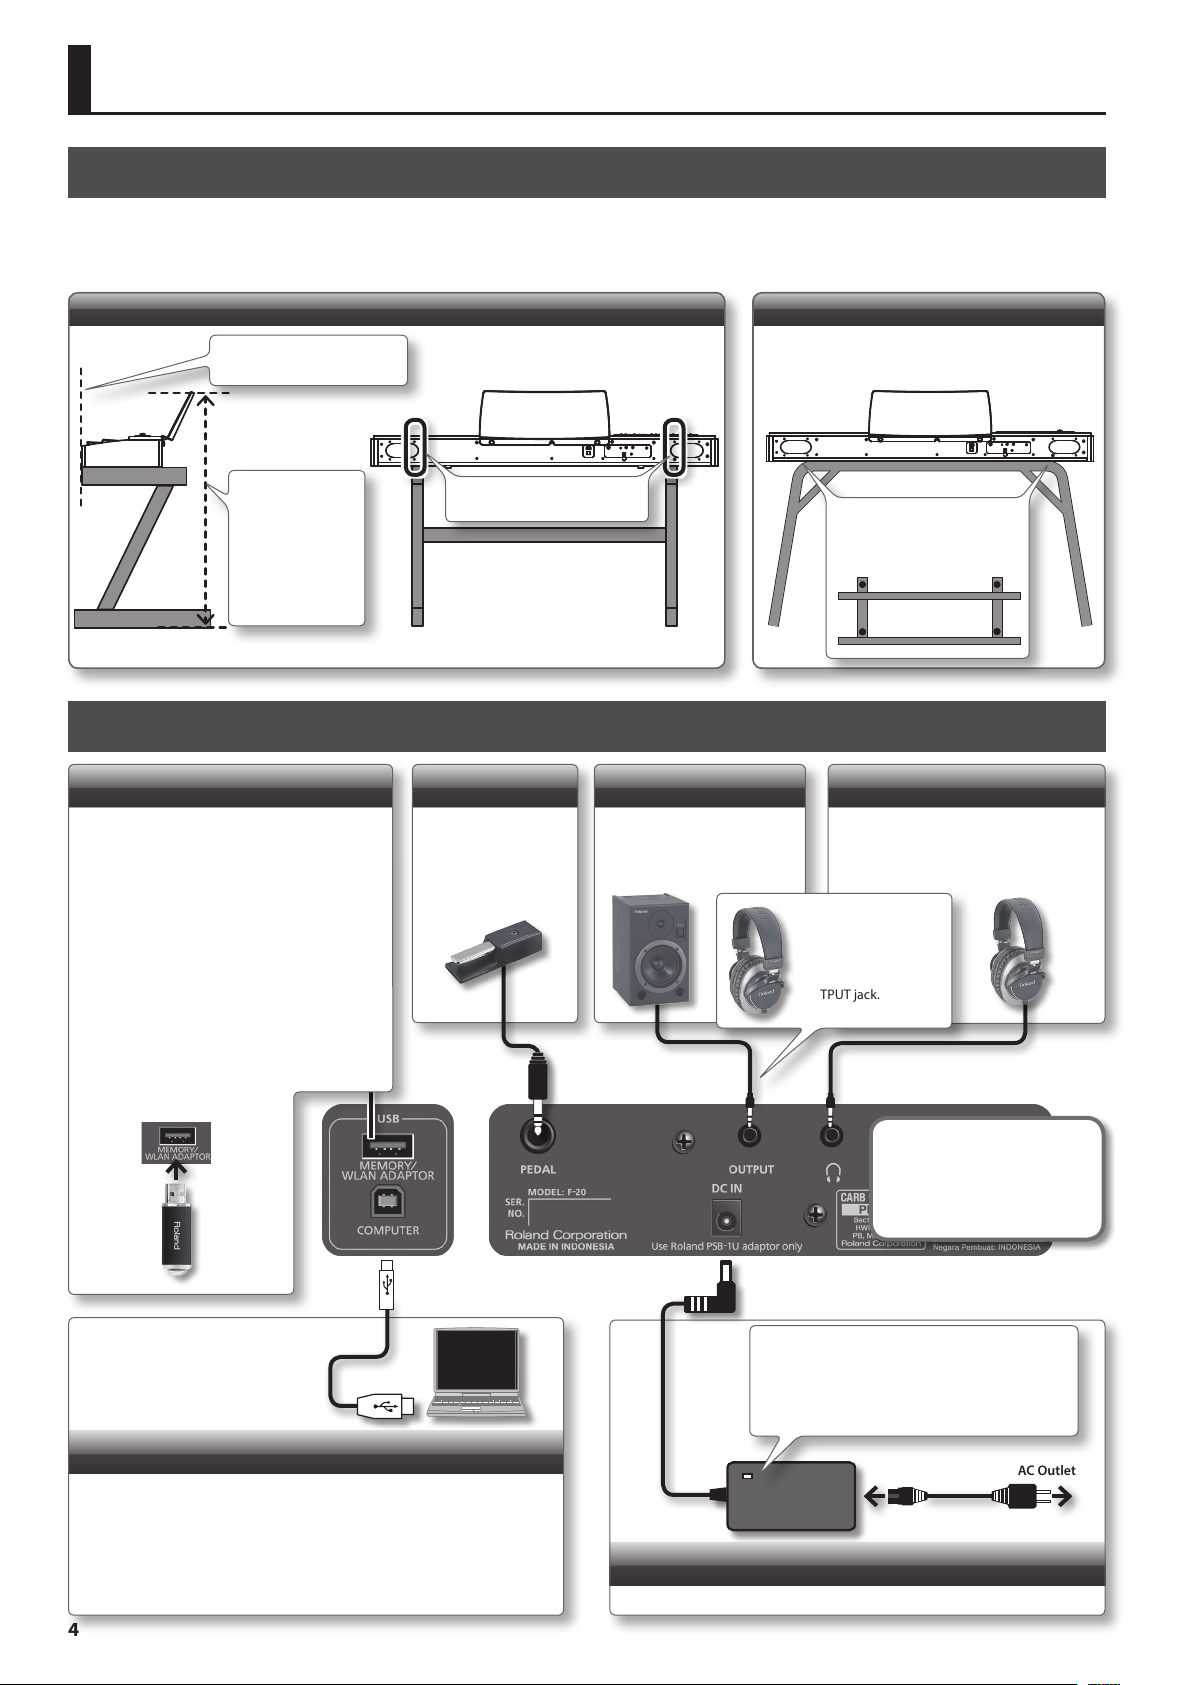
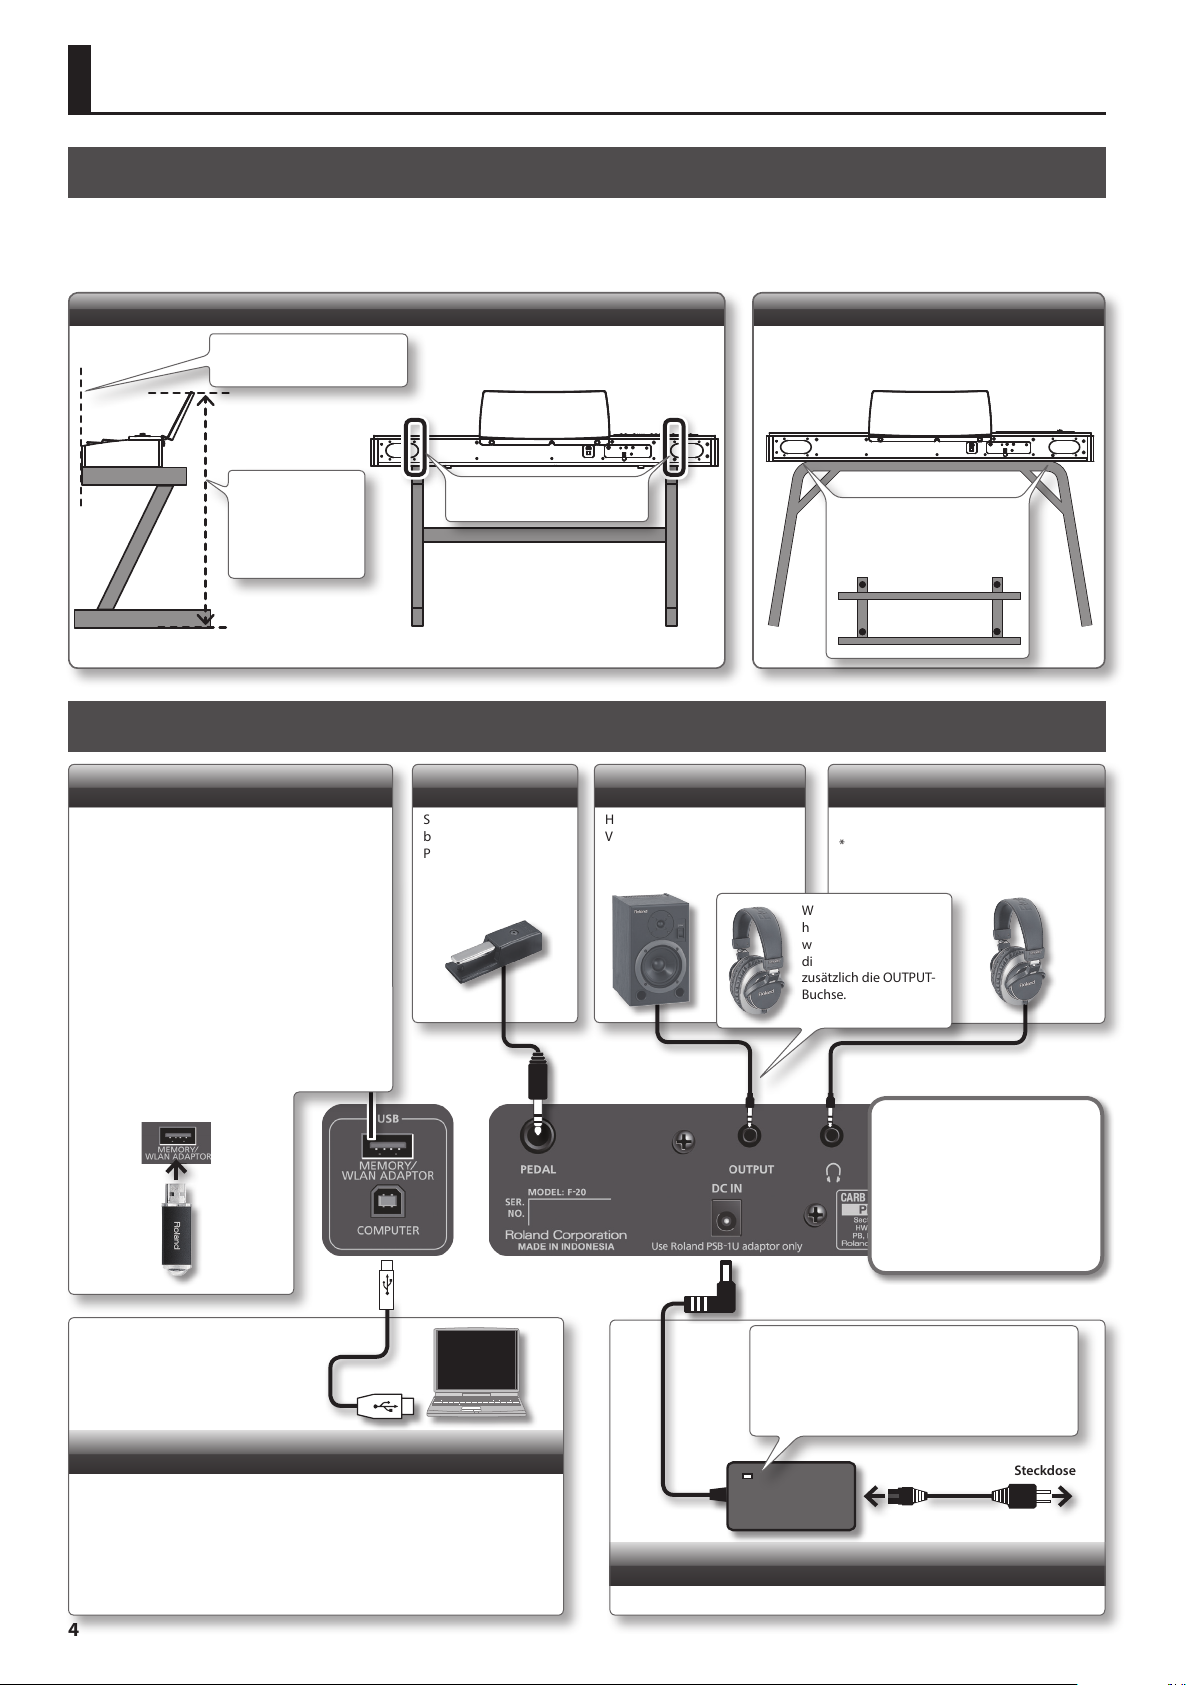
Placing the F-20 on a Stand
If you want to place the F-20 on a stand, use the Roland KSC-68 (refer to the KSC-68 Owner’s Manual), KS-18Z or KS-12.
* Be careful not to pinch your ngers when setting up the stand.
KS-18Z
Align the front of the F-20
with the front of the stand.
Adjust so that the
height does not
exceed 1 meter
(Adjust the stand
to a level no higher
than the second
level from the
bottom).
Rear Panel Connections
USB MEMORY port
Connect a USB ash drive here.
• If a USB ash drive is connected, you can play
or save songs.
• If a wireless USB adapter (WNA1100-RL; sold
separately) is connected, you can use wirelesscompatible iOS apps (p. 8).
• The volume of the F-20’s speakers will be
reduced if you connect a USB device to the USB
MEMORY port.
* Never insert or remove a USB ash drive while
this unit is turned on. Doing so may corrupt the
unit’s data or the data on the USB ash drive.
* Carefully insert the USB ash drive all the way
in—until it is rmly in place.
Align the legs of the stand with
the screws of the rear panel.
PEDAL jack
Connect the included
damper pedal.
KS-12
OUTPUT jack
If you connect this jack to
amplied speakers, the sound of
this unit will be heard through
them.
Adjust the width of the stand
so that the rubber feet of the
F-20 straddle the stand.
Keyboard side
Top view
PHONES jack
Connect headphones (sold separately).
* If you’re connecting only one set of
headphones, you must connect them to
the PHONES jack.
If two people are using
headphones (sold
separately), connect
the headphones to the
PHONES jack and the
OUTPUT jack.
USB COMPUTER port
If you use a commercially available USB cable to connect the F-20’s USB
COMPUTER port to your computer’s USB port, you’ll be able to do the following
things.
• SMF data played back by MIDI-compatible software can be sounded by the
F-20.
• MIDI data can be transferred between the F-20 and your sequencer software,
opening up a wide range of possibilities for music production and editing.
4
To prevent malfunction and
equipment failure, always turn
down the volume, and turn o
all the units before making any
connections.
Place the AC adaptor so the side with the indicator
(see illustration) faces upwards and the side with
textual information faces downwards.
The indicator will light when you plug the AC
adaptor into an AC outlet.
AC Outlet
Power Cord
DC IN jack
Connect the included AC adaptor here.
Page 7
Before You Play
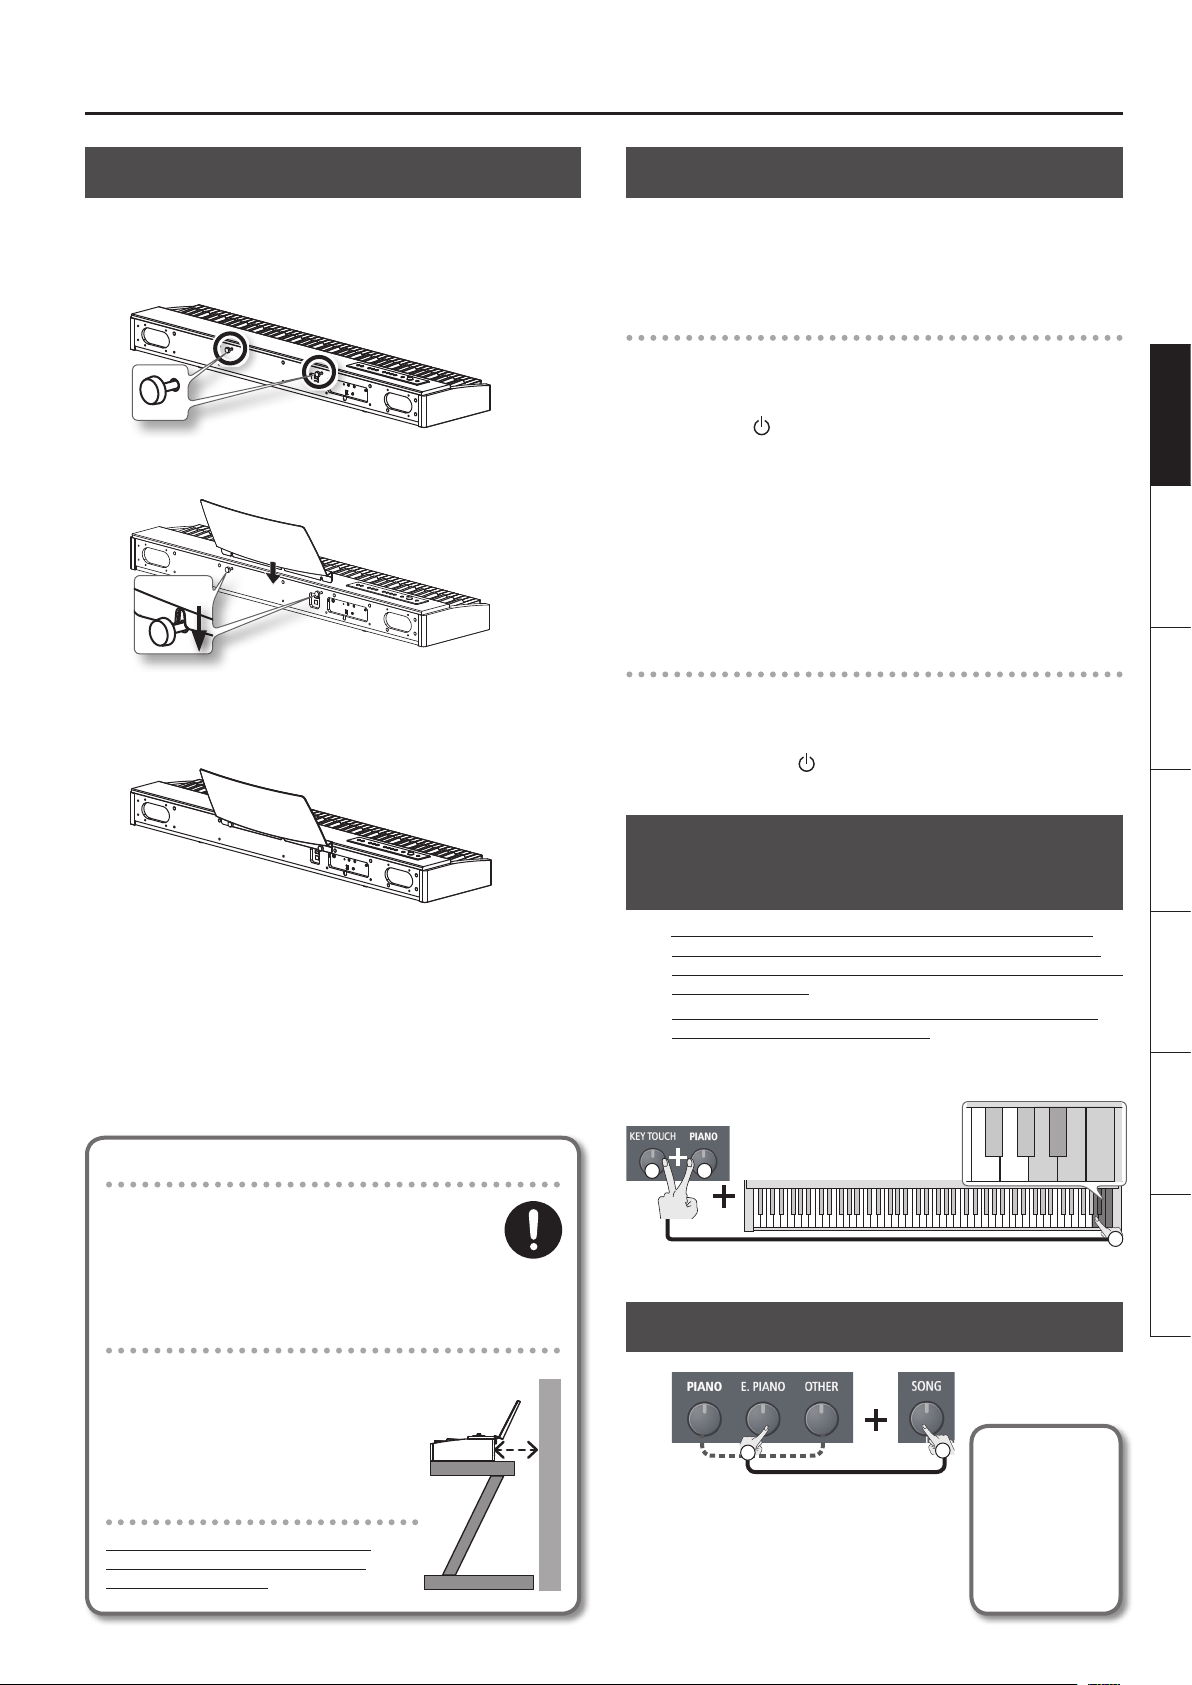
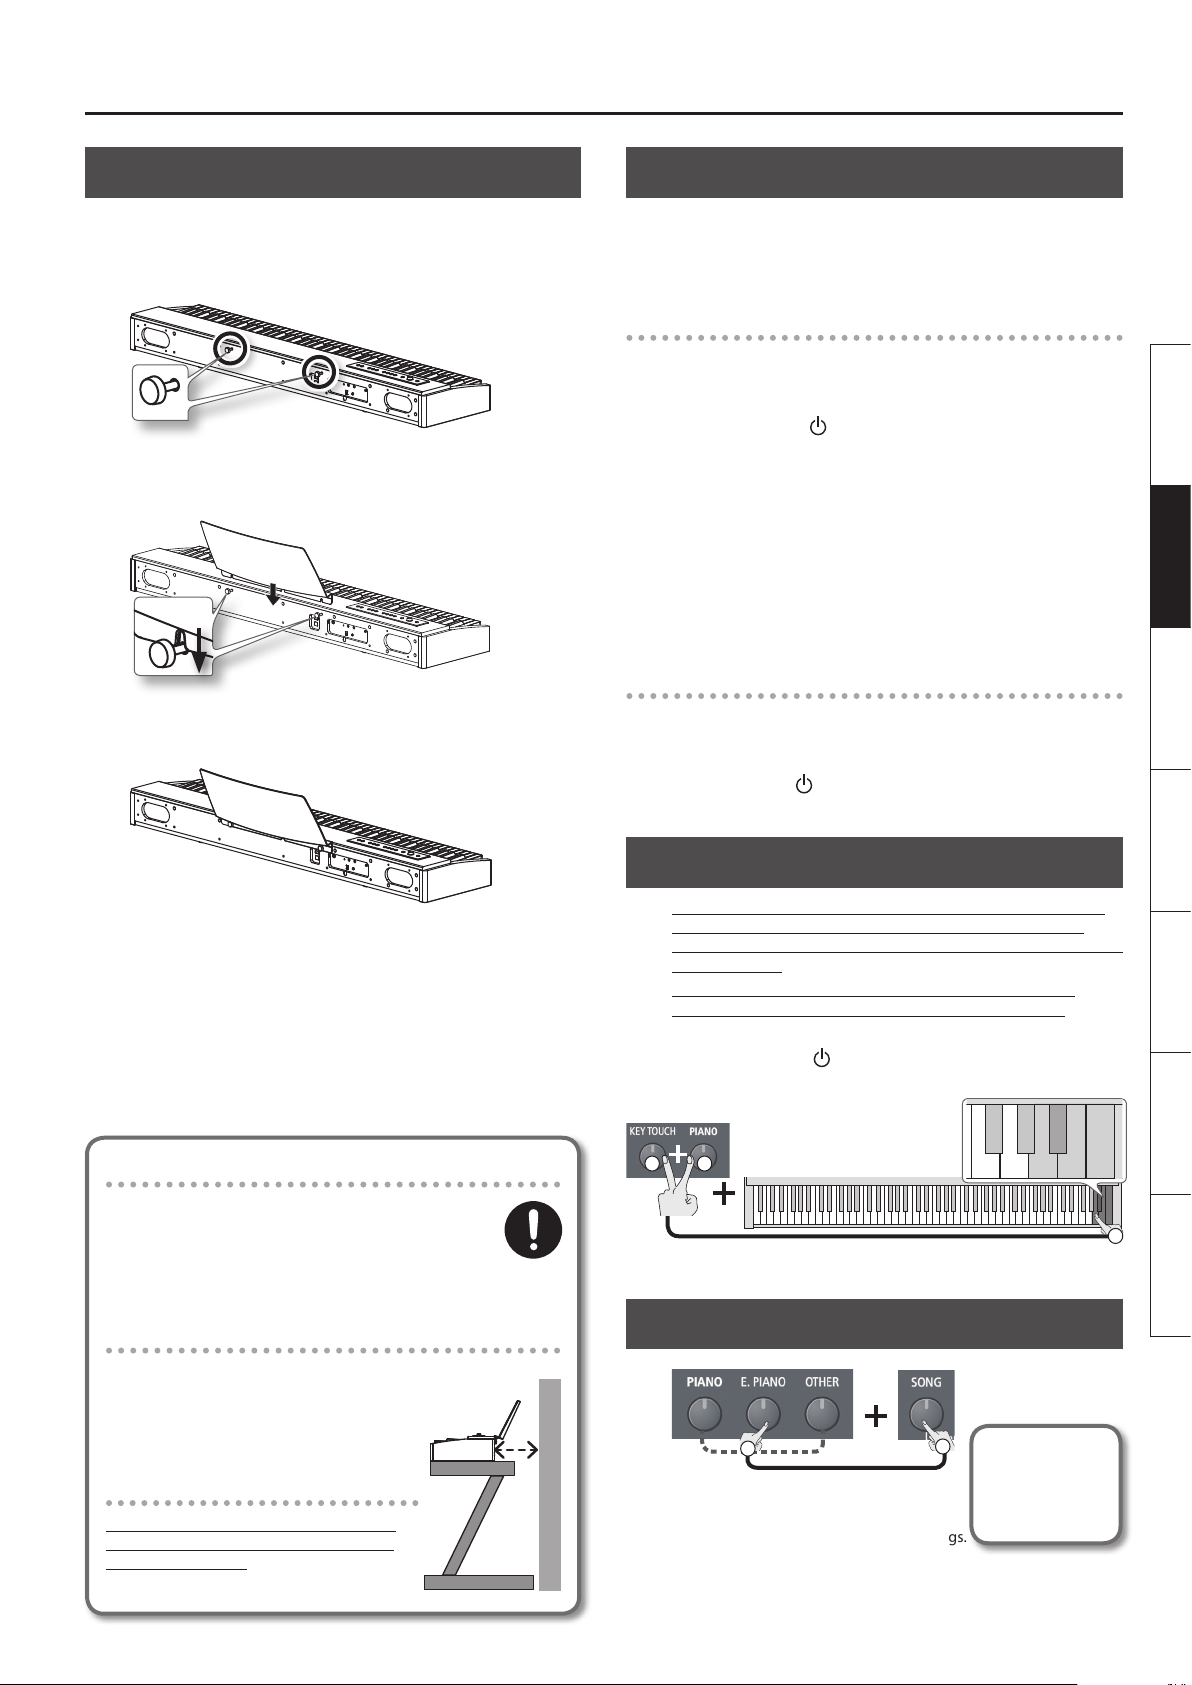
Attaching the Music Rest
Here’s how to attach the included music rest.
1. Loosen the music rest attachment screws located on the
back of the piano (two locations).
2. Place the music rest between the screws and the chassis.
3. While using one hand to support the music rest, tighten
the screws (two locations) to fasten the music rest rmly
in place.
Turning the Power On/O
Once everything is properly connected (p. 4), be sure to follow the
procedure below to turn on their power. If you turn on equipment
in the wrong order, you risk causing malfunction or equipment
failure.
Turning the Power On
1. Turn the [VOLUME] knob all the way toward the left to
minimize the volume.
2. Press the [ ] (POWER) button to turn the power on.
* This unit is equipped with a protection circuit. A brief interval (a
few seconds) after turning the unit on is required before it will
operate normally.
3. Use the [VOLUME] knob to adjust the volume.
* Before turning the unit on/o, always be sure to turn the volume
down. Even with the volume turned down, you might hear some
sound when switching the unit on/o. However, this is normal
and does not indicate a malfunction.
Turning the Power O
1. Turn the [VOLUME] knob all the way toward the left to
minimize the volume.
2. Hold down the [ ] (POWER) button for one second or
longer; the power will be turned o.
Deutsch Français Italiano Español Português NederlandsEnglish
* When attaching the music rest, you must use your hand to
support it rmly so that it does not fall. Be careful not to pinch
your hand.
* Don’t apply excessive force to the installed music rest.
* When attaching the music rest, you must use the music rest
attachment screws that were attached to the piano.
To remove the music rest, support it with one hand while you
loosen the screws. Remove the music rest, and then securely
retighten the screws.
Precautions regarding placement of this unit on a stand
Be sure to follow the instructions in the Owner’s Manual
carefully when placing this unit on a stand (p. 4).
If it is not set up properly, you risk creating an unstable
situation which could lead to the unit falling or the stand
toppling, and may result in injury.
Place the instrument 30 cm away from the wall
The speakers of the F-20 are mounted on
its rear panel. For this reason, you might
have trouble hearing the sound from the
speakers if the rear panel is placed directly
against a wall.
Don’t let the instrument fall over!
To prevent the F-20 from falling over,
don’t apply excessive force to it, and
never sit or stand on it.
30 cm
(12 inch)
Making the Power Automatically
Turn O After a Time (Auto O)
The power to this unit will be turned o automatically after
a predetermined amount of time has passed since it was last
used for playing music, or its buttons or controls were operated
(Auto O function).
If you do not want the power to be turned o automatically,
change the Auto O setting to “OFF.”
(Default: 30 min.)
* To restore power, turn the power on again.
1 2
Hold down
* This setting is remembered even after the power is turned o.
10 min.
Listening to the Demo Songs
* All rights reserved.
1
While holding either
There are three demo songs.
Press the [SONG] button to stop.
2
Unauthorized use
of this material for
purposes other
than private, personal enjoyment
is a violation of
applicable laws.
30 min.
240 min.
OFF
3
5
Page 8
Advanced Features
Adjusting the Brilliance (Brilliance)
Here’s how to adjust the brilliance of the sound (3 levels).
C5 C6
NORMAL
BRIGHT
MELLOW
3
1
2
Hold down
Adjusting the Reverberation (Ambience)
You can adjust a reverberation of the sound, and get the impression
that you are performing in a concert hall (5 levels).
C5 C6
DEFAULT
1 2
Hold down
+–
3
Dividing the Keyboard in Two (Twin Piano)
You can divide the keyboard into left and right sections so that two
people can play the same pitch ranges. This function lets you use
the unit as though it were two pianos.
C5 C6
PAIR
1 2
Hold down
The keyboard will be divided into left and right sections, with
“middle C” located in the center of each section.
You can choose one of the following ways in which the sound will
be heard.
Value Explanation
PAIR
INDIVIDUAL
* The left and right sections will have the same tone (Piano). Twin
Piano will be cancelled when you push one of the TONE buttons.
* The damper pedal aects only the right section of the keyboard.
The sound will be heard from the right as you play toward
the right of the keyboard, and from the left as you play
toward the left.
Notes played in the right area will be heard from the right
speaker, and notes played in the left area will be heard
from the left speaker.
OFF
3
Disabling the Buttons (Panel Lock)
While holding down the [PIANO] button, turn the power on. Keep
holding down [PIANO] button for at least six seconds. Panel Lock
will be set, and buttons other than the [ ] (POWER) button will be
disabled. This prevents the tones or settings from being changed if
you inadvertently press a button.
Panel Lock will be cancelled when you turn o the power.
6
Saving the Settings (Memory Backup)
When this unit’s power is turned o, it will return to its default
settings. However, if desired, you can save the following settings
so that they will be remembered even after the power is o. This is
called the “Memory Backup” function.
Settings saved by Memory Backup Page
Key Touch p. 2
Brilliance p. 6
Ambience p. 6
Master Tuning p. 7
1. Hold down the [KEY TOUCH] button and press the
[RHYTHM] button.
The [OTHER] button and the [SPLIT] button will blink.
To cancel, press the [OTHER] button.
2. To save the settings, press the [SPLIT] button.
When all the LEDs on the buttons are lit, the operation is complete.
Restoring the Factory Settings (Factory Reset)
The settings you’ve changed in the function mode (p. 7) can be
restored to their factory-set condition.
NOTE
When you execute a factory reset, all settings will be
initialized and the song you recorded in internal memory
will be erased.
1. While holding down the [KEY TOUCH] button, turn the
power on. Keep holding down [KEY TOUCH] button for at
least six seconds.
INDIVIDUAL
The [OTHER] button and the [SPLIT] button will blink.
To cancel, press the [OTHER] button.
2. To execute the Factory Reset, press the [SPLIT] button.
When all the LEDs on the buttons are lit, the operation is complete.
3. Turn the power o, then on again.
Formatting a USB Flash Drive
Here’s how to initialize (format) the entire contents
saved on a USB ash drive.
NOTE
• Formatting will erase everything that has been saved on the
USB ash drive.
• Before using a new USB ash drive with the F-20 for the rst
time, you must format the USB ash drive.
1. Connect the USB ash drive that you want to format to
the USB MEMORY port.
2. While holding down the [SONG] button, turn the power
on. Keep holding down [SONG] button for at least six
seconds.
The [OTHER] button and the [SPLIT] button will blink.
To cancel, press the [OTHER] button.
3. To execute the format, press the [SPLIT] button.
When all the LEDs on the buttons are lit, the operation is complete.
4. Turn the power o, then on again.
Page 9
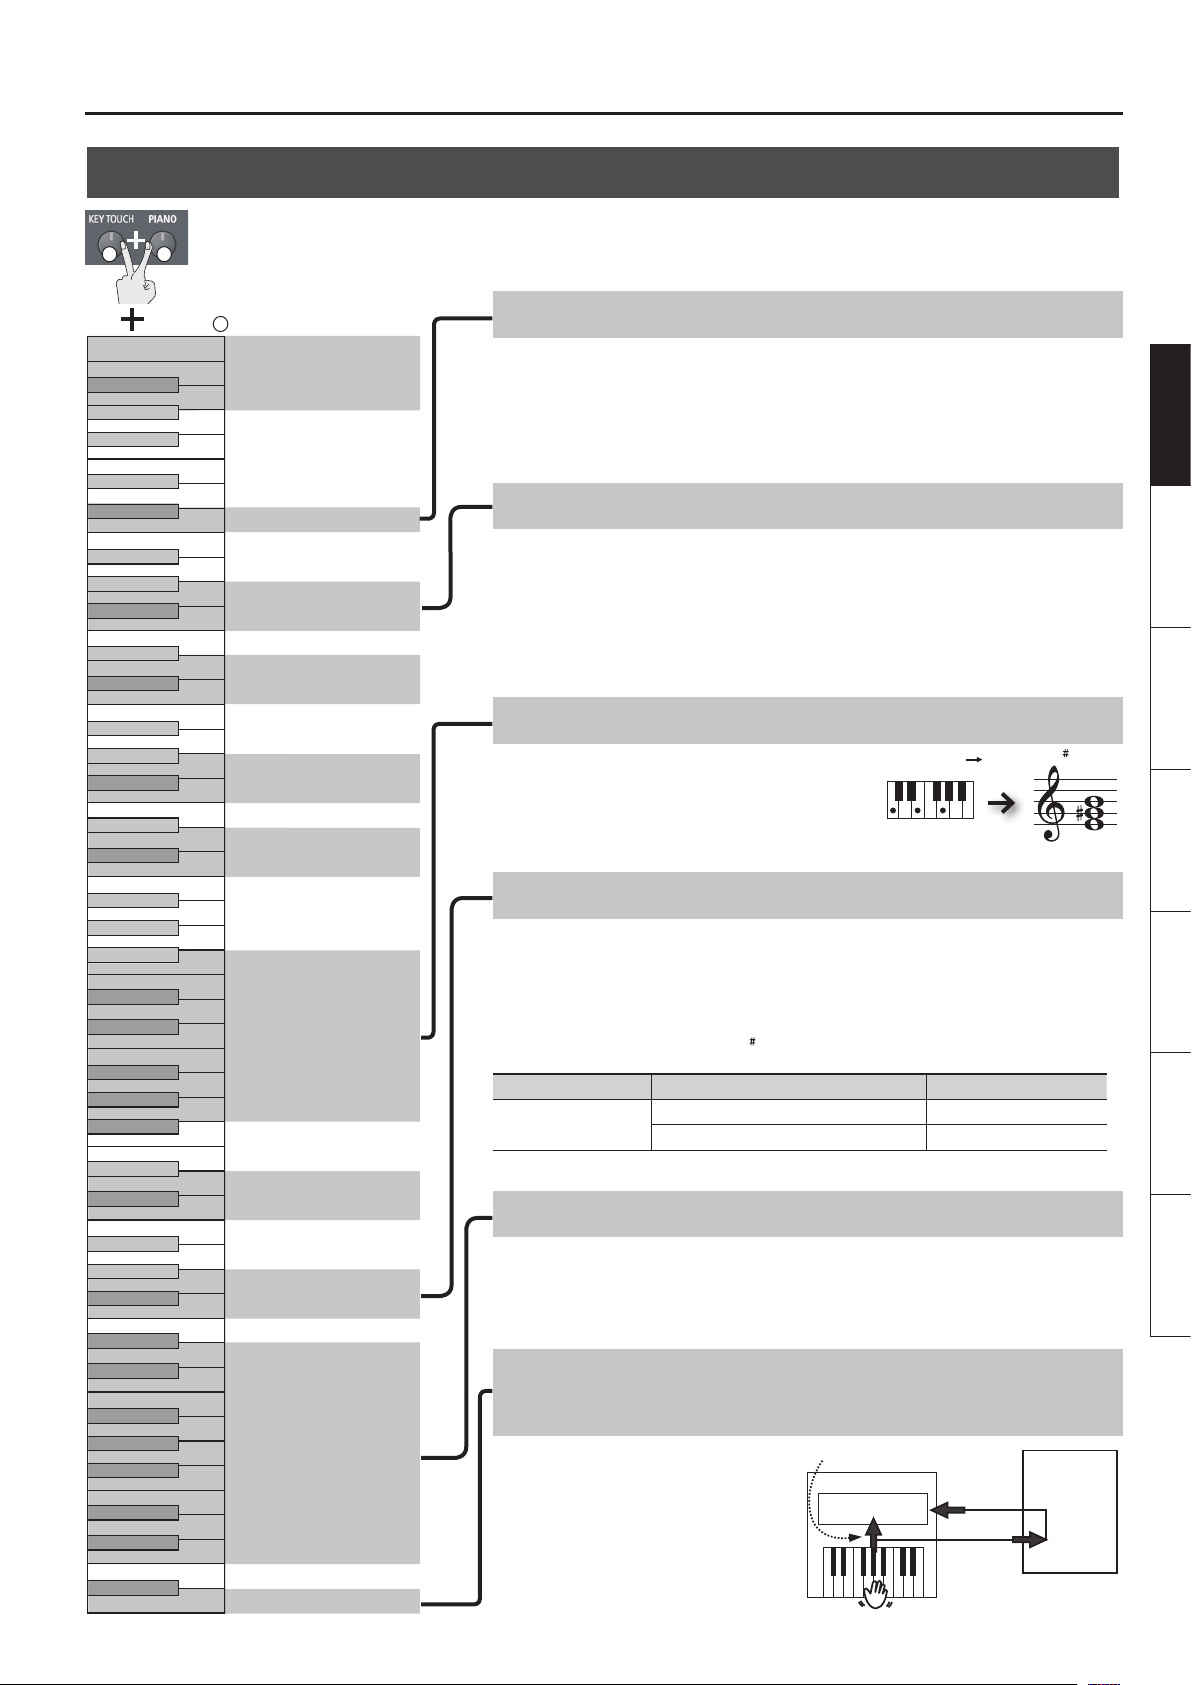
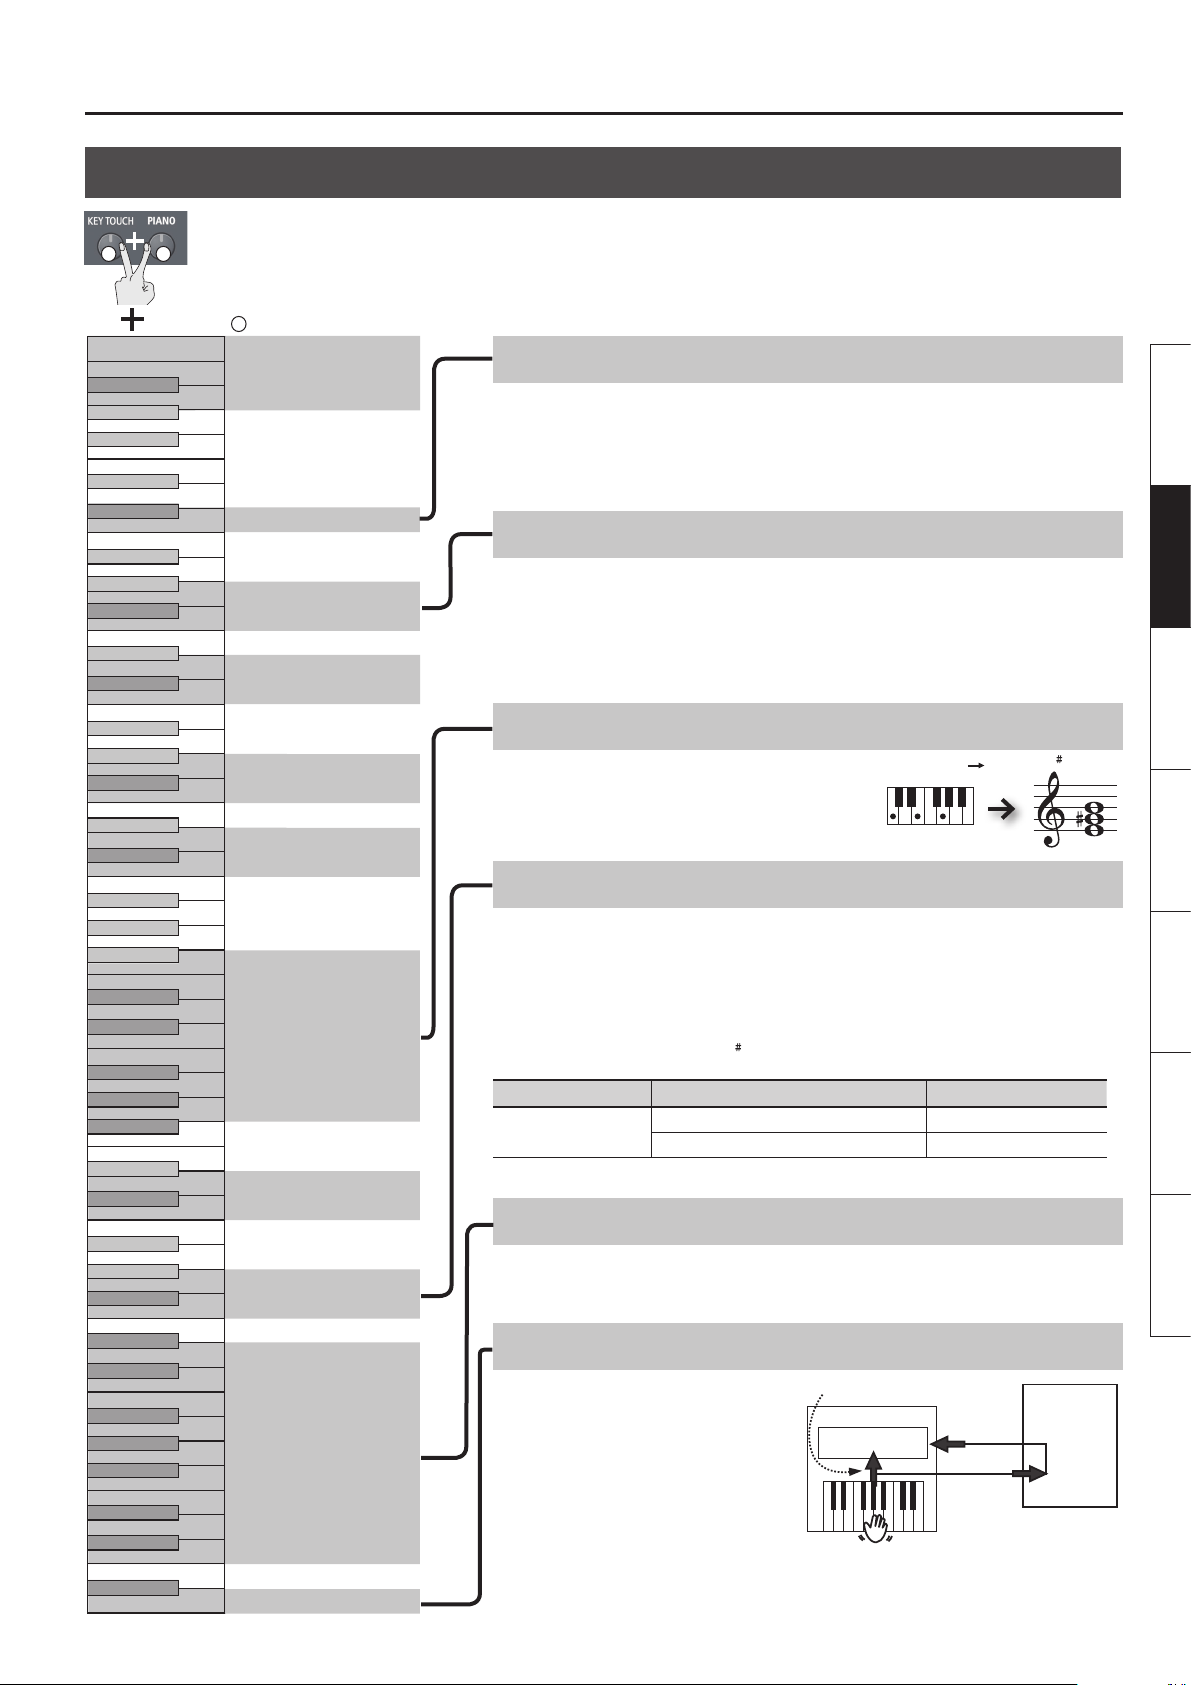
Various Function Settings (Func tion Mode)
To make settings in Function mode, while pressing the [KEY TOUCH] button, hold down the [PIANO] button, and press one of the keys
1 2
shown in the illustration.
Advanced Features
Hold down
C8
30 min.
C7
C6
2
440.0 Hz
INDIVIDUAL
PAIR
3
OFF
240 min.
10 min.
1
+
–
OFF
Auto O (p. 5)
USB Memory Mode
Master Tuning
Twin Piano (p. 6)
Changing the USB Flash Drive Setting (USB Memory Mode)
In some cases, when USB ash drive is connected to the USB MEMORY port, it may take longer for data to
be loaded, or data may fail to be loaded successfully. In this case, you may be able to solve the problem by
changing the USB MEMORY Mode setting to “1.” When the unit left the factory, this was set to “2.” Normally,
there is no need to make this setting.
* After you change this setting, you must turn the power o, then back on again. The new setting takes
eect when you turn the power back on.
Matching the Pitch with Other Instruments (Master Tuning)
When playing ensemble with other instruments and in other such instances, you can match the standard
pitch to another instrument.
The standard pitch generally refers to the pitch of the note that’s played when you nger the middle A key.
For a cleaner ensemble sound while performing with one or more other instruments, ensure that each
instrument’s standard pitch is in tune with that of the other instruments. This tuning of all the instruments to
a standard pitch is called “master tuning.”
You can adjust the tuning in the range of 415.3 Hz–440.0 Hz (default)–466.2 Hz (in 0.1 Hz steps).
Deutsch Français Italiano Español Português NederlandsEnglish
Changing the Key of the Keyboard (Transpose)
BRIGHT
NORMAL
MELLOW
C5
DEFAULT
Brilliance (p. 6)
+
Ambience (p. 6)
–
You can use the Transpose function to transpose the keyboard
in semitone steps.
For example, if a song is in the key of E major, and you want to
play it with the ngering of C major, set Transpose to a value of
“+4.”
If you play C E G It will sound E G B
Controlling Video Equipment (Visual Control Mode)
Visual Control is a function that lets you control images along with your performance.
+5
+4
+3
+2
+1
0
C4
-2
-4
-6
Transpose
-1
-3
-5
If you’ve set Visual Control mode to “MVC” (MIDI Visual Control, p. 9) or “V-LINK,” playing the keyboard of this
unit will control the images produced by the Visual Control device connected to this unit using a USB MIDI.
Visual Control function chart
Playing the lowest 12 keys of this unit (A0–G 1) will transmit the following MIDI messages.
Visual Control function Transmitted MIDI message This unit’s operation
Switch images
CC 0 (Bank Select): 0–4 Play black keys
Program Change: 1–7 Play white keys
Ad-Hoc ON
Ad-Hoc OFF
C3
MVC
16
C2
C1
14
11
9
7
4
2
OFF
Wireless LAN (p. 8)
WPS
V-LINK
Visual Control Mode
OFF
15
13
12
10
MIDI
8
Transmit Channel
6
5
3
1
ON
Local Control
MIDI Transmit Channel Settings
This setting species the MIDI channel on which this unit will transmit.
MIDI uses sixteen “MIDI channels,” which are numbered 1 through 16. By connecting MIDI devices and
specifying the appropriate MIDI channel for each device, you can play or select sounds on those devices.
This unit will receive all sixteen channels (1–16).
Preventing Double Notes When Working with a
Software Synthesizer
If a software synthesizer is connected to USB
MIDI, turn this item “OFF.”
Since most software synthesizer have their
Thru function turned on, notes you play on the
keyboard may be sounded in duplicate, or get
dropped. To prevent this, you can enable the
“Local O” setting so that the keyboard and
internal sound generator will be disconnected.
(Local Control)
Local Control
Sound Generator
USB MIDI
In
USB MIDI
Out
Software
Synthesizer
Computer
7
Page 10
About the Wireless LAN Function
Once successfully connected, the LED indicator of the Wireless USB
What Is Wireless LAN Function?
By inserting the wireless USB Adapter (WNA1100-RL; sold
separately) into the F-20’s USB MEMORY port, you’ll be able
to use wireless-compatible applications (iOS apps such as the
“Piano Partner” or “Air Performer” ).
iPhone etc.
Wireless LAN access point
(e.g., wireless LAN router)
Wireless USB Adapter (sold
separately:
F-20
WNA1100-RL)
Adapter will light.
You can use the wireless connection from an iOS app such as
“Air Performer.” Choose “F-20” in the instrument select screen of
your iOS app.
NOTE
* The device (e.g., iPhone) running the app must be connected to
MEMO
• The connection data is stored in memory when you perform
• All connection data will be erased if you perform a factory reset.
the same network.
the WPS procedure; the device will automatically connect to the
wireless network from the next time.
Wireless LAN Wireless LAN
Items required to use the wireless LAN function
Wireless USB Adapter (sold separately: WNA1100-RL)
Wireless LAN access point (e.g., wireless LAN router) *1 *2
iPhone, iPad, or iPod touch etc.
*1 The wireless LAN access point you use must support WPS. If
you’re unable to connect to the wireless LAN access point, try
connecting using Ad-Hoc mode.
*2 The ability to connect with all kinds of wireless LAN access
points is not guaranteed.
Basic Connection Method (Connect by WPS)
The rst time you connect the F-20 to a new wireless network, you’ll
need to perform the following procedure (WPS) to join the wireless
network.
This procedure is required only the rst time. (Once you’ve joined
the network, this procedure will no longer be necessary.)
What is WPS?
This is a standard that makes it easy to make security settings when
connecting to a wireless LAN access point. We recommend that you
use WPS when connecting to a wireless LAN access point.
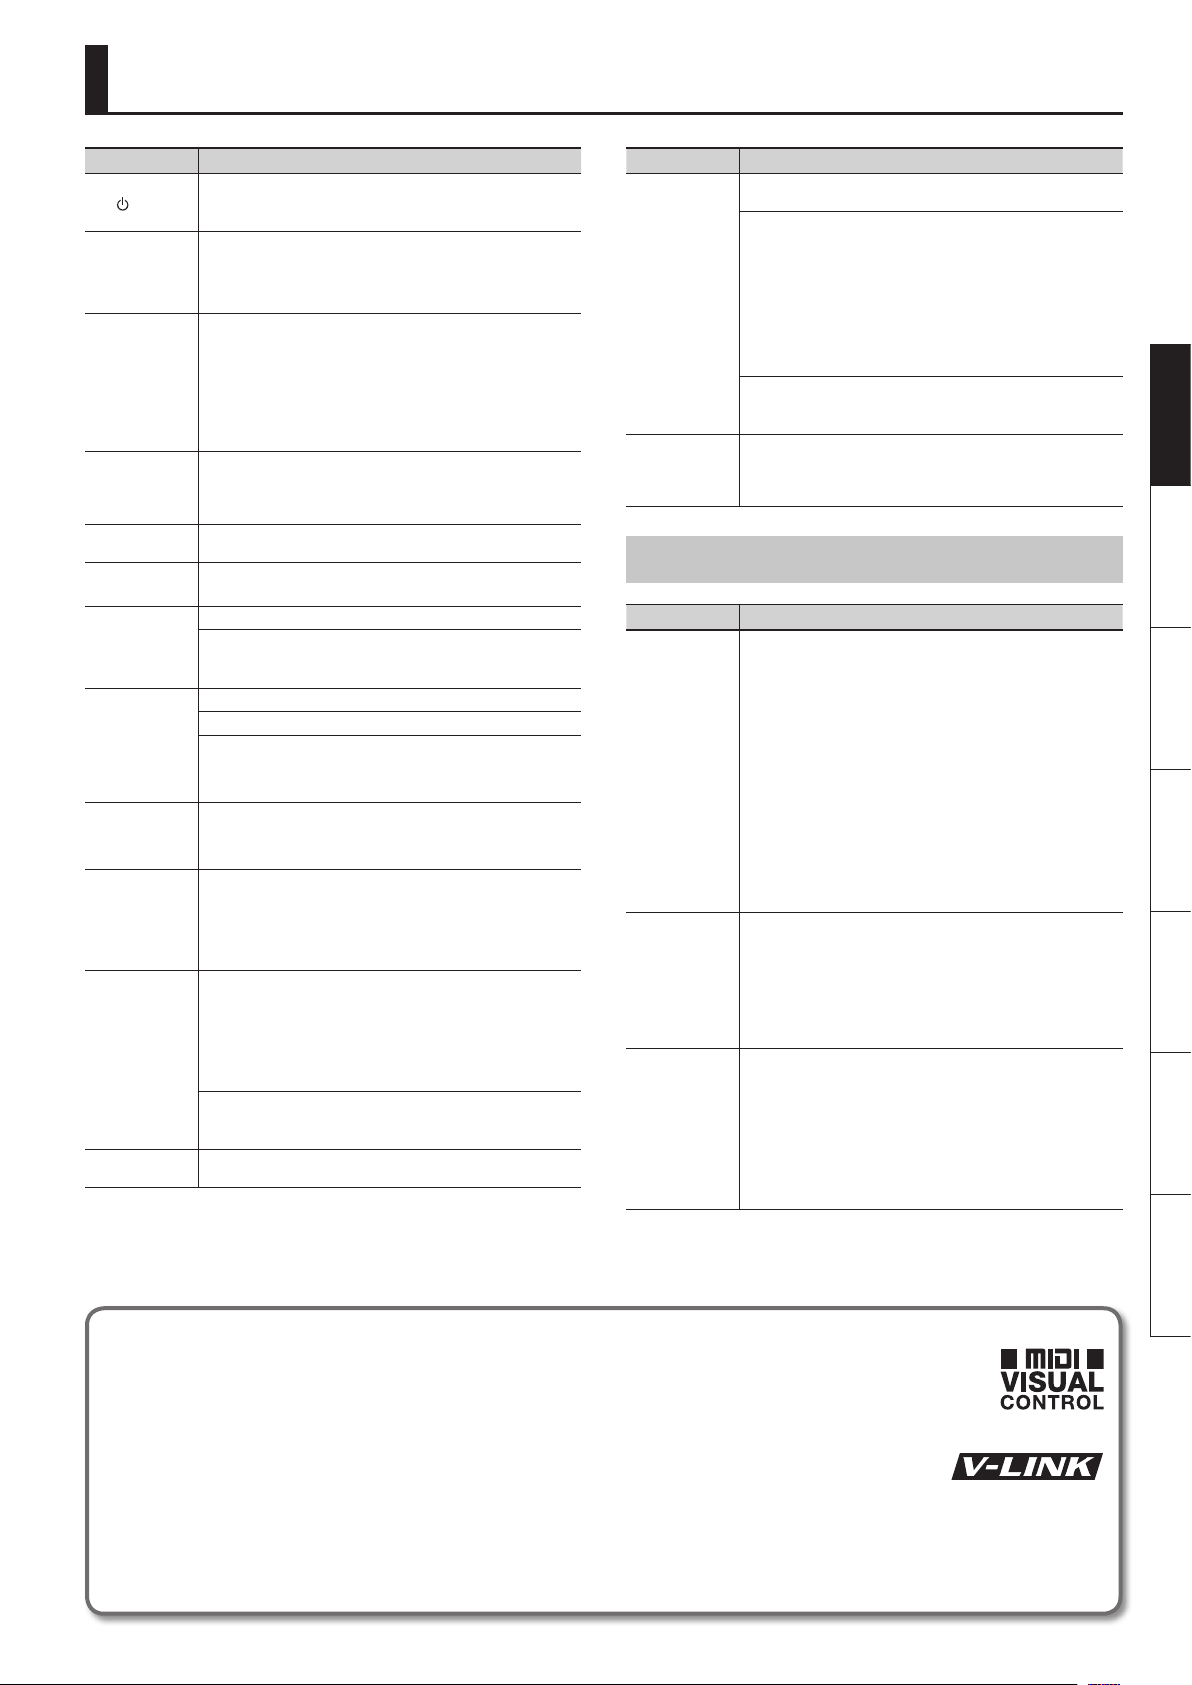
1. Insert the wireless USB Adapter (WNA1100-RL; sold
separately) into the F-20’s USB MEMORY port.
2. Hold down the button of the Wireless USB
Adapter for three seconds.
The LED indicator of the Wireless USB Adapter will blink.
NOTE
* If you apply excessive force to the USB adapter when
pressing the button, you may damage it. Please use caution.
MEMO
You can also perform the WPS procedure by pressing “WPS” in
“Various Function Settings (Function Mode)” (p. 7) instead of
pressing the button of the wireless USB adapter.
3. Perform the WPS operation on your wireless LAN access
point (e.g., press the WPS button on your wireless LAN
access point).
For details on WPS operation of your wireless LAN access point,
refer to the owner’s manual for your wireless LAN access point.
8
LED indicator of the Wireless USB Adapter
LED Explanation
Lit The adapter is connected to a network.
Unlit The adapter is not connected to a network.
Blinking The adapter is searching for a network.
Connecting in Ad-Hoc mode
Here’s how to connect in Ad-Hoc mode.
What is Ad-Hoc mode?
Ad-Hoc mode lets you connect the F-20 directly to an iPhone or
other wireless device without using a wireless LAN access point. This
is a convenient way to use the F-20 with an iPhone or other wireless
device if you’re in a location where the wireless LAN access point
you normally use is unavailable, such as when you’re away from
home.
Limitations
The iPod touch or other wireless device connected in Ad-Hoc
mode will be unable to communicate with the Internet or with
another wireless device. However, an iPhone or other wireless
device that has cellular capability will be able to connect to the
Internet via the cellular connection.
Please be aware that if you use a cellular connection for Internet
connectivity, you may incur costs depending on your rate plan.
1. In “Various Function Settings (Function Mode)” (p. 7), press
“Ad-Hoc ON.”
2. On the iPhone or other wireless device that you want
to connect, select “F-20” to make the connection. (For
example, on an iPhone, choose [Settings]
[Choose a Network] to select “F-20.” A password entry
screen will appear; enter “f20ak”.)
Ad-Hoc SSID F-20
Password f20ak
For details on how to connect to a wireless LAN from an iPhone or
other device, refer to the owner’s manual of that device.
3. When you want to end the Ad-Hoc mode connection,
restore the iPhone settings in [Settings] [Wi-Fi]
[Choose a Network] to their previous state.
[Wi-Fi]
Page 11
Troubleshooting
Problem Cause/Action
All LEDs other than
the [ ] (POWER)
button are blinking
The speakers
produce sound
even though
headphones are
connected
Even though you’re
using headphones
and the sound is
muted, a thumping
sound is heard
when you play the
keyboard
Power turns o on
its own
Power does not
turn on
Pedal does not
work, or is “stuck”
No sound/
No sound when you
play back a song
Pitch of the
keyboard or song is
incorrect
Sounds are heard
twice (doubled)
when the keyboard
is played
The sound of
the higher notes
suddenly changes
from a certain key
High-pitched
ringing is heard
Volume is reduced
Excessive current ow occurred at the USB MEMORY port.
Check whether there might be a problem with the USB ash drive. Next,
turn the power o, then back on again.
Could the headphones be connected to the OUTPUT jack instead of the
PHONES jack (p. 4)?
This unit uses a hammer action keyboard in order to simulate an acoustic
piano’s playing touch as realistically as possible. For this reason, you’ll hear
the hammers thump when you play the keyboard, just as you would when
playing an acoustic piano. Since this unit allows you to adjust its volume,
you might notice the sound of the hammers in certain situations, but this
does not indicate a malfunction. If vibration transmitted to the oor or
walls is a concern, you may be able to minimize the vibration by moving
the piano away from the wall, or by laying down a commercially available
anti-vibration mat designed for use with pianos.
When 30 minutes have elapsed since you last played or operated this unit,
the power will turn o automatically (This is the factory setting).
If you don’t need the power to turn o automatically, turn the “Auto O ”
setting “OFF” (p. 5).
Is the AC adaptor connected correctly (p. 4)?
Is the pedal connected correctly?
Plug the cord rmly into the PEDAL jack (p. 4).
Could the unit’s volume be turned down?
Could headphones be connected?
The speakers will not produce sound if headphones is connected to the
PHONES jack (p. 4).
Could you have made Transpose settings (p. 7)?
Is the Master Tune setting appropriate (p. 7)?
The notes of a piano are tuned using a unique method (stretched tuning),
which makes upper-range notes slightly higher in pitch, and lower-range
notes slightly lower in pitch. For this reason, you might perceive the pitch
as being incorrect, but this is the way an acoustic piano should sound.
Could you have selected a dual tone (p. 2)?
On an acoustic piano, the approximately one and a half octaves of notes
at the upper end of the keyboard will continue sounding regardless of the
damper pedal. These notes also have a somewhat dierent tonal character.
This unit faithfully simulate this characteristic of acoustic pianos. On
this unit, the range that is unaected by the damper pedal will change
according to the transpose setting.
If you hear this in headphones:
Piano sounds that have a brilliant and crisp character contain substantial
high-frequency components that may sound as though a metallic ringing
has been added. This is because the characteristics of an actual piano are
being faithfully reproduced, and is not a malfunction.
This ringing is more obtrusive if the reverb eect is applied heavily, so you
may be able to minimize it by decreasing the reverb.
If you don’t hear this in headphones:
It is likely that there is some other reason (such as resonances within the
unit). Please contact your dealer or the nearest Roland service center.
The volume will be reduced if you connect a USB device to the USB
MEMORY port. This does not indicate a malfunction.
Problem Cause/Action
If you set the volume to the maximum setting, the sound may be distorted
depending on how you perform. If this occurs, turn down the volume.
If you don’t hear this in headphones:
Performing at high volumes may cause the speakers or objects near
the unit to resonate. Fluorescent lights or glass doors may also resonate
sympathetically. In particular, this is more likely to occur for lower notes
Sound wrong, or
are buzzy
Power turns o
and higher volumes. You can take the following measures to minimize
resonances.
• Locate this unit 30 cm (12 inch) away from walls or other surfaces.
• Keep the volume down.
• Move away from the objects that are resonating.
If you hear this in headphones:
It is likely that there is some other reason. Please contact your dealer or a
nearby Roland service center.
In some cases, playing back extremely high-volume SMF or WAV data from
a USB ash drive may cause the protection circuit to operate, turning the
power o.
If this occurs, reduce the volume.
When Using the Wireless LAN Function
Problem Cause/Action
• Make sure that your wireless LAN access point supports WPS.
If your wireless LAN access point does not support WPS, you can connect
using the procedure described in “Connecting in Ad-Hoc mode” (p. 8).
• The 802.11a/b wireless standard is not supported. Please use the
802.11g/n (2.4 GHz) wireless standard.
• The WEP authentication method is not supported. Please use the WPA or
Can’t connect to a
wireless LAN access
point
Communication is
unstable
The F-20 is not
found in the instrument connections
of the iOS app (such
as “Air Performer”)
WPA2 authentication method.
• Make sure that DHCP is enabled for your wireless LAN access point.
• The connection might not occur successfully due to the state of the
radio signal. If so, use the procedure described in “Basic Connection
Method (Connect by WPS)” (p. 8), and reconnect your wireless LAN access
point.
• There is a limit to the connection data that can be remembered. Making
a new connection may cause older connection data to be deleted.
All connection data will be deleted if you execute a factory reset. If the
connection data has been deleted, please re-connect to the wireless
LAN access point.
Communication may be unstable depending on the usage of the radio
frequency spectrum.
If communication is unstable, the response may be sluggish, or if using
audio communication, there may be dropouts in the audio.
The following actions may improve the situation.
• Move the wireless LAN access point and the F-20 closer to each other.
• Change the channel setting of the wireless LAN access point.
• Is the F-20 turned on?
• Is the wireless USB adapter ( WNA1100-RL) inserted to the F-20?
• Is the F-20 connected to the wireless LAN?
• Are the F-20 and the iPhone connected to the same network (the same
wireless LAN access point)?
• Is the wireless LAN access point set to allow communication between
wireless LAN devices?
For details on settings, refer to the owner’s manual of your wireless LAN
access point.
Deutsch Français Italiano Español Português NederlandsEnglish
What is MIDI Visual Control?
MIDI Visual Control is an internationally-used recommended practice that was added to the MIDI specication so that visual expression could be linked with
musical performance. Video equipment that is compatible with MIDI Visual Control can be connected to electronic musical instruments via MIDI in order to control
video equipment in tandem with a performance.
What is V-LINK?
V-LINK is Roland’s proprietary specication that allows visual expression to be linked with musical performance. Video equipment that is compatible
with V-LINK can be connected to electronic musical instruments via MIDI, making it easy to enjoy a variety of visual eects that are linked with the
performance.
What is MIDI?
MIDI, short for “Musical Instrument Digital Interface,” was developed as a universal standard for the exchange of performance data among electronic musical instruments and computers.
This unit is equipped with USB COMPUTER port to let it exchange performance data with external devices. These connectors can be used to connect the unit to an external device for
even greater versatility.
9
Page 12
USING THE UNIT SAFELY
WARNING
To completely t urn o power to the unit, pull out t he plug
from the o utlet
Even with the power switch turned o, th is unit
is not compl etely separated from its main
source of power. When th e power needs to be
completely tu rned o, turn o the powe r switch
on the unit, then pull out the pl ug from the
outlet. For thi s reason, the outlet i nto which you choose to
connect the power cord’s plug should be on e that is within
easy reach an d readily accessible.
Concerning the Auto O fu nction
The power to th is unit will be turn ed o
automatically after a predetermined amount of
time has pas sed since it was last used for
playing musi c, or its buttons or con trols were
operated (Auto O function). If yo u do not want
the power to b e turned o automatica lly,
disengage th e Auto O function ( p. 5).
Use only th e stand that is r ecommended
This unit sh ould be used only with a stand that
is recommende d by Roland.
Do not pla ce in a locatio n that is unstabl e
When using t he unit with a stand recommended
by Roland, th e stand must be carefu lly placed so
it is level a nd sure
stand, you sti ll need to make sure t hat any
location you choose for placing the unit
provides a le vel surface that will properly
support t he unit, and keep it f rom wobbling.
Precautio ns regarding plac ement of this un it on a stand
Be sure to fol low the instructions in the Owner’s
Manual caref ully when placing thi s unit on a
stand (p. 4).
If it is no t set up properly, you ris k creating an
unstable sit uation which could lea d to the unit
falling or t he stand toppling, and may result in injury.
to remain st able. If not using a
WARNING CAUTION
Use only th e supplied AC ada ptor and the corr ect voltage
Be sure to us e only the AC adaptor s upplied with
the unit. Al so, make sure the line vol tage at the
installation matches the input volt age specied
on the AC ada ptor’s body. Other AC adaptors
may use a di erent polarity, or be desi gned for a
dierent voltag e, so their use could re sult in
damage, malfu nction, or electri c shock.
Use only th e supplied power c ord
Use only the attached power cord. Also, t he
supplied powe r cord must not be used with any
other device.
CAUTION
Use only th e specied stand (s)
This unit is designed to be used in combination
with specic stands (KSC-68, KS- 18Z, KS-12)
manufacture d by Roland. If used i n combination
with other s tands, you risk sustain ing injuries as
the result of this product dropping down or
toppling over due to a lack of stabi lity.
Evaluate safet y issues before u sing stands
Even if you ob serve the cautions gi ven in the
owner’s manual, ce rtain types of han dling may
allow this p roduct to fall from the stand, or
cause the st and to overturn. Plea se be mindful
of any safety issues before using thi s product.
Cautions w hen moving this unit
If you need to move the instrument, take note of
the precautio ns listed below. At least t wo
persons are re quired to safely lift a nd move the
unit. It s hould be handled carefu lly, all the while
keeping it l evel. Make sure to have a rm grip, to
protect yours elf from injury and the instrument
from damage.
• When using the KSC-68 stand, check to make sure the
screws securi ng the unit to the sta nd have not become
loose. Fasten them again securely wheneve r you notice
any loosening.
• Disconnect the power cord.
• Disconnect all cords coming from ex ternal devices.
• Remove the m usic stand.
Keep small items out of the reach of childre n
To prevent accidental ingestion of the par ts
listed below, alw ays keep them out of th e reach
of small chi ldren.
• Removable Par ts
Music rest at tachment screws (p. 5)
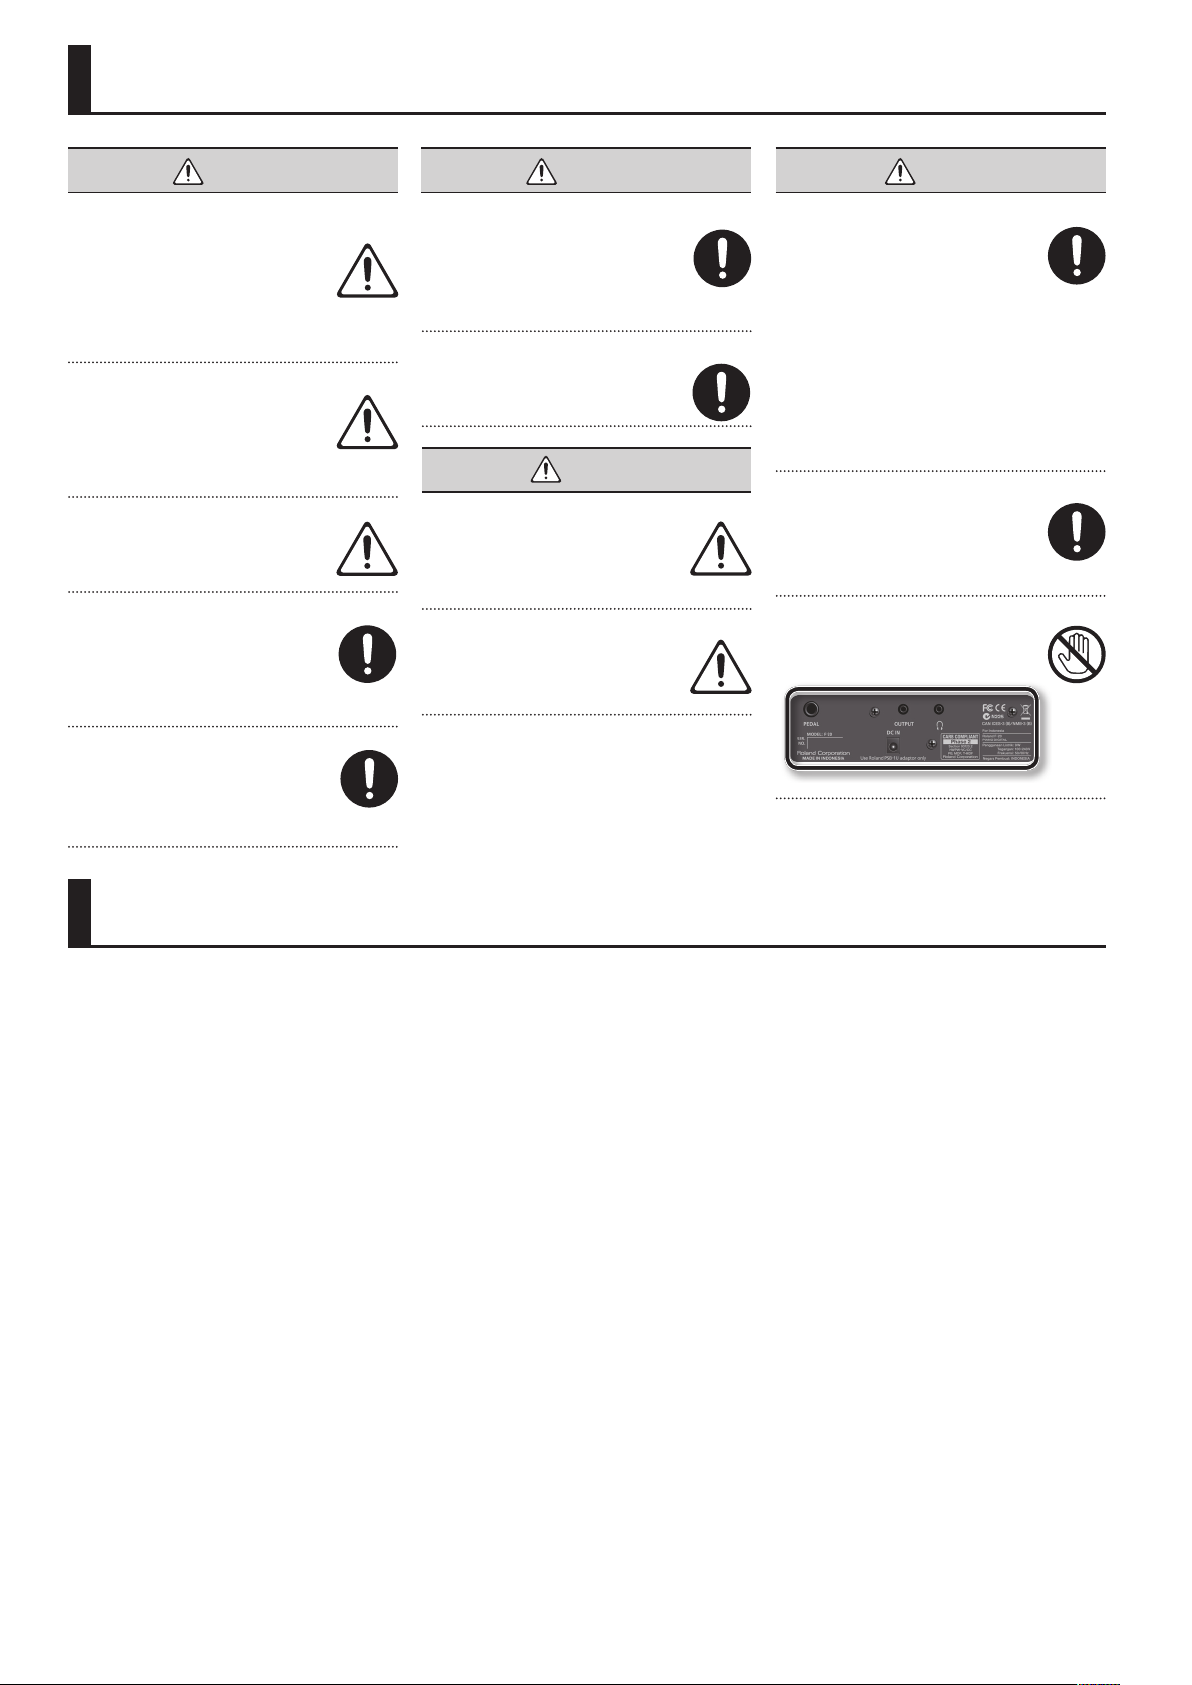
Take care not to get burned
The area shown in the illustration m ay become
hot, so take care to avoid burns.
Rear panel
IMPORTANT NOTES
Placement
• Do not expo se the unit to direct sunlight, place it nea r
devices that radiate heat, leave it in side an enclosed
vehicle, or ot herwise subject i t to temperature extremes.
Also, do not a llow lighting devices t hat normally are used
while their light source is very close to the unit (suc h as a
piano light) , or powerful spotli ghts to shine upon the same
area of the u nit for extended perio ds of time. Excessive heat
can deform or discolor the unit.
• Do not allo w objects to remain on top of the keyboard. This
can be the c ause of malfunction, such as keys ceasing to
produce sound.
• Depending o n the material and tem perature of the surf ace
on which you place the unit, its ru bber feet may discolor o r
mar the sur face.
You can place a piec e of felt or cloth unde r the rubber feet
to prevent this from happening. If you do so, please make
sure that the unit will not slip o r move accidentally.
Maintenance
• To clean the unit, use a dry, soft cloth; or one that is slightly
dampened. Try to wi pe the entire surface using an equal
amount of st rength, moving the clot h along with the
grain of the wood. Rubbing too hard in the same area can
damage the nish.
Repairs and Data
• Before sendin g the unit away for repai rs, be sure to make
a backup of the data stored within it; or you may prefer
to write down the needed information . Although we will
do our utmos t to preserve the dat a stored in your unit
when we carr y out repairs, in som e cases, such as when
the memor y section is physicall y damaged, restoration of
the stored con tent may be impossible. Roland assumes no
liability c oncerning the restoratio n of any stored content
that has bee n lost.
Additional Precautions
• Any data stored within the unit can be lost as the result of
equipment fa ilure, incorrect operati on, etc. Save the songs
you’ve recorded on a USB ash drive, so th at you won’t lose
them in the event of such a failure.
• Roland assu mes no liability conc erning the restoration of
any stored conte nt that has been lost.
• The sound of key s being struck and vib rations produced by
playing an i nstrument can be transm itted through a oor
or wall to an unexpected extent. P lease take care not to
cause annoyan ce to others nearby.
• Do not appl y undue force to the mus ic stand while it is
in use.
• The volume will b e reduced if you connec t a USB device to
the USB MEMO RY port.
Using External Memories
• Please obser ve the following preca utions when handling
external me mory devices.
Also, make sure to carefully observe all the precautions th at
were supplied with the external me mory device.
• Do not remove the device while readi ng/writing is in
progress.
• To prevent damage from static electricity, d ischarge
all static e lectricity from your person before handling
the device.
Care of the keyboard
• Do not wri te on the keyboard with any pen or other
implement, a nd do not stamp or pla ce any marking on the
instrument. Ink will seep into the surface lines and become
unremovable.
• Do not ax stickers on the keybo ard. Yo u may be unable to
remove stickers that use strong adhesive s, and the adhesive
may cause di scoloration.
• To remove stubborn d irt, use a commercial ly available
keyboard clea ner that does not cont ain abrasives. Start
by wiping li ghtly. If the dirt doe s not come o, wipe using
gradually inc reasing amounts of pres sure while taking care
not to scratch the keys.
Copyrights/Licences/Trademarks
• It is forb idden by law to make an audio recording, video
recording, copy o r revision of a third p arty’s copyrighted
work (musica l work, video work, broadcast, live
performanc e, or other work), whet her in whole or in pa rt,
and distrib ute, sell, lease, perfor m, or broadcast it wit hout
the permiss ion of the copyright ow ner.
• Do not use this product for purp oses that could infrin ge
on a copyrigh t held by a third par ty. We assume n o
responsibilit y whatsoever with rega rd to any infringements
of third-par ty copyrights arisi ng through your use of t his
product.
• The copyright of content in this product (the sound
waveform data, style data, accompanim ent patterns,
phrase data, audio loops and image data) is reserved by
Roland Corpo ration.
• Purchasers of this product are perm itted to utilize said
content (except song data such as Dem o Songs) for the
creating, per forming, recording and di stributing original
musical work s.
• Purchasers of this product are NOT per mitted to extract
said content i n original or modied form, for the purpose
of distribu ting recorded medium of said content or making
them availabl e on a computer networ k.
• Roland, GS, SuperNATURAL are either registered trademarks
or trademark s of Roland Corporatio n in the United States
and/or other countries.
10
Page 13
Digital Piano
Bedienungsanleitung
Inhalt
&
Kurzanleitung 2
Ein-/ Ausschalten ................................................2
Einstellen der Lautstärke ........................................2
Auswählen der Klänge ...........................................2
Übereinander legen zweier Klänge (Dual) ........................2
Spielen von zwei Klängen nebeneinander (Split) .................2
Einstellen der Tastaturdynamik (Key Touch) ......................2
Anwendung des Metronoms ....................................3
Abspielen eines Songs/ Rhythmus (Automatische Begleitung) ....3
Aufnahme des Spiels ............................................3
Vorbereitungen 4
Verwendung eines Piano-Ständers ...............................4
Anschlüsse an der Rückseite .....................................4
Anbringen der Notenablage .....................................5
Ein- und Ausschalten ............................................5
Die Auto O-Funktion ...........................................5
Abspielen der Demo Songs ......................................5
Umweltfreundliches, energieezientes Design
&
Das F-20 wird nach 30 Minuten automatisch abgeschaltet, wenn es in der Zwischenzeit
nicht gespielt bzw. bedient wurde.
* Wenn Sie diese automatische Abschaltung de-aktivieren möchten, stellen Sie den
Parameter “Auto O” auf “OFF” (S. 5).
Weitere Funktionen 6
Einstellen der Brillianz (Brilliance) ................................6
Einstellen des Raumhall-Eekts
Teilen der Tastatur (Twin Piano) ..................................6
Sperren der Taster-Funktionen (Panel Lock) ......................6
Sichern von Einstellungen (Memory Backup) .....................6
Abrufen der Werksvoreinstellungen (Factory Reset) ..............6
Formatieren eines USB-Speichers ................................6
Der Function-Modus (Function Mode) ...........................7
Anpassen der Stimmung an andere Instrumente (Master
Tuning) ...................................................7
Transponieren der Tastatur (Transpose) ....................7
(Ambience). . . . . . . . . . . . . . . . . . . . . . . .6
Die Wireless LAN-Funktion 8
Was ist die Wireless LAN-Funktion? ...............................8
Grundlegende Verbindungsmethode (WPS) ......................8
Verbindung im Ad-Hoc-Modus ............................8
Mögliche Fehlerursachen 9
Deutsch Français Italiano Español Português NederlandsEnglish
Technische Daten
&
Tastatur
Stromversorgung AC-Adapter
Stromverbrauch
Abmessungen 1,282 ( W) x 296 (D) x 132 (H) mm
Gewicht 20 kg
Lesen Sie zuerst die Abschnitte “SICHERHEITSHINWEISE” und “WICHTIGE HINWEISE” (Merk blatt “SICHERHEITSHINWEISE” und diese Anleitung, S. 10).
Diese enthalten wichtige Informationen bzgl. des sicheren Betriebes des Gerätes. Lesen Sie dann diese Anleitung ganz durch, um einen Überblick über
alle Funktionen zu erhalten. Bewahren Sie die Anleitung auf und verwenden Sie diese als Referenz.
Copyright © 2013 ROLAND CORPORATION
Alle Rechte vorbehalten. Vervielfältigung, als Print oder Datei, als Ganzes oder in Teilen, bedarf einer schriftlichen Genehmigung der ROLAND
CORPORATION.
88 Tasten (Ivory Feel-G Klaviatur mit DruckpunktSimulation)
9 W (2 W–18 W)
9 W: durchschnittlicher Stromverbrauch bei
Lautstärkeregler in der Mittelposition
2 W: Stromverbrauch nach Einschalten ohne
Spielen des Instrumentes
18 W: Maximaler Stromverbrauch
Beigefügtes
Zubehör
Zusätzliches
Zubehör
* Änderungen der technischen Daten und des Designs sind möglich.
Für Druckfehler wird keine Haftung übernommen.
Bedienungsanleitung, Merk blatt “SICHERHEITSHINWEISE”, Notenablage, AC-Adapter, Netzkabel,
Damper-Pedal (Halbpedal-fähig)
Ständer für stationäre Installation (KSC-68), Mobile
Ständer (KS-18Z, KS-12), Damper-Pedal (DP-10),
USB Flash-Speicher (*1), Wireless-USB -Adapter
(WN A110 0- RL ) (*1)
*1: Verwenden Sie nur von Roland empfohlene
USB-Speicher und Wireless-USB-Adapter. Bei Verwendung anderer Produkte kann die einwandfreie
Funktion nicht gewährleistet werden.
Page 14
Kurzanleitung
Auswählen der Klänge
Halten Sie einen der TONE-Taster gedrückt, und wählen Sie den gewünschten Klang mit den folgenden Tasten aus.
Auswahl eines Pianoklangs
Auswahl eines E. Pianoklangs
Grand Piano 1
1
Gedrückt halten
2
Auswahl anderer Klänge
Strings 1
1
Gedrückt halten
2
Ein-/ Ausschalten
Grand Piano 2
Grand Piano 3
Strings 2
Harp
Harpsichord 1
Ragtime Piano
Jazz Organ 2
Jazz Organ 1
Harpsichord 2
Church Organ 2
Church Organ 1
Accordion
Choir 1
(S. 5)
Jazz Scat
Choir 3
Choir 2
Vibraphone
1
Gedrückt halten
E. Piano 2
E. Piano 1
2
E. Piano 3
Synth Bell
Celesta
Cla v.
Übereinander legen zweier Klänge (Dual)
Drücken Sie zwei TONE-Taster gleichzeitig.
Mix Balance
Sie können das Lautstärke-Verhältnis beider Klänge einstellen (fünf Schritte,
0 = Werksvoreinstellung).
Acoustic Bass
A.Bass + Cymbal
Fingered Bass
Thum Voice
leuchtender
TONE-Taster
1
Gedrückt halten
Mix Balance (Dual)
Mix Balance (Split)
Decay Choir
Nylon-str.Gt
Synth Pad
Steel-str.Gt
Decay Strings
Decay Choir Pad
Gedrückt halten
00
+ ––
+
2
Einstellen der Lautstärke
Stellen Sie mit dem [VOLUME]-Regler die Lautstärke
ein.
Spielen von zwei Klängen nebeneinander (Split)
Drücken Sie den [SPLIT]-Taster, so dass die Anzeige leuchtet. Die Tastatur ist nun in zwei
Bereiche aufgeteilt, und Sie können mit der linken und rechten Hand zwei verschiedene
Klänge spielen. Wenn Sie den [SPLIT]-Taster gedrückt halten, leuchtet der TONE-Taster
für die linke Seite.
Wechseln der Klänge (Split)
Klang der linken Seite
Klang der rechten Seite Gehen Sie wie bei “Auswählen der Klänge” vor (s. oben).
Halten Sie den [SPLIT]-Taster, halten Sie dann zusätzlich
einen der TONE-Taster gedrückt, und wählen Sie über
die Tastatur den gewünschten Klang aus.
Einstellen der Tastaturdynamik (Key Touch)
Drücken Sie den [KEY TOUCH]-Taster, so dass die
Anzeige leuchtet. Sie können nun bestimmen,
mit welchem Kraftaufwand Sie die verschiedenen
Dynamikstufen erreichen.
Wenn die Anzeige des [KEY TOUCH]-Taster
erloschen ist, ist “MEDIUM” ausgewählt. Diese
Einstellung entspricht am ehesten dem eines
akustischen Pianos.
LIGHT
HEAVY
FIX
LIGHT
HEAVY
FIX
Verschieben des Splitpunktes
Halten Sie den [SPLIT]-Taster, und spielen Sie die gewünschte Note (Voreinstellung: F 3).
B1 B6
1
Gedrückt halten
Ermöglicht es, Fortissimo-Klänge ( ) zu spielen, ohne allzu stark auf die Tasten
schlagen zu müssen. Diese Einstellung ist insbesondere für Kinder geeignet.
Bei dieser Einstellung müssen Sie die Tasten stärker anschlagen, um Fortissimoklänge ( ) zu spielen. Diese Einstellung stellt die größte Dynamik-Bandbreite zur
Verfügung und ist daher besonders für Piano-Pros geeignet.
Der Sound reagiert nicht auf Anschlagdynamik. Er wird mit einer fest
eingestellten Lautstärke wiedergegeben.
2
1
Gedrückt halten
2
2
Page 15
Anwendung des Metronoms
Drücken Sie den [METRONOME]-Taster, so dass die Anzeige leuchtet; das Metronom erklingt. Stellen Sie mit den [SLOW]/[FAST]-Tastern das Tempo ein.
Kurzanleitung
Einstellen der Taktart
Sie können zwischen 0 (nur unbetonte Zählzeiten), 2, 3, 4, 5 oder 6 Zählzeiten
wählen.
52
0 3 4 6
1
Gedrückt halten
Sie können die Anzahl der Zählzeiten auch verändern, in dem Sie den
[METRONOME]-Taster gedrückt halten und die [SLOW]/[FAST]-Taster verwenden.
2
Ändern des Tempos durch Eingabe eines Zahlenwertes
Sie können das Tempo auch durch Eingabe eines Zahlenwertes bestimmen (20–250)
(Werksvoreinstellung: 108).
1
Gedrückt halten
Beispiel: Um “120” einzugeben, halten Sie den [METRONOME]-Taster gedrückt, und
Abspielen eines Songs/ Rhythmus (Automatische Begleitung)
Drücken Sie den [SONG]-Taster, um ein Song-Playback zu starten/ zu stoppen, und den [RHYTHM]Taster, um ein Rhythmus-Playback (Begleitung zu Ihren Akkorden) zu starten/ zu stoppen.
Sie können einen internen Song oder Rhythmus anwählen, in dem Sie den [SONG]- oder
[RHYTHM]-Taster gedrückt halten und die folgenden Tasten verwenden.
REFERENZ
Auswahl eines Songs
1
Gedrückt halten
Eine Liste der internen Songs und Rhythmen nden Sie im Abschnitt “Internal
Song List” und “Rhythm List” am Ende dieser Anleitung.
Drücken Sie die letzte rechte Taste; alle
Songs werden nacheinander gespielt.
2
Auswahl eines Rhythmus
1
2
drücken Sie die Tasten in dieser Reihenfolge 1
Rhythmus-Verlauf
Intro
[RHYTHM] an [RHYTHM] aus
Gedrückt halten
2
1 3 5 8
0 2 4 6 7 9
2 0 ENTER.
Begleitung
Ending
ENTER
Deutsch Français Italiano Español Português NederlandsEnglish
Aufnahme des Spiels
Sie können Ihr Spiel aufzeichnen.
* Wählen Sie zunächst den Klang aus, den Sie aufnehmen möchten.
1. Drücken Sie gleichzeitig den [SONG]- und den [RHYTHM]-Taster.
* Um die Aufnahme abzubrechen, drücken Sie erneut beide Taster gleichzeitig.
2. Beginnen Sie mit dem Tastaturspiel; die Aufnahme startet.
3. Drücken Sie den [SONG]-Taster, um die Aufnahme zu beenden.
Aufnahme mit Metronom
* Aktivieren Sie das Metronom, und stellen Sie Taktart und Tempo ein, bevor Sie
mit der Aufnahme beginnen.
Wenn Sie bei Schritt 2 den [SONG]-Taster betätigen, startet die Aufnahme erst nach
einem Vorzähler von zwei Takten.
Aufnahme mit Rhythmus-Playback
* Wählen Sie den gewünschten Rhythmus aus.
Wenn Sie bei Schritt 2 den [RHYTHM]-Taster betätigen, startet die Aufnahme erst
nach einem Vorzähler von zwei Takten.
Abspielen der Aufnahme
E3
Einstellung der Mix Balance
Sie können das Lautstärke-Verhältnis von Begleitung (Rhythmus, Song) und Tastaturspiel
einstellen (fünf Level, 0 = Werksvoreinstellung).
+0–
1
Jeweils
gedrückt halten
2
Wiederholen der Aufnahme
Beginnen Sie die Aufnahme wieder ab Schritt 1.
Sichern der Aufnahmedaten auf einem USB-Speicher
* Schließen Sie einen USB-Speicher an.
Halten Sie den [KEY TOUCH]-Taster gedrückt, und drücken Sie den
[SONG]-Taster. Sobald alle Taster-Anzeigen leuchten, sind die Daten
gespeichert (bis zu 99 Songs).
Abspielen eines Songs von einem USB-Speicher
Halten Sie den [SONG]-Taster gedrückt, und drücken Sie die “F 3”-Taste.
Mit den beiden Tasten vor und nach “F
USB-Speicher auswählen.
1
Gedrückt halten
3” können Sie einen Song auf dem
F
3
Play
Pre v.
Next
2
1
Gedrückt halten
2
* Sie können auch eine WAV- oder MIDI-Datei von Ihrem Computer auf den USB-
Speicher kopieren und diese auf dem F-20 abspielen. Genauere Informationen
zu den Formaten nden Sie am Ende dieser Anleitung.
3
Page 16
Vorbereitungen
Verwendung eines Piano-Ständers
Die folgenden Roland-Ständer sind für das F-20 zu verwenden: KSC-68 (lesen Sie dazu die Anleitung des KSC-68-Ständers), KS-18Z oder KS-12.
* Achten Sie darauf, sich bei Aufstellen des Ständers und des Instrumentes nicht die Hände zu verletzen.
KS-18Z
Die Vorderseite des F-20
muss mit der Vorderseite des
Ständers abschließen.
Stellen Sie den
Ständer nicht
höher als bis auf
die zweitniedrigste
Stufe ein.
Anschlüsse an der Rückseite
USB-Speicher-Anschluss
• Mithilfe eines USB-Speichers können Sie Songs
abspielen und speichern.
• Mithilfe eines Wireless USB-Adapters
(WNA1100-RL; zusätzliches Zubehör) können Sie
Drahtlos-kompatible iOS Apps nutzen (S. 8).
• Bei Anschluss eines USB-Gerätes wird die
Lautstärke der F-20-Lautsprecher reduziert.
* Schalten Sie das Gerät aus, bevor Sie einen
USB-Speicher anschließen oder entfernen,
andernfalls können Daten im Insturment oder
auf dem USB-Speicher beschädigt werden.
* Stellen Sie sicher, dass der USB-Speicher fest
eingesteckt ist.
Die Schrauben auf der Rückseite
benden sich über den Beinen.
PEDAL-Buchse
Schließen Sie das
beigefügte DamperPedal an.
KS-12
OUTPUT-Buchse
Hier können Sie ein externes
Verstärker-System anschließen.
Stellen Sie die Breite des Ständers so ein, dass die Gummifüße
des F-20 auf dem Ständer
auiegen.
Tastatur-Seite
Ansicht von oben
PHONES-Buchse
Zum Anschluss eines Stereokopfhörers.
* Wenn Sie nur einen Kopfhörer
anschließen wollen, nutzen Sie diese
Buchse.
Wenn Sie zwei Kopfhörer anschließen
wollen, nutzen Sie
die PHONES- und
zusätzlich die OUTPUT-
Buchse.
USB COMPUTER-Anschluss
Sie können mithilfe eines handelsüblichen USB-Kabels das F-20 mit einem
Computer verbinden und
• SMF-Daten (Standard MIDI Files) mit dem F-20 abspielen.
• MIDI-Daten vom F-20 in Ihre Sequenzer-Software übertragen und dort weiter
bearbeiten und editieren.
4
Bevor Sie Verbindungen mit
externen Geräten vornehmen,
schalten Sie alle beteiligten
Geräte aus. Sie verhindern so
eventuelle Fehlfunktionen
bzw. Beschädigungen der
Lautsprecher oder der
angeschlossenen Geräte.
Verlegen Sie den Netzadapter so, dass die Seite mit
der Leucht-Anzeige nach oben zeigt. Wenn Sie den
Adapter mit einer Steckdose verbinden, die Strom
führt, leuchtet diese Anzeige.
Steckdose
Stromkabel
DC IN-Buchse
Hier wird der beigefügte Netzadapter angeschlossen.
Page 17
Vorbereitungen
Anbringen der Notenablage
Setzen Sie die Notenablage wie nachfolgend gezeigt auf.
1. Lösen Sie die beiden Schrauben an der Rückseite des
Pianos.
2. Setzen Sie die Notenablage zwischen die Schrauben und
das Gehäuse.
3. Halten Sie mit einer Hand die Notenablage in Position,
und drehen Sie mit der anderen Hand die Schrauben fest.
Ein- und Ausschalten
Wenn alles korrekt angeschlossen ist (S. 4), können Sie das
Instrument wie nachfolgend beschrieben einschalten. Falls diese
Schritte nicht in der richtigen Reihenfolge durch geführt werden,
riskieren Sie eine Fehlfunktion oder Beschädigung der Lautsprecher.
Einschalten
1. Drehen Sie den [VOLUME]-Regler ganz nach links, um die
Lautstärke auf Minimum zu stellen.
2. Drücken Sie den [ ] (POWER)-Schalter.
* Aufgrund der Überbrückung einer Schutzschaltung benötigt
das Instrument eine kurze Zeit nach dem Einschalten, bevor es
einsatzbereit ist.
3. Stellen Sie mit dem [VOLUME]-Regler die gewünschte
Lautstärke ein.
* Bevor Sie das Instrument ein- oder ausschalten, regeln Sie
immer die Lautstärke auf ein Minimum. Auch bei minimaler
Lautstärke ist bei Ein- und Ausschalten ein Nebengeräusch
hörbar, dies ist aber normal und keine Fehlfunktion.
Ausschalten
1. Drehen Sie den [VOLUME]-Regler ganz nach links, um die
Lautstärke auf Minimum zu stellen.
Deutsch Français Italiano Español Português NederlandsEnglish
* Sie müssen die Notenablage bei der Montage fest in der
eingesteckten Position halten, damit sie nicht herab fällt. Achten
Sie darauf, sich nicht die Finger einzuklemmen.
* Üben Sie keinen übermäßigen Druck auf die montierte
Notenablage aus.
* Verwenden Sie ausschließlich die Schrauben, die dafür
vorgesehen sind.
Zum Entfernen der Notenablage halten Sie diese mit einer
Hand fest, während Sie die Schrauben lösen. Nehmen Sie die
Notenablage heraus und ziehen Sie die Schrauben wieder fest.
Vorsichtsmaßnahmen beim Platzieren auf einen Ständer
Halten Sie sich bei der Montage des Gerätes auf einen
Ständer genau an die Bedienungsanleitung (S. 4).
Wenn das Instrument nicht richtig platziert wird, riskieren
Sie, dass es herab fällt oder der Ständer kippt, was zu
Beschädigungen und Verletzungen führen kann.
Platzierung mit 30 cm Abstand zur Wand.
2. Halten Sie den [ ] (POWER)-Schalter solange gedrückt,
bis das Instrument ausgeschaltet ist.
Die Auto O-Funktion
Das Instrument wird in der Werksvoreinstellung nach einiger
Zeit automatisch ausgeschaltet, wenn in der Zwischenzeit
keine Bedienregler betätigt wurden bzw. nicht auf der Klaviatur
gespielt wurde.
Wenn Sie diese automatische Abschaltung de-aktivieren
möchten, stellen Sie den Parameter “Auto O” auf “O”.
(Voreinstellung: 30 Min.)
* Drücken Sie den [
wieder einzuschalten.
1 2
Halten
* Diese Einstellung bleibt auch nach Abschaltung gespeichert.
] (POWER)-Schalter, um das Instrument
30 min.
10 min.
Abspielen der Demo Songs
240 min.
OFF
3
Die Lautsprecher des F-20 benden sich
auf der Rückseite des Gerätes. Stellen Sie es
nicht zu nahe an einer Wand auf, da sonst
der Sound beeinträchtigt werden kann.
Nicht umkippen lassen!
Üben Sie keinen übermäßigen Druck auf
das F-20 aus, und setzen oder stellen Sie
sich niemals darauf.
30 cm
* Alle Rechte
1
Jeweils gedrückt halten
Das Instrument beinhaltet drei Demo Songs.
Starten Sie das Demo Song-Playback, in dem Sie einen der TONE-
Taster gedrückt halten und den [SONG]-Taster betätigen. Stoppen
Sie das Playback durch erneutes Drücken des [SONG]-Tasters.
2
vorbehalten. Bitte
beachten Sie
die gesetzlichen
CopyrightVorschriften.
5
Page 18
Weitere Funktionen
Einstellen der Brillianz (Brilliance)
Sie können die Brillianz der Klänge in drei Stufen verändern.
C5 C6
NORMAL
2
1
Halten
Einstellen des Raumhall-Eekts
Sie können einen Hall-Eekt auf die Klänge legen, so dass der Eindruck entsteht, Sie würden z.B. in einer Konzerthalle spielen (5 Stufen).
C5 C6
DEFAULT
1 2
Halten
+–
BRIGHT
MELLOW
3
(Ambience)
3
Teilen der Tastatur (Twin Piano)
Sie können die Tastatur in zwei Bereiche unterteilen, so dass zwei
Personen nebeneinander mit gleicher Tonlage spielen können, wie
auf zwei einzelnen Pianos.
C5 C6
PAIR
1 2
Halten
Die Tastatur wird in einen linken und einen rechten Bereich unterteilt, in deren Mitte jeweils das “mittlere C” (C4) angeordnet ist. Sie
können wählen, wie die Töne wiedergegeben werden:
Einstellung Beschreibung
PAIR
INDIVIDUAL
* Linker und rechter Bereich verwenden den gleichen Klang
(Piano). Das Damper Pedal wirkt nur auf die rechte Tastaturseite.
* Um den Twin Piano-Modus zu beenden, drücken Sie einen der
TONE-Taster.
Wenn Sie weiter rechts auf der Tastatur spielen, hören Sie
den Sound ebenfalls weiter rechts, wenn Sie weiter links
spielen, hören Sie den Sound ebenfalls weiter links.
Auf der rechten Seite gespielte Töne hören Sie aus dem
rechten Lautsprecher, auf der linken Seite gespielte Töne
aus dem linken Lautsprecher.
OFF
INDIVIDUAL
3
Sperren der Taster-Funktionen (Panel Lock)
Wenn Sie beim Einschalten des Instrumentes den [PIANO]-Taster
mindestens sechs Sekunden lang gedrückt halten, werden alle
Taster mit Ausnahme des [ ] (POWER)-Tasters blockiert, so dass
Einstellungen nicht versehentlich verändert werden können. Mit
Ausschalten des Instrumentes wird “Panel Lock” de-aktiviert.
6
Sichern von Einstellungen (Memory Backup)
Im Function-Modus geänderte Einstellungen werden normalerweise
wieder auf deren jeweilige Voreinstellungen zurück gesetzt, wenn
das Instrument ausgeschaltet wird. Wenn Änderungen an den
folgenden Einstellungen erhalten bleiben sollen, gehen Sie wie
nachfolgend beschrieben vor.
Einstellungen Seite
Key Touch (Tastaturdynamik) S. 2
Brilliance (Brillianz) S. 6
Ambience (Raumhall-Eekt) S. 6
Master Tuning (Gesamtstimmung) S. 7
1. Halten Sie den [KEY TOUCH]-Taster gedrückt, und drücken
Sie den [RHYTHM]-Taster.
Die Taster [OTHER] und [SPLIT] blinken. Um den Vorgang
abzubrechen, drücken Sie den [OTHER]-Taster.
2. Drücken Sie auf [SPLIT], um die Einstellungen zu sichern.
Sobald alle Taster-Anzeigen leuchten, ist der Vorgang beendet.
Abrufen der Werksvoreinstellungen (Factory Reset)
Sie können die im Function-Modus geänderten MEMORY BackupEinstellungen (S. 7) auf deren Werksvoreinstellungen zurück
setzen.
WICHTIG
Nach einem Factory Reset sind sämtliche BenutzerEinstellungen gelöscht, auch Ihre im internen Speicher
aufgenommenen Songs.
1. Halten Sie beim Einschalten des Instrumentes den
[KEY TOUCH]-Taster mindestens sechs Sekunden lang
gedrückt.
Die Taster [OTHER] und [SPLIT] blinken. Um den Vorgang
abzubrechen, drücken Sie den [OTHER]-Taster.
2. Drücken Sie auf [SPLIT], um die Werksvoreinstellungen
abzurufen.
Sobald alle Taster-Anzeigen leuchten, ist der Vorgang beendet.
3. Schalten Sie das Instrument aus und nach kurzer Zeit
wieder ein.
Formatieren eines USB-Speichers
Mit dieser Funktion können Sie einen USB-Speicher
formatieren.
WICHTIG
• Dabei werden alle vorherigen Inhalte des USB-Speichers
gelöscht.
• Ein neuer bzw. bisher anderweitig verwendeter USB-Speicher
muss vom F-20 formatiert werden, damit er für dieses
Instrument verwendet werden kann.
1. Schließen Sie den zu formatierenden USB-Speicher an
den USB-Speicher-Anschluss an.
2. Halten Sie beim Einschalten des Instrumentes den
[SONG]-Taster mindestens sechs Sekunden lang gedrückt.
Die Taster [OTHER] und [SPLIT] blinken. Um den Vorgang
abzubrechen, drücken Sie den [OTHER]-Taster.
3. Drücken Sie auf [SPLIT], um den USB-Speicher zu
formatieren.
Sobald alle Taster-Anzeigen leuchten, ist der Vorgang beendet.
4. Schalten Sie das Instrument aus und nach kurzer Zeit
wieder ein.
Page 19
Der Function-Modus (Function Mode)
Im Function-Modus können Sie verschiedene Einstellungen für die Wiedergabe und Aufnahme vornehmen. Halten Sie die beiden
1 2
Taster [KEY TOUCH] und [PIANO] gedrückt, und wählen Sie mit den in der Abbildung gezeigten Tasten den gewünschten Parameter aus.
Weitere Funktionen
OFF
240 min.
10 min.
1
3
Auto O (S. 5)
USB Memory Mode
Ändern der USB-Speicher-Einstellungen (USB Memory Mode)
Wenn Daten vom USB-Speicher nicht korrekt geladen werden oder der Datenzugri länger als erwartet
dauert, versuchen Sie, durch Ändern des USB MEMORY Mode auf “1” Abhilfe zu schaen. Die Werksvoreinstellung ist “2”; normalerweise muss diese Einstellung nicht verändert werden.
* Nach diesem Vorgang müssen Sie das Instrument aus- und wieder einschalten, damit die Änderung
wirksam wird.
Deutsch Français Italiano Español Português NederlandsEnglish
Gedrückt halten
C8
30 min.
C7
2
Anpassen der Stimmung an andere Instrumente (Master Tuning)
Wenn Sie z. B. im Ensemble mit anderen Akustik-Instrumenten spielen, können Sie die Standard-Tonhöhe
+
440.0 Hz
INDIVIDUAL
C6
PAIR
Master Tuning
–
Twin Piano (S. 6)
OFF
des F-20 an ein anderes Instrument anpassen. Dies wird als „Master-Tuning“ bezeichnet. Die StandardTonhöhe bezieht sich im Allgemeinen auf die Tonhöhe der Note „A4“. Stellen Sie sicher, dass die Standardtonhöhe des F-20 zu denen anderer Instrumente passt.
Sie können die Stimmung innerhalb des folgenden Bereiches anpassen:
415.3 Hz–440.0 Hz (Voreinstellung)–466.2 Hz (in 0,1 Hz-Schritten).
Transponieren der Tastatur (Transpose)
BRIGHT
NORMAL
MELLOW
C5
DEFAULT
Brilliance (S. 6)
+
Ambience (S. 6)
–
Mithilfe der Transpose-Funktion können Sie die Tonhöhe der
Tastatur in Halbton-Schritten verändern.
Wenn Sie z. B. einen Song in E-Dur lieber in C-Dur spielen
möchten, geben Sie als Transpose-Wert “+4” ein.
Sie spielen C E G es erklingt E G H
Steuern von Video-Equipment (Visual Control Mode)
Visual Control ist ein Steuer-Protokoll, welches ermöglicht, Bild- und Video-relevante Parameter über
MIDI-Befehle zu steuern.
+5
+4
+3
+2
+1
0
C4
-2
-4
-6
Transpose
-1
-3
-5
Wenn Sie den Visual Control-Modus “MVC” (MIDI Visual Control, S. 9) oder “V-LINK” einstellen, können Sie
Ihre Musik sehr einfach zu einer Video-Performance synchronisieren.
Visual Control-Funktionen
Bei Spielen der 12 untersten Tasten (A0–G 1) werden die folgenden MIDI-Informationen übertragen:
Visual Control-Funktion Übertragene MIDI-Meldung
Umschalten von Bildern
CC 0 (Bank Select): 0–4 Schwarze Taste spielen
Program Change: 1–7 Weiße Taste spielen
Bedienvorgang am
F-20
Ad-Hoc ON
Ad-Hoc OFF
C3
Wireless LAN (S. 8)
WPS
MIDI-Sendekanal (MIDI Transmit Channel)
Bestimmt den MIDI-Sendekanal des F-20 (1-16).
V-LINK
MVC
16
C2
C1
14
11
9
7
4
2
OFF
Visual Control Mode
OFF
15
13
12
10
MIDI
8
Transmit Channel
6
5
3
1
ON
Local Control
Empfangen kann das F-20 Daten auf allen MIDI-Kanälen (1–16).
Verbindung mit einem Sequenzer (Local Control)
Wenn Sie das F-20 mit einem MIDI-Sequenzer
verbinden, empelt sich die Einstellung “Local
O ” am F-20.
Grund: Das F-20 würde ansonsten das
Notensignal zweimal erhalten: einmal direkt
über das Tastaturspiel und ein weiteres Mal über
die Verbindung “F-20 MIDI OUT - Sequenzer
Soft Thru - F-20 MIDI IN”. Dabei kann es zum
Systemabsturz des MIDI-Sequenzers kommen,
oder das F-20 funktioniert nicht mehr korrekt.
Local Control
Klangerzeugung
USB MIDI
In
USB MIDI
Out
Software
Synthesizer
Computer
7
Page 20
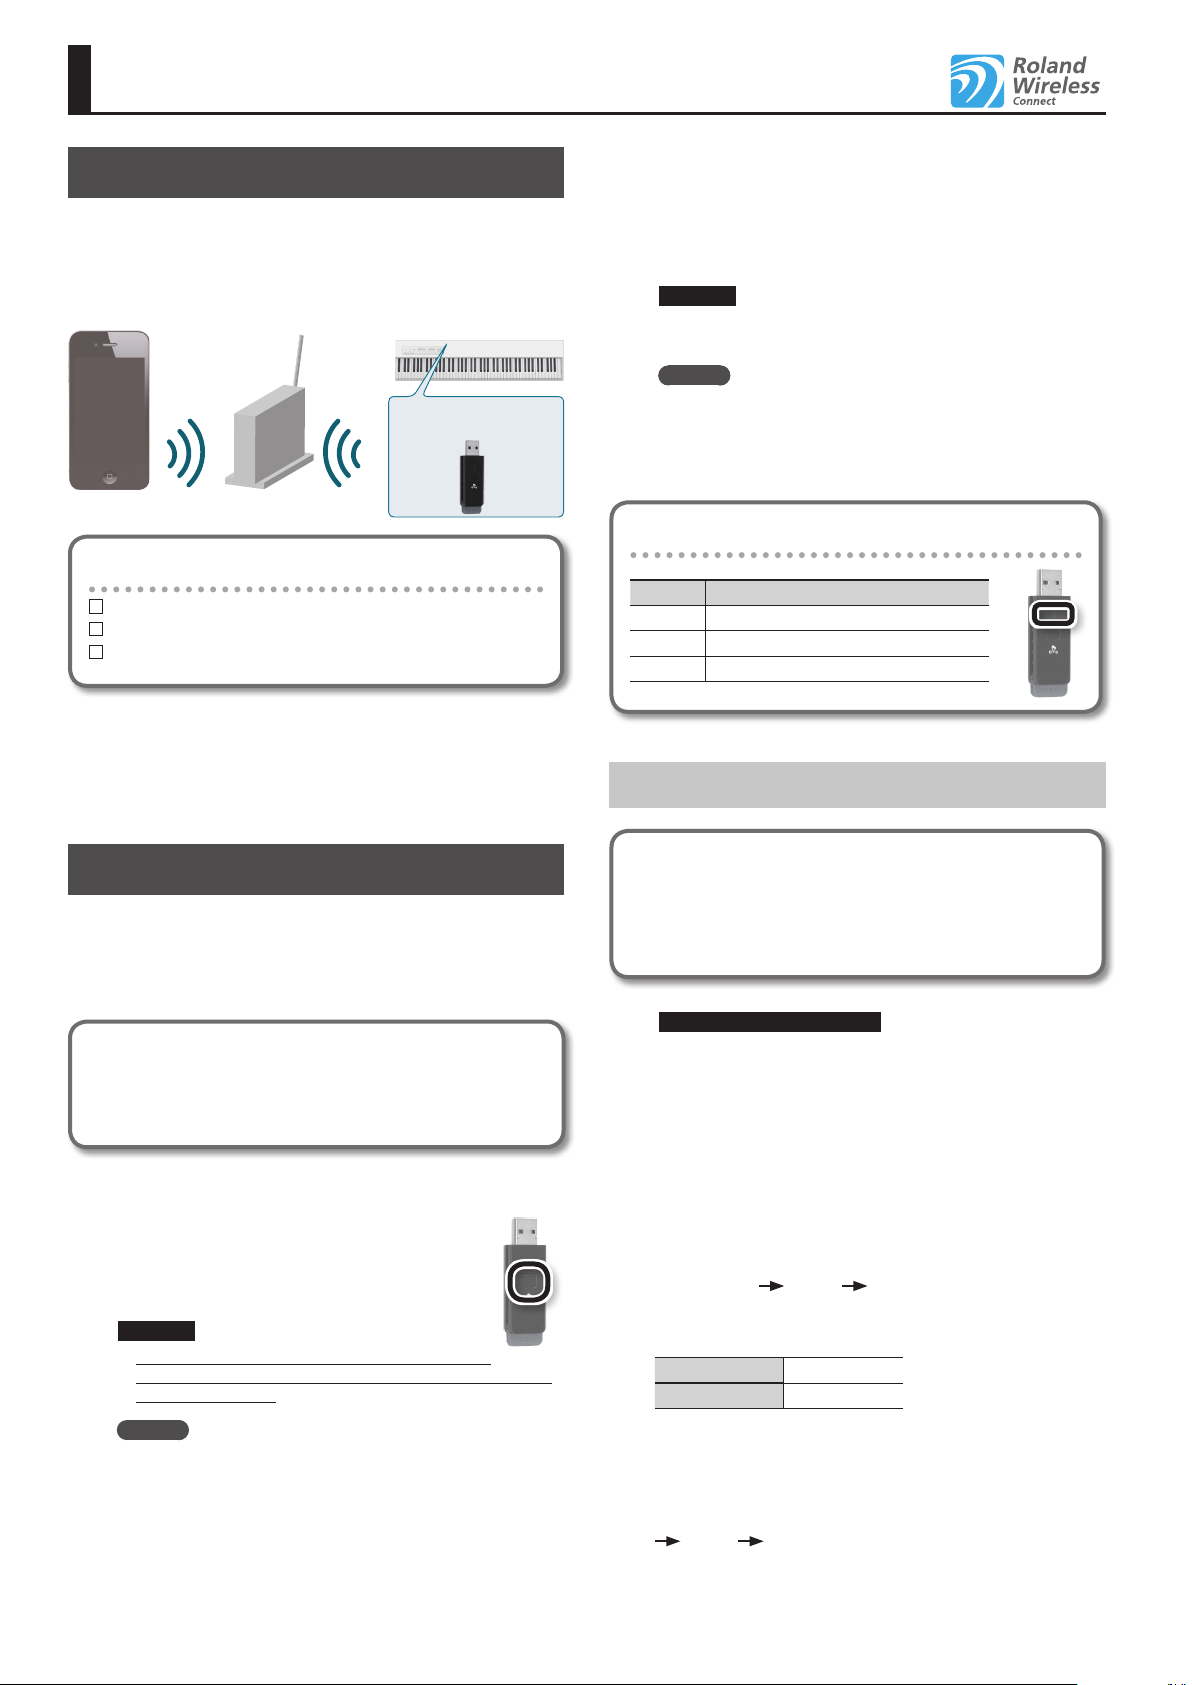
Die Wireless LAN-Funktion
Was ist die Wireless LAN-Funktion?
Durch Anschluss des Wireless-USB-Adapters (WNA1100-RL) an den
USB MEMORY-Anschluss des F-20 können Sie Anwendungen, die
mit WLAN kompatibel sind (z.B. iOS apps wie “Piano Partner” oder
“Air Performer”) nutzen.
iPhone etc.
Wireless LAN Wireless LAN
Erforderliches Zubehör
Wireless USB Adapter (WNA1100-RL; zusätzliches Zubehör)
Wireless LAN-Zugrispunkt (z.B. Wireless LAN Router) *1 *2
iPhone, iPad, oder iPod touch etc.
*1 Der von Ihnen genutzte WLAN-Zugrispunkt muss WPS
unterstützen. Ist dies nicht der Fall, versuchen Sie, den Ad-HocModus zu verwenden.
*2 Roland übernimmt keine Garantie für die Funktionsfähigkeit
eines WLAN-Zugrispunktes.
Wireless LAN Zugrispunkt
(z.B. Wireless LAN Router)
F-20
Wireless USB Adapter
(
WNA1100-RL)
Wenn die Verbindung erfolgreich hergestellt wurde, leuchtet die
LED-Anzeige des Wireless USB-Adapters.
Damit ist die Einrichtung abgeschlossen, und Sie können eine
Drahtlos-kompatible iOS App wie z.B. “Air Performer” nutzen.
Wählen Sie “F-20” in der Instrumentenauswahl Ihrer iOS app.
WICHTIG
* Das Gerät, auf welchem die App läuft (z.B. iphone), muss mit
dem selben Netzwerk verbunden sein.
Hinweis
• Die Verbindungsdaten werden im Speicher gesichert, wenn
Sie WPS aktivieren. Das Gerät wird sich beim nächsten Start
automatisch mit dem Drahtlosnetzwerk verbinden.
• Die Verbindungsdaten werden gelöscht, wenn Sie das Gerät auf
die Werksvoreinstellungen zurücksetzen.
Die LED-Anzeige des Wireless USB Adapters
LED Beschreibung
Leuchtet Ist mit einem Netzwerk verbunden.
Aus Hat keine Verbindung zu einem Netzwerk.
Blinkt Sucht nach Verbindung zu einem Netzwerk.
Verbindung im Ad-Hoc-Modus
Grundlegende Verbindungsmethode (WPS)
Wenn Sie das F-20 das erste Mal mit einem Drahtlosnetzwerk
verbinden, müssen Sie folgende Schritte (WPS) durchführen,
um sich am Netzwerk anzumelden. Dieser Vorgang muss nur
beim ersten Mal durchgeführt werden. Ist das Netzwerk einmal
ausgewählt, ist dieser Schritt nicht mehr notwendig.
Was ist WPS?
Dieser Standard erleichtert die Eingabe von Sicherheitseinstellungen, wenn Sie sich mit einem WLAN Zugrispunkt verbinden. Die
Verwendung von WPS wird grundsätzlich empfohlen.
1. Stecken Sie den Wireless USB-Adapter (WNA1100-RL) in
den USB MEMORY-Anschluss des F-20.
2. Halten Sie den Taster des Wireless USB-Adapters
für drei Sekunden gedrückt.
Die LED-Anzeige des Wireless USB-Adapters blinkt.
WICHTIG
* Üben Sie keinen übermäßigen Druck auf den USB-
Adapter aus, wenn Sie den Taster drücken. Er könnte sonst
beschädigt werden.
Hinweis
Sie können den WPS-Vorgang auch durchführen, indem Sie
im “Der Function-Modus (Function Mode)” (S. 7) “WPS”
auswählen statt auf den Taster des Wireless USB-Adapters zu
drücken.
3. Aktivieren Sie WPS auf Ihrem WLAN-Zugrispunkt
(drücken Sie z.B. den WPS-Taster auf Ihrem WLAN-Gerät).
Lesen Sie dazu bei Bedarf die Anleitung Ihres Wireless LAN-Gerätes.
8
Was ist der Ad-Hoc-Modus?
Im Ad-Hoc-Modus können Sie das F-20 direkt mit einem iPhone
oder einem anderen Drahtlos-kompatiblen Gerät verbinden, ohne
einen Wireless LAN-Zugrispunkt verwenden zu müssen, z.B. wenn
kein WLAN-Zugrispunkt zur Verfügung steht.
Hinweise zu Beschränkungen
Geräte, die im Ad-Hoc-Modus drahtlos verbunden sind, können
nicht mit dem Internet oder einem anderen Drahtlosgerät
kommunizieren. Geräte, die eine Mobiltelefonfunktion
besitzen (z.B. iPhone), können sich in diesem Fall über das
Mobilfunknetz mit dem Internet verbinden. Achten Sie bei
Mobilfunkverbindungen auf eventuell entstehende Mehrkosten.
1. Wählen Sie im “Function-Modus (S. 7) die Einstellung
“Ad-Hoc ON”.
2. Wählen Sie auf dem Drahtlos-kompatiblen Gerät, das
Sie verbinden möchten, “F-20” aus. Beispiel: iPhone
[Funktionen] [Wi-Fi] [Select Network]. Geben Sie
anschliessend innerhalb des Password-Displays “f20ak”
ein.
Ad-Hoc SSID F-20
Password f20ak
Lesen Sie dazu bei Bedarf die Anleitung Ihres Drahtlos-kompatiblen
Gerätes.
3. Zum Beenden der Ad-Hoc-Verbindung nehmen Sie
folgende Einstellungen an Ihrem iPhone vor: [Funktionen]
[Wi-Fi] [Select Network], und stellen Sie die
ursprünglichen Werte wieder her.
Page 21
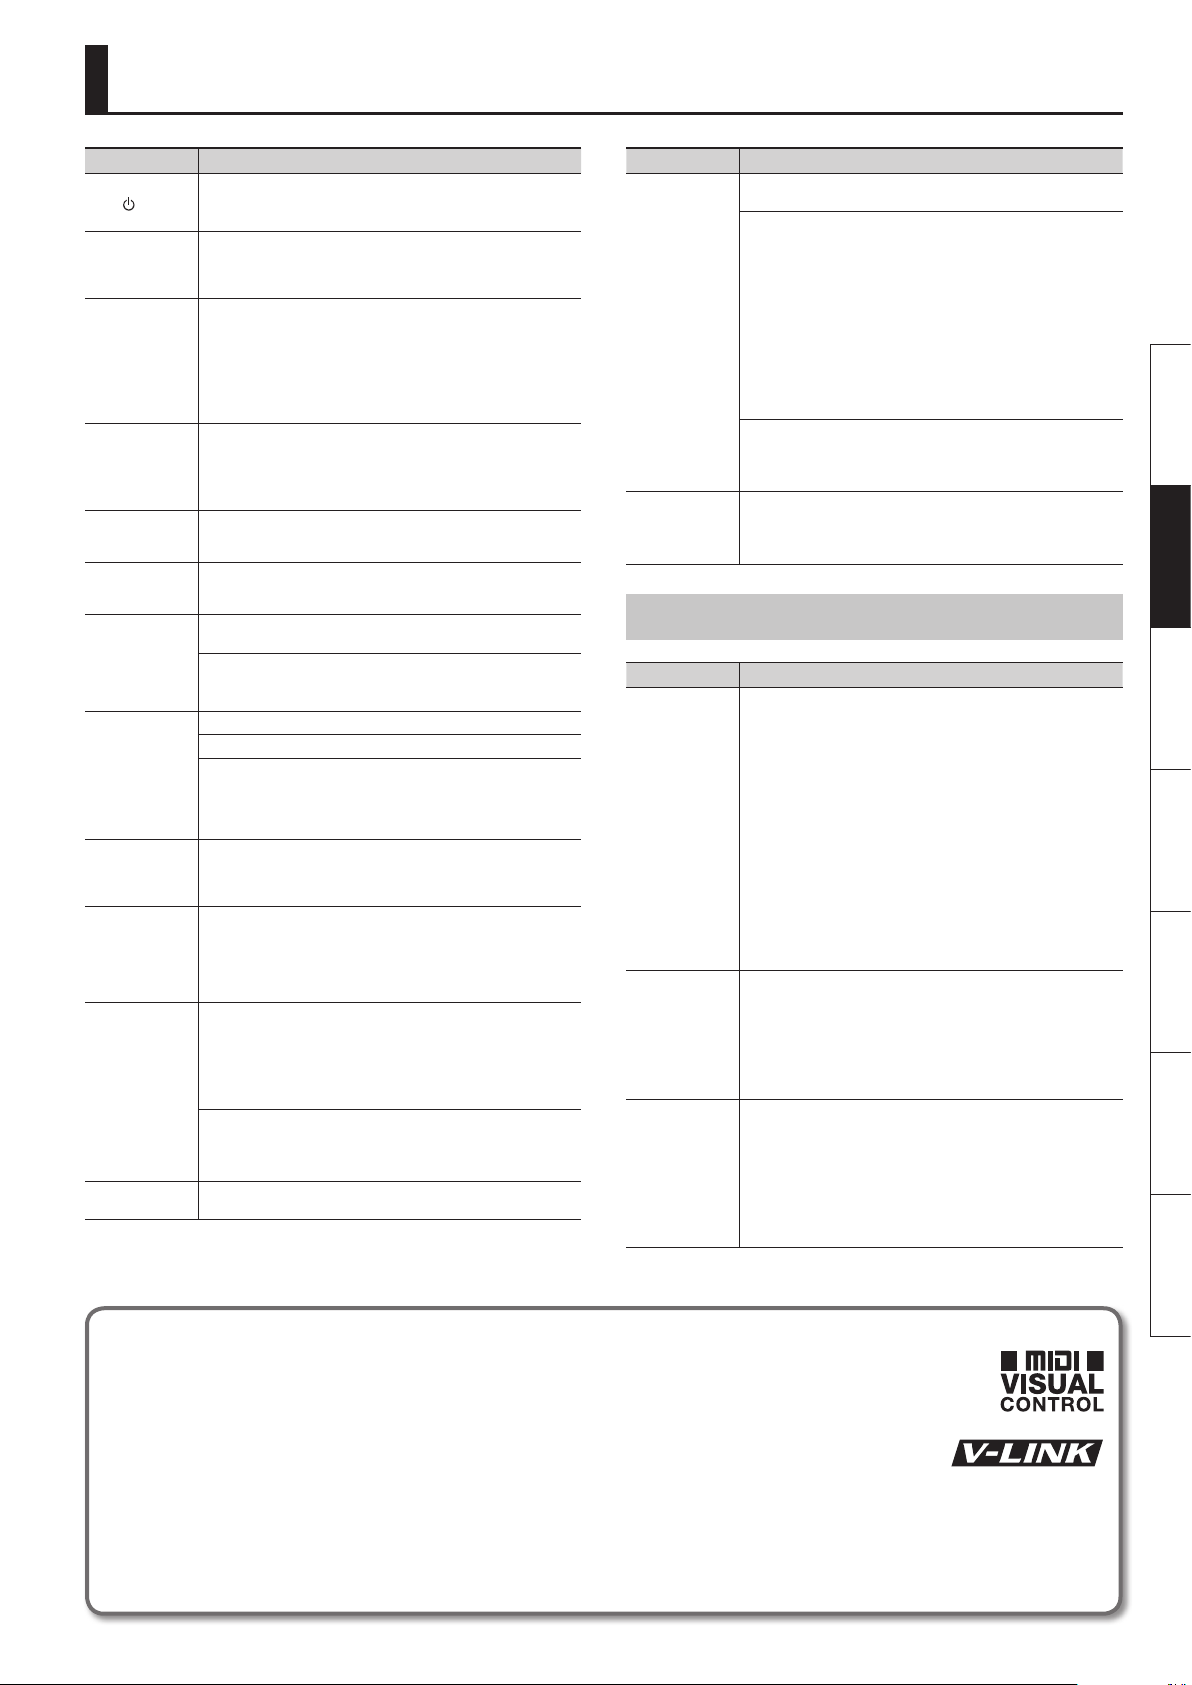
Mögliche Fehlerursachen
Problem Grund/Abhilfe
Alle LEDs außer
dem [ ] (POWER)Taster blinken.
Obwohl Kopfhörer
angeschlossen sind,
ertönt Klang aus
den Lautsprechern.
Obwohl Sie Kopfhörer verwenden
und der Klang
stumm geschaltet
ist, ist ein Klopfen
zu hören, wenn Sie
spielen.
Das Instrument hat
sich selbstständig
abgeschaltet.
Das Instrument
lässt sich nicht
einschalten.
Das Pedal funktioniert nicht oder
der Klang“hängt“.
Es ist kein Klang
hörbar.
Der Song ist nicht
zu hören.
Die Tonlage der
Tastatur oder Songs
ist falsch.
Es sind zwei Klänge
zu hören, wenn
auf der Tastatur
gespielt wird.
Der Klang der
höheren Töne
ändert sich abrupt
ab einer bestimmten Tonhöhe.
Ein hochfrequentes
Nebengeräusch ist
zu hören.
Die Lautstärke ist
reduziert.
Am USB-Speicher-Anschluss tritt übermäßiger Stromuss auf.
Prüfen Sie, ob es möglicherweise ein Problem mit dem USB-Speicher gibt.
Schalten Sie danach das Instrument aus und wieder an.
Sind die Kopfhörer an der OUTPUT-Buchse statt an der PHONES-Buchse
angeschlossen (S. 4)?
Dieses Instrument besitzt eine Hammermechanik-Tastatur, um
den Anschlag eines akustischen Pianos so realistisch wie möglich
nachzubilden, daher hören Sie beim Spielen das Anschlagen der Tasten,
wenn der Klang sehr leise eingestellt oder stumm geschaltet ist. Wenn
unerwünschte Vibrationen auf den Fußboden oder die Wände übertragen
werden, können Sie diese minimieren, in dem Sie das Instrument von der
Wand abrücken, oder eine im Fachhandel erhältliche Anti-Vibrationsmatte
unterlegen, die für Klaviere geeignet ist.
In der Werksvoreinstellung wird das Instrument nach 30 Minuten
automatisch abgeschaltet, wenn es in der Zwischenzeit nicht gespielt bzw.
bedient wurde.
Wenn Sie die automatische Abschaltung de-aktivieren möchten, stellen Sie
den Parameter “Auto O” auf “OFF” (S. 5).
Ist das Netzteil korrekt angeschlossen (S. 4)?
Ist das Pedal korrekt angeschlossen?
Stecken Sie das Pedalkabel fest in den Pedalanschluss ein (S. 4).
Ist die Lautstärke des F-20 oder des angeschlossenen Gerätes auf
Minimum geregelt?
Sind Kopfhörer angeschlossen?
Die Lautsprecher geben keinen Klang aus, wenn sich ein Kopfhörer in der
Kopfhörerbuchse bendet (S. 4).
Ist eventuell die Transponierung aktiviert (S. 7)?
Stimmt die Master-Tuning-Einstellung (S. 7)?
Die Töne eines Pianos werden nach einer besonderen Methode gestimmt
(Spreizung), die die oberen Oktaven leicht höher, die unteren Oktaven
leicht tiefer klingen lässt. Möglicherweise nehmen Sie die Tonhöhe daher
als fehlerhaft wahr, aber dieses entspricht der Klang-Charakteristik eines
akustisches Pianos.
Ist der Dual-Modus aktiviert (S. 2)?
Die ca. 1/1:2 Oktaven des oberen Klaviaturbereiches klingen auch nach
Loslassen der Tasten weiter und danach automatisch aus, unabhängig
davon, ob das Haltepedal gedrückt wird. Dieser Eekt existiert auch bei
akustischen Pianos und wird vom F-20 naturgetreu nachgebildet. Dieser
Bereich, der nicht vom Haltepedal kontrolliert werden kann, ist auch
abhängig von einer eventuellen Transponier-Einstellung.
Bei Abhören über Kopfhörer:
Einige Piano-Klänge besitzen einen hohen Anteil an hohen Frequenzen,
die bei einem zu hohen Hall-Anteil verstärkt werden. Dies ist auf die
naturgetreue Simulation eines akustischen Pianos zurückzuführen und
keine Fehlfunktion.
Reduzieren Sie den Anteil des “Ambience”-Eektes (S. 7).
Bei Abhören über Lautsprecher:
Eventuell wird das Nebengeräusch durch die Vibration des Gehäuses
erzeugt. Benachrichtigen Sie in diesem Fall Ihren Roland-Vertragspartner
bzw. Ihr Roland Service Center.
Die Lautstärke verringert sich, wenn ein USB-Gerät angeschlossen wird.
Dieses ist normal und keine Fehlfunktion.
Problem Grund/Abhilfe
Bei einigen Noten verzerren die Klänge eventuell. Drehen Sie in diesem Fall
die Lautstärke herunter.
Bei Abhören über Lautsprecher:
Wenn Sie das Instrument sehr laut spielen, vibrieren eventuell
Gegenstände, die direkt neben dem Instrument stehen. Der Grund für
einen Resonanz-Eekt können außerdem Lichtröhren, Glastüren etc. sein.
Dieser Eekt tritt allerdings nur dann auf, wenn die Bass-Frequenzen sehr
Die Bass-Frequenzen erklingen
fremdartig, oder
ein Resonanz-Eekt
ist zu hören.
Das Gerät schaltet
sich ab.
hoch eingestellt werden und der Klang mit einer sehr hohen Lautstärke
gespielt wird. Gehen Sie in diesem Fall wie folgt vor:
• Platzieren Sie das Gerät 30 cm von Wänden oder anderen Flächen
entfernt.
• Stellen Sie das Gerät mit größerem Abstand zu den vibrierenden
Gegenständen auf.
• Reduzieren Sie die Lautstärke.
Bei Abhören über Kopfhörer:
Es ist wahrscheinlich, dass ein anderer Grund bzw. technischer Fehler vorliegt. Nehmen Sie in diesem Fall Kontakt zu Ihrem Roland-Vertragspartner
bzw. Ihrem Roland Service Center auf.
In manchen Fällen wird durch das sehr laute Abspielen von SMF- oder
WAV-Daten von einem USB-Speicher die Schutzschaltung aktiviert, so dass
das Gerät abgeschaltet wird.
Wenn dieses auftritt, vermindern Sie die Lautstärke.
Probleme mit dem Drahtlos-Netzwerk
Problem Grund/Abhilfe
• Stellen Sie sicher, dass Ihr Wireless LAN-Zugrispunkt den WPS-Standard
unterstützt. Ist dies nicht der Fall, verwenden Sie die “Verbindung im
Ad-Hoc-Modus” (S. 8).
• Der 802.11a/b Wireless-Standard wird nicht unterstützt. Verwenden Sie
den 802.11g oder 802.11n (2.4 GHz) Wireless Standard.
• Die WEP Authentizierungs-Methode wird nicht unterstützt. Verwenden
Es besteht keine
Verbindung zum
ausgewählten
Wireless LANZugrispunkt.
Die Datenkommunikation ist
instabil
Das F-20 wird in
der iOS App als Instrumenteneintrag
nicht gefunden.
Sie die WPA- bzw. WPA2 Authentizierungs-Methode.
• Stellen Sie sicher, dass für den verwenden Wireless LAN-Zugrispunkt
das “Dynamic Host Conguration Protocol” (DHCP) eingeschaltet ist.
• Möglicher weise ist die Signalstärke nicht ausreichend. Wiederholen
Sie die Schritte unter “Grundlegende Verbindungsmethode (WPS)” (S.
8), und versuchen Sie erneut, eine Verbindung mit Ihrem Wireless
LAN-Zugrispunkt herzustellen.
• Das F-20 kann sich nur eine begrenzte Anzahl von NetzwerkVerbindungen merken, daher kann es passieren, dass ältere Einträge
durch neuere Einträge überschrieben werden. Bei einem “Factory Reset”
werden alle Verbindungsdaten gelöscht.
Der Grund kann eine instabile Funkfrequenz sein. Dieses kann zur Folge
haben, dass die Reaktionszeit träge ist oder bei einer Übertragung von
Audiodaten Aussetzer zu hören sind.
Versuchen Sie,
• den Abstand zwischen Wireless LAN-Zugrispunkt und F-20 zu
verringern.
• den Kanal des Wireless LAN-Zugrispunktes zu verändern.
• Ist das F-20 eingeschaltet?
• Ist der Wireless USB-Adapter (WNA1100-RL) am F-20 angeschlossen?
• Ist das F-20 mit dem Drahtlos-Netzwerk verbunden?
• Sind das F-20 und das iPhone mit dem gleichen Netzwerk ( Wireless
LAN-Zugrispunkt) verbunden?
• Ist der Wireless LAN-Zugrispunkt so eingestellt, dass eine Kommunikation zwischen externen Wireless LAN-Geräten erlaubt ist? Lesen Sie dazu
bei Bedarf die Anleitung des verwendeten Wireless LAN-Zugrispunktes.
Deutsch Français Italiano Español Português NederlandsEnglish
Was ist MIDI Visual Control?
MIDI Visual Control ist ein Hersteller-übergreifendes Steuer-Protokoll, welches ermöglicht, Bild- und Video-relevante Parameter über MIDI-Befehle zu steuern.
Damit können Sie sehr einfach Ihre Musik zu einer Video-Performance synchronisieren.
Was ist V-LINK?
V-LINK ist ein Steuer-Protokoll von Roland, welches ermöglicht, Bild- und Video-relevante Parameter über MIDI-Befehle zu steuern. Damit können Sie sehr
einfach Ihre Musik zu einer Video-Performance synchronisieren.
Was ist MIDI?
MIDI steht für “Musical Instrument Digital Interface” und ist ein weltweiter Standard für den Austausch von Spiel- und Kontrolldaten zwischen elektronischen Musikinstrumenten und
Geräten mit integriertem MIDI-Interface.
Dieses Instrument ist mit einem USB COMPUTER-Anschluss ausgestattet, über den MIDI-Daten mit anderen Geräten ausgetauscht werden können.
9
Page 22
Sicherheitshinweise
WARNUNG
Das Gerät vollständig von der S tromversorgung trennen
Auch wenn das Gerät ausgeschaltet ist, ist es
noch mit der Stromversorgung verbunden.
Wenn Sie das Gerät vollständig von der
Stromversorgung trennen möchten, ziehen Sie
den Netzdapter aus der Steckdose.
Die Auto O-Funktion
Das Gerät wird normalerweise nach der im
Gerät aktuell voreingestellten Zeit automatisch
ausgeschaltet. Wenn Sie die automatische
Abschaltung de-aktivieren möchten, stellen Sie
den Parameter “Auto O” auf “O” (S. 5).
Benutzung von Ständern
Verwenden Sie nur die von Roland
empfohlenen Piano- bzw. Keyboard- Ständer.
Keine instabilen Flächen
Sorgen Sie dafür, dass das Gerät bzw. der
Ständer auf einer ebenen, stabilen Unterlage
aufgestellt wird, auf der es nicht wackeln kann.
Vorsichtsmaßnahmen bei Verwendung des
Gerätes mit einem Keyboard-Ständer
Beachten Sie bitte sorgfältig die
Aufbauanweisungen dieser Bedienungsanleitung, wenn Sie das Gerät mit einem
Keyboard-Ständer verwenden (S. 4).
Bei nicht korrektem Aufbau riskieren Sie ein
Umkippen des Ständers, ein Herunterfallen des Gerätes oder
Verletzung von Personen.
WARNUNG VORSICHT
Nur das beigefügte Netzteil benutzen
Verwenden Sie nur den dem Gerät beigefügten
Netzadapter. Achten Sie immer auf eine stabile
Stromversorgung (siehe Aufschrift auf dem
Netzadapter). Die Benutzung von anderen
Netzadaptern mit ggf. unterschiedlicher Polarität
oder Spannung kann sowohl das Gerät als auch
den Netzadapter beschädigen bzw. zu Kurzschlüssen führen.
Nur das beigefügte Netzkabel benutzen
Verwenden Sie nur das dem Gerät beigefügte Netzkabel.
Benutzen Sie das Netzkabel nicht mit anderen Geräten.
VORSICHT
Verwendung von Keyboard-Ständern
Es wird empfohlen, dieses Gerät nur in
Kombination mit Roland Keyboard-Ständern
(KSC-68, KS-18Z, KS-12) zu verwenden. Bei
Verwendung von Keyboard-Ständern anderer
Hersteller kann es zu Verletzungen bedingt
durch Herunterfallen bzw. Umkippen des
Gerätes bei instabiler Aufstellung kommen.
Sicherheitshinweise für die Verwendung von KeyboardStändern
Auch bei Beachtung aller in der
Bedienungsanleitung beschriebenen
Vorsichtsmaßnahmen kann es unter
besonderen Umständen zum Herunterfallen des
Gerätes vom Keyboard- Ständer bzw. zu einem
Umkippen des Ständers kommen. Prüfen Sie selber vorher
Fragen der Sicherheit.
Hinweis für den Transport
Wenn Sie das Instrument bewegen bzw.
transportieren möchten, trennen Sie nicht nur
den Netzadapter vom Gerät, sondern auch alle
zu externen Geräten führenden Kabel. Der
Transport sollte von mindestens zwei Personen
durchgeführt werden. Beachten Sie außerdem
die folgenden Hinweise für den Transport.
• Wenn Sie den KSC-68-Ständer verwenden, stellen Sie
sicher, dass die Schrauben, welche das Piano mit dem
Ständer verbinden, fest angezogen sind.
• Entfernen Sie den Netzadapter.
• Entfernen Sie alle Kabel von externen Geräten.
• Nehmen Sie den Notenständer ab.
Kleine Gegenstände außerhalb der Reichweite von KIndern
aufbewahren
Bewahren Sie kleine Gegenstände immer
außerhalb der Reichweite von Kindern auf.
• bei diesem Instrument:
Erwärmung des Gerätes bei Betrieb
Bei Betrieb können Bereiche des Gerätes (wie in
der Abbildung gezeigt) übermäßig warm
werden. Vermeiden Sie Berührungen an diesen
Stellen. Diese Erwärmung ist normal und stellt
keine Fehlfunktion dar.
die Schrauben des Notenständers (S. 5)
Rückseite
Wichtige Hinweise
Positionierung
• Setzen Sie das Instrument keinen extremen Temperaturen
aus (z.B. Sonneneinstrahlung, Heizkörper). Die
Gehäuseoberäche kann dadurch beschädigt werden.
Dieses kann ebenfalls passieren, wenn das Instrument
direkt mit einer starken Lichtquelle angestrahlt wird. Setzen
Sie das Instrument keinen extremen Temperaturen aus (z.B.
Sonneneinstrahlung, Heizkörper). Die Gehäuseoberäche
kann dadurch beschädigt werden. Dieses kann ebenfalls
passieren, wenn das Instrument direkt mit einer starken
Lichtquelle angestrahlt wird.
• Legen Sie keine Gegenstände auf der Klaviatur ab, da
ansonsten Fehlfunktionen auftreten können.
• Dieses Instrument besitzt Gummifüße. Da diese die
Oberäche z.B. eines Tisches verfärben können, legen
Sie unter die Gummifüße ein Tuch o.ä. Achten Sie aber
gleichzeitig darauf, dass das Instrument nicht verrutschen
kann.
Reinigung
• Verwenden Sie ein trockenes oder feuchtes, weiches Tuch.
Verwenden Sie klares Wasser oder ein mildes neutrales
Reinigungsmittel, und trocknen Sie die Oberäche immer
gründlich mit einem weichen Tuch. Drücken Sie das Tuch
nicht zu fest an.
Reparaturen und Datensicherung
• Beachten Sie, dass beim Reparieren des Instrumentes alle
User-Daten verloren gehen können. Wichtige Daten sollten
Sie daher vorher sichern. Obwohl Roland bei Reparaturen
versucht, mit User-Daten vorsichtig umzugehen, ist ein
Datenerhalt bei Reparaturen oft nicht möglich.
Zusätzliche Hinweise
• Sind interne oder extern gesicherte Daten verloren
gegangen oder extern gesicherte Daten beschädigt,
können diese nicht mehr wiederhergestellt werden. Roland
übernimmt keine Haftung für eventuelle Datenverluste, die
aufgrund einer solchen Situation auftreten können.
• Auch während Ihrer Arbeit sollten Sie Ihre Daten
regelmäßig sichern, damit bei einer Fehlbedienung bzw.
einer Fehlfunktion Ihres Instrumentes die Daten nicht
verloren sind.
• Beachten Sie, dass das Spielen auf der Tastatur
mechanische Spielgeräusche erzeugt. Stellen Sie sicher,
dass diese Spielgeräusche nicht zu laut sind.
• Achten Sie darauf, dass der Notenständer nicht beschädigt
wird.
• Die Lautstärke wird reduziert, wenn ein USB-Speicher am
USB MEMORY-Port angeschlossen ist.
Verwendung von USB-Speichern
• Beachten Sie die folgenden Hinweise zu USB FlashSpeichern, und beachten Sie die dem USB-Speicher
beigefügten Hinweise.
• Ziehen Sie den USB-Speicher nicht ab, während
von diesem Daten gelesen bzw. auf diesen Daten
geschrieben werden.
• Um einer Beschädigung durch statische Elektrizität
vorzubeugen, entladen Sie die statische Elektrizität
durch Berühren eines metallischen Gegenstandes,
bevor Sie den USB-Speicher berühren.
Hinweise zur Klaviatur
• Achten Sie darauf, dass Sie keine Schreibgeräte
(Kugelschreiber usw.) auf der Tastatur ablegen. Eventuelle
Spuren von Schreibtinte lassen sich ggf. nicht mehr
entfernen.
• Befestigen Sie keine Aufkleber auf der Tastatur, da sich
eventuelle Rückstände ggf. nicht mehr entfernen lassen
bzw. die Tasten verfärben können.
• Verwenden Sie für die Reinigung ein sanftes
Reinungsmittel, das nicht scheuert (z.B. Scheuermilch).
Drücken Sie das Reinigungstuch nur leicht auf die Tasten
und achten Sie darauf, dass die Tasten nicht zerkratzen.
Hinweise zu Copyright/Lizenzen/Warenzeichen
• Das Aufzeichnen, Vertreiben, Verkaufen, Verleihen,
Auühren oder Senden von geschütztem Audio- und
Videomaterial (vollständig oder in Ausschnitten) unterliegt
den gesetzlichen Copyright-Bestimmungen und ist ohne
Genehmigung des Copyright-Inhabers nicht gestattet.
• Verwenden Sie dieses Gerät nicht mit per Copyright
geschützten Audiodaten, wenn Sie keine Genehmigung
des Copyright-Inhabers besitzen. Roland übernimmt keine
Haftung für Forderungen, die sich auf Grund der Verletzung
der Copyright-Bestimmungen ergeben können. Wenn Sie
Copyright-geschütztes Material für Ihre Arbeit verwenden
möchten, z.B. für die Veröentlichung einer kommerziellen
CD, befragen Sie einen Copyright-Spezialisten oder lesen
Sie entsprechende Fach-Publikationen.
• Das Copyright der Inhalte dieses Gerätes (Wellenformen,
Styles, Patterns, Phrasen, Audio Loops und Bilddaten) liegt
bei der Roland Corporation.
• Als Besitzer dieses Geräte haben Sie eine Lizenz für die
Nutzung dieser Daten für Ihre eigene Arbeit erhalten.
• Es ist nicht gestattet, die o.g. Inhalte dieses Gerätes in
originaler oder veränderter Form kommerziell anzubieten
(Beispiel: Veröentlichen der Daten im Internet, Verbreiten
über Datenträger wie DVDs).
• Roland, GS und SuperNATURAL sind eingetragene
Warenzeichen bzw. Warenzeichen der Roland Corporation
in den USA und/oder anderen Ländern.
10
Page 23

Piano numérique
Sommaire
Guide d’utilisation facile (panneau avant) 2
Mise sous/hors tension . . . . . . . . . . . . . . . . . . . . . . . . . . . . . . . . . . . . . . . . . . 2
Réglage du volume . . . . . . . . . . . . . . . . . . . . . . . . . . . . . . . . . . . . . . . . . . . . . 2
Sélection d’un son . . . . . . . . . . . . . . . . . . . . . . . . . . . . . . . . . . . . . . . . . . . . . . 2
Superposition de deux sons (Dual) . . . . . . . . . . . . . . . . . . . . . . . . . . . . . .2
Lecture de diérents sons avec les mains gauche et droite (Split) . . 2
Modication de la réponse du clavier (Key Touch) . . . . . . . . . . . . . . . . 2
Utilisation du métronome . . . . . . . . . . . . . . . . . . . . . . . . . . . . . . . . . . . . . . . 3
Lecture de morceaux/rythmes (accompagnement automatique
pour les accords) . . . . . . . . . . . . . . . . . . . . . . . . . . . . . . . . . . . . . . . . . . . . . . . . 3
Enregistrement de votre jeu . . . . . . . . . . . . . . . . . . . . . . . . . . . . . . . . . . . . . 3
Fonctions avancées 6
Régler la brillance (Brilliance) . . . . . . . . . . . . . . . . . . . . . . . . . . . . . . . . . . . .6
Régler la réverbération (Ambience) . . . . . . . . . . . . . . . . . . . . . . . . . . . . . . 6
Diviser le clavier en deux (Twin Piano) . . . . . . . . . . . . . . . . . . . . . . . . . . . 6
Désactiver les boutons (Panel Lock) . . . . . . . . . . . . . . . . . . . . . . . . . . . . . .6
Mémoriser les réglages (Memory Backup). . . . . . . . . . . . . . . . . . . . . . . . 6
Rétablir les paramètres d’usine
Formater une clé USB . . . . . . . . . . . . . . . . . . . . . . . . . . . . . . . . . . . . . . . . . . . 6
Réglages divers de fonctions (mode Function) . . . . . . . . . . . . . . . . . . . 7
Faire correspondre la hauteur de son à celle d’autres
instruments (Master Tuning) . . . . . . . . . . . . . . . . . . . . . . . . . . . . . . . 7
Transposer le clavier (Transpose) . . . . . . . . . . . . . . . . . . . . . . . . . . 7
Avant de jouer 4
Installation du F-20 sur un support . . . . . . . . . . . . . . . . . . . . . . . . . . . . . .4
Connexions du panneau arrière . . . . . . . . . . . . . . . . . . . . . . . . . . . . . . . . .4
Fixation du pupitre . . . . . . . . . . . . . . . . . . . . . . . . . . . . . . . . . . . . . . . . . . . . . .5
Mise sous/hors tension . . . . . . . . . . . . . . . . . . . . . . . . . . . . . . . . . . . . . . . . . . 5
Mise hors tension automatique à l’expiration d’un délai (Auto O) . . 5
Écouter les morceaux de démo . . . . . . . . . . . . . . . . . . . . . . . . . . . . . . . . . . 5
Conception éco-énergétique et respectueuse de l’environnement
Le F-20 est mis automatiquement hors tension 30minutes après que
vous l’ayez joué ou utilisé pour la dernière fois.
* Si vous préférez désactiver la mise hors tension automatique,
modiez le réglage «Auto O» (p. 5).
À propos de la fonction LAN sans l 8
Qu’est-ce que la fonction LAN sans l? . . . . . . . . . . . . . . . . . . . . . . . . . . 8
Méthode de connexion de base (connexion par WPS) . . . . . . . . . . . .8
Connexion en mode Ad-Hoc . . . . . . . . . . . . . . . . . . . . . . . . . . . . . .8
Guide de dépannage 9
(Factory Reset). . . . . . . . . . . . . . . . . . . .6
Deutsch Français Italiano Español Português NederlandsEnglish
Spécications principales
Clavier 88touches (clavier «Ivory Feel-G» avec échappement)
Alimentation
électrique
Consommation
Dimensions 1.282 (L) x 296 (P) x 132 (H) mm
Poids 20 kg
Avant d’utiliser cet appareil, lisez attentivement les sections intitulées «CONSIGNES DE SÉCURITÉ» et «REMARQUES IMPORTANTES» (livret
«CONSIGNES DE SÉCURITÉ» et Mode d’emploi p. 10). Ces sections fournissent d’importantes informations relatives au bon fonctionnement de l’appareil.
En outre, pour être sûr de bien maîtriser chacune des fonctionnalités de votre nouvel appareil, il est nécessaire de lire les «CONSIGNES DE SÉCURITÉ»
et le Mode d’emploi dans leur intégralité. Vous devez conserver ce manuel à portée de main an de pouvoir vous y reporter si besoin.
Copyright © 2013 ROLAND CORPORATION
Tous droits réservés. La reproduction intégrale ou partielle de cette publication est interdite sous quelque forme que ce soit sans l’autorisation écrite
de ROLAND CORPORATION.
Adaptateur secteur
9 W (2 W–18 W)
9 W : Consommation électrique moyenne en cas
d’utilisation du piano avec un volume en
position centrale
2 W : Consommation électrique immédiatement
après la mise sous tension ; sans jeu au piano
18 W : Consommation électrique nominale
Accessoires
Options
(vendu séparément)
* Dans l’intérêt de l’amélioration du produit, les caractéristiques,
l’aspect et/ou le contenu de cet appareil sont sujets à des
modications sans préavis.
Mode d’emploi, livret «CONSIGNES DE SÉCURITÉ»,
pupitre, adaptateur secteur, cordon d’alimentation
(pour connecter l’adaptateur secteur), pédale forte
(détection continue)
Support dédié (KSC-68), support clavier (KS-18Z, KS-12),
pédale forte (DP-10), clé USB (*1), adaptateur USB sans
l (WNA1100-RL) (*1)
*1 : Utilisez la clé USB et l’adaptateur USB sans l vendus
par Roland. Nous ne pouvons garantir le bon
fonctionnement en cas d’utilisation d’autres produits.
Page 24

Guide d’utilisation facile (panneau avant)
Sélection d’un son
Maintenez enfoncé le bouton TONE et appuyez sur l’une des touches suivantes ; le son change.
Sélection d’un Piano
Grand Piano 1
1
Maintenir enfoncé
2
Sélection d’autres sons
Strings 2
Strings 1
1
Maintenir enfoncé
2
Grand Piano 2
Grand Piano 3
Harp
Harpsichord 1
Ragtime Piano
Jazz Organ 2
Jazz Organ 1
Harpsichord 2
Church Organ 2
Church Organ 1
Accordion
Jazz Scat
Choir 1
Choir 3
Choir 2
Sélection d’un E. Piano
Vibraphone
1
Maintenir enfoncé
E. Piano 1
2
E. Piano 2
E. Piano 3
Synth Bell
Celesta
Clav.
Superposition de deux sons (Dual)
En appuyant sur deux boutons TONE
simultanément, vous pouvez superposer deux
sons.
Maintenir enfoncé
Équilibre de mélange
Vous pouvez ajuster l’équilibre de mélange de deux sons (cinq étapes, 0 = valeur
par défaut).
Acoustic Bass
A.Bass + Cymbal
Fingered Bass
Thum Voice
Bouton TONE
allumé
1
Maintenir enfoncé
Équilibre de mélange
pour double
Équilibre de mélange
pour séparation
00
+ ––
+
2
Decay Choir
Nylon-str.Gt
Synth Pad
Steel-str.Gt
Decay Strings
Decay Choir Pad
Mise sous/hors tension
(p. 5)
Réglage du volume
Réglez le volume à l’aide de la commande [VOLUME].
Lecture de diérents sons avec les mains gauche et droite (Split)
Activez le bouton [SPLIT]. Le clavier est divisé en sections gauche et droite, ce qui vous
permet de jouer un son diérent dans chaque section.
Si vous maintenez le bouton [SPLIT] enfoncé, le bouton TONE aecté à la section
gauche s’allume.
Permutation de sons (Split)
Permutation du son
gauche
Permutation du son
droit
Tout en appuyant sur le bouton [SPLIT], maintenez enfoncé
l’un des boutons TONE et appuyez sur une touche.
Procédez comme dans la section «Sélection d’un son»
ci-dessus.
Modication du point de division du clavier (Split Point)
Maintenez le bouton [SPLIT] enfoncé et appuyez sur une touche (par défaut : F 3).
1
Modication de la réponse du clavier (Key Touch)
Si vous activez le bouton [KEY TOUCH], vous
pouvez modier la sensibilité du clavier (toucher
du clavier).
Lorsque le bouton [KEY TOUCH] est désactivé,
la touche «MEDIUM» (équivalent à un piano
acoustique) est sélectionnée.
LIGHT
LIGHT
HEAVY
FIX
HEAVY
FIX
Vous pouvez jouer fortissimo () en exerçant moins de force que pour le réglage
«MEDIUM» sur les touches ; le clavier semble plus léger. Ce réglage facilite le
jeu, notamment pour les enfants.
Il faut exercer une force plus importante qu’avec le réglage «MEDIUM» pour
jouer fortissimo (); le clavier semble plus dur. Un toucher dynamique rend
votre jeu plus expressif.
Le volume des notes ne change pas, quelle que soit la force exercée sur les
touches.
Maintenir enfoncé
B1 B6
2
1
Maintenir enfoncé
2
2
Page 25

Guide d’utilisation facile (panneau avant)
Utilisation du métronome
Activez le bouton [METRONOME] ; le métronome émet un son. Utilisez les boutons [SLOW]/[FAST] pour régler le tempo.
Modication du nombre de battements
Vous pouvez choisir entre 0 (battements faibles uniquement), 2 (2 battements),
3 (3 battements), 4 (4 battements), 5 (5 battements) ou 6 (6 battements).
52
0 3 4 6
1
Maintenir enfoncé
Vous pouvez également modier le nombre de battements en maintenant enfoncé
le bouton [METRONOME] et en utilisant les boutons [SLOW]/[FAST].
2
Spécication d’un tempo numérique
Vous pouvez également spécier une valeur numérique pour le tempo (20–250)
(valeur par défaut : 108).
1
Maintenir enfoncé
Exemple : Pour entrer 120, maintenez le bouton [METRONOME] enfoncé et
Lecture de morceaux/rythmes (accompagnement automatique pour les accords)
Pour lire ou arrêter un morceau, appuyez sur le bouton [SONG]. Pour lire ou arrêter le rythme
(accompagnement automatique basé sur les accords que vous jouez), appuyez sur le bouton [RHYTHM].
Vous pouvez sélectionner un morceau interne ou un rythme en maintenant le bouton [SONG] ou
[RHYTHM] enfoncé et en appuyant sur l’une des touches suivantes.
RÉFÉRENCE
Sélection d’un morceau interne
1
Maintenir enfoncé
Pour plus d’informations sur les noms des morceaux et des rythmes, reportez-vous
à la «Liste des morceaux internes» et la «Liste des rythmes» à la n de ce manuel.
Appuyez sur la touche à l’extrémité droite.
Tous les morceaux sont lus à la suite.
2
Sélection d’un rythme
1
Maintenir enfoncé
1 3 5 8
0 2 4 6 7 9
2
appuyez sur les touches dans cet ordre : 1
2 0 ENTER.
Flux de rythme
Intro
[RHYTHM] activé [RHYTHM] désactivé
Accompagnement
2
ENTER
Deutsch Français Italiano Español Português NederlandsEnglish
Final
Enregistrement de votre jeu
Voici comment enregistrer un morceau.
* Avant de commencer, sélectionnez le son à enregistrer.
1. Appuyez sur les boutons [SONG] et [RHYTHM] simultanément.
* Pour annuler l’enregistrement, appuyez à nouveau une fois sur les boutons
[SONG] et [RHYTHM] simultanément.
2. Jouez au clavier pour lancer l’enregistrement.
3. Appuyez sur le bouton [SONG] pour arrêter l’enregistrement.
Si vous souhaitez enregistrer avec le métronome
* Activez le métronome et dénissez le nombre de battements et le tempo avant
de lancer l’enregistrement.
Si vous appuyez sur le bouton [SONG] à l’étape 2, l’enregistrement démarre après
un décompte de deux mesures.
Enregistrement avec un rythme
* Sélectionnez un rythme avant d’enregistrer.
Si vous appuyez sur le bouton [RHYTHM] à l’étape 2, l’enregistrement démarre
après un décompte de deux mesures.
Équilibre de mélange
Vous pouvez ajuster l’équilibre de mélange entre le morceau/rythme et le clavier (cinq
niveaux, 0 = valeur par défaut).
+0–
1
Tout en
maintenant l’un
des boutons
2
Si vous souhaitez recommencer l’enregistrement
Redémarrez l’enregistrement à partir de l’étape 1.
Sauvegarde du morceau enregistré sur une clé USB
* Connectez votre clé USB avant de continuer.
Maintenez le bouton [KEY TOUCH] enfoncé et appuyez sur le bouton
[SONG]. Lorsque tous les témoins DEL des boutons sont allumés, les
données sont enregistrées (jusqu’à 99 morceaux).
Lecture d’un morceau à partir d’une clé USB
Maintenez le bouton [SONG] enfoncé et appuyez sur la touche «F 3».
Vous pouvez utiliser les deux touches adjacentes à la touche «F
sélectionner un morceau sur la clé USB.
F
3
Lecture
Préc.
Suiv.
3» pour
Lecture du morceau enregistré
1
Maintenir enfoncé
E3
2
1
Maintenir enfoncé
* Vous pouvez également copier un chier WAV ou MIDI depuis votre ordinateur
sur une clé USB, puis le lire sur le F-20. Pour plus d’informations sur les formats
compatibles, reportez-vous à la n de ce manuel.
2
3
Page 26

Avant de jouer
Installation du F-20 sur un support
Si vous souhaitez placer le F-20 sur un support, utilisez le modèle Roland KSC-68 (voir le Mode d’emploi du KSC-68), KS-18Z ou KS-12.
* Faites attention à ne pas pincer vos doigts lorsque vous installez le support.
KS-18Z
Alignez l’avant du F-20 avec
l’avant du support.
Réglez le support de
manière à ce que la
hauteur ne dépasse
pas 1 mètre (réglez
le support sur un
niveau ne dépassant
pas le second niveau
à partir du bas).
Alignez les pieds du support
avec les vis du panneau arrière.
Connexions du panneau arrière
Port USB MEMORY
Connectez ici une clé USB.
• Si une clé USB est connectée, vous pouvez lire
ou enregistrer des morceaux.
• Si un adaptateur USB sans l (WNA1100-RL ;
vendu séparément) est connecté, vous pouvez
utiliser des applications iOS compatibles avec
le sans l (p. 8).
• Le volume des haut-parleurs du F-20 sera réduit
si vous connectez un dispositif USB au port USB
MEMORY.
* N’insérez et ne retirez jamais une clé USB
pendant que l’appareil est sous tension. Cela
pourrait endommager les données enregistrées
sur l’appareil ou sur la clé USB.
* Avec précaution, insérez à fond
la clé USB jusqu’à ce qu’elle
soit bien en place.
Prise PEDAL
Connectez la pédale
forte fournie.
Prise OUTPUT
Si vous branchez cette prise
à des haut-parleurs ampliés,
ils produiront le son de cet
appareil.
KS-12
Réglez la largeur du support de
manière à ce que les pieds en
caoutchouc du F-20 viennent
se placer de part et d’autre du
support.
Prise PHONES
Connectez le casque (vendu séparément).
* Si vous n’utilisez qu’un casque, branchez-
Si deux personnes
utilisent le casque
(vendu séparément),
connectez le casque à
la prise PHONES et à la
prise OUTPUT.
Côté du clavier
Vue de dessus
le à la prise PHONES.
Pour éviter un
dysfonctionnement ou une panne
de l’équipement, veillez à toujours
baisser le volume et à couper
l’alimentation de tous les appareils
avant de les connecter.
Port USB COMPUTER
Si vous utilisez un câble USB du commerce pour connecter le port USB
COMPUTER du F-20 au port USB de votre ordinateur, vous pourrez eectuer les
opérations suivantes.
• Le F-20 pourra jouer les données SMF lues par un logiciel compatible MIDI.
• Les données MIDI peuvent être transférées entre le F-20 et votre séquenceur, ce
qui vous ouvre toute une gamme de possibilités en matière de production et
d’édition musicales.
4
Installez l’adaptateur secteur de sorte que le
témoin (voir illustration) soit orienté vers le haut et
le texte vers le bas.
Le témoin s’allume lorsque vous branchez
l’adaptateur secteur à une prise secteur.
Prise secteur
Cordon d’alimentation
Prise DC IN
Connectez ici l’adaptateur secteur fourni.
Page 27

Avant de jouer
Fixation du pupitre
Voici comment xer le pupitre.
1. Desserrez les vis de xation du pupitre qui se trouvent à
l’arrière du piano (deux emplacements).
2. Placez le pupitre entre les vis et le châssis.
3. Tout en tenant le pupitre d’une main, resserrez les vis
(deux emplacements) pour xer solidement le pupitre.
Mise sous/hors tension
Une fois que l’équipement est correctement connecté (p. 4), suivez la
procédure de mise sous tension décrite ci-après. Si vous n’allumez
pas l’équipement dans le bon ordre, vous risquez de provoquer des
dysfonctionnements ou une panne de l’équipement.
Mise sous tension
1. Réglez la commande [VOLUME] au minimum (à fond à
gauche).
2. Appuyez sur le bouton [ ] (marche/arrêt) pour mettre
l’appareil sous tension.
* Cet appareil est équipé d’un circuit de protection. Un bref délai
(quelques secondes) après la mise hors tension de l’appareil est
nécessaire avant que ce dernier fonctionne correctement.
3. Réglez le volume à l’aide de la commande [VOLUME].
* Avant la mise sous/hors tension, veillez toujours à régler le
volume au minimum. Même si le volume est réglé au minimum,
il se peut que vous entendiez du son en mettant l’appareil sous/
hors tension. Ce phénomène est tout à fait normal et n’indique
aucunement un dysfonctionnement.
Mise hors tension
1. Réglez la commande [VOLUME] au minimum (à fond à
gauche).
Deutsch Français Italiano Español Português NederlandsEnglish
* Lorsque vous xez le pupitre, maintenez-le fermement de la
main pour éviter qu’il ne tombe. Faites attention à ne pas vous
coincer la main.
* N’appuyez pas sur le pupitre de façon excessive une fois qu’il est
installé.
* Lorsque vous xez le pupitre, utilisez les vis de xation du
pupitre qui étaient attachées au piano.
Pour détacher le pupitre, tenez-le d’une main pendant que vous
desserrez les vis. Retirez le pupitre, puis resserrez fermement les vis.
Précautions lors de l’installation de l’appareil sur un support
Veuillez vous conformer aux instructions fournies dans
le Mode d’emploi lorsque vous installez l’appareil sur un
support (p. 4).
S’il n’est pas correctement installé, il peut en résulter une
instabilité susceptible d’entraîner la chute de l’appareil ou
le basculement du support et de provoquer des blessures.
Placez l’instrument à 30 cm du mur
2. Maintenez le bouton [ ] (marche/arrêt) enfoncé pendant
une seconde ou plus ; l’appareil s’éteint.
Mise hors tension automatique à
l’expiration d’un délai (Auto O)
L’appareil s’éteindra automatiquement après une période
prédéterminée suivant la dernière performance musicale ou la
dernière utilisation des boutons ou commandes (fonction Auto
O).
Si vous ne souhaitez pas que l’appareil s’éteigne
automatiquement, désactivez la fonction Auto O.
(Valeur par défaut : 30 min.)
* Pour restaurer l’alimentation, mettez à nouveau l’appareil sous
tension.
1 2
Maintenir
enfoncé
* Ce paramètre est conservé même après que l’instrument est mis
hors tension.
30 min.
10 min.
240 min.
DÉSACTIVÉ
3
Les haut-parleurs du F-20 sont montés
sur son panneau arrière. Pour cette raison,
il se peut que vous ayez des dicultés à
entendre le son émis par les haut-parleurs
si le panneau arrière est placé directement
contre un mur.
Veillez à éviter toute chute de l’appareil.
Pour empêcher le F-20 de basculer,
n’appliquez pas de force excessive
dessus, ne vous asseyez jamais dessus
et ne vous appuyez jamais dessus.
30 cm
Écouter les morceaux de démo
* Tous droits
réservés. Tout
usage non autorisé
1
Tout en maintenant l’un des boutons
Trois morceaux de démo sont proposés.
Appuyez sur le bouton [SONG] pour arrêter
la lecture.
2
de ce matériel à
des ns autres que
personnelles et
privées est interdit
par les lois en
vigueur.
5
Page 28

Fonctions avancées
Régler la brillance (Brilliance)
Pour régler la brillance du son (3 niveaux), procédez comme suit.
C5 C6
1
2
Maintenir
enfoncé
DOUX
NORMAL
LUMINEUX
3
Régler la réverbération (Ambience)
Vous pouvez régler la réverbération du son, et avoir l’impression
que vous jouez dans une salle de concert (5 niveaux).
C5 C6
PAR DÉFAUT
1 2
Maintenir
enfoncé
+–
3
Diviser le clavier en deux (Twin Piano)
Vous pouvez diviser le clavier en zones gauche et droite permettant à
deux personnes de jouer dans la même tessiture. Cela signie que vous
pouvez utiliser le clavier comme s’il s’agissait de deux pianos distincts.
C5 C6
1 2
Maintenir
enfoncé
Le clavier est divisé en deux zones (gauche et droite) dotées
chacune d’un do «central» en leur milieu.
Vous pouvez choisir les réglages suivants pour dénir la façon dont
le son est produit.
Valeur Explication
PAIR
INDIVIDUAL
Le son est audible à droite lorsque vous jouez sur la droite du
clavier et à gauche lorsque vous jouez sur la gauche.
Les notes jouées dans la partie droite du clavier sont restituées
par le haut-parleur droit, tandis que les notes jouées dans la
partie gauche sont restituées par le haut-parleur gauche.
3
DÉSACTIVÉ
PAIR
Mémoriser les réglages (Memory Backup)
Lorsque l’instrument est mis hors tension, les valeurs par défaut des
réglages sont rétablies. Vous disposez toutefois d’une fonction qui
mémorise les réglages suivants même après la mise hors tension.
Cette fonction s’appelle «Memory Backup».
Réglages mémorisés par la fonction
Memory Backup
Toucher du clavier p. 2
Brillance p. 6
Ambiance p. 6
Diapason p. 7
Page
1. Maintenez enfoncé le bouton [KEY TOUCH] et appuyez sur
le bouton [RHYTHM].
Le bouton [OTHER] et le bouton [SPLIT] clignotent.
Pour annuler, appuyez sur le bouton [OTHER].
2. Pour mémoriser les réglages, appuyez sur le bouton [SPLIT].
Lorsque tous les témoins DEL sont allumés, l’opération est terminée.
Rétablir les paramètres d’usine
Vous pouvez rétablir les réglages d’usine des paramètres modiés
en mode Function (p. 7).
REMARQUE
Lorsque vous rétablissez les paramètres d’usine, tous les
paramètres sont initialisés et le morceau que vous avez
enregistré dans la mémoire interne est eacé.
(Factory Reset)
1. Tout en maintenant enfoncée la touche [KEY TOUCH],
INDIVIDUAL
mettez l’alimentation sous tension. Conservez la touche
[KEY TOUCH] enfoncée pendant au moins six secondes.
Le bouton [OTHER] et le bouton [SPLIT] clignotent.
Pour annuler, appuyez sur le bouton [OTHER].
2. Pour exécuter la fonction Factory Reset, appuyez sur le
bouton [SPLIT].
Lorsque tous les témoins DEL sont allumés, l’opération est terminée.
3. Mettez l’appareil hors tension puis à nouveau sous tension.
Formater une clé USB
Voici comment initialiser (formater) tout le contenu
enregistré sur une clé USB.
* Les sections gauche et droite utilisent le même son (Piano). La
fonction Twin Piano est annulée lorsque vous appuyez sur l’un
des boutons TONE.
* La pédale forte aecte uniquement la section droite du clavier.
Désactiver les boutons (Panel Lock)
Tout en maintenant enfoncée la touche [PIANO], mettez
l’alimentation sous tension. Conservez la touche [PIANO] enfoncée
pendant au moins six secondes. Le verrouillage du panneau sera
réglé et les touches autres que la touche [
désactivées. Ceci permet d’éviter les modications accidentelles des
sons ou des réglages pouvant survenir en appuyant sur un bouton.
La fonction de désactivation des boutons est annulée dès que vous
mettez l’instrument hors tension.
6
] (POWER) seront
REMARQUE
• Le formatage eace toutes les données qui ont été
enregistrées sur la clé USB.
• Avant d’utiliser une nouvelle clé USB avec le F-20 pour la
première fois, vous devez formater la clé USB.
1. Connectez la clé USB que vous souhaitez formater au port
USB MEMORY.
2. Tout en maintenant enfoncée la touche [SONG], mettez
l’alimentation sous tension. Conservez la touche [PIANO]
enfoncée pendant au moins six secondes.
Le bouton [OTHER] et le bouton [SPLIT] clignotent.
Pour annuler, appuyez sur le bouton [OTHER].
3. Pour exécuter le format, appuyez sur le bouton [SPLIT].
Lorsque tous les témoins DEL sont allumés, l’opération est terminée.
4. Mettez l’appareil hors tension puis à nouveau sous
tension.
Page 29

Réglages divers de fonctions (mode Function)
Pour eectuer des réglages en mode Function, appuyez sur le bouton [KEY TOUCH] et maintenez le bouton [PIANO] enfoncé, et
1 2
Maintenir enfoncé
30 min.
2
440,0 Hz
INDIVIDUAL
PAIR
DÉSACTIVÉ
DÉSACTIVÉ
C8
C7
C6
appuyez sur l’une des touches gurant sur l’illustration.
3
240 min.
Fonction Auto O (p. 5)
10 min.
1
Mode USB Memory
+
Diapason
–
Twin Piano (p. 6)
Fonctions avancées
Modier le réglage de la clé USB (mode USB Memory)
Dans certains cas, lorsque la clé USB est connectée au port USB MEMORY, le chargement des données peut
demander davantage de temps ou échouer. Dans ce cas, vous pourrez peut-être résoudre le problème en
modiant le réglage du mode USB MEMORY sur «1». À sa sortie d’usine, le réglage de l’appareil est déni
sur «2». Vous n’avez normalement pas à eectuer ce réglage.
* Après avoir modié ce réglage, vous devez mettre l’appareil hors tension puis à nouveau sous tension.
Le nouveau réglage s’applique lorsque vous rallumez l’appareil.
Faire correspondre la hauteur de son à celle d’autres instruments (Master Tuning)
Lorsque vous jouez avec d’autres instruments ou dans d’autres cas similaires, vous pouvez accorder la
hauteur de son de référence en fonction d’un autre instrument.
Le diapason est généralement déterminé par la hauteur de son de la note jouée lorsque vous appuyez sur
la touche correspondant au La central. Pour obtenir un son d’ensemble harmonieux avec un ou plusieurs
instruments, il faut veiller à ce que la hauteur de son de référence de chaque instrument soit accordée
en fonction de celle des autres instruments. L’accordage de tous les instruments sur une hauteur de son
standard est appelée «diapason ».
Vous devez accorder les instruments dans la plage de 415,3 Hz–440,0 Hz (valeur par défaut)–466,2 Hz (par
pas de 0,1 Hz).
Deutsch Français Italiano Español Português NederlandsEnglish
C5
C4
Ad-Hoc DÉSACTIVÉ
C3
C2
C1
NORMAL
PAR DÉFAUT
Ad-Hoc ACTIVÉ
MVC
DÉSACTIVÉ
LUMINEUX
DOUX
+5
+4
+3
+2
+1
-1
-2
-3
-4
-5
-6
WPS
V-LINK
DÉSACTIVÉ
16
15
14
13
12
11
10
9
7
4
2
ACTIVÉ
Brillance (p. 6)
+
Ambiance (p. 6)
–
0
Transposition
Réseau LAN sans l (p. 8)
Mode Visual Control
Canal de transmission
8
MIDI
6
5
3
1
Local Control
Transposer le clavier (Transpose)
Vous pouvez utiliser la fonction Transpose
(Transposition) an de transposer le clavier en
pas d’un demi-ton.
Par exemple, si un morceau est en MI majeur,
et que vous souhaitez le jouer en DO majeur,
dénissez la fonction Transpose sur «+4».
Si vous jouez Do Mi Sol le son joué correspondra à Mi Sol Si
Contrôler l’équipement vidéo (mode Visual Control)
La fonction Visual Control vous permet de contrôler des images associées à votre musique.
Si vous avez déni le mode Visual Control sur «MVC» (MIDI Visual Control, p. 9) ou «V-LINK», vous pouvez
contrôler les images produites par le dispositif Visual Control connecté à l’instrument par USB MIDI en
appuyant sur les touches de l’instrument.
Tableau des fonctions Visual Control
Appuyer sur les 12touches les plus basses de l’instrument (A0 1) transmet les messages MIDI suivants.
Fonction Visual Control Message MIDI transmis Fonctionnement de cet instrument
Permet de changer
d’image
CC 0 (sélection de banque) : 0–4 Jouer les touches noires
Changement de programme : 1-7 Jouer les touches blanches
Réglages du canal de transmission MIDI
Ce réglage dénit la canal MIDI sur lequel l’instrument transmet.
La norme MIDI utilise seize «canaux MIDI», qui sont numérotés de 1 à 16. Si vous branchez des appareils
MIDI et attribuez un canal MIDI à chaque dispositif, vous pouvez jouer ou sélectionner des sons sur ces
dispositifs. L’instrument réceptionnera l’ensemble des seize canaux (1 à 16).
Éviter les notes doubles en cas d’utilisation avec un
synthétiseur
Si un synthétiseur est connecté à USB MIDI,
désactivez cet élément.
Comme la fonction Thru de votre synthétiseur
est généralement activée, les notes jouées sur
le clavier peuvent être produites en double
ou coupées. Pour l’éviter, vous pouvez activer
le réglage «Local O» an que le clavier et le
générateur de sons interne soient déconnectés.
(Local Control)
Local Control
Générateur de sons
Entrée
USB Midi
Sortie
USB MIDI
Synthétiseur
Ordinateur
7
Page 30

À propos de la fonction LAN sans l
Une fois la connexion établie, le témoin DEL de l’adaptateur USB
Qu’est-ce que la fonction LAN sans l?
En insérant l’adaptateur USB sans l (WNA1100-RL ; vendu
séparément) dans le port USB MEMORY du F-20, vous pourrez
utiliser les applications compatibles avec le sans l (les applications
iOS telles que «Piano Partner» ou «Air Performer»).
iPhone etc.
Point d’accès du réseau LAN sans l
(par exemple routeur LAN sans l)
F-20
Adaptateur USB sans l
(vendu séparément :
WNA1100-RL)
sans l s’allume.
Vous pouvez utiliser la connexion sans l depuis une application
iOS telle que «Air Performer». Choisissez «F-20» dans l’écran de
sélection de l’instrument de votre application iOS.
REMARQUE
* Le dispositif (par exemple l’iPhone) exécutant l’application doit
être connecté au même réseau.
MÉMO
• Les données de connexion sont mémorisées lorsque vous
eectuez la procédure WPS. Le dispositif se connecte
automatiquement au réseau sans l la fois suivante.
• Toutes les données de connexion sont eacées si vous
rétablissez les réglages d’usine.
Réseau LAN sans l Réseau LAN sans l
Éléments nécessaires pour utiliser la fonction LAN sans l
Adaptateur USB sans l (vendu séparément : WNA1100-RL)
Point d’accès du réseau LAN sans l (par exemple routeur LAN sans l) *1 *2
iPhone, iPad ou iPod touch etc.
*1 Le point d’accès du réseau LAN sans l que vous utilisez doit
prendre en charge WPS. Si vous ne pouvez pas vous connecter
au point d’accès du réseau LAN sans l, essayez de vous
connecter à l’aide du mode Ad-Hoc.
*2 La possibilité de se connecter avec tous types de points d’accès
de réseau LAN sans l n’est pas garantie.
Méthode de connexion de base (connexion par WPS)
Lorsque vous connectez pour la première fois le F-20 à un nouveau
réseau sans l, vous devez eectuer la procédure suivante (WPS)
pour rejoindre le réseau sans l.
Cette procédure n’est nécessaire que la première fois. (Une fois que
vous avez rejoint le réseau, cette procédure n’est plus nécessaire.)
Qu’est-ce que WPS ?
Cette norme permet de faciliter la conguration des paramètres de
sécurité lors de la connexion à un point d’accès de réseau LAN sans
l. Nous vous recommandons d’utiliser WPS lors de la connexion à un
point d’accès de réseau LAN sans l.
1. Insérez l’adaptateur USB sans l (WNA1100-RL ; vendu
séparément) dans le port USB MEMORY du F-20.
2. Maintenez enfoncé le bouton de l’adaptateur
USB sans l pendant trois secondes.
Le témoin DEL de l’adaptateur USB sans l clignote.
REMARQUE
* Si vous appliquez une force excessive sur l’adaptateur
USB lorsque vous appuyez sur le bouton, vous risquez de
l’endommager. Veuillez procéder avec précaution.
MÉMO
Vous pouvez également eectuer la procédure WPS en
appuyant sur WPS dans «Réglages divers de fonctions (mode
Function)» (p. 7) plutôt que d’appuyer sur le bouton de
l’adaptateur USB sans l.
3. Eectuez l’opération WPS sur le point d’accès de votre
réseau LAN sans l (par exemple, appuyez sur le bouton
WPS du point d’accès de votre réseau LAN sans l).
Pour plus d’informations sur le fonctionnement WPS du point
d’accès de votre réseau LAN sans l, reportez-vous au mode
d’emploi du point d’accès.
8
Témoin DEL de l’adaptateur USB sans l
Témoin DEL Explication
Allumé L’adaptateur est connecté à un réseau.
Éteint L’adaptateur n’est pas connecté à un réseau.
Clignote L’adaptateur recherche un réseau.
Connexion en mode Ad-Hoc
Voici comment vous connecter en mode Ad-Hoc.
Qu’est-ce que le mode Ad-Hoc ?
Le mode Ad-Hoc vous permet de connecter directement le F-20 à
un iPhone ou à un dispositif sans l sans utiliser un point d’accès de
réseau LAN sans l. Il ore une manière pratique d’utiliser le F-20 avec
un iPhone ou un autre dispositif sans l si vous vous trouvez dans
un emplacement où le point d’accès du réseau LAN sans l que vous
utilisez habituellement n’est pas disponible, par exemple lorsque vous
n’êtes pas chez vous.
Limitations
L’iPod touch ou autre dispositif sans l connecté en mode
Ad-Hoc ne pourra pas communiquer avec Internet ou avec
un autre dispositif sans l. Par contre, un iPhone ou un autre
dispositif sans l doté d’une capacité cellulaire pourra se
connecter à Internet via la connexion cellulaire.
Gardez à l’esprit que si vous utilisez une connexion cellulaire
pour la connectivité Internet, vous risquez de supporter des
coûts selon votre plan de tarication.
1. Dans «Réglages divers de fonctions (mode Function)»
(p. 7), appuyez sur «Ad-Hoc ACTIVÉ».
2. Sur l’iPhone ou autre dispositif sans l que vous souhaitez
connecter, sélectionnez «F-20» pour établir la connexion.
(Par exemple, sur un iPhone, choisissez [Paramètres]
[Wi-Fi]
Un écran de saisie de mot de passe apparaît. Entrez
«f20ak».)
SSID Ad-Hoc F-20
Mot de passe f20ak
Pour savoir connecter à un réseau LAN sans l depuis un iPhone ou
autre dispositif, reportez-vous au mode d’emploi de ce dispositif.
3. Lorsque vous souhaitez arrêter la connexion au mode
Ad-Hoc, rétablissez les valeurs précédentes des
paramètres de l’iPhone dans [Paramètres]
[Choisir un réseau].
[Choisir un réseau] pour sélectionner «F-20».
[Wi-Fi]
Page 31

Guide de dépannage
Problème Cause/Remède
Tous les témoins
DEL autres que le
bouton [
(marche/arrêt)
clignotent
Les haut-parleurs
produisent du son
bien que le casque
soit connecté
Même si vous
utilisez un casque
et que le son est
mis en sourdine,
vous entendez un
bruit sourd lorsque
vous jouez au
clavier
L’instrument se
met hors tension
automatiquement
Impossible de
mettre l’instrument
sous tension
La pédale ne
fonctionne pas ou
est «bloquée»
Pas de son/
L’instrument ne
produit aucun son
lorsque vous lisez
un morceau
La hauteur de
son du clavier ou
du morceau est
incorrecte
Les notes résonnent
deux fois (elle sont
doublées) lorsque
vous jouez sur le
clavier
Le son des notes les
plus hautes change
subitement à partir
d’une certaine
touche
Un signal très haut
est audible
Le volume est
réduit
Un ux de courant excessif s’est produit au niveau du port USB MEMORY.
]
Vériez s’il y a un problème avec la clé USB. Ensuite, mettez l’appareil hors
tension puis à nouveau sous tension.
Le casque est-il connecté à la prise OUTPUT au lieu de la prise PHONES
(p. 4) ?
Cet instrument utilise un clavier toucher marteau an de simuler le
toucher d’un piano acoustique de façon aussi réaliste que possible. C’est
pourquoi vous entendez le bruit sourd des marteaux lorsque vous jouez
au clavier, comme si vous jouiez sur un piano acoustique. Étant donné que
cet instrument vous permet d’en régler le volume, vous remarquerez sans
doute le son des marteaux dans certains cas, mais ceci n’indique en rien
un dysfonctionnement. Si vous êtes gêné par les vibrations transmises
au sol ou aux murs, vous parviendrez peut-être à réduire les vibrations
en éloignant le piano du mur ou en le posant sur un tapis anti-vibrations
destiné aux pianos disponibles dans le commerce.
L’appareil est mis automatiquement hors tension 30minutes après que
vous l’ayez joué ou utilisé pour la dernière fois (réglage par défaut).
Si vous préférez désactiver la mise hors tension automatique, désactivez le
réglage «Auto O» (p. 5).
L’adaptateur secteur est-il correctement connecté (p. 4) ?
Le pédale est-elle correctement branchée?
Enfoncez fermement le cordon dans la prise PEDAL (p. 4).
Avez-vous baissé le volume de l’appareil ?
Avez-vous branché un casque?
Les haut-parleurs ne produisent aucun son si un casque est branché à la
prise PHONES (p. 4).
Avez-vous eectué des réglages de transposition (p. 7)?
Le diapason est-il correctement réglé (p. 7)?
Les notes d’un piano sont accordées à l’aide d’une méthode unique
(accordage élargi), qui donne une hauteur de son légèrement plus élevée
aux notes de gamme supérieure et une hauteur de son légèrement plus
basse aux notes de gamme inférieure. Pour cette raison, la hauteur de
son perçue peut paraître incorrecte, mais il s’agit du son qu’un piano
acoustique est censé produire.
L’instrument est-il en mode de superposition (p. 2) ?
Sur un piano acoustique, les notes de l’octave et demi la plus haute sont
maintenues, indépendamment de la pédale forte. Ces notes ont aussi un
timbre légèrement diérent.
L’instrument simule dèlement cette caractéristique d’un piano
acoustique. Sur cet instrument, la plage de notes qui n’est pas aectée par
la pédale forte change en fonction du réglage de transposition.
Si vous l’entendez avec le casque:
Les sons de piano aigus et brillants contiennent des hautes
fréquences pouvant évoquer une sonnerie métallique. Ce phénomène
reproduit dèlement les caractéristiques d’un piano et n’est pas un
dysfonctionnement.
Ce son de sonnerie est accentué par une forte réverbération. Vous pouvez
donc l’atténuer en diminuant la réverbération.
Si vous ne l’entendez pas avec le casque:
Elle doit être due à d’autres causes (comme des résonances au sein de
l’instrument). Contactez votre revendeur ou le centre de maintenance
Roland le plus proche.
Le volume sera réduit si vous connectez un dispositif USB au port USB
MEMORY. Ceci n’indique pas un dysfonctionnement.
Problème Cause/Remède
Si vous réglez le volume au maximum, il peut y avoir de la distorsion selon
la façon dont vous jouez. Dans ce cas, diminuez le volume.
Si vous ne l’entendez pas avec le casque:
Quand vous jouez à volume élevé, cela peut faire résonner des enceintes
ou d’autres objets à proximité de l’instrument. Les lampes uorescentes ou
des portes vitrées peuvent également entrer en résonance. Ce phénomène
Les notes
sonnent faux ou
bourdonnent
L’appareil s’éteint
est d’autant plus probable que les notes sont graves et le volume élevé.
Pour diminuer ce type de résonance, prenez les mesures suivantes:
• Placez cet appareil à une distance de 30 cm des murs ou d’autres
surfaces.
• Diminuez le volume.
• Éloignez-vous des objets entrant en résonance.
Si vous l’entendez avec le casque:
Il doit y avoir une autre cause. Contactez votre revendeur ou le centre de
maintenance Roland le plus proche.
Dans certains cas, la lecture de données SMF ou WAV à un volume
extrêmement élevé depuis une clé USB peut entraîner le déclenchement
du circuit de protection et la mise hors tension de l’appareil.
Dans ce cas, diminuez le volume.
Si vous utilisez la fonction LAN sans l
Problème Cause/Remède
• Vériez que votre point d’accès de réseau LAN sans l prend en charge
WPS.
Si votre point d’accès de réseau LAN sans l ne prend pas en charge
WPS, vous pouvez établir la connexion en utilisant la procédure décrite
dans «Connexion en mode Ad-Hoc» (p. 8).
• La norme sans l 802.11a/b n’est pas prise en charge. Utilisez la norme
sans l 802.11g/n (2,4 GHz).
• La méthode d’authentication WEP n’est pas prise en charge. Utilisez la
Échec de la
connexion à un
point d’accès de
réseau LAN sans l
La communication
est instable
Le F-20 est
introuvable dans
les connexions
d’instrument de
l’application iOS
(par exemple
«Air Performer»)
méthode d’authentication WPA ou WPA2.
• Assurez-vous que DHCP est activé pour votre point d’accès de réseau
LAN sans l.
• La connexion peut ne pas se dérouler correctement en raison de l’état
du signal radio. Dans ce cas, utilisez la procédure décrite dans «Méthode
de connexion de base (connexion par WPS)» (p. 8) et reconnectez le
point d’accès de votre réseau LAN sans l.
• Une limite s’applique aux données de connexion qui peuvent être
mémorisées. L’établissement d’une nouvelle connexion peut entraîner la
suppression des données de connexion plus anciennes.
Toutes les données de connexion seront supprimées si vous rétablissez
les paramètres d’usine. Si les données de connexion ont été supprimées,
veuillez vous reconnecter au point d’accès du réseau LAN sans l.
Il se peut que la communication soit instable selon l’utilisation du spectre
de radiofréquences.
Si la communication est instable, la réponse peut être lente, ou si vous
utilisez la communication audio, il peut y avoir des coupures dans l’audio.
Les actions suivantes peuvent améliorer la situation.
• Rapprochez le point d’accès du réseau LAN sans l et le F-20 l’un de
l’autre.
• Modiez le réglage de canal du point d’accès du réseau LAN sans l.
• Le F-20 est-il sous tension ?
• L’adaptateur USB sans l (WNA1100-RL) est-il inséré sur le F-20?
• Le F-20 est-il connecté au réseau LAN sans l?
• Le F-20 et l’iPhone sont-ils connectés au même réseau (au même point
d’accès de réseau LAN sans l) ?
• Le point d’accès du réseau LAN sans l est-il conguré pour autoriser la
communication entre les diérents dispositifs du réseau LAN sans l ?
Pour des détails sur les réglages, reportez-vous au mode d’emploi de
votre point d’accès de réseau LAN sans l.
Deutsch Français Italiano Español Português NederlandsEnglish
Qu’est-ce que MIDI Visual Control ?
MIDI Visual Control est une norme utilisée dans le monde entier ajoutée aux spécications MIDI an d’associer des images à de la musique. Un équipement vidéo
compatible avec la norme MIDI Visual Control peut être connecté en MIDI à des instruments musicaux électroniques an de contrôler un équipement vidéo et
sonore en simultané.
Qu’est-ce que V-LINK ?
V-LINK est la spécication propriétaire de Roland permettant d’associer des images à de la musique. L’équipement vidéo compatible avec la norme V-LINK
peut être connecté à des instruments musicaux électroniques par MIDI, ce qui simplie l’association d’une vaste palette d’eets visuels à la musique.
Qu’est-ce que MIDI ?
La norme MIDI, abréviation de «Musical Instrument Digital Interface», a été mise au point an de proposer une norme universelle pour l’échange de données musicales sur les
instruments de musique électroniques et les ordinateurs.
Cet instrument est équipé d’un port USB COMPUTER qui lui permet d’échanger des données de performances avec des dispositifs externes. Ces prises permettent de brancher
l’instrument sur un dispositif externe an de le rendre encore plus polyvalent.
9
Page 32

CONSIGNES DE SÉCURITÉ
AVERTISSEMENT
Pour couper complètement l’alimentation de l’appareil,
débranchez la che de la prise murale
Même s’il est hors tension, cet appareil n’est pas
complètement coupé de sa source
d’alimentation principale. Si vous avez besoin de
couper complètement l’alimentation, mettez
l’appareil hors tension, puis débranchez la che
de la prise murale. Pour cette raison, la prise murale à laquelle
vous choisissez de connecter la che du cordon d’alimentation
doit être à portée de main et facile d’accès.
À propos de la fonction Auto O
L’appareil s’éteindra automatiquement après une
période prédéterminée suivant la dernière
performance musicale ou la dernière utilisation
des boutons ou commandes (fonction Auto O).
Si vous ne souhaitez pas que l’appareil s’éteigne
automatiquement, désactivez la fonction Auto
O (p. 5).
Utilisez uniquement le support recommandé
Cet appareil ne doit être utilisé qu’avec un
support recommandé par Roland.
Ne le placez pas sur une surface instable
Lorsque vous utilisez l’appareil avec un support
recommandé par Roland, veillez à le placer sur
une surface plane en vériant qu’il est bien stable.
Si vous n’utilisez pas de support, vous devez
toutefois vous assurer que l’emplacement
d’installation de l’appareil ore une surface plane
capable de supporter l’appareil et de l’empêcher d’osciller.
Précautions lors de l’installation de l’appareil sur un support
Veillez à vous conformer aux instructions du
mode d’emploi lorsque vous installez cet appareil
sur un support (p. 4).
S’il n’est pas correctement installé, il peut en
résulter une instabilité susceptible d’entraîner la
chute de l’appareil ou le basculement du support et de
provoquer des blessures.
AVERTISSEMENT ATTENTION
Utilisez uniquement l’adaptateur secteur fourni et la tension
correcte
Veillez à utiliser uniquement l’adaptateur secteur
fourni avec l’appareil. En outre, assurez-vous que
la tension à l’installation correspond à la tension
en entrée indiquée sur l’adaptateur secteur. Les
autres adaptateurs secteur pouvant utiliser une
polarité diérente ou être conçus pour une
tension diérente, leur utilisation risque de provoquer des
dommages, des dysfonctionnements ou une décharge
électrique.
Utilisez uniquement le cordon d’alimentation fourni
Utilisez uniquement le cordon d’alimentation
joint. Par ailleurs, le cordon d’alimentation fourni
ne doit pas être utilisé avec un autre appareil.
ATTENTION
Utilisez uniquement le(s) support(s) spécié(s)
Cet appareil est conçu pour être utilisé en
association avec des supports spéciques
(KSC-68, KS-18Z, KS-12) fabriqués par Roland.
S’ilest utilisé en association avec d’autres
supports, vous risquez de vous blesser si le
produit chute ou bascule en raison d’un manque
de stabilité.
Évaluez les risques de sécurité avant d’utiliser des supports
Même si vous tenez compte des avertissements
mentionnés dans le mode d’emploi, il peut
arriver que le produit tombe du support ou que
le support bascule suite à certaines
manipulations. Prenez en considération tous les
risques de sécurité avant d’utiliser ce produit.
Précautions à prendre si vous déplacez l’appareil
Si vous avez besoin de déplacer l’appareil, tenez
compte des précautions décrites ci-dessous. Il
faut au moins deux personnes pour soulever et
déplacer l’appareil en toute sécurité. Il doit être
manipulé avec précaution, tout en le maintenant
droit à tout moment. Veillez à le tenir fermement,
à éviter de vous blesser et à ne pas endommager l’instrument.
• Lorsque vous utilisez le support KSC-68, vériez que
les vis qui xent l’instrument au pied ne se sont pas
desserrées. Si c’est le cas, resserrez-les pour garantir une
xation solide.
• Débranchez le cordon d’alimentation.
• Débranchez tous les cordons provenant de dispositifs
externes.
• Retirez le pupitre.
Tenez les pièces de petite taille hors de portée des enfants en
bas âge
Pour éviter tout ingestion accidentelle des pièces
indiquées ci-dessous, tenez-les toujours hors de
portée des enfants en bas âge.
• Pièces amovibles
Vis de xation du pupitre (p. 5)
Veillez à ne pas vous brûler
La zone indiquée sur l’illustration peut devenir
très chaude. Veillez à éviter tout risque de brûlure.
Panneau arrière
REMARQUES IMPORTANTES
Emplacement
• N’exposez pas l’appareil à la lumière directe du soleil, ne le
placez pas à proximité d’appareils produisant de la chaleur,
ne le laissez pas à l’intérieur d’un véhicule fermé, et ne
le soumettez pas de quelque manière que ce soit à des
températures extrêmes. Par ailleurs, évitez de laisser des
luminaires utilisés normalement à proximité immédiate de
l’appareil (comme une lampe de piano), ou des projecteurs
puissants illuminer la même zone de l’appareil pendant une
période prolongée. Une chaleur excessive peut déformer ou
décolorer l’appareil.
• Ne laissez pas d’objets sur le clavier. Ceci peut provoquer
un dysfonctionnement (les touches du clavier peuvent par
exemple cesser de produire du son).
• Suivant le matériau et la température de la surface sur
laquelle vous placez l’appareil, il est possible que ses pieds
en caoutchouc décolorent ou détériorent la surface.
Pour éviter cela, vous pouvez disposer un bout de feutre ou
de chion sous les pieds en caoutchouc. Ce faisant, assurezvous que l’appareil ne risque pas de glisser ou d’être déplacé
accidentellement.
Entretien
• Pour nettoyer l’appareil, utilisez un chion doux et sec, ou un
chion légèrement imbibé d’eau. Les parties en bois doivent
être nettoyées dans le sens du grain en appliquant une
pression égale sur l’ensemble de la surface. Un frottement
excessif à un même endroit peut endommager la nition.
Réparations et données
• Avant de coner votre appareil à un réparateur, veillez à
eectuer une sauvegarde des données qui sont stockées
dessus, ou, si vous préférez, à noter les informations dont
vous avez besoin. Nous nous eorçons de préserver au
mieux les données stockées sur l’appareil lorsque nous
eectuons des réparations. Il peut toutefois arriver que la
gestion de la mémoire soit endommagée physiquement,
dans quel cas il peut être impossible de restaurer le contenu
enregistré. Roland décline toute responsabilité quant à la
restauration de contenu enregistré qui aurait été perdu.
Précautions supplémentaires
• Une défaillance de l’équipement, une opération incorrecte
ou autre manipulation peut entraîner la perte des données
enregistrées sur l’appareil. Sauvegardez les chansons que
vous avez enregistrées sur un lecteur ash USB pour éviter
de les perdre si un problème de ce type se produit.
• Roland décline toute responsabilité quant à la restauration
de contenu enregistré qui aurait été perdu.
• Le son produit en appuyant sur les touches et les vibrations
émises en jouant d’un instrument peuvent se transmettre
au sol ou aux murs de façon insoupçonnée. Veillez à ne pas
déranger vos voisins.
• N’appuyez pas exagérément sur le pupitre lorsqu’il est en
cours d’utilisation.
• Le volume sera réduit si vous connectez un dispositif USB à
un port USB MEMORY.
Utilisation de mémoires externes
• Veuillez observer les précautions suivantes lors de
l’utilisation de dispositifs mémoire externes.
Veillez également à observer toutes les précautions qui
accompagnaient le dispositif mémoire externe.
• Ne retirez pas le dispositif lorsqu’une opération de lecture
ou d’écriture est en cours.
• Pour éviter les dommages dus à l’électricité statique,
veillez à vous décharger de toute électricité statique
avant d’utiliser le dispositif.
Entretien du clavier
• N’écrivez pas sur le clavier avec un stylo ou autre instrument,
et n’eectuez aucun marquage ou poinçonnage sur
l’instrument. De l’encre s’introduirait de manière indélébile
dans les lignes de la surface.
• N’apposez pas d’étiquettes sur le clavier. Vous risquez de
ne plus pouvoir retirer
fortes, lesquelles sont susceptibles de décolorer l’instrument.
les étiquettes qui utilisent des colles
• Pour retirer les saletés tenaces, utilisez un nettoyant pour
clavier disponible dans le commerce et ne contenant pas
de produits abrasifs. Commencez par frotter en douceur
l’appareil. Si cela ne sut pas pour éliminer les saletés,
exercez peu à peu davantage de pression en prenant soin de
ne pas rayer les touches.
Droits d’auteur/Licences/Marques commerciales
• L’enregistrement audio, l’enregistrement vidéo, la
duplication, la révision, la distribution, la vente, la location,
la performance ou la diusion de matériel sous copyright
(œuvres musicales ou visuelles, œuvres vidéo, diusions,
performances sur scène, etc.) appartenant à un tiers en
partie ou en totalité sans autorisation du propriétaire du
copyright sont interdits par la loi.
• N’utilisez pas ce produit pour des actions qui enfreindraient
un copyright détenu par un tiers. Nous déclinons toute
responsabilité en matière d’infraction des copyrights tiers
émanant de votre utilisation de ce produit.
• Les droits d’auteurs relatifs au contenu de ce produit (les
données de formes d’ondes sonores, les données de
les motifs d’accompagnement, les données de phrase, les
boucles audio et les données d’image) sont réservés par
Roland Corporation.
• Les acquéreurs de ce produit sont autorisés à utiliser le
contenu (à l’exception des données de morceau telles
que les morceaux de démonstration) susmentionné pour
la création, l’exécution, l’enregistrement et la distribution
d’œuvres musicales originales.
• Les acquéreurs de ce produit ne sont PAS autorisés à
extraire le contenu susmentionné sous sa forme d’origine
ou une forme modiée, dans le but de distribuer le support
enregistré dudit contenu ou de le mettre à disposition sur un
réseau informatique.
• Roland, GS, SuperNATURAL sont des marques déposées ou
des marques commerciales de Roland Corporation aux ÉtatsUnis et/ou dans d’autres pays.
style,
10
Page 33

Pianoforte digitale
Sommario
Guida rapida (pannello anteriore) 2
Accensione/spegnimento dell'unità . . . . . . . . . . . . . . . . . . . . . . . . . . . . . 2
Regolazione del volume . . . . . . . . . . . . . . . . . . . . . . . . . . . . . . . . . . . . . . . . . 2
Selezione di un suono . . . . . . . . . . . . . . . . . . . . . . . . . . . . . . . . . . . . . . . . . . . 2
Sovrapposizione di due suoni (Dual) . . . . . . . . . . . . . . . . . . . . . . . . . . . . . 2
Riproduzione di suoni diversi con la mano destra e con la
sinistra (Split) . . . . . . . . . . . . . . . . . . . . . . . . . . . . . . . . . . . . . . . . . . . . . . . . . . . 2
Modica della risposta della tastiera (Key Touch) . . . . . . . . . . . . . . . . . 2
Utilizzo del metronomo . . . . . . . . . . . . . . . . . . . . . . . . . . . . . . . . . . . . . . . . .3
Riproduzione di brani/ritmi (accompagnamento automatico
per gli accordi) . . . . . . . . . . . . . . . . . . . . . . . . . . . . . . . . . . . . . . . . . . . . . . . . . . 3
Registrazione delle esecuzioni . . . . . . . . . . . . . . . . . . . . . . . . . . . . . . . . . . . 3
Prima di suonare 4
Posizionamento dell'unità F-20 su un supporto . . . . . . . . . . . . . . . . . . 4
Connessioni del pannello posteriore . . . . . . . . . . . . . . . . . . . . . . . . . . . . . 4
Montaggio del leggio per spartiti . . . . . . . . . . . . . . . . . . . . . . . . . . . . . . . . 5
Accensione/spegnimento dell'unità . . . . . . . . . . . . . . . . . . . . . . . . . . . . . 5
Spegnimento automatico dopo un determinato periodo di
tempo (Auto O) . . . . . . . . . . . . . . . . . . . . . . . . . . . . . . . . . . . . . . . . . . . . . . . 5
Ascolto dei brani demo . . . . . . . . . . . . . . . . . . . . . . . . . . . . . . . . . . . . . . . . .5
Risparmio energetico e protezione dell'ambiente
L'unità F-20 si spegne automaticamente 30 minuti dopo l'ultima volta che è stata suonata
o utilizzata.
* Se non si desidera che l'unità si spenga automaticamente, modicare
l'impostazione "Auto O" (p. 5).
Funzioni avanzate 6
Informazioni sulla funzione LAN wireless 8
Risoluzione dei problemi 9
Regolazione della brillantezza (Brilliance) . . . . . . . . . . . . . . . . . . . . . . . .6
Regolazione del riverbero (Ambience) . . . . . . . . . . . . . . . . . . . . . . . . . . .6
Divisione della tastiera in due parti (Twin Piano) . . . . . . . . . . . . . . . . .6
Disabilitazione dei pulsanti (Panel Lock) . . . . . . . . . . . . . . . . . . . . . . . . . 6
Salvataggio delle impostazioni (Memory Backup) . . . . . . . . . . . . . . . . 6
Ripristino delle impostazioni di fabbrica (Factory Reset) . . . . . . . . . . 6
Formattazione di un'unità ash USB. . . . . . . . . . . . . . . . . . . . . . . . . . . . . . 6
Impostazioni varie (modalità Function) . . . . . . . . . . . . . . . . . . . . . . . . . . 7
Far corrispondere l'accordatura con gli altri strumenti
(Master Tuning) . . . . . . . . . . . . . . . . . . . . . . . . . . . . . . . . . . . . . . . . . . . 7
Modica l'intonazione della tastiera (Transpose) . . . . . . . . . . . 7
Cos'è la funzione LAN wireless? . . . . . . . . . . . . . . . . . . . . . . . . . . . . . . . . . . 8
Metodo di connessione di base (mediante WPS) . . . . . . . . . . . . . . . . . 8
Connessione in modalità Ad-Hoc . . . . . . . . . . . . . . . . . . . . . . . . . .8
Deutsch Français Italiano Español Português NederlandsEnglish
Speciche principali
Tastiera 88 tasti (tastiera Ivory Feel-G con Escapement)
Alimentazione Adattatore CA
9 W (2 W–18 W)
9 W: consumo energetico medio mentre si suona il
Consumo
energetico
Dimensioni 1.282 (L) x 296 (P) x 132 (A) mm
Peso 20 kg
Prima di usare questa unità, leggere attentamente le sezioni "UTILIZZO SICURO DELL'UNITÀ" e "NOTE IMPORTANTI" (opuscolo "UTILIZZO SICURO
DELL'UNITÀ" e Manuale dell'utente p. 10). In questi capitoli vengono fornite informazioni importanti sul corretto impiego dell'unità. Inoltre, per essere
sicuri di aver acquisito una buona conoscenza di tutte le funzioni oerte dalla nuova unità, è necessario leggere per intero l'opuscolo "UTILIZZO
SICURO DELL'UNITÀ" e il Manuale dell'utente. Conservare il manuale e tenerlo a portata di mano per usarlo come riferimento.
Copyright © 2013 ROLAND CORPORATION
Tutti i diritti riservati. Nessuna parte di questa pubblicazione può essere riprodotta, in alcuna forma, senza autorizzazione scritta di ROLAND CORPORATION.
pianoforte con il volume in posizione centrale
2 W: consumo energetico subito dopo l'accensione,
senza riproduzione di note
18 W: potenza di uscita nominale
Accessori
Accessori opzionali
(venduti a parte)
* Per garantire un costante miglioramento dei nostri prodotti, le
speciche tecniche e/o l'aspetto dell'unità sono soggetti a variazioni
senza ulteriore preavviso.
Manuale dell'utente, opuscolo "UTILIZZO SICURO
DELL'UNITÀ", leggio per spartiti, adattatore CA, cavo di
alimentazione (per il collegamento dell'adattatore CA),
pedale damper (compatibile con funzioni di rilevamento
continuo)
Supporto dedicato (KSC-68), supporto per tastiera
(KS-18Z, KS-12), pedale damper (DP-10), memoria ash
USB (*1), adattatore USB wireless (WNA1100-RL) (*1)
*1: utilizzare la memoria ash USB e l'adattatore USB
wireless venduti da Roland. Non viene garantito il
funzionamento di altri prodotti.
Page 34

Guida rapida (pannello anteriore)
Selezione di un suono
Tenere premuto il pulsante TONE e premere uno dei tasti seguenti per cambiare il suono.
Selezione di un pianoforte
Grand Piano 2
Grand Piano 1
Grand Piano 3
1
Tenere premuto
2
Selezione di altri suoni
Strings 2
Strings 1
Harp
1
Tenere premuto
2
Harpsichord 1
Ragtime Piano
Jazz Organ 2
Jazz Organ 1
Harpsichord 2
Church Organ 2
Church Organ 1
Accordion
Jazz Scat
Choir 1
Choir 3
Choir 2
Selezione di un pianoforte elettrico
Vibraphone
1
Tenere premuto
E. Piano 1
2
E. Piano 2
E. Piano 3
Synth Bell
Celesta
Clav.
Sovrapposizione di due suoni (Dual)
Premere contemporaneamente due pulsanti
TONE per sovrapporre due suoni.
Bilanciamento del mixaggio
È possibile regolare il bilanciamento del mixaggio dei due suoni (cinque livello,
0 = predenito).
Acoustic Bass
A.Bass + Cymbal
Fingered Bass
Thum Voice
Pulsante TONE
acceso
1
Tenere premuto
Bilanciamento del
mixaggio per Dual
Bilanciamento del
mixaggio per Split
Decay Choir
Nylon-str.Gt
Synth Pad
Steel-str.Gt
Decay Strings
Decay Choir Pad
Tenere premuto
+ ––
00
+
2
Accensione/spegnimento dell'unità
(p. 5)
Regolazione del volume
Per regolare il volume utilizzare la manopola
[VOLUME].
Riproduzione di suoni diversi con la mano destra e con la sinistra (Split)
Attivando il pulsante [SPLIT], la tastiera viene suddivisa in due sezioni (destra e sinistra),
in modo da suonare un suono diverso in ogni sezione.
Se si tiene premuto il pulsante [SPLIT], il pulsante TONE assegnato alla sezione sinistra
si accende.
Cambio dei suoni (Split)
Cambio del suono di
sinistra
Cambio del suono di
destra
Mentre si preme il pulsante [SPLIT], tenere premuto uno
dei pulsanti TONE e premere un tasto.
Attenersi alla stessa procedura descritta nella sezione
"Selezione di un suono" in alto.
Modica del punto di divisione della tastiera (punto di splittaggio)
Tenere premuto il pulsante [SPLIT] e premere un tasto (predenito: F 3).
1
Tenere premuto
Modica della risposta della tastiera (Key Touch)
Attivare il pulsante [KEY TOUCH] per modicare la
risposta della tastiera (sensibilità al tocco dei tasti).
Se il pulsante [KEY TOUCH] è disattivato, viene
applicato un tocco "MEDIUM" (equivalente a un
pianoforte acustico).
LIGHT
LIGHT
HEAVY
FIX
HEAVY
FIX
È possibile ottenere un suono fortissimo () suonando con minore forza rispetto
al valore "MEDIUM", quindi la tastiera sembra più leggera. Quest'impostazione
semplica l'esecuzione, specialmente per i bambini.
Per suonare in modalità fortissimo (), è necessario esercitare una pressione
maggiore rispetto all'impostazione "MEDIUM", quindi la tastiera risulta più
pesante. Il movimento dinamico delle dita aggiunge più sensibilità all'esecuzione.
Il suono ha sempre lo stesso volume, indipendentemente dalla forza utilizzata per
premere i tasti.
B1 B6
2
1
Tenere premuto
2
2
Page 35

Utilizzo del metronomo
Attivare il pulsante [METRONOME]; il metronomo inizierà a suonare. Utilizzare i pulsanti [SLOW]/[FAST] per regolare il tempo.
Guida rapida (pannello anteriore)
Modica del numero di battute
È possibile scegliere 0 (solo battute deboli), 2 (2 battute), 3 (3 battute), 4 (4 battute),
5 (5 battute) o 6 (6 battute).
52
0 3 4 6
1
Tenere premuto
È possibile anche cambiare il numero di battute tenendo premuto il pulsante
[METRONOME] e utilizzando i pulsanti [SLOW]/[FAST].
2
Specica di un tempo numerico
È possibile anche specicare un valore numerico per il tempo (20–250)
(predenito: 108).
1
Tenere premuto
Esempio: per immettere il valore 120, tenere premuto il pulsante [METRONOME] e
Riproduzione di brani/ritmi (accompagnamento automatico per gli accordi)
Per riprodurre o interrompere un brano, premere il pulsante [SONG]. Per riprodurre o interrompere
il ritmo (accompagnamento automatico basato sugli accordi che si suonano), premere il pulsante
[RHYTHM].
È possibile selezionare un brano o un ritmo interno tenendo premuto il pulsante [SONG] o
[RHYTHM] e premendo uno dei tasti seguenti.
RIFERIMENTO
Selezione di un brano interno
1
Tenere premuto
Per i dettagli sui nomi di brani e ritmi, consultare le sezioni "Lista dei brani interni"
e "Lista dei ritmi" alla ne del manuale.
Premere l'ultimo tasto a destra; tutti i
brani verranno riprodotti in sequenza.
2
Selezione di un ritmo
1
Tenere premuto
1 3 5 8
0 2 4 6 7 9
2
premere i tasti in quest'ordine 1
2 0 ENTER.
Flusso del ritmo
Intro
[RHYTHM] attivato [RHYTHM] disattivato
Accompagnamento
2
ENTER
Deutsch Français Italiano Español Português NederlandsEnglish
Finale
Registrazione delle esecuzioni
Di seguito viene descritto come registrare un brano.
* Prima di iniziare, selezionare il suono da registrare.
1. Premere contemporaneamente i pulsanti [SONG] e [RHYTHM].
* Per annullare la registrazione, premere di nuovo contemporaneamente i
pulsanti [SONG] e [RHYTHM].
2. Suonare la tastiera per avviare la registrazione.
3. Premere il pulsante [SONG] per arrestare la registrazione.
Per registrare a tempo con il metronomo
* Riprodurre il suono del metronomo e impostare il numero di battute e il tempo
prima di iniziare la registrazione.
Se si preme il pulsante [SONG] nel passo 2, la registrazione inizia dopo un
conteggio di due misure.
Registrazione a tempo con un ritmo
* Selezionare un ritmo prima di avviare la registrazione.
Se si preme il pulsante [RHYTHM] nel passo 2, la registrazione inizia dopo un
conteggio di due misure.
Bilanciamento del mixaggio
È possibile regolare il bilanciamento del mixaggio tra brano/ritmo e tastiera (cinque livelli;
0 = predenito).
+0–
1
Tenendo
premuto uno
dei due pulsanti
2
Per ripetere la registrazione
Avviare di nuovo la registrazione a partire dal passo 1.
Salvataggio del brano registrato in un'unità ash USB
* Collegare l'unità ash USB prima di continuare.
Tenere premuto il pulsante [KEY TOUCH] e premere il pulsante [SONG].
Quando tutti i LED dei pulsanti si accendono, vuol dire che i dati sono
stati salvati (massimo 99 brani).
Riproduzione di un brano da un'unità ash USB
Tenere premuto il pulsante [SONG] e premere il tasto "F 3".
È possibile utilizzare i due tasti adiacenti a "F
ash USB.
3" per selezionare un brano nell'unità
F
3
Play
Prec.
Succ.
Riproduzione del brano registrato
1
Tenere premuto
E3
2
1
Tenere premuto
* È possibile anche copiare un le WAV o MIDI dal computer a un'unità ash USB
e riprodurlo sull'unità F-20. Per i dettagli sui formati riproducibili, consultare la
sezione alla ne del manuale.
2
3
Page 36

Prima di suonare
Posizionamento dell'unità F-20 su un supporto
Se si desidera collocare l'unità F-20 su un supporto, utilizzare il modello Roland KSC-68 (consultare il Manuale dell'utente di KSC-68), KS-18Z o KS-12.
* Prestare attenzione a non schiacciarsi le dita mentre si monta il supporto.
KS-18Z
Allineare la parte frontale
dell'unità F-20 con la parte
frontale del supporto.
Non superare
il metro di
altezza (regolare
il supporto a
un livello non
maggiore del
secondo partendo
dal basso).
Allineare le gambe del supporto
con le viti del pannello posteriore.
Connessioni del pannello posteriore
Porta USB MEMORY
Per collegare un'unità ash USB.
• Se si collega un'unità ash USB, è possibile
riprodurre o salvare i brani.
• Se si collega un adattatore USB wireless
(WNA1100-RL; venduto a parte), è possibile
utilizzare le app iOS compatibili con la
tecnologia wireless (p. 8).
• Il volume degli altoparlanti dell'unità F-20 verrà
abbassato se si collega un dispositivo USB alla
porta USB MEMORY.
* Non inserire o rimuovere mai un'unità ash USB
mentre lo strumento è acceso. Ciò potrebbe
danneggiare i dati nello strumento o nell'unità
ash USB.
* Inserire con cautela l'unità
ash USB no in fondo.
Jack PEDAL
Per collegare il pedale
damper in dotazione.
KS-12
Jack OUTPUT
Se si collega questo jack agli
altoparlanti amplicati, il suono
dell'unità verrà riprodotto
attraverso di essi.
Regolare la larghezza di appoggio
del supporto in maniera che ogni
coppia di piedini in gomma dell'unità
F-20 venga a trovarsi sui due lati di
ciascun asse perpendicolare.
Lato tastiera
Vista dall'alto
Jack PHONES
Per il collegamento delle cue (vendute
a parte).
* Se si collega solo un paio di cue,
utilizzare il jack PHONES.
Se due persone
utilizzano le cue
(vendute a parte),
collegarle al jack
PHONES e al jack
OUTPUT.
Porta USB COMPUTER
Se si utilizza un cavo USB disponibile in commercio per collegare la porta USB
COMPUTER dell'unità F-20 alla porta USB del computer, è possibile eettuare le
seguenti operazioni.
• Riprodurre i dati SMF di un software compatibile con MIDI con l'unità F-20.
• Trasferire i dati MIDI tra l'unitàF-20e il software del sequencer in uso, in modo
da sfruttare moltissime funzioni per la produzione e l'editing musicale.
4
Per prevenire guasti e danni ai
dispositivi, abbassare sempre il
volume e assicurarsi che tutte
le unità siano spente prima di
eettuare qualsiasi collegamento.
Posizionare l'adattatore CA in modo che il lato con
l'indicatore (vedere l'immagine) sia rivolto verso
l'alto e il lato con le informazioni di testo sia rivolto
verso il basso.
L'indicatore si illumina quando l'adattatore CA viene
inserito in una presa CA.
Jack DC IN
Per il collegamento dell'adattatore CA in dotazione.
Presa CA
Cavo di alimentazione
Page 37

Prima di suonare
Montaggio del leggio per spartiti
Di seguito viene descritto come montare il leggio per spartiti in
dotazione.
1. Allentare le viti di ssaggio del leggio per spartiti sul retro
del pianoforte (due punti).
2. Collocare il leggio per spartiti tra le viti e la struttura dello
strumento.
3. Tenere con una mano il leggio per spartiti e stringere le viti
(due punti) per ssare saldamente il leggio per spartiti.
Accensione/spegnimento dell'unità
Dopo aver eettuato tutti i collegamenti (p. 4), procedere con
l'accensione delle unità come di seguito indicato. Accendendo le
unità nell'ordine sbagliato è possibile che si verichino guasti e
malfunzionamenti ai dispositivi.
Accensione dell'unità
1. Per ridurre al minimo il volume, ruotare la manopola
[VOLUME] completamente verso sinistra.
2. Premere il pulsante [ ] (POWER) per accendere l'unità.
* Questa unità è provvista di un circuito di protezione. Per
completare interamente la fase di avvio, l'unità impiega un
breve intervallo di tempo (pochi secondi).
3. Per regolare il volume utilizzare la manopola [VOLUME].
* Prima di accendere/spegnere l'unità, accertarsi sempre di
aver abbassato il volume. Anche con il volume al minimo,
si potrebbero percepire alcuni suoni durante l'accensione/
spegnimento. Tuttavia, si tratta di una condizione normale e non
di un malfunzionamento.
Spegnimento dell'unità
1. Per ridurre al minimo il volume, ruotare la manopola
[VOLUME] completamente verso sinistra.
2. Tenere premuto il pulsante [ ] (POWER) per almeno un
secondo per spegnere l'unità.
Deutsch Français Italiano Español Português NederlandsEnglish
* Quando si monta il leggio per spartiti, tenerlo con la mano in
modo che non cada. Fare attenzione a non schiacciarsi la mano.
* Non utilizzare una forza eccessiva per il montaggio del leggio
per spartiti.
* Quando si monta il leggio per spartiti, utilizzare le apposite viti
di ssaggio presenti sul pianoforte.
Per smontare il leggio per spartiti, tenerlo con una mano e allentare
le viti. Rimuovere il leggio per spartiti e riavvitare le viti saldamente.
Precauzioni relative all'utilizzo di un supporto
Assicurarsi di seguire le istruzioni del Manuale dell'utente
relative all'installazione dell'unità su un supporto (p. 4).
Se non installata correttamente, l'unità potrebbe cadere o
far rovesciare il supporto, causando infortuni alle persone.
Posizionare lo strumento a 30 cm dalla parete
Gli altoparlanti dell'unità F-20 si trovano
sul pannello posteriore. Per questo motivo,
potrebbe essere dicile ascoltare l'audio
emesso dagli altoparlanti se lo strumento
è accostato direttamente alla parete.
Evitare di far cadere lo strumento
Per evitare che l'unità F-20 cada o si
ribalti, non applicare eccessiva forza né
sedersi o salire sopra l'unità.
30 cm
Spegnimento automatico dopo un
determinato periodo di tempo (Auto O )
Questa unità si spegne automaticamente dopo che non si
suona o non si utilizzano pulsanti e controlli dopo un lasso di
tempo predeterminato (funzione Auto O).
Se non si desidera che l'unità si spenga automaticamente,
modicare l'impostazione Auto O su "OFF".
(impostazione predenita: 30 min.)
* Per riattivare l'unità, riaccenderla.
1 2
Tenere
premuto
* Questa impostazione resta memorizzata dopo lo spegnimento
dell'unità.
30 min.
10 min.
Ascolto dei brani demo
* Tutti i diritti
riservati. L'utilizzo
1
Tenendo premuto uno dei due pulsanti
Sono disponibili tre brani demo.
Premere il pulsante [SONG] per arrestare
la riproduzione.
2
non autorizzato di
questo materiale
a scopi diversi da
quelli privati, per
uso personale,
rappresenta una
violazione delle
leggi applicabili.
240 min.
OFF
3
5
Page 38

Funzioni avanzate
Regolazione della brillantezza (Brilliance)
Di seguito viene descritto come regolare la brillantezza del suono
(3 livelli).
C5 C6
NORMALE
BRILLANTE
SOFFUSO
3
1
Tenere premuto
2
Regolazione del riverbero (Ambience)
È possibile regolare il riverbero del suono per ottenere un eetto
simile all'esecuzione in una sala per concerti (5 livelli).
C5 C6
PREDEFINITO
1 2
Tenere premuto
+–
3
Divisione della tastiera in due parti (Twin Piano)
È possibile dividere la tastiera in due parti per consentire a due persone
di suonare sulla stessa gamma di note. Questa funzione consente di
utilizzare l'unità come se si trattasse di due pianoforti separati.
C5 C6
PAIR
1 2
Tenere premuto
La tastiera verrà divisa in sezione destra e sinistra, con il "DO
centrale" posizionato al centro di ogni sezione.
È possibile scegliere di ascoltare il suono in una delle seguenti modalità.
Valore Spiegazione
PAIR
INDIVIDUAL
Il suono proviene da destra se si suona la parte destra
della tastiera e da sinistra se si suona la parte sinistra.
Le note riprodotte nella parte destra verranno emesse
dall'altoparlante di destra e le note riprodotte nell'area
sinistra verranno emesse dall'altoparlante di sinistra.
OFF
INDIVIDUAL
3
Salvataggio delle impostazioni (Memory Backup)
Quando l'unità viene spenta, questa viene riportata alle
impostazioni predenite. Tuttavia, se lo si desidera, è possibile
salvare le seguenti impostazioni in modo che vengano
memorizzate anche dopo lo spegnimento. Questa funzione è
denominata "Memory Backup".
Impostazioni salvate da Memory Backup Pagina
Key Touch p. 2
Brilliance p. 6
Ambience p. 6
Master Tuning p. 7
1. Tenere premuto il pulsante [KEY TOUCH] e premere il
pulsante [RHYTHM].
I pulsanti [OTHER] e [SPLIT] inizieranno a lampeggiare.
Per annullare l'operazione, premere il pulsante [OTHER].
2. Per salvare le impostazioni, premere il pulsante [SPLIT].
Quando tutti i LED dei pulsanti si accendono, vuol dire che
l'operazione è completata.
Ripristino delle impostazioni di fabbrica (Factory Reset)
Le impostazioni modicate nella modalità Function (p. 7) possono
essere ripristinate alle impostazioni di fabbrica.
NOTA
Se si esegue la funzione Factory Reset, tutte le impostazioni
verranno inizializzate e i brani registrati nella memoria
interna verranno cancellati.
1. Tenere premuto il pulsante [KEY TOUCH] e accendere
l'unità. Continuare a tenere premuto il pulsante [KEY
TOUCH] per almeno sei secondi.
I pulsanti [OTHER] e [SPLIT] inizieranno a lampeggiare.
Per annullare l'operazione, premere il pulsante [OTHER].
2. Per ripristinare le impostazioni di fabbrica, premere il
pulsante [SPLIT].
Quando tutti i LED dei pulsanti si accendono, vuol dire che
l'operazione è completata.
3. Spegnere e riaccendere l'unità.
Formattazione di un'unità ash USB
Di seguito viene descritto come inizializzare
(formattare) tutti i contenuti di un'unità ash USB.
* Le sezioni di destra e di sinistra avranno il medesimo timbro
(Piano). La funzione Twin Piano può essere annullata premendo
uno dei pulsanti TONE.
* Il pedale damper agisce sulla sezione destra della tastiera.
Disabilitazione dei pulsanti (Panel Lock)
Tenere premuto il pulsante [PIANO] e accendere l'unità. Continuare
a tenere premuto il pulsante [PIANO] per almeno sei secondi. Verrà
impostata la funzione Panel Lock e tutti i pulsanti, tranne quello
dell'alimentazione [ ] (POWER), verranno disabilitati. In questo
modo, si evita che i toni o le impostazioni possano essere modicati
premendo inavvertitamente un pulsante.
La funzione Panel Lock viene annullata una volta scollegata
l'alimentazione.
6
NOTA
• Se si formatta l'unità ash USB, tutti i contenuti salvati al
suo interno verranno cancellati.
• Prima di utilizzare una nuova unità ash USB con l'unità F-20 per
la prima volta, è necessario formattare l'unità ash USB.
1. Collegare l'unità ash USB da formattare alla porta USB
MEMORY.
2. Tenere premuto il pulsante [SONG] e accendere l'unità.
Continuare a tenere premuto il pulsante [SONG] per
almeno sei secondi.
I pulsanti [OTHER] e [SPLIT] inizieranno a lampeggiare.
Per annullare l'operazione, premere il pulsante [OTHER].
3. Per eseguire la formattazione, premere il pulsante [SPLIT].
Quando tutti i LED dei pulsanti si accendono, vuol dire che
l'operazione è completata.
4. Spegnere e riaccendere l'unità.
Page 39

Impostazioni varie (modalità Function)
Per denire le impostazioni in modalità Function, mentre si preme il pulsante [KEY TOUCH], tenere premuto il pulsante [PIANO] e
premere uno dei tasti indicati nell'immagine.
3
OFF
240 min.
Auto O (p. 5)
10 min.
1
Modalità USB MEMORY
+
Master Tuning
–
Twin Piano (p. 6)
OFF
Brilliance (p. 6)
+
Ambience (p. 6)
–
+5
+4
+2
0
Transpose
-1
-3
-5
LAN wireless (p. 8)
WPS
V-LINK
Modalità Visual Control
OFF
15
13
12
10
Canale di trasmissione
8
MIDI
6
5
3
1
ON
Local Control
C8
C7
C6
C5
C4
C3
C2
C1
1 2
Tenere premuto
30 min.
2
440,0 Hz
INDIVIDUAL
PAIR
NORMALE
PREDEFINITO
+3
+1
Ad-Hoc OFF
MVC
16
14
11
OFF
BRILLANTE
SOFFUSO
-2
-4
-6
Ad-Hoc ON
9
7
4
2
Funzioni avanzate
Modica dell'impostazione dell'unità ash USB (modalità USB Memory)
In alcuni casi, se alla porta USB MEMORY è collegata un'unità ash USB, il caricamento dei dati potrebbe
richiedere più tempo o addirittura non riuscire. In questo caso, si potrebbe risolvere il problema cambiando
l'impostazione della modalità USB MEMORY su "1". L'impostazioni di fabbrica è "2". Di solito non è necessario
modicare questa impostazione.
* Dopo averla modicata, è necessario spegnere e riaccendere l'unità. La nuova impostazione diventa
eettiva alla riaccensione dell'unità.
Far corrispondere l'accordatura con gli altri strumenti (Master Tuning)
Quando si suona insieme ad altri strumenti è possibile regolare l'intonazione standard in base a quella di un
altro strumento.
L'intonazione standard di solito si riferisce all'intonazione della nota che viene suonata quando si preme il
LA centrale. Per ottenere un suono chiaro quando si suona insieme a uno o più strumenti, fare coincidere
l'intonazione standard del pianoforte con quella degli altri strumenti. L'impostazione di tutti gli strumenti su
un'intonazione standard è detta "master tuning".
È possibile regolare l'accordatura entro un intervallo compreso tra 415,3 Hz - 440,0 Hz (predenito) - 466,2 Hz
(con incrementi di 0,1 Hz).
Modica l'intonazione della tastiera (Transpose)
È possibile utilizzare la funzione Transpose per trasporre
la tastiera in intervalli di semitono.
Ad esempio, se un brano viene suonato in Mi maggiore
e si desidera suonarlo in Do maggiore, impostare
Transpose sul valore "+4".
Se si suona Do Mi Sol Questo suona come Mi Sol Si
Controllo dei dispositivi video (modalità Visual Control)
Visual Control è una funzione che consente di controllare le immagini insieme all'esecuzione.
Se la modalità Visual Control è stata impostata su "MVC" (MIDI Visual Control, p. 9) o "V-LINK", suonando la
tastiera dell'unità sarà possibile controllare le immagini prodotte dal dispositivo Visual Control collegato
all'unità mediante cavo MIDI USB.
Diagramma delle funzioni Visual Control
Suonando i 12 tasti più bassi dell'unità (A0–G 1) verranno trasmessi i seguenti messaggi MIDI.
Funzione Visual Control Messaggio MIDI trasmesso L'unità è in funzione
Cambia le immagini
CC 0 (Bank Select): 0–4 Tasti di riproduzione
Program Change: 1-7 Suona tasti bianchi
Impostazioni del canale di trasmissione MIDI
Questa impostazione specica il canale MIDI su cui trasmette l'unità.
MIDI utilizza sedici "canali MIDI", numerati da 1 a 16. Collegando i dispositivi MIDI e specicando il canale
MIDI appropriato per ogni dispositivo, è possibile suonare o selezionare i suoni su tali dispositivi. L'unità
riceverà tutti e sedici i canali (1-16).
Prevenzione delle note doppie nel caso di utilizzo
insieme a un sintetizzatore software
Se a USB MIDI è collegato un sintetizzatore
software, impostare questa voce su "OFF".
Dal momento che nella maggior parte dei
sintetizzatori software la funzione Thru è attivata,
le note suonate sulla tastiera potrebbero essere
duplicate o saltate. Per evitare quest'inconveniente, è possibile abilitare l'impostazione "Local
O" in modo che la tastiera e il generatore
sonoro interno siano scollegati.
Local Control
Generatore sonoro
(Local Control)
Ingresso
USB MIDI
Uscita
USB MIDI
Sintetizzatore
software
Computer
Deutsch Français Italiano Español Português NederlandsEnglish
7
Page 40

Informazioni sulla funzione LAN wireless
Una volta stabilita la connessione, l'indicatore LED dell'adattatore
Cos'è la funzione LAN wireless?
Se si inserisce un adattatore USB wireless (WNA1100-RL; venduto a
parte) nella porta USB MEMORY dell'unità F-20, è possibile utilizzare
le applicazioni compatibili con la tecnologia wireless (app iOS come
"Piano Partner" o "Air Performer").
iPhone etc.
Punto di accesso rete alla LAN wireless
(ad esempio un router LAN wireless)
Adattatore USB wireless
(venduto a parte: WNA1100-RL)
F-20
USB wireless si accende.
È possibile utilizzare la connessione wireless di un'app iOS come
"Air Performer". Scegliere "F-20" nella schermata di selezione degli
strumenti dell'app iOS.
NOTA
* Il dispositivo (ad esempio l'iPhone) in cui viene eseguita l'app
deve essere connesso alla stessa rete.
MEMO
• I dati di connessione vengono salvati in memoria quando
si esegue la procedura WPS. Pertanto, la volta successiva, il
dispositivo si connetterà automaticamente alla rete wireless.
• Tutti i dati di connessione verranno cancellati se si ripristinano le
impostazioni di fabbrica.
LAN wireless LAN wireless
Dispositivi necessari per utilizzare la funzione LAN wireless
Adattatore USB wireless (venduto a parte: WNA1100-RL)
Punto di accesso alla rete LAN wireless (ad esempio un router LAN wireless) *1 *2
iPhone, iPad o iPod touch ecc.
*1 Il punto di accesso della rete LAN wireless deve supportare lo
standard WPS. Se non è possibile connettersi al punto di accesso
della rete LAN, provare a connettersi in modalità Ad-Hoc.
*2 Non viene garantita la possibilità di connettersi a tutti i tipi di
punti di accesso delle reti LAN.
Metodo di connessione di base (mediante WPS)
La prima volta che si connette l'unità F-20 a una nuova rete wireless,
è necessario eettuare le seguenti operazioni (WPS) per accedere
alla rete wireless.
Questa procedura deve essere eseguita solo la prima volta. Dopo
aver eettuato l'accesso alla rete, non sarà più necessario ripetere
questa procedura.
Cos'è WPS?
È uno standard che semplica la denizione delle impostazioni di
sicurezza quando ci si connette al punto di accesso di una rete LAN
wireless. Si consiglia di utilizzare lo standard WPS quando si stabilisce la
connessione al punto di accesso di una rete LAN wireless.
1. Inserire l'adattatore USB wireless (WNA1100-RL; venduto
a parte) nella porta USB MEMORY dell'unità F-20.
2. Tenere premuto il pulsante dell'adattatore USB
wireless per tre secondi.
L'indicatore LED dell'adattatore USB wireless inizierà a
lampeggiare.
NOTA
* Quando si preme il pulsante, non applicare una forza
eccessiva sull'adattatore USB per evitare di danneggiarlo.
Utilizzare l'adattatore con cautela.
MEMO
È possibile eseguire la procedura WPS anche premendo "WPS"
nella sezione ”Impostazioni varie (modalità Function)” (p. 7)
invece di premere il pulsante dell'adattatore USB wireless.
3. Eseguire la procedura WPS sul punto di accesso della rete
LAN wireless, ad esempio premere il pulsante WPS sul
punto di accesso.
Per i dettagli sulla funzione WPS del punto di accesso della rete LAN
wireless, consultare il relativo Manuale dell'utente.
8
Indicatore LED dell'adattatore USB wireless
LED Spiegazione
Acceso L'adattatore è connesso alla rete.
Spento L'adattatore non è connesso alla rete.
Lampeggiante L'adattatore sta cercando una rete.
Connessione in modalità Ad-Hoc
Di seguito viene descritto come connettersi in modalità Ad-Hoc.
Cos'è la modalità Ad-Hoc?
La modalità Ad-Hoc consente di connettere l'unità F-20 direttamente
a un iPhone o a un altro dispositivo wireless senza utilizzare il punto di
accesso di una rete LAN wireless. Ciò è utile se occorre utilizzare l'unità
F-20 con un iPhone o un altro dispositivo wireless e ci si trova in un
luogo in cui il punto di accesso della rete LAN utilizzata normalmente
non è disponibile, ad esempio se ci si trova fuori di casa.
Limitazioni
L'iPod touch o un altro dispositivo wireless connesso in modalità
Ad-Hoc non potrà comunicare con Internet o altri dispositivi
wireless. Tuttavia, un iPhone o un altro dispositivo wireless con
funzioni cellulari possono connettersi a Internet.
Tenere presente che, se si utilizza una connessione cellulare
per connettersi a Internet, potrebbero venire applicate le tarie
previste dal proprio piano telefonico.
1. In "”Impostazioni varie (modalità Function)” (p. 7), premere
"Ad-Hoc ON".
2. Sull'iPhone o su un altro dispositivo wireless da
connettere, selezionare "F-20" per stabilire la connessione.
Ad esempio, su un iPhone scegliere [Impostazioni]
[Wi-Fi] [Scegli una rete] per selezionare "F-20".
Compare una schermata per l'immissione della password;
immettere "f20ak".
SSID Ad-Hoc F-20
Password f20ak
Per i dettagli su come connettersi a una rete LAN wireless da un
iPhone o da un altro dispositivo, consultare il rispettivo Manuale
dell'utente.
3. Per terminare la connessione in modalità Ad-Hoc,
ripristinare lo stato precedente delle impostazioni
dell'iPhone in [Impostazioni]
rete].
[Wi-Fi] [Scegli una
Page 41

Risoluzione dei problemi
Problema Causa/Azione
Tutti i LED tranne
quello del pulsante
] (POWER)
[
lampeggiano
Gli altoparlanti
emettono l'audio
anche se sono
collegate le cue
Sebbene si
stiano utilizzando
delle cue e
l'audio è muto,
si percepisce un
rumore martellante
quando si suona la
tastiera
L'unità si spegne
autonomamente
L'unità non si
accende
La pedaliera non
funziona o è
"bloccata"
Nessun suono/
Nessun
suono durante la
riproduzione di un
brano
Tono della tastiera
o brano errato
I suoni vengono
riprodotti due
volte (raddoppiati)
quando si suona
sulla tastiera
Il suono delle note
più acute cambia
improvvisamente
dopo un
determinato tasto
Si percepisce un
tintinnio acuto
Il volume è più
basso
Flusso di corrente eccessivo nella porta USB MEMORY.
Vericare se esiste un problema con l'unità ash USB. Quindi, spegnere e
riaccendere l'unità.
Le cue sono collegate al jack OUTPUT invece che al jack PHONES (p. 4)?
L'unità utilizza una tastiera con meccanica a martello d'azione per simulare,
in maniera più realistica possibile, il tocco di un piano acustico. Per questo
motivo, quando si suona sulla tastiera, si percepisce un suono simile
a un martello, proprio come se si stesse suonando un piano acustico.
L'unità consente di regolarne il volume e potrebbe essere quindi possibile
percepire il rumore di martelli in determinate situazioni. Tuttavia, questo
non indica un malfunzionamento. Se la vibrazione trasmessa al pavimento
o alle pareti rappresenta un problema, è possibile ridurre la vibrazione
spostando il piano dalla parete o utilizzando un tappeto anti-vibrazioni
disponibile in commercio, progettato per l'utilizzo con pianoforti.
L'unità si spegne automaticamente 30 minuti dopo l'ultima volta che è
stata suonata o utilizzata (questa è l'impostazione di fabbrica).
Se non è necessario che l'unità si spenga automaticamente, impostare
"Auto O" su "OFF" (p. 5).
L'adattatore CA è collegato correttamente (p. 4)?
Il pedale è stato collegato correttamente?
Inserire no in fondo il cavo nel jack PEDAL (p. 4).
Il volume dell'unità è abbassato?
Le cue sono collegate?
Se le cue sono collegate ai jack PHONES, gli altoparlanti non
produrranno alcun suono (p. 4).
Sono state create le impostazioni di trasposizione (p. 7)?
L'impostazione Master Tune è appropriata (p. 7)?
Le note del piano vengono sintonizzate con un metodo univoco (stretched
tuning), in modo che la gamma degli acuti risulti leggermente più in alto
e la gamma dei bassi leggermente più in basso rispetto al temperamento
costante. Per questo motivo, si potrebbe avere la sensazione che il tono
non sia corretto. Tuttavia, è il modo con cui avrebbe suonato un piano
acustico.
È possibile che sia selezionata l'opzione di tono Dual (p. 2)?
In un piano acustico le note dell'ottava e mezza più acuta continuano a
suonare no a decadere indipendentemente dal pedale damper. Tali note
hanno anche un carattere tonale abbastanza dierente.
Questa unità simula in maniera fedele tale caratteristica dei piani acustici.
Su questa unità, la gamma che non viene interessata dal pedale damper
cambia in base all'impostazione di trasposizione.
Se viene udito nelle cue:
I suoni con carattere frizzante e brillante contengono molte frequenze alte,
il che potrebbe produrre un tintinnio metallico. Questo accade perché le
caratteristiche di un vero piano vengono riprodotte fedelmente: non si
tratta di un malfunzionamento.
Il tintinnio risulta più fastidioso se viene applicato molto eetto riverbero,
quindi è possibile ridurlo diminuendo questo eetto.
Se non viene udito nelle cue:
Il motivo potrebbe essere diverso (come ad esempio, risonanza nell'unità).
Contattare il rivenditore o il Centro di assistenza Roland più vicino.
Il volume verrà abbassato se si collega un dispositivo USB alla porta USB
MEMORY. Ciò non indica un malfunzionamento.
Problema Causa/Azione
Se si imposta il volume al massimo, il suono potrebbe essere distorto in
base al tipo di esecuzione. Se questo si verica, abbassare il volume.
Se non viene udito nelle cue:
L'esecuzione ad alto volume può far risuonare altoparlanti o oggetti vicini
all'unità. Le luci uorescenti o le porte a vetri possono risuonare in maniera
simpatetica. In particolare, questo accade per le note più basse e i volumi
Suono errato o si
avverte un ronzio
L'unità si spegne
elevati. Per ridurre la risonanza, è possibile adottare le seguenti misure.
• Posizionare l'unità a 30 cm dalle pareti o da altre superci.
• Abbassare il volume.
• Allontanare l'unità dagli oggetti che risuonano.
Se viene udito nelle cue:
Il motivo potrebbe essere diverso. Contattare il rivenditore o il Centro di
assistenza Roland vicino.
In alcuni casi, la riproduzione a volume molto alto di dati SMF o WAV da
un'unità ash USB può causare l'attivazione del circuito di protezione, con
il conseguente spegnimento dell'unità.
In questo caso, abbassare il volume.
Quando si utilizza la funzione LAN wireless
Problema Causa/Azione
• Assicurarsi che il punto di accesso della rete LAN wireless supporti lo
standard WPS.
Se il punto di accesso della rete LAN wireless non supporta lo standard
WPS, è possibile connettersi seguendo la procedura descritta in
”Connessione in modalità Ad-Hoc” (p. 8).
• Lo standard wireless 802.11a/b non è supportato. Utilizzare lo standard
wireless 802.11g/n (a 2,4 GHz).
• Il metodo di autenticazione WEP non è supportato. Utilizzare il metodo
Impossibile
connettersi al
punto di accesso
di una rete LAN
wireless
Le comunicazioni
non sono stabili
L'unità F-20 non
è stata trovata
nell'elenco di
strumenti
connessi dell'app
iOS (ad esempio
"Air Performer")
di autenticazione WPA o WPA2.
• Assicurarsi che il protocollo DHCP sia abilitato nel punto di accesso della
rete LAN wireless.
• È possibile che la connessione non venga stabilita a causa della qualità
del segnale radio. In questo caso, seguire la procedura descritta in
”Metodo di connessione di base (mediante WPS)” (p. 8) e ristabilire la
connessione al punto di accesso della rete LAN wireless.
• Esiste un limite per i dati di connessione che possono essere
memorizzati. Se si stabilisce una nuova connessione, i dati precedenti
potrebbero venire eliminati.
Tutti i dati di connessione verranno cancellati se si ripristinano le
impostazioni di fabbrica. Se i dati di connessione vengono eliminati,
connettersi di nuovo al punto di accesso della rete LAN wireless.
Le comunicazioni potrebbero non essere stabili a seconda dell'uso dello
spettro delle frequenze radio.
Se le comunicazioni non sono stabili, la risposta potrebbe essere molto
lenta o, se si utilizzano comunicazioni audio, si potrebbero vericare
perdite del suono.
Le azioni riportate di seguito potrebbero migliorare la situazione.
• Avvicinare il punto di accesso della rete LAN wireless e l'unità F-20.
• Modicare l'impostazione del canale del punto di accesso della rete LAN
wireless.
• L'unità F-20 è accesa?
• L'adattatore USB wireless (WNA1100-RL) è inserito nell'unità F-20?
• L'unità F-20 è connessa a una rete LAN wireless?
• L'unità F-20 e l'iPhone sono connessi alla stessa rete, ovvero allo stesso
punto di accesso della rete LAN wireless?
• Il punto di accesso della rete LAN wireless è impostato in modo da
consentire le comunicazioni tra dispositivi LAN wireless?
Per i dettagli sulle impostazioni, consultare il Manuale dell'utente del
punto di accesso della rete LAN wireless.
Deutsch Français Italiano Español Português NederlandsEnglish
Cos'è MIDI Visual Control?
MIDI Visual Control è una pratica consigliata utilizzata a livello internazionale aggiunta alle speciche MIDI, in modo che l'espressione visiva possa essere collegata
all'esecuzione musicale. È possibile collegare a dispositivi video compatibili con MIDI Visual Control strumenti musicali elettronici mediante MIDI per poter
controllare il dispositivo video insieme a un'esecuzione.
Cos'è V-LINK?
V-LINK è una specica di proprietà di Roland che consente un'espressione visiva da collegare all'esecuzione musicale. Dispositivo video compatibile
con V-LINK che può essere collegato a strumenti musicali elettronici mediante MIDI, semplicando l'utilizzo di una vasta gamma di eetti visivi collegati
all'esecuzione.
Cos'è MIDI?
MIDI, acronimo di "Musical Instrument Digital Interface," è stato sviluppato come standard universale per lo scambio dei dati di esecuzione tra computer e strumenti musicali.
L'unità è dotata di una porta USB COMPUTER per consentire lo scambio di dati di esecuzione con i dispositivi esterni. Per una maggiore versatilità, tali connettori possono essere utilizzati
per collegare l'unità a un dispositivo esterno.
9
Page 42

UTILIZZO SICURO DELL'UNITÀ
AVVISO
Per disattivare completamente l'alimentazione dell'unità,
scollegare la spina dalla presa di corrente
Anche se viene spenta con l'apposito
interruttore, l'unità non è scollegata del tutto
dalla rete di corrente. Se è necessario scollegare
completamente l'alimentazione, spegnere l'unità
mediante l'apposito interruttore e scollegare la
spina dalla presa di corrente. Per questo motivo, la presa di
corrente alla quale collegare la spina del cavo di alimentazione
deve trovarsi vicino all'unità ed essere raggiungibile
facilmente.
Informazioni sulla funzione Auto O
Questa unità si spegne automaticamente dopo
che non si suona o non si utilizzano pulsanti e
controlli dopo un lasso di tempo predeterminato
(funzione Auto O). Se non si desidera che l'unità
si spenga automaticamente, disattivare la
funzione Auto O (p. 5).
Utilizzare solo il supporto per tastiere consigliato
Questa unità dovrebbe essere utilizzata solo con
il supporto consigliato da Roland.
Non collocare l'unità in una posizione instabile
Per l'utilizzo dell'unità su un supporto consigliato
da Roland, posizionare accuratamente il supporto
in maniera che sia in piano e rimanga stabile. In
mancanza di un supporto, assicurarsi di scegliere
una supercie di appoggio capace di reggere
adeguatamente il peso dell'unità, impedendole
di oscillare.
Precauzioni relative all'utilizzo di un supporto
Assicurarsi di seguire le istruzioni del Manuale
dell'utente relative all'installazione dell'unità su
un supporto (p. 4).
Se non installata correttamente, l'unità potrebbe
cadere o far rovesciare il supporto, causando
infortuni alle persone.
AVVISO ATTENZIONE
Utilizzare solo l'adattatore CA incluso e la corretta tensione di
rete
Utilizzare esclusivamente l'adattatore CA fornito
assieme a questa unità. Assicurarsi inoltre che la
tensione di rete all'installazione corrisponda alla
tensione in ingresso specicata sul corpo
dell'adattatore CA. Altri adattatori CA potrebbero
utilizzare una polarità dierente o essere indicati
per una tensione di corrente diversa, pertanto il loro utilizzo
potrebbe causare danni, malfunzionamenti o produrre scosse
elettriche.
Utilizzare solo il cavo di alimentazione in dotazione
Utilizzare solo il cavo di alimentazione in
dotazione. Il cavo di alimentazione incluso,
inoltre, non deve essere utilizzato con nessun
altro dispositivo.
ATTENZIONE
Utilizzare solo il supporto o i supporti specicati
L'unità è stata progettata per essere utilizzata in
combinazione con supporti specici (KSC-68,
KS-18Z, KS-12), prodotti da Roland. Se utilizzata
con altri supporti, la mancanza di stabilità
potrebbe far cadere l'unità o far rovesciare il
supporto, causando infortuni alle persone.
Valutare l'elemento sicurezza prima di utilizzare un supporto
Anche rispettando tutte le avvertenze fornite nel
manuale dell'utente, alcuni movimenti
potrebbero far cadere l'unità dal supporto o farlo
rovesciare. Tenere a mente tutte le avvertenze
sulla sicurezza prima di utilizzare il prodotto.
Precauzioni relative allo spostamento dell'unità
Nel caso in cui sia necessario spostare lo
strumento, prendere nota delle precauzioni
elencate di seguito. Per poter sollevare e spostare
l'unità in sicurezza, sono necessarie almeno due
persone. Maneggiare l'unità con attenzione e
tenerla sempre in posizione orizzontale.
Assicurarsi di avere una presa salda, per proteggere se stessi
da lesioni e lo strumento da danni.
• Se si utilizza il supporto KSC-68, vericare che le viti che
assicurano l'unità al supporto non si siano allentate.
Nel caso in cui si siano notati allentamenti, stringere
nuovamente le viti in maniera salda.
• Scollegare il cavo di alimentazione.
• Scollegare tutti i cavi di dispositivi esterni.
• Rimuovere il supporto.
Tenere lontano dalla portata dei bambini le parti di piccole
dimensioni
Per evitare l'ingerimento accidentale delle parti
elencate in basso, tenerle sempre fuori dalla
portata dei bambini.
• Parti rimovibili
Viti di ssaggio del leggio per spartiti (p. 5)
Fare attenzione a non ustionarsi
L'area indicata nell'immagine potrebbe
surriscaldarsi, pertanto occorre prestare
attenzione a non ustionarsi.
Pannello posteriore
NOTE IMPORTANTI
Posizionamento
• Non esporre l'unità alla luce solare diretta, non posizionarla
in prossimità di dispositivi che irradiano calore, non lasciarla
all'interno di un veicolo chiuso o sottoporla in altri modi
a temperature eccessive. Inoltre, non collocare fonti di
illuminazione troppo vicine all'unità (come ad esempio una
luce per pianoforte), né utilizzare faretti molto luminosi sulla
medesima area dell'unità per periodi di tempo prolungati. Il
calore eccessivo può deformare o scolorire l'unità.
• Non collocare oggetti sopra la tastiera. Il peso degli oggetti
potrebbe causare guasti, quali la rottura del meccanismo che
permette la produzione del suono.
• A seconda della temperatura e del materiale sul quale
si posiziona l'unità, è possibile che i piedini in gomma
della tastiera possano scolorire o marcare la supercie di
appoggio.
Se si desidera impedire ciò, porre sotto i piedini in gomma
dell'unità dei feltrini o un panno. In tal caso, assicurarsi che
l'unità non scivoli o non si sposti in modo accidentale.
Manutenzione
• Per pulire l'unità, utilizzare un panno asciutto e morbido o
uno leggermente inumidito. Stronare l'intera supercie
utilizzando possibilmente la stessa forza, movendo il panno
seguendo le nervature del legno. Stronare troppo la stessa
area può danneggiare la nitura.
Riparazione e dati
• Prima di inviare l'unità in riparazione, assicurarsi di
eettuare un backup dei dati memorizzati al suo interno e
di annotare le informazioni importanti. Sebbene l'assistenza
tecnica faccia del proprio meglio per preservare i dati
memorizzati nell'unità al momento di eettuare interventi
di riparazione, è possibile che alcuni contenuti non possano
essere ripristinati, ad esempio se la sezione della memoria
è danneggiata sicamente. Roland non si assume alcuna
responsabilità per il ripristino dei contenuti memorizzati che
potrebbero andare persi.
Precauzioni aggiuntive
• I dati memorizzati nell'unità possono andare persi in seguito
a guasti dell'apparecchiatura, utilizzo errato dell'unità ecc.
Salvare i brani registrati in un'unità ash USB per non perderli
in caso di guasti.
• Roland non si assume alcuna responsabilità per il ripristino
dei contenuti memorizzati che potrebbero andare persi.
• Il suono dei tasti premuti e le vibrazioni prodotte suonando
uno strumento possono essere trasmessi attraverso il
pavimento o una parete in maniera imprevedibile. Prestare
attenzione a non disturbare il vicinato.
• Non forzare il supporto quando è in uso.
• Il volume verrà abbassato se si collega un dispositivo USB
alla porta USB MEMORY.
Uso di memorie esterne
• Attenersi alle seguenti precauzioni per l'utilizzo dei
dispositivi di memoria esterni.
Inoltre, osservare con estrema cautela tutte le precauzioni
speciche per il dispositivo
• Non rimuovere il dispositivo mentre è in corso la lettura o
la scrittura dei dati.
• Per evitare danni causati da elettricità statica, scaricarla
dalla propria persona prima di toccare il dispositivo.
di memoria esterno.
Cura della tastiera
• Non scrivere sulla tastiera con pennarelli o altri marcatori, e
non aggere né collocare oggetti che possano lasciare segni
indelebili. L'inchiostro, una volta penetrato nella supercie,
non può più essere rimosso.
• Non aggere adesivi sulla tastiera. Una volta assi,
potrebbe risultare impossibile rimuovere alcuni adesivi a
causa della colla utilizzata, che può tra l'altro scolorire la
supercie.
• Per rimuovere lo sporco ostinato, utilizzare un prodotto
specico per tastiere (reperibile in commercio) che non
contenga abrasivi. Iniziare stronando leggermente. Se
lo sporco non viene rimosso, stronare utilizzando una
pressione sempre maggiore, facendo attenzione a non
graare i tasti.
Copyright/Licenze/Marchi di fabbrica
• È vietato per legge eettuare registrazioni audio e video,
copiare o rivedere i lavori protetti da copyright di terze parti
(opere musicali, opere visive, trasmissioni, esibizioni dal vivo
o altre opere), sia in parte che per intero, e anche distribuire,
vendere, cedere in noleggio, riprodurre o trasmettere tali
lavori senza l'autorizzazione del proprietario del copyright.
• Non utilizzare questo prodotto per ni che potrebbero
violare i diritti di copyright detenuti da terze parti. Il
Produttore non si assume alcuna responsabilità in alcun caso
in relazione a violazioni di copyright di terze parti provocate
dall'utilizzo di questo prodotto.
• Il copyright sul contenuto di questo prodotto (i dati delle
waveform, degli stili, i pattern di accompagnamento, le frasi,
i loop audio e i dati immagine) è di esclusiva proprietà di
Roland Corporation.
• Gli acquirenti del presente prodotto possono utilizzare
tali contenuti (tranne i dati dei brani, ad esempio i brani
demo) per la creazione, l'esecuzione, la registrazione e la
distribuzione di opere musicali originali.
• Gli acquirenti del presente prodotto NON sono autorizzati
all'estrazione di tali contenuti, originali o in forma modicata,
per scopi di distribuzione di media registrati con tali mezzi, o
per la divulgazione su una rete di computer.
• Roland, GS e SuperNATURAL sono marchi o marchi registrati
di Roland Corporation negli Stati Uniti d'America e/o in altri
paesi.
10
Page 43

Piano digital
Contenido
Guía de utilización rápida (Panel frontal) 2
Encendido/apagado de la unidad . . . . . . . . . . . . . . . . . . . . . . . . . . . . . . .2
Ajuste del volumen . . . . . . . . . . . . . . . . . . . . . . . . . . . . . . . . . . . . . . . . . . . . . 2
Selección de sonido . . . . . . . . . . . . . . . . . . . . . . . . . . . . . . . . . . . . . . . . . . . . . 2
Superposición de dos sonidos en capas (Dual) . . . . . . . . . . . . . . . . . . . 2
Reproducción de distintos sonidos con las manos izquierda y
derecha (Split) . . . . . . . . . . . . . . . . . . . . . . . . . . . . . . . . . . . . . . . . . . . . . . . . . . 2
Cambio de la respuesta del teclado (Key Touch) . . . . . . . . . . . . . . . . . . 2
Utilización del metrónomo . . . . . . . . . . . . . . . . . . . . . . . . . . . . . . . . . . . . . .3
Reproducción de canciones o ritmos (Acompañamiento
automático para acordes) . . . . . . . . . . . . . . . . . . . . . . . . . . . . . . . . . . . . . . . 3
Grabación de una interpretación . . . . . . . . . . . . . . . . . . . . . . . . . . . . . . . . 3
Funciones avanzadas 6
Ajuste del brillo (Brilliance) . . . . . . . . . . . . . . . . . . . . . . . . . . . . . . . . . . . . . .6
Ajuste de la reverberación (Ambience) . . . . . . . . . . . . . . . . . . . . . . . . . . . 6
División del teclado en dos (Twin Piano) . . . . . . . . . . . . . . . . . . . . . . . . .6
Desactivación de los botones (Panel Lock) . . . . . . . . . . . . . . . . . . . . . . .6
Almacenamiento de ajustes (Memory Backup) . . . . . . . . . . . . . . . . . . .6
Restablecimiento de los valores predeterminados de fábrica
(Factory Reset) . . . . . . . . . . . . . . . . . . . . . . . . . . . . . . . . . . . . . . . . . . . . . . . . . . 6
Formateo de una memoria USB. . . . . . . . . . . . . . . . . . . . . . . . . . . . . . . . . .6
Ajuste de varias funciones (Function Mode) . . . . . . . . . . . . . . . . . . . . . . 7
Coincidencia del tono con otros instrumentos (Master
Tuning) . . . . . . . . . . . . . . . . . . . . . . . . . . . . . . . . . . . . . . . . . . . . . . . . . . . 7
Cambio de la clave del teclado (Transpose) . . . . . . . . . . . . . . . . 7
Antes de empezar a tocar 4
Colocación del F-20 en un soporte . . . . . . . . . . . . . . . . . . . . . . . . . . . . . . . 4
Conexiones del panel posterior . . . . . . . . . . . . . . . . . . . . . . . . . . . . . . . . . . 4
Acoplamiento del atril . . . . . . . . . . . . . . . . . . . . . . . . . . . . . . . . . . . . . . . . . .5
Encendido/apagado de la unidad . . . . . . . . . . . . . . . . . . . . . . . . . . . . . . .5
Apagado automático de la unidad transcurridos unos minutos
(Auto O) . . . . . . . . . . . . . . . . . . . . . . . . . . . . . . . . . . . . . . . . . . . . . . . . . . . . . .5
Escuchar las canciones de prueba . . . . . . . . . . . . . . . . . . . . . . . . . . . . . . . 5
Diseño energéticamente eciente y respetuoso con el medio ambiente
Cuando han transcurrido 30 minutos desde la última vez que se tocó o utilizó el F-20,
este se apaga automáticamente.
* Si no desea que la unidad se apague automáticamente, cambie el
ajuste “Auto O” (p. 5).
Acerca de la función LAN inalámbrica 8
¿Qué es la función LAN inalámbrica? . . . . . . . . . . . . . . . . . . . . . . . . . . . . . 8
Método de conexión básico (Conectar mediante WPS) . . . . . . . . . . . 8
Conexión en modo Ad-Hoc . . . . . . . . . . . . . . . . . . . . . . . . . . . . . . . . 8
Solución de problemas 9
Deutsch Français Italiano Español Português NederlandsEnglish
Especicaciones principales
Teclado 88 teclas (teclado G con tacto de marl y escape)
Alimentación Adaptador de CA
9 W (2 W–18 W)
9 W: Consumo medio cuando se toca el piano con
Consumo energético
Dimensiones 1.282 (Ancho) x 296 (Fondo) x 132 (Alto) mm
Peso 20 kg
Antes de usar esta unidad, lea detenidamente las secciones “UTILIZACIÓN SEGURA DE LA UNIDAD” y “NOTAS IMPORTANTES” (folleto aparte
“UTILIZACIÓN SEGURA DE LA UNIDAD” y p. 10 del Manual de instrucciones). En estas secciones encontrará información importante acerca de la utilización
correcta de la unidad. Además, para familiarizarse con todas las funciones que le ofrece esta nueva unidad, lea con atención y en su totalidad el folleto
“UTILIZACIÓN SEGURA DE LA UNIDAD” y el Manual de instrucciones. Conserve este manual y téngalo a mano para consultarlo como referencia.
Copyright © 2013 ROLAND CORPORATION
Todos los derechos reservados. Se prohíbe la reproducción de cualquier parte de esta publicación, en cualquier formato, sin la previa
autorización por escrito de ROLAND CORPORATION.
el volumen en la posición central
2 W: Consumo justo después del encendido; sin
tocar nada
18 W: Consumo nominal
Accesorios
Opciones
(se venden por
separado)
* Con el n de mejorar el producto, las especicaciones y/o el aspecto
de la unidad pueden modicarse sin previo aviso.
Manual de instrucciones, folleto “UTILIZACIÓN SEGURA
DE LA UNIDAD”, atril, adaptador de CA, cable de
alimentación (para conectar el adaptador de CA), pedal
Damper (capaz de detección continua)
Soporte especíco (KSC-68), soporte para teclado
(KS-18Z, KS-12), pedal Damper (DP-10), memoria USB (*1),
adaptador USB inalámbrico (WNA1100-RL) (*1)
*1: Use una memoria USB y un adaptador USB
inalámbrico adquirido a través de Roland.
El funcionamiento con otros productos no está
garantizado.
Page 44

Guía de utilización rápida (Panel frontal)
Selección de sonido
Mantenga pulsado el botón TONE y pulse una de las siguientes teclas; el sonido cambia.
Selección de Piano
Grand Piano 2
Grand Piano 1
Grand Piano 3
1
Mantener pulsado
2
Selección de otros sonidos
Strings 2
Strings 1
Harp
1
Mantener pulsado
2
Harpsichord 1
Ragtime Piano
Jazz Organ 2
Jazz Organ 1
Harpsichord 2
Church Organ 2
Church Organ 1
Accordion
Jazz Scat
Choir 1
Choir 3
Choir 2
Selección de E. Piano
Vibraphone
1
Mantener pulsado
E. Piano 1
2
E. Piano 2
E. Piano 3
Synth Bell
Celesta
Clav.
Superposición de dos sonidos en capas (Dual)
Si pulsa dos botones TONE al mismo tiempo
puede superponer dos sonidos.
Balance de mezcla
Puede ajustar el balance del mezcla de los dos sonidos (cinco pasos, 0 = valor
predeterminado).
Acoustic Bass
A.Bass + Cymbal
Fingered Bass
Thum Voice
Botón TONE que
está iluminado
1
Mantener pulsado
Balance de mezcla para
modo Dual
Balance de mezcla para
modo Split
Decay Choir
Nylon-str.Gt
Synth Pad
Steel-str.Gt
Decay Strings
Decay Choir Pad
Mantener pulsado
+ ––
00
+
2
Encendido/apagado de la unidad
(p. 5)
Ajuste del volumen
Utilice el mando [VOLUME] para ajustar el volumen.
Reproducción de distintos sonidos con las manos izquierda y derecha (Split)
Active el botón [SPLIT] para dividir el teclado en las secciones izquierda y derecha, y
poder reproducir un sonido distinto en cada sección.
Si mantiene pulsado el botón [SPLIT], el botón TONE asignado a la sección izquierda se
iluminará.
Cambio de sonidos (Split)
Cambio del sonido
izquierdo
Cambio del sonido
derecho
Mientras mantiene pulsado el botón [SPLIT], mantenga
pulsado uno de los botones TONE y pulse una tecla.
Use el mismo procedimiento indicado en la sección
“Selección de sonido” anterior.
Cambio del punto donde se divide el teclado (Split Point)
Mantenga pulsado el botón [SPLIT] y pulse una tecla (valor predeterminado: F 3).
1
Mantener pulsado
Cambio de la respuesta del teclado (Key Touch)
Si activa el botón [KEY TOUCH], puede cambiar el
modo en que el teclado responde al tocarlo.
Cuando el botón [KEY TOUCH] está desactivado, el
toque “MEDIUM” (equivalente a un piano acústico)
es el ajuste seleccionado.
LIGHT
LIGHT
HEAVY
FIX
HEAVY
FIX
Puede conseguir una reproducción fortissimo () tocando con menos fuerza que
con el ajuste “MEDIUM”, de modo que pueda tocar el teclado con más suavidad. Con
este ajuste tocar resulta más fácil, incluso para los niños.
Debe tocar el teclado con más fuerza que con el ajuste “MEDIUM” para lograr una
interpretación fortissimo (), es decir, hay que ejercer más fuerza al tocar el teclado.
Tocando de un modo dinámico se añade más sentimiento a la interpretación.
El sonido se reproduce a un volumen determinado, independientemente de la
fuerza ejercida al tocar las teclas.
B1 B6
2
1
Mantener pulsado
2
2
Page 45

Guía de utilización rápida (Panel frontal)
Utilización del metrónomo
Active el botón [METRONOME] para oír el sonido del metrónomo. Use los botones [SLOW]/[FAST] para ajustar el tempo.
Cambio del número de compases
Puede elegir entre 0 (solo compases débiles), 2 (2 compases), 3 (3 compases),
4 (4 compases), 5 (5 compases) o 6 (6 compases).
52
0 3 4 6
1
Mantener pulsado
También puede cambiar el número de compases manteniendo pulsado el botón
[METRONOME] y utilizando los botones [SLOW]/[FAST].
2
Especicación de un tempo numérico
También puede especicar un valor numérico para el tempo (20–250) (valor
predeterminado: 108).
1
Mantener pulsado
Ejemplo: Para introducir el valor 120, mantenga pulsado el botón [METRONOME] y
Reproducción de canciones o ritmos (Acompañamiento automático para acordes)
Para reproducir o detener una canción, pulse el botón [SONG]. Para reproducir o detener el ritmo
(acompañamiento automático basado en los acordes que toca), pulse el botón [RHYTHM].
Puede seleccionar una canción o ritmo de la memoria interna manteniendo pulsado el botón
[SONG] o [RHYTHM], y pulsando una de las teclas siguientes.
REFERENCIA
Selección de una canción de la memoria interna
1
Mantener pulsado
Para obtener más información sobre los nombres de las canciones y los
nombres de los ritmos, consulte la “Lista de canciones de la memoria interna” y
la “Lista de ritmos” al nal de este manual.
Pulse la tecla del extremo derecho;
todas las canciones se reproducen de
forma consecutiva.
2
Selección de un ritmo
1
pulse las teclas en este orden: 1
Flujo del ritmo
Intro
[RHYTHM] activado [RHYTHM] desactivado
Mantener pulsado
2
2
1 3 5 8
0 2 4 6 7 9
2 0 ACEPTAR.
Acompañamiento
ACEPTAR
Deutsch Français Italiano Español Português NederlandsEnglish
Fin
Grabación de una interpretación
A continuación se explica cómo se graba una canción.
* Antes de comenzar, seleccione el sonido que desea grabar.
1. Pulse el botón [SONG] y el botón [RHYTHM] simultáneamente.
* Para cancelar la grabación, pulse el botón [SONG] y el botón [RHYTHM]
simultáneamente otra vez.
2. Toque el teclado para iniciar la grabación.
3. Pulse el botón [SONG] para detener la grabación.
Si desea realizar la grabación con el metrónomo
* Haga que suene el metrónomo y especique el número de compases y el tempo
antes de iniciar la grabación.
Si pulsa el botón [SONG] en el paso 2, la grabación empieza después de dos
compases.
Grabación con el ritmo
* Seleccione un ritmo antes de iniciar la grabación.
Si pulsa el botón [RHYTHM] en el paso 2, la grabación empieza después de dos
compases.
Balance de mezcla
Puede ajustar el balance del mezcla entre la canción/ritmo y el teclado (cinco niveles,
0 = valor predeterminado).
+0–
1
Mientras
mantiene
pulsado uno de estos botones
2
Si desea volver a realizar la grabación
Empiece a grabar otra vez desde el paso 1.
Almacenamiento de la canción grabada en una memoria USB
* Conecte la memoria USB antes de continuar.
Mantenga pulsado el botón [KEY TOUCH] y pulse el botón [SONG].
Cuando los indicadores LED de todos los botones estén iluminados,
esto signica que los datos se han guardado (hasta un máximo de
99 canciones).
Reproducción de una canción de la memoria USB
Mantenga pulsado el botón [SONG] y pulse el botón “F 3”.
Puede usar las dos teclas adyacentes al botón “F
de la memoria USB.
3” para seleccionar una canción
F
3
Reproducir
Anterior
Siguiente
Reproducción de la canción que ha grabado
E3
1
Mantener pulsado
2
1
Mantener pulsado
* También puede copiar un archivo WAV o un archivo MIDI del ordenador a la
memoria USB y reproducirlo en el F-20. Para obtener más información sobre los
formatos que se pueden reproducir, consulte el nal de este manual.
2
3
Page 46

Antes de empezar a tocar
Colocación del F-20 en un soporte
Si desea colocar el F-20 en un soporte, use uno de estos modelos: Roland KSC-68 (consulte el Manual de instrucciones del KSC-68), KS-18Z o KS-12.
* Procure no pillarse los dedos al instalar el soporte.
KS-18Z
Alinee la parte delantera del
F-20 con la parte delantera del
soporte.
Realice el ajuste de
manera que la altura
no sea superior
a 1 metro (ajuste
el soporte a un
nivel no superior al
segundo nivel desde
la parte inferior).
Alinee las patas del soporte con
los tornillos del panel posterior.
Conexiones del panel posterior
Puerto USB MEMORY
Conecte una memoria USB aquí.
• Si conecta una memoria USB puede reproducir
o grabar canciones en ella.
• Si conecta un adaptador USB inalámbrico
(WNA1100-RL, se vende por separado), puede
usar aplicaciones iOS que admiten conexión
inalámbrica (p. 8).
• El volumen de los altavoces del F-20 se reducirá
si conecta un dispositivo USB al puerto USB
MEMORY.
* No conecte ni desconecte jamás una memoria
USB mientras la unidad esté encendida. Si lo
hace, los datos de la unidad o los datos de la
memoria USB podrían resultar dañados.
* Conecte con cuidado la
memoria USB hasta que esté
bien en su sitio.
Conector PEDAL
Conecte el pedal
Damper incluido.
KS-12
Conector OUTPUT
Si conecta unos altavoces
amplicados en este conector,
el sonido de la unidad se
escuchará a través de ellos.
Ajuste la anchura del soporte
de modo que los tacos de
goma del F-20 queden a
ambos lados del soporte.
Lado del teclado
Vista superior
Conector PHONES
Conecte aquí los auriculares (se venden por
separado).
* Si solo va a conectar un par de auriculares,
hágalo en el conector PHONES.
Si hay dos personas que
van a utilizar auriculares
(se venden por
separado), conecte unos
auriculares al conector
PHONES y los otros al
conector OUTPUT.
Para evitar que el equipo no
funcione correctamente o que
sufra algún daño, baje siempre
el volumen y apague todas
las unidades antes de realizar
cualquier conexión.
Puerto USB COMPUTER
Utilice un cable USB de venta en comercios para conectar el puerto USB
COMPUTER del F-20 al puerto USB del ordenador y poder hacer lo siguiente.
• El F-20 puede reproducir los datos SMF que se reproducen mediante software
compatible con MIDI.
• Los datos MIDI se pueden transferir entre el F-20 y el software secuenciador, lo
que le ofrece numerosas posibilidades para producir y editar música.
4
Coloque el adaptador de CA de manera que el lado
en el que se encuentra el indicador luminoso (vea la
ilustración) quede hacia arriba y el lado que tiene la
información de texto quede hacia abajo.
El indicador se iluminará cuando enchufe el
adaptador de CA a una toma de CA.
Conector DC IN
Conecte aquí el adaptador de CA incluido.
A la toma de CA
Cable de alimentación
Page 47

Antes de empezar a tocar
Acoplamiento del atril
A continuación se explica cómo se acopla el atril incluido.
1. Aoje los tornillos de acoplamiento del atril situados en la
parte posterior del piano (dos ubicaciones).
2. Coloque el atril entre los tornillos y el chasis.
3. Utilice una mano para sujetar el atril y la otra para apretar
los tornillos (dos ubicaciones) y jar el atril en su sitio.
Encendido/apagado de la unidad
Una vez que todo esté correctamente conectado (p. 4), asegúrese
de seguir el procedimiento siguiente para encender los distintos
dispositivos. Si los enciende en un orden incorrecto, puede
provocar un funcionamiento anómalo o fallos en los dispositivos.
Encendido
1. Gire el mando [VOLUME] todo lo posible hacia la izquierda
para bajar el volumen al mínimo.
2. Pulse el botón [ ] (Encendido) para encender la unidad.
* Esta unidad incorpora un circuito de protección. Es necesario
que pase un breve intervalo de tiempo (unos cuantos segundos)
después de encenderla para que funcione con normalidad.
3. Utilice el mando [VOLUME] para ajustar el volumen.
* Antes de encender o apagar la unidad, asegúrese siempre de
bajar el volumen. Incluso con el volumen bajado, podría oírse
algún sonido al encender o apagar la unidad. No obstante, esto
es normal y no indica ningún fallo de funcionamiento.
Apagado
1. Gire el mando [VOLUME] todo lo posible hacia la izquierda
para bajar el volumen al mínimo.
Deutsch Français Italiano Español Português NederlandsEnglish
* Cuando vaya a acoplar el atril, debe usar una mano para
sujetarlo con rmeza y que no se caiga. Tenga cuidado de no
cogerse la mano.
* Una vez colocado, no aplique una fuerza excesiva al atril.
* Para acoplar el atril debe utilizar los tornillos de acoplamiento
del atril que se han colocado en el piano.
Para retirar el atril, sujételo con una mano mientras aoja los
tornillos con la otra. Retire el atril y, seguidamente, vuelva a apretar
bien los tornillos.
Precauciones al colocar la unidad sobre un soporte
Asegúrese de seguir las indicaciones del Manual de
instrucciones cuando vaya a colocar la unidad sobre un
soporte (p. 4).
Una colocación incorrecta puede dar lugar a cierta
inestabilidad y provocar que la unidad se caiga o que el soporte
vuelque, con el consiguiente riesgo de que se produzcan lesiones.
2. Mantenga pulsado el botón [ ] (Encendido) durante uno
o más segundos; la unidad se apagará.
Apagado automático de la unidad
transcurridos unos minutos (Auto O)
La unidad se apagará automáticamente cuando haya
transcurrido un periodo determinado de tiempo desde la
última vez que se utilizó para reproducir o tocar música, o se
accionó alguno de sus botones o controles (función Auto O).
Si no desea que la unidad se apague automáticamente, cambie
el ajuste Auto O a la posición “OFF”.
(Valor predeterminado: 30 min.)
* Para restablecer el suministro de corriente, vuelva a encender la
unidad.
1 2
Mantener
pulsado
* La unidad recordará el ajuste especicado incluso después de
apagarla.
30 min.
10 min.
240 min.
DESACT.
3
Coloque el instrumento a 30 cm de distancia de la pared
Los altavoces del F-20 van montados en su
panel posterior. Por este motivo, el sonido
de los altavoces podría no oírse bien si el
panel posterior se coloca directamente
contra la pared.
¡No deje que el instrumento se caiga!
Para evitar que el F-20 se caiga, no
le aplique una fuerza excesiva, no se
siente ni se suba encima de él.
30 cm
Escuchar las canciones de prueba
* Todos los derechos
reservados. El uso
no autorizado
1
Mientras mantiene pulsado uno de estos botones
Hay tres canciones de prueba.
Pulse el botón [SONG] para detenerlas.
2
de este material
para propósitos
no privados ni
de ocio personal
se considera una
violación de las
leyes aplicables.
5
Page 48

Funciones avanzadas
Ajuste del brillo (Brilliance)
Así es como se ajusta el brillo del sonido (3 niveles).
C5 C6
1
2
Mantener
pulsado
NORMAL
BRILLANTE
SUAVE
3
Ajuste de la reverberación (Ambience)
Puede ajustar la reverberación del sonido y conseguir la sensación
de que está actuando en una sala de conciertos (5 niveles).
C5 C6
PREDET.
1 2
Mantener
pulsado
+–
3
División del teclado en dos (Twin Piano)
Puede dividir el teclado en las secciones izquierda y derecha para que
dos personas puedan tocar en la misma escala tonal. Esto signica
que puede utilizar el teclado como si fuera dos pianos distintos.
C5 C6
PAIR
1 2
Mantener
pulsado
El teclado se dividirá en las secciones de derecha e izquierda;
la “C central” queda en el centro de cada sección.
Puede elegir uno de los modos siguientes según como desee
escuchar el sonido.
Valor Explicación
PAIR
INDIVIDUAL
* Las secciones de izquierda y derecha tendrán el mismo tono
(Piano). La función de división del teclado se cancelará cuando
se pulse uno de los botones TONE.
* El pedal Damper afecta únicamente a la sección derecha del teclado.
El sonido se oirá desde la derecha cuando toque en la
parte derecha del teclado, y desde la izquierda cuando
toque en la parte izquierda.
Las notas que se tocan en la sección derecha se oirán por
el altavoz derecho, y las notas que se tocan en la sección
izquierda se oirán por el altavoz izquierdo.
DESACT.
3
Desactivación de los botones (Panel Lock)
Encienda la unidad teniendo pulsado el botón [PIANO]. Siga
manteniendo pulsado el botón [PIANO] durante al menos seis
segundos. La función de bloqueo del panel se activará y se
desactivarán todos los botones a excepción de [
Esto evita que se puedan cambiar los tonos o los ajustes si se pulsa
algún botón sin darse cuenta.
La función de bloqueo del panel se cancelará al apagar la unidad.
6
] (Encendido).
Almacenamiento de ajustes (Memory Backup)
Al apagar la unidad se restablecerá el valor predeterminado de los
distintos ajustes. No obstante, y si así lo desea, puede guardar los
ajustes siguientes para que queden memorizados incluso después
de apagar la unidad. Esta función se denomina “Memory Backup”.
Ajustes guardados mediante Memory Backup Página
Toque de las teclas p. 2
Brillo p. 6
Ambiente p. 6
Anación principal p. 7
1. Mantenga pulsado el botón [KEY TOUCH] y pulse el botón
[RHYTHM].
Los botones [OTHER] y [SPLIT] se pondrán a parpadear.
Para cancelar la función, pulse el botón [OTHER].
2. Para guardar los ajustes, pulse el botón [SPLIT].
Cuando los indicadores LED de todos los botones estén iluminados,
esto signica que la operación ha nalizado.
Restablecimiento de los valores predeterminados de fábrica (Factory Reset)
Los ajustes modicados mediante el modo de funciones (p. 7)
pueden restablecerse a sus valores predeterminados de fábrica.
NOTA
Cuando se restablecen los valores predeterminados de
fábrica, se reiniciarán todos los ajustes y se borrarán las
canciones que se hayan grabado en la memoria interna.
INDIVIDUAL
1. Encienda la unidad teniendo pulsado el botón [KEY TOUCH].
Siga manteniendo pulsado el botón [KEY TOUCH] durante al
menos seis segundos.
Los botones [OTHER] y [SPLIT] se pondrán a parpadear.
Para cancelar la función, pulse el botón [OTHER].
2. Para llevar a cabo el restablecimiento de los valores
predeterminados de fábrica, pulse el botón [SPLIT].
Cuando los indicadores LED de todos los botones estén iluminados,
esto signica que la operación ha nalizado.
3. Apague la unidad y vuelva a encenderla.
Formateo de una memoria USB
A continuación se explica cómo se reinicia (formatea)
todo el contenido almacenado en una memoria USB.
NOTA
• La operación de formateo borrará todo el contenido
almacenado en la memoria USB.
• Antes de usar una memoria USB nueva con el F-20 por primera
vez, debe formatear la memoria USB en cuestión.
1. Conecte la memoria USB que desea formatear en el
puerto USB MEMORY.
2. Encienda la unidad teniendo pulsado el botón [SONG].
Siga manteniendo pulsado el botón [SONG] durante al
menos seis segundos.
Los botones [OTHER] y [SPLIT] se pondrán a parpadear.
Para cancelar la función, pulse el botón [OTHER].
3. Para llevar a cabo el formateo, pulse el botón [SPLIT].
Cuando los indicadores LED de todos los botones estén iluminados,
esto signica que la operación ha nalizado.
4. Apague la unidad y vuelva a encenderla.
Page 49

Ajuste de varias funciones (Function Mode)
Para realizar ajustes en el modo de funciones, mientras mantiene pulsado el botón [KEY TOUCH], mantenga pulsado también el botón
1 2
Mantener pulsado
C8
30 min.
C7
C6
C5
C4
2
440,0 Hz
INDIVIDUAL
PAIR
NORMAL
PREDET.
BRILLANTE
+3
+1
-2
-4
-6
[PIANO] y luego pulse una de las teclas que se muestran en la ilustración.
3
DESACT.
240 min.
Auto O (p. 5)
10 min.
1
Modo de memoria USB
+
Anación principal
–
División del teclado en dos
DESACT.
(p. 6)
Brillo (p. 6)
SUAVE
+
Ambiente (p. 6)
–
+5
+4
+2
0
Transposición
-1
-3
-5
Funciones avanzadas
Cambio del ajuste de la memoria USB (USB Memory Mode)
En algunos casos, cuando se conecta una memoria USB al puerto USB MEMORY, los datos pueden tardar
un poco más en cargarse o podrían no cargarse correctamente. En este caso, puede solucionar el problema
cambiando el ajuste del modo USB MEMORY a “1”. Cuando la unidad sale de la fábrica está denido en “2”.
Normalmente no es necesario realizar este ajuste.
* Después de cambiar este ajuste, tendrá que apagar la unidad y volver a encenderla. El ajuste nuevo se
aplica cuando se vuelve a encender la unidad.
Coincidencia del tono con otros instrumentos (Master Tuning)
Si toca junto con otros instrumentos y en otras circunstancias similares, puede hacer coincidir el tono
estándar con el de otro instrumento.
El tono estándar normalmente hace referencia al tono de la nota que suena al tocar la tecla A central. Para
conseguir un sonido de grupo más claro al tocar con uno o más instrumentos, asegúrese de que el tono
estándar de cada instrumento coincide con el de los demás. Esta coincidencia de todos los instrumentos en
un tono estándar se denomina “anación principal”.
Puede ajustar la anación en la frecuencia de 415,3 Hz–440,0 Hz (valor predeterminado)–466,2 Hz (en pasos
de 0,1 Hz).
Cambio de la clave del teclado (Transpose)
Puede utilizar la función de transposición para transponer el
teclado en semitonos.
Por ejemplo, si una canción está en clave de E mayor y
desea tocarla con la sección asignada a C mayor, dena la
transposición en un valor de “+4”.
Si toca C E G Sonará como E G B
Control de los equipos de vídeo (Visual Control Mode)
La función de control visual permite controlar imágenes en paralelo a la interpretación.
Si ha denido el modo de control visual como “MVC” (MIDI Visual Control, p. 9) o “V-LINK”, al tocar el teclado
de la unidad podrá controlar las imágenes generadas por el dispositivo de control visual conectado a la
unidad a través de USB MIDI.
Tabla de funciones de control visual
Al tocar con las 12 teclas más bajas de esta unidad (A0–G 1) se transmitirán los siguientes mensajes MIDI.
Función de control visual Mensaje MIDI transmitido Operación de esta unidad
Cambio de imágenes
CC 0 (Selección de banco): 0–4 Reproduce las teclas negras
Cambio de programa: 1-7 Reproduce las teclas blancas
Deutsch Français Italiano Español Português NederlandsEnglish
Ad-Hoc DESACT.
C3
C2
C1
Ad-Hoc ACTIV.
MVC
DESACT.
16
14
11
9
7
4
2
DESACT.
LAN inalámbrica (p. 8)
WPS
V-LINK
Modo de control visual
15
13
12
10
Canal de transmisión
8
MIDI
6
5
3
1
ACTIV.
Control local
Conguración del canal de transmisión MIDI
Este ajuste especica el canal MIDI por el que transmitirá la unidad.
MIDI utiliza dieciséis “canales MIDI” numerados del 1 al 16. Mediante la conexión de los dispositivos MIDI y
la especicación del canal MIDI adecuado para cada dispositivo, puede reproducir o seleccionar sonidos en
esos dispositivos. Esta unidad recibirá los dieciséis canales (1–16).
Prevención de notas duplicadas al trabajar con un
sintetizador de software
Si conecta un sintetizador de software a USB
MIDI, cambie esta opción a “DESACT.”.
La función Thru está activada en la mayoría de los
sintetizadores de software, por eso las notas que
toque en el teclado pueden sonar duplicadas
o cortarse. Para evitar que esto suceda, puede
activar el ajuste “Local O” para desconectar el
teclado y el generador de sonido interno.
(Local Control)
Control local
Generador de sonido
Entrada
USB MIDI
Salida
USB MIDI
Sintetizador de
software
Ordenador
7
Page 50

Acerca de la función LAN inalámbrica
Una vez realizada correctamente la conexión, el indicador LED del
¿Qué es la función LAN inalámbrica?
Al conectar el adaptador USB inalámbrico (WNA1100-RL, se vende
por separado) al puerto USB MEMORY del F-20, podrá usar las
aplicaciones que admiten conexión inalámbrica (aplicaciones iOS
como “Piano Partner” o “Air Performer”).
iPhone, etc.
Punto de acceso LAN inalámbrico
(por ejemplo, router LAN inalámbrico)
F-20
Adaptador USB inalámbrico
(se vende por separado:
WNA1100-RL)
adaptador USB inalámbrico se iluminará.
Puede usar la conexión inalámbrica de una aplicación iOS como
“Air Performer”. Seleccione “F-20” en la pantalla de selección de
instrumento de la aplicación iOS.
NOTA
* El dispositivo (por ejemplo un iPhone) donde se ejecuta la
aplicación debe estar conectado a la misma red.
RECUERDE
• Los datos de conexión se almacenan en la memoria cuando
se realiza el procedimiento WPS; el dispositivo se conectará
automáticamente a la red inalámbrica la próxima vez.
• Todos los datos de conexión se borrarán si restablece los valores
predeterminados de fábrica.
LAN inalámbrica LAN inalámbrica
Elementos necesarios para usar la función
LANinalámbrica
Adaptador USB inalámbrico (se vende por separado: WNA1100-RL)
Punto de acceso LAN inalámbrico (por ejemplo, router LAN inalámbrico) *1 *2
iPhone, iPad, iPod touch, etc.
*1 El punto de acceso LAN inalámbrico que utilice debe admitir WPS.
Si no puede conectar con el punto de acceso LAN inalámbrico,
intente establecer la conexión mediante el modo Ad-Hoc.
*2 No se garantiza la conexión con todos los tipos de punto de
acceso LAN inalámbrico.
Método de conexión básico (Conectar mediante WPS)
La primera vez que conecte el F-20 a una red inalámbrica nueva,
tendrá que realizar el procedimiento siguiente (WPS) para unirse a
la red inalámbrica.
Este procedimiento solo es necesario la primera vez. (Una vez que
se haya unido a la red, ya no tendrá que repetir el procedimiento.)
¿Qué es WPS?
Es un estándar que permite establecer una conguración segura cuando
se conecta a un punto de acceso LAN inalámbrico. Se recomienda utilizar
WPS cuando conecte a un punto de acceso LAN inalámbrico.
1. Conecte el adaptador USB inalámbrico (WNA1100-RL, se
vende por separado) al puerto USB MEMORY del F-20.
Indicador LED del adaptador USB inalámbrico
LED Explicación
Iluminado El adaptador está conectado a una red.
Apagado El adaptador no está conectado a una red.
Parpadeando El adaptador está buscando una red.
Conexión en modo Ad-Hoc
Aquí se explica cómo se conecta en modo Ad-Hoc.
¿Qué es el modo Ad-Hoc?
El modo Ad-Hoc le permite conectar el F-20 directamente a un iPhone
u otro dispositivo inalámbrico sin necesidad de un punto de acceso
LAN inalámbrico. Es una forma muy práctica de usar el F-20 con un
iPhone u otro dispositivo inalámbrico cuando se encuentra en un lugar
donde el punto de acceso LAN inalámbrico que utiliza normalmente
no está disponible, por ejemplo cuando no está en casa.
Limitaciones
Un iPod touch u otro dispositivo inalámbrico conectado en
modo Ad-Hoc no podrá comunicarse con Internet ni con otros
dispositivos inalámbricos. Sin embargo, un iPhone u otro
dispositivo inalámbrico con función móvil podrá conectarse a
Internet a través de la conexión móvil.
Tenga en cuenta que la utilización de una conexión móvil para
acceder a Internet puede conllevar gastos adicionales, depende
de la tarifa del plan que tenga contratado.
2. Mantenga pulsado el botón del adaptador USB
inalámbrico durante tres segundos.
El indicador LED del adaptador USB inalámbrico
parpadeará.
NOTA
* Si al pulsar el botón aplica una fuerza excesiva al adaptador
USB, podría dañarlo. Tenga cuidado.
RECUERDE
También puede realizar el procedimiento WPS pulsando “WPS”
en “Ajuste de varias funciones (Function Mode)” (p. 7) en lugar de
pulsar el botón del adaptador USB inalámbrico.
3. Realice la operación WPS en su punto de acceso LAN
inalámbrico (por ejemplo, pulse el botón WPS de su punto
de acceso LAN inalámbrico).
Para obtener más información sobre la operación WPS de su punto
de acceso LAN inalámbrico, consulte el Manual de instrucciones del
punto de acceso LAN inalámbrico.
8
1. En “Ajuste de varias funciones (Function Mode)” (p. 7),
pulse “Ad-Hoc ON”.
2. En el iPhone u otro dispositivo inalámbrico que desee
conectar, seleccione “F-20” para establecer la conexión.
(Por ejemplo, en un iPhone, seleccione [Ajustes]
[Wi-Fi]
Aparecerá una pantalla para que introduzca la
contraseña; escriba “f20ak”.)
Ad-Hoc SSID F-20
Contraseña f20ak
Para obtener más información sobre cómo se conecta a una red
LAN inalámbrica desde un iPhone u otro dispositivo, consulte el
manual de instrucciones de ese dispositivo.
[Seleccionar red] para seleccionar “F-20”.
3. Cuando desee poner n a la conexión en modo Ad-Hoc,
restablezca la conguración del iPhone en [Ajustes]
[Wi-Fi]
[Seleccionar red] a su estado anterior.
Page 51

Solución de problemas
Problema Causa/Solución
Todos los
indicadores LED,
menos el del botón
] (Encendido),
[
están parpadeando.
El sonido sale
por los altavoces
a pesar de estar
conectados los
auriculares.
A pesar de
utilizar auriculares
y haber silenciado
el sonido, se oye un
sonido repetitivo al
tocar el teclado.
La unidad se apaga
sola.
La unidad no se
enciende.
El pedal no
funciona o está
“bloqueado”.
No hay sonido o
no hay sonido al
reproducir una
canción.
El tono del teclado
o de la canción es
incorrecto.
Los sonidos
se oyen dos
veces (duplicados)
cuando se toca el
teclado.
El sonido de las
notas más altas
cambia de repente
a partir de una tecla
en concreto.
Se oye un timbre
muy agudo.
El volumen baja.
Llega corriente excesiva al puerto USB MEMORY.
Compruebe si hay algún problema con la memoria USB. A continuación,
apague la unidad y vuelva a encenderla.
¿Es posible que los auriculares se hayan conectado al conector OUTPUT en
lugar de al conector PHONES (p. 4)?
Esta unidad utiliza un teclado de acción martillo para simular el efecto
de un piano acústico de la forma más realista. Por este motivo, se oirá el
golpeteo de los martillos al tocar el teclado, igual que sucedería al tocar un
piano acústico. Como esta unidad permite ajustar el volumen, es posible
que el sonido de los martillos se note en algunos casos, pero esto no indica
un problema de funcionamiento. Si le preocupa que las vibraciones se
transmitan por el suelo o las paredes, puede reducirlas al mínimo alejando
el piano de la pared o colocando una alfombra antivibraciones diseñada
especialmente para pianos (de venta en comercios).
Cuando han transcurrido 30 minutos desde la última vez que tocó o
utilizó la unidad, esta se apaga automáticamente (esto forma parte de la
conguración predeterminada de fábrica).
Si no quiere que la unidad se apague automáticamente, cambie el ajuste
“Auto O” a “OFF” (p. 5).
¿Está bien conectado el adaptador de CA (p. 4)?
¿Está bien conectado el pedal?
Asegúrese de que el cable está bien enchufado al conector PEDAL (p. 4).
¿Es posible que el volumen de la unidad esté al mínimo?
¿Hay conectados unos auriculares?
Los altavoces no emitirán ningún sonido si se han conectado unos
auriculares al conector PHONES (p. 4).
¿Ha denido los ajustes de transposición (p. 7)?
¿Es correcto el ajuste de anación principal (p. 7)?
Las notas de un piano se anan utilizando un método único (anación
extendida) para que las notas del registro superior suenen en un tono algo
más agudo y las notas del registro inferior suenen en un tono algo más
grave. Por este motivo, puede parecer que el tono es incorrecto aunque, en
realidad, es como debe sonar un piano acústico.
¿Es posible que haya seleccionado un tono dual (p. 2)?
En un piano acústico, las notas de aproximadamente una octava y media
que se encuentran en la parte superior del teclado seguirán sonando
independientemente del pedal Damper. Estas notas también tienen un
carácter tonal algo diferente.
La unidad simula elmente esta característica de los pianos acústicos.
En esta unidad, el intervalo que no se ve afectado por el pedal Damper
cambiará en función del ajuste de transposición.
Si se oye por los auriculares:
Los sonidos de piano con un carácter brillante y nítido contienen un
número considerable de componentes de alta frecuencia que pueden
sonar como si se hubiera añadido un timbre metálico. Esto se debe a que
se están reproduciendo elmente las características de un piano real y no
se trata de un funcionamiento incorrecto.
Esta especie de timbre se acentúa si el efecto de reverberación se aplica con
intensidad, por tanto, puede minimizarlo disminuyendo la reverberación.
Si no se oye por los auriculares:
Es probable que el motivo sea otro distinto (como resonancias dentro de
la unidad). Póngase en contacto con su distribuidor o con el centro de
servicio Roland más cercano.
El volumen se reducirá si conecta un dispositivo USB al puerto USB
MEMORY. Esto no indica un funcionamiento incorrecto.
Problema Causa/Solución
Si el volumen se ha ajustado al máximo, el sonido puede distorsionarse en
función de su forma de interpretar. En este caso, baje el volumen.
Si no se oye por los auriculares:
La interpretación a un volumen alto puede provocar que los altavoces
o los objetos cercanos a la unidad resuenen. Las luces uorescentes o
las puertas de cristal también pueden resonar. En particular, esto es más
El sonido no se oye
bien o suena con
zumbidos.
La unidad se apaga.
probable que ocurra con las notas más graves y los volúmenes más altos.
Puede tomar las siguientes medidas para minimizar las resonancias.
• Coloque la unidad a 30 cm de distancia de las paredes o de otras
supercies.
• Mantenga el volumen bajo.
• Aléjese de los objetos que resuenan.
Si se oye por los auriculares:
Es probable que el motivo sea otro distinto. Póngase en contacto con su
distribuidor o con un centro de servicio Roland cercano.
En algunos casos, cuando se reproducen los datos SMF o WAV de una
memoria USB a volúmenes extremadamente altos, podría accionarse el
circuito de protección y apagar la unidad.
En este caso, baje el volumen.
Cuando se usa la función LAN inalámbrica
Problema Causa/Solución
• Asegúrese de que su punto de acceso LAN inalámbrico admite WPS.
Si el punto de acceso LAN inalámbrico no admite WPS, puede establecer
la conexión mediante el procedimiento que se explica en “Conexión en
modo Ad-Hoc” (p. 8).
• El estándar inalámbrico 802.11a/b no es compatible. Utilice el estándar
inalámbrico 802.11g/n (2,4 GHz).
• El método de autenticación WEP no es compatible. Utilice el método de
No se puede
conectar con un
punto de acceso
LAN inalámbrico.
La comunicación es
inestable.
El F-20 no
aparece entre
las conexiones
de instrumento
disponibles en
la aplicación iOS
(por ejemplo,
“Air Performer”).
autenticación WPA o WPA2.
• Asegúrese de que DHCP está habilitado en su punto de acceso LAN
inalámbrico.
• La conexión podría no establecerse debido al estado de las señales de
radio. En este caso, use el procedimiento que se explica en “Método de
conexión básico (Conectar mediante WPS)” (p. 8) y vuelva a conectar con
el punto de acceso LAN inalámbrico.
• Hay un límite aplicable a los datos de conexión que se pueden
memorizar. El establecimiento de una conexión nueva puede hacer que
se eliminen los datos de una conexión más antigua.
Todos los datos de conexión se eliminarán si se restablece la
conguración de fábrica. Si los datos de conexión se han eliminado,
vuelva a conectar el punto de acceso LAN inalámbrico.
La comunicación puede ser inestable en función de cómo se utilice el
espectro de radiofrecuencias.
Si la comunicación es inestable, la respuesta puede ser lenta o, si se está
usando la comunicación de audio, podría haber saltos en el sonido.
La situación se puede mejorar mediante las acciones siguientes:
• Acerque el punto de acceso LAN inalámbrico y el F-20 entre sí.
• Cambie el ajuste de canal del punto de acceso LAN inalámbrico.
• ¿Está encendido el F-20?
• ¿Se ha conectado el adaptador USB inalámbrico ( WNA1100-RL) al F-20?
• ¿Se ha conectado el F-20 al punto de acceso LAN inalámbrico?
• ¿Están el F-20 y el iPhone conectados a la misma red (al mismo punto de
acceso LAN inalámbrico)?
• ¿Está el punto de acceso LAN inalámbrico congurado para admitir la
comunicación entre los dispositivos LAN inalámbricos?
Para obtener más información sobre la conguración, consulte el
manual de instrucciones de su punto de acceso LAN inalámbrico.
Deutsch Français Italiano Español Português NederlandsEnglish
¿Qué es MIDI Visual Control?
MIDI Visual Control es una práctica internacional recomendada que se incorporó a la especicación MIDI para poder vincular efectos de expresión visual con la
interpretación musical. Los equipos de vídeo compatibles con MIDI Visual Control pueden conectarse a instrumentos musicales electrónicos a través de MIDI para
controlar los equipos de vídeo en paralelo a una interpretación.
¿Qué es V-LINK?
V-LINK es una especicación propiedad de Roland que permite vincular efectos de expresión visual con la interpretación musical. Los equipos de vídeo
compatibles con V-LINK pueden conectarse a instrumentos musicales electrónicos a través de MIDI, lo que permite disfrutar de los diferentes efectos
visuales que se han vinculado a la interpretación.
¿Qué es MIDI?
MIDI, abreviatura de “Musical Instrument Digital Interface”, se desarrolló como un estándar universal para el intercambio de datos de interpretación entre instrumentos musicales
electrónicos y ordenadores.
Esta unidad está equipada con un puerto USB COMPUTER para poder intercambiar datos de interpretación con otros dispositivos externos. Estos conectores pueden utilizarse para
conectar la unidad a un dispositivo externo y disfrutar de mayor versatilidad.
9
Page 52

UTILIZACIÓN SEGURA DE LA UNIDAD
ADVERTENCIA
Para apagar por completo la unidad, retire el enchufe de la toma
de corriente
Aunque apague el interruptor de encendido, la
unidad no se desconecta por completo de la
fuente de alimentación. Cuando tenga que apagar
la unidad por completo, apague el interruptor de
encendido de la unidad y luego desenchufe el
cable de alimentación de la toma de corriente. Por este motivo,
es necesario poder acceder fácilmente a la toma de corriente en
la que elija conectar el enchufe del cable de alimentación.
Acerca de la función de apagado automático
La unidad se apagará automáticamente cuando
haya transcurrido un periodo determinado de
tiempo desde la última vez que se utilizó para
reproducir o tocar música, o se accionó alguno
de sus botones o controles (función Auto O). Si
no desea que la unidad se apague
automáticamente, cambie el ajuste de la función Auto O (p. 5).
Utilice únicamente el soporte recomendado
Esta unidad solo se debe utilizar con el soporte
recomendado por Roland.
No coloque la unidad en un lugar inestable
Cuando utilice la unidad con el soporte
recomendado por Roland, dicho soporte deberá
colocarse de
Si no va a utilizar ningún soporte, debe
asegurarse igualmente de que el lugar donde
coloca la unidad tiene una supercie nivelada
capaz de aguantarla y evitar que se tambalee.
Precauciones al colocar la unidad sobre un soporte
Asegúrese de seguir las indicaciones del Manual
de instrucciones cuando coloque la unidad sobre
un soporte (p. 4).
Una colocación incorrecta puede dar lugar a
cierta inestabilidad y provocar que la unidad se
caiga o que el soporte vuelque, con el consiguiente riesgo de
que se produzcan lesiones.
forma que quede nivelado y estable.
ADVERTENCIA PRECAUCIÓN
Utilice únicamente el adaptador de CA suministrado y la tensión
correcta
Asegúrese de utilizar únicamente el adaptador de
CA que se entrega con la unidad. Asimismo,
compruebe que la tensión de la instalación
eléctrica coincida con la tensión de entrada
especicada en el adaptador de CA. Es posible
que otros adaptadores de CA utilicen polaridades
diferentes, o que estén diseñados para una tensión distinta, de
modo que al utilizarlos podría causar daños, un
funcionamiento incorrecto o descargas eléctricas.
Utilice únicamente el cable de alimentación suministrado
Utilice únicamente el cable de alimentación
suministrado. Del mismo modo, el cable de
alimentación suministrado tampoco debe usarse
con ningún otro dispositivo.
PRECAUCIÓN
Utilice únicamente el soporte o soportes especicados
Esta unidad está diseñada para ser utilizada junto
con soportes especícos (KSC-68, KS-18Z, KS-12)
fabricados por Roland. Si se utiliza con otros
soportes, la unidad podría caerse o volcar por
falta de estabilidad, y provocar lesiones.
Evalúe todos los aspectos de seguridad antes de utilizar los
soportes
Aunque observe las precauciones recomendadas
en el Manual de instrucciones, determinados
modos de manejar el producto pueden hacer
que se caiga del soporte o que este último
vuelque. Tenga en cuenta todas las precauciones
de seguridad antes de utilizar este producto.
Precauciones al mover la unidad
Si necesita mover el instrumento, tenga en cuenta
las siguientes precauciones. Para levantar y mover
la unidad de una forma segura, hacen falta dos
personas como mínimo. Se debe manejar con
cuidado y manteniéndola siempre horizontal.
Asegúrese de sujetarla rmemente para evitar
lesiones o dañar el instrumento.
• Cuando utilice el soporte KSC-68, compruebe que los
tornillos que jan la unidad al soporte no se hayan
aojado. Si nota que se han aojado, apriételos de nuevo.
• Desconecte el cable de alimentación.
• Desconecte todos los cables de los equipos externos.
• Retire el atril.
Mantenga las piezas pequeñas fuera del alcance de los niños
Para evitar que los niños puedan tragarse sin
querer los siguientes componentes, manténgalos
siempre fuera de su alcance.
• Piezas extraíbles
Tornillos de acoplamiento del atril (p. 5)
Tenga cuidado de no quemarse
El área que se muestra en la ilustración puede
ponerse muy caliente, así que tenga cuidado de
no quemarse.
Panel posterior
NOTAS IMPORTANTES
Colocación
• No exponga la unidad a la luz solar directa, no la coloque
cerca de dispositivos que desprendan calor, no la deje
dentro de un vehículo cerrado ni la someta a temperaturas
extremas. Tampoco sitúe cerca de la unidad equipos de
iluminación muy potentes, como luces de pianos o focos
potentes, ni permita que proyecten su luz sobre la unidad
durante periodos de tiempo muy prolongados. El calor
excesivo puede deformar o decolorar la unidad.
• No deje objetos encima del teclado. Podría provocar fallos
de funcionamiento, por ejemplo, que las teclas dejen de
producir sonido.
• Según el material y la temperatura de la supercie sobre la
que coloque la unidad, es posible que los tacos de goma
decoloren o estropeen la supercie.
Para evitarlo, puede colocar un trozo de eltro o de
tejido debajo de los tacos de goma. Si opta por hacer
esto, asegúrese de que la unidad no pueda resbalarse ni
desplazarse accidentalmente.
Mantenimiento
• Para limpiar la unidad, utilice un paño seco y suave, o
uno ligeramente humedecido. Limpie toda la supercie
aplicando la misma fuerza, y mueva el paño siguiendo las
aguas de la madera. Si frota demasiado fuerte en la misma
zona puede dañar el acabado.
Reparaciones y datos
• Antes de enviar la unidad para alguna reparación,
asegúrese de hacer una copia de seguridad de los datos
que ha almacenado en ella; o si lo preere, anote toda la
información que pueda necesitar. Aunque haremos todo
lo posible por conservar los datos almacenados en la
unidad a la hora de realizar cualquier reparación necesaria,
hay casos (como cuando la sección de la memoria está
físicamente dañada) en los que resultará imposible restaurar
el contenido almacenado. Roland no se responsabiliza de
la restauración de cualquier contenido almacenado que se
haya podido perder.
Precauciones adicionales
• Los datos almacenados en la unidad se pueden perder como
consecuencia de un fallo del equipo, un funcionamiento
incorrecto, etc. Guarde las canciones que haya grabado en
una memoria USB para no perderlas si se produjera un fallo
de este tipo.
• Roland no se responsabiliza de la restauración de cualquier
contenido almacenado que se haya podido perder.
• El sonido de las teclas al tocarlas y las vibraciones producidas
por un instrumento pueden transmitirse a través de una
pared o el suelo hasta distancias insospechadas. Procure no
molestar a los demás.
• No aplique una fuerza
• El volumen se reducirá si conecta un dispositivo USB al
puerto USB MEMORY.
Utilización de memorias externas
• Observe las siguientes precauciones cuando utilice
dispositivos de memoria externos.
Asimismo, asegúrese de observar todas las precauciones
suministradas con el dispositivo de memoria externo.
• No extraiga el dispositivo mientras hay un proceso de
• Para prevenir los posibles daños que puede causar la
Cuidado del teclado
• No escriba sobre el teclado con un bolígrafo u objeto similar,
y no estampe ni adhiera nada sobre el instrumento. La tinta
podría ltrarse por las líneas de la supercie y ser imposible
de eliminar.
• No pegue pegatinas en el teclado. Hay pegatinas que
usan un adhesivo muy fuerte y podría resultar imposible
despegarlas; además, este tipo de adhesivo puede decolorar
el instrumento.
innecesaria al atril cuando lo utilice.
lectura o escritura en curso.
electricidad estática, descargue toda la electricidad
estática de su cuerpo antes de manipular el dispositivo.
• Para eliminar la suciedad persistente, utilice uno de los
productos especícos para limpiar teclados que no contenga
agentes abrasivos. Empiece pasándole un paño con
suavidad. Si no consigue eliminar la suciedad, aplique cada
vez una presión mayor pero procurando no
rayar las teclas.
Copyrights/Licencias/Marcas comerciales
• La ley prohíbe realizar grabación de sonido, grabación de
vídeo, la copia o revisión del trabajo de terceros protegido
por derechos de autor (trabajos musicales, de vídeo, difusión,
actuaciones en directo, o trabajos de otra naturaleza),
ya sea parcialmente o en su totalidad, así como su
distribución, venta, alquiler, representación o difusión sin el
consentimiento expreso del propietario del copyright.
• No use este producto con nes que pudieran infringir las
leyes de derechos de autor de terceros. Roland declina toda
responsabilidad por cualquier infracción de los derechos
de autor de terceros derivada del uso que se haga de este
producto.
• El copyright del contenido de este producto (datos de
forma de onda del sonido, datos de estilo, patrones de
acompañamiento, datos de frase, bucles de audio y datos de
imagen) es propiedad de Roland Corporation.
• Los compradores de este producto tienen autorización para
utilizar este contenido (excepto los datos de las canciones,
por ejemplo las canciones de prueba) para crear, interpretar,
grabar y distribuir obras musicales originales.
• Los compradores de este producto NO tienen autorizaci
para extraer dicho contenido, ya sea en formato original o
modicado, con el objetivo de distribuir soportes grabados
de dicho contenido o publicarlo en una red informática.
• Roland, GS y SuperNATURAL son marcas comerciales
registradas o marcas comerciales de Roland Corporation en
los Estados Unidos y/o en otros países.
ón
10
Page 53

Piano Digital
Sumário
Guia de Operação Fácil (Painel Frontal) 2
Ligar/Desligar o Equipamento . . . . . . . . . . . . . . . . . . . . . . . . . . . . . . . . . . . 2
Ajuste do volume . . . . . . . . . . . . . . . . . . . . . . . . . . . . . . . . . . . . . . . . . . . . . . .2
Selecionar um som . . . . . . . . . . . . . . . . . . . . . . . . . . . . . . . . . . . . . . . . . . . . . . 2
Sobrepondo Dois Sons (Dual) . . . . . . . . . . . . . . . . . . . . . . . . . . . . . . . . . . . 2
Tocar diferentes sons com as mãos esquerda e direita (Split) . . . . . . 2
Alterar a Resposta do Teclado (Key Touch) . . . . . . . . . . . . . . . . . . . . . . .2
Usar o Metrônomo . . . . . . . . . . . . . . . . . . . . . . . . . . . . . . . . . . . . . . . . . . . . . . 3
Reproduzindo músicas/ritmos (acompanhamento automático
para acordes) . . . . . . . . . . . . . . . . . . . . . . . . . . . . . . . . . . . . . . . . . . . . . . . . . . . 3
Gravar sua performance . . . . . . . . . . . . . . . . . . . . . . . . . . . . . . . . . . . . . . . . . 3
Antes de Tocar 4
Posicionamento do F-20 em um Suporte . . . . . . . . . . . . . . . . . . . . . . . .4
Conexões do Painel Traseiro . . . . . . . . . . . . . . . . . . . . . . . . . . . . . . . . . . . . . 4
Fixação da estante da partitura . . . . . . . . . . . . . . . . . . . . . . . . . . . . . . . . . .5
Ligar/Desligar o Equipamento . . . . . . . . . . . . . . . . . . . . . . . . . . . . . . . . . . . 5
Desligamento Automático Após um Tempo (Auto O ) . . . . . . . . . . . 5
Ouvir as músicas de demonstração . . . . . . . . . . . . . . . . . . . . . . . . . . . . . . 5
Projeto ecológico que economiza energia
Depois de transcorridos 30 minutos sem tocar ou operar o F-20, ele será desligado
automaticamente.
* Se você não quiser que o equipamento seja desligado automaticamente, altere o
ajuste “Auto O” (p. 5).
Recursos avançados 6
Ajuste de Brilho (Brilliance) . . . . . . . . . . . . . . . . . . . . . . . . . . . . . . . . . . . . . .6
Ajuste de Reverberação (Ambience) . . . . . . . . . . . . . . . . . . . . . . . . . . . . .6
Divisão do Teclado em Dois (Twin Piano) . . . . . . . . . . . . . . . . . . . . . . . . . 6
Desativar os Botões (Panel Lock) . . . . . . . . . . . . . . . . . . . . . . . . . . . . . . . . . 6
Salvar os Ajustes (Memory Backup) . . . . . . . . . . . . . . . . . . . . . . . . . . . . . .6
Restauração dos Ajustes de Fábrica (Factory Reset) . . . . . . . . . . . . . . . 6
Formatar um Pen Drive USB . . . . . . . . . . . . . . . . . . . . . . . . . . . . . . . . . . . . .6
Várias Congurações de Função (Modo Function) . . . . . . . . . . . . . . . .7
Igualar a Anação com Outros Instrumentos
(Master Tuning) . . . . . . . . . . . . . . . . . . . . . . . . . . . . . . . . . . . . . . . . . . . 7
Alterar as notas do teclado (Transpose) . . . . . . . . . . . . . . . . . . . . 7
Sobre a Função Rede Local Sem Fio 8
O que é a Função Rede Local Sem Fio? . . . . . . . . . . . . . . . . . . . . . . . . . . . 8
Método de Conexão Básico (Conexão por WPS) . . . . . . . . . . . . . . . . . .8
Conectar no Modo Ad-Hoc . . . . . . . . . . . . . . . . . . . . . . . . . . . . . . . . 8
Solução de problemas 9
Deutsch Français Italiano Español Português NederlandsEnglish
Especicações principais
Teclado 88 teclas (Teclado Ivory Feel-G com escapament)
Fonte de
alimentação
Consumo de energia
Dimensões 1.282 (L) x 296 (P) x 132 (A) mm
Peso 20 kg
Antes de usar este equipamento, leia com atenção as seções chamadas “USO SEGURO DO EQUIPAMENTO” e “OBSERVAÇÕES IMPORTANTES” (folheto
“USO SEGURO DO EQUIPAMENTO” e Manual do Proprietário p. 10). Essas seções oferecem informações importantes sobre o uso correto da unidade.
Além disso, para ter uma boa compreensão sobre todos os recursos da sua nova unidade, leia o folheto “USO SEGURO DO EQUIPAMENTO” e o Manual
do Proprietário em sua integridade. Este manual deverá ser guardado em um local de fácil acesso para consultas futuras.
Copyright © 2013 ROLAND CORPORATION
Todos os direitos reservados. Nenhuma parte desta publicação poderá ser reproduzida em qualquer formato sem permissão por escrito da
ROLAND CORPORATION.
Adaptador de força
9 W (2 W–18 W)
9 W: Consumo médio de energia quando o piano é
tocado com volume na posição central
2 W: Consumo de energia imediatamente após
ligar; nada sendo tocado
18 W: Consumo de potência nominal
Acessórios
Opcionais
(vendidos
separadamente)
* Com a nalidade de aprimorar o produto, as especicações e/ou a
aparência deste equipamento estão sujeitas a alterações sem aviso
prévio.
Manual do proprietário, folheto “USO SEGURO DO
EQUIPAMENTO”, estante de partituras, adaptador de
força, cabo de força (para conectar o adaptador de
força), pedal de sustain (capaz de detecção contínua)
Estante dedicada (KSC-68), suporte para teclado
(KS-18Z, KS-12), pedal de sustentação (DP-10), pen drive
USB (*1), adaptador wireless USB (WNA1100-RL) (*1)
*1: Use o pen drive USB e o adaptador wireless USB
vendidos pela Roland. Não podemos garantir a
operação se outros produtos forem utilizados.
Page 54

Guia de Operação Fácil (Painel Frontal)
Selecionar um som
Mantenha o botão TONE pressionado e pressione uma das seguinte teclas; o som mudará.
Selecionar um Piano
Grand Piano 1
1
Pressionar
2
Selecionar Outros Sons
Strings 2
Strings 1
1
Pressionar
2
Grand Piano 2
Grand Piano 3
Harp
Harpsichord 1
Ragtime Piano
Jazz Organ 2
Jazz Organ 1
Harpsichord 2
Church Organ 2
Church Organ 1
Accordion
Jazz Scat
Choir 1
Choir 3
Choir 2
Selecionar um Piano Elétrico
Vibraphone
1
Pressionar
E. Piano 1
2
E. Piano 2
E. Piano 3
Synth Bell
Celesta
Clav.
Sobrepondo Dois Sons (Dual)
Ao pressionar dois botões TONE
simultaneamente, é possível sobrepor dois sons.
Equilíbrio de mixagem
É possível ajustar o equilíbrio de mixagem de dois sons (cinco graus,
0 = valor padrão).
Acoustic Bass
A.Bass + Cymbal
Fingered Bass
Thum Voice
Botão TONE
que está aceso
1
Pressionar
Equilíbrio de mixagem
para Dual
Equilíbrio de mixagem
para Split
Decay Choir
Nylon-str.Gt
Synth Pad
Steel-str.Gt
Decay Strings
Decay Choir Pad
Pressionar
+ ––
00
+
2
Ligar/Desligar o Equipamento
(p. 5)
Ajuste do volume
Use o botão [VOLUME] para ajustar o volume.
Tocar diferentes sons com as mãos esquerda e direita (Split)
Ligue o botão [SPLIT] e o teclado será dividido nas seções esquerda e direita,
permitindo tocar um som diferente em cada seção.
Se manter o botão [SPLIT] pressionado, o botão TONE atribuído à seção esquerda
acenderá.
Trocar Sons (Split)
Trocar os sons da
esquerda
Trocar os sons da direita
Enquanto pressionar o botão [SPLIT], mantenha um dos
botões TONE pressionados e pressione uma tecla.
Use a mesma operação descrita em “Selecionar um som”
acima.
Alterar a Resposta do Teclado (Key Touch)
Se você ligar o botão [KEY TOUCH], é possível
alterar a resposta do teclado (sensibilidade do
teclado).
Quando o botão [KEY TOUCH] estiver desligado, a
sensibilidade “MEDIUM” (equivalente a um piano
acústico) estará selecionada.
LIGHT
HEAVY
FIX
LIGHT
HEAVY
FIX
Alterar o Ponto de Divisão do Teclado (Split Point)
Mantenha pressionado o botão [SPLIT] e pressione uma tecla (padrão: F 3).
B1 B6
1
Pressionar
Você pode tocar fortíssimo () com menos força que no ajuste “MEDIUM”, assim,
a sensação é que o teclado ca mais leve. Esse ajuste faz com que seja mais fácil
tocar, mesmo para crianças.
Você precisa usar mais força no teclado do que no ajuste “MEDIUM” para
reproduzir o fortíssimo (), por isso, o teclado irá parecer mais pesado. O toque
dinâmico adiciona mais sensibilidade ao que você toca.
O som é reproduzido a um volume denido, independente da força utilizada
para tocar as teclas.
2
1
Pressionar
2
2
Page 55

Guia de Operação Fácil (Painel Frontal)
Usar o Metrônomo
Gire o botão [METRONOME] na posição ligado; o metrônomo tocará. Use os botões [SLOW]/[FAST] para ajustar o andamento.
Alterar a Fórmula de Compasso
Você pode escolher desde 0 (apenas batidas fracas), 2 (2 tempos), 3 (3 tempos),
4 (4 tempos), 5 (5 tempos) ou 6 (6 tempos).
52
0 3 4 6
1
Pressionar
É também possível alterar a fórmula de compasso mantendo o botão
[METRONOME] pressionado e usando os botões [SLOW]/[FAST].
2
Especicar um Andamento Numérico
Um valor numérico também pode ser especicado para o andamento (20-250)
(padrão: 108).
Exemplo: para inserir 120, mantenha o botão [METRONOME] pressionado e
Reproduzindo músicas/ritmos (acompanhamento automático para acordes)
Para reproduzir ou interromper uma música, pressione o botão [SONG]. Para reproduzir ou
interromper o ritmo (acompanhamento automático baseado nos acordes tocados), pressione o
botão [RHYTHM].
É possível selecionar uma música ou ritmo interno mantendo o botão [SONG] ou [RHYTHM]
pressionado e em seguida pressionar uma das seguintes teclas.
REFERÊNCIA
Selecionar uma Música Interna
1
Pressionar
Para obter detalhes sobre os nomes das músicas e dos ritmos, consulte “Lista de
músicas internas” e “Lista de ritmos” no nal deste manual.
Pressione a tecla nal direita; todas as
músicas tocam consecutivamente.
2
Selecionar um Ritmo
1
Pressionar
pressione as teclas nesta ordem: 1
Fluxo Rítmico
[RHYTHM] ligado [RHYTHM] desligado
1
Pressionar
Introdução
2
2
1 3 5 8
0 2 4 6 7 9
2 0 ENTER.
Acompanhamento
ENTER
Deutsch Français Italiano Español Português NederlandsEnglish
Final
Gravar sua performance
Como gravar uma música.
* Antes de iniciar, selecione o som que deseja gravar.
1. Pressione os botões [SONG] e [RHYTHM] simultaneamente.
* Para cancelar a gravação, pressione os botões [SONG] e [RHYTHM]
simultaneamente novamente.
2. Toque o teclado e comece a gravar.
3. Pressione o botão [SONG] para parar de gravar.
Se Desejar Gravar Junto com o Metrônomo
* Ligue o metrônomo e dena a fórmula de compasso e andamento, antes da
gravação.
Se você pressionar o botão [SONG] na etapa 2, a gravação começará após a
contagem de dois compassos.
Gravar Junto com o Ritmo
* Selecione o ritmo antes da gravação.
Se você pressionar o botão [RHYTHM] na etapa 2, a gravação começará após a
contagem de dois compassos.
Equilíbrio de mixagem
É possível ajustar o equilíbrio de mixagem entre a música/ritmo e o teclado (cinco níveis,
0 = padrão).
+0–
1
Pressionando
um deles
2
Se Você Desejar Refazer a Gravação
Comece a gravar novamente da etapa 1.
Salvar a Música Gravada em um Pen Drive USB
* Conecte seu pen drive USB antes de prosseguir.
Mantenha o botão [KEY TOUCH] pressionado e pressione o botão
[SONG]. Assim que todos os LEDs nos botões acenderem, os dados
estarão salvos (até 99 músicas).
Tocar uma Música de um Pen Drive USB
Mantenha o botão [SONG] pressionado e pressione a tecla “F 3”.
É possível usar as duas teclas adjacentes a “F
drive USB.
3” para selecionar uma música no pen
F
3
Tocar
Ant.
Próx.
Tocar a Música Gravada por Você
1
Pressionar
E3
2
1
Pressionar
* Também é possível copiar um arquivo WAV ou MIDI do seu computador para um
pen drive USB e reproduzi-lo no F-20. Para obter detalhes sobre os formatos que
podem ser reproduzidos, consulte o nal deste manual.
2
3
Page 56

Antes de Tocar
Posicionamento do F-20 em um Suporte
Se desejar colocar o F-20 em um suporte, utilize o Roland KSC-68 (consulte o Manual do Proprietário do KSC-68), KS-18Z ou KS-12.
* Ao preparar o suporte, tenha cuidado para não prender os dedos.
KS-18Z
Alinhe a parte frontal do F-20
com a parte frontal do suporte.
Ajuste de forma que
a altura não exceda
1 metro (ajuste o
suporte em um
nível que não seja
mais alto do que
o segundo nível
a partir da parte
inferior).
Conexões do Painel Traseiro
Porta USB MEMORY
Conecte um pen drive USB aqui.
• Se um pen drive USB estiver conectado, será
possível reproduzir ou salvar músicas.
• Se um adaptador wireless USB (WNA1100-RL;
vendido separadamente) estiver conectado,
será possível usar aplicativos iOS compatíveis
com redes sem o (p. 8).
• O volume dos alto-falantes do F-20 será
reduzido se você conectar um dispositivo USB à
porta USB MEMORY.
* Nunca insira ou remova um pen drive USB
enquanto essa unidade estiver ligada. Fazer isso
poderá corromper os dados da unidade ou os
dados no pen drive USB.
* Insira completamente e com
cuidado o pen drive USB—até
que ele que preso no lugar.
Alinhe as pernas do suporte com
os parafusos do painel traseiro.
Conector PEDAL
Conecte o pedal de
sustain incluso.
Saída OUTPUT
Se você ligar este conector
a alto-falantes amplicados,
o som dessa unidade será
reproduzido através deles.
KS-12
Ajuste a largura do suporte
para que os pés de borracha do
F-20 se posicionem no meio do
suporte.
Conector PHONES
Conecte fones de ouvido (vendidos
separadamente).
* Se você estiver usando apenas um único
Se duas pessoas
estiverem usando fones
de ouvido (vendidos
separadamente),
conecte os fones de
ouvido no conector
PHONES e saída OUTPUT.
Lado do teclado
Visão superior
fone de ouvido, será necessário conectá-lo
ao conector PHONES.
Porta USB COMPUTER
Se você usar um cabo USB comercialmente disponível para conectar a porta USB
COMPUTER do F-20 à porta USB do seu computador, será possível fazer o seguinte:
• Dados SMF reproduzidos por software compatível com MIDI podem ser
tocados pelo F-20.
• Dados MIDI podem ser transferidos entre o F-20 e o software do sequenciador,
abrindo uma grande variedade de possibilidades para produção musical e
edição.
4
Para evitar mau funcionamento
e falha do equipamento, sempre
diminua o volume e desligue
todas as unidades antes de fazer
qualquer conexão.
Coloque o adaptador de força de modo que o lado
com o indicador (consulte a ilustração) que voltado
para cima e o lado com informações escritas que
voltado para baixo.
O indicador acenderá quando você conectar o
adaptador de força à tomada.
Tomada elétrica
Cabo de força
Conector DC IN
Conecte o adaptador de força incluído aqui.
Page 57

Antes de Tocar
Fixação da estante da partitura
Como prender a estante da partitura inclusa
1. Solte os parafusos de xação da estante da partitura
localizados na parte de trás do piano (dois locais).
2. Coloque a estante da partitura entre os parafusos e o chassi.
3. Usando uma mão para apoiar a estante da partitura,
aperte os parafusos (dois locais) para prender rmemente
a estante da partitura no lugar.
Ligar/Desligar o Equipamento
Quando tudo estiver conectado corretamente (p. 4), siga o
procedimento abaixo para ligar a energia. Se o equipamento
for ligado na ordem errada, haverá o risco de provocar mau
funcionamento ou falha do equipamento.
Ligar o Equipamento
1. Gire o botão [VOLUME] totalmente para a esquerda para
diminuir o volume.
2. Pressione o botão [ ] (POWER) para ligar o
equipamento.
* Esta unidade está equipada com um circuito de proteção.
É necessário um breve intervalo (alguns segundos) após ligar a
unidade para que ela possa operar normalmente.
3. Use o botão [VOLUME] para ajustar o volume.
* Antes de ligar/desligar a unidade, lembre-se sempre de abaixar
o volume. Mesmo com o volume abaixado, você poderá ouvir
algum som ao ligar/desligar a unidade. Entretanto, isso é normal
e não indica mau funcionamento.
Desligar o Equipamento
1. Gire o botão [VOLUME] totalmente para a esquerda para
diminuir o volume.
Deutsch Français Italiano Español Português NederlandsEnglish
* Ao prender a estante da partitura, é necessário usar sua mão
para apoiá-la rmemente para que não caia. Tome cuidado para
não prender sua mão.
* Não aplique força excessiva à estante de partituras instalada.
* Ao prender a estante da partitura, é necessário usar os parafusos
de xação da estante da partitura que estão presos ao piano.
Para remover a estante da partitura, apoie-a com uma mão
enquanto soltar os parafusos. Remova a estante de partitura e, a
seguir, volte a apertar com rmeza os parafusos.
Precauções com relação ao posicionamento desta
unidade em um suporte
Siga cuidadosamente as instruções do Manual do Proprietário
ao posicionar esta unidade sobre um suporte (p. 4).
Se ela não for colocada corretamente, você correrá o risco
de criar uma situação instável, fazendo a unidade cair ou
o suporte tombar, resultando em ferimentos.
Posicione o instrumento a 30 cm de distância da parede
2. Mantenha o botão [ ] (POWER) pressionado por um
segundo ou mais; o equipamento será desligado.
Desligamento Automático Após um Tempo
(Auto O)
Este equipamento será desligado automaticamente após um
tempo predeterminado, se não for tocado ou seus botões ou
controles não forem operados (função Auto O).
Se você não quiser que o equipamento seja desligado
automaticamente, altere o ajuste “Auto O” para “OFF”.
(Padrão: 30 min.)
* Para restaurar a energia, ligue novamente.
1 2
Pressionar
* Esse ajuste é lembrado após o equipamento ser desligado.
30 min.
10 min.
240 min.
OFF
3
Ouvir as músicas de demonstração
Os alto-falantes do F-20 são montados em
seu painel traseiro. Por esse motivo, pode
ser difícil ouvir o som dos alto-falantes se
o painel traseiro for colocado diretamente
contra uma parede.
Não deixe o instrumento cair!
Para evitar que o F-20 caia, não aplique
força excessiva sobre ele e nunca se
sente ou se apoie nele.
30 cm
1
Pressionando um deles
Existem três músicas de demonstração.
Pressione o botão [SONG] para parar.
* Todos os direitos
2
reservados. O uso
não autorizado,
que não seja a
escuta pessoal e
privada, é uma
violação de leis
vigentes.
5
Page 58

Recursos avançados
Ajuste de Brilho (Brilliance)
Veja como ajustar o brilho do som (3 níveis).
C5 C6
NORMAL
BRANDO
BRILHANTE
3
1
2
Pressionar
Ajuste de Reverberação (Ambience)
É possível ajustar a reverberação do som e ter a impressão de que
você está tocando em uma sala de concertos (5 níveis).
C5 C6
PADRÃO
1 2
Pressionar
+–
3
Divisão do Teclado em Dois (Twin Piano)
Você pode dividir o teclado em duas seções, esquerda e direita,
para que duas pessoas possam tocar com o mesmo intervalo de
anação. Essa função permite que a unidade seja usada como se
existissem dois pianos.
C5 C6
1 2
Pressionar
O teclado será dividido em uma seção esquerda e uma seção direita
com o “dó central” localizado no centro de cada seção.
Você pode escolher uma das seguintes maneiras para que o som
seja ouvido.
Valor Explicação
PAIR
INDIVIDUAL
O som será ouvido da direita à medida que você tocar em
direção à direita do teclado, e da esquerda à medida que
você tocar em direção à esquerda.
As notas tocadas na área direita serão ouvidas pelo
alto-falante direito e as notas tocadas na área esquerda
serão ouvidas pelo alto-falante esquerdo.
OFF
3
PAIR
Salvar os Ajustes (Memory Backup)
Quando a unidade for desligada, os ajustes serão retornados aos
ajustes padrão. Contudo, se quiser, você pode salvar os seguintes
ajustes para que eles sejam lembrados mesmo após o equipamento
ser desligado. Isso é chamado de função “Memory Backup”.
Ajustes salvos pela função Memory Backup Página
Sensibilidade das teclas p. 2
Brilho p. 6
Ambiência p. 6
Master Tuning p. 7
1. Mantenha o botão [KEY TOUCH] pressionado e pressione
o botão [RHYTHM].
O botão [OTHER] e o botão [SPLIT] piscarão.
Para cancelar, pressione o botão [OTHER].
2. Para salvar os ajustes, pressione o botão [SPLIT].
Quando todos os LEDs nos botões estão acesos, a operação é
concluída.
Restauração dos Ajustes de Fábrica (Factory Reset)
Os ajustes que você alterou no modo Função (p. 7) podem ser
restaurados para as denições originais de fábrica.
OBSERVAÇÃO
Ao fazer a restauração dos padrões de fábrica, todas as
congurações serão inicializadas e a música gravada na
memória interna será apagada.
1. Ligue o equipamento mantendo o botão [KEY TOUCH]
pressionado. Continue pressionando o botão [KEY TOUCH]
INDIVIDUAL
por pelo menos seis segundos.
O botão [OTHER] e o botão [SPLIT] piscarão.
Para cancelar, pressione o botão [OTHER].
2. Para executar a Restauração dos Padrões de Fábrica,
pressione o botão [SPLIT].
Quando todos os LEDs nos botões estão acesos, a operação é
concluída.
3. Desligue o equipamento e depois ligue-o novamente.
Formatar um Pen Drive USB
Como inicializar (formatar) todo o conteúdo salvo em
um pen drive USB.
* As seções esquerda e direita terão o mesmo tom (Piano). O Twin
Piano será cancelado quando você pressionar um dos botões TONE.
* O pedal de sustentação afeta apenas a parte direita do teclado.
Desativar os Botões (Panel Lock)
Ligue o equipamento mantendo o botão [PIANO] pressionado.
Continue pressionando o botão [PIANO] por pelo menos seis
segundos. Será denido o Panel Lock (bloqueio de painel) e
todos os botões, exceto o botão [ ] (POWER) serão desativados.
Isso evita que os tons e os ajustes sejam alterados caso você
acidentalmente pressione um botão.
O Panel Lock será cancelado quando você desligar o equipamento.
6
OBSERVAÇÃO
• Formatar apagará tudo que estiver salvo no pen drive USB.
• Antes de usar seu novo pen drive USB com o F-20 pela primeira
vez, é necessário formatar o pen drive USB.
1. Conecte o pen drive USB que você deseja formatar na
porta USB MEMORY.
2. Ligue o equipamento mantendo o botão [SONG]
pressionado. Continue pressionando o botão [SONG] por
pelo menos seis segundos.
O botão [OTHER] e o botão [SPLIT] piscarão.
Para cancelar, pressione o botão [OTHER].
3. Para executar a formatação, pressione o botão [SPLIT].
Quando todos os LEDs nos botões estão acesos, a operação é
concluída.
4. Desligue o equipamento e depois ligue-o novamente.
Page 59

Várias Congurações de Função (Modo Function)
Para fazer congurações no modo Função, ao pressionar o botão [KEY TOUCH], mantenha o botão [PIANO] pressionado, e pressione
1 2
Pressionar
C8
30 min.
uma das teclas mostradas na ilustração.
3
OFF
240 min.
Auto O (p. 5)
10 min.
Alterar a Conguração do Pen Drive USB (Modo USB Memory)
Em alguns casos, quando o pen drive USB está conectado à porta USB MEMORY, ele pode levar mais tempo
para que os dados sejam carregados ou pode haver uma falha no carregamento dos dados. Nesse caso,
pode ser possível resolver o problema mudando a conguração do Modo USB MEMORY para o valor “1”.
Quando a unidade deixa a fábrica, ele é congurado como “2”. Normalmente, não há necessidade para fazer
essa conguração.
* Após alterar essa conguração, é necessário desligar o equipamento e depois religá-lo. A nova congura-
ção entra em vigor ao ligar novamente o equipamento.
Recursos avançados
2
1
C7
440,0 Hz
INDIVIDUAL
C6
C5
C4
PAIR
NORMAL
PADRÃO
BRILHANTE
BRANDO
+3
+1
-2
-4
-6
Modo USB Memory
+
Master Tuning
–
Twin Piano (p. 6)
OFF
Brilho (p. 6)
+
Ambiência (p. 6)
–
+5
+4
+2
0
Transpose
-1
-3
-5
Igualar a Anação com Outros Instrumentos (Master Tuning)
Ao tocar em conjunto com outros instrumentos e em outros casos assim, você pode igualar a anação
padrão com outro instrumento.
Normalmente, a anação padrão é referente à anação da nota que é tocada quando a tecla A médio é
tocada. Para um som em conjunto mais limpo durante a performance com um ou mais instrumentos,
certique-se de que a anação padrão de cada instrumento esteja no mesmo tom dos outros instrumentos.
Essa anação de todos os instrumentos com uma nota é chamada de “anação geral”.
É possível ajustar a anação no intervalo de 415,3 Hz–440,0 Hz (padrão)–466,2 Hz (em incrementos de 0,1 Hz).
Alterar as notas do teclado (Transpose)
Você pode utilizar a função Transpose para transpor o
teclado em intervalos de semitom.
Por exemplo, se uma música estiver em mi maior e você
quiser tocá-la com um dedilhado de dó maior, ajuste a
função Transpose para o valor “+4”.
Se você tocar dó mi sol Poderá soar mi sol si
Controlar o Equipamento de Vídeo (Modo Visual Control)
O Visual Control é uma função que permite controlar imagens durante a sua performance.
Se você tiver ajustado o modo Visual Control para “MVC” (MIDI Visual Control, p. 9) ou “V-LINK”, tocar o teclado
dessa unidade irá controlar as imagens produzidas pelo dispositivo Visual Control conectado a essa unidade
utilizando um USB MIDI.
Gráco das funções do Visual Control
Tocar as 12 teclas mais baixas dessa unidade (A0–G 1) fará com que as seguintes mensagens MIDI sejam
transmitidas.
Funções do Visual Control Mensagem MIDI transmitidas Essa operação da unidade
Alterna imagens
CC 0 (Seleção do Banco): 0–4 Reproduz as teclas pretas
Alteração de Programa: 1-7 Reproduz as teclas brancas
Deutsch Français Italiano Español Português NederlandsEnglish
Ad-Hoc ON
Ad-Hoc OFF
C3
Rede Local Sem Fio (p. 8)
WPS
Ajustes do Canal de Transmissão MIDI
Esse ajuste especica o canal MIDI na qual essa unidade irá transmitir.
V-LINK
MVC
16
C2
C1
14
11
9
7
4
2
OFF
Modo Visual Control
OFF
15
13
12
10
Canal de Transmissão
8
MIDI
6
5
3
1
ON
Local Control
O MIDI utiliza dezesseis “canais MIDI”, que são numerados de 1 a 16. Conectando dispositivos MIDI e
especicando o canal MIDI adequado para cada dispositivo, você pode tocar ou selecionar sons nesses
dispositivos. Esta unidade irá receber todos os dezesseis canais (1–16).
Evitar notas duplas ao trabalhar com um
sequenciador em software
Se um sequenciador em software estiver
conectado ao USB MIDI, coloque esse item na
posição “OFF”.
Como a função “Thru” da maioria dos
sintetizadores em software normalmente ca
ligada, as notas tocadas no teclado podem car
duplicadas, ou o som pode car estranho. Para
evitar isso, você pode habilitar o ajuste “Local O ”
para que o teclado e o gerador de som interno
sejam desconectados.
(Local Control)
Local Control
Gerador de som
USB MIDI
In
USB MIDI
Out
Sintetizador em
software
Computador
7
Page 60

Sobre a Função Rede Local Sem Fio
Assim que for conectado com sucesso, o indicador de LED do
O que é a Função Rede Local Sem Fio?
Inserindo o adaptador wireless USB (WNA1100-RL; vendido
separadamente) na porta USB MEMORY do F-20, será possível usar
aplicativos compatíveis com redes sem o (aplicativos iOS como
“Piano Partner” ou “Air Performer”).
iPhone etc.
Ponto de acesso da rede local sem o
(p.ex., roteador de rede local sem o)
F-20
Adaptador wireless USB
(vendido separadamente:
WNA1100-RL)
Adaptador wireless USB acenderá.
É possível usar a conexão sem o de um aplicativo iOS como
“Air Performer”. Escolha “F-20” na tela de seleção do instrumento do
seu aplicativo iOS.
OBSERVAÇÃO
* O dispositivo (p.ex., iPhone) executando o aplicativo precisa
estar conectado na mesma rede.
MEMO
• Os dados de conexão são armazenados na memória ao realizar o
procedimento WPS; o dispositivo se conectará automaticamente
à rede sem o da próxima vez.
• Todos os dados de conexão serão apagados caso você realize
uma restauração aos padrões de fábrica.
Rede local sem o Rede local sem o
Itens necessários para usar a função de rede local sem o
Adaptador wireless USB (vendido separadamente: WNA1100-RL)
Ponto de acesso da rede local sem o (p.ex., roteador de rede local sem o) *1 *2
iPhone, iPad, ou iPod touch etc.
*1 O ponto de acesso da rede local sem o deve suportar WPS. Se
não conseguir se conectar ao ponto de acesso da rede local sem
o, tente se conectar usando o modo ad-hoc.
*2 A capacidade de se conectar com todos os tipos de ponto de
acesso da rede local sem o não é garantida.
Método de Conexão Básico (Conexão por WPS)
A primeira vez que você conectar o F-20 a uma nova rede sem
o, será necessário executar o seguinte procedimento (WPS) para
ingressar na rede sem o.
Este procedimento é necessário apenas na primeira vez. (Assim que
ingressar na rede, este procedimento não será mais necessário).
O que é WPS?
É um padrão que facilita fazer congurações de segurança ao se
conectar a um ponto de acesso da rede local sem o. Recomendamos
usar WPS ao se conectar ao ponto de acesso da rede local sem o.
1. Insira o adaptador wireless USB (WNA1100-RL; vendido
separadamente) na porta USB MEMORY do F-20.
Indicador de LED do Adaptador wireless USB
LED Explicação
Aceso O adaptador está conectado a uma rede.
Apagado O adaptador não está conectado a uma rede.
Piscando O adaptador está procurando uma rede.
Conectar no Modo Ad-Hoc
Para se conectar no modo Ad-Hoc.
O que é o modo Ad-Hoc?
O modo Ad-Hoc permite que você se conecte o F-20 diretamente a um
iPhone ou outro dispositivo sem o sem usar um ponto de acesso de
rede local sem o. Essa é uma maneira conveniente para usar o F-20
com um iPhone ou outro dispositivo sem o, se estiver em um local
onde o ponto de acesso de rede local sem o que você normalmente
usa estiver indisponível, como quando você está longe de casa.
Limitações
O iPod Touch, ou outro dispositivo sem o, conectado no modo
Ad-Hoc não conseguirá se comunicar com a Internet ou outro
dispositivo sem o. No entanto, um iPhone, ou outro dispositivo
sem o, que tenha recurso de celular poderá se conectar à
Internet através da conexão do celular.
Saiba que ao utilizar a conexão do celular para se conectar à
Internet, você poderá incorrer em gastos, dependendo do seu
plano de taxa.
2. Mantenha pressionado o botão do Adaptador
wireless USB por três segundos.
O indicador de LED do Adaptador wireless USB piscará.
OBSERVAÇÃO
* Se você aplicar muita força no adaptador USB ao pressionar
o botão, você poderá danicá-lo. Tenha cuidado.
MEMO
É também possível realizar o procedimento WPS pressionando
“WPS” no “Várias Congurações de Função (Modo Function)”
(p. 7), em vez de pressionar o botão do adaptador wireless USB.
3. Execute a operação WPS em seu ponto de acesso da rede
local sem o (p.ex., pressione o botão WPS em seu ponto
de acesso da rede local sem o).
Para obter detalhes sobre a operação WPS do seu ponto de acesso
da rede local sem o, consulte o manual do proprietário do seu
ponto de acesso da rede local sem o.
8
1. Em “Várias Congurações de Função (Modo Function)”
(p. 7), pressione “Ad-Hoc ON.”
2. No iPhone ou outro dispositivo sem o que deseja
conectar, selecione “F-20” para fazer a conexão. (Por
exemplo, em um iPhone, selecione [Settings]
[Choose a Network] para selecionar “F-20.” Uma tela
de entrada de senha será exibida; insira “f20ak”.)
SSID Ad-Hoc F-20
Senha f20ak
Para obter detalhes sobre como se conectar a uma rede local sem
o a partir de um iPhone ou outro dispositivo, consulte o manual
do proprietário desse dispositivo.
[Wi-Fi]
3. Quando desejar encerrar a conexão no modo Ad-Hoc,
restaure as congurações do iPhone em [Settings]
[Wi-Fi]
[Choose a Network] para o estado anterior.
Page 61

Solução de problemas
Problema Causa/O que fazer
Todos os LEDs,
exceto o botão [
(POWER), estão
piscando
Os alto-falantes
produzem som
mesmo com os
fones de ouvido
conectados
Mesmo quando
você está usando os
fones de ouvido e o
som está mudo, um
som forte é ouvido
quando você toca o
teclado
O equipamento se
desliga sozinho
O equipamento não
será desligado
O pedal não
funciona, ou está
“preso”
Sem som/
Quando uma
música é
reproduzida não é
emitido nenhum
som
A anação do
teclado ou da
música está
incorreta
O som é
produzido duas
vezes (dobrado)
quando o teclado é
tocado
O som das notas
mais agudas muda
de repente a partir
de uma certa tecla
Um ruído agudo é
produzido
O volume está
reduzido
Fluxo de corrente excessivo na porta USB MEMORY.
]
Verique se há um problema com o pen drive USB. Em seguida. desligue o
equipamento e depois ligue-o novamente.
Os fones de ouvido estão conectados na saída OUTPUT em vez do
conector PHONES (p. 4)?
Essa unidade utiliza um teclado com ação de martelo no intuito de simular
a resposta de um piano acústico da forma mais realista possível. Por essa
razão você irá ouvir o barulho de martelos quando tocar o teclado, assim
como você ouviria ao tocar um piano acústico. Visto que essa unidade
permite o ajuste de volume, você pode ouvir o som dos martelos em
alguns casos, contudo, isso não signica que há um defeito. Se a vibração
transmitida para o chão e para as paredes é uma problema, você pode
minimizar a vibração afastando o piano da parede, ou usando um tapete
antivibração projetada para pianos disponível para venda.
Depois de transcorridos 30 minutos sem tocar ou operar essa unidade, ela
será desligada automaticamente (esta é a conguração de fábrica).
Se não precisar que ela desligue automaticamente, coloque a conguração
“Auto O” em “OFF” (p. 5).
O adaptador AC está conectado corretamente (p. 4)?
O pedal está conectado corretamente?
Conecte o cabo com rmeza ao conector PEDAL (p. 4).
O volume da unidade está desligado?
Os fones de ouvido estão conectados?
Os alto-falantes não irão produzir som se fones de ouvido estiverem
conectados no conector PHONES (p. 4).
A função Transpose está sendo utilizada (p. 7)?
Master Tune (anação geral) está denido corretamente (p. 7)?
As notas de um piano são anadas usando um método único (anação
estendida), que faz com que as notas agudas quem um pouco mais altas
e as notas mais graves um pouco mais baixas. Por essa razão, pode parecer
que a anação esteja incorreta, no entanto, é assim que o som de um
piano acústico deve ser.
O modo Dual foi selecionado (p. 2)?
Em um piano acústico, o som das notas da última oitava e meia, na direita
do teclado, continuaram produzindo som independente do pedal de
sustentação. Essas notas também possuem um som um pouco diferente.
Essa unidade simula de maneira el essa característica dos pianos
acústicos. Nessa unidade, a extensão das notas que não é afetada pelo
pedal de sustentação será alterada de acordo com o ajuste da função
Transpose.
Se você escutar isso nos fones de ouvido:
O som do piano tem características de brilho e nitidez com componentes
substanciais de alta frequência que podem criar um som metálico.
Isso porque as características de um piano verdadeiro são elmente
reproduzidas e não se trata de um defeito.
Esse ruído é mais perceptível quando o efeito reverb é muito aplicado,
assim, você pode minimizá-lo diminuindo o efeito reverb.
Se você não escutar isso nos fones de ouvido:
Alguma outra razão (como ressonância do piano) pode ser a razão. Entre
em contato com o seu fornecedor ou com o centro de serviços técnicos da
Roland mais próximo.
O volume será reduzido se você conectar um dispositivo USB à porta USB
MEMORY. Isso não indica um mau funcionamento.
Problema Causa/O que fazer
Se você ajustar o volume para o ajuste máximo, o som pode car distorcido
dependendo de como você toca. Se isso ocorrer, diminua o volume.
Se você não escutar isso nos fones de ouvido:
Tocar com o volume muito alto pode fazer com que os alto-falantes ou
objetos próximos ao piano criem uma ressonância. Lâmpadas orescentes
ou portas de vidro também podem criar ressonância por simpatia. É mais
provável que isso ocorra com as notas mais graves em volumes mais altos.
Som errado ou com
ruídos
A unidade desliga
Você pode tomas as seguintes medidas para minimizar as ressonâncias.
• Posicione essa unidade a 30 cm de distância da parede ou outras
superfícies.
• Diminua o volume.
• Afaste os objetos que criam ressonância.
Se você escutar isso nos fones de ouvido:
Alguma outra razão pode ser a razão. Entre em contato com o seu
fornecedor ou com um centro de serviços técnicos da Roland perto de você.
Em alguns casos, reproduzir dados SMF ou WAV em um volume
extremamente alto a partir de um pen drive USB pode fazer com que o
circuito de proteção seja ativado, desligando a unidade.
Se isso ocorrer, reduza o volume.
Ao Utilizar a Função Rede Local Sem Fio
Problema Causa/O que fazer
• Certique -se de que seu ponto de acesso de rede local sem o suporta
WPS.
Se seu ponto de acesso de rede local sem o não suportar WPS, é
possível se conectar usando o procedimento descrito em “Conectar no
Modo Ad-Hoc” (p. 8).
• O padrão sem o 802.11a/b não é suportado. Use o padrão sem o
802.11g/n (2,4 GHz).
• O método de autenticação WEP não é suportado. Use o método de
Não é possível se
conectar ao ponto
de acesso da rede
local sem frio
A comunicação está
instável
O F-20 não é
encontrado nas
conexões de
instrumento
do aplicativo
iOS (como
“Air Performer”)
autenticação WPA ou WPA2.
• Certique -se de que DHCP está ativado para seu ponto de acesso de
rede local sem o.
• A conexão pode não ser bem sucedida devido ao estado do sinal de
rádio. Neste caso, use o procedimento descrito em “M étodo de Conexão
Básico (Conexão por WPS)” (p. 8) e reconecte seu ponto de acesso de rede
local sem o.
• Há um limite para dados de conexão que pode ser lembrado. Fazer uma
nova conexão pode fazer com que os dados de conexão mais antigos
sejam excluídos.
Todos os dados de conexão serão excluídos caso você realize uma
restauração aos padrões de fábrica. Se os dados de conexão foram
excluídos, conecte-se novamente ao ponto de acesso de rede local sem
o.
A comunicação pode estar instável dependendo da utilização do espectro
de frequência de rádio.
Se a comunicação estiver instável, a resposta poderá ser lenta, ou se estiver
utilizando a comunicação de áudio, poderá haver interrupções no áudio.
As ações a seguir podem melhorar a situação.
• Coloque o ponto de acesso de rede local sem o e o F-20 próximos um
do outro.
• Altere a conguração de canal do ponto de acesso de rede local sem o.
• O F-20 está ligado?
• O adaptador wireless USB ( WNA1100-RL) está inserido no F-20?
• O F-20 está conectado à rede local sem o?
• O F-20 e o iPhone estão conectados à mesma rede (o mesmo ponto de
acesso da rede local sem o)?
• O ponto de acesso da rede local sem o está denido para permitir
comunicação entre dispositivos de rede local sem o?
Para obter detalhes sobre a conguração, consulte o manual do
proprietário do seu ponto de acesso de rede local sem o.
Deutsch Français Italiano Español Português NederlandsEnglish
O que é MIDI Visual Control?
O MIDI Visual Control é uma prática recomendada e usada internacionalmente que foi adicionada à especicação MIDI para que a expressão visual possa ser ligada
à performance musical. Um equipamento de vídeo que seja compatível com MIDI Visual Control pode ser conectado a instrumentos musicais eletrônicos via MIDI
para controlar equipamentos de vídeos em conjunto com uma performance.
O que é V-LINK?
V-LINK é uma especicação própria da Roland que permite que expressões visuais sejam ligadas a uma performance musical. Um equipamento de vídeo
que seja compatível com V-LINK pode ser conectado a instrumentos musicais eletrônicos através de MIDI, tornando mais fácil para você desfrutar de uma
variedade de efeitos visuais que são ligados com o desempenho.
O que é MIDI?
O MIDI, abreviatura para “Musical Instrument Digital Interface” (Interface Digital para Instrumentos Musicais), foi desenvolvido como um padrão universal para a troca de dados de
performance entre computadores e instrumentos musicais eletrônicos.
Essa unidade é equipada com uma porta USB COMPUTER para permitir a troca de dados de performance com dispositivos externos. Esses conectores podem ser usados para conectar a
unidade a um dispositivo externo para uma versatilidade ainda maior.
9
Page 62

USO SEGURO DO EQUIPAMENTO
AVISO
Para desligar completamente a unidade, retire o plugue da tomada
Mesmo com o interruptor de energia desligado,
essa unidade não está completamente separada
de sua fonte principal de energia. Quando for
necessário desligar completamente, desligue o
interruptor de energia na unidade e depois retire
o plugue da tomada. Por esse motivo, a tomada
escolhida para conectar o plugue do cabo de força deve estar
prontamente e rapidamente acessível.
Com relação à função Auto O
Este equipamento será desligado
automaticamente após um tempo
predeterminado se não for tocado ou seus
botões ou controles não forem operados (função
Auto O). Se você não quiser que o equipamento
seja desligado automaticamente, desative a
função “Auto O” (p. 5).
Use somente o suporte recomendado.
Esta unidade deve ser usada somente com um
suporte recomendado pela Roland.
Não coloque em um local instável
Quando estiver usando a unidade com um
suporte recomendado pela Roland, este deverá
ser cuidadosamente posicionado de forma a
manter-se nivelado e garantir a estabilidade. Se
você não estiver usando um suporte, será
necessário vericar se o local escolhido para
colocar a unidade tem uma superfície nivelada capaz de
suportar a unidade sem balançar.
Precauções com relação ao posicionamento desta unidade em
um suporte
Siga cuidadosamente as instruções do Manual do
Proprietário ao posicionar esta unidade sobre um
suporte (p. 4).
Se ela não for colocada corretamente, você
correrá o risco de criar uma situação instável,
fazendo a unidade cair ou o suporte tombar e resultando em
ferimentos.
AVISO CUIDADO
Use somente o adaptador CA especicado e a voltagem correta
Certique-se de usar somente o adaptador CA
fornecido com a unidade. Além disso, verique se
a voltagem de linha na instalação corresponde à
voltagem de entrada especicada no corpo do
adaptador CA. Outros adaptadores CA podem
usar uma polaridade diferente ou ter sido
projetados para uma voltagem diferente, portanto, o uso
desses adaptadores pode resultar em danos, mau
funcionamento ou choques elétricos.
Use somente o cabo de força incluso
Use somente o cabo de força que acompanha a
unidade. Além disso, o cabo de força fornecido
não deve ser usado em outros aparelhos.
CUIDADO
Use somente os suportes especicados
Esta unidade foi projetada para ser usada
especicamente com os suportes (KSC-68,
KS-18Z, KS-12) fabricados pela Roland. Ao usá-la
com outros suportes, você correrá o risco de se
ferir se o produto cair ou tombar por falta de
estabilidade.
Avalie a segurança antes de usar suportes
Mesmo se você observar os avisos do manual do
proprietário, certas formas de manuseio podem
fazer o produto cair do suporte ou o suporte
virar. Fique atento a qualquer problema de
segurança antes de usar o produto.
Precauções ao mover essa unidade
Se você precisar mover o instrumento, observe as
precauções listadas abaixo. São necessárias pelo
menos duas pessoas para erguer e mover a
unidade. Ela deve ser manuseada com cuidado e
ser mantida sempre nivelada. Segure a unidade
com rmeza para se proteger contra ferimentos e
proteger o instrumento contra danos.
• Ao usar o suporte KSC-68, verique se os parafusos que
prendem a unidade ao suporte não estão soltos. Aperte-os
novamente com rmeza se você perceber que eles estão
soltos.
• Desconecte o cabo de força.
• Desconecte todos os cabos provenientes de dispositivos
externos.
• Remova a estante de partituras.
Mantenha as peças pequenas fora do alcance de crianças
Para evitar ingestão acidental das peças listadas
abaixo, sempre mantenha as mesmas fora do
alcance de crianças pequenas.
• Pelas Removíveis
Parafusos de xação da estante de partituras (p. 5)
Tome cuidado para não se queimar
A área mostrada na ilustração pode car quente,
por isso tenha cuidado para evitar queimaduras.
Painel traseiro
OBSERVAÇÕES IMPORTANTES
Posicionamento
• Não exponha a unidade à luz solar direta, coloque-a perto
de dispositivos que irradiam calor, deixe-a dentro de um
veículo fechado ou sujeite-a a temperaturas extremas em
geral. Além disso, não permita que dispositivos luminosos
que normalmente são usados tendo a sua fonte de luz muito
próxima da unidade (como uma luminária para pianos) ou
holofotes poderosos sejam direcionados para a área onde
está a unidade por períodos prolongados. O calor excessivo
pode deformar ou descolorir a unidade.
• Não deixe objetos sobre o teclado. Isso pode causar mau
funcionamento, como as teclas pararem de produzir som.
• Dependendo do material e da temperatura da superfície
sobre a qual você colocar a unidade, os pés de borracha
poderão perder a cor ou marcar a superfície.
Você pode colocar um pedaço de feltro ou pano sob os
pés de borracha para evitar que isso aconteça. Se zer isso,
certique-se de que a unidade não possa deslizar ou se
mover acidentalmente.
Manutenção
• Para limpar a unidade, utilize um pano seco e macio, ou
levemente umedecido. Tente limpar toda a superfície usando
uma quantidade igual de força, movendo o pano na direção
da madeira. Esfregar a mesma área com muita força pode
danicar o acabamento.
Reparos e dados
• Antes de despachar a unidade para reparos, certique-se de
fazer um backup dos dados nela armazenados, ou escreva
as informações necessárias. Embora façamos o máximo
para preservar os dados armazenados na unidade ao
efetuar os reparos, em alguns casos, como quando a parte
da memória está danicada sicamente, a restauração do
conteúdo armazenado pode ser impossível. A Roland não
assume nenhuma responsabilidade relativa à restauração de
nenhum conteúdo armazenado que tenha sido perdido.
Precauções adicionais
• Qualquer dado armazenado na unidade por ser perdido
como resultado de falha de equipamento, operação
incorreta, etc. Salve as músicas gravadas em um pen drive
USB para que você não as perca em caso de falha.
• A Roland não assume nenhuma responsabilidade relativa à
restauração de nenhum conteúdo armazenado que tenha
sido perdido.
• O som das teclas ao serem pressionadas e as vibrações
produzidas ao tocar um instrumento pode ser transmitidos
através do chão e da parede até uma extensão inesperada.
Tome cuidado para não causar
perto de você.
• Não aplique força indevida à estante de partituras quando
ela estiver em uso.
• O volume será reduzido se você conectar um dispositivo USB
à porta USB MEMORY.
incômodo a outras pessoas
Usando Memórias Externas
• Observe as seguintes precauções ao lidar com dispositivos
de memória externa.
Além disso, certique-se de observar com atenção todas
as precauções fornecidas com o dispositivo de memória
externa.
• Não remova o dispositivo durante a leitura ou gravação.
• Para evitar danos resultantes de eletricidade estática,
descarregue toda a sua eletricidade estática antes de
manipular o dispositivo.
Cuidado com o teclado
• Não escreva no teclado com caneta ou outro instrumento
e não estampe ou coloque nenhuma marcação no
instrumento. A tinta se inltrará nas linhas da superfície e se
tornará irremovível.
• Não cole adesivos no teclado. Você pode não conseguir
remover adesivos que utilizam colas fortes, e o adesivo pode
provocar descoloração.
• Para remover as sujeiras mais difíceis, utilize um limpador de
teclado disponível para venda que não contenha abrasivos.
Comece limpando levemente. Se a sujeira não sair, limpe
aumentando gradualmente a pressão e tomando
para não arranhar as teclas.
cuidado
Direitos autorais/licenças/marcas comerciais
• É proibido por lei fazer uma gravação de áudio, gravação de
vídeo, cópia ou revisão de um trabalho com direitos autorais
de terceiros (trabalho de música, de vídeo, transmissão,
performance ao vivo, ou outros trabalhos), em todo ou em
parte, e distribuir, vender, arrendar, executar ou transmiti-lo
sem a permissão do proprietário do direito autoral.
• Não use este equipamento para ns que possam infringir
direitos autorais de propriedade de um terceiro. Não
assumimos nenhuma responsabilidade no que diz respeito a
qualquer infração de direitos autorais de terceiros decorrente
do uso deste equipamento.
• Os direitos autorais de propriedade do conteúdo deste
produto (os dados da forma de onda sonora, dados de estilo,
modelos de acompanhamento, dados de expressão, loops
de áudio e dados de imagem) são reservados pela Roland
Corporation.
• Os compradores deste produto têm a permissão de utilizar
tal conteúdo (exceto os dados de música, como das músicas
de demonstração) para criação, execução, gravação e
distribuição
• Os compradores deste produto NÃO têm a permissão de
extrair tal conteúdo na forma original ou modicada com a
nalidade de distribuir a parte gravada de tal conteúdo ou
disponibilizá-lo em uma rede de computadores.
• Roland, GS e SuperNATURAL são marcas registradas ou
nomes comerciais da Roland Corporation nos Estados
Unidos e/ou em outros países.
de trabalhos musicais originais.
10
Page 63

Digitale piano
Inhoudsopgave
Basisbedieningshandleiding (Voorpaneel) 2
Het apparaat in- of uitschakelen . . . . . . . . . . . . . . . . . . . . . . . . . . . . . . . . .2
Het volume aanpassen . . . . . . . . . . . . . . . . . . . . . . . . . . . . . . . . . . . . . . . . . .2
Een geluid selecteren . . . . . . . . . . . . . . . . . . . . . . . . . . . . . . . . . . . . . . . . . . . 2
Twee geluiden in lagen over elkaar plaatsen (Dual) . . . . . . . . . . . . . . .2
Verschillende geluiden afspelen met de linker- en rechterhand
(Split) . . . . . . . . . . . . . . . . . . . . . . . . . . . . . . . . . . . . . . . . . . . . . . . . . . . . . . . . . . . 2
De respons van het klavier wijzigen (Key Touch) . . . . . . . . . . . . . . . . . . 2
De metronoom gebruiken . . . . . . . . . . . . . . . . . . . . . . . . . . . . . . . . . . . . . .3
Songs/ritmes afspelen (Automatische begeleiding voor
akkoorden) . . . . . . . . . . . . . . . . . . . . . . . . . . . . . . . . . . . . . . . . . . . . . . . . . . . . . 3
Uw gespeelde muziekstukken opnemen . . . . . . . . . . . . . . . . . . . . . . . . . 3
Voordat u begint te spelen 4
De F-20 op een standaard plaatsen . . . . . . . . . . . . . . . . . . . . . . . . . . . . . .4
Aansluitingen op het achterpaneel . . . . . . . . . . . . . . . . . . . . . . . . . . . . . . 4
De muzieksteun bevestigen . . . . . . . . . . . . . . . . . . . . . . . . . . . . . . . . . . . . .5
Het apparaat in- en uitschakelen . . . . . . . . . . . . . . . . . . . . . . . . . . . . . . . . 5
Het apparaat na een bepaalde tijd automatisch laten
uitschakelen (Auto O) . . . . . . . . . . . . . . . . . . . . . . . . . . . . . . . . . . . . . . . . .5
De demosongs beluisteren . . . . . . . . . . . . . . . . . . . . . . . . . . . . . . . . . . . . . . 5
Milieuvriendelijk energie-eciënt ontwerp
Als er 30 minuten verstreken zijn na het uitvoeren van de laatste handeling op de F-20,
wordt het apparaat automatisch uitgeschakeld.
* Als u niet wilt dat het apparaat automatisch uitgeschakeld wordt, wijzigt u de
“Auto O”-instelling (p. 5).
Geavanceerde functies 6
De helderheid regelen (Brilliance) . . . . . . . . . . . . . . . . . . . . . . . . . . . . . . . 6
De galm regelen (Ambience) . . . . . . . . . . . . . . . . . . . . . . . . . . . . . . . . . . . . 6
Het klavier in twee splitsen (Twin Piano) . . . . . . . . . . . . . . . . . . . . . . . . . 6
De knoppen uitschakelen (Panel Lock) . . . . . . . . . . . . . . . . . . . . . . . . . . . 6
De instellingen opslaan (Memory Backup) . . . . . . . . . . . . . . . . . . . . . . . 6
De fabrieksinstellingen herstellen (Factory Reset) . . . . . . . . . . . . . . . . 6
Een USB-stick formatteren . . . . . . . . . . . . . . . . . . . . . . . . . . . . . . . . . . . . . . . 6
Diverse functie-instellingen (Function Mode) . . . . . . . . . . . . . . . . . . . . 7
De toonhoogte afstemmen op andere instrumenten
(Master Tuning) . . . . . . . . . . . . . . . . . . . . . . . . . . . . . . . . . . . . . . . . . . . 7
De toonhoogte van het klavier veranderen (Transpose) . . . . 7
Over de Wireless LAN-functie 8
Wat is de Wireless LAN-functie? . . . . . . . . . . . . . . . . . . . . . . . . . . . . . . . . . . 8
Basisverbindingsmethode (Verbinding maken via WPS) . . . . . . . . . .8
Verbinding maken in Ad-Hoc-modus . . . . . . . . . . . . . . . . . . . . . . 8
Problemen oplossen 9
Deutsch Français Italiano Español Português NederlandsEnglish
Voornaamste specicaties
Klavier 88 toetsen (Ivory Feel-G-klavier met drukpunt)
Stroomtoevoer Netstroomadapter
9 W (2 W–18 W)
9 W: Gemiddeld stroomverbruik wanneer de
piano wordt bespeeld met het volume in de
Stroomverbruik
Afmetingen 1.282 (B) x 296 (D) x 132 (H) mm
Gewicht 20 kg
Lees zorgvuldig de hoofdstukken “HET APPARAAT VEILIG GEBRUIKEN” en “BELANGRIJKE OPMERKINGEN” (infoblad “HET APPARAAT VEILIG GEBRUIKEN”
en de Gebruikershandleiding p. 10) voordat u het apparaat gaat gebruiken. Deze hoofdstukken bevatten belangrijke informatie over de juiste bediening
van het apparaat. Om er bovendien zeker van te zijn dat u elke functie van uw nieuwe apparaat goed begrijpt, leest u best het infoblad “HET
APPARAAT VEILIG GEBRUIKEN” en de hele Gebruikershandleiding. Deze handleiding moet als handige referentie worden bewaard en voorhanden zijn.
Copyright © 2013 ROLAND CORPORATION
Alle rechten voorbehouden. Niets uit deze uitgave mag op enige wijze worden gereproduceerd zonder schriftelijke toestemming van ROLAND CORPORATION.
middenpositie
2 W: Stroomverbruik onmiddellijk na het opstarten,
wanneer niets wordt gespeeld
18 W: Nominaal stroomverbruik
Accessoires
Opties
(afzonderlijk
verkocht)
* De specicaties en/of het uiterlijk van dit apparaat zijn, in het belang
van productverbetering, onderhevig aan veranderingen zonder
voorafgaande kennisgeving.
Gebruikershandleiding, Infoblad “HET APPARAAT
VEILIG GEBRUIKEN”, Muzieksteun, Netstroomadapter,
Netsnoer (om de netstroomadapter aan te sluiten),
Demperpedaal (continue detectie mogelijk)
Bijgeleverde standaard (KSC-68), Klavierstandaard
(KS-18Z, KS-12), Demperpedaal (DP-10), USB-stick (*1),
Draadloze USB-adapter (WNA1100-RL) (*1)
*1: Gebruik de USB-stick en draadloze USB-adapter
die door Roland worden verkocht. Wij kunnen
geen correcte werking garanderen als u andere
producten gebruikt.
Page 64

Basisbedieningshandleiding (Voorpaneel)
Een geluid selecteren
Houd de TONE-knop ingedrukt en druk op een van de volgende toetsen. Het geluid wijzigt.
Een piano selecteren
Grand Piano 2
Grand Piano 1
Grand Piano 3
1
Ingedrukt houden
2
Andere geluiden selecteren
Strings 2
Strings 1
Harp
1
Ingedrukt houden
2
Harpsichord 1
Ragtime Piano
Jazz Organ 2
Jazz Organ 1
Harpsichord 2
Church Organ 2
Church Organ 1
Accordion
Jazz Scat
Choir 1
Choir 3
Choir 2
Een E. Piano selecteren
Vibraphone
1
Ingedrukt houden
E. Piano 2
E. Piano 1
2
E. Piano 3
Synth Bell
Celesta
Clav.
Twee geluiden in lagen over elkaar plaatsen (Dual)
Als u op twee TONE-knoppen tegelijk drukt,
kunt u twee geluiden over elkaar plaatsen.
Mixbalans
U kunt de mixbalans van de twee geluiden aanpassen (vijf stappen,
0 = standaardwaarde).
Acoustic Bass
A.Bass + Cymbal
Fingered Bass
Thum Voice
TONE-knop die
oplicht
1
Ingedrukt houden
Mixbalans voor Dual
Mixbalans voor Split
Decay Choir
Nylon-str.Gt
Synth Pad
Steel-str.Gt
Decay Strings
Decay Choir Pad
Ingedrukt houden
+ ––
00
+
2
Het apparaat in- of uitschakelen
(p. 5)
Het volume aanpassen
Gebruik de [VOLUME]-knop om het volume te
wijzigen.
Verschillende geluiden afspelen met de linker- en rechterhand (Split)
Schakel de [SPLIT]-knop in. Het klavier wordt in een linker- en rechterdeel opgesplitst,
zodat u met elk deel een ander geluid kunt spelen.
Als u de [SPLIT]-knop ingedrukt houdt, zal de TONE-knop die aan het linkerdeel is
toegewezen, oplichten.
Schakelen tussen geluiden (Split)
Het linkergeluid
inschakelen
Het rechtergeluid
inschakelen
Druk op de [SPLIT]-knop en houd tegelijk een van de
TONE-knoppen ingedrukt. Druk vervolgens op een toets.
Voer dezelfde bewerking uit als in “Een geluid selecteren”
hierboven.
Het punt wijzigen waarop het klavier wordt opgesplitst (Split Point)
Houd de [SPLIT]-knop ingedrukt en druk op een toets (standaard: F 3).
1
Ingedrukt houden
De respons van het klavier wijzigen (Key Touch)
Als u de [KEY TOUCH]-knop inschakelt, kunt u het
reactievermogen van het klavier wijzigen (Key
Touch).
Als de [KEY TOUCH]-knop is uitgeschakeld,
wordt de “MEDIUM”-aanslag (hetzelfde als een
akoestische piano) geselecteerd.
LIGHT
LIGHT
HEAVY
FIX
HEAVY
FIX
U kunt fortissimo () spelen met een minder sterke aanslag dan bij “MEDIUM”.
Het klavier voelt dus lichter aan. Deze instelling maakt spelen makkelijker, zelfs
voor kinderen.
U moet de toetsen harder aanslaan dan bij “MEDIUM” om fortissimo () te
spelen. Het klavier voelt dus zwaarder aan. Dynamische aanslagen geven dat wat
u speelt nog meer gevoel.
Het geluid heeft steeds hetzelfde volume, ongeacht de kracht die wordt gebruikt
om de toetsen aan te slaan.
B1 B6
2
1
Ingedrukt houden
2
2
Page 65

Basisbedieningshandleiding (Voorpaneel)
De metronoom gebruiken
Schakel de [METRONOME]-knop in. De metronoom zal klinken. Druk op de [SLOW]/[FAST]-knoppen om het tempo aan te passen.
Het aantal tellen wijzigen
U kunt kiezen uit 0 (alleen zwakke tellen), 2 (2 tellen), 3 (3 tellen), 4 (4 tellen),
5 (5 tellen) of 6 (6 tellen).
52
0 3 4 6
1
Ingedrukt houden
U kunt ook het aantal tellen wijzigen door de [METRONOME]-knop ingedrukt te
houden en de [SLOW]/[FAST]-knoppen te gebruiken.
2
Een numeriek tempo opgeven
U kunt ook een numerieke waarde opgeven voor het tempo (20–250)
(standaardwaarde: 108).
1
Ingedrukt houden
Voorbeeld: Als u 120 wilt invoeren, houdt u de [METRONOME]-knop ingedrukt en
Songs/ritmes afspelen (Automatische begeleiding voor akkoorden)
Druk op de [SONG]-knop om een song af te spelen of te stoppen. Druk op de [RHYTHM]-knop om het
ritme af te spelen of te stoppen (automatische begeleiding op basis van de akkoorden die u speelt).
U kunt een interne song of een intern ritme selecteren door de [SONG]- of [RHYTHM]-knop
ingedrukt te houden en op een van de volgende toetsen te drukken.
REFERENTIE
Een interne song selecteren
1
Ingedrukt houden
Raadpleeg “Lijst van interne songs” en “Lijst van ritmes” op het einde van deze
handleiding voor meer informatie over de songnamen en ritmenamen.
Druk op de toets aan het rechtereinde. Alle
songs worden opeenvolgend afgespeeld.
2
Een ritme selecteren
1
2
drukt u in deze volgorde op de toetsen: 1
Ritme
Intro
[RHYTHM] aan [RHYTHM] uit
Ingedrukt houden
2
1 3 5 8
0 2 4 6 7 9
2 0 ENTER.
Begeleiding
ENTER
Deutsch Français Italiano Español Português NederlandsEnglish
Einde
Uw gespeelde muziekstukken opnemen
U kunt als volgt een song opnemen.
* Selecteer voor u begint het geluid dat u wilt opnemen.
1. Druk tegelijk op de [SONG]-knop en de [RHYTHM]-knop.
* Om het opnemen te annuleren, drukt u opnieuw tegelijk op de [SONG]-knop
en de [RHYTHM]-knop.
2. Bespeel het klavier om het opnemen te starten.
3. Druk op de [SONG]-knop om het opnemen te stoppen.
Als u wilt opnemen met de metronoom
* Activeer de metronoom en stel het aantal maten en het tempo in voordat u het
opnemen start.
Als u op de [SONG]-knop drukt in stap 2, start het opnemen na een aftelling van
twee maten.
Opnemen met het ritme
* Selecteer een ritme voordat u het opnemen start.
Als u op de [RHYTHM]-knop drukt in stap 2, start het opnemen na een aftelling van
twee maten.
Mixbalans
U kunt de mixbalans tussen de song/het ritme en het klavier aanpassen (vijf niveaus,
0 = standaardwaarde).
+0–
1
Tegelijk een van
deze ingedrukt houden
2
Als u de opname opnieuw wilt uitvoeren
Start de opname opnieuw vanaf stap 1.
De opgenomen song opslaan op een USB-stick
* Sluit uw USB-stick aan voordat u verder gaat.
Houd de [KEY TOUCH]-knop ingedrukt en druk op de [SONG]-knop.
Zodra alle LED-lampjes op de knoppen oplichten, zijn alle gegevens
opgeslagen (maximaal 99 songs).
Een song afspelen vanaf een USB-stick
Houd de [SONG]-knop ingedrukt en druk op de “F 3”-toets.
U kunt de twee toetsen naast “F
selecteren.
3” gebruiken om een song op de USB-stick te
F
3
Afspelen
Vorige
Volgende
De songs afspelen die u hebt opgenomen
E3
1
Ingedrukt houden
2
1
Hold down
* U kunt ook een WAV-bestand of MIDI-bestand van uw computer kopiëren naar een
USB-stick en het afspelen op de F-20. Raadpleeg het einde van deze handleiding
voor meer informatie over de indelingen die kunnen worden afgespeeld.
2
3
Page 66

Voordat u begint te spelen
De F-20 op een standaard plaatsen
Als u de F-20 op een standaard wilt plaatsen, gebruikt u de KSC-68 van Roland (raadpleeg de Gebruikershandleiding van KSC-68), KS-18Z of KS-12.
* Pas op dat u uw vingers niet knelt bij het opstellen van de standaard.
KS-18Z
Lijn de voorkant van de F-20
uit met de voorkant van de
standaard.
Pas deze zodanig
aan dat de hoogte
niet meer is dan
1 meter (pas de
standaard aan tot
een hoogte van niet
meer dan het tweede
niveau, onderaan
beginnend).
Lijn de poten van de standaard
uit met de schroeven op het
achterpaneel.
Aansluitingen op het achterpaneel
USB MEMORY-poort
Sluit hier een USB-stick aan.
• Als een USB-stick is geplaatst, kunt u songs
afspelen en opslaan.
• Als een draadloze USB-adapter (WNA1100-RL,
afzonderlijk verkocht) is aangesloten, kunt u
iOS-apps gebruiken die compatibel zijn met
draadloze verbindingen (p. 8).
• Het volume van de luidsprekers van de F-20
wordt verlaagd als u een USB-apparaat aansluit
op de USB MEMORY-poort.
* Plaats of verwijder nooit een USB-stick terwijl
dit apparaat is ingeschakeld. Hierdoor kunnen
de gegevens van het apparaat of de gegevens
op de USB-stick beschadigd raken.
* Sluit de USB-stick voorzichtig
helemaal aan, totdat de
aansluiting stevig vast zit.
PEDAL-aansluiting
Sluit het meegeleverde
demperpedaal aan.
KS-12
OUTPUT-aansluiting
Als u deze aansluiting verbindt
met versterkte luidsprekers,
wordt het geluid van dit apparaat
via deze luidsprekers uitgestuurd.
Pas de breedte van de standaard
aan zodat de rubberen
voetstukken van de F-20 schrijlings
over de standaard passen.
Zijkant van het klavier
Bovenaanzicht
PHONES-aansluiting
Sluit een hoofdtelefoon aan (afzonderlijk
verkocht).
* Als u slechts één hoofdtelefoon aansluit,
dan moet u deze op de PHONESaansluiting aansluiten.
Als twee personen
een hoofdtelefoon
(afzonderlijk verkocht)
gebruiken, dan sluit
u de hoofdtelefoons
aan op de PHONESaansluiting en de
OUTPUT-aansluiting.
USB COMPUTER-poort
Als u een in de handel verkrijgbare USB-kabel gebruikt om de USB COMPUTERpoort van de F-20 aan te sluiten op de USB-poort van uw computer, kunt u de
volgende dingen doen.
• SMF-gegevens die worden afgespeeld door MIDI-compatibele software
kunnen door de F-20 worden afgespeeld.
• MIDI-gegevens kunnen worden overgedragen tussen de F-20 en uw
sequencersoftware, zodat u beschikt over een breed gamma aan mogelijkheden
voor het produceren en bewerken van muziek.
4
Zet het volume altijd lager
en schakel alle apparaten uit
voordat u aansluitingen maakt
om defecten en storingen van
de apparatuur te voorkomen.
Plaats de netstroomadapter met de zijde met het
lampje (zie afbeelding) naar boven en de zijde met
de tekstinformatie naar beneden.
Het lampje gaat branden als u de netstroomadapter
aansluit op een stopcontact.
Stopcontact
Netsnoer
DC IN-aansluiting
Sluit de bijgeleverde netstroomadapter aan op deze aansluiting.
Page 67

Voordat u begint te spelen
De muzieksteun bevestigen
U kunt als volgt de meegeleverde muzieksteun bevestigen.
1. Draai de bevestigingsschroeven van de muzieksteun aan
de achterkant van de piano (twee plaatsen) los.
2. Plaats de muzieksteun tussen de schroeven en het frame.
3. Ondersteun de muzieksteun met één hand en span de
schroeven (twee plaatsen) aan om de muzieksteun stevig
te bevestigen.
Het apparaat in- en uitschakelen
Zorg ervoor dat u de onderstaande procedure volgt om alle
apparaten in te schakelen zodra alles correct is aangesloten (p. 4).
Wanneer u apparatuur in de verkeerde volgorde inschakelt, bestaat
het risico op apparaatstoringen of -defecten.
De stroom inschakelen
1. Draai de [VOLUME]-knop volledig naar links om het
volume te minimaliseren.
2. Druk op de [ ] (POWER)-knop om het apparaat in te
schakelen.
* Dit apparaat is uitgerust met een beveiligingscircuit. Nadat u het
apparaat hebt ingeschakeld, duurt het even (enkele seconden)
voordat het normaal werkt.
3. Gebruik de [VOLUME]-knop om het volume te wijzigen.
* Verlaag altijd eerst het volume voor u het apparaat in- of
uitschakelt. Zelfs als u het volume verlaagd hebt, hoort u
mogelijk geluid wanneer u het apparaat in- of uitschakelt. Dit is
normaal en wijst niet op een defect.
Het apparaat uitschakelen
1. Draai de [VOLUME]-knop volledig naar links om het
volume te minimaliseren.
2. Houd de [ ] (POWER)-knop gedurende een seconde of
langer ingedrukt. Het apparaat zal worden uitgeschakeld.
Deutsch Français Italiano Español Português NederlandsEnglish
* Wanneer u de muzieksteun bevestigt, moet u uw hand
gebruiken om deze te ondersteunen zodat deze niet valt. Zorg
ervoor dat uw hand niet geklemd raakt.
* Oefen geen overmatige druk uit op de geïnstalleerde muzieksteun.
* Wanneer u de muzieksteun bevestigt, moet u de
bevestigingsschroeven van de muzieksteun gebruiken die op de
piano waren bevestigd.
Als u de muzieksteun wilt verwijderen, ondersteunt u deze met één
hand terwijl u de schroeven losdraait. Verwijder de muzieksteun en
draai de schroeven vervolgens weer stevig vast.
Voorzorgsmaatregelen bij de plaatsing van dit apparaat
op een standaard
Volg de instructies in de Gebruikershandleiding zorgvuldig
op als u het apparaat op een standaard plaatst (p. 4).
Als u het geheel niet correct opstelt, loopt u het risico een
onstabiele situatie te creëren waarbij het apparaat kan
vallen of de standaard kan omslaan, met mogelijk letsel
als gevolg.
Plaats het instrument op 30 cm van de muur
De luidsprekers van de F-20 worden op het
achterpaneel van het apparaat gemonteerd.
Daarom hoort u het geluid van de
luidsprekers mogelijk niet goed als u het
achterpaneel direct tegen een muur plaatst.
Laat het instrument niet vallen!
Oefen geen overmatige druk uit op het
apparaat en sta of zit niet op het apparaat
om te voorkomen dat de F-20 valt.
30 cm
Het apparaat na een bepaalde tijd
automatisch laten uitschakelen (Auto O)
Dit apparaat wordt automatisch uitgeschakeld na een vooraf
ingestelde tijdsspanne sinds het apparaat voor het laatst
werd gebruikt om muziek af te spelen of sinds de knoppen of
bedieningselementen van het apparaat voor het laatst werden
gebruikt (Auto O-functie).
Als u niet wilt dat het apparaat automatisch wordt
uitgeschakeld, stelt u de Auto O-functie in op “OFF”.
(Standaard: 30 min.)
* Druk opnieuw op de aan/uit-knop om het apparaat weer in te
schakelen.
1 2
Ingedrukt
houden
* Deze instelling blijft behouden, zelfs wanneer het apparaat
wordt uitgeschakeld.
30 min.
10 min.
240 min.
De demosongs beluisteren
* Alle rechten
voorbehouden.
Ongeoorloofd
1
Tegelijk een van deze ingedrukt houden
Er zijn drie demosongs.
Druk op de [SONG]-knop om te stoppen.
2
gebruik van dit
materiaal voor andere
doeleinden dan
privaat, persoonlijk
gebruik betekent een
schending van de
geldende wetgeving.
OFF
3
5
Page 68

Geavanceerde functies
De helderheid regelen (Brilliance)
Hier wordt uitgelegd hoe u de helderheid van het geluid kunt
regelen (3 niveaus).
C5 C6
NORMAL
BRIGHT
MELLOW
3
1
2
Ingedrukt
houden
De galm regelen (Ambience)
U kunt de galm van het geluid regelen zodat u het gevoel krijgt dat
u optreedt in een concertzaal (5 niveaus).
C5 C6
DEFAULT
1 2
Ingedrukt
houden
+–
3
Het klavier in twee splitsen (Twin Piano)
U kunt het klavier opsplitsen in een linker- en een rechterdeel zodat
twee personen binnen hetzelfde toonhoogtebereik kunnen spelen. Dit
betekent dat u het apparaat kunt gebruiken als twee aparte piano's.
C5 C6
1 2
Ingedrukt
houden
Het klavier wordt opgesplitst in een linker- en een rechterdeel,
waarbij de “middelste C” het midden van elke partij is.
U kunt de volgende manieren kiezen om in te stellen hoe het geluid
zal geproduceerd worden.
Waarde Uitleg
PAIR
INDIVIDUAL
* Het linker- en rechterdeel hebben dezelfde klank (Piano). Twin
Piano wordt geannuleerd wanneer u op een van de TONEknoppen drukt.
* Het demperpedaal beïnvloedt alleen het rechterdeel van het klavier.
U hoort het geluid rechts als u aan de rechterkant van het
klavier speelt en links als u aan de linkerkant speelt.
Noten die in het rechtergebied worden gespeeld, hoort u
via de rechterluidspreker en noten die in het linkergebied
worden gespeeld, hoort u via de linkerluidspreker.
3
De knoppen uitschakelen (Panel Lock)
Schakel het apparaat in terwijl u de [PIANO]-knop ingedrukt
houdt. Houd de [PIANO]-knop gedurende minstens zes seconden
ingedrukt. Panel Lock wordt ingesteld en alle knoppen behalve de
[ ] (POWER)-knop worden uitgeschakeld. Zo kunt u voorkomen
dat de klank of de instellingen gewijzigd worden als u onbedoeld
op een knop zou drukken.
Panel Lock wordt geannuleerd als u het apparaat uitschakelt.
6
OFF
PAIR
De instellingen opslaan (Memory Backup)
Als het apparaat uitgeschakeld wordt, keren de instellingen terug
naar de standaardwaarden. Indien gewenst kunt u er ook voor
kiezen om deze instellingen op te slaan zodat deze bewaard blijven,
ook als u het apparaat uitschakelt. Hiervoor gebruikt u de functie
“Memory Backup”.
Instellingen die worden opgeslagen met
Memory Backup
Key Touch p. 2
Brilliance p. 6
Ambience p. 6
Master Tuning p. 7
Pagina
1. Houd de [KEY TOUCH]-knop ingedrukt en druk op de
[RHYTHM]-knop.
De [OTHER]-knop en de [SPLIT]-knop knipperen.
Druk op de [OTHER]-knop om te annuleren.
2. Om de instellingen op te slaan, drukt u op de [SPLIT]-knop.
Als alle LED-lampjes op de knoppen branden, is de bewerking voltooid.
De fabrieksinstellingen herstellen (Factory Reset)
U kunt de fabriekswaarden herstellen voor de instellingen die u
gewijzigd hebt in de functiemodus (p. 7).
OPMERKING
Als u de fabriekswaarden herstelt, worden alle instellingen
geïnitialiseerd en wordt de song die u in het interne
geheugen hebt opgeslagen, gewist.
1. Schakel het apparaat in terwijl u de [KEY TOUCH]-knop
INDIVIDUAL
ingedrukt houdt. Houd de [KEY TOUCH]-knop gedurende
minstens zes seconden ingedrukt.
De [OTHER]-knop en de [SPLIT]-knop knipperen.
Druk op de [OTHER]-knop om te annuleren.
2. Om Factory Reset uit te voeren, drukt u op de [SPLIT]-knop.
Als alle LED-lampjes op de knoppen branden, is de bewerking voltooid.
3. Schakel het apparaat uit en vervolgens opnieuw in.
Een USB-stick formatteren
U kunt als volgt de volledige inhoud die op een USB-stick
is opgeslagen, initialiseren (formatteren).
OPMERKING
• Bij het formatteren worden alle gegevens gewist die op de
USB-stick zijn opgeslagen.
• Voordat u een nieuwe USB-stick voor de eerste keer gebruikt
met de F-20, moet u de USB-stick formatteren.
1. Sluit de USB-stick die u wilt formatteren, aan op de
USBMEMORY-poort.
2. Schakel het apparaat in terwijl u de [SONG]-knop
ingedrukt houdt. Houd de [SONG]-knop gedurende
minstens zes seconden ingedrukt.
De [OTHER]-knop en de [SPLIT]-knop knipperen.
Druk op de [OTHER]-knop om te annuleren.
3. Om het formatteren uit te voeren, drukt u op de [SPLIT]-
knop.
Als alle LED-lampjes op de knoppen branden, is de bewerking voltooid.
4. Schakel het apparaat uit en vervolgens opnieuw in.
Page 69

Diverse functie-instellingen (Function Mode)
Als u instellingen wilt maken in de functiemodus, moet u de [PIANO]-knop ingedrukt houden terwijl u op de [KEY TOUCH]-knop drukt
1 2
3
ingedrukt houden
C8
30 min.
C7
C6
C5
C4
C3
C2
C1
2
440,0 Hz
INDIVIDUAL
PAIR
NORMAL
DEFAULT
+3
+1
-2
-4
-6
Ad-Hoc ON
Ad-Hoc OFF
MVC
16
14
11
OFF
9
7
4
2
en vervolgens op een van de toetsen in de afbeelding drukken.
OFF
240 min.
MELLOW
Auto O (p. 5)
10 min.
1
USB Memory Mode
+
Master Tuning
–
Twin Piano (p. 6)
OFF
BRIGHT
Brilliance (p. 6)
+
Ambience (p. 6)
–
+5
+4
+2
0
Transponeren
-1
-3
-5
Wireless LAN (p. 8)
WPS
V-LINK
Visual Control-modus
OFF
15
13
12
10
MIDI
8
Transmit Channel
6
5
3
1
ON
Local Control
Geavanceerde functies
De instelling van de USB-stick wijzigen (USB Memory Mode)
Soms wanneer de USB-stick op de USB MEMORY-poort is aangesloten, kan het langer duren voordat de
gegevens geladen zijn of het laden van de gegevens kan mislukken. In dit geval kunt u het probleem
mogelijk oplossen door de instelling van de USB MEMORY-modus op “1” te zetten. Deze instelling staat op
“2” wanneer het apparaat de fabriek verlaat. Normaal moet u deze instelling niet maken of wijzigen.
* Nadat u deze instelling hebt gewijzigd, moet u het apparaat uitschakelen en vervolgens opnieuw
inschakelen. De nieuwe instelling wordt van kracht wanneer het apparaat opnieuw wordt ingeschakeld.
De toonhoogte afstemmen op andere instrumenten (Master Tuning)
Wanneer u samen met andere instrumenten speelt (of in andere gevallen), kunt u de standaardtoonhoogte
afstemmen op die van een ander instrument.
De standaardtoonhoogte verwijst meestal naar de toonhoogte van de noot die gespeeld wordt als u
de middelste A-toets aanslaat. Voor een zuiverder ensemblegeluid tijdens het samenspelen met een of
meerdere instrumenten, dient u ervoor te zorgen dat de standaardtoonhoogte van elk instrument gelijk is.
Dit stemmen van alle instrumenten volgens een standaardtoonhoogte wordt “Master Tuning” genoemd.
U kunt de stemming regelen binnen het bereik van 415,3 Hz–440,0 Hz (standaard)–466,2 Hz (in stappen van
0,1 Hz).
De toonhoogte van het klavier veranderen (Transpose)
Met de Transpose-functie kunt u het klavier in stappen van een
halve toon transponeren.
Als een song bijvoorbeeld de toonsoort E majeur heeft en u
de song wilt spelen met de vingerzetting van C majeur, stelt u
Transpose in op “+4”.
Als u C E G speelt klinkt dit als E G B
Videoapparatuur bedienen (Visual Control Mode)
Visual Control is een functie waarmee u tegelijk met een muzikale uitvoering visuele eecten kunt regelen.
Als u de Visual Control-modus ingesteld hebt op “MVC” (MIDI Visual Control, p. 9) of “V-LINK” en u op het
klavier speelt, zullen tegelijk de beelden gebruikt worden die geproduceerd worden door het Visual
Control-apparaat dat aangesloten is op dit apparaat via een USB MIDI.
Visual Control-functietabel
Als u de 12 laagste toetsen van dit apparaat (A0–G 1) aanslaat, worden de volgende MIDI-berichten verstuurd.
Visual Control-functie Verstuurd MIDI-bericht Bediening van dit apparaat
Schakelen tussen
beelden
CC 0 (Bank Select): 0–4 Zwarte toetsen aanslaan
Program Change: 1–7 Witte toetsen aanslaan
Instellingen voor het MIDI-verzendkanaal
Met deze instelling kunt u selecteren via welk MIDI-kanaal dit apparaat gegevens verstuurt.
MIDI maakt gebruik van zestien “MIDI-kanalen” die genummerd zijn van 1 tot 16. Door MIDI-apparaten aan
te sluiten en voor elk apparaat het gewenste MIDI-kanaal te selecteren, kunt u op die apparaten klanken
afspelen of selecteren. Dit apparaat ontvangt alle zestien kanalen (1–16).
Dubbele noten vermijden bij het werken met een
softwaresynthesizer
Als een softwaresynthesizer op USB MIDI is
aangesloten, stelt u dit item in op “OFF”.
Omdat bij de meeste softwaresynthesizers de
Thru-functie ingeschakeld is, klinken noten
die op het klavier worden gespeeld mogelijk
dubbel of vallen deze weg. Om dit te vermijden,
kunt u de instelling “Local O” inschakelen
zodat het klavier en de interne klankgenerator
losgekoppeld worden.
(Local Control)
Local Control
Klankgenerator
USB MIDI
In
USB MIDI
Out
Softwaresynthesizer
Computer
Deutsch Français Italiano Español Português NederlandsEnglish
7
Page 70

Over de Wireless LAN-functie
Wat is de Wireless LAN-functie?
Door de draadloze USB-adapter (WNA1100-RL, afzonderlijk
verkocht) op de USB MEMORY-poort van de F-20 aan te sluiten,
kunt u toepassingen gebruiken die compatibel zijn met draadloze
netwerken (iOS-apps zoals “Piano Partner” of “Air Performer”).
iPhone enz.
Wireless LAN Wireless LAN
Vereiste items voor het gebruik van de Wireless LAN-functie
Draadloze USB-adapter (afzonderlijk verkocht: WNA1100-RL)
Wireless LAN-toegangspunt (bijvoorbeeld Wireless LAN-router) *1 *2
iPhone, iPad, iPod touch enz.
*1 Het Wireless LAN-toegangspunt dat u gebruikt moet WPS
ondersteunen. Als u geen verbinding kunt maken met het
Wireless LAN-toegangspunt, probeert u een verbinding te
maken met de Ad-Hoc-modus.
*2 Wij kunnen niet garanderen dat met alle soorten Wireless LAN-
toegangspunten verbinding kan worden gemaakt.
Wireless LAN-toegangspunt
(bijvoorbeeld Wireless LAN-router)
F-20
Draadloze USB-adapter
(afzonderlijk verkocht:
WNA1100-RL)
Zodra de verbinding is gelukt, gaat het LED-lampje van de
draadloze USB-adapter branden.
U kunt de draadloze verbinding gebruiken van een iOS-app zoals
“Air Performer”. Kies “F-20” in het instrumentselectiescherm van uw
iOS-app.
OPMERKING
* Het apparaat (bijvoorbeeld iPhone) dat de app uitvoert, moet
verbonden zijn op hetzelfde netwerk.
MEMO
• De verbindingsgegevens worden in het geheugen opgeslagen
wanneer u de WPS-procedure uitvoert. Het apparaat maakt
automatisch verbinding met het draadloze netwerk dat u de
vorige keer hebt gebruikt.
• Alle verbindingsgegevens worden gewist als u de
fabriekswaarden herstelt.
LED-lampje van de draadloze USB-adapter
LED Uitleg
Licht op De adapter is verbonden met een netwerk.
Licht niet op De adapter is niet verbonden met een netwerk.
Knippert De adapter zoekt naar een netwerk.
Verbinding maken in Ad-Hoc-modus
U kunt als volgt verbinding maken in Ad-Hoc-modus.
Basisverbindingsmethode (Verbinding maken via WPS)
De eerste keer dat u de F-20 verbindt met een nieuw draadloos
netwerk, moet u de volgende procedure (WPS) uitvoeren om deel
uit te maken van het draadloze netwerk.
Deze procedure is slechts één keer nodig. (Zodra u verbinding hebt
gemaakt met het netwerk, is deze procedure niet langer vereist.)
Wat is WPS?
Dit is een standaard die het maken van beveiligingsinstellingen voor
verbindingen met Wireless LAN-toegangspunten vereenvoudigt. Wij
raden u aan WPS te gebruiken wanneer u verbinding maakt met een
Wireless LAN-toegangspunt.
1. Steek de draadloze USB-adapter (WNA1100-RL, afzonderlijk
verkocht) in de USB MEMORY-poort van de F-20.
2. Houd de knop van de draadloze USB-adapter
gedurende drie seconden ingedrukt.
Het LED-lampje van de draadloze USB-adapter knippert.
OPMERKING
* De USB-adapter kan beschadigd raken als u overmatige
druk uitoefent wanneer u op de knop drukt. Wees voorzichtig
als u dit doet.
MEMO
U kunt de WPS-procedure ook uitvoeren door op “WPS” te
drukken in “Diverse functie-instellingen (Function Mode)” (p. 7) in
plaats van op de knop van de draadloze USB-adapter te drukken.
Wat is de Ad-Hoc-modus?
In de Ad-Hoc-modus kunt u de F-20 rechtstreeks aansluiten op een
iPhone of een ander draadloos apparaat zonder dat u een Wireless
LAN-toegangspunt moet gebruiken. Dit is een handige manier om de
F-20 te gebruiken met een iPhone of een ander draadloos apparaat
als u zich bevindt op een locatie waar het Wireless LAN-toegangspunt
dat u normaal gebruikt, niet beschikbaar is, bijvoorbeeld wanneer u
onderweg bent.
Beperkingen
De iPod touch of een ander draadloos apparaat dat verbonden
is in Ad-Hoc-modus kan niet met internet of een ander
draadloos apparaat communiceren. Een iPhone of een ander
draadloos apparaat met mobiele functie kan echter wel
verbinding maken met internet via de mobiele verbinding.
Als u een mobiele verbinding gebruikt voor internet, moet
u weten dat er kosten in rekening kunnen worden gebracht
afhankelijk van uw tariefplan.
1. Druk in “Diverse functie-instellingen (Function Mode)”
(p. 7), op “Ad-Hoc ON”.
2. Selecteer “F-20” op de iPhone of een ander draadloos
apparaat dat u wilt aansluiten om de verbinding te
maken. (Kies op een iPhone bijvoorbeeld [Instellingen]
[Wi-Fi] [Kies een netwerk] om “F-20” te selecteren.
Er verschijnt een scherm om uw wachtwoord in te voeren.
Voer “f20ak” in.)
Ad-Hoc SSID F-20
Wachtwoord f20ak
3. Voer de WPS-bediening op het Wireless LAN-
toegangspunt uit (druk bijvoorbeeld op de WPS-knop op
het Wireless LAN-toegangspunt).
Voor meer informatie over de WPS-bediening van het Wireless
LAN-toegangspunt raadpleegt u de gebruikershandleiding van het
Wireless LAN-toegangspunt.
8
Raadpleeg de gebruikershandleiding van de iPhone of een ander
apparaat voor meer informatie over het aansluiten van dat apparaat
op een Wireless LAN.
3. Als u de verbinding in Ad-Hoc-modus wilt beëindigen,
stelt u de iPhone-instellingen in [Instellingen] [Wi-Fi]
[Kies een netwerk] in op de vorige status.
Page 71

Problemen oplossen
Probleem Oorzaak/handeling
Alle LED-lampjes
behalve de [
(POWER)-knop
knipperen
De luidsprekers
produceren
geluid hoewel een
hoofdtelefoon is
aangesloten
U gebruikt de
hoofdtelefoon
en het geluid is
gedempt, maar
toch hoort u een
dof geluid wanneer
u het klavier
bespeelt
Het apparaat
wordt automatisch
uitgeschakeld
Het apparaat kan
niet ingeschakeld
worden
Het pedaal
werkt niet of de
pedaalfunctie zit
“vast”
Geen geluid/
Geen geluid
wanneer u een
song afspeelt
De toonhoogte van
het klavier of de
song is niet correct
U hoort klanken
dubbel wanneer u
het klavier bespeelt
Het geluid van
de hogere noten
wijzigt plots vanaf
een bepaalde toets
U hoort een hoge
toon
Het volume is
verlaagd
Er was sprake van overmatige stroomafgifte op de USB MEMORY-poort.
]
Controleer of er een probleem is met de USB-stick. Schakel nu het
apparaat uit en vervolgens opnieuw in.
Is de hoofdtelefoon aangesloten op de OUTPUT-aansluiting in plaats van
op de PHONES-aansluiting (p. 4)?
Dit apparaat maakt gebruik van een hamerklavier om de aanslag van
een akoestische piano zo realistisch mogelijk te benaderen. Dit betekent
dat u de hamers hoort kloppen wanneer u het klavier bespeelt, net zoals
dat het geval is bij het bespelen van een akoestische piano. Aangezien u
het volume van dit apparaat kunt regelen, hoort u in bepaalde situaties
mogelijk het geluid van de hamers. Dit wijst niet op een defect. Als u
problemen ervaart met trillingen die doorgegeven worden aan de vloer of
muren, kunt u de trillingen mogelijk beperken door de piano niet tegen de
muur te plaatsen of door een in de handel verkrijgbare antivibratiemat die
geschikt is voor piano's op de vloer te leggen.
Als er 30 minuten verstreken zijn na het uitvoeren van de laatste handeling
op dit apparaat, wordt het apparaat automatisch uitgeschakeld. (Dit is de
fabrieksinstelling.)
Als u niet wilt dat het apparaat automatisch uitgeschakeld wordt, stelt u de
“Auto O”-functie in op “OFF” (p. 5).
Is de netstroomadapter correct aangesloten (p. 4)?
Is het pedaal correct aangesloten?
Steek de kabel stevig in de PEDAL-aansluiting (p. 4).
Staat het volume van het apparaat uit?
Is er een hoofdtelefoon aangesloten?
De luidsprekers produceren geen geluid als er een hoofdtelefoon is
aangesloten op de PHONES-aansluiting (p. 4).
Hebt u Transpose-instellingen doorgevoerd (p. 7)?
Is de Master Tune-instelling correct (p. 7)?
De noten van een piano worden gestemd via een unieke methode
(Stretched Tuning), waardoor noten in het hogere bereik een iets hogere
toonhoogte en noten in het lagere bereik een iets lagere toonhoogte
hebben. De toonhoogte voelt hierdoor mogelijk fout aan, maar zo moet
een akoestische piano klinken.
Hebt u een dubbele klank geselecteerd (p. 2)?
Op een akoestische piano blijven de ongeveer anderhalve octaaf noten
aan het hoge uiteinde van het klavier weerklinken, ongeacht het gebruik
van het demperpedaal. Het toonkarakter van deze noten is ook enigszins
verschillend.
Dit apparaat zorgt voor een getrouwe weergave van dit kenmerk van
akoestische piano's. Op dit apparaat zal het bereik dat niet beïnvloed
wordt door het demperpedaal wijzigen in overeenstemming met de
Transpose-instelling.
Als u dit hoort in een hoofdtelefoon:
Pianoklanken die helder en scherp van aard zijn, bevatten componenten met
een aanzienlijk hoge frequentie die kunnen klinken alsof er een metaaltoon
toegevoegd is. Dit komt doordat de kenmerken van een akoestische piano
getrouw gereproduceerd worden. Dit wijst dus niet op een defect.
Deze toon is opvallender aanwezig als het galmeect in sterke mate
toegepast wordt. Mogelijk kunt u de toon dus minimaliseren door het
galmeect te verminderen.
Als u dit niet in een hoofdtelefoon hoort:
Mogelijk heeft dit een andere oorzaak (bijvoorbeeld resonantie in het
apparaat). Neem contact op met uw verdeler of uw dichtstbijzijnde Roland
Service Center.
Het volume wordt verlaagd als u een USB-apparaat aansluit op de USB
MEMORY-poort. Dit wijst niet op een defect.
Probleem Oorzaak/handeling
Als u het volume instelt op het maximum, wordt het geluid afhankelijk van
uw prestaties mogelijk vervormd. Verlaag in dat geval het volume.
Als u dit niet in een hoofdtelefoon hoort:
Als u speelt bij een hoog volumeniveau, gaan de luidsprekers of
voorwerpen in de buurt van het apparaat mogelijk resoneren. Fluorescentielampen of glazen deuren kunnen ook aanzienlijk resoneren. Dit is
Fout of zoemend
geluid
Apparaat schakelt
uit
vooral het geval bij lagere noten en hogere volumes. U kunt de volgende
voorzorgsmaatregelen treen om resonanties te minimaliseren.
• Plaats dit apparaat 30 cm verwijderd van muren of andere oppervlakken.
• Houd het volumeniveau laag.
• Plaats het apparaat uit de buurt van voorwerpen die resoneren.
Als u dit hoort in een hoofdtelefoon:
Mogelijk heeft dit een andere oorzaak. Neem contact op met uw verdeler
of uw dichtstbijzijnde Roland Service Center.
Wanneer SMF- of WAV-gegevens van een USB-stick aan extreem hoge
volumes worden afgespeeld, kan dit er in sommige gevallen toe leiden
dat het beveiligingscircuit in werking treedt zodat het apparaat wordt
uitgeschakeld.
Verlaag in dat geval het volume.
De Wireless LAN-functie gebruiken
Probleem Oorzaak/handeling
• Zorg ervoor dat uw Wireless LAN-toegangspunt WPS ondersteunt.
Als uw Wireless LAN-toegangspunt WPS niet ondersteunt, kunt u
verbinding maken volgens de procedure beschreven in “Verbinding
maken in Ad-Hoc-modus” (p. 8).
• De standaard 802.11a/b voor draadloze netwerken wordt niet
ondersteund. Gebruik in plaats daarvan de standaard 802.11g/n (2,4 GHz)
voor draadloze netwerken.
• De WEP-vericatiemethode wordt niet ondersteund. Gebruik in plaats
Kan geen
verbinding maken
met een Wireless
LAN-toegangspunt
De communicatie is
onstabiel
De F-20 is niet
gevonden in de
instrumentverbindingen van
de iOS-app (zoals
“Air Performer”)
daarvan de WPA- of WPA2-vericatiemethode.
• Zorg ervoor dat DHCP is ingeschakeld voor uw Wireless LANtoegangspunt.
• De verbinding kan mogelijk misluk ken door de status van het
radiosignaal. Als dit het geval is, gebruikt u de procedure beschreven in
“Basisverbindingsmethode (Verbinding maken via WPS)” (p. 8) en maakt
u opnieuw verbinding met uw Wireless LAN-toegangspunt.
• Er is een limiet op de verbindingsgegevens die kunnen worden
onthouden. Als u een nieuwe verbinding maakt, kunnen oudere
verbindingsgegevens verwijderd worden.
Alle verbindingsgegevens worden verwijderd als u de fabriekswaarden
herstelt. Als de verbindingsgegevens zijn verwijderd, maakt u opnieuw
verbinding met het Wireless LAN-toegangspunt.
De communicatie kan mogelijk onstabiel worden afhankelijk van het
gebruik van het radiofrequentiespectrum.
Als de communicatie onstabiel is, kan de reactie vertragen of als
audiocommunicatie wordt gebruikt, kunnen er problemen met de audio
optreden.
De volgende handelingen kunnen de situatie verbeteren.
• Plaats het Wireless LAN-toegangspunt en de F-20 dichter bij elkaar.
• Wijzig de kanaalinstelling van het Wireless LAN-toegangspunt.
• Is de F-20 ingeschakeld?
• Is de draadloze adapter (WNA1100-RL) in de F-20 geplaatst?
• Is de F-20 verbonden met de Wireless LAN?
• Zijn de F-20 en de iPhone verbonden met hetzelfde netwerk (hetzelfde
Wireless LAN-toegangspunt)?
• Is het Wireless LAN-toegangspunt zo ingesteld dat communicatie tussen
Wireless LAN-apparaten mogelijk is?
Raadpleeg de gebruikershandleiding van uw Wireless LANtoegangspunt voor meer informatie over instellingen.
Deutsch Français Italiano Español Português NederlandsEnglish
Wat is MIDI Visual Control?
MIDI Visual Control is een internationaal gebruikte en aanbevolen werkwijze die toegevoegd werd aan de MIDI-specicatie zodat visuele expressies gekoppeld
kunnen worden aan muzikale uitvoeringen. Videoapparatuur die MIDI Visual Control ondersteunt, kan via MIDI aangesloten worden op een elektronisch
muziekinstrument om de videoapparatuur samen met een muzikale uitvoering aan te sturen.
Wat is V-LINK?
V-LINK is een eigen ontwikkelde technologie van Roland waarmee visuele expressies gekoppeld kunnen worden aan muzikale uitvoeringen.
Videoapparatuur die V-LINK ondersteunt, kan via MIDI aangesloten worden op een elektronisch muziekinstrument, waardoor het eenvoudig wordt om
visuele eecten te koppelen aan muzikale uitvoeringen.
Wat is MIDI?
MIDI, een afkorting voor “Musical Instrument Digital Interface”, werd ontwikkeld als een universele standaard voor de uitwisseling van muzikale gegevens tussen elektronische
instrumenten en computers.
Dit apparaat is uitgerust met de USB COMPUTER-poort voor het uitwisselen van muzikale gegevens met externe apparaten. Deze aansluitingen kunnen gebruikt worden om het
apparaat op een extern apparaat aan te sluiten voor een nog grotere veelzijdigheid.
9
Page 72

HET APPARAAT VEILIG GEBRUIKEN
WAARSCHUWING
Trek de stekker uit het stopcontact als u het apparaat volledig
wilt uitschakelen
Zelfs als de aan/uit-knop uit staat, betekent dit
niet dat het apparaat volledig van de
stroomtoevoer is losgekoppeld. Als u de
stroomtoevoer volledig wilt afsluiten, zet u de
aan/uit-knop op het apparaat uit en trekt u de
stekker uit het stopcontact. Steek de stekker van
het netsnoer daarom in een stopcontact dat gemakkelijk
bereikbaar is.
Over de Auto O-functie
Dit apparaat wordt automatisch uitgeschakeld
na een vooraf ingestelde tijdsspanne sinds het
apparaat voor het laatst werd gebruikt om
muziek af te spelen of sinds de knoppen of
bedieningselementen van het apparaat voor het
laatst werden gebruikt (Auto O-functie). Als u
niet wilt dat het apparaat automatisch wordt uitgeschakeld,
schakelt u de Auto O-functie uit (p. 5).
Gebruik alleen de aanbevolen standaard
Gebruik dit apparaat uitsluitend met een
standaard die door Roland wordt aanbevolen.
Plaats het apparaat niet op een instabiele ondergrond
Als u het apparaat gebruikt met een standaard die
door Roland wordt aangeraden, dient u deze
zorgvuldig te plaatsen, zodat de standaard mooi
horizontaal en stabiel is. Als u geen standaard
gebruikt, dient u ervoor te zorgen
op een een oppervlak plaatst dat het apparaat
goed ondersteunt, en dat het apparaat niet kan wankelen.
Voorzorgsmaatregelen bij de plaatsing van dit apparaat op een
standaard
Volg de instructies in de Gebruikershandleiding
zorgvuldig op als u het apparaat op een
standaard plaatst (p. 4).
Als u het geheel niet correct opstelt, loopt u het
risico een onstabiele situatie te creëren waarbij
het apparaat kan vallen of de standaard kan
omslaan, met mogelijk letsel als gevolg.
dat u het apparaat
WAARSCHUWING OPGELET
Gebruik alleen de meegeleverde netstroomadapter en het
correcte voltage
Gebruik alleen de netstroomadapter die bij het
apparaat wordt geleverd. Ga na of het lijnvoltage
van het elektriciteitsnet overeenkomt met het
ingangsvoltage dat op de netstroomadapter
wordt weergegeven. Andere netstroomadapters
gebruiken mogelijk een andere polariteit of zijn
ontworpen voor een ander voltage. Het gebruik van dergelijke
adapters kan resulteren in schade, defecten of elektrische
schokken.
Gebruik alleen het meegeleverde netsnoer
Gebruik uitsluitend het bevestigde netsnoer. Sluit
het meegeleverde netsnoer ook niet aan op
andere apparaten.
OPGELET
Gebruik alleen de specieke standaard(en)
Dit apparaat is ontworpen voor gebruik in
combinatie met specieke standaarden (KSC-68,
KS-18Z, KS-12) vervaardigd door Roland.
Wanneer u gebruik maakt van andere
standaarden, loopt u het risico letsels op te lopen
wanneer het apparaat valt of omslaat als gevolg
van onvoldoende stabiliteit.
Beoordeel de veiligheidsaspecten vooraleer u standaarden
gebruikt
Zelfs wanneer u de voorzorgsmaatregelen
vermeld in de gebruikershandleiding opvolgt,
kunnen sommige manieren van omgaan met het
apparaat ervoor zorgen dat het toch van de
standaard valt, of dat de standaard omslaat. Ga
bewust om met de veiligheidsaspecten vooraleer dit apparaat
te gebruiken.
Voorzorgsmaatregelen bij het verplaatsen van dit apparaat
Houd u aan de onderstaande
voorzorgsmaatregelen als u het instrument moet
verplaatsen. Er zijn minstens twee personen
nodig om het apparaat veilig op te tillen en te
verplaatsen. Het apparaat dient voorzichtig
behandeld en altijd horizontaal gehouden te
worden. Zorg ervoor dat u het apparaat goed vasthoudt om
uzelf tegen verwondingen en het instrument tegen
beschadigingen te beschermen.
• Controleer of de schroeven waarmee het apparaat aan
de standaard KSC-68 is bevestigd, niet los zijn gekomen.
Wanneer dit het geval is, draait u deze opnieuw vast.
• Koppel het netsnoer los.
• Koppel alle kabels van externe apparaten los.
• Verwijder de muziekstandaard.
Houd kleine items buiten het bereik van kinderen
Bewaar de volgende kleine onderdelen buiten
het bereik van kleine kinderen om het per
ongeluk inslikken van deze onderdelen te
voorkomen.
• Verwijderbare onderdelen
Bevestigingsschroeven van de muzieksteun (p. 5)
Let erop dat u zich niet verbrandt
De zone die weergegeven wordt op de afbeelding
kan erg heet worden. Wees voorzichtig dat u zich
niet verbrandt.
Achterpaneel
BELANGRIJKE OPMERKINGEN
Plaatsing
• Stel het apparaat niet bloot aan rechtstreeks zonlicht, plaats
het niet in de buurt van warmtebronnen, laat het niet achter
in een gesloten voertuig en stel het niet bloot aan extreme
temperaturen. Laat ook geen verlichting die in de buurt
van het apparaat wordt gebruikt (zoals een pianolamp) of
sterke spots gedurende langere tijd op dezelfde plaats op
het apparaat schijnen. Overmatige hitte kan het apparaat
vervormen of verkleuren.
• Laat geen voorwerpen op het klavier liggen. Dat kan leiden
tot defecten, zoals toetsen die geen signaal meer geven.
• Afhankelijk van het materiaal en de temperatuur van
het oppervlak waarop u het apparaat plaatst, kunnen de
rubberen voetstukken mogelijk het oppervlak verkleuren
of ontsieren.
U kunt een stuk vilt of stof onder de rubberen voetstukken
plaatsen om dit te voorkomen. Zorg er in dat geval voor dat
het apparaat niet verschuift of per ongeluk in beweging
komt.
Onderhoud
• Gebruik voor het reinigen van dit apparaat een droge, zachte
doek of een licht bevochtigde doek. Probeer het volledige
oppervlak met dezelfde kracht te reinigen met de nerf van
het hout mee. Als u te hard op eenzelfde plek wrijft, kan de
afwerking beschadigd raken.
Reparatie en gegevens
• Voordat het apparaat voor reparaties wordt verzonden,
maakt u een back-up van de gegevens die op het apparaat
zijn opgeslagen of noteert u de nodige gegevens op papier
als u dat wilt. Tijdens de reparatie doen wij uiteraard ons
uiterste best om de gegevens die op uw apparaat zijn
opgeslagen, te behouden, maar er kunnen gevallen zijn
waarbij de opgeslagen inhoud niet kan worden hersteld,
bijvoorbeeld wanneer het fysieke geheugen beschadigd is
geraakt. Roland kan niet aansprakelijk worden gesteld voor
het herstel van opgeslagen inhoud die verloren is gegaan.
Extra voorzorgsmaatregelen
• Gegevens die op dit apparaat zijn opgeslagen, kunnen
verloren gaan door defecten of storingen van de apparatuur,
een onjuiste bediening enzovoort. Sla de songs die u hebt
opgenomen, op een USB-stick op, zodat deze niet verloren
gaan in geval van defecten of storingen.
• Roland kan niet aansprakelijk worden gesteld voor het
herstel van opgeslagen inhoud die verloren is gegaan.
• Het geluid van toetsen die worden aangeslagen en trillingen
die door het bespelen van een instrument geproduceerd
worden, kunnen via een vloer of muur onverwacht ver
worden doorgegeven. Let erop geen hinder te veroorzaken
voor andere personen in de buurt.
• Oefen geen overmatige druk uit op de muziekstandaard
terwijl u het apparaat gebruikt.
• Het volume wordt verlaagd als u een USB-apparaat aansluit
op de USB MEMORY-poort.
Externe geheugens gebruiken
• Leef de volgende voorzorgsmaatregelen na wanneer u
externe geheugenapparaten gebruikt.
Zorg er ook voor dat u alle voorzorgsmaatregelen naleeft die
met het externe geheugenapparaat werden meegeleverd.
• Verwijder het apparaat niet terwijl het aan het lezen/
schrijven is.
• Om schade als gevolg van statische elektriciteit te
voorkomen, moet u zorgen dat alle statische elektriciteit
van uw eigen lichaam is ontladen voordat u het apparaat
aanraakt.
Het klavier onderhouden
• Schrijf niet met een pen of enig ander materiaal op het
klavier, en plaats geen stempels of andere markeringen op
het instrument. De inkt zal in het oppervlak doordringen en
kan dan niet meer worden verwijderd.
• Plaats geen stickers op het klavier. U zult stickers met sterke
lijm mogelijk niet meer kunnen verwijderen en de lijm kan
bovendien verkleuring veroorzaken.
• Gebruik een in de handel verkrijgbare klavierreiniger
die geen schuurmiddelen bevat om hardnekkig vuil te
verwijderen. Begin met zachtjes af te vegen. Wanneer het
vuil niet meteen loskomt, oefen dan geleidelijk aan meer
druk uit, maar let er hierbij op dat u geen krassen maakt op
de toetsen.
Auteursrechten/Licenties/Handelsmerken
• Het opnemen met audio- of videoapparatuur, kopiëren,
herwerken, distribueren, verkopen, leasen, uitvoeren
of uitzenden van materiaal (muziek, videomateriaal,
uitzendingen, live-uitvoeringen enzovoort) onder
auteursrecht dat geheel of gedeeltelijk eigendom is van een
derde, is wettelijk verboden zonder de toestemming van de
auteursrechteigenaar.
• Gebruik dit apparaat niet voor doeleinden die de
auteursrechten van een derde kunnen schenden. Wij
kunnen niet aansprakelijk worden gesteld voor schendingen
van auteursrechten van derden door uw gebruik van dit
apparaat.
• De auteursrechten op de inhoud van dit product
(golfvormgegevens van het geluid, stijlgegevens,
begeleidende patronen, frasegegevens, audioloops
en beeldgegevens) zijn voorbehouden door Roland
Corporation.
• Kopers van dit product hebben de toestemming de
betreende inhoud (behalve songgegevens zoals
demosongs) te gebruiken voor het aanmaken, uitvoeren,
opnemen en verdelen van originele muziekuitvoeringen.
• Kopers van dit product hebben GEEN toestemming
om de betreende inhoud in de oorspronkelijke of een
gewijzigde vorm aan het apparaat te onttrekken met als
doel het verspreiden van een opgenomen medium met de
betreende inhoud of het ter beschikking stellen van deze
inhoud via een computernetwerk.
• Roland, GS, SuperNATURAL zijn gedeponeerde
handelsmerken of handelsmerken van de Roland
Corporation in de Verenigde Staten en/of andere landen.
10
Page 73

For the U.K.
IMPORTANT: THE WIRES IN THIS MAINS LEAD ARE COLOURED IN ACCORDANCE WITH THE FOLLOWING CODE.
BLUE:
BROWN:
As the colours of the wires in the mains lead of this apparatus may not correspond with the coloured markings identifying
the terminals in your plug, proceed as follows:
The wire which is coloured BLUE must be connected to the terminal which is marked with the letter N or coloured BLACK.
The wire which is coloured BROWN must be connected to the terminal which is marked with the letter L or coloured RED.
Under no circumstances must either of the above wires be connected to the earth terminal of a three pin plug.
This product complies with the requirements of EMC Directive 2004/108/EC.
NEUTRAL
LIVE
For EU Countries
For the USA
FEDERAL COMMUNICATIONS COMMISSION
RADIO FREQUENCY INTERFERENCE STATEMENT
This equipment has been tested and found to comply with the limits for a Class B digital device, pursuant to Part 15 of the
FCC Rules. These limits are designed to provide reasonable protection against harmful interference in a residential
installation. This equipment generates, uses, and can radiate radio frequency energy and, if not installed and used in
accordance with the instructions, may cause harmful interference to radio communications. However, there is no guarantee
that interference will not occur in a particular installation. If this equipment does cause harmful interference to radio or
television reception, which can be determined by turning the equipment off and on, the user is encouraged to try to correct the
interference by one or more of the following measures:
– Reorient or relocate the receiving antenna.
– Increase the separation between the equipment and receiver.
– Connect the equipment into an outlet on a circuit different from that to which the receiver is connected.
– Consult the dealer or an experienced radio/TV technician for help.
This device complies with Part 15 of the FCC Rules. Operation is subject to the following two conditions:
(1) this device may not cause harmful interference, and
(2) this device must accept any interference received, including interference that may cause undesired operation.
This equipment requires shielded interface cables in order to meet FCC class B limit.
Any unauthorized changes or modifications not expressly approved by the party responsible for compliance could void the user’s
authority to operate the equipment.
CAN ICES-3 (B)/NMB-3 (B)
For C.A. US (Proposition 65
WARNING
This product contains chemicals known to cause cancer, birth defects and other reproductive harm, including lead.
DECLARATION OF CONFORMITY
Compliance Information Statement
Model Name :
Type of Equipment :
Responsible Party :
Address :
Telephone :
F-20
Digital Piano
Roland Corporation U.S.
5100 S. Eastern Avenue Los Angeles, CA 90040-2938
(323) 890-3700
For Canada
For Korea
)
For the USA
Page 74

For EU Countries
For China
Page 75

Page 76

Internal Song List
No. Song name Composer
1 Floral Pursuits * Léo Delibes, Arranged by John Maul
The Nutcracker “Waltz of the
2
Flowers” (Jazz Arrangement)
3 The Marriage of Figaro “Overture” Wolfgang Amadeus Mozart
4 Midsummer * Masashi Hirashita
5 Swan-derful Samba *
6 My Pleasure * Masashi Hirashita
7 Barcarolle Fryderyk Franciszek Chopin
8 Zhavoronok
9 Valse, op.34-1 Fryderyk Franciszek Chopin
10 Polonaise op.53 Fryderyk Franciszek Chopin
11 Nocturne No.20 Fryderyk Franciszek Chopin
12 Die Forelle
13 Reets dans l’Eau Claude Achille Debussy
14 La Fille aux Cheveux de Lin Claude Achille Debussy
15 La Campanella Franz Liszt
16 Scherzo No.2 Fryderyk Franciszek Chopin
17 Liebesträume 3 Franz Liszt
Peter Ilyich Tchaikovsky, Arranged by
*
Masashi Hirashita
Peter Ilyich Tchaikovsky, Arranged by
John Maul
Mikhail Ivanovich Glinka, Arranged
by Mily Alexeyevich Balakirev
Franz Peter Schubert, Arranged by
Franz Liszt
Rhythm List
No. Rhythm name
1 8-Beat
2 16-Beat
3 Triplet
4 Shue
5 Ballad 1
6 Ballad 2
7 Blues
8 Country 1
No. Rhythm name
9 Country 2
10 Gospel 1
11 Gospel 2
12 Swing 1
13 Swing 2
14 Brush Swing 1
15 Brush Swing 2
16 5-Beat Swing
No. Song name Composer
18 Étude, op.10-3 Fryderyk Franciszek Chopin
19 Je te veux Erik Satie
20 Fantaisie-Impromptu Fryderyk Franciszek Chopin
21 Clair de Lune Claude Achille Debussy
22 Nocturne No.2 Fryderyk Franciszek Chopin
23 Für Elise Ludwig van Beethoven
24 Late Night Chopin *
25 Fly Free * John Maul
26 L’éveil de l’amour * Masashi Hirashita
27 Wedding Song * John Maul
28 Yesterday’s Dream * John Maul
29 Windy Afternoon * Masashi Hirashita
30 Scrambled Egg * Masashi Hirashita
* All rights reserved. Unauthorized use of this material for purposes other than
private, personal enjoyment is a violation of applicable laws.
* No data for the music that is played will be output from the USB COMPUTER port.
* Songs marked by an asterisk “*” are original songs composed for the Roland
Corporation. The copyrights to these songs are owned by the Roland Corporation.
No. Rhythm name
17 Waltz
18 Jazz Waltz
19 Hand Clap
20 Ragtime
21 Bossa Nova
22 Samba
23 Rumba
24 Mambo
Fryderyk Franciszek Chopin,
Arranged by John Maul
No. Rhythm name
25 Beguine
26 Salsa
27 ChaCha
28 Tango
29 March 4/4
30 March 6/8
31 Disco
32 Rock’n’roll
123 45678 9101112131415 1617181920 21222324252627 2829303132
Formats Playable from a USB Flash Drive
The F-20 can play back data in the following formats.
• SMF formats 0/1
• Roland Piano Digital format (i-format)
• Audio les: WAV format, 44.1 kHz, 16-bit linear
* 5 1 0 0 0 3 4 4 5 5 - 0 1 *
 Loading...