Roland DA-2496 User Manual

Owner’s Manual

We’d like to take a moment to thank you for purchasing the DA-2496 (Digital Audio Interface).

This document explains how to set up the DA-2496 system.

To avoid problems and enjoy optimal performance, please carefully follow the setup instructions described in this document.

201b

Before using this unit, carefully read the sections entitled: “IMPORTANT SAFETY INSTRUCTIONS” (p. 2), “USING THE UNIT SAFELY” (p.3, 4), and “IMPORTANT NOTES” (p.5, 6). These sections provide important information concerning the proper operation of the unit. Additionally, in order to feel assured that you have gained a good grasp of every feature provided by your new unit, this manual should be read in its entirety. The manual should be saved and kept on hand as a convenient reference.

Copyright © 2001 ROLAND CORPORATION

All rights reserved. No part of this publication may be reproduced in any form without the written permission of ROLAND CORPORATION.

Roland DA-2496 User Manual

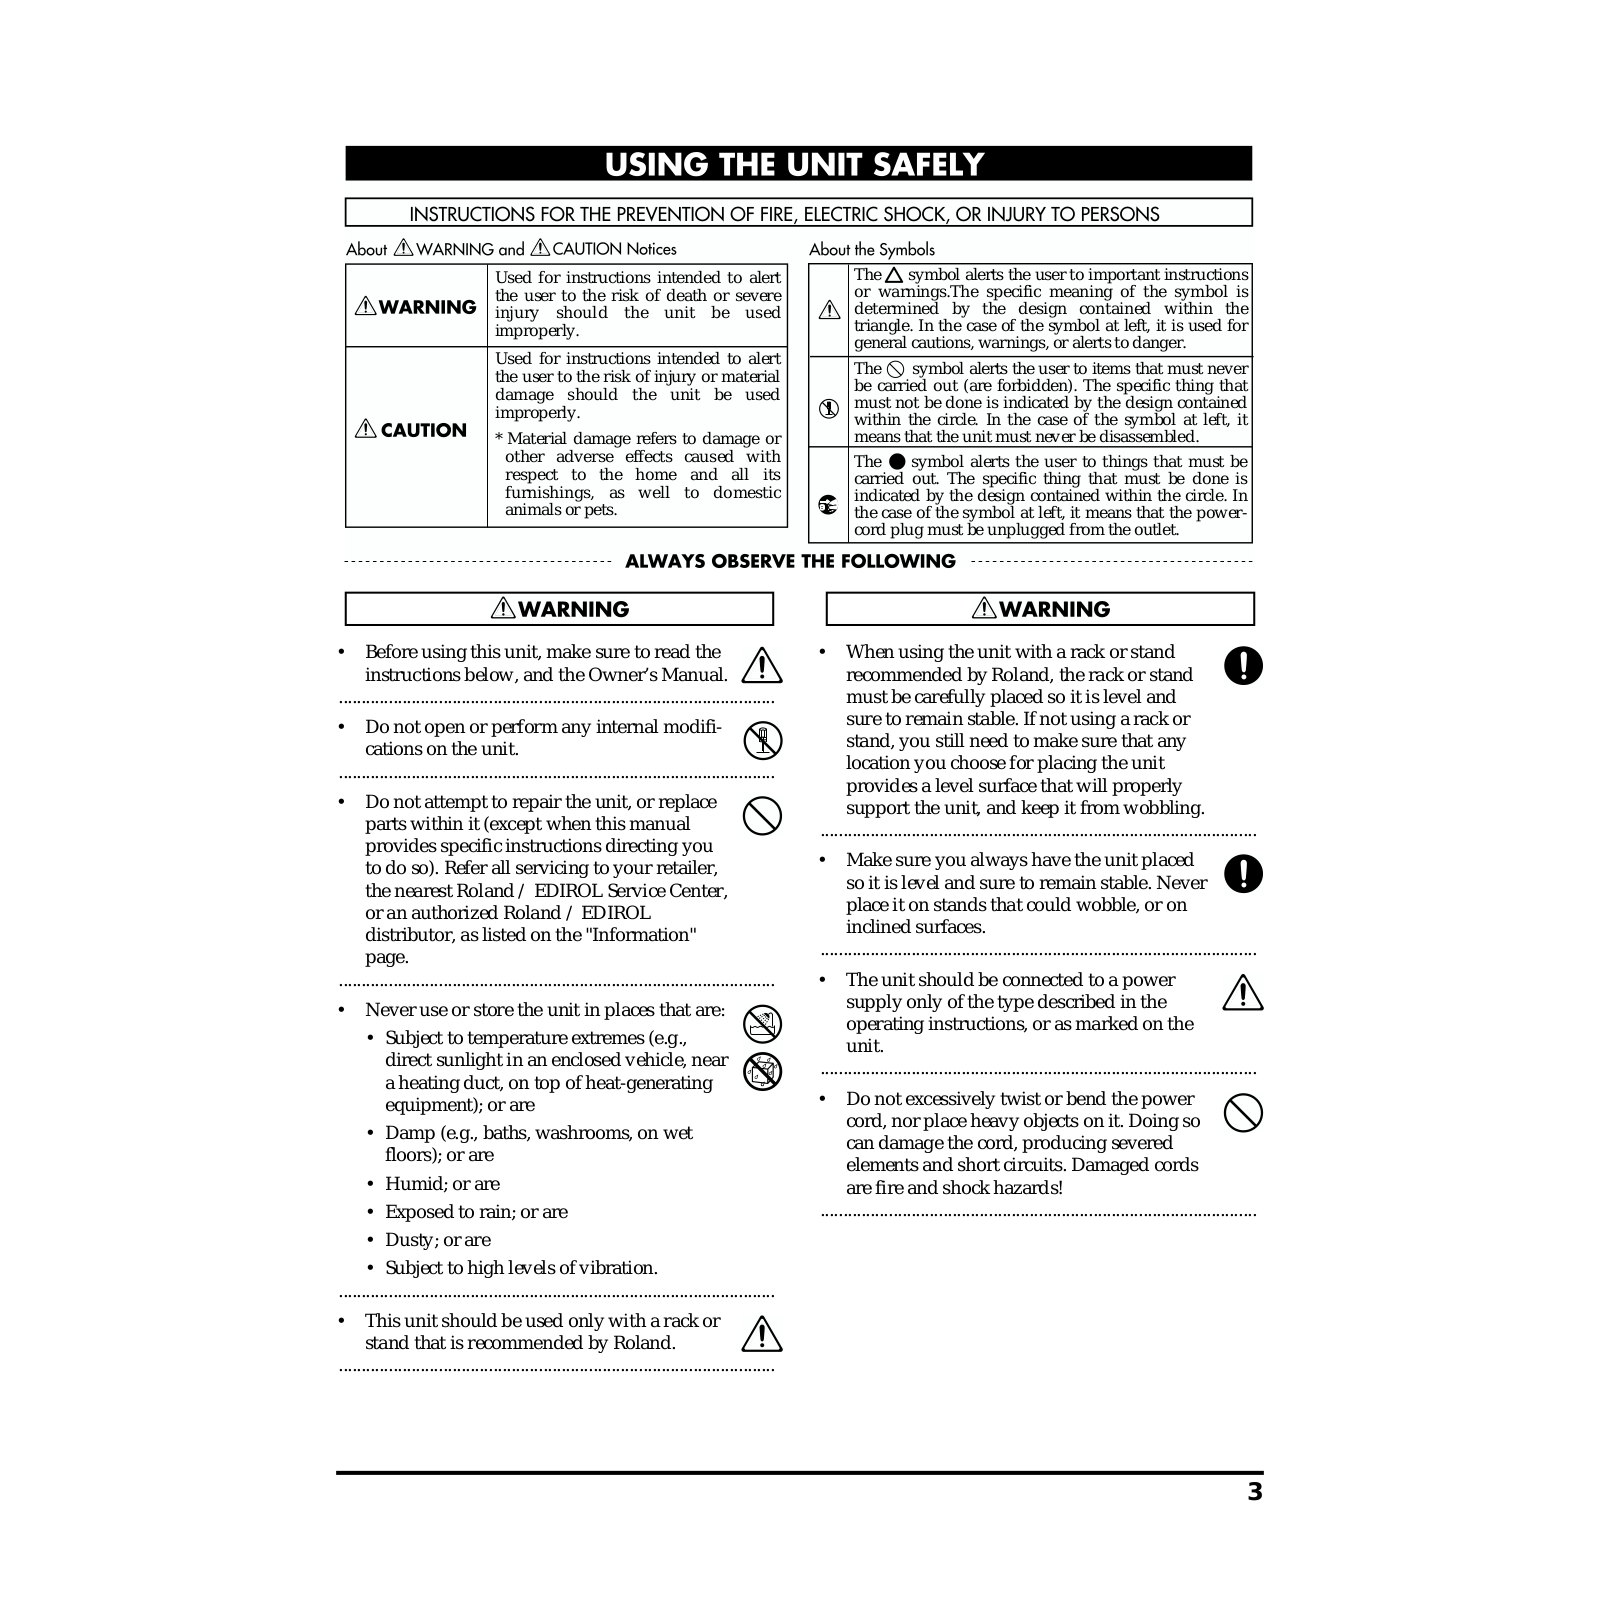
Used for instructions intended to alert the user to the risk of death or severe injury should the unit be used improperly.

Used for instructions intended to alert the user to the risk of injury or material damage should the unit be used improperly.

* Material damage refers to damage or other adverse effects caused with respect to the home and all its furnishings, as well to domestic animals or pets.

The symbol alerts the user to important instructions or warnings.The specific meaning of the symbol is determined by the design contained within the triangle. In the case of the symbol at left, it is used for general cautions, warnings, or alerts to danger.

The symbol alerts the user to items that must never be carried out (are forbidden). The specific thing that must not be done is indicated by the design contained within the circle. In the case of the symbol at left, it means that the unit must never be disassembled.

The symbol alerts the user to things that must be carried out. The specific thing that must be done is indicated by the design contained within the circle. In the case of the symbol at left, it means that the powercord plug must be unplugged from the outlet.

• Before using this unit, make sure to read the instructions below, and the Owner’s Manual.

................................................................................................

• Do not open or perform any internal modifications on the unit.

................................................................................................

Do not attempt to repair the unit, or replace parts within it (except when this manual provides specific instructions directing you to do so). Refer all servicing to your retailer, the nearest Roland / EDIROL Service Center, or an authorized Roland / EDIROL

distributor, as listed on the "Information" page.

................................................................................................

• Never use or store the unit in places that are:

• Subject to temperature extremes (e.g., direct sunlight in an enclosed vehicle, near a heating duct, on top of heat-generating equipment); or are

Damp (e.g., baths, washrooms, on wet floors); or are

Humid; or are

Exposed to rain; or are

Dusty; or are

Subject to high levels of vibration.

................................................................................................

This unit should be used only with a rack or

stand that is recommended by Roland.

................................................................................................

• When using the unit with a rack or stand recommended by Roland, the rack or stand must be carefully placed so it is level and

sure to remain stable. If not using a rack or stand, you still need to make sure that any location you choose for placing the unit provides a level surface that will properly support the unit, and keep it from wobbling.

................................................................................................

• Make sure you always have the unit placed

so it is level and sure to remain stable. Never place it on stands that could wobble, or on inclined surfaces.

................................................................................................

• The unit should be connected to a power

supply only of the type described in the operating instructions, or as marked on the

unit.

................................................................................................

Do not excessively twist or bend the power cord, nor place heavy objects on it. Doing so can damage the cord, producing severed elements and short circuits. Damaged cords are fire and shock hazards!

................................................................................................

3

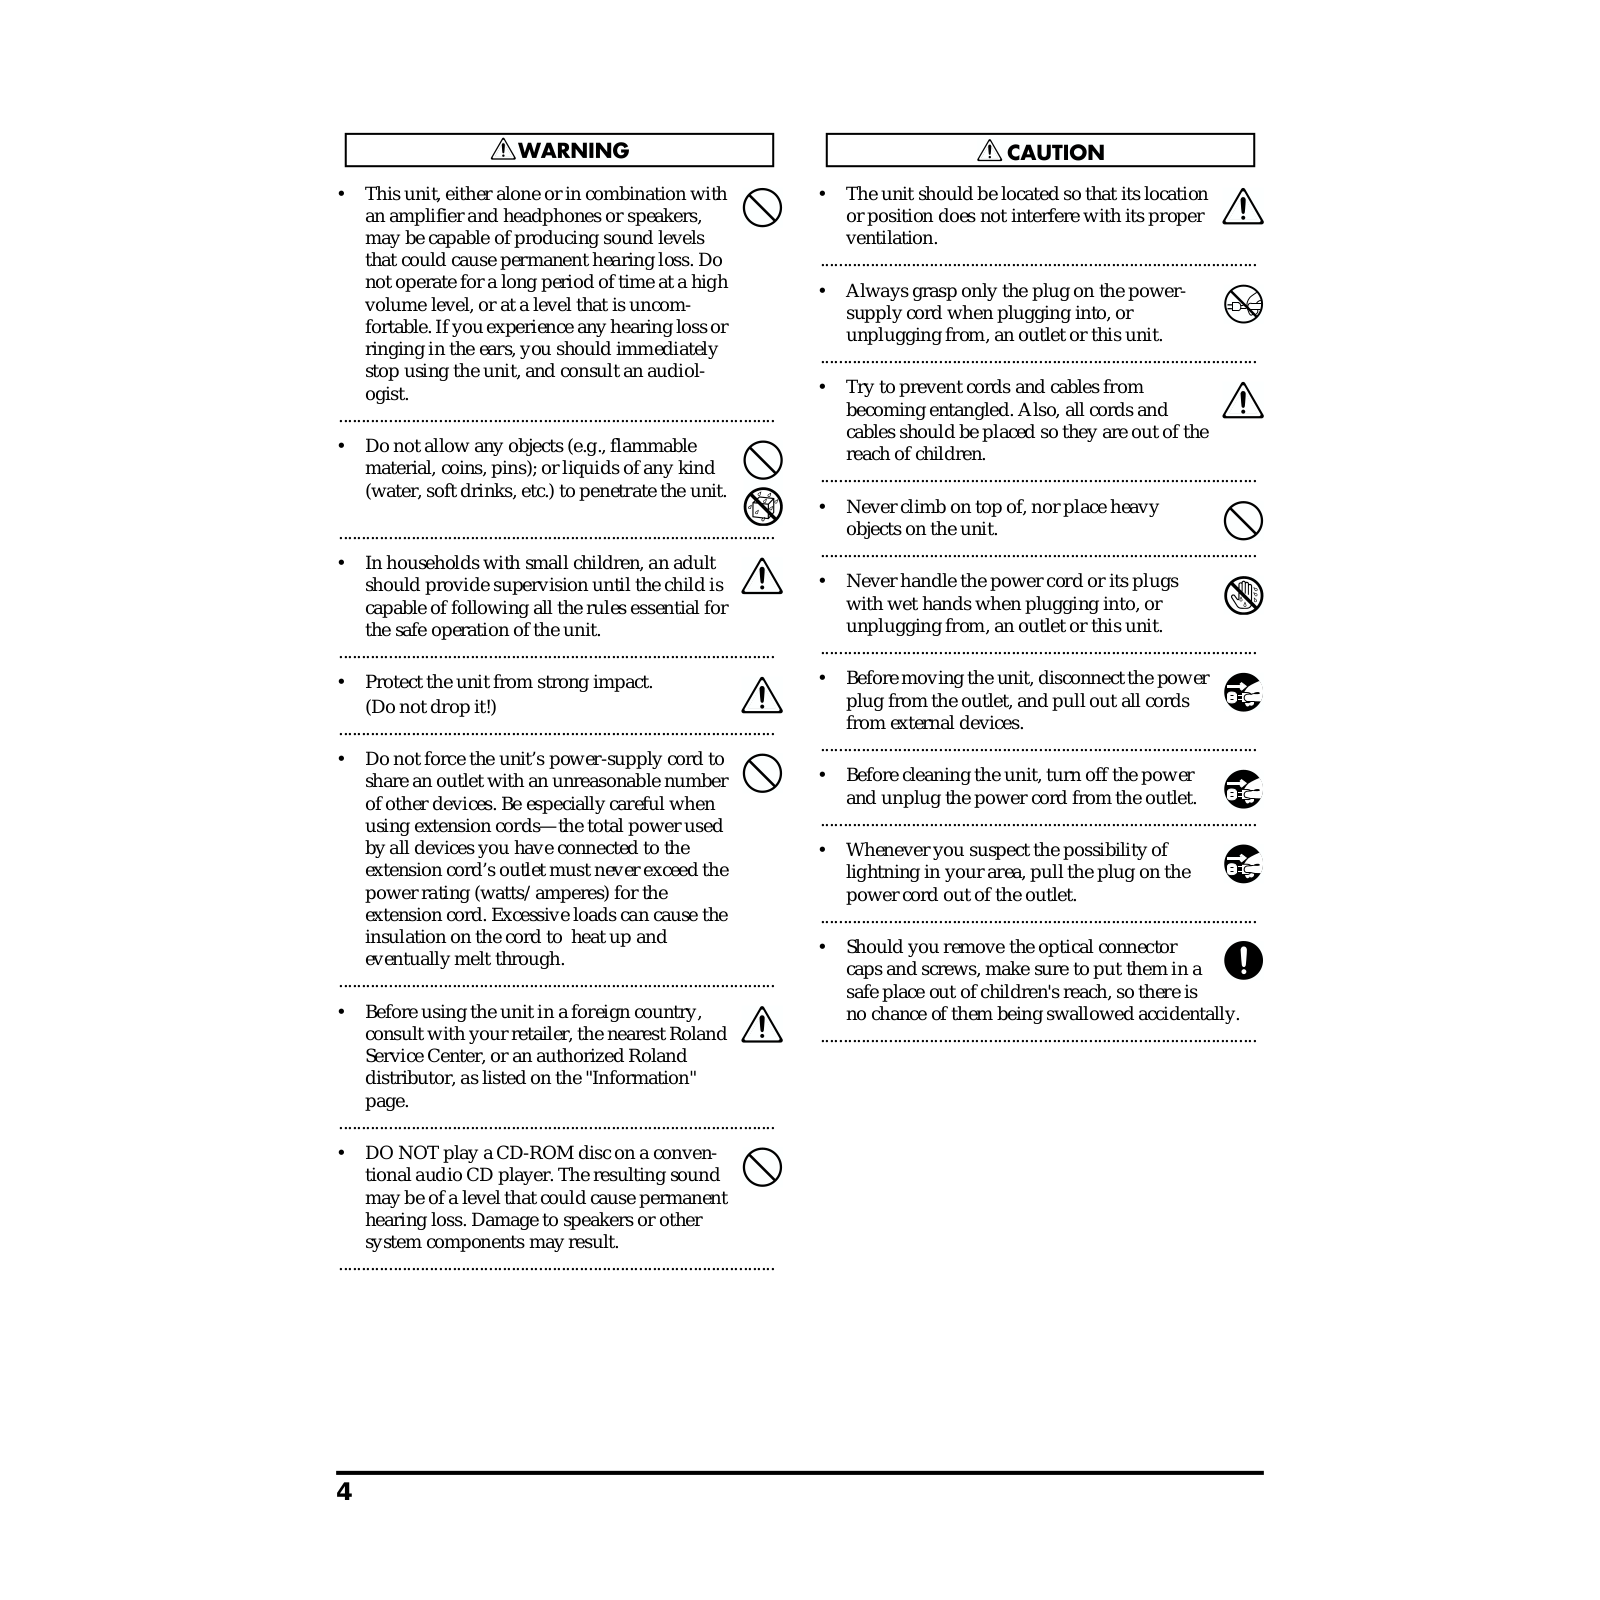
This unit, either alone or in combination with an amplifier and headphones or speakers, may be capable of producing sound levels that could cause permanent hearing loss. Do not operate for a long period of time at a high volume level, or at a level that is uncom-

fortable. If you experience any hearing loss or ringing in the ears, you should immediately stop using the unit, and consult an audiologist.

................................................................................................

• Do not allow any objects (e.g., flammable material, coins, pins); or liquids of any kind (water, soft drinks, etc.) to penetrate the unit.

................................................................................................

• In households with small children, an adult should provide supervision until the child is capable of following all the rules essential for

the safe operation of the unit.

................................................................................................

• Protect the unit from strong impact.

(Do not drop it!)

................................................................................................

Do not force the unit’s power-supply cord to share an outlet with an unreasonable number of other devices. Be especially careful when using extension cords—the total power used by all devices you have connected to the extension cord’s outlet must never exceed the power rating (watts/amperes) for the

extension cord. Excessive loads can cause the insulation on the cord to heat up and eventually melt through.

................................................................................................

• Before using the unit in a foreign country,

consult with your retailer, the nearest Roland Service Center, or an authorized Roland distributor, as listed on the "Information"

page.

................................................................................................

DO NOT play a CD-ROM disc on a conventional audio CD player. The resulting sound may be of a level that could cause permanent hearing loss. Damage to speakers or other system components may result.

................................................................................................

• The unit should be located so that its location

or position does not interfere with its proper ventilation.

................................................................................................

• Always grasp only the plug on the power-

supply cord when plugging into, or unplugging from, an outlet or this unit.

................................................................................................

• Try to prevent cords and cables from

becoming entangled. Also, all cords and cables should be placed so they are out of the reach of children.

................................................................................................

Never climb on top of, nor place heavy objects on the unit.

................................................................................................

• Never handle the power cord or its plugs with wet hands when plugging into, or unplugging from, an outlet or this unit.

................................................................................................

• Before moving the unit, disconnect the power

plug from the outlet, and pull out all cords from external devices.

................................................................................................

• Before cleaning the unit, turn off the power

and unplug the power cord from the outlet.

................................................................................................

• Whenever you suspect the possibility of

lightning in your area, pull the plug on the power cord out of the outlet.

................................................................................................

• Should you remove the optical connector

caps and screws, make sure to put them in a safe place out of children's reach, so there is

no chance of them being swallowed accidentally.

................................................................................................

4

IMPORTANT NOTES

In addition to the items listed under “IMPORTANT SAFETY INSTRUCTIONS” and “USING THE UNIT SAFELY” on pages 3 and 4, please read and observe the following:

Power Supply

• Do not use this unit on the same power circuit with any device that will generate line noise (such as an electric motor or variable lighting system).

• Before connecting this unit to other devices, turn off the power to all units. This will help prevent malfunctions and/or damage to speakers or other devices.

Placement

Using the unit near power amplifiers (or other equipment containing large power transformers) may induce hum. To alleviate the problem, change the orientation of this unit; or move it farther away from the source of interference.

This device may interfere with radio and television reception. Do not use this device in the vicinity of such receivers.

Do not expose the unit to direct sunlight, place it near devices that radiate heat, leave it inside an enclosed vehicle, or otherwise subject it to temperature extremes. Excessive heat can deform or discolor the unit.

To avoid possible breakdown, do not use the unit in a wet area, such as an area exposed to rain or other moisture.

Maintenance

• For everyday cleaning wipe the unit with a soft, dry cloth or one that has been slightly dampened with water. To remove stubborn dirt, use a cloth impregnated with a mild, non-abrasive detergent. Afterwards, be sure to wipe the unit thoroughly with a soft, dry cloth.

• Never use benzine, thinners, alcohol or solvents of any kind, to avoid the possibility of discoloration and/or deformation.

Additional Precautions

Use a reasonable amount of care when using the unit’s buttons, sliders, or other controls; and when using its jacks and connectors. Rough handling can lead to malfunctions.

When connecting / disconnecting all cables, grasp the connector itself—never pull on the cable. This way you will avoid causing shorts, or damage to the cable’s internal elements.

A small amount of heat will radiate from the unit during normal operation.

To avoid disturbing your neighbors, try to keep the unit’s volume at reasonable levels. You may prefer to use headphones, so you do not need to be concerned about those around you (especially when it is late at night).

When you need to transport the unit, package it in the box (including padding) that it came in, if possible. Otherwise, you will need to use equivalent packaging materials.

5

IMPORTANT NOTES

Use a cable from Roland to make the connection. If using some other make of connection cable, please note the following precautions.

Some connection cables contain resistors. Do not use cables that incorporate resistors for connecting to this unit. The use of such cables can cause the sound level to be extremely low, or impossible to hear. For information on cable specifications, contact the manufacturer of the cable.

Handling CD-ROMs

• Avoid touching or scratching the shiny underside (encoded surface) of the disc. Damaged or dirty CD-ROM discs may not be read properly. Keep your discs clean using a commercially available CD cleaner.

Copyright

Unauthorized recording, distribution, sale, lending, public performance, broadcasting, or the like, in whole or in part, of a work (musical composition, video, broadcast, public performance, or the like) whose copyright is held by a third party is prohibited by law.

When exchanging audio signals through a digital connection with an external instrument, this unit can perform recording without being subjected to some of the restrictions of the Serial Copy Management System (SCMS). This is because the unit is intended solely for musical production, and is designed not to be subject to restrictions as long as it is used to record works (such as your own compositions) that do not infringe on the copyrights of others. (SCMS is a feature that prohibits second-generation and later copying through a digital connection. It is built into MD recorders and other consumer digital-audio equipment as a copyright-protection feature.)

Do not use this unit for purposes that could infringe on a copyright held by a third party. Roland assumes no responsibility whatsoever with regard to any infringements of third-party copyrights arising through your use of this unit.

*Microsoft and Windows are registered trademarks of Microsoft Corporation.

*Windows® 98 is known officially as: “Microsoft® Windows® 98 operating system.”

*Screen shots in this documents are reprinted with permission from Microsoft Corporation.

*Windows® 2000 is known officially as: “Microsoft® Windows® 2000 operating system.”

*Windows® Me is known officially as: ”Microsoft® Windows® Millennium Edition operating system.”

*Apple and Macintosh are registered trademark of Apple Computer, Inc.

*MacOS is a trademark of Apple Computer, Inc.

*All product names mentioned in this document are trademarks or registered trademarks of their respective owners.

6

Contents


USING THE UNIT SAFELY .................................

3

IMPORTANT NOTES ...........................................

5

Contents ..............................................................

7

Before you begin ................................................

8

Check the included items .................................................................

8

Main features......................................................................................

9

Names of things and what they do .................

10

DA-2496.............................................................................................

10

DA-PCI ..............................................................................................

13

DA-PCI (French language) .............................................................

14

Preparations for using the DA-2496 ...............

15

Installing the DA-PCI......................................................................

16

Installation de la carte DA-PCI (French language).....................

17

Driver installation and settings .....................................................

18

DA-PCI Control Panel .......................................

32

Starting the Control Panel ..............................................................

32

Signal flow ........................................................................................

32

DA-PCI Control Panel.....................................................................

33

Troubleshooting ...............................................

36

About the drivers ..............................................

39

Synchronization settings .................................

41

DA-2496/DA-PCI synchronization settings................................

41

Synchronization settings for multiple DA-PCI units .................

43

Block diagram...................................................

44

Main Specifications ..........................................

45

7

Before you begin

Check the included items

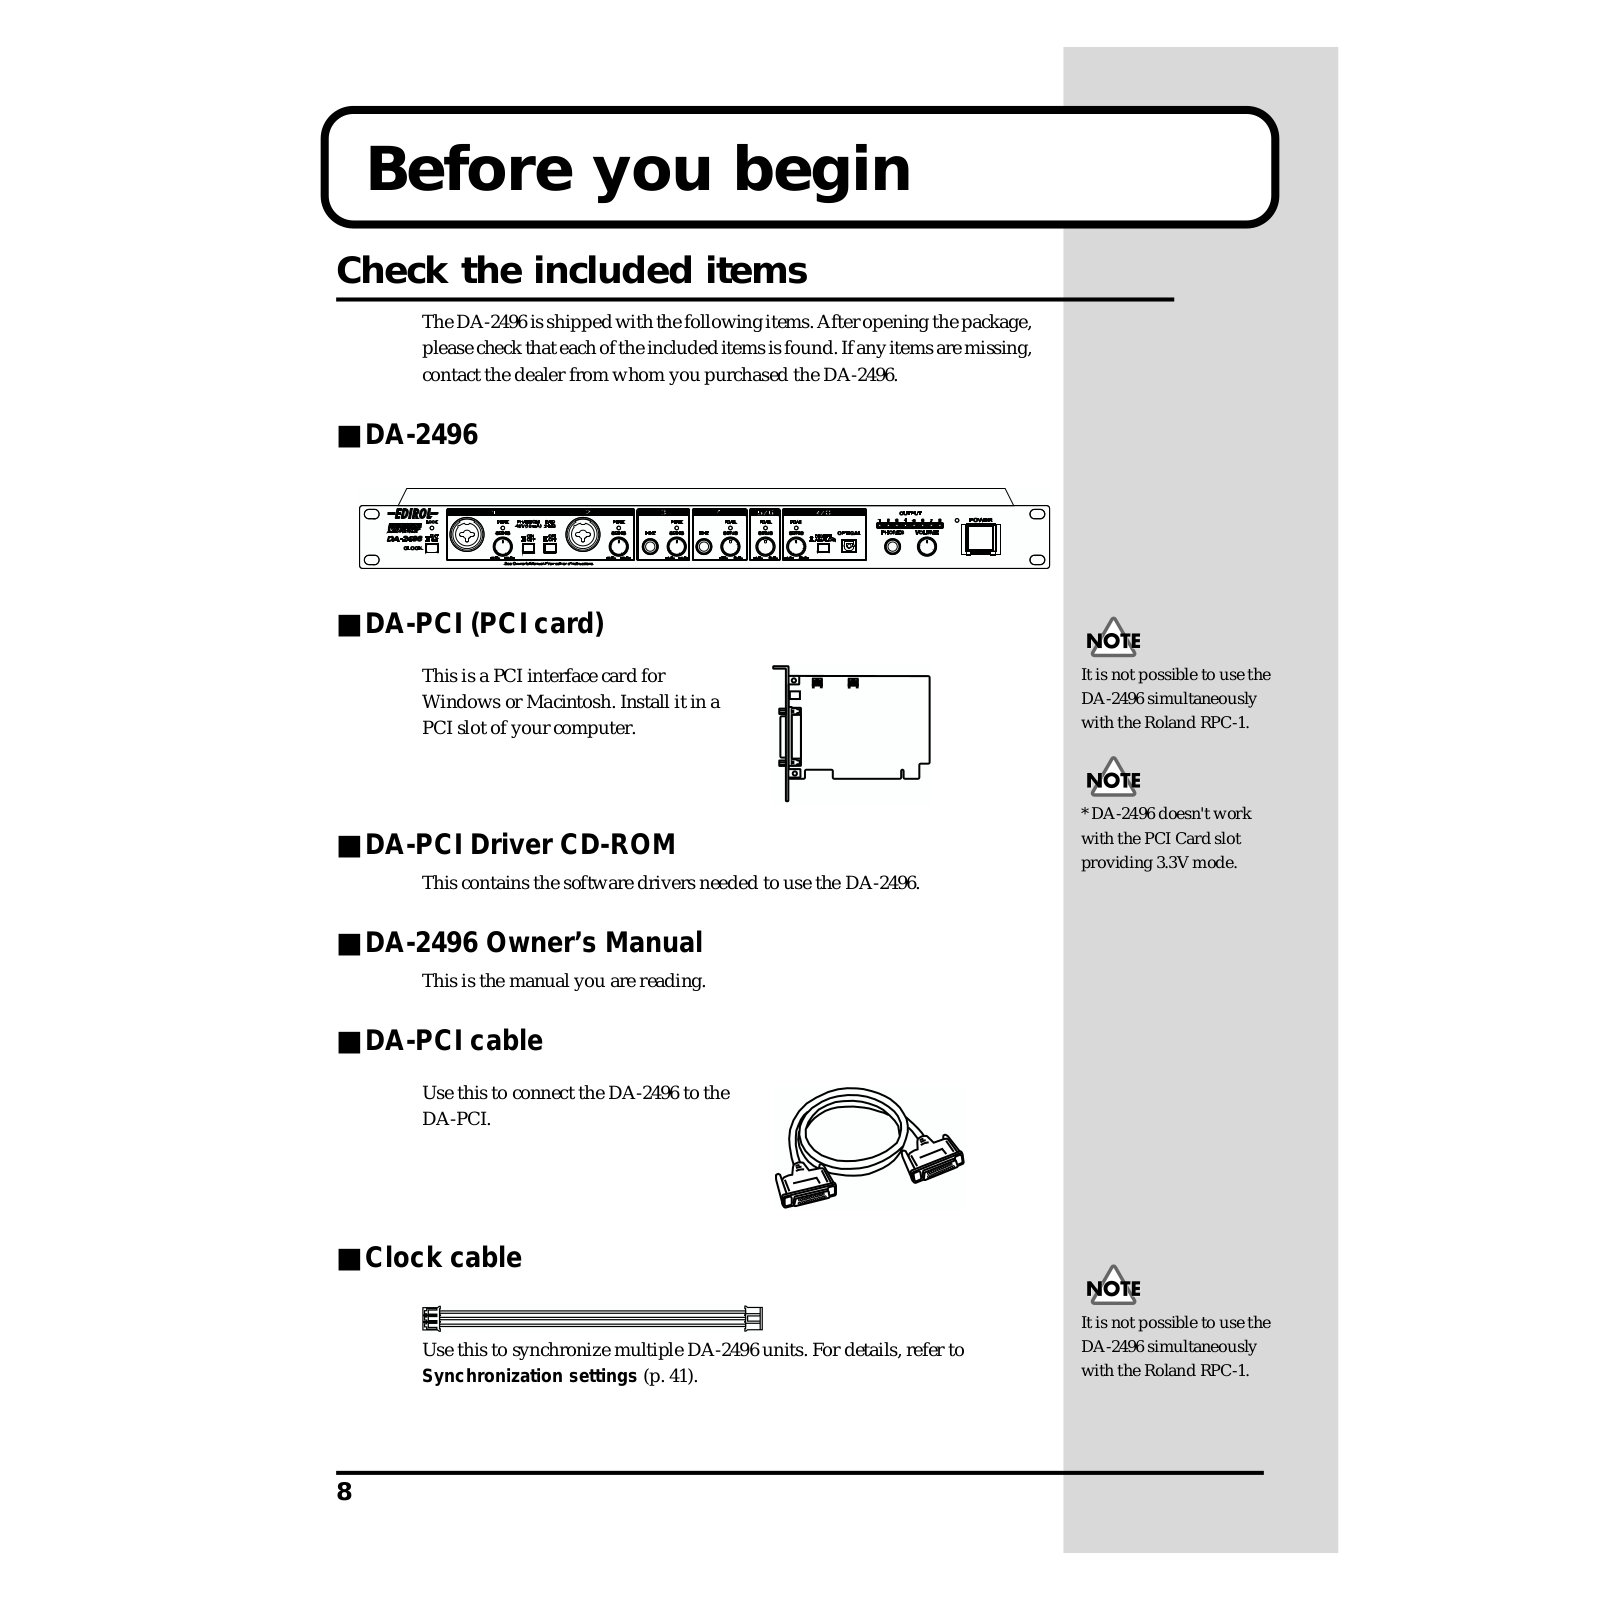
The DA-2496 is shipped with the following items. After opening the package, please check that each of the included items is found. If any items are missing, contact the dealer from whom you purchased the DA-2496.

DA-2496

DA-PCI (PCI card)

This is a PCI interface card for

Windows or Macintosh. Install it in a

PCI slot of your computer.

DA-PCI Driver CD-ROM

This contains the software drivers needed to use the DA-2496.

DA-2496 Owner’s Manual

This is the manual you are reading.

DA-PCI cable

Use this to connect the DA-2496 to the

DA-PCI.

It is not possible to use the DA-2496 simultaneously with the Roland RPC-1.

* DA-2496 doesn't work with the PCI Card slot providing 3.3V mode.

Clock cable


It is not possible to use the


Use this to synchronize multiple DA-2496 units. For details, refer to

DA-2496 simultaneously

Synchronization settings (p. 41).

with the Roland RPC-1.

8

Before you begin

Main features

8 IN/8 OUT audio input/output with up to 24-bit/96 kHz quality

The DA-2496 supports eight channels of audio input and output simultaneously with astounding 24-bit/96 kHz quality, allowing pro-quality digital recording and playback. Sampling rates from 22.05–96 kHz are supported. MIDI input/output connectors and word clock input/output connectors are also standard.

Up to four DA-2496 units can be used simultaneously, letting you expand your system to 32 INs/32 OUTs. (Only on Windows Me/98.)

Internal digital mixer

The internal digital mixer can be controlled directly from the control panel of your computer. You can mix eight channels of input with audio data from your computer, and output the two-channel mix.

The Direct Monitor function lets you monitor in real time without passing the data through your computer application.

MIDI interface functionality

The DA-2496 provides a set of MIDI IN/OUT connectors, allowing it to be connected to MIDI devices for synchronization via MTC.

Included drivers

The included dedicated drivers for the DA-2496 support ASIO 2.0 for both Windows and Macintosh versions. A WDM drive for Windows 2000 is also included. You can enjoy enhanced performance with WDM-compatible applications such as SONAR, and ASIO-compatible applications such as Cubase and Logic. Of course, the DA-2496 can also be used with applications that support MME (Windows) or Sound Manager (Mac OS).

In order to use the MIDI functionality of the DA2496 on the Macintosh, you must install Opcode Corporation’s OMS 2.3.3. Use the DA-PCI Driver CD-ROM to install this. For details, refer to Driver

installation and settings

(p. 18).

9

Names of things and what they do

DA-2496

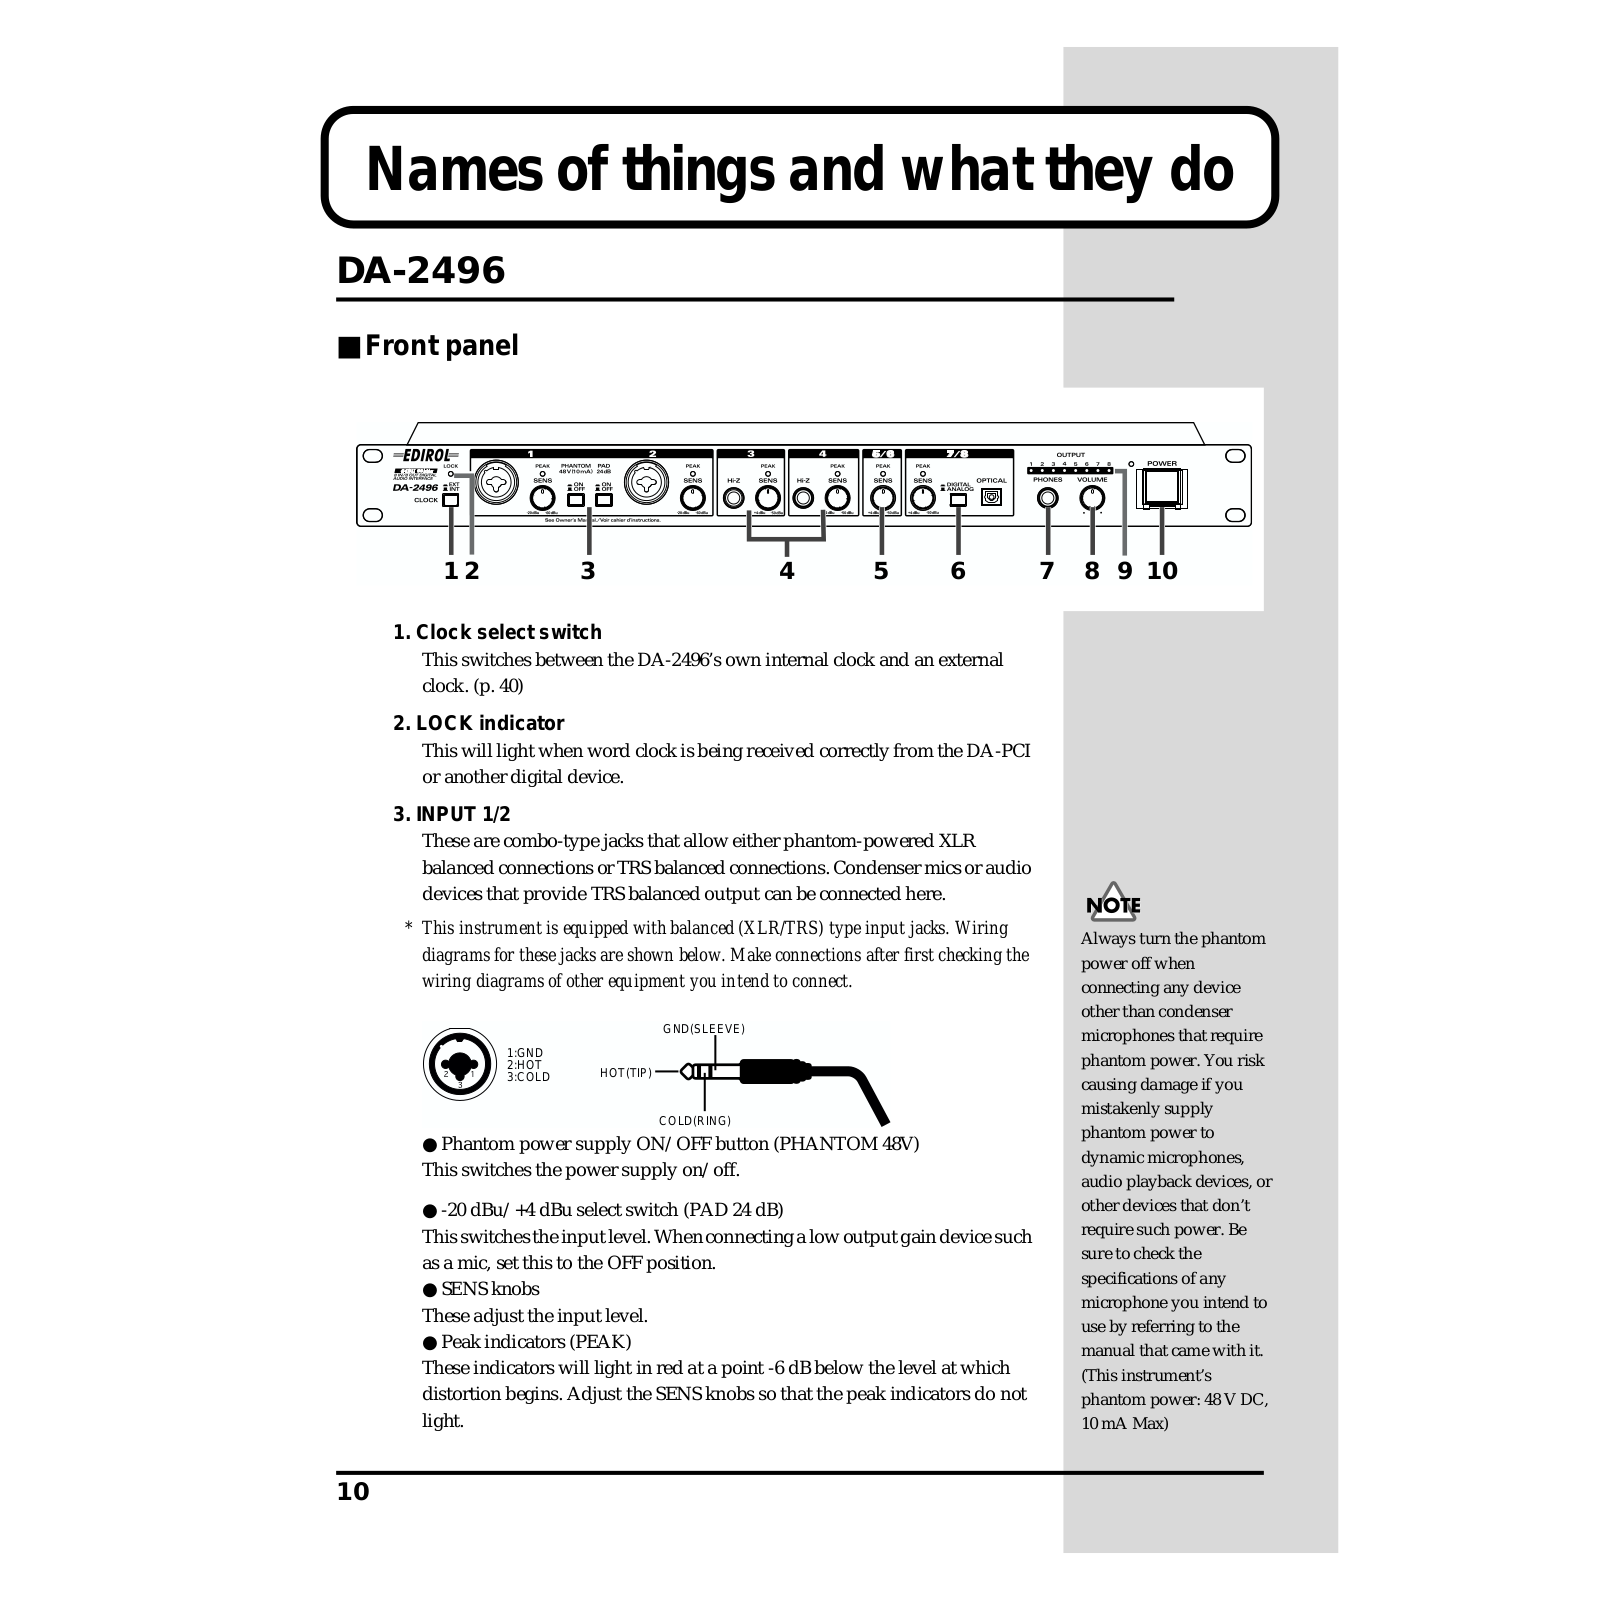
Front panel


1 2

3

4

5

6

7

8

9 10


1. Clock select switch

This switches between the DA-2496’s own internal clock and an external clock. (p. 40)

2. LOCK indicator

This will light when word clock is being received correctly from the DA-PCI or another digital device.

3. INPUT 1/2

These are combo-type jacks that allow either phantom-powered XLR balanced connections or TRS balanced connections. Condenser mics or audio devices that provide TRS balanced output can be connected here.

*This instrument is equipped with balanced (XLR/TRS) type input jacks. Wiring diagrams for these jacks are shown below. Make connections after first checking the wiring diagrams of other equipment you intend to connect.


GND(SLEEVE)

1:GND


2:HOT

HOT(TIP)

3:COLD


COLD(RING)

Phantom power supply ON/OFF button (PHANTOM 48V) This switches the power supply on/off.

-20 dBu/+4 dBu select switch (PAD 24 dB)

This switches the input level. When connecting a low output gain device such as a mic, set this to the OFF position.

SENS knobs

These adjust the input level. Peak indicators (PEAK)

These indicators will light in red at a point -6 dB below the level at which distortion begins. Adjust the SENS knobs so that the peak indicators do not light.

Always turn the phantom power off when connecting any device other than condenser microphones that require phantom power. You risk causing damage if you mistakenly supply phantom power to dynamic microphones, audio playback devices, or other devices that don’t require such power. Be sure to check the specifications of any microphone you intend to use by referring to the manual that came with it. (This instrument’s phantom power: 48 V DC, 10 mA Max)

10

Names of things and what they do

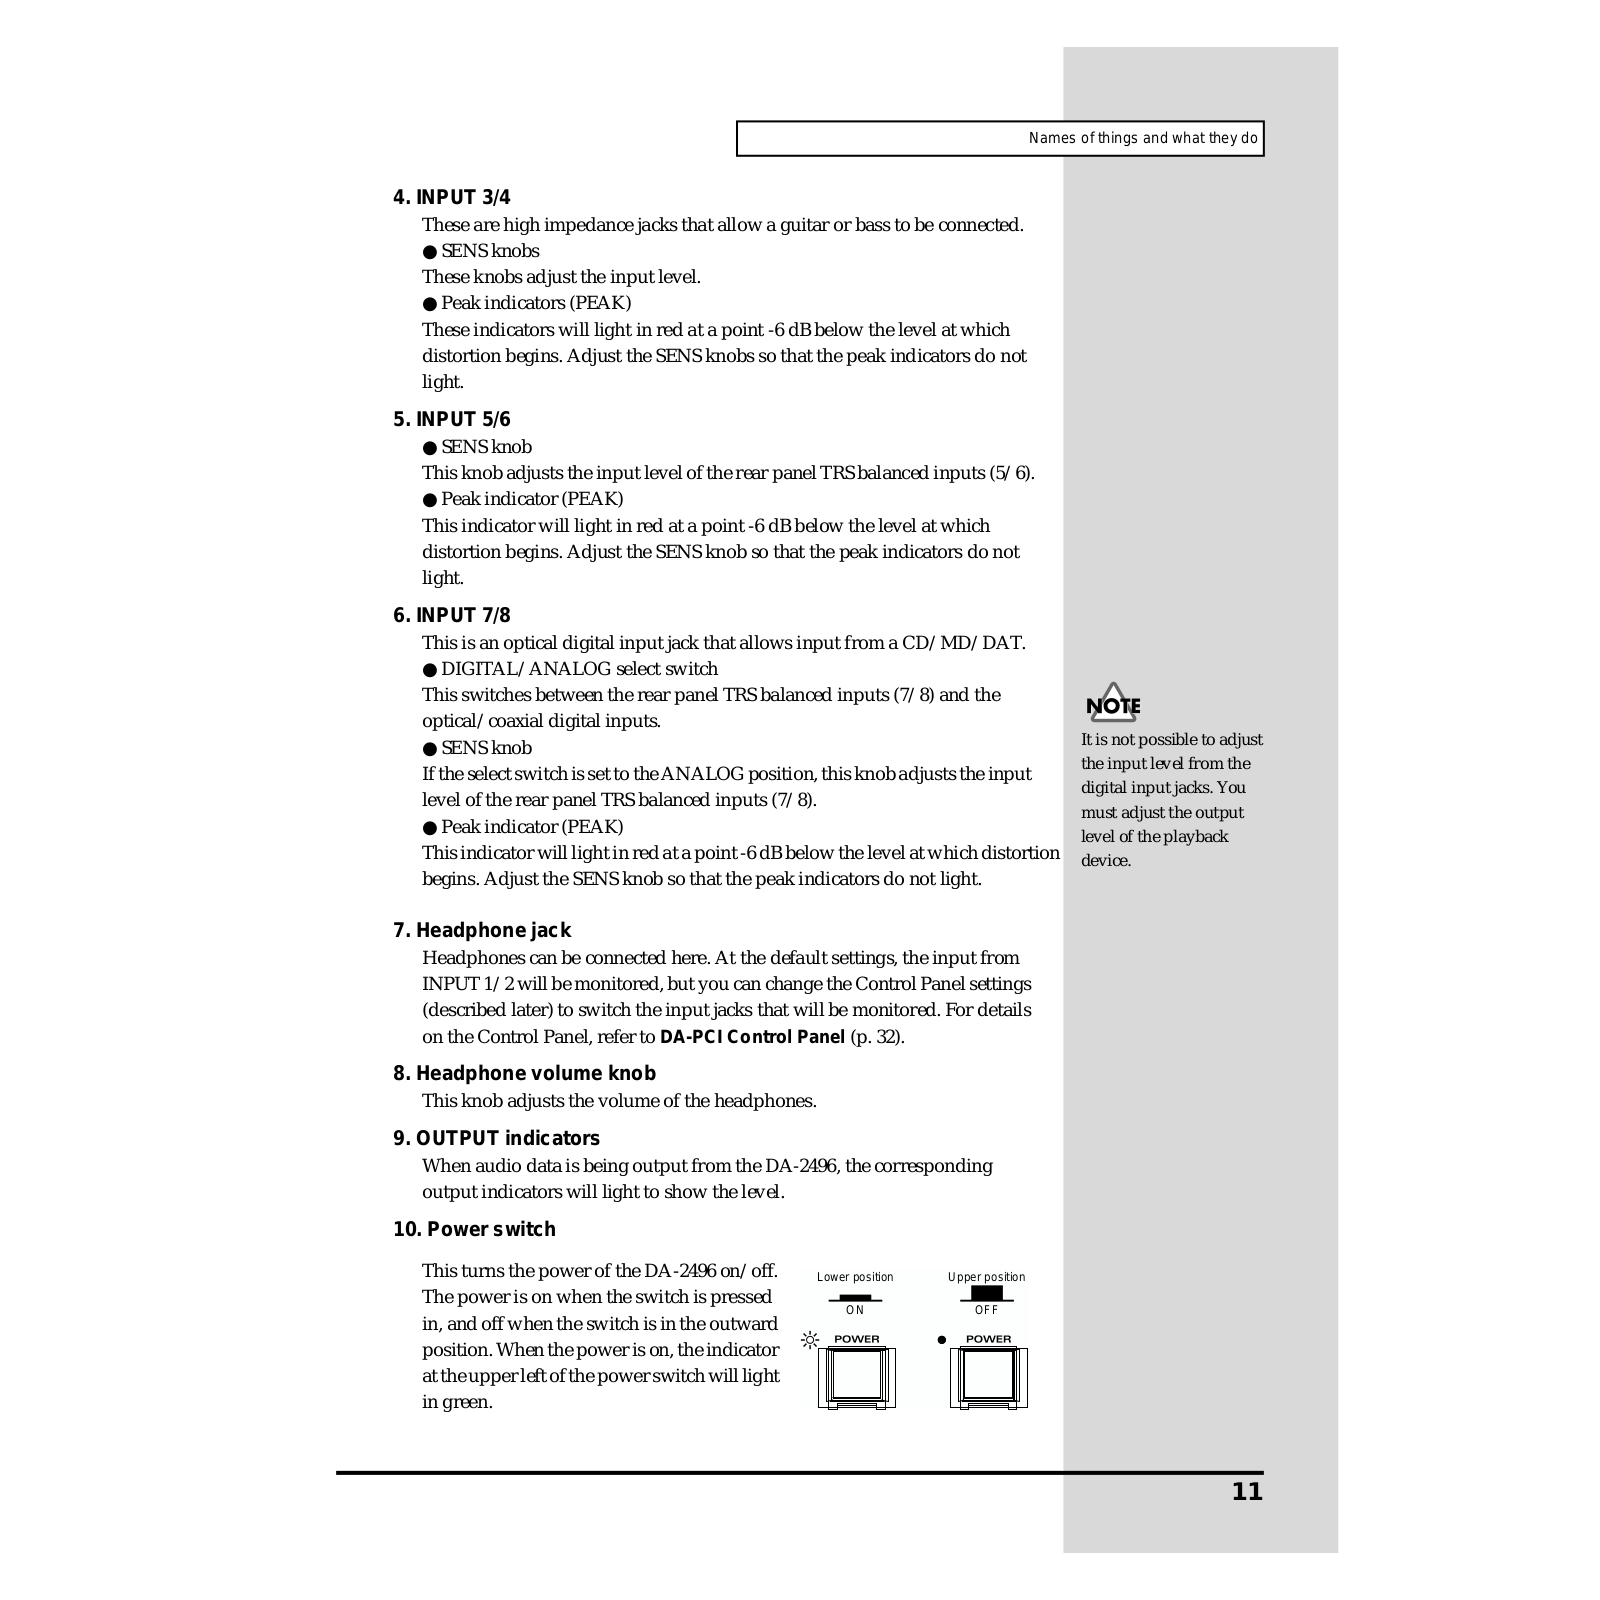
4. INPUT 3/4

These are high impedance jacks that allow a guitar or bass to be connected. SENS knobs

These knobs adjust the input level. Peak indicators (PEAK)

These indicators will light in red at a point -6 dB below the level at which distortion begins. Adjust the SENS knobs so that the peak indicators do not light.

5. INPUT 5/6

SENS knob

This knob adjusts the input level of the rear panel TRS balanced inputs (5/6). Peak indicator (PEAK)

This indicator will light in red at a point -6 dB below the level at which distortion begins. Adjust the SENS knob so that the peak indicators do not light.

6. INPUT 7/8

This is an optical digital input jack that allows input from a CD/MD/DAT. DIGITAL/ANALOG select switch

This switches between the rear panel TRS balanced inputs (7/8) and the optical/coaxial digital inputs.

SENS knob

If the select switch is set to the ANALOG position, this knob adjusts the input level of the rear panel TRS balanced inputs (7/8).

Peak indicator (PEAK)

This indicator will light in red at a point -6 dB below the level at which distortion begins. Adjust the SENS knob so that the peak indicators do not light.

7. Headphone jack

Headphones can be connected here. At the default settings, the input from INPUT 1/2 will be monitored, but you can change the Control Panel settings (described later) to switch the input jacks that will be monitored. For details on the Control Panel, refer to DA-PCI Control Panel (p. 32).

8. Headphone volume knob

This knob adjusts the volume of the headphones.

9. OUTPUT indicators

When audio data is being output from the DA-2496, the corresponding output indicators will light to show the level.

10. Power switch

This turns the power of the DA-2496 on/off. The power is on when the switch is pressed in, and off when the switch is in the outward position. When the power is on, the indicator at the upper left of the power switch will light in green.


Lower position

Upper position


ON


OFF


It is not possible to adjust the input level from the digital input jacks. You must adjust the output level of the playback device.

11

Names of things and what they do

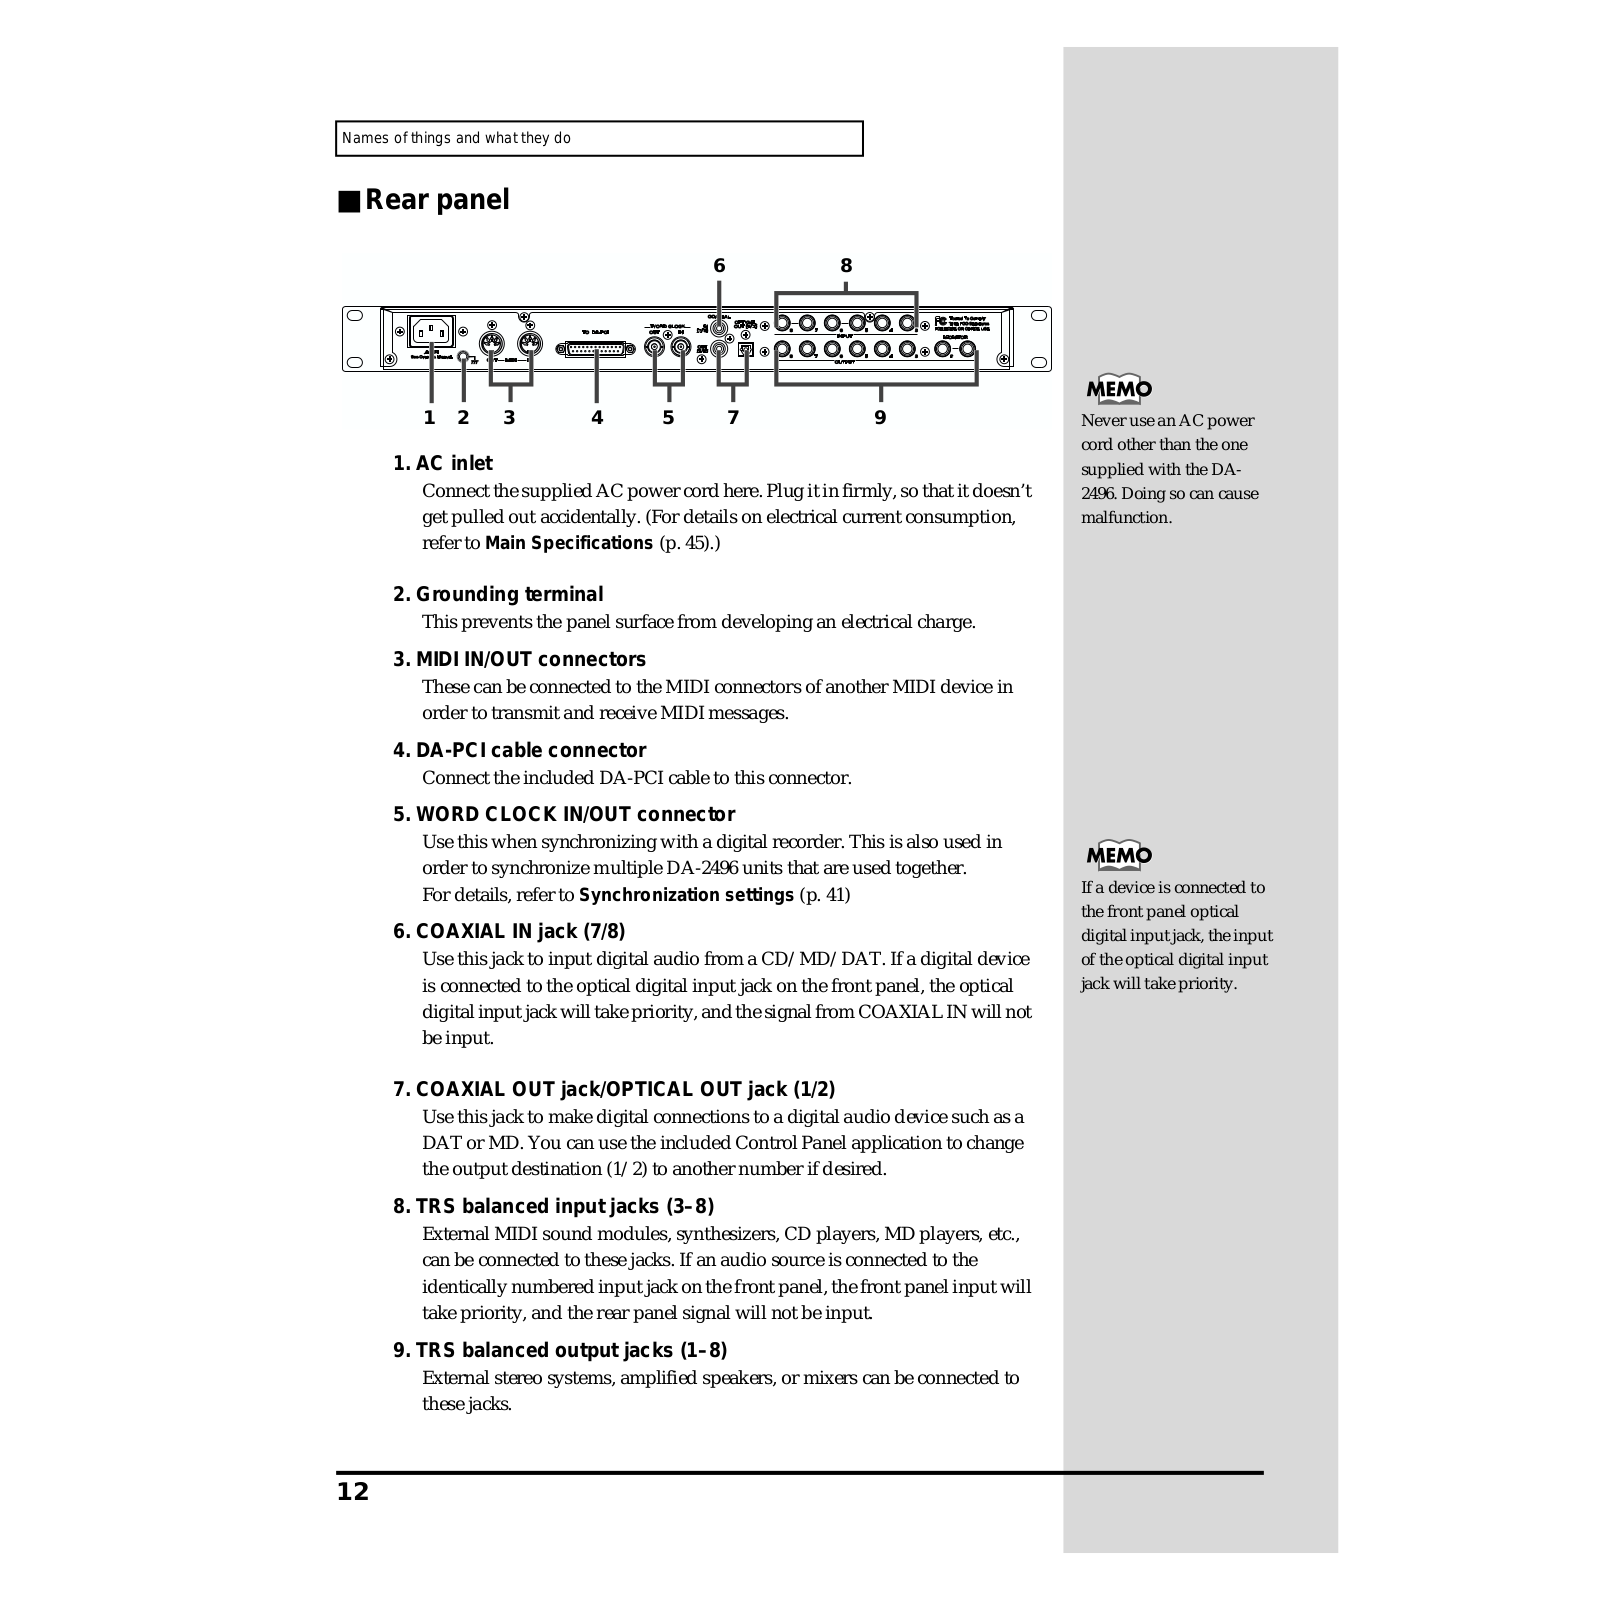
Rear panel

6 8

1

2

3

4

5

7

9

1. AC inlet

Connect the supplied AC power cord here. Plug it in firmly, so that it doesn’t get pulled out accidentally. (For details on electrical current consumption, refer to Main Specifications (p. 45).)

2. Grounding terminal

This prevents the panel surface from developing an electrical charge.

3. MIDI IN/OUT connectors

These can be connected to the MIDI connectors of another MIDI device in order to transmit and receive MIDI messages.

4. DA-PCI cable connector

Connect the included DA-PCI cable to this connector.

5. WORD CLOCK IN/OUT connector

Use this when synchronizing with a digital recorder. This is also used in order to synchronize multiple DA-2496 units that are used together. For details, refer to Synchronization settings (p. 41)

6. COAXIAL IN jack (7/8)

Use this jack to input digital audio from a CD/MD/DAT. If a digital device is connected to the optical digital input jack on the front panel, the optical digital input jack will take priority, and the signal from COAXIAL IN will not be input.

7. COAXIAL OUT jack/OPTICAL OUT jack (1/2)

Use this jack to make digital connections to a digital audio device such as a DAT or MD. You can use the included Control Panel application to change the output destination (1/2) to another number if desired.

8. TRS balanced input jacks (3–8)

External MIDI sound modules, synthesizers, CD players, MD players, etc., can be connected to these jacks. If an audio source is connected to the identically numbered input jack on the front panel, the front panel input will take priority, and the rear panel signal will not be input.

9. TRS balanced output jacks (1–8)

External stereo systems, amplified speakers, or mixers can be connected to these jacks.

Never use an AC power cord other than the one supplied with the DA2496. Doing so can cause malfunction.

If a device is connected to the front panel optical digital input jack, the input of the optical digital input jack will take priority.

12

DA-PCI

2 1 ON

Names of things and what they do

3

1 ON

2

2

Clock In

Clock Out


* DA-2496 doesn't work with the PCI Card slot providing 3.3V mode.

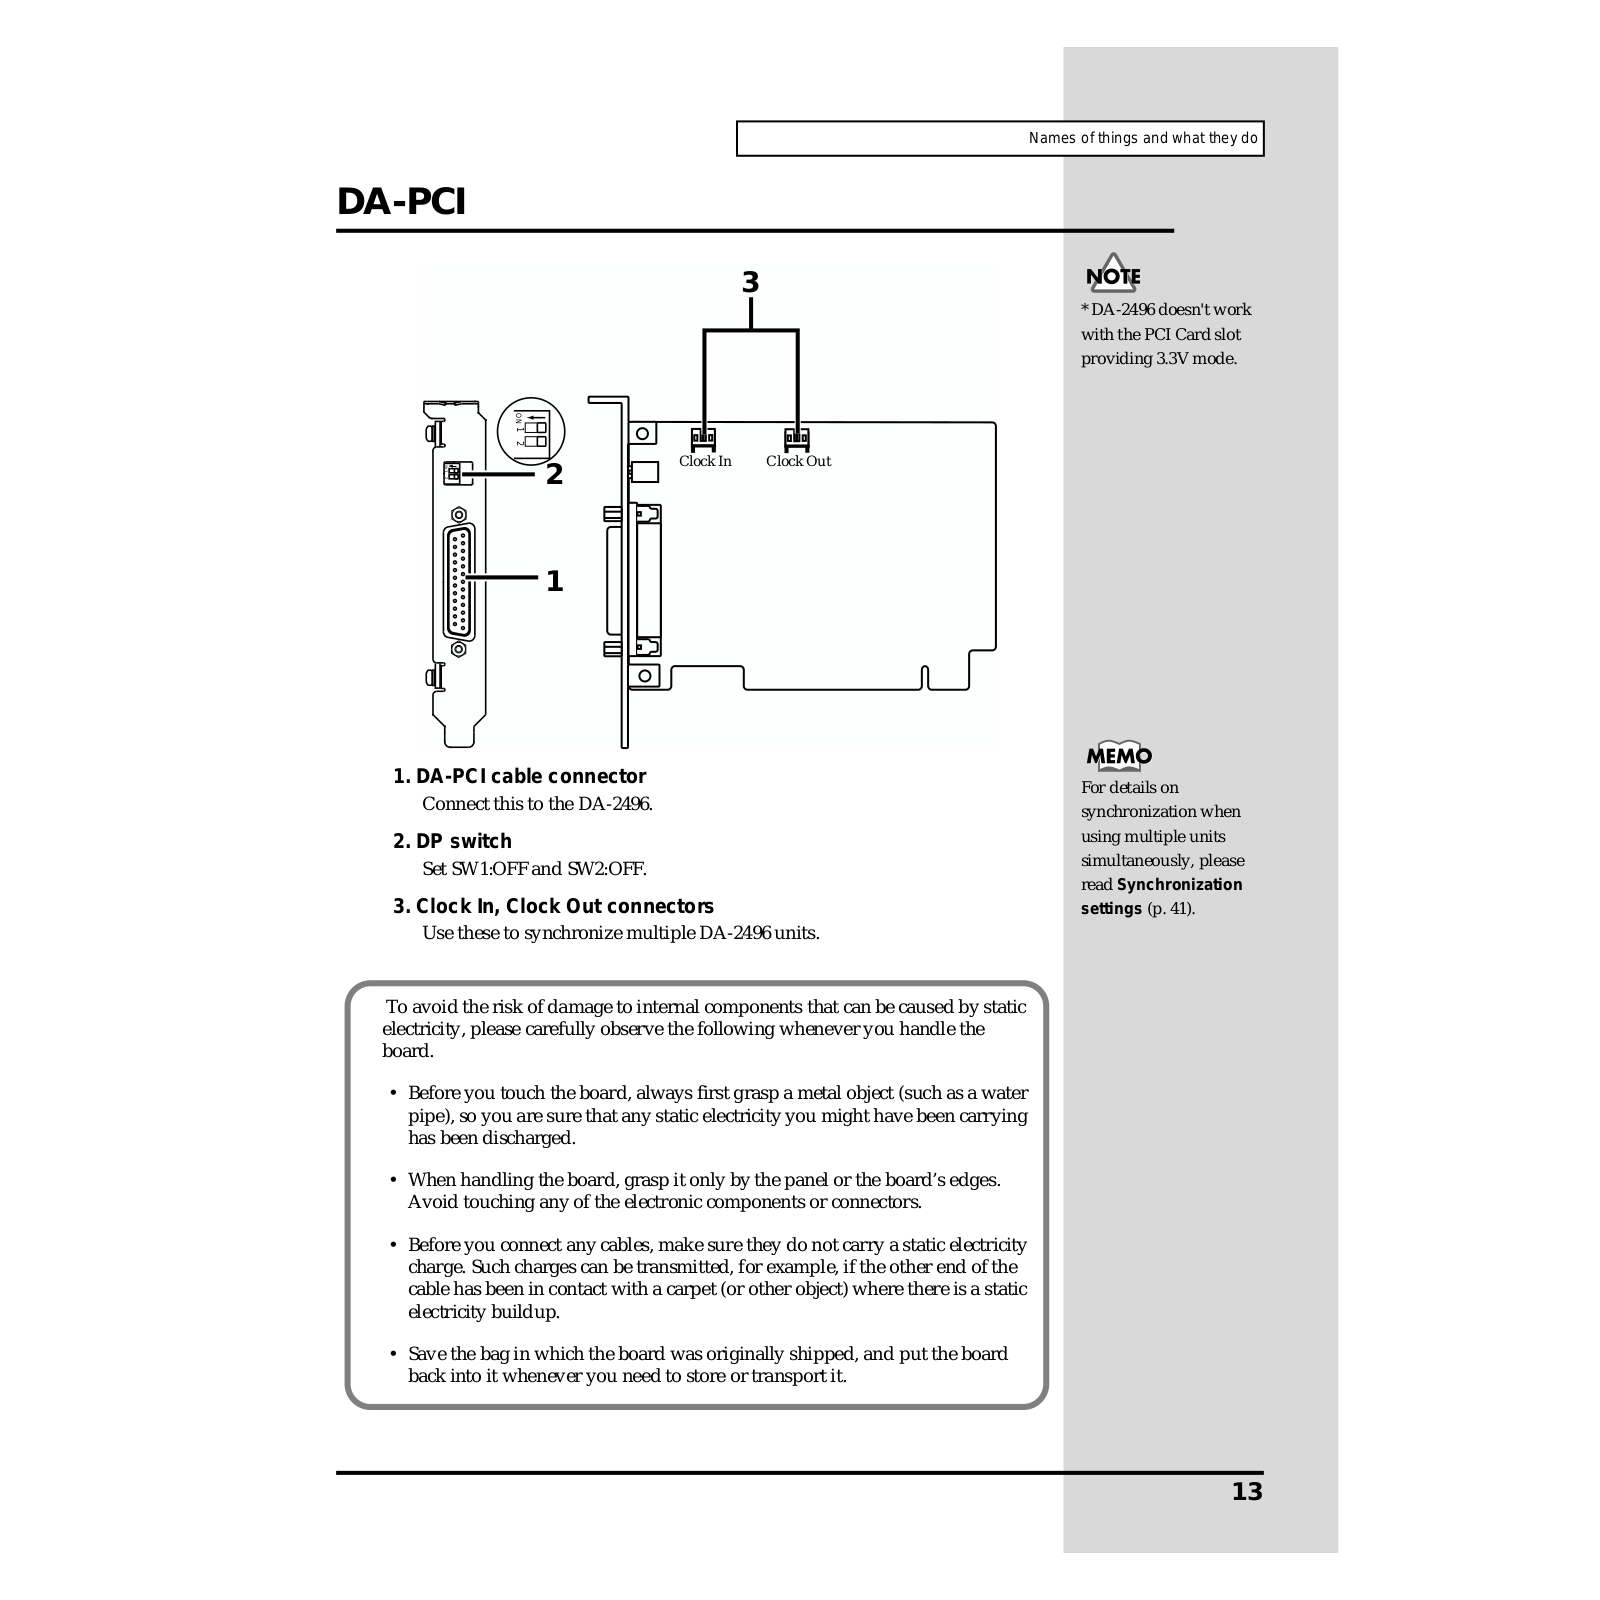
1

1.DA-PCI cable connector

Connect this to the DA-2496.

2.DP switch

Set SW1:OFF and SW2:OFF.

3. Clock In, Clock Out connectors

Use these to synchronize multiple DA-2496 units.

To avoid the risk of damage to internal components that can be caused by static electricity, please carefully observe the following whenever you handle the board.

1

Before you touch the board, always first grasp a metal object (such as a water pipe), so you are sure that any static electricity you might have been carrying has been discharged.

3

When handling the board, grasp it only by the panel or the board’s edges. Avoid touching any of the electronic components or connectors.

4

Before you connect any cables, make sure they do not carry a static electricity charge. Such charges can be transmitted, for example, if the other end of the cable has been in contact with a carpet (or other object) where there is a static electricity buildup.

5

Save the bag in which the board was originally shipped, and put the board back into it whenever you need to store or transport it.

For details on synchronization when using multiple units simultaneously, please read Synchronization

settings (p. 41).

13

Names of things and what they do

DA-PCI (French language)

3

1 ON

2

ON

2

Clock In

Clock Out

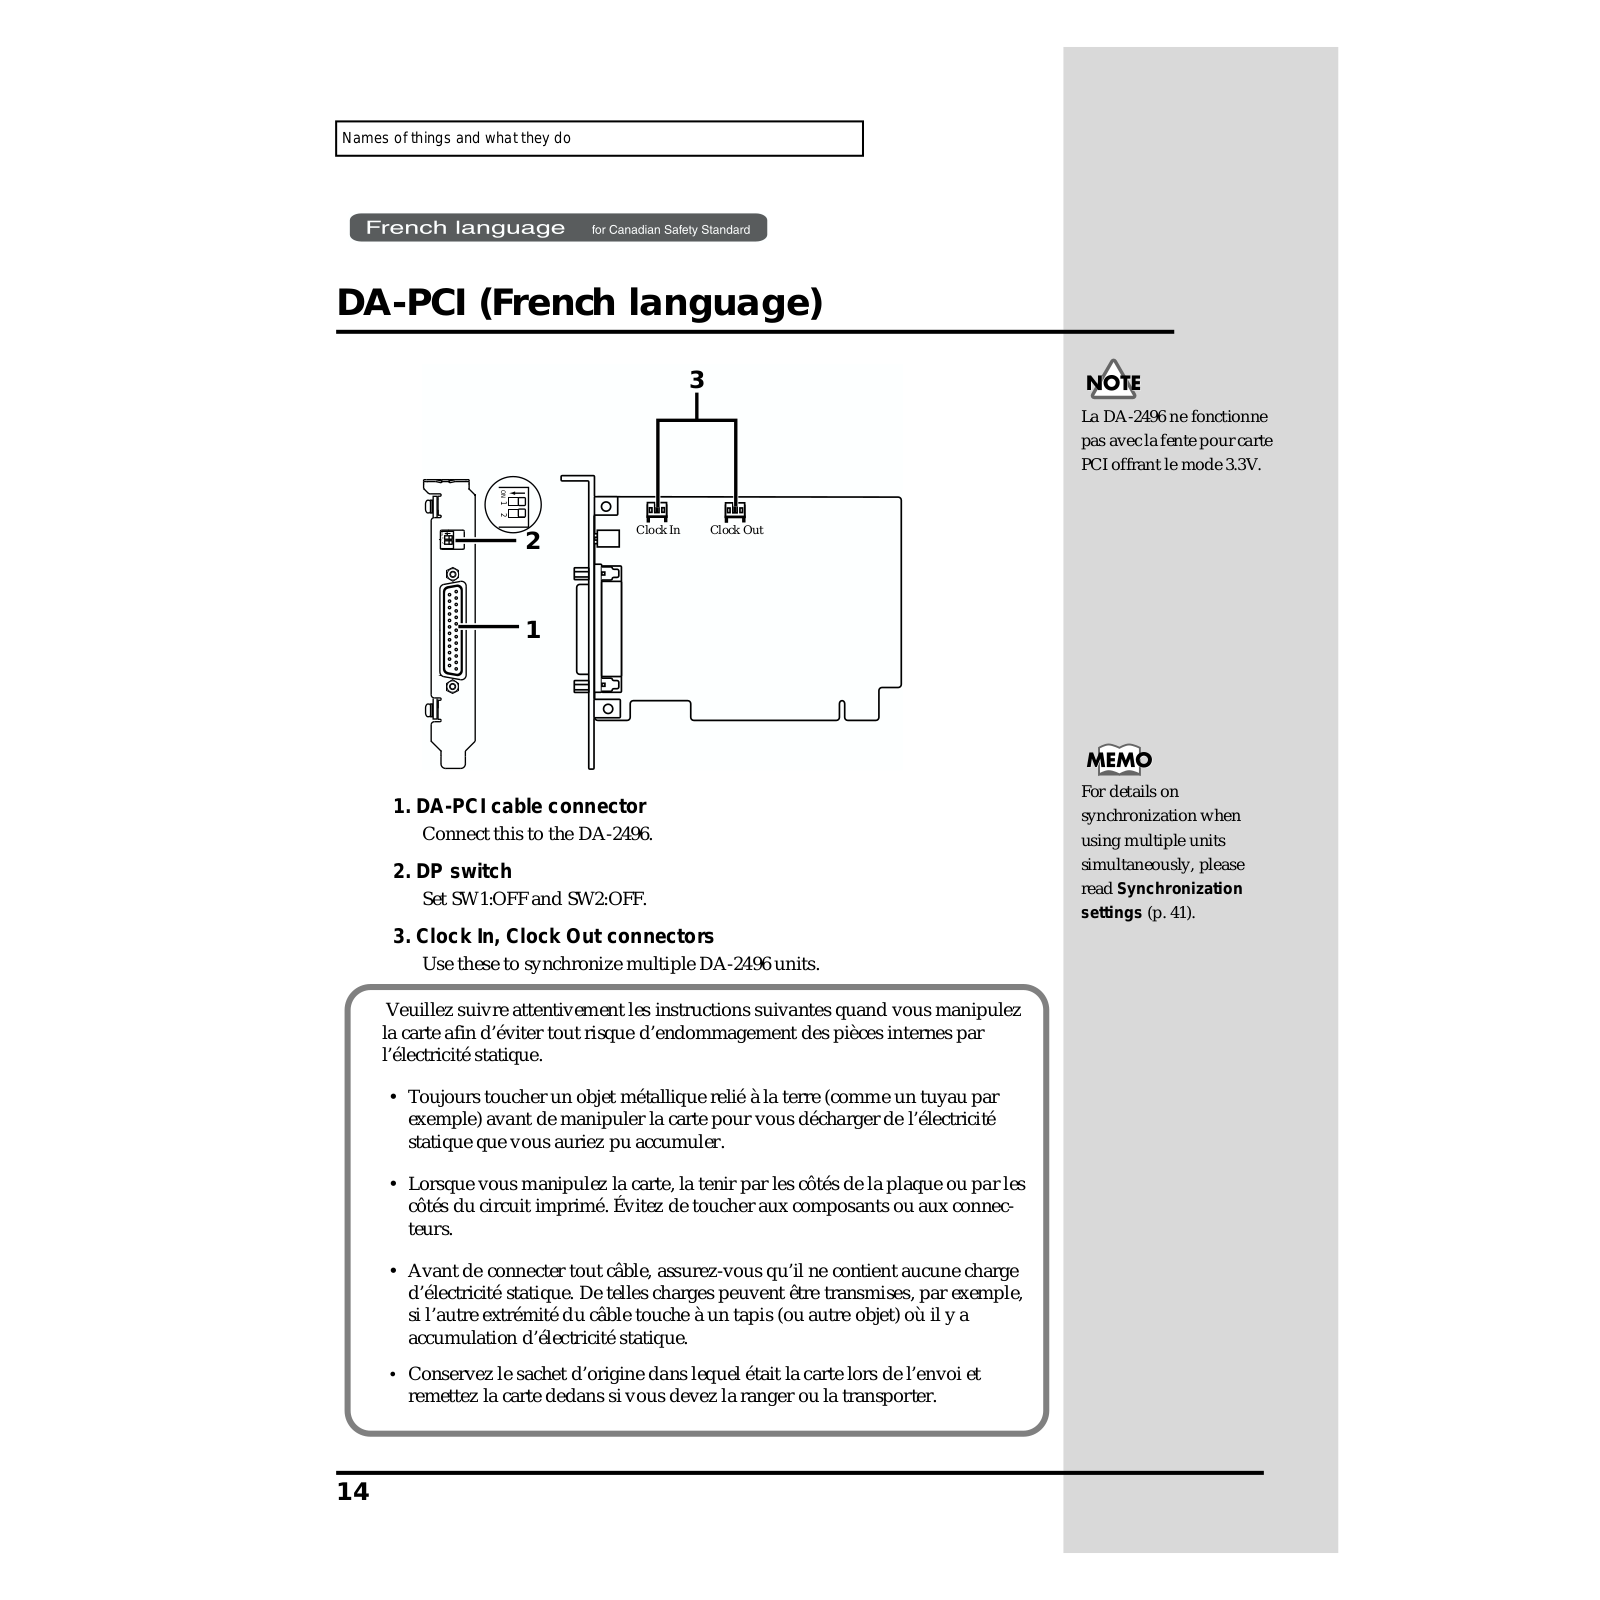
1


2


1

La DA-2496 ne fonctionne pas avec la fente pour carte PCI offrant le mode 3.3V.

1.DA-PCI cable connector

Connect this to the DA-2496.

2.DP switch

Set SW1:OFF and SW2:OFF.

3. Clock In, Clock Out connectors

Use these to synchronize multiple DA-2496 units.

Veuillez suivre attentivement les instructions suivantes quand vous manipulez la carte afin d’éviter tout risque d’endommagement des pièces internes par l’électricité statique.

1

Toujours toucher un objet métallique relié à la terre (comme un tuyau par exemple) avant de manipuler la carte pour vous décharger de l’électricité statique que vous auriez pu accumuler.

3

Lorsque vous manipulez la carte, la tenir par les côtés de la plaque ou par les côtés du circuit imprimé. Évitez de toucher aux composants ou aux connecteurs.

4

Avant de connecter tout câble, assurez-vous qu’il ne contient aucune charge d’électricité statique. De telles charges peuvent être transmises, par exemple, si l’autre extrémité du câble touche à un tapis (ou autre objet) où il y a accumulation d’électricité statique.

5

Conservez le sachet d’origine dans lequel était la carte lors de l’envoi et remettez la carte dedans si vous devez la ranger ou la transporter.

For details on synchronization when using multiple units simultaneously, please read Synchronization

settings (p. 41).

14

Preparations for using the

DA-2496

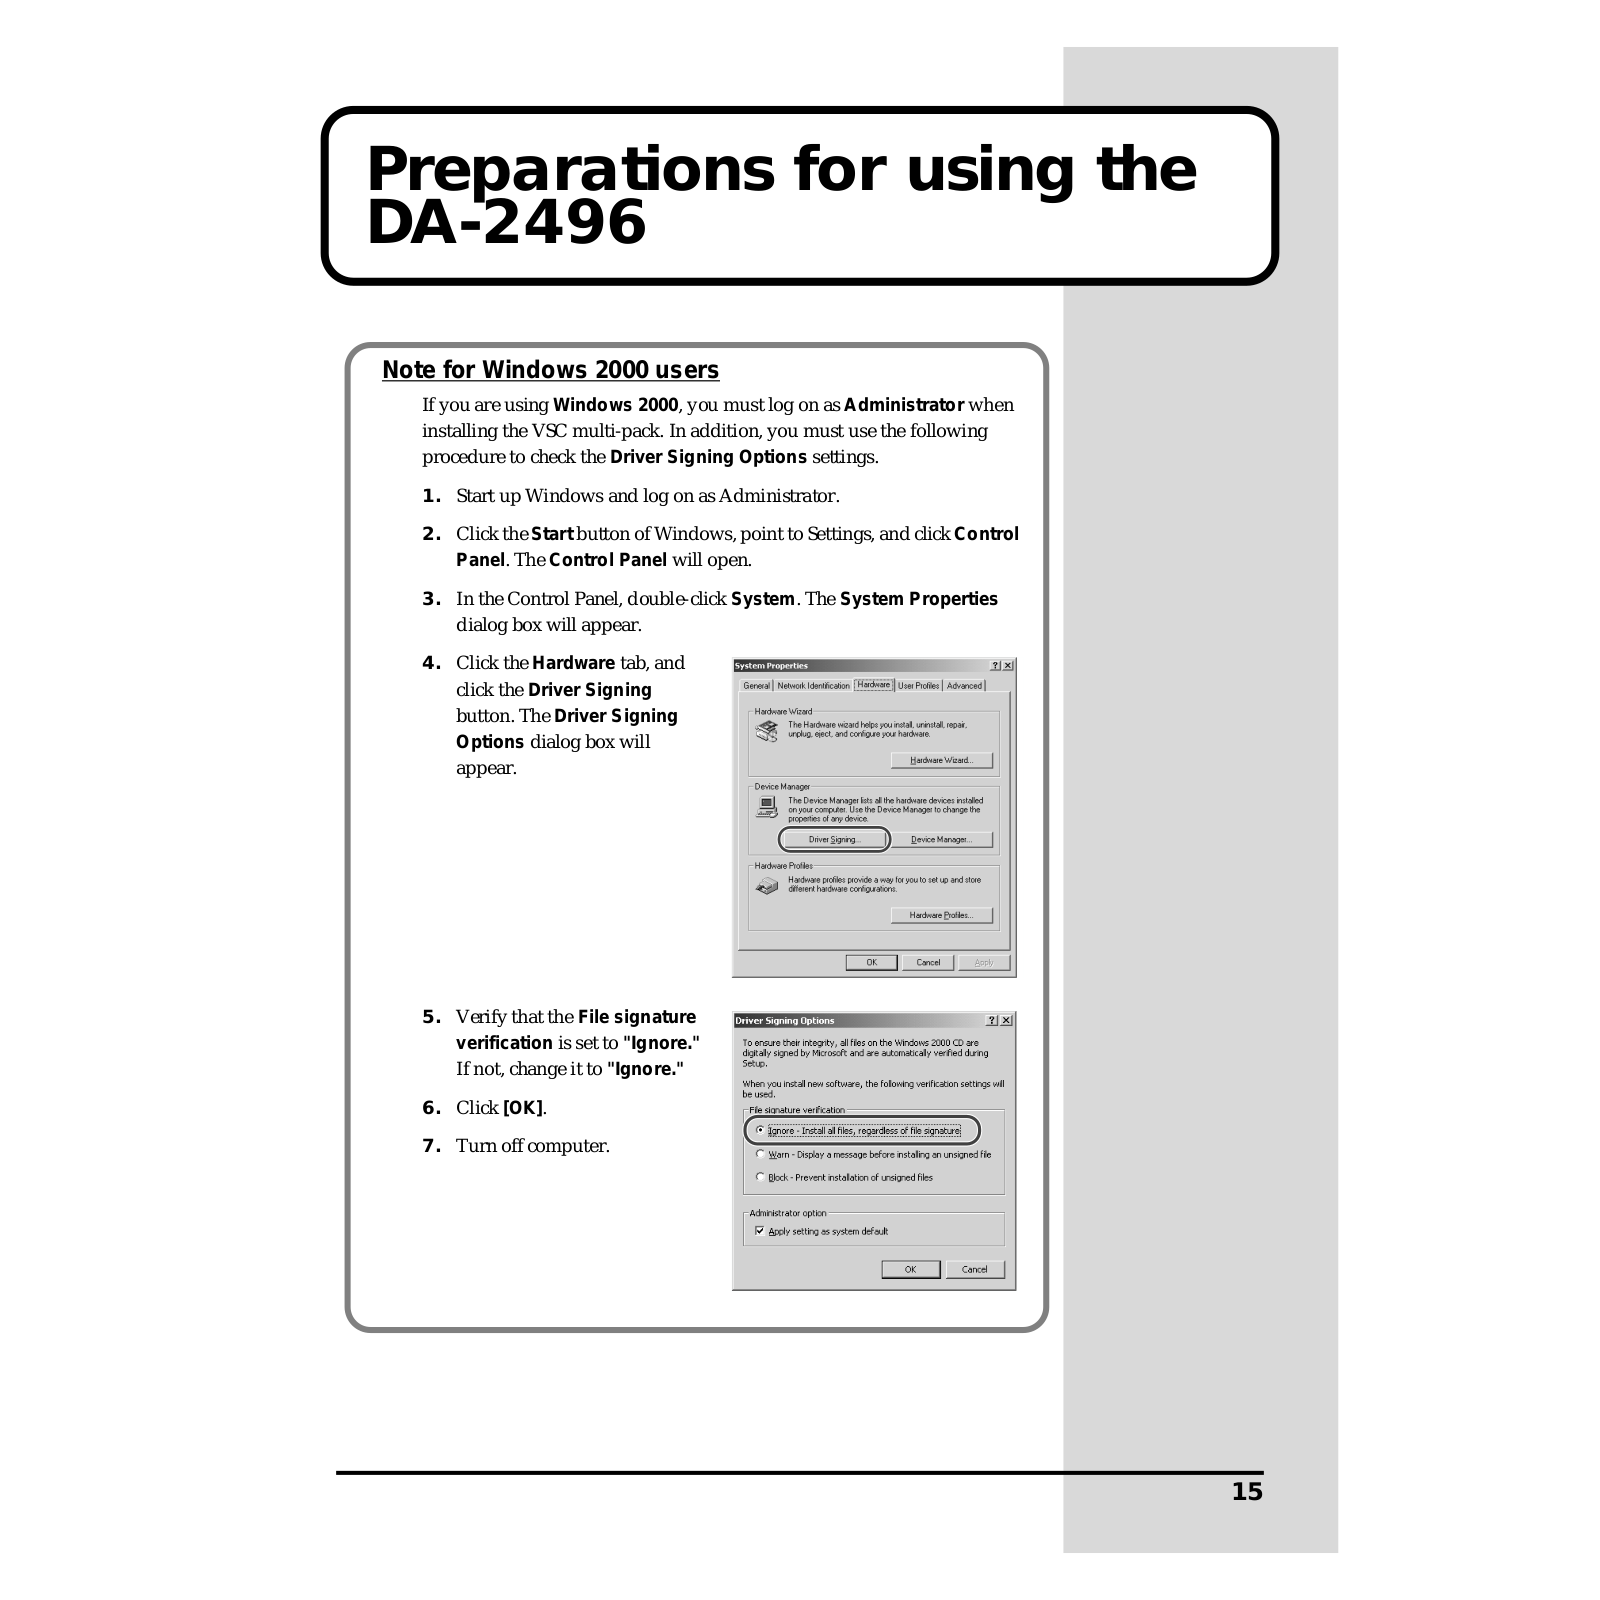
Note for Windows 2000 users

If you are using Windows 2000, you must log on as Administrator when installing the VSC multi-pack. In addition, you must use the following procedure to check the Driver Signing Options settings.

1.Start up Windows and log on as Administrator.

2.Click the Start button of Windows, point to Settings, and click Control Panel. The Control Panel will open.

3.In the Control Panel, double-click System. The System Properties dialog box will appear.

4.Click the Hardware tab, and click the Driver Signing button. The Driver Signing Options dialog box will appear.

5.Verify that the File signature verification is set to "Ignore."

If not, change it to "Ignore."

6.Click [OK].

7.Turn off computer.

15

Loading...
+ 33 hidden pages