

Page 1

Page 2

Before using this unit, carefully read the sections entitled: “IMPORTANT SAFETY
INSTRUCTIONS” (p. 2), “USING THE UNIT SAFELY” (p. 3, 4), and “IMPORTANT NOTES”
(p. 5, 6). These sections provide important information concerning the proper operation
of the unit. Additionally, in order to feel assured that you have gained a good grasp of
every feature provided by your new unit, Owner’s manual should be read in its entirety.
The manual should be saved and kept on hand as a convenient reference.
Copyright © 2004 ROLAND CORPORATION
All rights reserved. No part of this publication may be reproduced in any
form without the written permission of ROLAND CORPORATION.
Page 3
WARNING: To reduce the risk of fire or electric shock, do not expose this apparatus to rain or moisture.
CAUTION
RISK OF ELECTRIC SHOCK
DO NOT OPEN
ATTENTION: RISQUE DE CHOC ELECTRIQUE NE PAS OUVRIR
CAUTION: TO REDUCE THE RISK OF ELECTRIC SHOCK,
DO NOT REMOVE COVER (OR BACK).
NO USER-SERVICEABLE PARTS INSIDE.
REFER SERVICING TO QUALIFIED SERVICE PERSONNEL.
The lightning flash with arrowhead symbol, within an
equilateral triangle, is intended to alert the user to the
presence of uninsulated “dangerous voltage” within the
product’s enclosure that may be of sufficient magnitude to
constitute a risk of electric shock to persons.
The exclamation point within an equilateral triangle is
intended to alert the user to the presence of important
operating and maintenance (servicing) instructions in the
literature accompanying the product.
INSTRUCTIONS PERTAINING TO A RISK OF FIRE, ELECTRIC SHOCK, OR INJURY TO PERSONS.
IMPORTANT SAFETY INSTRUCTIONS
SAVE THESE INSTRUCTIONS
WARNING - When using electric products, basic precautions should always be followed, including the following:
1. Read these instructions.
2. Keep these instructions.
3. Heed all warnings.
4. Follow all instructions.
5. Do not use this apparatus near water.
6. Clean only with a dry cloth.
7. Do not block any of the ventilation openings. Install in
accordance with the manufacturers instructions.
8. Do not install near any heat sources such as radiators,
heat registers, stoves, or other apparatus (including
amplifiers) that produce heat.
9. Do not defeat the safety purpose of the polarized or
grounding-type plug. A polarized plug has two blades with
one wider than the other. A grounding type plug has two
blades and a third grounding prong. The wide blade or the
third prong are provided for your safety. When the provided
plug does not fit into your outlet, consult an electrician for
replacement of the obsolete outlet.
10. Protect the power cord from being walked on or pinched
particularly at plugs, convenience receptacles, and the
point where they exit from the apparatus.
11. Only use attachments/accessories specified by the
manufacturer.
12. Never use with a cart, stand, tripod, bracket,
or table except as specified by the
manufacturer, or sold with the apparatus.
When a cart is used, use caution when
moving the cart/apparatus combination to
avoid injury from tip-over.
13. Unplug this apparatus during lightning storms or when
unused for long periods of time.
14. Refer all servicing to qualified service personnel. Servicing
is required when the apparatus has been damaged in any
way, such as power-supply cord or plug is damaged, liquid
has been spilled or objects have fallen into the apparatus,
the apparatus has been exposed to rain or moisture, does
not operate normally, or has been dropped.
2
For the U.K.
IMPORTANT: THE WIRES IN THIS MAINS LEAD ARE COLOURED IN ACCORDANCE WITH THE FOLLOWING CODE.
BLUE:
BROWN:
As the colours of the wires in the mains lead of this apparatus may not correspond with the coloured markings identifying
the terminals in your plug, proceed as follows:
The wire which is coloured BLUE must be connected to the terminal which is marked with the letter N or coloured BLACK.
The wire which is coloured BROWN must be connected to the terminal which is marked with the letter L or coloured RED.
Under no circumstances must either of the above wires be connected to the earth terminal of a three pin plug.
NEUTRAL
LIVE
Page 4
USING THE UNIT SAFELY
Used for instructions intended to alert
the user to the risk of death or severe
injury should the unit be used
improperly.
Used for instructions intended to alert
the user to the risk of injury or material
damage should the unit be used
improperly.
* Material damage refers to damage or
other adverse effects caused with
respect to the home and all its
furnishings, as well to domestic
animals or pets.
001
• Before using this unit, make sure to read the
instructions below, and the Owner’s Manual.
..........................................................................................................
002b
• Do not open or perform any internal modifications on the unit. (The only exception would be
where this manual provides specific instructions
which should be followed in order to put in place
user-installable options; see p. 242.)
..........................................................................................................
003
• Do not attempt to repair the unit, or replace parts
within it (except when this manual provides
specific instructions directing you to do so). Refer
all servicing to your retailer, the nearest Roland
Service Center, or an authorized Roland
distributor, as listed on the “Information” page.
..........................................................................................................
004
• Never use or store the unit in places that are:
• Subject to temperature extremes (e.g., direct
sunlight in an enclosed vehicle, near a heating
duct, on top of heat-generating equipment); or
are
• Damp (e.g., baths, washrooms, on wet floors);
or are
• Humid; or are
• Exposed to rain; or are
• Dusty; or are
• Subject to high levels of vibration.
..........................................................................................................
007
• Make sure you always have the unit placed so it is
level and sure to remain stable. Never place it on
stands that could wobble, or on inclined surfaces.
..........................................................................................................
008a
• The unit should be connected to a power supply
only of the type described in the operating instructions, or as marked on the rear side of unit.
..........................................................................................................
The symbol alerts the user to important instructions
or warnings.The specific meaning of the symbol is
determined by the design contained within the
triangle. In the case of the symbol at left, it is used for
general cautions, warnings, or alerts to danger.
The symbol alerts the user to items that must never
be carried out (are forbidden). The specific thing that
must not be done is indicated by the design contained
within the circle. In the case of the symbol at left, it
means that the unit must never be disassembled.
The ● symbol alerts the user to things that must be
carried out. The specific thing that must be done is
indicated by the design contained within the circle. In
the case of the symbol at left, it means that the powercord plug must be unplugged from the outlet.
008e
• Use only the attached power-supply cord. Also,
the supplied power cord must not be used with
any other device.
..........................................................................................................
009
• Do not excessively twist or bend the power cord,
nor place heavy objects on it. Doing so can
damage the cord, producing severed elements and
short circuits. Damaged cords are fire and shock
hazards!
..........................................................................................................
010
• This unit, either alone or in combination with an
amplifier and headphones or speakers, may be
capable of producing sound levels that could
cause permanent hearing loss. Do not operate for
a long period of time at a high volume level, or at
a level that is uncomfortable. If you experience
any hearing loss or ringing in the ears, you should
immediately stop using the unit, and consult an
audiologist.
..........................................................................................................
011
• Do not allow any objects (e.g., flammable material,
coins, pins); or liquids of any kind (water, soft
drinks, etc.) to penetrate the unit.
..........................................................................................................
012a:
• Immediately turn the power off, remove the
power cord from the outlet, and request servicing
by your retailer, the nearest Roland Service
Center, or an authorized Roland distributor, as
listed on the “Information” page when:
• The power-supply cord, or the plug has been
damaged; or
• If smoke or unusual odor occurs
• Objects have fallen into, or liquid has been
spilled onto the unit; or
• The unit has been exposed to rain (or otherwise
has become wet); or
• The unit does not appear to operate normally or
exhibits a marked change in performance.
..........................................................................................................
3
Page 5
013
• In households with small children, an adult
should provide supervision until the child is
capable of following all the rules essential for the
safe operation of the unit.
..........................................................................................................
014
• Protect the unit from strong impact.
(Do not drop it!)
..........................................................................................................
015
• Do not force the unit’s power-supply cord to share
an outlet with an unreasonable number of other
devices. Be especially careful when using
extension cords—the total power used by all
devices you have connected to the extension
cord’s outlet must never exceed the power rating
(watts/amperes) for the extension cord. Excessive
loads can cause the insulation on the cord to heat
up and eventually melt through.
..........................................................................................................
016
• Before using the unit in a foreign country, consult
with your retailer, the nearest Roland Service
Center, or an authorized Roland distributor, as
listed on the “Information” page.
..........................................................................................................
022a
• Always turn the unit off and unplug the power
cord before attempting installation of the light
bulbs (p. 19).
..........................................................................................................
026
• Do not put anything that contains water (e.g.,
flower vases) on this unit. Also, avoid the use of
insecticides, perfumes, alcohol, nail polish, spray
cans, etc., near the unit. Swiftly wipe away any
liquid that spills on the unit using a dry, soft cloth.
..........................................................................................................
107b
• Never handle the power cord or its plugs with wet
hands when plugging into, or unplugging from,
an outlet or this unit.
..........................................................................................................
108d: Selection
• If you need to move the instrument, take note of
the precautions listed below. At least two persons
are required to safely lift and move the unit. It
should be handled carefully, all the while keeping
it level. Make sure to have a firm grip, to protect
yourself from injury and the instrument from
damage.
• Disconnect the power cord.
• Disconnect all cords coming from external
devices.
• Close the lid.
• Fold down the music stand.
..........................................................................................................
109a
• Before cleaning the unit, turn off the power and
unplug the power cord from the outlet (p. 19).
..........................................................................................................
110a
• Whenever you suspect the possibility of lightning
in your area, pull the plug on the power cord out
of the outlet.
..........................................................................................................
116
• Be careful when opening/closing the lid so you do
not get your fingers pinched (p. 18). Adult supervision is recommended whenever small children
use the unit.
..........................................................................................................
118
• Should you remove screws, cap, and light bulbs,
make sure to put them in a safe place out of
children’s reach, so there is no chance of them
being swallowed accidentally.
..........................................................................................................
101a
• The unit should be located so that its location or
position does not interfere with its proper ventilation.
..........................................................................................................
102b
• Always grasp only the plug on the power-supply
cord when plugging into, or unplugging from, an
outlet or this unit.
..........................................................................................................
103a:
• At regular intervals, you should unplug the power
plug and clean it by using a dry cloth to wipe all
dust and other accumulations away from its
prongs. Also, disconnect the power plug from the
power outlet whenever the unit is to remain
unused for an extended period of time. Any
accumulation of dust between the power plug and
the power outlet can result in poor insulation and
lead to fire.
..........................................................................................................
104
• Try to prevent cords and cables from becoming
entangled. Also, all cords and cables should be
placed so they are out of the reach of children.
..........................................................................................................
106
• Never climb on top of, nor place heavy objects on
the unit.
..........................................................................................................
4
Page 6

Important Notes
291b
In addition to the items listed under “IMPORTANT SAFETY INSTRUCTIONS” and “USING THE UNIT SAFELY” on pages 2
and 3, please read and observe the following:
Power Supply
301
• Do not connect this unit to same electrical outlet that is
being used by an electrical appliance that is controlled by
an inverter (such as a refrigerator, washing machine,
microwave oven, or air conditioner), or that contains a
motor. Depending on the way in which the electrical
appliance is used, power supply noise may cause this unit
to malfunction or may produce audible noise. If it is not
practical to use a separate electrical outlet, connect a
power supply noise filter between this unit and the
electrical outlet.
307
• Before connecting this unit to other devices, turn off the
power to all units. This will help prevent malfunctions
and/or damage to speakers or other devices.
308
• Although the LCD and LEDs are switched off when the
POWER switch is switched off, this does not mean that the
unit has been completely disconnected from the source of
power. If you need to turn off the power completely, first
turn off the POWER switch, then unplug the power cord
from the power outlet. For this reason, the outlet into
which you choose to connect the power cord’s plug
should be one that is within easy reach.
Placement
351
• Using the unit near power amplifiers (or other equipment
containing large power transformers) may induce hum.
To alleviate the problem, change the orientation of this
unit; or move it farther away from the source of interference.
352a
• This device may interfere with radio and television
reception. Do not use this device in the vicinity of such
receivers.
352b
• Noise may be produced if wireless communications
devices, such as cell phones, are operated in the vicinity of
this unit. Such noise could occur when receiving or initiating a call, or while conversing. Should you experience
such problems, you should relocate such wireless devices
so they are at a greater distance from this unit, or switch
them off.
353
• Observe the following when using the unit’s floppy disk
drive. For further details, refer to “Before Using Floppy
Disks” (p. 6).
• Do not place the unit near devices that produce a
strong magnetic field (e.g., loudspeakers).
• Install the unit on a solid, level surface.
• Do not move the unit or subject it to vibration while
the drive is operating.
354b
• Do not expose the unit to direct sunlight, place it near
devices that radiate heat, leave it inside an enclosed
vehicle, or otherwise subject it to temperature extremes.
Also, do not allow lighting devices that normally are used
while their light source is very close to the unit (such as a
piano light), or powerful spotlights to shine upon the
same area of the unit for extended periods of time.
Excessive heat can deform or discolor the unit.
355b
• When moved from one location to another where the
temperature and/or humidity is very different, water
droplets (condensation) may form inside the unit. Damage
or malfunction may result if you attempt to use the unit in
this condition. Therefore, before using the unit, you must
allow it to stand for several hours, until the condensation
has completely evaporated.
356
• Do not allow rubber, vinyl, or similar materials to remain
on the unit for long periods of time. Such objects can
discolor or otherwise harmfully affect the finish.
358
• Do not allow objects to remain on top of the keyboard or
pedal board. This can be the cause of malfunction, such as
keys ceasing to produce sound.
359
• Do not paste stickers, decals, or the like to this instrument.
Peeling such matter off the instrument may damage the
exterior finish.
Maintenance
401b
• To clean the unit, use a dry, soft cloth; or one that is
slightly dampened. Try to wipe the entire surface using an
equal amount of strength, moving the cloth along with the
grain of the wood. Rubbing too hard in the same area can
damage the finish.
402
• Never use benzine, thinners, alcohol or solvents of any
kind, to avoid the possibility of discoloration and/or
deformation.
Repairs and Data
452
• Please be aware that all data contained in the unit’s
memory may be lost when the unit is sent for repairs.
Important data should always be backed up on a floppy
disk, or written down on paper (when possible). During
repairs, due care is taken to avoid the loss of data.
However, in certain cases (such as when circuitry related
to memory itself is out of order), we regret that it may not
be possible to restore the data, and Roland assumes no
liability concerning such loss of data.
Additional Precautions
551
• Please be aware that the contents of memory can be
irretrievably lost as a result of a malfunction, or the
improper operation of the unit. To protect yourself against
the risk of loosing important data, we recommend that
you periodically save a backup copy of important data
you have stored in the unit’s memory on a floppy disk.
552
• Unfortunately, it may be impossible to restore the contents
of data that was stored on a floppy disk once it has been
lost. Roland Corporation assumes no liability concerning
such loss of data.
553
• Use a reasonable amount of care when using the unit’s
buttons, sliders, or other controls; and when using its jacks
and connectors. Rough handling can lead to malfunctions.
554
• Never strike or apply strong pressure to the display.
555
•A small amount of noise may be heard from the display
during normal operation.
5
Page 7
Important Notes
556
• When connecting / disconnecting all cables, grasp the
connector itself—never pull on the cable. This way you
will avoid causing shorts, or damage to the cable’s
internal elements.
557
•A small amount of heat will radiate from the unit during
normal operation.
558a
• To avoid disturbing your neighbors, try to keep the unit’s
volume at reasonable levels. You may prefer to use
headphones, so you do not need to be concerned about
those around you (especially when it is late at night).
559b
• When you need to transport the unit, pack it in shockabsorbent material. Transporting the unit without doing
so can cause it to become scratched or damaged, and
could lead to malfunction.
560
• Do not apply undue force to the music stand while it is in
use.
562
• Use a cable from Roland to make the connection. If using
some other make of connection cable, please note the
following precautions.
• Some connection cables contain resistors. Do not use
cables that incorporate resistors for connecting to this
unit. The use of such cables can cause the sound level
to be extremely low, or impossible to hear. For information on cable specifications, contact the manufacturer of the cable.
Before Using Floppy Disks
Handling the Floppy Disk Drive
602
• Install the unit on a solid, level surface in an area free from
vibration.
603
• Avoid using the unit immediately after it has been moved
to a location with a level of humidity that is greatly
different than its former location. Rapid changes in the
environment can cause condensation to form inside the
drive, which will adversely affect the operation of the
drive and/or damage floppy disks. When the unit has
been moved, allow it to become accustomed to the new
environment (allow a few hours) before operating it.
604
• To insert a disk, push it gently but firmly into the drive—
it will click into place. To remove a disk, press the EJECT
button firmly. Do not use excessive force to remove a disk
which is lodged in the drive.
605a
• Never eject a disk while reading or writing is in progress,
since that can damage the magnetic surface of the disk,
rendering it unusable. (The disk drive’s indicator will
light up at full brightness when the drive is busy reading
or writing data. Ordinarily, the indicator will be less
brightly lit, or be extinguished.)
606
• Remove any disk from the drive before powering up or
down.
607
• To prevent damage to the disk drive’s heads, always try to
hold the floppy disk in a level position (not tilted in any
direction) while inserting it into the drive. Push it in
firmly, but gently. Never use excessive force.
608
• To avoid the risk of malfunction and/or damage, insert
only floppy disks into the disk drive. Never insert any
other type of disk. Avoid getting paper clips, coins, or any
other foreign objects inside the drive.
Handling Floppy Disks
651
• Floppy disks contain a plastic disk with a thin coating of
magnetic storage medium. Microscopic precision is
required to enable storage of large amounts of data on
such a small surface area. To preserve their integrity,
please observe the following when handling floppy disks:
• Never touch the magnetic medium inside the disk.
• Do not use or store floppy disks in dirty or dusty areas.
• Do not subject floppy disks to temperature extremes
(e.g., direct sunlight in an enclosed vehicle). Recommended temperature range: 10 to 50° C (50 to 122° F).
• Do not expose floppy disks to strong magnetic fields,
such as those generated by loudspeakers.
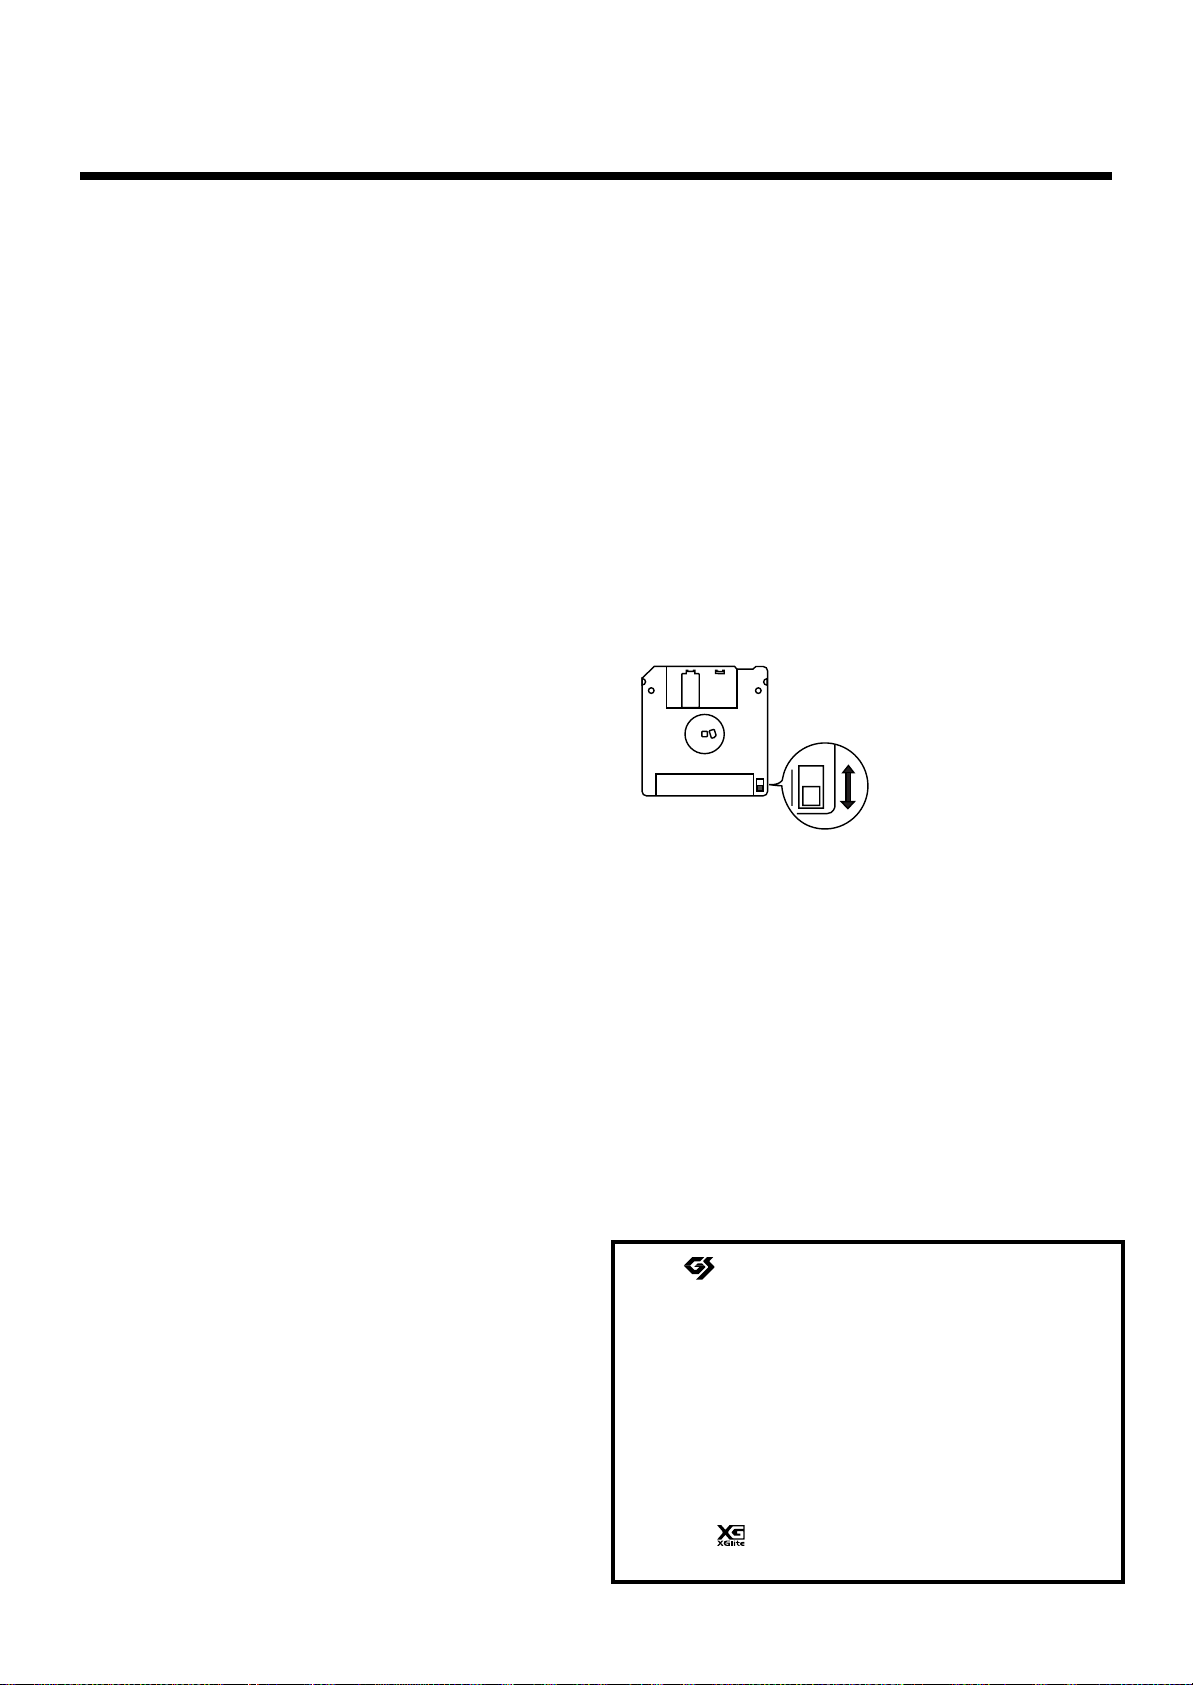
652
• Floppy disks have a “write protect” tab which can protect
the disk from accidental erasure. It is recommended that
the tab be kept in the PROTECT position, and moved to
the WRITE position only when you wish to write new
data onto the disk.
Rear side of the disk
Write
(can write new data onto disk)
Write Protect Tab
653
• The identification label should be firmly affixed to the
disk. Should the label come loose while the disk is in the
drive, it may be difficult to remove the disk.
654
• Store all disks in a safe place to avoid damaging them, and
to protect them from dust, dirt, and other hazards. By
using a dirty or dust-ridden disk, you risk damaging the
disk, as well as causing the disk drive to malfunction.
655
• Disks containing performance data for this unit should
always be locked (have their write protect tab slid to the
“Protect” position) before you insert them into the drive
on some other unit (except the PR-300, or a product in the
HP-G, MT, KR, or Atelier families), or into a computer’s
drive. Otherwise (if the write protect tab remains in the
“Write” position), when you perform any disk operations
using the other device’s disk drive (such as checking the
contents of the disk, or loading data), you risk rendering
the disk unreadable by this unit’s disk drive.
* GS ( ) is a registered trademark of Roland Corpo-
ration.
204
* Microsoft and MS-DOS are registered trademarks of
Microsoft Corporation.
207
* Apple and Macintosh are registered trademark of Apple
Computer, Inc.
210
* IBM and IBM PC are registered trademark of International
Business Machines Corporation.
220
* All product names mentioned in this document are trade-
marks or registered trademarks of their respective owners.
203
* XG lite ( ) is a registered trademark of Yamaha Corpo-
ration.
Protect
(prevents writing to disk)
6
Page 8

Main Features
We want to take a moment to thank you for your purchase of the Roland AT-90S Luxury “Atelier Series” Organ. The AT90S Luxury is an electronic organ which provides a generous collection of rich organ sounds. In addition, it is designed to
be easy to learn and use. In order to enjoy reliable performance of your new keyboard for many years to come, please take
the time to read through this manual in its entirety.
* The AT-90S Luxury is abbreviated in this manual as “AT-90SL” respectively.
Basic concepts of the ATELIER series
A full complement of organ sounds
A wide range of basic organ sounds, ranging from jazz organ and pipe organ to theatre organ, are onboard so you are sure
to enjoy having access to all the sounds you expect from an organ.
Panel layout based on a tradition of emphasis on realtime operation
Based on the idea that you should be able to sit down and begin playing immediately, the operation buttons of the panel
are arranged by function as dictated by classic organ traditions, ensuring easy and intuitive operation. All models of the
ATELIER series feature the same operability, allowing you to start playing immediately even if you switch models.
High-quality sounds that you can use without editing
In addition to a full range of organ sounds, high-quality sounds such as strings and brass are also included onboard. You
can simply select sounds and enjoy playing the organ—no need to perform complicated editing operations.
Expansive lower keyboard with damper pedal for piano-like expressiveness
Piano is indispensable to the performance of contemporary music. On the ATELIER series, the lower keyboard features an
expanded range that gives you the expressive power of a piano. The keyboard also features half-damper pedal capability
and initial touch sensitivity, both indispensable for piano performance.
All models provide high-quality grand piano sounds.
Design utilizes your existing music data
The ATELIER series is designed so that even on new models, you will feel right at home and can begin playing
immediately. Data compatibility has also been carefully taken into account, and song data or registration data from earlier
models can be used without change.
Music styles from around the world
Many of the best-loved musical styles from around the world (rhythm and automatic accompaniment patterns) are built
in, allowing you to enjoy an international range of performances.
Utilizes SMF music files
Compatible with GM2, the world standard in SMF music files, and equipped with its own floppy disk drive, the ATELIER
brings you access to the wealth of SMF music files available on the market. You can also mute parts, allowing you to
practice the part for each hand separately, and enjoy performing ensemble with the music files.
7
Page 9

Main Features
Features
RSS reverb technology is used to create a high-quality ambience that surrounds the listener
The AT-90SL provides an AUX OUT for RSS Ambience, allowing you to enjoy very high quality RSS reverb sound. In
addition, a speaker is built into the panel, ensuring that the performer will also enjoy the exceptional sound quality.
Highly realistic rhythms and automatic accompaniment functions
All rhythms use data from performances by professional drummers, featuring high-quality patterns with all the grooves
and subtle nuance of the real thing. In addition, you can use automatic accompaniments that are perfectly matched to each
rhythm to enjoy the feeling of playing with your own band in the background.
Active Expression sounds
For some of the sounds, moving the expression pedal will vary not only the volume but also the tone, or add other sounds.
From pianissimo to fortissimo, the tonal character of the sound itself will change as you perform a crescendo, or strings
may appear behind the piano, creating dynamic changes in tonality.
“Music Assistant” and “Quick Registration” functions
The “Music Assistant” function makes it easy to recall appropriate rhythm and sound settings simply by selecting a
desired atmosphere for your song. The “Quick Registration” function lets you use keywords to select wonderful
registrations created by top-ranking organists such as Hector Olivera.
Human voices and phrases
In addition to a full array of organ sounds, the ATELIER-S series provides human voices such as “Jazz Scat,” and human
voice phrases such as “Amen.”
Harmony Intelligence
The Harmony Intelligence function automatically adds harmony to the upper keyboard sound according to the chord you
play in the lower keyboard. This gives you greater tonal depth and a more powerful performance.
Rhythm Customize function lets you arrange the internal rhythms
You can use the “Rhythm Customize” function to edit the internal rhythms, for example by adding a single cymbal at the
end or changing the drum tone in a pattern. You can also save edited rhythms to the instrument as well as to floppy disks.
76-note lower keyboard for plenty of range
The 76-note range can be split into zones, allowing a solo voice, pedal bass voice, percussion, etc., to be played
independently for an even wider range of performance possibilities. Since the lower keyboard can be divided into a
maximum of four parts, you have at your command expressive power that rivals that of a three-manual organ.
In addition, you can use the Drums/SFX function to play drum sounds or sound effects from the entire lower keyboard.
Notation display in the LCD screen
The large LCD screen allows recorded data or loaded music data to be displayed as a notation. You can enjoy the
convenience of playing from a notation, or checking the notation of a song you recorded.
Furthermore, the instrument features a color LCD panel for great visibility and comfortable operation.
Video output of lyrics
You can connect a television to view the lyrics from SMF music files.
8
Page 10

■
Conventions Used in This Manual
This manual uses the following conventions in the interest of simpler, more concise instructions.
• Button names are enclosed in square brackets (“[ ]”), as in [Drums/SFX] button.
• On screen text is enclosed in angled brackets “< >”, as in <Exit>.
• [+] [-], [▲] [▼], [ ] [ ] means that you should press one or the other button.
Example: Value [-][+] buttons, Reverb [▲] [▼] buttons, Tempo [ ] [ ] buttons.
• For easier readability, some screens and colors used here may differ in part from actual screens
and colors.
• The act of lightly contacting the Touch Screen with your finger is called “touching.”
Main Features
• An asterisk (*) or a at the beginning of a paragraph indicates a note or precaution. These
should not be ignored.
• (p. **) refers to pages within the manual.
NOTE
9
Page 11

Contents
USING THE UNIT SAFELY.......................................................................................................... 3
Important Notes .......................................................................................................................... 5
Main Features..........................................................................................7
Conventions Used in This Manual ............................................................................................... 9
Panel Descriptions................................................................................16
Before You Start Playing......................................................................18
Attaching the Pedalboard........................................................................................................................ 18
Opening/Closing the Lid........................................................................................................................ 18
Setting Up the Music Rest ....................................................................................................................... 18
Connecting the Power Cord.................................................................................................................... 19
Turning the Power On and Off ..............................................................................................................19
Turning On the Power.................................................................................................................. 19
Turning Off the Power .................................................................................................................19
Using Headphones................................................................................................................................... 20
Using a Microphone................................................................................................................................. 20
Turning On the Lights .............................................................................................................................21
About the Hole of the AT-90SL’s Cabinet............................................................................................. 22
About the Bench .......................................................................................................................................22
Restoring All the Factory Default Settings ...........................................................................................22
Restoring All Settings Other Than the User Memory to the Original Factory Settings................. 24
About the Display .................................................................................25
Understanding the Main and Related Screens .........................................................................25
Convenient Functions ..........................................................................29
Listening to the Demo Songs .................................................................................................................. 29
Music Assistant Function ........................................................................................................................ 31
Music Assistant Search................................................................................................................. 33
Choose a Keyword for Quick Registration Selection.......................................................................... 35
About the Quick Guide function............................................................................................................ 37
About the Index menu.................................................................................................................. 37
Chapter 1 Selecting and Playing Sounds ...........................................39
Selecting Voices ........................................................................................................................................39
About the Voices and Parts .........................................................................................................39
Functions of the Upper/Lower/Pedal Bass Sound Select Buttons .......................................40
Selecting the Upper and Lower Voices...................................................................................... 41
Selecting Pedal Bass Voice........................................................................................................... 42
Selecting Solo Voice ...................................................................................................................... 43
Selecting a Voice Using the [Others] Button ............................................................................. 44
Performing with a Human Voice................................................................................................ 46
Performing with an Active Expression Voice........................................................................... 48
Creating Organ Sounds (Footage) ......................................................................................................... 49
Adjust the Volume Balance..................................................................................................................... 52
Transpose the Pitch in Octave Units (Octave Shift) ............................................................................54
Playing Drum Sounds or Sound Effects from the Entire Lower Keyboard (Drums/SFX) ...........56
10
Page 12

Contents
Changing Drums/SFX Sets .........................................................................................................57
Playing a Lower Voice with Percussion Instrument Sounds and a Voice Phrase
(Manual Percussion) ................................................................................................................................58
Changing the Manual Percussion Sets.......................................................................................59
Sustaining Notes in the Lower Part (Lower Hold).............................................................................. 60
Chapter 2 Using Rhythm Performance ...............................................61
Selecting a Rhythm................................................................................................................................... 61
Using Rhythms Stored in User Memory ................................................................................... 62
Rhythm Search............................................................................................................................... 63
Playing Rhythm........................................................................................................................................ 65
Starting at the Press of a Button.................................................................................................. 65
Starting the Rhythm Automatically When You Play the Lower Keyboard or Pedalboard
(Sync Start) .....................................................................................................................................66
Stopping the Rhythm.................................................................................................................... 67
Changing a Rhythm’s Tempo................................................................................................................. 67
Playing the Count Sound at the End of the Intro ................................................................................ 68
Playing Rhythm and Automatic Accompaniment .............................................................................. 68
Adding Variety to the Rhythm or Automatic Accompaniment........................................................ 69
Changing the Arrangement of the Rhythm and Accompaniment (Style Orchestrator)..... 69
Playing Chords with Simple Fingering................................................................................................. 70
Leading Bass Function............................................................................................................................. 72
A Simple Way to Make Automatic Accompaniment Settings (One Touch Program)................... 74
Using a Rhythm from a Disk ..................................................................................................................76
Inserting and Ejecting a Floppy Disk......................................................................................... 76
Reviewing the Styles on a Music Style Disk ............................................................................. 77
Copying Rhythms on Disks into User Memory................................................................................... 78
Restoring the Rhythm Stored in the User Memory to Their Original Factory Settings................. 80
Copying Rhythms Saved in User Memory to Floppy Disks.............................................................. 81
Changing the Order of the Rhythms Stored in User Memory........................................................... 83
Changing the Names of Rhythms Stored in User Memory ...............................................................85
Deleting Rhythms Stored in User Memory ..........................................................................................87
Chapter 3 Using the Registration Buttons .........................................89
Storing Registrations................................................................................................................................ 90
Recalling a Registration........................................................................................................................... 91
How to Recall a Registration (DELAYED) ................................................................................ 91
How to Recall a Registration (INSTANT) .................................................................................91
Changing the Timing of Recalling Registrations...................................................................... 92
Automatically Registering When You Switch Panel Settings............................................................ 93
Assigning a Name to a Registration Set................................................................................................ 94
Formatting Disks ......................................................................................................................................96
Saving Registration Sets to a Floppy Disk............................................................................................ 98
Loading Previously Saved Registration Sets Into the AT-90SL....................................................... 101
Loading a Set of Registrations...................................................................................................101
Loading an Individual Registration .........................................................................................103
Recalling the Order that the Registrations are Saved on the Floppy Disk (Load Next)... 106
Deleting a Set of Registrations from a Floppy Disk ..........................................................................108
Changing the Order of Registration on Floppy Disk........................................................................ 110
Using Registrations Created on an Earlier Model............................................................................. 111
11
Page 13

Contents
Chapter 4 Using the Performance Functions...................................114
Transposing to a Different Key (Key Transpose) ..............................................................................114
Adjusting the Brightness of the Sound................................................................................................ 115
Adding Decay to the Sound (Damper Pedal)..................................................................................... 115
Pitch Bend and Vibrato Effects............................................................................................................. 116
Using the Foot Switches ........................................................................................................................117
Changing the Function of the Foot Switch.............................................................................. 118
Using the Foot Switch to Switch Registrations....................................................................... 119
Adjusting the Overall Volume Using an Expression Pedal ............................................................. 120
Adjusting the Depth of the Expression Pedal......................................................................... 121
Chapter 5 Applying Various Effects to the Sound...........................122
Adding Harmony to a Melody (Harmony Intelligence) .................................................................. 122
Harmony Intelligence [Others] button..................................................................................... 123
Adding Modulation to the Sound (Rotary Effect)............................................................................. 125
Rotary Speed................................................................................................................................ 126
Rotary Color................................................................................................................................. 127
Chorus Effect........................................................................................................................................... 128
Sustain Effect........................................................................................................................................... 129
Changing the Sustain Length .................................................................................................... 130
Reverb Effect ...........................................................................................................................................131
Changing the Reverb Type........................................................................................................ 132
Changing the Wall Type ............................................................................................................133
Changing the Depth of the Reverb........................................................................................... 134
Chapter 6 Using the Lower Keyboard Effectively............................136
Making Effective Use of the Lower Keyboard................................................................................... 136
Playing the Solo Voice on the Lower Keyboard (Solo [To Lower] Button) ...................................138
Changing How the Solo Voice Responds................................................................................ 139
Layering the Solo Voice and Lower Voice .............................................................................. 139
Changing the Solo Split Point ................................................................................................... 140
Using the Lower Keyboard to Play the Bass Voice ([Bass Split] Button) ....................................... 141
Changing the Bass Split Point ...................................................................................................142
Using the Lower Keyboard to Play the Bass Voice (Pedal [To Lower] Button)............................ 143
Chapter 7 Recording/Playing Back What You Play .........................144
What is a Track Button? .............................................................................................................145
Displaying the Track Buttons.................................................................................................... 146
Playing Back Performance Songs Stored on Floppy Disk and SMF Music Files .......................... 146
Silencing a Specific Track (Track Mute).............................................................................................. 148
Muting Individual Tracks of Performance Data .................................................................... 149
Viewing a Notation ................................................................................................................................ 150
Changing the Notation Settings................................................................................................ 151
Recording a Performance ...................................................................................................................... 153
Playing Back a Performance Song........................................................................................................ 154
Add a Count Sound to Match the Timing (Count In Play) .............................................................. 154
Recording Each Part Separately ........................................................................................................... 155
Re-Recording........................................................................................................................................... 156
Erasing a Performance Song (Song Clear) .......................................................................................... 157
Changing the Name of a Performance Song (Rename) ....................................................................157
12
Page 14

Contents
Saving Performance Songs Onto Floppy Disk................................................................................... 159
Loading Performance Songs Into the AT-90SL.................................................................................. 160
Deleting Performance Songs Stored on Floppy Disk........................................................................ 161
Layering a New Recording onto SMF Music Files ............................................................................ 162
Using Song with a Different Tempo Than That of the Performance Song ....................................163
Re-Recording Part of Your Performance (Punch-in Recording)...................................................... 163
Recording and Layering Drum Parts (Loop Recording) ..................................................................164
Count-In Recording................................................................................................................................ 165
Chapter 8 Editing Your Musical Performance Data .........................166
Deleting a Specific Measure (Delete Measure)................................................................................... 166
Delete the Recording from a Track (Delete Track) ............................................................................ 167
Erase Recording (Erase Event) ............................................................................................................. 169
Copying Measures (Copy) ....................................................................................................................171
Correct Timing Inaccuracies (Quantize) ............................................................................................. 172
Chapter 9 Creating Original Accompaniment Rhythms..................174
Preparations for Creating User Rhythms............................................................................................ 175
Displaying the Rhythm Customize Screen.............................................................................. 175
Selecting the Division ................................................................................................................. 176
Loading the Rhythm................................................................................................................... 177
Making the Division Settings ....................................................................................................178
Editing the Rhythm..................................................................................................................... 179
Changing and Deleting the Instruments Used ....................................................................... 182
Deleting Rhythms You Have Created...................................................................................... 183
Changing the Name of a User Rhythm (Rename).................................................................. 183
Saving User Rhythms to the User Memory or Floppy Disk ............................................................184
Chapter 10 Various Other Settings ...................................................185
Adjusting How the Instrument Responds.......................................................................................... 185
Turning Aftertouch On/Off ...................................................................................................... 185
Adjusting the Depth of Aftertouch........................................................................................... 185
Adjusting the Initial Touch Sensitivity .................................................................................... 186
Changing the Pedalboard Polyphony...................................................................................... 186
Performance Function Settings............................................................................................................. 187
Selecting the Range of Keys to Which the Damper Pedal will Apply................................. 187
Changing the Function of the Expression Pedal ....................................................................187
Selecting the Range of Keys to Which the Pitch Bend/Vibrato Lever will Apply............ 188
Changing the Pitch Bend Range ...............................................................................................189
Rhythm Settings...................................................................................................................................... 189
Turning Chord Hold On/Off.................................................................................................... 189
Count Down Sound .................................................................................................................... 190
Preventing Rhythm Tempos from Switching Automatically............................................... 190
Registration Settings ..............................................................................................................................191
Changing the Timing at Which Arranger Settings are Recalled.......................................... 191
Changing the Timing at Which Transposition Settings are Recalled.................................. 191
Composer settings.................................................................................................................................. 192
Switching the Display of Lyrics On or Off .............................................................................. 192
Changing the Key When Playing Back Songs (Play Transpose).......................................... 192
Changing the Metronome Setting............................................................................................. 193
13
Page 15

Contents
Adjusting the Metronome Volume........................................................................................... 193
Changing the Sound of the Metronome ..................................................................................194
Setting the Beat............................................................................................................................ 194
Other Settings.......................................................................................................................................... 195
Adjust the Standard Pitch (Master Tune)................................................................................ 195
Mic Echo ....................................................................................................................................... 195
Enabling Transmission of PC Numbers................................................................................... 196
Setting the PC Number............................................................................................................... 196
MIDI IN Mode............................................................................................................................. 197
Selecting the MIDI Transmit Channel...................................................................................... 197
Repositioning the Touch Screen................................................................................................ 198
Displaying a Graphic at Power-up........................................................................................... 199
Deleting an Image Stored in Internal Memory....................................................................... 200
Switching the Background of the Main Screen....................................................................... 201
Eliminating the Bouncing Ball from the Main Screen............................................................ 202
Using the V-LINK function ....................................................................................................... 202
Chapter 11 Connecting with External Device...................................204
Name and Functions of Jack and Connectors ....................................................................................204
Connecting to Audio Equipment......................................................................................................... 205
Connecting a Computer ........................................................................................................................206
Connect to the MIDI Connectors .............................................................................................. 207
Connecting MIDI Devices ..................................................................................................................... 208
Connecting a Television to View the Lyrics ....................................................................................... 209
Switching the TV Format ........................................................................................................... 209
Connecting External Speakers or an external Reverb Unit to Broaden the Reverb
Switching the Aux Out On/OFF ..............................................................................................210
Switching the Aux Out Mode.................................................................................................... 210
(RSS Reverb)
.. 210
Appendices
Troubleshooting...................................................................................................................................... 213
Error Message .........................................................................................................................................218
Voice List .................................................................................................................................................220
Drums/SFX Set List ...............................................................................................................................223
Manual Percussion List ......................................................................................................................... 227
Instruments List (Rhythm Customize Function) ............................................................................... 228
Rhythm List............................................................................................................................................. 235
Music Style Disk List.............................................................................................................................. 237
Chord List................................................................................................................................................ 238
Glossary ...................................................................................................................................................240
About ATELIER Series Sound Generator................................................................................ 241
Replacing the Illumination Bulbs......................................................................................................... 242
Before you continue.................................................................................................................... 242
Required items............................................................................................................................. 242
Panel illumination....................................................................................................................... 242
Music stand illumination ........................................................................................................... 244
Pedal illumination.......................................................................................................................245
Remplacement des ampoules ............................................................................................................... 246
Avant de poursuivre le remplacement .................................................................................... 246
Outils nécessaires........................................................................................................................ 246
14
Page 16

Contents
Éclairage du panneau ................................................................................................................. 246
Éclairage du lutrin....................................................................................................................... 248
Éclairage des pédales.................................................................................................................. 249
Settings That Are Stored After the Power Is Turned Off.................................................................. 250
Settings That Are Stored After the Power Is Turned Off ...................................................... 250
Settings That Are Stored In the Registration Buttons............................................................ 250
Settings That Are Stored In the Individual Registration Buttons ........................................ 250
Demo Song List....................................................................................................................................... 252
Short Cut List ..........................................................................................................................................255
Main Specifications ................................................................................................................................256
Index......................................................................................................................................................... 259
15
Page 17

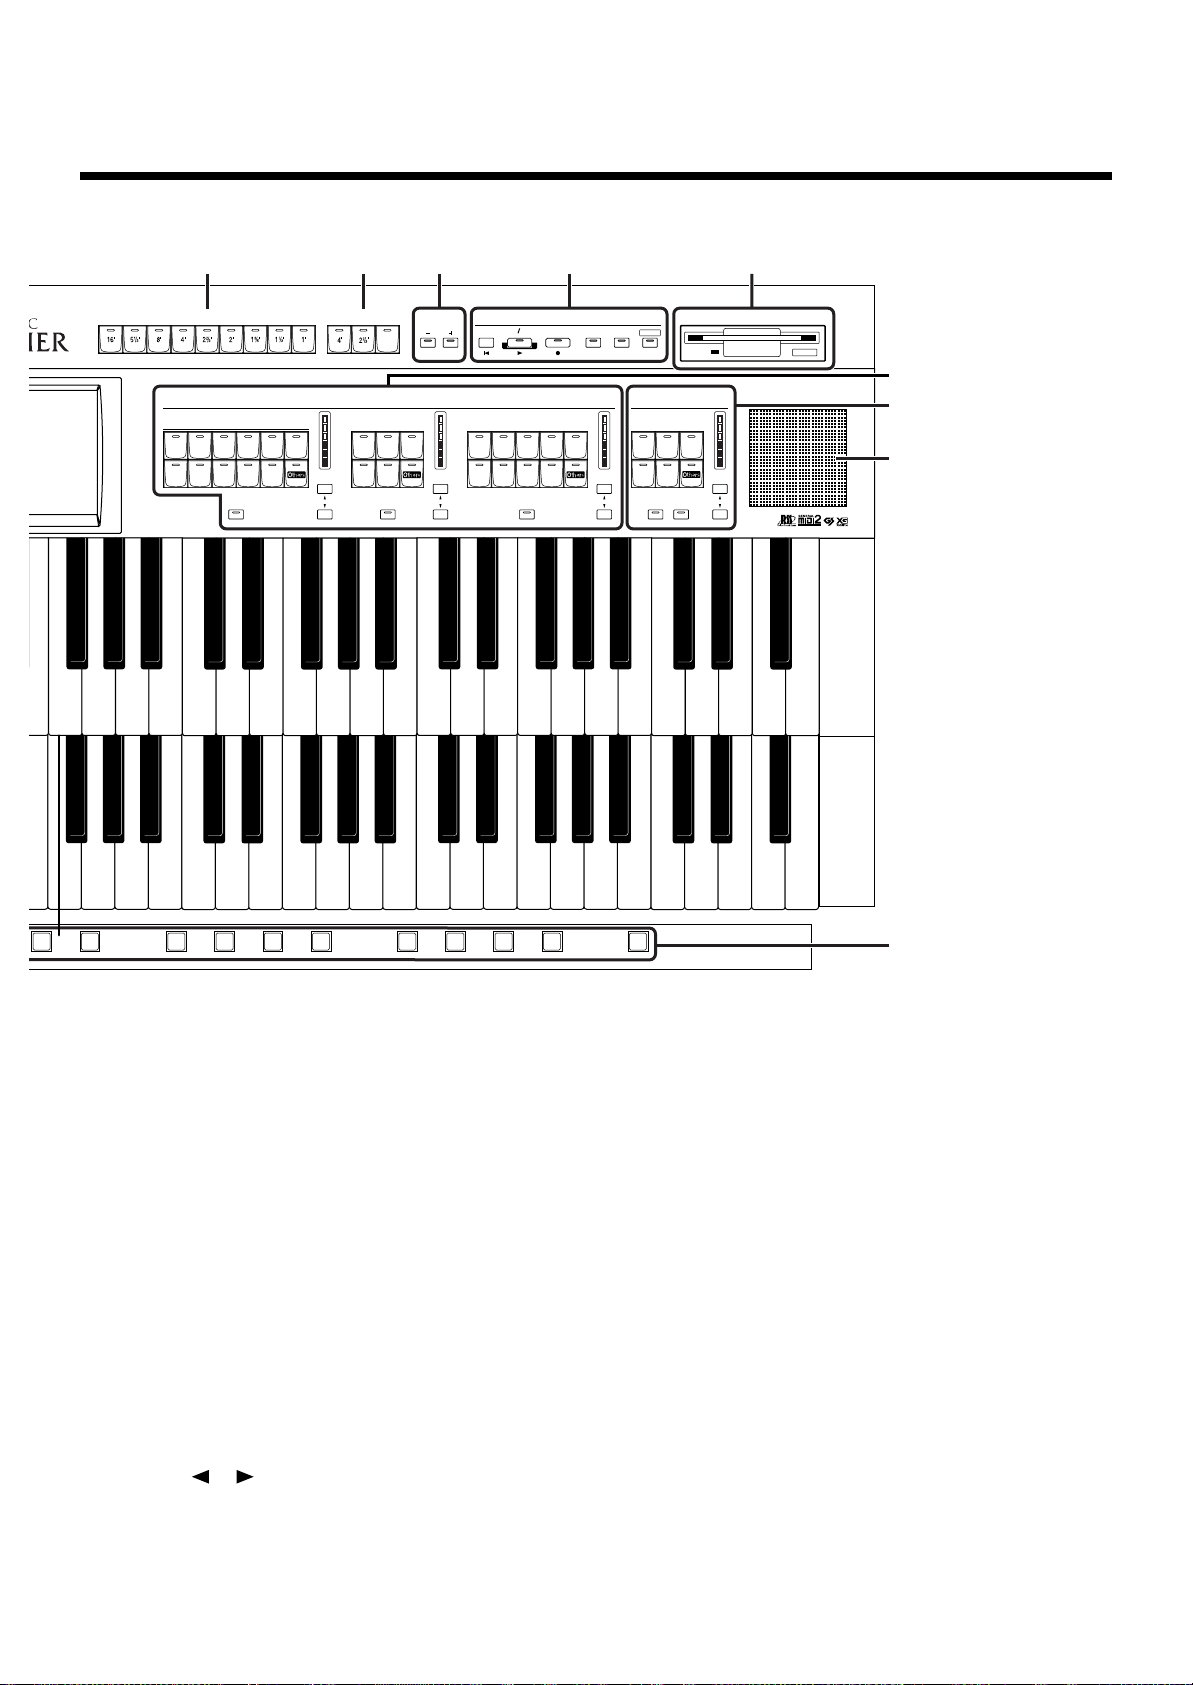
Panel Descriptions
54 7 8963
1
2
19
17
18
20
21
22
23
Power On
Lower
Drums/
SFX
BigBand
Swing
Latin
Master
Volume
Manual
Perc
Country Oldies
Gospel
Contempo
Waltz Trad
Showtime
March
Rhythm
Max
Min
Brilliance
Vibrato
Bender
Lower
Bright
Mellow
Hold
Acoustic
On/Off
Fast/
Slow
Rotary
Sound
Reverb SMF Rhythm Organ
SustainVoice
Lower UpperPedal
WorldBallad
Max
Min
Accomp/
Max
Min
Advanced1Advanced
Big
Band
Max
Max
Min
Min
Pedal
Orch
To
Lower
Organ1Organ2Octave
Bass
Split
Pipe Electric
FullBasic
2
Harmony Intelligence
Rotary Sound
1
Pipe Pipe Pipe
123
Pedal
Up
Theater
Standard
TempoStyle Orchestrator
Footage Type
Traditional
HymnOrgan
String
HarpStrings Block
Organ
Lower1Lower2Lower
Full3Full2Full
Alternate Alternate Alternate
OrchestralOrgan
Contrabass
Bass&
Cymbal
To
VariationToOriginal
Fill In
Theater Theater
12
Octave
Up
3
Level Level Level
Arranger
On/ Off
Count
Down
Intro/
Break
Ending
One Touch
Program
Set
Sync
Start
Start/
Stop
PipeFlute
Lower
Symphonic
Strings
Choir
Theater
French
Horn
Lower Footage
Orchestral
BrassPiano
A.Guitar
E.Piano
Accordion
Vibes
Harp
Harpsi
Harmonica
Marimba
1.
[Power On] switch → p. 19
2.
Panel Speaker
3.
Part Balance [▲] [▼] buttons → p. 52
Part Balance Indicator → p. 53
4.
Pedal Bass Voice select buttons → p. 42
Pedal Organ Part
Pedal Orchestral Part
[To Lower] button → p. 143
[Bass Split] button → p. 141
Harmony Intelligence buttons → p. 122
5.
Lower Voice select buttons → p. 41
6.
Lower Organ Part
Lower Symphonic Part
Lower Orchestral Part
[Alternate] button
Level [▲] [▼] buttons → p. 52
Level indicator → p. 53
7.
Footage Type buttons → p. 49
8.
Lower Footage buttons → p. 49
Touch Screen → p. 25
9.
24
10.
Upper Footage buttons → p. 49
11.
Percussion buttons → p. 49
12.
Transpose [-] [+] buttons → p. 114
Composer → p. 144
13.
[Reset] button
[Play/Stop] button
[Rec] button
[Song] button
[Registration] button → p. 101
[Demo] button → p. 29, p. 147
14.
Floppy Disk Drive → p. 76, p. 96, p. 159
15.
Upper Voice select buttons → p. 41
Upper Organ Part
Upper Symphonic Part
Upper Orchestral Part
[Alternate] button
Level [▲] [▼] buttons → p. 52
Level indicator → p. 53
Write
Manual
1 2
16
Page 18
10 11 12 13 14
Panel Descriptions
Rotary Sound
Organ
Full Full Full
123
123
Alternate Alternate Alternate Alternate To Lower
Jazz1Jazz2Jazz
TheaterPipe Pipe Pipe Theater
12
E.Piano
Vibes
Marimba
Play/ Stop
Orchestral
A.Guitar
Mandolin
Composer
Rec
BrassPiano
E.Guitar
Accordion
Harmonica
Banjo
Demo
RegistrationSong
Violin Trumpet
Oboe
Flute
Clarinet
Fast
Decay
Upper
Symphonic
Slow
Strings
Choir
Synth
Strings
Transpose
Reset
Harp
Harpsi
PercussionUpper Footage
3
Strings
French
Horn
Level Level Level Level
15
Solo
16
Sax
2
3 4 5 6 7 8 9 10 11 12
16.
Solo Voice select buttons → p. 43
Solo Part
[Alternate] button
[To Lower] button → p. 138
Level [▲] [▼] buttons → p. 52
Level indicator → p. 53
17.
Lower
[Drums/SFX] button → p. 56
[Manual Perc] button → p. 58
18.
Lower Voice [Hold] button → p. 60
19.
Sustain → p. 129
[Pedal] button
[Lower] button
[Upper] button
20.
Rhythm select buttons → p. 61
Style Orchestrator buttons → p. 69
Tempo [ ] [ ] buttons → p. 67
Fill In [To Variation] button → p. 69
Fill In [To Original] button → p. 69
[Break] button → p. 69
Load
Next
[Count Down] button → p. 68
[Intro/Ending] button → p. 65, p. 66
[Sync Start] button → p. 66
[Start/Stop] button → p. 65, p. 67
Arranger [On/Off] button → p. 68
[One Touch Program] button → p. 74
21.
[Brilliance] slider → p. 115
22.
[Master Volume] slider → p. 19
23.
[Bender/Vibrato] lever → p. 116
24.
Rotary Sound → p. 125
[On/Off] button
[Fast/Slow] button
Registration buttons
25.
[Write] button → p. 90
[Manual] button → p. 93
Registration [1] - [12] buttons → p. 89
[Load Next] button → p. 106
25
17
Page 19
Before You Start Playing
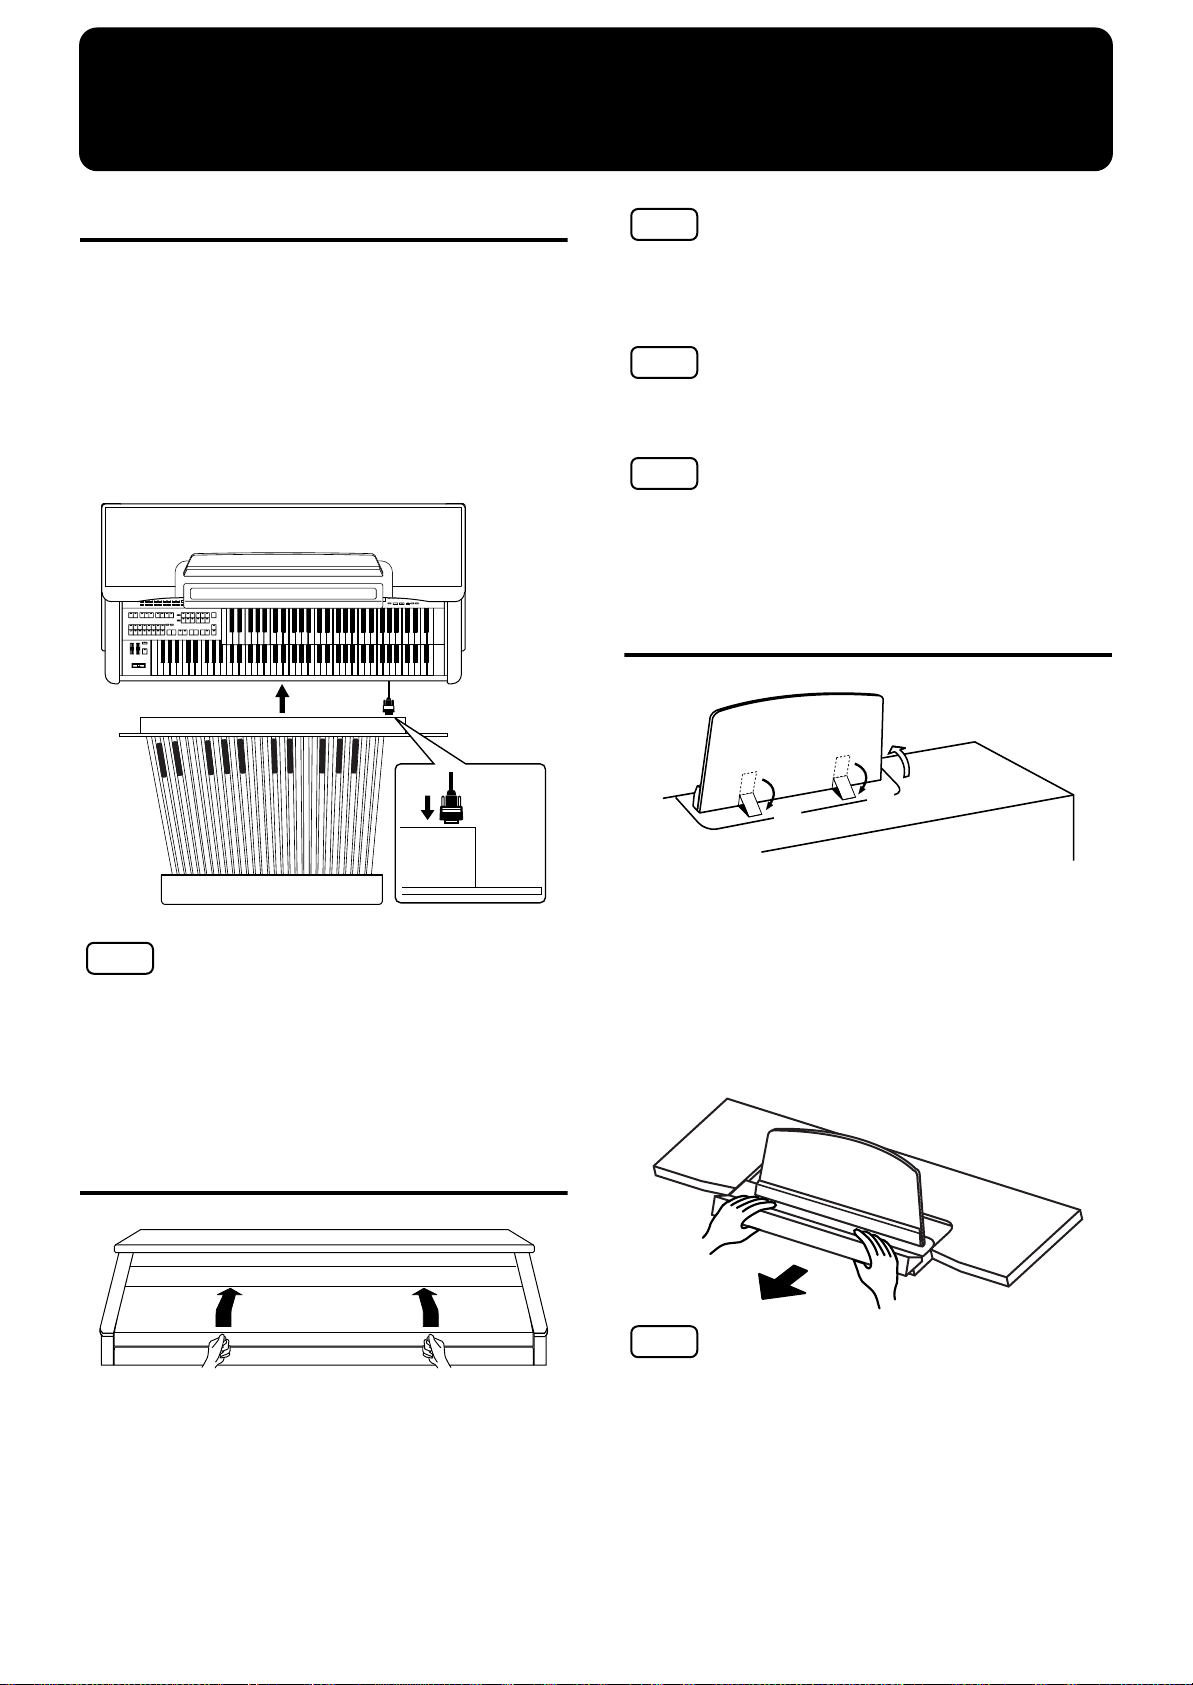
Attaching the Pedalboard
1.
Detach the pedal cable that is temporarily
fastened to the board on the upper part of the
Expression Pedal.
Connect the pedal cable to the connector located
2.
at the right side of the Pedalboard.
Slide the Pedalboard firmly all the way back so
3.
that it is secure and unable to move.
fig.00-21
NOTE
Be careful not to get your fingers caught when opening or
closing the lid. Adult supervision is recommended when
small children are going to be using the instrument.
NOTE
To prevent accidents, be sure to close the lid before moving
the organ.
NOTE
Make sure you don’t have anything (such as sheet music) on
the keyboard when you close the lid.
Setting Up the Music Rest
fig.00-23
(1)
(2)
(2)
NOTE
Do not remove the fastener located near the Expression
Pedal. Before transporting the AT-90SL, be sure to wind up
the pedal cable so that there is no slack, and attach it to the
fastener.
Opening/Closing the Lid
fig.00-22
1.
To open the lid, hold handles with both hands
and lift it straight up. Then, slide it to the rear.
2.
To close the lid, slowly pull it forward until it
stops. Then, gently lower it into place.
1.
Lift the music rest gently.
2.
To collapse the music rest, fold in the metal
fittings while supporting the music rest with
hand and gently fold down the stand.
3.
To set up the music stand, always use both hands
to lift the base, and pull it gently toward yourself.
fig.00-24
NOTE
Do not apply excessive force to the installed music rest.
18
Page 20
Max
Max
Max
Max
Min
Min
Min
Min
Harmony Intelligence
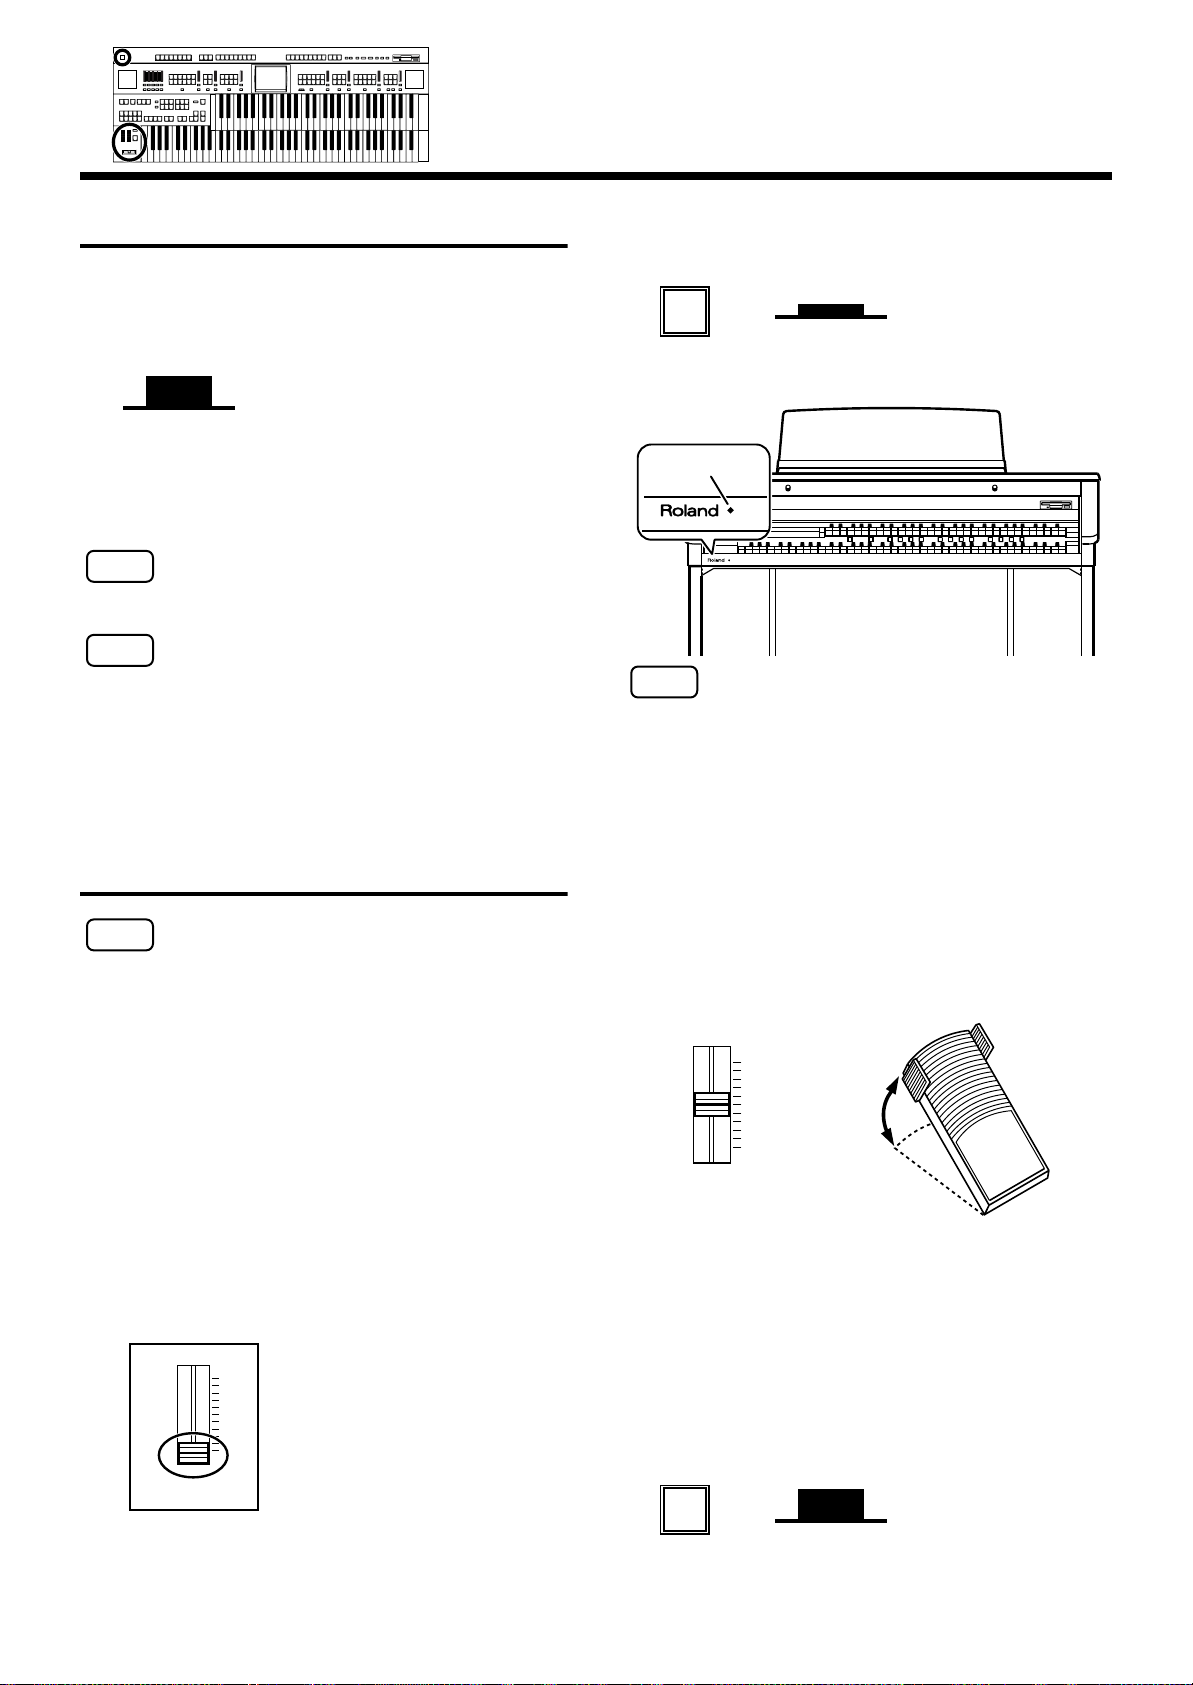
Connecting the Power Cord
1.
First, make sure that the [Power On] switch at the
panel’s left side is OFF (not pushed in).
fig. 00-27
Upper position
OFF
Connect the supplied power cord to the AC Inlet
2.
connector, then plug the other end into an AC
outlet.
NOTE
Only use the power cord supplied with this instrument.
Before You Start Playing
Press the [Power On] button to turn on the power.
2.
fig. 00-27
Power On
The Power indicator lights in red.
Power Indicator
Lower position
ON
NOTE
Whenever you do not intend to use the instrument for
extended periods of time, pull out the power cord from the
AC outlet.
Turning the Power On and Off
NOTE
Once the connections have been completed, turn on or off
power to your various devices in the order specified. By
turning on or off devices in the wrong order, you risk
causing malfunction and/or damage to speakers and other
devices.
■
Turning On the Power
Make sure of the following before the power is
1.
turned on.
• Is the power cord correctly connected to the AC inlet?
• Is the power cord correctly connected to the AC outlet?
• Is the [Master Volume] slider (located at the left of the
Lower Keyboard) set to the Min (minimum) position?
fig.00-26
Max
NOTE
This unit is equipped with a protection circuit. A brief
interval (a few seconds) after power up is required before the
unit will operate normally.
3.
The [Master Volume] slider located on the left of
the Lower Keyboard panel is an overall control
for adjusting the volume of the entire instrument.
Now adjust the [Master Volume] slider to a suitable
level. The volume will be increased when the Expression
Pedal is pressed down, and decreased when the pedal is
returned.
fig.00-28
Max
Min
Master
Volume
■
Turning Off the Power
Before switching the power off, set the [Master
1.
decrease
the volume
increase
the volume
Volume] slider to the Min (minimum) position.
Master
Volume
2.
Press the [Power On] button to turn off the power.
Min
fig. 00-27
Power On
Upper position
OFF
19
Page 21
Before You Start Playing
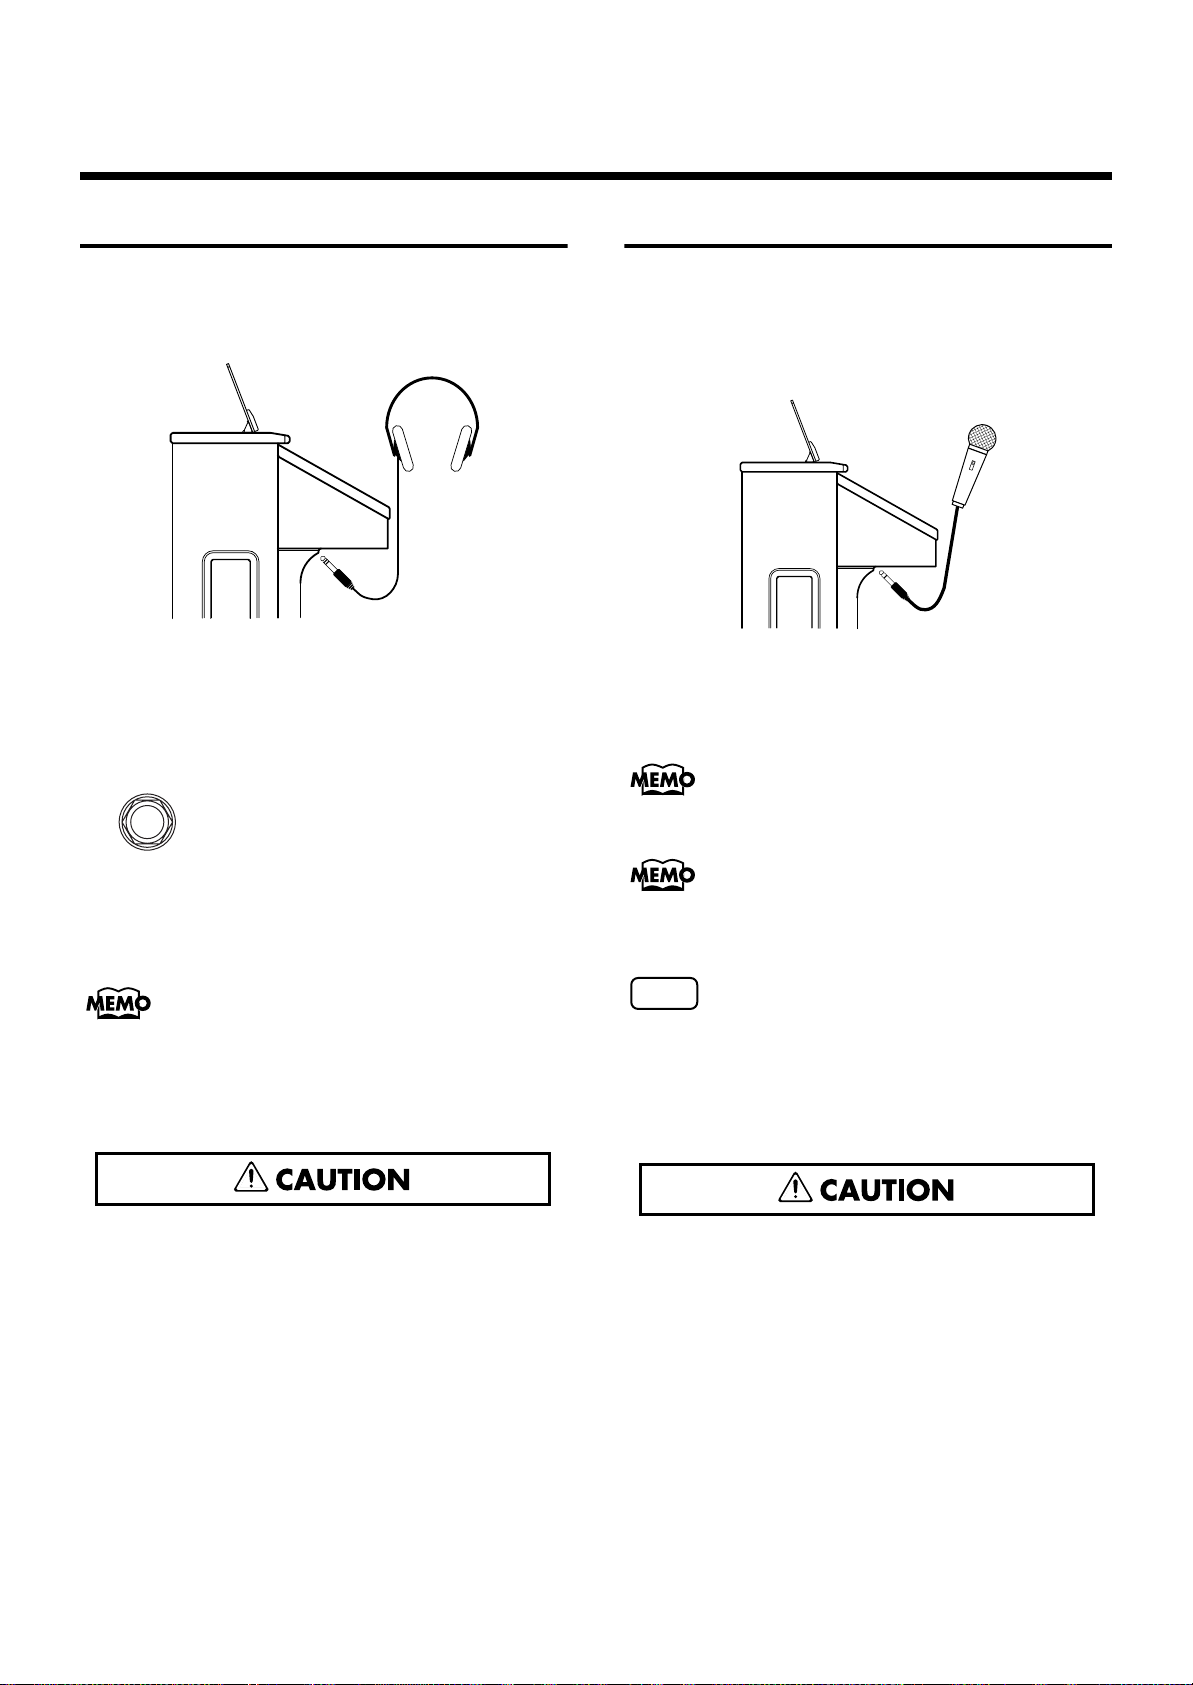
Using Headphones
The AT-90SL features a Phones jack. This allows you to play
without having to worry about bothering others around you,
even at night.
fig.00-29
Connect your headphones to the [Phones] jack
1.
underneath the left side of the keyboard.
The sound from the built-in speakers stops.
Now, sound is heard only through the headphones.
fig.00-30
Using a Microphone
The AT-90SL is equipped with a Mic jack.
Since this instrument has a Mic In jack, you can use a
microphone to enjoy a variety of possibilities such as singing
along with your performance, or singing along with SMF
music files (sold separately).
fig.00-32
1.
Connect your microphone to the [Mic In] jack
underneath the left side of the keyboard.
2.
Use the [Mic Volume] knob to adjust the volume
level for the microphone.
Phones
Adjust the headphones volume with the [Master
2.
Volume] slider and Expression pedal.
Accepts connection of Stereo headphones.
Some Notes on Using Headphones
fifig.00-31
• To prevent damage to the cord, handle the headphones
only by the headset or the plug.
• Headphones may be damaged if the volume is too high
when they are plugged in. Lower the volume on the AT90SL before plugging in headphones.
• To prevent possible auditory damage, loss of hearing, or
damage to the headphones, the headphones should not
be used at an excessively high volume. Use the
headphones at a moderate volume level.
You can adjust the depth of the echo applied to sound from
the microphone (p. 195).
The microphone must be purchased separately. When
purchasing a microphone, please consult the vender where
you bought the AT-90SL.
NOTE
If the Input switch is set to “RSS,” RSS reverb will be applied
to the sound from the microphone. You can use the [Mic
Volume] knob to adjust the microphone volume (p. 210).
Some Notes on Using a Microphone
fig.00-31
• To avoid disturbing others, be careful of the volume
level when playing late at night or very early in the
morning.
• When connecting a microphone to the AT-90SL, be sure
to lower the volume. If the volume control is too high
when the microphone is plugged in, noise may be
produced by the speakers.
• Howling could be produced depending on the location
of microphones relative to speakers. This can be
remedied by:
• Changing the orientation of the microphone.
• Relocating the microphone so it is farther from the
speakers.
• Lowering volume levels.
20
Page 22
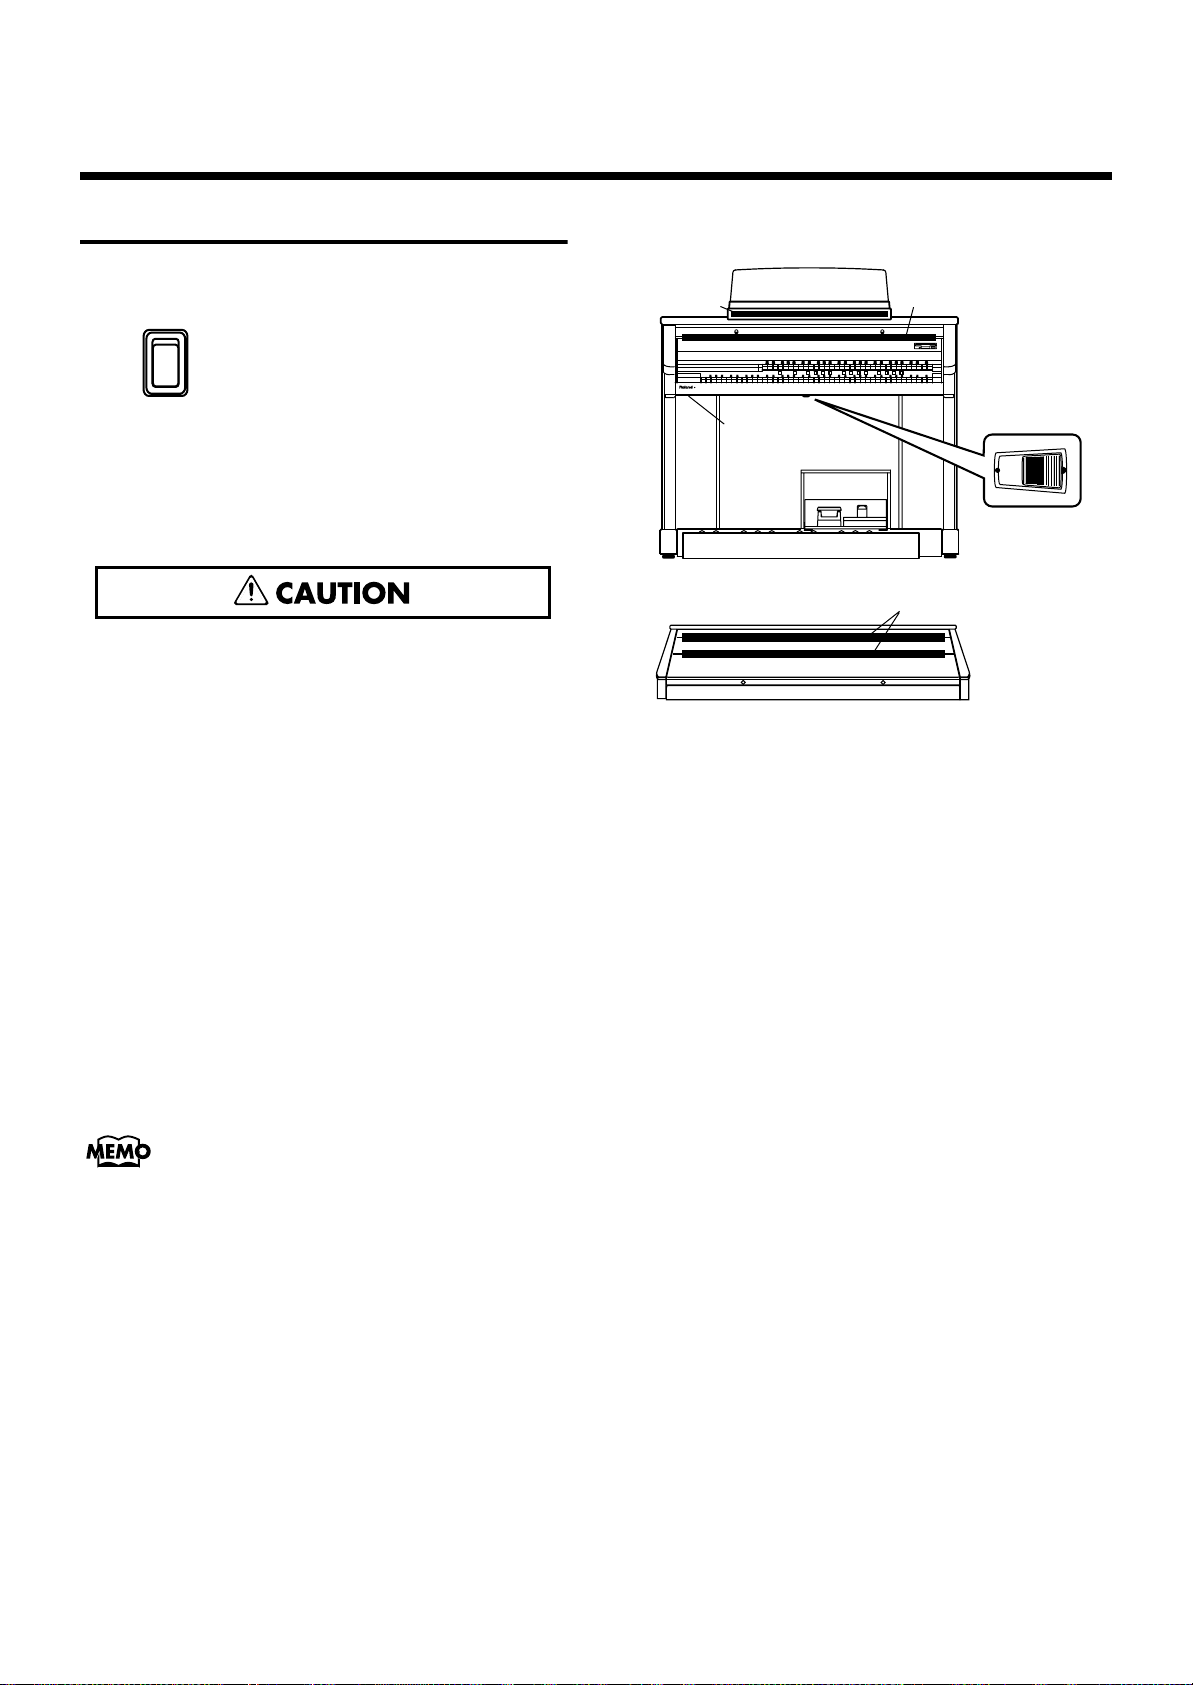
Turning On the Lights
After turning on the power, turn on the [Illumination] switch
(located underneath the left-hand side of the keyboard).
fig. 00-33
fig.00-34
Before You Start Playing
3
1
On
Illumination
The panel illumination of the instrument will light.
Cautions When Using Illumination
fig.00-31
When the illumination is used for an extended period, the
light bulbs and the metal parts near the light bulb (see
diagram below) will become hot. Be careful not to touch
these areas. In particular, be careful of the following
locations.
Panel illumination light bulb
1.
Do not touch the light bulb or nearby parts. When
closing the lid, be sure to hold the handles.
2.
Metal fittings of the cover
After closing the lid, do not touch this area.
3.
Music stand
Do not touch the light bulb cover.
4
Illumination Switch
2
4.
Light bulb cover for foot area (below keyboard)
The entire cover will become hot. Be careful not to touch
your leg to this area.
The bulbs used for illumination can be replaced. For details
on replacing a bulb, refer to
Bulbs”
(p. 242).
“Replacing the Illumination
21
Page 23

Before You Start Playing
Min
Max
Min
Max
Min
Max
Min
Max
Harmony Intelligence
About the Hole of the AT90SL’s Cabinet
To provide a way for cables to be passed from the front of the
instrument to its rear, a hole has been drilled in the AT90SL’s cabinet.
Avoid inserting fingers into this hole.
Restoring All the Factory Default Settings
You can restore all of the settings stored in the AT-90SL to
what they were when the instrument shipped from the
factory. This function is called “Factory Reset.”
Make sure there is no floppy disk in the disk
1.
drive before carrying out the procedure.
Touch <System> on the Main screen.
2.
The System screen appears.
fig.00-37.eps
About the Bench
The bench seat can be opened, and sheet music and other
items can be stored inside.
Caution When Using the Bench
fig.00-31
When opening/closing the seat, be careful not to pinch your
fingers.
fig.00-36
3.
In the System screen, touch <Utility> to open the
Utility screen.
fig.00-38.eps
4.
In the Utility screen, touch <Factory Reset>.
fig.00-39.eps
To restore all settings other than the User memory (p. 62) to
their original factory settings, touch <Panel Reset>.
22
Page 24
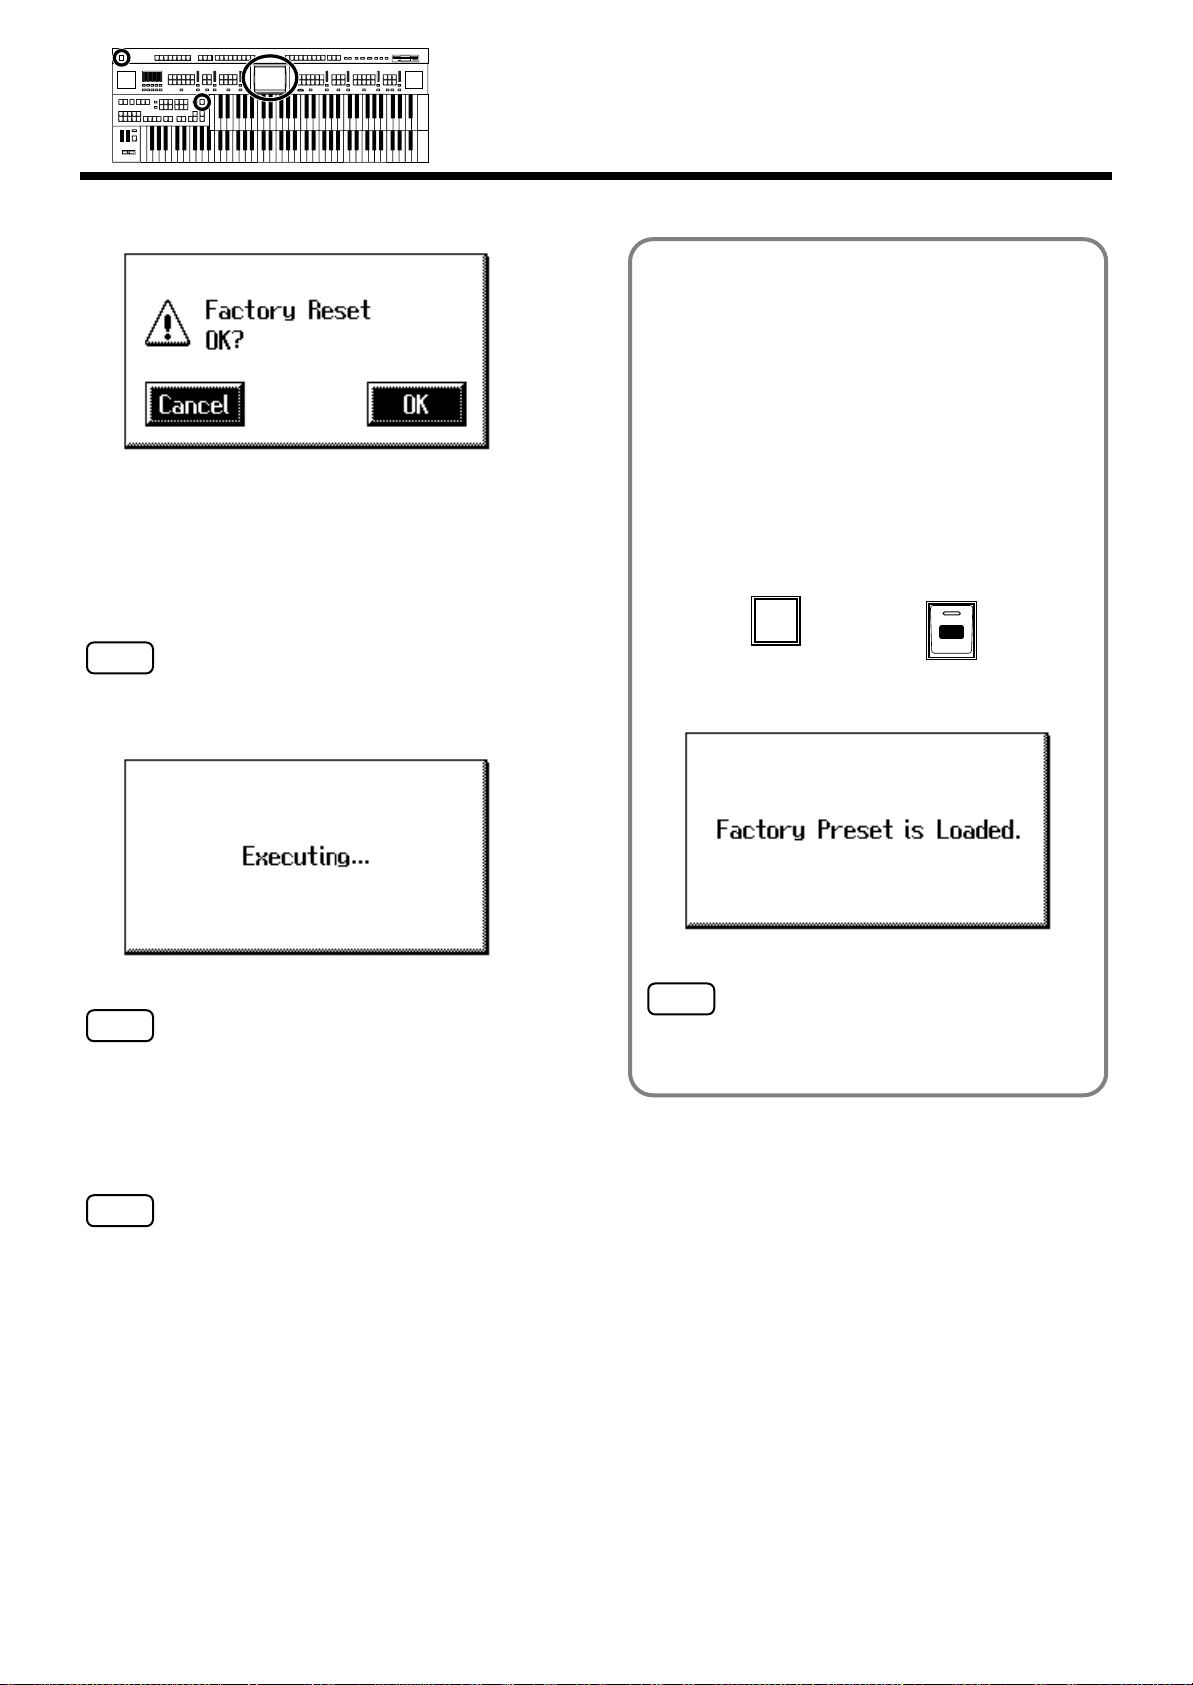
NOTE
Power On
Program
One Touch
Set
Max
Max
Max
Max
Min
Min
Min
Min
Harmony Intelligence
The confirmation message appears on screen.
fig.00-40.eps
Before You Start Playing
You can also use the following method to return to the
factory-set condition.
1. Make sure there is no floppy disk in the disk
drive before carrying out the procedure.
2. Turn down the volume to the minimum level,
then turn off the power.
If you touch <Cancel>, the Factory Reset will not be
performed, and you will return to the System screen.
5.
When you touch <OK>, the Factory Reset
operation will begin, and the settings will return
to the factory-set condition.
NOTE
Never switch off the power while this operation is in
progress!
fig.00-40.eps
NOTE
Loading factory default settings will erase any Registrations
currently in the memory of the AT-90SL. To save the
registrations you are currently using, refer to
Registration Sets to a Floppy Disk”
(p. 98).
“Saving
3. While holding down the [One Touch
Program] button, press the [Power On] switch
to turn the power on.
fig.00-41
The following screen appears.
fig.00-40.eps
Never switch off the power while this operation is in
progress!
NOTE
To reset only the User memory (p. 62) to its original factory
settings, refer to p. 78.
23
Page 25
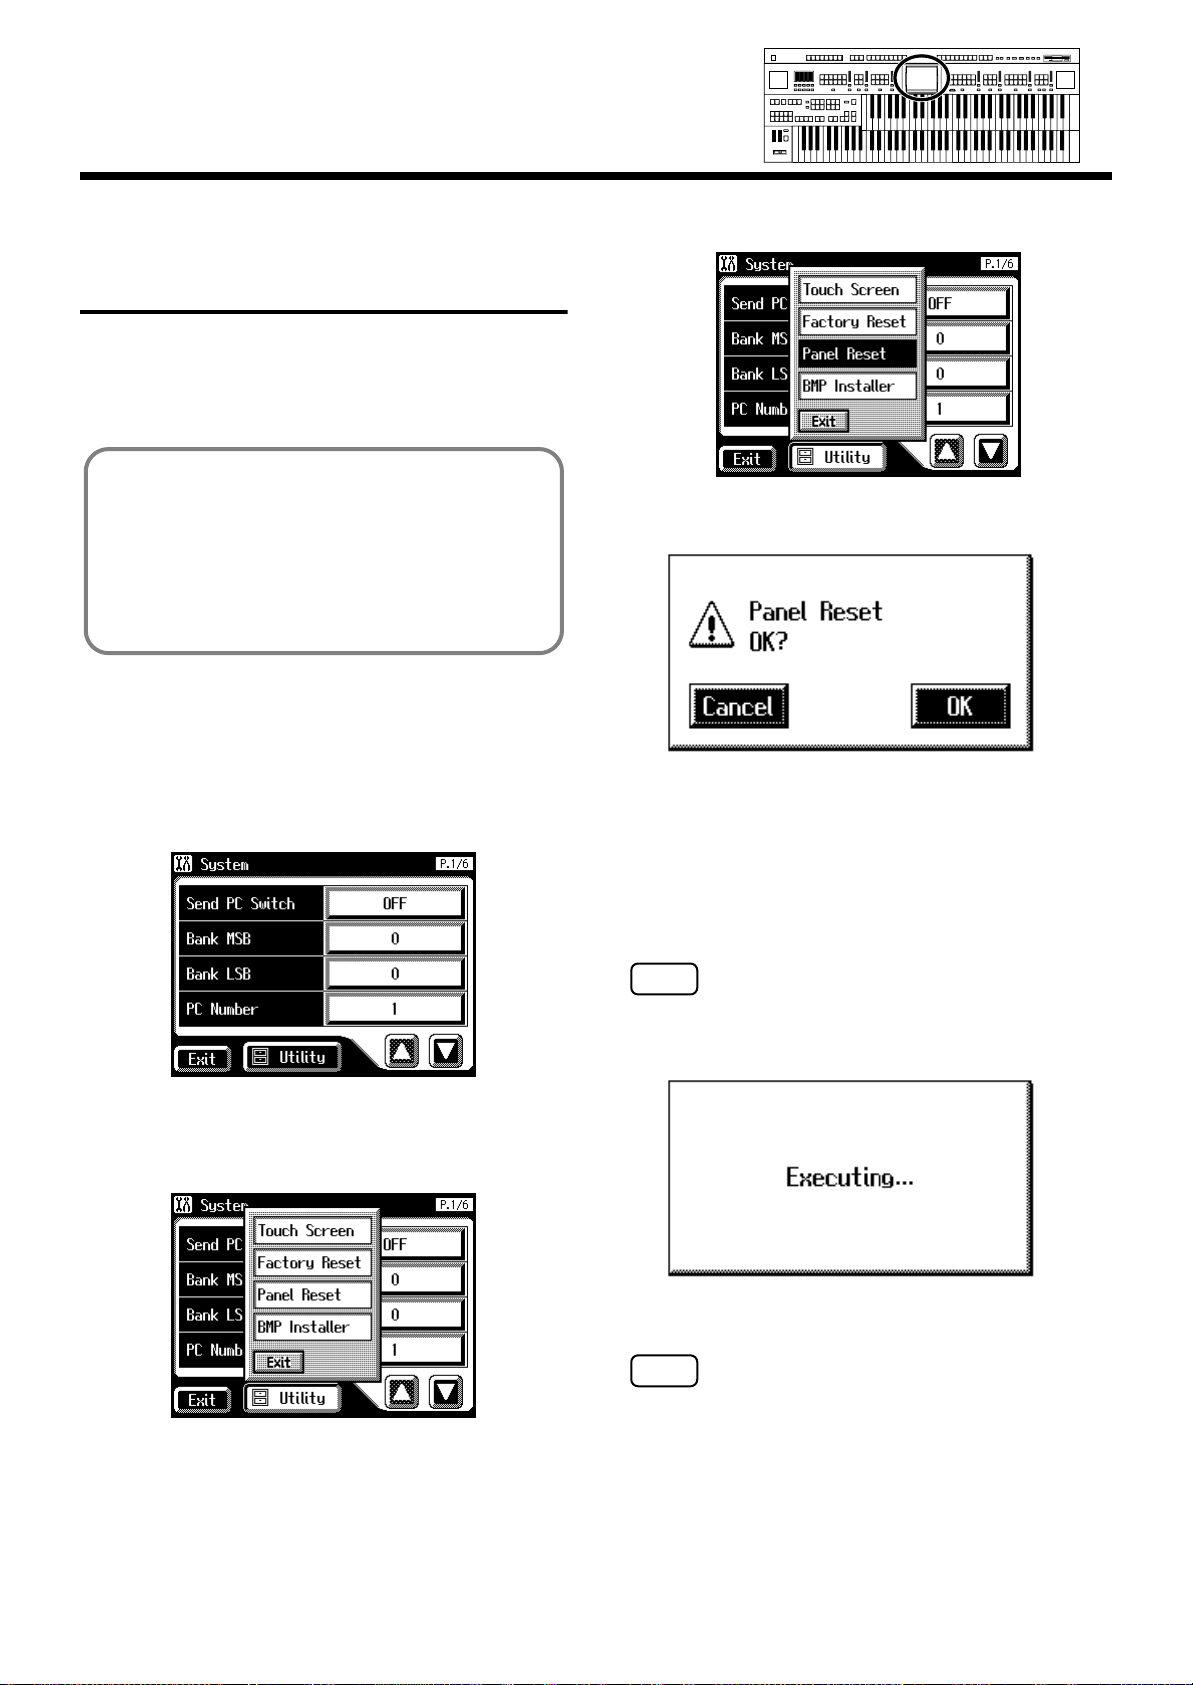
Before You Start Playing
Min
Max
Min
Max
Min
Max
Min
Max
Harmony Intelligence
Restoring All Settings Other Than the User Memory to the Original Factory Settings
You can restore all of the settings other than the User
memory (p. 62) to their original factory settings.
This function is called “Panel Reset.”
What is the User Memory?
The User memory is the area within the instrument
where User rhythms you create as well as rhythms from
Music Style Disks are stored.
You can also copy rhythms (p. 78) saved on floppy disks
to the User memory.
4.
In the Utility screen, touch <Panel Reset>.
fig.00-39.eps
The confirmation message appears on screen.
fig.00-40.eps
Make sure there is no floppy disk in the disk
1.
drive before carrying out the procedure.
Touch <System> on the Main screen.
2.
The System screen appears.
fig.00-37.eps
3.
In the System screen, touch <Utility> to open the
Utility screen.
fig.00-38.eps
If you touch <Cancel>, the Panel Reset will not be
performed, and you will return to the System screen.
5.
When you touch <OK>, the Panel Reset operation
will begin, and the settings will return to the
factory-set condition.
NOTE
Never switch off the power while this operation is in
progress!
fig.00-40.eps
NOTE
To reset only the User memory (p. 62) to its original factory
settings, refer to p. 80.
24
Page 26
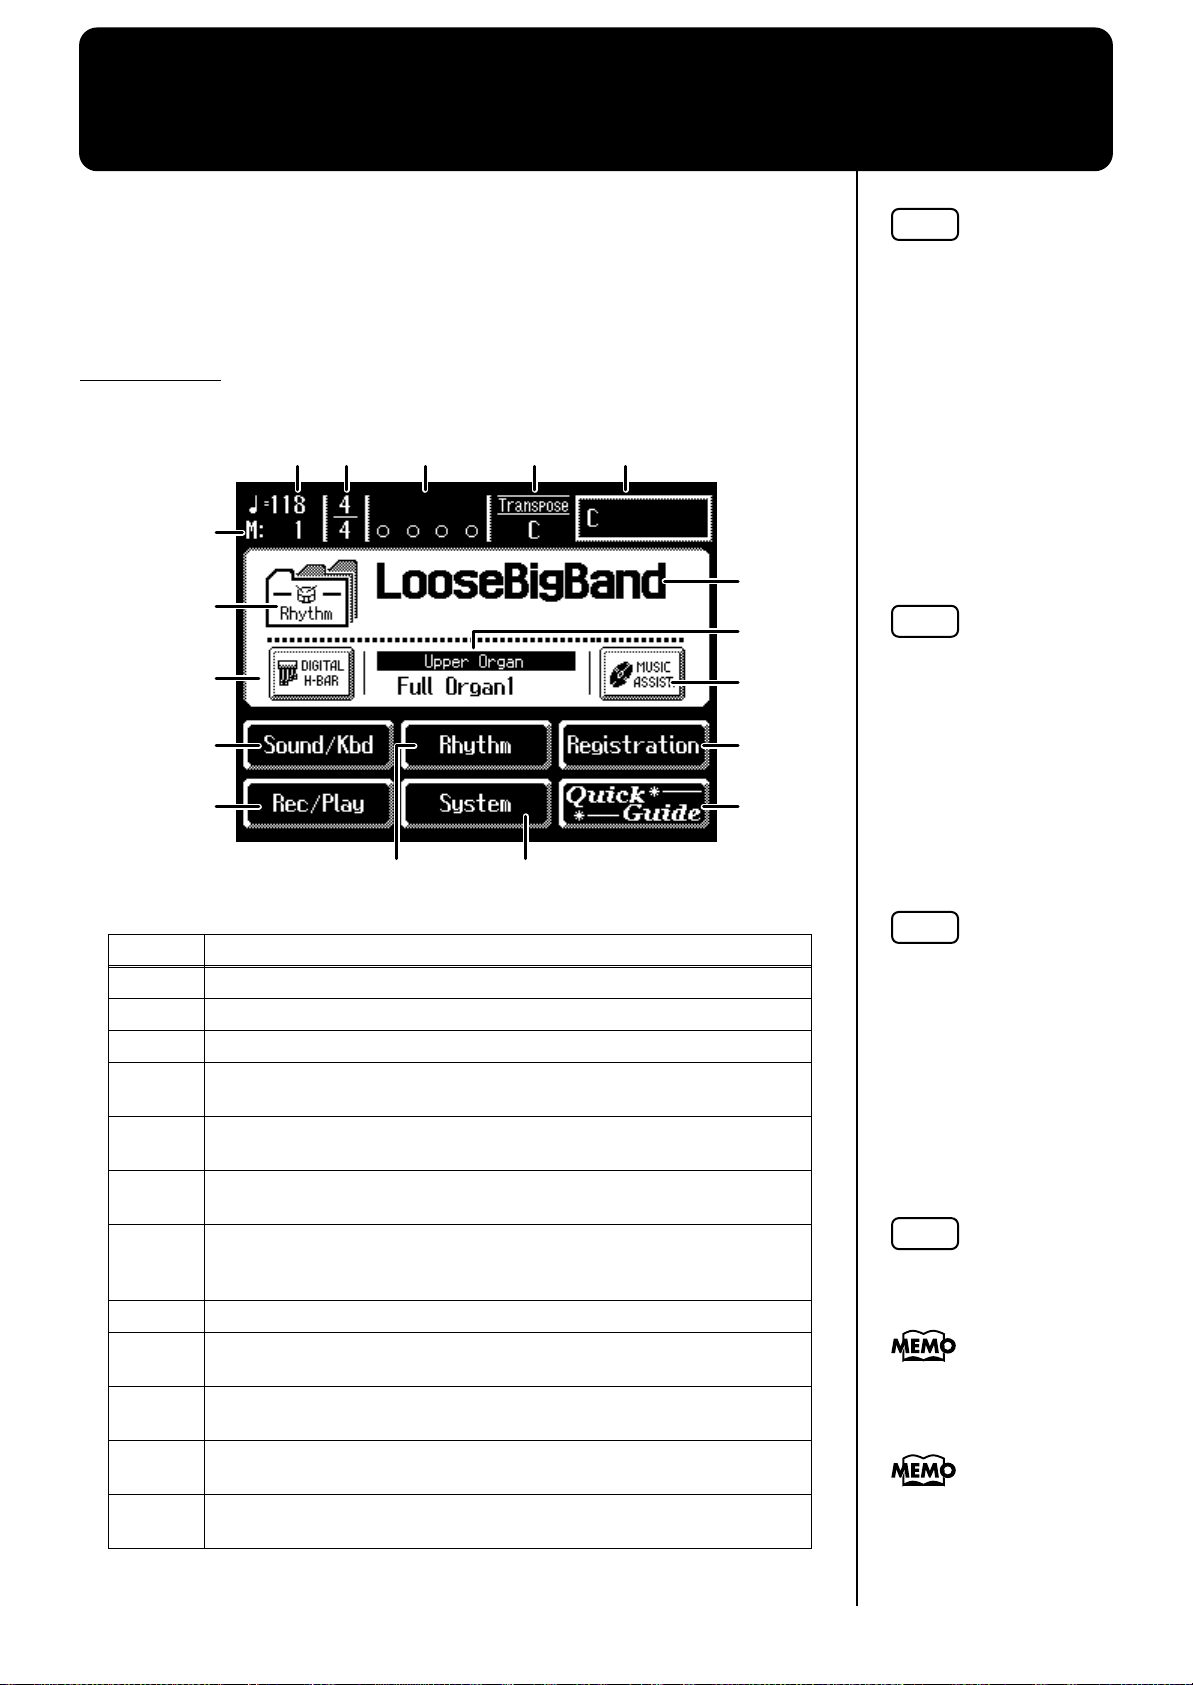
About the Display
b
b
The AT-90SL makes use of a Touch Screen. This lets you carry out a wide
variety of actions just by touching the screen lightly.
■
Understanding the Main and Related Screens
Main Screen
fig.04-02
1
3
4 5
6
2
7
9
12
15
1613
8
10
11
14
17
NOTE
The explanations in this
manual include
illustrations that depict
what should typically be
shown by the display.
Note, however, that your
unit may incorporate a
newer, enhanced version of
the system (e.g., includes
newer sounds), so what
you actually see in the
display may not always
match what appears in the
manual.
NOTE
The Touch Screen is
operated by touching it
lightly with your finger.
Pressing hard, or using a
hard object can damage the
Touch Screen. Be careful
not to press too hard, and
e sure to use only your
fingers to operate the
Touch Screen.
NOTE
Number
1
2 Measure
3 Beat
4
5
6
7
8
9
10
11
12
Tempo
Bouncing Ball
A ball will bounce in time with the rhythm or song.
Transpose
Displays the transpose setting.
Chord Name
Displays the name of the chord that is played in the lower keyboard.
Indication button
Pressed to choose which name to have indicated; either the Rhythm
Name, Song Name, or Registration Name.
Rhythm Name/Song Name/Registration Name
Digital H-Bar (Digital Harmonic Bar)
You can display the Footage screen (p. 49).
Voice Name
Displays the name of the upper keyboard voice.
MUSIC ASSIST (Music Assistant)
Press this when you want to use the Music Assistant function (p. 31).
Sound/Kbd (Sound/Keyboard)
Select a voice (tone), or make settings for the effect depth, keyboard, etc.
Explanations
The positioning of the
Touch Screen may become
displaced due to changes in
the surrounding
environment and over
time. If this happens,
follow the steps in
“Repositioning the Touch
Screen” (p. 198) to correct
the pointer position.
NOTE
Do not place items on the
touch screen.
You can adjust the
rightness of the screen (p.
204).
You can set the Main screen
so that the bouncing ball
does not appear (p. 202).
25
Page 27
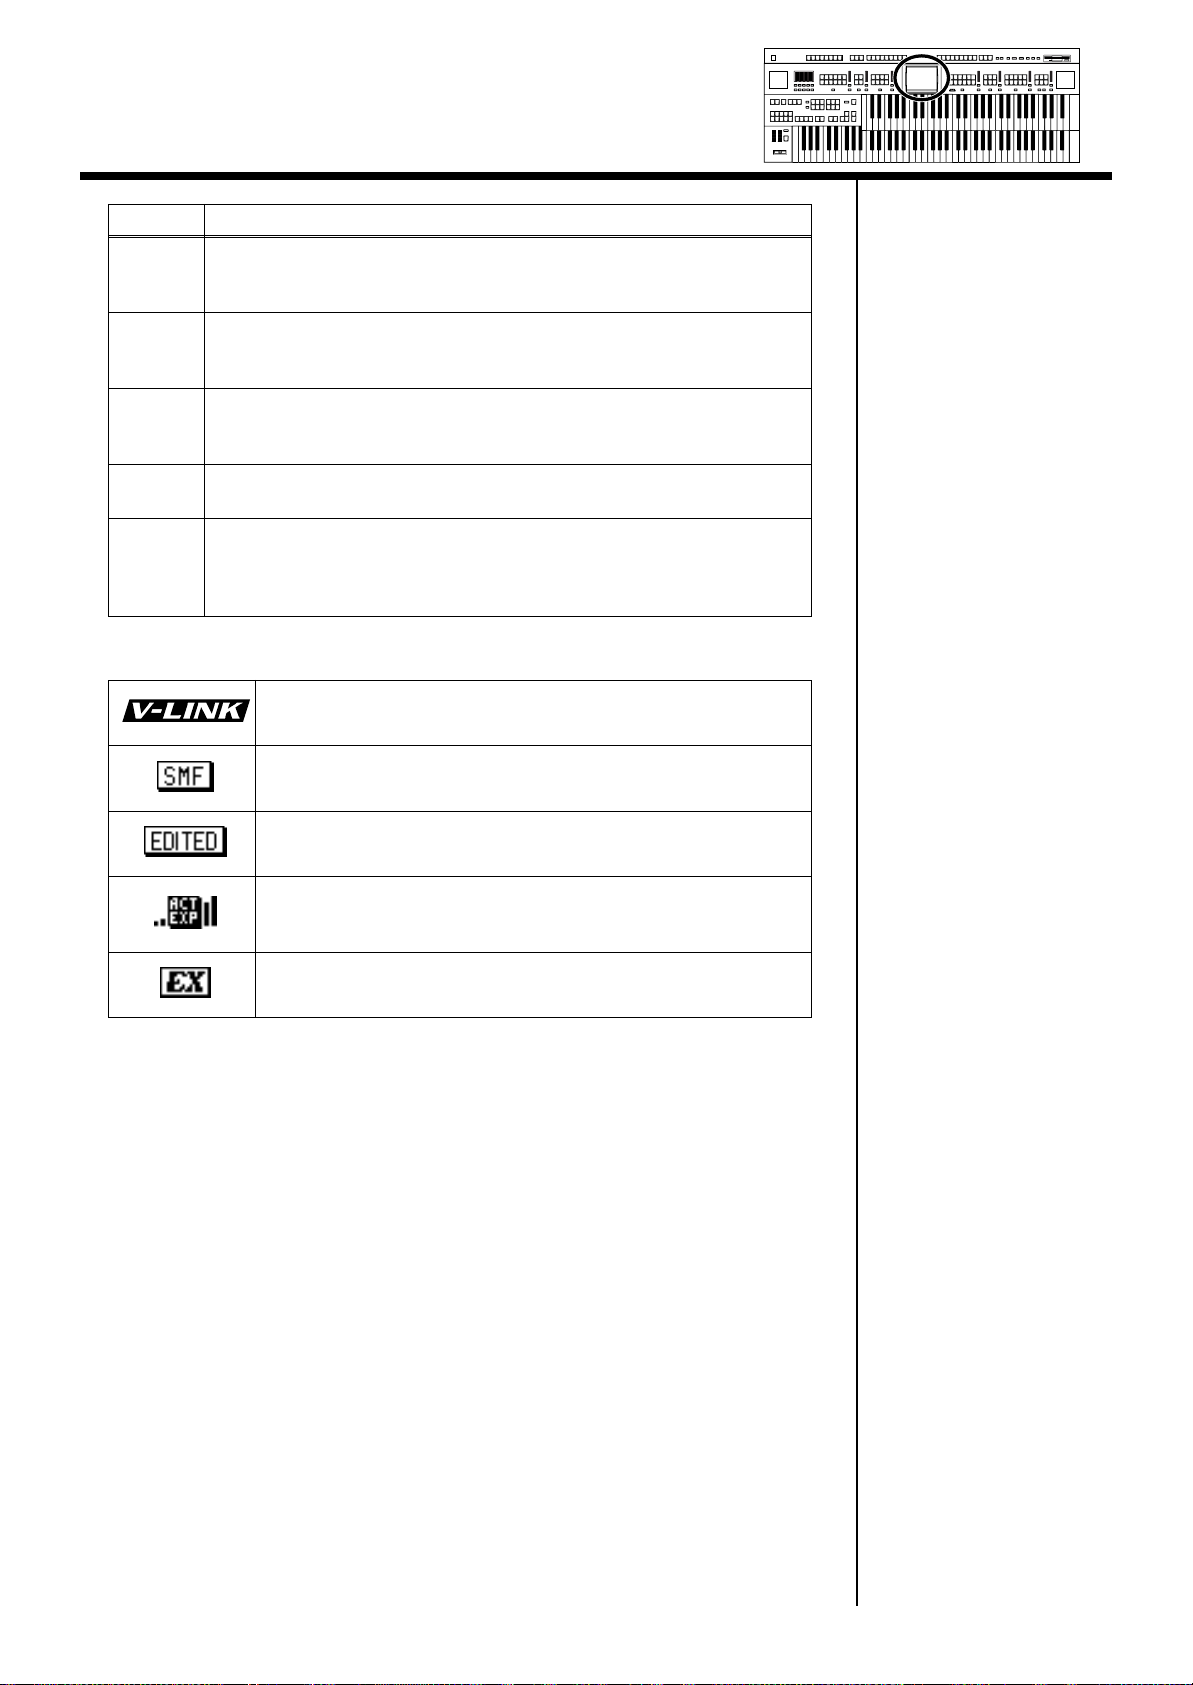
About the Display
Min
Max
Min
Max
Min
Max
Min
Max
Harmony Intelligence
Number Explanations
Rhythm
13
14
15
16
17
Play the internal rhythms, and play disk rhythms or copy them in internal
memory. Rhythm-related settings can also be made here.
Registration
Load registrations from disk into internal memory, or save registrations to
disk. Registration-related settings can also be made here.
Rec/Play
Play back or record a song. You can also view a notation display while a
song plays.
System
Make various settings.
Quick Guide
Displays the Quick Guide screen. While the Quick Guide screen is
displayed, you can press the keyboard, a button, or a foot switch to jump
to the related setting screen (p. 37).
This icon is displayed when the V-LINK function is on.
➝
V-LINK function (p. 202)
This icon is displayed when the instrument contains SMF music
files.
This icon is displayed when any portion of the recorded song has
been altered.
This icon appears in the display when an Active Expression voice is
selected.
➝
Active Expression Voice (p. 48)
This icon appears in the display when an EX voice is selected.
➝
Ex Voice (p. 44)
26
Page 28
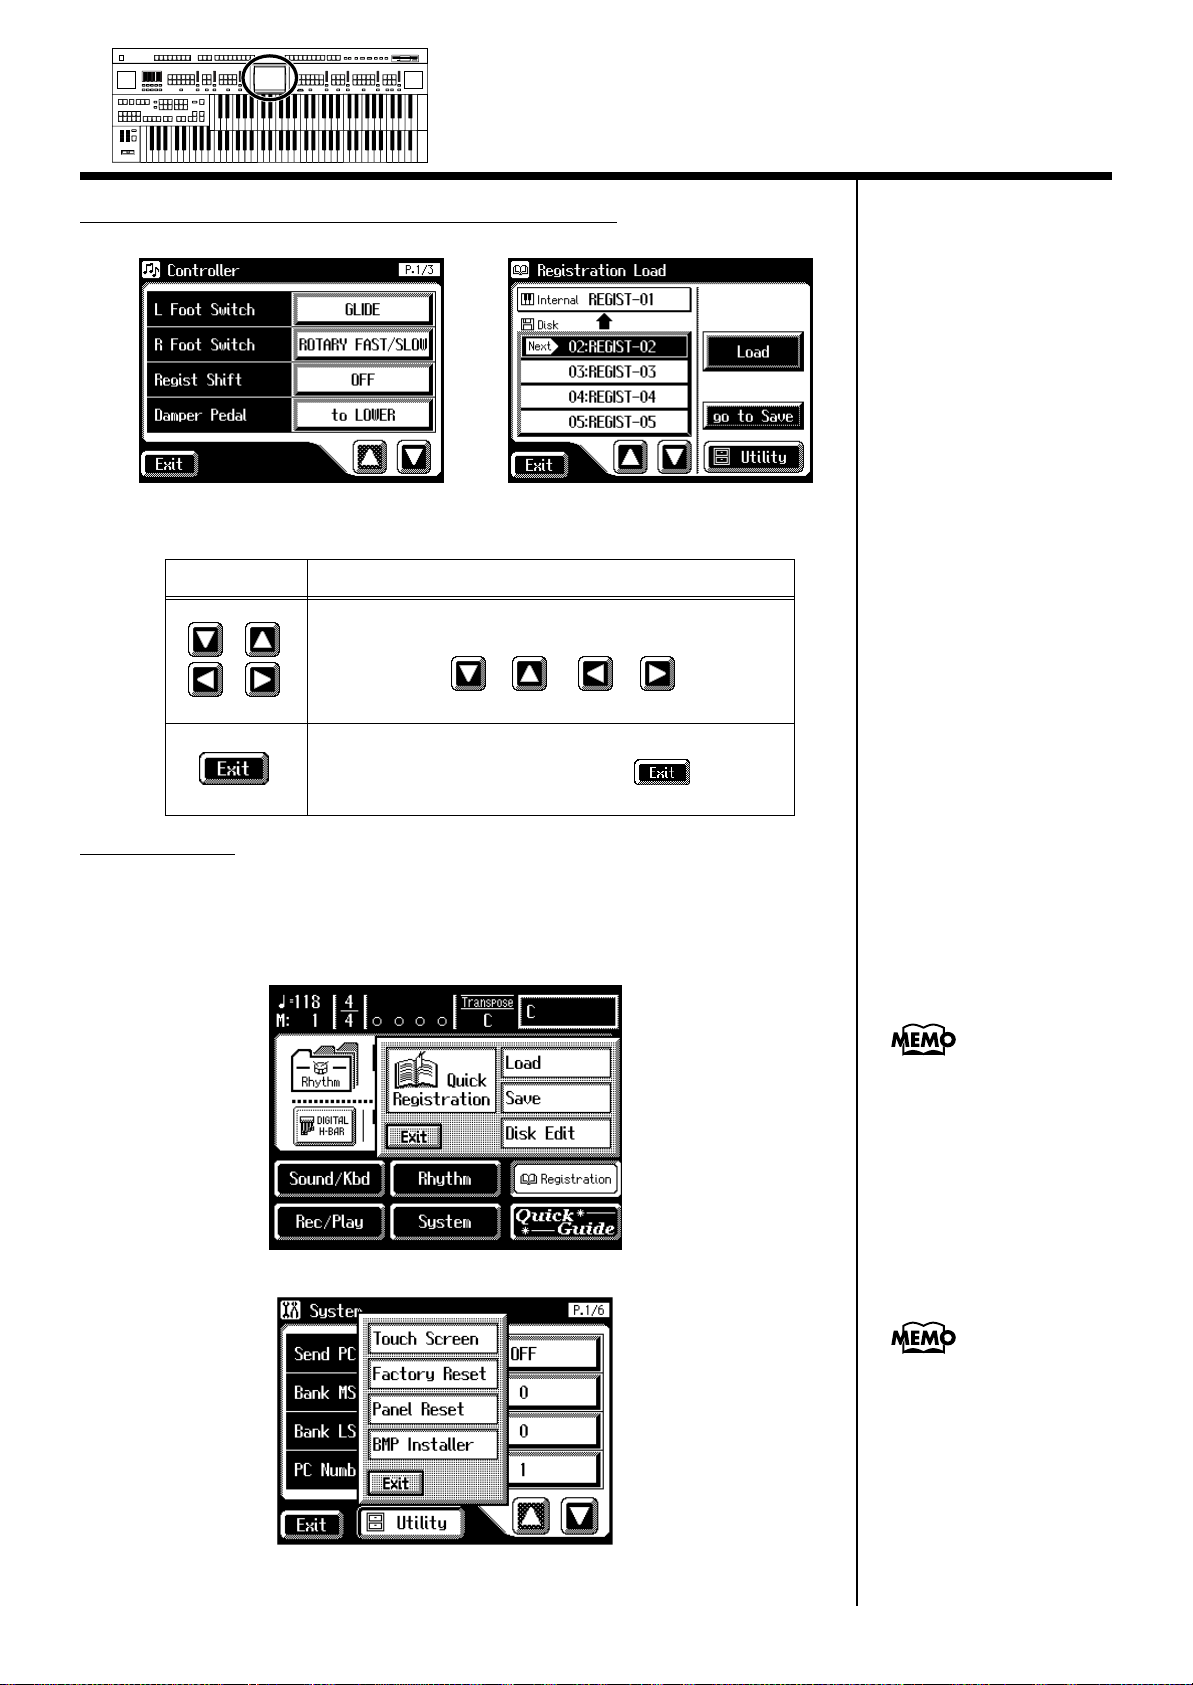
Max
Max
Max
Max
Min
Min
Min
Min
Harmony Intelligence
About the principal icons and the Utility screen
About the Display
Button
Sub-windows
You can touch <Registration> in the Main screen or <Utility> in other
screens to access a screen like the following.
This type of screen is called a “sub-window.”
Meaning
Depending on the function, some screens are spread over
multiple pages.
You can touch < >< > < >< > to display
the next or previous page of the screen.
Touch this when you want to exit (close) the currently
displayed screen. Normally, touching < > several
times takes you back to the Main screen.
When you touch a menu in
the sub-window, the subwindow will close, and the
selected menu screen will
appear.
In a sub-window, touch
<Exit> to exit the subwindow.
27
Page 29
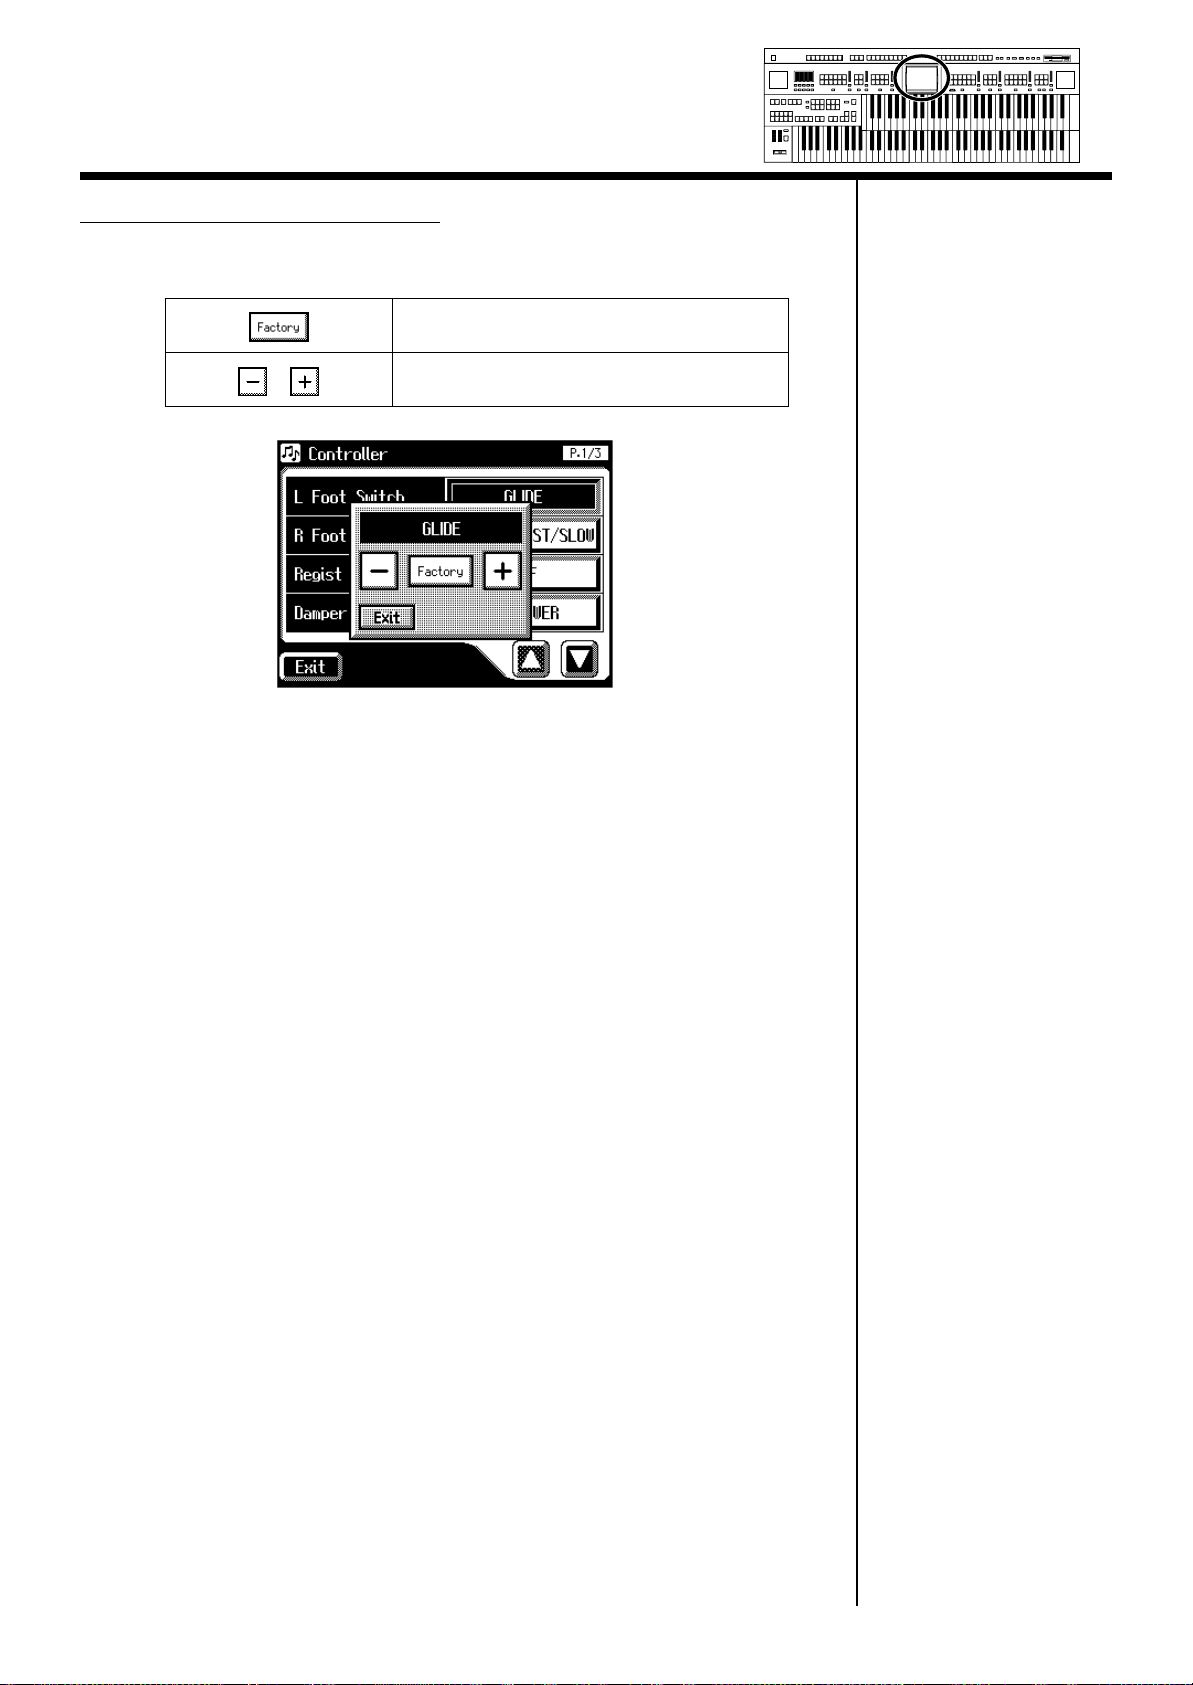
About the Display
Min
Max
Min
Max
Min
Max
Min
Max
Harmony Intelligence
Sub-windows for setting values
When you are making settings in the System screen, the following type of
screen appears.
Return to the factory settings.
Modify the value.
28
Page 30
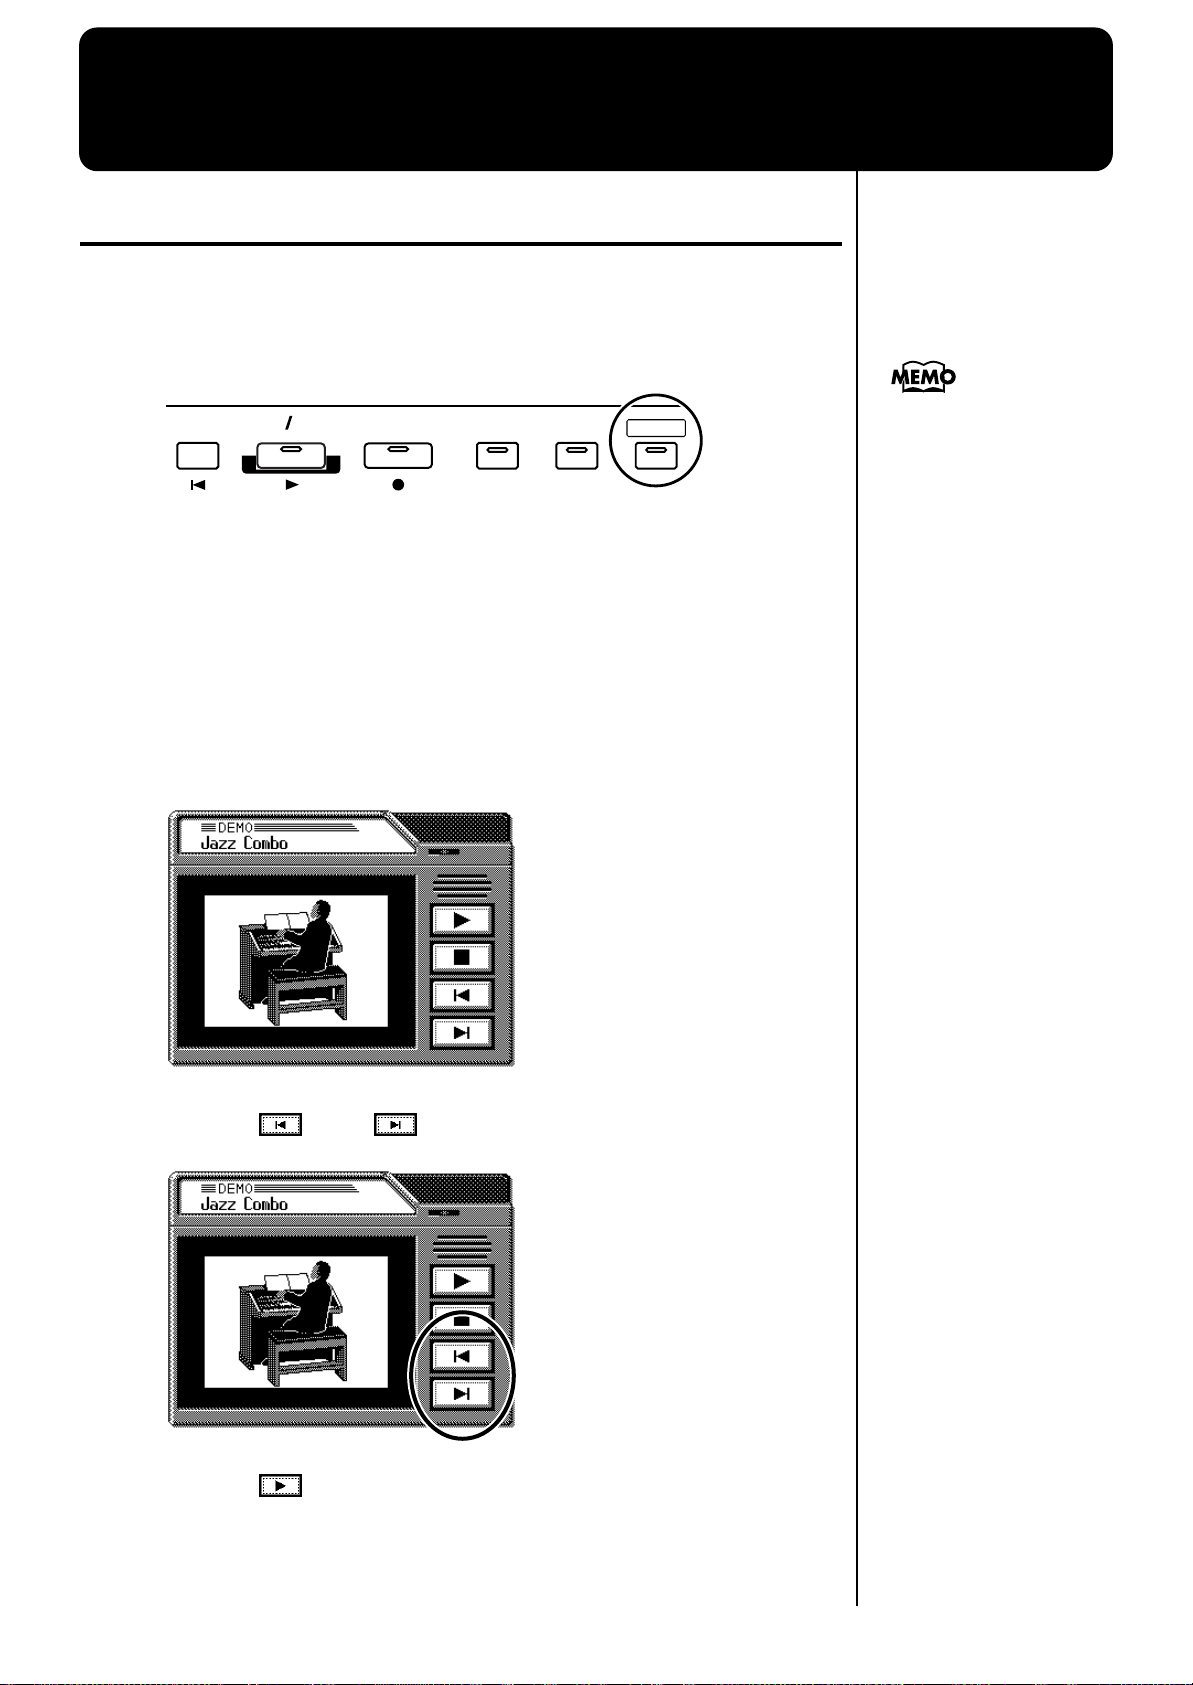
Convenient Functions
Listening to the Demo Songs
The AT-90SL provides demo songs. Here’s how to play the Demo songs,
and fully appreciate the sounds, Rhythms, and Automatic Accompaniment
that are available with the AT-90SL.
fig.01-01
Composer
Reset
Play/ Stop
Rec
RegistrationSong
Demo
For details on the composer
of each demo song and
their profiles, refer to
“Demo Song List” (p.
252).
1.
2.
3.
Make sure that a floppy disk is not inserted in the disk drive.
If a floppy disk is in the disk drive, press the Eject button and remove the
floppy disk (p. 76).
Press the [Demo] button to make the indicator light.
The Demo Screen appears.
Touch < > or < > on screen to select the demo song.
4.
Touch < > to start playback of the demo song.
When the selected demo song ends, the next demo song will begin playing.
29
Page 31

Convenient Functions
b
Min
Max
Min
Max
Min
Max
Min
Max
Harmony Intelligence
5.
6.
Touch < > to stop playback of the demo song.
Press the [Demo] button to exit the demonstration screen.
If the following screen appears
If the performance song in the unit has not been saved to floppy disk, the
following message appears, and it will not be possible to play the Demo
songs.
fig.E-62
You can play/stop the
demo songs by pressing the
panel [Play/Stop] button.
The performance data can
e saved on a floppy disk.
If you wish to save the
musical data to a floppy
disk, refer to “Saving
Performance Songs Onto
Floppy Disk” (p. 159).
1.
If you want to delete the performance data, touch <OK>.
If you do not want to delete the performance data, touch <Cancel>.
NOTE
All rights reserved.
Unauthorized use of this
material for purposes other
than private, personal
enjoyment is a violation of
applicable laws.
NOTE
The data for the Demo song
that is being played is not
available at the MIDI Out
connector.
30
Page 32

Max
Max
Max
Max
Min
Min
Min
Min
Harmony Intelligence
Music Assistant Function
A collection of the world’s best, most well-known songs were carefully
selected, then the optimum panel settings for each of them were
determined, and the resulting data was stored inside the instrument.
Simply select the keyword that most closely suggests the character of the
song you have in mind, and a rhythm performance, a sound for the melody,
and other selections will be made for you. Once you’ve selected a keyword,
all you have to do is play the keyboard to start performing.
Convenient Functions
1.
2.
Display the Main screen.
Touch <MUSIC ASSIST> on the Main screen.
If some other screen is
displayed, touch <Exit> to
close the currently open
screen.
The Music Assistant screen appears.
31
Page 33

Convenient Functions
Min
Max
Min
Max
Min
Max
Min
Max
Harmony Intelligence
3.
4.
Touch < >< > to switch screens, and touch a keyword
appropriate for the character of the song.
The Registration buttons [1]–[4] flash.
Panel settings appropriate for the keyword will automatically be called up
for the Registration [1]–[4] buttons.
On the Lower keyboard, play a chord.
At the moment you play the keyboard, the Intro will begin, and then the
Rhythm and Automatic Accompaniment will play.
5.
6.
7.
Press a Registration button from [1] through [4] to switch the
panel settings.
Press the [Intro/Ending] or [Start/Stop] button to stop the
Rhythm.
To end the Music Assistant function, press the [One Touch
Program] button, extinguishing its indicator.
32
Page 34

Max
Max
Max
Max
Min
Min
Min
Min
■
Music Assistant Search
Harmony Intelligence
You can specify a song name and other search terms and use these for a
Music Assistant search.
Convenient Functions
1.
2.
Touch <MUSIC ASSIST> on the Main screen.
The Music Assistant screen appears.
Touch <Search> on the Music Assistant screen.
A sub-window appears.
If some other screen is
displayed, touch <Exit> to
close the currently open
screen.
Searching by Music Assistant name
3.
Touch <By Name>.
33
Page 35

Convenient Functions
Min
Max
Min
Max
Min
Max
Min
Max
Harmony Intelligence
4.
Decide which character you will use for the search.
The selected character appears in the middle of the screen.
Enter the character you are searching for. For example, touching <ABC> in
succession cycles you through the available choices in that character group
(“A”→“B”→“C”...).
Touch <ABC/123> to toggle between alphabets and numerals.
5.
Touch <Start> (Start Search).
The results of the search appear in the display.
To cancel the search, touch <Exit> in the Search Results screen.
6.
Touch a Music Assistant name to select a Music Assistant.
Touch <Exit> to return to the Music Assistant screen.
Searching by conditions
3.
Touch <By Conditions>.
You can use four different criteria in searches: “Tempo,” “Rhythm,”
“Genre,” and “Scene.”
4.
5.
6.
Touch the value for the search term.
Touch < >< > to adjust the settings.
Touch <Start> (Start Search).
The results of the search appear in the display.
To cancel the search, touch <Exit> in the Search Results screen.
7.
Touch a Music Assistant name to select a Music Assistant.
Touch <Exit> to return to the Music Assistant screen.
34
Page 36

Max
Max
Max
Max
Min
Min
Min
Min
Harmony Intelligence
Choose a Keyword for Quick Registration Selection
You can select a voice appropriate for your performance by selecting from
keywords representing your situation, location, musical genre, etc. You can
call up registrations created by top-level organists, and refer to them for
hints on how to select and layer sounds when creating your own
registrations.
Convenient Functions
1.
2.
Touch <Registration> on the Main screen.
The sub-window appears.
fig.03-04_55
Touch <Quick Registration>.
The Quick Registration screen appears.
3.
Touch a button that shows a Quick Registration group.
35
Page 37

Convenient Functions
Min
Max
Min
Max
Min
Max
Min
Max
Harmony Intelligence
A sub-window appears, allowing you to select a Quick Registration group.
4.
5.
In the sub-window, touch a sound Quick Registration group
name to select the desired Quick Registration group.
The sub-window closes, and the Quick Registration screen returns to the
display.
Touch <Upper>, <Lower>, or <Pedal>, switching the
respective button’s indicator on or off, to select the keyboard
to which the voice is to be assigned.
Setting
Upper
Upper keyboard
Keyboard for which you select a voice
Lower Lower keyboard
Pedal Pedalboard
6.
Touch < >< > to switch pages, and touch the desired
keyword.
The voice will be assigned to the selected keyboard.
Repeat Steps 5 and 6 if you want to make any further changes in the voice
setting.
36
Page 38

Max
Max
Max
Max
Min
Min
Min
Min
Harmony Intelligence
About the Quick Guide function
The AT-90SL offers a Quick Guide function, which makes it easy for you to
access various functions. While the Quick Guide screen is displayed, you
can press the keyboard, a button, or a foot switch to jump to the related
setting screen.
Convenient Functions
1.
2.
3.
4.
Touch <Quick Guide> on the Main screen.
The following Quick Guide screen appears.
While the Quick Guide screen is displayed, press a button,
keyboard, pedal, or foot switch.
You will be taken to the screen that contains settings related to the button,
keyboard, pedal, or foot switch that you pressed.
Make settings in the screen to which you jumped.
When you are finished making settings, touch <Exit> to
If some other screen is
displayed, touch <Exit> to
close the currently open
screen.
For more on keys, buttons,
and controllers that can be
used with the Quick Guide
function, refer to “Settings
That Are Stored After the
Power Is Turned Off” (p.
250).
close the screen.
The Main screen appears.
■
About the Index menu
In the Quick Guide screen, you can touch <index> to access the Index Menu.
In the Index Menu screen, you can touch a keyword to jump to the setting
screen for that keyword.
1.
Touch <Quick Guide> on the Main screen.
The following Quick Guide screen appears.
37
Page 39

Convenient Functions
Min
Max
Min
Max
Min
Max
Min
Max
Harmony Intelligence
2.
3.
Touch <index>.
The following screen appears.
Touch a letter of the alphabet A–W to select the first letter of
the desired keyword.
4.
5.
6.
The Quick Guide Index screen appears, and the keywords will be displayed.
Touch the desired keyword.
The setting screen for the specified keyword appears.
Make settings in the setting screen that appeared.
Touch <Exit>.
The Main screen appears.
38
Page 40

Chapter 1 Selecting and Playing Sounds
b
Selecting Voices
You can play the sounds of various instruments on the AT-90SL. These
sounds are called “Voices.”
■
About the Voices and Parts
The AT-90SL has two manual keyboards and a pedalboard.
From top to bottom these are called the “Upper Keyboard,” “Lower
Keyboard,” and “Pedalboard.”
fig.01-05
Upper Keyboard
Lower Keyboard
Pedalboard
Four parts, “Organ,” “Symphonic,” “Orchestral,” and “Footage” are
assigned to the Upper and Lower keyboards, respectively, and you can
select one voice from each part. Plus, with the addition of the “Solo” part
voice, you can have up to five voices playing simultaneously (the Solo voice
can be played in either the Upper or Lower keyboard).
The Pedalboard has two parts: “Pedal Organ” and “Pedal Orchestral.” You
can select one voice for each part, meaning that it is possible to play up to
two voices simultaneously.
Keyboard
Upper Keyboard
Lower Keyboard
Pedalboard
Upper Organ
Upper Symphonic
Upper Orchestral
Upper Footage
Solo
(This voice is sounded only when the Solo [To Lower]
button be extinguished)
Lower Organ
Lower Symphonic
Lower Orchestral
Lower Footage
Solo
(This voice is sounded only when the Solo [To Lower]
button lights up)
Pedal Organ
Pedal Orchestral
Parts
To play a Solo voice on the
Lower keyboard, select the
Solo voice and press the
Solo [To Lower] button (p.
138).
To play a Pedal Bass voice
on the Lower keyboard,
select the Pedal Bass voice
and press the [Bass Split]
utton (p. 141).
39
Page 41

Chapter 1 Selecting and Playing Sounds
b
Min
Max
Min
Max
Min
Max
Min
Max
Harmony Intelligence
■
Functions of the Upper/Lower/Pedal Bass Sound Select Buttons
fig.01-06
Upper
Harp
Harpsi
Harp
Harpsi
Orchestral
E.Piano
Vibes
Marimba
Orchestral
E.Piano
Vibes
Marimba
A.Guitar
Mandolin
Banjo
A.Guitar
Accordion
Harmonica
E.Guitar
Accordion
Harmonica
BrassPiano
BrassPiano
Rotary Sound
Full Full Full
123
123
Organ
Alternate Alternate Alternate
Rotary Sound
Full
Full
2
1
Pipe Pipe Pipe
123
Jazz1Jazz2Jazz
TheaterPipe Pipe Pipe Theater
12
Organ
Lower1Lower2Lower
Full
3
Theater Theater
12
Symphonic
Synth
Slow
3
Strings
French
Horn
Level Level Level
3
Level Level Level
Strings
Chior
Lower
Symphonic
Strings
Chior
Strings
French
Horn
Alternate Alternate Alternate
To
Lower
Organ1Organ2Octave
Bass
Split
Theater
Pipe Electric
Pedal
Up
String
OrchestralOrgan
Contrabass
Cymbal
Bass&
Octave
Up
Each time you press a voice button, its indicator will switch between being
lit and being turned off. Voices that have their button indicator lit can be
played.
Two voices of the same family are assigned to each voice button. Buttons
with voices from two different families have the names of both voices
printed on them.
The [Alternate] button switches between these two voices.
The [Alternate] button
Voice that will be selected
NOTE
No sounds are produced,
even when the keys are
played, when the Voice
utton is unlit and all
footage voices are off.
The [Alternate] button is not lit.
The voice indicated on the button is
selected.
Another voice of the same family or
The [Alternate] button is lit.
the voice indicated on the bottom half
of the button is selected.
40
Page 42

Max
Max
Max
Max
Min
Min
Min
Min
■
Selecting the Upper and Lower Voices
Harmony Intelligence
Press the “Organ,” “Symphonic,” or “Orchestral” buttons for each
Keyboard (Upper/Lower) to select the desired voice.
When the power is turned on, the Upper keyboard will play “Full Organ1”
and the Lower keyboard will play “Lower Organ1.”
Chapter 1 Selecting and Playing Sounds
Example: Selecting “Full Organ 5” for the Upper Organ, “Full
Strings” for the Upper Symphonic, and Upper
Orchestral “Grand Piano” for the Upper Orchestral.
1.
2.
Press the Upper Organ [Full 2] button (indicator lights).
The name of the selected voice appears in the display for several seconds.
fig.01-08
Now when you play the Upper keyboard, the “Full Organ 2” will sound.
Press the Upper Organ [Alternate] button (the indicator
lights).
When you play the Upper keyboard, the “Full Organ 5” will sound.
Each time you press the [Alternate] button you will switch between the two
voices which are assigned the button.
The lower voice can be
selected in the same way as
the upper voice.
3.
4.
Press the Upper Symphonic [Strings] button (the indicator
lights).
Now when you play the Upper keyboard, the two voices “Full Organ 5” and
“Full Strings” will sound simultaneously (mixed together).
Press the Upper Orchestral [Piano] button (the indicator
lights).
When you play the Upper keyboard, “Grand Piano” will be added,
producing a mixture of three different voices.
41
Page 43

Chapter 1 Selecting and Playing Sounds
b
Min
Max
Min
Max
Min
Max
Min
Max
Harmony Intelligence
■
Selecting Pedal Bass Voice
Immediately after the power is turned on, the Pedal Bass voice will sound
single notes using the “Organ Bass1” voice.
Press the buttons of the various parts of “Pedal Organ” and “Pedal
Orchestral” to select voices.
fig.01-09
Pedal
String
OrchestralOrgan
Contrabass
Bass &
Cymbal
Octave
Up
To
Lower
Bass
Split
Organ1Organ2Octave
Up
Theater
Pipe Electric
12
Example: Select “Pipe Org. Bs” for the Pedal Organ part,
and select “Str.Bass Pdl” for the Pedal
Orchestral part
Normally, playing the
pedalboard will sound one
note at a time. Settings can
e adjusted to allow
multiple notes to be played
on the Pedalboard (p. 186).
If you press the Pedal [To
Lower] button (indicator
lights → p. 143) or [Bass
Split] button (indicator
lights → p. 141), the Pedal
Bass voice can now be
played by the Lower
keyboard, not by the
Pedalboard.
1.
2.
Press the Pedal Organ [Pipe] button (indicator lights).
The name of the selected voice appears in the display for several seconds.
fig.01-10
Now when you play the Pedalboard, “Pipe Org. Bs” (Pipe Organ Bass) will
be heard.
Press the Pedal Orchestral [String] button (indicator lights).
Now when you play the Pedalboard, the two voices Pipe Organ Bass and
Str.Bass Pdl (String Bass Pedal) will sound simultaneously (mixed together).
AT-90SL have the [Octave
Up] button.
Play the Pedalboard once
more. Notice that when the
[Octave Up] button is on,
the selected Pedal Bass
voice will sound an octave
higher.
42
Page 44

Max
Max
Max
Max
Min
Min
Min
Min
■
Selecting Solo Voice
Harmony Intelligence
Chapter 1 Selecting and Playing Sounds
The Solo section of the Upper keyboard is monophonic, that is, the Solo
voice will only sound for the highest note played on the Upper keyboard.
This allows you to play full chords and have the selected Solo voice playing
the highest (solo) note.
fig.01-11
Solo
1
Violin Trumpet
Flute
Oboe
Clarinet
Alternate To Lower
Sax
Level
Example: Selecting “Trumpet” for the Solo part
1.
Press the Solo [Trumpet] button (indicator lights).
The name of the selected voice appears in the display for several seconds.
fig.01-12
By pressing the Solo [To
Lower] button, you can
play the Solo voice from
the Lower keyboard.
For details refer to
“Playing the Solo Voice
on the Lower Keyboard
(Solo [To Lower] Button)”
(p. 138).
It is possible to change how
a Solo voice will sound.
Normally, the Solo voice
will be sounded by the
highest note you play on
the Upper keyboard, but
you can make settings so
that the last-played note
will sound the Solo voice.
For details, refer to
“Changing How the Solo
Voice Responds” (p. 139).
Play the Upper keyboard. The selected voice will sound by the highest note
played.
When you press the [Alternate] button, the two voices assigned to the
button will alternate.
43
Page 45

Chapter 1 Selecting and Playing Sounds
b
b
b
Min
Max
Min
Max
Min
Max
Min
Max
Harmony Intelligence
■
Selecting a Voice Using the [Others] Button
Notice that there is an [Others] button for each part. By using the [Others]
button, you can select all voices.
As with the other voice buttons, the [Others] button can be assigned two
voices (one voice for “Pedal Organ” and one for “Pedal Orchestral”). You
can use the [Alternate] button to switch between these two voices.
1.
2.
Press the [Alternate] button for the Part for which you wish
to specify a voice to select ON (lit) or OFF (dark).
The setting of the [Alternate] button: ON (lit) or OFF (dark), determines to
which of the two available locations a newly selected voice will be assigned.
Press the [Others] button for the Part for which you wish to
specify a voice.
The Others Voice screen appears for several seconds.
fig.01-15
Step 1 is unnecessary in the
case of Pedal Bass Part.
NOTE
When you press the
[Others] button, the Others
Voice screen appears in the
display screen, but the
asic screen will reappear if
you wait several seconds
without touching the
screen.
If you want to change the
voice for the [Others]
utton, press the [Others]
utton once more, then
select the voice by quickly
touching the screen while
the Others Voice screen
appears in the display.
3.
Touch a button that shows a sound group.
fig.01-15
A voice indicated by
is called an “EX voice.”
These voices are especially
recommended.
44
Page 46

4.
b
Max
Max
Max
Max
Min
Min
Min
Min
Harmony Intelligence
Chapter 1 Selecting and Playing Sounds
A sub-window appears, allowing you to select a sound group.
fig.01-16
In the sub-window, touch a sound group name to select the
desired sound group.
The indicator of the selected [Others] button will blink.
The Others Voice screen appears, showing the sounds of the specified sound
group.
fig.01-17
You can touch <AEx
Voice> in the Voice Select
screen to have only the
Active Expression voices be
displayed.
“Active Expression voices”
can be assigned to the
[Others] buttons of the
Upper Orchestral part,
Lower Orchestral part,
Pedal Orchestral part, and
Solo part.
For more on the active
expression voices, refer to
“Performing with an
Active Expression Voice”
(p. 48).
5.
6.
Touch < >< > to switch screens, and touch a voice
name to select a voice.
Once again, press the blinking [Others] button to confirm
the voice.
The indicator of the [Others] button will change from blinking to lit.
You can also confirm the
voice by touching <Exit> in
the Others Voice (Other
Voice select) screen. You
can also press the key for
the part containing a
changed voice to confirm
the voice setting.
For more information
about the voices that can be
assigned to an [Others]
utton, please refer to
“Voice List” (p. 220).
45
Page 47

Chapter 1 Selecting and Playing Sounds
b
b
Min
Max
Min
Max
Min
Max
Min
Max
Harmony Intelligence
■
Performing with a Human Voice
1.
2.
3.
In addition to sounds such as organ and piano, you can also play “human
voice,” which produces a vocal-like sound.
Press the [Alternate] button for the Part for which you wish
to specify a voice to select ON (lit) or OFF (dark).
The setting of the [Alternate] button: ON (lit) or OFF (dark), determines to
which of the two available locations a newly selected voice will be assigned.
Press the [Others] button for the Part for which you wish to
specify a voice.
The Others Voice screen appears for several seconds.
fig.01-15
Touch a button that shows a sound group.
fig.01-15
For details on the Human
Voice that are available,
refer to “Voice List” (p.
220).
Step 1 is unnecessary in the
case of Pedal Bass Part.
NOTE
When you press the
[Others] button, the Others
Voice screen appears in the
display screen, but the
Main screen will reappear
if you wait several seconds
without touching the
screen.
If you want to change the
voice for the [Others]
utton, press the [Others]
utton once more, then
select the voice by quickly
touching the screen while
the Others Voice screen
appears in the display.
A sub-window appears, allowing you to select a sound group.
fig.01-16
46
Page 48

Max
Max
Max
Max
Min
Min
Min
Min
Harmony Intelligence
Chapter 1 Selecting and Playing Sounds
4.
5.
In the sub-window, touch <Human Voice>.
The indicator of the selected [Others] button will blink.
The Others Voice screen appears, showing the sounds of the Human Voice
group.
The Others Voice screen will appear, and the sounds of the Human Voice
group will appear.
fig.01-
Touch < >< > to switch the screen, and touch a voice
name to select the desired voice.
fig.01-
For some human voices,
such as “Jazz Scat,” the
sound will change
depending on the strength
at which you play the
keyboard. If the Utility
menu setting “Initial
Touch” (p. 186) is “OFF,”
the sound will not change
in response to the
dynamics of your keyboard
playing.
6.
Once again, press the [Others] button for the part whose
sound you wish to set to confirm the voice.
The indicator of the [Others] button will change from blinking to lit.
You can also confirm the
voice by touching <Exit> in
the Others Voice (Other
Voice select) screen. You
can also press the key for
the part containing a
changed voice to confirm
the voice setting.
47
Page 49

Chapter 1 Selecting and Playing Sounds
b
Min
Max
Min
Max
Min
Max
Min
Max
Harmony Intelligence
■
Performing with an Active Expression Voice
1.
2.
Some voices are “Active Expression voices,” for which advancing the
expression pedal will not only vary the volume, but will also add other
voices.
Touch the [Others] button of the Part to which you want to
assign an Active Expression voice.
“Active Expression voices” can be assigned to the [Others] buttons of the
Upper Orchestral part, Lower Orchestral part, Pedal Orchestral, and Solo
part. The Others Voice screens appears.
Touch a button that shows a sound group.
A sub-window appears, allowing you to select a sound group.
fig.01-17
For details on the active
expression voices that are
available, refer to “Voice
list” (p. 220).
NOTE
Although you can select an
Active Expression voice
with the [Others] button for
parts other than Lower
Orchestral, Upper
Orchestral, Pedal
Orchestral, and Solo, no
Active Expression effect is
applied. The
(Active Expression) icon
does not appear when an
Active Expression voice is
selected for a part for
which the Active
Expression effect is not
eing used.
3.
In the sub-window, touch <AEx Voice> (Active Expression
Voice).
The indicator of the selected [Others] button will blink.
The Others Voice (Others Voice Select) screen appears, and only the Active
Expression Voices from the entire collection are displayed.
fig.01-17
Sounds marked by
“” support the
Active Expression function.
You can also confirm the
voice by touching <Exit> in
4.
Touch < >< > to change screens, and touch a voice
name.
5.
Once again, press the [Others] button for the part whose
sound you wish to set to confirm the voice.
The indicator of the [Others] button will change from blinking to lit.
48
An active expression voice will be selected.
the Others Voice (Other
Voice select) screen. You
can also press the key for
the part containing a
changed voice to confirm
the voice setting.
Page 50

b
Max
Max
Max
Max
Min
Min
Min
Min
Chapter 1 Selecting and Playing Sounds
Creating Organ Sounds (Footage)
The Upper and Lower keyboards provide Footage Tablets that allow you to
create a wide variety of organ sounds by combining voices of different
pitches. Here’s how to use the Footage Tablets to create a voice, so that you
can play sounds that are not provided by the three sections discussed
earlier. To more easily hear the characteristics of the Footage Tablets, turn
off the voices of the three (four) parts “Organ,” “Symphonic” and
“Orchestral” (& Solo).
The Footage Tablets are organized as follows.
fig.01-22
Type of Footage Voice
Footage Type Lower Footage
Theater
PipeFlute
Feet
PercussionUpper Footage
Fast
Decay
Percussion
Types of Footage Voice (Footage Type)
Flute
: Full Organ
Pipe
: Pipe Organ
Theater
: Theater Organ
Footage Voices of Differing Pitch (Upper Footage, Lower
Footage)
As the number decreases, the pitch will become correspondingly higher (see
next page).
Percussion Voice (Voices which Add Crispness)
These add a crisp sound with an attack to the Footage voices of the Upper
part.
Button Explanation
Percussion [4’] button
Percussion [2 2/3’] button
[Fast Decay] button
Percussion one octave above
Percussion one octave and a fifth above
Shortens the decay time of the percussion
(short percussion)
Percussion is often used
with Flute. It can also be
used with Pipe or Theater,
ut if you have selected
percussion for Flute,
switching to Pipe or
Theater will cause
percussion to be cancelled
automatically.
49
Page 51

Chapter 1 Selecting and Playing Sounds
b
Min
Max
Min
Max
Min
Max
Min
Max
1.
2.
Press the Footage Type button (indicator lights).
Each time you press the button, the indicator will alternate between ON (lit)
and OFF.
There are a total of three types of Footage voices.
Press the Upper Footage button (indicator lights).
Each time you press the button, the indicator will alternate between ON (lit)
and OFF.
Try combining various pitches and play the Upper keyboard.
Various pitches can be combined for the Lower keyboard in the same way
as for the Upper keyboard.
Footage tablets and pitch correspond as follows.
fig.01-23
below
1
´16´ 8´52´
3
root5th
4´
1 octave
2
3
´
2
1 octave
5th
2 octave
1´ ´ 1´1
2 octave
3rd
3
5
1
3
2 octave
5th
3 octave1 octave
NOTE
Pitch bend, glide, and
sustain effects are not
applied to the footage.
3.
4.
8'
=
Press the Percussion [4’] button or [2 2/3’] button (indicator
lit).
Play the Upper keyboard and notice that an attack has been added.
Press the [Fast Decay] button (indicator lit).
The percussive sound will decay more quickly.
NOTE
Percussion [4’] and [2 2/3’]
uttons cannot be used
simultaneously.
NOTE
The Percussion effect is
only available when a voice
is selected in the Upper
Organ Type section.
50
Page 52

Max
Max
Max
Max
Min
Min
Min
Min
Harmony Intelligence
Chapter 1 Selecting and Playing Sounds
If you press the Footage Type button, Lower Footage button, or Upper
Footage button to turn it on (button’s indicator lit), a footage screen like the
following appears.
Footage Screen
When the Footage Type is “Flute”
The sliders displayed in the screen are called “harmonic bars.”
By touching the harmonic bars and sliding them, you can adjust the volume
of each footage.
You can open the Upper
Footage (Flute) screen by
touching <Digital H-Bar>
on the Main screen.
The Footage screen will be
displayed for several
seconds, then it will close
automatically.
If you touch <Hold>, the
screen continues to be
displayed until you touch
<Exit>. When you touch
the Footage screen and
then change the settings,
the screen is held in that
condition.
The volume can be adjusted over nine steps (0–8).
When a harmonic bar is pulled out all the way (8), the volume is loudest.
When it is pushed in all the way (0), there will be no sound.
When the Footage Type is “Pipe” or “Theater”
On Off
The buttons displayed in the screen are called “tablets.”
You can press each tablet to turn it on/off.
You can touch < > to
switch between the Upper
Footage screen and Lower
Footage screen.
51
Page 53

Chapter 1 Selecting and Playing Sounds
Min
Max
Min
Max
Min
Max
Min
Max
Harmony Intelligence
Adjust the Volume Balance
The AT-90SL allows you to adjust the volume balance individually for each
Part.
fig.01-26
Max
Max
Min
Min
Accomp/
Reverb SMF Rhythm Organ
Rotary Sound
Full Full Full
Organ
123
123
Alternate Alternate Alternate
Max
Max
Min
Min
Pedal
Orch
Jazz1Jazz2Jazz
TheaterPipe Pipe Pipe Theater
12
Rotary Sound
Pipe Pipe Pipe
3
Level Level Level
Organ
Lower1Lower2Lower
Full3Full2Full
1
123
Theater Theater
Alternate Alternate Alternate
Upper
Symphonic
Slow
Strings
Strings
Human
French
Voice
Horn
12
Synth
Strings
3
Lower
Symphonic
French
Strings
Horn
Human
Voice
Level Level Level
Orchestral
BrassPiano
A.Guitar
E.Piano
E.Guitar
Harp
Harpsi
Vibes
Marimba
Mandolin
Banjo
Accordion
Harmonica
Orchestral
BrassPiano
A.Guitar
E.Piano
Accordion
Vibes
Harp
Harpsi
Harmonica
Marimba
Solo
Sax
Violin Trumpet
Oboe
Flute
Clarinet
Alternate To Lower
Level
The following buttons are used to adjust the volume of a multiple number
of Parts.
Button
Part
Accomp/SMF [▲] [▼] button
Rhythm [▲] [▼] button
(When the [Manual Perc]
button is ON)
Rhythm [▲] [▼] button
(When the [Manual Perc]
button is OFF)
Pedal Organ [▲] [▼] button
Automatic Accompaniment (except Bass)
Playback of performance songs from
something other than the Atelier performance
songs (for example: SMF music files)
Manual percussion
Rhythm performance
Drums/SFX
Pedal Organ voice
Bass note of automatic accompaniment
52
Page 54

Max
Max
Max
Max
Min
Min
Min
Min
Harmony Intelligence
Chapter 1 Selecting and Playing Sounds
1.
The volume levels of each part are adjusted using the
corresponding [▲] and [▼] buttons.
Pressing the upper button ([▲] button) will increase the volume.
Pressing the lower button ([▼] button) will decrease the volume.
The volume can be set to any value from 0 to 12.
When the volume value shown in the display is 0, that part will produce no
sound.
You can also press the [▲] button and [▼] button of the part whose volume
you wish to adjust, so that the “Part Balance Monitor screen” is displayed
for several seconds, allowing you to check the volume balance.
fig.01-27
The Part Balance Monitor
screen is displayed for
several seconds and then
closes automatically.
If you touch <Hold>, the
screen continues to be
displayed until you touch
<Exit>.
You can check the volume by viewing the Level indicators of each part.
fig.01-27-2
Solo
Violin Trumpet
Flute
Oboe
Clarinet
Alternate To Lower
Sax
Level
53
Page 55

Chapter 1 Selecting and Playing Sounds
Min
Max
Min
Max
Min
Max
Min
Max
Harmony Intelligence
Transpose the Pitch in Octave Units (Octave Shift)
The pitch of the sound played by the keyboard can be adjusted in one-octave
steps. This function is called “Octave Shift.” You can apply an Octave shift
to all Parts.
1.
Touch <Sound/Kbd> on the Main screen.
fig.05-08
The Sound/Keyboard screen appears.
fig.01-29
2.
3.
Touch either <UPPER>, <LOWER>, or <PEDAL>.
Menu
UPPER
LOWER
PEDAL
To change the pitch of the Upper and Solo part
To change the pitch of the Lower part
To change the pitch of the Pedal part
Part whose pitch will change
Touch < >< > to display the Octave Shift.
54
Page 56

b
Max
Max
Max
Max
Min
Min
Min
Min
Harmony Intelligence
Chapter 1 Selecting and Playing Sounds
4.
5.
6.
Touch the part display of the part whose Octave Shift
settings you wish to change.
fig.01-30.eps
Touch < >< > to adjust the settings.
The value can be set to a range of +/- 3 octaves.
fig.01-30.eps
Touch <Exit>.
You can open the
Pedalboard screen, Lower
Keyboard screen, or Upper
Keyboard screen with
touching <Pedal>,
<Lower>, and <Upper>.
When the power is turned
on, the Octave Shift setting
for each part of the Pedal
Bass will be set to -1 (1
octave down).
If you turn on the [Octave
Up] button, the Octave
Shift will be automatically
set to “0” regardless of the
previous setting. When you
turn off the [Octave Up]
utton, the Octave Shift
will always return to “-1”
regardless of the previous
setting.
You will return to the Upper Keyboard/Lower Keyboard/Pedalboard
screen.
NOTE
Please note that when you
apply the Octave Shift
function to certain voices,
their pitch could be
stretched beyond their
recommended note ranges,
and they may not sound as
expected. Care should be
taken when using Octave
Shift.
55
Page 57

Chapter 1 Selecting and Playing Sounds
b
Min
Max
Min
Max
Min
Max
Min
Max
Harmony Intelligence
Playing Drum Sounds or Sound Effects from the Entire Lower Keyboard (Drums/SFX)
You can use the Lower keyboard to play various drum sounds (drum set).
In this case, the Lower voices will no longer sound.
fig.01-32
Lower
Manual
Perc
1.
Drums /
SFX
Press the [Drums/SFX] button, getting its indicator to light
up.
The [Drums/SFX] button indicator will alternate between on (lit) and off
(dark) each time it is pressed.
The Drums/SFX (drums/sound effects) screen will be displayed for several
seconds.
fig.01-33
Refer to “Drum Set List” (p.
223) for details on which
drum sound or Sound
Effect will be played by
each note.
NOTE
It is not possible to select
and play both [Drums/
SFX] and [Manual Perc]
uttons simultaneously.
NOTE
For some drum sets, there
will be keys that do not
sound.
2.
Play the Lower keyboard and listen to the various drum
sounds on each key.
56
Page 58

Max
Max
Max
Max
Min
Min
Min
Min
■
Changing Drums/SFX Sets
Harmony Intelligence
Chapter 1 Selecting and Playing Sounds
1.
2.
Immediately after the power is turned on, the POP drum set will sound.
As the drum set, you can choose the types of drum set and sound effect.
When you change the drum set, the sound produced by each note will
change.
Press the [Drums/SFX] button, getting its indicator to light
up.
The Drums/SFX screen will be displayed for several seconds.
fig.01-33
While the Drums/SFX screen is displayed, touch a Drum/SFX
For the types of drum set
and the sound effects
played by each key, refer to
“Drum/SFX Set List” (p.
223).
NOTE
After the Drums/SFX
(drums/sound effects)
screen is displayed, it will
close automatically after
several seconds unless you
touch the screen to select a
drums/sound effects set. If
you wish to switch drums/
sound effect sets, quickly
select the desired drums/
sound effect set while the
Drums/SFX (drums/
sound effects) screen is
displayed.
3.
set name in the screen.
The [Drums/SFX] button indicator will begin to blink.
You can select from 18 different Drum Sets and one set of Sound Effects as
follows:
POP, R&B, ROCK, JAZZ BRUSH, HIP HOP, VOX DRUM, STANDARD,
STANDARD2, ROOM, ROOM2, POWER, ELECTRONIC, TR-808,
DANCE, JAZZ, BRUSH, BRUSH2, ORCHESTRA, SOUND EFFECTS
Press the [Drums/SFX] button once again.
The [Drums/SFX] button indicator will be lit constantly, and the selected
Drum Set Type will be applied.
You can also confirm the
Drums/SFX set by
touching <Exit> in the
Drums/SFX screen.
You can also play the lower
manual to confirm the
drum set.
57
Page 59

Chapter 1 Selecting and Playing Sounds
b
Min
Max
Min
Max
Min
Max
Min
Max
Harmony Intelligence
Playing a Lower Voice with Percussion Instrument Sounds and a Voice Phrase (Manual Percussion)
You can play various drum sounds and Sound Effects using the bottom 15
keys of the Lower keyboard. This is convenient when you wish to play the
Lower voice together with drum sounds or Sound Effects.
fig.01-34
Lower
Drums /
Manual
SFX
fig.01-35
the keys for Drum sounds
or Sound Effects
fig.01-35-2
1.
Press the [Manual Perc] button (indicator lights).
The button will alternate between ON (lit) and OFF (dark) each time it is
pressed.
The Manual Percussion screen will be displayed for several seconds.
fig.01-36
Perc
Lower Keyboard
NOTE
It is not possible to select
and play both [Drums/
SFX] and [Manual Perc]
uttons simultaneously. (p.
56).
2.
When you play the bottom 15 keys of the Lower keyboard
the chosen drum sound is played on each key.
58
Page 60

Max
Max
Max
Max
Min
Min
Min
Min
■
Changing the Manual Percussion Sets
Harmony Intelligence
Chapter 1 Selecting and Playing Sounds
1.
2.
Immediately after the power is turned on, the PERC SET1 drum set will
sound.
You can choose the type of Manual Percussion Set. When you change the
Manual Percussion Set, the sound played by each of the 15 lowest notes of
the Lower keyboard will change.
Press the [Manual Perc] button (indicator lights).
The Manual Percussion screen will be displayed for several seconds.
fig.01-36
While the Manual Percussion screen is displayed, touch a
manual percussion set name in the screen.
The [Manual Perc] button indicator will begin to flash.
You can select from 14 different Manual Percussion Sets;
PERC SET1, PERC SET2, PERC SET3, ORCHESTRA SET,
ORCHESTRA SET2, LATIN SET, ASIAN SET, VOICE PHRASE,
VOICE PHRASE 2, VOICE PHRASE 3, SFX SET, SFX SET 2,
JAPANESE SET, JAPANESE SET 2
Refer to “Manual
Percussion List” (p. 227)
for details on which
percussion sound will be
played by each note.
NOTE
The Manual Percussion
screen will automatically
close after several seconds
if you do not touch the
screen to select a manual
percussion set. If you wish
to change the manual
percussion set, you must
select a manual percussion
set quickly while the
manual percussion screen
is displayed.
3.
Press the [Manual Perc] button once again.
The [Manual Perc] button indicator will be lit constantly, and the selected
Manual Percussion Set will be applied.
You can also confirm the
Manual Percussion set by
touching <Exit> in the
Manual Percussion screen.
You can also play the lower
manual to confirm the
manual percussion set.
59
Page 61

Chapter 1 Selecting and Playing Sounds
Min
Max
Min
Max
Min
Max
Min
Max
Harmony Intelligence
Sustaining Notes in the Lower Part (Lower Hold)
You can have Lower voice continue to sound after you release you fingers
from the keys, until the next key is played.
fig.02-14
Lower
Voice
Hold
1.
2.
Press the Lower Voice [Hold] button (confirm that the
indicator is lit).
The Lower voice will continue sounding.
While the Lower Voice [Hold] button is lit, pressing a key will cause the note
to continue sounding.
When you press the Lower Voice [Hold] button to make the
indicator go dark, the notes which had continued to sound
will stop.
60
Page 62

Chapter 2 Using Rhythm Performance
The AT-90SL lets you enjoy playing along with a rhythmic accompaniment.
For more on the internal
Selecting a Rhythm
The AT-90SL provides various Rhythms and Automatic Accompaniments
(Music Styles).
These are organized into 10 groups.
fig.02-01
BigBand
Swing
Latin
Country Oldies
Gospel
Contempo
Waltz Tr ad
Showtime
March
Rhythm
WorldBallad
Acoustic
rhythms, refer to the
“Rhythm List” (p. 235).
1.
2.
Press a Rhythm button to select a Rhythm group.
The indicator will light.
A Rhythm screen like the following appears.
fig.02-09_55
The rhythms in the selected rhythm group appears in the display.
Touch < >< > to switch screens, and touch a rhythm
name to select the desired rhythm.
The indicator of Rhythm button will blink.
You can also open the
Rhythm screen by touching
<Rhythm> in the Main
screen.
3.
Press the Rhythm button once again (indicator lights
constantly).
The Rhythm button’s indicator will change from blinking to light.
The Rhythm has now been applied.
You can also confirm the
rhythm by touching <Exit>
in the Rhythm screen.
61
Page 63

Chapter 2 Using Rhythm Performance
Min
Max
Min
Max
Min
Max
Min
Max
Harmony Intelligence
■
Using Rhythms Stored in User Memory
The AT-90SL features a User memory.
What is the User Memory?
The User memory is the area within the instrument where User rhythms
you create as well as rhythms from Music Style Disks are stored.
You can also copy User rhythms saved on floppy disks to the User
memory (p. 174).
The AT-90SL is shipped from the factory with rhythms already stored in
User memory. You can replace these rhythms with rhythms loaded in from
Music Style Disks, or with User rhythms you’ve created and saved using the
Rhythm Customize function (p. 174).
The content of User memory is retained even while the AT-90SL’s power is
turned off.
You can call up rhythms in User memory by pressing the [Disk/User]
button.
Calling Up Rhythms Stored in User Memory
If you wish to store a disk
Rhythm in the User
memory, refer to “Copying
Rhythms on Disks into
User Memory” (p. 78).
If you want to restore the
original rhythms that User
memory contained at the
time the instrument was
shipped from the factory,
refer to “Restoring the
Rhythm Stored in the
User Memory to Their
Original Factory
Settings” (p. 80).
1.
2.
3.
4.
Press the [Disk/User] button.
The Rhythm screen appears.
Touch < > on the Rhythm screen.
The rhythms stored in User Memory are displayed.
Touch < >< > to switch screens, and touch a rhythm
name to select the desired rhythm.
The indicator of [Disk/User] button will blink.
After selecting a rhythm, press the flashing [Disk/User]
button once more.
The [Disk/User] button stops flashing and remains lit, indicating that the
rhythm has been selected.
If a floppy disk containing
saved rhythms is in the
disk drive, then when you
touch < >, the
rhythms on the floppy disk
are displayed.
You can also confirm the
rhythm by touching <Exit>
in the Rhythm screen.
62
Page 64

b
Max
Max
Max
Max
Min
Min
Min
Min
■
Rhythm Search
You can search for Rhythm that match the tempo of the song, musical genre,
or other criteria you set.
You can also search Rhythm using the first character of the Rhythm names.
Harmony Intelligence
Chapter 2 Using Rhythm Performance
1.
Touch <Rhythm> on the Main screen.
fig.05-08
The following Rhythm screen appears.
If some other screen is
displayed, touch <Exit> to
close the currently open
screen.
You can also open the
Rhythm screen by pressing
Rhythm buttons.
2.
Touch < > on the Main screen.
You can also search only
for rhythms other than the
A sub-window appears.
internal rhythms accessed
with the [Disk/User]
utton. The icon does
not appear in the display
while [Disk/User] button
rhythms are displayed.
63
Page 65

Chapter 2 Using Rhythm Performance
Min
Max
Min
Max
Min
Max
Min
Max
Harmony Intelligence
Searching by Rhythm name
3.
4.
5.
6.
Touch <By Name>.
Decide which character you will use for the search.
The selected character appears in the middle of the screen.
Enter the character you are searching for. For example, touching <ABC> in
succession cycles you through the available choices in that character group
(“A”→“B”→“C”...).
Touch <ABC/123> to toggle between alphabets and numerals.
Touch <Start> (Start Search).
The search results appear in the display.
To cancel the search, touch <Exit> in the Search Results screen.
Touch a Rhythm name to select a Rhythm.
Touch <Exit> to return to the Rhythm screen.
Searching by Conditions
3.
4.
5.
6.
7.
Touch <By Conditions>.
You can use four different criteria in searches: “Tempo,” “Beat,” “Groove,”
and “Genre.”
Touch the value for the search term.
Touch < >< > to adjust the settings.
Touch <Start> (Start Search).
The search results appear in the display.
To cancel the search, touch <Exit> in the Search Results screen.
Touch a Rhythm name to select a Rhythm.
Touch <Exit> to return to the Rhythm screen.
64
Page 66

Max
Max
Max
Max
Min
Min
Min
Min
Harmony Intelligence
Playing Rhythm
There are two ways to start the Rhythm:
• Manually by pressing the [Start] button,
• Automatically by playing a note on the Lower keyboard or Pedalboard
(Sync Start).
You can press (Sync Start) or the [Intro/Ending] button to start the rhythm
from the intro, or stop the rhythm at the ending.
fig.02-03
Count
Down
Sync
Start
Chapter 2 Using Rhythm Performance
The functions of the [Intro/
Ending] button and [Start/
Stop] button can be
assigned to the foot
switches located on each
side of the Expression
Pedal (p. 118).
Break
■
Starting at the Press of a Button
Intro/
Ending
Start /
Stop
Starting with an Added Intro
1.
Press the [Intro/Ending] button.
The Intro is played and the Rhythm starts.
While the Intro is playing, the [Intro/Ending] button indicator will light,
until the Intro ends then the button indicator will go dark.
Making the Intro Short and Simple
1.
Press the [To Variation] or [To Original] button.
[Start/Stop] button indicator will blink.
The indicator for the [To Variation] or [To Original] button will blink.
For more on the [To
Variation] and [To
Original] buttons, refer to
“Adding Variety to the
Rhythm or Automatic
Accompaniment” (p. 69).
2.
Press the [Start/Stop] button.
A short Intro is played and the Rhythm starts.
Starting Without an Intro
1.
Press the [Start/Stop] button.
The Rhythm starts without an Intro being played.
65
Page 67

Chapter 2 Using Rhythm Performance
b
Min
Max
Min
Max
Min
Max
Min
Max
Harmony Intelligence
■
Starting the Rhythm Automatically When You Play the Lower Keyboard or Pedalboard (Sync Start)
Starting with an Added Intro
1.
Press the [Sync Start] button to make the indicator light up.
NOTE
If the Arranger function is
ON (the Arranger [On/Off]
utton indicator is lit), it is
not be able to start the
Rhythm by playing the
Pedalboard (p. 68).
2.
3.
Press the [Intro/Ending] button.
The [Intro/Ending] button’s indicator will blink.
Play either the Lower keyboard or the Pedalboard.
The Intro is played and the Rhythm starts.
While the Intro is playing, the [Intro/Ending] button indicator will light,
until the Intro ends then the button indicator will go dark.
Making the Intro Short and Simple
1.
2.
3.
Press the [Sync Start] button to make the indicator light up.
Press the [To Variation] or [To Original] button.
[Start/Stop] button indicator will blink.
The indicator for the [To Variation] or [To Original] button will blink.
Play either the Lower keyboard or the Pedalboard.
A short Intro is played and the Rhythm starts.
For more on the [To
Variation] and [To
Original] buttons, refer to
“Adding Variety to the
Rhythm or Automatic
Accompaniment” (p. 69).
Starting Without an Intro
1.
2.
Press the [Sync Start] button to make the indicator light up.
Play either the Lower keyboard or the pedalboard.
The Rhythm starts without an Intro being played.
66
Page 68

Max
Max
Max
Max
Min
Min
Min
Min
■
Stopping the Rhythm
Harmony Intelligence
Chapter 2 Using Rhythm Performance
Stopping with an Ending
1.
Press the [Intro/Ending] button.
An Ending is played, then the Rhythm stops.
While the Ending is playing, the [Intro/Ending] button indicator will light,
until the Ending finishes the button indicator will be turned off.
Making the Ending Short and Simple
1.
Press the [To Variation] or [To Original] button, and then
press the [Start/Stop] button.
A short Ending is played, then the Rhythm stops.
Stopping without an Ending
1.
Press the [Start/Stop] button.
The Rhythm stops without an Ending being played.
The functions of the [Intro/
Ending] button and [Start/
Stop] button can be
assigned to the foot
switches located on each
side of the Expression
Pedal (p. 118).
Changing a Rhythm’s Tempo
You can change the tempo of the Rhythm or Automatic Accompaniment (p.
68).
fig.02-04
Standard
Tempo
1.
Press the Tempo [ ] and [ ] buttons to change the tempo
(speed) of the Rhythm or Automatic Accompaniment.
Tempo [ ] button
Tempo [ ] button
By pressing the Tempo [ ] and[ ] buttons simultaneously, the tempo is
returned to the standard (preset) tempo for the selected Rhythm.
The value of the tempo currently set (20–500 beats per minute) can be
checked in the Main screen and Rhythm screen.
The tempo becomes slower
The tempo becomes faster
If you switch rhythms
when “Auto Std Tempo”
(p. 190) is on, the tempo
changes to match the
rhythm. If you switch
rhythms when “Auto Std
Tempo” is off, the tempo
remains unchanged even
when you switch the
rhythm.
You can confirm the tempo
and beat with the
“bouncing ball” in the
Main screen (p. 25).
67
Page 69

Chapter 2 Using Rhythm Performance
Min
Max
Min
Max
Min
Max
Min
Max
Harmony Intelligence
Playing the Count Sound at the End of the Intro
If an intro is played before your performance, you can have a countdown
played to the end of the intro, allowing you to understand easily where you
are to start playing.
fig.02-05
1.
2.
Count
Down
Break
Intro/
Ending
Press the [Count Down] button, getting the indicator to light.
Press the [Intro/Ending] button.
Sync
Start
Start /
Stop
The intro plays, and a countdown plays to the end of the intro.
When the [Sync Start] button is lit, specifying the chord on the Lower
keyboard starts the intro, and again, a countdown is given.
3.
To stop the countdown, press the [Count Down] button,
turning off the indicator light.
Playing Rhythm and Automatic Accompaniment
The Arranger function of the AT-90SL can add an Automatic
Accompaniment to each Rhythm. Based on the selected Rhythm, the
Arranger function automatically adds an accompaniment that is suitable for
the chord being pressed on the Lower keyboard.
fig.02-06
Arranger
On / Off
You can change the
countdown sound (p. 190).
NOTE
When the Arranger [On/
Off] button is on, Sync Start
(p. 66) on the pedalboard
cannot be used.
1.
Press the Arranger [On/Off] button (indicator lights.)
Arranger [On/Off] button
Indicator is lit (On)
Indicator is not lit (Off) Rhythm (Drums only)
Rhythm and Automatic Accompaniment
Function
NOTE
2.
Start the rhythm (p. 65).
The rhythm and the automatic accompaniment will play together.
If the Arranger [On/Off] button is ON and no Pedal Bass voice is selected,
the Automatic Accompaniment will play the bass sound.
The lower voice is not
played during the
performance of the intro
and ending, even when the
Lower keyboard is played.
68
Page 70

Max
Max
Max
Max
Min
Min
Min
Min
Harmony Intelligence
Chapter 2 Using Rhythm Performance
Adding Variety to the Rhythm or Automatic Accompaniment
You can add variety to the rhythm or automatic accompaniment by
changing the rhythm pattern of the rhythm or the arrangement of the
automatic accompaniment, or by inserting a break (i.e., stopping the rhythm
for one measure).
fig.02-07
Count
Down
To
Var iationToOriginal
Break
Intro/
Ending
Fill In
Button name
Fill In [To Variation] button
Fill In [To Original] button
[Break] button
After the Fill-In has played, play the
Variation Rhythm pattern.
After the Fill-In has played, play the
Original Rhythm pattern.
Stop the rhythm at the end of that
measure (Break).
Function
What’s a fill-in?
A Fill In is a short phrase that is inserted at a break in the melody or at a
point where the character of the song changes (between Chorus’s or Verses).
■
Changing the Arrangement of the Rhythm and Accompaniment (Style Orchestrator)
The functions of the Fill In
[To Variation] button and
Fill In [To Original] button
can be assigned to the foot
switches located on each
side of the Expression
Pedal. Please refer to
“Changing the Function
of the Foot Switch” (p.
118).
1.
You can change the arrangement of the accompaniment. This function is
called “Style Orchestrator.” For each rhythm, there are four types of
arrangement for the accompaniment.
The following buttons are called Style Orchestrator buttons.
fig.02-08
Advanced1Advanced
FullBasic
2
Style Orchestrator
Press the Style Orchestrator buttons to change the
arrangement of the accompaniment.
The indicator of the button you pressed will light.
The [Basic] button produces the simplest arrangement, and the [Full] button
produces the most florid.
69
Page 71

Chapter 2 Using Rhythm Performance
b
Min
Max
Min
Max
Min
Max
Min
Max
Harmony Intelligence
Playing Chords with Simple Fingering
“Chord Intelligence” is a feature that intelligently plays the correct
accompaniment chords the moment you play a key specifying a chord on
the Lower keyboard during Automatic Accompaniment.
1.
2.
For example, in order to make the instrument detect a “C Major” chord, you
must normally play the three keys “C,” “E,” and “G.” If you use the Chord
Intelligence function, you can simply press a single “C” key in the lower
keyboard to sound a C Major chord with the voice selected for the Lower
part.
Touch <Rhythm> on the Main screen.
The Rhythm screen appears.
fig.02-09_55
Touch < > (Utility) on the Rhythm screen.
The Utility screen appears.
fig.02-10_55
For more information
about chord fingering, refer
to the “Chord List” (p.
238).
You can also open the
rhythm screen by pressing
a Rhythm button.
If you press the root note of
the chord (p. 240) in the
lower keyboard when the
Chord Intelligence function
is ON, all notes in that
chord will sound.
For example, if you press
the root “C” of the C major
chord in the lower
keyboard, the notes of the
C major chord “C,” “E,”
and “G” will be sounded
y the voice selected for the
lower part.
70
Page 72

Max
Max
Max
Max
Min
Min
Min
Min
Harmony Intelligence
Chapter 2 Using Rhythm Performance
3.
4.
5.
Touch <Options>.
The Rhythm Options screen appears.
fig.02-11_55
Touch the Chord Intelligence setting to turn it “ON.”
The Chord Intelligence function can now be used.
Each time you touch the Chord Intelligence setting, it will be switched ON/
OFF.
If you wish to turn off the Chord Intelligence function,
switch it “OFF.”
When the Leading Bass
function (p. 72) is on and
the Chord Intelligence
function is off, you can
specify chords with a
combination of the lower
keyboard and pedalboard.
When you touch the [One
Touch Program] button, the
Chord Intelligence setting
will automatically be
turned ON.
71
Page 73

Chapter 2 Using Rhythm Performance
Min
Max
Min
Max
Min
Max
Min
Max
Harmony Intelligence
Leading Bass Function
When Automatic Accompaniment is used, and the Pedal [To Lower] button
is ON, the Pedal Bass voice will normally play the root note (p. 240) of the
chord you play on the Lower keyboard.
If the Leading Bass function is enabled, the lowest note of the chord you play
on the Lower keyboard will then be used as the bass note (the bottom note
of the chord). This allows the bass to be a note other than the root of the
chord you play and the bass note will change when inverted chords are
played (p. 240).
1.
2.
Touch <Rhythm> on the Main screen.
The Rhythm screen appears.
fig.02-09_55
Touch < > (Utility) on the Rhythm screen.
The Utility screen appears.
fig.02-10_55
You can also open the
Rhythm screen by pressing
the Rhythm buttons.
When the Leading Bass
function is on and the
Chord Intelligence function
(p. 70) is off, you can
specify chords with a
combination of the lower
keyboard and pedalboard.
72
Page 74

Max
Max
Max
Max
Min
Min
Min
Min
Harmony Intelligence
Chapter 2 Using Rhythm Performance
3.
4.
5.
Touch <Options>.
The Rhythm Options screen appears.
fig.02-11_55
Touch the Leading Bass setting to turn it “ON.”
Each time you touch the Leading Bass setting, it will be switched ON/OFF.
To turn off the Leading Bass function, set the Leading Bass
setting to “OFF.”
You can assign the Leading
Bass functions to either of
the foot switches located on
each side of the Expression
Pedal. Please refer to
“Changing the Function
of the Foot Switch” (p.
118).
73
Page 75

Chapter 2 Using Rhythm Performance
Min
Max
Min
Max
Min
Max
Min
Max
Harmony Intelligence
A Simple Way to Make Automatic Accompaniment Settings (One Touch Program)
The AT-90SL provides a very convenient [One Touch Program] button. By
simply pressing this button once, the Arranger function will be turned ON,
and keyboard voices that are most appropriate for playing with the
currently selected Rhythm/Automatic Accompaniment are selected.
By pressing the [One Touch Program] button, you can make the following
settings.
• Panel settings (e.g., sounds and volume) suitable for the rhythm
• Arranger [On/Off] button lit (Automatic Accompaniment playing)
• [Sync Start] button lit, [Intro/Ending] button blinking (Waiting for Sync
Start)
• Chord Intelligence function is ON (p. 70)
What is Sync Start?
Sync Start is a function that starts the rhythm at the moment that you play
the lower keyboard.
What is Chord Intelligence?
“Chord Intelligence” is a feature that intelligently decides on
accompaniment chords the moment you play some keys specifying a chord
during automatic accompaniment.
The panel settings specified by the One Touch Program function are as
follows.
16 panel settings for each rhythm (4 panel settings x 4 groups)
1 2 3 4
1 2 3 4
1 2 3 4
1 2 3 4
2 Group
4 Group
3 Group
1 Group
74
Page 76

Max
Max
Max
Max
Min
Min
Min
Min
Harmony Intelligence
Chapter 2 Using Rhythm Performance
1.
2.
Select a Rhythm (p. 61).
Press the [One Touch Program] button.
The [One Touch Program] button’s indicator will light.
fig.02-15
One Touch
Program
Set
An One Touch Program Group (One Touch Program Group select) screen
like the one shown below will be displayed for several seconds.
f
3.
4.
5.
6.
7.
While the One Touch Program Group screen is displayed,
touch the screen to select a One Touch Program group.
If you fail to select a One Touch Program group while the One Touch
Program Group screen is displayed, “Group 1” will be selected
automatically.
Panel settings appropriate for the rhythm and automatic accompaniment
will automatically be called up for Registration [1]–[4] buttons.
Press the Registration [1] – [4] button to select panel settings.
On the Lower keyboard, play a chord.
At the moment you play the lower keyboard, the Intro will begin, and then
the Rhythm and Automatic Accompaniment will play.
Press the [Intro/Ending] or [Start/Stop] button to stop the
Rhythm.
Rhythm and Automatic Accompaniment stops.
Press the [One Touch Program] button, extinguishing its
indicator.
You will return to the panel settings that were in effect prior to pressing the
[One Touch Program] button.
To redisplay the One Touch
Program Group screen,
while holding down the
Registration [Write] button,
press the [One Touch
Program] button.
Touch the One Touch
Program Group screen to
reselect the group.
When you press the [One
Touch Program] button, the
“Arranger Update” setting
will automatically change
to “INSTANT” (p. 92).
75
Page 77

Chapter 2 Using Rhythm Performance
b
Min
Max
Min
Max
Min
Max
Min
Max
Harmony Intelligence
Using a Rhythm from a Disk
The AT-90SL contains built-in Rhythms (Music Styles). Additional Rhythms
(Music Styles) are available on the Music Style disk included are available.
Here’s how to select a Rhythm (Music Style) from a Music Style disk.
■
Inserting and Ejecting a Floppy Disk
1.
Hold the floppy disk face up, and push it into the disk drive
until it clicks into place.
The disk drive is on the right side of the unit, above the keyboard.
fig.02-18
Eject buttonIndicator
Floppy Disk
NOTE
All rights reserved.
Unauthorized use of
commercially available
Music Style disk for
purposes other than
private, personal
enjoyment is a violation of
applicable laws.
NOTE
If you’re using the disk
drive for the first time, be
sure to read the important
notes on p. 6.
2.
Press the Eject button.
The end of the floppy disk comes out of the slot. Gently grasp the end of the
floppy disk and pull it out.
fig.02-19
Eject Button
NOTE
Never eject a disk while
reading or writing is in
progress, since that can
damage the magnetic
surface of the disk,
rendering it unusable. (The
disk drive’s indicator will
light up at full brightness
when the drive is busy
reading or writing data.
Ordinarily, the indicator
will be less brightly lit, or
e extinguished.)
76
Page 78

b
Max
Max
Max
Max
Min
Min
Min
Min
Harmony Intelligence
Chapter 2 Using Rhythm Performance
■
Reviewing the Styles on a Music Style Disk
1.
2.
Press the Rhythm [Disk/User] button (confirm that its
indicator is lit).
The Rhythm screen appears.
fig.02-20_55
Insert the Music Style disk into the disk drive.
The Rhythm screen will show the Rhythms on the music style disk.
Rhythms from the music style disk are indicated by an “ ” icon.
fig.02-21_55
3.
4.
Touch < >, causing it to light up; the rhythms on the
music style disk are displayed.
Touch the Rhythm screen to select a Rhythm on the Music
When < > is lit,
the rhythms stored in User
memory are displayed.
Style disk.
The [Start/Stop] button indicator will blink while the Rhythms are being
loaded into internal memory.
When loading is finished, you will be able to play the selected rhythm.
5.
Press the [Start/Stop] button or the [Intro/Ending] button.
The selected Rhythm is played.
If rhythms from a music
style disk are stored in User
memory, you can recall the
Rhythms simply by
pressing the [Disk/User]
utton (p. 78).
77
Page 79

Chapter 2 Using Rhythm Performance
Min
Max
Min
Max
Min
Max
Min
Max
Harmony Intelligence
Copying Rhythms on Disks into User Memory
While the AT-90SL comes with rhythms already loaded in its User memory
(p. 62), you can replace these with Music Style Disk rhythms. Rhythms
loaded from the disk into User memory will not be lost even if the power is
turned off. It is convenient to load frequently-used disk Rhythms into User
memory.
1.
2.
3.
Insert the Music Style disk into the disk drive.
Touch <Rhythm> on the Main screen.
The Rhythm screen appears.
fig.02-21_55
Touch < > (Utility) on the Rhythm screen.
The Utility screen appears.
fig.02-22_55
78
Page 80

Max
Max
Max
Max
Min
Min
Min
Min
Harmony Intelligence
Chapter 2 Using Rhythm Performance
4.
5.
6.
Touch <Copy to User>.
The Copy To User screen appears.
fig.02-23_55
Touch < >< > to select the Music Style Disk rhythm
you want to copy to the User memory.
Rhythm [Disk/User] button indicator will blink.
After selecting the Music Style Disk Rhythm, touch <Next>.
The following screen appears.
fig.02-24_55
At this time, you can press
<> or the [Start/
Stop] button to play the
rhythm to make sure of
your choice.
7.
Touch <Back> to go back to the previous screen.
Touch < >< > to switch screens, and touch the savedestination rhythm.
The following screen appears.
fig.02-25_55
To cancel operation, touch <Cancel>.
79
Page 81

Chapter 2 Using Rhythm Performance
Min
Max
Min
Max
Min
Max
Min
Max
Harmony Intelligence
8.
To store the Rhythm in User memory, touch <OK>.
The saving of the rhythm to User memory begins.
Once the Rhythm has been accommodated in memory, the Rhythm screen
will reappear.
Restoring the Rhythm Stored in the User Memory to Their Original Factory Settings
NOTE
Never remove the disk or
turn off the power while
the Rhythm data is being
loaded from disk into the
AT-90SL. If you do so, the
Rhythm data will not be
loaded into the AT-90SL,
and malfunctions could
result. After returning the
Rhythm stored in the
[Disk/User] button to the
factory settings (see
following section), reload the Rhythm from
disk.
1.
2.
3.
Use the following procedure to restore only the rhythm stored in the User
Memory to their factory settings.
Touch <Rhythm> on the Main screen.
Touch < > (Utility) on the Rhythm screen.
fig.02-22_55
Touch <Reset User> on the Sub-window.
The confirmation message appears on the screen.
To restore all of the factory
settings, use the Factory
Reset operation (p. 22).
You can restore the User
Memory to the factory
settings by using the
following method.
1. Press the [Power On]
button to turn off the
power.
2. Hold down the Rhythm
[Disk/User] button, and
press the [Power On]
button.
Never turn off the
power while the
following screen is
displayed.
fig.02-27_70
4.
Touch <OK>.
The Rhythm that had been stored in the User Memory button will return to
the factory settings.
The Rhythm that had
been stored in the User
Memory will return to
the factory settings.
80
Page 82

Max
Max
Max
Max
Min
Min
Min
Min
Harmony Intelligence
Chapter 2 Using Rhythm Performance
Copying Rhythms Saved in User Memory to Floppy Disks
You can take rhythms saved in User memory (p. 62) and copy them to
floppy disks.
1.
2.
3.
4.
Make sure that the disk drive contains a disk that was
formatted (p. 96) by the ATELIER.
Press the Rhythm [Disk/User] button.
The Rhythm screen appears.
fig.02-09_55
Touch < >.
Touch the Rhythm name to select the rhythm you want to
copy to the floppy disk.
When < > is lit,
the rhythms stored on the
floppy disk are displayed.
81
Page 83

Chapter 2 Using Rhythm Performance
Min
Max
Min
Max
Min
Max
Min
Max
Harmony Intelligence
5.
6.
7.
Touch < > (Utility) on the Rhythm screen.
The Utility screen appears.
fig.02-22_55
Touch <Copy to Disk>.
The Copy to Disk screen appears.
Touch < >< > to select the copy-destination number.
Numbers which have not been used in the saving operation will be
displayed as “- - - - -.”
To cancel the copy, touch the <Exit> button to close the Copy to Disk screen.
8.
Touch <Copy> to copy the rhythm to the floppy disk.
Copying of the rhythm to the floppy disk begins.
82
Page 84

Max
Max
Max
Max
Min
Min
Min
Min
Harmony Intelligence
Chapter 2 Using Rhythm Performance
Changing the Order of the Rhythms Stored in User Memory
You can rearrange the order of the rhythms stored in User memory (p. 62).
1.
2.
Touch <Rhythm> on the Main screen.
The Rhythm screen appears.
fig.02-09_55
Touch < > (Utility) on the Rhythm screen.
The Utility screen appears.
fig.02-22_55
3.
Touch <Edit User>.
The Edit User screen appears.
83
Page 85

Chapter 2 Using Rhythm Performance
Min
Max
Min
Max
Min
Max
Min
Max
Harmony Intelligence
4.
5.
6.
Touch < >< > in the screen to select a rhythm.
Touch <Up> or <Down> to move the rhythm.
Button
Rename
Up
Down
Delete
Meaning Description
The Rename screen appears. You can
Modify the name
touch the screen and rename the
selected rhythm (p. 85).
Change the order
(upward)
Change the order
(downward)
Delete the Rhythm
The selected rhythm will be moved
earlier in the order.
The selected rhythm will be moved
later in the order.
The selected rhythm will be deleted
(p. 87).
Touch <Exit>.
84
Page 86

Max
Max
Max
Max
Min
Min
Min
Min
Harmony Intelligence
Chapter 2 Using Rhythm Performance
Changing the Names of Rhythms Stored in User Memory
You can rename rhythms stored in User memory (p. 62).
1.
2.
3.
Touch <Rhythm> on the Main screen.
The Rhythm screen appears.
Touch < > (Utility) on the Rhythm screen.
The Utility screen appears.
fig.02-22_55
Touch <Edit User>.
The Edit User screen appears.
4.
Touch < >< > to select the rhythm whose name you
want to change.
85
Page 87

Chapter 2 Using Rhythm Performance
Min
Max
Min
Max
Min
Max
Min
Max
Harmony Intelligence
5.
6.
7.
Touch <Rename>.
The Rename screen appears.
Touch < > to change among uppercase/
lowercase/symbols.
Each touch of the character switch button takes you to the next available
choice, like this: uppercase → lowercase → symbols → uppercase ....
Touch the screen to specify the desired character.
8.
9.
The following characters can be selected.
Uppercase
Lowercase a b c d e f g h i j k l m n o p q r s t u v w x y z
Symbols ! " # % & ' ( ) * + , - . / : = ? ^ _ 0 1 2 3 4 5 6 7 8 9
A B C D E F G H I J K L M N O P Q R S T U V W X Y Z
Delete a character.
Insert a space.
Move the cursor (the symbol that indicates the location at
which characters will be input) to left or right.
To cancel the operation, touch <Cancel>.
When you’re done making the settings, touch <OK>.
The Rhythm has now been named. The Edit User screen reappears.
Touch <Exit>.
86
Page 88

Max
Max
Max
Max
Min
Min
Min
Min
Harmony Intelligence
Chapter 2 Using Rhythm Performance
Deleting Rhythms Stored in User Memory
You can delete rhythms stored in User memory (p. 62).
1.
2.
3.
Touch <Rhythm> on the Main screen.
The Rhythm screen appears.
Touch < > (Utility) on the Rhythm screen.
The Utility screen appears.
fig.02-22_55
Touch <Edit User>.
The Edit User screen appears.
4.
In the screen, touch < >< > to select the rhythm that
you wish to delete.
87
Page 89

Chapter 2 Using Rhythm Performance
Min
Max
Min
Max
Min
Max
Min
Max
Harmony Intelligence
5.
6.
Touch <Delete>.
The following display appears.
To cancel operation, touch <Cancel>.
If you are sure that you wish to delete the rhythm, touch
<OK>.
When a rhythm is deleted, the deleted rhythm name will change to “- - - - -.”
88
Page 90

Chapter 3 Using the Registration Buttons
b
b
The AT-90SL allows you to store sound settings and panel settings in the
Registration buttons. The AT-90SL has a total of twelve registration buttons,
and one set of panel settings can be registered to each button, for a total of
twelve types of panel settings. Each set of panel settings that has been stored
in a Registration button is called a “Registration.”
This provides a convenient way to change large numbers of panel settings
during a performance, or to recall a complex panel setting.
fig.03-01
Settings that have been
stored to Registration
uttons [1]–[12] are
remembered even if the
power is turned off. If you
wish to restore the settings
stored in the Registration
uttons to their factory
settings, use the “Factory
Reset” operation (p. 22).
Manual
Write
234 5 78 91011121
6
Load
Next
About the Registration Buttons
In addition to assigning voices and rhythms to the Registration buttons, you
can also store the following settings:
• Panel button settings (for example, settings for the Level [▲] [▼] buttons
and Solo [To Lower] button, etc.)
• Controller settings (functions assigned to foot switches, pitch bend
range, etc.)
• Other types of settings (reverb type, tempo settings, degree of initial
touch, etc.)
If you would like to know all of the settings that can be recorded to the
Registration buttons, refer to
Is Turned Off”
(p. 250).
Furthermore, you can group the settings assigned to the Registration
buttons as a single set, and then register and save up to a maximum of 99
sets onto a single floppy disk (p. 98).
In addition to the settings recorded to the Registration buttons, the
following data is also saved when Registration sets are saved to floppy
disks.
• Registration Name →p. 94
• Registration Shift →p. 119
• Arranger Update →p. 92
• Trans. Update (Transpose Update) →p. 191
• Exp. Curve (Expression Curve) →p. 121
“Settings That Are Stored After the Power
Recorded performance data
and rhythms from User
memory (p. 62) are not
stored in Registration sets.
When a rhythm saved in
User memory is assigned to
a Registration set, that
rhythm is copied
beforehand to the User
memory.
89
Page 91

Chapter 3 Using the Registration Buttons
Procedure for Creating Registration Sets
You can change voice and other panel settings by pressing the Registration
buttons during performance of songs.
Prepare the Registrations
A convenient way to make the sequence of Registration buttons to be
pressed easy to understand is to store the panel settings starting from the
Registration [1] button, continuing with subsequent buttons in accordance
with the progression of the song.
Save the Registrations to the floppy disk
If you want to use more than twelve Registrations in a song, save the
settings for Registration buttons [1]–[12] to a floppy disk as a set, then
continue to store further panel settings again, starting from Registration
button [1]. Save all of the Registration sets you have set to the floppy disk.
Arrange the Registrations in the sequence they are to be used
Save the Registration sets to the floppy disk in the order they are to be used
in the song. You can use the Disk Edit function (p. 110) to alter the sequence
and names of rhythms contained on the floppy disk (p. 94) as well as delete
such rhythms (p. 108).
Using Registration Sets
Call up the Registration sets saved on the floppy disk to the AT-90SL
Insert the floppy disk containing the saved Registration sets into the disk
drive, and read the Registration sets into the AT-90SL.
Switch the Registration sets as you perform
Press the Registration buttons to switch Registrations as you play the song.
To call up the next Registration Set, press the [Load Next] button, then press
the Registration buttons.
Storing Registrations
fig.03-02
1.
2.
Write
Manual
Make all the panel settings that you wish to store.
While holding down the [Write] button, press one of the
Registration buttons [1]–[12].
23 5641
You can also assign the
“Right + Load Next” to the
foot switch and use it to
call up subsequent
Registration sets (p. 119).
For details on the settings
that are stored in a
Registration, refer to
“Settings That Are Stored
After the Power Is Turned
Off” (p. 250).
90
The panel settings will be stored in the selected Registration button.
Page 92

Recalling a Registration
Chapter 3 Using the Registration Buttons
Settings that have been registered to Registration buttons [1]–[12] can be
recalled in two ways: “INSTANT” and “DELAYED.”
At the factory this is set to “DELAYED.”
■
How to Recall a Registration (DELAYED)
Recalling voices and other panel settings
1.
Recalling settings for Rhythm and Automatic Accompaniment in
addition to the panel settings
1.
Press and immediately release one of the Registration
buttons [1]–[12].
Press and hold a Registration button [1]–[12] for several
seconds.
The indicator of the rhythm select button will blink, and the panel settings
and settings related to rhythm performance and automatic accompaniment
will be recalled.
When changing the way
Registrations are called up,
refer to “Changing the
Timing of Recalling
Registrations” (p. 92).
■
How to Recall a Registration (INSTANT)
Recalling panel settings of a voice, or when recalling settings for
rhythm performance and Automatic Accompaniment in addition
to panel settings
1.
Press and immediately release one of the Registration
buttons [1]–[12].
91
Page 93

Chapter 3 Using the Registration Buttons
b
Min
Max
Min
Max
Min
Max
Min
Max
Harmony Intelligence
■
Changing the Timing of Recalling Registrations
Settings for Rhythm play and Automatic Accompaniment are recalled when
you continue holding a Registration button [1]–[12] for several seconds, but
you can change this so that the settings are recalled the instant you press the
button.
1.
2.
Touch <Registration> on the Main screen.
The sub-window appears.
fig.03-04_55
Touch <Load>.
The Registration Load screen appears.
fig.03-05_55
You can also open the
Registration Load screen by
pressing the [Registration]
utton on the panel.
3.
Touch <Utility>.
The Utility screen appears.
fig.03-06_55
92
Page 94

Max
Max
Max
Max
Min
Min
Min
Min
Harmony Intelligence
Chapter 3 Using the Registration Buttons
4.
5.
Touch <Options>.
The Registration Options screen appears.
fig.03-07_55
Touch the Arranger Update setting to switch between
“DELAYED” and “INSTANT.”
Each time you touch the Arranger Update setting, it will alternate between
“DELAYED” and “INSTANT.”
Setting
DELAYED
INSTANT
When you press and hold a Registration button [1]–[12]
for several seconds, the settings for Rhythm and
Automatic Accompaniment will be recalled in addition to
the panel settings.
If you press and immediately release a Registration button
[1]–[12], only the settings that are not related to Rhythm or
Automatic Accompaniment will be recalled.
Settings for Rhythm and Automatic Accompaniment will
be recalled the instant that you press a Registration button
[1]–[12].
Descriptions
You can change the timing
of recalling the transpose
setting when you press a
Registration button.
For details refer to
“Changing the Timing at
Which Transposition
Settings are Recalled” (p.
191).
6.
Touch <Exit>.
Automatically Registering When You Switch Panel Settings
When the [Manual] button is ON (lit), all panel settings you make will be
stored automatically in the [Manual] button as they are made, thus updating
the Registration that had been previously saved.
fig.03-08
Write
Manual
23 5641
NOTE
The settings stored in the
[Manual] button will return
to their default values
when the power is turned
off.
93
Page 95

Chapter 3 Using the Registration Buttons
j
Min
Max
Min
Max
Min
Max
Min
Max
Harmony Intelligence
Assigning a Name to a Registration Set
When saving Registration sets, names like “Factory Reg.” will be assigned
by default, but you can assign a name that will help you later to identify the
contents of the Registration set.
1.
2.
Touch <Registration> on the Main screen.
The sub-window appears.
fig.03-04_55
Touch <Save>.
The Registration Save screen appears.
fig.03-09_55
When you touch <go to
Load>, the instrument
umps to the Registration
Load screen.
3.
Touch <Utility> to open the Utility screen.
The Utility screen appears.
fig.03-10_55
94
Page 96

Max
Max
Max
Max
Min
Min
Min
Min
Harmony Intelligence
Chapter 3 Using the Registration Buttons
4.
5.
6.
Touch <Rename>.
The Rename screen appears.
fig.03-11_55
Touch < > to change among uppercase/
lowercase/symbols.
Each touch of the character switch button takes you to the next available
choice, like this: uppercase → lowercase → symbols → uppercase ....
Touch the screen to specify the desired character.
The following characters can be selected.
The Rename screen can
also be opened in the
following ways.
Main screen
<Registration>
→ <Load>→
Registration Load screen
<Utility>
→ Utility screen
<Rename>
7.
Uppercase
A B C D E F G H I J K L M N O P Q R S T U V W X Y Z
Lowercase a b c d e f g h i j k l m n o p q r s t u v w x y z
Symbols ! " # % & ' ( ) * + , - . / : = ? ^ _ 0 1 2 3 4 5 6 7 8 9
Delete a character.
Insert a space.
Move the cursor (the symbol that indicates the location at
which characters will be input) to left or right.
To cancel the operation, touch <Cancel>.
When you’re done making the settings, touch <OK>.
The Registration set in the AT-90SL’s internal memory has now been
named.
fig.03-12_55
95
Page 97

Chapter 3 Using the Registration Buttons
Min
Max
Min
Max
Min
Max
Min
Max
Harmony Intelligence
Formatting Disks
Before any floppy disk (new or used) can be used with the AT-90SL it must
first be formatted (prepared).
Formatting a floppy disk erases all information stored on the disk, and puts
it in a format that is acceptable for the device in which it will be used. If a
floppy disk is in a format that doesn’t match the format of this unit, you
won’t be able to use that floppy disk.
1.
Make sure that the write protect tab of the floppy disk is in
the “Write” (permit) position.
fig.07-17
Rear side of the disk
Write Protect Tab
Write
(can write new data onto disk)
Protect
(prevents writing to disk)
NOTE
Formatting a disk erases all
data previously stored on
the disk. If you’re
formatting a used floppy
disk for reuse, be sure to
check first to make sure the
disk doesn’t contain any
data you don’t want to lose.
2.
3.
With the label of the floppy disk facing upward, insert it
into the disk drive until it clicks into position.
The disk drive is located to the upper right of the AT-90SL’s keyboard.
fig.07-17
Eject buttonIndicator
Floppy Disk
Touch <Registration> on the Main screen.
The sub-window appears.
fig.03-04_55
96
Page 98

Max
Max
Max
Max
Min
Min
Min
Min
Harmony Intelligence
Chapter 3 Using the Registration Buttons
4.
5.
6.
Touch <Save>.
The Registration Save screen appears.
fig.03-09_55
Touch <Utility>.
The Utility screen appears.
Touch <Format Disk>.
The Format Disk screen appears.
fig.
7.
If you touch <Cancel>, you will return to the Registration Save screen
without formatting.
Touch <OK> to start formatting.
While formatting is in progress, the following display appears.
fig.
When the format is finished, the Registration Save screen returns.
NOTE
Never attempt to remove
the floppy disk until
formatting is complete.
97
Page 99

Chapter 3 Using the Registration Buttons
j
Min
Max
Min
Max
Min
Max
Min
Max
Harmony Intelligence
Saving Registration Sets to a Floppy Disk
With the settings of Registration buttons [1]–[12] considered as one set, a
single floppy disk can store up to 99 sets of data. We recommend that
complex panel settings or Registrations you wish to keep be saved on disk.
Furthermore, when you save registrations created on the AT-90SL to floppy
disks, you can call up their settings on other Atelier Series instruments and
use the registrations the same way.
1.
2.
3.
Make sure that the disk drive contains a disk that was
formatted (p. 96) by the ATELIER.
Touch <Registration> on the Main screen.
The sub-window appears.
fig.03-04_55
Touch <Save>.
The Registration Save screen appears.
fig.03-09_55
When you touch <go to
Load>, the instrument
umps to the Registration
Load screen.
If you wish to assign a
name before you save, refer
to “Assigning a Name to a
Registration Set” (p. 94).
98
Page 100

Max
Max
Max
Max
Min
Min
Min
Min
Harmony Intelligence
Chapter 3 Using the Registration Buttons
4.
5.
Touch < >< > in the screen to select the savedestination number.
Numbers which have not been used in the saving operation will be
displayed as “- - - - -.”
fig.03-13_55
To cancel the Save operation, touch the <Exit> button to close the
Registration Save screen.
Touch <Save>.
The Save Format screen appears.
fig.03-14_55
6.
7.
Touch <Original> or <R-Series>.
Settings
Original
R-Series
Save formats that can be used with the AT-SL Series
When saved in this format, the data can also be used by AT45, AT-15 and AT-S Series devices.
Save formats that can be used with AT-R Series devices
Description
Touch <OK>.
Saving of the registration data will begin.
When saving ends, the “- - - - -” in the screen will change to the registration
name that you saved.
If you have assigned a name, the Registration set will be saved to floppy
disk with that name.
99
 Loading...