


Before using this unit, carefully read the sections entitled: “USING THE UNIT SAFELY” (p. 8), and “IMPORTANT NOTES” (p. 10). These sections provide important
information concerning the proper operation of the unit. Additionally, in order to feel assured that you have gained a good grasp of every feature provided
by your new unit, Owner’s manual should be read in its entirety. The manual should be saved and kept on hand as a convenient reference.
Copyright © 2011 ROLAND CORPORATION
All rights reserved. No part of this publication may be reproduced in any form without the written permission of ROLAND CORPORATION.
Roland, GS, SuperNATURAL, VIMA, and VIMA TUNES are either registered trademarks or trademarks of Roland Corporation in the United
States and/or other countries.
Quick Start
Upper keyboard
Lower keyboard
Pedalboard sound
Lower keyboard sound
Upper keyboard sound
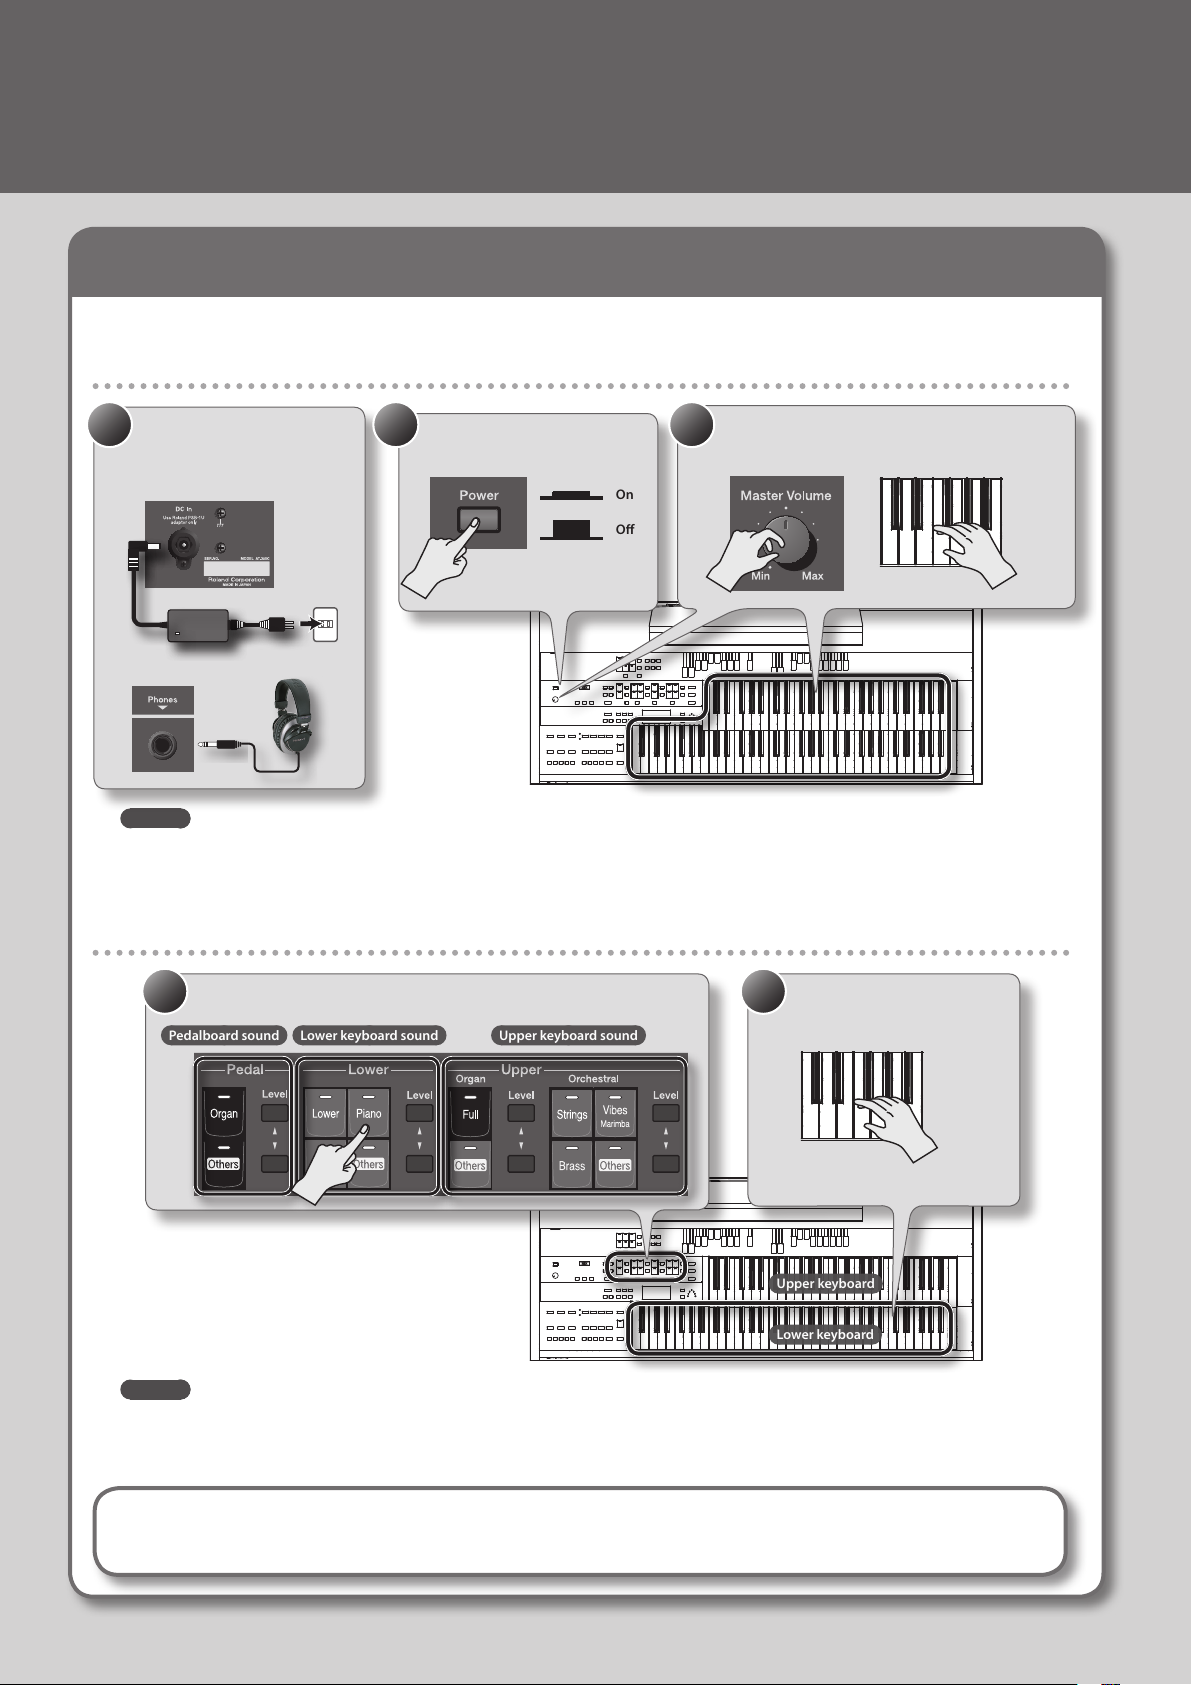
Trying Out the Sounds
Let’s try playing various instrumental sounds.
Producing Sound
1. Make connections.
1 2 3
Connect the AC adaptor and
headphones (sold separately) (p. 23).
AC adaptor
Headphones
MEMO
• You can also connect speakers (sold separately) and listen to the ATELIER’s sound through speakers (p. 23).
• If a pedalboard (PK series; sold separately) or an expression pedal (sold separately) is connected, use the [Master Volume] knob and the
expression pedal to adjust the volume (p. 55).
2. Press the [Power] switch
to turn on the power.
On
O
3. While playing the keyboard, use the
[Master Volume] knob to adjust the volume.
Playing piano sounds in the lower keyboard
21
1. Press the Lower [Piano] button to select the piano voice.
2. Play the lower keyboard.
You’ll hear the piano sound.
MEMO
What is a Voice?
4
• For each keyboard (upper, lower, and pedal), you can select a dierent voice of your choice (p. 28).
If you want to use a pedalboard, you’ll need to connect it (PK series; sold separately) (p. 24).
• You can use the [Others] button to select a variety of voices, such as violin or ute (p. 30).
The ATELIER lets you play the sounds of a wide variety of instruments. Each of these sounds is called a “voice.”

Performing with Rhythms
Here’s how to enjoy listening to rhythms in various styles while you play.
Quick Start
1. Press a Rhythm button to select the
1
desired rhythm group (p. 58).
MEMO
You can use the Tempo [ ] [ ]
buttons to change the tempo of
the rhythm.
2. Use the Value [-] [+] buttons to
2
select a rhythm.
3. Press the [Start/Stop] button to
3
start the rhythm.
MEMO
You can also add an intro or ending to the rhythm (p. 60).
4. Play along with the rhythm.
4
Press the [Start/Stop] button once again to
stop the rhythm.
5
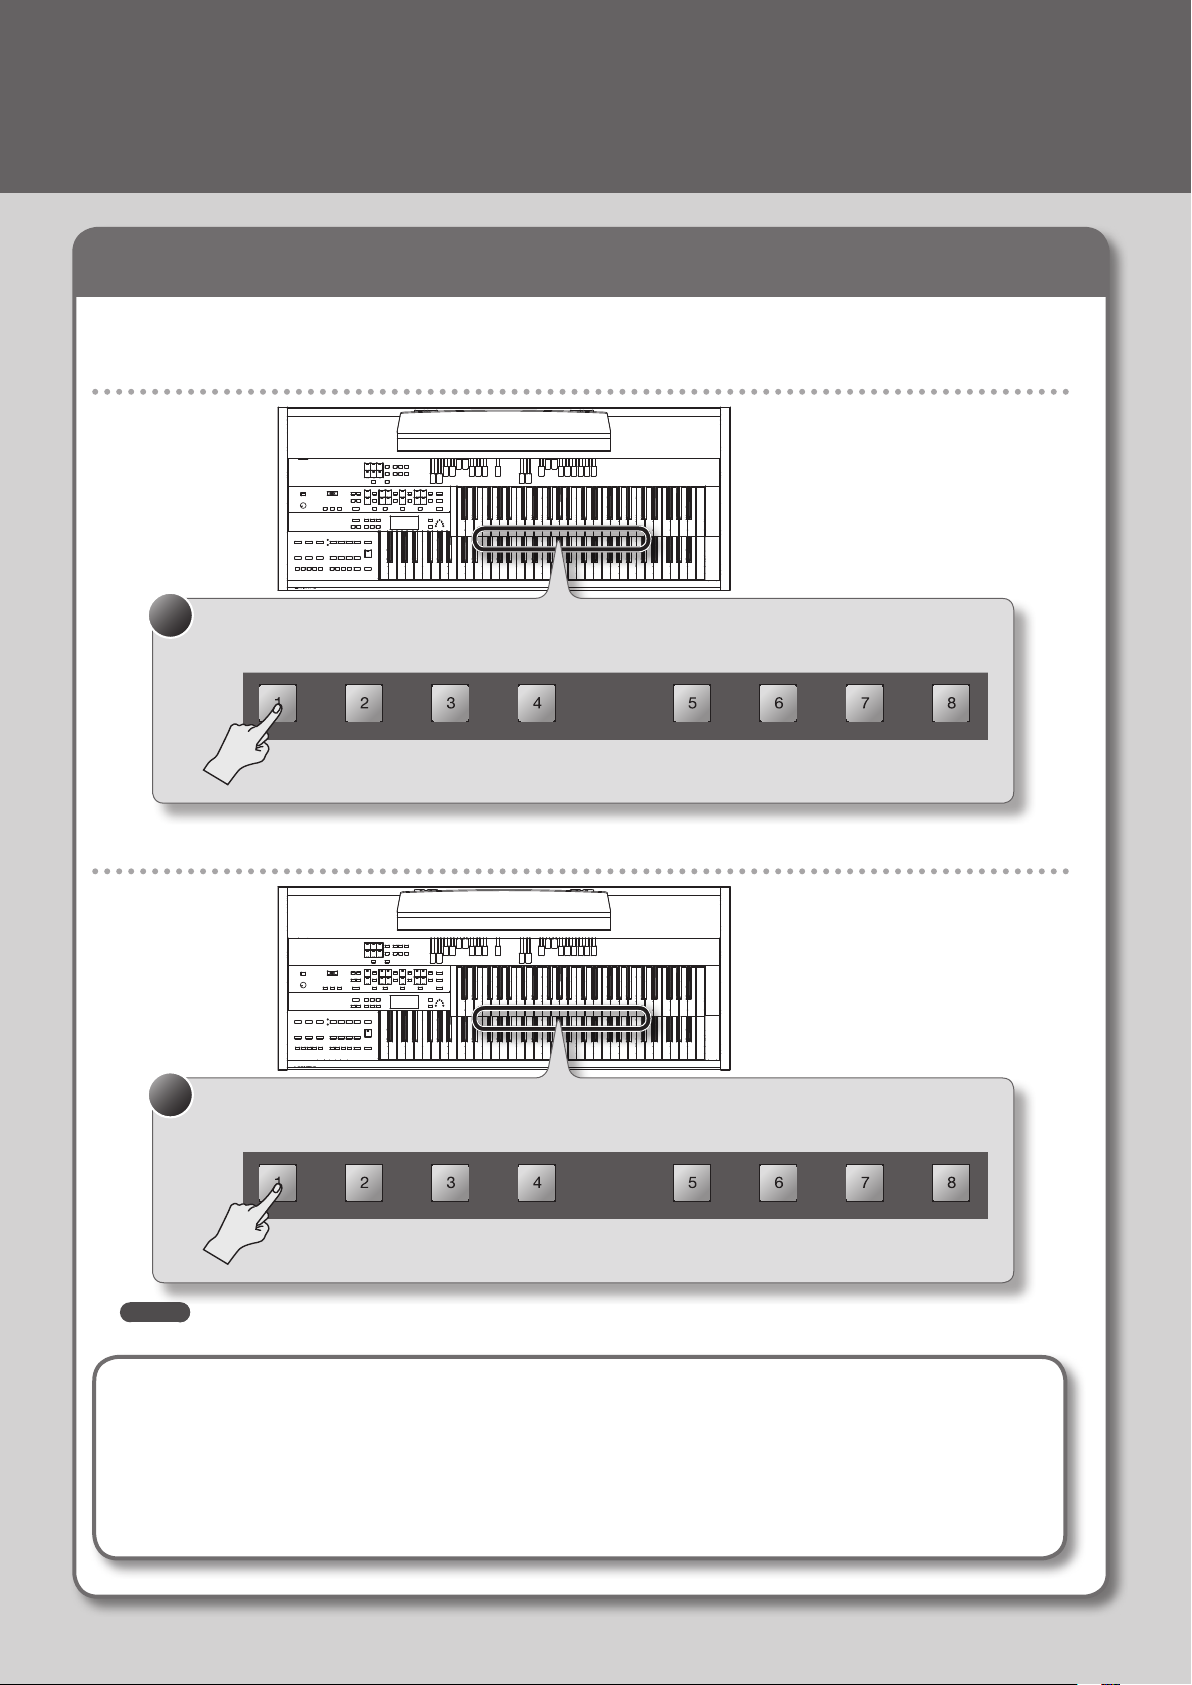
Quick Start
Recalling Voices and Rhythms with a Single Button
Here’s how you can recall settings for voices and rhythms by pressing a single button.
Recalling voices and other panel settings
1
1. Press and immediately release one of the registration [1]–[8] buttons.
The voices and other panel settings will be recalled.
Recalling voices and other panel settings as well as rhythm and tempo
1
1. Press and hold one of the Registration [1]–[8] buttons for several seconds.
The panel settings as well as the rhythm settings will be recalled.
Hold for several seconds
MEMO
The settings for your favorite sounds and rhythms can be stored at a registration button (p. 67).
What are “panel settings”?
“Panel settings” are the settings you make when selecting a voice, or when setting the tempo, the speed of the rotary eect, etc., using
the ATELIER’s panel.
What is a Registration?
The ATELIER lets you recall the settings for voices, rhythms, etc., at the press of a single button. When you store a collection of such
settings, it becomes what it known as a “registration” (p. 66).
6
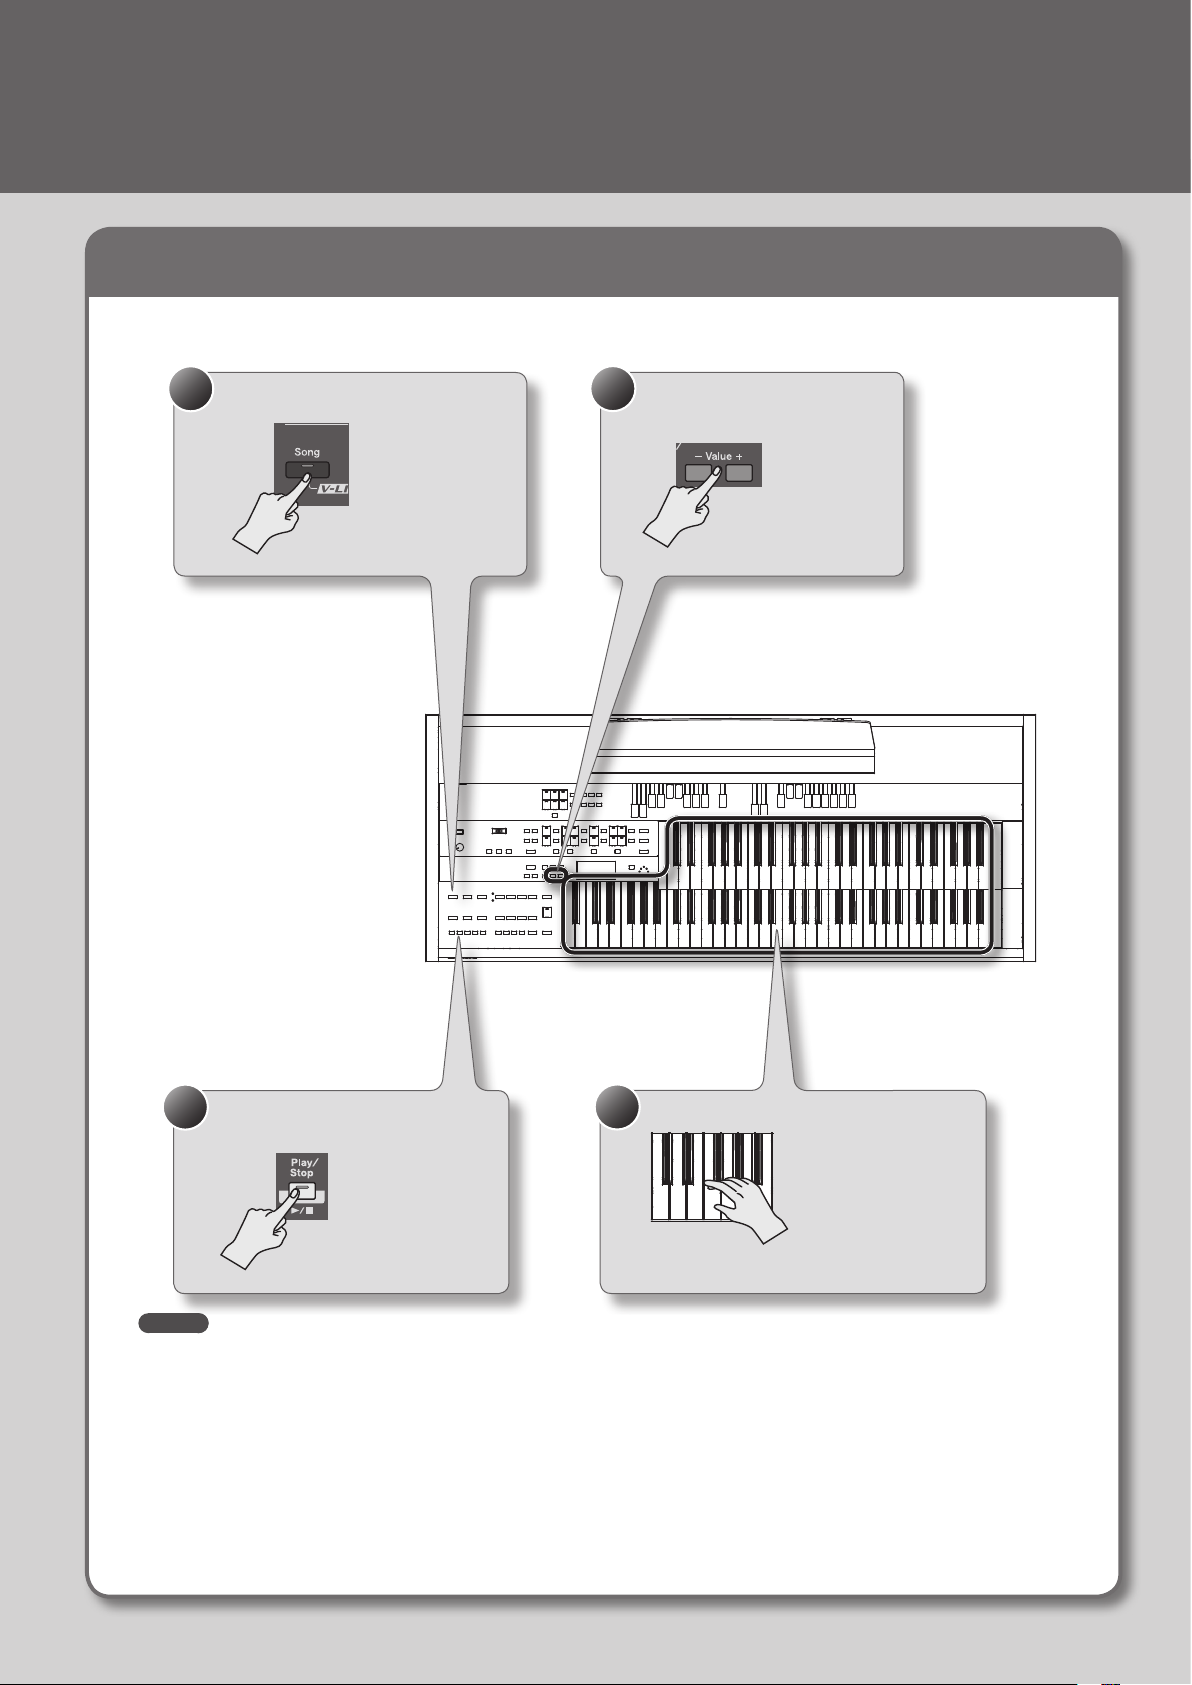
Playing Along with a Song
Here’s how you can play back one of the songs that are built into the ATELIER, and perform along with the song.
Quick Start
1. Press the [Song] button.
1
2. Use the Value [-] [+] buttons to
2
select a song.
3. Press the [Play/Stop] button to play
3
back the song.
MEMO
You can also play back songs from USB memory or a CD (p. 88, p. 109).
4. Play along with the song.
4
Press the [Start/Stop] button once again to
stop the song.
7
About WARNING and CAUTION Notices
ALWAYS OBSERVE THE FOLLOWING
Used for instructions intended to alert the
user to the risk of death or severe injury
should the unit be used improperly.
Used for instructions intended to alert the
user to the risk of injury or material
damage should the unit be used
improperly.
* Material damage refers to damage or
other adverse eects caused with
respect to the home and all its
furnishings, as well to domestic animals
or pets.
About the Symbols
The symbol alerts the user to important instructions or
warnings.The specic meaning of the symbol is
determined by the design contained within the triangle. In
the case of the symbol at left, it is used for general
cautions, warnings, or alerts to danger.
The symbol alerts the user to items that must never be
carried out (are forbidden). The specic thing that must
not be done is indicated by the design contained within
the circle. In the case of the symbol at left, it means that
the unit must never be disassembled.
The symbol alerts the user to things that must be
carried out. The specic thing that must be done is
indicated by the design contained within the circle. In the
case of the symbol at left, it means that the power-cord
plug must be unplugged from the outlet.
Do not open (or modify in any way) the unit or its AC
adaptor.
Do not attempt to repair the unit, or replace parts within
it (except when this manual provides specic instructions
directing you to do so). Refer all servicing to your retailer,
the nearest Roland Service Center, or an authorized Roland
distributor, as listed on the “Information” page.
Never install the unit in any of the following locations.
• Subject to temperature extremes (e.g., direct sunlight
in an enclosed vehicle, near a heating duct, on top of
heat-generating equipment); or are
• Damp (e.g., baths, washrooms, on wet oors); or are
• Exposed to steam or smoke; or are
• Subject to salt exposure; or are
• Humid; or are
• Exposed to rain; or are
• Dusty or sandy; or are
• Subject to high levels of vibration and shakiness.
This unit should be used only with a stand that is
recommended by Roland.
When using the unit with a rack or stand recommended by
Roland, the rack or stand must be carefully placed so it is
level and sure to remain stable. If not using a rack or stand,
you still need to make sure that any location you choose for
placing the unit provides a level surface that will properly
support the unit, and keep it from wobbling.
Be sure to use only the AC adaptor supplied with the unit.
Also, make sure the line voltage at the installation matches
the input voltage specied on the AC adaptor’s body. Other
AC adaptors may use a dierent polarity, or be designed
for a dierent voltage, so their use could result in damage,
malfunction, or electric shock.
Use only the attached power-supply cord. Also, the supplied
power cord must not be used with any other device.
Do not excessively twist or bend the power cord, nor
place heavy objects on it. Doing so can damage the cord,
producing severed elements and short circuits. Damaged
cords are re and shock hazards!
This unit, either alone or in combination with an amplier
and headphones or speakers, may be capable of producing
sound levels that could cause permanent hearing loss. Do
not operate for a long period of time at a high volume level,
or at a level that is uncomfortable. If you experience any
hearing loss or ringing in the ears, you should immediately
stop using the unit, and consult an audiologist.
Do not place containers containing liquid (e.g., ower vases)
on this product. Never allow foreign objects (e.g., ammable
objects, coins, wires) or liquids (e.g., water or juice) to enter
this product. Doing so may cause short circuits, faulty
operation, or other malfunctions.
Immediately turn the power o, remove the AC adaptor
from the outlet, and request servicing by your retailer, the
nearest Roland Service Center, or an authorized Roland
distributor, as listed on the “Information” page when:
• The AC adaptor, the power-supply cord, or the plug has
been damaged; or
• If smoke or unusual odor occurs
• Objects have fallen into, or liquid has been spilled onto the
unit; or
• The unit has been exposed to rain (or otherwise has
become wet); or
• The unit does not appear to operate normally or exhibits a
marked change in performance.
8
USING THE UNIT SAFELY
In households with small children, an adult should provide
supervision until the child is capable of following all the
rules essential for the safe operation of the unit.
Protect the unit from strong impact.
(Do not drop it!)
Do not force the unit’s power-supply cord to share an outlet
with an unreasonable number of other devices. Be especially
careful when using extension cords the total power used
by all devices you have connected—to the extension
cord’s outlet must never exceed the power rating (watts/
amperes) for the extension cord. Excessive loads can cause
the insulation on the cord to heat up and eventually melt
through.
Before using the unit in a foreign country, consult with your
retailer, the nearest Roland Service Center, or an authorized
Roland distributor, as listed on the “Information” page.
Never climb on top of, nor place heavy objects on the unit.
Never handle the AC adaptor or its plugs with wet hands
when plugging into, or unplugging from, an outlet or this
unit.
If you need to move the instrument, take note of the
precautions listed below. At least two persons are required
to safely lift and move the unit. It should be handled
carefully, all the while keeping it level. Make sure to have a
rm grip, to protect yourself from injury and the instrument
from damage.
• Disconnect the AC adaptor.
If the AC adaptor is attached to the bottom of the AT-350C,
detach the AC adaptor.
• Disconnect all cords coming from external devices.
• Remove the music stand.
Before cleaning the unit, turn o the power and unplug the
AC adaptor from the outlet (p. 22).
The unit and the AC adaptor should be located so their
location or position does not interfere with their proper
ventilation.
This (AT-350C) for use only with Roland stand KS-G8 or
KS-12. Use with other stands is capable of resulting in
instability causing possible injury.
Even if you observe the cautions given in the owner’s
manual, certain types of handling may allow this product to
fall from the stand, or cause the stand to overturn. Please be
mindful of any safety issues before using this product.
Always grasp only the plug on the AC adaptor cord when
plugging into, or unplugging from, an outlet or this unit.
At regular intervals, you should unplug the AC adaptor
and clean it by using a dry cloth to wipe all dust and other
accumulations away from its prongs. Also, disconnect the
power plug from the power outlet whenever the unit is
to remain unused for an extended period of time. Any
accumulation of dust between the power plug and the
power outlet can result in poor insulation and lead to re.
Whenever you suspect the possibility of lightning in your
area, disconnect the AC adaptor from the outlet.
Should you remove the music rest fastening screws and
the ground terminal screw, keep them in a safe place out
of children’s reach, so there is no chance of them being
swallowed accidentally.
Try to prevent cords and cables from becoming entangled.
Also, all cords and cables should be placed so they are out of
the reach of children.
9
9

IMPORTANT NOTES
Power Supply
• Do not connect this unit to same electrical outlet that is being used by an
electrical appliance that is controlled by an inverter (such as a refrigerator,
washing machine, microwave oven, or air conditioner), or that contains
a motor. Depending on the way in which the electrical appliance is used,
power supply noise may cause this unit to malfunction or may produce
audible noise. If it is not practical to use a separate electrical outlet,
connect a power supply noise lter between this unit and the electrical
outlet.
• The AC adaptor will begin to generate heat after long hours of consecutive
use. This is normal, and is not a cause for concern.
• Before connecting this unit to other devices, turn o the power to all units.
This will help prevent malfunctions and/or damage to speakers or other
devices.
Placement
• Using the unit near power ampliers (or other equipment containing large
power transformers) may induce hum. To alleviate the problem, change
the orientation of this unit; or move it farther away from the source of
interference.
• This device may interfere with radio and television reception. Do not use
this device in the vicinity of such receivers.
• Noise may be produced if wireless communications devices, such as
cell phones, are operated in the vicinity of this unit. Such noise could
occur when receiving or initiating a call, or while conversing. Should you
experience such problems, you should relocate such wireless devices so
they are at a greater distance from this unit, or switch them o.
• Do not expose the unit to direct sunlight, place it near devices that
radiate heat, leave it inside an enclosed vehicle, or otherwise subject it to
temperature extremes. Also, do not allow lighting devices that normally
are used while their light source is very close to the unit (such as a piano
light), or powerful spotlights to shine upon the same area of the unit for
extended periods of time. Excessive heat can deform or discolor the unit.
• When moved from one location to another where the temperature and/or
humidity is very dierent, water droplets (condensation) may form inside
the unit. Damage or malfunction may result if you attempt to use the unit
in this condition. Therefore, before using the unit, you must allow it to
stand for several hours, until the condensation has completely evaporated.
• Do not allow rubber, vinyl, or similar materials to remain on this unit for
long periods of time. Such objects can discolor or otherwise harmfully
aect the nish.
• Never use benzine, thinners, alcohol or solvents of any kind, to avoid the
possibility of discoloration and/or deformation.
Repairs and Data
• Please be aware that all data contained in the unit’s memory may be lost
when the unit is sent for repairs. Important data should always be backed
up USB memories, or written down on paper (when possible). During
repairs, due care is taken to avoid the loss of data. However, in certain
cases (such as when circuitry related to memory itself is out of order), we
regret that it may not be possible to restore the data, and Roland assumes
no liability concerning such loss of data.
Additional Precautions
• Please be aware that the contents of memory can be irretrievably lost as
a result of a malfunction, or the improper operation of the unit. To protect
yourself against the risk of loosing important data, we recommend that
you periodically save a backup copy of important data you have stored in
the unit’s memory on USB memories.
• Unfortunately, it may be impossible to restore the contents of data that
was stored in the unit’s memory or USB memories once it has been lost.
Roland Corporation assumes no liability concerning such loss of data.
• Use a reasonable amount of care when using the unit’s buttons, sliders, or
other controls; and when using its jacks and connectors. Rough handling
can lead to malfunctions.
• Never strike or apply strong pressure to the display.
• When connecting / disconnecting all cables, grasp the connector itself—
never pull on the cable. This way you will avoid causing shorts, or damage
to the cable’s internal elements.
• To avoid disturbing your neighbors, try to keep the unit’s volume at
reasonable levels. You may prefer to use headphones, so you do not need
to be concerned about those around you.
• The sound of keys being struck and vibrations produced by playing an
instrument can be transmitted through a oor or wall to an unexpected
extent. In particular, when using headphones, please take care not to
cause annoyance to others nearby.
• When you need to transport the unit, package it in the box (including
padding) that it came in, if possible. Otherwise, you will need to use
equivalent packaging materials.
• Do not apply undue force to the music rest while it is in use.
• Do not allow objects to remain on top of the keyboard. This can be the
cause of malfunction, such as keys ceasing to produce sound.
• Do not paste stickers, decals, or the like to this instrument. Peeling such
matter o the instrument may damage the exterior nish.
• Depending on the material and temperature of the surface on which you
place the unit, its rubber feet may discolor or mar the surface.
You can place a piece of felt or cloth under the rubber feet to prevent this
from happening. If you do so, please make sure that the unit will not slip or
move accidentally.
• Do not put anything that contains water (e.g., ower vases) on this unit.
Also, avoid the use of insecticides, perfumes, alcohol, nail polish, spray
cans, etc., near the unit. Swiftly wipe away any liquid that spills on the unit
using a dry, soft cloth.
Maintenance
• To clean the unit, use a dry, soft cloth; or one that is slightly dampened. Try
to wipe the entire surface using an equal amount of strength. Rubbing too
hard in the same area can damage the nish.
10
• Use only the specied expression pedal (EV-7; sold separately). By
connecting any other expression pedals, you risk causing malfunction
and/or damage to the unit.
• Some connection cables contain resistors. Do not use cables that
incorporate resistors for connecting to this unit. The use of such cables
can cause the sound level to be extremely low, or impossible to hear. For
information on cable specications, contact the manufacturer of the cable.
• The usable range of D Beam controller will become extremely small when
used under strong direct sunlight. Please be aware of this when using the
D Beam controller outside.
• The sensitivity of the D Beam controller will change depending on the
amount of light in the vicinity of the unit. If it does not function as you
expect, adjust the sensitivity as appropriate for the brightness of your
location.
• When moving the ATELIER, take care not to damage the keyboard or the
harmonic bars.

Before Using USB Memories
Using USB Memories
• Carefully insert the USB memories all the way in—until it is rmly in place.
• Never touch the terminals of the USB memories. Also, avoid getting the
terminals dirty.
• USB memories are constructed using precision components; handle the
USB memories carefully, paying particular note to the following.
• To prevent damage to the USB memories from static electricity, be sure
to discharge any static electricity from your own body before handling
the USB memories.
• Do not touch or allow metal to come into contact with the contact
portion of the USB memories.
• Do not bend, drop, or subject USB memories to strong shock or
vibration.
• Do not keep USB memories in direct sunlight, in closed vehicles, or
other such locations.
• Do not allow USB memories to become wet.
• Do not disassemble or modify the USB memories.
Copyright
• Recording, duplication, distribution, sale, lease, performance, or broadcast
of copyrighted material (musical works, visual works, broadcasts, live
performances, etc.) belonging to a third party in part or in whole without
the permission of the copyright owner is forbidden by law.
• Do not use this product for purposes that could infringe on a copyright
held by a third party. We assume no responsibility whatsoever with regard
to any infringements of third-party copyrights arising through your use of
this product.
IMPORTANT NOTES
• The copyright of content in this product (the sound waveform data, style
data, accompaniment patterns, phrase data, audio loops and image data)
is reserved by Roland Corporation and/or Atelier Vision Corporation.
• Purchasers of this product are permitted to utilize said content for the
creating, performing, recording and distributing original musical works.
• Purchasers of this product are NOT permitted to extract said content
in original or modied form, for the purpose of distributing recorded
medium of said content or making them available on a computer network.
* XGlite ( ) is a registered trademark or a trademark of
Yamaha Corporation.
* MMP (Moore Microprocessor Portfolio) refers to a patent
portfolio concerned with microprocessor architecture, which
was developed by Technology Properties Limited (TPL).
Roland has licensed this technology from the TPL Group.
* Company names and product names appearing in this
document are registered trademarks or trademarks of their
respective owners.
11
11

Contents
Quick Start . . . . . . . . . . . . . . . . . . . . . . . . . . . . . . . . . . . . . . . . . 4
Trying Out the Sounds . . . . . . . . . . . . . . . . . . . . . . . . . . . . . . . . . . . . . . . . . . . 4
Performing with Rhythms . . . . . . . . . . . . . . . . . . . . . . . . . . . . . . . . . . . . . . . . 5
Recalling Voices and Rhythms with a Single Button . . . . . . . . . . . . . . . . 6
Playing Along with a Song . . . . . . . . . . . . . . . . . . . . . . . . . . . . . . . . . . . . . . . . 7
USING THE UNIT SAFELY . . . . . . . . . . . . . . . . . . . . . . . . . . . . . 8
IMPORTANT NOTES . . . . . . . . . . . . . . . . . . . . . . . . . . . . . . . . 10
Panel Descriptions . . . . . . . . . . . . . . . . . . . . . . . . . . . . . . . . . 14
Top Panel . . . . . . . . . . . . . . . . . . . . . . . . . . . . . . . . . . . . . . . . . . . . . . . . . . . . . . . 14
Rear Panel . . . . . . . . . . . . . . . . . . . . . . . . . . . . . . . . . . . . . . . . . . . . . . . . . . . . . .18
Other Connectors . . . . . . . . . . . . . . . . . . . . . . . . . . . . . . . . . . . . . . . . . . . . . . . 19
Getting Ready . . . . . . . . . . . . . . . . . . . . . . . . . . . . . . . . . . . . . 20
Placing the ATELIER on the Stand . . . . . . . . . . . . . . . . . . . . . . . . . . . . . . . . 20
Attaching the Music Rest . . . . . . . . . . . . . . . . . . . . . . . . . . . . . . . . . . . . . . . . 21
Connecting the AC adaptor . . . . . . . . . . . . . . . . . . . . . . . . . . . . . . . . . . . . . . 21
Turning the Power On/O . . . . . . . . . . . . . . . . . . . . . . . . . . . . . . . . . . . . . . .22
Turning the Power On . . . . . . . . . . . . . . . . . . . . . . . . . . . . . . . . . . . . .22
Turning the Power O . . . . . . . . . . . . . . . . . . . . . . . . . . . . . . . . . . . . .22
Connections . . . . . . . . . . . . . . . . . . . . . . . . . . . . . . . . . . . . . . . . . . . . . . . . . . . . 23
Connecting to Output Device . . . . . . . . . . . . . . . . . . . . . . . . . . . . . . 23
Using Headphones . . . . . . . . . . . . . . . . . . . . . . . . . . . . . . . . . . . . . . . .24
Connecting Pedals . . . . . . . . . . . . . . . . . . . . . . . . . . . . . . . . . . . . . . . .24
Using the USB Memory . . . . . . . . . . . . . . . . . . . . . . . . . . . . . . . . . . . .26
Listening to the Demo Songs . . . . . . . . . . . . . . . . . . . . . . . . . . . . . . . . . . . .27
Playing Drums from the Entire Lower Keyboard
(Drums/SFX) . . . . . . . . . . . . . . . . . . . . . . . . . . . . . . . . . . . . . . . . . . . . . .50
Using the Lower Keyboard to Play the Bass Voice
(Pedal To Lower) . . . . . . . . . . . . . . . . . . . . . . . . . . . . . . . . . . . . . . . . . . . 51
Easily Playing Chords on the Lower Keyboard
(Easy One Finger) . . . . . . . . . . . . . . . . . . . . . . . . . . . . . . . . . . . . . . . . . .51
Realistically Expressing Acoustic Instrument Performances
(SuperNATURAL Voices) . . . . . . . . . . . . . . . . . . . . . . . . . . . . . . . . . . . . . . . . . 52
Selecting a SuperNATURAL Voice . . . . . . . . . . . . . . . . . . . . . . . . . . 52
Optimal Settings for Playing a SuperNATURAL Voice . . . . . . . . 53
Playing a SuperNATURAL Voice . . . . . . . . . . . . . . . . . . . . . . . . . . . . 54
Adjusting the Overall Volume Using an Expression Pedal . . . . . . . . .55
Performing with an Active Expression Voice . . . . . . . . . . . . . . . . . . . . . .56
Adding Decay to the Sound (Damper Pedal) . . . . . . . . . . . . . . . . . . . . .56
Using the Foot Switch . . . . . . . . . . . . . . . . . . . . . . . . . . . . . . . . . . . . . . . . . . .57
Performing with Rhythms . . . . . . . . . . . . . . . . . . . . . . . . . . 58
Selecting a Rhythm. . . . . . . . . . . . . . . . . . . . . . . . . . . . . . . . . . . . . . . . . . . . . . 58
Selecting Rhythms Stored in User Memory or USB Memory . 59
Playing Rhythm . . . . . . . . . . . . . . . . . . . . . . . . . . . . . . . . . . . . . . . . . . . . . . . . . 60
Stopping the Rhythm. . . . . . . . . . . . . . . . . . . . . . . . . . . . . . . . . . . . . .61
Changing a Tempo of Rhythm and Automatic Accompaniment . . .62
Playing Rhythm and Automatic Accompaniment . . . . . . . . . . . . . . . . . 62
Adding Variety to the Rhythm or Automatic Accompaniment . . . . . 63
Changing the Arrangement of the Rhythm and
Accompaniment (Variation) . . . . . . . . . . . . . . . . . . . . . . . . . . . . . . .63
A Simple Way to Make Automatic Accompaniment Settings
(One Touch Program) . . . . . . . . . . . . . . . . . . . . . . . . . . . . . . . . . . . . . . . . . . . .64
Deleting a Rhythm from User Memory or USB Memory . . . . . . . . . . . 65
Performing . . . . . . . . . . . . . . . . . . . . . . . . . . . . . . . . . . . . . . . . 28
Selecting Sounds (Voices) . . . . . . . . . . . . . . . . . . . . . . . . . . . . . . . . . . . . . . .28
About the Voices and Parts . . . . . . . . . . . . . . . . . . . . . . . . . . . . . . . .28
Functions of the Voice Buttons . . . . . . . . . . . . . . . . . . . . . . . . . . . . . 29
Selecting a Voice . . . . . . . . . . . . . . . . . . . . . . . . . . . . . . . . . . . . . . . . . .29
Recalling Panel Settings by Choosing a Keyword
(Music Assistant) . . . . . . . . . . . . . . . . . . . . . . . . . . . . . . . . . . . . . . . . . . . . . . . . 31
Creating Organ Sounds (Vintage Organ) . . . . . . . . . . . . . . . . . . . . . . . . . 32
Playing a Vintage Organ Voice . . . . . . . . . . . . . . . . . . . . . . . . . . . . . 33
Adjust the Volume Balance . . . . . . . . . . . . . . . . . . . . . . . . . . . . . . . . . . . . . . 35
Transposing to a Dierent Key (Key Transpose) . . . . . . . . . . . . . . . . . . . 36
Transpose the Pitch in Octave Units (Octave Shift) . . . . . . . . . . . . . . . .37
Adding Eects to a Voice . . . . . . . . . . . . . . . . . . . . . . . . . . . . . . . . . . . . . . . .38
Adding Harmony to a Melody (Harmony Intelligence) . . . . . . 38
Changing the Type of Harmony Intelligence . . . . . . . . . . . . . . . . 38
Adding Modulation to the Sound (Rotary Eect). . . . . . . . . . . . 39
Adding Resonance to the Sound (Sustain Eect) . . . . . . . . . . . .40
Adding Reverberation to the Sound (Reverb Eect) . . . . . . . . .41
Making the Sound Distort (Overdrive Eect) . . . . . . . . . . . . . . . . 43
Using the D Beam Controller to Modify the Sound . . . . . . . . . . . . . . . . 44
Using the Lower Keyboard Eectively . . . . . . . . . . . . . . . . . . . . . . . . . . . . 45
Playing the Solo Voice on the Lower Keyboard
(Solo To Lower) . . . . . . . . . . . . . . . . . . . . . . . . . . . . . . . . . . . . . . . . . . . . 47
Using the Lower Keyboard to Play the Bass Voice
(Bass Split) . . . . . . . . . . . . . . . . . . . . . . . . . . . . . . . . . . . . . . . . . . . . . . . . 48
Playing a Lower Voice with Percussion Instrument Sounds
and a Voice Phrase (Manual Percussion) . . . . . . . . . . . . . . . . . . . .49
Storing Your Performance Settings (Registration) . . . . 66
Storing Registrations . . . . . . . . . . . . . . . . . . . . . . . . . . . . . . . . . . . . . . . . . . . .67
Recalling a Registration . . . . . . . . . . . . . . . . . . . . . . . . . . . . . . . . . . . . . . . . . .67
Automatically Registering When You Switch Panel Settings . . . . . . .67
Saving Registration Sets . . . . . . . . . . . . . . . . . . . . . . . . . . . . . . . . . . . . . . . . .68
Loading Previously Saved Registration Sets Into the ATELIER . . . . . .70
Loading a Set of Registrations . . . . . . . . . . . . . . . . . . . . . . . . . . . . .70
Loading an Individual Registration . . . . . . . . . . . . . . . . . . . . . . . . . 71
Recalling the Order that the Registrations are Saved
(Load Next) . . . . . . . . . . . . . . . . . . . . . . . . . . . . . . . . . . . . . . . . . . . . . . .72
Deleting a Set of Registrations . . . . . . . . . . . . . . . . . . . . . . . . . . . . . . . . . . .73
Recording Your Performance . . . . . . . . . . . . . . . . . . . . . . . 74
Recording in SMF Format . . . . . . . . . . . . . . . . . . . . . . . . . . . . . . . . . . . . . . . . 75
Add a Count Sound to Match the Timing (Count In) . . . . . . . . . 76
Advanced Recording Methods . . . . . . . . . . . . . . . . . . . . . . . . . . . . . 77
Saving Performance Songs . . . . . . . . . . . . . . . . . . . . . . . . . . . . . . . . 81
Using Song with a Dierent Tempo Than That of the
Performance Data . . . . . . . . . . . . . . . . . . . . . . . . . . . . . . . . . . . . . . . . .83
Erasing Performance Data . . . . . . . . . . . . . . . . . . . . . . . . . . . . . . . . . 84
Recording in Audio Format . . . . . . . . . . . . . . . . . . . . . . . . . . . . . . . . . . . . . .85
Changing the Name of Performance Data . . . . . . . . . . . . . . . . . .87
Playing Performance Data from User Memory or a USB memory . . 88
Deleting a Saved Performance Songs . . . . . . . . . . . . . . . . . . . . . . . . . . . . 89
Detailed Settings for Various Functions . . . . . . . . . . . . . 90
Basic Operations in the Utility Screen . . . . . . . . . . . . . . . . . . . . . . . . . . . . 90
Adjusting How the Instrument Responds . . . . . . . . . . . . . . . . . . . . . . . .92
12

Contents
Adjusting the Volume of the Vintage Organ
(VintageOrganVolume) . . . . . . . . . . . . . . . . . . . . . . . . . . . . . . . . . . . .92
Selecting the Parts to which Vibrato or Chorus will be
Applied (Vibrato/Chorus Part) . . . . . . . . . . . . . . . . . . . . . . . . . . . . .92
Adjusting the Initial Touch Sensitivity (Initial Touch) . . . . . . . .92
Turning Initial Touch O (EZ Touch) . . . . . . . . . . . . . . . . . . . . . . . . 92
Changing How the Solo Voice Responds (Solo Mode) . . . . . . . 92
Layering the Solo Voice and Lower Voice
(SoloToLower Mode) . . . . . . . . . . . . . . . . . . . . . . . . . . . . . . . . . . . . . .92
Changing the Solo Split Point (Solo Split Point) . . . . . . . . . . . . .92
Changing the Bass Split Point (Bass Split Point) . . . . . . . . . . . . . 92
Changing the Pedalboard Polyphony (Pedal Bass Mode) . . . .93
Performance Settings . . . . . . . . . . . . . . . . . . . . . . . . . . . . . . . . . . . . . . . . . . .93
Changing the Foot Switch Functions
(L Foot Switch, R Foot Switch) . . . . . . . . . . . . . . . . . . . . . . . . . . . . . . 93
Changing the Pitch Bend Range (Pitch Bend Range) . . . . . . . .94
Changing the Function of the Expression Pedal
(Exp. Source) . . . . . . . . . . . . . . . . . . . . . . . . . . . . . . . . . . . . . . . . . . . . . .94
Adjusting the Depth of the Expression Pedal (Exp. Curve) . . . 94
Adjusting the Sensitivity of the D Beam Controller
(D Beam Sensitivity) . . . . . . . . . . . . . . . . . . . . . . . . . . . . . . . . . . . . . . . 94
Rhythm Settings . . . . . . . . . . . . . . . . . . . . . . . . . . . . . . . . . . . . . . . . . . . . . . . . 95
Producing Chords with Simple Fingering
(Chord Intelligence) . . . . . . . . . . . . . . . . . . . . . . . . . . . . . . . . . . . . . . . 95
Using the Leading Bass Function (Leading Bass) . . . . . . . . . . . .95
Preventing Rhythm Tempos from Switching Automatically
(Auto Std Tempo) . . . . . . . . . . . . . . . . . . . . . . . . . . . . . . . . . . . . . . . . . . 95
Playing a Countdown Sound When the Intro Ends
(Intro Count Down) . . . . . . . . . . . . . . . . . . . . . . . . . . . . . . . . . . . . . . . . 95
Changing the Sound of the Countdown
(Count Down Sound) . . . . . . . . . . . . . . . . . . . . . . . . . . . . . . . . . . . . . .95
Adjusting the Volume Balance of the Arranger
(AccompPartBalance) . . . . . . . . . . . . . . . . . . . . . . . . . . . . . . . . . . . . . .96
Registration Settings . . . . . . . . . . . . . . . . . . . . . . . . . . . . . . . . . . . . . . . . . . . . 96
Using the Foot Switch to Switch Registrations
(Registration Shift) . . . . . . . . . . . . . . . . . . . . . . . . . . . . . . . . . . . . . . . .96
Registration Arranger Update (Arranger Update) . . . . . . . . . . . 97
Registration Transpose Update (Trans. Update) . . . . . . . . . . . . .97
Recording and Playback Settings . . . . . . . . . . . . . . . . . . . . . . . . . . . . . . . . 97
Changing the Key When Playing Back Songs
(Playback Transpose) . . . . . . . . . . . . . . . . . . . . . . . . . . . . . . . . . . . . . .97
Changing the Metronome Setting (Metronome) . . . . . . . . . . . . 97
Adjusting the Metronome Volume (Metronome Volume) . . . 97
Changing the Sound of the Metronome
(Metronome Sound) . . . . . . . . . . . . . . . . . . . . . . . . . . . . . . . . . . . . . . . 97
Changing the Beat Setting (Beat) . . . . . . . . . . . . . . . . . . . . . . . . . .97
Silencing a Specic Track (Track Mute) . . . . . . . . . . . . . . . . . . . . .98
Muting Individual Channels of Performance Data
(Channel Mute) . . . . . . . . . . . . . . . . . . . . . . . . . . . . . . . . . . . . . . . . . . . .99
Adjusting the Audio Recording Volume (Audio Rec Gain) . . . 99
Switching the Display of Lyrics On or O (Lyrics) . . . . . . . . . . . . 99
Setting the Type of CD to be Played Back (CD/Audio Type) . .99
Media Settings . . . . . . . . . . . . . . . . . . . . . . . . . . . . . . . . . . . . . . . . . . . . . . . . 100
Creating a Folder in USB Memory or User Memory
(Create Folder) . . . . . . . . . . . . . . . . . . . . . . . . . . . . . . . . . . . . . . . . . . 100
Copying Performance Song (Copy Song) . . . . . . . . . . . . . . . . . 101
Copying Registrations (Copy Registration) . . . . . . . . . . . . . . . . 102
Copying Rhythms (Copy Rhythm) . . . . . . . . . . . . . . . . . . . . . . . . 103
Formatting a USB Memory (Format Media) . . . . . . . . . . . . . . . 104
Changing the USB Memory Setting
(USB Memory Mode) . . . . . . . . . . . . . . . . . . . . . . . . . . . . . . . . . . . . 104
MIDI Settings . . . . . . . . . . . . . . . . . . . . . . . . . . . . . . . . . . . . . . . . . . . . . . . . . 105
Selecting the MIDI Transmit Channel
(Tx MIDI Channel) . . . . . . . . . . . . . . . . . . . . . . . . . . . . . . . . . . . . . . . 105
MIDI IN Mode (MIDI IN Mode) . . . . . . . . . . . . . . . . . . . . . . . . . . . . 105
Specifying Transmission of PC Numbers
(Send PC Switch) . . . . . . . . . . . . . . . . . . . . . . . . . . . . . . . . . . . . . . . . 105
Setting PC Numbers (PC Number) . . . . . . . . . . . . . . . . . . . . . . . . 105
Other Settings . . . . . . . . . . . . . . . . . . . . . . . . . . . . . . . . . . . . . . . . . . . . . . . . 106
Adjust the Standard Pitch (Master Tune) . . . . . . . . . . . . . . . . . . 106
Adjusting the Display Brightness (LCD Contrast) . . . . . . . . . . 106
Selecting the Screen Language (Language) . . . . . . . . . . . . . . 106
Disabling Rhythm-related Buttons (Rhythm Lock) . . . . . . . . 106
Using the V-LINK function (V-LINK) . . . . . . . . . . . . . . . . . . . . . . . . . . . . . 106
Restoring All the Factory Default Settings (Factory Reset) . . . . . . . 108
Connections with Other Equipment . . . . . . . . . . . . . . . 109
Connecting a CD Drive and Playing Songs. . . . . . . . . . . . . . . . . . . . . . 109
Listening to Songs from Music CD . . . . . . . . . . . . . . . . . . . . . . . 109
Enjoying Karaoke with a Music CD (Center Cancel) . . . . . . . . 110
Using a Song’s Melody as a Guide (Guide) . . . . . . . . . . . . . . . . 110
Enjoying VIMA TUNES Songs . . . . . . . . . . . . . . . . . . . . . . . . . . . . . 111
Connecting an Audio Device and Playback Sounds . . . . . . . . . . . . . 111
Changing the Speaker Connection Settings . . . . . . . . . . . . . . . . . . . . 112
Outputting Sounds from the Aux Out Jacks (Aux Out) . . . . 112
Specifying the Output of the Aux Out Jacks
(Aux Out Mode) . . . . . . . . . . . . . . . . . . . . . . . . . . . . . . . . . . . . . . . . . 112
Connecting a Computer . . . . . . . . . . . . . . . . . . . . . . . . . . . . . . . . . . . . . . . 113
Making the Settings for the USB Driver . . . . . . . . . . . . . . . . . . . 113
Connecting MIDI Devices . . . . . . . . . . . . . . . . . . . . . . . . . . . . . . . . . . . . . . 113
Troubleshooting . . . . . . . . . . . . . . . . . . . . . . . . . . . . . . . . . . 115
Error Message . . . . . . . . . . . . . . . . . . . . . . . . . . . . . . . . . . . . 119
Chord List . . . . . . . . . . . . . . . . . . . . . . . . . . . . . . . . . . . . . . . . 120
Glossary . . . . . . . . . . . . . . . . . . . . . . . . . . . . . . . . . . . . . . . . . . 122
Stored Items . . . . . . . . . . . . . . . . . . . . . . . . . . . . . . . . . . . . . . 123
Main Specications . . . . . . . . . . . . . . . . . . . . . . . . . . . . . . . 124
Index . . . . . . . . . . . . . . . . . . . . . . . . . . . . . . . . . . . . . . . . . . . . 126
13
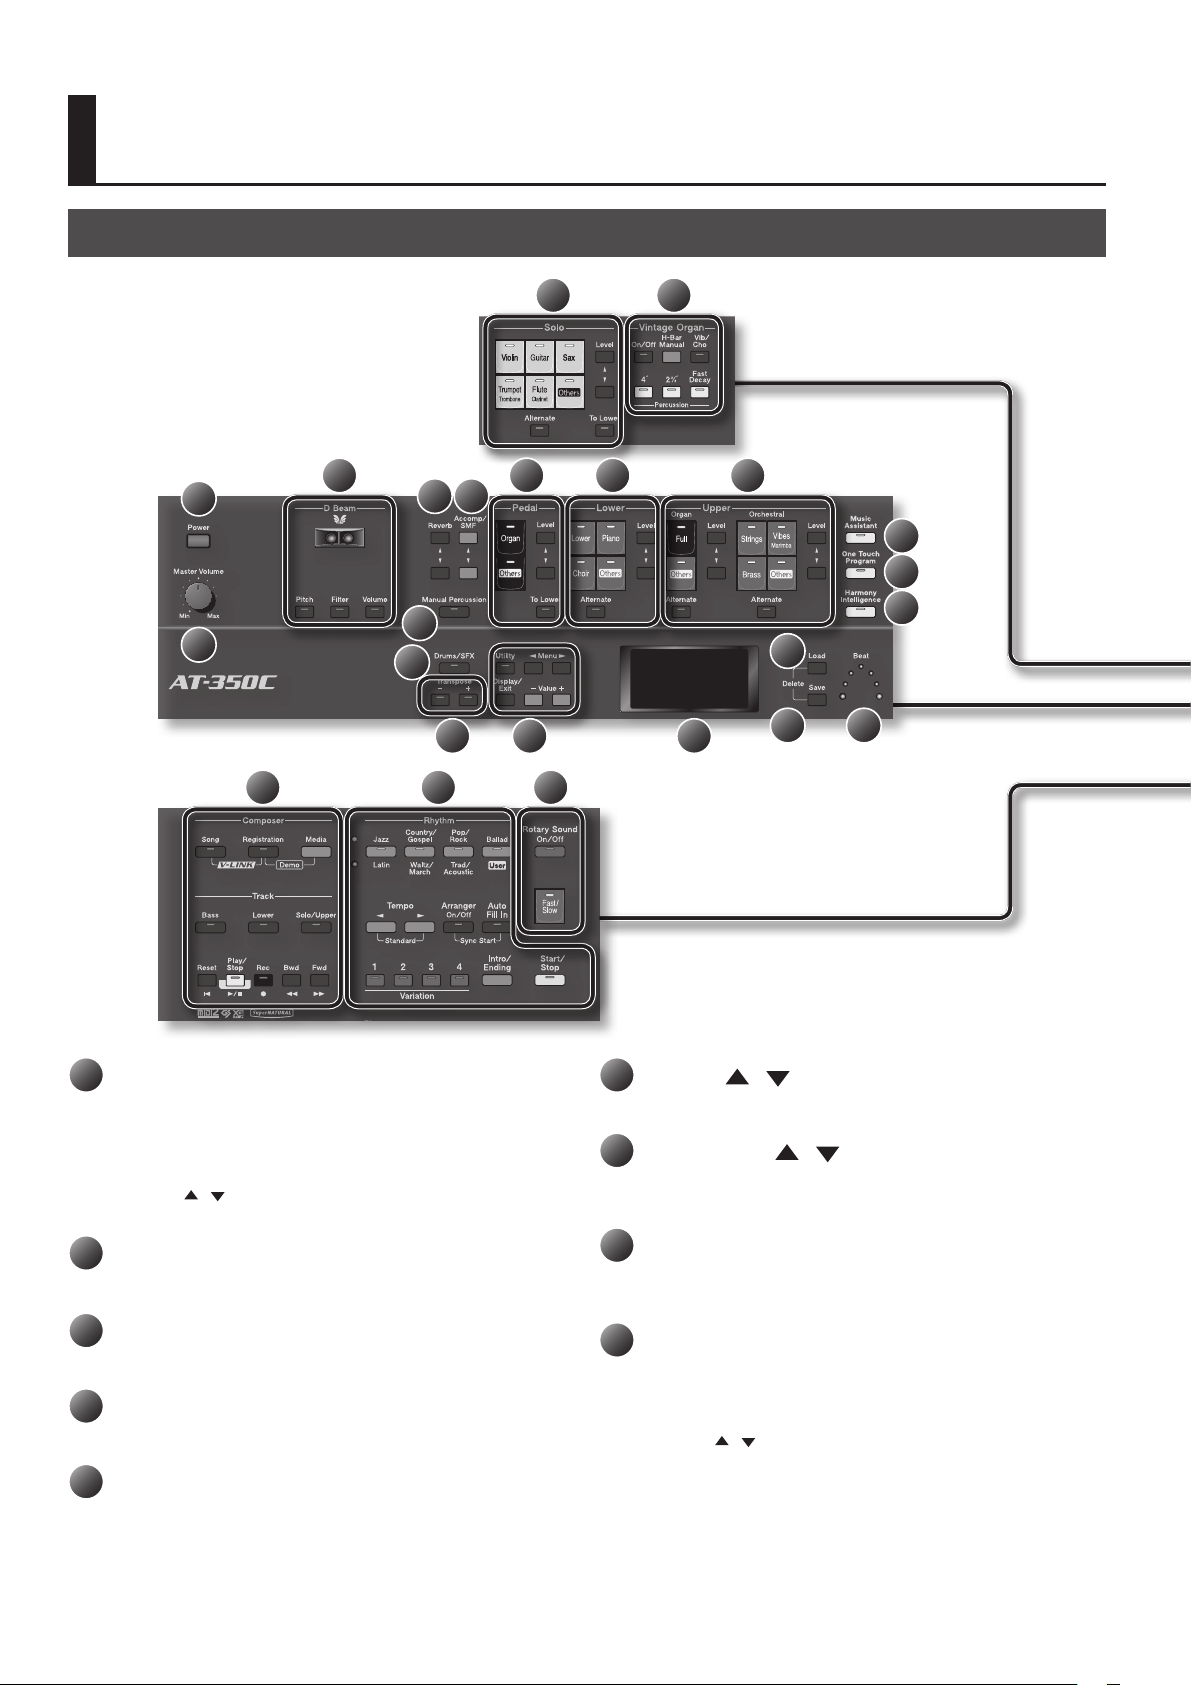
Panel Descriptions
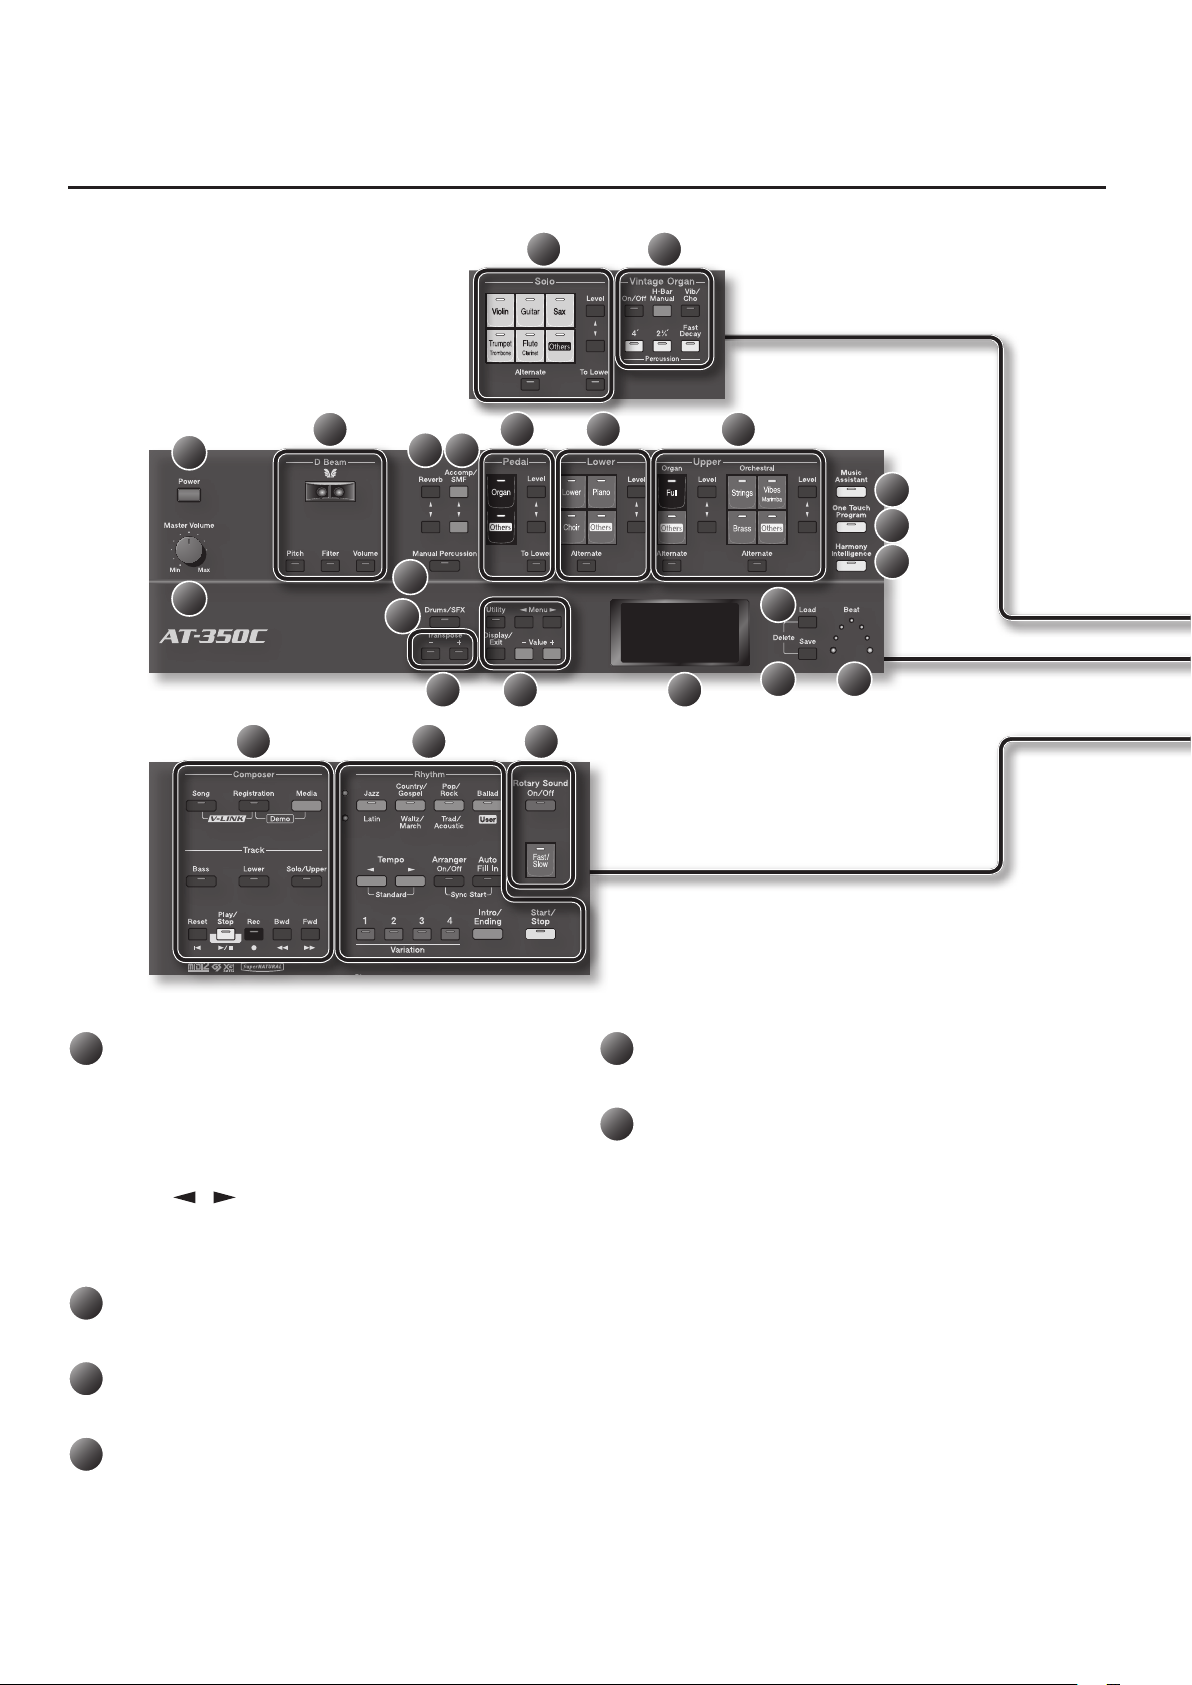
Top Panel
5
3
8
4
15
22 23 24
1
9 10
6 7
16 17 18
2
11
12
13
14
19
20 21
1
Solo voice select buttons (p. 29)
Use these buttons to select a solo voice and to adjust the volume of
the solo voice.
Solo part
[Alternate] button (p. 29)
Level [
[To Lower] button (p. 47)
2
Vintage Organ buttons (p. 32)
These buttons add vintage organ sounds.
3
[Power] switch (p. 22)
This switch turns the power on/o.
4
[Master Volume] knob (p. 22)
This knob adjusts the overall volume.
5
D Beam (p. 44)
You can apply eects to the sound by positioning your hand above
the D Beam controller.
] [ ] buttons (p. 35)
14
6
Reverb [ ] [ ] buttons (p. 41)
These buttons adjust the amount of reverb.
7
Accomp/SMF [ ] [ ] buttons (p. 35)
These buttons adjust the volume of the automatic accompaniment
or rhythm.
8
[Manual Percussion] button (p. 45)
This button lets you play a variety of drum sounds or sound eects
on the lower keyboard.
9
Pedal bass voice select buttons (p. 29)
These buttons let you select the pedal bass voice and adjust the
volume of the pedal bass voice.
Pedal part
Level [
[To Lower] button (p. 35)
] [ ] buttons (p. 51)
Panel Descriptions
25
Panel Descriptions
10
Lower voice select buttons (p. 29)
These buttons let you select the lower voice and adjust the volume
of the lower voice.
Lower part
[Alternate] button (p. 29)
Level [
11
Upper voice select buttons (p. 29)
These buttons let you select the upper voice and adjust the volume
of the upper voice.
Upper Organ part, Upper Orchestral part
[Alternate] button (p. 29)
Level [
12
[Music Assistant] button (p. 31)
This button lets you recall panel settings by selecting a keyword.
] [ ] buttons (p. 35)
] [ ] buttons (p. 35)
26
13
[One Touch Program] button (p. 64)
This button automatically selects panel settings that are suitable for
the automatic accompaniment or rhythm.
14
[Harmony Intelligence] button (p. 38)
This button adds harmony to the sound.
15
[Drums/SFX] button (p. 50)
This button lets you play a variety of drum sounds or sound eects
across the entire lower keyboard.
16
Transpose [-] [+] buttons (p. 36)
These buttons transpose the keyboard pitch.
15
Panel Descriptions
5
3
8
4
15
22 23 24
1
9 10
6 7
16 17 18
2
11
12
13
14
19
20 21
17
[Utility] button (p. 90)
This button takes you to the Utility menu.
[Display/Exit] button
This button returns you to the previous screen or cancels an
operation.
Menu [
These buttons select parameters.
Value [-] [+] buttons
These buttons select a song or rhythm, or edit the value of a setting.
18
Display (p. 23)
This shows information such as the rhythm name or song title.
19
[Load] button (p. 70)
This button loads a registration set or song into the ATELIER.
20
[Save] button (p. 68, p. 81)
This button saves a registration set or performance data.
] [ ] buttons
16
21
Beat indicator (p. 62)
This indicator will blink in time with the tempo or time signature.
22
Composer (p. 74)
These buttons let you record your performance or play back a song.
[Song] button
[Registration] button
[Media] button
Track buttons
[Bass] button
[Lower] button
[Solo/Upper] button
[Reset] button
[Play/Stop] button
[Rec] button
[Bwd] button
[Fwd] button
25
Panel Descriptions
Panel Descriptions
23
Rhythm select buttons (p. 58)
These buttons select and play rhythms.
Rhythm button
Tempo [
Arranger [On/O] button (p. 62)
Auto [Fill in] button (p. 63)
Variation [1]–[4] buttons (p. 63)
[Intro/Ending] button (p. 60)
[Start/Stop] button (p. 60)
24
Rotary sound buttons (p. 39)
These buttons add modulation to the sound.
[On/O] button
[Fast/Slow] button
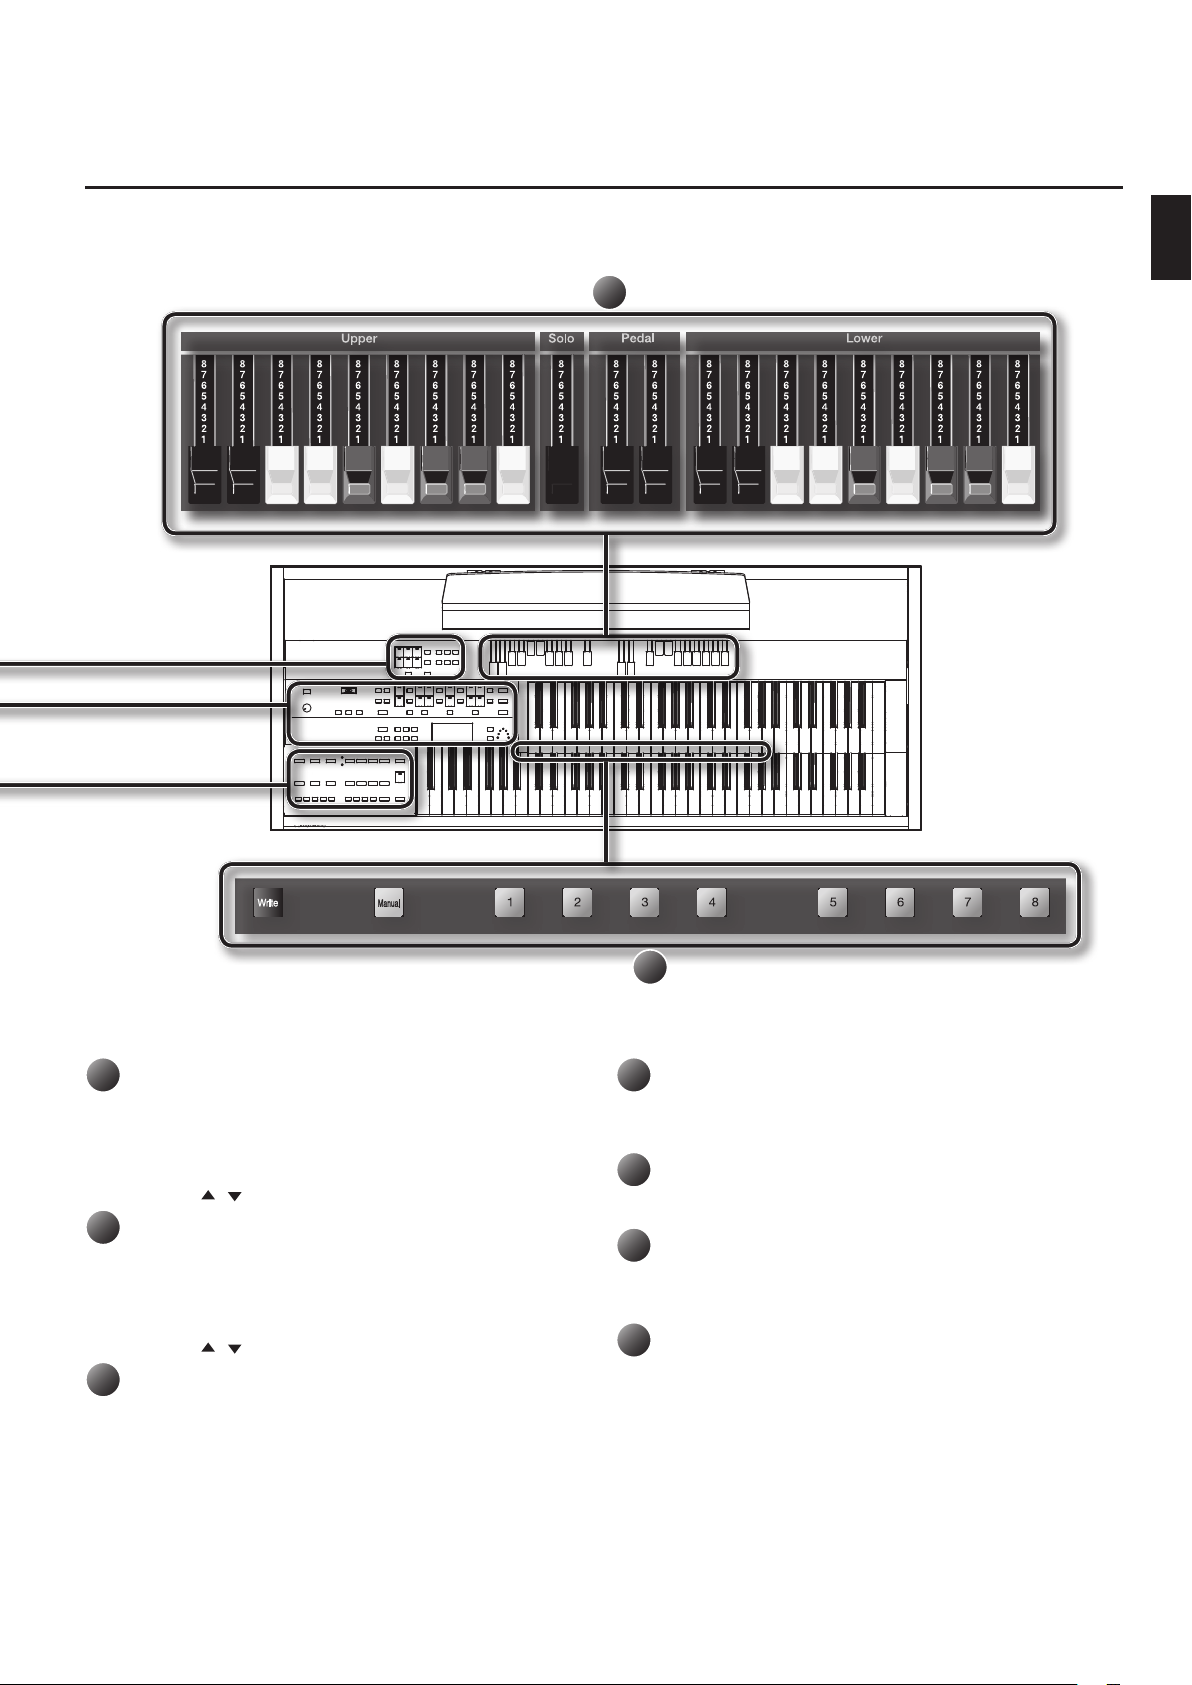
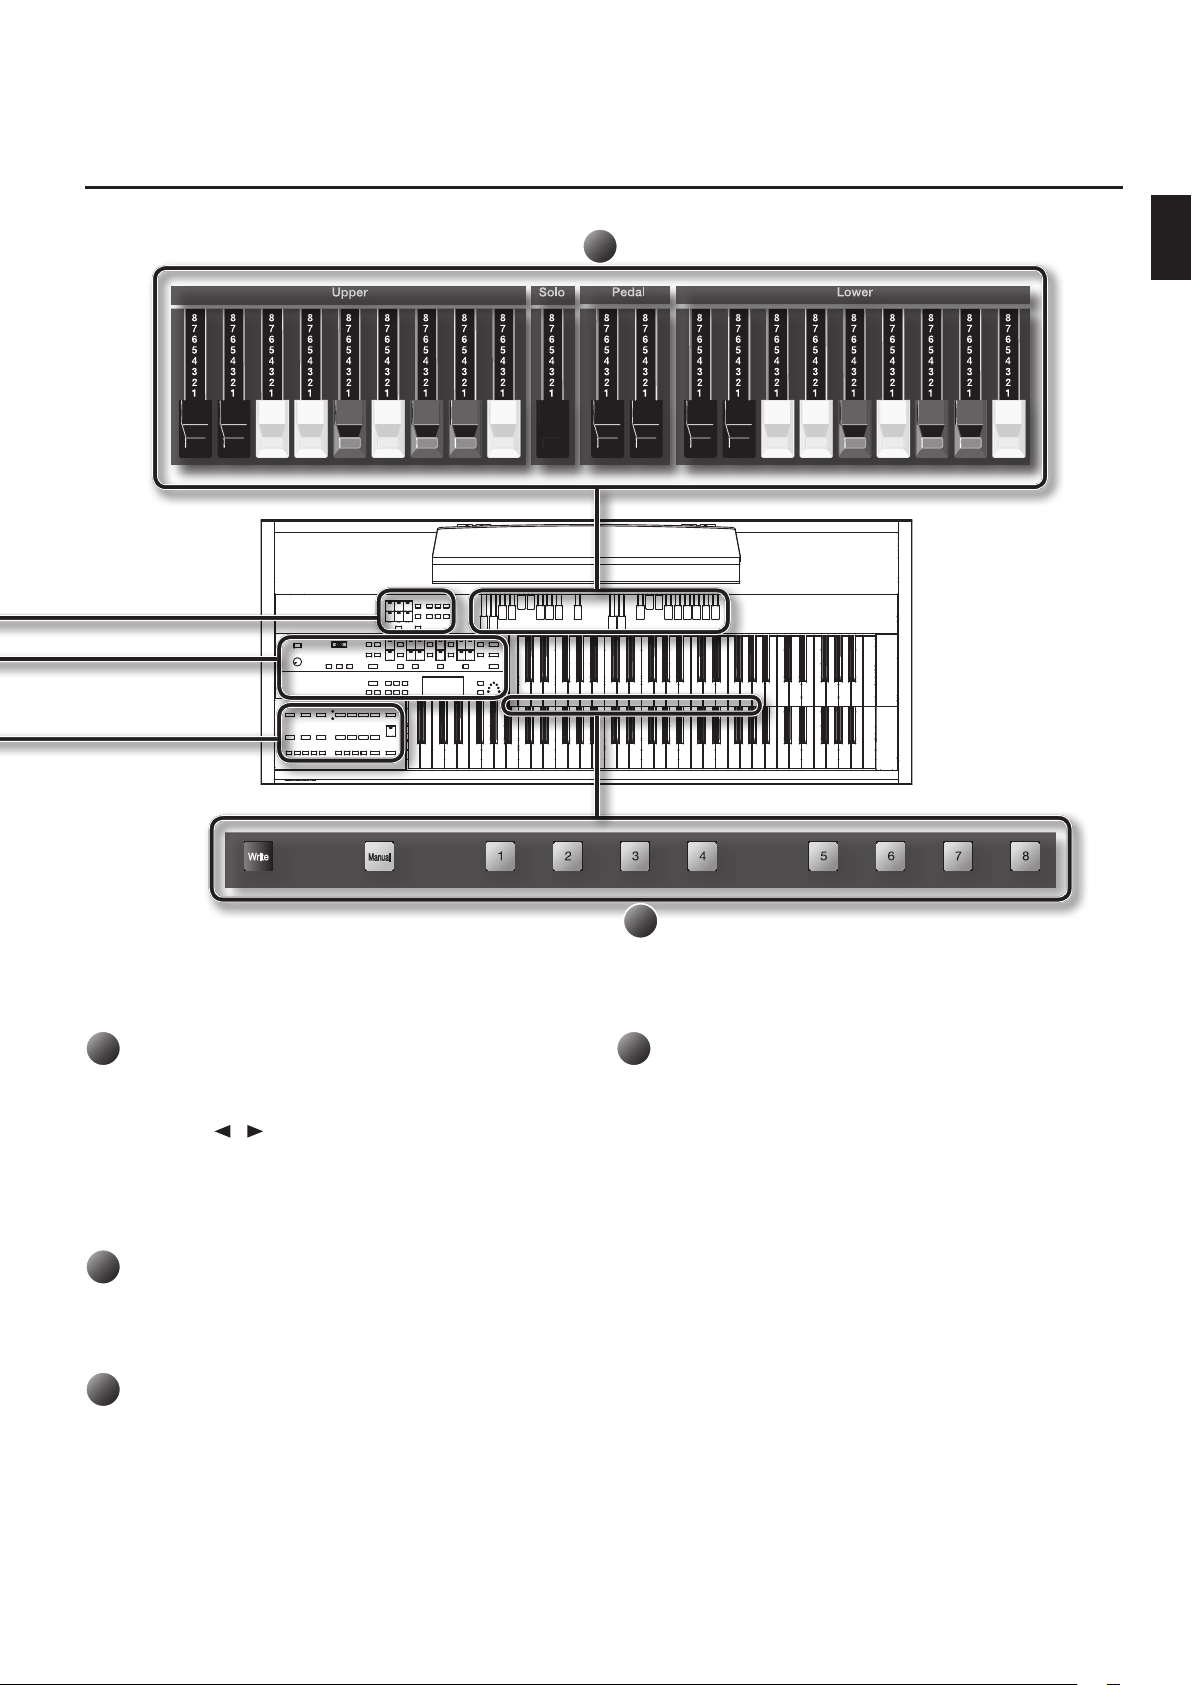
25
Harmonic bars (p. 32)
Use these bars to shape the organ sound.
] [ ] buttons (p. 62)
26
26
Registration buttons (p. 67)
Use these buttons to recall or store registrations.
[Write] button
[Manual] button
Registration [1]–[8] buttons
17
Panel Descriptions
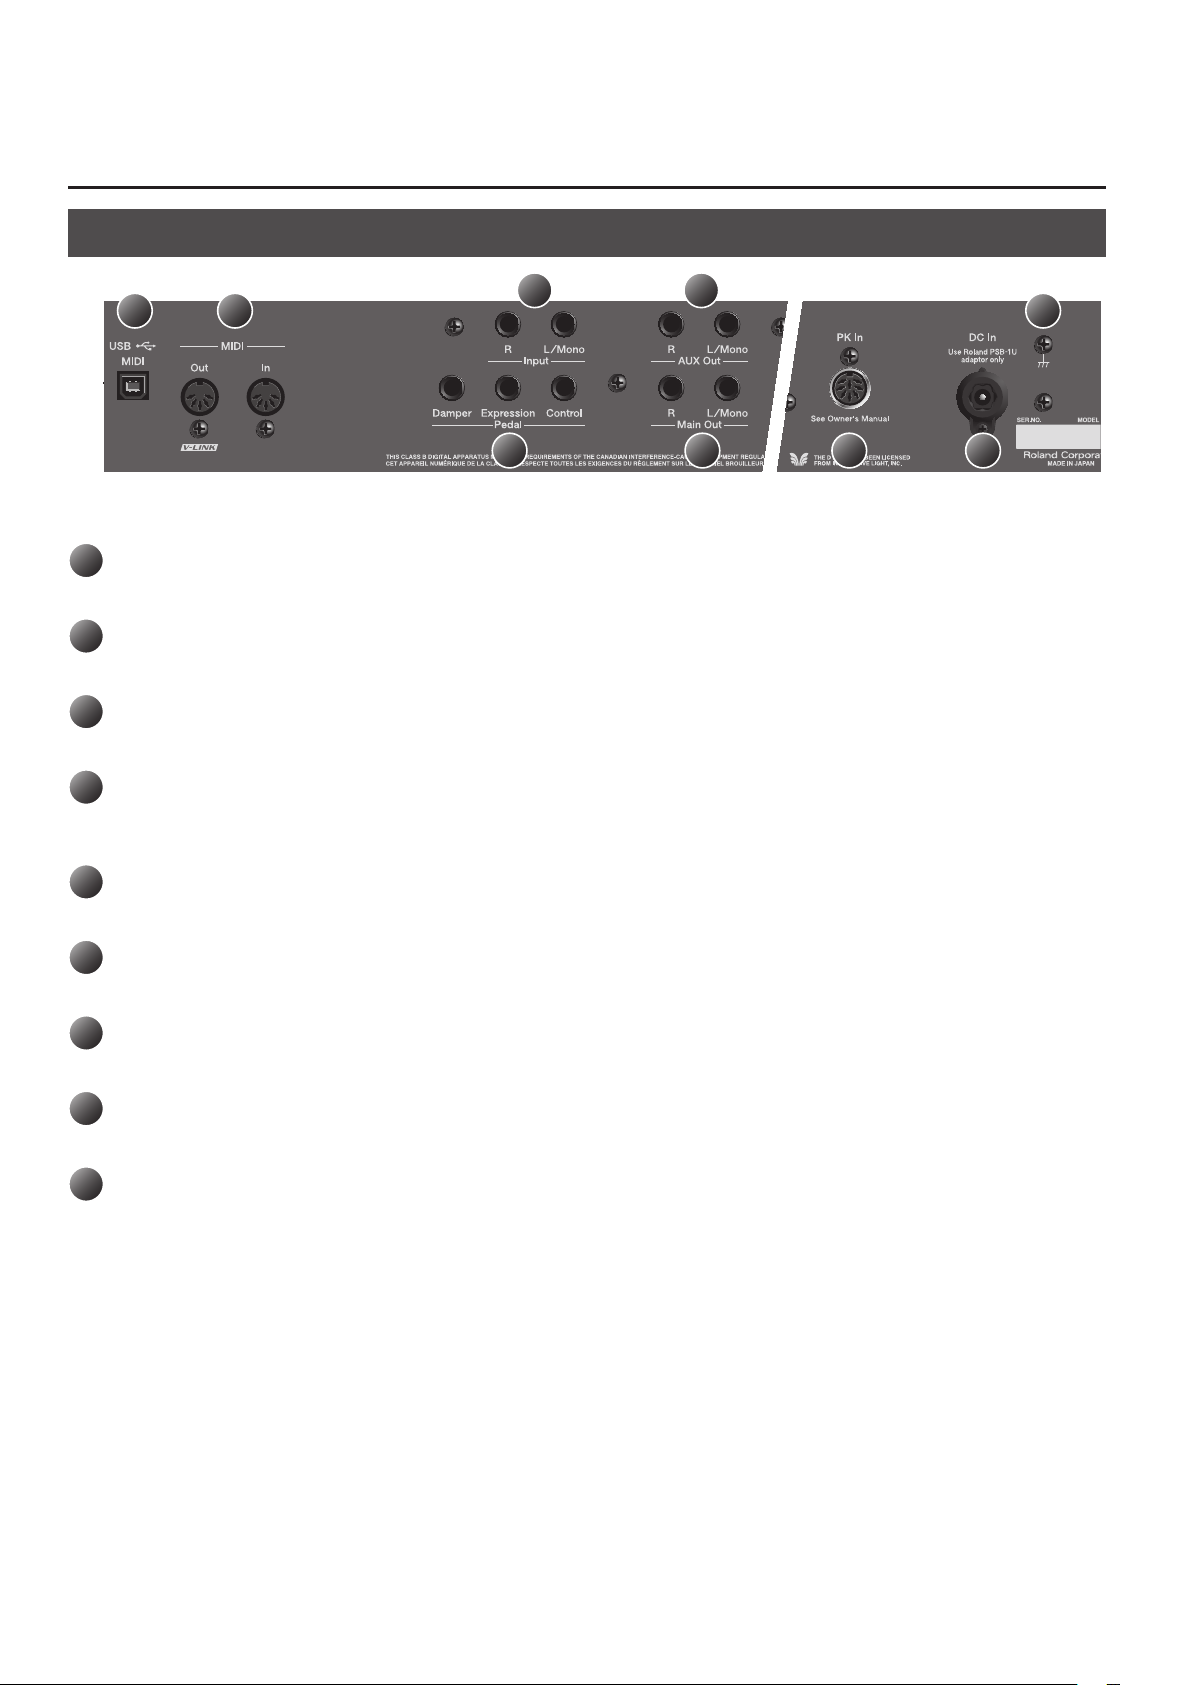
Rear Panel
3
1
1
USB (MIDI) connector
Connect your computer for transferring performance data (p. 113).
2
MIDI connectors
Connect an external MIDI device here to transfer performance data (p. 113).
3
Input jacks
You can connect an audio source here (p. 111).
4
AUX Out jacks
By connecting speakers or an external reverb unit here, you’ll be able to much more readily express the expansiveness of the stereo sound eld and
add more of a sense of presence to your music (p. 112).
2
5
4
6 7 8
9
5
Pedal jacks
Connect an expression pedal (EV-7; sold separately) or pedal switch (DP series; sold separately) to these jacks (p. 26).
6
Main Out jacks
To listen to the ATELIER’s sound through speakers, connect your audio system or speakers to these jacks.
7
PK In connector
Connect the pedalboard (PK series; sold separately) to this socket (p. 24).
8
DC In jack
Connect the included AC adaptor here (p. 21).
9
Grounding terminal
Depending on the circumstances of a particular setup, you may experience a discomforting sensation, or perceive that the surface feels gritty to
the touch when you touch this device, or the metal portions of other objects. This is due to an innitesimal electrical charge, which is absolutely
harmless.
However, if you are concerned about this, connect the ground terminal (see gure) with an external ground. When the unit is grounded, a slight
hum may occur, depending on the particulars of your installation. If you are unsure of the connection method, contact the nearest Roland Service
Center, or an authorized Roland distributor, as listed on the “Information” page.
Unsuitable places for connection
• Water pipes (may result in shock or electrocution)
• Gas pipes (may result in re or explosion)
• Telephone-line ground or lightning rod (may be dangerous in the event of lightning)
18
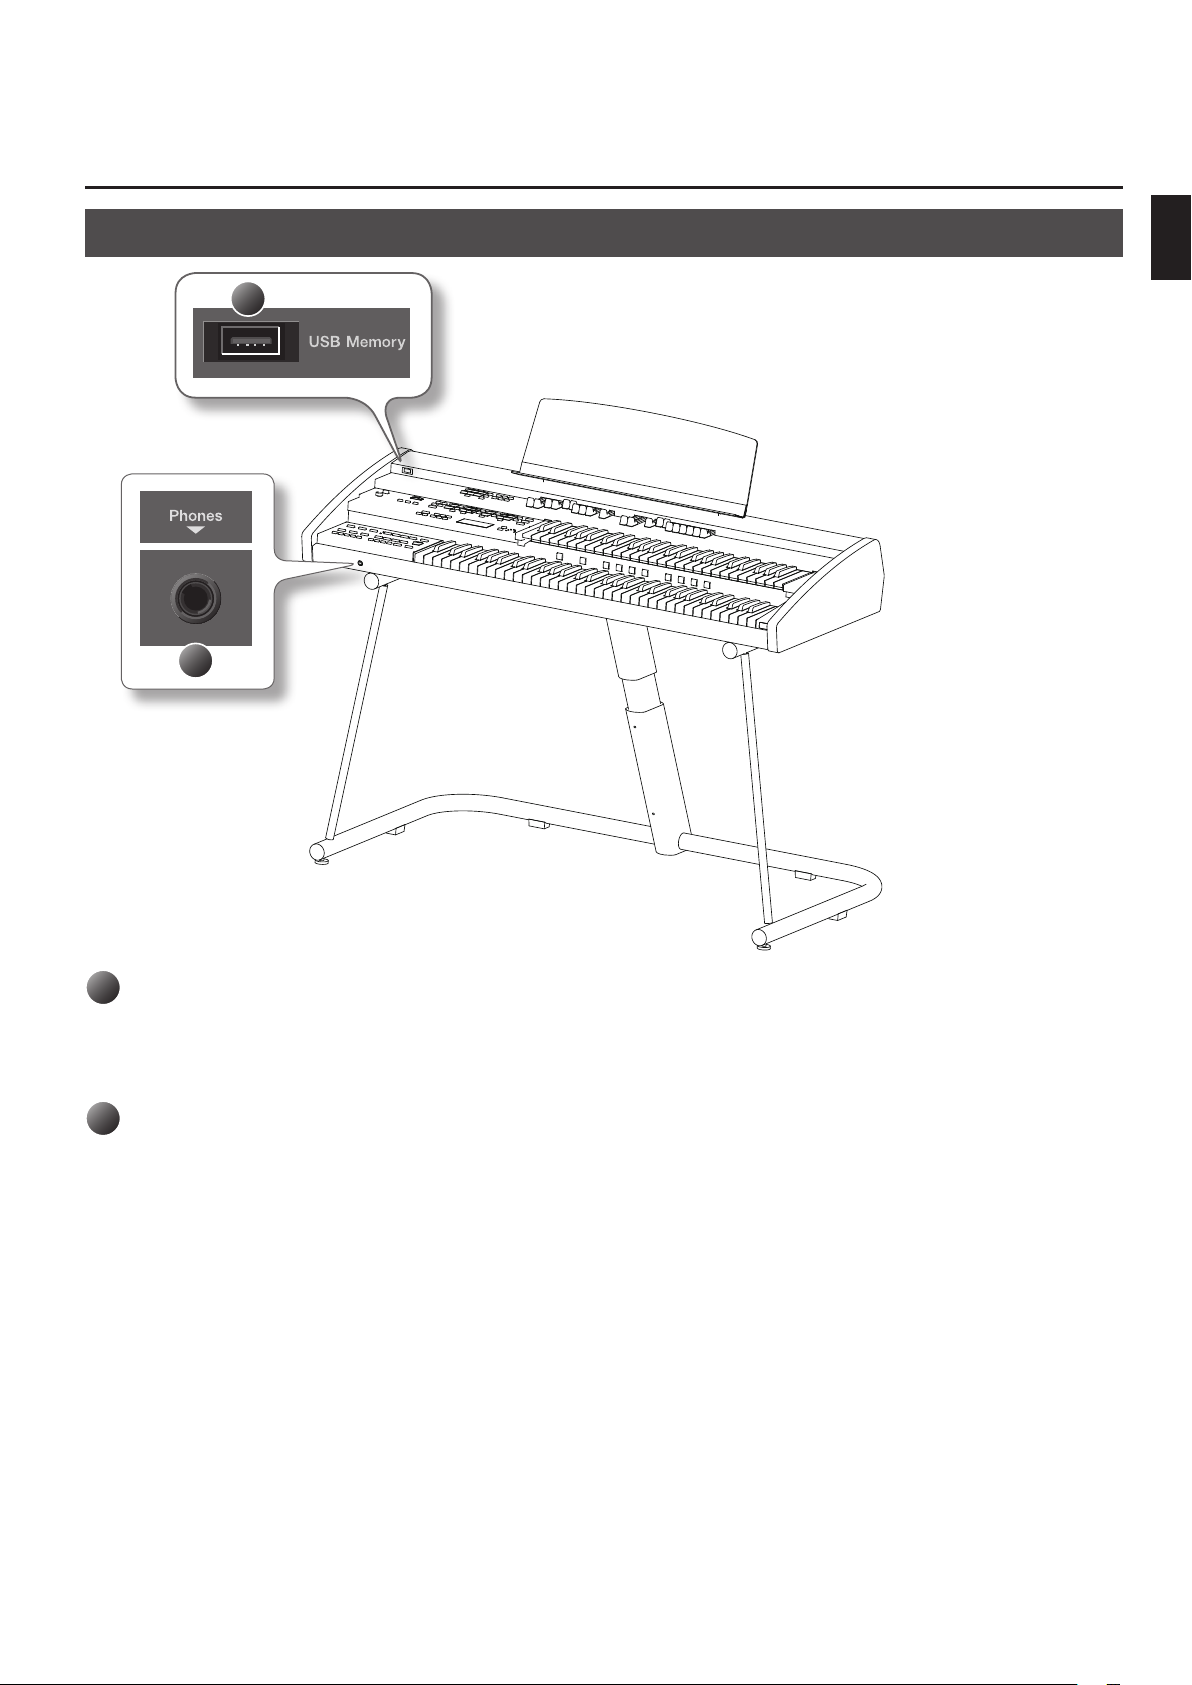
Other Connectors
Panel Descriptions
1
2
Panel Descriptions
1
USB Memory connector
This port lets you connect separately available USB memory or a CD drive.
You can use USB memory to store a registration set or a song that you’ve recorded on the ATELIER (p. 68).
You can also connect a CD drive and play back a music CD or a CD-ROM that contains SMF music les (p. 109).
2
Phones jack
Connect your headphones here (p. 24).
19
Getting Ready
Top view
Top view
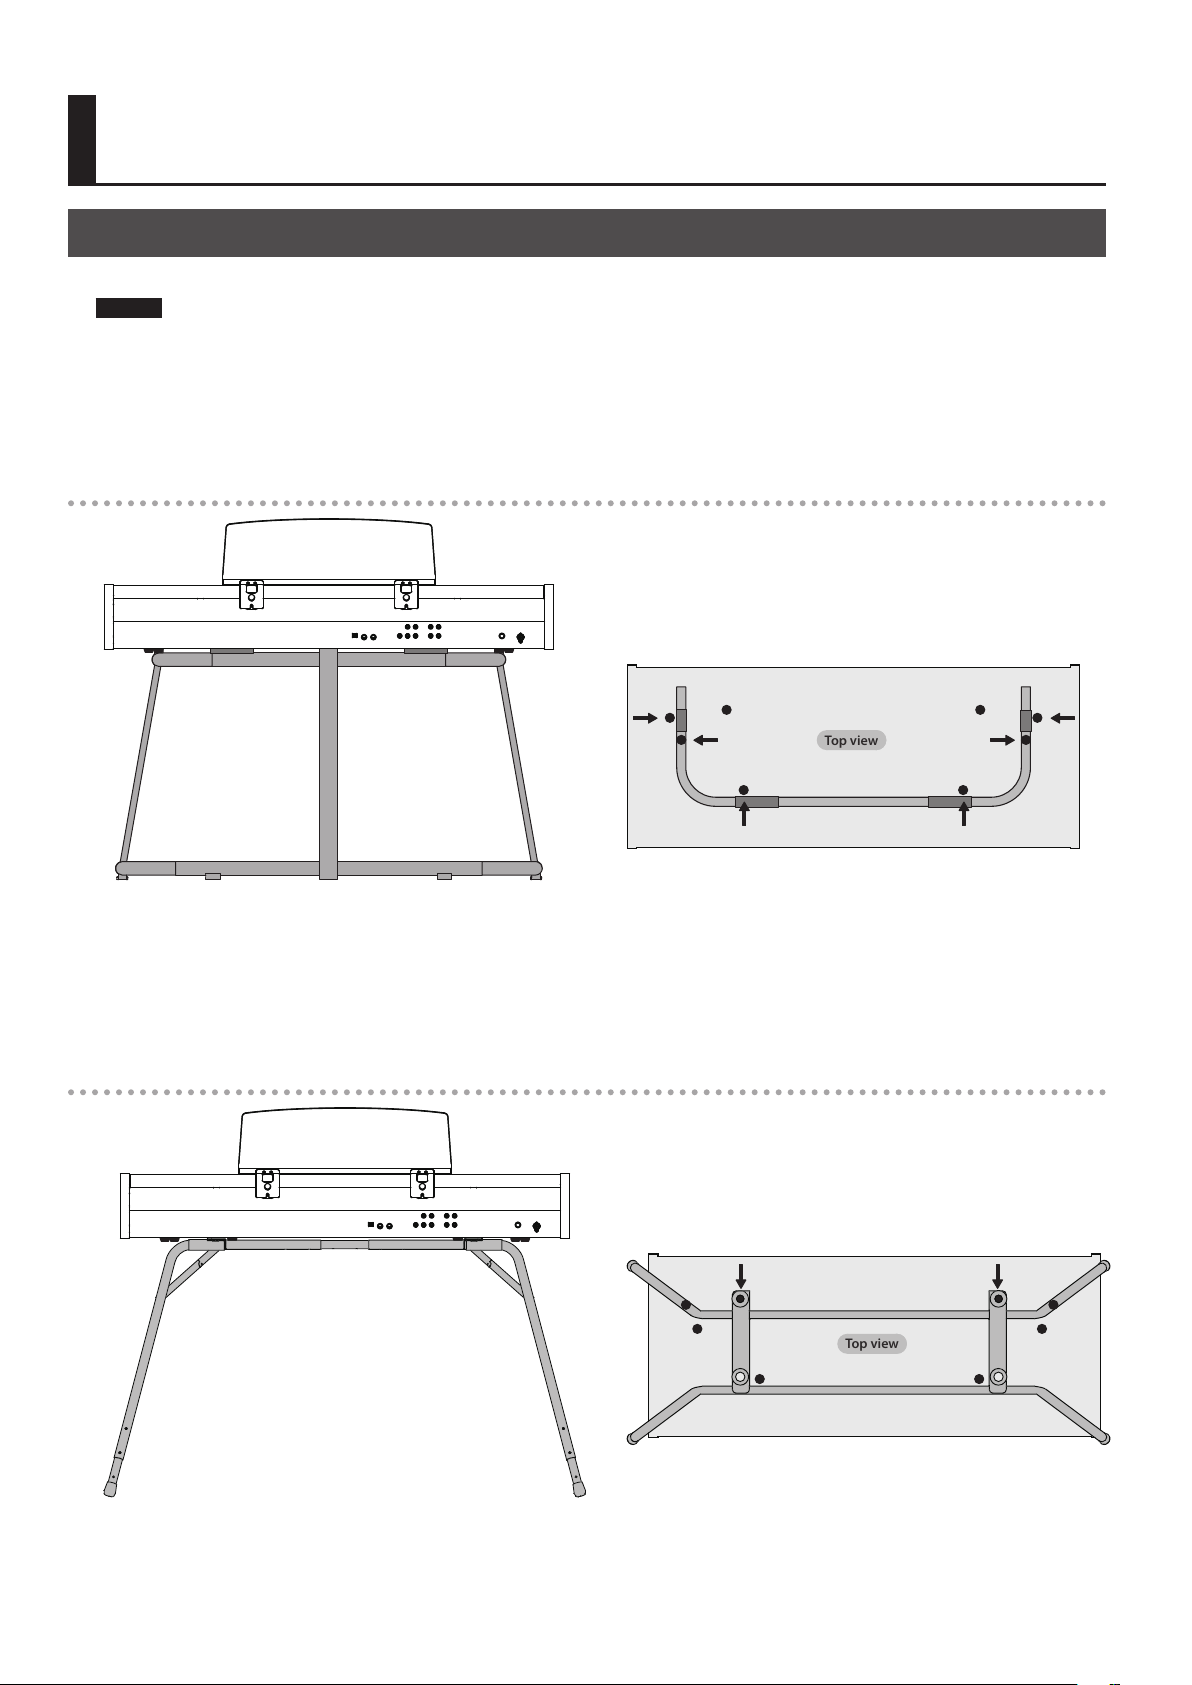
Placing the ATELIER on the Stand
If you place the ATELIER on a stand, you must use the KS-G8 or the KS-12 (sold separately).
NOTE!
• When placing the ATELIER on the stand, be careful not to pinch your ngers between the instrument and the stand.
• When lifting the ATELIER onto the stand, make sure to enlist the help of at least one other person.
• Using the ATELIER with any other stand may produce an unstable situation, possibly causing the instrument to fall or overturn, and resulting in
injury or damage.
• For details on how to assemble the stand, refer to the owner’s manual that accompanied the stand.
Placing on the KS-G8
Front (keyboard) side
D D
A
B
B
A
1. Place the ATELIER in the position shown in the illustration.
• Position rubber feet “A” on the outside of the stand’s rubber pads.
• Position rubber feet “B” directly above the stand’s arms.
• Position rubber feet “C” so that they contact the inside of the stand’s rubber pads.
* Make sure that the ATELIER’s eight rubber feet (A–D) are not resting on the stand’s rubber pads.
Placing on the KS-12
C
Rear panel side
D D
Front (keyboard) side
C
1. Place the ATELIER in the position shown in the illustration.
Position rubber feet “D” so they t inside the holes on the stand.
20
Rear panel side
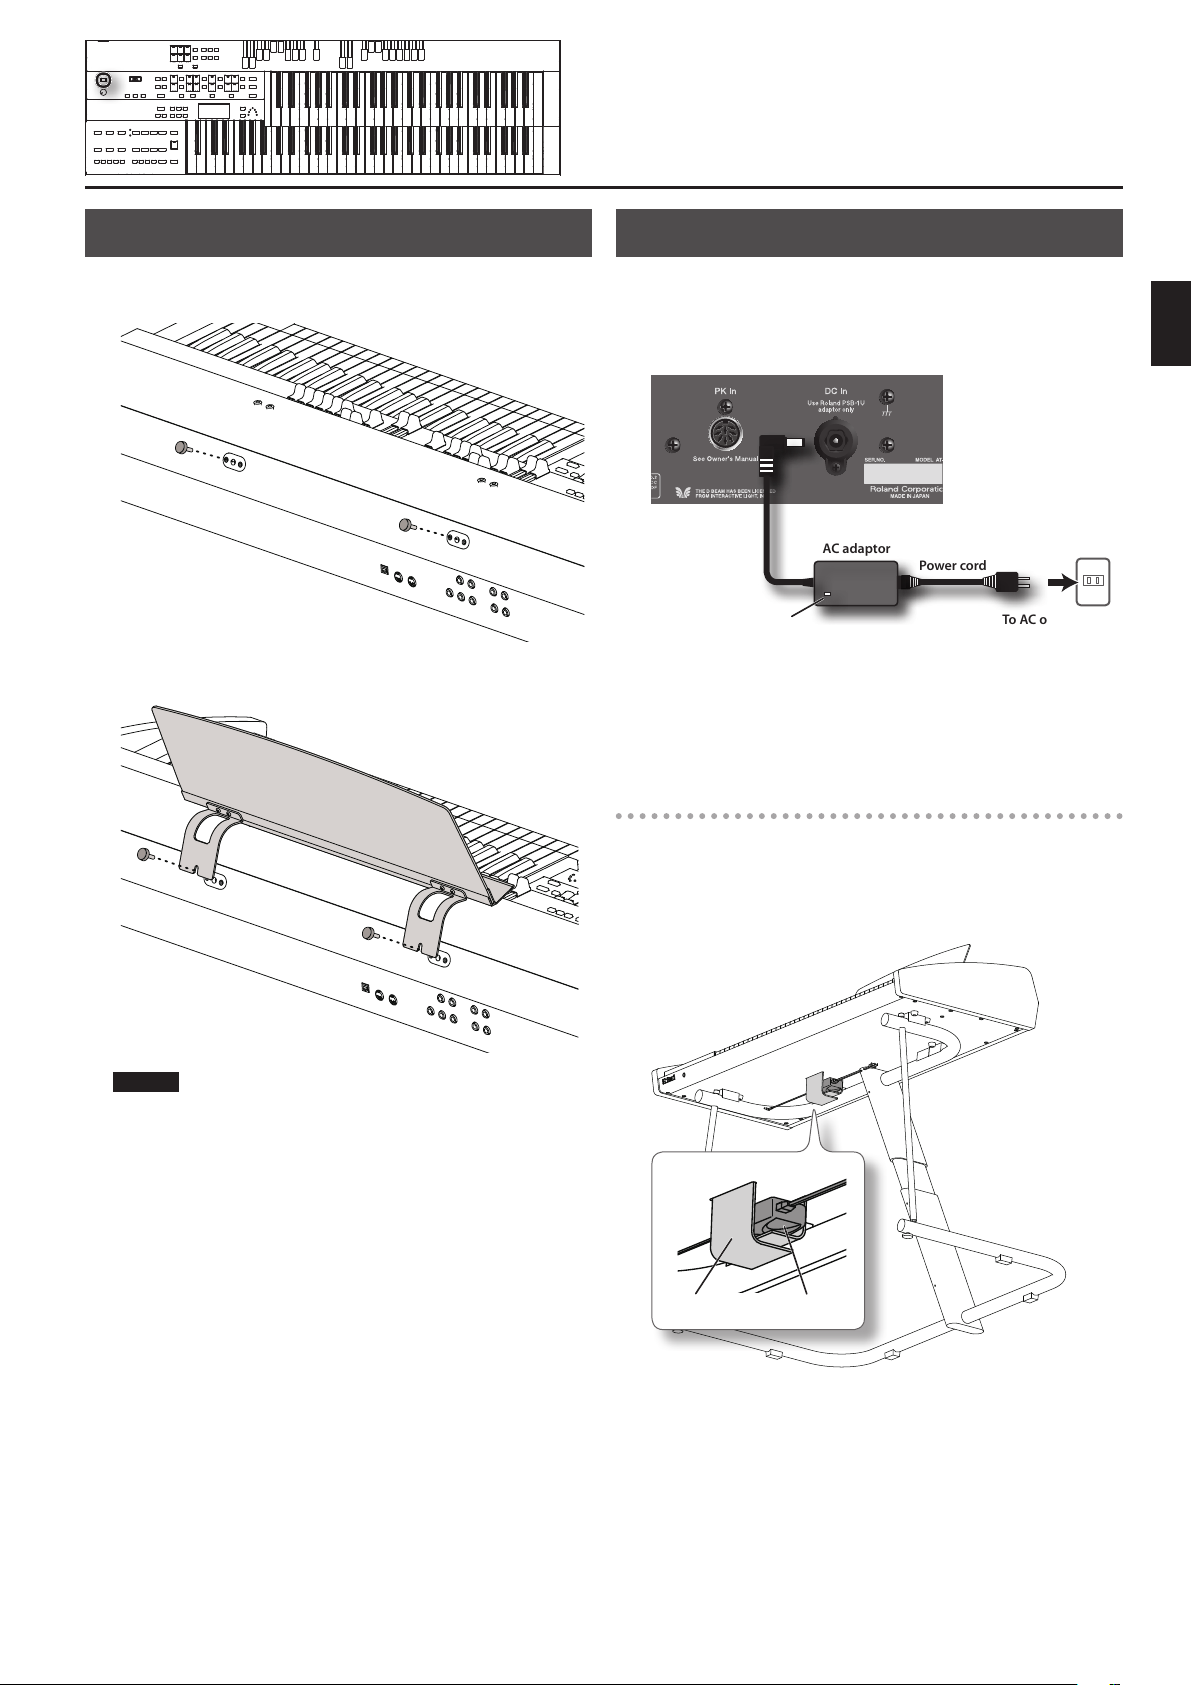
Attaching the Music Rest
Connecting the AC adaptor
1. Remove the two music rest fastening screws from the rear
panel.
2. Tighten the two screws to fasten the music rest in place.
1. Make sure that the [POWER] switch is o (outward position).
2. Connect the included AC adaptor to the DC In jack located
on the ATELIER’s rear panel, and plug the power cord into an
electrical outlet.
AC adaptor
Indicator
If you do not wish to attach the AC adaptor to the bottom of the
ATELIER, place the AC adaptor so that the surface with the indicator
(see illustration) is facing upward.
The indicator will light when you plug the AC adaptor into an AC
outlet.
Power cord
To AC outlet
Placing the ATELIER on a stand
If you wish to use the ATELIER while it is placed on a stand, attach the
AC adaptor to the bottom of the instrument.
Orient the AC adaptor so that its printed surface is against the bottom
of the instrument (upward) and its indicator is facing down, and fasten
it with the strap.
Getting Ready
NOTE!
• When attaching the music rest, support it securely with your hand
so that it does not fall.
• Be careful not to pinch your hand or ngers when attaching the
music rest.
• Use only the included screws.
• To detach the music rest, support it with your hand and slowly
remove the screws. After detaching the music rest, rmly tighten
the fastening screws.
• The music rest fastening screws you remove must be kept out
of the reach of small children so that they will not be swallowed
accidentally.
Band AC adaptor
* Fasten the AC adaptor securely so that it does not fall.
* When removing the ATELIER from a stand, always be sure to rst
detach the AC adaptor from the bottom panel of the instrument.
21
Turning the Power On/O
Turning the Power O
* Once the connections have been completed, turn on power to your
various devices in the order specied. By turning on devices in
the wrong order, you risk causing malfunction and/or damage to
speakers and other devices.
* Before switching the power on/o, always be sure to turn the
volume down. Even with the volume turned down, you might hear
some sound when switching the power on/o. However, this is
normal and does not indicate a malfunction.
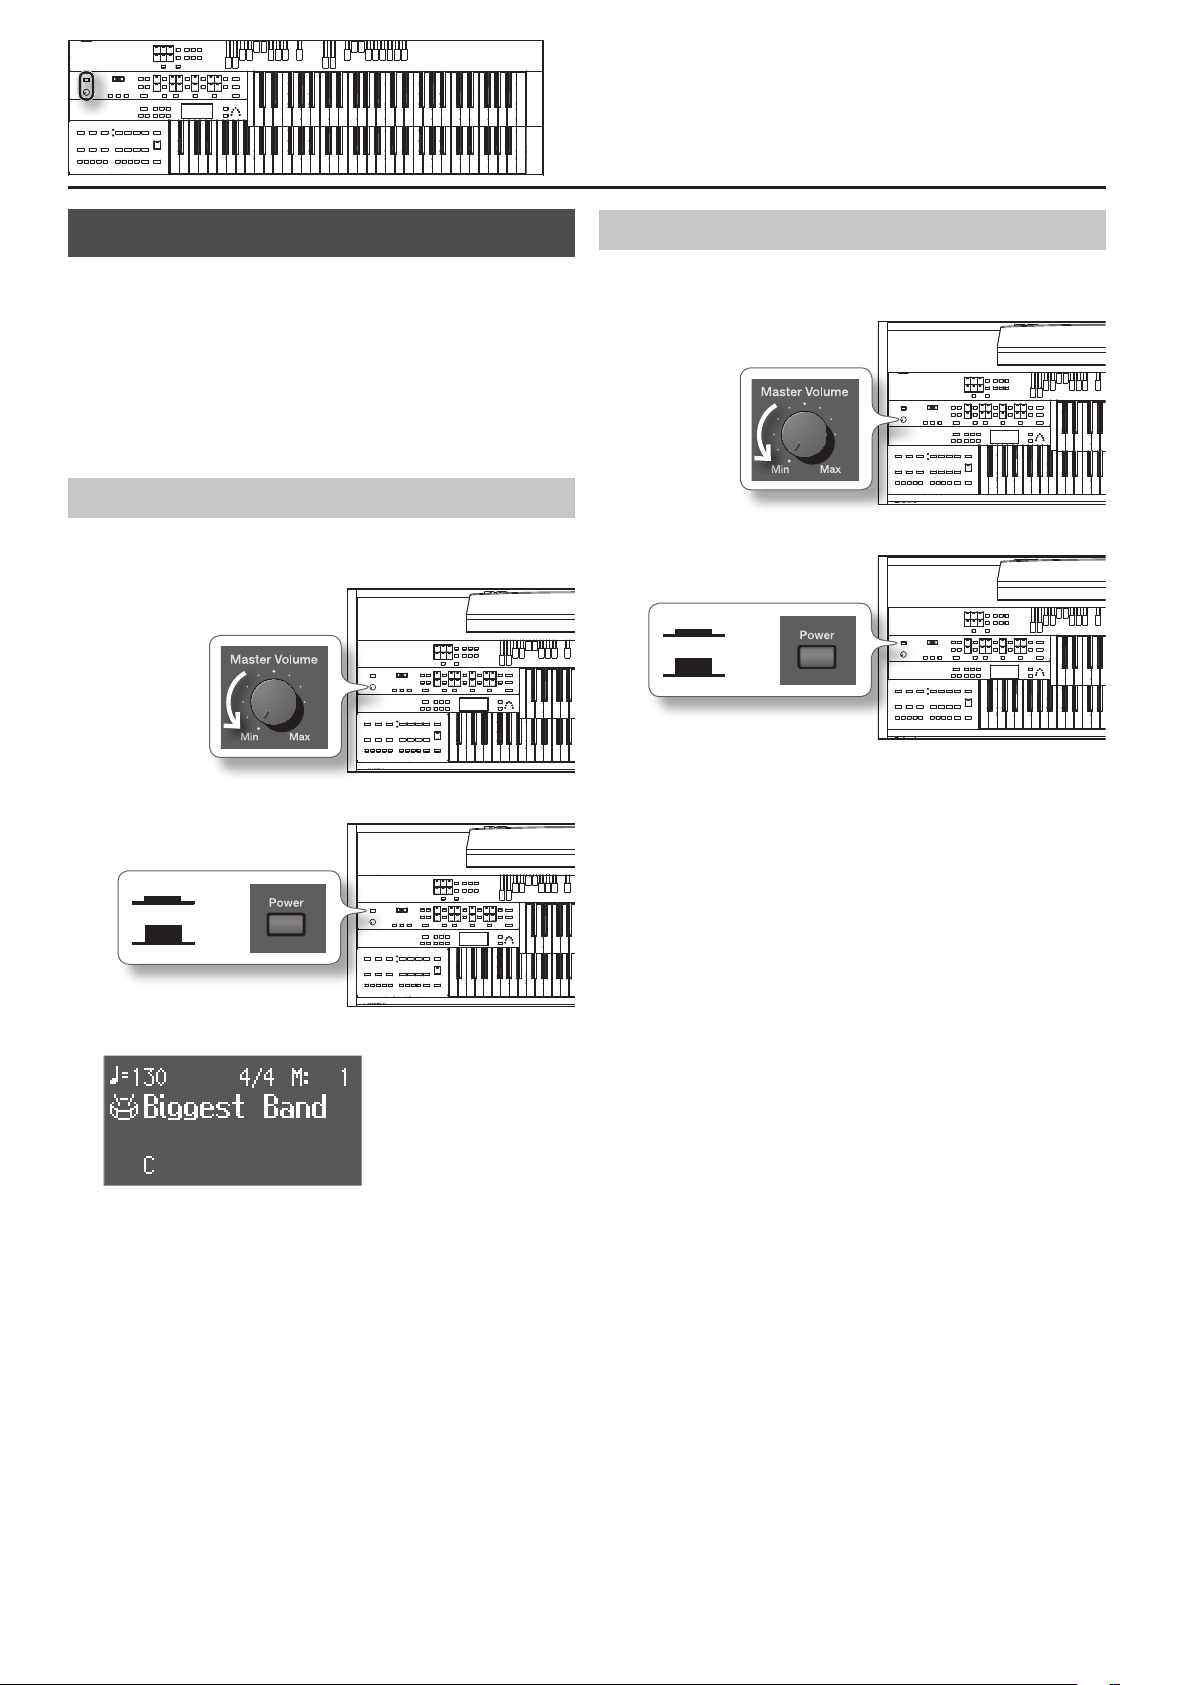
Turning the Power On
1. Turn the [Master Volume] knob all the way toward the left to
minimize the volume.
2. Press the [Power] switch to turn it on.
1. Turn the [Master Volume] knob all the way toward the left to
minimize the volume.
2. Press the [Power] switch to turn it o.
On
O
On
O
The basic screen appears in the display.
* This unit is equipped with a protection circuit. A brief interval (a
few seconds) after power up is required before the unit will operate
normally.
* The explanations in this manual include illustrations that depict
what should typically be shown by the display. Note, however, that
your unit may incorporate a newer, enhanced version of the system
(e.g., includes newer sounds), so what you actually see in the display
may not always match what appears in the manual.
3. Use the [Master Volume] knob to adjust the volume.
Turning the [Master Volume] knob towards “Max” increases the
volume; turning the knob towards “Min” decreases the volume.
22
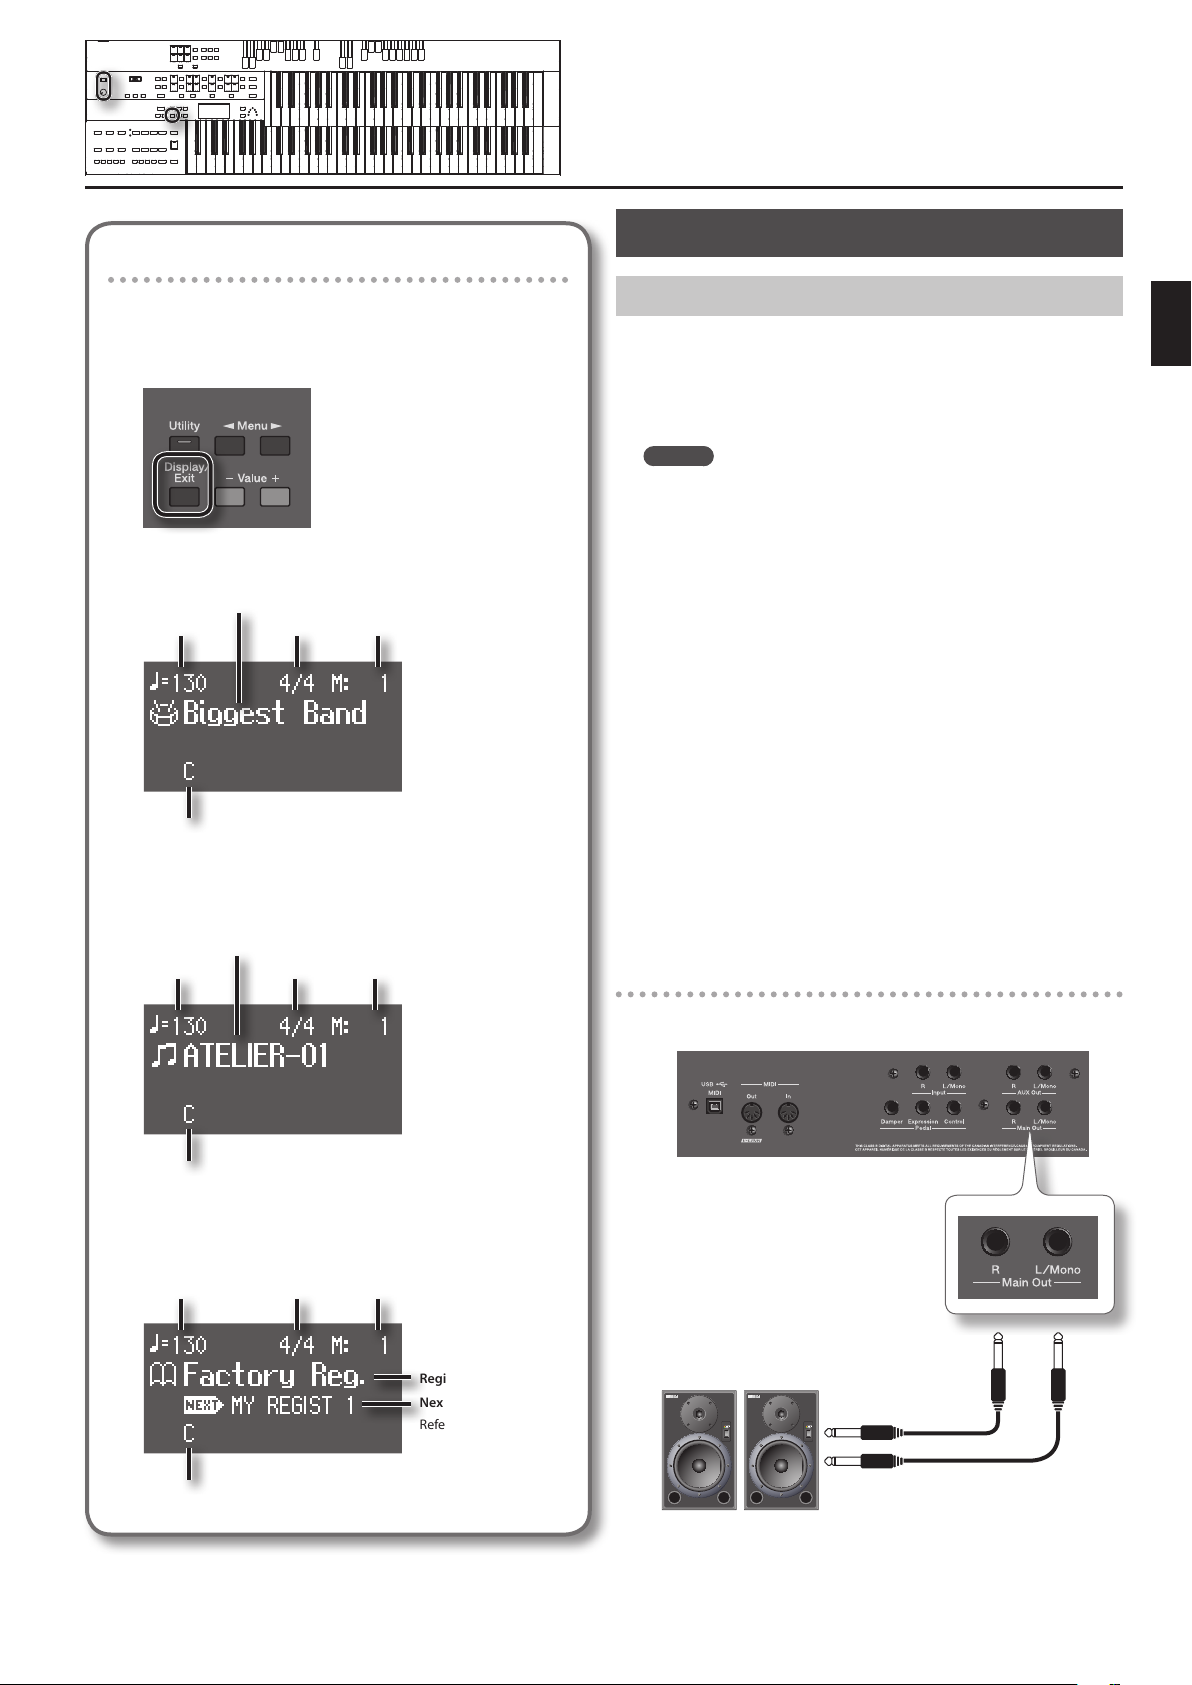
Viewing the basic screen
Connections
The ATELIER has three types of basic display screen: the Rhythm
Screen, the Composer Screen and the Registration Screen.
You can alternate from one to the other by pressing the
[Display/Exit] button.
Rhythm Screen
Rhythm Name
Tempo
Chord Name
Beat Measure
Composer Screen
Song Name
Tempo
Beat Measure
Connecting to Output Device
You can connect the ATELIER to output devices such as speakers, and
use them to listen to the ATELIER’s sound.
The ATELIER does not have built-in speakers. To have sound be
reproduced, you’ll need to connect monitor speakers or a stereo set; or
you can connect headphones.
MEMO
To make connections, use audio cables that have 1/4-inch phone
plugs and that do not contain resistors.
* To prevent malfunction and/or damage to speakers or other devices,
always turn down the volume, and turn o the power on all devices
before making any connections.
1. Turn down the volume all the way on all equipment.
2. Turn o the power to the ATELIER and other connected
equipment.
3. Connect the ATELIER and other equipment with audio cables
(sold separately).
4. Turn on the ATELIER.
5. Turn on the connected equipment.
6. Adjust the volume.
Turning O the Power
1. Turn down the volume all the way on all equipment.
2. Turn o the connected equipment.
3. Turn o the ATELIER.
Connection example
Getting Ready
Chord Name
Registration Screen
Tempo Beat Measure
Chord Name
Registration set Name
Next Registration set Name
Refer to “Load Next
Function” (p. 72).
Home use
Main Out jack
Powered speaker
(Amplier contained within)
23
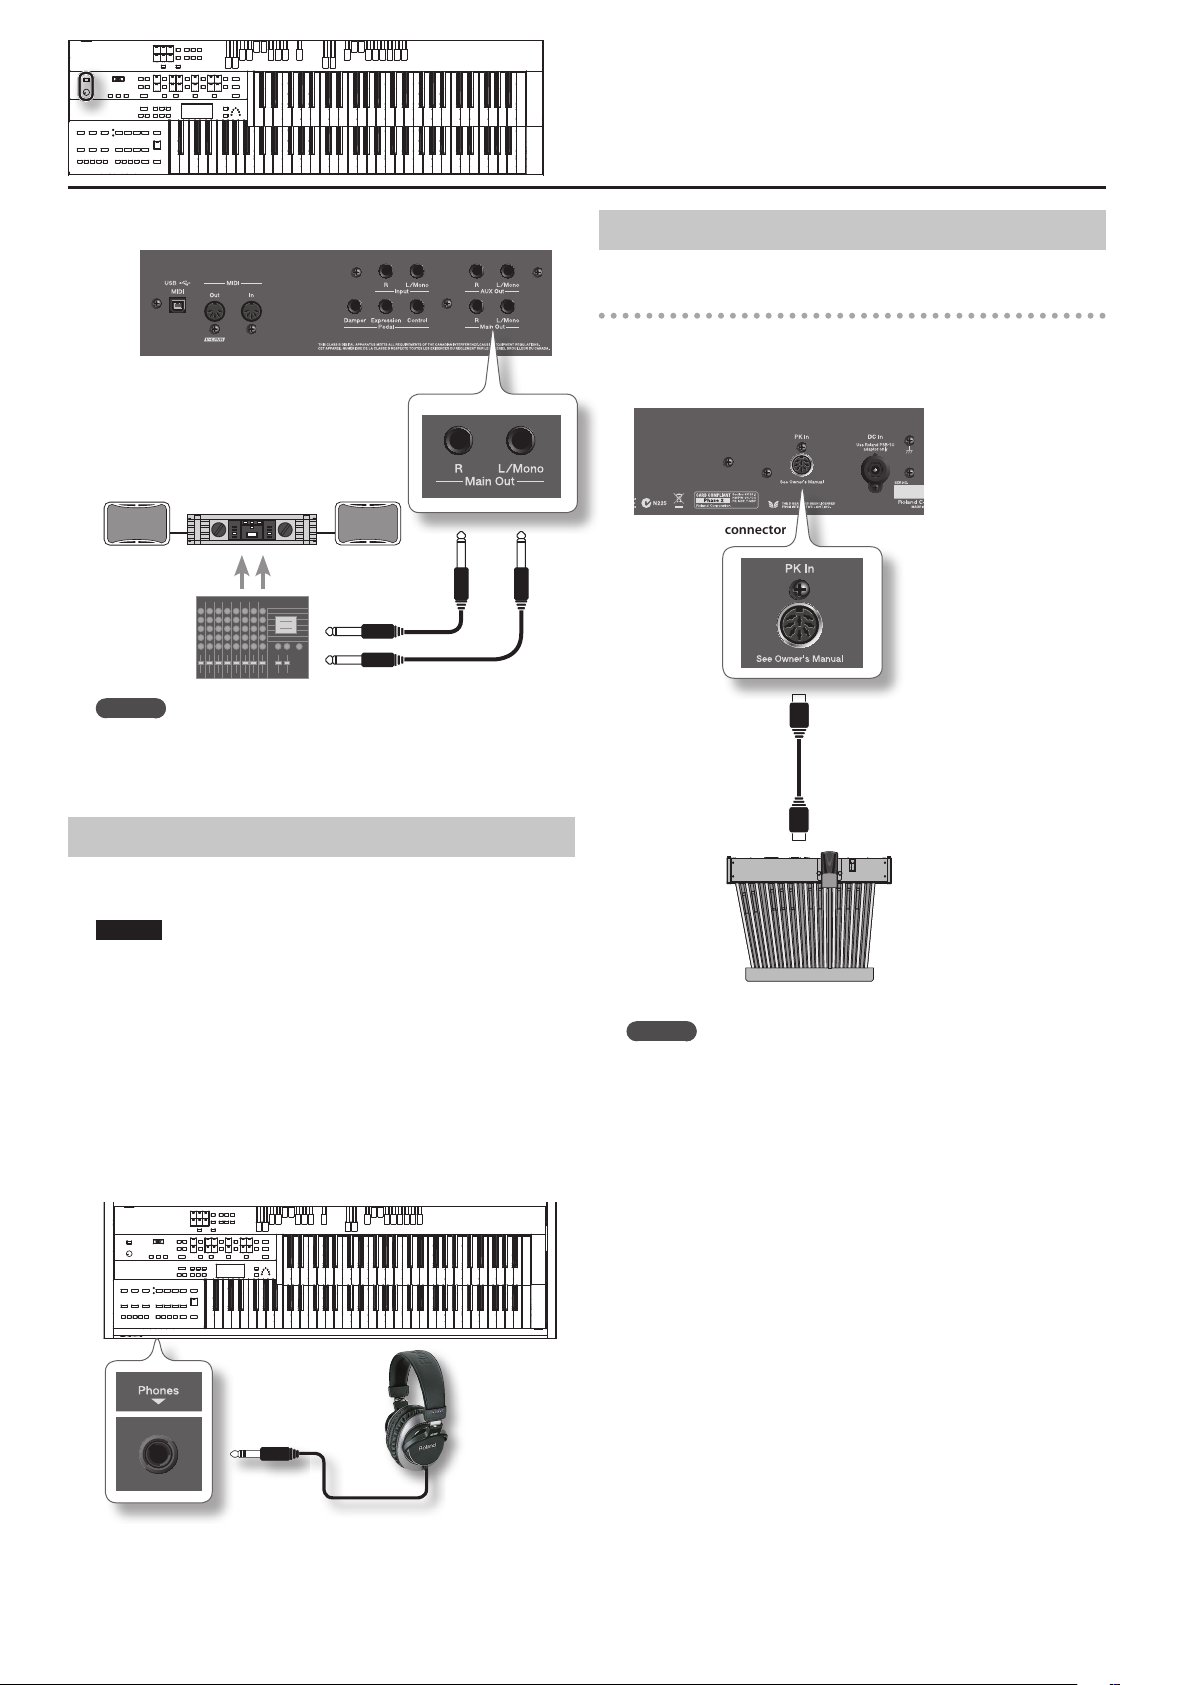
Live performance
Main Out jack
Power amp/speaker
Mixer, etc.
MEMO
If you connect speakers or an external reverb unit to the AUX
Out jacks, you’ll be able to much more readily express the
expansiveness of the stereo sound eld and add more of a sense of
presence to your music (p. 112).
Connecting Pedals
Connecting a pedalboard
You can connect the ATELIER to pedalboard (PK series; sold separately).
* Only pedalboard units that have a PK OUT connector can be
connected.
PK In connector
Using Headphones
The ATELIER features Phones jacks. These allow you to play without
having to worry about bothering others around you, even at night.
NOTE!
• Accepts connection of stereo headphones.
• To prevent damage to the cord, handle the headphones only by the
headset or the plug.
• Headphones may be damaged if the volume is too high when they
are plugged in. Lower the volume on the ATELIER before plugging
in headphones.
• To prevent possible auditory damage, loss of hearing, or damage
to the headphones, the headphones should not be used at an
excessively high volume. Use the headphones at a moderate
volume level.
PK series
MEMO
The AC adaptor supplied with the pedalboard is not used. The
pedalboard will be turned on/o by the [Power] switch of the
ATELIER, regardless of the position of the pedalboard’s own power
switch.
1. Make sure that the [Power] switch the ATELIER and the
pedalboard (PK series) are both switched o.
2. Using the dedicated PK cable that is included with the
ATELIER, connect the ATELIER’s PK In connector to the
pedalboard’s PK OUT connector.
3. Switch on the ATELIER’s power.
4. Make sure that the indicator on the pedalboard’s rear panel
is lit.
Try playing the pedalboard; if you hear the sound of the pedal part
from the ATELIER, the connection is complete.
* This unit is equipped with a protection circuit. A brief interval (a
few seconds) after power up is required before the unit will operate
normally.
* For details on settings for the pedalboard, refer to the owner’s
manual for your pedalboard.
1. Connect your headphones to the Phones jack underneath
the left side of the keyboard.
2. Adjust the headphones volume with the [Master Volume] knob.
24

Setting up the pedalboard
Set up the pedalboard as shown below.
For the PK-25A
Getting Ready
Position the pedalboard so that the lower
keyboard’s A4 key is aligned with the
center of the PK-25A’s expression pedal.
For the PK-7A
Position the pedalboard so that the
ATELIER’s rear panel is aligned with the
PK-25A’s rear panel.
Position the pedalboard so that the lower
keyboard’s C5 key is aligned with the
center of the PK-7A’s expression pedal.
Position the pedalboard so that the
ATELIER’s rear panel is aligned with the
PK-7A’s rear panel.
25
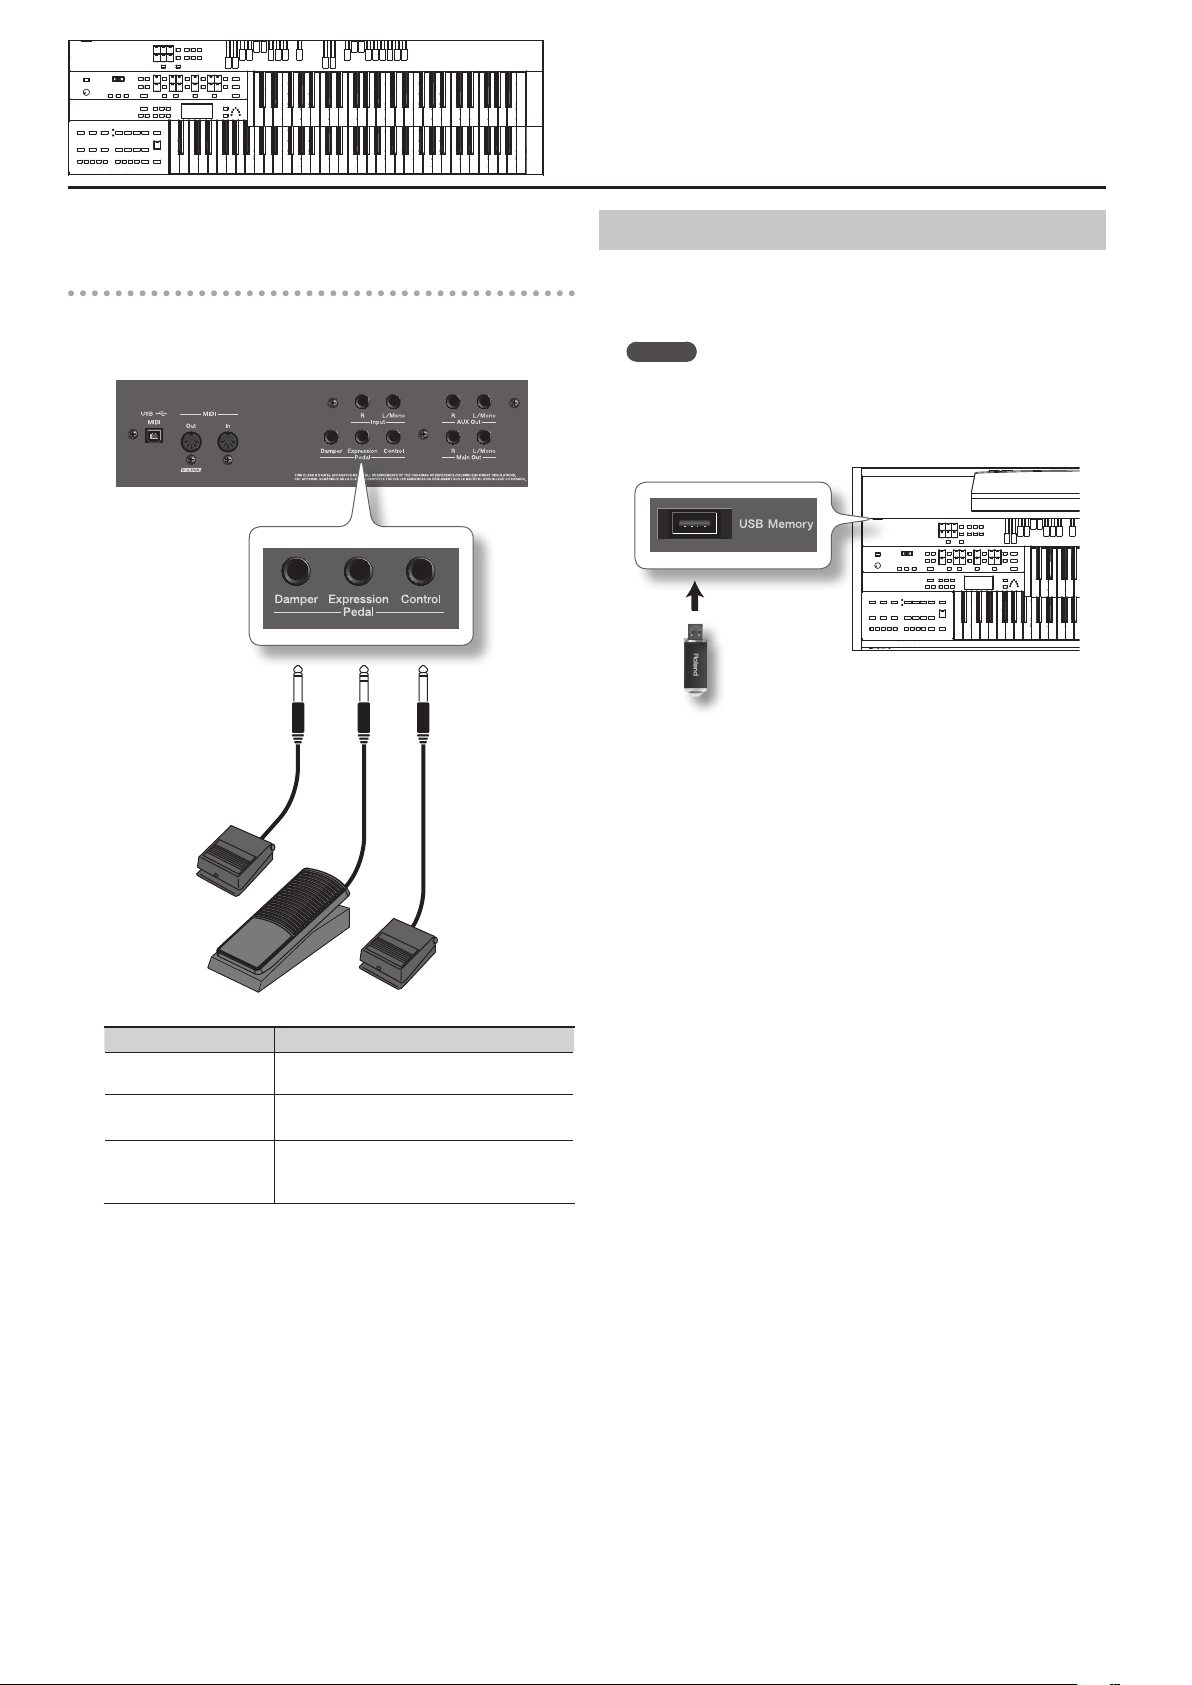
Connecting expression pedals and pedal
Using the USB Memory
switches
You can connect an expression pedal (EV-7; sold separately) and pedal
switches (DP series; sold separately) to the Pedal jacks on the rear
panel.
Pedal jack
Songs you record on the ATELIER and registration sets you create can
be copied to separately available USB memory for safekeeping.
You can also play back SMF music les saved on USB memory (p. 88).
MEMO
If you’re using new USB memory, you’ll need to initialize (format)
it on the ATELIER. For details, refer to “Formatting a USB Memory
(Format Media)” (p. 104).
1. Connect your USB memory to the USB Memory connector.
USB Memory
connector
USB Memory
* Carefully insert the USB memories all the way in—until it is rmly in
place.
* Use USB memory available from Roland. Proper operation cannot be
guaranteed if other USB device is used.
Foot switch
Expression pedal
Connected jack Explanation
Pedal (Damper) jack
Pedal (Expression) jack
Pedal (Control) jack
* Use only the specied expression pedal (EV-7; sold separately). By
connecting any other expression pedal, you risk causing malfunction and/or damage to the unit.
The pedal switch will sustain the notes played
on the lower keyboard (p. 56).
The expression pedal will adjust the overall
volume (p. 55).
The pedal switch will control the function
that’s assigned to the right foot switch of the
pedalboard (PK series; sold separately) (p. 93).
Foot switch
*
26
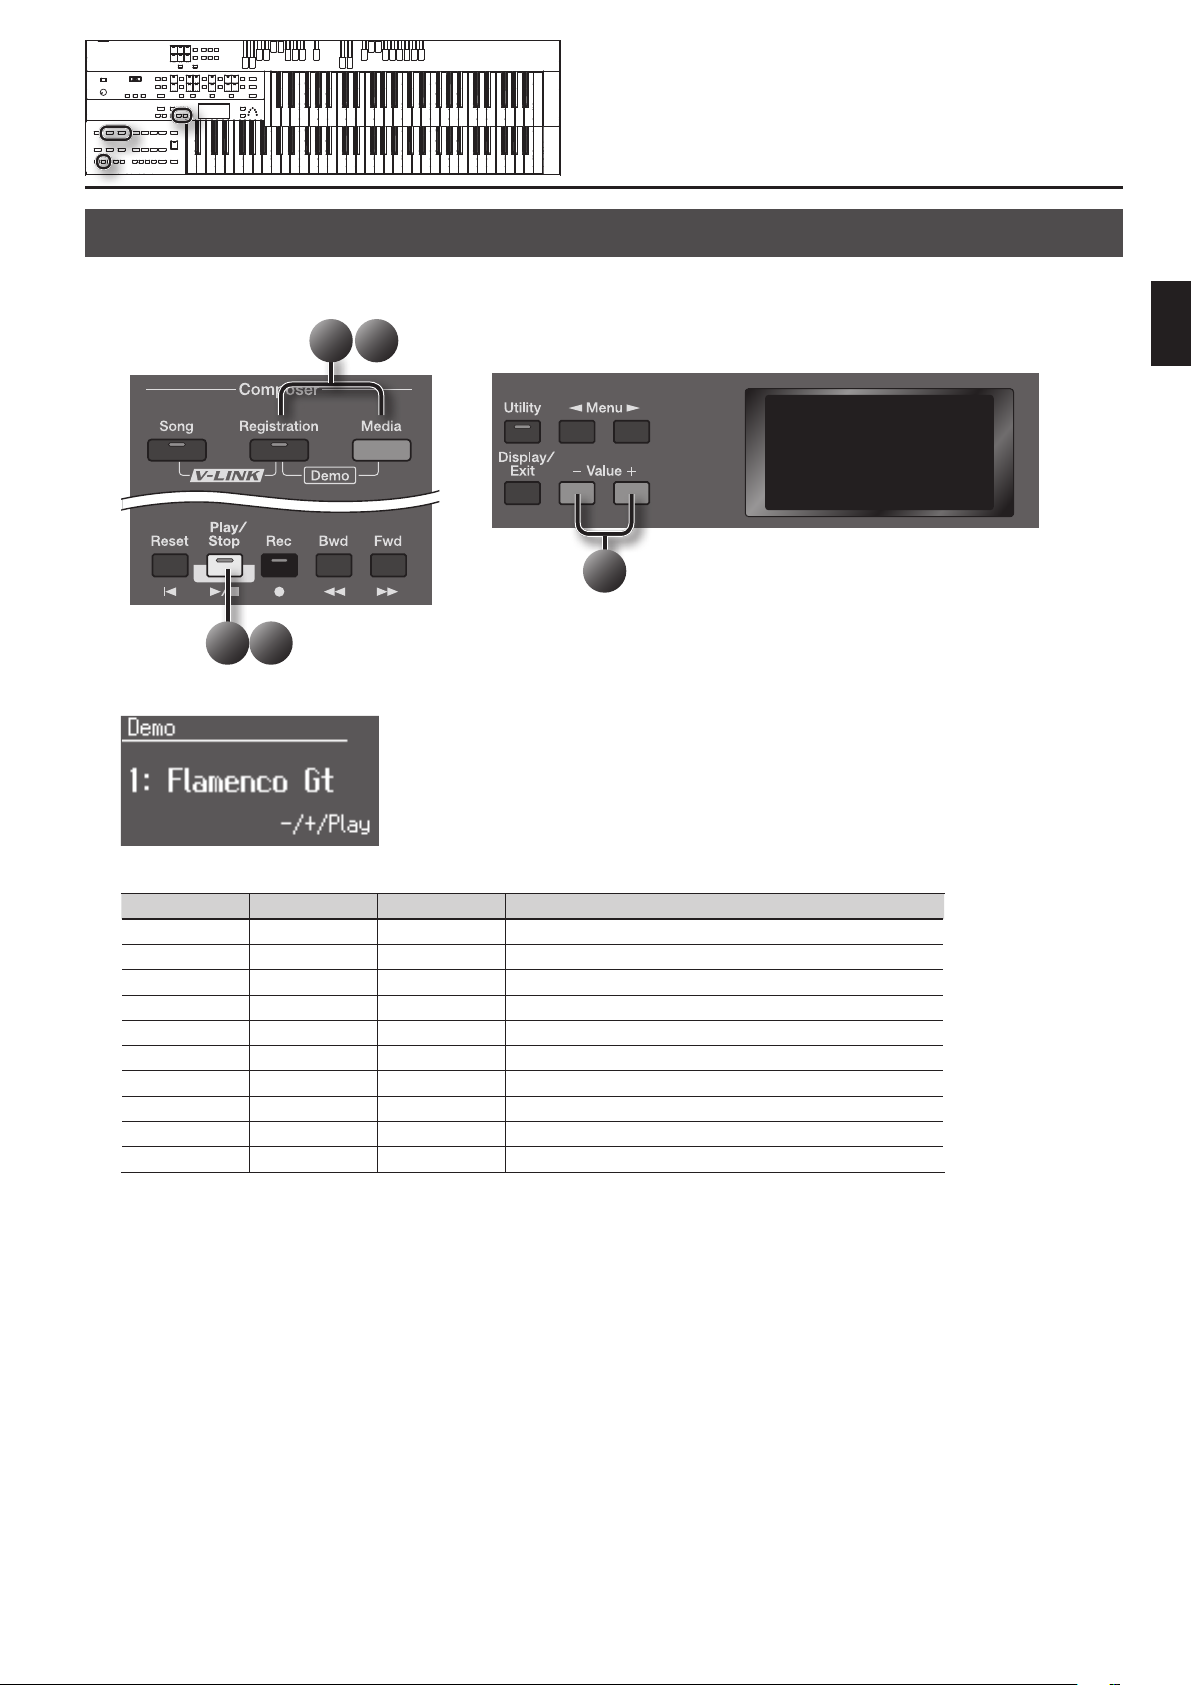
Listening to the Demo Songs
The ATELIER contains 10 demo songs. Here’s how to play the demo songs, and fully appreciate the sounds, Rhythms, and Automatic Accompaniment
that are available with the ATELIER.
1 5
2
3 4
1. Press the [Registration] button and [Media] button simultaneously.
Getting Ready
2. Press the Value [-] [+] buttons to select a demo song.
Song name Composer Player Copyright
Flamenco Gt Ryoki Yamaguchi Ryoki Yamaguchi © 2011 Roland Corporation
Organ & Scat Akio Sasaki Akio Sasaki © 2011 Roland Corporation
Pop Organ Ralf Schink Ralf Schink © 2004 Roland Corporation
Jazz Organ Akio Sasaki Akio Sasaki © 2007 Roland Corporation
Soft Gospel Ric Iannone Ric Iannone © 2001 Roland Corporation
Jazz Combo Ric Iannone Ric Iannone © 2003 Roland Corporation
Hawaiian Ric Iannone Ric Iannone © 2003 Roland Corporation
Dixieland Ric Iannone Ric Iannone © 2003 Roland Corporation
Slow Waltz Ric Iannone Ric Iannone © 2003 Roland Corporation
Jazz Scat Ric Iannone Ric Iannone © 1999 Roland Corporation
3. Press the [Play/Stop] button to start playback of the demo song.
When the selected demo song ends, the next demo song will begin playing.
4. To stop playback in the middle of the song, press the [Play/Stop] button.
5. Press the [Registration] button and [Media] buttons simultaneously to exit the demonstration screen.
* All rights reserved. Unauthorized use of this material for purposes other than private, personal enjoyment is a violation of applicable laws.
* The data for the demo song that is being played is not available at the MIDI Out connector, USB (MIDI) connector, and USB Memory connector.
27

Performing
Upper Keyboard
Lower Keyboard
Selecting Sounds (Voices)
The ATELIER is able to produce the sounds of various instruments. These sounds are called “Voices.”
About the Voices and Parts
The ATELIER is a two-manual instrument. These two manuals are called the “upper keyboard” and the “lower keyboard.”
The voices of each keyboard are organized into several parts according to their character.
The upper keyboard has three parts: Upper Vintage Organ, Upper Organ, and Upper Orchestral. The lower keyboard has two parts: Lower Vintage
Organ and Lower.
You can select one voice for each part, which allows you to play multiple, layered voices.
For the upper keyboard and the lower keyboard, you can also layer on the voice of the Solo part.
MEMO
If you’ve connected a pedalboard (PK series; sold separately), you’ll be able to perform using the pedalboard (p. 24). The pedalboard has two parts:
Pedal and Pedal Vintage Organ.
Upper Vintage Organ Pedal Vintage Organ Lower Vintage Organ
Solo
Pedal Lower Upper Organ Upper Orchestral
Keyboard Part
Upper Vintage Organ
Upper Keyboard
Lower Keyboard
Pedalboard
Upper Organ
Upper Orchestral
Solo (This voice is sounded only when the Solo [To Lower] button be extinguished)
Lower
Lower Vintage Organ
Solo (This voice is sounded only when the Solo [To Lower] button lights up)
Pedal (This voice is sounded when the Pedal [To Lower] button lights up or turn ”Bass Split” on)
Pedal
Pedal Vintage Organ
28
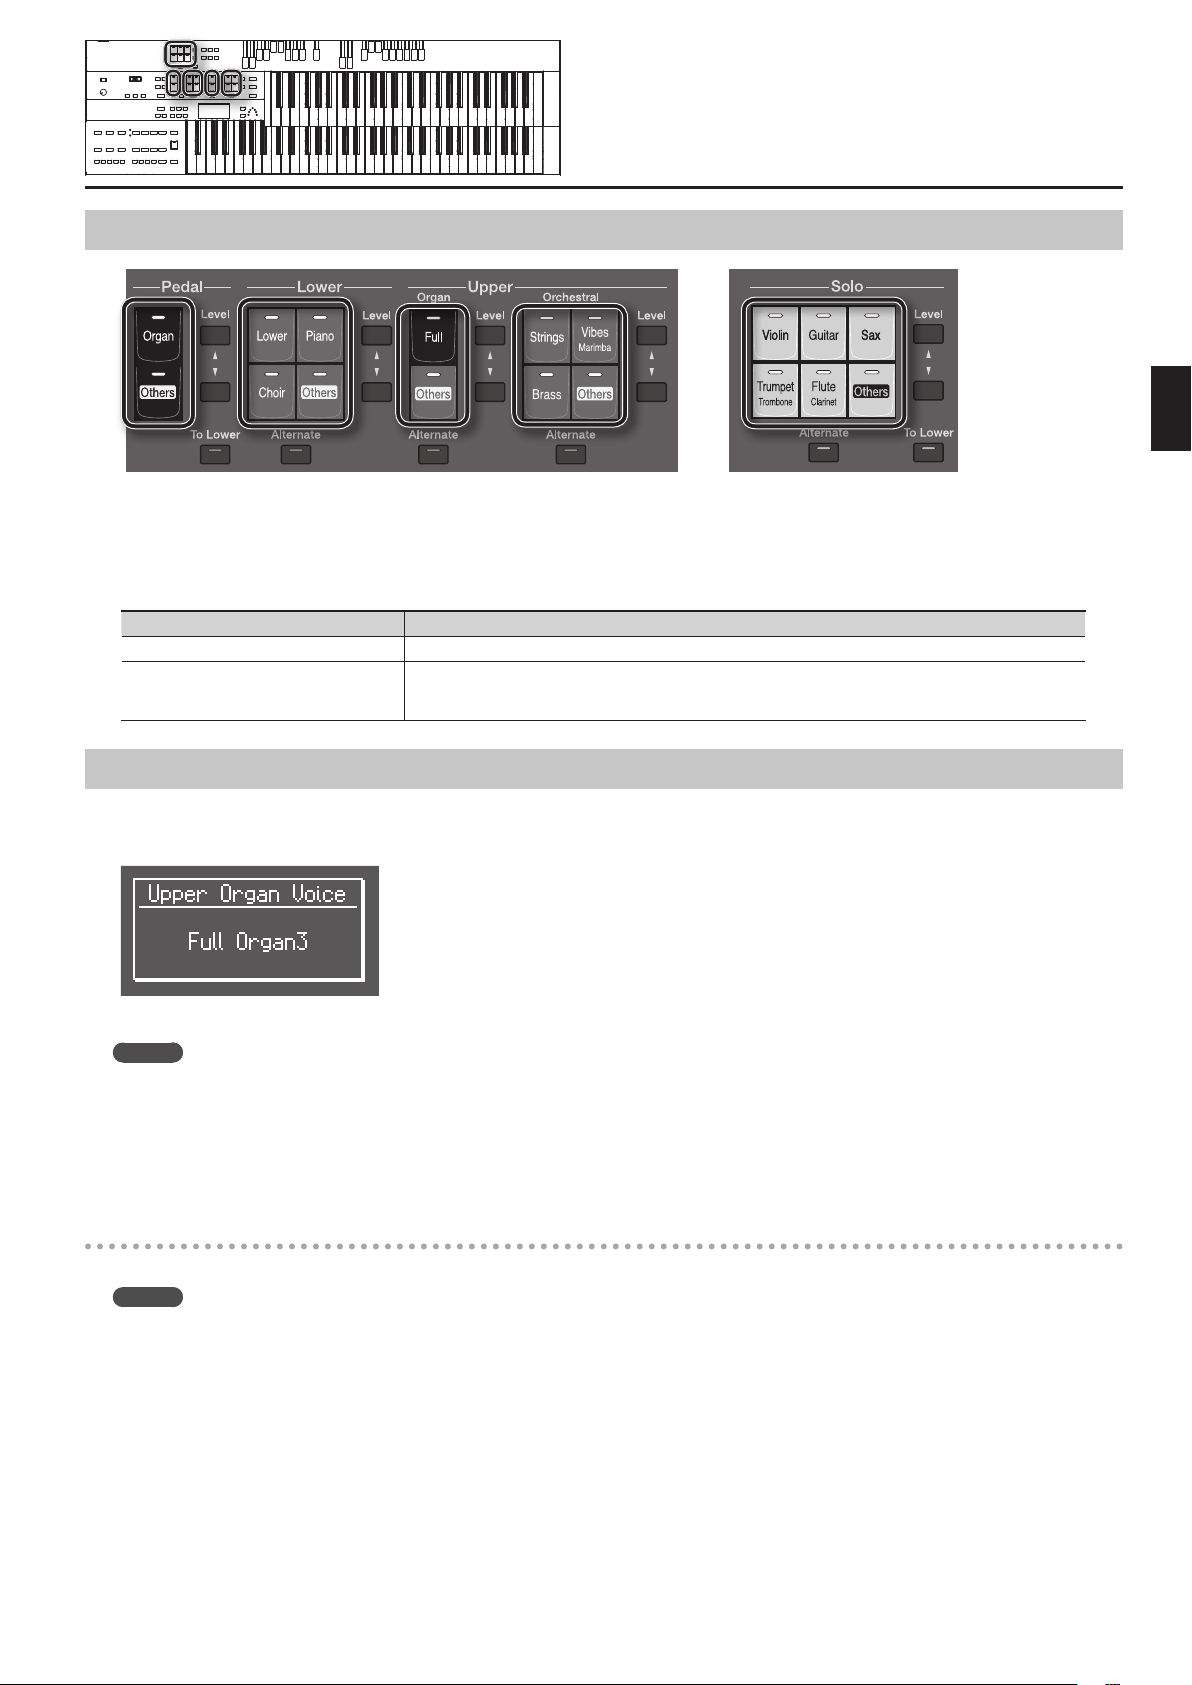
Functions of the Voice Buttons
Each time you press a voice button, its indicator will alternate between lit and unlit; when the indicator of a voice’s button is lit, that voice can be
played.
With the exception of the pedal bass buttons, two voices of the same category are assigned to each button. If a voice of a dierent category is assigned,
the voice names of the two voices are printed on the button.
These two voices will alternate each time you press the [Alternate] button.
[Alternate] button Selected voice
Unlit The voice printed on the button is selected.
Lit
Another voice of the same category as the voice printed on the button is selected.
If a voice of a dierent category is assigned to the button, the voice printed in the lower line on that button is
selected.
Selecting a Voice
1. Press one of the buttons for a part to select a voice for that part.
The name of the selected voice is displayed for several seconds.
Performing
If you want to switch to the other voice assigned to that button, press the [Alternate] button.
MEMO
Normally, playing the pedalboard will produce single notes. If you want to play more than one note simultaneously, you are free to change the way
in which the pedal bass is sounded (p. 93).
* If the voice buttons are unlit and the vintage organ voice is o, no sound will be heard when you play the keyboard.
* If you press the Pedal [To Lower] button (p. 51) so its indicator is lit, the pedal bass voice will sound on the lower keyboard; it will not sound on the
pedalboard.
About solo voices
Solo voices will sound only the highest note of the notes played on the upper keyboard.
MEMO
• For the Solo part, you can select voices (SuperNATURAL voices) that are particularly rich in expressive power (p. 52).
• You are free to change the way in which the solo voice is sounded (p. 92).
* If you press the Solo [To Lower] button (p. 47) so its indicator is lit, the solo voice will sound on the lower keyboard; it will not sound on the upper
keyboard.
29
Selecting a voice of the [Others] button
Each part has an [Others] button. By using the [Others] button you can select voices other than organ, such as violin or ute.
1. Press the [Others] button for the Part for which you wish to specify a voice.
The voice name appears in the display.
2. While the voice name is shown in the display screen, use the Value [-] [+] buttons to select the desired voice.
The indicator of the selected [Others] button will blink.
MEMO
• You can jump by voice group by pressing Menu [ ] [ ] buttons to select the voice.
• To stop mid-way through this or any procedure, press the [Display/Exit] button.
3. Once again, press the [Others] button for the part whose sound you wish to set to conrm the voice.
The indicator of the [Others] button will change from blinking to light.
MEMO
For details on the voices that can be selected with the [Others] buttons, refer to “Voice & Rhythm List.”
30

Recalling Panel Settings by Choosing a Keyword (Music Assistant)
The ATELIER contains panel settings appropriate for various well-known songs from around the world.
By choosing a keyword that suits the feel of your song, you can easily recall a rhythm accompaniment and melody voices. Choose a keyword, and then
try playing the keyboard.
1. Press the [Music Assistant] button.
The Music Assistant screen appears.
2. Use the Value [-] [+] or Menu [ ] [ ] buttons to choose a keyword.
The registration [1]–[4] buttons will blink.
Panel settings and rhythms appropriate for the keyword will be recalled to the registration [1]–[4] buttons.
3. Play a chord on the lower keyboard.
When you play the keyboard, an intro will play, and the rhythm will start.
4. Press the registration [1]–[4] buttons to switch the panel settings.
5. Press the [Intro/Ending] button or the [Start/Stop] button to stop the rhythm.
6. To cancel the Music Assistant function, press the [Music Assistant] button so its indicator goes out.
Performing
31

Creating Organ Sounds (Vintage Organ)
The Vintage Organ button lets you add vintage organ sounds to the upper and lower parts.
In addition, you can also use the harmonic bars to modify the selected sound as desired.
The ATELIER provides nine harmonic bars each for the upper keyboard and lower keyboard parts, and two harmonic bars for the pedalboard part.
Each harmonic bar is assigned a sound of a dierent footage (pitch), and by layering these sounds you can create a variety of organ tones.
By sliding the harmonic bars forward or backward (in or out), you can adjust the volume of the various footages.
The volume can be adjusted over nine steps (0–8).
When a harmonic bar is pulled out all the way (8), the volume is loudest. When it is pushed in all the way (0), there will be no sound.
MEMO
You can use the Solo part’s harmonic bar to adjust the volume of the Solo part.
What’s the feet?
“Feet” is a term that began as a measurement of the length of the pipes in a pipe organ.
The pipes that produce the basic pitch (fundamental) for each note are considered to be “8 feet” in length.
Therefore, a pipe producing a pitch one octave below that of the reference of 8’ (eight feet) would be 16’; for one octave above the reference,
the pipe would be 4’, and to take the pitch up yet another octave it would be shortened to 2’.
32
one octave
below
5th root 8th 12th 15th 17th 19th 22nd

Playing a Vintage Organ Voice
1. Press the Vintage Organ [On/O] button so its indicator is lit.
Each time you press the button, the indicator will alternate between ON (lit) and OFF.
The Vintage organ screen appears.
2. Slide the harmonic bars that you want to hear.
When a harmonic bar is pulled out all the way (8), the volume is loudest. When it is pushed in all the way (0), there will be no sound.
MEMO
The harmonic bar for the Solo part adjusts the volume of the voice that’s selected for the Solo part.
* Glide and sustain eects are not applied to the Vintage Organ voice.
Performing
Adding sparkle to the sound (percussion)
This adds an attack sound to the beginning of the note, making the sound crisper.
1. Press the Percussion [4’] button or the Percussion [2 2/3’] button so its indicator is lit.
Play the Upper keyboard and notice that an attack has been added.
Button Explanation
Percussion [4’] button Percussion one octave above
Percussion [2 2/3’] button Percussion one octave and a fth above
* The Percussion [4’] button and the Percussion [2 2/3’] button are valid only for vintage organ voices of the upper part.
* When the Percussion [4’] button or the Percussion [2 2/3’] button are on, the 1’ pitch will not be produced.
33

Adjusting the rate at which the percussion decays
You can shorten the decay time of the percussion sound.
1. Press the Percussion [Fast Decay] button to switch the indicator between lit/unlit.
Percussion [Fast Decay] Button Explanation
Lit The percussion sound will disappear quickly. The percussion will have a sharper attack.
Unlit The percussion sound will disappear slowly. The percussion will have a more gentle attack.
Using the harmonic bar settings of the panel
If you’ve switched registrations so that the Vintage Organ settings have changed, you can switch the Vintage Organ settings to the positions (settings)
of the harmonic bars on the panel.
1. Press the [H-Bar Manual].
The part whose indicator is lit will have the settings of the harmonic bar positions (settings) of the panel.
Adding an eect to the sound
You can add a vibrato or chorus eect to the vintage organ voice.
1. Press the [Vib/Cho] button so it’s lit.
The name of the eect is shown for several seconds.
2. While the name of the eect is shown in the display, use the Value [-] [+] buttons to select the desired eect.
Type Explanation
Vibrato Applies a vibrato eect to the sound.
Chorus Applies a chorus eect to the sound.
MEMO
You can select the part to which the vibrato eect or chorus eect is applied (p. 92).
34

Adjust the Volume Balance
The ATELIER allows you to adjust the volume balance individually for each Part.
The following buttons are used to adjust the volume of a multiple number of Parts.
Button Part
Automatic Accompaniment (except Bass)
Playback of performance songs from something other than the ATELIER performance songs
Accomp/SMF [
Pedal Level [
] [ ] button
] [ ] button
(for example: SMF music les)
Rhythm performance
Drums/SFX
Manual Percussion
Pedal voice
Bass note of Automatic Accompaniment
Performing
1. The volume levels of each part are adjusted using the corresponding [ ] [ ] buttons.
The volume can be set to any value from 0 to 12.
When the volume value shown in the display is 0, that part will produce no sound.
You can also press the [
seconds, allowing you to check the volume balance.
Display Part
Ac Accomp/SMF
Pd Pedal
Lw Lower
Org Upper Organ
Och Upper Orchestral
So Solo
] button or [ ] button of the part whose volume you wish to adjust, so that the “Part Balance ” screen is displayed for several
MEMO
From the Part Balance screen, you can press the Menu [ ] button to access the Accomp Part Balance screen. In the Accomp Part Balance screen
you can adjust the volume balance for each of the arranger’s accompaniment parts (p. 96).
35

Transposing to a Dierent Key (Key Transpose)
You can transpose the key of a performance without having to shift the position of your ngers on the keyboard. This feature is called “Key Transpose.”
For example: you may play in the familiar C major scale while your music will sound in any key of your choice.
1. Press the Transpose [-] [+] buttons.
Each press of the Transpose [-] [+] buttons transposes the key a semitone.
The transpose value is displayed in the screen.
Acceptable values range from A
If the pitch is transposed (something other than C), the indicator of one of the Transpose buttons, either [-] [+], will be lit.
If the pitch is not transposed (i.e., the key is C), the indicator of both the Transpose [-] [+] buttons will be extinguished.
MEMO
• By pressing the Transpose [-] [+] buttons simultaneously, you can restore the default setting “C.”
• You can change the timing at which the transposition settings saved in a Registration will be recalled. For details refer to “Registration Transpose
Update (Trans. Update)” (p. 97).
to G (in semitone steps).
36

Transpose the Pitch in Octave Units (Octave Shift)
The pitch of the sound played by the keyboard can be adjusted in one-octave steps. This function is called “Octave Shift.”
You can individually specify Octave Shift for each of the following parts.
• Upper Organ part
• Upper Orchestral part
• Lower part
• Pedal part
• Solo part
1. Press the [Utility] button.
2. Press the Menu [
3. Press the [Utility] button.
4. Use the Menu [
Part Upper Organ, Upper Orch, Lower, Pedal, Solo
] [ ] buttons to select “Octave Shift.”
] [ ] buttons to select a Part to which you wish to apply an Octave Shift.
Performing
5. Use the Value [-] [+] buttons to set the amount of shift.
The value can be set to a range of +/- 3 octaves.
To return to the basic screen, press the [Display/Exit] button a number of times.
MEMO
By holding down the [Utility] button and using the Menu [ ] [ ] buttons, you can jump to editing screens for the reverb eect (p. 41) and sustain
eect (p. 40) of the same part.
* Please note that when you apply the Octave Shift function to certain voices, their pitch could be stretched beyond their recommended note
ranges, and they may not sound as expected. Care should be taken when using Octave Shift.
37

Adding Eects to a Voice
The ATELIER allows you to apply various eects to the sounds you play from the keyboard.
Adding Harmony to a Melody (Harmony Intelligence)
Harmony appropriate for the chord you play in the lower keyboard can be added to the highest note played in the upper keyboard. This function is
called “Harmony Intelligence.”
When you press the [Harmony Intelligence] button, the voice most suitable for the selected harmony intelligence will be selected automatically.
1. Press the [Harmony Intelligence] button (indicator lights).
Each time you press a [Harmony Intelligence] button, the indicator will alternate between ON (lit) and OFF.
Changing the Type of Harmony Intelligence
The ATELIER provides 18 types of harmony intelligence.
When you press the [Harmony Intelligence] button, the most appropriate voice(s) will be automatically set. The manner in which notes will sound also
depends on the Harmony type.
1. Press the [Harmony Intelligence] button (indicator lights).
2. While the Harmony Intelligence name is shown in the display screen, use the Value [-] [+] buttons to select the Harmony
Intelligence.
The indicator of the [Harmony Intelligence] button will blink.
To cancel the procedure, press the [Display/Exit] button.
3. Once again, press the [Harmony Intelligence] button.
The indicator of the [Harmony Intelligence] button will light, and the Harmony Intelligence is conrmed.
Harmony Intelligence types:
Type Solo Voice Upper Voice
BIG BAND Trumpet Flugel Horn 5
STRINGS Strings 1 Strings 5 4
BLOCK Vibraphone Natural Piano 5
TRADITIONAL* Currently selected tone 3
HARP — Harp 2
COMBO Clarinet Trombone 3
JAZZ SCAT Jazz Scat Jazz Scat 4
COUNTRY Full Organ1 Jazz Guitar 3
BROADWAY Celesta Theater Or.1 3
OCTAVE 1* Currently selected tone 2
OCTAVE 2* Currently selected tone 2
1 NOTE* Currently selected tone 2
3 NOTES* Currently selected tone 4
BIG BAND* Currently selected tone 5
STRINGS* Currently selected tone 4
BLOCK* Currently selected tone 5
JAZZ SCAT* Currently selected tone 4
BROADWAY* Currently selected tone 3
Number of notes
of the harmony
* For types indicated by “*,” the currently selected voice
will be selected.
* Harmonies are added only to the Upper voice.
MEMO
Harp-type harmony intelligence will not sound the
keys you play. Use your left hand to play a chord in
the lower keyboard and use your right hand to play
a glissando on the upper keyboard, and a beautiful
harp glissando will be produced.
38

Adding Modulation to the Sound (Rotary Eect)
Rotary is an eect which simulates the sound of rotating speakers.
There is a choice of two settings: Fast and Slow.
1. Select the voice to which you wish to apply the Rotary eect.
2. Press the Rotary Sound [On/O] button (conrm that its indicator is lit).
The Rotary eect will be applied to the voice.
3. Press the Rotary Sound [Fast/Slow] button to switch between Rotary Fast (Lit) and Rotary Slow (Unlit).
Rotary Sound [Fast/Slow] button Eect
Lit (Fast) The eect obtained is equivalent to speakers being rapidly rotated.
Unlit (Slow) Eect simulating the slow rotation of speakers.
Performing
When you switch the rotary eect from “Fast” to “Slow,” the modulation will slow down gradually, and when you switch from “Slow” to “Fast” the
modulation will speed up gradually.
MEMO
• The function of the Rotary Sound [Fast/Slow] button can be assigned to the foot switch of the pedalboard (PK series; sold separately) (p. 93).
• For details on voices to which the rotary eect can be applied, refer to “Voice & Rhythm List.”
39

Adding Resonance to the Sound (Sustain Eect)
Sustain allows you to add a Sustain eect or decay to each voice after the keys are released.
The Sustain eect can be added simultaneously to the Upper (except the Solo Part), Lower, and Pedal voices.
* The Sustain eect will not be applied to the Solo part and vintage organ part voice.
1. Press the [Utility] button.
2. Press the Menu [
3. Press the [Utility] button.
4. Press the Menu [
Part Upper, Lower, Pedal
] [ ] buttons to select the “Sustain.”
] [ ] buttons to select the desire part.
5. Press the Value [-] [+] buttons to switch ON or OFF.
To return to the basic screen, press the [Display/Exit] button.
MEMO
By holding down the [Utility] button and using the Menu [ ] [ ] buttons, you can jump to editing screens for the octave shift (p. 37) and reverb
eect (p. 41) of the same part.
Changing the sustain length
The sustain length can be set independently for the each keyboard.
1. Press the [Utility] button.
2. Press the Menu [
3. Press the [Utility] button.
4. Press the Menu [
5. Press the Menu [ ] [ ] buttons to select the part whose sustain length you wish to adjust.
Part Upper, Lower, Pedal
6. Press the Value [-] [+] buttons to adjust the setting.
] [ ] buttons to select the “Sustain.”
] [ ] buttons to select “Length.”
Settings SHORT, MIDDLE, LONG
To return to the basic screen, press the [Display/Exit] button.
40

Adding Reverberation to the Sound (Reverb Eect)
Reverb is an eect that adds a sense of spaciousness to the sound, creating the illusion of playing in a concert hall.
1. Press the Reverb [ ] [ ] buttons to adjust the overall Reverb amount.
When you press the Reverb [ ] button, additional Reverb is applied. Pressing the Reverb [ ] button decreases the Reverb level.
When you press the Reverb [
] [ ] buttons, the Reverb level will be shown in the display.
Changing the reverb type
By changing the reverberations of the notes, you can enjoy the atmosphere of performance in a wide variety of dierent locations.
1. Press the [Utility] button.
2. Press the Menu [
3. Press the [Utility] button.
4. Press the Menu [
] [ ] buttons to select “Reverb.”
] [ ] buttons to select “Reverb Type.”
Performing
5. Press the Value [-] [+] buttons to select a Reverb type.
Type Explanation
ROOM 1 Reverberation of a small room
ROOM 2 Reverberation of a small club
ROOM 3 Reverberation of a large room
HALL 1 Reverberation of a large concert hall
HALL 2 Reverberation of a small concert hall
SMALL CHURCH The reverberation of a small church
LARGE CHURCH The reverberation of a large church
CATHEDRAL The reverberation of a cathedral
PLATE A bright, metallic reverberation
DELAY An echo-like sound repeated several times
PAN DELAY Similarly to the above but where the sound is panned between the left and right speakers
To return to the basic screen, press the [Display/Exit] button.
41

Changing the wall type
By changing the type of reverb you can experience the feeling of performing in various dierent locations, and by changing the Wall Type (wall
material) you can make further adjustments to the way in which reverberation occurs.
1. Press the [Utility] button.
2. Press the Menu [
3. Press the [Utility] button.
4. Press the Menu [
5. Press the Value [-] [+] buttons to select a Wall type.
Type Explanation
DRAPERY Pleated curtain
CARPET Carpet
ACOUSTIC TILE Acoustical tile, sound-absorptive tile
WOOD Wood
BRICK Brick
PLASTER Plaster
CONCRETE BLOCK Concrete block
MARBLE Marble
] [ ] buttons to select “Reverb.”
] [ ] buttons to select “Wall Type.”
To return to the basic screen, press the [Display/Exit] button.
Changing the depth of the reverb
You can make independent settings for each Part.
1. Press the [Utility] button.
2. Press the Menu [
3. Press the [Utility] button.
4. Press the Menu [
5. Press the Menu [ ] [ ] buttons to select the part whose reverb depth you wish to adjust.
Part
6. Press the Value [-] [+] buttons to adjust the setting.
Settings Explanation
0–10, AUTO (Accomp, Rhythm, A.Bass) Increasing the value will increase the amount of reverb eect.
] [ ] buttons to select “Reverb.”
] [ ] buttons to select “Depth.”
Accomp (Automatic Accompaniment except Bass), Rhythm, Drums, M.Perc
A.Bass (Bass part of Automatic Accompaniment), Pedal, Lower, Solo, Vintage
For the three Parts of the Accomp, Rhythm and A.Bass, you have the option of selecting the “AUTO” setting. Parts for which “AUTO” is selected will be set
to the Reverb Depth that is most suitable for the Rhythm currently selected.
To return to the basic screen, press the [Display/Exit] button.
MEMO
By holding down the [Utility] button and using the Menu [ ] [ ] buttons, you can jump to editing screens for the octave shift (p. 37) and sustain
eect (p. 41) of the same part.
42

Making the Sound Distort (Overdrive Eect)
The Overdrive eect makes the sound distort.
1. Press the [Utility] button.
2. Use the Menu [
3. Use Value [-] [+] to adjust the amount of distortion.
Settings Explanation
0–12 Higher values apply the Overdrive eect more strongly.
To return to the basic screen, press the [Display/Exit] button.
MEMO
For details on voices to which the overdrive eect can be applied, refer to “Voice & Rhythm List.”
] [ ] buttons to select “Overdrive.”
Performing
43

Using the D Beam Controller to Modify the Sound
By positioning your hand above the D Beam controller located on the front panel, you can easily modify the sound or produce sound eects.
This is a useful way to make your live performance even more expressive.
1. Press either the D Beam [Pitch], [Filter], or [Volume] button, so its indicator is lit.
Pressing the button cycles the illumination status of the indicator between lit (red), lit (green), and unlit. Switch the color of the button’s indicator to
select the desired eect.
Button Indicator color Explanation
[Pitch] button
[Filter] button
[Volume] button
Red Changes the pitch of the sounds you play on the upper keyboard (Pitch bend).
Green A bass drum and cymbal will sound.
Red
Green The cymbal will be struck with gradually increasing force.
Red Changes the volume of the sounds you play on the upper keyboard.
Green The sound of a wind chime is produced.
Changes the tonal character of the sounds you play on the upper keyboard.
* For some sounds, the tonal change may be dicult to notice.
2. Place your hand above the D Beam controller.
The eect assigned to the D Beam controller will be applied to the sound.
3. To turn o the D Beam controller, press the button you pressed in step 1 a number of times until the indicator goes out.
Eective range of the D Beam controller
The illustration at right shows the eective range of the D Beam controller. Moving your hand outside this range will
not produce any eect.
The eective range of the D Beam controller will be drastically decreased under strong direct sunlight. Please be
aware of this when using the D Beam controller outdoors.
MEMO
The sensitivity of the D Beam controller will vary according to the brightness of its surroundings. If it does not
operate as you expect, you can readjust the sensitivity. Increasing the D Beam sensitivity value (p. 94) will make it
more sensitive.
44

Using the Lower Keyboard Eectively
You can divide the lower keyboard into two or more sections and play solo voices, play the pedal bass voice, or combine a variety of uses for even more
versatility.
For example, the following applications are possible.
Using the lower keyboard to play the solo voice
Press the Solo [To Lower] button in the Solo section to Play the Solo voice to the Lower keyboard (p. 48).
Drums/SFX
Manual Percussion
Bass
Lower
Solo
Using the lower keyboard to play the bass part by hand
Set “Bass Split” to “ON” to play the Pedal Bass voice from the Lower keyboard (p. 48).
Drums/SFX
Manual Percussion
Bass
Lower
Solo
Performing
Using the lower keyboard to play drum sounds or sound eects
Press the [Manual Percussion] button to play drum sounds or sound eects with the Lower voice on the lower keyboard (p. 49).
Drums/SFX
Manual Percussion
Bass
Lower
Solo
Playing drum sounds from the entire lower keyboard
Press the [Drums/SFX] button (p. 50).
Drums/SFX
Manual Percussion
Bass
Lower
Solo
45

Using the lower keyboard to play drum sounds and solo voice
Press the [Drums/SFX] button, and then press the Solo [To Lower] button (p. 47, p. 50).
Drums/SFX
Manual Percussion
Bass
Lower
Solo
By changing the combination of voices that are played on the Lower keyboard, and by changing the Solo Split Point (p. 47) and Bass Split Point (p. 48), you
can create the following types of setup.
Drums/SFX
Manual Percussion
Bass
Lower
Solo
Drums/SFX
Manual Percussion
Bass
Lower
Solo
Drums/SFX
Manual Percussion
Bass
Lower
Solo
46

Playing the Solo Voice on the Lower Keyboard (Solo To Lower)
Normally, the solo voice will sound on the upper keyboard.
By using the Solo [To Lower] button, you can play the solo voice in the righthand side of the lower keyboard that includes the B4 key. The state in which
the keyboard is divided in this way is called “split,” and the location at which the keyboard is divided to play the solo voice in the lower keyboard is
called the “Solo Split Point.”
1. Press a voice button for the Solo part to select the voice you want to play (p. 29).
2. Press the Solo [To Lower] button (indicator lights).
When you play the Lower keyboard, the Solo voice will sound in the range to the right of the Solo Split Point.
Performing
Lower keyboard
Solo Split Point
Solo voice
3. To turn o the Solo split, press the Solo [To Lower] button (indicator turns o).
The Solo voice will no longer sound in the Lower keyboard; the Solo voice will now be played in the Upper keyboard.
* If the Solo [To Lower] is ON, the Solo voice will not be heard from the upper keyboard.
MEMO
• You can change how the Solo voice will sound (p. 92).
• You can adjust the Solo Split Point (p. 92).
47

Using the Lower Keyboard to Play the Bass Voice (Bass Split)
By using the “Bass Split” function you can play the bass voice in the left-hand side (including C3) of the lower keyboard.
The location at which the lower keyboard is divided in this way, to play the pedal bass voice, is called the “Bass Split Point.”
1. Select a Pedal Bass voice (p. 29).
2. Press the [Utility] button.
3. Press the Menu [
4. Use the Value [-] [+] buttons to turn ”Bass Split” on.
When you play the Lower keyboard, the Pedal Bass voice will sound in the range to the left of (and including) the bass split point note.
] [ ] buttons to select “Bass Split.”
Pedal Bass voice
Bass Split Point
To return to the basic screen, press the [Utility] button.
* It is not possible to select and play both “Bass Split” function and Pedal [To Lower] buttons simultaneously (p. 51).
* If the ”Bass Split” function is on, the Pedal Bass voice will not be heard from the pedalboard. The Pedal Bass voice will sound from the Lower
keyboard.
Lower keyboard
MEMO
You can adjust the Bass Split Point (p. 92).
48

Playing a Lower Voice with Percussion Instrument Sounds and a Voice Phrase (Manual Percussion)
You can play various drum sounds and sound eects using the bottom 15 keys of the Lower keyboard. This is convenient when you wish to play the
Lower voice together with drum sounds or sound eects.
The keys for Drum sounds
or Sound Eects
Performing
15 keys
1. Press the [Manual Percussion] button (indicator lights).
The button will alternate between ON (lit) and OFF (dark) each time it is pressed.
The Manual Percussion screen will be displayed for several seconds.
* It is not possible to select and play both [Drums/SFX] and [Manual Percussion] buttons simultaneously (p. 50).
2. When you play the bottom 15 keys of the Lower keyboard the chosen drum sound is played on each key.
Lower keyboard
Changing the manual percussion sets
You can choose from seven dierent manual percussion sets.
When you change the Manual Percussion Set, the sound played by each of the 15 lowest notes of the Lower keyboard will change.
1. Press the [Manual Percussion] button (indicator lights).
The Manual Percussion screen will be displayed for several seconds.
2. While the Manual Percussion screen is displayed, use the Value [-] [+] buttons to select the desired manual percussion set.
The [Manual Percussion] button indicator will begin to ash.
Manual Percussion Set PERC SET 1, PERC SET 2, ORCHESTRA SET, LATIN SET, ASIAN SET, VOICE PHRASE, SFX SET
3. Press the [Manual Percussion] button once again.
The [Manual Percussion] button indicator will change from blinking to lit, and your choice of drum set will be nalized.
49

Playing Drums from the Entire Lower Keyboard (Drums/SFX)
You can use the Lower keyboard to play various drum sounds (drum set). In this case, the Lower voices will no longer sound.
1. Press the [Drums/SFX] button (indicator lights).
Play the Lower keyboard and listen to the various drum sounds on each key.
The [Drums/SFX] button will alternate between on (lit) and o each time it is pressed.
* For some drum sets, there will be keys that do not sound.
Changing the Drum/SFX set
As the drum set, you can choose from 18 types of drum set. When you change the drum set, the sound produced by each note will change.
1. Press the [Drums/SFX] button (indicator lights).
The Drums/SFX will be displayed for several seconds.
2. When the Drum Set name is displayed on the screen, press the Value [-] [+] buttons to select a Drum Set or Sound Eect Set.
The [Drums/SFX] button indicator will begin to blink.
Drum/SFX set
To stop mid-way through this or any procedure, press the [Display/Exit] button.
3. Press the [Drums/SFX] button once again.
The [Drums/SFX] button indicator will light constantly, and the selected Drum/SFX set will be applied.
POP, ROCK, JAZZ BRUSH, VOX DRUM, STANDARD, STANDARD 2, ROOM, ROOM 2, POWER, ELECTRONIC, TR-808,
DANCE, JAZZ, BRUSH, BRUSH 2, ORCHESTRA, ETHNIC, SOUND EFFECTS
50

Using the Lower Keyboard to Play the Bass Voice (Pedal To Lower)
By using the Pedal [To Lower] button, you can sound the Pedal Bass voice by playing the root note (p. 122) of a chord on the Lower keyboard in the area
that is playing the Lower voice.
1. Select a Pedal Bass voice (p. 29).
2. Press the Pedal [To Lower] button (indicator lit).
When you play a chord in the area of the Lower keyboard that sounds the Lower voice, the Pedal Bass voice will also be heard and will play the root
note.
If the “Leading Bass” function is on (p. 95), the lowest note played in the lower keyboard will sound the pedal bass voice.
* If no portion of the Lower keyboard is sounding the Lower voice (the [Drums/SFX] button is ON), the Pedal Bass voice will not sound.
* If the Pedal [To Lower] is ON, the Pedal Bass voice will not be heard from the pedalboard.
Easily Playing Chords on the Lower Keyboard (Easy One Finger)
Performing
This function lets you produce chords simply by playing one or two keys on the lower keyboard; it’s called the “Easy One Finger” function.
1. Hold down the Pedal [To Lower] button for several seconds until its indicator starts lighting.
Easy One Finger will turn on.
MEMO
If Easy One Finger is turned on, the sound of the lower keyboard part will be sustained even after you release the notes you were pressing in the
lower keyboard; this sound will be sustained until you play the next note.
The following functions will also turn on.
• Chord Intelligence (p. 95)
• Pedal To Lower
• EZ Touch (p. 92)
51

Realistically Expressing Acoustic Instrument Performances (SuperNATURAL Voices)
Acoustic instruments are noted for their richly varied tonal changes and the diversity of their performance techniques; these are indispensable
elements that produce the distinctive charm of such instruments. “SuperNATURAL voices” are special voices that are able to realistically express the
sounds and performance techniques of these acoustic instruments.
Selecting a SuperNATURAL Voice
* SuperNATURAL voices can be selected only for the Solo part.
1. Press one of the Solo part voice buttons.
A SuperNATURAL voice will be selected.
If you want to switch to the other SuperNATURAL voice assigned to the button, press the [Alternate] button.
52

Selecting the SuperNATURAL voice of the [Others] button
1. Press the Solo part [Others] button.
The display will show the voice name.
The indicator of the selected [Others] button will light.
2. While the display shows the voice name, use the Value [-] [+] buttons to select a SuperNATURAL voice.
The indicator of the Solo [Others] button will blink.
SuperNATURAL voices have an “N.” at the beginning of their name.
If you decide to cancel the procedure, press the [Display/Exit] button.
3. Press the Solo part [Others] button once again to conrm the voice you selected.
The indicator of the Solo part [Others] button will change from blinking to steadily lit, and the SuperNATURAL voice will be selected.
Performing
Optimal Settings for Playing a SuperNATURAL Voice
You can play SuperNATURAL voices even more eectively by making the appropriate solo mode and foot switch settings.
You can also automatically set these controllers for optimally playing a SuperNATURAL voice.
MEMO
If you want to use the foot switches, connect a pedalboard (PK series; sold separately) (p. 24).
1. Select a SuperNATURAL voice.
2. While the display shows the voice name, press the [Rec] button.
A conrmation message appears.
3. Press the [Rec] button.
The setting will be changed.
The following settings are changed.
Parameter Value set Explanation
Solo Mode (p. 92) POLYPHONIC The solo voice will sound on all keys played in the solo part.
L Foot Switch (p. 93) N.CONTROL1 Applies an eect to the SuperNATURAL voice (p. 54).
53

Playing a SuperNATURAL Voice
When you play a SuperNATURAL voice, its tone quality will change appropriately when you play legato or staccato passages.
In addition, using the foot switches or D Beam while you perform can apply a variety of eects to the sound, making your performance expression
even richer and more realistic.
If you want to use the foot switches while performing, assign the foot switch functions (L Foot Switch, R Foot Switch) to “N.CONTROL 1” and
“N.CONTROL 2” (p. 93).
MEMO
If you want to use the foot switches, connect a pedalboard (PK series; sold separately) (p. 24).
Characteristics of the SuperNATURAL voices
Voice name Characteristics
N.Violin
N.Cello
N.Er Hu
N.NylonStrGt
N.FlamencoGt
N.Trumpet The “falls” typical of a trumpet are particularly eective. Glissando Fall
N.Trombone
N.Alto Sax
N.Tenor Sax
N.Flute
N.EnglishHrn
N.Clarinet
N.Shakuhachi
N.Harmonica
N.Marimba
A sound with beautifully applied portamento and
vibrato.
This is characterized by the portamento and ornaments
distinctive to the Er Hu.
A hold eect that sustains the sound and sound eects
in the lower range make this unique.
When you play chords, the sound of guitar strumming
is produced.
The glissando that smoothly connects pitches is typical
of this instrument.
This is notable for its beautifully supple tone and its
growl playing technique.
This sound has an appealing glissando that smoothly
connects the notes.
The ability to sustain long notes and the beautiful
vibrato make this voice special.
The glissando has a sense of pitch that is distinctive of
the clarinet.
You can use ornaments in a way that is unique to the
shakuhachi.
The growl technique that characterizes the harmonica
is particularly expressive.
This sound provides the distinctive tremolo of the
marimba.
N.CONTROL 1 N.CONTROL 2
Portamento Pizzicato
Portamento Ornament
Hold Harmonics
Glissando Fall
Glissando Growl
Glissando Growl
Glissando Growl
Glissando Growl
Glissando Ornament
Glissando Growl
Glissando Tremolo
Foot switch eect
Foot switch eects
Eect Explanation
Portamento, Glissando
Pizzicato
Ornament
Harmonics
Fall
Growl This technique produces a powerful sound by simultaneously breathing and growling into a wind instrument.
Tremolo This is the technique of rapidly repeating a single note, or rapidly alternating between multiple notes.
54
These performance techniques continuously vary the pitch between two notes. The way in which notes are
connected will depend on the construction of the instrument.
In this performance technique, the strings of the violin are plucked with the ngers rather than bowed with the
bow, producing sharply dened notes.
This performance technique produces a rapid change in pitch at the beginning of the note, in a way that is
distinctive of that particular instrument.
This is a technique in which a string of the guitar is ngered lightly to sound an overtone. A pitch one octave
higher than the keyboard note will be heard.
This is the technique of rapidly lowering the pitch of a wind instrument while simultaneously producing a
decrescendo.

Adjusting the Overall Volume Using an Expression Pedal
You can use a pedalboard (PK series; sold separately) or expression pedal (EV-7; sold separately) to adjust the ATELIER’s overall volume. Stepping down
on the expression pedal will increase the volume; releasing the pedal will decrease the volume.
Decrease
the volume
Increase
the volume
* Completely releasing the expression pedal does not lower the volume to zero. If you do want to turn down the volume completely, set the [Master
Volume] knob to the Min (Minimum) position.
MEMO
• Even as you release your foot from the expression pedal and lower the volume, the lower-range portion will linger on. This provides a natural
sounding resonance.
• When an Active Expression voice is selected, the expression pedal can be used to produce changes in the voice (p. 56).
• Likewise you can specify whether the Expression Pedal will or will not control the volume during the playback of recorded music data (p. 94).
• You can specify whether the expression pedal will function when playing back performance data that was recorded on the ATELIER series (p. 94).
Performing
55

Performing with an Active Expression Voice
For “Active Expression Voices,” operating the expression pedal will control not only the volume but also the tone, or may add additional sounds.
MEMO
If you want to use an expression pedal, you’ll need to connect a pedalboard (PK series; sold separately) or an expression pedal (EV-7; sold separately)
(p. 26).
1. Press the [Others] button of the Part to which you want to assign an Active Expression voice.
The voice name appears in the display.
The indicator of the selected [Others] button will light.
* You can also use the Upper Organ part’s [Others] button to select an Active Expression voice, but the active expression eect won’t be applied.
2. Press the Value [-] [+] buttons to select the Active Expression Voice.
The indicator of the selected [Others] button will blink.
Active Expression Voices have the letters “AEx” preceding their voice name.
To stop mid-way through this or any procedure, press the [Display/Exit] button.
3. Once again, press the [Others] button for the part whose sound you wish to set to conrm the voice.
The indicator of the [Others] button will change from blinking to light.
Example: selecting and performing the active expression voice
1. Select the Active Expression voice “AEx Strings.”
2. Depress the expression pedal.
As you further step down on the expression pedal, the sound will gradually change to a bright strings sound, and a strings sound one octave higher
will be added.
Adding Decay to the Sound (Damper Pedal)
You can use the hold switch of the pedalboard (PK series; sold separately) or a pedal switch (DP series; sold separately) to sustain the notes played on
the lower keyboard.
While you continue depressing the damper pedal, notes will be sustained even if you release the keys.
* Decay cannot be added to the Solo voices.
MEMO
Decay can not be applied to Pedal Bass voices played on the Lower keyboard (when the Pedal [To Lower] button indicator is lit or Bass Split function
is ON).
56

Using the Foot Switch
There are two foot switches located at either side of the expression pedal on the pedalboard (PK series; sold separately). These two foot switches are
assigned the following functions.
Right foot switch
Left foot switch
When the power to the ATELIER is turned on, the following functions are assigned to the left and right foot switches.
Foot switch Function
Right foot switch
Left foot switch
* The glide eect applies only to the upper keyboard part. It will not apply to the vintage organ of the upper keyboard part.
MEMO
• You can change the functions that are assigned to the left and right foot switches. For details, refer to “Changing the Foot Switch Functions (L Foot
Switch, R Foot Switch)” (p. 93).
• The functions assigned to the foot switches can be stored individually for each registration button (p. 66).
• A pedal switch (DP series; sold separately) connected to the Pedal (Control) jack will have the same function as the right foot switch.
Switch the Rotary eect between Fast/Slow
If Rotary is turned on, the Rotary eect will switch between “Fast” and “Slow” each time you press the Right foot
switch.
Glide eect
While you are pressing the foot switch, the pitch will be temporarily lowered. When you release the Left foot
switch, the pitch will return to normal.
Performing
57

Performing with Rhythms
The ATELIER lets you enjoy playing along with a rhythmic accompaniment.
Selecting a Rhythm
The ATELIER provides 210 types of Rhythms and Automatic Accompaniments (Music Styles).
The four buttons shown below are known as the “Rhythm buttons.” They allow you to select a rhythm from eight dierent groups, which are organized
according to musical genre.
Each rhythm button corresponds to two groups.
By pressing a button that is lit, you can select that button’s other group.
The selected group is shown by the illumination status of the two indicators located beside the rhythm buttons.
Indicators located beside the rhythm buttons Explanation
Upper indicator lit
Lower indicator lit
The rhythm group printed above the button is selected.
(Jazz, Country/Gospel, Pop/Rock, Ballad)
The rhythm group printed below the button is selected.
(Latin, Waltz/March, Trad/Acoustic, User)
3 21
1. Press a Rhythm button to select a Rhythm group.
The indicator of Rhythm button will light.
That Rhythm select screen appears.
2. Press the Value [-] [+] buttons to select a dierent Rhythm within the same group.
The indicator of the Rhythm button will blink.
3. Press the ashing rhythm button once more.
The Rhythm button’s indicator will change from blinking to light.
The Rhythm has now been applied.
MEMO
For more on the internal rhythms, refer to “Voice & Rhythm List.”
58

Selecting Rhythms Stored in User Memory or USB Memory
Here’s how to play rhythms that are stored in user memory or USB memory.
You can select these rhythms by choosing the User group.
MEMO
With the factory settings, rhythms are already stored in user memory.
1. If you want to select rhythms from USB memory, connect your USB memory to the USB Memory connector.
2. Press the Rhythm [Ballad/User] button a number of times to select the user group.
The Rhythm select screen appears.
3. Press the [Media] button to select a memory.
If you want to select the registration to USB memory, select “USB Memory.”
If you want to select the registration to user memory, select “User.”
4. Press the Value [-] [+] buttons to select a Rhythm.
The indicator of Rhythm [Ballad/User] button will blink.
5. After selecting a rhythm, press the blinking Rhythm [Ballad/User] button once more.
The Rhythm [Ballad/User] button stops blinking and remains lit, indicating that the rhythm has been selected.
MEMO
If you wish to copy a Rhythm saved on USB memory to User memory, refer to “Copying Rhythms (Copy Rhythm)” (p. 103).
Performing with Rhythms
What is User Memory?
“User Memory” refers to an area inside the instrument where you can store the registration you create and the performances you record.
Registration and SMF music les saved on USB memory can also be copied to user memory (p. 101, p. 101).
User memory is quite useful, since anything you place there will be retained even while the power is turned o.
The following things are stored in User memory:
• Songs you’ve registered in “Favorites”
• Rhythms
• Registration sets
59

Playing Rhythm
There are two ways to start the rhythm. You can press the [Start/Stop] button to start the rhythm, or you can use Synchro Start to have the rhythm start
when you play the lower keyboard or the pedalboard.
You can also make the rhythm start with an intro, or stop with an ending.
Starting with an added intro
1. Press the [Intro/Ending] button.
The [Intro/Ending] button indicator will light.
2. Press the [Start/Stop] button.
The Intro is played and the Rhythm starts.
While the Intro is playing, the [Intro/Ending] button indicator will light, until the Intro ends then the button indicator will go dark.
Starting without an intro
1. Press the [Start/Stop] button.
The Rhythm starts without an Intro being played.
Making the intro short and simple
1. Press the Variation [1] button (indicator lights).
2. Press the [Intro/Ending] button.
3. Press the [Start/Stop] button.
A short Intro is played and the Rhythm starts.
Starting the Rhythm Automatically When You Play the Lower Keyboard or Pedalboard (Synchro Start)
If you perform the following operation before starting the rhythm, the rhythm will start the moment you play the lower keyboard or
pedalboard.
1. While holding down the Arranger [On/O] button, press Auto [Fill In] button to turn Synchro Start on.
The [Start/Stop] button indicator will blink.
* If the Arranger function is ON (the Arranger [On/O] button indicator is lit), it is not be able to start the Rhythm by playing the Pedalboard
(p. 62).
60

Stopping the Rhythm
Stopping with an ending
1. Press the [Intro/Ending] button.
An Ending is played, then the Rhythm stops.
While the Ending is playing, the [Intro/Ending] button indicator will light, until the Ending nishes the button indicator will be turned o.
Stopping without an ending
1. Press the [Start/Stop] button.
The Rhythm stops without an Ending being played.
Stopping with the ending short and simple
1. Press the Variation [1] button.
2. Press the [Intro/Ending] button.
A short Ending is played, then the Rhythm stops.
Performing with Rhythms
61

Changing a Tempo of Rhythm and Automatic Accompaniment
You can change the tempo of the Rhythm or Automatic Accompaniment.
1. Press the Tempo [ ] [ ] buttons to change the tempo (speed) of the Rhythm or Automatic Accompaniment.
Button Explanation
Tempo [
Tempo [
The value of the tempo currently set (20–500 beats per minute) can be checked in the display.
You can also check the tempo by viewing the Beat indicator.
] button
] button
MEMO
• By pressing the Tempo [ ] [ ] buttons simultaneously, the tempo is returned to the standard (preset) tempo for the selected Rhythm.
• If you switch rhythms when “Auto Std Tempo” (p. 95) is on, the tempo changes to match the rhythm. If you switch rhythms when “Auto Std Tempo” is
o, the tempo remains unchanged even when you switch the rhythm.
The tempo becomes slower
The tempo becomes faster
Playing Rhythm and Automatic Accompaniment
The Arranger function of the ATELIER can add an Automatic Accompaniment to each Rhythm.
Based on the selected Rhythm, the Arranger function automatically adds an accompaniment that is suitable for the chord being pressed on the Lower
keyboard.
1. Press the Arranger [On/O] button (indicator lights).
Arranger [On/O] button Explanation
Lit (On) Rhythm and Automatic Accompaniment
Unlit (O) Rhythm
2. Start the rhythm (p. 60).
The rhythm and the automatic accompaniment will play together.
If the Arranger [On/O] button is ON and no Pedal Bass voice is selected, the Automatic Accompaniment will play the bass sound.
* When the Arranger [On/O] button is on, Synchro Start (p. 60) on the pedalboard cannot be used.
* The lower voice is not played during the performance of the intro and ending, even when the Lower keyboard is played.
62

Adding Variety to the Rhythm or Automatic Accompaniment
You can add variety to the rhythm or automatic accompaniment by changing the rhythm pattern of the rhythm.
1. Press the Auto [Fill In] button (indicator lights).
A ll-in will automatically be added when you press a Variation [1]–[4] button to change the accompaniment or rhythm arrangement.
What’s a ll-in?
A Fill In is a short phrase that is inserted at a break in the melody or at a point where the character of the song changes (between Chorus’s or
Verses).
Changing the Arrangement of the Rhythm and Accompaniment (Variation)
Performing with Rhythms
You can change the arrangement of the accompaniment. This function is called “Variation.”
For each rhythm, there are four types of arrangement for the accompaniment.
1. Press the Variation [1]–[4] buttons to change the arrangement of the accompaniment.
The indicator of the button you pressed will light.
The Variation [1] button produces the simplest arrangement, and the [4] button produces the most orid.
For an intro or ending, Variation [1] is the shortest and simplest.
63

A Simple Way to Make Automatic Accompaniment Settings (One Touch Program)
When using the Arranger function (p. 62) for automatic accompaniment, you can also use the “One Touch Program” function to automatically select panel
settings that are appropriate for the selected rhythm.
By pressing the [One Touch Program] button, you can make the following settings.
• Panel settings (e.g., sounds and volume) suitable for the rhythm
• Automatic Accompaniment playing
• [Start/Stop] button blinking (Waiting for Synchro Start) (p. 60)
• Chord Intelligence function is ON (p. 95)
* If the arranger function (p. 62) is on (the (Arranger [On/O] button’s indicator is lit), you can’t start the rhythm from the pedalboard.
1. Select a Rhythm (p. 58).
2. Press the [One Touch Program] button.
Panel settings appropriate for the rhythm and automatic accompaniment will automatically be called up for Registration [1]–[4] buttons.
* When you press the [One Touch Program] button, the “Arranger Update” setting will automatically change to “INSTANT” (p. 97).
3. Press the Registration [1]–[4] buttons to select panel settings.
4. On the Lower keyboard, play a chord.
At the moment you play the keyboard, the Intro will begin, and then the Rhythm and Automatic Accompaniment will play.
5. Press the [Intro/Ending] or [Start/Stop] button to stop the Rhythm.
Rhythm and Automatic Accompaniment stops.
6. Press the [One Touch Program] button, extinguishing its indicator.
The One Touch Program function is turned o, and the panel settings in eect prior to the [One Touch Program] button being pressed are restored.
64

Deleting a Rhythm from User Memory or USB Memory
You can delete rhythms stored in User memory or USB memory.
1. Select the rhythm you want to delete (p. 58).
2. Press the [Load] button and [Save] buttons simultaneously.
The following display appears.
To cancel the procedure, press the [Reset] button.
3. Press the [Rec] button.
While the Rhythm is being deleted, the following screen will be displayed.
Performing with Rhythms
When saving is complete, the Rhythm select screen reappears.
* Never turn o the power while the operation is in progress. Doing so will damage the ATELIER’s internal memory or USB memory, making it
unusable.
65

Storing Your Performance Settings (Registration)
Registration sets
Save
Save
Write
Load
Load
Copy
Registration sets
Registration sets
The ATELIER allows you to store sound settings and panel settings such as 8 in the Registration buttons.
There are a total of 8 Registration buttons, and one set of panel settings can be stored in each, allowing you to register a total of 8 dierent panel
settings.
A “registration,” which consists of a collection of panel settings, can be stored at each of the registration buttons. When grouped together, all eight of
the registrations stored at the eight registration buttons are called a “registration set.”
This provides a convenient way to change large numbers of panel settings during a performance, or to recall a complex panel setting.
8 registrations
=
Registration set
MEMO
• You can save a registration set in user memory or on USB memory (sold separately) (p. 68).
• For details on the settings that are stored in a registration, refer to “Stored Items” (p. 123).
Saving or loading a registration set
You can save or load registration set as shown in the illustration below.
ATELIER
Registrations you can recall
by pressing a button
Voices, Rhythm settings,
etc.
1 2 3 6 7 854
1 2 3 6 7 854
1 2 3 6 7 854
1 2 3 6 7 854
User memory
1 2 3 6 7 854
1 2 3 6 7 854
1 2 3 6 7 854
1 2 3 6 7 854
1 2 3 6 7 854
USB memory
66

Storing Registrations
1. Make all the panel settings that you wish to store.
2. While holding down the [Write] button, press one of the Registration [1]–[8] buttons.
The panel settings will be stored in the selected Registration button.
* If you’ve made panel settings, but haven’t saved them, and then call up a registration, the panel settings that you didn’t save will be discarded.
Whenever you have any panel settings that you want to keep, make sure to store them in a registration before you call up a registration.
MEMO
For details on the settings that are stored in a Registration, refer to “Stored Items” (p. 123).
Recalling a Registration
Here’s how panel settings stored at a registration button can be recalled.
Recalling voices and other panel settings
1. Press and immediately release one of the Registration [1]–[8] buttons.
Recalling settings for rhythm and automatic accompaniment in addition to the panel settings
1. Press and hold a Registration [1]–[8] button for several seconds.
The indicator of the rhythm select button will blink, and the panel settings and settings related to rhythm performance and automatic accompaniment
will be recalled.
MEMO
• You can switch the way in which registrations are recalled (p. 97).
• You can also switch registrations by using the foot switch of a pedalboard (PK series; sold separately) or a pedal switch (DP series; sold separately) (p.
96).
Automatically Registering When You Switch Panel Settings
When the [Manual] button is ON (lit), all panel settings you make will be stored automatically in the [Manual] button as they are made, thus updating
the Registration that had been previously saved. If you change to a preset Registration [1]–[8] button, it is possible to return to the previous panel
settings by pressing the [Manual] button.
* The settings stored in the [Manual] button will return to their default state when you turn o the power.
Storing Your Performance Settings (Registration)
MEMO
You can use the [Manual] button to successively recall registrations in the order in which they are saved in USB memory or user memory (p. 72).
67

Saving Registration Sets
With the settings of Registration buttons [1]–[8] considered as one set, you can store the registration set to USB memory or User memory.
We recommend that complex panel settings or Registrations you wish to keep be saved on USB memory.
Furthermore, when you save registrations created on the ATELIER to USB memory, you can call up their settings on other ATELIER Series instruments
and use the registrations the same way.
1. Prepare to save the performance data.
If you want to save a registration from USB memory, connect your USB memory to the USB Memory connector.
2. Press the [Registration] button to make the indicator light.
The Registration select screen appears.
3. Press the [Media] button to select the desired media.
If you want to save the registration to USB memory, select “USB Memory.”
If you want to save the registration to user memory, select “User.”
4. Press the Value [-] [+] buttons to select the save destination number.
Numbers which have not been used in the Saving operation will be displayed as “------------.”
To cancel the operation, press the [Registration] button.
5. Press the [Save] button.
6. Give the registration set a name.
Press the Menu [ ] [ ] buttons to move the cursor, and press the Value [-] [+] buttons to select a character.
Button Explanation
Value [-] [+] buttons
[Reset] button Delete a character.
[Rec] button Inserts a space.
Select a character. The following characters can be selected.
space ! “ # % & ’ ( ) * + , - . / : ; = ? ^ _ A B C D E F G H I J K L M N O P Q R S T U V W X Y Z a b c d e f g h i j k l m n o p q r
s t u v w x y z 0 1 2 3 4 5 6 7 8 9
7. Once you’ve given it a name, press the [Save] button.
68

8. Press the Value [-] [+] buttons to select the format in which the data will be saved.
Display Explanation
ORIGINAL
R-SERIES Save formats that can be used with AT-R Series devices.
9. Press the [Save] button.
Saving of the registration data will begin.
When saving ends, the “------------” in the screen will change to the registration name that you saved.
* Never remove the USB memory or turn o the power while the operation is in progress. Doing so will damage the ATELIER’s internal memory or
USB memory, making it unusable.
Save formats that can be used with the AT-350C. When saved in this format, the data can also be used by AT-S
series, AT-900, AT-900C AT-800, AT-300, AT-100, AT-75, AT-45 and AT-15 devices.
If the following screen appears
If you select a number at which a registration has already been saved and press the [Save] button, the following screen appears.
Storing Your Performance Settings (Registration)
If you wish to update the contents of the Registration data
1. Press the [Rec] button.
The Registration will be rewritten.
If you wish to save new data instead of updating the registration
1. Press the [Reset] button to cancel the procedure.
Rewriting of the Registration will be canceled.
2. Press the Value [-] [+] buttons to select a number for which “------------” is displayed on the upper right of the screen.
3. Press the [Save] button to save the Registration set.
When saving is complete, the saved registration name will be displayed.
69

Loading Previously Saved Registration Sets Into the ATELIER
Here’s how to recall a previously saved Registration set from the User memory or USB memory into the memory of the ATELIER.
Registrations can be selected in the following three ways.
Loading a Set of Registrations
You can load a “set” (a collection of settings for Registration buttons [1]–[8]) from USB memory or user memory.
Loading an Individual Registration (p. 71)
Recall the settings of one of the Registration [1]–[8] buttons.
Recalling the Order that the Registrations are Saved on the USB Memory or User Memory (Load Next) (p. 72)
Assign “RIGHT+ Load Next” to the foot switch, and recall Registration sets in the order in which they are stored in USB memory or user memory.
* Be aware that when you load Registrations from a USB memory or user memory, the Registrations that were previously in internal memory will be
lost. It is a good idea to save important Registrations to USB memory or user memory (p. 68).
Loading a Set of Registrations
You can load a “set” (a collection of settings for Registration buttons [1]–[8]) from USB memory or user memory.
1. If you want to load a registration from USB memory, connect your USB memory to the USB Memory connector.
2. Press the [Registration] button to make the indicator light.
The Registration select screen appears.
3. Press the [Media] button to select the desired media.
If you want to load from the registration of USB memory, select “USB Memory.”
If you want to load from the registration of user memory, select “User.”
4. Press the Value [-] [+] buttons to select the Registration that you wish to load into internal memory.
To cancel the procedure, press the [Registration] button.
5. Press the [Load] button.
When loading is complete, the Registration Select screen reappears.
70

Loading an Individual Registration
Recall the settings of one of the Registration [1]–[8] buttons.
1. If you want to load a registration from USB memory, connect your USB memory to the USB Memory connector.
2. Press the [Registration] button to make the indicator light.
The Registration Select screen appears.
3. Press the [Media] button to select the desired media.
If you want to load from the registration of USB memory, select “USB Memory.”
If you want to load from the registration of user memory, select “User.”
4. Press the Value [-] [+] buttons to select the Registration that you wish to load into internal memory.
5. Press the [Utility] button.
6. Press the Value [-] [+] buttons to specify the Registration button number to be loaded.
To cancel the operation, press the [Utility] button.
7. Press the [Utility] button.
8. Press the Value [-] [+] buttons to specify the storage destination Registration.
The registration will be loaded to the Registration button of the number you’ve selected here.
Storing Your Performance Settings (Registration)
9. Press the [Utility] button.
The following display appears.
To cancel the procedure, press the [Reset] button.
10. Press the [Rec] button.
When the Registration has been loaded, the Registration Load screen reappears.
71

Recalling the Order that the Registrations are Saved (Load Next)
You can recall Registrations in the order in which they were saved on the USB memory or User memory. This function is called “Load Next.”
When you will be performing live, you can save Registration sets to USB memory in the order in which you will be performing. Then while you perform,
you can recall the next Registration set easily and smoothly.
Changing the assignment of the [Manual] button
Here’s how you can assign the Load Next function to the [Manual] button.
1. Press the [Utility] button.
2. Press the Menu [
3. Use the Value [-] [+] buttons to select “LOAD NEXT.”
4. Press the [Display/Exit] button.
To return to the basic screen.
] [ ] buttons to select “ManualButtonAssign.”
Using the load next function to recall registrations
You can recall registrations in the order in which they are saved on a USB memory or in user memory.
1. If you want to load a Registration from USB memory, connect your USB memory to the USB Memory connector.
2. Press the [Manual] button.
The rst Registration saved on the USB memory will be recalled into the ATELIER.
To cancel the procedure, press the [Reset] button.
3. Press the [Rec] button.
The Registration will be conrmed.
4. Press one of the Registration [1]–[8] buttons.
The Registration will be loaded (recalled into internal memory).
5. Repeat steps 2 and 4 to successively recall the Registration sets.
MEMO
You can assign the Load Next functions to either of the foot switches located on each side of the Expression Pedal (p. 93).
72

Deleting a Set of Registrations
Here’s how to delete a Registration set that was saved to a USB memory, or User memory.
1. Prepare the registration that you want to delete.
If you want to delete registration data from the USB memory, connect the USB memory to the USB Memory connector.
2. Press the [Registration] button to make the indicator light.
The Registration select screen appears.
3. Press the [Media] button to select the desired media.
If you want to delete from the registration to USB memory, select “USB Memory.”
If you want to delete from the registration to user memory, select “User.”
4. Press the Value [-] [+] buttons to select the registration that you wish to delete.
5. Simultaneously press the [Load] button and [Save] button.
The following display appears.
Storing Your Performance Settings (Registration)
To cancel the procedure, press the [Reset] button.
6. If you are sure that you wish to delete the data, press the [Rec] button.
When a registration is deleted, the deleted registration name will change to “------------.”
* Never remove the USB memory or turn o the power while the operation is in progress. Doing so will damage the ATELIER’s internal memory or
USB memory, making it unusable.
73

Recording Your Performance
You can record your own performance to see how you sound, or you can play along with a recorded performance.
The ATELIER lets you record in the following ways.
Recording format Explanation
SMF recording (p. 75)
Audio recording (p. 85)
MEMO
SMFs (Standard MIDI Files) use a standard format for music le that was formulated so that les containing music le could be widely compatible,
regardless of the manufacturer of the listening device.
Button operations used in recording and playback
Records the song in SMF format.
You’ll be able to record and play back parts individually, using the ATELIER’s distinctive functionality.
Records the song in audio format.
You’ll be able to play back the song on your digital audio player or computer.
* Performances recorded in audio format are saved on a USB memory. If you want to make an audio
recording, connect your USB memory to the USB Memory connector.
Button Explanation
[Reset] button Returns you to the beginning of the song.
[Play/Stop] button
[Rec] button
[Bwd] button Rewinds the song.
[Fwd] button Fast-forwards the song.
Plays/stops the song.
If you’ve pressed the [Rec] button to put the ATELIER in recording-standby mode, recording will start when you
press the [Play/Stop] button.
Places the instrument in recording-standby mode.
When in recording-standby mode, the [Rec] button will light and the [Play/Stop] button will blink.
74

Recording in SMF Format
Here’s how a song you perform can be recorded in SMF format.
3
6
5 7
24
Preparing to record
1. Select the panel settings needed for recording the performance.
2. Press the [Rec] button.
The [Rec] button indicator will light, and the [Play/Stop] button will blink.
3. Press the Value [-] [+] buttons to select ”SMF.”
Starting and stopping recording
4. Press the [Play/Stop] button to start recording.
When you press [Play/Stop] button, the metronome will sound a two-measure count, and then recording will begin.
MEMO
If you wish to use Rhythm and Automatic Accompaniment as you record, press the [Start/Stop] button (p. 60) instead of the [Play/Stop] button to
begin recording. Also, if the Sync Start is ON, recording will begin the instant you play the Lower keyboard.
5. Press the [Play/Stop] button when you have completed your recording.
The Track button’s indicator where performance data is recorded will light.
MEMO
When you press the [Intro/Ending] button or [Start/Stop] button while recording a Rhythm performance or Automatic Accompaniment, the Rhythm
performance and Automatic Accompaniment will stop. However, the recording itself will continue. Press the [Play/Stop] button to stop recording.
Recording Your Performance
75

Listening to the recorded performance
6. Press the [Reset] button.
The location at which playback will start will return to the beginning of the rst measure (bar).
If you wish to begin playback from the middle of the song, press the [Bwd] button or [Fwd] button to move to the measure from which you wish to
begin playback.
7. Press the [Play/Stop] button to start playback.
After playback reaches the end of the performance, it will stop automatically.
To stop playback at any point, press the [Play/Stop] button.
MEMO
• The function of the [Play/Stop] button can be assigned to a foot switch (located on either side of the expression pedal) (p. 93).
• You can specify whether or not the Expression Pedal will aect the playback and what you play while ATELIER music data is being played back (p. 94).
* If you use the Rhythm or Automatic Accompaniment immediately after having loaded and played back a song other than an ATELIER perfor-
mance song, such as SMF’s, etc., the playback may not sound right (the voices may have changed, etc.) To prevent this from happening, press the
[Reset] button before playback.
Track button assignments for the recorded performance
The parts of a performance you record as an SMF are automatically assigned to the three “track buttons,” as shown in the following table.
Recording and playback can be carried out independently for each track button; for example, when re-recording, you can specify that it pertain
only to a certain track button.
Button Explanation
[Bass] button
[Lower] button Lower Voice Performance Data (Note, Hold)
[Solo/Upper] button
Pedal Bass Voice Performance Data (Note)
Bass part of the Automatic Accompaniment
Upper Voice Performance Data (Note, Hold)
Solo Voice Performance Data (Note, Hold)
MEMO
• More information about the track assignments when playing commercial SMF music les, please refer to “Silencing a Specic Track (Track
Mute)” (p. 98).
• If you wish to erase all the recorded data and record new performance data, use the editing function “Erase” (erase performance data) to
erase the data (p. 84).
Add a Count Sound to Match the Timing (Count In)
In cases such as when you want to perform in time with a song, you can have a count sound played before playback of the song begins, allowing you
to synchronize your own performance with the song.
Playing back a song after playing the count sound is called “Count In.”
1
1. Hold down the [Reset] button and press the [Play/Stop] button.
The metronome will play two measures (bars) of count-in before recording begins.
76

Advanced Recording Methods
Recording each part separately
In this method, each part (track button) is recorded one after another: rst the bass part, then the Lower part, etc. If there are any previously recorded
performances, you can listen to them as you record additional parts.
4
25 6 3
1. Select the panel settings needed for recording the performance.
2. Press the [Bwd] button or the [Fwd] button to select the desired measure (bar) when you start recording.
If you wish to start recording from the beginning of the song, press the [Reset] button.
3. Press the [Rec] button to enter recording standby mode.
The [Rec] button indicator will light, and the [Play/Stop] button and the unrecorded track buttons will blink.
The track buttons that are already recorded will light.
4. Press the button of the track you want to record, so it’s blinking.
The existing performance data in the specied track will be erased as recording takes place.
* When the button for a track lights steadily, it means it won’t be recorded.
5. Press the [Play/Stop] button to start recording.
When you press [Play/Stop] button, the metronome will sound a two-measure count, and then recording will begin. As you listen to the performance
data previously recorded, record the Part into a new Track.
6. Press [Play/Stop] button to stop recording.
The track button for which performance data has been recorded will be lit.
7. Repeat steps 2–6 to record each part.
Recording Your Performance
77

Re-recording
You can record over recorded performance data.
3
14 5 2
1. Press the [Bwd] button or the [Fwd] button to select the desired measure (bar) when you start recording.
If you wish to start recording from the beginning of the song, press the [Reset] button.
2. Press the [Rec] button to enter recording standby mode.
The [Rec] button indicator will light, and the [Play/Stop] button and the unrecorded track buttons will blink.
The track buttons that are already recorded will light.
3. Press the button of the track you want to record, so it’s blinking.
The existing performance data in the specied track will be erased as recording takes place.
* When the button for a track lights steadily, it means it won’t be recorded.
4. Press the [Play/Stop] button to start recording.
When you press [Play/Stop] button, the metronome will sound a two-measure count, and then recording will begin. As you listen to the performance
data previously recorded, record the Part into a new Track.
5. Press [Play/Stop] button to stop recording.
The track button for which performance data has been recorded will be lit.
* If you wish to re-record with dierent settings for voices, tempo, part balance, erase the recorded song (p. 84) and re-record again. If the Control
track still contains data from before you re-recorded, the volume or sounds may change during playback.
* If you wish to keep the existing Expression Pedal data, and record only the panel operations, you can make settings to prevent the operation of
the Expression Pedal from being recorded (p. 94).
78

Layering a new recording onto SMF music les
You can load commercially available SMF music les into the ATELIER, and record your own performance on top of it. During recording, the data you’ve
loaded will be played back, while you record your performance.
4 5
2 3
1. Prepare the SMF music les.
If you’re using SMF music les from USB memory, connect it to the USB Memory connector.
2. Press the [Song] button (conrm that its indicator is lit).
The Song Select screen appears.
3. Press the [Media] button to select “USB Memory.”
4. Press the Value [-] [+] buttons to select the SMF music les that you wish to load into internal memory.
5. Press the [Load] button.
The selected performance data will be loaded into internal memory.
6. Select the panel settings needed for recording the performance.
7. Record as described in “Re-recording” (p. 78).
MEMO
The performance data you recorded can be saved on a USB memory, or “Favorites” (p. 81).
* Commercially sold music les can also be loaded into the ATELIER, but for reasons of copyright protection, cannot be saved in SMF format.
* The performances of Channel 2 in SMF music les are deleted when pedal performances are recorded over again.
Recording Your Performance
79

Re-recording using performance data from a USB memory
If you want to re-record performance data from a USB memory, you must rst load that performance data into the ATELIER’s internal memory.
4 5
2 3
1. Prepare the performance data.
Connect the USB memory to the USB Memory connector.
2. Press the [Song] button (conrm that its indicator is lit).
The Song Select screen appears.
3. Press the [Media] button to select “USB Memory.”
4. Press the Value [-] [+] buttons to select the performance data that you wish to load into internal memory.
5. Press the [Load] button.
The selected performance data will be loaded into internal memory.
6. Select the panel settings needed for recording the performance.
7. Record as described in “Re-recording” (p. 78).
If the following screen appears
If the performance data in the ATELIER has not been saved to a USB memory or Favorites (User Memory), the following message appears.
Press the [Rec] button if you’re sure you want to delete the performance data. If you decide that you don’t want to delete it, press the [Reset]
button.
MEMO
You can store performance data on a USB memory or in the Favorites (user memory) (p. 81).
80

Saving Performance Songs
The performance data that you recorded will disappear when the power of the ATELIER is turned o. If you wish to keep the performance data, you can
save it on a USB memory, or “Favorites” (internal memory).
If the recorded performance data has not been saved, the display will show the “
performance data.
6
64 8 75 9
2 3
” symbol. This symbol will disappear when you save the
Recording Your Performance
1. Prepare to save the performance data.
If you want to save performance song to a USB memory, connect the USB memory to the USB Memory connector.
2. Press the [Song] button (conrm that its indicator is lit).
The Song select screen appears.
3. Press the [Media] button to select the media.
Select “USB Memory” to save the data in USB memory, select “Favorites” to save it in user memory.
4. Press the Value [-] [+] buttons to select the number of the save destination.
If the save destination contains no data, the screen will indicate “------------.”
5. Press the [Save] button.
81

6. Give the performance data a name.
Press the Menu [ ] [ ] buttons to move the cursor, and press the Value [-] [+] buttons to select a character.
Button Explanation
Value [-] [+] buttons
[Reset] button Delete a character.
[Rec] button Inserts a space.
Select a character. The following characters can be selected.
space ! “ # % & ’ ( ) * + , - . / : ; = ? ^ _ A B C D E F G H I J K L M N O P Q R S T U V W X Y Z a b c d e f g h i j k l m n o p q r
s t u v w x y z 0 1 2 3 4 5 6 7 8 9
7. Once you’ve given it a name, press the [Save] button.
8. Press the Value [-] [+] buttons to select the format.
You can select either “ORIGINAL” or “SMF” format.
Display Explanation
ORIGINAL Save data in ATELIER format
SMF Saving in SMF Format for ATELIER Sound Modules
To cancel the procedure, press the [Display/Exit] button.
9. Press the [Save] button to conrm the format.
Saving of the performance data will begin.
* Never turn o the power while the operation is in progress. Doing so will damage the ATELIER’s internal memory or USB memory, making it
unusable.
* Performance data saved by the ATELIER format cannot be played back properly by the sound generator of an instrument that is not a member of
the ATELIER series.
* Saving performance data in SMF format (SMF) requires a longer time than saving it in ATELIER format (ORIGINAL).
82

If the following screen appears
If you select a number at which performance data has already been saved, the following screen appears.
If you wish to update the contents of the performance data
1. Press the [Rec] button.
If you want to save your performance as new data without overwriting the existing data
1. Press the [Reset] button to stop the Save operation.
2. In the Song Select screen, select the number that is displayed as “------------” (a number that currently does not contain
performance data).
3. Save the performance data.
When saving is complete, the saved performance name will be displayed.
Using Song with a Dierent Tempo Than That of the Performance Data
Here’s how to change the tempo of performance data that you’ve saved.
Recording Your Performance
34
1. Prepare the performance data whose tempo you want to change.
If you’re using performance data from USB memory, connect it to the USB Memory connector.
2. Load the performance data into the ATELIER (p. 80).
3. Determine the tempo with the Tempo [
4. Hold down the panel [Reset] button and press the [Rec] button.
The tempo of the performance data will change.
] [ ] buttons.
83

Erasing Performance Data
If you wish to discard your recording and re-record from the beginning, or if you wish to record a new performance, you must erase the previouslyrecorded data.
2
1
3
1. Press the [Display/Exit] button a number of times to access the composer screen.
2. Press the [Load] and [Save] buttons simultaneously.
The following message, asking you to conrm your choice, will be displayed.
To cancel the procedure, press the [Reset] button.
3. If you are sure that you wish to erase the song, press the [Rec] button.
84

Recording in Audio Format
Here’s how to record your performance in audio format.
* Performances recorded in audio format are saved on a USB memory. If you want to record audio, you must connect your USB memory to the USB
Memory connector.
4 7 8
5 6 9 3
Preparing to record
1. Connect your USB memory to the USB Memory connector (p. 26).
2. Select the panel settings needed for recording the performance.
3. Press the [Rec] button.
The [Rec] button indicator will light, and the [Play/Stop] button will blink.
4. Press the Value [-] [+] buttons to select ”Audio.”
Starting and stopping recording
5. Press the [Play/Stop] button to start recording.
MEMO
If you wish to use Rhythm and Automatic Accompaniment as you record, press the [Start/Stop] button (p. 60) instead of the [Play/Stop] button to
begin recording. Also, if the Synchro Start is ON, recording will begin the instant you play the Lower keyboard.
6. Press the [Play/Stop] button when you have completed your recording.
MEMO
When you press the [Intro/Ending] button or [Start/Stop] button while recording a Rhythm performance or Automatic Accompaniment, the Rhythm
performance and Automatic Accompaniment will stop. However, the recording itself will continue. Press the [Play/Stop] button to stop recording.
Recording Your Performance
85

Naming your performance data
7. Press the Menu [ ] [ ] buttons to move the cursor, and press the Value [-] [+] buttons to select a character.
Button Explanation
Select a character. The following characters can be selected.
Value [-] [+] buttons
[Reset] button Delete a character.
[Rec] button Inserts a character.
_ A B C D E F G H I J K L M N O P Q R S T U V W X Y Z 0 1 2 3 4 5 6 7 8 9
* You can’t specify “_” (underline) as the rst character.
Saving the performance data
8. Once you’ve given it a name, press the [Save] button.
The performance data will be saved.
MEMO
You can adjust the recording volume (p. 99).
* Never turn o the power while the operation is in progress. Doing so will damage the ATELIER’s internal memory or USB memory, making it
unusable.
Listening to the recorded performance
9. Press the [Play/Stop] button to start playback.
After playback reaches the end of the performance, it will stop automatically.
To stop playback at any point, press the [Play/Stop] button.
MEMO
The function of the [Play/Stop] button can be assigned to a foot switch (located on either side of the expression pedal) (p. 93).
86

Changing the Name of Performance Data
You can change the name of performance data that’s been recorded in audio format.
4 32 5
1. Load the performance data that is to be given a name change (p. 80).
2. Press the [Display/Exit] button a number of times to access the composer screen.
3. Press the [Save] button.
4. Press the Menu [
] [ ] buttons to move the cursor, and press the Value [-] [+] buttons to select a character.
Recording Your Performance
Button Explanation
Select a character. The following characters can be selected.
Value [-] [+] buttons
[Reset] button Delete a character.
[Rec] button Inserts a character.
5. Once you’ve given it a name, press the [Save] button.
The new name is now inserted.
_ A B C D E F G H I J K L M N O P Q R S T U V W X Y Z 0 1 2 3 4 5 6 7 8 9
* You can’t specify “_” (underline) as the rst character.
87

Playing Performance Data from User Memory or a USB memory
Here’s how to play back performance data that’s been saved in user memory or on a USB memory.
4
2 3
5 6
1. Prepare the song that you want to play back.
If you want to play back performance data from a USB memory, connect it to the USB Memory connector.
2. Press the [Song] button so its indicator is lit.
The song select screen appears.
3. Press the [Media] button to choose the media.
Choose “Favorites” if you want to play back performance data from user memory. Choose “USB Memory” if you want to play back performance data
from a USB memory.
4. Use the Value [-] [+] buttons to select the desired song.
5. Press the [Play/Stop] button to play back the song.
6. Press the [Play/Stop] button to stop the song.
MEMO
You can use the [Bwd] button or [Fwd] button to rewind or fast-forward the playback.
88

Deleting a Saved Performance Songs
You can delete performance data that was saved onto a “Favorites,” or USB memory.
If you want to delete a song in USB memory, connect your USB memory to the USB Memory connector before you continue.
4
3
1 2
Recording Your Performance
5
1. Press the [Song] button (conrm that its indicator is lit).
The Song select screen appears.
2. Press the [Media] button to select the media.
If you want to delete a song from the “Favorites,” choose “Favorites.” If you want to delete a song from USB memory, choose “USB Memory.”
3. Press the Value [-] [+] button to select the performance data that you wish to delete.
4. Press the [Load] button and [Save] buttons simultaneously.
The following message, asking you to conrm your choice, will be displayed.
To cancel the procedure, press the [Reset] button, and you will return to the Song select screen.
5. If you are sure that you wish to delete the song, press the [Rec] button.
* Never turn o the power while the operation is in progress. Doing so will damage the ATELIER’s internal memory or USB memory, making it
unusable.
89

Detailed Settings for Various Functions
Basic Operations in the Utility Screen
In the Utility screen you can make various settings related to performance and recording.
21 3
5
4
Selecting the parameter to edit
1. Press the [Utility] button.
The [Utility] button’s indicator will light, and the Utility screen appears.
2. Use the Menu [ ] [ ] buttons to select the parameter that you want to edit.
If you’ve selected a parameter for which “Press [Rec]” is not shown in the lower right of the screen, proceed to step 4.
MEMO
By holding down the [Utility] button while using the Menu [ ] [ ] buttons, you can skip several parameters when making your selection.
3. Press the [Utility] button.
Repeat these steps to select the parameters that you want to edit.
Pressing the [Display/Exit] button will take you back to the previous screen.
Editing the value
4. Use the Value [-] [+] buttons to change the value of the setting.
Pressing the [-] [+] buttons simultaneously will return the value to the factory setting.
Pressing the [Display/Exit] button will take you back to the previous screen.
If you want to edit other settings, return to step 2 of “Selecting the parameter to edit,” and select the item that you want to change.
5. Press the [Display/Exit] button a number of times.
The [Utility] button’s indicator will go out, and you will return to the basic screen.
MEMO
• When you turn o the power, the settings you edited will return to their original values.
• Some settings are remembered even after the power is turned o. For details on the settings that can be saved, refer to “Stored Items” (p. 123).
90

Settings you can change
Parameter Page
Octave Shift: Pedal
Octave Shift: Lower
Octave Shift
Sustain
Reverb
VintageOrganVolume p. 92
Overdrive p. 43
Vibrato/Chorus Part p. 92
Initial Touch
EZ Touch p. 92
Registration Shift p. 96
L Foot Switch
R Foot Switch
Pitch Bend Range p. 94
Playback Transpose p. 97
Chord Intelligence p. 95
Leading Bass p. 95
Solo Mode p. 92
SoloToLower Mode p. 92
Solo Split Point p. 92
Bass Split p. 48
Bass Split Point p. 92
PedalBass Mode p. 93
Auto Std Tempo p. 95
Intro Count Down p. 95
Count Down Sound p. 95
Arranger Update p. 97
Trans. Update p. 97
ManualButtonAssign p. 72
AccompPartBalance p. 96
Octave Shift: Upper Organ
Octave Shift: Upper Orchestra
Octave Shift: Solo
Sustain: Upper
Sustain: Lower
Sustain: Pedal
Length: Upper
Length: Lower
Length: Pedal
Reverb Type
Wall Type
Depth: Accomp
Depth: Rhythm
Depth: Drums
Depth: M.Perc
Depth: A.Bass
Depth: Pedal
Depth: Lower
Depth: Upper Organ
Depth: Upper Orchestra
Depth: Solo
Depth: Vintage
Upper
Lower
p. 37
p. 40
p. 41
p. 92
p. 93
Parameter Page
Create Folder p. 100
Copy Song p. 101
Media Utility
VIMA TUNES
Metronome
Beat p. 97
Track Mute p. 98
Channel Mute p. 99
Audio Rec Gain p. 99
Exp. Source
Exp. Curve p. 94
Lyrics p. 99
Master Tune p. 106
V-LINK p. 106
MIDI
Aux Out
LCD Contrast p. 106
D Beam Sensitivity p. 94
USB Driver p. 113
USB Memory Mode p. 104
Language p. 106
CD Audio Type p. 99
CD Audio Sync p. 99
Rhythm Lock p. 106
Copy Registration p. 102
Copy Rhythm p. 103
Format Media p. 104
Melody p. 110
Recommended Tone p. 111
Metronome p. 97
Metronome Volume p. 97
Metronome Sound p. 97
Recording
Playback
TxMIDI Channel: Solo
TxMIDI Channel: Upper
TxMIDI Channel: Lower
TxMIDI Channel: Pedal
TxMIDI Channel: Drums
TxMIDI Channel: M.Perc
TxMIDI Channel: Control
MIDI IN Mode p. 105
Send PC Switch p. 105
PC Number: BankMSB
PC Number: PC Num
Aux Out p. 112
Aux Out Mode p. 112
p. 94
p. 105
p. 105PC Number: BankLSB
Detailed Settings for Various Functions
91

Adjusting How the Instrument
Changing How the Solo Voice Responds
Responds
Adjusting the Volume of the Vintage Organ (VintageOrganVolume)
You can adjust the volume of the Vintage Organ sound to regulate the
volume balance relative to the other sounds.
Value Explanation
0–12
Selecting the Parts to which Vibrato or Chorus will be Applied (Vibrato/Chorus Part)
For the vintage organ voices, you can choose the parts to which the
vibrato or chorus eect (p. 34) will be applied.
Value Explanation
UPPER+LOWER
UPPER
LOWER
Increasing the value will increase the volume of
the Vintage Organ sound.
The eect will be applied to the upper keyboard
part and the lower keyboard part.
The eect will be applied to the upper keyboard
part.
The eect will be applied to the lower keyboard
part.
(Solo Mode)
When the Solo voice is assigned to the Upper keyboard or Lower
keyboard, you can specify how the Solo voice will respond when more
than one key is pressed.
Value Explanation
TOP NOTE
LAST NOTE
POLYPHONIC
The Solo voice will sound the highest note that
is played for the Solo part.
The Solo voice will sound the note that was
most recently played for the Solo part.
The Solo voice will sound all notes that are
played for the Solo part.
Layering the Solo Voice and Lower Voice (SoloToLower Mode)
When the Solo voice is being played by the Lower keyboard (i.e., when
the Solo [To Lower] button is ON), you can specify whether the Lower
voice and the Solo voice will sound together (layered), or will sound
separately (split).
Value Explanation
SPLIT The parts will sound separately.
LAYER
The Lower voice and Solo voice will sound
together.
Adjusting the Initial Touch Sensitivity (Initial Touch)
This adjusts the amount of the Initial Touch eect applied.
Initial Touch is a function that translates the force used in playing the
keys into a directly proportional amount of volume.
This can be set separately for both the upper keyboard and lower
keyboard.
Parameter Value Explanation
Initial Touch is ON.
Striking the keys more forcefully will
1–10
Upper, Lower
OFF
produce correspondingly louder sounds.
The change in volume when the keys are
played forcefully increases as the value
is increased.
Initial Touch is o.
Volume remains constant regardless of
how hard you play.
Turning Initial Touch O (EZ Touch)
This allows you to perform at a consistent volume regardless of how
strongly you play the keyboard.
Value Explanation
OFF Initial touch will be on.
The volume will remain constant regardless of
ON
the force you use when playing the keyboard.
Initial touch will be o.
Changing the Solo Split Point (Solo Split Point)
This setting is used to determine the Solo Split Point (lower limit of the
playable range of the Solo voice) on the Lower keyboard to any desired
position.
Value A1–C7
Changing the Bass Split Point (Bass Split Point)
You can assign the Bass Split Point (the highest key up to which the
Pedal Bass voice will sound), to any key of the Lower keyboard.
Value A1–C7
92

Changing the Pedalboard Polyphony (Pedal Bass Mode)
You can set the Bass Pedalboard to play simultaneous multiple notes
or single notes only.
Value Explanation
MONOPHONIC Only single notes can be played.
POLYPHONIC Multiple notes can be played.
Performance Settings
Changing the Foot Switch Functions (L Foot Switch, R Foot Switch)
You can select the functions that are assigned to the foot switches of
the pedalboard (PK series; sold separately).
MEMO
A pedal switch (DP series; sold separately) connected to the Pedal
(Control) jack will have the same function as the right foot switch.
Value Explanation
ROTARY FAST/SLOW
GLIDE
LEADING BASS
RHYTHM START/STOP Start/Stop the Rhythm.
COMP PLAY/STOP
INTRO/ENDING Play an Intro or Ending.
VARIATION UP
VARIATION DOWN
VARIATION ALT
FILL IN Inserts a ll-in.
BREAK Stop the Rhythm for one measure (break).
DAMPER OF UPPER
DAMPER OF LOWER
N.CONTROL1
N.CONTROL2
OFF Turns the foot switch function o.
Switch the Rotary speed between “FAST” and
“SLOW.”
While the foot switch is pressed, the pitch will
temporarily be lowered, and will gradually
return to normal when you release the foot
switch.
Glide eect is added to the voice of all the
sections being played on Upper keyboard.
* The glide eect is applied only to the upper
keyboard part (Upper Organ and Upper
Orchestral). It won’t be applied to the
vintage organ part of the upper keyboard.
The Leading Bass function (p. 95) will operate only
while you continue pressing the foot switch.
The same function as the [Play/Stop] button.
Each time you press the foot switch, the
performance data will play back or stop.
Switches the Variation button.
Each time you press the foot switch, the
Variation number will increment.
Switches the Variation button.
Each time you press the foot switch, the
Variation number will decrement.
Switches the Variation button.
If the Variation [1] button or [3] button is
selected, this will switch between the Variation
[1] and [3] buttons.
If the Variation [2] button or [4] button is
selected, this will switch between the Variation
[2] and [4] buttons.
Notes played on the Upper keyboard will be
sustained only while you continue pressing the
foot switch.
* Decay cannot be added to the Solo voices.
Notes played on the Lower keyboard will be
sustained only while you continue pressing the
foot switch.
* Decay cannot be added to the Solo voices.
Applies an eect to a SuperNATURAL voice (p. 54).
Detailed Settings for Various Functions
* If the Utility menu “Registration Shift” setting is “RIGHT”, “LEFT” or
“RIGHT+LoadNext“, the foot switch will be dedicated to switching
through the Registrations, and the “R Foot Switch” or “L Foot Switch”
setting will be ignored.
93

Changing the Pitch Bend Range
Adjusting the Depth of the Expression Pedal
(Pitch Bend Range)
This setting allows you to choose the maximum amount of Pitch
change (range) permissible when using Pitch Bend (p. 44). The range can
be set anywhere between 1–12 (in semitone units; with a maximum of
one octave).
Value 1–12 (semitone steps)
Changing the Function of the Expression Pedal (Exp. Source)
Specify how the Expression Pedal will function when your
performance is being recorded and when ATELIER song les are being
played back.
Parameter Value Explanation
Expression Pedal movements will be
recorded. The previous recording will be
erased as new songs are recorded.
Expression Pedal movements will not be
recorded. The previous data will remain
without being erased.
Expression pedal will function. Expression pedal recording within the song le
will also be eective.
Expression pedal will not function. The
Expression pedal recording within the
song le will be eective.
Expression pedal will function. The
Expression Pedal recording within the
song le will be ignored.
Recording
Playback
PEDAL
COMPOSER
PEDAL+
COMPOSER
COMPOSER
PEDAL
(Exp. Curve)
You can set the amount of eect applied when you step on the
expression pedal.
Value Explanation
The position of the expression pedal does not really aect
the Rhythm performances and Automatic Accompaniment.
This setting is convenient when you do not want to have
the Rhythm or Automatic Accompaniment volume change
much.
1
2
3
Rhythm,
Auto Accompaniment
Keyboard Part
The expression pedal is applied to the Rhythms and
Automatic Accompaniment just as it is to the keyboard
performance.
The volume is easily adjusted according to the angle of
the expression pedal, making this setting perfect for use in
songs with big changes in dynamics.
Rhythm, Auto Accompaniment, Keyboard Part
The expression pedal is applied to the Rhythms and
Automatic Accompaniment just as it is to the keyboard
performance.
The expression aect is applied more gently than with
Setting 2, so this setting is appropriate for quieter songs
with less intense dynamic changes.
94
Rhythm, Auto Accompaniment, Keyboard Part
The expression pedal does not aect the Rhythms and
Automatic Accompaniment at all.
This setting is suitable for ensemble performances and
other performances featuring multiple instruments.
4
Rhythm,
Auto Accompaniment
Keyboard Part
Adjusting the Sensitivity of the D Beam Controller (D Beam Sensitivity)
This lets you adjust the sensitivity of the D Beam controller.
Value Explanation
1–10
Higher settings will make the D Beam controller
more sensitive.

Rhythm Settings
Producing Chords with Simple Fingering (Chord Intelligence)
“Chord Intelligence” is a feature that intelligently plays the correct
accompaniment chords the moment you play a key specifying a chord
on the Lower keyboard during Automatic Accompaniment.
To play a C chord on the Lower keyboard, for example, you usually
have to press down the three keys C, E, and G; but with Chord
Intelligence, you only have to press the C Key to initiate a C chord
accompaniment.
Value Explanation
ON Chord Intelligence function is ON.
OFF Chord Intelligence function is OFF.
Preventing Rhythm Tempos from Switching Automatically (Auto Std Tempo)
You can prevent rhythm tempos from switching automatically when
you switch rhythms.
Value Explanation
ON
OFF
Switching the rhythm while the rhythm is
stopped automatically changes the tempo
settings to those in the new rhythm.
When the rhythm is stopped, the tempo settings
are not changed automatically when the
rhythms are changed.
Playing a Countdown Sound When the Intro Ends (Intro Count Down)
MEMO
• When the [One Touch Program] button is pressed, the Chord
Intelligence function is automatically switched ON.
• When the Leading Bass function (p. 95) is on and the Chord
Intelligence function is o, you can specify chords with a
combination of the lower keyboard and pedalboard.
Using the Leading Bass Function (Leading Bass)
When Automatic Accompaniment is used, and the Pedal [To Lower]
button is ON, the Pedal Bass voice will normally play the root note (p. 122)
of the chord you play on the Lower keyboard.
If the Leading Bass function is enabled, the lowest note of the chord
you play on the Lower keyboard will then be used as the bass note
(the bottom note of the chord). For this reason, the bass note will be
sounded dierently than normal when you play an inverted chord (p.
122).
Value Explanation
ON The Leading Bass function is ON.
OFF The Leading Bass function is OFF.
MEMO
• You can assign the Leading Bass functions to either of the foot
switches located on each side of the Expression Pedal (p. 94).
• When the Leading Bass function (p. 95) is on and the Chord
Intelligence function is o, you can specify chords with a
combination of the lower keyboard and pedalboard.
If an intro is played before your performance, you can have a
countdown played to the end of the intro, allowing you to understand
easily where you are to start playing.
Value Explanation
ON A countdown will be sounded.
OFF A countdown will not be sounded.
Detailed Settings for Various Functions
Changing the Sound of the Countdown (Count Down Sound)
You can change the sound that is used for the count played at the end
of the intro with the Intro Countdown function.
Value Explanation
VOICE Human voice count (One, two, three...)
STICK Stick sound count
95

Adjusting the Volume Balance of the Arranger (AccompPartBalance)
You can adjust the volume balance of each part.
1. Press the [Utility] button.
2. Use the Menu [
“AccompPartBalance.”
3. Press the [Utility] button.
The Accomp Part Balance screen appears.
MEMO
You can also access the Accomp Part Balance screen from the Part
Balance screen (p. 35) by pressing the Menu [
4. Use the Menu [ ] [ ] buttons to select the part that you
want to adjust.
The arranger accompaniment is divided into six parts: A1–A6.
The content assigned to each part will depend on the accompaniment.
5. Use the Value [-] [+] buttons to adjust the volume.
Value Explanation
0–12 Higher values make the volume louder.
Press the [Display/Exit] button to return to the basic screen.
] [ ] buttons to select
] button.
Registration Settings
Using the Foot Switch to Switch Registrations (Registration Shift)
A foot switch of the pedalboard (PK series; sold separately) can be
assigned the function of successively switching registrations. Each
time you press the foot switch, the registration will be changed.
MEMO
A pedal switch (DP series; sold separately) connected to the Pedal
(Control) jack will have the same function as the right foot switch.
* The Registration Shift settings are stored to each individual
Registration Set. When “RIGHT + Load Next” is assigned to the foot
switch and the Load Next function (p. 72) is used to switch Registration Sets saved to a USB memory, set the Registration Shift setting
to “RIGHT + Load Next” for all saved Registrations.
Value Explanation
OFF
RIGHT
LEFT
RIGHT + Load Next
You can use a function assigned to the foot
switch.
The right foot switch is dedicated to switching
registrations.
The function assigned to the right foot switch
cannot be used.
The left foot switch is dedicated to switching
registrations.
The function assigned to the left foot switch
cannot be used.
The right foot switch is dedicated to switching
registrations. The function assigned to the right
foot switch cannot be used.
Selecting the Registration [8] button and
pressing the right foot switch activates the Load
Next function, calling up the next registration
saved to the USB memory, or user memory.
The Registration Load window appears in the
display.
When you then press the right foot switch
again, the Registration Set is conrmed, and the
Registration [1] button is selected.
Example:
1→2→3...→8→Load Next→(Next Registration) 1
96

Registration Arranger Update (Arranger Update)
You can specify how the settings related to Rhythm performances
and Automatic Accompaniment will be recalled when you press a
Registration [1]–[8] button.
Value Explanation
Settings related to Rhythm performances and
Automatic Accompaniment will be recalled
DELAYED
INSTANT
when you hold a Registration button for several
seconds. If you quickly press the Registration
button, only the panel settings (voice, etc.)
that are not related to Rhythm and Automatic
Accompaniment will be updated.
Settings related to Rhythm performances and
Automatic Accompaniment will be recalled the
instant you press a Registration button along
with all other panel settings.
Registration Transpose Update (Trans. Update)
You can specify how the transpose setting will be recalled when you
press a Registration [1]–[8] button.
Value Explanation
DELAYED
INSTANT
Transpose settings will be recalled when you
hold a Registration button for several seconds.
Transpose setting will be recalled the instant
you press a Registration button along with all
other panel settings.
Recording and Playback Settings
Changing the Key When Playing Back Songs (Playback Transpose)
SMF Music les or a performance that you recorded can be transposed
for playback.
Value -6–0–+5
MEMO
You can transpose the keyboard for performance (p. 36).
Changing the Metronome Setting (Metronome)
This setting determines whether or not the metronome will sound.
Value Explanation
OFF Not heard at all
REC Heard only while recording
ON Heard constantly
Detailed Settings for Various Functions
Adjusting the Metronome Volume (Metronome Volume)
You can adjust the volume of the metronome.
Value Explanation
1–10
Increasing the value will raise the volume of the
metronome.
Changing the Sound of the Metronome (Metronome Sound)
You can choose one of 4 dierent sounds for the metronome.
Value Explanation
CLICK&BELL Conventional metronome sound
ELECTRONIC Electronic metronome sound
VOICE ENGLISH Human voice (English)
VOICE JAPANESE Human voice (Japanese)
Changing the Beat Setting (Beat)
This setting determines the beat to be used when recording
performance songs.
Value
* When recording your performance with playing Rhythm perfor-
mances or Automatic Accompaniment, the beat is set automatically.
* You cannot change the beat of previously recorded songs.
2/2, 0/4, 2/4, 3/4, 4/4, 5/4, 6/4, 7/4, 3/8, 6/8, 9/8,
12/8
97

Silencing a Specic Track (Track Mute)
Assigning commercial SMF music les to the
Here’s how to individually mute tracks of SMF format performance
data.
1. Press the [Utility] button.
2. Using the Menu [
3. Press the Value [-] [+] buttons to select the track that you
wish to mute.
Performance data recorded in SMF format has seven tracks. On each of
the tracks, a certain type of performance is recorded, as shown below.
Track Explanation
R (Rhythm)
A (Accomp) Automatic Accompaniment (except Bass)
B (Bass)
L (Lower) Lower voice
U (Upper) Upper voice
S (Solo) Solo voice
C (Control) Panel operations, Expression Pedal operations
] [ ] buttons, select “Track Mute.”
Rhythm performances, Drums/SFX, Manual
Percussion
Pedal Bass voice, Bass part of the Automatic
Accompaniment
tracks
Track Channel
R (Rhythm) 10
A (Accomp) 5, 6, 7, 8, 9, 11, 12, 13, 14, 15, 16
B (Bass) 2
L (Lower) 3
U (Upper) 4
S (Solo) 1
What the control track (control) does during
recording
Panel operations (Voice selections, Tempo changes, Rotary
fast/slow etc.)
Newly recorded performance data will be added without erasing the
previously recorded data.
If you wish to record new performance data, erase all the recorded
data (p. 84).
Expression pedal operations
The way in which expression operations are recorded will depend on
the setting of the “Exp. Source” (p. 94) item “Recording.”
4. Press the [Utility] button.
The character changes to “–,” indicating that the track is muted.
5. Once again press the [Utility] button, and muting will be
canceled.
To return to the basic screen, press the [Display/Exit] button.
98

Muting Individual Channels of Performance
Switching the Display of Lyrics On or O
Data (Channel Mute)
You can mute (silence) individual channels of performance data of SMF
music les (commercially available).
1. Press the [Utility] button.
2. Press the Menu [
3. Press the Value [-] [+] buttons to select the channel that you
wish to mute.
From the left, these are “1 Ch. (channel 1), 2 Ch. ... 15 Ch., and 16 Ch.”
4. Press the [Utility] button.
The number will change to “–,” indicating that the corresponding
channel has been muted.
5. Once again press the [Utility] button, and muting will be
canceled.
To return to the basic screen, press the [Display/Exit] button.
MEMO
Channel mute will be defeated when you select dierent
performance data.
] [ ] buttons to select “Channel Mute.”
Adjusting the Audio Recording Volume (Audio Rec Gain)
This adjusts the volume for audio recording.
Value -24 dB–6 dB
(Lyrics)
Some music les have Lyrics included and these Lyrics can be
displayed on the screen. You can turn on or o the lyrics display of
such music les.
Value Explanation
ON Lyrics will be displayed.
OFF Lyrics not will be displayed.
* If you press a voice select button while playing back music les that
contains lyrics, the display screen will switch, and the lyrics will no
longer be displayed. To re-display the lyrics, press the [Rec] button.
Setting the Type of CD to be Played Back (CD/Audio Type)
The ATELIER may be unable to correctly recognize the type of CD being
used. In such instances, you can specify the type of CD manually.
Value Explanation
AUTO The CD type is detected automatically.
TYPE A
TYPE B
STEREO
* Note that some commercial player piano CDs cannot be played back
on the ATELIER.
General CDs for Player Piano contain audio and
MIDI data, and the data format may vary from
one CD to the next. If the CD’s data format does
not match the ATELIER’s settings, a “beep” will
sound.
Commercial Audio CD (CDs other than those
designed for use with the player piano).
Adjusting the Timing of a Player Piano CD’s
Piano Sound and Accompaniment
(CD Audio Sync)
With some player piano CDs, the piano and accompaniment sounds
may not be synchronized properly.
In such instances, you can adjust the timing of the piano sounds so
that they are in time with the accompaniment.
Detailed Settings for Various Functions
Value 0–100
99

Media Settings
Creating a Folder in USB Memory or User Memory (Create Folder)
You can create folders in a connected USB memory device or in user
memory.
If you want to create a folder in USB memory, connect the USB
memory to the USB Memory connector.
1. Press the [Utility] button.
2. Press the Menu [
3. Press the [Utility] button.
4. Press the Menu [
5. Press the [Utility] button.
6. Press the [Media] button to select the media.
Choose “USB Memory” if you want to create a folder in USB memory, or
“User” if you want to create a folder in user memory.
7. Press the [Utility] button.
8. Assign a name to the folder.
Rename the folder as described in “Changing the Name of a Folder.”
] [ ] buttons to select “Media Utility.”
] [ ] buttons to select “Create Folder.”
Changing the name of a folder
Here’s how to rename a folder.
* If the folder name includes Japanese characters, you won’t be able
to rename the folder.
1. Press the [Registration] button.
2. In the Registration select screen, select the folder that you
want to rename.
3. Press the [Save] button.
4. Press the Menu [ ] [ ] buttons to move the cursor, and
press the Value [-] [+] buttons to select a character.
The following characters can be selected when changing a name:
Button Explanation
Select a character. The following characters can
Value [-] [+] button
[Reset] button Delete a character.
[Rec] button Insert a character.
5. To conrm the new name, press the [Save] buttons once
again.
The new name is now inserted.
be selected.
_ A B C D E F G H I J K L M N O P Q R S T U V W X
Y Z 0 1 2 3 4 5 6 7 8 9
9. To conrm the new name, press the [Save] button.
The name will be assigned to the newly created folder.
100
 Loading...