

Page 1

Quick Start
PlantPAx System Application Templates
System Release 3.0
Page 2
Important User Information
IMPORTANT
Read this document and the documents listed in the additional resources section about installation, configuration, and
operation of this equipment before you install, configure, operate, or maintain this product. Users are required to familiarize
themselves with installation and wiring instructions in addition to requirements of all applicable codes, laws, and standards.
Activities including installation, adjustments, putting into service, use, assembly, disassembly, and maintenance are required to
be carried out by suitably trained personnel in accordance with applicable code of practice.
If this equipment is used in a manner not specified by the manufacturer, the protection provided by the equipment may be
impaired.
In no event will Rockwell Automation, Inc. be responsible or liable for indirect or consequential damages resulting from the use
or application of this equipment.
The examples and diagrams in this manual are included solely for illustrative purposes. Because of the many variables and
requirements associated with any particular installation, Rockwell Automation, Inc. cannot assume responsibility or liability for
actual use based on the examples and diagrams.
No patent liability is assumed by Rockwell Automation, Inc. with respect to use of information, circuits, equipment, or software
described in this manual.
Reproduction of the contents of this manual, in whole or in part, without written permission of Rockwell Automation, Inc., is
prohibited.
Throughout this manual, when necessary, we use notes to make you aware of safety considerations.
WARNING: Identifies information about practices or circumstances that can cause an explosion in a hazardous environment,
which may lead to personal injury or death, property damage, or economic loss.
ATTENTION: Identifies information about practices or circumstances that can lead to personal injury or death, property
damage, or economic loss. Attentions help you identify a hazard, avoid a hazard, and recognize the consequence.
Identifies information that is critical for successful application and understanding of the product.
Labels may also be on or inside the equipment to provide specific precautions.
SHOCK HAZARD: Labels may be on or inside the equipment, for example, a drive or motor, to alert people that dangerous
voltage may be present.
BURN HAZARD: Labels may be on or inside the equipment, for example, a drive or motor, to alert people that surfaces may
reach dangerous temperatures.
ARC FLASH HAZARD: Labels may be on or inside the equipment, for example, a motor control center, to alert people to
potential Arc Flash. Arc Flash will cause severe injury or death. Wear proper Personal Protective Equipment (PPE). Follow ALL
Regulatory requirements for safe work practices and for Personal Protective Equipment (PPE).
Allen-Bradley, Rockwell Software, PlantPAx, RSLog ix, RSLinx, FactoryTalk, Integrated Architecture, Logix5000, ControlLogix, Com pactLogix, and Rockwell Automation are trademarks of Rockwell Automation, Inc.
Trademarks not belonging to Rockwell Automation are property of their respective companies.
Page 3

Table of Contents
Preface
Configure the Controller Application
About This Publication. . . . . . . . . . . . . . . . . . . . . . . . . . . . . . . . . . . . . . . . . . . . . 5
Before Using This Publication . . . . . . . . . . . . . . . . . . . . . . . . . . . . . . . . . . . . . . 6
Before You Begin . . . . . . . . . . . . . . . . . . . . . . . . . . . . . . . . . . . . . . . . . . . . . . . . . . 7
PlantPAx Quick Start Worksheet . . . . . . . . . . . . . . . . . . . . . . . . . . . . . . . . . . . 7
Additional Resources . . . . . . . . . . . . . . . . . . . . . . . . . . . . . . . . . . . . . . . . . . . . . . . 8
Chapter 1
Before You Begin . . . . . . . . . . . . . . . . . . . . . . . . . . . . . . . . . . . . . . . . . . . . . . . . . . 9
What You Need . . . . . . . . . . . . . . . . . . . . . . . . . . . . . . . . . . . . . . . . . . . . . . . . . . . 9
Follow These Steps. . . . . . . . . . . . . . . . . . . . . . . . . . . . . . . . . . . . . . . . . . . . . . . 11
Controller Template Overview. . . . . . . . . . . . . . . . . . . . . . . . . . . . . . . . . . . . 12
Download the PlantPAx Library . . . . . . . . . . . . . . . . . . . . . . . . . . . . . . . . . . 13
Open Your Template. . . . . . . . . . . . . . . . . . . . . . . . . . . . . . . . . . . . . . . . . . . . . 13
Modify Controller Properties . . . . . . . . . . . . . . . . . . . . . . . . . . . . . . . . . 14
Configure Controller Task Rates . . . . . . . . . . . . . . . . . . . . . . . . . . . . . . . . . . 16
Add Modules to Local Chassis . . . . . . . . . . . . . . . . . . . . . . . . . . . . . . . . . . . . 17
Configure Network Adapters . . . . . . . . . . . . . . . . . . . . . . . . . . . . . . . . . . . . . 18
Configure I/O Modules . . . . . . . . . . . . . . . . . . . . . . . . . . . . . . . . . . . . . . . . . . 19
Add Remote I/O Chassis and Modules . . . . . . . . . . . . . . . . . . . . . . . . . . . . 20
Download the Project . . . . . . . . . . . . . . . . . . . . . . . . . . . . . . . . . . . . . . . . . . . . 21
Create Your HMI Project
Chapter 2
Before You Begin . . . . . . . . . . . . . . . . . . . . . . . . . . . . . . . . . . . . . . . . . . . . . . . . 23
What You Need . . . . . . . . . . . . . . . . . . . . . . . . . . . . . . . . . . . . . . . . . . . . . . . . . 23
Follow These Steps. . . . . . . . . . . . . . . . . . . . . . . . . . . . . . . . . . . . . . . . . . . . . . . 25
HMI Template Overview. . . . . . . . . . . . . . . . . . . . . . . . . . . . . . . . . . . . . . . . . 26
Download the PlantPAx Library . . . . . . . . . . . . . . . . . . . . . . . . . . . . . . . . . . 26
Load the HMI Template . . . . . . . . . . . . . . . . . . . . . . . . . . . . . . . . . . . . . . . . . 26
Create Your HMI Project. . . . . . . . . . . . . . . . . . . . . . . . . . . . . . . . . . . . . . . . . 29
Deploy Your HMI Template. . . . . . . . . . . . . . . . . . . . . . . . . . . . . . . . . . . . . . 30
Configure Your Data Servers. . . . . . . . . . . . . . . . . . . . . . . . . . . . . . . . . . . . . . 33
Configure Your Alarm Servers . . . . . . . . . . . . . . . . . . . . . . . . . . . . . . . . . . . . 35
Add Controllers to Data Server . . . . . . . . . . . . . . . . . . . . . . . . . . . . . . . . . . . 38
Set Runtime Security . . . . . . . . . . . . . . . . . . . . . . . . . . . . . . . . . . . . . . . . . . . . . 40
Rockwell Automation Publication PROCES-QS001A-EN-P - October 2013 3
Page 4

Table of Contents
Chapter 3
Start Using Your HMI Project
Add Basic System Diagnostics
Before You Begin. . . . . . . . . . . . . . . . . . . . . . . . . . . . . . . . . . . . . . . . . . . . . . . . . 41
What You Need. . . . . . . . . . . . . . . . . . . . . . . . . . . . . . . . . . . . . . . . . . . . . . . . . . 41
Follow These Steps . . . . . . . . . . . . . . . . . . . . . . . . . . . . . . . . . . . . . . . . . . . . . . . 42
Observe the Template Structure . . . . . . . . . . . . . . . . . . . . . . . . . . . . . . . . . . . 43
Create Your OWS Client File . . . . . . . . . . . . . . . . . . . . . . . . . . . . . . . . . . . . . 44
Explore Template Features . . . . . . . . . . . . . . . . . . . . . . . . . . . . . . . . . . . . . . . . 48
Alarm Tools. . . . . . . . . . . . . . . . . . . . . . . . . . . . . . . . . . . . . . . . . . . . . . . . . . 48
System Status. . . . . . . . . . . . . . . . . . . . . . . . . . . . . . . . . . . . . . . . . . . . . . . . . 49
Navigation Tools . . . . . . . . . . . . . . . . . . . . . . . . . . . . . . . . . . . . . . . . . . . . . 49
Chapter 4
Before You Begin. . . . . . . . . . . . . . . . . . . . . . . . . . . . . . . . . . . . . . . . . . . . . . . . . 51
What You Need. . . . . . . . . . . . . . . . . . . . . . . . . . . . . . . . . . . . . . . . . . . . . . . . . . 51
Follow These Steps . . . . . . . . . . . . . . . . . . . . . . . . . . . . . . . . . . . . . . . . . . . . . . . 52
Download the PlantPAx Library. . . . . . . . . . . . . . . . . . . . . . . . . . . . . . . . . . . 53
Add Diagnostics to the Controller . . . . . . . . . . . . . . . . . . . . . . . . . . . . . . . . . 53
Add Controller Diagnostics to a HMI Project . . . . . . . . . . . . . . . . . . . . . . 55
Configure PASS Server Status . . . . . . . . . . . . . . . . . . . . . . . . . . . . . . . . . . . . . 61
Add These Additional Resources . . . . . . . . . . . . . . . . . . . . . . . . . . . . . . . . . . 67
Access the Quick Start Worksheet
Index
Appendix A
Enable Content . . . . . . . . . . . . . . . . . . . . . . . . . . . . . . . . . . . . . . . . . . . . . . . . . . 69
Using the Worksheet . . . . . . . . . . . . . . . . . . . . . . . . . . . . . . . . . . . . . . . . . . . . . 70
. . . . . . . . . . . . . . . . . . . . . . . . . . . . . . . . . . . . . . . . . . . . . . . . . . . . . . . . . . . . . . . . . 75
4 Rockwell Automation Publication PROCES-QS001A-EN-P - October 2013
Page 5
Preface
IMPORTANT
Code
Sy
T
Co
e
&
Procure
Sy
&
Conguration
Config ure the Controller
Create Your HMI Project
Start Using Your HMI
46250
Add System Diagnostics
About This Publication
The purpose of this quick start is to describe how to apply application templates to start development of your PlantPAx™
Process Automation System. Basic procedures explain how to configure pre-built controller and human-machine interface
(HMI) templates to provide an application framework with these goals:
• Provides a consistent starting point for system implementation
• Promotes a standardized application framework for control systems and process skids to provide a unified
system experience
• Reduces implementation risks and promotes application practices for optimal system performance
Before using this guide, you must have an installed system available to follow the procedures in this guide. You also need to make
sure your system is properly sized by using the PlantPAx System Estimator (PSE). The PSE is part of the Integrated Architecture™
Builder (IAB) tools.
For more information on system resources, such as Define and Procure and System Set-up, see the Additional Resources on page 8
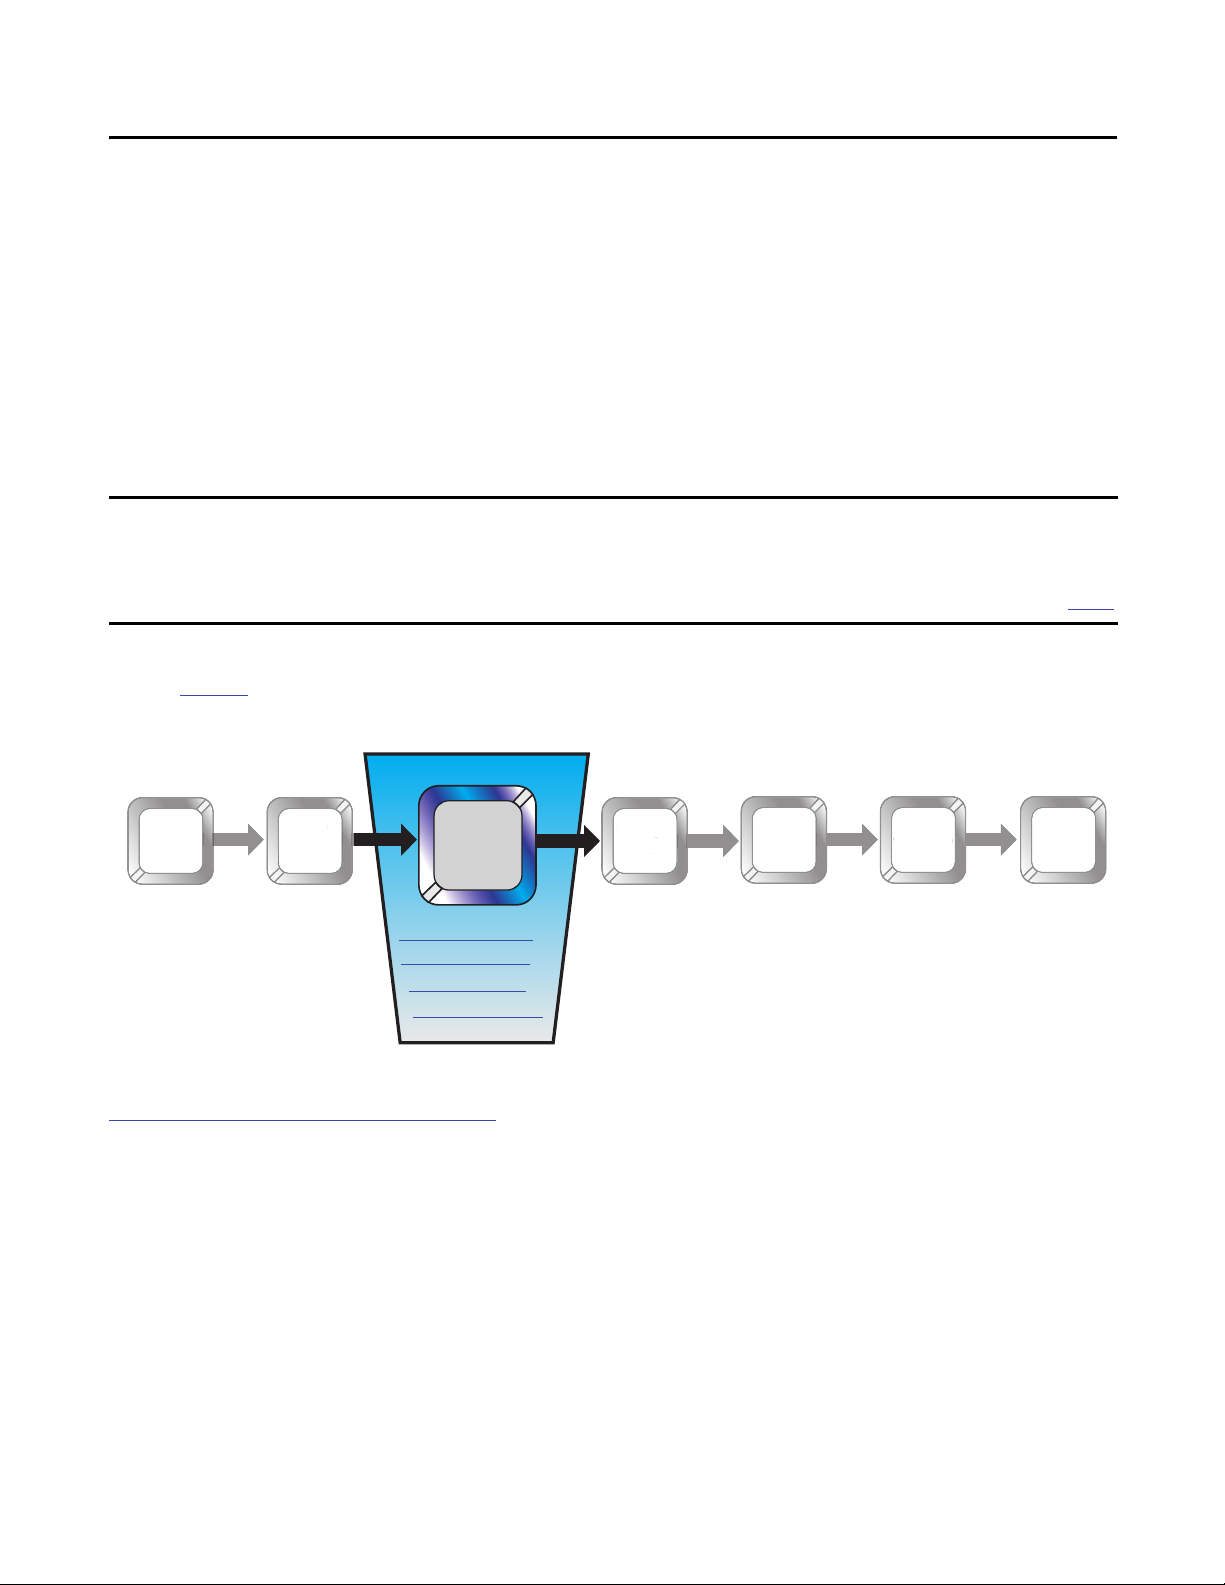
This guide walks you through the tasks for applying the templates that provide a starting point for your application specific
code. In Figure 1
, the lesson goals are underlined per chapter.
.
Figure 1 - Quick Start Manual Scope
Dene
Den
&
Procure
stem
Set-up &
Set-up
Conguration
Apply
Templates
Application
Application
Specic
Specic
Code
System
stem
Test
est
Commission Support
mmission Support
System
The application templates described in this guide are downloaded from the Knowledgebase Answer ID 62682 at
http://www.rockwellautomation.custhelp.com
. Typically, you apply application templates on your Process Automation
System Server (PASS) and HMI visualization client by using the Engineering Workstation (EWS). Once the templates are
applied, you run your application on the Operator Workstation (OWS) to review results.
Rockwell Automation Publication PROCES-QS001A-EN-P - October 2013 5
Page 6
Preface
IMPORTANT
46249
OWS PASS Server EWS
IMPORTANT
Before Using This Publication
You can use the tasks described in this publication only after first completing some prerequisite tasks. For example, you
must have your workstations and servers installed and communicating on a network. Ta b l e 1
The procedures in this quick start use the following software versions:
• RSLogix™ 5000 software, version 20.x
• FactoryTalk® View software, version 7.0.
We suggest that you refer to the PlantPAx Process Automation System Reference Manual, publication PROCES-RM001,
for system guidelines during and after you use this guide. For example, the reference manual documents recommended task
configurations applied by the procedures contained within this guide. There also are recommended rules to follow when creating
your specific configuration after completing this quick start.
Table 1 - Required Tasks to Complete before Using This Quick Start
Objective Task Descriptions
Define the system • Collect requirements. For example, I/O counts,
redundancy, simplex controllers, and so forth
• Choose the controller family, I/O family, network
topology. For example, EtherNet/IP, Ring or Star,
Control Logix®, CompactLo gix™
• Size your system based on requirements
• Create system layout by assigning slots and
IP addresses, chassis locations, I/O counts, and so forth
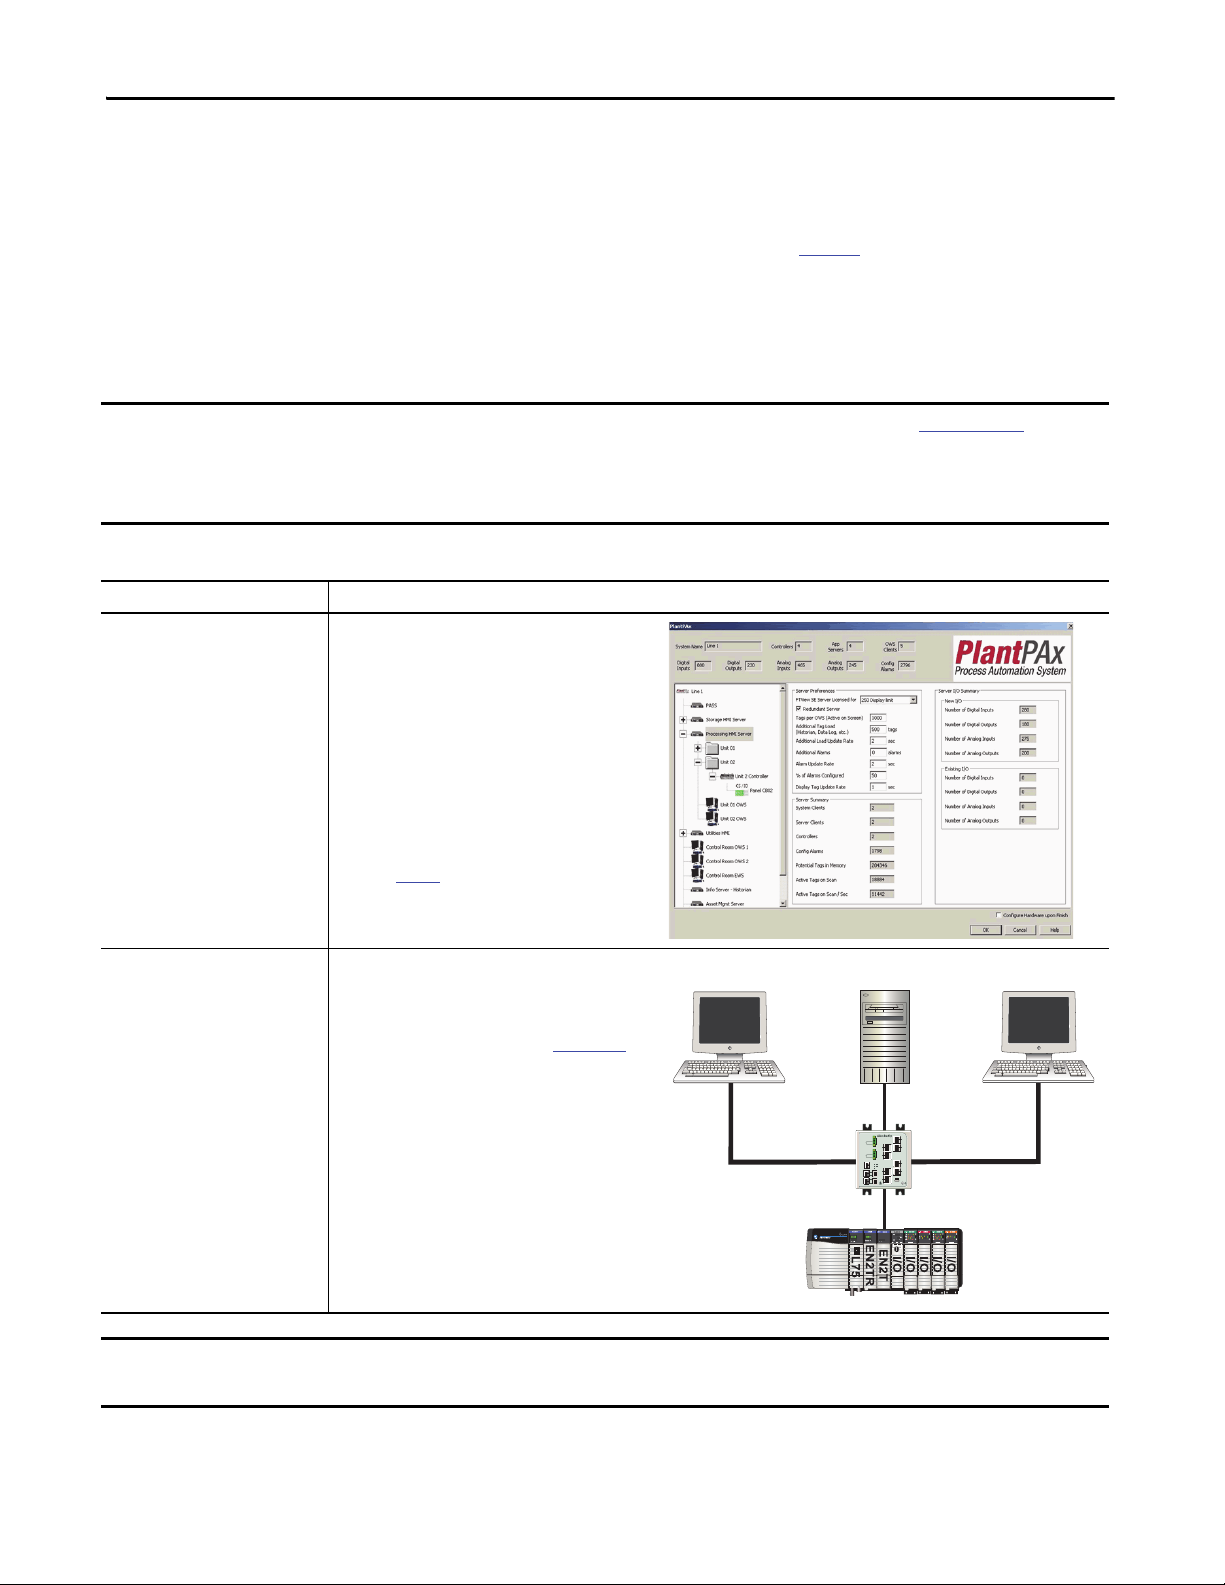
describes the prerequisites.
IMPORTANT: The system must be defined and sized
properly by using the PSE (shown at right) that is part of
the IAB tool. The worksheet that is included with this
guide (see page 69
requirements but is a helpful tool for defining information
that you need for template initiation. To size a system, use
the PSE.
Install the system • Set up infrastructure. For example, install computer
hardware, wire networks, configure network switches
• Install servers and workstations (PASS, OWS, EWS)
If using virtual image templates, see the Virtual Image
Templates User Manual, publication 9528-UM001
or
Configure the operating system and NIC cards, join a
domain, and install software
• Set up the FactoryTalk Directory (FTD) server
• Install controller hardware (c hassis, power supply,
modules)
• Test communication. For example, ping or use RSWho
to locate each server, workstation, and controller
IMPORTANT: The FTD location must be specified for each
workstation and server on your system.
It’s possible to follow the tasks in this quick start without the entire production environment. However, a minimal set up is
required, including PASS servers and controllers.
) cannot determine sizing
6 Rockwell Automation Publication PROCES-QS001A-EN-P - October 2013
Page 7
Preface
IMPORTANT
Before You Begin
The beginning of each chapter contains the following information. Read these sections carefully before beginning work in
each chapter:
• Before You Begin – This section lists the steps that must be completed and decisions that must be made before
starting that chapter. This section defines the minimum amount of preparation required before completing the
current chapter.
• What You Need – This section lists the tools that are required to complete the steps in the current chapter. This
includes, but is not limited to, hardware and software.
• Follow These Steps – This illustrates the steps in the current chapter and identifies which steps are required to
complete the examples by using the section.
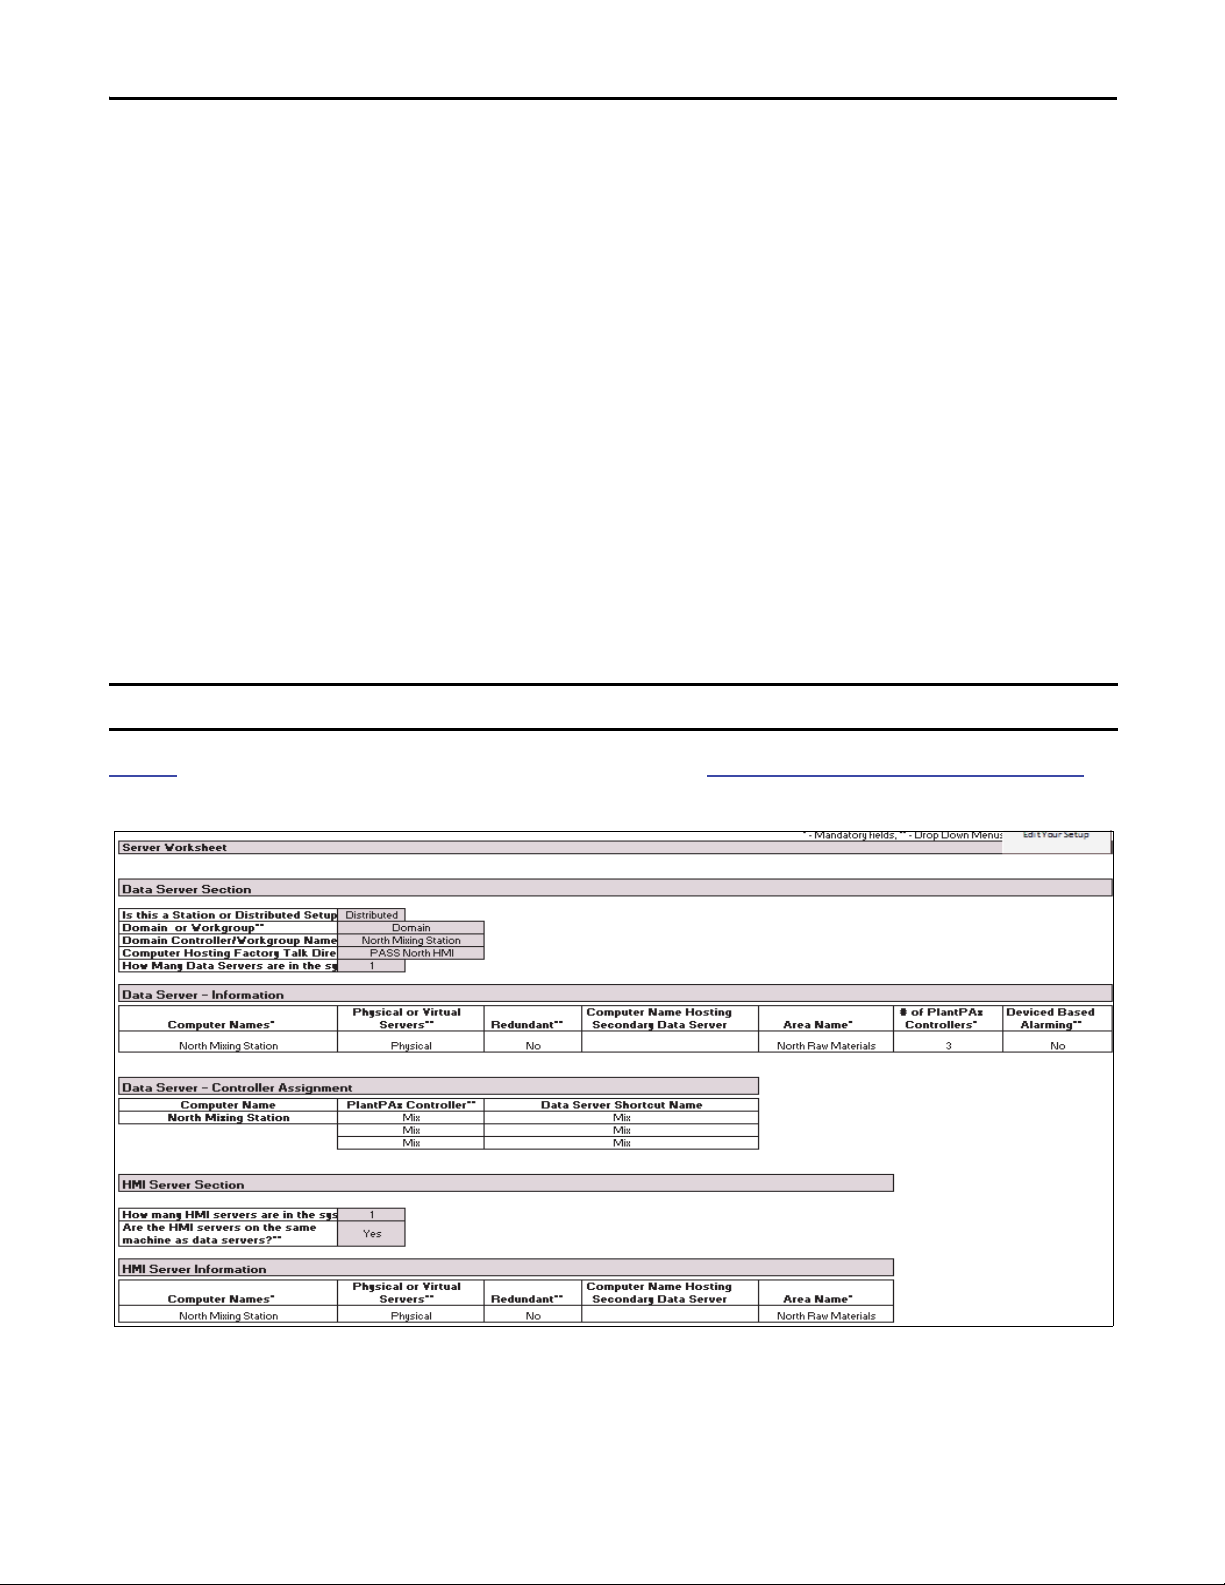
PlantPAx Quick Start Worksheet
The PlantPAx Quick Start Worksheet can help you determine the information required for following the procedures in
this guide. The worksheet is a Microsoft Excel macro-enabled workbook (.xlsm). As information is entered, additional
entry fields are dynamically created to collect more information.
You do not have to use the worksheet with the procedures in this quick start.
Figure 2
Figure 2 - Quick Start Worksheet Example
shows an example of a portion of the completed worksheet. See Access the Quick Start Worksheet on page 69.
Rockwell Automation Publication PROCES-QS001A-EN-P - October 2013 7
Page 8
Preface
Additional Resources
These documents contain additional information concerning related products from Rockwell Automation.
Resource Description
Define and Procure
PlantPAx Process Automation System Selection Guide, publication PROCES-SG001
1756 ControlLogix Controllers Technical Data, publication 1756-TD001 Contains specifications for ControlLogix controllers.
Virtualization for Process Automation Systems, publication PROCES-WP007 Explains and illustrates virtual servers, topologies, and PlantPAx system
System Setup and Configuration
PlantPAx Process Automation System Reference Manual, publication PROCES-RM001
Virtual Image Templates User Manual, publication 9528-UM001 Provides catalog numbers and details for using virtual image templates for setting up
FactoryTalk View Site Edition (SE) Installation Guide, publication VIEWSE-IN003
FactoryTalk Alarms and Events System Configuration Guide, publication FTAE-RM001 Provides details on how to install, configure, and use FactoryTalk Alarms and Events
FactoryTalk AssetCentre Installation Guide, publication FTAC-IN005
FactoryTalk Batch Installation Guide, publication BATCH-IN011 Provides information and procedures for installing FactoryTalk Batch software.
ControlLogix System User Manual, publication 1756-UM001 Explains how to use traditional and extreme environment ControlLogix controllers.
ControlLogix Enhanced Redundancy System User Manual, publication 1756-UM535
Ethernet-to-the-Factory 1.2 Design and Implementation Guide, publication ENET-TD001 Provides collaborative design guidelines based on the Cisco Ethernet-to-the-Factory
ControlLogix and CompactLogix 5370 Segmentation Methods for Plant-wide/Site-wide
Networks with OEM Convergence-ready Solutions, publication ENET-AT004
Application Specific Code
Logix5000 Controllers Common Procedures Programming Manual,
publication 1756-PM001
Logix5000 Controllers General Instructions Reference Manual, publication 1756-RM003 Provides programming controller applications by using relay ladder instructions.
Logix5000 Controllers Advanced Process Control and Drives Instructions Reference
Manual, publication 1756-RM006
PlantPAx Library of Process Objects, publication PROCES-RM002
Apply Templates
PlantPAx Library of Logix Diagnostic Objects, publication PROCES-RM003
FactoryTalk View SE Edition User Manual, publication VIEWSE-UM006
Provides information to assist with equipment procurement for your PlantPAx system.
recommendations.
Provides characterized recommendations for implementing your PlantPAx system.
virtual machines.
Provides ‘how to’ tasks for installing and deploying HMI applications that can involve
multiple users and servers, distributed over a network.
services as part of a FactoryTalk-enabled automation system.
Provides installation instructions for monitoring your factory automation system.
Provides information on the installation and configuration for an enhanced redundancy
controller system for greater availability.
solution and the Rockwell Automation® Integrated Architecture solution.
Highlights the design considerations of various network segmentation methodologies
to assist plant engineers with managing their industrial automation and control
system (IACS) traffic flow, and OEMs to develop convergence-ready solutions to help
simplify integration.
Provides links to a collection of programming manuals that describe how you can use
procedures that are common to all Logix5000™ controller projects.
Provides details on process control and drives instructions.
Provides general considerations for the PlantPAx system library of process objects.
Provides Add-On Instructions for monitoring and diagnostic information of
Logix co ntrollers.
Provides details on how to use this software package for developing and running humanmachine interface (HMI) applications that can involve multiple users and servers,
distributed over a network.
You can view or download publications at http:/www.rockwellautomation.com/literature/
. To order paper copies of
technical documentation, contact your local Allen-Bradley distributor or Rockwell Automation sales representative.
8 Rockwell Automation Publication PROCES-QS001A-EN-P - October 2013
Page 9

Chapter 1
Configure the Controller Application
In this chapter, you learn how to configure controller templates that aid consistent controller implementation, including
the use of periodic tasks and setting appropriate task priorities. You complete the following tasks:
• Download the controller templates based on system requirements
• Apply the template to your controller
• Configure EtherNet/IP communication modules for the controller
•Configure I/O modules
• Add HART modules with diagnostic capability, if applicable
• Add remote I/O chassis connections
The described tasks are to be repeated for each controller that is being configured within your system.
Before You Begin
You must complete these tasks before using this chapter:
• Prerequisites listed on page 6
• Information needed per controller:
– Controller names and types, including if redundancy is to be used
– Controller task rates for the application based on tasks used in sizing calculations in the PSE
– Network adapter IP addresses
– Local and remote I/O rack configuration
What You Need
You have RSLogix 5000 software installed and able to communicate with the controllers. If this is a virtual environment,
the virtual image templates are deployed.
Rockwell Automation Publication PROCES-QS001A-EN-P - October 2013 9
Page 10
Chapter 1 Configure the Controller Application
TIP
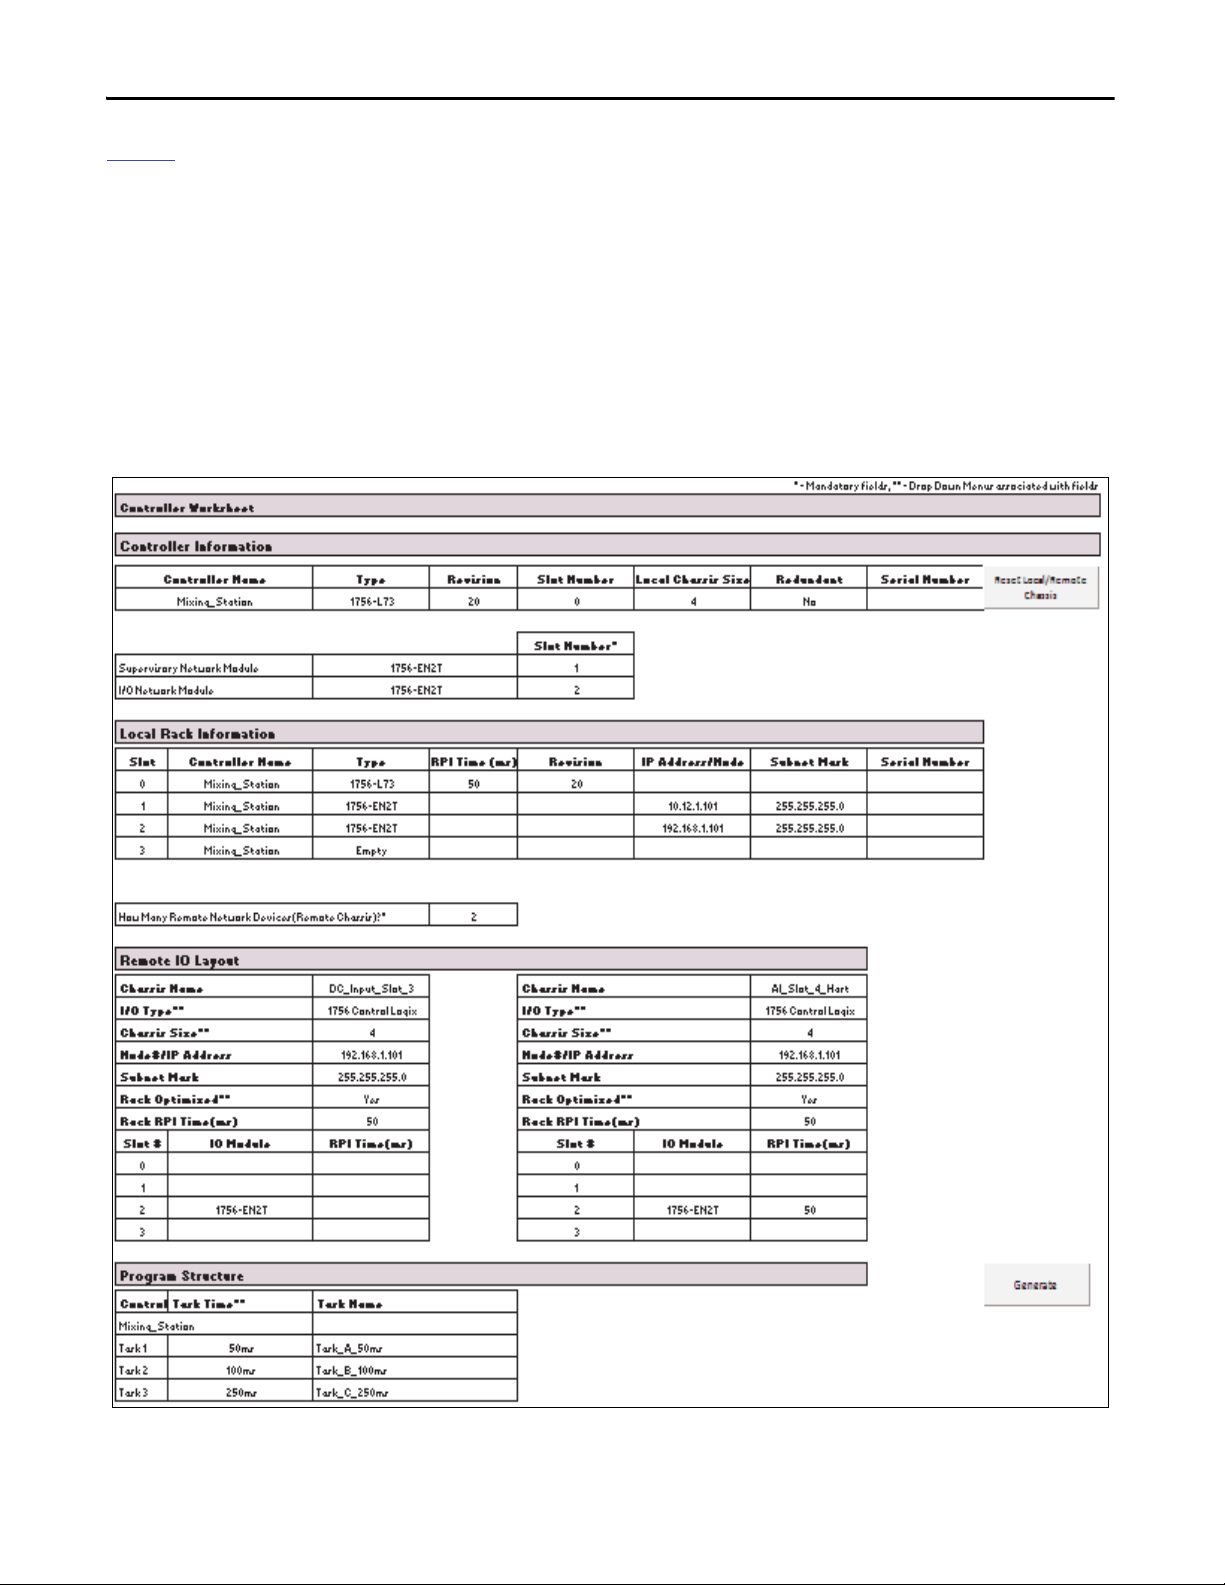
Figure 3 shows an example of the information required for this chapter based on a sample project using the PlantPAx Quick
Start Worksheet. The worksheet is a useful aid in completing tasks in this chapter. The controller sections of the worksheet
include the following:
• Basic controller information, such as the controller name, firmware revision, and slot number
• Local rack information
•Remote I/O layout
•Controller task rates
The PlantPAx Quick Start Worksheet is not the same tool as the PSE, which sizes an application based on system requirements. The
worksheet merely documents pre-determined system elements defined by the PSE.
Figure 3 - Example of the Controller Worksheet Section
10 Rockwell Automation Publication PROCES-QS001A-EN-P - October 2013
Page 11

Configure the Controller Application Chapter 1
Start
Download the PlantPAx Library
on page 13
Op en You r Temp lat e
on page 13
Modify Controller Properties
on page 14
Configure Cont roller Task Rate s
on page 16
Add Modules to Local Chassis
on page 17
Configure Network Adapters
on page 18
Configure I/O Modules
on page 19
Add Remote I/O Chassis and Modules
on page 20
Download the Project
on page 21
Follow These Steps
The following tasks outlined below describe how to configure your template with a Logix5000 controller. You could
already be familiar with many of these tasks, depending on your knowledge of Logix controllers. However, we suggest that
you follow these steps to set up your controller for optimal performance of your PlantPAx system.
The procedures in this chapter have to be completed for each controller in your project.
Rockwell Automation Publication PROCES-QS001A-EN-P - October 2013 11
Page 12
Chapter 1 Configure the Controller Application
IMPORTANT
Controller Template Overview
Controller templates provide the necessary task configurations that are required for the PlantPAx system. Controller
template options also are provided with pre-loaded PlantPAx Library content if the PlantPAx Library is to be used. Library
content definitions use controller memory, so use the guidance in Tab le 2
application.
Controller templates are distributed with the PlantPAx Library of Process Objects. To download the templates, see Knowledgebase
Answer ID 62682 at https://www.rockwellautomation.custhelp.com
when selecting the appropriate template for your
.
For each controller, you must choose one of three templates to begin system configuration. Tab le 2
and Tab le 3 show the
templates that are recommended (denoted by ‘X’) based on the selected controller.
Table 2 - PlantPAx Controller Templates and ControlLogix Controllers
Simplex Controllers Redundant Controllers
1756-L71 1756-L72 1756-L73 1756-L74 1756-L75 1756-L73 1756-L74 1756-L75
User memory 2 MB 4 MB 8 MB 16 MB 32 MB 8 MB 16 MB 32 MB
No libraryXXXXXXXX
Basic library
All library
(1) B asic library template is approximately 0.4 MB.
(2) All library template is approximately 1.2 MB.
Table 3 - PlantPAx Controller Templates and CompactLogix Controllers
User memory 0.75 MB 2 MB
No library X X
Basic library
All library
(1)
(2)
(1)
(2)
XXXXXXXX
XXXX XX
1769-L24ER-QBFC1B 1769-L33ER
XX
(1) B asic library template is approximately 0.4 MB.
(2) All library template is approximately 1.2 MB.
Table 4 - Contro ller Template Descr iptions
Template Name
No library RSL5k_18_Template_PlantPAx_noLib.acd No PlantPAx Library of Process Objects.
Basic library RSL5k_v18_Template_PlantPAxLib_3_0_00_basic.acd
All library RSL5k_18_Template_PlantPAxLib_3_0_00_all.acd Complete PlantPAx Library of Process Objects.
(1) PlantPAx Library 3.0 supports RSLogix 5000 software version 18 and later. Templates are provided with software version 18 so they can be used in any later supported version of RSLogix 5000.
(2) The service release number (boldfaced) can change as ser vice revisions are created.
12 Rockwell Automation Publication PROCES-QS001A-EN-P - October 2013
(1)
Description
(2)
PlantPAx Library of Process Objects, includes diagnostics and the following Process Add-On
Instructions: P_AIn, P_Alarm, P_AOut, P_DIn, P_Gate, P_DOut, P_Intlk, P_Mode, P_Motor,
P_Perm, P_Reset, P_ValveSO, P_VSD, P_PIDE, T_ADD, T_Clock, T_DST, T_Valid.
Page 13
Configure the Controller Application Chapter 1
TIP
TIP
Download the PlantPAx Library
Follow these steps to download a controller template that is included in the PlantPAx Library of Process Objects.
1. Open the Knowledgebase Answer ID 62682 at http://www.rockwellautomation.custhelp.com.
2. Click the download link to access the zip files in the PlantPAx Library of Process Objects.
3. Select the V3.0 zip file and download the files to a folder.
You will need to access these Library files again so place the folder in a convenient location.
4. Unzip the files to your folder.
The controller templates described in Tab le 4 are distributed with the Library in a folder titled, Templates.
Open Your Template
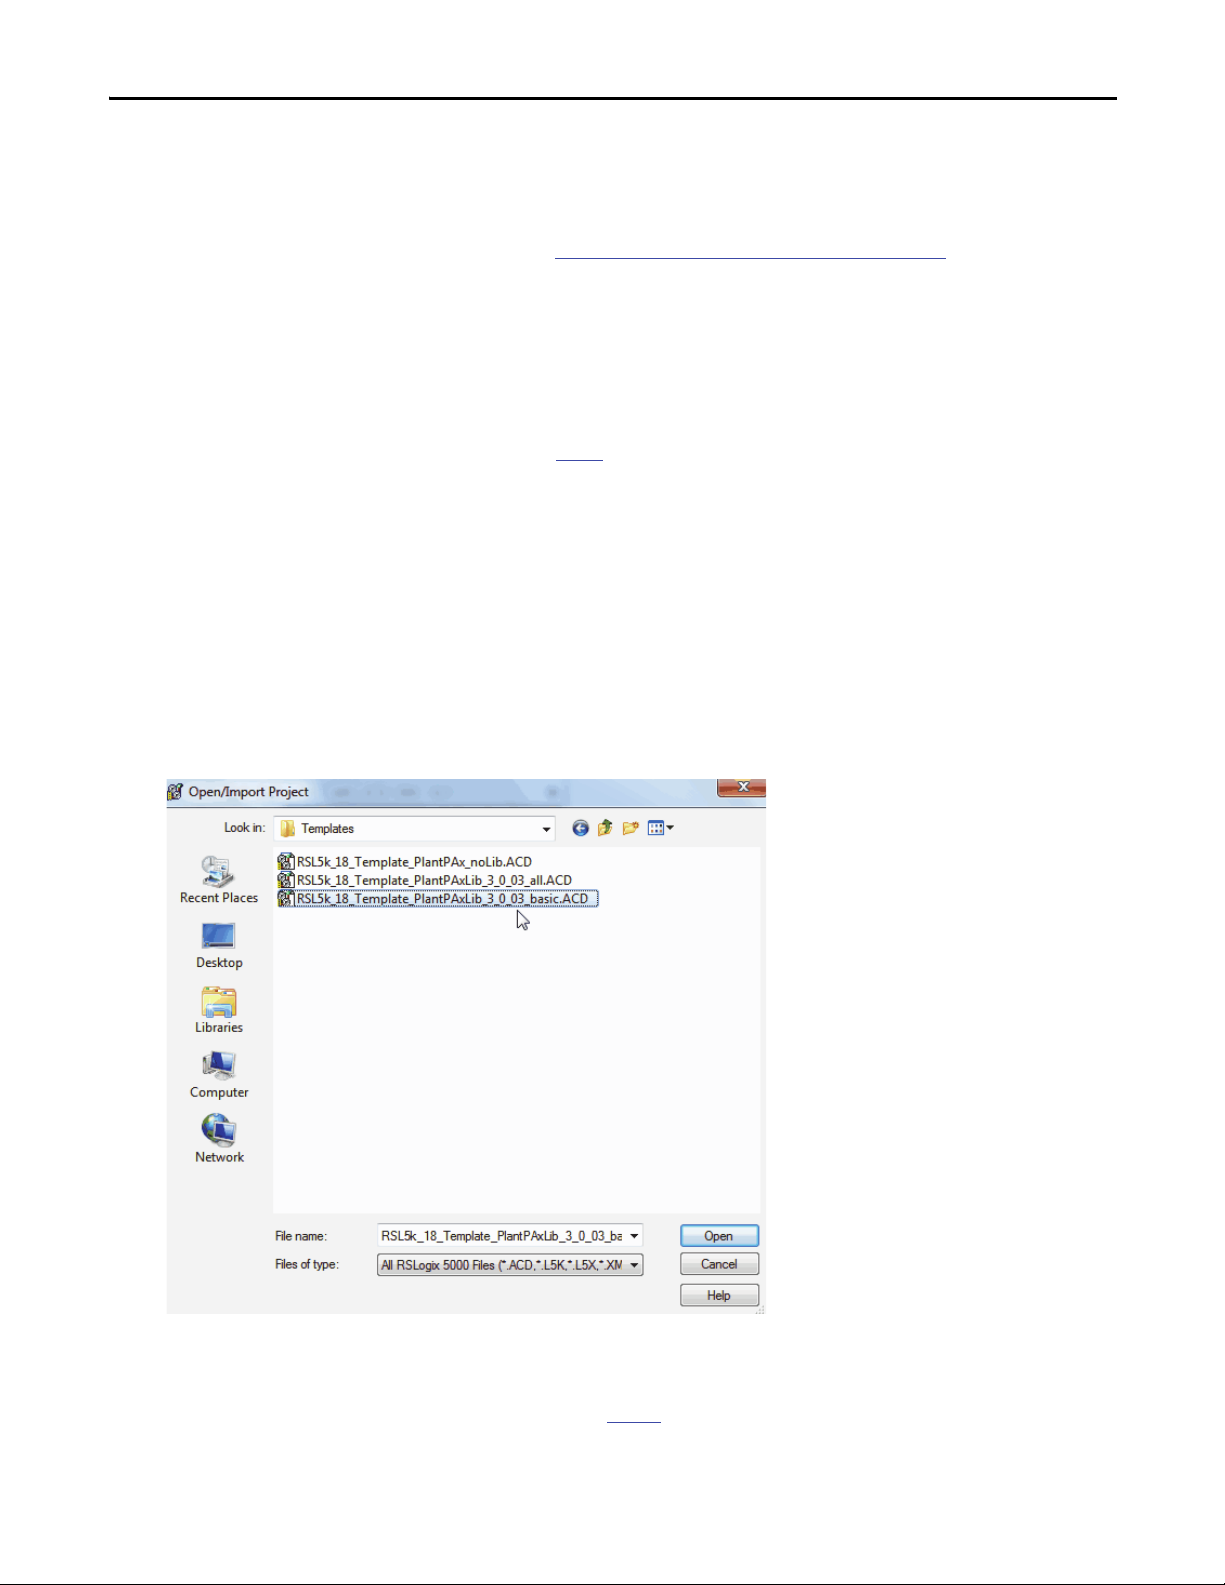
Follow these steps to open the controller template that is appropriate for your target controller.
1. Open RSLogix 5000 software.
2. From the File menu, choose Open.
3. From the Look in pull-down menu, browse to the Templates folder where the downloaded PlantPAx Library files
are stored.
4. Select the appropriate controller template and click Open to begin applying the template to the target controller.
If you do not have RSLogix 5000 software version 18 installed, you will be prompted to change the firmware revision upon
opening the template. Follow steps 4…7 on page 15
Rockwell Automation Publication PROCES-QS001A-EN-P - October 2013 13
.
Page 14
Chapter 1 Configure the Controller Application
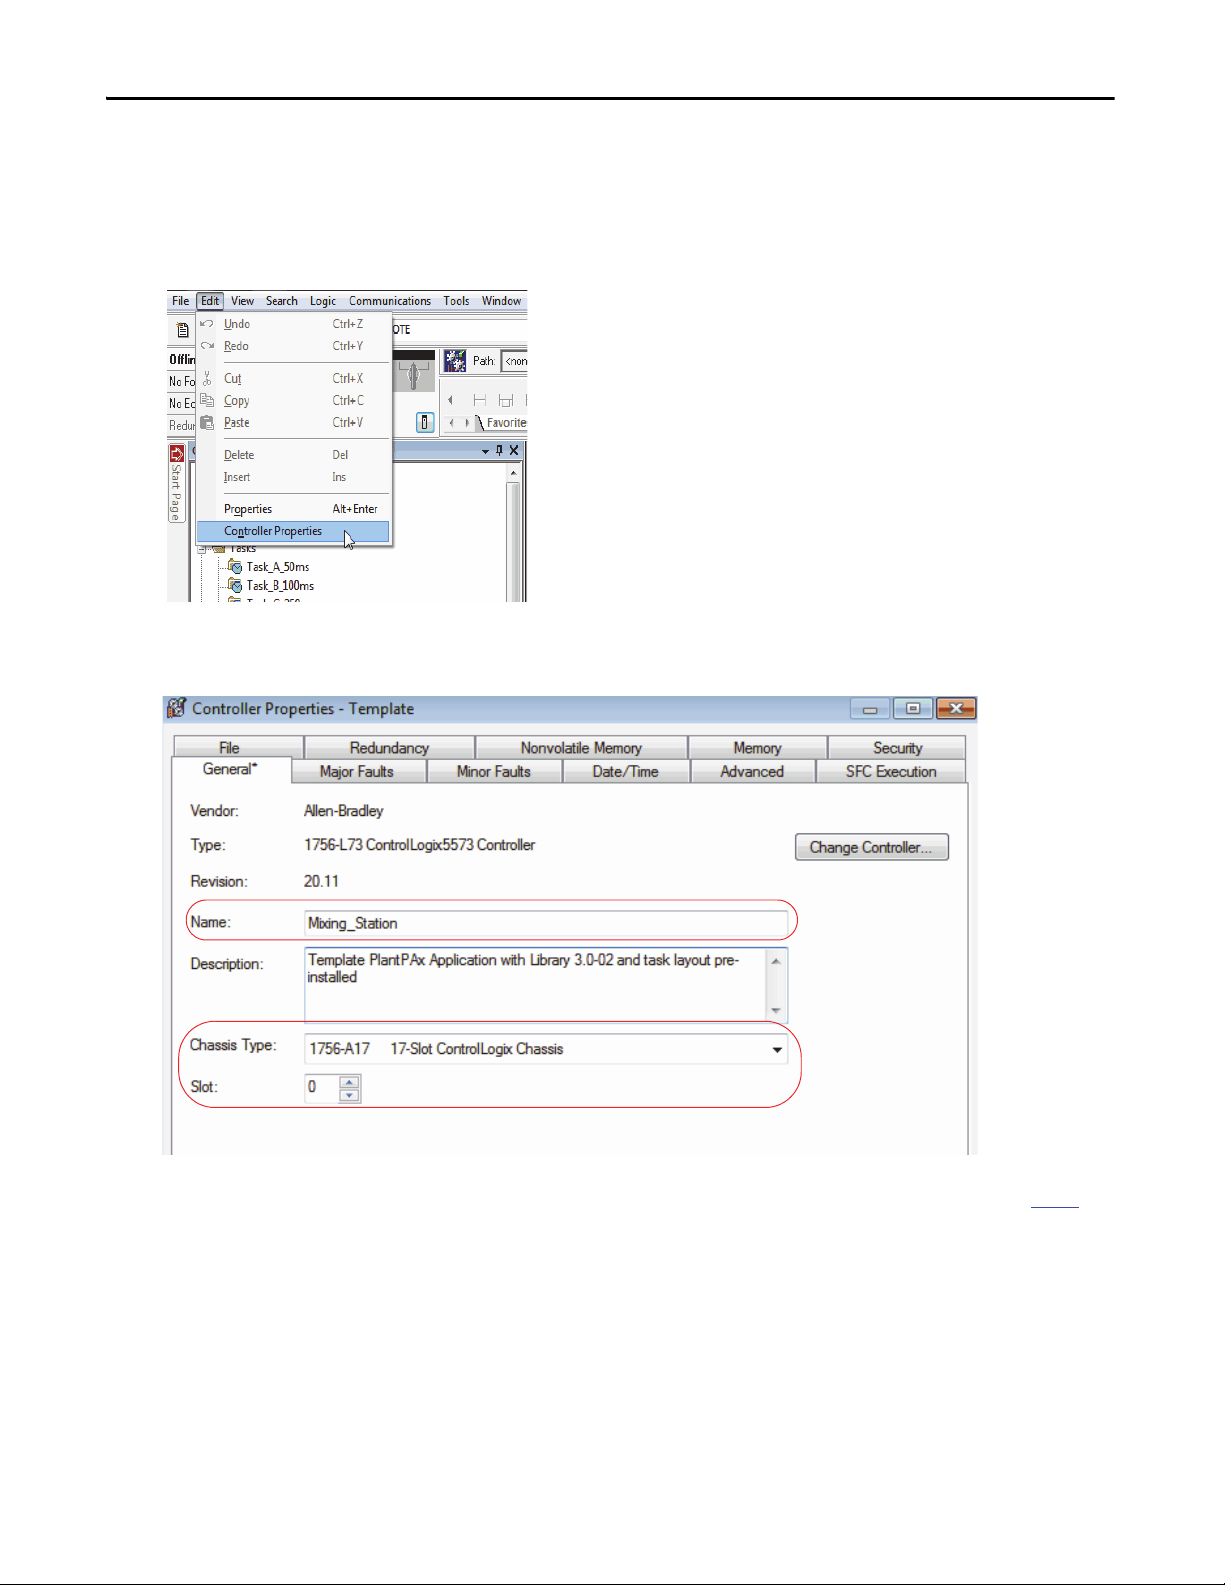
Modify Controller Properties
Follow these steps to modify the controller properties to associate the template to the target controller.
1. From the Edit menu, choose Controller Properties.
2. On the Controller Properties dialog box, type the name of the controller, slot number, and chassis type for the
target controller.
3. Click Change Controller if your controller is not the type or firmware revision shown. Otherwise, skip to step 8
14 Rockwell Automation Publication PROCES-QS001A-EN-P - October 2013
.
Page 15
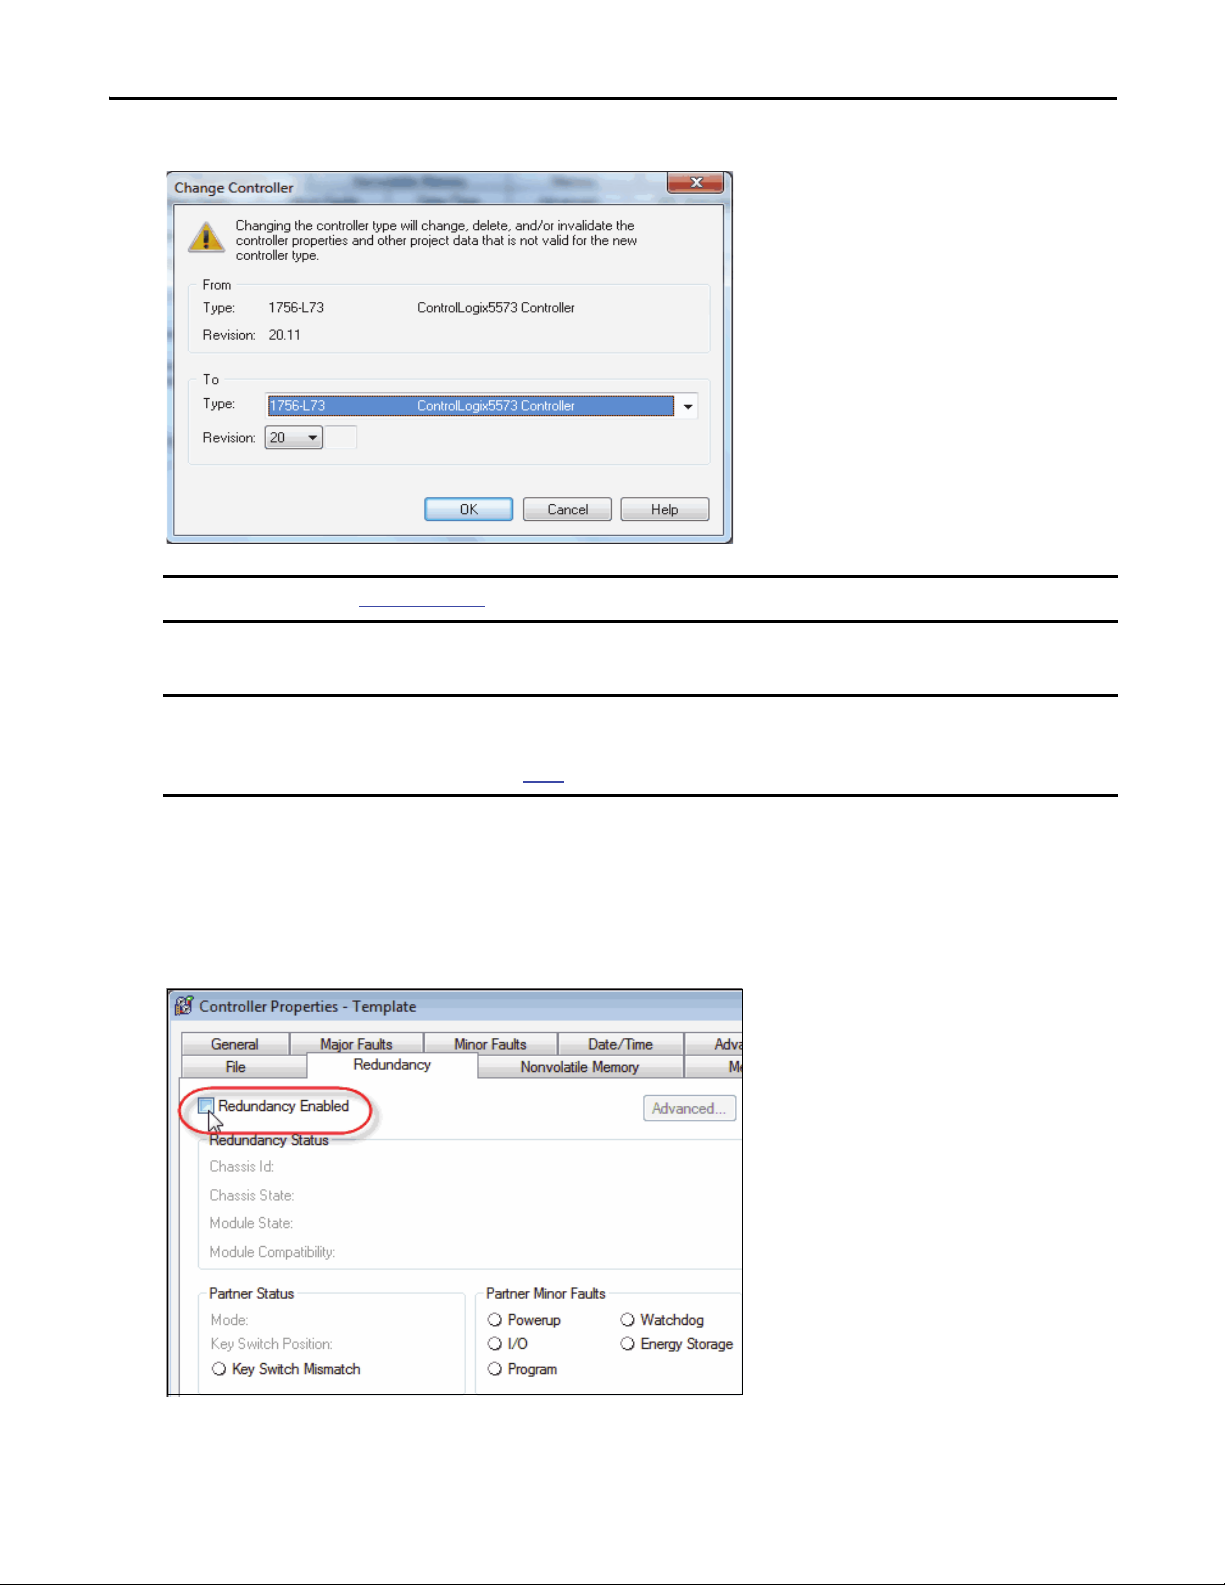
4. From the Type pull-down menu, choose a controller
IMPORTANT
IMPORTANT
Refer to Table 2 on page 12 to make sure the controller has enough memory for the selected template.
5. From the Revision pull-down menu, choose your firmware revision.
Configure the Controller Application Chapter 1
The revision number for the firmware must match the version level of the software being used. For PlantPAx system
release 3.0, select revision 20.
If you are using redundancy (see step 8
), we recommend you verify the software that you are using supports redundancy.
6. Click OK.
A dialog box appears with a warning if the controller type or revision has changed.
7. Click Yes.
8. If the target controller is redundant, click the Redundancy tab and check the Redundancy Enabled checkbox.
Otherwise, skip this step.
9. Click OK to save your controller settings.
Rockwell Automation Publication PROCES-QS001A-EN-P - October 2013 15
Page 16
Chapter 1 Configure the Controller Application
IMPORTANT
TIP
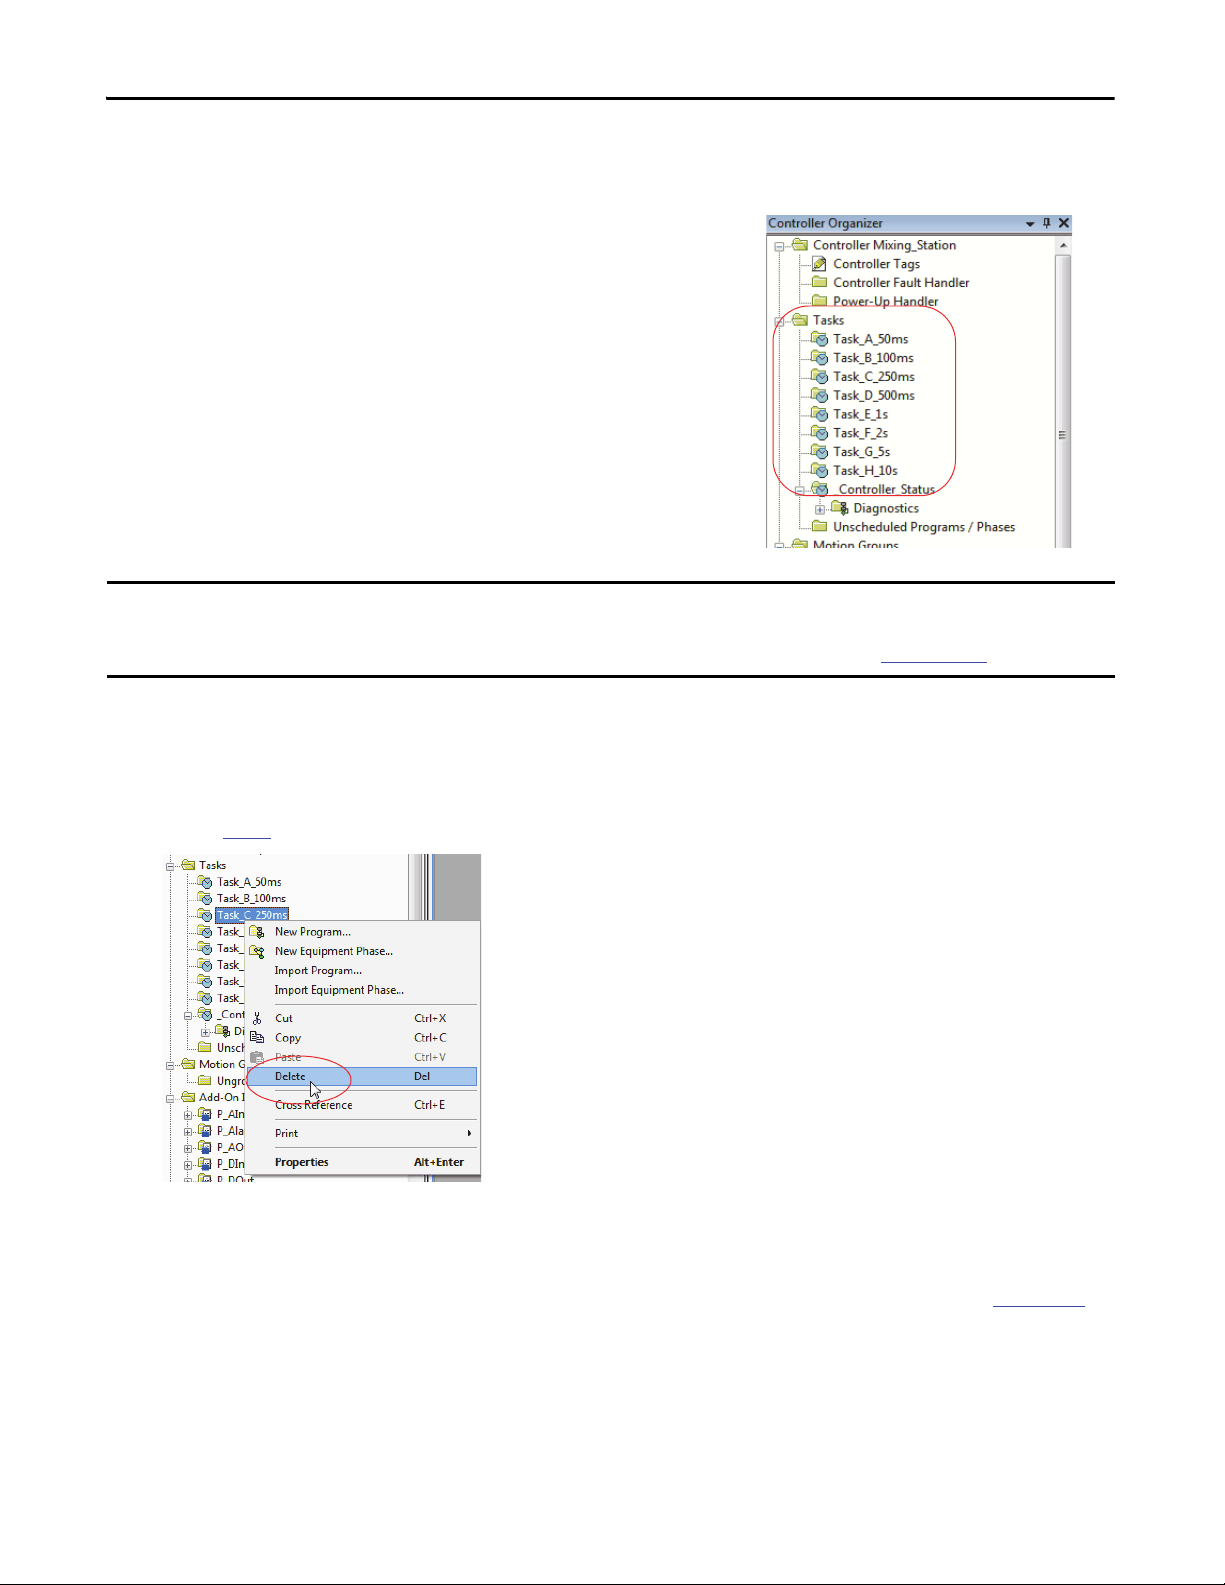
Configure Controller Task Rates
The controller template contains nine predefined periodic tasks, eight of
these named Task A…H. There is a separate periodic task named Controller
Status, which is used to collect system diagnostics, for example, by using the
L_CPU Add-On Instruction.
Each task is set to execute at a defined time interval from 50 ms…10 s, with
faster tasks getting higher priority.
Best practice is for your task setup to match the execution rates used during
system sizing, with unused tasks being deleted or inhibited.
We recommend that you use a minimal number of periodic tasks to provide required execution rates. A controller is typically
configured with four periodic tasks: fast, medium, slow, and a dedicated task for diagnostics. For details, see Task Configuration
and CPU Utilization in the PlantPAx Process Automation System Reference Manual, publication PROCES-RM001
.
As stated above, there is the possibility that not all of the tasks are used for your application. Follow these steps to delete
unused tasks.
1. From the Controller Organizer in RSLogix 5000 software, right-click a task and choose Delete.
2. Repeat step 1
3. Review your final task configuration to verify it matches your sizing calculation in the PSE.
for each unnecessary task
Periodic tasks do not have programs attached when a project is created in RSLogix 5000 software. You must create
programs and routines per task. For procedures, see the ControlLogix Systems User Manual, publication 1756-UM001.
16 Rockwell Automation Publication PROCES-QS001A-EN-P - October 2013
Page 17
Configure the Controller Application Chapter 1
TIP
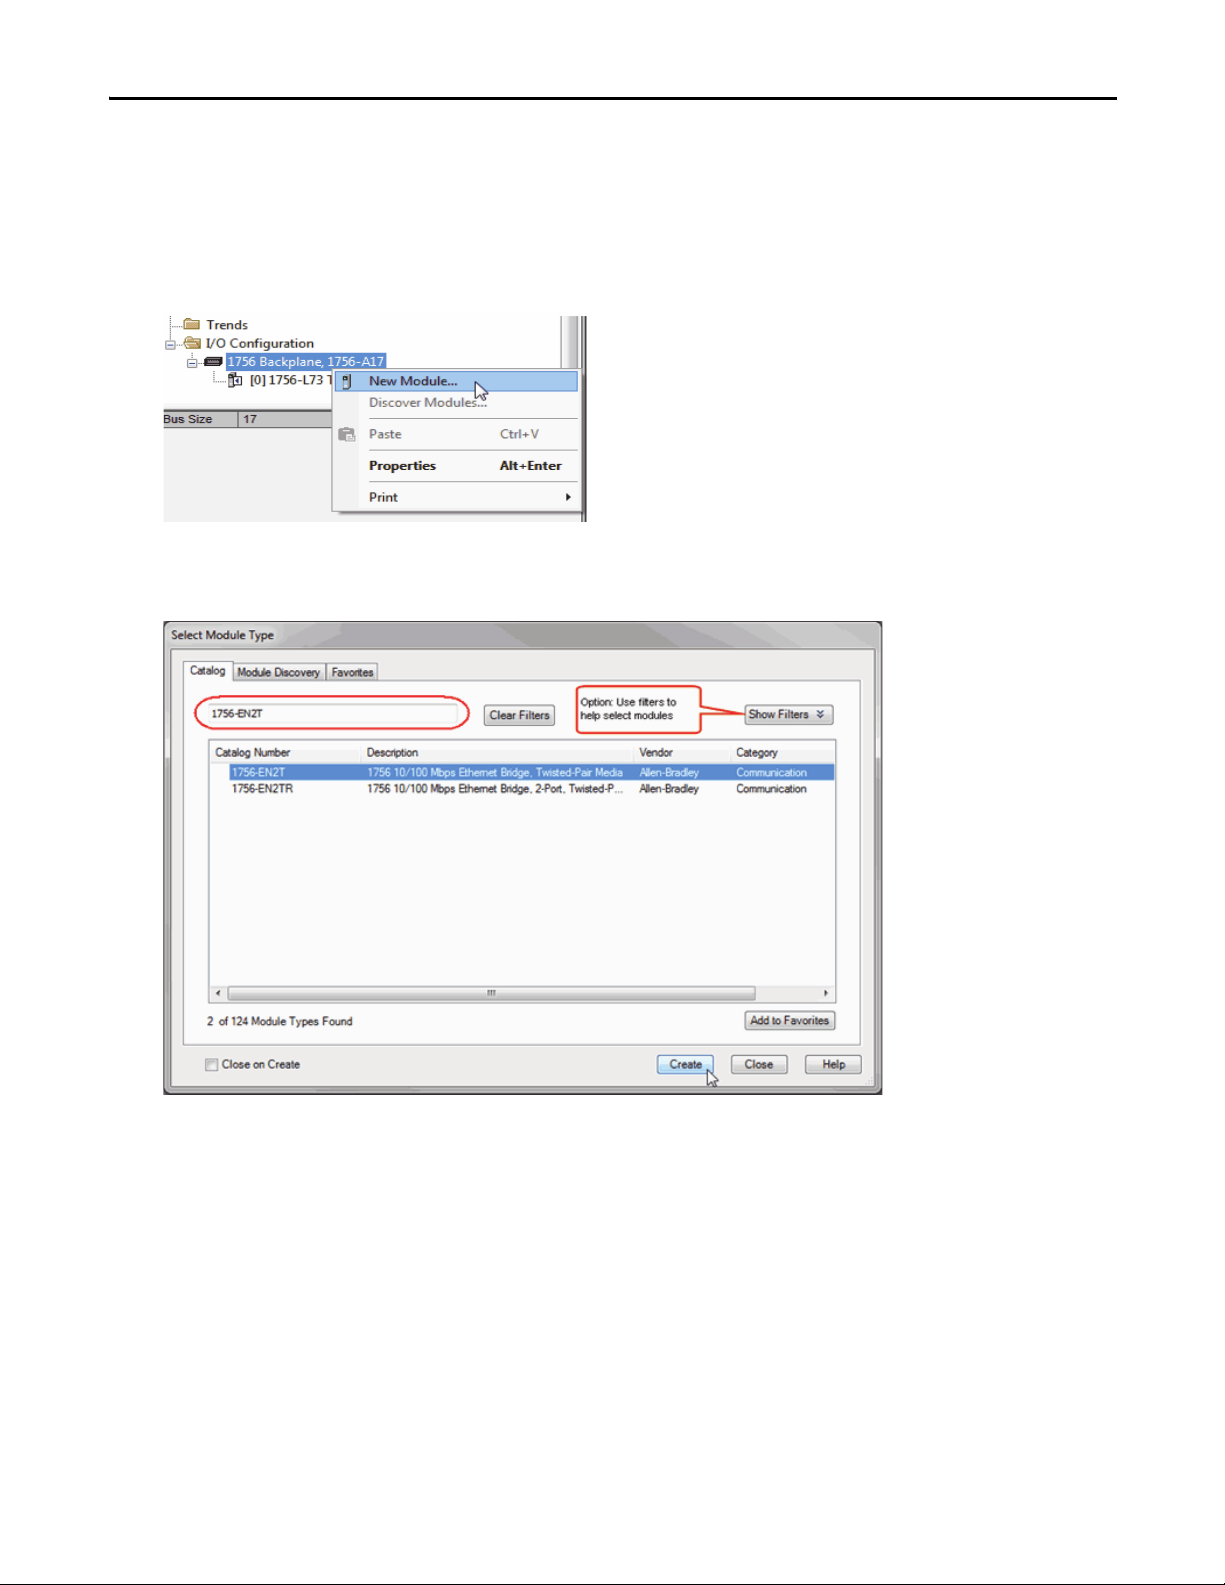
Add Modules to Local Chassis
In this section, you are adding all the necessary modules to your local chassis, including network adapters and I/O modules,
to the I/O tree of a Logix controller.
1. In the Controller Organizer, right-click the backplane and choose New Module.
2. In the Search field, type a catalog number of a module that you are adding.
The example shows a 1756-EN2T network adapter being selected.
To make it easier to locate a particular module, use the filters to view only the module types you need.
The Module Discovery tab takes you through the I/O tree of the Logix controller to determine which modules you need to
configure or modify. The tab is active if the controller is online and the network path is valid.
3. Select a module and click Create.
Rockwell Automation Publication PROCES-QS001A-EN-P - October 2013 17
Page 18
Chapter 1 Configure the Controller Application
TIP
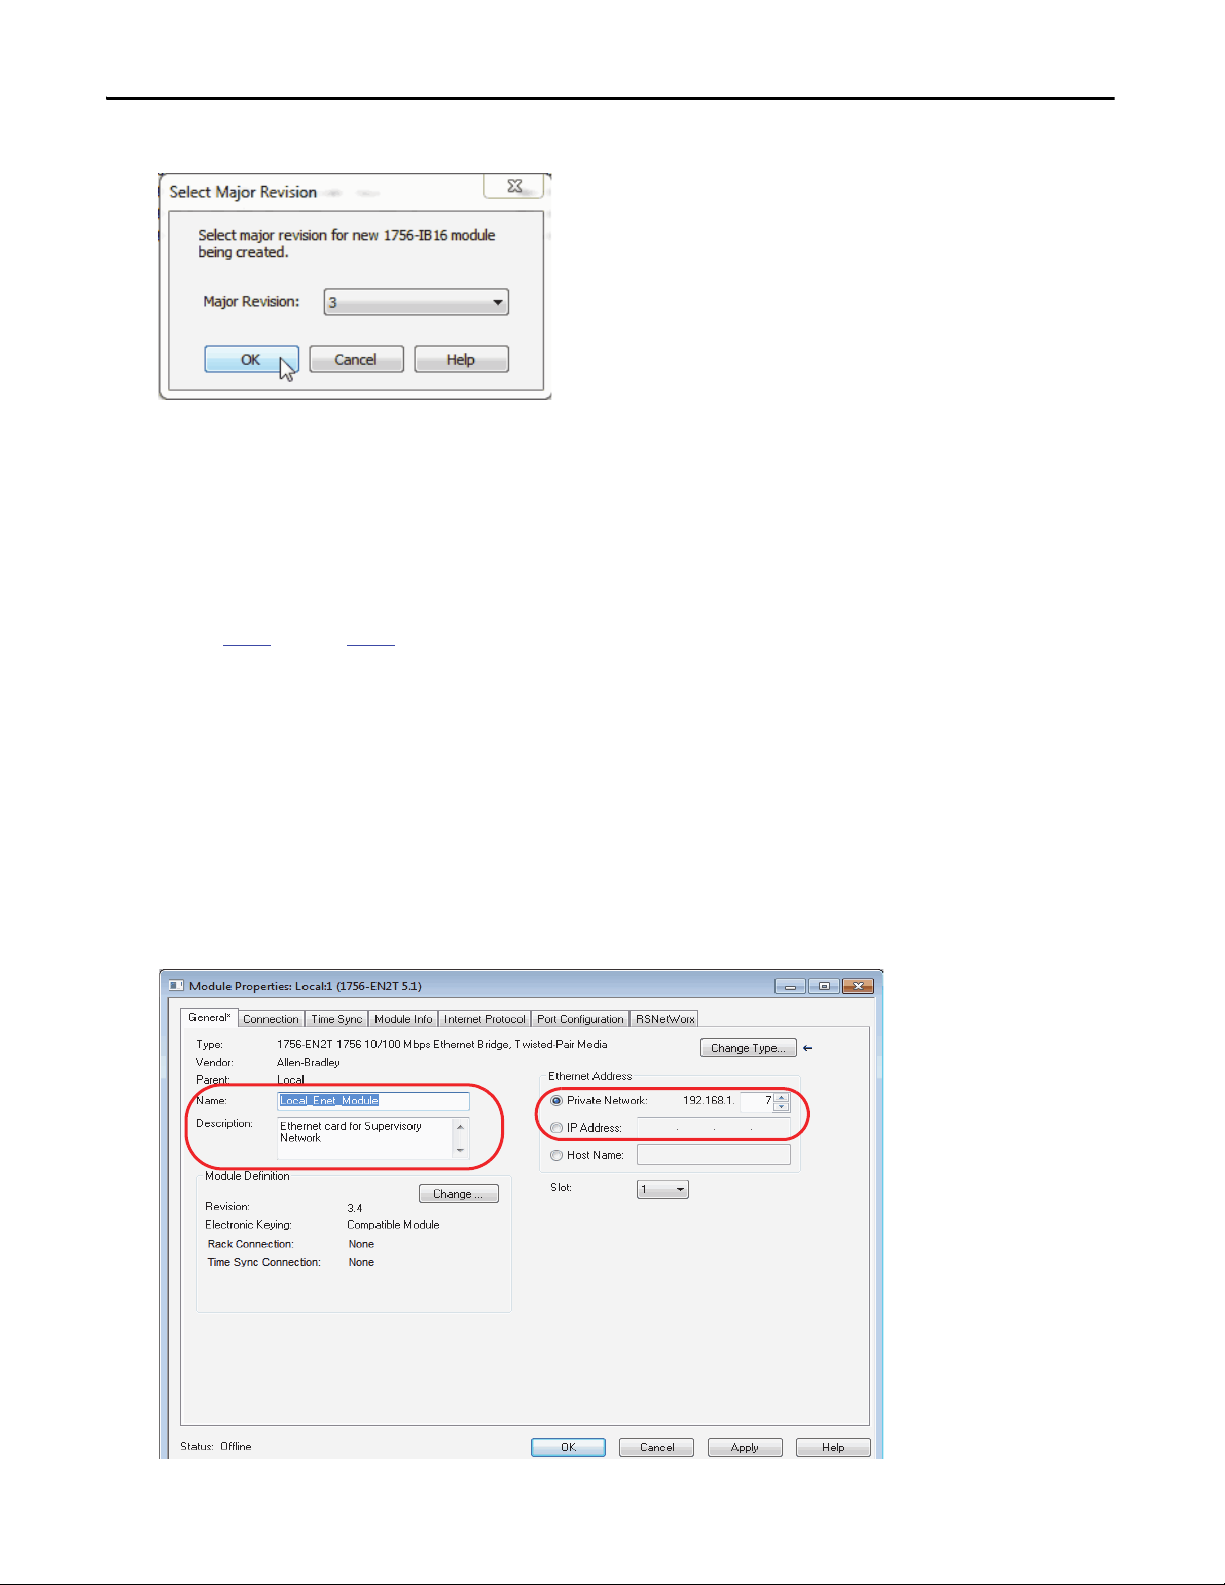
If applicable for your selected module, from the Major Revision pull-down menu, choose a firmware revision.
4. Click OK.
5. On the New Module dialog box, type a module name, description, and slot number (and IP address if adding a
communication module).
Make sure the slot number for the module in the chassis is correct.
6. Click OK.
7. Repeat step 1
through step 6 to add each module in the local chassis of the target controller.
Configure Network Adapters
In this section, you learn how to select and configure network adapters to communicate with PASS servers and remote
I/O chassis.
1. In the Controller Organizer, double-click the module to be configured.
2. On the Module Properties dialog box, modify the module name, if necessary.
For example, Supervisory_Network or Remote_IO_Local.
18 Rockwell Automation Publication PROCES-QS001A-EN-P - October 2013
Page 19
3. Type the Ethernet address for the module in the chassis.
IMPORTANT
4. Click OK.
Configure the Controller Application Chapter 1
5. Repeat step 1
through step 4 to configure each network adapter in the local chassis of the target controller.
Configure I/O Modules
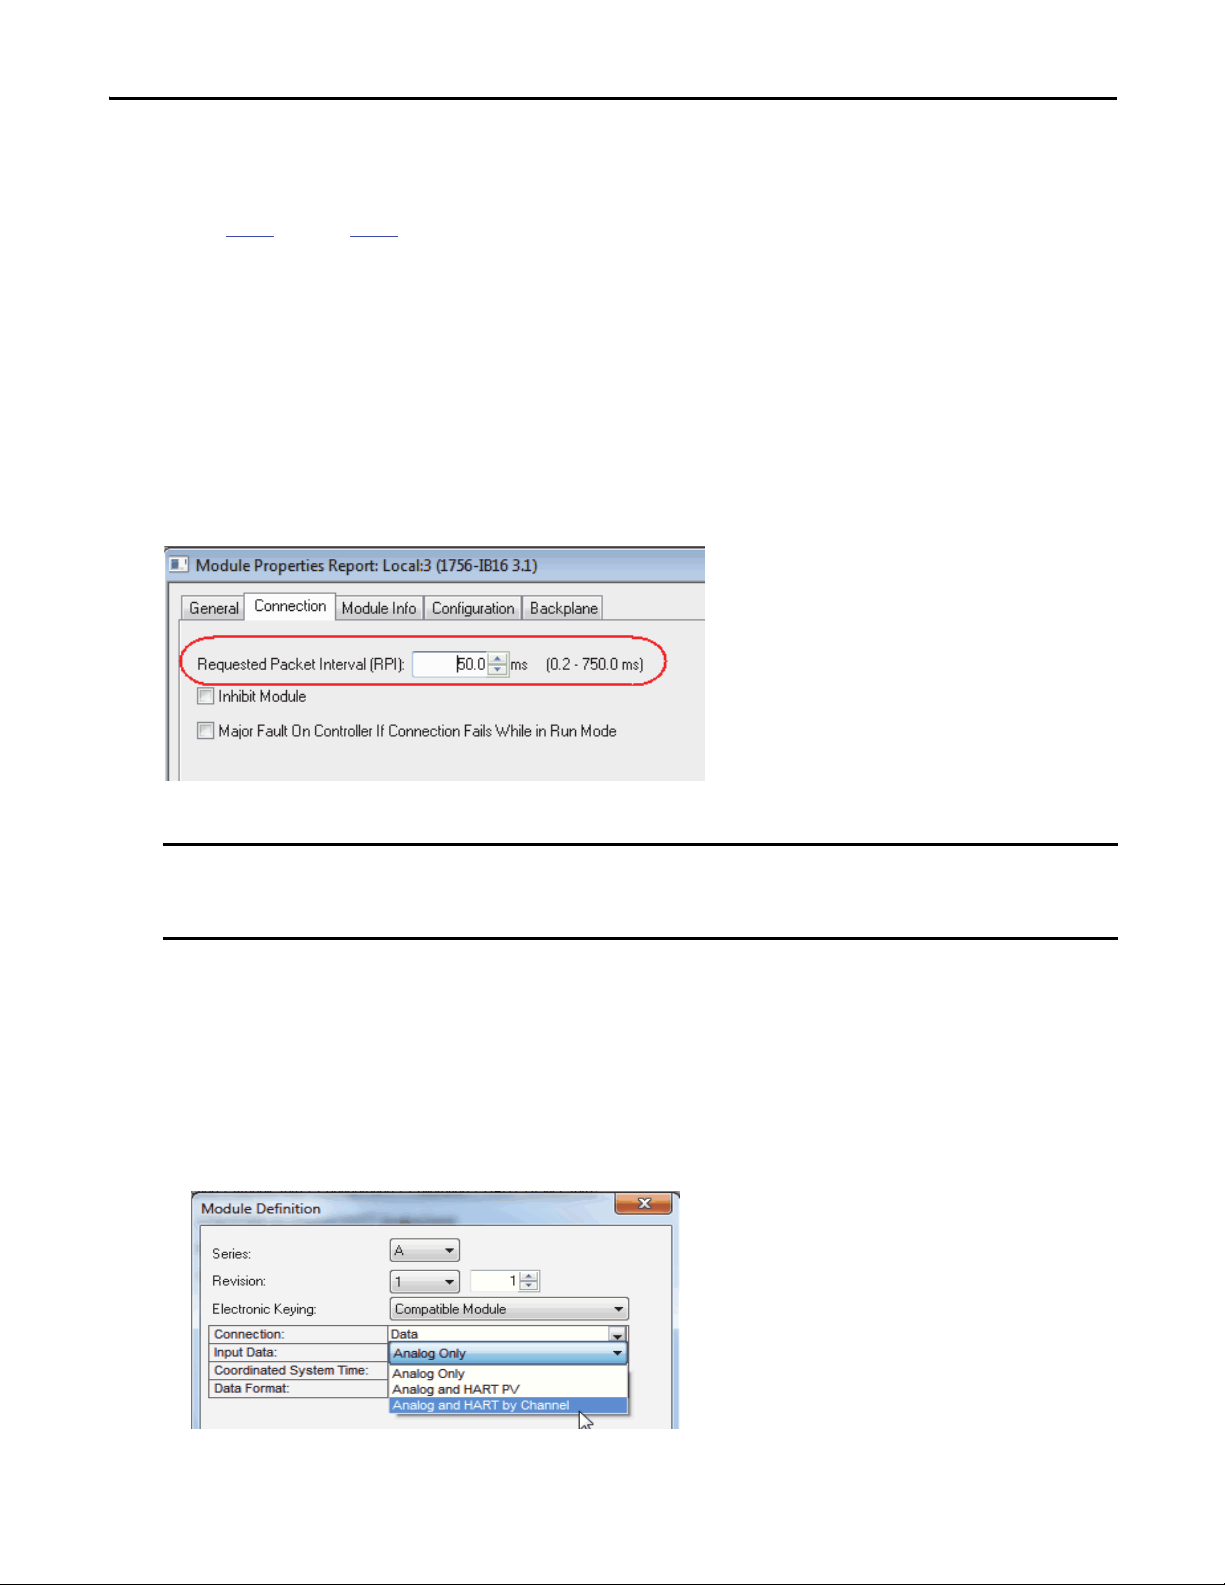
Follow these steps to configure local analog and digital I/O modules with a Requested Packet Interval (RPI) and module
definition, if applicable. The RPI is the amount of elapsed time for an exchange of data between the controller
and module.
1. In the Controller Organizer, double-click the I/O module to be configured.
2. On the Module Properties dialog box, click the Connection tab.
3. Set the RPI and click OK.
An RPI that is set too fast can affect controller performance. We suggest that you specify an RPI that is two times faster
than task execution or based on inherent properties of the signal being measured. For example, a 250 ms task requires a
125 ms time, but temperature measurements can be set slower as they are unlikely to change that quickly.
For certain device types, there can be additional configuration required. For example, when using a HART module,
you have to change the module definition to collect HART data.
4. Follow these steps to modify the module definition:
a. On the New Module dialog box, click Change in the Module Definition area.
b. From the Input Data pull-down menu, choose from the list.
For example, Analog and HART by Channel.
c. Click OK.
d. Click Yes if a warning message appears that you are changing the module definition.
Rockwell Automation Publication PROCES-QS001A-EN-P - October 2013 19
Page 20
Chapter 1 Configure the Controller Application
5. Repeat step 1 through step 4 to configure each I/O module in the local chassis of the target controller.
Add Remote I/O Chassis and Modules
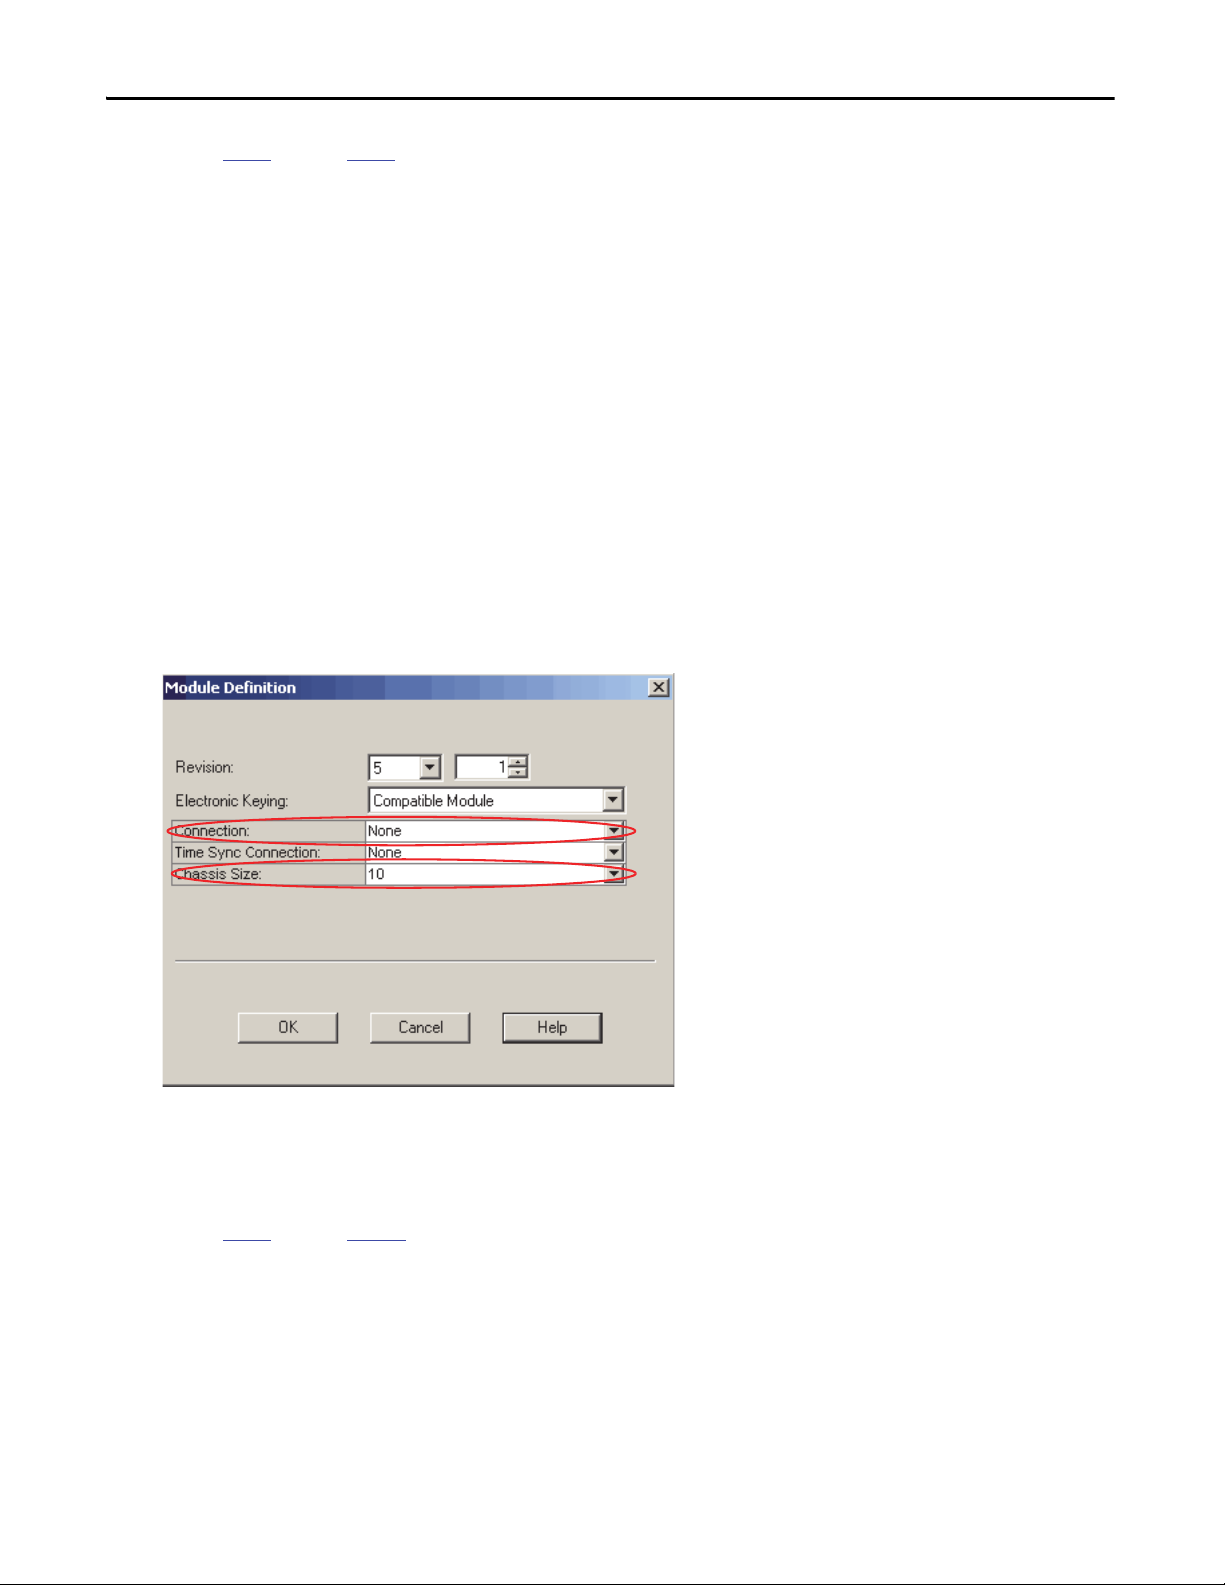
Follow these steps to add the remote I/O chassis and associated I/O modules for the target controller.
1. In the I/O Configuration tree, right-click the remote I/O network adapter and choose New Module.
2. Type a catalog number to search for the network adapter in the remote I/O chassis.
3. Select a network adapter and click Create.
4. Type the chassis name and description based on the target controller.
5. Type an IP address and a slot number for this module.
6. Click Change.
7. On the Module Definition dialog box, from the Connection pull-down menu, choose None to collect all of the
diagnostic data.
8. From the Chassis Size pull-down menu, choose the size for the first remote chassis.
9. Click OK.
10. To add a module to the remote chassis, right-click the remote communication module and choose New Module.
11. Follow the previous steps in this chapter for adding digital and analog I/O modules to the remote chassis.
12. Repeat step 1
20 Rockwell Automation Publication PROCES-QS001A-EN-P - October 2013
through step 11 for each remote I/O chassis.
Page 21
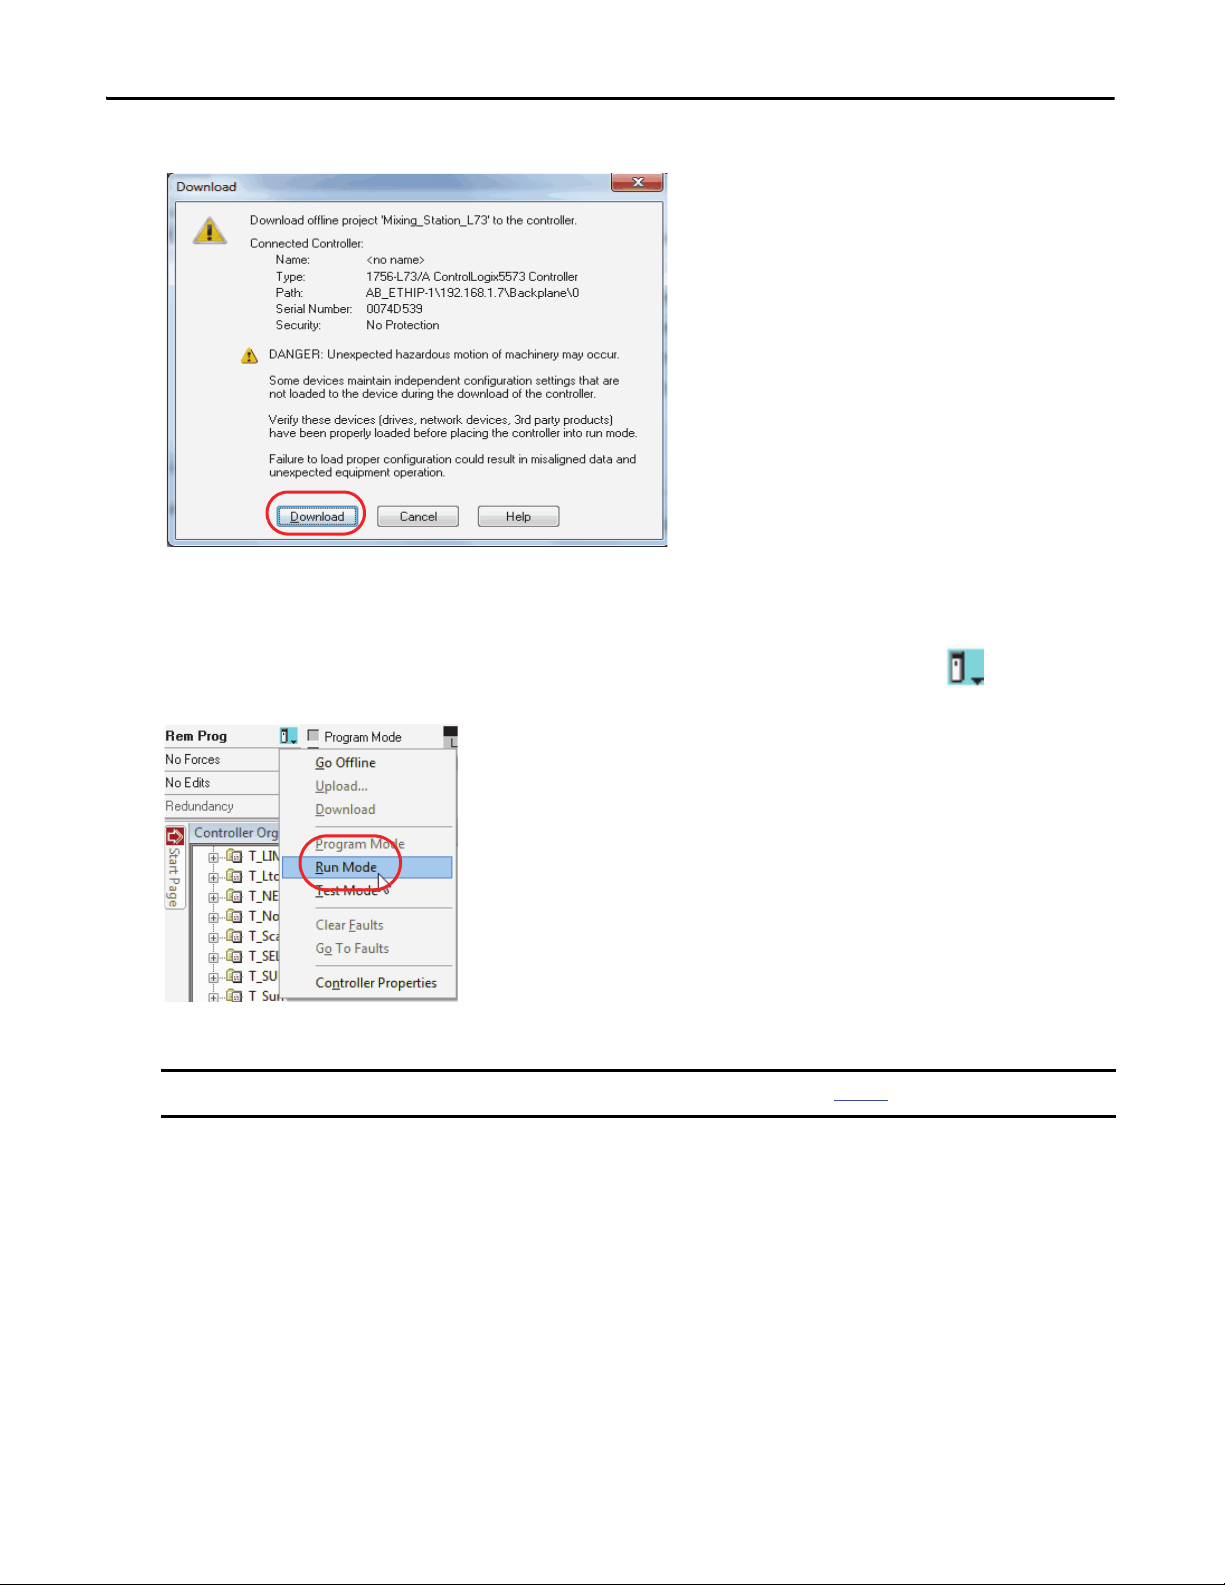
Download the Project
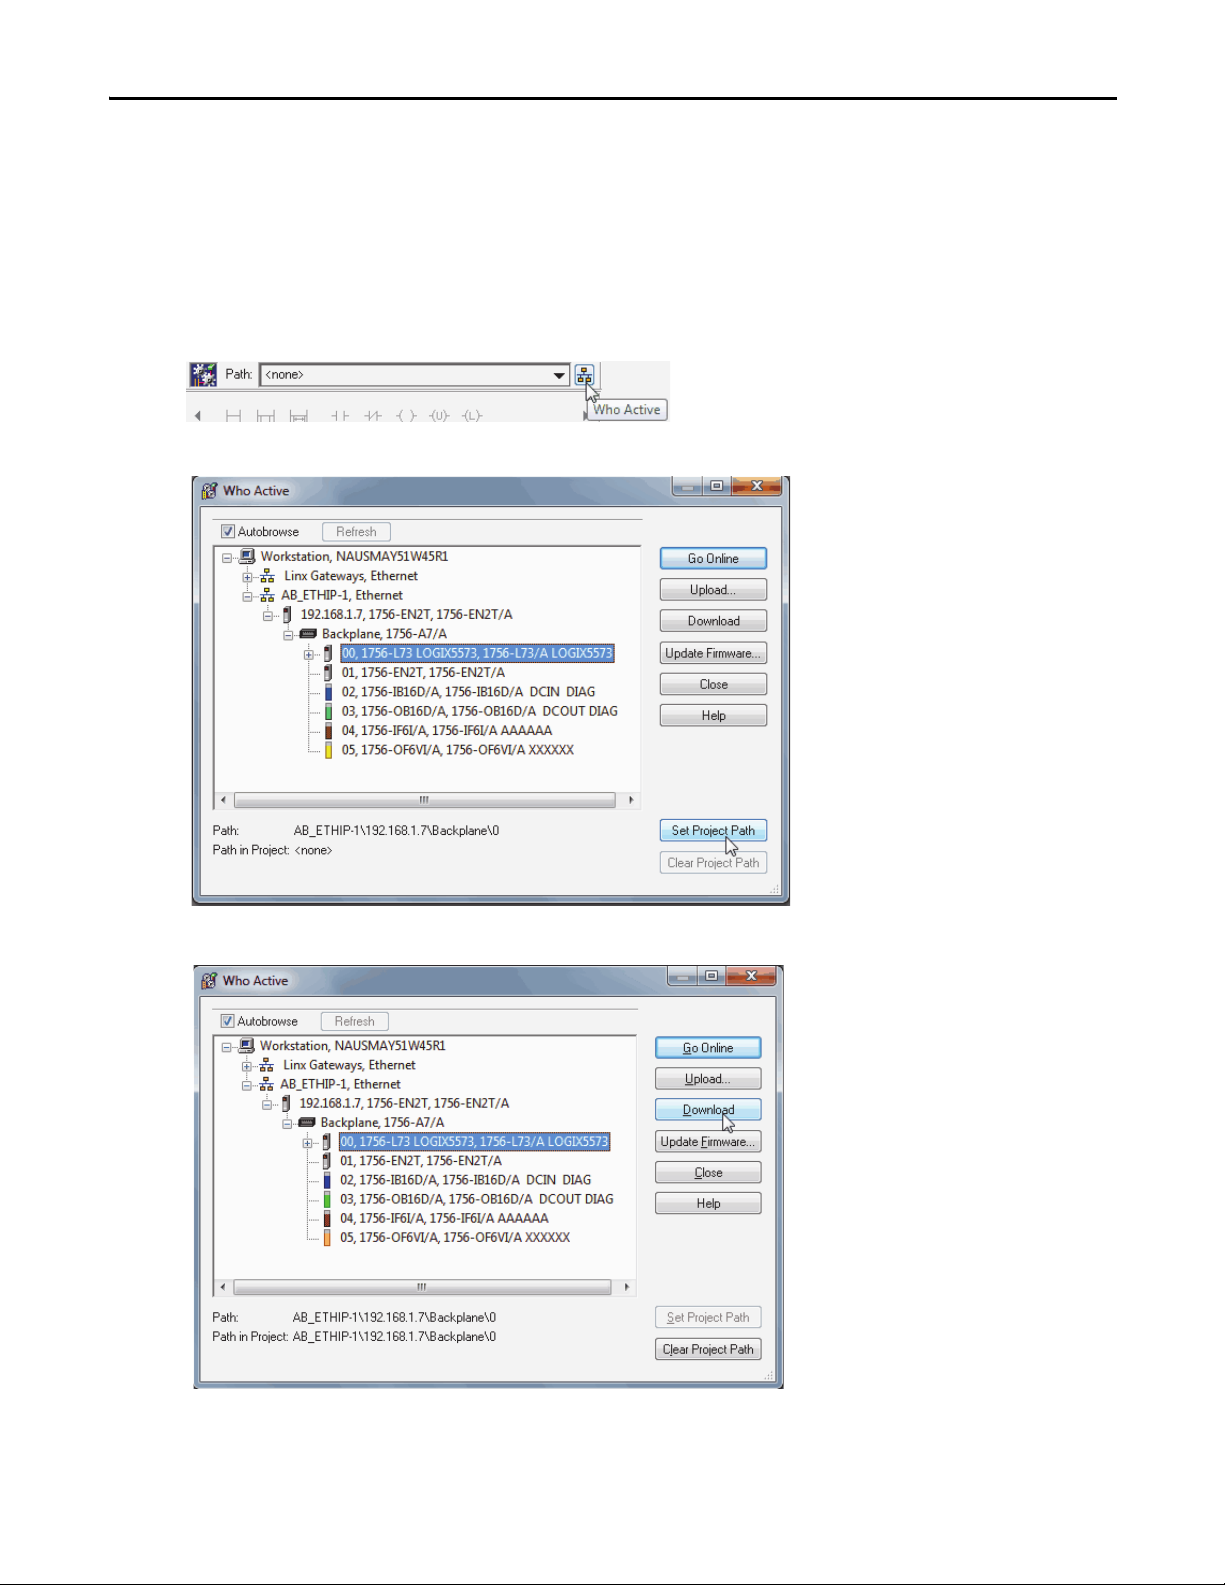
Follow these steps to download your project to a controller.
1. Make sure your controller is in Remote Program mode.
2. If necessary, set a path to the controller.
a. Click the Who Active icon.
b. In the Who Active dialog box, navigate to your controller and click Set Project Path.
Configure the Controller Application Chapter 1
3. Click Download.
Rockwell Automation Publication PROCES-QS001A-EN-P - October 2013 21
Page 22
Chapter 1 Configure the Controller Application
IMPORTANT
4. Click Download again.
Your project is downloaded to your controller.
5. Place your controller in whatever mode is necessary.
For example, if you want the controller in Remote Run mode, from the Mode pull-down menu , choose
Run Mode.
6. When finished, save the file to a convenient location.
Repeat the tasks in this chapter for the next controller, if applicable, starting on page 13.
22 Rockwell Automation Publication PROCES-QS001A-EN-P - October 2013
Page 23
Chapter 2
Create Your HMI Project
In Chapter 1, you learned how to structure the controller application for your system. In this chapter, you create your HMI
project to follow PlantPAx system recommendations by using the PlantPAx HMI templates.
To build an HMI project, you must complete the following tasks:
• Download and select an HMI template
• Create all logical servers (data, HMI, and alarms, if applicable) and configure communication and system settings
• In the process of creating your HMI servers, apply the PlantPAx HMI template to your project
The HMI project is built by using one of three software components: HMI servers, Data servers, or Tag Alarm and Event
servers. All of these software components are assigned to a PASS server.
Before You Begin
You must complete these tasks before using this chapter:
• Tasks described in Before Using This Publication on page 6
– Define the system
where they are hosted)
– Install the system
• You identify the target screen resolution on your OWS
(for example, determine the number of HMI, Data, and Alarm and Event servers to be used
(PASS servers must be installed and available)
, including the following:
What You Need
To complete tasks in this chapter, you need FactoryTalk View SE
client software, version 7.0, running on a PASS server. You can use an
EWS to implement the steps in this chapter.
The illustration shows an example of an HMI project structure.
Rockwell Automation Publication PROCES-QS001A-EN-P - October 2013 23
Page 24
Chapter 2 Create Your HMI Project
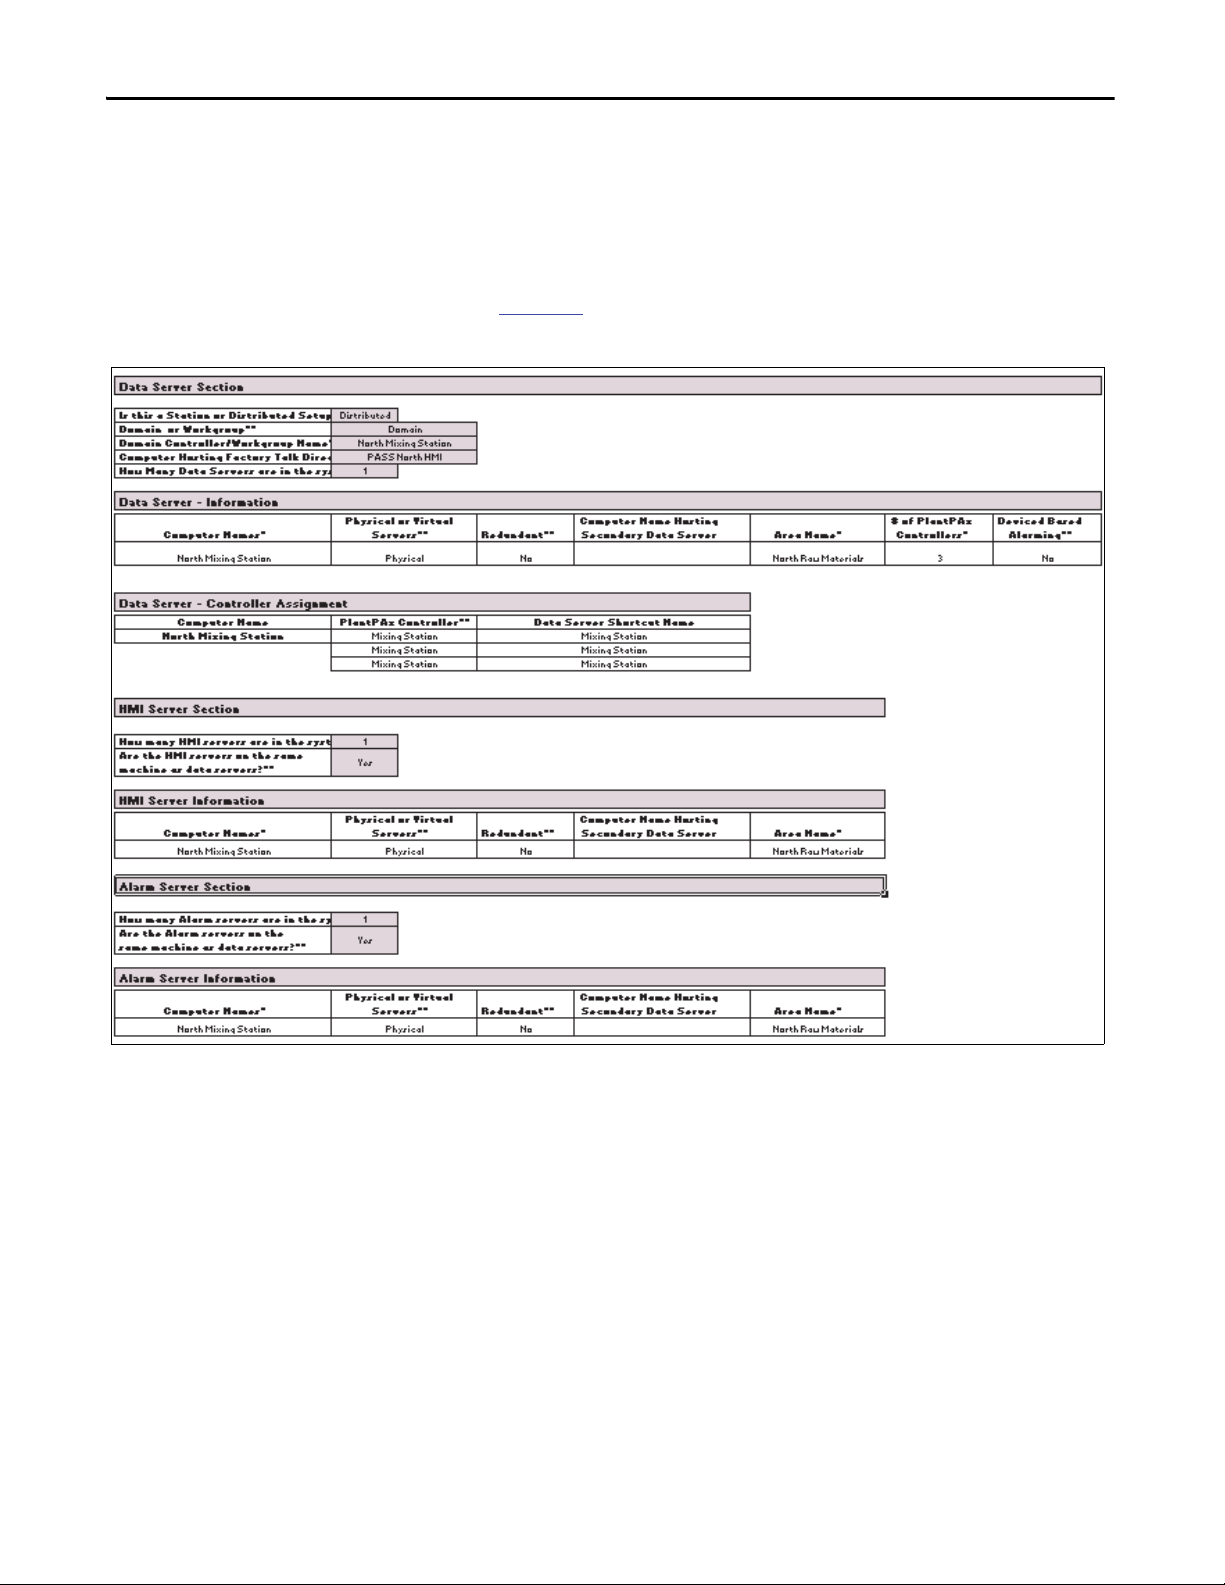
The server section of the worksheet is a useful aid for completing tasks in this chapter. The worksheet sections include the
following:
• Information from the PSE sizing tool:
– Number of servers and controllers
– Domain or workgroup
• Information about the controller used in Chapter 1
Figure 4 - PASS Worksheet Example
, such as controller name and IP addresses
24 Rockwell Automation Publication PROCES-QS001A-EN-P - October 2013
Page 25

Follow These Steps
Start
Download the PlantPAx Library
on page 26
Load the HMI Template
on page 26
Create Your HMI Project
on page 29
Deploy Your HMI Template
on page 30
Configure Your Data Servers
on page 33
Configure Your Alarm Servers
on page 35
Add Controllers to Data Server
on page 38
Set Runtime Security
on page 40
These steps describe how to create your HMI project.
Create Your HMI Project Chapter 2
Rockwell Automation Publication PROCES-QS001A-EN-P - October 2013 25
Page 26

Chapter 2 Create Your HMI Project
TIP
HMI Template Overview
There are three HMI templates available for download on the Knowledgebase Answer ID 62682
at http://www.rockwellautomation.custhelp.com
the EWS, and your system data is viewed on the OWS.
Table 5 - HMI Template Names and Display Resolutions
Name Supported Resolution
FTVSE_7_P1FHD_3_0_00.apa 1920 x 1080, Full HD
FTVSE_7_P1SXGA_3_0_00.apa 1280 x 1024, SXGA
FTVSE_7_P1WXGA_3_0_00.apa 1366 x 768, WXGA
PlantPAx HMI templates are provided as local site edition back-up files. All of the above templates include the following
attributes:
• Basic display layout
• Navigation
• FactoryTalk View Alarms and Events displays
. For most systems, you load the templates on the PASS server by using
Download the PlantPAx Library
If you have not done so already, complete the task on page 13 to download the HMI template files in the PlantPAx Library
of Process Objects.
The HMI templates described in Tabl e 5 are distributed with the Library in a folder titled, Templates.
Load the HMI Template
The downloaded PlantPAx HMI templates are local site edition back-up files. This task restores the HMI back-up file onto
your system and makes the template available for deployment as you create HMI servers for your project.
1. From the Start menu, run the FactoryTalk View tool Application Manager .
26 Rockwell Automation Publication PROCES-QS001A-EN-P - October 2013
Page 27

2. Click Site Edition (Local Station) and click Next.
3. Click Restore application and click Next.
Create Your HMI Project Chapter 2
4. Click Browse (…).
Rockwell Automation Publication PROCES-QS001A-EN-P - October 2013 27
Page 28

Chapter 2 Create Your HMI Project
5. Select a template .apa file that you want to restore and click Open.
6. Leave the default file location and click Next.
7. Type an application name and click Finish.
28 Rockwell Automation Publication PROCES-QS001A-EN-P - October 2013
Page 29

Create Your HMI Project Chapter 2
Create Your HMI Project
To create your HMI project, in FactoryTalk View Studio software, first you create the network distributed or network
station application, and then you add elements such as areas, HMI servers, Data servers, and Tag Alarm and Event servers.
You assign the servers to their associated PASS servers.
Follow these steps to create your application.
1. From the FactoryTalk View Studio software program, click View Site Edition (Network Distributed)
or View Site Edition (Network Station).
2. Click Continue.
3. Click the New tab, and type an application name and description.
4. From the Language pull-down menu, choose your language.
5. Click Create.
Rockwell Automation Publication PROCES-QS001A-EN-P - October 2013 29
Page 30

Chapter 2 Create Your HMI Project
Deploy Your HMI Template
In this section, you use your HMI template to create your HMI servers. Your HMI project puts each logical server into its
own area.
The HMI server stores project components, such as the graphic displays, and provides the components to the OWSs
upon request.
1. To create a new area, right-click the application name and choose New Area.
2. Type a name and description for the area and click OK.
The area is added to your application. You are ready to add the HMI server to the area.
3. Right-click the area name and choose Add New Server>HMI server.
30 Rockwell Automation Publication PROCES-QS001A-EN-P - October 2013
Page 31

4. Click Import a project and click Next.
5. On the FactoryTalk View message box, click OK.
Create Your HMI Project Chapter 2
6. From the Project type pull-down menu, choose FactoryTalk View Site Edition Project.
7. Click Browse (…) to locate the file path of the template you named on the Application Manager dialog box
on page 28
.
Rockwell Automation Publication PROCES-QS001A-EN-P - October 2013 31
Page 32

Chapter 2 Create Your HMI Project
IMPORTANT
The file path appears in the Project file text box.
8. Click Next.
9. Type a name and description of the server.
10. From the Computer pull-down menu, choose the PASS server that is to host the HMI server.
11. Click Finish.
All the HMI template files are loaded into the PASS server.
12. Repeat step 1
through step 11 for each HMI server in your project.
We recommend that HMI server redundancy be configured at the end of the project after the majority of your HMI
application is developed.
32 Rockwell Automation Publication PROCES-QS001A-EN-P - October 2013
Page 33

Create Your HMI Project Chapter 2
Configure Your Data Servers
In this section, you learn how to initiate a Data server, which provides communication between the process controllers and
the servers.
Follow these steps to configure a Data server.
1. Right-click the main application area created for the associated HMI server and choose New Area.
2. Type a name and description of the Data server area.
3. Click OK.
Rockwell Automation Publication PROCES-QS001A-EN-P - October 2013 33
Page 34

Chapter 2 Create Your HMI Project
4. Right-click the Data server area and choose Add New Server>Rockwell Automation Device Server
(RSLinx Enterprise).
5. Type a description of the Data server.
6. Click Browse and select the PASS server that is to host the Data server.
34 Rockwell Automation Publication PROCES-QS001A-EN-P - October 2013
Page 35

7. On the RSLinx Enterprise Server Properties dialog box, click the Alarms and Events tab.
IMPORTANT
IMPORTANT
8. To disable device-based alarming, clear the Enable alarm and event support checkbox.
The PlantPAx system sizing rules and critical system attributes are based on tag-based alarms. Therefore, we recommend a
limited usage of device-based alarms. If device-base alarming is to be used, make sure additional loading has been
considered. For more information and alarm recommendations, see Chapter 4 in the PlantPAx Process Automation System
Reference Manual, publication PROCES-RM001
The alarm history database requires a separate SQL Server installation. If there is no database selection available under
Alarm History, a database must be created. Refer to the FactoryTalk View Site Edition Installation Guide,
publication VIEWSE-IN003
9. Click Apply, and OK.
.
.
Create Your HMI Project Chapter 2
10. Repeat step 1
through step 9 for each data server in your application.
We recommend that data server redundancy be configured at the end of the project after the majority of your HMI
application is developed.
Configure Your Alarm Servers
In this section, you learn how to configure Alarm and Event servers for tag-based alarms.
1. Right-click the main application area created for the associated HMI server and choose New Area.
2. Type the name and description for the Alarm and Event server area in the application.
Rockwell Automation Publication PROCES-QS001A-EN-P - October 2013 35
Page 36

Chapter 2 Create Your HMI Project
3. Click OK.
4. Right-click the alarm server area and choose Add New Server>Tag Alarm and Event Server.
5. Type a name and description for the Alarm and Event server.
6. From the Computer pull-down menu, choose the PASS server that is to host the Tag Alarm and Event server.
36 Rockwell Automation Publication PROCES-QS001A-EN-P - October 2013
Page 37

7. Click the Priorities and History tab.
IMPORTANT
IMPORTANT
Create Your HMI Project Chapter 2
8. Check the Enable history checkbox to enable alarm and event history.
9. From the Database definition pull-down menu, choose the alarm history database that was created during the
installation of the FactoryTalk View SE software.
The alarm history database requires a separate SQL server installation. If there is no database selection available under
Alarm and Event History, a database must be created. Refer to the FactoryTalk Alarms and Events System Configuration
Guide, publication FTAE-RM001
.
10. Click Apply, and OK.
11. Repeat step 1
through step 10 for each alarm server in your application.
We recommend that alarm server redundancy be configured at the end of the project after the majority of your HMI
application is developed.
Rockwell Automation Publication PROCES-QS001A-EN-P - October 2013 37
Page 38

Chapter 2 Create Your HMI Project
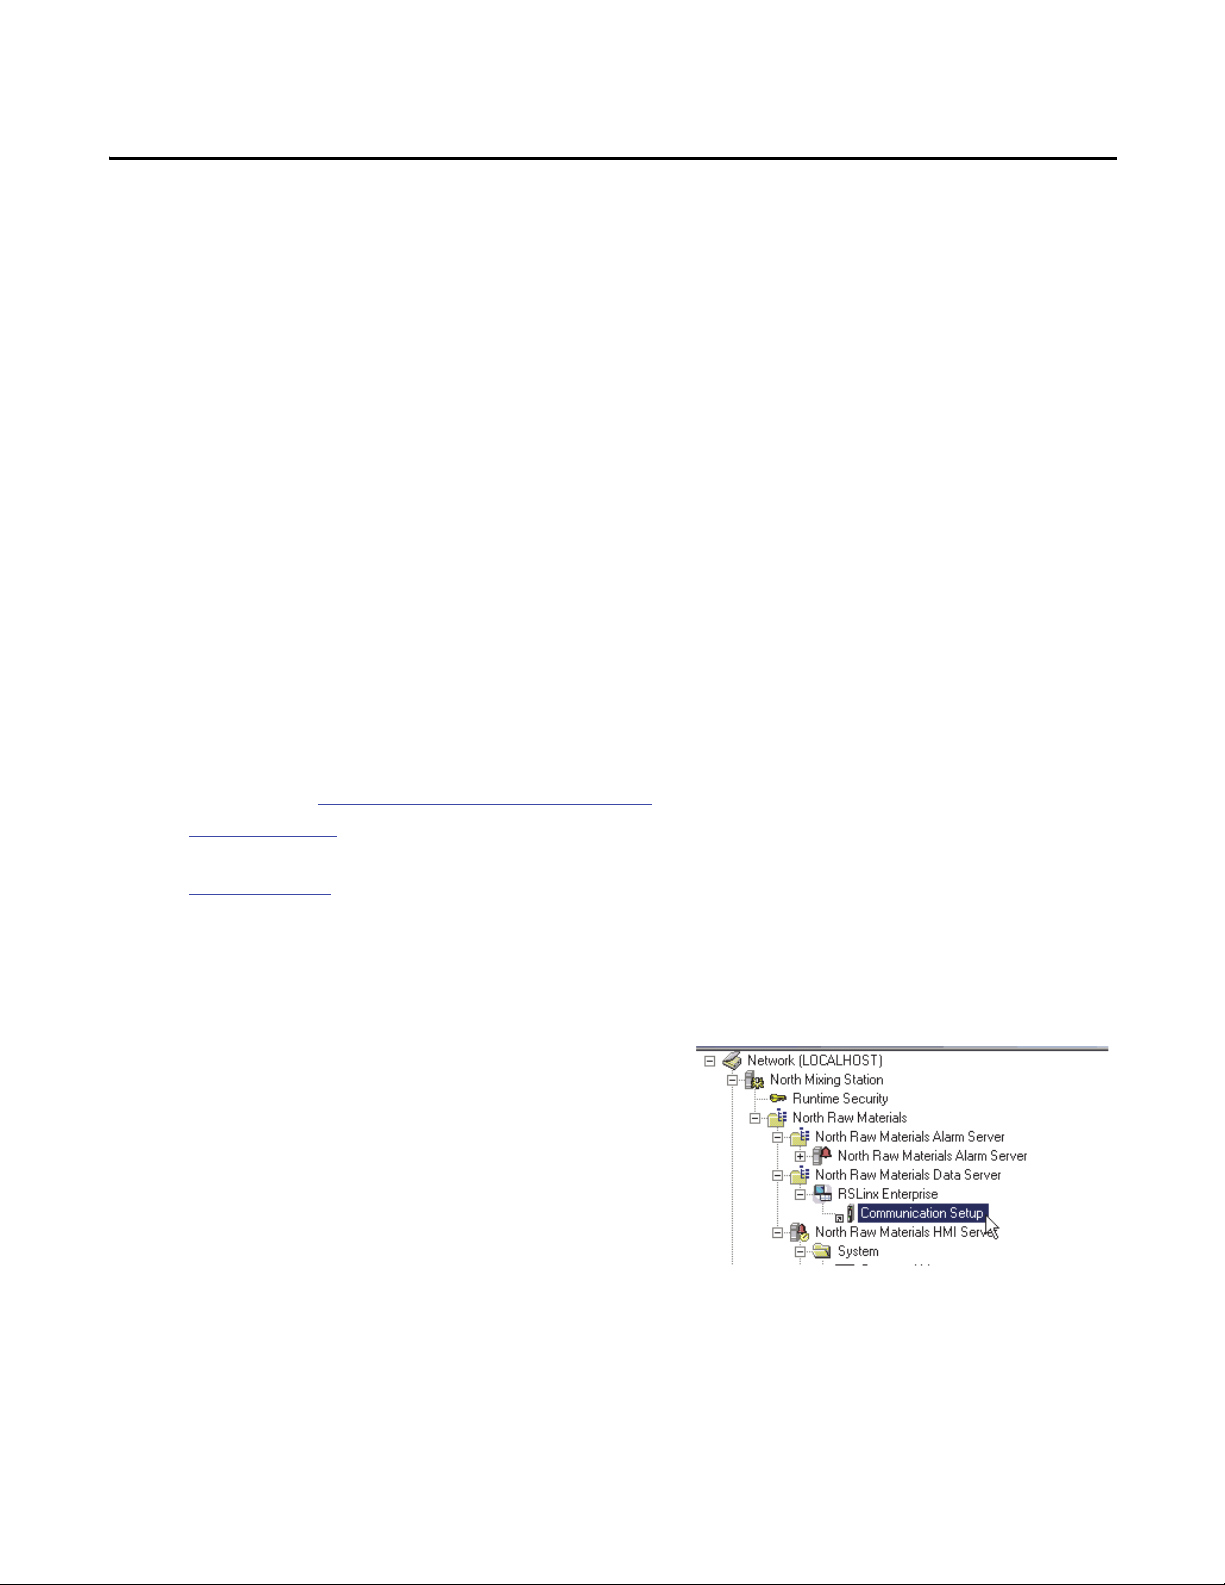
Add Controllers to Data Server
In this section, we create device shortcuts on Data servers so controllers can be connected.
1. In the project tree, click ‘+’ to expand the RSLinx Enterprise data server and double-click Communication Setup.
2. In the Device Shortcuts pane, click Add.
3. For the shortcut name, type the controller name.
4. In the Primary pane, expand the Ethernet driver to select the controller.
5. Click Apply.
38 Rockwell Automation Publication PROCES-QS001A-EN-P - October 2013
Page 39

6. On the message box, click Yes to apply changes to the shortcut.
Create Your HMI Project Chapter 2
7. Repeat step 1
through step 6 for each Data server and controller combination in your application.
Rockwell Automation Publication PROCES-QS001A-EN-P - October 2013 39
Page 40

Chapter 2 Create Your HMI Project
Set Runtime Security
If you are using the PlantPAx library, you must set up your runtime security to provide each account or group with the
correct FactoryTalk View software security codes. These security codes verify that the correct permissions are provided to
the operator, maintenance personnel, and engineer on the PlantPAx library faceplates.
The PlantPAx library provides guidance on the proper maintenance of the security codes.
Figure 5
Edition User's Guide, publication VIEWSE-UM006
Figure 5 - Runtime Security Settings
is an illustrated example for setting up library security codes. For more information, see the FactoryTalk View Site
.
40 Rockwell Automation Publication PROCES-QS001A-EN-P - October 2013
Page 41

Chapter 3
Start Using Your HMI Project
In this chapter, you examine the template structure and then create a FactoryTalk View SE software client file for your
OWS. You also become familiar with the features of your HMI template.
Before You Begin
You must complete these tasks before using this chapter:
• Tasks described in Before Using This Publication on page 6
• Load a template and create an HMI project; see Chapter 2 for procedures.
What You Need
FactoryTalk View SE software, version 7.0, must be running on an EWS to view the template structure. You also need an
EWS or OWS with a monitor matching the selected resolution to run the client site and review the template.
For template resolutions, see Table 5 on page 26
The illustration shows the client file (left), display layouts (center), and a HMI template structure.
.
Rockwell Automation Publication PROCES-QS001A-EN-P - October 2013 41
Page 42

Chapter 3 Start Using Your HMI Project
Follow These Steps
These steps describe how to configure your HMI project.
Start
Observe the Template Structure
on page 43
Create Your OWS Client File
on page 44
Explore Template Features
on page 48
42 Rockwell Automation Publication PROCES-QS001A-EN-P - October 2013
Page 43

Observe the Template Structure
P1
Macros
FRAME
The example tree diagram shows the HMI template
structure. Display and start-up macros are created as part of
the template (shown at the bottom of the example).
The displays included in the template have the following
naming structure:
•(FRAME) is a prefix used on items intended only to
be used as is with minimum customization. These
may be instantiated to create different environments
on large projects.
• P1f is a unique template identifier. This prefix
identifies the template that is being applied as well as
the files that are part of the template.
• Te m p l a t e is used to identify a template that can be
copied multiple times to create application-specific
content. If this is not a template display, this word is
omitted.
• The remaining name is a brief description of the
display file. We suggest that these names be similar
across templates. For example, P1 Home is the initial
display.
Start Using Your HMI Project Chapter 3
Macros configure the initial display structure during
runtime. The start-up macros open the framework files in
the orientation intended. For example, the header display at
the top and the footer display at the bottom.
Rockwell Automation Publication PROCES-QS001A-EN-P - October 2013 43
Page 44

Chapter 3 Start Using Your HMI Project
Create Your OWS Client File
In this section, you create a FactoryTalk View SE client file. Client files are used to launch a FactoryTalk View software
client from the OWS. Once created, this client file can be copied to each OWS.
1. From the FactoryTalk View Studio software Tools menu, choose Launch SE Client.
2. To create a new client file, click New.
3. From the FactoryTalk View SE Client Wizard dialog box, click New.
4. Type the name of the new client file and click Next.
44 Rockwell Automation Publication PROCES-QS001A-EN-P - October 2013
Page 45

5. Click Network Distributed or Network Station and click Next.
Start Using Your HMI Project Chapter 3
6. From the pull-down menu, choose the name of the application.
7. Click Next.
Rockwell Automation Publication PROCES-QS001A-EN-P - October 2013 45
Page 46

Chapter 3 Start Using Your HMI Project
8. From the Startup macro pull-down menu, choose a startup macro.
The startup macro launches the initial displays and docks the navigation and alarm tool bars.
9. Click Next.
10. Check Maximize window and click Next.
Make sure your selections in the check boxes match the dialog box as shown below.
11. From the FactoryTalk View SE Client Auto Logout dialog box, click Next.
46 Rockwell Automation Publication PROCES-QS001A-EN-P - October 2013
Page 47

12. Click Save configuration and open FactoryTalk View SE Client now, and click Finish.
Navigation Button Bar
Current Active Alarms
Login/Logout Buttons Current User
Start Using Your HMI Project Chapter 3
When the client file opens, your application window (example below) appears with the layout of the
selected template.
Rockwell Automation Publication PROCES-QS001A-EN-P - October 2013 47
Page 48

Chapter 3 Start Using Your HMI Project
IMPORTANT
Alarm Access
Explore Template Features
This section shows display navigation for your HMI project. We suggest you familiarize yourself with these features to
enhance productivity with your templates.
Actual layout varies depending on the HMI template selection and the revision being applied.
Alarm Tools
Click the bell icon to access active alarms. Additional icons appear to access an alarm summary, alarm history, shelved
alarms, and an alarm explorer.
Additional Alarm Information
48 Rockwell Automation Publication PROCES-QS001A-EN-P - October 2013
Page 49

Start Using Your HMI Project Chapter 3
System Status
Forward/Backward/History
System Status
Click the System Status icon to view system diagnostics. Fort more information on diagnostics, see Chapter 4.
Navigation Tools
There are three quick screen navigation buttons: Next, Previous, History.
The Display Navigation Map icon lets you move around your application faster. This feature is typically used for
applications that have more than 10 displays. Use the button bar (page 47
) for less than 10 displays.
Rockwell Automation Publication PROCES-QS001A-EN-P - October 2013 49
Page 50

Chapter 3 Start Using Your HMI Project
The Administrator icon accesses information about the system including display element sizes and version numbers
and security codes.
The View Security icon accesses the Current Security Access display that shows the security level of the
current user. This is a view-only display. A user’s security cannot be changed from this display.
The Repaint/Repair icon can be used when making edits to an application. After a change is made, click
the icon to refresh the application with the changes. This option also can be used to repaint the application if displays are
not shown properly.
50 Rockwell Automation Publication PROCES-QS001A-EN-P - October 2013
Page 51

Chapter 4
Add Basic System Diagnostics
In this chapter, you learn how to add controller and PASS server diagnostics to your system health screen that is provided in
the HMI template. As you develop your project, you can add additional diagnostics for your system. Add These Additional
Resources are listed at the end of this chapter.
Before You Begin
You must complete these tasks before using this chapter:
• Tasks described in Before Using This Publication on page 6
• Configure your system; see Chapter 1 and Chapter 2 for procedures
• Familiarize yourself with the HMI template; see Chapter 3
for procedures
What You Need
You must have RSLogix 5000 and FactoryTalk View Studio software, the HMI template, and ControlLogix controllers
online to complete the tasks in this chapter.
The sample illustration shows diagnostic displays that are explored in this chapter.
Rockwell Automation Publication PROCES-QS001A-EN-P - October 2013 51
Page 52

Chapter 4 Add Basic System Diagnostics
Start
Download the PlantPAx Library
on page 53
Add Diagnostics to the Controller
on page 53
Add Controller Diagnostics to a HMI Project
on page 55
Configure PASS Server Status
on page 61
Add These Additional Resources
on page 67
Follow These Steps
These steps describe how to configure your system diagnostics.
52 Rockwell Automation Publication PROCES-QS001A-EN-P - October 2013
Page 53

Add Basic System Diagnostics Chapter 4
TIP
Download the PlantPAx Library
If you have not done so already, complete the task on page 13 to download the Logix diagnostic objects from the PlantPAx
Library of Process Objects.
The diagnostics that you need to complete tasks in the next section are distributed with the Library in the Logix Diagnostic
Objects Library folder.
Add Diagnostics to the Controller
The Logix Controller CPU Utilization (L_CPU) Add-On Instruction faceplate monitors a Logix controller and provides
controller information on the system status page of the HMI template. This status information includes controller CPU
utilization, communication usage, memory usage, task scan times, and controller loading.
Follow these steps to add the Add-On Instruction to an online controller by using RSLogix 5000 software.
1. Open RSLogix 5000 software.
2. Open your target controller application from the saved location in step 6
3. From the Controller Organizer, click the ‘+’ to expand the Controller Status task and the Diagnostics program and
then double-click the LCPU routine.
4. Right-click Rung 0 and choose Import Rungs.
on page 22.
Rockwell Automation Publication PROCES-QS001A-EN-P - October 2013 53
Page 54

Chapter 4 Add Basic System Diagnostics
5. Select the L_CPU L5X file based on your controller revision and click Import.
6. On the Import Configuration dialog box, click OK to create all of the tags and data types that are required for the
Add-On Instruction.
7. Click Import Logic Edits as Pending and click OK.
54 Rockwell Automation Publication PROCES-QS001A-EN-P - October 2013
Page 55

Add Basic System Diagnostics Chapter 4
8. Type the controller slot number in the MOV instruction.
9. Change the GSV instruction to a CLR instruction that is configured as shown in the illustration.
10. Click the Finalize All Edits in Program icon .
11. Click Yes to finalize all of the edits.
Add Controller Diagnostics to a HMI Project
Follow these steps to add controller diagnostics to your HMI project.
1. Open the project that you created in Chapter 2 in the FactoryTalk View Studio software. See page 29
2. Load the required HMI files for the L_CPU Add-On Instruction as documented in the PlantPAx Library of Logix
Diagnostic Objects Reference Manual, publication PROCES-RM003
3. From your HMI project, right-click a system diagnostic display (for example, P1f System) from the template and
choose Open.
.
.
See page 43
for descriptions of the components in a HMI project.
Rockwell Automation Publication PROCES-QS001A-EN-P - October 2013 55
Page 56

Chapter 4 Add Basic System Diagnostics
4. From your HMI project, right-click Logix Graphics Library and choose Open.
5. Right-click the controller graphic in the L_CPU box and choose Copy.
56 Rockwell Automation Publication PROCES-QS001A-EN-P - October 2013
Page 57

6. On the P1f System display, right-click anywhere in the window and choose Paste.
Add Basic System Diagnostics Chapter 4
7. Right-click the L_CPU graphics on the P1 System display and choose Global Object Parameter Values.
Rockwell Automation Publication PROCES-QS001A-EN-P - October 2013 57
Page 58

Chapter 4 Add Basic System Diagnostics
TIP
8. Type a shortcut name for the controller and click OK.
Make sure that you put the controller name inside brackets [ ] as shown.
9. Save the display.
10. Open the HMI template that you created in Chapter 3
.
58 Rockwell Automation Publication PROCES-QS001A-EN-P - October 2013
Page 59

11. On the HMI display, click the System Status icon.
System Status
Add Basic System Diagnostics Chapter 4
On the HMI template, the controller graphic has some animation showing the position of the key switch and
controller status indicators.
Rockwell Automation Publication PROCES-QS001A-EN-P - October 2013 59
Page 60

Chapter 4 Add Basic System Diagnostics
Home Tab
Communication Tab
CPU Usage Tab
Connectio ns Tab
Maintenance Tab
Controller Memory Tab
12. Click the controller to access the controller status faceplate.
Tabs on the faceplate also include information on the CPU usage and the status of controller memory and
connections. For complete details, see the PlantPAx Library of Logix Diagnostic Objects,
publication PROCES-RM003
.
60 Rockwell Automation Publication PROCES-QS001A-EN-P - October 2013
Page 61

Add Basic System Diagnostics Chapter 4
Configure PASS Server Status
In this section, you learn how to add diagnostics for your PASS servers. These diagnostics provide information on the
software components that run on the PASS, including a HMI server, data server, and alarms and events server.
1. Open Knowledgebase Answer ID 44624 at http://rockwellautomation.custhelp.com
zip attachment.
2. Right-click the file and choose Open.
and download the
Rockwell Automation Publication PROCES-QS001A-EN-P - October 2013 61
Page 62

Chapter 4 Add Basic System Diagnostics
3. Right-click server status-state cpr9 and choose Extract All.
The example shows the unzipped files.
4. In the FactoryTalk View HMI template, right-click Displays and choose Add Component Into Application.
62 Rockwell Automation Publication PROCES-QS001A-EN-P - October 2013
Page 63

Add Basic System Diagnostics Chapter 4
5. Open the server status-state cpr9 V505.gfx file from the files that were unzipped in step 3.
6. Right-click the imported display and choose VBA Code.
7. Find the text circled in the example and type the name of your HMI server and data server.
8. Save the changes to the VBA code and close the server status display.
9. Open a system display.
For example, P1x.
Rockwell Automation Publication PROCES-QS001A-EN-P - October 2013 63
Page 64

Chapter 4 Add Basic System Diagnostics
10. From the Objects menu, choose Push Button>Button.
11. Click the display and drag the mouse to draw a button.
12. Click Browse (…) next to Release action.
64 Rockwell Automation Publication PROCES-QS001A-EN-P - October 2013
Page 65

13. From the All Commands and Macros list, select Display and click Next.
Add Basic System Diagnostics Chapter 4
14. From the File pull-down menu, choose the server status screen.
15. Click Finish.
Rockwell Automation Publication PROCES-QS001A-EN-P - October 2013 65
Page 66

Chapter 4 Add Basic System Diagnostics
16. On the Button Properties dialog box, click the Up Appearance tab.
17. In the Caption text box, type Server Status.
18. Click OK.
19. Save the changes to the P1 System display.
20. Run the client file and access the System Status page.
21. Click Server Status.
66 Rockwell Automation Publication PROCES-QS001A-EN-P - October 2013
Page 67

Add Basic System Diagnostics Chapter 4
TIP
The Server Status faceplate appears.
The example shows a networked station application with the FactoryTalk server, HMI server, and data server on one
workstation. None of the servers is redundant in this application example.
We recommend that diagnostic alarms for network adapters and I/O modules be added to the Alarm server to be displayed on the
alarm banner and included in the alarm log and history.
Add These Additional Resources
The following resources are available to assist with developing your application.
Topic Description Where To Find Information
DLR diagnostics The device-level ring (DLR) faceplate shows network
status and where a break is in the EtherNet/IP network.
L_ChangeDet, L_Redun, L_TaskMon library objects These PlantPAx Library of Logix Diagnostic Objects
monitor Logix controllers on the network, checking for
changes that impact operation for primary and secondary
controller status.
The DLR diagnostics faceplate application can be
downloaded from the Rockwell Automation Sample Code
website at http://samplecode.rockwellautomation.com
PlantPAx Library of Logix Diagnostic Objects,
publication PROCES-RM003
Rockwell Automation Publication PROCES-QS001A-EN-P - October 2013 67
Page 68

Chapter 4 Add Basic System Diagnostics
Notes:
68 Rockwell Automation Publication PROCES-QS001A-EN-P - October 2013
Page 69

Appendix A
Access the Quick Start Worksheet
The Microsoft Excel file attached to this PDF file contains a worksheet that you can use to gather information required for
executing the quick start.
To use the Excel file, click the Attachments link (the paper clip icon) and double-click the Excel file.
Enable Content
Verify that macros are enabled when using the file.
If this is the first time you are opening a Microsoft Excel file, you need to enable macros, if prompted.
Click Enable Content.
Rockwell Automation Publication PROCES-QS001A-EN-P - October 2013 69
Page 70

Appendix A Access the Quick Start Worksheet
Using the Worksheet
The worksheet is a macro-enabled spreadsheet that contains entry fields. As information is entered, additional entry fields
are dynamically created to collect more information.Where possible, some fields are auto-populated and entries are
verified automatically.
When completed, the worksheet must be saved as an Excel workbook (.xlsm) without the macros enabled. Select the
Edit Your Setup button (circled in Figure 8
the worksheet manually.
The separate portions of the worksheet shown are examples of the information that can be documented for the controllers
and PASS servers.
Figure 6 - Controllers Worksheet
) and the File menu appears to let you save your data. You can then edit
70 Rockwell Automation Publication PROCES-QS001A-EN-P - October 2013
Page 71

Figure 7 - Controller Detail Worksheet
Access the Quick Start Worksheet Appendix A
Rockwell Automation Publication PROCES-QS001A-EN-P - October 2013 71
Page 72

Appendix A Access the Quick Start Worksheet
Figure 8 - PASS Worksheet
72 Rockwell Automation Publication PROCES-QS001A-EN-P - October 2013
Page 73

Figure 9 - PASS Worksheet (continued)
Access the Quick Start Worksheet Appendix A
Rockwell Automation Publication PROCES-QS001A-EN-P - October 2013 73
Page 74

Appendix A Access the Quick Start Worksheet
Notes:
74 Rockwell Automation Publication PROCES-QS001A-EN-P - October 2013
Page 75

Index
A
access
worksheet file
adapters
add network
add
controller to data server
modules 17
remote chassis
additional resources
administrator access
alarm
servers configuration
tools 48
application manager
69
18
20
C
change
controller type
module definition 19
chassis
remote modules
client files
44
HMI
CompactLogix
controllers
configure
alarm servers
controller diagnostics
controller templates 9
data servers
HMI servers
I/O modules
network adapters 18
controller
add to data server
change type
CompactLogix
configure templates
ControlLogix
diagnostic configuration
download
enable redundancy
modify properties 14
open template
overview
quick steps
redundant
simplex, redundant
task rates
template description
templates
worksheet example
ControlLogix
controllers
create
HMI project
14
12
35
33
30
19
14
12
12
21
13
12
11
12
controllers
16
12
12
23, 29
20
12
8
50
26
38
15
9
10
35
12
53
38
53
D
data servers
configuration
deploy
HMI template
description
controller templates
diagnostics
controller configuration
quick steps
system
display
HMI templates
navigation map
download
Knowledgebase
project
33
30
52
51
26
49
5
21
E
enable
controller redundancy
examine
HMI project
execution
set task rate
41
19
F
features
HMI template
firmware
revision
48
15
H
HMI
additional resources
client files
create project
deploy templates
load templates 26
quick steps
server configuration
server status 61
software versions
template features
template names and resolutions
template overview
template structure
44
23, 29
30
25
23
48
I
I/O modules
configuration
set RPI
19
19
12
53
15
67
30
26
26
43
Rockwell Automation Publication PROCES-QS001A-EN-P - October 2013 75
Page 76

Index
K
Knowledgebase
downloads
templates
L
learn about
HMI project
load
HMI templates
M
m 26
manual
5
scope
map
display navigation
modify
controller properties
module
17
add
add remote
change definition
N
navigation
display map
tools
network
49
add adapters
O
overview
controller
HMI templates
P
PlantPAx
reference manual
preface
5
prerequisite
HMI tasks
6
tasks
project
create HMI
download
HMI familiarity 41
properties
modify controller
5
12
23
21
5
29
41
20
49
18
26
26
19
6
14
49
14
quick steps
controller
diagnostics
HMI 25
redundancy
enable controller
repaint
repair
repair
repaint
resolution
HMI templates
resources
additional
revision
firmware
RPI
module execution
scope
manual
security
view display
server
HMI status
worksheet example
simplex
controllers
software
23
HMI
versions
status
system
structure
HMI template
system
diagnostics
status
task rates
controller
tasks
prerequisite
11
52
R
15
50
50
26
8
15
19
S
5
50
61
24
12
6
49
43
51
49
T
16
6
Q
quick start
worksheet
76 Rockwell Automation Publication PROCES-QS001A-EN-P - October 2013
7
Page 77

templates
12
controller
controller configuration
deploy HMI 30
descriptions for controllers
explore HMI features
HMI names
HMI overview
HMI structure
Knowledgebase 5
load HMI
open controller
purpose 5
tools
alarms
HMI templates
navigation 49
type
change controller
26
26
48
V
versions
6
software
view
50
security
Index
9
12
48
26
43
13
48
14
worksheet
access file
controller example
quick start
server example 24
W
69
10
7
Rockwell Automation Publication PROCES-QS001A-EN-P - October 2013 77
Page 78

Index
Notes:
78 Rockwell Automation Publication PROCES-QS001A-EN-P - October 2013
Page 79

Page 80

Rockwell Automation Support
Rockwell Otomasyon Ticaret A.Ş., Kar Plaza İş Merkezi E Blok Kat:6 34752 İçerenköy, İstanbul, Tel: +90 (216) 5698400
Rockwell Automation provides technical information on the Web to assist you in using its products.
At http://www.rockwellautomation.com/support
software service packs. You can also visit our Support Center at https://rockwellautomation.custhelp.com/
updates, support chats and forums, technical information, FAQs, and to sign up for product notification updates.
In addition, we offer multiple support programs for installation, configuration, and troubleshooting. For more
information, contact your local distributor or Rockwell Automation representative, or visit
http://www.rockwellautomation.com/services/online-phone
Installation Assistance
If you experience a problem within the first 24 hours of installation, review the information that is contained in this
manual. You can contact Customer Support for initial help in getting your product up and running.
United States or Canada 1.440.646.3434
Outside United States or Canada Use the Wor ldwi de Lo cato r
Rockwell Automation representative.
at http://www.rockwellautomation.com/rockwellautomation/support/overview.page, or contact your local
New Product Satisfaction Return
you can find technical and application notes, sample code, and links to
for software
.
Rockwell Automation tests all of its products to help ensure that they are fully operational when shipped from the
manufacturing facility. However, if your product is not functioning and needs to be returned, follow these procedures.
United States Contact your distributor. You must provide a Customer Support case number (call the phone number above to obtain one) to your
Outside United States Please contact your local Rockwell Automation representative for the return procedure.
distributor to complete the return process.
Documentation Feedback
Your comments will help us serve your documentation needs better. If you have any suggestions on how to improve this
document, complete this form, publication RA-DU002
, available at http://www.rockwellautomation.com/literature/.
Publication PROCES-QS001A-EN-P - October 2013
Copyright © 2013 Rockwell Auto mation, Inc. All rights reserved. Pr inted in the U.S.A.
 Loading...