

Page 1
Installation Instructions
Original Instructions
ArmorView Plus 7
Catalog Numbers
2711P-T12W22D9P-BM001, 2711P-T12W22D9P-BM002, 2711P-T12W22D9P-BM003, 2711P-T12W22D9P-BM004, 2711P-T12W22D9P-BM005,
2711P-T12W22D9P-BM006, 2711P-T12W22D9P-BM007, 2711P-T12W22D9P-BM008, 2711P-T12W22D9P-BM009, 2711P-T12W22D9P-BM010, 2711P-T12W22D9P-BM011,
2711P-T12W22D9P-BM012, 2711P-T12W22D9P-BM013, 2711P-T12W22D9P-BM014, 2711P-T12W22D9P-BM015, 2711P-T12W22D9P-BM016, 2711P-RVESA01,
2711P-RHNDL01, 2711P-RIOIN3M, 2711P-RIOUT3M
Topic Page
Product Advisories 2
ArmorView Plus 7 Configurations and Mounting Options 3
ArmorView Plus 7 Optional Accessories 3
Required Tools 6
Required System Components 6
Product Dimensions 7
NEMA/IP Ratings and Requirements 9
Configure the ArmorView Plus 7 Terminal 10
Mount the ArmorView Plus 7 Terminal 24
Wire the ArmorView Plus 7 Terminal 26
Program the ArmorView Plus 7 Terminal 31
Maintain the ArmorView Plus 7 Terminal 31
Dispose of the ArmorView Plus 7 Terminal 32
Specifications 33
Environmental Specifications 34
Additional Resources 34
The ArmorView™ Plus 7 product consists of a 12.1 inch PanelView™ Plus 7 Performance module (with the FactoryTalk® Machine Edition software installed) that is enclosed in
a cast-aluminum enclosure. There are several mounting options available for this terminal, and various button plate configurations and optional accessories that give you
increased versatility in how you monitor and control the devices in your facility.
If you order an ArmorView Plus 7 terminal with a pre-populated button plate, your terminal also includes a 1732E ArmorBlock® Dual Port EtherNet/IP I/O module. The Studio
5000 Logic Designer® application is what you use to program the components of the button plate, which can include:
• Push buttons
• Two- and three-position selector switches
• Three-position key selector switches
An E-stop button is also available. It can be used to quickly stop a machine or process when a hazardous condition occurs.
For more details about the various button plate configurations and mounting options, see Table 1
information about the available accessories, see ArmorView Plus 7 Optional Accessories
in ArmorView Plus 7 Configurations and Mounting Options, and for
.
Page 2
ArmorView Plus 7 Installation Instructions
95 (3.74)
76.7 ( 3.02)
80.9 (3.19)
54.4 (2.14)
40 (1.57)
123.1 (4.85)
72.4 (2.85)
6.5 (0.26)
Approximate Dimensions
mm (in.)
Product Advisories
The following advisories and cautions apply to the ArmorView Plus 7 terminal.
Product Environmental Ingress Ratings
This product meets the specified NEMA, UL Type, and IEC ratings only when connected to an equivalently-rated coupling. Use of the optional VESA kit (includes a VESA
access cover and an I/O plate) can also meet these ratings. The product is designed to be used with couplers that have the same mounting pattern, such as those shown in
the following table:
Rittal Hoffman Other
Supported Coupling
Supported Arm Systems
Supported Pedestal Systems
(1) The arm mount adapter accommodates coupling with four M6 mounting screws 95 x 40 mm (3.74 x 1.58 in.) with a seal that is contained in 80.9 x 123.1 mm
(3.19 x 4.85 in.). The product will only meet specified NEMA, UL Type, and IEC ratings with user-installed accessories (stack light, buttons, indicators, and so
on), if the accessories have equivalent ratings and are installed properly.
CP 6501.130 (CP40 120x65)
CP 6206.340 (CP60 swivel)
CP 6206.360 (CP60 rigid)
CP40 (steel)
CP60 (extruded aluminum)
CP 6106.500 with these CP60
couplings:
•CP 6206.340
• CP 6206.360
S1MFC
Syspend 180
–
Any compatible coupling
(1)
IMPORTANTIMPORTANT
Customization and Configuration
This product is designed and rated for low voltage internal components. Use only stack lights, lamps, E-stop buttons, and other components that are supplied by safety
extra low voltage (SELV) or protective extra-low voltage (PELV) power sources.
2 Rockwell Automation Publication 2711P-IN013B-EN-P - February 2021
The ArmorView Plus 7 terminal is sealed in several places with a Foam In Place (FIP) gasket construction. Damage to the FIP gasket
defeats the product environmental ingress performance. Take care when working on the unit to avoid damaging the FIP gasket. The FIP
gaskets are located on the button plate (to seal against the bezel) and on the back cover (to seal against the bezel, against the access
cover, and against the arm mount adapter (or I/O plate)). To assure ingress protection, if the FIP gasket is in any way damaged, replace
the unit with a new one.
Page 3

ArmorView Plus 7 Installation Instructions
Precautions
This product contains a sealed lithium battery, which may need to be replaced during the life of the product.
At the end of its life, the battery that is contained in this product must be collected separately from any unsorted municipal waste.
The collection and recycling of batteries helps protect the environment and contributes to the conservation of natural resources as valuable
materials are recovered.
WARNING: There is a danger of explosion if the lithium battery or real-time clock module in this product is incorrectly placed. Replace the
battery only with the indicated type. Do not replace the battery or real-time clock module unless power has been removed or the area is known
to be nonhazardous.
Do not dispose of the lithium battery or real-time clock module in a fire or incinerator. Dispose of the battery in accordance with the local
regulations. For safety information on the handling of lithium batteries. including handling and disposing of leaking batteries, see Guidelines for
Handling Lithium Batteries, publication AG-5.4.
ATTENTION: Disconnect all power before installing or replacing any components. Failure to remove power can result in electrical shock or
damage to the terminal.
Work in a static-free environment and wear a properly grounded electrostatic discharge (ESD) wristband.
Be careful when touching any of the exposed electronic components to help prevent damage from ESD.
Perchlorate material – special handling may apply. See www.dtsc.ca.gov/hazardouswaste/perchlorate.
This perchlorate warning only applies to primary Lithium Manganese Dioxide (LiMnO2) cells or batteries, and products that contain these cells or batteries, which are sold or
distributed in California, USA.
Electromagnetic Compatibility Ratings
The ArmorView Plus 7terminal contains grounding pads between several elements of the product. Damage to, or removal of, these pads compromises the product EMC
performance. Take care when working on the unit to avoid damaging, moving, or losing the grounding pads. The grounding pads are located on the back cover (to connect
to the access cover), on the bezel assembly (to connect to the back cover), and on the arm mount to connect to the back cover. If these pads are damaged, moved, or lost,
the connection can be remade by using the grounding screw locations provided on these elements. For more information, see Optional–Attach Additional Grounding Wires to
the ArmorView Plus 7 Terminal.
ArmorView Plus 7 Configurations and Mounting Options
The ArmorView Plus 7 product is available with various button plate configurations, as described in Table 1. For information about the optional accessories that are available
for the terminal, see Table 2.
The most-basic configuration of the Armor View Plus 7 terminal (cat. no. 2711P-T12W22D9P-BM001) consists of the following components:
• ArmorView Plus 7 terminal (includes the PanelView Plus 7 Performance module)
• Arm mount adapter
• Blank button plate
• Standard access cover
The other catalog numbers (2711P-T12W22D9P-BM002…2711P-T12W22D9P-BM0016) come with pre-populated button plates that can be programmed to meet specific needs.
Among the available button plate components are different combinations of push buttons, including an E-stop button, and two-position selector, three-position selector, or
three-position key selector switches. If you choose these components, your ArmorView Plus 7 terminal also includes the 1732E ArmorBlock® Dual Port EtherNet/IP I/O
module (except 2711P-T12W22D9P-BM003), which is used to interface to the buttons and selectors (except the E-stop button which is independent). See Table 1
information about the available configurations.
for detailed
You can mount the ArmorView Plus 7 terminal on an arm mount system, a machine, or a pedestal, or you can use the optional VESA kit, if you prefer to mount the terminal by
using a VESA-compatible bracket (purchased separately). If you use the VESA kit, you get an I/O plate (included in the VESA kit) to install in place of the arm mount adapter.
All ArmorView Plus 7 configurations and mounting options allow you to add the following optional accessories to the terminal:
• Handles–to provide ease in grasping and moving the terminal. Handles can be mounted on the bottom of the terminal (the side opposite the arm mounter adapter or
I/O plate), and on each side.
• Stack lights–to provide high-visibility, multi-status indication of machine operation. Stack lights can be mounted on both sides of the terminal. If you choose, you
can use the 12.70 mm (0.5 in.) adapter hole under the stack light cover for any compatible accessory.
Rockwell Automation Publication 2711P-IN013B-EN-P - February 2021 3
Page 4
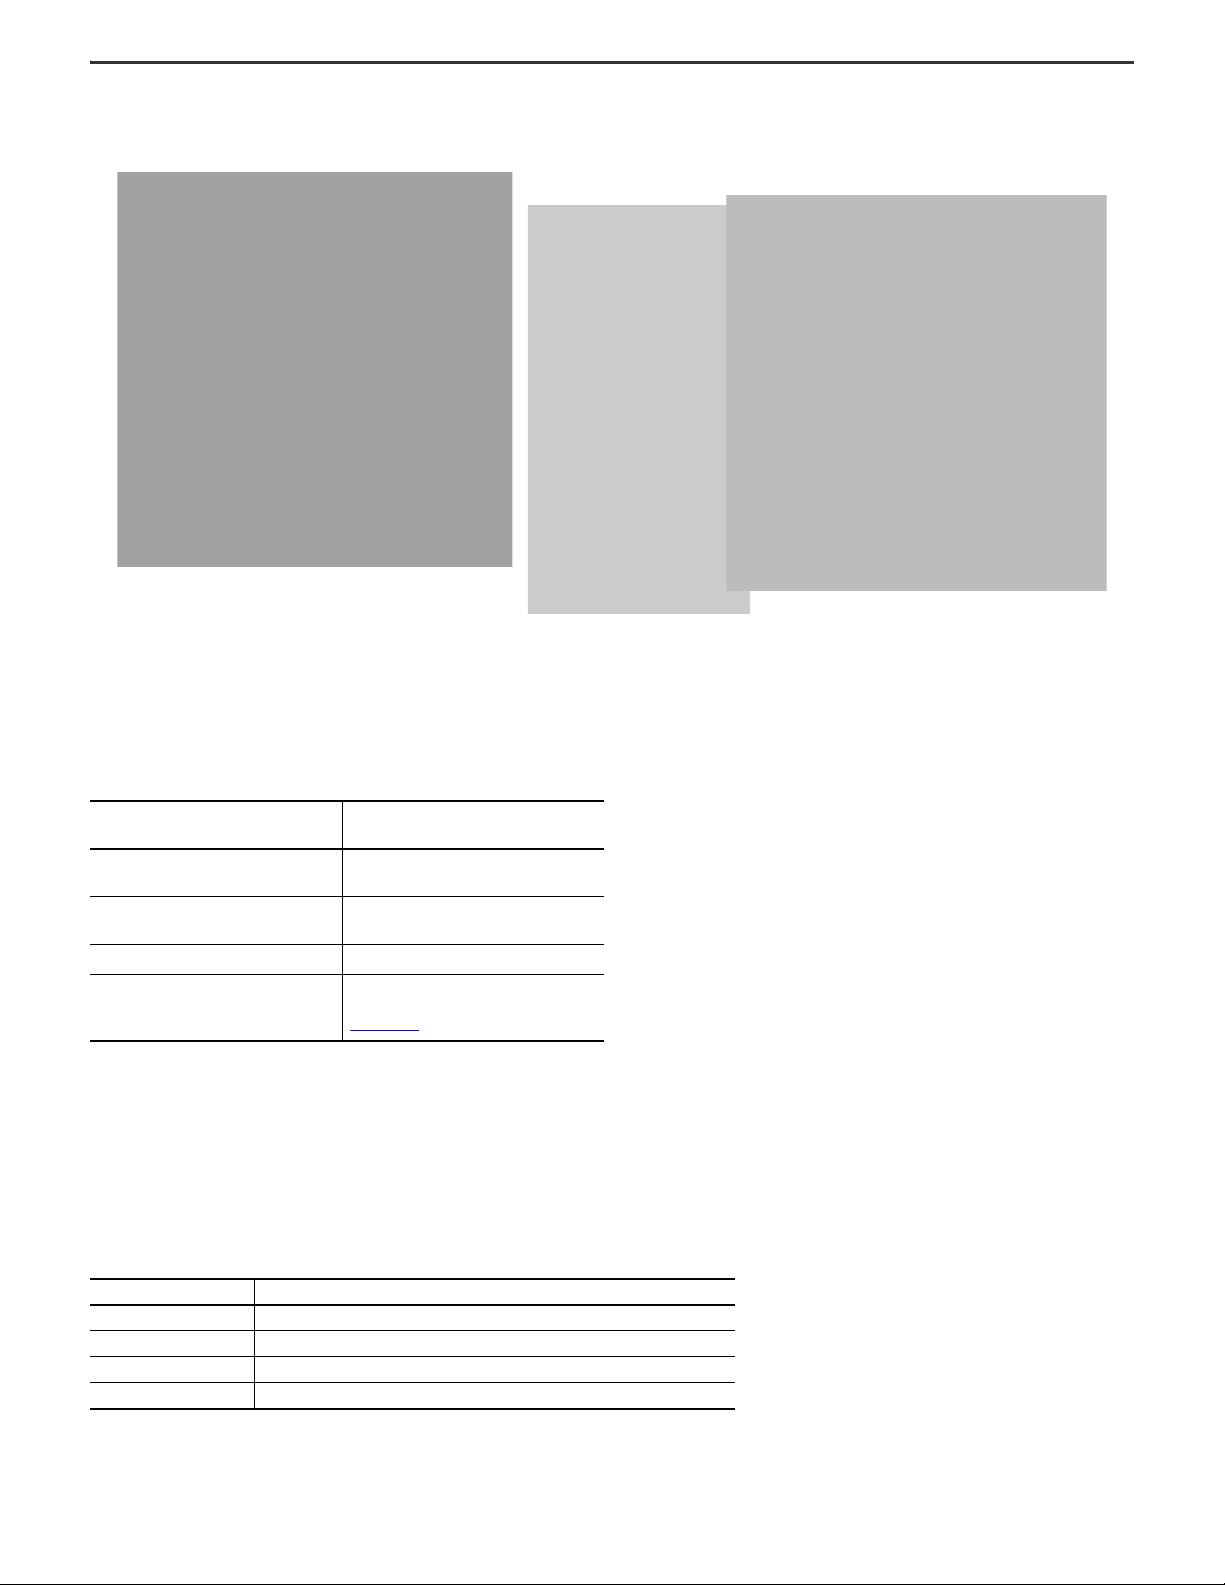
ArmorView Plus 7 Installation Instructions
Optional VESA Access Cover
Standard Access Cover
Arm Mount Adapter
Optional I/O Plate
Button Plate
3
Bezel
Back Cover
Optional Handle
2
Optional Stack Light
1
1 The optional stack light can be installed on either side of the ArmorView Plus 7 terminal. Each stack light kit contains one stack light. If you want to install two
stack lights, order two stack light kits.
2 The optional handle can be installed on the bottom (the side opposite the arm mount adapter or the I/O plate) of the ArmorView Plus 7 terminal, or on either side.
Each handle kit includes one handle. f you want to install more than one handle, order multiple handle kits.
3 A pre-populated button plate is shown in this diagram. A blank button plate is also available.
Stack Light Opening
Display Adapter Plate
Stack Light Opening
Optional Handle
2
Logic Module
(PanelView Plus 7 Performance)
Optional Handle
2
Components of the ArmorView Plus 7 Terminal
4 Rockwell Automation Publication 2711P-IN013B-EN-P - February 2021
Page 5
Table 1 - ArmorView Plus 7 Configurations
ArmorView Plus 7 Installation Instructions
(1)
Three-position
Key Selector
• Three-position
Key-Selector
Switch (800FMKM33
•Latch (800F-ALP)
• Contact Block, 1
N.O.
(800F-X10)
Cat. No.
2711P-T12W22D9P-
(5)
BM001
Components Included with
All Catalog Numbers
Ethernet I/O
(2)
Module
(1732E-
8CFGM8R)
Additional Components Included with Individual Catalog Numbers
(3)
Three-position
Selector
• Three-position
Selector Switch
(800FM-SM32)
•Latch (800F-ALP)
• Contact Block, 1
N.O.
(800F-X10)
E-stop Button
•Twist-to-release
E-stop Button
(800FM-LMT44)
•Latch (800F-ALP)
• Self-monitoring
Contact Block
(800F-X01S)
• Red LED Module
(800F-N3R)
•Dual-circuit
Contact Block
(800F-X11D)
Button Plate Components
# Push
(4)
Buttons
• Push Button
(800FM-F9)
•Latch (800F-ALP)
• Contact Block, 1
N.O.
(800F-X10)
Two-position
Selector
•Two-position
Selector Switch
(800FM-SM22
•Latch (800F-ALP)
• Contact Block, 1
N.O.
(800F-X10)
2711P-T12W22D9P-BM002 x
2711P-T12W22D9P-BM003 x
2711P-T12W22D9P-BM004 x x
2711P-T12W22D9P-BM005 x x 2
2711P-T12W22D9P-BM006 x x 2 x
2711P-T12W22D9P-BM007 x x 2 x
2711P-T12W22D9P-BM008 x x 2 x
2711P-T12W22D9P-BM009 x x 3
2711P-T12W22D9P-BM010 x x 3 x
• ArmorView Plus 7 terminal
• PanelView Plus 7
Performance module
• Arm mount adapter
• Button plate
• Standard access cover
• Product Information
document
2711P-T12W22D9P-BM011 x x 3 x
2711P-T12W22D9P-BM012 x x 3 x
2711P-T12W22D9P-BM013 x x 6
2711P-T12W22D9P-BM014 x x 5 x
2711P-T12W22D9P-BM015 x x 5 x
2711P-T12W22D9P-BM016 x x 5 x
(1) All catalog numbers come with nine M4 screws (6 for the access cover and 3 for grounding the subassembly chassis) and eight wire routing clips.
(2) The Ethernet I/O module is used to interface to the buttons on the button plate. It includes eight ports that can be configured as inputs or outputs.
(3) All button plate components (push buttons, selector switches, and key selector switches) are 22 mm (0.87 in.) in diameter.
(4) Catalog numbers 2711P-T12W22D9P-BM005…2711P-T12W22D9P-BM016 include nine push button key caps (assorted colors) that can be used to customize the button color and
location.
(5) This catalog number represents the most basic configuration of the ArmorView Plus 7 product. It is shipped with an arm mount adapter, a blank button plate, and a standard
access cover. It does not include any extra features.
Rockwell Automation Publication 2711P-IN013B-EN-P - February 2021 5
Page 6
ArmorView Plus 7 Installation Instructions
ArmorView Plus 7 Optional Accessories
Table 2 lists the optional accessories that are available for the ArmorView Plus 7 terminal.
Table 2 - ArmorView Plus 7 Optional Accessories
If You Purchase This
Accessory…
2711P-RVESA01
(VESA Kit)
2711P-RHNDL01
(Handle)
2711P-RIOIN3M
(Input Cable)
2711P-RIOUT3M
(Output Cable)
854J-BVMC (vertical mount)
(Stack Light)
(1) For units without the Ethernet I /O module that require a DLR connection, you must remove the Ethernet I/O module cable
and replace it with the Ethernet I/O module to terminal cable.
(2) For terminals that do not have an E-stop on the I/O plate, you can replace the connector with the M16 hole plug.
(3) There are three possible handle mounting locations. To install more than one handle, order multiple handle kits.
(4) There are two possible stack light mounting locations. The ArmorView Plus 7 mounting position for stack lights is
compatible with the vertical mount base option.
(3)
(4)
You Receive These Items…
•VESA access cover
•M4 screws (8)
• I/O Plate fitted with these cables:
- Power to terminal
- Connection to E-stop button
- Ethernet (I/O Plate to Ethernet I/O Module)
- Ethernet (I/O Plate to PanelView terminal)
- Ground wire
• Ethernet (I/O Plate to PanelView terminal
• M6 screws (4)
• M16 hole plug (1)
•Handle
•M4 screws (2)
Input point cable for customer-installed switch (3-pin male Pico™ style
connector for Ethernet I/O module)
Output point cable for customer-installed indicator light (3-pin male Pico
style connector for Ethernet I/O module)
•Stack light
• 100 mm (3.94 in.) stack light extension, if ordered (1)
• Reuse screws (2) from cover
(2)
(1)
)
Required Tools
To install or remove components of your ArmorView Plus 7 unit, you need the following tools:
• Phillips screw drivers, Nos. 1…3
• Flat blade screwdriver, 0.5 x 3.5 mm (0.02 x 0.14 in.), for terminal block wiring
• Torque wrenches capable of achieving torque values between 0.39…6.33 N•m (3.5…56 lb•in)
• Optional Allen-Bradley™ 800F-AW2 22.5 mm (0.89 in.) button mounting ring wrench
Required System Components
In addition to the required tools, you need cables or cordsets to make the following connections:
•Power
• Ethernet
• E-stop (when included)
The recommended cables are listed in Wire the ArmorView Plus 7 Terminal
.
6 Rockwell Automation Publication 2711P-IN013B-EN-P - February 2021
Page 7
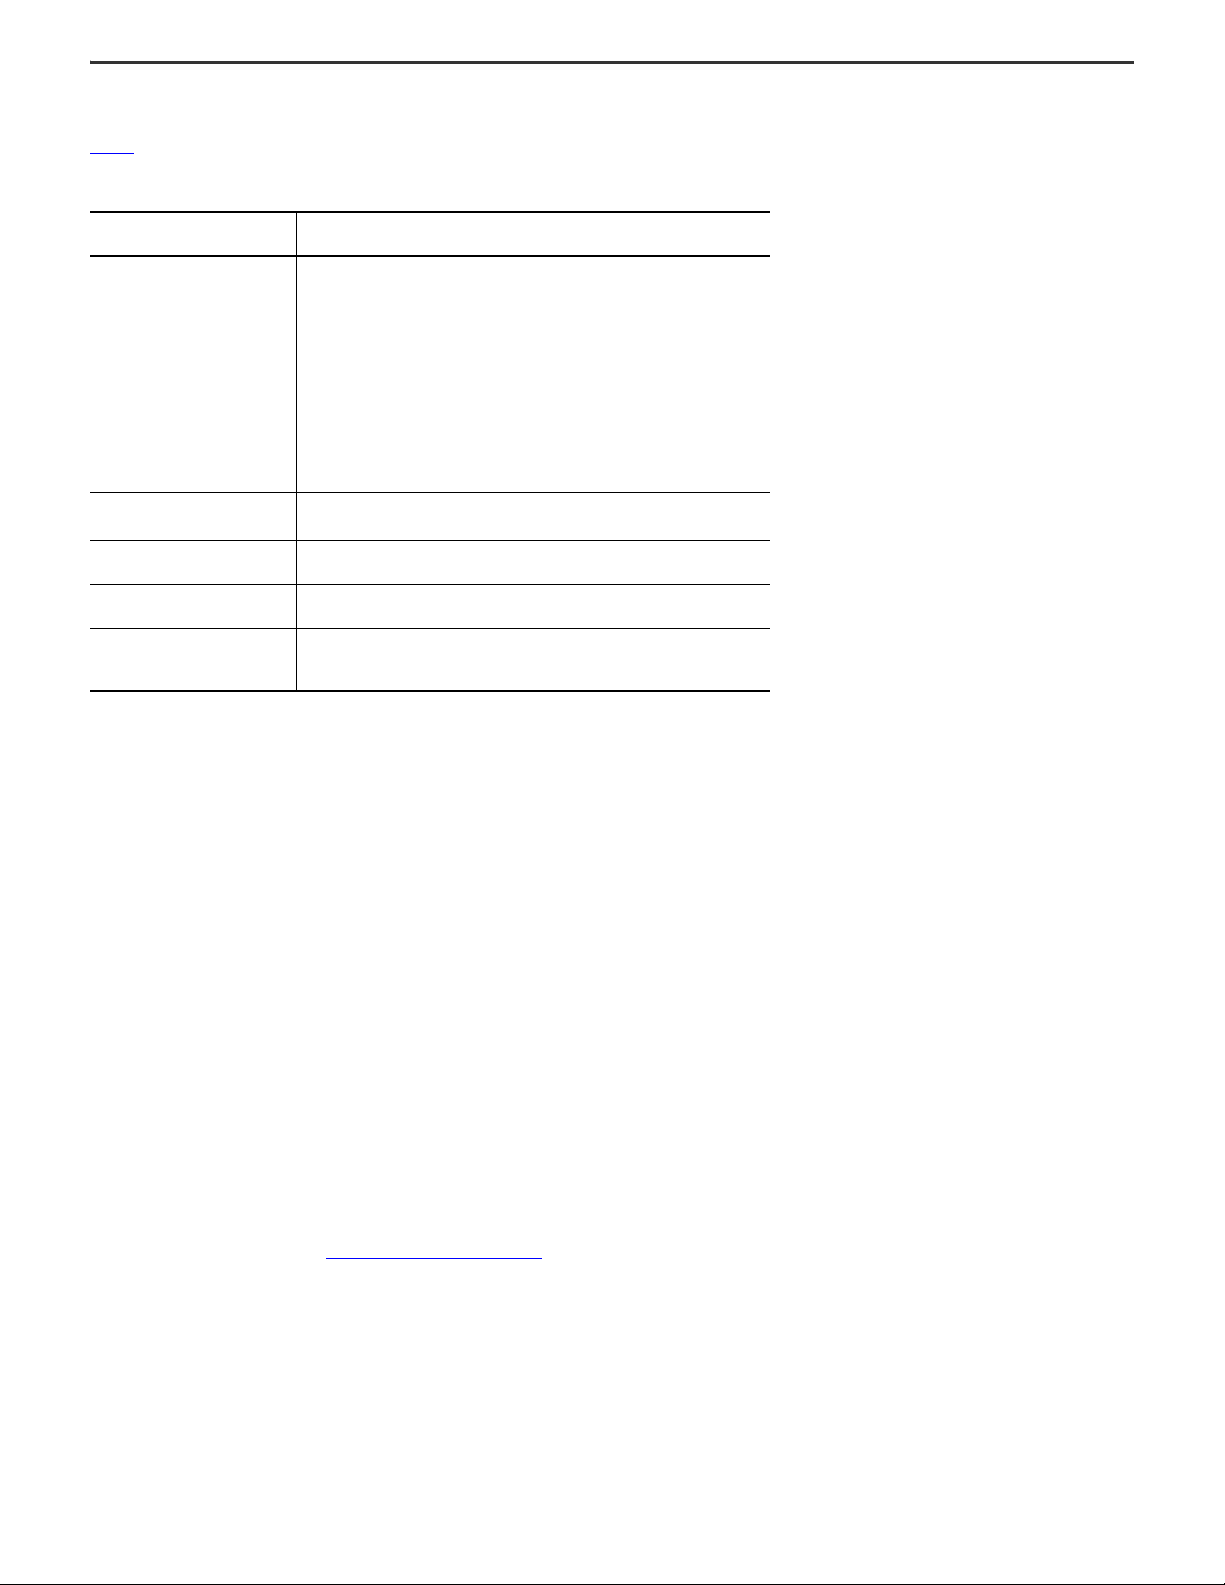
Product Dimensions
Front View
Side View
Top View
The following sections list the dimensions of each component of the ArmorView Plus 7 product.
ArmorView Plus 7 Installation Instructions
ArmorView Plus 7 Component
ArmorView Plus 7 Terminal with Arm
Adapter
ArmorView Plus 7 Terminal with I/O
Plate
Standard Access Cover 226 (8.9) 226 (8.9) 3.18 (0.12))
VESA Access Cover 226 (8.9) 226 (8.9)
Arm Adapter 71 (2.8) 170 (6.69) 82.8 (3.26)
I/O Plate 32.4 (1.28) 169.8 (6.69) 54.8 (2.16)
Button Plate 57.8 (2.28) 282.8 (11.14) 1.0 (0.04)
Handle 83.1 (3.27) 345 (13.58) 50.7 (2.0)
Stack Light
(1) With the clinch nut, the overall depth of the VESA access cover is 16.9 mm (0.67 in.).
ArmorView Plus 7 Terminal with Arm Mount Adapter Installed
Height
mm (in.)
381.6 (15.02) 345 (13.58) 166.6 (6.56)
345 (13.58) 345 (13.58) 166.6 (6.56))
See Bulletin 854J Control Tower Installation
Instructions, publication 854J-IN001
Width
mm (in.)
Overall Depth
mm (in.)
3.4 (0.13)
(1)
.
Rockwell Automation Publication 2711P-IN013B-EN-P - February 2021 7
Page 8
ArmorView Plus 7 Installation Instructions
Front Vi ew
Side View
Back View
ArmorView Plus 7 Terminal with Optional I/O Plate Installed
Product Weights
Size your mounting system to handle the appropriate weights.
ArmorView Plus 7 Component
ArmorView Plus 7 Terminal with Arm
Adapter
ArmorView Plus 7 Terminal with VESA
Kit
Handle Kit (one handle) 0.70 (1.537)
Stack Light
7.41 (16.335)
8.19 (18.063)
See Bulletin 854J Control Tower
Installation Instructions, publication
854J-IN001
Weight
kg (lb)
.
Mounting Clearances
When you mount the ArmorView Plus 7 terminal to your preferred mounting system, you must allow adequate clearances for mounting, airflow, cabling, and maintenance.
The following table provides the minimum recommended clearances for mounting the ArmorView Plus 7 terminal.
The ambient temperature around the terminal must be 0…50 °C (32…122 °F).
Table 3 - Minimum Required Clearances
Product Area Minimum Clearance
Top 51 mm (2 in.)
Bottom 51 mm (2 in.)
Sides 0 mm (0 in.)
Back 51 mm (2 in.)
8 Rockwell Automation Publication 2711P-IN013B-EN-P - February 2021
Page 9
ArmorView Plus 7 Installation Instructions
NEMA/IP Ratings and Requirements
The following table lists the NEMA/IP rating for each of the ArmorView Plus 7 catalog numbers. This product meets the specified NEMA/IP ratings only when connected to an
equivalently-rated coupling and user-configured accessories.
Cat. No. NEMA/IP Rating
2711P-T12W22D9P-BM001
2711P-T12W22D9P-BM002
2711P-T12W22D9P-BM003
2711P-T12W22D9P-BM004
2711P-T12W22D9P-BM005
2711P-T12W22D9P-BM006
2711P-T12W22D9P-BM007
2711P-T12W22D9P-BM008
2711P-T12W22D9P-BM009
2711P-T12W22D9P-BM010
2711P-T12W22D9P-BM011
2711P-T12W22D9P-BM012
2711P-T12W22D9P-BM013
2711P-T12W22D9P-BM014
2711P-T12W22D9P-BM015
2711P-T12W22D9P-BM016
User-configured button
plate
No agency sanctioned ingress protection. Ratings are
dependent on proper installation of the user-selected
button.
NEMA 4x/12/13, IP66
NEMA 4/12/13, IP66
Rockwell Automation Publication 2711P-IN013B-EN-P - February 2021 9
Page 10

ArmorView Plus 7 Installation Instructions
Configure the ArmorView Plus 7 Terminal
IMPORTANT
Before you use any of the procedures in this document, do the following:
• If necessary, disconnect the power supply to the ArmorView Plus 7 terminal.
• If necessary, discharge any electrostatic charge on the ground connection.
• Verify that the terminal is removed from all potential sources of electrical power.
• Place the terminal on a flat, stable surface before you begin to work on it. If you need to work on the terminal with the
display facing downward, make sure the display is protected and that the terminal is positioned to lie flat and stable. The
original packing material can provide this stabilization.
This section describes the procedures that you may need to use as you customize your ArmorView Plus 7 terminal to meet your needs:
Access Cover
• Remove the Access Cover
• Install the Access Cover
Back Cover
• Remove the Back Cover
• Rotate the Back Cover
• Install the Back Cover
Button Plate
• Remove the Button Plate
• Remove a Button from the Button Plate
• Replace an Existing Button on the Button Plate
• Add a New Button to the Button Plate
• Rotate the Button Plate
• Install the Button Plate
• Install the Button Key Caps
VESA Kit
• Configure the I/O Plate
• Install the I/O Plate
Optional Accessories
• Install the Stack Light
• Install the Handle
• Insert an SD Card
• Remove an SD Card
• Insert a USB Drive
• Remove a USB Drive
• Replace the Battery in the ArmorView Plus 7 Terminal
After you configure your ArmorView Plus 7 terminal, there are additional tasks that you need to complete before you can operate the terminal. These tasks are available in
the following sections:
• Mount the ArmorView Plus 7 Terminal
• Wire the ArmorView Plus 7 Terminal
• Program the ArmorView Plus 7 Terminal
10 Rockwell Automation Publication 2711P-IN013B-EN-P - February 2021
Page 11
ArmorView Plus 7 Installation Instructions
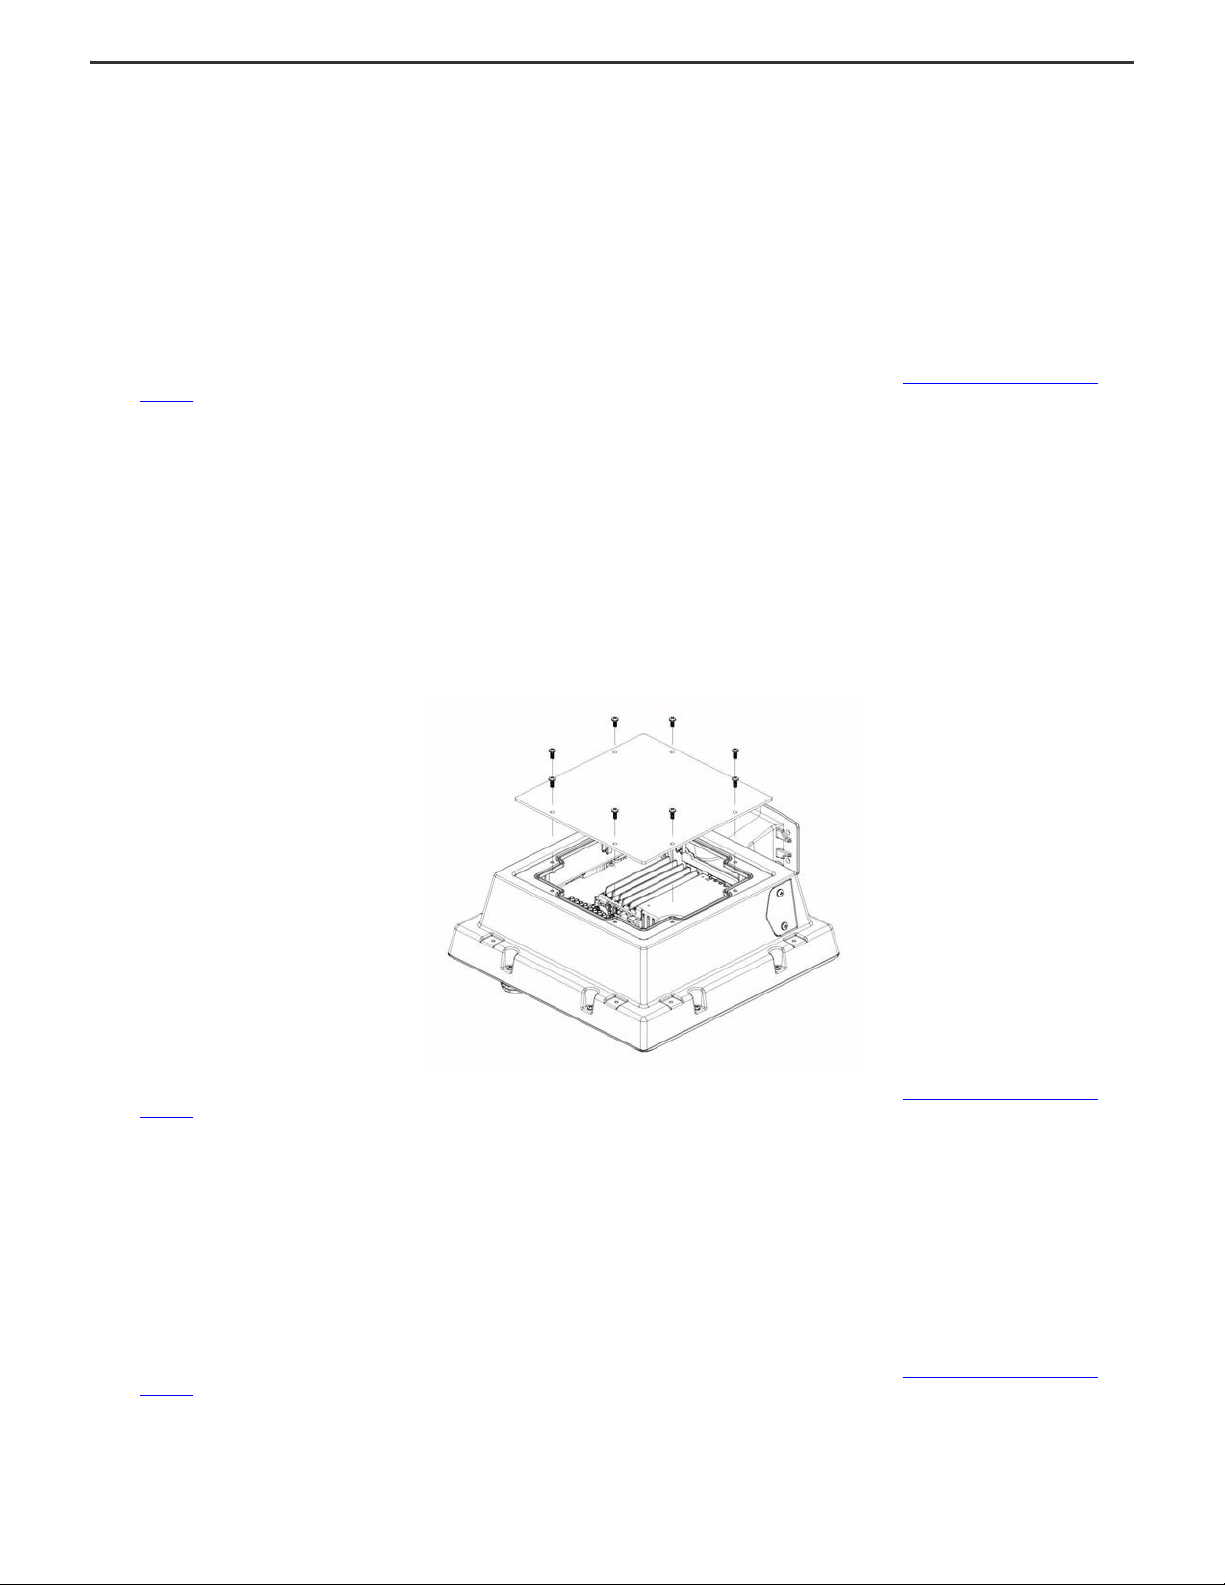
The standard access cover is
shown in this illustration.
Remove the Access Cover
Note: The following steps are the same for both the standard access cover and the VESA access cover.
To remove the access cover, complete the following steps:
1. Remove the M4 screws from the access cover and set them aside.
Note: The access cover requires eight screws for proper installation and for safe mounting. To make it easier for you to work with your ArmorView Plus 7 unit,
however, the unit is shipped with only two screws inserted in the access cover. The remaining screws are included in the box.
2. Carefully lift the access cover and set it aside.
Note: As you lift the cover, be careful not to damage the foam-in-place (FIP) gasket and the foam grounding pads that are applied around the access cover opening.
3. For additional configurations that you can make to the ArmorView Plus 7 terminal, see the other procedures that are listed in Configure the ArmorView Plus 7
Terminal.
Install the Access Cover
Note: The following steps are the same for both the standard access cover and the VESA access cover.
To install the access cover, complete the following steps:
1. Place the access cover over the access cover opening and align the eight screw holes.
2. Verify that the part number that is etched into the access cover faces inward.
3. Insert the eight M4 screws and tighten them to a torque value of 1.36…1.58 N•m (12…14 lb•in.).
4. For additional configurations that you can make to the ArmorView Plus 7 terminal, see the other procedures that are listed in Configure the ArmorView Plus 7
Remove the Back Cover
To remove the back cover, complete the following steps:
1. Remove the eight M4 screws from the back cover and set them aside.
2. Lift the back cover from the bezel assembly.
3. Set the back cover on the work surface with the access cover opening facing downward.
Note: The remaining screws are included in the box.
Terminal.
Note: This precaution is to project the FIP gasket and the foam grounding pads that are applied around the back cover opening.
4. For additional configurations that you can make to the ArmorView Plus 7 terminal, see the other procedures that are listed in Configure the ArmorView Plus 7
Terminal.
Rockwell Automation Publication 2711P-IN013B-EN-P - February 2021 11
Page 12

ArmorView Plus 7 Installation Instructions
Rotate the Back Cover
The ArmorView Plus 7 terminal is designed so that it can be mounted in various ways with no thermal derating. You can configure the terminal to have the arm mount
adapter on any side (for example, on the bottom for pedestal mounting). You can also mount the terminal with the arm-mating surface perpendicular to the display, or you
can reverse it to allow for oblique angle mounting. At each orientation, the display can be adjusted to show information, right side up, in either a portrait or landscape
orientation. For more information about how to adjust the terminal views, see the PanelView Plus 7 Performance Terminals User Manual, publication 2711P-UM008
These examples are a few of the possible mounting orientations.
Because the button plate position is independent of the arm mount adapter position, you can also change the button location and orientation, as shown in the following
illustrations.
.
In addition, you can position the wiring connections independently.
To rotate the back cover of the ArmorView Plus 7 terminal, complete the following steps:
1. Remove the Back Cover.
2. Rotate the back cover as desired (90°, 180°, or 270°).
3. Install the Back Cover
4. For additional configurations that you can make to the ArmorView Plus 7 terminal, see the other procedures that are listed in Configure the ArmorView Plus 7
Terminal.
.
12 Rockwell Automation Publication 2711P-IN013B-EN-P - February 2021
Page 13

Install the Back Cover
Bezel Ground Wire
Connection
Button Plate Screws
Button Plate Screws
Note: For clarity, this
illustration does not show
wires.
To install the back cover, complete the following steps:
1. Determine how you want to orient the ArmorView Plus 7 terminal. For instructions on how to do that, see Rotate the Back Cover.
2. Place the back cover over the terminal and align the eight screw holes.
Note: Be careful not to damage the FIP gasket and the foam grounding pads that are applied around the back cover opening.
3. Insert the eight M4 screws and tighten them to a torque value of 1.36…1.58 N•m (12…14 lb•in).
ArmorView Plus 7 Installation Instructions
Remove the Button Plate
The button plate for the ArmorView Plus 7 terminal can accommodate up to seven components in various combinations. The button plate is pre-configured as shown in
Table 1
You can change the configuration of the button plate, but in order to do that, you first need to remove the button plate.
To remove the button plate, complete the following steps:
4. For additional configurations that you can make to the ArmorView Plus 7 terminal, see the other procedures that are listed in Configure the ArmorView Plus 7
Terminal.
, which includes a combination of the following items:
• Push buttons
• Two-position selector switch
• Three-position selector switch
• Three-position key selector
• E-stop button
1. Remove the Back Cover
.
2. Remove the four M6 screws from the button plate and set them aside.
3. Disconnect the ground wire on the bezel.
Rockwell Automation Publication 2711P-IN013B-EN-P - February 2021 13
Page 14

ArmorView Plus 7 Installation Instructions
Power Cable
Ethernet Cables
Note: This illustration depicts external wiring to the PanelView
Plus 7 Performance module and the terminal block
Ethernet I /O Module Mounting Bracket Screws
4. Lift and rotate the button plate from the bezel, and then do the following:
• Disconnect the Ethernet cable from the Ethernet I/O module to the PanelView Plus 7 Performance terminal.
• Disconnect the power cable from the PanelView Plus 7 Performance terminal by loosening the two screws.
5. Continue with the following procedures:
• Remove a Button from the Button Plate
• Replace an Existing Button on the Button Plate
• Add a New Button to the Button Plate
• Rotate the Button Plate
• Install the Button Plate
Remove a Button from the Button Plate
To remove a button from the button plate, complete the following steps:
1. Remove the Button Plate
2. Remove the two M4 screws from the Ethernet I/O module mounting bracket and set them aside.
3. Carefully lift the Ethernet I/O module bracket assembly and set it aside.
.
14 Rockwell Automation Publication 2711P-IN013B-EN-P - February 2021
Page 15

4. Identify which button you want to remove from the button plate, and do the following:
Button Plate
E-stop Button
Selector Switch
Button Mounting Ring
Latch
Push Button
Contact Block
a. Remove the latch and contact block assembly.
b. Remove the button lock nut.
c. Remove the button.
5. Do one of the following:
a. If you want to replace the button, see Replace an Existing Button on the Button Plate
b. If you do not want to replace the button, install one of the following hole plugs into the hole:
- 800F-N2 hole plug (black plastic)
- 800F-N8 hole Plug (gray plastic)
6. Install the Button Plate
.
ArmorView Plus 7 Installation Instructions
.
For further information about how to add or remove a button, see the following documents:
• IEC Push Button Specifications Technical Data, publication 800-TD008
• 22.5 mm Push Buttons (800F) section of the Industrial Controls Catalog
• Knowledgebase document 999271
Replace an Existing Button on the Button Plate
To replace an existing button on the button plate, complete the following steps:
1. Remove the Button Plate
2. Remove a Button from the Button Plate
3. From the outer side of the button plate, orient the new button properly and insert it into the button hole.
4. From the inner side of the button plate, insert the remaining button elements in the following order:
• Button mounting ring tightened to a torque value that is specified in the instructions included with the button
• Latch and contact block assembly or contact block assemblies and LED light (if used)
Note: Make sure that the latch clicks when you insert it.
5. Place the Ethernet I/O module bracket assembly over the button plate and align the two screw holes.
6. Insert the two M4 screws and tighten them to a torque value of 1.36…1.58 N•m (12…14 lb•in).
7. Install the Button Plate
For further information about how to add or remove a button, see the following publications:
• IEC Push Button Specifications Technical Data, publication 800-TD008
• 22.5 mm Push Buttons (800F) section of the Industrial Controls Catalog
• Knowledgebase document 999271
.
.
.
Rockwell Automation Publication 2711P-IN013B-EN-P - February 2021 15
Page 16

ArmorView Plus 7 Installation Instructions
Ethernet I/O Module Mounting Bracket Screws
Back Side of Button Plate
Cut through the button plate overlay.
Add a New Button to the Button Plate
IMPORTANT
The Ethernet I/O module has eight configurable I/O locations. Ensure that you have enough locations for the desired buttons and LEDs,
or else provide other means of interfacing with the buttons and LEDs.
Make sure that there is enough space available for the desired buttons and selectors. There is one location with a slightly larger hole-tohole space. This location is occupied by the E-stop button on configurations that include an E-stop button.
To add a button to the button plate, complete the following steps:
1. Remove the Button Plate
.
2. If you don’t have an Ethernet I/O module, skip to step 4. Otherwise, remove the two M4 screws from the Ethernet I/O module mounting bracket and set them aside.
3. Carefully lift the Ethernet I/O module mounting bracket assembly and set it aside.
4. On the button plate, identify in which location you want to place the new button.
5. Using a sharp knife, in the new button location, carefully cut an opening through the button plate overlay (only one alignment feature is required depending on the
button orientation).
Note: To avoid potential ingress issues, cut the hole from the back side of the button plate, using the hole in the casting as a cutting guide.
6. From the outer side of the button plate, orient the new button properly and insert it into the button hole.
7. From the inner side of the button plate, insert the remaining button elements in the following order:
• Button mounting ring tightened to a torque value that is specified in the instructions included with the button
• Latch and contact block assembly or contact block assemblies and LED light (if used)
Note: Make sure that the latch clicks when you insert it.
8. If you are hardwiring a switch, connect the wires to the contact blocks or LEDs, then skip to step 11. For information on how to hard-wire a switch, see the
instructions for the switch.
9. If you want to connect the switch to the Ethernet I/O block, attach the 2711P (input or output) cables as follows:
a. For the input cable (2711P-RIOIN3M), connect the black and brown wires to the contact block.
b. For the output cable (2711P-RIOUT3M), connect the black and blue wires to the 800F LED power modules.
Note: These LED power modules are not polarity-sensitive.
c. Connect the PICO connector end of the cable to the Ethernet I/O module.
10. Place the Ethernet I/O module mounting bracket over the button plate and align the two screw holes.
11. Insert the two M4 screws and tighten them to a torque value of 1.36…1.58 N•m (12…14 lb•in).
12. Install the Button Plate
13. Install the Back Cover
.
.
16 Rockwell Automation Publication 2711P-IN013B-EN-P - February 2021
Page 17

ArmorView Plus 7 Installation Instructions
Cable Wire Tie
For further information about how to add or remove a button, see the following publications:
• IEC Push Button Specifications Technical Data, publication 800-TD008
• 22.5 mm Push Buttons (800F) section of the Industrial Controls Catalog.
• Knowledgebase document 999271
Rotate the Button Plate
All pre-populated button plate configurations for the ArmorView Plus 7 terminal display the E-stop button on the right. You can reverse the orientation of the button plate so
that the E-stop button displays on the left.
To rotate the button plate, complete the following steps:
1. Remove the Button Plate
2. Mark the I/O cables with their location number on the Ethernet I/O module.
3. Disconnect the I/O cables from the Ethernet I/O module.
4. Cut the cable wire tie that holds the wire from the E-stop button to the terminal block.
.
5. Remove the two screws from the Ethernet I/O module mounting bracket.
6. Rotate the button plate and move the cables to the other side.
7. Add a cable wire tie to the E-Stop wire at the same location from which you removed it in step 4.
Note: This step is recommended to avoid pinching the wire when you install the back cover.
8. Place the Ethernet I/O module mounting bracket over the button plate and align the two screw holes.
Note: Be careful not to pinch the wires.
9. Insert the two M4 screws and tighten them to a torque value of 1.36…1.58 N•m (12…14 lb•in).
10. Insert and tighten the I/O cables into the correct locations on the Ethernet I/O module.
11. Install the Button Plate
.
Install the Button Plate
To install the button plate, complete the following steps:
1. Insert the PanelView power terminal block and tighten the captive screws to a torque value of 0.40 N•m (3.5 lb•in).
2. Install the Ethernet connector to the PanelView terminal.
3. Place the button plate over the bezel assembly and align the four screw holes.
4. Insert the four M6 screws and tighten them to a torque value of 3.73…3.95 N•m (33…35 lb•in.).
5. Align the two ground wires to the bezel, and tighten them to a torque value of 1.36…1.58 N•m (12…14 lb•in.).
6. For additional configurations that you can make to the ArmorView Plus 7 terminal, see the other procedures that are listed in Configure the ArmorView Plus 7
Terminal.
Install the Button Key Caps
To install the supplied button key caps, complete the following steps:
1. Select the desired color for the button.
2. Align the prongs of the key cap with the holes in the button.
3. Press firmly until you hear a click.
Rockwell Automation Publication 2711P-IN013B-EN-P - February 2021 17
Page 18

ArmorView Plus 7 Installation Instructions
Ethernet Connectors
Power Connector
E-stop Connector
Note: This Ethernet Connector is shown
with a dust cap.
4. Repeat steps 1…3 for each key.
Note: Alternate color or additional key caps can be ordered from Rockwell Automation. For additional information about the button key caps, see the 22.5 mm Push
Buttons (800F) section of the Industrial Controls Catalog.
5. For additional configurations that you can make to the ArmorView Plus 7 terminal, see the other procedures that are listed in Configure the ArmorView Plus 7
Terminal.
Configure the I/O Plate
If you decide to mount your ArmorView Plus 7 terminal on a VESA bracket, you need to purchase the optional VESA kit, which comes with a VESA access cover and an I/O
plate. You need to replace the standard access cover with the VESA access cover, and you need to install the I/O plate in place of the arm mount adapter.
The I/O plate provides connections for one power cable, two Ethernet cables, and an E-stop button. Before you install the I/O plate, you need to decide how to configure it.
The following choices are available:
• You can replace the E-stop connector with a hole plug.
• You can use one or two Ethernet connectors.
• You can substitute one Ethernet cable.
To configure the I/O plate, complete the following steps:
1. If the E-stop button is not required, remove the E-stop connector, insert the supplied M16 hole plug in its place, and tighten it to a torque value of 4.18…4.41 N•m
(37…39 lb•in).
2. Determine whether you want to use one or two Ethernet connections, and then do the following:
• If you plan to use one Ethernet connection, leave the dust cap in place. You are finished with configuring the I/O plate. Continue with step 3.
• If you plan to use both Ethernet connections, and your ArmorView Plus 7 terminal has the Ethernet I/O module, you are finished with configuring the I/O plate.
Continue with step 3.
• For configurations without the Ethernet I/O module (for example, catalog numbers 2711P-T12W22D9P-BM001 or
2711P-T12W22D9P-BM003), replace the Ethernet cable with the supplied alternate Ethernet cable that has the RJ45 connector.
3. Install the I/O Plate
.
4. For additional configurations that you can make to the ArmorView Plus 7 terminal, see the other procedures that are listed in Configure the ArmorView Plus 7
Terminal.
Install the I/O Plate
To install the I/O plate, complete the following steps:
1. Remove the Access Cover
2. Remove the four M6 screws from the arm mount adapter, and set them aside.
3. Lift the arm mount adapter, and set it aside.
4. Place the I/O plate over the opening on the terminal, and from the access opening, guide the wires from the I/O plate into the terminal.
Note: Be sure to orient the I/O plate assembly so that the thicker portion faces the access cover (back of the terminal) as shown in the illustration.
.
18 Rockwell Automation Publication 2711P-IN013B-EN-P - February 2021
Page 19

ArmorView Plus 7 Installation Instructions
Note: The thicker side of the
I/O plate must face the same
direction as the access cover (back
side of the terminal).
Note: Cables are not shown in this
illustration.
Te rm i na l 4
Te rm i na l 2
Te rm i na l 1
Te rm i na l 3
Te rm i na l 5
Black
White
Brown
Blue
Gray
Black
White
Brown
Blue
Gray
In n+1
In n (no test pulse)
24V DC Power
-24V (Common)
Tes t s o ur ce n +1
Pin 4
Pin 2
Pin 1
Pin 3
Pin 5
Male Pinout
Face View
Factory Wiring
10-pin
Te rm i na l
Block
Install the I/O plate
5. Insert the four M6 screws and tighten them to a torque value of 3.73…3.95 N•m (33…35 lb•in).
6. From the access opening, connect the wires from the I/O plate to the correct internal components as follows:
a. For the power connection, do the following:
• Connect the blue wire from the power connector to +24V DC, as marked on the ten-position terminal block. If your configuration does not have the ten-position
terminal block, connect the wire to the “+” terminal on the power terminal block of the PanelView Plus 7 Performance module.
• Connect the white wire from the power connector to -24V DC, as marked on the ten-position terminal block. If your configuration does not have the ten-position
terminal block, connect the wire to the “-” terminal on the power terminal block of the PanelView Plus 7 Performance module.
• Connect the green wire from the I/O plate to the ground terminal of the ten-position terminal block. If your configuration does not have the ten-position terminal
block, connect the wire to the “GND” terminal on the power terminal block of the PanelView Plus 7 Performance module.
b. For the Ethernet connection, connect the Ethernet cable or cables to the Ethernet port or ports.
c. For the E-stop connection, connect similarly colored wires from the I/O plate connector to the terminal block as follows:
• For terminal 1, connect the brown wire
• For terminal 2, connect the white wire
• For terminal 3, connect the blue wire
• For terminal 4, connect the black wire
• For terminal 5, connect the gray wire
Rockwell Automation Publication 2711P-IN013B-EN-P - February 2021 19
Page 20

ArmorView Plus 7 Installation Instructions
Location of Wire Retention Clips
7. Insert the wire retention clips, as needed.
Note: Eight wire retention clips are included in the box. Holes for the wire retention clip are located inide the back cover, near the access cover screw holes.
8. Press the cables into the wire retention clips.
Note: Rockwell Automation recommends that the power cables be separated from the Ethernet cables.
9. Install the Access Cover
.
Note: Be sure to install the VESA access cover.
10. For additional configurations that you can make to the ArmorView Plus 7 terminal, see the other procedures that are listed in Configure the ArmorView Plus 7
Terminal.
20 Rockwell Automation Publication 2711P-IN013B-EN-P - February 2021
Page 21

Install the Stack Light
Note: Illustrations depict the ArmorView Plus 7 terminal with the I/O plate and VESA access cover installed.
Stack Light Cover
Right Side
Stack Light Cover
Left S ide
Left Side with Stack Light Mounted
ArmorView Plus 7 Installation Instructions
IMPORTANT
When the ArmorView Plus 7 terminal is mounted on an arm mount system or a pedestal mount, and the stack light is installed near the
mount, the product vibration rating is reduced to 0.75 g. When the stack light is installed further from the mount, the product vibration
rating is reduced to 0.25 g. The product shock rating is unchanged at 5 g.
When the ArmorView Plus 7 terminal is mounted on a VESA bracket, the product vibration rating is reduced to 0.75 g, and the product
shock rating is reduced to 20 g for both stack light mounting locations.
Before you install the stack light, verify that the rotation of the terminal does not interfere with the stack light and the arm mounting
system.
Do not use the stack light as a handle to move or rotate the ArmorView Plus 7 terminal.
To install the stack light, complete the following steps:
1. Remove the Access Cover
.
2. Determine on which side you want to install the stack light.
Note: A stack light can be installed in two locations. When it is installed on the left side, it faces upward. When it is installed on the right side, it faces downward. If
the cover is rotated sideways, the stack light faces left or right.
3. Remove the two M5 screws from the stack light cover, and set them aside.
4. Remove the stack light cover.
5. Position the stack light into the recess, and align the two holes on the vertical-mount base of the stack light to the two holes on the ArmorView Plus 7 terminal.
6. Insert the two M5 screws and tighten them to a torque value of 1.92…2.15 N•m (17…19 lb•in).
Note: For instructions on how to wire, program, and operate the stack light, see the following publications:
• Bulletin 854J Control Tower Instruction Sheet (included with the product).
• Signaling Specifications Technical Data, publication 855-TD001
7. Install the Access Cover
.
.
8. For additional configurations that you can make to the ArmorView Plus 7 terminal, see the other procedures that are listed in Configure the ArmorView Plus 7
Terminal.
Rockwell Automation Publication 2711P-IN013B-EN-P - February 2021 21
Page 22

ArmorView Plus 7 Installation Instructions
Recesses for attaching the handle are on three
sides of the terminal.
For proper installation, the
handle must face towards the
front of the terminal.
SD Slot
Viewed inside the ArmorView Plus 7 Terminal with
the Access Cover Removed
Install the Handle
To install the handle, complete the following steps:
1. Determine in which location you want to install the handle.
Note: You can install up to three handles on the terminal.
2. Place the brackets of the handle in the recesses along the side of the back cover.
Note: As you install each handle, for proper installation, make sure that the handle faces towards the front of the terminal, as shown in the graphic.
3. Align the two holes on the handle with the two holes on the terminal.
4. Insert the two M4 screws and tighten them to a torque value of 1.36…1.58 N•m (12…14 lb•in.).
5. For additional configurations that you can make to the ArmorView Plus 7 terminal, see the other procedures that are listed in Configure the ArmorView Plus 7
Insert an SD Card
To install a Secure Digital (SD) card in the ArmorView Plus 7 terminal, complete the following steps:
1. Remove the Access Cover
2. Reach into the terminal and insert the SD card firmly into the SD slot until you hear a click.
Terminal.
.
3. Install the Access Cover
.
4. For additional configurations that you can make to the ArmorView Plus 7 terminal, see the other procedures that are listed in Configure the ArmorView Plus 7
Terminal.
22 Rockwell Automation Publication 2711P-IN013B-EN-P - February 2021
Page 23

ArmorView Plus 7 Installation Instructions
Viewed inside the ArmorView Plus 7 Terminal with
the Access Cover Removed
USB Ports
Remove an SD Card
To remove an SD card from the ArmorView Plus 7 terminal, complete the following steps:
1. Remove the Access Cover.
2. Reach into the terminal, push the SD card in slightly, and then remove it from the slot.
3. Install the Access Cover
4. For additional configurations that you can make to the ArmorView Plus 7 terminal, see the other procedures that are listed in Configure the ArmorView Plus 7
Terminal.
.
Insert a USB Drive
To insert a USB drive in the ArmorView Plus 7 terminal, complete the following steps:
1. Remove the Access Cover
.
2. Reach into the terminal and insert the USB drive firmly into the USB slot.
3. Install the Access Cover
4. For additional configurations that you can make to the ArmorView Plus 7 terminal, see the other procedures that are listed in Configure the ArmorView Plus 7
Terminal.
Remove a USB Drive
To remove a USB drive from the ArmorView Plus 7 terminal, complete the following steps:
1. Remove the Access Cover
2. Reach into the terminal and pull the USB drive from the slot.
3. Install the Access Cover
4. For additional configurations that you can make to the ArmorView Plus 7 terminal, see the other procedures that are listed in Configure the ArmorView Plus 7
Terminal.
.
.
.
Replace the Battery in the ArmorView Plus 7 Terminal
For instructions on how to replace the battery in the ArmorView Plus 7 terminal, see the Battery Replacement Installation Instructions, publication 2711P-IN009.
Rockwell Automation Publication 2711P-IN013B-EN-P - February 2021 23
Page 24

ArmorView Plus 7 Installation Instructions
Arm Mount System
Arm Mount Coupling
Arm Mount Adapter
Pedestal Mount Coupling
Pedestal Mount
Mount the ArmorView Plus 7 Terminal
When you purchase an ArmorView Plus 7 terminal, your unit is delivered with all of its components installed and all factory wiring completed. There is minimal installation or
wiring that you need to do. If the terminal is oriented the way that you want it to be, the only actions that you need to complete are to mount the ArmorView Plus 7 terminal,
wire the terminal, and program the terminal. For instructions on how to mount the terminal, see:
• Mount the ArmorView Plus 7 Terminal to an Arm Mount System or Pedestal
• Mount the ArmorView Plus 7 Terminal on a VESA Bracket
If you need to change the orientation of the terminal before you mount it, see Rotate the Back Cover.
Mount the ArmorView Plus 7 Terminal to an Arm Mount System or Pedestal
To mount the ArmorView Plus 7 terminal to an arm mount system or pedestal, complete the following steps:
1. Install the arm mount system or pedestal, according to the instructions supplied by the manufacturer, in the desired location in your work area.
2. Align the four holes on the arm mount adapter with the four holes on the arm mount coupling or pedestal mount coupling.
Note: For dimensions and recommended arm mount systems, see Product Environmental Ingress Ratings
.
3. Insert the four screws and tighten them according to the instructions provided by the manufacturer of the arm mount system or pedestal.
4. For instructions on how to wire the terminal, see Wire the ArmorView Plus 7 Terminal
.
24 Rockwell Automation Publication 2711P-IN013B-EN-P - February 2021
Page 25

ArmorView Plus 7 Installation Instructions
Mount the ArmorView Plus 7 Terminal on a VESA Bracket
Note: If you install the ArmorView Plus 7 terminal on a VESA bracket, you must install the I/O plate in place of the arm mount adapter. For further instructions, see Install the
I/O Plate.
To mount the ArmorView Plus 7 terminal on a VESA bracket, complete the following steps:
1. Install the VESA bracket, according to the instructions supplied by the VESA bracket manufacturer, in the desired location in your work area.
2. Align the four threaded holes on the VESA access cover to the four openings on the VESA bracket.
3. Insert the four screws and tighten them according to the instructions provided by the manufacturer of the VESA bracket, but not to exceed the Rockwell Automation
recommended torque value of 1.36…1.58 N•m (12…14 lb•in), or a penetration depth of 10 mm (.39 in.).
.
4. For instructions on how to wire the terminal, see Wire the ArmorView Plus 7 Terminal.
Unmount the ArmorView Plus 7 Terminal from the Arm Mount System or Pedestal Mount
To unmount the ArmorView Plus 7 terminal from the arm mount system or pedestal, complete the following steps:
1. Remove the Access Cover
2. Disconnect the cables that are attached to the terminal:
•Power
• Ethernet (2)
•E-stop
•Ground
3. Support the terminal and remove the four screws that attach the arm mount adapter to the arm mount system or pedestal mount.
4. Carefully pull the cables from the arm mount system or pedestal as you move the terminal away.
5. For additional configurations that you can make to the ArmorView Plus 7 terminal, see the other procedures that are listed in Configure the ArmorView Plus 7
Terminal.
.
Unmount the ArmorView Plus 7 Terminal from the VESA Bracket
To unmount the ArmorView Plus 7 terminal from the VESA bracket, complete the following steps:
1. Disconnect the cables that are attached to the I/O plate:
•Power
• Ethernet (2)
•E-stop
•Ground
2. Support the terminal and remove the four screws that pass from the VESA bracket into the VESA access cover.
3. For additional configurations that you can make to the ArmorView Plus 7 terminal, see the other procedures that are listed in Configure the ArmorView Plus 7
Terminal.
Rockwell Automation Publication 2711P-IN013B-EN-P - February 2021 25
Page 26

ArmorView Plus 7 Installation Instructions
Wire the ArmorView Plus 7 Terminal
The following sections describe how to wire the ArmorView Plus 7 terminal. The procedures are different based on whether you use an arm mount system or a VESA mount.
The ArmorView Plus 7 terminal has these power ratings:
• 24V DC nominal (18…30V DC)
• 37 W maximum (1.5 A at 24V DC)
ATTENTION: The power supply is internally protected against reverse polarity. To avoid damage to the terminal:
- Do not connect DC+ or DC- to the earth ground terminal.
- Do not connect AC power, or more than 30V DC, to the power terminal block.
The terminals support operation from a safety extra low voltage (SELV) or protective extra-low voltage (PELV) 24V DC power supply. Supported power supplies include
catalog numbers 1606-XLP95E, 1606-XLP100E, or 2711P-RSACDIN.
ATTENTION: Use a SELV or PELV supply as required by local wiring codes for your installation. The SELV and PELV power sources provide
protection so that under normal and single fault conditions, the voltage between conductors and earth ground does not exceed a safe value.
You can power the terminal from the same power source as other equipment by using a DC power bus. Wire power to the terminal according to local and agency guidelines
and requirements. Select a wire with consideration to required voltage, current, and temperature. The internal operating temperatures of the ArmorView Plus 7 terminal can
reach 74 °C (165.2 °F) under heavy use and maximum ambient temperature.
ArmorView Plus 7 Terminal with an Arm Mount System
To wire the ArmorView Plus 7 terminal, you need to connect to DC power, ground, and a network. In addition, depending on the configuration of your terminal, you may also
need to connect to an E-stop button.
Connect to DC Power
Before you connect to DC power, consider the following guidelines:
• For catalog configurations without an internal ten-position terminal block (for example, 2711P-T12W22D9P-BM001), connect power and ground directly to the
PanelView Plus 7 module according to instructions in the PanelView Plus 7 Performance Terminals User Manual, publication 2711P-UM008
• For catalog configurations that include an internal ten-position terminal block, connect power using the parameters that are shown in Table 4
Table 4 - Wire Specifications for Ten-position Terminal Block
Wire Type Wire Size Strip Length
Stranded or solid
Cu 90 °C (194 °F)
To connect the terminal to a DC power source, complete the following steps:
1. Verify that the wiring is not connected to a power source.
2. Strip 5 mm (0.20 in.) of insulation from the ends of the wire.
3. Secure the DC power wires to the marked terminals (+24 and -24) on the ten-position terminal block.
4. Secure an earth ground wire to the terminal marked on the internal terminal block.
The GND terminal must be connected to a low-impedance earth ground.
2.1…0.64 mm
(12…22 AWG)
5 mm (0.20 in.)
Mounting
Torque
0.56 N•m
(4.96 lb•in)
.
.
ATTENTION: The earth ground connection to ground is mandatory. This connection is required for noise immunity, reliability, and
Electromagnetic Compliance (EMC) with the European Union (EU) EMC Directive for CE marking conformance.
26 Rockwell Automation Publication 2711P-IN013B-EN-P - February 2021
Page 27

ArmorView Plus 7 Installation Instructions
Ter m in a l 4
Ter m in a l 2
Ter m in a l 1
Ter m in a l 3
Ter m in a l 5
Black
White
Brown
Blue
Gray
In n+1
In n (no test pulse)
24V DC Power
-24V (Common)
Tes t s o ur ce n+ 1
End E-Stop
On-machine I/O
Non-SensaGuard
Factory Wiring
10-pin
Ter m in a l
Block
Connect to a Network
The ArmorView Plus 7 terminal has two available Ethernet ports. The Ethernet network can be configured in linear, star, or Device Level Ring (DLR) topologies.
• For ArmorView Plus 7 configurations without an Ethernet I/O module, connect one or two RJ45 cables to the PanelView Plus 7 Performance module.
• For ArmorView Plus 7 configurations with an Ethernet I/O module, there is an Ethernet cable that connects the PanelView module to the Ethernet I/O module.
• For star or linear topologies, connect one RJ45 Ethernet cable to the PanelView module or one M12 Ethernet cable to the Ethernet I/O module.
• For DLR or star topologies, connect one RJ45 Ethernet cable to the PanelView module and one M12 Ethernet cable to the Ethernet I/O module.
For recommended Ethernet cables and media solutions, see the Industrial Ethernet Media Brochure, publication 1585-BR001
.
For additional information about Ethernet usage, performance, and configuration on each device, refer to their respective individual publications.
Connect to an E-stop Button
The pin numbers of this diagram are shown on the ten-position terminal block in the ArmorView Plus 7 terminal. Make connections that are appropriate to your application.
Note: If you are installing this E-stop button into a system, the wiring is equivalent to the 800F-1YMD51 on-machine I/O non SensaGuard E-stop button. For more information,
see the 800F Enclosed E-Stop Stations Product Information, publication 800F-PP006.
ArmorView Plus 7 Terminal with a VESA Mount
To wire the ArmorView Plus 7 terminal, you need to connect to DC power, ground, and a network. In addition, depending on the configuration of your terminal, you may also
need to connect to an E-stop button.
Connect to DC Power
To connect the terminal to a DC power source, complete the following steps:
1. Connect +24V to pin 2 of the power connector.
2. Connect -24V to pin 3 of the power connector.
Male Connector (Power Input) Pin Signal
1 Not Connected
2+24V DC
3 -24V DC (DC Common)
4 Not Connected
Note: Pins 1 and 4 are used for switched/Aux power in other on-machine products. However, they are not connected in the ArmorView Plus 7 products.
The following cables are recommended for this connection:
889N-F4AFxx-xx 16 AWG PVC
889N-F4AExx-xx 18 AWG PVC
889N-F4HFxx-xx 16 AWG TPE, high flex
889N-F4HJxx-xx 18 AWG TPE, high flex
Rockwell Automation Publication 2711P-IN013B-EN-P - February 2021 27
Page 28

ArmorView Plus 7 Installation Instructions
Cordsets with Flying Leads (per SAE-J-1738A) Armor ControlLogix Controller (per EN 50044)
Female FemaleMale Male
2-White [V-]
2-Green [V+]
4-Green [V+]
3- White [V-]
Grounding Connection
Power can easily be daisy-chained from ArmorStart®, Armor ControlLogix, Armor™ GuardLogix® or On-Machine™ I/O products. For more information on this, see the Armor
ControlLogix Controllers Installation Instructions, publication 1756-IN061.
IMPORTANT
On Machine end devices, such as the ArmorView Plus 7 terminal, use the EN-50044 wiring standard while On-Machine cordsets with
flying leads use the SAE-J-1738A standard for wiring. Use care to follow the pin numbering convention that is shown below before
powering up the unit.
Connect to Ground
Connect a factory ground wire to the ground location on the I/O plate by using a ring-terminated 14 AWG wire (or larger) and one of the supplied M4 screws.
For information on best grounding practices, see publication 1770-
IMPORTANT
Avoid ground loops. The USB host ports have a chassis-grounded shield. Do not connect to devices (e.g. printers) which utilize a separate
ground.
IN041.
Connect to a Network
Connect one of the following recommended cables to the Ethernet port or ports:
1585D-M4xxxx-xx (straight, male)
1585D-E4xxxx-xx (right angle, male)
Note: Cables may be shielded or unshielded.
28 Rockwell Automation Publication 2711P-IN013B-EN-P - February 2021
Page 29

Connect to an E-Stop Button
Te rm i na l 4
Te rm i na l 2
Te rm i na l 1
Te rm i na l 3
Te rm i na l 5
Black
White
Brown
Blue
Gray
Black
White
Brown
Blue
Gray
In n+1
In n (no test pulse)
24V DC Power
-24V (Common)
Tes t s o ur ce n +1
Pin 4
Pin 2
Pin 1
Pin 3
Pin 5
Male Pinout
Face View
Factory Wiring
10-pin
Te rm i na l
Block
Install the I/O plate
(For more information, see Install the I/O Plate)
The E-stop connector pinout on the I/O plate is shown below.
Connect one of the following recommended cables to the E-stop button:
ArmorView Plus 7 Installation Instructions
889D-F5ACDM-xx 22 AWG PVC, straight
889D-R5ACDM-xx 22 AWG PVC, right angle
889D-F5UCDM-xx 22 AWG PUR, straight
889D-R5UCDM-xx 22 AWG PUR, right angle
The E-stop button can easily be incorporated into an existing system. It is similar in configuration and function to the 800F-1YMD51 End
E-Stop - OnMachine Enclosed E-Stop product. For more information on this product, see 800F Enclosed E-Stop Stations Product Information, publication 800F-PP006.
Rockwell Automation Publication 2711P-IN013B-EN-P - February 2021 29
Page 30

ArmorView Plus 7 Installation Instructions
Grounding Connection on the Bezel
Grounding Connection on the Bu tton Plate
Grounding Connection Inside the Back Cover
(near the arm mount adapter and I/O plate opening)
Grounding Connection Inside the Arm Mount Adapter
Grounding Connection
Optional–Attach Additional Grounding Wires to the ArmorView Plus 7 Terminal
The ArmorView Plus 7 terminal ships with all necessary internal components grounded together. However, if additional grounding is required (for example. due to the
addition of customizations), several of the components include M4-tapped connection points and additional M4 screws for this purpose. Internal connection points are in
the following locations:
• Inside the arm mount adapter.
• Inside the back cover.
• On the button plate.
• On the bezel.
Note: This connection from the terminal block to the bezel to the RTB is factory-installed for catalog numbers
2711P-T12W22D9P-BM002…2711P-T12W22D9P-BM016.
To attach a ground wire, complete the following steps:
1. Disassemble the ArmorView Plus 7 terminal to make the desired grounding connections accessible.
2. Use ring-terminated ground wires and the supplied M4 screws to connect the desired grounding points.
3. Reassemble the ArmorView Plus 7 terminal.
30 Rockwell Automation Publication 2711P-IN013B-EN-P - February 2021
Page 31

Program the ArmorView Plus 7 Terminal
ArmorView Plus 7 Installation Instructions
IMPORTANT
For programming purposes, the AVP7 terminal consists of two distinct devices: the PanelView Plus 7 Performance module (2711P-T12W22D9P), and the Ethernet I/O module
(1732E-8CFGM8R).
For instructions on how to configure, program, and operate the PanelView Plus 7 Performance module, see the PanelView Plus 7 Performance Terminals User Manual,
publication 2711P-UM008
For instructions on how to configure the button plate networking parameters, see the 1732E ArmorBlock® EtherNet/IP dual-port 8-Point Sequence of Events Input and
Scheduled Output Modules, publication 1732E-UM003
Before you turn on the ArmorView Plus 7 terminal for the first time, check the following items:
• Have all installation procedures been observed?
• Have the permissible environmental conditions been considered for the device?
• Is the power supply connected correctly?
• Are the ground cables connected correctly to the ground connections?
.
. After configuration, the Ethernet I/O module can be used by your Logix 5000 controller.
Maintain the ArmorView Plus 7 Terminal
The ArmorView Plus 7 terminal is designed with low-maintenance requirements. However, to maintain optimal performance, it is important that you clean the terminal
regularly, especially at the following points:
• Before you install the terminal
• When you notice any residue build-up on the terminal
• According to the general cleaning schedule that is used in your plant
To clean the terminal, complete the following steps:
1. Turn off the power supply to the terminal before you begin.
Note: Leaving the power on could allow the touch screen to be inadvertently activated by the cleaning process.
2. Use a clean sponge or soft cloth with mild soap or detergent.
3. Apply the cleaning agent to the cloth, not to the terminal.
4. Clean the device by using a gentle, circular motion.
5. Dry the display with a chamois or moist cellulose sponge.
ATTENTION: Do not use abrasive cleaners or solvents, because they can damage the display. Do not scrub or use brushes.
Do not apply cleaning solution directly on the terminal screen. The solution can drip or seep onto the gasket. Apply cleaning solution to a clean
sponge or soft cloth, and gently wipe the screen to remove the dirt and grime.
Equipment Wash Downs
ATTENTION: Do not use a high-pressure washer for cleaning the front bezel of the terminal. A high-pressure washer can damage the
terminal.
Do not use a high-pressure washer for cleaning vented enclosures. Water can enter the enclosure and damage the terminal and other
equipment.
Remove power from the terminal before performing any wash downs. It is possible for screen objects to activate during equipment wash
downs if the terminal is powered on.
Resistance to Chemicals
The outer surfaces of the terminal including the bezel, touch screen overlay, and panel gasket seal are tested for chemical resistance. Some of the chemicals can cause
discoloration, but they do not interfere with the operation of the terminal.
IMPORTANT
For more information on chemical resistance of the product, go to https://rockwellautomation.custhelp.com and search the Knowledgebase
for keywords ‘Chemical Resistance PanelView Plus’.
Do not operate the terminal in direct sunlight. Direct exposure to ultraviolet light can discolor the touch screen.
Rockwell Automation Publication 2711P-IN013B-EN-P - February 2021 31
Page 32

ArmorView Plus 7 Installation Instructions
Outdoor Installation Recommendations
ATTENTION: Failure to follow the recommended installation practices for outdoor use can substantially reduce terminal life and void its
warranty.
When you use an ArmorView Plus 7 terminal outdoors, you must follow the recommendations outlined below to maximize the field life of the front bezel and display:
• Add UV protection and shielding
• Manage terminal temperature
• Consider terminal orientation
Ultraviolet (UV) and infrared radiation can reduce the field life of any electronic terminal. While the materials used in the terminal bezels provide long field life, that life can
be improved by proper installation and by following the suggested guidelines.
UV radiation from the sun causes all plastics to fade or yellow and become brittle over time. Using a sacrificial anti-glare overlay helps protect the front of the terminal from
direct exposure to UV radiation, and by avoiding direct sunlight exposure, this overlay greatly increases its field life. Another recommendation for UV protection is a shield
to shade the terminal from the direct rays of the sun. This also helps reduce the solar heating caused by direct sun exposure. When installing a sun shield that closes over
the display, the temperature between the sun shield and the display cannot exceed the maximum temperature of the display, which is 55 °C (131°F). Adequately ventilate all
sun shields to help prevent excess heat rise on the terminal display.
Use stirring fans or active cooling in high altitude and high ambient temperature locations to keep the internal enclosure temperature below 55 °C (131 °F).
Make sure that the ambient temperature the product is operating in does not fall below its minimum rated 0°C (32°F).
The temperature differential between the inside of the ArmorView Plus 7 enclosure and the front panel must be minimized to reduce the potential for condensation and
possible pressure variation between the inside and outside of the product.
Avoid orienting the LCD on the south (north in the southern hemisphere) or west side of the installation. This reduces the heat rise due to solar heating during the hottest
part of the day.
Mount the terminal vertically to minimize solar heating on the display. Do not mount the terminal in a sloped orientation if it exposes the terminal to direct sunlight.
Protect the terminal from water and dust by properly mounting as described above. The terminals meet specified NEMA, UL Type, and IEC ratings only when properly
mounted to a arm mount system (or equivalent) with the equivalent rating. Other sections of this publication may contain additional information regarding specific
enclosure type ratings that are required to comply with certain product safety certifications.
Dispose of the ArmorView Plus 7 Terminal
At the end of its life, this equipment must be collected separately from any unsorted municipal waste.
32 Rockwell Automation Publication 2711P-IN013B-EN-P - February 2021
Page 33

ArmorView Plus 7 Installation Instructions
Specifications
The table in this section provides technical specifications for the ArmorView Plus 7 terminals.
12.1 inch ArmorView Plus 7 Terminals
Attribute 2711P-T12W22D9P-BM001…2711P-T12W22D9P-BM002 2711P-T12W22D9P-BM003…2711P-T12W22D9P-BM016
Operator input Touch screen
Display type TFT Color
Display size, diagonal 12.1-in. wide screen
Viewing area (W x H) 261 x 163 mm (10.3 x 6.4 in.)
Display resolution 1280 x 800 WXGA, 18-bit color graphics
Aspect ratio 16:10
Brightness, typical
Backlight life
2
(Nits)
300 cd/m
White light-emitting diode, solid state
Life: 50,000 h min at 40 °C (104 °F) to half-brightness, backlight is not replaceable
Analog resistive
Touch screen
Actuation rating: 1 million presses
Operating force: 100 grams
E-stop —
Push buttons —
Selector switches —
Accuracy: +/-2 minutes per month.
Battery (real-time clock backup)
Memory:
System
User
Battery life: 4 years min at 25 °C (77 °F)
Replacement: CR2032 lithium coin cell
512 MB RAM and 512 MB storage
80 MB, approx, nonvolatile storage for applications
Secure Digital (SD) card slot One SD card slot for external storage; supports cat. no. 1784-SDx and 1784-SDHCx cards
USB ports:
Host
Device
Two USB high-speed 2.0 host ports (type A) support removable flash drives for external storage
One high-speed 2.0 device port (type B) that will be functional in a future release
Windows CE with Extended Features and MS Office Viewers (includes FTP, VNC client server, ActiveX controls, PDF
Operating system
Ethernet ports
reader,
third-party device support)
Four 10/100 Base-T, Auto MDI/MDI-X Ethernet ports that support Device Level Ring (DLR), linear, or star network
topologies
Software FactoryTalk View Studio for Machine Edition, FactoryTalk ViewPoint, version 2.6 or later
(1)
Electrical
Input voltage
Power consumption
Power supply
Mechanical
Weight, approx (with arm
adapter)
24V DC nom
(18…30V DC)
37 W max
(1.54 A at 24V DC)
Supports (SELV) and (PELV) 24V DC supplies
7.41 kg (16.34 lb)
(2)
Weight, approx (with VESA Kit) 8.19 kg (18.06 lb)
Dimensions with arm adapter,
approx (H x W x D)
Dimensions with I/O plate,
approx (H x W x D)
(1) Reverse polarity will cause the unit not to work, but it will not permanently damage it. AC or DC overvoltage can permanently damage the unit.
(2) DC-powered terminals support safety extra low voltage (SELV) and protective extra low voltage (PELV) 24V DC power supplies such as cat. nos. 1606-XLP95E, 1606-XLP100E,
2711P-RSACDIN.
381.6 x 345 x 166.6 mm
15.02 x 13.58 x 6.56 in.
345 x 345 x 166.6 mm
13.58 x 13.58 x 6.56 in.
Touch screen and push button, selector switches, or
key switches
Illuminated twist-to-release
300,000 cycles
Momentary push buttons
10,000,000 cycles
Two-position selector, three-position selector,
three-position key selector
1,000,000 cycles
Rockwell Automation Publication 2711P-IN013B-EN-P - February 2021 33
Page 34

ArmorView Plus 7 Installation Instructions
Environmental Specifications
This table lists environmental specifications for the 12.1 inch ArmorView Plus 7 terminals.
Attribute
Temperature, operating
12.1 inch ArmorView Plus 7 Terminal
2711P-T12W22D9P-BM001 and 2711P-T12W22D9P-BM002
0…50 °C (32…122 °F) ambient
(1)
12.1 inch ArmorView Plus 7 Terminal
2711P-T12W22D9P-BM003…2711P-T12W22D9P-BM016
Temperature, non operating -25…+70 °C (-13…+158 °F)
Heat dissipation
Typical BTU measurements were taken at 25 °C (77 °F):
12.1-in. DC, 60 BTU (typical)
Altitude, operating 2000 m (6562 ft)
Relative humidity
Vibration
Shock, operating
Shock, non operating
Enclosure ratings
(1) The optional VESA accessory kit (1/0 plate) is rated to 45 °C (113 °F).
(2) To avoid internal condensation, consider using a desiccant. In a sealed unit such as the VESA configuration, use at least 3 g of clay or equivalent.
(3) When the VESA mount is used.
(4) When the arm mount adapter is used.
(5) Without buttons, the 2711P-T12W22D9P-BM001 and 2711P-T12W22D9P-BM002 are rated NEMA and UL Type 4X. Customer-installed buttons can be selected to preserve this rating.
5…95% without condensation
0.012 pk-pk, 10…57 Hz
2 g peak at 57…500 Hz
15 g at 11 ms
5 g at 11 ms
30 g at 11 ms
5 g at 11 ms
(3)
(4)
(3)
(4)
NEMA and UL Type 12, 13, 4X (with properly rated buttons)
and IP66 as classified by UL
(2)
(5)
NEMA and UL Type 12, 13, 4, also rated IP66 as classified by UL
Additional Resources
These documents contain additional information concerning related products from Rockwell Automation.
Resource Description
PanelView Plus 7 Performance Terminals User
Manual, publication 2711P-UM008
Battery Replacement Installation Instructions,
publication 2711P-IN009
1732E ArmorBlock Dual Port EtherNet/IP 8-Point
Digital Modules Installation Instructions,
publication 1732E-IN007
1732E ArmorBlock EtherNet/IP Dual Port 8-Point
Sequence of Events Input and Scheduled Output
Modules User Manual, publication 1732E-UM003
Bulletin 854J Control Tower Installation
Instructions, publication 854J-IN001
Rittal website,
https://www.rittal.com
Hoffman website,
https://hoffman.nvent.com
Industrial Automation Wiring and Grounding
Guidelines, publication 1770-4.1
Product Certifications website,
http://www.rockwellautomation.com/global/
certification/overview.page
Provides instructions on how to install, configure,
and operate the PanelView Plus 7 Performance
terminals.
Provides instructions on how to replace the
battery in the ArmorView Plus 7 terminal.
Provides instructions on how to install and
configure the 1732E ArmorBlock dual-port
Ethernet/IP module.
Provides instructions on how to install, wire,
troubleshoot, and use the 1732E ArmorBlock dualport Ethernet/IP module.
Provides instructions on how to install the Bulletin
854J stack lights.
Provides information about the Rittal arm mount
system.
Provides information about the Hoffman Syspend
180 arm mount system.
Provides general guidelines for installing a
Rockwell Automation industrial system.
Provides declarations of conformity, certificates,
and other certification details.
You can view or download publications at http://www.rockwellautomation.com/global/literature-library/overview.page
34 Rockwell Automation Publication 2711P-IN013B-EN-P - February 2021
.
Page 35

Notes:
ArmorView Plus 7 Installation Instructions
Rockwell Automation Publication 2711P-IN013B-EN-P - February 2021 35
Page 36

Rockwell Automation Support
Use these resources to access support information.
Technical Support Center Find help with how-to videos, FAQs, chat, user forums, and product notification updates. rok.auto/support
Knowledgebase Access Knowledgebase articles. rok.auto/knowledgebase
Local Technical Support Phone Numbers Locate the telephone number for your country. rok.auto/phonesupport
Literature Library Find installation instructions, manuals, brochures, and technical data publications. rok.auto/literature
Product Compatibility and Download Center
(PCDC)
Download firmware, associated files (such as AOP, EDS, and DTM), and access product
release notes.
rok.auto/pcdc
Documentation Feedback
Your comments help us serve your documentation needs better. If you have any suggestions on how to improve our content, complete the form at rok.auto/docfeedback.
Waste Electrical and Electronic Equipment (WEEE)
At the end of life, this equipment should be collected separately from any unsorted municipal waste.
Rockwell Automation maintains current product environmental compliance information on its website at rok.auto/pec.
Your comments help us serve your documentation needs better. If you have any suggestions on how to improve our content, complete the form at rok.auto/docfeedback.
For technical support, visit rok.auto/support.
Rockwell Otomasyon Ticaret A.Ş. Kar Plaza İş Merkezi E Blok Kat:6 34752 İçerenköy, İstanbul, Tel: +90 (216) 5698400 EEE Yönetmeliğine Uygundur
Allen-Bradley, ArmorBlock, Armor GuardLogix, ArmorStart, ArmorView, expanding human possibility, FactoryTalk, OnMachine, PanelView, Pico, Rockwell Automation,
and Studio 5000 Logix Designer are trademarks of Rockwell Automation, Inc.
EtherNet/IP is a trademark of ODVA, Inc.
SD and SDHC are trademarks of SD-3C LLC.
Trademarks not belonging to Rockwell Automation are property of their respective companies.
Publication 2711P-IN013B-EN-P - February 2021 | Supersedes Publication 2711P-IN013A-EN-P-March 2019
Copyright © 2021 Rockwell Automation, Inc. All rights reserved. Printed in the U.S.A.
 Loading...