

Page 1

User Manual
Virtual Image Templates
Catalog Numbers 9528-PAXVTENE, 9528-APPOWSENE, 9528-APPHISTENE
System Release 3.0
Page 2
Important User Information
IMPORTANT
Read this document and the documents listed in the additional resources section about installation, configuration, and
operation of this equipment before you install, configure, operate, or maintain this product. Users are required to
familiarize themselves with installation and wiring instructions in addition to requirements of all applicable codes, laws,
and standards.
Activities including installation, adjustments, putting into service, use, assembly, disassembly, and maintenance are required
to be carried out by suitably trained personnel in accordance with applicable code of practice.
If this equipment is used in a manner not specified by the manufacturer, the protection provided by the equipment may be
impaired.
In no event will Rockwell Automation, Inc. be responsible or liable for indirect or consequential damages resulting from the
use or application of this equipment.
The examples and diagrams in this manual are included solely for illustrative purposes. Because of the many variables and
requirements associated with any particular installation, Rockwell Automation, Inc. cannot assume responsibility or
liability for actual use based on the examples and diagrams.
No patent liability is assumed by Rockwell Automation, Inc. with respect to use of information, circuits, equipment, or
software described in this manual.
Reproduction of the contents of this manual, in whole or in part, without written permission of Rockwell Automation,
Inc., is prohibited.
Throughout this manual, when necessary, we use notes to make you aware of safety considerations.
WARNING: Identifies information about practices or circumstances that can cause an explosion in a hazardous environment,
which may lead to personal injury or death, property damage, or economic loss.
ATTENTION: Identifies information about practices or circumstances that can lead to personal injury or death, property
damage, or economic loss. Attentions help you identify a hazard, avoid a hazard, and recognize the consequence.
Identifies information that is critical for successful application and understanding of the product.
Labels may also be on or inside the equipment to provide specific precautions.
SHOCK HAZARD: Labels may be on or inside the equipment, for example, a drive or motor, to alert people that dangerous
voltage may be present.
BURN HAZARD: Labels may be on or inside the equipment, for example, a drive or motor, to alert people that surfaces may
reach dangerous temperatures.
ARC FLASH HAZARD: Labels may be on or inside the equipment, for example, a motor control center, to alert people to
potential Arc Flash. Arc Flash will cause severe injury or death. Wear proper Personal Protective Equipment (PPE). Follow ALL
Regulatory requirements for safe work practices and for Personal Protective Equipment (PPE).
Allen-Bradley, Rockwell Software, Rockwell Automation, TechConnect, PlantPAx, FactoryTalk, RSLinx, RSLogi x, RSNetworx, and ControlFLASH are trad emarks of Rockwell Automation, Inc.
Trademarks not belonging to Rockwell Automation are property of their respective companies.
Page 3

Summary of Changes
This manual contains new and updated information. Changes throughout this
revision are marked by change bars, as shown to the right of this paragraph.
New and Updated Information
This table contains the changes made to this revision.
Top ic Pag e
Application Server OWS (AppServ-OWS) and Application Server Historian
(AppServ-Hist) added to the list of virtual image templates.
Added AppServ-OWS and AppServ-Hist to Virtual Templates figure. 7
Added Application Server to list of templates that require Microsoft Volume
License keys.
Made the following changes to the Catalog Numbers table:
• Modified 9528-OWSLICENE to include AppServ-OWS.
• Added 9528-APPOWSENE.
• Added 9528-APPHISTENE.
Added Application Server OWS and Application Server Historian to System and
Software Requirements table.
Added the following to the Additional Resources table:
• FactoryTalk Historian SE Installation and Configuration Guide
• Knowledgebase Answer ID 567658 - Using FactoryTalk View SE with Windows
2008 R2 Remote Desktop Services - Getting Started Whitepaper
Chapter 1:
Added ‘AppServ-OWS’ and 'AppServ-Hist' to the list of virtual image templates.
Added cross-references to Chapters 4 and 5.
Chapter 2:
Added 'Before You Begin' section.
Minor changes to 'Rename the Computer for Your Location' steps.
Changed heading title and steps.
Chapter 3:
Added 'Before You Begin' section.
Modified steps 5…7 in 'Rename the Computer for Your Location'.
Chapter 4: New chapter. 65
Chapter 5: New chapter. 85
7
8
9
9
11
13
29
32
42
43
54
58
Rockwell Automation Publication 9528-UM001C-EN-P - March 2014 3
Page 4

Summary of Changes
Notes:
4 Rockwell Automation Publication 9528-UM001C-EN-P - March 2014
Page 5

Table of Contents
Preface
Configure the Virtual Image
Templates
Configure the Process Automation
System Server (PASS)
Before You Begin . . . . . . . . . . . . . . . . . . . . . . . . . . . . . . . . . . . . . . . . . . . . . . . . . . 8
Microsoft Software Licensing. . . . . . . . . . . . . . . . . . . . . . . . . . . . . . . . . . . . 8
Catalog Numbers . . . . . . . . . . . . . . . . . . . . . . . . . . . . . . . . . . . . . . . . . . . . . . . . . . 9
Build Details. . . . . . . . . . . . . . . . . . . . . . . . . . . . . . . . . . . . . . . . . . . . . . . . . . . . . . . 9
Additional Resources . . . . . . . . . . . . . . . . . . . . . . . . . . . . . . . . . . . . . . . . . . . . . 11
Chapter 1
Deploy a Virtual Image Template for the First Time . . . . . . . . . . . . . . . . 13
Create a Template on Datacenter for Future Deployments . . . . . . . . . . 20
Deploy Additional Virtual Machines from Datacenter . . . . . . . . . . . . . . 25
Chapter 2
Before You Begin . . . . . . . . . . . . . . . . . . . . . . . . . . . . . . . . . . . . . . . . . . . . . . . . 32
Configure Microsoft Windows Server 2008 . . . . . . . . . . . . . . . . . . . . . . . . 32
Create an Administrator User Account . . . . . . . . . . . . . . . . . . . . . . . . 37
Rename the Computer for Your Location . . . . . . . . . . . . . . . . . . . . . . 42
Configure Ethernet Network Adapter Settings . . . . . . . . . . . . . . . . . . . . . 43
Configure the FactoryTalk Directory on the PASS. . . . . . . . . . . . . . . . . . 44
Delete the Old Computer Name. . . . . . . . . . . . . . . . . . . . . . . . . . . . . . . 46
Configure the FactoryTalk Activation Server . . . . . . . . . . . . . . . . . . . . . . . 50
Open Activation Manager . . . . . . . . . . . . . . . . . . . . . . . . . . . . . . . . . . . . 51
Configure the EWS and OWS System
Elements
Configure Application Server OWS
(Microsoft Remote Desktop Services)
Chapter 3
Before You Begin . . . . . . . . . . . . . . . . . . . . . . . . . . . . . . . . . . . . . . . . . . . . . . . . 54
Configure Microsoft Windows 7 Professional . . . . . . . . . . . . . . . . . . . . . . 54
Rename the Computer for Your Location . . . . . . . . . . . . . . . . . . . . . . 58
Configure Ethernet Network Adapter Settings . . . . . . . . . . . . . . . . . . . . . 59
Define the FactoryTalk Directory Location . . . . . . . . . . . . . . . . . . . . . . . . 60
Configure the FactoryTalk Activation Server . . . . . . . . . . . . . . . . . . . . . . . 61
Open Activation Manager . . . . . . . . . . . . . . . . . . . . . . . . . . . . . . . . . . . . 62
Update Activation Search Path . . . . . . . . . . . . . . . . . . . . . . . . . . . . . . . . 62
Chapter 4
Before You Begin . . . . . . . . . . . . . . . . . . . . . . . . . . . . . . . . . . . . . . . . . . . . . . . . 66
Configure Microsoft Windows Server 2008 . . . . . . . . . . . . . . . . . . . . . . . . 66
Create an Administrator User Account . . . . . . . . . . . . . . . . . . . . . . . . 71
Rename the Computer for Your Location . . . . . . . . . . . . . . . . . . . . . . 75
Configure the Ethernet Network Adapter Settings. . . . . . . . . . . . . . . . . . 76
Define the FactoryTalk Directory Location . . . . . . . . . . . . . . . . . . . . . . . . 77
Configure the FactoryTalk Activation Server . . . . . . . . . . . . . . . . . . . . . . . 78
Open Activation Manager . . . . . . . . . . . . . . . . . . . . . . . . . . . . . . . . . . . . 79
Update Activation Search Path . . . . . . . . . . . . . . . . . . . . . . . . . . . . . . . . 79
Configure Remote Desktop Services . . . . . . . . . . . . . . . . . . . . . . . . . . . . . . . 81
Remote Desktop Services with FactoryTalk View SE . . . . . . . . . . . . 82
Rockwell Automation Publication 9528-UM001C-EN-P - March 2014 5
Page 6

Table of Contents
PlantPAx AppServ-OWS Base Configuration . . . . . . . . . . . . . . . . . . 83
Microsoft Remote Desktop Services Licensing . . . . . . . . . . . . . . . . . . . . . . 84
Install Additional Software. . . . . . . . . . . . . . . . . . . . . . . . . . . . . . . . . . . . . . . . 84
Install Special Mode . . . . . . . . . . . . . . . . . . . . . . . . . . . . . . . . . . . . . . . . . . 84
Add Remote Desktop Services Users . . . . . . . . . . . . . . . . . . . . . . . . . . . . . . . 84
Chapter 5
Configure Application Server
Historian
Index
Before You Begin. . . . . . . . . . . . . . . . . . . . . . . . . . . . . . . . . . . . . . . . . . . . . . . . . 86
Configure Microsoft Windows Server 2008 . . . . . . . . . . . . . . . . . . . . . . . . 86
Create an Administrator User Account. . . . . . . . . . . . . . . . . . . . . . . . . 91
Rename the Computer for Your Location . . . . . . . . . . . . . . . . . . . . . . 96
Configure the Ethernet Network Adapter Settings . . . . . . . . . . . . . . . . . . 97
Define the FactoryTalk Directory Location. . . . . . . . . . . . . . . . . . . . . . . . . 98
Configure the FactoryTalk Activation Server . . . . . . . . . . . . . . . . . . . . . . . 99
Open Activation Manager . . . . . . . . . . . . . . . . . . . . . . . . . . . . . . . . . . . . 100
Update Activation Search Path . . . . . . . . . . . . . . . . . . . . . . . . . . . . . . . 100
Rename SQL Server . . . . . . . . . . . . . . . . . . . . . . . . . . . . . . . . . . . . . . . . . . . . . 101
Install Historian Asset Framework (AF). . . . . . . . . . . . . . . . . . . . . . . . . . . 103
Delete Old Computer Name . . . . . . . . . . . . . . . . . . . . . . . . . . . . . . . . . . . . . 110
Synchronize AF Database . . . . . . . . . . . . . . . . . . . . . . . . . . . . . . . . . . . . . . . . 112
Perform Synchronization. . . . . . . . . . . . . . . . . . . . . . . . . . . . . . . . . . . . . 112
Verify Synchronization. . . . . . . . . . . . . . . . . . . . . . . . . . . . . . . . . . . . . . . 113
Complete Historian Configuration . . . . . . . . . . . . . . . . . . . . . . . . . . . . . . . 114
. . . . . . . . . . . . . . . . . . . . . . . . . . . . . . . . . . . . . . . . . . . . . . . . . . . . . . . . . . . . . . . . 115
6 Rockwell Automation Publication 9528-UM001C-EN-P - March 2014
Page 7
Preface
IMPORTANT
This manual describes how to use virtual image templates for setting up virtual
machines. Virtual machines are independent operating environments that use
virtual resources. As the manufacturing industry embraces the virtual
infrastructure, the use of the PlantPAx™ Virtual Image Templates provides
reduced complexity and increased efficiency of system deployment.
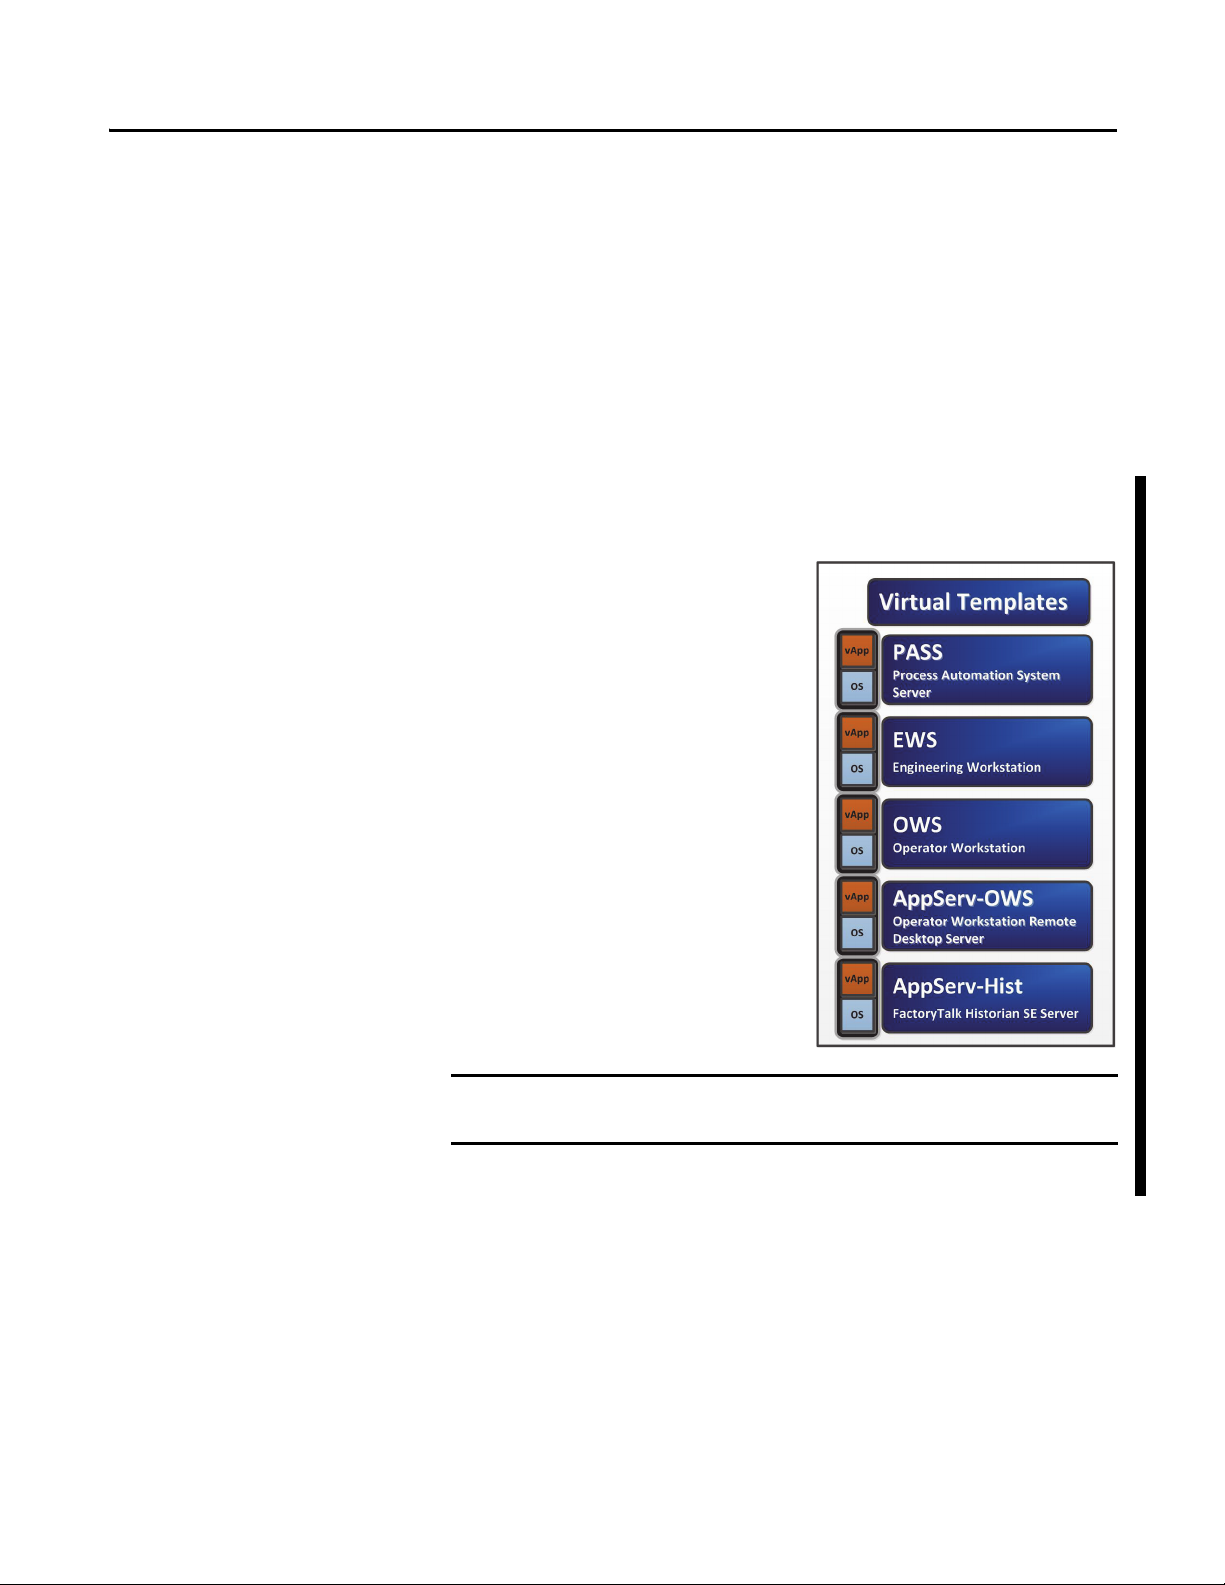
Virtual image templates are provided for the following PlantPAx
system elements:
• Process Automation System Server (PASS)
• Engineering Workstation (EWS)
• Operator Workstation (OWS)
• Application Server OWS (AppServ-OWS)
• Application Server Historian (AppServ-Hist)
The templates are delivered as an Open
Virtual Format (OVF) file, which lets you
use any virtualization platform for
deployment. The guidelines contained in
this manual are for setup and deployment
of the templates in a VMware vSphere
environment.
The OVF templates required for the
corresponding system element are
included and pre-installed, but not
activated (see figure on right). This helps
to minimize the set-up and configuration
time required to deploy the PlantPAx
system in a traditional IT environment. To
activate each system element, you can
purchase a separate activation license.
The images that appear in this document are for example only and can be
different than your vSphere environment.
Rockwell Automation Publication 9528-UM001C-EN-P - March 2014 7
Page 8

Preface
TIP
IMPORTANT
Before You Begin
You need the following items during the setup and configuration of the
virtual templates:
• PlantPAx Virtual Images Templates USB drive to access the template files
• Microsoft Volume License keys:
– PASS template requires a Microsoft Volume License Key for
Windows Server 2008 R2 SP1 operating system
– EWS and OWS workstation templates each require a
Microsoft Volume License for Windows 7 Professional SP1
operating system
– Application Server OWS (AppServ-OWS) template requires a
Microsoft Volume License Key for Windows Server 2008 R2 SP1
operating system
Remote Desktop Services has its own method, separate from licensing
for the Windows Server 2008 R2 family of operating systems, for
licensing clients that log on to Remote Desktop Services servers.
Therefore, AppServ-OWS Remote Desktop Connections must receive a
valid license issued by a Remote Desktop Licensing Server before they
can log on to a Remote Desktop Session Host or Connection Broker.
– Application Server Historian template requires a Microsoft Volume
License Key for Windows Server 2008 R2 SP1 operating system
• VMware vSphere Client software with access to the vCenter server and
appropriate credentials for creating and deploying virtual machines
• FactoryTalk® Activation Certificates that you purchased with the templates
that contain serial numbers and product keys
See Catalog Numbers
• Domain servers must be installed and available if you use a Domain
(recommended).
on page 9.
If you already own individual product activations, these activations
also can be used to activate the virtual image templates.
Microsoft Software Licensing
The PlantPAx templates were designed for use with Microsoft Volume Licensing
only. Each template contains a Full Packaged Product (FPP) license and must be
converted to a Volume License within 90 days. Retail Microsoft licensing is
not supported.
To activate the templates, contact your Microsoft software representative to
convert the FPP license or to obtain a Microsoft Volume License Agreement.
8 Rockwell Automation Publication 9528-UM001C-EN-P - March 2014
Page 9

Preface
Catalog Numbers
Category Cat. No.
Virtual tem plates 9528-PAXVTENE USB device that contains three virtual im age templates (PASS, EWS, and OWS). E ach template contains
Licenses 9528-EWSLICENE Software activation license for the EWS.
(1) English version is listed. Different languages are available by contacting your local Allen-Bradley distributor or Rockwell Automation sales representative.
(1)
9528-APPOWSENE USB device that contains the virtual image template for AppServ-OWS. The template contains a
9528-APPHISTENE USB device that contains the virtual image template for AppServ-Hist. The template contains a
9528-OWSLICENE Software activation license for the OWS and AppServ-OWS.
9528-PASS100ENE 100-display license for the PASS server.
9528-PASS250ENE 250-display license for the PASS server.
9528-PASSUNLENE Unlimited display license for the PASS server.
This table lists the product catalog numbers for activations.
Description
a Microsoft Windows operating system, with all required Rockwell Automation software pre-installed
but not activated. A Microsoft full packaged product license is included.
Microsoft Windows operating system, with all required Rockwell Automation software pre-installed
but not activated. A Microsoft full-packaged product license is included.
IMPORTANT: Each client connecting to AppServ-OWS must have a valid client license.
Microsoft Windows operating system, with all required Rockwell Automation software pre-installed
but not activated. A Microsoft full-packaged product license is included.
IMPORTANT: There are no separate vTemplate Serial Number/Product IDs for licensing Application
Server Historian. You must use individual Historian product licenses.
Build Details
This table lists the system build details for the PlantPAx system virtual
image templates. The virtual image templates are based on VMware Virtual
Hardware, version 7.
Table 1 - System and Software Requirements
Element Category Description
EWS Operating system Windows 7 Professional SP1 operating system, 64-bit
Rockwell Automation software • FactoryTalk View SE Studio and Client software, version 7.00.00
Additional third-party software • Adobe Acrobat Reader software, version 10.01
• Fac toryTa lk Serv ices Platf orm
– FactoryTalk Services Platform software, version 2.60.00
– RSLinx® Classic OEM software, version 2.59.00
– RSLinx Enterprise software, version 5.60.00
• FactoryTalk Activation software, version 3.60.00
• RSLogix™ 5000 Professional software, versions 19.00.00, 20.00.00
– PID Auto Tune software
– All firmware toolkits (no Motion)
– RSNetWorx™ for DeviceNet software
– RSNetWorx for ControlNet software
– RSNetWorx for Ethernet software
– RSLogix Architect software
– ControlF LASH™ software
– RSLogix 5000 Fuzzy Designer software (activated separately)
– RSLogix Emulate 5000 software
• Control Station LOOP-PRO TUNER software, version 1.5.0
(Allen-Bradley edition) (activated separately)
• Microsoft Internet Explorer software, version 8
• VMware tools, version 8.3.7
Rockwell Automation Publication 9528-UM001C-EN-P - March 2014 9
Page 10

Preface
Table 1 - System and Software Requirements
Element Category Description
OWS Operating system Windows 7 Professional SP1 operating system, 64-bit
Rockwell Automation software • FactoryTalk View SE Client software, version 7.00.00
Additional third-party software • Adobe Acrobat Reader software, version 10.01
PASS Operating system Windows 2008 R2 SP1 operating system, 64-bit
Rockwell Automation software • FactoryTalk View SE software, version 7.00.00
Additional third-party software • Adobe Acrobat Reader software, version 10.01
Application Server
OWS
FactoryTalk Historian
Application Server
Operating system Windows 2008 R2 SP1 operating system, 64-bit
Rockwell Automation software • FactoryTalk View SE Client software, version 7.00.00
Additional third-party software • Adobe Acrobat Reader software, version 10.01
Operating system Windows 2008 R2 SP1 operating system, 64-bit
Rockwell Automation software FactoryTalk Historian SE software, version 4.0
Additional third-party software • Adobe Acrobat Reader software, version 10.01
• FactoryTalk Services Platform software, version 2.60.00
• FactoryTalk Activation software, version 3.60.00
• Microsoft Internet Explorer software, version 8
• VMWare tools, version 8.3.7
• FactoryTalk View SE Studio software, version 7.00.00
• Fac toryTa lk Serv ices Platf orm
– FactoryTalk Services Platform software, version 2.60.00
– RSLinx Enterprise software, version 5.60.00
– FactoryTalk Activation software, version 3.60.00
• Alarms and Events server software, version 2.60.00
• Microsoft Internet Explorer software, version 8
• VMware tools, version 8.3.7
• FactoryTalk Services Platform software, version 2.60.00
• FactoryTalk Activation software, version 3.60.00
• Microsoft Internet Explorer software, version 8
• VMware tools, version 8.3.7
• Microsoft Internet Explorer software, version 8
• Microsoft SQL Server 2008 R2 Express
• VMware tools, version 8.3.7
10 Rockwell Automation Publication 9528-UM001C-EN-P - March 2014
Page 11

Preface
Additional Resources
These documents contain additional information concerning related products
from Rockwell Automation.
Resource Description
PlantPAx Process Automation System Reference Manual,
publication PROCES-RM001
PlantPAx Process Automation System Selection Guide,
publication PROCES-SG001
Product Certifications website, http://www.ab.com Provides declarations of conformity, certificates, and
FactoryTalk Historian SE Installation and Configuration
Guide, publication HSE-IN025
Knowledgebase Answer ID 32715 - Cannot add/change pens
in trend from SE client on Terminal Server at
https://rockwellautomation.custhelp.com/app/answers/
detail/a_id/32715
You must have a TechConnect™ license to view this
document.
Knowledgebase Answer ID 496679 - FAQ: FactoryTalk
Historian SE: MDB to AF Preparation Wizard at
https://rockwellautomation.custhelp.com/app/answers/
detail/a_id/496679
You mu st h ave a Te chC onne ct license to view this document.
Knowledgebase Answer ID 567658 - Using FactoryTalk View
SE with Windows 2008 R2 Remote Desktop Services Getting Started Whitepaper at
https://rockwellautomation.custhelp.com/app/answers/
detail/a_id/567658
You mu st h ave a Te chC onne ct license to view this document.
Knowledgebase Answer ID 60585 - FactoryTalk Historian SE
Collective Manager Error - Error Writing Server at
https://rockwellautomation.custhelp.com/app/answers/
detail/a_id/60585
You mu st h ave a Te chC onne ct license to view this document.
Details the application rules for implementing a
PlantPAx system.
Provides procurement information for a
PlantPAx system.
other certification details.
Provides information on how to install, secure,
configure, use, and troubleshoot
FactoryTalk Historian SE.
Provides details on the problem of adding/changing
pens in trend from SE client on Terminal Services.
Provides information on using the FactoryTalk Historian
SE MDB to AF Preparation wizard.
Provides information on using FactoryTalk View SE with
Microsoft Windows 2008 R2 Remote Desktop Services.
Provides information on implementing a collective for
FactoryTalk SE Historian.
You can view or download publications at
http:/www.rockwellautomation.com/literature/
. To order paper copies of
technical documentation, contact your local Allen-Bradley distributor or
Rockwell Automation sales representative.
Rockwell Automation Publication 9528-UM001C-EN-P - March 2014 11
Page 12

Preface
Notes:
12 Rockwell Automation Publication 9528-UM001C-EN-P - March 2014
Page 13
Chapter 1
IMPORTANT
Configure the Virtual Image Templates
Virtualization lets you remove the operating system dependency on computer
hardware and enables you to consolidate workloads by putting multiple virtual
machines on a single piece of hardware. Each virtual machine is dynamically
allocated a share of the hardware resources to function like a physical machine.
The PlantPAx system offers pre-built templates of virtual machines for specific
server and workstation system elements.
You must have VMware vSphere Client software connected to a vCenter server
to deploy a PlantPAx system virtual image template to the ESXi server.
The table outlines the process for creating virtual machines by using the virtual
image templates.
Deploy a Virtual Image Template for the First Time
Top ic Page
Deploy a Virtual Image Template for the First Time 13
Create a Template on Datacenter for Future Deployments 20
Deploy Additional Virtual Machines from Datacenter 25
Complete these steps to import a virtual image template from the USB drive to
the Datacenter for the first time. This procedure must be repeated for each
virtual image template (PASS, EWS, OWS, AppServ-OWS, AppServ-Hist).
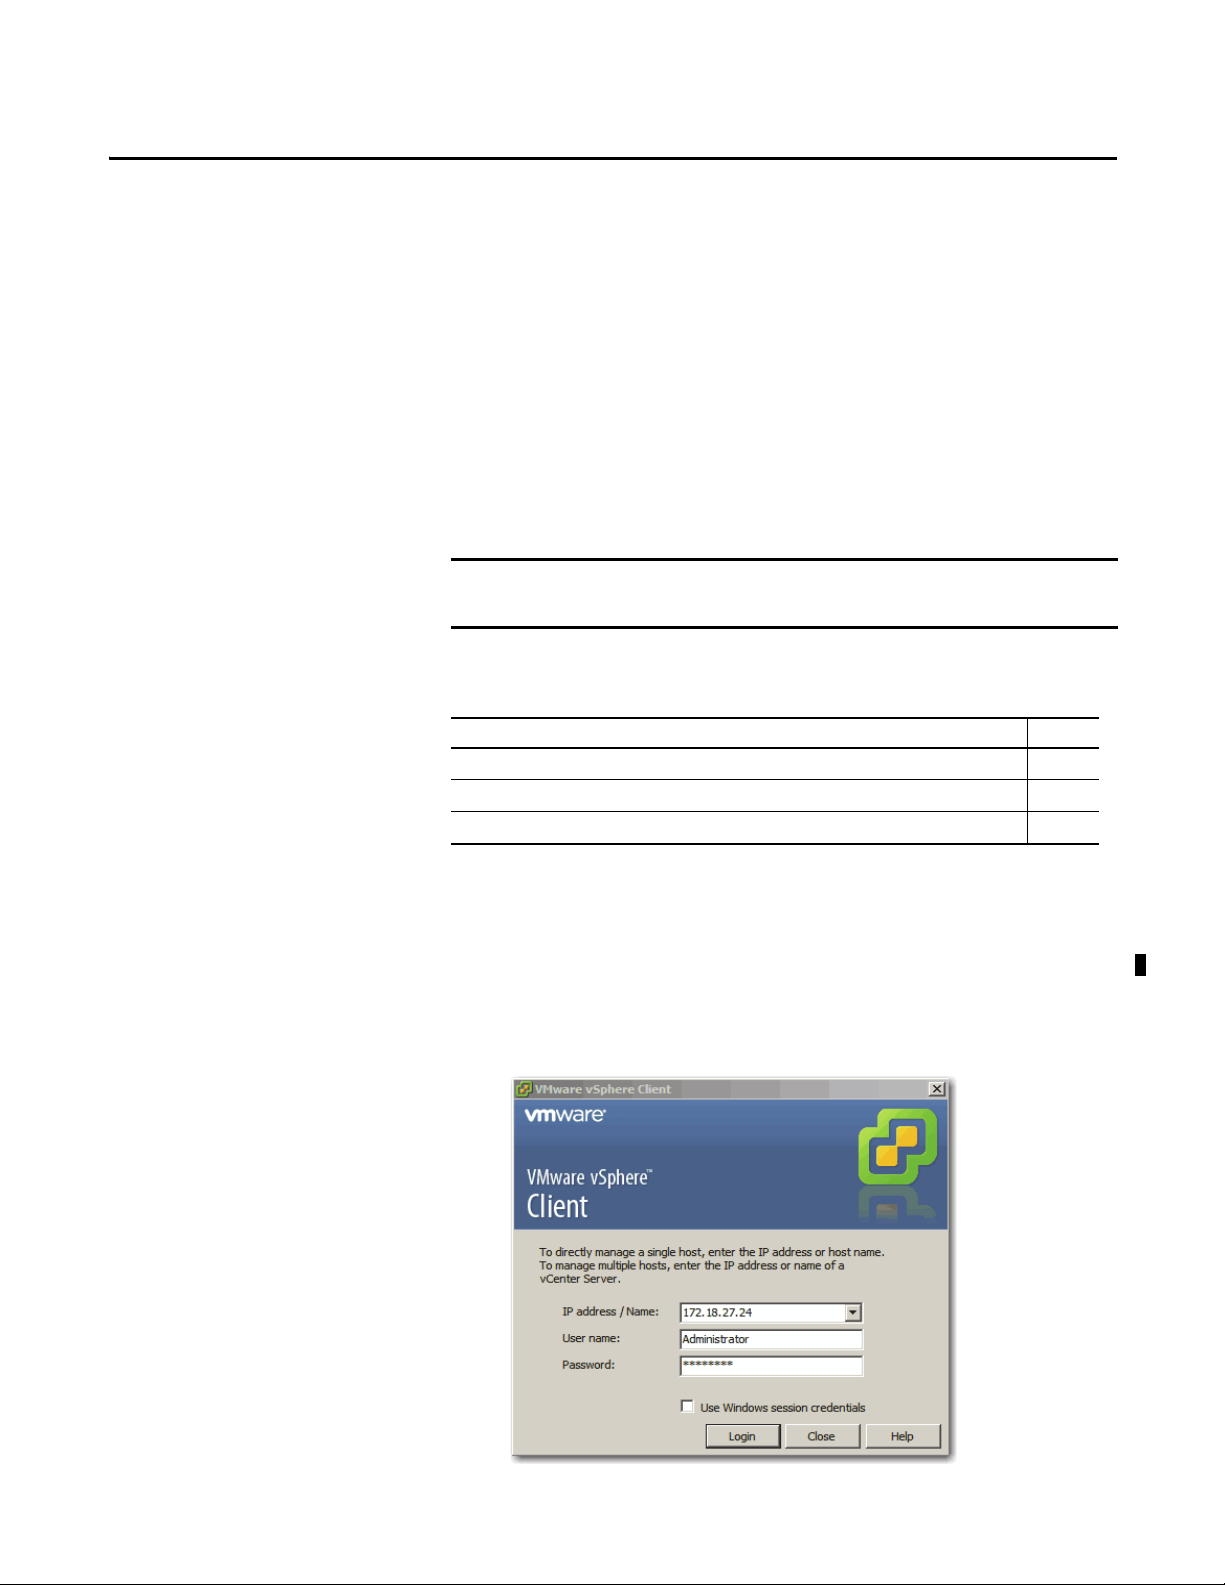
1. Click Start and choose All Programs>VMware>VMware vSphere Client.
The VMware vSphere Client login dialog box appears.
Rockwell Automation Publication 9528-UM001C-EN-P - March 2014 13
Page 14
Chapter 1 Configure the Virtual Image Templates
2. Type information in the login dialog box.
Field Description
IP address/Name Type an IP address for the server.
For example: 172.18.27.24
User name Type a user name for the server specified above.
Password Type the specified user’s password.
Use Windows session credentials Clear the checkbox.
3. Click Login.
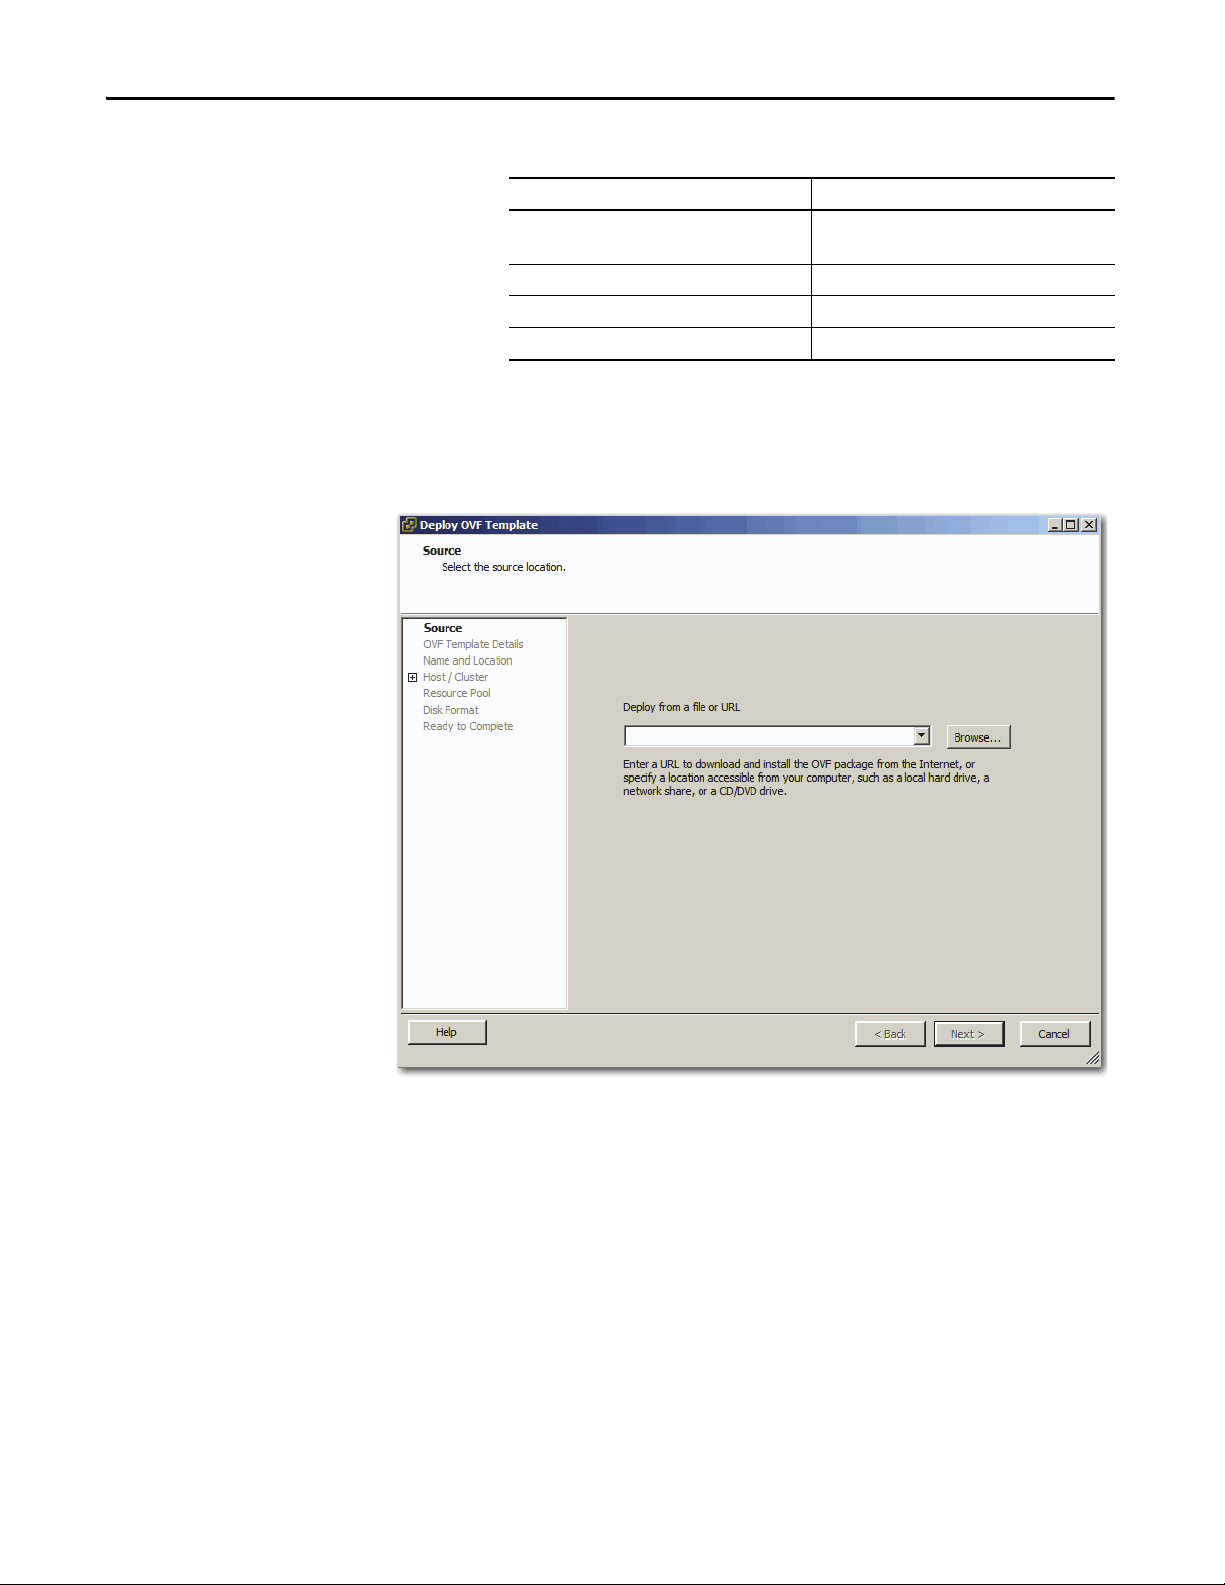
4. From the File menu, choose Deploy OVF Template.
The Deploy OVF Template Wizard appears.
5. Browse to the OVF template.
6. Select the appropriate file and click Open.
The path to the file appears in the Deploy from a file or URL field.
7. Click Next.
14 Rockwell Automation Publication 9528-UM001C-EN-P - March 2014
Page 15
Configure the Virtual Image Templates Chapter 1
IMPORTANT
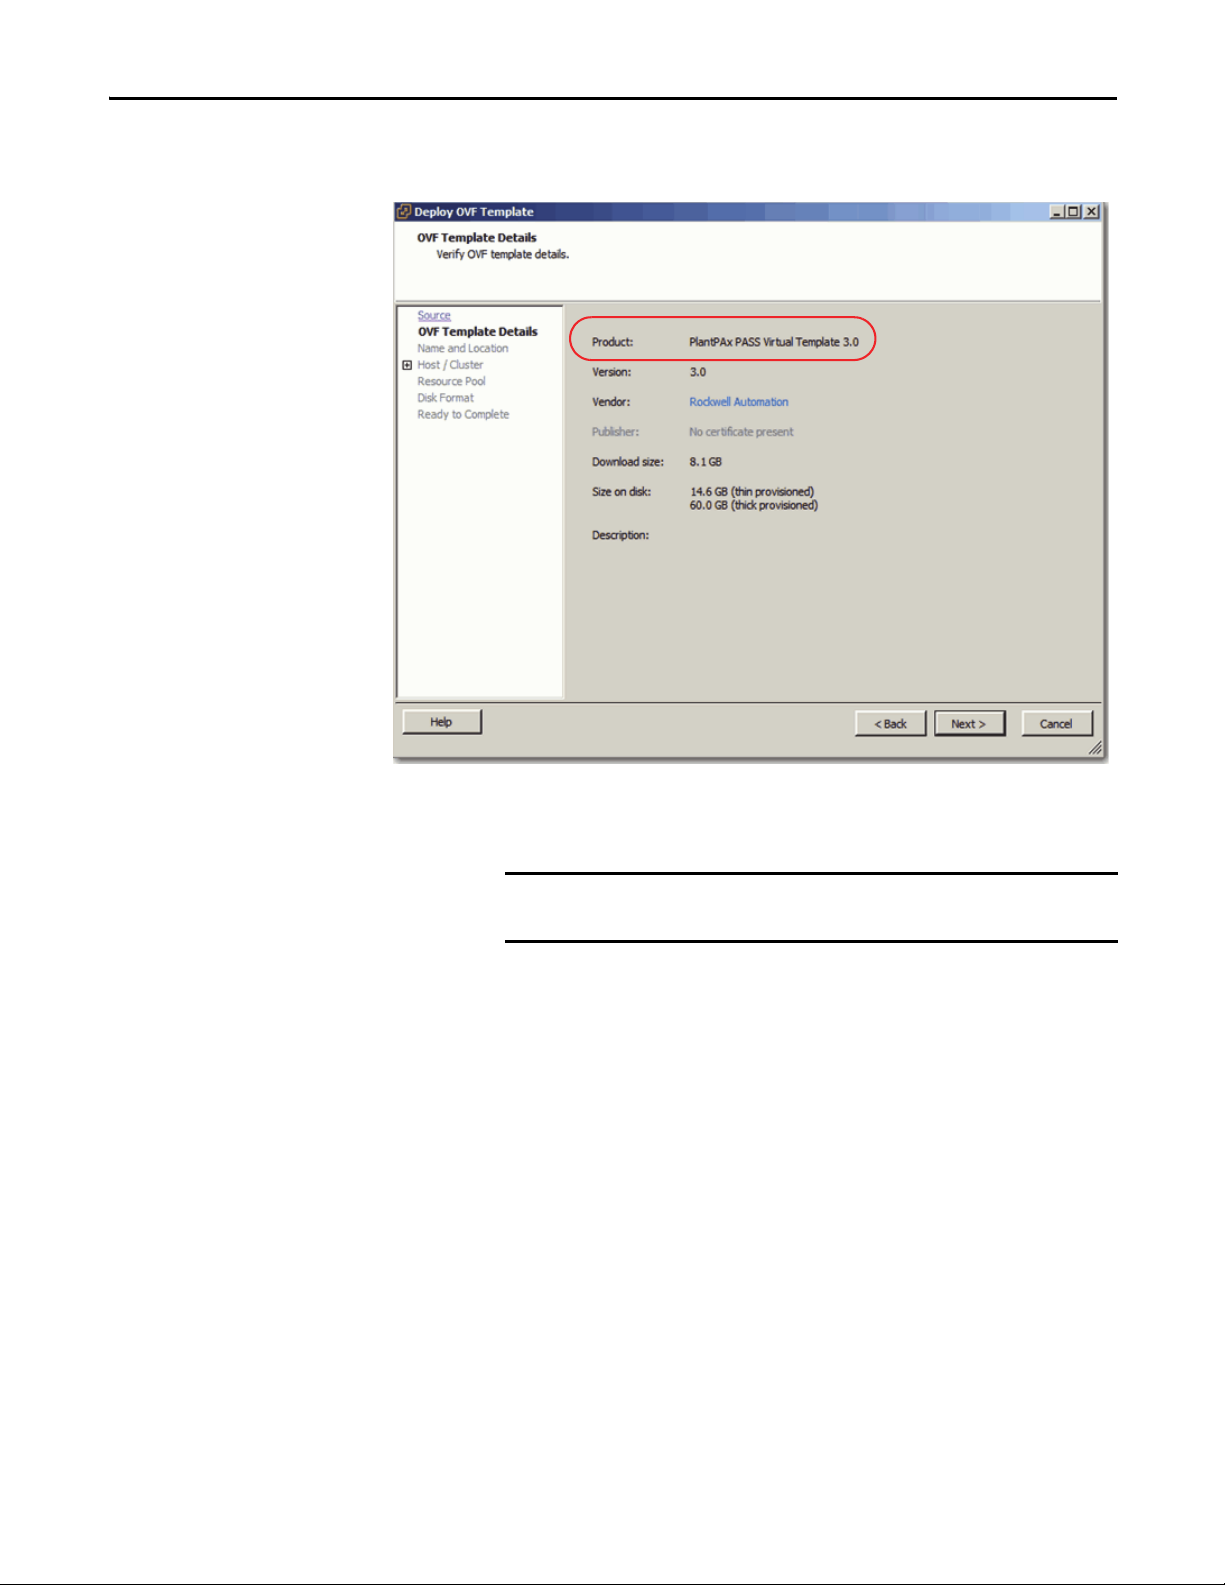
The Deploy OVF Template dialog box shows the OVF Template Details
(boldfaced in the left column).
8. Review the information in the Product Name (circled above) field to verify
that it is the correct image you want to deploy.
The product name, such as ‘PlantPAx PASS Virtual Template v3.0’, and
size can vary between virtual images.
9. Click Next.
Rockwell Automation Publication 9528-UM001C-EN-P - March 2014 15
Page 16

Chapter 1 Configure the Virtual Image Templates
The Deploy OVF Template dialog box shows the Name and Location
section to define for your virtual environment.
10. In the Name box, type a name for your deployed template.
11. In the Inventory Location box, select a location in your Datacenter for the
deployed template and click Next.
The Deploy OVF Template dialog box shows the Host/Cluster section.
16 Rockwell Automation Publication 9528-UM001C-EN-P - March 2014
Page 17
Configure the Virtual Image Templates Chapter 1
12. Select the host in the cluster and click Next.
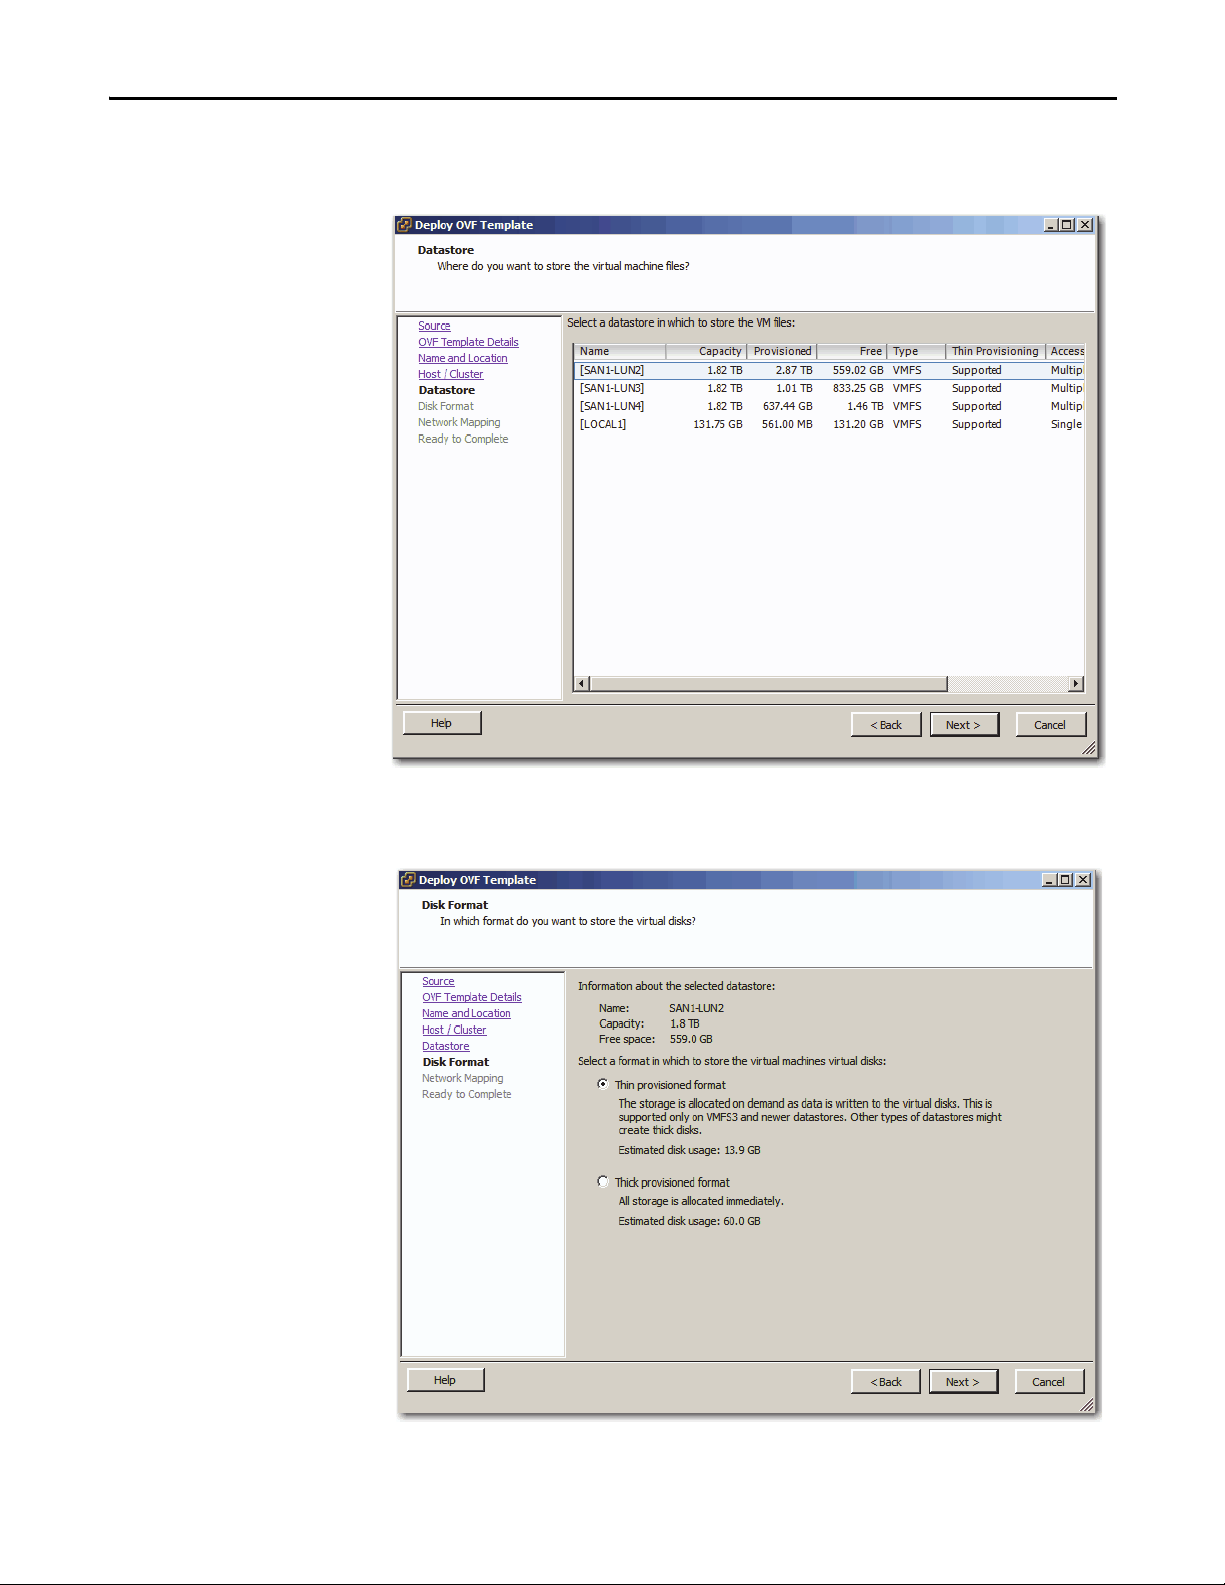
The Deploy OVF Template dialog box shows the Datastore section.
13. Select the Datastore to host the deployed template and click Next.
The Deploy OVF Template dialog box shows the Disk Format section.
Rockwell Automation Publication 9528-UM001C-EN-P - March 2014 17
Page 18
Chapter 1 Configure the Virtual Image Templates
14. Select one of the following formats to store the virtual disks:
• Thin provisioned format - Disk storage is allocated on demand as data
is written to virtual disks.
• Thick provisioned format - Disk storage is allocated immediately.
15. Click Next.
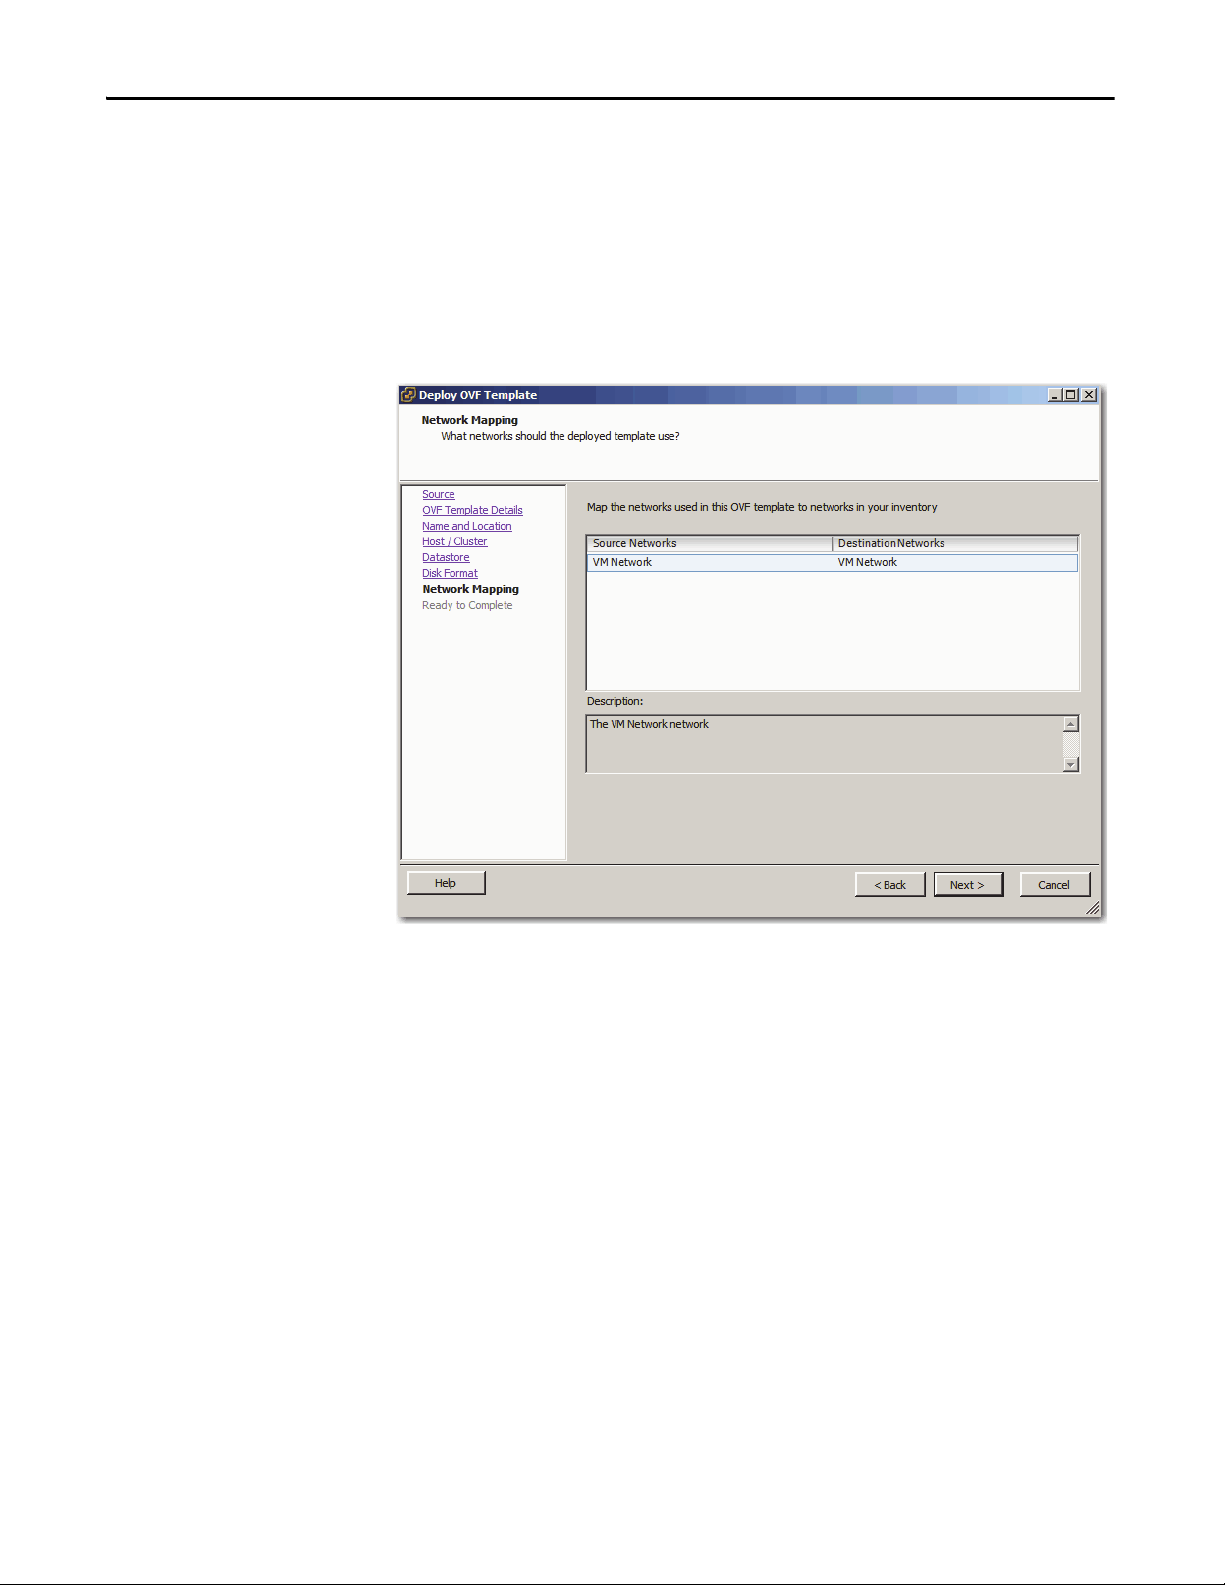
The Deploy OVF Template dialog box shows the Network Mapping
section.
16. Map the networks in the Source column to networks in your inventory.
17. Click Next.
18 Rockwell Automation Publication 9528-UM001C-EN-P - March 2014
Page 19
Configure the Virtual Image Templates Chapter 1
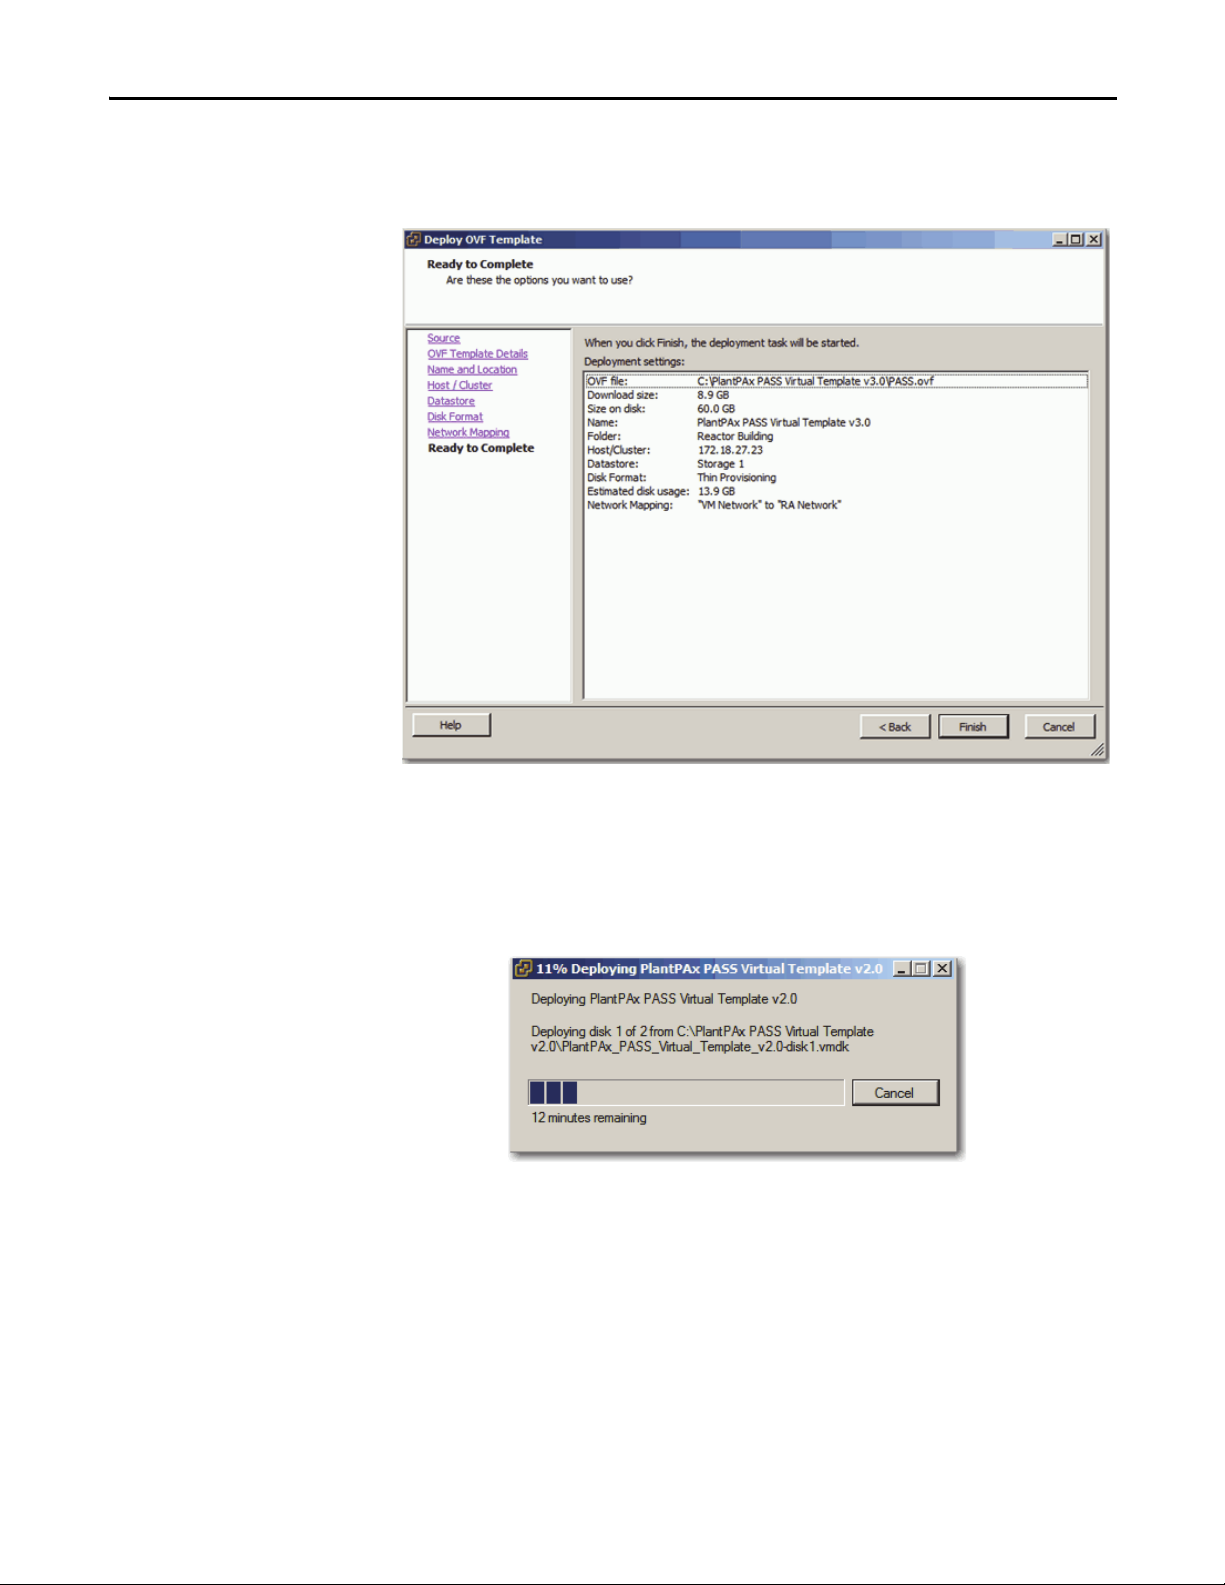
The Deploy OVF Template dialog box shows the Ready to Complete
section so you can verify the deployment settings. Your information can
vary from the example dialog box.
18. Select one of the following to verify settings:
• If information is wrong, click Back to correct the information.
• If the information is correct, click Finish.
The template deployment can take 20 minutes or more depending on the
size of your template.
When the deployment is finished, a message dialog box appears with
‘Deployment Completed Successfully’.
19. Click Close.
The name of the new virtual machine in the Organizer tree appears under
the correct Datacenter, such as PlantPAx vTemplate Library.
20. Select the new virtual machine, and then click the Summary tab to see
general and resource details for your new machine.
Rockwell Automation Publication 9528-UM001C-EN-P - March 2014 19
Page 20
Chapter 1 Configure the Virtual Image Templates
Create a Template on Datacenter for Future Deployments
Now that you have deployed the OVF template from the USB drive, this section
shows how to create a template within the Datacenter for future deployments.
This new template is no longer in OVF format, but in a format used by VMware.
1. If the VMware vSphere Client is not already open, on a computer with
VMware vSphere Client software installed click Start and choose
All Programs>VMware>VMware vSphere Client.
The vSphere Client Window appears.
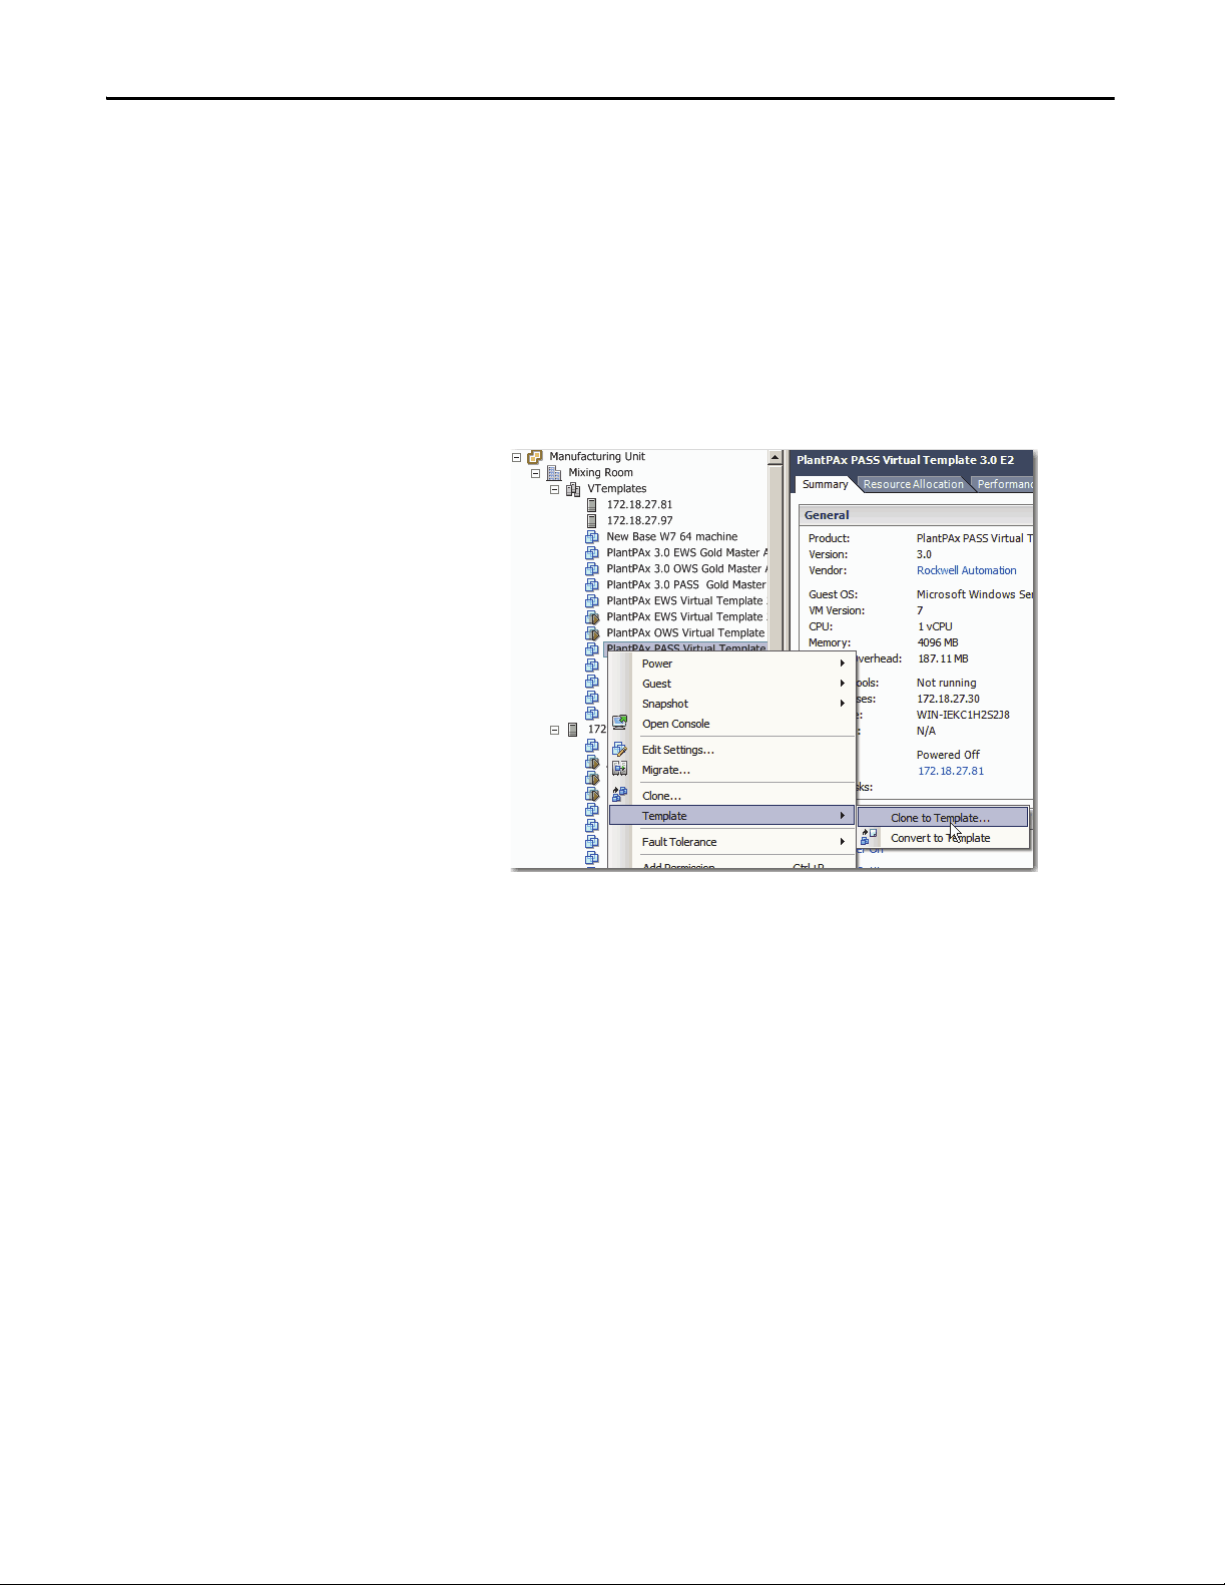
2. Right-click the template that you want to clone and select
Template>Clone to Template from the menus that appear.
20 Rockwell Automation Publication 9528-UM001C-EN-P - March 2014
Page 21
Configure the Virtual Image Templates Chapter 1
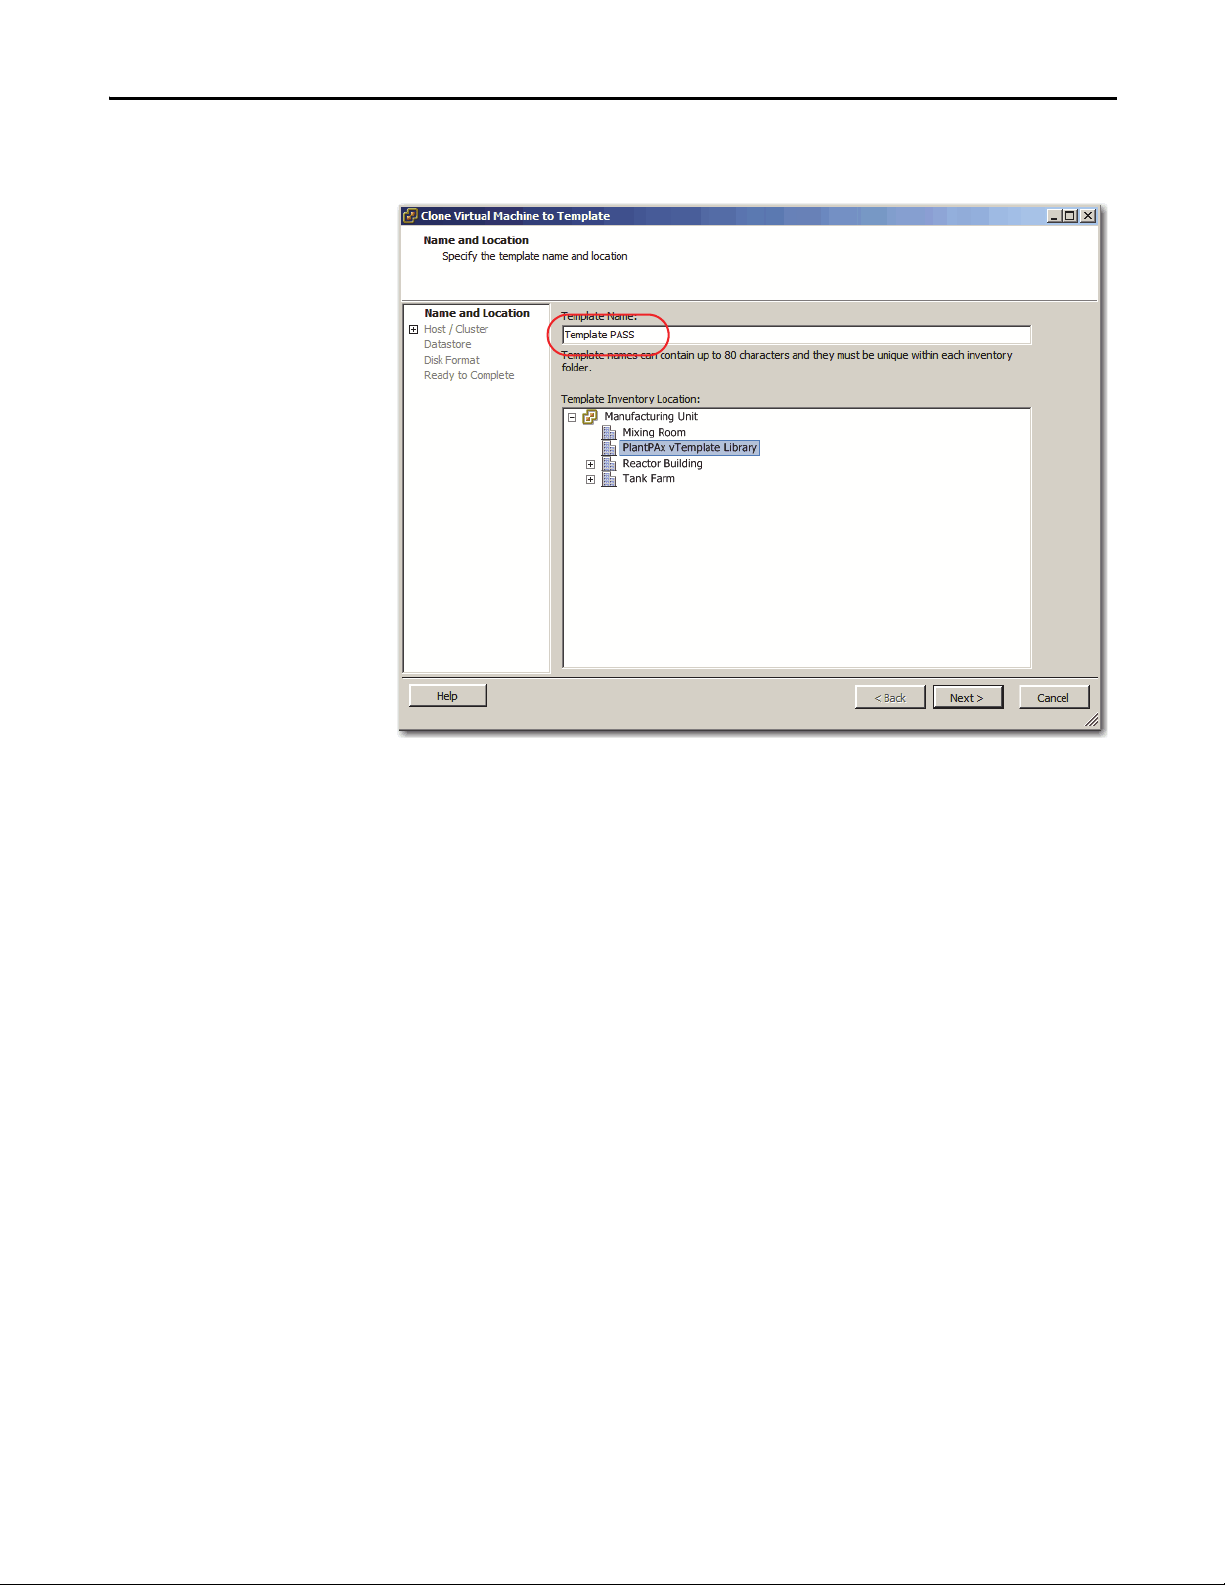
The Clone Virtual Machine to Template dialog box shows the Name and
Location section.
3. In the Template Name box (circled above), type a name for the cloned
template.
4. In the Template Inventory Location box, select a location to store the new
template and click Next.
Rockwell Automation Publication 9528-UM001C-EN-P - March 2014 21
Page 22
Chapter 1 Configure the Virtual Image Templates
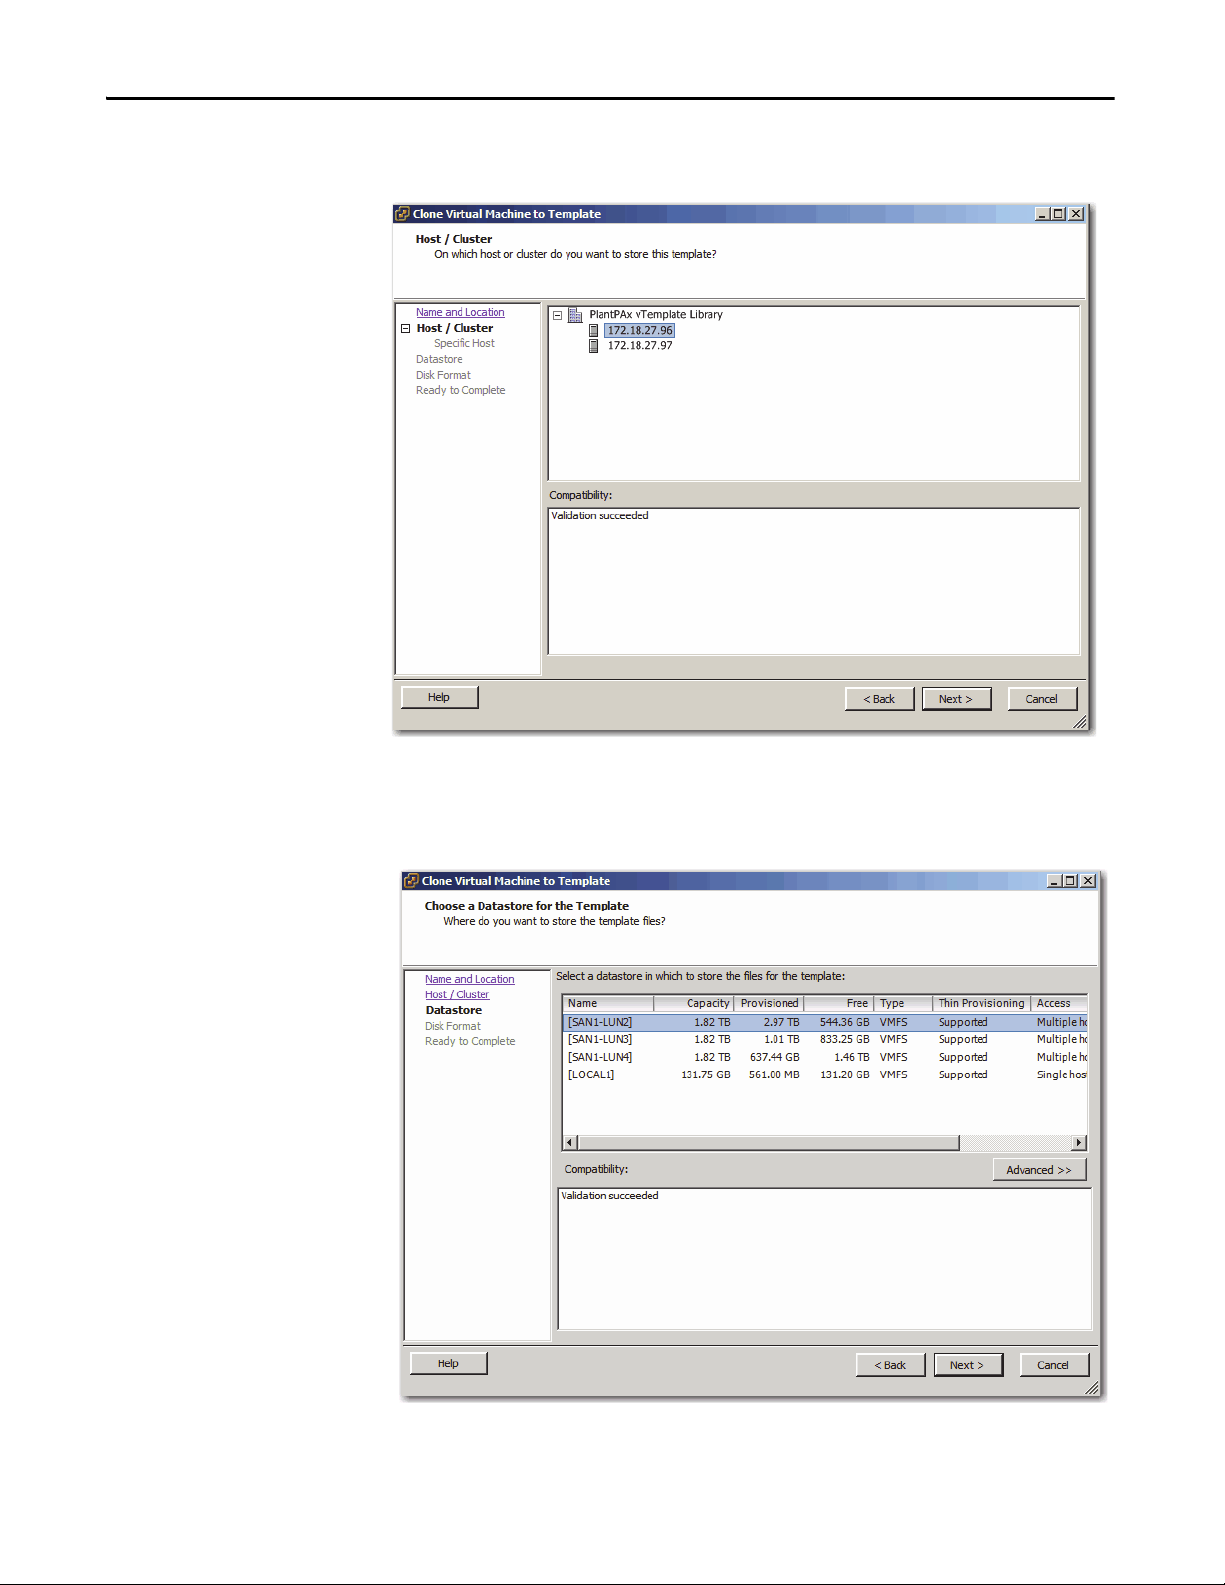
The Clone Virtual Machine to Template dialog box shows the
Host/Cluster section.
5. Select the host in the cluster and click Next.
The Clone Virtual Machine to Template dialog box shows the
Datastore section.
6. Select the Datastore to host the cloned template and click Next.
22 Rockwell Automation Publication 9528-UM001C-EN-P - March 2014
Page 23
Configure the Virtual Image Templates Chapter 1
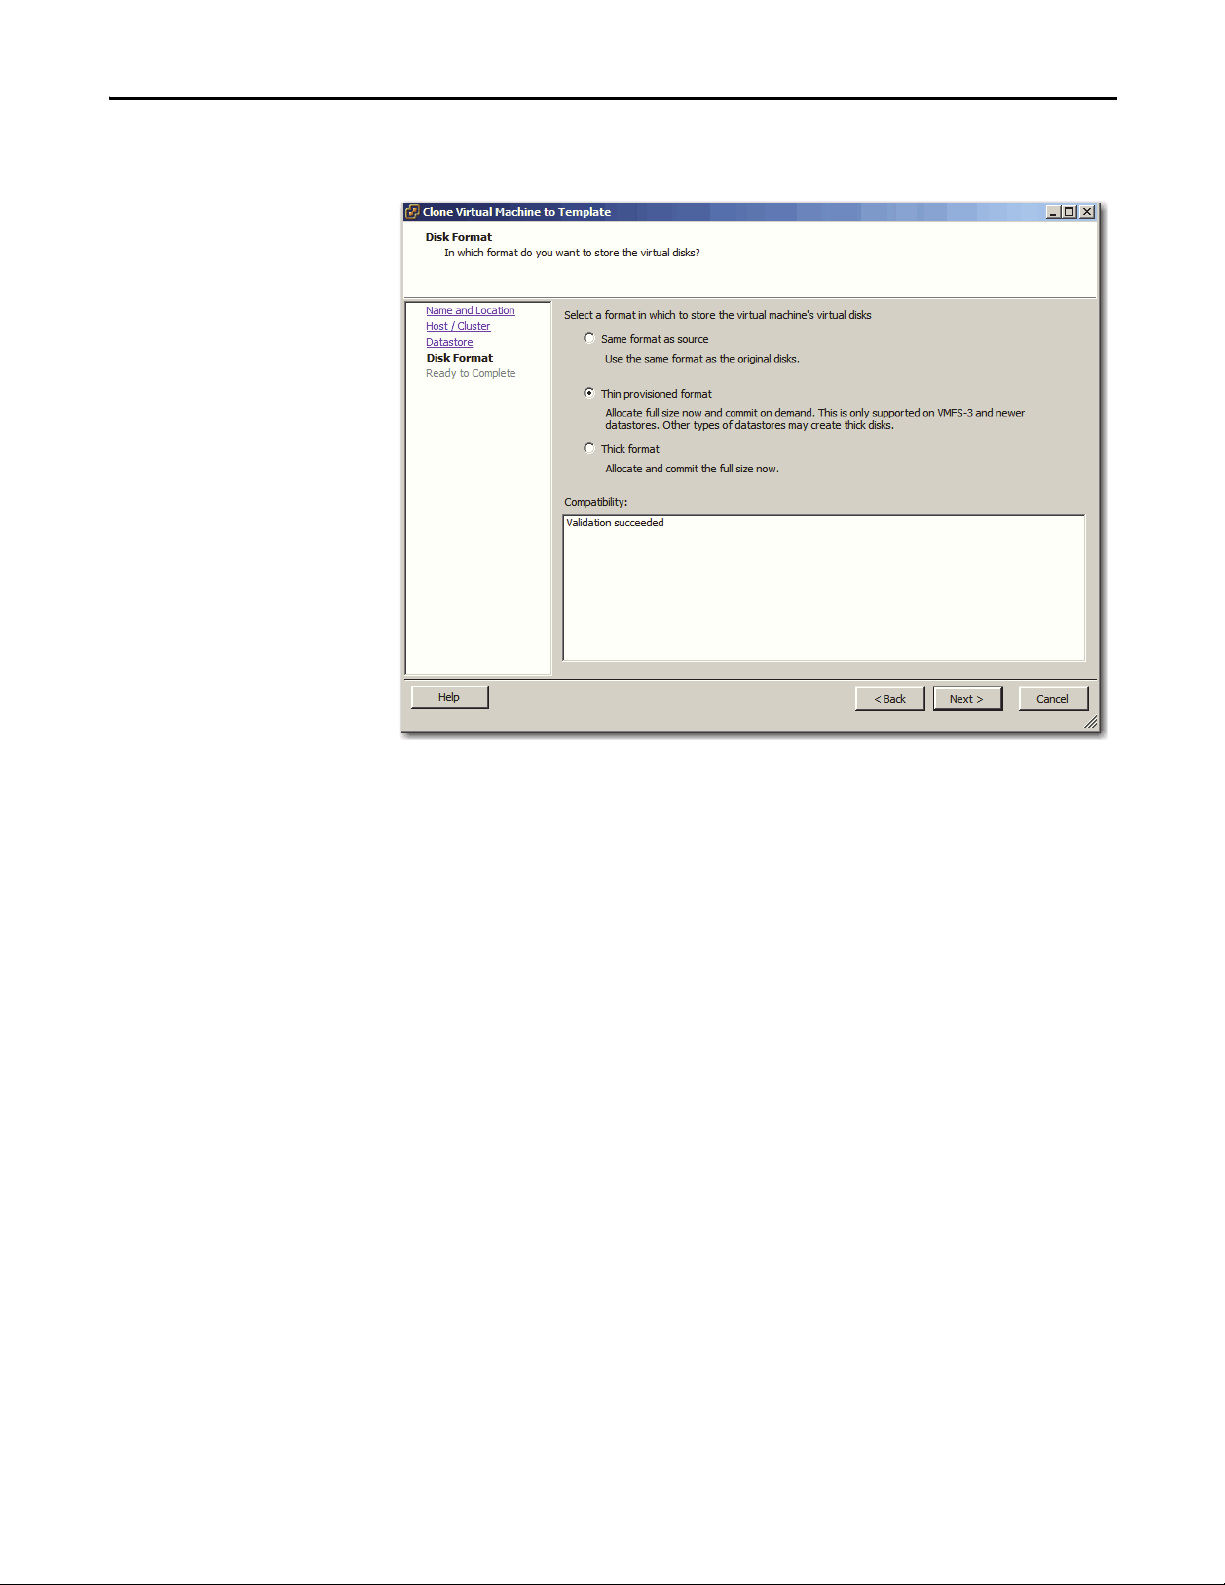
The Clone Virtual Machine to Template dialog box shows the
Disk Format section.
7. Select one of the following formats to store the virtual back-up disks:
• Same format as source
• Thin provisioned format - Disk storage is allocated on demand as data
is written to virtual disks.
• Thick format - Disk storage is allocated immediately.
8. Click Next.
Rockwell Automation Publication 9528-UM001C-EN-P - March 2014 23
Page 24
Chapter 1 Configure the Virtual Image Templates
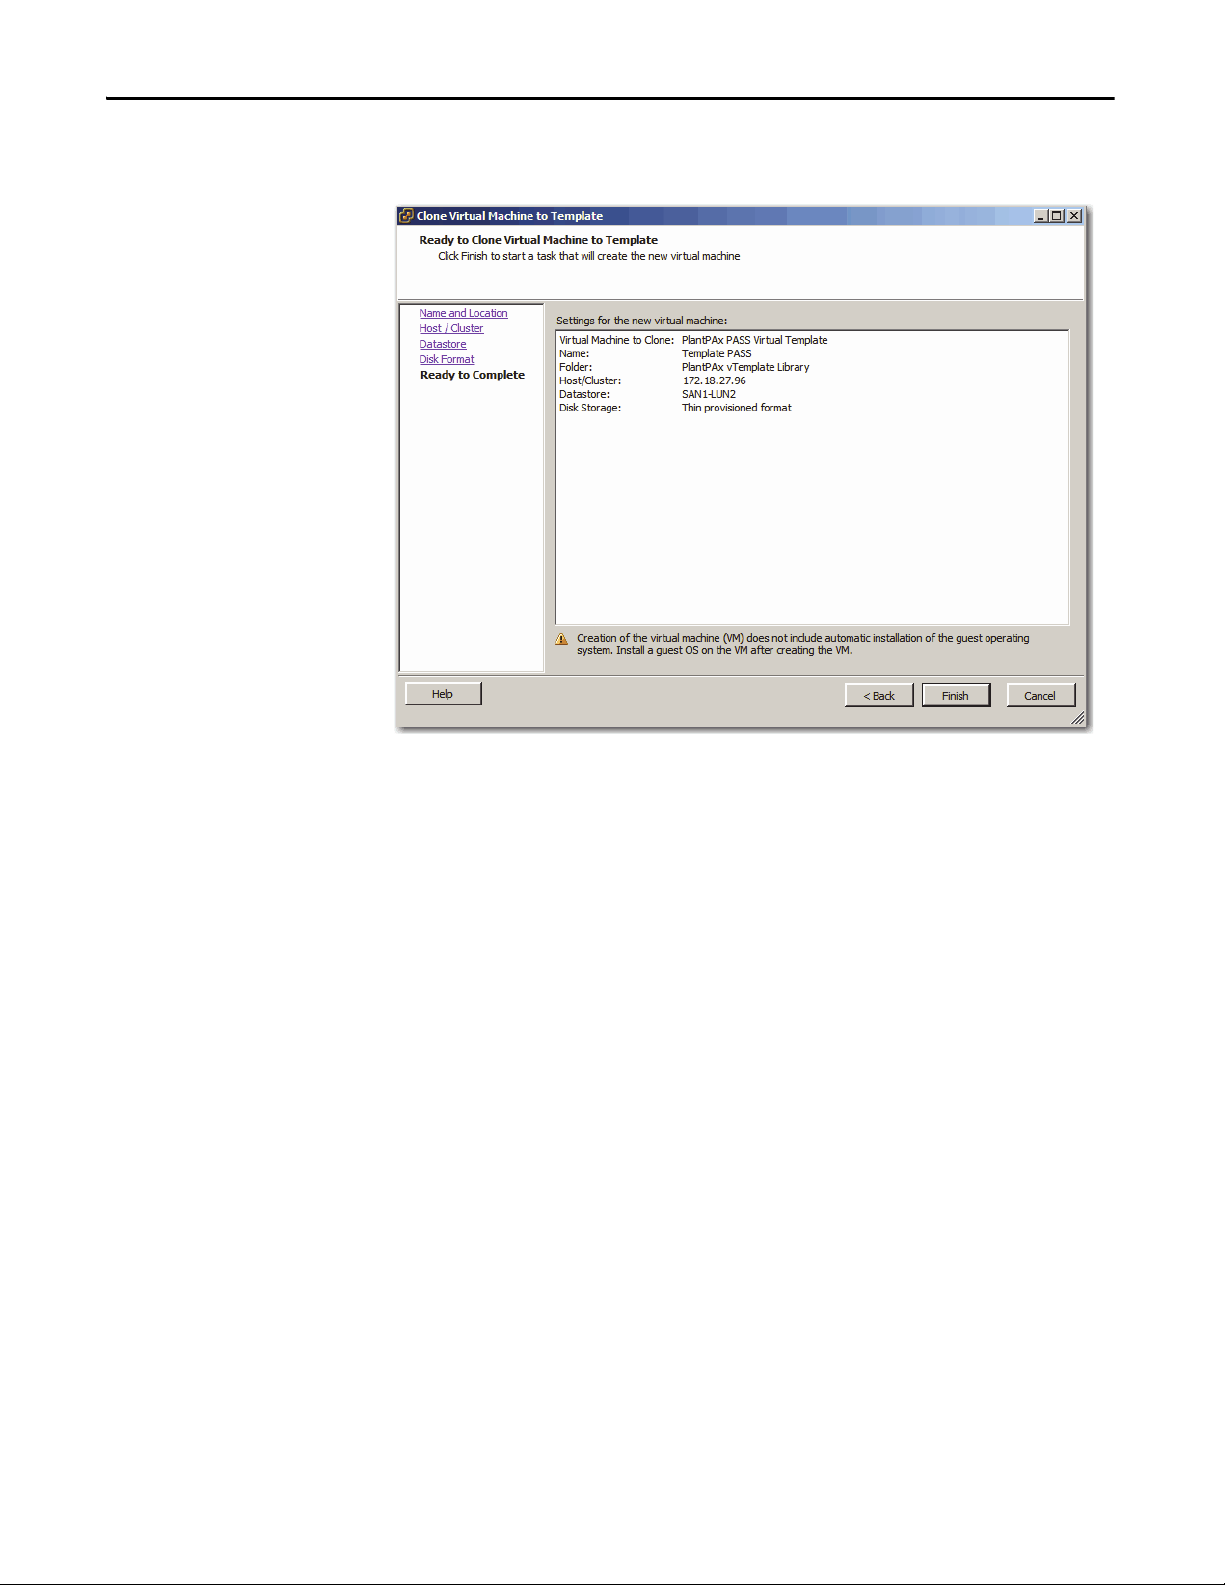
The Clone Virtual Machine to Template dialog box shows the
Click to Finish section.
9. Select one of the following to verify settings:
• If information is incorrect, click Back to correct the information.
• If the information is correct, click Finish.
It can take 30 minutes, depending on the size of the hard drive, to clone a
virtual machine to a template.
In the vSphere Client software, look at the Recent Tasks in the bottom of
the window. You can view the status by finding ‘Clone Virtual Machine’.
When the status = Completed, the cloning is finished.
24 Rockwell Automation Publication 9528-UM001C-EN-P - March 2014
Page 25
Configure the Virtual Image Templates Chapter 1
Deploy Additional Virtual Machines from Datacenter
Now that we have templates on the Datacenter, additional deployments can be
performed from these new templates. We no longer require the USB drive or
VMware to convert from the OVF format.
This new template is no longer in OVF format, but in a format used by VMware.
1. If VMware vSphere Client is not already open; on a computer with
VMware vSphere Client software installed, click Start and choose
All Programs>VMware>VMware vSphere Client.
The vSphere Client Window appears.
2. Click Home.
3. Click the VMs and Templates icon.
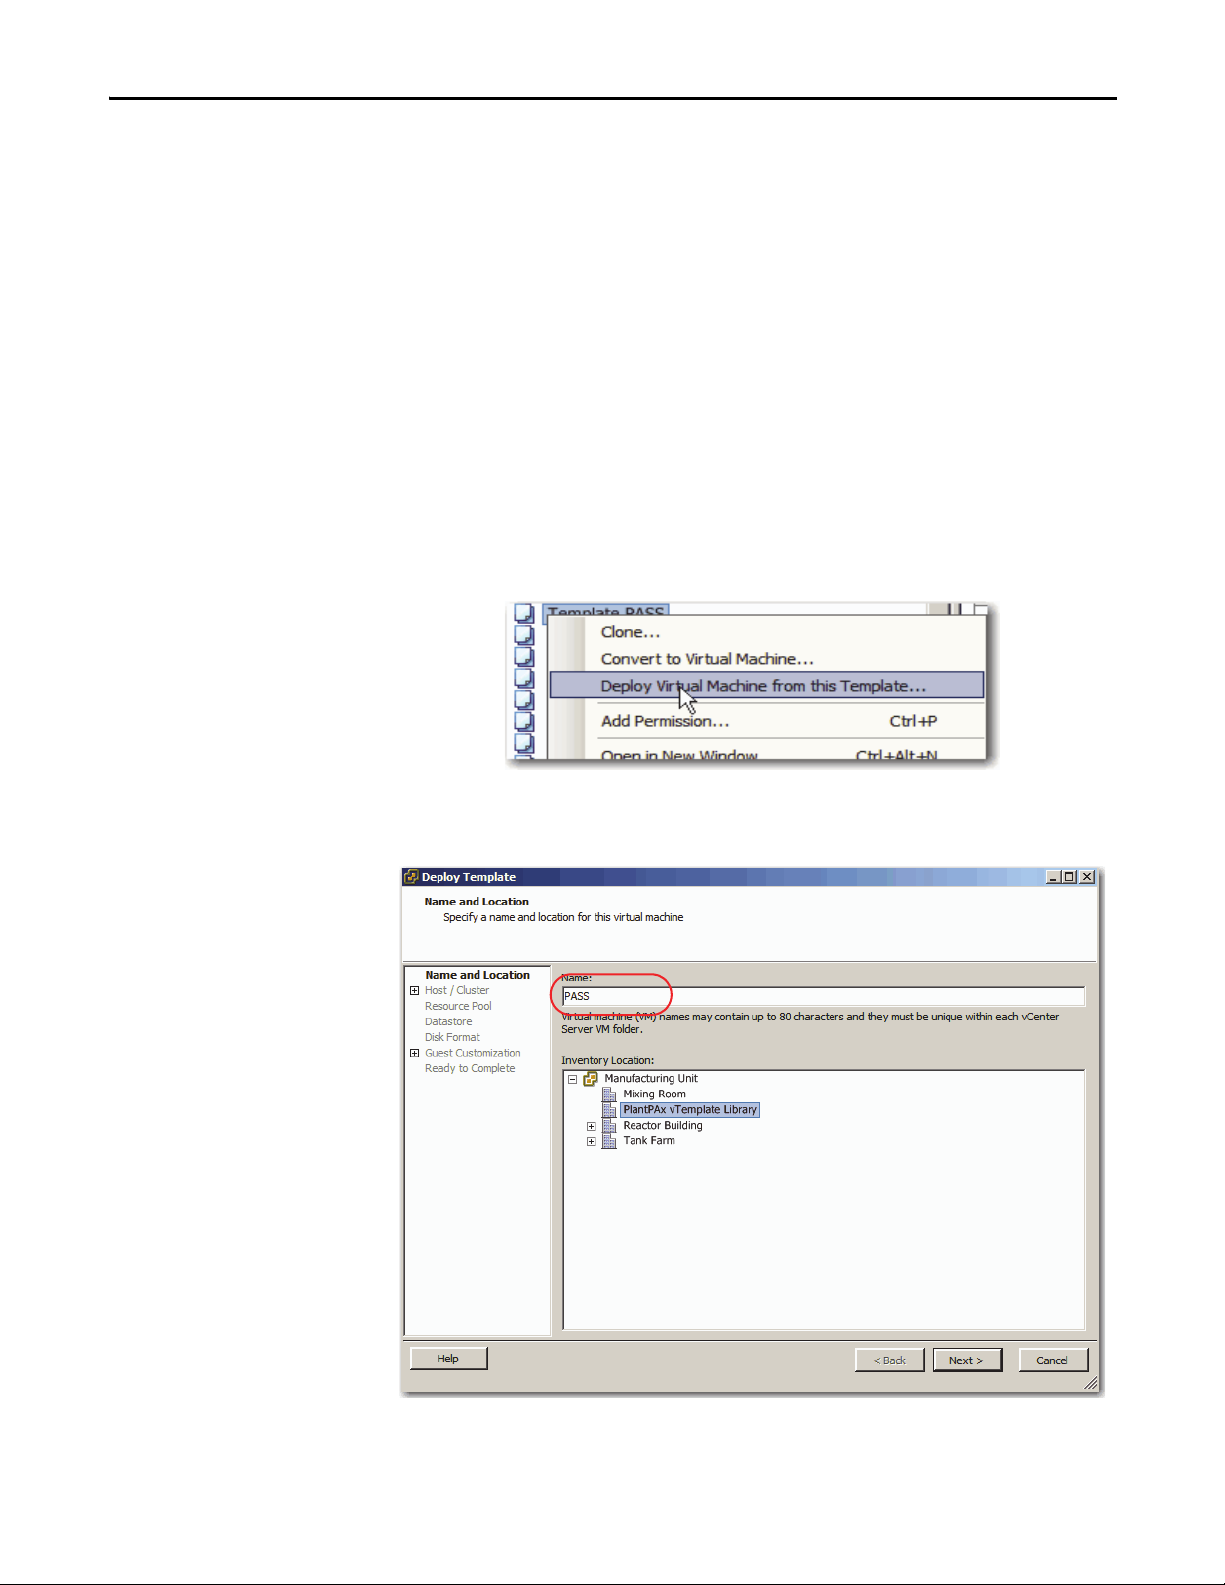
4. Right-click a template and choose 'Deploy Virtual Machine from
this Template'.
The Deploy Template dialog box appears with the Name and
Location section.
5. In the Name box (circled above), type a name for your virtual machine.
Rockwell Automation Publication 9528-UM001C-EN-P - March 2014 25
Page 26

Chapter 1 Configure the Virtual Image Templates
6. In the Inventory Location box, select the location of the virtual
environment in the template and click Next.
The Deploy Template dialog box shows the Host/Cluster section.
7. Select the host in the cluster and click Next.
The Deploy Template dialog box shows the Datastore section.
8. Select the Datastore to host the deployed template and click Next.
26 Rockwell Automation Publication 9528-UM001C-EN-P - March 2014
Page 27
Configure the Virtual Image Templates Chapter 1
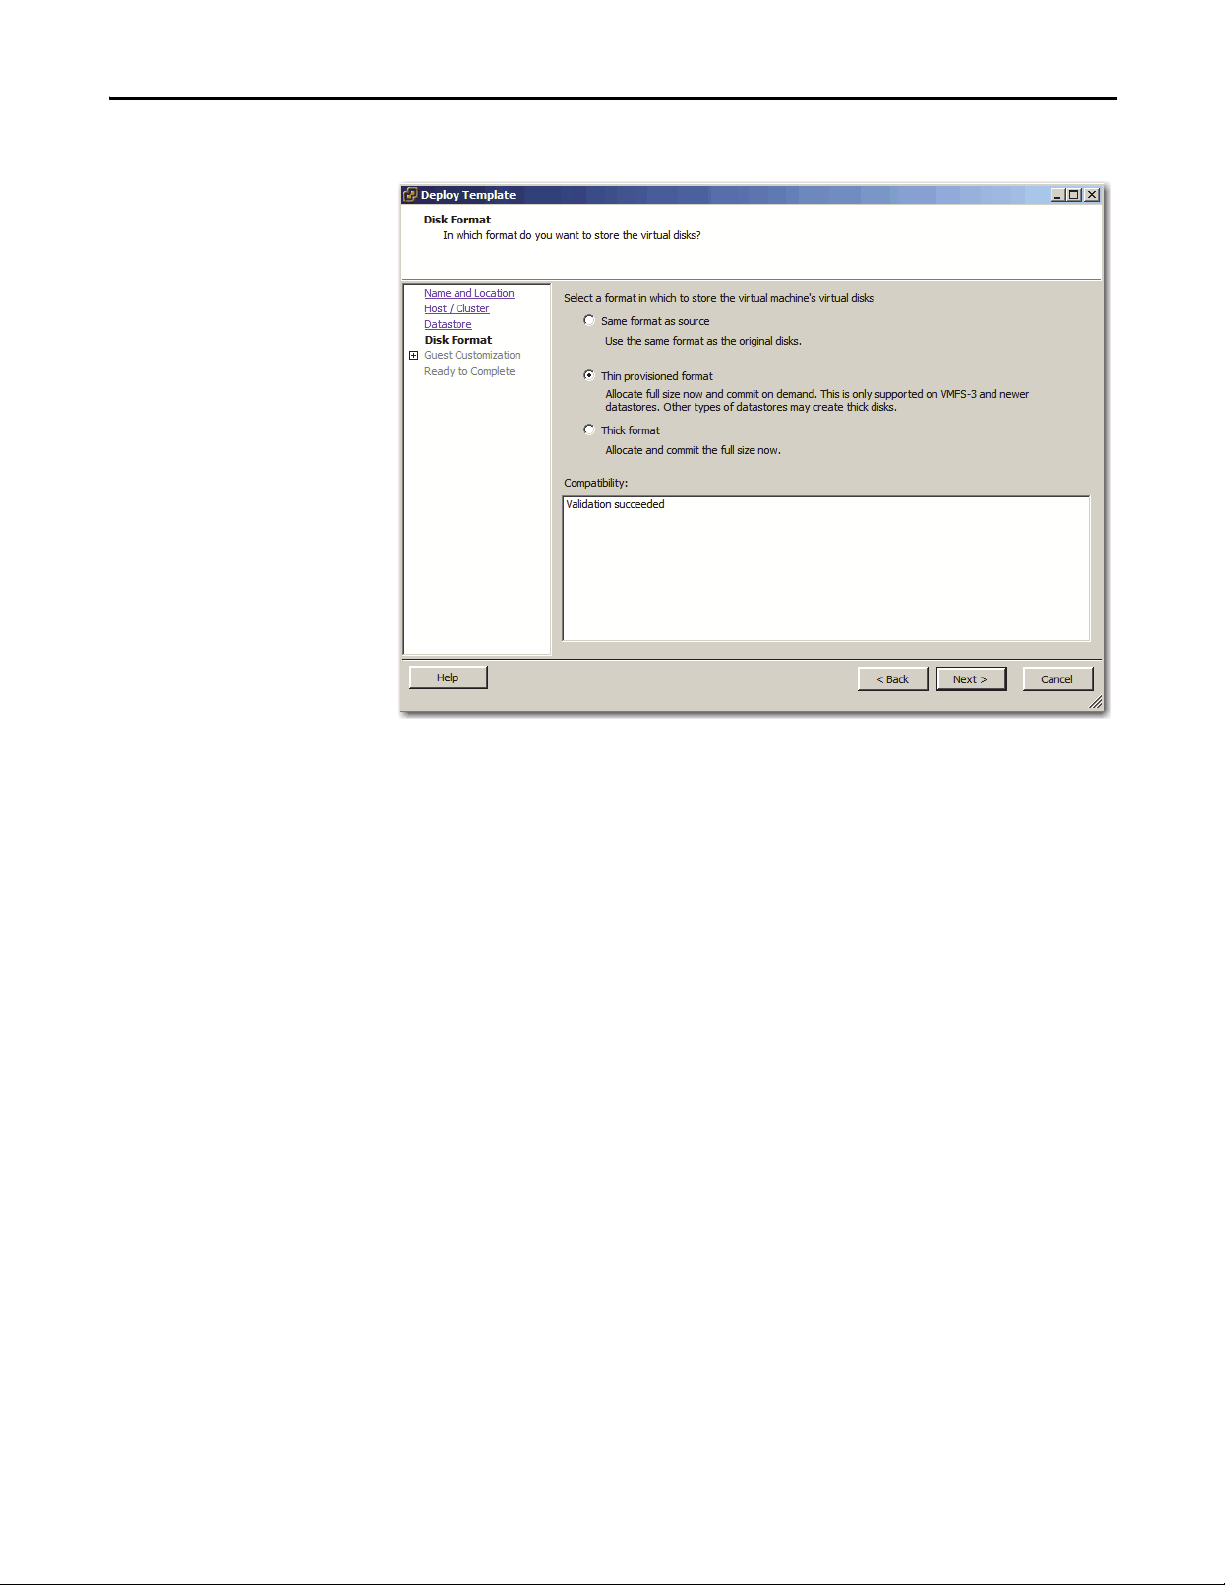
The Deploy Template dialog box shows the Disk Format section.
9. Select one of the following formats to store the virtual disks:
• Same format as source
• Thin provisioned format - Disk storage is allocated on demand as data
is written to virtual disks.
• Thick format - Disk storage is allocated immediately.
10. Click Next.
Rockwell Automation Publication 9528-UM001C-EN-P - March 2014 27
Page 28
Chapter 1 Configure the Virtual Image Templates
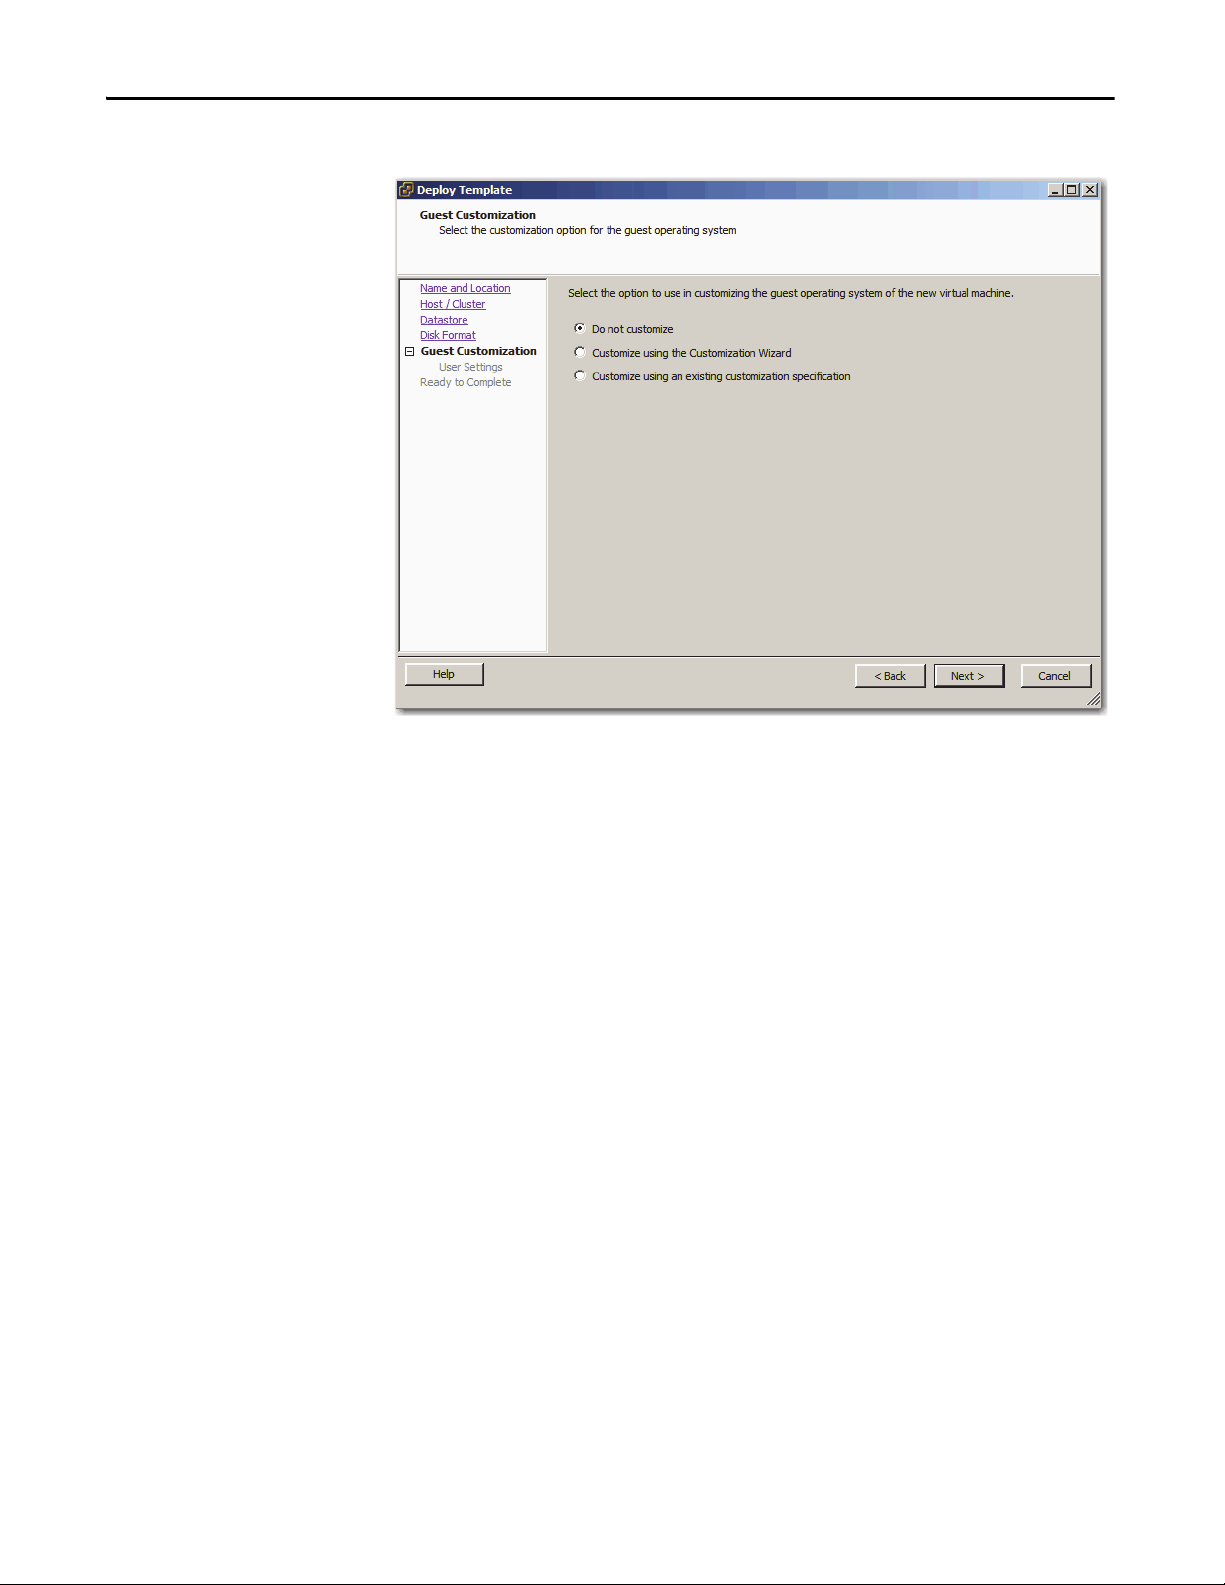
The Deploy Template dialog box shows the Guest Customization section.
11. Click one of the following options for the guest operating system that is
hosting the new virtual machine:
• Do not customize (recommended)
• Customize by using the Customization Wizard
• Customize by using an existing customization specification
12. Click Next.
28 Rockwell Automation Publication 9528-UM001C-EN-P - March 2014
Page 29
Configure the Virtual Image Templates Chapter 1
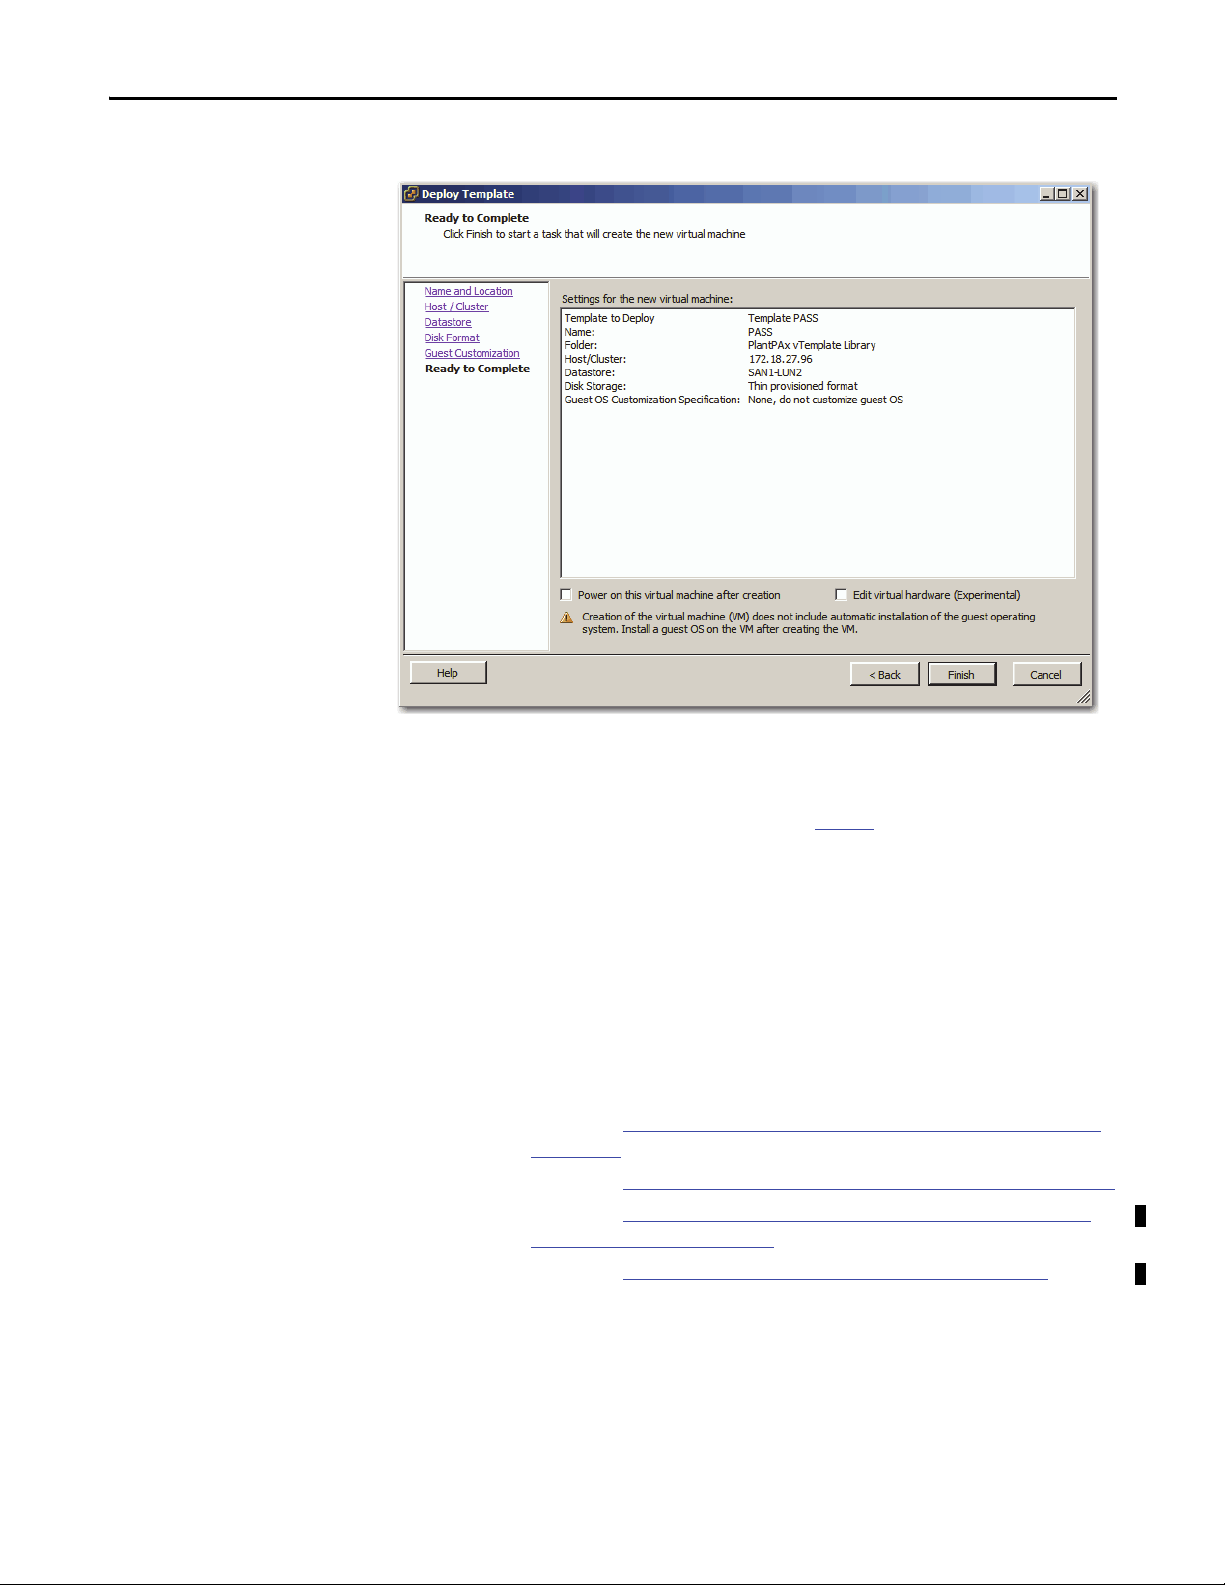
The Deploy Template dialog box shows the Ready to Complete section.
13. Select one of the following to verify settings:
• If information is wrong, click Back to correct the information.
• If the information is correct, go to step 14
.
14. Clear the following checkboxes:
• Power on this virtual machine after creation
• Edit virtual hardware (Experimental)
15. Click Finish.
The template deployment can take 30 minutes or more depending on the
size of the virtual machine.
To start your virtual machine, see the respective section:
• Chapter 2, Configure the Process Automation System Server (PASS)
on page 31
• Chapter 3, Configure the EWS and OWS System Elements on page 53
• Chapter 4, Configure Application Server OWS (Microsoft Remote
Desktop Services) on page 65
• Chapter 5, Configure Application Server Historian on page 85
Rockwell Automation Publication 9528-UM001C-EN-P - March 2014 29
Page 30

Chapter 1 Configure the Virtual Image Templates
Notes:
30 Rockwell Automation Publication 9528-UM001C-EN-P - March 2014
Page 31

Chapter 2
IMPORTANT
IMPORTANT
Configure the Process Automation System
Server (PASS)
This chapter details several procedures for configuring a new Process Automation
System Server (PASS) virtual machine:
• Setting up Windows Server 2008 for the new instance
• Setting up the Network Adapter
• Setting up FactoryTalk Directory
• Setting up activation files
The FactoryTalk Directory is the information hub that centralizes the settings
and administration of Rockwell Automation software components across
multiple computers throughout the PlantPAx system. You must designate a PASS
server for the FactoryTalk Directory.
The required Rockwell Automation software for the PASS system element
virtual template is included and pre-installed in the virtual image templates, but
not activated. To activate each PASS virtual template, you can purchase a single
activation license for each virtual template instance.
See page 9
The table includes topics that describe how to configure the PASS template.
Top ic Pag e
Before You Begin 32
Configure Microsoft Windows Server 2008 32
Configure Ethernet Network Adapter Settings 43
Configure the FactoryTalk Directory on the PASS 44
Configure the FactoryTalk Activation Server 50
for product catalog numbers.
If you already own individual product activations, these activations also can be
used to activate the virtual image templates.
During the configuration of the PASS server you can encounter a User Account
Control window that asks if you want to allow a program to make changes to
the computer. Click Yes and continue on.
Rockwell Automation Publication 9528-UM001C-EN-P - March 2014 31
Page 32

Chapter 2 Configure the Process Automation System Server (PASS)
Before You Begin
Configure Microsoft Windows Server 2008
You must have your template deployed from the USB drive to perform the
following procedures in this chapter. If you need to deploy the template, see
Chapter 1 on page 13
Complete these steps on a virtual machine to initiate the Microsoft Windows
Server 2008 operating system setup for the PASS server. You set your own
administration account password, computer name, and file location preference in
this procedure.
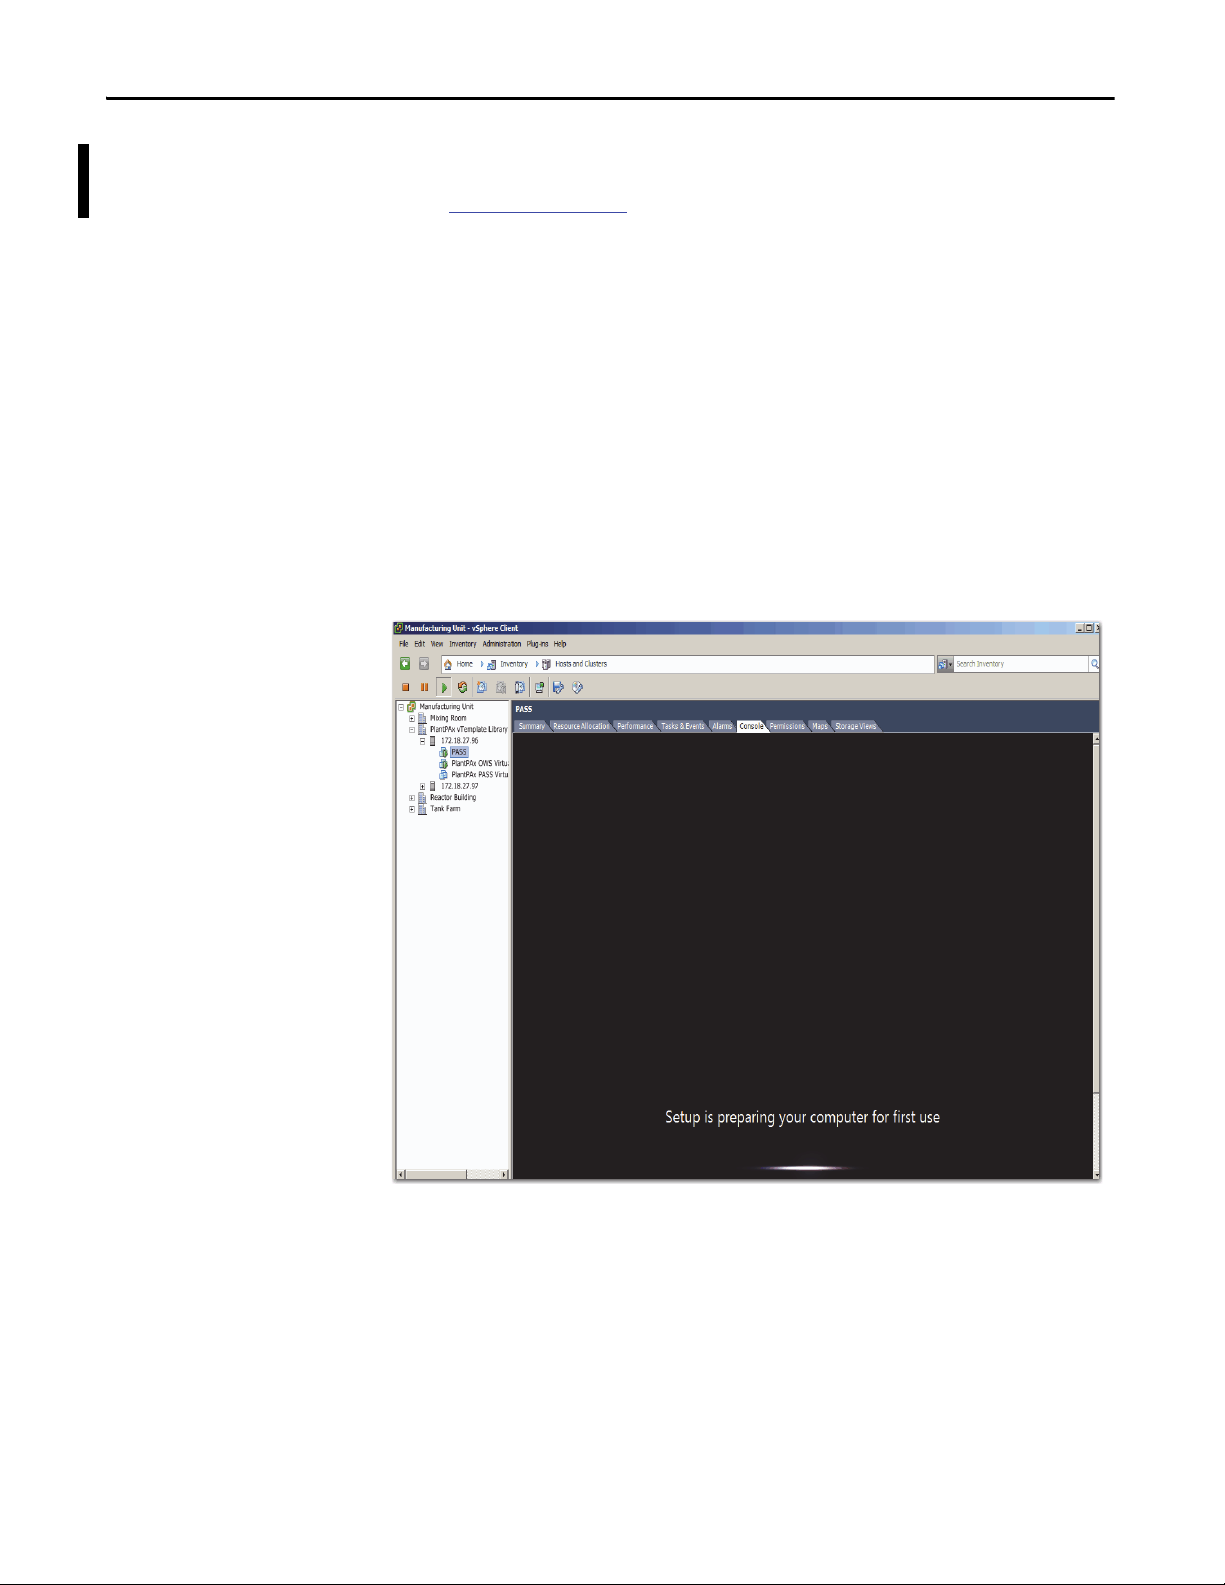
1. If the vSphere Client is not already open, on a computer with VMware
vSphere Client software installed, click Start and choose All
Programs>VMware>VMware vSphere Client.
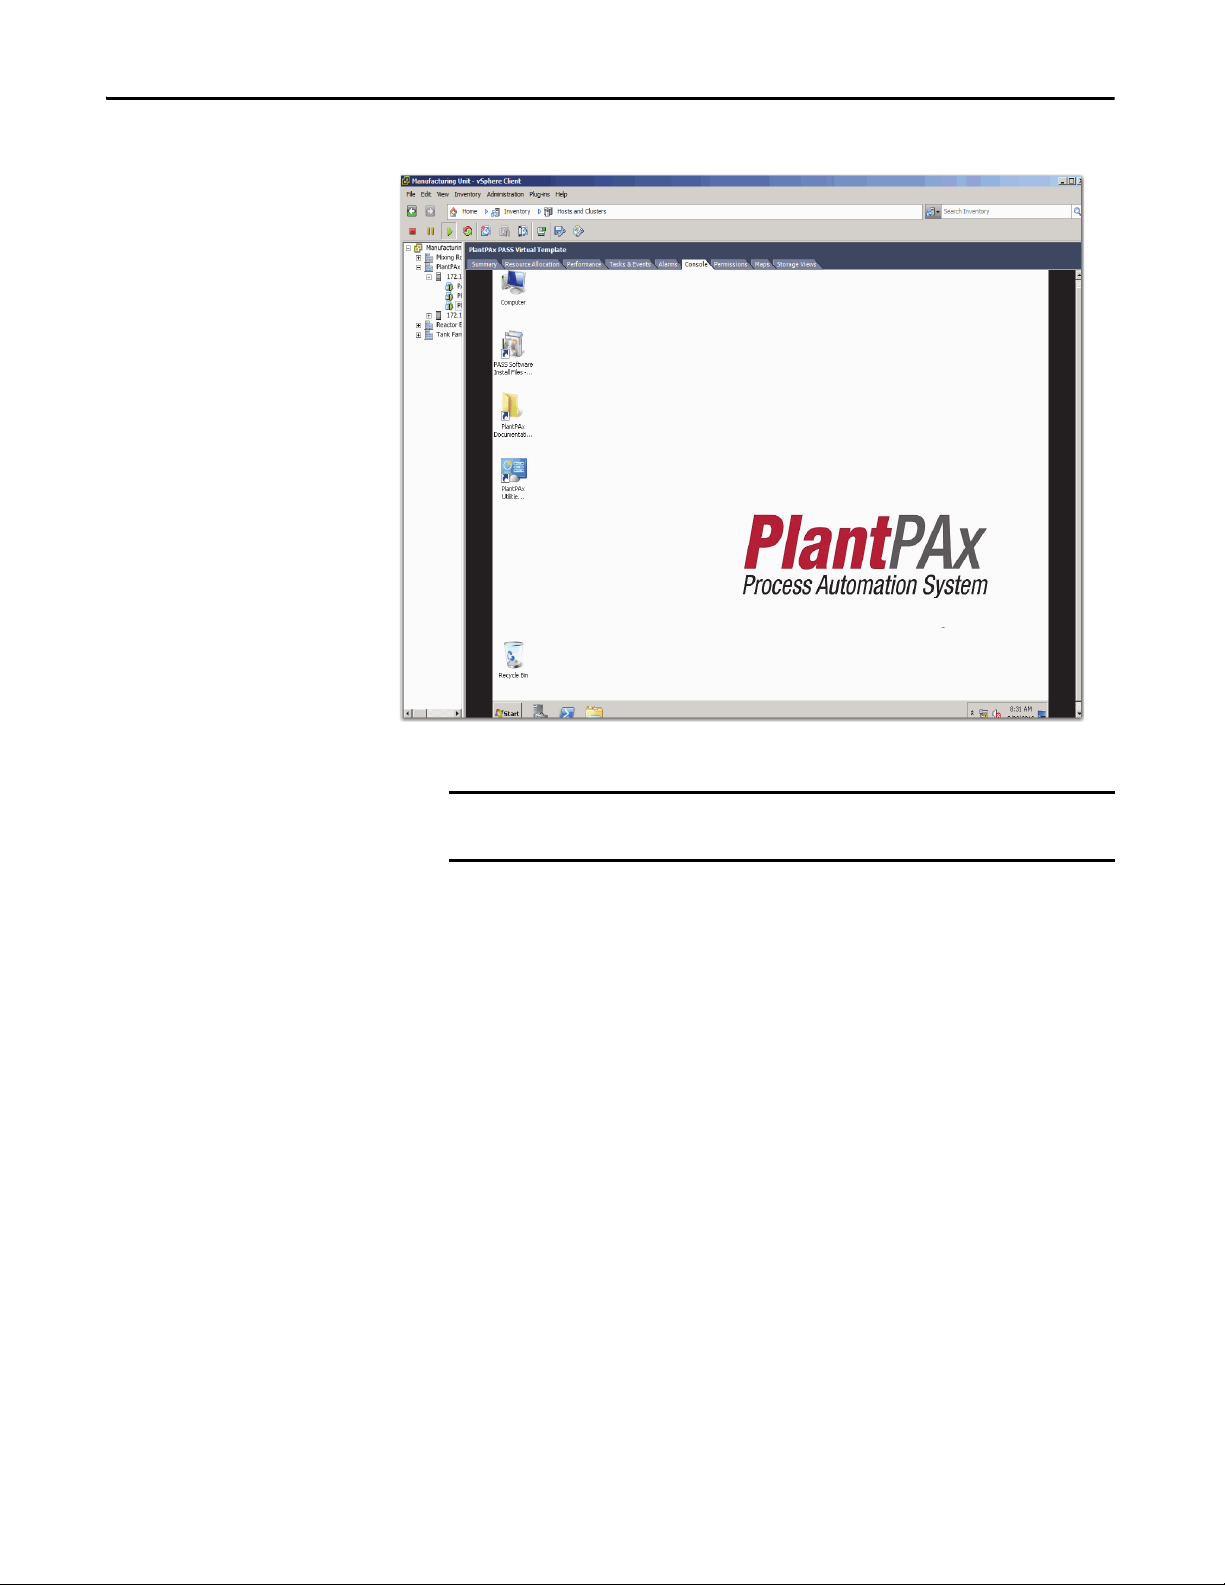
2. Click the Console tab.
3. In the Organizer tree, right-click the virtual machine and choose
Power>Power On.
for details.
32 Rockwell Automation Publication 9528-UM001C-EN-P - March 2014
Page 33

Configure the Process Automation System Server (PASS) Chapter 2
IMPORTANT
You see this window after initial setup is complete. This stage can take a
few minutes.
The Microsoft Windows Set Up Windows dialog box appears.
First, click inside the console to activate the controls for your virtual
machine.
Rockwell Automation Publication 9528-UM001C-EN-P - March 2014 33
Page 34

Chapter 2 Configure the Process Automation System Server (PASS)
4. Choose the appropriate option from the following pull-down menus.
Menu Description
Country or region Choose your country or region, for example,
Time and currency Choose your time and currency, for example, English
Keyboard layout Choose your keyboard layout, for example, US.
United States.
(United States).
5. Click Next.
The License Agreement appears. This agreement includes
Microsoft Windows, Rockwell Automation Software, and Adobe Reader.
6. Read the license agreement, and then click ‘I accept the license terms’.
7. Click Start.
8. If you get a message stating 'The User’s password must be changed before
logging on the first time.', click OK.
34 Rockwell Automation Publication 9528-UM001C-EN-P - March 2014
Page 35

Configure the Process Automation System Server (PASS) Chapter 2
IMPORTANT
The Administrator account dialog box appears so you can change
a password.
Passwords must meet the following minimum requirements:
• Cannot contain the user's account name or parts of the user's full
name that exceed two consecutive characters
• Must be at least six characters in length
• Must contain characters from three of the following four
categories:
– English uppercase characters (A…Z)
– English lowercase characters (a…z)
– Base 10 digits (0…9).
– Non-alphabetic characters (for example, !, $, #, %).
9. Type a password, then verify the entry by typing the same password in the
second entry field.
10. Click the arrow.
11. Click OK to acknowledge your password has been changed.
Rockwell Automation Publication 9528-UM001C-EN-P - March 2014 35
Page 36

Chapter 2 Configure the Process Automation System Server (PASS)
IMPORTANT
The virtual image desktop appears.
The default time zone for Windows Server 2008 is Pacific Time. If you are not in
the Pacific Time zone, you need to change time zone and update the time.
36 Rockwell Automation Publication 9528-UM001C-EN-P - March 2014
Page 37

Configure the Process Automation System Server (PASS) Chapter 2
Create an Administrator User Account
We suggest that you create an Administrator user account for each user that
requires administrative privileges. This best practice safeguards server corruption
by restricting access to the default administrative account, thus creating a backup
of critical system information. Each user can be delegated a separate user account
with password protection.
Follow these steps to create a new user account with administrative privileges.
1. On the virtual image desktop, click Start and choose Control Panel.
The Control Panel appears.
2. Click Add or remove user accounts (circled above).
The Manage Accounts window appears.
Rockwell Automation Publication 9528-UM001C-EN-P - March 2014 37
Page 38

Chapter 2 Configure the Process Automation System Server (PASS)
Current Administrator
Account D efault
New user account that is
being configured.
3. Click Create a new account (circled above).
4. Type your new user account name (circled above) and make sure
The Create New Account dialog box appears.
Administrator is selected.
5. Click Create Account.
The New Manage Accounts window appears.
The current Administrator account (default) is shown with a blue
background. After you create a password for the new user account, it
appears as the default.
6. Click the newly created New_User_Account.
38 Rockwell Automation Publication 9528-UM001C-EN-P - March 2014
Page 39

Configure the Process Automation System Server (PASS) Chapter 2
IMPORTANT
The Change an Account window appears.
7. Click Create a password (circled above).
The Create Password dialog box appears.
8. Complete the password configuration.
Topic Description
Password Type a password, then re-type the password to
confirm the entry.
See page 35 for password requirements.
Passphrase Type a password that contains a string of words and
characters. Passphrases are generally longer in
length, thus more secure, than passwords.
Remember this password because you need it when you configure your
FactoryTalk Directory.
9. Click Create password.
10. Close the window.
Rockwell Automation Publication 9528-UM001C-EN-P - March 2014 39
Page 40

Chapter 2 Configure the Process Automation System Server (PASS)
IMPORTANT
11. Click Start and log off the virtual machine.
First, click inside the console to activate the controls for your virtual
machine.
12. Do not press CRTL+ALT+DELETE as shown on the screen.
Press CTRL+ALT+INSERT to access the virtual machine.
40 Rockwell Automation Publication 9528-UM001C-EN-P - March 2014
Page 41

Configure the Process Automation System Server (PASS) Chapter 2
13. Click the newly created New_User_Account.
The New User Account window appears.
14. Type your password and press Return.
The Windows virtual image desktop appears with your personal
account privileges.
Rockwell Automation Publication 9528-UM001C-EN-P - March 2014 41
Page 42

Chapter 2 Configure the Process Automation System Server (PASS)
IMPORTANT
IMPORTANT
Rename the Computer for Your Location
Follow these steps before using your virtual machine.
1. On the desktop of the virtual machine, right-click the computer icon and
2. From the Computer name, domain, and workgroup settings area, click
3. On the Computer Name tab, click Change.
4. Type a new computer name in the Computer Name box.
5. Select Domain or Workgroup (default) and click OK.
choose Properties.
Change Settings (on the right side).
Do not use spaces, hyphens, or any special character symbols.
We recommend that PlantPAx servers and workstations be members of a
Windows domain for systems with 10 or more computers. The domain
centralizes administration of the users, groups, and security settings.
To join a domain, the user must have the appropriate domain user
account with proper credentials to add the computer to the domain.
6. Restart the virtual computer to enable the changes to the settings.
7. Login by using your domain credentials or local user administration
account previously created.
42 Rockwell Automation Publication 9528-UM001C-EN-P - March 2014
Page 43

Configure the Process Automation System Server (PASS) Chapter 2
Configure Ethernet Network Adapter Settings
Use the following procedure to set the speed, duplex, and power management
settings for the Ethernet adapter.
1. Click Start and choose Control Panel.
2. Click System & Security.
3. Click Network & Internet.
4. Click Network and Sharing Center.
The Network and Sharing Center dialog box appears.
5. Click Change Adapter Settings.
6. Right-click Local Area Connection and choose Properties.
The Network Properties dialog box appears.
7. Click Configure.
8. Click the Advanced tab.
9. From the Property window, choose Link Speed & Duplex.
10. From the Value menu, choose Auto Negotiation.
11. Click the Power Management tab.
12. Clear the ‘Allow the computer to turn off this device to save power’
checkbox.
13. Click OK.
Rockwell Automation Publication 9528-UM001C-EN-P - March 2014 43
Page 44

Chapter 2 Configure the Process Automation System Server (PASS)
IMPORTANT
Configure the FactoryTalk Directory on the PASS
The following procedure assumes the PASS is going to host the FactoryTalk
Directory. The directory server manages applications that can exist on multiple
clients and servers on separate computers on the PlantPAx system.
It is required to have a username and password with Administrator privileges
to install FactoryTalk software and to specify a FactoryTalk Directory location.
Use the same username and password for all FactoryTalk installations on the
PlantPAx system.
You must click inside the console to activate the controls for the
virtual machine.
1. Click Start and choose All Programs>Rockwell Software>
FactoryTalk Tools>FactoryTalk Directory Configuration Wizard.
The FactoryTalk Directory Configuration Wizard appears.
2. Check the following checkboxes:
• Configure the FactoryTalk Network Directory
• Configure the FactoryTalk Local Directory
3. Click Next.
It can take 30 seconds to process the request.
4. Type the FactoryTalk Administration Console credentials (see below) for
the network directory configuration and click Next.
44 Rockwell Automation Publication 9528-UM001C-EN-P - March 2014
Page 45
Configure the Process Automation System Server (PASS) Chapter 2
Wo r k g r o u p : Username: New_user_account
Password: Use the password you created with your
new_user_account. See page 39
.
Domain: Use the username and password of the domain account.
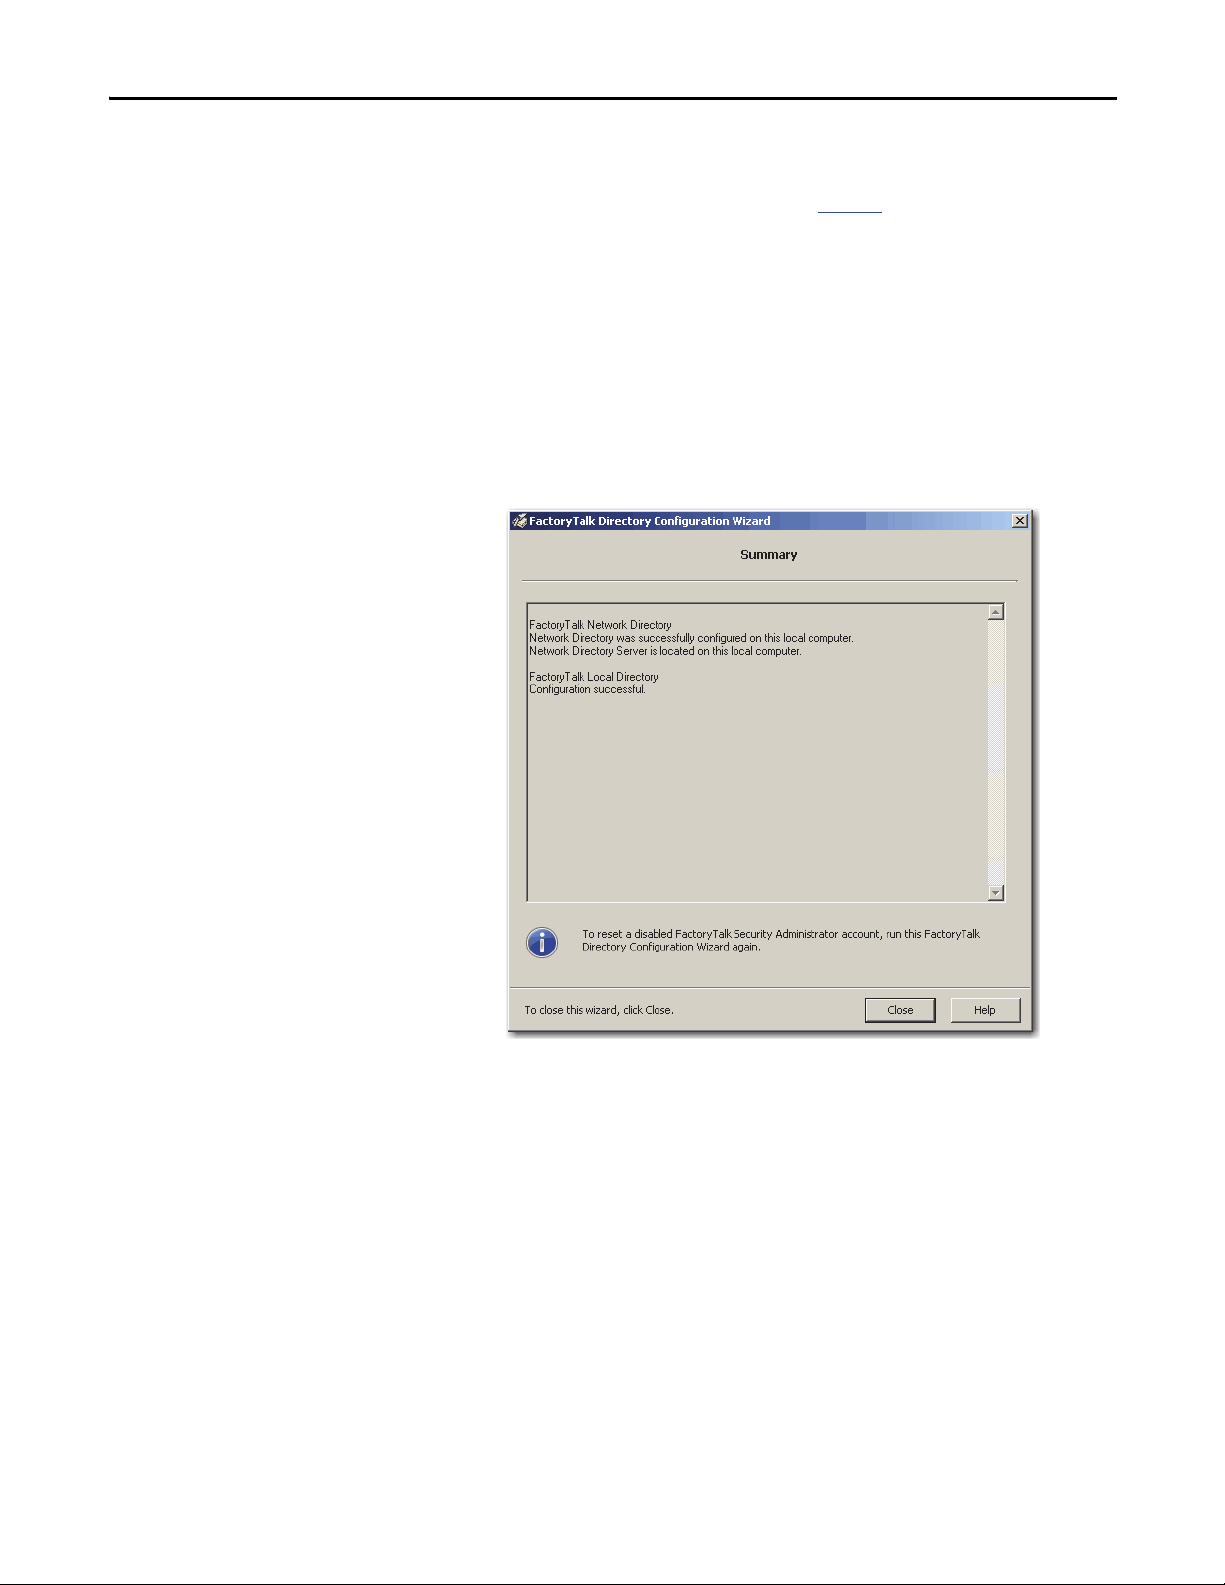
5. Type the credentials for the local directory configuration and click Next.
The password verification occurs twice because you checked both the
Network and Local Directory checkboxes on the FactoryTalk Directory
Configuration Wizard.
It can take 30 seconds to process the request.
The network and local directory are now set up and are shown as being
configured successfully.
6. Click Close.
Rockwell Automation Publication 9528-UM001C-EN-P - March 2014 45
Page 46
Chapter 2 Configure the Process Automation System Server (PASS)
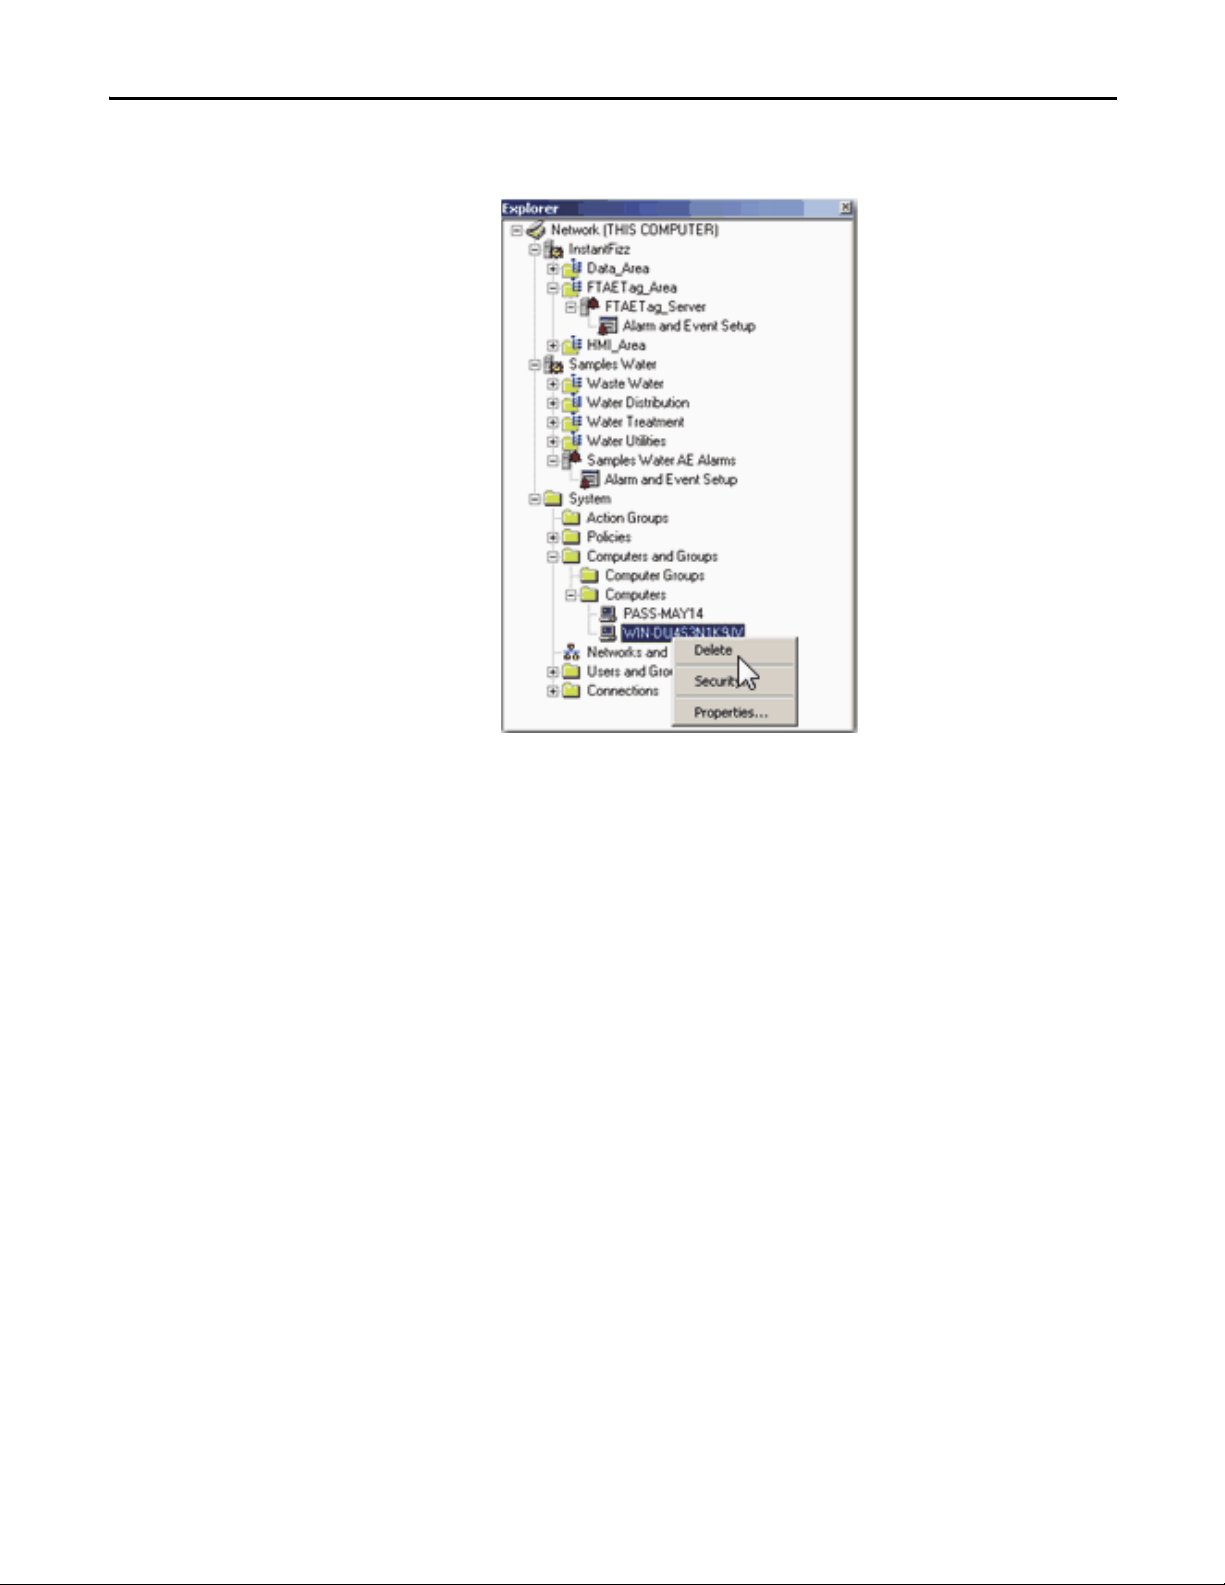
Delete the Old Computer Name
The old computer name is embedded in the sample applications. Therefore, if
you want to use the sample applications, complete the following steps to rehost
the applications on the new computer name. You delete the old computer name
from the FactoryTalk Directory by using the Administration Console.
1. Click Start and choose All Programs>Rockwell Software>
FactoryTalk Administration Console.
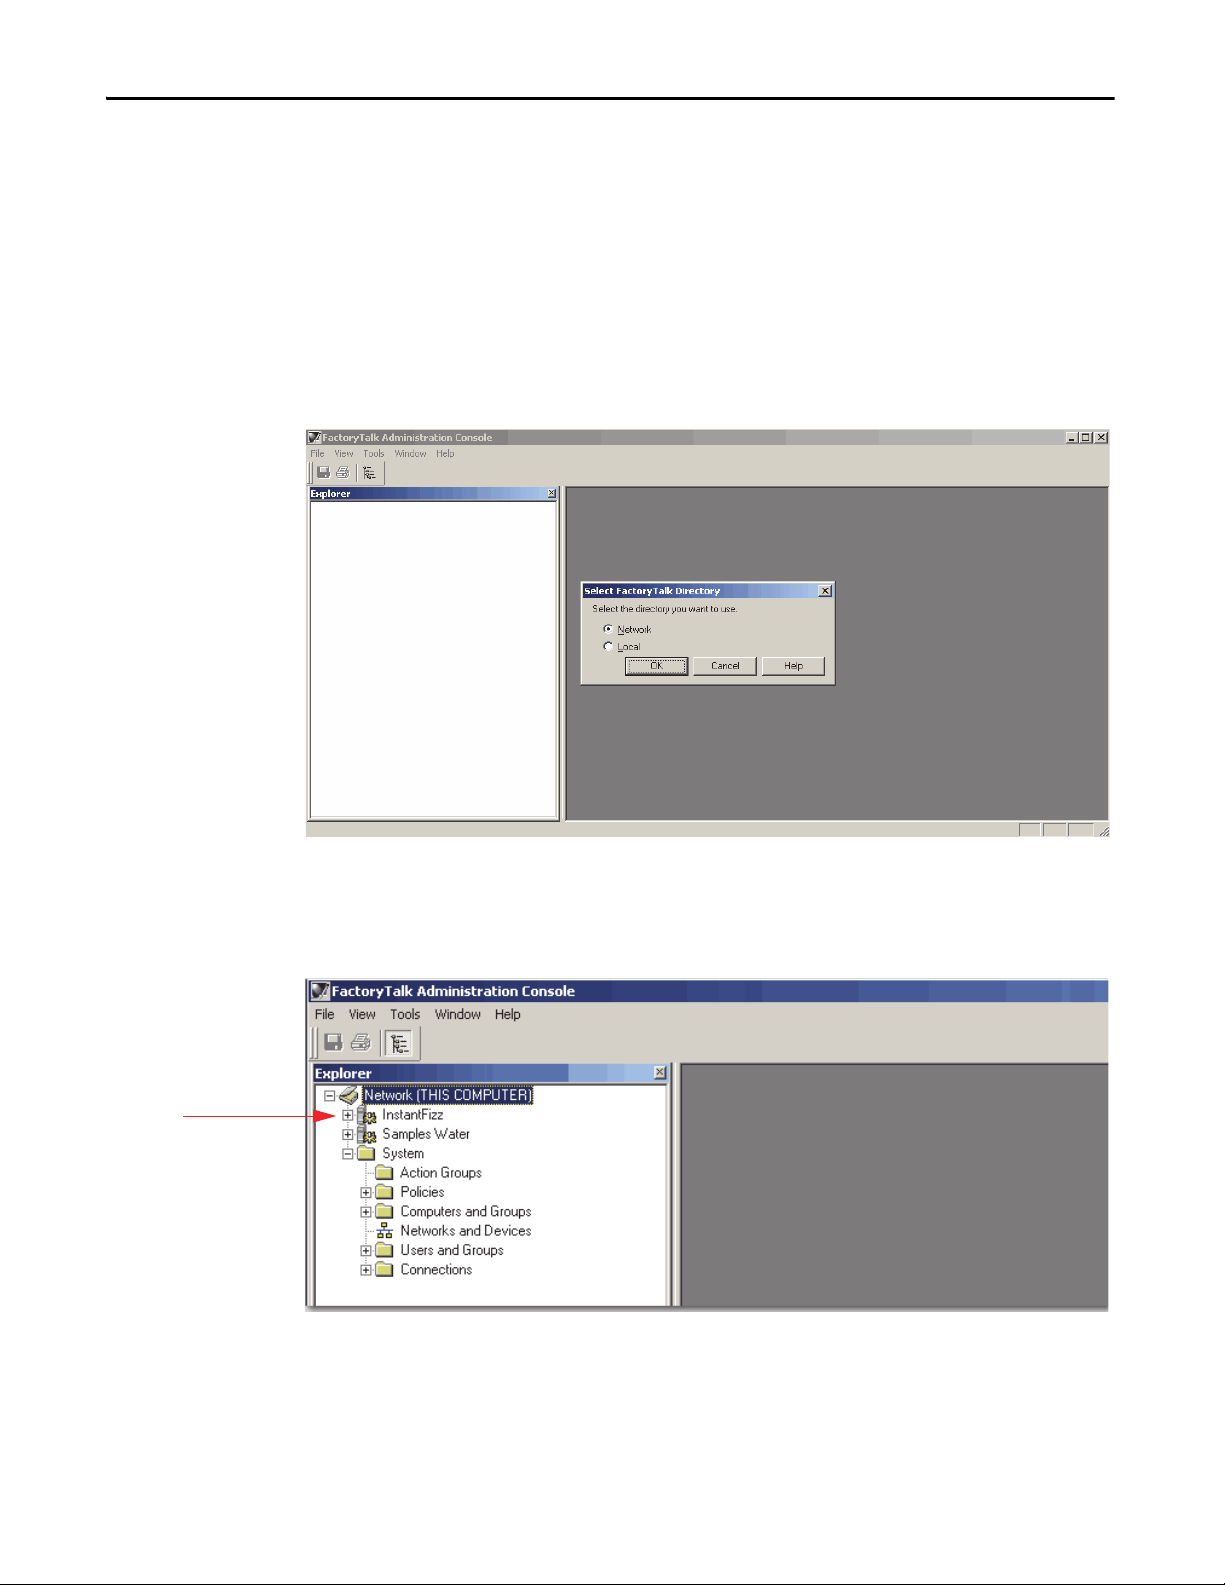
The FactoryTalk Administrator Console appears.
2. Click Network (default) and click OK.
3. In the Explorer window, browse to Network (THIS COMPUTER) and
click ‘+’ to expand InstantFizz.
4. Click ‘+’ to expand FTAETag_Area.
46 Rockwell Automation Publication 9528-UM001C-EN-P - March 2014
Page 47
Configure the Process Automation System Server (PASS) Chapter 2
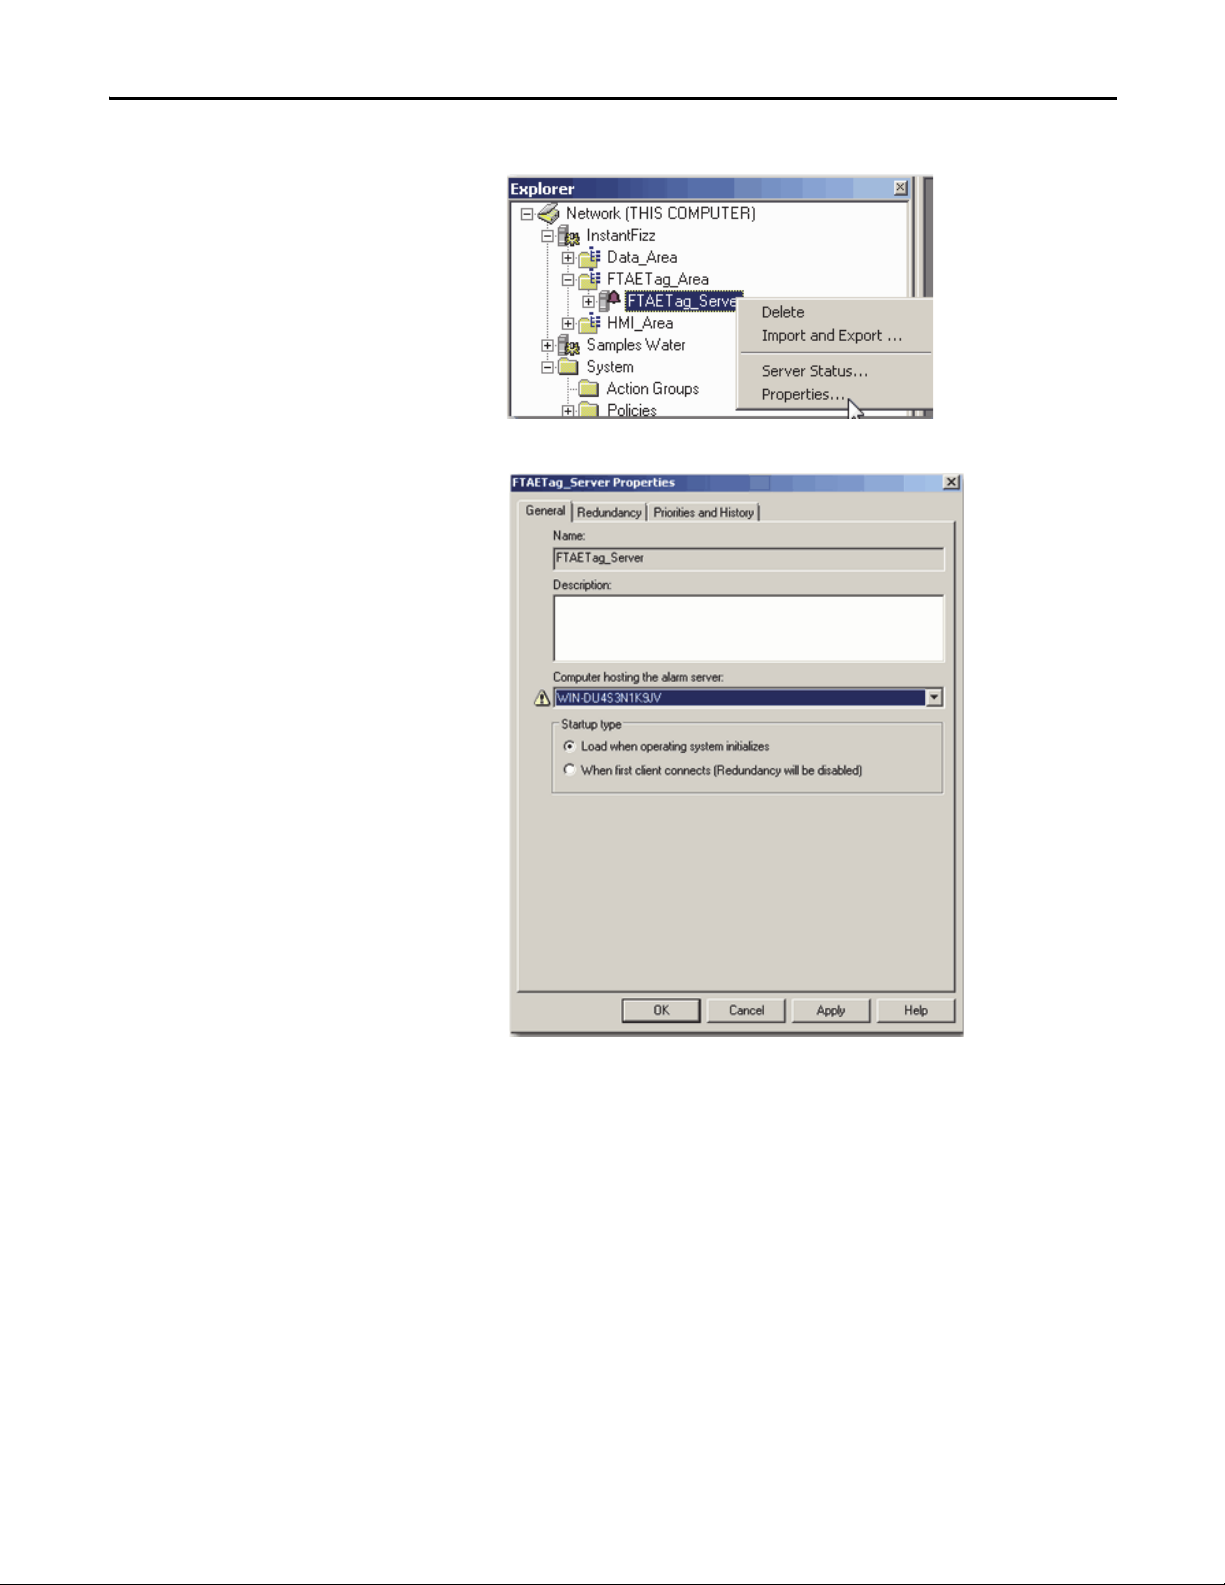
5. Right-click FTAETag_Server and choose Properties.
The FTAETag_Server Properties dialog box appears.
6. From the 'Computer hosting the alarm server' pull-down menu, choose
your new computer name.
7. Click OK.
8. In the Explorer window, click ‘+’ to expand Samples Water.
Rockwell Automation Publication 9528-UM001C-EN-P - March 2014 47
Page 48

Chapter 2 Configure the Process Automation System Server (PASS)
9. Right-click Samples Water AE Alarms and choose Properties.
The Samples Water AE Alarms Properties dialog box appears.
10. Select the new computer name and click OK.
A warning message appears.
11. Click OK.
12. In the Explorer window, choose Network>System>
Computers and Groups>Computers.
48 Rockwell Automation Publication 9528-UM001C-EN-P - March 2014
Page 49
Configure the Process Automation System Server (PASS) Chapter 2
13. Right-click the old computer name that was generated by the operating
system and choose Delete.
Rockwell Automation Publication 9528-UM001C-EN-P - March 2014 49
Page 50

Chapter 2 Configure the Process Automation System Server (PASS)
IMPORTANT
Configure the FactoryTalk Activation Server
For continuous use of FactoryTalk products and other Rockwell Automation
software products, computers running the software must have access to activation
files. FactoryTalk Activation software provides a secure, software-based system
for activating Rockwell Automation software products and managing software
activation files. With FactoryTalk Activation software, there is no need for a
physical master disk or any physical media. Instead, activation files are generated
and distributed electronically.
We recommend that the PASS server be designated as the FactoryTalk
activation server.
Concurrent activations are locked to a central activation-server computer on the
network. The activation server manages a pool of activation keys for connected
clients to share. Floating concurrent activations are assigned automatically to
clients that need them, and returned automatically to the activation server pool
when the software stops running on the client, or when the client computer
shuts down.
Client computers must be configured to obtain floating activations from the
activation server. A continuous network connection is also required for clients to
use floating activations. After a client obtains a floating activation, if the
activation server detects that the client has been disconnected, the activation is
returned to the server pool.
Table 2 - Activation Considerations
Consideration Details
Software that is not activated If the components you have installed cannot be activated, for example, because the activation server is unavailable,
Location of activation server The PASS is the primary choice for ac tivation management and is recommended to be the location of the activation
Options for adding activation files to the PASS To make concurrent floating activations available to activation clients, first you must download the activation files to
Protect activation files Activation files are simple text files that must have a .lic extension.
then the software continues to run for up to seven days. The seven-day grace period provides time to correct the
problem with acquiring activations, without disrupting critical applications. If activation is restored within seven days,
normal operations resume. If activation is not restored, the grace period expires. After the grace period expires, if you
restart the components and activation remains unavailable, the software runs for two hours in Demo mo de.
server. In the instance that the PASS is not an acceptable location, for example, when you make use of a redundant PASS
solution, the EWS is the secondary choice. In this instance, the EWS can be a dedicated station with a permanent
Ethernet connection to the system. The FactoryTalk Activation software can be configured to run as both a server and
client utility.
the activation server computer, from the Rockwell Automation Activation window.
If the PASS has Internet access, see Open Activation Manager
If the PASS does not have Internet access, the activations can be downloaded on a different computer with Internet
connectivity and then transferred to the PASS.
As long as the .lic extension is retained, you can copy or rename an activation file without harming it. However,
tampering with text inside the activation file can disable your Rockwell Software® produc ts.
If an activation file is damaged or deleted, contact Rockwell Automation Technical Support.
For safekeeping, keep an original set of your activation files on back-up media. Use descriptive names for the files, so
that you can identify them later, and copy them back to the appropriate computers.
Activation files are locked to the Host IDs of the computers (or dongles) that need them. Activation fails for Rockwell
Software products on a computer where the specified Host ID is not recognized by the activation file.
on page 51.
50 Rockwell Automation Publication 9528-UM001C-EN-P - March 2014
Page 51
Configure the Process Automation System Server (PASS) Chapter 2
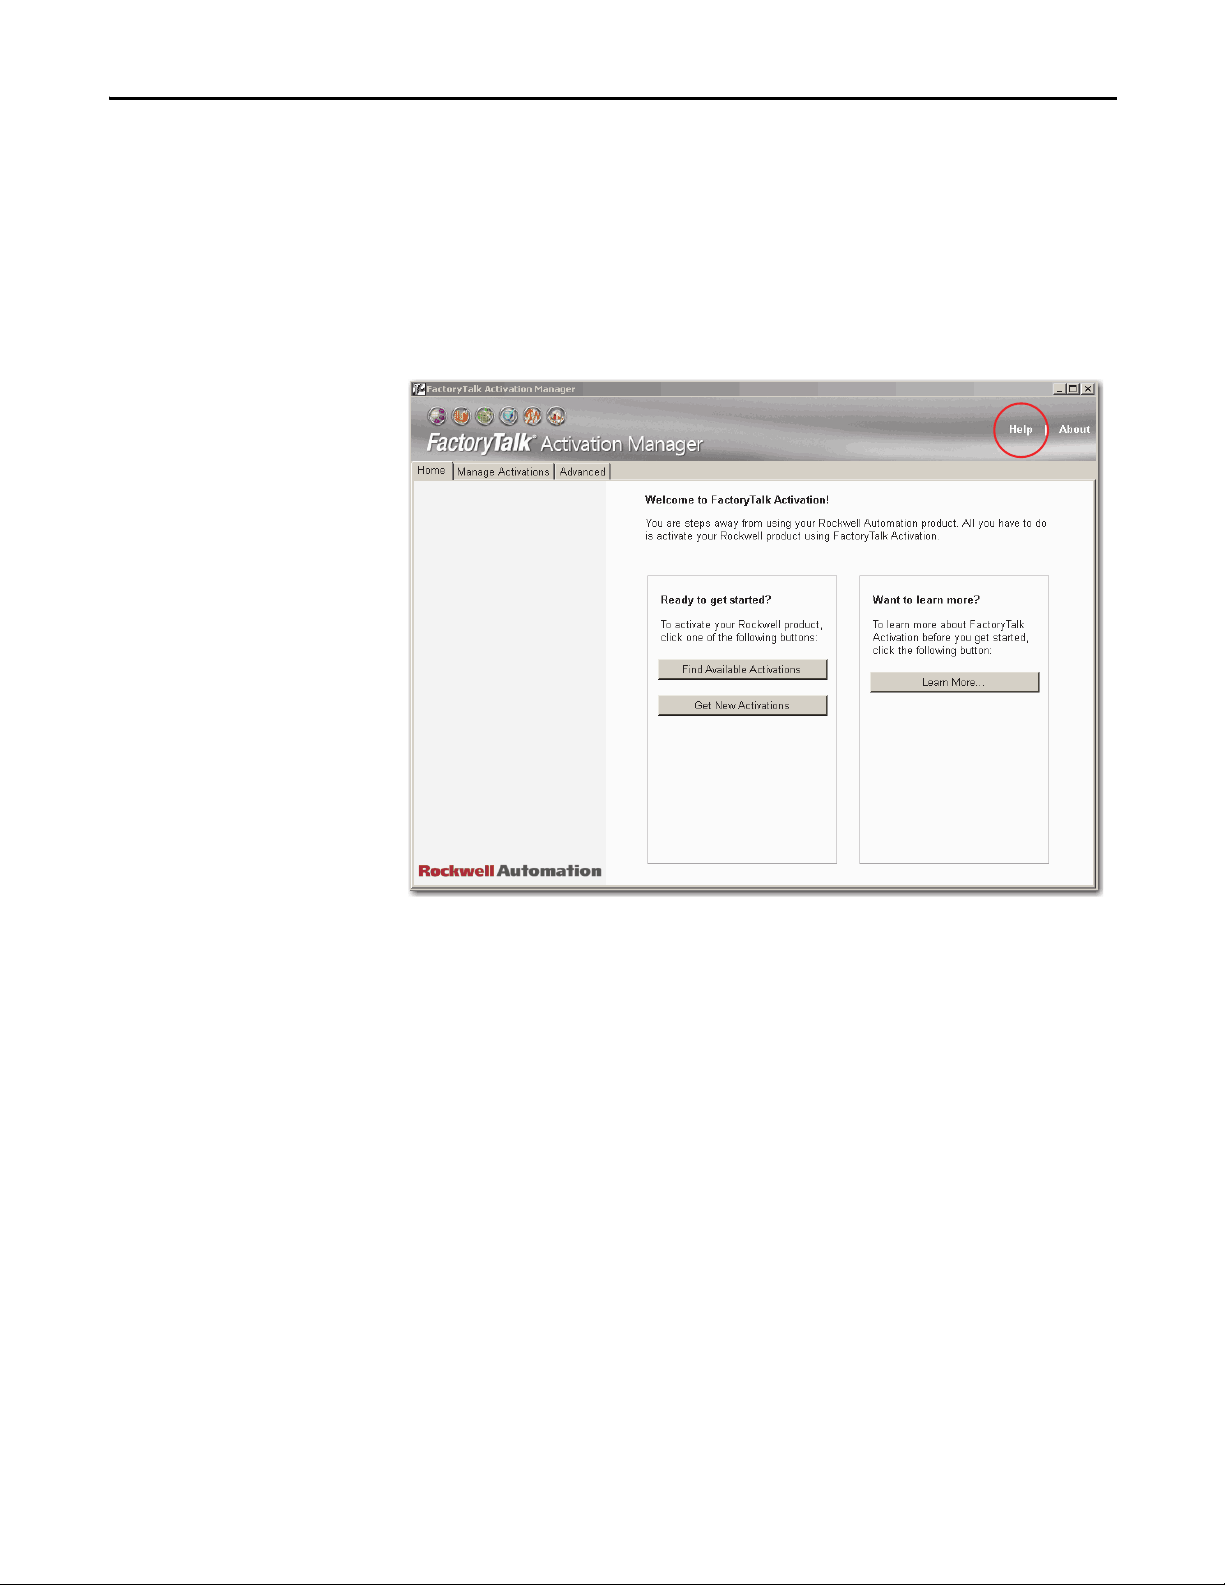
Open Activation Manager
On the Activation Manager computer, start the activation process by opening the
Activation Manager.
1. Click Start and choose All Programs>Rockwell Software>
FactoryTalk Activation>FactoryTalk Activation Manager.
The FactoryTalk Activation Manager window appears.
2. For instructions on installing FactoryTalk activations, click Help (circled
above).
3. Use the Help instructions to complete the activations.
After completing the activation process, your PASS is ready to use.
Rockwell Automation Publication 9528-UM001C-EN-P - March 2014 51
Page 52

Chapter 2 Configure the Process Automation System Server (PASS)
Notes:
52 Rockwell Automation Publication 9528-UM001C-EN-P - March 2014
Page 53

Chapter 3
IMPORTANT
IMPORTANT
Configure the EWS and OWS System Elements
This chapter describes how to configure workstations for your virtual
environment. The configuration procedures for the EWS and OWS are similar
even though these PlantPAx system elements operating differently. These
procedures include:
• Setting up Windows 7 Professional for the new instance
• Setting up the Network Adapter
• Setting up FactoryTalk Directory
• Setting up activation files
The engineering workstation (EWS) supports system configuration, application
development, and maintenance functions. This is the central location for
monitoring and maintaining the system’s operation.
The operator workstation (OWS) is not meant to support development or
maintenance activities. This workstation’s purpose is to support operator
interaction with a graphical view and interface into the process.
The required Rockwell Automation software for the EWS and OWS
workstations virtual template is included and pre-installed in the virtual image
templates, but not activated. To activate each EWS or OWS virtual template,
you can purchase a single activation license for each virtual template instance.
See page 9
The table shows the topics in this section.
Top ic Pag e
Before You Begin 54
Configure Microsoft Windows 7 Professional 54
Configure Ethernet Network Adapter Settings 59
Define the FactoryTalk Directory Location 60
Configure the FactoryTalk Activation Server 61
for product catalog numbers.
If you already own individual product activations, these activations also can be
used to activate the virtual image templates.
During the configuration of EWS and OWS you can encounter a User Account
Control window that asks if you want to allow a program to make changes to
the computer. Click Yes and continue on.
Rockwell Automation Publication 9528-UM001C-EN-P - March 2014 53
Page 54
Chapter 3 Configure the EWS and OWS System Elements
Before You Begin
Configure Microsoft Windows 7 Professional
You must have your template deployed from the USB drive to perform the
following procedures in this chapter. If you need to deploy the template, see
Chapter 1 on page 13
Complete these steps to configure Microsoft Windows 7 Professional settings for
the EWS and OWS workstations on your virtual machine.
1. If the vSphere Client is not already open, on a computer with VMware
vSphere Client software installed, click Start and choose All
Programs>VMware>VMware vSphere Client.
2. Click the Console tab.
3. In the Organizer tree, right-click the virtual machine and choose
Power>Power On.
This window appears after initial setup is complete. This stage can take a
few minutes.
for details.
54 Rockwell Automation Publication 9528-UM001C-EN-P - March 2014
Page 55

Configure the EWS and OWS System Elements Chapter 3
The Microsoft Windows Set Up Windows dialog box appears.
4. Choose the appropriate option from the following pull-down menus.
Menu Description
Country or region Choose your country or region, for example,
Time and currency Choose your time and currency, for example, English
Keyboard layout Choose your keyboard layout, for example, US.
United States.
(United States).
5. Click Next.
Rockwell Automation Publication 9528-UM001C-EN-P - March 2014 55
Page 56

Chapter 3 Configure the EWS and OWS System Elements
IMPORTANT
The Set Up Window dialog box shows the user name and computer name.
6. Type information in the Set Up Windows dialog box.
Topic Description
Type a user name Type a user name for the virtual machine.
Type a computer name Type a computer name.
You need the user name again when you configure your
FactoryTalk Directory.
7. Click Next.
56 Rockwell Automation Publication 9528-UM001C-EN-P - March 2014
Page 57

Configure the EWS and OWS System Elements Chapter 3
IMPORTANT
The Set Up Window dialog box shows the account password.
8. Type information in the Set Up Windows dialog box.
Topic Description
Type a password Type a password.
Retype your password Retype the password.
Type a password hint Type a hint that reminds you of the password.
You need the password again when you configure your
FactoryTalk Directory.
9. Click Next.
The License Agreement appears.
10. Read the license agreement, and then click ‘I accept the license terms’.
11. Click Next.
Rockwell Automation Publication 9528-UM001C-EN-P - March 2014 57
Page 58

Chapter 3 Configure the EWS and OWS System Elements
IMPORTANT
The Windows Update window appears.
12. Click Ask me later.
13. From the Time Zone pull-down menu, choose your time zone.
14. If you need to, click ‘Automatically adjust clock for Daylight Savings Time’.
15. Click Next.
The Set Up Window shows the current location options.
16. Click Work Network.
A message appears indicating that ‘Windows is finalizing your settings’.
The desktop of the virtual machine then opens.
Rename the Computer for Your Location
You have an option of giving the computer a different name than the one assigned
during configuration of the Windows settings or add the workstation to a
domain by following these steps:
1. On the desktop of the virtual machine, right-click the computer icon and
choose Properties.
2. From the Computer name, domain, and workgroup settings area, click
Change Settings (on the right side).
3. On the Computer Name tab, click Change.
4. In the Computer Name box, type a computer name.
Do not use spaces, hyphens, or any special character symbols.
58 Rockwell Automation Publication 9528-UM001C-EN-P - March 2014
Page 59

Configure the EWS and OWS System Elements Chapter 3
IMPORTANT
5. Select Domain or Workgroup (default) and click OK.
We recommend that PlantPAx servers and workstations be members of a
Windows domain for systems with 10 or more computers. The domain
centralizes administration of the users, groups, and security settings.
To join a domain, the user must have the appropriate domain user
account with proper credentials to add the computer to the domain.
6. When prompted, restart the virtual computer to enable the changes to the
settings.
7. Login by using your domain credentials or local user administration
account previously created.
Configure Ethernet Network Adapter Settings
Use the following procedure to set the speed, duplex, and power management
settings for the Ethernet adapter.
1. Click Start and choose Control Panel.
2. Click System & Security.
3. Click Network & Internet.
4. Click Network and Sharing Center.
The Network and Sharing Center dialog box appears.
5. Click Change Adapter Settings.
6. Right-click Local Area Connection and choose Properties.
The Network Properties dialog box appears.
7. Click Configure.
8. Click the Advanced tab.
9. From the Property window, choose Link Speed & Duplex.
10. From the Value menu, choose Auto Negotiation.
11. Click the Power Management tab.
12. Clear the ‘Allow the computer to turn off this device to save power’
checkbox.
13. Click OK.
Rockwell Automation Publication 9528-UM001C-EN-P - March 2014 59
Page 60
Chapter 3 Configure the EWS and OWS System Elements
IMPORTANT
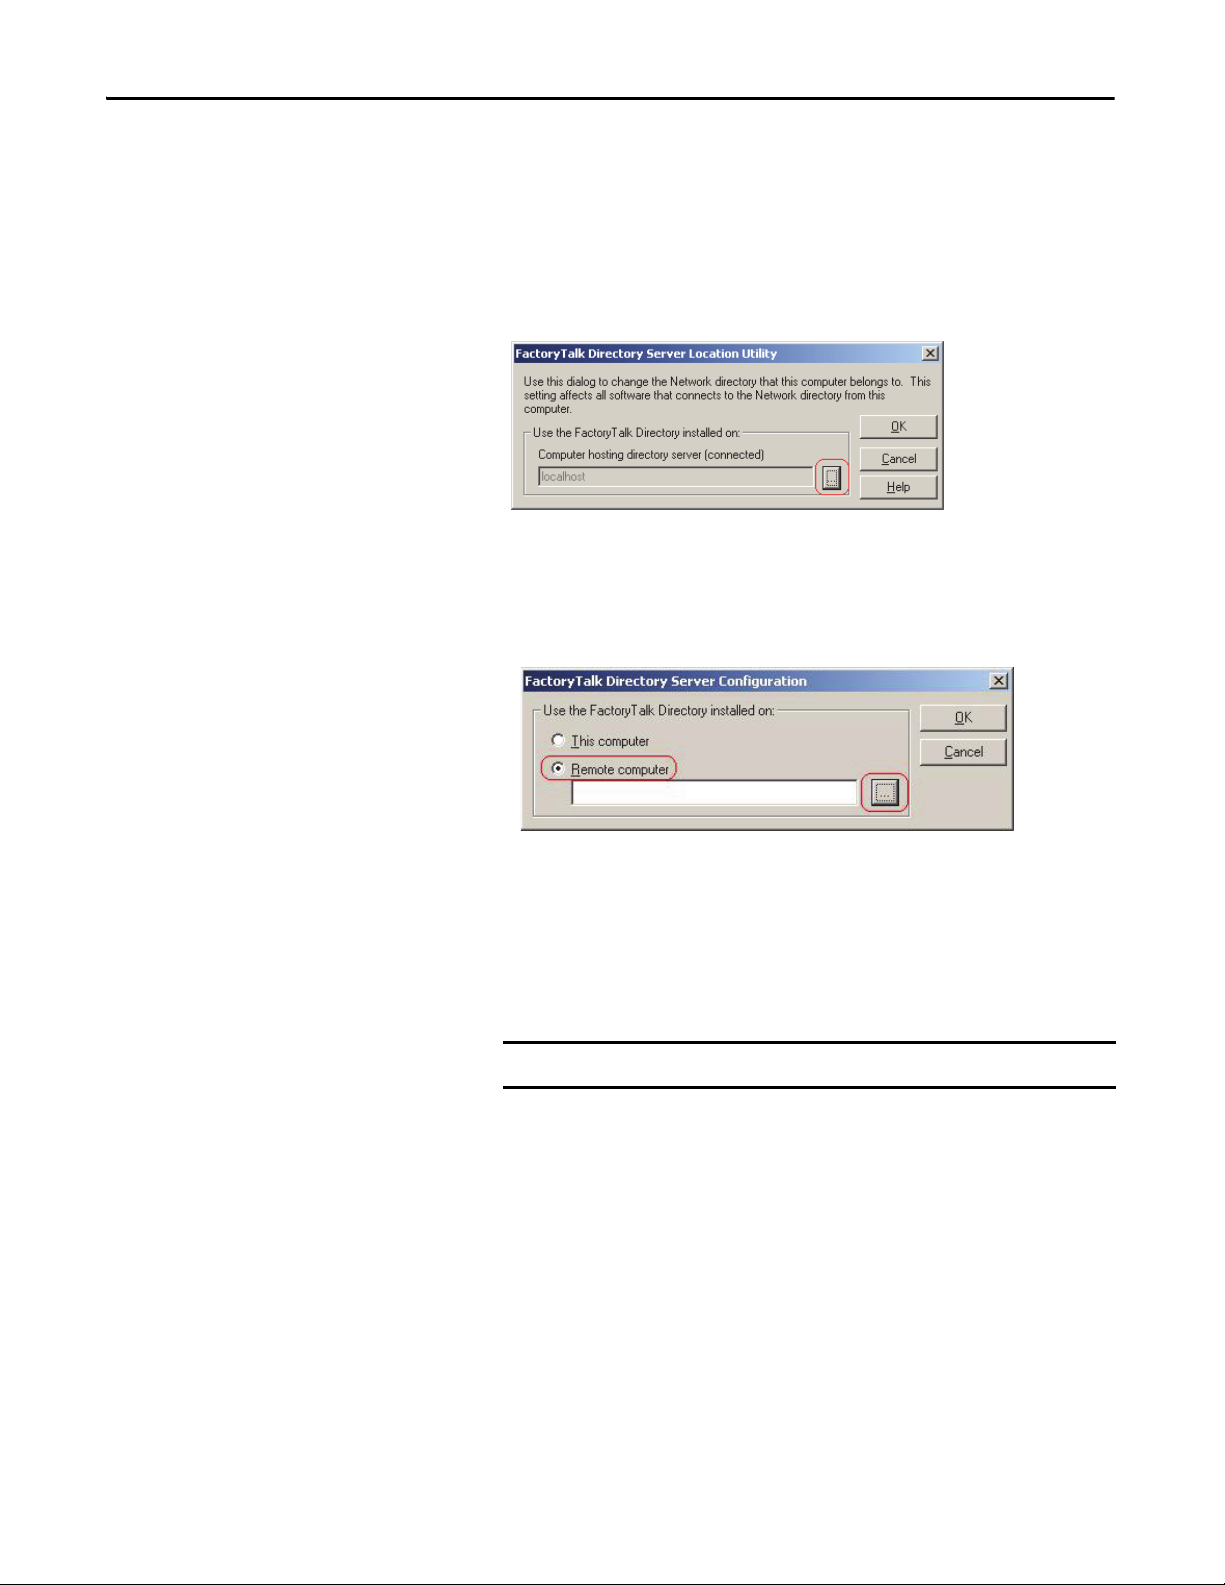
Define the FactoryTalk Directory Location
Complete the following steps to specify the Network FactoryTalk Directory
location for the EWS and OWS workstations. Complete these steps for each
workstation.
1. Click Start and choose All Programs>Rockwell Software>
FactoryTalk Tools>Specify FactoryTalk Directory Location.
The FactoryTalk Directory Server Location Utility appears.
2. Click Browse (ellipsis '…' in box).
3. Type your FactoryTalk Directory Administration Console credentials into
the login screen and click OK.
4. Click Remote computer.
Click Browse (ellipsis '…' in box) to navigate the network to find the
computer name of the PASS server that is hosting the FactoryTalk
Directory services.
5. Choose the appropriate PASS server name and click OK.
The Network FactoryTalk Directory location has now been specified.
You must repeat all the steps for each workstation.
6. When prompted, enter your credentials and click OK.
7. Restart the server or workstation after making a change.
60 Rockwell Automation Publication 9528-UM001C-EN-P - March 2014
Page 61

Configure the EWS and OWS System Elements Chapter 3
Configure the FactoryTalk Activation Server
For continuous use of FactoryTalk products and other Rockwell Automation
software products, computers running the software must have access to activation
files. FactoryTalk Activation software provides a secure, software-based system
for activating Rockwell Automation software products and managing software
activation files. With FactoryTalk Activation software, there is no need for a
physical master disk or any physical media. Instead, activation files are generated
and distributed electronically.
Concurrent activations are locked to a central activation-server computer on the
network. The activation server manages a pool of activation keys for connected
clients to share. Floating concurrent activations are assigned automatically to
clients that need them, and returned automatically to the activation server pool
when the software stops running on the client, or when the client computer
shuts down.
Client computers must be configured to obtain floating activations from the
activation server. A continuous network connection is also required for clients to
use floating activations. After a client obtains a floating activation, if the
activation server detects that the client has been disconnected, the activation is
returned to the server pool.
Table 3 - Activation Considerations
Consideration Details
Software that is not activated If the components you have installed cannot be activated, for example, because the activation server is unavailable,
Location of activation server The PASS is the primary choice for ac tivation management and is recommended to be the location of the activation
Options for adding activation files to the PASS To make concurrent floating activations available to activation clients, first you must download the activation files to
Protect activation files Activation files are simple text files that must have a .lic extension.
then the software continues to run for up to seven days. The seven-day grace period provides time to correct the
problem with acquiring activations, without disrupting critical applications. If activation is restored within seven days,
normal operations resume. If activation is not restored, the grace period expires. After the grace period expires, if you
restart the components and activation remains unavailable, the software runs for two hours in Demo mo de.
server. In the instance that the PASS is not an acceptable location, for example, when you make use of a redundant PASS
solution, the EWS is the secondary choice. In this instance, the EWS can be a dedicated station with a permanent
Ethernet connection to the system. The FactoryTalk Activation software can be configured to run as both a server and
client utility.
the activation server computer, from the Rockwell Automation Activation window.
If the PASS has Internet access, see Open Activation Manager
If the PASS does not have Internet access, the activations can be downloaded on a different computer with Internet
connectivity and then transferred to the PASS.
As long as the .lic extension is retained, you can copy or rename an activation file without harming it. However,
tampering with text inside the activation file can disable your Rockwell Software® produc ts.
If an activation file is damaged or deleted, contact Rockwell Automation Technical Support.
For safekeeping, keep an original set of your activation files on back-up media. Use descriptive names for the files, so
that you can identify them later, and copy them back to the appropriate computers.
Activation files are locked to the Host IDs of the computers (or dongles) that need them. Activation fails for Rockwell
Software products on a computer where the specified Host ID is not recognized by the activation file.
on page 62.
Rockwell Automation Publication 9528-UM001C-EN-P - March 2014 61
Page 62

Chapter 3 Configure the EWS and OWS System Elements
Open Activation Manager
On the Activation Manager computer, start the activation process by opening the
Activation Manager.
1. Click Start and choose All Programs>Rockwell Software>
FactoryTalk Activation>FactoryTalk Activation Manager.
The FactoryTalk Activation Manager window appears.
2. For instructions on installing FactoryTalk activations, click Help (circled
above).
3. Use the Help instructions to complete the activations.
After completing the activation process, your workstation(s) are
ready to use.
Update Activation Search Path
After the license files are on the PASS, you must update the Activation Search
Path on the workstations.
1. If the Activation Manager is not already open, on the OWS or EWS
computer, click Start and choose All Programs>
Rockwell Software>FactoryTalk Activation>
FactoryTalk Activation Manager.
2. Click Find Available Activations.
The Manage Activations section appears on the FactoryTalk Activation
Manager window.
62 Rockwell Automation Publication 9528-UM001C-EN-P - March 2014
Page 63

Configure the EWS and OWS System Elements Chapter 3
3. Click Update Activation Search Path.
The Update Activation Search Path window appears.
4. Click Add Server.
5. Click Browse (ellipsis ‘…’ in box).
The Browse for Server message window appears.
6. Select the PASS in the network and click OK.
The name of the PASS computer appears in the table under Path to
Activations.
7. Check the box next to the name of the PASS computer.
8. Click ‘Up’ so that the PASS computer moves to the top of the list.
9. Click Save.
10. Click Refresh Activations.
Available activations appear in the table.
11. Complete steps 1…10 for all OWS and EWS workstations.
Rockwell Automation Publication 9528-UM001C-EN-P - March 2014 63
Page 64

Chapter 3 Configure the EWS and OWS System Elements
Notes:
64 Rockwell Automation Publication 9528-UM001C-EN-P - March 2014
Page 65

Chapter 4
IMPORTANT
Configure Application Server OWS
(Microsoft Remote Desktop Services)
The Application Server OWS (AppServ-OWS) provides PlantPAx users with an
alternative to the standard OWS client machine (physical or virtual). AppServOWS uses Microsoft Remote Desktop Services (RDS) technology to serve
multiple instances of the OWS from a single server virtual template. This
architecture is ideal for PlantPAx users wishing to use Thin Clients as Operator
Wor k S tat io ns .
This chapter provides you with the procedures necessary to deploy the
Application Server OWS (AppServ-OWS) virtual template:
• Setting up Windows Server 2008 for the new instance
• Setting up the Network Adapter
• Setting up FactoryTalk Directory
• Setting up activation files
• Configure Remote Desktop Services
For more information regarding recommended architecture and the actual
configuration of the Application Server, see the PlantPAx Process Automation
System Reference Manual, publication PROCES-RM001
product documentation.
The required Rockwell Automation software for the AppServ-OWS virtual
template is included and pre-installed in the virtual image templates, but not
activated. You need an activation license for each client connection.
See page 9
for product catalog numbers.
If you already own individual product activations, these activations also can be
used to activate the virtual image templates.
, and the specific
Rockwell Automation Publication 9528-UM001C-EN-P - March 2014 65
Page 66

Chapter 4 Configure Application Ser ver OWS (Microsoft Remote Desktop Ser vices)
IMPORTANT
The table shows the topics in this section.
Top ic Pag e
Before You Begin 66
Configure Microsoft Windows Server 2008 66
Configure the Ethernet Network Adapter Settings 76
Define the FactoryTalk Directory Location 77
Configure the FactoryTalk Activation Server 78
Configure Remote Desktop Services 81
Microsoft Remote Desktop Ser vices Licensing 84
Install Additional Software 84
Add Remote Desktop Services Users 84
During the configuration of Application Server OWS you can encounter a User
Account Control dialog box that asks if you want to allow a program to make
changes to the computer. Click Yes and continue on.
Before You Begin
Configure Microsoft Windows Server 2008
You must have your template deployed from the USB drive to perform the
following procedures in this chapter. If you need to deploy the template, see
Chapter 1 on page 13
for details.
Complete these steps on a virtual machine to initiate the Microsoft Windows
Server 2008 operating system setup for the Application Server OWS. You set
your own administration account password, computer name, and file location
preference in this procedure.
1. If the vSphere Client is not already open, on a computer with VMware
vSphere Client software installed, click Start and choose All
Programs>VMware>VMware vSphere Client.
2. Click the Console tab.
66 Rockwell Automation Publication 9528-UM001C-EN-P - March 2014
Page 67

Configure Application Server OWS (Microsoft Remote Desktop Services) Chapter 4
3. In the Organizer tree, right-click the virtual machine and choose
Power>Power On.
You see this window after initial setup is complete. This stage can take a
few minutes.
Rockwell Automation Publication 9528-UM001C-EN-P - March 2014 67
Page 68

Chapter 4 Configure Application Ser ver OWS (Microsoft Remote Desktop Ser vices)
IMPORTANT
The Microsoft Windows Set Up Windows dialog box appears.
First, click inside the console to activate the controls for your virtual
machine.
4. Choose the appropriate option from the following pull-down menus.
Menu Description
Country or region Choose your country or region, for example,
Time and currency Choose your time and currency, for example, English
Keyboard layout Choose your keyboard layout, for example, US.
United States.
(United States).
5. Click Next.
The License Agreement appears. This agreement includes
Microsoft Windows, Rockwell Automation Software, and Adobe Reader.
6. Read the license agreement, and then click ‘I accept the license terms’.
7. Click Start.
8. If you get a message stating 'The User’s password must be changed before
logging on the first time.', click OK.
68 Rockwell Automation Publication 9528-UM001C-EN-P - March 2014
Page 69

Configure Application Server OWS (Microsoft Remote Desktop Services) Chapter 4
IMPORTANT
The Administrator account dialog box appears so you can change
a password.
Passwords must meet the following minimum requirements:
• Cannot contain the user's account name or parts of the user's full
name that exceed two consecutive characters
• Must be at least six characters in length
• Must contain characters from three of the following four
categories:
– English uppercase characters (A…Z)
– English lowercase characters (a…z)
– Base 10 digits (0…9).
– Non-alphabetic characters (for example, !, $, #, %).
9. Type a password, then verify the entry by typing the same password in the
second entry field.
10. Click the arrow.
11. Click OK to acknowledge your password has been changed.
Rockwell Automation Publication 9528-UM001C-EN-P - March 2014 69
Page 70
Chapter 4 Configure Application Ser ver OWS (Microsoft Remote Desktop Ser vices)
IMPORTANT
The virtual image desktop appears.
The default time zone for Windows Server 2008 is Pacific Time. If you are not in
the Pacific Time zone, you need to change time zone and update the time.
70 Rockwell Automation Publication 9528-UM001C-EN-P - March 2014
Page 71

Configure Application Server OWS (Microsoft Remote Desktop Services) Chapter 4
Create an Administrator User Account
We suggest that you create an Administrator user account for each user that
requires administrative privileges. This best practice safeguards server corruption
by restricting access to the default administrative account, thus creating a backup
of critical system information. Each user can be delegated a separate user account
with password protection.
Follow these steps to create a new user account with administrative privileges.
1. On the virtual image desktop, click Start and choose Control Panel.
The Control Panel appears.
2. Click Add or remove user accounts (circled above).
The Manage Accounts window appears.
Rockwell Automation Publication 9528-UM001C-EN-P - March 2014 71
Page 72

Chapter 4 Configure Application Ser ver OWS (Microsoft Remote Desktop Ser vices)
Current Administrator
Account D efault
New user account that is
being configured.
3. Click Create a new account (circled above).
The Create New Account dialog box appears.
4. Type your new user account name (circled above) and make sure
Administrator is selected.
5. Click Create Account.
The New Manage Accounts window appears.
The current Administrator account (default) is shown with a blue
background. After you create a password for the new user account, it
appears as the default.
6. Click the newly created New_User_Account.
72 Rockwell Automation Publication 9528-UM001C-EN-P - March 2014
Page 73

Configure Application Server OWS (Microsoft Remote Desktop Services) Chapter 4
IMPORTANT
The Change an Account window appears.
7. Click Create a password (circled above).
The Create Password dialog box appears.
8. Complete the password configuration.
Topic Description
Password Type a password, then re-type the password to
confirm the entry.
See page 69 for password requirements.
Passphrase Type a password that contains a string of words and
characters. Passphrases are generally longer in
length, thus more secure, than passwords.
Remember this password because you need it when you configure your
FactoryTalk Directory.
9. Click Create password.
10. Close the window.
Rockwell Automation Publication 9528-UM001C-EN-P - March 2014 73
Page 74
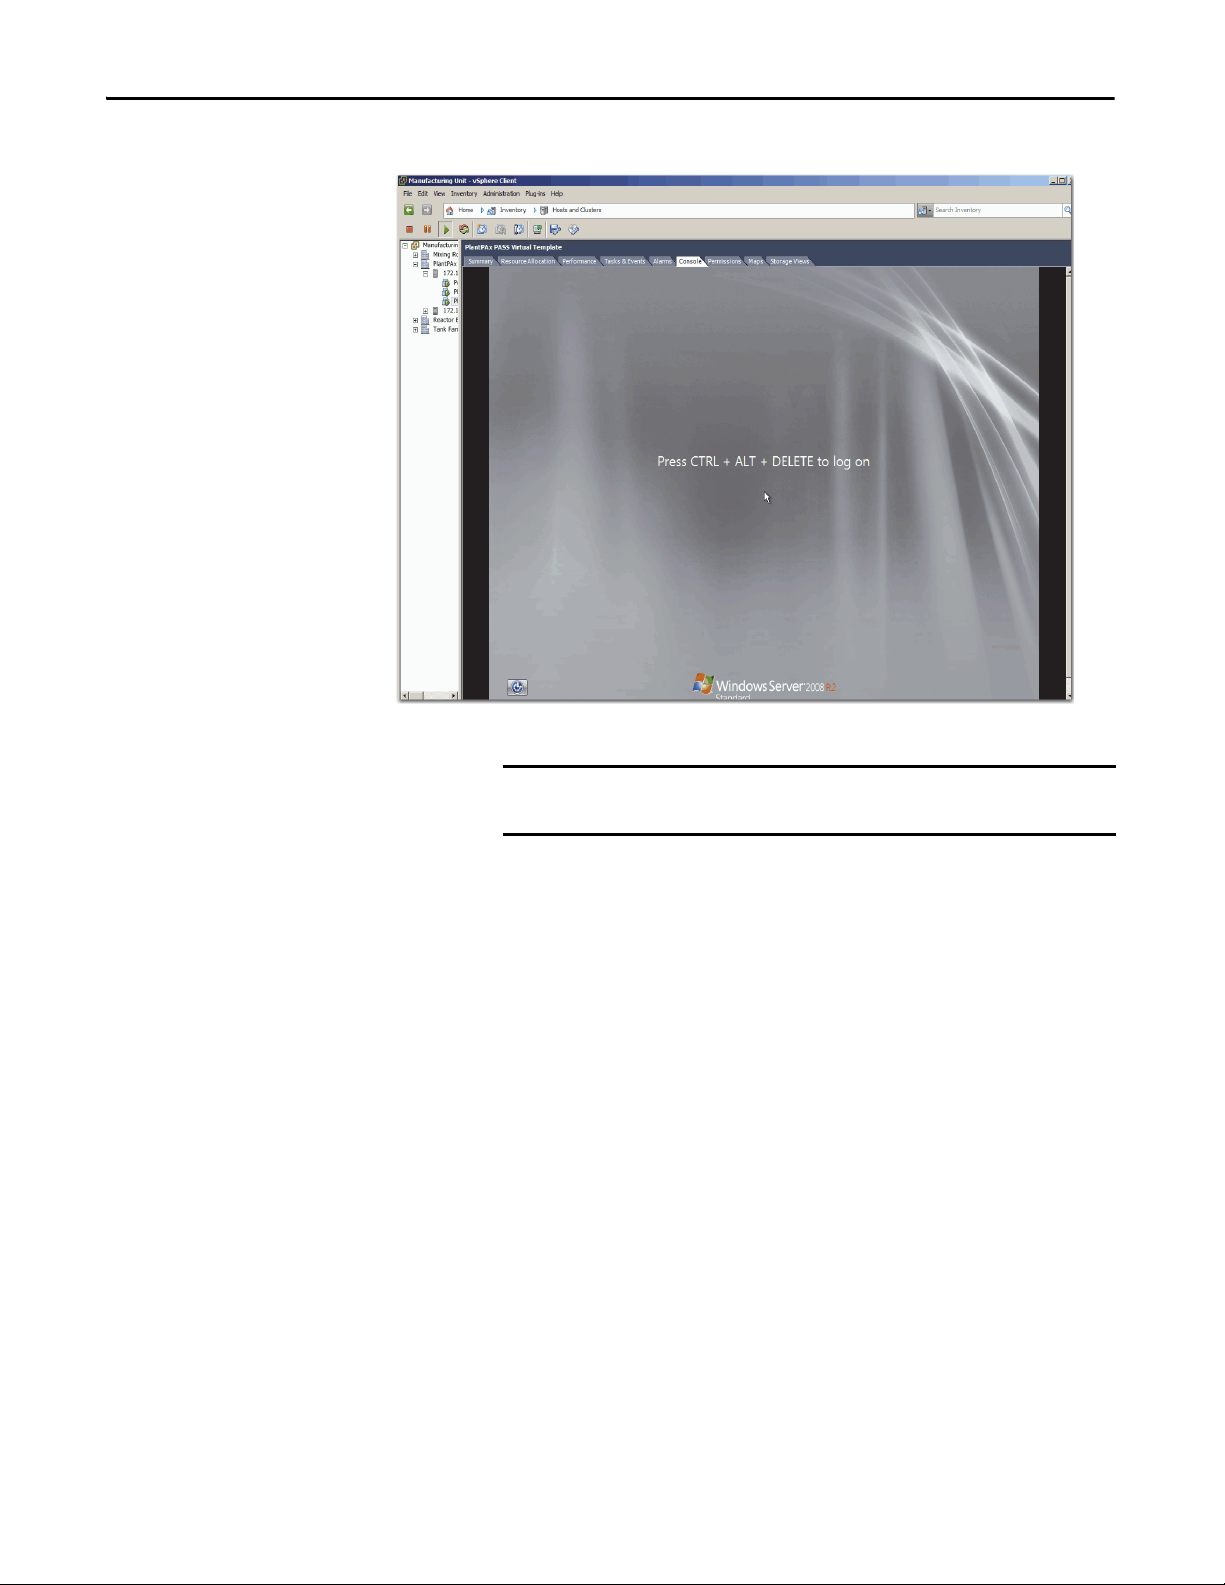
Chapter 4 Configure Application Ser ver OWS (Microsoft Remote Desktop Ser vices)
IMPORTANT
11. Click Start and log off the virtual machine.
First, click inside the console to activate the controls for your virtual
machine.
12. Do not press CRTL+ALT+DELETE as shown on the screen.
Press CTRL+ALT+INSERT to access the virtual machine.
74 Rockwell Automation Publication 9528-UM001C-EN-P - March 2014
Page 75

Configure Application Server OWS (Microsoft Remote Desktop Services) Chapter 4
IMPORTANT
13. Click the newly created New_User_Account.
The New User Account window appears.
14. Type your password and press Return.
The Windows virtual image desktop appears with your personal
account privileges.
Rename the Computer for Your Location
Follow these steps before using your virtual machine.
1. On the desktop of the virtual machine, right-click the computer icon and
choose Properties.
2. From the Computer name, domain, and workgroup settings area, click
Change Settings (on the right side).
3. On the Computer Name tab, click Change.
4. Type a new computer name in the Computer Name box.
Do not use spaces, hyphens, or any special character symbols.
Rockwell Automation Publication 9528-UM001C-EN-P - March 2014 75
Page 76

Chapter 4 Configure Application Ser ver OWS (Microsoft Remote Desktop Ser vices)
IMPORTANT
5. Select Domain or Workgroup (default) and click OK.
We recommend that PlantPAx servers and workstations be members of a
Windows domain for systems with 10 or more computers. The domain
centralizes administration of the users, groups, and security settings.
6. Restart the virtual computer to enable the changes to the settings.
7. Login by using your domain credentials or local user administration
account previously created.
To join a domain, the user must have the appropriate domain user
account with proper credentials to add the computer to the domain.
Configure the Ethernet Network Adapter Settings
Use the following procedure to set the speed, duplex, and power management
settings for the Ethernet adapter.
1. Click Start and choose Control Panel.
2. Click System & Security.
3. Click Network & Internet.
4. Click Network and Sharing Center.
The Network and Sharing Center dialog box appears.
5. Click Change Adapter Settings.
6. Right-click Local Area Connection and choose Properties.
The Network Properties dialog box appears.
7. Click Configure.
8. Click the Advanced tab.
9. From the Property window, choose Link Speed & Duplex.
10. From the Value menu, choose Auto Negotiation.
11. Click the Power Management tab.
12. Clear the ‘Allow the computer to turn off this device to save power’
checkbox.
13. Click OK.
76 Rockwell Automation Publication 9528-UM001C-EN-P - March 2014
Page 77
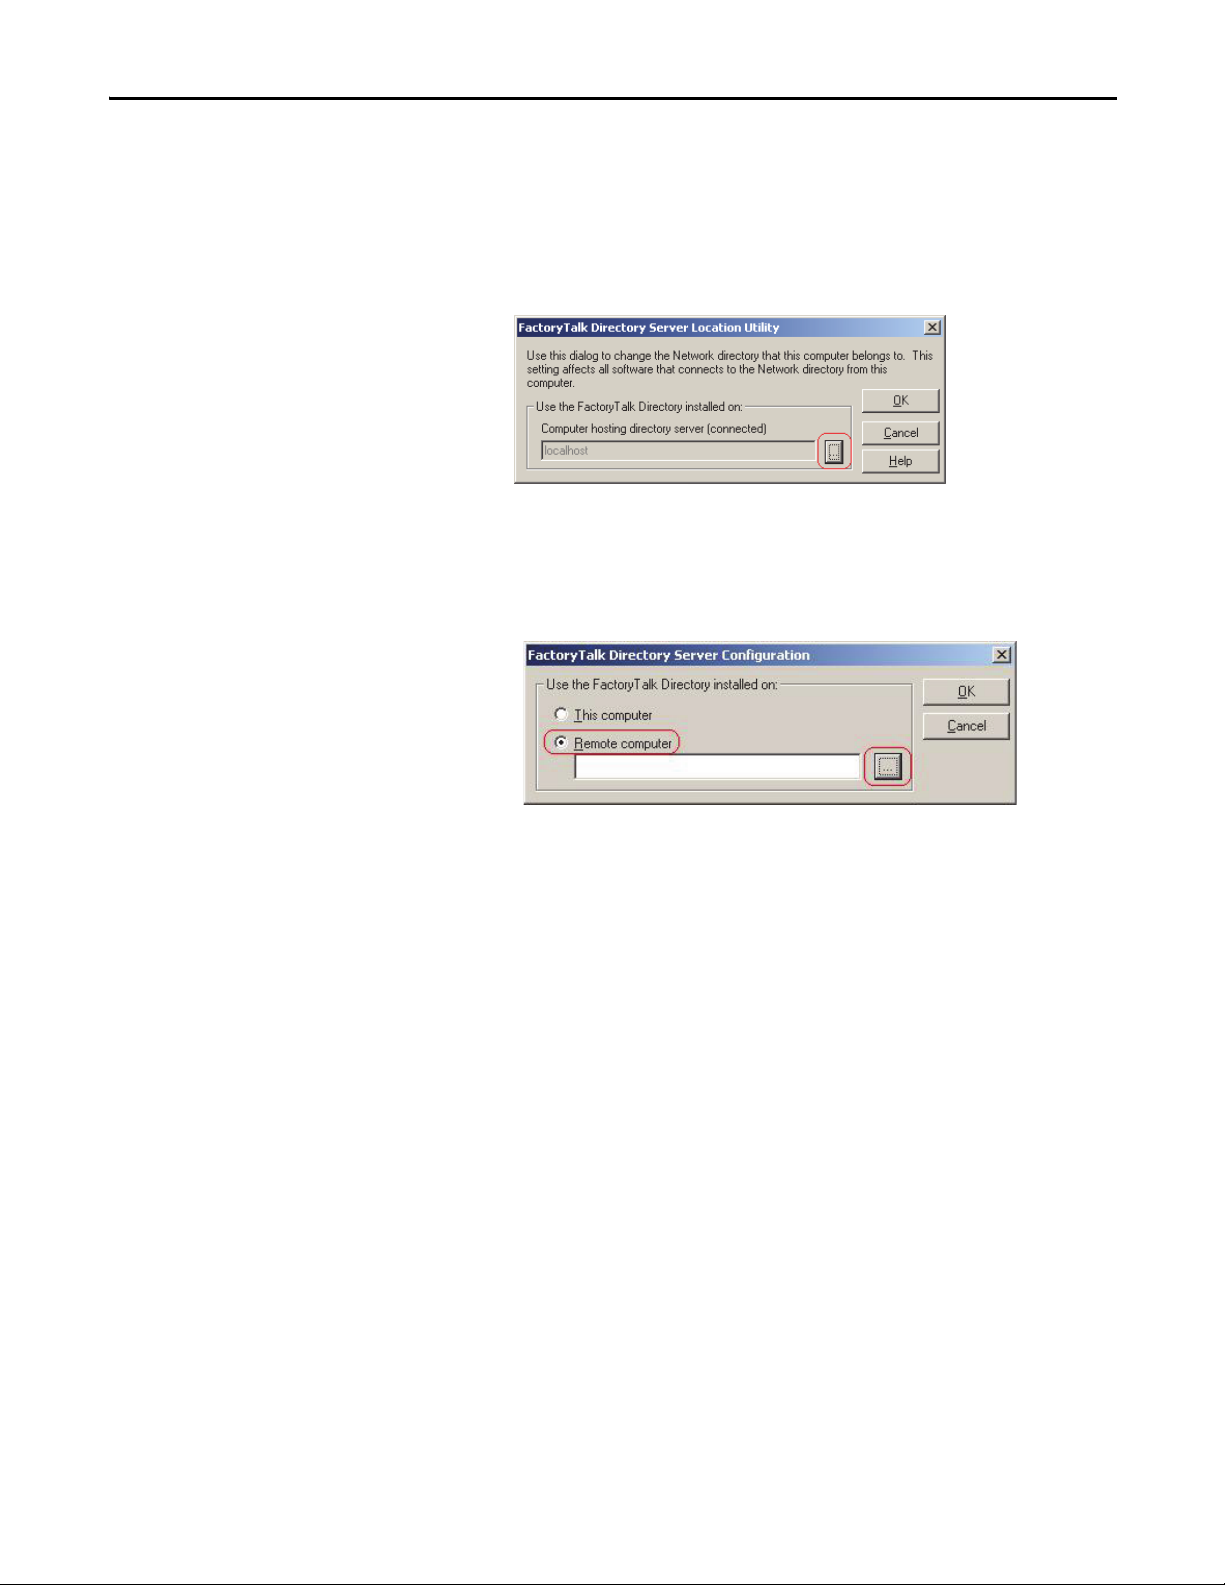
Configure Application Server OWS (Microsoft Remote Desktop Services) Chapter 4
Define the FactoryTalk Directory Location
Complete the following steps to specify the Network FactoryTalk Directory
location for AppServ-OWS.
1. Click Start and choose All Programs>Rockwell Software>
FactoryTalk Tools>Specify FactoryTalk Directory Location.
The FactoryTalk Directory Server Location Utility appears.
2. Click Browse (ellipsis '…' in box).
3. Type your FactoryTalk Directory Administration Console credentials into
the login screen and click OK.
4. Click Remote computer.
Click Browse (ellipsis '…' in box) to navigate the network to find the
computer name of the PASS server that is hosting the FactoryTalk
Directory services.
5. Choose the appropriate PASS server name and click OK.
The Network FactoryTalk Directory location has now been specified.
6. When prompted, enter your credentials and click OK.
7. Restart the server after making this change.
Rockwell Automation Publication 9528-UM001C-EN-P - March 2014 77
Page 78

Chapter 4 Configure Application Ser ver OWS (Microsoft Remote Desktop Ser vices)
Configure the FactoryTalk Activation Server
For continuous use of FactoryTalk products and other Rockwell Automation
software products, computers running the software must have access to activation
files. FactoryTalk Activation software provides a secure, software-based system
for activating Rockwell Automation software products and managing software
activation files. With FactoryTalk Activation software, there is no need for a
physical master disk or any physical media. Instead, activation files are generated
and distributed electronically.
Concurrent activations are locked to a central activation-server computer on the
network. The activation server manages a pool of activation keys for connected
clients to share. Floating concurrent activations are assigned automatically to
clients that need them, and returned automatically to the activation server pool
when the software stops running on the client, or when the client computer
shuts down.
Client computers must be configured to obtain floating activations from the
activation server. A continuous network connection is also required for clients to
use floating activations. After a client obtains a floating activation, if the
activation server detects that the client has been disconnected, the activation is
returned to the server pool.
Table 4 - Activation Considerations
Consideration Details
Software that is not activated If the components you have installed cannot be activated, for example, because the activation server is unavailable,
Location of activation server The PASS is the primary choice for ac tivation management and is recommended to be the location of the activation
Options for adding activation files to the PASS To make concurrent floating activations available to activation clients, first you must download the activation files to
Protect activation files Activation files are simple text files that must have a .lic extension.
then the software continues to run for up to seven days. The seven-day grace period provides time to correct the
problem with acquiring activations, without disrupting critical applications. If activation is restored within seven days,
normal operations resume. If activation is not restored, the grace period expires. After the grace period expires, if you
restart the components and activation remains unavailable, the software runs for two hours in Demo mo de.
server. In the instance that the PASS is not an acceptable location, for example, when you make use of a redundant PASS
solution, the EWS is the secondary choice. In this instance, the EWS can be a dedicated station with a permanent
Ethernet connection to the system. The FactoryTalk Activation software can be configured to run as both a server and
client utility.
the activation server computer, from the Rockwell Automation Activation window.
If the PASS has Internet access, see Open Activation Manager
If the PASS does not have Internet access, the activations can be downloaded on a different computer with Internet
connectivity and then transferred to the PASS.
As long as the .lic extension is retained, you can copy or rename an activation file without harming it. However,
tampering with text inside the activation file can disable your Rockwell Software® produc ts.
If an activation file is damaged or deleted, contact Rockwell Automation Technical Support.
For safekeeping, keep an original set of your activation files on back-up media. Use descriptive names for the files, so
that you can identify them later, and copy them back to the appropriate computers.
Activation files are locked to the Host IDs of the computers (or dongles) that need them. Activation fails for Rockwell
Software products on a computer where the specified Host ID is not recognized by the activation file.
on page 79.
78 Rockwell Automation Publication 9528-UM001C-EN-P - March 2014
Page 79

Configure Application Server OWS (Microsoft Remote Desktop Services) Chapter 4
Open Activation Manager
On the Activation Manager computer, start the activation process by opening the
Activation Manager.
1. Click Start and choose All Programs>Rockwell Software>
FactoryTalk Activation>FactoryTalk Activation Manager.
The FactoryTalk Activation Manager window appears.
2. For instructions on installing FactoryTalk activations, click Help (circled
above).
3. Use the Help instructions to complete the activations.
After completing the activation process, your AppServ-OWS is
ready to use.
Update Activation Search Path
After the license files are on the PASS, you must update the Activation Search
Path on AppServ-OWS.
1. If the Activation Manager is not already open, click Start and choose
All Programs>Rockwell Software>FactoryTalk Activation>
FactoryTalk Activation Manager.
2. Click Find Available Activations.
The Manage Activations section appears on the FactoryTalk Activation
Manager window.
Rockwell Automation Publication 9528-UM001C-EN-P - March 2014 79
Page 80

Chapter 4 Configure Application Ser ver OWS (Microsoft Remote Desktop Ser vices)
3. Click Update Activation Search Path.
The Update Activation Search Path window appears.
4. Click Add Server.
5. Click Browse (ellipsis ‘…’ in box).
The Browse for Server message window appears.
6. Select the PASS in the network and click OK.
The name of the PASS computer appears in the table under Path to
Activations.
7. Check the box next to the name of the PASS computer.
8. Click ‘Up’ so that the PASS computer moves to the top of the list.
9. Click Save.
10. Click Refresh Activations.
Available activations appear in the table.
80 Rockwell Automation Publication 9528-UM001C-EN-P - March 2014
Page 81

Configure Application Server OWS (Microsoft Remote Desktop Services) Chapter 4
IMPORTANT
Configure Remote Desktop Services
The Application Server OWS provides PlantPAx users with an alternative to the
standard OWS client machine (physical or virtual). The AppServ-OWS uses
Microsoft Remote Desktop Services (RDS) technology to serve multiple
instances of the OWS from a single server Virtual Template. This architecture is
ideal for PlantPAx users wishing to use Thin Clients as Operator Work Stations.
A valid FactoryTalk activation is still required for each instance of the OWS that
is in use.
Microsoft RDS (formerly known as Terminal Services) is a standard Role
built into the Windows Server family of operating systems that allows remote
access to applications and data on a remote computer over a network.
It can be used as an administrative tool to connect to a remote machine and
perform maintenance tasks, or as a thin client solution to let remote clients to
execute applications or even access the entire desktop of the host server.
The thin client solution is a transparent system that runs applications and
performs data processing and storage functions on a remote computer to
minimize the amount of information traveling across your network. While
multiple sessions can run on a single server, each user can see only their individual
session. Only the user interface is shown on client, user input from client is
redirected over the network to the remote desktop session. User's desktops are
transmitted to clients for display by using terminal emulation software. Similarly,
the software sends command functions such as keyboard inputs and mouse clicks
across the network between the client and the server.
The PlantPax AppServ-OWS has been pre-configured with the Microsoft
Remote Desktop server role and the FTView SE Client 7.0 application. This
configuration provides a thin client solution for FactoryTalk View SE Clients
that lets users, with the proper credentials, to login into the AppServ-OWS and
run the FactoryTalk View SE Client application.
Rockwell Automation Publication 9528-UM001C-EN-P - March 2014 81
Page 82

Chapter 4 Configure Application Ser ver OWS (Microsoft Remote Desktop Ser vices)
TIP
One FactoryTalk View SE client activation key is required for each Remote
Desktop Session in which FactoryTalk View SE client is run. The first instance of
FactoryTalk View SE client loaded within a Remote Desktop Session acquires an
activation key. Any additional FactoryTalk View SE clients that are started within
a session do not require additional keys.
Remote Desktop Services with FactoryTalk View SE
The benefits of using Remote Desktop Services with FactoryTalk View SE
include the following:
• Increased network flexibility: RDS lets you to deploy thin and ultrathin
clients on the plant floor or out in the field. The minimal requirements of
RDS Clients allows for a variety of thin products designed to handle most
environmental conditions, be they radical temperatures, extreme
vibrations, or areas where mobility is key. Users can gain access to a RDS
over any Transmission Control Protocol/Internet Protocol (TCP/IP)
connection including Remote Access, Ethernet, the Internet, wireless, wide
area network (WAN), or virtual private network (VPN).
• Lower cost of ownership: A thin client typically consists only of the
Operating System and the Remote Desktop Connection software. RDS
deliver a virtual Windows Server 2008 R2 experience from server to
clients, regardless of what Operating System the client uses.
•Minimize downtime: Upgrade your entire FactoryTalk View SE
installation with a single operation. Because FactoryTalk View SE products
install only on the server side, any future software upgrades are limited to
the server, making software upgrades on clients a thing of the past.
•Improve data security: A FactoryTalk View SE architecture that uses
RDS is less vulnerable to security threats. RDS lets you focus your security
measures on the server because all data is processed on the server, which
you can manage in a secure location.
For more information see Knowledgebase Answer ID 567658 - Using
FactoryTalk View SE with Windows 2008 R2 Remote Desktop Services - Getting
Started Whitepaper at
https://rockwellautomation.custhelp.com/app/answers/detail/a_id/567658
You must have a TechConnect license to download the library.
The known limitations when using Remote Desktop Services with FactoryTalk
View SE include the following:
• The Microsoft RDS protocol does not transfer the physical display aspect
ratio (height/width proportion) from the server to its clients. Clients need
to specify the display properties (resolution, aspect ratio, color depth etc…)
for each session they create. Verify the appearance of the application
visually on the Remote Desktop Clients before placing the system in a
production environment, modifying graphics as necessary.
82 Rockwell Automation Publication 9528-UM001C-EN-P - March 2014
Page 83

Configure Application Server OWS (Microsoft Remote Desktop Services) Chapter 4
TIP
IMPORTANT
• When the FactoryTalk View SE Server is also the Remote Desktop Session
Host, it is possible that thin clients cannot add/change pens in a trend.
For more information see Knowledgebase Answer ID 32715 - Cannot
add/change pens in trend from SE client on Terminal Server at
https://rockwellautomation.custhelp.com/app/answers/detail/a_id/
32715.
• If your FactoryTalk View SE client configuration (.cli) enables 'Show
Diagnostics List', the list shows all activity from all clients running on the
same Remote Desktop Session Host. This is due to the fact that although
each instance of the FactoryTalk View SE client runs in a separate session,
they are all hosted on the same computer and share common log resources.
This can be confusing for HMI operators because they see diagnostic
activity on their client that they did not initiate.
• Using the Tag Import and Export Wizard does not work correctly when
used in a Remote Desktop Client session. Run this wizard only from a
FactoryTalk View Studio instance on the HMI Server console. Using a
Remote Desktop Client to connect to the console session can avoid this
issue, but is not recommended.
PlantPAx AppServ-OWS Base Configuration
You can add additional role services to your server depending on your specific
deployment of Remote Desktop Services and connectivity needs. This can add
additional configuration beyond which this base Remote Desktop Server has
been configured for.
Rockwell Automation Publication 9528-UM001C-EN-P - March 2014 83
Page 84

Chapter 4 Configure Application Ser ver OWS (Microsoft Remote Desktop Ser vices)
Microsoft Remote Desktop Services Licensing
Install Additional Software
RDS has its own method for licensing clients that log on to RDS servers, separate
from the licensing for the Windows Server 2008 R2 family of operating systems.
Remote Desktop Connections must receive a valid license issued by a Remote
Desktop Licensing Server before they can log on to a Remote Desktop Session
Host or Connection Broker.
One Remote Desktop Licensing Server can serve multiple RDS servers
concurrently; therefore, you can either leverage an existing Remote Desktop
Licensing Server or create your own.
To make sure that patches and additional software are installed correctly to work
in a multiuser environment, you must put the Remote Desktop Session Host
server into a special installation mode before you install any application. Failure
to use the special installation mode can prevent an application from functioning
properly.
Install Special Mode
Put the Remote Desktop Session Host into the special installation mode by
Clicking Start and choosing Control Panel>Programs>Install Application on
Remote Desktop.
Add Remote Desktop Services Users
After the application is installed, you must put the RD Session Host server back
into execution mode before remote users begin using the application. The Install
Application on Remote Desktop Session Host tool automatically puts the RD
Session Host server into execution mode when it is finished running, but always
verify before continuing.
It is important to put the Remote Desktop Session Host server back into
execution mode before running any of the installed applications. Some
applications can not execute properly or can have loss of functionality if the
server is not put back into execution mode.
Each user who logs on to a RDS server must have a user account either on the
server or in a domain on the network that the server is on. The user account
contains additional information that determines when user can log on, under
what conditions, and how specific desktop settings are stored. Windows Server
2008 R2 family operating systems contain a built-in User group called Remote
Desktop Users, which is used to manage RDS users.
On the Select User Groups Allowed Access to This RD Session Host Server page,
select the users and/or groups that can connect to the Remote Desktop Session
Host Server and click Next.
Alternatively, you can add additional users later via the Local Users and Groups
option in Computer Management.
84 Rockwell Automation Publication 9528-UM001C-EN-P - March 2014
Page 85

Chapter 5
Configure Application Server Historian
This chapter provides you with the details necessary to deploy the Application
Server Historian (AppServ-Hist) virtual template. AppServ-Hist (based on
FactoryTalk Historian) satisfies the Data Collection role of the PlantPAx system
architecture.
This chapter provides you with the procedures necessary to deploy the
Application Server Historian (AppServ-Hist) virtual template:
• Setting up Windows Server 2008 for the new instance
• Setting up the Network Adapter
• Setting up FactoryTalk Directory
• Setting up activation files
• Rename SQL Server
• Install and configure Historian Asset Framework
For more information regarding recommended architecture and the actual
configuration of the Application Server, see the PlantPAx Process Automation
System Reference Manual, publication PROCES-RM001
, and the specific
product documentation.
The required Rockwell Automation software for the AppServ-Hist virtual
template is included and pre-installed in the virtual image templates, but not
activated. Use an individual FactoryTalk Historian SE activation license to
activate each AppServ-Hist virtual template.
See page 9 for product catalog numbers.
The table shows the topics in this section.
Top ic Pag e
Before You Begin 86
Configure Microsoft Windows Server 2008 86
Configure the Ethernet Network Adapter Settings 97
Define the FactoryTalk Directory Location 98
Configure the FactoryTalk Activation Server 99
Rename SQL Server 101
Install Historian Asset Framework (AF) 103
Rockwell Automation Publication 9528-UM001C-EN-P - March 2014 85
Page 86

Chapter 5 Configure Application Server Historian
IMPORTANT
TIP
Top ic Pag e
Delete Old Computer Name 110
Synchronize AF Database 112
Complete Historian Configuration 114
During the configuration of Application Server Historian you can encounter a
User Account Control window that asks if you want to allow a program to make
changes to the computer. Click Yes and continue on.
This template represents a base installation of a FactoryTalk Historian Server and
does not include optional features such as Advanced Server or DataLink.
To use DataLink, you must install Microsoft Excel yourself by using a valid
Microsoft Excel license.
Before You Begin
Configure Microsoft Windows Server 2008
You must have your template deployed from the USB drive to perform the
following procedures in this chapter. If you need to deploy the template, see
Chapter 1 on page 13
Complete these steps on a virtual machine to initiate the Microsoft Windows
Server 2008 operating system setup for the Application Server Historian. You set
your own administration account password, computer name, and file location
preference in this procedure.
1. If the vSphere Client is not already open, on a computer with VMware
vSphere Client software installed, click Start and choose All
Programs>VMware>VMware vSphere Client.
2. Click the Console tab.
3. In the Organizer tree, right-click the virtual machine and choose
Power>Power On.
for details.
86 Rockwell Automation Publication 9528-UM001C-EN-P - March 2014
Page 87
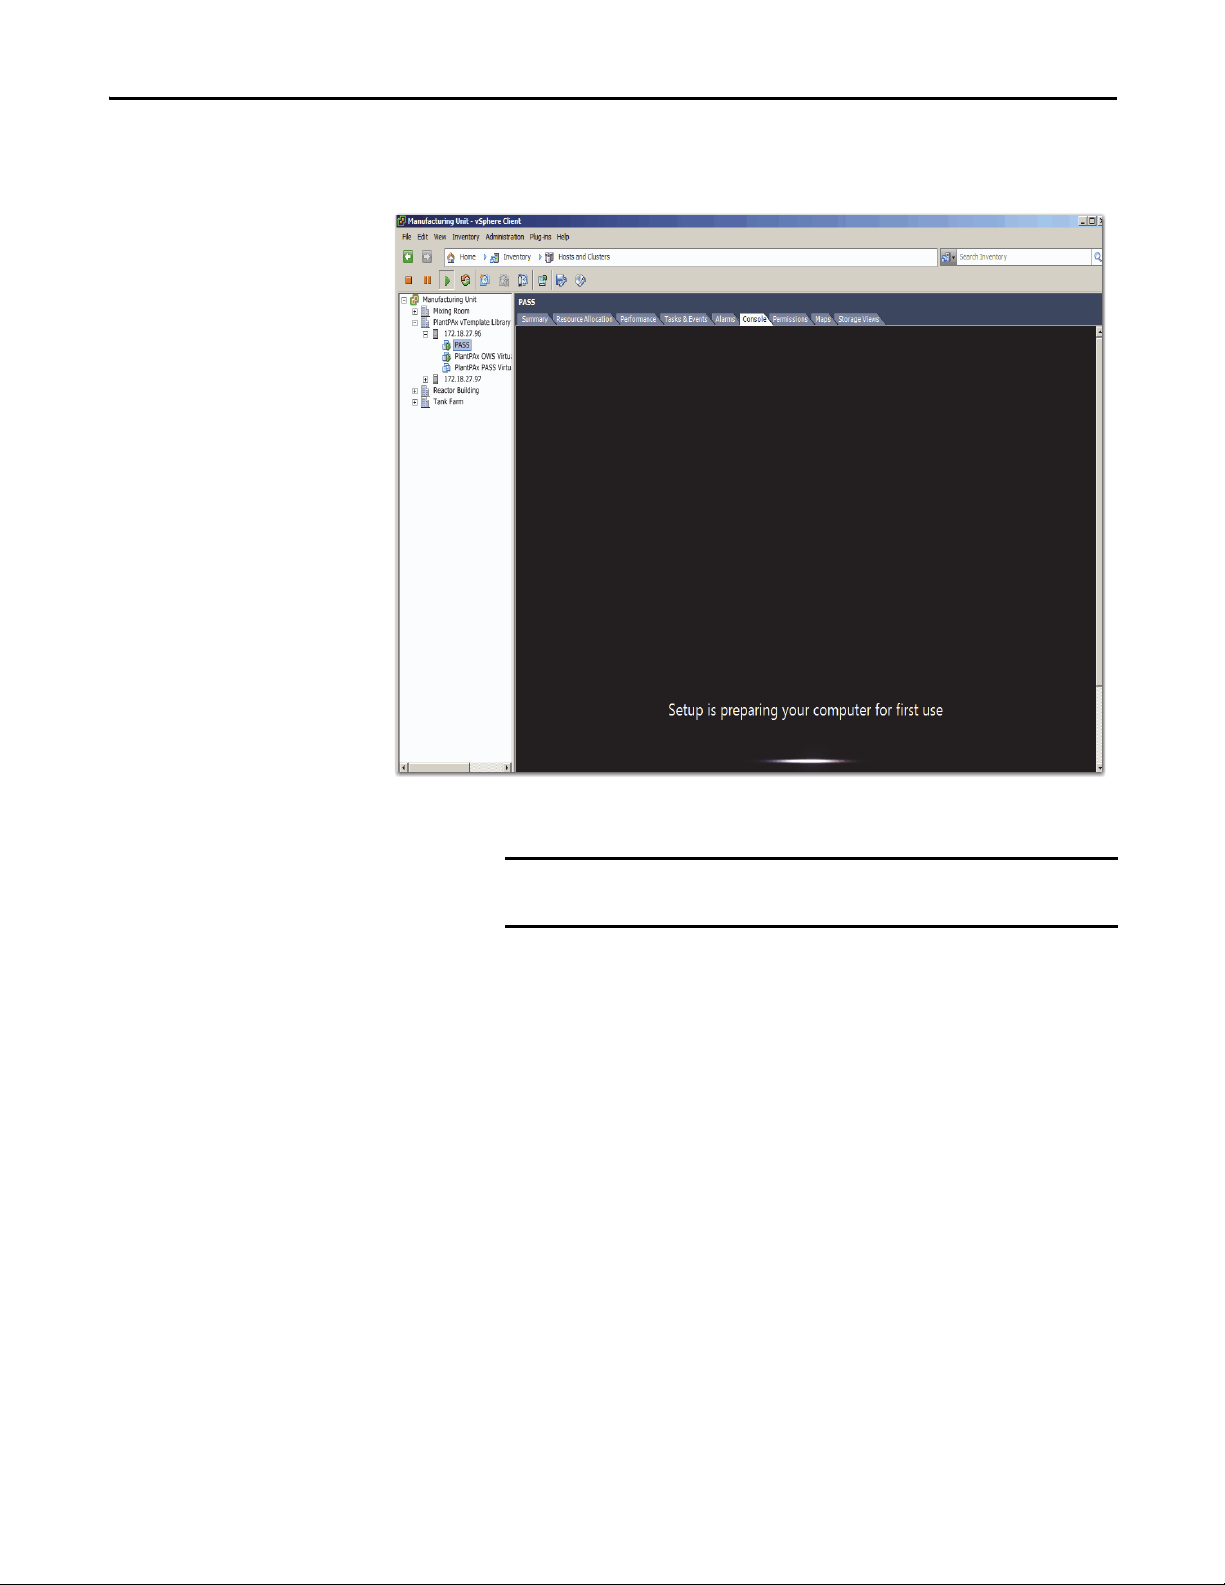
Configure Application Server Historian Chapter 5
IMPORTANT
You see this window after initial setup is complete. This stage can take a
few minutes.
The Microsoft Windows Set Up Windows dialog box appears.
First, click inside the console to activate the controls for your virtual
machine.
Rockwell Automation Publication 9528-UM001C-EN-P - March 2014 87
Page 88
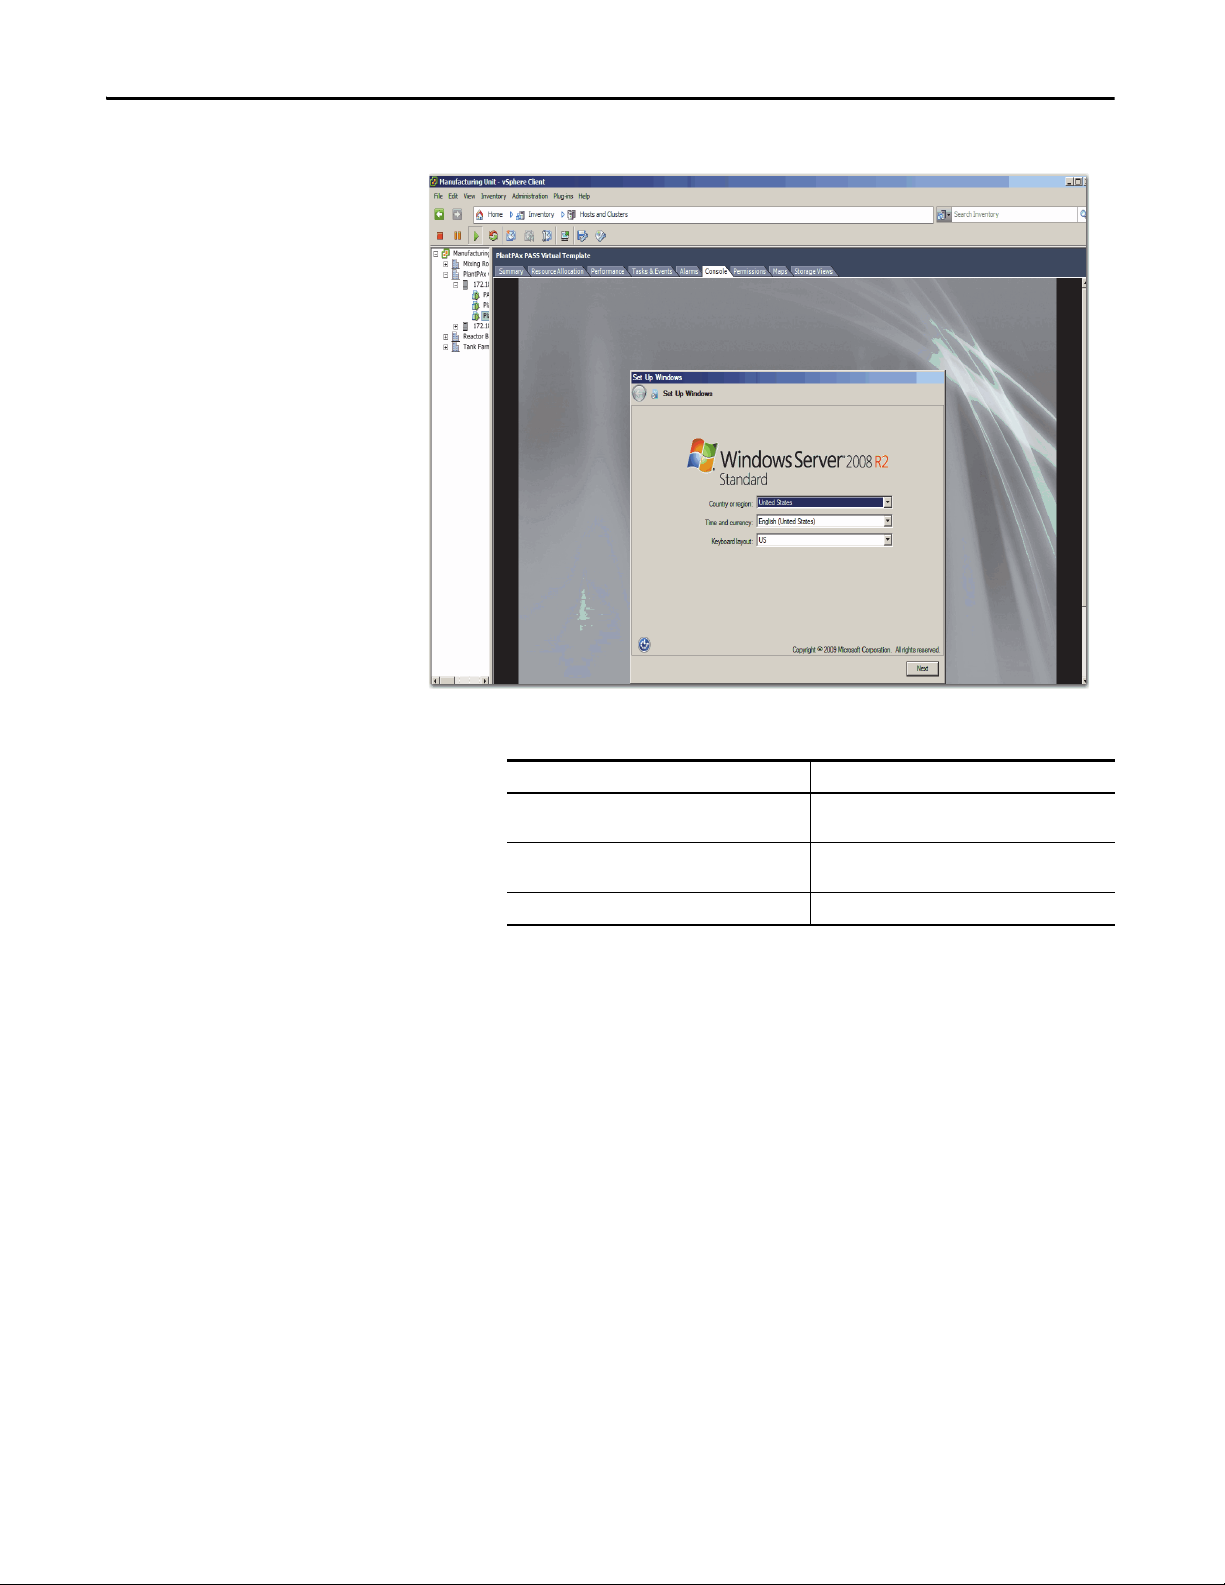
Chapter 5 Configure Application Server Historian
4. Choose the appropriate option from the following pull-down menus.
Menu Description
Country or region Choose your country or region, for example,
Time and currency Choose your time and currency, for example, English
Keyboard layout Choose your keyboard layout, for example, US.
United States.
(United States).
5. Click Next.
The License Agreement appears. This agreement includes
Microsoft Windows, Rockwell Automation Software, and Adobe Reader.
6. Read the license agreement, and then click ‘I accept the license terms’.
7. Click Start.
8. If you get a message stating 'The User’s password must be changed before
logging on the first time', click OK.
88 Rockwell Automation Publication 9528-UM001C-EN-P - March 2014
Page 89

Configure Application Server Historian Chapter 5
IMPORTANT
The Administrator account dialog box appears so you can change
a password.
Passwords must meet the following minimum requirements:
• Cannot contain the user's account name or parts of the user's full
name that exceed two consecutive characters
• Must be at least six characters in length
• Must contain characters from three of the following four
categories:
– English uppercase characters (A…Z)
– English lowercase characters (a…z)
– Base 10 digits (0…9).
– Non-alphabetic characters (for example, !, $, #, %).
9. Type a password, then verify the entry by typing the same password in the
second entry field.
10. Click the arrow.
11. Click OK to acknowledge your password has been changed.
Rockwell Automation Publication 9528-UM001C-EN-P - March 2014 89
Page 90

Chapter 5 Configure Application Server Historian
IMPORTANT
The virtual image desktop appears.
The default time zone for Windows Server 2008 is Pacific Time. If you are not in
the Pacific Time zone, you need to change time zone and update the time.
90 Rockwell Automation Publication 9528-UM001C-EN-P - March 2014
Page 91

Configure Application Server Historian Chapter 5
Create an Administrator User Account
We suggest that you create an Administrator user account for each user that
requires administrative privileges. This best practice safeguards server corruption
by restricting access to the default administrative account, thus creating a backup
of critical system information. Each user can be delegated a separate user account
with password protection.
Follow these steps to create a new user account with administrative privileges.
1. On the virtual image desktop, click Start and choose Control Panel.
The Control Panel appears.
2. Click Add or remove user accounts (circled above).
The Manage Accounts window appears.
Rockwell Automation Publication 9528-UM001C-EN-P - March 2014 91
Page 92
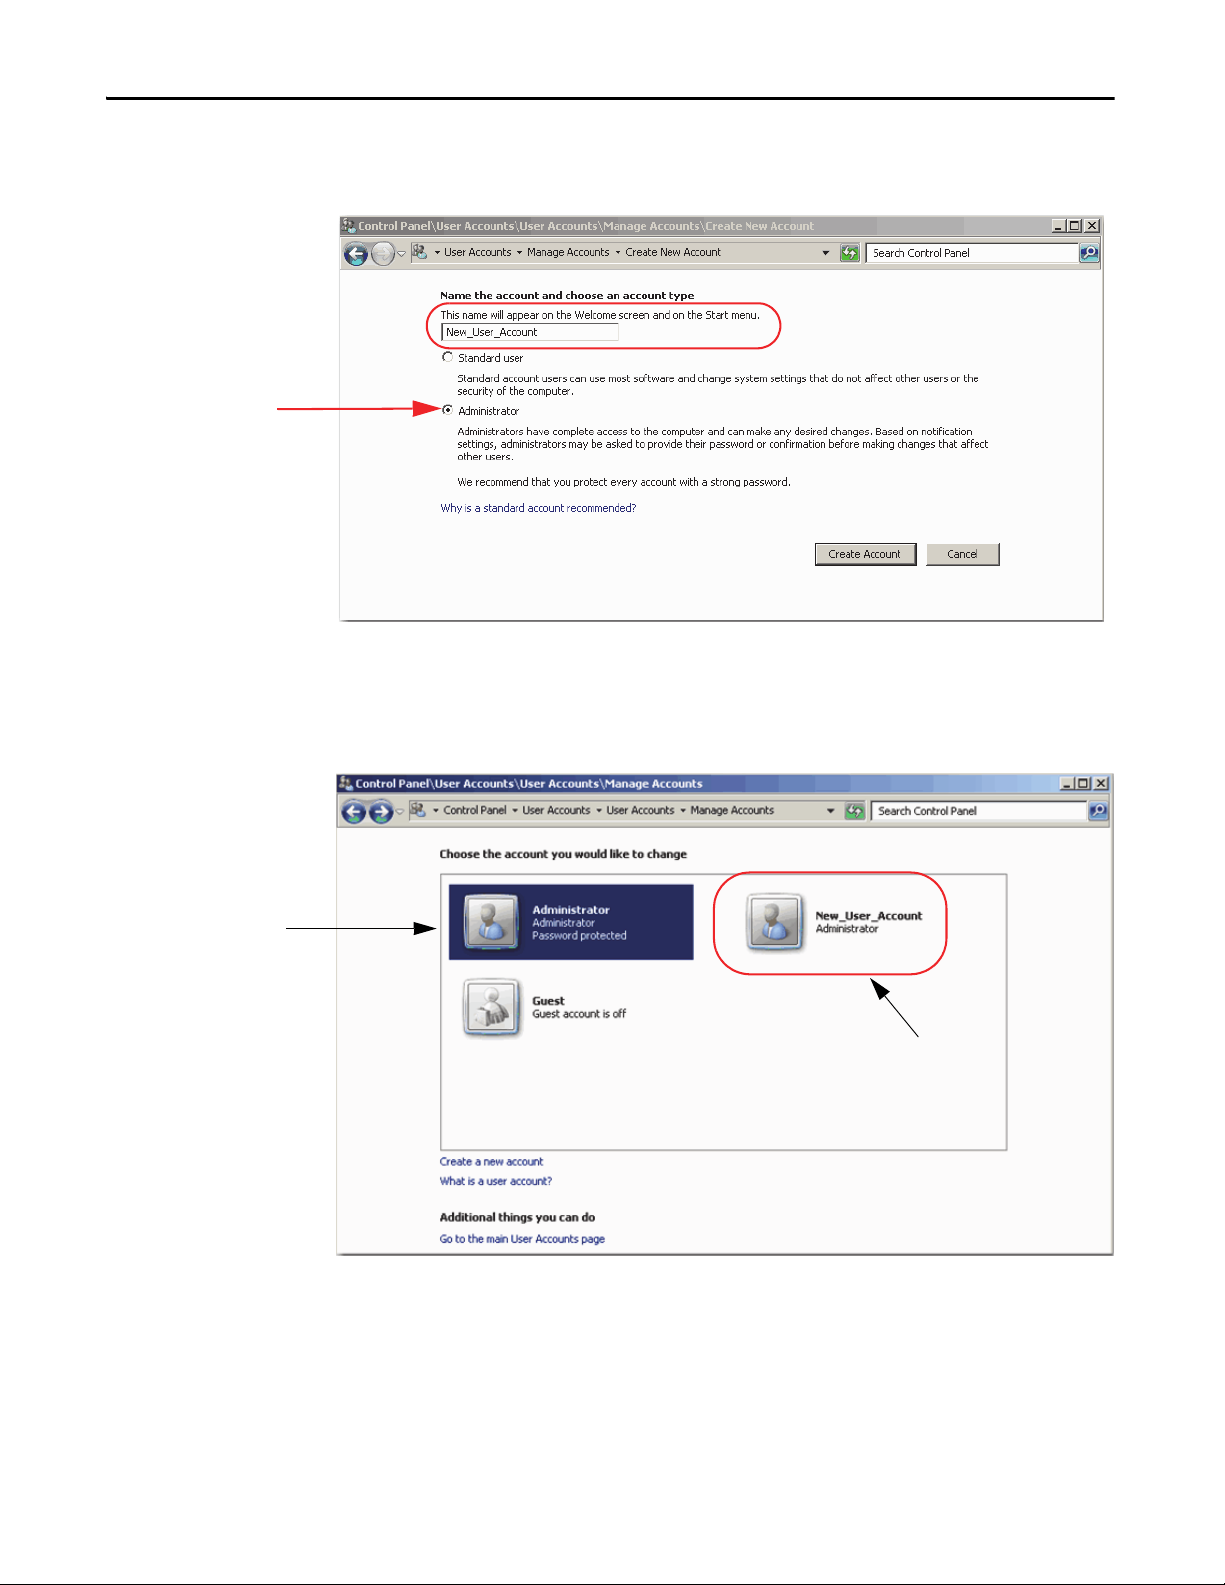
Chapter 5 Configure Application Server Historian
Current Administrator
Account D efault
New user account that is
being configured.
3. Click Create a new account (circled above).
The Create New Account dialog box appears.
4. Type your new user account name (circled above) and make sure
Administrator is selected.
5. Click Create Account.
The New Manage Accounts window appears.
The current Administrator account (default) is shown with a blue
background. After you create a password for the new user account, it
appears as the default.
6. Click the newly created New_User_Account.
92 Rockwell Automation Publication 9528-UM001C-EN-P - March 2014
Page 93
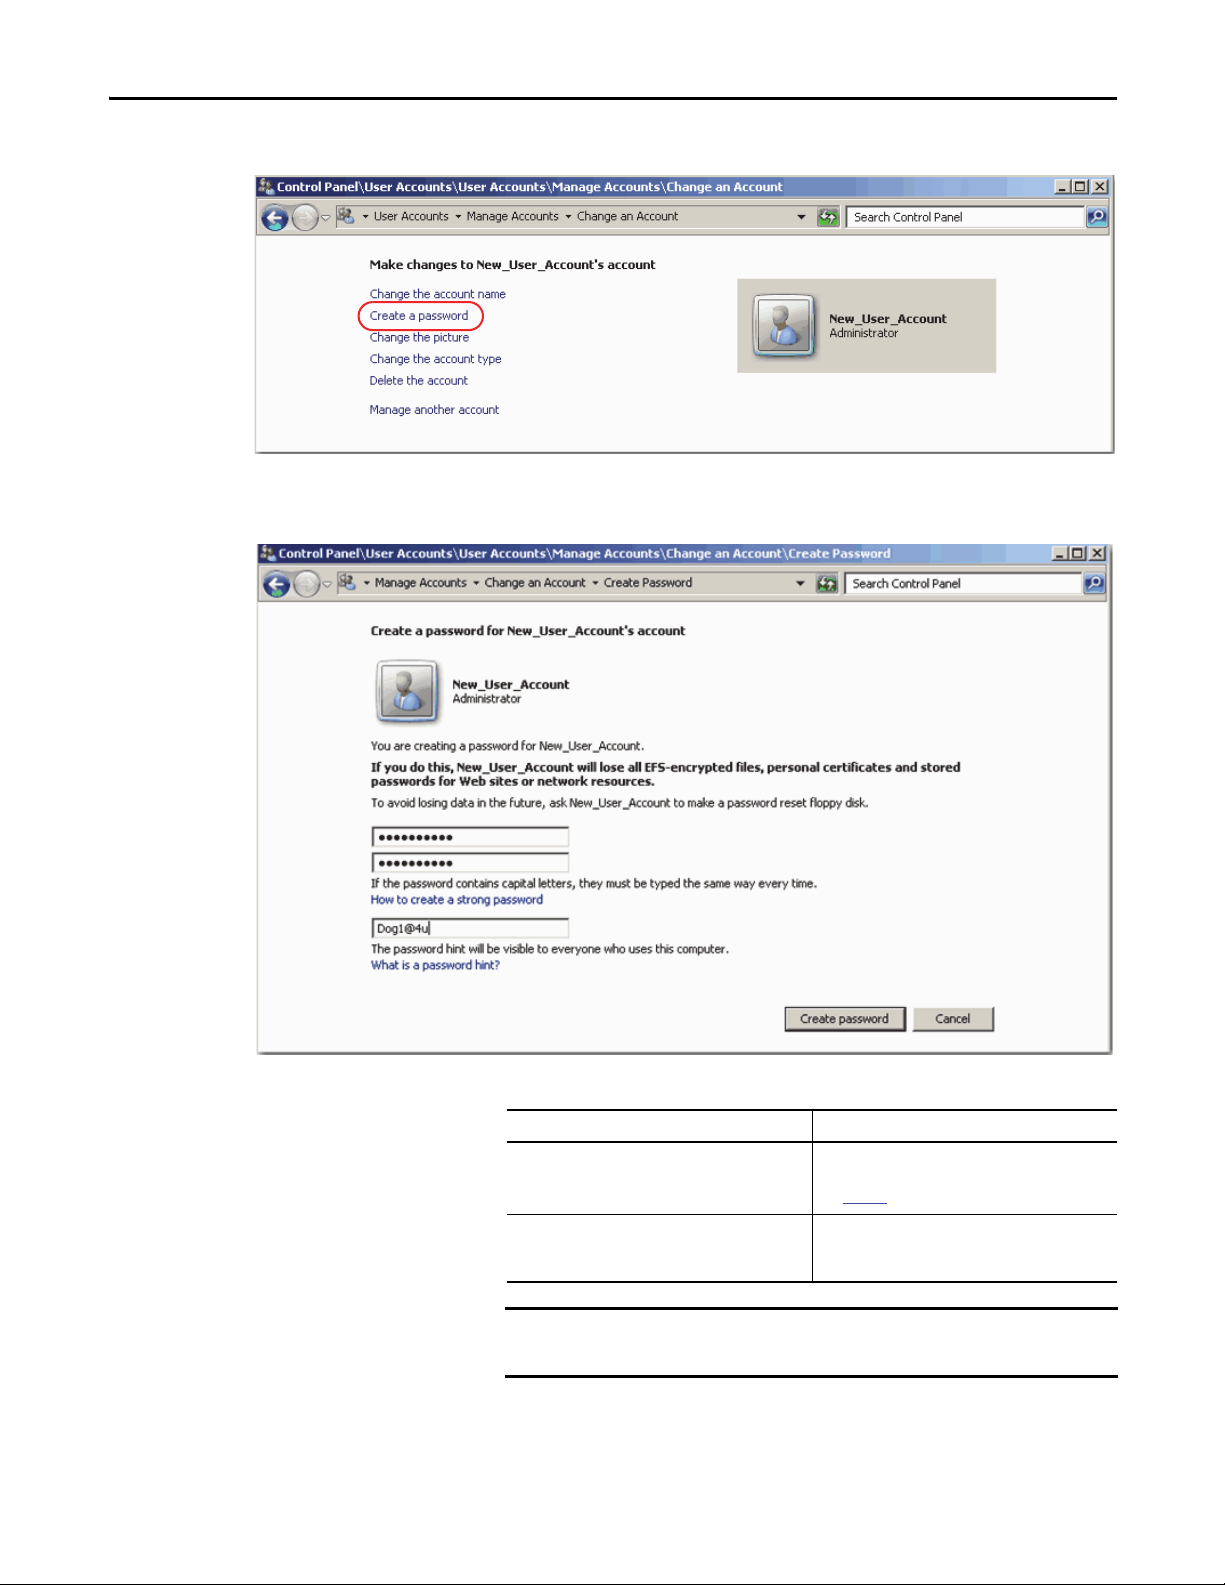
The Change an Account window appears.
IMPORTANT
7. Click Create a password (circled above).
The Create Password dialog box appears.
Configure Application Server Historian Chapter 5
8. Complete the password configuration.
Topic Description
Password Type a password, then re-type the password to
confirm the entry.
See page 89 for password requirements.
Passphrase Type a password that contains a string of words and
characters. Passphrases are generally longer in
length, thus more secure, than passwords.
Remember this password because you need it when you configure your
FactoryTalk Directory.
9. Click Create password.
10. Close the window.
Rockwell Automation Publication 9528-UM001C-EN-P - March 2014 93
Page 94

Chapter 5 Configure Application Server Historian
IMPORTANT
11. Click Start and log off the virtual machine.
First, click inside the console to activate the controls for your virtual
machine.
12. Do not press CRTL+ALT+DELETE as shown on the screen.
Press CTRL+ALT+INSERT to access the virtual machine.
94 Rockwell Automation Publication 9528-UM001C-EN-P - March 2014
Page 95

Configure Application Server Historian Chapter 5
13. Click the newly created New_User_Account.
The New User Account window appears.
14. Type your password and press Return.
The Windows virtual image desktop appears with your personal
account privileges.
Rockwell Automation Publication 9528-UM001C-EN-P - March 2014 95
Page 96

Chapter 5 Configure Application Server Historian
IMPORTANT
IMPORTANT
Rename the Computer for Your Location
Follow these steps before using your virtual machine.
1. On the desktop of the virtual machine, right-click the computer icon and
choose Properties.
2. From the Computer name, domain, and workgroup settings area, click
Change Settings (on the right side).
3. On the Computer Name tab, click Change.
4. Type a new computer name in the Computer Name box.
Do not use spaces, hyphens, or any special character symbols.
5. Select Domain or Workgroup (default) and click OK.
We recommend that PlantPAx servers and workstations be members of a
Windows domain for systems with 10 or more computers. The domain
centralizes administration of the users, groups, and security settings.
To join a domain, the user must have the appropriate domain user
account with proper credentials to add the computer to the domain.
6. Restart the virtual computer to enable the changes to the settings.
7. Login by using your domain credentials or local user administration
account previously created.
96 Rockwell Automation Publication 9528-UM001C-EN-P - March 2014
Page 97

Configure Application Server Historian Chapter 5
Configure the Ethernet Network Adapter Settings
Use the following procedure to set the speed, duplex, and power management
settings for the Ethernet adapter.
1. Click Start and choose Control Panel.
2. Click System & Security.
3. Click Network & Internet.
4. Click Network and Sharing Center.
The Network and Sharing Center dialog box appears.
5. Click Change Adapter Settings.
6. Right-click Local Area Connection and choose Properties.
The Network Properties dialog box appears.
7. Click Configure.
8. Click the Advanced tab.
9. From the Property window, choose Link Speed & Duplex.
10. From the Value menu, choose Auto Negotiation.
11. Click the Power Management tab.
12. Clear the ‘Allow the computer to turn off this device to save power’
checkbox.
13. Click OK.
Rockwell Automation Publication 9528-UM001C-EN-P - March 2014 97
Page 98

Chapter 5 Configure Application Server Historian
Define the FactoryTalk Directory Location
Complete the following steps to specify the Network FactoryTalk Directory
location for AppServ-Hist.
1. Click Start and choose All Programs>Rockwell Software>
FactoryTalk Tools>Specify FactoryTalk Directory Location.
The FactoryTalk Directory Server Location Utility appears.
2. Click Browse (ellipsis '…' in box).
3. Type your FactoryTalk Directory Administration Console credentials into
the login screen and click OK.
4. Click Remote computer.
Click Browse (ellipsis '…' in box) to navigate the network to find the
computer name of the PASS server that is hosting the FactoryTalk
Directory services.
5. Choose the appropriate PASS server name and click OK.
The Network FactoryTalk Directory location has now been specified.
6. When prompted, enter your credentials and click OK.
7. Restart the server after making a change.
98 Rockwell Automation Publication 9528-UM001C-EN-P - March 2014
Page 99

Configure Application Server Historian Chapter 5
Configure the FactoryTalk Activation Server
For continuous use of FactoryTalk products and other Rockwell Automation
software products, computers running the software must have access to activation
files. FactoryTalk Activation software provides a secure, software-based system
for activating Rockwell Automation software products and managing software
activation files. With FactoryTalk Activation software, there is no need for a
physical master disk or any physical media. Instead, activation files are generated
and distributed electronically.
Concurrent activations are locked to a central activation-server computer on the
network. The activation server manages a pool of activation keys for connected
clients to share. Floating concurrent activations are assigned automatically to
clients that need them, and returned automatically to the activation server pool
when the software stops running on the client, or when the client computer
shuts down.
Client computers must be configured to obtain floating activations from the
activation server. A continuous network connection is also required for clients to
use floating activations. After a client obtains a floating activation, if the
activation server detects that the client has been disconnected, the activation is
returned to the server pool.
Table 5 - Activation Considerations
Consideration Details
Software that is not activated If the components you have installed cannot be activated, for example, because the activation server is unavailable,
Location of activation server The PASS is the primary choice for ac tivation management and is recommended to be the location of the activation
Options for adding activation files to the PASS To make concurrent floating activations available to activation clients, first you must download the activation files to
Protect activation files Activation files are simple text files that must have a .lic extension.
then the software continues to run for up to seven days. The seven-day grace period provides time to correct the
problem with acquiring activations, without disrupting critical applications. If activation is restored within seven days,
normal operations resume. If activation is not restored, the grace period expires. After the grace period expires, if you
restart the components and activation remains unavailable, the software runs for two hours in Demo mo de.
server. In the instance that the PASS is not an acceptable location, for example, when you make use of a redundant PASS
solution, the EWS is the secondary choice. In this instance, the EWS can be a dedicated station with a permanent
Ethernet connection to the system. The FactoryTalk Activation software can be configured to run as both a server and
client utility.
the activation server computer, from the Rockwell Automation Activation window.
If the PASS has Internet access, see Open Activation Manager
If the PASS does not have Internet access, the activations can be downloaded on a different computer with Internet
connectivity and then transferred to the PASS.
As long as the .lic extension is retained, you can copy or rename an activation file without harming it. However,
tampering with text inside the activation file can disable your Rockwell Software® produc ts.
If an activation file is damaged or deleted, contact Rockwell Automation Technical Support.
For safekeeping, keep an original set of your activation files on back-up media. Use descriptive names for the files, so
that you can identify them later, and copy them back to the appropriate computers.
Activation files are locked to the Host IDs of the computers (or dongles) that need them. Activation fails for Rockwell
Software products on a computer where the specified Host ID is not recognized by the activation file.
on page 100.
Rockwell Automation Publication 9528-UM001C-EN-P - March 2014 99
Page 100

Chapter 5 Configure Application Server Historian
Open Activation Manager
On the Activation Manager computer, start the activation process by opening the
Activation Manager.
1. Click Start and choose All Programs>Rockwell Software>
FactoryTalk Activation>FactoryTalk Activation Manager.
The FactoryTalk Activation Manager window appears.
2. For instructions on installing FactoryTalk activations, click Help (circled
above).
3. Use the Help instructions to complete the activations.
After completing the activation process, your AppServ-Hist is ready to use.
Update Activation Search Path
After the license files are on the PASS, you must update the Activation Search
Path on the AppServ-Hist.
1. If the Activation Manager is not already open, click Start and choose
All Programs>Rockwell Software>FactoryTalk Activation>
FactoryTalk Activation Manager.
2. Click Find Available Activations.
The Manage Activations section appears on the FactoryTalk Activation
Manager window.
3. Click Update Activation Search Path.
100 Rockwell Automation Publication 9528-UM001C-EN-P - March 2014
 Loading...