

Page 1

®
A.I. Series
Installation Guide
Page 2

Installation Guide
Copyright Notice
1995 Rockwell Software Inc. All rights reserved
Printed in the United States of America
Portions copyrighted by Allen-Bradley Company, Inc. and used with permission.
This manual and any accompanying Rockwell Software products are copyrighted by Rockwell
Software Inc. Any reproduction and/or distribution without prior written consent from Rockwell
Software Inc. is strictly prohibited. Please refer to the license agreement for details.
Trademark Notices WINtelligent Series is a registered trademark and the Rockwell Software logo, AdvanceDDE,
ControlView, INTERCHANGE, Packed DDE, WINtelligent, WINtelligent EMULATE 5,
WINtelligent EMULATE 500, WINtelligent LINX, WINtelligent LOGIC 5, WINtelligent TREND,
and WINtelligent VIEW are trademarks of Rockwell Software Inc.
PLC, PLC-2, PLC-3 and PLC-5, are registered trademarks, and Data Highway Plus, DH+, DHII,
DTL, Network DTL, Pyramid Integrator, SLC, and SLC 500 are trademarks of the Allen-Bradley
Company, Inc.
Microsoft, MS-DOS, Windows, Microsoft Access and Visual Basic are registered trademarks, and
Windows NT is a trademark of the Microsoft Corporation.
All other trademarks are the property of their respective holders and are hereby acknowledged.
Important User
Information
This Rockwell Software product is warranted in accord with the product license. The product's
performance will be affected by system configuration, the application being performed, operator
control and other related factors.
The product's implementation may vary among users.
This manual is as up-to-date as possible at the time of printing; however, the accompanying software
may have changed since that time. Rockwell Software reserves the right to change any information
contained in this manual or the software at anytime without prior notice.
The instructions in this manual do not claim to cover all the details or variations in the equipment,
procedure, or process described, nor to provide directions for meeting every possible contingency
during installation, operation, or maintenance.
ii
Page 3

Table of Contents
1 Installation/Update Procedure...........................................................................................1-1
Installing A.I. Series Software......................................................................................... 1-2
Installation for Multiple Computers.......................................................................... 1-5
Setting Environment Variables................................................................................. 1-7
Advanced Installation: Network, Multi-User .................................................................. 1-8
Preparing a Multi-Tasking or Network Environment................................................ 1-9
Files Affected by PLCLL ........................................................................................ 1-10
Updating A.I. Series Software ....................................................................................... 1-11
If Your Disks Are Damaged.......................................................................................... 1-15
Running A.I. Series Software ........................................................................................ 1-17
Executable Files ..................................................................................................... 1-19
Exiting A.I. Series Software.......................................................................................... 1-24
2 Copy Protection .................................................................................................................2-1
How the Copy Protection System Works.......................................................................... 2-2
Activation Files........................................................................................................2-2
Sharing Drives in Windows for Workgroups v3.11................................................... 2-3
Using a Floppy Disk as a Key Disk.................................................................................. 2-4
Damaged Activation File.......................................................................................... 2-4
Use on More Than One Computer............................................................................2-4
Using a Key Disk...................................................................................................... 2-5
Removing A.I. Series Software (Recall Function)............................................................ 2-6
Moving Activation Files.................................................................................................. 2-9
DOS Mode ............................................................................................................. 2-10
Shortcut for Moving Activation Files ...................................................................... 2-12
Windows Mode ...................................................................................................... 2-15
Moving Activation Without a Master Disk ............................................................. 2-18
Making a Keydisk on a Single Floppy System......................................................... 2-18
Resetting Activation...................................................................................................... 2-19
DOS Reset Utility................................................................................................... 2-20
Windows Reset Utility............................................................................................ 2-21
iii
Page 4

1 1 Installation/Update Procedure
This chapter discusses installing and updating the software.
Note Files are time-stamped to reflect their revision number. For example, files for version
8.02 display a creation time of 8:02 a.m. when the DOS DIR command is used on the
directory containing the files. (The date-stamp is the date of the software release.)
A.I. Series software is copy protected to prevent unauthorized use. During an
installation, activation files are moved from the Master Disk to the destination drive
(usually your hard drive). The software will not run without the activation files. The
original Master Disk will continue to operate as a “key disk” for that module. The key
disk is your backup copy of the activation file. (A key disk is simply a disk which
allows the software to run if the activation file is not found. The Master disk can be
placed in the floppy drive to run A.I. Series software if the activation files are not
present on the hard disk. See Using a Floppy Disk as a Key Disk on page 2-4 for more
information on key disks.) Refer to Chapter 2 - Copy Protection for more information
on activation files and copy protection.
Page 5
Installation Guide
Installing A.I. Series Software
The Setup program performs two functions. First, it uncompresses files from the
distribution disks to the destination drive and directory. Second, the Setup program
inserts registration information into the programs on the destination disk. A.I. Series
software will not run unless the registration information is inserted correctly. You
must use the Setup program to install the software correctly. The software cannot be
installed without using the Setup program.
Note Pressing the [Esc] key at any time during the installation aborts the installation
program and returns you to the DOS prompt (after confirmation). If the master disks
were successfully processed before the full install was aborted, use the Update option
to complete the installation, instead of attempting another full installation.
To install the A.I. Series software:
1. Insert the Setup disk into your floppy drive.
2. Start the Setup program.
• Type: A: [Enter] (Use the appropriate drive letter for your system.)
• Type: SETUP [Enter]
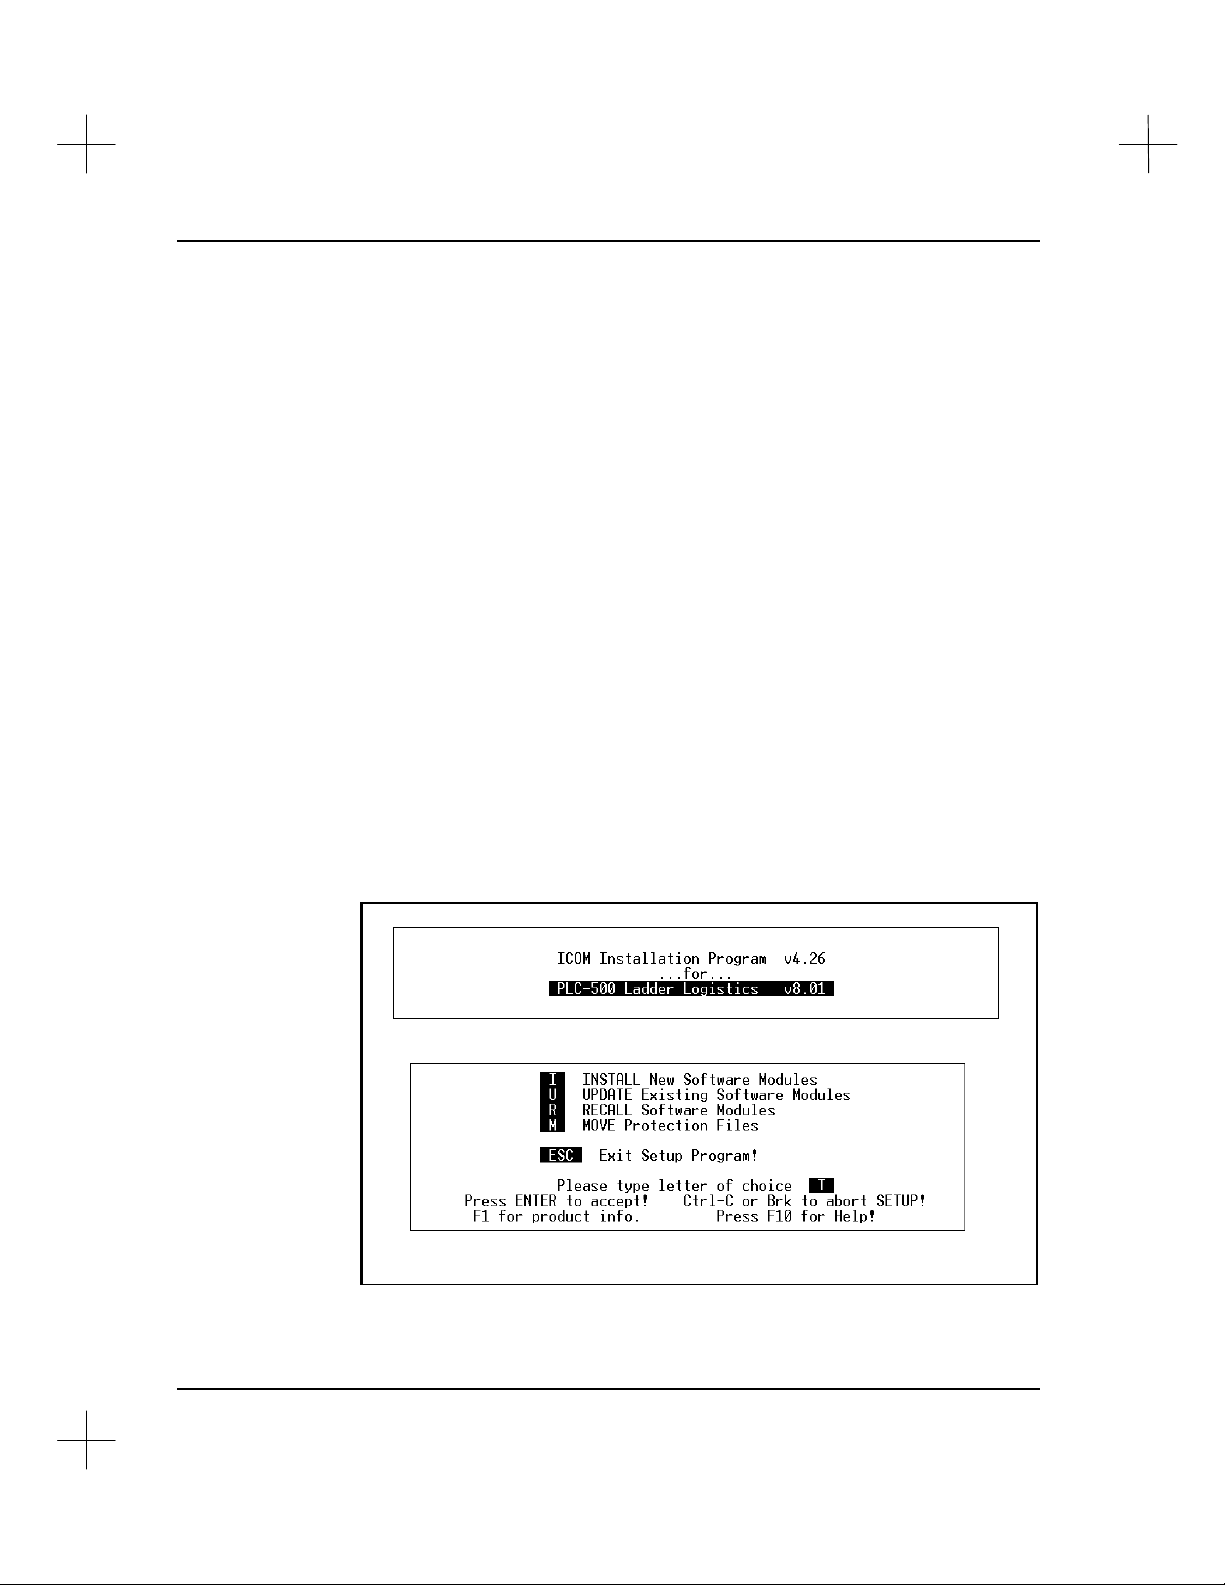
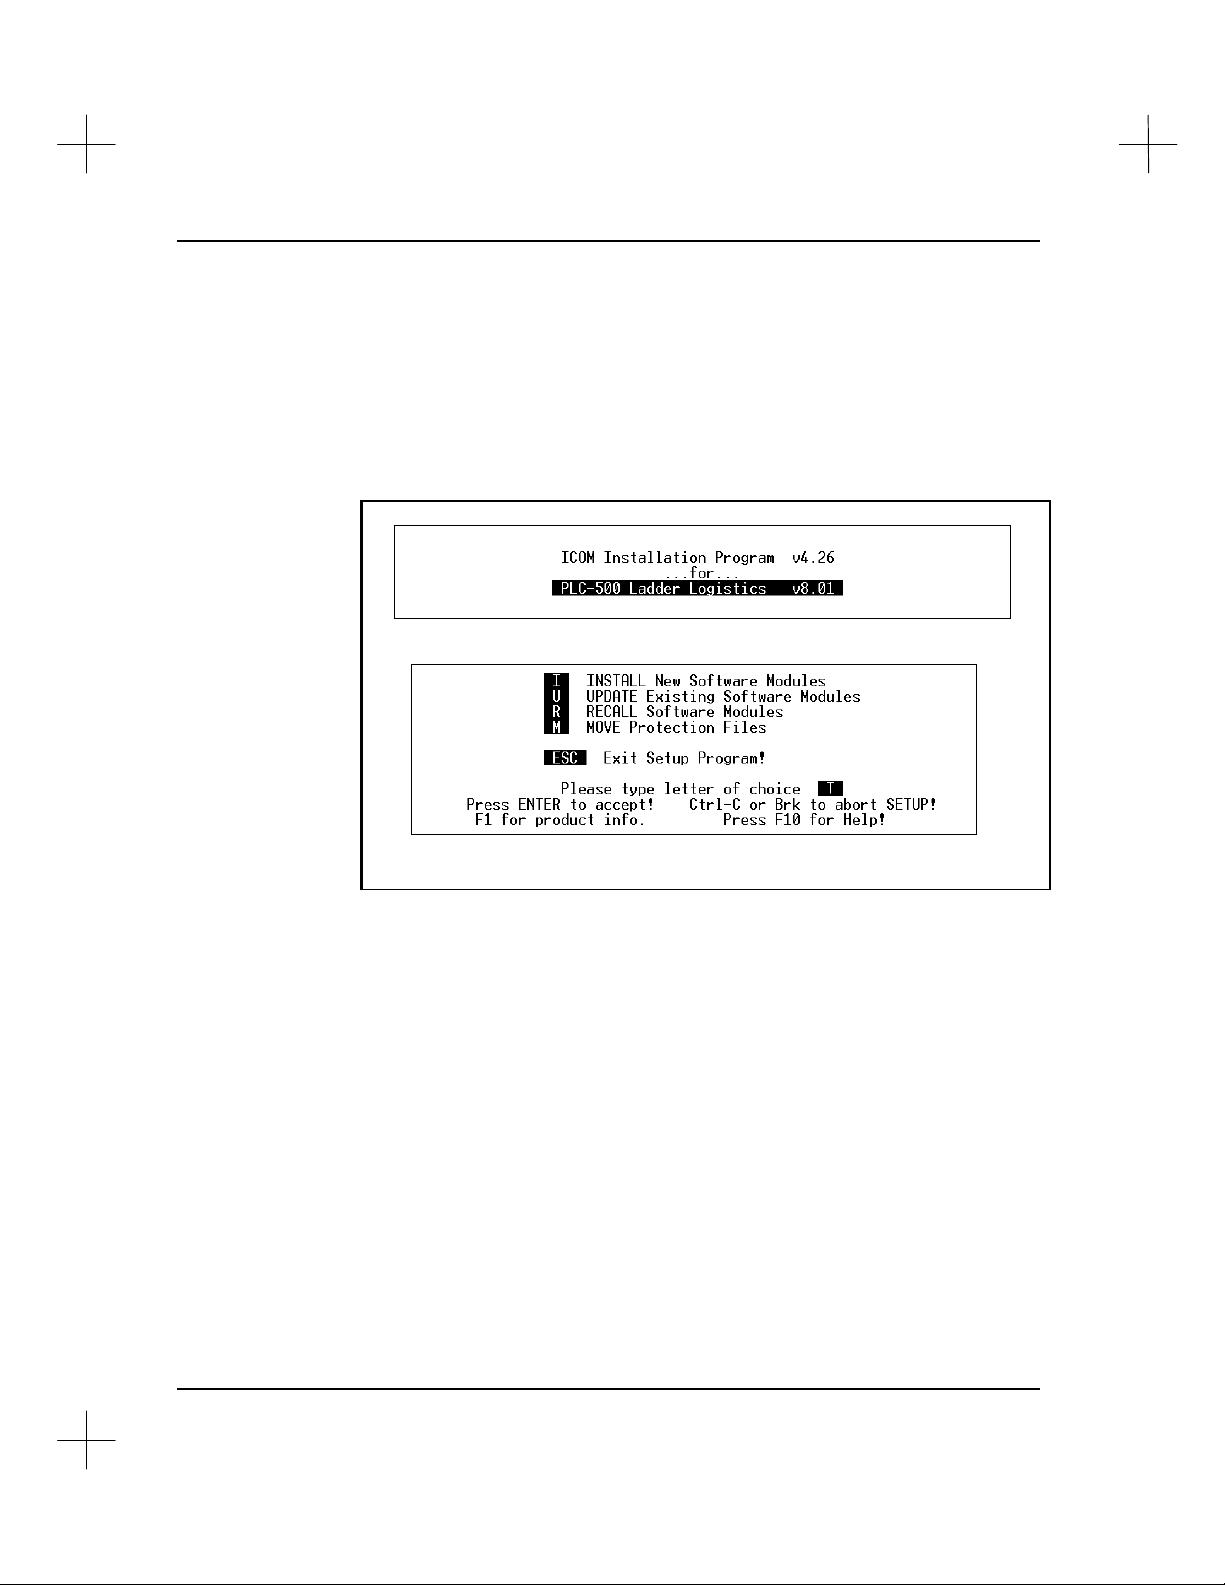
You will see the following screen.
1-2
Page 6
Installation/Update Procedure
3. Select the INSTALL option. This option moves the Rockwell Software product
and activation files from floppy disks to your computer's hard drive.
• Type I.
• When prompted to confirm, type: Y [Enter] to install the A.I. Series software
and display the following screen. Otherwise, type: N [Enter] to return to the
beginning of this step.
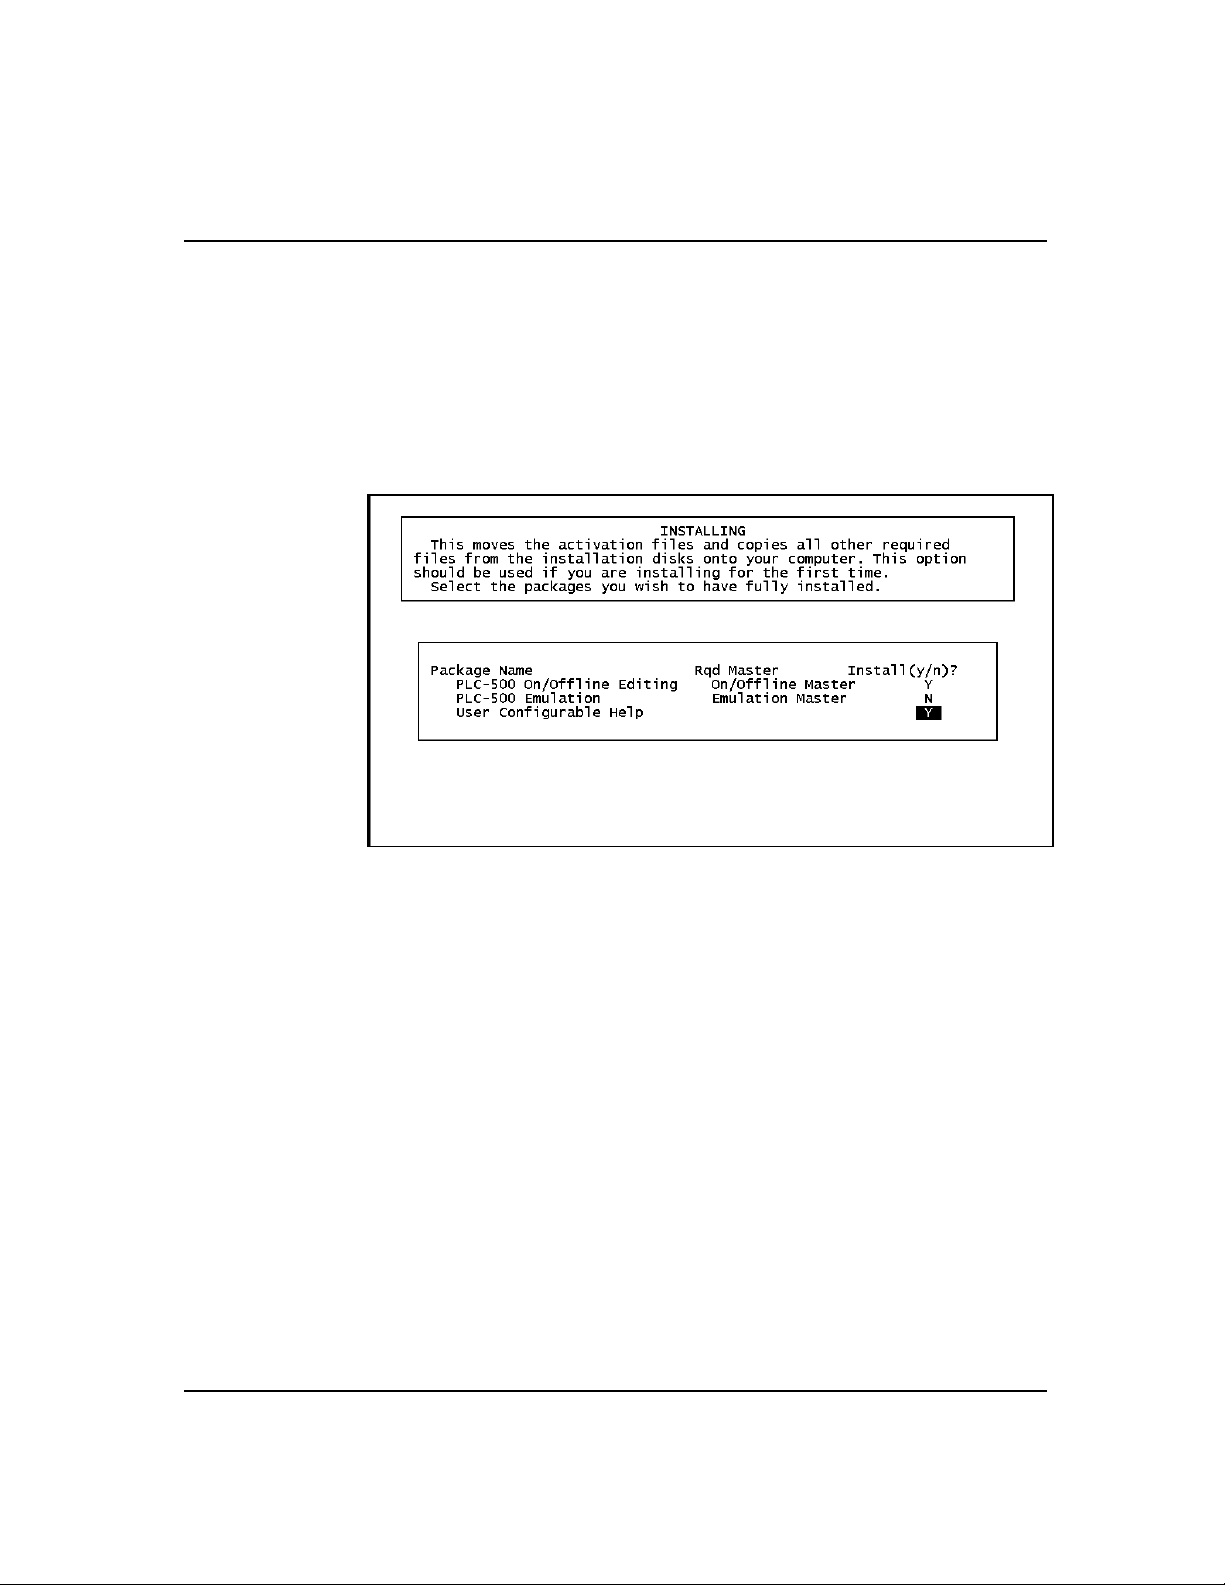
The system displays the following screen, listing the available software modules.
Note The Emulation module is an added-cost option. Do not attempt to install Emulation
unless you have an Emulation Master disk.
4. Type Y in the field to the right of each module you want to install. When you
reach the bottom of the screen, type Y and press [Enter]. A screen like the
following will appear.
1-3
Page 7
Installation Guide
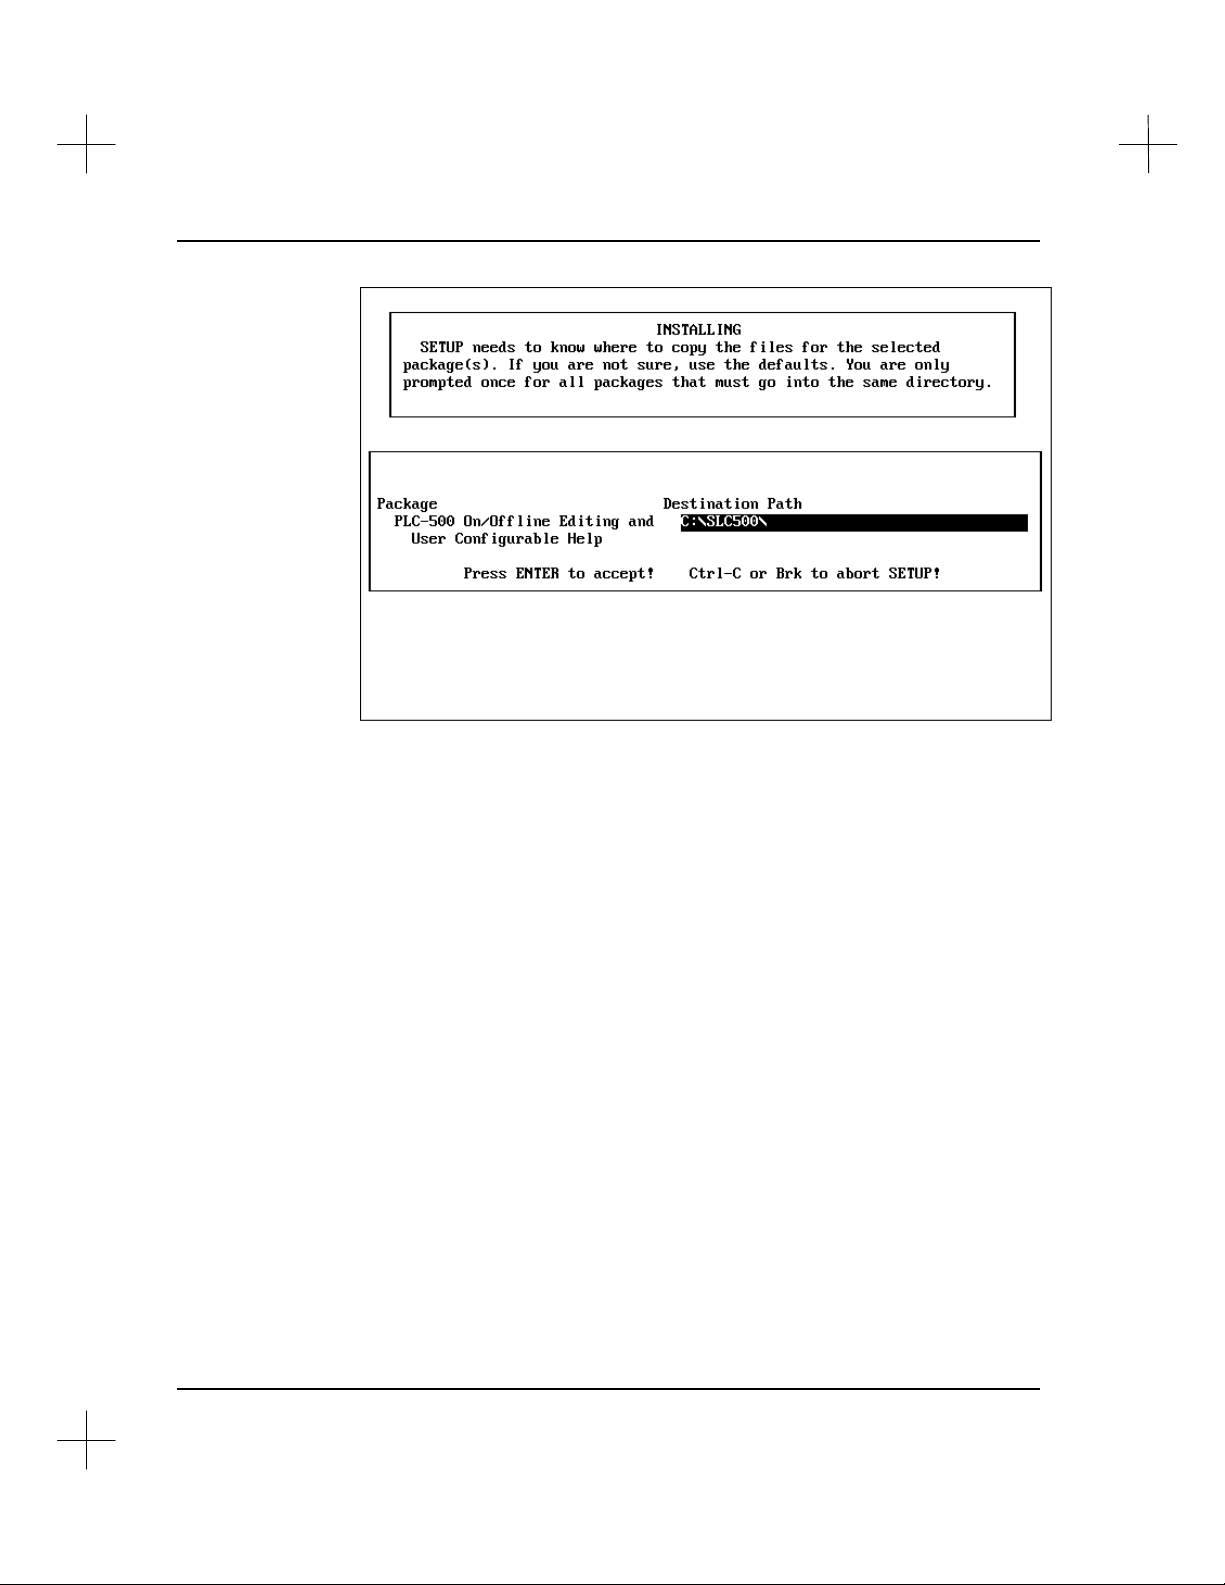
5. Setup asks for the directory in which to install the software. Either accept the
default directory (recommended) by pressing [Enter], or edit the directory name to
one of your own choosing. When you are finished editing, press [Enter].
• If the directory name you entered does not exist, you will be prompted to allow
the Setup program to create the directory for you. Press Y [Enter] to install
the files in the selected directory. Type N [Enter] to return to the beginning of
this step.
• After entering the directory name, you will be prompted to confirm the
installation. Type: Y [Enter] to install the files in the selected directory.
Type: N [Enter] to return to the beginning of this step.
6. The Setup program uncompresses the archived files from your A.I. Series software
disk(s), and copies them into the desired directory.
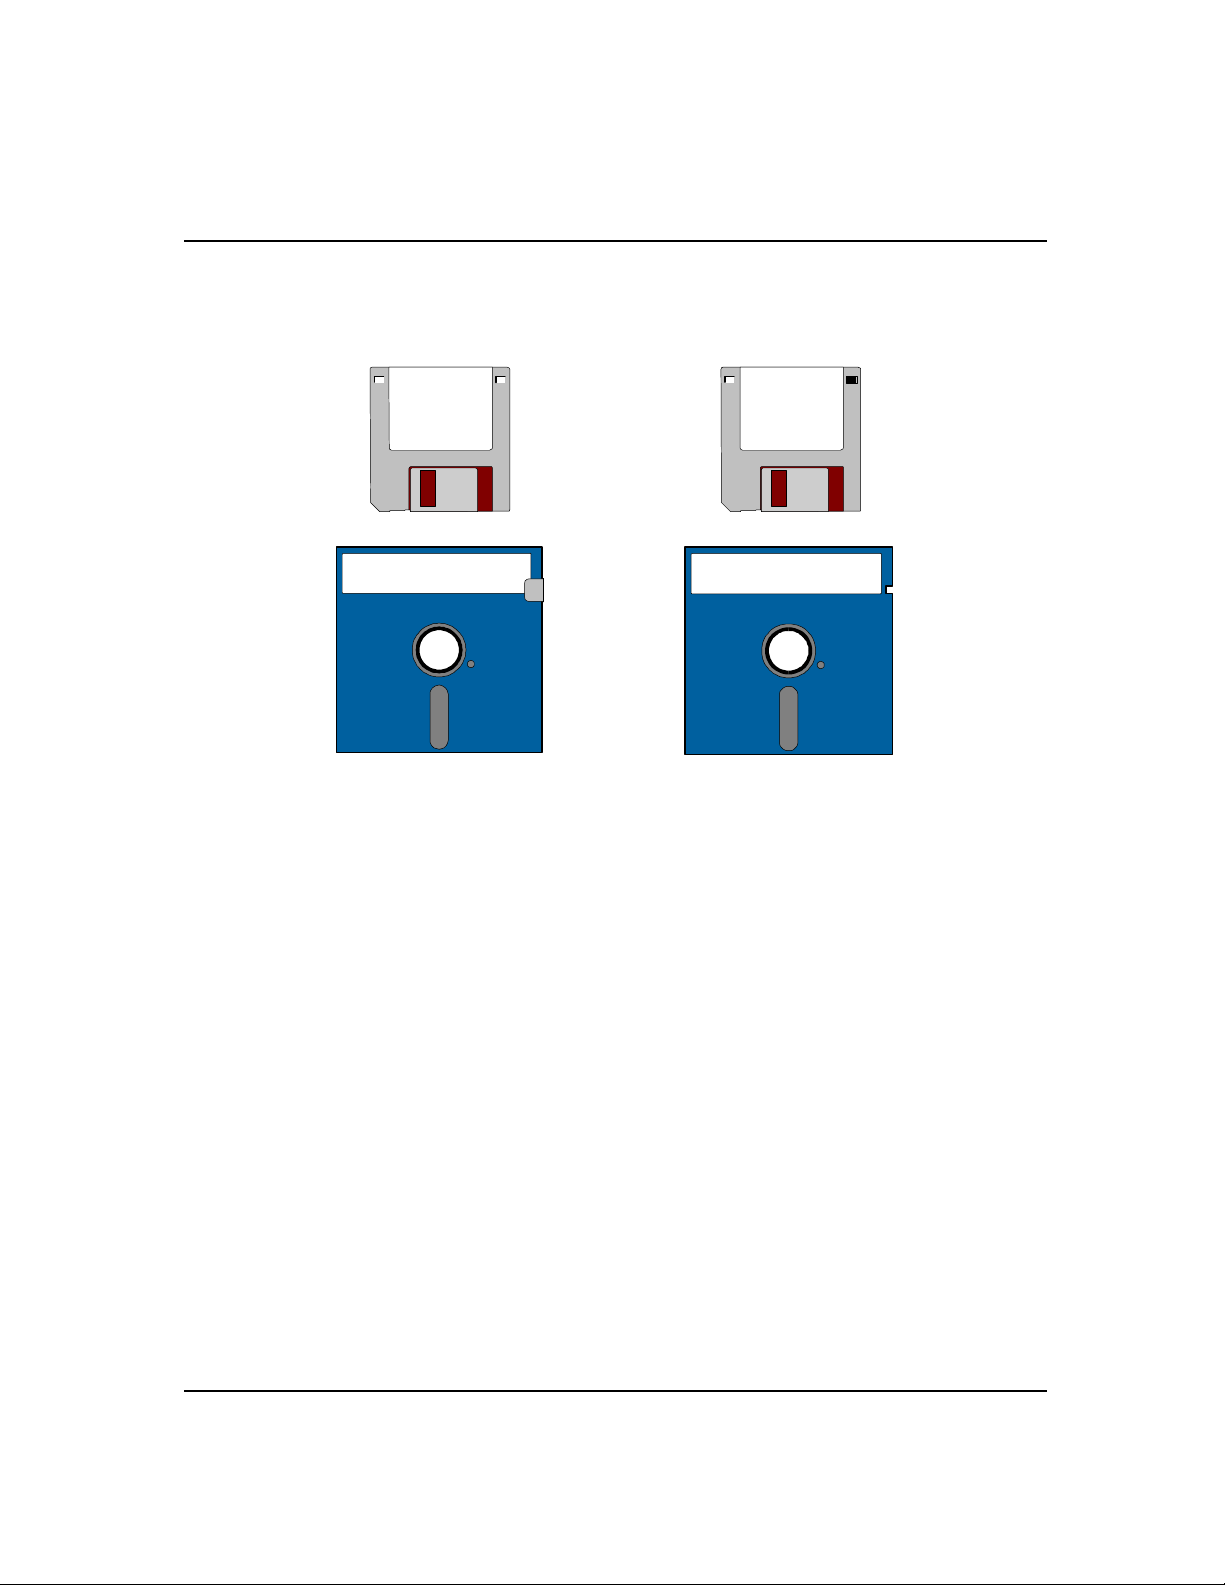
Note When switching disks, make certain that you have NOT write protected any of the
disks! (You can tell whether a disk is write protected by looking at the notch or hole in
the upper right hand corner of the disk. See the figure on the following page.)
1-4
Page 8
Installation/Update Procedure
Write Protected Not Write Protected
open closed
covered uncovered
When the Install routine is complete, store the disks in a safe place. You won't need
them again unless you recall the software.
Installation for Multiple Computers
Note Like all commercial software, Rockwell Software products are licensed for use by a
single user on a single PC. Running multiple copies of the same serial number at the
same time is a violation of international copyright laws and may subject you to
prosecution and subsequent fines and penalties.
If you need to run multiple copies of the software at the same time, quantity discounts
for Rockwell Software products are available. Contact Rockwell Software for details.
You can have A.I. Series software files (except the activation files) with the same serial
number resident on more than one computer, but you are authorized to run it on only
one computer at a time. This is useful if you need a primary system for office use and a
secondary system for use in the field.
1-5
Page 9

Installation Guide
To install the software on more than one computer, perform a full install on the
primary system. Then use the Setup program's Update option to transfer the executable
files to the secondary system. You then have three options for running the software on
these two systems:
• Move the activation files from one system to the other as needed.
• Move the activation files to a blank, formatted floppy disk and use that disk as a
key disk for both systems.
• Use the Master disk as a key disk to run the software. (You do not need to move
the activation file back to the Master disk.) This is the least favorable solution,
however, as your Master disk could be damaged!
See Moving Activation Files on page 2-9 for directions on moving activation files.
1-6
Page 10

Setting Environment Variables
You can use the DOS SET command to set environment variables to control different
functions of your A.I. Series software. The table below describes some environment
variables that you can set. Add these commands to your autoexec.bat file or to a batch
file that starts your A.I. Series software.
If you have this
package…
any A.I. Series
package
any A.I. Series
package
PLC-500 A.I.
MicroLogix A.I.
PLC-5 A.I.
PLC-3 A.I.
PLC-5/250 A.I.
PLC-500 A.I.
MicroLogix A.I
PLC-5 A.I.
PLC-3 A.I.
PLC-5/250 A.I.
PLC-500 A.I. v8.03+
MicroLogix A.I.
PLC-5 A.I. v7.21+
PLC-3 A.I. v6.18
PLC-5/250 A.I. v1.36
PLC-500 A.I. v8.03+
MicroLogix A.I.
PLC-5 A.I. v7.21+
PLC-3 A.I. v6.18
PLC-5/250 A.I. v1.36
PLC-500 A.I. v8.03+
MicroLogix A.I.
PLC-500 A.I. v8.03+
MicroLogix A.I.
PLC-5 A.I. tell the software not to run in protected
PLC-5 A.I. run the software without ICOM EMM
You can… With this DOS command…
specify the directory containing
configuration and other system files in a
network environment (see pages 1-8 - 1-10)
tell the user configurable help where to look
for HELP.DIR and related .HLP files.
prevent users from exiting the A.I. Series
software
prevent users from shelling out to DOS from
within the A.I. Series software
specify the drives and order in which to
check for activation files (see page 2-3 )
tell A.I. to search for activation files only on
hard drives (see page 2-3)
run your A.I. Series software in
monochrome
specify a temporary directory on your local
hard drive when operating in a network
environment (see page 1-9)
mode which uses extended memory
memory management. Refer to the PLC-5
A.I. Version 7 Manual Addendum for more
details.
Installation/Update Procedure
SET PLCLL=pathname
SET ICOMHELPDIR=pathname
SET NOEXITTOPMENU=1
SET NOEXITTODOS=1
SET CHECKDRIVES=drives
SET KEYDISK=0
SET FORCEMONO=1
SET TNT=-SWD pathname
SET NOPROT=1
SET NOICOMEMM=1
1-7
Page 11

Installation Guide
Advanced Installation: Network, Multi-User
Note Use of Rockwell Software products in multi-user and network environments may
require special licensing arrangements depending on the operating system in use. Call
Rockwell Software Technical Support at (414) 321-4266 if you have questions
regarding licensing.
System configuration options discussed in this section are specific to MS-DOS versions
5.0 and 6.x and have been tested under MS-DOS, Windows 3.xx, Windows NT,
Windows 95, OS/2 and Novell Netware.
The Setup program may require file sharing services (SHARE.EXE in your computer’s
AUTOEXEC.BAT or CONFIG.SYS file in Windows v3.1 or VSHARE.386 in
SYSTEM.INI in Windows for Workgroups) in some cases when the copy protection is
located on a network drive.
The A.I. Series software recognizes an environment variable called PLCLL. This
variable is used by the executable files to locate configuration and other system files.
1-8
All A.I. Series programs recognize and use the PLCLL variable. In a multitasking or
networked environment, the variable must be used to specify a unique drive and
directory for each user or session. Each user or session must have read/write access to
the drive and directory specified by PLCLL. If the environment variable is not
specified, the current directory is used.
Page 12

Preparing a Multi-Tasking or Network Environment
Set the PLCLL environment variable with the DOS SET command. The SET
command may be used in the AUTOEXEC.BAT file or a batch file that starts the A.I.
Series software.
To change the PLCLL environment variable, use the SET command to specify a new
directory. To erase the PLCLL environment variable and use the default drive and
directory, issue the SET command with no parameter.
To specify a new directory, type (from the DOS prompt):
SET PLCLL = drive:\directory [Enter]
To reset the variable and use the default directory, type:
SET PLCLL = [Enter]
Make sure the temporary directory in your A.I. Series software is set to the same
directory as PLCLL:
1. From the Main Menu, select [F9] Configure Program Parameters.
2. Select [F4] Program Operational Parms.
Installation/Update Procedure
3. Press [F3] Directory to hold temporary files. Type the same drive and directory as
the PLCLL environment variable is set to and press [Enter].
32-bit Products (PLC-500 A.I. and Micro A.I.)
If you want to run PLC-500 A.I. or Micro A.I. from a network drive where you don’t
have read/write rights to the root directory, you will have to set environment variables
pointing to the temporary directory on your local hard drive. Place the following lines
in your AUTOEXEC.BAT file or in a batch file that runs the software. Replace
“C:\TEMP” in the examples with the path of the temporary directory on your system.
SET PLCLL=C:\TEMP
SET TNT=-SWD C:\TEMP
1-9
Page 13
Installation Guide
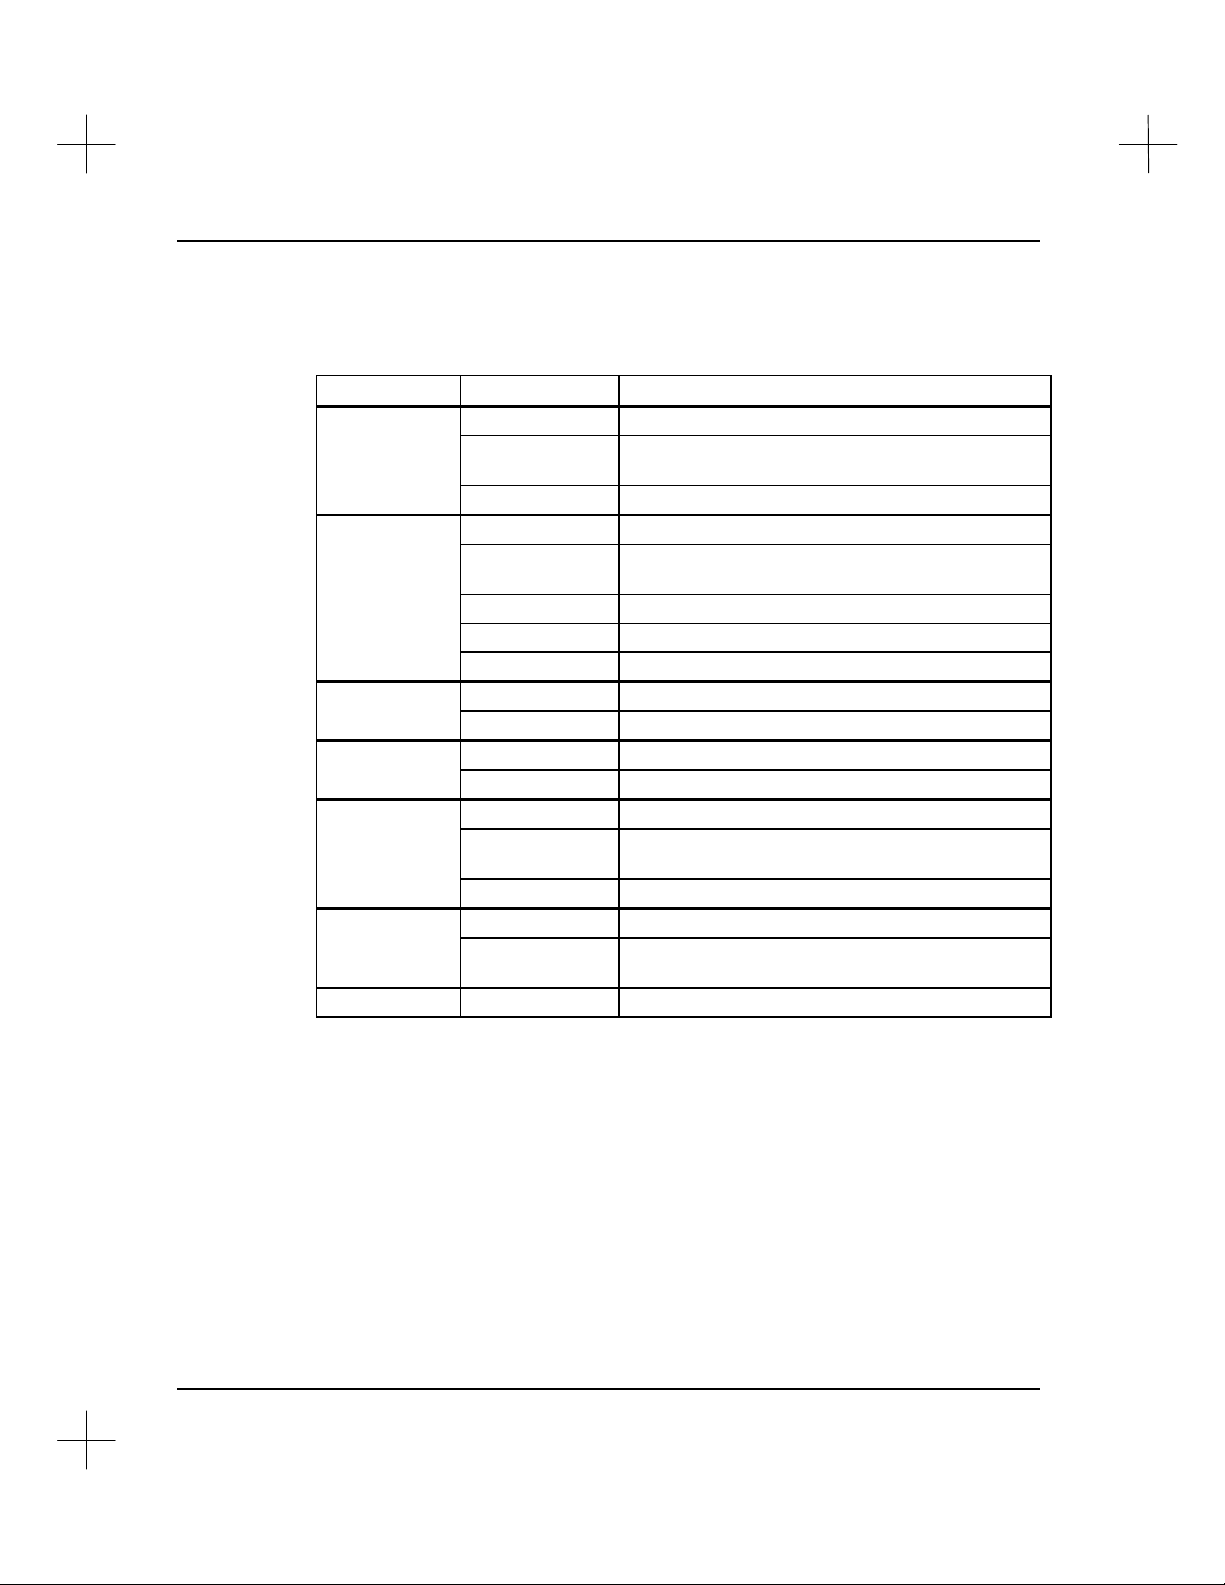
Files Affected by PLCLL
System files affected by the PLCLL variable include:
Product Filename Purpose
SLC5LL.CFG Main configuration file
PLC-500 A.I. *SLC5LL.DEF Status file descriptions, loaded automatically to
SLC5LL.PKY User-defined keyboard mappings
PLC5LL0.CFG Main configuration file
*PLC5LL.DEF Status file descriptions, loaded automatically to
PLC-5 A.I. $ICOMRUN.OVL Primary video driver
PLC5LL.PKY User-defined keyboard mappings
USERSWD.DEV User-defined device codes
PLC2LL0.CFG Main configuration file
PLC-2 A.I. PLC2LL.PKY User-defined keyboard mappings
PLC3LL0.CFG Main configuration file
PLC-3 A.I. PLC3LL.PKY User-defined keyboard mappings
PLC5250.CFG Main configuration file
PLC-5/250 A.I. *PLC5250.DEF Status file descriptions, loaded automatically to
PLC5250.PKY User-defined keyboard mappings
MICROLL.CFG Main configuration file
MicroLogix A.I. *MICROLL.DEF Status file descriptions, loaded automatically to
MICROLL.PKY User-defined keyboard mappings
*Make sure these files are manually copied to the drive and directory specified by the
PLCLL environment variable.
new databases
new databases
new databases
new databases
1-10
Page 14

Updating A.I. Series Software
!
Software updates consist of a complete set of distribution disks, without the master
disks. You can discard the distribution disks from the previous version, but retain any
disks labeled “MASTER.” Master disks are not version specific, and will remain in
use for the life of the product.
Executable files access one or more common files. Updating the online OR offline
modules replaces these common files with the newer version. If the online and
offline modules reside in the same directories, make sure to update both modules
to the new version. Running the software from a directory that contains mixed
revisions will yield unpredictable results.
If you receive an update that does not include both modules, you can install and
run the one module in a separate directory until the update for the other module
arrives.
Installation/Update Procedure
Use the Setup program to update files on your hard disk.
Note Program configuration, system security, and printer driver files are not overwritten by
the update function. If you want these files updated, delete them from the destination
directory before updating. (These filenames end with .CFG, .SCY, and .PDL
respectively.)
Note Pressing the [Esc] key at any time during the update aborts the program and returns
you to the DOS prompt (after confirmation).
1-11
Page 15
Installation Guide
To update A.I. Series software:
1. Start the update procedure by inserting the new Setup disk into your floppy drive.
2. Start the Setup program.
• Type: A: [Enter] (Use the appropriate drive letter for your system.)
• Type: SETUP [Enter]
You will see a screen like the following.
1-12
Page 16
Installation/Update Procedure
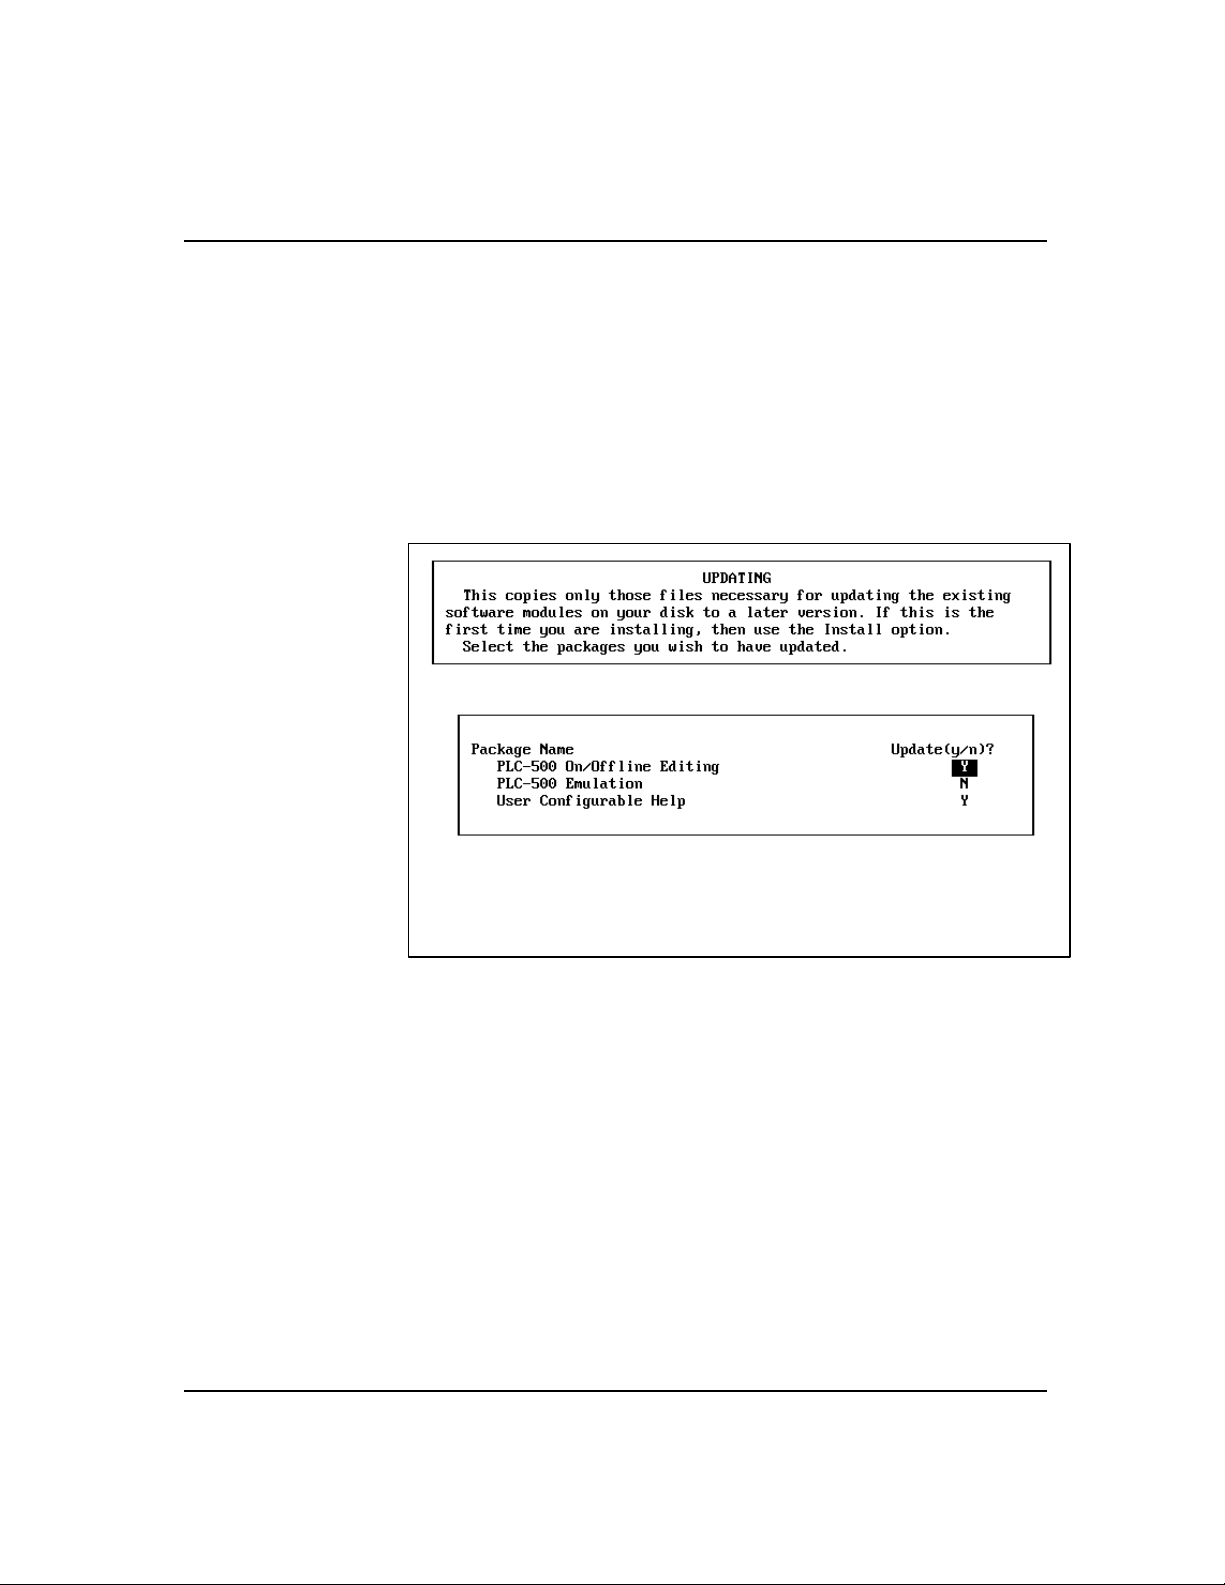
3. Select the UPDATE option. This option moves the Rockwell Software program
files from your floppy disks to your computer's hard drive. Note that an Update
does not affect the activation files in any way.
• Type U.
• When prompted to confirm, type Y [Enter] to update A.I. Series software and
display the next screen, or type N [Enter] to return to the beginning of this
step. The system displays a screen like the following, listing the available
software modules.
• Type Y in the field to the right of each module you want to update. When you
reach the bottom of the screen, type Y and press [Enter].
Note The Emulation module is an added-cost option. Do not attempt to update Emulation
unless you have an Emulation Master disk.
1-13
Page 17

Installation Guide
4. Setup asks for the name of the directory where you originally installed the A.I.
Series software. Either accept the default directory by pressing [Enter], or edit the
directory name appropriately. When you are finished editing, press [Enter].
• If the directory name you entered does not exist, you will be prompted to allow
the Setup program to create the directory for you. Press Y [Enter] to update
the files in the selected directory. Type N [Enter] to return to the beginning of
this step.
• After entering the directory name, you will be prompted to confirm the update.
Type: Y [Enter] to update the files in the selected directory. Type: N [Enter]
to return to the beginning of this step.
5. The Setup program uncompresses the archived files from your A.I. Series software
disk(s), and copies them into the desired directory.
Note When switching disks, make certain that you have NOT write protected any of the
disks! (See the note on page 1-4 if you need help distinguishing a write protected
disk.)
1-14
Page 18

Installation/Update Procedure
If Your Disks Are Damaged
If your product disks (or hard drive) are damaged, you might need to call Rockwell
Software for assistance. The following questions and answers illustrate some common
situations and their solutions.
Note All disk replacements assume that your product support is up to date. Call Rockwell
Software at (414) 321-4266 for information on Rockwell Software's Extended Product
Support.
1. “I have A.I. Series software installed on my hard disk, and one of my program
disks has been damaged.”
If any of your program disks is damaged (including the Master disk), but the
software is still functioning correctly on the hard disk, call Rockwell Software at
(414) 321-4266 for a replacement disk. Continue to use your software on your
hard disk.
2. “I accidentally deleted the directory which contained all my A.I. Series
software files. Do I need to call Rockwell Software for a replacement set of
Activation files?”
No. Deleting the program files does not delete your Activation files. The
Activation files are not stored in the program directory, they are located in the root
directory. Your Activation files won't be lost unless you format the hard disk or
tamper with hidden files in the root directory. For a list of more operations that
can damage the activation file, refer to page 2-1. If you run the Setup program and
perform an Update, a new set of program files will be copied to the hard disk and
the A.I. Series software will operate normally. (See Updating A.I. Series Software
on page 1-11 for the Update procedure.)
1-15
Page 19

Installation Guide
3. “A.I. Series software was installed on my hard disk, but my hard disk crashed
(was damaged) and now I've lost my Activation files.”
This isn't as bad as it sounds. First, use the Update procedure in the Setup
program to re-copy the A.I. Series software files onto the new or repaired hard
disk. (See Updating A.I. Series Software on page 1-11 for the Update procedure.)
After updating the files, you can run the A.I. Series software as long as the Master
disk for the module you want to run is in one of the floppy drives. (You can run
some functions of the software such as upload/download, reporting, and program
compare even without the Master disk.) When started, the A.I. Series software will
automatically look for the Master disk in the floppy drives when it can't find the
Activation files on the hard disk.
Call Rockwell Software at (414) 321-4266 to obtain the reset code for your
activation files. If you are near an IBM compatible computer, with the Master
disks in hand, we may be able to reset your activation files over the phone. If the
reset process was successful, you should use the Move procedure in the Setup
program to move the reset activation files back onto the hard disk. (See Moving
Activation Files on page 2-9 for the Move procedure.)
1-16
Page 20

Running A.I. Series Software
To start the A.I. Series software:
1. Change to the directory where the A.I. Series software has been installed. (See the
table below for the default directory.)
• Type CD pathname [Enter]
2. Enter the command to run the software. (See the table below for the run
command.)
Software Package Default Directory Run Command
PLC-2/1774-PLC A.I. C:\PLC2 AB2
PLC-3 A.I. C:\PLC3 AB3
PLC-5 A.I. C:\PLC5 AB5
PLC-500 A.I. C:\SLC500 AB500
PLC-5/250 A.I. C:\PLC5250 AB5250
MicroLogix A.I. C:\MICRO MICRO
Installation/Update Procedure
1-17
Page 21

Installation Guide
The Main Menu will appear. The screen shown below is from the PLC-500 A.I.
software for Allen-Bradley SLC 500 processors.
The second line from the top of the screen identifies the currently selected Project, on
the left, and the default network address for the processor, on the right.
The third line from the top of the screen displays the currently selected communication
device followed by the addressing mode of the processor station address on the DH+
(octal), DH-485 (decimal), or Ethernet (decimal) network.
The large box across the lower part of the screen shows your Company name and
Address (city and state or province). The currently activated software modules, the
drives they are installed on, and their serial numbers are displayed immediately below
those lines if the activation files are found on a local or network hard drive.
Note Company name and address information is taken directly from our customer database.
Please contact Rockwell Software Technical Support at (414) 321-4266 to correct
spelling errors or incorrect registration information.
1-18
Page 22

Installation/Update Procedure
Executable Files
The A.I. Series Ladder Logistics products consist of a number of separately executable
modules. These executable files may be run directly from the DOS prompt by typing in
the filename.
Note Before attempting to run any of the executable files directly, run the A.I. Series
software and configure it (select a project and configure a communication device).
PLC-2/1774-PLC A.I.
Executable file Function
AB2.EXE Main Menu
COMP2.EXE Program Compare Utility
DBE2.EXE Database Editor
DHDIAG.EXE Online monitoring over DH
INSTOVL.EXE Selects screen overlay mode
OFF2.EXE Offline Programming
ON2.EXE Online Programming
ONPLC.EXE Online programming for 1774 PLC’s
REPORT2.EXE Program Reporting
SYSCONF2.EXE Security System
XFER2.EXE Upload/Download Module
XREF2.EXE Cross Reference Generation
1-19
Page 23

Installation Guide
PLC-3 A.I.
Executable file Function
AB3.EXE Main Menu
AITERM.EXE Terminal Utility Program
COMP3.EXE Program Compare Utility
DBE3.EXE Database Editor
EXP2AB3.EXE Export to A-B 6200 Series
INSTOVL.EXE Selects screen overlay mode
ITIMPRT3.EXE Import A-B 6200 Series
MAKEVDI.EXE Converts .ACH file to .VDI file
MEMEDIT3.EXE Offline editor for PLC-3 E5 memory area
MEMEDO3.EXE Online editor for PLC-3 E5 memory area
OFF3.EXE Offline Programming
ON3.EXE Online Programming
REPORT3.EXE Program Reporting
SYSCONF3.EXE Security System
XFER3.EXE Upload/Download Module
XREF3.EXE Cross Reference Generation
1-20
Page 24

PLC-5 A.I.
Executable file Function
AB5.EXE Main Menu
AITERM.EXE Terminal Utility Program
COMP5.EXE Program Compare Utility
DBE5.EXE Database Editor
EXP2AB.EXE Export to A-B 6200 Series
INSTOVL.EXE Selects screen overlay mode
IOCFG5.EXE*
Configures smart I/O modules
ITIMPORT.EXE Import A-B 6200 Series
LIB2PC5.EXE Converts a .LIB file to a .PC5 file
OFF5.EXE Offline Programming
OFF5N.EXE Offline “normal” mode; no emulation available
OFF5P.EXE
Offline “protect” mode; emulation available if installed
ON5.EXE Online Programming
REPORT5.EXE Program Reporting
SFC.EXE*
SFC2.EXE*
SFCCONV.EXE*
SFC editor for “classic” PLC-5’s
SFC editor for “NP5” PLC-5’s
Converts SFC’s from a “classic” to an “NP5”
SYSCONF5.EXE Security System
VIDSETUP.EXE*
Determines video display for online or offline ladder editing
XFER5.EXE Upload/Download Module
XREF5.EXE Cross Reference Generation
*Do not run files marked with an asterisk ( * ) directly.
Installation/Update Procedure
1-21
Page 25

Installation Guide
PLC-500 A.I.
PLC-5/250 A.I.
Executable file Function
AB500.EXE Main Menu
AITERM.EXE Terminal Utility Program
COMP0.EXE Program Compare Utility
CP5.EXE*
DBE0.EXE Database Editor
EXP2AB0.EXE Export to A-B APS
ITIMPORT.EXE Import A-B APS
OFF0.EXE Offline Programming
REPORT0.EXE Program Reporting
SYSCONF0.EXE Security System
VIDSETUP.EXE*
XFER0.EXE Upload/Download Module
XREF0.EXE Cross Reference Generation
Ladder program compiler
Determines video display for online or offline ladder editing
*Do not run files marked with an asterisk ( * ) directly.
1-22
Executable file Function
AB5250.EXE Main Menu
AITERM.EXE Terminal Utility Program
COMP.EXE Program Compare Utility
DBE.EXE Database Editor
INSTOVL.EXE Selects screen overlay mode
IOCFG.EXE*
OFF.EXE Offline Programming
ON.EXE Online Programming
REPORT.EXE Program Reporting
SYSCONF.EXE Security System
VIDSETUP.EXE*
XFER.EXE Upload/Download Module
XREF.EXE Cross Reference Generation
Configures smart I/O modules
Determines video display for online or offline ladder editing
*Do not run files marked with an asterisk ( * ) directly.
Page 26

MicroLogix A.I.
*Do not run files marked with an asterisk ( * ) directly.
Executable file Function
AITERM.EXE Terminal Utility Program
CP5.EXE*
Ladder program compiler
DBE0.EXE Database Editor
MICRO.EXE Main Menu
OFFM.EXE Offline Programming
REPORT0.EXE Program Reporting
VIDSETUP.EXE*
Determines video display for online or offline ladder editing
XFER0.EXE Upload/Download Module
XREF0.EXE Cross Reference Generation
Installation/Update Procedure
1-23
Page 27

Installation Guide
Exiting A.I. Series Software
1. Use the [Esc] key to move backwards through the menu structure until you reach
the Main Menu screen. (You may see messages asking if you want to save your
work. Answer any questions accordingly.)
2. From the Main Menu, press [Esc] again.
3. The A.I. software asks you if you want to exit. Answer yes to exit the program.
1-24
Page 28

2 2 Copy Protection
!
A.I. Series software is copy protected. The software is intended for use solely by the
party who has registered the software. This company’s name and address appear in a
window at the bottom of the A.I. Series software’s Main Menu. Since the package is
copy protected, only a computer with access to the activation files installed can actually
execute the software package (see the section on Activation Files, on page 2-2).
This chapter deals with how the protection system works and what to do if something
goes wrong (like a hard drive crash).
Performing certain operations on your hard disk will damage the activation files!
Before performing the following operations, move the activation files from your hard
disk back to the Master disk. Perform the operation, then move the activation files
back to your hard disk. (See Moving Activation Files on page 2-9 for details.)
• upgrade to Novell DOS
• reinstall the current version of DOS
• uninstall DOS
• compress the hard drive with SuperStor/DS (package with PC-DOS v 6.x) or
Windows 95 Drive Space 3
• uncompress the hard drive
• turn off Windows for Workgroups 32-bit file access
Note You can turn on 32-bit disk access and 32-bit file access in Windows for Workgroups
with no problems.
Before running any type of utility that may modify the structure or organization of the
hard drive, recall the activation file. (Note: Defragmentation utilities will not harm
the activation file.) After running the utility, re-install the activation. (If you have
compressed your hard drive, re-install the activation file to the uncompressed portion of
the drive.)
Page 29

Installation Guide
How the Copy Protection System Works
When you install the software, the setup program asks you to insert a Master disk for
the product you are installing. The Master disk has two main functions; it carries the
activation file for the software, and it provides you with a key disk in case the
activation file is lost or damaged. The software will not run without the activation file.
During the setup process, the setup program moves the activation file from the Master
disk to the root directory of the drive on which you’re installing the software. Leave
this file where it is! Removing it, renaming it, or doing anything else to it can render
your software inoperative.
Activation Files
The activation files are stored in the root directory of your hard drive. These files are
marked as system, read-only, and hidden which means that they will not show up when
you execute a DOS DIR command. Some third-party file management programs show
hidden files. You should take care that you do not accidentally delete these files from
your hard drive.
2-2
When you start your A.I. Series software, it searches for the activation file on local or
network hard drives. If the activation files reside on a local floppy drive you will see
the message "No Activation Found" on the Main Menu. Open the Offline or Online
Editor. The software will then search for the activation file first on the local hard
drive, then on remote (network) drives, then on local floppy drives. Once the activation
files are found, the serial numbers for installed software modules will appear on the
Main Menu, below the Company Name and Address lines.
Page 30

You can use the Checkdrives environment variable to specify the drives and order in
which to check them for the activation file. In your AUTOEXEC.BAT file or a batch
file that starts your software, include the line
SET CHECKDRIVES=drive_letters
where “drive_letters” is a list of drives to check. The command can be in upper or
lower case and no punctuation is required. For example,
SET CHECKDRIVES=AQC
will check drives A, Q, and C in that order for the activation file.
If you do not want your A.I. Series software to search local floppy drives for the
activation file, you can set the KEYDISK environment variable to false.
SET KEYDISK=FALSE (or SET KEYDISK=0)
Sharing Drives in Windows for Workgroups v3.11
The following table describes circumstances under which the copy protection will allow
different clients to use A.I. Series software residing on client A’s local shared hard
drive.
Copy Protection
If 32-Bit File Access
is…
disabled on client A’s
system
enabled on client A’s
system
And… Then…
client A moves the activation files
to client A’s drive
a different client moves the
activation files to client A’s drive
anyone moves the activation files
to client A’s drive
all clients can use the A.I.
Series software
client A can not use the
software
all clients can use the
software
2-3
Page 31

Installation Guide
Using a Floppy Disk as a Key Disk
Rockwell Software products require either an activation file (installed by the Rockwell
Software setup program) or a Rockwell Software Master disk to operate. In certain
circumstances you may want to use a floppy disk to operate your software.
Damaged Activation File
The first circumstance is when you have lost the copy protection because the activation
file is damaged (hard drive crash, file corruption on the hard drive, etc.). In this case,
contact Rockwell Software Technical Support at (414) 321-4266. In an emergency, you
can still run the A.I. Series software using the Master disk as a key disk. Follow the
instructions for resetting activation files on page 2-19 for a more permanent solution.
Use on More Than One Computer
Perhaps you have a desktop computer for your office and a portable computer for field
work, and you need to use an A.I. Series package on both computers.
2-4
To install the software on more than one computer, perform a full install on the
primary system. Then use the Setup program's Update option to transfer the executable
files to the secondary system. You then have three options for running the software on
these two systems:
• Move the activation files from one system to the other as needed.
• Move the activation files to a blank, formatted floppy disk and use that disk as a
key disk for both systems.
• Use the Master disk as a key disk to run the software. (You do not need to move
the activation file back to the Master disk.) This is the least favorable solution,
however, as your Master disk could be damaged!
See Moving Activation Files on page 2-9 for directions on moving activation files.
Page 32

Using a Key Disk
To use a key disk:
1. Place the master disk or a floppy containing the activation files in the floppy drive.
2. Execute the desired function.
The A.I. Series software will check first your local hard drives, then network hard
drives, and finally local floppy drives. If your network contains a large number of
drives, you can speed up the activation search by using the CHECKDRIVES
environment variable. See page 2-3 for more information on using CHECKDRIVES.
Copy Protection
2-5
Page 33

Installation Guide
Removing A.I. Series Software (Recall Function)
You can use the Setup program’s Recall feature to remove the activation files from your
computer's hard drive and place them back on your Master disk. The Recall function
does not delete any of the product files from your hard disk. Delete these files from
the hard disk manually, using DOS or another disk management program.
Note Make certain that your Master Disk is not write protected before attempting to recall
your software. (See the note on page 1-4 if you need help distinguishing a write
protected disk.)
If you leave the product files on your hard disk, you can re-enable the files using the
Move function in the Setup program.
To recall A.I. Series software:
1. Insert the Setup disk into your floppy drive.
2. Start the Setup program.
• Type: A: [Enter] (Use the appropriate drive letter for your system.)
• Type: SETUP [Enter]
2-6
You will see a screen like the following.
Page 34

Copy Protection
3. Select the RECALL option.
• Type: R
• When prompted to confirm, type: Y [Enter] to recall the A.I. Series software
and display the next screen. Type: N [Enter] to return to the beginning of this
step.
A window will appear listing the packages you can recall.
4. Type Y in the field to the right of each module you want to recall. When you reach
the bottom of the screen, type Y and press [Enter].
Note The Emulation module is an added-cost option. Do not attempt to recall Emulation
unless you have an Emulation Master disk.
5. Another window will appear, asking for the hard disk drive letter that the
activation files are on (the default is C) and the floppy disk drive letter where the
Master disk will be inserted (the default is A).
• Either press [Enter] to accept the defaults or type in the appropriate drive
letters.
6. You will be asked to verify your selections.
• Press: Y [Enter]
2-7
Page 35

Installation Guide
Note If you ran Setup from Windows or from a DOS box in Windows 95 or Windows NT, the
dialog box for the Windows version of EvMove will appear at this point. Click OK.
Another dialog box will appear. Click Move. For more information on the Windows
version of the move utility, see page 2-15.
7. Following the prompts on the screen, insert the Master disks as they are requested.
2-8
Page 36

Copy Protection
Moving Activation Files
If you decide to move your A.I. Series software to another computer, you need to
remove the activation files from the computer on which the software is installed. The
Setup program provides a utility for moving Activation files. The Move function will
not install any of the program or data files associated with the A.I. Series software. If
you wish to move both the Activation files and the program files to the hard drive, use
the Setup program's Install routine instead. The Move utility allows you to copy
Activation files to and from any local or network drive.
You can run the Move utility from the Master disk or directly from a hard drive. Copy
the file EVMOVE.EXE from the Master disk onto your hard disk. You can then run
EVMOVE in basically the same way as described on the following pages, except
without the Master disk.
Note To move activation files to a network drive, you must have read, write, and creation
privileges for the root directory of that network drive.
The Move utility, EvMove, can run in DOS or Windows mode depending on your
operating system.
If you run EvMove from… Then…
DOS the DOS flavor of the Move utility will run.
Windows the Windows flavor of the Move utility will run.
a DOS box under Windows the DOS flavor of the Move utility will run.
a DOS box under Windows 95 or
Windows NT
the Windows flavor of the Move utility will run.
You can also shortcut the Move utility in Setup by typing commands directly at the
DOS prompt. Each of these options is described in the following sections.
2-9
Page 37

Installation Guide
DOS Mode
To move the A.I. Series software:
1. Insert the Setup disk into your floppy drive.
2. Start the Setup program either from DOS or a DOS box under Windows.
• Type: A:[Enter]
• Type: SETUP [Enter]
You will see a screen like the following.
2-10
3. Select the MOVE option.
• Type: M
• When prompted to confirm, type Y [Enter] to move the A.I. Series software
and display the next screen. Type N [Enter] to return to the beginning of this
step.
Page 38

Copy Protection
A window will appear listing the packages you can move.
4. Type Y in the field to the right of each module you want to move. When you reach
the bottom of the screen, type Y and press [Enter].
Note The Emulation module is an added-cost option. Do not attempt to move Emulation
unless you have an Emulation Master disk.
5. Another window will appear, asking for the hard disk drive letter that the
activation files are to be moved to (the default is C) and the floppy disk drive letter
where the Master disk is inserted (the default is A).
• Either press [Enter] to accept the defaults or type in the appropriate drive
letters.
6. You will be asked to verify your selections.
• Press: Y [Enter]
7. Following the prompts on the screen, insert the Master disks as they are requested.
2-11
Page 39

Installation Guide
Shortcut for Moving Activation Files
You can move the activation files without using the SETUP disk.
Note Make certain that your Master Disk is not write protected before using it to move your
software. (See the note on page 1-4 if you need help distinguishing a write protected
disk.)
Note In this example, we use drive A: for the floppy disk drive, and C: for the hard drive.
This is a common configuration, but yours may be different. If it is, substitute the
appropriate drive letters for your system.
To move the activation files from one computer to another without the Setup disk:
1. Make sure you are at a DOS prompt. If you are using Windows either exit or shell
to DOS or open a DOS window.
2. Insert the Master Disk in drive A: on the primary system (substitute drive letters
appropriate for your system) and type:
• A: [Enter]
• EVMOVE C A [Enter]
• Y [Enter] (to confirm the move)
3. Take the Master Disk to the secondary system, insert it in drive A: and type:
• A: [Enter]
• EVMOVE A C [Enter]
• Y [Enter] (to confirm the move)
Note You can run EvMove without the Master disk if you have copied the file EVMOVE.EXE
from the Master disk onto your hard disk.
2-12
Page 40

Copy Protection
EvMove Command Line Switches
The DOS version of EvMove has the following syntax.
Note The syntax is shown in upper case for clarity; it is not case sensitive. It may be typed in
upper case, lower case or mixed upper/lower case. Items in brackets [ ] are optional
items; the brackets are not part of the required syntax.
EVMOVE [[/]?]
or
EVMOVE SOURCE DESTINATION [/B]
or
EVMOVE SOURCE DESTINATION [PRODUCT [SERIAL# [COUNT]]] [/B]
where:
/? displays help text for EvMove; the slash is optional.
SOURCE is a required value and may be any valid storage drive
letter; the drive specified must contain the product
activation files. SOURCE may be followed by a colon
( : ), but the colon is not required.
DESTINATION is a required value and may be any valid storage drive
letter; the drive specified must contain the product
activation files. DESTINATION may be followed by a
colon ( : ), but the colon is not required.
/B is an optional switch and is used to suppress the
confirmation prompt.
Note If the following switches are used, they should be filled left to right and separated by a
single space.
2-13
Page 41

Installation Guide
PRODUCT is an optional switch and is used to move the activation
for a specific product. PRODUCT represents the
executable file name of a product. You may use ALL or
an asterisk ( * ) to move all products on the source drive
to the destination drive. A list of currently installed
products may be obtained by typing the following at a
DOS prompt: RESET SOURCE /V (see Resetting
Activation on pages 2-19 through 2-21).
SERIAL# is an optional switch and is used to move the activation
for a specific serial number.
COUNT is an optional switch and is used to specify the number
of activation counts to move. If COUNT is not specified,
COUNT defaults as follows:
If DESTINATION is a network drive, COUNT defaults to
ALL.
If DESTINATION is a local drive (hard disk or nonMaster floppy disk), COUNT defaults to 1.
2-14
If DESTINATION is a Master disk, COUNT defaults to
the specific product and serial number that was
originally shipped on that Master disk.
EvMove Examples
EVMOVE A C
Moves one install of the product and serial number on the Master disk from drive A to
drive C.
EVMOVE A C OFF5.EXE
Moves one install of the Offline editor for PLC-5 A.I. Series Ladder Logistics from
drive A to drive C.
EVMOVE A C * 12345 2
Moves two installs of any product having serial number 12345 from drive A to drive C.
Page 42

Copy Protection
EVMOVE A C OFF5.EXE 1
Moves one install of the Offline editor for PLC-5 A.I. Series Ladder Logistics from
drive A to drive C.
EVMOVE A C OFF5.EXE 12345 1 /B
Moves one install of the Offline editor for PLC-5 A.I. Series Ladder Logistics having
serial number 12345 from drive A to drive C and suppresses the confirmation prompt.
Windows Mode
Note Windows mode requires sharing services for any local or network drives. In Windows
3.1, SHARE.EXE may need to be loaded in CONFIG.SYS or AUTOEXEC.BAT. In
Windows for Workgroups, VSHARE.386 is automatically loaded in the SYSTEM.INI
file.
To use the Windows version of the program to move activation files:
1. Insert the Master disk in drive A (or the appropriate drive for your system).
If you have the EvMove icon in Windows, you can simply double click the icon
and go to step 3.
2. Run EvMove either with a run command in Windows or in a DOS box under
Windows 95 or Windows NT.
• Select Run from the file menu (or Start menu in Windows 95) and type:
A: EVMOVE. Click OK.
• In Windows 95 or Windows NT, open a DOS box. Type:
A: EVMOVE [Enter].
3. The Move utility starts and displays an EvMove dialog box similar to the one
shown below.
2-15
Page 43

Installation Guide
4. EvMove is asking you to select the drive you are moving the activation file from,
and the drive to which you want it moved. Use the drop-down list boxes to set the
drive letters, then click the OK button.
5. EvMove displays an EvMove dialog box similar to the one shown below.
This dialog box shows the activation files on the source and destination drives you
selected (the lists on your screen will look different). EvMove determines the
number of installs to move as shown in the table below.
If the destination drive is… EvMove sets the default value for Moving to…
a remote (network) drive all installs available for all products on the source
drive
a Master disk all installs available for the product serial number
on the Master disk
a local non-Master disk one install for all products on the source drive
2-16
Page 44

Copy Protection
6. To change the number of installs to be moved for a particular product, scroll
through the list, select the product and either double-click on it or click the Edit
Selected... button. An Item Detail dialog box similar to the one shown below is
displayed.
7. The number of installs to move is highlighted in the Move data field. Type the
number representing the number of installs to be moved and click the OK button to
set the Moving value and return to the previous dialog box. Click the Cancel
button to return to the previous dialog box without making any changes to the
Moving value for that product.
8. If you have many products installed and want to change the Moving value for all of
them, click the Edit All... button in the EvMove dialog box. An Item Detail
dialog box similar to the one shown below is displayed.
This Item Detail dialog box may be used to change the Moving value for all
products. Type the number of installs to move for all products in the Move data
field. Click the OK button and the EvMove dialog box will return. A useful
strategy if you have many products installed and want to move the activation for
only one of them is to use the Edit All... button in the EvMove dialog box to set
2-17
Page 45

Installation Guide
the Moving value for all products to 0, then use the Edit Selected... button to set
the Moving value for the selected product to 1.
9. Click the Move button to move the activation file(s). To go back to the previous
dialog box, click the Back button. To cancel moving the activation file, click the
Cancel button. When EvMove finishes moving the selected activation files, an
EvMove report dialog box similar to the one shown below is displayed.
Click the OK button to close the EvMove report dialog box.
Moving Activation Without a Master Disk
The Move utility allows you to copy Activation files to and from any local or network
drive. You can run the Move utility from the Master disk or directly from a hard drive.
Copy the file EVMOVE.EXE from the Master disk onto your hard disk. You can then
run EVMOVE in basically the same way as described on the preceding pages, except
without the Master disk.
Making a Keydisk on a Single Floppy System
You can move activation files from a Master disk to a floppy disk even if you only have
one floppy drive. Simply use the same drive for both the source and destination. For
example, if you type
EVMOVE A A [Enter]
the utility will ask you first to insert the Master (or source) disk in A:, then the
destination floppy.
2-18
Page 46

Resetting Activation
!
!
Resetting activation is required when you have lost the copy protection because the
activation file is damaged (hard drive crash, file corruption on the hard drive, etc.). In
this case, read and familiarize yourself with the procedures below, locate the Master
disk for your software, then contact Rockwell Software Technical Support at (414) 321-
4266. You will want to be at an IBM compatible computer when you call Technical
Support. In an emergency, you can use the Master disk as a keydisk until you are able
to reset the activation files.
If you do not have the Master disk for your software, we will not be able to reset your
activation. Always store the Master disk for your software in a safe place.
The Reset utility can run in DOS or Windows mode depending on your operating
system.
Copy Protection
If you run Reset from… Then…
DOS the DOS flavor of the Reset utility will run.
Windows the Windows flavor of the Reset utility will run.
a DOS box under Windows the DOS flavor of the Reset utility will run.
a DOS box under Windows 95 or
Windows NT
Note The Windows version contains two additional useful functions. Hunt searches all disk
drives for activation files and Show Usage displays the number of installs currently in
use for each package. See page 2-22.
Always call Rockwell Software Technical Support when resetting an activation file.
Entering incorrect reset codes could render your Master disk useless.
the Windows flavor of the Reset utility will run.
2-19
Page 47

Installation Guide
DOS Reset Utility
To use the DOS version of the reset utility:
1. Insert your Master disk from the Rockwell Software product that needs to be reset
in the floppy disk drive. We will assume this is drive A for our example.
2. At the DOS prompt, type:
A: [Enter]
3. Type the following command. You can enter this command in several different
formats. See the next section for the correct syntax.
RESET
4. Information like the following will appear on your screen.
2-20
5. Call Rockwell Software Technical Support at (414) 321-4266 for the reset code.
The support technician will ask you for information shown on your screen in the
previous step.
6. Type the reset code and press [Enter]. The utility resets your activation files and
displays a message indicating that the activation files were successfully reset.
Page 48

DOS Reset Command Syntax
The DOS version of RESET has the following syntax.
RESET
RESET /?
RESET DRIVE RESETCODE
RESET DRIVE [/V] [/D]
RESET /F [/V] [/D]
where
/? displays help text for Reset; the slash is optional.
DRIVE Drive letter with the software to be reset
RESETCODE Reset code issued by the Rockwell Software technician
/V View products on the drive
/D Detail current network usage counts
/F Find drives containing activation
Copy Protection
Windows Reset Utility
To use the Windows version of the reset utility:
1. Insert your Master disk from the Rockwell Software product that needs to be reset
in the floppy disk drive. We will assume this is drive A for our example.
If you have the Reset icon in Windows, you can simply double click the icon and
go to step 3.
2. Run Reset either with a run command in Windows or in a DOS box under
Windows 95 or Windows NT.
• Select Run from the file menu (or Start menu in Windows 95) and type:
A: RESET. Click OK.
• In Windows 95 or Windows NT, open a DOS box. Type:
A: RESET[Enter].
2-21
Page 49

Installation Guide
3. A Reset dialog box similar to the one shown below is displayed.
4. The checkbox, buttons, fields, and lists in this window are described below. Use
these functions to set up the reset utility for your situation.
5. Call Rockwell Software Technical Support at (414) 321-4266 for the reset code.
6. Click the Apply button to reset the copy protection.
Reset Window Options
2-22
Drive Drop-down list box
Use the Drive drop-down list box to select the disk drive where your Rockwell Software
products are installed. When a different drive letter is selected, product activation files
on that drive are displayed.
Show Usage Checkbox
The Show Usage checkbox toggles the display of the InUse column which displays the
number of installs currently being used.
Hunt Button
Use the Hunt button to instruct the program to do an immediate search of all disk
drives for Rockwell Software products. When the search is completed, the drive letters
shown in the Drive drop-down list box are only those drives on which the program has
found Rockwell Software product activation files.
Page 50

System ID Data Display Field
The System ID data display field contains information that will be requested by the
Rockwell Software technician for use in generating the reset code.
Product Field
The Product field displays a text string that identifies the specific Rockwell Software
products found on the selected drive.
Serial# Field
The Serial# field displays the serial number of the product that was found on the
selected drive.
Installs Field
The Installs field displays the number of installs available for the product/serial# that
was found on the selected drive.
InUse Field
(Displayed only if the Show Usage checkbox is checked.) The InUse field displays the
number of installs currently in use for the product/serial # that was found on the
selected drive.
Copy Protection
Product ID Field
The Product ID data display field contains information that will be requested by the
Rockwell Software technician for use in generating the reset code.
Reset Code Data Entry Field
Type the reset code provided by the Rockwell Software technician in the Reset Code
data entry field.
Apply Button
Click the Apply button to apply the reset code provided by the Rockwell Software
technician to the selected product.
2-23
Page 51

Installation Guide
Cancel Button
Click the Cancel button to abort the reset process and exit the reset software.
2-24
Page 52

Index
—A—
Index
Executable Files ........................................1-20–1-24
Exiting A.I. Series Software ...............................1-25
Activation File ....................... 1-16, 2-1, 2-2–2-3, 2-4
damaged ........................................ 1-17, 2-4, 2-20
moving...................................................See Move
recalling (removing)..................................2-6–2-9
reset......................................................2-20–2-25
resetting.........................................................1-17
search for ..................................................2-2, 2-3
AUTOEXEC.BAT File................................1-10, 2-3
—C—
CHECKDRIVES............. See Environment Variables
Compressed Hard Drives......................................2-1
Copy Protection...........................................1-1–2-25
—D—
Damaged Disks..................................................1-16
—E—
Environment Variable
CHECKDRIVES..............................................2-3
KEYDISK........................................................ 2-3
Environment Variables.........................................1-7
CHECKDRIVES..............................................1-7
FORCEMONO ................................................1-7
NOEXITTODOS.............................................. 1-7
PLCLL....................................................1-9–1-11
TNT...............................................................1-10
EvMove ...........................................2-10, 2-13–2-16
command syntax ............................................ 2-14
—F—
FORCEMONO................ See Environment Variables
—I—
Install............... See Setup Program, INSTALL option
Installation...........................................1-1–1-11, 2-2
for multiple computers ..............................1-5, 2-4
network...................................................1-9–1-11
new revisions................................... See Updating
upgrades .......................................... See Updating
—K—
Key Disk..............................................................1-1
creating..........................................................2-19
Key Disks ............................................................2-4
—L—
Licensing .............................................................1-9
—M—
Master Disks .................................1-1, 1-12, 2-2, 2-4
as key disks...................................... 1-6, 2-4, 2-20
Move.........................................................2-10–2-19
DOS mode ................................... 2-10, 2-11–2-12
EvMove command.................................2-13–2-16
Windows mode ............................2-10, 2-16–2-19
without a Master disk............................2-10, 2-19
i
Page 53

Installation Guide
—N—
Networks
copy protection and............................ 1-9, 2-2–2-3
file sharing...................................................... 1-9
installation on..........................................1-9–1-11
NOEXITTODOS .............See Environment Variables
—P—
PLCLL ............................See Environment Variables
—Q—
Quitting A.I. Series Software............................. 1-25
—R—
Recall................See Setup Program, RECALL option
Removing A.I. Series Software ..................... 2-6–2-9
Reset.........................................................2-20–2-25
DOS utility............................................ 2-21–2-22
Windows utility .....................................2-22–2-25
Running A.I. Series Software ..............1-18–1-24, 2-2
—S—
SET command (DOS) ......See Environment Variables
Setup Program..................................................... 1-2
INSTALL option.............................................. 1-3
MOVE option ....................................... 2-10–2-19
RECALL option........................................ 2-6–2-9
UPDATE option ..............................1-6, 1-14, 2-4
Shared Drives...................................................... 2-3
Starting A.I. Series Software.............. 1-18–1-24, 2-2
—T—
TNT ................................See Environment Variables
—U—
Update.............. See Setup Program, UPDATE option
Updating................................................... 1-12–1-15
—W—
Windows 95.............................................. 2-10, 2-20
Windows NT ............................................ 2-10, 2-20
Write Protection, discerning on floppy disks.........1-4
ii
 Loading...