

Page 1

937CU-AITXF-DC1 Installation Instructions
Transmitter Supply Converter
Page 2

Page 3

Symbols Used
Warning
Attention
Note
Bul. 937C Transmitter Supply Converter Installation Instructions
This symbol warns of possi
Failure to heed this warning may result in personal injury or death, or property
damage, including destruction.
This symbol warns the user of a possible fault.
to heed this warning can lead to total failure of the device and any other
Failure
connected equipment.
This symbol draws attention to important information.
ble danger.
1
Page 4
Safety Notes
Attention
Attention
Bul. 937C Transmitter Supply Converter Installation Instructions
The Transmitter Supply Converter must only be operated by trained personnel in
accordance with this handbook.
The protection of operating personnel and of the system is only
accordance with their intended purpose. Any other type of operation than that described in this
manual places the safety and functionality of the devices and systems connected to them in
question.
The devices may only be installed, connected, and a
hazardous area.
ensured if the devices are used in
djusted by electrical professionals outside the
2
Attention
Warning
Note
If faults cannot be eliminated, the devices must be taken out of operation and protected from being
placed in service again
dangerous and therefore not permitted. They render the warranty void.
The responsibility for the adherence to local
Note
inadvertently. Tampering with or making changes to the devices is
safety standards lies with the operator.
Page 5
Bul. 937C Transmitter Supply Converter Installation Instructions
ation and Connection
Install
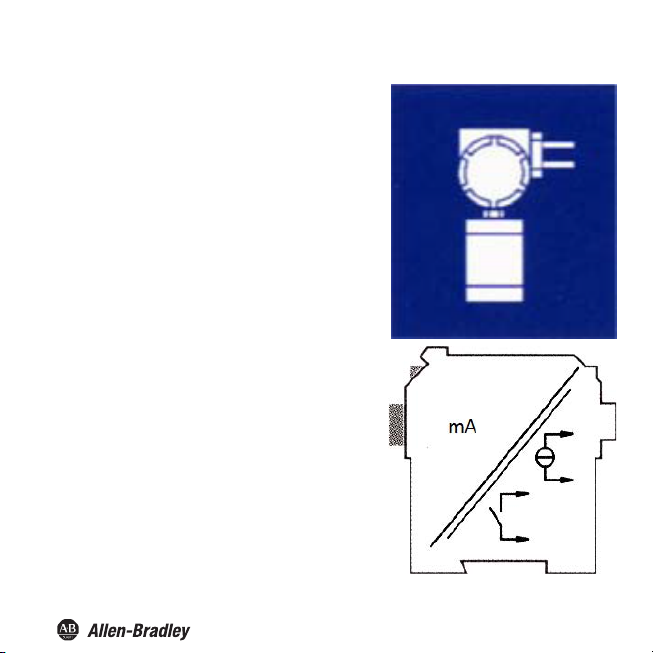
Application Information
Bulletin 937 Intrinsically Safe Barriers transmit si gnals
between field devices and a process control system/control
system.
They are suitable for the connection of field devices used in
potentially explosive atmospheres. Safe field circuits for
these devices are intrinsically safe and are galvanically
isolated from non-intrinsically safe circuits. establish an
electroma gnetic separation be tween the potentially
explosive atmospheres and the safe areas in a system.
The transmitter supply coverters are measuring units that
provide an output signal consisting of a unit current signal
(4 mA ... 20 mA). A transmitter power supply provides a
transmitter with power and processes the
current signal.
The transmitter supply conerter translates a fully
parameterizable partition of input signal into a
proportional output current (4ma...20mA)
This output signal will be transferred to indicators or to
analog inputs on the process control system/control
system, for example. Both relay outputs of the transmitter
supply converter can monitor two fully parameterizable
trip values of the input signal.
3
Page 6
Bul. 937C Transmitter Supply Converter Installation Instructions
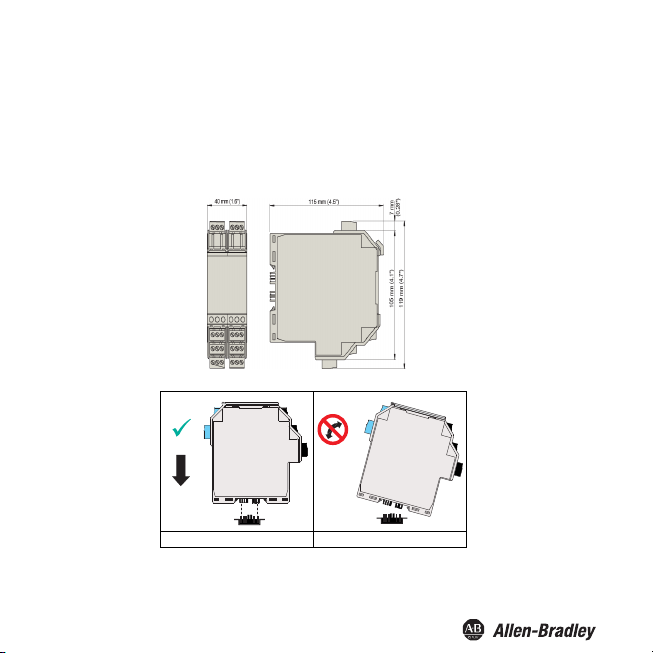
Installa
tion
The Transmitter Supply Converter can be mounted on a 35 mm standard rail corresponding to DIN EN
60175. The devices must be snapped onto the rail vertically, and never slanted or tipped to the side.
CORRECT: Device
snapped on vertically.
INCORRECT: Device snapped
on from the side. Can damage
the contacts and cause the
device to fail.
4
Page 7
Bul. 937C Transmitter Supply Converter Installation Instructions
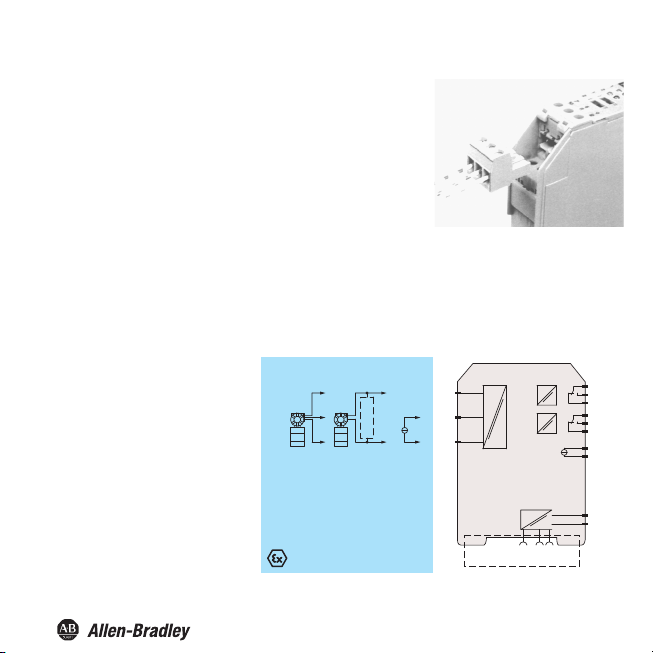
Connection
The removable terminals of the Bulletin 937 Converters simplif y the
connection and the switch cabinet assembly. They make it possible to
replace devices quickly and without error if a customer service becomes
necessary.
Terminals are equipped with screws, are self- opening , have a large
connection area for a wire cross-section up to 2.5 mm/14 AWG and
coded plugs, making it impossible to mix them up.
Connection terminals (Input) IS Side
The intrinsically safe field circuit is connected to the blue
terminals 1 and 3. These may be g uided into the potentially
explosive areas with connector cables in accordance with
DIN EN 60079-14. Terminal 2 is always left unconnected.
The non-intrinsically safe field circuit is connected to the
black terminals 1
Yo u c an co nn e ct :
a 3-wire transmitter
•
•
a 2-wire transmitter with HART
•
an active current source
through 3.
1
2
3.
HART
mA
1+
2-
3
mA
Zone 0, 1, 2
Div. 1, 2
Power Rail
ERR 24 V DC
5
Page 8

Bul. 937C Transmitter Supply Converter Installation Instructions
Connection (Output) Safe Side
The functions of the other black terminals are as
follows:
The control circuit and the power supply are connected to the b
te
rminals 7 to 24
The terminals have the following functions:
• Terminals 7/8: current output (terminal 9 not used)
•
• Terminals 16 ... 18: relay 2
•
24 V DC power supply
Terminals 4 ... 6, 13 ... 15 and 19 ... 21 do not exist
6
.
Terminals 10 ... 12: relay 1
Terminals 23/24: (terminal 22 not used)
lack
1+
2-
3
Power Rail
ERR 24 V DC
10
11
I
12
16
17
II
18
7-
mA
III
8+
23+
24 V DC
24-
Zone 2
Div. 2
Page 9
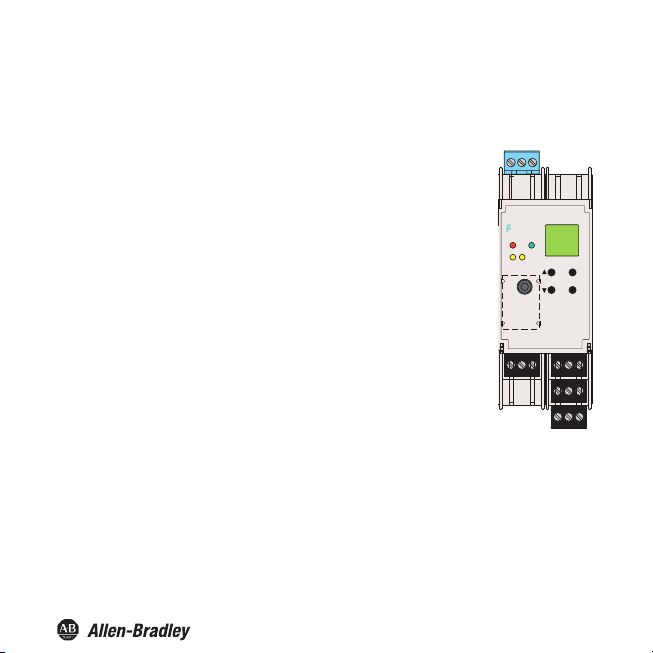
Bul. 937C Transmitter Supply Converter Installation Instructions
Front
The following indicating and operating elements are located on the front of the
Transmitter Supply Converter:
ED CHK (red) to indicate a device fault
• L
• LED PWR (green) to indicate the presen
• LED OUT 1 (yellow) to indi
• LED OUT 2 (yellow) to indi
•
RS 232 serial interface for a connection to a PC for setting parameters
cate that relay 1 is active
cate that relay 2 is active
and diagnosis of the transmitter supply converter using FDT.
• Display for indicati
parameteri
on of the measured values, fault messages and
zation modi
• Four keys for setting the parameters of the transmitter supply converter:
(Up)
(Down) ESC (Escape) OK
ce of
the supply voltage
1 234 5
PWR
ERR
1 2
OUT
RS232
7 8 9
13
14 15
192021
10 11 12
16
222324
6
ESC
OK
17 18
7
Page 10

Bul. 937C Transmitter Supply Converter Installation Instructions
Display modes and error messages
In normal operation, the current measured value is indicated in the selected unit.
If the Alarm freeze is triggered but the device continues operating normally, a corresponding
message appears in the second line of the display.
If a fault occurs, one of the following messages is displayed until the fault is rectified (when
parameterized):
• Err Mem for device fault,
• Err LB for lead breakage,
• Err SC for short circuit,
The relays de-energizes when a fault occurs.
The display of the device is updated at regular intervals. This can causes a short
flickering of the display. This flickering isn't a defect of the display.
Note
Editing Device Data
WARNING: A change in device data will change the operation of the device!
WARNING: Before entering new data into the device, you should therefore as
certain that no danger to the installation will result.
FDT Interface
This manual describes Parameterization mode of the universal frequency converter using the
control panel. parameterization mode
for the universal frequency converter is more convenient with a PC using Field Device Tool (FDT)
software.
Some specialized functions can only be selected using the FDT , for instance, pulse suppression
as an alternative to the start-up override.
The FDT interface is the specification describing the standardized data exchange between devices and
control system or engineering or asset management tools. Examples include: PACTwareTM , FieldCare,
FactoryTalk AssetCentre, and Process Device Configuration. FDT frame software can be downloaded
from the web: www.pactware.com www.fdtgroup.org.
PACTwareTM is trademark of PACTware Consortium
8
Page 11

Parameterization mode control panel
Programming
Bul. 937C Transmitter Supply Converter Installation Instructions
Main menu parameterization mode
Display mode
You can return to display mode from any point in the menu in parameterization mode by pressing
the ESC key (possibly multiple times). If you do not press any key for 10 m
parameterization mode, the device automatically switches back into display mode.
OK + ESC (simultaneously, 1 sec)
←ESC
Unit ()
Input ()
Output
Service
inutes in
9
Page 12

Bul. 937C Transmitter Supply Converter Installation Instructions
Password
You can protect the current configuration from unauthorized changes by using a password (See
Service ; inactive when universal frequency converter is delivered).
If password protection is active, the various settings in parameterization mode are visible before
entry of the password, but may not be
setting, the device automatically displays a window for entering the password.
You must enter the password once each time after switching from display mode to parameterization
•
mode.
The password cannot be changed and is 1234.
•
How to enter the password:
automatic switch to password entry →
Change
attempt
Parameters still protected ←ESC
Parameters released ←OK, value 1234
changed. The first time an attempt is made to change a
Value 0, flashing
, ↓ *:
new value, flashing
ESC↑
OK, wrong value ↑
*
If the or keys are pressed, the value changes stepwise. If you hold the or
"rolls" to higher or lower values.
10
key, the setting
Page 13

Bul. 937C Transmitter Suppl
y Converter Installation Instructions
Navigation Method
The following illustration shows the navigation method in parameterization mode using the , ,
OK, and ESC keys:
Rel1
OK
ESC
ESC
ESC
ESC ESC
ESC
ESC
Min/Max
Trip
Hysteresis
Mode
Alarm freeze
Delay
OK
Active
11
Page 14

Bul. 937C Transmitter Supply Converter Installation Instructions
Lowest menu le
vel
Choose Values, Enter Numbers
At the lowest level of the menus, you can either choose between particular possible values for
individual parameters, or
When entering numeric values, please note:
•
If you press the
epwise.
st
•
If you hold the or key for a longer time, the value "rolls" to higher or lower
values.
• The algebraic sign switches automatically.
• The decimal point is moved automatically.
12
enter a numeric value.
Parameters
or key, the value chang
OK→
←ESC
←ESC
es
Lowest menu level
current value, flashing
, ↓ :
new value, flashing
OK↓
new value, saved, not flashing
ESC↑
Page 15

Bul. 937C Transmitter Suppl
y Converter Installation Instructions
Units
The following illustration shows the units menu. Menu items on the lowest level are outlined in bold.
The Universal Transmitter Power Supply measures in mA. Using the parameters zero point and conversion
factor it converts the measured value into the selected units. These units are used for the display of the
measured values and for all corresponding settings in the parameterization mode.
Unit —— °F Continued from the left
°C m
bar
Pa l/h
N
t
kg l
km/h %
m/s mA
Continued right
m³/h
l/min
m³
13
Page 16

Input
Bul. 937C Transmitter Supply Converter Installation Instructions
The following diagram shows the input parameters menu. Items
The menu items Zero point and Conversion factor will not be shown if the unit mA is selected.
Input —— Line monitor —— LB —— LB On
Zero point —— -15 mA ... 15
Conversion factor —— 0.100 ... 5000
Linearization —— Linearization On
Smoothing —— 0 s ... 255 s
from the lowest menu level are outlined in bold.
SC —— SC On
Linearization Off
14
LB Off
SC Off
Page 17

Editing device data: Input
Bul. 937C Transmitter Supply Converter Installation Instructions
Line monitor
•
If you select On for LB,an input current <0.2 mA will be registered as a lead break.
If you select On for SC,an input current >0.22 mA will be registered as a short circuit.
•
•
If you wish to process the <0.2 mA input values as measured values, you must deselect the lead
breakage deterction (Off LB). If not, an error will be signalled within the measuring range.
Zero point and Conversion factor
The device measures in mA. If you have selected different units, the device calculates the measured value in the
selected units using the parameters Zero point and Conversion factor.
The parameters for you application must be determined according to the following formula:
Measured value in
the selected units
An arbitrary value between -15 mA and +15 mA can be set as the Zero point, and values between 0.100
and 5000 as the Conversion factor.
The following includes examples where the
=(Original measured value{mA] - Zero point) x Conversion factor
formulas are applied.
15
Page 18

Editing device data: Input
Bul. 937C Transmitter Supply Converter Installation Instructions
Example 1: selected unit °C, 0 °C ... 200 °C is to correspond to 4 mA ... 20 mA
y [°C]
200
150
100
50
-4 -3 -2 11 12 13 14 15 16 17 18 19 20 x [mA]
-100
-150
-200
•
Linearization
y = m x + n
• Conversion factor = rise in the graph
m = (y2 – y1) / (x2 – x1)
m = (200
• Zero point = intersection point with the x-axis on the graph, providing that the physical measuring
– 0) / (20 – 4) = 12.5
range starts from 0 (y = 0 °C). The zero point corresponds to the lower measuring range limit (x = 4
mA) from which the
The zero point can be calculated as follows: n =
y – m x
n = 200 – 12.5 x 20 = -50
y = m x + n
x = (y – n) / m
x = (0 + 50) / 12.5 = 4
21 9876543 10-1
-50
measuring range starts.
16
Page 19

Editing device data: Input
Bul. 937C Transmitter Supply Converter Installation Instructions
Example 2: selected unit °C, 0 °C ... -100 °C is to correspond to 20 mA ... 0 mA
y [°C]
200
150
100
50
111112111 10
-1
-4 -3 -2
-50
-100
-150
-200
•
Linearization
y = m x + n
• Conversion factor = rise in the graph
m = (y2 – y1) / (x2 – x1) m
= (100
– 0) / (20 – 0) = 5
• Zero point = intersection point with the x-axis on the graph, with the condition that the physical
11 12 13 14 15 16 17 18 19 20
x [mA]
The zero point can be calculated a
y – m x
n = -100 – 5 x 0 = -100
y = m x + n
x = (y – n) / m
x = (0 + 100) / 5 = 20
s follows: n =
17
Page 20

Editing device data: Input
Bul. 937C Transmitter Suppl
y Converter Installation Instructions
Example 3: selected unit bar, -4 bar ... 4 bar is to correspond to 4 mA ... 20 mA
y [bar]
4
3
2
1
-4 -3 -2 11 12 13 14 15 16 17 18 19 20
-1
-2
-3
-4
•
Linearization
y = m x + n
7 98654321 10 x [mA]-1
• Conversion factor = rise in the graph
m = (y2 – y1) / (x2 – x1) m
= (4 - 0) / (20 – 12) = 0.5
•
Zero point = intersection point with the x-axis on the graph (bar value at y = 0)
n = y – m x
n = 4 – 0.5 x 20 = -6
y = m x + n
x = (y – n) / m
x = (0 + 6) / 0.5 = 1
18
Page 21

Bul. 937C Transmitter Suppl
y Converter Installation Instructions
Linearization
Using the FDT parameterization software, a linearization table can be saved in the Transmitter Supply
Converter; for details of this function see On-line help. Via the operator panel you can merely switch the
use of the table for the calculation of the output value on and off (On/Off).
Smoothing
For extremely variable measurement values, you can use Smoothing to influence how quickly an output reacts
nge in input value: 0 s = no smoothing, 255 s = maximum smoothing.
to a cha
19
Page 22

Bul. 937C Transmitter Suppl
y Converter Installation Instructions
Relays
The following diagram shows the relay outputs menu. Items from the lowest menu
From the Rel1 and Rel2 menu options, you can use the OK key to get to a menu in which you can enter
individual parameters for the selected relay. Both menus are structured in the same way and are thus only
described once. Information about current output.
Output —— Rel1 ——
Rel2 Min
Iout
Min/Max
level are outlined in bold.
—— Max
Trip ——
Hysteresis ——
Mode
Continued on next page
—— Active
Trip
Hysteresis
Pass ive
20
Page 23

Bul. 937C Transmitter Suppl
y Converter Installation Instructions
Alarm freeze ——
Delay
Operating behaviour
The switching direction can be set as Max or Min and the direction of action as Active or Passive .
Application ranges:
• Switching direction Max, mode of operation Active:
alarm on trip value overrange, e. g. audible alarm on
•
Switching direction Max, mode of operation Passive:
switch off on trip value overrange, e. g. pump, heating, ... off; with large
hysteresis Min/Max operation (pump, heating, ... on/off)
• Switching direction Min, mode of operation Active:
alarm on trip value underrange, e. g. audible alarm on
• Switching direction Min, mode of operation Passive:
switch off on trip value underrange, e. g. pump, heating, ... off; with
large hysteresis Min/Max operation
(pump, heating, ... off/on)
On
Off
—— 0 s ... 250 s
21
Page 24

Bul. 937C Transmitter Suppl
The exact operating behaviour of the Transmitter Supply Converter is shown in the following
diagram:
Val ue
Max – hysteresis
Min + hysteresis
Max
Min
y Converter Installation Instructions
Switching direction Max, mode of operation Active:
Switching direction Max, mode of operation Passive:
Switching direction Min, mode of operation Active:
Switching direction Min, mode of operation Passive:
energized
de-energized
energized
de-energized
energized
de-energized
energized
de-energized
Time
22
Page 25

Bul. 937C Transmitter Suppl
y Converter Installation Instructions
Trip and Hysteresis
When enterin
• Both values are to be entered in the units, which were selected under Units.
• You can
• The h
•
These input limits are automatically preset by the transmitter supply converter.
g the values for Trip and Hysteresis ple
enter values
−
0 mA and
between
- between the converted values of these limits in the selected units; for conversion using the
parameters Zero point and Conversion factor.
ysteresis must be selected as >
As the representation of the operating behaviour, the following must apply:for the switching direction
Max: Trip point - Hysteresis > 0
− for the switching direction Min: Trip point + Hysteresis < upper limit trip point
24
mA
and
1 %
note:
ase
of
ip
point to prevent the relay from vibrating.
the tr
Alarm freeze
The Alarm freeze helps you to avoid that short-term trip value overranges are not noticed by th
operating staff.
If Alarm freeze On h
pressed or the device is restarted. These actions reset the relay, except for a limit violation.
as been selected, the ne
w state
maintained a
is
the relay switching until the ESC key is
fter
Delay
If you set a time > 0 sec, you preven
• The relay only switches if the trip point is exceeded/fallen short of for a period that is longer th
time.
• The relay only switches back if the trip point -/+ hysteresis is fallen short of/exceeded for a period
that is longer than the delay time.
• If the trip point is exceeded/fallen short of for a short time, this does not have any effects.
t short-time violations of
the trip value from triggering an alarm.
e
an the
delay
23
Page 26

Bul. 937C Transmitter Suppl
y Converter Installation Instructions
The following diagram shows the operating behaviour for the trip mode Max, operating mode Active.
Val ue
Trip point Max
Max – hysteresis
Time
Switching direction Max, mode of operation Active, with delay
energized
de-energized
Delay Delay
24
Page 27

Bul. 937C Transmitter Suppl
y Converter Installation Instructions
Current output
The following illustrations show the current output menus. Items from the lowest menu level are outlined in
bold. Review the information about relay outputs.
Output —— Rel1
Rel2
Iout
—— Characteristics —— 0 mA ... 20 mA
Continued on next page
4 mA ... 20 mA
NE43
4 mA ... 20 mA
Fault current —— Up/Down
Hold
Max
Min
25
Page 28

Bul. 937C Transmitter Supply Converter Installation Instructions
Start value —— 7.5.3
End value —— 7.5.3
Inverted ——
Characteristic
With the parameters Start value and End value establish a sub-range of the input signal as the measuring
range of the application. This measuring range is formed linearly on the output signal.
The following table shows, for the various characteristics, the conversion of the Start value and End value
and the behaviour during measuring overrange.
The statements apply for the setting Inverted το Normal.
•
•If you select Inverted to Inverted, the conversion of Start value and End value are re
start value is thus converted to 20 mA and the end value to 0 mA or
• Measuring overrange, which extend over the described linear range, cannot be evaluated. In the
case of such overrange, the specified value is constantly output.
26
4 mA.
Inverted
Normal
versed. The
Page 29

Bul. 937C Transmitter Supply Converter Instal
lation Instructions
Characteristic Start value
0 mA ... 20 mA 0 mA 20 mA 0 mA 20.5 mA
4 mA ... 20 mA
NE43
4 mA ... 20 mA 4 mA 20 mA 0 mA approx. 22 mA
Example of a diagram of a mA measurement range on the output signal
Characteristic 4 mA ... 20 mA NE43, start value 2 mA, end value 10 mA
mA
20.5
20.0
4.0
3.8
0
Example diagram displaying the input signal in °C to the output signal
Characteristic 4 mA ... 20 mA NE43, start value 0 °C, end value 200 °C.
mA
20.5
20.0
4.0
3.8
0
converted into
-1.9 2
Start value
-2 0
Start value
4 mA 20 mA 3.8 mA 20.5 mA
End value
converted i nto
Linear
underrange up to
10.25
10
End value
205
200
End value
Linear overrange
up to
mA
Measuring
range
°C
Measuring
range
27
Page 30

Bul. 937C Transmitter Supply Converter Installation Instructions
Fault current
The following table shows the current output in the event of a fault, depending on the characteristic.
Setting 0 mA ... 20 mA 4 mA ... 20 mA NE43 4 mA ... 20 mA
Up/Down 21.5 mA 21.5 mA 22 mA
Hold Last measured value before the fault
Max 21.5 mA 21.5 mA 22 mA
Min 2.0 mA0 mA
with short-circuit with short-circuit with short-circuit
(not distinguishable from
0 mA 2.0 mA 0 mA
(not distinguishable from
Sta rt va lue measu rement)
(not distinguishable from
Sta rt va lue measu rement)
with lead breakagewith lead breakage
End value overrange)
with lead breakage
(not distinguishable from
Star t val ue underrange)
(not distinguishable from
End value overrange)
(not distinguishable from
Star t val ue underrange)
Start value and End value
Please note when entering Start value and End value:
• Both values are to be entered in the units, which were selected under Units.
•
Values between 0 mA and 20 mA can be entered, or
into the selected units, using the parameters Zero point and Conversion factor.
The difference between End value and Start value must be at least 1 % of the End value (preset
automatically by the transmitter supply converter).
between the values of these limits converted
0 mA
28
Page 31

Bul. 937C Transmitter Supply Converter Installation Instructions
Service
The following diagram shows the service parameter menus. Items from the lowest menu level are out-lined in
bold.
Service
Reset: Pressing the OK key when On Reset is flashing resets all settings on the transmitter supply
converter to default. Any entries that you have made in parameterization mode are lost.
—— Password ——
Language —— DE (German)
Reset (see below) —— On
On
Off
ENG (English)
Of
29
Page 32

Editing device data: Default settings
Bul. 937C Transmitter Supply Converter Installation Instructions
Default settings
Menu Parameter Default setting Separate value
Main menu Unit mA
Input Line monitor On LB/On SC
Zero poi nt 4.000 mA
Conversion factor 0.100
Linearization Off
Smoothing 3 s
Output Rel1 Min/Max (= switching direction) Min
Trip 16.00 mA
Hysteresis 2.000 mA
Mode Passive
Alarm freeze Off
Delay 0 s
Output Rel2 Min/Max (= switching direction) Min
Trip 2.000 mA
Hysteresis 2.000 mA
Mode Active
Alarm freeze Off
Delay 0 s
Output Iout Characteristics 4 mA ... 20 mA NE43
30
Page 33

Bul. 937C Transmitter Supply Converter Installation Instructions
Menu Parameter Defau lt setting S eparate value
Fault cur rent Min
Start value 0.000 mA
End value 20.00 mA
Inverted Normal
Servic e Password Off
Language ENG
31
Page 34

Page 35

Page 36

Publication 937-IN002A-EN-P - April 2014 (DIR 10001099000) 814569
(DIR 10001176477)
Copyright © 2014 Rockwell Automation, Inc. All rights reserved. Printed in the U.S.A .
 Loading...