

Page 1
MultiSight™ Vision Sensors
USER MANUAL
48MS
Page 2
Important User Information
WARNING
ATTENTION
BURN HAZARD
In no event will Rockwell Automation, Inc. be responsible or liable for indirect or consequential damages resulting from the use or
application of this equipment.
The examples and diagrams in this manual are included solely for illustrative purposes. Because of the many variables and
requirements associated with any particular installation, Rockwell Automation, Inc. cannot assume responsibility or liability for
actual use based on the examples and diagrams. No patent liability is assumed by Rockwell Automation, Inc. with respect to use of
information, circuits, equipment, or software described in this manual.
Reproduction of the contents of this manual, in whole or in part, without written permission of Rockwell Automation, Inc., is
prohibited.
Throughout this manual, when necessary, we use notes to make you aware of safety considerations.
Identifies information about practices or circumstances that can cause an
explosion in a hazardous environment, which may lead to personal injury or
death, property damage, or economic loss.
IMPORTANT
Identifies information that is critical for successful application and
understanding of the product.
Identifies information about practices or circumstances that can lead to
personal injury or death, property damage, or economic loss. Attentions
help you identify a hazard, avoid a hazard, and recognize the consequences.
SHOCK HAZARD
Labels may be on or inside the equipment (for example, drive or motor) to
alert people that dangerous voltage may be present.
Labels may be on or inside the equipment (for example, drive or motor) to
alert people that surfaces may reach dangerous temperatures.
We recommend that you save this user manual for future use. The following symbols are used in this manual for clarification.
This symbol indicates supplemental sections of the text which contain useful
tips.
Identifies features and functions that are only available with EtherNet/IP
E
models. These features and functions are not available on the standard
MultiSight models.
Page 3

MultiSight™ User Manual
Important User Information
Table of Contents
Important User Information and Definition of Symbols . . . . . . . . . . . . . . . . . . . . . . . . . . . . . . . . . . . . . . . . . . . . . . . . . . . .2
Components Supplied. . . . . . . . . . . . . . . . . . . . . . . . . . . . . . . . . . . . . . . . . . . . . . . . . . . . . . . . . . . . . . . . . . . . . . . . . . . . . . . . . . . .4
Typical Applications . . . . . . . . . . . . . . . . . . . . . . . . . . . . . . . . . . . . . . . . . . . . . . . . . . . . . . . . . . . . . . . . . . . . . . . . . . . . . . . . . . . . . .4
Requirements for Use. . . . . . . . . . . . . . . . . . . . . . . . . . . . . . . . . . . . . . . . . . . . . . . . . . . . . . . . . . . . . . . . . . . . . . . . . . . . . . . . . . . . .4
Performance Features . . . . . . . . . . . . . . . . . . . . . . . . . . . . . . . . . . . . . . . . . . . . . . . . . . . . . . . . . . . . . . . . . . . . . . . . . . . . . . . . . . . .5
Description of Operation . . . . . . . . . . . . . . . . . . . . . . . . . . . . . . . . . . . . . . . . . . . . . . . . . . . . . . . . . . . . . . . . . . . . . . . . . . . . . . . . .5
Installation Instructions. . . . . . . . . . . . . . . . . . . . . . . . . . . . . . . . . . . . . . . . . . . . . . . . . . . . . . . . . . . . . . . . . . . . . . . . . . . . . . . . . . .6
Installation. . . . . . . . . . . . . . . . . . . . . . . . . . . . . . . . . . . . . . . . . . . . . . . . . . . . . . . . . . . . . . . . . . . . . . . . . . . . . . . . . . . . . . . . . . .6
Electrical Installation . . . . . . . . . . . . . . . . . . . . . . . . . . . . . . . . . . . . . . . . . . . . . . . . . . . . . . . . . . . . . . . . . . . . . . . . . . . . . . . . .8
Network Settings . . . . . . . . . . . . . . . . . . . . . . . . . . . . . . . . . . . . . . . . . . . . . . . . . . . . . . . . . . . . . . . . . . . . . . . . . . . . . . . . . . . . . . . 11
Basic Settings for PC and MultiSight Sensor . . . . . . . . . . . . . . . . . . . . . . . . . . . . . . . . . . . . . . . . . . . . . . . . . . . . . . . . . 12
Setting the IP Address of the PC . . . . . . . . . . . . . . . . . . . . . . . . . . . . . . . . . . . . . . . . . . . . . . . . . . . . . . . . . . . . . . . . . . . . 12
Setting the IP Address of the MultiSight. . . . . . . . . . . . . . . . . . . . . . . . . . . . . . . . . . . . . . . . . . . . . . . . . . . . . . . . . . . . . 15
Firmware Update. . . . . . . . . . . . . . . . . . . . . . . . . . . . . . . . . . . . . . . . . . . . . . . . . . . . . . . . . . . . . . . . . . . . . . . . . . . . . . . . . . . 18
Start-up . . . . . . . . . . . . . . . . . . . . . . . . . . . . . . . . . . . . . . . . . . . . . . . . . . . . . . . . . . . . . . . . . . . . . . . . . . . . . . . . . . . . . . . . . . . . . . . 18
Program Description. . . . . . . . . . . . . . . . . . . . . . . . . . . . . . . . . . . . . . . . . . . . . . . . . . . . . . . . . . . . . . . . . . . . . . . . . . . . . . . . . . . . 22
Menu . . . . . . . . . . . . . . . . . . . . . . . . . . . . . . . . . . . . . . . . . . . . . . . . . . . . . . . . . . . . . . . . . . . . . . . . . . . . . . . . . . . . . . . . . . . . . . 22
File/Exit. . . . . . . . . . . . . . . . . . . . . . . . . . . . . . . . . . . . . . . . . . . . . . . . . . . . . . . . . . . . . . . . . . . . . . . . . . . . . . . . . . . . . . . . 22
Options/Language. . . . . . . . . . . . . . . . . . . . . . . . . . . . . . . . . . . . . . . . . . . . . . . . . . . . . . . . . . . . . . . . . . . . . . . . . . . . . 22
Help/Help . . . . . . . . . . . . . . . . . . . . . . . . . . . . . . . . . . . . . . . . . . . . . . . . . . . . . . . . . . . . . . . . . . . . . . . . . . . . . . . . . . . . . 22
Help/About. . . . . . . . . . . . . . . . . . . . . . . . . . . . . . . . . . . . . . . . . . . . . . . . . . . . . . . . . . . . . . . . . . . . . . . . . . . . . . . . . . . . 22
Program Interface. . . . . . . . . . . . . . . . . . . . . . . . . . . . . . . . . . . . . . . . . . . . . . . . . . . . . . . . . . . . . . . . . . . . . . . . . . . . . . . . . . 23
Commands . . . . . . . . . . . . . . . . . . . . . . . . . . . . . . . . . . . . . . . . . . . . . . . . . . . . . . . . . . . . . . . . . . . . . . . . . . . . . . . . . . . . 24
Select Detector . . . . . . . . . . . . . . . . . . . . . . . . . . . . . . . . . . . . . . . . . . . . . . . . . . . . . . . . . . . . . . . . . . . . . . . . . . . . . . . . 26
Detector Parameters . . . . . . . . . . . . . . . . . . . . . . . . . . . . . . . . . . . . . . . . . . . . . . . . . . . . . . . . . . . . . . . . . . . . . . . . . . . 32
Detector Types—Detailed Description . . . . . . . . . . . . . . . . . . . . . . . . . . . . . . . . . . . . . . . . . . . . . . . . . . . . . . . . . 35
Image . . . . . . . . . . . . . . . . . . . . . . . . . . . . . . . . . . . . . . . . . . . . . . . . . . . . . . . . . . . . . . . . . . . . . . . . . . . . . . . . . . . . . . . . . 42
Pattern . . . . . . . . . . . . . . . . . . . . . . . . . . . . . . . . . . . . . . . . . . . . . . . . . . . . . . . . . . . . . . . . . . . . . . . . . . . . . . . . . . . . . . . . 47
Results . . . . . . . . . . . . . . . . . . . . . . . . . . . . . . . . . . . . . . . . . . . . . . . . . . . . . . . . . . . . . . . . . . . . . . . . . . . . . . . . . . . . . . . . 47
Setup—Quick Guide. . . . . . . . . . . . . . . . . . . . . . . . . . . . . . . . . . . . . . . . . . . . . . . . . . . . . . . . . . . . . . . . . . . . . . . . . . . . . . . . . . . . 49
Example Application. . . . . . . . . . . . . . . . . . . . . . . . . . . . . . . . . . . . . . . . . . . . . . . . . . . . . . . . . . . . . . . . . . . . . . . . . . . . . . . . . . . . 52
RESET/Power On. . . . . . . . . . . . . . . . . . . . . . . . . . . . . . . . . . . . . . . . . . . . . . . . . . . . . . . . . . . . . . . . . . . . . . . . . . . . . . . . . . . . . . . . 55
Maintenance . . . . . . . . . . . . . . . . . . . . . . . . . . . . . . . . . . . . . . . . . . . . . . . . . . . . . . . . . . . . . . . . . . . . . . . . . . . . . . . . . . . . . . . . . . . 55
Appendix . . . . . . . . . . . . . . . . . . . . . . . . . . . . . . . . . . . . . . . . . . . . . . . . . . . . . . . . . . . . . . . . . . . . . . . . . . . . . . . . . . . . . . . . . . . . . . 56
Frequently Asked Questions. . . . . . . . . . . . . . . . . . . . . . . . . . . . . . . . . . . . . . . . . . . . . . . . . . . . . . . . . . . . . . . . . . . . . . . . 56
Technical Data . . . . . . . . . . . . . . . . . . . . . . . . . . . . . . . . . . . . . . . . . . . . . . . . . . . . . . . . . . . . . . . . . . . . . . . . . . . . . . . . . . . . . 57
Use of Control Input IN2. . . . . . . . . . . . . . . . . . . . . . . . . . . . . . . . . . . . . . . . . . . . . . . . . . . . . . . . . . . . . . . . . . . . . . . . . . . . 58
Control Input: Activate 0 or 1 and Activate 0 to 31. . . . . . . . . . . . . . . . . . . . . . . . . . . . . . . . . . . . . . . . . . . . . . . 60
Control Input: Teach Temporary or Teach Permanent. . . . . . . . . . . . . . . . . . . . . . . . . . . . . . . . . . . . . . . . . . . . 61
Trigger Mode Parameter. . . . . . . . . . . . . . . . . . . . . . . . . . . . . . . . . . . . . . . . . . . . . . . . . . . . . . . . . . . . . . . . . . . . . . . . . . . . 63
Minimum Operating Distance and Field of View by Cat. No.. . . . . . . . . . . . . . . . . . . . . . . . . . . . . . . . . . . . . . . . . . 63
Connector Pin Assignments . . . . . . . . . . . . . . . . . . . . . . . . . . . . . . . . . . . . . . . . . . . . . . . . . . . . . . . . . . . . . . . . . . . . . . . . 66
Accessories . . . . . . . . . . . . . . . . . . . . . . . . . . . . . . . . . . . . . . . . . . . . . . . . . . . . . . . . . . . . . . . . . . . . . . . . . . . . . . . . . . . . . . . . 67
Dimensional Drawings . . . . . . . . . . . . . . . . . . . . . . . . . . . . . . . . . . . . . . . . . . . . . . . . . . . . . . . . . . . . . . . . . . . . . . . . . . . . . 68
Mounting Setup Illustration . . . . . . . . . . . . . . . . . . . . . . . . . . . . . . . . . . . . . . . . . . . . . . . . . . . . . . . . . . . . . . . . . . . . . . . . 73
10000000877(02) 3
Page 4
MultiSight™ User Manual
E
E
E
IMPORTANT
Components Supplied
Components Supplied
• Bulletin 48MS MultiSight vision sensor with integrated lighting
• Computer software on CD-ROM
• Installation instructions, mounting bracket 48MS-BKTDT with three screws, Allen wrench, screwdriver, and protective cap for
M12 Ethernet connector.
• Two PVC M12 QD covers (must be installed around the metal coupling nuts of both connection cables for ESD protection).
Typical Applications
The MultiSight is an optical multipixel sensor with a pass/fail PNP output. The MultiSight uses three ( four) different methods of
evaluation (pattern matching, contrast, brightness, and contour matching) to detect or differentiate objects by means of
previously defined optical characteristics, e.g. for separating “good” and “bad” parts. The main applications are in the field of
industrial automation for quality assurance purposes. The MultiSight can be used for detecting presence or absence, completeness,
position, markings, labeling, packaging, and components. The MultiSight is an economical alternative to conventional vision
systems.
Requirements for Use
To configure the MultiSight, the following items are required: PC or notebook with minimum Pentium III, 1 GHz, 256 MB RAM,
Microsoft Windows 98, 2000, XP™, or Vista™ network connection or network with TCP-IP protocol. Recommended screen resolution
1024 x 768 pixels. Basic knowledge of computing and electronics wiring is also essential. The IP address of the MultiSight is set by
the manufacturer to 192.168.100.100 with sub-net mask 255.255.255.0.
The operation of the MultiSight is independent of a computer or PLC. A PC or notebook is required only for configuring the sensor.
For reproducible results and avoidance of malfunctions, adequate and consistent object illumination is essential.
Reflections or varying incident light may affect detection results.
If necessary, use an external white-light source and/or light-
screening devices to exclude incident light.
4 10000000877(02)
Page 5

MultiSight™ User Manual
E
E
E
E
E
E
Description of Operation
Performance Features
• Vision sensor
• Easier handling and setup than traditional vision systems
• 640 x 480 resolution CCD chip
• Integrated white-light illumination
• Image display on computer using included software
• Standalone sensor function
• Compact, sturdy, industrial housing (IP67) with standard 8-pin micro (M12) QD connectors
• Detection distance adjustable from 20 mm to infinity (see “Minimum Operating Distance and Field of View by Cat. No.” on
page 63 for corresponding field of view)
• Four outputs (PNP type sourcing MOSFETs), two inputs (sinking)
• Short evaluation time
• Three (or four) evaluation methods: Pattern Matching, Brightness, Contrast, and Contour Matching
• Ten virtual detectors or 32 virtual detectors
• Individual virtual detectors can be logically linked or grouped for evaluation of different objects with several characteristics
for inspection
• Ethernet connection for setup
• EtherNet/IP connection for communication of I/O information
• RSLogix 5000 Add-on Profile for ease of integration into a Logix-based control system
Description of Operation
Basics
The image recorder of the MultiSight is a CCD chip with a resolution of 640 x 480 pixels. Evaluation is based on 320 x 240 scanning
points. The sensor is designed for inspection and cannot provide measurement information. To operate the MultiSight, at least one
virtual detector must be configured by designating a Region of Interest and teaching a sample image (see screen shot on page 20).
This virtual detector is stored in a non-volatile flash memory on the sensor and is re-activated for standalone operation after
switching off and on. Standalone operation is, therefore, possible with or without PC or PLC.
Evaluation Method
During operation, the MultiSight continuously compares the pattern of the detected image with that of the reference image. The
pixel grey-scale values of the sample are analyzed and a level of conformity to the original sample is determined. If this level falls
within the user adjustable threshold settings, the sensor turns the PNP output ON or OFF (i.e., the part passes or fail s the inspection).
The EtherNet/IP connection is capable of communicating additional data about the inspection.
10000000877(02) 5
Page 6
MultiSight™ User Manual
E
E
E
IMPORTANT
Installation Instructions
Setup
The PC must be connected to a MultiSight sensor via the Ethernet
port to load the configuration software. Also, Run mode of the
sensor is automatically stopped when the software connects to
the sensor. The software is tightly integrated with the firmware on
the sensor. As parameters are changed in the software they are
changed in the sensor. There is not a typical “download” or
“upload” process, but the “write to flash memory” button in the
software must be pushed to save the settings from the sensor’s
RAM to the sensor’s nonvolatile flash memory. The Teach
command is used only for teaching the pattern, contour, or
shutter speed (in automatic shutter adjustment mode). The active
detector in the software is the active detector in the sensor. This
means that if the sensor is switched to run mode, whatever
detector was most recently selected in the software will
determine the output of the sensor ( unless it is changed via
EtherNet/IP).
If an EtherNet/IP connection is established, the Logix add-on
profile output tag FirstDetector will control which detector is
active and override the configuration software setting. To give
control of which detector is active back to the configuration
software, set the FirstDetector tag value to -1.
Installation Instructions
Installation
To help provide maximum accuracy of detection, the MultiSight should be protected from vibration.
Secure the connection cables with cable binders to prevent
crushing or slipping.
Select a position for the MultiSight in which interfering factors
such as slight differences in the position of the object or
variations in lighting have little or no effect.
Attach the MultiSight onto the dovetail mounting bracket, 48MS-BKTDT (supplied with the unit) and then onto a suitable object
above the target. Use only the 48MS-BKTDT for mounting the unit (see “Approximate Dimensions—mm (in.)” on page 68).
6 10000000877(02)
Page 7
MultiSight™ User Manual
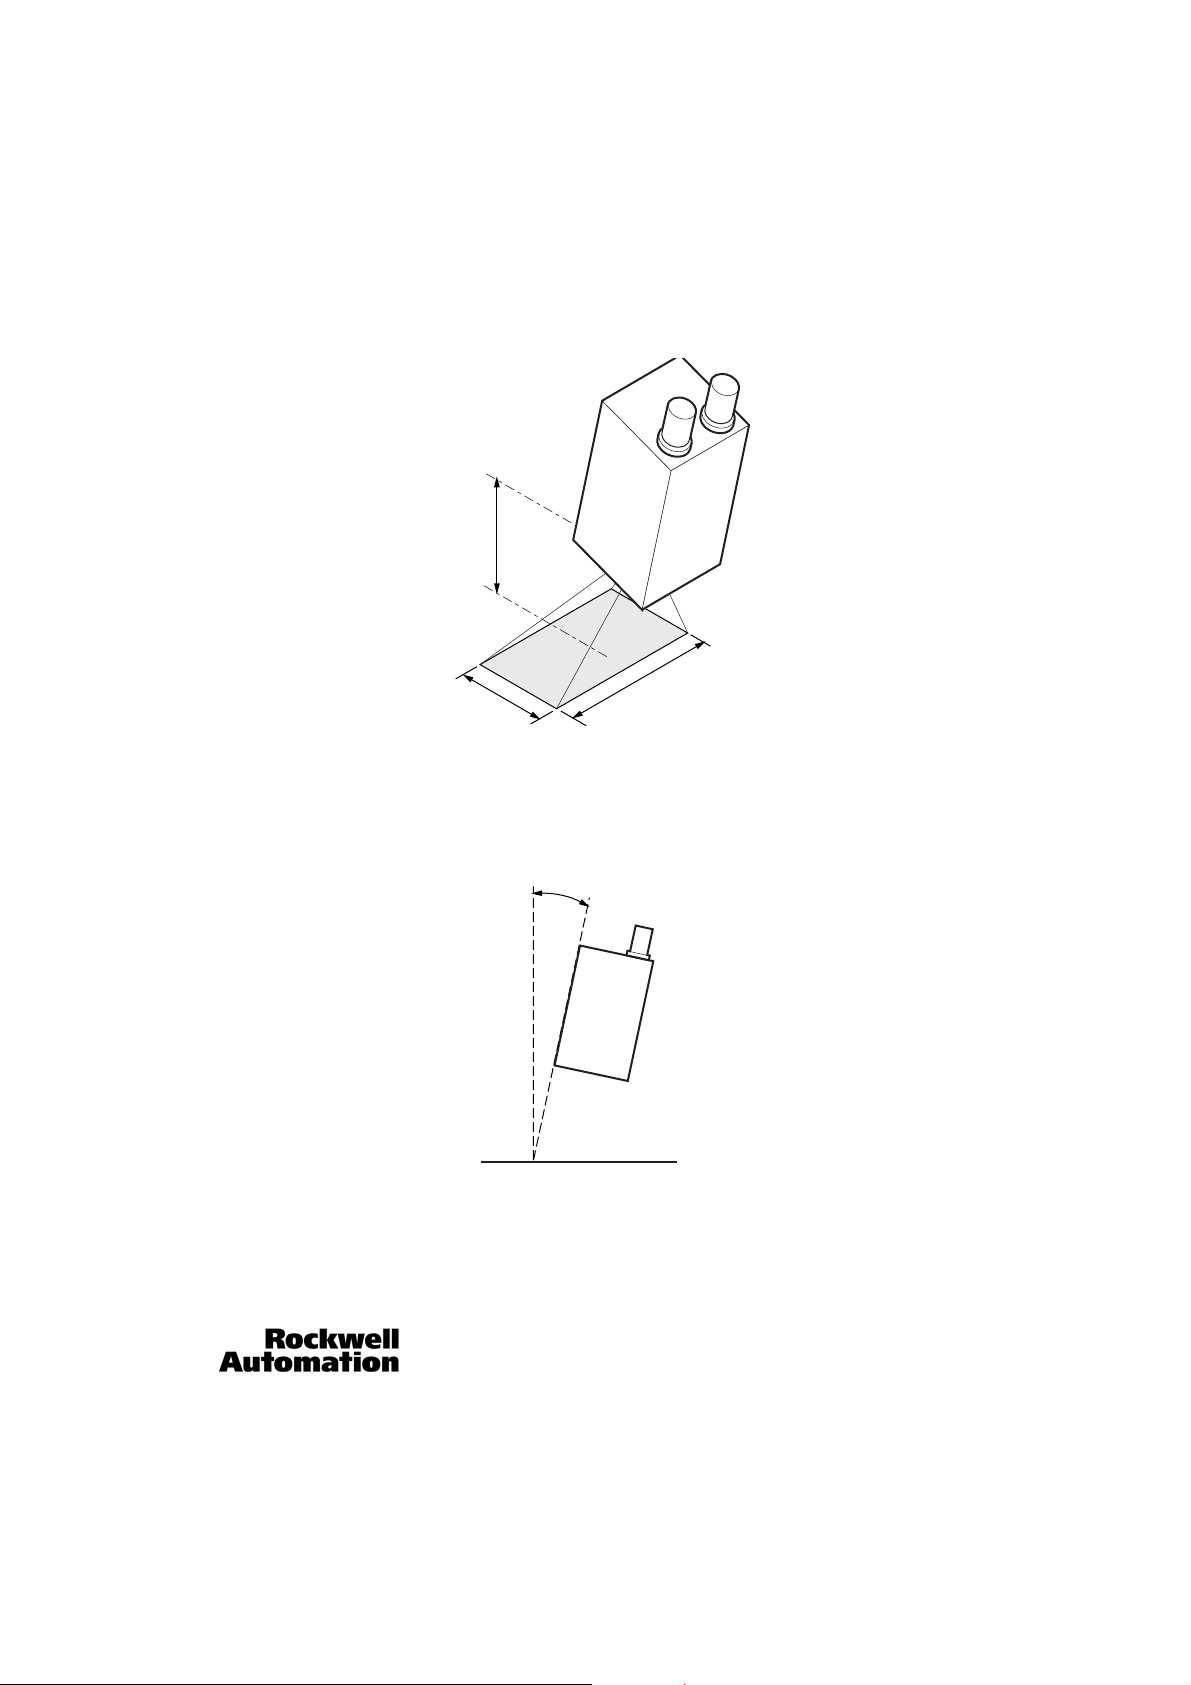
Operating
Distance
Height of
Field of View
Width of
Field of View
Approx. 10…15°
Target Surface
Installation Instructions
The height and width of the field of view is determined by the operating distance (see “Minimum Operating Distance and Field of
View by Cat. No.” on page 63).
For most applications, it is recommended to align the MultiSight at an angl e of approximately 10…15° with reference to the optical
axis in order to avoid interfering reflections from the inspection target.
10000000877(02) 7
Page 8
MultiSight™ User Manual
IMPORTANT
ATTENTION
E
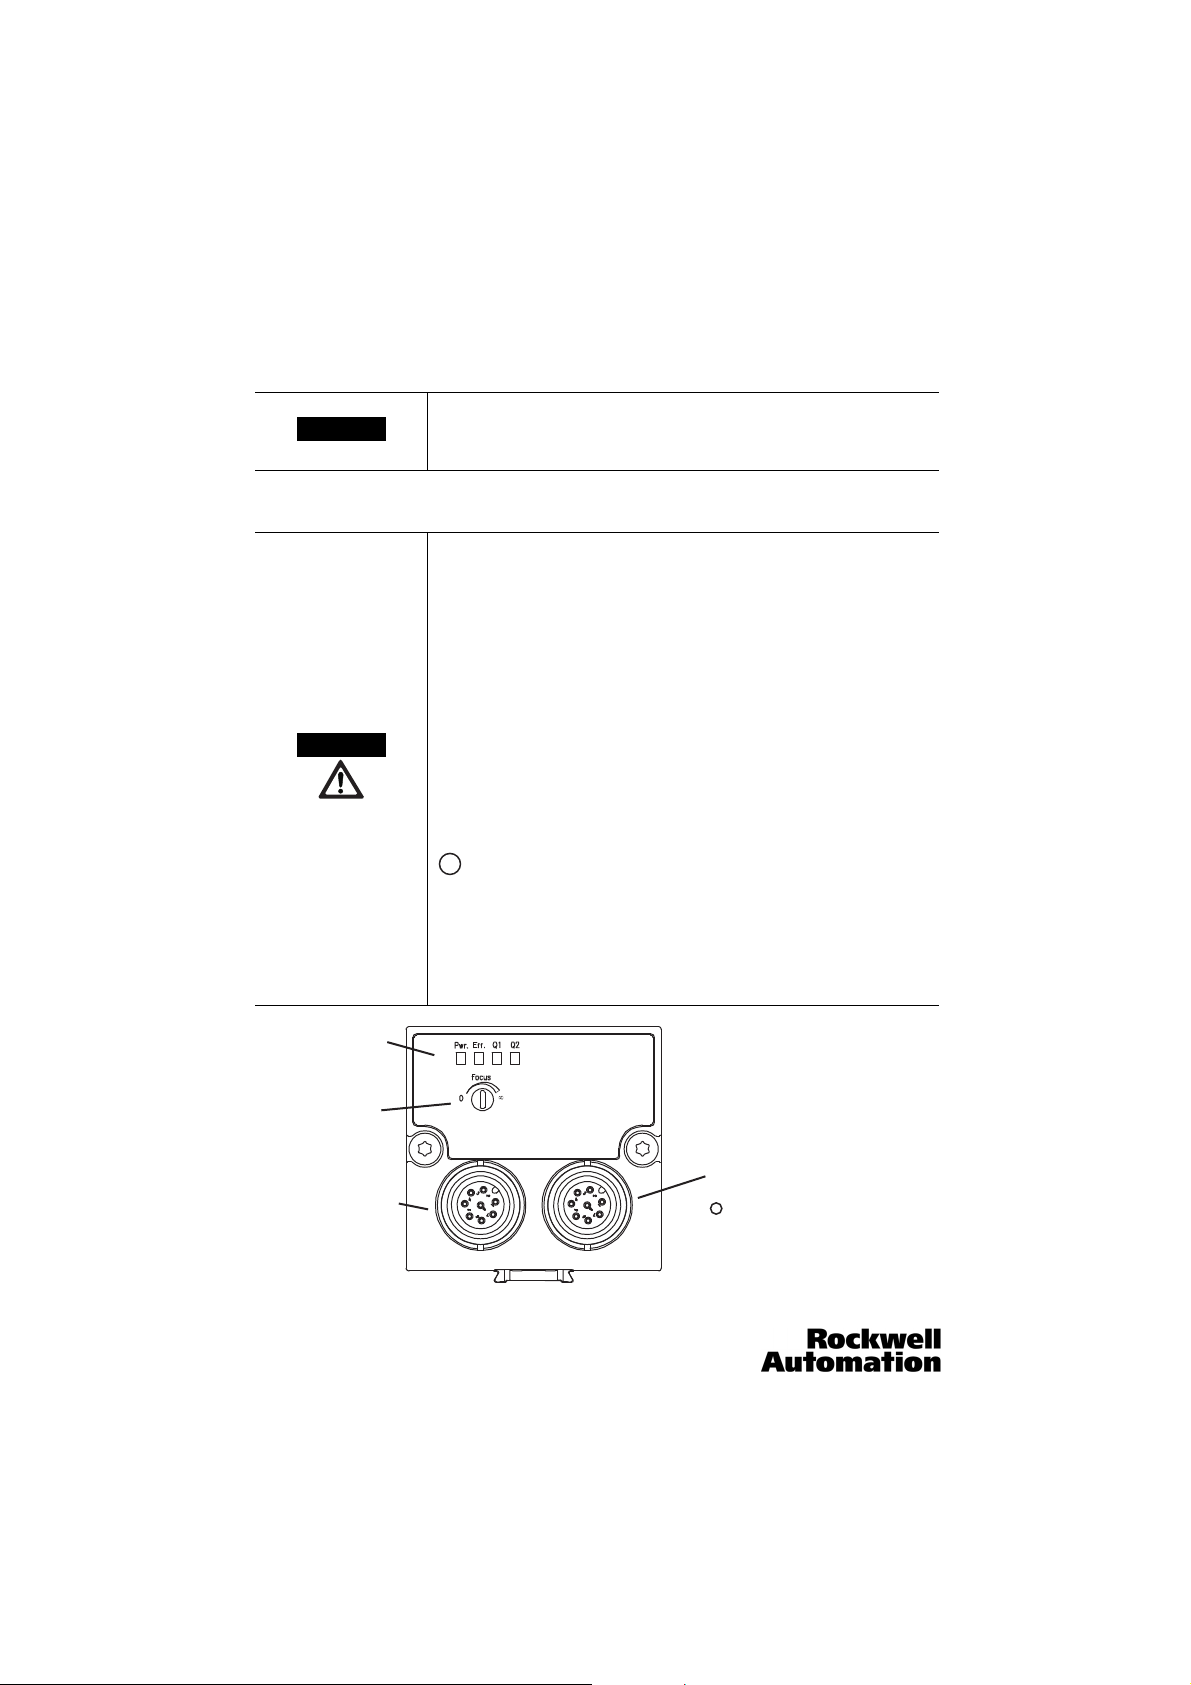
Focus Adjustment
LED Indicators
M12 Connection Socket
24 V DC and I/O
M12 Connection Socket ENET
(8-pin on standard models,
4-pin D-code on EtherNet/IP models)
PWR-I/O ENET
E
Installation Instructions
Fine Adjustment
Electrical Installation
Fine adjustment of the MultiSight should not be carried out until
after electrical connection and start-up (PC software installation)
(see “Start-up” on page 18).
The electrical installation of the MultiSight must be carried out by
a qualified electrician.
When installing the MultiSight disconnect all electrical
components from the power supply.
When the unit is used on a network, make sure that the network
address (IP address) of the MultiSight set by the manufacturer at
192.168.100.100 is still free and is not in use by any other unit
connected to the system.
If necessary, reset the IP address of the MultiSight as described in
“Network Settings” on page 11.
When the MultiSight is in use, the protective caps supplied must
be covering the M12 socket (Ethernet) if it is not in use. Failure to
do this may cause malfunction.
EtherNet/IP models only:
The supplied black PVC M12 covers must be installed around the
coupling nut of each connection cable (Power-I/O and ethernet)
to protect from ESD when using standard cables. (There is a
plastic nut on the MultiSight specific cables to provide this ESD
protection, so the PVC cover is not required for 48MS-CS-2 and
48MS-ECSCROSS-3.)
8 10000000877(02)
Page 9
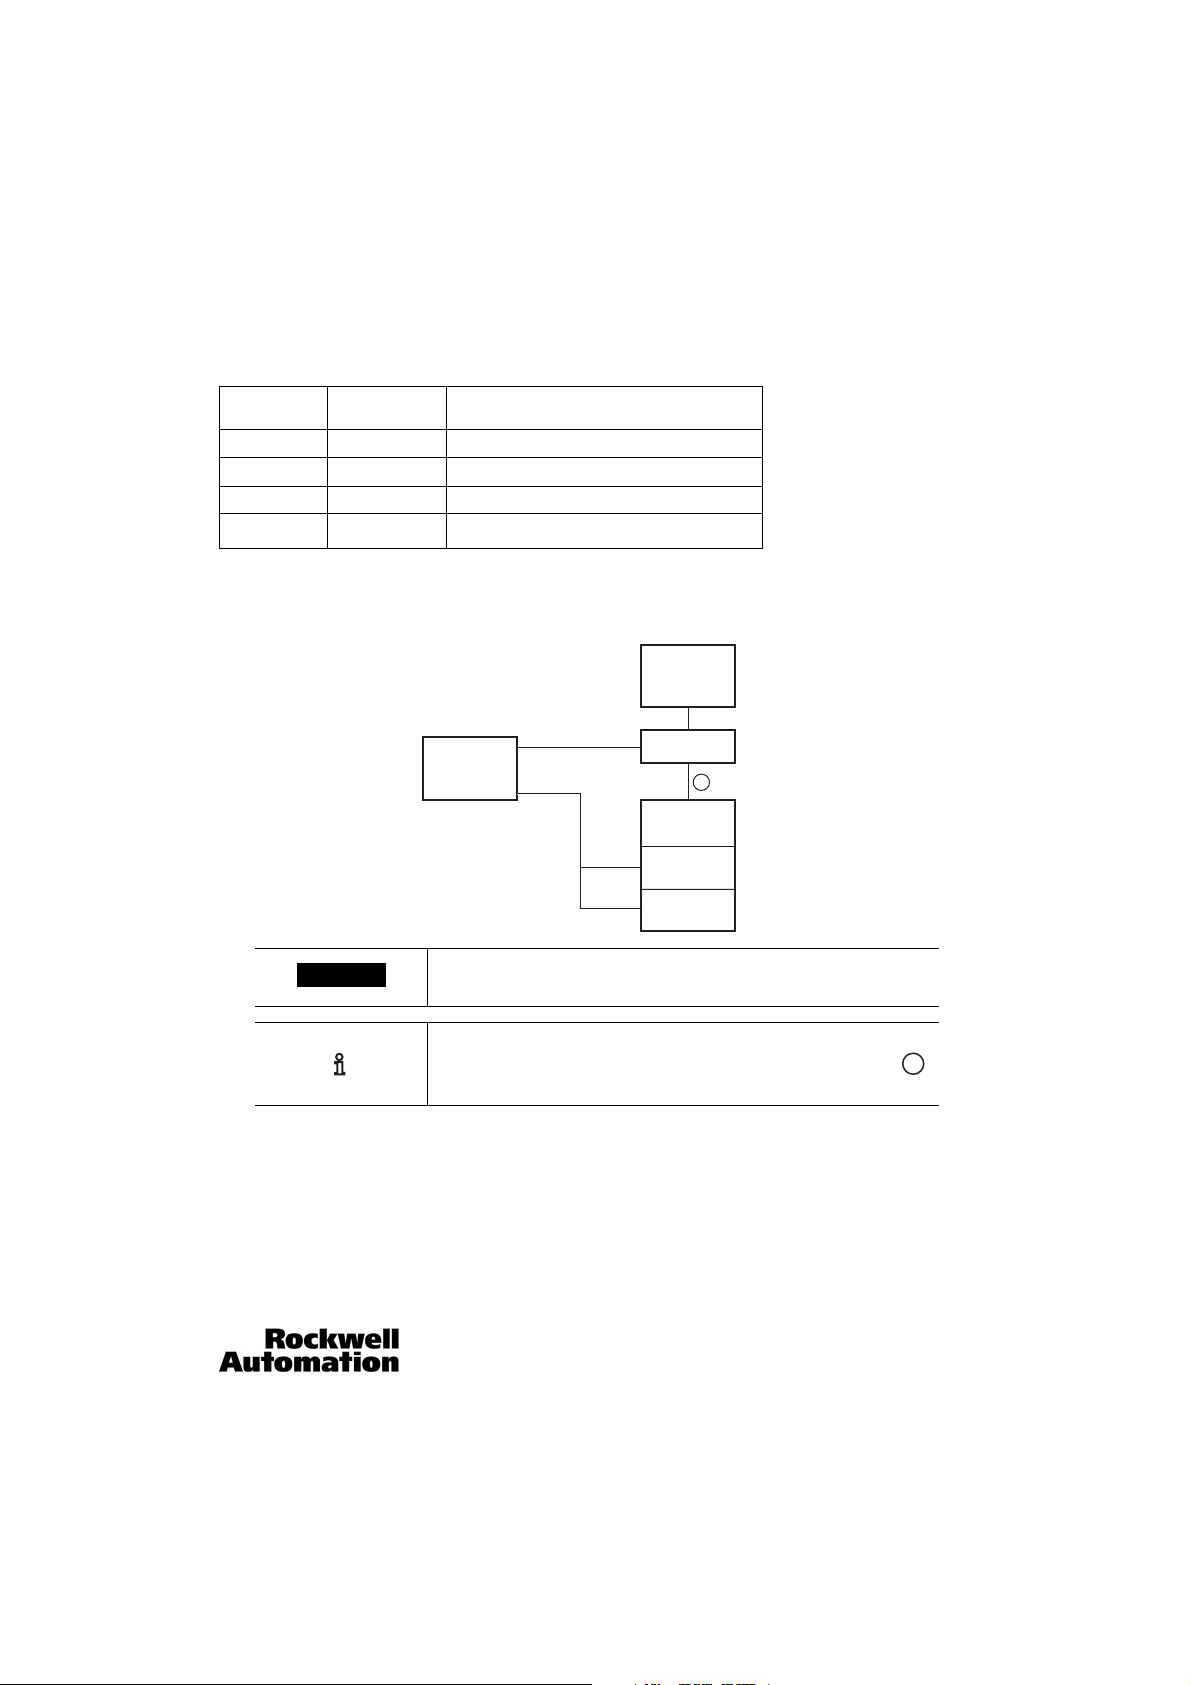
Sensor Display LED Description
48MS
ENET
PC
PWR
I/O
PLC
ENET (a)
PWR and I/O (b)
E
IMPORTANT
E
Name Color Meaning
Pwr. green
Err. red
Q1 yellow
Q2 yellow
Operating voltage
Error
Result 1 (pass/fail = OUT1)
Result 2 (position = OUT2)
Tab le 1 : Tabl e Dis pla y LE Ds
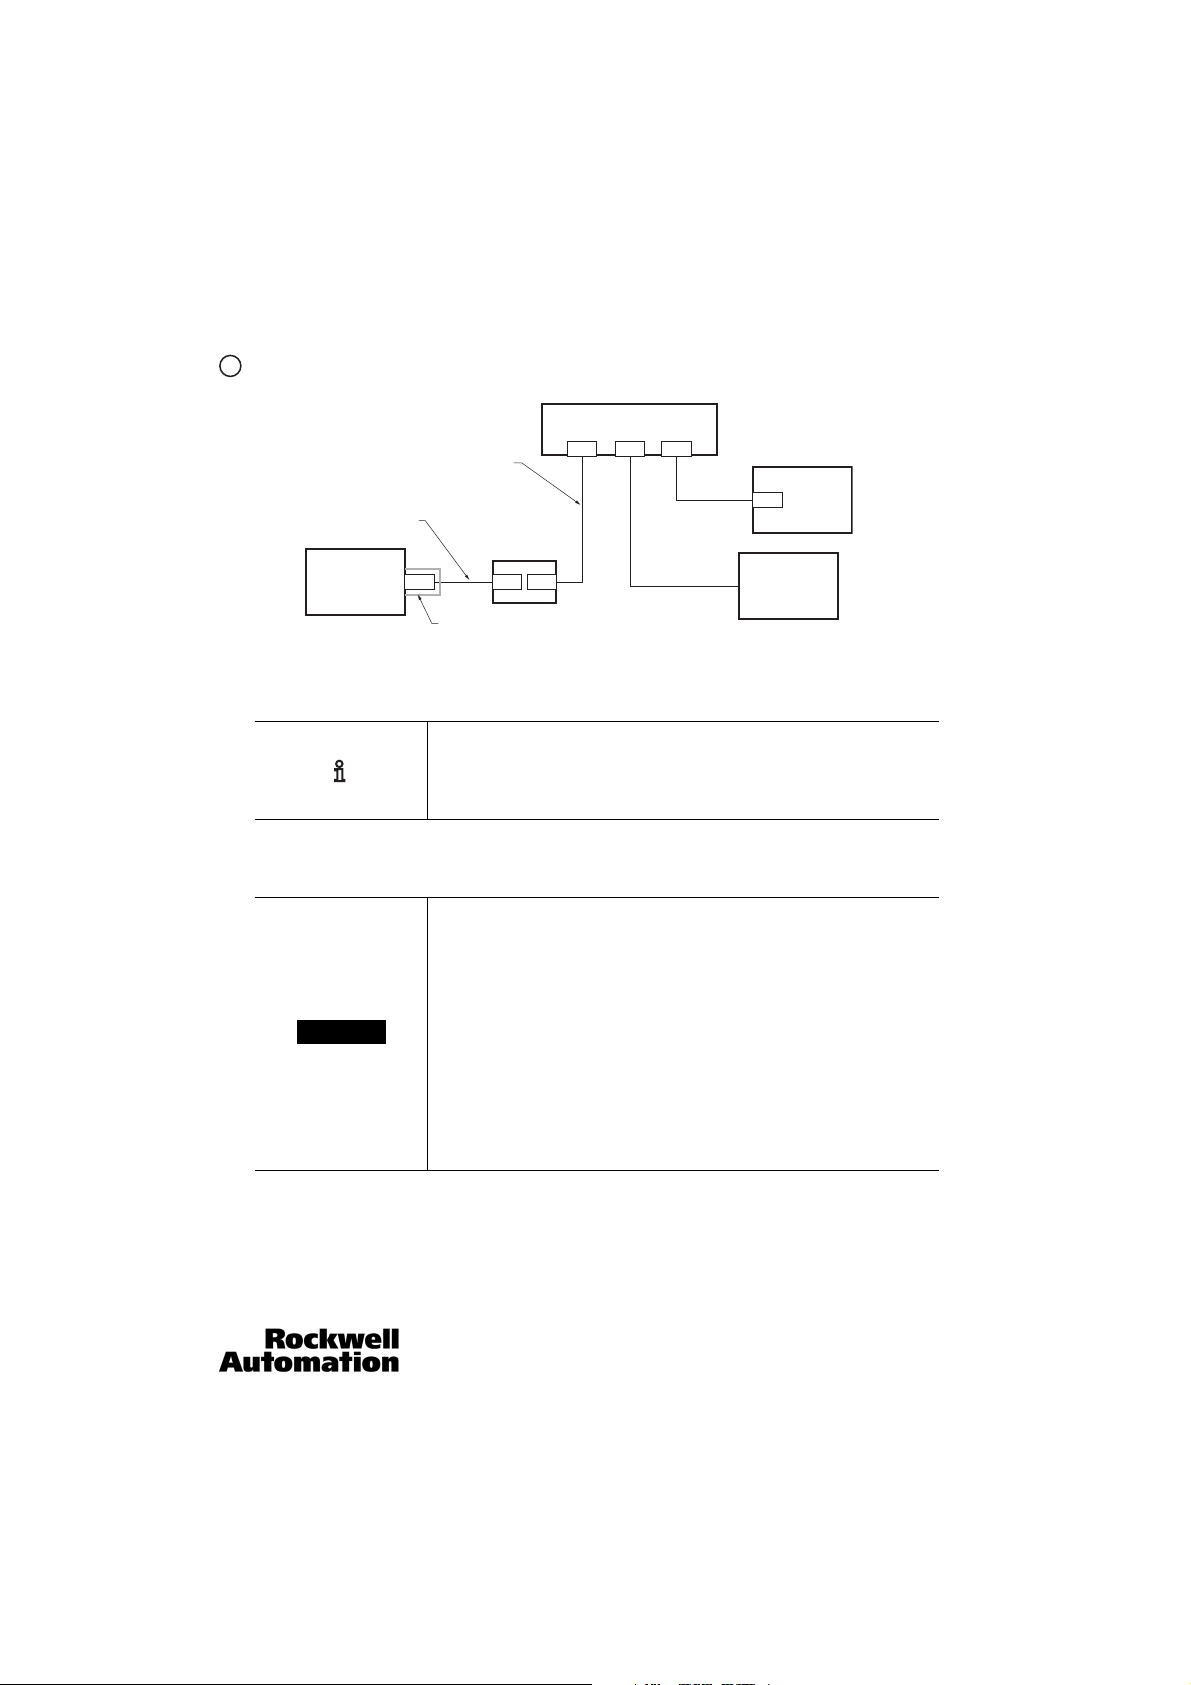
For electrical installation, connect the MultiSight as shown:
MultiSight™ User Manual
Installation Instructions
Use only the correct connection cables as listed below (see
“Accessories” on page 67).
The Ethernet connection is only required for setup. During normal
operation, only the PWR and I/O cable needs to be connected (
unless using the EtherNet/IP functionality).
10000000877(02) 9
Page 10
MultiSight™ User Manual
48MS PC
Ethernet Cable
48MS-ECS-3
Network
e.g. Switch, Hub, etc
Standard
Network Cable
M12
RJ45 RJ45
RJ45
E
E
48MS
48MS-M12CVR
PC
Ethernet
Connector
1585A-DD4JD
Ethernet
Cross Cable
48MS-ECROSS
M12 M12 RJ45 RJ45
Ethernet Cordset
(1585D-M4TBDM-2*)
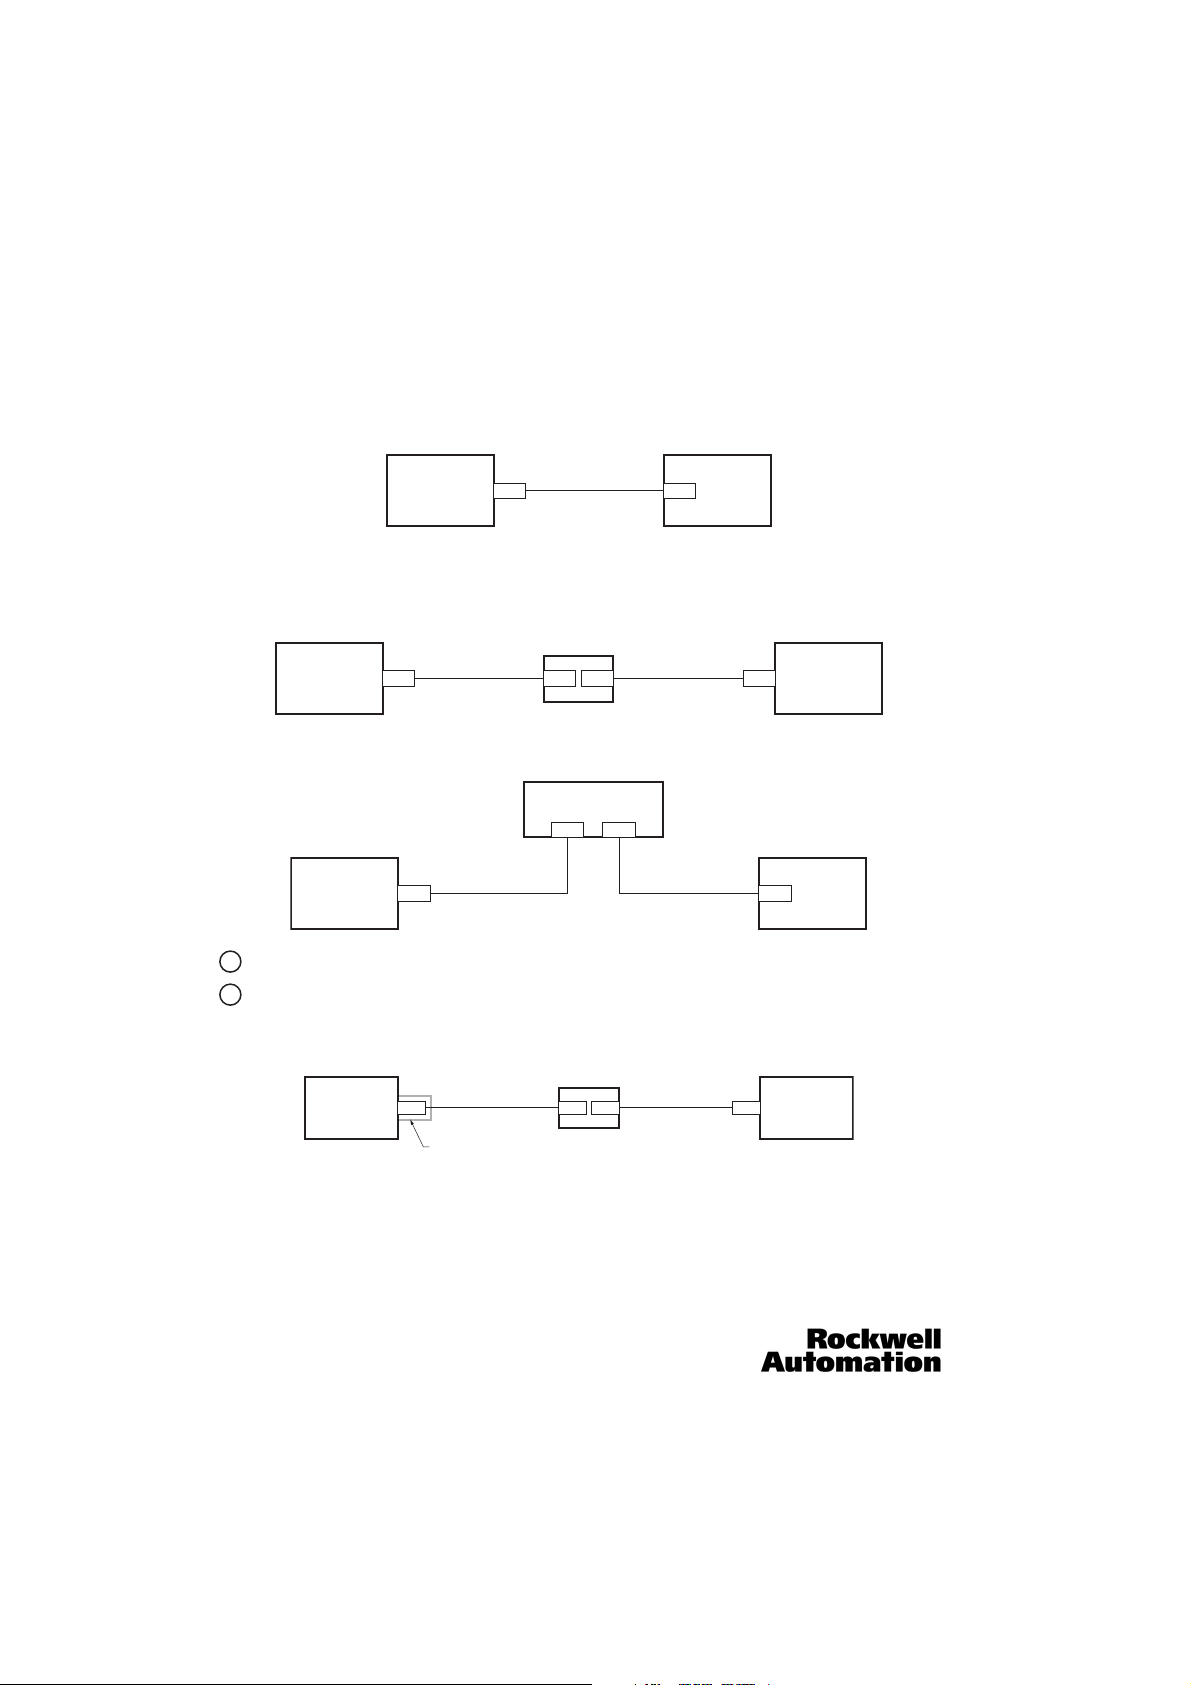
Installation Instructions
Network Connection (a) for standard models
Direct connection of the MultiSight to a PC with a single crossover cable (recommended):
Ethernet
Cross-over Cable
48MS-ECSCROSS-3
48MS PC
Direct connection of the MultiSight to a PC with an industrial ethernet cable and a separate standard RJ-45 crossover cable:
Ethernet Cable
48MS PC
Connection of the MultiSight to a PC via a network:
M12 RJ45
Ethernet
Connector
48MS-RJ45Conn
48MS-ECS-3
RJ45M12 RJ45 RJ45
Ethernet
Cross Cable
48MS-Ecross
Network Connection (a) for EtherNet/IP Models
Direct connection of the MultiSight with EtherNet/IP to a PC with an industrial ethernet cable and a separate standard RJ-45
crossover cable:
10 10000000877(02)
Page 11
MultiSight™ User Manual
E
48MS
PC
Ethernet Cable
1585J-M8TBJM-2*
Ethernet Cable
1585J-M8TBJM-2*
Network
e.g. Switch, Hub, etc
Standard
Network
Cable
RJ45 RJ45RJ45
RJ45
Ethernet
Connector
1585A-DD4JD
EtherNet Cable
1585D-M4TBDM-2*
M12 RJ45
PLC EtherNet/
IP Scanner
48MS-M12CVR
M12
IMPORTANT
Network Settings
Connection of the MultiSight with EtherNet/IP to a PC and PLC via a network:
Power and I/O Connection (b)
Connector pinouts and a detailed wiring diagram are shown in the “Connector Pin Assignments” section on page 66.
If the “Control Input” parameter of the active detector is set to
“Enable” (the default setting), the control input (IN2) must be
connected to V+ (24V DC) in order to operate the sensor with an
external trigger (input IN1) (see page 66).
Network Settings
The following instructions indicate how to change the network
configuration of the PC and the MultiSight. If incorrect settings
are used, the network links in the computer may be lost. Note the
current settings for later use before making any changes.
It may be necessary to re-start the system during this procedure.
In order to determine which IP addresses are allowed in your
network or locally in your PC, and to carry out the necessary
settings on your PC, contact your system administrator.
The illustrations, dialogues and menus originate from the
TM
operating system Microsoft Windows XP
. The illustrations are
similar in other operating systems.
10000000877(02) 11
Page 12
MultiSight™ User Manual
IMPORTANT
IMPORTANT
Network Settings
Basic Settings for PC and MultiSight
To configure the MultiSight Sensor with a PC it is essential that Ethernet capability is installed in the PC and the LAN connection on
the PC is active with a TCP/IP protocol. This also applies when the PC is not connected to a network (see “Network Connection” on
page 8). In addition, every machine in the network must be allocated a unique IP address.
For the MultiSight Sensor Finder software to detect a MultiSight
via Ethernet, all wireless Ethernet connections from the PC must
be disabled. Also, deselect “Check Point SecuRemote” in the Local
Area Connection Properties and disable any firewalls.
The IP address consists of four decimal blocks in the for mat aaa.bbb.ccc.ddd where each block may have a value from 0-255. The first
three decimal blocks (aaa.bbb.ccc) form the address area.
In order to use the configuration software, the address area of the PC and the MultiSight must be identical. The fourth decimal block
(ddd) must be different.
The sensor finder tool (Connect/Find) can be used to change the IP address of the MultiSight, even if the address area of the PC and
MultiSight are different.
Example:
If the IP address of the PC is 192.168.2.67, any address between 192.168.2.1 and 192.168.2.254 can be selected for (with selected
subnet mask 255.255.255.0) the MultiSight, with the exception of the IP address of the PC (192.168.2.67) and the IP addresses of
any other machines in the network.
The IP address of the MultiSight is set by the manufacturer to 192.168.100.100. In the above example, the IP address of the
MultiSight therefore has to be reset to the address range of the PC (see “Setting the IP Address of the MultiSight” on page 15).
Setting the IP Address of the PC
Contact your system administrator to determine which IP
addresses are allowed in your network or locally in your PC, and to
carry out the necessary settings on your PC.
The IP address of the computer needs to be set when the MultiSight is directly connected with the computer (see “Electrical
Installation” on page 8) and only if the computer has no IP address. In all other cases, the IP address of the MultiSight has to be
adjusted to that of the computer (see “Electrical Installation” on page 8).
12 10000000877(02)
Page 13
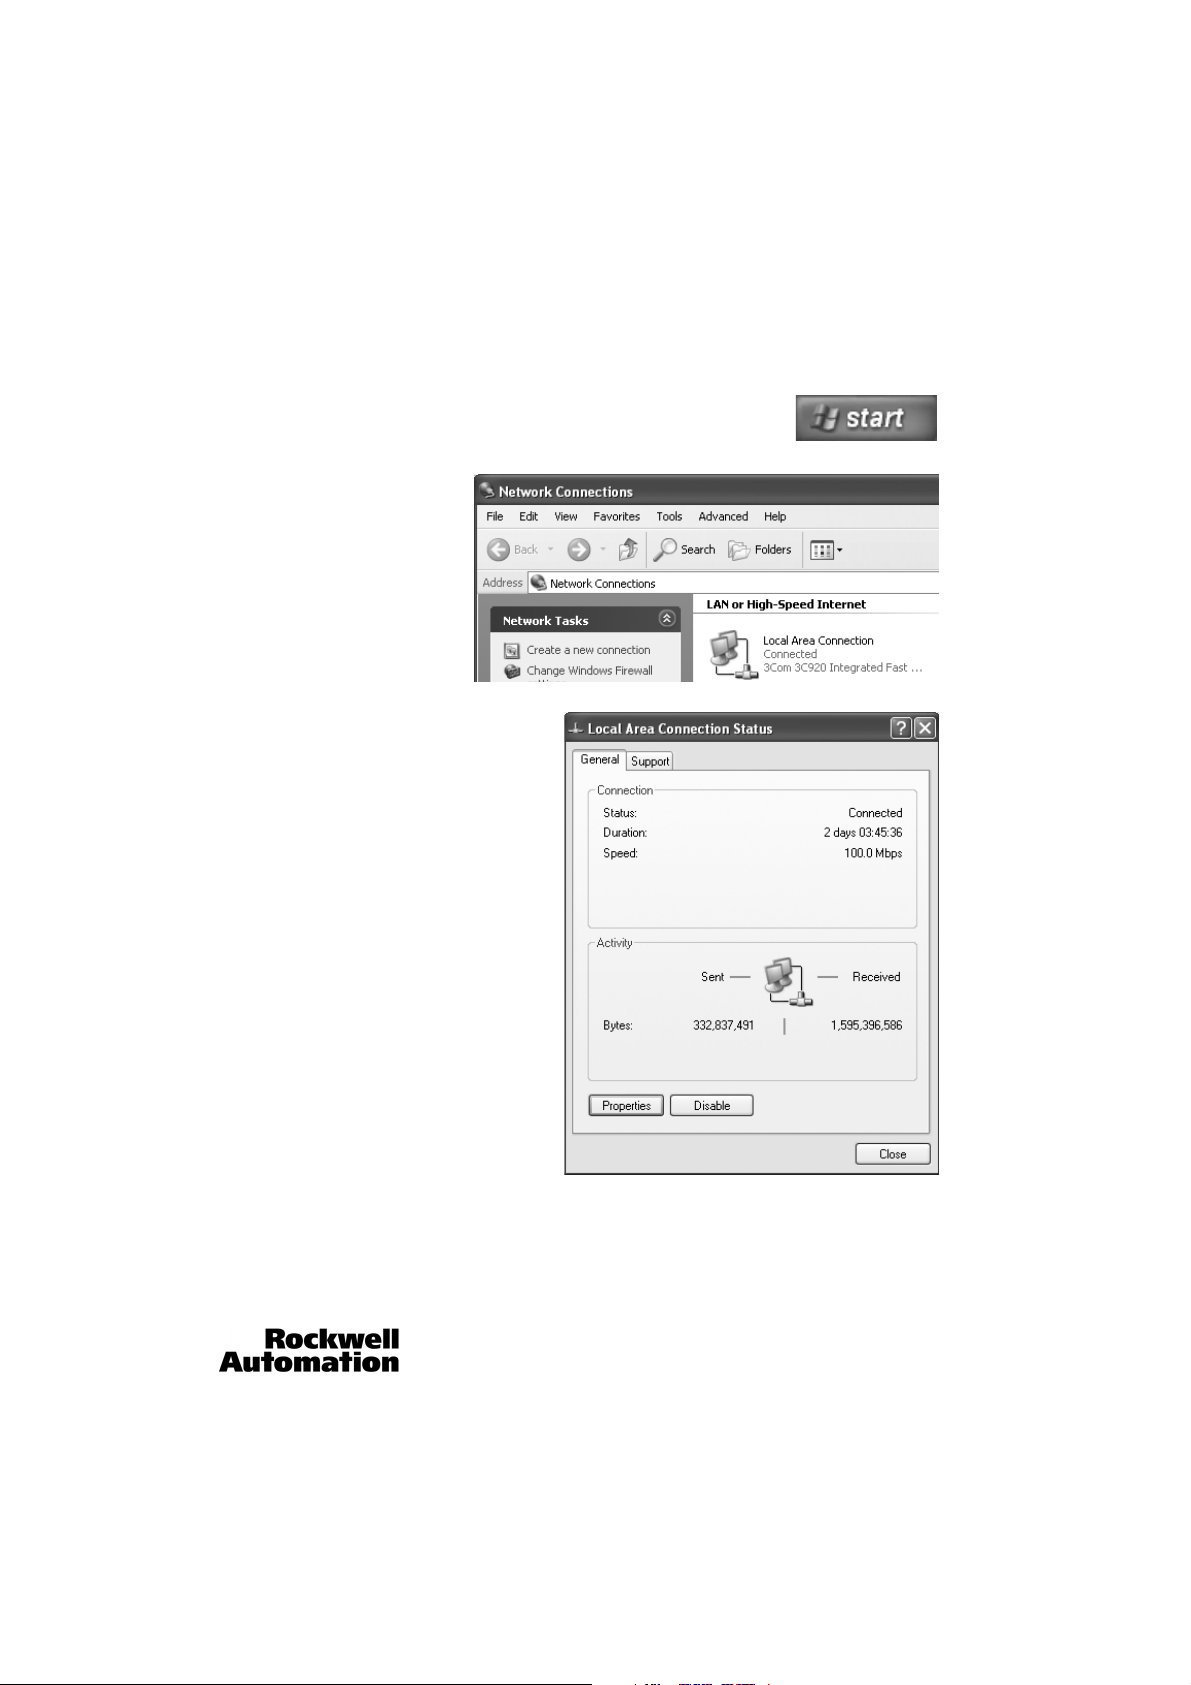
To set the IP address of the computer carry out the following procedure in the operating system:
1. Click on the “Start” button on your computer.
2. Click on “Settings”
3. Click on “Network Connections”
4. Double click on “Local Area Connection”
MultiSight™ User Manual
Network Settings
10000000877(02) 13
Page 14
MultiSight™ User Manual
Network Settings
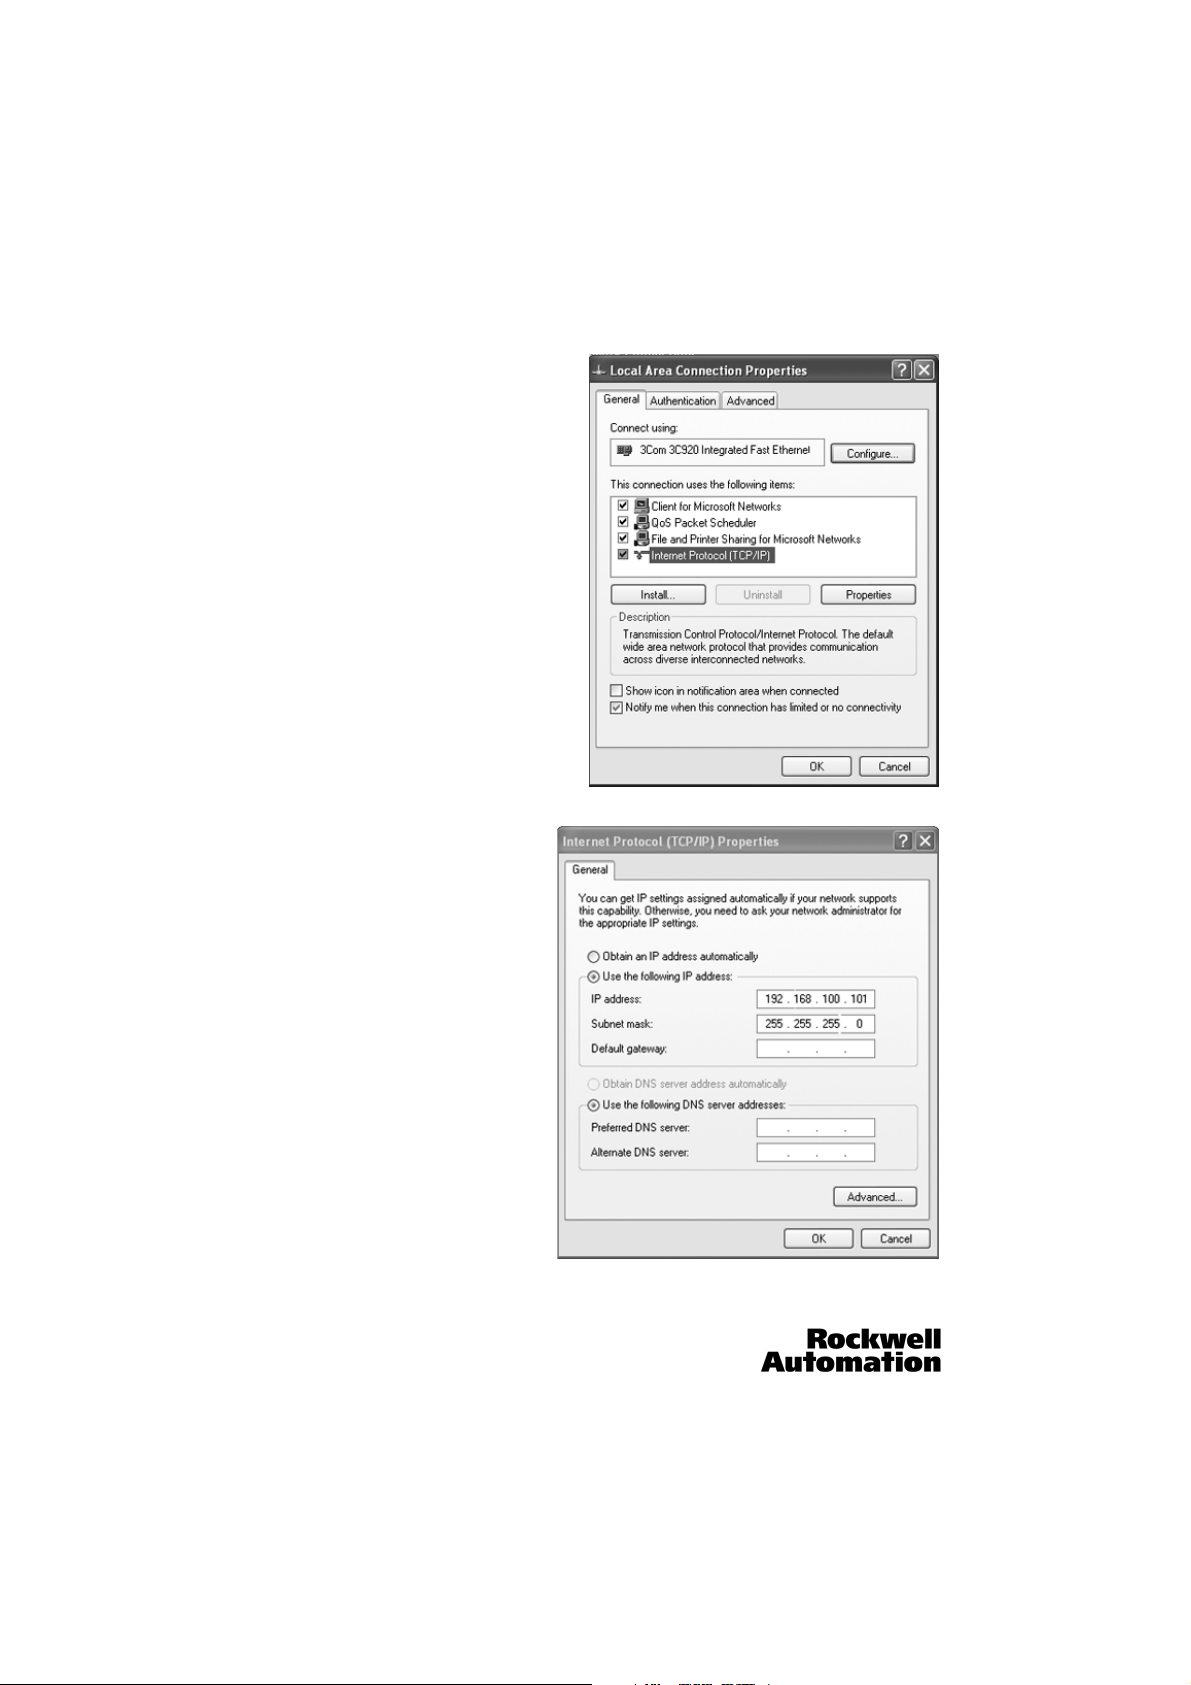
5. Click on “Properties”
6. Click on “Internet Protocol TCP/IP” properties
7. Set the IP address and Subnet mask per the
previous page
14 10000000877(02)
Page 15

MultiSight™ User Manual
IMPORTANT
IMPORTANT
Network Settings
Setting the IP Address of the MultiSight
Contact the system administrator to determine which IP
addresses are allowed on your network for the MultiSight. The IP
address set for the MultiSight should be marked on the enclosed
label. After installation, stick the label on the sensor in a clearly
visible position.
Before setting the IP address, make sure that the computer is connected as described in “Electrical Installation” and “Basic Computer
Settings” (see “Electrical Installation” on page 8 and “Basic Settings for PC and MultiSight” on page 12).
To set the IP address on the MultiSight, proceed as follows in
the PC software:
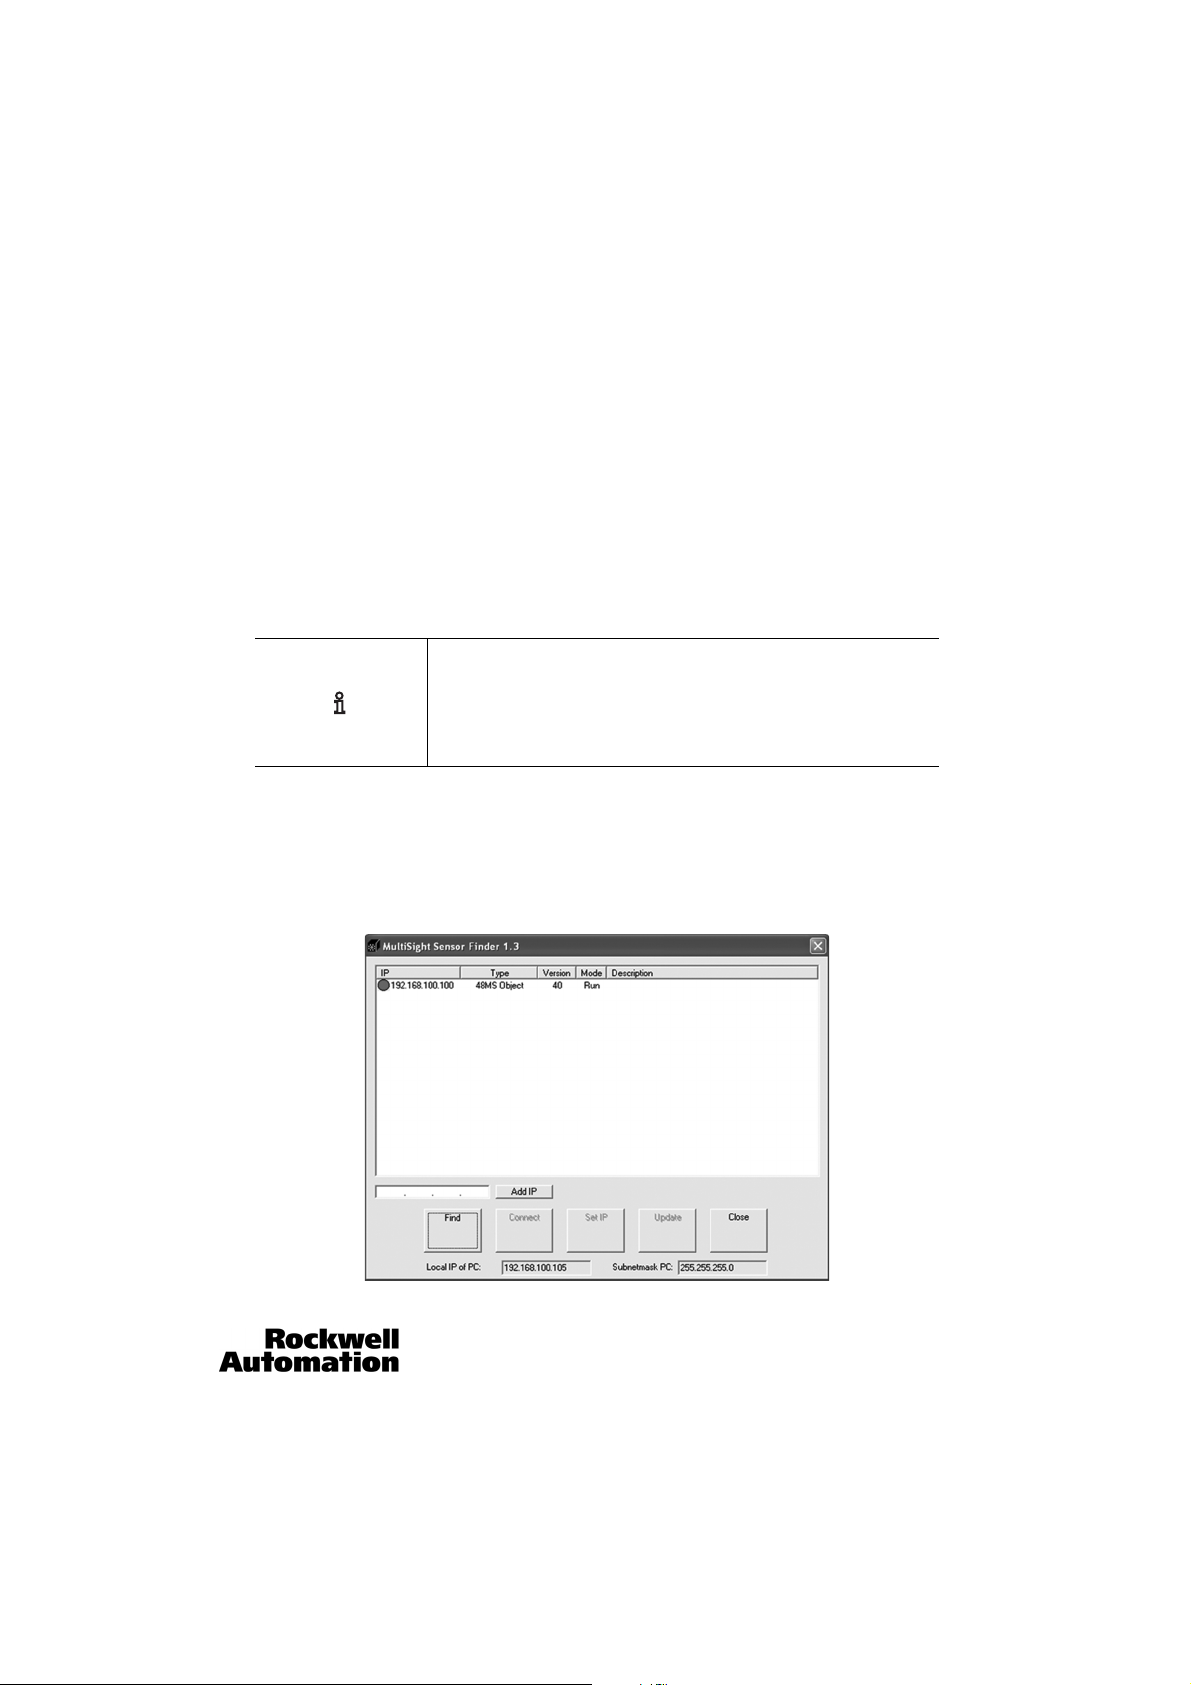
1. Open the MultiSight software.
2. Click on the “Find” button. After a few seconds, a list of
sensors in the network appears. If this does not happen,
repeat the Find process.
3. Select the desired sensor by clicking on it.
4. Click on the “Set IP” button and enter the desired IP
address for the MultiSight (same as the IP address of the
PC except for the last block, see “Basic Settings for PC and
MultiSight” on page 12). Click Set to accept.
It is possible to adjust the subnet mask and standard
gateway using the set IP function. It is recommended to
not change these settings unless necessary.
It is not possible to see a MultiSight on a different standard
gateway than your PC using the sensor finder function.
5. Switch the power to MultiSight off and on again, and
click on Find again to locate the sensor with the newly assigned address.
Note: the period between the sensor re-start and successful Find is approx. 6 sec. If necessary, repeat Find operation.
The MultiSight is now ready for operation at the newly-assigned IP address.
For network operation use only IP addresses which have not already been assigned.
10000000877(02) 15
Page 16
MultiSight™ User Manual
Network Settings
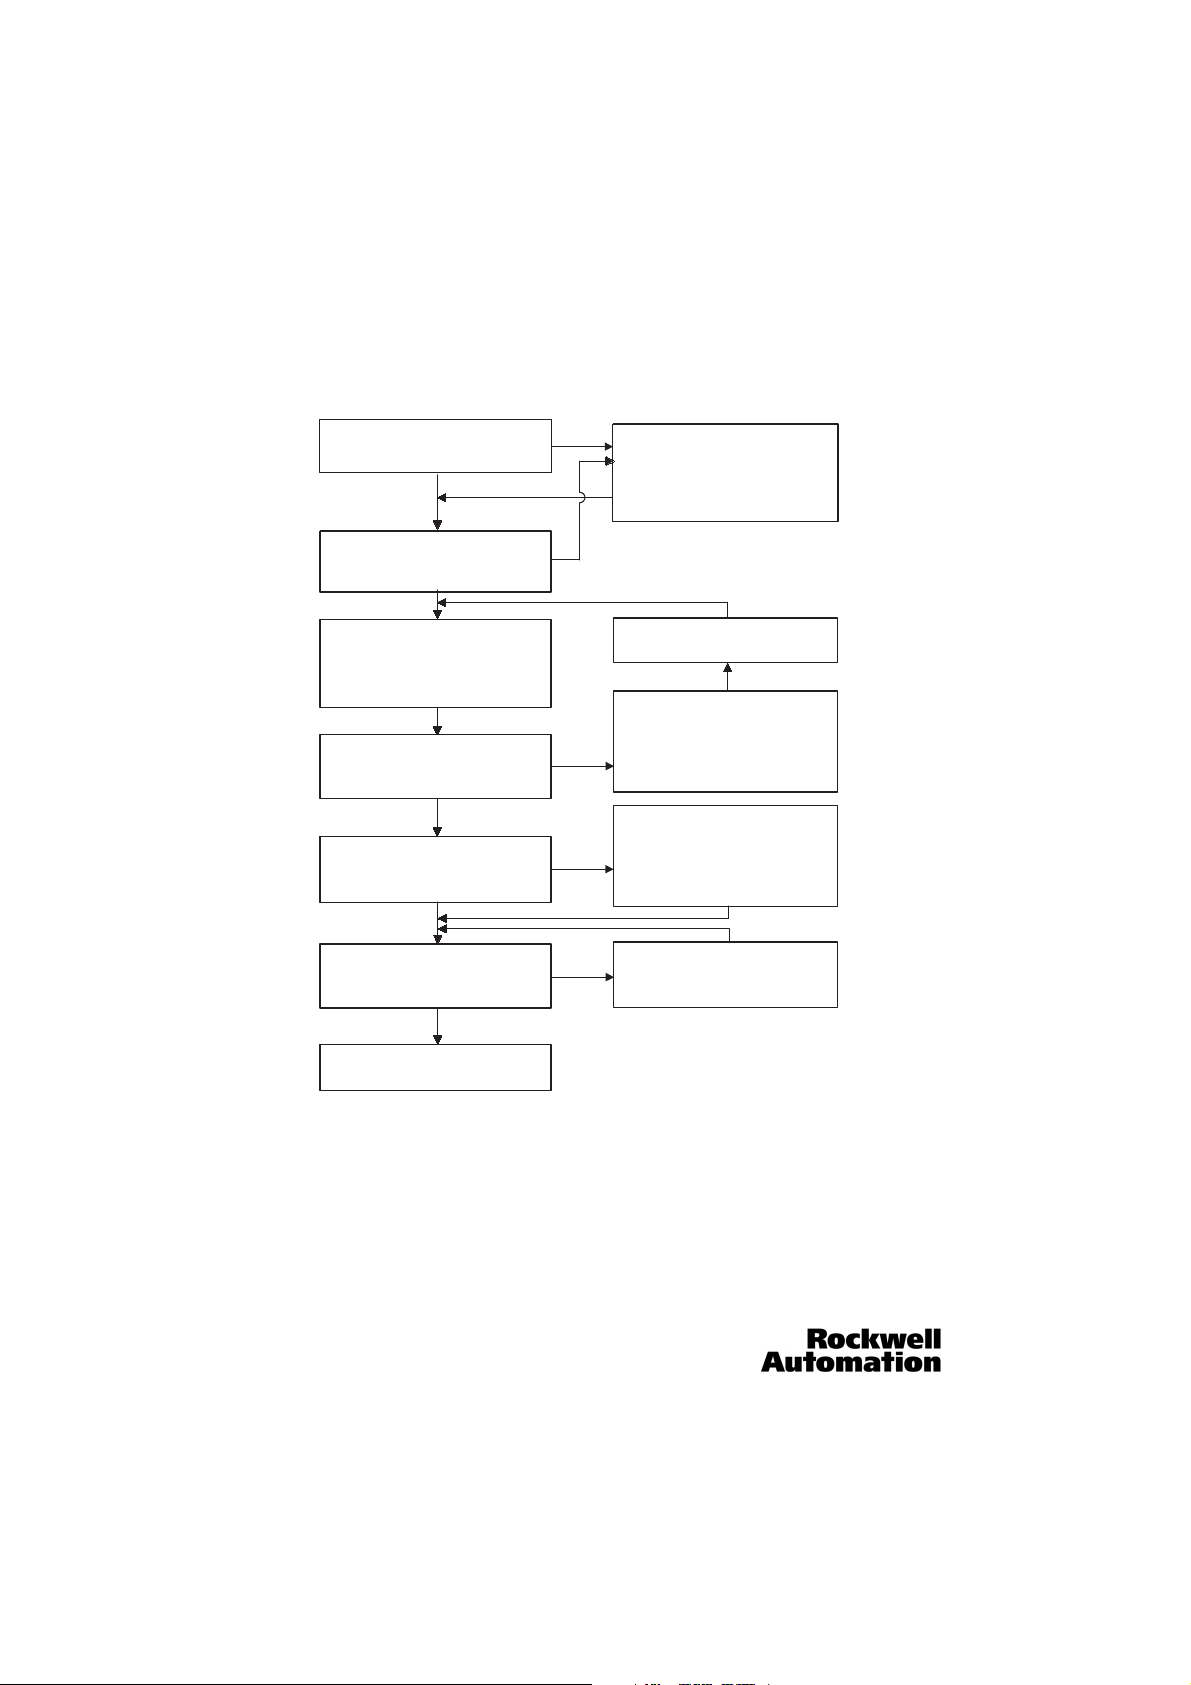
Creating a Functioning Ethernet Connection Between a PC and a MultiSight
1. Direct connection (see “Electrical Installation” on page 8)
All cables correctly connected?
24V DC Power Supply?
yes
Electrical connection ok?
MultiSight Pwr LED on
Network: Start/Settings/Network connections
No red X on Local Area Connection
Set IP address of PC to xed address.
Start/settings/network connections/
(right click) local area connection/
Internet Protocol (TCP/IP)/Properties/
IP address = 192.168.100.101/255.255.255.0
Click Connect/Find in MultiSight PC Software
IP Address area of sensor and PC identical?
Click Connect/Find in MultiSight PC software
and make connection with "Connect"
yes
Contact system administrator
Sensor is listed with IP
Success
i.e., IP aaa.bbb.ccc = identical
yes
no
no
Failure
no
Failure
Connect all cables correctly
1. Power and I/O cable
2. Ethernet crossover cable
Check settings, adjust if necessary
Conrm (via LAN properties) that rewalls,
wireless networks, and check point
secure remote are disabled.
After second attempt
Execute "Ipcong"
Start/run/cmd: input. "ipcong"
Execute "ARP"
Start/run/arp -a -d
Reset IP address of sensor
i.e., aaa.bbb.ccc. = identical to PC IP
address area
.ddd = dierent
Execute "Ping"
Start/run/cmd/ping "IP-Adr.Sensor"
e.g., "192.168.100.100"
Check software and sensor version?
Success
Done
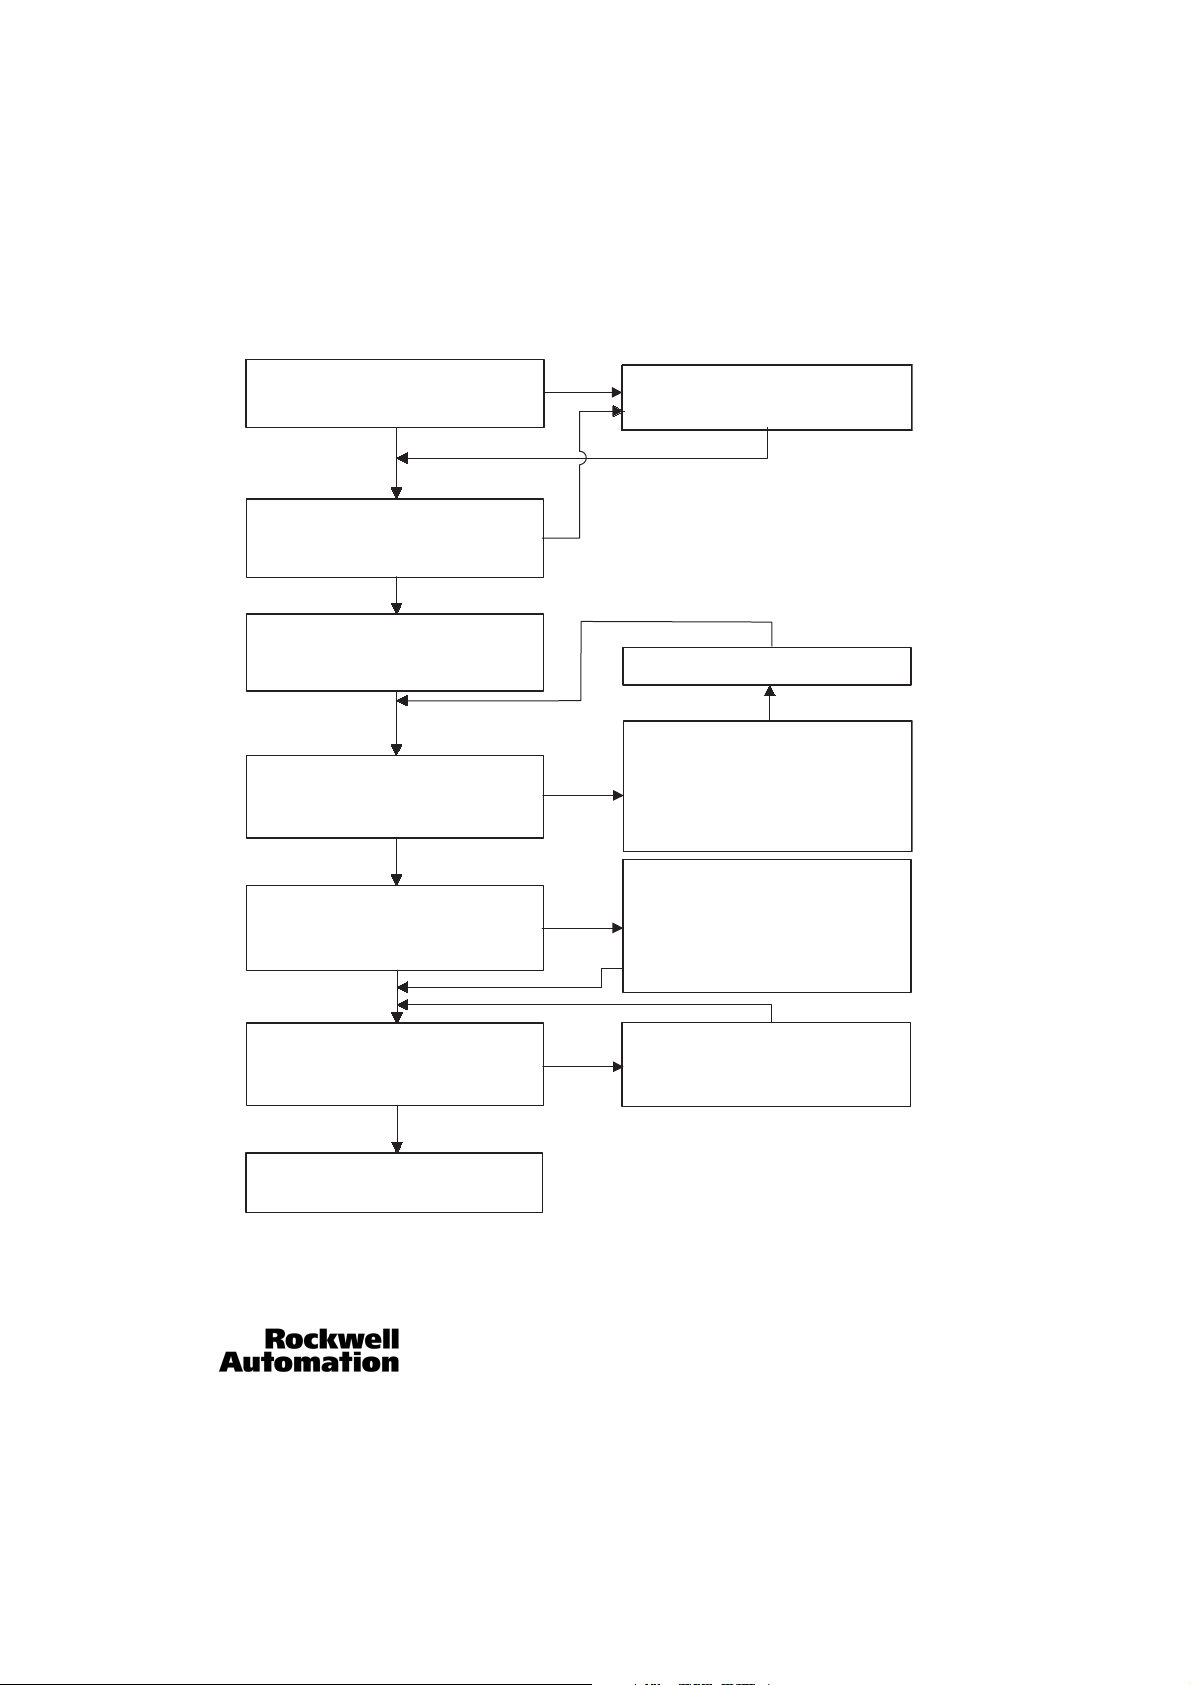
2. Network connection (see “Network Connection (a) for standard models” on page 10)
16 10000000877(02)
Page 17
MultiSight™ User Manual
Connect all cables correctly
1. Connecting cable
2. Ethernet cable (straight)
Obtain IP address for sensor
from system administrator
If necessary execute IPCong.
Determine IP of PC and note
yes
no
no
Failure
Failure
All cables correctly connected?
Check settings, adjust if necessary
Success
Success
no
Done
yes
yes
Electrical connection ok?
MultiSight Pwr LED on
Network: Start/Settings/Network connections
No red X on Local Area Connection
Click Connect/Find in MultiSight PC Software
Sensor is listed with IP
Click Connect/Find in MultiSight PC software
and make connection with "Connect"
IP Address area of sensor and PC identical?
i.e., IP aaa.bbb.ccc = identical
Check software and sensor version?
Execute "ARP"
Start/run/arp -a -d
Conrm (via LAN properties) that rewalls,
wireless networks, and check point
secure remote are disabled
Execute "Ipcong"
Start/run/cmd: input. "ipcong"
Reset IP address of sensor
i.e., aaa.bbb.ccc. = identical to PC IP
address area
.ddd = dierent
Execute "Ping"
Start/run/cmd/ping "IP-Adr.Sensor"
e.g., "192.168.100.100"
Network Settings
10000000877(02) 17
Page 18
MultiSight™ User Manual
IMPORTANT
IMPORTANT
Start-up
Firmware Update
Before using the Update function, consult your Support group
and use only the original update files from the manufacturer. The
execution of the function must not be interrupted as this may
cause failure of the MultiSight. The stored detector configurations
are deleted by the update and must be redefined when the
function is concluded.
This function allows you to update the software of the MultiSight.
To update the software of the MultiSight proceed as follows:
Open the MultiSight software.
“Find” and select the desired sensor.
Click on the button “Update” and select the desired update file.
Switch the MultiSight Sensor off and on again.
Reconfigure the MultiSight Sensor with the PC software.
Start-up
Rockwell Automation supplies defect-free software for
installation in the customer‘s plant and integration in the
customer‘s computing system. Rockwell Automation is not liable
for any interference, failure or damage to the customer‘s system
caused by the installation or integration of this software.
These conditions are accepted by the customer without
reservation by clicking the button at the start of the softwareinstallation process.
The MultiSight functions only with software supplied. Software
updates are available online at www.ab.com/go/multisight.
The PC Software must always match the corresponding sensor
firmware.
Installation of older versions of the software using Windows 98,
2000 and XP™, requires administration rights. Please download
the latest version of the software from the above location.
18 10000000877(02)
Page 19
MultiSight™ User Manual
Start-up
To start the MultiSight, proceed as follows:
1. Switch on the power supply (24V DC) for the MultiSight. If necessary, connect the control input (IN2) with V+ (24V DC) (see
note on page 11).
2. For the first start-up of the MultiSight, install the supplied software on the computer that will be used for configuring the
sensor. When the CD is inserted, the installation program starts automatically or can be started using the setup program /
Software/ MultiSight.exe. Then follow the instructions on the screen.
3. During installation, the file MultiSight Sensor Finder.EXE is created (standard folder: C:\Program Files\Rockwell
Automation\MultiSight\…), a link is added to the start menu (standard location: Start\Programs\Rockwell
Automation\MultiS ight\…), and an icon is added to the desktop (icon “MultiSight Sensor Finder”). This User Manual can also
be read directly from the CD-ROM (supplied).
Un-install Procedure
The software can be un-installed by using the operating system
(Windows 2000 and XP™) under Start/Settings/Control Panel/Add
or Remove Programs. Scroll down and select “MultiSight Sensor,”
then click the “Remove” button.
4. Configure the network settings according to the instructions in the “Network Settings” section on page 11.
5. Start the PC sof tware by double-clicking the “MultiSight Sensor Finder” icon.
After the installation of the PC software, only one related icon (MultiSight Sensor Finder) is visible on the desktop. Double
click on this icon to open the software which then executes one find loop and shows the list of all MultiSight sensors found on
the local ethernet network. The IP address of the computer is shown at the bottom of the window.
10000000877(02) 19
Page 20
MultiSight™ User Manual
Start-up
6. Click the desired sensor to select it in order to Connect, SetIP, or Update. Click the Connect button in order to establish a
network connection with the sensor and start the configuration software.
If no sensor can be found with the Find command, it is possible to connect manually with function “Add IP” by filling in the
known IP-address of the sensor.
7. Click “Yes” to stop Run mode of the MultiSight and connect to the sensor.
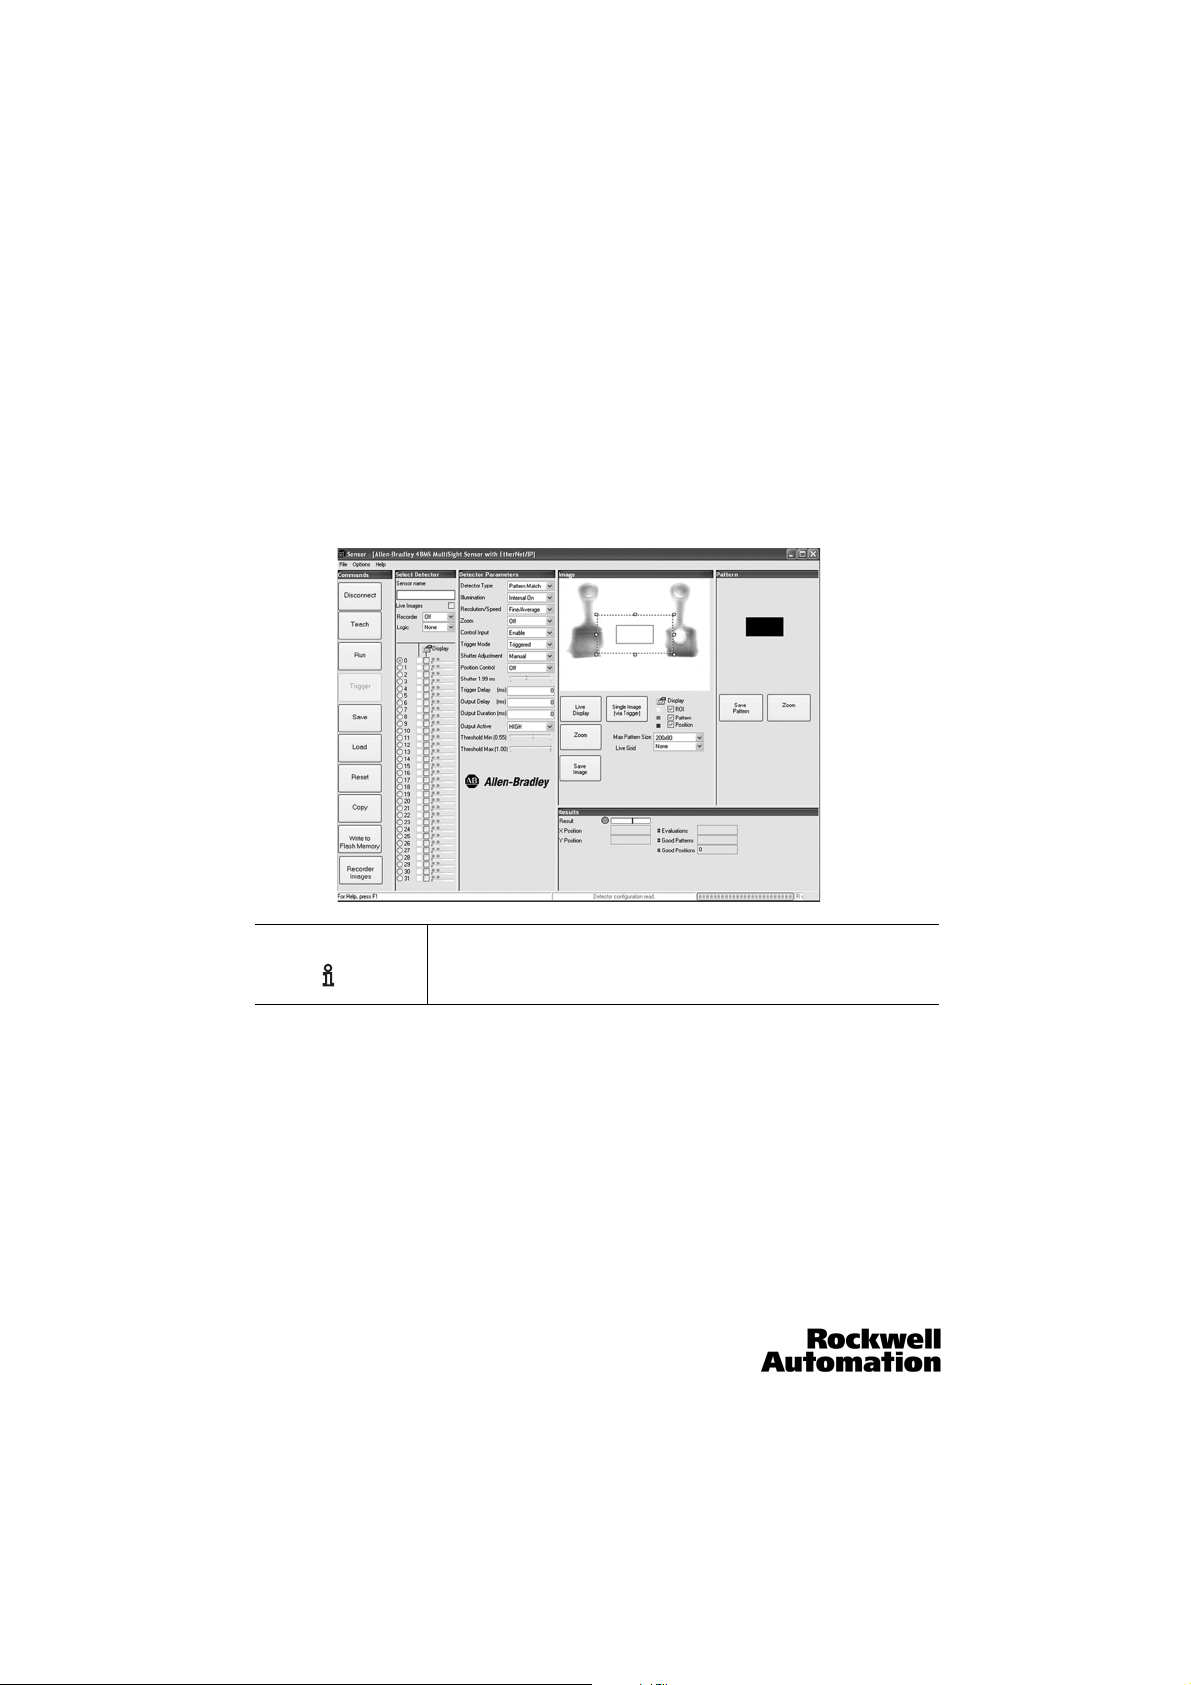
8. The configuration software looks like this:
The configuration software can only be opened when the
computer is connected to a powered and functional MultiSight.
9. If the software was able to make a connection with the MultiSight, all the buttons are activated after a few seconds and the
image currently “seen” by the sensor is displayed in the Image window.
If the buttons are not activated, (i.e., greyed out) the software was not able to connect with the MultiSight.
• Check cable connections and IP address of both the MultiSight and the computer. If necessary, set the IP address of the
PC and/or the sensor as described in the “Network Settings” section on page 11. Use the MultiSight Sensor Finder software to attempt to reconnec t. If unable to connect, read the “Network settings” section on page 11 and make the necessary settings to the PC and/or sensor.
10. Click the “Live Display” button in the Image window. After a moment the image in the window begins to be repeatedly
refreshe d.
20 10000000877(02)
Page 21
MultiSight™ User Manual
IMPORTANT
Start-up
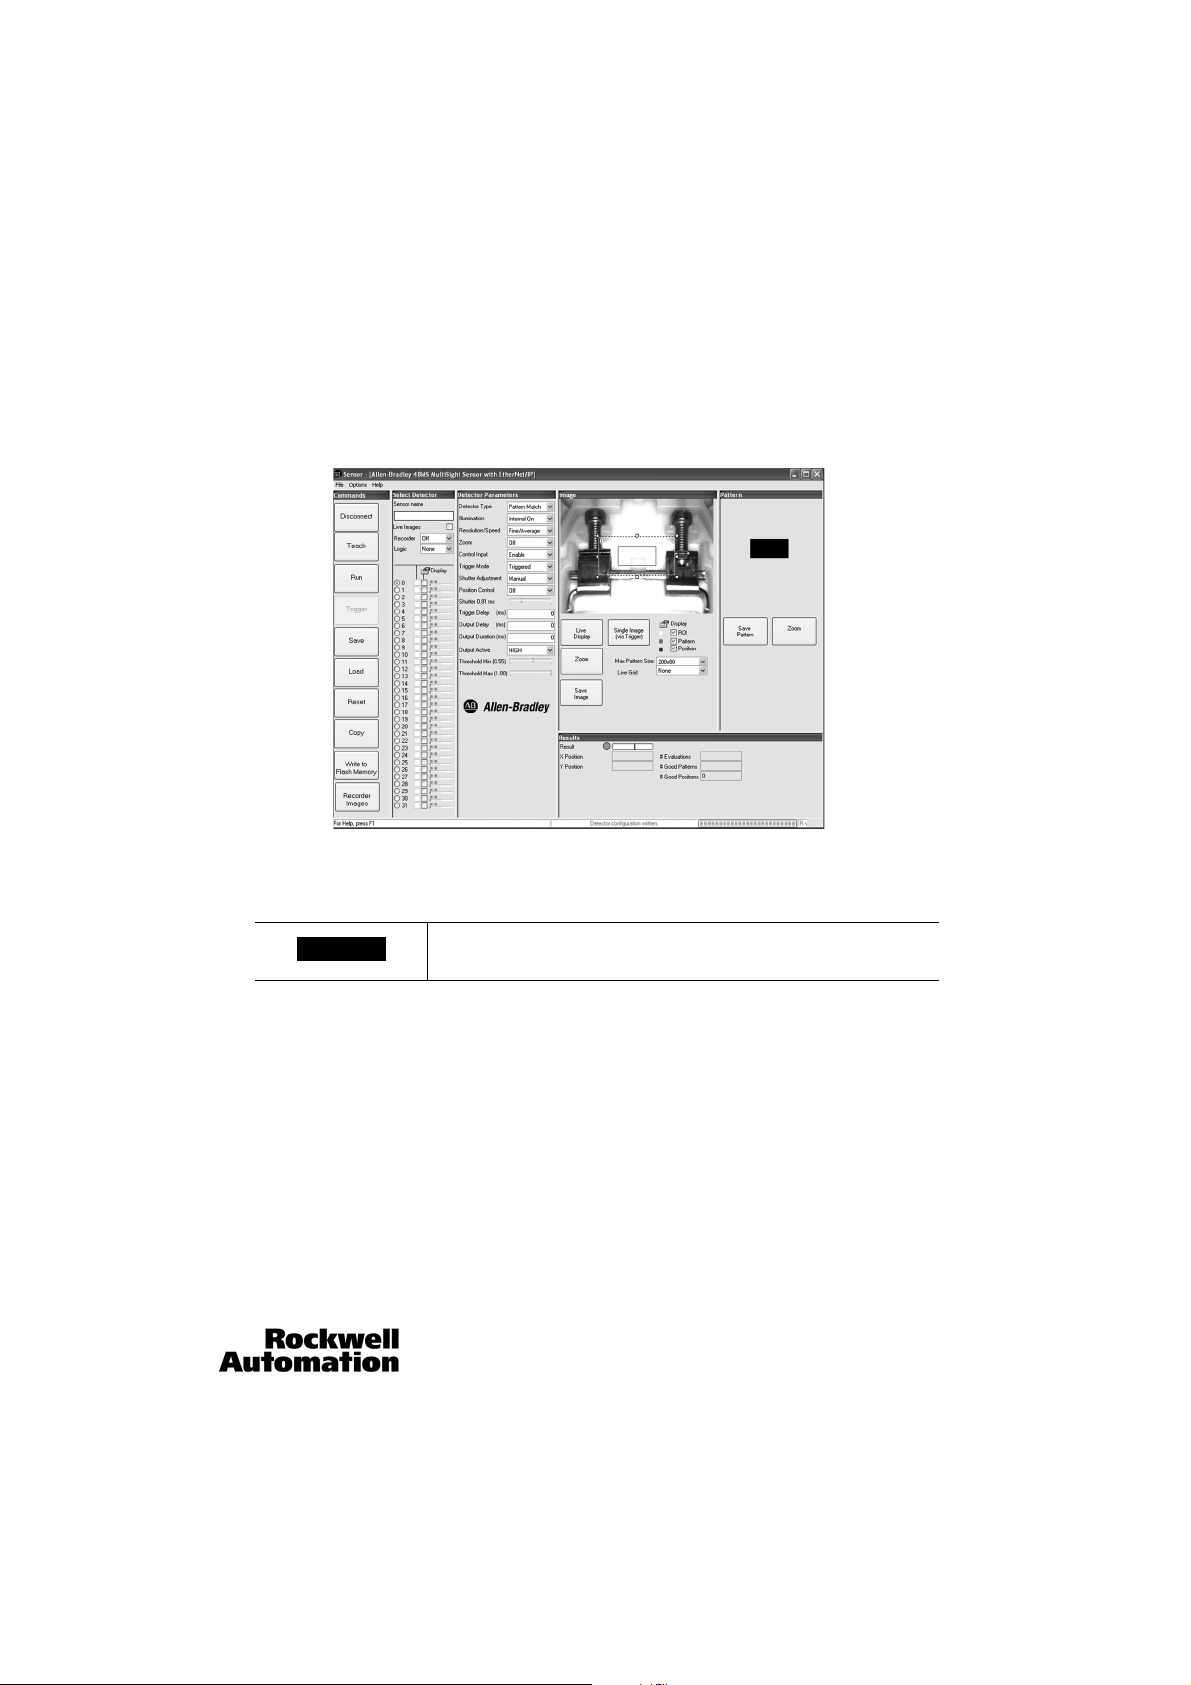
11. If no live image appears, check to confirm the following:
a. No obstruction in front of the lens.
b. Sufficient lighting. Detector Parameter “Illumination” should be “Internal ON” or sufficient external lighting provided.
c. Correct shutter settings (under Detector Parameters—see screen shot). Increase shutter time to brighten the image.
d. Correct focus—focus screw on back of MultiSight.
5. Adjusting image focus: To adjust image definition, turn the focusing screw on the back of the housing (see the illustration in
“Electrical Installation” on page 8) in clockwise direction (increase the focusing distance) or counterclockwise direction
(decrease the focusing distance). Check the position of the MultiSight and adjust if necessary.
Make fine adjustments to shutter speed and focus using “GOOD”
parts to enable optimal configuration.
The basic setup of the MultiSight is complete. To differentiate between “GOOD” and “BAD” parts, use the software to configure the
MultiSight. The next sec tion describes the configuration software.
10000000877(02) 21
Page 22
MultiSight™ User Manual
IMPORTANT
Start-up
Program Description
Menu
The menu for the PC program has main and subsections. These are selec ted by clicking the desired menu item or by pressing the ALT
key and the first letter of the menu item at the same time.
File/Exit
Exit program.
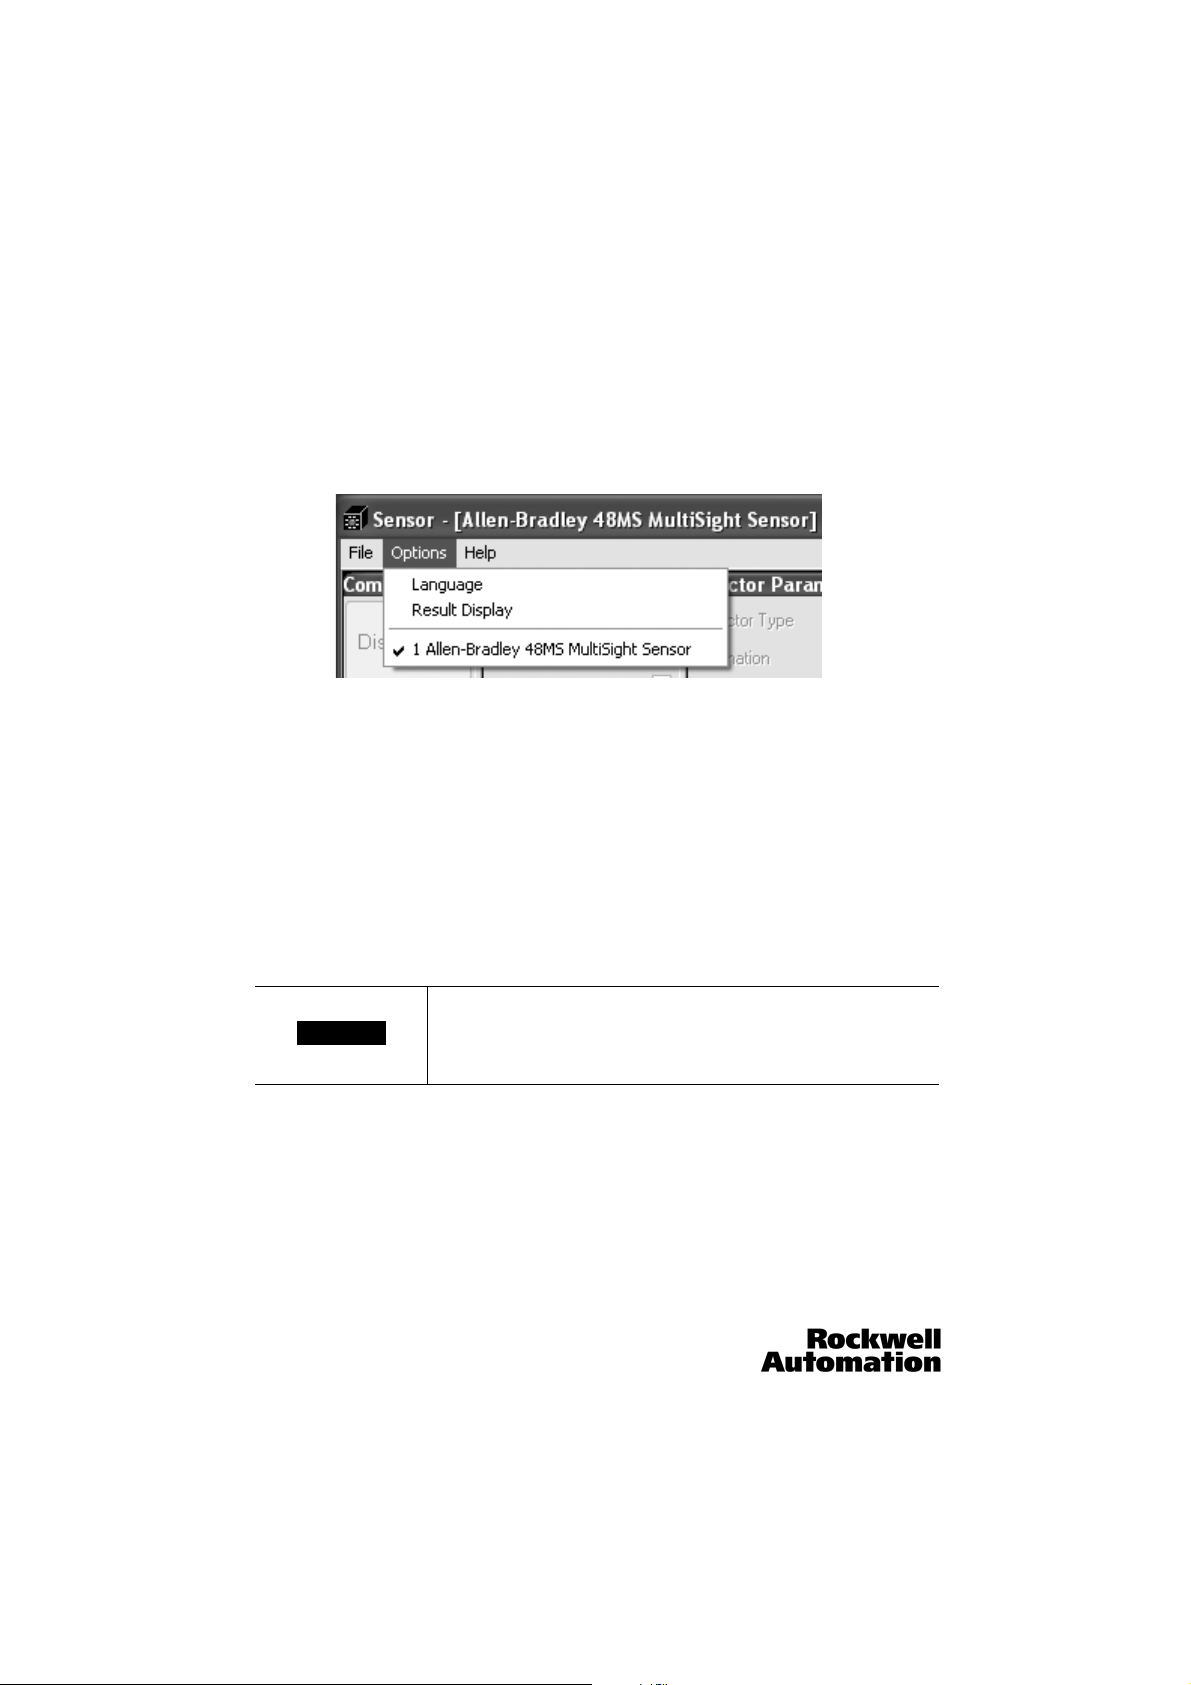
Options/Language
Select language. The new language does not take effect until the software is restarted. (Currently English is the only available
language.)
Options/Result Display
(Keyboard Locked)
The “Result” window is shown enlarged in a pop-up window. This mode locks the keyboard and limits the mouse pointer to the popup window.
This mode can only be de-activated by placing the mouse pointer
over the Result indicator (the grey, green, or red circle next to the
top bar graph) and pressing the key combination ALT + B at the
same time.
Help/Help
Display the help file (a pdf of the User Manual).
Help/About
Displays software version number.
22 10000000877(02)
Page 23
MultiSight™ User Manual
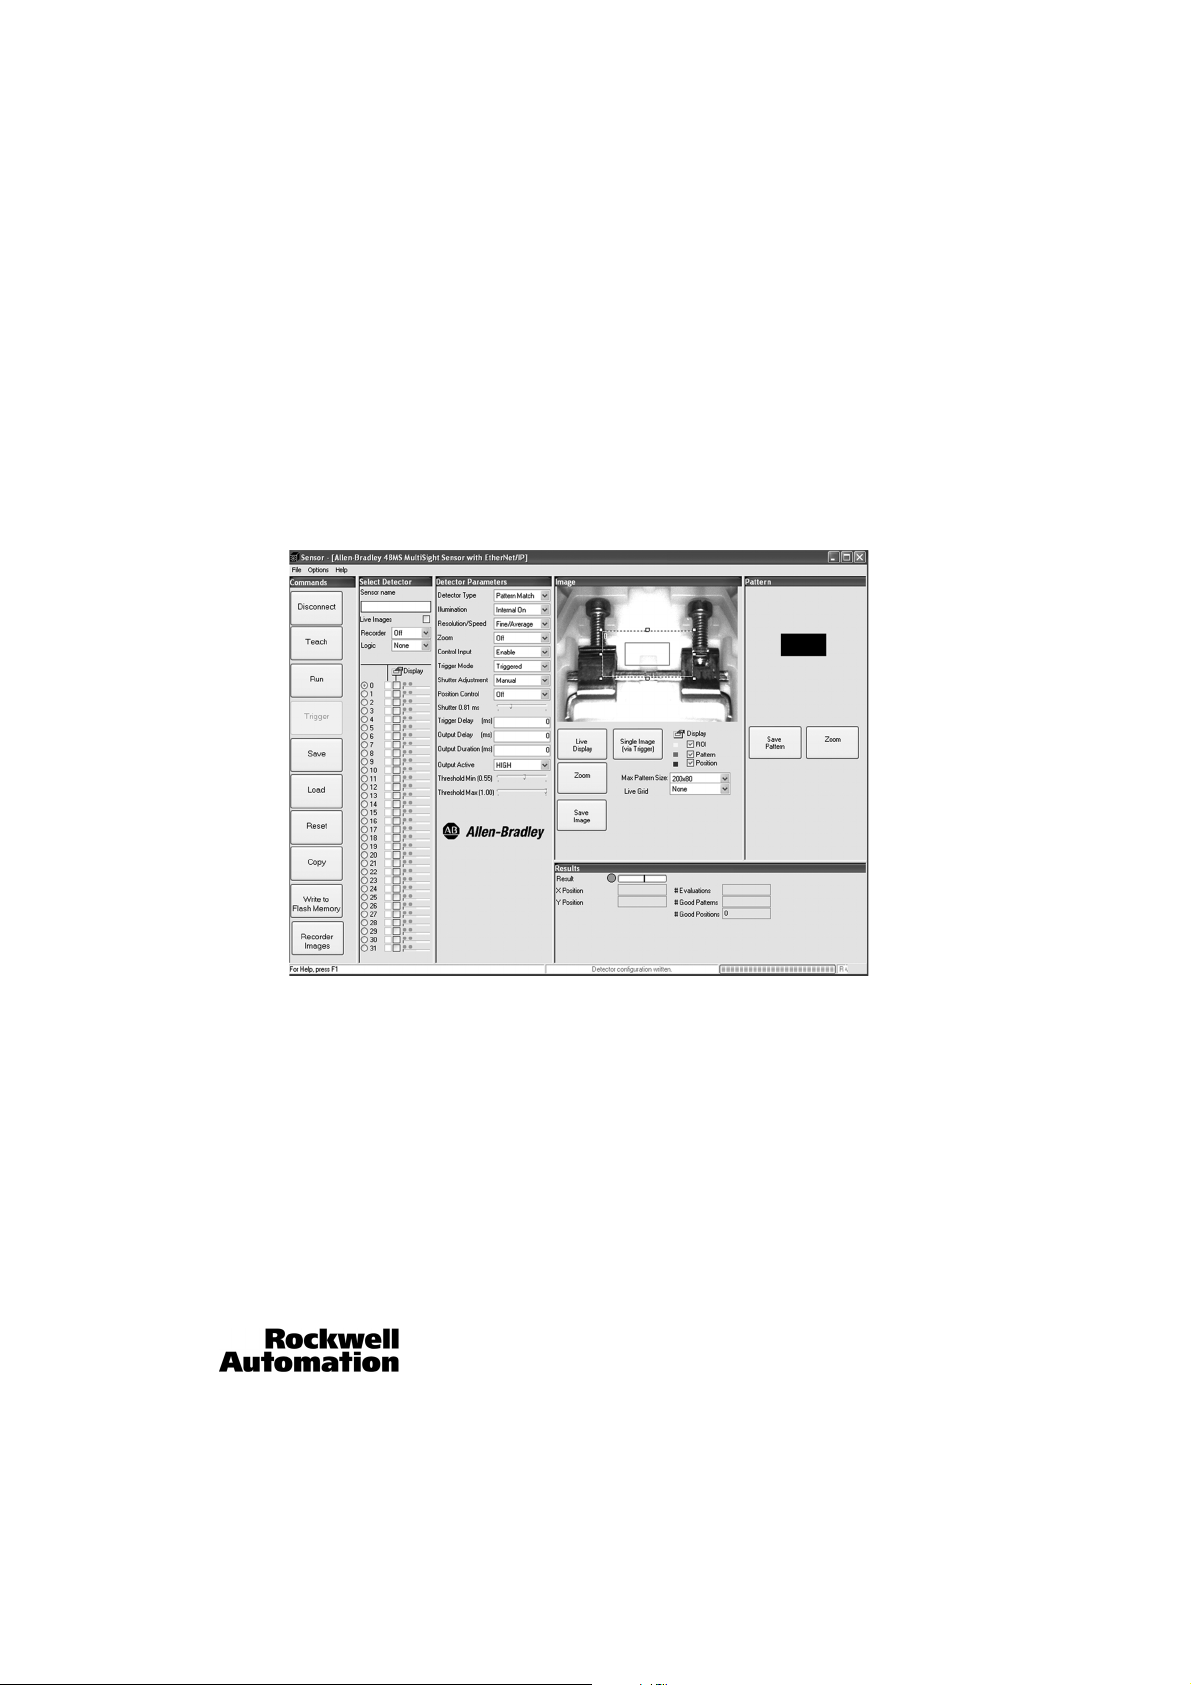
Program Interface
The program interface is entirely displayed on one screen. It is arranged into six windows as follows:
Commands
Select Detector
Detector Parameters
Image
Patte rn
Results
Start-up
10000000877(02) 23
Page 24

MultiSight™ User Manual
E
Start-up
Commands
The buttons shown along the left hand side of the screen are for the general operation of the MultiSight, administration of detector
configuration and displaying other information on the program.
If a button is not active (i.e., greyed out) then that command is not
available in the current mode.
Command Description
Connect/Disconnect Connect to or disconnect from MultiSight (see Setup).
Conne ct:
Last IP—connects to the most recent IP address used
Default IP—connects to the default IP address 192.168.100.1 00
New IP—type in IP address to connect to
Find—Opens sensor finder (use when IP address of MultiSight is unknown)
Listed IP addresses—recently used IP addresses. Connect to an address by clicking on it.
Disconnect:
Existing connection to MultiSight is disconnected. MultiSight goes into run mode.
Tea c h
Teach the pattern ( or contour) currently in the red pattern box in the image window.
Also used to determine th e shutter speed (when Shutter Adjustment param eter is set to
Automatic).
The Teach command does not affect other configuration
parameters. Other configuration parameters are changed on
the MultiSight as soon as they are changed in the software.
Teach from MultiSight image—the MultiSight will take a new picture and learn the pattern
or contour in the red pattern frame. Note: this image could be different than what is
currently displayed, if the part has moved or a setting has been changed.
Teach from PC image—[Recommended method] the MultiSight will learn the pattern or
contour in the red pattern frame of the image currently displayed in the image section of the
software.
24 10000000877(02)
Page 25

MultiSight™ User Manual
Start-up
Command Description
Run/Stop Run Evaluation mode (MultiSight is automatically in Run mode when not connected to
Trigger Manual triggering of MultiSight image evaluation (active only in “Run” mode and if Trigger
Save Save the detector configuration for one detector or all detectors.
Load Load previously saved detector configuration(s).
Reset The configuration parameters for a single detector or for all detectors are reset to the default
Copy Copy the configuration of one or many parameters from one Source Detector Configuration
Write to Flash Memory Writes all detector parameter settings to nonvolatile flash memory so that they are
the software)
Stop Configuration mode. Configuration parameters can only be changed in this mode.
parameter is set to “tri ggered” (see “Detector Parameters” on page 32) or when triggered
image button in image section is pushed).
settings.
to other detector s.
Logically linked or grouped detectors must have identical settings for certain parameters
(see page 28). Recommended procedure:
1. Set the parameters of one detector to the desired configuration
2. Press the Copy button
3. In the Copy command pop-up window, select the configured detector from the
Source Detector Configuration drop-down list.
4. Selec t the detectors along the left side of the window that need to match the Source
Detector Configuration (e.g., detectors that are logically linked or grouped with the
source detector).
5. Selec t Default Par. at the bottom right of the window. This automatically selects all
the parameters that n eed to match for logically linked or grouped detec tors.
6. Press the OK button to copy the Source Detector Configuration to the other selected
detectors.
maintained if the sensor loses power.
10000000877(02) 25
Page 26

MultiSight™ User Manual
E
E
E
Start-up
Command Description
Recorder Images Transfers the images saved on the MultiSight to the computer.
The MultiSight can save up to 30 images on its local memory. To save images, the Recorder
parameter in the Sele ct Detector window must be turned on (see page 27). Based on the
setting of that parameter, the MultiSight can save either the last 30 images or the last 30
images of inspections that resulted in an output of FAIL.
When the images are transferred to the computer, they are deleted from the MultiSight
memory. In order to keep the image, it must be saved to the computer using the Save button
on the Saved Pics pop-up window that opens when the images are transferred.
It is possible to save either the current image or all the images by using the Save or Save All
buttons. The images are stored as bitmap files (.bmp).
Images are saved in dynamic memory and are, therefore, lost if the sensor loses power or is
turned off.
Select Detector
The MultiSight can be configured with up to ten ( 32) vi rtual detectors (i.e. inspection of ten ( 32) different characteristics).
In order to configure one of the ten ( 32) detectors, select the appropriate numbered radio button in the Select Detector
window. The current configuration of that detector appears and can be edited in the Detector Parameters section. (If that detector
on the MultiSight has not been previously configured, the default values appear.) Parameters that are changed in the software are
immediately changed on the MultiSight in dynamic memory. In order to permanently save changes in Flash memory on the
MultiSight, click the Write to Flash button in commands window..
When the sensor is in run mode, each detector is independently evaluated. The results of these evaluations are indicated to the right
of the radio buttons for each detector. The small grey dots change color to represent the results of the individual detector evaluation,
with green indicating PASS and red indicating FAIL. The first dot is for inspection (pass/fail) OUT1 (LED Q1) and the second dot is for
position OUT2 (LED Q2). While in run mode, a green (or blue) line on the bar graph indicates the degree of similarity to the pattern or
contour the sensor has been taught for that detector. When using contrast or brightness detector types, the bar graph indicates the
level of contrast or brightness. The black line on the bar graph represents the threshold (configured in the “Detector Parameters” on
page 34).
Detectors can be logically linked together. For example, the sensor can be set up to inspect multiple components on a product. Each
component is inspected by a single detector. The evaluation result of each detector is then logically combined with the evaluation
results of all the other detectors, resulting in a single output (OUT1/LED Q1). If the AND (All) logic is selected, all selected detectors
must pass evaluation for the pass/fail output OUT1 to give a PASS output. (If any one detector fails its evaluation output OUT1 gives
a FAIL output.) I f the OR (Search) logic is select ed, OUT1 gives a PASS output if any one of the detectors passes its evaluation. See the
parameter descriptions below for an explanation of how to logically link detectors.
Detectors can also be grouped. The grouping of detectors makes it possible to check several characteristics on different parts without
reconnecting the software during part changes. For example, during the first production shift of the day Part A is inspected for
several characteristics, then during the second production shift Part B is inspected for different characteristics. The sensor can be
changed via the Control Input on the PWR and I/O connector from Part A to Part B without having to reconnect to the software via
the Ethernet port. See “Use of Control Input IN2” section on page 58.
26 10000000877(02)
Page 27

MultiSight™ User Manual
IMPORTANT
Parameter Description Screen Shot
Sensor name Assign a name for the connected MultiSight. This name appears in
Live Images When this checkbox is selected, the live image is displayed in the
Recorder Off No images are recorded on the sensor
the MultiSight Sensor Finder software and allows for easier
identification of the correct sensor when multiple MultiSight
sensors are on a single network.
Image window of the software during Run mode.
Selecting this mode increases evaluation
cycle time (whether the sensor is connected
to the software or not). Deselect this option
for the faster evaluation time.
Failed images The MultiSight records up to the last 30 images
of evaluations that FAIL
All images The MultiSight records up to the last 30 images
(both PASS and FAIL)
See Commands/Recorder Images on page 24 for instructions on
transferring the images from the MultiSight to the computer
Start-up
10000000877(02) 27
Page 28

MultiSight™ User Manual
IMPORTANT
Start-up
Parameter Description Screen Shot
Logic The Logic field allows the user to define how the detectors are
linked together to determine the single OUT1 (pass/fail) output. A
detector can be standalone (inspection of a single characteristic),
logically linked (multiple inspections on a single part), or grouped
(multiple inspections on different parts). ( The concept is more
thoroughly described in the above general description of the Select
Detector window.) The state of the inspection output OUT1
(passes/fails)/LED Q1 is determined by how the individual detec tor
evaluation results are linked in the Logic field.
The evaluation of logically linked detectors is
based on a single image. This means that
certain detector parameters must be the
same for all detectors that are logically
linked together (see the chart below). The
recommended procedure is to set the first
detector in the group to the desired settings,
then use the Copy command in the
Commands window (on the left of the
software screen, see page 24) to copy the
configuration of that detector to the other
detectors that will be logically linked.
The software will give the error message
“group parameter check failed” when the
sensor is put into run mode if detectors that
are linked together have nonmatching
parameters that should match.
28 10000000877(02)
Page 29

MultiSight™ User Manual
E
Parameter Description Screen Shot
Logic (con tinued)
Select radio buttons 0-9 ( 0-31) in order to configure the
parameters for that detec tor. Detectors that are logical ly linked
should follow these guidelines for the Detector Parameter
configurations:
Detector Type any
Illumination identical
Resolution/Speed any
Zoom identical
Control Input identical
Trigger Mode identical
Shutter Adjustment manual
Posit ion Contro l any
Shutter identical
Trigger Delay identical
Output Delay identical
Output Duration identical
Output Active identical
Threshold
Min any
Threshold Max any
The Logic field has the following options:
None—No logical link or grouping, i.e. only the selected detector
determines the output.
AND (All) and OR (Search)—The inspection output OUT1 (pass/
fail) is based on the evaluation of all detectors selected via the lefthand check box. (In the screen shot, detectors 1-6 are logically
linked.)
AND (All)—OUT1 is active if ALL selected detectors pass
evaluation
OR (Search)—OUT1 is active if ANY of the selected detectors
passes evaluation
AND and OR (group)—The group functionality allows the
MultiSight to make several different inspections on multiple parts
without reconnecting to the software to change between the
parts. (This functionality is described more thoroughly above in the
general description of the Select Detector window.)
Start-up
10000000877(02) 29
Page 30

MultiSight™ User Manual
IMPORTANT
Start-up
Parameter Description Screen Shot
Logic (continued) In order to use the grouping functionality,
It is not possible to logically link groups with one another.
The functionality of the left-hand check box is different for
grouping than for the logical linking previously described. The
evaluation of a group begins with the detector last selected via the
Control Input (IN2). (When the sensor is connected to the
computer for configuration, the radio button currently selected will
determine which detector the sensor begins the group evaluation
with.) The sensor evaluates each detector that has a check in the
left hand box. The next detector that does NOT have a check is the
last detector in the group. If detectors 1-3 have a check and 4 does
not, Group A is detectors 1-4. See the screen shot to the right.
The detectors in different groups do not have to have matching
parameters; however, those within the same group must follow
the matching parameter guidelines listed above.
Detector Parameter Control Input must be
set to “Activate 031” for ALL active
detectors.
The same Logic is applied to each Group of
detectors. Example: if the detectors in Group
A are logically linked with AND, the detectors
in Group B will be logically linked with AND.
It is not possible to link Group A with AND
and Group B with OR.
}
Group AGroup B
}
30 10000000877(02)
Page 31

MultiSight™ User Manual
E
Parameter Description Screen Shot
Radio buttons
0…9
0…31)
(
Display icon Checking this box indicates whether the yellow Region of Interest
Designates the active detector—by clicking one of the ten radio
buttons, the corresponding detector is selected and its parameters
can be configured. The parameters are displayed in the Detector
Parameters window in the middle of the screen. Only one detector
can be configured at a time. After restart, the most recently
selected detector is active. The selected detector evaluates a
Region of Interest (ROI) which is configured in the Image window.
If a certain de tector is to be tested, select that detec tor and click
the Run command button to the left.
(ROI) and red pattern frames should be shown on the Image during
Run mode even if the detector is not selected with the radio
button. The Region of Interest (ROI) and pattern frames of the
detector selected with the radio button are automatically
displayed during Run mode; other detectors with a check in the
display icon box are shown but greyed out. This function does not
affect the performance; it is just included to ease the setup process.
Logical link—The time required for execution increases with the
number of logically linked active detectors.
The evaluation with logical linking affects both the primary
inspection pass/fail output OUT1 and the secondary position
result OUT2.
Start-up
10000000877(02) 31
Page 32

MultiSight™ User Manual
E
E
Start-up
Detector Parameters
To configure a detector, select the appropriate radio button in the Select Detector window and then set the parameters in the
Detector Parameters and Image windows. Each detector is configured independently. (Detector parameter configurations can be
copied into other detector parameters using the Copy command, see page 24.)
Parameter Description
Detector Type
Illumination Internal On Internal lighting is on for image exposure. Trigger
There are 3 ( 4) different methods of evaluation:
Pattern Matching (page 35)
Contrast (page 36)
Brightness (page 35)
Contour Matching (page 37)
These detector types are described in detail starting on page 35.
Each of the 10 detectors can have a different detector type (e.g.
Detector 1 = Pattern Match, Detec tor 2 = Contrast, etc.). This is
true even if the detectors are logically linked or grouped together.
for external lighting is generated.
Internal Off Inter nal lig hting i s off for image exposure. Trigger
for external lighting is generated.
External Constant Internal lighting is off for image exposure.
External lighting trigger is on constantly while the sensor is in Run
mode (or the Live Display in the Image window is selected during
configuration), i.e., the external light is always on; it does not
strobe with each image exposure. Use this setting to help reduce
annoyance from constantly strobing light.
Resolution/Speed Changes the resolution and therefore also the speed
Zoom Zoom function: On/Off (digital zoom 2:1)
Normal/Faster
Fine/Average
Rough/Fastest
Use this setting to improve cycle time
32 10000000877(02)
Page 33

Paramete r Descri ption
E
Control Input The settings for the Control Input are described in detail on page 58)
Enable
Teach temporary
Activate 0 or 1
Activate 0 to 31
Tea ch per man en t
If this parameter is set to Enable (the default setting), the I/O control input IN2 must be
connected to V+ (24V DC). (This is in addition to a trigger input on IN1 (external trigger)). If
the control input IN2 is not connected to V+, the MultiSight is in standby mode and will not
execute evaluations unless the trigger mode is continuous (see page 58 for more details.)
MultiSight™ User Manual
Start-up
Trigger Mode Triggered External trigger signal (IN1) or the software command button “Trigger” initiates image exposure
Shutter Adjustment Manual Manual setting of the shutter speed (recommended).
Position Control Activate evaluation of position deviation X and/or Y (pass/fail output only; positional information not available as a
and evaluation.
Continuous A new evaluation is started as soon as the previous evaluation completes.
Automatic Teach The shutter value is set automatically by the MultiSight when the Teach command is
executed.
discrete output. position data is available via EtherNet/IP.)
Off Position evaluation de-activated
Only X Evaluation direction X
Only Y Evaluation direction Y
X/Y rectangle Evaluation direction X and Y with rectangular deviation area (blue frame)
X/Y ellipse Evaluation direction X and Y with elliptical deviation area (blue frame)
Position Control is only used with Detector Types Pattern Match and Contour Match. When the pattern or contour is
successfully detected (i.e., OUT1 is active), the Position Control analyzes whether the pattern is within the blue
position frame. The Position Output OUT2 is active when the pattern is detected and the center of the pattern (the
green cross in the center of the green “detected pattern” frame) is inside the blue position frame.
The area for the position evaluation can be marked by double clicking the blue frame and adjusting the position
and shape using the mouse. Approach the line with the mouse pointer until it changes to a horizontal or vertical
double arrow. Keeping the left-hand mouse button pressed, the line can now be moved to the desired position.
10000000877(02) 33
Page 34

MultiSight™ User Manual
Start-up
Paramete r Descri ption
Shutter x.xx ms Exposure time: slide for se tting shutter value manually. Increase to brighten image; dec rease to darken image. The
Trigger Delay (ms) Time between trigger and exposure/evaluation in 0-3000 ms (see “Configurable Delays” on page 40).
Output Delay (ms) Time between trigger and availability of result on OUT1 and OUT2 in 0-3000 ms.
Output Duration (ms) Time in 0-3000 ms that the output state is maintained. Please review the notes in the Configurable Delays section
Output Active HIGH or LOW = inverting of OUT1 and OUT2.
Threshold Min. and Max. Threshold values define the minimum and/or maximum evaluation score for the inspection to pass. Can be
Threshold Min. and Max.
(cont.)
shutter speed can also be adjusted by clicking on the number and typing a new value into the pop-up window.
on page 40).
HIGH Passing evaluation results in the PNP output turning ON (sourcing current). Failing evaluation results in
the output turning OFF (normally open).
LOW Passing evaluation results in the PNP output turning OFF. Failing evaluation results in the output turning
ON (normally closed).
The result indicators in the software do not change with this parameter (i.e., green dot always indicates passing
evaluation).
adjusted by the sliders or by clicking on the threshold number and typing a new value into the pop-up window.
Values = 0.00…1.00 in 0.05 increments (35% conformity threshold would be entered as ‘0.35’). The threshold
values are depicted by small vertical black lines on the detector results bar graph when the sensor is in run mode.
Both thresholds can be used at the same time and in this case a section in the middle of the results bar graph can
be defined as the “Good zone.” (PASS output when Threshold Min. is exceeded AND Threshold Max. is not
exceeded.)
Setting the Threshold Max below the Threshold Min is not possible.
In practice, “Good” parts are not 100% identical with the pattern taught. Slight differences
in position or fluctuations in light level mean that they do not conform completely to the
reference pattern. “Bad” parts should differ from “Good” parts in as many characteristics or
as large a part of the pattern area as possible. If a pattern has been taught using a “Good”
part, it must first be established what degree of conformity with the pattern is achieved
with various “Bad” parts (reference the length of bar graph for results). The degrees of
conformity with the pattern achieved with various “Good” and “Bad” parts should be as far
apart as possible. The threshold value should be set approximately at the center of this
difference between the “Good” and “Bad” parts.
34 10000000877(02)
Page 35

MultiSight™ User Manual
E
Start-up
Detector Types—Detailed Description
The following detector types are available: Pattern Matching, Brightness, and Contrast.
The EtherNet/IP model also has a Contour Matching detector type.
Pattern Matching
With this method, the detector looks for a pattern in a defined Region of Interest (ROI). By defining this ROI as larger than the
pattern there is some tolerance in positioning of the inspected part. The ROI is the yellow frame on the image and the pattern is
defined by the red frame. In run mode, the sensor evaluates the ROI on the current image to see if the pattern is present. The
evaluated pattern must match the taught pattern to a degree of conformity greater than the minimum threshold value (and less
than the maximum threshold value).
Example: The sensor is taught the following pattern:
In the next row of three patterns, each pattern is recognized with 100% conformity
because the evaluated pattern is exactly the same as the taught pattern even
though it is in a different position in the Region of Interest (ROI). It differs only in
direction X and Y and is not rotated.
In the next row of three patterns, each pattern is recognized but with less than
100% conformity. Pass or Fail result is dependant on the threshold settings (degree
of conformity).
Pattern detection is also tolerant of up to ± 5° of rotation. The next two images
would be recognized. Due to the slightly rotated orientation of the pattern, the
conformity would be less than 100% even though there is 100% pixel conformity.
(Patterns with more than 5° of rotation are not recognized.)
Brightness
The MultiSight uses an 8 bit grey-scale CCD chip to capture images. The chip assigns each pixel a value of 0 (black) to 255 (white).
The Brightness Detector Type evaluates all pixels that are darker than grey-scale value 128 as black. The detector examines the
Region of Interest (ROI) and determines the “Brightness” level (White = 100%, Black = 0%). If this level is between the configured
threshold minimum and maximum, the detector passes the evaluation.
The shutter speed has a significant effect on the number of pixels which are evaluated as black and thus which images pass or fail
this inspection.
10000000877(02) 35
Page 36

MultiSight™ User Manual
Region of Interest:
Shutter setting:
=
=
=
=
=
= 100%
=0%
5%
=
Detector Type
ROI Image
Brightness
bar graph
Contrast
bar graph
100% <10%
50% >90%
0% <10%
Start-up
For example, here is the same image with three different shutter speeds:
The setting of the threshold determines the maximum number of pixels detected as being dark which is required to pass the
evaluation. The position of each dark pixel within the ROI does not affect the evaluation.
Example:
These two images produce exactly the same result in the brightness evaluation because
in each case 9 of the 25 pixels are detected as dark.
Contrast
The Contrast Detector Type evaluates the difference between the brightness levels of the pixels in the ROI. An image that is all one
shade of one color has low contrast. An image that is half white and half black has very high contrast.
Example:
Summary of Brightness and Contrast Detector Types
For Contrast and Brightness Detector Types, the teach function is only used for Automatic Shutter Adjustment. It is recommended
that the Shutter Adjustment parameter is set to Ma nual, in which case the Teach command has no effect.
36 10000000877(02)
Page 37

MultiSight™ User Manual
Start-up
Contour Matching
The Contour Matching detector type is essentially a simplified pattern matching algorithm. Instead of the fully detailed pattern with
relative grey scale levels and complex area evaluation used for comparison in the Pattern Matching detector type, the Contour
Matching detector type compares simple line contours and shapes. In contour mode, the teach process identifies the borders
between dark and bright areas on the image. These borders between dark and light are highlighted with a blue line and
subsequently represent what the MultiSight looks for in run mode. When the MultiS ight performs an inspection in run mode, it
identifies these line shapes and determines if they match the taught line contour. The threshold settings affect how closely the
found line shapes match the taught line shape.
As an example, a solid black circle on a white background would cause a single circular contour line. A black ring on a white
background would cause a large circular contour line (at the outer diameter) and within it a smaller circular contour line (the inner
diameter). There is a contour line tracing border between black and white.
The primary advantage of Contour Matching (in comparison to Pattern Matching) is that this detector type is fully tolerant of shape
rotation, i.e. the object may appear in any angular position and still be detected. Another advantage is that the taught contour can
be edited by the user to remove parts of the contour that are not to be used for the inspection. The primary disadvantage of Contour
Matching (in comparison to Pattern Matching) is that it cannot detect as complex a pattern. Contour Matching is also typically
slower.
To edit the taught line contour, place the cursor over the pattern in the Pattern section of the software on the right hand side of the
screen. The cursor becomes an eraser. The size of the eraser is determined by the Eraser Size parameter under the pattern. It is
recommended to use the Zoom button (in the Pattern section) to work with a larger image. This eraser can be used to eliminate
portions of the taught line contour (depicted as a blue line) that should not be included in the inspection. For example, another
component near the part to be inspected, or even a shadow, may cause a contour shape in the taught image. The blue contour lines
created by these conditions can be eliminated by placing the cursor-eraser over those sections and clicking the mouse button. If a
desired blue contour line is accidentally deleted, the entire contour must be re-taught.
For a repeatable inspection results using the Contour Matching
detector type, a high-contrast image is essential.
There are several additional parameters that appear when the Contour Matching detector type is used. These parameters affect
either the teach process or the inspection process. They are described in more detail below. For most applications these can remain
in their default states.
10000000877(02) 37
Page 38

MultiSight™ User Manual
Start-up
Parameter Description Screen Shot
Edge con trast
1
Edge gradient
Min. edge length
Search mode
Edge width
2
2
1
Difference in grey-scale value.
Minimum difference in grey scale value to define a line
contour, i.e. the min. difference between bright and
dark areas to get a blue contour line.
Defined in terms of 8 bit grey scale value
Value range = 7…128, default = 50.
Edge steepness.
Maximum number of pixels for the edge width, within
which the above edge contrast difference should take
place.
Value range = 6…19, default = 12.
1
Minimum length of a contour element.
For rem oving or allowing small contour lines.
Value range = 4…24, default = 8
Complete search = Searches the entire ROI for the
contour with the best match. If multiple matches are
found, the best match is identified.
st
good = Stops search as soon as first contour
Until 1
match is found. Results in faster application speed but
risks matching similar line contours in the ROI.
This parameter gives the user the capability to improve
the speed of the application at the expense of accuracy.
Posit ion tole rance.
Allows for more or less tolerance in matching a contour
to the taught contour. Defined in number of pixels.
Used for deviations in shape.
Value options = 3, 5, 7, 9, default = 5
38 10000000877(02)
Page 39

MultiSight™ User Manual
Parameter Description Screen Shot
2
Min. scaling
Max. scaling
Starting angle
Tot al ang le
Threshold Contour
2
2
2
Minimum factor for scaling the size of the contour.
Values = 0.5 … 1.0, default = 1.0
Maximum factor for scaling the size of the contour.
Values = 1.0 … 1.5, default = 1.0
Angle at which the search starts. Search in clockwise
direction.
Valu es = - 180° … 179°, default = -10°
0° = 12:00am on a clock
Maximum search angle. Used to reduce the angular
positions that are inspected, so that only a contour
with minimal displacement from the original angular
position is matched. E.G. – The application is to
confirm that a part is in the correct orientation, so
reduce the Total angle. If the part is not in the correct
orientation, the contour will not be found.
2
Threshold Contour defines the minimum evaluation
score for the inspection to pass. Threshold is adjusted
by the slider.
Values = 0.00 … 1.00 in increments of 0.05
The threshold value is depicted by a small vertic al black
line on the detector results bar graph when the sensor
is in run mode.
Start-up
Note: The default settings for all Contour Matching parameters can be used for most
applications
1
Parameter for teaching
2
Parameter for evaluation
The angle information displayed in the Results area and available via the EtherNet/IP connection is only a rough estimation. To help
improve the precision of angle data, the Contour Matching parameters should use the following settings:
Edge contrast: set value as high as possible
Edge gradient: set value as low as possible
Min. edge length: set value as high as possible
Search mode: Complete Search
Edge width: set value as low as possible
10000000877(02) 39
Page 40

MultiSight™ User Manual
IN1
(Trigger)
Evaluation Time of Sensor
Ready On
"
Ouput Valid
OUT4
(Ready/Busy)
OUT 1+2
(Pass/Fail)
IN1
(Trigger)
Evaluation
Time
Trigger
Delay
Ready On
"
Ouput Valid
OUT4
(Ready/Busy)
OUT 1+2
(Pass/Fail)
Start-up
Configurable Delays
There are three timing mechanisms that can be used: Trigger Delay, Output Delay, and Output Duration. Each has a range of
0…3000 ms. The following timing diagrams show the behavior of the outputs for each timing mechanism condition.
Case 1: No delay timers used (default state)
Case 2) Trigger Delay = Time (in ms) between the Trigger Input turning on (rising edge) and the image exposure
40 10000000877(02)
Page 41

MultiSight™ User Manual
IN1
(Trigger)
Output Delay
(Includes Evaluation Time)
Ready On
"
Ouput Valid
OUT4
(Ready/Busy)
OUT 1+2
(Pass/Fail)
IN1
(Trigger)
Evaluation Time
+ Output Duration
Ready ON
"
Output NOT Valid
(Output OFF)
Output
Duration
(Output Valid)
OUT4
(Ready/Busy)
OUT 1+2
(Pass/Fail)
Evaluation
Time
Start-up
Case 3) Output Delay = Time (in ms) between the Trigger and the availability of results from Output 1+2 (Pass/Fail). Note that the
Output Delay must be longer than the evaluation time.
Case 4) Output Duration = Duration (in ms) of the result output on Outputs 1+2. The outputs will turn OFF once the Output Duration
is complete (unle ss the Output Active parameter is set to LOW/Normally Closed, in which case the outputs will turn ON once the
Output Duration is complete)
When the configurable delays are used, the minimum total cycle
time will be at least as long as the sum of the delay times. This will
reduce the number of inspections that can be made in a given
period of time.
A new part cannot initiate a trigger signal until the previous
evaluation, timing delays, and output duration are complete.
10000000877(02) 41
Page 42

MultiSight™ User Manual
Start-up
Special Case: Control of Outputs with Use of Output Duration Parameter
Output Behavior with 0 ms Output Duration (default setting) Behavior with > 0 ms Output Duration
OUT4 (Ready) This output shows when the sensor is ready to make an
OUT1 (pass/fail) and
OUT2 (position)
evaluation and when the results of the previous
evaluation are valid.
Turned ON while sensor is waiting for an external
trigger. Turned OFF when an evaluation is initiated
(either with the external trigger or Trigger Delay after
the external trigger). Turned ON again when the result
outputs (OUT1 and OUT2) are valid.
Output state is held until the next evaluation is
complete
Image
The Image section contains the current camera image as well as the Region of Interest (ROI), Pattern, and Position frames for the
detector currently selected via the radio buttons in the Select Detector window (and other detectors selected with the Display Icon
check box in the Select Detector window).
This output shows when the sensor is ready to make an
evaluation but DOES NOT show when the results of the
previous evaluation are valid.
Turned ON while sensor is waiting for an external
trigger. Turned OFF when an evaluation is initiated
(either with the external trigger or Trigger Delay after
the external trigger). Turned ON again after the
evaluation is processed AND the Output Duration has
elapsed. OUT1 and OUT2 are reset (outlined below) at
the same time as OUT4 is turned ON.
This means that there is no output to confirm OUT1 and
OUT2 data validity. The PLC must account for the
evaluation time before reading the output results.
Output state is de-activated after the Output Duration
time elapses. (Output ON or OFF based on setting of
parameter Output Active.)
42 10000000877(02)
Page 43

MultiSight™ User Manual
Screen Shot Field name Description
Region of Interest (ROI) –
Yellow frame with a
number
Frames: Region of
Interest (ROI - Yellow),
Patter n (Red) ,
Posit ion (Bl ue), and
Match (Green)
Live Display Displays the current live image of the MultiSight and
Zoom Magnifies the ima ge with a digital zoom (2:1 ratio).
Save image Saves the current image as a bitmap file (.bmp) with or
Max. Pattern Size Select a maximum pattern size of 400 x 160, 160 x 400,
When a detector is selected (radio buttons in Select
Detector window) its ROI appears as a yellow frame
with a number on the image. The ROI can be selected
by double clicking anywhere inside it. A dot will be
displayed just outside each corner and along each side
to indicate that it is selected. When the ROI frame is
selected, it can be moved by clicking and dragging
inside the frame and it can be resized by placing the
cursor on the side or corner and then clicking and
dragging.
The red pattern frame within the ROI is used to teach
the pattern or contour to be detected. When the Teach
button is clicked, whatever pattern is in the red frame is
taught to the sensor. Double click inside the red frame
to select it and then resize or move it.
In run mode, the green match frame indicates where
the pattern or contour was detected.
The blue frame is the position frame and only appears
when the Position Control parameter is active.
The ROI, pattern, and position frames of non-selected
detectors will appear if the Display Icon check box in
the Select Detector window is checked. They are
greyed out to differentiate them from the currently
selected detector.
continuously refreshes the image.
The ROI and Pattern frames are displayed and can be
adjusted.
without the ROI, pattern, and position frames.
or 248 x 248 pixels.
Start-up
10000000877(02) 43
Page 44

MultiSight™ User Manual
Start-up
Screen Shot Field name Description
Display: ROI, Pattern, and
Posit ion
Single Image
(via Trigger)
Redraw (Brightness
detector type only)
Region of Interest (yellow frame with detector #) should always fully
surround the pattern to be detected. It defines the maximum search
area in which the pattern will be recognized.
Pattern (red frame)
Defines the pattern or contour to be taught. During the inspection
process the pattern frame does not have any function other than to
mark the original location of the taught pattern. The green match
frame indicates where the pattern was detected.
Posit ion fram e (blue)
The Position Control (OUT2) determines whether the detected
pattern’s center is within this frame.
For currently non-selected detectors whose Display
Icon check box is selected, the check boxes determine
whether each respective frame is displayed on the
image.
Allows the user to capture a single image initiated by
the external (or software) trigger, including trigger
delay parameter settings. This allows the user to
capture an image for teaching without stopping the
production line. This also can be used to identify the
ideal trigger delay setting.
When using the brightness detector type, the image
will color all of the “dark” (or “light”) pixels blue (or
other selected color).
44 10000000877(02)
Page 45

MultiSight™ User Manual
Start-up
Recommendations for selecting a pattern or contour:
For reliable evaluation
- The pattern/contour should have a unique characteristic—
some aspect that does not occur on a “bad” part.
- Patterns or pattern characteristics should have clear contours/
shapes.
- Pattern/contour characteristics should NOT vary.
- The pattern area should be set as large as possible within the
image. A pattern that fills 10% of the image will be more
reliably detected than a pattern that only fills 1% of the image.
If necessary, move the sensor closer to the target.
The pattern area (red frame) should be entirely within the yellow
frame (region of interest).
For higher resolution and speed, do not set the yellow frame
larger than necessary relative to the size of the pattern. The larger
the area that requires evaluation (namely, the ROI) relative to the
size of the pattern, the slower the evaluation time.
Region of
Interest
Sensor Image Sensor Image
Pattern
More Consistent Detection Less Consistent Detection
Pattern
10000000877(02) 45
Region of
Interest
Page 46

MultiSight™ User Manual
Pattern
Region of
Interest
Sensor Image
Pattern
Region of
Interest
Sensor Image
Faster Slower
Start-up
Position Deviation Check and Frame Type
Position control can be activated when the pattern matching or contour matching detector types are selected. If position control is
selected, a blue frame is displayed on image screen. The X/Y coordinates for the center of the pattern detected (green cross at the
center of the green frame) with reference to the top left-hand corner of the image (zero point) is displayed in the result window. The
increment for X/Y coordinate values while using Detector Type Pattern Matching is 2 pixels so only even coordinate values will occur.
The center of the detected green pattern area (green cross) is inside the blue frame for correctly positioned parts. In Run mode, this
will activate the position output OUT2.
X
The center of the detected pattern (indicated by the green cross
in the green frame) is within the blue position frame. Position
output OUT2 would be active.
Y
46 10000000877(02)
Page 47

Pattern
E
LED = OUT 1 and OUT2
The Pattern window shows the taught pattern or contour for the currently selected detector.
Save Pattern Saves the taught pattern (or contour) as a bitmap file (.bmp)
Zoom Opens a window showing an enlarged version of the pattern (2:1 ratio, digital zoom)
MultiSight™ User Manual
Start-up
Eraser size (contour matching only)— determines the size (in pixels) of the square eraser that can be used to edit the taught
contour (which is depicted as a blue line). The cursor acts as the eraser when clicked on the contour in the pattern window.
Undesired contour lines, such as those caused by other parts or shadows, can be deleted.
Results
The Results window shows the status of OUT1 and OUT2 along with additional information.
10000000877(02) 47
Page 48

MultiSight™ User Manual
E
IMPORTANT
Start-up
Field Description
Result Bar Graph The degree of conformity of the current pattern with the pattern taught is shown as a bar graph. The status of the
X/Y Position Shows the X and Y coordinates of the detected pattern (center of green frame) with reference to the zero point
Direction With “center,” “top,” “top right,” “right,” etc. shows the direction in which the current pattern deviates from the
Counters After every activation of Run mode, the three counters are reset to zero. For the purposes of these counters, an
# Evaluations Displays the number of evaluation cycles since the last activation of Run mode.
# Good Patterns Number of evaluation that resulted in OUT1 (pass/fail) output of PASS
# Good Positions Number of evaluation that resulted in OUT2 (position) output of PASS
Sort result (Only when logic is set to OR)
Rotation angle
overall inspection is shown as a green (pass) or red (fail) dot. The result is determined by whether the degree of
conformity is within the configured thresholds.
For a standalone detector, the bar graph indicates the degree of conformity.
For logically linked detectors, the bar graph represents the detector with the highest degree of conformity
(measurement value).
The threshold value set in “Detector Parameters” section is shown as a black line.
(upper left-hand corner of the field of view) and a coordinate system of X = 640 and Y = 480 units.
taught pattern with reference to position. “Center” is displayed (or LED = green/OUT2 = high) as long as the center
of the green frame (green cross) is located inside the blue position frame.
evaluation cycle of five logically linked detectors (resulting in a single output) is counted as one evaluation.
Displays which detector had the highest evaluation score
(Only for contour match)
Displays the angle of the detected contour with reference to the taught contour position. This data is not highly
precise—typical tolerance is ±10°
Status Line
The Status Line along the bottom right edge of the screen shows the current status of the last action performed.
The Status Line indicates that the software is currently executing
a task. It is best to not attempt additional tasks while the Status
Bar indicates software activity.
48 10000000877(02)
Page 49

MultiSight™ User Manual
Setup—Quick Guide
Setup—Quick Guide
Preparation
1. Double click the MultiSight software icon to launch the Sensor Finder software.
2. The Sensor Finder software will show ALL MultiSight sensors on the local Ethernet network. Select the sensor and set the IP
address if necessary. The IP address and subnet mask of the PC is shown at the bottom of the window.
3. Select the MultiSight by clicking on its IP address. Establish the connection by clicking Connect. A warning will pop up asking
if you want to stop run mode. Click Yes. The configuration software will now open.
Optimize Image
4. Click the Live Display button under the Image. The MultiSight illumination LEDs will begin flashing and you will get updated
images.
5. Place the target (terminal block or other item for inspec tion) in the Image area.
6. Notice that the Image is either too bright or dark and out of focus. The first step in a new application is to perfect the image.
Two factors affect the image: shutter speed and the manual focus. The shutter para meter is in the Detector Parameters
section (third column) about half way down the list. Adjust the shutter speed by clicking on the current shutter speed and
typing in a new speed or dragging the slider bar. Make the image darker or brighter by adjusting the shutter speed lower or
higher.
10000000877(02) 49
Page 50

MultiSight™ User Manual
Setup—Quick Guide
7. Slowly adjust the manual focus on the back of the MultiSight using the small screw driver until the image comes into focus.
You may need to adjust the shutter speed more to get the best image. The ideal is to have a high level of contrast and a sharp
focus.
8. Click Stop in the Image window to exit live image mode.
Define Search Criteria
The next step is to position the Region of Interest (ROI) and Pattern frames. The yellow ROI frame defines WHERE the sensor will look
for a pattern; the red Pattern frame will define WHAT the sensor will look for.
9. By default, the yellow ROI frame will be selected – notice the dot at each corner and along each side. Double click the red
frame to select it. Position and resize the red pattern frame around the unique feature to be inspected (the pattern that will
always be there on a good part and never for a bad part).
10. Next adjust the yellow Region of Interest (ROI) frame. This frame defines WHERE the sensor will look for the pattern we
defined with the red box. This means it must always be bigger than and completely containing the red frame. Double click the
yellow frame to select it. Move and resize the frame.
50 10000000877(02)
Page 51

MultiSight™ User Manual
Setup—Quick Guide
11. In the Detector Parameters section (third column), change the Trigger Mode setting to Continuous (from Triggered). While in
run mode, this will cause a new inspection to start as soon as the last one finishes. In the Select Detector section (second
column), click the Live Images checkbox so that images will be displayed in the software while the sensor is connected.
12. Click the Teach button in the Commands section. Click Teach From PC Image. Once the teach process is complete, the taught
pattern appears in the Pattern window on the right.
Function Test
13. Click the Run button in the Commands section. Confirm that the inspection is passing by referencing the indicators. Based on
the results of several good and bad parts, you may need to adjust the threshold settings.
10000000877(02) 51
Page 52

MultiSight™ User Manual
Setup—Quick Guide
14. Based on the results of several good and bad parts, you may need to adjust the threshold settings. Click the Stop button in the
Commands section to return to configuration mode and make adjustments.
Example Application
Example: Detecting whether hex nuts are welded on mounting brackets by using the detector type “Pattern Matching.”
During machine assembly, inspect mounting brackets to ensure
that hex nuts are welded in specified places.
Condition:
Mount the MultiSight sensor in position (see “Installation” on
page 6) and attach all cables and wires per “Electrical
Installation” on page 8 and “Connector Pin Assignments” on page 66. The software connection to the MultiSight is described in the
“Start-up” section on page 18.
52 10000000877(02)
Page 53

When the MultiSight is powered up, the image shown in the
IMPORTANT
“Image” section of the computer software is the last image
recorded. For setting up a new inspection, click on the “Reset”
Command button. To view and continuously update the live
image, click the “Live Image” button.
To bring the object into focus, turn the
focusing screw on the back of the sensor.
To improve the contrast, use the “Shutter” in “Detector
Parameters.”
Set up:
Select Detector Type to be “Pattern Match” in the “Detector
Parameters” section.
MultiSight™ User Manual
Setup—Quick Guide
Set region o f intere st (RO I) by do uble cl icking on the y ellow b ox
and placing it on the image. This is the area in which the
MultiSight will look for the taught pattern.
Set pattern by double clicking on the red frame and placing it
on the image where the inspection needs to be performed.
In most cases, the majority of the parameters can be set using the
standard settings. A different setting may be necessary to
improve detection or shorten cycle times.
10000000877(02) 53
Page 54

MultiSight™ User Manual
Setup—Quick Guide
Click on the “Stop” button to stop live image.
Change the trigger mode to “Continuous.”
This makes it easier to check good and bad parts.
Click on the “Teach” and select “Teach from PC image” button to
teach the pattern. Click on the “Stop” button after a few
seconds.
Notice the taught pattern display in the “Pattern Section.”
Select “Live Images” check box in the Select Detector section.
Click the “Run” button. The pattern is now evaluated
continuously.
The desired pattern is detected with 100% conformity.
The green outline on the image indicates where the taught
pattern is found. The green bar graph (in the “Results” & “Select
Detector ” windows) indicates the degree of similarity to the
taught pattern. The black line on the bar graph is the current
threshold.
Further objects can be set using the same procedure described
above. Select a new detector in “Select Detector” section, select
the desired parameters in “Detector Parameter” section and
repeat the above steps.
If several objects or detectors are defined, they can be logically linked or grouped (see Select Detector/Logic on page 26).
Set the threshold value (required degree of conformity of the pattern detected with the pattern taught). This can be achieved by
testing a variety of good parts and adjusting the “Threshold Min” parameter in the “Detector Parameters” window.
54 10000000877(02)
Page 55

MultiSight™ User Manual
In the opposite figure, MultiSight sensor has evaluated the
object as “bad.” Notice that the red LED is on and the hex nut is
missing from the bracket.
RESET/Power On
To reset the MultiSight, pull out the plug or turn off the power supply and then restore power.
Maintenance
Cleaning
Clean the MultiSight with a clean dry cloth. Do not use solvents. Do not use sharp objects. Do not scratch.
RESET/Power On
10000000877(02) 55
Page 56

MultiSight™ User Manual
Maintenance
Appendix
Frequently Asked Questions
How do I change the IP address of the MultiSight sensor?
Proceed as described in “Network Settings” and “Setting the IP Address of the MultiSight
Sensor” sections on pages 11 and 15, respectively.
What is the easiest way of testing the connection to the MultiSight?
In the start menu of the operating system, click on “Run” and then “cmd.” In the window
which appears, enter the command “Ping” and then the MultiSight IP address:
e.g., ping 192.168.100.100
If all connections are correct, and the sensor and the PC address section are identical and the
MultiSight is ready for operation, the command “Ping” will produce a positive signal. If not,
re-check your network configurations and consult your network administrator.
How do I avoid image dissipation and reflections (indicated by light-colored areas of the
image)?
Mount the MultiSight and set the shutter manually. Adjust the illumination of the object and
avoid fluctuations in brightness, e.g. due to ambient light.
I am getting dissipation of image and brightness for the same object. The brightness
values at the edge of the illuminated image zone differ from image to image. What can
I do?
Set the shutter to “Manual” in the window “Detector Parameters” and set the slide so that
there is no fluctuation in brightness. Generally speaking, a higher shutter value causes slight
overexposure, but also produces a more consistent result.
Reflections occur when the alignment or position are changed slightly, e.g., an impression
which varies in brightness. How can I get a more consistent image?
Mount the MultiSight at an angle of 10…15° so that it is at a slight angle to the reflecting
surface (see the illustration on page 7). Or select another position for the pattern screen in
which the reflections do not adversely affect pattern detection (see “Installation” on page 6).
56 10000000877(02)
Page 57

MultiSight™ User Manual
E
Maintenance
Technical Data
Electrical Data
Certifications cULus and CE Marked for all applicable directives
Supply Voltage 24 V DC ± 10% (absolute maximum 18…30 V)
Residual Ripple < 5 Vpp
Current Cons umption (no I/O ) 200 mA, max.
Inpu ts I N1/IN 2 High 10 V…V+/24V DC (+10%), low 0…3 V
Input Resistance > 20 kOhm
Trigger Input rising edge, 10 V…V+/24V DC
Outputs OUT1 - 4 PNP type (sourcing MOSFET)
Output Rating (per output) 200 mA
Output Current (per output) 1.5 A, max., in case of short circuit
Protection Type Short- circuit (all outputs), inverted polarity, electrical shock (CLASS 2 EN 61140)
Set-up Interfaces Ethernet (LAN)
Network Ethernet (configuration only)
EtherNet/IP (data transfer only)
Power O n Delay App rox. 6 sec onds
Optical Data
Pixel Number, Tec hnology 640 x 480, CCD
Integrated Lighting 8 LEDs (6 x white, 2 x red)
Integrated Lens, Focal Length 6 or 12 mm, adjustable focus
Lens: (adjustable to infinity)
Min. Operating Distance in mm
Min. Field of View X x Y in mm
Field of View @ 200 mm
Depth of focus approx. ± 5% of operating distance
Mechanical Data
Length x Width x Height
Weight Approx. 160 g
Vibration/Shock EN 60947-5-2
Ope rating Temper ature —C ( F) 0…50° (32…122°) (80% humidity, noncondensing)
Storage Temperature—C (F) -20…60° (-4…140°) (80% humidity, noncondensing)
Enclosure Type Rating IP 67
For use in NFPA79 applications only.
612
20 20
18 x 14 8 x 6
150 x 100 60 x 40
3
Standard model: 77 x 45 x 45 mm
EtherNet/IP model: 81 x 45 x 45 mm
(including connector)
3
(including connector)
10000000877(02) 57
Page 58

MultiSight™ User Manual
E
E
E
E
IMPORTANT
E
Maintenance
Technical Data (continued)
Connections PWR and I/O connector M12, 8 pins; Ethernet M12, 8 pins
Ethernet M12, 4-pins, D-code
Housing Material aluminum, plastic
Functions and Characteristics
Number of test detectors per sensor
Detector Types • pattern match with/without position detection
up to 10 ( 3 2) detectors with definable parameters for each
•area test brightness
•area test contrast
• contour match with/without position detection
• position data (via EtherNet/IP only)
Typical cycle time Pattern matching: 50…100 ms
Contrast or brightness area test: 40…50 ms
Contour matching: 120…500 ms
Use of Control Input IN2
This section details the operation of the control input IN2
For operation using the control input, set the “Control Input”
parameter in the “Detector parameters” window as described
below.
The detector which is activated by “Reset” or “Power on” is the
one which was activated most recently using the radio buttons in
the window “Select detector” of the PC software or via
EtherNet/IP.
Enable (Case 1 on page 60)
Activate 0 or 1 (Case 2)
Activate 0 to 31 (Case 3)
Teach temporary (Case 4)
Teach permanent (Case 4)
For the signal sequence see the diagram below. Pin assignments are on page 66.
58 10000000877(02)
Page 59

MultiSight™ User Manual
E
D
C
B
A
5
4
3
2a
2
1
Typ 5ms / 5ms
IN 1 (Trigger)
Out 4 (Ready)
Out 1 (Pass/Fail)
1 or 2
Activate 0 to 31
Teach temp/perm
.
IN 2 (case 2)
IN 2 (case 3)
IN 2 (case 4)
Activate 1 or 2
Maintenance
1. Rising edge at IN1 (Trigger) starts sensor (triggers exposure and processing).
2. Trigger starts falling edge at OUT4 (Ready). Ready stays low for duration of evaluation. (Duration of evaluation is indicated in
Run mode with Trigger mode = “Continuous” in sax ms at the bottom right hand of the software screen.)
3. The rising edge at OUT4 (Ready) indicates (1) that processing is complete and (2) that the outputs OUT1 (= result of
evaluation) and OUT2 (position) are now valid (A) and can be processed by the control system (unless output duration 0,
see Configurable Delays section on page 40).
4. The next rising edge at the trigger input IN1 starts the next evaluation.
5. Period between rising edge at output OUT4 (Ready) and next rising edge at trigger input (IN1) = period which can be used for
changing from detec tor to detector (activate 0 or 1; ac tivate 0 to 31) or Teach temporary/permanently by control input IN2.
OUT3: Trigger of external illumination, high as long as image is taken = shutter open (unless Illumination parameter is set to
External Constant, in which case OUT3 is always ON).
See the signal sequence diagram on page 58 for more information about the use of trigger and output delay timers.
10000000877(02) 59
Page 60

MultiSight™ User Manual
IMPORTANT
IMPORTANT
Maintenance
Case 1: Control Input = Enable
Control input = Enable means that IN2 must be connected to V+ (+24 V DC) to allow the external trigger.
If control input = enable (default state), IN2 (grey wire) MUST be
connected to V+ (24V DC) for the external trigger to work.
Case 2: Control input = Activate 0 or 1
This function allows the Control Input to determine whether detector 1 or detector 2 is evaluated. A change in the state of the
control input (B) can take place in period “5” (Ready = high). A high level (V+) on the control input IN2 means evaluation according
to detector 2 configuration, a low level (V-/GND) means evaluation according to detector 1 configuration (more details below).
Case 3: Control input = Activate 0 to 31
This function allows the Control Input to determine which detector is evaluated by using a series of pulses during the Ready state. In
period “5” (Ready = high/V+) pulses are counted “C” (type: 5 ms pause/5 ms pulse/5 ms pause/etc.). The next evaluation takes
place with the detector corresponding to the number of pulses counted. The count always starts at 1, regardless of which detector
was active previously. The pulses must be generated bounce-free, preferably by a control system (more details below).
Case 4: Control input = Teach temporary or Teach permanently (only possible on detector 1)
This function allows the MultiSight to be taught a new pattern without being connected to the software. In period “5” (Ready =
high/V+), a high level (V+) can be applied at IN2 to trigger a temporary (saved in RAM only) or permanent Teach (saved in flash).
This must be applied at least until the next rising edge at trigger input IN1. Then the new pattern is taught in detector 1 and saved
according to specification. The control input IN2 must be pulled low (V-/GND) before the next rising edge at trigger input IN1, or
another Teach is triggered. In this mode, only detector 1 is used and overwritten by the next Teach. Detector 1 can still be logically
linked to other detectors (more details below).
Additional Details on the Special Uses of the Control Input
Control Input: Activate 0 or 1 and Activate 0 to 31 (Cases 2 and 3)
The parameter Control Input can be set up to allow the control input IN2 to select between the different detectors. The parameter
setting is Activate 0 or 1 OR Activate 0 to 31.
When one of these options is selected, the following parameters
must be set accordingly for all used detectors:
Control Input must be the same for all (either “Activate 0 or 1 OR
Activate 0 to 31”) (more details below)
Shutter Adjustment = Manual
Trigger mode = Triggered
It is recommended to keep a list of which pattern is saved in
which detector number.
60 10000000877(02)
Page 61

MultiSight™ User Manual
Maintenance
When changing d etectors, if a detector i s selected that does not h ave the Control Inpu t parameter set to Activate 0 to 31 (or Activate
0 or 1), it is not possible to change to another detector using the control input IN2. The control input has a different function and
therefore is no longer capable of switching to another detector. For this reason, it must be confirmed that the control system only
selects detectors that are configured to allow the control input to change detectors. If an incorrectly configured detector is selected,
the sensor may no longer respond and therefore would need to be reconfigured by connecting to the software.
Recommended Procedure:
Configure detector 1 with the desired parameters, including the above required parameters (Control Input = Activate 0 to 31,
Shutter Adjustment = Manual, Trigger Mode = Triggered).
Use the Copy command to copy the required parameters from Detector 1 to the other detectors required for use (instructions on
pages 25 and 29).
Set up the control system to generate the appropriate number of pulses for detector selection during the OUT4 Ready signal.
Testing Saved Detectors:
When all detectors to be used have been configured as described above, a detector can be selected using the radio buttons in the
Select Detector window. Put the sensor into Run mode (Run command). The sensor starts with the last detector selected (via the
radio buttons or the control input IN2). The detector can now be tested using various “good” or “bad” parts. Parameters such as
Shutter or Threshold value can be adjusted if required. To test other detectors, select the radio button of that detector.
Control Input: Teach Temporary or Teach Permanent (Case 4)
The parameter Control Input can be set up to allow the control input IN2 to allow a pattern Teach for the first detector. This gives the
input on the PWR and I/O connector the same functionality as the Teach command button so that the software does not have to be
connected for a Teach function to occur. (Only for the first detector.) The Teach function occurs when the external trigger (IN1)
transitions low (GND) to high (V+/24V DC) while the control input IN2 is high (V+/24V DC). The signal sequence is as follows:
High level (V+/24V DC) on control input IN2
Rising edge (GND to V+) to trigger input IN1
Note that if a second trigger on IN1 occurs while the control input IN2 is held high (V+) a second Teach function will occur. Be sure
that the control input IN2 is pulled low (GND) after the Teach function is completed.
Applications where the object is continuously moving:
Pull control input IN2 high (V+) for at least one external trigger/image exposure. The new pattern for detector 1 is saved and this
new configuration applies immediately. If the signal at input IN2 is held high (V+) for several trigger cycles (several image
exposures), the last exposure is saved as the new pattern for the first detector.
Applications with Timer Delays:
Apply a High level (V+/24V DC) to control input IN2 when the next target object is being transported to the evaluation position,
therefore causing a trigger signal,
OR
when the reference object is in the correct position and triggering has already taken place (due to a Trigger Delay), the trigger signal
must be interrupted and re-triggered (the teach is initiated by the rising edge of the trigger input IN1). Only after this should the
signal at control input IN2 fall to low level (GND). Interruption and re-application of the trigger signal can be achieved by installing a
control relay in the trig ger circuit or by using a PLC to drive the trigger (as opposed to directly wiring from a trigger sensor).
10000000877(02) 61
Page 62

MultiSight™ User Manual
IMPORTANT
Maintenance
The save operation for permanent save (Teach permanent) may
take up to 500 ms.
During this period in continuous moving applications, the output
locks to FAIL regardless of the part evaluation (i.e. both “good”
and “bad” parts give a FAIL output). When the Teach Temporary
function is used, the new pattern is stored only in the RAM (this
requires much less time). In this case, the pattern is no longer
available after the MultiSight is reset and must therefore be retaught.
62 10000000877(02)
Page 63

MultiSight™ User Manual
IMPORTANT
Maintenance
Trigger Mode Parameter
Triggered or Continuous
When “Tr igge red” is selected, the sensor initiates an exposure and evaluation when the external trigger IN1 transitions from low
(GND) to high (V+/24V DC) or the “Trigger” command button in the computer software is clicked.
When the “Continuous” Trigger Mode is selected, the sensor initiates a new exposure and evaluation as soon as the last evaluation
is complete, i.e., the sensor cycles as fast as possible. This Continuous internal triggering is initiated as soon as the sensor is put in
Run mode.
Setting Up the Trigger Sensor
During operation of the MultiSight sensor, the position of the additional external trigger sensor can be optimized. To do this, make
the following parameter settings to the PC software:
• Trigger mode = “Triggered”
• “Live Images” in Run mode = check box selected (live images update activated)
• Click the Run command button to put the sensor in Run mode
Observe the exposure that is continuously updating in the Image window. Note where the pattern to be inspected falls within the
Field of View. Adjust the position of the trigger sensor to optimize its position in relation to the exposure Field of View.
Minimum Operating Distance and Field of View by Cat. No.
Catalog Number
48MS-SE1PF1-M2
48MS-SN1PF1-M2
48MS-SE1PF2-M2
48MS-SN1PF2-M2
Min. Operating Distance—mm
(in)
20 (0.8) 18 x 14 (0.7 x 0.6) 6 mm
20 (0.8) 8 x 6 (0.3 x 0.2) 12 mm
Field of View at Min. Operating
An operating distance of more than 100 mm may require external lighting.
The typical focus range is operating distance ± 5%.
The 48MS-SE1PF1-M2 and 48MS-SN1PF1-M2 (6 mm focal length
models) typically require external lighting because the integrated
lighting does not illuminate the entire field of view, i.e., the edges
of image are dark.
10000000877(02) 63
Distance—mm (in) Focal Length of Lens
Page 64

MultiSight™ User Manual
12 mm Lens
Operating Distance—mm (in)
Field of View—mm
0
50
100
150
200
0100
(3.93)
200
(7.87)
300
(11.8)
400
(15.7)
500
(19.6)
600
(23.6)
X
Y
6 mm Lens
Operating Distance—mm (in)
Field of View—mm
0
50
100
150
200
250
300
350
400
0
100
(3.93)
200
(7.87)
300
(11.8)
400
(15.7)
500
(19.6)
600
(23.6)
X
Y
X = Width
Y = Height
Operating
Distance
Height of
Field of View
Width of
Field of View
Maintenance
Field of View per Operating Distance
64 10000000877(02)
Page 65

MultiSight™ User Manual
5
6
7
8
4
3
1
2
E
Pass/ Fail
Position
Ready
PLC
Input
(I/O)
Control
V+ or
PLC
Output
White (1)
Green (3)
Br own (2)
Blue (7)
Pink (6)
Red (8)
Yellow (4)
Gr ey (5)
V+
(24V DC)
V-
(GND)
Not
Connected
Trigger
Sensor
48MS
Inspection Target
Trigger Sensor
PNP Output
Connection: M12 (Micro) 8-pin Male QD (both PWR and I/O and ethernet)
Ethernet connection: M12 (micro) 4-pin D-code female quick disconnect (ethernet connection, EtherNet/IP model).
Maintenance
1
4
Power and I/O Connection Cable Wiring Diagram
2
3
10000000877(02) 65
Page 66

MultiSight™ User Manual
E
Maintenance
Connector Pin Assignments
PWR and I/O connector
Pin (M12) Color Use
1 White IN1 (external trigger)
2Brown 24V DC (V+)
3 Green OUT1 (pass/fail); display LED = Q1
4Yellow
5 Grey IN2 (control input)
6PinkOUT3 (external illumination trigger)
7Blue GND (V-)
8RedOUT2 (position); display LED = Q2
Indicates sensor evaluation is valid for OUT1 and OUT2, except in special cases noted in the Configurable
Delays section on page 40.
Control Input IN2: if the Control Input parameter (Detector Parameter window) is set to Enable (default
setting), the control input IN2 must be connected to V+ (24V DC) for the sensor to operate. If the control
input IN2 is not connected to V+, the MultiSight will not execute evaluations if the trigger mode is set to
“triggered” (standby mode) (see page “Use of Control Input IN2” on page 58).
OUT4 (ready)
Ethernet M12 D-Code 4-Pin Connector
Pin (M12 D-Code) Use
1Tx+
2Rx+
3Tx4Rx-
66 10000000877(02)
Page 67

Accessories
Product Descriptor Cat. No.
Dovetail Bracket 48MS-BKTDT
Angle Bracket 48MS-BKTANG
Rod Bracket 48MS-BKTROD
Mounting Rod 200 mm 48MS-ROD200
Mounting Rod 400 mm 48MS-ROD400
Rod Clamp 48MS-CLAMP
Mount Plate 48MS-MTPLATE
RJ45 Connector 48MS-RJ45CONN
Ethernet Crossover Cable, RJ45 to RJ45 48MS-ECROSS
Area Light—White Light 48MS-ALWH
Ring Light—White Light 48MS-RLWH
Angle Bracket for Ring Light 48MS-BKTANG2
MultiSight Test Box 48MS-TESTBOX
Standard Model
MultiSight™ User Manual
Maintenance
Product Descriptor Cat. No.
Cordset 2 m 48MS-CS-2
Cordset 5 m 48MS-CS-5
Cordset 10 m 48MS-CS-10
Cordset Right Angle 2 m 48MS-CSRT-2
Cordset Right Angle 5 m 48MS-CSRT-5
ENET Cordset Crossover 3 m 48MS-ECSCROSS-3
ENET Cordset 3 m 48MS-ECS-3
Lighting Cable 48MS-LCS
Lighting Cable Right Angle 48MS-LCRT
Sealing Cap - M12 Male Connector 889A-DCAP
Included with MultiSight sensor.
10000000877(02) 67
Page 68

MultiSight™ User Manual
E
45 (1.77)
43
(1.69)
11.6
(0.46)
14
(0.55)
13.1
(0.51)
31.9
(1.25)
2
(0.79)
12.7
(0.5)
M12 x 1
Optical
Axis
30.5
(1.2)
30.5
(1.2)
22.7
(0.97)
22.5
(0.89)
64 (2.52)
Maintenance
EtherNet/IP Model
Product Descriptor Cat. No.
Power and I/O cordset—M12 8-pin female, 2 m 889D-F8AB -2
Cable Connector Cover (nonconducting)—M12 48MS-M12CVR
Sealing Cap—M12 Female Connector 1485A-M12
Ethernet Patchcord M12 D-code to M12 D-code—2 m 1585D-M4TBDM-2
Ethernet M12 D-code to RJ45 converter 1585A-DD4JD
Ethernet Cable RJ45 to RJ45—2 m 1585J-M8TBJM-2
Ethernet Patchcord Crossover M12 D-code to RJ45—3 m 48MS-EPC-3
M12 Patchcord for Lighting Accessory M12 to M12—2 m 889D-F8ABDM-2
Included with MultiSight sensor.
Other lengths available—replace 2 with length in meters (5 m and 10 m are standard)
Note: Additional accessories (longer cordsets and additional LED colors for external lighting)
available with longer lead times. Contact your Rockwell sales representative for
additional information.
Approximate Dimensions—mm (in.)
MultiSight Standard Models
Dimensions are not drawn to scale.
68 10000000877(02)
Page 69

MultiSight™ User Manual
M4
1.8
(0.07)
12.4
(0.48)
14.5
(0.57)
60°
20 (0.78)
10
(0.39)
8
(0.31)
15
(0.59)
23
(0.90)
10
(0.39)
35
(1.37)
35
(1.37)
90°
3
(0.11)
5
(0.19)
9 (0.35)
R2.25
(R.088)
10
(0.39)
60°
4.5
(0.17)
Dia.
14.25
(0.56)
10
(0.39)
20 (0.78)
R2.25
(R.088)
10
(0.39)
60°
4.5
(0.17) Dia.
MultiSight EtherNet/IP Models
Dovetail Bracket—48MS-BKTDT Angle Bracket—48MS-BKTANG
(Included with MultiSight)
Maintenance
10000000877(02) 69
Page 70

MultiSight™ User Manual
12.5
(0.49)
10
(0.39)
10 (0.39)
32
(1.26)
32
(1.26)
20 (0.78)
10 (0.39
M4 (10X)
30
(1.18)
30
(1.18)
90°
3
(0.11)
5
(0.19)
13 (0.51)
R2.25
(R.088)
10
(0.39)
60°
4.5
(0.17)
Dia.
14.25
(0.56)
10
(0.39)
20 (0.78)
R2.25
(R.088)
10
(0.39)
60°
4.5
(0.17) Dia.
200 (7.87)
12 (0.47) Dia.
M6
Maintenance
Angle Bracket for Ring Light— Rod Bracket—
48MS-BKTANG2 48MS-BKTROD
Mounting Rod 200—48MS-ROD200
Mounting Rod 400—48MS-ROD400
400 (15.74)
M6
12 (0.47) Dia.
Rod Link
70 10000000877(02)
Page 71

Rod Clamp—48MS-CLAMP
A
A
6.8 (0.26)
11
(0.43)
(4X)
6.3 (0.24) Dia.
(4X)
10 (0.39)
20
(0.78)
50 (1.96)
100 (3.93)
150 (5.90)
20
(0.78)
Mounting Plate—48MS-MTPLATE
MultiSight™ User Manual
Maintenance
MADE
ALLE
48MS-
10000000877(02) 71
Page 72

MultiSight™ User Manual
IN
Connector Pin Conguration
6
5
8
7
4
3
2
1
6
5
8
7
4
3
2
1
115 (4.52)
Dia.
65 (2.55)
Dia.
25
(0.98)
12.7
(0.50)
53.5
(2.10)
10
(0.39)
30°
35°
3X120°=360°
M4
Maintenance
Area Light (White Light)—48MS-ALWH
45 (1.77)
OUTPower
43
(1.69)
31.4
(1.23)
11.6
(0.45)
13.1
(0.51)
IN
14
(0.55)
31.9 (1.25)
Ring Light (White Light)—48MS-RLWH
M12X1
2
3
4
5
6
24
12.7
(0.94)
(0.50)
Connector Pin Conguration
1
7
2
3
4
5
8
6
30.5
(1.20)
30.5
22.65
(0.89)
22.5
(0.88)
(1.20)
1
8
7
72 10000000877(02)
Page 73

Mounting Set-up Illustrations
Rod clamp
Rod bracket
Angle bracket
Dovetail bracket
Mounting rod
Mounting plate
Mounting rod
Dovetail Bracket
(48MS-BKTDT)
Angle Bracket
(48MS-BKTANG)
Rod Bracket
(48MS-BKTROD)
Mounting Plate
(48MS-MTPLATE)
Mounting Rod
(48MS-RODxxx)
Rod Clamp
(48MS-RODLINK)
MultiSight™ User Manual
Maintenance
10000000877(02) 73
Page 74

MultiSight™ User Manual
Maintenance
74 10000000877(02)
Page 75

MultiSight™ User Manual
Maintenance
10000000877(02) 75
Page 76

Publication 10000000877(02) - December 2013
Power, Control and Information Solutions Headquarters
Americas: Rockwell Automation, 1201 South Second Street, Milwaukee, WI 53204-2496 USA, Tel: (1) 414.382.2000, Fax: (1) 414.382.4444
Europe/Middle East/Africa: Rockwell Automation NV, Pegasus Park, De Kleetlaan 12a, 1831 Diegem, Belgium, Tel: (32) 2 663 0600, Fax: (32) 2 663 0640
Asia Pacic: Rockwell Automation, Level 14, Core F, Cyberport 3, 100 Cyberport Road, Hong Kong, Tel: (852) 2887 4788, Fax: (852) 2508 1846
www.rockwel lautomation.com
Copyright 2013 Rockwell Automation. All ri ghts reserved. Printed in Germany.
 Loading...