

Page 1
Installation Instructions
IMPORTANT: SAVE THESE INSTRUCTIONS FOR FUTURE USE.
ATTENTION
45LMS Laser Measurement Sensor
Description
The 45LMS family of long distance laser sensors is available in a
variety of measuring ranges. The 8 m diffuse and 50 m
retroreflective models use a Class 1 visible red laser and the
15 m diffuse models use a Class 2 visible red laser. The discrete
and analog outputs can be easily set using the 5-step rotary
switch and the push button. Potential applications include object
position (analog output) and object detection (background
suppression with discrete output).
This sensor utilizes the Time of Flight (ToF) principle and has a
relatively small beam spot even at 15 m away. The sensor is
completely self-contained and does not require any external
control devices which add cost and require additional mounting
space.
The 45LMS is easily set up by mounting the sensor such that the
target is within the operating range of the sensor and teaching in
the appropriate set-points required for the application. All
sensors in this family have one discrete output with one analog
output. The discrete output can be wired for either Light Operate
(L.O.) or Dark Operate (D.O.) and the analog output is
automatically scaled between the selected set-points with either
a positive or negative slope.
The 45LMS is an excellent solution for long range detection and
measurement applications including: distance measurement,
verifying material position, stack level, thickness measurement,
roll diameter, positioning fixtures, error proofing inspection, long
standoff distance, level monitoring, crane crash protection and
other difficult applications that exceed the capabilities of
standard diffuse or background suppression photosensors.
Features
• Eye Safe Class 1 or Class 2 laser (by model)
• 8 m (26 ft.), 15 m (49 ft.) or 50 m (164 ft.) sensing
range, dependent on model
• One discrete output (1 x NPN/PNP) and one analog
output (1 x 4…20 mA)
• Easy setup of switch points or analog scaling using
programming buttons
• IP65 enclosure
• Self-contained sensor
This installation instruction should be read and
understood before operating the sensor.
The 45LMS sensor should only be installed by
qualified personnel.
The 45LMS is not a safety component as described
by the EU machinery directives.
General Specifications
Certifications
Operation
Sensing Beam
Spot Size
Sensing Distance
Absolute Accuracy ± 25 mm (± 0.98 in.)
Repeatability < 5 mm (0.20 in.)
Angle Deviation ± 2° max.
Reference Target Kodak white (90%)
Temperature Influence ≤ 0.25 mm/K typ.
Electrical
Operating Voltage
Current Consumption ≤70 mA @ 24V DC
Discrete Output Type
Discrete Output Rating 30V DC max. / 100 mA max.
Analog Output Type
Switching Frequency 50 Hz
Response Time 10 ms
Mechanical
Housing Material Plastic ABS
Optical Face Material Plastic pane
Control Inputs
LED Indicators
Connection Type 4-Pin DC Micro (M12)
Supplied Accessories None
Environmental
Operating Environment IP65
Vibration
Shock
Operating Temperature
Storage Temperature -30…70°C (-22…158°F)
UL, cULus, and CE marked for all applicable
directives
Class 1 laser, visible red 660 nm (for 8 m & 50 m
models)
Class 2 laser, visible red 660 nm (for 15 m model)
< 10 mm (0.39 in.) at a distance of 8 m (26 ft)
°
at 20
C (68°F)
< 15 mm (0.59 in.) at a distance of 15 m (49 ft)
°
at 20
C (68°F)
< 50 mm (2 in.) at a distance of 50 m (164 ft)
°
C (68°F)
at 20
0.2…8 m (0.66…26.25 ft) diffuse
0.2…15 m (0.66…49.21 ft) diffuse
0.2…50 m (0.66…164.04 ft) retroreflective
10…30V DC
(18…30V DC when operating in IO-Link mode)
1 NPN/PNP output, short-circuit protected, reverse
polarity protected
1 analog output 4…20 mA, short-circuit/overload
protected
5-step rotary switch for operating modes selection
Push button for set-point teach
Green: Power
Yellow: Output switching states
Green/Yellow Flashing 2.5 Hz: Teach indication
Green/Yellow Flashing 8.0 Hz: Teach error
10…55 Hz, 0.5 mm amplitude; 3 planes; meets or
exceeds IEC 60068-2-6
30 g; 11 ms: 3 planes: meets or exceeds
IEC 60068-2-27
°
C (-22…122°F)
-30…50
Page 2
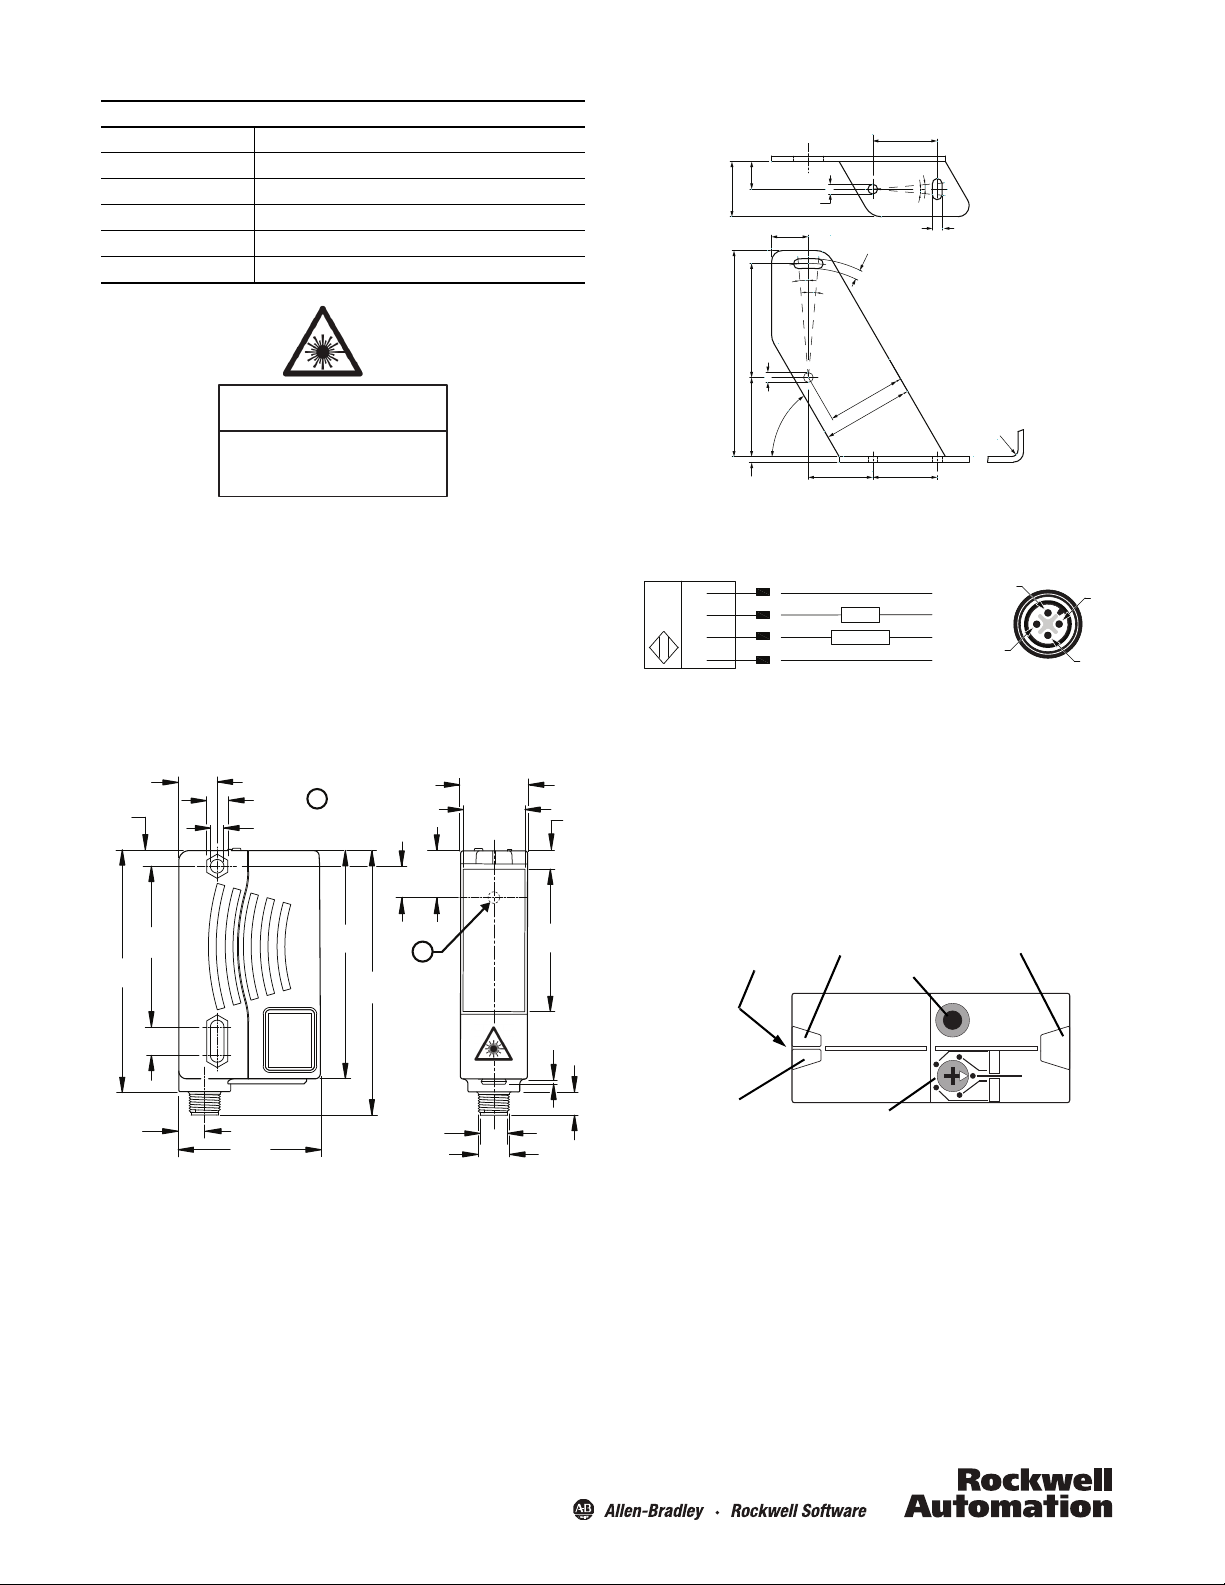
Interface
8 m & 50 m MODELS
Laser Class 1
15 m MODELS
Laser Class 2
DO NOT STARE INTO BEAM
88
(3.47)
102
(4.02)
11
(.43)
6
(0.24)
62
(2.44)
93
(3.66)
10
(.39)
54.6
(2.15)
Ø5.2
(Ø0.205)
14.8
(0.58)
8
(0.32)
CLASS 1
LASER PRODUCT
Complies with 21 CFR
dated June 24, 2007
1040.10 and 1040.11 except
for deviations pursuant to
Laser Notice No. 50,
IEC 60825-1: 2007 certified
2
(0.08)
25.8
(1.02)
9
(0.36)
9.8
(0.39)
M12
23.8
(0.94)
12
(0.47)
18
(0.71)
54.9
(2.16)
7
(0.28)
A
Laser output
1
3
4
2
3
4
2
1
Blue
Black
White
Brown
+
ANALOG
LOAD
−
(Q2)
(Q1)
Yellow LEDs - Signal indicators
SET button
Rotary Switch
Laser output
Green LED
Operating indicator
Interface type IO-Link
Protocol IO-Link V1.0
Cycle time Min. 2.3 ms
Mode COM 2 (38.4 kBaud)
Process data width 16 bit
SIO mode support Yes
The 8 m & 50 m models of the 45LMS are Class 1 laser products.
A Class 1 laser is safe under all conditions of normal use. This
means the maximum permissible exposure (MPE) is impossible
to exceed.
The 15 m models of the 45LMS are Class 2 laser products. A
Class 2 laser is not safe to stare at continuously; however, the
blink reflex of the human eye will prevent eye damage, unless the
person deliberately stares into the beam for an extended period
of time.
Dimensions [mm (in.)]
A
45LMS-BKT1 mounting bracket [mm (in.)]
35
)
15
(0.59
62
(4.41)
43
3
(2.44)
5.3
(1.69)
(0.12)
20
(0.787)
(0.21)
60°
5.3
(0.21)
5°
5°
(1.38)
30
(1.18)
112
(1.38)
5°
5°
5.3
(0.21)
5.3
(0.21)
43
(1.69)
50
(1.97)
35
35
(1.38)
0.14
R3.5
Wiring
NPN or PNP (Push-Pull)
The 45LMS photoelectric sensor is available with a micro quickdisconnect for ease of installation and maintenance.
Rockwell Automation recommends the use of the 889 Series of
cordsets and patchcords for quick-disconnect model sensors. All
external wiring should conform to the National Electric Code and
all applicable local codes.
The 45LMS features a Push-Pull discrete output. This means the
outputs always drive either 24V or 0V and can therefore be wired
like either an NPN or a PNP sensor.
Mounting
Securely mount the sensor on a firm, stable surface or support for
reliable operation. A mounting subject to excessive vibration or
shifting may cause intermittent operation. The 45LMS-BKT1
mounting bracket is available for installation convenience. Once
securely mounted, the sensor can be wired per the wiring
instructions in the next section.
2
Controls and indicators
SET
A
Q1
B
RUN
A
Q2
B
Setting the sensor
The 45LMS is set up using the Rotary Switch and the SET button,
and it displays feedback via the Yellow and Green LED indicators
on the top of the sensor.
Upon completion of any set-point Teach, both LEDs flash
simultaneously, followed by alternating flashing of the LEDs.
• A successful Teach is indicated by a slower alternating
flashing (2.5 Hz).
• An unsuccessful Teach is indicated by a faster alternating
flashing (8 Hz). After an unsuccessful Teach, the sensor
continues to operate with the previous valid setting.
Page 3

After the LEDs flash simultaneously, they flash alternately to
indicate whether the Teach was successful:
Successful: slower alternating flashing (2.5 Hz)
Unsuccessful: faster alternating flashing (8 Hz).
¹
Set-points can be independently taught. For example, set-point
IMPORTANT
IMPORTANT
24 V
0 V
0.2 m Q1B
MAX
24 V
0 V
0.2 m Q1A MAX
Q1-B can be set/re-taught without changing set-point Q1-A.
By pressing the SET button for >5 s when Q1-A, Q1-B or Q2-A is
selected with the Rotary Switch, the taught value for that set-point
is deleted, leaving the sensor with no value for the set-point that
was selected. When you delete Q2-A, the analog output changes
to Zero Point mode (see “Zero Point (Positive Slope)” on page 4
for details). Note that the value for Q2-B cannot be deleted, it can
only be overwritten.
When switching between discrete sensing modes, it is necessary
to delete or teach the set-points for both Q1-A and Q1-B.
The remainder of these instructions refer to the 24V
state as ON and the 0V state as OFF (PNP). If wired
as NPN, the logic is inverted.
Setting the discrete output: Q1
The discrete NPN/PNP output can be set as a switchpoint or
switching window as described below.
These instructions were made with the assumption that the
sensor is being used for Light Operate and that a PNP output is
desired. If the required output is NPN, then refer to the rotary
positions listed in the parentheses () throughout the Discrete
Output instructions.
Switch-point and farther
In this mode, the sensor output will turn on if it detects an object
at the Teach-point or at any distance farther than the Teach-point
up to the maximum range of the sensor. For example, if the
Teach-point is at 2 m, the output will turn on if the sensor detects
an object anywhere from 2 m to the maximum range.
1. Place a target at the desired Teach-point, move the Rotary
Switch to position Q1-A (Q1-B for NPN).
2. Press and hold the SET button until the Green and Yellow
LEDs flash simultaneously
1
.
3. If the Teach is successful, move the Rotary Switch to RUN.
Switching window
24 V
0 V
0.2 m
Q1A
Q1B
MAX
Please note that when you use the sensor for an
NPN output, the Yellow LED will behave opposite to
the sensor output.
For example, when the NPN output is ON, the
Yellow LED will be OFF.
Switch-point and closer
This is the most commonly used mode for object detection with
background suppression. If using the sensor for this type of
application set the Teach-point at the farthest distance from the
sensor that the target will pass.
When using this mode, the sensor output will turn on if it detects
an object between 200 mm (8 in.) from the sensor face and up to
the Teach-point. For example, if the Teach-point is set at 2 m (6.6
ft), the output would turn on if the sensor detects an object
anywhere between 200 mm and 2 m.
1. Place a target at the desired Teach-point, move the Rotary
Switch to position Q1-B (Q1-A for NPN).
2. Press and hold the SET button until the Green and Yellow
LEDs flash simultaneously
1
.
3. If the Teach is successful, move the Rotary Switch to RUN.
When setting the sensor this way, the output will turn on when it
detects an object within a window created between two Teachpoints. For example, if the Teach-point for Q1-A is set at 2 m, and
the Teach-point for Q1-B is set at 3 m, the sensor will turn the
output on if it detects an object between 2 and 3 m.
1. Place a target at the closer (relative to the sensor) desired
Teach-point, move the Rotary Switch to position Q1-A
(Q1-B for NPN).
2. Press and hold the SET button until the Green and Yellow
LEDs flash simultaneously
1
.
3. Place a target at the farther (relative to the sensor) desired
Teach-point, move the Rotary Switch to position Q1-B
(Q1-A for NPN).
4. Press and hold the SET button until the Green and Yellow
LEDs flash simultaneously
1
.
5. If the Teach is successful, move the Rotary Switch to RUN
Switching window (inverted)
24 V
0 V
0.2 m
Q1B
Q1A
MAX
When setting the sensor this way, the output will turn on when
there is no object detected within the defined window created
between 2 Teach-points. For example, if the Teach-point for Q1-B
is set at 2 m, and the Teach-point for Q1-A is set at 3 m, the
sensor will remain on as long as there is no object detected
between 2 and 3 m.
1. Place a target at the closer (relative to the sensor) desired
Teach-point, and move the Rotary Switch to position Q1-B
(Q1-A for NPN).
2. Press and hold the SET button until the Green and Yellow
LEDs flash simultaneously
1
.
3
Page 4

Power, Control and Information Solutions Headquarters
Americas: Rockwell Automation, 1201 South Second Street, Milwaukee, WI 53204-2496 USA, Tel: (1) 414.382.2000, Fax: (1) 414.382.4444
Europe/Middle East/Africa: Rockwell Automation NV, Pegasus Park, De Kleetlaan 12a, 1831 Diegem, Belgium, Tel: (32) 2 663 0600, Fax: (32) 2 663 0640
Asia Pacic: Rockwell Automation, Level 14, Core F, Cyberport 3, 100 Cyberport Road, Hong Kong, Tel: (852) 2887 4788, Fax: (852) 2508 1846
www.rockwel lautomation.com
After the LEDs flash simultaneously, they flash alternately to
indicate whether the Teach was successful:
Successful: slower alternating flashing (2.5 Hz)
Unsuccessful: faster alternating flashing (8 Hz).
¹
3. Place a target at the farther (relative to the sensor) desired
20 mA
4 mA
~3.9 mA
0.2 m Q2A MAXQ2B
20 mA
4 mA
~3.9 mA
0.2 m Q2B MAXQ2A
Teach-point, move the Rotary Switch to position Q1-A
(Q1-B for NPN).
4. Press and hold the SET button until the Green and Yellow
LEDs flash simultaneously
1
.
5. If the Teach is successful, move the Rotary Switch to RUN.
Setting the analog output: Q2
The 4…20 mA output can be defined as any range within 200 mm
to the maximum range of the sensor, as either a rising or falling
slope, as described below. The default analog output setting for
Q2 is A = 200 mm (8 in.) and B = 5,000 mm (16 ft) for all sensor
models. Minimum window for setting the analog span is 21 mm
(0.83 in.)
Positive Slope
In the Positive Slope mode (also called Rising Slope) a target
positioned at the closer set-point results in an analog output of
4 mA while a target at the farther set-point results in an output of
20 mA, with the analog output scaled linearly in between. In this
mode, the sensor will output 20 mA when the target is outside of
the operating range, which is 0…200 mm (0…8 in.) and anything
greater than the maximum sensing range.
1. Place a target at the minimum Teach-point.
2. Move the Rotary Switch to position Q2-A.
3. Press and hold the SET button until the Green and Yellow
LEDs flash simultaneously
4. Place a target at the maximum Teach-point.
5. Move the Rotary Switch to position Q2-B.
6. Press and hold the SET button until the Green and Yellow
LEDs flash simultaneously
7. If the Teach is successful, move the Rotary Switch to RUN.
Negative Slope
1
.
1
.
20 mA, with the analog output scaled linearly in between. In this
mode, the sensor will output 3.9 mA when the target is outside of
the operating range, which is 0…200 mm (0…8 in.) and anything
greater than the maximum sensing range.
1. Place a target at the maximum Teach-point, and move the
Rotary Switch to position Q2-A.
2. Press and hold the SET button until the Green and Yellow
LEDs flash simultaneously
1
.
3. Place a target at the minimum Teach-point, move the Rotary
Switch to position Q2-B.
4. Press and hold the SET button until the Green and Yellow
LEDs flash simultaneously
1
.
5. If the Teach is successful, move the Rotary Switch to RUN.
Zero Point (Positive Slope)
20 mA
<3.9 mA
<0.2 m MAXQ2B
In the Zero Point (Positive Slope) mode a target positioned at the
farther set-point (Q2-B) results in an analog output of 20 mA and
the analog signal is scaled linearly between 0.0 mm and (Q2-B).
This is useful for simplifying the scaling within the PLC or control
device. For example, the following equation can be used:
D = (D
Max
/ I
Max) * Ii
where
D = Current distance of target
D
= set-point distance
Max
I
= analog range (which is always 20 for the 45LMS)
Max
I
= current analog output from sensor.
i
However, even though the analog signal is scaled linearly from
0.0 mm to (Q2-B) it will still provide an analog output of 20 mA
when the target is outside of the operating range, which is
0…200 mm (0…8 in.) and anything greater than the maximum
sensing range. (This is due to the fact that the 45LMS cannot
detect objects between 0…200 mm.)
1. Place a target at the maximum Teach-point.
2. Move the Rotary Switch to position Q2-B.
3. Press and hold the SET button until the Green and Yellow
LEDs flash simultaneously
1
.
4. Move the Rotary Switch to position Q2-A, and delete the setpoint [factory default is 200 mm (8 in.)] by pressing and holding
the SET button for >5 s. Successful completion is indicated by
both LEDs turning off.
5. If the Teach is successful, move the Rotary Switch to RUN.
In the Negative Slope mode (also called Falling Slope) a target
positioned at the farther set-point results in an analog output of
4 mA while a target at the closer set-point results in an output of
10000237459 Ver 00 Copyright ©2012 Rockwell Automation, Inc. All Rights Reserved.
March 2012
 Loading...