

Page 1
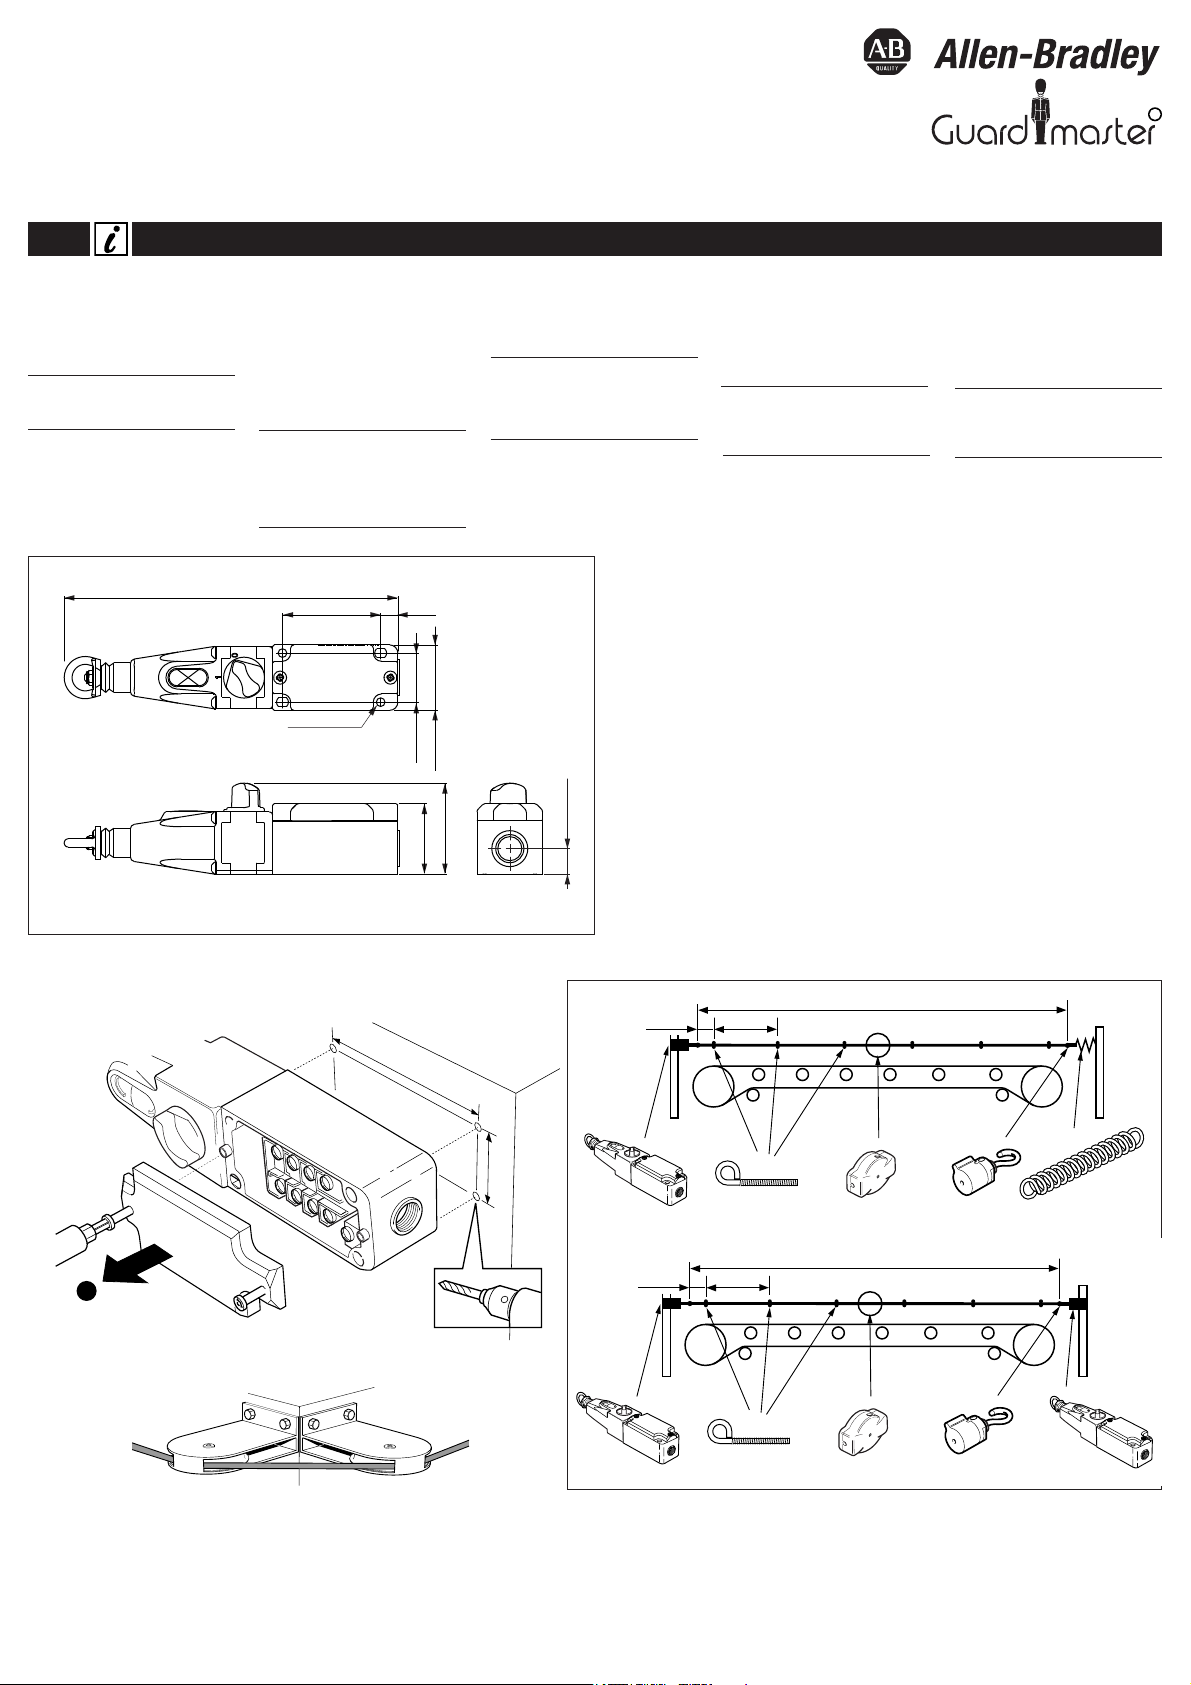
125mm
2-3m
≤ 10m
Installation Instructions
R
www.ab.com/safety
Lifeline 3
# = mm (in)
56 (2.20)
43 (1.69)
204 (8.03)
60 (2.36)
30 (1.18)
4 x 5.5 (0.22)
40 (1.57)
10.5 (0.41)
15.5 (0.61)
Installationsanleitung
Notice d'installation
Istruzioni per l'installazione
Instrucciones de instalación
Installation must be in accordance
with the following steps and stated
specifications and should be carried
out by suitably competent personnel.
Adherence to the recommended
maintenance instructions forms part of
the warranty.
WARNING: Do not defeat, tamper,
remove or bypass this unit. Severe
injury to personnel could result.
L'installation doit être effectuée par un
personnel qualifié conformément aux
étapes et aux spécifications suivantes.
Le respect des instructions de
maintenance recommandée est l'une
des conditions de la garantie.
AVERTISSEMENT: ne pas entraver le
fonctionnement de cet interrupteur, ne
pas le modifier, le retirer ni le
contourner au risque de s'exposer à
de graves blessures.
Bei der Installation müssen die im
Folgenden beschriebenen
Anweisungen und angegebenen
Spezifikationen eingehalten werden.
Zudem darf die Installation nur von
entsprechend qualifizierten
Mitarbeitern ausgeführt werden.
Werden die empfohlenen
Wartungsanweisungen nicht
eingehalten, entfällt die
Gewährleistung.
WARNUNG: Nehmen Sie niemals
Eingriffe am Gerät vor, und zerlegen,
entfernen oder überbrücken Sie das
Gerät nicht. Andernfalls können
schwere Körperverletzungen die Folge
sein.
Le operazioni di installazione devono
essere eseguite da personale
competente conformemente alle fasi
qui di seguito illustrate nonché alle
specifiche stabilite.
Il rispetto delle istruzioni di
manutenzione raccomandate
costituisce parte della garanzia.
ATTENZIONE: non forzare,
manomettere, rimuovere o bypassare
questa unità. Pericolo di gravi lesioni
alle persone.
La instalación debe realizarse según
los pasos siguientes y las
especificaciones establecidas, y debe
ser realizada por personal
debidamente capacitado.
El cumplimiento de las instrucciones
de mantenimiento recomendadas
forma parte de la garantía.
ADVERTENCIA: No cambie ni
manipule indebidamente, ni desmonte
u omita esta unidad. Esto podría
causar lesiones personales graves.
125mm
2-3m
≤ 30m
a
60
30
4 x M5
5.0 N•m
(44.25 lb•••in)
2.0 N•m
(17.7 lb•••in)
•••
•
Page 2
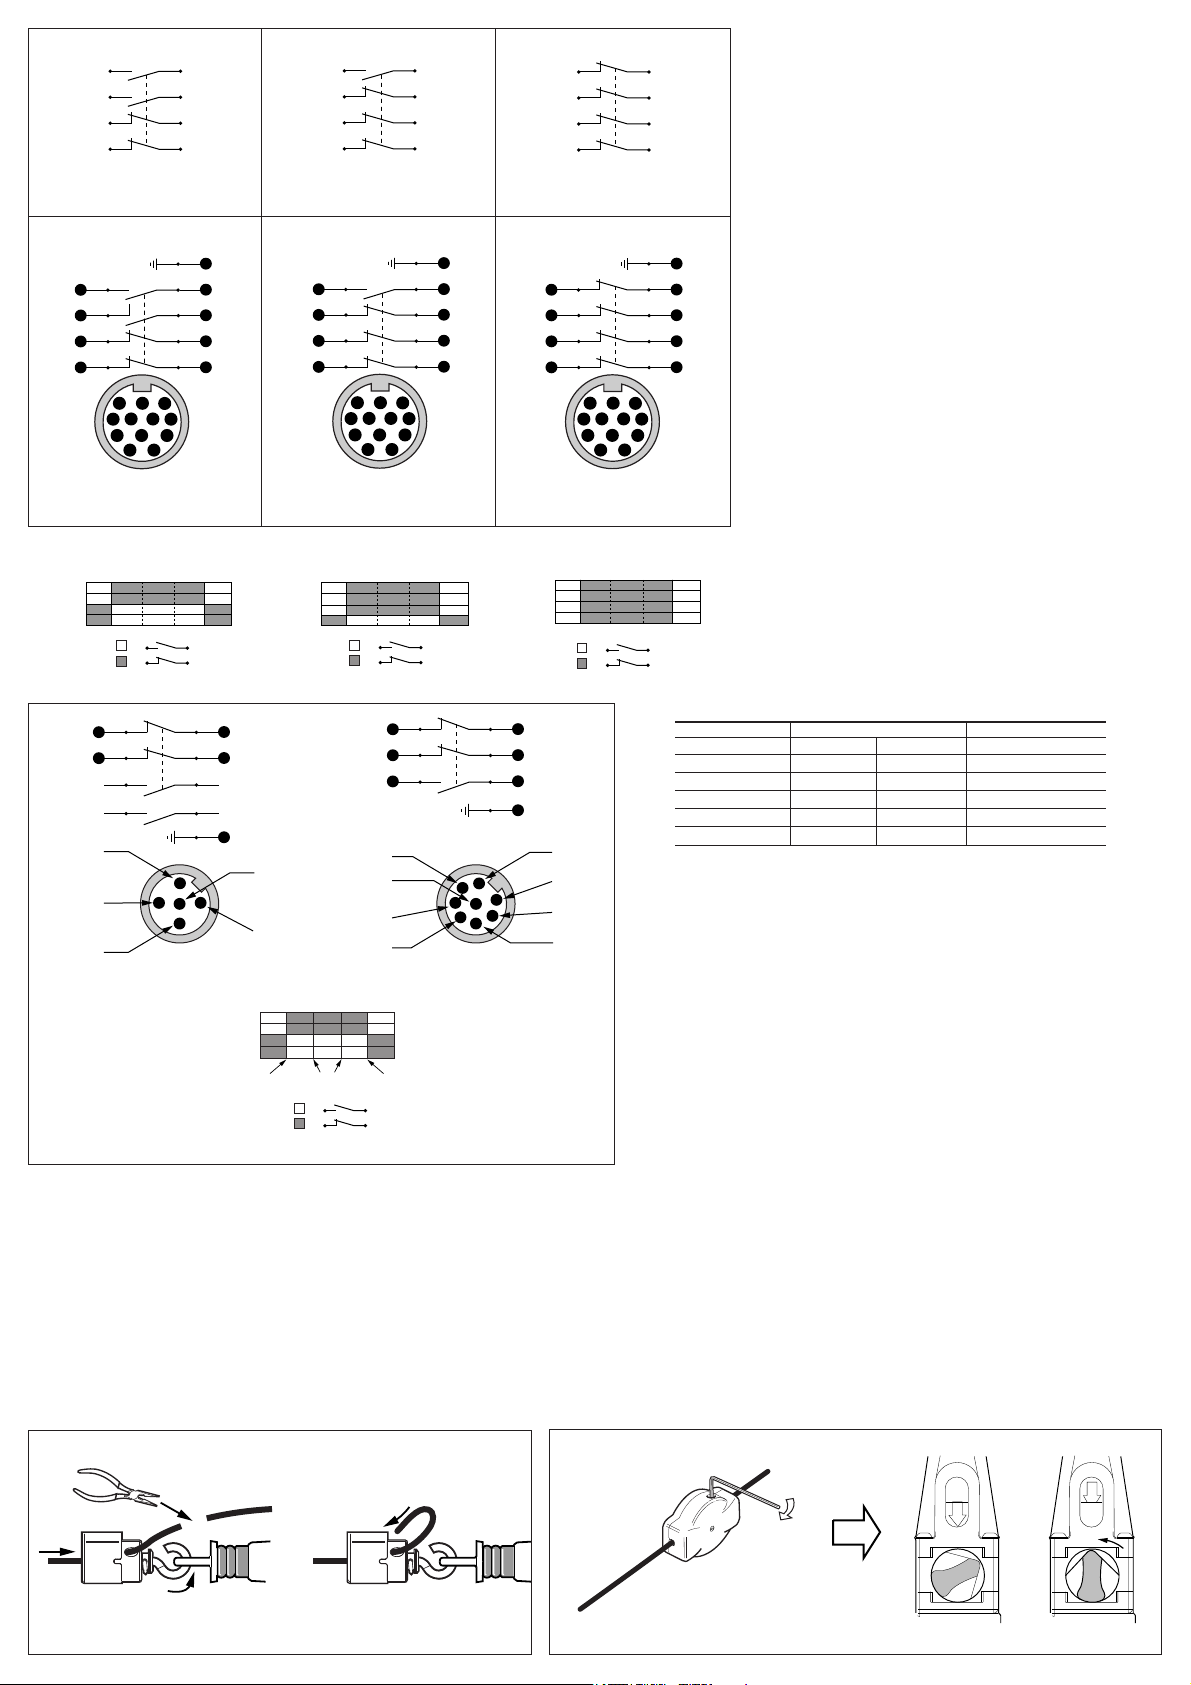
1112
2122
3334
4344
Lifeline 3
1112
2122
3334
4344
8 9
1
1
3
4
6
7
8
9
10
10
12
6 11
3
7
2
5 4
12
Lifeline 3 QD
1112
2122
3132
4344
Lifeline 3
1112
2122
3132
4344
8 9
1
1
3
4
6
7
8
9
10
10
12
6 11
3
7
2
5 4
12
Lifeline 3 QD
1112
2122
3132
4142
Lifeline 3
1112
2122
3132
4142
8 9
1
1
3
4
6
7
8
9
10
10
12
6 11
3
7
2
5 4
12
Lifeline 3 QD
0
11/12
21/22
33/34
43/44
2.5 6 9 11.5 14
=
=
0
1
0
1
0
11/12
21/22
31/32
43/44
2.5 6 9 11.5 14
=
=
0
11/12
21/22
31/32
41/42
2.5 6 9 11.5 14
=
=
21 22
11 12
2
5
1
5
4
2
1
3
4
=
=
3.5 6 9 12.5
Cable Slack
Lockout
Cable Tension
Range
Cable Pulled
Lockout
11/12
21/22
33/34
43/44
Aux A
13.5
Safety A
Safety A
Safety B
Safety B
0mm
33 34
Aux B
43 44
2
3
8
7
5
1
4
6
Safety A
Safety A
Ground
Ground
N/A
Aux A
Aux A
Safety B
Safety B
21 22
11 12
6
4
7
3
1
8
5
33 34
3
2 N.C. & 2 N.O.
5-Pin Micro (M12) 8-Pin Micro (M12)
for ArmorBlock Guard I/O
Connectors Ratings
Max. Ratings
AC DC Applicable Standards
4-Pin Micro (M12) 250V, 4A 250V, 4A IEC 61076-2-101:2003
5-Pin Micro (M12) 60V, 4A 60V, 4A IEC 61076-2-101:2003
6-Pin Micro (M12) 30V, 2A 30V, 2A IEC 61076-2-101:2003
8-Pin Micro (M12) 30V, 2A 30V, 2A IEC 61076-2-101:2003
12-Pin M23 63V, 6A 63V, 6A IEC 61984:200 1
Page 3

Maintenance
Every Week
Check the correct operation of the
switching circuit. Also check for signs
of abuse or tampering. Inspect the
switch casing for damage. Of
particular importance is damage which
causes loss of sealing at the lid or
conduit entry.
At least every 6 months
Isolate all power! Remove the lid.
Inspect all terminals for tightness.
Clean out any accumulation of fine dirt
etc. Check for any sign of wear or
damage, e.g. cam assembly wear,
contact oxidisation and replace if
apparent. Replace covers & tighten
screws to specified settings. Reinstate
the power & check for correct
operation. Re-apply tamper evident
varnish or similar compound to fixings.
Repair
If there is any malfunction or damage,
no attempts at repair should be made.
The unit should be replaced before
machine operation is allowed.
DO NOT DISMANTLE THE UNIT.
Information in regard to UL508
When used in elevated ambients,
temperature rating of field wiring shall
not be less than ambient.
Electrical spec of rating code:
A600
Current, Max:
120V AC - make 60A, break 6A
240V AC - make 30A, break 3A
Max. V/A: make 7200, break 720
Use copper conductors only. Use
polymeric conduit only. Use one
conduit entrance for field connections.
Wartung
Jede Woche
Auf ordnungsgemäße Funktion des
Schaltkreises kontrollieren. Außerdem
auf Anzeichen von Missbrauch oder
Manipulation untersuchen. Das
Schaltergehäuse auf Beschädigung
kontrollieren. Dabei ist besonders auf
Beschädigungen zu achten, die
Undichtigkeit am Deckel oder
Kabelrohreingang verursachen
könnten.
Mindestens alle 6 Monate
Alle Stromversorgungen trennen! Den
Deckel abnehmen. Alle Klemmen auf
Festigkeit kontrollieren. Etwaige
Ansammlungen feiner
Schmutzteilchen etc. entfernen. Auf
Anzeichen von Verschleiß und
Beschädigungen untersuchen, z.B.
Nockenbaugruppenverschleiß oder
Kontaktoxidation, und ersetzen, wenn
diese aufgetreten sind. Deckel wieder
anbringen & Schrauben auf die
vorgegebenen Werte anziehen. Strom
wieder anschließen & auf
ordnungsgemäßen Betrieb
kontrollieren. Manipulationanzeigenden Lack oder ein ähnliches
Mittel neu auf die Befestigungsteile
auftragen.
Reparatur
Bei Fehlfunktion oder Beschädigung
dürfen keine Reparaturversuche
unternommen werden. Die Einheit
muss ersetzt werden, bevor weiterer
Betrieb der Maschine zugelassen
wird.
DIE EINHEIT DARF NICHT
AUSEINANDERGEBAUT WERDEN.
Information betreffs UL508
Bei Einsatz in höheren
Umgebungstemperaturen darf die
Nenntemperatur für die
Feldverdrahtung nicht niedriger sein
als die Umgebungstemperatur.
Elektrische Spezifikation des
Nennwertcodes:
A600
Strom, Max:
120V AC - Schließen 60A, Öffnen 6A
240V AC - Schließen 30A, Öffnen 3A
Max. V/A: Schließen 7200, Öffnen 720
Nur Kupferleiter benutzen. Nur
polymerische Leitungsrohre benutzen.
Einen Leitungsrohreingang für die
Feldanschlüsse benutzen.
Maintenance
Toutes les semaines
Vérifier le bon fonctionnement du
circuit de commutation. Chercher
également les signes d'un éventuel
tripatouillage. Vérifier l'état du boîtier,
en particulier au niveau de l'étanchéité
du couvercle ou de l'entrée du
conduit.
Tous les 6 mois au minimum
Couper l'alimentation ! Déposer le
couvercle. Vérifier le serrage de
toutes les bornes. Éliminer la
poussière, etc. Vérifier l'état et l'usure
(usure de la came, oxydation des
contacts, etc.) et remplacer si
nécessaire. Remettre les couvercles
en place en serrant les vis au couple
spécifié. Rétablir l'alimentation et
vérifier le bon fonctionnement.
Appliquer sur les vis une nouvelle
couche de vernis témoin ou de tout
autre produit similaire.
Réparation
En cas de défaut de fonctionnement
ou d'endommagement, ne jamais
essayer de réparer le dispositif. Il doit
être remplacé avant de remettre la
machine en service.
NE JAMAIS DÉMONTER LE
DISPOSITIF.
Informations relatives au dispositif
UL508
Lorsque le dispositif est utilisé dans
des températures ambiantes élevées,
le câblage utilisé doit être prévu pour
supporter des températures
supérieures à celle de l'application.
Spécifications électriques du code :
A600
Tension maxi. :
120 V ca - fermeture 60 A, ouverture 6A
240 V ca - fermeture 30 A, ouverture 3A
V/A maxi. : fermeture 7200, ouverture 720
Utiliser des conducteurs en cuivre
uniquement. Utiliser des conduits en
polymère uniquement. Utiliser une
seule entrée pour la connexion sur
site.
Manutenzione
Ogni settimana
Controllare che il circuito di
commutazione funzioni come
richiesto. Sincerarsi anche che non
esistano indicazioni di un uso non
autorizzato o di manomissioni.
Esaminare l'involucro dell'interruttore
per verificare che non sia
danneggiato. È di particolare
importanza ogni danno che possa
determinare la perdita della tenuta sul
coperchio o all'ingresso del tubo
protettivo.
Almeno ogni 6 mesi
Isolare tutte le alimentazioni di
corrente! Rimuovere il coperchio.
Controllare che tutte le morsettiere
siano ben strette. Rimuovere ogni
traccia di polvere ecc. che si sia
accumulata. Sincerarsi che non
esistano segni di usura o danno, ad
es. usura del gruppo camme,
ossidazione dei contatti, e sostituire in
caso di usura o danno. Rimettere al
loro posto i coperchi e serrare le viti
con le coppie specificate. Riconnettere
l'alimentazione elettrica e verificare il
corretto funzionamento. Applicare
nuovamente vernice tamper evident o
un composto simile ai punti di
fissaggio.
Riparazione
In caso di funzionamento anomalo o
di danno, non si deve cercare di
effettuare una riparazione. L'unità
deve essere sostituita prima di
ricominciare a far funzionare la
macchina.
NON SMONTARE L'UNITÀ.
Informazioni su UL508
Per un utilizzo in temperature
ambientali elevate, il cablaggio di
campo dovrà essere dimensionato per
limiti d'impiego a temperature non
inferiori a quelle ambientali
Specifica elettrica del codice delle
prestazioni nominali:
A600
Corrente massima:
120V c.a. - chiusura 60A, apertura 6A
240V c.a. - chiusura 30A, apertura 3A
Max. VA: chiusura 7200, apertura 720
Utilizzare solo conduttori di rame.
Utilizzare solo tubi protettivi polimerici.
Utilizzare una entrata del condotto
protettivo per le connessioni di campo.
Mantenimiento
Cada semana
Compruebe que el circuito de
conmutación funciona correctamente.
Compruebe también que no haya
signos de uso incorrecto o
manipulación no autorizada.
Compruebe que la carcasa no
presente daños. Fíjese especialmente
de que no haya daños que pudieran
provocar una pérdida de estanqueidad
en la tapa o la entrada del conducto.
Cada 6 meses, como mínimo
Aísle toda entrada de corriente. Retire
la tapa. Compruebe el ajuste de todos
los terminales. Limpie cualquier
acumulación de polvo, etc.
Compruebe si hubiera signos de
desgaste o daños en el conjunto de la
leva, óxido en los contactos, etc., y
haga los cambios pertinentes. Vuelva
a colocar las tapas y apriete los
tornillos con los ajustes
correspondientes. Vuelva a conectar
la toma de corriente y compruebe que
funciona correctamente. Vuelva a
aplicar a las sujeciones un barniz
revelador de intentos de apertura o
compuesto similar.
Reparación
Si hubiera algún defecto o avería, no
intente repararlos. Sustituya la unidad
antes de autorizar el funcionamiento
de la máquina.
NO DESMONTE LA UNIDAD.
Información referente a UL508
Si se utiliza en entornos elevados, la
temperatura efectiva del cableado del
inductor no deberá ser inferior a la
temperatura ambiente.
Especificaciones eléctricas de
servicio:
A600
Corriente, máx:
120V CA - apertura 60A, cierre 6A
240V CA - apertura 30A, cierre 3A
V/A máx.: apertura 7200, cierre 720
Use solamente hilos conductores de
cobre. Use solamente conductos
poliméricos. Use una entrada de
conducto para las conexiones
inductoras.
Declaration of Conformity
This is to declare that the products
shown on this document conforms
with the Essential Health and Safety
Requirements (EHSR’s) of the
European Machinery Directive
(98/37/EC), the relevant requirements
of the Low Voltage Directive
(73/23/EEC as amended by
93/68/EEC). These products also
conform to EN 60947-5-1, EN 1088,
EN 292, EN 60204-1 and have Third
Party Approval.
For a comprehensive certificate
please visit: www.ab.com/safety
Konformitätserklärung
Hiermit wird bescheinigt, dass die auf
diesem Dokument aufgeführten
Produkte die grundlegenden
Gesundheits- und
Sicherheitsanforderungen (EHSR's)
der Europäischen Maschinenrichtlinie
(98/37/EC), die relevanten
Anforderungen der
Niederspannungsrichtlinie (73/23/EEC
gemäß Änderung durch 93/68/EEC)
erfüllen. Diese Produkte entsprechen
auch EN 60947-5-1, EN 1088, EN
292, EN 60204-1 und sind für Dritte
zugelassen.
Für ein ausführliches Zertifikat
besuchen Sie bitte: www.ab.com/safety
Déclaration de conformité
Nous déclarons par la présente que
les produits mentionnés dans ce
document sont conformes aux
prescriptions essentielles d'hygiène et
de sécurité de la directive européenne
sur les machines (98/37/CEE), aux
prescriptions pertinentes de la
directive sur les basses tensions
(73/23/CEE amendée par la directive
93/68/CEE). Ces produits sont
également conformes aux normes EN
60947-5-1, EN 1088, EN 292, EN
60204-1 et bénéficient de
l'homologation tierce partie.
Pour le certificat complet, consulter
le site : www.ab.com/safety
Dichiarazione di conformità
Con la presente si dichiara che i
prodotti illustrati su questo documento
sono conformi ai Requisiti essenziali
per la salute e la sicurezza (EHSR)
della Direttiva europea sui macchinari
(98/37/CE), ai requisiti pertinenti della
Direttiva per la bassa tensione
(73/23/CEE come modificata da
93/68/CEE). Questi prodotti sono
anche conformi alle normative EN
60947-5-1, EN 1088, EN 292, EN
60204-1 e sono approvati per un uso
da parte di terzi.
Per visualizzare un certificato
completo, si prega di visitare il sito:
www.ab.com/safety
Declaración de conformidad
Los productos que aparecen en este
documento cumplen los requisitos
esenciales de seguridad e higiene de
la Directiva Europea de Maquinaria
(98/37/EC) y los requisitos pertinentes
de la Directiva de Bajo Voltaje
(73/23/EEC, enmendada por
93/68/EEC). Asimismo, los productos
cumplen la normativa EN 60947-5-1,
EN 1088, EN 292, EN 60204-1 y
cuentan con el sello Third Party
Approval.
Para obtener toda la información
acerca de seguridad, visite:
www.ab.com/safety
Installation
If the application is located in an area
with large daily or seasonal
temperature variations, care should be
taken to set up the installation kit, and
reset it as required, under median
temperature conditions.
Installationsanleitung
Wenn sich die Einheit in einem
Bereich mit täglich oder
saisonbedingten starken
Temperaturschwankungen befindet,
sollte beim Einrichten der
Installationsausrüstung aufgepasst
und sie ggf. bei mittlerer Temperatur
wieder eingestellt werden.
Installation
Si l'application est localisée dans une
zone soumise à de fortes variations
quotidiennes ou saisonnières de
température, toutes les précautions
doivent être prises pour procéder à
l'installation et aux réglages requis à
une température ambiante moyenne.
Installazione
Se l'applicazione si trova in un'area
che presenta forti variazioni di
temperatura durante la giornata o tra
una stagione e l'altra, occorre fare
attenzione a impostare il kit di
installazione, e ad impostarlo
nuovamente come richiesto, in
condizioni di temperatura media.
Instalación
Si la aplicación se encuentra en un
área de grandes variaciones térmicas
diarias o periódicas, tenga cuidado al
montar el kit de instalación y
reajústelo, según convenga, en
condiciones de temperatura media.
Page 4

English
Deutsch
Français
ESPAÑOL
Italiano
Safety Contacts
2 N.C. or 3 N.C. or 4 N.C. direct opening action
Designation / Utilization Cat.
A600 / AC-15 (Ue/Ie)
600V / 1.2 A, 500V / 1.4 A, 240V / 3 A, 120V / 6 A
N600 / DC-13 (Ue/Ie)
600V / 0.4 A, 500V / 0.55 A, 250V / 1.1 A, 125V / 2.2 A, 24V / 2A
Thermal Current 10 A
Current, Min.
5V 5 mA
Auxiliary Contacts
1 N.O. or 2 N.O
Operating Temperature
–25 °C…+80 °C, (–13 °F…+176 °F)
Mechanical Life
1,000,000 operations
Torque Settings, Max.
5.0 N•m (44 lb•in) fixing bolts
2.0 N•m (18 lb•in) lid screws
1.0 N•m (9 lb•in) terminal screws
Note: The safety contacts of these products are described as normally closed (N.C.), ie. with
the guard closed, actuator in place (where relevant) and the machine able to be started.
Operation Force <125 N (28.1 lb) (300 mm cable deflection)
Tensioning Force to Run Position 103 N (23.17 lb) typical
Tension Force to lockout 188 N (42.3 lb) typical
Cable (Rope) Span, Max. 30m (98.4 ft)
Actuator Material
Cable (Rope): Steel cable with polypropelene
sheath
Ingress Protection Rating
IP67
Electrical Life
1,000,000 operations
Sicherheitskontakte
2 N.C. oder 3 N.C. oder 4 N.C. direkte Öffnung
Bezeichnung / Einsatzkat.
A600 / AC-15 (Ue/Ie)
600V / 1.2 A, 500V / 1.4 A, 240V / 3 A, 120V / 6 A
N600 / DC-13 (Ue/Ie)
600V / 0.4 A, 500V / 0.55 A, 250V / 1.1 A, 125V / 2.2 A, 24V / 2A
Wärmestrom 10 A
Strom, Min.
5V 5 mA
Hilfskontakte
1 N.O. oder 2 N.O
Betriebstemperatur
–25 °C…+80 °C
Mechanische Lebensdauer
1.000.000 Betätigungen
Drehmomenteinstellungen, Max
5.0 N•m Befestigungsschrauben
2.0 N•m Deckelschrauben
1.0 N•m Klemmenschrauben
Hinweis: Die Sicherheitskontakte dieser Produkte sind als normalerweise geschlossen (N.C.)
beschrieben, d.h. bei geschlossener Schutzvorrichtung, Betätigungselement in Position (falls
zutreffend) und Maschine startfähig.
Betriebskraft <125 N 12.7 Kgf (300 mm Kabelabbiegung)
Spannkraft für Betriebsposition 103 N 10.5 Kgf Normalwert
Spannkraft für Sperrung 188 N 19.2 Kgf Normalwert
Kabel- (Seil-) Spannweite, Max. 30m
Betätigungselement-Material
Kabel (Seil): Stahlkabel mit
Polypropylenummantelung
Eindringen-Schutzgrad
IP67
Elektrische Lebensdauer
1.000.000 Betätigungen
Contacts de sécurité
2 N.F. ou 3 N.F. ou 4 N.F. ouverture directe
Désignation/utilisation
A600 / AC-15 (Ue/Ie)
600V / 1.2 A, 500V / 1.4 A, 240V / 3 A, 120V / 6 A
N600 / DC-13 (Ue/Ie)
600V / 0.4 A, 500V / 0.55 A, 250V / 1.1 A, 125V / 2.2 A, 24V / 2A
Intensité thermique 10 A
Intensité minimale
5V 5 mA
Contacts auxiliaires
1 N.O. ou 2 N.O
Plage de températures de service
–25 °C…+80 °C
Durée de vie mécanique
1 million de cycles
Couples de serrage
Vis de fixation 5,0 Nm
Vis du couvercle 2,0 Nm
Vis des bornes 1,0 Nm
Remarque : Les contacts de sécurité de ces produits sont décrits comme normalement fermés
(NF), c'est-à-dire lorsque la protection est fermée, l'actionneur en place (si applicable) et la
machine en état de démarrer.
Force d'activation < 125 N 12.7 Kgf (déplacement du câble de 300 mm)
Tension jusqu'à la position de fonctionnement 103 N 10.5 Kgf (typique)
Tension de déclenchement 188 N 19.2 Kgf (typique)
Longueur maxi. de câble 30m
Actionneur
Câble en acier avec gaine polypropylène
Protection
IP67
Durée de vie électrique
1 million de cycles
Contactos de seguridad
2 N.C. o 3 N.C. o 4 N.C. acción de apertura directa
Cat. designación / utilización
A600 / AC-15 (Ue/Ie)
600V / 1.2 A, 500V / 1.4 A, 240V / 3 A, 120V / 6 A
N600 / CC-13 (Ue/Ie)
600V / 0.4 A, 500V / 0.55 A, 250V / 1.1 A, 125V / 2.2 A, 24V / 2A
Corriente térmica 10 A
Corriente, mín
5V 5 mA
Contactos auxiliares
1 N.O. o 2 N.O
Temperatura operativa
–25 °C…+80 °C
Vida mecánica
1,000,000 operaciones
Ajustes de par, máx.
5.0 N•m tornillos de sujeción
2.0 N•m tornillos de la tapa
1.0 N•m tornillos terminales
Nota: Los contactos de seguridad de estos productos se describen como normalmente
cerrados (o N.C.), es decir, con el protector cerrado, el accionador en su lugar (si procede) y la
máquina en condiciones de arrancar.
Fuerza operativa <125 N 12.7 Kgf (300 mm desviación del cable)
Fuerza de tensión a la posición de ejecución 103 N 10.5 Kgf típica
Fuerza de tensión a bloqueo 188 N 19.2 Kgf típica
Longitud del cable (cordón), máx 30m
Material del accionador
Cable (cordón): Cable de acero recubierto de
polipropileno
Protección contra el ingreso
IP67
Vida eléctrica
1,000,000 operaciones
Contatti di sicurezza
2 N.C. o 3 N.C. o 4 N.C. ad azione diretta di apertura
Designazione / Cat. di utilizzazione
A600 / c.a.-15 (Ue/Ie)
600V / 1,2 A, 500V / 1,4 A, 240V / 3 A, 120V / 6 A
N600 / c.c.-13 (Ue/Ie)
600V / 0.4 A, 500V / 0.55 A, 250V / 1.1 A, 125V / 2.2 A, 24V / 2A
Corrente termica 10 A
Corrente, min.
5V 5 mA
Contatti ausiliari
1 N.O. o 2 N.O
Temperatura d'esercizio
–25 °C…+80 °C
Durata meccanica
1.000.000 di funzionamenti
Regolazioni coppia, massima
5,0 Nm per i bulloni di fissaggio
2,0 Nm per le viti del coperchio
1,0 Nm per le viti dei morsetti
NB: i contatti di sicurezza di questi prodotti sono descritti come normalmente chiusi (NC), vale
a dire con la protezione chiusa, l'attuatore in funzione (ove sia richiesto) e la macchina in
condizione di avviamento.
Forza di funzionamento <125 N 12.7 Kgf (deflessione del cavo 300 mm)
Forza di regol. tensione alla posiz. di corsa 103 N 10.5 Kgf (valore tipico)
Forza di tensione a bloccaggio 188 N 19.2 Kgf (valore tipico)
Campata cavo (corda), massima 30m
Materiale attuatore
Cavo (corda): cavo d'acciaio con rivestimento
di polipropilene
Classificazione IP
IP67
Durata elettrica
1.000.000 di funzionamenti
Copyright © 2012 Rockwell Automation, Inc. All Rights Reserved.Master Material: 13891
Drg No: 13891 Rev 12
 Loading...