

Page 1
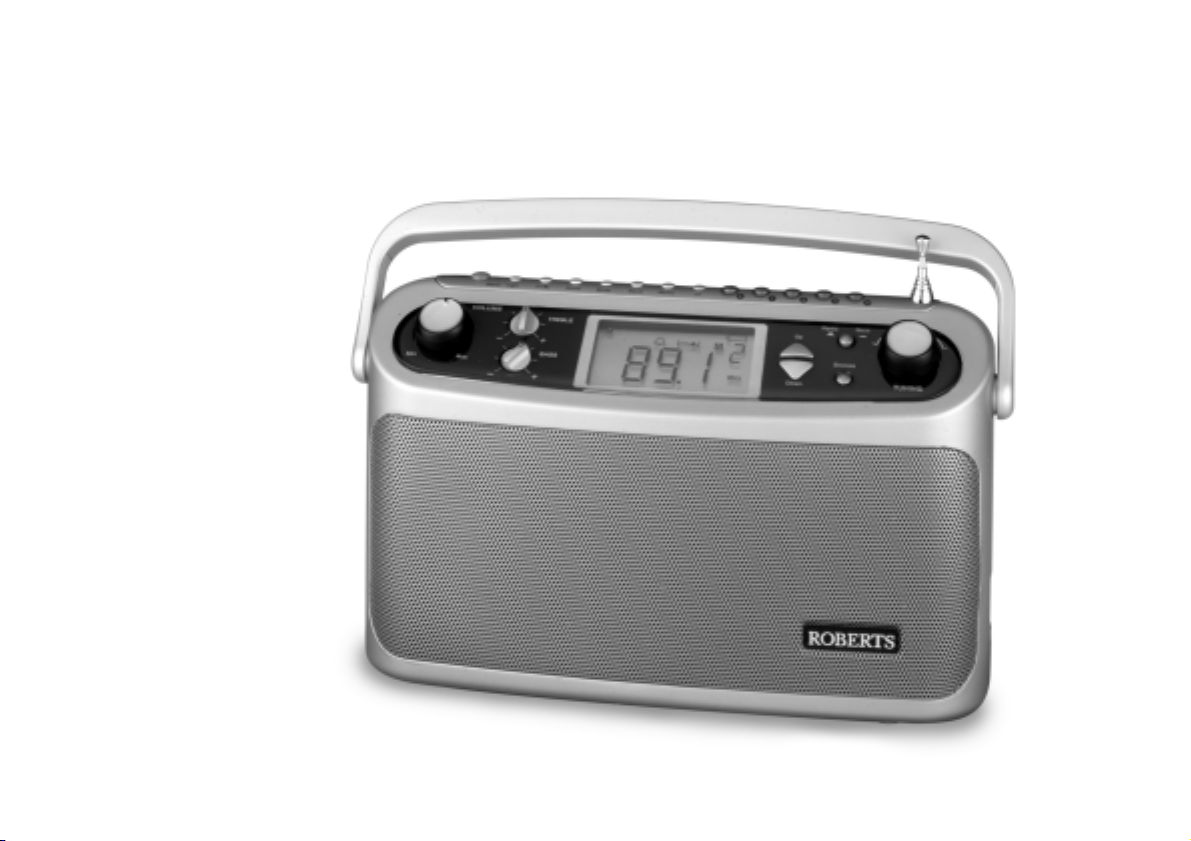
R9939
PLL Synthesised 3 band mains battery radio
ROBERTS
Sound for Generations
Please read this manual before use
Page 2

Contents
Important Information ....................................................... 1
Automatic FM setup .......................................................... 2
Controls .......................................................................... 3-4
Display ............................................................................... 5
Battery Operation .............................................................. 6
Mains Operation ................................................................ 6
Setting the clock time ...................................................... 7
Setting the alarm time ...................................................... 8
Displaying the alarm time ................................................. 9
Wake to buzzer ................................................................ 9
Wake to radio .................................................................. 10
Snooze control ................................................................ 10
Operating your radio - search tuning .............................. 11
Operating your radio - manual tuning ............................. 12
Presetting stations .......................................................... 13
Recalling a preset station ............................................... 14
Last station memory ....................................................... 14
Sleep timer ...................................................................... 15
Display backlight............................................................. 15
Headphones .................................................................... 15
Troubleshooting............................................................... 16
General ............................................................................ 16
Specifications.................................................................. 17
Circuit features ................................................................ 17
Mains supply .................................................................... 18
Guarantee ......................................................... back cover
Important Information - please read before use
To assist the auto setup of your radio it is recommended
that, before connecting your radio to a power supply
(batteries or mains), you fully extend the telescopic
aerial and place your radio in a position where radio
reception is best.
note : the two LR6 (AA size) batteries provide power for
the clock/memory backup and must be fitted at all times.
1
Page 3
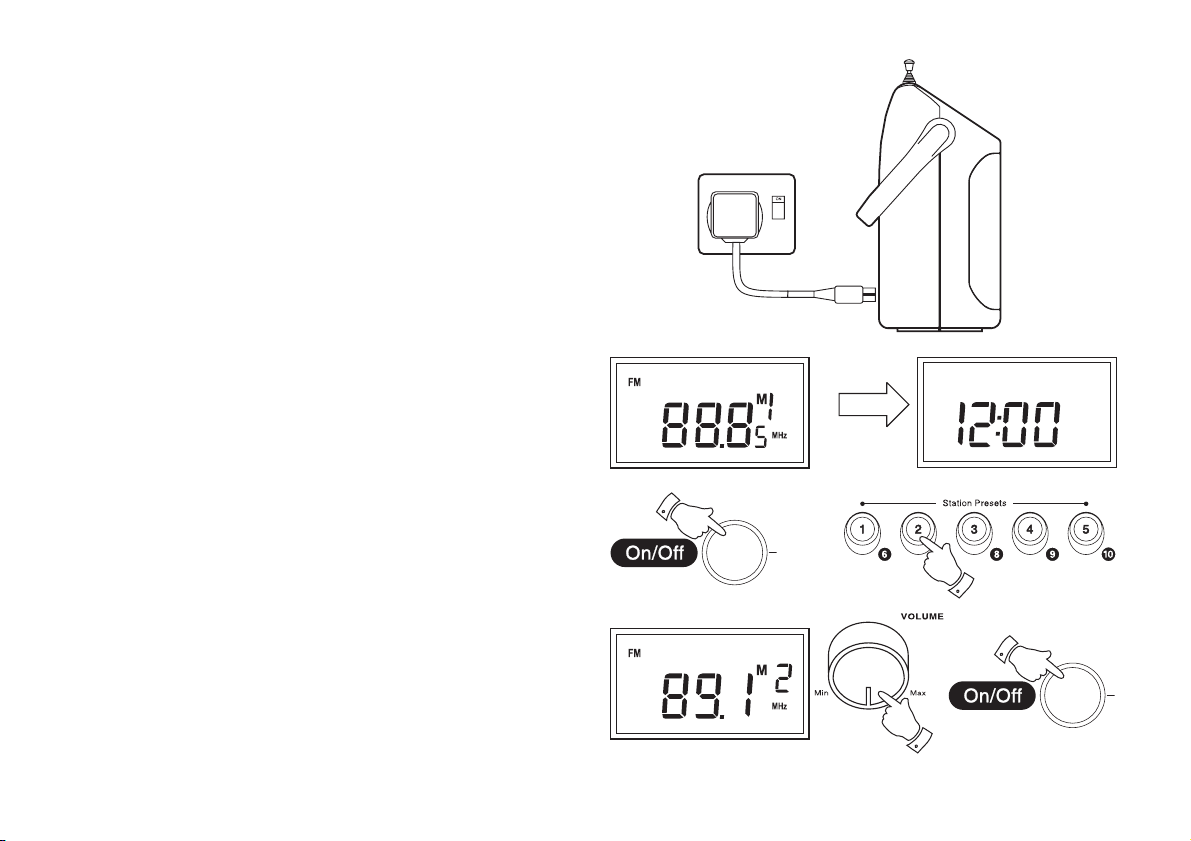
Automatic FM setup
When your radio is first connected to a power supply (batteries or mains)
or after a power failure (when backup batteries are not installed), the
Auto setup will automatically search the FM waveband and store
stations in presets.
1. Install batteries or connect to mains (see page 6). Your radio will
show start searching the FM waveband.
2. Your radio will automatically switch off and return to time display
when setup is complete. (Setting the clock time is described on page
7)
3. Press the On/Off button to switch on your radio and press one of
the Preset buttons to select a station.
4. Adjust the volume using the Volume control. To switch off your
radio press the On/Offbutton.
Note:- Auto setup can take 3-4 minutes to complete and is dependent on the signal strength and number of stations in your area.
To interrupt the Auto setup press and release the Memo button.
Should Auto setup fail, setting FM pre-setting stations can be
carried out manually as described in the following sections.
3
3
If you need any further advice, please call our Technical Helpline on :-
020 8758 0338 (Mon-Fri)
4
4
2
Page 4
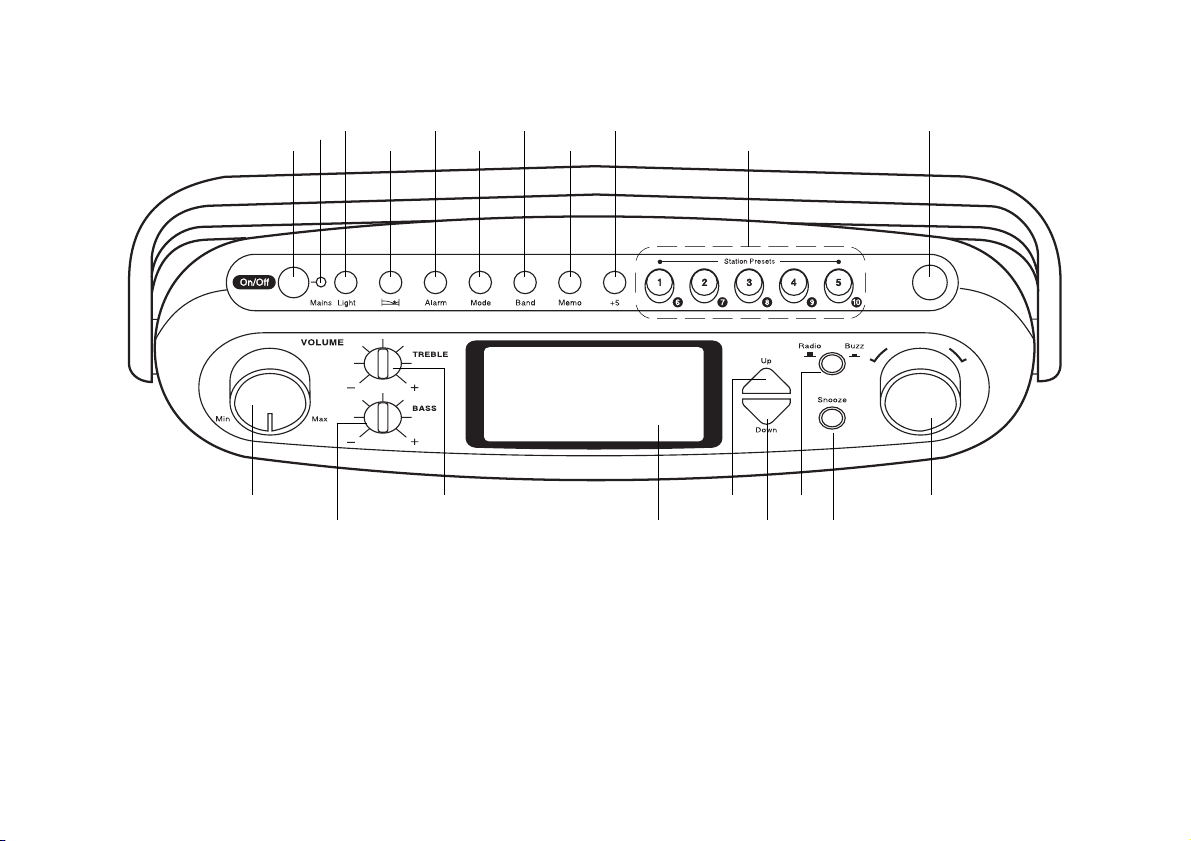
Controls
(Top)
1. On/Off button
2. Mains LED indicator
3. Light button
4. Sleep button
5. Alarm button
6. Mode button
35679
2
1 4810
20
1719
7. Band button
8. Memo button
9. +5 button
10. Preset buttons
11. Telescopic aerial
12. Tuning control
1618
15
13. Snooze button
14. Alarm mode button
15. Tuning down button
16. Tuning up button
17. Liquid crystal display
(LCD)
11
1214
13
18. Treble control
19. Bass control
20. Volume control
3
Page 5
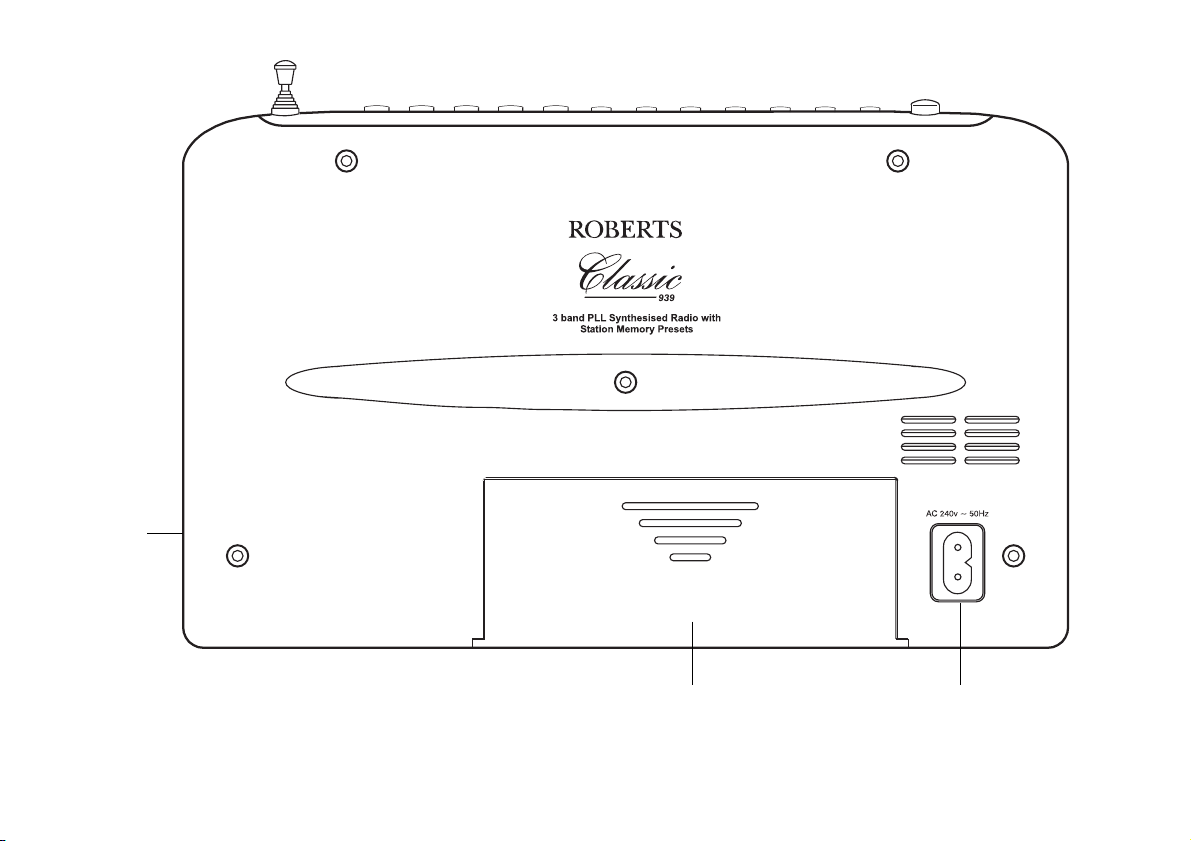
Controls
(Rear)
21
21. Headphone socket (on side)
22. Battery compartment
If you need any further advice, please call our Technical Helpline on :-
020 8758 0338 (Mon-Fri)
22 23
23. Mains socket
4
Page 6
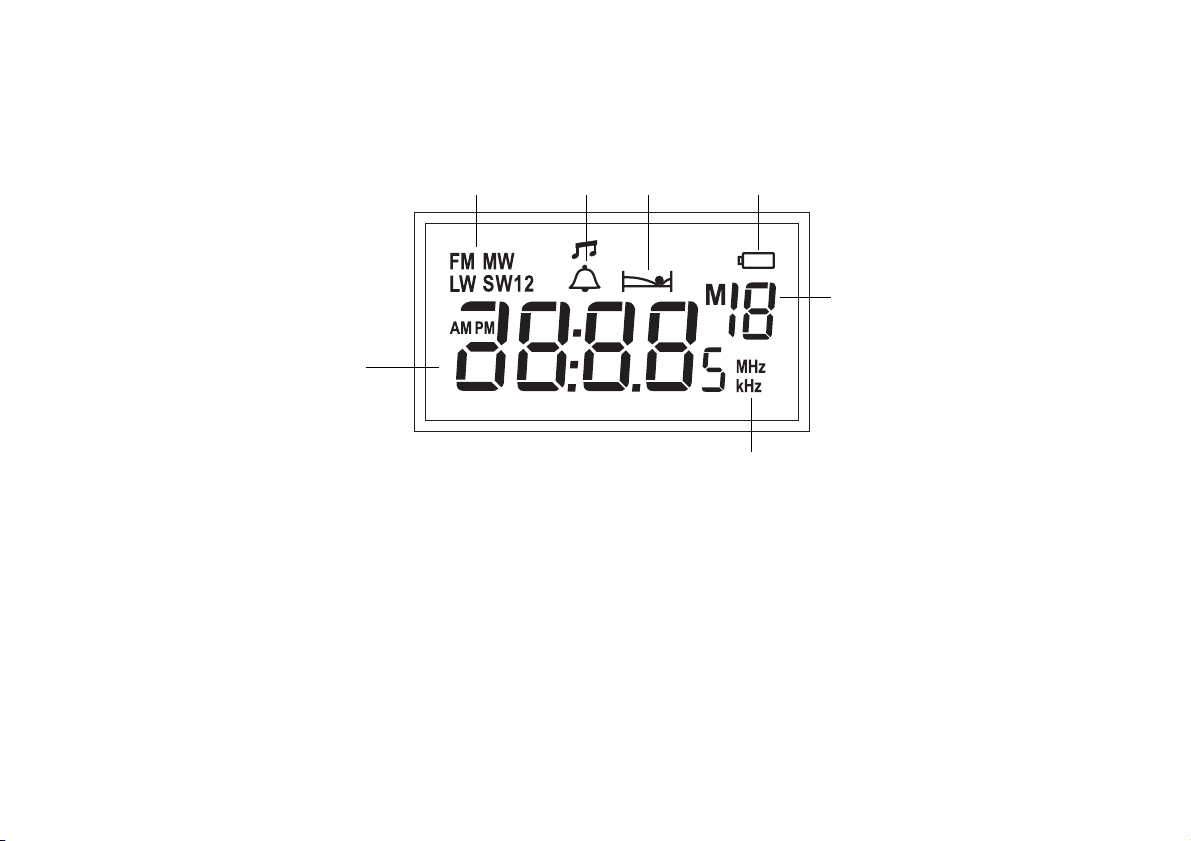
Display
23 41
5
7
6
1. Waveband indicators
2. Alarm symbol
3. Sleep time symbol
4. Battery indicator
5
5. Preset indicator
6. Frequency units
7. Frequency/time digits
Page 7

Battery operation
1. Remove the Battery cover on the rear of the unit by pushing the
battery door in and downwards.
2. Insert two LR6 (AA size) batteries into the small spaces under flap
with yellow label. Insert four LR14 (C size) batteries into the remaining spaces in the compartment. Take care to ensure all batteries are
inserted with the correct polarity as shown inside the battery compartment. Replace the battery cover.
note : the two LR6 (AA size) batteries provide power for the
clock/memory backup and must be fitted at all times.
3. Reduced power, distortion and a ‘stuttering’ sound are all signs that
the 4 LR14 batteries may need replacing.
4. If the radio is not to be used for any extended period of time it is
recommended that the batteries are removed from the radio.
We would recommend for economy that the R9939 is used on the
mains whenever possible with battery operation for occasional or
stand-by use only.
Mains operation
1. Place your radio on a flat surface.
2. Plug the mains lead into the Socket located on the rear of your radio
ensuring that the plug is pushed fully into the socket.
3. Plug the other end of the mains lead into a wall socket and switch on
the wall socket.
If you need any further advice, please call our Technical Helpline on :-
020 8758 0338 (Mon-Fri)
6
Page 8

Setting the clock time
1. Ensure that you radio is switched off.
2. When first connected to mains or batteries the display will show
"12:00"
3. Hold down the Mode button until the display begins to flash.
1
3
4. Set the hours using the Down button or turn Tuning Control to
the left.
5. Set the minutes using the Up button or turn Tuning control to the
right.
6. Press the Mode button to store the time.
Note: The clock uses the 24 hour system e.g. 2:00pm is shown as 14:00
7
5
4
5
4
6
Page 9

Setting the alarm time
1. Ensure that you radio is switched off.
2. Press and release the Mode button. The current alarm time and a
flashing alarm symbol will appear in the display.
3. Press and hold down the Mode button until the alarm time flashes
in the display.
1
2
4. Set the hours using the Down button or turn Tuning Control to
the left
5. Set the minutes using the Up button or turn Tuning control to the
right.
6. Press the Mode button to store the alarm time.
Note: Setting the alarm time can only be carried out whilst display is
flashing (8 seconds).
If you need any further advice, please call our Technical Helpline on :-
020 8758 0338 (Mon-Fri)
3
5
4
5
4
6
8
Page 10

Displaying the alarm time
1. Switch off your radio using the On/Off button.
2. Press the Mode button once to display alarm time. Clock time will
resume automatically after 3 seconds.
Wake to buzzer
1. Set the alarm time as previously described.
2. Switch off your radio using the On/Off button.
3. Press and release the Alarm button until either the or
symbol appears in the display.
4. Press the Radio/Buzz button until the symbol appears in the
display.
5. At the preselected time the buzzer will switch on. The buzzer will
switch off automatically after 90 minutes. The buzzer alarm may be
switched off for 24 hours by pressing the On/Off button.
6. To permanently cancel the buzzer alarm repeatedly press and
release the Alarm button until the symbol is removed from
the display.
1
2
2
3
4
5
6
9
Page 11

Wake to radio
1. Set the alarm time as previously described.
2. Switch off your radio using the On/Off button.
3. Press and release the Alarm button until either the or
symbol appears in the display.
4. Press the Radio/Buzz button until the symbol appears in the
display.
5. At the preselected time the radio will switch on. The radio will switch
off automatically after 90 minutes. The radio alarm may be switched
off for 24 hours by pressing the On/Off button.
6. To permanently cancel the radio alarm repeatedly press and release
the Alarm button until the symbol is removed from the display.
Snooze control
1. The radio or buzzer alarm can be silenced for 5 minutes by pressing
the Snooze button. The alarm symbols or will flash in the
display. This sequence can be repeated during the 90 minutes alarm
period.
2
3
4
5
6
1
If you need any further advice, please call our Technical Helpline on :-
020 8758 0338 (Mon-Fri)
10
Page 12

Operating your radio - search tuning
1. Switch on your radio by pressing the On/Off button.
2. Select the required waveband by pressing the Band button. The
waveband selected will appear in the display. On FM fully extend
the Telescopic aerial. On MW and LW rotate your radio for best
reception.
1
2
3. Press and hold down either the Tuning Up or Down buttons or
turn the Tuning control left or right until the frequency in the display
begins to change rapidly. Release the button. Your radio will scan
the selected waveband, stopping each time it finds a station of
sufficient strength.
4. Adjust the Volume, Bass and Treble controls to the required
settings.
5. To search for additional stations repeat the above procedure.
Search tuning may be stopped by a single press on either the
Tuning Up or Down buttons.
6. Press the On/Off button to switch off your radio.
11
3
3
3
3
4
4
4
6
Page 13

Operating your radio - manual tuning
1. Switch on your radio by pressing the On/Off button.
2. Select the required waveband by pressing the Band button. The
waveband selected will appear in the display. On FM fully extend
the Telescopic aerial. On MW and LW rotate your radio for best
reception.
1
2
3. A single press on either the Tuning + or - buttons or turn and
release the Tuning control to change the frequency up or down.
The frequency steps are:- FM 50kHz, MW 9kHz and LW 1kHz.
4. Adjust the Volume, Bass and Treble controls to the required
settings.
5. Press the On/Off button to switch off your radio.
If you need any further advice, please call our Technical Helpline on :-
020 8758 0338 (Mon-Fri)
3
3
3
3
5
5
5
6
12
Page 14

Pre-setting stations
You may store up to 10 different stations on FM and MW and 5 stations
on LW giving a total of 25 preset stations.
1. Switch on your radio using the On/Off button.
2. Select the desired waveband using the Band button.
1
2
3. Tune into the required station using one of the tuning methods
previously described.
4. Press and release the Memo button, 'M'' will flash in the display
for 8 seconds.
5. Whilst 'Memory' is flashing press one of the Preset buttons 1 to
5 under which you wish to store the station.
·
6. Press the Memo button to store the station. The preset number will
now appear in the display.
7. On FM and MW Presets 6 to 10 are obtained by pressing +5 and
Preset button 1 to 5. e.g preset 7 can be set by pressing +5
followed by Preset button 2
8. Repeat the above procedure for the remaining presets
9. Press the On/Off button to switch off your radio.
Note: Pre-setting of stations can only be carried out whilst 'M' is flashing
in the display (8 seconds).
13
4
6
5
7
7
9
Page 15

Recalling a preset station
1. Switch on your radio using the On/Off button.
2. Select the desired waveband using the Band button.
3. Press one of the Preset buttons 1-5 to recall the station.
1
2
4. On FM and MW Presets 6 to 10 are obtained by pressing +5 and
Preset button 1 to 5. e.g preset 7 can be recalled by pressing +5
followed by Preset button 2.
5. Press the On/Off button to switch off your radio.
Last station memory
1. Your radio provides an automatic last station memory function. This
function recalls the station that was playing when the radio was
switched off.
If you need any further advice, please call our Technical Helpline on :-
020 8758 0338 (Mon-Fri)
3
4
4
5
14
Page 16

Sleep timer
Your radio can be set to turn off after a preset time has elapsed.
1. Press and hold down the button until the desired time is
reached (maximum 90 minutes in 10 minute steps). The radio will
switch off after the sleep time has elapsed.
2. To cancel the sleep function before the preset time has expired,
press the On/Off button.
Display backlight
1. The display backlight will be switched on for 8 seconds when the
Light button is pressed.
Headphones
1. A Headphone Socket (3.5mm) located on the right hand end of
your radio is provided for use with either headphones or an
earpiece. Inserting the headphone plug automatically mutes the
internal loudspeaker.
1
2
1
15
Page 17

Troubleshooting
Due to external interference (caused by static charges from carpets,
thunderstorms, etc.), the control electronics of your radio could receive
bad information. If the display is incomplete or the radio is not responding
to control buttons, proceed as follows:-
Remove the power supply (the mains and all batteries) and re-install
them again after one minute.
This resets the radio to its initial state. The stored data for the individual
memory positions, the clock, the alarm settings and the Last Station
Memory are all cleared.
General
Do not allow this radio to be exposed to water, steam or sand. Do not
leave your radio where excessive heat could cause damage such as in
a parked car where the heat from the sun can build up even though the
outside temperature may not seem too high. It is recommended that the
FM band be used wherever possible as better results in terms of quality
and freedom from interference will usually be obtained than on the MW
or LW bands.
If you need any further advice, please call our Technical Helpline on :-
020 8758 0338 (Mon-Fri)
16
Page 18

Specifications
Power Requirements
Mains AC 230 volts, 50Hz only
Batteries 4 x LR14 (C size) for radio
2 x LR6 (AA size) for clock/memory
Circuit Features
Loudspeaker 92mm 4ohms
Output Power 1W into 4ohms
Battery Life
Frequency Coverage
Approx. 40hrs of listening for 4 hours a day at
normal volume using alkaline cells.
FM 87.5-108MHz
MW 522- 1620kHz
LW 144- 281kHz
Headphone socket 3.5mm dia
Aerial System FM Telescopic aerial
MW Built-in Ferrite aerial
LW Built-in Ferrite aerial
17
Page 19

Mains supply
The R9939 will operate from a supply of AC 230 volts, 50Hz only.
DO NOT cut off the mains plug from this equipment. If the plug
fitted is not suitable for the power points in your home or the cable is too
short to reach a power point, then obtain an appropriate safety approved
extension lead or adaptor. If in doubt consult your dealer.
If nonetheless the mains plug is cut off, remove the fuse and dispose
of the plug immediately.This will avoid a possible shock hazard by
inadvertent connection to the mains supply.
If this product is not supplied with a mains plug, or one has to be fitted,
then follow the instructions given below:
IMPORTANT. DO NOT make any connection to the larger terminal which
is marked with the letter E or by the safety earth symbol or coloured
Green or Green-and-yellow.
The wires in the mains lead are coloured in accordance with the
following codes :-
BLUE - NEUTRAL BROWN - LIVE
The wire coloured BLUE must be connected to the terminal marked N or
coloured BLACK.
The wire coloured BROWN must be connected to the terminal marked
L or coloured RED.
Fuse
When replacing the fuse only a 3A ASTA approved to BS1362 type
should be used and be sure to re-fit the fuse cover.
If you need any further advice, please call our Technical Helpline on :-
020 8758 0338 (Mon-Fri)
IF IN DOUBT - CONSULT A QUALIFIED ELECTRICIAN.
Replacement fuse holders are available from Roberts Radio Technical
Services at the address shown on the rear of this manual.
18
Page 20

Guarantee
This instrument is guaranteed for twelve months from the date of delivery to the original owner against failure due to faulty workmanship or component
breakdown, subject to the procedure stated below. Should any component or part fail during this guarantee period it will be repaired or replaced free
of charge.
The guarantee does not cover:
1. Damage resulting from incorrect use.
2. Consequential damage.
3. Receivers with removed or defaced serial numbers.
N.B. Damaged or broken telescopic aerials will not be replaced under guarantee.
Procedure:
Any claim under this guarantee should be made through the dealer from whom the instrument was purchased. It is likely that your Roberts' dealer
will be able to attend to any defect quickly and efficiently, but should it be necessary the dealer will return the instrument to the company’s service
department for attention. In the event that it is not possible to return the instrument to the Roberts' dealer from whom it was purchased, please contact
Roberts Radio Technical Services at the address shown below.
These statements do not affect the statutory rights of a consumer.
ROBERTS RADIO TECHNICAL SERVICES
97-99 Worton Road
Isleworth Middlesex
TW7 6EG
Issue 2
Technical Helpline:- 020 8758 0338 (Mon-Fri)
 Loading...