

Page 1
ENGLISH
DEUTSCH
FRANCAIS
PROJECTION CLOCK
Press the SNOOZE / LIGHT button
(1) to switch ON the projector for 5
seconds.
NOTE : PROJECTS TIME IMAGE ON
THE CEILING OR WALL OF A DAR
KENED ROOM. MAXIMUM PROJECTION DISTANCE IS 3-9 FEET .
TIMER
Press TIMER then SET then UP
DOWN to adjust the countdown
timer.
NATURAL SOUND
Press "SOUND" (9) to select one of
the 4 Natural Sound effects availa
ble.
Specifications subject to change
without notice.
LAC-2005P
Digital LCD Alarm Clock and
Pojection Clock.
POWER SUPPLY
1. Open the battery cover on the
bottom.
2. Insert and connect 3 UM-4 (AAA)
batteries following the correct
polarities.
3. Replace the battery cover.
Note: Check your batteries regularly.
Old or discharged batteries must be
replaced to avoid acid leaking that may
damage your unit. If the unit is not to be
used for a long time, remove the
batteries from their compartment.
(Battery is not included in the packing).
DISPLAY
1. Normally the LCD DISPLAY
indicates the CALENDAR, which
shows the MONTH, DATE, DAY,
and TIME.
2. Press LIGHT/SNOOZE once and the
illumination will activate. The
BACKLIGHT will automatically turn
OFF after 6 seconds.
SETTING THE LCD DISPLAY
1. In the normal Display mode, to set
the TIME, press SET Button and the
HOUR digits will flash. Press UP/
DOWN to adjust the HOUR digits.
2. To set the MINUTE, press SET once
more and the MINUTE digits will
flash. Press UP/DOWN to adjust the
MINUTE digits.
3. To set the MONTH, press SET again
again and the MONTH digits will
flash. Press UP/DOWN adjust the
MONTH digit.
4. To set the DATE, press SET again
one more time and the DATE DIGIT
digit will flash. Press UP/DOWN to
adjust the DATE digit.
5. To set the DAY, press SET again
and the DAY CHARACTERS will
flash. Press UP/DOWN to adjust
the DAY.
SETTING THE ALARM
1. In the normal Display mode, press
MODE once and the display will
show the ALARM TIME. The
"ALARM" icon indicates that the
display is showing the ALARM
TIME.
2. To set the ALARM TIME, press SET
Button for 8 seconds and the OUR
digits will flash. Press UP/DOWN
to adjust the HOUR digits.
3. To set the ALARM MINUTE, press
SET once more and the MINUTE
digits will flash. Press UP/DOWN
to adjust the MINUTE digits.
4. When the Time meets the PRESET
ALARM TIME, the alarm sound will
be on. Press SNOOZE (3), and the
alarm will turn off, and automatically turn on after 5 minutes.
Datumanzeige. Drücken Sie UP/
DOWN um das Datum einzustellen.
5. Um den Tag einzustellen, drücken
Sie SET zweimal, blinkt die
Taganzeige. Drücken Sie UP/
DOWN um den Tag einzustellen.
6. Drücken Sie SET nochmals um zur
normalen Anzeige zurückzukehren.
WECKER-EINSTELLEN
1. Im normalen Anzeigemodus,
drücken Sie MODE einmal. In der
Anzeige wird die Alarmzeit
angezeigt. Das symbol "ALARM"
erscheint um zu bestätigen, dass
die Alarmzeit angezeigt wird.
2. Um die Weckerzeit einzustellen,
Drücken Sie die SET-Taste (7) und
halten Sie sie gedrückt.. Die Stun-
den blinken. Drücken Sie UP/DOWN
um die Stunden einzustellen.
3. Um di Minuten einzustellen, drücken
Sie SET nochmals. Die Minuten
blinken. Drücken Sie UP/DOWN um
die Minuten einzustellen.
4. Drücken Sie SET nochmals um zur
normalen Anzeige zurückzukehren.
LAC-2005P
Digital-LCD-Uhr mit Wecker UhrProjektion und Kalendar.
STROMVERSORGUNG
1. Den Deckel des Batteriefachs in der
unteren Seite abnehmen.
2. 3 UM-4 Batterien einlegen.
3. Den Deckel des Batteriefachs
wieder anbringen.
Anmerkung: Die Batterien regelmässig
prüfen. Alte oder entladene Batterien
auswechseln, um eine Beschädigung
des Geräts durch auslaufende Batterie
zu vermeiden. Wenn das Gerät langere
Zeit nicht benutzt wird, die Batterien
aus dem Batteriefach herausnehmen.
(Batterien nicht mitgeliefert).
ANZEIGE
1. Normalerweise zeigt das Gerät
das Kalendar, mit Monat, Datum,
Tag, und die Zeit an.
4. Drücken Sie LIGHT/SNOOZE einmal
um die Hinterbeleuchtung zu
aktivieren. Die Hinterbeleuchtung
schaltet nach 6 Sekunden aus.
LCD-ANZEIGE EINSTELLEN
1. In normalem Anzeigemodus,
Drücken Sie die SET-Taste (7) und
halten Sie sie gedrückt. Die Stun-
den blinken. Drücken Sie die UP-
DOWN-Taste, bis die gewünschte
Weckzeit auf dem Display angezeigt wird.
2. Um di Minuten einzustellen, drücken
Sie SET nochmals. Die Minuten
blinken.
3. Um den Monat einzustellen,
drücken Sie SET zweimal, blinkt die
Monatanzeige. Drücken Sie UP/
DOWN um den Monat einzustellen.
4. Um das Datum einzustellen,
drücken Sie SET einmal, blinkt die
4. Pour régler la date, presser SET
une fois et la date clignotera.
Presser UP/DOWN pour régler la
date.
5. Pour régler le jour, presser SET une
fois encore et le jour clignotera.
Presser UP/DOWN pour régler le
jour.
6. Presser SET encore une fois pour
retourner à l'affichage normal.
REGLAGE DE L'ALARME
1. Dans la modalité d'affichage
normale, presser MODE une fois et
l'afficheur montrera l'horaire
d'alarme. Le symbole "ALARM"
indique que l'horaire montré est
celui de l'alarme.
2. Pour régler l'horaire d'Alarme,
presser SET jusqu' au les chifres
des heures clignoteront. Presser
UP/DOWN pour régler les heures.
3. Pour régler les minutes de l'alarme,
presser SET une fois et les
minutes clignoteront. Presser UP/
DOWN pour régler les minutes.
LAC-2005P
Horloge numérique LCD avec
alarme et affichage calendrier.
1. Ouvrir le logement des piles sur l’arrière
de l’appareil
2. Introduire 3 piles de type UM-4 (pas
incluses) dans le logement en veillant à les
bien placer conformément au schéma
indiqué à l'interieur du logement (nous
recommandons des piles Alcalines).
3. Fermer le logement.
Note: Contrôlez vos piles régulièrement.
Les piles trop vieilles ou déchargées
devront être remplacées afin d'éviter un
endommagement résultant de fuites d'acide.
Si l'appareil ne doit pas être utilisé pendant
une longue période de temps, enlevez les
piles du logement.
4. Presser SET encore une fois pour
retourner à l'affichage normal.
5. Lorsque l'horaire d'alarme arrive
le réveil sonne. En appuyant sur
la touche de LIGHT/SNOOZE (1),
on l'arrête momentanément
pendant environ 5 minutes,
après quoi le réveil recommence
à sonner.
PROJECTION
Presser LIGHT/SNOOZE (1) pour
maintenant projeter l' oraire 5
secondes.
FONCTION TIMER
Presser la touche TIMER, puis SET et
finalement UP/DOWN pour régler le
timer.
NATURAL SOUND
presser SOUND (9) pour actionnerun
des quatre effets sonores disponi
bles.
Les fonctions et le design peuvent
faire l'objet de modifications sans
AFFICHEUR
1. Normalement l'afficheur LCD montre
le calendrier avec le mois, la date
le jour et l'horaire.
2. Pour sélectionner le système
d'affichage de l'heure, presser la
touche MODE en séquence.
3. Presser LIGHT/SNOOZE une fois et
la rétro-illumination s'activera. Elle
s'éteindra automatiquement après
6 secondes.
REGLAGE DE L'AFFICHEUR LCD
1. Dans la modalité d'affichage
normale, pour régler l'horaire,
presser SET jusqu' au les chiffres
des heures clignoteront. Presser
UP/DOWN pour régler les heures.
2. Pour régler les minutes, presser
SET une fois et les minutes
clignoteront. Presser UP/DOWN
pour régler les minutes.
3. Pour régler le mois, presser SET
une fois encore et le mois
clignotera. Presser UP/DOWN
pour régler le mois.
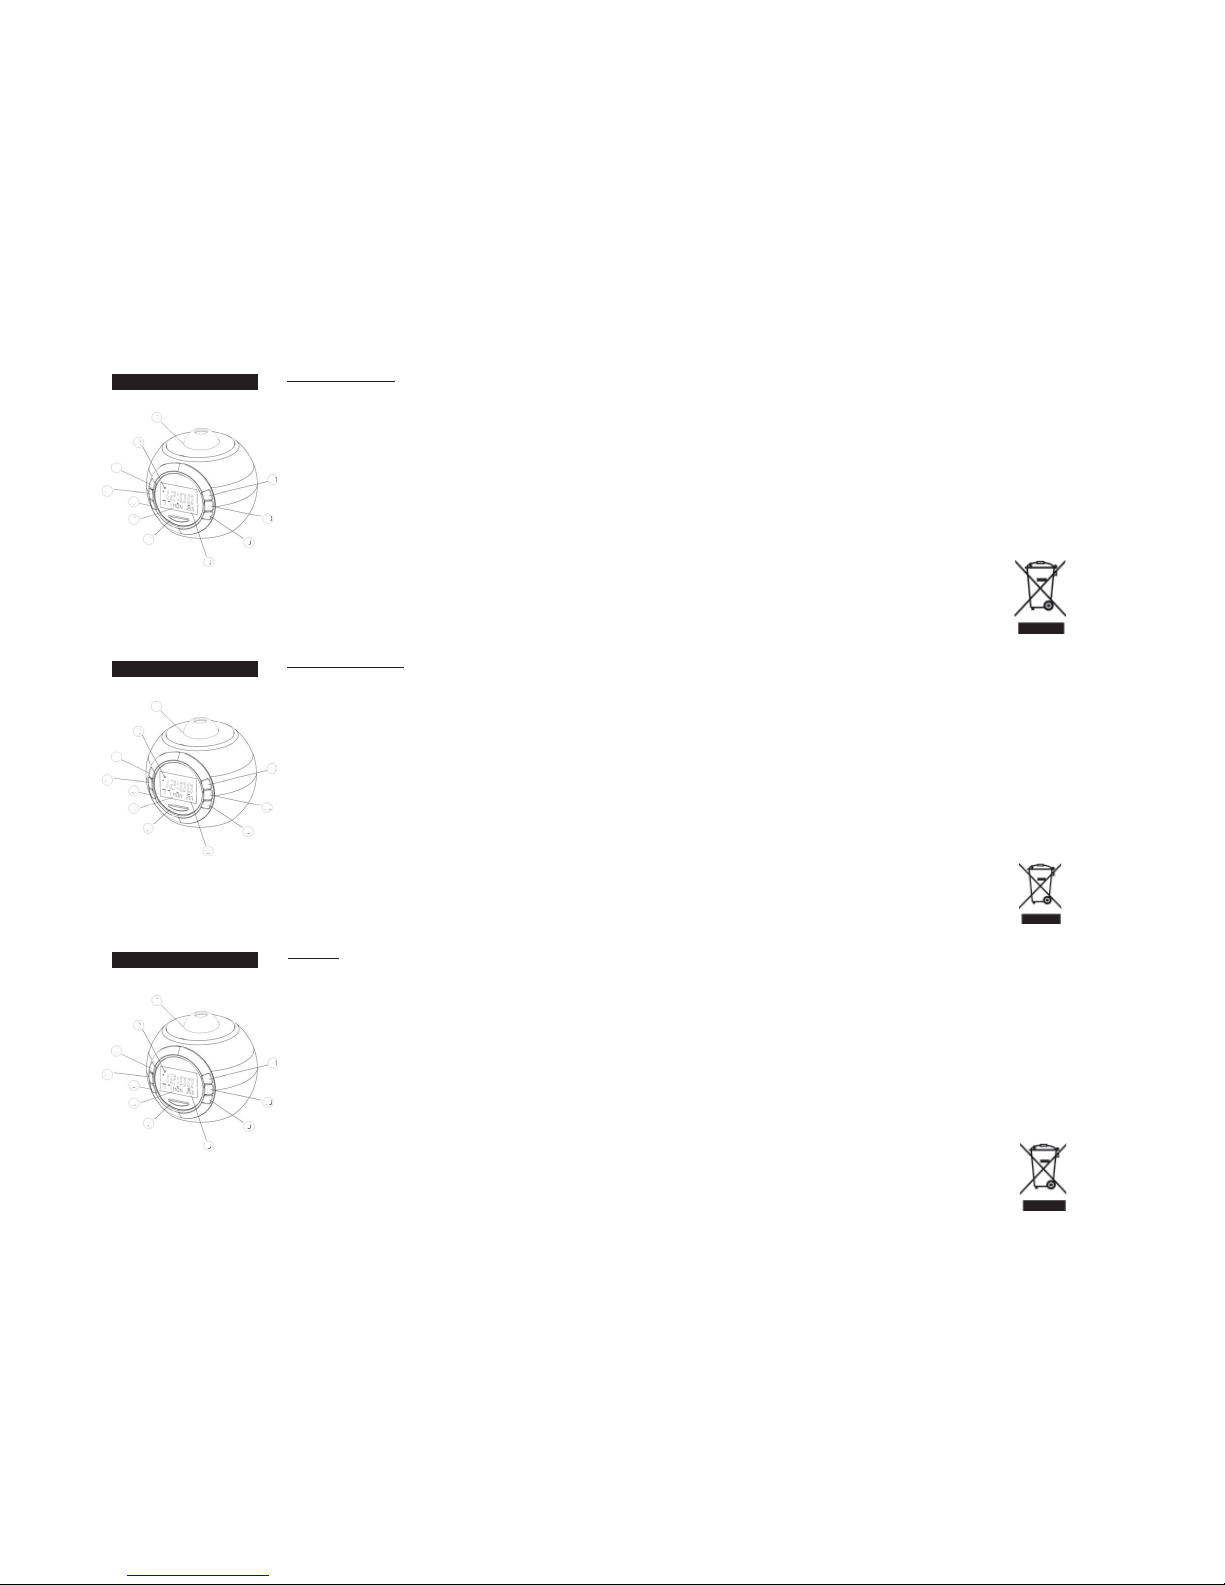
COMMANDES
1. Touche de Light/Snooze
2. Afichage LCD
3. Touche Compte à rebours
4. Touche de MODE
5. Touche Down
6. Touche de UP
7. Touche de SET
8. Touche Calendrier
9. Touche Natural Sound
10. Temperature
11. Touche Temps
KONTROLLE UND FUNKTIONEN
1. Projektion Licht/Snooze-Taste
2. LCD Display
3. Countdown-Timer-Taste
4. MODE-Taste
5. DOWN-Taste
6. UP-Taste
7. SET-Taste
8. Kalender-Taste
9. Natural SOund-Taste
10. Temperatur-Taste
11. Time-Taste
5. Wenn die Weckerzeit erreicht,
ertönt der Wecker. Wenn der
Wecker ertönt und Sie die
SNOOZE (3) drücken, stoppt der
Wecker zeitweilig für ca. 5
Minuten, danach ertönt er
wieder.
PROJEKTION
Drücken Sie das SNOOZE / LEUCHTKnopf (1), den Projektor einzuschalten für 5 Sekunden.
TIMER
Drücken Sie TIMER, dann Sie die
SET-Taste (7) dann UP/DOWN-Taste
um die Stunden Minuten einzustellen.
NATURAL SOUND
Drücken Sie SOUND (9) zu einen der
vier "Natural Sound" effekt.
Änderung vorbehalten.
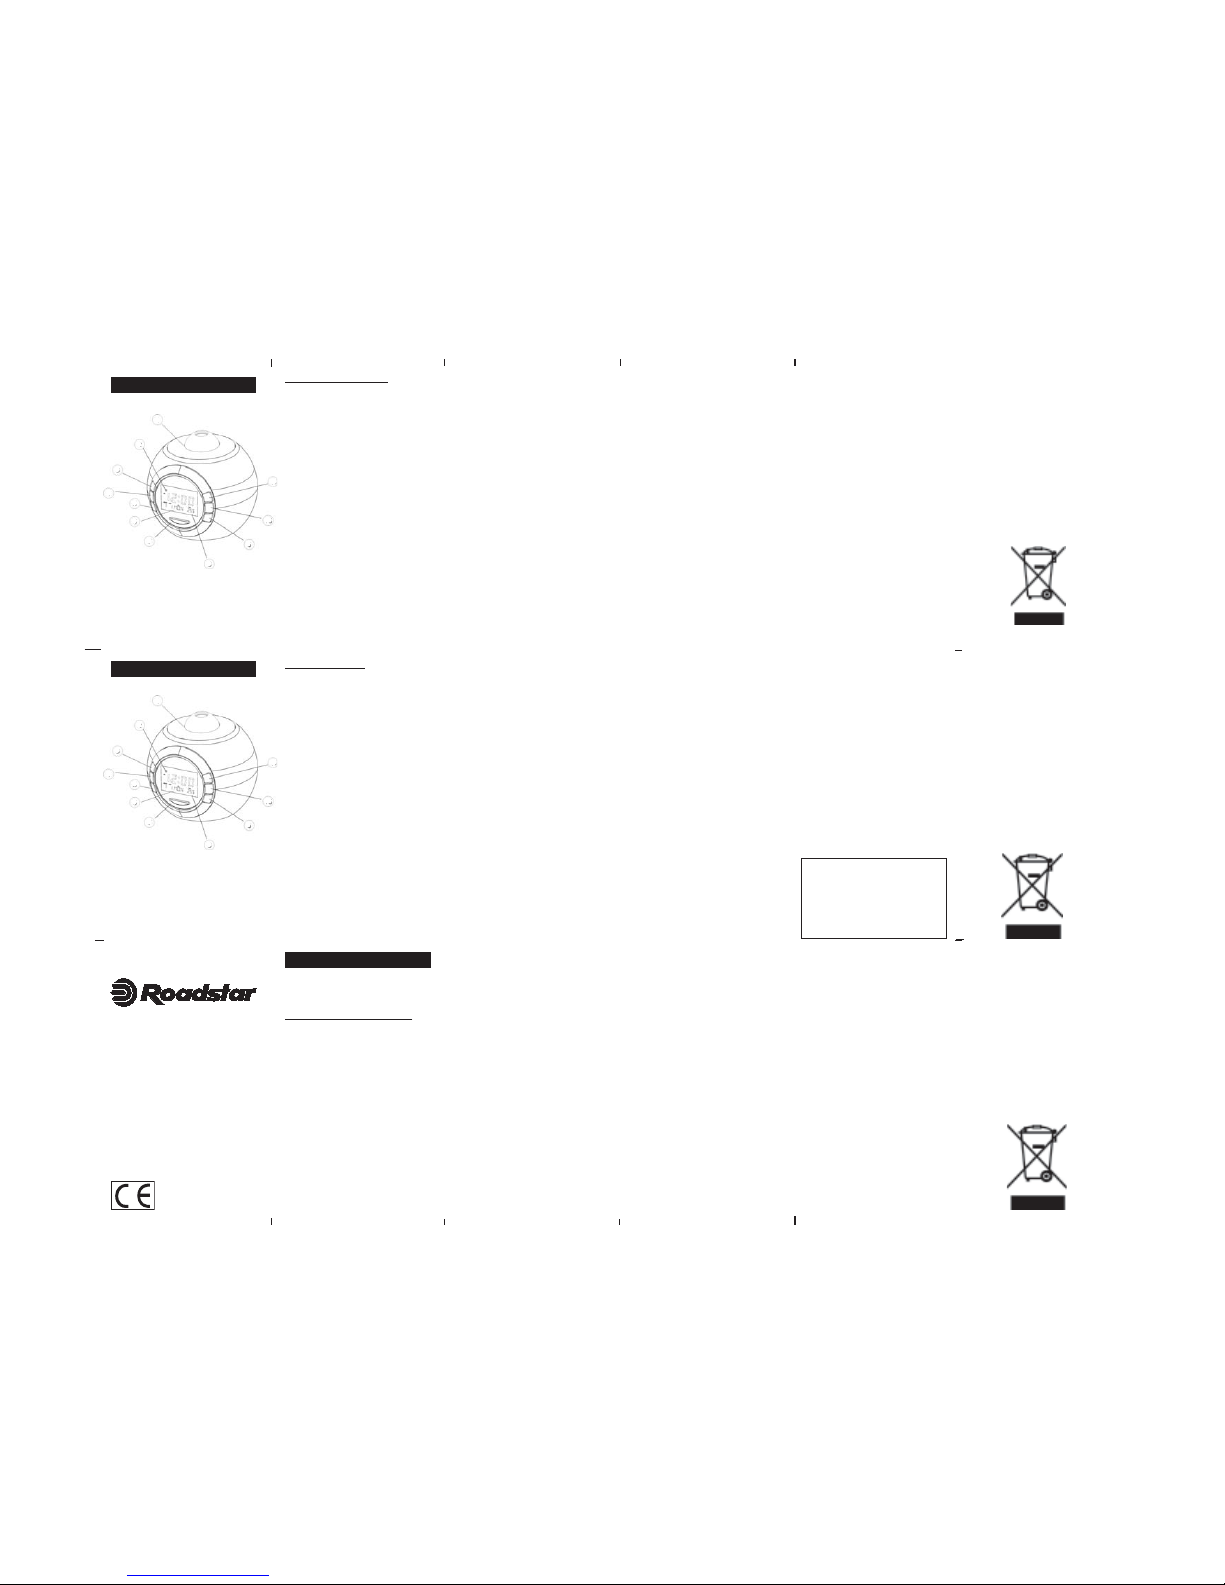
CONTROLS AND FUNCTIONS
1. Projection Light/Snooze Button
2. LCD Display
3. Countdown Timer Button
4. Mode Button
5. Down button
6. Up Button
7. Set Button
8. Calender
9. Natural Sound
10. Temperature
11. Time Button
Correct Disposal of ThisProduct(Waste
Electrical &Electronic Equipment)This
marking shown on the product orits literature,
indicates that it should notbe disposed with
other householdwastes at the end of its
working life. Toprevent possible harm to
theenvironment or human health from
uncontrolled waste disposal, pleaseseparate
this from other types ofwastes and recycle it
responsibly topromote the sustainable reuse
ofmaterial sources. Household users should
contact eitherthe retailer where they puröchased thisproduct, or their local governmen
toffice, for details of where and howthey can
take this item forenvironmentally safe
recycling.Business users should contact
theirsupplier and check the terms and
conditions of the purchase contract.This
product should not be mixed withother
commercial wastes for disposal.
Korrekte Entsorgungdieses
Produkts(Elektromüll)Die Kennzeichnung auf
dem Produktbzw. auf der dazugehörigen
Literaturgibt an, dass es nach seiner
Lebensdauer nicht zusammen mit dem
normalen HaushaltsmüIl entsorgtwerden darf.
Entsorgen Sie diesesGerat bitte getrennt von
anderenAbfallen, um der Umwelt bzw.
dermenschlichen Gesundheit nicht durchunkontrollierte Müllbeseitigung zus-chaden.
Recyceln Sie das Gerät, umdie nachhaltige
Wiederverwertung vonstofflichen Ressourcen
zu fördern.Private Nutzer sollten den Händler,
beidem das Produkt gekauft wurde, oderdie
zuständigen Behördenkon-taktieren, um in
Erfahrung zubringen, wie sie das Gerät
aufumweltfreundliche Weise recycelnkönnen.
Gewerbliche Nutzer sollten sich anIhren
Lieferanten wenden und dieBedingungen des
Verkauf svertragskonsu-ltieren. Dieses Produkt
darf nichtzusammen mit anderem
Gewerbemüllentsorgt werden.
Comment éliminer ceproduit (déchets
d'éuipements électriqueset électroniques)Ce
symbole sur le produit ou sadocumentation
indique qu'il ne doit pasêtre éliminé en fin de
vie avec lesautres déchets ménagers.
L'éliminationincontrôlée des déchets pouvant
porter préjudice a l'environ-nement ou ala
santé humaine, veuillez le séparerdes autres
types de déchets et lerecycler de façon
responsable. Vous favoriserez ainsi la réutilisation durabledes ressources matérielles.Les
particuliers sont invites acontacter le distributeur leur ayantvendu le produit ou a se renseignera uprès de leur mairie pour savoir ou
etcom- ment ils peuvent se débarrasserde ce
produit afin qu'il soit recyclé enrespectant
l'environ-nement.Les entreprises sont invitées
aconta-cter leurs fournisseurs et aconsulter les
cond-itions de leur contratde vente. Ce produit
ne doit pas êtreéliminé avec les autres
déchets commerciaux.
9
1
4
3
2
6
5
11
7
8
9
10
9
1
4
3
2
6
5
11
7
8
9
10
9
1
4
3
2
6
5
11
7
8
9
10
Page 2
LAC-2005P
Digital LCD Alarm
Projection Clock with
Calendar
ESPAÑOL
ITALIANO
e verrà mostrato l'orario d'allarme.
La scritta ALARM indica che
l'orario mostrato è quello
dell'alarme.
2. Per regolare l'orario d'Allarme,
premere SET e le cifre delle ore
dell'allarme lampeggeranno.
Premere UP/DOWN per regolare le
ore.
3. Per regolare i minuti, premere SET
una volta e le cifre dei minuti
dell'allarme lampeggeranno.
Premere UP/DOWN per regolare i
minuti.
4. Premere SET ancora una volta per
ritornare alla visualizzazione normale.
5. Quando l'orario d'allarme arriva la
sveglia suonerà, premendo
SNOOZE (3), questa si fermerà
temporaneamente per circa 5
minuti e poi la sveglia suonerà
nuovamente.
PROIETTORE OROLOGIO
Premere il bottone SNOOZE/LIGHT
per avere proiettata l' ora per 6
secondi.
LAC-2005P
Orologio digitale LCD con allarme,
calendario e proiezione ora.
BATTERIE
1. Aprire il vano batterie sul retro.
2. Inserire tre batterie (non incluse) del
tipo UM-4 (si raccomandano quelle
alcaline). Seguire le polarità
indicate sul retro.
3. Richiudere il vano.
Nota: Controllate le batterie regolar-
mente. Le batterie vecchie o
scariche devono essere sostituite
perche possono perdere materiale
acido che danneggia l'apparecchio.
NOTA: PROIETT A L'IMMAGINE
DELL'ORA SUL SOFFITTO O LE
PARETI D'UNA ST ANZA BUIA. LA
MASSIMA DISTANZA DI PROIEZIONE
È DI 1-3 METRI.
TIMER
Premere TIMER quindi SET e succes
sivamente UP/DOWN per impostare il
timer.
NATURAL SOUND
Premere SOUND per selezionare una
delle 4 modalita Natuiral Sound
disponbibili.
Le caratteristiche ed il design
possono essere modificati senza
preavviso.
DISPLAY
1. Normalmente il display LCD mostra il
calendario con il mese, la data e il
COMANDI - FUNZIONI
1. Proiettore Orologio
2. Display LCD
3. Tasto Timer
4. Tasto Mode
5. Tasto Down
6. Tasto UP
7. Tasto SET
8. Calendatrio
9. Tasto Natural Sound
10. Temperatua
11. Tasto Orario
Pulsar UP/DOWN para ajustar la
data.
5. Para ajustar el día, pulsar SET una
veces y el día relampagueará.
Pulsar UP/DOWN para ajustar el
día.
AJUSTE DEL DESPERTADOR
(ALARMA)
1. En la modalidad de visualización
normal, pulsar MODE una vez y
aparece el horario del despertador.
El símbolo ALARM indica qué el
horario visualizado es el horario
del despertador.
2. Para ajustar el horario del despertador, pulsar conjuntamente SET y
las horas relampaguearán. Pulsar
UP/DOWN para ajustar las horas.
3. Para ajustar los minutos, pulsar SET
una vez y los minutos relampaguearán. Pulsar UP/DOWN para ajustar los minutos.
4. Cuando el horario del despertador
se encuentra el despertador
LAC-2005P
Reloj digital Proyeccion LCD con
alarma y calendario.
ALIMENTACION
1. Quitese la tapa dei compartimiento
de pila
2. Introduzca 3 pilas UM-4 (AAA)
3. Pongase nuevamente la tapa.
Nota: Controlase periódicamente la pila.
Cambiase la pila que está vieja o
descargada para evitar daños
provocados por eventuales pérdidas
de àcido. Si no se usará el aparato por
mucho tiempo quítense la pila del
compartimiento.
sonará. Pulsando el botón
SNOOZE (3) este se detendrá
momentaneamente por
aproximadamente 5 minutos
luego el despertador sonará
nuevamente.
AJUSTES LA PROYECCION
Presione el botón SNOOZE/LIGHT
para proyectar las horas 5
segundos.
NOTA: PROYECCION DE LA IMAGEN
DEL TIEMPO EN EL CIELORASO O
PARED DE UN CUARTO OSCURO. LA
MAXIMADISTANCIA DE PROYECCION
ES DE 1-3 METROS.
TIMER
Pulsar TIMER. Pulsar SET y UP/
DOWN para ajustar las horas.
NATURAL SOUND
Pulsar SOUND para seleccionar el
modalidad Natural Sound (4 disponible).
Las especificaciones estan sujetas
a cambios sin previo aviso.
PANTALLA
1. Normalmente el display LCD
muestra el calendario con el més,
la data el día y el horario.
2. Pulsar LIGHT/SNOOZE una vez y la
retro-iluminación se activará. Se
apagará automaticamente después
de 6 segundos.
AJUSTE DEL DISPLAY LCD
1. En la modalidad de visualización
normal, para ajustar la hora, pulsar
conjuntamente SET y las horas
relampaguearán. Pulsar UP/DOWN
para ajustar las horas.
2. Para ajustar los minutos, pulsar SET
una vez y los minutos
relampaguearán. Pulsar UP/DOWN
para ajustar los minutos.
3. Para ajustar el més, pulsar SET una
veces y el més relampagueará.
Pulsar UP/DOWN para ajustar el
més.
4. Para ajustar la data, pulsar SET una
vez y la data relampagueará.
CONTROLES Y FUNCIONES
1. Proyeccion Light/Snooze
2. Pantalla LCD
3. Botón cuenta atrás
4. Botón MODE
5. Botón Down
6. Botón UP
7. Calendario
8. Scan Radio
9. Botón Natural Sound
10.Temperatura
11. Botón Horario
LAC-2005P
Relógio digital LCD com alarma y
calendário.
LOCALIZAÇÃO DOS CONTROLES
1. PROJECÇÕES
2. LCD Display
3. Tecla TIMER
4. Tecla Mode
5. Tecla DOWN
6. Tecla UP
7. Tecla SET
8. Tecla Calendar
9. Tecla Natural Sound
10. Temperadura
11. Tecla Relogio
PILHAS
1. Abra o compartimento das pilhas .
2. Coloque 3 pilhas do tipo UM-4 .
Obedeça as polaridades indicadas
atrás.
3. Feche novamente o compartimento.
Observação: verifique as pilhas
periodicamente. É necessário trocar as
4. Para ajustar a data, premir SET uma
vez e a data piscará. Premir UP/
DOWN para ajustar a data.
5. Para ajustar o dia, premir SET uma
vezes e o dia piscará. Premir UP/
DOWN para ajustar o dia.
AJUSTE DO ALARME
1. Na modalidade de visualização
normal, premir MODE uma vez e
aparece o horario do alarme. O
símbolo ALARM indica qué o
horario visualizado este o horario
do alarme.
2. Para ajustar o horario do alarme,
premir SETdeixe-os apertados até
que osdígitos dos horas piscarán.
Premir UP/DOWN para ajustar as
horas.
3. Para ajustar os minutos, premir SET
uma vez e os minutos piscarán.
Premir UP/DOWN para ajustar os
minutos.
4. Premir SET uma vez mais para
retornar na visualização normal.
5. Quando o horario do alarme chega
o alarme toca, e poderá desligalo durante cerca de 5 minutos
pressionando a tecla SNOOZE
(3). O alarme tornará a tocar
após os 5 minutos se não
desactivar esta função.
HORA PARA PROJECÇÕES
Pressionando a tecla SNOOZE (1)
uma vez para activaro projeccoes 5
segundos.
OBSERVAÇÃO: PROJECÇÃO DA
IMAGEM DA HORA NO TETO OUNA
PAREDE DE UM QUARTO ESCURO.
DISTANCIA MÁXIMA DEPROJECÇÃO
E DE 1-3 metros.
TIMER
Para ajustar o TIMER, premir TIMER,
SET y UP/DOWN.
NATURAL SOUND
Premir SOUND para selecionar um de
quatro Natural Sound disponivel.
Estas especificações estão sujeitas a
alterações sem prévio aviso.
ECRÃ
1. Normalmente o ecrã LCD mostra o
calendario com o mês, a data e o
dia e o horario.
2. Premir LIGHT/SNOOZE uma vez
para activar a retro-iluminação. A
retro-iluminação desligara-se
automaticamente depois de 6
segundos.
AJUSTE DO ECRÃ LCD
1. Na modalidade de visualização
normal, para ajustar a hora, premir
SET deixe-os apertados até que
osdígitos dos horas piscarán.
Premir UP/DOWN para ajustar as
horas.
2. Para ajustar os minutos, premir SET
uma vez e os minutos piscarán.
Premir UP/DOWN para ajustar os
minutos.
3. Para ajustar o mês, premir SET uma
vezes e o mês piscará. Premir UP/
DOWN para ajustar o mês.
PORTUGUÊS
giorno e l'orario.
2. Premere LIGHT/SNOOZE una volta
e la retroilluminazione si attiverà.
Si spegnerà automaticamente dopo
6 secondi.
IMPOSTAZIONE DEL DISPLA Y LCD
1. Nella modalità di visualizzazione
normale, per regolare l'ora,
premere SET fino a che le cifre
delle ore lampeggeranno. Premere
UP/DOWN per regolare le ore.
2. Per regolare i minuti, premere SET
una volta e le cifre dei minuti
lampeggeranno. Premere UP/
DOWN per regolare i minuti.
3. Per regolare il mese, premere SET e
il mese lampeggerà. Premere UP/
DOWN per regolare il mese.
4. Per regolare la data, premere SET una
volta e la data lampeggerà. Premere
UP/DOWN per regolare la data.
5. Per regolare il giorno, premere SET e il
giorno lampeggerà. Premere UP/
DOWN per regolare il giorno.
IMPOSTAZIONE DELL'ALARME
1. Nella modalità di visualizzazione
normale, premere MODE una volta
pilhas velhas ou descarregadas
porque pode vazar material ácido que
pode danificar a aparelho.
Noi. Roadstar Italia Spa, Viale Matteotti, 39 I-22012 Cernobbio (Como)
Dichiariamo: Che il modello orologio digitale
LAC-2005P della Roadstar è prodotto in
conformità al D.M. no. 548 datato 28/08/
95 (G.U. no. 301 datata 28/12/95) e, in
particolare, è in conformità alle prescrizioni
dell’articolo 2 comma 1.
Eliminación correcta deeste producto (materialelectrico y electrónico dedescarte)La
presencia de esta marca en elproducto o en el
materiál informativo quelo acompaña, indica que al
finalizar suvida útil no deberá eliminarse junto con
otros residuos domésticos. Para evitarlos posibles
daños al medio ambiente oa la salud humane que
representa laeliminación incontrolada de residuos,
separe este producto de otros tipos deresiduos y
reciclelo correctamente parapromover la reutilización
sostenible derecursos materiales.Los usuarios
particulares puedencontactar con el establecimiento
dondeadquirieron el producto, o con lasautoridades
locales pertinentes, parainformarse sobre cómo y
dóndepueden lIevario para que sea sometidoa un
reciclaje ecológico y seguro.Los usuarios comerciales puedencontactar con su proveedor y consultarlas condiciones del contrato de compra.Este producto no debe eliminarsemezclado con otros residuos
comerciales.
Corretto smaltimento delprodotto - (rifiuti
elettrici edelettronici)II marchio riportato sul
prodotto e sullasua documentazione indica
che ilprodotto non deve essere smaltito
canaltri rifiuti domestici al termine del ciclo
divita. Per evitare eventuali danniall'ambiente
o alla salute causatidall'inopportuno
smaltimento dei rifiuti, siinvita l'utente a
separare questoprodotto da altri tipi di rifiuti e
di riciclarloin maniera responsabile per
favorire ilriutilizzo sostenibile delle
risorsemateriali.Gli utenti domestici sono
invitati acontattare il rivenditore presso il
quale estato acquistato il prodotto a
l'ufficiolocale preposto per tutte le
informazionirelative alla raccolta differenziata
e alriciclaggio per questo tipo di prodotto.Gli
utenti aziendali sono invitati acontattare il
proprio fornitore e verificarei termini e le
condizioni del contratto diacquisto. Questo
prodotto non deveessere smaltito unitamente
ad altri rifiuticommerciali.
Eliminaçao Correcta Deste Produto (Resíduo de Equipamentas Eléctricos e
Electrónicos) Esta marca, apresentada no produto
ou na sua literatura indica que ele não deverá ser
eliminado juntamente com os residuos domésticos
indiferenciados no final do seu periodo de vida útil.
Para impedir danos ao ambiente e á saúde humana
causados pela eliminação incontrolada de resíduos
deverá separar este equipamento de outros tipos de
residuos e reciclá-lo de forma responsável, para
promover uma reutilização sustentável dos recursos
materiais. Os utilizadores domesticos deverão
contactar ou o estabelecimento onde adquiriram este
produto ou as entidades oficiais locais para obterem
informaçães sobre onde e de que forma podem levar
este produto para permitir efectuar uma reciclagem
segura em termos ambientais. Os utilizadores
profissionais deverão contactar o seu fornecedor e
consultar os termos e condições do contrato de
compra. Este produto não devera ser misturado com
outros residuos comerciais para eliminação.
9
1
4
3
2
6
5
11
7
8
9
10
9
1
4
3
2
6
5
11
7
8
9
10
 Loading...