

Page 1

!
!
User’s Guide
MADI Router
12 x 12 Port MADI Stream Switcher/Router/Merger
With Integrated 768 x 256 Channel Routing Matrix
4 Coaxial Inputs and Outputs
4 Optical Inputs and Outputs
4 Twisted Pair Inputs and Outputs
Preset Memory
TFT Display
Word Clock I/O
24 Bit / 192 kHz Digital Audio
Firmware 1.33b
Page 2

User’s Guide MADI Router © RME !2
Table of Contents
!
Important Safety Instructions ...................................... 3
1. Introduction ................................................................ 4
2. Package Contents ..................................................... 4
3. Brief Description and Characteristics ..................... 4
4. Firmware .................................................................... 5
5. Technical Specifications .......................................... 6
5.1 Inputs ......................................................................... 6
5.2 Outputs ...................................................................... 7
5.3 Other Connectors ..................................................... 7
6. First Usage ................................................................. 8
6.1 Overview & Basic Concepts .................................... 8
6.2 Creating a Simple Routing ....................................... 9
6.3 Loading a Preset From a USB Flash Drive ........... 10
7. Front Panel Operation and Usage ......................... 11
7.1 Status Display ......................................................... 11
7.2 Detailed Input Status .............................................. 12
7.3 ROUTE Menu ........................................................... 14
Full Stream Routing ................................................. 14
Channel Block and Individual Channel Routing ....... 16
7.3.1 Accessing a matrix .......................................... 16
7.3.2 Inspecting a matrix .......................................... 18
7.3.3 Routing Indicator ............................................. 19
7.3.4 Modifying a matrix ........................................... 23
7.3.5 Buttons while in matrix view ............................ 23
7.4 PRESET Menu ......................................................... 25
7.5 SETUP Menu ............................................................ 26
7.5.1 Matrix Clocking ............................................... 26
7.5.2 Word Clock Output .......................................... 29
7.5.3 Bit Transparency ............................................. 30
7.5.4 Remote Operation ........................................... 31
7.5.5 Lock Device .................................................... 31
7.5.6 Firmware Updates ........................................... 32
8. Appendix .................................................................. 33
9. Declarations of Conformity .................................... 34!
Page 3
User’s Guide MADI Router © RME !3
Important Safety Instructions
ATTENTION! Do not open chassis – risk of electric shock
The unit has non-isolated live parts inside. No user serviceable parts
inside. Refer service to qualified service personnel.
Mains
• The device must be earthed – never use it without proper grounding
• Do not use defective power cords
• Operation of the device is limited to the manual
• Use same type of fuse only
To reduce the risk of fire or electric shock do not expose this device to
rain or moisture. Prevent moisture and water from entering the device.
Never leave a pot with liquid on top of the device. Do not use this
product near water, i. e. swimming pool, bathtub or wet basement.
Danger of condensation inside – don't turn on before the device has
reached room temperature.
Installation
Surface may become hot during operation – ensure sufficient ventilation.
Avoid direct sunlight and do not place it near other sources of heat, like
radiators or stoves. When mounting in a rack, leave some space
between this device and others for ventilation.
Unauthorized servicing/repair voids warranty. Only use accessories
specified by the manufacturer.
Read the manual completely. It includes all information necessary to
use and operate this device.
!
Page 4

User’s Guide MADI Router © RME !4
1. Introduction
The RME MADI Router is designed to be the centerpiece of small and large digital audio
networks based on the widely adopted point-to-point Multichannel Audio Digital Interface
(MADI alias AES10).
It is able to manage all the tasks that are required to set up and to control a MADI environment,
from inspection of signal integrity and sampling frequency, to format conversion, to full stream
and single-channel block routing. It supports a variety of common physical interface formats
of MADI including optical and coaxial, supplemented by the evolving twisted pair variant, which
allows much simpler and more affordable MADI setups.
2. Package Contents
Please check that your MADI Router package contains each of the following:
● MADI Router
● 2 rack ears with screws
● 2 power cords
● User’s guide
3. Brief Description and Characteristics
The MADI Router is a compact device designed to link MADI devices of any manufacturer with
unprecedented flexibility in signal routing. It provides this flexibility by serving as a format
converter between optical and electrical signals, as a signal repeater, and as a distributor and
merger of several MADI signals, all at the same time. The MADI Router combines many
advantages of point-to-point audio connections, such as low latency and fast recovery time
from signal line interruptions, with the flexibility of networked audio connections in which any
device has access to any channel available on the network of connected devices.
At the simplest level all input signals are passed on to the desired output unaltered. This type
of connection is beneficial when manufacturers have embedded additional status or remote
control data information in the MADI stream, or if parts of the MADI signals should be re-routed
at the touch of a button, for example if a stage box fails.
It is also possible to create new arrangements of audio channels within a MADI output stream.
For this purpose, four independent ‘virtual’ matrices are provided, each of which comprises
768 input and 64 output channels. As such, any of the 768 audio channels that make up the
12 physical MADI input ports can be used to compose a 64 channel output from this matrix.
This 64 channel 'virtual' matrix output can then be sent to any of the MADI Router's 12 physical
MADI output ports.
!
Page 5

User’s Guide MADI Router © RME !5
4. Firmware
The MADI Router’s core has been created using programmable logic and is user updateable.
This is achieved by simply saving a firmware update file to a USB stick, attaching the USB
stick directly to the MADI Router’s USB port and then running the firmware update from the
SETUP menu. Please see chapter 7.5.6 for detailed information.
At the time of writing this manual, the unit is shipped with firmware 1.29. The firmware version
is displayed on the TFT display after powering the unit on.
When updates become available, they are published on http://www.rme-audio.com in the
download section.
Version 1.28: first release
Version 1.29: added transparency settings (see chapter 7.5.3)
Version 1.33b: compatibility improvements
Known issues:
In the current MADI TP implementation, the usable bandwidth of the four ports is reduced to
either 56/28/14 audio channels at 48/96/192 kHz sampling frequency, or 64/32/16 audio
channels at 44.1/88.2/176.4 kHz sampling frequency. Signals that exceed these limits are not
detected.
Page 6

User’s Guide MADI Router © RME !6
5. Technical Specifications
● Two internal redundant power supplies, 100-240V AC, typ. 30W, max. 75W1
● Dimensions without rack ears (WxHxD): 440 x 44 x 240 mm (17.32” x 1.73” x 9.45”)
● Temperature range: +5° up to +50° Celsius (41° F up to 122° F)
● Relative humidity: < 75%, non condensing
● Weight: 2.8 kg
5.1 Inputs
MADI
● Coaxial via BNC, 75 Ohm, according to AES10-1991
● High-sensitivity input stage (< 0.2 Vpp)
● Optical via FDDI duplex SC connector
● 62.5/125 and 50/125 multimode compatible
● Both Optical and Coaxial ports accept any MADI signal
● Twisted Pair via RJ45 connector (input and output)
● Pinout “EXT”: 1-2 receive, 3-6 send, 4-5 DC +48V, 7-8 -48V
Note: The Twisted Pair implementation uses standard ethernet technology such as
8b/10b encoding for DC-balance, which is important to achieve stability over long cable
runs. At the time of writing it is proprietary to RME. Different implementations made by
other manufacturers may show incompatibilities.
Word Clock
● BNC, not terminated (10 kOhm)
● Switch for internal termination 75 Ohm
● Automatic Double/Quad Speed detection
● SteadyClock guarantees super low jitter synchronization
● Capacitive coupled, galvanically isolated input
● Signal Adaptation Circuit: signal refresh through auto-center and hysteresis
● Overvoltage protection
● Level range: 0,7 Vpp – 3.3 Vpp
!
!!!!!!!!!!!!!!!!!!!!!!!!!!!!!!!!!!!!!!!!!!!!!!!!!!!!!!!!
1
depending on number of attached MADI TP powered devices and USB peripherals.
Page 7

User’s Guide MADI Router © RME !7
5.2 Outputs
MADI
● Coaxial via BNC, 75 Ohm, according2 to AES10-1991
● Output voltage 1,6 Vpp
● Cable length: up to 200 m
● Optical via FDDI duplex SC connector
● 62.5/125 and 50/125 multimode compatible
● Fiber length: up to 2000m
● Twisted Pair via RJ45 “EXT” connector (combined input and output)
● Category 5e cable: length up to 75m
● Category 7 cable: length up to 150m
Word Clock
● BNC
● Max. output voltage: 3,3 Vpp
● Output voltage @ 75 Ohm: 1.65 Vpp
● Impedance: 68 Ohm
● Frequency range: 27 kHz – 200 kHz
5.3 Other Connectors
USB
● USB 2.0 Type A socket for attaching USB Storage
● USB 2.0 Type B - reserved
SFP
● SFP 1 and SFP 2 slots - reserved
!!!!!!!!!!!!!!!!!!!!!!!!!!!!!!!!!!!!!!!!!!!!!!!!!!!!!!!!
2
the MADI output voltage is higher than AES10-1991, which leads to better performance over long
cable runs and causes no known issues
Page 8

User’s Guide MADI Router © RME !8
6. First Usage
6.1 Overview & Basic Concepts
Connect a power cable to either of the MADI Router's AC inlets and flip the adjacent power
switch. The device will go into Standby or Power On mode, depending on the state that the
device was in when the rear switch was last turned off. This is indicated by the color of the
illuminated Standby switch on the front of the device - red for standby, white for power on.
When in Standby mode, pushing the Standby switch (inside the illuminated circle on the front
panel) will power on the MADI Router. Note: in standby mode, the connectors of the unit do
not send or receive any signal.
The following information is important to understand in order to successfully operate the MADI
Router:
● The device’s features are controlled with a set of four buttons and two rotary encoders
that can also be pushed. Throughout this manual, the buttons and encoders are
referred to as [ROUTE], [GANG], [PRESET], [SETUP], [IN] and [OUT].
● After powering on, the device shows the current routing status on the TFT display. The
buttons [ROUTE], [PRESET] and [SETUP] open different menus on the display.
Pushing one of these buttons several times leads back to the status display.
● The device has four I/O groups labeled A, B, C and D. On the display, inputs are shown
as a horizontal line of icons in the upper half of the display, ordered by group, then by
format: A Optical, A Coaxial, A Twisted Pair, B Optical, B Coaxial, B Twisted Pair, etc.
● Four additional inputs labeled “MX 1” to “MX 4” appear when turning the [IN] encoder
beyond the furthest right MADI input icon. They are used to combine audio channels
from several MADI inputs into up to four new MADI signals. See Chapter 7.3 for details.
● The outputs are shown likewise as a horizontal band in the lower half of the display.
Routings are shown as a line going from an input icon (upper half) to an output icon
(lower half).
● If the IDLE display is active, [IN] can be turned to inspect the signals at each individual
input in detail.
!
Page 9

User’s Guide MADI Router © RME !9
● The [ROUTE] button opens the main routing page from which all MADI signals can be
routed in streams, individual channels, or in groups of 2, 4 or 8 channels.
● The concept of the patching operation is to address an output first. Selecting an
output is non-destructive and will not alter the current routing. It should always
be the first step when creating a patch. Conversely, adjusting the input selector
is destructive and changes the routing immediately. A useful consequence of
this mode of operation is that the user can always turn the output encoder to
toggle through channels and ports to verify the current routing.
● The firmware should always be updated to the newest available version (see Chapter
7.5.6). The firmware version is shown after powering on the unit.
6.2 Creating a Simple Routing
Connecting a physical input port to one or more physical output ports, regardless of connector
type, sampling frequency or channel count, is easy and straightforward.
1. Verify that you have a valid input signal (source) on the STATUS display by
checking if the icon of the respective input shows a small green indicator, or
that the LED next to the connector on the back panel is on.
2. Press [ROUTE]
3. Turn the [OUT] encoder in either direction to select the desired output port
4. Turn the [IN] encoder in either direction to select the desired source port
5. Press [ROUTE] again to return to the STATUS display.
!
Page 10

User’s Guide MADI Router © RME !10
6.3 Loading a Preset From a USB Flash Drive
If you have been provided with a configuration file ROUTING.RME, save it onto a USB flash
drive (do not place it into a folder), then eject the USB Stick from the computer and connect it
to the USB port on the MADI Router.
1. Press [PRESET]
2. Rotate the [IN] encoder to select “Load USB Preset”
3. Press the [IN] encoder
4. Confirm that you want to load the preset by pressing [IN] again
The preset is now loaded and activated. In order to save it into internal storage, follow the
steps below:
1. Press [PRESET]
2. Rotate the [OUT] encoder to select one of the 15 internal presets that you would
like to overwrite
3. Rotate the [IN] encoder to highlight “Save”
4. Press the [IN] encoder twice to confirm overwriting the selected preset.
!
Page 11
User’s Guide MADI Router © RME !11
7. Front Panel Operation and Usage
The TFT display provides quick access to the status and control options of the MADI Router.
The device’s features are controlled with a set of four buttons and two rotary encoders that
can also be pushed as buttons. The buttons are labeled and in this manual referred to as
[ROUTE], [GANG], [PRESET], [SETUP], [IN] and [OUT].
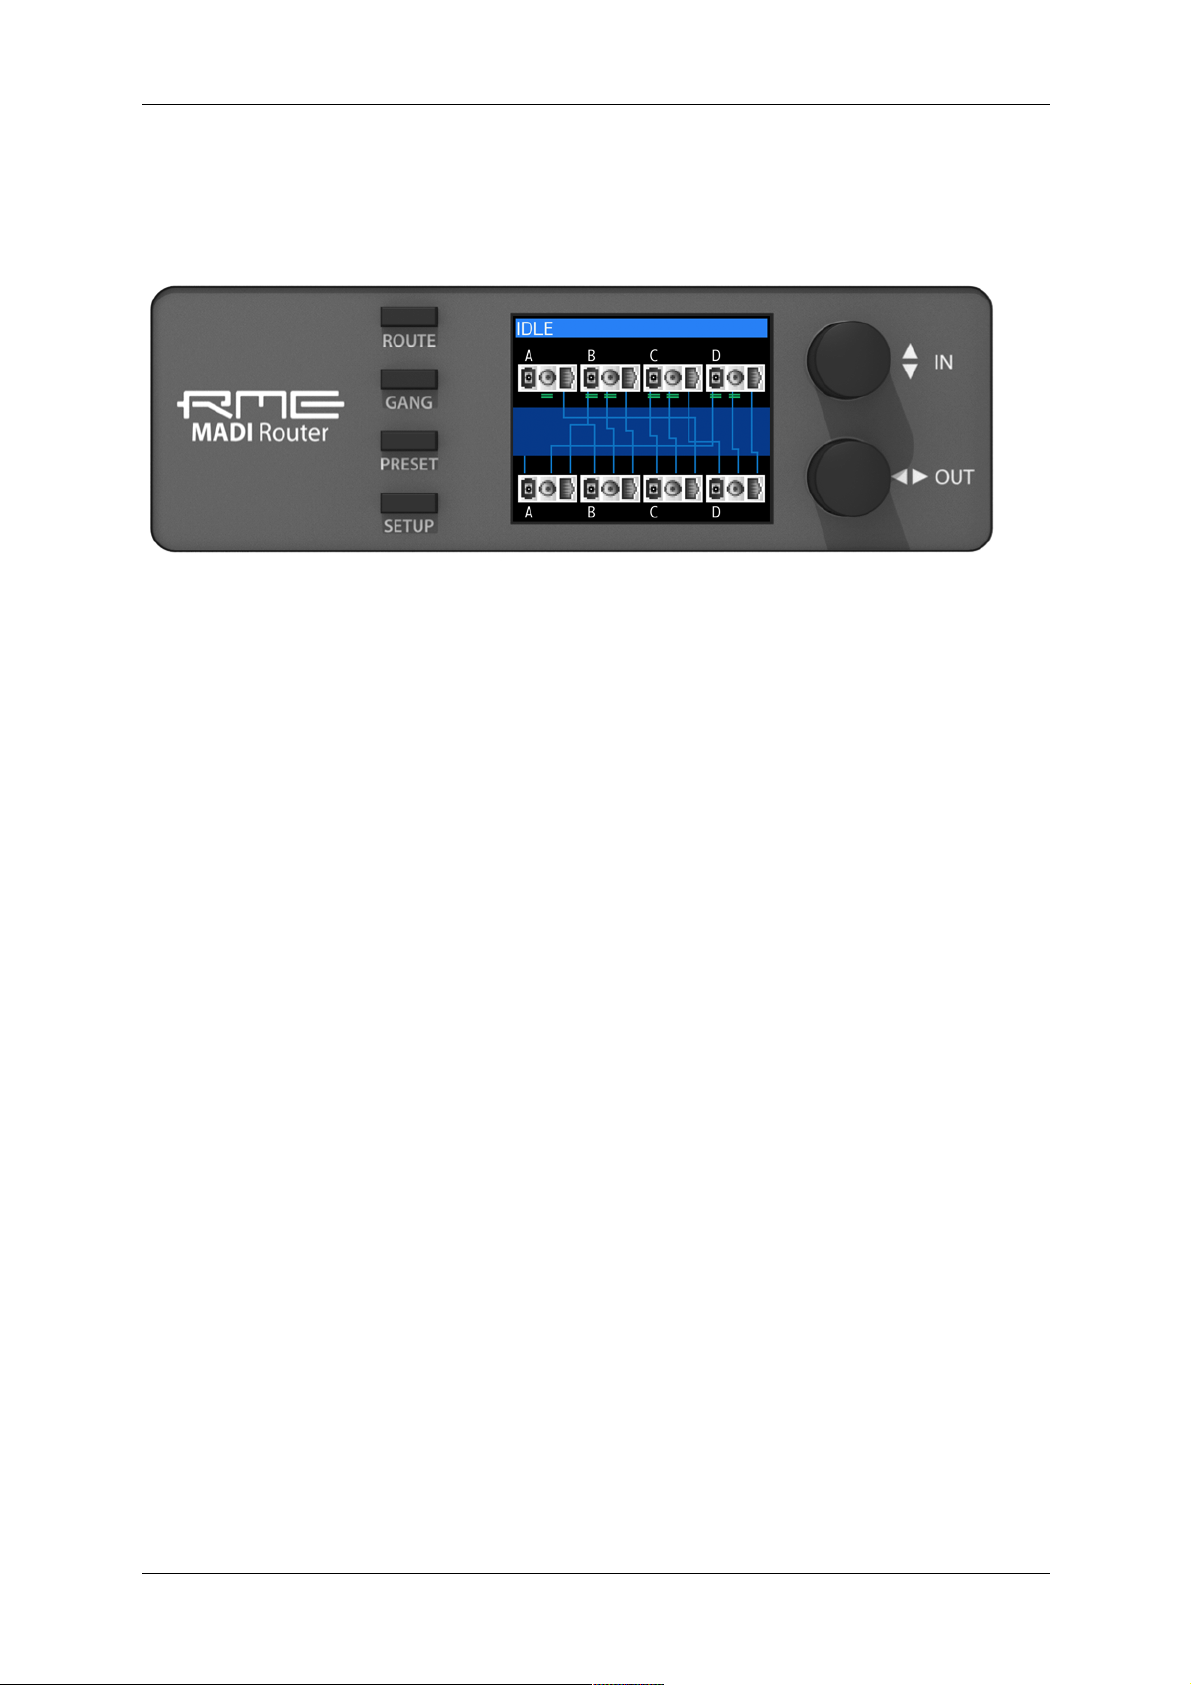
7.1 Status Display
The status display provides the user with an overview of the current state of the device
regarding input signals present at the rear connectors and the current routing setup. The upper
row of connector icons displays the inputs, the lower row displays the outputs. Lines in
between input and output reflect the active routing.
Icons for inputs and outputs are placed in four groups A, B, C and D. Pictograms of an optical
SC port, a BNC connector for coaxial cables and an RJ45 port have been chosen to distinguish
the physical connectors. Additionally, the input icons show a small green indicator when a
signal is detected.
It duplicates the green status LED at the rear of the device associated with the input ports.
‘Valid’ means that the signal at the input is free of errors. As soon as an error occurs, the
associated output is muted. If a connector is removed or a connection broken, then this
behavior results in a distortion- and noise-free transition to the muted state. The mute is
removed after the signal has been entirely free of errors after a minimum of one second.
Each output can receive a signal from any of the twelve source signals, or from one of the four
matrices. If an output is configured to receive a signal from a matrix, the line originates at the
output icon but stops shortly after.
!
Page 12

User’s Guide MADI Router © RME !12
7.2 Detailed Input Status
While in the status display, rotating or pushing the [IN] encoder immediately activates the
'Inspect Input' screen. This page shows the detailed status of an input port selected by turning
the [IN] encoder. Information about all other ports including routing is hidden in order to allow
a dedicated focus on the selected input port. Pressing either encoder exits the detailed view
and returns to the main status display.
In this detailed view of the input status, the following information is displayed for each physical
MADI input port:
● Lock | Invalid | No signal
Lock: a MADI signal is detected and has been present for a minimum of 1
second.
Invalid signal: a signal is detected but it violates MADI (AES10) definitions
No signal: no signal is detected for more than one second.
● Rate: 32 kHz – 192 kHz
Shows the sampling rate of the MADI input:
● 32kHz, 44.1kHz, 48kHz in 48k frame mode
● 88.2kHz, 96kHz in 96k frame mode
● 176.4kHz, 192kHz in a non-standard 192k frame (experimental)
!
Page 13

User’s Guide MADI Router © RME !13
● S/MUX: ? | Off
Double Speed (88.2/96kHz) and Quad Speed (176/192kHz) signals that make
use of the sample multiplexing method instead of longer frame lengths cannot
be identified automatically, but are instead shown as Single Speed signals. In
this case, S/MUX shows “?” to indicate that the incoming signal may or may
not be multiplexed. If a 96k frame is detected, this field shows “Off”.
Note: the MADI Router does not perform sample rate conversion. The Signals
that are aggregated within one matrix must have the exact same reference
clock (they all must be “in sync”).
!
Page 14

User’s Guide MADI Router © RME !14
7.3 ROUTE Menu
The [ROUTE] button opens the routing menu. It is used to create routings by first selecting an
output stream with the [OUT] encoder and then assigning a MADI signal to it from any of the
twelve physical input ports (full stream routing) or the four matrices (channel block or individual
channel routing) by turning the [IN] encoder.
Full Stream Routing
Full Stream Routing describes a fully transparent MADI connection between an input and at
least one output port. This type of connection refreshes the signal from the input electrically
but keeps all of its original data and timing information. This means that as long as a signal is
detected, it is passed on, regardless of its sample rate, or the sample rates of any other input,
or the internal clock of the MADI Router.
To create a routing, follow the steps below:
1. While on the IDLE screen, press the [ROUTE] button
- As an alternative, you may also turn the [OUT] encoder.
2. The screen changes to STREAM ROUTING and a red cursor at the bottom of
the screen indicates the currently active output port.
3. Rotate the [OUT] encoder to the desired output port.
4. Start rotating the [IN] encoder left or right to select the source for the connection.
The cursor now moves along the input icons. While it moves, the patches are
immediately activated.
Page 15

User’s Guide MADI Router © RME !15
To delete a routing, rotate the input encoder counter-clockwise until the cursor disappears to
the left of the "A Optical" input icon, or rotate the [IN] encoder counter-clockwise while pressing
the [GANG] button.
To copy a routing to the next port on the right of the currently selected output port, press and
hold the [GANG] button while turning the [OUT] encoder clockwise.
Pushing the [IN] encoder while holding down the [GANG] button toggles the source for the
currently selected port between the corresponding input port (loopback), matrix 1 and no patch.
!
Page 16

User’s Guide MADI Router © RME !16
Channel Block and Individual Channel Routing
Channel Routing describes the process of creating new MADI streams with the help of four
768x64 audio channel matrices (at 44.1/48kHz sampling rate) that are referred to on the
display as “MX 1” to “MX 4”. These matrices can be routed to any of the twelve physical outputs
using the same process that is described above – the four matrices extend the 12 physical
input ports by four “composed streams”.
As a first step, it is recommended to verify, and if necessary to modify the clock settings for
the matrix that you are about to edit (see chapter 7.5.1). Each matrix can be synchronized to
any one of the twelve MADI input signals, the word clock input or the internal clock of the
router. It can also automatically synchronize itself to the signal that is routed to its first output
channel (AutoSync). All signals that are routed to the matrix have to be in sync with the matrix.
It is possible to assign a different sample rate to each of the four matrices, for example 48kHz
to matrix 1, 44.1kHz to matrix 2, 192kHz to matrix 3 and 96kHz to matrix 4. However, it is
mandatory that any signals patched to the same matrix are in sync with each other and with
the matrix itself.
7.3.1 Accessing a matrix
In order to access a matrix, follow the initial steps described in Full Stream Routing:
1. While on the IDLE screen, press the [ROUTE] button
2. The screen changes to: STREAM ROUTING and a red cursor at the bottom of
the screen indicates the currently active output port.
3. Rotate the [OUT] encoder to select an output port that should contain the signal
from the matrix.
Note: it is not possible to create or make changes to a matrix that is not routed
to a physical output, however its routing is saved even if its output patch is
removed.
4. Rotate the [IN] encoder clockwise to move the input cursor along the input icons.
The four matrices appear once the cursor passes the last physical input icon
Page 17

User’s Guide MADI Router © RME !17
(„D Twisted Pair“):
Note that in order to edit a matrix, it has to be routed to at least one physical
output port. If the same matrix is routed to several output ports, it can be
accessed from all outputs that it is sent to, using this procedure.
5. Press the [IN] encoder to open the matrix for editing:
!
Page 18

User’s Guide MADI Router © RME !18
7.3.2 Inspecting a matrix
In order to inspect a matrix, follow the steps above to access the matrix first.
1. The matrix is displayed as a horizontal bar in the middle of the display. The
bottom row shows a blue cursor that moves along the matrix outputs when the
[OUT] encoder is rotated.
Only one patch is shown at a time. To get an overview of all the patches, use
the [OUT] encoder to browse through all output channels.
By default, audio channels extracted from any physical input port are patched
in groups of eight channels, and the first channel of the group is displayed on
the left of the cursor. This grouping is useful for most routings, however the
grouping can be changed as described in Chapter 7.3.5.
2. The grey cursor in the upper row reflects the current source for the patch. In
the picture above, channels 17-24 from optical input “A” are sent to channels
1-8 of Matrix 1, which is then sent to optical output “A”.
!
Page 19

User’s Guide MADI Router © RME !19
7.3.3 Routing Indicator
A thin line in the lower half of the display reflects the current fragmentation of the output
patches. It serves as an aid to get a quick overview of what is happening across the complete
matrix. It has the same length as the channel indicator (here shown for 64 channels). The
routing indicator has several possible states:
It is helpful to imagine a continuous thick line as equivalent to a diagonal line in a routing matrix
where inputs are represented in rows and outputs are represented in columns. Any breaks in
this line reflect an interruption of the diagonal.
The continuous thin line represents a horizontal line in the routing matrix, which means that
for the duration of the line, all outputs receive the signal from the same input channel.
Page 20

User’s Guide MADI Router © RME !20
Example 1: Uninterrupted thick line
A thick line states that for the duration of the line, the patches are continuously
following the +1:+1 principle:
Input&1
Input&2
Input&3
Input&4
...
Input&64
Output&1
Output&2
Output&3
Output&4
...
Output&64
Note that the input and output channel number do not have to be identical.
Routings may also include an offset, for example:
Input&5
Input&6
Input&7
Input&8
...
Input&39
Output&1
Output&2
Output&3
Output&4
...
Output&35
!
Page 21

User’s Guide MADI Router © RME !21
Example 2, 3: Interrupted thick line
An interruption in the thick line states that the consecutive input channel
increments are interrupted. A thick line that is interrupted once between
channel 32 and 33, as shown in example 2, would for instance be the result of
the following two routings:
Input&1
Input&..
Input&32
Input&33
...
Input&34
Output&1
Output&..
Output&32
Output&33
...
Output&64
Input&1
Input&..
Input&32
Input&33
...
Input&34
Output&1
Output&..
Output&32
Output&33
...
Output&64
!
Page 22

User’s Guide MADI Router © RME !22
Example 4: Uninterrupted thin line
Thin lines reflect the so-called 1:n state. This means that for the duration of the
thin line, each output channel receives its signal from the exact same input
channel.
Input&1
Input&2
Input&3
Input&4
...
Input&64
Output&1
Output&2
Output&3
Output&4
...
Output&64
Example 5, 6: Interrupted thin line
Interruptions in the thin line simply show a break in the 1:n process, such as:
Input&2
Input&4
Output&1
...
Output&32
Output&33
...
Output&64
Example 7: Combinations of thick and thin lines
This routing indicator shows that channels 1-8 and 17-32 receive their signals
from consecutive inputs, whereas channels 9-16, 33-40, 41-48 and 49-64 each
receive their signals from the same source channel.
As mentioned above, rotating the [OUT] encoder displays quickly which
channels are routed to the selected outputs.
!
MX
1
1
1
Example 7
Page 23

User’s Guide MADI Router © RME !23
7.3.4 Modifying a matrix
In order to modify a matrix, follow the steps outlined in chapter 7.3.1 to first access the matrix.
Then move the blue cursor to the output channels for which you'd like to choose a different
input source.
1. Rotate the [IN] encoder in order to immediately change the current set of source
channels. In the above example, rotating it clockwise by one step would move
the grey cursor to channels 25-32, while the output cursor remains on channels
1-8 of Matrix 1.
2. In order to change the physical MADI stream that is currently selected as a
source, push the input encoder once. A thin red line below the physical input
icon shows that the [IN] encoder can now be used to change the MADI input
port for the channel group selection.
After selecting a different MADI input port, press the [OUT] encoder once in
order to reassign the [IN] encoder to the audio channel selection.
To leave the routing screen, press the [OUT] encoder several times until IDLE is shown on
the router display.
7.3.5 Buttons while in matrix view
When displaying or editing a matrix, the buttons [ROUTE], [GANG] and [SETUP] have new
assignments. In order to access the standard [PRESET] and [SETUP] menus, it is necessary
to first leave the matrix view by pressing the [OUT] encoder three times.
[GANG] button
While the [GANG] button is pushed, the behavior of the [IN] and [OUT] encoder changes:
[GANG] + rotate [INPUT] encoder clockwise
This combination links the output cursor to the movement of the input cursor and as a
result automatically increments the channel routings. It is the most commonly used
ganging mechanism and it should be employed when you need to extend patches
consecutively (such as IN4-OUT6, IN5-OUT7, IN6-OUT8…).
On the routing indicator, this process simply extends a thick line.
[GANG] + rotate [OUTPUT] encoder clockwise
This feature copies the current input patch to the next output.
[GANG] + push [INPUT] encoder
Page 24

User’s Guide MADI Router © RME !24
This feature toggles the type of patch from consecutive input channels to ‘one to many’,
in the routing indicator shown as a thin line. In case the patch had been deleted,
[GANG] + push [INPUT] creates a new patch.
[GANG] + rotate encoder counter-clockwise
Rotating either encoder counter-clockwise while pushing the [GANG] button deletes
the patches. Note that there always has to be a patch to output channel one since the
matrix uses it as a clock reference when in Auto-Sync mode.
[SETUP] Button
When a matrix is displayed, the [SETUP] button allows the user to quickly verify and
change the clock settings of the matrix.
[ROUTE] Button
While holding the [ROUTE] button, press and hold the [IN] encoder in order to change
the size of the output cursor from eight channels to 1, 2, or 4 channels.
!
Page 25

User’s Guide MADI Router © RME !25
7.4 PRESET Menu
In addition to saving its current state, the MADI Router has sufficient memory for 15 internal
presets that can be previewed, recalled, cleared and saved. Furthermore a routing file from
an external USB stick can be loaded into its current state and from there saved to any of the
internal presets. A preset contains all clocking and transparency settings along with the routing.
Pushing the [PRESET] button while the router is IDLE opens the Preset menu, which is
operated with the two encoders.
The [OUT] encoder is used to select one of 15 internal presets, indicated at the bottom of the
screen.
The [IN] encoder can then be used to choose an operation for the selected preset. The
following menu items can be selected and activated by pushing the [IN] encoder:
- Save
Saves the current state of the device to the selected preset.
- Recall
Recalls the saved state of the selected preset.
- Clear
Clears the currently selected preset.
- Browse
Previews the routing of a stored preset.
Rotating the [IN] encoder while in Browse mode allows the user to quickly flick
through the 15 presets. Pushing the [IN] encoder leads to an additional screen
that asks the user to confirm the recall of the selected preset.
!
Page 26
User’s Guide MADI Router © RME !26
7.5 SETUP Menu
The setup menu gives access to the individual clock settings for each matrix, the wordclock
output settings and also allows the user to update the firmware of the device. It can be
accessed by pressing the [SETUP] button while the unit displays its IDLE screen.
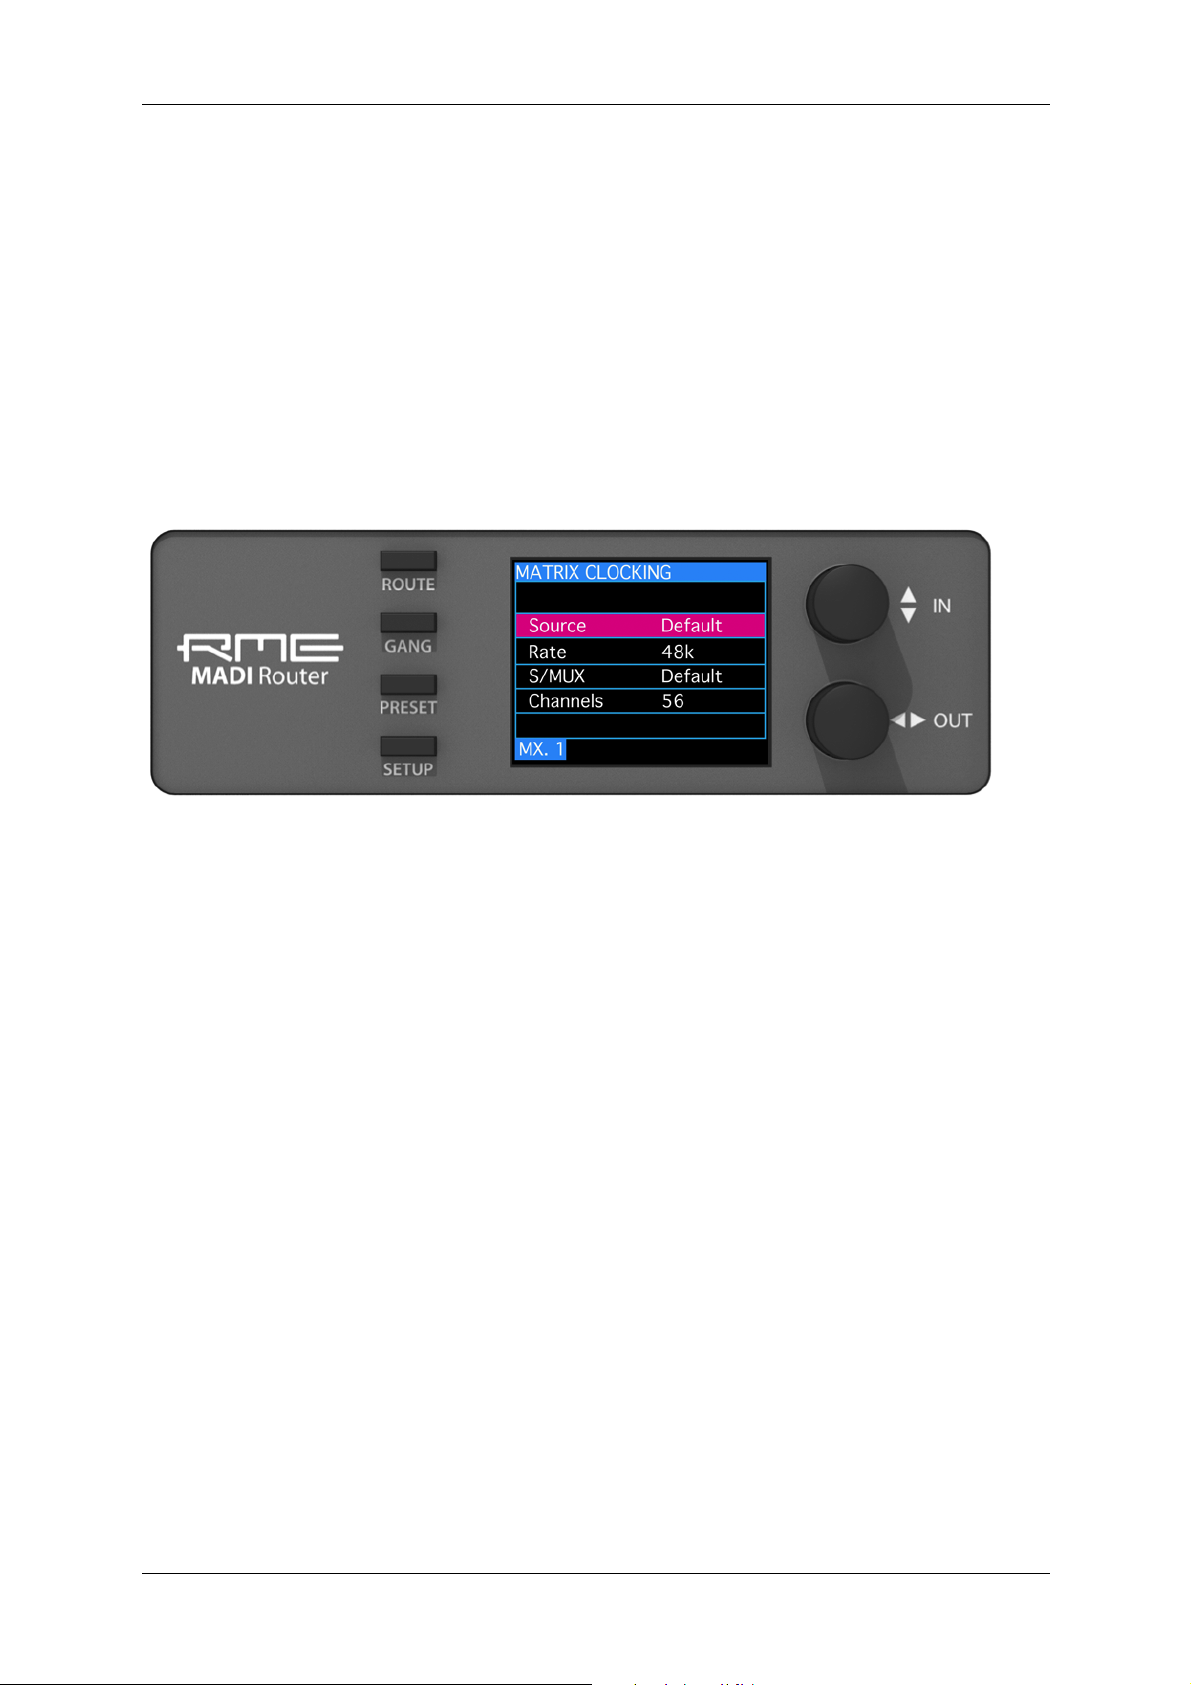
7.5.1 Matrix Clocking
The Matrix Clocking section of the setup menu is used to set the correct reference clock and
sample rate settings for each of the four internal matrices and to create one additional default
setting.
Note: This menu can also be quickly accessed by pressing and holding the [SETUP] button
while editing a matrix in the routing section.
Rotating the [OUT] encoder while in the matrix clocking section changes the matrix you are
addressing. The currently addressed matrix is indicated as MX.1, MX.2, MX.3 and MX.4 in the
lower portion of the display.
One additional screen, DEF, allows the user to define default settings that can be accessed
across all matrices.
Rotating the [IN] encoder highlights one of the following settings, which can then be changed
with the same encoder after pushing it once. Pushing the [OUT] encoder leads back to the
item selection.
!
Page 27

User’s Guide MADI Router © RME !27
Source:
Default
uses the clock source defined in the default screen
Internal
uses the MADI Router’s internal reference clock
Auto Sync
uses the clock of the audio channel routed to the first output channel of
the matrix
Word Clock
uses a reference clock from the physical word clock input
Optical A, Optical B, Optical C, Optical D
Coaxial A, Coaxial B, Coaxial C, Coaxial D
Twisted A, Twisted B, Twisted C, Twisted D
synchronizes the matrix to a valid MADI signal detected at the selected
physical input.
Rate:
Sets the sampling rate for the matrix if it is set to internal.
Also sets the scale of the channel indicators in the matrix view, so it is highly
recommended to select the correct value.
Values:
Default
32k
44.1k
48k
88.2k
96k
176.4k
192k
!
Page 28

User’s Guide MADI Router © RME !28
S/MUX:
Values: On | Off
“Sample multiplexing” (S/MUX) describes the technique of spreading the larger
amount of samples per audio channel in double speed (88.2, 96kHz) and quad
speed (176.4, 192kHz) signals to the 56 or 64 channels of a single speed MADI
signal. The receiver of the signal detects this as single speed first - each original
source channel now occupying two or four audio channels in the MADI stream
- however when manually set to double or quad speed, the receiver can
reassemble the original audio signals.
For 88.2 and 96 kHz, this is an alternative to the so-called 96k frame defined
in the MADI standard, which has the advantage of being automatically detected
by the receiver if the receiver supports detection of 96k frame based MADI
signals. The 96k frame is active if S/MUX is set to “Off” and the sampling
frequency set to 88.2 or 96kHz.
For 176.4 and 192 kHz audio signals, S/MUX is the common mode of
transmission since the MADI standard does not define a “192kHz frame” and
should therefore be set to ‘On’.
Channels:
Values: 56 | 64
Sets the number of channels in the MADI stream.
AES-10 Mode 1 = 56 Channels
AES-10 Mode 2 = 64 Channels
!
Page 29

User’s Guide MADI Router © RME !29
7.5.2 Word Clock Output
The word clock output menu can be used to set the clock at the physical output.
Source:
Values:
Internal
Auto Sync
Word clock
Optical A, Optical B, Optical C, Optical D
Coaxial A, Coaxial B, Coaxial C, Coaxial D
Twisted A, Twisted B, Twisted C, Twisted D
Rate:
If set to internal, a sampling rate can be set with this second menu item
to the following rates (Hz):
32k
44.1k
48k
88.2k
96k
176.4k
192k
!
Page 30

User’s Guide MADI Router © RME !30
7.5.3 Bit Transparency
The Bit Transparency menu gives access to two settings that are related to the MADI
streams and to the matrices. The [OUT] encoder is used to access the two settings, the [IN]
encoder is used to change their value. A short text informs about the current setting.
Stream Routing
Options:
Activate MADI receiver
Before routed to the selected output port, bit stream is recovered and decoded.
Content of MADI is left untouched.
This feature enables a complete signal regeneration and should be switched on when
using standard MADI signals. Incoming signals are decoded, re-clocked and checked
for errors. When an error is detected, the incoming signal is muted for a duration of at
least one second.
Bypass MADI receiver
Input port is connected to selected output port directly, as if setting a wire. No decoding
of bits, no interpretation.
If this setting is active, an incoming signal is amplified to a standard level and then
directly passed on to the output driver stage without any further processing. This is
required when the incoming MADI signal contains special invisible control commands,
out-of-spec data rates or violations of the MADI protocol.
The disadvantage is that the quality of the output signal depends on the quality of the
input signal, since the signal is passed on without any change. For the maximum cable
length, note that the cables to and from the router have to be counted as one cable
when this mode is active.
Channel Routing
Each individual mono channel of a MADI signal contains – aside from the audio data –
additional information, such as embedded control protocols or MIDI, channel grouping
information, status information and a check digit.
The following settings allow to pass on or by-pass this additional data:
!
Page 31

User’s Guide MADI Router © RME !31
Pass MADI subframes
All bits of a subframe are passed to the output transparently (including proprietary bit
assignments).
This setting is necessary when control data – for example to control a microphone
preamp – is present and should be passed on. However, since individual channels
may contain additional information such as the the grouping of channels and their
channel numbers, there may be problems if the receiving MADI device decodes this
information. This is not the case for RME MADI devices and this setting should be
switched on.
When using the matrix, it is important to note that embedded data is always patched
with the individual audio channels. Therefore it is important to patch the audio channel
containing the data to an output channel with the same channel number (for example
channel 56 for the “MIDI over MADI” feature of RME devices). For further information
about which channels are used, please consult the manufacturer of the MADI devices
involved.
New MADI subframes
Except audio, all input bits are ignored. Legal MADI bits, including a suitable Channel
Status Block are generated.
This setting removes all data except for the audio data itself and generates a new
MADI signal when using a matrix. This feature should be switched on if the receiving
device does not properly recognize the MADI signal from the Router.
7.5.4 Remote Operation
This mode is at the time of writing not implemented and required for a future extension to the
MADI Router.
7.5.5 Lock Device
Activating “Lock Device” with the [IN] Encoder secures the device from accidental operation.
It is possible to unlock the device by pushing
[SETUP] + [IN] + [OUT]
at the same time.
!
Page 32

User’s Guide MADI Router © RME !32
7.5.6 Firmware Updates
“Firmware Updates” allows users to update the device firmware. In order to perform an update,
a firmware file (main.upd) has to be placed in the root folder of a USB stick and the stick
attached to the rear USB port of the device.
After an initial confirmation, the device first checks for a firmware update file on the attached
USB stick, then compares it to the currently flashed firmware. If the current firmware is different
from the one on the USB stick, the firmware update procedure starts. The firmware is checked
in a fourth and final step.
A progress bar indicates each step. The steps may not be interrupted, as this would damage
the device.
Page 33

User’s Guide MADI Router © RME !33
8. Appendix
RME news and further information can be found on our website:
http://www.rme-audio.com
Worldwide Distributor and manufacturer’s representative:
Audio AG
Am Pfanderling 60
D-85778 Haimhausen
Germany
Tel.: (+49) 8133 / 918170
Fax: (+49) 8133 / 9166
E-Mail: info@audioag.com
Trademarks
All trademarks and registered trademarks belong to their respective owners. S/MUX is
copyright Sonorus.
Copyright © RME, 5/2016. Version 1.11
All entries in this User's Guide have been thoroughly checked, however no guarantee for
correctness can be given. RME cannot be held responsible for any misleading or incorrect
information provided throughout this manual. Lending or copying any part of the complete
manual or its contents as well as any software belonging to it is only possible with the written
permission from RME. RME reserves the right to change specifications at any time without
notice.
Page 34

User’s Guide MADI Router © RME !34
9. Declarations of Conformity
CE
The RME MADI Router conforms with the essential emission requirements of the European
Generic Emission Standard EN 61000-6-3:2007 + A1:2011 and the immunity requirements
according to the European Generic Immunity Standard EN 61000-6-2:2005 and therefore
complies with the essential requirements and provisions of the EMC directive.
FCC
This device complies with Part 15 of the FCC Rules. Operation is subject to the following two
conditions: (1) this device may not cause harmful interference, and (2) this device must accept
any interference received, including interference that may cause undesired operation.
Warning: Changes or modifications to this unit not expressly approved by the party responsible
for compliance could void the user's authority to operate the equipment.
NOTE: This equipment has been tested and found to comply with the limits for a Class B digital
device, pursuant to Part 15 of the FCC Rules. These limits are designed to provide reasonable
protection against harmful interference in a residential installation. This equipment generates,
uses and can radiate radio frequency energy and, if not installed and used in accordance with
the instructions, may cause harmful interference to radio communications.
However, there is no guarantee that interference will not occur in a particular installation. If
this equipment does cause harmful interference to radio or television reception, which can be
determined by turning the equipment off and on, the user is encouraged to try to correct the
interference by one or more of the following measures:
● Reorient or relocate the receiving antenna.
● Increase the separation between the equipment and receiver.
● Connect the equipment into an outlet on a circuit different from that to which the
receiver is needed.
● Consult the dealer or an experienced radio/TV technician for help.
Shielded cables must be used with this unit to ensure compliance with the Class B
FCC limits.
Responsible Party:
Synthax United States, 6600 NW 16th Street, Suite 10, Ft Lauderdale, FL 33313,
T.:754.206.4220
Trade Name: RME, Model Number: MADI Router
!
Page 35

User’s Guide MADI Router © RME !35
RoHS
This product has been soldered lead-free and fulfils the requirements of the RoHS directive.
Note on disposal
According to the guideline RL2002/96/EG (WEEE – Directive on Waste
Electrical and Electronic Equipment), valid for all European countries, this
product has to be recycled at the end of its lifetime.
In case a disposal of electronic waste is not possible, the recycling can also
be done by Audio AG, the distributor of the MADI Router.
For this the device has to be sent free to the door to:
Audio AG
Am Pfanderling 60
D-85778 Haimhausen
Germany
Shipments not prepaid will be rejected and returned on the original sender's costs.
 Loading...