

Page 1
Wireless 2-Way Slim Keypad
UK
Tel: +44-(0)-161-655-5500
technical@riscogroup.co.uk
U.S.A
Tel: +1-631-719-4400
support-usa@riscogroup.com
ITALY
Tel: +39-02-66590054
support@riscogroup.it
BRAZIL
Tel: +1-866-969-5111
support-br@riscogroup.com
SPAIN
Tel: +34-91-490-2133
support-es@riscogroup.com
CHINA (Shanghai)
Tel: +86-21-52-39-0066
support-cn@riscogroup.com
CHINA (Shenzhen)
Tel: +86-755-82789285
support-cn@riscogroup.com
FRANCE
Tel: +33-164-73-28-50
support-fr@riscogroup.com
POLAND
Tel: +48-22-500-28-40
support-pl@riscogroup.com
BELGIUM
Tel: +32-2522-7622
support-be@riscogroup.com
ISRAEL
Tel: +972-3-963-7777
support@riscogroup.com
Rehov Hahoma 14
Rishon Lezion, Israel
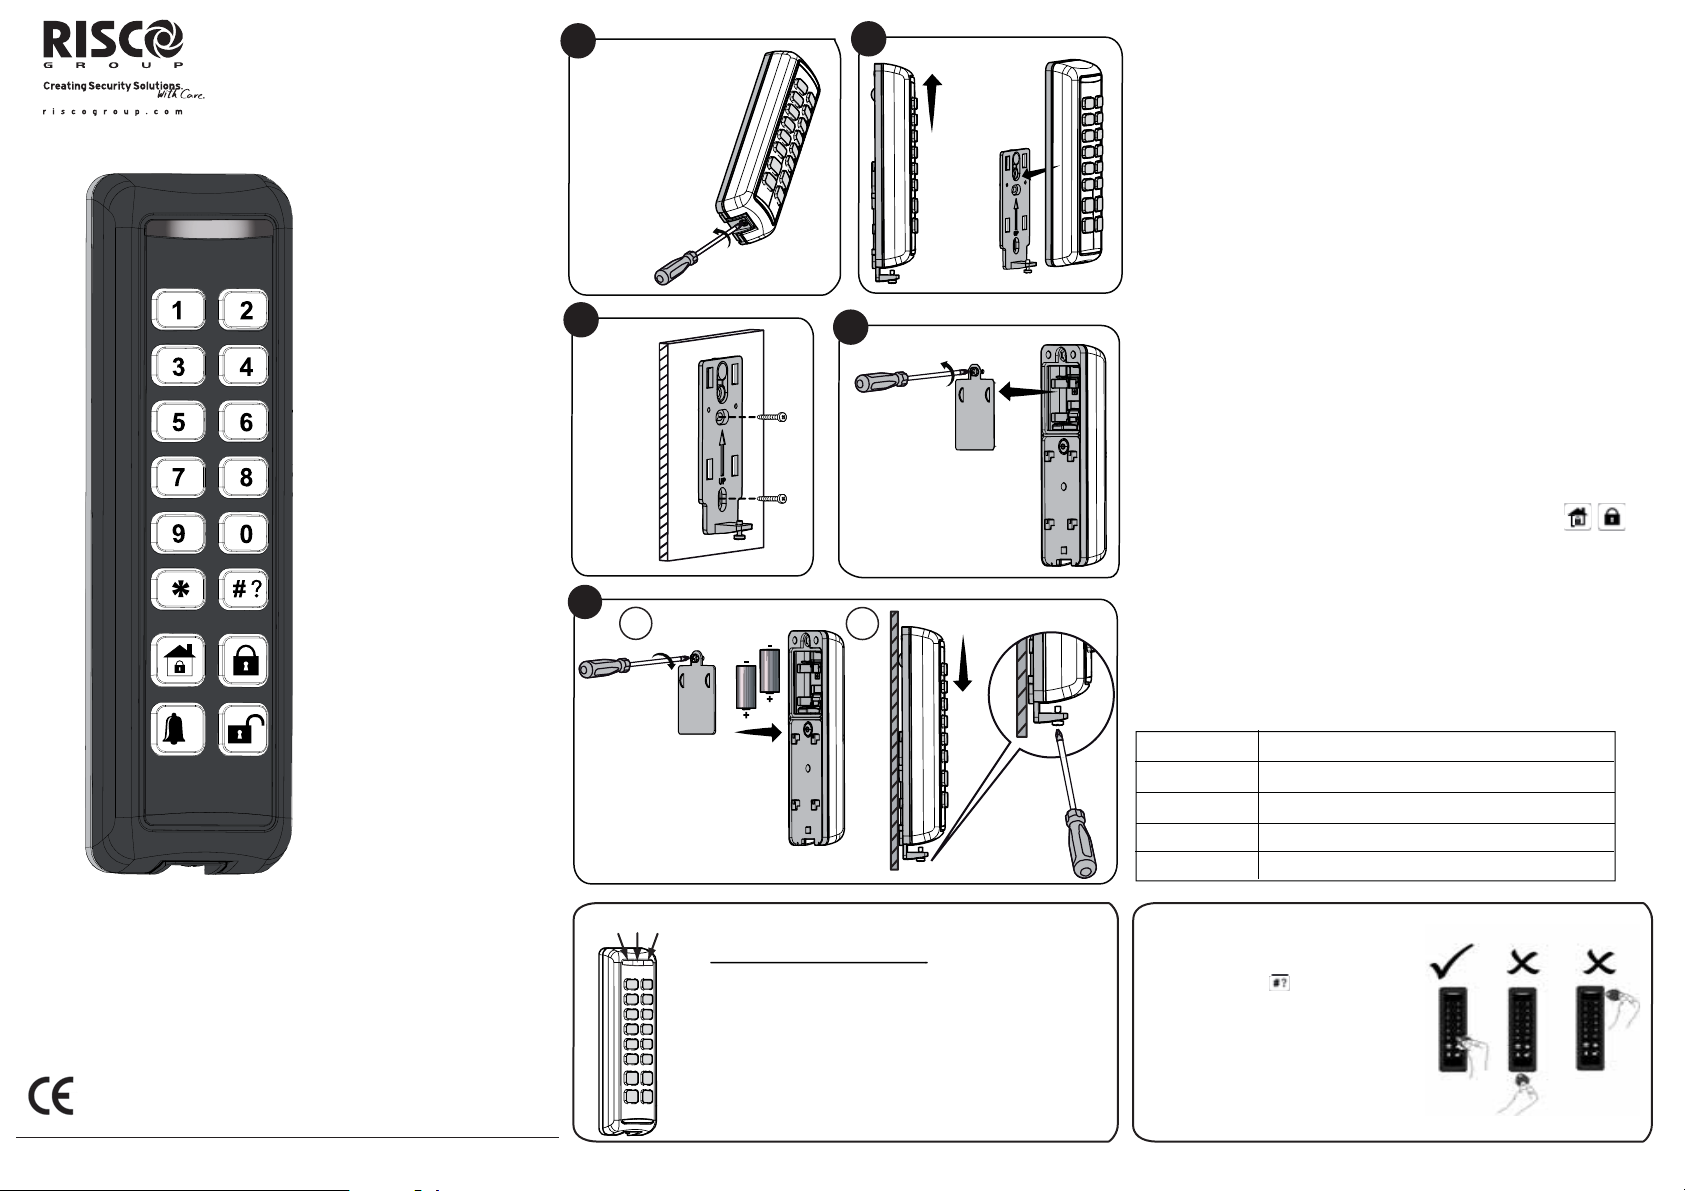
1
Remove locking pin
securing the mounting
bracket to the unit.
3
Mount the
bracket to
the wall
using the
supplied
screws.
5
A
A. Close the battery
compartment.
B. Mount the keypad
to the bracket (B)
2
Separate the
mounting
plate
from the
keypad's
main
unit.
4
Release the battery cover
screw and place the
supplied two batteries.
Pay attention to polarity.
B
Introduction
The Wireless 2-Way Slim Keypad empowered with a proximity reader
comes in two models:
RW132KL1P — a black protection-insulated outdoor model
RW132KL2P — a white indoor model
The keypad operates in either of two modes:
• Full function Mode: Wireless LED operating keypad
• Bypass unit Mode: Used to activate an entry countdown period
Being bi-directional the 2-Way keypad receives a reply status indication from the panel
for each command that it has sent to the panel.
To use functions of the keypad you can use a proximity tag or a code.
Main Features
• Bi-directional wireless communication
• Up to three wireless keypads per system
• Power-save light sensor
• Proximity tag operation
• Wall tamper protection
• Battery economy mode
• Wireless doorbell function
• 2 operation modes
• Outdoor-certi¿ed IP65 (RW132KL1P only)
Communication setup
The 2-Way Slim Outdoor Keypad must identify itself to the system receiver. This can be
done by entering the 11-digit serial number of the keypad into the system or using RF mode.
To setup the communication:
1. Set the system to Learn Mode by RF or by Code.
2. Send an allocation message *.
• By RF communication: Send a Write message by pressing both keys
simultaneously for at least 2 seconds.
• By Code: Enter the keypad's 11 digit serial code number
3. The system automatically recognizes the device and allocates it the next available
index number. The system will announce the keypad device type and the place it has
been allocated to.
4. If required to change the keypad's default settings, con¿gure the keypad's parameters
according to the system installation manual.
* Notes: • Before mounting the keypad, test the keypad communication with the system.
• Adding the keypad to the system can be done remotely using the
Con¿guration Software.
Buzzer Indication:
Duration Operation
Long beep Con¿tmation
3 short beeps Wrong code
Pulsed beeps Exit/Entry beeps (programmable)
Short beep Each key press
Models: RW132KL1P; RW132KL2P
RTTE Compliance Statement:
Hereby, RISCO Group declares that this equipment is in compliance with the essential requirements and
other relevant provisions of Directive 1999/5/EC. For the CE Declaration of Conformity please refer to our
website: www.riscogroup.com
EN50131-1, EN50131-3, Grade 2
EN50130-5, Environmental class IV (RW132KL1P),
Environmental class II (RW132KL2P)
EN50131-6, Type C
RISCO Group 08/2013 5IN1736 E
Blue Red Green
LED Indicator
Color State Status
Blue Blink During communication with
the panel
Red On System fully or partially armed
Slow Àash During Exit delay
Rapid Àash During Alarm
Green Blink Trouble indication in the system
while the system is unset*
Green/Red Toggle Waiting for code to be entered.
USING THE PROXIMITY TAG
The proximity tag, is correctly used by
applying it within a 2 cm (two centimeter)
distance from the key
as shown at right
FRANÇAIS
(after waking the keypad by pressing the
appropriate key).
Page 2

p
Full-Function Mode
p
User Operations
The following list details the user operations from the 2-way wireless slim keypad
in a full functional mode. User operation can be de¿ned to be activated by a quick
mode or high security mode that requires the use of a code or proximity tag.
In the high security mode the proximity tag can be used as a substitute for
inserting a user code when prompted to insert a code.
* Note: When using the proximity tag, the keypad needs to be woken up before
operation (see Using the Proximity Tag text)
Common Operations:
Operation Quick High Security Mode1
Set (Full) (Away Arm) Press Press > Code
2
Set (Partial) (Stay Arm)3 Press Press > Code2
Unset (Full Disarm) 1. Press
> Code or 2. proximity tag (after wakeup)
Advanced Operations:
Operation Quick High Security Mode1
Partition 1/2/3 setting Select partition 1/2/3 Select partition 1/2/3 and
(Away) and press press followed by Code
Stay arm partition 1/2/3
Select partition 1/2/3 Select partition 1/2/3 and
and press press followed by Code
Partition Disarm
Select partition 1/2/3 and press followed by Code
2
2
2
Panic alarm Press buttons + simutaneously for 2 seconds
Fire alarm Press buttons + simutaneously for 2 seconds
Emergency/Med. alarm Press buttons + simutaneously for 2 seconds
6
System Chime On/Off
Main unit
speaker volume
Press to save your selection
Set keypad Press the button for 2 seconds to toggle
exit/entry beeps
Activate/Deactivate Press the button for 2 seconds to toggle
light sensor
4
between On/Off
Press the button for 2 seconds
Press the button for 2 seconds.
6
Select the volume level (0=No sound, 4= full volume)
6
between On/Off
Press the button Press the button for 2
Status request for 2 seconds for system seconds followed by code
system status message6 for system status message
2
6
and view LED display and view LED display
Outputs Control Press 1/2/3 for 2 Press 1/2/3 for 2 seconds
seconds followed by code
Ring local door bell
5, 6
Press the button to activate a door bell sound
on the main system.
2
Notes:
1. Consult your installer for the operations de¿ned with a code.
2. The proximity tag can be used instead of code.
3. For Part Setting (Stay Arming) with no entry delay press the key for two seconds.
4. Light sensor is used to save battery by turning on/off the keypad backlight.
5. Needs to be de¿ned by your installer
6. Not applicable to LightSYS
Bypass Unit mode (Not applicable to LightSYS)
For units con¿gured by installers as being in bypass mode, the actions keys
are disabled and the keypad is used only to authorize an opening of an
exit/entry door. The following explanation details the user operations from the
2-way wireless slim outdoor keypad in bypass unit mode.
User Operation
When the system is armed, a user must get access using the keypad to open
the door. Opening a door without an approval from the main unit will cause an
immediate intruder alarm.
Granted Access to Open Entry Door
1. Before opening an entry door enter an authorized code
wake up the keypad by pressing and present a proximity tag
2. Once access is granted (Green Led On) the user has a time window
open the front door.
3. Once the front door is opened entry time will start in which the security
system needs to be disarmed.
Notes:
a. Activating the RF Wake-up mode can measurably impact on battery
life. Consult your installer.
b. Bypass code can be unique or the same code as the security code.
Ask your installer for the code de¿nition.
c. An incorrect keypad code entered ¿ve times locks it for one minute.
d. Ask your installer for the de¿ned time window.
Replacing Batteries
1. Remove the unit from the wall1.
2. Remove the battery compartment cover screw located at the bottom of the
cover by turning screw counter clockwise.
3. Pull up the battery compartment cover.
4. Pull out the batteries and replace them with new ones. Pay attention to the
polarity when inserting the new batteries.
5. Close the case and secure the screw to its place.
Note:
1. A tamper alarm may result. Inform your alarm company before replacing batteries
CAUTION: Risk of explosion if battery is replaced by an incorrect type.
Dispose of used batteries according to local regulations.
Changing Keypad Parameters
Any change performed in the de¿nition of the keypad parameters requires
updating the keypad as well. This is performed by pressing the key for 2
seconds. Doing so, the panel will send an update to the keypad.
a
b
in the keypad or
c
.
d
to
Technical Speci¿cation:
Electrical
Battery Type CR123, 3V lithium battery (x 2)
Current Consumption Stand-by current 10A, Max current 100 mA
Frequency 868.65 MHz, 433.92 MHz (model dependant)
Modulation Type 00K
Typical Battery Life 3 Years
Physical
Dimensions (HXWXD) 100 mm X 45 mm X 25 mm (3.9 i X 1.8 X .98 inches)
Weight (incl batteries) 0.157 kg
Environmental:
RF Immunity According to EN50130-4
Operating termperature -40
Storage temperature -40
IP Rating 65 (RW132KL1P model only)
RISCO Group Limited Warranty
RISCO Group and its subsidiaries and af¿liates ("Seller") warrants its products to be free from defects in
materials and workmanship under normal use for 24 months from the date of production. Because Seller
does not install or connect the product and because the product may be used in conjunction with products
not manufactured by the Seller, Seller cannot guarantee the performance of the security system which uses
this product. Seller's obligation and liability under this warranty is expressly limited to repairing and replacing,
at Seller's option, within a reasonable time after the date of delivery, any product not meeting the speci¿cations.
Seller makes no other warranty, expressed or implied, and makes no warranty of merchantability or of ¿tness
for any particular purpose.In no case shall seller be liable for any consequential or incidental damages for breach
of this or any other warranty, expressed or implied, or upon any other basis of liability whatsoever. Seller's
obligation under this warranty shall not include any transportation charges or costs of installation or any liability
for direct, indirect, or consequential damages or delay. Seller does not represent that its product may not be
compromised or circumvented; that the product will prevent any personal injury or property loss by burglary,
robbery, ¿re or otherwise; or that the product will in all cases provide adequate warning or protection. Buyer
understands that a properly installed and maintained alarm may only reduce the risk of burglary, robbery or fire
without warning, but i s no t in surance or a guaranty that such event will not occur or that there will be no personal
injury or property loss as a result thereof. Consequently seller shall have no liability for any personal Minjury,
property damage or loss based on a claim that the product fails to give warning. Howev er, if seller is held liable,
whether directly or indirectly, for any loss or d amage arising under this limited warranty or otherwise, regardless
of cause or origin, seller's maximum liability shall not exceed the purchase price of the product, Mwhich shall
be complete and exclusive remedy against seller. No employee or representative of Seller is authorized to
change this warranty in any way or grant any other warranty.
WARNING: This product should be tested at least once a week.
CAUTION: risk of explosion if battery is replaced by an incorrect type.
Dispose of used batteriess according to local regulations.
o
C to 70o C (-40o F to 159o F)
o
C to 70o C (-40o F to 159o F)
Wake up keypad Press
 Loading...