

RIDGID SP-330, SP-500, SP-330D, SSP-1000 Operator's Manual
SP-330
Submersible
SP-330D
Sump Pump
SP-500
SSP-1000
OPERATOR’S
MANUAL
• Pour français voire page 11
• Para ver el castellano vea
la paginá 21
W ARNING!
Read this operators Manual
carefully before using this
tool. Failure to understand
and follow the contents of
this manual may result in
electrical shock, fire and/or
serious personal injury.

SP-330, SP-330D, SP-500, SSP-1000 Submersible Sump Pumps
Table of Contents
Recording Form for Pump Serial Number . . . . . . . . . . . . . . . . . . . . . . . . . . . . . . . . . . . . . . . . . . . . . . . . . . . . . . . 1
General Safety Information
Work Area. . . . . . . . . . . . . . . . . . . . . . . . . . . . . . . . . . . . . . . . . . . . . . . . . . . . . . . . . . . . . . . . . . . . . . . . . . . . . . 2
Electrical Safety . . . . . . . . . . . . . . . . . . . . . . . . . . . . . . . . . . . . . . . . . . . . . . . . . . . . . . . . . . . . . . . . . . . . . . . . . 2
Personal Safety. . . . . . . . . . . . . . . . . . . . . . . . . . . . . . . . . . . . . . . . . . . . . . . . . . . . . . . . . . . . . . . . . . . . . . . . . . 2
Service . . . . . . . . . . . . . . . . . . . . . . . . . . . . . . . . . . . . . . . . . . . . . . . . . . . . . . . . . . . . . . . . . . . . . . . . . . . . . . . . 3
Specific Safety Information
Submersible Pump Safety . . . . . . . . . . . . . . . . . . . . . . . . . . . . . . . . . . . . . . . . . . . . . . . . . . . . . . . . . . . . . . . . . 3
Description and Specifications
Description . . . . . . . . . . . . . . . . . . . . . . . . . . . . . . . . . . . . . . . . . . . . . . . . . . . . . . . . . . . . . . . . . . . . . . . . . . . . . 3
Specifications . . . . . . . . . . . . . . . . . . . . . . . . . . . . . . . . . . . . . . . . . . . . . . . . . . . . . . . . . . . . . . . . . . . . . . . . . . . 4
Performance Curve and Performance Chart . . . . . . . . . . . . . . . . . . . . . . . . . . . . . . . . . . . . . . . . . . . . . . . . . . . 4
Pump Installation
Installation. . . . . . . . . . . . . . . . . . . . . . . . . . . . . . . . . . . . . . . . . . . . . . . . . . . . . . . . . . . . . . . . . . . . . . . . . . . . 4-6
Testing . . . . . . . . . . . . . . . . . . . . . . . . . . . . . . . . . . . . . . . . . . . . . . . . . . . . . . . . . . . . . . . . . . . . . . . . . . . . . . . . 6
Maintenance Instructions . . . . . . . . . . . . . . . . . . . . . . . . . . . . . . . . . . . . . . . . . . . . . . . . . . . . . . . . . . . . . . . . . . . . 6
Suggested Part Replacement Schedule. . . . . . . . . . . . . . . . . . . . . . . . . . . . . . . . . . . . . . . . . . . . . . . . . . . . . . . 6
Service and Repair . . . . . . . . . . . . . . . . . . . . . . . . . . . . . . . . . . . . . . . . . . . . . . . . . . . . . . . . . . . . . . . . . . . . . . . . . . 7
Troubleshooting . . . . . . . . . . . . . . . . . . . . . . . . . . . . . . . . . . . . . . . . . . . . . . . . . . . . . . . . . . . . . . . . . . . . . . . . . . . . 7
Lifetime Warranty . . . . . . . . . . . . . . . . . . . . . . . . . . . . . . . . . . . . . . . . . . . . . . . . . . . . . . . . . . . . . . . . . . . Back Cover
ii
Ridge Tool Company
SP-330, SP-330D,
SP-500, & SSP-1000
Submersible Sump Pumps
SP-330, SP-330D, SP-500, and SSP-1000 Submersible Sump Pumps
Record Serial Number From Product Decal Below
Serial
No.
351411-005 1/10
SP-330, SP-330D, SP-500, SSP-1000 Submersible Sump Pumps
General Safety Information
Safety is a combination of common sense, staying alert
and understanding how your sump pump works.
Safety Signal Words
means if the safety information is not
followed someone will be seriously
injured or killed.
means if safety information is not
followed someone could be
seriously injured or killed.
means if safety information is not
followed someone may be injured.
indicates important information, that
if not followed, may cause damage
to the equipment or fl ooding.
Read and understand all
instructions. Failure to follow all
instructions listed below may result in fatal electric
shock, fi re, property damage, and/or serious
personal injury.
SAVE THESE INSTRUCTIONS!
Work Area
• Do not operate pump in explosive atmospheres,
such as in the presence of flammable liquids,
gases, or dust. Pump motors create sparks
which may ignite the dust or fumes.
• Do not abuse cord. Never use the cord to carry
the pump or pull the plug from an outlet. Keep
cord away fr om heat, oil, sharp edges, or moving
parts. Replace damaged cords immediately.
Damaged cords increase the risk of electrical
shock.
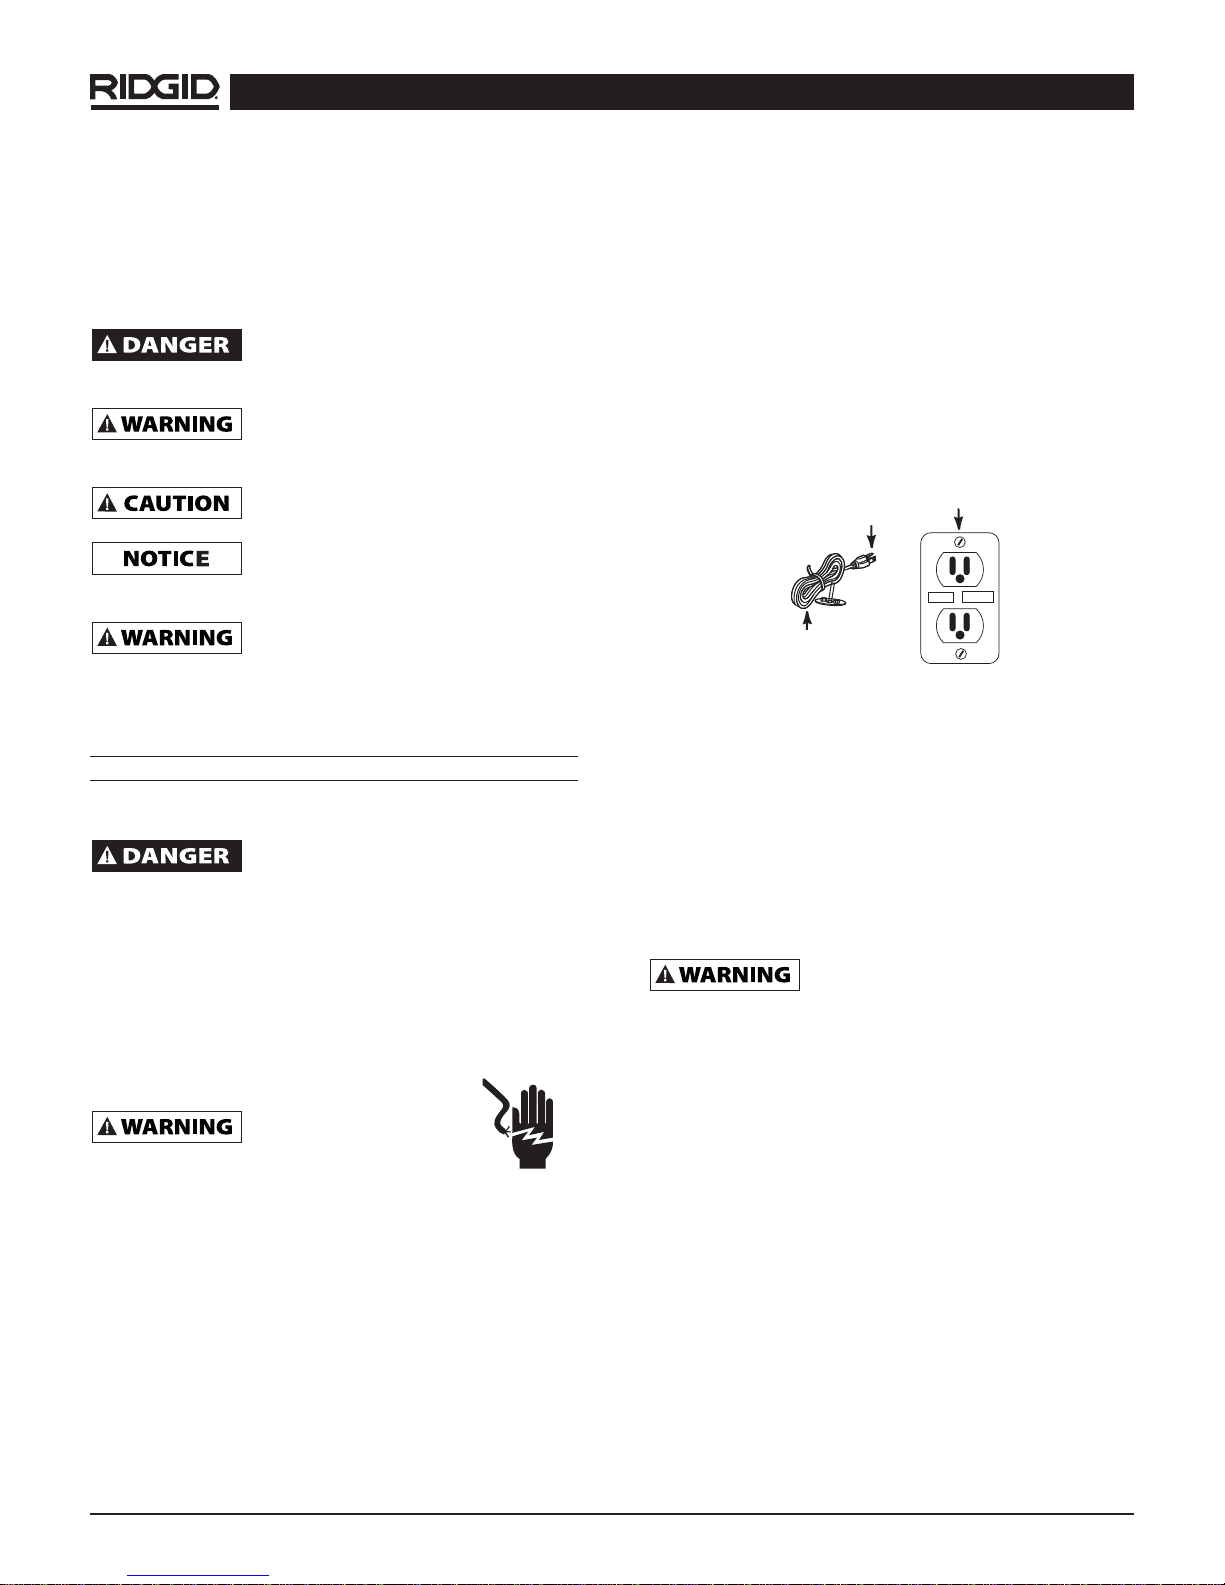
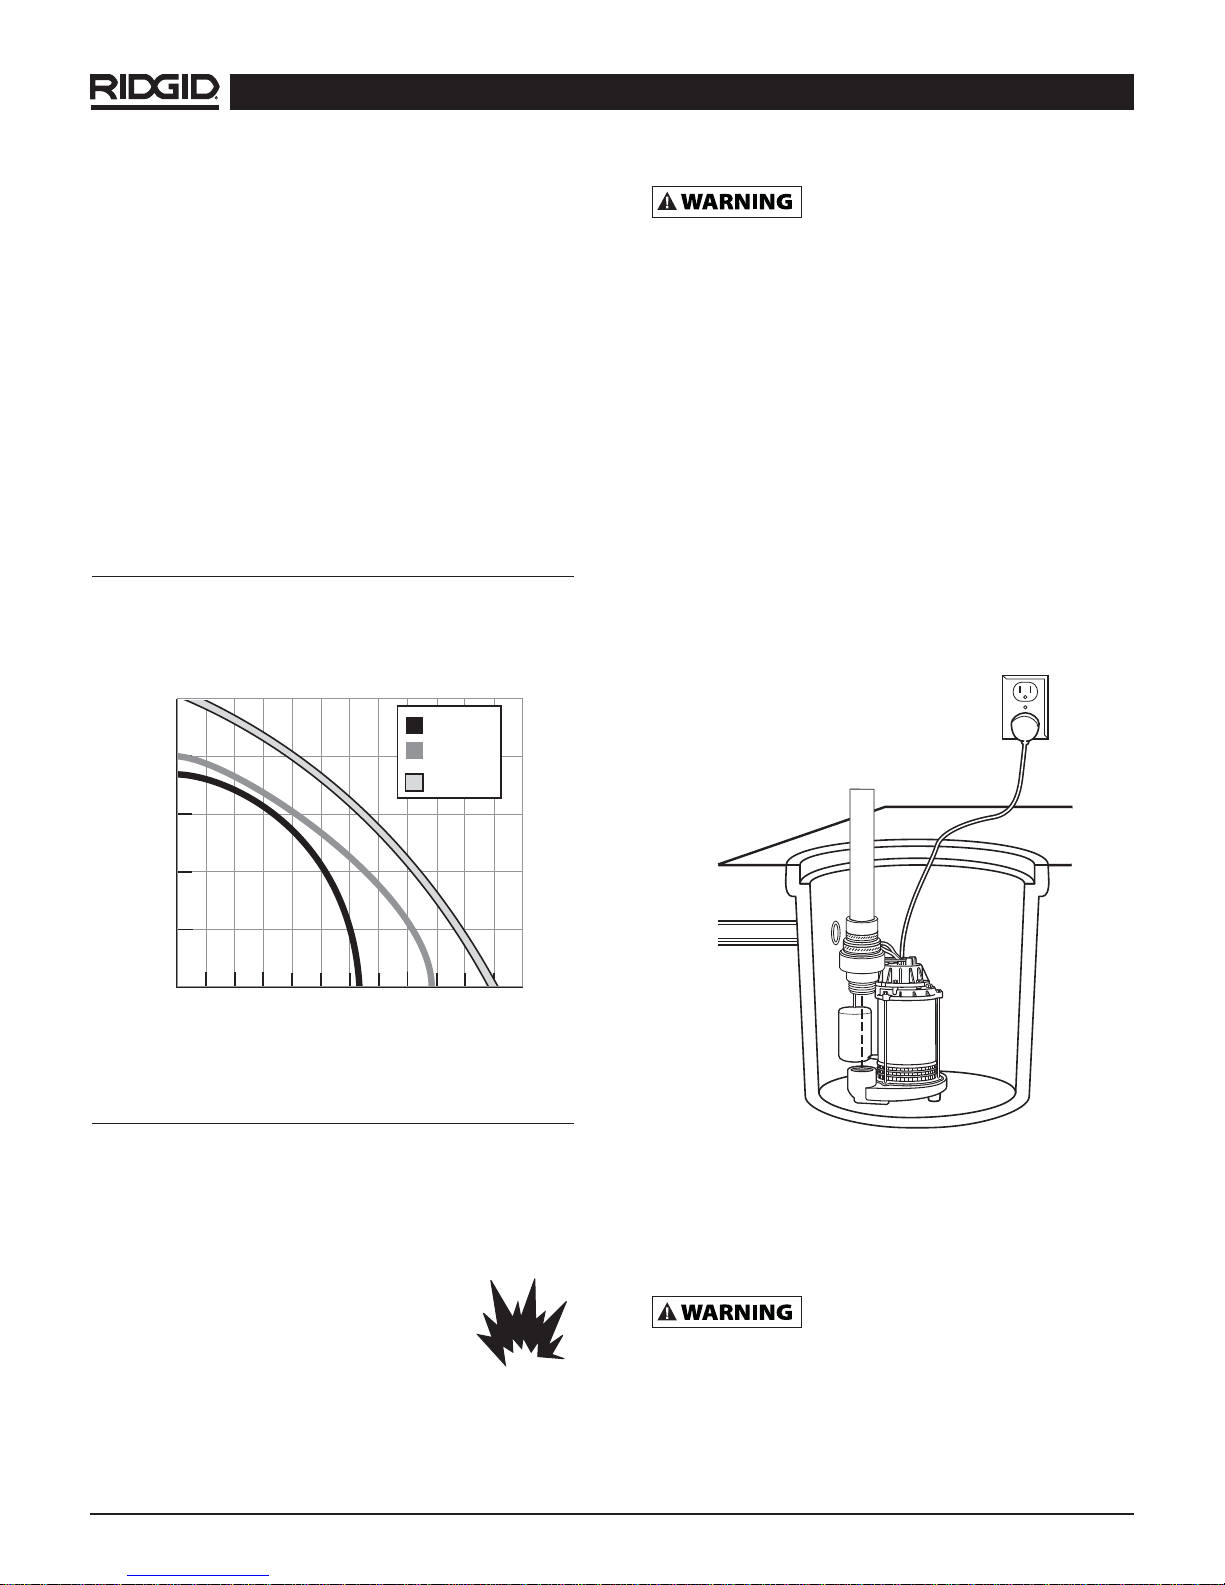
• Pump must be plugged into an outlet receptacle
that includes a Ground Fault Circuit Interrupter
(GFCI). In the event of current leakage, a GFCI will
trip, thus reducing the risk of serious injury or death
from electrical shock.
Grounded
Grounding
Blade
Power
Cord
Outlet
TEST
RESET
Figure 1
• Before using, test the Ground Fault Circuit
Interrupter (GFCI) to insure it is operating
correctly. A GFCI reduces the risk of electrical
shock.
• Do not use an extension cord. This increases
the risk of electrical shock. If necessary, install a
properly grounded outlet closer to the pump.
Personal Safety
• Keep by-standers, children, and visitors away
while installing pump. Distractions can result in
mistakes.
Electrical Safety
• This pump must be plugged into
an outlet, properly installed, and grounded
in accordance with all applicable codes and
ordinances. Never remove the grounding prong
or modify the plug in any way. Do not use any
adapter plugs. Check with a qualified electrician
if you are not sure the outlet is grounded. If
the pump should electrically malfunction or break
down, grounding provides a low resistance path to
carry electricity away from the user.
• Electrical wiring must be performed by a
qualified electrician. Improper wiring could result
in fatal electrical shock.
2
• Stay alert, watch what you are doing, and use
common sense when installing this pump. Do
not attempt to install this pump while tired
or under the influence of drugs, alcohol or
medications. A moment of inattention may result
in serious personal injury.
• Dress properly. Do not wear loose clothing
or jewelry. Contain long hair. Keep your hair,
clothing, and gloves away from moving parts.
Loose clothes, jewelry, or long hair can be caught
in moving parts.
• Do not overreach. Keep proper footing and
balance at all times. Proper footing and balance
enables better control in unexpected situations.
• Use safety equipment. Always wear eye
protection. Dust mask, non-skid safety shoes and
hard hat must be used for appropriate conditions.
Ridge Tool Company
SP-330, SP-330D, SP-500, SSP-1000 Submersible Sump Pumps
Service
• The motor is oil filled and sealed for cooler
running. Allow 2 hours for the motor to cool
before servicing. Hot oil is under pressure and
could result in severe burns.
• Pump service must be performed only by
qualified repair personnel. Service or maintenance
performed by unqualified repair personnel could
result in injury and may void the warranty.
• When servicing a pump, use only identical
replacement parts. Follow instructions in the
Maintenance Section of this manual. Use of
unauthorized parts or failure to follow maintenance
instructions may create a risk of electrical shock or
injury.
NOTE! Disassembly of the motor will void warranty.
Specifi c Safety Information
Risk of electric shock. This
pump is supplied with a grounding-type plug. To
reduce risk of electric shock be certain that it is
connected only to a properly grounded, groundingtype receptacle that is protected by a GFCI.
For your own safety, before assembling and operating
this unit, read this operators manual carefully and
completely. Learn the operation, application, and
potential hazards peculiar to this unit.
Call the Ridge Tool Company, Technical Services
Department at 1-877-9RIDGID if you have any questions.
is in the basement, call an electrician. Failure
to follow this warning could result in fatal electrical
shock.
• Always disconnect the power source before
attempting to install, service, relocate, or maintain the pump. Never handle a pump or pump
motor with wet hands or when standing on wet
or damp surface or in water. Failure to follow
this warning could result in personal injury and/or
death.
• Pump motor is equipped with automatic reset-
ting thermal protector that could restart unexpectedly. Disconnect power source when servicing
pump.
• Do not modify float or position float switch
so that pump will operate continuously. Pump
is not designed for continuous operation, this will
reduce performance and life of the pump.
• Do not hang pump by handle for permanent
installation. This minimizes twisting which can
lead to damage during pump operations.
Description and Specifi cations
Description
The submersible pump is designed for home sump
operations only. The unit is equipped with an 8 foot,
3-prong grounding type power cord. The motor has an
automatic reset thermal protector to prevent burnouts
due to overloading or clogging. The pump is designed
to automatically maintain water level between factory
preset points.
The SSP-1000 is provided with a solid-state electronic
water level control. When water is detected, the pump
will start automatically.
The sensor is designed to run the pump a minimum of
4 seconds and a maximum of 16 seconds.
Submersible Pump Safety
• Do not use to pump flammable or
explosive fluids such as gasoline, fuel oil, kerosene, solvents, thinners etc. Do not use in a
flammable and/or explosive atmosphere. Pump
should only be used to pump clear water . Improper
use could result in personal injury and/or death.
• If there is water or moisture on the floor or
ground near the pump, do not walk on wet area
until all power is turned off. If the shut-off box
salt water, brine, laundry discharge, or any other
application which may contain caustic chemicals and/
or foreign materials. This pump is not suitable for use
with aquatic life. Pump damage or failure could occur
if used in these applications and will void the warranty.
Do not use for sewage or effl uent applications.
a battery back-up system be used. Power outages,
excessive w ater fl ow, G.F.C.I. tripping and primary pump
wear can cause fl ooding. A battery back-up system
reduces this risk. Contact your Ridge Tool distributor.
Ridge Tool Company
This pump is not designed to handle
It is strongly recommended that
3
SP-330, SP-330D, SP-500, SSP-1000 Submersible Sump Pumps
Specifi cations
Motor:
Type . . . . . . . . . . . . . . . . . . . 1/3 HP & 1/2 HP
Shaded Pole
1HP Split Phase
Rating . . . . . . . . . . . . . . . . . . 120V, Single Phase
1/3 HP, 9.5 Amps
1/2 HP, 10 Amps
1HP, 9.8 Amps
Pump
1/3 HP . . . . . . . . . . . . . . . . . 3100 GPH @ 0 Ft.
1/2 HP . . . . . . . . . . . . . . . . . 4400 GPH @ 0 Ft.
1HP . . . . . . . . . . . . . . . . . . . 5400 GPH @ 0 Ft.
Liquid temperature range . . .40F to 120F
Model Cut-in Cut-out
SP-330 & SP-500 9 inches 4 inches
SP-330D 10-13 inches 4-7 inches
SP-1000 7 inches 3 inches
Performance Curve
25
SP-300
SP-300D
20
15
SP-500
SSP-1000
To prevent property damage,
serious injury, or death, proper installation of
the pump is required. The following procedures
should be followed:
• Pump must be plugged into an outlet receptacle
that includes a Ground Fault Circuit Interrupter
(GFCI) (Figure 1).
• Always disconnect the power source before
attempting to install, service, relocate, or maintain the pump. Never handle a pump or pump
motor with wet hands or when standing on wet
or damp surface or in water.
Installation
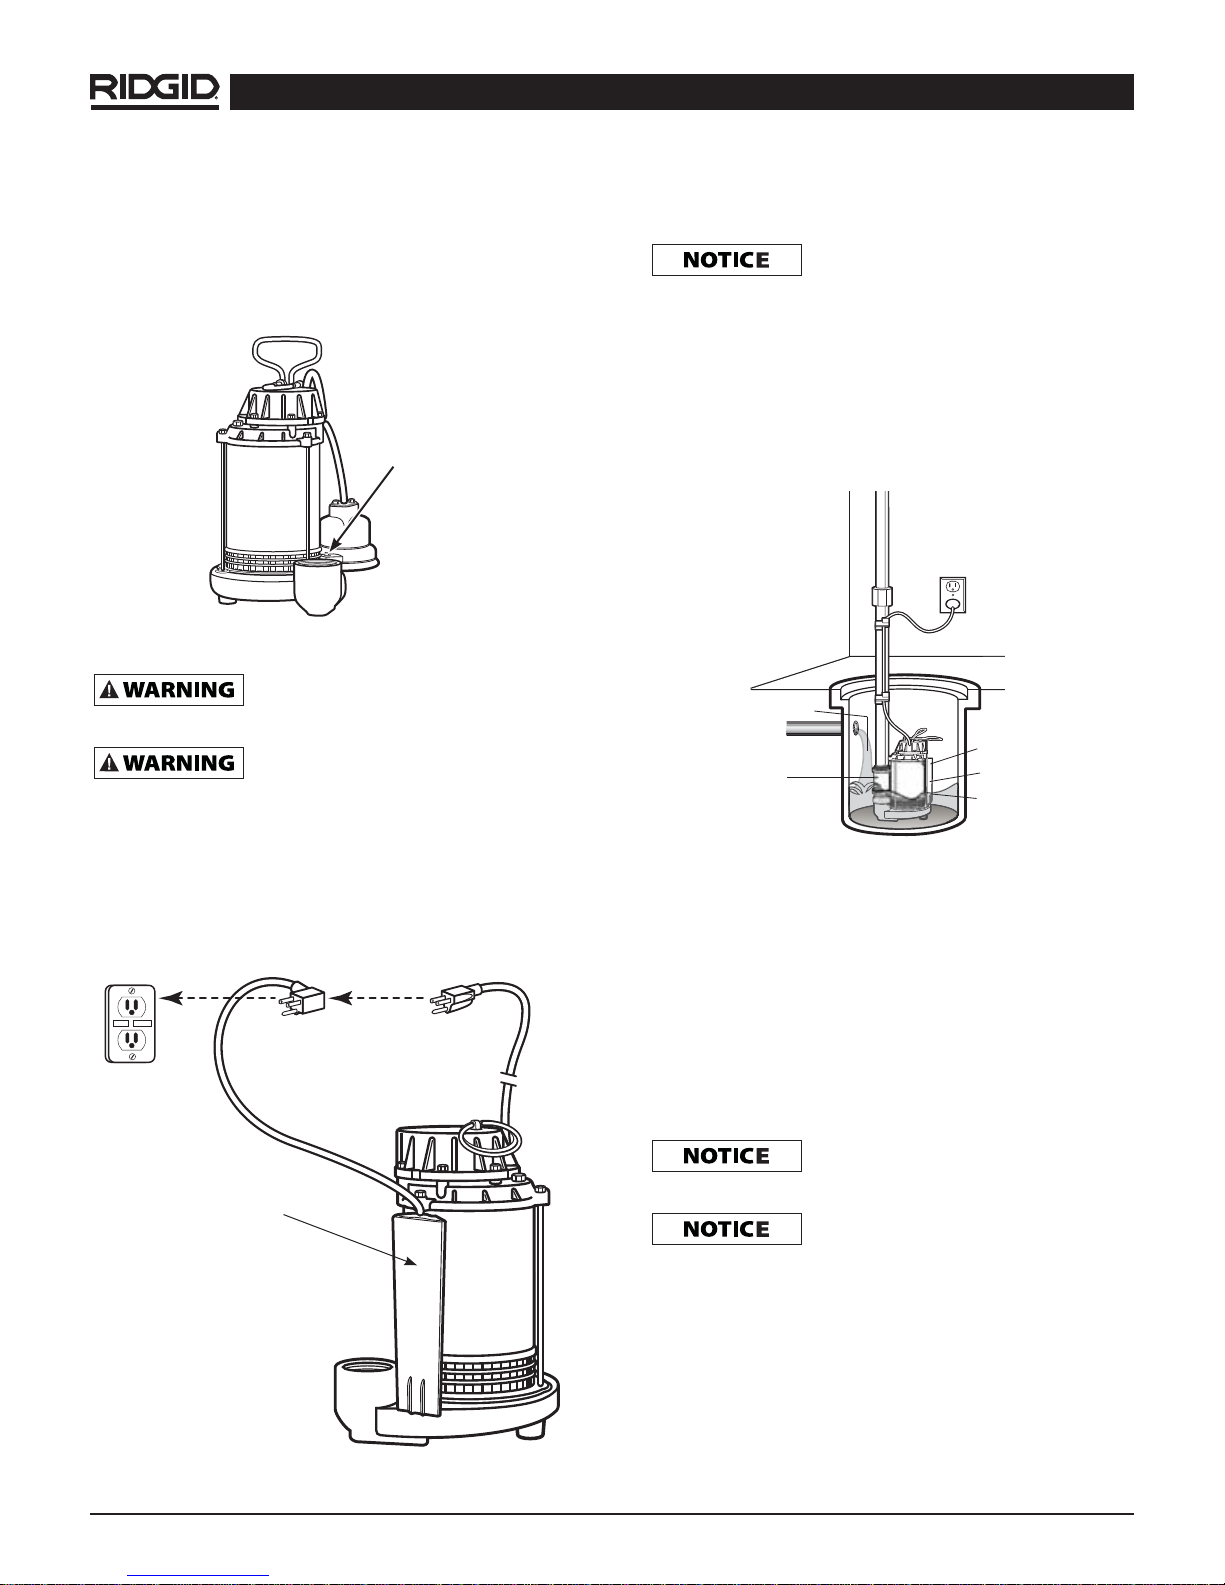
1. Construct a sump pit from concrete, steel, or
plastic that is at least 24" deep and at least 11"
in diameter (Figure 2). If the sump already exists,
make sure it is the proper size.
10
Discharge (Feet)
5
0
1000 2000 3000 4000 5000 6000
Gallons Per Hour
Performance Chart
Discharge Head 0' 5' 10' 15'
SP-330 Gallons/Hour 3100 3000 2700 1680
SP-330D Gallons/Hour 3100 3000 2700 1680
SP-500 Gallons/Hour 4400 4100 3200 2000
SSP-1000 Gallons/Hour 5400 4860 4200 3360
Pump Installation
• Pump should only be used to pump
clear water. Do not use to pump
fluids such as gasoline, fuel oil,
or kerosene. Do not use in a flammable or explosive atmosphere. Improper use
could result in personal injury and/or death.
Figure 2 – Submersible Pump Installation
2. Make sure the electrical outlet is grounded and
is rated for 115 volts and at least 15 amps. The
outlet must be protected by a Ground Fault Circuit
Interrupter (GFCI).
Use of a grounded receptacle that
is protected by a GFCI reduces risk of a fatal electrical
shock.
3. Inspect the power cord and plug for damage. If the
plug is missing the grounding prong or the cord is
damaged, do not install the pump until the cord
has been replaced.
4
Ridge Tool Company
SP-330, SP-330D, SP-500, SSP-1000 Submersible Sump Pumps
(SP-330D Diaphragm Switch Only)
4. Remove the two fasteners in the cast iron volute
near the discharge area. Align the hole with the
diaphragm switch and replace the fasteners without over tightening (Figure 3).
Attach switch
with screws (2)
provided
Figure 3 – Diaphragm Switch
Never cut off grounding prong or
use an adapter.
Support pump and piping when
assembling and after installation. Failure to do so
could cause piping to break or pump to fail, which
could result in property damage and/or personal injury.
(SSP-1000 Solid-State Water Sensor only)
5. Insert the pump power cord plug directly into the
back of the Solid-State Water Sensor cord plug
(Figure 4).
RESET
TEST
6. Set pump into sump. Locate the pump on a solid
level surface.
Do not place directly on clay, gravel,
or any loose or sandy surfaces. These surfaces
contain small stones or sand that may clog or damage
the pump, which could result in pump failure causing
fl ooding and property damage.
(SSP-1000 Solid-State Water Sensor only)
• Position pump switch away from the inlet so the
switch is clear from incoming water. (See Figure 5)
DISCHARGE PIPE
GFCI PROTECTED
OUTLET
INCOMING
WATER
INLET PIPE
CHECK VALVE
@
ON
8”
SWITCH
OFF @
APPROX. 3”
Figure 5 – Inlet water fl ow
7. This pump has a 1-1/2" NPT discharge. If existing piping is 1-1/4" NPT, an adapter bushing (not
included) may be used. Do not use piping that is
less than 1-1/4" NPT. Piping that is too small will
result in reduced output.
8. A check valve is required in the discharge line to
prevent bac k-flow when the pump shuts off . It is best
to install the check-valve directly to the pump discharge. Thread a check valve into pump discharge.
Working surface of sensor to be kept free of
foreign material.
This will keep the pump
from cycling too often
Figure 4 – Solid-State Water Sensor
thread. Do not use pipe joint sealant.
temporary use only . Rigid PVC or metal pipe is required
for a permanent installation. If fl exible discharge hose is
temporarily used, make sure pump is secured in sump
pit to prevent mo v ement. Failure to secure pump could
allow pump movement and cause s witch interference
and prevent pump from starting or stopping. This could
result in fl ooding and property damage.
Ridge Tool Company
Be careful not to strip or cross-
Flexible discharge hose is intended f or
5
SP-330, SP-330D, SP-500, SSP-1000 Submersible Sump Pumps
IMPORTANT! Make sure there is adequate room
for fl oat switch to move freely during operation. A
1" minimum is required. Do not allow water infl ow
to affect fl oat.
9. Connect 1-1/4" diameter rigid pipe to rubber boot
on check valve (not included). Reverse boot for
1-1/2" diameter pipe. Tighten clamps.
10. For SP-330 and SP-500 pumps:
Insert the pump cord plug directly into a GFCI protected 115 volt grounded outlet (see Figure 1).
For SP-330D and SSP-1000 pumps:
Insert the switch cord plug into a GFCI protected
115 volt grounded outlet. Insert the pump cord
plug directly into the back of the switch cord plug
(see Figure 4).
When routing electrical cord protect cord from sharp objects, hot surfaces, oils,
and chemicals. Do not kink or tightly clamp cord;
replace any damaged cord immediately.
Testing
1. Fill sump pit with water.
2. While the pump is draining the pit, verify that the
discharge piping is carrying the water to a point at
least 15 feet away from the foundation.
The outside piping must be tilted
downward to drain. This helps prevent debris from
entering the discharge pipe, and also prevents trapped
water from freezing which can damage the pump.
3. Install sump pit cover (not included) to prevent
debris from clogging or damaging the pump.
(SSP-1000 Solid State Water Sensor only)
Sensor is designed to run the pump a minimum
of 4 seconds. If water is removed in less time, a
gurgling sound will be generated as air is ingested
into the pump. This will not damage the pump.
Maintenance Instructions
• The motor is oil filled and sealed for cooler
running. Allow 2 hour s for motor to cool before
servicing. Hot oil under pressure could result
in severe burns.
1. Check the operation of the Ground Fault Circuit
Interrupter (GFCI) on a monthly basis.
2. Keep pump inlet clean and free of all foreign
objects. Inspect at least once a year and clean
sump as needed.
3. Check pump for proper operation monthly by filling
sump with water until pump turns on.
4. Inspect all plumbing connections for any leaks or
looseness monthly.
(SSP-1000 Solid-State Water Sensor only)
5. Pump can be checked for proper operation by briefly removing pump power cord from the back of the
Solid-State W ater Sensor plug and inserting directly
into the grounded outlet. In this condition, the pump
will run continuously. Once pump operation is verified, replace pump power cord into the back of the
Solid-State Water Sensor plug (see Figure 3).
NOTE! Disassembly of the motor will void the
warranty.
Part Replacement Schedule
Failure to follow replacement schedule will void
lifetime warranty.
Replace pump switch every 2 years. See page 8 for
Ridgid catalog #.
Replace fl oat every 2 years. See page 8 for Ridgid
catalog #.
Replace stator every 5 years. See page 8 for Ridgid
Catalog number.
SSP-1000 uses a solid-state electronic control with no
moving parts (see Figure 3), therefore replacement is
not needed.
• Always disconnect the electrical supply or
unplug the pump before attempting to install,
service, relocate, or perform any maintenance.
If the power source is out of sight, lock and tag
in the open (OFF) position to prevent unexpected power application. Failure to do so could
result in fatal electrical shock. Only a qualified
technician should repair this unit. Improper
repair could result in fatal electrical shock.
6
Ridge Tool Company
SP-330, SP-330D, SP-500, SSP-1000 Submersible Sump Pumps
Service And Repair
• Service and repair work on this pump must be performed by qualified repair personnel. Pump should
be taken to a RIDGID Independent Authorized
Service Center or returned to the factory. All
repairs made by Ridge service facilities are warranted against defects in material and workmanship.
• When servicing this pump, only identical replacement parts should be used. Failure to follow these
steps may create a risk of flooding, property damage, fatal electrical shock, or other serious injury
and may also void your warranty.
If you have any questions regarding the service or
repair of this machine, call or write to:
Ridge Tool Compan y
Technical Service Department
400 Clark Street
Elyria, Ohio 44036-2023
E-Mail: TechService@ridgid.com
For name and address of your nearest Independent
Authorized Service Center, contact the Ridge Tool
Company at http://www.RIDGID.com
For Customer Support, call 1-877-9RIDGID.
Troubleshooting
Let the pump cool for a minimum of two hours before servicing because the pump contains hot oil under
pressure. Disconnect pump from power source before servicing.
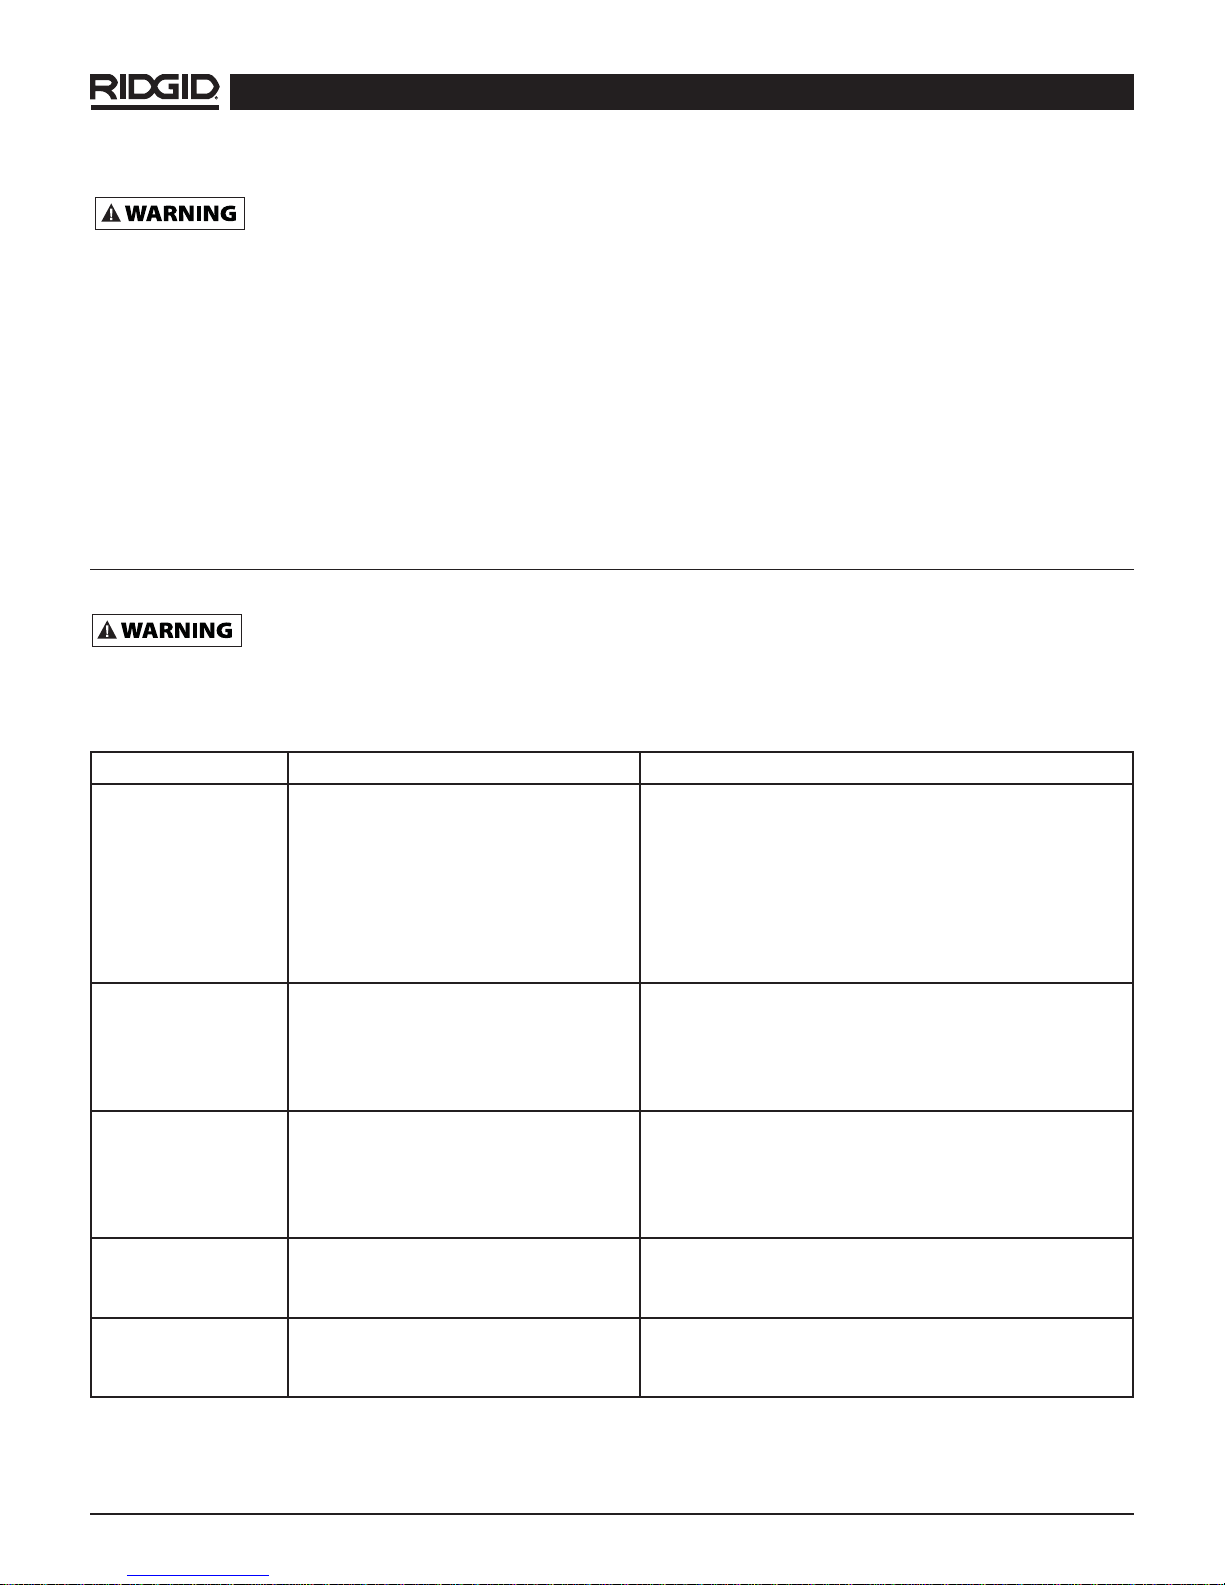
TROUBLESHOOTING CHART
Symptom Possible Cause(s) Corrective Action
Pump will not start
or run
Pumps start and
stops too often
Pump will not shut
off or thermal protector turns off
Pump operates but
delivers little or not
water
Gurgling sound
from pump at end of
cycle
1. Blown fuse or breaker
2. Low line voltage
3. Worn motor
4. Worn switch
5. Impeller not rotating
6. Float obstruction
1. Backflow of water from piping
2. Defective switch
3. Dir ty Solid-State Water Sensor
(Model SSP-1000 only)
1. Dirty Solid-State Water Sensor
(Model SSP-1000 only)
2. Defective switch
3. Obstacle in piping
4. Float obstructed
1. Low line voltage
2. Plugged impeller
1. Air injested into pump
2. Time required for pumping is less
than 4 seconds
1. If blown, replace with proper sized fuse or reset
breaker.
2. If voltage is under 108 volts, check wiring size.
3. Replace motor or pump.
4. Replace switch.
5. If impeller will not turn, remove housing and
remove blockage.
6. Make sure float moves freely up and down.
1. Install or replace check valve.
2. Replace switch (SP-330, SP-330-D, SP-500
Only).
3. Clean sensor face / see Maintenance steps
1. Clean sensor face / see Maintenance steps
2. Replace switch.
3. Remove pump and clean pump and piping.
4. Make sure float moves freely up and down.
1. If voltage is under 108 volts, check wiring size.
2. Clean out impeller.
1. Wipe off surface of sensor (see Figure 4).
2. Additional run time will not damage pump.
Ridge Tool Company
7
SP-330, SP-330D, SP-500, SSP-1000 Submersible Sump Pumps
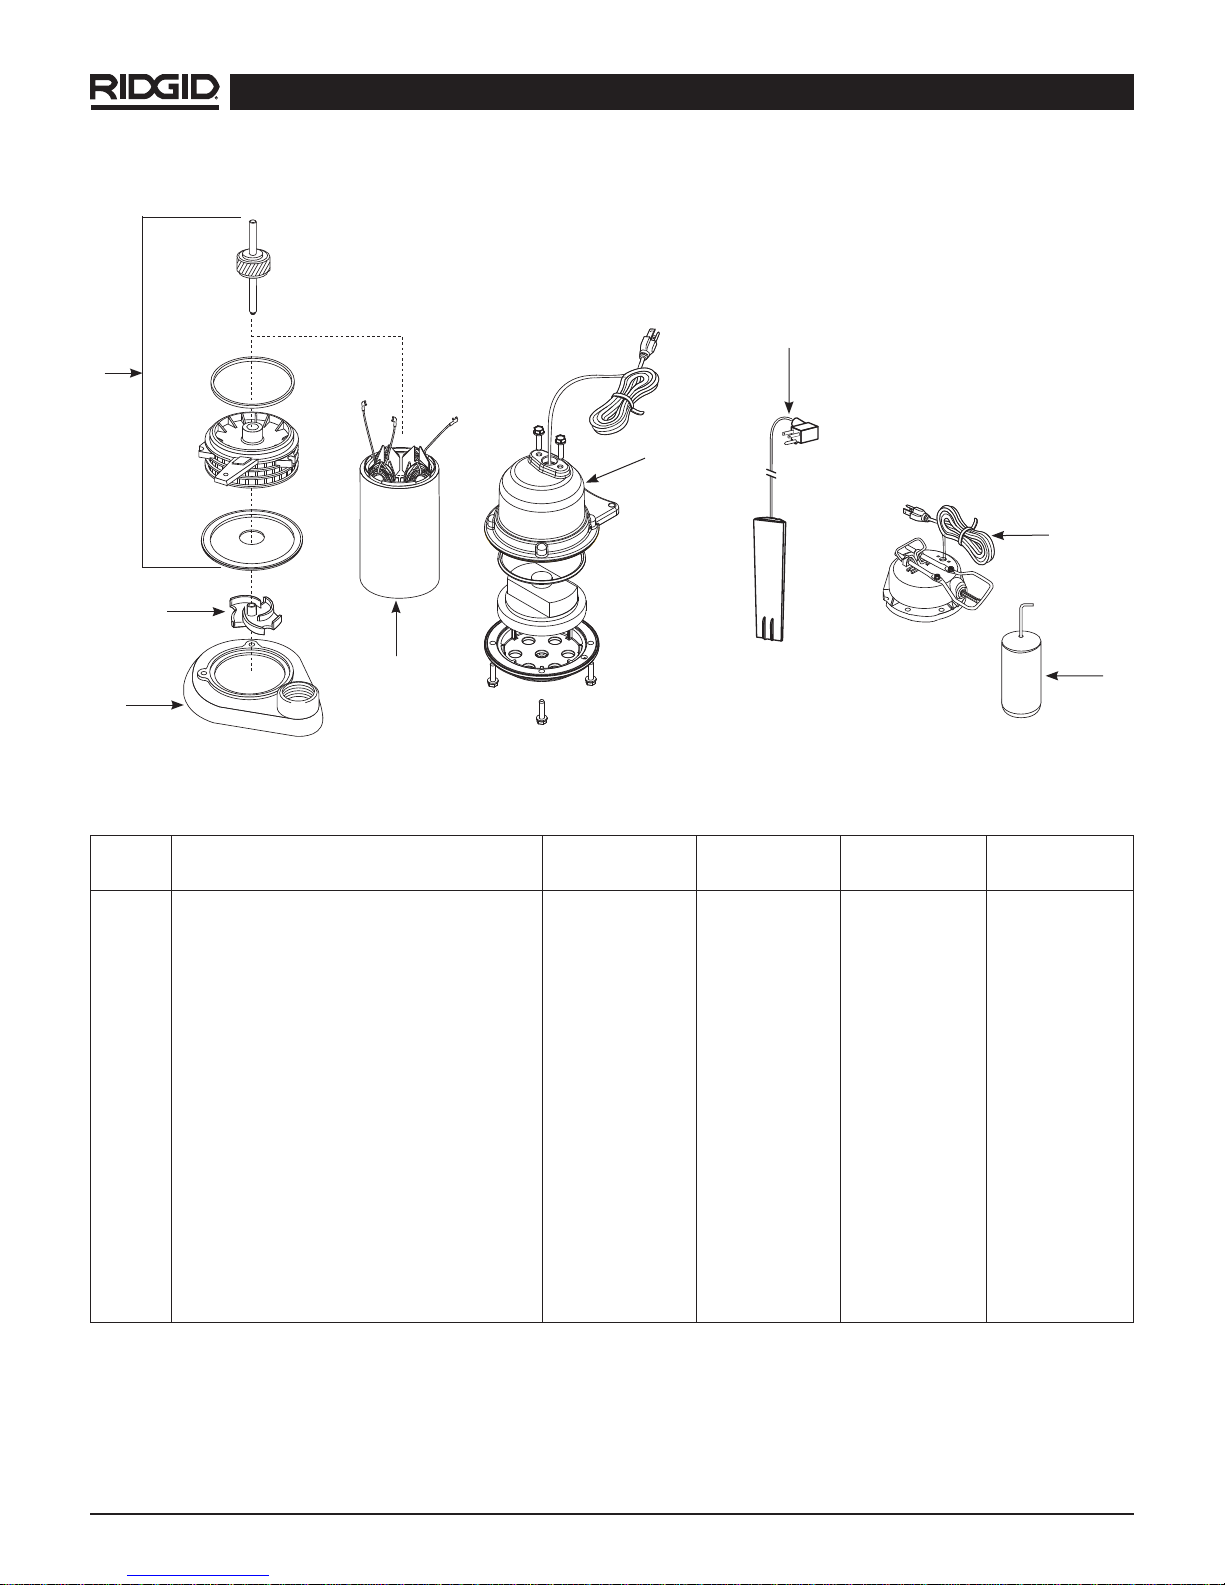
2b
4
2a
2
5
3
6
Figure Description RIDGID cat. #
SP330
1 Float Kit 88557 N/A 88557 N/A
2 Switch / Top Assembly 88562 N/A 88562 25138
2a Diaphragm Switch Assembly N/A 88567 N/A N/A
2b Solid-State Water Sensor N/A N/A N/A 25143
3 Stator 88577 88577 88582 25148
4 Lower Bracket / Rotor 88587 88587 88592 25153
5 Cast Iron Impeller 88597 88597 88597 25158
RIDGID cat. #
SP330D
RIDGID cat. #
SP500
RIDGID cat. #
SSP-1000
1
6 Cast Iron Volute 88602 90382 88602 88602
8
Ridge Tool Company
 Loading...