

Page 1
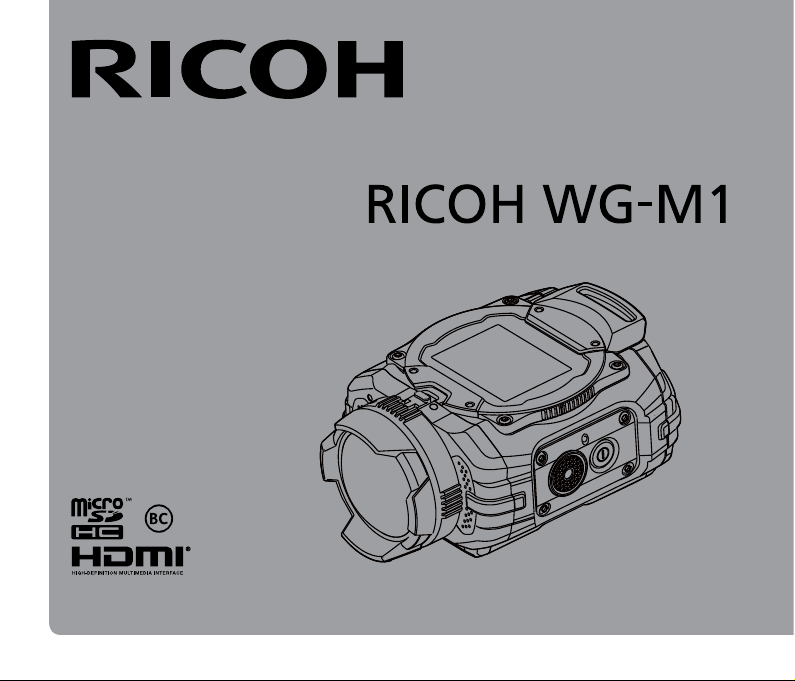
Digital Camera
Operating Manual
To ensure the best performance from your camera, please read the Operating Manual
before using the camera.
Page 2

Thank you for purchasing RICOH WG-M1.
Please read this manual before using the camera in order to get the most out of all the features and
functions. Keep this manual safe, as it can be a valuable tool in helping you to understand all the
camera’s capabilities.
Regarding copyrights
Images taken using the RICOH WG-M1 that are for anything other than personal enjoyment
cannot be used without permission according to the rights as specied in the Copyright Act. Please
take care, as there are cases where limitations are placed on taking pictures even for personal
enjoyment during demonstrations, performances or of items on display. Images taken with the
purpose of obtaining copyrights also cannot be used outside the scope of use of the copyright as
laid out in the Copyright Act, and care should be taken here also.
Regarding trademarks
• microSDHC logo is a trademark of SD-3C, LLC.
• Microsoft, Windows and Windows Vista are registered trademarks of Microsoft Corporation in
the United States of America and other countries.
• Macintosh, Mac OS, OS X and App Store are trademarks of Apple Inc., registered in the U.S.
and other countries.
• Google and Google Play are trademarks of Google Inc.
• HDMI, the HDMI logo, and High-Denition Multimedia Interface are trademarks or registered
trademarks of HDMI Licensing, LLC in the United States and/or other countries.
• Intel, Intel Core, and Pentium are trademarks of Intel Corporation in the U.S. and/or other
countries.
• This product is licensed under the AVC Patent Portfolio License for the personal use of a
consumer or other uses in which it does not receive remuneration to (i) encode video in
compliance with the AVC standard (“AVC video”) and/or (ii) decode AVC video that was encoded
by a consumer engaged in a personal activity and/or was obtained from a video provider
1
Page 3

licensed to provide AVC video. No license is granted or shall be implied for any other use.
Additional information may be obtained from MPEG LA, LLC.
See http://www.mpegla.com.
• All other trademarks are the property of their respective owners.
• Throughout this manual, the following symbols are used to help you locate information quickly
and easily:
Indicates useful information.
• In introducing you how to operate this camera, the following symbol may appear to facilitate
your understanding:
「Item properties」
: The optional properties in the camera interface are indicated by the
symbol「 」.
2
Page 4

To users of this camera
• Do not use or store this device in the vicinity of equipment that generates strong electromagnetic
radiation or magnetic elds.
Strong static charges or the magnetic elds produced by equipment such as radio transmitters
could interfere with the monitor, damage the stored data, or affect the product’s internal circuitry
and cause camera misoperation.
• The liquid crystal panel used in the display is manufactured using extremely high precision
technology. Although the level of functioning pixels is 99.99% or better, you should be aware
that 0.01% or fewer of the pixels may not illuminate or may illuminate when they should not.
However, this has no effect on the recorded image.
• There is a possibility that the illustrations and the display screen in this manual are different
from the actual product.
• In this manual, the generic term “computer(s)” refers to either a Windows PC or a Macintosh
hereafter.
• In this manual, the term “battery(ies)” refers to any type of batteries used for this camera and
accessories.
3
Page 5

Using Your Camera Safely
We have paid close attention to the safety of this product. When using this product, we request
your special attention regarding items marked with the following symbols.
Warning This symbol indicates that violating this item could cause serious personal
Caution This symbol indicates that violating this item could cause minor or medium
About the Camera
Warning
• Do not attempt to take the camera apart or modify the camera. High voltages are present within
the camera, and there is a danger of electric shock if the camera is taken apart.
• If the inside of the camera should become exposed as a result of, for example, the camera
being dropped, please do not under any circumstances touch such exposed portions, as there is
a danger of receiving an electric shock.
• Wrapping the strap of the camera around your neck is also dangerous. Please take care that
small children do not hang the strap around their necks.
• If any irregularities occur during use, such as smoke or a strange odor, stop use immediately,
remove the battery or the power adapter, and contact your nearest service center. Continuing to
use the product can cause a re or electric shock.
injuries.
personal injuries, or loss of property.
4
Page 6

Caution
• Some portions of the camera heat up during use, so please take care, as there is a risk of low
temperature burns if such portions are held for long periods of time.
• Should the LCD be damaged, be careful of glass fragments. Also, be careful not to allow the
liquid crystal to get on your skin, in your eyes, or in your mouth.
• Depending on your individual factors or physical condition, the use of the camera may cause
itching, rashes or blisters. In case of any abnormality, stop using the camera and get medical
attention immediately.
About the Power Adapter
Warning
• Always use the power adapter exclusively developed for this product, with the specied power
and voltage. Using a power adapter not exclusive to this product, or using the exclusive power
adapter with an unspecied power or voltage can cause a re, electric shock, or camera
breakdown. The specied voltage is 100- 240V AC.
• Do not disassemble or modify the product. This can cause a re or electric shock.
• If the generation of smoke or strange odor from the product or other abnormality occurs,
immediately discontinue its use and consult your nearest service center. Continuing to use the
product can cause a re or electric shock.
• If water should happen to get inside the product, consult your nearest service center. Continuing
to use the product can cause a re or electric shock.
• If a thunder storm should occur while using the power adapter, unplug it and discontinue use.
Continuing to use the product can cause damage to the equipment, re, or electric shock.
• Wipe off the plug of the power adapter if it becomes covered with dust. Dust on the plug may
cause a re.
5
Page 7

Caution
• Do not place heavy objects on the USB cable, allow heavy objects to drop onto it or allow it to
become damaged due to excessive bending. If the USB cable becomes damaged, consult your
nearest service center.
• Do not short or touch the output terminals of the product while it is still plugged in.
• Do not plug in the power adapter with wet hands. This can cause an electric shock.
• Do not subject the product to strong impacts or allow it to drop onto a hard surface. This can
cause a malfunction.
• Do not use the power adapter to charge a battery other than the rechargeable lithium-ion battery
DB-65. This can cause overheating, explosion, or power adapter failure.
• To reduce the risk of hazards, use only a CSA/UL certied power supply cord set, cord is Type
SPT-2 or heavier, minimum NO.18 AWG copper, one end with a molded-on male attachment
plug cap (with a specied NEMA conguration), and the other is provided with a molded-on
female connector body (with a specied IEC nonindustrial type conguration) or the equivalent.
About the Battery
Warning
• Be sure to store the battery out of the reach of small children. Placing it in their mouths may
cause an electric shock.
• If any leakage from the battery should come in contact with your eyes, it may cause a loss of
sight. Flush your eyes with clean water and get medical attention immediately. Do not rub them.
6
Page 8

Caution
• Only use the specied battery with this camera. Use of other batteries may cause an explosion
or re.
• Do not disassemble the battery. Disassembling the battery may cause an explosion or leakage.
• Remove the battery from the camera immediately if it becomes hot or begins to smoke. Be
careful not to burn yourself during removal.
• Keep wires, hairpins, and other metal objects away from the + and - contacts of the battery.
• Do not short the battery or dispose of the battery in re. This can cause an explosion or re.
• If any leakage from the battery should come in contact with skin or clothes, it may cause
irritation to the skin. Wash the affected areas thoroughly with water.
• Precautions for DB-65 Battery Usage:
- Use designated charger only.
- Do not incinerate, disassemble, short, use in high temp.
Keep the Camera and Accessories Out of the Reach of Small Children
Warning
• Be sure to keep the camera and its accessories out of the reach of small children.
1. Injuries may result from the product falling or from unexpected movement.
2. Suffocation may result from wrapping the strap around the neck.
3. Small accessories such as battery or a microSD Card may be swallowed. Seek medical
attention immediately if an accessory is accidentally swallowed.
7
Page 9

Care to be Taken During Handling
Before Starting Use
• When the camera has not been used for a long time, conrm that it is still working properly,
particularly prior to taking important pictures (such as at a wedding or when traveling). Contents
of the recording cannot be guaranteed if recording, playback or transferring your data to a
computer, etc. is not possible due to a malfunction of your camera or recording media (microSD
Card), etc.
• The lens on this camera is not interchangeable. The lens is not removable.
About the Battery and Power Adapter
• Storing the battery fully charged may decrease the battery performance. Avoid storing it
especially in high temperatures.
• If the battery is left inserted and the camera is not used for a long time, the battery will over-
discharge and shorten the battery’s service life.
• Charging the battery a day before use or on the day of use is recommended.
• The power adapter supplied with the camera is for exclusive use with this camera. Do not use it
with any other equipment.
Cautions when Carrying and Using the Camera
• Do not use or store the camera in a hot environment or under direct sunlight.
• Hot and humid places should be avoided. Particular care should be taken regarding vehicles,
which can become very hot inside.
• The temperature range in which the camera can be used is -10°C to 40°C (14°F to 104°F).
• The liquid crystal display will become black at high temperatures but will return to normal at
normal temperatures.
• The response speed of the liquid crystal display becomes slow at low temperatures. This is due
8
Page 10

to the properties of the liquid crystal and is not a malfunction.
• If the camera is subjected to rapid temperature changes, condensation may form on the inside
and outside of the camera. Therefore put the camera in a bag or plastic bag and take the
camera out when the difference in temperature has subsided.
• Avoid contact with garbage, mud, sand, dust, water, toxic gases, or salts. These could cause the
camera to breakdown. Wipe the camera to dry off any rain or water drops.
• Please do not press forcefully on the display. This could cause it to break or malfunction.
• Be careful not to sit down with the camera in you back pocket as this may damage the exterior
of the camera or the display.
• When using a tripod with the camera, be careful not to overtighten the screw in the tripod socket
on the camera.
About Repairs
• Do not clean the product with organic solvents such as thinner, alcohol or benzine.
• Use a lens brush to remove dust accumulated on the lens. Never use a spray blower for
cleaning as it may damage the lens.
About Storage
• Avoid storing the camera where pesticides and chemicals are handled. Remove the camera
from its case and store it in a well-ventilated place to prevent the camera from becoming moldy
during storage.
• Avoid using or storing the camera where it may be exposed to static electricity or electrical
interference.
• Avoid using or storing the camera in direct sunlight or in locations where it may be exposed to
rapid changes in temperature or to condensation.
• Periodic checks are recommended every 1 to 2 years in order to maintain high performance.
9
Page 11

Others
• Care should be taken when removing the microSD Card immediately after using the camera, as
the card may be hot.
• Keep the battery/card cover closed and do not remove the microSD Card or turn the camera
off while the data is being played back or saved to the card, or the camera is connected to a
computer with the USB cable, as this may cause the data to be lost or the card to be damaged.
• Do not bend the microSD Card or subject it to violent impact. Keep it away from water and store
away from high temperature.
• Do not remove the microSD Card during formatting as this may damage the card and render it
unusable.
• The data on the microSD Card may be lost in the following circumstances. We do not accept
any liability for data that is deleted
1. when the microSD Card is mishandled by the user.
2. when the microSD Card is exposed to static electricity or electrical interference.
3. when the microSD Card has not been used for a long time.
4. when the microSD Card is ejected or the batteries are removed while the card is being
accessed.
• If it is not used for a long time, the data on the card may become unreadable. Be sure to
regularly make a backup of important data on a computer.
• Be sure to format microSD Card that are unused or have been used on another camera.
• Please note that deleting data, or formatting the microSD Card or the built-in memory does
not completely erase the original data. Deleted les can sometimes be recovered using
commercially available software. It is user’s responsibility to ensure the privacy of such data.
10
Page 12
Regarding Waterproof, Dustproof, and Shockproof Design
• This camera is provided with a waterproof/dustproof design complying with JIS waterproof
grade 8 and JIS dustproof grade 6 (equivalent to IP68).
• The camera satises our drop test (2 m height onto a 5 cm thick plywood surface) complying
with MIL-Standard 810F Method 516.5-Shock testing.
• The camera satises our test for the waterproof, dustproof, and shockproof performance, but
this does not guarantee it will remain free of trouble or damages.
• Waterproof performance is not guaranteed if the camera is exposed to impact such as being
dropped or hit.
• Be sure to attach the underwater lens protector O-LP1532 included in the package to the
camera when using the camera in the water. Waterproof performance is guaranteed only when
the camera is equipped with the lens protector.
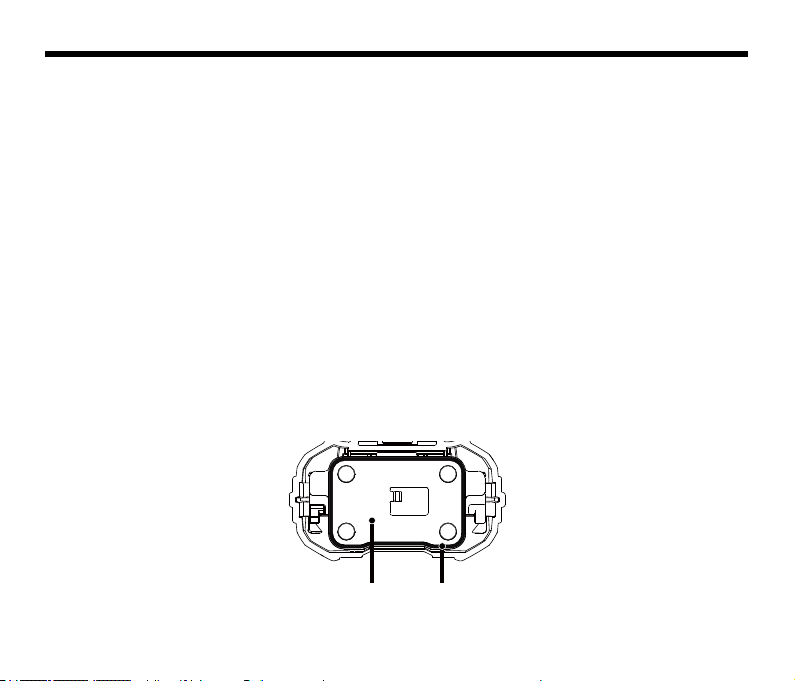
Precautions Before Using the Camera in the Water
Check the Following Before Going Near the Water
• Make sure that there are no cracks or scratches on the rubber seal of the battery/card cover.
Waterproof PackingBattery/Card Cover
11
Page 13

• Make sure there are no foreign objects (dust, sand, hair, lint or liquid) on the rubber seals or the
surface they contact before closing the battery/card cover. Wipe off any foreign objects with a
clean lint-free cloth.
• Close the battery/card cover properly until it click. Otherwise water may get in and damage the
camera.
Be Careful Near the Water
• Avoid opening the battery/card cover when near the waterside or with wet hands. Wait until the
camera is completely dry before changing the battery or the microSD Card. Avoid changing the
battery or card where the camera is likely to get wet or dirty, and make sure that your hands are
dry.
• The camera will sink if dropped in water, so be sure to attach the strap and slip the strap over
your wrist when using the camera in or near water.
• To enhance the waterproof performance of the camera, the front of the lens is protected by
glass. As any dirt or water on the glass will affect the quality of pictures taken, the glass should
be kept clean at all times.
Precautions When Using the Camera in the Water
• Do not use the camera deeper than 10 meters underwater. Do not use the camera underwater
for more than 60 minutes consecutively.
• Do not open the battery/card cover underwater.
• Do not use in hot water or in a hot spring.
• Do not apply excessive force to the camera, for example diving into water with it. Doing so may
compromise the waterproof performance of the camera or cause the cover to open.
• Leaving the camera on the sand at the beach may cause the camera to exceed its operating
temperature or cause the speaker or microphone to become blocked with sand.
• Avoid subjecting the camera to substantial vibrations, shocks, or pressure as this may cause a
12
Page 14

loss in waterproof performance. If the camera is subjected to substantial vibrations, shocks or
pressure, take your camera to your nearest service center and have it checked.
• Avoid getting sunscreen or sun oil on the camera as it may cause discoloration of the surface. If
any oil gets on the camera, wash it off immediately with warm water.
• Sudden and extreme changes in temperature may cause condensation to form in and on the
camera. Keep the camera in a bag or case to reduce the difference in temperature.
Precautions After Using the Camera in the Water
• Do not open the battery/card cover if the camera is wet. Wipe off any water with a clean lint-free
cloth.
• The inside surface of the cover may get wet when it is opened. Wipe off any water that is on the
cover.
• Wiping off the camera while there is sand or dust on it may scratch the surface of the camera.
Make sure that the battery/card cover is rmly closed before washing the camera in tap water.
After washing the camera, dry it with a soft cloth.
• Wipe off any dirt or sand on the waterproof packing or the packing contact surface. The
camera’s waterproof performance may be compromised by loose packing or cracks or dents
in the packing or packing contact surface. If there is any such damage, contact your nearest
service center.
• If the camera is very dirty or after it has been used in the sea, make sure that it is turned off and
the battery/card cover is rmly closed before rinsing it under running tap water or leaving it in a
bowl of clean water for a short time (2 or 3 minutes).
13
Page 15

• Avoid cleaning with agents such as soapy water, mild detergents, or alcohol as this may
compromise the waterproof performance of the camera.
• To maintain the waterproof performance of the camera, you are recommended to change the
waterproof packing once a year. Contact your nearest service center regarding changing the
packing. (A charge will be made.)
• The camera’s accessories are not waterproof (excluding underwater lens protector O-LP1532.).
14
Page 16

Contents
Using Your Camera Safely ........................................................................................4
Care to be Taken During Handling
............................................................................8
Regarding Waterproof, Dustproof, and Shockproof Design ....... 11
Contents
..................................................................................... 15
Getting Ready............................................................................. 19
Accessories Included ................................................................................................19
Part Names
Attaching the Carabiner Strap
Attaching and Removing the Lens Protector
Installing Battery and Memory Card
...............................................................................................................21
..................................................................................23
............................................................24
.........................................................................26
15
Page 17

Charging ...................................................................................................................28
Introduction to Various Button Functions
..................................................................29
Operation Method ....................................................................... 31
Turn On / Off .............................................................................................................31
Set your Language, Date and Time after the rst power-on
LCD Screen Display
Introduction to Basic Operation of Recording and Shooting
LCD Screen Display under Playback Mode
Introduction to Basic Operation of Playback
Introduction to the Setting Mode of Menu Options
Menu Introduction
.................................................................................................33
..............................................................36
.............................................................37
.....................................................................................................42
16
...................................................41
.....................................32
.....................................34
Page 18

Introduction to General Settings ...............................................................................43
Introduction to Mode Settings
Movie Settings Introduction
Still Settings Introduction
AP Settings Introduction
...................................................................................47
......................................................................................48
..........................................................................................55
...........................................................................................58
Smart Device APP Operating Method ........................................ 61
Position Service Function .........................................................................................61
APP Home
Playback
Remote Viewnder....................................................................................................73
About
................................................................................................................63
...................................................................................................................63
........................................................................................................................76
17
Page 19

Connection Port Introduction ...................................................... 77
Connect to a Computer .............................................................................................77
HDMI Connected TV Output
.....................................................................................78
Appendices ................................................................................. 79
Main Specications ...................................................................................................79
Prompts and Warning Messages
..............................................................................84
Using the WG Flat Adhesive Mount O-CM1531 ......................... 87
Warranty Policy
18
.......................................................................... 90
Page 20

Getting Ready
Accessories Included
Rechargeable lithium-ion battery
DB-65
USB cable
I-USB152
Quick Start Guide
Quick start guide
The plug shape of the power adapter may vary depending on the country or region. The
actual item may vary from the drawing.
Power adapter
GAC-03
Carabiner strap
O-ST153
Operating Manual
(CD-ROM)
19
Page 21
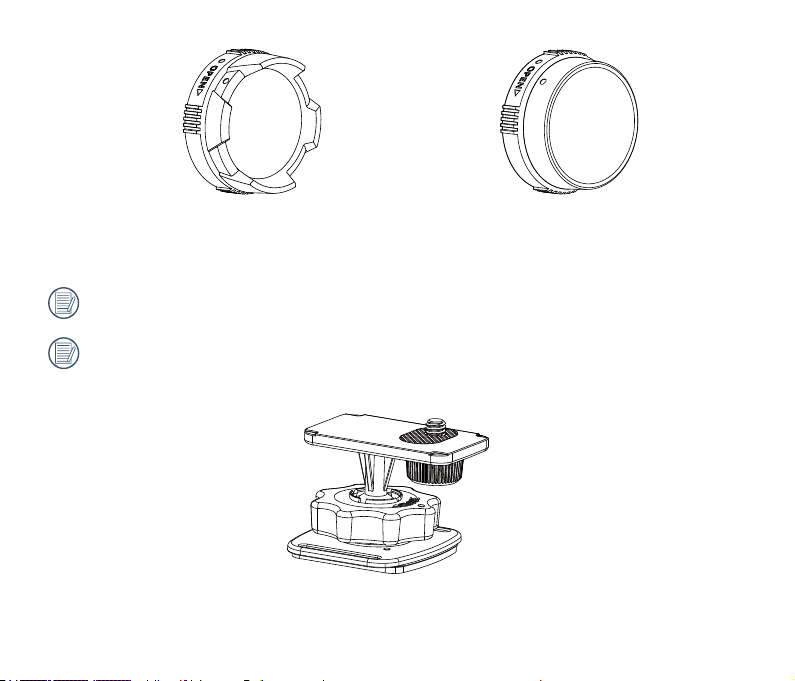
Lens protector
O-LP1531
Lens protector O-LP1531 has been installed on the product when leaving factory.
In order to guarantee the waterproof and dustproof performance, please make sure to attach
the lens protector to the camera all the time. Waterproof performance is guaranteed only
when the camera is equipped with the underwater lens protector O-LP1532.
WG Flat Adhesive Mount
O-CM1531
Underwater lens protector
O-LP1532
20
Page 22
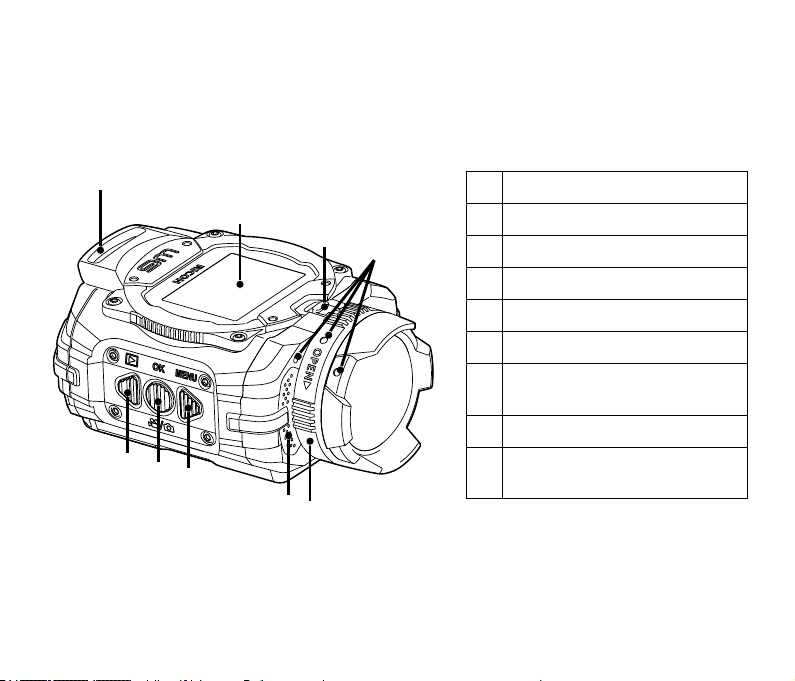
Part Names
1
2
3
4
9
8
7
6
5
1 Strap Lug
2 LCD Screen
3 Lens Protector Lock
4 Alignment Points
5 Lens Protector
6 Microphone
Menu Button /
7
Direction Button (Upper)
8 OK Button
Playback Button /
9
Direction Button (Lower)
21
Page 23
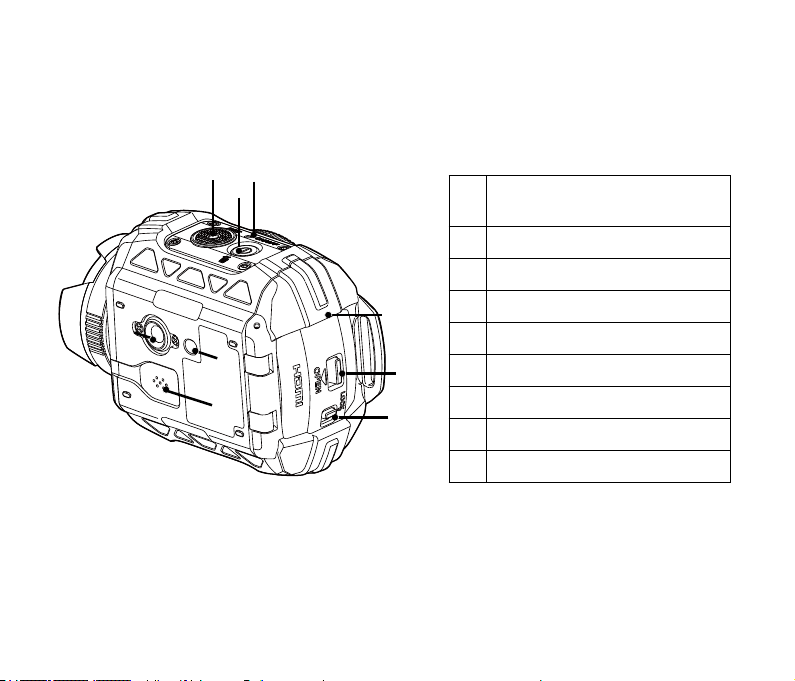
22
18
10
16
17
11
12
13
15
14
Video Recording Button /
10
Shutter Button
11 Power Button / Delete Button
12 Status Indicator
13
Battery / Card Cover
14 Cover Open Switch
15
Cover Lock
16 Positioning Hole
17 Speaker
18 Tripod Socket
Page 24
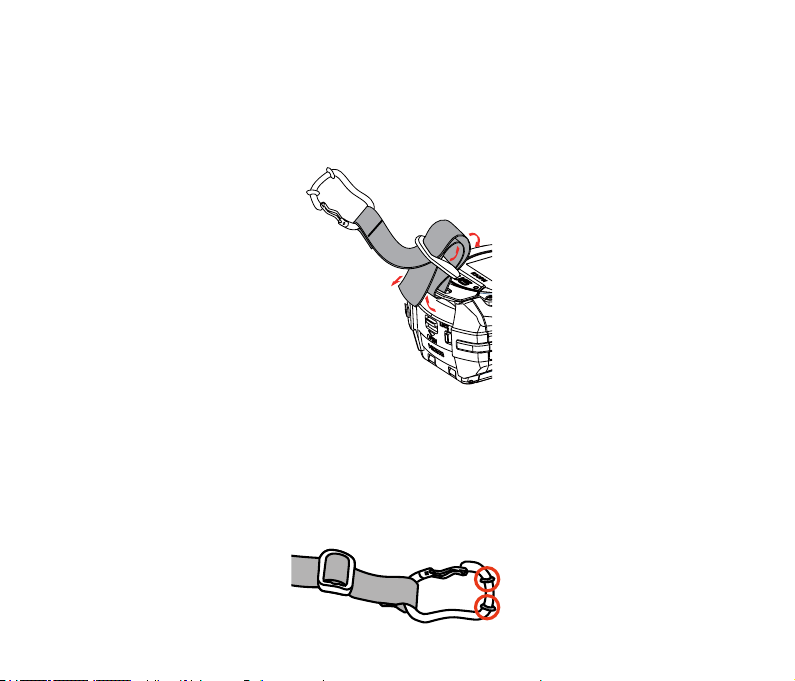
Attaching the Carabiner Strap
Attach the carabiner strap supplied with the camera.
1. Pass the end of the strap through the strap lug on the camera.
2. Fix the end of the strap to the stopper.
Protective rubber ring
The carabiner has rubber rings to prevent damage to the display. These rubber rings cushion the
impact when the carabiner hits the display.
Be sure to adjust the position of the rubber rings as shown in the gure below for the best results
before using the carabiner strap.
23
Page 25
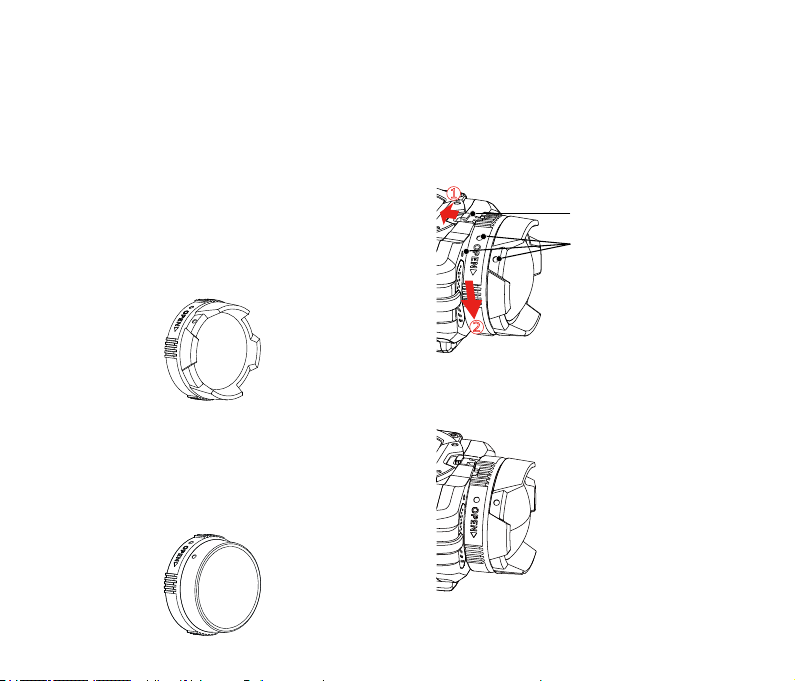
Attaching and Removing the Lens Protector
Two types of replaceable lens protectors
are provided for the product. Please put the
lens protector on all the time to ensure the
waterproof and dustproof performance.
Lens protector O-LP1531:
Applicable for general use. Do not use
underwater.
Visual angle in the air is about 160° (*1). Will
not focus underwater.
(*1) Still, 4:3, Field of View: Wide
Underwater Lens protector O-LP1532:
Applicable for use in water.
Visual angle in the air is about 130° (*2), and
visual angle in water is about 90° (*2).
(*2) Still, 4:3, Field of View: Underwater
Steps for removing the lens protector:
1. Slide the lens protector lock in the direction
shown by arrow ①, and rotate the lens
protector in the direction shown by arrow
②
.
1
2
2. When three alignment points are in a
straight line, remove the lens protector.
Lens protector lock
Alignment points
24
Page 26

Steps for installing the lens protector:
Slide the lens protector lock in the direction
shown by arrow ①. When three alignment
points are in a straight line, rotate the lens
protector in the direction shown by arrow ②.
until it clicks.
1
2
When the product is exposed to
uctuations in temperature, condensation
may form on the inside surface of the
lens protector. If this happens, remove
the lens protector, clean it with a soft,
dry, lint-free cloth, and then reinstall in
the lens.
25
Page 27
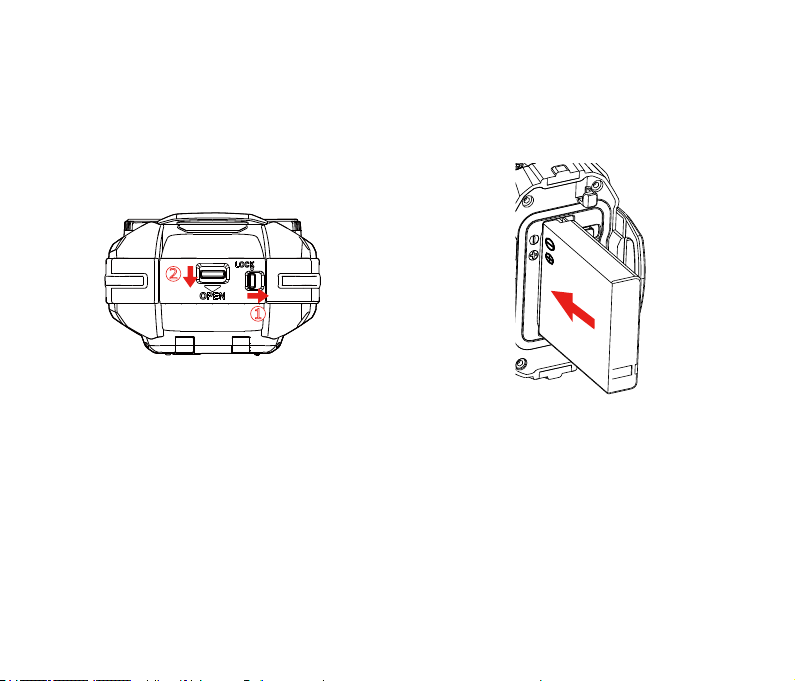
Installing Battery and Memory Card
1. Open the battery/card cover
First, move the cover lock to the right (①),
and push down on the cover open switch
(②) to open the battery/card cover around
the axis in the downward direction.
2
1
2. Insert the battery into the battery
compartment according to the negative
and positive directions as illustrated in the
following picture.
26
Page 28

3. Insert the memory card into the card slot
according to the direction illustrated in
the picture when the product is turned off.
When inserting a memory card, make sure
to match the notch of the card and of the
card slot. Do not push forcedly the memory
card into the card slot.
4. Close the battery/card cover
Close the battery/card cover around the
axis in the upward direction until it clicks,
and move the cover lock to the left.
Memory card (refers to microSD card or
microSDHC card) is optional, which is
not included in the product package and
needs to be purchased separately. It is
recommended to use a memory card of
Class 4 or higher.
To remove the memory card, please
open the battery/card cover and gently
push the memory card. After it is ejected,
remove the card carefully.
The product will automatically turn
off if the memory card is inserted and
extracted when the product is on.
27
Page 29
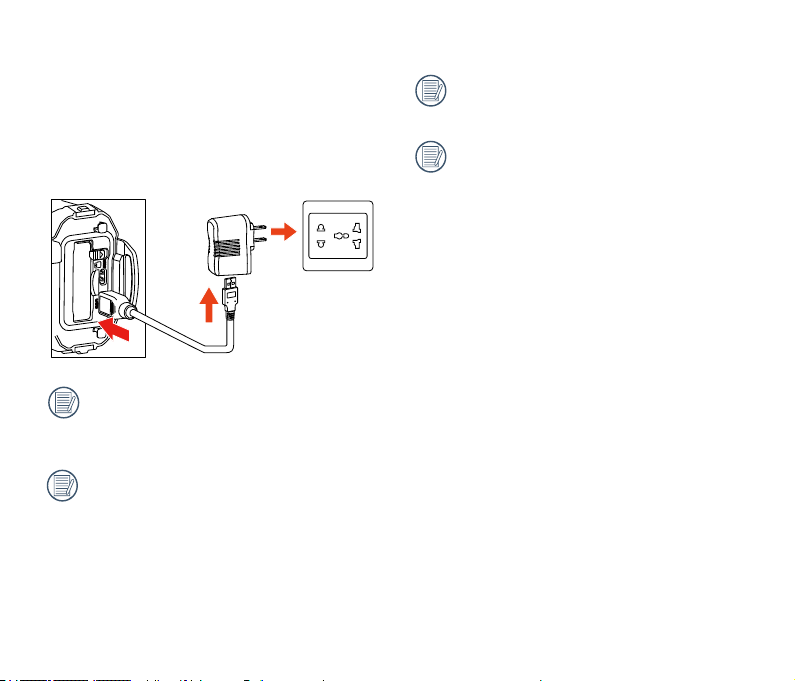
Charging
Please charge after the product is turned off.
1. Connect the product to the power adapter
with the USB cable.
2. Then insert the plug of the power adapter to
the power outlet for charging.
After the battery is stored for a long
period, use the supplied power adapter to
charge the battery prior to use.
Charging indicator:
Red ash: Charging
The indicator will go out once charging is
nished, and the camera will be powered
off automatically.
To have maximum battery life, charge the
battery for at least 4 hours the rst time.
The longest charging time is 200 minutes
(it depends on ambient temperature and
charging condition). Please charge the
battery indoors between 0°C and 40°C
(32°F to 104°F).
28
Page 30

Introduction to Various Button Functions
Viewnder status refers to viewnder of recording and shooting.
To save power, if the product is not operated for 30 seconds, it will automatically enter the
LCD off status (power saving mode). Pressing any button can wake LCD.
Video mode or shooting mode:
Button Name Menu Status Viewnder Status
During Video
Recording
Power Button /
Delete Button
OK Button Conrm selection
Menu Button /
Direction Button (Upper)
Playback Button / Direction
Button (Lower)
Video Recording Button /
Shutter Button
(except Wireless feature)
In the viewnder status, when the Motion detection or
- Display all the hidden information -
Press and hold: turn off the product
Switch between video mode and
shooting mode
Switch menu Enter the mode setting interface -
Switch menu Enter playback mode -
Enter viewnder status
Start recording /
Shoot a photo
Time Lapse
function is set to be
enabled, press to enter the state of preparing for video recording.
-
Stop recording
29
Page 31

Playback mode:
Button Name Photo Playback
Playing Back
Movie Playback
Fast Forwarding /
Rewinding
Pausing
30
Power Button /
Delete Button
OK Button
Menu Button /
Direction Button (Upper)
Playback Button /
Direction Button (Lower)
Video Recording Button /
Shutter Button
Delete Back to the initial state of the movie
Press and hold: turn off the product
Photo le: no action
Movie le: start playback
Previous File Rewind Rewind Previous Frame
Next File Forward Forward Next Frame
Enter viewnder status
Pause
Normal speed
playback
-
Continue to play
back
Page 32

Operation Method
Turn On / Off
Turn on:
When the power is off, press and hold for more than 2 seconds to turn on the product; or press
and hold for more than 2 seconds to turn on the product and enter playback mode.
Turn off:
When the power is on, press and hold for more than 2 seconds to turn off the product.
31
Page 33

Set your Language, Date and Time after the rst power-on
.0
Please set at the rst time you use.
1. Press and hold the to turn on the product and enter the language selection screen;
2. Press or to select language;
3. After pressing button to select desired language, the product will enter「Date / Time」setting
screen;
4. Press or to adjust the date and time display format, and press to conrm the display
format;
5. In the date and time options, press or to adjust the values, and press to conrm;
6. After conrming, automatically appears in a frame. Press to enter the viewnder status.
Date/Time
32
2014
00:00H-M
01 .
1
Page 34

LCD Screen Display
00:01: 2300:01: 23
SD
2.
7.
8.
9.
00 :5 6: 0000 :5 6: 00
1080
1234
00:01:23
10.
11.
12.
14.
13.
1080
960960
720
720
n
a
r
r
o
w
n
a
r
r
o
w
n
a
r
r
o
w
n
a
r
r
o
w
n
a
r
r
o
w
n
a
r
r
o
w
1.
5.
3.
4.
6.
120
1. Mode Display
2. Time Lapse Display
3. Burst Shot Display
4. Loop recording
Display
5. Motion detection
Display
6. White Balance Display
7. Number of remaining
shots Display
8. Remaining Recording
Time Display
9. Internal Memory /
Memory Card Display
10. Battery Status Display
11. Movie Size Display
12. Still Size Display
13. Field of View Display
14. Wind Cut Display
Some icons will automatically
hide after 2 seconds. Press to
display all current setting.
Indicates 16:9 display range.
Indicates 4:3 display range.
33
Page 35

Introduction to Basic Operation of Recording and Shooting
1. Enter the viewnder status, and press to switch between video mode and shooting mode;
2. Align the lens to the object to be recorded, and press
3. Under the video mode, repress the to stop recording.
The longest recording time is 25 minutes at one time.
for video recording or shooting;
34
00: 56: 0000: 56: 00
00:01:2 300:01:23
1080
Page 36

Under shooting mode, when the product detects a human face, a green focus frame will appear.
When two or more human faces are detected, a green main focus frame and a white secondary
focus frame will appear.
When in shooting and video mode, the LCD may turn off to save power. Pressing will turn
on the LCD and immediately initiate / terminate recording. Pressing any other button will only
turn on the LCD.
35
Page 37

LCD Screen Display under Playback Mode
1.
7.
4.
8.
11.
13.
12.
00:01:2 300:01: 23
1/1234
1/1234
9.
10.
14.
00 :0 1: 23
00 :0 1: 23
1/ 1234
1/ 1234
201 10-10 12 :2 1
1 2: 21
1080
2.
6.
1080
960960
720
720
120
3.
5.
n
a
r
r
o
w
n
a
r
r
o
w
n
a
r
r
o
w
n
a
r
r
o
w
n
a
r
r
o
w
n
a
r
r
o
w
2014 10-10
201 10-10 12 :2 1
12 :2 12014 10-10
1. Movie Display
2. Burst Shot Display
3. Time Lapse Display
4. Loop recording Display
5. Motion detection Display
6. White Balance Display
7. Memory Card or Internal
Memory Display
8. Battery Status Display
9. Movie Size Display
36
10. Still Size Display
11. Field of View Display
12. Movie Time Length
Display
13. Display of Current number
of Shots / Total Number of
Shots
14. Shooting Time and Date
Display
Some icons will automatically
hide after 2 seconds.
only displayed when
playing back the movie le.
Indicates 16:9 display
range.
Indicates 4:3 display
range.
Page 38

Introduction to Basic Operation of Playback
Single Photo:
1. When in viewnder status, press to enter the playback mode of video and pictures;
2. Display movie or picture les on the LCD screen;
3. Press or to view the movies or pictures stored in the memory card or internal memory.
Press
When the memory card is inserted, only les in the memory card will be displayed, les on
internal memory will not be displayed.
If there are no les in the memory card or internal memory, a no image warning will appear.
to return to the viewnder status.
?
37
Page 39

Movie Playback:
1. Select movie to be played back, and press to start movie playback.
00:00:4700:00:47 00:01:2300:01:23
2. When playing back the movie, an operation guidance will appear on the screen. You can press
buttons to perform the corresponding functions.
Press
Press
Press : Under normal playback mode, the movie playback will be paused; under the forward,
Press
: Movie playback rewind, multiple presses will fasten the speed: x2 / x4 / x8 / x16
: Movie playback forward, multiple presses will fasten the speed: x2 / x4 / x8 / x16
rewind or pause status, normal speed playback will be recovered
: Movie playback back to the initial state
38
Page 40

Movie playback rewind or forward:
00:00:4700:00:47 00:01:2300:01:23
Movie playback pause:
00:00:4700:00:47 00:01:2300:01:23
There will be no sound output during rewinding or forwarding.
39
Page 41

Movie or Picture Delete:
1. Select the movies or photos to be deleted, and press to enter the Delete screen. Press or
to select 「Delete」, and press to conrm.
2. After a movie or a photo is successfully deleted, the LCD will display the next movie or photo. If
you wish to delete additional les, please repeat the above step.
3. If you want to exit the Delete screen, select 「Exit」, and press to conrm.
Delete
Exit
00:01:2300:01:23
Movie and / or pictures cannot be restored after being deleted.
A protected le cannot be deleted.
40
Page 42

Introduction to the Setting Mode of Menu Options
1. Under the viewnder status, press to enter the setting menu;
2. Press or to select「Mode Settings」, 「Movie Settings」, 「Still Settings」, 「AP
Settings」 and 「General Settings」;
3. Select one item (except for 「Mode Settings」), press to enter the secondary level menu
interface;
4. Press or to select one item, and press to enter the tertiary menu interface;
5. Press or to select one item, and press conrm. Select 「Exit」 and press to back to
the rst level menu interface.
In the menu interface (except for the Wireless connecting status in AP
return to the viewnder status.
Settings), press to
41
Page 43

Menu Introduction
First Level
Menu
Secondary
Level
Menu
42
Mode
Settings
Movie Movie Size Still Size
Still
Movie Settings Still Settings
Time Lapse
Loop recording Field of View
Field of View White Balance Date / Time
Motion detection Exit Language
Wind Cut Format
White Balance Copy to Card
Exit Reset Settings
Burst Shot Power Off
AP
Settings
-
General Settings
Sound Settings
Wireless Power
Saving
FW Version
Screen rotate
Exit
Page 44

Introduction to General Settings
11 options in 「General Settings」 of the rst
level menu:
• 「Sound Settings」
• 「Power Off」
• 「Wireless Power Saving」
• 「Date / Time」
• 「Language」
• 「Format」
• 「Copy to Card」
• 「Reset Settings」
• 「FW Version」
• 「Screen rotate」
• 「Exit」
Sound Settings
There are 4 options in 「Sound Settings」:
Volume 1
•
• Volume 2
• Volume 3
• Off
Power Off
Power Off means the product will automatically
shut down in 60 seconds after the LCD is off.
There are 2 options in 「Power Off」:
•
Off
• 60 seconds
The Power Off will be invalid during
recording, movie playing back and
wireless connecting.
43
Page 45

Wireless Power Saving
Wireless Power Saving mode means that after
30 seconds of remote-controlled recording
with the APP, the wireless connection will
automatically disconnect, but the product will
continue to record until it is turned off. Wireless
Power Saving mode will prolong battery life.
There are 2 options in 「Wireless Power
Saving」:
Off
•
• Enable
Date / Time
Date and time can be set when the product
is turned on for the rst time. If you wish to
change the date or time thereafter, please
operate as the following.
1. Enter 「Date / Time」in the secondary level
interface and press to conrm;
2. Press or to adjust the date and time
display format, and press to conrm the
display format;
3. In the date and time options, press or
to adjust the values, and press to
conrm;
4. After the setting is completed, select
, and press to return to 「Date /
Time」in the secondary level interface;
5. Press to return to the viewnder status.
44
Page 46

Language
The language can be set when the product
is turned on for the rst time. If you wish
to change the language thereafter, please
operate as the following.
1. Enter 「Language」 in the secondary level
interface and press to conrm;
2. Press or to select language;
3. Press to conrm and back to
「Language」 in the secondary level
interface;
4. Press to return to the viewnder status.
Format
Format can clear all data stored in the memory
card or memory (including protected movies
and photos).
There are 2 options in 「Format」:
Cancel
•
• Conrm
When a memory card is inserted, only
the card can be formatted. If you need to
format the internal memory, remove the
memory card rst.
45
Page 47

Copy to Card
Copy to Card is to copy the les in the internal
memory to the memory card.
There are 2 options in 「Copy to Card」:
Cancel
•
• Conrm
When the memory card cannot be
detected by the product, options will
not be displayed on 「Copy to Card」
interface.
Reset Settings
Reset Settings can reset all product settings to
the factory defaults.
There are 2 options in 「Reset Settings」:
Cancel
•
• Conrm
FW Version
FW Version can display the current rmware
version.
Screen rotate
When this function is enabled, the display on
the LCD screen will rotate 180 degrees (up and
down).
Images transferred from the camera can be
played back on your computer with a software
that supports image rotation.
There are 2 options in 「Screen rotate」:
Off
•
• Enable
46
Page 48

Introduction to Mode Settings
2 options in 「Mode Settings」 of the rst level
menu:
「Movie」: for recording movies
•
「Still」: for shooting photos
•
Mode Settings method of operation:
1. After selecting or options, press
to conrm.
2. Press to enter the viewnder status, and
display your selected or status.
Under the viewnder status, directly
press
to switch or status.
47
Page 49

Movie Settings Introduction
1080
960
960
720
720
120
120
120
There are 8 options in rst level menu 「Movie
Settings」:
• 「Movie Size」
• 「Time Lapse」
• 「Loop recording」
• 「Field of View」
• 「Motion detection」
• 「Wind Cut」
• 「White Balance」
• 「Exit」
48
Movie Size
Movie Size indicates the image resolution
during recording.
There are 7 options in「Movie Size」:
「1080p30」: 1920×1080 (30fps)
「960p50」: 1280×960 (50fps)
「960p30」: 1280×960 (30fps)
「720p60」: 1280×720 (60fps)
「720p30」: 1280×720 (30fps)
「WVGA60」: 848×480 (60fps)
「WVGA120」: 848×480 (120fps)
When selecting
shoots ultra high speed movies, and
plays back with normal 30 fps speed, in
order to capture visually indistinguishable
moments easily.
When selecting
recordable time is 60 seconds. When the
time reaches 60 seconds, the product will
automatically stop recording and return
to the viewnder status.
, the product
, the maximum
Page 50

When selecting
120
120
1080
960
960
720
720
120
, the sound cannot be recorded.
When selecting
, 「Time Lapse」, 「Loop recording」or「Motion detection」 cannot
be enabled.
When selecting
, 「Time Lapse」 or 「Loop recording」 cannot be enabled.
The longest recording time is 25 minutes at one time.
Please use a memory card (Class 4 or above) for video recording.
Movie Size Image Size Frame Rate
1080p30
960p50
960p30
720p60
720p30
WVGA60
WVGA120
1920×1080 30fps
1280×960 50fps 31min. 39sec.
1280×960 30fps 49min. 40sec.
1280×720 60fps 35min. 11sec.
1280×720 30fps 1hr. 3min. 45sec.
848×480 60fps
848×480 120fps 35min. 10sec.
The maximum recording time
(4GB)
31min. 39sec.
1hr. 3min. 43sec.
49
Page 51

120
Time Lapse
Time Lapse enables the recording of an
interval of time, and splices the frames
together to present a condensed video which
usually requires a long period of time to
complete.
There are 7 options in 「Time Lapse」:
•
Off
• 1 second
• 2 seconds
• 5 seconds
• 10 seconds
• 30 seconds
• 60 seconds
Time Lapse method of operation:
1. After selecting Time Lapse time, press
to back to the viewnder status. LCD will
display corresponding icons;
2. Press , the LCD will display red font time
countdown;
3. Press again to nish recording.
00:08:0800:08:08
09
09
Movie Size cannot be set to
or
.
The sound cannot be recorded.
When Loop recording or Motion detection
is enabled, the Time Lapse feature
cannot be used.
The longest recording time is 25 minutes
at one time.
50
Page 52

Loop recording
120
Loop recording allows to record independent
segments of movies according to selected
time length. The product will continually record
movies until the video recording button is
pressed to terminate recording. When the
memory card is full, the product will overwrite
the recorded les to record another movies
circularly.
There are 3 options in 「Loop recording」:
Off
•
00:00:2300:00:23
Movie Size cannot be set to
.
or
• 5 minutes
• 10 minutes
Loop recording method of operation:
1. After selecting Loop recording time, press
to return to the viewnder status. LCD
will display corresponding icons;
2. Press to start recording;
3. Press again to nish recording.
When Time Lapse or Motion detection
is enabled, the Loop recording feature
cannot be used.
Loop recording feature can only be used
when there is a memory card in the
product.
Turn off the product when the Loop
recording function is enabled and then
restart the product. You’ll nd the Loop
recording function is still enabled.
51
Page 53

Field of View
n
a
r
r
o
w
n
a
r
r
o
w
n
a
r
r
o
w
n
a
r
r
o
w
n
a
r
r
o
w
n
a
r
r
o
w
1080
1080
Field of View sets the viewing angle.
There are 4 options in 「Field of View」:
Wide
•
Medium
•
•
Narrow
• Underwater
Field of View method of operation:
1. After selecting the Field of View angle,
press to return to the viewnder status.
LCD will display corresponding icons;
2. Press
3. Press again to nish recording.
to start recording;
Medium or Narrow can only be selected
when the Movie Size is set to
Movie Size other than
is selected
under Medium or Narrow status, the
product will automatically set the Field of
View to Wide.
. If a
Motion detection
Motion detection means that if the product
detects moving objects entering into the
LCD screen, it will automatically start
recording. During the recording process, if
there is no moving object detected for 10
consecutive seconds, the recording will pause
automatically.
There are 2 options in 「Motion detection」:
Off
•
• Enable
Motion detection method of operation:
1. After the Motion detection is enabled, press
to back to the viewnder status. LCD will
display corresponding icons;
2. Press . If the product detects moving
objects, it will automatically start recording;
3. The product will stop recording when there
is no moving object detected for 10seconds;
4. When the object moves again, the product
will start recording automatically, and this
time it will regenerate a video le;
5. Press to stop recording.
52
Page 54

When Motion detection is enabled, Time
120
00:00: 01
00:00: 01
00:00: 01
00:00: 01
15:0 0
15:0 0
①
②
③
00:00:0000:00:00
00
00
15:00
15:00
000000
0
0
Lapse or Loop recording setting cannot
be performed.
When the memory card is full, ① will
become red font and ashes for 2
seconds.
Movie Size cannot be set to
Motion detection interface icon:
①
Indicates the total time of recording
② Indicates the time of the recording
③ Indicates the total time from the
beginning of recording
.
53
Page 55

Wind Cut
04:56:0004:56:00
Wind Cut reduces noise caused by wind.
There are 2 options in 「Wind Cut」:
Off
•
• Enable
Wind Cut method of operation:
1. After the Wind Cut is enabled, press
to return to the viewnder status. LCD will
display corresponding icons;
2. Press to start recording;
3. Press again to nish recording.
White Balance
White Balance means that the user adjusts the
color temperature under different light sources
to ensure that the colors of the subjects are
reproduced correctly.
There are 5 options in 「White Balance」:
AWB
•
• Daylight
• Cloudy
• Fluorescent
•
Underwater
White Balance method of operation:
1. After the White Balance is set, press
to return to the viewnder status. LCD will
display corresponding icons;
2. Press to start recording;
3. Press again to nish recording.
54
Page 56

Still Settings Introduction
There are 5 options in rst level menu 「Still Settings」:
• 「Still Size」
• 「Burst Shot」
• 「Field of View」
• 「White Balance」
• 「Exit」
55
Page 57

Still Size
Still Size indicates the number of pixels for still
pictures.
There are 3 options in 「Still Size」:
• 「14M」 : 4320×3240(4:3)
• 「10M」 : 4320×2432(16:9)
• 「5M」 : 2592×1944(4:3)
Number of photos that can be stored on a 4GB
memory card:
Still Size
14M
10M 1208 shots
5M 2391 shots
Approximate maximum
number of images
911 shots
Burst Shot
Burst Shot allows ten photos to be captured
continuously at one time.
There are 2 options in「Burst Shot」:
Off
•
• Enable
Burst Shot method of operation:
1. After Enable in Burst Shot is selected, press
to return to the viewnder status. LCD
will display corresponding icons;
2. Press to start Burst Shot shooting. It will
stop after 10 photos are taken.
56
Page 58

Field of View
n
a
r
r
o
w
n
a
r
r
o
w
n
a
r
r
o
w
n
a
r
r
o
w
n
a
r
r
o
w
n
a
r
r
o
w
Field of View sets the viewing angle.
There are 4 options in「Field of View」:
Wide
•
Medium
•
•
Narrow
• Underwater
Field of View method of operation:
1. After selecting the Field of View angle,
press to return to the viewnder status.
LCD will display corresponding icons;
2. Press to shoot.
When the still size is set to「5M」,
Medium and Narrow cannot be enabled.
White Balance
White Balance means that the user adjusts the
color temperature under different light sources
to ensure that the colors of the subjects are
reproduced correctly.
There are 5 options in 「White Balance」:
AWB
•
• Daylight
• Cloudy
• Fluorescent
Underwater
•
White Balance method of operation:
1. After an option of the White Balance is
selected, press to return to the viewnder
status. LCD will display corresponding icons;
2. Press to shoot.
57
Page 59

AP Settings Introduction
The camera can be wirelessly connected with your smart device.
Please review the following items before your rst connection:
1. Your smart device system version needs to be iOS 6.0-7.1 or Android 4.0-4.3. If not, please
upgrade your smart device system version rst.
2. Please do not use in places having high intensity magnetic eld, electrostatic and electric wave
interference (for example near a microwave oven), which may cause failure in receiving signals.
3. Please maintain a distance between the camera and the smart device less than 10 meters (32.8
feet) without signal shielding interference.
4. Please do not use wireless connection function on a plane.
5. The camera and the smart device can only be connected one to one.
6. When the temperature of the battery is too high.
① AP setting cannot be enabled;
Wireless connection will be automatically disconnected.
②
58
Page 60

Connection setting method of the
SSID:RICOH-WG-M1_XXXX
camera and the smart device:
Step 1: Install the dedicated application on the
smart device.
Download the dedicated application (WG-M1)
from Google Play or App Store, and install it on
your smart device.
Step 2: Setting up the camera
Press
Settings」, and press to enable wireless
connection function so that the SSID screen
in 「AP mode」 appears. SSID and WPA2
password messages are displayed in the
screen.
in the viewnder status, select 「AP
Press or to select , then press
to change the WPA2 password.
If there is a need to turn off wireless, press
button or press after selecting
so that the selection interface appears.
Select , press to turn off wireless.
AP mode
AP mode
WPA2-PSK:00000000
SSID screen
Wireless connection process takes about
30 seconds. During this process, only
is activated.
Wireless connection interrupted screen
59
Page 61

Step 3: Setting up the smart device
1. Enable the wireless function of the smart
device to search surrounding wireless
devices;
2. Select the name of the camera to be
connected (RICOH-WG-M1_XXXX),
and input the eight-digit digital password
displayed next to WPA2-PSK on the
camera;
Wireless connected screen
If press , the camera returns to the
SSID interface.
3. Click the icon to enable the application
(APP hereafter).
APP connected screen
If there is a need to interrupt the
connection, press , so that the
connection interrupted screen appears.
Press
interrupt the connection and return to the
SSID screen.
or to select , press to
Connection interrupted screen
60
Page 62

Smart Device APP Operating Method
Position Service Function
The APP supports the position service function on your device. It can record GPS information in the
photo les. This function is not supported for movie les.
Android system:
1. When the APP is enabled for the rst time, it may prompt that 「“WG-M1” would like to use
your current location」. If the position service of the smart device is not enabled, you can select
whether to enable the position service or not according to prompting in the interface.
2. When the APP is enabled for the second time or later, if the position service function has been
enabled already, the interface will directly turn to the home page of the APP; and if the position
service function is not enabled, you can select whether to enable the position service or not
according to prompting in the interface.
61
Page 63

iOS system:
1. When the APP is enabled for the rst time, if the position service is enabled, it will prompt
whether to not 「"WG-M1” would like to use your current location」; if the position service
is disabled, it will prompt 「Turn on location services to allow "WG-M1" to determine your
location」; and if clicking 「setting」, the smart device position service setting interface will
appear.
2. When the APP is enabled for the second time or later, status of position service will be as
follows:
Position service
state selected
at the rst-time
enabling of the APP
62
The second-time or later enabling of the APP
The position service is
enabled
Enable Enable the position service
A prompting message that「Location services is disabled for WG-M1.
Off
Please exit WG-M1 , then go to ‘Settings; General; Location Services’ and
enable the service for WG-M1.」; and if clicking 「OK」, the APP home
interface will appear. Besides, the position service will be automatically
disabled.
The position service is Off
A prompting message 「Turn on location
services to allow "WG-M1" to determine
your location」will appear; and if clicking
「setting」, the smart device position service
setting interface will appear.
Page 64

APP Home
Playback
Enter APP Home interface, and three options
are displayed:
• 「Playback」: enter playback mode
• 「Remote Viewnder」:
• 「About」
In the interface of the APP, click
return to the previous stage of interface.
But in index playback and Remote
Viewnder states, click
APP home directly.
enter the viewnder status
and control the camera to
shoot by using the smart
device
: check the version of the
APP.
to
to return to the
Click 「Playback」 in the APP Home to enter
the playback mode.
There are two playback options in the playback
mode:
• Index playback
(camera / smart device)
• Single photo (movie / photo)
63
Page 65

Index playback (camera / smart device)
1. In the APP Home, click 「Playback」to
enter the index playback state, and enter
the photo album of the camera.
<
2. When you press the icon, images that
you downloaded to the smart device appear
as thumbnails. When you press the
icon, return to the thumbnail display of
images stored on the camera.
<
• : enter the Remote Viewnder status
(See Page 73 for explanations.)
•
: download les in the camera into the
smart device
(See Page 66 for explanations.)
•
: delete les
(See Page 67 for explanations.)
64
28:01
28:01
28:01
• : enter the Remote Viewnder status
(See Page 73 for explanations.)
•
: Select multiple photos
Page 66

Enter the selection interface after selecting
, and click thumbnails so that les can
be selected. Clicking the same thumbnail
for the second time will cancel the selection.
4 items selected
<
28:01
28:01
Setting function
at the right upper corner of the
Click
interface so that the setting interface can
appear.
<
• : share
: slide play
•
• : delete
Cache can be wiped in the Android system.
Cache can be wiped in the iOS, where login
and logout accounts also can be set.
65
Page 67

Download function
In the index playback interface of the camera,
click
to enter the download mode. Select a
le to begin downloading.
Download
<
15:01 28:01
You can choose up to 20 les at the
same time.
In the index playback interface, clicking
or will pause downloading.
Download will restart when the playback
interface appears again.
Downloading will be continued after
switching to the index interface of the
smart device, and the downloading
progress bar will be displayed.
<
: downloading
: wait downloading
: the download is complete
: cancel download
: fail in downloading
66
28:01
28:01
Page 68

Delete function
1. In the index playback interface of the
camera, click to enter the selection
interface. Select the les to be deleted, click
again to choose whether or not to delete
the les.
2. In the index playback interface of the smart
device, click to enter the selection
interface. Select the les to be deleted, click
to choose whether or not to delete the
les.
<
28:01
<
4 items selected
28:01
The les which are being downloaded
and wait downloading cannot be deleted.
<
1
28:01
28:01
28:01
2
<
4 items selected
1
28:01
28:01
2
No select box icon □ is displayed on the
le which is being downloaded.
67
Page 69

Slide play function
1. In the index playback interface of the smart
device, click to enter the selection
interface;
2. Firstly, select the les to be played, and
then click to start slide play;
3. If no le is selected, directly click so that
all les will be played.
<
<
4 items selected
Clicking a photo in slide play will stop the
playback and the single photo interface
will appear.
When playing movie in a slide, only the
rst frame is displayed; clicking the movie
will stop slide play and the movie play
interface will appear.
68
28:01
28:01
28:01
1
28:01
2
Page 70

Share function
1. In the index playback interface of the smart
device, click to enter the selection
interface.
2. Select the les to be shared, and click
to pop up the share option.
Share option will differ according to the
settings of the smart device.
<
28:01
28:01
<
4 items selected
1
28:01
28:01
2
69
Page 71

Single Photo
In the index playback interface, the single
photo interface will appear if a single le is
clicked.
Previous and next les can be displayed by
scrolling.
100% enlargement screen will appear by
double clicking one single photo, and the
original dimension will be recovered by double
clicking again.
If you want to play the videos on smart
Android device specication, please
make sure to select a video app that
corresponds to the sound source of the
PCM format. You are unable to play
sound if you use a video app that is
incorresponding to PCM format.
1. Executable operations in single photo
playback of the les at the camera side:
: enter the Remote Viewnder status
•
(See Page 73 for explanations.)
•
: download the les on the camera
into the smart device
•
: delete
• / : start playing back movie/pause
(only iOS system)
<
13/26
70
Page 72

2. Executable operations in single photo
playback of the les on the smart device:
•
: share
: slide play
•
• : edit
• : delete
• / : start playing back movie/pause
(only iOS system)
Edit function
1. Editing photo les:
Click
to enter the effect interface, where
lter effects, brightness adjustment and
modeling effects can be set.
• Filter effects:
The lter effects have 23 types. More
effect options can be viewed by sliding the
effect option bar from side to side.
13/26
<
Effect
<
13/26
Effect option bar
71
Page 73

• Brightness adjustment effects:
123
: Off
: Auto
• Modeling effects:
: Off
: Round shape
: Belt-like shape (lateral direction)
First, click the desired effect and then click
to select the options of 「Save」or
「Cancel」, or select the location to share
the le.
2. Editing movie les:
Click
to enter the trim interface.
Trim
00:00:00
• and : play movies
• : increase the number of frames
•
: shorten the number of frames
: trim starting point
•
• : trim nishing point
Trim
4
00:00:08
72
Page 74

Steps of movie trim:
Click or to increase or shorten
①
the number of frames.
②
Slide the quick browse bar from side to
side so that the vertical line stays on a
frame to be cut, and click to select
the trim starting point.
③
Slide the quick browse bar again to the
left so that the vertical line stays on a
frame to be cut, and click to select
the trim nishing point.
Click to select the option of
④
「Save」 or 「Cancel」, or select the
location to share the le.
Remote Viewnder
Click 「Remote Viewnder」 in the APP Home
to enter the viewnder status, and control the
camera to shoot by using the smart device.
The les shot through the APP are saved
in the camera.
The setting parameters of the camera are
displayed at the tops of the video mode and the
shooting mode interfaces on the smart device.
Movie Size: 「1080p30」
「960p50」
「960p30」
「720p60」
「720p30」
「WVGA60」
「WVGA120」
73
Page 75

Field of View: Wide
n
a
r
r
o
w
n
a
r
r
o
w
n
a
r
r
o
w
n
a
r
r
o
w
n
a
r
r
o
w
n
a
r
r
o
w
Medium
Narrow
Underwater
White Balance: AWB
Daylight
Cloudy
Fluorescent
Underwater
Still Size: 14M
10M-16:9
5M
Burst Shot: Single
Burst Shot
The characteristics of these parameters
are the same as the camera.
Video mode:
1080
23:30
<
1080
99:99
• : enter the index playback state on
the camera.
: start video recording / stop video
•
recording
•
: switch to the shooting mode from
the video mode
74
Page 76

Video mode method of operation:
1. Click icons at the top of the interface to set
corresponding parameters.
2. Click to start video recording, and click
to stop video recording.
3. Click to enter the index playback state.
In Wireless Power Saving enabled state,
a prompting message about breaking of
wireless connection in 30 seconds will be
popped up when video recording on the
smart device. At this moment, if the user
does not stop video recording, wireless
online will be automatically disconnected,
and the wireless disconnection message
will be displayed while video recording is
continued on the camera.
Shooting mode:
Shooting mode method of operation:
1. Click icons at the top of the interface to set
corresponding parameters.
2. Click to shoot photos.
3. Click to enter the index playback state.
75
Page 77

23:30
<
<
9999
• : enter the index playback state on
the camera.
: shoot photos
•
About
Click「About」 in the APP Home, so that the
version of the APP can be checked.
• : switch to the video mode from the
shooting mode
76
Page 78

Connection Port Introduction
Connect to a Computer
You can use the USB cable to connect the
camera and copy (transmit) images to a
computer.
Transferring images to your computer
Follow the steps below to connect the camera
to a computer.
1. Make sure the computer is turned on.
2. Connect one end of the supplied USB cable
to the USB port on your camera.
3. Connect the other end of the USB cable to
an available USB port on your computer.
4. The computer will automatically detect the
camera as a removable drive. Double-click
the Computer icon on the desktop to locate
the removable drive and to copy folders and
les in the drive to a directory on your PC.
5. After the transmission is complete,
disconnect the USB cable according to
the instructions specifying how to safely /
remove USB devices.
77
Page 79

Viewing Images on Computer
Display transferred images on a standard image viewer etc. that an OS has. For details about
viewing images, see the help menu on the viewer.
®
Supported OS==>Windows: Windows Vista
Macintosh: Mac OS X 10.6, OS X 10.7 / 10.8 / 10.9
If a memory card is inserted in the product, only les in the memory card will be read. If
needing to read the les in the internal memory, please pull out the memory card before
connecting to the computer.
/ Windows® 7 / Windows® 8 / Windows® 8.1
HDMI Connected TV Output
The product is capable of realizing movie and photo playback on a TV through an HDMI cable.
Steps:
1. Open the battery/card cover of the product, connect one end of an HDMI cable (not included) to
a TV which is up to the HDMI standard (the TV and the product both need to be turned on) and
the other end to the cable to the HDMI port of the product;
2. The product will automatically enter the playback mode after the connection is complete. The
operating method is the same as 「Introduction to Basic Operation of Playback」 on page 37.
78
Page 80

Appendices
Main Specications
Type Compact Digital Still Camera
Number of effective
pixels
Image sensor 1/2.3 inch CMOS
Number of recorded
pixels
Sensitivity Automatic (ISO 100 - 800)
File format
Storage media
Approx. 14 megapixels
Still
Movie
Still JPEG (Exif 2.3), DCF2.0
Movie
Built-in memory (approx. 100MB),
microSD Memory Card / microSDHC Memory Card
(4:3) 14M: 4320×3240
5M: 2592×1944
(16:9) 10M: 4320×2432
1920×1080(30fps)
1280×960(50fps)
1280×960(30fps)
1280×720(60fps)
1280×720(30fps)
848×480(60fps)
848×480 (120fps)
MOV/H.264, 30fps/50fps/60fps/120fps, PCM system,
stereo sound
79
Page 81

Approximate Image Storage Capacity and Recording Time
Still
Built-in Memory 4GB microSD Memory Card
14M (4320×3240) 24 pictures 9 11 pictures
10M (4320×2432) 32 pictures 1208 pictures
5M (2592×1944) 64 pictures 2391 pictures
• The image storage capacity is for reference only. The actual image storage capacity may vary
depending on the microSD Memory Card and the subject.
Movie
Built-in Memory 4GB microSD Memory Card
1920×1080.30fps 46sec. 31min. 39sec.
1280×960.50fps 46sec. 31min. 39sec.
1280×960.30fps 1min. 15sec. 49min. 40sec.
1280×720.60fps 52sec. 35min. 11sec.
1280×720.30fps 1min. 38sec. 1hr. 3min. 45sec.
848×480.60fps 1min. 38sec. 1hr. 3min. 43sec.
848×480.120fps 52sec. 35min. 10sec.
• The above gures are based on our standard shooting conditions and may vary depending on the
subject, shooting conditions and type of the microSD Memory Card used.
• You can continue recording until the recording time reaches 25 minutes (only 848×480.120fps is
60 seconds) per a recording.
80
Page 82

White balance
Lens
Image stabilization Electronic image stabilization (movie only)
Display 1.5-inch LCD, approx. 115,000 dots
Playback modes Photo playback, Movie playback
Focus
Exposure control AE Metering AiAE, Face AE (not switchable)
Shooting modes Still, Movie,
Face detection 10 people's faces
Drive modes Still: Single, Burst Shot
AWB, Daylight, Cloudy, Fluorescent, Underwater
Focal Length: 3mm (approx. 16.8mm in 35mm format equivalent)
Brightness: F2.8
Lens Construction: 6 elements in 6 groups (2 aspherical elements)
Maximum eld of view: Still image approx. 160° (4:3 wide)
Movie approx. 137° (1280 x 960)
Type Fixed focus
In air (Lens protector O-LP1531, Underwater lens
Focus range
protector O-LP1532): 60cm - ∞
Underwater (Underwater lens protector O-LP1532):
80cm - ∞
Time Lapse,
Loop recording, Motion detection
81
Page 83

Power source Rechargeable lithium-ion battery: DB-65
Image
Storage
Capacity
Battery life
Interfaces USB 2.0 (high-speed compatible), HDMI port (Type D)
Wireless
interface
Dimensions
Movie
Recording
Time
Playback
Time
• Standard: 802.11b/g/n
• Frequency: 2.4GHz band
• Security: WPA2
Approx. 66.5 (W)×42.5 (H)×89.5 (D) mm (excluding operating or protruding
parts)
Approx. 350 pictures
(using specied battery)
Approx. 150 minutes
(using specied battery)
Approx. 400 minutes
(using specied battery)
82
The number of pictures is an
estimated value based on our
measurements. Actual number may
vary according to usage conditions.
The time is an estimated value
based on our measurements. Actual
number may vary according to
usage conditions.
The time is an estimated value
based on our measurements. Actual
number may vary according to
usage conditions.
Page 84

Weight
Accessories
Approx. 190g (including battery, memory card, and Lens protector O-LP1531)
Approx. 151g (excluding battery, memory card, and Lens protector)
Rechargeable lithium-ion battery DB-65
Power adapter GAC-03
USB cable I-USB152
Carabiner strap O-ST153
Quick start guide
Operating Manual(CD-ROM)
Lens protector O-LP1531
Underwater lens protector O-LP1532
WG Flat Adhesive Mount O-CM1531
83
Page 85

Prompts and Warning Messages
Message Description Solution
The le folders in the memory card have
!
reached the maximum number (999), the
images will not be saved.
Too much folders in memory card will result
in longer power up time.
Copy the images to your
PC and format the memory
card.
84
SD
IN
!
!
The memory card is full. Delete unwanted images.
The internal memory is full. Delete unwanted images.
Page 86

Message Description Solution
The memory card still cannot be recognized
after format.
An error occurs when reading the memory
SD
card.
Format the memory card.
Interruption problem is encountered in the
period of writing in the memory card during
the video recording or shooting process.
The internal memory can’t be identied after
being formatted.
IN
Interruption problem is encountered in the
period of writing in the internal memory
Format the internal
memory.
during the video recording or shooting
process.
!
SD
is used to record an HD movie, the writing
speed is too slow and recording will not
Use a memory card with
Class 4 or higher.
continue.
85
When a memory card lower than Class 4
Page 87

Message Description Solution
86
The battery is used up. It is a warning
indicating that the camera is going to shut
down.
The message will be displayed when the
temperature of the battery is too high
during recording.
When the AP setting is enabled, the
message will be displayed when the
temperature of the battery is too high.
Replace a new battery.
Replace a fully charged
battery.
Remove the battery after the
product is turned off. You can
continue to use the battery
when it cools.
Remove the battery after the
product is turned off. You can
continue to use the battery
when it cools.
Page 88

Using the WG Flat Adhesive Mount O-CM1531
This accessory included in the package xes our digital camera on a at surface.
Please read the instructions below carefully for safe use.
Warning Do not install this product in vehicles in a way which might hinder driving
operations or cause accidents resulting from dropping the product. Do not
operate the camera while driving.
Caution Always observe the following cautions. Otherwise, your camera may fall off
and result in injuries, damages or submerging.
1. Make sure to install the camera onto the appurtenant camera platform
securely.
2. Make sure to install the mount in an intended object securely.
3. Tighten the nut securely so that it will not loosen.
If not followed, could result in injuries, damages or submerging.
Precautions When Using This Product
• Do not disassemble or modify this product.
• Make sure to use our genuine repair parts for replacement.
• Do not leave this product sitting in direct sunlight or high humidity.
• This product set up with a camera will sink if dropped in water. Be careful and prevent its falling
by using a gear such as a fall protection strap (commercially available) when using this product
on a ship etc.
Optional repair parts are available for this product :
WG Repair Parts 1 O-CM1474 (Double-sided adhesive tape)
WG Repair Parts 2 O-CM1475 (Nut)
87
Page 89

How to Install the Mount
1. Align the screw to the tripod socket of the camera. Rotate the screw for xing.
Appurtenant camera
2. Inset the appurtenant camera platform with the nut into the adhesive mount and tighten the nut
to x them.
3. Peel off a seal stuck to the underside of the adhesive mount to x this product on a at surface
such as a table. The angle of the mounted camera can be adjusted by loosening the nut. Make
sure to tighten the nut securely once the angle is determined.
platform
Screw
Nut
Adhesive mount
88
Page 90

Caution:
• Make sure to x this product on a at surface without irregularities or roughness after wiping off
dirt or oil on it.
• Do not twist this product forcedly after xing since its adhesion may weaken. Make sure to use
an optional double-sided adhesive tape (WG Repair Parts 1 O-CM1474) for replacing a used
adhesive instead of reusing it.
• Remove this product carefully. Otherwise, the mounting surface may damage or its painting may
peel off depending on the conditions.
• The nut may loosen during the travelling. Make sure to follow the proper procedures to install
this product securely.
• We shall not be held liable for any damages, malfunctions, losses or accidents of your camera
or this product resulting from tipping over or dropping the product.
89
Page 91

Warranty Policy
All our cameras purchased through authorized bona de photographic distribution channels
are guaranteed against defects of material or workmanship for a period of twelve months
from the date of your purchase. Service will be rendered, and defective parts will be replaced
without cost to you within that period, provided the camera does not show evidence of impact,
sand or liquid damage, mishandling, tampering, battery or chemical corrosion, operation
contrary to operating instructions, or modication by an unauthorized repair shop. The
manufacturer or its authorized representatives shall not be liable for any repair or alterations
except those made with its written consent and shall not be liable for damages from delay or
loss of use or from other indirect or consequential damages of any kind, whether caused by
defective material or workmanship or otherwise; and it is expressly agreed that the liability of
the manufacturer or its representatives under all guarantees or warranties, whether expressed
or implied, is strictly limited to the replacement of parts as hereinbefore provided. No refunds
will be made on repairs by non-authorized service facilities.
90
Page 92

Procedure During 12-month Warranty Period
Any camera which proves defective during the 12-month warranty period should be returned
to the dealer from whom you purchased the camera or to the manufacturer. If there are no
representatives of the manufacturer in your country, send the camera to the manufacturer, with
postage prepaid. In this case, it will take a considerable length of time before the camera can be
returned to you owing to the complicated customs procedures required. If the camera is covered by
warranty, repairs will be made and parts replaced free of charge, and the camera will be returned to
you upon completion of servicing. If the camera is not covered by warranty, regular charges of the
manufacturer or of its representatives will apply. Shipping charges are to be borne by the owner.
If your camera was purchased outside of the country where you wish to have it serviced during
the warranty period, regular handling and servicing fees may be charged by the manufacturer’s
representatives in that country. Notwithstanding this, your camera returned to the manufacturer will
be serviced free of charge according to this procedure and warranty policy. In any case, however,
shipping charges and customs clearance fees to be borne by the sender. To prove the date of your
purchase when required, please keep the receipt or bills covering the purchase of your camera for
at least a year. Before sending your camera for servicing, please make sure that you are sending
it to the manufacturer’s authorized representatives or their approved repair shops, unless you
are sending it directly to the manufacturer. Always obtain a quotation for the service charge, and
only after you accept the quoted service charge, instruct the service station to proceed with the
servicing.
• This warranty policy does not affect the customer’s statutory rights.
• The local warranty policies available from our distributors in some countries can supersede this
warranty policy. Therefore, we recommend that you review the warranty card supplied with your
product at the time of purchase, or contact our distributor in your country for more information
and to receive a copy of the warranty policy.
The CE Mark is a Directive conformity mark of the European Union.
91
Page 93

For customers in USA
STATEMENT OF FCC COMPLIANCE
This device complies with Part 15 of the FCC Rules. Operation is subject to the following two
conditions: (1) This device may not cause harmful interference, and (2) this device must accept
any interference received, including interference that may cause undesired operation. Changes or
modications not approved by the party responsible for compliance could void the user’s authority
to operate the equipment. This equipment has been tested and found to comply with the limits
for a Class B digital device, pursuant to part 15 of the FCC Rules. These limits are designed
to provide reasonable protection against harmful interference in a residential installation. This
equipment generates, uses and can radiate radio frequency energy and, if not installed and used
in accordance with the instructions, may cause harmful interference to radio communications.
However, there is no guarantee that interference will not occur in a particular installation. If
this equipment does cause harmful interference to radio or television reception, which can be
determined by turning the equipment off and on, the user is encouraged to try to correct the
interference by one or more of the following measures:
• Reorient or relocate the receiving antenna. Increase the separation between the equipment
and receiver. Connect the equipment into an outlet on a circuit different from that to which the
receiver is connected.
* Consult the dealer or an experienced radio/TV technician for help.
For customers in Canada
This Class B digital apparatus complies with Canadian ICES-003.
This device complies with Industry Canada licence-exempt RSS standard(s). Operation is subject
to the following two conditions: (1) this device may not cause interference, and (2) this device must
accept any interference, including interference that may cause undesired operation of the device.
Industry Canada ICES-003 Compliance Label:
CAN ICES-3 (B)/NMB-3(B)
Le présent appareil est conforme aux CNR d’Industrie Canada applicables aux appareils radio
exempts de licence. L’exploitation est autorisée aux deux conditions suivantes : (1) l’appareil
ne doit pas produire de brouillage, et (2) l’utilisateur de l’appareil doit accepter tout brouillage
radioélectrique subi, même si le brouillage est susceptible d’en compromettre le fonctionnement.
92
Page 94

Pour les utilisateurs au Canada
Cet appareil numérique de la classe B est conforme à la norme NMB-003 du Canada.
FOR CALIFORNIA, U.S.A. ONLY
Perchlorate Material-special handling may apply. The lithium battery used in this camera contains
perchlorate material, which may require special handling.
See www.dtsc.ca.gov/hazardouswaste/perchlorate
93
Page 95

Declaration of Conformity
According to 47CFR, Parts 2 and 15 for
Class B Personal Computers and Peripherals
We: RICOH IMAGING AMERICAS CORPORATION
Located at: 633 17 Street, Suite 2600, Denver, Colorado 80202, U.S.A.
Phone: 800-877-0155 Fax: 303-790-1131
Declare under sole responsibility that the product identied herein complies with 47CFR Parts
2 and 15 of the FCC rules as a Class B digital device. Each product marketed is identical
to the representative unit tested and found to be compliant with the standards. Records
maintained continue to reect the equipment being produced can be expected to be within the
variation accepted, due to quantity production and testing on the statistical basis as required
by 47CFR §2.909. Operation is subject to the following two conditions: (1) This device may
not cause harmful interference, and (2) This device must accept any interference received,
including interference that may cause undesired operation. The above named party is
responsible for ensuring that the equipment complies with the standards of 47CFR §15.101 to
§15.109.
Product Name: Digital Camera
Model Number: RICOH WG-M1
Contact person: Customer Service Manager
Date and Place: October, 2014, Colorado
94
Page 96

Information for Users on Collection and Disposal of Old Equipment and Used
Batteries
1. In the European Union
These symbols on the products, packaging and/or accompanying documents mean that
used electrical and electronic equipment and batteries should not be mixed with general
household waste.
Used electrical/electronic equipment and batteries must be treated separately and in
accordance with legislation that requires proper treatment, recovery and recycling of these
products.
By disposing of these products correctly you will help ensure that the waste undergoes the
necessary treatment, recovery and recycling and thus prevent potential negative effects on
the environment and human health which could otherwise arise due to inappropriate waste
handling.
If a chemical symbol is added beneath the symbol shown above, in accordance with the Battery
Directive, this indicates that a heavy metal (Hg = Mercury, Cd = Cadmium, Pb = Lead) is present in
the battery at a concentration above an applicable threshold specied in the Battery Directive.
For more information about collection and recycling of used products, please contact your local
authorities, your waste disposal service or the point of sale where you purchased the products.
2. In other countries outside the EU
These symbols are only valid in the European Union. If you wish to discard used products, please
contact your local authorities or dealer and ask for the correct method of disposal.
For Switzerland: Used electrical/electronic equipment can be returned free of charge to the dealer,
even when you don’t purchase a new product. Further collection facilities are listed on the home
page of www.swico.ch or www.sens.ch.
95
Page 97

RICOH IMAGING COMPANY, LTD.
RICOH IMAGING EUROPE
S.A.S
2-35-7, Maeno-cho, Itabashi-ku, Tokyo 174-8639, JAPAN
(http://www.ricoh-imaging.co.jp)
112 Quai de Bezons, B.P. 204, 95106 Argenteuil Cedex,
FRANCE
(http://www.ricoh-imaging.fr)
RICOH IMAGING
DEUTSCHLAND GmbH
RICOH IMAGING UK LTD.
RICOH IMAGING
AMERICAS CORPORATION
RICOH IMAGING CANADA INC.
RICOH IMAGING CHINA
CO., LTD.
Am Kaiserkai 1, 20457 Hamburg, GERMANY
(http://www.ricoh-imaging.de)
PENTAX House, Heron Drive, Langley, Slough, Berks
SL3 8PN, U.K.
(http://www.ricoh-imaging.co.uk)
633 17th Street, Suite 2600, Denver, Colorado 80202, U.S.A.
(http://www.us.ricoh-imaging.com)
5520 Explorer Drive Suite 300, Mississauga, Ontario,
L4W 5L1, CANADA
(http://www.ricoh-imaging.ca)
23D, Jun Yao International Plaza, 789 Zhaojiabang
Road, Xu Hui District, Shanghai, 200032, CHINA
(http://www.ricoh-imaging.com.cn)
http://www.ricoh-imaging.co.jp/english
• Specications and external dimensions are subject to change without notice.
54891EN
Copyright © RICOH IMAGING COMPANY, LTD. 2014
201409
 Loading...