

Page 1

Operating Manual
The serial number is located inside the battery/card cover.
Chapter 1: Introduction
Read this chapter before use.
This chapter gives you an overview of the RICOH WG-6.
Chapter 2: Getting Started
Read this chapter before using the RICOH WG-6 for the first time.
This chapter explains about basic operations such as turning the camera on,
performing shooting, and playing back images.
Chapter 3 and later
Read these chapters when you want to learn more about the different
camera functions.
These chapters explain about shooting and playback functions, as well as
how to customize the camera settings and use it with a computer.
Model: R02050
Page 2

Regarding User Registration
Thank you for purchasing a RICOH product.
In order to provide you with the best customer support and service experience for the product you have purchased, we ask you to complete the user
registration.
Visit the following website to complete the user registration.
http://www.ricoh-imaging.com/registration/
Registered users will be notified by e-mail about important customer support information, such as firmware version updates, etc.
Page 3

Introduction
This Operating Manual provides information on how to use the shooting and playback
functions of this camera and related precautions.
Thoroughly read this Operating Manual to make the best use of the functions available
with this camera. Be sure to keep this Operating Manual for future reference.
It is recommended to update the camera firmware to the latest version before using
the camera.
For details on the latest firmware version, refer to the following firmware download site.
http://www.ricoh-imaging.co.jp/english
Safety precautions Read all safety precautions thoroughly to ensure safe use.
Test shots Take test shots to ensure that the camera is working properly be-
Copyright Reproduction or alteration of copyrighted documents, magazines,
Exemption from liability RICOH COMPANY assumes no liability for failure to record or display
Radio interference Operating this camera in the vicinity of other electronic equipment
This publication may not be reproduced in whole or in part without RICOH COMPANY’s express written permission.
© RICOH COMPANY, LTD. 2019
RICOH COMPANY reserves the right to change the contents of this manual at any time without prior notice.
Every effort has been made to ensure the accuracy of the information in this manual. Should you nevertheless
notice any errors or omissions, we would be grateful if you would notify us at the address listed on the back cover
of this manual.
fore taking pictures on important occasions.
and other materials, other than for personal, home, or other similarly limited purposes, without the consent of the copyright holder,
is prohibited.
images as a result of product malfunction.
may adversely affect both the camera and the other device. Interference is particularly likely if the camera is used in close proximity
to a radio/TV receiver. In such case, take the following measures.
• Keep the camera as far away as possible from the radio/TV receiver.
• Reorient the antenna of the radio/TV receiver.
• Use a different wall outlet.
RICOH COMPANY, LTD.
1
Page 4

Trademarks
• Microsoft and Windows are registered trademarks of Microsoft Corporation in the United States of America and
other countries.
• Mac, macOS, and OS X are trademarks of Apple Inc., registered in the U.S. and other countries.
• SDXC Logo is a trademark of SD-3C, LLC.
• FlashAir is a trademark of Toshiba Memory Corporation.
• USB Type-C is a trademark of USB Implementers Forum.
• HDMI, the HDMI logo, and High-Definition Multimedia Interface are trademarks or registered trademarks of HDMI
Licensing, LLC in the United States and/or other countries.
All other trademarks are the property of their respective owners.
• This product uses the RICOH RT font designed by RICOH COMPANY, LTD.
AVC Patent Portfolio License
This product is licensed under the AVC Patent Portfolio License for the personal use of a consumer or other uses
in which it does not receive remuneration to (i) encode video in compliance with the AVC standard (“AVC video”)
and/or (ii) decode AVC video that was encoded by a consumer engaged in a personal activity and/or was obtained
from a video provider licensed to provide AVC video. No license is granted or shall be implied for any other use.
Additional information may be obtained from MPEG LA, L.L.C.
See http://www.mpegla.com.
2
Page 5
Safety Precautions
Warning Symbols
Various symbols are used throughout this Operating Manual and on the product to
prevent physical harm to you or other people and damage to property. The symbols
and their meanings are explained below.
Danger
Warning
Caution
Meaning of Symbols
Observe the following precautions to ensure safe use of this camera.
This symbol indicates matters that may lead to imminent risk of
death or serious injury if ignored or incorrectly handled.
This symbol indicates matters that may lead to death or serious injury
if ignored or incorrectly handled.
This symbol indicates matters that may lead to injury or property
damage if ignored or incorrectly handled.
The symbol alerts you to actions that must be performed.
The symbol alerts you to prohibited actions.
The symbol may be combined with other symbols to indicate that a specific action is prohibited.
Example:
: Do not touch : Do not disassemble
Danger
QQ
Do not attempt to disassemble, repair, or alter the camera yourself. The
high-voltage circuitry in the equipment poses significant electrical hazard.
QQ
Do not attempt to disassemble, alter, or directly solder the battery.
QQ
Do not put the battery in a fire, attempt to heat it, or use or leave it in a
high temperature environment such as next to a fire or inside a car. Do not
put it into water or the sea or allow it to get wet.
QQ
Do not attempt to pierce, hit, compress, drop, or subject the battery to any
other severe impact or force.
QQ
Do not use a battery that is significantly damaged or deformed.
3
Page 6
Warning
QQ
Turn off the power immediately in the event of abnormalities such as
smoke or unusual odors being emitted. Remove the battery as soon as
possible, being careful to avoid electric shocks or burns. If you are drawing
power from a household electrical outlet, be sure to unplug the power
plug from the outlet. Failure to observe this precaution could result in
fire or electric shocks. Contact the nearest service center at your earliest
convenience. Stop using the camera immediately if it is malfunctioning.
QQ
Turn off the power immediately if any metallic object, water, liquid, or other foreign object gets into the camera. Remove the battery and memory
card as soon as possible, being careful to avoid electric shocks or burns.
If you are drawing power from a household electrical outlet, be sure to
unplug the power plug from the outlet. Failure to observe this precaution
could result in fire or electric shocks. Contact the nearest service center
at your earliest convenience. Stop using the camera immediately if it is
malfunctioning.
QQ
If the monitor is damaged, avoid any contact with the liquid crystal inside it.
Follow the appropriate emergency measures below.
• SKIN: If any of the liquid crystal gets on your skin, wipe it off and rinse the
affected area thoroughly with water, then wash well with soap.
• EYES: If it gets in your eyes, wash your eyes with clean water for at least 15
minutes and seek medical advice immediately.
• INGESTION: If any of the liquid crystal is ingested, rinse the mouth out
thoroughly with water. Have the person drink a large amount of water and
induce vomiting. Seek medical assistance immediately.
QQ
Follow these precautions to prevent the battery from leaking, overheating, igniting, or exploding.
• Do not use a battery other than those specifically recommended for the
camera.
• Do not carry or store the battery together with metal objects such as ballpoint pens, necklaces, coins, and hairpins.
• Do not put the battery into a microwave or high pressure container.
• If leakage of battery fluid, a strange odor, color change, etc. is noticed
during use or during charging, remove the battery from the camera or
battery charger immediately and keep it away from fire.
QQ
Observe the following in order to prevent fire, electrical shock, or cracking
of the battery while charging.
• Use only the indicated power supply voltage. Also avoid the use of
multi-socket adapters and extension cords.
• Do not damage, bundle, or alter the AC plug cord. Also, do not place heavy
objects on, stretch, or bend the AC plug cord.
• Do not connect or disconnect the power plug with wet hands. Always grip
the plug section when disconnecting a power plug. Do not cover the camera while charging the battery.
4
Page 7
QQ
Keep the battery and SD memory card used in the camera out of the reach
of children to prevent accidental swallowing. The battery and memory
card are harmful if swallowed. Seek medical assistance immediately.
QQ
Keep the camera out of the reach of children. For children, accidents may
occur because they cannot understand the contents of “Safety Precautions” and “Precautions for Use”.
QQ
Do not touch the internal components of the camera if they become exposed as a result of being dropped or damaged. The high-voltage circuitry
in the equipment could lead to electric shocks. Remove the battery as
soon as possible, being careful to avoid electric shocks or burns. Take the
camera to your nearest dealer or service center if it is damaged.
QQ
When using the camera in wet areas such as a kitchen, be careful not to
wet the inside of the camera. Failure to observe this precaution could result in fire or electric shocks.
QQ
Do not use the camera near flammable gases, gasoline, benzine, thinner,
or similar substances. Failure to observe this precaution could result in an
explosion, fire, or burns.
QQ
Do not use the camera in a location where usage is restricted or prohibited, such as on airplanes. Failure to observe this precaution could result
in an accident.
QQ
Wipe off any dust that accumulates on the power plug. Failure to observe
this precaution could result in fire.
QQ
When using a household power outlet, always use the dedicated AC
adapter. Failure to observe this precaution could result in fire, electric
shocks, or product malfunction.
QQ
Do not use the battery charger or AC adapter with commercially available
electronic transformers when traveling abroad. Failure to observe this precaution could result in fire, electric shocks, or product malfunction.
5
Page 8
Safety Precautions
for Accessories
Caution
QQ
Contact with fluid leaking from a battery can lead to burns. If part of your
body comes in contact with a damaged battery, rinse the area with water
immediately. (Do not use soap.)
If a battery starts to leak, remove it immediately from the camera and wipe
the battery chamber thoroughly before replacing it with a new battery.
QQ
Plug the power plug securely into the electrical outlets. Failure to observe
this precaution could result in fire.
QQ
Do not allow the camera interior to get wet. When operating the camera
with wet hands, be careful not to get the camera interior wet. Failure to
observe this precaution could result in electric shocks.
QQ
Do not fire the flash at drivers of vehicles, as this may cause the driver to
lose control and result in a traffic accident. Failure to observe this precaution could result in a traffic accident.
When using optional products, carefully read the user’s manuals provided with the product before using that product.
6
Page 9

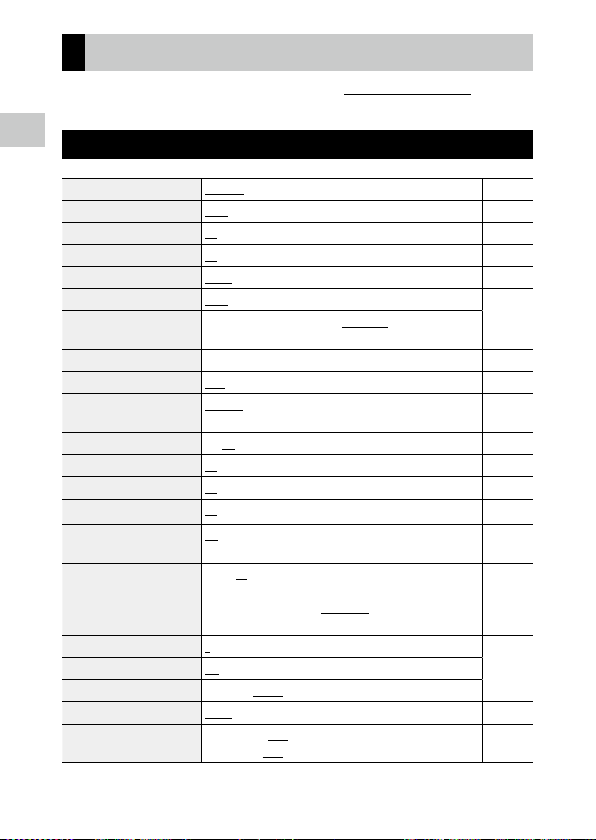
Contents
Introduction ........................................................................................................................... 1
Safety Precautions ................................................................................................................ 3
1
Introduction 11
Checking the Contents of the Package ......................................................................11
Names and Functions of the Working Parts .............................................................. 12
Operating Controls ...........................................................................................................................14
Indicators on the Monitor ................................................................................................16
Shooting Screen .................................................................................................................................16
Playback Screen .................................................................................................................................17
Changing the Screen Display ........................................................................................................18
How to Change Function Settings ...............................................................................19
Using the Button ................................................................................................................................19
Setting from the Menus ..................................................................................................................22
Menu List ...............................................................................................................................24
A Shooting Menu ...........................................................................................................................24
B Movie Menu .................................................................................................................................25
C Playback Menu ............................................................................................................................26
D Customize Menu.........................................................................................................................27
E Setup Menu ..................................................................................................................................29
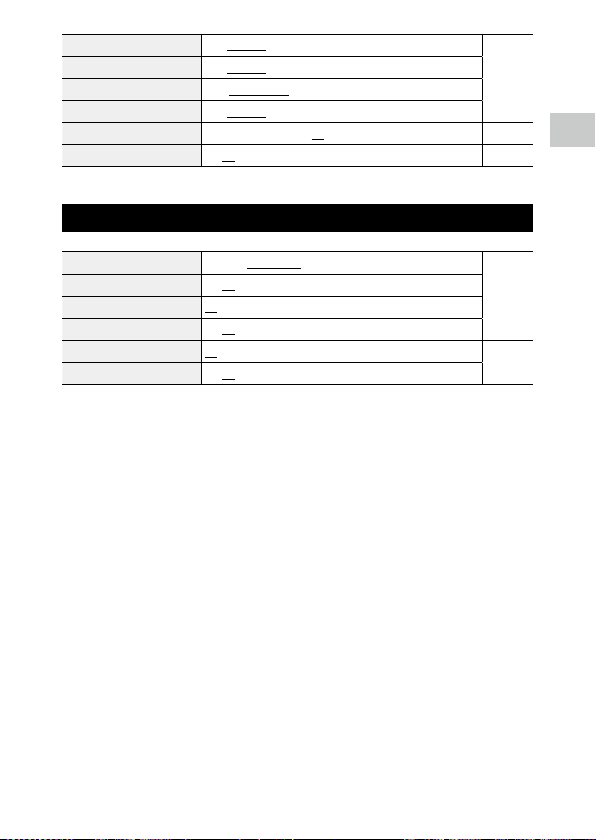
2
Getting Started 31
Setting the Battery and a Memory Card .................................................................... 31
Inserting the Battery and a Memory Card ................................................................................ 31
Charging the Battery ........................................................................................................................33
Initial Settings ...................................................................................................................... 35
Turning the Camera On ...................................................................................................................35
Setting the Language and the Date and Time ........................................................................36
Formatting a Memory Card ............................................................................................................37
Basic Shooting Operation ................................................................................................38
Shooting in the Auto Mode ...........................................................................................................38
Viewing the Captured Images.......................................................................................................39
3
Taking Pictures 40
Taking Still Images .............................................................................................................40
Setting the Capture Mode ..............................................................................................................40
Using Exposure Compensation ....................................................................................................43
Recording Movies ...............................................................................................................44
Playing Back Movies .........................................................................................................................46
7
Page 10

Setting the Focus Mode ...................................................................................................47
Focusing Manually (Manual Focus) .............................................................................................49
Setting the Exposure .........................................................................................................50
Selecting a Metering Method ....................................................................................................... 50
Setting the ISO Sensitivity .............................................................................................................. 51
Using the Flash ...................................................................................................................................52
Setting the White Balance ...............................................................................................54
Setting the White Balance Manually ...........................................................................................55
Setting the Drive Mode ....................................................................................................56
Shooting Using the Self-timer ......................................................................................................56
Shooting Continuously ....................................................................................................................57
Shooting Using the Remote Control Unit .................................................................................58
Shooting with Varied Exposure Values ......................................................................................59
Configuring the Capture Settings ................................................................................60
Image Capture Settings ...................................................................................................................60
Movie Capture Settings ...................................................................................................................60
Setting the Image Finishing Tone and Correction ..................................................61
Setting the Image Atmosphere (Image Tone) .........................................................................61
Setting the Sharpness, Saturation, Tone, and Contrast ........................................................62
Imprinting the Date on Still Images ............................................................................................62
Taking Images with Clearer Details .............................................................................................62
Correcting a Range of Tones (D-Range Setting) .....................................................................63
Reducing Blurring of Images ......................................................................................................... 63
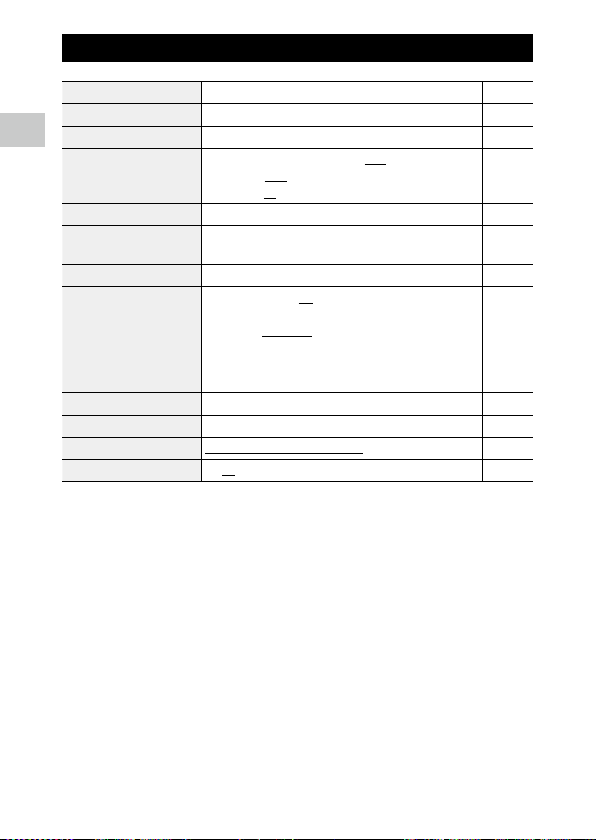
4
Playback Functions 64
Changing the Playback Method ....................................................................................64
Displaying Multiple Images ...........................................................................................................64
Playing Back Images Continuously (Slideshow) .....................................................................65
Displaying Rotated Images ............................................................................................................66
Connecting the Camera to an AV Device ..................................................................................67
Organizing Files ...................................................................................................................68
Deleting Files .......................................................................................................................................68
Copying Images .................................................................................................................................69
Protecting Images from Deletion ................................................................................................70
Copying Images to a Computer ...................................................................................................71
Editing and Processing Images .....................................................................................72
Changing the Image Size ................................................................................................................72
Processing Images with Filters ......................................................................................................74
Editing Movies ....................................................................................................................................75
Correcting Red Eyes in Images .....................................................................................................77
8
Page 11

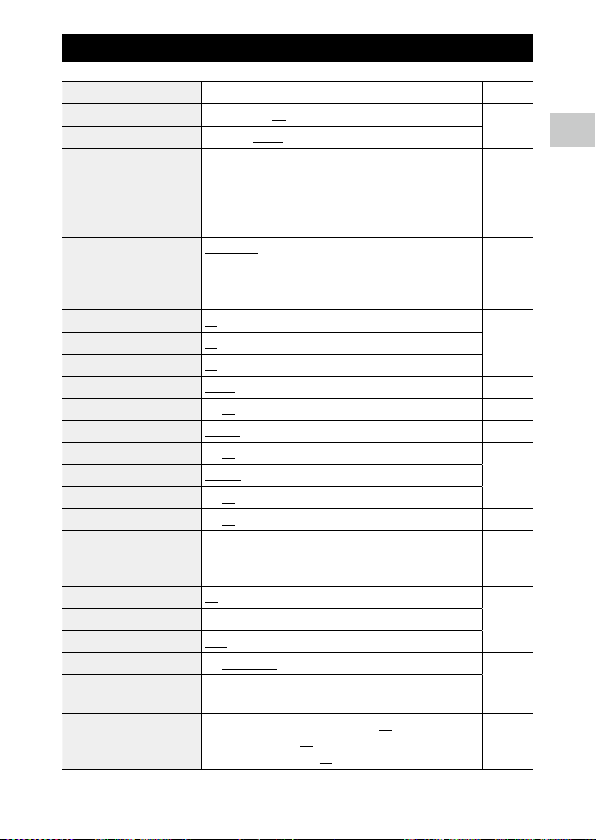
5
Changing the Settings 78
Saving Frequently Used Settings ..................................................................................78
Using the Mode Dial .........................................................................................................................78
Exporting the Settings to a File ....................................................................................................79
Customizing the Button Functions ..............................................................................80
Registering Functions to the Movie Button .............................................................................80
Changing the Functions of the Green Button .........................................................................81
Display and Sound Settings ............................................................................................82
Setting the Start-up Screen ........................................................................................................... 82
Setting the Information Displayed when the Camera Is Turned On/Off ....................... 82
Setting the Live View Display ........................................................................................................82
Setting the Brightness of the Monitor .......................................................................................83
Setting the Lamp ...............................................................................................................................83
Setting the Sound Volume .............................................................................................................83
Power Saving Settings ......................................................................................................84
Automatically Turning the Power Off .........................................................................................84
Dimming the Display........................................................................................................................84
Setting the GPS ...................................................................................................................86
Displaying the GPS Information ...................................................................................................87
Automatically Adjusting the Date and Time Settings ..........................................................88
Recording the Camera Route ........................................................................................................88
Setting the Direction Information ...............................................................................................90
Imprinting the GPS Information ...................................................................................................91
File Management Settings ..............................................................................................92
Specifying the Folder/File Settings .............................................................................................92
Setting the Copyright Information ..............................................................................................95
Saving the Local Date and Time of the Specified City ..........................................................97
6
Appendix 98
Attaching Optional Accessories ....................................................................................98
Wide Conversion Lens ......................................................................................................................98
AC Adapter ...........................................................................................................................................99
Troubleshooting ...............................................................................................................100
Power Supply ....................................................................................................................................100
Shooting .............................................................................................................................................101
Playback/Deletion ...........................................................................................................................103
Others ..................................................................................................................................................104
Error Messages ..................................................................................................................................105
9
Page 12

Main Specifications ..........................................................................................................106
Camera ................................................................................................................................................106
USB Power Adapter AC-U1/AC-U2 .............................................................................................109
Rechargeable Battery DB-110 .....................................................................................................109
Image Storage Capacity ................................................................................................................110
Operating Environment ................................................................................................................111
Using the Camera Abroad .............................................................................................112
Precautions for Use ..........................................................................................................113
Camera Care and Storage ..............................................................................................116
Warranty Policy..................................................................................................................118
Regulatory Compliance Statements ..........................................................................119
Index......................................................................................................................................124
10
Page 13
Introduction
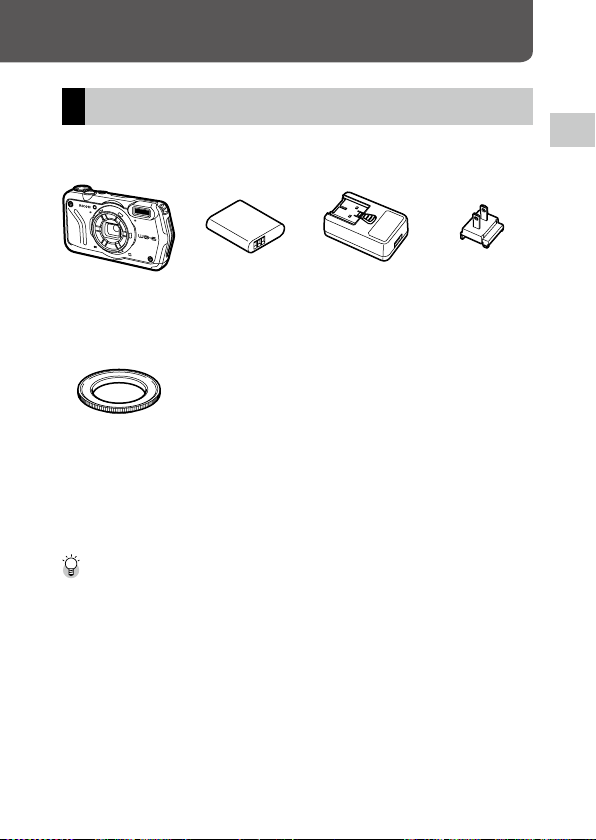
Checking the Contents of the Package
Before using your digital camera, confirm that the package contains the
items listed below.
1
Introduction
RICOH WG-6 Rechargeable
battery (DB-110)
USB power
adapter (AC-U1
Power plug
or AC-U2)*
* Differs depending
on the region.
Macro stand
(O-MS3)
g
USB cable (I-USB173)
g
Hand strap (O-ST104)
g
Operating Manual (this manual)
g
Regarding Waterproof Design
Macro Stand -------------------------------------------------------------------------------------------------
• The macro stand is used to keep a distance of 1 cm between the lens and the subject. Attach the
macro stand to the camera by screwing it into the lens. You can use it in capture modes such as the
digital microscope mode. (p.40)
• When the macro stand is attached to the camera, it may be difficult to focus on the subject depending
on the type of subject.
11
Page 14
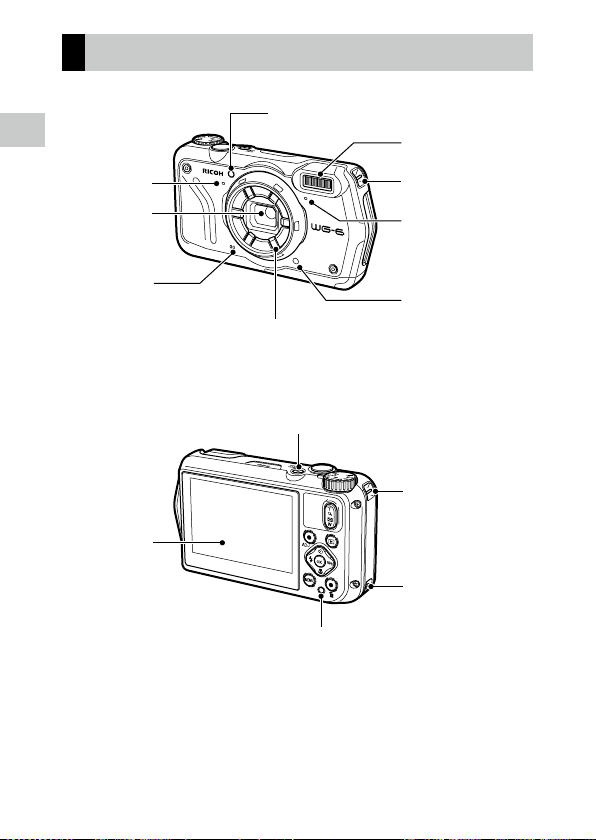
Names and Functions of the Working Parts
1
Introduction
Microphone
Lens
Speaker
Monitor
AF assist light
Ring light
Power button lamp
Remote control
receiver
Flash
Strap eyelet
Microphone
Remote control
receiver
Strap eyelet
Strap eyelet
12
Page 15
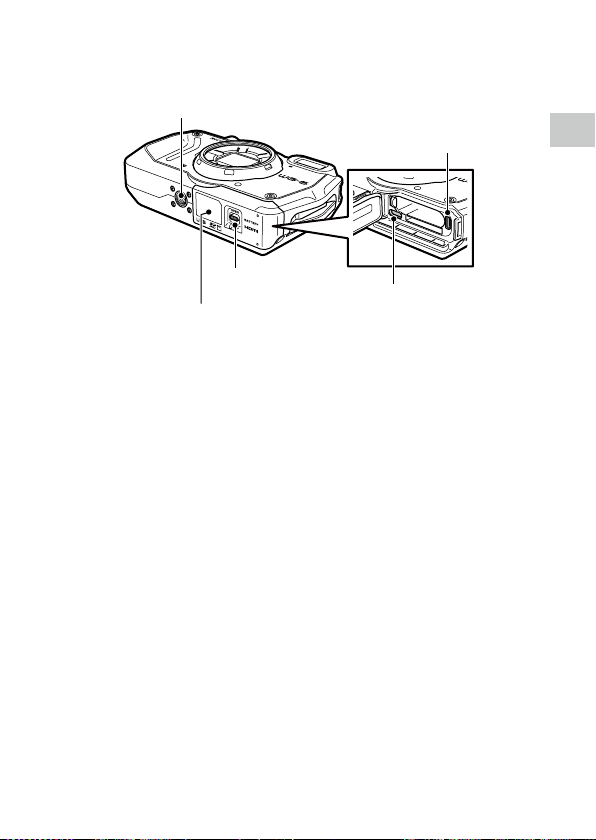
Tripod screw hole
HDMI® micro output terminal
(Type D)
1
Introduction
Release lever
Battery/card cover
USB terminal (USB Type-C)
13
Page 16
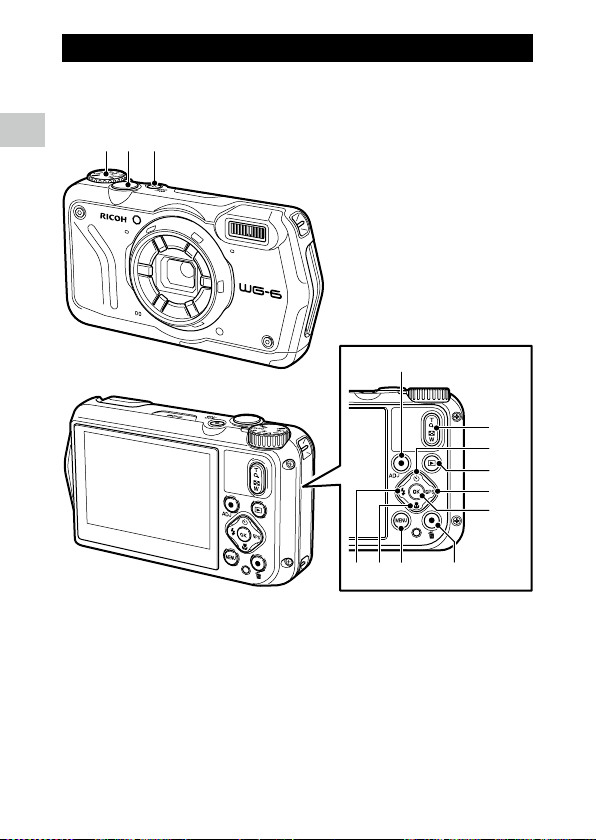
Operating Controls
12 3
This section explains about operating controls.
The icons in parentheses are used in the descriptions of this manual.
1
Introduction
4
78
5
6
9
10
11
12
13
1 Mode dial
Changes the capture mode. (p.40)
2 Shutter release button (z)
Press to capture images.
Press halfway to activate autofocus. (p.38)
14
3 Power button
Turns the power on or off. (p.35)
Page 17

4 Movie/ADJ. button
In the still image mode, press to start and end
the movie recording. (p.44)
Calls ADJ. mode functions when the functions
are assigned to the button. (p.20)
5 Flash/Left button (l/c)
Changes the flash mode. (p.52)
Moves the cursor to the left when an item is
selected.
6 Focus/Down button (s/b)
Changes the focus mode. (p.47)
Moves the cursor down when an item is selected.
7 MENU button (f)
Displays a menu. Press this button while the
menu is displayed to return to the previous
screen. (p.22)
8 Green/Delete button (i)
Press to perform shooting in the green mode.
(p.40)
When a function is assigned to the button, press
to call the assigned function. (p.21)
In the playback mode, press to delete images.
(p.39)
9 Zoom button (4 (T)/5 (W))
Changes the zoom magnification. (p.38)
10 Drive/Up button (w/a)
Changes the drive mode. (p.56)
Moves the cursor up when an item is selected.
11 Playback button (g)
Switches between the shooting mode and the
playback mode. (p.39)
12 GPS/Right button (x/d)
Press and hold to turn the GPS function on or
off. (p.87)
Moves the cursor to the right when an item is
selected.
13 OK button (e)
Switches the information displayed on the
shooting screen and playback screen. (p.18)
Confirms the selected items when setting a
function.
1
Introduction
15
Page 18
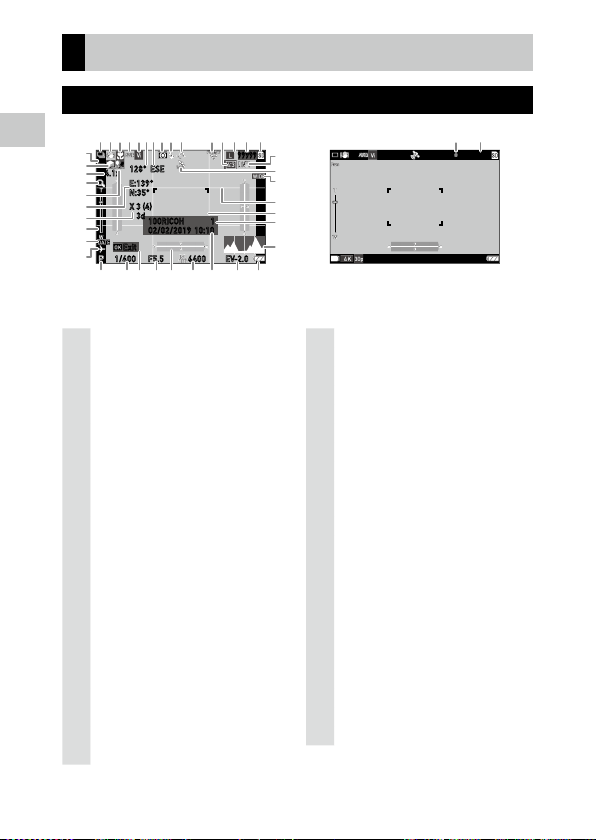
Indicators on the Monitor
12
3
45 8
9
13 1576 1412
24
25
26
28
27
29
30
31
32
33 34 36 37 38 39 40 41
16
18
21
20
19
22
23
11
10
35
17
42
43
Shooting Screen
1
Introduction
4.1x
10:10
99999
1100RICOH
1/400
Exit
128° ESE
E:139°
N:35°
X 3 (4)
3d
02/02/2019
F5.5 EV-2.06400
Still image mode Movie mode
0:58´58˝
1 Drive mode (p.56)
2 Motion blur reduction/Movie SR (p.63)
3 Focus mode (p.47)
White balance
4
5 Image tone (p.61)
6 Electronic compass information (azimuth)
(p.90)
7 Electronic compass direction
8 AE metering (p.50)
9 Flash mode (p.52)
10 GPS positioning status (p.87)
11 FlashAir communication status (p.32)
12 Aspect ratio (p.60)
13 Recorded pixels (p.60)
14 Number of storable images
15 Storage location (p.32)
16 Face detection (p.48)
17 Highlight correction (p.63)
18 Zoom magnification (p.38)
16
19 Digital zoom (p.39)
20 Shadow correction (p.63)
21 GPS information (p.87)
22 GPS positioning quality
23 Zoom bar/Focus bar (p.38, p.49)
24 Date imprint (p.62)
25 World time (p.97)
(p.54)
26 Camera shake warning
27 GPS lock (p.88)
28 Conversion lens (p.98)
29 Grid guide (p.82)
30 Focus frame
31 Save destination folder (p.92)/
Number of files
32 Histogram
33 Capture mode (p.40)
34 Shutter speed
35 Operation guide
36 Aperture value
37
Electronic level
(p.82)
38 ISO setting (p.50)
39 Date and time (p.36)
40 Exposure compensation (p.43)
41 Battery level (p.17)
42 Recording indicator
43 Recording time/Remaining recording time
Page 19
Playback Screen
1
2
3
6
7
810111213
45
9
9998/9999
999-9999
10:0002/02/2019
14
15
10:0002/02/2019
99998 99999
/
1
Introduction
100-0630
EV+0.71/2400 F5.5
250
00´ 20˝
Still image mode Movie mode
1 Shooting date and time
2 Image protection (p.70)
3 GPS information (p.87)
4 Recorded pixels (p.60)
5 Current file/Total files
6 Data source
7 Face detection (p.48)
8 Folder number/File number (p.92)
9
Shutter speed
10 Aperture value
11 ISO setting
12 Exposure compensation
13 Battery level (p.17)
14 Length of time of the recorded movie/
Elapsed time
15 Operation guide
Battery Level
The icon display changes depending on the battery level.
The battery level is sufficient.
The battery level started to drop.
The battery level is low. Charge the battery.
The camera will turn off soon.
There is a problem with the battery.
17
Page 20

Changing the Screen Display
99998 99999
/
100-0630
1/2400 F5.5 EV+0.7
6400
1/2400 F5.5 EV+0.7
6400
99998 99999
/
100-0630
10:0010:00 02/02/201902/02/2019
You can switch the information displayed on the screen by pressing e.
Shooting Mode
1
The information displayed on the shooting screen can be switched.
Introduction
Standard information display Displays the standard information such as shooting settings and electronic
Detailed information display Displays the standard information, electronic compass information, and GPS
Grid guide display Displays the grid guide. Autofocus frame is displayed during range-finding.
No information display Displays the autofocus frame during range-finding.
Display off Displays the autofocus frame and Live View only when z is pressed
Memo ---------------------------------------------------------------------------------------------------------
• The grid style can be selec ted in [Grid Guide Display Op.] of the D menu. (p.82)
Playback Mode
You can switch the screen display among “Standard information display”,
“Detailed information display”, and “No information display” in the single
image display.
Use ab to switch the page in “Detailed information display”.
level.
information.
halfway.
18
00:00´23˝
5184x3888
35.0mm
a
10
b
42m
N 35°
E138°
XXXXXXXXXXX
123° ESE
02/02/2019
10:10:01
Memo ---------------------------------------------------------------------------------------------------------
• The displayed information differs between still images and movies.
Page 21
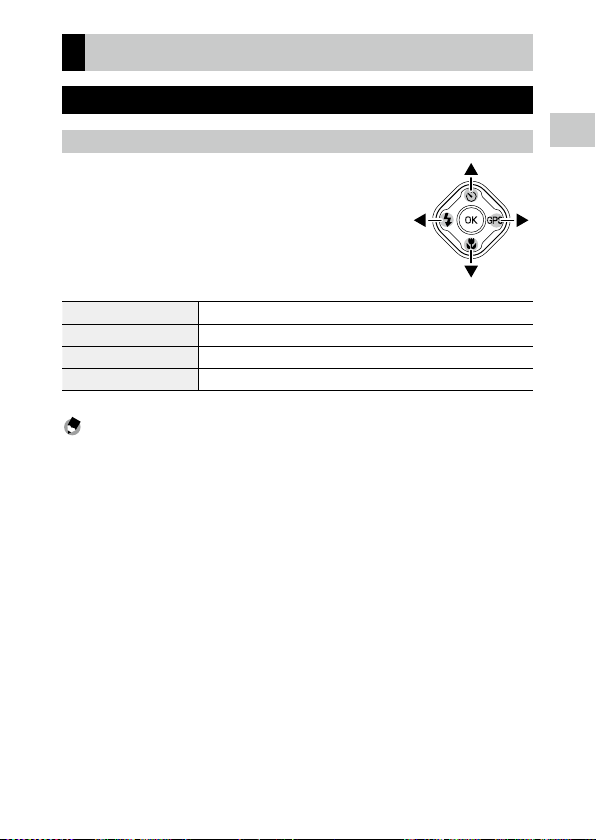
How to Change Function Settings
Using the Button
Using the Direct Keys
Quick settings are possible by pressing abcd in
the shooting mode. The following functions can be
activated.
a (w) Drive Mode (p.56)
b (s) Focus Mode (p.47)
c (l) Flash Mode (p.52)
Press and hold d (x) GPS On/Off (p.87)
Memo ---------------------------------------------------------------------------------------------------------
• The functions mentioned above can be set from the menu by pressing f.
1
Introduction
19
Page 22

Using the ADJ. Mode
3648x2736
Recorded Pixels
The functions assigned to the movie button in [ADJ Button Setting 1] to [ADJ
Button Setting 5] of the D menu can be easily recalled. (p.80)
1 Set [Movie Button] to [Off ] in the D menu.
1
Introduction
The ADJ. mode is enabled.
2 Press the movie button in the
shooting mode.
The mode switches to the ADJ. mode and the
icons for the assigned functions appear.
3 Use cd to select a function.
The five functions assigned to the button can
be selected.
4 Press e.
The selected function is set and the camera is ready to perform shooting.
Caution -------------------------------------------------------------------------------------------------------
• By default, the movie button functions as the button to start and end the movie recording. When
recording movies with the movie button, set [Movie Button] to [On] in the D menu. (p.44)
OK
20
Page 23

Using the Green Button
The assigned function can be activated by
pressing the green button in the shooting
mode.
By default, [Green Mode] is assigned to the
button. You can perform shooting in the green
mode by pressing the button. (p.40)
Memo ---------------------------------------------------------------------------------------------------------
• The function of the green button can be changed in [Green Mode] of the D menu. (p.81)
1
Introduction
21
Page 24
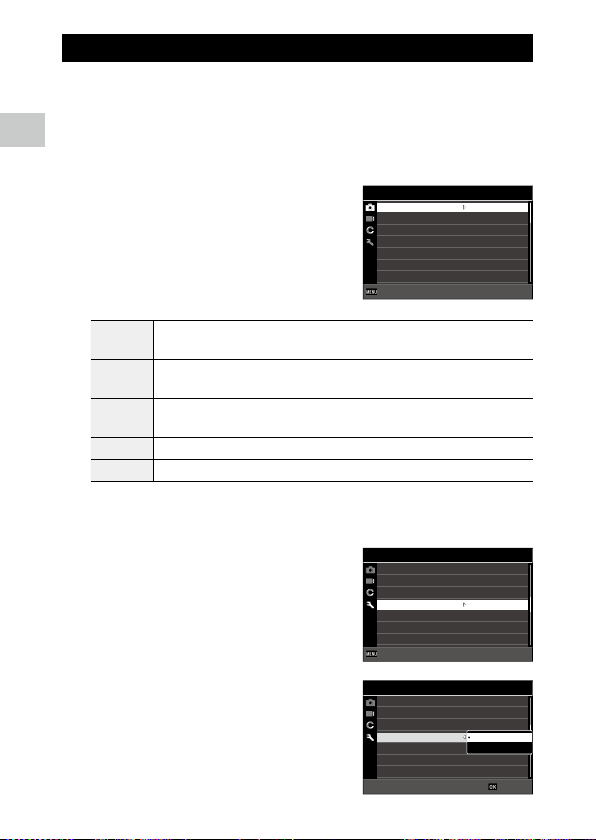
Setting from the Menus
1/4
Most functions are set from the menus.
1 Press f.
1
Introduction
The menu appears.
The menu displayed differs depending on the camera status.
2 When changing the menu type, press
c, and use ab to select a type.
Shooting menu (p.24)
A
This menu is displayed only in the shooting mode.
Movie menu (p.25)
B
This menu is displayed only in the shooting mode.
Playback menu (p.26)
C
This menu is displayed only in the playback mode.
D Customize menu (p.27)
E Setup menu (p.29)
3 Press d.
4 Use ab to select a function to set,
and press d.
The settings for the selected setting item are
displayed.
5 Use ab to select a setting, and
press e.
The screen in Step 4 reappears.
Press f to return to the previous screen.
When you have finished setting, press f
several times to return to previous screens.
22
Shooting
Focus
AF
Auto Macro
Focus Assist
AE Metering
Setting
AUTO Range
ExitExit
Setup
LCD Brightness
Power Saving
Outdoor View
Power Button Lamp
Operation Volume
Playback Volume
Sound
ExitExit
Setup
LCD Brightness
Power Saving
Outdoor View
Power Button Lamp
Operation Volume
Playback Volume
Sound
Standard
Multi
ON
ON
Divide
AUTO
125-1600
5sec.
O
ON
3
3
5sec.
O
ON
O
3/5
3/5
OKOK
Page 25

Memo ---------------------------------------------------------------------------------------------------------
• When f is pressed, the last used menu screen appears first. To display the most appropriate
menus for the camera settings at that time, set [Cursor Poison Keeping] to [Off] in the E menu.
• The setting is saved even after the power is turned off. To reset the menu settings, select a menu type
to reset in [Initialized Setting] of the E menu, and execute [Reset] in the E menu.
1
Introduction
23
Page 26
Menu List
The following menus are available. (The underlined settings and the
square-bracketed settings are the default settings.)
1
A Shooting Menu
Introduction
Focus Standard, Macro, 1cm Macro, PF, Infinity, MF p.47
AF
Auto Macro
Focus Assist
AE Metering
Setting
AUTO Range
EV Comp. -2.0 to +2.0 p.43
Flash Mode
White Balance
Pix. Track SR
Face Detection
Blink Detection
Digital Zoom
Drive Mode
Ring Light
Recorded Pixels
Aspect Ratio
Quality Level
Image Tone
D-Range Setting
Multi, Spot, Tracking p.48
On, Off p.47
On, Off p.48
Divide, Center, Spot p.50
AUTO, 125 to 6400 p.51
125 - 200, 125 - 400, 125 - 800, 125 - 1600, 125 - 3200,
125 - 6400
Auto, Flash Off, Flash On, Auto+R. eye, On+Red-eye, Ring Light p.52
Auto WB, Daylight, Shade, Cloudy, Fl. DL Color, Fl. DL White, Fl.
Cool Wt., Fl. Warm Wt., Tungsten, Ring Light, Manual WB
On, Off p.63
On, Smile, Assist, Assist+Smile, Off p.48
On, Off p.38
On, Off p.39
Off, Self-timer, Cont. Shoot, Burst Shoot, M-Cont, S-Cont, Remote Ctl, A-Bracket
Select: All, Right, Left, High, Low, Off
Brightness: 1 to 9 [5]
LightningTime: Always On, Shutter 10s, Shutter 20s, Shutter 30s,
Shutter 60s
L, M, S, XS, VGA p.60
4:3, 3:2, 1:1
8, 9, 0
Bright, Natural, Vibrant, Slide Film, Monochrome p.61
Highlight Cor.: Auto, Off
Shadow Cor.: Auto, Off
p.54
p.56
p.53
p.63
24
Page 27
Sharpness Sof t, Standard, Hard p.62
Saturation
Tone Adjustment
Contrast
Date Imprint
IQ Enhancer
Soft, Standard, Hard
Blue, Black & White, Sepia
Soft, Standard, Hard
Date, Date & Time, Time, Off p.62
On, Off p.62
B Movie Menu
Recorded Pixels 4K 30fps, FullHD 30fps, HD 60fps, HD 30fps p.60
HDR
Microphone
Wind Suppression
Movie SR
Movie SR+
On, Off
On, Off
On, Off
On, Off p.63
On, Off
1
Introduction
25
Page 28
C Playback Menu
Image Copy [Internal M]>>>[Card], [Card]>>>[Internal M] p.69
Protect 1 File, Sel. Multiple, Select All, Cancel All p.70
1
Rotation 0°, 90° (counterclockwise), 180°, 90° (clockwise) p.66
Introduction
Slideshow
Recover File — p.69
Resize Recorded Pixels: L, M, S, XS, 2M, 1M, VGA
Cropping — p.73
Filter
Movie Edit Save as Still Image, Divide Movies, Adding title picture p.75
Red-eye Edit — p.77
Start-up Screen
Auto Image Rotation
Interval: 30sec., 20sec., 10sec., 5sec., 3sec.
Screen Effect: Wipe, Checker, Fade, Random, Off
Sound Effect: On, Off
Quality Level: 8, 9, 0
Small Face Filter: 5%, 7%, 10%
Ink Rubbing Filter: 1 to 5
Digital Filter: B&W/Sepia, Toy Camera, Retro, Color, Extract Color,
Color Emphasis, High Contrast, Starburst, Soft, Fish-eye, Miniature, Brightness
HDR Filter
Start-up screen with operation guide, RICOH, Photographs, Off p.82
On, Off p.66
p.65
p.72
p.74
26
Page 29
D Customize Menu
Reg. USER U1, U2 p.78
CALS Pixels
CALS Quality
ADJ Button Setting 1
ADJ Button Setting 2
ADJ Button Setting 3
ADJ Button Setting 4
ADJ Button Setting 5
Green Mode
START DATE/TIME
Show folder at startup
Shut-down Screen
Confirm. Time
Quick Zoom
Grid Guide Display Op.
GPS
GPS Disp Mode
GPS Lock
GPS Time Adjustment
GPS Log Record log: Logging Interval, Logging Duration
Compass Heading
Compass Calibration —
Declination
Level Setting
Calibrate Level Reset
Data Imprint
L, M, S, XS, 2M, 1M, VGA p.40
8, 9, 0
Off, EV Comp. [Setting1], Recorded Pixels [Setting2], Aspect
Ratio [Setting3], Setting [Setting4], White Balance [Setting5],
Image Tone, Quality Level, AE Metering, AF, Face Detection,
Highlight Cor., Shadow Cor., Outdoor View
Green Mode, EV Comp., Recorded Pixels, Quality Level, Aspect
Ratio, White Balance, Setting, AF, Face Detection, Auto Macro, AE
Metering, Highlight Cor., Shadow Cor., Sharpness, Saturation/
Tone Adjustment, Contrast, Outdoor View
On, Off p.82
On, Off
On, Off
0.5sec., 1sec., 2sec., 3sec., HOLD, Off p.38
On, Off p.39
9 Divide, 16 Divide p.82
On, Off p.87
LAT/LON, UTM, MGRS
On, Off
On, Off p.88
Save log data: NMEA, KML
Discard log data
Off, Cardinal, Degrees, Cardinal/Deg. p.90
TRUE, MAG
Off, Level + Shift, Level p.82
Calibration
GPS Data Imprint: LAT/LON, UTM, MGRS, Off
UTC Data Imprint: ON, Off
Heading Data Imprint: On, Off
p.80
p.81
p.88
p.91
1
Introduction
27
Page 30

Lens Adapter On Off, WIDE p.98
Movie Button
On, Off p.45
1
Introduction
28
Page 31

E Setup Menu
Format [Card] — p.37
Format [Internal M] —
New folder options
File name
File Sequence No.
Reset File Number — p.95
Embed Info
Copyright Info A freely defined string of 32 characters
Copyright Print
Copyright Position
Copyright Font Size
Copyright Color
Guide Display
Cursor Poison Keeping
LCD Brightness -4 to +4 p.83
Power Saving
Outdoor View -2 to +2 p.83
Power Button Lamp
Operation Volume Off, 1 to 5 [3] p.83
Playback Volume Off, 1 to 8 [3]
Sound Startup Sound, Shutter Sound, Operation Sound, Self-timer
Auto Power Off
Monitor Auto off Delay
Power Button Hold Op.
Certifications — —
Version Info — —
Camera Settings File
USB Connection
HDMI Out
FlashAir Connection
Standard, Date, Custom p.92
Standard, Custom p.94
On, Off p.94
On, Off p.95
On(OVR), On(New), Off p.96
Left, Middle, Right
Large, Middle, Small
Orange, White, Black, Red, Blue, Green, Yellow
On, Off p.42
On, Off p.23
Off, 5sec., 15sec., 30sec., 1min., 2min. p.84
On, Off p.83
Sound
1min., 3min., 5min., 10min., 30min., Off p.84
Off, 1min., 5min., 30min. p.84
On, Off p.35
Write, Read p.79
MSC, MTP p.71
AUTO, 2160P (4K), 1080i, 720P, 480P p.67
On, Off p.32
1
Introduction
29
Page 32

Language/H English, French, German, Spanish, Portuguese, Italian, Dutch,
Date Adjustment Date Format: Y/M/D, D/M/Y, M/D/Y
1
Introduction
World Time
Initialized Setting Still, Movie, Playback, Customize, Setup, Quality p.23
Reset —
Danish, Swedish, Finnish, Polish, Czech, Hungarian, Turkish,
Greek, Russian, Thai, Korean, Traditional Chinese, Simplified
Chinese, Japanese
Date: January 1, 2019 to December 31, 2045
Time: 00:00 to 23:59
Select Time: Hometown, Destination
Hometown: City, DST
Destination: City, DST
p.36
p.36
p.97
30
Page 33

Getting Started
Setting the Battery and a Memory Card
Inserting the Battery and a Memory Card
SD memory cards, SDHC memory cards, and SDXC memory cards can be
used with this camera. “Memory card” refers to these memory cards in this
manual.
1 Make sure that the camera power is off.
2 Slide the release lever on the bottom
of the camera toward OPEN, and slide
the battery/card cover to the right to
open it.
1
2
3 Make sure that the memory card is
facing the right way and then push
the card all the way in until it clicks.
To remove it, press in the memory card and
then release your hand.
4 Insert the battery.
Use the rechargeable battery (DB-110) to
press the latch and insert the battery all the
way into the battery compartment.
To remove the battery, slide the latch.
2
Getting Started
5 Close the battery/card cover and slide
it to the left.
Slide the battery/card cover until it clicks and
confirm that it is closed securely.
31
Page 34

Caution -------------------------------------------------------------------------------------------------------
• When opening and closing the battery/card cover, be sure to remove water and dirt such as sand
adhering to the camera, and avoid locations where dirt can enter the camera interior.
• Close the battery/card cover securely. If the battery/card cover is not closed securely, water or dust
may enter the camera interior.
Data Storage Location
2
Images taken and movies recorded with this camera are saved in the internal
Getting Started
memory or a memory card.
Memo ---------------------------------------------------------------------------------------------------------
• S aved images can be copied between the internal memory and the memory card. (p.69)
• The storage capacity varies depending on the memory card. (p.110)
FlashAir Card ------------------------------------------------------------------------------------------------
• An SD memor y card with a built-in wireless LAN function (FlashAir card) can be used with the camera.
When communicating using the FlashAir card, set [FlashAir Connection] to [On] in the E menu. If
the write-protect switch of the FlashAir card is locked, the settings cannot be made.
• Use of an access point and an Internet connection are required for transferring images via a wireless
LAN. For details, refer to the card manufacturer’s website, etc.
• The operability of FlashAir card functions including the wireless transmission function is not guaranteed with this camera. Contact the FlashAir card manufacturer regarding any malfunctions or problems concerning FlashAir cards. FlashAir cards can be used only in the country in which the card was
purchased. For details, contact the FlashAir card manufacturer.
32
Page 35

Charging the Battery
Charge the rechargeable battery DB-110 using the provided USB cable, USB
power adapter, and power plug before use.
1 Insert the power plug to the USB
power adapter.
Insert it until it clicks into place.
2 Open the battery/card cover, and
connect the USB cable to the USB
terminal.
3 Connect the USB cable to the USB
power adapter.
4 Plug the USB power adapter into a
power outlet.
The power button lamp of the camera turns
on and charging starts.
Depending on the battery level, the charging
time differs. An exhausted battery will be fully recharged in about 3 hours (at 25°C (77°F)).
When charging is complete, the power button lamp turns off. Unplug the USB power
adapter from the power outlet.
4
3
2
Getting Started
5 Remove the USB cable from the USB terminal, and close the
battery/card cover.
33
Page 36

Storage Capacity --------------------------------------------------------------------------------------------
• About 340 pic tures can be taken when the battery is fully charged.
• This is based on tests conducted according to CIPA standards under the following conditions: At 23°C
(73°F) temperature; the monitor is on; a picture is taken every 30 seconds; the flash is fired every two
pictures; the camera is turned off and back on after 10 pictures are taken.
• The storage capacity is for reference. For long periods of use, it is recommended that you carry spare
batteries.
2
Caution -------------------------------------------------------------------------------------------------------
Getting Started
• When opening and closing the battery/card cover, be sure to remove water and dirt such as sand
adhering to the camera, and avoid locations where dirt can enter the camera interior.
• Use only genuine rechargeable battery (DB-110).
• If the batter y starts to run down more quickly even after being charged, the battery has reached the
end of its service life. In this case, replace the battery with a new one.
• The battery may become very hot immediately after operation. Turn the camera off and leave it to
cool down sufficiently before removing the battery.
Memo ---------------------------------------------------------------------------------------------------------
• You can also charge the battery by connecting the camera to a computer using the USB cable. (p.71)
• The battery can be recharged with the optional battery charger BJ-11.
34
Page 37

Initial Settings
Turn the camera on and make the initial settings.
Turning the Camera On
1 Press the power button.
The power button lamp turns on.
The first time the camera is turned on after
purchase, the [Language/H] screen appears.
When the power button is pressed again, the
power turns off.
Memo ---------------------------------------------------------------------------------------------------------
• When g is pressed and held with the camera turned off, the camera turns on in the playback mode.
The following operations are available.
• The power button lamp can be set to [Off ] in [Power Button Lamp] of the E menu. (p.83)
• If no operations are made for about one minute (default setting), the camera turns off automatically
to suppress battery drain. The power saving function can be set in the E menu. (p.84)
• The display of the start-up screen can be set in [Star t-up Screen] of the C menu. (p.82)
• You can also make settings so that the camera is turned on and off by pressing and holding the power
button to prevent misoperation. When [Power Button Hold Op.] is set to [On] in the E menu, press
and hold the power button for about 2 seconds to turn the camera on, and press and hold for about
5 seconds to turn the camera off.
2
Getting Started
35
Page 38

Setting the Language and the Date and Time
You can set the display language for menus and the date and time.
1 Use ab to select a language and press e.
The selected language is set and the [Date Adjustment] screen appears.
2 Set the display format and the date
2
Getting Started
and time.
Use cd to select an item and ab to
change the value.
Press f to cancel the setting.
3 Press e.
The date and time are set and the camera is ready to take a picture.
Memo ---------------------------------------------------------------------------------------------------------
• If the battery is removed for about five days, the date and time settings will be lost. To retain the
date and time settings, insert a battery with sufficient power for at least two hours, and then remove
the battery.
• You can change the language and the date and time settings in the E menu.
Date Adjustment
Set the date, time, and format.
M/D/Y 01 2019
Cancel
01/01/2019
00 0001 ://
00:00
OK
36
Page 39

Formatting a Memory Card
When using a new memory card or a memory card used with another device, be sure to format the memory card with this camera. The internal memory can also be formatted with the same operations.
1 Press f.
The menu appears.
Standard
Standard
ON
O
1/5
2 Press c, and use ab to select E.
Setup
Format [Card]
Format [Internal M]
New folder options
File name
File Sequence No.
Reset File Number
Embed Info
ExitExit
3 Press d, select [Format [Card]], and press d.
When formatting the internal memory, select [Format [Internal M]].
2
Getting Started
4 Use a to select [Execute], and press
e.
The memory is formatted.
All data will be erased.
Execute
Cancel
5 Press e.
6 Press f.
The shooting screen reappears.
Caution -------------------------------------------------------------------------------------------------------
• D o not remove the memory card while formatting, or the card may be damaged.
• Formatting deletes all data, both protected and unprotected.
• D o not format FlashAir cards with this camera.
OK
37
Page 40

Basic Shooting Operation
Shooting in the Auto Mode
The camera automatically selects the optimal capture mode.
1 Set the mode dial to S.
2
Getting Started
The capture mode is set to S, and the
Live View is displayed.
2 Use 4 (T)/5 (W) to change the zoom magnification.
The optical zoom up to 5x magnification is available. The digital zoom up to
40.5x magnification is available by further pressing 4.
3 Press z halfway.
The capture mode is selected, and the focus
is adjusted.
When the subject cannot be in focus, the red
frame appears.
1/400
4 Press z fully.
The image you have just taken is displayed on the monitor (Instant Review)
and saved.
Instant Review and Blink Detection --------------------------------------------------------------------
• You can set the display time of Instant Review in [Confirm. Time] of the D menu. When set to
[Hold], the Instant Review is displayed until z is pressed halfway or the mode dial is turned.
• If the camera detects that the subjec t’s eyes are closed, the message [Closed eyes have been detected]
appears during Instant Review. You can also set [Blink Detection] to [Off] in the A menu to disable
this function.
F5.6
400
38
Page 41

Zoom ----------------------------------------------------------------------------------------------------------
• When 4 is pressed and held, the zooming method switches from the optical zoom to the intelligent
zoom. If 4 is release and pressed again, the zooming method switches from the intelligent zoom to
the digital zoom with up to 40.5x magnification. The digital zoom magnification varies depending on
the [Recorded Pixels] settings in the A menu.
• The quality of images captured with the digital zoom slightly deteriorates. You can set whether to use
the digital zoom in [Digital Zoom] of the A menu.
Viewing the Captured Images
Review the captured image on the monitor.
1 Press g.
The camera switches to the playback mode
and the last image you took is displayed. (Single image display)
2 View an image.
The following operations are available.
cd Displays the previous or next image.
Press and hold cd Fast-reverses/Fast-forwards playback.
ab Reverses/Forwards playback by 10 frames.
i Deletes the image.
4 (T) Magnifies the image.
5 (W) In magnified view: Reduces the image.
abcd In magnified view: Moves the magnified area.
e Switches the displayed information.
2
Getting Started
Memo ---------------------------------------------------------------------------------------------------------
• Movies cannot be magnified.
• When [Quick Zoom] is set to [On] in the D menu, pressing 4 once magnifies the image at the
maximum magnification.
39
Page 42

Taking Pictures
Taking Still Images
Setting the Capture Mode
Turn the mode dial to select capture modes.
3
Taking Pictures
U
CALS Mode
S
Auto Mode
J
Program Mode
T
Scene Mode
V
Digital Microscope Mode
P/Q
User Mode
B
Movie Mode
Green Mode --------------------------------------------------------------------------------------------------
• When the green button is pressed, the camera switches to the green mode. In this mode, you can
perform shooting with the standard settings regardless of the capture mode and A menu settings.
Press the green button again to return to the previous capture mode.
• In the green mode, the A menu settings cannot be changed.
• If the camera is turned off in the green mode, the camera turns on in the green mode next time.
• The green mode cannot be used when [Green Mode] is set to a function other than the green button
in the D menu.
Takes images with the recorded pixels and quality level set in [CALS Pixels] and
[CALS Quality] of the D menu. The aspect ratio is fixed to [4:3].
By default, the recorded pixels are set to [1M] and the quality level is set to
[9]. These settings are appropriate to take construction site pictures submitted to local authorities.
Takes images with the optimal capture mode automatically selected by the camera. (p.38)
Takes images with the shutter speed and aperture value automatically set by the
camera.
Selects a scene from various scenes and takes images with the optimal settings for
the selected scene. (p.41)
Turns the ring light on for shooting at a close focus distance of 1 cm to the subject.
The focus mode, flash mode, recorded pixels, and aspect ratio are fixed to [1cm
Macro], [Ring Light], [XS], and [4:3], respectively.
You can fix the distance to the subject to 1 cm by attaching the provided macro
stand (p.11) to the camera.
Uses the saved shooting settings. (p.78)
Records a movie. (p.44)
40
Page 43

Performing Shooting in the Scene Mode
1 Set the mode dial to T.
The mode switches to the T mode.
2 Press f.
The T menu appears.
3 Use abcd to select a scene.
The following scenes can be selected.
HDR Interval Shooting
Handheld Night Snap Interval Movie
Night Scene High Speed Movie
Underwater Surf & Snow
Underwater Movie Kids
Landscape Pet
Flower Sport
Portrait Fireworks
Digital SR DOF Composite
4 Press e.
The scene is set.
Scene Mode
HDR
Combines 3 images into a
single image delivering a
wider dynamic range image
CancelCancel OKOK
3
Taking Pictures
41
Page 44

Memo ---------------------------------------------------------------------------------------------------------
• The T menu is displayed only in the T mode.
• When the scene is set to [Interval Shooting] or [Interval Movie], shooting is performed at a fixed interval. You can set [Interval] ([Total Time] for [Interval Movie]), [Number of Shots], and [Start Delay].
• A description of the selec ted scene is displayed on the screen in Step 3. If you do not want to display
this description, set [Guide Display] to [Off] in the E menu.
Caution -------------------------------------------------------------------------------------------------------
• The functions that can be set var y depending on the scene.
• [Inter val Shooting] and [Interval Movie] cannot be selected during the GPS logging. (p.88)
3
Taking Pictures
42
Page 45

Using Exposure Compensation
EV Comp.
1 Select [EV Comp.] in the A menu, and press d.
The [EV Comp.] screen appears.
2 Use ab to select a compensation
value.
The compensation value can be selected in
the range of ±2.0.
0.0
Cancel
3 Press e.
4 Press f.
The shooting screen reappears.
Caution -------------------------------------------------------------------------------------------------------
• The exposure compensation is not available in the S mode.
3
Taking Pictures
OK
43
Page 46

Recording Movies
Movies can be directly recorded even when the mode dial is set to a mode
other than B.
1 Set [Movie Button] to [On] in the D menu.
Movie recording with the movie button is enabled.
2 Press the movie button.
3
Taking Pictures
Recording starts.
The recording time is displayed while record-
ing.
3 Press the movie button again.
Recording stops.
Memo ---------------------------------------------------------------------------------------------------------
• Regardless of the mode dial setting, when the movie recording has been started with the movie
button, [Recorded Pixels] and [Movie SR] are fixed to [FullHD 30fps] and [On], respectively.
• When the mode dial is set to B, use z to start the movie recording.
44
Page 47

Caution -------------------------------------------------------------------------------------------------------
• When [Movie Button] is set to [Off ] in the D menu, turn the mode dial to B and use z to
start and end the movie recording.
• When the movie recording has been started with the movie button, use the movie button to end
the recording.
• The movie recording cannot be started with the movie button in the following cases.
• In [Pet] of the T mode or in the V mode
• When [Face Detection] is set to [Smile] or [Assist+Smile] in the A menu
• When [Microphone] is set to [On] (default setting) in the B menu, camera operation sounds are
also recorded.
• If the internal temperature of the camera becomes high during recording, recording may be terminated.
• The flash cannot be used in the B mode.
• When the function of the movie button has been changed in [ADJ Button Setting 1] to [ADJ Button
Setting 5] of the D menu, use z to start recording. (p.80)
• You can record a movie continuously up to 4 GB or 25 minutes. Recording stops when the memory
card or internal memory becomes full. The maximum recording time per shooting depends on the
capacity of the memory card. (p.110) Shooting may stop even before the maximum recording time
is reached.
• The amount of time remaining is calculated based on the amount of memory available and may not
diminish at an even rate.
• For the memory cards with which proper operation has been confirmed for recording movies, refer
to p.111.
• The use of the battery with sufficient power or the optional AC adapter (K-AC166) is recommended.
3
Taking Pictures
45
Page 48

Playing Back Movies
1 Press g.
An image is displayed in the single image display of playback mode.
2 Use cd to select a movie to play back.
The first frame of the movie is displayed as a still image.
3 Play back a movie.
3
Taking Pictures
The following operations are available.
a Plays back/Pauses a movie.
cd Fast-reverses/Fast-forwards playback.
b Stops playback.
4 (T)/5(W) Adjusts the sound volume.
e Switches the displayed information.
Memo ---------------------------------------------------------------------------------------------------------
• The sound volume at the start of movie playback can be set in [Playback Volume] of the E menu.
• In [Movie Edit] of the C menu, you can divide a movie file into multiple segments and add a title
image to a movie. (p.75)
46
Page 49

Setting the Focus Mode
Focus Mode
Standar
1 Press s (b) in the shooting mode.
The [Focus Mode] screen appears.
2 Use ab to select a setting.
Focuses on the subject at a distance of 50 cm or more from the camera when
z is pressed halfway.
Standard
Macro
1cm Macro
Pan Focus
Infinity
MF
When [Auto Macro] is set to [On] (default setting) in the A menu, focusing is also performed for subjects in the macro range.
Focuses on the subject at a distance of 10 to 60 cm from the camera.
Focuses on the subject at a distance of 1 to 30 cm from the camera.
Focuses on the entire picture, from the front to the back.
Fixes the focus distance at infinity. This is useful for shooting distant scenes.
Focuses manually. (p.49)
3 Press e.
The shooting screen reappears.
Cancel
d
3
Taking Pictures
OK
47
Page 50

Memo ---------------------------------------------------------------------------------------------------------
• The focus mode can also be set in [Focus] of the A menu.
• The autofocus method for the still image mode can be set in [AF] of the A menu.
3
Taking Pictures
Multi Measures the distances from 3 × 3 AF areas and focuses to the nearest
Spot Focuses to the center AF area.
Tracking Keeps focusing while z is pressed halfway.
• Faces of people (up to 30 people) are automatically detected during autofocusing. The detection
method can be selected in [Face Detection] of the A menu.
On Detects human faces.
Smile Automatically performs shooting when the subject smiles.
Assist Flashes the ring light when a human face is detected. The position of
Assist+Smile Flashes the ring light when a human face is detected and automatically
Off Does not detect human faces.
• The AF assist light on the front of the camera lights as necessary during autofocusing. The AF assist
light can be set to [Off] in [Focus Assist] of the A menu.
AF area. (Default setting)
flashing ring light LED indicates where the face is detected within the
angle of view.
performs shooting when the subject smiles.
48
Page 51

Focusing Manually (Manual Focus)
100
100
If the camera fails to focus automatically, you can focus manually.
The manual focus enables shooting at a fixed distance.
1 Select [MF] in Step 2 on p.47, and press e.
The focus bar appears on the shooting screen.
2 Use ab to set a focus distance.
When e is pressed and held, the center of
the screen is magnified. Pressing and holding
e again restores the normal display.
Memo ---------------------------------------------------------------------------------------------------------
• When changing the focus mode from [MF], change the mode in [Focus] of the A menu.
3
Taking Pictures
49
Page 52

Setting the Exposure
Selecting a Metering Method
Set the metering method in [AE Metering] of the A menu.
Meters exposure in multiple areas of the frame.
Divide
3
Taking Pictures
Center
Spot
Meters exposure with emphasis on the center.
Meters exposure within a narrow range.
Use this option when metering exposure in a part of an image or when the metering target subject is small.
50
Page 53

Setting the ISO Sensitivity
1 Select [Setting] in the A menu, and press d.
2 Use ab to select a setting.
[AUTO] or a setting from [125] to [6400] can
be set.
Shooting
Focus
AF
Auto Macro
Focus Assist
AE Metering
Setting
AUTO Range
CancelCancel OKOK
AUTO
125
200
400
800
1600
3200
3 Press e.
4 Press f.
The shooting screen reappears.
Memo ---------------------------------------------------------------------------------------------------------
• The adjustment range of [AUTO] can be set in [AUTO Range] of the A menu.
Caution -------------------------------------------------------------------------------------------------------
• Images taken with a higher sensitivity may appear grainy.
• Depending on the ISO sensitivity setting, the setting of [D-Range Setting] of the A menu is disabled. (p.60)
1/4
3
Taking Pictures
51
Page 54

Using the Flash
Flash Mode
Auto
1 Press l (c) in the shooting mode.
The [Flash Mode] screen appears.
2 Use ab to select a setting.
3
Taking Pictures
Fires the flash according to conditions.
Auto
Does not fire the flash.
Flash Off
Always fires the flash.
Flash On
Fires the flash according to conditions while reducing the red-eye phenom-
Auto+R. eye
On+Red-eye
Ring Light
enon.
Forces the flash to fire while reducing the red-eye phenomenon.
Turns on the ring light around the lens. (p.53)
Cancel
OK
52
3 Press e.
The shooting screen reappears.
Page 55

Memo ---------------------------------------------------------------------------------------------------------
Ring Light
• The flash mode can also be set in [Flash Mode] of the A menu.
• When [Underwater] is selected in the T mode, both an image with the flash used and an
image with the flash not used can be taken.
Caution -------------------------------------------------------------------------------------------------------
• You cannot perform shooting while the flash is being charged.
• The flash cannot be used in the B mode.
Using the Ring Light
Select [Ring Light] in Step 2 on p.52 and
press d to set the brightness of the ring light.
The settings for the ring light can be made in
[Ring Light] in the A menu.
Select [All], [Right], [Left], [High], [Low], [Off]
Brightness [1] to [9]
LightningTime [Always On], [Shutter 10s], [Shutter 20s], [Shutter 30s], [Shutter 60s]
5
Cancel
Caution -------------------------------------------------------------------------------------------------------
• [R ing Light] cannot be selected in the following cases.
• In the S mode, T mode, or V mode
3
Taking Pictures
OK
53
Page 56

Setting the White Balance
White Balance
Auto
Make adjustments to the white balance so that white subjects will appear
white under any kind of light.
1 Select [White Balance] of the A menu, and press d.
The [White Balance] screen appears.
3
Taking Pictures
2 Use ab to select a setting.
Adjusts the white balance automatically.
Auto WB
Used when shooting in daylight under clear skies.
Daylight
Used when shooting in shade.
Shade
Used when shooting in daylight under cloudy skies.
Cloudy
Used with daylight fluorescent lighting.
Fl. DL Color
Used with neutral white fluorescent lighting.
Fl. DL White
Used with cool white fluorescent lighting.
Fl. Cool Wt.
Used with warm white fluorescent lighting.
Fl. Warm Wt.
WB
Cancel
OK
54
Page 57

Tungsten
White Balance
Manual
Ring Light
Manual WB
Used with incandescent lighting.
Used when the ring light of the camera is used.
Set the white balance manually. (p.55)
3 Press e.
4 Press f.
The shooting screen reappears.
Caution -------------------------------------------------------------------------------------------------------
• The white balance may not be adjusted correctly for a subject that is mostly dark.
Setting the White Balance Manually
1 Select [Manual WB] in Step 2 on p.54.
2 Aim the camera at a white subject, such as a sheet of paper,
under the light for shooting.
3 Press the green button.
An image to be used for white balance adjustment is taken.
WB
Cancel
4 Press e.
5 Press f.
The shooting screen reappears.
3
Taking Pictures
OK
55
Page 58

Setting the Drive Mode
Drive Mode
O
You can set the drive mode by pressing w
(a) in the shooting mode.
The drive mode can also be set in [Drive Mode]
of the A menu.
3
Taking Pictures
Cancel
Shooting Using the Self-timer
1 Press w (a) in the shooting mode.
The [Drive Mode] screen appears.
2 Use ab to select a setting.
Releases the shutter about 10 seconds after z is pressed.
Self-Timer10s
Releases the shutter about 2 seconds after z is pressed.
Self-Timer 2s
3 Press e.
The shooting screen reappears.
4 Press z.
The AF assist light blinks during the countdown, and the shutter is released
after about 10 seconds or 2 seconds.
OK
56
Page 59

Shooting Continuously
1 Press w (a) in the shooting mode.
The [Drive Mode] screen appears.
2 Use ab to select a setting.
Performs continuous shooting while z is pressed.
Cont. Shoot
Fixes the recorded pixels and aspect ratio to [S] and [4:3], respectively, and
Burst Shoot
M-Cont
S-Cont
performs continuous shooting at high speed.
Performs continuous shooting while z is pressed, and saves last 16
or 25 still images taken for 2 seconds before the button is released as an
image of 5184 × 3888 pixels. (Memory retrospective continuous shooting)
Performs continuous shooting for 16 or 25 still images after z is fully
pressed, and saves them as an image of 5184 × 3888 pixels. (Streaming
continuous shooting)
3 Press e.
The shooting screen reappears.
Caution -------------------------------------------------------------------------------------------------------
• The following functions cannot be used.
• Flash
• [Copyright Print] of the E menu
• [Cont. Shoot] cannot be selected in the following capture modes.
• S mode
• [Night Scene], [Under water Movie], [Interval Shooting], or [Fireworks] in the T mode
• B mode
• When [Drive Mode] is set to [M-Cont] or [S-Cont], [Digital Zoom] is fixed to [On] in the A menu.
3
Taking Pictures
57
Page 60

Memo ---------------------------------------------------------------------------------------------------------
• The focus setting and exposure value are fixed during continuous shooting.
• The maximum number of images that can be taken continuously varies depending on the [Recorded
Pixels] setting in the A menu.
• The continuous shooting setting is reset when the camera is turned off and on again.
• If you release z early for [M-Cont], the number of saved images may not reach 16 or 25.
• The images taken with [M-Cont] or [S-Cont] are displayed in 16 or 25 thumbnails in the single image
display of C mode. Press 4 (T) to display an image in the single image display, and cd to
display the previous or next image.
3
Taking Pictures
Shooting Using the Remote Control Unit
You can perform shooting using the optional remote control unit.
1 Press w (a) in the shooting mode.
The [Drive Mode] screen appears.
2 Use ab to select a setting.
Releases the shutter immediately after the shutter release button on the
0-sec Remote Control
3-sec Remote Control
remote control unit is pressed.
Releases the shutter about 3 seconds after the shutter release button on the
remote control unit is pressed.
3 Press e.
The shooting screen reappears.
4 Point the remote control unit towards the remote control
receiver of the camera, and press the shutter release button.
Memo ---------------------------------------------------------------------------------------------------------
• The maximum operating distance of the remote control unit is about 4 m from the front of the camera
and about 2 m from the rear of the camera.
58
Page 61

Shooting with Varied Exposure Values
Takes three images with different exposure settings of -0.5 EV, 0 EV, and +0.5
EV.
1 Press w (a) in the shooting mode.
The [Drive Mode] screen appears.
2 Use ab to select [A-Bracket], and press e.
The shooting screen reappears.
3 Press z.
Three images are taken by pressing z once.
The three images are displayed side by side during Instant Review.
3
Taking Pictures
59
Page 62

Configuring the Capture Settings
Image Capture Settings
Set the file format for still images in the A menu.
Recorded Pixels [L], [M], [S], [XS], [2M], [1M], [ VGA]
Aspect Ratio [4:3], [3:2], [1:1]
Quality Level [8], [9], [0]
3
Taking Pictures
Caution -------------------------------------------------------------------------------------------------------
• The settings that can be selected are limited depending on the capture mode.
• [2M] and [1M] are displayed only in the U mode.
Movie Capture Settings
Set the file format for movies in the B menu.
Recorded Pixels Sets the number of recorded pixels.
HDR Sets whether to perform the HDR recording.
Microphone Sets whether to record sounds.
Wind Suppression Reduces wind noise during recording.
Memo ---------------------------------------------------------------------------------------------------------
• For the reduction of blurring during recording movies, refer to “Reducing Blurring of Images” (p.63).
Caution -------------------------------------------------------------------------------------------------------
• When [Recorded Pixels] is set to [4K 30fps], [Movie SR+] of the B menu and [HDR] are fixed to
[Off].
• [Movie SR+] of the B menu and [HDR] cannot be set simultaneously.
[4K 30fps] (3840 × 2160)
[FullHD 30fps] (1920 × 1080)
[HD 60fps] (1280 × 720)
[HD 30fps] (1280 × 720)
60
Page 63

Setting the Image Finishing Tone and Correction
Setting the Image Atmosphere (Image Tone)
You can control the finishing tone for taken images.
1 Select [Image Tone] in the A menu, and press d.
The [Image Tone] screen appears.
2 Use ab to select a setting.
Increases the values of [Contrast], [Sharpness], and [Saturation] to take
Bright
Natural
Vibrant
Slide Film
Monochrome
sharp images.
Takes images with a natural tone close to the actual color.
Takes bright and gorgeous images with a deep tone of color.
Takes contrast-emphasized images like those taken with a reversal film.
Takes a black and white image.
Set [Tone Adjustment] in the A menu. (p.62)
3 Press e.
4 Press f.
The shooting screen reappears.
3
Taking Pictures
61
Page 64

Setting the Sharpness, Saturation, Tone, and Contrast
The following settings can be made in the A menu.
Sharpness [Sof t], [Standard], or [Hard] can be selected.
Saturation [Soft], [Standard], or [Hard] can be selected.
Tone Adjustment [Blue], [Black & White], or [Sepia] can be selected.
3
Contrast [Soft], [Standard], or [Hard] can be selected.
Taking Pictures
[Saturation] can be set only when [Image Tone] is set to [Monochrome] in the A
menu.
[Tone Adjustment] can be set only when [Image Tone] is set to [Monochrome] in
the A menu.
Imprinting the Date on Still Images
The date can be imprinted at the bottom right of the image based on the
date set in the camera. The date imprinting can be set in [Date Imprint] of
the A menu.
Caution -------------------------------------------------------------------------------------------------------
• The imprinted date cannot be deleted.
• The date cannot be imprinted in the following cases.
• D uring the shooting in [Underwater Movie] or [High Speed Movie] of the T mode.
• In the B mode
• When [Drive Mode] is set to [Burst Shoot], [M-Cont], or [S-Cont]
• When [UTC Data Imprint] of [Data Imprint] is set to [On] in the D menu, [Date Imprint] is fixed to
[Off] in the A menu. (p.91)
Taking Images with Clearer Details
Images with clearer details can be taken by image processing. Set in [IQ Enhancer] of the A menu.
Caution -------------------------------------------------------------------------------------------------------
• [IQ Enhancer] is disabled in the following case.
• When [Drive Mode] is set to [Burst Shoot], [M-Cont], [S-Cont], or [A-Bracket]
62
Page 65

Correcting a Range of Tones (D-Range Setting)
With [D-Range Setting] of the A menu, you can expand an image gradation
to make the bright and dark portions of an image clearly visible.
Highlight Cor. Corrects the bright portions of the image.
Shadow Cor. Corrects the dark portions of the image.
Caution -------------------------------------------------------------------------------------------------------
• When the shooting location is too bright or too dark, the [D-Range Setting] setting may not be effective.
Reducing Blurring of Images
To automatically reduce blurring of images, set the following functions.
Still image mode [Pix. Track SR] in the A menu
Movie mode [Movie SR] or [Movie SR+] in the B menu
Memo ---------------------------------------------------------------------------------------------------------
• When [Drive Mode] is set to [Self-timer], each setting is fixed to [Off ].
• S etting [Movie SR+] to [On] achieves movies with less blurring.
Caution -------------------------------------------------------------------------------------------------------
• [Movie SR] and [Movie SR+] are fixed to [Off ] in the following case.
• When [Interval Movie] or [High Speed Movie] is selected in the T mode
• [Movie SR+] is fixed to [Off ] in the following cases.
• When [Recorded Pixels] is set to [4K 30fps]
• When [HDR] is set to [On] in the B menu
3
Taking Pictures
63
Page 66

Playback Functions
LAST FILE
100-0630
1/60 F3.5 EV+0.5
125
10:0002/02/2019
Changing the Playback Method
Displaying Multiple Images
You can display multiple images in the thumbnail view.
1 Press 5 (W ) in the single image
display of playback mode.
4
The images are displayed in 20 thumbnails.
Playback Functions
The following operations are available.
abcd Moves the selection frame.
5 (W)/4 (T) Switches between the 20-thumbnail display, the 81-thumbnail display, and the
Green button Switches between the folder display and the calendar display.
i Deletes the selected image. (p.68)
folder (calendar) display.
2 Press e.
The selected image is displayed in the single image display.
Memo ---------------------------------------------------------------------------------------------------------
• Images are played back in the order of file numbers automatically assigned to them.
64
Page 67

Playing Back Images Continuously (Slideshow)
1 Select [Slideshow] in the C menu, and press d.
The [Slideshow] screen appears.
2 Set the image switching interval and screen effects.
Interval Sets the image switching interval.
[Interval] cannot be set when [Screen Effect] is set to [Random].
Screen Effect Sets the screen effects applied when images are switched.
Sound Effect Sets the sound effects.
[Sound Effect] is fixed to [Off] when [Screen Effect] is set to [Random].
3 Select [Start], and press e.
A slideshow starts.
When any button is pressed, the slideshow stops.
4
Playback Functions
65
Page 68

Displaying Rotated Images
Rotation
You can change image rotation information.
1 Display an image in the single image display of playback mode.
2 Select [Rotation] in the C menu, and press d.
3 Select the rotation direction, and
press e.
4
Playback Functions
Caution -------------------------------------------------------------------------------------------------------
• Rotation direction cannot be changed when the write-protect switch on the memor y card is locked
or for the following images.
• Movies
• Images taken with [M-Cont] or [S-Cont]
• Protected images
Auto Image Rotation --------------------------------------------------------------------------------------
• When [Auto Image Rotation] is set to [On] in the C menu, the displayed image is rotated according to the camera’s orientation during the single image display. When [Auto Image Rotation] is set
to [Off] (default setting), the image display orientation is fixed regardless of the [Rotation] setting.
• The following images cannot be rotated.
• Movies
• Images taken with [M-Cont] or [S-Cont]
• The images are not rotated in the following cases.
• D uring a slideshow
• While an AV device is connected to the camera
Cancel OK
66
Page 69

Connecting the Camera to an AV Device
Connect to an AV device, such as T Vs, equipped with an HDMI® terminal to
display Live View images while shooting or to play back images.
Prepare a commercially available HDMI® cable that is suitable for the device
connected to the camera.
1 Turn the AV device and camera off.
2 Open the battery/card cover of the
camera, and connect the HDMI® cable
to the HDMI® micro output terminal.
3 Connect the other end of the HDMI® cable to the input terminal
on the AV device.
For details, refer to the operating manual for the AV device.
4 Turn the AV device and camera on.
Caution -------------------------------------------------------------------------------------------------------
• When opening and closing the battery/card cover, be sure to remove water and dirt such as sand
adhering to the camera, and avoid locations where dirt can enter the camera interior.
• While the camera is connected to an AV device, nothing is displayed on the camera monitor.
• The audio of the movie is output from the AV device. Adjust the volume on the AV device.
• Use an HDMI® cable with a length of 3 m or less (recommended product: RP-CHEU15-K manufactured
by Panasonic). The RICOH HDMI cable HC-1 cannot be used.
Memo ---------------------------------------------------------------------------------------------------------
• If the camera is connected to an AV device in the playback mode, an image is displayed in the single
image display.
• When outputting images to an AV device with an HDMI® terminal, the maximum resolution supported by both the AV device and camera is automatically selected. If the AV device fails to play back
images properly, change the setting in [HDMI Out] of the E menu.
4
Playback Functions
67
Page 70

Organizing Files
100 99999
/
10:00
Sel/Cancel
Delete
02/02/2019
Deleting Files
1 Press i in the single image display or multiple image display.
2 Select the deletion method, and press e.
Available deletion methods vary depending on the camera status when i
is pressed.
4
Playback Functions
Single image display [Delete One], [Delete Multi], or [Delete All] can be selected.
20-thumbnail display or
81-thumbnail display
When [Delete All] is selected, proceed to Step 5.
When [Delete Multi] is selected, select [Sel. Indiv.] or [Sel. Range].
[Sel. Indiv.] or [Sel. Range] can be selected.
3 Select the images to delete.
abcd Moves the selection frame.
e Selects/Deselects an image.
When [Sel. Range] is selected: Selects the starting or ending point for image selection range.
4 Press i.
The confirmation screen appears.
68
5 Select [Execute], and press e.
The selected images are deleted.
Memo ---------------------------------------------------------------------------------------------------------
• Protected images cannot be selected.
Page 71

Restoring Deleted Files
You can restore the deleted files in [Recover File] of the C menu.
Caution -------------------------------------------------------------------------------------------------------
• The images cannot be restored when the following operations have been performed after deleting
them.
• Turning the camera off
• Switching from the playback mode to the shooting mode
• Executing [Image Copy], [Resize], or [Cropping] of the C menu
• Executing [Format [Card]] or [Format [Internal M]] of the E menu
Copying Images
Images can be copied between the internal memory and the memory card.
1 Insert a memory card.
2 Select [Image Copy] in the C menu, and press d.
3 Select the copy method, and press e.
[Internal M]>>>[Card] Copies all images in the internal memory to the memory card.
When the memory card space is insufficient, the images cannot be copied.
[Card]>>>[Internal M] Copies images in the memory card to the internal memory one by one after
confirming copying of each file.
The file names are automatically changed.
4
Playback Functions
69
Page 72

4
100 99999
/
10:00
Sel/Cancel
Execute
02/02/2019
Playback Functions
Protecting Images from Deletion
You can protect images to prevent them from being deleted accidentally.
1 Select [Protect] in the C menu, and press d.
2 Select the protection method.
Select the method from [1 File], [Sel. Multiple], [Select All], and [Cancel All].
When [1 File] is selected, use cd to display the previous/next image.
3 Press e.
When [Sel. Multiple] is selected, proceed to Step 4.
4 Select [Sel. Indiv.] or [Sel. Range].
5 Select the images to protect.
abcd Moves the selection frame.
e Selects/Deselects an image.
When [Sel. Range] is selected: Selects the starting or ending point for image selection range.
6 Press the green button.
The selected images are protected or unprotected.
Memo ---------------------------------------------------------------------------------------------------------
• If you apply protection to the images that have already been protected, they are unprotected.
Caution -------------------------------------------------------------------------------------------------------
• If [Format [Card]] or [Format [Internal M]] of the E menu is executed, protected images are also
deleted.
70
Page 73

Copying Images to a Computer
Connect the camera to a computer using the provided USB cable.
1 Turn the camera off.
2 Open the battery/card cover of the
camera, and connect the USB cable to
the USB terminal.
3 Connect the USB cable to the USB port of the computer.
The battery charging starts.
When the camera is turned on, it is recognized as a device by the computer.
When a memory card is inserted, the files on the memory card are displayed.
When a memory card is not inserted, the files in the internal memory are
displayed.
4 Copy the captured images to the computer.
5 Disconnect the camera from the computer when the copy is
complete.
6 Remove the USB cable from the camera.
Caution -------------------------------------------------------------------------------------------------------
• When opening and closing the battery/card cover, be sure to remove water and dirt such as sand
adhering to the camera, and avoid locations where dirt can enter the camera interior.
• D o not remove the USB cable while copying images.
• For Mac, images with a size of 4 GB or more cannot be copied.
Memo ---------------------------------------------------------------------------------------------------------
• Refer to “Operating Environment” (p.111) for system requirements to connect the camera to a computer.
• When the camera is connected to a computer, the transfer method is set to [MSC]. The transfer method can be changed in [USB Connection] of the E menu.
4
Playback Functions
71
Page 74

Editing and Processing Images
You can edit and process taken images.
Caution -------------------------------------------------------------------------------------------------------
• Only images taken with this camera can be edited and processed. Still images saved from movies
cannot be edited and processed.
• If you edit and process images repeatedly, image quality will deteriorate.
Changing the Image Size
4
Changing the Number of Recorded Pixels (Resize)
Playback Functions
1 Display an image in the single image display of playback mode.
2 Select [Resize] in the C menu, and press d.
The [Resize] screen appears.
3 Set [Recorded Pixels] and [Quality
Level] for the resized image.
The smaller size than the setting for shooting
can be selected.
4 Press e.
5 Select [Overwrite] or [Save as], and press e.
The image is saved.
72
Resize
Recorded Pixels
Quality Level
CancelCancel OKOK
Page 75

Cropping Images
1280x960
Cropping
You can crop a part of images and then save them.
1 Display an image in the single image display of playback mode.
2 Select [Cropping] in the C menu, and press d.
The [Cropping] screen appears.
3 Specify the range to crop.
Cancel OK
4 (T)/5 (W) Changes the cropping size.
abcd Moves the cropping frame.
4 Press e.
The image is saved as a new image.
4
Playback Functions
73
Page 76

Processing Images with Filters
Digital Filter
T
You can process images with filters.
1 Display an image in the single image display of playback mode.
2 Select [Filter] in the C menu, and press d.
The [Filter] screen appears.
3 Use ab to select a filter, and press d.
Small Face Filter [5%], [7%], [10%]
4
Playback Functions
Ink Rubbing Filter [1] to [5]
Digital Filter [B&W/Sepia], [Toy Camera], [Retro], [Color], [Extract Color], [Color Empha-
sis], [High Contrast], [Starburst], [Soft], [Fish-eye], [Miniature], [Brightness]
HDR Filter —
When [HDR Filter] is selected, proceed to Step 5.
74
4 Use cd to specify a value.
For [Digital Filter], use ab to select a filter
type, and then use cd to specify a value.
oy Camera
Cancel
5 Press e.
6 Select [Overwrite] or [Save as], and press e.
The image is saved.
OK
Page 77

Editing Movies
9998/9999
10:00
100-0630
02/02/2019
1 Select [Movie Edit] in the C menu, and press d.
The [Movie Edit] screen appears.
2 Use ab to select an editing method.
Save as Still Image Saves the specified frame as a still image.
Divide Movies Divides a movie into two files at the specified devision point and saves as
new files.
Adding title picture Specifies the image to be used as the thumbnail for a movie.
For each editing method, refer to the following.
Saving the Specified Frame as a Still Image
1 Select [Save as Still Image], and press e.
The movie playback screen appears.
2 Display the frame to save.
You can play or pause the movie in the same
manner as when viewing a movie in the playback mode.
00´ 20˝
3 Press e.
The selected frame is saved as a still image.
4
Playback Functions
75
Page 78

Dividing a Movie
1 Select [Divide Movies], and press e.
The movie playback screen appears.
2 Display the frame at which you want to divide the movie.
You can play or pause the movie in the same manner as when viewing a movie in the playback mode.
The dividing point can be specified in 30 frames increments.
3 Press e.
4
Playback Functions
The confirmation screen appears.
4 Select [Divide], and press e.
The movie is divided at the selected frame and saved as new movie files.
Caution -------------------------------------------------------------------------------------------------------
• The movies with a recording time of less than 2 seconds cannot be divided.
Specifying the Image to Be Used as the Thumbnail for a Movie
1 Select [Adding title picture], and press e.
The image selection screen appears.
2 Use cd to select an image.
The images with the same aspect ratio as the
movie can be selected.
Select title picture
Cancel
3 Press e.
4 Specify whether to insert the image at the beginning or at the
end of the movie, and press e.
The image is inserted at the beginning or end of the movie.
76
OK
Page 79

Memo ---------------------------------------------------------------------------------------------------------
• The inser ted image is displayed for 3 seconds at the beginning or end of the movie.
• When the image is inserted at the beginning of the movie, it is displayed as the thumbnail for the
movie. When the image is inserted at the end of the movie, the thumbnail for the movie is not
changed.
Caution -------------------------------------------------------------------------------------------------------
• When the recording time of the movie reaches 26 minutes with the title image inserted, the image
cannot be inserted.
Correcting Red Eyes in Images
You can correct red eyes in images taken with a flash.
1 Display an image in the single image display of playback mode.
2 Select [Red-eye Edit] in the C menu, and press d.
The image is saved as a new image.
Caution -------------------------------------------------------------------------------------------------------
• The red eyes cannot be corrected for the following images.
• Images in which the camera cannot detec t red eyes
• Movies
4
Playback Functions
77
Page 80

Changing the Settings
Saving Frequently Used Settings
Using the Mode Dial
You can assign frequently used shooting settings to the mode dial P and
Q so that you can easily recall the settings.
The following settings can be saved.
• Capture mode
• A/B menu settings (with exceptions)
• A part of D menu settings
5
Changing the Settings
Saving the Settings
1 Set the capture mode and all the necessary settings to save.
2 Select [Reg. USER] in the D menu, and press d.
3 Select [U1] or [U2], and press e.
The settings are saved.
Using the User Mode
1 Set the mode dial to P or Q in the shooting mode.
2 Change the settings as necessary.
Memo ---------------------------------------------------------------------------------------------------------
• The settings changed in Step 2 are not saved in the camera. If the mode dial is turned, the settings
are reset to the saved settings.
78
Destination to save
current settings?
U1
U2
OK
Page 81

Exporting the Settings to a File
You can export the menu settings to a file and save it in a memory card.
The settings can be restored from the exported file. Also, the settings can be
copied to multiple cameras using the exported file.
You can export the settings in a memory card using [Write] and can import
the settings to the camera using [Read] in [Camera Settings File] of the E
menu.
Caution -------------------------------------------------------------------------------------------------------
• The setting file is saved in the “SYSTEM” folder in the memory card with the file name “CAMERA.PRM”.
When [Write] is executed, the old file is overwritten.
• If the memor y card is not available for recording, the setting file cannot be saved.
5
Changing the Settings
79
Page 82

Customizing the Button Functions
Registering Functions to the Movie Button
You can change the settings for “ADJ. mode” of which functions can be easily
used by pressing the movie button.
Five functions selected from the following functions can be saved. (The
functions indicated with a square-bracketed item are the default settings
for the item.)
• Off
• EV Comp. [Setting1]
• Recorded Pixels [Setting2]
• Aspect Ratio [Setting3]
• Setting [Setting4]
• White Balance [Setting5]
5
• Image Tone
Changing the Settings
• Quality Level
• AE Metering
• AF
• Face Detection
• Highlight Cor.
• Shadow Cor.
• Outdoor View
1 Select [ADJ Button Setting 1] to [ADJ Button Setting 5] in the D
menu, and press d.
2 Use ab to select a function, and
press e.
Custumize
Reg. USER
CALS Pixels
CALS Quality
ADJ Button Setting 1
ADJ Button Setting 2
ADJ Button Setting 3
ADJ Button Setting 4
3 Set [Movie Button] to [Off ] in the D menu.
The ADJ. mode is enabled.
Memo ---------------------------------------------------------------------------------------------------------
• Refer to “Using the ADJ. Mode” (p.20) for how to use the ADJ. mode.
1/4
O
EV Comp.
Recorded Pixels
Aspect Ratio
Setting
White Balance
Image Tone
OKOKCancelCancel
80
Page 83

Changing the Functions of the Green Button
You can change the functions activated when the green button is pressed.
The following functions can be saved.
Still images
• Green Mode (default setting)
• EV Comp.
• Recorded Pixels
• Quality Level
• Aspect Ratio
• White Balance
• Setting
• AF
• Face Detection
• Auto Macro
• AE Metering
• Highlight Cor.
• Shadow Cor.
• Sharpness
• Saturation/Tone Adjustment
• Contrast
• Outdoor View
Movies
• Green Mode (default setting)
• Movie SR
• Movie SR+
• White Balance
• AF
• Face Detection
• EV Comp.
• Sharpness
• Saturation/Tone Adjustment
• Contrast
• Outdoor View
1 Select [Green Mode] in the D menu, and press d.
5
Changing the Settings
2 Use ab to select a function, and
press e.
The green button function is changed.
Custumize
ADJ Button Setting 5
Green Button
START DATE/TIME
Show folder at startup
Shut-down Screen
Confirm. Time
Quick Zoom
Green Mode
EV Comp.
Recorded Pixels
Quality Level
Aspect Ratio
White Balance
Setting
Memo ---------------------------------------------------------------------------------------------------------
• You can display the current green button function when the camera is turned on. Set [Start-up
Screen] to [Start-up screen with operation guide] in the C menu. (p.82)
• The function set to the green button is enabled in the shooting mode only.
2/4
OKOKCancelCancel
81
Page 84

Display and Sound Settings
Setting the Start-up Screen
The screen display when the camera is turned on can be set in [Start-up
Screen] of the C menu.
Start-up screen with
operation guide
RICOH Displays the RICOH logo.
Photographs Displays the selected captured image.
Off Displays nothing.
5
Setting the Information Displayed when the Camera Is
Changing the Settings
Turned On/Off
You can set the information displayed when the camera is turned on and off
in the D menu.
START DATE/TIME Displays the current date and time until the camera is operated after it is turned on.
Show folder at startup Displays the name of the current folder and the number of images in the folder
Shut-down Screen
Setting the Live View Display
You can set the Live View display in the D menu.
Grid Guide Display Op. Select the grid style from [9 Divide] or [16 Divide].
Level Setting Select the level display from [Off], [Level + Shift], or [Level].
Displays the capture mode.
until the camera is operated after it is turned on.
Displays the RICOH logo and the number of images captured on the day except for
deleted images when the camera is turned off.
Memo ---------------------------------------------------------------------------------------------------------
• The current tilt can be saved as a reference tilt by executing [Calibrate Level] in the D menu.
82
Page 85

Setting the Brightness of the Monitor
You can adjust the brightness of the monitor in the E menu.
LCD Brightness Sets the brightness of the monitor.
Outdoor View Adjusts the brightness of the monitor when the monitor display is difficult to see
during outdoor shooting or in other situations.
Caution -------------------------------------------------------------------------------------------------------
• The [LCD Brightness] setting cannot be changed when [Outdoor View] is set.
Setting the Lamp
You can set whether to turn the power button lamp on when the power is
turned on in [Power Button Lamp] of the E menu.
Setting the Sound Volume
You can set the sound volume in the E menu.
Operation Volume Sets the sound volume when buttons are operated.
Playback Volume Sets the sound volume during playback.
Sound Sets the sound volume for [Startup Sound], [Shutter Sound], [Operation Sound],
and [Self-timer Sound].
5
Changing the Settings
83
Page 86

Power Saving Settings
Automatically Turning the Power Off
The camera turns off automatically if no operations are made for a certain
period of time. Set the time until the the camera is turned off in [Auto Power
Off ] of the E menu.
Memo ---------------------------------------------------------------------------------------------------------
• [Auto Power Off] is not available in the following cases.
• D uring shooting in the B mode or in [Interval Shooting] of the T mode
• D uring movie playback or slideshow
• D uring data processing
• While the camera is connected to a computer
5
Changing the Settings
• D uring FlashAir connection
Dimming the Display
The camera dims or turns off the display automatically if no operations are
performed during the set time. The following settings can be set in the E
menu.
Power Saving Dims the display automatically if no operations are performed during the set time
to suppress battery drain.
Select the time until the display is dimmed from [5sec.], [15sec.], [30sec.], [1min.],
and [2min.].
Monitor Auto off Delay Turns the monitor off automatically if no operations are performed during the set
time.
Select the time until the the monitor is turned off from [1min.], [5min.], and
[30min.].
If the camera is operated, the original brightness and display are restored.
84
Page 87

Memo ---------------------------------------------------------------------------------------------------------
• [Power Saving] is not available in the following cases.
• D uring shooting in the B mode or in [Interval Shooting] of the T mode
• In the V mode
• In the C mode
• While a menu is displayed
• While the AC adapter is used
• [Monitor Auto off Delay] is not available in the following cases.
• D uring shooting in [Interval Shooting] of the T mode
• D uring movie playback or slideshow
• While the camera is connected to a computer
• While an AV device is connected to the camera
5
Changing the Settings
85
Page 88

Setting the GPS
The camera can acquire information from GPS satellites using the built-in
GPS function.
Caution -------------------------------------------------------------------------------------------------------
• Local geographic conditions such as places where radio waves are blocked or reflected may prevent or
delay the acquisition of GPS information.
• The positions of GPS satellites are continuously changing and this may prevent or delay the acquisition of GPS information.
• The presence of devices transmitting frequencies close to those of GPS satellites or devices generating
a strong magnetic field may interfere with the acquisition of GPS information or deteriorate the GPS
information precision.
• Note that the camera may take a while to acquire the GPS information if it has not been used for
an extended period or has been moved a great distance from where the GPS information was last
5
Changing the Settings
acquired.
• The presence of devices generating a strong magnetic field or devices blocking magnetic fields may
interfere with the acquisition of correct direction information.
• The GPS function may not work near a broadcast tower, etc. and in a place where strong static electricity is generated.
• The use of GPS, the collection of location information, etc. may be regulated depending on the country and region. When bringing the camera to a foreign country, check with your embassy or travel
agency beforehand if there are restrictions on bringing in the camera with the GPS function, logging
GPS information, etc.
86
Page 89

Displaying the GPS Information
21
5
6
7
8
34
You can record the location information in images using the GPS function.
Set in [GPS] of the D menu or press and hold x (d) to turn the GPS function on and off. The GPS information is acquired every one second in the
shooting mode.
The acquired GPS information can be
checked in “Detailed information display” in
the shooting mode (p.18).
128° ESE
E:139°
N:35°
X 3 (4)
3d
100
1 Electronic compass information (azimuth)
2 Electronic compass direction
5
Changing the Settings
3 GPS positioning status
4 GPS lock
5 Longitude
6 Latitude
7 Number of GPS satellites used (Number of acquired visible GPS satellites)
8 Positioning quality
[no fix]: Positioning is not possible.
[2d]: The GSA positioning mode in the NMEA-0183 format is “2d”.
[3d]: The GSA positioning mode in the NMEA-0183 format is “3d”.
[Diff]: The GGA quality in the NMEA-0183 format is “DGPS”.
87
Page 90

Memo ---------------------------------------------------------------------------------------------------------
• The standard of GPS information displayed on the monitor can be set in [GPS Disp Mode] of the D
menu.
LAT/LON Displays the latitude and longitude.
UTM Displays the Universal Transverse Mercator (UTM) coordinates.
MGRS Displays the Military Grid Reference System (MGRS) coordinates used as mil-
• The details of the location information recorded in images can be checked in “Detailed information
display” in the playback mode (p.18).
• S et [GPS Lock] to [On] in the D menu to enable the function to protect the acquired GPS information. The GPS information is protected when d is pressed on the shooting screen. The information is
unprotected when d is pressed again.
5
Automatically Adjusting the Date and Time Settings
Changing the Settings
The camera date and time settings can be adjusted based on the GPS information by setting [GPS Time Adjustment] to [On] in the D menu.
itary information.
Recording the Camera Route
You can record the camera route using the GPS information.
1 Select [GPS Log] in the D menu, and press d.
The [GPS Log] screen appears.
2 Select [Record log], and press e.
88
GPS Log
Record log
Save log data
Discard log data
OK
Page 91

3 Set [Logging Interval] and [Logging
Duration].
Logging Interval Select from [1sec.] to [60sec.].
Logging Duration Select from [1] hour to [18] hours.
Logging Interval
Logging Duration
ExitExit
Record log
Start
10sec.
1
4 Select [Start], and press e.
GPS logging starts.
Select [Stop] to stop the GPS logging.
When the set logging time elapses, the GPS logging stops.
Caution -------------------------------------------------------------------------------------------------------
• [GPS Log] is not available during the shooting in [Interval Shooting] or [Interval Movie] of the
T mode. This interval shooting cannot be performed during the GPS logging.
• The logging interval may fluctuate in the following cases.
• When the camera is being turned on or off
• When the information of a new satellite is being acquired
• The data may be acquired about 1 minute longer than the time set in [Logging Duration].
5
Changing the Settings
89
Page 92

Saving Logs
You can save the recorded logs to the memory card as a file.
1 Select [Save log data] on the screen in Step 2 on p.88, and
press d.
2 Select [NMEA] or [KML], and press e.
The log file is saved in the “GPSLOG” folder in the memory card with the file
name composed of the serial number 001 to 999 and the month and day.
(Example: 001_0505)
Memo ---------------------------------------------------------------------------------------------------------
• You can check the log file by using a software supporting the file on a computer.
• When deleting the log file, select [Discard log data] on the screen in Step 2. The log file cannot be
5
Changing the Settings
deleted with [Format [Card]] in the
Caution -------------------------------------------------------------------------------------------------------
• If the memor y card is not available for recording, the log file cannot be saved.
• When the GPS information has not been acquired, the log file is not saved.
Setting the Direction Information
You can set the direction information displayed on the shooting screen in
the D menu.
Compass Heading Sets the displayed information.
Compass Calibration Executes the adjustment of the compass.
Declination Select from [TRUE] and [MAG].
Hold the camera with one hand and move it slowly like drawing the figure 8. When
the adjustment is completed, a beep sounds.
When the GPS information has not been acquired, the information for [TRUE] is
not displayed.
E menu.
90
Page 93

Imprinting the GPS Information
The acquired GPS information can be imprinted at the bottom right of the
image. Set in [Data Imprint] of the D menu.
GPS Data Imprint Sets the standard of GPS information to imprint.
UTC Data Imprint Imprints the Universal Coordinated Time.
[Date Imprint] of the A menu is disabled.
Heading Data Imprint Imprints the direction information.
Caution -------------------------------------------------------------------------------------------------------
• The imprinted GPS information cannot be deleted.
• The GPS information cannot be imprinted in the following cases.
• D uring the shooting in [Underwater Movie] or [High Speed Movie] of the T mode.
• In the B mode
• When [Drive Mode] is set to [Burst Shoot], [M-Cont], or [S-Cont]
5
Changing the Settings
91
Page 94

File Management Settings
Specifying the Folder/File Settings
By default, folders and files are automatically named as follows.
Folder Name 100RICOH to 999RICOH
File Name R0000001.JPG to R0999999.JPG
When the file number exceeds R09999, the next folder is created and
the file number becomes R00001. If the file number exceeds R09999
when the folder number is 999, no more files can be stored on the memory
card currently inserted.
The folder and file names can be changed.
5
New Folder Options
Changing the Settings
When images are captured with this camera, a folder is automatically created and the captured images are stored in it. Each folder name consists of a
sequential number from 100 to 999 and a string of 5 characters.
The character string in the folder name can be changed.
1 Select [New folder options] in the E menu, and press d.
2 Use ab to select a setting.
Standard 100RICOH to 999RICOH
Date Assigns four digits of the month and day of the shooting date after the folder
Custom Assigns a freely defined string of five characters after the folder number.
When [Standard] or [Date] is selected, proceed to Step 6.
number.
The month and day appear according to the date format set in [Date Adjustment]
of the E menu.
Example) 101_0125: Images taken on January 25th
(Default: RICOH)
Example) 101RICOH
92
Page 95

3 Select [Custom], and press d.
The text-entry screen appears.
4 Enter a folder name.
Up to five single-byte alphanumeric characters can be entered.
The following operations are available.
abcd Moves the text selection cursor.
e Enters a character selected with the text selection cursor.
RICOH
㹕 E R T Y U I O PQ
S D F G H J K LA
Z
X C V B N M
123
Cancel Finish
_
5 After entering the text, move the text selection cursor to 1,
and press e.
The confirmation screen appears.
6 After checking the setting, press e.
Memo ---------------------------------------------------------------------------------------------------------
• A folder with a new number is created when the next shooting is performed after the folder name
is changed.
Caution -------------------------------------------------------------------------------------------------------
• The maximum folder number is 999. If the folder name is changed after the folder number reaches 999, you cannot capture new images. Also, you cannot capture new images when the file name
number reaches 9999.
5
Changing the Settings
93
Page 96

File Name
The following string of characters is used as the file name prefix by default.
Recording Format File Name
Still image R0
Movie M0
You can change the first two characters of still image file names from “R0”.
.JPG
.MOV
1 Select [File name] in the E menu, and press d.
2 Select [Custom], and press d.
3 Select a character to enter.
5
Changing the Settings
Uppercase alphanumeric characters and “_”
can be entered.
The following operations are available.
abcd Moves the text selection cursor.
e Enters a character selected with the text selection cursor.
RO
㹕 E R T Y U I O PQ
S D F G H J K LA
Z
X C V B N M
123
Cancel Finish
_
4 Press e.
File Sequence No.
In [File Sequence No.] of the E menu, you can set whether to continue the
sequential numbering for file names even when memory cards are replaced.
On Continues the sequential numbering for file names even after memory cards are replaced.
Off Resets the numbering for file names after memory cards are replaced.
94
Page 97

Reset File Number
If [Reset File Number] of the E menu is executed, a folder with a new number is created and file number starts from 0001.
Memo ---------------------------------------------------------------------------------------------------------
• When the file number reaches 9999, a new folder is created and the file number is reset.
• When a memor y card is not inserted, the file number in the internal memory is reset.
Setting the Copyright Information
You can set the copyright information embedded in the Exif data.
1 Select [Embed Info] in the E menu, and press d.
2 Select [On] or [Off], and press e.
3 Select [Copyright Info], and press d.
The text-entry screen appears.
5
Changing the Settings
4 Enter the copyright holder.
Up to 32 single-byte alphanumeric characters and symbols can be entered.
The following operations are available.
abcd Moves the text selection cursor.
e Enters a character selected with the text selection cursor.
㹵 e r t y u i o pq
s d f g h j k la
z
x c v b n m
123
Cancel Finish
5 After entering the text, move the text selection cursor to 1,
and press e.
The E menu reappears.
The first 11 characters of the entered copyright holder are displayed.
Memo ---------------------------------------------------------------------------------------------------------
• You can check the copyright information in “Detailed information display” in the playback mode
(p.18).
95
Page 98

Imprinting the Copyright Information
The copyright information can be imprinted at the bottom of the image. Set
in the E menu.
Copyright Print Select from [On(OVR)], [On(New)], and [Off].
Copyright Position Select from [Left], [Middle], and [Right].
Copyright Font Size Select from [Large], [Middle], and [Small].
Copyright Color Select from [Orange], [White], [Black], [Red], [Blue], [Green], and [Yellow].
Caution -------------------------------------------------------------------------------------------------------
• The imprinted copyright information cannot be deleted.
• The copyright information cannot be imprinted in the following cases.
• D uring the shooting in [Underwater Movie] or [High Speed Movie] of the T mode.
5
Changing the Settings
• In the B mode
• When [Drive Mode] is set to [Burst Shoot], [M-Cont], or [S-Cont]
• When [Copyright Info] is not set in the E menu
• When [Copyright Font Size] is set to [Large] or [Middle], a part of the copyright information may
not be imprinted.
96
Page 99

Saving the Local Date and Time of the Specified City
:
The date and time set in “Initial Settings” (p.35) serve as the date and time
of your present location and are reflected in the shooting date and time for
images.
Setting the destination to a location other than your present location enables you to save images time-stamped with the local date and time.
1 Select [World Time] in the E menu, and press d.
The [World Time] screen appears.
2 Select [Destination] in [Select Time].
Select [Hometown] to reset the date and
time to the ones of your present location.
World Time
Select Time
Destination
New York
Hometown
New York
Destination
Hometown
10:00
DST OFF
10:00
3 Press d at [Destination], and set the daylight saving time.
If the daylight saving time is applied to the city to set, turn [DST] on.
4 Press d at the city name row, and
select the destination city.
The destination city can be selected from 75
cities.
Destination
Chicago
Miami
Toronto
New York
Halifax
Mexico City
Lima
00:00
5 Press e.
Memo ---------------------------------------------------------------------------------------------------------
• Even if [Reset] of the E menu is executed, the [Hometown] and [Destination] settings are not reset.
5
Changing the Settings
OKOKCancelCancel
10
00
OKOKCancelCancel
97
Page 100

Appendix
Attaching Optional Accessories
Wide Conversion Lens
If the wide conversion lens (DW-5) is attached to the camera, you can perform shooting with the 0.8x lens magnification (35 mm equivalent focal
length: 22 mm (wide angle)).
When using the wide conversion lens, set [Lens Adapter On] to [WIDE] in
the D menu. Refer to the User’s Manual provided with the lens for details.
Memo ---------------------------------------------------------------------------------------------------------
• A commercially available 37 mm diameter filter can be attached to the lens. This filter is effective to
protect the camera from scratches and condensation.
6
Appendix
• When [Lens Adapter On] is set to [WIDE] in the D menu, this setting information is recorded in
the Exif data.
Caution -------------------------------------------------------------------------------------------------------
• When [Lens Adapter On] is set to [WIDE] in the D menu, the functions that can be set are restricted.
98
 Loading...