

Page 1

INTRODUCTION
INTRODUCTION
This manual contains detailed instructions on the operation and care of
this machine. To get maximum versatility from this machine, all operators should read and fo llow the instructions in this manual. Please keep
this manual in a han dy place near th e machine.
SAFETY INFORMATION
When using your machine, the following safety precautions should always be followed:
Safety During Operation
In this manual, all s afety messages are identifie d by the words “WARNING” and “Caution”. The se words mean the fo llowing:
WARNING:
Important information to alert you to a situation that might cause
serious injury and damage to your property if instructions are not
followed.
Caution:
Important information on how to prevent damage to your equipment, or
how to avoid a situation th at might cause m inor injury.
– WARNING –
❐
Do not modify or replace any parts other than the ones specified in this
manual.
❐
Since some parts of the machine are supplied with high voltage, touch
only the parts specified in this manual.
❐
Do not operate the machine without covers. You might get your fingers
caught in the machine, or the machine might be damaged because for
example dust or the like might get inside it.
❐
Since some parts of the machine are sharp and might cause injury,
touch only the parts specified in this manual.
i
Page 2

SAFETY INFORMATION
– Caution –
While printing, do not turn off the main switch.
❐
While printing, do not open the door or covers.
❐
While printing, do not unplug the power cord.
❐
While printing, do not move the machine.
❐
Keep corrosive liquids, such as acid, off the machine.
❐
Do not allow paper clips, staples, or other small objects to fall inside the
❐
machine.
Open and close the door and covers softly.
❐
Do not put anything except originals on the machine.
❐
Do not spill liquid on the machine.
❐
When you open or close the door or covers, don’t let go of them.
❐
If you clean rubber parts with benzine, wipe them with a dry cloth afterwards.
❐
General Safety Information
Always turn the machine off when you have finished printing for the day.
❐
When the machine will not be used for long periods, disconnect the power
❐
cord.
If the machine must be transported by vehicle, please contact your service
❐
representative.
ii
Page 3

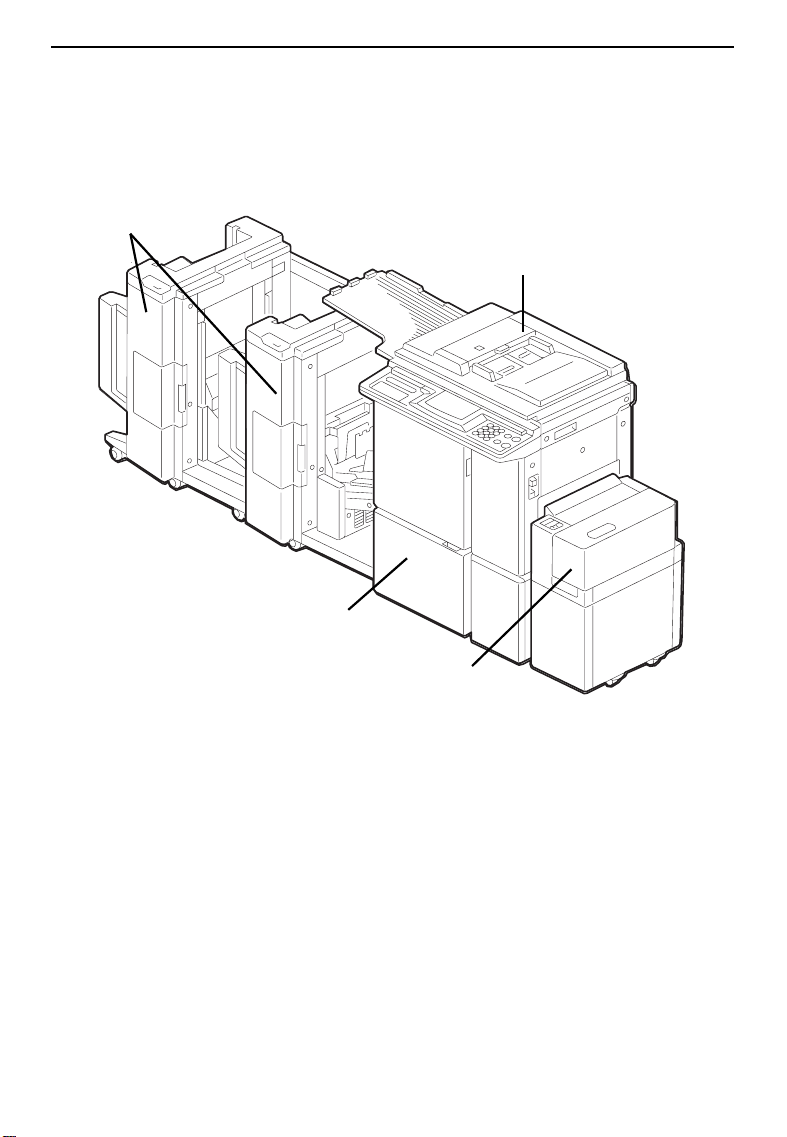
Machine Exterior
GUIDE TO COM PONENT S
GUIDE TO COMPONENTS
12
11
2
1
10
9
8
4
7
5
6
3
1
Page 4

GUIDE TO COMPONENTS
1. Platen Cover
2. Front Door
3. Side Plate Fine
Adjusting Dial
4. Paper Feed Table
Down key
or
Change Paper key
5. Paper Feed Side
Plates
6. Paper Feed Table
7. Separation Roller
Pressure Levers
8. Feed Roller
Pressure Lever
9. Original Table
Release Lever
10. Original Holder
Lower this cover over an original before printing.
Open for access to the inside of the machine.
Use to shift the paper feed table sideways.
Press to lower the paper feed table.
When you have an optional large capacity tray,
this key is used to remove paper.
Use to prevent paper skew.
Set paper on this table for printing.
Use to adjust the separation roller pressure to
prevent double feed.
Use to adjust the contact pressure of the paper feed roller according to paper thick ness.
Use to open the original table unit when installing the master.
Convenient place for holding originals while operating the machine.
11. Operation Panel
12. Behind Cover
2
Operator controls and indicators are located
here. ☛ See page 6.
Open to access the
☛
See page 6.
CS Mode
key and so on.
Page 5

Machine Interior
GUIDE TO COM PONENT S
1
2
3
4
5
6
13
12
11
10
9
8
7
3
Page 6

GUIDE TO COMPONENTS
1. Main Switch
2. Master Eject
Container Cover
3. Paper Delivery Side
Plates
4. Paper Delivery End
Plate
5. Small Size Paper
Delivery End Plate
6. Paper Delivery Table
7. Ink Holder
8. Drum Unit
9. Drum Unit Lock
Lever
10. Drum Rotation
Button
11. Pressure Release
Lever
12. Master Cut Button
Use to turn the power on or off.
Open when removing the master eject box.
Use to align the prints on the paper delivery table.
Use to align the leading edge of prints larger
than A4, 8
Use to align the leading edge of prints that ar e
A4, 8
1/2" x 11" or smaller.
Completed prints are delivered here.
Set the ink cartridge in this holder.
The master is wrapped around this unit.
Lift to unlock and pull out the drum unit.
Press to rotate the drum unit.
Use to install the master roll.
Press this button to cut the master leading
edge after installing a new master roll.
" x 11".
1/2
13. Master Eject Unit
Open Button
4
Press to remove misfed paper or a misfed master.
Page 7
GUIDE TO COM PONENT S
Options
This machine can be provided with the follow ing options:
20-Bin Sorter
Staplers
50 Originals Do cument
Feeder
LCT Cabinet
Large Capacity
Tray
*Other options: 20 Originals Docu ment Feede r
Color Drums (red, blue, g reen, brown, ye llow,
purple, navy, and maroon)
Tape Dispenser
Key Counter
Cabinet
❐
If you have sorter staplers and you want to have a document feeder, the 50
originals document feeder should be equipped with your machine.
❐
Sorter staplers and a tape dispenser cannot be equipped together.
5
Page 8

GUIDE TO COMPONENTS
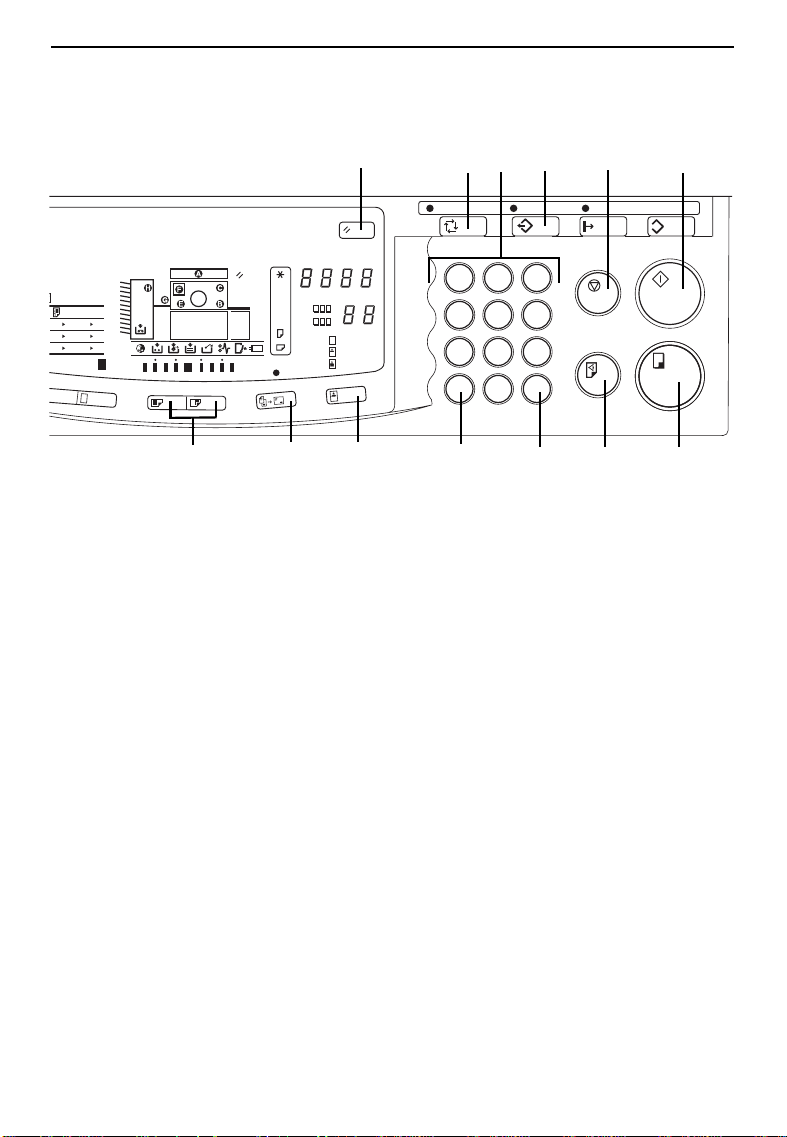
Operation Panel
Keys
3
2
1.
2.
3.
4.
1
567
12345
4
1. CS Mode key
☛
See pages 56 and 104.
2. Screen key
Press to select the screen image.
☛
See page 36.
3. Contrast key
Press to select the contrast.
☛
See page 36.
4. Image Density key
Press to make prints darker or
lighter. ☛ See page 23.
5. Economy Mode key
Press to save ink. ☛ See page 37.
6. Speed keys
Press to adjust the printing speed.
* See pages 23 and 24.
7. Memory/Class key
Press to select Memory or Class
mode. ☛ See pages 40 and 63.
10
8
11
A3 B4
B4 A4
A3 A4
9
12
8. Skip Feed key
Press to select skip feed printing.
☛
See page 51.
9. Up/Down keys
Press to select the size of margin
erase or SP menu.
10. Margin Erase key
Press to print book originals that
have a solid image on the edges.
☛ See page 31.
11. Sort key (for the optional
sorter stapler)
Press to select Sort, Staple Sort,
or Class Sort mode. ☛ See
page 65.
12. Reduce key
Press to reduce the image.
☛ See page 26.
13. Full Size key
Press to make full size prints.
A4 B5
B5 A5
B4 B5
100
100
13
+2 +1 0
6
Page 9
GUIDE TO COM PONENT S
A3 B4
B4 A4
A3 A4
A4 B5
B5 A5
B4 B5
100
100
M
+2 +1 0 -1 -2
14
A3
B4
ABC
A4
AAA
B5
123
15
14. Image Position keys
Press to shift the image forwards
or backwards. ☛ See page 21.
15. Combine 2 Originals key
Press to combine 2 originals onto
1 print. ☛ See pages 47 and 61.
16. Image Mode key
Press to select Line, P hoto, or
Line/Photo mode. ☛ See page 35.
17
aa
aa
aa
16
21
1
4
7
C
18
19
22
2
3
5
6
8
9
0
#
20
23
24
26
C
25
20. Enter key
Press to input data into memory.
21. Auto Cycle key
Use to process the master and
make prints automatically.
☛ See page 38.
22. Program key
Press to input or recall user
programs. ☛ See page 53.
17. Reset key
Press to reset error indicators.
☛ See page 140.
18. Clear key
Press to change the number set
in the counter.
19. Number keys
Press to enter the number of
prints and data.
23. Stop key
Press to stop the machine
operation.
24. Proof key
Press to make proof prints.
25. Print Start key
Press to start printing.
26. Master Making key
Press to make a master .
7
Page 10
GUIDE TO COMPONENTS
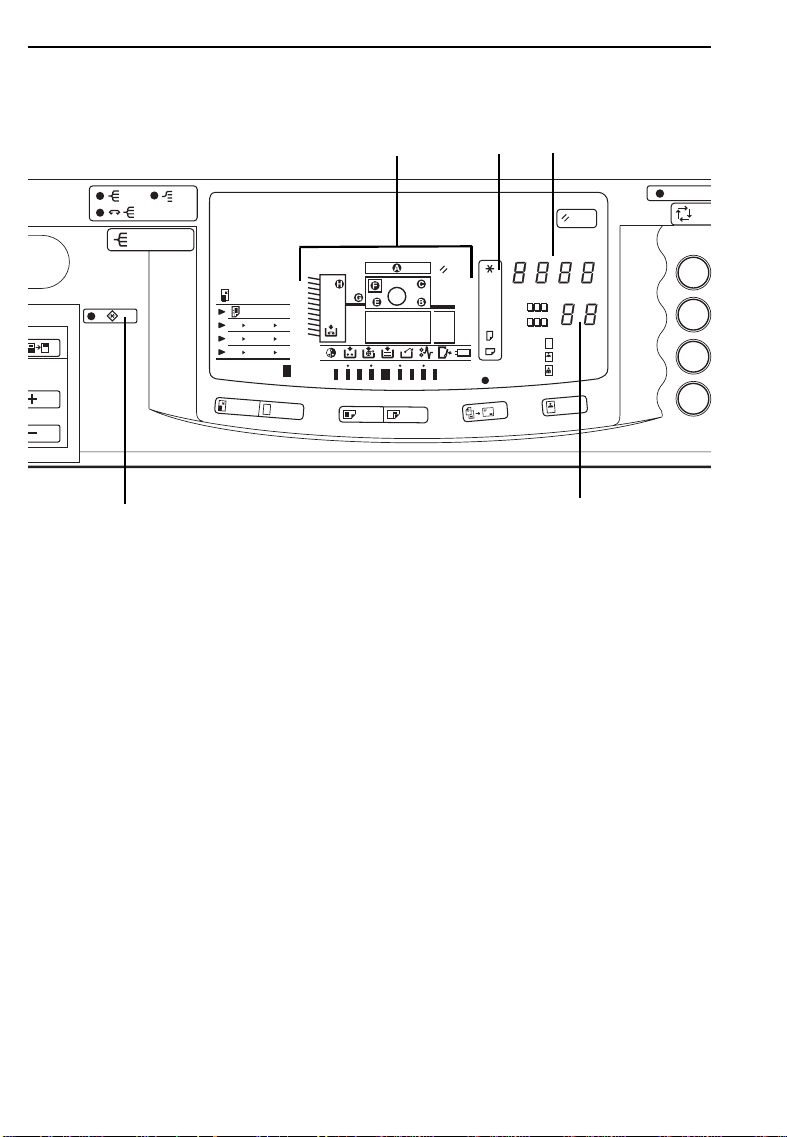
Indicators
A3 B4
A4 B5
B4 A4
B5 A5
A3 A4
B4 B5
100
100
1
1. Special Feature indicator
This indicator is lit when you press
keys under the cover on the
operation panel.
2. Monitors
The monitors light up or blink
when a non-standard condition
occurs within the machine. ☛ See
page 135.
2 3
M
+2 +1 0 -1 -2
4. Counter
Displays the number of prints
entered. While printing, it shows
the number of prints remaining.
Also, displays the machine’s
condition.
5. Memory/Class indicator
Shows the number entered in
Memory mode or Class mode.
4
A3
B4
ABC
A4
AAA
B5
123
aa
aa
aa
1
4
7
C
5
3. Paper Size and Direction
indicators
Indicates print paper size and
direction.
8
Page 11

INSTALLATION REQUIREMENTS
INSTALLATION REQUIREMENTS
The machine’s location should be carefully chosen because environmental conditions c an affect its performan ce.
Optimum Environmental Conditions
❐
Temperature: 10 – 30°C, 50 - 86°F
❐
Humidity: 20 – 90% RH
❐
A strong and level base (a sturdy desk and cabinet etc.).
❐
The machine must be level within 5 mm (13/64") both front to rear and left to
right.
❐
Make sure to locate this machine in a large well ventilated room that has an
air turnover of more than 30 m
Environments To Avoid
❐
Direct sunlight or strong light (more than 1500 lux).
3
/hr/person.
❐
Locations directly exposed to cool air from an air conditioner or heated air
from a heater. (Sudden temperature changes from low to high or vice versa
may cause condensation within the machine.)
❐
Dusty areas.
Access To The Machine
❐
Place the machine near a power source, providing clearance as shown.
Main Frame
9
Page 12
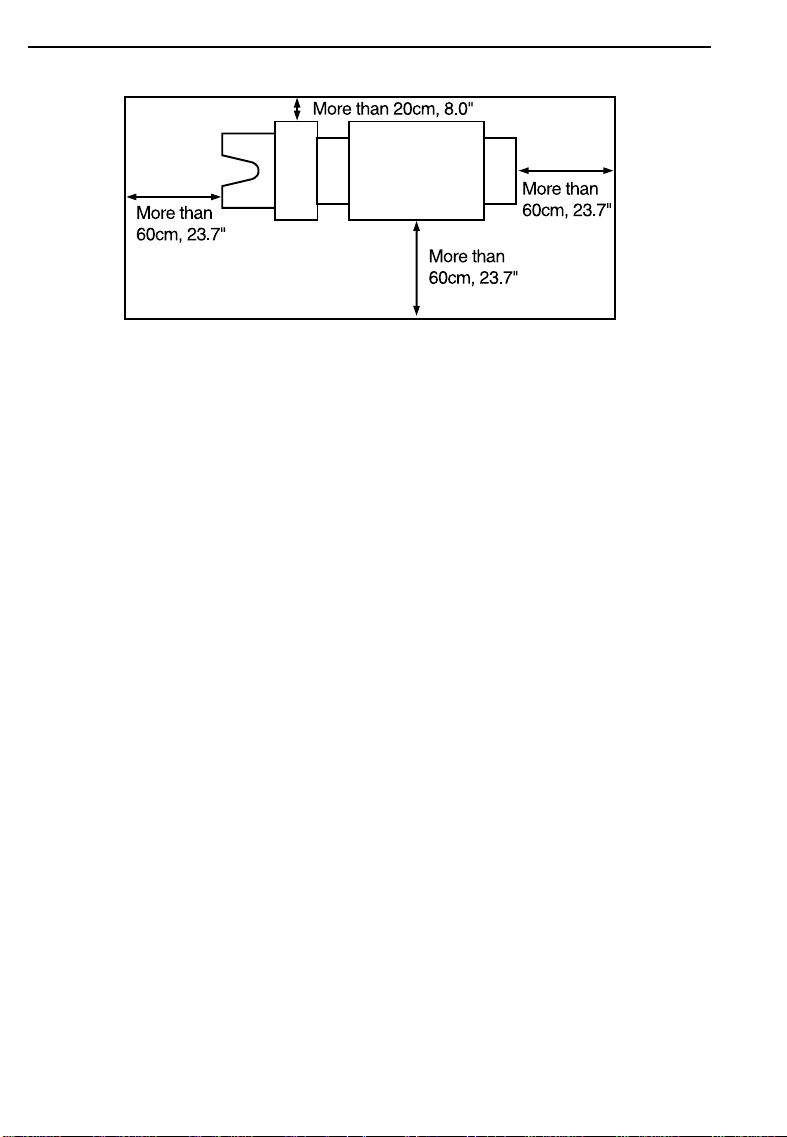
INSTALLATION REQUIREMENTS
Main Frame With Optional Sorter Stapler
Power Connection
Main Frame
❐
Securely connect the power cord to an dedicated 220/240V, 50/60Hz power
source which supplies less than 2.0A.
❐
Make sure the plug is firmly inserted in the outlet.
❐
Avoid multiwiring.
❐
Do not pinch the power cord.
❐
Make sure that the wall-outlet is near the machine and easily accessible.
Optional Sorter Stapler
❐
Securely connect the power cord to an dedicated 220 ~ 240V, 50/60Hz
power source which supplies more than 2.0A.
❐
The socket out-let must be near this equipment and easily accessible.
10
Page 13
OPERATION
OPERATION
Printing Paper
❐
The following types of print paper are not recommended for this machine.
• Paper smaller than 90 mm x 148 mm, 3.6" x 5.9"
• Paper larger than 297 mm x 432 mm, 11.6" x 17.0"
• Paper heavier than 209.3 g/m
• Paper lighter than 47.1 g/m
• Roughly-cut paper
• Paper of different thickness in the same stack
• Buckled or curled paper
• Short grain paper
• Low stiffness paper
❐
A3 (297 x 420 mm), 11" x 17", originals or printing paper can be used but
the maximum print area is 250 x 355 mm, 9.8" x 13.9". Select Reduce mode
when you want to print the entire image of an A3, 11" x 17" original.
❐
Correct curls in the paper before setting it in the machine. When you cannot
correct the paper curl, stack the paper with the curl face down. Otherwise
the paper might wrap around the drum or stains might appear.
❐
Store paper where it will not curl or absorb moisture. Use paper soon after it
is unpacked.
❐
Only use paper where the leading edge has two right angle corners, as
shown below.
2
, 55.6 lb
2
, 12.6 lb
11
Page 14
OPERATION
Originals
❐
Under the following conditions, the machine might not detect the original on
the exposure glass. If you press the
will start making a master anyway.
• When you set a dark original on the exposure glass.
• When the original is not centered according to the size marks on the left
scale.
• If you do not open the platen cover at an angle of more than 25 degrees
with the exposure glass when you replace originals.
❐
The maximum original size you can set on the exposure glass is 307 x 432
mm, 12" x 17".
❐
If you use paste-up originals, make sure the pasted parts hold firmly to the
base sheet. If the thickness of the paste-up original is more than 0.2 mm,
2/250" and the space between the pasted parts is less than 2 mm, 2/25", a
shadow might appear on the prints.
❐
If you use originals that have bold letters or solid images at the leading
edges, you might get prints with dirty edges. In this case, insert the widest
margin first, or raise the printing speed.
❐
The first 5 mm, 0.2" of the leading edge and the last 3 mm, 0.12" of the
trailing edge cannot be printed. Make sure the leading edge margin is at
least 5 mm, 0.2" and the trailing edge margin is at least 3 mm, 0.12".
Master Making
key again, the machine
12
Original
5 mm, 0.2"
Print
3 mm, 0.12"
Page 15
OPERATION
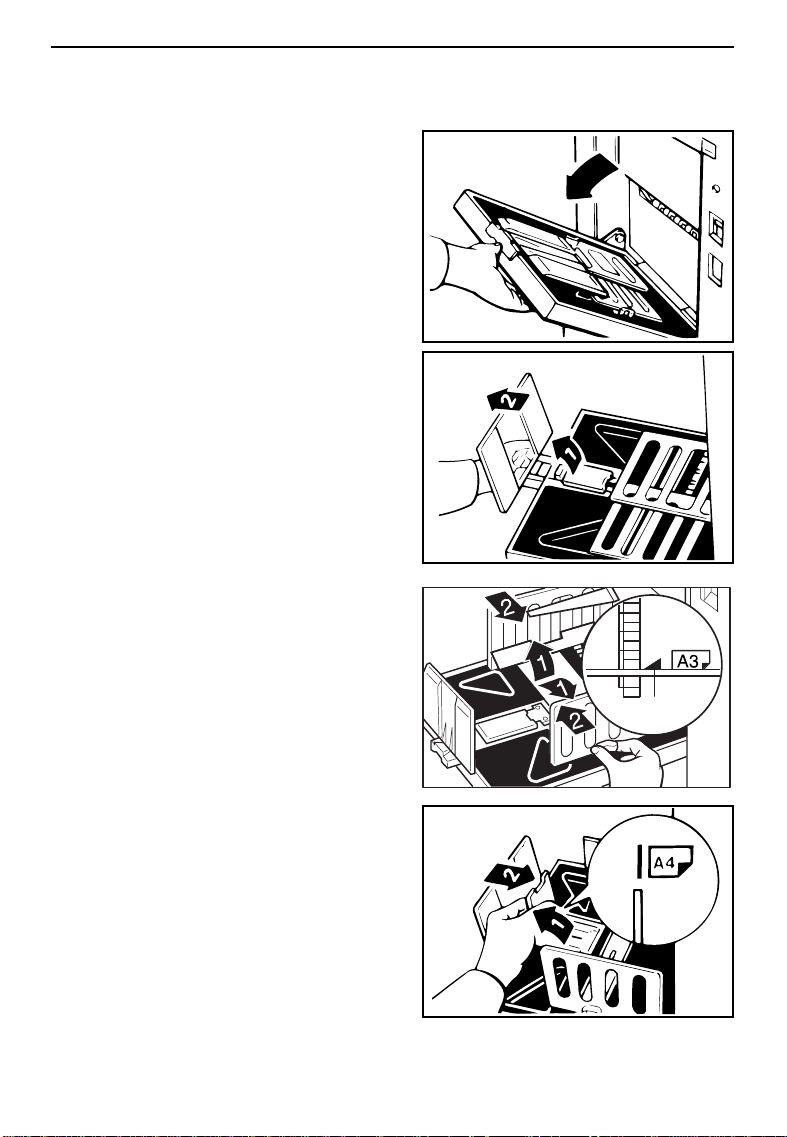
Preparation For Printing
☛
❐
See page 83 when you load paper in the optional large capacity tray.
☛
❐
See page 89 when you load paper in the optional paper cassette for LCT.
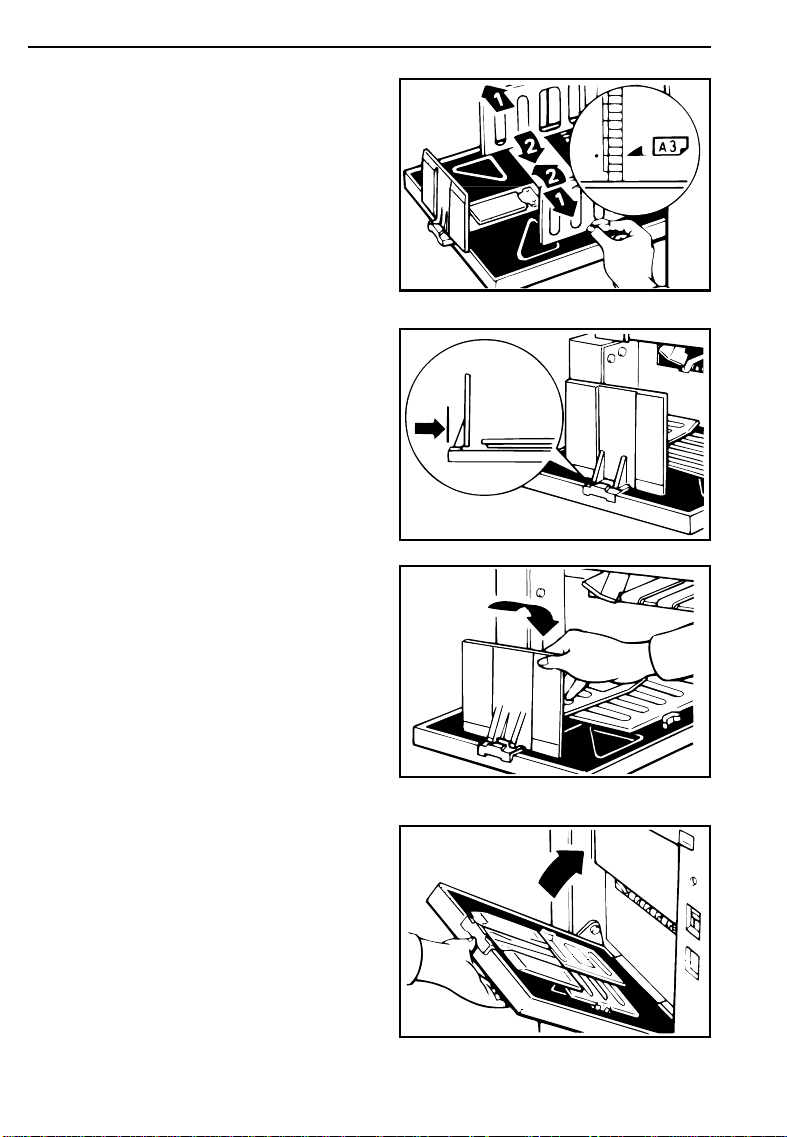
Loading paper
Carefully open the paper feed
1
table.
Adjust the side plates to match
2
the paper size.
Place the paper on the paper
3
feed table.
❐
Correct the paper curl before setting the paper. If you cannot do so,
stack the paper with the curl face
down as shown.
13
Page 16
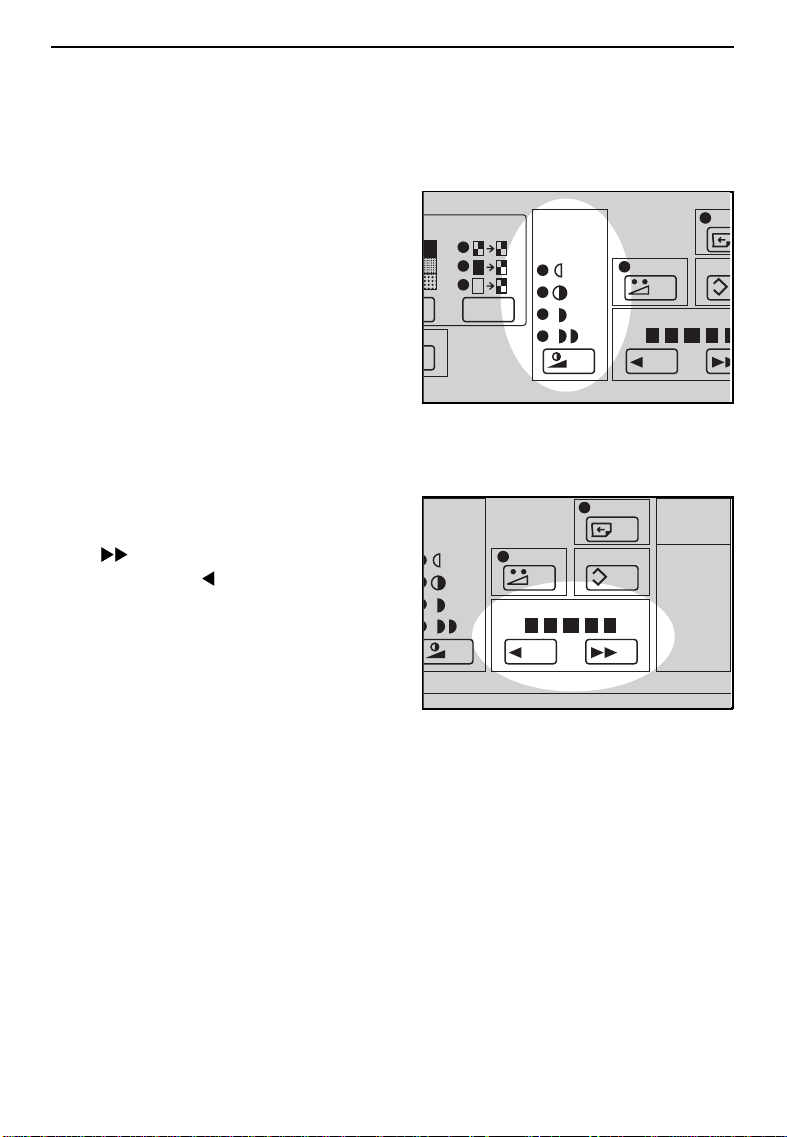
OPERATION
Make sure that the paper feed
4
side plates contact the paper
lightly.
14
Page 17
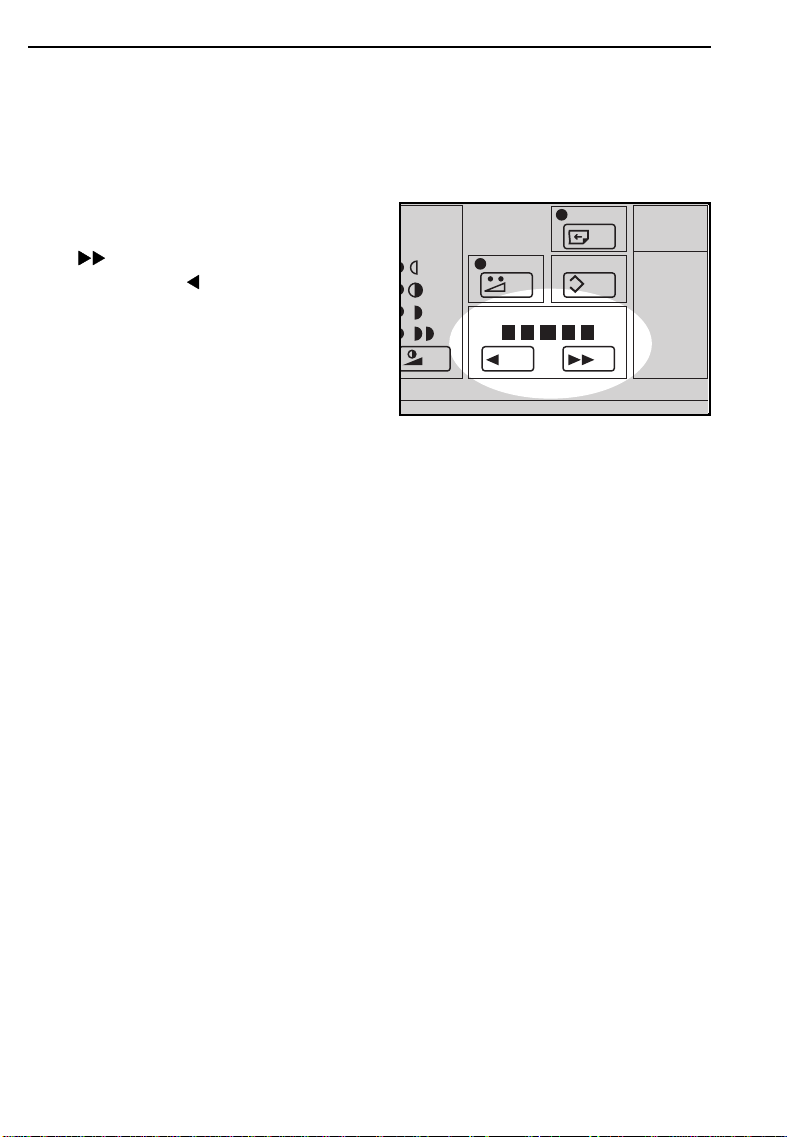
Setting up the paper delivery table
Open the paper de livery table.
5
Lift the paper delivery end pla te
6
and move it to match the print
paper size.
Lift the paper delivery side
7
plates and adjust them to the
paper size.
OPERATION
If you want to use A4, 8
8
11" or smaller paper, lift the
small size paper delivery end
plate and move it to match the
print paper size.
❐
When you use B4, 8
larger size paper, you do not need
to lift the small size paper delivery
end plate.
1/2
" x
1/2
" x 14" or
1
15
Page 18
OPERATION
If necessary, lift the left and
9
right guides.
❐
If you find paper is not delivered
properly when printing on thin paper, make sure the guides are up.
❐
When printing on paper thicker
than 81.4 g/m
up the guides.
❐
When the guides are up, you may
not load the unit to full capacity
(1,000 sheets) depends on the paper you are using.
❐
If you have the optional tape dispenser installed, the paper capacity
is 500 sheets.
2
, 21.6 lb, do not lift
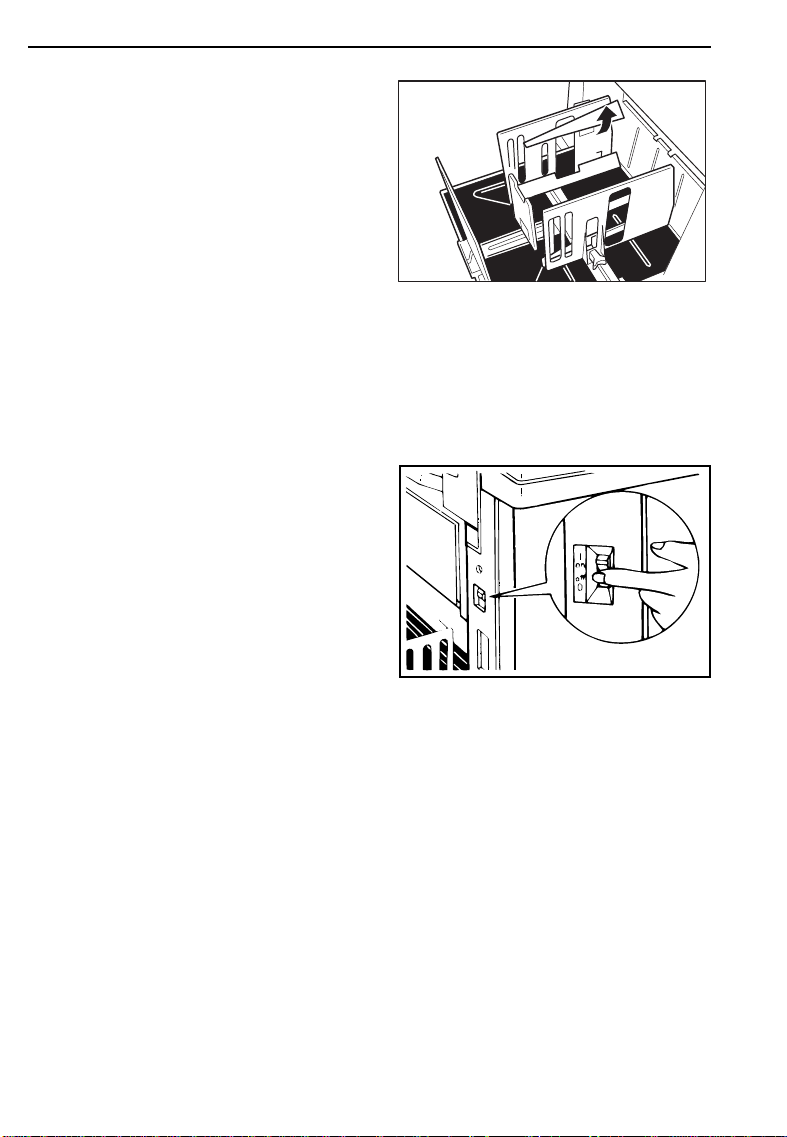
Turn on the main switch.
A
16
Page 19

Standard Printing
Open the platen co ver.
1
Place the original fa ce down on
2
the exposure glass. Th e original
should be centere d according to
the size marks on the left scale.
OPERATION
Lower the platen cover.
3
Enter the number of prints re-
4
quired using the
❐
Up to 9999 prints can be entered
at one time.
❐
To change the number entered,
press the
the new number.
Clear
Number
key and then enter
keys.
1
2
3
4
5
6
7
8
9
0
C
#
17
Page 20
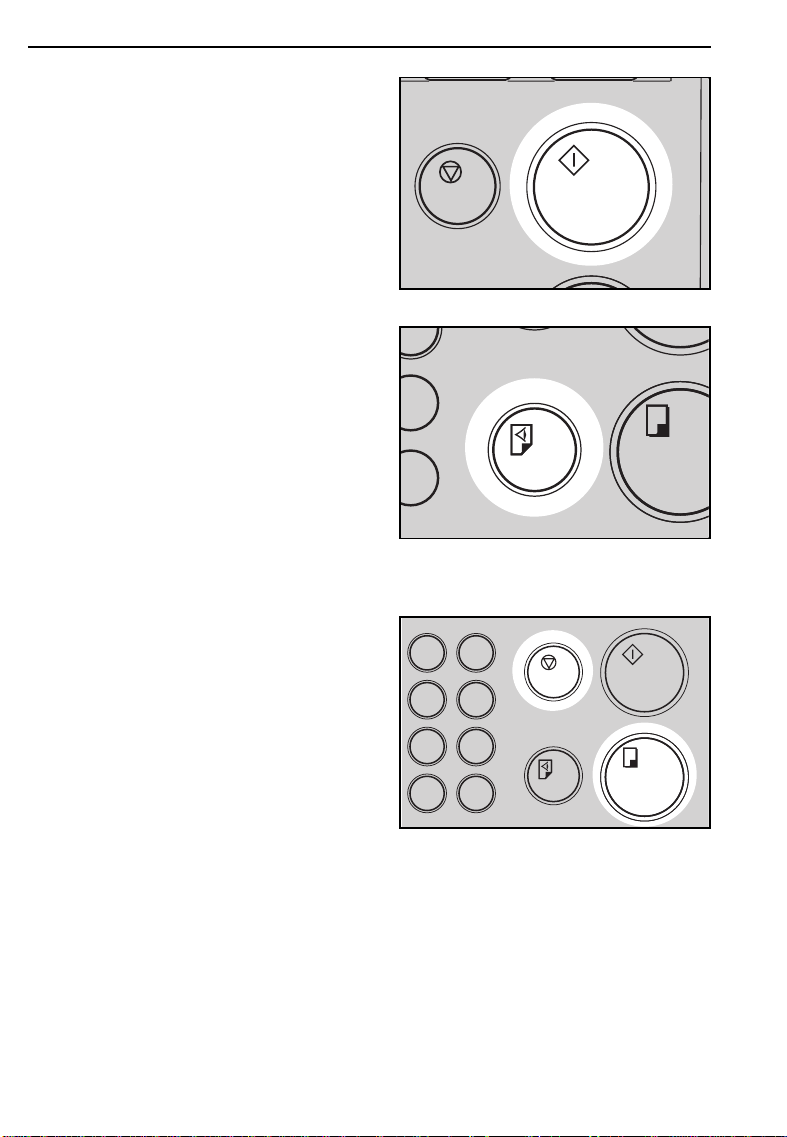
OPERATION
Press the
5
❐
A trial print is delivered to the paper delivery table.
Press the
6
the image density and the im-
Master Making
Proof
key and check
age position of the proo f print.
❐
If the image position is not correct,
adjust it using the
keys or the fine adjustment dial.
(☛ See pages 21 and 22.)
❐
If the image density is slightly dark
or light, adjust the image density
by pressing the
See page 24.)
Press the
7
❐
After printing is completed, the
same number of prints is automatically set for the next job.
❐
If you want to stop the machine
during a print run, press the
key.
Print Start
Image Position
Speed
key.
key.
keys. (
Stop
☛
9
#
2
3
5
6
8
9
0
#
Remove the prints from the pa-
8
per delivery table.
❐
To clear all the modes you have
selected, press the
key.
18
Clear Modes
Page 21
OPERATION
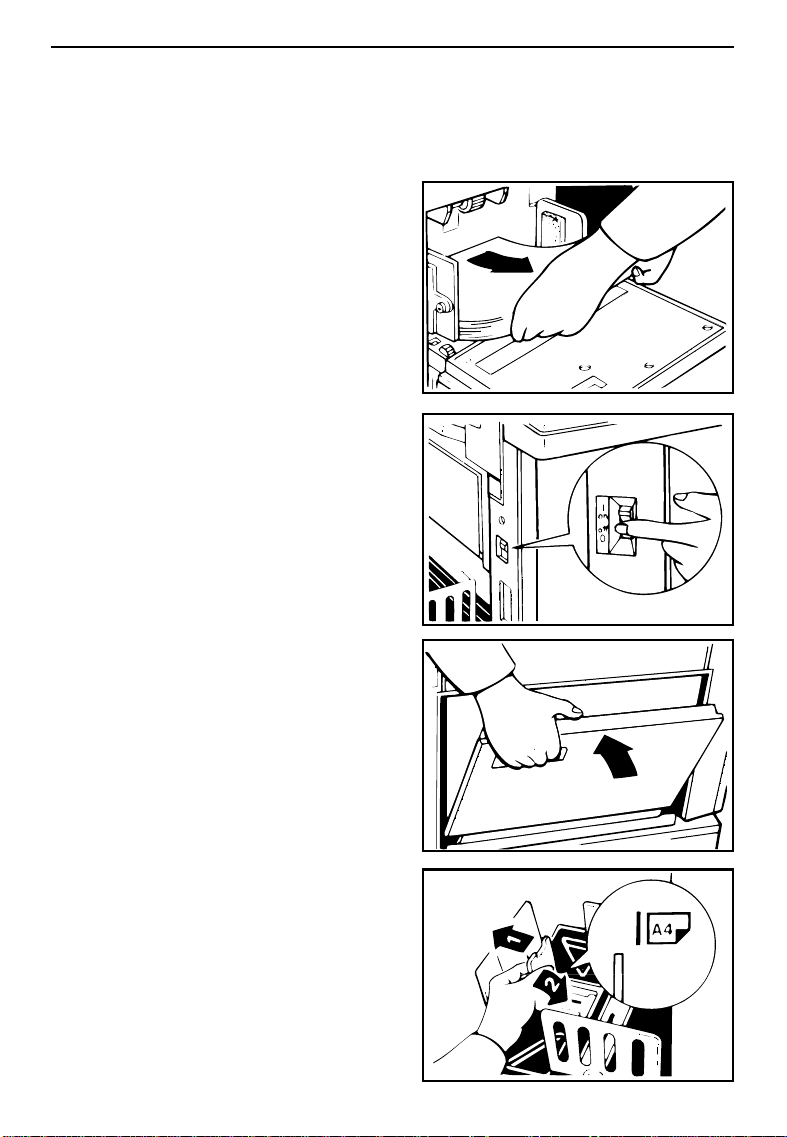
Restoring Paper Feed And Paper Delivery Tables
Remove the pa per from the pa-
1
per feed table.
❐
The paper feed table will lower.
Turn off the main switc h.
2
Close the paper feed table.
3
Push the small size paper deliv-
4
ery plate to the left, then lower
it, if necessary.
Return the left and right guides
to their original positions , if nec-
essary.
19
Page 22
OPERATION
Move the side plates to the
5
sides, then lower them.
❐
Make sure that the side plates do
not touch the small size paper delivery end plate.
Move the end plate until the
6
plate handle is flush with the
end of the table.
Lower the end plate.
7
Close the table.
8
20
Page 23

6
OPERATION
Adjusting The Image Position
Shifting the image position forward or backward
Press the right or left
1
Position
❐
When you shift the image forwards,
leave a margin (more than 5 mm,
0.2") at the leading edge. If there is
no margin, paper might wrap
around the drum and cause a misfeed.
❐
The right or left
keys shift the image about 0.5 mm,
1/50" each time they are pressed.
When the indicator changes, the
image position shifts about 5 mm,
1/5".
Press the
2
image position ag ain.
key.
Proof
Image Position
key. Check the
Image
12 3
+2 +1 0 -1 -2
9
#
21
Page 24

6
OPERATION
Shifting the image to the right or left
❐
When your machine is equipped with the optional large capacity tray, ☛ see
page 88.
Turn the side plate fine adjust-
1
ing dial as shown in th e illustrations.
❐
The image position can be shifted
up to about 10 mm, 2/5" each way.
Each division on the scale is 2
mm, 0.08".
❐
If your machine is equipped with
the optional sorter stapler, the image position is shifted to 3 mm,
0.12" for each division on the
scale.
Adjust the paper delivery side
2
plates to the print paper position.
Press the
3
image position.
Proof
key. Check the
Shifting the image to the rig ht
Shifting the image to the left
9
#
22
Page 25
Adjusting The Image Density
5
Before making a master
OPERATION
Use the
1
fore pressing the
ing
Image Density
key.
key be-
Master Mak-
After making a master
Press the
1
crease the speed, press the
“ ” key. To reduce the sp eed,
press the “ ” key.
❐
The faster the printing speed becomes, the lighter the printing density is. If you want darker prints,
decrease the printing speed.
❐
If you use the Sort, Staple Sort, or
Class Sort function, the setting
should be Setting 1.
Speed
keys. To in-
1234
12345
23
Page 26
OPERATION
Changing The Printing Speed
Use the
Speed
keys to adjust the sp eed of the machine with the im age
density and printing p aper.
Press the
Speed
keys. To increase the speed, press the
“ ” key. To reduce the speed,
press the “ ” key. The printing speed will be changed as
follows:
Setting 1: 60 sheets/minu te
Setting 2: 75 sheets/minu te
Setting 3: 90 sheets/minu te
Setting 4: 105 sheets/min ute
Setting 5: 120 sheets/min ute
❐
When the main switch is turned on,
Setting 3 is selected.
❐
The faster the printing speed becomes, the lighter the printing density is, and vice versa.
❐
If you use the Sort, Staple Sort, or
Class Sort function, the setting
should be Setting 1.
12345
24
Page 27
OPERATION
Stopping The Machine During A Print Run
When you want to stop the machine during a print
run and print the next original
Press the
Stop
key.
C
1
Set the new original.
2
Enter the number of prints and
3
press the
When you want to change the number of prints entered or check the completed prints
Press the
1
Change the nu mber of prints or
2
check the completed prints.
❐
When you change the number of
prints, you can re-enter the number
using the
pressing the
Master Making
Stop
key.
Number
Stop
keys after
key.
key.
2
3
5
6
8
9
0
#
Press the
3
Print Start
key.
25
Page 28
OPERATION
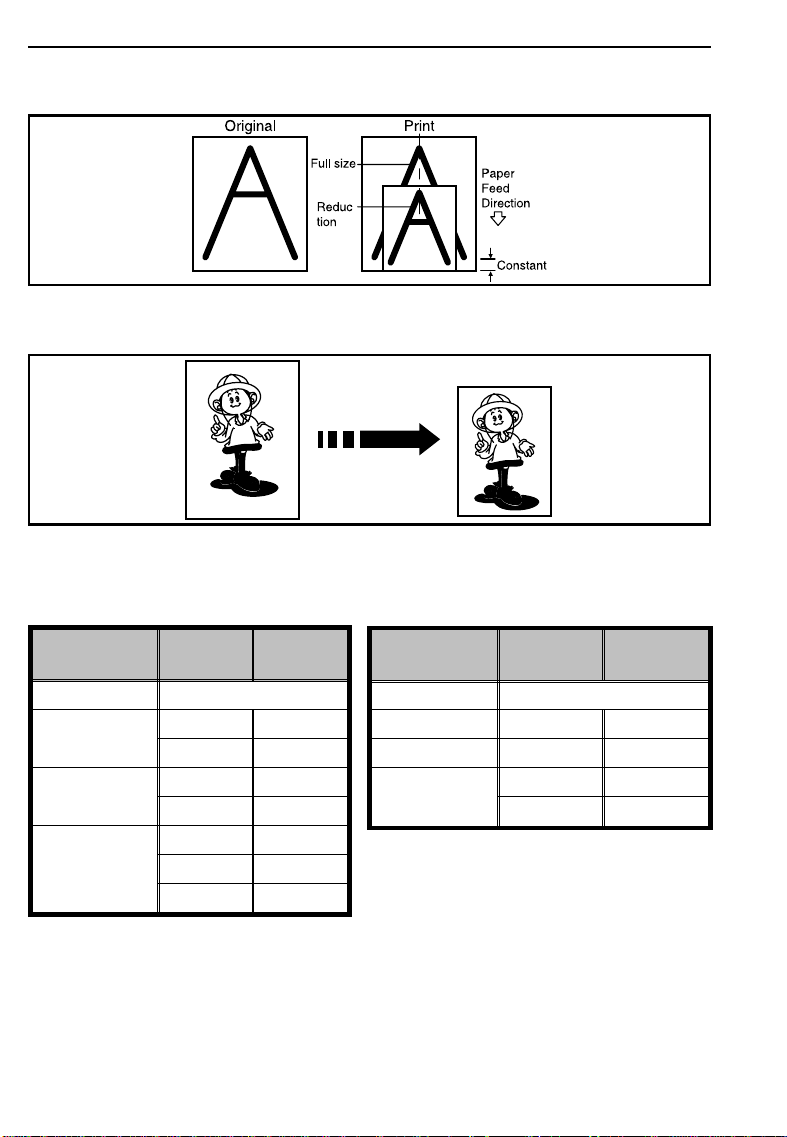
Reduce Printing
❐
The center and the leading edge of the print image do not shift when a print
image is made with this function.
Prints can be reduc ed in size by using the
Metric version
—
Reproduction
Ratio
Original
Size
—
Print
Size
Reproduction
93 % *
87 %
A3 B4
A4 B5
82 %
B4 A4
B5 A5
Reduce
key.
— Inch version —
Original
Ratio
93 % *
77 % 8
74 % 11" x 15" 8
65 %
Size
1/2" x 14" 81/2" x 11"
11" x 17" 8
1/2" x 11" 51/2" x 81/2"
8
Print Size
A3 A4
71 %
A4 A5
B4 B5
* Select this ratio when you make prints with a lot of edge margins.
26
1/2" x 11"
" x 11"
1/2
Page 29
A3 B4
A4 B5
OPERATION
Select the desired reduction ra-
1
tio using the
Make sure that the original and
2
the print paper are the correct
size.
Set your originals on the expo-
3
sure glass or in the optional
document feeder.
Press the
4
Check the ima ge position of the
trial or proof print.
❐
If the image position is not correct,
adjust it using the
keys (☛ see page 21) or the side
plate fine adjusting dial (☛ see
page 22).
Reduce
Master Making
key.
Image Position
key.
B4 A4
A3 A4
B5 A5
B4 B5
100
100
+2
Make your prints.
5
27
Page 30
OPERATION
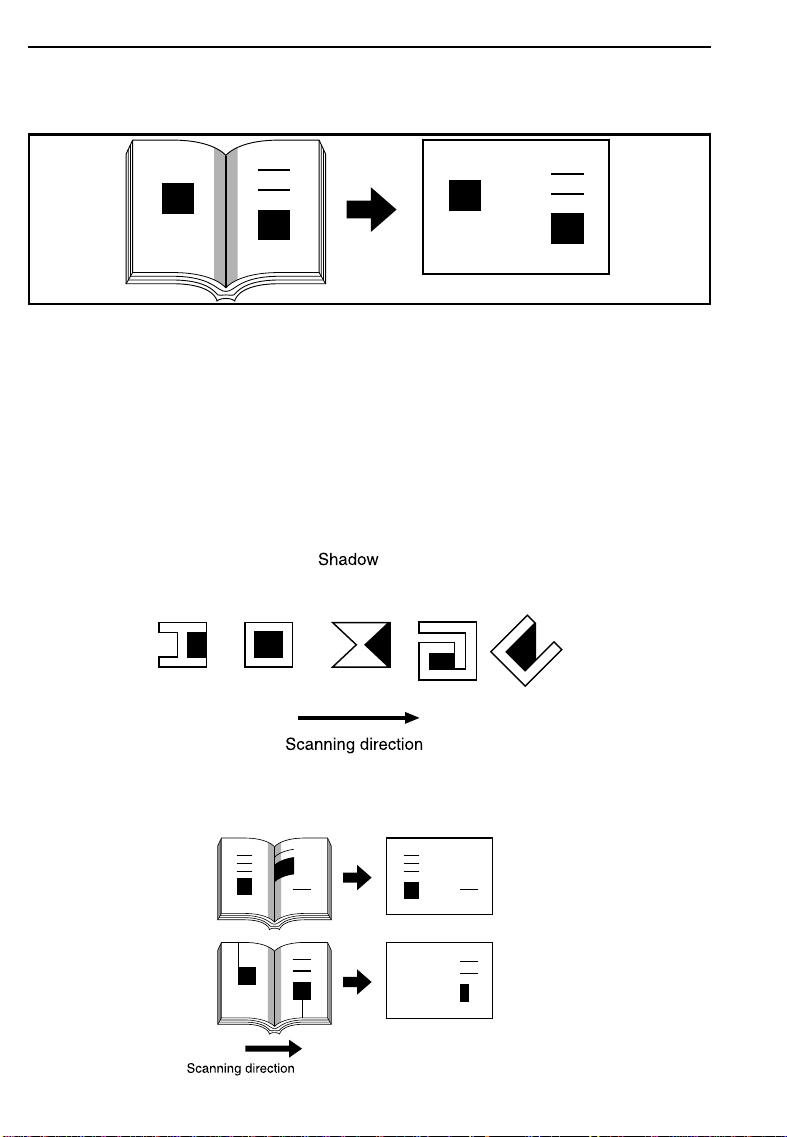
Erasing Center And Edge Margins
When printing from thick books, or similar originals, the binding margin
at the center and the edges might appear on prints. To prevent this,
follow the steps on th e next page.
❐
The 1 mm, 0.02" margins on all four sides of the original will be erased. The
width of the margins will change depending on the reduction ratios.
❐
Shadows near the book edge might not be erased completely.
❐
If the shape of the originals are as below, shadows might appear on the
prints. In this case, make a master with the platen cover closed.
❐
If there is a line or solid image on the margin and you erase the center and
the edges, the image might be erased as shown below. In this case, use
the function described on page 31.
28
Page 31

OPERATION
❐
If you do not press hard on the book while it is scanned, the margin at the
center might not be erased completely.
❐
If the machine is installed under a strong light, such as a fluorescent light, a
shadow might appear on the prints. In this case, close the platen cover a little to block the light or move the machine.
❐
If you set the original on the exposure glass as shown below, the screened
image below will not be printed. Lines or solid images that run from the
screened image below onto the original may also not be printed.
Set the book on the exposure
1
glass.
Keep the platen cove r at an an-
2
gle of
the exposure glass.
at least 25 degrees with
Press the
3
Press hard on the book with
your hand while it is scanned.
Master Making
key.
29
Page 32

6
OPERATION
Check the image positio n of the
4
trial or proof print.
❐
If the image position is not correct,
adjust it using the
keys (☛ see page 21) or the side
plate fine adjusting dial (☛ see
page 22).
Make your prints.
Image Position
5
9
#
30
Page 33

OPERATION
If you reproduce originals that have solid images at the edges, erasing
the binding a nd edge shadows w ill also erase solid imag es at the edge.
To reproduce the s olid image, follow the steps below.
Set the original on the exposu re
1
glass.
Enter the number of prints re-
2
quired using the
Number
keys.
Press the
Margin Erase
3
The following message will ap-
4
pear on the counter. The paper
size and direction will be
changed by pressing the
Up/Down
❐
Metric version
❐
Inch version
keys.
key.
31
Page 34

OPERATION
When you reach the desired
5
paper size and direction, press
Enter
the
key.
8
9
Press the
6
Check the image positio n of the
trial or proof print.
❐
If the image position is not correct,
adjust it using the
keys (☛ see page 21) or the side
plate fine adjusting dial (☛ see
page 22).
Make your prints.
Master Making
Image Position
7
key.
0
#
32
Page 35

Printing On Thick Or Thin Paper
OPERATION
When you make prints on thick (127.9 to 209.3 g/m2, 34 to 55.6 lb) or
thin (47.1 to 81.4 g/m
2
, 12.5 to 21.6 lb) paper, perform the following
steps.
Printing on thick paper
When you use paper heavier
1
than 127.9 g/m
lighter than 209.3 g/m
position the pressure lever (A)
to the Thick paper po sition.
❐
When you use paper heavier than
64 g/m
157.0 g/m
pressure lever (A) to the standard
position.
❐
In the case of paper smaller than
B5, 5
81.4 g/m
roller pressure lever to the Thin paper position.
2
, 17 lb and lighter than
2
" x 8
1/2
2
(21.6 lb), move the feed
Push the pressure levers (B)
2
down.
❐
There are two pressure levers (B).
Make sure that both levers are
down.
❐
If dog-eared or wrinkled prints are
delivered, push the levers up.
2
, 34.0 lb and
2
, 55.6 lb,
, 41.7 lb, position the
" and heavier than
1/2
33
Page 36

OPERATION
Printing on thin paper
Set the side pads (move the
1
side pad levers to the right).
Position the pressure lever (A)
2
to the Thin paper positio n.
Push the pressure levers (B)
3
down.
❐
If dog-eared or wrinkled prints are
delivered, push the levers up.
❐
There are two pressure levers (B).
Make sure that both levers are
down.
34
Page 37

5
OPERATION
Photo Mode Printing
Original Photo mode Line mode Line/Photo mode
When printing a photog raph or a color orig inal, select Photo mod e.
❐
Moire patterns may occur when screened originals are printed.
❐
When printing originals with both letters and photos using Photo mode, the
image of the letters will be light. Select Line/Photo mode using the
Mode
key.
Image
Press the
1
select Photo mode.
Press the
2
to adjust the image density.
Image Mode
Image Density
key to
aa
aa
key
1234
35
Page 38

OPERATION
If necessary, adjust the screen
3
image by pressing the
key.
If necessary, adjust the contrast
by pressing the
Set your originals on the expo-
4
sure glass or in the optional
document feeder.
Contrast
Screen
key.
Press the
5
Check the image positio n of the
trial or proof print.
❐
If the image position is not correct,
adjust it using the
keys (☛ see page 21) or the side
plate fine adjusting dial (☛ see
page 22).
Make your prints.
Master Making
Image Position
6
key.
36
Page 39

Ink Saving (Economy Mode)
When you want to sa ve ink, select Eco nomy mode.
❐
The printing density may be light in this mode.
OPERATION
Press the
Economy Mode
1
Set your originals on the expo-
2
sure glass or in the optional
document feeder.
Press the
3
Check the ima ge position of the
trial or proof print.
❐
If the image position is not correct,
adjust it using the
keys (☛ see page 21) or the side
plate fine adjusting dial (☛ see
page 22).
Make your prints.
Master Making
Image Position
4
key.
12345
key.
37
Page 40

OPERATION
Printing From Several Originals At Once
Use the
Auto Cycle
key to process masters and make prints at one
stroke.
❐
When you use the optional document feeder, it is not necessary to place
originals one by one. All originals are fed and prints are completed after you
press the
❐
If you use the optional tape dispenser, the tape dispenser drops a strip of
paper onto the top of the paper stack after the last page of each printing set
is fed out to the paper delivery table. This marks the end of each printing
group.
Print Start
key.
Set the original face down on
1
the exposure glass or in the optional document feeder.
❐
You can set up to 20 originals into
the optional 20 originals document
feeder.
❐
You can set up to 50 originals into
the optional 50 originals document
feeder.
Enter the number of prints re-
2
quired using the
Number
keys.
1
2
3
4
5
6
Press the
3
Check the image positio n of the
Master Making
trial or proof print.
❐
If the image position is not correct,
adjust it using the
keys (☛ see page 21) or the side
plate fine adjusting dial (☛ see
page 22).
38
Image Position
key.
7
8
9
0
C
#
Page 41

OPERATION
Press the
Auto Cycle
key.
4
❐
If you press the
you cannot make proof prints by
pressing the
If you use the optional tape dis-
5
penser, turn on the power
switch of the tape dispe nser.
Press the
Auto Cycle
Proof
key.
Print Start
key.
6
❐
If you set originals into the optional
document feeder, originals are fed
and prints are completed automatically.
key,
Repeat steps 1 through 3 until
7
all originals are printed when
you set originals on the expo-
sure glass.
❐
After the last page of each set is
fed out to the paper delivery table,
the optional tape dispenser drops a
strip of paper on the top of the paper stack. The next cycle begins.
39
Page 42

OPERATION
Group Printing From The Same Original (Class Mode)
Use the
original. The same number of prin ts is made for each s et.
❐
The optional tape dispenser automatically feeds out strips of paper which
separate the printing groups on the paper delivery table.
❐
Up to 99 sets of prints can be selected for one original.
1
2
Memory/Class
Press the
light the Class indicato r.
Set the original face down on
the exposure glass or in the optional document feeder.
Memory/Class
key to make sets of prints from the same
key to
12345
40
Page 43

OPERATION
With the
3
the number of prints for each
Number
keys, enter
set to be made from the origi-
nal.
Press the
4
With the
5
the desired numb er of sets.
❐
The maximum number of sets that
can be made is 99.
Enter
key.
Number
keys, enter
8
0
1
2
3
4
5
6
7
8
9
0
C
#
9
#
1
2
3
4
5
6
Turn on the power s witch of the
6
optional tape dispenser.
7
8
9
0
C
#
41
Page 44

OPERATION
Press the
7
Check the image positio n of the
Master Making
trial or proof print.
❐
If the image position is not correct,
adjust it using the
keys (☛ See page 21) or the side
plate fine adjusting dial (☛ See
page 22).
Image Position
Make your prints.
8
❐
After the last page of each printing
set is fed out to the paper delivery
table, the tape dispenser drops a
strip of paper on the top of the paper stack.
❐
If the power switch of the optional
tape dispenser is turned off or the
tape dispenser is not installed in
your machine, the group printing
cycle stops after each set is delivered. Remove the set of prints
from the paper delivery table and
press the
the next group printing cycle.
Print Start
key to start
key.
42
Page 45

Group Printing From Different Originals (Memory Mode)
OPERATION
Use the
Memory/Class
key to make sets of prints from different origi-
nals.
❐
With the optional document feeder, you can set several originals and make
prints of all of them at once. ☛ See page 63.
❐
The optional tape dispenser automatically feeds out strips of paper which
separate the printing groups on the paper delivery table.
Press the
1
light the Memory indica tor.
With the
2
the desired number of prints for
Memory/Class
Number
keys, enter
key to
12345
1
2
3
the first original.
4
5
6
7
8
9
C
0
#
43
Page 46

OPERATION
Press the
3
stores the number of prints to
be made for the first original in
memory 1.
❐
When the number of prints in each
set is the same, it is not necessary
to input the number of prints for
each group in memory. Simply select Auto Cycle mode and enter the
desired number of prints once.
With the
4
the number of prints for the
second original.
Press the
5
stores the number of prints to
be made for the second original
in memory 2.
Repeat steps 4 and 5 for each
6
original.
❐
The number of prints for up to 20
originals can be stored.
Enter
Number
Enter
key. This
keys, enter
key. This
8
0
9
#
1
2
3
4
5
6
7
8
9
0
C
#
Press the
7
memory returns to memo ry 1.
❐
If you store the number of prints for
20 originals, the memory number
returns to 1. It is not necessary to
press the
44
Enter
Enter
key again. The
key.
8
0
9
#
Page 47

Set the first original face down
8
on the exposure glass.
❐
Set originals one sheet at a time in
the same order that you stored
them in memory.
OPERATION
Press the
9
Check the ima ge position of the
trial or proof print.
❐
If the image position is not correct,
adjust it using the
keys (☛ see page 21) or the side
plate fine adjusting dial (☛ see
page 22).
.
Turn on the power s witch of the
A
optional tape dispenser.
.
Press the
Master Making
Image Position
Auto Cycle
key.
B
❐
If you press the
you cannot make proof prints by
pressing the
Auto Cycle
Proof
key.
key.
key,
45
Page 48

OPERATION
.
Press the
Print Start
key.
C
❐
After the first set is fed to the paper delivery table, the optional tape
dispenser drops a strip of paper on
the top of the paper stack.
.
After the first set is completed,
D
set the second original on the
exposure glass and press the
Master Making
.
Repeat step 13 until you have
E
finished printing.
key.
46
Page 49

OPERATION
Combine 2 Originals
You can print 2 separate originals on a single sheet of paper. The
following tables list the combinations that can be used when combin ing
two originals.
Metric version
—
Original Size
Paper Size
B4
A4
B5
—
:
A4
;
;
;
87% 100% — — —
71% 82% 100% — —
— 71% 87% 100% —
B5
:
A5
:
B6
:
A6
:
;
A5
— Inch version —
Original Size
Paper Size
1/2" x 14"
8
1/2" x 11"
8
1/2" x 81/2"
5
— — 71% 82% 100%
81/2" x 11"
;
;
;
77% 100%
65% 100%
:
— 65%
51/2" x 81/2"
:
47
Page 50

OPERATION
❐
If originals are longer than the maximum allowable length for combined
prints, images do not completely appear on prints. The following table gives
the maximum allowable combined original length for each print paper size.
Print paper
size
;
B4
;
A4
;
B5
;
A5
" x 14"
1/2
8
" x 11"
1/2
8
1/2" x 81/2"
5
Maximum allowable original length for combining
prints
182 mm
148 mm
128 mm
105 mm
;
;
;
178 mm, 7.0"
140 mm, 5.5"
108 mm, 4.25"
Maximum allowable original length = actual
original length x magnification ratio
❐
Any image closer than 5 mm, 0.2" to the leading edge of the first original will
not be printed. Also, any image closer than 4 mm, 0.16" to the leading edge
of the second original will not be printed. When the image is too close to the
leading edge, use copies of the originals with the image shifted at least 5
mm, 0.2" for the first original (4 mm, 0.16" for the second original) from the
leading edge.
❐
You can select different kinds of image settings for the first and second
original.
❐
When you use the optional document feeder with this function, ☛ see page
61.
❐
Make sure that the paper feed side plates contact the paper lightly in the
Combine 2 Originals function. Otherwise, the two original images do not appear at the proper position on the prints.
48
Page 51

Set the first original face down
1
and with the top toward the o p-
erating side.
❐
The first original will be printed on
the leading part of the print.
Enter the number of prints us-
2
ing the
Number
keys.
Check the print paper size and
3
the reproduction ratio.
OPERATION
1
2
3
4
5
6
7
8
9
0
C
#
Press the
4
key.
Combine 2 Originals
12 3
-2
aa
aa
aa
49
Page 52

OPERATION
Press the
5
The beeper sounds after the
6
first original is on the master.
Set the second original face
down and with the top toward
the operating side.
Press the
7
Check the image positio n of the
trial or proof print.
❐
If the image position is not correct,
adjust it using the
keys (☛ See page 21) or the side
plate fine adjusting dial. (☛ See
page 22.)
Master Making
Master Making
Image Position
key.
key.
Make your prints.
8
50
Page 53

1
4
7
2
5
8
0
3
6
9
#
Memory
Class
Line
Line/Photo
Photo
Reset
C
OPERATION
Skip Feed Printing (Skip Feed Mode)
If the back of prints are dirty, you can increase the time between two
prints using the
paper is fed the drum rotates once. However, you can select the
number of rotations of the drum. This gives you the chance to remove
prints one by one from the paper delivery table or insert one sheet of
paper between two prints. If you use this function, you can also use
paper longer than 447 mm, 17.5" in spite of the maximum length
limitations of paper.
❐
The maximum length of paper in Skip Feed mode is 590 mm, 23.2".
❐
When you use paper longer than 447 mm, 17.5", completed prints will not be
delivered to the paper delivery table properly, so receive them by hand.
Set your originals on the expo-
1
sure glass or in the optional
document feeder.
Skip Feed
key. In the d efault setting, when on e sheet of
While pressing the
2
key, select the number of rota-
Skip Feed
tions of the drum while one
sheet of paper is fed, using the
Number
❐
You can select from 1 to 9 rotations.
❐
The beeper sounds after you set
the number of rotations.
key.
Enter the number of prints us-
3
ing the
Number
keys.
1
2
3
4
5
6
7
8
9
0
C
#
51
Page 54

OPERATION
Press the
4
Check the image positio n of the
trial or proof print.
❐
If the image position is not correct,
adjust it using the
keys (☛ see page 21) or the side
plate fine adjusting dial (☛ see
page 22).
Make your prints.
Master Making
Image Position
5
key.
52
Page 55

OPERATION
User Program
This User Program function allows you to store and recall up to 9
frequently used job setups.
❐
The stored programs are not cleared when you turn off the main switch.
How to input a user program
Select and enter the job set-
1
tings you want to sto re in mem-
ory.
Press the
Program
key.
2
Select one of the program num-
3
bers (1 to 9). Then, continue
pressing the
the beeper sounds.
❐
Make sure that the previous job
settings stored under the selected
program number are overwritten.
Number
key until
1
2
3
4
5
6
7
8
9
0
C
#
53
Page 56

OPERATION
How to access a user program
Press the
Program
key.
1
Using the
2
the number of the program that
you want to access .
Press the
3
❐
All stored job settings are recalled.
Number
Enter
key.
keys, enter
8
1
2
3
4
5
6
7
8
9
0
C
#
9
54
0
#
Page 57

Set your originals on the expo-
4
sure glass or in the optional
document feeder.
OPERATION
Press the
5
Master Making
key.
55
Page 58

OPERATION
Printing Of Secret Documents (Security Mode)
This function prevents others from making prints of secret documents
using its master.
Make your prints.
1
Proof
CS Mode
key or the
While pressing the
2
key, press "1" using the
ber
key.
❐
If you press the
Print Start
print job, the beeper sounds and
you cannot make prints.
❐
You cannot cancel Security mode
even if you turn off the main
switch.
❐
If you make the next master, Security mode is canceled.
key after finishing one
Num-
1.
2.
3.
4.
56
Page 59

OPTIONAL FUNCTIONS
OPTIONAL FUNCTIONS
Printing Using The Optional 20 Originals Or 50
Originals Document Feeder
Guide to document feeder components
❐
If you have optional sorter staplers and you want to have a document feeder,
the optional 50 originals document feeder should be equipped with your machine.
ADF Unit Open Lever
Use to open the ADF
unit.
Original Tray
Originals used to
make masters are
delivered to this
tray.
Original Guides
Adjust these guides
to position the originals correctly.
ADF Unit
Feeds the original
to the master making position.
57
Page 60

OPTIONAL FUNCTIONS
Originals
❐
The following types of originals are not recommended for use with the optional document feeder. Set these types of originals on the exposure glass.
2
• Originals heavier than 127.9 g/m
• Originals lighter than 40.7 g/m
• Carbon coated originals
• Damaged originals
• Originals with glue on them
• Originals perforated for ring binders
• Book originals
• Originals written with a pencil or ball-point pen
• Originals smaller than 90 mm x 140 mm, 3.6" x 5.6"
• Originals larger than 307 mm x 432 mm, 12.0" x 17.0"
• Folded, curled, creased originals
• Bound, stapled, or clipped originals
❐
If you use paste-up originals, make sure the pasted parts hold firmly to the
base sheet. If the thickness of the paste-up original is more than 0.2 mm,
1/125" and the space between the pasted parts is less than 2 mm, 2/25", a
shadow might appear on the prints.
❐
The first 5 mm, 0.2", of the leading edge and the last 3 mm, 0.12", of the
trailing edge cannot be printed. Make sure the leading edge margin is at
least 5 mm, 0.2", and the trailing edge margin is at least 3 mm, 0.12".
, 34 lb
2
, 10.8 lb
58
Original
5 mm, 0.2"
Print
3 mm, 0.12"
Page 61

OPTIONAL FUNCTIONS
Setting originals into the document feeder
❐
If you set one original into the document feeder while another original is still
on the exposure glass, the original set into the document feeder will be
scanned first.
Set the original tray.
1
Adjust the origina l guides to the
2
size of the originals .
Insert the originals face do wn in
3
the document feeder until it
stops.
❐
Do not insert different size originals
at the same time.
❐
Approximately 20 originals can be
inserted at one time in the 20 originals document feeder. The first
(bottom) original will be fed first.
❐
Approximately 50 originals can be
inserted at one time in the 50 originals document feeder. The last
(top) original will be fed first.
❐
The guides must fit snugly against
both sides of the stack.
59
Page 62

OPTIONAL FUNCTIONS
Set the required image settings
4
and press the
Master Making
key.
Make your prints.
5
❐
If the next original has been set in
the document feeder before the
machine stops, that original is fed
automatically and a trial print is delivered to the paper delivery table
after the print of the first original is
completed. Check the image position of the trial print of the next
original. If necessary, make proof
prints using the
the image position again.
❐
When you set originals in the 50
originals document feeder, the last
original (original set on the top of
the original stack in the document
feeder) will be delivered to the
original tray first and the first original (original set at the bottom of
the original stack in the document
feeder) will be delivered to the
original tray last. So, the order of
originals is inverted as shown in
the illustration. Reset the order of
originals.
Proof
key to check
60
Page 63

OPTIONAL FUNCTIONS
Combine 2 originals with the document feeder
☛
❐
See page 47 for details about the Combine 2 originals function.
.
Insert the 2 originals face down
1
and with the top toward the o p-
eration side.
❐
When you use the optional 20
originals document feeder, the bottom original will be printed on the
leading part of print.
❐
When you use the optional 50
originals document feeder, the top
original will be printed on the leading part of print.
Enter the number of prints us-
2
ing the
Number
keys.
1
2
3
4
5
6
7
8
9
.
Check the print paper size and
3
the reproduction ratio.
.
Press the
4
key.
Combine 2 Originals
0
C
12 3
-2
#
aa
aa
aa
61
Page 64

OPTIONAL FUNCTIONS
Press the
5
Check the image positio n of the
Master Making
trial or proof print.
❐
If the image position is not correct,
adjust it using the
keys (☛ see page 21) or the side
plate fine adjusting dial (☛ see
page 22).
❐
After the first original is on the
master, the second original is fed.
❐
If you set only one original, the
beeper sounds after the first original is on the master. Set the second original and the desired image
settings. Then, press the
Making
key.
Image Position
key.
Master
62
Page 65

OPTIONAL FUNCTIONS
Group printing from different originals with the document feeder (Memory mode)
❐
To prevent original misfeed, do not set originals of different sizes.
❐
Do not set more than 20 originals at one time.
Follow steps 1 to 7 o n page 43
1
and 44.
Set the originals fa ce down into
2
the document feeder.
❐
When you use the optional 20
originals document feeder, the
originals are fed from the bottom of
the stack. Make sure that the originals are set in the correct sequence with the first original on the
bottom.
❐
When you use the optional 50
originals document feeder, the
originals are fed from the top of the
stack. Make sure that the originals
are set in the correct sequence
with the first original on top.
Press the
3
Check the ima ge position of the
Master Making
trial or proof print.
❐
If the image position is not correct,
adjust it using the
keys (☛ see page 21) or the side
plate fine adjusting dial (☛ see
page 22).
Image Position
key.
63
Page 66

OPTIONAL FUNCTIONS
Turn on the power switc h of the
4
optional tape dispe nser.
Press the
Auto Cycle
key.
5
❐
In Auto Cycle mode, printing starts
automatically after a trial print is
delivered.
Press the
6
❐
After the last page of each set is
fed out to the paper delivery table,
the tape dispenser drops a strip of
paper on the top of the paper
stack. The next cycle begins.
Print Start
key.
64
Page 67

OPTIONAL FUNCTIONS
Printing Using The Optional Sorter Stapler
Guide to 20-bin sorter stapler components
❐
Up to 2 sorter staplers can be equipped with your machine.
❐
If you have optional sorter staplers and you want to have a document feeder,
the optional 50 originals document feeder should be equipped with your machine.
❐
Sorter staplers and a tape dispenser cannot be equipped together.
❐
When you use the Sort, Staple Sort or Class Sort function, set the speed to
Setting 1.
Non-sort Tray
Staple Key
Press to set or
cancel Staple
mode.
If you do not select
Sort, Staple Sort or
Class Sort mode,
prints are delivered
here.
When a misfeed occurs, open to re move
misfed paper.
Stapler Cover
Open to remove misfed
staples.
65
Page 68

OPTIONAL FUNCTIONS
When you do not make prints in Sort, Staple, or Class Sort mode
When you have optional sorter staplers and you do not select Sort,
Staple Sort, or Class Sort mod e, the prints are delivered to the non-sort
tray.
Lift the side plates of the non-
1
sort tray and move them to
match the paper siz e.
Lift the end plate of the non-sort
2
tray and adjust it to the paper
size.
Set your originals on the expo-
3
sure glass or in the optional
document feeder.
66
Page 69

OPTIONAL FUNCTIONS
Press the
4
Then, make your prints.
Master Making
key.
Sorting into sets (123, 123, 123) (Sort mode)
3
1
2
3
1
2
3
1
2
One print of ea ch original is delive red to each bin and prints are collated
into sets.
❐
For Sorting, the following limitations apply:
3
1
2
Metric version:
Paper size A3 ;, B4 ;, A4 :;, B5 :;, A5 ;.
Paper weight 64 ~ 82 g/m
Maximum
capacity of bins
Maximum
number of sets
Paper that
cannot be used
Paper sizes described above with exception of A3:
50 sheets
A3 and paper sizes other than the sizes described above:
25 sheets
20 sets (per sorter stapler)
p Roughly-cut paper
p Paper of different thickness in the same stack
p Buckled or curled paper
p Short grain paper
2
67
Page 70

OPTIONAL FUNCTIONS
Inch version:
Paper size 11" x 17" ;, 8
Paper
weight
Maximum
capacity of
bins
Maximum
number of
sets
Paper that
cannot be
used
❐
Print sets over the maximum number of sets are delivered to the non-sort
tray.-
Paper sizes described above with exception of 11" x 17":
50 sheets
11" x 17" and paper sizes other than the sizes described
above: 25 sheets
❐
Roughly-cut paper
❐
Paper of different thickness in the same stack
❐
Buckled or curled paper
❐
Short grain paper
" x 14" ; , 8
1/2
17.1 ~ 21.8 lb
20 sets (per sorter stapler)
" x 11"
1/2
:;
, 5
1/2
" x 8
1/2
When you set orig inals on the exp osure glass
Press the
1
the Sort indicator.
Sorter
key to light
" ;.
If the Speed function Setting 1
2
indicator and the Special Feature indicator blink, set the
speed to Setting 1.
68
12345
Page 71

Set the last original on the ex-
3
posure glass.
❐
Make sure that the last original is
set first. Otherwise, prints are delivered to the bins in the wrong order.
Enter the number of sets re-
4
quired using the
❐
For the maximum number of sets,
☛
see page 67 or 68.
Number
keys.
OPTIONAL FUNCTIONS
1
2
3
4
5
6
7
8
9
0
C
#
Press the
5
Check the ima ge position of the
Master Making
trial or proof print.
❐
If the image position is not correct,
adjust it using the
keys (☛ see page 21) or the side
plate fine adjusting dial (☛ see
page 22).
❐
The trial and proof prints are delivered to the non-sort tray.
Image Position
Make your prints.
6
❐
Each print is delivered to each bin
of the sorter stapler.
key.
69
Page 72

OPTIONAL FUNCTIONS
Set the second to last original
7
on the exposure g lass.
Press the
8
Check the image positio n of the
trial or proof print.
Make your prints.
Master Making
key.
9
Repeat steps 7 through 9 until
A
you have finished printing.
When you set orig inals in the option al 50 originals do cument feeder
Follow steps 1 and 2 on page
1
68.
Set your originals in the op-
2
tional document feeder.
70
Page 73

Enter the number of sets re-
3
quired using the
❐
For the maximum number of sets,
☛
see page 67 or 68.
Number
keys.
OPTIONAL FUNCTIONS
1
2
3
4
5
6
7
8
9
0
C
#
Press the
4
Check the ima ge position of the
Master Making
trial or proof print.
❐
If the image position is not correct,
adjust it using the
keys (☛ see page 21) or the side
plate fine adjusting dial (☛ see
page 22).
❐
The trial and proof prints are delivered to the non-sort tray.
❐
If you press the
all sets of prints are delivered to
the bins automatically after pressing the
case, you cannot make proof prints
for each original.
Print Start
Image Position
Auto Cycle
key. In this
Make your prints.
5
❐
Each print is delivered to each bin
of the sorter stapler. Then, the next
original is fed and the machine
makes its master automatically.
key.
key,
Repeat step 5 until you have
6
finished printing.
71
Page 74

OPTIONAL FUNCTIONS
Stapling prints (Staple Sort mode)
3
1
2
3
1
2
3
1
2
1
2
3
3
1
2
1
2
3
1
3
After prints are sorted into s ets, they are stapled automatically.
❐
The original set direction and the
staple position of the prints are as
shown in the illustration.
❐
For Stapling, the following limitations apply:
Metric version:
Paper size A3 ; , B4 ;, A4
Paper weight 64 ~ 82 g/m
2
: 2 ~ 50 sheets
2
: 2 ~ 42 sheets
2
: 2 ~ 40 sheets
20 sets (per sorter stapler)
Stapler capacity
Maximum number
of sets
Paper that cannot
be used
64 g/m
75 g/m
80 g/m
❐
Roughly-cut paper
❐
Paper of different thickness in the same stack
❐
Buckled or curled paper
❐
Short grain paper
:;
2
, B5 :.
3
2
1
2
72
Page 75

OPTIONAL FUNCTIONS
Inch version:
Paper size 11" x 17" ; , 8
Paper weight 17.1 ~ 21.8 lb
17.1 lb: 2 ~ 50 sheets
Stapler capacity
Maximum number
of sets
❐
Roughly-cut paper
Paper that cannot
be used
❐
Print sets over the maximum number of sets are delivered to the non-sort
tray.
❐
Paper of different thickness in the same stack
❐
Buckled or curled paper
❐
Short grain paper
20.0 lb: 2 ~ 42 sheets
21.8 lb: 2 ~ 40 sheets
20 sets (per sorter stapler)
" x 14" ;, 8
1/2
" x 11"
1/2
:;
Setting stapling before prin ting (Auto Staple mode)
❐
This function can be used only when your machine is equipped with the
optional 50 originals document feeder.
.
Press the
1
the Staple Sort indicator.
Sorter
key to light
If the Speed function Setting 1
2
indicator and the Special Feature indicator blink, set the
speed to Setting 1.
12345
73
Page 76

OPTIONAL FUNCTIONS
Set your originals in the op-
3
tional 50 originals document
feeder.
Enter the number of sets re-
4
quired using the
Number
keys.
1
2
3
4
5
6
7
8
9
0
C
#
Press the
5
Check the image positio n of the
Master Making
trial or proof print.
❐
If the image position is not correct,
adjust it using the
keys (☛ see page 21) or the side
plate fine adjusting dial (☛ see
page 22).
❐
The trial and proof prints are delivered to the non-sort tray.
❐
If you press the
all sets of prints are delivered to
the bins automatically after pressing the
case, you cannot make proof prints
for each original.
74
Print Start
Image Position
Auto Cycle
key. In this
key.
key,
Page 77

Make your prints.
6
❐
Each print is delivered to each bin
of the sorter stapler. Then, the next
original is fed and the machine
makes its master automatically.
Repeat step 6 until you have
7
finished printing.
Caution: Do not insert your hands in
❐
❐
the bins during printing or
stapling.
After all prints are delivered to the
bins, the machine starts stapling.
To cancel Staple Sort mode, press
Staple
the
pler. If you press the
again, the machine starts stapling
prints again.
key on the sorter sta-
Staple
key
OPTIONAL FUNCTIONS
75
Page 78

OPTIONAL FUNCTIONS
Setting stapling after printin g (Manual Staple M ode)
When you set originals on the
1
exposure glass , follow the steps
1 through 10 on pages 68, 69
and 70.
When you set originals in the
optional document feeder, follow steps 1 through 6 on pag es
70 and 71.
When you use 2 or more origi-
2
nals, the
Staple
key on the
sorter stapler will be lit. Press
Staple
the
Caution: Do not insert your hands in
❐
To cancel Staple Sort mode while
stapling, press the
again. If you want to restart stapling, press the
again.
key.
the bins during printing or
stapling.
Staple
key
Staple
key once
76
Page 79

OPTIONAL FUNCTIONS
Bypass Feed Stapling
You can staple a stack of paper that is set on the first bin of the sorter
stapler.
❐
Before setting paper on the first bin, make sure that no prints remain on any
of the bins.
❐
For stapler capacity, ☛ see page 72 or 73.
Set the stack of pape r you want
1
to staple on the first bin.
❐
Make sure that the
the sorter stapler is lit.
❐
The paper stack must make contact the front cover and the fence
inside of the bins.
Staple
key on
Press the
2
Caution: Do not insert your hands in
Staple
the bin during stapling.
key.
77
Page 80

OPTIONAL FUNCTIONS
Group printing from the same original with the sorter stapler (Class Sort mode)
Use this function to make sets of prints from the same original. The
same number of prints is made for each set. They are delivered to the
each bin of the sorter s tapler.
❐
For Class Sorting, the following limitations apply:
Metric version:
Paper size A3 ;, B4 ; , A4
:;
Paper weight 64 ~ 82 g/m
Capacity of
bins
Maximum
number of sets
Paper that
cannot be used
Paper sizes described above with exception of A3:
50 sheets
A3 and paper sizes other than the sizes described above:
25 sheets
18 sets (When you have 1 sorter stapler)
38 sets (When you have 2 sorter staplers)
❐
Roughly-cut paper
❐
Paper of different thickness in the same stack
❐
Buckled or curled paper
❐
Short grain paper
, B5
2
:;
, A5 ;.
78
Page 81

Inch version:
Paper Size 11" x 17" ;, 8
Paper
Weight
Capacity of
bins
Maximum
number of
sets
Paper that
cannot be
used
Paper sizes described above with exception of 11" x 17":
50 sheets
11" x 17" and paper sizes other than the sizes described
above: 25 sheets
18 sets (When you have 1 sorter stapler)
38 sets (When you have 2 sorter staplers)
❐
Roughly-cut paper
❐
Paper of different thickness in the same stack
❐
Buckled or curled paper
❐
Short grain paper
" x 14" ; , 8
1/2
17.1 ~ 21.8 lb
" x 11"
1/2
OPTIONAL FUNCTIONS
:;
, 5
1/2
" x 8
1/2
:
"
Press the
1
the Stack indicator.
Sorter
key to light
If the Speed function Setting 1
2
indicator and the Special Fea-
ture indicator blink, set the
speed to Setting 1.
Set an original on the exposure
3
glass or in the document
feeder.
12345
79
Page 82

OPTIONAL FUNCTIONS
With the
4
the number of prints for each
Number
keys, enter
set to be made from the original.
Press the
5
With the
6
the desired number of sets.
❐
For the maximum number of sets,
☛
see page 78 or 79.
Enter
key.
Number
keys, enter
8
0
1
2
3
4
5
6
7
8
9
0
C
#
9
#
1
2
3
4
5
6
7
8
9
Press the
5
Check the image positio n of the
Master Making
trial or proof print.
❐
If the image position is not correct,
adjust it using the
keys (☛ see page 21) or the side
plate fine adjusting dial (☛ see
page 22).
80
Image Position
key.
0
C
#
Page 83

Make your prints.
6
❐
When you want to make prints using another original, remove prints
from the bins. Then, repeat steps 3
through 8.
OPTIONAL FUNCTIONS
81
Page 84

OPTIONAL FUNCTIONS
Printing Using The Optional Large Capacity
Tray (LCT)
Guide to large capacity tray components
❐
To install the large capacity tray, the LCT cabinet is required.
LCT image position
Switch
Press to shift the print
image to the right or
left.
LCT Cover
Open to load paper
or remove misfed
paper.
82
Paper Cassette for LCT
Page 85

Loading paper
❐
Maximum paper capacity is as follows:
4,000 sheets (64 g/m
3,000 sheets (80 g/m
Open the LCT co ver.
1
Push the slide cover in .
2
2
, 17 lb)
2
, 20 lb).
OPTIONAL FUNCTIONS
Load 500 sheets of paper at a
3
time.
83
Page 86

OPTIONAL FUNCTIONS
Press the
Down
key.
4
Repeat steps 3 and 4 until you
5
have finished load ing paper.
Close the slide cover and LCT
6
cover.
84
Page 87

Changing paper size
❐
The following sizes can be set in the LCT.
Metric version : A3
Inch version : 11" x 17"
, B4 ;, A4 :;, B5 :;, A5 ;.
;
, 8
" x 14" ;, 8
1/2
;
" x 11" :;.
1/2
OPTIONAL FUNCTIONS
Press the
1
with the LCT cove r closed.
After the beeper sounds, open
2
the LCT cover and push the
slide cover in.
Remove paper from the LCT.
Change Paper
3
key
Repeat steps 1 through 3 until
4
no paper remains in th e LCT.
85
Page 88

OPTIONAL FUNCTIONS
Loosen the screws of the side
5
plates.
Adjust the side plates to match
6
the paper size.
Secure the side plates with the
7
screws.
Load 500 sheets of paper at a
8
time.
86
Page 89

OPTIONAL FUNCTIONS
Press the
Down
key.
9
Repeat steps 9 and 10 until you
A
have finished loa ding paper.
Close the slide cover and LCT
BC
cover.
87
Page 90

OPTIONAL FUNCTIONS
Adjusting the image po sition to the right or left
❐
The image position can be shifted up to about 10 mm, 2/5" each way. Each
division on the scale is 2 mm, 0.08".
❐
If your machine is equipped with the optional sorter stapler, the image position is shifted to 3 mm, 0.12" for each division on the scale.
Shifting the image to the rig ht
Press the LCT image position
1
switch as shown in the illustration.
Shifting the image to the le ft
Press the LCT image position
1
switch as shown in the illustration.
88
Page 91

OPTIONAL FUNCTIONS
Printing using the paper cassette for LCT
While you make prints using the optional large capacity tray, you can
change paper size te mporarily using the p aper cassette for LC T.
❐
Maximum paper capacity is as follows:
500 sheets (64 g/m
400 sheets (80 g/m
Loading paper
Open the LCT co ver.
1
Push the slide cover in .
2
2
, 17 lb)
2
, 20 lb).
Load paper in the paper cas-
3
sette for LCT.
89
Page 92

OPTIONAL FUNCTIONS
Press the
4
seconds.
❐
Make sure that the
not lit.
Push the cassette forward until
5
it stops.
Close the slide cover and LCT
6
cover.
Down
key for about 2
Down
key is
Make your prints.
7
After printing is finished, remo ve
8
the cassette a nd close the slide
cover and LCT cover.
90
Page 93

OPTIONAL FUNCTIONS
Changing paper size
❐
The following sizes can be set in the paper cassette for LCT.
Metric version: A3
Inch version: 11" x 17"
Remove paper from the cas-
1
sette.
While pressing the release lever
2
on the left guide, adjust the left
and right side guides to match
the paper size.
, B4 ;, A4 :;, B5 :;, A5 ;, A6 ;.
;
, 8
;
" x 14" ;, 8
1/2
" x 11" :;.
1/2
Remove the end plate as
3
shown in the illustration.
91
Page 94

OPTIONAL FUNCTIONS
Set the end plate to match the
4
paper size as shown in the illustration.
Load paper in the cas sette.
5
92
Page 95

Set the paper size selector to
6
match the paper size and direc-
tion.
❐
The indicators on the paper size
selector and their equivalent paper
size are as following.
Metric version:
Indicators Paper size
A3 A3
B4 B4
A4 A4
A4R A4
B5 B5
B5R B5
A5R A5
A6R A6
Inch version:
Indicators Paper size
11 x 17 11" x 17"
1/2 x 14 81/2" x 14"
8
1/2 81/2" x 11"
11 x 8
1/2 x 11R 81/2" x 11"
8
OPTIONAL FUNCTIONS
;
;
:
;
:
;
;
;
;
;
:
;
Continue pressing the
7
key until the
Down
lit.
Down
key is not
93
Page 96

OPTIONAL FUNCTIONS
Push the cassette forward until
8
it stops.
Close the slide cover and LCT
9
cover.
94
Page 97

OPTIONAL FUNCTIONS
Color Printing Using The Optional Color Drum
Color drum units (red, blue, green, brown, yellow, purple, navy, and
maroon) are available as options in addition to the standard black unit.
For making color prints, a separate drum unit is necessary for each
color.
Making color prints
Make sure that the Color Print
1
indicator is lit.
B5
A5
B5
100
+2 +1 0
Press the
2
Check the image position on
the trial or proof print.
❐
If the image position is not correct,
adjust it using the
keys (☛ see page 21) or side plate
fine adjusting dial (☛ see page
22).
Make your prints.
Master Making
Image Position
3
key.
95
Page 98

OPTIONAL FUNCTIONS
Changing the drum unit for color printing
Open the front door.
1
.
Make sure that the lamp of the
2
drum rotation button is green. If
this lamp is red, pres s the drum
rotation button until the beeper
sounds and the lamp turns
green.
Lift the lock lever until it locks in
3
position.
96
Page 99

Pull out the drum unit handle
4
while pressing the release bar
inside the green h andle.
❐
If you cannot pull out the drum unit
even when the lamp of the drum
rotation button is green, push the
drum unit handle, then pull out the
drum unit.
Hold the rail on the drum and
5
slide out the drum while pulling
the release towards you.
Remove the drum unit from the
6
machine while holding the up-
per drum stay.
Caution: Be careful no t to let the drum
unit fall.
OPTIONAL FUNCTIONS
Insert the color drum unit along
7
the guide rail.
97
Page 100

OPTIONAL FUNCTIONS
Slide in the drum unit until the
8
drum unit locks in po sition.
Lower the drum un it lock lever.
9
Close the front door.
A
❐
Make sure that the Cover Open indicator turns off, and the Color
Drum indicator lights.
98
 Loading...