

Page 1
TELECOM
LASER MFP
SP1100S
Aficio SP1100S
User’s Guide
Read this manual carefully before you use this machine and keep it handy for future reference.
For safe and correct use, be sure to read the Safety Information in this manual before using the machine.
Page 2

Contents
Security 1
Security directives 1
Laser safety 1
For Europe/Asia 1
For North America 1
Certification 2
Declaration of conformity 2
Notice to Users in EU Countries 2
Notice to Users Accessing Analog PSTN
in EU Countries 2
Symbols for the main power switch 2
Positions of Warning and Caution labels on
the machine 3
Environment 4
Batteries and rechargeable batteries 4
The product 4
Users in the EU, Switzerland and Norway 4
All Other Users 4
Software use license 5
Definition 5
License 5
Property 5
Duration 5
Warranty 5
Responsibility 5
Development 5
Registered trademarks 6
Notice 6
Installation 7
Location conditions 7
Cautions of use 7
Safety information 8
Safety During Operation 8
Power Supply 9
Rules for use symbols 9
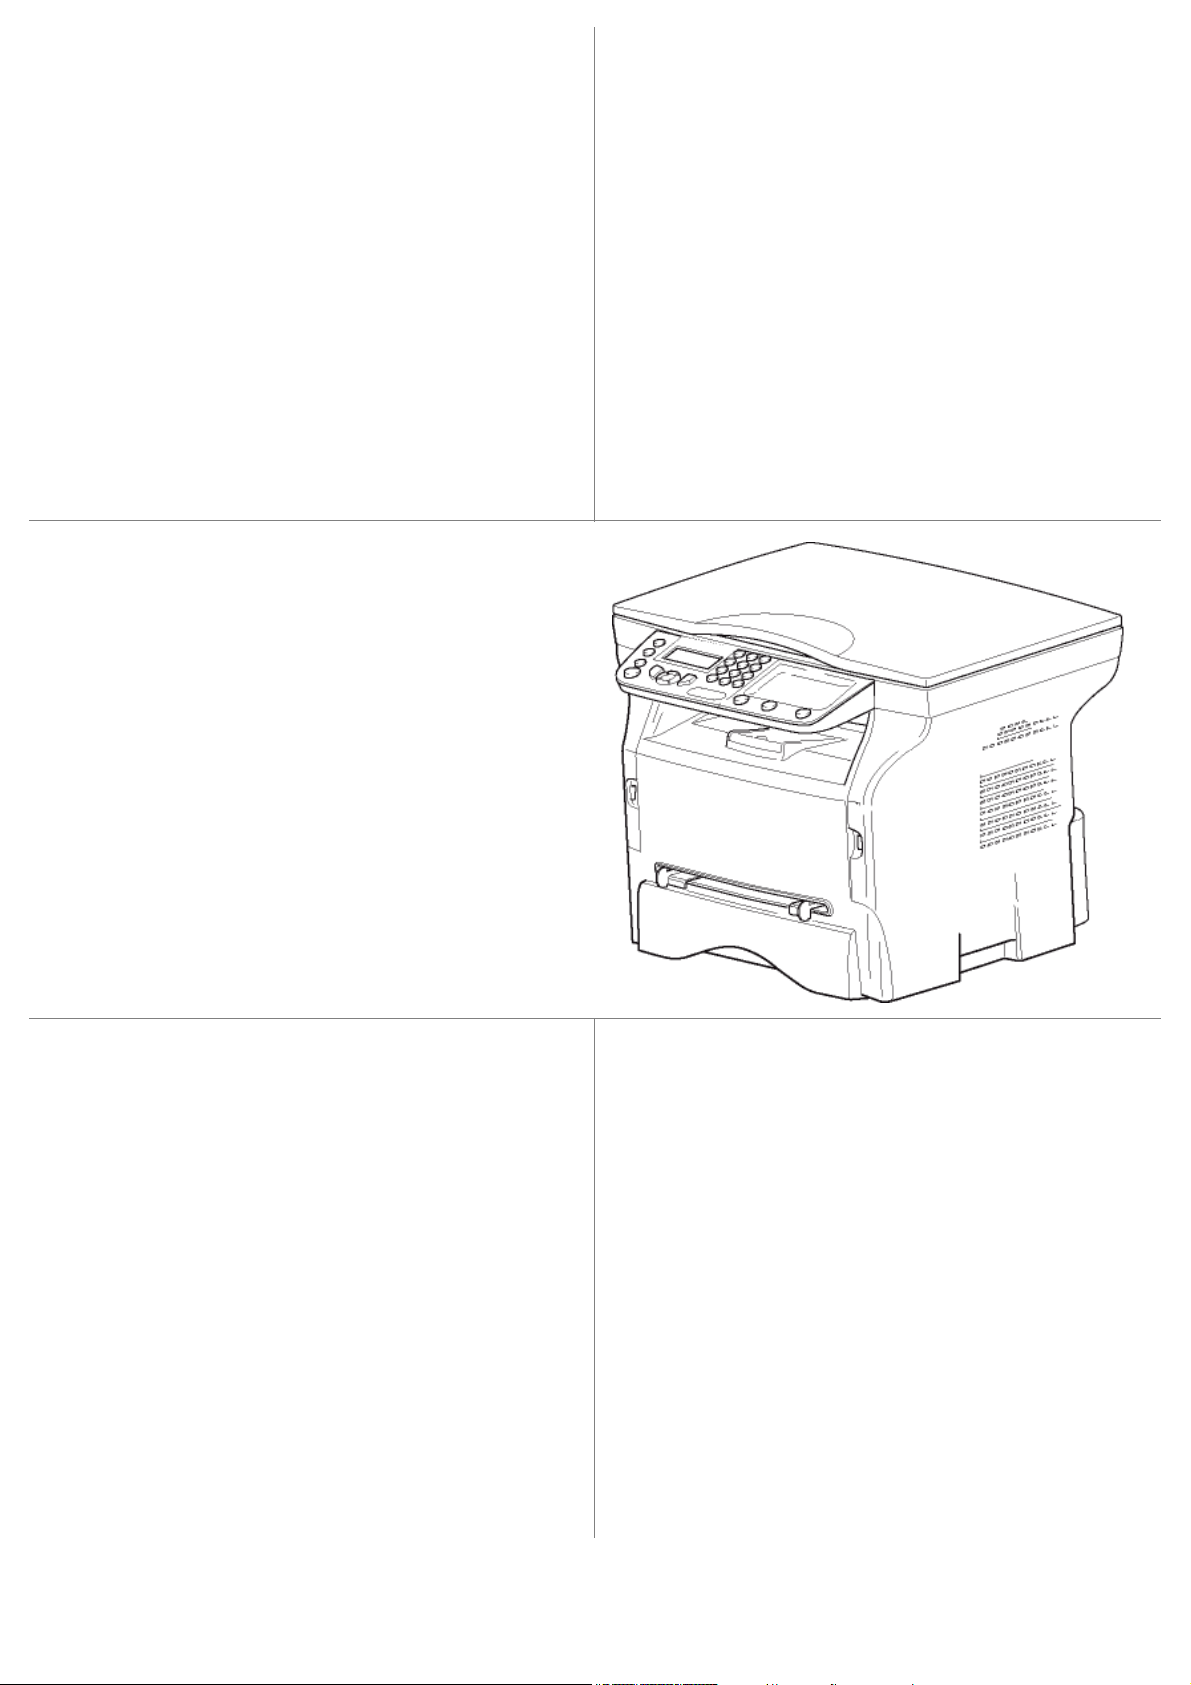
Terminal description 10
Command panel 11
Presentation 11
Accessing terminal functions 11
Packaging contents 12
Device installation 12
Loading paper 12
Loading paper in the paper Tray 12
Handling of paper 12
Humidity control 12
Handling the unit 12
Operator shocks 12
Moving the unit 12
Handling the Toner Cartridge 13
Feed cassette paper insertion 13
Cartridge installation 13
Paper delivery stop 14
Starting your device 14
Device connection 14
Device initial setup 15
Paper insertion in the manual input tray 15
SP1100S/Aficio SP1100S
Copy 16
Simple copy 16
ECO mode copy 16
Sophisticated copy 16
ID Card Copy mode 16
Special setup for the copy 17
Resolution setup 17
Zoom setup 17
Analysis origin setup 18
Contrast setup 18
Brightness setup 18
Paper type setup 18
Paper tray selection 18
Flat-bed analysis margins setup 18
Left and right printing margins setup 18
Top and bottom printing margins setup 19
Format paper setup 19
Parameters/Setup 20
Language 20
Technical Parameters 20
Printing the functions guide 21
Print the list of setups 21
Lock the machine 21
Lock the keyboard 21
Lock the Media service 21
Read the counters 21
Scanned pages counter 21
Printed pages counter 21
Display the consumables status 22
Calibrate your scanner 22
Games 23
Sudoku 23
Print a grid 23
Print the solution to a grid 23
USB memory key 24
Use of the USB memory key 24
Print your documents 24
Print the list of files located in the key 24
Print the files located in the key 24
Delete your files located in the key 25
Analyse the USB memory key content 25
Save a document on a USB memory key 25
PC Features 27
Introduction 27
Configuration requirements 27
Software installation 27
Installing the full software package 27
Installing drivers only 29
Installing the drivers using the Companion
Suite Pro software 29
Installing the drivers manually 30
Connections 31
Multifunction Terminal's Supervision 32
Checking the connection between the PC
and the multifunction machine 32
Companion Director 32
Graphical presentation 32
Utilities and applications activation 32
Companion Monitor 32
Graphical presentation 32
Device management 32
Contents
- I -
Page 3

SP1100S/Aficio SP1100S
Selecting the current device 32
Status of the connection 33
Device parameters 33
Display the consumable status 33
Companion Suite Pro functionalities 34
Document analysis 34
Analysis with Scan To 34
Character recognition software (OCR) 34
Printing 35
Printing on the multifunction machine 35
Printing in duplex mode with the
multifunction machine 35
Software Uninstallation 36
Uninstall the software from your PC 36
Uninstall the drivers from your PC 36
Uninstall the drivers using the Companion
Suite Pro software 37
Uninstall the drivers manually 37
Maintenance 38
Service 38
General information 38
Toner cartridge replaceme nt 38
Issues with smart cards 39
Cleaning 39
Scanner reading system cleaning 39
Printer cleaning 39
Printer external cleaning 39
Printer issues 39
Error messages 39
Paper jam 40
Miscellaneous issues 40
PC printing issues 40
PC printing via USB connection 41
Firmware update 41
Specifications 42
Physical specifications 42
Electrical specifications 42
Environmental specifications 42
Peripheral specifications 42
Contents
- II -
Page 4
SP1100S/Aficio SP1100S
Security
Security directives
Before turning on your device, check that the outlet that you are going to plug it into conforms to the indications shown
on the information plate (voltage, current, power network frequency) located on your device. This device shall be
connected to a single phase power network. The device shall not be installed on bare ground.
Batteries and rechargeable batteries, packaging and electric and electronic equipment (EEE), shall be thrown away,
as specified by the Instructions of the ENVIRONMENT chapter of this manual.
Because of the device model, the power connector is the only way to disconnecting the device from the power network,
that is why it is imperative to apply the following safety measures: your device shall be connected to a power outlet
located nearby. The outlet shall be easily accessible.
Your device is delivered with a grounded power cord. It is imperative to connect a grounded connector to a grounded
outlet connected to the building earthing.
Repairs-maintenance: Repairs and maintenance should only be carried out by a
qualified technician. No user serviceable parts inside the machine. To reduce the risk
of electrical shock, you shall not proceed with these operations yourself, because by
opening or removing the lids, you could expose yourself to two hazards:
- The laser beam can cause irreversible eye damage.
- Avoid contact with powered parts because it can lead to electrical shock with
unfortunate consequences.
For installation conditions and safe use precautions, refer to chapter Installation, page 7.
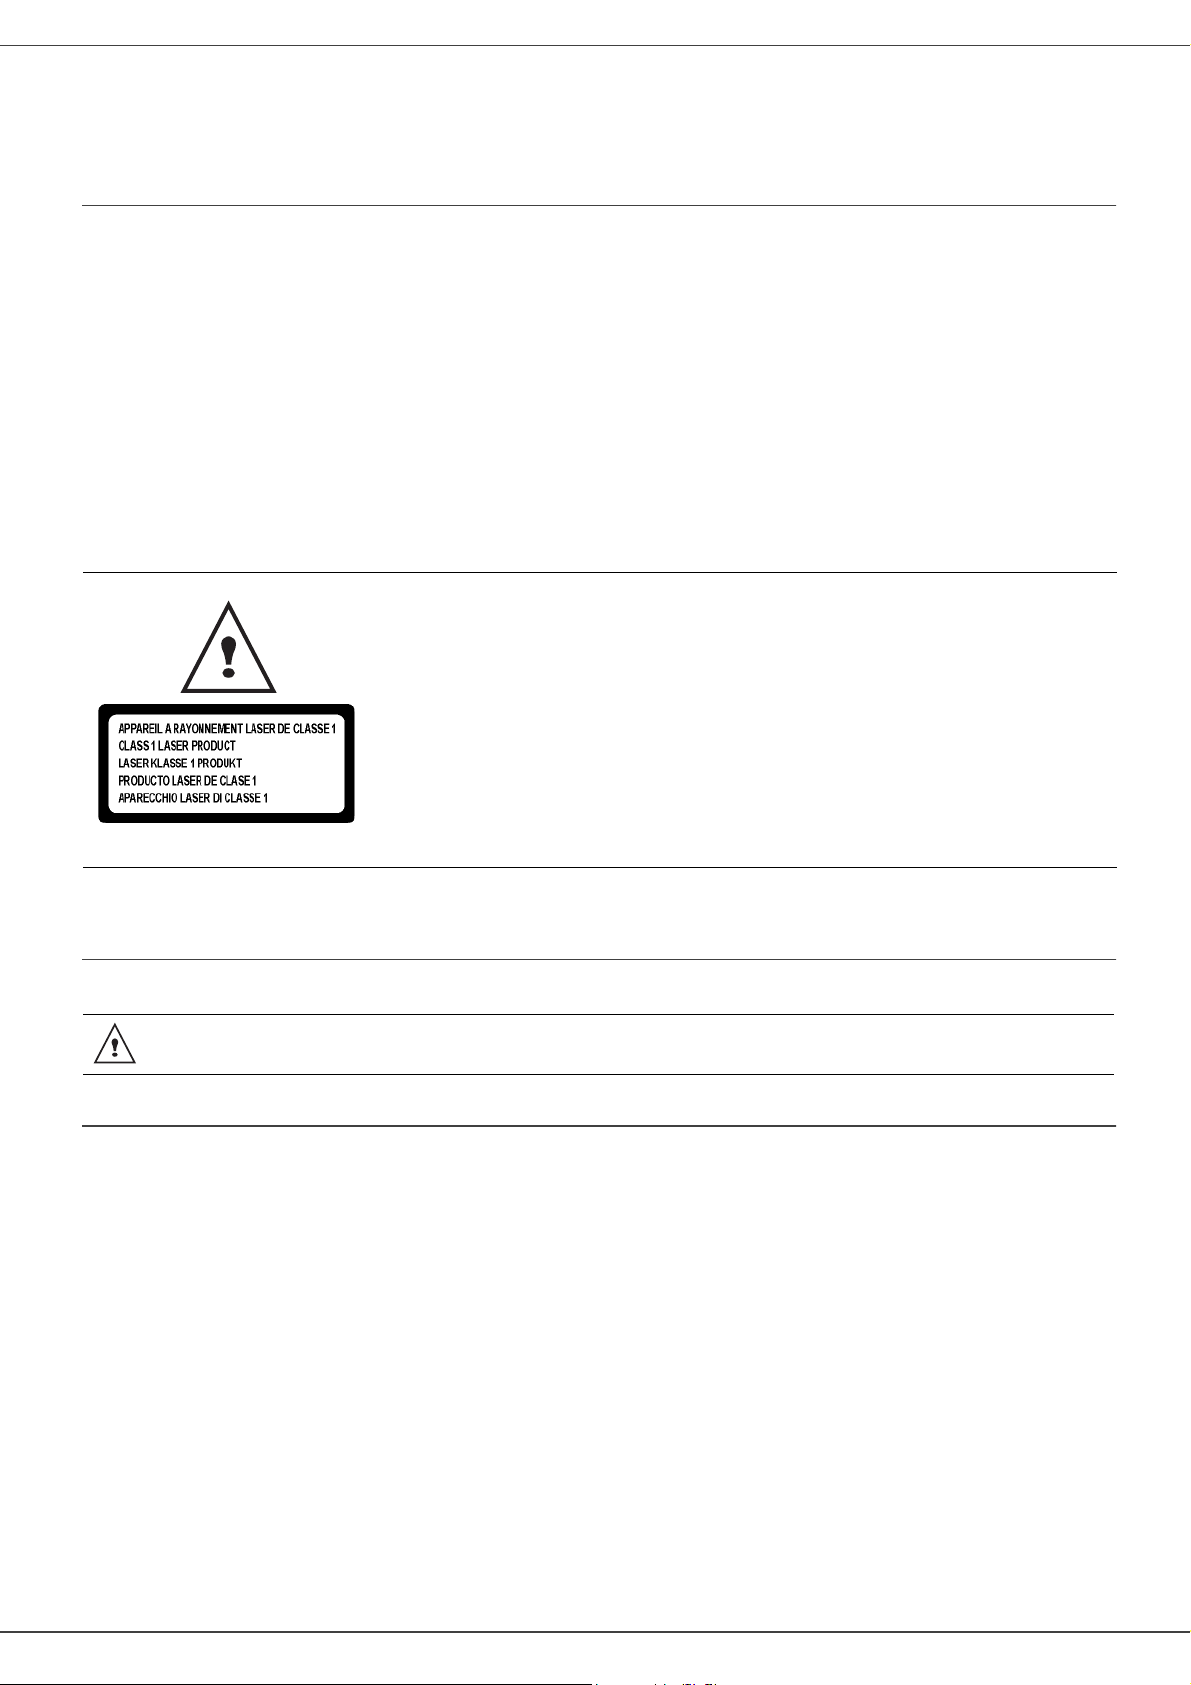
Laser safety
Use of controls or adjustments or performance of procedures other than those specified in the
CAUTION
For Europe/Asia
This machine complies with IEC 60825-1:1993+A1:1997+A2:2001 standard, is classified as laser class 1 product and
is safe for office/EDP use. It contains one class 3B laser diode, 10.72 mW max, 770-795 nm and other class 1 LEDs
(280 µW at 639 nm).
User’s Guide might result in hazardous radiation exposure.
1 - Security - Certification - Environment - Software use license
Direct (or indirect reflected ) eye contact with the laser beam might cause serious eye damage. Safety precautions and
interlock mechanisms have been designed to prevent any possible laser beam exposure to the operator.
- 1 -
Page 5
SP1100S/Aficio SP1100S
Certification
Declaration of conformity
Notice to Users in EU Countries
This product complies with the essential requirements and provisions of Directive 1999/5/EC of the European
Parliament and of the Council of 9 March 1999 on radio equipment and telecommunications terminal equipment and
the mutual recognition of their conformity.
Notice to Users Accessing Analog PSTN in EU Countries
This product is designed to be able to access analog PSTN in all EU countries. Local PSTN compatibility is dependent
on software switch settings. Please contact your service representative if relocating this product to another country. In
the event of problems, please contact your service representative in the first instance.
SP1100S / Aficio SP1100S: The CE declaration of Comformity is available on the Internet at URL :
http://www.ricoh.co.jp/fax/ce_doc
CE Marking Traceability Information (For EU Countries Only.)
Manufacturer:
Ricoh Co., Ltd.
3-6 Nakamagome 1-chome, Ohta-ku, Tokyo, 143-8555 Japan
Authorized representative:
Ricoh Europe PLC
66 Chiltern Street London
Symbols for the main power switch
In accordance with IEC 60417, this machine uses the following symbols for the main power switch:
- means POWER ON.
- means POWER OFF.
1 - Security - Certification - Environment - Software use license
- 2 -
Page 6
SP1100S/Aficio SP1100S
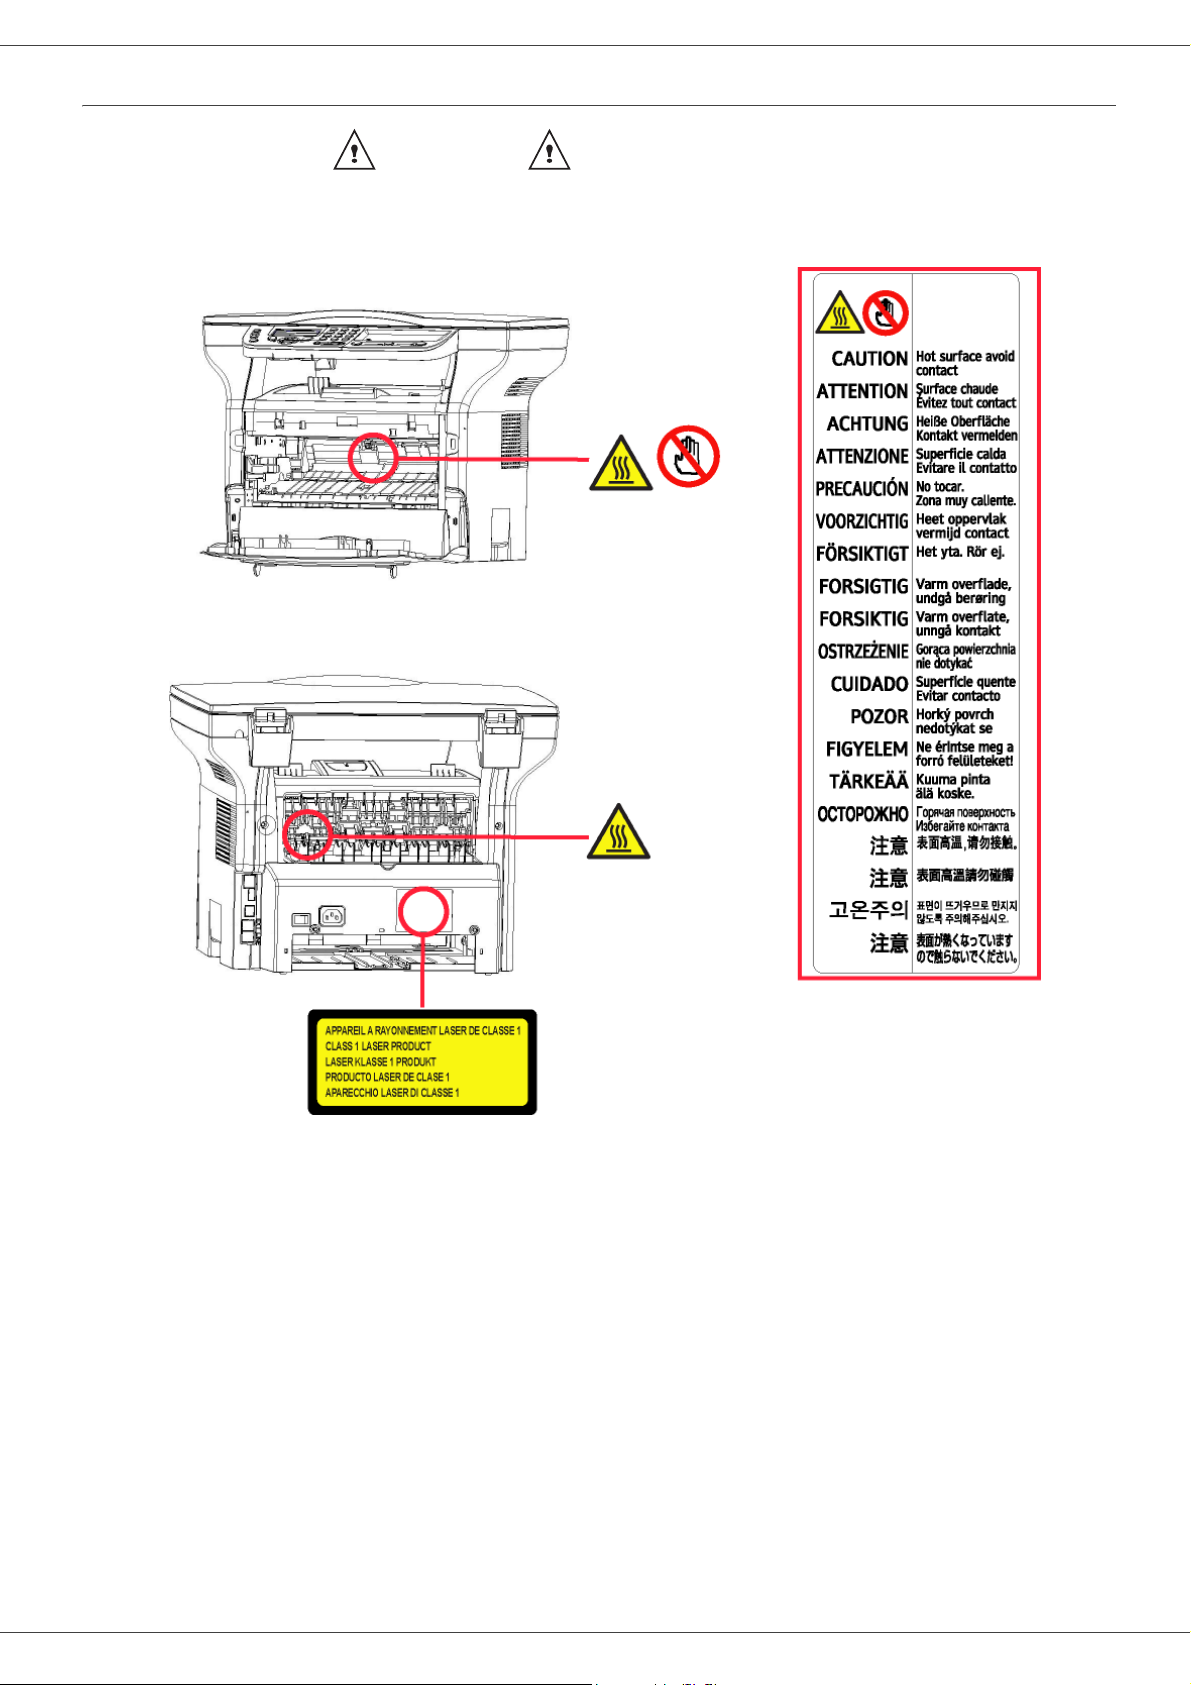
Positions of Warning and Caution labels on the machine
This machine has labels for WARNING and CAUTION at the positions shown below. For safety, please
follow the instructions and handle the machine as indicated.
- 3 -
1 - Security - Certification - Environment - Software use license
Page 7

SP1100S/Aficio SP1100S
Environment
The preservation of the environment is of importance to the manufacturer. The manufacturer wishes to service the
installations with respect to the environment and has chosen to integrate the environmental performance in the whole
lifecycle of its products, throughout manufacturing, release, use and disposal.
Batteries and rechargeable batteries
If your product contains batteries or rechargeable batteries, these shall be disposed of at the designated
collecting centers.
The product
Users in the EU, Switzerland and Norway
Our Products contain high quality components and are designed to facilitate recycling.
Our products or product packaging are marked with the symbol below.
The symbol indicates that the product must not be treated as municipal waste. It must be disposed of
separately via the appropriate return and collection systems available. By following these instructions you
ensure that this product is treated correctly and help to reduce potential impacts on the environment and
human health, which could otherwise result from inappropriate handling. Recycling of products helps to
conserve natural resources and protect the environment.
For more detailed information on collection and recycling systems for this product, please contact the shop
where you purchased it, your local dealer or sales/service representatives.
All Other Users
If you wish to discard this product, please contact your local authorities, the shop where you bought this
product, your local dealer or sales/service representatives.
1 - Security - Certification - Environment - Software use license
- 4 -
Page 8

SP1100S/Aficio SP1100S
Software use license
CAREFULLY READ ALL THE TERMS AND CONDITIONS OF THE PRESENT LICENSE BEFORE OPENING THE
SEALED ENVELOPE CONTAINING THE SOFTWARE. OPENING THIS ENVELOPE INDICATES THAT YOU
ACCEPT THESE TERMS AND CONDITIONS.
In case you should not accept the terms of this license, the CD-ROM packaging should be returned to the retailer
unopened, along with the other components of the product.
Definition
The Software designates programs and associated documentation.
License
- This license allows you to use this Software on personal computers on a local network. You only have permission to
use this Software to print on one multifunction machine; you can not lend the Software or authorize anyone to use it.
- You are allowed to make a back up copy.
- This license is non-exclusive and non-transferable.
Property
The manufacturer or its providers hold the Software property right. You only become the owner of the CD-ROM. You
shall not modify, adapt, decompile, translate, create any derived piece, rent or sell the Software or the documentation.
Any rights not explicitly approved are reserved by the manufacturer or its providers.
Duration
This license remains valid until cancelled. You can cancel it by destroying the program and the documentation as well
as any other copies of them. This license will automatically be canceled in case you do not respect the terms of this
license. If the license is rendered invalid, you agree to destroy all copies of the program and the associate
documentation.
Warranty
The Software is provided "as is" with no warranties what so ever, whether expressed or implied, including without
limitation, any warranties of merchantability or fitness for a particular purpose; all the risks concerning the results and
performance of this Software are assumed by the buyer. In case the program should appear defective, all the repair
and service expenses will be covered by the buyer.
Nevertheless, the license holder benefits from the following warranty: we guarantee that the CD-ROM on which the
Software is recorded is free from hardware or manufacturing faults if used in normal conditions, the guarantee is valid
for ninety (90) days from the delivery date, the copy of the receipt being the proof of purchase. In case of a CD-ROM
fault that due to accident or misuse, the CD-ROM will not be replaced as per the warranty.
Responsibility
If the CD-ROM is not working properly, send it to the retailer together with a copy of the receipt. It is the retailer's sole
responsibility to replace the CD-ROM. Nobody, not even the manufacturer who is involved in the creation, realization,
merchantability and delivery of this program would be responsible for direct, indirect or immaterial damages, such as,
but not limited to, loss of information, loss of time, execution loss, loss of revenue, loss of customers, due to the use or
inability to use the program.
1 - Security - Certification - Environment - Software use license
Development
With a constant concern for improvement, the manufacturer reserves the right to modify the Software specifications
without any notice. In case of modification, your user right does not give you access to free updates.
- 5 -
Page 9

SP1100S/Aficio SP1100S
Registered trademarks
Companion Suite Pro is a registered trademark of Sagem Communications.
Adobe® and the Adobe® products referred to here are registered trademarks of Adobe Systems Incorporated.
PaperPort®11SE is a registered trademark of ScanSoft.
Microsoft® Windows 2000®, Microsoft® Windows Server 2003®, Microsoft® Windows XP®, Microsoft® Windows
Vista® and any other Microsoft® product referred to here are registered trademarks of Microsoft Corporation registered
and/or used in the United States and/or in other countries.
All the other brands or products referred to as examples or in order to give additional information are registered
trademarks of their respective owners.
The screenshots presented in this User’s Guide have been created with Windows Vista. If you use another operating
system, the screenshots displayed may be different from the ones presented in this booklet.
Notice
Do not copy or print any item for which reproduction is prohibited by law.
Copying or printing the following items is generally prohibited by local law: bank notes, revenue stamps, bonds, stock
certificates, bank drafts, checks, passports, driver's licenses.
The preceding list is meant as a guide only and is not inclusive. We assume no responsibility for its completeness or
accuracy.
If you have any questions concerning the legality of copying or printing certain items, consult with your legal advisor.
The informations contents of this user manual are subject to change without notice.
1 - Security - Certification - Environment - Software use license
- 6 -
Page 10

SP1100S/Aficio SP1100S
Installation
Location conditions
By choosing an appropriate location, you preserve the longevity of the machine. Check that the selected location has
the following characteristics:
- Choose a well ventilated location.
- Make sure not to obstruct the ventilation grids located on the left and right sides of the device. During the
installation, make sure to place the machine thirty centimeters away from the surrounding objects so all the lids
can be easily opened.
- Make sure that this location does not present any ammonia nor any other organic gasses emission hazard.
- The ground outlet (refer to the security notices presented in the Security chapter) to which you plan to connect
the machine shall be located close to this one and have an easy access.
- Make sure that the machine is not directly exposed to sun light.
- Make sure not to place the machine in an area exposed to an air flow generated by an air conditioning, heating or
ventilation system, nor in an area subject to big temperature or humidity jumps.
- Choose a solid and horizontal surface on which the machine will not be exposed to intense vibrations.
- Keep the machine away from any object that could obstruct its ventilation por ts.
- Do not place the machine close to hangings or any other flammable objects.
- Choose a location where the water and other splashes of liquid are limited.
- Make sure that this location is dry, clean and dust free.
Cautions of use
Take into account the important precautions below when using the machine.
Running environment:
- Temperature: 10 °C to 27 °C [50 °F to 80.6 °F] with an ambient humidity included between 15 to 80% (up to 32°C
[89.6 °F] with an ambient humidity included between 15 to 54%).
Terminal:
2 - Installation
The section below describes the precautions to be taken when using the machine:
- Never turn the machine off and never open the lids while printing.
- Never use gas or flammable liquids, or objects generating magnetic field close to the machine.
- When you unplug the power cord, always hold the connector without pulling the cord. A damaged cord presents
a potential fire hazard or an electric shock hazard.
- Never touch the power cord with wet hands. You risk getting an electric shock.
- Always unplug the power cord before moving the machine. Otherwise, you could risk having the cord damaged
and create a fire hazard or an electric shock hazard.
- Always unplug the power cord when you plan not to use the machine for a long period of time.
- Never put objects on the power cord, never pull it and never fold it. This could cause a fire hazard or an electric
shock hazard.
- Always make sure that the machine is not sitting on the power cord or any other electric device communication
cables. Make sure also that neither cord nor cable is introduced to the machine inner mechanism. This would
expose you to a machine malfunction risk or to a fire hazard.
- Make sure that the printer is unplugged from the power outlet before connecting or disconnecting an interface
cable to the printer (use a shielded interface cable).
- Never try to remove any fixed pane or hood. The machine contains high voltage circuits. Any contact with these
circuits can cause an electric shock risk.
- Never try to modify the machine. This could cause a fire hazard or an electric shock hazard.
- Always make sure that paper clips, staples or other small metallic items do not get inside the machine via the
ventilation ports or other ports. Such items create fire hazards or electric shock hazards.
- Prevent water and any other liquid from spilling on the machine or near to it. Any contact of the machine with water
or liquid can cause a fire hazard or an electric shock hazard.
- 7 -
Page 11
SP1100S/Aficio SP1100S
- If liquid or metallic item gets accidentally inside the machine, turn it off immediately, unplug the power cord and
contact your retailer. Otherwise, you would face a fire hazard or an electric shock hazard.
- In case of heat, smoke, unusual smell or abnormal noise emissions, turn the machine off, unplug the power cord
immediately and contact your retailer. Otherwise, you would face a fire hazard or an electric shock hazard.
- Avoid using the machine during an "electric storm", this can cause an electric shock hazard due to lightning.
Paper for printing: if you use paper already printed by your machine or another printer, the printing quality may not be
optimal.
Make sure to place the machine in well ventilated premises. When operating, the printer generates
CAUTION
a small amount of ozone. An unpleasant smell can come from the printer if it is used intensively in
not well ventilated premises. For a secure use, make sure you place the machine in well ventilated
premises.
Safety information
When using your product, the following safety precautions should always be followed.
2 - Installation
Safety During Operation
In this information slip, the following important symbols are used:
Indicates a potentially hazardous situation which, if instructions are not followed, could result in
WARNING:
CAUTION:
WARNING
- Connect the power cord directly into a wall outlet and never use an extension cord.
- Disconnect the power plug (by pulling the plug, not the cable) if the power cable or plug becomes frayed or
otherwise damaged.
- To avoid hazardous electric shock or laser radiation exposure, do not remove any covers or screws other than
those specified in the User’s Guide.
- Turn off the power and disconnect the power plug (by pulling the plug, not the cable) if any of the following
conditions exists:
- Do not incinerate spilled toner or used toner. Toner dust might ignite when exposed to an open flame.
- Disposal can take place at our authorized dealer or at appropriate collection sites.
- Dispose of the used toner cartridge (or bottle) in accordance with the local regulation.
death or serious injury.
Indicates a potentially hazardous situation which, if instructions are not followed, may result in
minor or moderate injury or damage to property.
• You spill something into the product.
• You suspect that your product needs service or repair.
• Your product’s cover has been damaged.
CAUTION
- Protect the product from dampness or wet weather, such as rain, snow, and so on.
- Unplug the power cord from the wall outlet before you move the product. While moving the product, you should
take care that the power cord will not be damaged under the product.
- When you disconnect the power plug from the wall outlet, always pull the plug (not the cable).
- Do not allow paper clips, staples, or other small metallic objects to fall inside the product.
- Keep toner (used or unused), toner cartridge (or bottle), ink (used or unused) or ink cartridge out of reach of
children.
- Be careful not to cut yourself on any sharp edges when you reach inside the product to remove misfed sheets of
paper or masters.
- 8 -
Page 12
SP1100S/Aficio SP1100S
- For environmental reasons, do not dispose of the product or expended supply wastes at household waste
collection point. Disposal can take place at our authorized dealer or at appropriate collection sites.
- Our products are engineered to meet the high standards of quality and functionality, and we recommend that you
only use the expendable supplies available at an authorized dealer.
Power Supply
The socket-outlet shall be installed near the product and shall be easily accessible.
Rules for use symbols
WARNING
Indicates important safety notes.
Ignoring these notes could result in serious injury or death. Be sure to read these notes. They can be found in the
“Safety Information” section of this manual.
CAUTION
Indicates important safety notes.
Ignoring these notes could result in moderate or minor injury, or damage to the machine or to property. Be sure to read
these notes. They can be found in the “Safety Information” section of this manual.
2 - Installation
Important
Indicates points to pay attention to when using the machine, and explanations
of likely causes of paper misfeeds, damage to originals, or loss of data. Be sure to read these explanations.
Note
Indicates supplementary explanations of the machine's functions, and instructions on resolving user errors.
- 9 -
Page 13
Terminal description
SP1100S/Aficio SP1100S
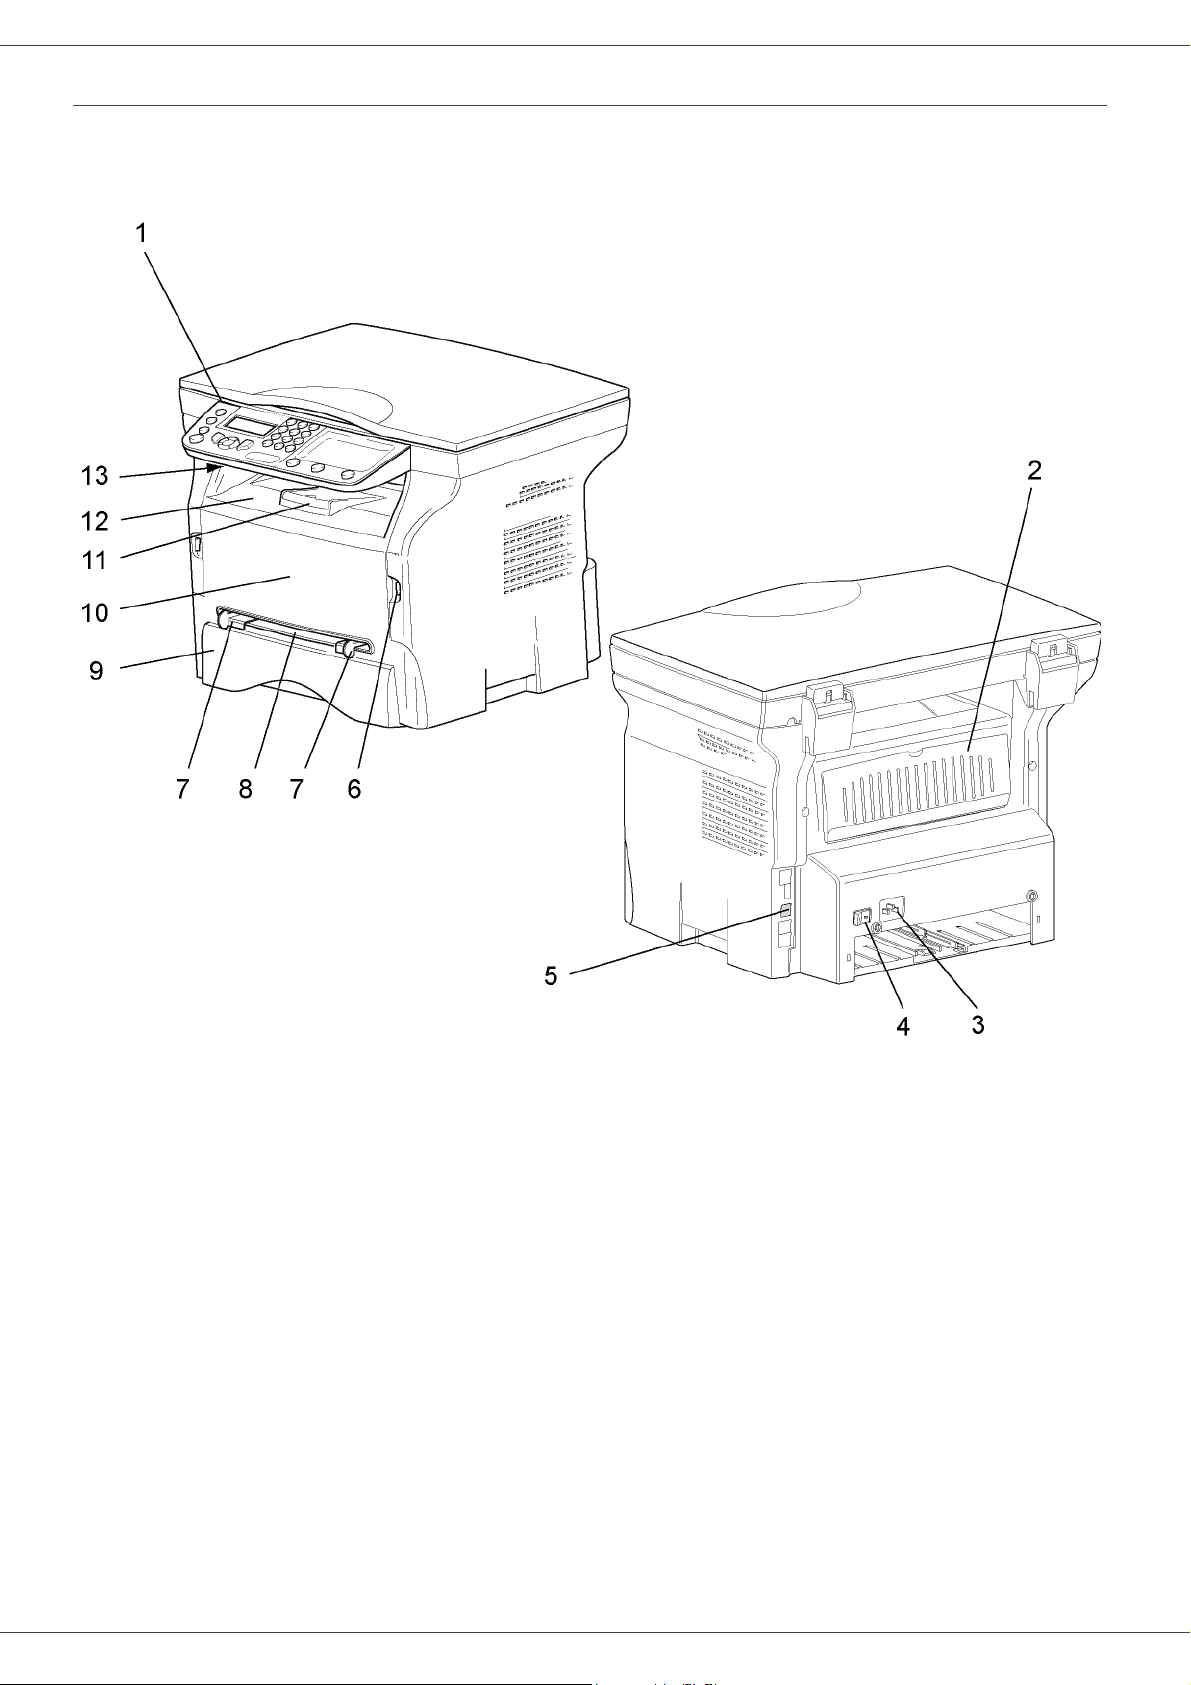
Front and Back sides
2 - Installation
1. Control panel
2. Paper jam cover
3. Power supply cord connection
4. On/Off switch
5. Slave USB connection (for PC)
6. Master USB connection (USB key)
7. Manual paper feed setup guides
8. Manual input tray
9. Paper tray
10. Cartridge access cover
11. Fold-down stopper for paper delivery
12. Paper output
13. Smart card insertion point
- 10 -
Page 14
SP1100S/Aficio SP1100S
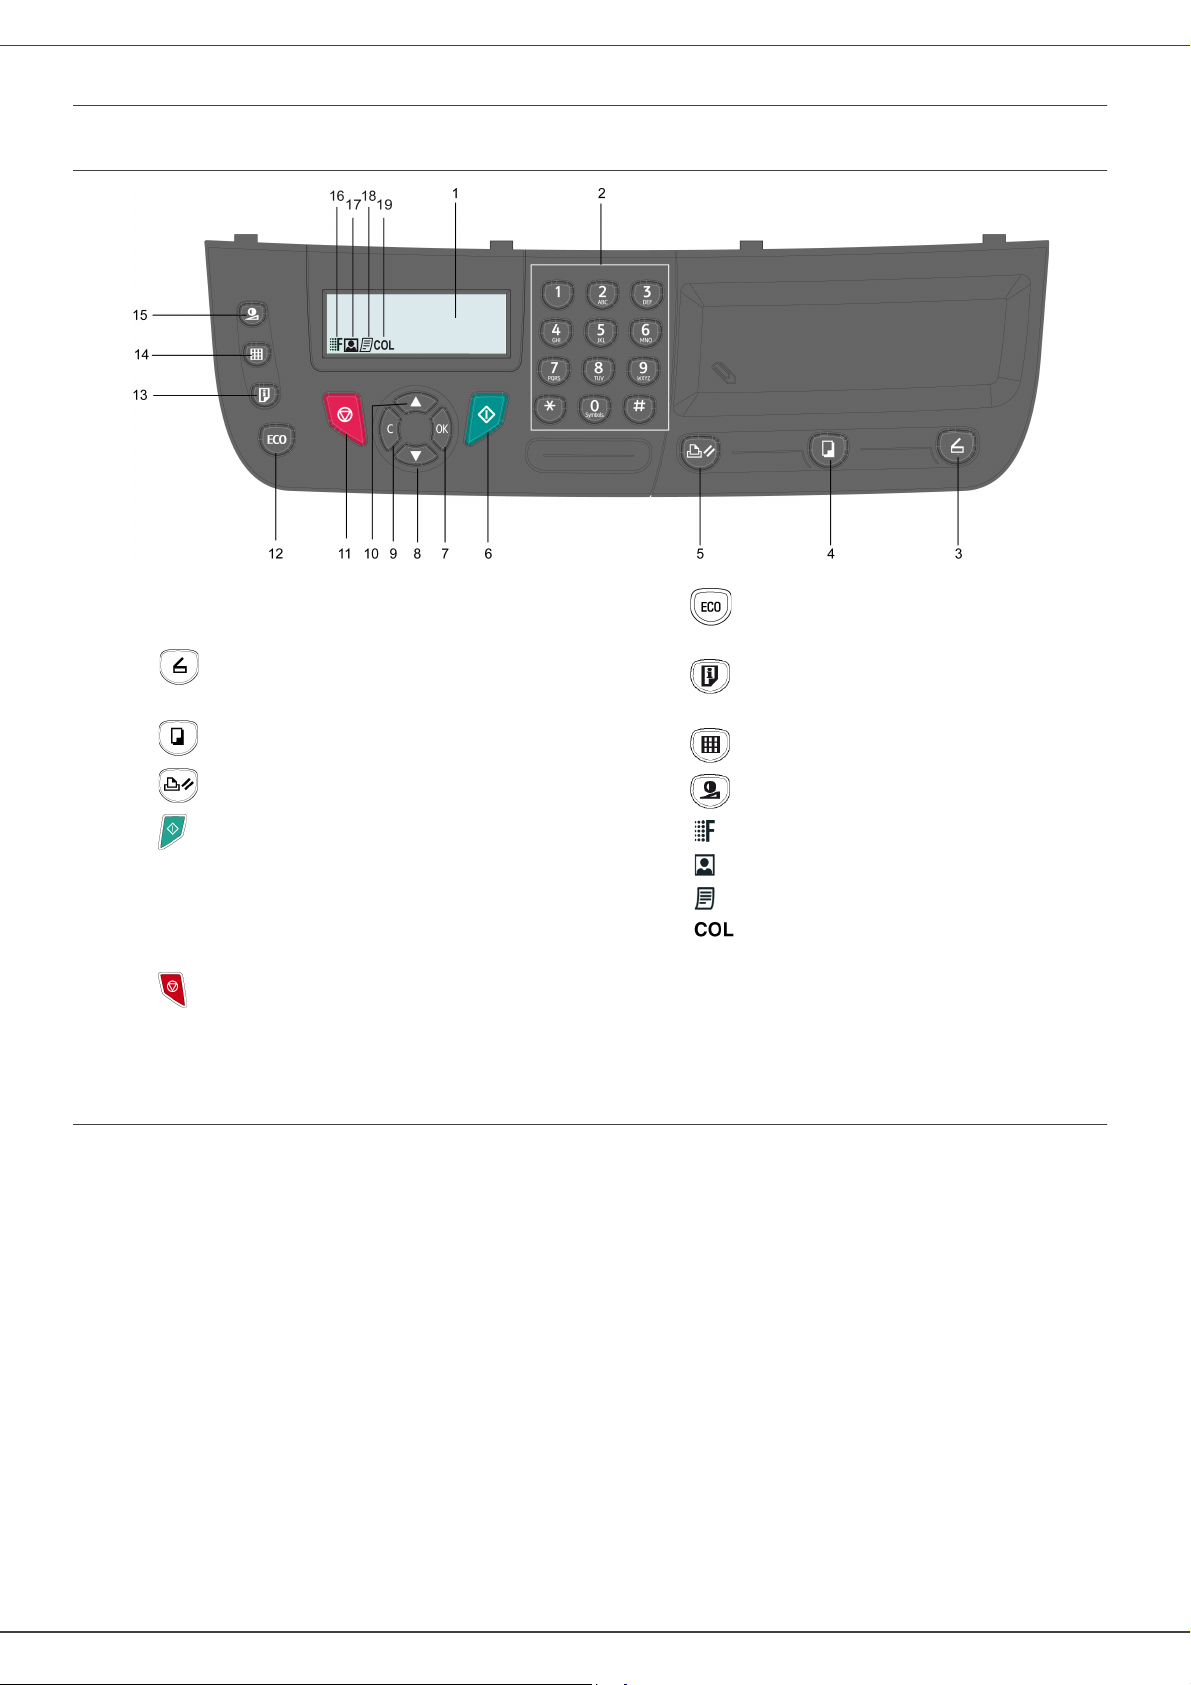
1. Screen.
2. Digital keypad.
3. Key : document analysis to the PC or a media
(USB key).
4. Key : local copy.
5. Key : stops the current PC print job.
6. Key : Validation.
7. Key
OK
: confirms the displayed selection.
8. Key
: menu access and navigation down the menus.
9. Key
C
: back to the previous menu and input correction.
10. Key
: navigation up the menus.
11. Key : stops the current operation.
12. Key : sets up the activation delay and toner save
in copy mode.
13. Key : print menu (print functions list, machine
settings, etc.).
14. Key : analysis resolution setup.
15. Key : contrast setup.
16. Icon : resolution "
Quality Text
".
17. Icon : resolution "
Photo
".
18. Icon : resolution "
Text
".
19. Icon : colour mode.
Command panel
Presentation
2 - Installation
Accessing terminal functions
All terminal functions and settings are available via the menu and are associated to a specific menu command. For
example, C
Two methods are available to access menu items : a step by step method or a shortcut method.
To access the C
1 Press on to access the menu.
2 Use the or buttons to browse the menu and select 8-A
3 Use the or buttons to browse the A
4 Use the or buttons to browse the C
To access the C
1 Press on to access the menu.
2 Enter 844 with the alphanumerical keypad to directly access the C
ONTRAST
ONTRAST
ONTRAST
copy settings are identified in the menu with the command 844.
settings with the Step by step method :
settings with the shortcut method :
DVANCED FUNCTIONS
OPY
menu and select 844-C
- 11 -
DVANCED FCT
menu and select 84-C
ONTRAST
. Confirm with OK.
ONTRAST
. Confirm with OK.
item.
OPY
. Confirm with OK.
Page 15

SP1100S/Aficio SP1100S
Packaging contents
The packaging contains the items listed below:
Multifunction device
1 toner cartridge
Device installation
1 Unpack the device.
2 Install the device respecting the security notices
stated at the beginning of this booklet.
3 Remove all stickers from the machine.
4 Remove the plastic protection film from the screen.
Loading paper
Loading paper in the paper Tray
(1) Paper to be used must be inserted face down, and
abutting the side fence and back fence. Not abutting
the paper may cause feed failure, skewing or paper
jams.
(2) Amount of loaded paper must not exceed the loading
mark. If the loading mark is exceeded, this may cause
feed failure, skewing, or paper jams.
(3) Adding paper to the pile may cause double feeding,
and should be avoided.
(4) When withdrawing the cassette from the main unit,
always hold it with both hands.
2 - Installation
1 installation guide and 1 PC installation CD ROM
1 Safety Guide, Command Guide (For Europe and
North America only)
1 power cord
Handling of paper
(1) Curling must be corrected before loading.
(2) Curls must not exceed 10 mm.
(3) Care must be taken with storage to prevent feed faults
and image defects due to leaving the paper in
conditions of high humidity.
Adding paper to the pile, or splitting the pile may cause
feeding problems, and must be avoided.
Humidity control
(1) Paper which has become damp, or paper which has
been left unused for a very long time, must not be
used.
(2) After opening the paper, it must be kept in a plastic
bag.
(3) Paper with waved ends, paper which is creased, paper
with crumples, and any other non-normal paper must
not be used.
Handling the unit
1 USB cord
Operator shocks
During printing, shocks must not be applied to the paper
feed cassette, tray, cover, and other parts of the machine.
Moving the unit
When moving the unit on a desk, it must be lifted, and not
dragged.
- 12 -
Page 16

Handling the Toner Cartridge
(1) Must not be stood on the side, or held upside down.
(2) Must not be shaken strongly.
Feed cassette paper insertion
Your device accepts a number of formats and types of
papers.
Important
1 Remove the paper feed cassette completely.
See chapter Specifications for the
various formats and types of paper.
SP1100S/Aficio SP1100S
2 - Installation
2 Push the lower panel down until it clicks.
3 Setup the back side feed cassette stop by pushing
the "PUSH" lever (A).
Then adjust the lateral paper guides to the paper
format by pushing lever (B) located on the left
guide. Adjust the length paper guide to the paper
format by pushing lever (C).
4 Take a paper stack, pull the paper off and align it
on a flat surface.
5 Put the paper stack in the feed cassette
(200 sheets for 80 g/m² paper for instance).
6 Put the feed cassette back in its location.
Cartridge installation
1 Stand in front of the machine.
2 Push the left and right sides of the cover and pull it
at the same time towards you.
- 13 -
Page 17

SP1100S/Aficio SP1100S
3 Remove the starter toner cartridge from its bag.
Gently roll the cartridge 5 or 6 times to distribute the
toner evenly inside the cartridge.
Thoroughly rolling the cartridge will assure the
maximum copies per cartridge.
4 Hold it by its handle.
5 Insert the cartridge in its slot by pushing it until it
clicks (last move down) as shown on the picture
below.
Paper delivery stop
Adjust the paper delivery stop, depending on the format of
the document to be printed. Do not forget to raise the flap
to prevent the sheets from falling down.
2 - Installation
Starting your device
6 Close the cover.
Device connection
Before plugging the power cord, it is
WARNING
1 Connect the power cord to the device.
2 Make sure that the On/Off switch is off (O position).
Plug the power cord to outlet on the wall.
imperative to refer to the Security
directives, page 1.
- 14 -
The power cord is used as a 230 V
power unit cut off. As a precaution,
WARNING
3 Press the On/Off button to turn on the device
(I position).
the outlet shall be located close to
the device and be of easy access in
case of danger.
Page 18

SP1100S/Aficio SP1100S
Device initial setup
After a few seconds, when the machine has warmed up,
the Eas y Install function is launched and the LCD screen
displays the following message:
1 - FRANCAIS
2 - ENGLISH
The Easy Install function will help you configure your
machine by guiding you through the basic settings.
If you wish to modify the setting displayed, press the OK
button. If you do not want to modify the displayed setting,
press the C button: the Easy Install function then
displays the next basic setting.
If you do not want to carry out the
initial setup, press the button. A
confirmation message appears. Press
Note
the button again to confirm.
T o manually mod ify and customise the
machine settings, refer to
Parameters/Setup, page 20.
3 Adjust the paper guides against the right and left
edges of the sheet or the envelope.
4 Print making sure that the chosen paper format
corresponds to the selected format on the printer.
Note: When using envelopes
• Feeding can be done only through the manual feed.
• Recommended area should be the area which
excludes 15 mm from the leading edge, 10 mm from
and both the left and right edges, and the rear edge.
• Envelopes which are not recommended may lead to
improper printing.
• Curled envelope after printing should be fixed
manually.
• Small crumples on the edge of the wide side of
envelopes. Smearing, or less clear printing may
appear on the reverse side.
• Set envelope by pressing the folding line of four edges
properly after releasing air inside.
• Set envelope in a proper position after aligning in case
it is bent or warped.
• Paper conditioning is not allowed. And it should be
used under normal office environment.
2 - Installation
1 Select the desired language using the or
buttons and confirm with OK.
The setup is now complete and the functions list is
automatically printed out.
The LCD screen displays the message P
paper has been loaded in the paper tray (see Loading
paper, page 12). Once paper has been loaded, printing
will resume.
APER EMPTY if no
Paper insertion in the manual input
tray
The manual input tray allows you to use various paper
formats with greater weightings than the one used in the
paper feed cassette.
Only one sheet or envelope can be fed at a time.
Important
1 Spread the manual feed guides to the maximum.
See chapter Specifications for the
various formats and types of paper.
2 Insert a sheet or an envelope in the manual input
tray.
- 15 -
Page 19

SP1100S/Aficio SP1100S
Copy
Your machine has the function to make one or more
copies.
You can also setup several parameters in order to make
copies at your will.
Simple copy
In this case, the default parameters are applied.
1 Place the document to be copied face down on the
glass, respecting the indications around the glass.
2 Press the button twice. The copy is made
using the default parameters.
ECO mode copy
The ECO mode enables you to reduce the amount of
toner consumed on the page so as to save your printing
costs.
When the ECO mode is used, the toner consumption is
reduced and the print density becomes lighter.
5 Choose with the buttons or the printing option
(see examples below) depending on the copy
mode that you want:
- 1 Page to 1, 1 Page to 4 or 1 page to 9.
3 - Copy
1 Place the document to be copied face down on the
glass, respecting the indications around the glass.
2 Press the button.
3 Press the button.
Sophisticated copy
The sophisticated copy allows to do custom setups for the
current copy.
You can start copy by pressing
Note
1 Place the document to be copied face down on the
glass, respecting the indications around the glass.
Note
button at any time in below
steps.
After step 1, you can directly enter
the number of copies with the
numerical keypad and press the
OK button to validate. Then refer to
step 4.
Confirm with the OK button.
6 Adjust the desired zoom level, from 25% TO 400%
with the buttons or , confirm with the OK
button (only available in 1 Page to 1 copy mode).
7 Adjust the desired origin values with the digital
keyboard buttons or then confirm with the OK
button.
8 Choose the resolution depending on the printing
quality that you want AUTO, TEXT, QUALITY
TEXT or PHOTO with the buttons or , then
confirm with the OK button.
9 Adjust the contrast level with the buttons or ,
then confirm with the OK button.
10 Adjust the desired brightness level with the buttons
or , then confirm with the OK button.
11 Choose the paper type NORMAL
buttons or , then confirm with the OK button.
, THICK with the
ID Card Copy mode
The ID CARD copy function is used for copying both sides
of an identity card or driver’s license type document on an
A4 format sheet (original document size < A5) or on a
Letter format sheet (original document size < Statement).
2 Press the button.
3 Enter the number of copies that you want and
confirm with the OK button.
4 Choose the paper tray AUTOMATIC or MANUAL
with the buttons or , then confirm with the OK
button.
The LCD screen displays useful operating instructions
(when the original document should be placed, when the
document should be turned over, etc.) and asks for your
confirmation to proceed with the operation.
Important
1 Press the button.
- 16 -
Zoom and Origin adjustments are
not available in this copy mode.
Page 20

2 Enter the desired number of copies and confirm
with the OK button.
3 Choose the paper tray AUTOMATIC or MANUAL
with the buttons or , then confirm with the OK
button.
Copying in ID Card mode is only
possible on A4 (original document
size < A5) or Letter (original
Important
4 Choose the copying option ID CARD with the
buttons or and confirm with the OK button.
5 Choose the resolution depending on the desired
printing quality AUTO, TEXT, QUALITY TEXT or
PHOTO with the buttons or , then confirm with
the OK button. For optimal results with ID
documents, select the PHOTO resolution.
6 Adjust the contrast level with the buttons or ,
then confirm with the OK button.
7 Adjust the desired brightness level with the buttons
or , then confirm with the OK button.
8 Choose the paper type NORMAL, THICK with the
buttons or , then confirm with the OK button.
The LCD screen displays the following message:
document size < Statement) paper
size. Make sure that the selected
paper tray uses the correct paper
size.
PUT ID CARD
THEN OK
SP1100S/Aficio SP1100S
When the quality of the printing is not
Important
Resolution setup
The RESOLUTION parameter allows you to setup the
photocopy resolution.
841 - ADVANCED FCT/COPY/RESOLUTION
1 Choose the resolution with the buttons or
according to the following table:
Parameter Signification Icon
AUTO Low resolution. none
TEXT
QUALITY
TEXT
PHOTO
satisfying, you can proceed to a
calibration with MENU 80.
Standard resolution for
documents containing text and
graphics.
Optimal resolution for
documents containing text.
Optimal resolution for
documents containing
photographies.
3 - Copy
9 Place your identity card or any other official
document against the glass of the flatbed scanner,
as shown below:
10 Press the OK button.
The document is scanned then the LCD screen
displays the following message:
TURN UP DOC
THEN OK
11 Turn your document over then confirm with the
OK button.
The machine prints out a copy of your document.
2 Confirm your choice by pressing the OK button.
You can also make temporary
Note
changes to the resolution by
pressing the button.
Zoom setup
The ZOOM parameter allows you to reduce or enlarge an
area of a document by choosing the origin and the zoom
level to apply to the document, from 25 to 400 %.
842 - ADVANCED FCT/COPY/ZOOMING
1 Enter the desired zoom level with the
Alpanumerical keyboard or choose among
predefined values with the buttons and .
2 Confirm your choice by pressing the OK button.
Special setup for the copy
Setups done through this menu become the device
default setups after you confirm.
- 17 -
Page 21

SP1100S/Aficio SP1100S
Analysis origin setup
If you want, you can change the origin of the scanner.
By entering new values for X and Y in mm (X < 210 and
Y < 280), you move the analysed area as shown on the
diagram below.
x
y
DEBUT FEUILLE
BEGIN. OF SHEET
Analysed area
FIN FEUILLE
END OF SHEET
843 - ADVANCED FCT/COPY/ORIGIN
1 Select the X and Y coordinates with the buttons
or .
2 Setup the desired coordinates with the digital
keyboard or the buttons and , confirm your
choice by pressing on the OK button.
Contrast setup
Paper tray selection
The Automatic selection can have two meanings
depending on the paper format defined on the paper
trays. The following table describes the different cases.
Default tray Tray used for copy
Selection between the
Same paper
format in the
trays
Different paper
format in the
trays
AUTOMATIC
MANUAL
AUTOMATIC
MANUAL
852 - ADVANCED FCT/SCAN. & PRINT/TRAY
1 Select the default paper tray to use, AUTOMATIC
or MANUAL, with the buttons and .
2 Confirm by pressing the OK button.
main tray and the
manual tray.
The manual tray is
used.
The main tray is used
The manual tray is
used.
PAPER
3 - Copy
The CONTRAST parameter allows to choose the
photocopy contrast.
844 - ADVANCED FCT/COPY/CONTRAST
1 Setup the desired level of contrast with the buttons
and , confirm by pressing the OK button.
2 You can also directly setup the desired contrast
with the button, press several times on this
button until the desired setup without using the
Menu 845.
3 Quit this menu by pressing the
button.
Brightness setup
The BRIGHTNESS para meter allows to lighten or darken
your original document.
845 - ADVANCED FCT/COPY/BRIGHTNESS
1 Setup the desired brightness with the buttons
and .
2 Confirm your choice by pressing the OK button.
3 Quit this menu by pressing the
button.
3 Quit this menu by pressing the
button.
Flat-bed analysis margins setup
If you want to, you can offset the lateral margins of the
document to the left or right during the analysis with your
flat-bed scanner.
854 - ADVANCED FCT/SCAN. & PRINT/
FLATBED MARG
1 Setup the left / right margins offsets (by 0.5 mm
steps) with the buttons and .
2 Confirm by pressing the OK button.
3 Quit this menu by pressing the
button.
Left and right printing margins setup
If you want to, you can offset the lateral margins of the
document to the left or right during printing.
855 - ADVANCED FCT/SCAN. & PRINT/
PRINTER MARG
1 Setup the left / right margins offsets (by 0.5 mm
steps) with the buttons and .
2 Confirm by pressing the OK button.
Paper type setup
851 - ADVANCED FCT/SCAN. & PRINT/PAPER
1 Select the paper NORMAL or THICK that you use
with the buttons and .
2 Confirm your setup by pressing the OK button.
3 Quit this menu by pressing the
button.
TYPE
- 18 -
3 Quit this menu by pressing the
button.
Page 22

Top and bottom printing margins setup
If you want to, you can offset the lateral margins of the
document towards the top or the bottom during printing.
SP1100S/Aficio SP1100S
856 - ADVANCED FCT/SCAN. & PRINT/TOP
PRINT.
1 Setup the top / bottom margins offsets (by 0.5 mm
steps) with the buttons and .
2 Confirm by pressing the OK button.
3 Quit this menu by pressing the
button.
Format paper setup
This menu allows you to define the default paper format
of the manual tray and the main tray. You can also setup
the default scanning width.
857 - ADVANCED FCT/SCAN. & PRINT/
PAPER FORMAT
1 Select the paper tray for which you want to define
a default paper format with the buttons and .
2 Confirm by pressing the OK button.
3 Choose the paper format with the buttons or
according to the following table:.
Paper tray Available paper format
3 - Copy
MAN. TRAY
AUTO. TRAY
SCANNER
4 Confirm by pressing the OK button.
5 Quit this menu by pressing the button.
A5, A4, Legal and Letter
A5, A4, Legal and Letter
LTR/LGL and A4
- 19 -
Page 23

SP1100S/Aficio SP1100S
Parameters/
Setup
You can setup your machine as you like depending on the
use. You will find in this chapter description of the
functions.
You can print the functions guide and the available setup
of your multifunction machine.
Your machine is continuously being
updated, new functions are regularly
made available.
Note
Language
This setting enables you to choose the menu language of
your choice. By default, the multifunction machine is set
to English.
To select the language:
203 - SETUP / GEOGRAPHICAL / LANGUAGE
1 Press , enter 203 using the keypad. Confirm with
OK.
2 Select the required language using and ,
then press the OK button to confirm.
Contact your Dealer to check if
firmware updates are available for your
machine (see Firmware update,
page 41).
P a r a m e t e r S i g n i f i c a t i o n
8 - Eco energy Choosing the printer standby delay: the
printer will switch to standby after a
delay (in minutes) of NON-operation or
during the period of time of your
choice.
Note: you can also access this
parameter by pressing the key
from the idle screen.
79 - Toner
Management
80 - Toner save Makes printing lighter to save toner
91 - Printer error
timeout
92 - Printer wait
timeout
This parameter helps you manage the
consumable. When set to W
10%], you can only replace the toner
cartridge when the toner has reached
the threshold.
If ever you need to replace the toner
cartridge before the toner near end, set
the parameter to W
proceed with the toner cartridge
replacement (see chapter
Maintenance, page 38).
Disabling the toner management
(parameter set to W
not recommended as you may loose
faxes and spill toner in your print
mechanism. When set to W
screen displays T
cartridge ink.
Time-out before document being
printed is deleted following a print error
in PC print mode.
Wait time-out for data from PC before
the task is deleted in PC print.
ITH [0-100%] and
ITHOUT) is strongly
ONER ? %.
ITH [0-
ITHOUT, the
4 - Parameters/Setup
3 To exit this menu, press .
Technical Parameters
As delivered your machine is preset by default. However,
you may adjust it to meet your requirements by resetting
the technical parameters.
To set the technical parameters:
1 Select the desired parameter and confirm with OK.
2 With the buttons
settings by following the table below and press OK.
29 - SETUP / TECHNICALS
or , modify the parameter
93 - Replace format Page format change. This parameter
allows you to print a LETTER format
document on A4 pages using the
LETTER/A4 setting.
- 20 -
Page 24

SP1100S/Aficio SP1100S
Printing the functions guide
Important
1 Press on and enter 51 with the digital keypad.
The printing of the functions guide starts.
The printing is not possible on A5
paper format.
51 - PRINT / FUNCTIONS LIST
Print the list of setups
Important
To print the list of setups:
Press , enter 56 using the keypad.
The printing of the list of setups starts.
Note
The printing is not possible on A5
paper format.
56 - PRINT / SETUP
You can also access the list of setups
by pressing the button directly.
Lock the machine
This function prevents non-authorized people from
accessing the machine. An access code will be required
every time someone wants to use the device. After each
use, the device will lock automatically.
Before that you have to enter a lock code.
4 Quit this menu by pressing the
button.
Lock the Media service
This function prevents access to the Media service. The
access code will be required every time someone wants
to use the USB key functions:
• analyse the contents of a connected USB key,
• print from a USB key, delete files,
To access the Media service locking menu:
816 - ADVANCED FCT / LOCK / LOCK MEDIA
1 Press , enter 816 using the keypad.
2 Enter the four-digit locking code with the keypad.
3 Press OK to confirm.
4 With the buttons or , choose ON and confirm
with OK.
5 Quit this menu by pressing the button.
Read the counters
This function allows you to view the activity counters for
your machine at any time.
According to your needs, you can read the counters for:
• scanned pages,
• printed pages.
Scanned pages counter
To view the number of pages scanned from your
machine:
4 - Parameters/Setup
811 - ADVANCED FCT / LOCK / LOCKING CODE
1 Press on , enter 811 with the digital keyboard.
2 Enter your lock code (4 digits) with the keyboard,
confirm with OK.
If a code is already registered, enter
Important
3 Enter again your lock code (4 digits) with the
keyboard, confirm with OK.
4 Quit this menu by pressing the
the old code before typing the new
one.
button.
Lock the keyboard
Everytime you use your machine, you will have to enter
your code.
1 Press on , enter 812 with the keyboard.
2 Enter the lock code and confirm with OK.
3 With the buttons or , choose ON and confirm
812 - ADVANCED FCT / LOCK / LOCK KEYBD.
with OK.
823 - ADVANCED FCT / COUNTERS / SCANNED
PAGES
1 Press on , enter 823 with the keyboard.
2 The number of sent pages appears on the screen.
3 Quit this menu by pressing the
button.
Printed pages counter
To view the number of pages printed on your machine:
824 - ADVANCED FCT / COUNTERS / PRINTED PG
1 Press on , enter 824 with the keyboard.
2 The number of printed pages appears on the
screen.
3 Quit this menu by pressing the
button.
- 21 -
Page 25

SP1100S/Aficio SP1100S
Display the consumables status
You can read at any time the remaining toner in the
cartridge. This level appears in percentage.
86 - ADVANCED FCT / CONSUMABLES
1 Press on , enter 86 with the keyboard.
2 The available toner percentage appears on the
screen.
3 Quit this menu by pressing the
button.
Calibrate your scanner
You can do this operation when the quality of ph otocopied
documents is not satisfactory anymore.
80 - ADVANCED FCT / CALIBRATION
1 Press on , enter 80 with the keyboard, confirm
with OK.
2 The scanner is triggered and a calibration is done
automatically.
3 At the end of the calibration, the machine comes
back to the screen saver
.
4 - Parameters/Setup
- 22 -
Page 26

SP1100S/Aficio SP1100S
Games
Sudoku
10 Confirm with OK.
The number of copies of the solution to the grid requested
is printed.
Sudoku is a Japanese puzzle. The game is in a grid
format of three squares by three squares to be distributed
in fields in zones of 3 × 3. Depending on the level of
difficulty, more or fewer numbers are already entered at
the start of the game. The aim of the game is to distribute
the numbers 1 to 9 between the boxes in such a way th at
each number appears only once in each row, column and
in each of the nine grids. There is only one solution.
Print a grid
There are 400 Sudoku grids available in total, 100 for
each difficulty level.
Important
521 - PRINT / SUDOKU / PRINT GRID
1 Press , enter 5 using the keypad. Confirm
with OK.
2 Select SUDOKU using the or button.
3 Confirm with OK.
4 Select PRINT GRID using the or button.
5 Select the level of difficulty EASY, MEDIUM,
HARD, EVIL using the or button.
6 Confirm with OK.
7 Choose the grid you want by entering the number
on the numeric keypad (1 to 100).
8 Confirm with OK.
9 Choose the number of copies you want by entering
a number from 1 to 9 on the numeric keypad.
10 Confirm with OK.
The number of copies of the grid requested is printed.
The printing is not possible on
A5 paper format.
5 - Games
Print the solution to a grid
Important
522 - PRINT / SUDOKU / PRT SOLUTION
1 Press , enter 5 using the keypad. Confirm
with OK.
2 Select SUDOKU using the or button.
3 Confirm with OK.
4 Select PRT SOLUTION using the or button.
5 Select the level of difficulty EASY, MEDIUM,
HARD, EVIL using the or button.
6 Confirm with OK.
7 Choose the grid you want by entering the number
on the numeric keypad (1 to 100).
8 Confirm with OK.
9 Choose the number of copies you want by entering
a number from 1 to 9 on the numeric keypad.
The printing is not possible on
A5 paper format.
- 23 -
Page 27

SP1100S/Aficio SP1100S
USB memory key
You can connect a USB memory Key on the front side of
your machine. The files stored in TXT, TIFF and JPEG
formats will be analysed and you will be able to use the
following actions:
- print the stored files contained in your USB memory
1
key
,
- delete the files contained in your USB memory key,
- run an analysis on the contents of the inserted USB
memory key,
- digitalise a document on your USB memory key,
Use of the USB memory key
Always respect the insertion way
when you connect a USB memory
key to the machine.
Important
Print your documents
Important
You can print the stored files or a list of the files located in
the USB memory key.
Print the list of files located in the key
To print the list of files located in the key:
Do not disconnect your USB
memory key while the machine is
reading its contents or writing
contents.
The printing is not possible on A5
paper format.
01 - MEDIA / PRINT DOC. / LIST
4 Select LIST with the or buttons and confirm
with OK.
5 The list is shown in a table with the following
information:
- the analyzed files are indexed in an incremental
1 by 1 order,
- the files name with their extension,
- the date of the files last save,
- the files size in Kbytes.
Print the files located in the key
To print the files located in the key:
01 - MEDIA / PRINT DOC. / FILE
1 Insert the USB memory key on the front side of the
machine respecting the way of insertion.
ANALYSIS MEDIA appears on the screen.
2 Select PRINT DOC. with the or buttons and
confirm with OK.
3 Select FILE with the or buttons and confirm
with OK.
4 You have three possibilities to print your files:
- ALL, to print all the files located in the USB
memory key.
Select ALL with the or buttons and
confirm with OK. The printing is started
automatically.
- SERIES, to print a series of files located in the
USB memory key.
Select SERIES with the or buttons and
confirm with OK.
FIRST FILE and the first indexed file appears
on the screen. Select with the or buttons
the first file of the series to print and confirm
with OK. A star (Ä) appears on the left side of
the file.
LAST FILE appears on the screen. Select with
the or buttons the last file of the series to
print and confirm with OK.
Press the button.
COPIES NUMBER appears on the screen,
enter the desired number of copies with the
numerical keypad and confirm with OK.
Select the printing format (for JPEG files): A4 or
LETTER (depending on model), or PHOTO and
confirm with OK.
Select the printing format: THICK or NORMAL
and confirm with OK to start printing.
6 - USB memory key
1 Insert the USB memory key on the front side of the
machine respecting the way of insertion.
2 ANALYSIS MEDIA appears on the screen.
3 Select PRINT DOC. with the or buttons and
confirm with OK.
1. It may be possible that some TIFF files of your USB
memory key cannot be printed due to data format
limitation.
- 24 -
Page 28

SP1100S/Aficio SP1100S
- SELECTION, to print one or several files
located in the USB memory key.
Select with the or buttons the file to print
and confirm with OK. A star (Ä) appears on the
left side of the file.
Repeat this step for each file you want to print.
Press the button.
COPIES NUMBER appears on the screen,
enter the desired number of copies with the
numerical keypad and confirm with OK.
Select the printing format (for JPEG files): A4 or
LETTER (depending on model), or PHOTO and
confirm with OK.
Select the printing format: THICK or NORMAL
and confirm with OK to start printing.
5 Quit this menu by pressing the
button.
Delete your files located in the key
You can delete files located in your USB memory key.
06 - MEDIA / DELETE / MANUAL
You come back to the previous menu.
5 Quit this menu by pressing
the button.
Analyse the USB memory key content
After a period of inactivity, your machine will return to the
main menu. To view the USB memory key again please
proceed as follows:
07 - MEDIA / ANALYSE MEDIA
1 Press on , enter 07 with the keyboard.
2 The USB memory key analysis is started.
3 You can print or delete the detected files located in
your USB memory key. Refer to the previous
chapters.
Save a document on a USB memory key
This function allows you to digitise and save a document
directly in the folder MFPrinter Laser Pro LL2\SCAN on a
USB memory key. The folder MFPrinter Laser Pro
LL2\SCAN is created by the application.
6 - USB memory key
1 Insert your USB memory key on the front side of
your machine respecting the way of insertion.
MEDIA ANALYSIS appears on the screen.
2 Select DELETE with the or buttons and
confirm with OK.
3 Select MANUAL with the or buttons and
confirm with OK.
4 You have three possibilities to delete your files:
- ALL, to delete all the files located in the USB
memory key.
Select ALL with the or buttons and
confirm with OK.
You come back to the previous menu.
- SERIES, to delete a series of files located in the
USB memory key.
Select SERIES with the or buttons and
confirm with OK.
FIRST FILE and the first indexed file appears
on the screen. Select with the or buttons
the first file of the series to delete and confirm
with OK. A star (Ä) appears on the left of the
file.
LAST FILE appears on the screen, select with
the or buttons the last file of the series to
delete and confirm with OK. A star (*) appears
on the left side of the file.
Before digitalising a document,
make sure that your USB memory
Important
1 Place the document to be copied face down on the
glass.
2 Insert the USB memory key in the USB connector
of your multifunction device.
The USB memory key analysis is started.
When the analysis is finished, the MEDIA menu is
displayed.
3 Select
confirm with the <Touches>OK button.
Important
key has sufficient disk space. If not,
you can delete manually the files.
See section “Delete your files
located in the key”, page 25..
SCAN TO with the or buttons then
You can also access this function in
two other ways:
• by pressing the button of the
machine deck then by selecting
SCAN-TO-MEDIA.
• By pressing the button from the
screen saver then by typing 03 on
the digital keyboard.
Press the button.
You come back to the previous menu.
- SELECTION, to delete only one or several files
located in the USB memory key.
Select with the or buttons the file to delete
and confirm with OK. A star (*) appears on the
left side of the file.
Repeat this step for each file you want to delete.
Press the button.
- 25 -
4 Choose between
with the or buttons and confirm with OK.
5 With the alphanumeric keyboard, give a name to
the scan file (up to 20 characters) and confirm with
<Touches>OK.
6 Choose the scan format between
and confirm to start the scan and the recording of
the document.
IMAGE allows to have the same kind of file as a
photo.
PDF is a format for the digital documents
B&W SCAN or COLOUR SCAN
IMAGE and PDF,
Page 29

SP1100S/Aficio SP1100S
creation.
With the IMAGE format, if you have
selected:
• BLACK&WHITE, the picture will
be saved in TIFF format.
• COLOUR, the picture will be
saved in JPEG format.
You can choose the image resolution
that will be digitized to the USB
memory key; the default resolution is
AUTO.
Important
The beginning button immediately starts the scan
and sends a file to the support with the parameters
defined in the analysis format.
Press the button several times
and select the resolution you require:
• Scanning in BLACK&WHITE:
- icon: text resolution.
- icon: photo resolution.
- no icon: auto resolution.
• Scanning in COLOUR:
- icon: text resolution.
- no icon: auto resolution.
6 - USB memory key
- 26 -
Page 30

PC Features
Introduction
The Companion Suite Pro software allows the connection
of a personal computer with a compatible multifunction
machine.
SP1100S/Aficio SP1100S
Software installation
This section describes the following installation
procedures:
• full installation of the Companion Suite Pro software,
• installation of the drivers only.
Installing the full software package
From the PC, you can:
- manage the multifunction machine, allowing you to
set it up according to your needs,
- print your documents on the multifunction machine
from your usual applications,
- scan colour, grey scale or black and white
documents and edit them on your PC.
Configuration requirements
The minimum configuration requirements for your
personal computer are:
Supported operating systems:
• Windows 2000 with at least Service Pack 4,
• Windows XP x86 (Home and Pro) with at least Service
Pack 1,
• Windows 2003 server for printing driver only,
• Windows Vista.
Processor:
• 800 MHz for Windows 2000,
• 1 GHz for Windows XP x86 (Home and Pro),
• 1 GHz for Windows Vista.
A CD-ROM drive
A free USB port
600 Mbytes of available disk space for the installation
RAM memory:
• 128 Mbytes minimum for Windows 2000,
• 192 Mbytes minimum for Windows XP x86 (Home and
Pro),
• 1 GByte for Windows Vista.
Turn your PC on. Open an account session with the
administration rights.
1 Open the CD-ROM drive, insert the installation CD-
ROM and close the drive.
2 An installation procedure is automatically run (Auto
run). If it does not, double-click on setup.exe at the
CD-ROM's root.
3 A screen titled C
appears. This screen allows you to install and
uninstall the software, access the product's user
guides or browse the CD-ROM contents.
4 Place your cursor on I
confirm with left-click of the mouse.
5 The Products Installation screen appears.
Place your cursor on A
left-click with the mouse.
Note
OMPANION SUITE PRO LL2
NSTALL PRODUCTS and
LL PRODUCTS and confirm by
For full installation copies on your hard
disk the software required for the good
execution of the Companion Suite Pro
kit, which is:
- Companion Suite Pro LL2 (machine
management software, printer drivers,
scanner, ...),
- Adobe Acrobat Reader,
- PaperPort®SE.
You may already be the owner of a
version of the software available in the
installation CD-ROM.
In this case use the CUSTOMIZED
installation, select the software that
you want to install on your hard drive
and confirm your choice.
7 - PC Features
- 27 -
Page 31

SP1100S/Aficio SP1100S
6 The welcome screen appears. Click on the NEXT
button to launch the installation of the Companion
Suite Pro in your PC.
9 The final installation is ready to be executed. Click
on the I
The following screen appears to indicate the
progression of the installation.
NSTALL button.
7 - PC Features
7 To continue, you need to accept the proposed
license agreement.
8 Click on the N
EXT button.
10 Click on OK to finish the installation.
Your Companion Suite Pro kit is successfully installed on
your PC.
You can now connect your multifunction machine, refer to
paragraph Connections.
You can start the multifunction machine's management
software from the menu S
> C
OMPANION SUITE > COMPANION SUITE PRO LL2
> C
OMPANION DIRECTOR or by clicking on the icon
C
OMPANION - DIRECTOR located on your desktop.
TART > ALL PROGRAMS
- 28 -
Page 32

SP1100S/Aficio SP1100S
Installing drivers only
This section describes the following installation
procedures:
• installation of drivers using the Companion Suite Pro
software,
• manual installation of drivers.
Installing the drivers using the Companion Suite
Pro software
Turn your PC on. Open an account session with the
administration rights.
1 Open the CD-ROM drive, insert the installation CD-
ROM and close the drive.
2 An installation procedure is automatically run (Auto
run). If it does not, double-click on setup.exe at the
CD-ROM's root.
3 A screen titled C
appears. This screen allows you to install and
uninstall the software, access the product's user
guides or browse the CD-ROM contents.
4 Place your cursor on I
confirm with left-click of the mouse.
OMPANION SUITE PRO LL2
NSTALL PRODUCTS and
6 Place your cursor on C
and confirm with left-click of the mouse.
7 The welcome screen appears. Click on the N
button to launch the installation of the Companion
Suite Pro kit on your PC.
OMPANION SUITE PRO LL2
7 - PC Features
EXT
5 The Products Installation screen appears.
Place your cursor on C
left-click with the mouse.
USTOMIZED and confirm by
8 To continue, you need to accept the proposed
license agreement.
9 Click on the N
10 Select I
N
EXT button.
EXT button.
NSTALL DRIVERS in the list and click on the
- 29 -
Page 33

SP1100S/Aficio SP1100S
11 Select the destination folder for installation and
click on the N
12 The final installation is ready to be executed. Click
on the I
EXT button.
NSTALL button.
Installing the drivers manually
You can install the printer and scan drivers manually
without running any setup software.
Note
1 Locate your USB cable connectors and connect as
shown below on the picture.
This installation mode is only possible
on Windows 2000, XP and Vista.
7 - PC Features
13 A screen informs you of the installation progress.
14 Click on OK to finish the installation.
2 Power on your multifunction machine.
The PC detects the device.
3 Click on L
(
RECOMMENDED).
The following screen appears:
OCATE AND INSTALL DRIVER SOFTWARE
The Companion Suite Pro software is now installed on
your PC.
You can now connect your multifunction machine, refer to
paragraph Connections.
4 Open the CD-ROM drive, insert the installation CD-
ROM and close the drive.
The drivers are detected automatically.
- 30 -
Page 34

SP1100S/Aficio SP1100S
5 Select LASER PRO LL2 in the list and click on NEXT.
6 A screen informs you that the drivers have been
installed. Click on the C
You can now use the multifunction machine to print or
scan your documents.
LOSE button.
Connections
Make sure that your multifunction machine is powered off.
The connection between the PC and the machine
requires a USB 2.0 shielded cable no more than 3 meters
long.
1 Locate your USB cable connectors and connect as
shown below on the picture.
7 - PC Features
2 Power on your multifunction machine.
The PC detects the device and the drivers are
automatically installed.
3 Once the installation is finished, a message
indicates that the drivers are installed correctly.
Important
It is recommended to install the
Companion Suite Pro software first
and then to connect the USB cable
to your machine (See section
“Installing the full software
package”, page 27.).
If you connect the USB cable
before installing the Companion
Suite Pro software the recognition
system (plug and play) identifies
automatically that new hardware
has been added. To start your
machine drivers installation, refer to
paragraph Installing the drivers
manually and follow the
instructions on screen. When you
use this procedure, only printing
and scanning functions are
activated.
You can now use the multifunction machine to print or
scan your documents.
- 31 -
Page 35

SP1100S/Aficio SP1100S
Multifunction Terminal's Supervision
The software that you have installed contains two
multifunction machine management applications,
C
OMPANION DIRECTOR and COMPANION MONITOR, which
allow you to:
• check whether the multifunction machine is connected
to your PC,
• monitor the multifunction machine activities,
• monitor the status of the multifunction machine
consumables from the PC,
• quickly access the graphic editor applications.
To manage the multifunction machine, run the
Companion Director application by clicking on the icon
located on your desktop or from the menu S
>A
LLPROGRAMS > COMPANION SUITE >COMPANION SUITE
P
RO LL2 > COMPANION DIRECTOR.
Checking the connection between the PC
and the multifunction machine
To check if the connection between the devices is good,
run the C
located on the desktop and check that the same
information is displayed on the multifunction machine.
OMPANION MONITOR software from the icon
TART
Companion Monitor
Graphical presentation
Run the application by clicking on the COMPANION
M
ONITOR icon located on your desktop or from the menu
S
TART >ALLPROGRAMS >COMPANION SUITE >COMPANION
S
UITE PRO LL2 > COMPANION MONITOR.
From this screen you can monitor the information or
configure your multifunction machine from the tabs:
7 - PC Features
Companion Director
This graphical Interface allows you to run the utilities and
the software to manage your multifunction machine.
Graphical presentation
Run the application by clicking on the COMPANION
D
IRECTOR icon located on your desktop or from the menu
S
TART >ALLPROGRAMS > COMPANION SUITE >COMPANION
S
UITE PRO LL2 > COMPANION DIRECTOR.
EVICE SELECTION: Displays the list of devices
• D
managed by the PC.
• C
OMPANION: Presents the multifunction machine
screen (USB connection only, not compatible with
Chinese, Korean and Russian language).
• C
ONSUMABLES: Displays the consumables status.
Device management
This tab shows the list of devices managed by the PC.
Selecting the current device
Only one device at a time may be connected to the PC.
The current device may be selected by clicking on the
radio button corresponding to the device.
Utilities and applications activation
The Companion Suite Pro graphical interface allows you
to run the following utilities and software:
• get H
•run the P
To run a software or utility contained in the Companion
Suite Pro kit, place the cursor on it and left-click with the
mouse.
ELP from the current documentation,
APERPORT software (Doc Manager).
- 32 -
Page 36

SP1100S/Aficio SP1100S
Status of the connection
The status of the connection between the current device
and the PC is indicated by a colour. The following table
defines the possible states of the connection.
Colour State
Yellow Connection in progress.
Green Connection established.
Red
The PC cannot connect to the device.
Check the USB connection.
Device parameters
1 Select a device by clicking on its line in the list and
click on P
parameters to be applied for this device when you
use the S
ROPERTIES to configure the scanning
CAN TO function.
3 Select the desired scan R
down menu.
4 Click OK to confirm the new parameters.
ESOLUTION in the drop-
Display the consumable status
The following information will be available from the
C
ONSUMABLES tab:
• current consumables status,
• number of printed pages,
• number of scanned pages,
• number of sent and received pages.
7 - PC Features
2 Select the desired scan M
menu.
ODE in the drop-down
- 33 -
Page 37

SP1100S/Aficio SP1100S
Companion Suite Pro functionalities
Document analysis
The document analysis can be carried out in two ways:
• either by the S
from the Companion Director window or from the
SCAN button on the machine),
• or directly from a standard compatible application.
Analysis with Scan To
Run the application by clicking on the COMPANION
D
IRECTOR icon located on your desktop or from the menu
S
TART >ALL PROGRAMS > COMPANION SUITE >
C
OMPANION SUITE PRO LL2 > COMPANION DIRECTOR.
CAN TO function (application accessible
To scan a document from PaperPort:
1 Click on F
2 Select the desired scanner.
3 Customise the advanced properties of the
digitisation by clicking on the A
OF THE SCANNED PICTURE link.
4 Adjust the desired parameters and click on the OK
button.
ILE > SCAN.
DJUST THE QUALITY
7 - PC Features
1 Click on the S
SCAN button on your machine and select SCANTO-PC.
2 You can follow the ongoing digitisation on a screen.
3 At the end of the digitisation, the scanned picture
appears in the PaperPort window.
CAN TO graphical image or press the
5 Click on the S
ongoing digitisation on a screen.
CAN button, you can follow the
Character recognition software (OCR)
The character recognition function allows to create a
usable data file for desktop applications from a hardcopy
document or from a picture.
The character recognition only works for printed
characters, such as printer outputs or typed text.
Nevertheless you can request for a handwritten text block
to be kept intact (a signature for instance) by outlining it.
Given your machine environment and the character
recognition from your machine, the OCR is done with a
Drag&drop of a document from the PaperPort to the
Notepad icon .
For more details about the usage of
Note
this software, check the online help of
the product.
Note
If the PaperPort software is not
installed on your hard drive, the
scanned picture will appear on your
desktop in TIFF format.
- 34 -
Page 38

SP1100S/Aficio SP1100S
Printing
You have the possibility to print your documents via the
USB connection.
During the installation of the Companion Suite Pro
software, the L
installed automatically onto your PC.
Printing on the multifunction machine
Printing a document on the multifunction machine from
your PC is like printing a document in Windows.
1 Use the P
currently open application on the screen.
2 Select the L
Printing in duplex mode with the multifunction
machine
The machine offers the possibility to print a document in
manual duplex mode from your PC.
Warning
ASER PRO LL2 printer driver will be
RINT command from the FILE menu of the
ASER PRO LL2 printer.
In manual duplex, the print
quality and paper transport are
not guaranteed.
- If some trouble occurred to the
paper during the print of the first
side, such as wrinkle, dog ear or
staple, do not use the paper for
manual duplex.
- When you load paper, please
true up the end of paper on a flat
surface.
For best results, we recommend
that you use 80 g/m² A4 paper or
20 lbs/m² Letter paper.
3 Check the Duplex box and choose among the two
binding modes:
Binding mode Printing
Long sides
Short sides
4 Click on the OK button to begin printing.
5 The machine prints the odd pages (from the higher
odd page to page 1) and the LCD screen displays:
** PRINTING **
** PC **
6 Once the odd pages are printed, the LCD screen
displays the message **P
THE PAPER TRAY WITH THE PRINTED SIDE VISIBLE...:
** PUT THE PRIN
... AND PRESS <OK>
The PC generates and prints a
page explaining how to reload the
sheets for a duplex job. Read this
Important
page carefully and place it back
with the other sheets.
it is very important that you return
the explanation sheet to the paper
tray to continue printing correctly .
UT THE PRINTED SHEETS IN
7 - PC Features
To print a document in manual duplex mode:
The duplex printing mode is
available only in a paper format
Important
1 Use the P
currently open application on the screen.
2 Select the L
managed by the paper tray.
The manual tray cannot be used to
print in duplex mode.
RINT command from the FILE menu of the
ASER PRO LL2 printer.
7 Place the sheets in the paper tray as indicated on
the explanation page and below.
The following illustrations describe the necessary
operations depending on the selected binding
mode:
- 35 -
Page 39

SP1100S/Aficio SP1100S
• Long sides
• Short sides
Software Uninstallation
This section describes the following procedures:
• full uninstallation of the Companion Suite Pro
software,
• uninstallation of the drivers only.
Uninstall the software from your PC
Turn your PC on. Open an account session with the
administration rights.
Run the programs removal from the menu S
>A
LL PROGRAMS >COMPANION SUITE > COMPANION SUITE
P
RO LL2 > UNINSTALL.
1 A confirmation screen appears. Click on the Y
button to continue the Companion Suite Pro
program removal.
TART
7 - PC Features
ES
8 Press OK on the command panel to resume
printing.
9 Even pages are printed on the other side of the
sheets. Once all pages are printed, remove the
explanation sheet.
If a paper jam or a paper format
Important
error occurs, the job is cancelled.
You must then resubmit the print
job.
2 The uninstall program is launched. You can cancel
the removal by clicking on C
3 Click on the OK button.
4 You need to restart your system at the end of the
procedure. Click on the Y
ANCEL.
ES button.
Uninstall the drivers from your PC
Turn your PC on. Open an account session with the
administration rights.
Depending on the installation mode used, select the
required uninstallation mode:
• If you have installed the drivers with the Companion
Suite Pro software, see paragraph Uninstall the
drivers using the Companion Suite Pro software.
• If you have installed the drivers manually, see
paragraph Uninstall the drivers manually.
- 36 -
Page 40

SP1100S/Aficio SP1100S
Uninstall the drivers using the Companion Suite
Pro software
Run the programs removal from the menu START
>A
LL PROGRAMS >COMPANION SUITE >COMPANION SUITE
P
RO LL2 > UNINSTALL.
You can also uninstall C
S
Note
UITE PRO LL2 drivers using the
Windows function A
P
ROGRAMS from the control panel.
1 A confirmation screen appears. Click on the Y
button to continue the C
OMPANION SUITE PRO LL2
drivers program removal.
2 The uninstall program is launched. You can cancel
the removal by clicking on C
OMPANION
DD/REMOVE
ES
ANCEL.
6 Select the option R
PACKAGE and click on the OK button.
EMOVE DRIVER AND DRIVER
7 A confirmation screen appears. Click on the Y
button to continue.
8 Click on the D
ELETE button to confirm the removal.
To remove scan and modem drivers:
1 Open the D
>C
ONTROL PANEL > SYSTEM > HARDWARE > DEVICE
MANAGER or START >CONTROL PANEL > HARDWARE
AND SOUND > DEVICE MANAGER, depending on the
EVICE MANAGER window (START
operating system).
ES
7 - PC Features
Uninstall the drivers manually
The following drivers must be removed:
• print driver
• scan driver
• modem driver
To remove the print driver:
1 Open the P
PANEL > PRINTERS AND FAXES or START > CONTROL
PANEL > HARDWARE AND SOUND > PRINTERS,
depending on the operating system).
2 Delete the L
3 In the P
and select R
PROPERTIES.
4 Select the D
5 Select the L
R
EMOVE button.
RINTERS window (START > CONTROL
ASER PRO LL2 icon.
RINTERS window, right-click with the mouse
UN AS ADMINISTRATOR > SERVER
RIVERS tab.
ASER PRO LL2 driver and click on the
2 In the O
MF P
THER DEVICES sub-menu, select the
RINTER LASER PRO LL2 item and click on the
right button of the mouse.
3 Select U
NINSTALL on the menu and left-click with
the mouse.
- 37 -
4 Click on the OK button to confirm the removal.
5 In the I
S
MAGING DEVICES sub-menu, select the
CANNER PRO LL2 item and right-click with the
mouse.
6 Select U
NINSTALL on the menu and left-click with
the mouse.
7 Click on the OK button to confirm the removal.
Page 41

SP1100S/Aficio SP1100S
Maintenance
Service
Your machine comes with a current consumable
management system. It tells you if your toner cartridge is
close to its end of cycle. The following message will
appear on your machine screen.
TONER NEAR
END
General information
For your safety, it is imperative to
CAUTION
To ensure that your machine is kept in the best
conditions, it is recommended that you periodically clean
the inner parts.
Please respect the following rules while using this
machine:
- Do not leave the scanner cover open.
- Do not try to lubricate the device.
- Do not close the scanner cover violently or do not
apply vibrations to the machine.
- Do not open the cartridge access cover while printin g.
- Do not try to disassemble the machine.
- Do not use paper which has stayed in the tray for too
long.
refer to the safety information
presented in chapter Security,
page 1.
Toner cartridge replacement
To quit this screen, press OK.
To replace the toner cartridge, proceed as shown below.
When the following message is displayed on the screen:
TONER EMPTY
REPLACE <OK>
1 Press OK.
OPEN FRONT COVER
REPLACE TONER
2 Stand in front of the device.
3 Push on the left and right sides of the cover and pull
it towards you.
4 Raise and remove the toner cartridge from the
machine.
5 Unpack the new cartridge and insert it into the slot
as indicated in the diagram below.
8 - Maintenance
Three toner cartridge replacement procedures can be
used depending on the T
• T
ONER MANAGEMENT setting set to WITH [0-10%] : the
replacement of the cartridge can be perfomed only
when the message Toner near end is displayed. At
the end of replacement, validation with the smart card
is required.
• T
ONER MANAGEMENT setting set to WITH [0-100%] :
the replacement of the cartridge can be perfomed at
any time. At the end of replacement, validation with the
smart card is required.
• T
ONER MANAGEMENT setting set to WITHOUT : the
replacement of the cartridge can be perfomed at any
time and no validation with the smart card is
necessary. When set to W
T
ONER ? %.
To set the T
SETUP / TECHNICALS / TONER MANAGEMENT and
choose the setting.
ONER MANAGEMENT setting, select 2979 -
ONER MANAGEMENT setting.
ITHOUT, the screen displays
This procedure applies when the
setting T
W
ONER MANAGEMENT is set to
ITH [0-10%].
CAUTION
When set to With [0-100%], follow the
procedure from step 2.
When set to WITHOUT, follow the
procedure from step 2 to step 7.
6 Close the cover.
The following message appears:
HAVE YOU CHANGED
THE TONER? <OK>
7 Press OK.
- 38 -
Page 42

SP1100S/Aficio SP1100S
8 When this message appears,
INSERT THE
TONER CARD
insert the smart card provided with the new toner
cartridge as shown on the picture below.
9 A wait message appears.
PLEASE
WAIT
The smart card is read.
NEW TONER
REMOVE CARD
Remove the smart card from the reader, your
machine is ready to print again.
If the C button is pressed while the smart card is being
read, the machine displays:
ACTION CANCELLED
REMOVE CARD
Cleaning
Scanner reading system cleaning
When one or more vertical lines appear on the copies,
clean the glass of the scanner.
1 Open the scanner cover until it is standing in
vertical position.
2 Wipe the glass with a soft lint-free cloth soaked with
mild alcohol.
3 Close the scanner cover.
4 Make a copy to check that the symptoms have
disappeared.
Printer cleaning
Dust, dirtiness and paper debris on the external and
internal surfaces of the printer can affect its operation. We
advise that it is cleaned regularly.
8 - Maintenance
To continue the printing of your
documents when the message
T
ONER NEAR END is displayed, set
the T
ONER MANAGEMENT setting to
W
ITHOUT.
CAUTION
Caution : this procedure is not
recommended as disabling toner
management (parameter set to
W
ITHOUT) can lead to fax loss and
toner being spilled in your print
mechanism.
Issues with smart cards
If you use a smart card that has already been used, the
machine will display:
PLEASE
WAIT
then,
REMOVE CARD
ALREADY USED
If you use a defective smart card, the machine will display:
PLEASE
WAIT
then,
UNKNOWN CARD
REMOVE CARD
Printer external cleaning
Clean the external part of the printer with a soft cloth
soaked in mild detergent.
Printer issues
Error messages
When the printer encounters any of the problems
described below, the corresponding message is shown
on the machine display.
Message Action
CHECK TONER
TONER NEAR END
REPLACE PAPER
HEATING
CLOSE COVER
PRINTER
TONER EMPTY
REPLACE <OK>
Check the presence of a
toner cartridge in the
machine.
Indicates that your
consumable will need
changing soon.
Add paper in tray.
Message displayed when
starting the machine.
The printer front cover is
open, close it.
Replace the toner cartridge.
- 39 -
Page 43

SP1100S/Aficio SP1100S
Message Action
PAPER JAM
REMOVE TONER
PAPER JAM
EXTERNAL TRAY
PAPER EMPTY
Note
After one of the error messages
listed above is displayed, it may
happen that the active print job is
cancelled (see PC printing
issues, page 40).
A sheet of paper is jammed in
the machine. Take out the
toner cartridge and remove
the jammed paper sheet.
Take out the paper tray and
remove the jammed paper
sheet. Then open and close
the Front cover.
A sheet of paper is jammed in
the machine. Open the paper
jam cover. Remove the
jammed paper sheet. Then
open and close the Front
cover.
Add paper in the paper tray.
Paper jam
The fusion unit can reach a very high
temperature during the operation. To
prevent any harm, do not touch this
CAUTION
In case of paper jam, the following message appears:
1 Remove the toner cartridge and check if a sheet is
jammed.
2 Remove the sheet of paper which causes the paper
jam.
3 Put the toner cartridge in the machine, or remove
the paper tray and remove the sheet of paper which
causes the paper jam.
4 Check that the paper sheets in the paper tray are
correctly placed.
area.
For details, refer to Positions of
Warning and Caution labels on the
machine, page 3.
PAPER JAM
REMOVE TONER
8 - Maintenance
When printing, a sheet of paper may get stuck in the
printer or the paper tray and cause a paper jam.
In case of a paper jam in the machine, the following
message appears:
PAPER JAM
EXTERNAL TRAY
1 Open the paper jam cover located at the back of
the machine.
2 Remove the jammed sheet of paper and close the
cover.
5 Replace the paper tray in the machine.
Miscellaneous issues
When turning on the terminal, nothing is displayed on
the screen.
Check the connection between the power cord and the
outlet.
PC printing issues
This section details how the machine handles a print
request after having encountered an issue (paper jam,
connection loss, etc.).
3 Open and close the Front cover.
The printer starts again automatically.
Refer to the sections below to know if the printing of your
document will resume or will be cancelled, depending on
the problem encountered during printing.
- 40 -
Page 44

PC printing via USB connection
Issue encountered Print request handling
Once the problem is resolved,
Paper empty
No paper feed Once the problem is resolved,
Paper jam
Paper format problem
Toner empty
printing resumes from the first
non-printed page.
printing resumes from the first
non-printed page.
Exception: If the document
was to be printed in manual
duplex mode, the printing of
the document is cancelled.
The printing of the active
document is cancelled.
Documents waiting to be
printed, however, will print
after the toner cartridge is
replaced.
SP1100S/Aficio SP1100S
8 - Maintenance
The machine switches to idle
mode after a timeout (30
seconds by default).
Pause requested
from the spooler
Loss of USB
connection
The printing of the active
document is cancelled.
Documents waiting to be
printed, however, will be
printed.
Once the problem is resolved,
the printing of the document
restarts from the beginning,
regardless of the number of
pages already printed before
the connection loss.
Firmware update
Updating the machine firmware requires that the
Companion Suite Pro software be installed on your PC,
and that the PC is connected to the machine (see PC
Features, page 27).
Contact your Dealer to check if firmware updates are
available for your machine.
Then, access the update utility (S
> COMPANION SUITE > COMPANION SUITE PRO LL2
> C
OMPANION - FIRMWARE UPDATE), select the
downloaded file and launch the update.
TART > ALL PROGRAMS
- 41 -
Page 45

SP1100S/Aficio SP1100S
Specifications
Physical specifications
Dimensions: 344 x 447 x 386 mm
Weight: 11.6 kg
Electrical specifications
Power supply (see rating plate): Single phase 220-240 V - 50/60 Hz - 4.5 A
Electric consumption: 10 W typical in powersave
33 W typical in standby
450 W average during printing (900W peak)
Environmental specifications
Operating temperature: 10° C to 27° C [50° F to 80.6°
included between 15 to 80% (up to 32° C [89.6° F] w ith an
ambient humidity included between 15 to 54%)
F] with an ambient humidity
Peripheral specifications
Printer
Type: Laser (on normal paper)
Resolution: 600 dpi
Speed:
Preheating time: 21 sec.
First page out time: 13 sec.
a. Printing speed may vary depending on used operating systems, computer specifications, software applications, paper formats as well
as file types and sizes.
20 ppm maximum
Copier
Type: Autonomous Black and White
Copy speed: 20 ppm maximum
Resolution: 600 dpi
Multiple copies: 99 pages maximum
Zoom range: 25 % to 400 %
Scanner
a
8 - Maintenance
Type: Colour scanner
Colour depth: 36 bits
Resolution: 600 dpi (optical)
2400 dpi (interpolated)
Software compatibility: TWAIN, WIA
Maximum paper format: Letter
Printing supports
Main paper tray capacity: 250 sheets maximum (60 g/m²), 200 sheets maximum (80 g/m²)
Output tray capacity: 50 sheets
Main tray paper format: A4, A5, Legal, Letter
60 to 105 g/m² paper
Paper format for manual printing: A4, A5, Legal, Letter, B5, exec, A6
52 to 160 g/m² paper
PC connection
Slave USB 2.0 port (PC connection)
Master USB 2.0 port (reader, USB memory key reader)
Operating System: Windows 2000 ≥ SP4, Windows XP x86 ≥ SP1, Windows Vista, Windows 2003 server (for printing
only)
Specifications are subject to changes for improvement without notice.
M049-8651
- 42 -
 Loading...