

Ricoh SG 2100N, SG 3110DN, SG K3100DN, SG 3110DNW, SG 7100DN User Manual
...
Operating Instructions
User Guide
For safe and correct use, be sure to read "Safety Information" before using the machine.


TABLE OF CONTENTS
Manuals for This Machine.................................................................................................................................9
Manuals List......................................................................................................................................................10
Notice................................................................................................................................................................11
Important......................................................................................................................................................11
User's Notes.................................................................................................................................................11
How to Read This Manual...............................................................................................................................14
Symbols........................................................................................................................................................14
Notes............................................................................................................................................................14
Model-Specific Information.............................................................................................................................15
Available Units and Options for Each Model...........................................................................................15
1. About This Product
Guide to Components......................................................................................................................................17
Front View.....................................................................................................................................................17
Rear View.....................................................................................................................................................18
Left Side View...............................................................................................................................................19
Paper Feed Unit (SG 3110DN/SG 3110DNw).....................................................................................19
Paper Feed Unit (SG 7100DN).................................................................................................................21
Duplex Unit...................................................................................................................................................21
Multi Bypass Tray (SG 3110DN/SG 3110DNw)..................................................................................22
Multi Bypass Tray (SG 7100DN)..............................................................................................................23
Control Panel....................................................................................................................................................24
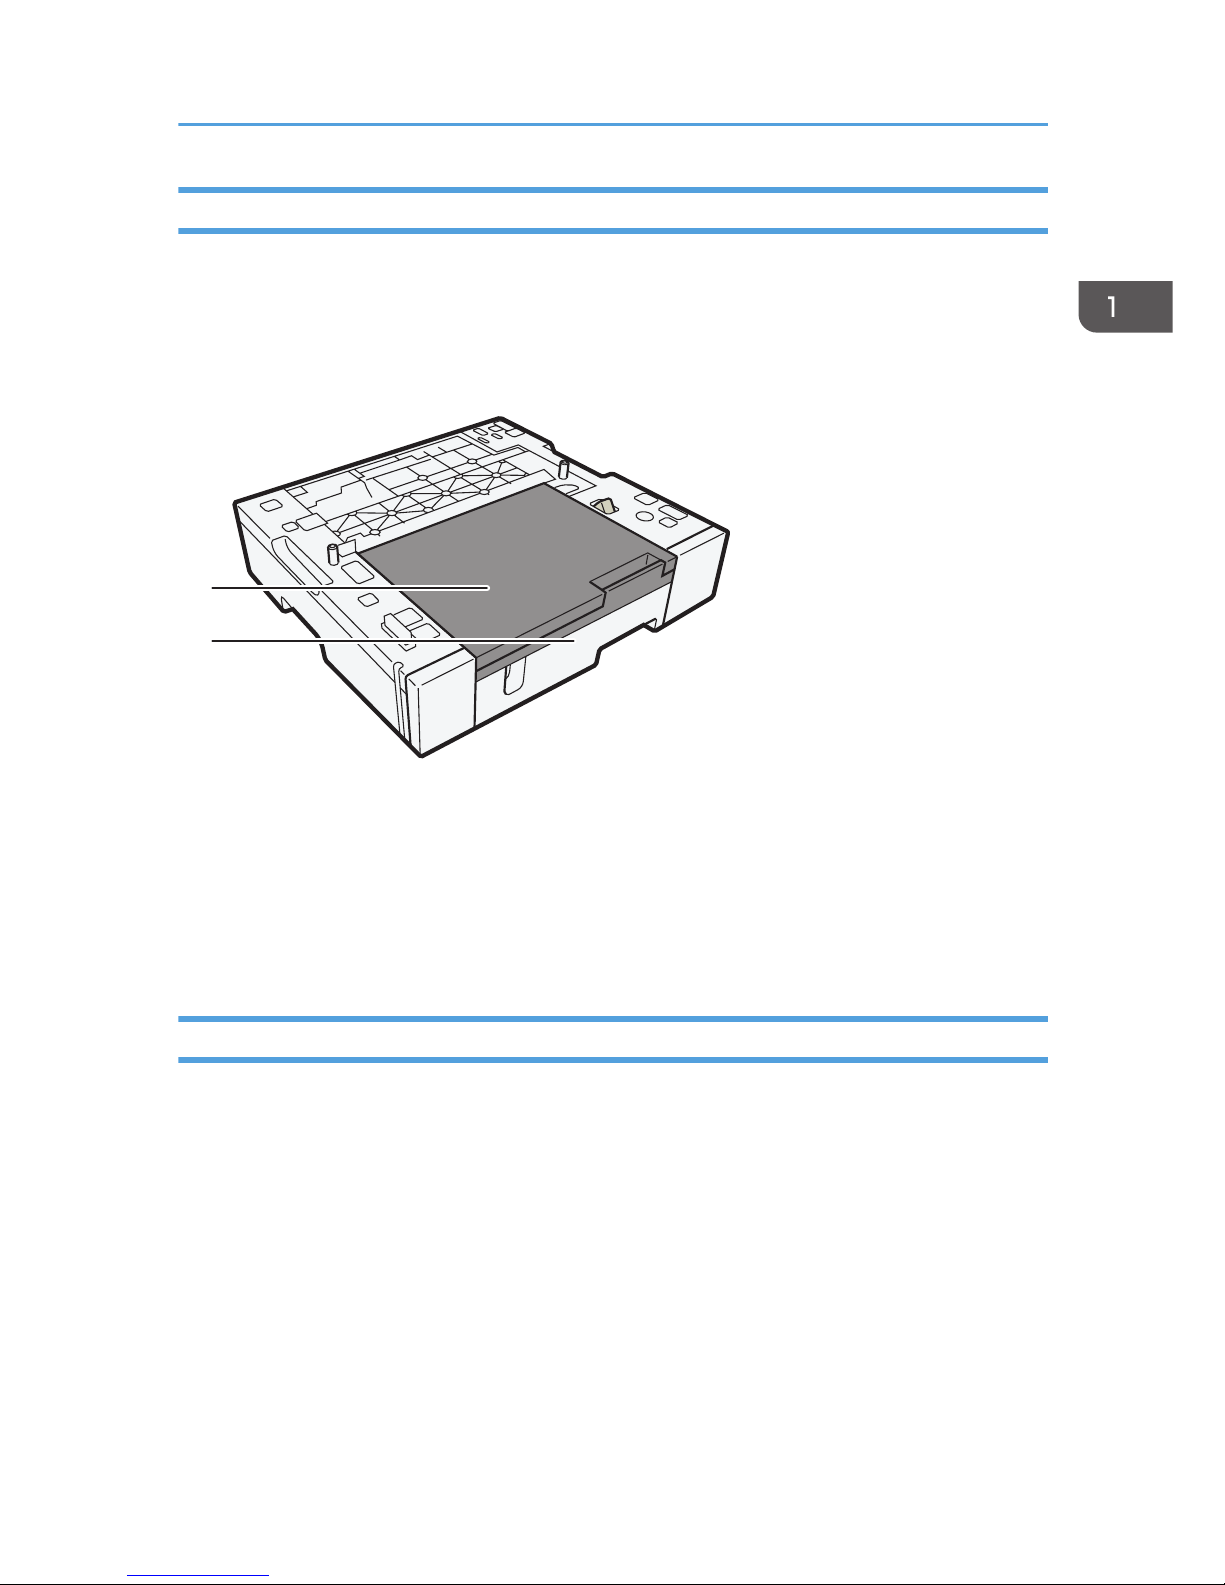
Attaching and Detaching Units and Options.................................................................................................26
Attaching and Detaching the Paper Feed Unit..........................................................................................26
Attaching and Detaching the Duplex Unit.................................................................................................28
Attaching and Detaching the Multi Bypass Tray.......................................................................................30
Turning On/Off the Power..............................................................................................................................33
2. Preparing for Printing
Setup Procedure...............................................................................................................................................35
Checking the Computer and Installation Area...............................................................................................36
The area where the machine is to be placed............................................................................................36
Checking the power source........................................................................................................................39
Checking the Computer to be Connected.................................................................................................40
Checking the Supplied Items and Unpacking the Machine.........................................................................42
1

Installing the Print Cartridges...........................................................................................................................44
Plugging in the Power Cord and Turning the Power On...............................................................................47
Confirming the Connection Method...............................................................................................................50
Connecting the Computer and Installing the Software (USB Connection)..................................................51
Before Installing the Software.....................................................................................................................51
Quick Install for USB....................................................................................................................................53
Connecting the Computer and Installing the Software (Network Connection)..........................................55
Before Installing the Software.....................................................................................................................55
Connecting the Machine via a Wireless LAN Interface...........................................................................60
Quick Install for Network............................................................................................................................64
Installing and Opening the User Guide.........................................................................................................66
Opening the User Guide When an Error Message Appears on the Status Monitor.............................67
Opening the User Guide from the CD-ROM.................................................................................................68
Installing the Printer Drivers for a USB Connection.......................................................................................69
Sharing the Printer........................................................................................................................................72
Installing the Printer Drivers for a Network Connection................................................................................74
Using the Standard TCP/IP Port.................................................................................................................75
Using the LPR Port.........................................................................................................................................76
Using the WSD Port.....................................................................................................................................78
Using the IPP port.........................................................................................................................................80
Using the SmartDeviceMonitor for Client Port...........................................................................................81
Using as the Windows Network Printer.....................................................................................................83
Downloading Utility Software.........................................................................................................................85
SmartDeviceMonitor for Client...................................................................................................................85
Paper.................................................................................................................................................................86
Loadable Paper Sizes and Quantities........................................................................................................86
Paper Handling Precautions.......................................................................................................................94
Loading Paper................................................................................................................................................100
Loading Paper into Tray 1-3....................................................................................................................100
Extending the Paper Tray To Load Paper................................................................................................102
Loading Paper into Bypass Tray...............................................................................................................105
3. Specifying the Printer Driver Settings
Opening the Printer Driver Dialog Box........................................................................................................107
2

Opening the [Printer Properties] Dialog Box...........................................................................................107
Opening the [Printing Preferences] Dialog Box......................................................................................107
Opening from an Application..................................................................................................................107
Specifying Settings on [Accessories] Tab....................................................................................................109
Conditions for Bidirectional Communication...........................................................................................109
If Bidirectional Communication is Unavailable.......................................................................................109
Printing............................................................................................................................................................111
Canceling Printing..........................................................................................................................................113
Canceling Printing from the Status Monitor.............................................................................................113
Canceling Printing Using the [Job Reset] Key.........................................................................................113
Canceling Printing from the Taskbar........................................................................................................116
4. Machine Setup Menus
Making Machine Settings Using the Control Panel....................................................................................117
Using the [Counter] Menu.............................................................................................................................122
Displaying the Counter.............................................................................................................................124
Printing the Counter...................................................................................................................................124
Differences Between the Counter and the Total Counter.......................................................................125
Using the [Paper Input] Menu.......................................................................................................................126
Changing the [Paper Input] Menu...........................................................................................................126
Using the [List/Test Print] Menu....................................................................................................................128
Printing a Configuration Page..................................................................................................................128
Interpreting the Configuration Page.........................................................................................................129
Using the [Maintenance] Menu....................................................................................................................130
Nozzle Check............................................................................................................................................131
Head-cleaning...........................................................................................................................................132
Head-flushing............................................................................................................................................134
Head Position.............................................................................................................................................135
Adj.Paper Feed..........................................................................................................................................138
Registration................................................................................................................................................140
Setting the Date and Time.........................................................................................................................142
De-condensation.......................................................................................................................................144
Using the [System] Menu..............................................................................................................................145
Changing the [System] Menu...................................................................................................................148
3

Using the [Host Interface] Menu...................................................................................................................149
Changing the [Host Interface] Menu.......................................................................................................152
Precautions to Take When Using in a Network......................................................................................152
Using the [PCL Menu]....................................................................................................................................154
Changing the [PCL Menu]........................................................................................................................155
Using the [User Code] Menu........................................................................................................................157
Using the [Language] Menu.........................................................................................................................159
5. Monitoring and Configuring the Machine
Using the Status Monitor...............................................................................................................................161
Using Web Image Monitor...........................................................................................................................162
Displaying Top Page.................................................................................................................................162
Menu..........................................................................................................................................................164
Logging in Using Web Image Monitor....................................................................................................164
Changing the Machine Settings...............................................................................................................165
Notifying the Machine Status by E-mail..................................................................................................169
About the Web Image Monitor Help......................................................................................................176
SNMP.............................................................................................................................................................177
6. Using the Machine with a Macintosh
System Requirements for Macintosh............................................................................................................179
Instructions Applicable to Both Macintosh and Windows Computers......................................................180
Installing the Printer Driver on a Macintosh.................................................................................................182
Adding the Printer through a USB Connection via the Print & Fax Preferences Pane..........................182
Adding the Printer in the Print & Fax Panel Using Bonjour.....................................................................183
Adding the Printer through a Network Connection via the Print & Fax Preferences Pane..................183
Printer Properties Pane on a Macintosh.......................................................................................................185
Displaying the Page Setup Pane on a Macintosh...................................................................................185
Displaying the Print Pane on a Macintosh...............................................................................................185
Displaying the Machine Status on a Macintosh..........................................................................................186
Displaying the [Maintenance Utility] on a Macintosh............................................................................186
Displaying the Status Monitor on a Macintosh.......................................................................................186
Specifying Option Settings on a Macintosh............................................................................................186
Printing with a Macintosh..............................................................................................................................187
Canceling Printing on a Macintosh..............................................................................................................189
4

Canceling a Print Job from the Print Job Queue Window......................................................................189
Opening Help on a Macintosh.....................................................................................................................190
Displaying the Printer Driver Help from the Print Pane...........................................................................190
Displaying the Printer Driver Help from the Mac Help...........................................................................190
Software on the CD-ROM for Macintosh....................................................................................................191
Files for Macintosh....................................................................................................................................191
RPCS Raster Printer Drivers for Macintosh...............................................................................................191
Manuals for Macintosh.............................................................................................................................191
7. Maintenance
Restricting Machine Functions.......................................................................................................................193
Locking the Keys........................................................................................................................................193
Unlocking the Keys....................................................................................................................................193
Replacing a Print Cartridge...........................................................................................................................194
Checking the Remaining Ink.....................................................................................................................194
Replacing a Print Cartridge......................................................................................................................195
Handling Print Cartridges.........................................................................................................................197
Replacing an Ink Collector Unit....................................................................................................................200
Checking the Waste Ink Level..................................................................................................................200
Replacing an Ink Collector Unit...............................................................................................................201
Cleaning.........................................................................................................................................................205
Cleaning the Power Cable Plug...............................................................................................................205
Moving...........................................................................................................................................................207
Moving a Short Distance..........................................................................................................................207
Moving a Long Distance...........................................................................................................................208
Disposing........................................................................................................................................................209
When Not Using for a Long Period of Time................................................................................................210
8. Troubleshooting
Software Cannot Be Installed.......................................................................................................................211
Confirming Installation..............................................................................................................................211
Checking Your Computer Environment....................................................................................................211
Printer Driver Cannot Be Installed............................................................................................................213
USB Connection is not Automatically Detected......................................................................................214
If Test Print Fails..............................................................................................................................................215
5

Uninstalling.....................................................................................................................................................216
Uninstalling the Printer Driver...................................................................................................................216
Deleting Devices........................................................................................................................................217
Removing the User Guide.........................................................................................................................218
Printing Does Not Start..................................................................................................................................220
Paper Is Not Fed or Delivered Normally.....................................................................................................222
Paper Jam.......................................................................................................................................................224
Using the [Form Feed] Key to Remove Jammed Paper..........................................................................225
Removing Paper Jammed in Tray 1.........................................................................................................226
Paper Jam in Tray 2/3.............................................................................................................................227
Removing Paper Jammed in the Multi Bypass Tray................................................................................228
Removing Paper Jammed under the Top Cover.....................................................................................229
Paper Jam in the Duplex Unit...................................................................................................................231
Paper Jam in the Duplex Unit and Tray 2/3...........................................................................................231
Opening the Rear Cover to Remove Jammed Paper.............................................................................232
Removing Paper Jammed in Tray 2/3....................................................................................................233
Opening the Rear Unit Cover to Remove Jammed Paper (SG 3110DN/SG 3110DNw)...............235
Opening the Duplex Unit Cover to Remove Jammed Paper.................................................................236
Removing Paper Jammed in the Duplex Unit..........................................................................................237
Print Results Are Not Satisfactory.................................................................................................................239
Prints are Unsatisfactory............................................................................................................................239
Colors Do Not Match the Displayed Image...........................................................................................241
Positions Do Not Match the Displayed Image........................................................................................242
Other Problems..........................................................................................................................................242
Checking the Consumables......................................................................................................................244
If a Message Appears during Installation....................................................................................................245
Error & Status Messages on the Display......................................................................................................246
Error Messages..........................................................................................................................................246
Status Monitor Errors.....................................................................................................................................253
Status Monitor Does Not Open...............................................................................................................253
No Response from Machine.....................................................................................................................253
No Paper/Tray Not Detected (Tray 1)...................................................................................................254
No Paper/Tray Not Detected (Tray 2/3)..............................................................................................254
6

No Paper/Tray Not Detected (Bypass Tray).........................................................................................254
Paper Size Mismatch/Paper Type Mismatch (Tray 1)..........................................................................255
Paper Size Mismatch/Paper Type Mismatch (Tray 2/3).....................................................................255
Paper Size Mismatch/Paper Type Mismatch (Bypass Tray).................................................................255
Paper Size Mismatch/Paper Type Mismatch (Auto Tray Select)..........................................................256
Cover Open...............................................................................................................................................256
Cover Open / Print Cartridge(s) Not Detected......................................................................................258
Duplex Unit Not Detected........................................................................................................................260
Cartridge Almost Empty............................................................................................................................260
Cartridge Empty.........................................................................................................................................260
Used Cartridge..........................................................................................................................................261
Ink Collector Unit Not Detected...............................................................................................................261
Ink Collector Unit Almost Full....................................................................................................................262
Ink Collector Unit Full................................................................................................................................262
Used Ink Collector Unit.............................................................................................................................262
Out of Printable Temperature Range.......................................................................................................262
Printer Error................................................................................................................................................263
Network Interface Error............................................................................................................................263
Maintenance Failed..................................................................................................................................263
Cannot Recover Error Page......................................................................................................................264
9. Appendix
Software on the CD-ROM............................................................................................................................265
Files.............................................................................................................................................................265
RPCS Raster Printer Drivers.......................................................................................................................265
PCL Printer Drivers.....................................................................................................................................266
Manuals.....................................................................................................................................................267
Electromagnetic Interference........................................................................................................................268
Specifications.................................................................................................................................................269
Machine Body...........................................................................................................................................269
Paper Feed Unit.........................................................................................................................................275
Bypass Tray................................................................................................................................................275
Where to Inquire............................................................................................................................................277
Recommended Consumables.......................................................................................................................278
7

Options and Consumables...........................................................................................................................279
When Using Windows Terminal Service/Citrix Presentation Server/Citrix XenApp..............................280
Operating Environment.............................................................................................................................280
Supported Printer Drivers..........................................................................................................................280
Limitations...................................................................................................................................................280
Copyrights......................................................................................................................................................282
expat...........................................................................................................................................................282
JPEG LIBRARY............................................................................................................................................282
IPSTM print language emulations.............................................................................................................283
NetBSD......................................................................................................................................................283
newlib.........................................................................................................................................................285
OpenSSL....................................................................................................................................................300
Zilb..............................................................................................................................................................302
Trademarks.....................................................................................................................................................303
INDEX...........................................................................................................................................................305
8

Manuals for This Machine
Read this manual carefully before you use this machine.
Refer to the manuals that are relevant to what you want to do with the machine.
• Media differ according to manual.
• A Web browser must be installed in order to view the html manuals.
Safety Information
This booklet contains important information about using the machine safely and correctly. Be sure
to read this before using the machine.
Quick Installation Guide
This guide briefly explains how to unpack and install the machine.
User Guide (HTML)
This guide, which is on the CD-ROM, explains in detail how to use the machine.
The guide explains how to make network and printer driver settings, and how to make and check
machine settings using a Web browser and other utilities.
The guide also contains troubleshooting procedures, such as those related to printing and paper
jams, and important information about types of paper and replacing consumables.
We recommend you install this guide on your computer so you can refer to it easily.
9

Manuals List
Manual Name Printed Manuals Provided HTML Manuals Provided
Quick Installation Guide Yes No
User Guide No Yes
Safety Information Yes No
10
Notice
Important
In no event will the company be liable for direct, indirect, special, incidental, or consequential damages
as a result of handling or operating the machine.
For good output quality, the manufacturer recommends that you use genuine ink from the manufacturer.
The manufacturer shall not be responsible for any damage or expense that might result from the use of
parts other than genuine parts from the manufacturer with your office products.
User's Notes
• High temperatures inside the machine can cause a breakdown. Do not lean anything against the
vent or block it in any way.
CHU067
• Warm air from the vent is normal and not a cause for concern.
• Do not leave the top or right front cover open. If you do, dust or other matter might get inside the
machine, and this will reduce print quality.
• During printing, do not move the machine or open its covers.
• Do not open the top or right front cover during printing. If you do, printing will stop.
• During printing, do not pull out a tray. Printing will stop and the paper will jam.
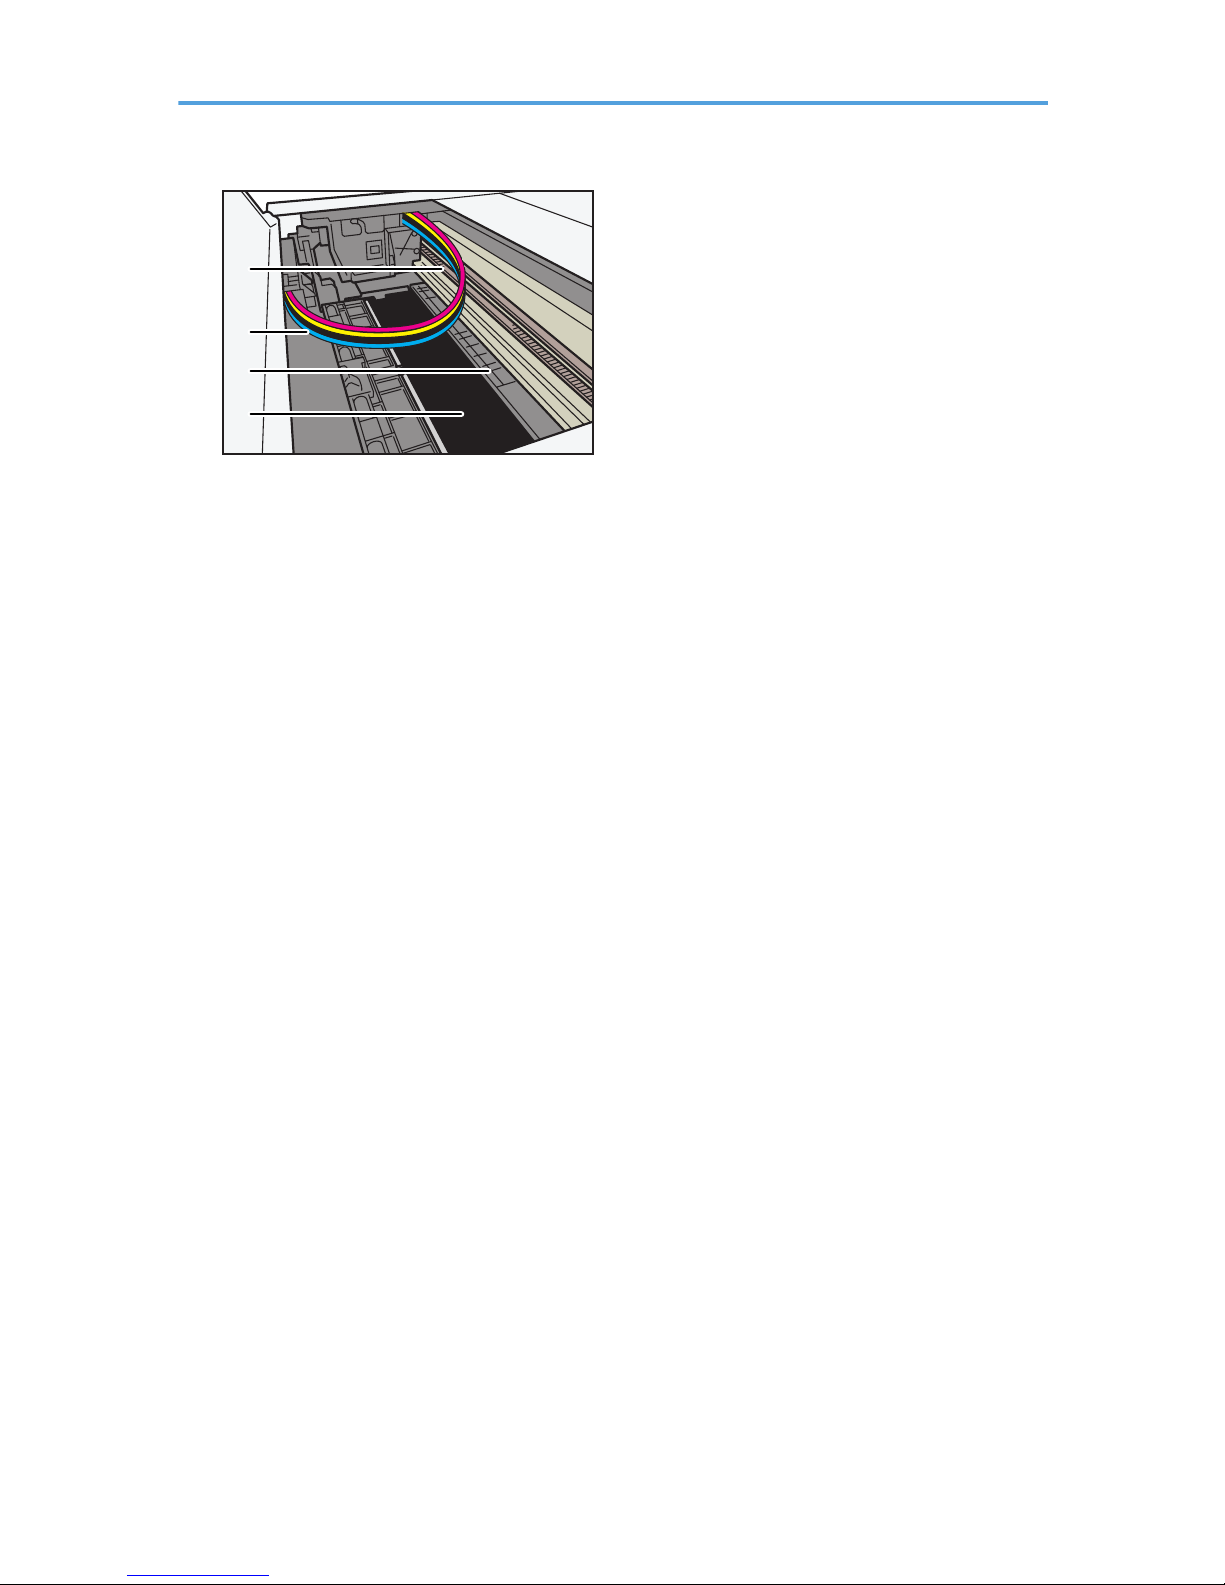
• Do not touch the feed belt, ink tubes, paper pressing board, or toothed rubber belt. Also, take care
not to catch cables or ink tubes with your sleeves.
11
2
3
4
1
CHU097
1. Toothed rubber belt
2. Ink tubes
3. Paper pressing board
4. Feed belt
• Take care not to let paper clips and other foreign objects fall inside the machine.
• After you install the print cartridge and turn the machine on for the first time, the print head priming
process will begin. This process sometimes clogs the print head. If this happens, perform the head
cleaning procedure.
• During printing, do not turn off the power or unplug the power cord from the wall outlet.
• During printing, do not subject the machine to external shock such as that caused by tapping paper
on it.
• When not using the machine, turn off the power.
• You can place up to 10 kg (22.1 lb.) of evenly spread weight on the machine. Do not place any
concentrated weight of more than 2.5 kg (5.6 lb.) on the machine.
• Do not place unsteady objects on the machine. If they fall, they will cause injury to users and/or
damage to the machine.
• This machine is designed to have an operational life of 5 years or be good for 150,000 pages.
• This machine has an operational life of 5 years if used normally to produce up to 2,500 A4 prints
a month. Exceeding these limits may reduce the operational life. The operational life also depends
on the environment in which the machine is used.
• "Pages Printed" displays the number of pages printed. Use "Pages Printed" to estimate the number
of pages that can be printed within the machine's remaining operational life. The machine's
operational life is calculated based on the number of pages that it can print on plain paper in
[Speed Priority] mode.
• Depending on your printing document, the ink collector unit may fill up sooner than normal.
"Prepare new Ink Collector Unit" message appears shortly before the ink collector unit is full.
Although the machine remains usable until the unit is completely full, contact your sales or service
representative as early as possible (charge incurred).
12

• Print cartridges should be used up before their expiry date, ideally within six months of being
removed from their packaging.
• Cartridges that are no longer usable for printing reserve a small quantity of ink for maintenance
usage.
• Print cartridges and supplies comply with the manufacturer's safety specifications. To ensure safety
and reliability, use genuine print cartridges and supplies.
• Single-sided copies are printed at higher density than duplex-printed copies.
• Printing hundreds of copies in a single day might cause the print head to clog the following day. If
this happens, perform the head cleaning procedure.
• This machine performs regular automatic maintenance, after and during printing, to ensure
consistent print quality. Maintenance is also performed when printing begins after a period of
disuse.
• Color ink may be used even if you print all-black text or if you specify black and white printing. It
may also be used for print head cleaning and refreshing, which are done to maintain machine
performance.
• If the machine will not be used for a long time, turn its power off, disconnect the USB cable, and
unplug the power cord from the wall outlet. Because the machine consumes a lot of ink for
maintenance and print head cleaning when turned on after a long period of inactivity, we
recommend you use the machine at least once a month.
• Do not move the machine while it is powered. Even when it is off, make sure the machine is on a
level surface and safe from shock and vibration.
• Do not turn the machine off while it is busy. Make sure the machine is idle before turning it off.
• Condensation can form inside the machine if it is moved from a cold place to a warm place. Allow
any condensation to fully evaporate by not turning the machine on for at least an hour after moving
it.
13

How to Read This Manual
Be sure to read this section before anything else.
This guide uses Windows 7 procedures for its examples. Procedures and screens might vary depending
on the operating system you are using.
Symbols
This manual uses the following symbols:
Indicates points to pay attention to when using the machine, and explanations of likely causes of paper
misfeeds, damage to originals, or loss of data. Be sure to read these explanations.
Indicates supplementary explanations of the machine's functions, and instructions on resolving user
errors.
This symbol is located at the end of sections. It indicates where you can find further relevant information.
[ ]
Indicates the names of keys on the machine's display or control panels.
(mainly Europe and Asia)
(mainly North America)
Differences in the functions of Region A and Region B models are indicated by two symbols. Read the
information indicated by the symbol that corresponds to the region of the model you are using. For
details about which symbol corresponds to the model you are using, see page 15 "Model-Specific
Information".
Notes
Contents of this manual are subject to change without prior notice.
The color samples in this manual may differ slightly from the colors of actual copies.
Some illustrations in this manual might be slightly different from the machine.
Certain options might not be available in some countries. For details, please contact your local dealer.
Depending on which country you are in, certain units may be optional. For details, please contact your
local dealer.
14
Model-Specific Information
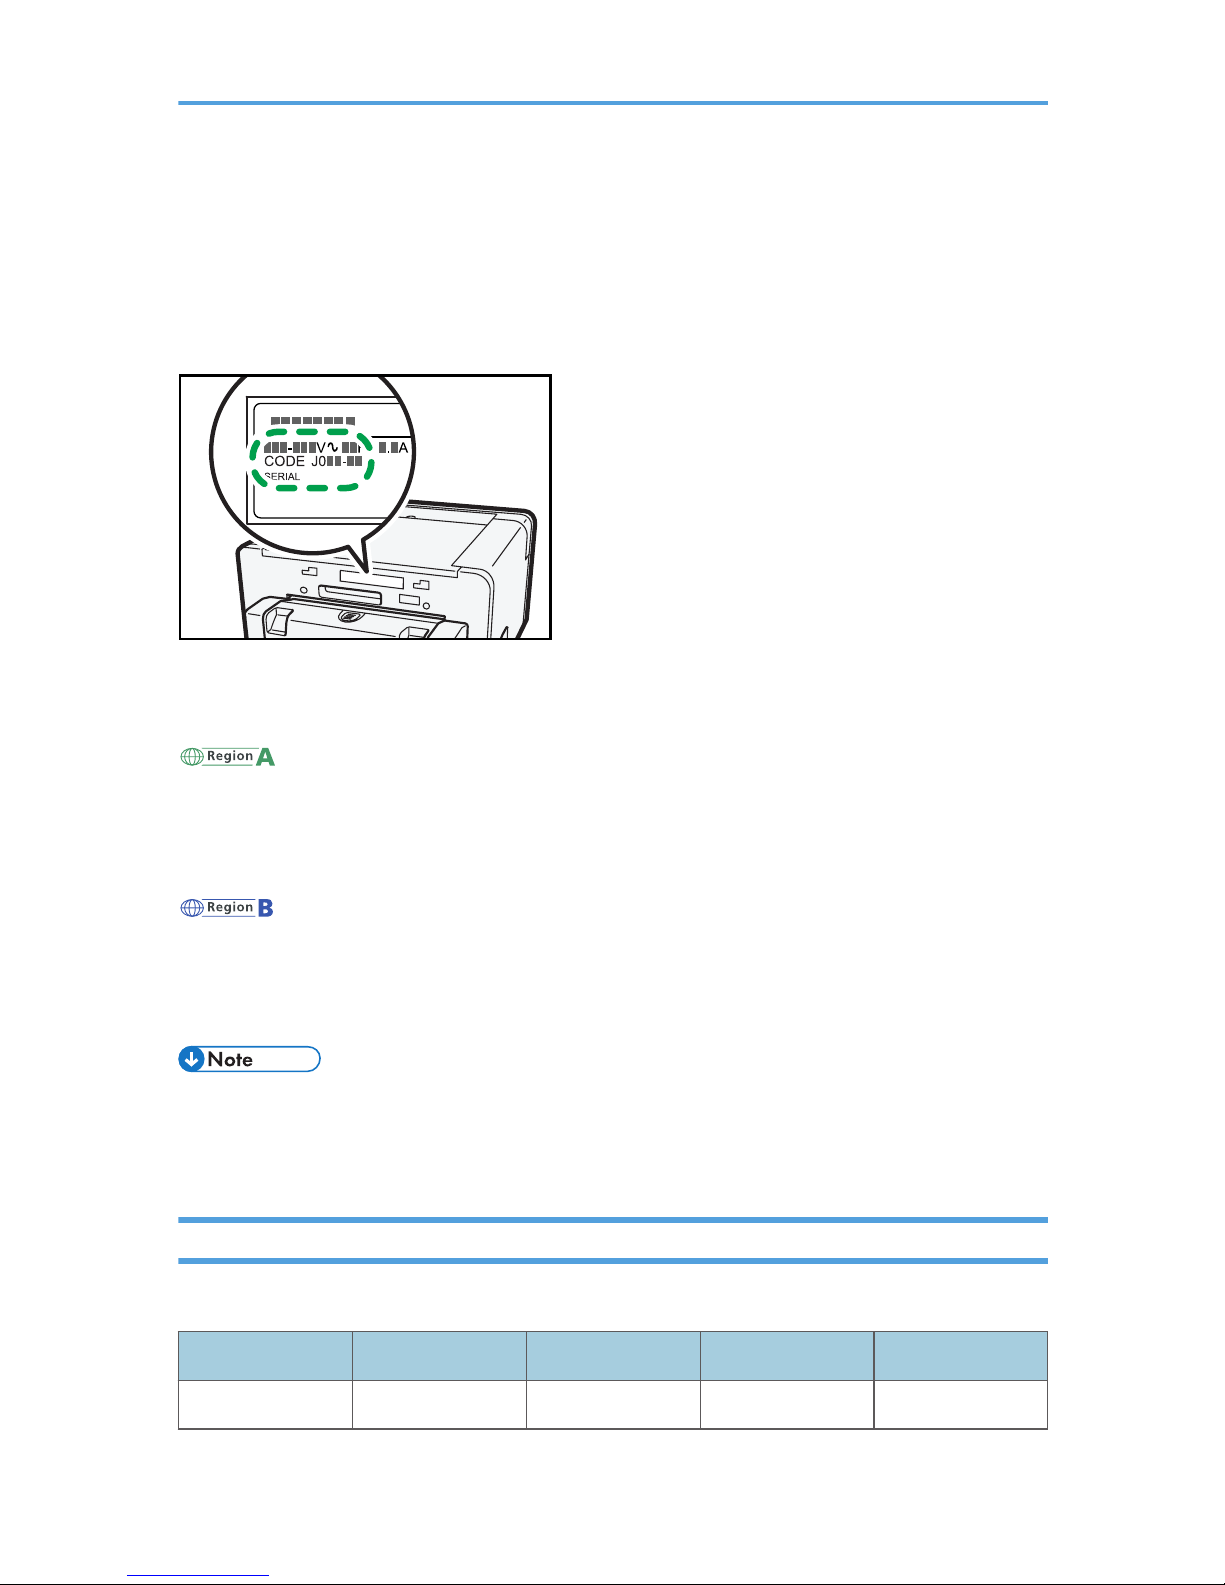
This section explains how you can identify the region your machine belongs to.
There is a label on the rear of the machine, located in the position shown below. The label contains
details that identify the region your machine belongs to. Read the label.
CHU107
The following information is region-specific. Read the information under the symbol that corresponds to
the region of your machine.
(mainly Europe and Asia)
If the label contains the following, your machine is a region A model:
• CODE XXXX -22, -27
• 220-240 V
(mainly North America)
If the label contains the following, your machine is a region B model:
• CODE XXXX -17
• 100-120 V
• Dimensions in this manual are given in two units of measure: metric and inch. If your machine is a
Region A model, refer to the metric units. If your machine is a Region B model, refer to the inch
units.
Available Units and Options for Each Model
The available units and options differ depending on the model.
Unit/Option SG 2100N SG 3110DN SG 3110DNw SG 7100DN
Paper Feed Unit Not Available Optional Optional Optional
15

Unit/Option SG 2100N SG 3110DN SG 3110DNw SG 7100DN
Multi Bypass Tray Not Available Optional Optional Optional
Duplex Unit Not Available
*1
Standard
Equipment
Standard
Equipment
Standard
Equipment
Ethernet Interface
Standard
Equipment
Standard
Equipment
Standard
Equipment
Standard
Equipment
USB2.0
Standard
Equipment
Standard
Equipment
Standard
Equipment
Standard
Equipment
Wireless LAN
Interface
Not Available Not Available
Standard
Equipment
Not Available
SG 2100N/SG 7100DN model does not support the PCL printer driver.
*1
Manual duplex printing is supported. For details, see the printer driver Help.
16
1. About This Product
This chapter describes the names and functions of the machine's parts and options.
Guide to Components
Front View
CTW012
1
2
4
3
6
5
7
8
9
10
11
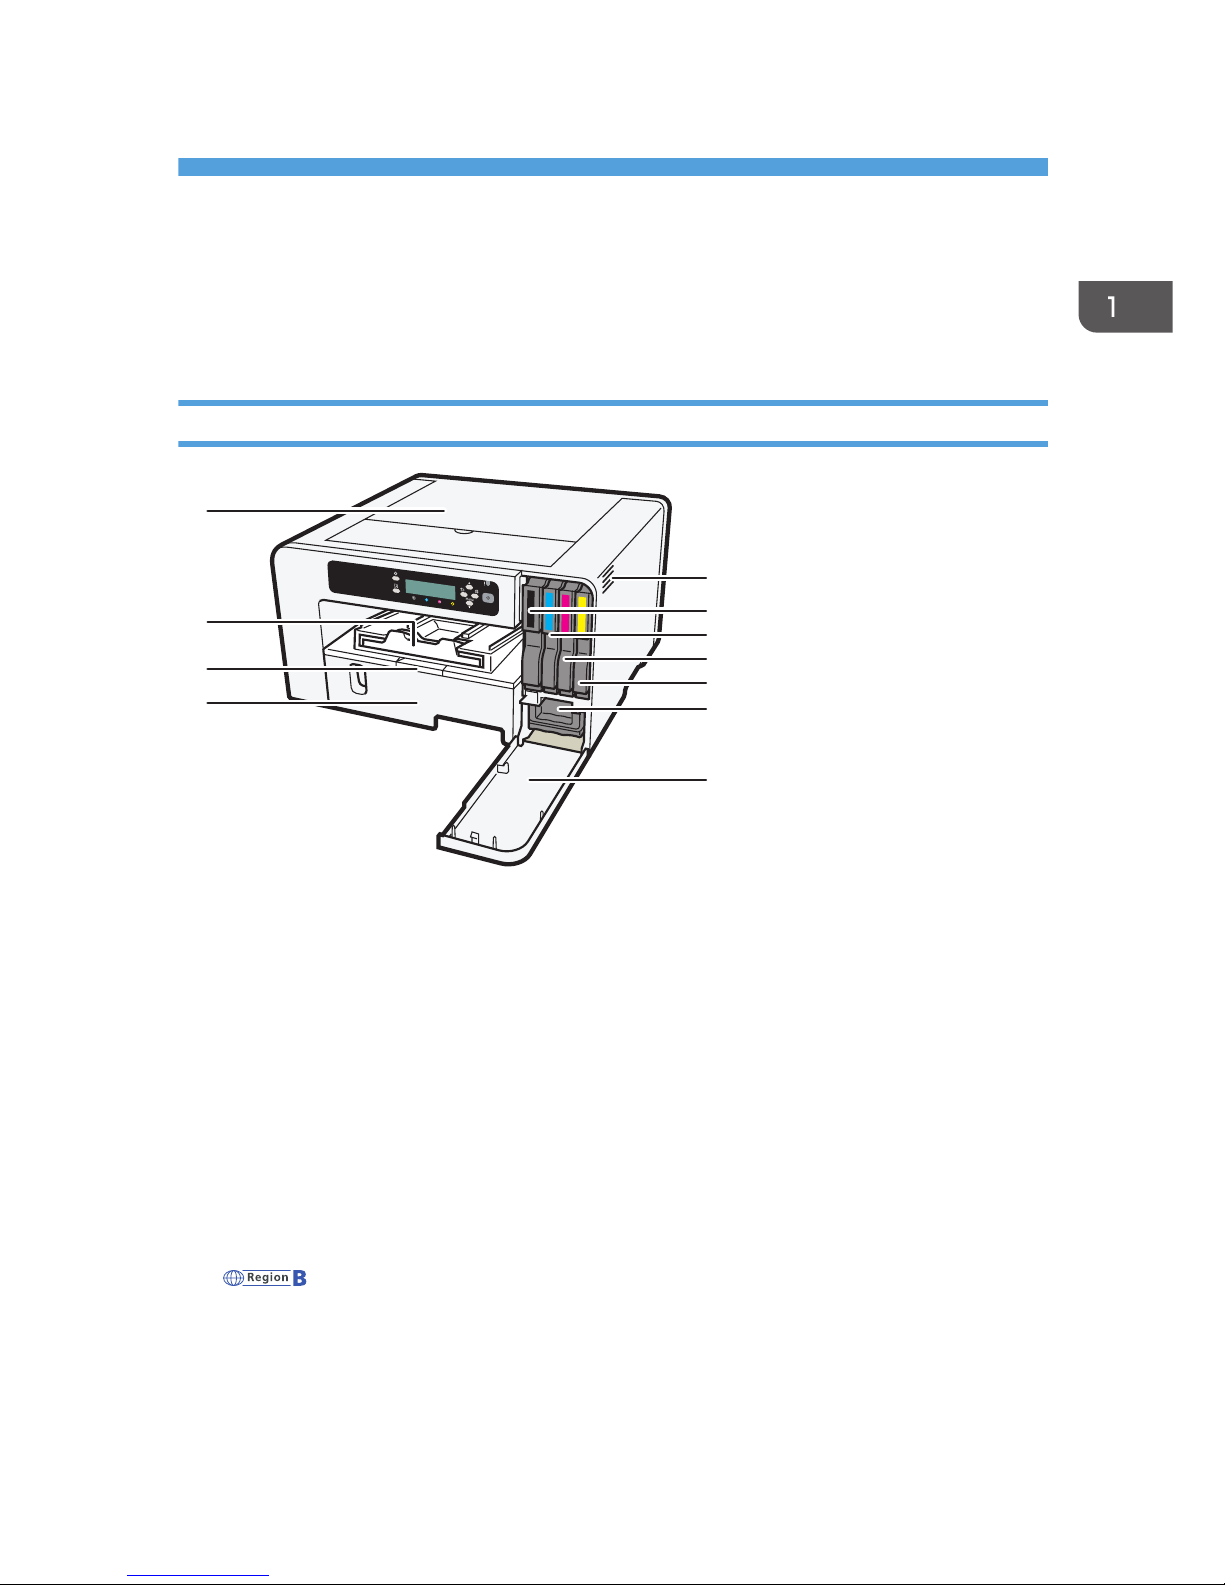
1. Top Cover
Normally, keep this cover closed. If you cannot locate paper jams, or jammed paper cannot be removed
easily, you can check the condition of paper from the top of the machine.
2. Output Ramp
Prints are delivered on the output ramp.
Pull out when using large paper to keep the printed paper from falling.
3. Paper Tray Cover Extension (SG 7100DN)
Pull out this cover when using the tray extension, so you can prevent the tray from being dusty.
Do not pull out this cover if you do not use the extension unit.
4. Tray 1
Load paper here.
(mainly North America)
If you want to print on paper larger than A4 or letter size, pull the tray extension out.
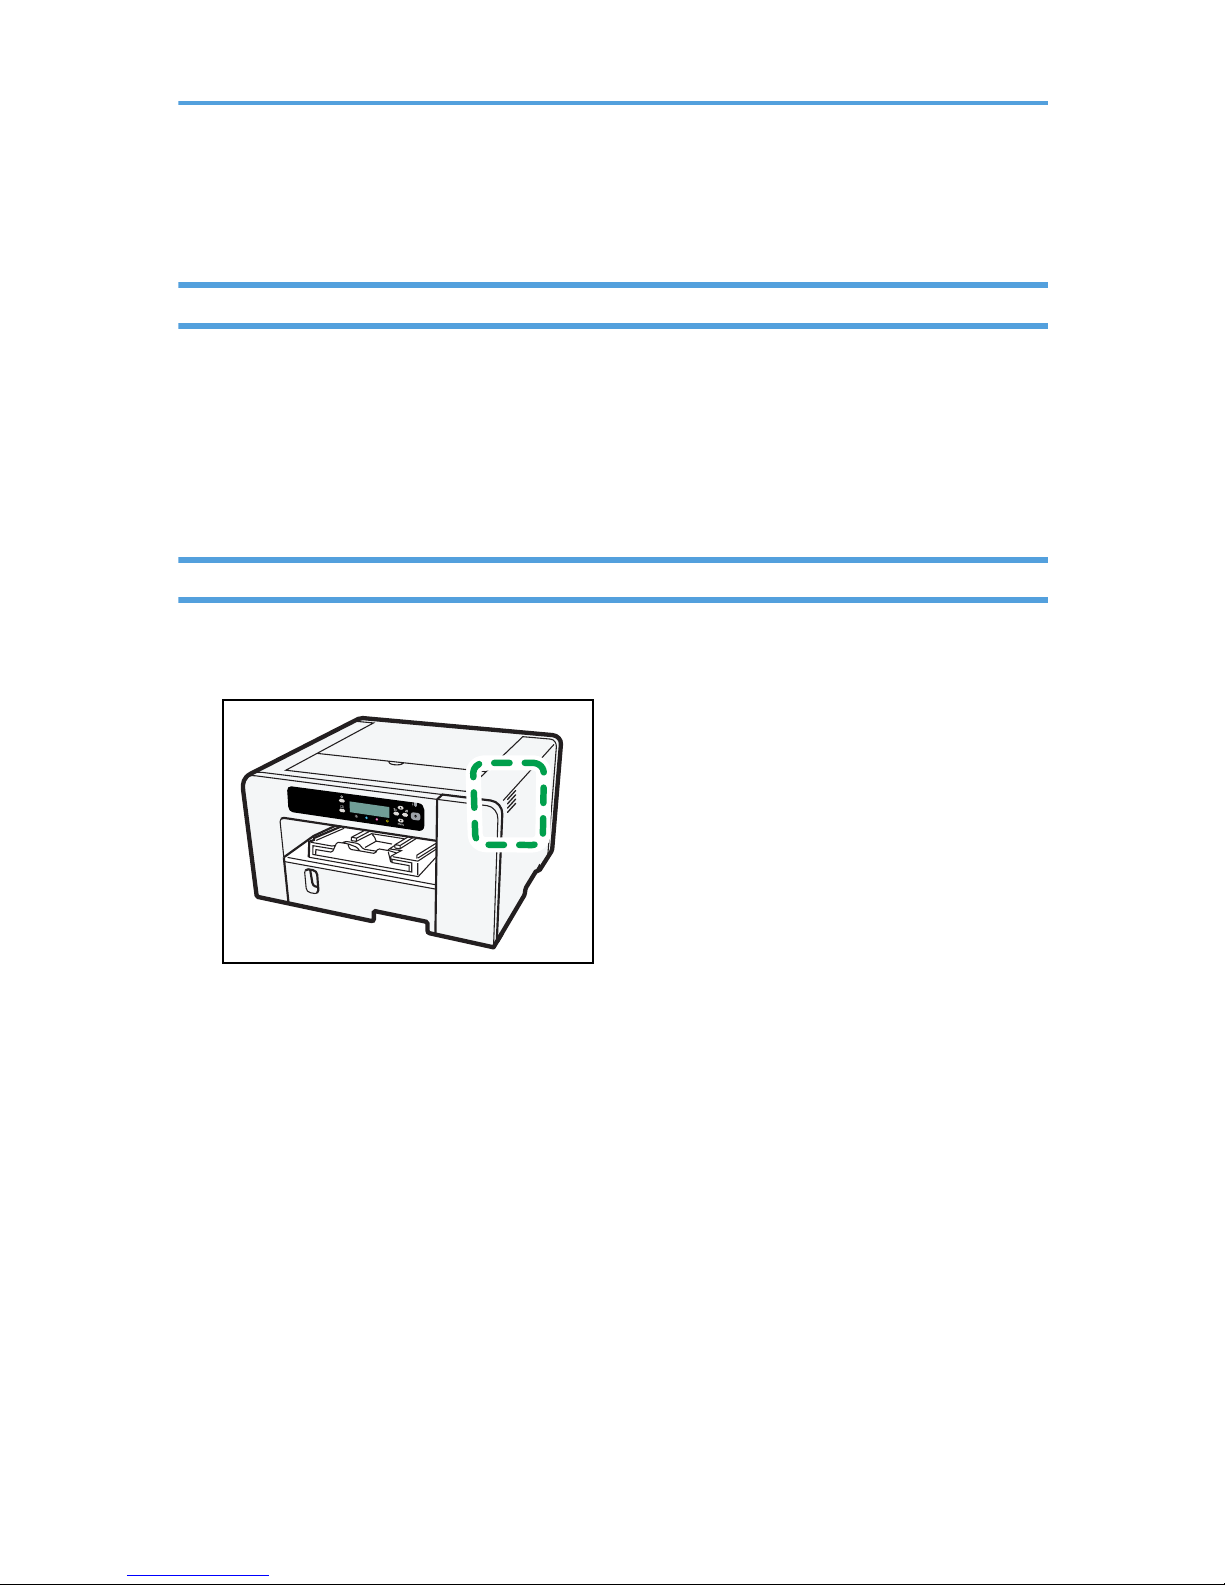
5. Vent
Air is vented here to prevent the inside of the machine from getting too warm. Do not lean anything against the
vent or block it in any way. If the inside of the machine gets too warm, a breakdown could occur.
17
6. Print Cartridge (black)
7. Print Cartridge (cyan)
8. Print Cartridge (magenta)
9. Print Cartridge (yellow)
10. Ink Collector Unit
11. Right Front Cover
Normally, keep this cover closed. Open this cover only when you need to install or replace the print cartridge
or the ink collector unit.
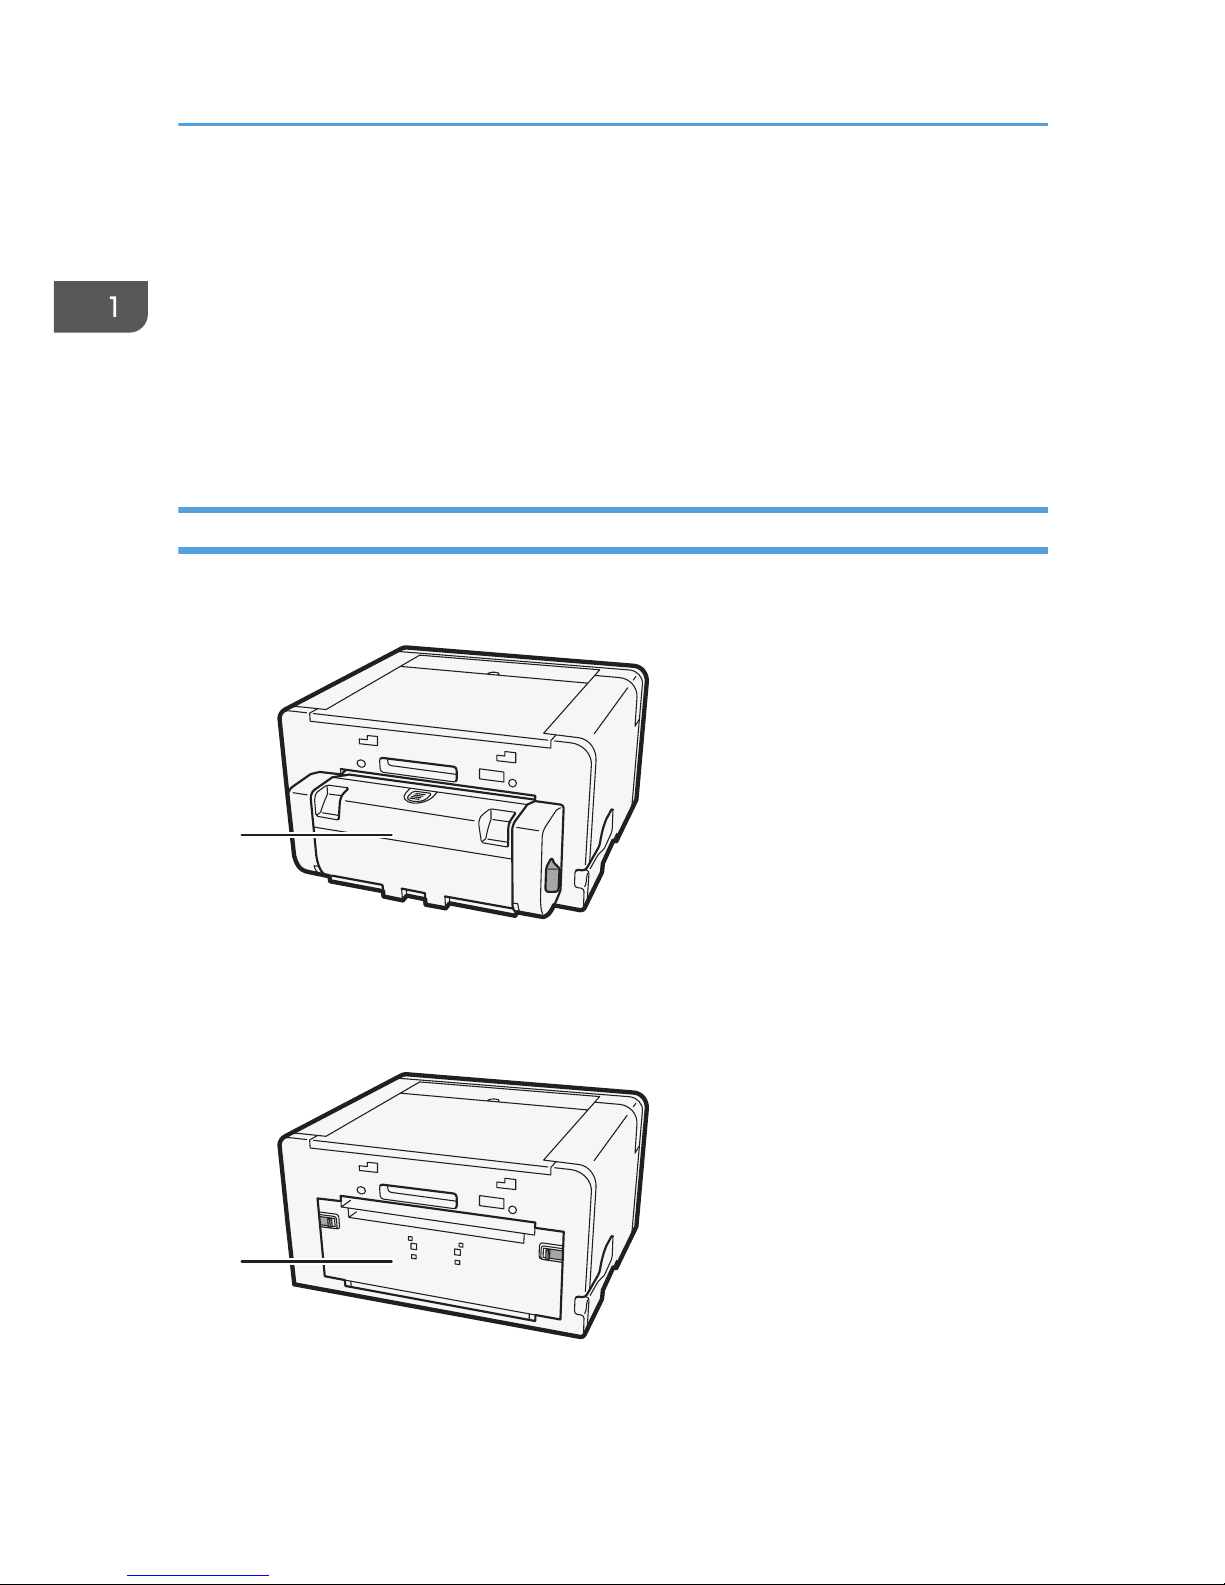
Rear View
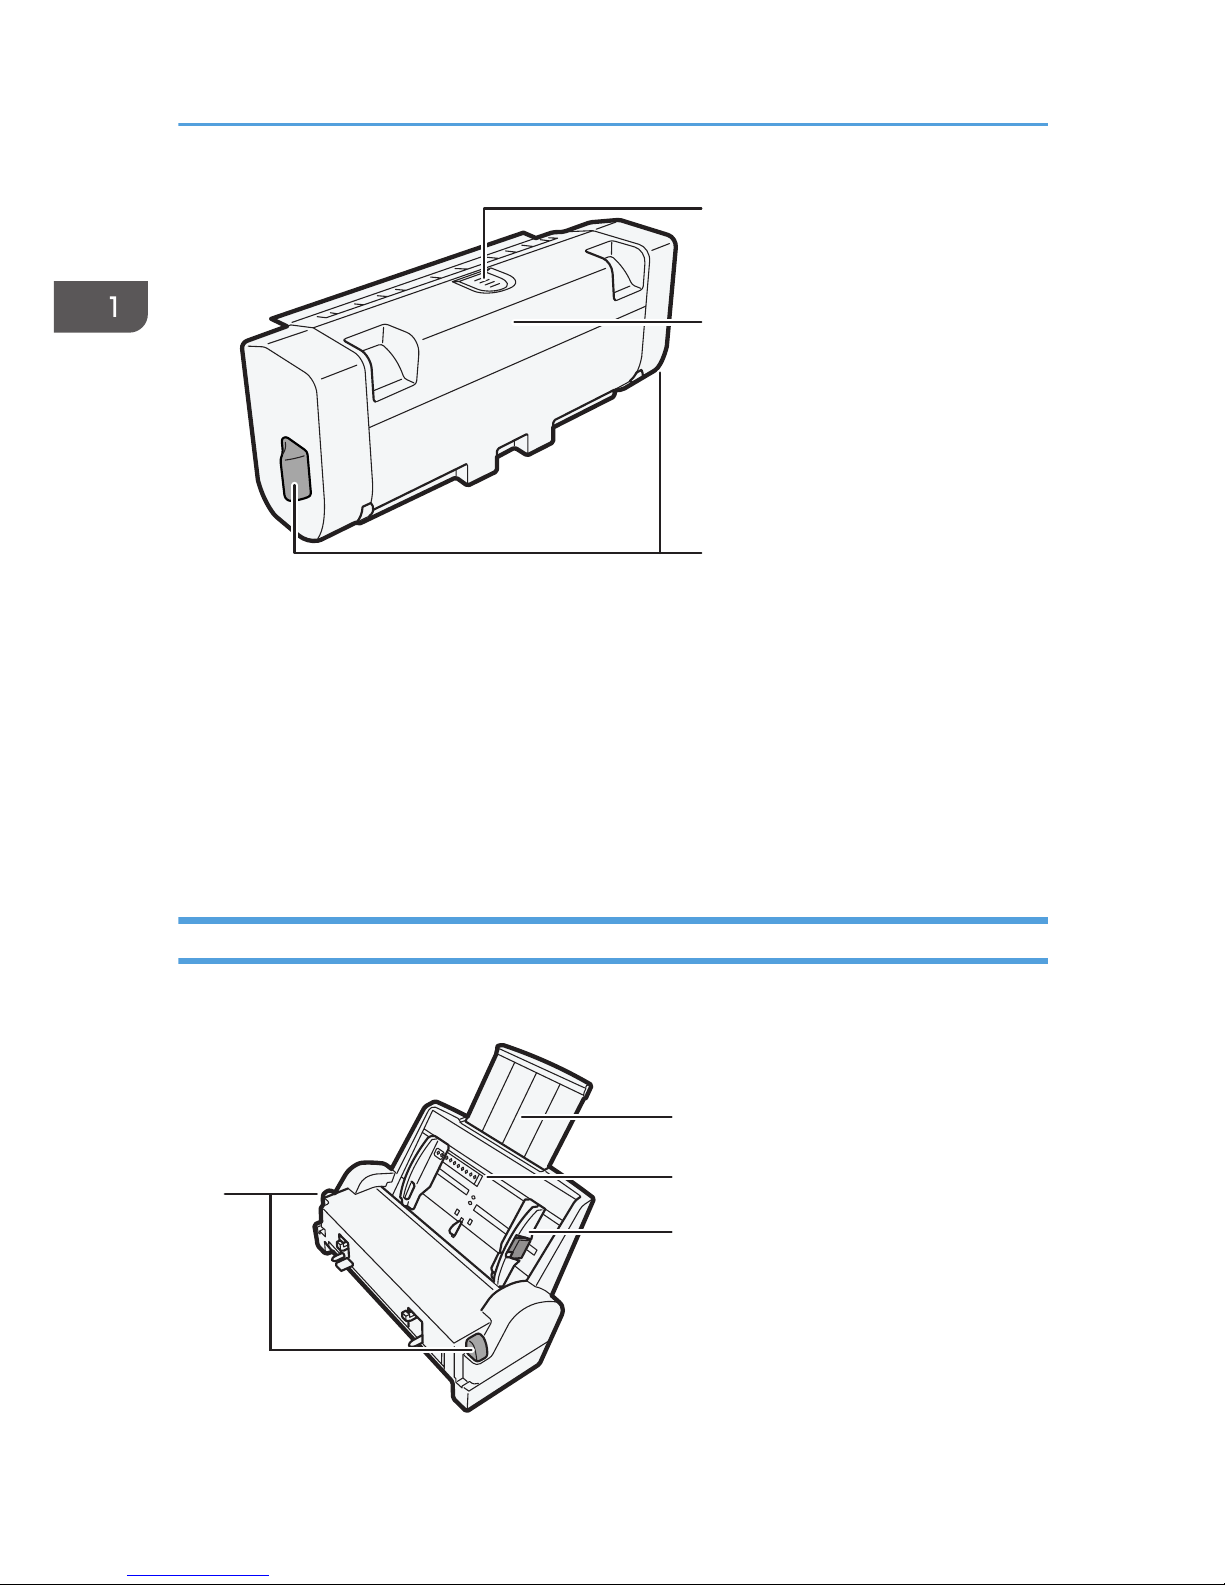
CHU0611CHU065
2
1. About This Product
18
1. Duplex Unit
Turns the paper over when performing duplex printing.
2. Rear cover
Open this to clear paper jams inside the machine.
Left Side View
CHU113
1
2
3
4
1. Power inlet
Plug the power cord.
2. USB port
Port for connecting the USB2.0 interface cable.
3. Ethernet port
Port for connecting the 100BASE-TX or 10BASE-T cable.
4. Wireless LAN cable
Connect this to the Ethernet port if you are accessing the machine via wireless LAN.
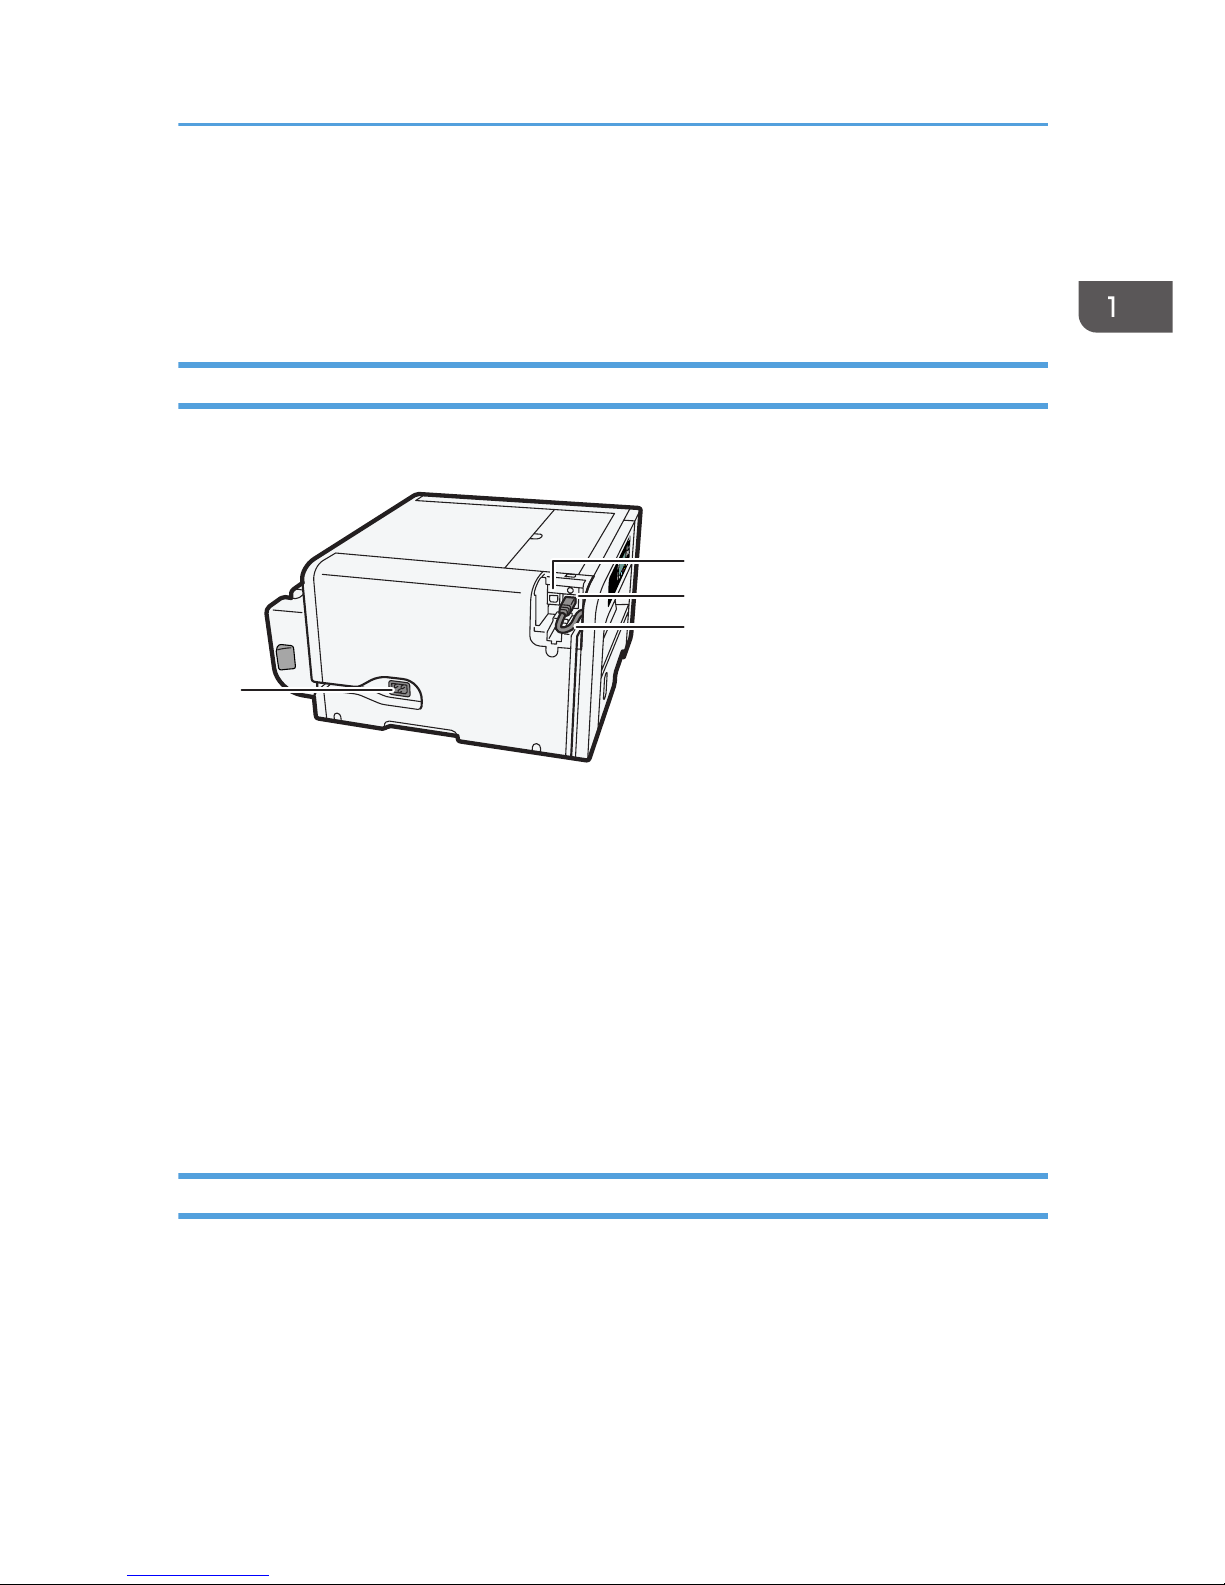
Paper Feed Unit (SG 3110DN/SG 3110DNw)
This unit allows you to load additional 250 sheets.
Two units can be stacked.
Guide to Components
19
Front View
CHU043
1
Rear View
CHU044
2
1. Tray 2/Tray 3
When using paper larger than A4, extend the tray.
If you have attached two paper feed units one on top of the other, the unit on top is Tray 2, and the unit on the
bottom is Tray 3.
2. Rear unit cover
Open to remove paper that has jammed inside the paper feed unit.
1. About This Product
20
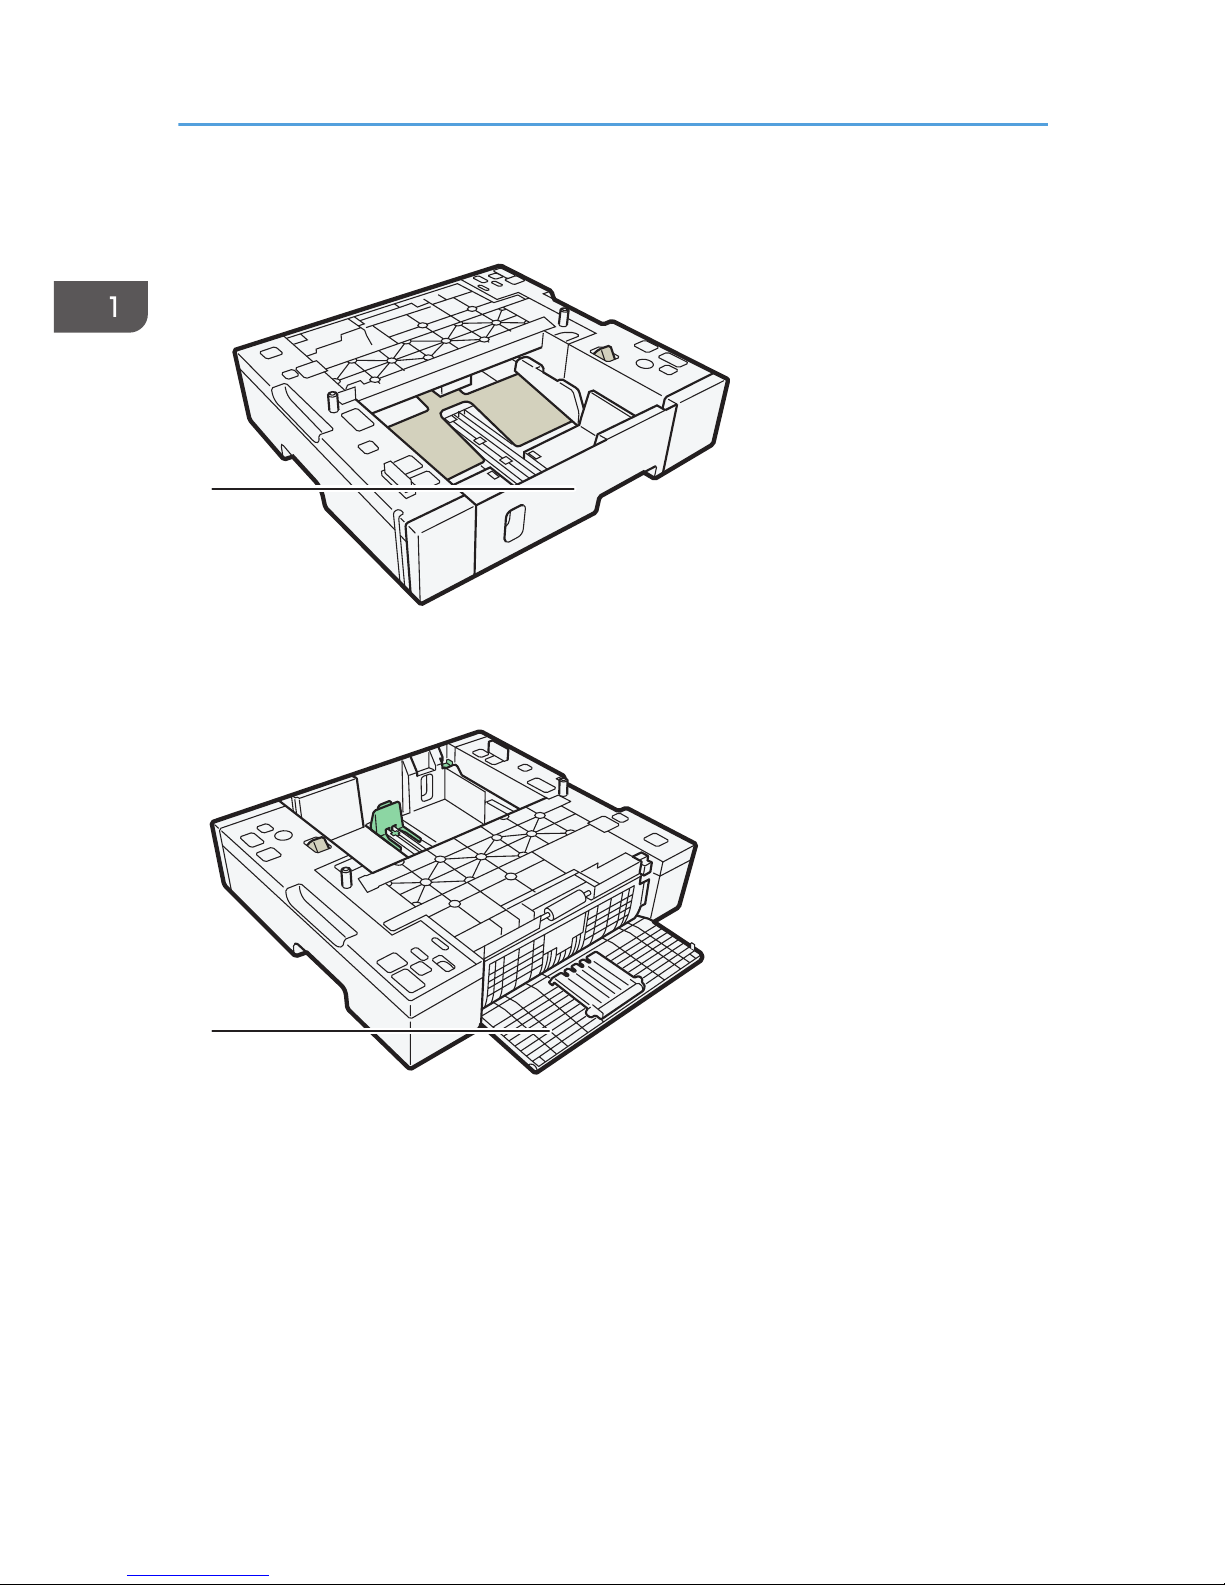
Paper Feed Unit (SG 7100DN)
This unit allows you to load additional 250 sheets.
Only one unit can be attached.
Front View
CTW013
2
1
1. Paper Tray Cover Extension
Pull out this cover when using the tray extension unit, so you can prevent the tray from being dusty.
Do not pull out this cover if you do not use the extension unit.
2. Tray 2
If you want to print on paper larger than A4 or letter size, pull the tray extension out.
Duplex Unit
This unit allows the machine to automatically perform duplex printing.
Guide to Components
21
CHU045
3
2
1
1. Duplex unit cover button
Press to open the duplex unit cover.
2. Duplex unit cover
Open to remove paper that has jammed inside the duplex unit.
3. Catches for the duplex unit attachment and detachment
Press to unlock the duplex unit when detaching it. Do not press the catches when attaching.
If the catches for the duplex unit attachment and detachment are installed correctly, they will click. Make sure
they click when attached.
Multi Bypass Tray (SG 3110DN/SG 3110DNw)
Use this tray to feed in sheets manually.
CHU046
1
2
3
4
1. About This Product
22
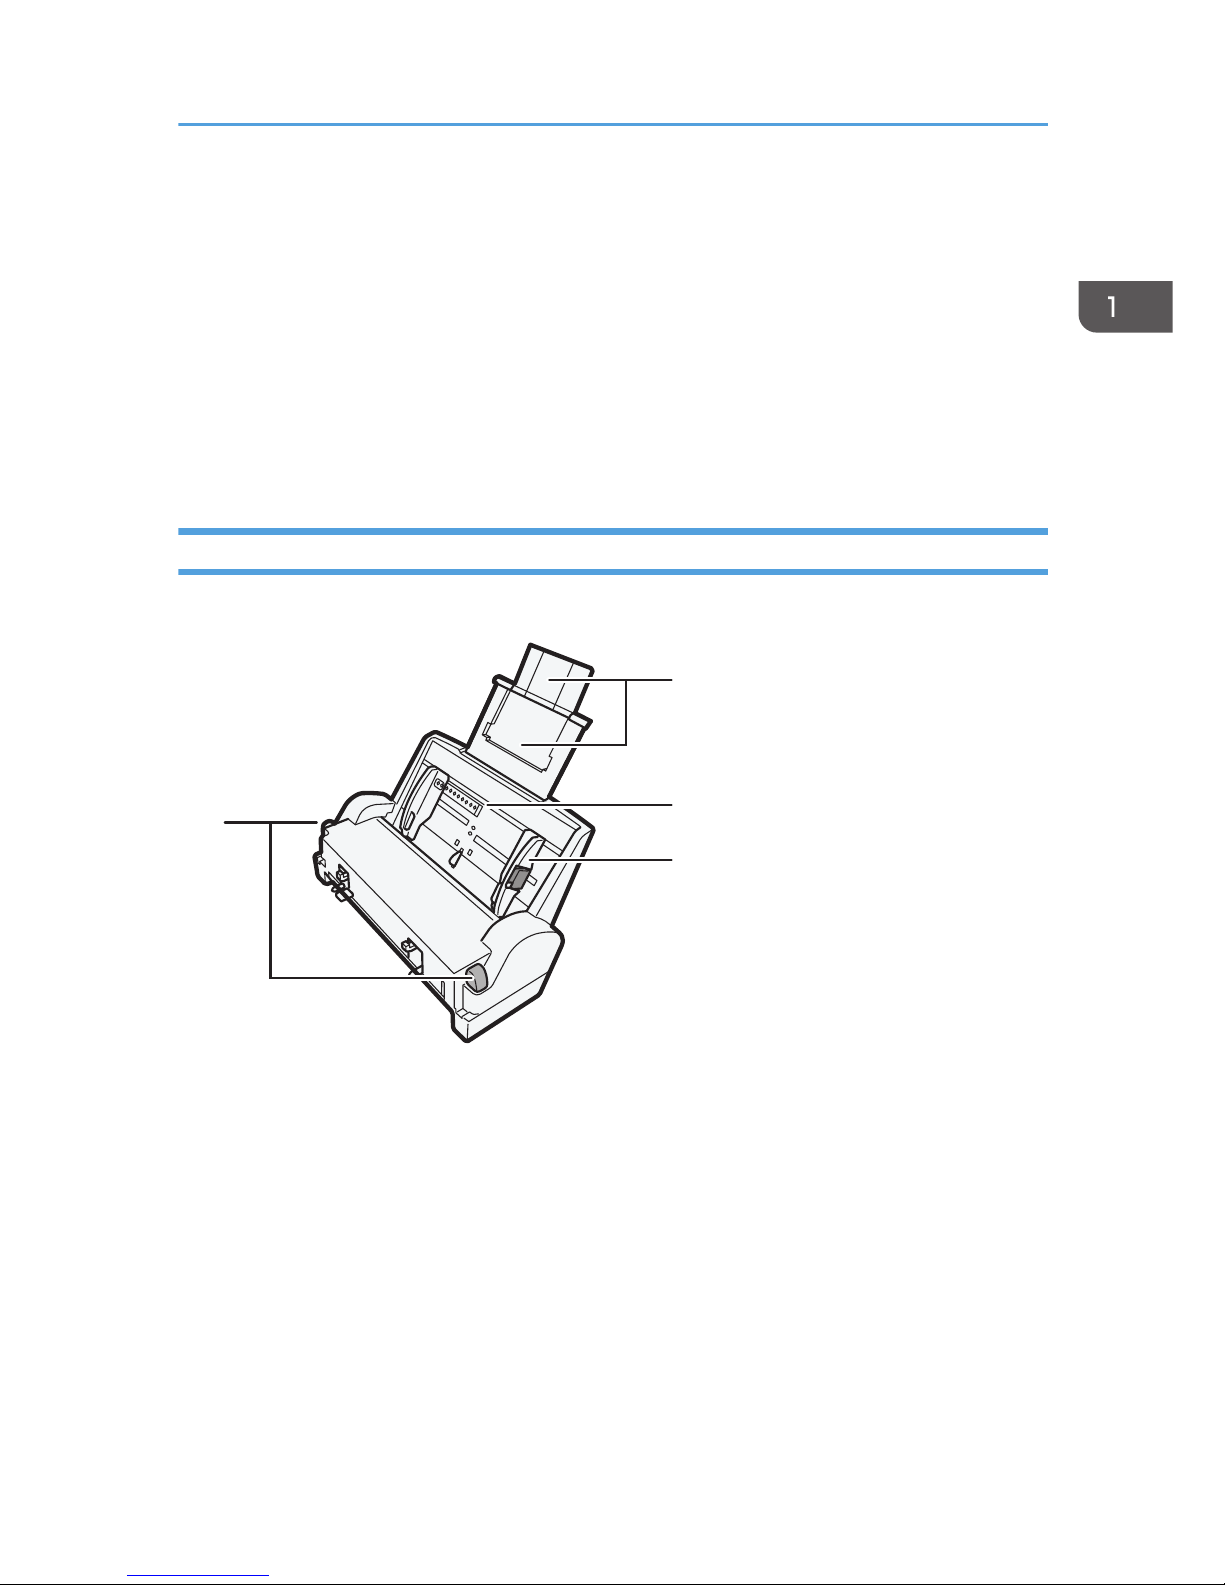
1. Tabs for multi bypass tray attachment and detachment
Press to lock the multi bypass tray before attaching it or to unlock the tray before detaching it.
2. Bypass tray extension
Pull this out according to the paper size.
3. Bypass tray
Load paper here.
4. Side paper guides
Adjust the position of the side paper guides to match the paper size. Squeeze the locking lever and push the
side paper guides.
Multi Bypass Tray (SG 7100DN)
Use this tray to feed in sheets manually.
CTW026
3
4
1
2
1. Tabs for multi bypass tray attachment and detachment
Press to lock the multi bypass tray before attaching it or to unlock the tray before detaching it.
2. Bypass tray extension
Pull this out according to the paper size.
To load A3 or larger paper, extend the auxiliary trays.
3. Bypass tray
Load paper here.
4. Side paper guides
Adjust the position of the side paper guides to match the paper size. Squeeze the locking lever and push the
side paper guides.
Guide to Components
23
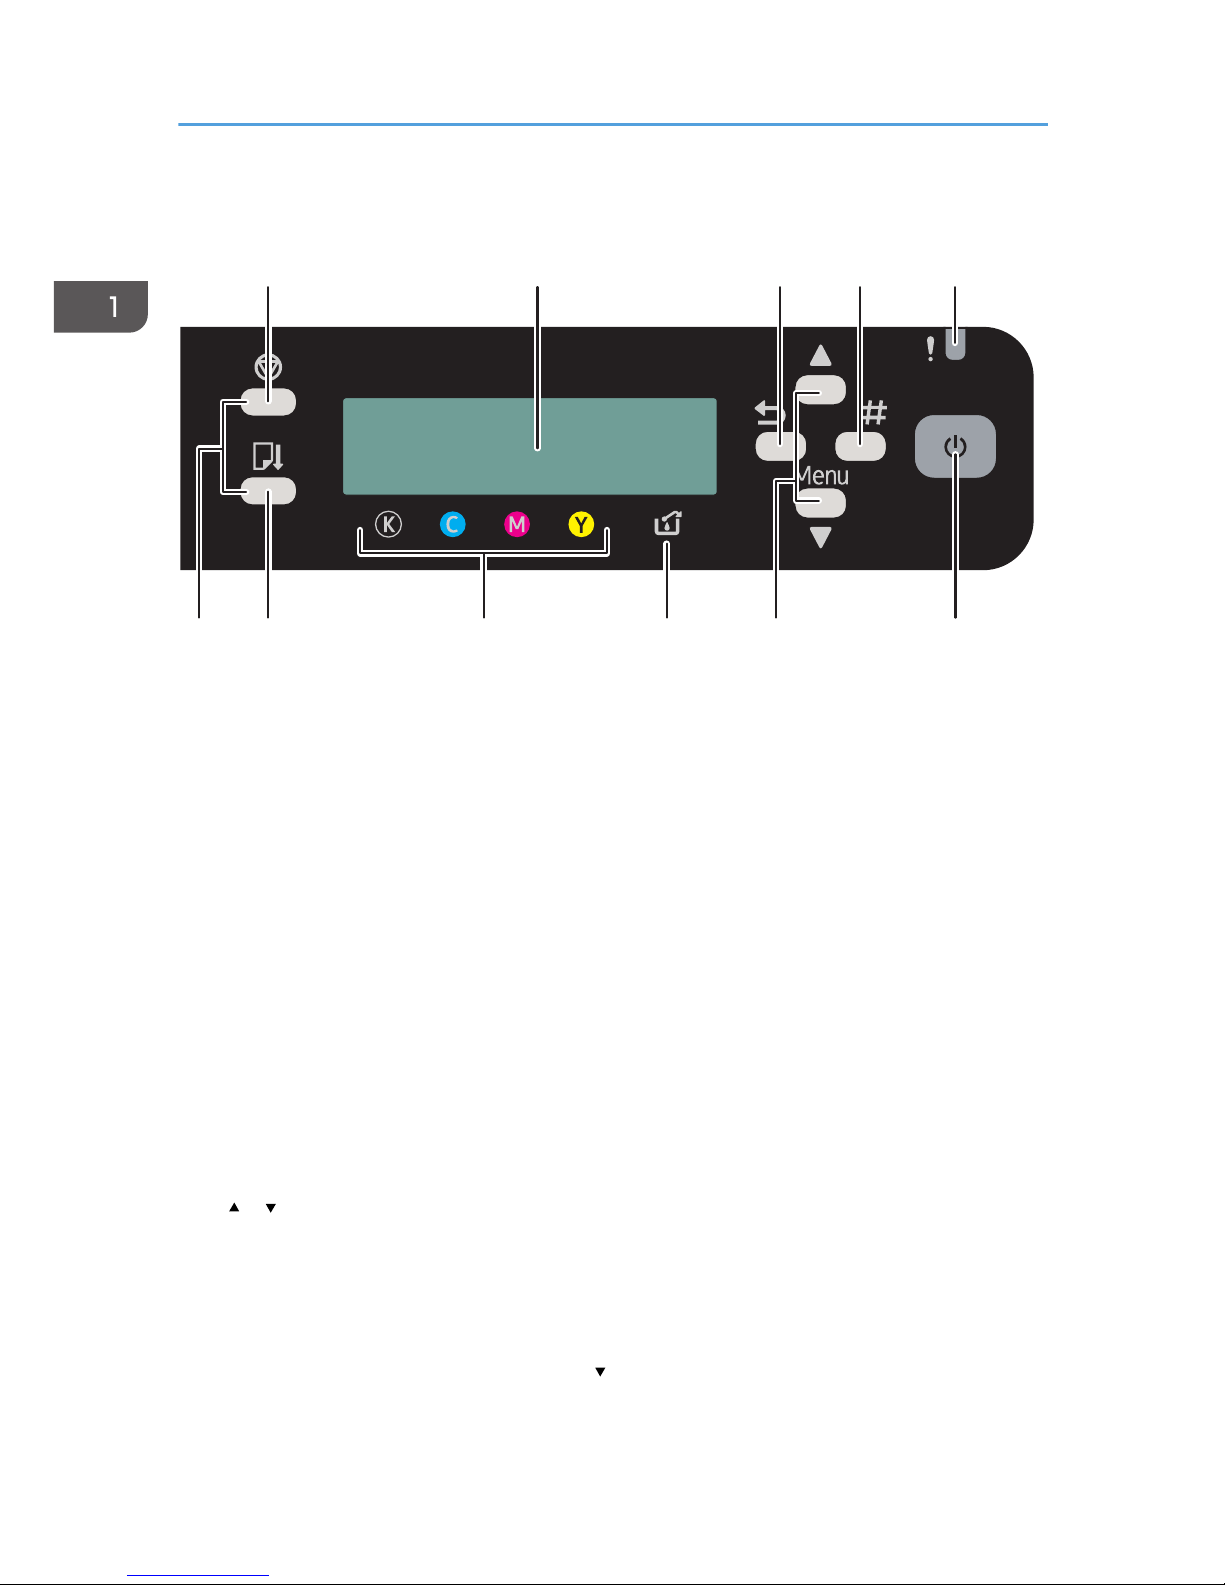
Control Panel
CTW001
1
10
711 9 68
2 3 4 5
1. [Job Reset] key
When the machine is online, press this key to cancel an ongoing print job.
2. Display
Displays the current machine status and messages.
3. [Escape] key
Press this key to return to the previous condition on the display.
4. [#Enter] key
Press this key to execute menu items selected on the display.
5. Alert indicator
Lights up or blinks whenever a machine error occurs.
If the red light is on, follow the instructions that appear on the display.
6. [Power] key
Press this key to turn the power on. To turn the power off, press and hold down this key for one second.
See page 33 "Turning On/Off the Power".
Blinks when the machine is receiving data from a computer or if there is data to be printed.
7. [ ], [ /Menu] keys
Use these keys to increase or decrease values on the display when making settings.
Keep the key pressed to quicken scrolling, and increase or decrease values on the display in units of 10.
To apply this function: under [Maintenance], set [Key Repeat] to [On].
See page 130 "Using the [Maintenance] Menu".
When the machine is in standby mode, press the [ /Menu] key to make and check the current machine
settings.
1. About This Product
24

8. Waste ink full indicator
The amount of waste ink is indicated on the six-level display. A message appears when it is time to replace the
ink collector unit.
9. Cartridge replacement indicator
Each color corresponds to a print cartridge.
K, C, M, and Y indicate black, cyan, magenta, and yellow, respectively.
The amount of ink remaining in each print cartridge is indicated on the six-level display.
10. [Form Feed] key
You can use this to force the machine to print data received when the paper size or type does not match the
actual size or type of paper loaded in the tray.
If there is a paper jam, press this key according to the displayed error message and remove the jammed
paper.
If a print job using the PCL driver does not start, press this key to force it to print.
11. No-Fuss Head Cleaning
When the machine is in standby mode, press the [Job Reset] and [Form Feed] keys at the same time to perform
head cleaning for all colors.
Control Panel
25
Attaching and Detaching Units and Options
• The following explains the warning messages on the plastic bag used in this product's
packaging.
• Keep the polythene materials (bags, etc.) supplied with this machine away from babies
and small children at all times. Suffocation can result if polythene materials are brought into
contact with the mouth or nose.
Attaching and Detaching the Paper Feed Unit
This section explains how to attach and detach the paper feed unit.
• SG 7100DN weighs around 15 kg (33 lb).
• Grip the center area at the base of the machine's sides. Lift it slowly and do not strain your
body.
• When moving the machine, remove the option. Careless handling and over exertion when
lifting can result in breakage and/or injury.
• Before installing or removing options, always disconnect the power cord plugs from the wall outlet.
Attaching the paper feed unit
1. Press and hold down the [Power] key until it turns off, and then unplug the power cord.
2. Disconnect the USB cable or Ethernet cable.
3. Take the paper feed unit out of the box, and remove the tape.
4. Position the paper feed unit close to the machine.
1. About This Product
26
5. Align the connecting parts of the machine and paper feed unit, and then lower the
machine onto the paper feed unit.
CTW034
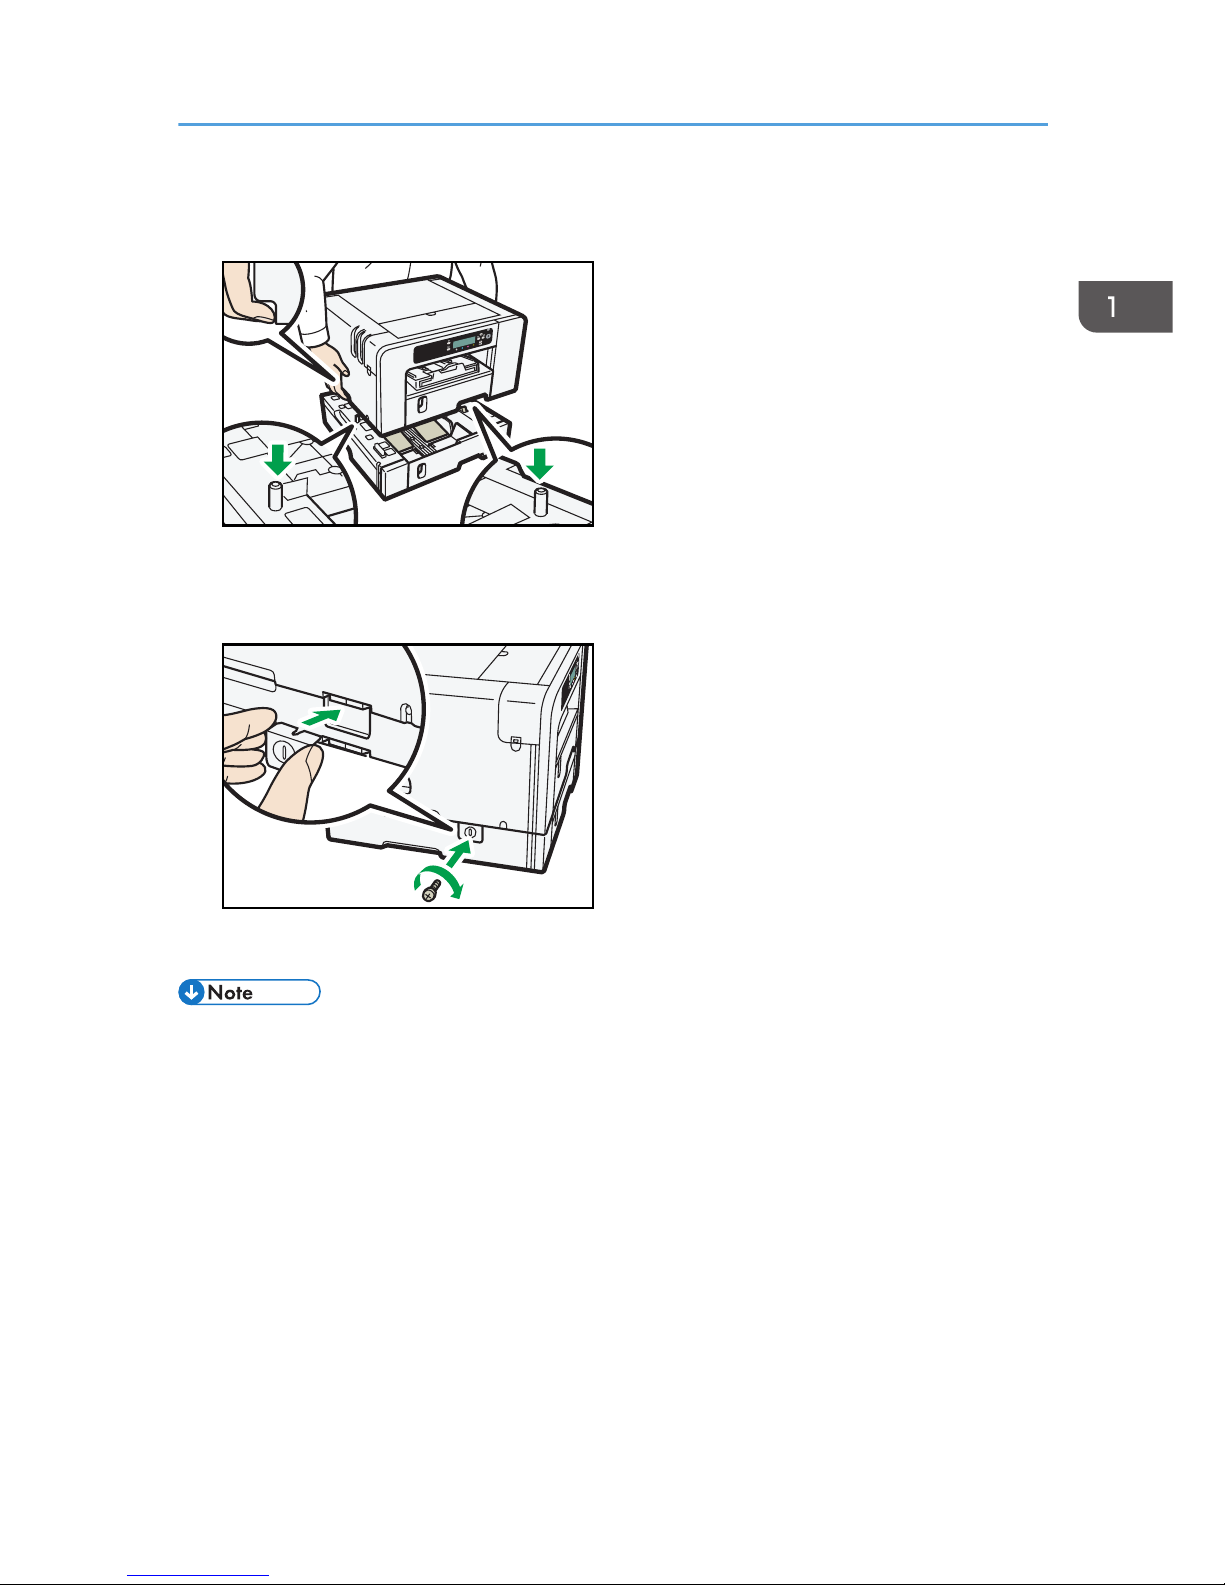
Grip the center area at the base of the machine's sides. Lift it slowly and do not strain your body.
6. Attach the clamping plate, and then secure it with a coin screw. (SG 7100DN)
CTW003
7. Connect the power cord, USB cable, or Ethernet cable.
• Align the paper feed unit and machine using their corners.
• When the machine is placed on top of the paper feed unit, installation is complete.
• Do not tilt the machine.
• Be careful not to trap your fingers.
• Up to two paper feed units can be attached. (SG 3110DN/SG 3110DNw)
• To install two paper feed units, put the upper paper feed unit (Tray 2) on the lower paper feed tray
(Tray 3) first, and then lower the machine onto the upper paper feed unit (Tray 2).
• After attaching an option, check that the printer driver has recognized it. See page 109
"Specifying Settings on [Accessories] Tab", page 186 "Displaying the Machine Status on a
Macintosh".
• After attaching the paper feed unit, you must register where to start printing on paper loaded in the
paper feed unit. See page 140 "Registration".
Attaching and Detaching Units and Options
27

Detaching the paper feed unit
1. Press and hold down the [Power] key until it turns off, and then unplug the power cord.
2. Disconnect the USB cable or Ethernet cable.
3. Remove the coin screw, and then detach the clamping plate. (SG 7100DN)
CTW004
4. Remove the machine and place it on a nearby flat and stable surface, and then detach the
paper feed unit from the place where the machine was installed.
CTW033
Grip the center area at the base of the machine's sides. Lift it slowly and do not strain your body.
5. Place the machine in the previous place.
6. Connect the power cord, USB cable, or Ethernet cable.
• Do not tilt the machine.
• Be careful not to trap your fingers.
Attaching and Detaching the Duplex Unit
This section explains how to attach and detach the duplex unit.
1. About This Product
28
 Loading...