

Ricoh MP 161F, Aficio MP 161SPF, Aficio MP 161F, IS 2416F, IS 2416FPS Operating Instructions Manual
...
Getting Started
1
Entering Text
2
Appendix
3
Operating Instructions
About This Machine
Read this manual carefully before you use this machine and keep it hand y for future reference. For safe and correct use, be sure to read the
Safety Information in this manual before using the machine.

Introduction
This manual contains detailed instructions and notes on the operation and use of this machine. For your
safety and benefit, read this manual carefully before using the machine. Keep this manual in a handy
place for quick reference.
Important
Contents of this manual are subject to change without prior notice. In no event will the company be liable for direct, indirect, special, incidental, or consequential damages as a result of handling or operating the machine.
Notes:
Some illustrations in this manual might be slightly different from the machine.
Certain options might not be available in some countries. For details, please contact your local dealer.
Depending on which country you are in, certain units may be optional. For details, please contact your
local dealer.
Laser Safety:
This machine is considered a class 1 laser device, safe for office/EDP use. The machine contains a
5-milliwatt, 760-800 nanometer wavelength, GaAlAs laser diode. Direct (or indirect reflected) eye contact
with the laser beam might cause serious eye damage. Safety precautions and interlock mechanisms
have been designed to prevent any possible laser beam exposure to the operator.
The following label is attached on the rear side of the machine.
Caution:
Use of controls or adjustments or performance of procedures other than those specified in this manual
might result in hazardous radiation exposure.
Two kinds of size notation are employed in this manual. With this machine refer to the metric version.
For good copy quality, the supplier recommends that you use genuine toner from the supplier.
The supplier shall not be responsible for any damage or expense that might result from the use of parts
other than genuine parts from the supplier with your office products.
Power Source
220-240V, 50/60Hz, 4A or more
Please be sure to connect the power cord to a power source as above. For details about power source,
see Troubleshooting.

Manuals for This Machine
Refer to the manuals that are relevant to what you want to do with the machine.
Important
❒ Media differ according to manual.
❒ The printed and electronic versions of a manual have the same contents.
❒ Adobe Acrobat Reader/Adobe Reader must be installed in order to view the
manuals as PDF files.
❒ Depending on which country you are in, there may also be html manuals. To
view these manuals, a Web browser must be installed.
❖ About This Machine
Be sure to read the Safety Information in this manual before using the machine.
This manual provides an introduction to the functions of the machine. It also
explains the control panel, preparation procedures for using the machine,
how to enter text, and how to install the CD-ROMs provided.
❖ General Settings Guide
Explains User Tools settings, and Address Book procedures such as registering fax numbers, e-mail addresses, and user codes. Also refer to this manual
for explanations on how to connect the machine.
❖ Troubleshooting
Provides a guide to solving common problems, and explains how to replace
paper, toner, and other consumables.
❖ Security Reference
This manual is for administrators of the machine. It explains security functions that the administrators can use to protect data from being tampered
with, or prevent the machine from unauthorized use.
Also refer to this manual for the procedures for registering administrators, as
well as setting user and administrator authentication.
❖ Copy Reference
Explains Copier functions and operations. Also refer to this manual for explanations on how to place originals.
❖ Facsimile Reference
Explains Facsimile functions and operations.
❖ Printer Reference
Explains Printer functions and operations.
❖ Scanner Reference
Explains Scanner functions and operations.
i

❖ Network Guide
Explains how to configure and operate the machine in a network environment, and use the software provided.
This manual covers all models, and includes descriptions of functions and
settings that might not be available on this machine. Images, illustrations, and
information about operating systems that are supported might also differ
slightly from those of this machine.
❖ Other manuals
•Quick Reference Copy Guide
•Quick Reference Fax Guide
• Quick Reference Printer Guide
•Quick Reference Scanner Guide
• PostScript3 Supplement
• UNIX Supplement
• Manuals for DeskTopBinder Lite
• DeskTopBinder Lite Setup Guide
• DeskTopBinder Introduction Guide
• Auto Document Link Guide
Note
❒ Manuals provided are specific to machine types.
❒ For “UNIX Supplement”, please visit our Web site or consult an authorized
dealer.
❒ “PostScript3 Supplement” and “UNIX Supplement” include descriptions of
functions and settings that might not be available on this machine.
❒ The following software products are referred to using general names:
Product name General name
DeskTopBinder Lite and DeskTopBinder Professional
ScanRouter EX Professional
er EX Enterprise
*1
Optional
*1
*1
*1
and ScanRout-
DeskTopBinder
the ScanRouter delivery software
ii
What You Can Do with This Machine
This section introduces the features of this machine.
Note
❒ For details about additional items, see “Other Items”.
❒ Some functions may not be available depending on your machine type.
Reference
p.11 “Other Items”
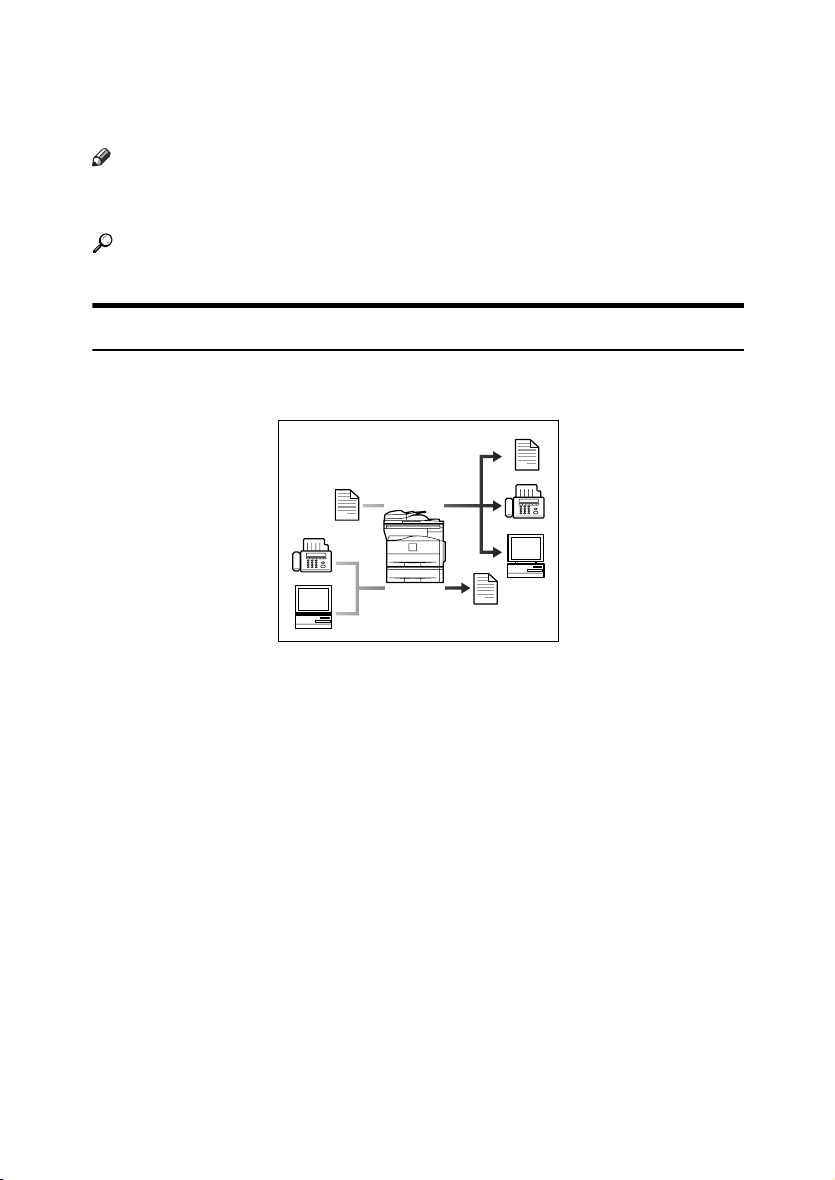
Copier, Facsimile, Printer, and Scanner Functions
This machine provides copier, facsimile, printer, and scanner functions.
ARC002S
• You can make copies of originals. See Copy Reference.
• You can send originals by fax or e-mail, and receive faxes from other parties.
See Facsimile Reference.
• You can print documents created in applications. See Printer Reference.
• You can print documents from Windows 95/98/Me (TCP/IP, IPP), Windows
2000 (TCP/IP, IPP), Windows XP/Server 2003 (TCP/IP, IPP), Windows NT
4.0 (TCP/IP, IPP), NetWare, UNIX (TCP/IP), and Macintosh (AppleTalk) environments because the machine supports all these (multi-protocol).
• You can scan originals and send scan files to a computer. See Scanner Reference.
• You can scan originals in full colour using the scanner function.
iii
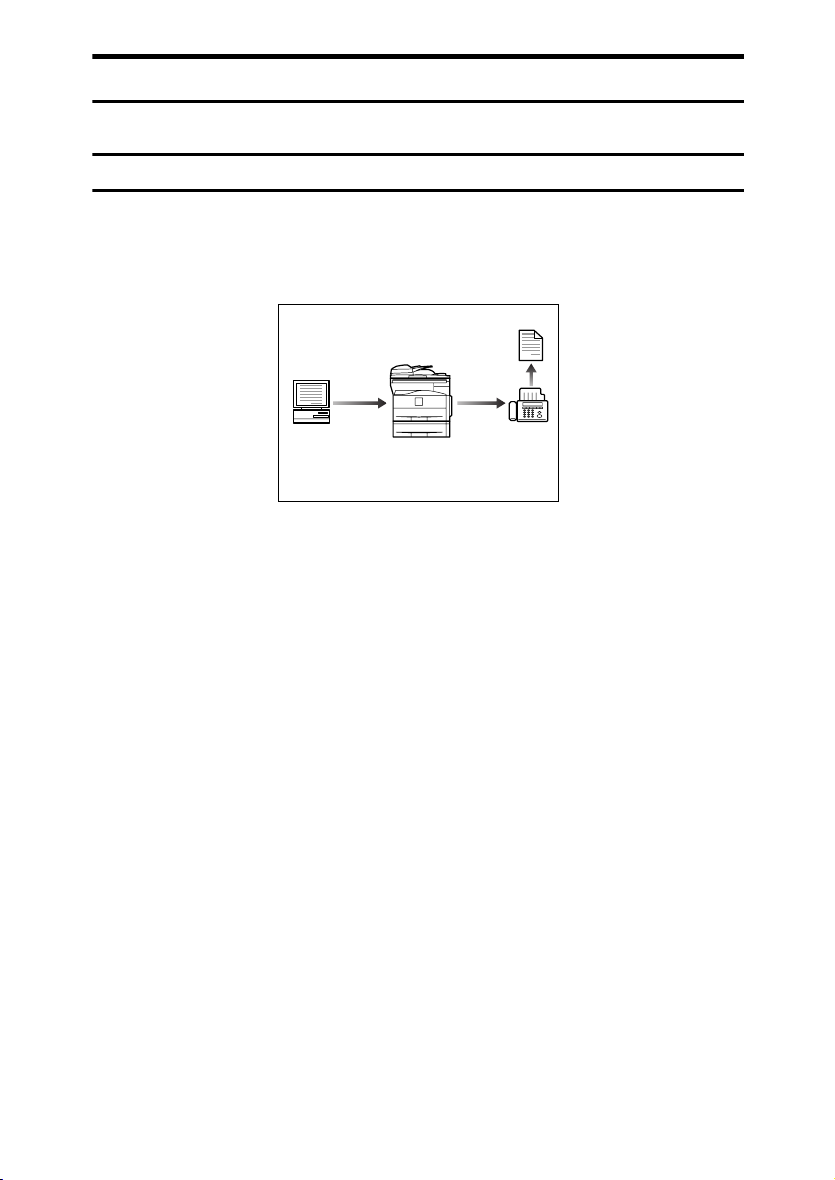
Paperless Fax Transmission
You can send a file by fax without printing it.
Transmission
You can send a fax from your computer over the network (Ethernet, or wireless
LAN) to this machine, which then forwards the fax via its telephone connection
(LAN-Fax).
ARC003S
• To send a fax, print from the Windows application you are working with, select LAN-Fax as the printer, and then specify the destination.
• You can also check the sent image data.
• For details about the machine's settings, see “Network Settings”, General Settings Guide.
• For details about how to use the function, see “Fax via Computer”, Facsimile
Reference.
iv

Fax Transmission and Reception Through the Internet
You can send fax documents via e-mail by specifying the recipient's e-mail address (Internet Fax Transmission). You can receive sent documents via Internet
Fax, or from computers (Internet Fax Reception). You can send fax documents
by specifying IP-fax destination using IP addresses (IP-Fax Transmission). You
can receive sent documents via Internet Fax (IP-Fax Reception).
ARC004S
❖ Internet Fax
• You can send fax documents through e-mail by specifying the recipient’s
e-mail address.
• E-mails can be received on a fax machine that supports Internet Fax, or on
a computer that can receive normal e-mail.
• You can receive e-mails or Internet Fax, and then print or forward them.
• For details about the machine's settings, see “Network Settings”, General
Settings Guide.
• For details about how to use the function, see “Transmission”, Facsimile
Reference.
❖ IP-Fax
• You can exchange documents between fax machines directly connected to
the TCP/IP network.
• You can send documents by specifying an IP address or host name instead
of a fax number.
• For details about the machine's settings, see “Network Settings”, General
Settings Guide.
• For details about how to use this function, see “Transmission”, Facsimile
Reference.
v
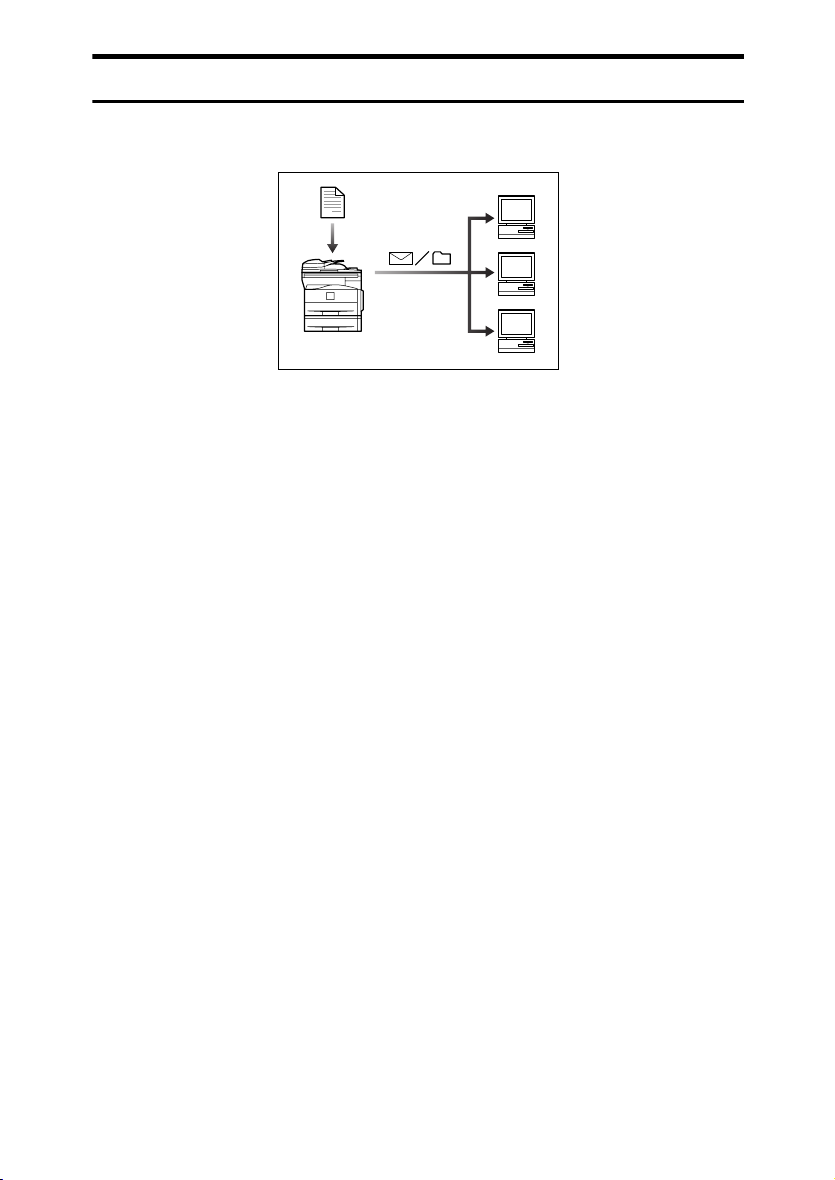
Using the Scanner in a Network Environment
You can use a scanner over the network.
ARC005S
• You can send scan files to a specified destination using e-mail (Sending scan
file by e-mail). See “Sending Scan Files by E-mail”, Scanner Reference.
• With the ScanRouter delivery software, you can save scan files in specified
destinations on network computers (Saving scan files). See “Sending Scan
Files by Scan to Folder”, Scanner Reference.
• You can send scan files directly to folders (Sending scan file by Scan to Folder).
• Under the network delivery scanner function, you can use the machine as a
delivery scanner for the ScanRouter delivery software or DeskTopBinder.
You can save scan files or fax-received files in the delivery server, or deliver
them to a folder on a computer on the same network.
• For details about specifying the machine’s settings for using its scanner function over the network, see “Network Settings”, General Settings Guide.
• For details about using the scanner function over the network, see “Using the
Network TWAIN Scanner Function”, Scanner Reference.
vi
Administrating the Machine (Security Functions)
You can prevent information leakage by managing the machine.
ARC006S
• You can control the use of the machine, as well as prevent machine settings
from being changed without authorization. See Security Reference.
• By setting passwords, you can prevent unauthorized access via the network.
See Security Reference.
vii
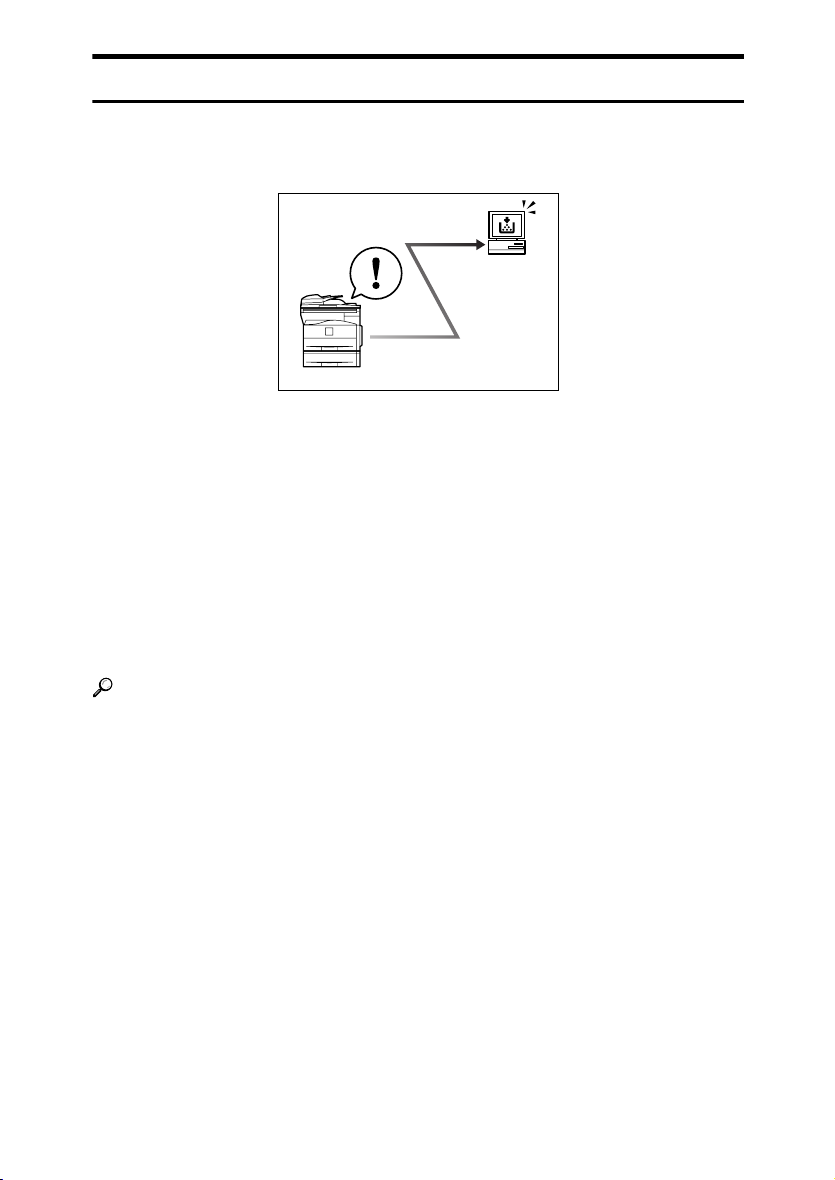
Monitoring the Machine Via Computer
You can change the machine's settings and monitor its status from a connected
computer.
ARC007S
Web Image Monitor lets you configure and operate the machine using a Web
browser on a computer. You can also install SmartDeviceMonitor for Admin on
a computer to configure and operate the machine.
Using Web Image Monitor, you can register information in the address book,
specify the machine’s settings, and check the machine’s status with ease.
Using Web Image Monitor, you can check and specify the initial settings (system
settings, printer features, fax features, network settings, security settings/certificate management, and E-mail Notification), control print jobs, display the print
job journal, and protect the data in the machine using authentication.
You can also use SmartDeviceMonitor for Admin to register information in the
address book.
viii
Reference
General Settings Guide
SmartDeviceMonitor for Admin Help
Web Image Monitor's Help

TABLE OF CONTENTS
Manuals for This Machine ...................................................................................... i
What You Can Do with This Machine.................................................................. iii
Copier, Facsimile, Printer, and Scanner Functions................................................... iii
Paperless Fax Transmission ..................................................................................... iv
Fax Transmission and Reception Through the Internet ............................................. v
Using the Scanner in a Network Environment .......................................................... vi
Administrating the Machine (Security Functions) ..................................................... vii
Monitoring the Machine Via Computer..................................................................... viii
Notice ......................................................................................................................1
Important ....................................................................................................................1
How to Read This Manual .....................................................................................2
Symbols .....................................................................................................................2
Name of Major Item.................................................................................................... 2
Safety Information ................................................................................................. 3
Safety During Operation............................................................................................. 3
Positions of RWARNING and RCAUTION labels .............................................. 6
ENERGY STAR Program ....................................................................................... 7
Specifications .............................................................................................................8
Recycled Paper.......................................................................................................... 8
1. Getting Started
Guide to Components ........................................................................................... 9
Other Items ..............................................................................................................11
Control Panel........................................................................................................ 12
Display .................................................................................................................. 15
Reading the Display and Using Keys....................................................................... 15
When the Authentication Screen is Displayed.................................................. 16
User Code Authentication (Using the Control Panel)...............................................16
User Code Authentication (Using a Printer Driver) ..................................................16
Login (Using the Control Panel)...............................................................................17
Logout (Using the Control Panel).............................................................................17
Login (Using a Printer Driver)...................................................................................18
Login (Using Web Image Monitor) ...........................................................................18
Logout (Using Web Image Monitor) .........................................................................18
Changing Modes .................................................................................................. 19
Turning On the Power ......................................................................................... 20
Turning On the Main Power .....................................................................................20
Turning On the Power .............................................................................................. 21
Turning Off the Power .............................................................................................. 21
Turning Off the Main Power .....................................................................................22
Saving Energy .......................................................................................................... 23
2. Entering Text
Entering Text ........................................................................................................25
Available Characters ................................................................................................ 25
Keys ......................................................................................................................... 25
How to Enter Text .................................................................................................... 26
ix

3. Appendix
Dos and Don'ts..................................................................................................... 35
Software and Utilities Included on the CD-ROM ...............................................36
Viewing the Contents of the CD-ROM ..................................................................... 37
Printer Drivers for This Machine............................................................................... 37
TWAIN Driver ...........................................................................................................38
LAN-Fax Driver ........................................................................................................ 39
DeskTopBinder Lite..................................................................................................40
SmartDeviceMonitor for Admin ................................................................................41
DeskTopBinder-SmartDeviceMonitor for Client ....................................................... 42
Installing the Operating Instructions ................................................................. 43
PDF Manuals ...........................................................................................................44
Opening the Installed Operating Instructions ................................................... 45
Opening from the Icon.............................................................................................. 45
Opening from the [Start] Menu .................................................................................45
Opening from the CD-ROM...................................................................................... 46
Specifications for the Main Unit ......................................................................... 47
Specifications for External Items ....................................................................... 50
Exposure Glass Cover ............................................................................................. 50
Auto Document Feeder capable of scanning both sides of a sheet (ARDF)............50
Paper Tray Unit (Tray 2) .......................................................................................... 51
Copy Paper ...........................................................................................................52
Recommended Paper Sizes and Types...................................................................52
Unusable Paper .......................................................................................................54
Paper Storage .......................................................................................................... 55
INDEX......................................................................................................... 56
x

Notice
Important
Do not copy or print any item for which reproduction is prohibited by law.
Copying or printing the following items is generally prohibited by local law:
bank notes, revenue stamps, bonds, stock certificates, bank drafts, checks, passports, driver's licenses.
The preceding list is meant as a guide only and is not inclusive. We assume no
responsibility for its completeness or accuracy. If you have any questions concerning the legality of copying or printing certain items, consult with your legal
advisor.
1

How to Read This Manual
Symbols
This manual uses the following symbols:
Indicates important safety notes.
Ignoring these notes could result in serious injury or death. Be sure to read these
notes. They can be found in the “Safety Information” section of this manual.
Indicates important safety notes.
Ignoring these notes could result in moderate or minor injury, or damage to the
machine or to property. Be sure to read these notes. They can be found in the
“Safety Information” section of this manual.
Indicates points to pay attention to when using the machine, and explanations
of likely causes of paper misfeeds, damage to originals, or loss of data. Be sure
to read these explanations.
This symbol indicates information or preparations required prior to operating.
Indicates supplementary explanations of the machine’s functions, and instructions on resolving user errors.
This symbol is located at the end of sections. It indicates where you can find further relevant information.
[ ]
Indicates the names of keys that appear on the machine’s display panel.
{ }
Indicates the names of keys on the machine’s control panel.
Name of Major Item
Major item of this machine is referred to as follows in this manual:
• Auto Document Feeder capable of scanning both sides of a sheet → ARDF
2

Safety Information
When using this machine, the following safety precautions should always be followed.
Safety During Operation
In this manual, the following important symbols are used:
Indicates a potentially hazardous situation which, if instructions are not followed, could result
in death or serious injury.
Indicates a potentially hazardous situation which, if instructions are not followed, may result
in minor or moderate injury or damage to property.
R WARNING:
• Disconnect the power plug (by pulling the plug, not the cable) if the
power cable or plug becomes frayed or otherwise damaged.
• To avoid hazardous electric shock or laser radiation exposure, do not
remove any covers or screws other than those specified in this manual.
• Turn off the power and disconnect the power plug (by pulling the plug,
not the cable) if any of the following occurs:
• You spill something into the machine.
• You suspect that your machine needs service or repair.
• The external housing of your machine has been damaged.
• Do not incinerate used toner or toner containers. Toner dust might ig-
nite when exposed to an open flame.
• Disposal can take place at our authorized dealer.
• Dispose of used toner containers in accordance with local regulations.
• Keep the machine away from flammable liquids, gases, and aerosols.
A fire or an electric shock might occur.
• Connect the machine only to the power source described on the inside front cover of this manual. Connect the power cord directly into
a wall outlet and do not use an extension cord.
• Do not damage, break or make any modifications to the power cord.
Do not place heavy objects on it. Do not pull it hard nor bend it more
than necessary. These actions could cause an electric shock or fire.
• If the power cord is damaged (exposure of the core, disconnection,
etc.), contact your service representative to change a new one. Operating the machine with a damaged power cord may cause an electric
shock or fire.
3

R CAUTION:
• Protect the machine from dampness or wet weather, such as rain and snow.
• Unplug the power cord from the wall outlet before you move the machine.
While moving the machine, you should take care that the power cord will not
be damaged under the machine.
• Before moving the machine, be sure to disconnect all external connections,
especially the power cord from the wall outlet. Damaged power cords are a
fire and electric shock hazard.
• When you disconnect the power plug from the wall outlet, always pull the
plug (not the cable).
• To disconnect the power cord, pull it out by plug. Do not drag the cord itself.
Doing so may result in damage to the cord, leading to fire or electric shock.
• For safety reason, unplug the power cord from the wall outlet if the machine
will not be used for an extended period of time such as holidays.
• Do not allow paper clips, staples, or other small metallic objects to fall inside
the machine.
• Keep toner (used or unused) and toner containers out of reach of children.
• For environmental reasons, do not dispose of the machine or expended
supply waste at household waste collection points. Disposal can take place
at an authorized dealer.
• The inside of the machine could be very hot. Do not touch the parts with a
label indicating the “hot surface”. Otherwise, an injury might occur.
• The fusing section of this machine might be very hot. Caution should be taken when removing misfed paper.
• Keep the machine away from humidity and dust. Otherwise a fire or an electric shock might occur.
• Do not place the machine on an unstable or tilted surface. If it topples over,
an injury might occur.
• Do not use aluminum foil, carbon paper, or similar conductive paper to avoid
a fire or machine failure.
• Make sure the room where you are using the machine is well ventilated and
spacious. Good ventilation is especially important when the machine is used
heavily.
• Do not open toner containers forcefully. Toner can spill, dirtying your clothes
or hands, and possibly resulting in accidental ingestion.
• If toner or used toner is inhaled, gargle with plenty of water and move into a
fresh air environment. Consult a doctor if necessary.
• If toner or used toner gets into your eyes, flush immediately with large
amounts of water. Consult a doctor if necessary.
• If toner or used toner is swallowed, dilute by drinking a large amount of water. Consult a doctor if necessary.
4

R CAUTION:
• Avoid getting toner on your clothes or skin when removing a paper jam or
replacing toner. If your skin comes into contact with toner, wash the affected
area thoroughly with soap and water.
• If toner gets on your clothing, wash with cold water. Hot water will set the
toner into the fabric and may make removing the stain impossible.
• Do not look into the lamp - it can damage your eyes.
• When loading paper, take care not to trap or injure your fingers.
• During operation, rollers for transporting the paper and originals revolve. A
safety device is being installed so that the machine can be operated safely.
But take care not to touch the rollers during operation. An injury might occur.
• Fire and breakdown can result from heavy accumulation of dust inside this
machine. Consult your service representative for details about and charges
for cleaning the machine’s interior.
• If you have to move the machine when the optional paper tray unit is attached, do not push on the main unit's top section. Doing so can cause the
optional paper tray unit to detach, possibly resulting in injury.
5
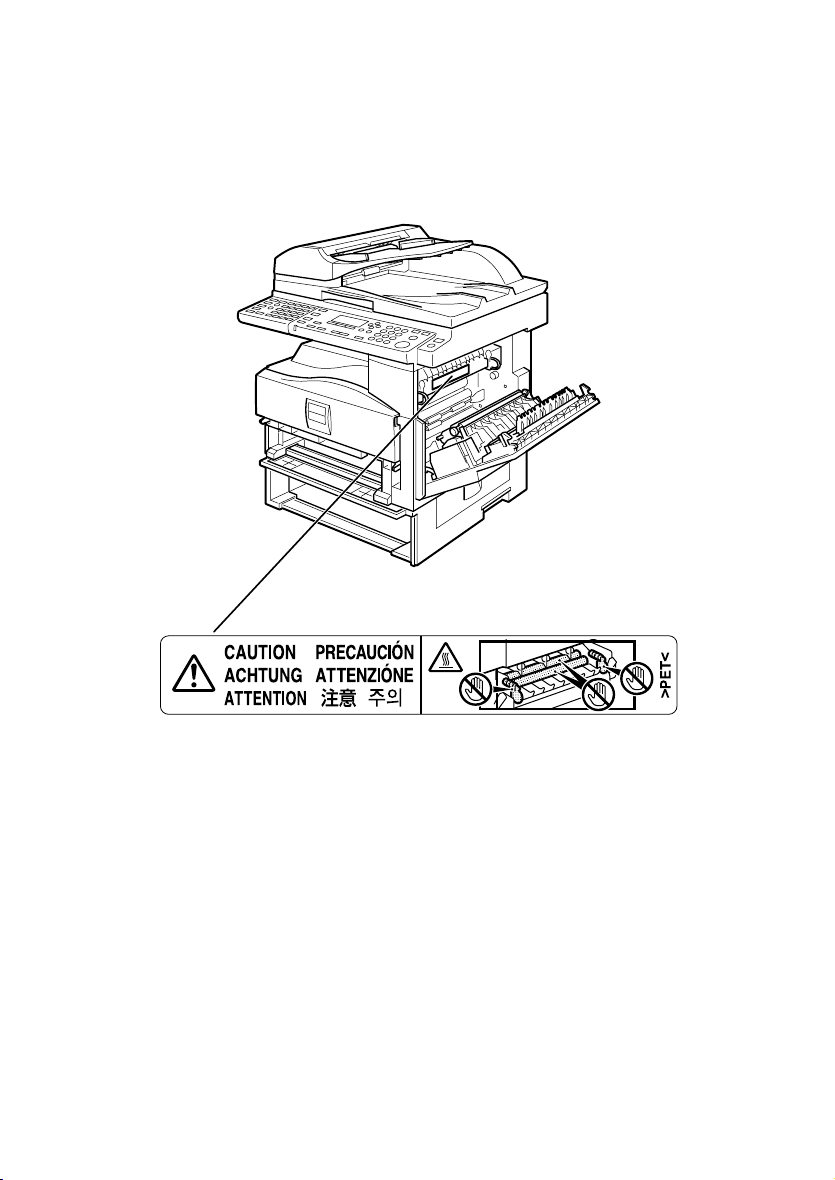
Positions of RWARNING and RCAUTION
labels
This machine has labels for RWARNING and RCAUTION at the positions
shown below. For safety, please follow the instructions and handle the machine
as indicated.
High temperature. Be careful of hot parts when clearing paper jams.
6
ARC017S

ENERGY STAR Program
ENERGY STAR® Program
The ENERGY STAR
computers and other office equipment.
The program backs the development and dissemination of products that feature energy saving
functions.
It is an open program in which manufacturers participate voluntarily.
Targeted products are computers, monitors, printers, facsimiles, copiers, scanners, and multifunction devices. Energy Star standards and logos are internationally uniform.
®
Program encourages energy conservation by promoting energy efficient
•Low Power mode
This machine automatically lowers its power consumption 1 minute after finishing the last copy or print job. Fax reception and printing is still possible in
Low Power mode, but to make copies, you have to press the operation switch
first.
• Off mode (Copier only)
To conserve energy, this machine automatically turns off 1 minute after finishing the last copy or print job. In this manual, the Off mode is called the
Auto Off mode.
• Sleep mode (Fax, printer, or scanner installed)
If there is a fax, printer, or scanner unit installed, this machine automatically
lowers its power consumption even further 1 minute after finishing the last
copy or print job. Fax reception and printing is still possible in Sleep mode,
but to make copies, you have to press the operation switch first.
Note
❒ If you want to operate this machine while it is in either of these modes, do
one of the following:
• Turn on the operation switch.
• Place originals in the ARDF.
Reference
“Timer Settings”, General Settings Guide
7

•Duplex Priority
We recommend the duplex function. This function is less of a burden to the environment. For applicable machines, duplex function (one-sided originals → two-sided
copies) can be selected preferentially when the operation switch or the {Clear
Modes} key is pressed, or the machine resets automatically.
Specifications
Copier only Fax, printer, or
Low Power mode Power consumption 25 W 35 W
Default interval 1 minute 1 minute
Recovery time Less than 10 seconds Less than 10 seconds
Sleep mode Power consumption - Less than 10 W
Default interval - 1 minute
Recovery time - Less than 10 seconds
Off mode Power consumption Less than 1 W -
Default interval 1 minute -
Recovery time Less than 10 seconds -
Duplex Priority 1 Sided → 1 Sided
scanner installed
Recycled Paper
We recommend you use environmentally friendly recycled paper. Please contact your sales representative for recommended paper.
8

1. Getting Started
This section describes how to start using this machine.
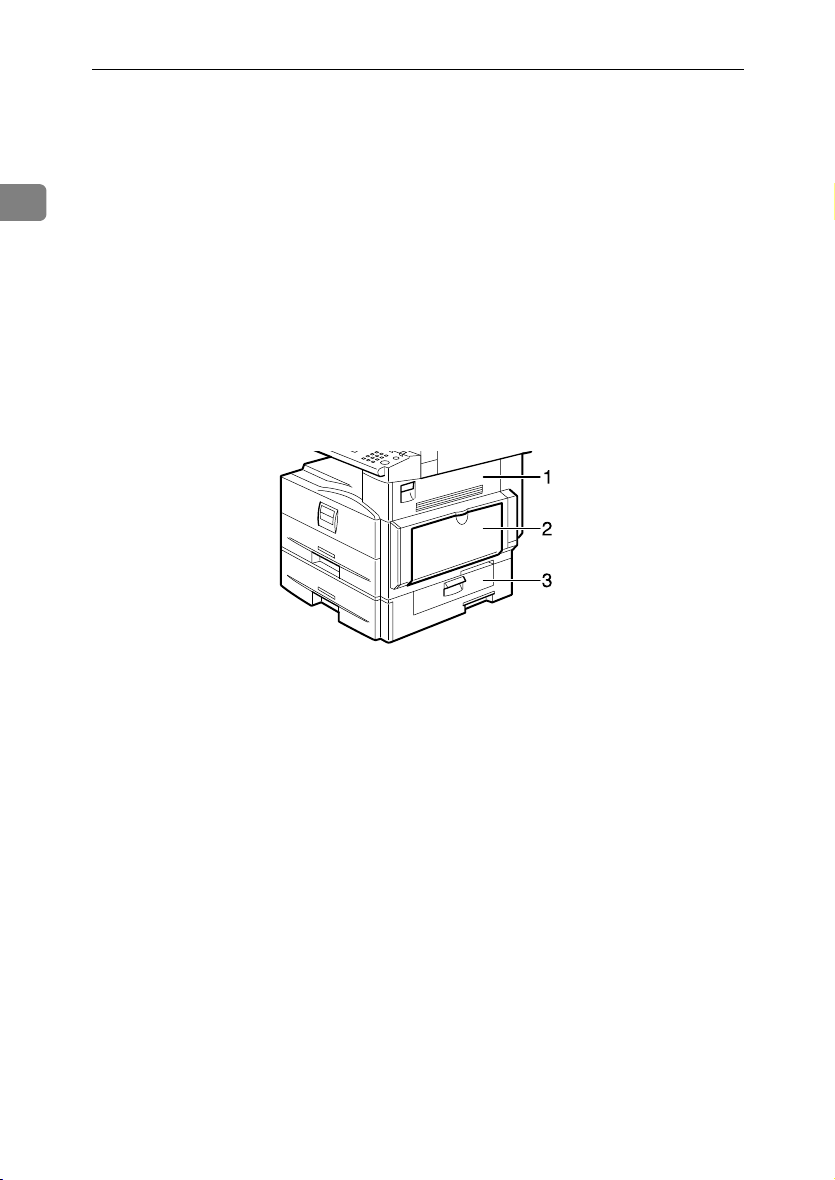
Guide to Components
This section introduces the names and functions of the components.
1. ARDF
Place a stack of originals here face up.
They will be fed in automatically. This
document feeder can be used for two-sided originals.
2. Exposure glass
Place originals here face down.
ARC031S
3. Internal tray
Copied or printed paper or fax messages
are delivered here.
Paper capacity: 250 sheets
4. Ventilation holes
Prevents overheating. Do not obstruct
the ventilation holes by placing objects
near them or leaning things against them.
If the machine overheats, a fault might
occur.
9
Getting Started
5. Main power switch
If the machine is not powered on after
pressing the operation switch, check that
the main power switch is turned on. If it
1
is off, turn it on.
6. Main power indicator
Lights when the main power switch is
turned on, and goes off when the switch
is turned off.
7. Operation switch
Press to turn the power on (the operation
switch indicator lights). To turn the power off, press again (the operation switch
indicator goes off).
1. Right cover
Open this cover to remove jammed paper
fed from the paper tray.
8. Control panel
See p.12 “Control Panel”.
9. Front cover
Open to access the inside of the machine.
10. Paper tray
Load paper here.
11. Paper tray unit (Tray 2)
See p.11 “External Items”.
12. Internal tray guide
Open out and raise the end fence to support large paper.
ARC015S
3. Lower right cover
Open this cover to remove jammed paper
fed from the paper tray unit (Tray 2).
2. Bypass tray
Use to copy or print onto OHP transparencies, adhesive labels, translucent paper, envelopes, and custom size paper.
10
 Loading...