

Ricoh InfoPrint 1892, MT 4864 User Manual

InfoPrint 1892
MT(4864)
User’s Guide
G510-9799-00


InfoPrint 1892
MT(4864)
User’s Guide
G510-9799-00

Contents
Safety information.............................................................................5
Learning about the printer...............................................................6
Finding information about the printer...........................................................................................................................6
Selecting a location for the printer..................................................................................................................................6
Understanding the home screen.....................................................................................................................................7
Additional printer setup....................................................................9
Installing internal options...................................................................................................................................................9
Installing hardware options.............................................................................................................................................22
Attaching cables..................................................................................................................................................................24
Loading paper.......................................................................................................................................................................26
Linking and unlinking trays.............................................................................................................................................31
Verifying printer setup.......................................................................................................................................................33
Setting up the printer software......................................................................................................................................34
Installing the printer on a wired network...................................................................................................................35
Changing port settings after installing a new network Internal Solutions Port...........................................38
Setting up serial printing..................................................................................................................................................40
Setting up and using the Home Screen applications................42
Making the home screen applications work for you..............................................................................................42
Configuring the Home Screen or idle screen............................................................................................................43
Configuring Eco-Settings..................................................................................................................................................45
Configuring Forms and Favorites..................................................................................................................................48
Minimizing your printer's environmental impact.....................50
Saving paper and toner.....................................................................................................................................................50
Saving energy.......................................................................................................................................................................50
Reducing printer noise......................................................................................................................................................52
Printing...............................................................................................54
Printing a document..........................................................................................................................................................54
Printing confidential and other held jobs...................................................................................................................56
Printing information pages..............................................................................................................................................57
Canceling a print job from the printer control panel.............................................................................................58
Contents
2

Clearing jams.....................................................................................59
200 and 201 paper jams....................................................................................................................................................59
202 and 203 paper jams....................................................................................................................................................60
230 paper jam.......................................................................................................................................................................60
241–245 paper jams...........................................................................................................................................................61
250 paper jam.......................................................................................................................................................................62
270–279 paper jams...........................................................................................................................................................62
280–282 paper jams...........................................................................................................................................................63
283 staple jams.....................................................................................................................................................................63
Maintaining the printer...................................................................65
Ordering supplies................................................................................................................................................................65
Checking the status of supplies.....................................................................................................................................65
Moving the printer to another location......................................................................................................................66
Shipping the printer...........................................................................................................................................................66
Administrative support...................................................................67
Using the Embedded Web Server.................................................................................................................................67
Checking the device status..............................................................................................................................................67
Restoring the factory default settings..........................................................................................................................67
Troubleshooting...............................................................................68
Solving basic problems.....................................................................................................................................................68
Solving printing problems...............................................................................................................................................69
Solving option problems..................................................................................................................................................72
Solving paper feed problems..........................................................................................................................................74
Solving print quality problems.......................................................................................................................................75
Solving application problems.........................................................................................................................................86
Contacting Customer Support.......................................................................................................................................86
Notices................................................................................................87
Product information...........................................................................................................................................................87
Edition notice........................................................................................................................................................................87
Index...................................................................................................89
Contents
3 4


Safety information
IMPORTANT SAFETY INFORMATION: FOR INITIAL EQUIPMENT SETUP AND POWER-ON, SEE THE SAFETY INFORMATION
SHEET THAT IS INCLUDED IN THE PACKAGING WITH YOUR PRODUCT. ADDITIONAL SAFETY INFORMATION IS
INCLUDED IN THE ONLINE USER'S GUIDE.
Connect the power cord to a properly grounded electrical outlet that is near the product and easily accessible.
CAUTION—SHOCK HAZARD: Do not set up this product or make any electrical or cabling connections, such
as the power cord or telephone, during a lightning storm.
CAUTION—SHOCK HAZARD: If you are accessing the system board or installing optional hardware or memory
devices sometime after setting up the printer, then turn the printer off, and unplug the power cord from the
wall outlet before continuing. If you have any other devices attached to the printer, then turn them off as well,
and unplug any cables going into the printer.
CAUTION—POTENTIAL INJURY: Before moving the printer, follow these guidelines to avoid personal injury
or printer damage:
• Turn the printer off using the power switch, and then unplug the power cord from the wall outlet.
• Disconnect all cords and cables from the printer before moving it.
• Lift the printer off the optional drawer, and set it aside instead of trying to lift the drawer and printer at the same
time.
Note: Use the handholds located on both sides of the printer to lift it off the optional drawer.
CAUTION—HOT SURFACE: The inside of the printer might be hot. To reduce the risk of injury from a hot
component, allow the surface to cool before touching.
CAUTION—POTENTIAL INJURY: If your printer weight is greater than 18 kg (40 lbs), it requires two or more
trained personnel to lift it safely.
Safety information
5

Learning about the printer
Finding information about the printer
User's Guide
• Check the User's Guide for information on:
– The touch screen and its applications.
– Setting up and using printer software.
– Caring for and maintaining the printer.
• The User's Guide is available on the Publications CD that came with your printer.
• Windows or Mac Help—Open a printer software program or application, and then click Help.
Click
Notes:
to view context-sensitive information.
– The Help installs automatically with the printer software.
– The printer software is located in the printer Program folder or on the desktop, depending on your operating
system.
, Help, and more information
Selecting a location for the printer
When selecting a location for the printer, leave enough room to open trays, covers, and doors. If you plan to install
any options, leave enough room for them also. It is important to:
• Make sure airflow in the room meets the latest revision of the ASHRAE 62 standard.
• Provide a flat, sturdy, and stable surface.
• Keep the printer:
– Away from the direct airflow of air conditioners, heaters, or ventilators
– Free from direct sunlight, humidity extremes, or temperature fluctuations
– Clean, dry, and free of dust
• Allow the following recommended amount of space around the printer for proper ventilation:
Learning about the printer
6

5
4
1 Right Side 31 cm (12 in.)
2 Left Side 31 cm (12 in.)
3 Front 51 cm (20 in.)
4 Rear 31 cm (12 in.)
5 Top
1
Allows for addition of all output options.
1
137 cm (54 in.)
3
2
Understanding the home screen
1
After the printer is turned on and a short warm-up period occurs, the display shows a basic screen which is referred
to as the home screen. Use the home screen buttons to initiate an action such as printing a form, opening the menu
screen; or responding to messages.
Note: Buttons appearing on the home screen may vary depending on home screen customization settings.
Display item Description
1 Showroom Shows the functions of your printer
2 Change background Changes the background on the home screen
3
Menus
Opens the menus. These menus are available only when the printer is in the
Ready state.
Learning about the printer
7
Display item Description
4 Eco-Settings Determines how your printer saves paper, toner, and energy
5 Status message bar
• Shows the current printer status such as Ready or Busy
• Shows printer conditions such as Toner Low
• Shows intervention messages to give instructions on what you should do so
the printer can continue processing, such as Close door
6 Status/Supplies Appears on the display whenever the printer status includes a message requiring
intervention. Touch it to access the messages screen for more information on
the message, including how to clear it.
7 Forms and Favorites Provides access to frequently used forms and bookmarks
Other buttons may appear on the home screen, such as:
Display item Description
Search Held Jobs Searches on any of the following items and returns search results:
• User names for held or confidential print jobs
• Job names for held jobs, excluding confidential print jobs
• Profile names
• Bookmark container or job names
• USB container or job names for supported extensions only
Held Jobs Opens a screen containing all the held jobs
Lock Device This button appears on the screen when the printer is unlocked and a Device Lockout
Personal Identification Number (PIN) has been set.
Touching this button opens a PIN entry screen. Entering the correct PIN locks the
printer control panel (touch screen and hard buttons).
Unlock Device This button appears on the screen when the printer is locked. The printer control panel
buttons and shortcuts cannot be used while it appears.
Touching this button opens a PIN entry screen. Entering the correct PIN unlocks the
printer control panel (touch screen and hard buttons).
More Information Appears on the display when the user must interact with the printer to continue
printing. “More information” provides step-by-step instructions with clear drawings
to show users how to perform such tasks as changing the toner cartridges.
Learning about the printer
8

Additional printer setup
Installing internal options
CAUTION—SHOCK HAZARD: If you are accessing the system board or installing optional hardware or memory
devices sometime after setting up the printer, then turn the printer off, and unplug the power cord from the
wall outlet before continuing. If you have any other devices attached to the printer, then turn them off as well,
and unplug any cables going into the printer.
All the listed options may not be available. For more information, contact the place where you purchased the printer.
Available internal options
• Memory cards
– Printer memory
– Flash memory
– Fonts
• Firmware cards
– Bar Code and Forms
– IPDS and SCS/TNe
– PrintCryption
• Internal Solutions Ports (ISP)
– RS-232-C Serial ISP
– Parallel 1284-B ISP
– MarkNet
– MarkNet N8130 10/100 Fiber ISP
– MarkNet N8120 10/100/1000 Ethernet ISP
TM
TM
N8150 802.11 b/g/n Wireless ISP
All of these options may not be available. For more information, contact the place where you purchased the printer.
Additional printer setup
9
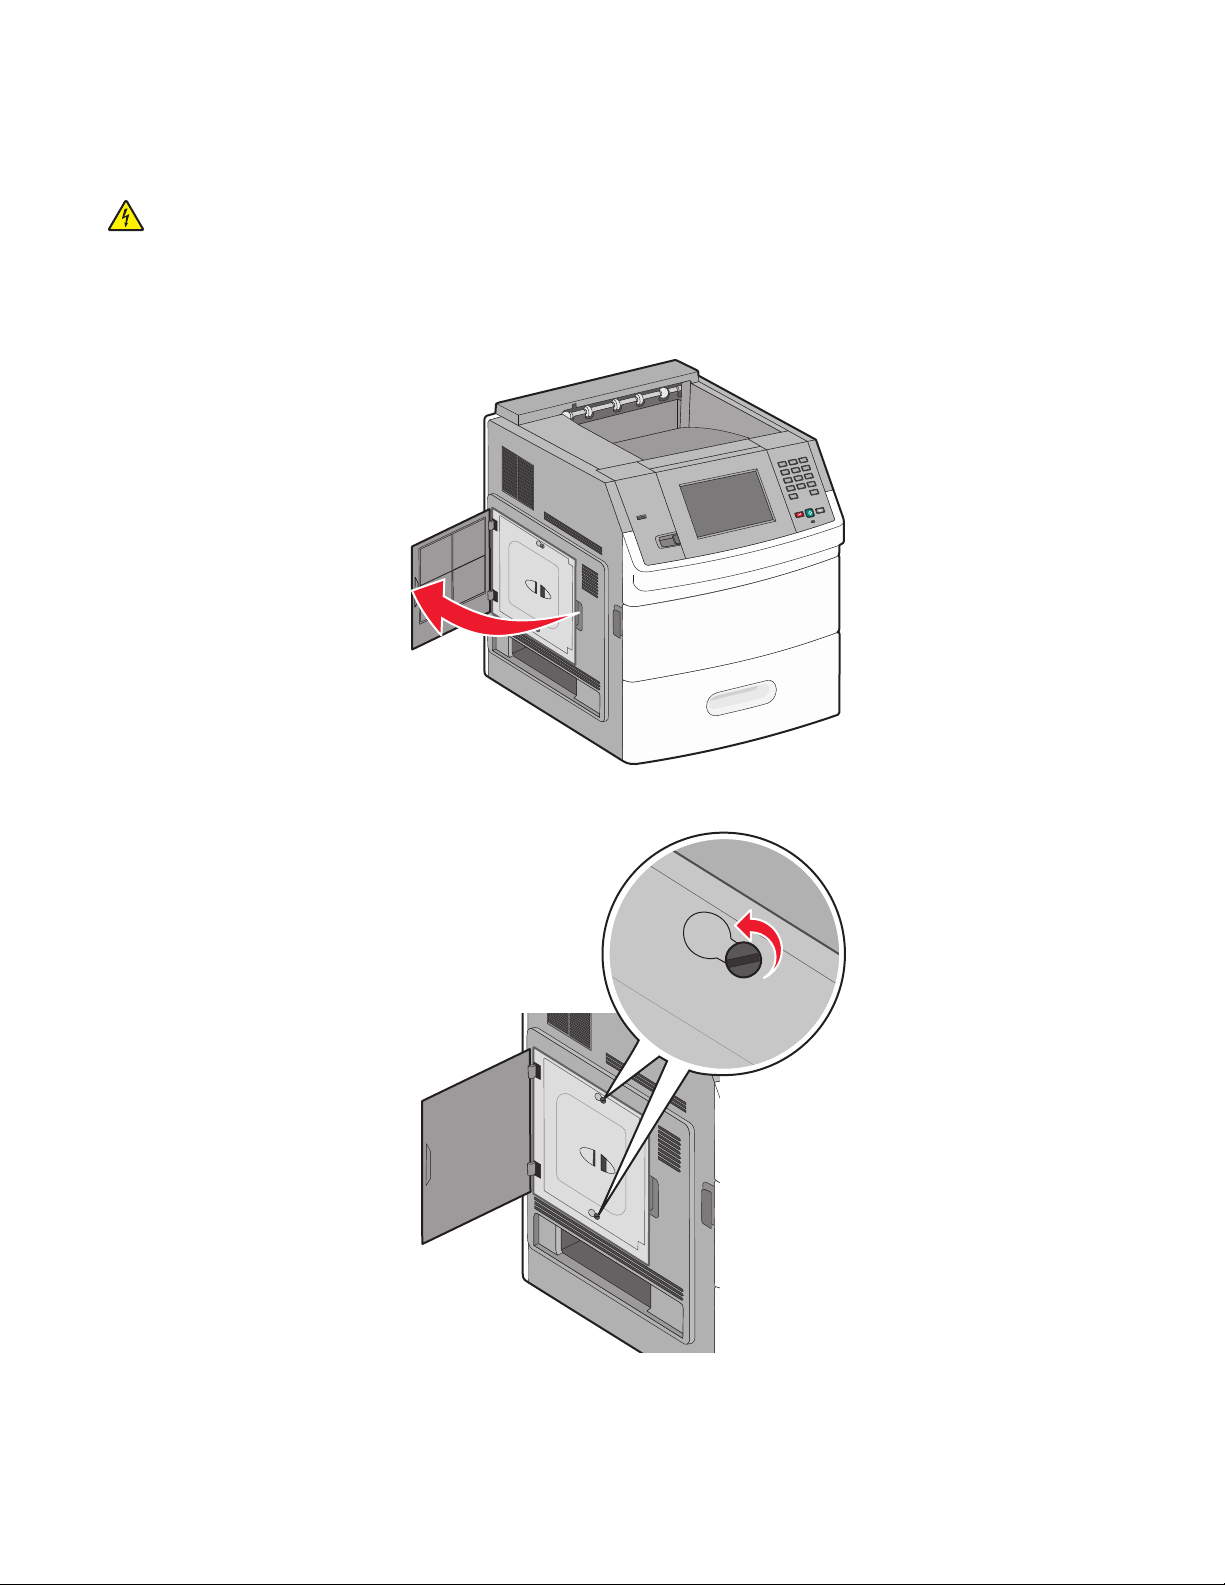
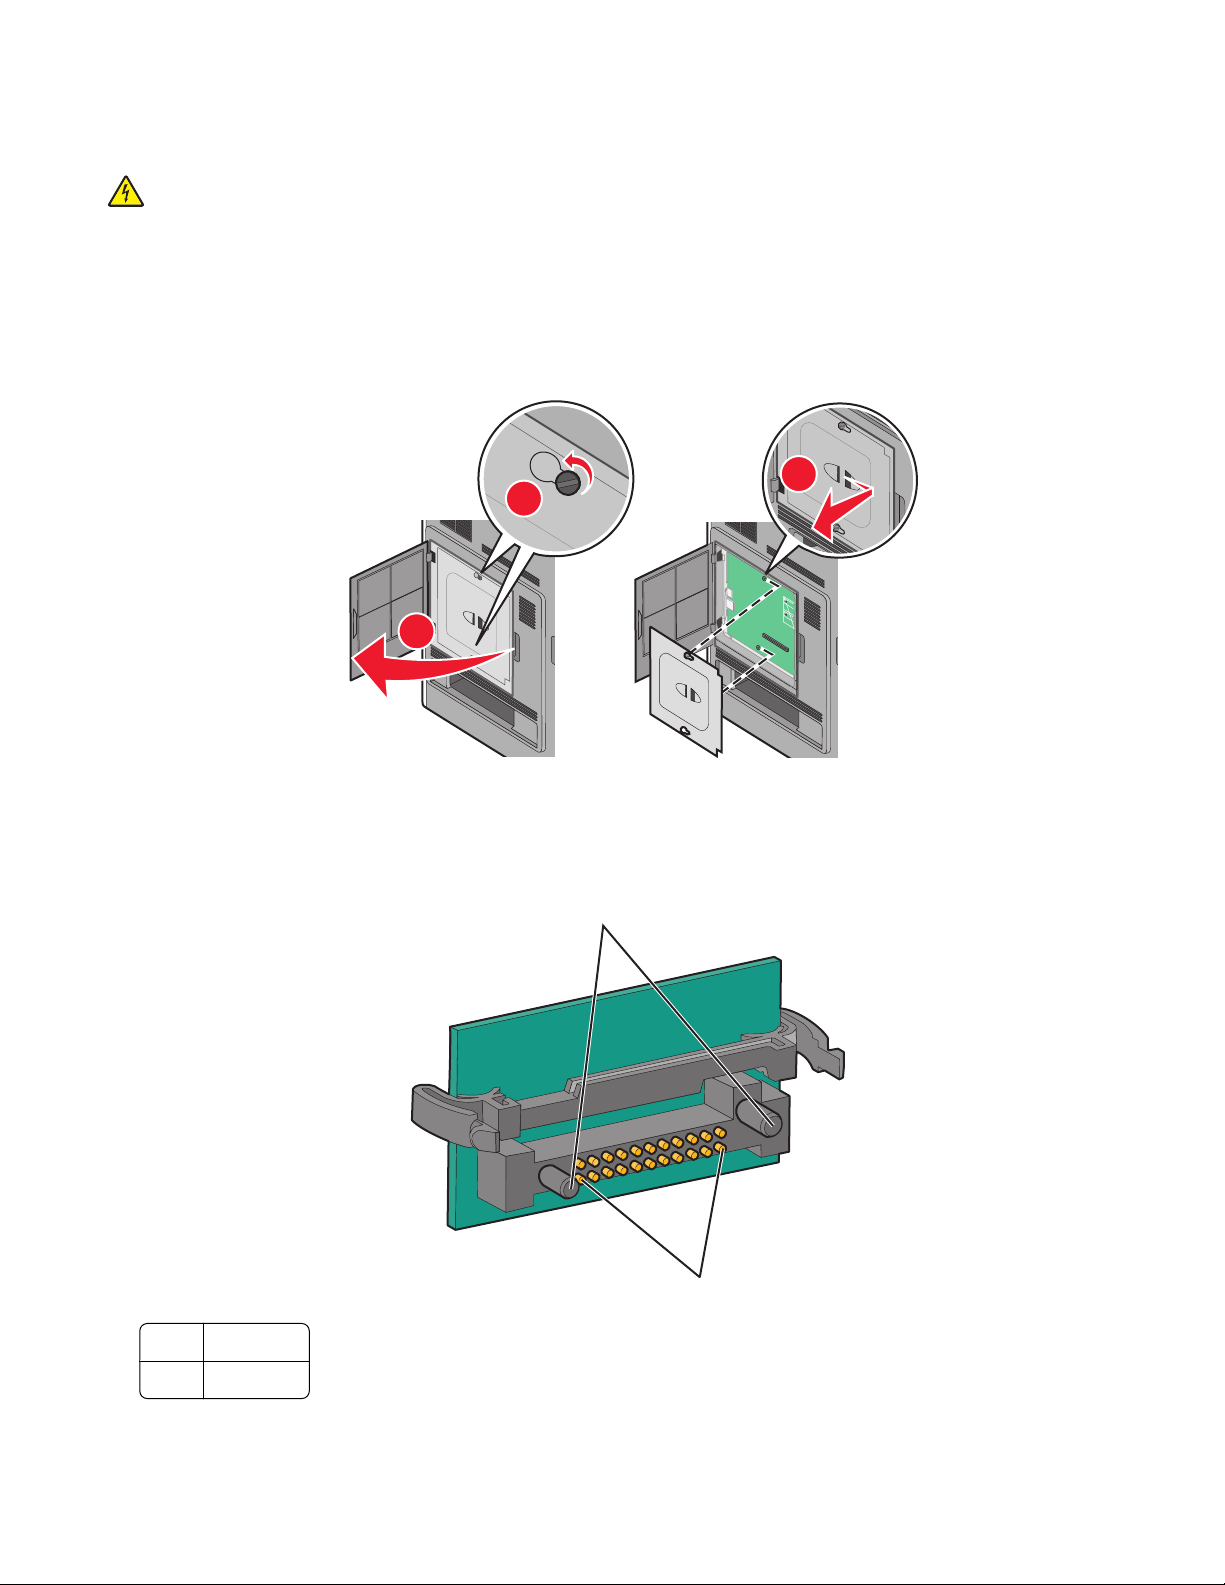
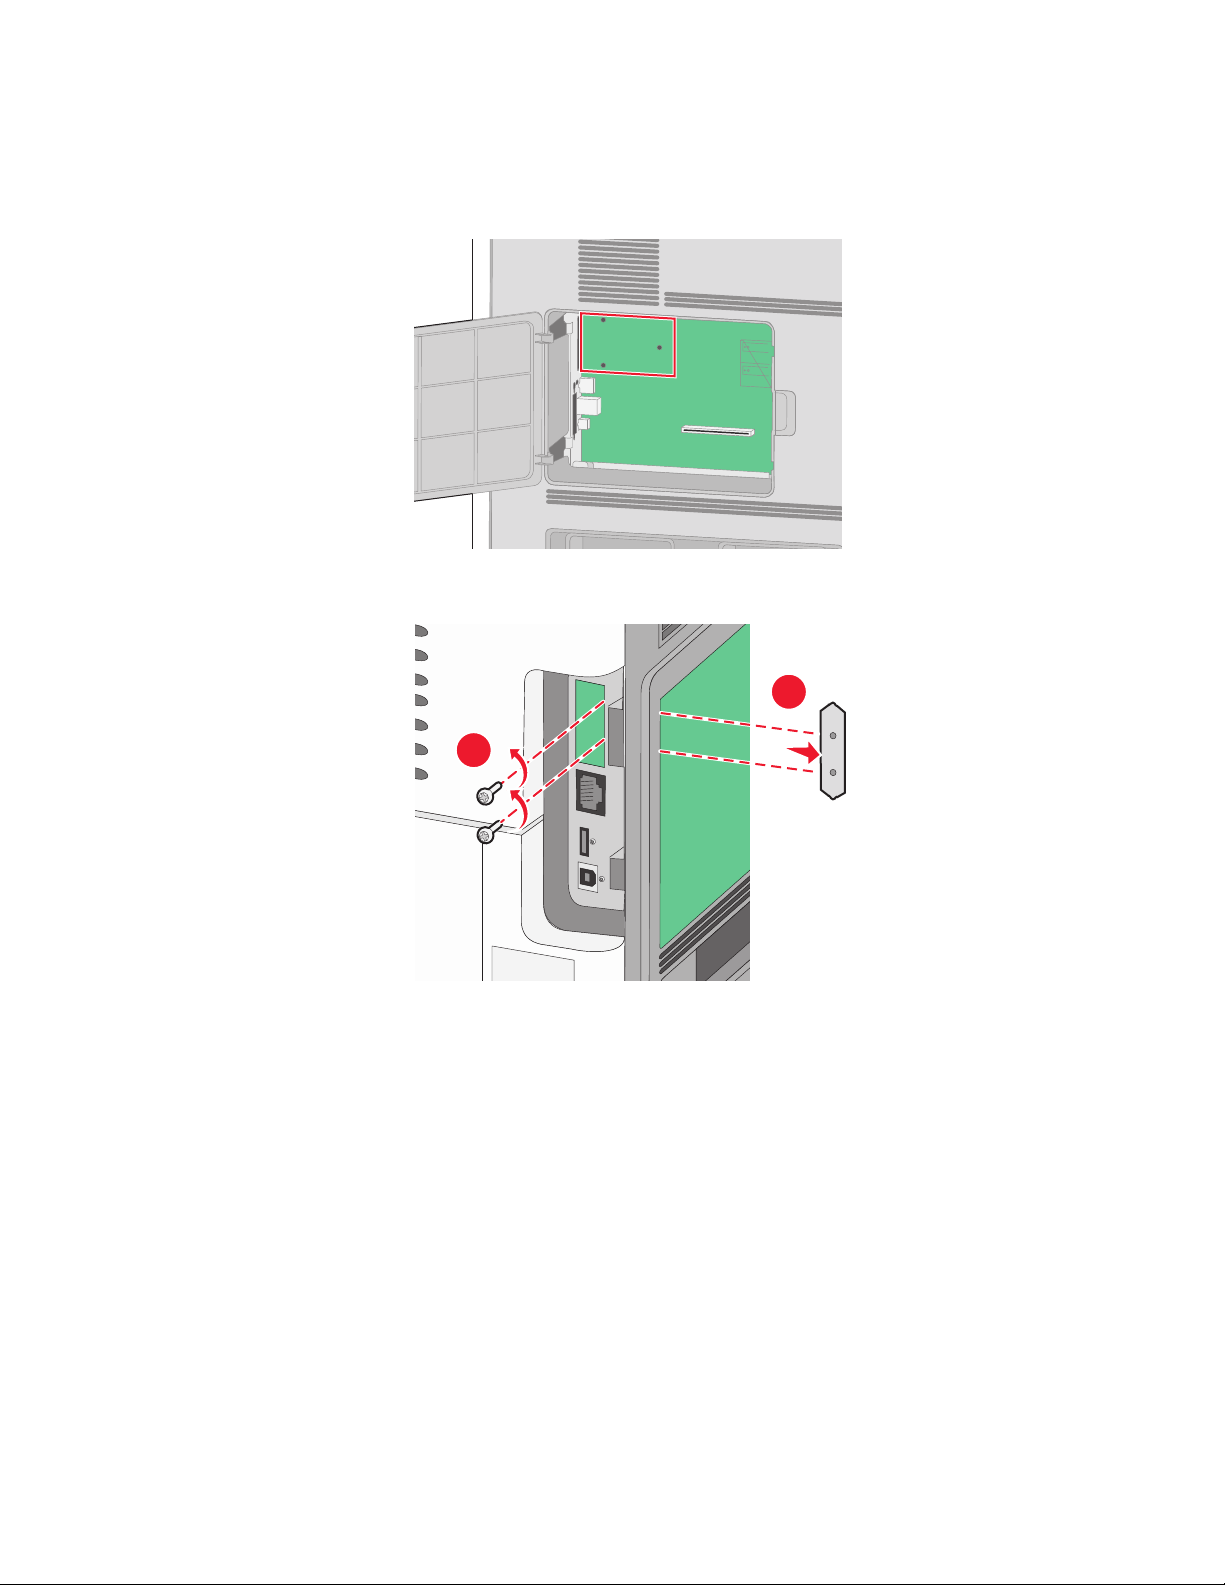
Accessing the system board to install internal options
Note: This task requires a flathead screwdriver.
CAUTION—SHOCK HAZARD: If you are accessing the system board or installing optional hardware or memory
devices sometime after setting up the printer, then turn the printer off, and unplug the power cord from the
wall outlet before continuing. If you have any other devices attached to the printer, then turn them off as well,
and unplug any cables going into the printer.
1 Open the system board door.
2 Loosen the screw(s) on the system board cover.
Additional printer setup
10
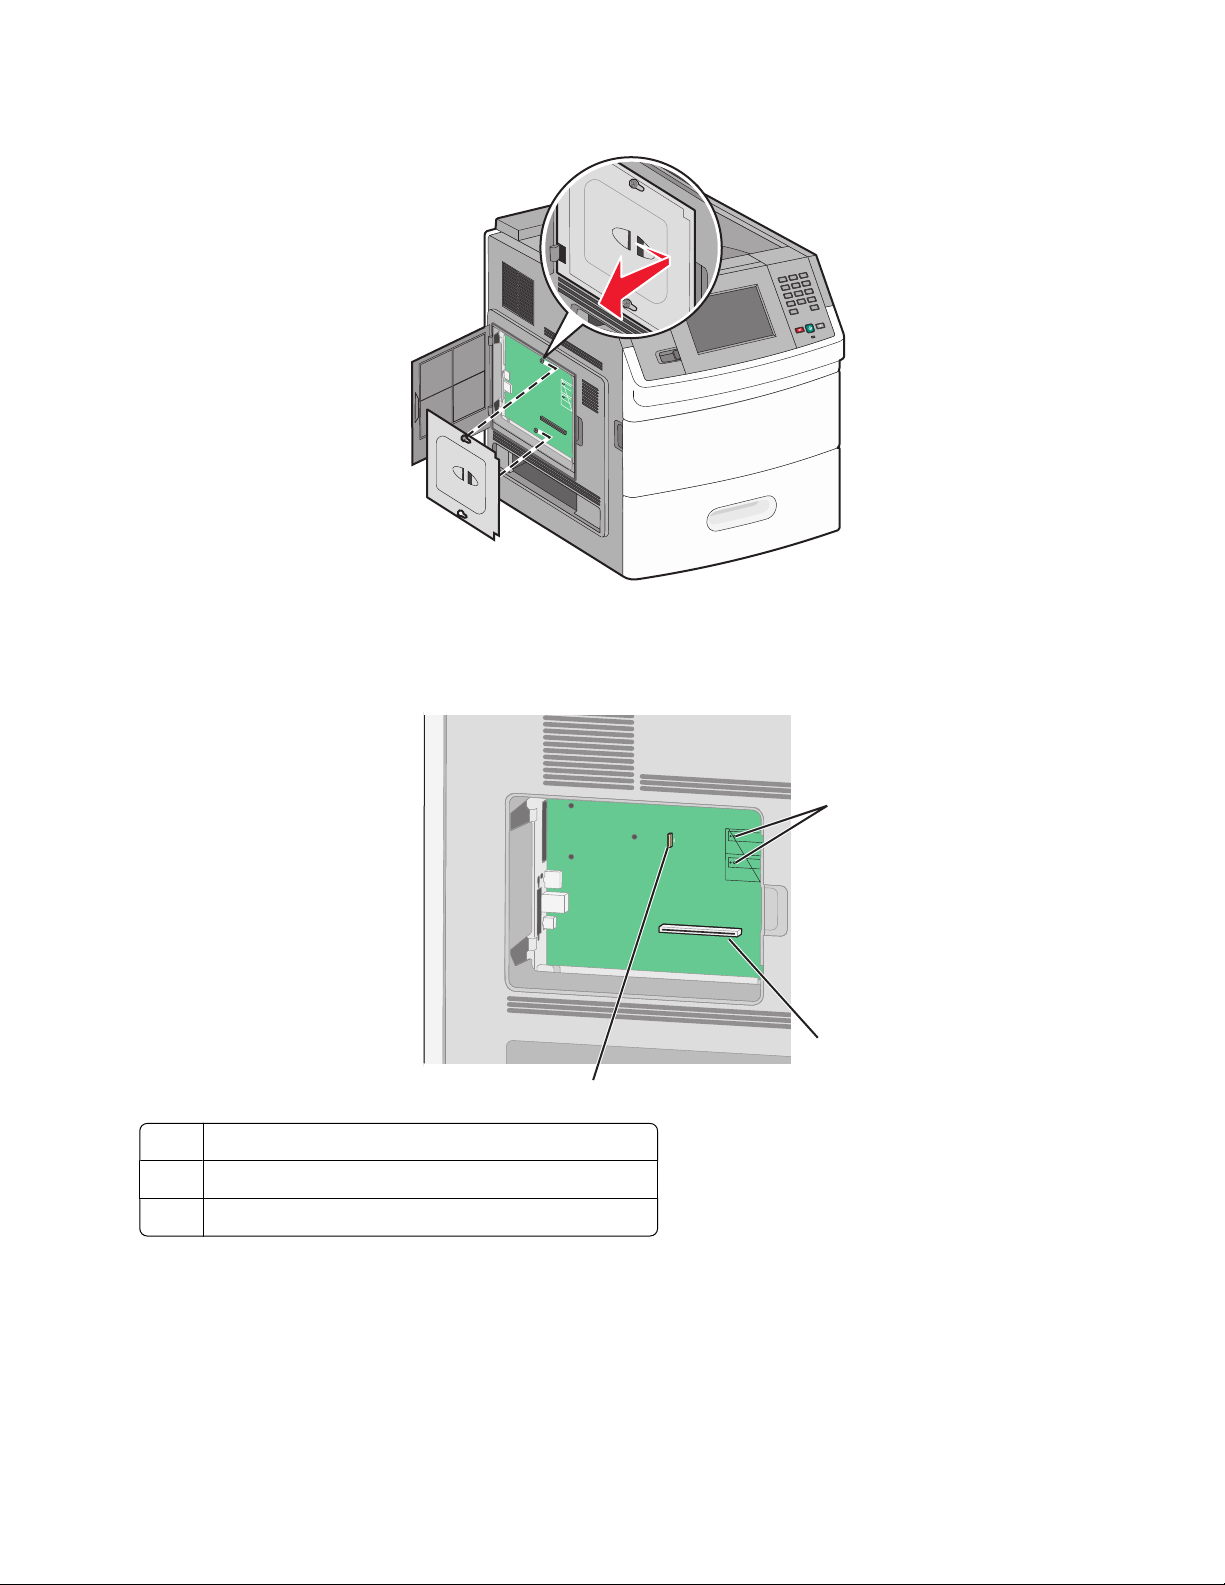
3 Remove the system board cover.
4 Use the illustration below to locate the appropriate connector.
Warning—Potential Damage: System board electronic components are easily damaged by static electricity.
Touch something metal on the printer before touching any system board electronic components or connectors.
3
1 Firmware and flash memory card connectors
2 Memory card connector
3 Internal Solutions Port or printer hard disk connector
1
2
Additional printer setup
11
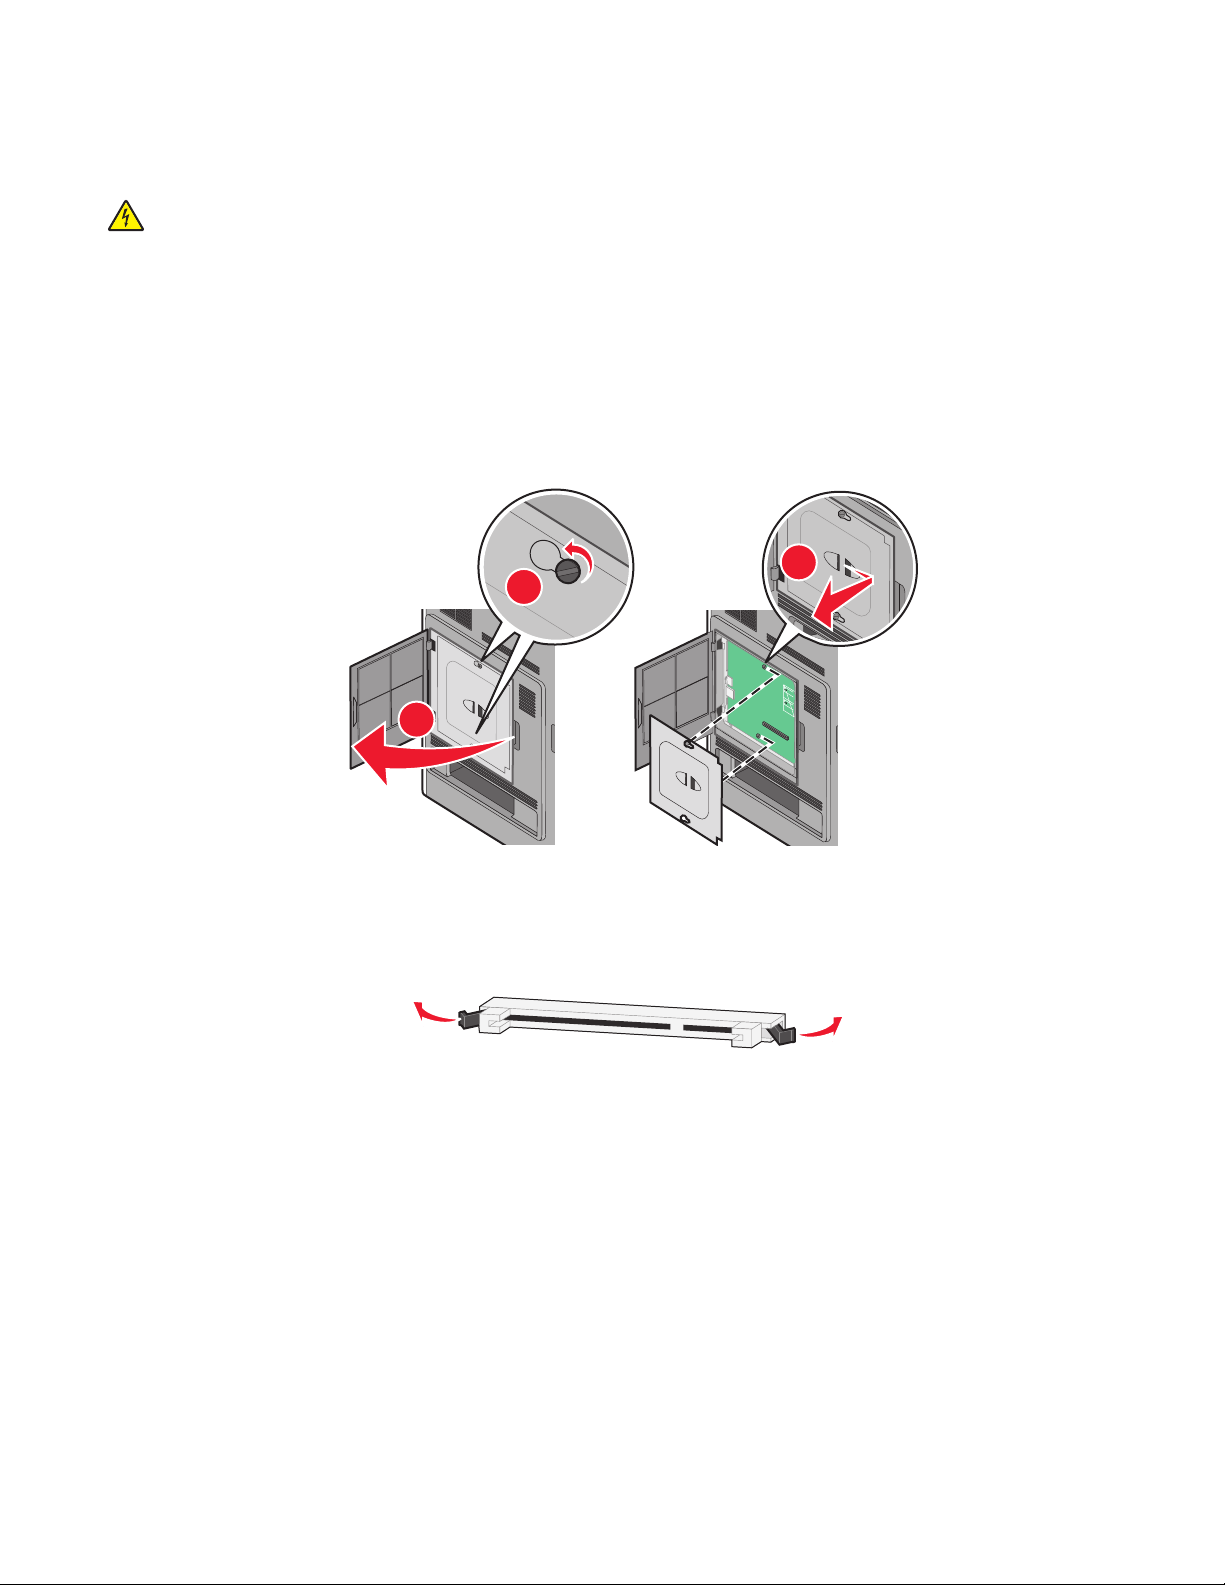
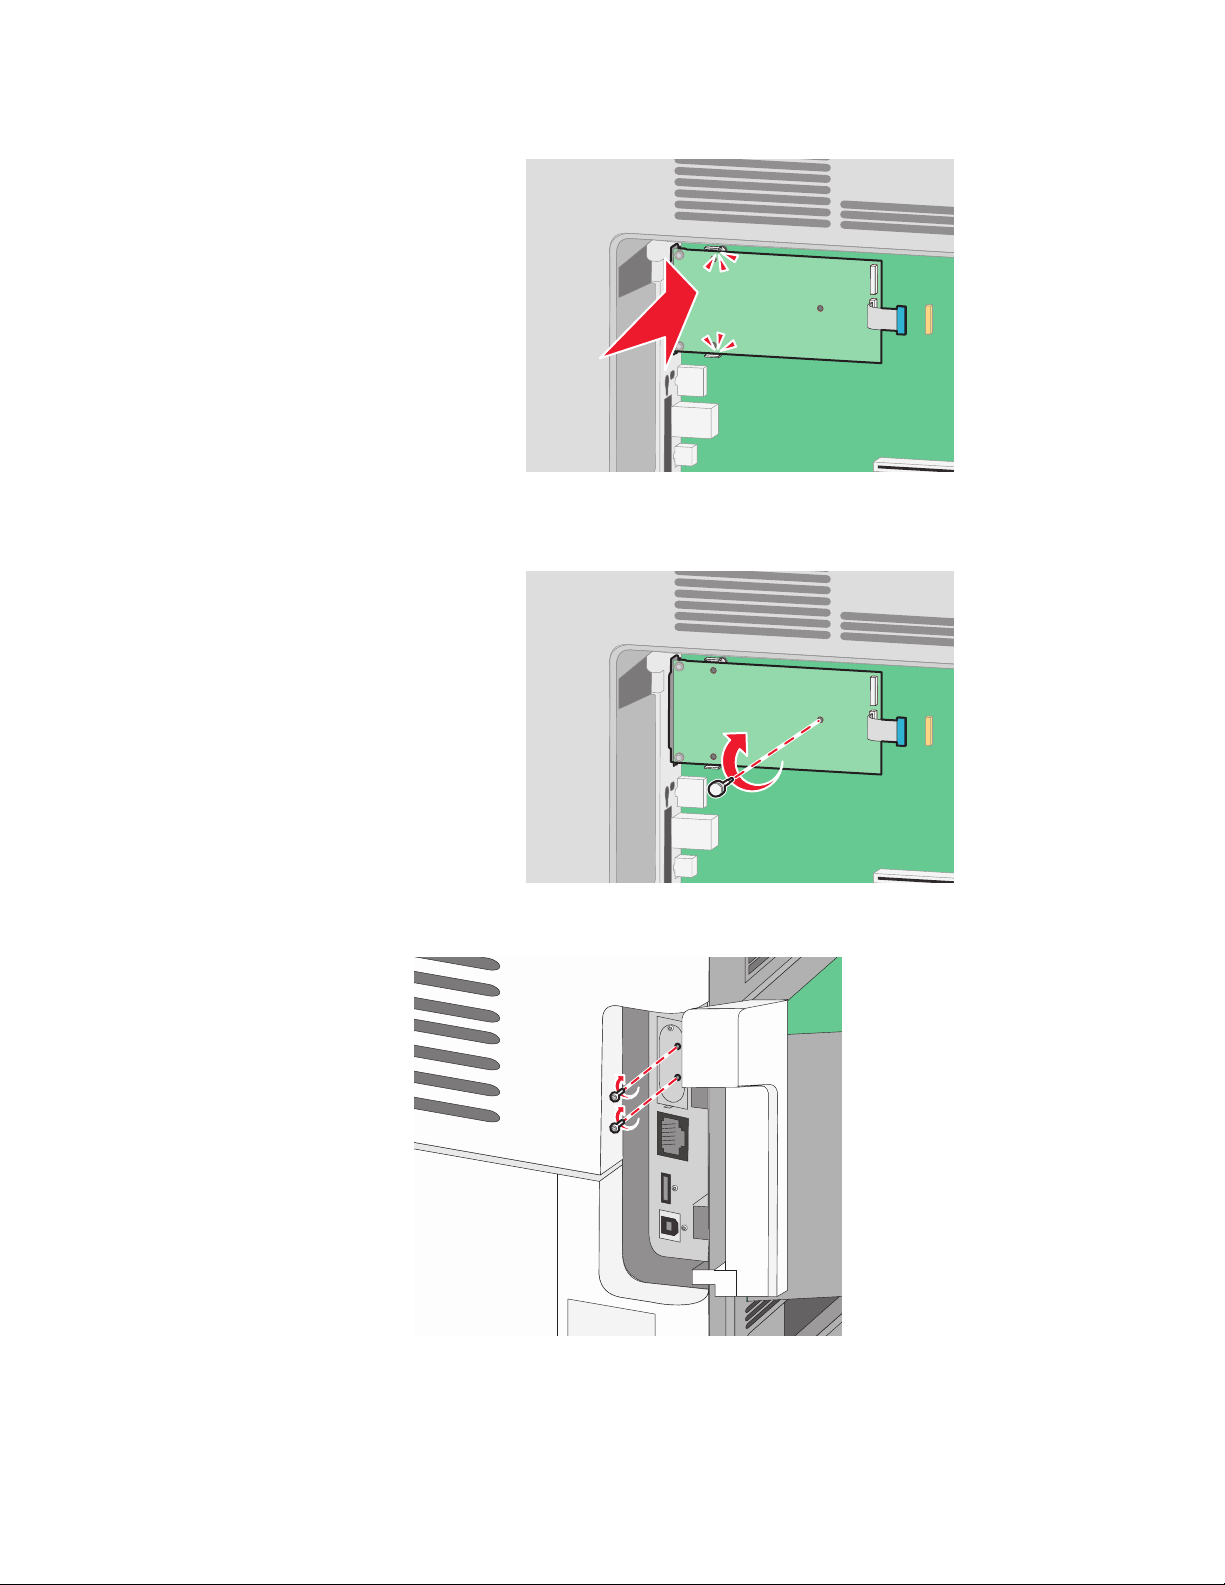
Installing a memory card
Note: This task requires a flathead screwdriver.
CAUTION—SHOCK HAZARD: If you are accessing the system board or installing optional hardware or memory
devices sometime after setting up the printer, then turn the printer off, and unplug the power cord from the
wall outlet before continuing. If you have any other devices attached to the printer, then turn them off as well,
and unplug any cables going into the printer.
Warning—Potential Damage: System board electronic components are easily damaged by static electricity. Touch
something metal on the printer before touching any system board electronic components or connectors.
An optional memory card can be purchased separately and attached to the system board. To install the memory
card:
1 Access the system board.
3
2
1
2 Unpack the memory card.
Note: Avoid touching the connection points along the edge of the card.
3 Open the memory card connector latches.
Additional printer setup
12
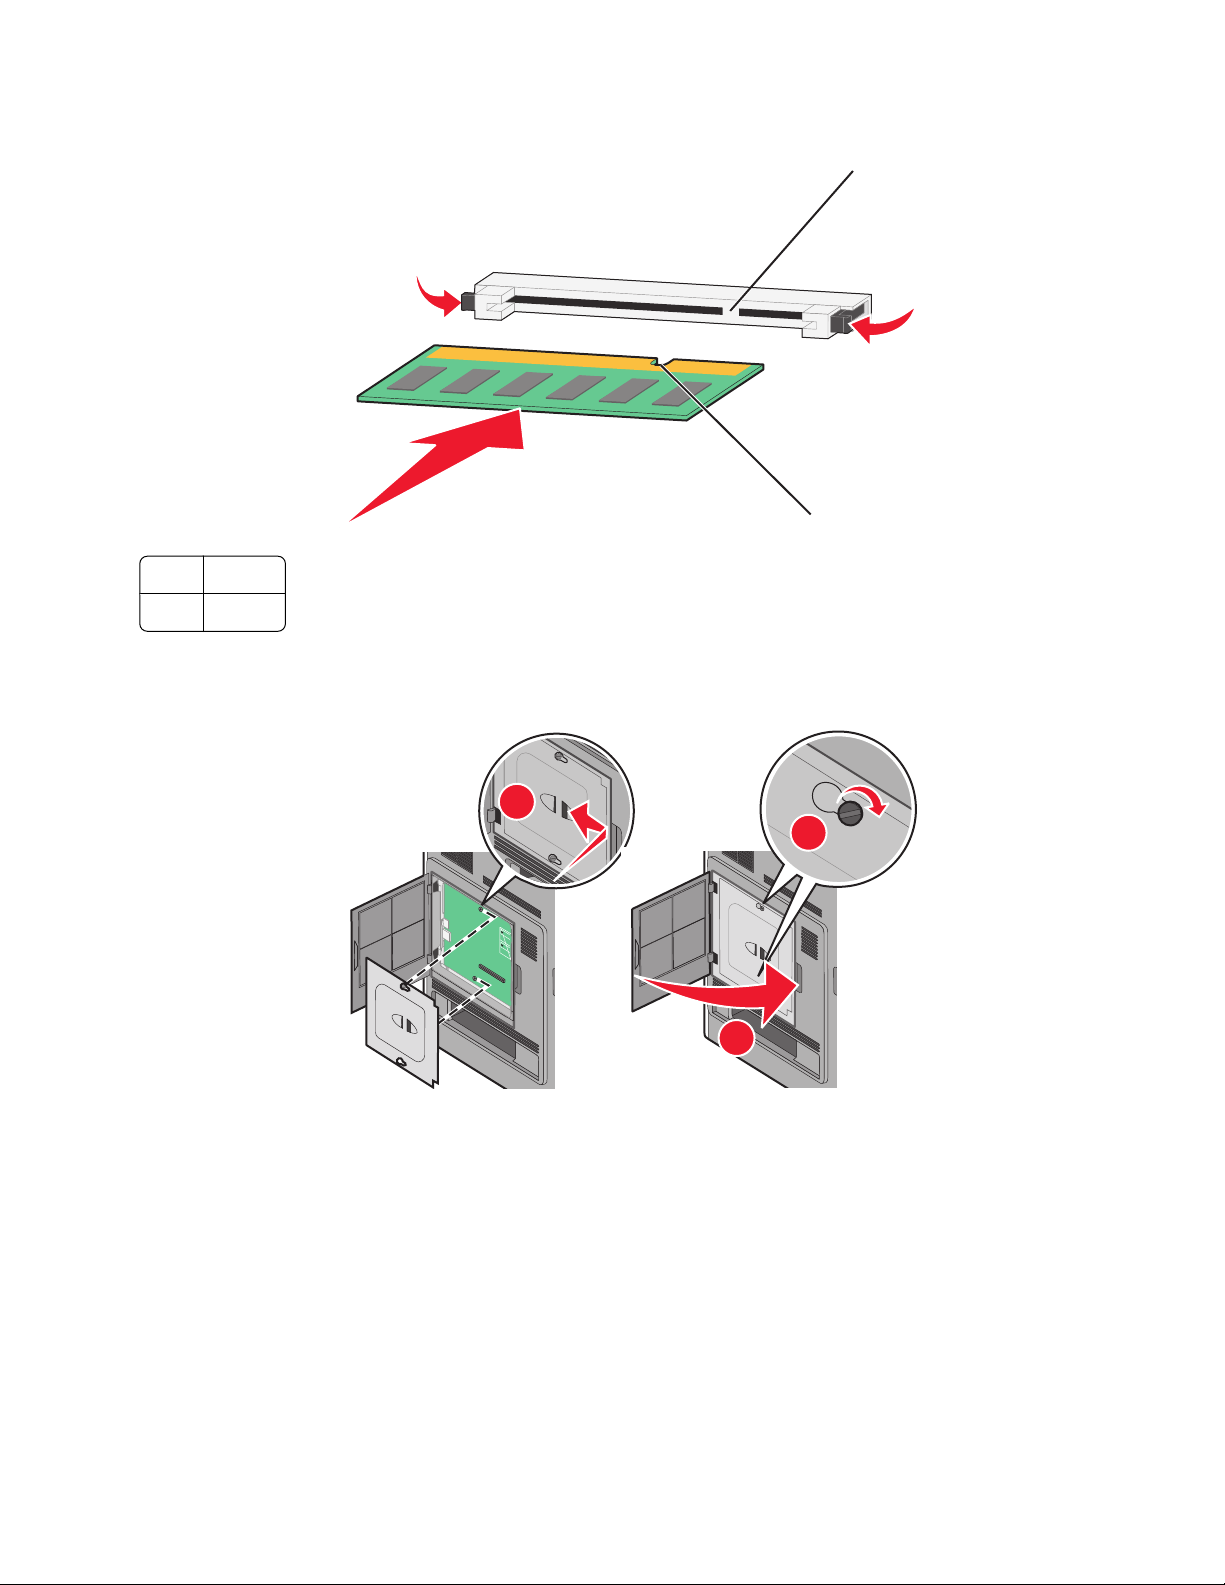
4 Align the notches on the memory card with the ridges on the connector.
1 Notches
2 Ridges
5 Push the memory card straight into the connector until it snaps into place.
6 Replace the system board cover and close the system board door.
2
1
1
3
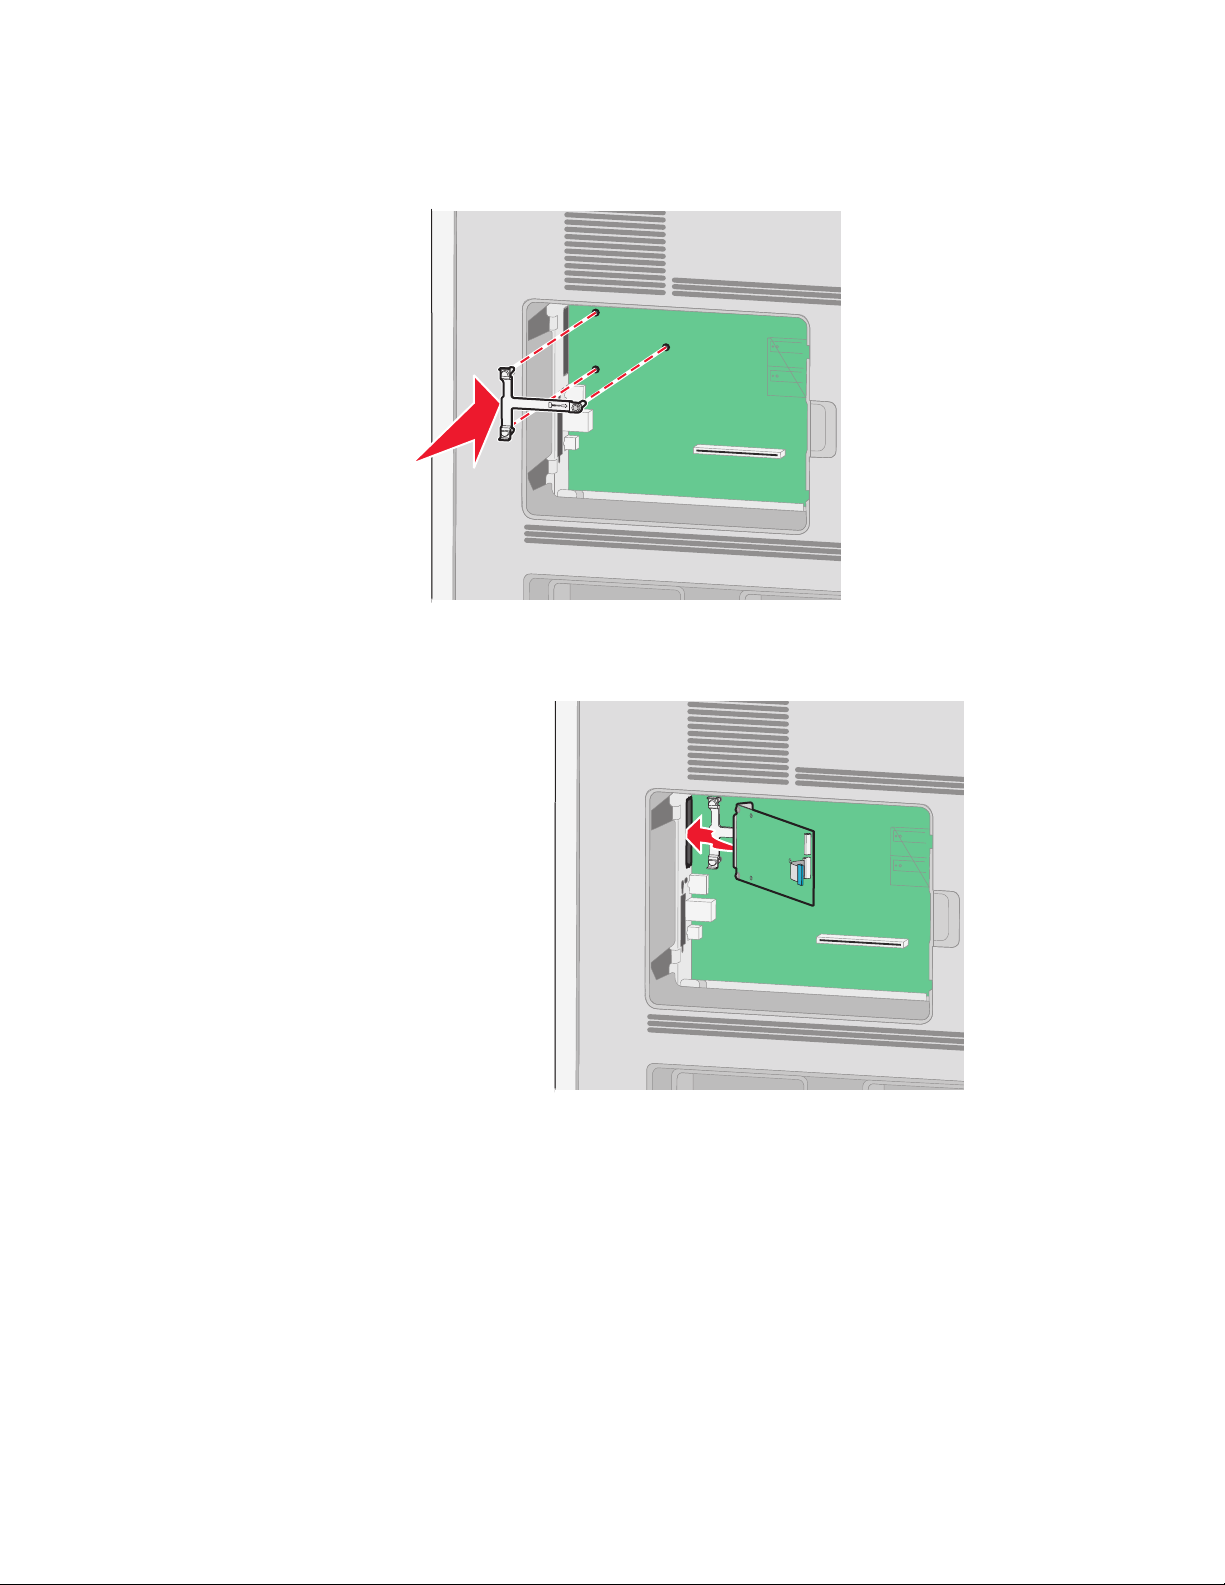
Installing a flash memory or firmware card
Note: This task requires a flathead screwdriver.
2
Additional printer setup
13
The system board has two connections for an optional flash memory or firmware card. Only one of each may be
installed, but the connectors are interchangeable.
CAUTION—SHOCK HAZARD: If you are accessing the system board or installing optional hardware or memory
devices sometime after setting up the printer, then turn the printer off, and unplug the power cord from the
wall outlet before continuing. If you have any other devices attached to the printer, then turn them off as well,
and unplug any cables going into the printer.
Warning—Potential Damage: System board electronic components are easily damaged by static electricity. Touch
something metal on the printer before touching any system board electronic components or connectors.
1 Access the system board.
3
2
1
2 Unpack the card.
Note: Avoid touching any electrical components on the card.
3 Holding the card by its sides, align the plastic pins on the card with the holes on the system board.
1
2
1 Plastic pins
2 Metal pins
Additional printer setup
14
4 Push the card firmly into place.
Notes:
• The entire length of the connector on the card must touch and be flush against the system board.
• Be careful not to damage the connectors.
5 Replace the system board cover and close the system board door.
1
2
3
Additional printer setup
15
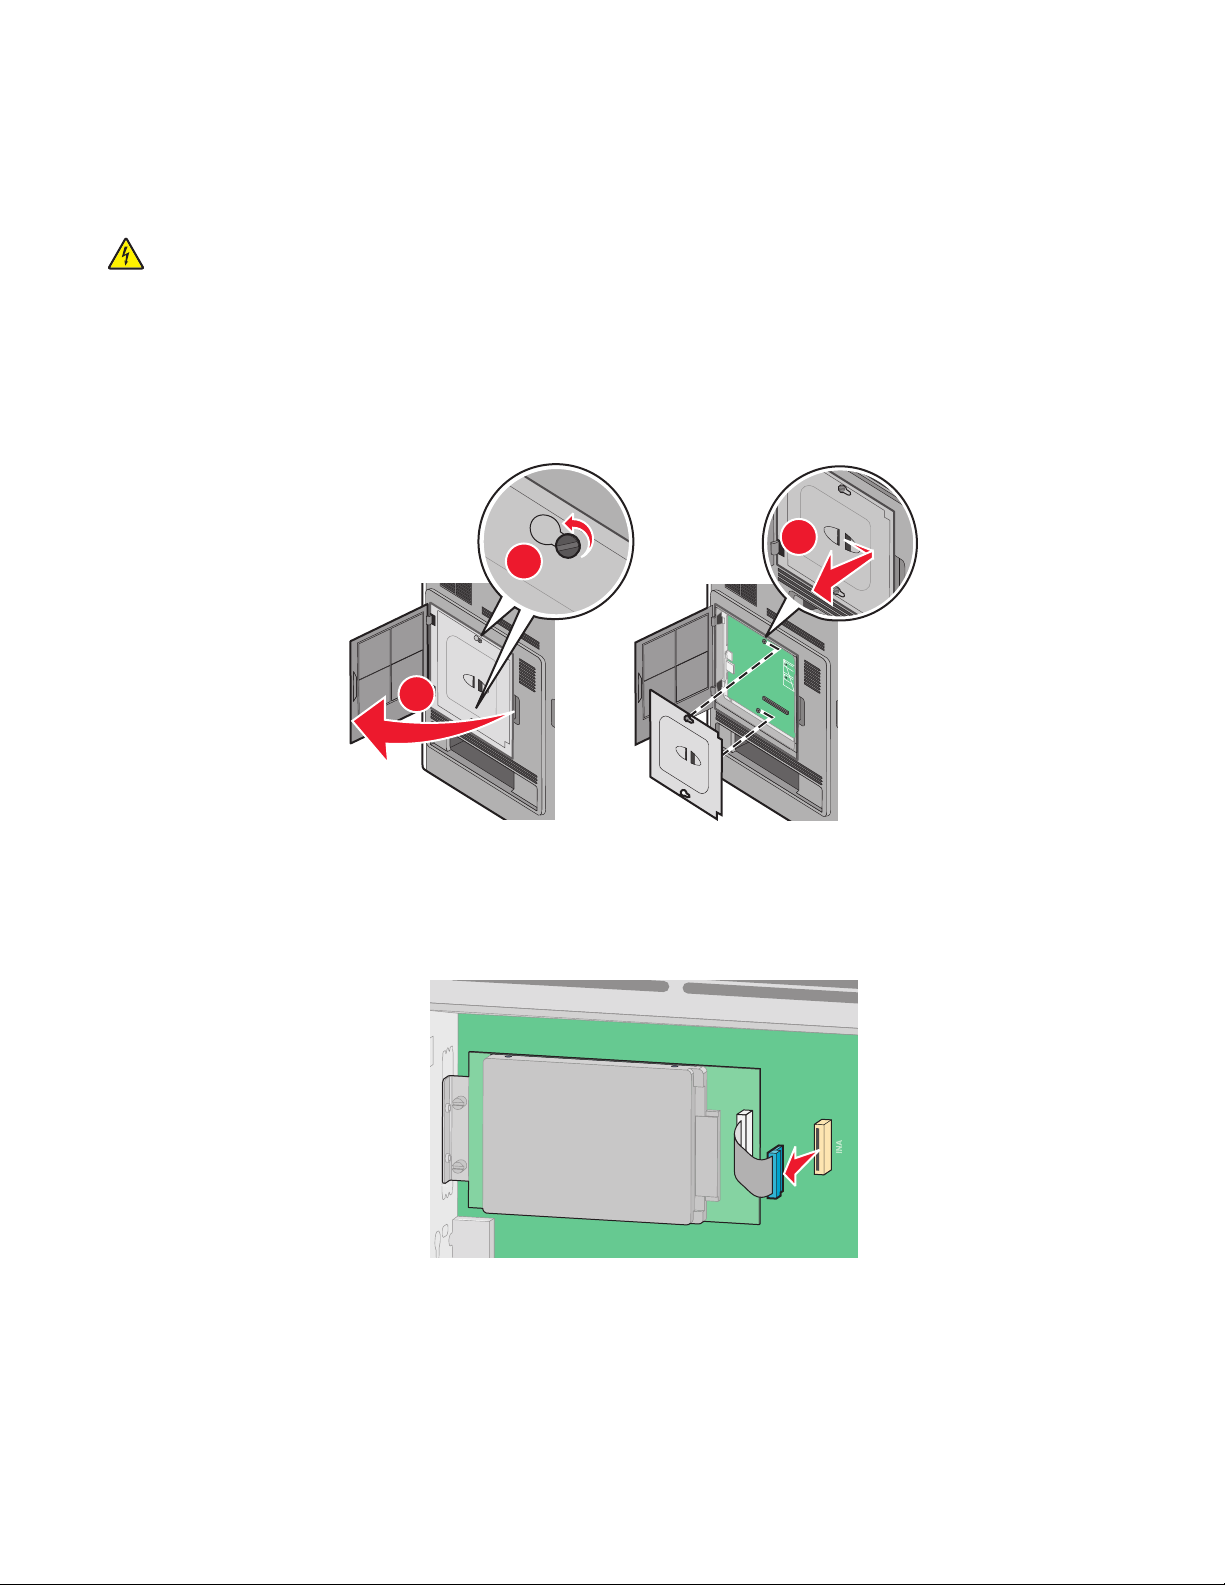
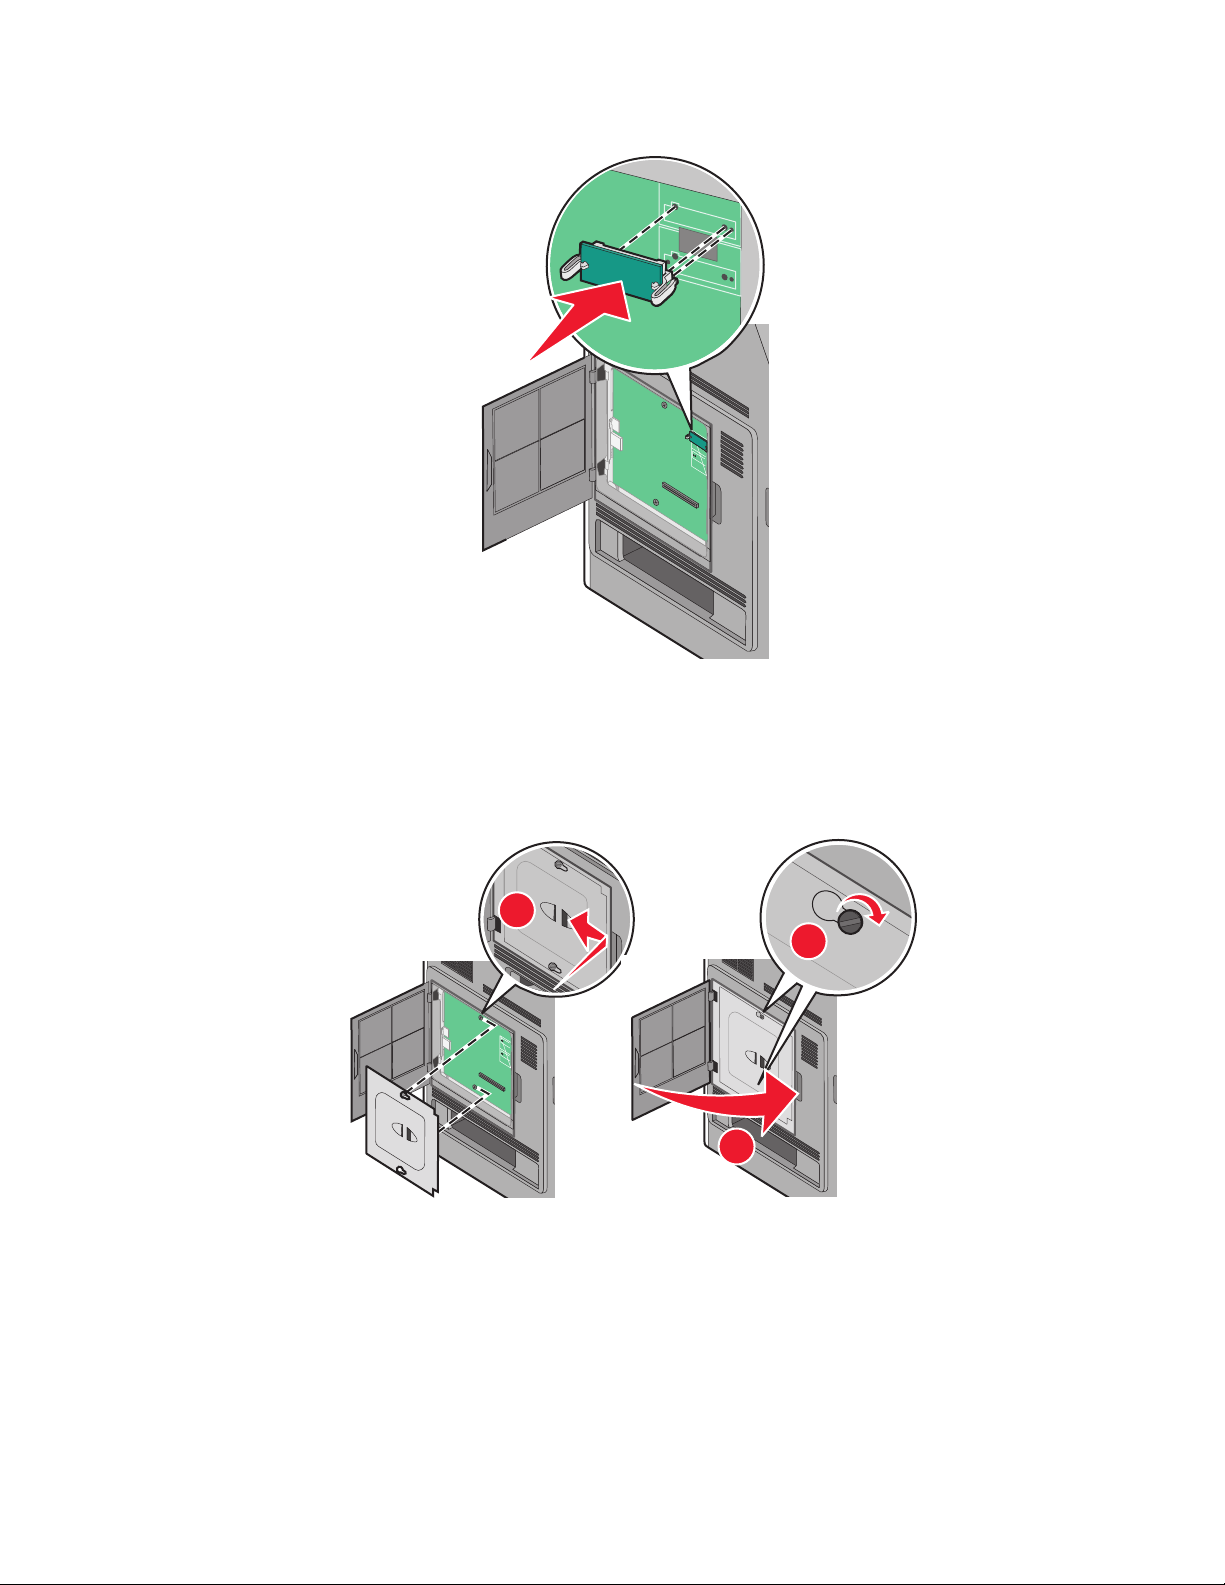
Installing an Internal Solutions Port
The system bo ard supports one optional Internal Solutions Port (ISP). Install a n ISP for additional conn ectivity options.
Note: This task requires a flathead screwdriver.
CAUTION—SHOCK HAZARD: If you are accessing the system board or installing optional hardware or memory
devices sometime after setting up the printer, then turn the printer off, and unplug the power cord from the
wall outlet before continuing. If you have any other devices attached to the printer, then turn them off as well,
and unplug any cables going into the printer.
Warning—Potential Damage: System board electronic components are easily damaged by static electricity. Touch
something metal on the printer before touching any system board electronic components or connectors.
1 Access the system board.
3
2
1
2 Remove the hard disk:
a Unplug the printer hard disk interface cable from the system board, leaving the cable attached to the printer
hard disk. To unplug the cable, squeeze the paddle at the plug of the interface cable to disengage the latch
before pulling the cable out.
Additional printer setup
16
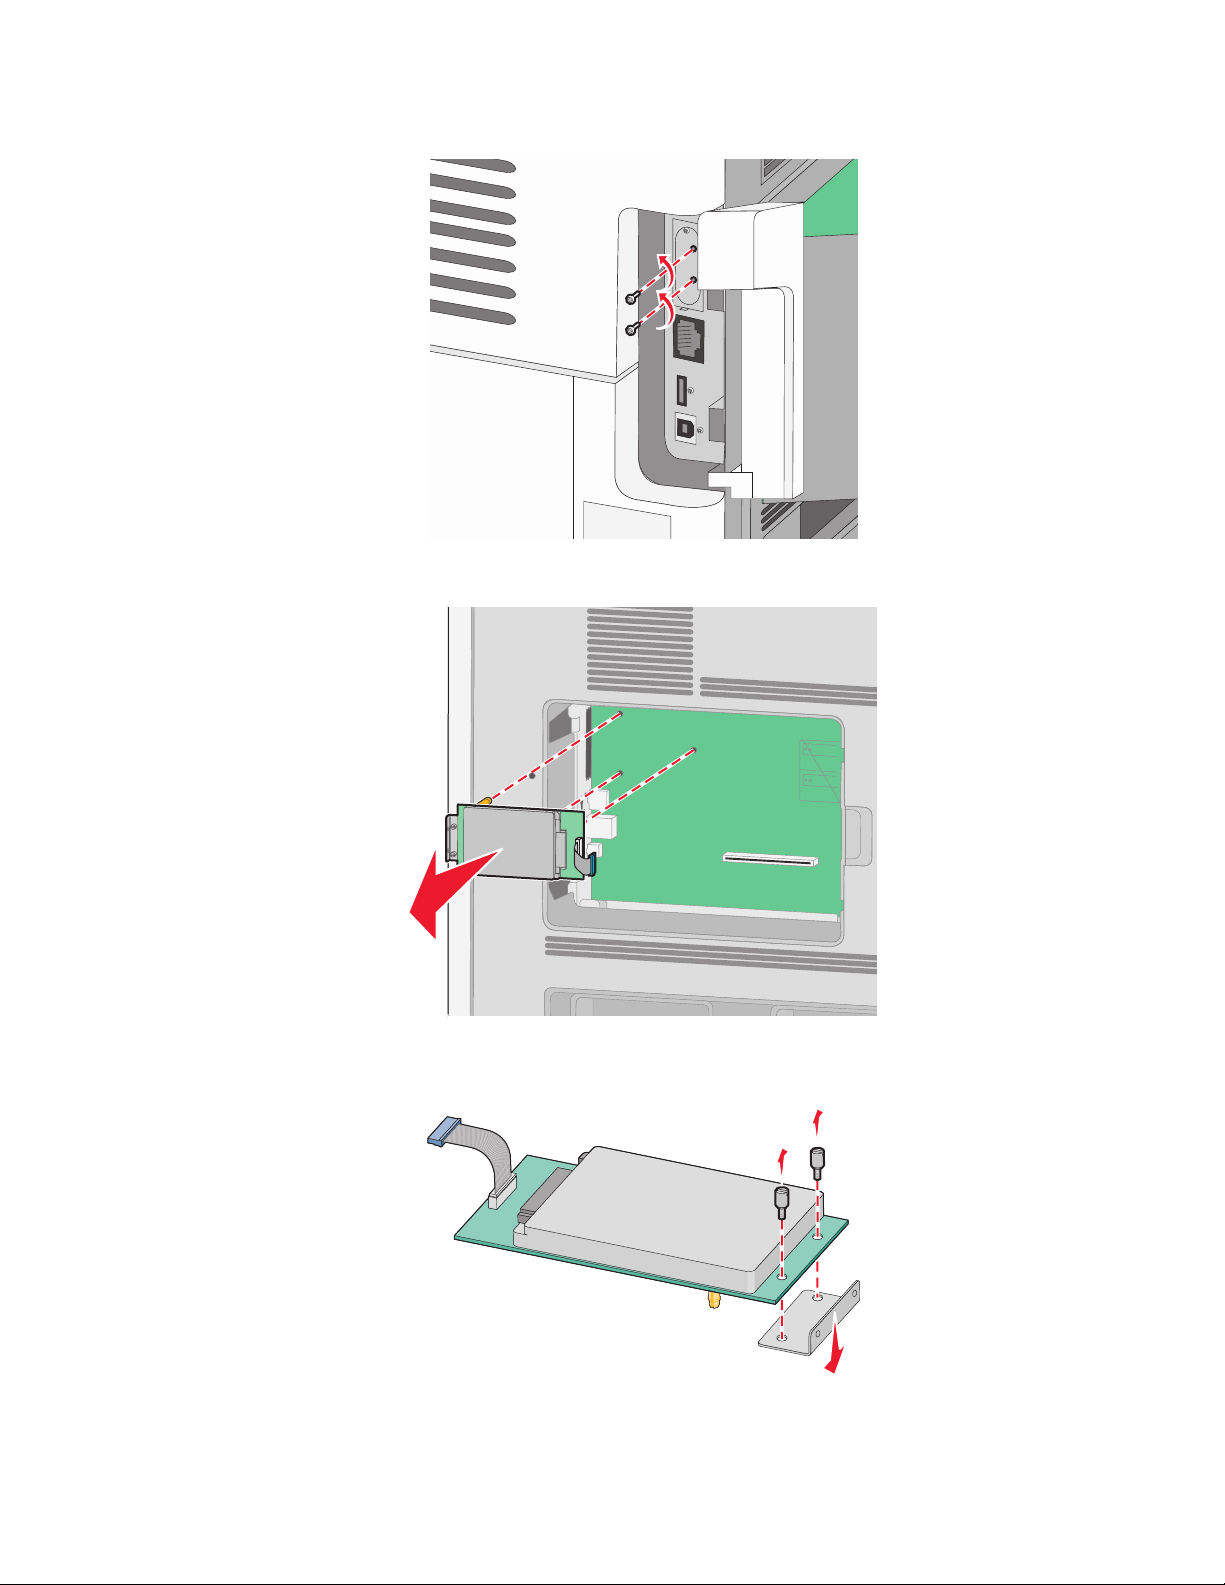
b Remove the screws holding the printer hard disk in place.
c Remove the printer hard disk by pulling it upward to unseat the standoffs.
d Remove the thumbscrews that attach the printer hard disk mounting bracket to the printer hard disk, and
then remove the bracket. Set the printer hard disk aside.
Additional printer setup
17
3 Unpack the ISP and plastic tee.
Note: Avoid touching the components on the card.
4 Locate the appropriate connector on the system board.
5 Remove the metal cover from the ISP opening.
2
1
Additional printer setup
18
6 Align the posts of the plastic tee to the holes in the system board, and then press downward until the tee snaps
into place. Be sure each post of the tee has latched completely, and that the tee is seated firmly onto the system
board.
7 Install the ISP onto the plastic tee. Angle the ISP over the plastic tee, and then approach the plastic tee so that
any overhanging connectors will pass through the ISP opening in the system board cage.
Additional printer setup
19
8 Lower the ISP toward the plastic tee until the ISP is seated between the guides of the plastic tee.
9 Insert the long thumbscrew and turn it clockwise enough to hold the ISP in place, but do not tighten the
thumbscrew at this time.
10 Attach the two provided screws to secure the ISP mounting bracket to the system board cage.
11 Tighten the long thumbscrew.
Note: Do not overtighten the thumbscrew.
Additional printer setup
20
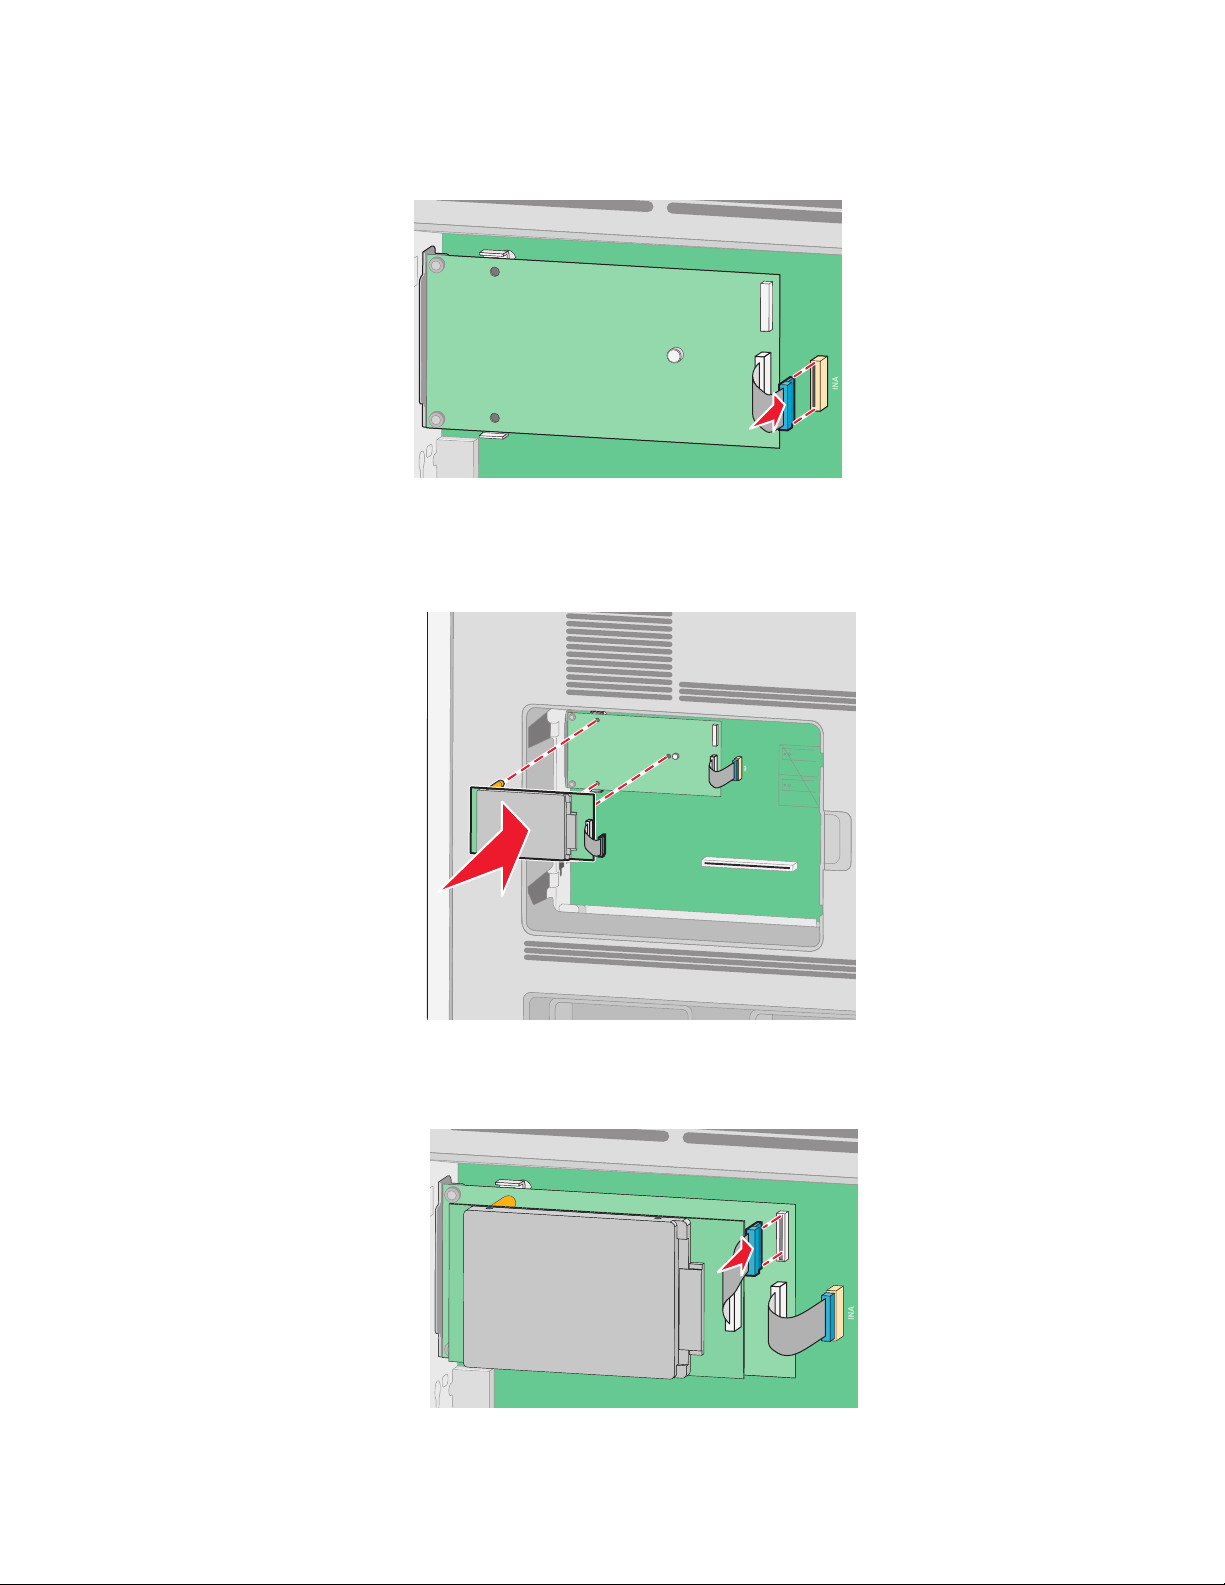
12 Insert the plug of the ISP interface cable into the receptacle of the system board.
Note: The plugs and receptacles are color coded.
13 Reattach the hard drive to the ISP.
a Align the standoffs of the printer hard disk with the holes in the ISP, and then press downward on the printer
hard disk until the standoffs have seated into place.
b Insert the plug of the printer hard disk interface cable into the receptacle of the ISP.
Note: The plugs and receptacles are color coded.
Additional printer setup
21

14 Replace the system board cover and close the system board door.
1
Installing hardware options
Order of installation
2
3
CAUTION—SHOCK HAZARD: If you are accessing the system board or installing optional hardware or memory
devices sometime after setting up the printer, then turn the printer off, and unplug the power cord from the
wall outlet before continuing. If you have any other devices attached to the printer, then turn them off as well,
and unplug any cables going into the printer.
Install the printer and any options you have purchased in the following order:
1 Printer stand or caster base
2 2000-sheet tray
3 250- or 550-sheet tray
4 Printer
CAUTION—POTENTIAL INJURY: If your printer weight is greater than 18 kg (40 lbs), it requires two or more
trained personnel to lift it safely.
For more information on installing a printer stand, caster base, or 2000-sheet tray, see the setup documentation that
came with the option.
Additional printer setup
22

Installing paper drawers
The printer supports up to four optional drawers. A drawer consists of a tray and a support unit. All drawers are
installed the same way.
CAUTION—SHOCK HAZARD: If you are accessing the system board or installing optional hardware or memory
devices sometime after setting up the printer, then turn the printer off, and unplug the power cord from the
wall outlet before continuing. If you have any other devices attached to the printer, then turn them off as well,
and unplug any cables going into the printer.
1 Unpack the drawer, and then remove any packing material.
2 Place the drawer in the location chosen for the printer.
Note: If you have multiple options to install, then see the section about the recommended order of installation.
The 2000-sheet drawer must be the bottom drawer.
3 Align the printer with the drawer, and then lower the printer into place.
CAUTION—POTENTIAL INJURY: If your printer weight is greater than 18 kg (40 lbs), it requires two or more
trained personnel to lift it safely.
Removing an optional drawer
Warning—Potential Damage: Lifting the printer from a drawer without pushing in the safety latches could damage
the latches.
Additional printer setup
23
To remove an optional drawer, push in the safety latches on both sides of the drawer until they click and stay recessed,
and then lift the printer.
Attaching cables
CAUTION—POTENTIAL INJURY: Do not set up this product or make any electrical or cabling connections, such
as the power cord or telephone, during a lightning storm.
Connect the printer to the computer using a USB cable or Ethernet cable.
Be sure to match the following:
• The USB symbol on the cable with the USB symbol on the printer
• The appropriate Ethernet cable to the Ethernet port
Additional printer setup
24
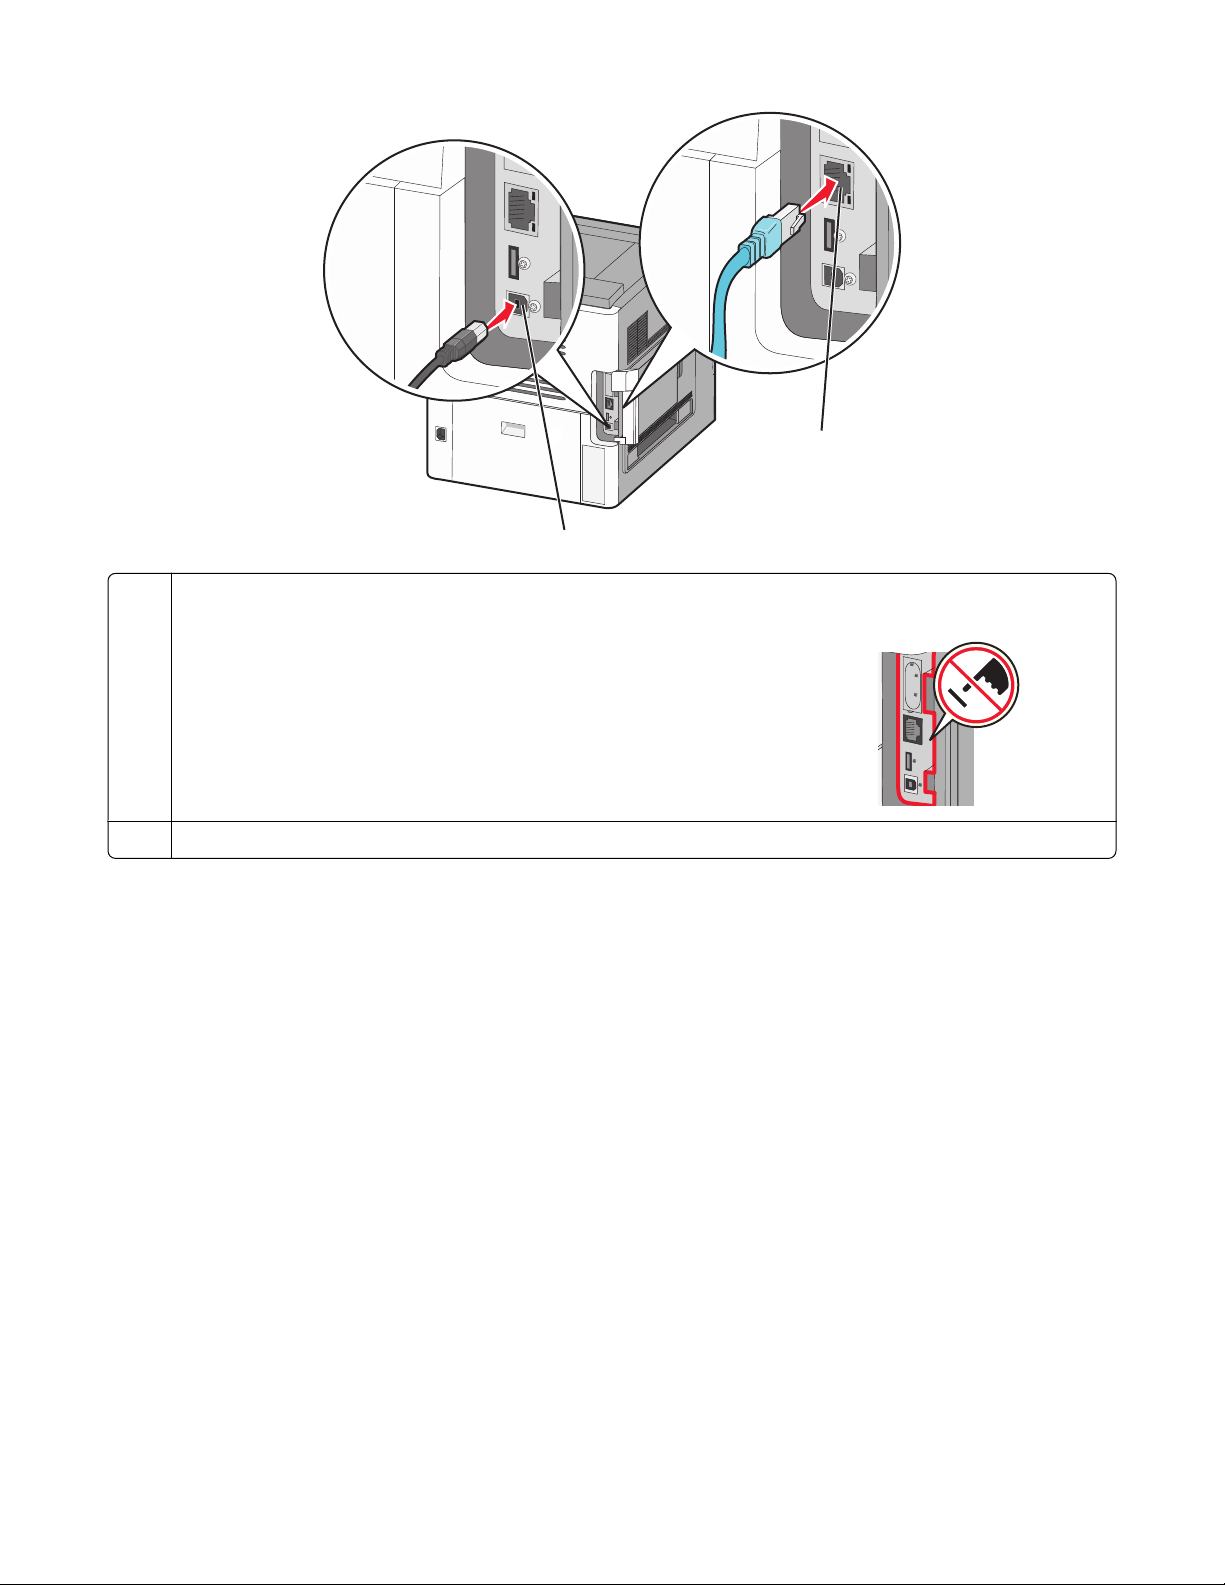
2
1
USB port
1
Warnin g—Potential Da mage: Potential Damage: Do not touch the USB cable, any network adapter, or the printer
in the area shown while actively printing. A loss of data or a malfunction can occur.
2 Ethernet port
Additional printer setup
25
Loading paper
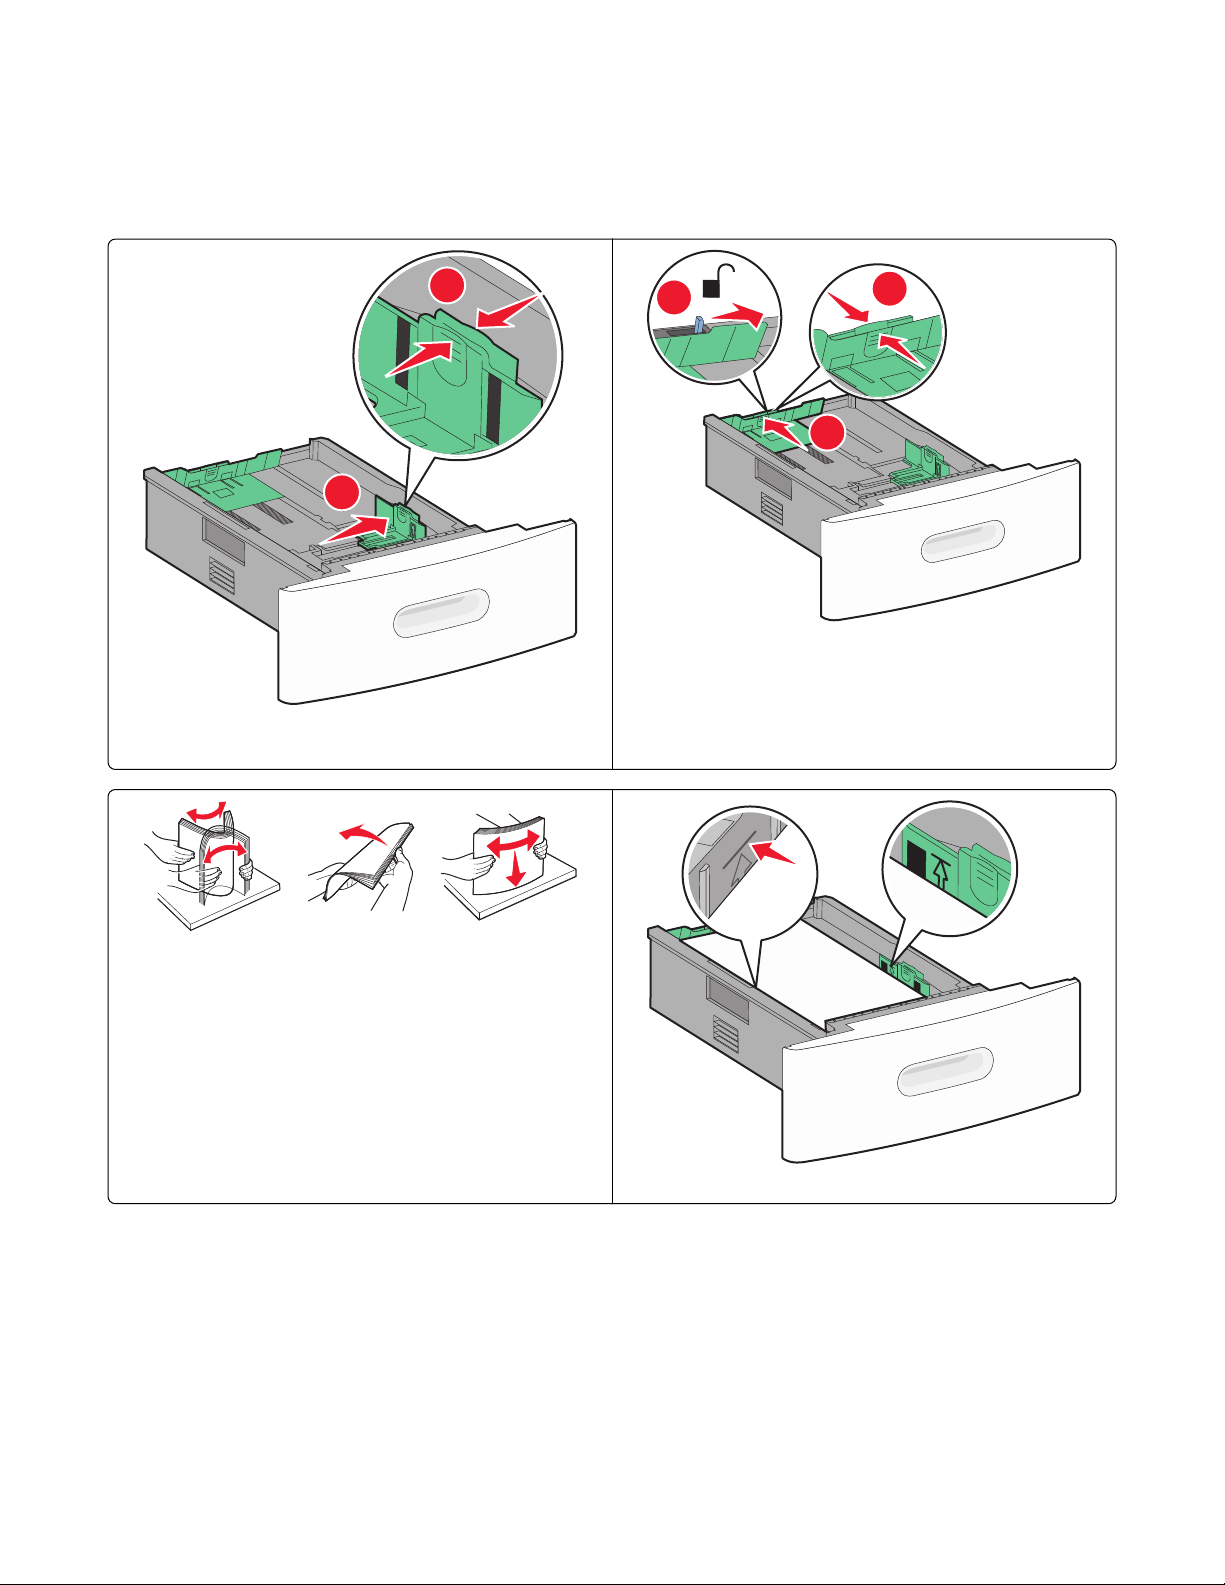
Loading paper in the 250- and 550-sheet trays
1
2
Squeeze and move the width guide to the correct position
for the paper size being loaded.
1
2
3
Squeeze and move the length guide to the correct position
for the paper size being loaded.
Flex and fan the paper, and then straighten the edges on a
level surface before loading it in the tray.
Additional printer setup
Do not load paper past the fill line.
26
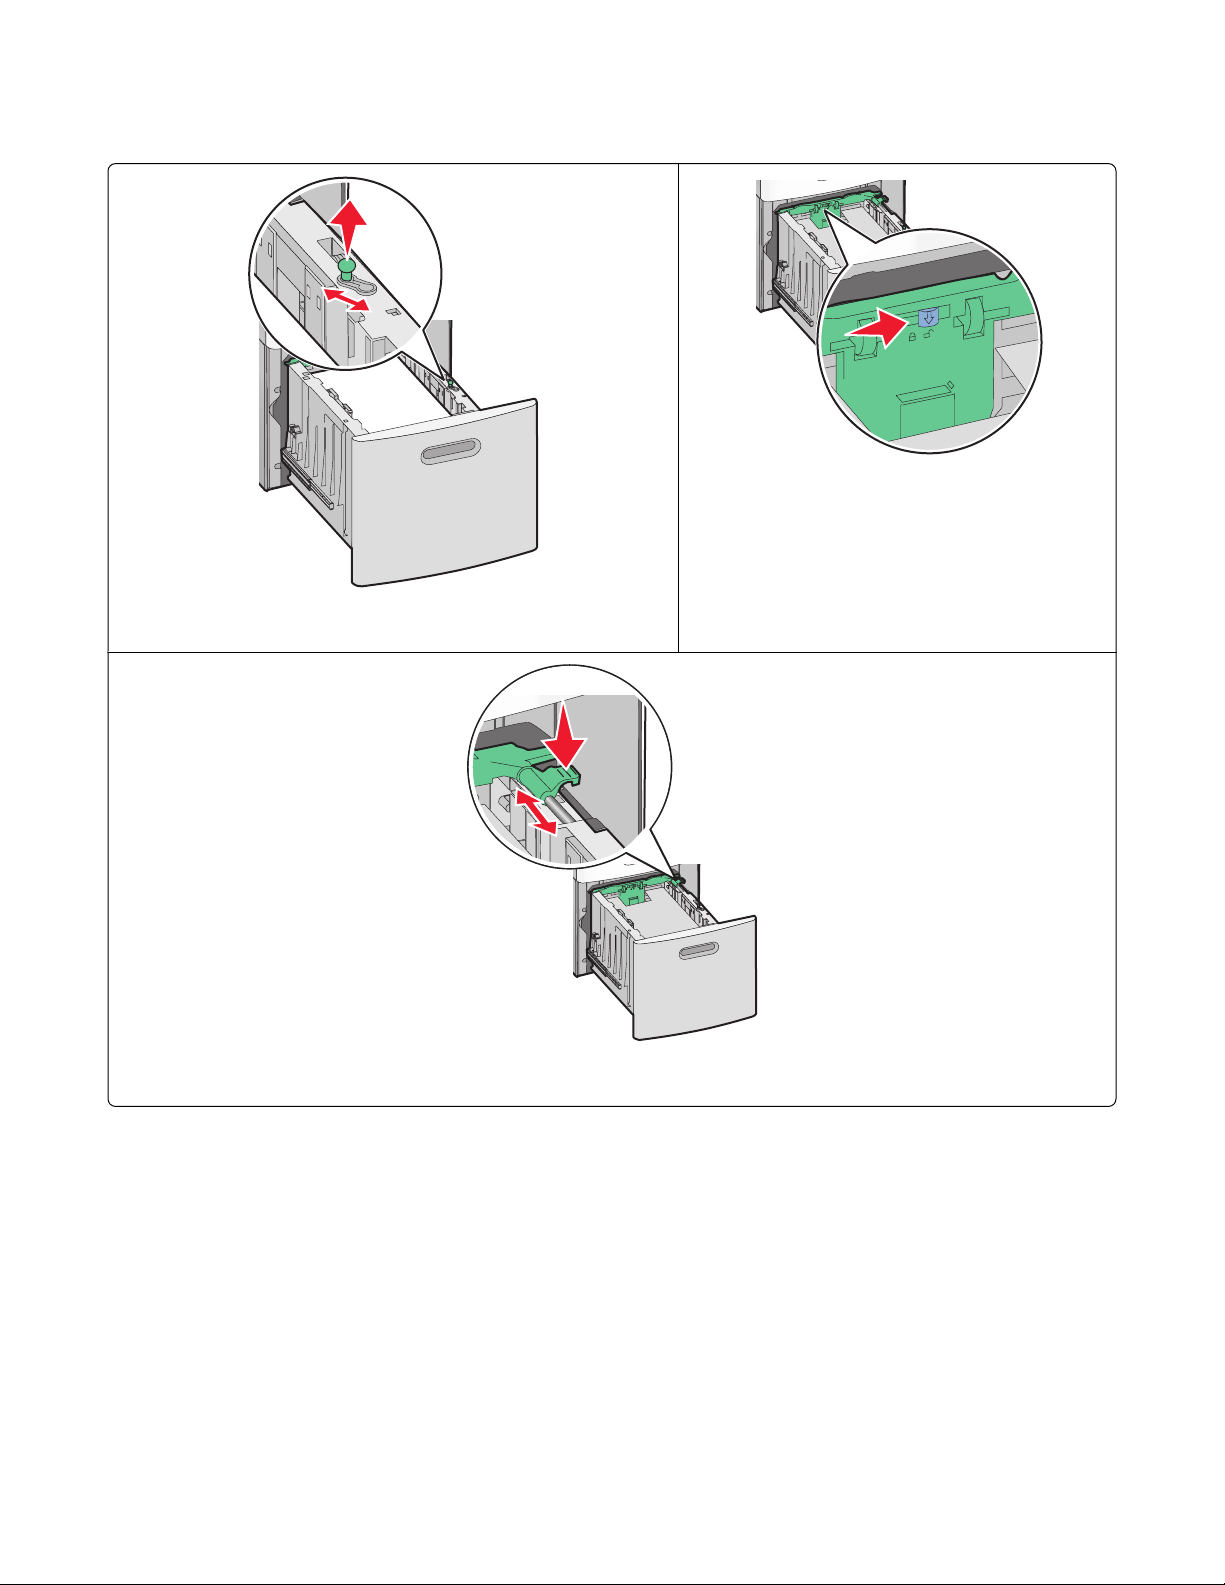
Loading paper in the 2000-sheet tray
Pull up and slide the width guide to the correct position for the paper
size being loaded.
Unlock the length guide.
Push the length guide release latch to raise the length guide, slide the guide to the correct position for the paper size
being loaded, and then lock the guide.
Additional printer setup
27
 Loading...