

Ricoh InfoPrint 1767 User Manual

InfoPrint Color 1767
MT(4960)
User’s Gui de
S510-7083-00

Safety information
Connect the power supply cord to a properly grounded electrical outlet that is near the product and easily accessible.
Refer service or repairs, other than those described in the user documentation, to a professional service person.
CAUTION:
such as the power supply cord or telephone, during a lightning storm.
CAUTION: The printer weighs 201 lbs (91.2 kg), and requires at least four people or a properly rated mechanical handling system
to lift it safely.
This product is designed, tested, and approved to meet strict global safety standards with the use of specific manufacturer's components.
The safety features of some parts may not always be obvious. The manufacturer is not responsible for the use of other replacement parts.
CAUTION:
their marked plug-in ports.
This product uses a laser.
CAUTION:
radiation exposure.
This product uses a printing process that heats the print media, and the heat may cause the media to release emissions. You must
understand the section in your operating instructions that discusses the guidelines for selecting print media to avoid the possibility of
harmful emissions.
This symbol indicates the presence of a hot surface or component.
CAUTION:
This product uses a ground fault circuit interrupter (GFCI). Monthly testing of the GFCI is recommended.
CAUTION:
cord from the wall outlet before continuing. If you have any other devices attached to the printer, turn them off as well and unplug
any cables going to the printer.
Do not use the fax feature during a lightning storm. Do not set up this product or make any electrical or cabling connections,
Make sure that all external connections (such as Ethernet and telephone system connections) are properly installed in
Use of controls or adjustments or performance of procedures other than those specified herein may result in hazardous
To reduce the risk of injury from a hot component, allow the surface to cool before touching it.
If you are installing memory or option cards sometime after setting up the printer, turn the printer off and unplug the power
CAUTION: Turn the printer off, and unplug the power cord from the wall outlet before continuing. If you have any other devices
attached to the printer, turn them off as well and unplug any cables going into the printer.
CAUTION: If you are installing a memory card after setting up the printer, turn the printer off, and unplug the power cord from the
wall outlet before continuing.
CAUTION: If installing a flash memory or firmware card after setting up the printer, turn the printer off, and unplug the power cord
from the wall outlet before continuing.
CAUTION: If installing a printer hard disk after setting up the printer, turn the printer off, and unplug the power cord from the wall
outlet before continuing.
CAUTION: The inside of the printer might be hot. To reduce the risk of injury from a hot component, allow the surface to cool before
touching.
CAUTION: The printer weighs 91.2 kg (201 lb); therefore, it requires at least four people or a properly rated mechanical handling
system to lift it safely. Use the handholds on the sides of the printer to lift it, and make sure your fingers are not under the printer
when you set it down. Disconnect all cords and cables from the printer before moving it.

Contents
Learning about the printer............................................................................................9
Printer configurations...........................................................................................................................9
Understanding the control panel.......................................................................................................12
Installing options.........................................................................................................13
Installing internal options...................................................................................................................13
Available options ........................................................................................................................................13
Accessing the system board to install internal options...............................................................................13
Installing a memory card ............................................................................................................................15
Installing a flash memory or firmware card................................................................................................. 16
Installing a printer hard disk........................................................................................................................17
Installing an internal print server or port interface card ..............................................................................19
Reinstalling the system board ....................................................................................................................20
Attaching cables................................................................................................................................21
Loading paper and specialty media...........................................................................23
Setting the Paper Size and Paper Type............................................................................................23
Configuring Universal paper settings.................................................................................................23
Loading the 520-sheet trays..............................................................................................................25
Loading the 520-sheet trays.......................................................................................................................25
Using A5 or statement paper sizes.............................................................................................................27
Loading the 867- and 1133-sheet trays.............................................................................................28
Using the multipurpose feeder...........................................................................................................29
Linking and unlinking trays................................................................................................................32
Linking trays ...............................................................................................................................................32
Unlinking trays............................................................................................................................................32
Assigning a Custom Type <x> name..........................................................................................................32
Changing a Custom Type <x> name.......................................................................................................... 33
Paper and specialty media guide...............................................................................34
Paper guidelines................................................................................................................................34
Paper characteristics..................................................................................................................................34
Unacceptable paper ...................................................................................................................................35
Selecting paper...........................................................................................................................................35
Selecting preprinted forms and letterhead..................................................................................................35
Using letterhead................................................................................................................................35
Using transparencies.........................................................................................................................37
Using envelopes................................................................................................................................37
Using labels.......................................................................................................................................38
Using card stock................................................................................................................................39
3

Storing paper.....................................................................................................................................39
Supported paper sizes, types, and weights.......................................................................................40
Paper sizes supported by the printer.......................................................................................................... 40
Paper types and weights supported by the printer .....................................................................................41
Paper types and weights supported by the finisher.................................................................................... 42
Supported finishing features....................................................................................................................... 43
Printing.........................................................................................................................46
Installing printer software...................................................................................................................46
Printing a document from Windows...................................................................................................46
Printing a document from a Macintosh computer..............................................................................46
Printing confidential and other held jobs...........................................................................................46
Holding jobs in the printer........................................................................................................................... 46
Printing confidential and other held jobs from Windows............................................................................. 47
Printing confidential and other held jobs from a Macintosh computer........................................................48
Printing from a USB flash memory device.........................................................................................49
Printing information pages.................................................................................................................50
Printing a menu settings page....................................................................................................................50
Printing a network setup page....................................................................................................................50
Printing a font sample list ...........................................................................................................................50
Printing a directory list ................................................................................................................................51
Printing the print quality test pages ............................................................................................................51
Canceling a print job..........................................................................................................................51
Canceling a print job from the control panel...............................................................................................51
Canceling a print job from the Windows taskbar ........................................................................................52
Canceling a print job from the Windows desktop .......................................................................................52
Canceling a print job from Mac OS 9..........................................................................................................52
Canceling a print job from Mac OS X .........................................................................................................52
Printing in black and white.................................................................................................................52
Using Max Speed and Max Yield......................................................................................................53
Clearing jams...............................................................................................................54
Avoiding jams....................................................................................................................................54
Understanding jam numbers and locations.......................................................................................54
200–203 paper jams..........................................................................................................................55
230–231 paper jams..........................................................................................................................56
241 paper jam....................................................................................................................................58
242–244 paper jams..........................................................................................................................59
250 paper jam....................................................................................................................................61
280–282 paper jams..........................................................................................................................62
283–284 and 287–288 paper jams....................................................................................................63
284–286 paper jams..........................................................................................................................65
4

289 staple jam...................................................................................................................................66
Understanding printer menus.....................................................................................70
Menus list..........................................................................................................................................70
Supplies menu...................................................................................................................................71
Paper menu.......................................................................................................................................72
Default Source menu.................................................................................................................................. 72
Paper Size/Type menu...............................................................................................................................72
Configure MP menu....................................................................................................................................74
Substitute Size menu..................................................................................................................................74
Paper Texture menu................................................................................................................................... 75
Paper Loading menu ..................................................................................................................................76
Custom Types menu ..................................................................................................................................77
Universal Setup menu ................................................................................................................................77
Bin Setup menu..........................................................................................................................................78
Reports menu....................................................................................................................................79
Reports menu.............................................................................................................................................79
Settings menu....................................................................................................................................80
Setup menu ................................................................................................................................................80
Finishing menu ...........................................................................................................................................84
Quality menu ..............................................................................................................................................86
Utilities menu..............................................................................................................................................89
PDF menu ..................................................................................................................................................91
PostScript menu .........................................................................................................................................92
PCL Emul menu .........................................................................................................................................92
PPDS menu................................................................................................................................................ 95
HTML menu................................................................................................................................................96
Image menu................................................................................................................................................97
Security menu....................................................................................................................................98
Network/Ports menu..........................................................................................................................98
TCP/IP menu..............................................................................................................................................98
IPv6 menu ..................................................................................................................................................99
Wireless menu..........................................................................................................................................100
Standard Network and Network <x> menus............................................................................................. 100
Standard USB and USB <x> menus ........................................................................................................102
Serial <x> menu .......................................................................................................................................103
NetWare menu .........................................................................................................................................106
AppleTalk menu........................................................................................................................................106
LexLink menu ...........................................................................................................................................107
USB Direct menu......................................................................................................................................107
Help menu.......................................................................................................................................107
Understanding printer messages.............................................................................108
List of status and error messages...................................................................................................108
5

Maintaining the printer..............................................................................................121
Cleaning the exterior of the printer..................................................................................................121
Maintaining supplies........................................................................................................................121
Storing supplies........................................................................................................................................121
Conserving supplies .................................................................................................................................121
Checking the status of supplies from the control panel............................................................................121
Checking the status of supplies from a network computer.......................................................................122
Printing a menu settings page..................................................................................................................122
Replacing supplies..........................................................................................................................122
Replacing the waste toner box .................................................................................................................122
Cleaning the printhead lenses..................................................................................................................127
Replacing a toner cartridge ......................................................................................................................131
Replacing a photoconductor..................................................................................................................... 134
Moving the printer............................................................................................................................136
Before moving the printer .........................................................................................................................136
Moving the printer to another location ......................................................................................................137
Setting the printer up in a new location ....................................................................................................137
Shipping the printer ..................................................................................................................................138
Administrative support..............................................................................................139
Adjusting the brightness or contrast of the display..........................................................................139
Disabling control panel menus........................................................................................................139
Adjusting Power Saver....................................................................................................................139
Restoring the factory default settings..............................................................................................140
Encrypting the printer hard disk.......................................................................................................140
Locking the control panel menus using the Embedded Web Server...............................................141
Locking the entire printer.................................................................................................................141
Modifying confidential print settings................................................................................................141
Supporting IPSec.............................................................................................................................142
Supporting SNMPv3........................................................................................................................142
Using 802.1x authentication............................................................................................................142
Creating an administrative password..............................................................................................143
Using Secure mode.........................................................................................................................143
Troubleshooting.........................................................................................................145
Checking an unresponsive printer...................................................................................................145
Door A will not shut properly............................................................................................................145
Solving printing problems................................................................................................................146
Multiple-language PDFs do not print ........................................................................................................146
Control panel display is blank or displays only diamonds ........................................................................146
Error message about reading USB drive appears.................................................................................... 146
Jobs do not print.......................................................................................................................................146
6

Confidential and other held jobs do not print............................................................................................147
Job takes longer than expected to print....................................................................................................147
Job prints from the wrong tray or on the wrong paper.............................................................................. 148
Incorrect characters print.......................................................................................................................... 148
Tray linking does not work........................................................................................................................ 148
Large jobs do not collate ..........................................................................................................................148
Unexpected page breaks occur................................................................................................................ 148
Solving option problems..................................................................................................................149
Option does not operate correctly or quits after it is installed................................................................... 149
Drawers ....................................................................................................................................................149
Finisher.....................................................................................................................................................150
Flash memory card...................................................................................................................................150
Hard disk with adapter.............................................................................................................................. 150
Internal print server...................................................................................................................................150
Memory card.............................................................................................................................................150
USB/parallel interface card....................................................................................................................... 150
Solving paper feed problems...........................................................................................................150
Paper frequently jams...............................................................................................................................150
Print jobs are not routed to the booklet-maker bin....................................................................................151
Paper jam message remains after jam is cleared ....................................................................................151
Page that jammed does not reprint after you clear the jam...................................................................... 151
Solving print quality problems..........................................................................................................152
Isolating print quality problems.................................................................................................................152
Blank pages.............................................................................................................................................. 152
Characters have jagged or uneven edges................................................................................................153
Clipped images......................................................................................................................................... 153
Dark lines..................................................................................................................................................153
Gray background......................................................................................................................................153
Incorrect margins......................................................................................................................................154
Light colored line, white line, or incorrectly colored line ...........................................................................154
Paper curl .................................................................................................................................................154
Print irregularities......................................................................................................................................155
Print is too dark.........................................................................................................................................155
Print is too light.........................................................................................................................................156
Repeating defects.....................................................................................................................................157
Skewed print............................................................................................................................................. 157
Solid color pages......................................................................................................................................157
Toner fog or background shading appears on the page ..........................................................................157
Toner rubs off ...........................................................................................................................................158
Toner specks............................................................................................................................................158
Transparency print quality is poor ............................................................................................................158
Uneven print density................................................................................................................................. 159
Solving color quality problems.........................................................................................................159
FAQ about color printing...........................................................................................................................159
Contacting Customer Support.........................................................................................................162
7

Notices........................................................................................................................163
Edition notice...................................................................................................................................163
Industry Canada notices..................................................................................................................164
Power consumption.........................................................................................................................169
Index............................................................................................................................171
8
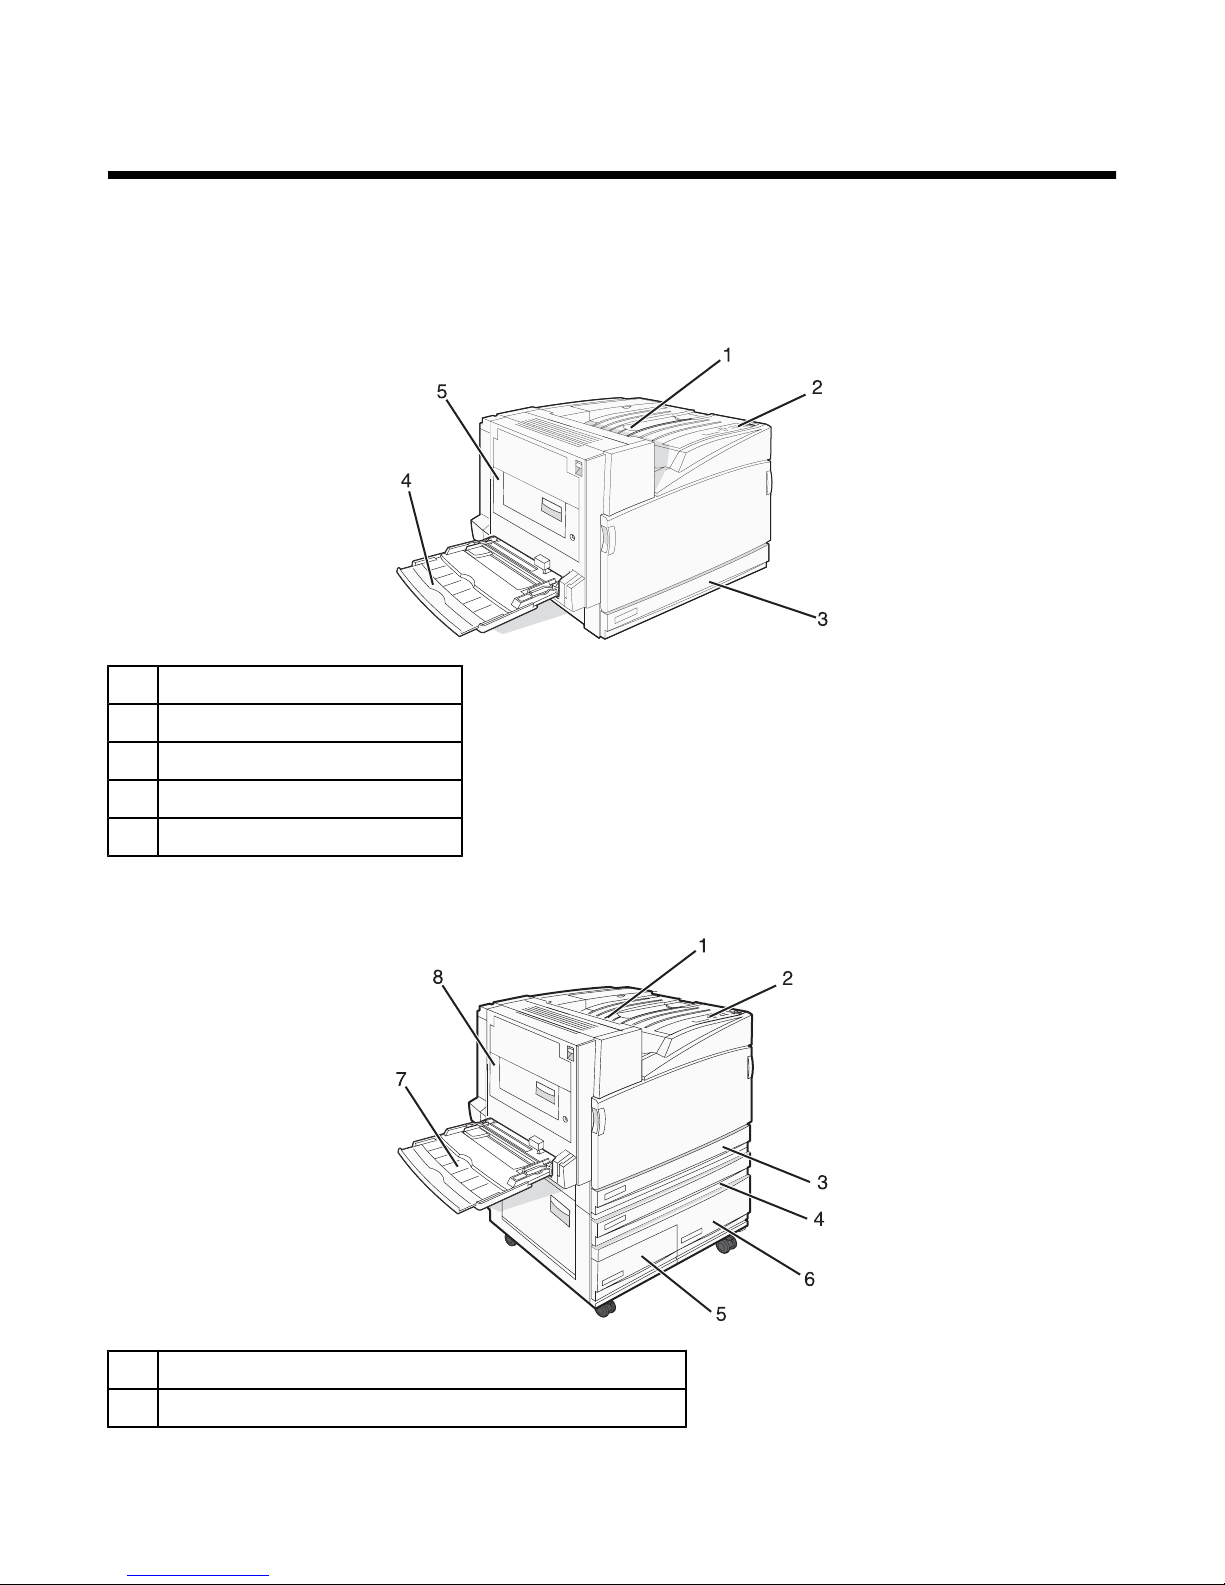
Learning about the printer
Printer configurations
All printer models have standard network capability.
Basic model
Standard exit bin
1
Control panel
2
Standard 520-sheet tray (Tray 1)
3
Multipurpose feeder
4
Duplex unit
5
Configured models
Standard exit bin
1
Control panel
2
9

Standard 520-sheet tray (Tray 1)
3
The High capacity feeder holds 2520 sheets and includes:
4–6
• 4—520-sheet tray (Tray 2)
• 5—867-sheet tray (Tray 3)
• 6—1133-sheet tray (Tray 4)
Multipurpose feeder
7
Duplex unit
8
Standard exit bin
1
Control panel
2
Standard 520-sheet tray (Tray 1)
3
The Tandem tray module (TTM) holds 1560 sheets and includes:
4-6
• 4—520-sheet tray (Tray 2)
• 5—520-sheet tray (Tray 3)
• 6—520-sheet tray (Tray 4)
Multipurpose feeder
7
Duplex unit
8
10

Fully configured model
Horizontal transport unit (HTU)
1
Control panel
2
Finisher
3
Finisher standard bin
4
Finisher bin 1
5
Finisher bin 2 (booklet-maker)
6
Standard 520-sheet tray (Tray 1)
7
The High capacity feeder includes:
8–10
• 8—520-sheet tray (Tray 2)
• 9—867-sheet tray (Tray 3)
• 10—1133-sheet tray (Tray 4)
Multipurpose feeder
11
Duplex unit
12
Note: The finisher shown above is the booklet finisher. The standard finisher is not shown.
11
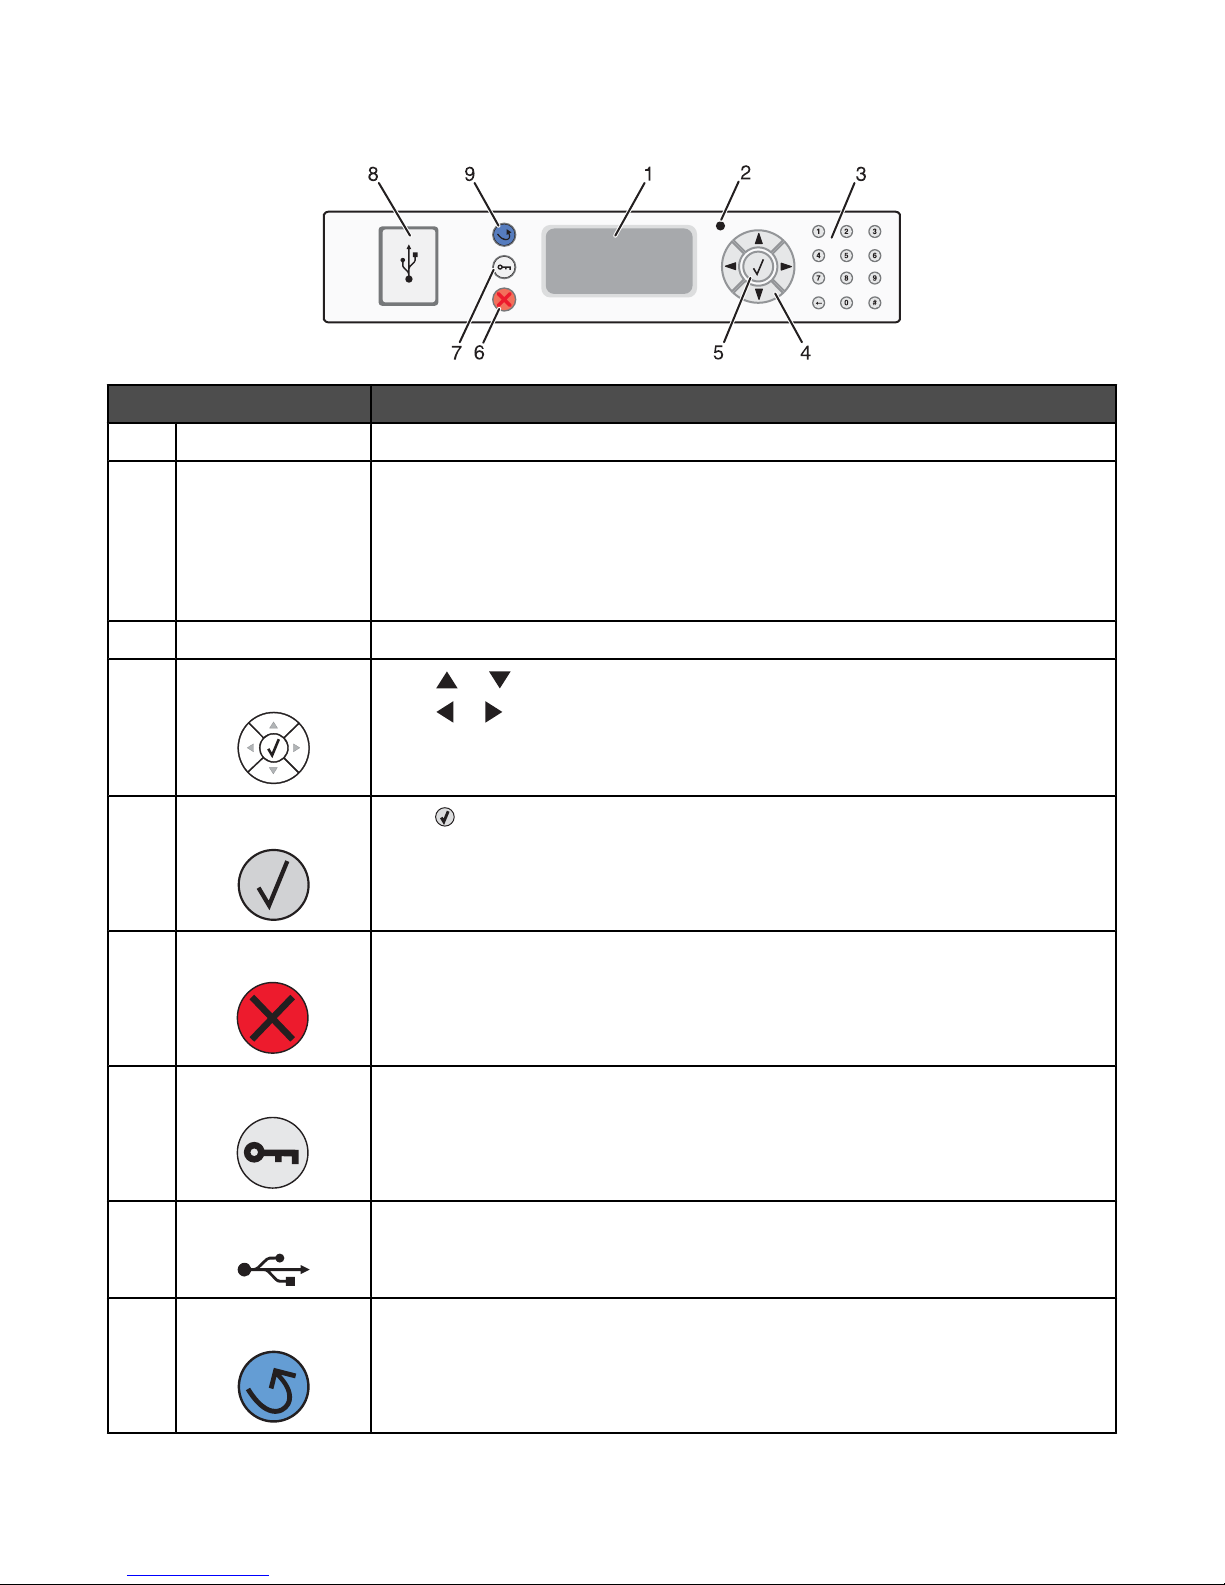
Understanding the control panel
Control panel item Description
Display Shows messages and pictures that communicate the status of the printer
1
Indicator light Indicates the printer status:
2
• Off—The power is off.
• Blinking green—The printer is warming up, processing data, or printing.
• Solid green—The printer is on, but idle.
• Solid red—Operator intervention is needed.
Keypad Enter numbers or symbols on the display.
3
Navigation buttons Press or to scroll through menu lists.
4
Press or to scroll through values or text that roll to another screen.
Select Press to initiate action on a menu item.
5
Stop Stops all printer activity
6
A list of options is offered once Stopped appears on the display.
Menu Opens the menu index
7
Note: The menus are available only when the printer is in the Ready state.
USB Direct interface Use this port to connect a USB flash memory device to the printer. You can print
8
from the connected device.
Back Returns the display to the previous screen
9
12

Installing options
Installing internal options
CAUTION: If you are installing memory or option cards sometime after setting up the printer, turn the printer off
and unplug the power cord from the wall outlet before continuing. If you have any other devices attached to the
printer, turn them off as well and unplug any cables going to the printer.
You can customize your printer connectivity and memory capacity by adding optional cards. The instructions in this
section explain how to install the available cards; you can also use them to locate a card for removal.
Available options
Memory cards
• Printer memory
• Flash memory
• Fonts
Firmware cards
• Bar Code and Forms
• IPDS and SCS/TNe
• PrintCryption
• PRESCRIBE
TM
Other internal options
• Printer hard disk
• RS-232 serial interface card
• Parallel 1284-B interface card
• MarkNet
TM
N8000 Series Internal Print Servers
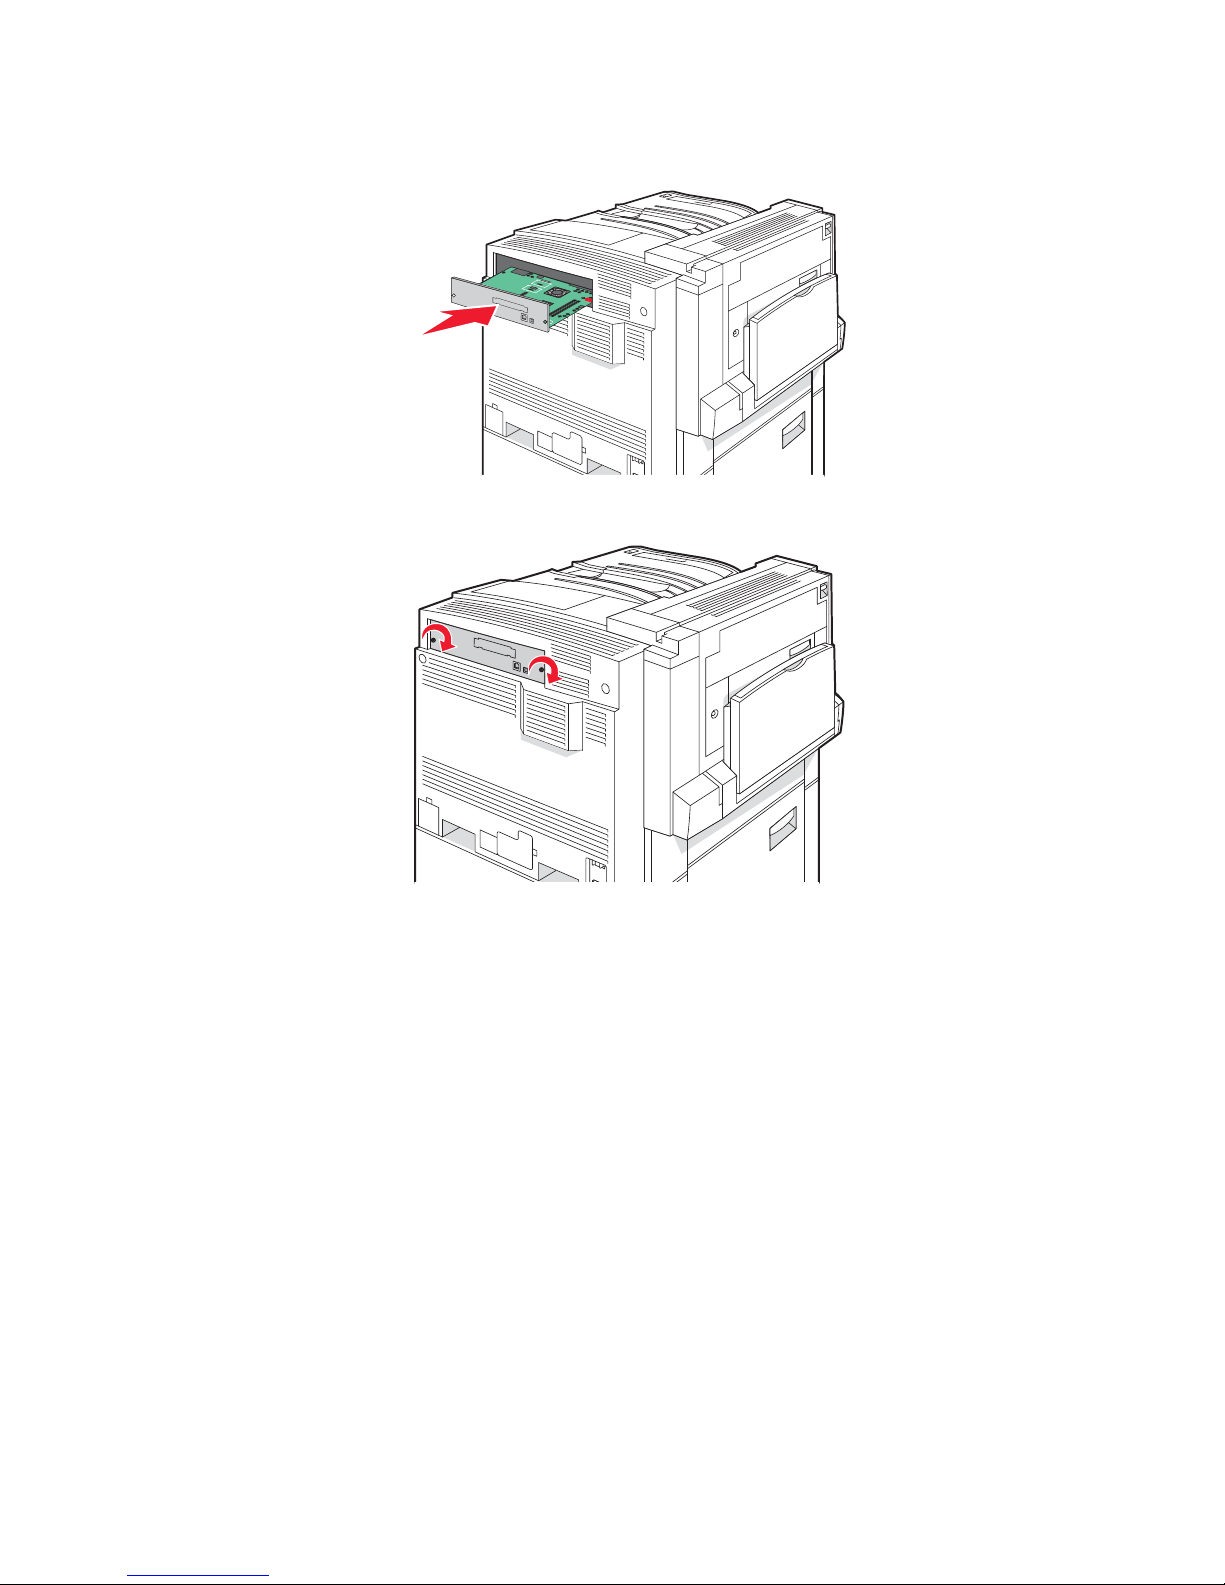
Accessing the system board to install internal options
CAUTION: Turn the printer off, and unplug the power cord from the wall outlet before continuing. If you have
any other devices attached to the printer, turn them off as well and unplug any cables going into the printer.
13
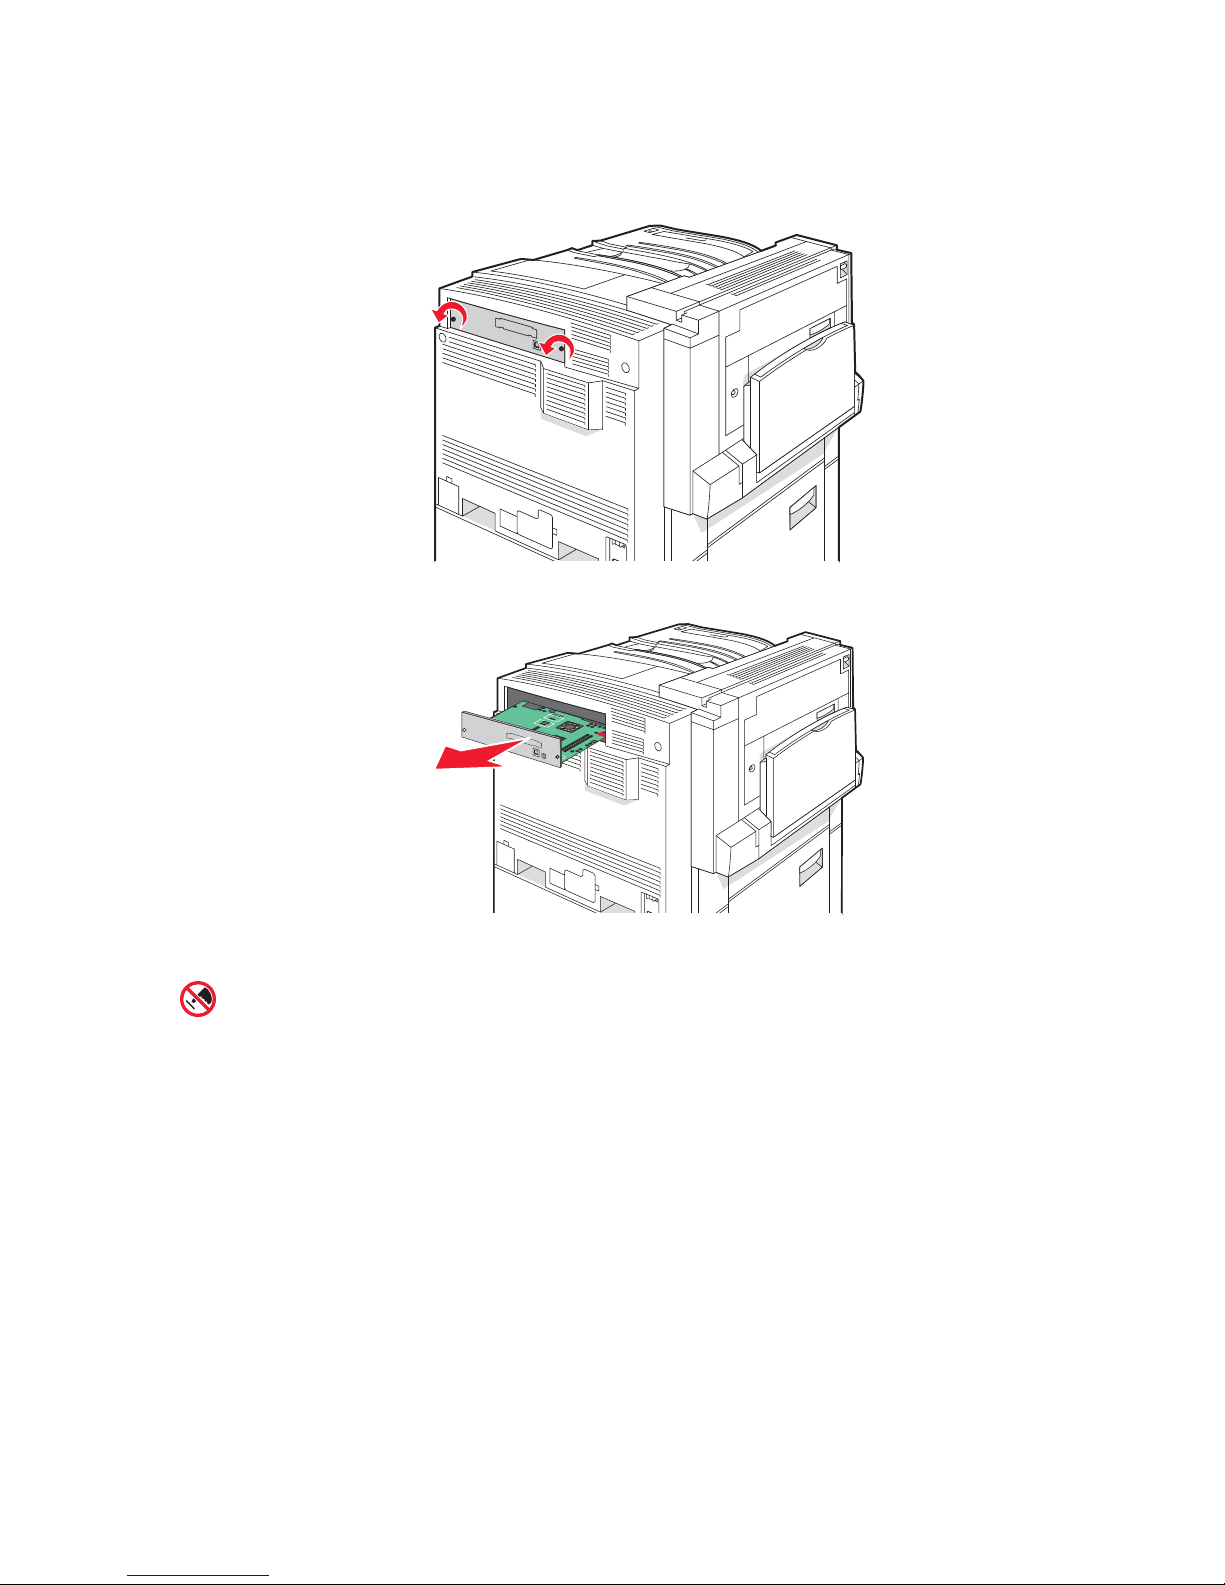
Note: This operation requires a #2 Phillips screwdriver.
1 Remove the cover and system board.
a Turn the screws on the cover counterclockwise, and then remove them.
b Gently pull the cover and system board away from the printer, and then remove it.
2 Use the illustration below to locate the appropriate connector.
Warning: System board electrical components are easily damaged by static electricity. Touch
something metal on the printer before touching any system board electronic components or connectors.
14
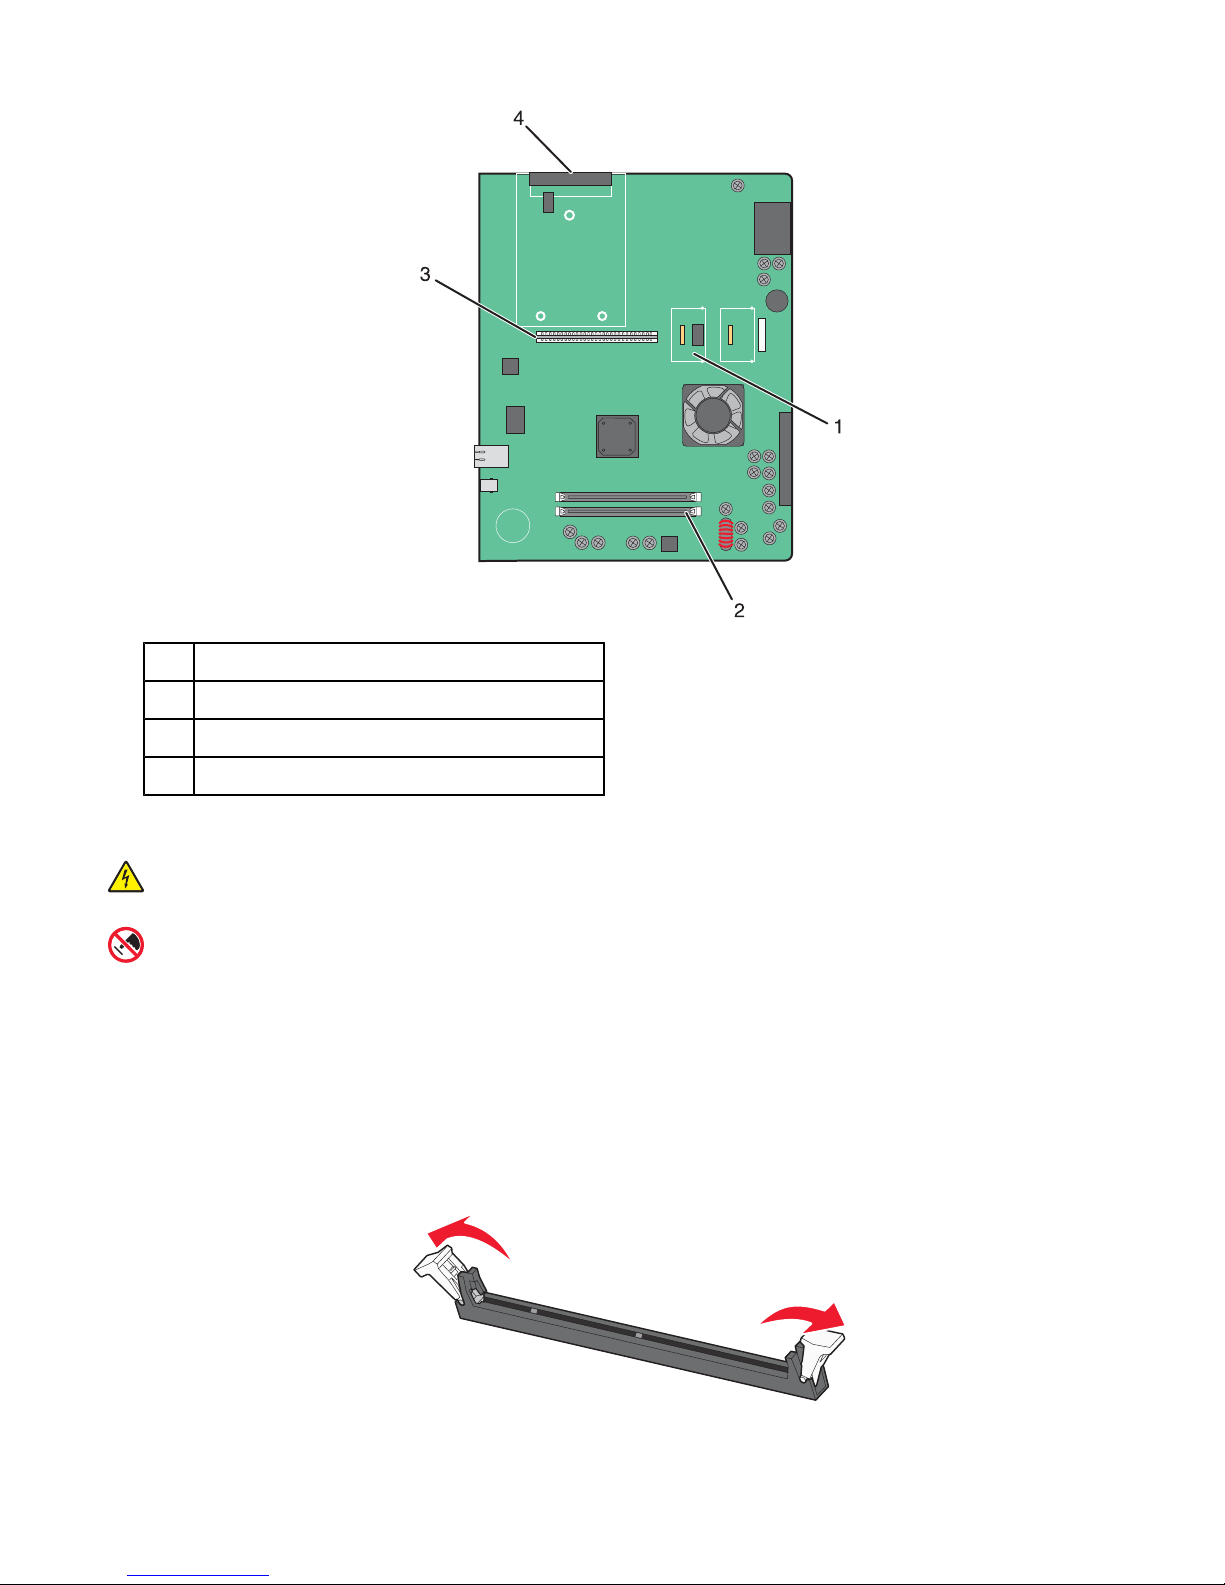
Firmware and flash memory card connectors
1
Memory card connector
2
Internal print server connector
3
Hard disk connector
4
Installing a memory card
CAUTION: If you are installing a memory card after setting up the printer, turn the printer off, and unplug the
power cord from the wall outlet before continuing.
Warning: System board electrical components are easily damaged by static electricity. Touch something metal
on the printer before touching any system board electronic components or connectors.
An optional memory card can be purchased separately and attached to the system board. To install the memory
card:
1 Access the system board.
2 Unpack the memory card.
Note: Avoid touching the connection points along the edge of the card.
3 Open the memory card connector latches.
15
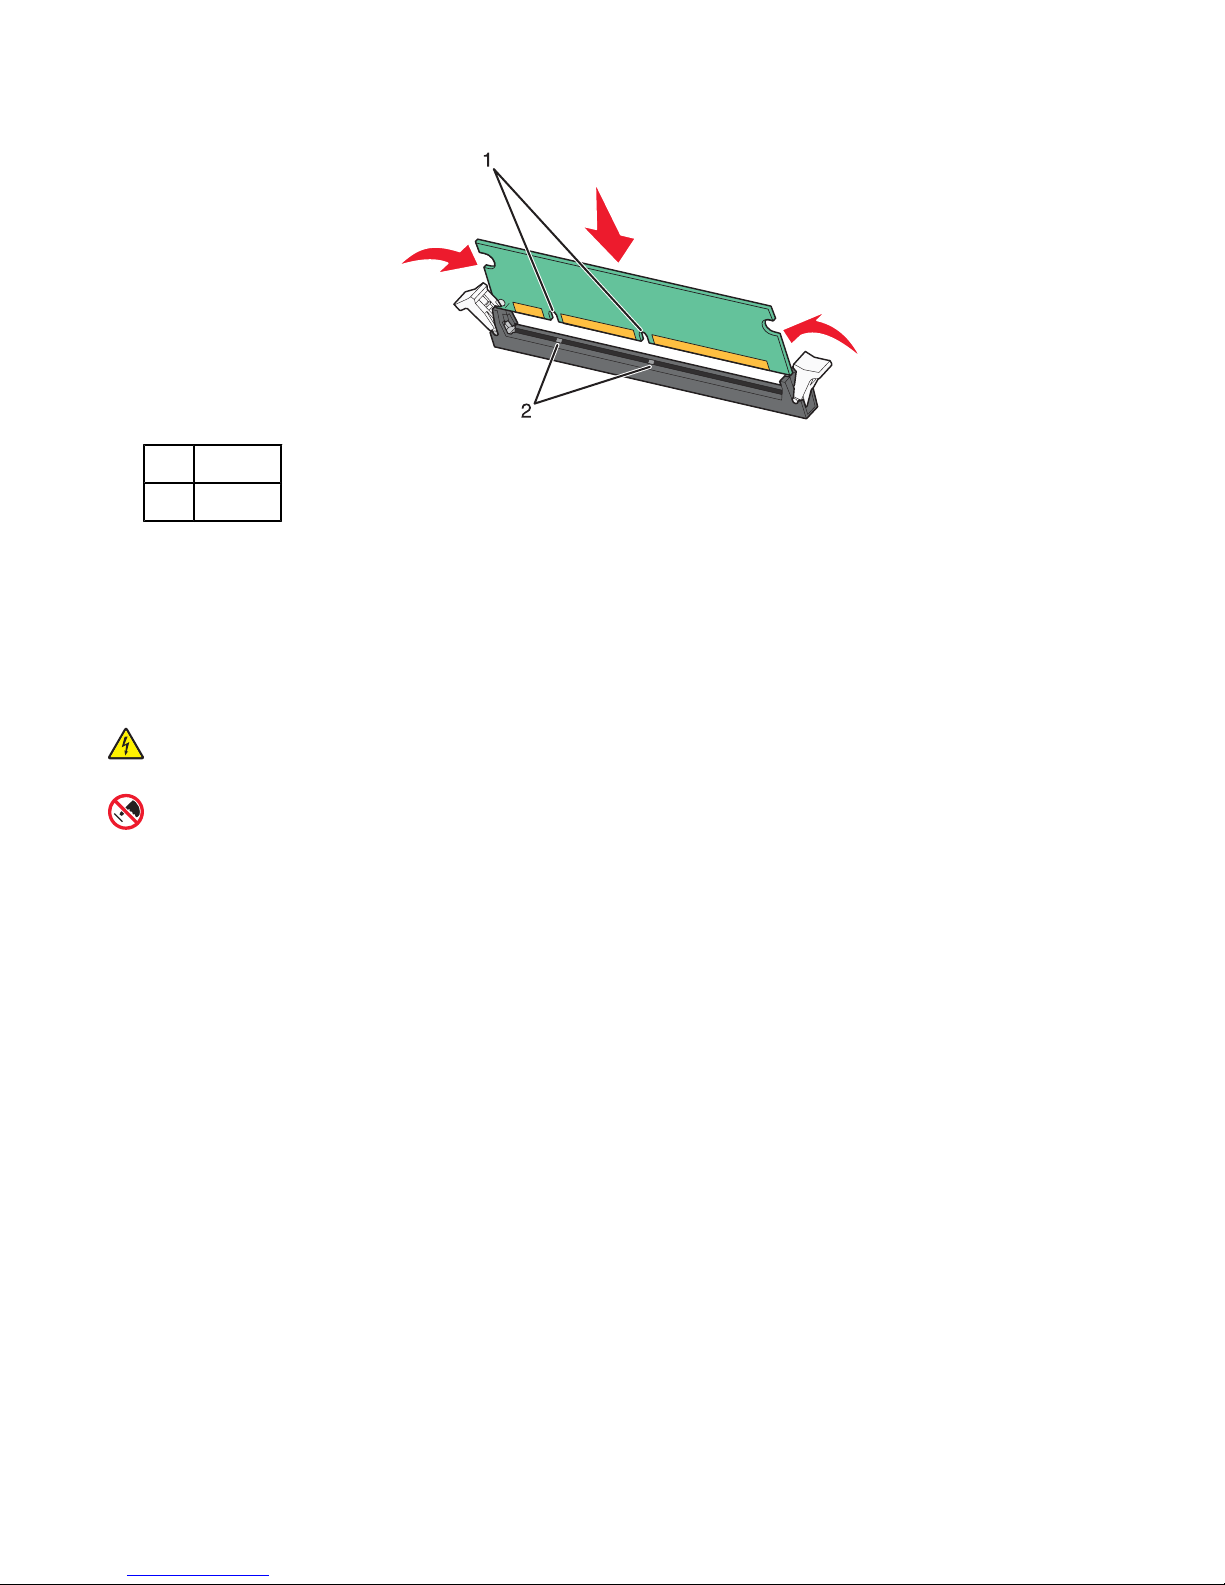
4 Align the notches on the memory card with the ridges on the connector.
Notches
1
Ridges
2
5 Push the memory card straight into the connector until it snaps into place.
6 Reinstall the system board.
Installing a flash memory or firmware card
The system board has two connections for an optional flash memory or firmware card. Only one of each may be
installed, but the connectors are interchangeable.
CAUTION: If installing a flash memory or firmware card after setting up the printer, turn the printer off, and
unplug the power cord from the wall outlet before continuing.
Warning: System board electrical components are easily damaged by static electricity. Touch something metal
on the printer before touching any system board electronic components or connectors.
1 Access the system board.
2 Unpack the card.
Note: Avoid touching the connection points along the edge of the card.
3 Holding the card by its sides, align the plastic pins on the card with the holes on the system board.
16
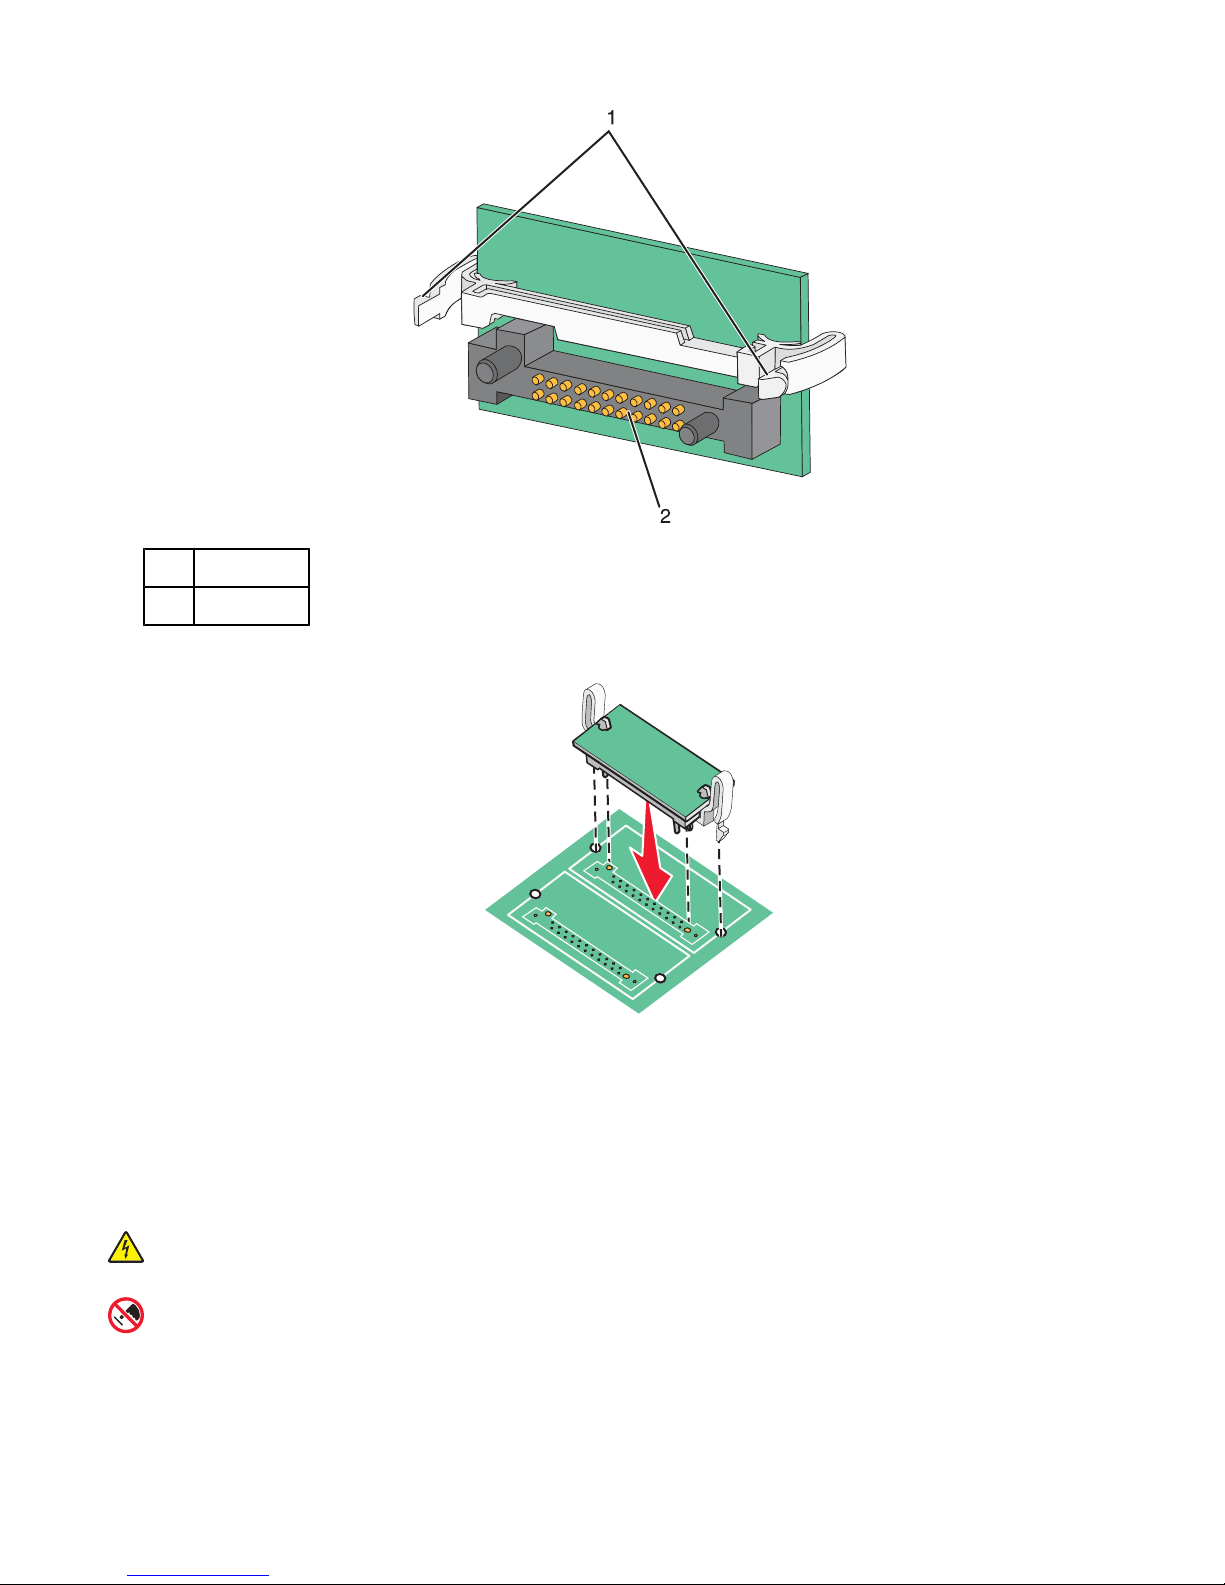
Plastic pins
1
Metal pins
2
4 Push the card firmly into place.
Notes:
• The entire length of the connector on the card must touch and be flush against the system board.
• Be careful not to damage the connectors.
5 Reinstall the system board.
Installing a printer hard disk
CAUTION: If installing a printer hard disk after setting up the printer, turn the printer off, and unplug the power
cord from the wall outlet before continuing.
Warning: System board electrical components and hard disks are easily damaged by static electricity. Touch
something metal on the printer before touching any system board electronic components, connectors, or the
hard disk.
17
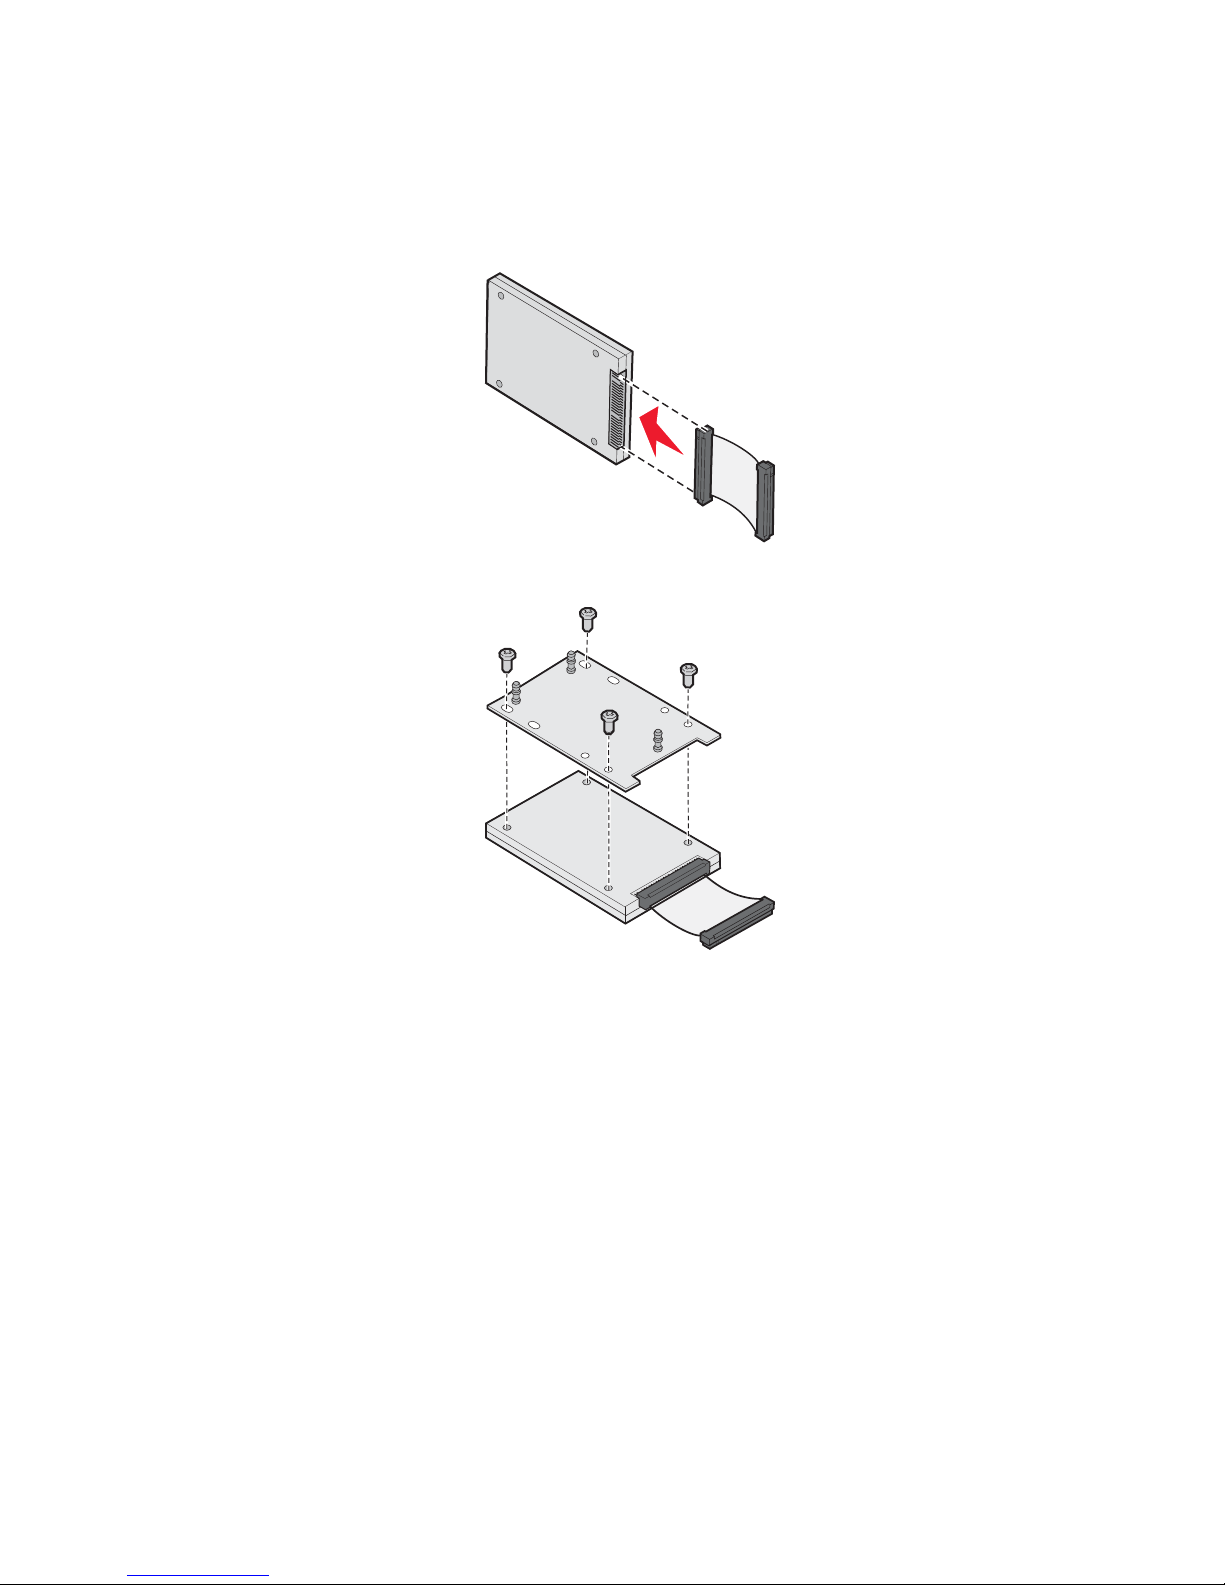
Note: A #2 Phillips screwdriver is needed to attach the hard disk to the mounting plate.
1 Access the system board.
2 Remove the mounting plate, hard disk, ribbon cable, and attachment screws from the package.
3 Attach the ribbon cable to the hard disk.
4 Attach the mounting plate to the hard disk with the screws.
18
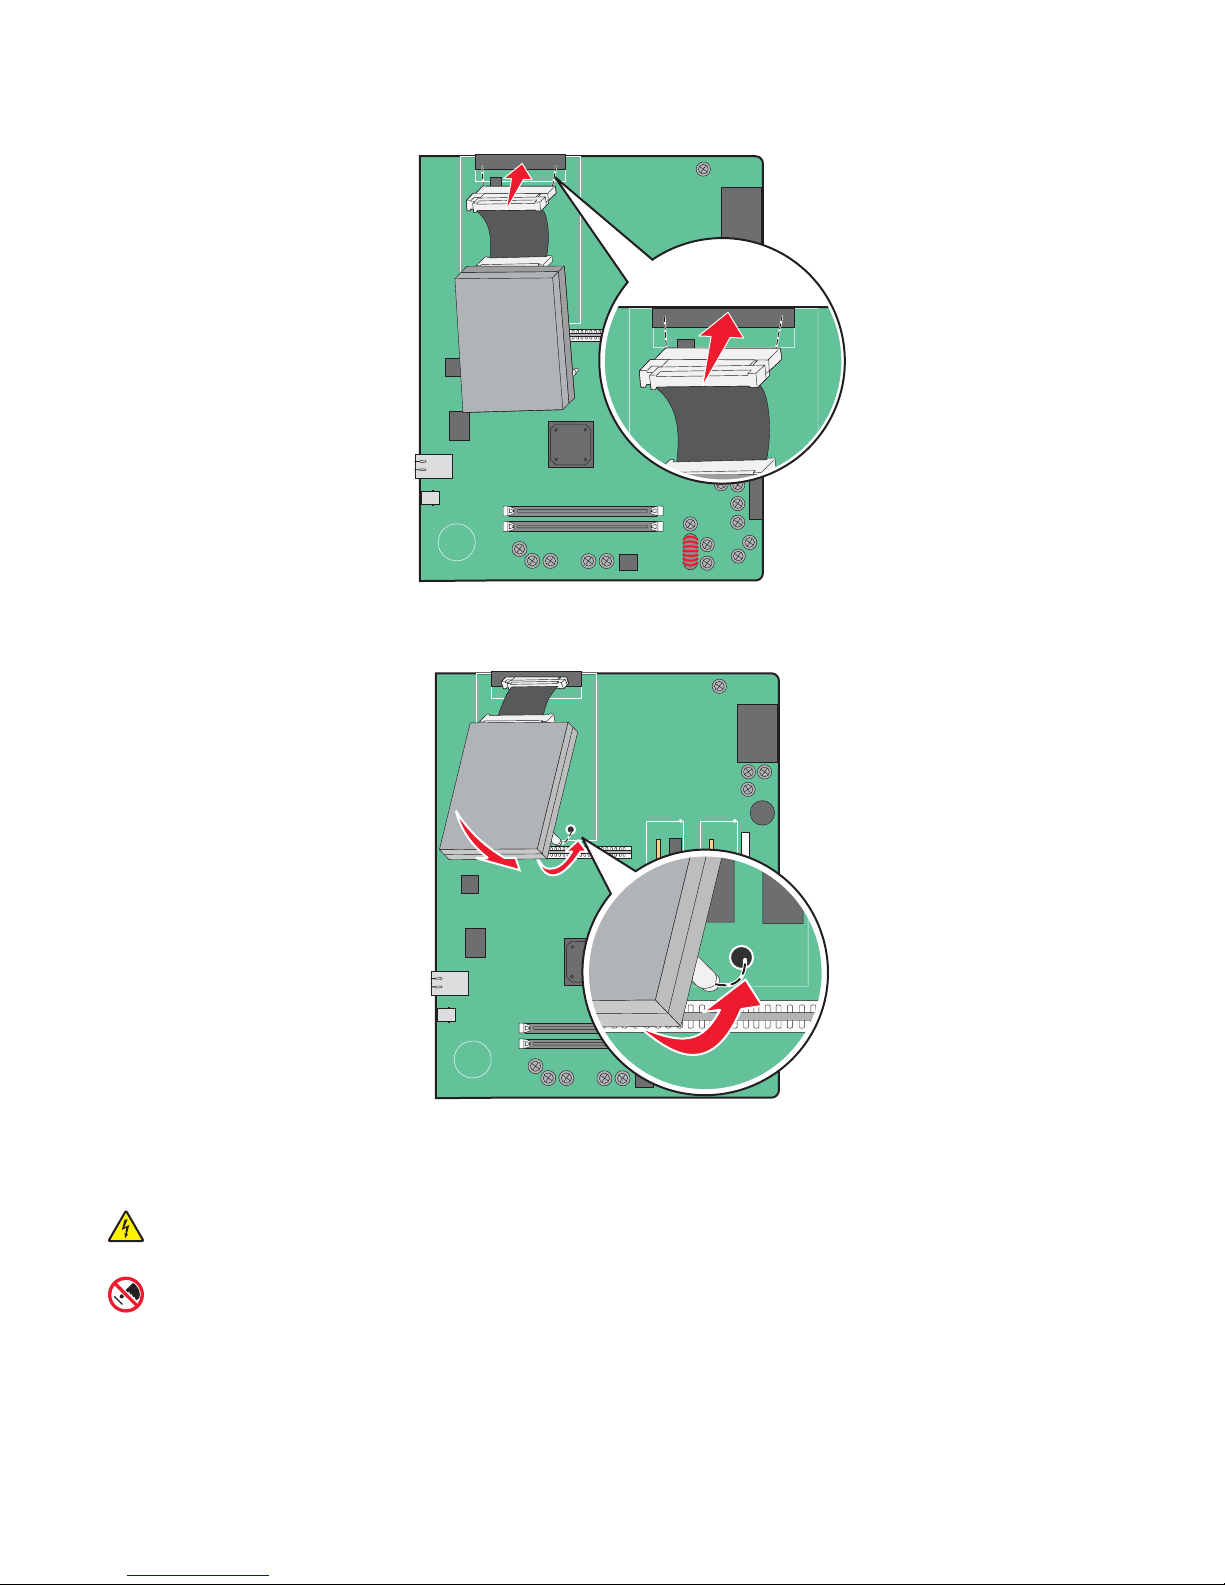
5 Press the ribbon cable connector into the hard disk connector on the system board.
6 Flip the hard disk over, and then press the three posts on the mounting plate into the holes on the system board.
The hard disk snaps into place.
7 Reinstall the system board.
Installing an internal print server or port interface card
CAUTION: Turn the printer off, and unplug the power cord from the wall outlet before continuing. If you have
any other devices attached to the printer, turn them off as well and unplug any cables going into the printer.
Warning: System board electrical components are easily damaged by static electricity. Touch something metal
on the printer before touching any system board electronic components or connectors.
Note: A #2 Phillips screwdriver is needed to install an internal print server or port interface card.
19

An internal print server allows connection from the printer to the local area network (LAN). An optional port interface
card expands the ways the printer can connect to a computer or external print server.
1 Access the system board.
2 Unpack the internal print server or port interface card.
3 Remove the metal plate on the system board tray that covers the connector slot and save the metal plate.
4 Align the connector on the internal print server or port interface card with the connector on the system board.
Note: The cable connectors on the side of the optional card must fit through the opening in the faceplate.
5 Push the internal print server or port interface card firmly into the card connector on the system board.
6 Insert a screw into the hole on the right side of the connector slot. Gently tighten the screw to secure the card
to the system board tray.
7 Reinstall the system board.
Reinstalling the system board
Warning: System board electrical components are easily damaged by static electricity. Touch something metal
on the printer before touching any system board electronic components or connectors.
20
Note: This operation requires a #2 Phillips screwdriver.
1 Gently insert the system board into the printer.
2 Replace the cover screws, and then turn them clockwise.
3 Tighten the screws firmly.
Attaching cables
Connect the printer to the computer using a USB cable or Ethernet cable. A USB port requires a USB cable. Be sure
to match the USB symbol on the cable with the USB symbol on the printer. Match the appropriate Ethernet cable to
the Ethernet port.
21

USB port
1
Ethernet port
2
22

Loading paper and specialty media
This section explains how to load the 520-, 850-, and 1150-sheet trays, and the multipurpose feeder. It also includes
information about paper orientation, setting the Paper Size and Paper Type, and linking and unlinking trays.
Setting the Paper Size and Paper Type
The Paper Size setting is determined by the position of the paper guides in the tray for all trays except the
multipurpose feeder. The Paper Size setting for the multipurpose feeder must be set manually. The factory default
Paper Type setting is Plain Paper. The Paper Type setting must be set manually for all trays that do not contain plain
paper.
1 Make sure the printer is on and Ready appears.
2 From the control panel, press .
3 Press repeatedly until Paper Menu appears, and then press .
4 Press repeatedly until Paper Size/Type appears, and then press .
5 Press repeatedly until the correct tray appears, and then press .
6 Press repeatedly until appears next to the correct size, and then press .
7 Press or repeatedly until the correct Paper Type setting appears, and then press .
Submitting Selection appears.
Configuring Universal paper settings
The Universal Paper Size is a user-defined setting that lets you print on paper sizes that are not preset in the printer
menus. Set the Paper Size for the specified tray to Universal when the size you want is not available from the Paper
Size menu. Then, specify all of the following Universal size settings for your paper:
• Units of measure (inches or millimeters)
• Portrait Height and Portrait Width
• Feed Direction
Note: The smallest supported Universal size is 100 x 148 mm (3.9 x 5.8 in.); the largest is 305 x 483 mm
(11.7 x 19 in.).
Specify a unit of measurement
1 Make sure the printer is on and Ready appears.
2 From the control panel, press .
3 Press repeatedly until Paper Menu appears, and then press .
4 Press repeatedly until Universal Setup appears, and then press .
23

5 Press repeatedly until Units of Measure appears, and then press .
6 Press repeatedly until appears next to the correct unit of measure, and then press .
Submitting Selection appears, followed by the Universal Setup menu.
Specify the paper height and width
Defining a specific height and width measurement for the Universal paper size (in the portrait orientation) allows the
printer to support the size, including support for standard features such as duplex printing and printing multiple pages
on one sheet.
1 From the Universal Setup menu, press repeatedly until Portrait Width or Portrait Height appears,
and then press .
Note: Select Portrait Height to adjust the paper height setting or Paper Width to adjust the paper width
setting.
2 Press to decrease the setting or to increase the setting, and then press .
Submitting Selection appears, followed by the Universal Setup menu.
Specify a feed direction
Short Edge is the factory default setting for feed direction for Universal paper settings. The Feed Direction menu will
not appear from the Universal Setup menu unless Long Edge is an available setting. If necessary, specify whether
the short or long edge of the paper will enter the printer first.
1 From the Universal Setup menu, press repeatedly until Feed Direction appears, and then press .
2 Press repeatedly until appears next to the correct feed direction, and then press .
Submitting Selection appears.
24

Loading the 520-sheet trays
The Size Sensing setting is only available for A5- and statement-size paper.
Loading the 520-sheet trays
The printer has a standard 520-sheet tray (Tray 1), and it may have one or more optional 520-sheet trays. All
520-sheet trays support the same paper sizes and types. Paper may be loaded in the trays in either the long-edge
or short-edge orientation.
1 Grasp the handle, and pull the tray out.
2 Squeeze the width guide tabs together as shown, and move the width guide to the correct position for the paper
size being loaded.
25
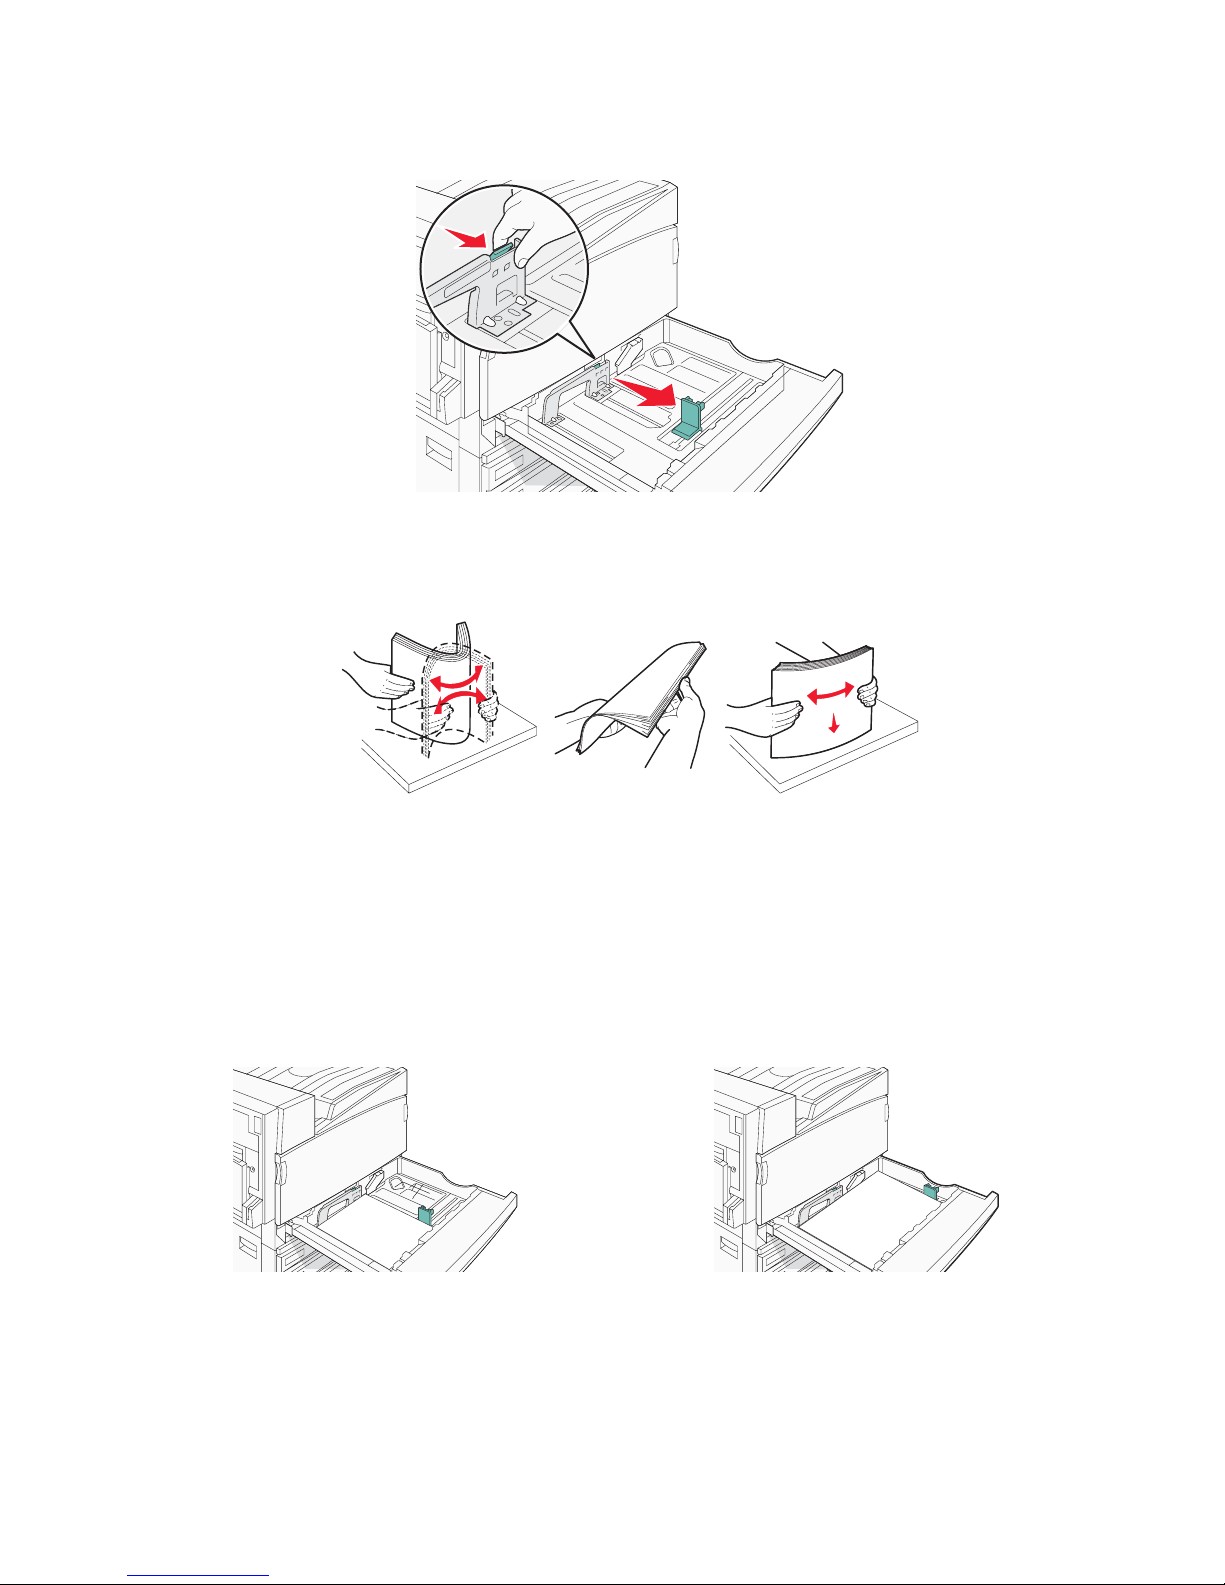
3 Squeeze the length guide tab inward as shown, and slide the guide to the correct position for the paper size
being loaded.
Note: Use the size indicators on the bottom of the tray to help position the guides.
4 Flex the sheets back and forth to loosen them, and then fan them. Do not fold or crease the paper. Straighten
the edges on a level surface.
5 Load the paper stack with the recommended print side faceup. Load the paper in either the long-edge or
short-edge orientation as shown below:
Notes:
• Load sizes larger than A4 in the short-edge orientation.
• Paper must be loaded in the short-edge orientation to create booklets if the optional booklet finisher is
installed.
Long-edge orientation Short-edge orientation
6 Make sure the paper guides are secure against the edges of the paper.
26
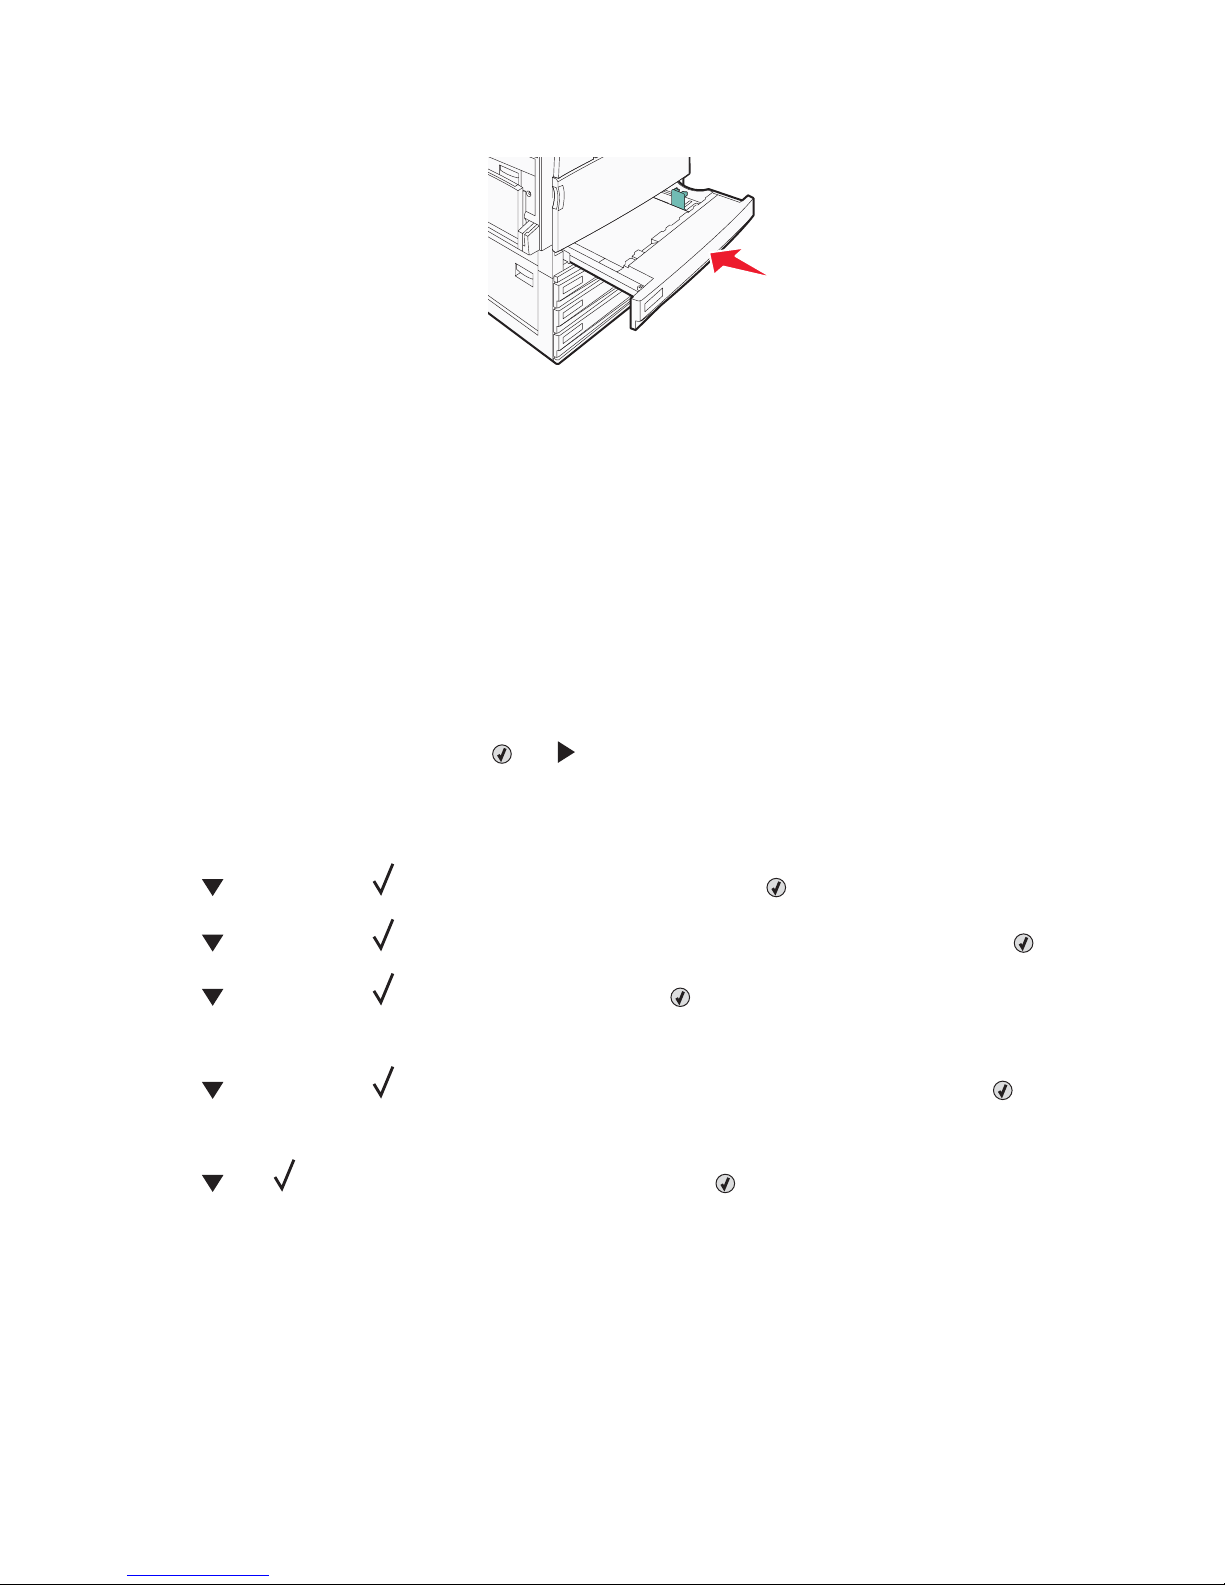
7 Align the tray, and insert it.
8 If a different type of paper was loaded than the type previously loaded in the tray, change the Paper Type setting
for the tray from the control panel.
Using A5 or statement paper sizes
The printer trays cannot distinguish between A5- (148 x 210 mm) and statement-size (140 x 216 mm) paper when
both sizes are loaded in the printer trays. From the Size Sensing menu, specify which size you want the printer to
detect. Load either A5- or statement-size paper in the paper trays, but not both.
Note: The multipurpose feeder does not use auto-size sensing and can support both A5- and statement-size print
jobs. The Size Sensing setting does not affect the multipurpose feeder settings.
1 Load either A5- or statement-size paper in a paper tray.
2 Make sure the printer is turned off.
3 From the control panel, press and hold and while turning the printer on.
4 Release both buttons when Performing Self Test appears.
The printer performs its power-on sequence, and then CONFIG MENU appears.
5 Press repeatedly until SIZE SENSING appears, and then press .
6 Press repeatedly until appears next to the tray in which the paper is loaded, and then press .
7 Press repeatedly until Auto appears, and then press .
The Statement/A5 menu appears.
8 Press repeatedly until appears next to Sense Statement or Sense A5, and then press .
Submitting Selection appears.
9 Press until Exit Config Menu appears, and then press .
The printer performs its power-on sequence, and then Ready appears.
27
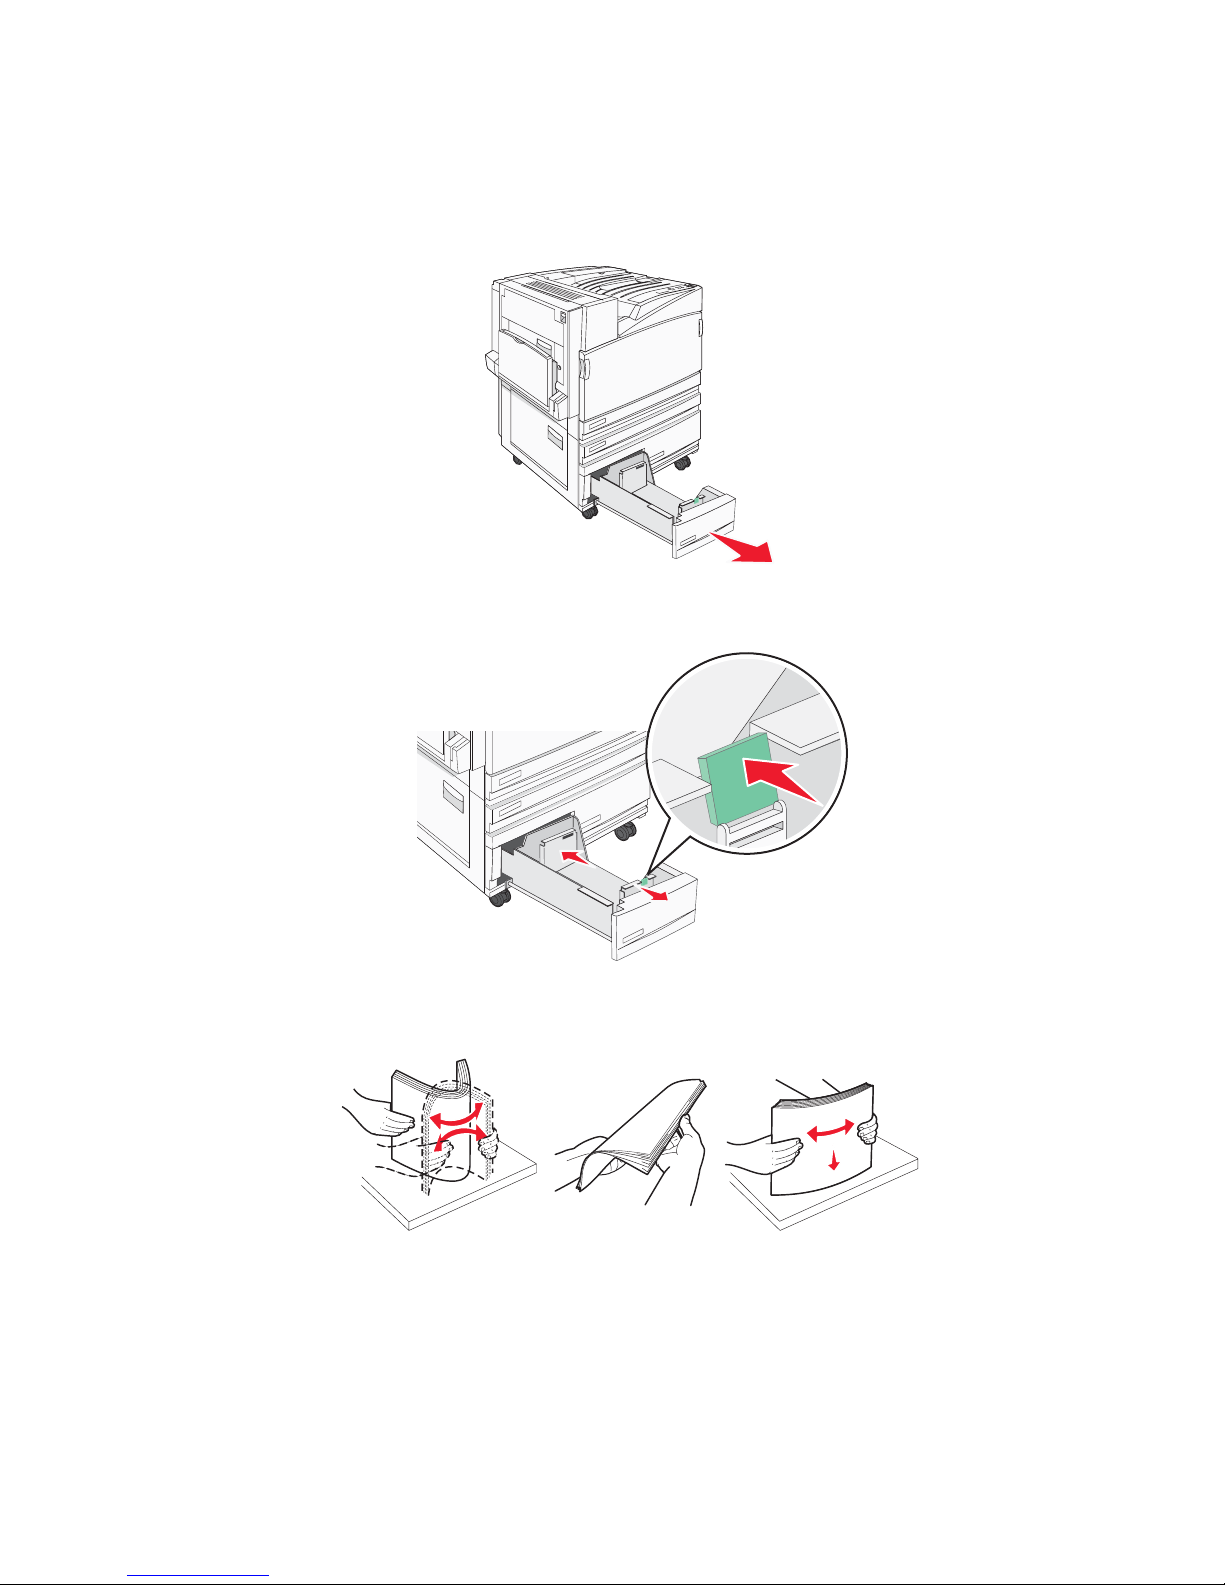
Loading the 867- and 1133-sheet trays
Although the 867-sheet tray and the 1133-sheet tray are different in appearance, they support the same paper sizes
and types and require the same process for loading paper. Use these instructions to load paper in either tray:
1 Grasp the handle, and open the tray.
2 Squeeze the length guide tab inward as shown, and slide the guide to the correct position for the paper size
being loaded.
3 Flex the sheets back and forth to loosen them, and then fan them. Do not fold or crease the paper. Straighten
the edges on a level surface.
28
4 Load the paper stack with the recommended print side faceup.
5 Make sure the paper guides are secure against the edges of the paper.
6 Insert the tray into the printer.
7 If a different type of paper was loaded than the type previously loaded in the tray, change the Paper Type setting
for the tray from the control panel.
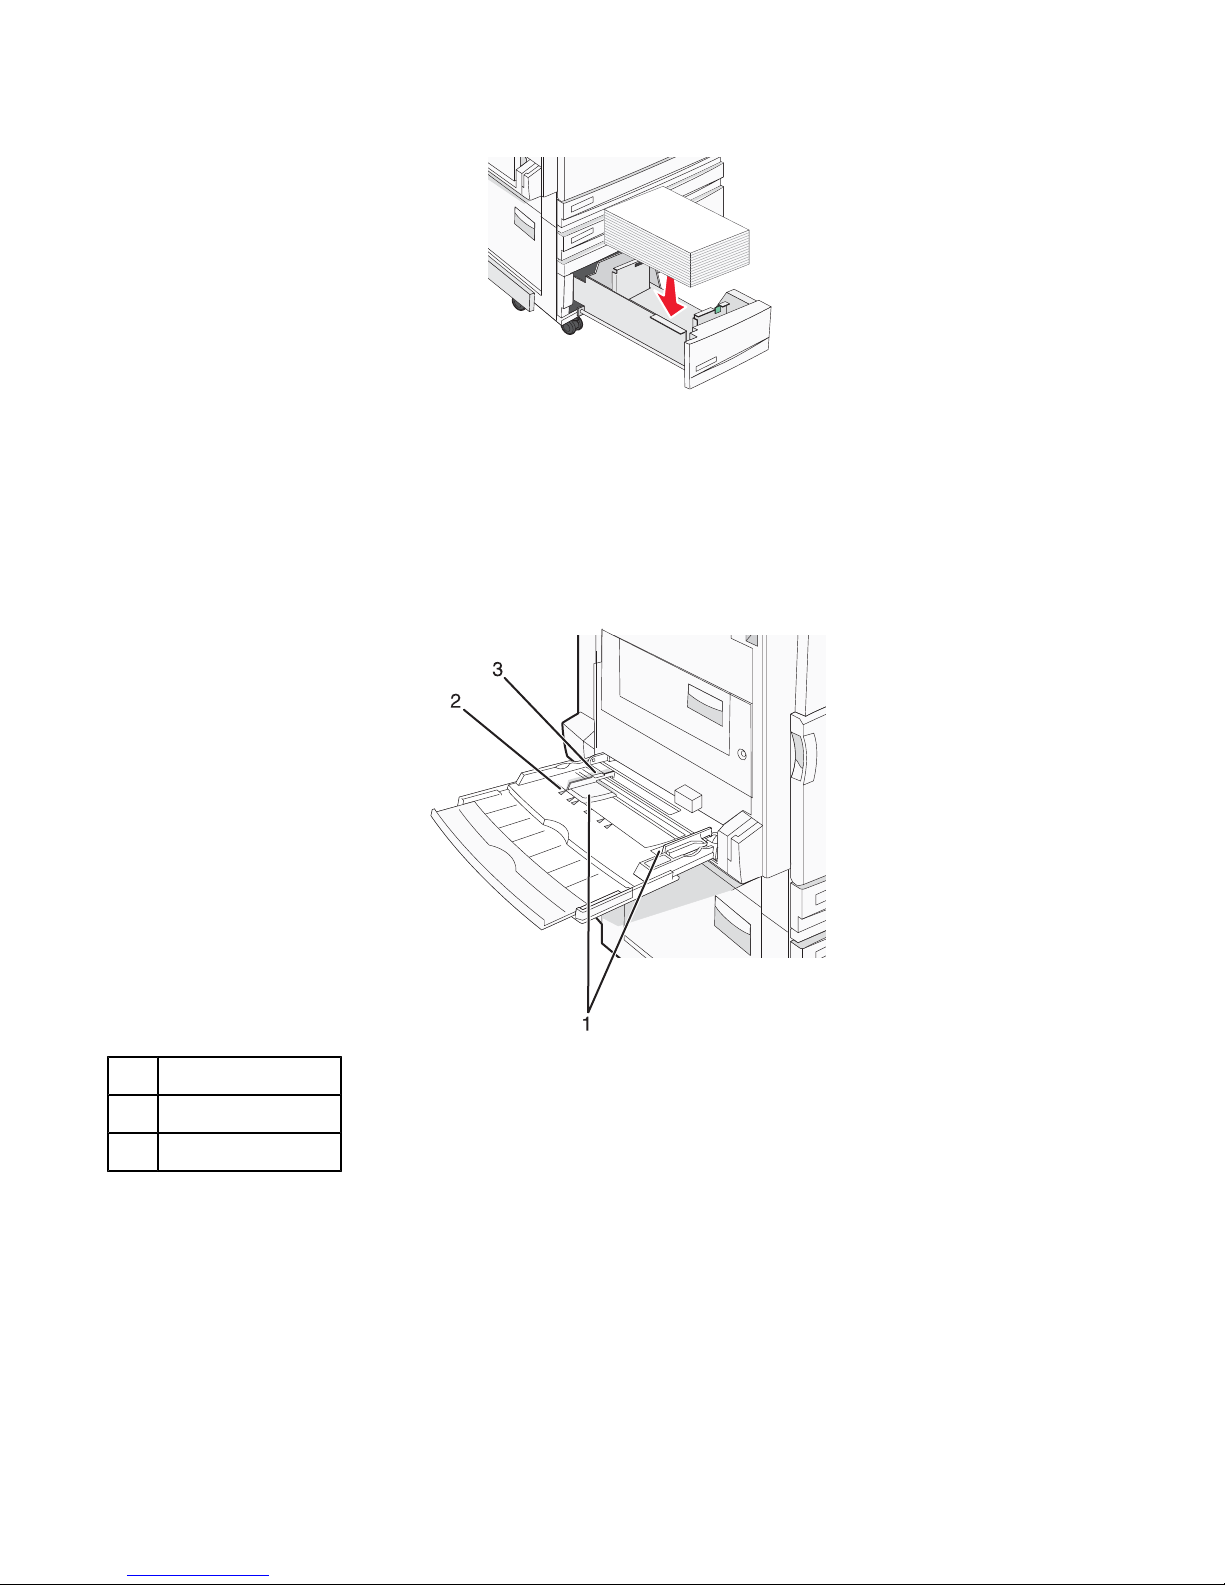
Using the multipurpose feeder
Paper guides
1
Size indicators
2
Stack height limiter
3
29
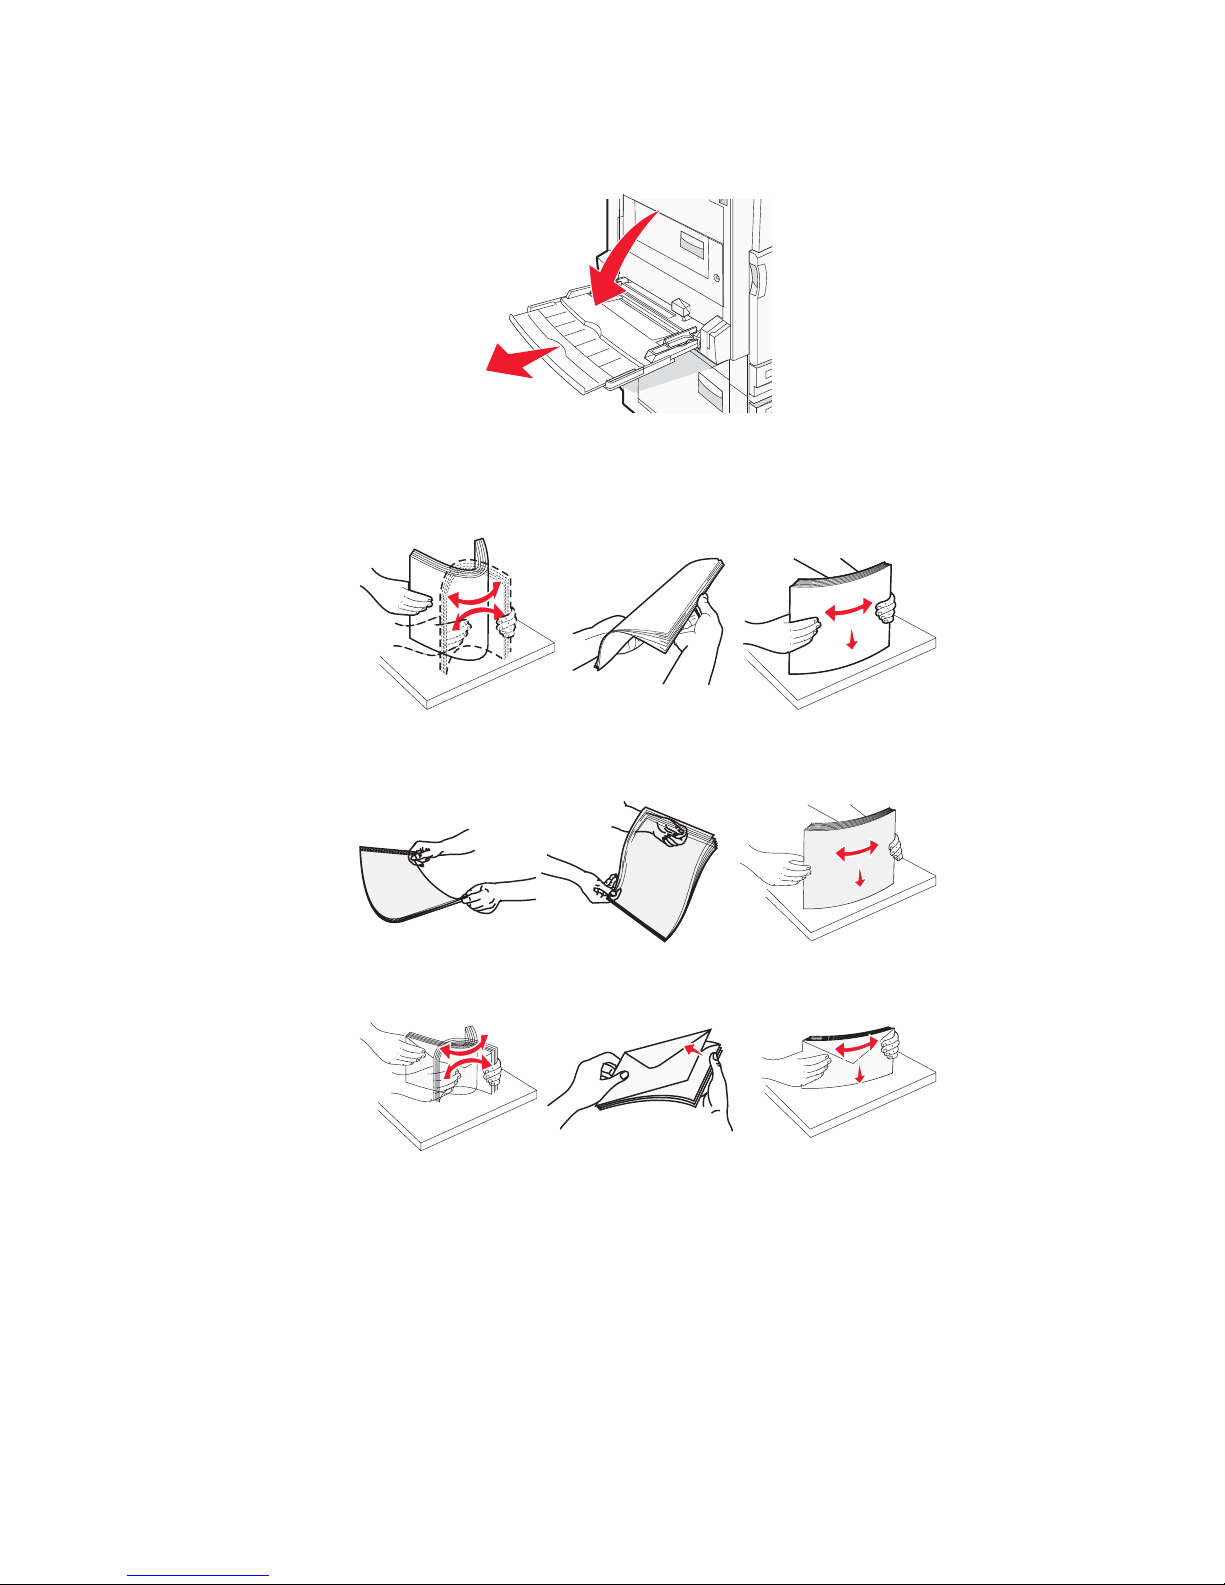
1 Pull the multipurpose feeder tray down.
2 Grasp the extension, and gently pull it out until it is fully extended.
3 Prepare the paper for loading.
• Flex sheets of paper back and forth to loosen them, and then fan them. Do not fold or crease the paper.
Straighten the edges on a level surface.
• Hold transparencies by the edges, and then fan them. Straighten the edges on a level surface.
Note: Avoid touching the print side of the transparencies. Be careful not to scratch them.
• Flex a stack of envelopes back and forth to loosen them, and then fan them. Straighten the edges on a level
surface.
30
 Loading...