

Ricoh InfoPrint 1759, InfoPrint 1769, InfoPrint Color 1759 MFP, InfoPrint Color 1769 MFP User Manual

InfoPrint Color 1759 MFP & 1769 MFP
MT(4886 & 4887)
User’s Gui d e
S510-7102-00


Contents
Safety information.......................................................................................................15
Learning about the printer..........................................................................................17
Printer configurations.........................................................................................................................17
Basic functions of the scanner...........................................................................................................17
Understanding the ADF and scanner glass.......................................................................................18
Understanding the control panel.......................................................................................................19
Understanding the home screen.......................................................................................................20
Using the touch-screen buttons.........................................................................................................22
Installing options.........................................................................................................27
Installing internal options...................................................................................................................27
Available options ........................................................................................................................................27
Accessing the system board to install internal options............................................................................... 27
Installing a memory card ............................................................................................................................29
Installing a flash memory or firmware card.................................................................................................30
Installing an internal print server or port interface card ..............................................................................31
Reinstalling the system board .................................................................................................................... 32
Attaching cables................................................................................................................................33
Loading paper and specialty media...........................................................................35
Setting the Paper Size and Paper Type............................................................................................35
Loading the 520-sheet trays..............................................................................................................35
Loading the 520-sheet trays.......................................................................................................................35
Using A5 or statement paper sizes.............................................................................................................37
Loading the 867- and 1133-sheet trays.............................................................................................38
Using the multipurpose feeder...........................................................................................................39
Configuring Universal paper settings.................................................................................................42
Linking and unlinking trays................................................................................................................42
Linking trays ...............................................................................................................................................42
Unlinking trays............................................................................................................................................ 42
Changing a Custom Type <x> name..........................................................................................................43
Assigning a custom paper type name ........................................................................................................43
Paper and specialty media guide...............................................................................44
Paper guidelines................................................................................................................................44
Paper characteristics..................................................................................................................................44
Unacceptable paper ...................................................................................................................................45
Selecting paper...........................................................................................................................................45
3

Selecting preprinted forms and letterhead..................................................................................................45
Using recycled paper..................................................................................................................................45
Using letterhead................................................................................................................................46
Using transparencies.........................................................................................................................47
Using envelopes................................................................................................................................48
Using labels.......................................................................................................................................48
Using card stock................................................................................................................................49
Storing paper.....................................................................................................................................49
Supported paper sizes, types, and weights.......................................................................................49
Paper sizes supported by the printer.......................................................................................................... 50
Paper types and weights supported by the printer .....................................................................................51
Paper types and weights supported by the finisher....................................................................................51
Supported finishing features....................................................................................................................... 52
Copying.........................................................................................................................56
Making copies....................................................................................................................................56
Making a quick copy...................................................................................................................................56
Copying using the ADF...............................................................................................................................56
Copying using the scanner glass (flatbed) ................................................................................................. 57
Copying photos..................................................................................................................................57
Copying on specialty media...............................................................................................................57
Making transparencies ...............................................................................................................................57
Copying to letterhead .................................................................................................................................57
Customizing copy settings.................................................................................................................58
Copying from one size to another...............................................................................................................58
Making copies using paper from a selected tray ........................................................................................58
Copying a document that contains mixed paper sizes ............................................................................... 59
Copying on both sides of the paper (duplexing)......................................................................................... 59
Reducing or enlarging copies.....................................................................................................................60
Adjusting copy quality.................................................................................................................................60
Collating copies .......................................................................................................................................... 61
Placing separator sheets between copies.................................................................................................. 61
4

Copying multiple pages onto a single sheet............................................................................................... 61
Creating a custom job (job build)................................................................................................................ 62
Job interrupt.......................................................................................................................................63
Placing information on copies............................................................................................................63
Placing the date and time at the top of each page .....................................................................................63
Placing an overlay message on each page................................................................................................64
Canceling a copy job.........................................................................................................................64
Canceling a copy job while the document is in the ADF............................................................................. 64
Canceling a copy job while copying pages using the scanner glass..........................................................64
Canceling a copy job while the pages are being printed ............................................................................ 64
Understanding the copy screens and options...................................................................................64
Copy from................................................................................................................................................... 64
Copy to .......................................................................................................................................................65
Scale........................................................................................................................................................... 65
Darkness ....................................................................................................................................................65
Color...........................................................................................................................................................65
Photo .......................................................................................................................................................... 65
Sides (Duplex)............................................................................................................................................ 65
Collate ........................................................................................................................................................65
Options ....................................................................................................................................................... 65
Improving copy quality.......................................................................................................................67
E-mailing.......................................................................................................................68
Getting ready to e-mail......................................................................................................................68
Setting up the e-mail function.....................................................................................................................68
Setting up the address book....................................................................................................................... 68
Creating an e-mail shortcut...............................................................................................................69
Creating an e-mail shortcut using the Embedded Web Server ..................................................................69
Creating an e-mail shortcut using the touch screen ...................................................................................69
E-mailing a document........................................................................................................................69
Sending an e-mail using the keypad .......................................................................................................... 69
Sending an e-mail using a shortcut number............................................................................................... 70
Sending an e-mail using the address book ................................................................................................70
E-mailing color documents................................................................................................................70
Using profiles.....................................................................................................................................71
Creating an e-mail profile ...........................................................................................................................71
E-mailing to a profile................................................................................................................................... 71
Customizing e-mail settings...............................................................................................................71
Adding e-mail subject and message information........................................................................................71
Changing the output file type......................................................................................................................72
Canceling an e-mail...........................................................................................................................72
Understanding e-mail options............................................................................................................72
Original Size ...............................................................................................................................................72
Sides (Duplex)............................................................................................................................................ 72
5

Orientation.................................................................................................................................................. 73
Binding........................................................................................................................................................ 73
E-mail Subject ............................................................................................................................................73
E-mail Message..........................................................................................................................................73
Resolution................................................................................................................................................... 73
Send As...................................................................................................................................................... 73
Content.......................................................................................................................................................73
Advanced Options ......................................................................................................................................73
Faxing...........................................................................................................................75
Getting the printer ready to fax..........................................................................................................75
Choosing a fax connection ......................................................................................................................... 75
Using an RJ11 adapter...............................................................................................................................76
Connecting directly to a telephone wall jack in Germany...........................................................................79
Connecting to a telephone..........................................................................................................................80
Connecting to an answering machine ........................................................................................................81
Connecting to a computer with a modem................................................................................................... 82
Setting the outgoing fax name and number................................................................................................ 84
Setting the date and time............................................................................................................................84
Turning daylight saving time on or off.........................................................................................................84
Sending a fax.....................................................................................................................................85
Sending a fax using the control panel ........................................................................................................85
Sending a fax using the computer..............................................................................................................85
Creating shortcuts.............................................................................................................................85
Creating a fax destination shortcut using the Embedded Web Server.......................................................85
Creating a fax destination shortcut using the touch screen........................................................................86
Using shortcuts and the address book..............................................................................................86
Using fax destination shortcuts...................................................................................................................86
Using the address book.............................................................................................................................. 87
Customizing fax settings....................................................................................................................87
Changing the fax resolution........................................................................................................................ 87
Making a fax lighter or darker.....................................................................................................................87
Sending a fax at a scheduled time ............................................................................................................. 88
Viewing a fax log ........................................................................................................................................88
Canceling an outgoing fax.................................................................................................................88
Canceling a fax while the original documents are still scanning.................................................................88
Canceling a fax after the original documents have been scanned to memory...........................................89
Understanding fax options.................................................................................................................89
Original Size ...............................................................................................................................................89
Content.......................................................................................................................................................89
Sides (Duplex)............................................................................................................................................ 89
Resolution................................................................................................................................................... 89
6

Darkness ....................................................................................................................................................89
Advanced Options ......................................................................................................................................90
Improving fax quality..........................................................................................................................90
Holding and forwarding faxes............................................................................................................90
Holding faxes..............................................................................................................................................90
Forwarding a fax.........................................................................................................................................91
Scanning to an FTP address.......................................................................................92
Scanning to an FTP address.............................................................................................................92
Scanning to an FTP address using the keypad..........................................................................................92
Scanning to an FTP address using a shortcut number ..............................................................................93
Scanning to an FTP address using the address book................................................................................ 93
Creating shortcuts.............................................................................................................................93
Creating an FTP destination shortcut using the Embedded Web Server...................................................93
Creating an FTP destination shortcut using the touch screen....................................................................94
Understanding FTP options...............................................................................................................94
Original Size ...............................................................................................................................................94
Sides (Duplex)............................................................................................................................................ 94
Binding........................................................................................................................................................ 94
Resolution................................................................................................................................................... 94
Send As...................................................................................................................................................... 94
Content.......................................................................................................................................................94
Advanced Options ......................................................................................................................................95
Improving FTP quality........................................................................................................................95
Scanning to a computer or USB flash memory device............................................96
Scanning to a computer.....................................................................................................................96
Scanning to a USB flash memory device..........................................................................................97
Understanding scan to computer options..........................................................................................97
Quick Setup................................................................................................................................................ 97
Format Type ...............................................................................................................................................97
Compression ..............................................................................................................................................98
Default Content........................................................................................................................................... 98
Color...........................................................................................................................................................98
Original Size ...............................................................................................................................................98
Orientation.................................................................................................................................................. 98
Sides (Duplex)............................................................................................................................................ 98
Darkness ....................................................................................................................................................98
Resolution................................................................................................................................................... 98
Advanced Imaging......................................................................................................................................98
Improving scan quality.......................................................................................................................99
7

Printing.......................................................................................................................100
Installing printer software.................................................................................................................100
Printing a document.........................................................................................................................100
Printing a document from Windows.......................................................................................................... 100
Printing a document from a Macintosh computer..................................................................................... 100
Printing confidential and other held jobs.........................................................................................100
Holding jobs in the printer.........................................................................................................................100
Printing confidential and other held jobs from Windows...........................................................................101
Printing confidential and other held jobs from a Macintosh computer......................................................101
Printing from a USB flash memory device.......................................................................................102
Printing information pages...............................................................................................................104
Printing a menu settings page..................................................................................................................104
Printing a network setup page..................................................................................................................104
Printing a directory list .............................................................................................................................. 104
Printing the print quality test pages ..........................................................................................................104
Canceling a print job........................................................................................................................105
Canceling a print job from the control panel............................................................................................. 105
Canceling a print job from the Windows taskbar ......................................................................................105
Canceling a print job from the Windows desktop .....................................................................................105
Canceling a print job from Mac OS 9........................................................................................................105
Canceling a print job from Mac OS X .......................................................................................................105
Printing in black and white...............................................................................................................106
Using Max Speed and Max Yield....................................................................................................106
Clearing jams.............................................................................................................107
Avoiding jams..................................................................................................................................107
Understanding jam numbers and locations.....................................................................................107
200–203 paper jams........................................................................................................................109
230–231 paper jams........................................................................................................................109
241 paper jam..................................................................................................................................112
242–244 paper jams........................................................................................................................113
250 paper jam..................................................................................................................................115
280–282 paper jams........................................................................................................................116
283–284 and 287–288 paper jams..................................................................................................117
284–286 paper jams........................................................................................................................119
289 staple jam.................................................................................................................................120
290–295 paper jams........................................................................................................................123
8

Understanding printer menus...................................................................................125
Menus list........................................................................................................................................125
Supplies menu.................................................................................................................................126
Paper menu.....................................................................................................................................127
Default Source menu................................................................................................................................127
Paper Size/Type menu.............................................................................................................................127
Configure MP menu..................................................................................................................................129
Substitute Size menu................................................................................................................................130
Paper Texture menu.................................................................................................................................130
Paper Loading menu ................................................................................................................................131
Custom Types menu ................................................................................................................................132
Custom Names menu...............................................................................................................................132
Custom Bin Names menu.........................................................................................................................133
Universal Setup menu ..............................................................................................................................133
Bin Setup menu........................................................................................................................................ 134
Reports menu..................................................................................................................................135
Reports menu........................................................................................................................................... 135
Settings menu..................................................................................................................................137
General Settings menu............................................................................................................................. 137
Copy Settings menu .................................................................................................................................142
Fax Settings menu....................................................................................................................................144
E-mail Settings menu ...............................................................................................................................152
E-mail Server Setup menu ....................................................................................................................... 155
FTP Settings menu...................................................................................................................................156
Scan to USB Settings...............................................................................................................................159
Print Settings ............................................................................................................................................162
Security menu........................................................................................................................................... 176
Set Date and Time....................................................................................................................................180
Network/Ports menu........................................................................................................................181
TCP/IP menu............................................................................................................................................ 181
IPv6 menu ................................................................................................................................................183
E-mail Server Setup menu ....................................................................................................................... 184
Active NIC menu....................................................................................................................................... 185
Standard Network menu...........................................................................................................................185
Standard USB menu................................................................................................................................. 187
NetWare menu .........................................................................................................................................188
AppleTalk menu........................................................................................................................................189
LexLink menu ...........................................................................................................................................189
Help menu.......................................................................................................................................189
Understanding printer messages.............................................................................191
List of status and error messages...................................................................................................191
9

Maintaining the printer..............................................................................................205
Storing supplies...............................................................................................................................205
Checking the status of supplies.......................................................................................................205
Checking the status of supplies from the control panel............................................................................ 205
Printing a menu settings page..................................................................................................................205
Checking the status of supplies from a network computer....................................................................... 205
Conserving supplies........................................................................................................................206
Replacing supplies..........................................................................................................................206
Replacing the waste toner box .................................................................................................................206
Cleaning the printhead lenses..................................................................................................................211
Replacing a photoconductor..................................................................................................................... 215
Replacing a toner cartridge ......................................................................................................................218
Cleaning the exterior of the printer..................................................................................................220
Cleaning the scanner glass.............................................................................................................221
Moving the printer............................................................................................................................221
Before moving the printer ......................................................................................................................... 221
Moving the printer and options to another location within the office......................................................... 222
Disassembling the printer from the scanner shelf prior to the move ........................................................ 222
Setting the printer up in a new location ....................................................................................................224
Shipping the printer ..................................................................................................................................225
Administrative support..............................................................................................226
Adjusting the brightness of the display............................................................................................226
Disabling control panel menus........................................................................................................226
Adjusting Power Saver....................................................................................................................226
Restoring the factory default settings..............................................................................................227
Encrypting the printer hard disk.......................................................................................................227
Locking the control panel menus using the Embedded Web Server...............................................228
Locking the entire printer.................................................................................................................228
Modifying confidential print settings................................................................................................228
Supporting IPSec.............................................................................................................................229
Supporting SNMPv3........................................................................................................................229
Using 802.1x authentication............................................................................................................229
Creating an administrative password..............................................................................................230
Using Secure mode.........................................................................................................................230
10

Troubleshooting.........................................................................................................232
Checking an unresponsive printer...................................................................................................232
Door A will not shut properly............................................................................................................232
Solving printing problems................................................................................................................233
Multiple-language PDFs do not print ........................................................................................................ 233
Control panel display is blank or displays only diamonds ........................................................................233
11

Error message about reading USB drive appears....................................................................................233
Jobs do not print.......................................................................................................................................233
Confidential and other held jobs do not print............................................................................................ 234
Job takes longer than expected to print....................................................................................................234
Job prints from the wrong tray or on the wrong paper..............................................................................235
Incorrect characters print..........................................................................................................................235
Tray linking does not work........................................................................................................................235
Large jobs do not collate .......................................................................................................................... 235
Unexpected page breaks occur................................................................................................................ 235
Solving copy problems....................................................................................................................236
Copier does not respond .......................................................................................................................... 236
Scanner unit does not close .....................................................................................................................236
Poor copy quality......................................................................................................................................236
Partial document or photo copies .............................................................................................................237
Solving scanner problems...............................................................................................................238
Checking an unresponsive scanner .........................................................................................................238
Scan was not successful ..........................................................................................................................238
Scanning takes too long or freezes the computer .................................................................................... 238
Poor scanned image quality ..................................................................................................................... 238
Partial document or photo scans ..............................................................................................................239
Cannot scan from a computer ..................................................................................................................239
Solving fax problems.......................................................................................................................239
Caller ID is not shown............................................................................................................................... 239
Cannot send or receive a fax....................................................................................................................239
Can send but not receive faxes................................................................................................................241
Can receive but not send faxes................................................................................................................241
Received fax has poor print quality .......................................................................................................... 241
Blocking junk faxes...................................................................................................................................242
Solving option problems..................................................................................................................242
Option does not operate correctly or quits after it is installed...................................................................242
Drawers .................................................................................................................................................... 243
Finisher.....................................................................................................................................................243
Flash memory card...................................................................................................................................243
Hard disk with adapter.............................................................................................................................. 243
Internal print server...................................................................................................................................244
Memory card.............................................................................................................................................244
USB/parallel interface card.......................................................................................................................244
Solving paper feed problems...........................................................................................................244
Paper frequently jams...............................................................................................................................244
Paper jam message remains after jam is cleared ....................................................................................244
Print jobs are not routed to the booklet-maker bin.................................................................................... 244
Page that jammed does not reprint after you clear the jam...................................................................... 245
Solving print quality problems..........................................................................................................246
Isolating print quality problems.................................................................................................................246
Blank pages..............................................................................................................................................246
12

Characters have jagged or uneven edges................................................................................................247
Clipped images.........................................................................................................................................247
Dark lines.................................................................................................................................................. 247
Gray background......................................................................................................................................247
Incorrect margins......................................................................................................................................248
Light colored line, white line, or incorrectly colored line ...........................................................................248
Paper curl .................................................................................................................................................249
Print irregularities......................................................................................................................................249
Repeating defects.....................................................................................................................................250
Skewed print.............................................................................................................................................250
Print is too light.........................................................................................................................................250
Print is too dark......................................................................................................................................... 251
Solid color pages......................................................................................................................................251
Toner fog or background shading appears on the page ..........................................................................252
Toner rubs off ...........................................................................................................................................252
Toner specks............................................................................................................................................252
Transparency print quality is poor ............................................................................................................ 253
Uneven print density.................................................................................................................................253
Solving color quality problems.........................................................................................................253
FAQ about color printing...........................................................................................................................253
Contacting Customer Support.........................................................................................................256
Notices........................................................................................................................257
Edition notice...................................................................................................................................257
Industry Canada notices..................................................................................................................258
Power consumption.........................................................................................................................263
Index............................................................................................................................265
13

14

Safety information
Connect the power supply cord to a properly grounded electrical outlet that is near the product and easily accessible.
Refer service or repairs, other than those described in the user documentation, to a professional service person.
CAUTION: Do not use the fax feature during a lightning storm. Do not set up this product or make any electrical
or cabling connections, such as the power supply cord or telephone, during a lightning storm.
Use only a 26 AWG or larger telecommunications (RJ-11) cord when connecting this product to the public switched
telephone network.
CAUTION: The printer weighs 91.2 kg (201 lbs); therefore, it requires two people to roll it safely into place. The
scanner weighs 25 kg (55 lb); therefore, it requires two people to roll it safely while it is on its scanner shelf.
CAUTION: The printer weighs 91.2 kg (201 lbs); therefore, it requires two people to roll it safely.
CAUTION: If you are installing memory or option cards sometime after setting up the printer, turn the printer off
and unplug the power cord from the wall outlet before continuing. If you have any other devices attached to the
printer, turn them off as well and unplug any cables going to the printer.
CAUTION: Turn the printer off, and unplug the power cord from the wall outlet before installing an internal option.
If you have any other devices attached to the printer, turn them off as well and unplug any cables going into the
printer.
CAUTION: Make sure that all external connections (such as Ethernet and telephone system connections) are
properly installed in their marked plug-in ports.
CAUTION: If you are installing a memory card after setting up the printer, turn the printer off, and unplug the
power cord from the wall outlet before continuing.
This product is designed, tested, and approved to meet strict global safety standards with the use of specific
manufacturer's components. The safety features of some parts may not always be obvious. The manufacturer is not
responsible for the use of other replacement parts.
This product uses a laser.
CAUTION: Use of controls or adjustments or performance of procedures other than those specified herein may
result in hazardous radiation exposure.
This product uses a printing process that heats the print media, and the heat may cause the media to release
emissions. You must understand the section in your operating instructions that discusses the guidelines for selecting
print media to avoid the possibility of harmful emissions.
This symbol indicates the presence of a hot surface or component.
CAUTION: To reduce the risk of injury from a hot component, allow the surface to cool before touching it.
This product uses a ground fault circuit interrupter (GFCI). Monthly testing of the GFCI is recommended.
CAUTION: If you are installing memory or option cards sometime after setting up the printer, turn the printer off
and unplug the power cord from the wall outlet before continuing. If you have any other devices attached to the
printer, turn them off as well and unplug any cables going to the printer.
CAUTION: Turn the printer off, and unplug the power cord from the wall outlet before continuing. If you have
any other devices attached to the printer, turn them off as well and unplug any cables going into the printer.
15

CAUTION: To avoid the risk of electric shock, unplug the power cord from the wall outlet and disconnect all cables
to the printer before proceeding.
CAUTION: If you are installing a memory card after setting up the printer, turn the printer off, and unplug the
power cord from the wall outlet before continuing.
CAUTION: If installing a flash memory or firmware card after setting up the printer, turn the printer off, and
unplug the power cord from the wall outlet before continuing.
CAUTION: If installing a printer hard disk after setting up the printer, turn the printer off, and unplug the power
cord from the wall outlet before continuing.
CAUTION: The inside of the printer might be hot. To reduce the risk of injury from a hot component, allow the
surface to cool before touching.
16
Learning about the printer
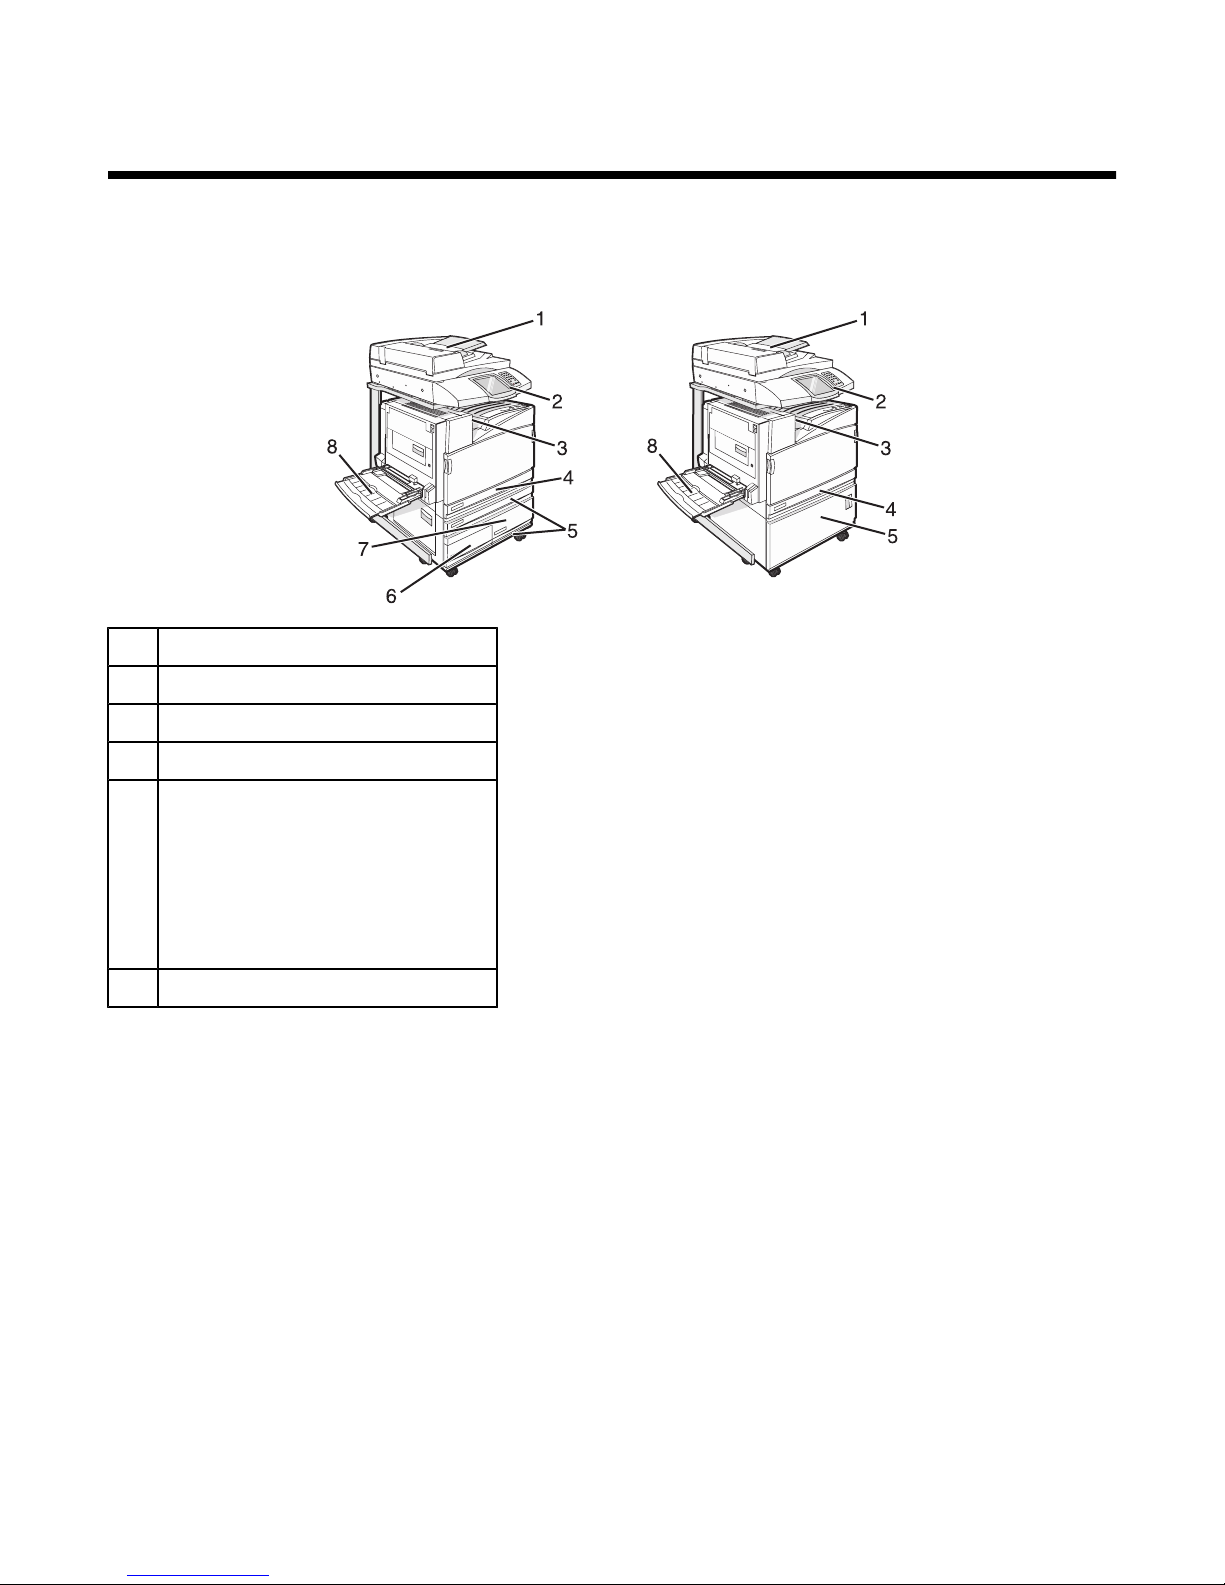
Printer configurations
Basic models
Automatic Document Feeder (ADF)
1
Control panel
2
Standard exit bin
3
Standard 520-sheet tray (Tray 1)
4
Cabinet or high capacity feeder.
5
The high capacity feeder consists of:
520-sheet tray (Tray 2)
2000-sheet dual input
• 6—867-sheet tray (Tray 3)
• 7—1133-sheet tray (Tray 4)
Multipurpose feeder
8
Basic functions of the scanner
The scanner provides copy, fax, and scan-to-network capability for large workgroups. You can:
• Make quick copies, or change the settings on the control panel to perform specific copy jobs.
• Send a fax using the control panel.
• Send a fax to multiple fax destinations at the same time.
• Scan documents and send them to your computer, an e-mail address, a USB flash memory device, or an FTP
destination.
• Scan documents and send them to another printer (PDF by way of FTP).
17

Understanding the ADF and scanner glass
ADF Scanner glass
Use the ADF for multiple-page documents.
Use the scanner glass for single pages, small items (such as
postcards or photos), transparencies, photo paper, or thin media
(such as magazine clippings).
You can use the ADF or the scanner glass to scan documents.
Using the ADF
The Automatic Document Feeder (ADF) can scan multiple pages including duplex pages. When using the ADF:
• Load the document into the ADF faceup, short edge first.
• Load up to 75 sheets of plain paper in the ADF input tray.
• Scan sizes from 114.0 x 139.4 mm (4.5 x 5.5 in.) to 297.18 x 431.8 mm (11.7 x 17 in.).
• Scan documents with mixed page sizes (letter and legal).
• Scan media weights from 52 to 120 g/m
2
(14 to 32 lb).
• Do not load postcards, photos, small items, transparencies, photo paper, or thin media (such as magazine
clippings) into the ADF. Place these items on the scanner glass.
Using the scanner glass
The scanner glass (flatbed) can be used to scan or copy single pages or book pages. When using the scanner glass:
• Place a document facedown on the scanner glass in the upper left corner.
• Scan or copy documents up to 215.9 x 355.6 mm (8.5 x 14 in.).
• Copy books up to 25.3 mm (1 in.) thick.
18
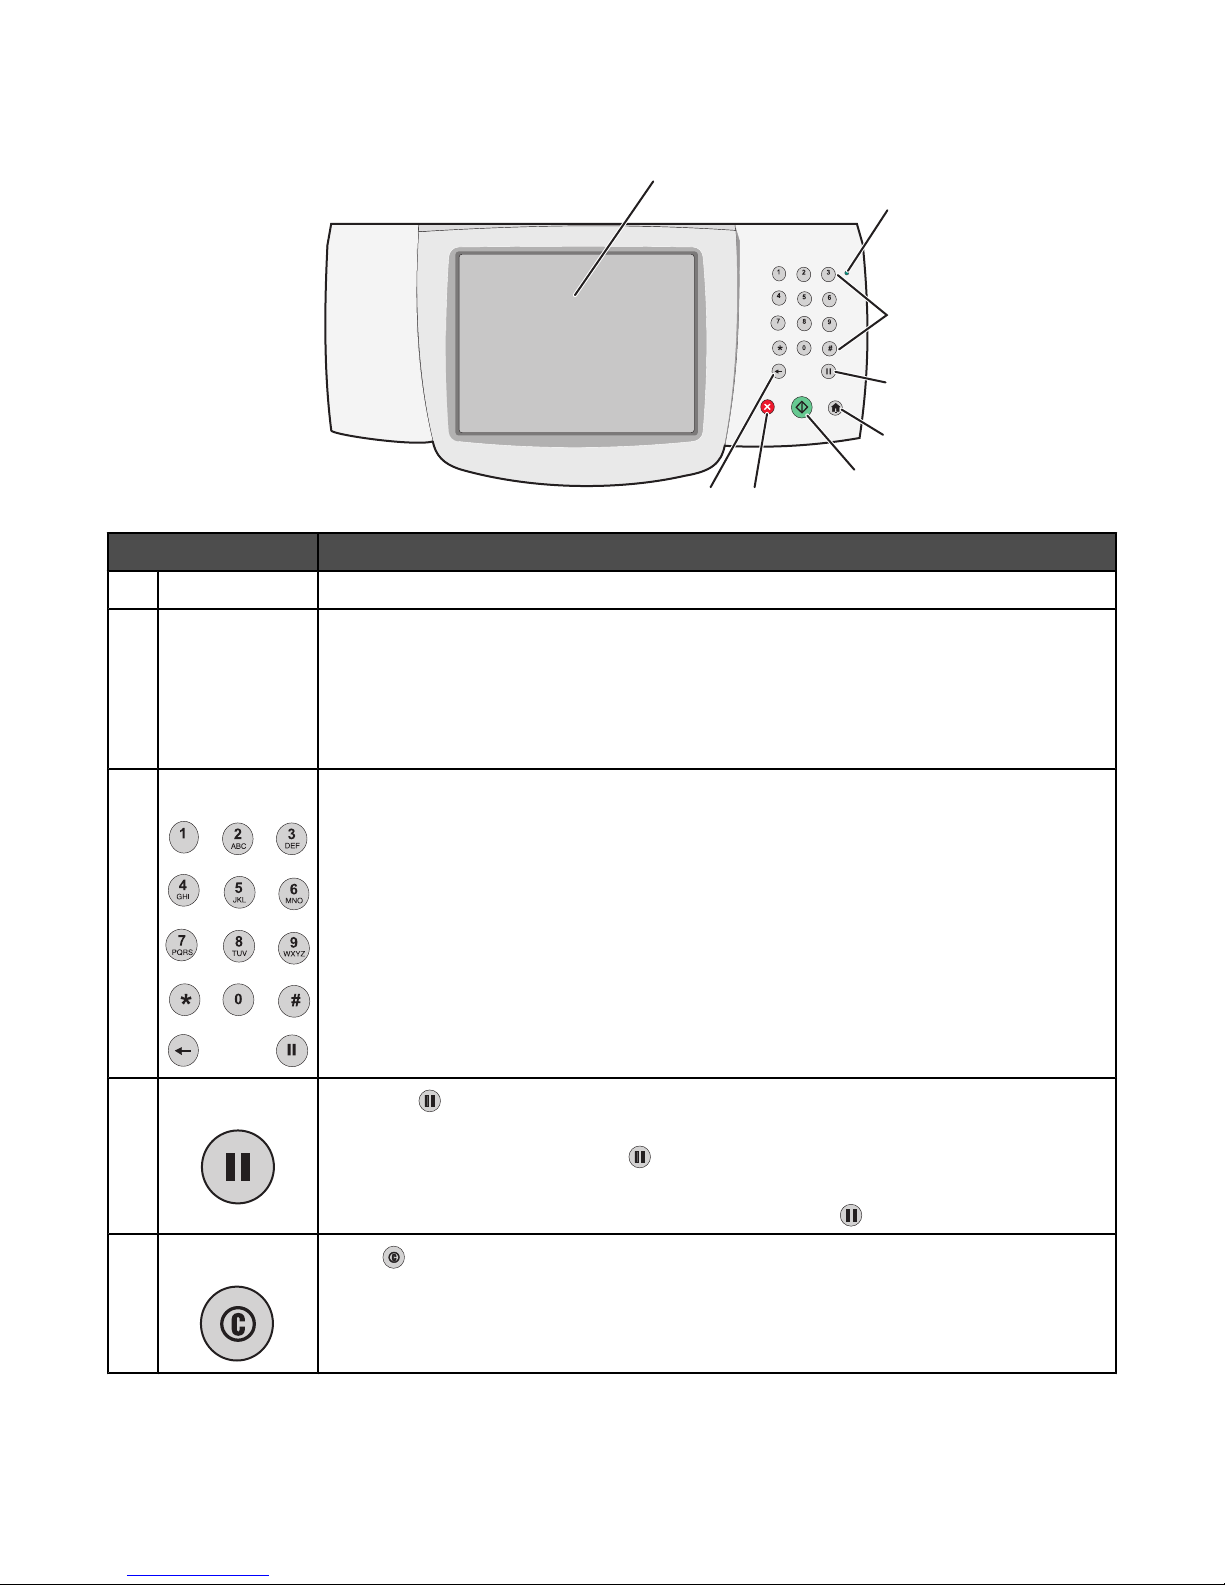
Understanding the control panel
1
2
DEF
ABC
GHI
JKL
MNO
PQRS
TUV
WXYZ
8
7
Control panel item Description
Display View scanning, copying, faxing, and printing options as well as status and error messages.
1
Indicator light Indicates the printer status:
2
• Off—The power is off.
• Blinking green—The printer is warming up, processing data, or printing.
• Solid green—The printer is on, but idle.
• Solid red—Operator intervention is needed.
3
4
5
6
Keypad Enter numbers or symbols on the display.
3
Dial Pause
4
• Press to cause a two- or three-second dial pause in a fax number. In the Fax To:
field, a Dial Pause is represented by a comma (,).
• From the home screen, press to redial a fax number.
• The button functions only within the Fax menu or with fax functions. When outside of
the Fax menu, fax function, or home screen, pressing
Home
5
Press to return home.
causes an error beep.
19
Control panel item Description
Start
6
• Press to initiate the current job indicated on the display.
• From the home screen, press to start a copy job with the default settings.
• If pressed while a job is scanning, the button has no effect.
Stop Stops all printer activity
7
A list of options is offered once Stopped appears on the display.
Back
8
In the Copy menu, press to delete the right-most digit of the value in the Copy Count.
The default value of 1 appears if the entire number is deleted by pressing
times.
In the Fax Destination List, press
manually. You can also press
deleted, another press of
numerous
to delete the right-most digit of a number entered
to delete an entire shortcut entry. Once an entire line is
causes the cursor to move up one line.
In the E-mail Destination List, press
the character is in a shortcut, the shortcut is deleted.
to delete the character to the left of the cursor. If
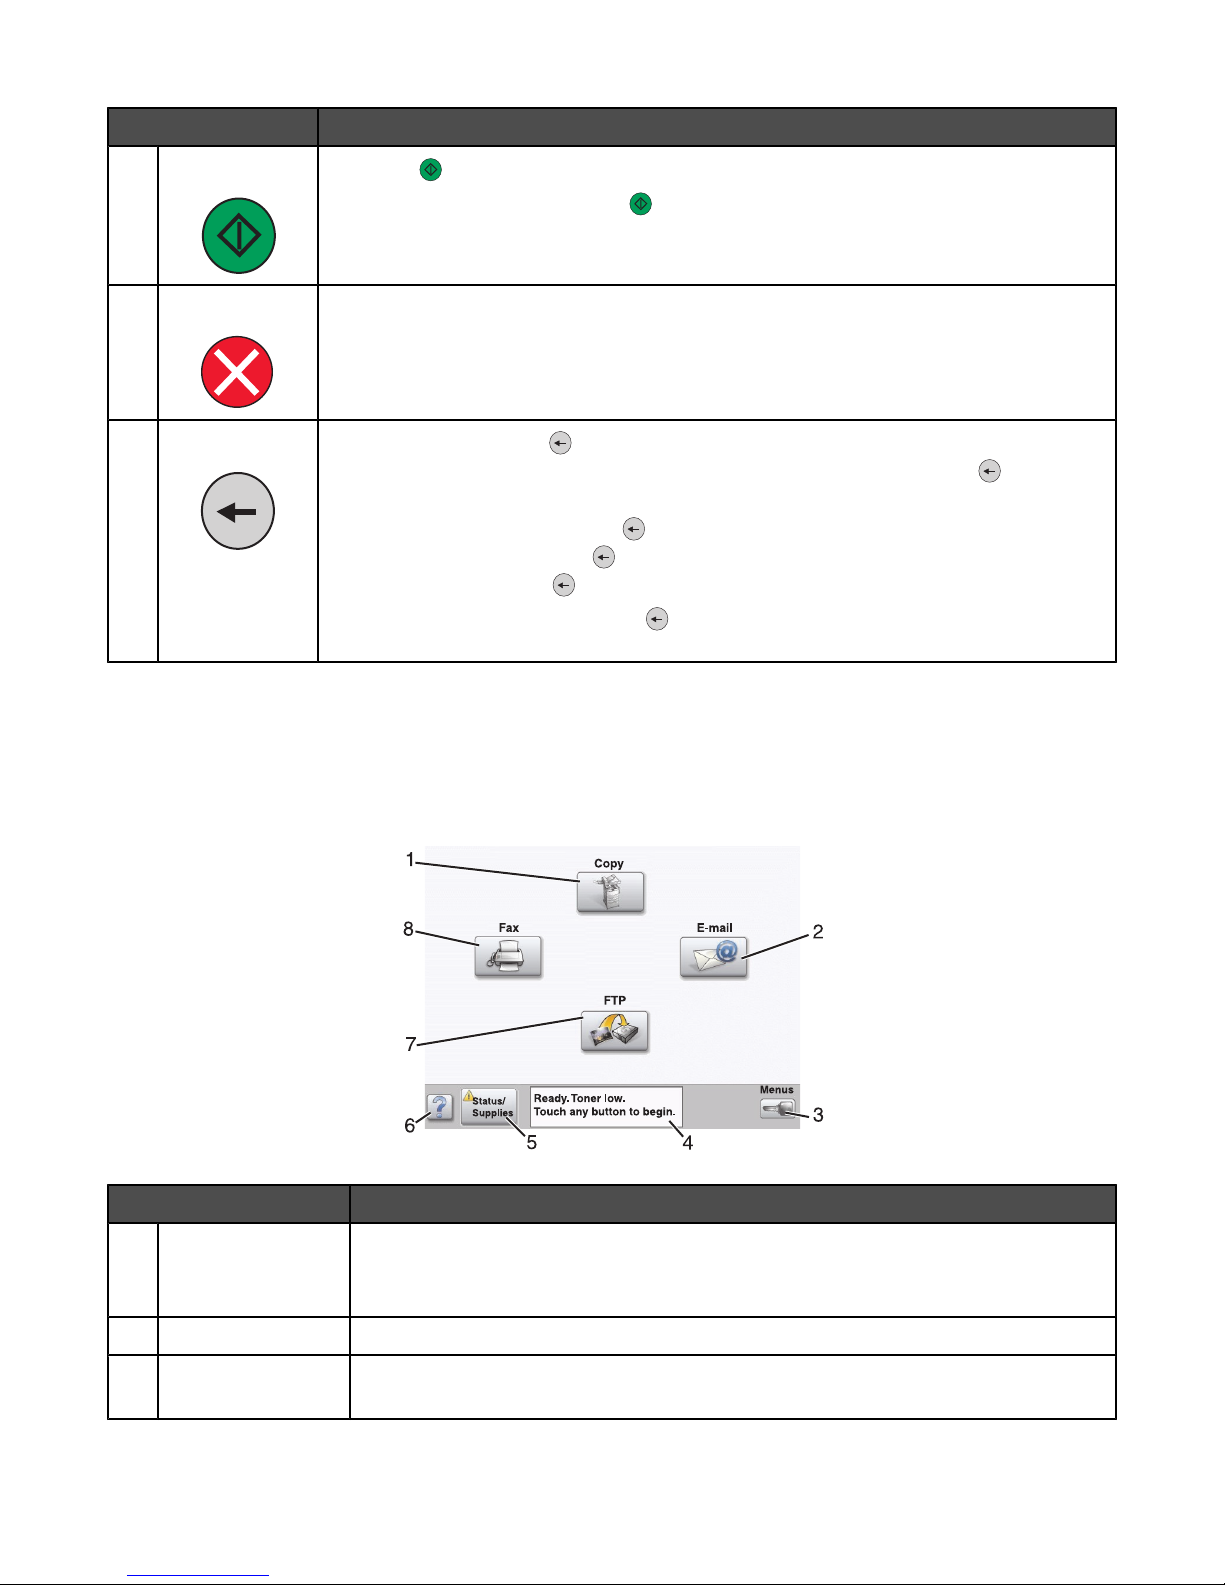
Understanding the home screen
After the printer is turned on and a short warm-up period occurs, the display shows the following basic screen which
is referred to as the home screen. Use the home screen buttons to initiate an action such as copying, faxing, or
scanning; to open the menu screen; or to respond to messages.
Display item Description
Copy Access the Copy menus.
1
Note: If the home screen is shown, you can also access the Copy menus by pressing
a number on the keypad.
E-mail Access the E-mail menus.
2
Menus Access the menus. These menus are available only when the printer is in the Ready
3
state.
20
Display item Description
Status message bar
4
• Shows the current printer status such as Ready or Busy.
• Shows printer conditions such as Toner Low.
• Shows intervention messages to give instructions on what the user should do so
the printer can continue processing, such as Close door or Insert print
cartridge.
Status/Supplies Appears on the display whenever the printer status includes a message requiring
5
intervention. Touch it to access the messages screen for more information on the
message, including how to clear it.
Tips All menus have a Tips button. Tips is a context-sensitive Help feature within the display
6
touch screens.
FTP Access the File Transfer Protocol (FTP) menus.
7
Note: This function must be set up by your system support person. Once it is set up,
it appears as a display item.
Fax Access the Fax menus.
8
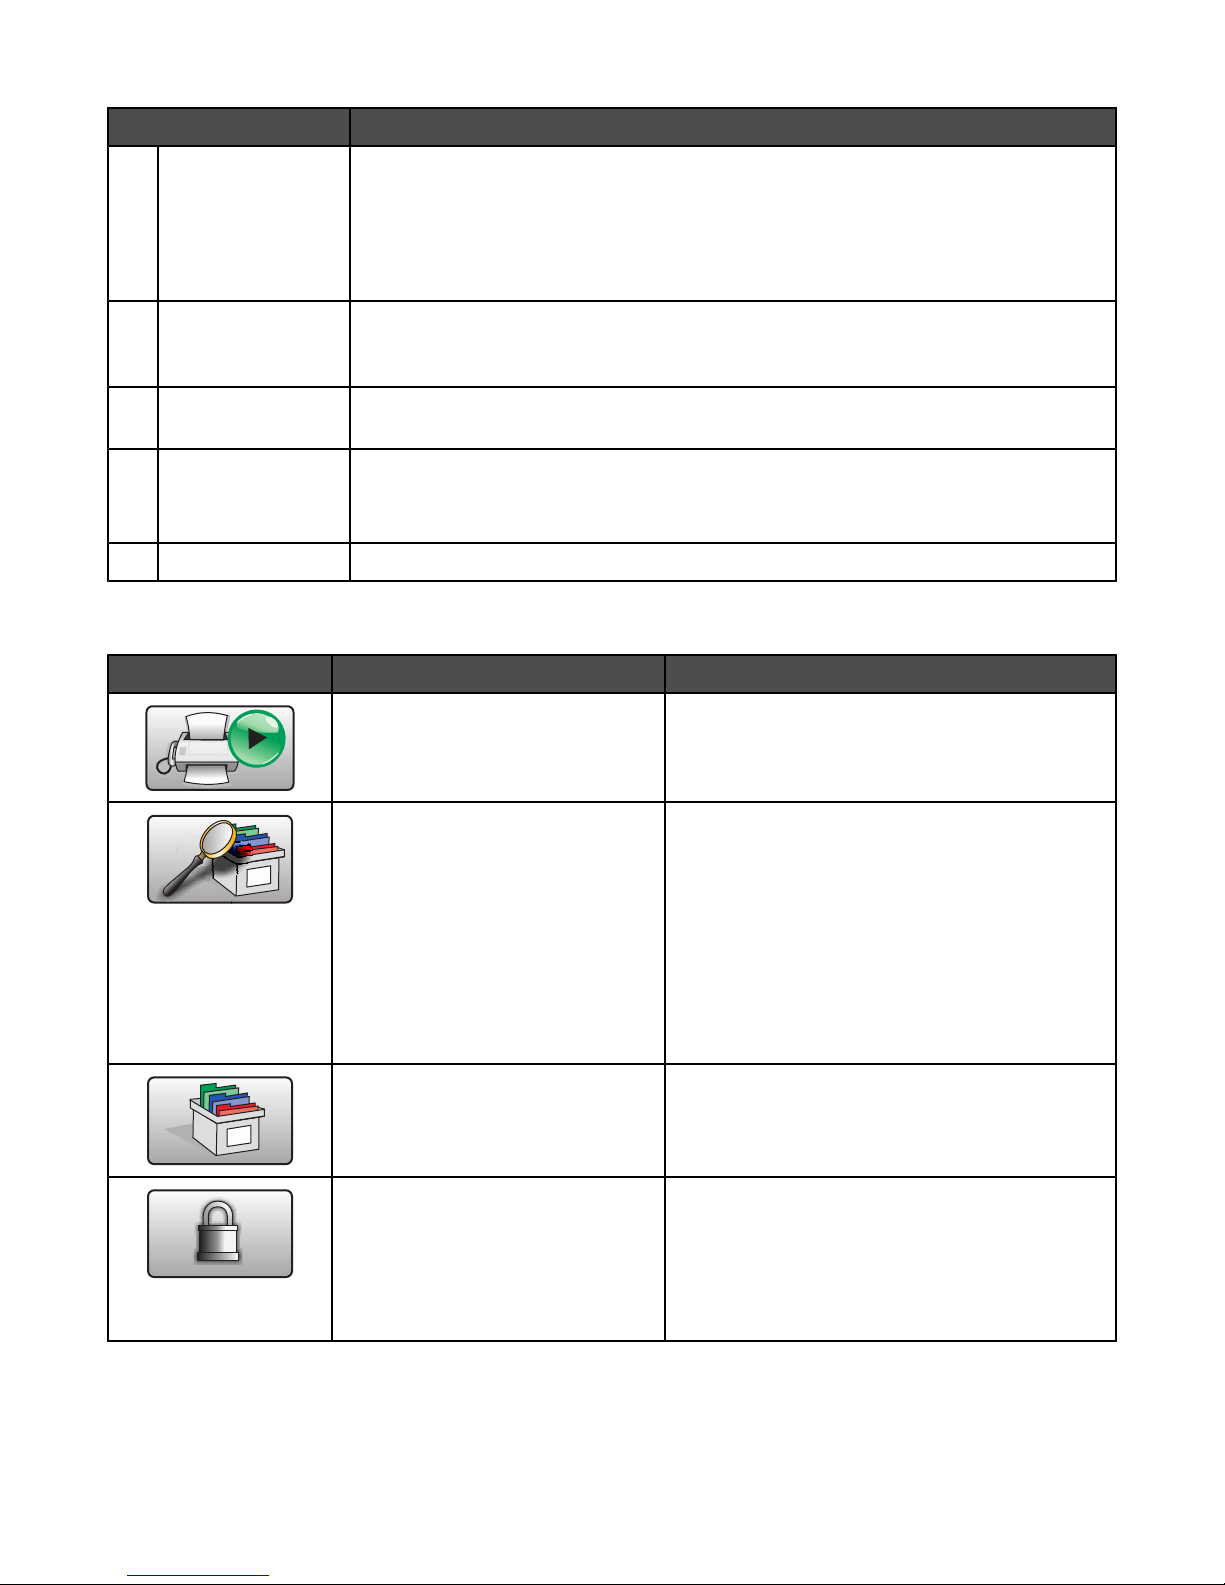
Other buttons that may appear on the home screen:
Button Button name Function
Release Held Faxes If this button is shown, there are held faxes with a
scheduled hold time previously set. To access the
list of held faxes, touch this button.
Search Held Jobs Searches on any of the following items and returns
search results:
• User names for held or confidential print jobs
• Job names for held jobs, excluding
confidential print jobs
• Profile names
• Bookmark container or job names
• USB container or job names for supported
extensions only
Held Jobs Opens a screen containing all the held jobs
Lock Device This button appears on the screen when the printer
is unlocked and Device Lockout Personal
Identification Number (PIN) is not empty.
Touching this button opens a PIN entry screen.
Entering the correct PIN locks the control panel
(touch screen and hard buttons).
21
Button Button name Function
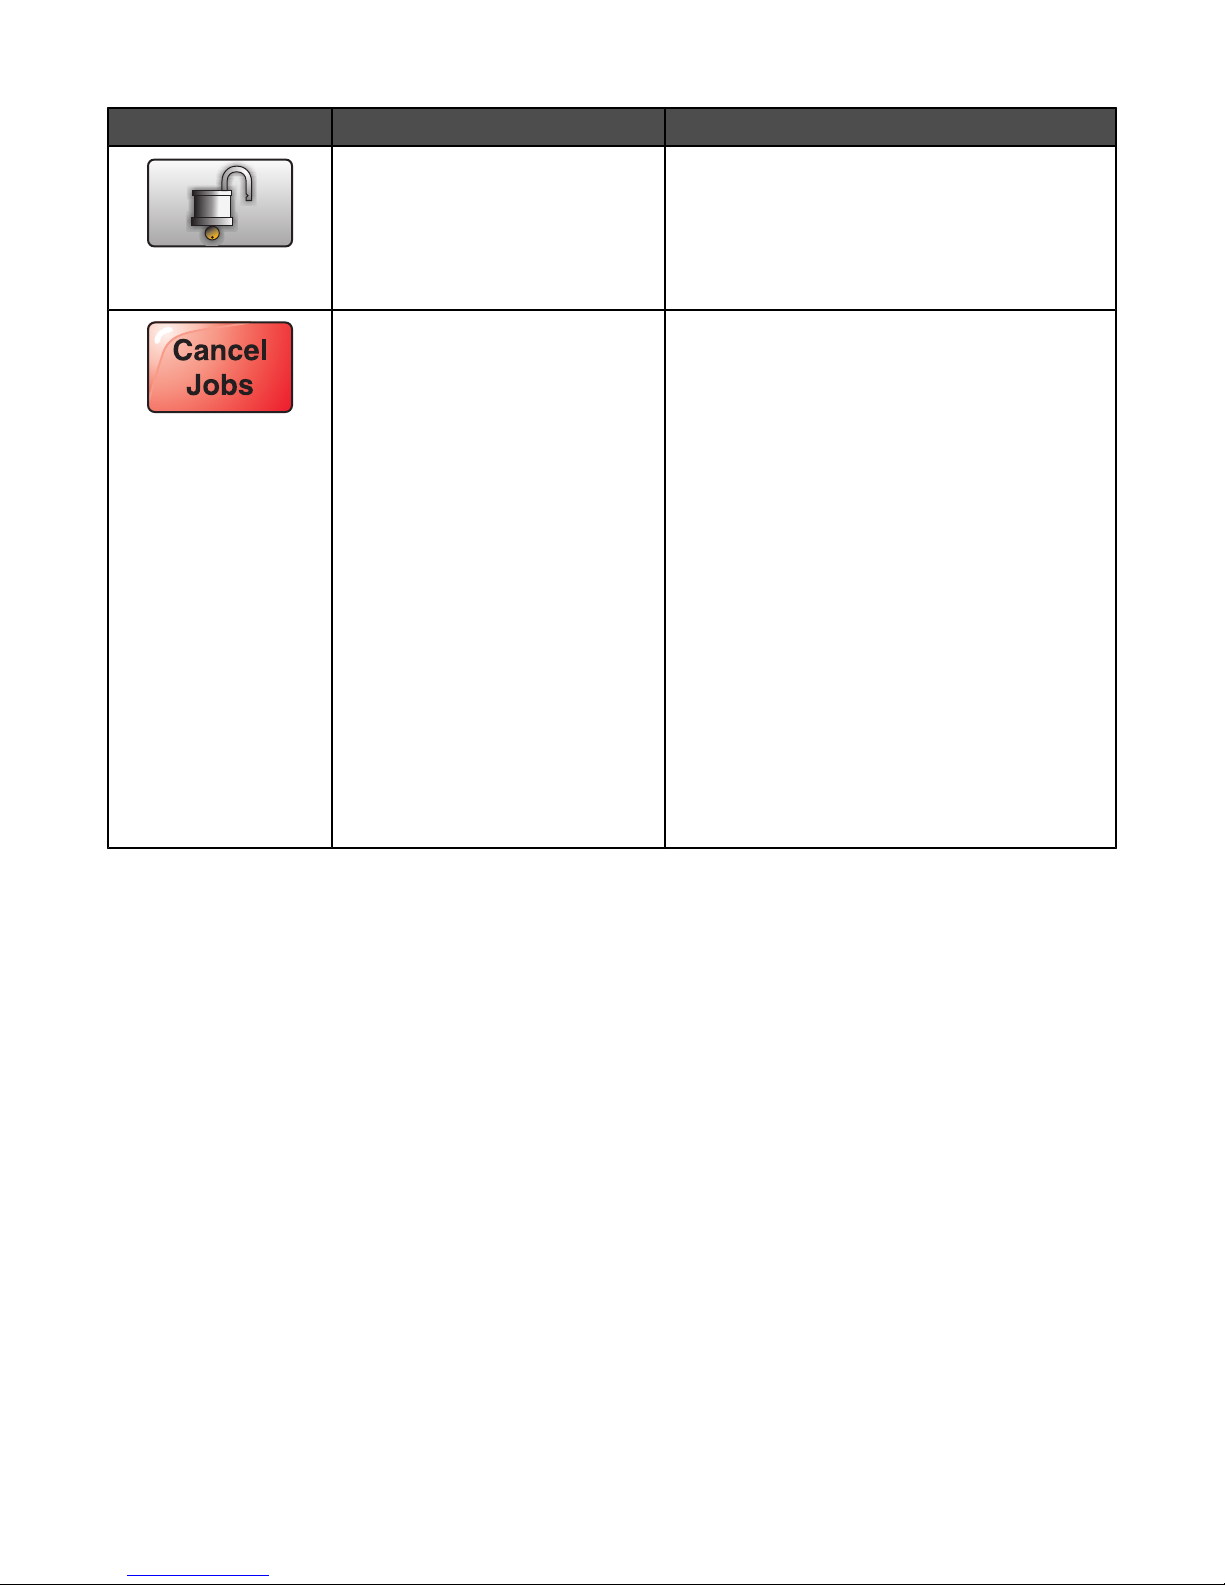
Unlock Device This button appears on the screen when the printer
is locked. The control panel buttons and shortcuts
cannot be used while it appears.
Touching this button opens a PIN entry screen.
Entering the correct PIN unlocks the control panel
(touch screen and hard buttons).
Cancel Jobs Opens the Cancel Jobs screen. The Cancel Jobs
screen shows three headings: Print, Fax, and
Network.
The following items are available under the Print,
Fax, and Network headings:
• Print job
• Copy job
• Fax profile
• FTP
• E-mail send
Each heading has a list of jobs shown in a column
under it. Each column can show only three jobs per
screen. The job appears as a button which you can
touch to access information about the job. If more
than three jobs exist in a column, then the down
arrow appears at the bottom of the column. Each
touch of the down arrow accesses one job in the
list. When more than three jobs exist, once the
fourth job in the list is reached, then an up arrow
appears at the top of the column.
Using the touch-screen buttons
Note: Depending on your options and administrative setup, your screens and buttons may vary from those shown.
22
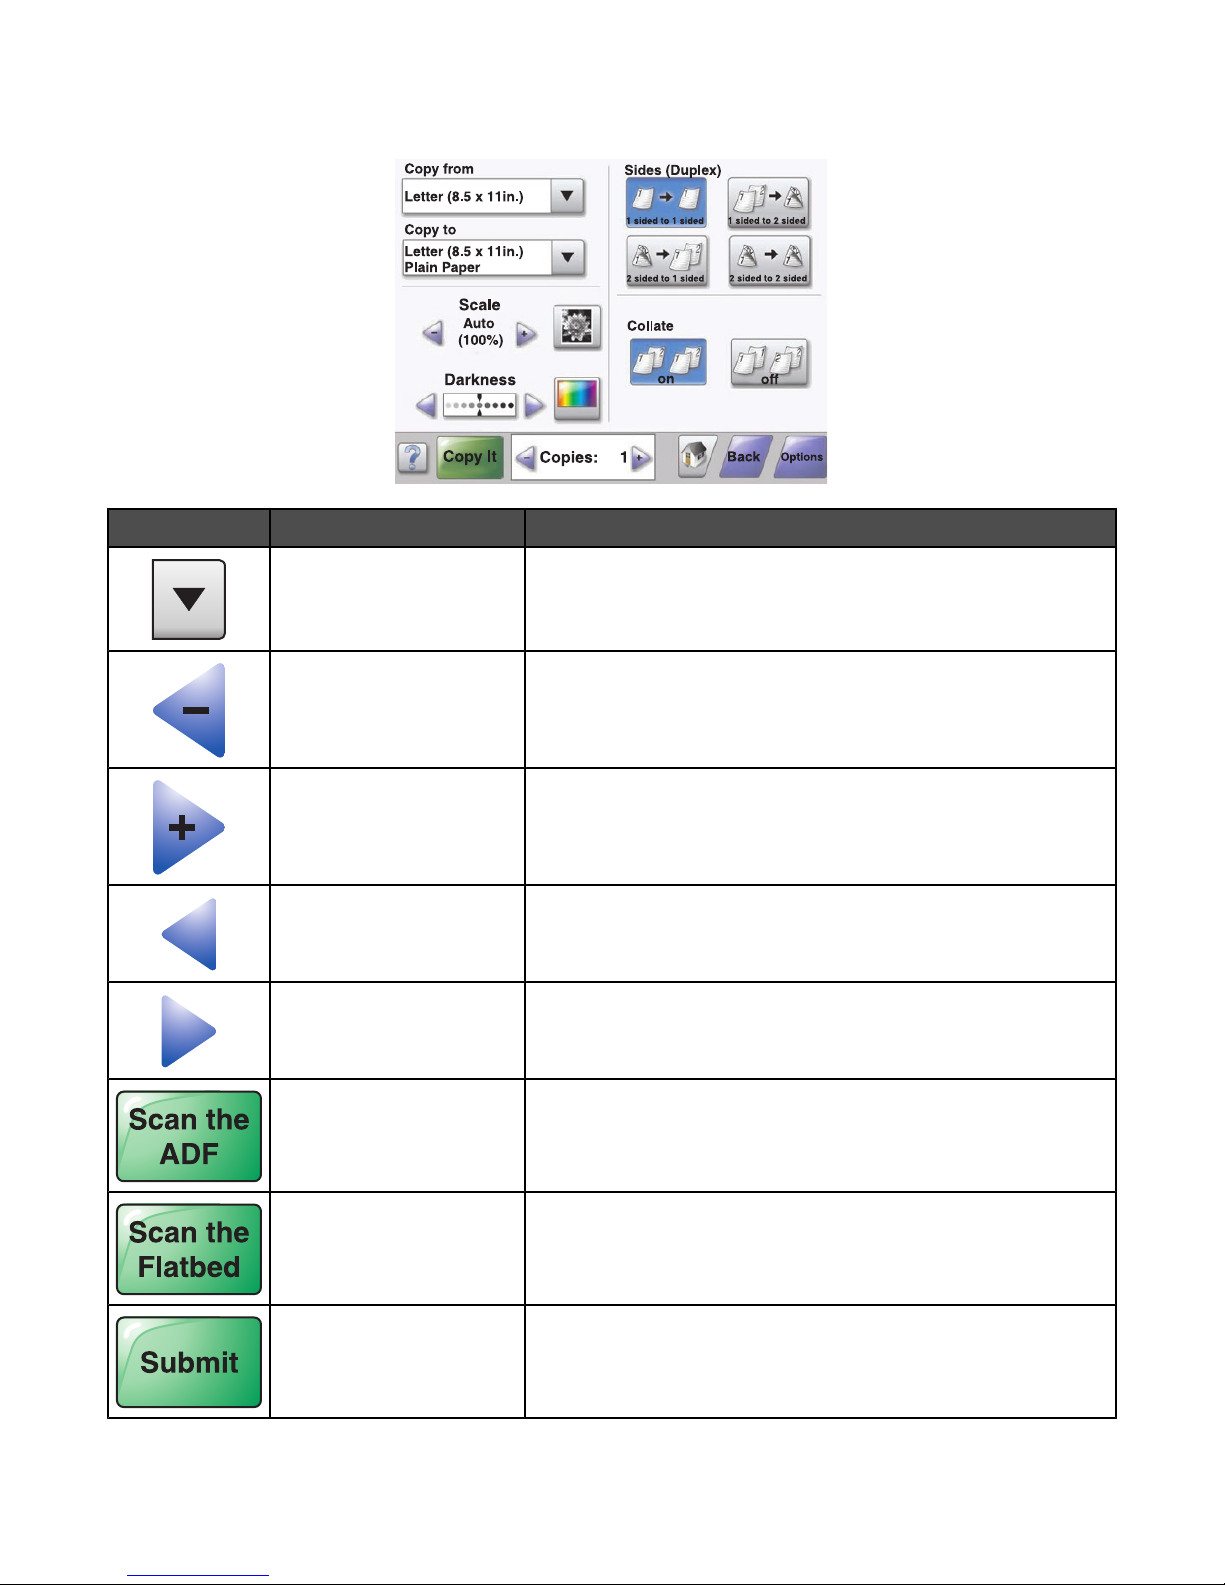
Sample screen one
Button Button name Function
Scroll down Opens a drop-down list
Left scroll decrease button Scrolls to another value in decreasing order
Right scroll increase button Scrolls to another value in increasing order
Left arrow button Scrolls left
Right arrow button Scrolls right
Scan the ADF Scans using the ADF
Scan the flatbed Scans using the scanner glass
Submit Saves a value as the new user default setting
23
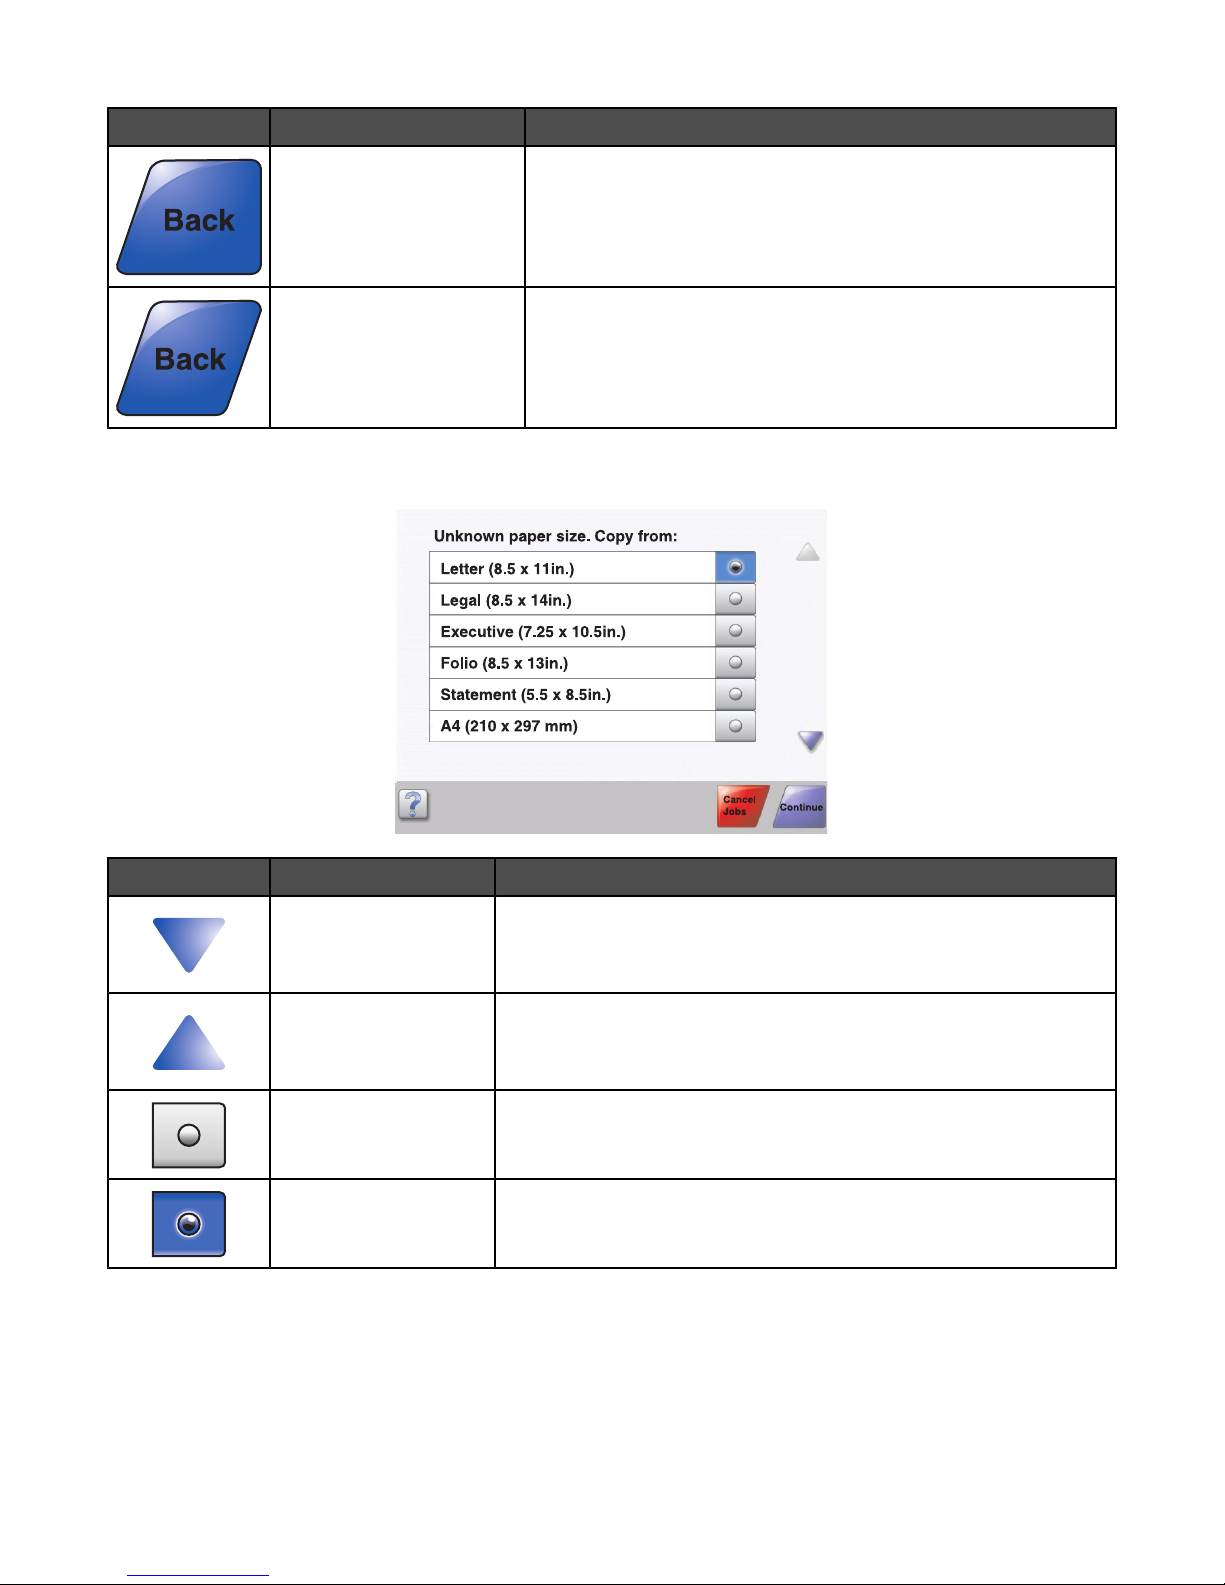
Button Button name Function
Back When the button is shaped like this, no other navigation is possible
from this screen except to go back.
Back When the button is shaped like this, both forward and backward
navigation is possible from this screen.
Sample screen two
Button Button name Function
Down arrow Moves down to the next screen
Up arrow Moves up to the next screen
Unselected radio button This is an unselected radio button. The radio button is gray to show it
is unselected.
Selected radio button This is a selected radio button. The radio button is blue to show it is
selected.
24
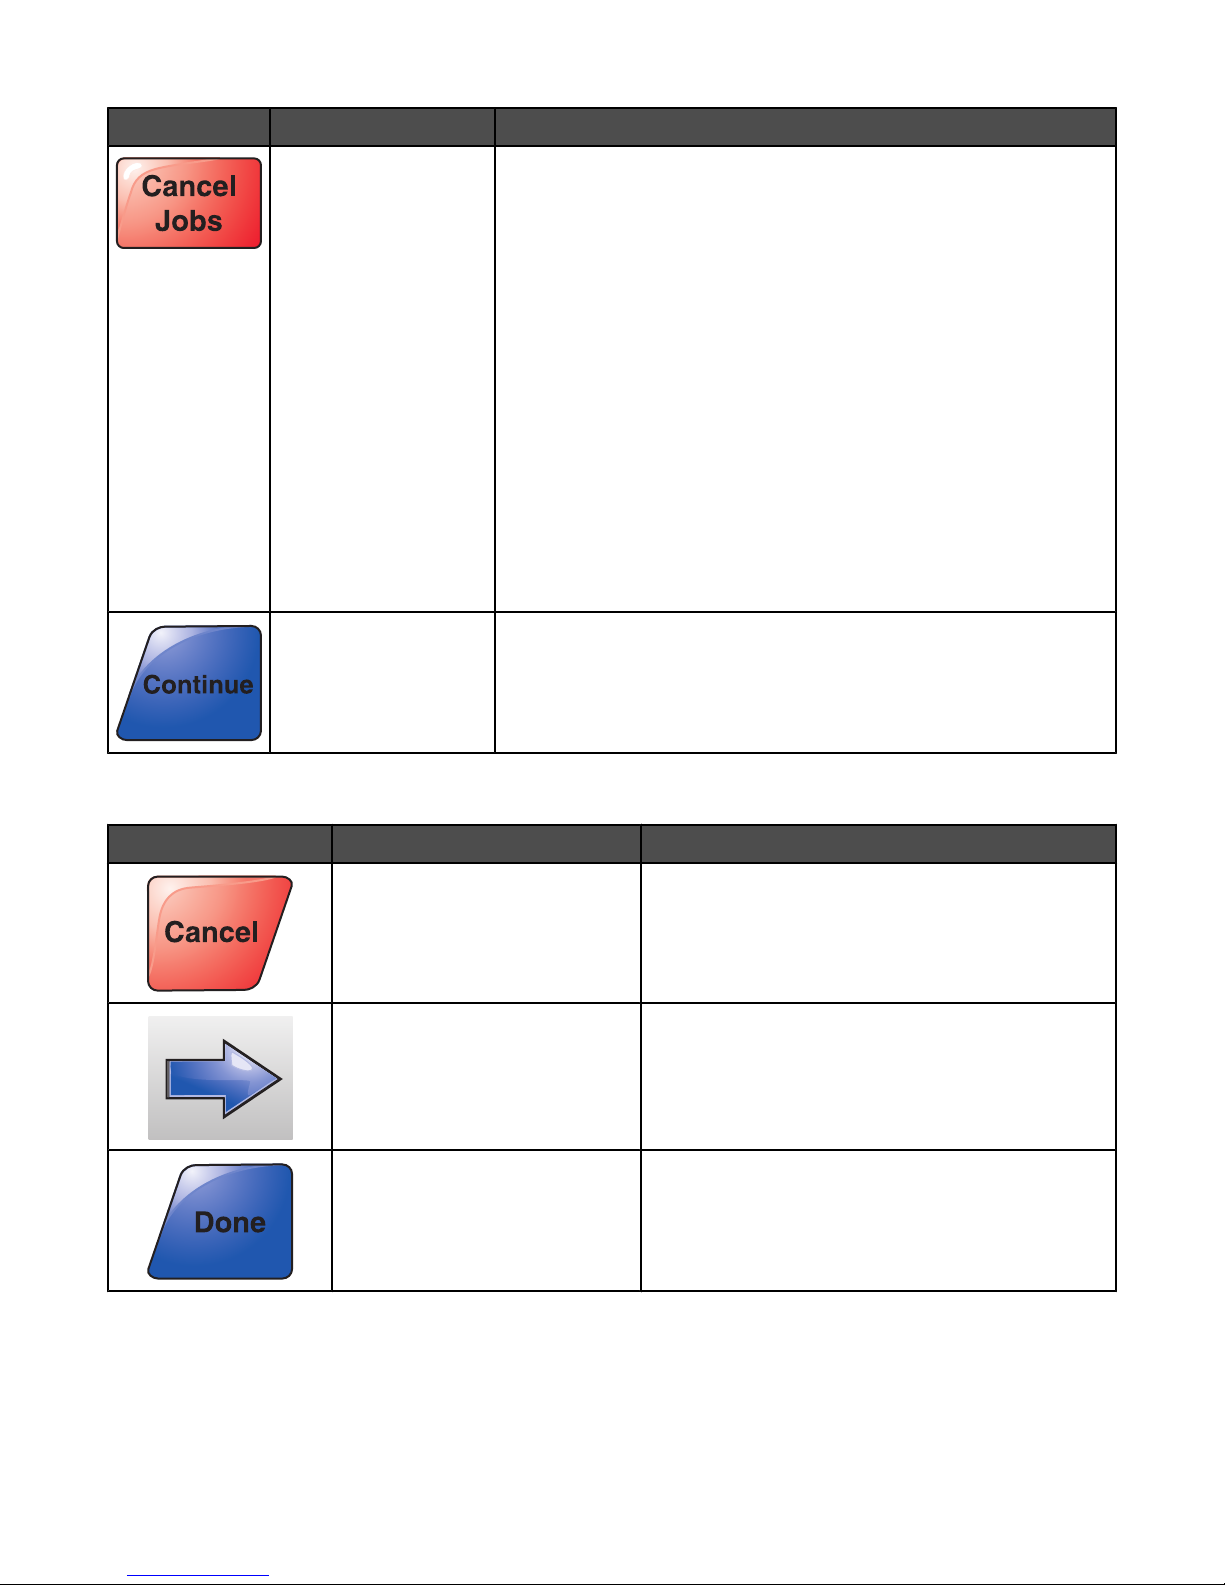
Button Button name Function
Cancel Jobs Opens the Cancel Jobs screen. The Cancel Jobs screen shows three
headings: Print, Fax, and Network.
The following items are available under the Print, Fax, and Network
headings:
• Print job
• Copy job
• Fax profile
• FTP
• E-mail send
Each heading has a list of jobs shown in a column under it. Each
column can show only three jobs per screen. The job appears as a
button which you can touch to access information about the job. If
more than three jobs exist in a column, then the down arrow appears
at the bottom of the column. Each touch of the down arrow accesses
one job in the list. When more than three jobs exist, once the fourth
job in the list is reached, then an up arrow appears at the top of the
column.
Continue Touch this button when more changes need to be made for a job or
after clearing a paper jam.
Other touch-screen buttons
Button Button name Function
Cancel
Select Selects a menu or menu item
Done Specifies that a job is finished
• Cancels an action or a selection
• Cancels out of a screen and returns to the
previous screen
For example, when scanning an original document,
touch this button to indicate the last page has
scanned. The job then begins printing.
25

Features
Feature Feature name Description
Menus Settings
Copy Settings
Number of Copies
Menu trail line A Menu trail line is located at the top of each menu
screen. This feature acts as a trail, showing the path
taken to arrive at the current menu. It gives the exact
location within the menus.
Touch any of the underlined words to return to that
menu or menu item.
The Number of Copies is not underlined since this is
the current screen. If this feature is used on the
Number of Copies screen before the Number of
Copies is set and saved, then the selection is not
saved, and it does not become the user default
setting.
Attendance message alert If an attendance message occurs which closes a
function, such as copy or fax, then a solid red
exclamation point appears over the function button
on the home screen. This indicates that an
attendance message exists.
26

Installing options
Installing internal options
CAUTION: If you are installing memory or option cards sometime after setting up the printer, turn the printer off
and unplug the power cord from the wall outlet before continuing. If you have any other devices attached to the
printer, turn them off as well, and unplug any cables going to the printer.
You can customize your printer connectivity and memory capacity by adding optional cards. The instructions in this
section explain how to install the available cards; you can also use them to locate a card for removal.
Available options
Memory cards
• Printer memory
• Flash memory
• Fonts
Firmware cards
• Bar Code and Forms
• IPDS and SCS/TNe
• PrintCryption
• PRESCRIBE
TM
Other internal options
• RS-232 serial interface card
• Parallel 1284-B interface card
• MarkNet
All of these options may not be available. For more information, contact the place where you purchased the printer.
TM
N8000 Series Internal Print Servers
Accessing the system board to install internal options
CAUTION: Turn the printer off, and unplug the power cord from the wall outlet before installing an internal option.
If you have any other devices attached to the printer, turn them off as well and unplug any cables going into the
printer.
27
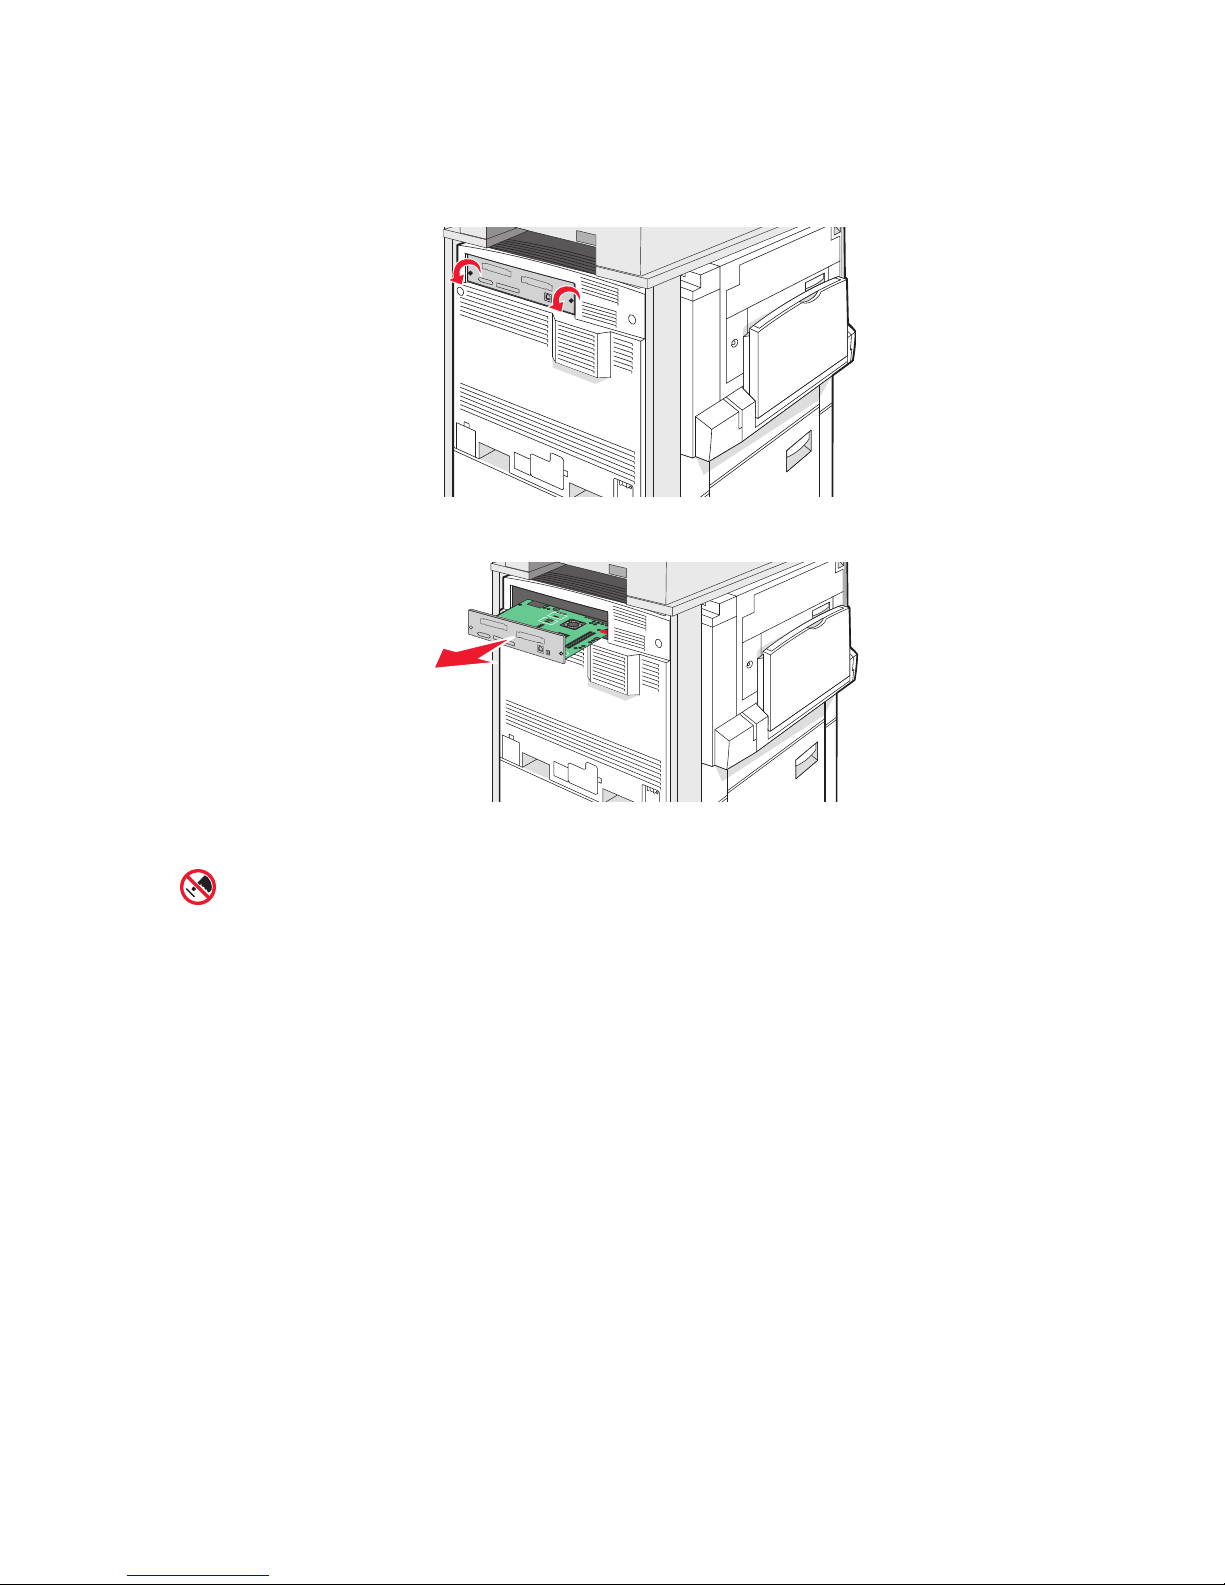
Note: This operation requires a #2 Phillips screwdriver.
1 Remove the cover and system board.
a Turn the screws on the cover counterclockwise, and then remove them.
b Gently pull the cover and system board away from the printer, and then remove it.
2 Use the illustration below to locate the appropriate connector.
Warning: System board electrical components are easily damaged by static electricity. Touch
something metal on the printer before touching any system board electronic components or connectors.
28
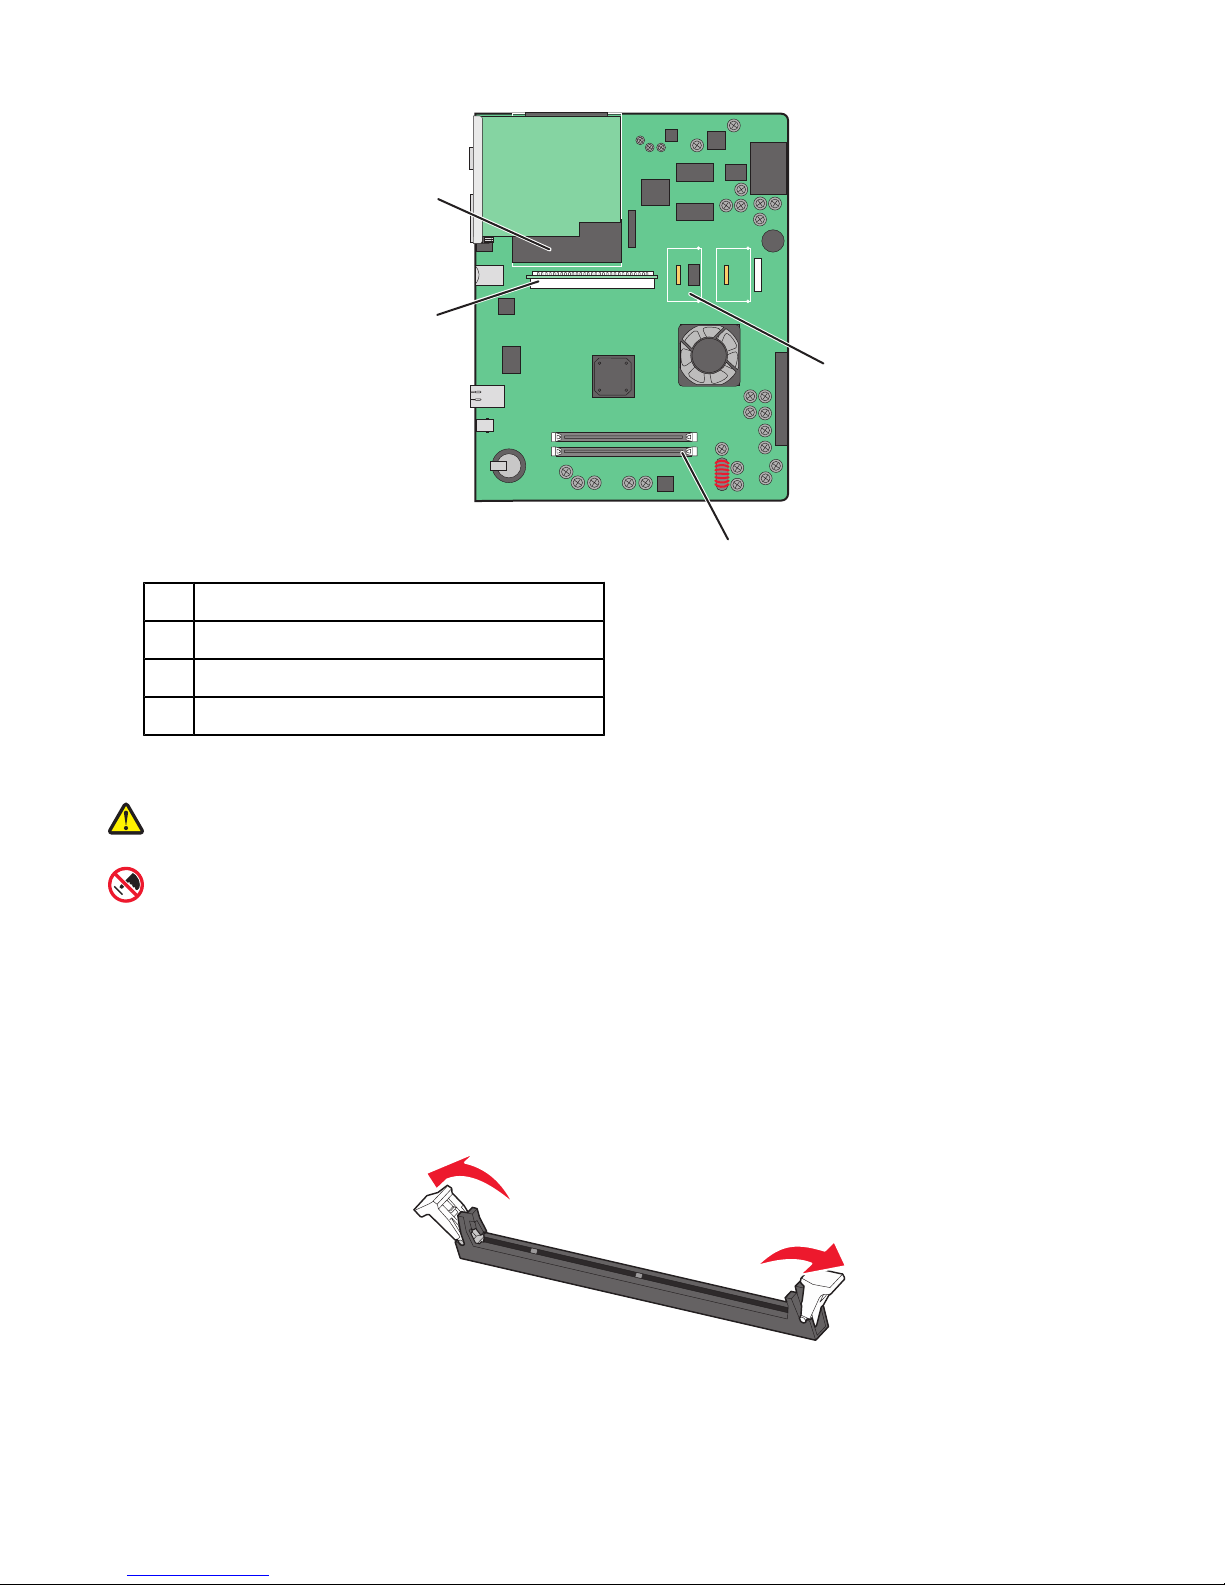
Firmware and flash memory card connectors
1
Memory card connector
2
Internal print server connector
3
Hard disk
4
Installing a memory card
4
3
1
2
CAUTION: If you are installing a memory card after setting up the printer, turn the printer off, and unplug the
power cord from the wall outlet before continuing.
Warning: System board electrical components are easily damaged by static electricity. Touch something metal
on the printer before touching any system board electronic components or connectors.
An optional memory card can be purchased separately and attached to the system board. To install the memory
card:
1 Access the system board.
2 Unpack the memory card.
Note: Avoid touching the connection points along the edge of the card.
3 Open the memory card connector latches.
4 Align the notches on the memory card with the ridges on the connector.
29
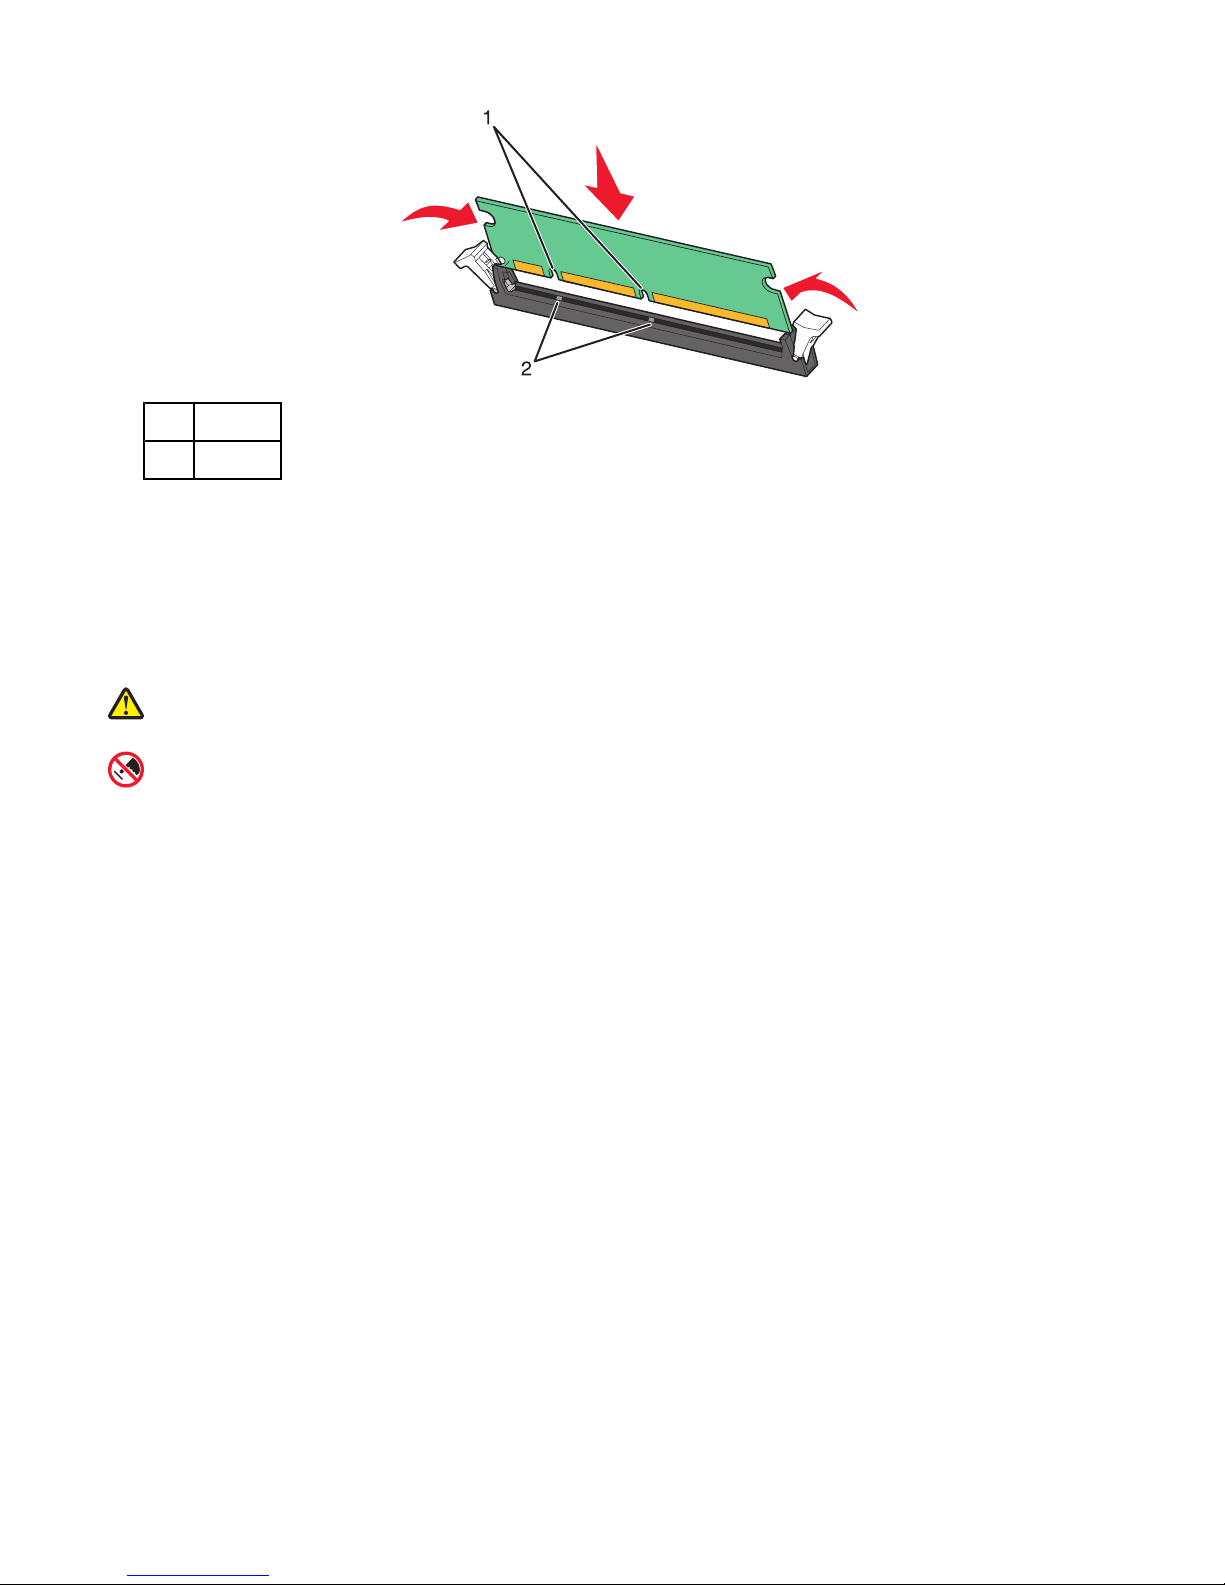
Notches
1
Ridges
2
5 Push the memory card straight into the connector until it snaps into place.
6 Reinstall the system board.
Installing a flash memory or firmware card
The system board has two connections for an optional flash memory or firmware card. Only one of each may be
installed, but the connectors are interchangeable.
CAUTION: If you are installing a memory card after setting up the printer, turn the printer off, and unplug the
power cord from the wall outlet before continuing.
Warning: System board electrical components are easily damaged by static electricity. Touch something metal
on the printer before touching any system board electronic components or connectors.
1 Access the system board.
2 Unpack the card.
Note: Avoid touching the connection points along the edge of the card.
3 Holding the card by its sides, align the plastic pins on the card with the holes on the system board.
30
 Loading...