

Page 1

GXR DIGITAL CAMERA BODY
Camera Body User Guide
The product serial number can be found on the bottom of
the camera body.
Before You Begin
Before using your camera body, take a few moments to familiarize
yourself with the controls and displays (pages 1–10). Refer to this
section as you read through the rest of the manual.
Basic Photography and Playback
Read this section before using the camera for the rst time. It covers the
steps involved in readying the camera for use, taking photographs,
and playing them back (pages 11–44).
Reference
Read this section for information on topics not covered in “Basic Photography
and Playback.” It covers advanced shooting and playback options, and
describes how to print photographs, customize camera settings,
and copy pictures to a computer (pages 45–187).
The rechargeable battery needs to be charged before use. The
battery is not charged at the time of purchase.
Page 2
ii
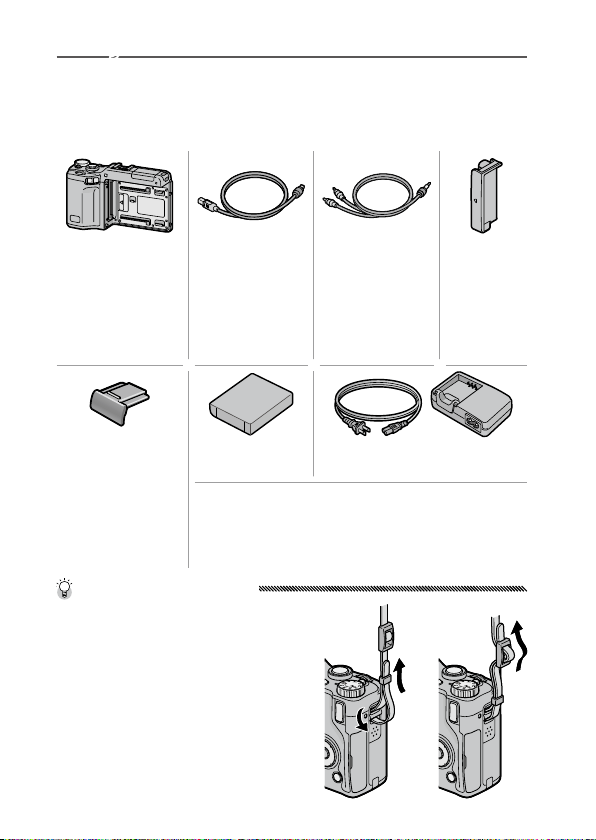
Package Contents
Conrm that the package contains the items listed
below.
* The actual appearance of included items may dier.
GXR camera body
The serial number
can be found on
the bottom of the
camera body.
Hot shoe cover
The cover comes
mounted on the
hot shoe of the
camera body.
USB cable with
mini-B connector
Connect the
camera body to
a computer or
printer.
DB-90 rechargeable
battery
•
CD: Contains software and a Software User Guide.
• Camera Body User Guide (this manual)
• Neck strap
• Warranty
Tip: Attaching the Neck Strap
Put the ends of the neck strap
through the strap eyelets on each
side of the camera body, and
thread the ends through the clips
as shown.
A/V cable
Connect the
camera body to
a TV.
BJ-9 battery charger
Connector Cap
The cap
comes
mounted on
the camera
body.
Page 3

Notices
• Safety precautions: Read all safety precautions thoroughly to ensure
safe use.
• Test shots: Take test shots to ensure that the camera is working
properly before taking photos on important occasions.
• Copyright: Reproduction or alteration of copyrighted documents,
magazines, and other materials, other than for personal, home,
or other similarly limited purposes, without the consent of the
copyright holder, is prohibited.
• Exemption from liability: Ricoh Co., Ltd. assumes no liability for failure to
record or display images as a result of product malfunction.
• Warranty: This product is manufactured to local specications and the
warranty is valid within the country of purchase. The manufacturer
assumes no responsibility for servicing the product in other countries
or bearing any expense thereby incurred.
• Radio interference: Operating this product in the vicinity of other
electronic equipment may adversely aect both the camera and
the other device. Interference is particularly likely if the camera is
used in close proximity to a radio or television. This can be resolved
by moving the camera as far as possible from the other device,
reorienting the radio or television antenna, or plugging the radio or
television into a dierent outlet.
© 2009 RICOH CO., LTD. All rights reserved. This publication may not
be reproduced in whole or in part without Ricoh’s express written
permission. Ricoh reserves the right to change the contents of this
document at any time without prior notice.
Every eort has been made to ensure the accuracy of the information in
this document. Should you nevertheless notice any errors or omissions,
we would be grateful if you would notify us at the address listed on the
back cover of this booklet.
Microsoft, Windows, Windows Vista, and Internet Explorer are registered
trademarks of Microsoft Corporation in the United States of America
and other countries. Macintosh and Mac OS are registered trademarks of
Apple Inc. in the United States of America and other countries. Adobe,
the Adobe logo, and Adobe Reader are trademarks of Adobe Systems
Incorporated.
HDMI, the Logo and High-Denition Multimedia Interface are
trademarks or registered trademarks of HDMI Licensing LLC.
All other trade names mentioned in this document are the property of
their respective owners.
iii
Page 4
iv
Safety Precautions
Warning Symbols
Various symbols are used throughout this instruction manual and
on the product to prevent physical harm to you or other people and
damage to property. The symbols and their meanings are explained
below.
This symbol indicates matters that may lead to
Danger
Warning
Caution
Sample Warnings
The symbol alerts you to actions that must be performed.
The symbol alerts you to prohibited actions.
The symbol may be combined with other symbols to indicate
that a specic action is prohibited.
Examples
Observe the following precautions to ensure safe use of this
equipment.
Do not attempt to disassemble, repair or alter the equipment
yourself. The high-voltage circuitry in the equipment poses
signicant electrical hazard.
Do not attempt to disassemble, alter or directly solder the
battery.
imminent risk of death or serious injury if ignored or
incorrectly handled.
This symbol indicates matters that may lead to death
or serious injury if ignored or incorrectly handled.
This symbol indicates matters that may lead to injury
or physical damage if ignored or incorrectly handled.
Do not touch Do not disassemble
Danger
Page 5
Do not put the battery in a re, attempt to heat it, use it in a
high temperature environment such as next to a re or inside a
car, or abandon it. Do not put it into water or the sea or allow it
to get wet.
Do not attempt to pierce, hit, compress, drop, or subject the
battery to any other severe impact or force.
Do not use a battery that is signicantly damaged or deformed.
Warning
Turn o the power immediately in the event of abnormalities
such as smoke or unusual odors being emitted. Remove the
battery as soon as possible, being careful to avoid electric
shocks or burns. If you are drawing power from a household
electrical outlet, be sure to unplug the power cord from the
outlet to avoid re or electrical hazards. Discontinue use of the
equipment immediately if it is malfunctioning. Contact the
nearest service center at your earliest convenience.
Turn o the power immediately if any metallic object, water,
liquid or other foreign object gets into the camera body.
Remove the battery and memory card as soon as possible,
being careful to avoid electric shocks or burns. If you are
drawing power from a household electrical outlet, be sure to
unplug the power cord from the outlet to avoid re or electrical
hazards. Discontinue use of the equipment immediately if it
is malfunctioning. Contact the nearest service center at your
earliest convenience.
v
Page 6

vi
Avoid any contact with the liquid crystal inside the picture
display, should the monitor be damaged. Follow the
appropriate emergency measures below.
• SKIN: If any of the liquid crystal gets on your skin, wipe it o
and rinse the aected area thoroughly with water, then wash
well with soap.
• EYES: If it gets in your eyes, wash your eyes with clean water
for at least 15 minutes and seek medical advice immediately.
• INGESTION: If any of the liquid crystal is ingested, rinse the
mouth out thoroughly with water. Have the person drink a
large amount of water and induce vomiting. Seek medical
assistance immediately.
Follow these precautions to prevent the battery from leaking,
overheating, igniting or exploding.
• Do not use a battery other than those specically
recommended for the equipment.
• Do not carry or store together with metal objects such as
ballpoint pens, necklaces, coins, hairpins, etc.
• Do not put the battery into a microwave or high pressure
container.
• If leakage of battery uid or a strange odor, color change, etc.
is noticed during use or during charging, remove the battery
from the camera body or battery charger immediately and
keep it away from re.
Please observe the following in order to prevent re, electrical
shock or cracking of the battery while charging.
• Use only the indicated power supply voltage. Also avoid the
use of multi-socket adapters and extension cords.
• Do not damage, bundle or alter power cords. Also, do not
place heavy objects on, stretch or bend power cords.
• Do not connect or disconnect the power plug with wet hands.
Always grip the plug section when disconnecting a power
cord.
• Do not cover equipment while charging.
Page 7
Keep the battery and SD memory card used in this equipment
out of the reach of children to prevent accidental ingestion.
Consumption is harmful to human beings. If swallowed, seek
medical assistance immediately.
Keep the equipment out of the reach of children.
Do not touch the internal components of the equipment if they
become exposed as a result of being dropped or damaged. The
high-voltage circuitry in the equipment could lead to an electric
shock. Remove the battery as soon as possible, being careful
to avoid electric shocks or burns. Take the equipment to your
nearest dealer or service center if it is damaged.
Do not use the equipment in wet areas as this could result in re
or electric shock.
Do not use the equipment near ammable gases, gasoline,
benzene, thinner or similar substances to avoid the risk of
explosion, re or burns.
Do not use the equipment in locations where usage is restricted
or prohibited as this may lead to disasters or accidents.
Wipe o any dust that accumulates on the electrical plug as this
may lead to re.
To avoid the risk of re, electric shock or injury, do not use
the battery charger with commercially available electronic
transformers when traveling abroad.
vii
Page 8
viii
Observe the following precautions to ensure safe use of this unit.
Caution
Contact with uid leaking from a battery can lead to burns. If
part of your body comes in contact with a damaged battery,
rinse the area with water immediately. (Do not use soap.)
If a battery starts to leak, remove it immediately from the
equipment and wipe the battery chamber thoroughly before
replacing it with a new battery.
Plug the power cords securely into the electrical outlets. Loose
cords pose a re hazard.
Do not allow the camera body to get wet. In addition, do not
operate it with wet hands. Both pose the risk of electric shock.
Do not re the ash at drivers of vehicles, as this may cause the
driver to lose control and result in a trac accident.
Safety
Precautions for
Accessories
When using optional products, carefully read the
instructions provided with the product before
using that product.
Page 9
Product Manuals
The following manuals are provided with the GXR camera body:
Camera Body User Guide (this booklet)
This guide describes how to use your camera and install the
supplied software.
* Read this guide along with the documentation provided
with the camera unit.
Software User Guide (pdf le)
The Software User Guide describes how to copy pictures from
your camera body to a computer for display and editing. It is
available in several languages, each in its own folder in the
“DC Manual” folder on the supplied CD.
For ease of reference, copy the
pdf le from the CD to your
computer hard disk.
“Irodio Photo & Video Studio” image viewing and editing software
is also included with this product. For information on using this
software, see the Help menu in Irodio Photo & Video Studio or
telephone one of the following customer support centers:
•
North America (U. S. A.): +1–800–458–4029 (toll free)
• U. K., Germany, France, and Spain: +800–1532–4865 (toll free)
•
Other European countries: +44–1489–564–764
• China: +86–21–5385–3786
•
Other Asian countries: +63–2–438–0090
Business hours: 9:00 AM to 5:00 PM
ix
Page 10
x
Table of Contents
Package Contents ......................................................................................................ii
Notices .............................................................................................................................iii
Safety Precautions ....................................................................................................iv
Product Manuals ........................................................................................................ix
Before You Begin 1
Read this section before using your camera body for the rst time.
Introduction .................................................................................... 2
Parts of the Camera Body .....................................................................................2
Basic Photography and Playback 11
Read this section before using your camera for the rst time.
First Steps .......................................................................................12
Charging the Battery ............................................................................................. 12
Inserting the Battery .............................................................................................14
Inserting Memory Cards ..................................................................................... 15
Attaching the Camera Unit to the Camera Body ................................17
Turning the Power On and O .......................................................................18
Basic Setup ..................................................................................................................20
Taking Photographs .....................................................................21
Holding the Camera .............................................................................................. 21
Taking a Photograph .............................................................................................22
Zoom ..............................................................................................................................26
Close-ups (Macro Mode) ....................................................................................27
Flash Photography .................................................................................................28
Self-Timer .....................................................................................................................31
Tilt Indicator ................................................................................................................ 32
Viewing and Deleting Photographs ..........................................34
Viewing Photographs ........................................................................................... 34
Deleting Photographs ..........................................................................................39
O (DISP.) Button ................................................................................................... 42
Page 11

Reference 45
Read this section for more information on camera functions.
More on Photography .................................................................46
Mode P: Program Shift .........................................................................................46
Mode A: Aperture Priority ..................................................................................48
Mode S: Shutter Priority ...................................................................................... 49
Mode M: Manual Exposure ............................................................................... 50
4 Mode: Settings for Various Scenes .............................................. 52
“MY” Modes: Using Custom Settings........................................................... 57
Shooting Menu ........................................................................................................58
Playback Functions ......................................................................94
Viewing Movies ........................................................................................................94
Viewing MP Files ...................................................................................................... 95
Playback Menu ............................................................................101
Playback Menu ......................................................................................................101
Viewing Pictures on TV .....................................................................................118
Printing Photographs ................................................................120
Connecting the Camera Body ..................................................................... 120
Printing ....................................................................................................................... 122
Camera Settings ..........................................................................126
Key Custom Options .......................................................................................... 129
Setup ............................................................................................................................ 139
Copying Pictures to a Computer ..............................................151
Windows .................................................................................................................... 151
Macintosh ................................................................................................................. 162
Technical Notes ...........................................................................167
Troubleshooting ................................................................................................... 167
Specications.......................................................................................................... 175
Optional Accessories .........................................................................................178
Using the Product Abroad..............................................................................183
Precautions for Use .............................................................................................183
Care and Storage .................................................................................................. 185
Warranty and Servicing .................................................................................... 186
NOTICES ..................................................................................................................... 187
Index .............................................................................................188
xi
Page 12

xii
Page 13

Before You Begin
Read this section before using your camera
body for the rst time.
Introduction .............................................................. 2
First-time user? read this.
1
1
Page 14

First-time user? read this.
2
Introduction
3 4 5 76
1112
13
8 109
14
21
This manual describes how to take pictures and play
them back. To ensure that you get the most from this
product, read this manual thoroughly before use and
keep it handy when using the product.
Parts of the Camera Body
For more information, refer to the page number to the
right of each item.
Front
1 Up-down dial ................................5
2 Mode dial lock release ...................4
3 Mode dial ......................................4
4 Shutter-release button ..........21, 23
5 Power switch .........................18, 21
6 AF auxiliary light .................31, 140
7 Hot shoe ....................................181
8 Flash cover...................................29
9 Microphone .................................. –
10 Strap eyelet ...................................ii
11 Alignment mark for attaching
camera unit .................................
12 Connector ....................................17
13 Camera unit release lever ............17
14 Flash ............................................ 28
17
Page 15
Back
4
1
2
3
17
16
13
14
15
12
9
202122 19
5
6237 8
101811
First-time user? read this.
1 DIRECT button ..............................5
2 OPEN/f(ash) button ................ 29
3 VF/LCD button.............................42
4 Picture display ...............................8
5 Autofocus/ash lamp
................................ 18, 22, 29 ,141
6 Connector for USB cable
.......................... 120, 159, 160, 162
7 Connector for A/V cable ............. 118
8
Connector for HDMI mini cable
9 ADJ. lever ..............................5, 134
10 6 (playback) button
................................ 19, 34, 94, 101
11 N (macro) button ......................27
12 8 (telephoto)/z (enlarged
view) button .........................26, 36
14 Directional pad ............................37
+ (!) .....................................137
– (
%) .....................................137
Fn1 (Function1) (
Fn2 (Function2) (
15 C/D button
.................................... 58, 101, 126
16 O (DISP.) button ....................42
17 t (self-timer)/d (delete) button
...119
..............................................31, 39
18 Tripod screw hole ......................176
19 Battery/card cover .................14, 15
20 Release lever .........................14, 15
21 Speaker ........................................–
22 Strap eyelet ...................................ii
23 Connector cover ................. 118, 121
#) ...............136
$) ...............136
13 9 (wide-angle)/Z (thumbnail
display) button ......................26, 36
3
Page 16
First-time user? read this.
4
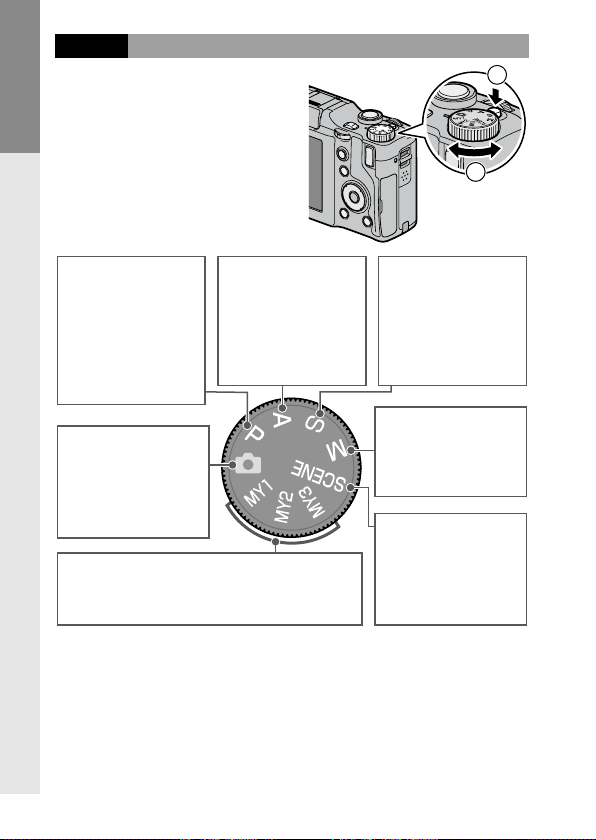
Mode Dial
1
2
Before shooting, press the
mode dial lock release (1)
and rotate the mode dial
to choose a shooting mode
(2).
P (program shift):
You choose from
combinations of
shutter speed
and aperture that
produce the same
exposure (page 46).
5 (auto): The camera
sets shutter speed
and aperture for
optimal exposure
(page 21).
MY1, MY2, MY3 (“my settings”): Recall settings
saved using Reg. My Settings (pages 57,
129).
A (aperture priority): You
choose an aperture
and let the camera
adjust the shutter
speed for optimal
exposure (page 48).
S (shutter priority): You
choose a shutter
speed and let the
camera adjust
aperture for optimal
exposure (page 49).
M (manual exposure):
You choose shutter
speed and aperture
(page 50).
4 (scene):
Optimize settings for
the current subject
or scene, or shoot
movies (page 52).
Page 17
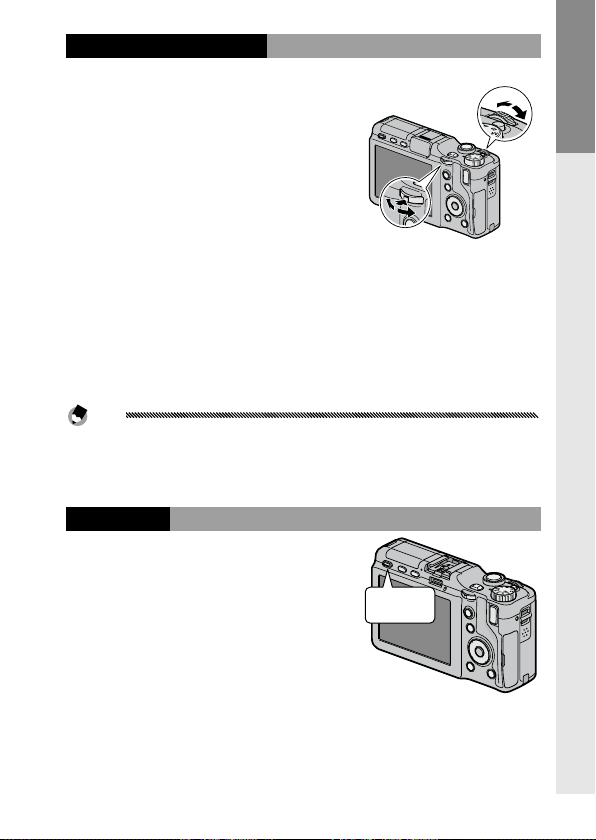
Up-down Dial and ADJ. Lever
DIRECT
When viewing pictures or
Up-down dial
navigating the menus, you can
use the up-down dial in place of
+ and –, and the ADJ. lever in place
of Fn1 and Fn2. The ADJ. lever and
up-down dial can also be used to
select shutter speed and aperture
in P, A, S, and M modes.
ADJ. lever
You can assign frequently-used shooting menu items
to the ADJ. lever for easy access (page 134). To display a
shooting menu item, center the ADJ. lever and press it in;
you can then use the lever and up-down dial to select an
option.
Note
The M Mode Dial Options and Playback Mode Dial Options
items in the key custom options tab can be used to change the
assigned functions of the up-down dial and ADJ. lever (page 138).
DIRECT Button
Press the DIRECT button in the
shooting mode to display the
current shooting settings.
First-time user? read this.
5
Page 18
First-time user? read this.
6
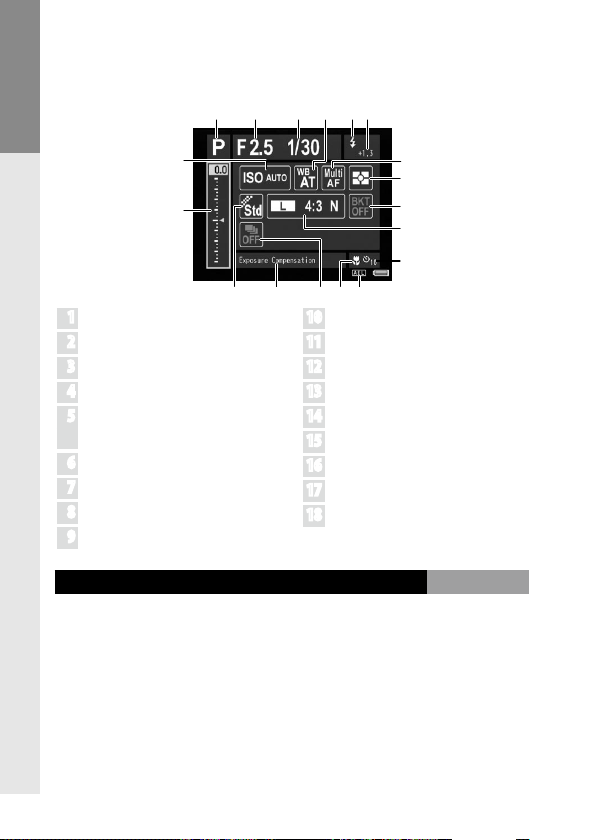
DIRECT screen
1
2 3 8 4 5
12
13
18
10
9
171615 1411
6
7
For more information, refer to the page number to the
right of each item.
1 Shooting mode ..............................4
2 Aperture .......................... 46, 48, 50
3 Shutter speed .................. 46, 49, 50
4 Flash mode .................................. 28
5 Flash compensation/manual
ash amount ......................... 78, 79
6 Exposure compensation ..............85
7 ISO ............................................... 90
8 White balance .............................86
10 Exposure metering ......................70
11 Image settings ............................71
12 Picture quality/size/movie size .... 61
13 Bracketing ...................................75
14 Continuous ..................................73
15 Information area ...........................7
16 Macro mode ................................27
17 AE Lock ......................................136
18 Self-timer ....................................31
9 Focus mode .................................64
Changing the Shooting Settings on the DIRECT screen
On the DIRECT screen, move the cursor using +, –, Fn1,
Fn2 or the ADJ. lever (left and right) to highlight an item,
and change the setting directly using the up-down dial.
The exposure compensation can be adjusted using +
and – instead of the up-down dial.
Page 19

Displaying the Options for the Shooting Settings
Pressing the ADJ. lever when an item is highlighted on
the DIRECT screen displays the options for the setting
item. Select the desired option using + and –, or the updown dial, and then press the ADJ. lever or the C/
D button to set the option.
Caution
The settings of shooting mode, macro mode, self-timer, and ash
mode for built-in ash cannot be changed by selecting the item
on the DIRECT screen. Change the settings using the mode dial
or the buttons on the camera body.
Notes
• Pressing the
image (page 140).
• Pressing
shooting menu (page 59).
• After setting the exposure compensation, press Fn1
ADJ. lever (left or right) to move the cursor to other items.
• When in manual exposure mode, the exposure indicator to
achieve optical exposure will be displayed instead of the
exposure compensation slider.
• When in program shift mode, the value of shutter speed and
aperture will be changed at the same time to produce the same
exposure.
• The item name of shooting menu corresponding to the
selected item on the DIRECT screen will be displayed in the
information area.
DISP. button changes the setting of background
C/D on the DIRECT screen will display the
, Fn2, or the
First-time user? read this.
Displaying the Next or Previous Page
If the items displayed on a screen extends over multiple pages,
you can display the next or previous page by pressing + or –, or
rotating the up-down dial while pressing the DIRECT button.
7
Page 20
First-time user? read this.
8
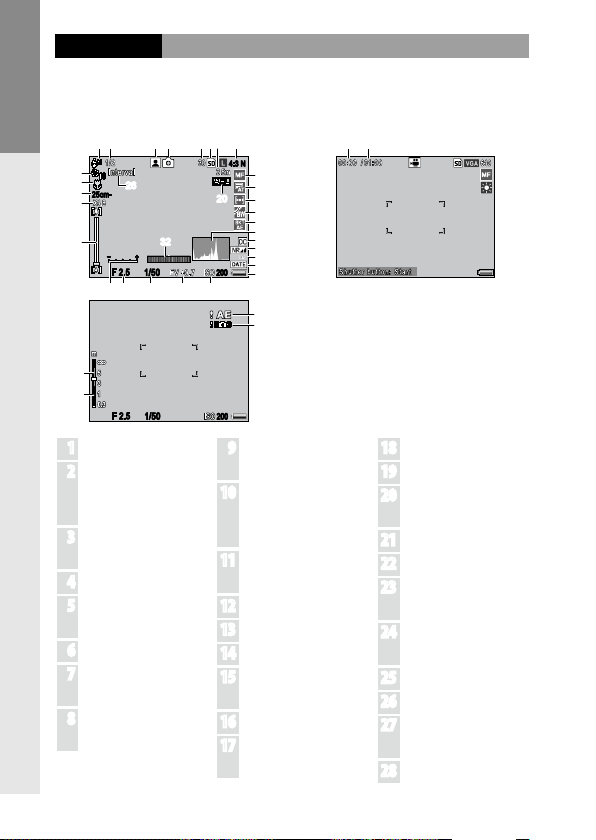
Picture Display
4:3 N
F 2.5
25cm-
1/50
200
1 2
3 4
5 678
9
10
11
12
13
14
16
17
15
18
311930292827
26
32
20
25
24
22
23
21
37 38
F 2.5
1/50
200
34
33
35
36
The following indicators may be displayed during
shooting and playback.
Shooting (still photography) Shooting (movie mode)
1 Flash mode ............ 28
2 Flash compensation/
3 Scene mode ........... 52
4 Shooting mode ........ 4
5 Number of exposures
6 Destination ............ 15
7 Snap focus distance
8 Picture quality/size
manual ash amount
.........................78, 79
Continuous .............73
remaining * .......... 177
.........................64, 68
..............................
9 Focus mode/full
press snap ........64, 69
10 White balance/
white balance
compensation ...86, 89
11 Exposure metering
..............................
12 Image settings ...... 71
13 Bracketing ............. 75
14 Histogram ............. 44
15 Distortion correction
..............................
16 Noise reduction ..... 80
61
17 Camera shake
correction ..............92
18 Date imprint .......... 84
19 Battery level .......... 10
20 Autoexposure lock
............................
21 Self-timer .............. 31
22 Macro mode .......... 27
70
23 Minimum shooting
distance ............... 144
24 Digital zoom ratio
..............................
25 Zoom bar ............... 26
81
26 Interval shooting ... 83
27 Exposure indicator
..............................
28 Aperture .....46, 48, 50
136
26
50
Page 21
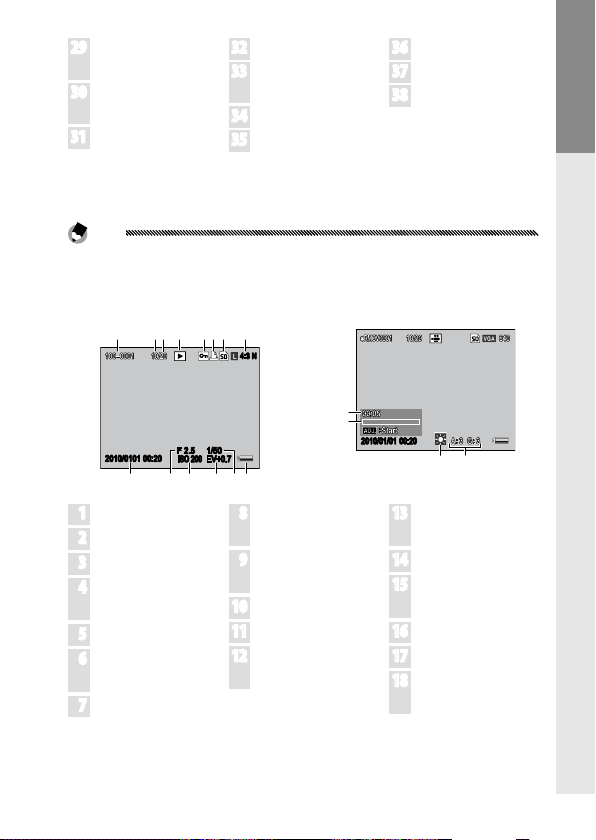
29 Shutter speed
1 2
3 4
5 678
149 10 11 12 13
4:3 N
2010/ 0101 00: 20
F 2. 5
ISO 200
1/50
EV+0.7
2010/01/01
00:20
16
15
17 18
...................46, 49, 50
30 Exposure
compensation ....... 85
31 ISO ......................... 90
32 Tilt indicator .......... 32
33 Exposure
warning ................. 86
34 Blur warning ....24, 93
35 Depth of eld ........ 64
36 Focus bar ............... 64
37 Movie length ..63, 177
38 Time available * ...... 55
* Approximation only; actual capacity varies with shooting conditions
and make of memory card. Display shows “9999” when memory remains
for over 9,999 images.
Note
The shooting settings can be viewed by pressing the DIRECT
button (page 5).
Playback (photographs) Playback (movies)
First-time user? read this.
1 File number .............–
2 Current frame ..........–
3 Total frames ............–
4 Playback mode
indicator ..................–
5 Protected image .. 112
6 DPOF print
indicator .............. 115
7 Source ................... 15
8 Picture quality/size
..............................
61
9 Date of recording
.......................20, 149
10 Aperture .....46, 48, 50
11 ISO ......................... 90
12 Exposure
compensation ....... 85
13 Shutter speed
...................46, 49, 50
14 Battery level .......... 10
15 Length/elapsed time
................................
16 Progress indicator ....–
17 White balance ....... 86
18 White balance
compensation .........89
–
9
Page 22
Notes
4:3 N
2.5 200
• The picture display may also display warnings and messages.
• Additional information can be viewed
by pressing the DISP. button (page 42).
First-time user? read this.
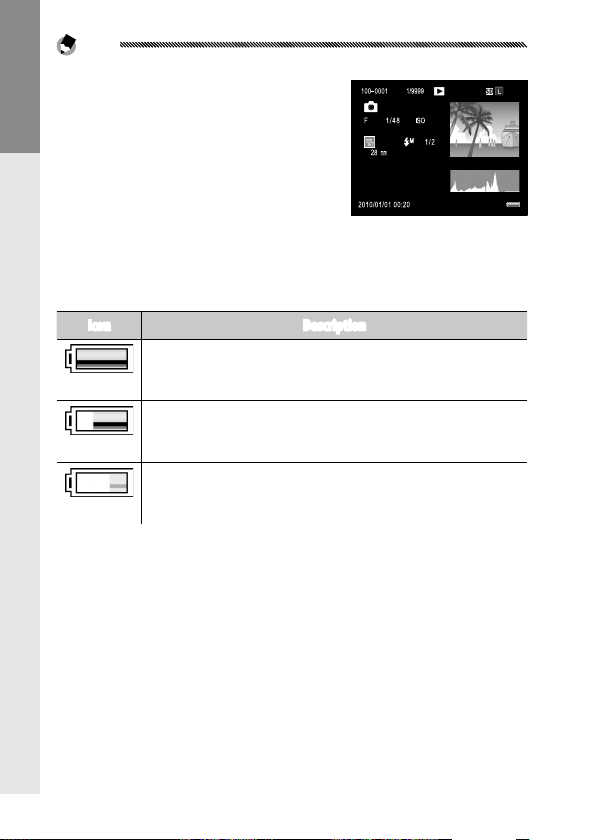
The Battery Level Indicator
Battery level is shown by the icon at the bottom right
corner of the picture display.
Icon Description
10
(green)
Battery fully charged.
Battery partially discharged.
(green)
Low battery. Charge or replace as soon as possible.
(orange)
Page 23

Basic Photography and
Playback
Read this section before using your camera
for the rst time.
First Steps ................................................................ 12
Taking Photographs ................................................. 21
Viewing and Deleting Photographs........................... 34
First-time user? read this.
11
11
Page 24
First Steps
Prepare the camera for use.
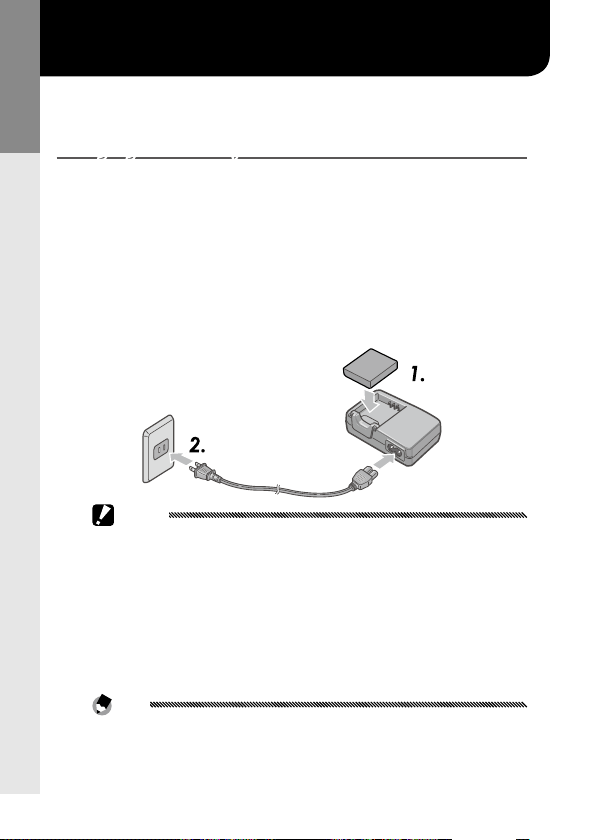
Charging the Battery
First-time user? read this.
The rechargeable battery (DB-90) supplied with the
camera body is not charged at the time of purchase.
Charge the battery in the supplied BJ-9 battery charger
before use.
Place the battery in the charger.
1
Place the battery label up with the “+” and “–” labels
oriented to match the labels on the charger.
Caution
Be sure the battery is in the correct orientation.
Connect the power cord to the charger, and then
2
plug in.
The charger lamp will light while the battery
charges. An exhausted battery will recharge in
about ve hours at 25 °C.
Note
If the charger lamp blinks, a battery or charger fault may
have occurred. Unplug the power cord and remove the
battery from the charger.
12
Page 25

Remove the battery.
3
Charging is complete when the charger lamp turns
o. Unplug the power cord and remove the battery
from the charger.
Cautions
•
Rechargeable Li-ion battery: Use only a genuine DB-90 battery. Do
not use a battey not specically designated by Ricoh for use in
this camera body.
• The battery may be hot immediately after use. Before removing
the battery, turn the power o and wait for the battery to cool
down.
• Remove the battery if the camera will not be used for extended
periods.
Tip: Battery Capacity
The number of shots that can be taken with a fully-charged
DB-90 battery diers depending on the camera unit. The tests
are conducted according to CIPA standards under the following
conditions: at the temperature of 23 °C (73 °F); with the picture
display on; shoot every 30 seconds with ash red every other
shot; turn the camera o and on every 10 shots taken. See the
documentation provided with the camera unit for details.
First-time user? read this.
13
Page 26
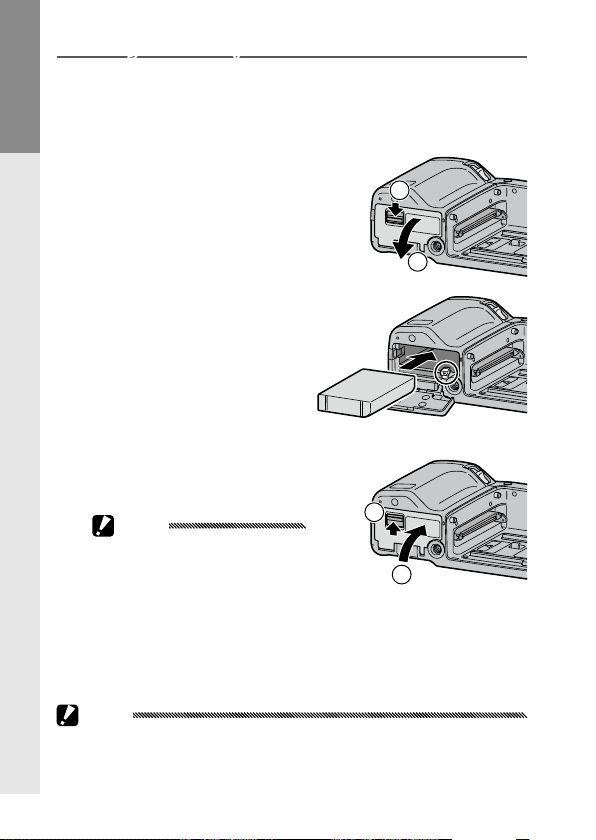
Inserting the Battery
1
2
1
2
Be sure the power is o before inserting or removing the
battery.
Open the battery/card cover.
1
First-time user? read this.
Unlatch (1) and open
(2) the cover.
Insert the battery.
2
Using the battery to keep
the battery latch pressed
downward, slide the
battery in. The latch will
click into place when the
battery is fully inserted.
Close the battery/card cover.
3
Close (1) and latch (2)
the cover.
Caution
Be sure the cover is latched.
Removing the Battery
Unlatch and open the battery/card cover, press the latch
downward to release it, and then remove the battery. Be
careful not to drop the battery.
Caution
If the camera will not be used for an extended period, remove
and store the battery in a cool dry place.
14
Page 27
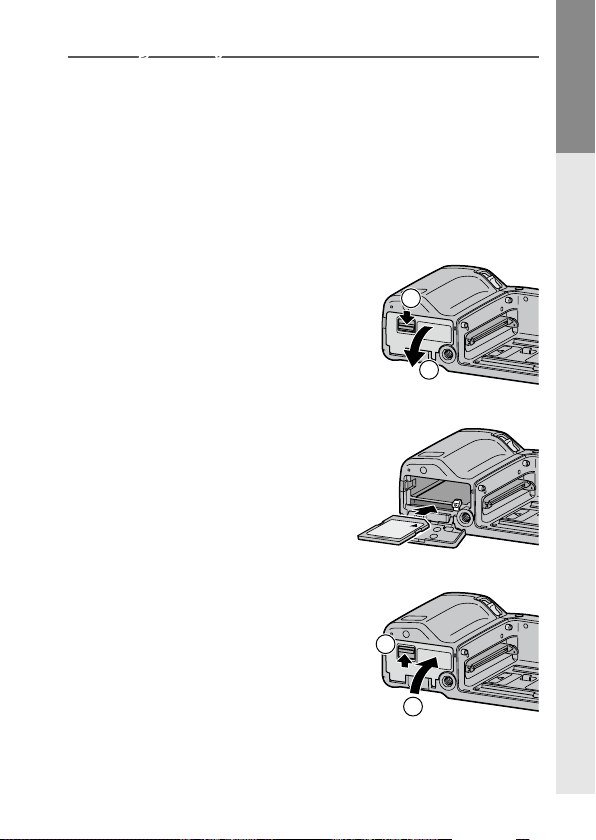
Inserting Memory Cards
1
2
1
2
Pictures can be stored in the camera body’s 86 MB
internal memory, or optional SD and SDHC memory
cards. Internal memory is used if no card is inserted; if a
card is inserted, the card will be used instead.
Be sure the power is o before inserting or removing a
memory card.
Open the battery/card cover.
1
Unlatch (1) and open (2)
the cover.
Insert the card.
2
Holding the memory card
in the orientation as shown,
slide it in until it clicks into
place.
Close the battery/card cover.
3
Close (1) and latch (2) the
cover.
First-time user? read this.
15
Page 28
Removing Memory Cards
Unlatch and open the battery/card cover, and then press
the memory card in to eject it. The card can then be
removed.
Cautions
First-time user? read this.
• Pictures will not be saved to internal memory when a memory
card is inserted, even if the memory card is full.
• Keep the memory card contacts clean.
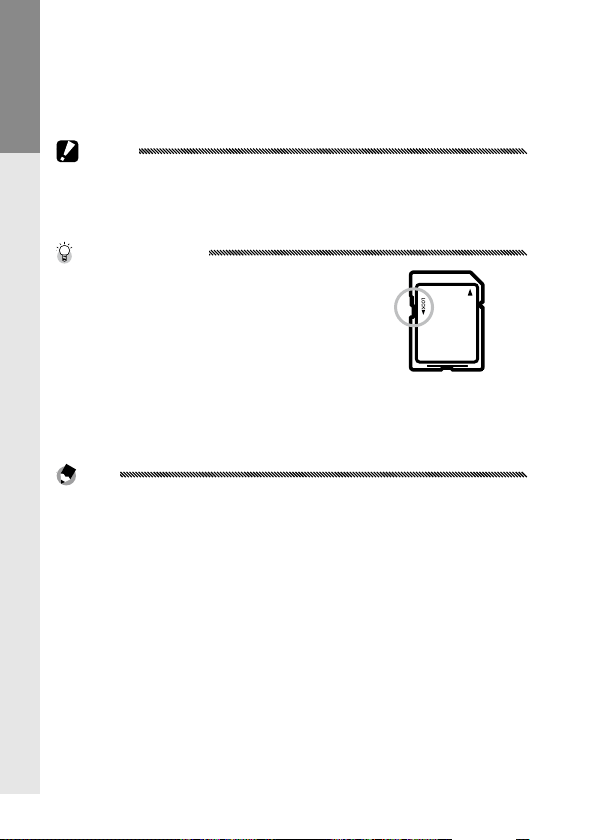
Tip: Write Protection
Slide the write-protection switch on
memory card to “LOCK” to keep data
from being written to or deleted from
the card and to prevent the card from
being formatted.
Pictures cannot be taken when the memory card is locked; lock
the card only to prevent accidental loss of data and be sure to
unlock the card before shooting.
Notes
• Format memory cards before rst use or after they have been
used in a computer or other device (page 139). Be sure to back
up any important data before formatting.
• See page
• Pictures can be copied to memory cards from internal memory
(page 115).
177 for information on memory card capacity.
16
Page 29
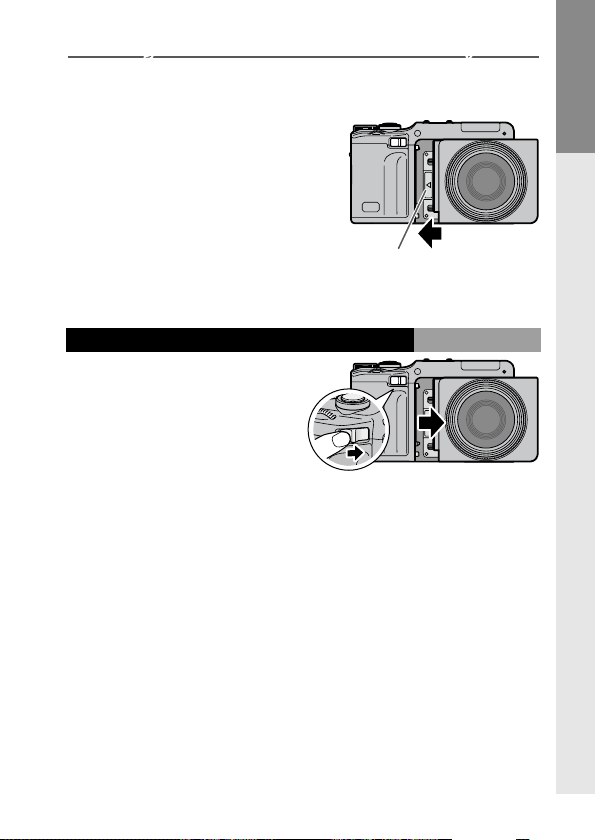
Attaching the Camera Unit to the Camera Body
Be sure the power is o before attaching or removing
the camera unit to/from the camera body.
Remove the connector caps
from the camera body and
camera unit respectively. Align
the left side of the camera unit
with the alignment mark on the
camera body, and then slide the
camera unit to the left until it
clicks.
Removing the Camera Unit from the Camera Body
Slide the camera unit
release lever to the right,
and remove the camera
unit.
Be careful not to drop the
camera body and camera
unit when removing the
camera unit from the
camera body.
Alignment mark for
attaching camera unit
First-time user? read this.
17
Page 30
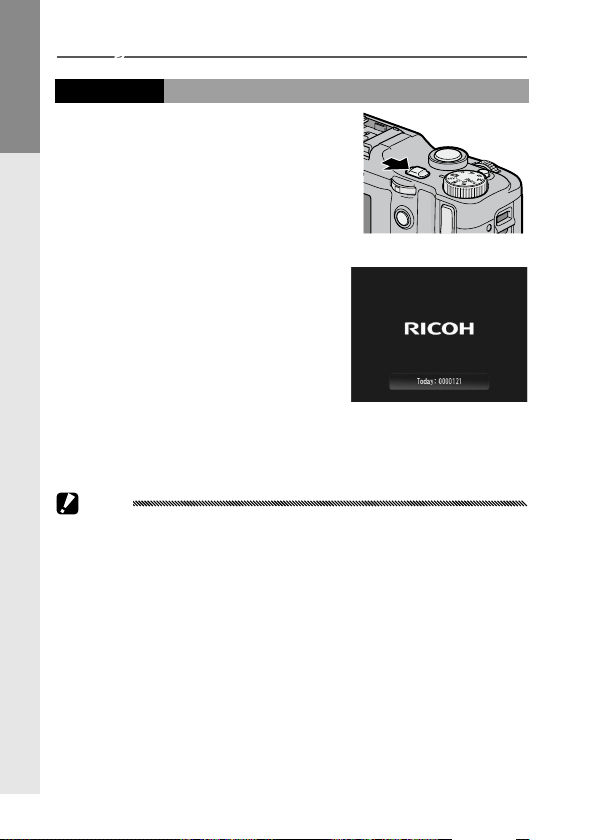
Turning the Power On and O
Shooting Mode
Slide the power switch to ON to
turn the camera on. The camera
First-time user? read this.
will play the start-up sound. The
autofocus/ash lamp blinks for
several seconds while the camera
starts up.
To turn the camera o, slide the
power switch to OFF. The number
of pictures taken so far that day
will be displayed before the
camera turns o (zero is displayed
if the camera clock has not
been set; if you turn the camera o after changing the
clock (page 20), the camera will display the number of
pictures taken after the clock setting was changed).
Caution
Changes to continuous (page 73), interval (page 83), and selftimer (page 31) settings are lost when the camera is turned
o. Turning the camera o restores settings for MY modes to
the values saved with Reg. My Settings. Other settings are
unaected.
18
Page 31

Playback Mode
When the power is o, pressing
the 6 button for about a second
turns the camera on in playback
mode. Press the 6 button again
to turn the power o.
Tip: Sleep Mode and Auto Power O
The camera will turn the display or power o automatically to
save power if no operations are performed for the specied time
in the Sleep Mode (page 141) and Auto Power O (page 141).
First-time user? read this.
19
Page 32

Basic Setup
A language-selection dialog is displayed the rst time
the camera is turned on. Follow the steps below to
choose a language and set the time and date. To exit
before setup is complete, press the DISP. button. The
First-time user? read this.
language, time, and date can be changed at any time in
the setup menu (page 149).
Select a language.
1
Press +, –, Fn1, or Fn2 to
highlight a language, and
press C/D.
Set the clock.
2
Press Fn1 or Fn2 to highlight
the year, month, day, hour,
minute, or date format, and
then press + or – to change.
After checking that the date
is correct, press C/D.
A conrmation dialog will be
displayed; press C/D
to set the clock.
Notes
• If you leave the battery in the camera body for at least two
hours, the clock and language settings are retained for about a
week after the battery was removed.
• The time and date of recording can be imprinted on
photographs (page 84).
20
Page 33

Taking Photographs
After setting up the camera
as described in “First Steps”
(page 12), you are ready to take
photographs. Slide the power
switch to ON to turn the camera
on, and rotate the mode dial to
5.
Holding the Camera
Hold the camera in both hands.
1
Hold the camera in both
hands with your elbows
lightly pressed against your
body.
Caution
Be sure that your ngers, hair or
the neck strap do not obstruct the
lens or ash.
Get ready to shoot.
2
Rest the nger on the
shutter-release button.
First-time user? read this.
21
Page 34

Taking a Photograph
4:3 N
Focus.
1
Frame your subject in the center of the picture
display and press the shutter-release button halfway
First-time user? read this.
to set focus and exposure.
If the camera is able to focus, the
focus frames for the objects in
focus are displayed in green
(up to nine frames).
If the camera is unable to focus, the
focus frame blinks red and the
autofocus/ash lamp blinks
green.
Take a picture.
2
Gently press the shutter-release button the rest
of the way down to take the picture. The picture
is displayed immediately after shooting for a few
seconds (page 142), and saved to internal memory
or memory card.
22
Autofocus/ash lamp
Focus frame
Page 35

Tip: Shutter-Release Button
The camera has a two-stage shutter-release button. To focus,
lightly press the shutter-release button until you feel resistance.
This is called “pressing the shutter-release button halfway.” Press
the shutter-release button the rest of the way down to shoot.
Tip: Focus
The autofocus/ash lamp and the focus frame show whether the
subject is in focus.
Focus status Focus frame Autofocus/ash lamp
Before focusing White O
Subject in focus Green On (green)
Unable to focus Red (blinks) Blinks (green)
The camera may be unable to focus on the following:
• Objects that lack contrast, such as the sky, a wall that is only one
color, or the hood of a car
• Flat objects containing only horizontal lines
• Fast-moving objects
• Objects that are poorly lit
• Objects with bright reections or backlighting
• Flickering objects, such as uorescent lights
• Point light sources, such as light bulbs, spotlights, or LEDs
Note that one or more focus frames may be displayed in green
even if the camera is unable to focus on the above subjects;
check focus in the picture display before shooting. If the camera
is unable to focus, lock focus on another object at the same
distance from the camera as your subject, then recompose the
photograph and take the picture (page 25).
First-time user? read this.
23
Page 36

Tip: Avoiding Blurred Pictures
To prevent blurring caused by the camera movement when the
shutter is released (“camera shake”), press the shutter-release
button smoothly and gently. Blurring is particularly likely to occur
if:
• The ash is o and lighting is poor
First-time user? read this.
• Using digital zoom (page
In situations in which photographs are especially prone to
blurring caused by camera shake, a J icon will be displayed
in the picture display. Hold the camera steady and try focusing
again, or attempt one of the followings:
• Turning the ash on (
• Choosing a higher ISO (page
• Using the self-timer (page
• Using the camera shake correction (page
Notes
• If the ash will re when the picture is taken, a pre-ash will be
emitted to assist focus and exposure.
• In the case of overexposure or underexposure, a
be displayed.
• You can choose how long pictures are displayed in the picture
display after shooting. If desired, photographs can be displayed
until the shutter-release button is pressed halfway (page 142).
26)
) or using auto ash ( ; see page 28)
90)
31)
92)
icon will
24
Page 37

Focus Lock
4:3 N
Use focus lock to compose photographs in which the
subject is not in the center of the frame. Focus lock can
also be used if the camera is unable to focus.
Focus.
1
Position your subject in the center of the picture
display and press the shutter-release button halfway
to focus.
Recompose the photograph.
2
Keeping the shutter-release button pressed halfway
to lock focus, recompose the photograph.
Final composition
Main subject
Take a picture.
3
Gently press the shutter-release button the rest of
the way down to take the picture.
Caution
If the distance between the camera and subject changes while
focus lock is in eect, focus again at the new distance.
First-time user? read this.
25
Page 38

Zoom
4:3 N
4:3 N
The 8 (telephoto) button can be used to zoom in and
the 9 (wide-angle) button to zoom out.
First-time user? read this.
Frame the picture using the 8 and 9 buttons.
1
Focus.
2
Press the shutter-release
9 8
Zoom
Zoom
out
in
button halfway.
Take a picture.
3
Gently press the shutterrelease button the rest of the
way down.
Notes
• If using the camera unit without optical zoom,
works instead of optical zoom.
• If using a camera unit equipped with optical and digital zoom,
to switch from optical zoom to digital zoom, release the 8
button once at the maximum magnication by the optical
zoom, and then press the 8 button again. To switch from
digital zoom to optical zoom, press and hold the 9 button.
• You can check the amount of optical zoom with the zoom bar
in the picture display. When using the digital zoom, the zoom
ratio is displayed in the picture display.
• When
digital zoom cannot be used.
RAW is selected for Picture Quality/Size (page 61),
digital zoom
26
Page 39

Close-ups (Macro Mode)
4:3 N
Use macro mode for close-ups of small objects.
Press the N button.
1
A N icon will be briey
displayed in the center of
the picture display. N will
then appear at the upper
left of the display.
Focus.
2
Frame the subject in the
picture display and press
the shutter-release button
halfway.
Take a picture.
3
Gently press the shutter-release button the rest of
the way down.
To exit macro mode, press the N button again.
Note
Even if Multi AF, Snap, ∞ is selected for Focus, Spot AF is used
in macro mode (page 64).
First-time user? read this.
27
Page 40

Flash Photography
The ash only res when it is raised. Press the OPEN/f
button to raise the ash, and press the button again to
choose from the following ash modes:
First-time user? read this.
Mode Description
Flash O The ash is o.
Auto The ash res automatically when required.
Red-Eye
Flash
Flash On The ash res with every shot.
Flash
Synchro.
Manual
Flash
Reduces “red-eye” in portraits taken with the ash.
Combines the ash with slow shutter speeds. Use when
taking portraits that include details of the background or
nightscape. Use of a tripod is recommended to prevent
blur.
The ash res with every shot. The amount of ash can
be set in Manual Flash Amount (page 79).
Note
The eective range of the ash diers depending on the camera
unit. See the documentation provided with the camera unit for
details.
28
Page 41

Using the Built-in Flash
OPEN
Raise the ash.
1
Press the OPEN/f button.
Select a ash mode.
2
Press the OPEN/f button to select a ash mode. The
ash mode icon appears at the top left corner of the
display.
Notes
• The selected ash mode remains in eect until a new
mode is chosen.
• The
autofocus/ash lamp blinks while the ash charges.
Photographs can be taken when the lamp stops blinking.
Focus and shoot.
3
If the ash will re when the picture is taken, a preash will be emitted to assist focus and exposure.
First-time user? read this.
29
Page 42

Notes
• To close the ash when it is not in use, gently press the center of
the ash cover down until it latches.
• The ash turns o automatically in movie, continuous, and
bracketing modes.
• Do not use the built-in ash when an optional ash is attached.
First-time user? read this.
Failure to observe this precaution could cause damage to the
product.
Caution
Do not use the ash unit in close proximity to your subject’s eyes.
Particular care should be observed when photographing infants.
Do not direct the ash at the operator of a motor vehicle.
30
Page 43

Self-Timer
4:3 N 4:3 N
Choose from ten-second, two-second, and custom
setting timers. Use the two-second timer to prevent blur
caused by camera movement when the shutter-release
button is pressed. With the custom setting, a specied
number of pictures can be taken at a specied interval.
Set the shooting interval and number of pictures with
Custom Self-Timer in the shooting menu (page 82).
Choose a self-timer mode.
1
Press the t button once to
select the ten-second timer,
twice to select the twosecond timer, and three times
to select the custom setting
timer. Pressing the button the
fourth time turns the timer o.
The current selection is displayed in the picture
display.
Note
The selected self-timer mode remains in eect until a new
mode is chosen.
Start the timer.
2
Press the shutter-release button to lock focus and
start the timer. If the ten-second timer or custom
setting timer is selected, the AF auxiliary light will
light.
Note
Press C/D to cancel the custom setting timer during
shooting.
First-time user? read this.
31
Page 44

Tilt Indicator
Use the tilt indicator to level the camera when
photographing buildings or landscapes. It is particularly
useful for compositions in which the horizon is visible.
First-time user? read this.
Display options.
1
Press and hold the O (DISP.)
button until level setting
options are displayed.
Select an option.
2
Press + or – to highlight an option, and press
C/D to select the highlighted option.
Option Description
O Tilt indicator is not displayed.
Tilt indicator is shown in the picture display. The amount
and direction of tilt can be checked in the tilt indicator.
The indicator turns green when the camera is level, orange
when the camera is tilted, and red if the degree of tilt
Display
exceeds the maximum degree that can be displayed with
the indicator. Tilt indicator is not shown if the display is
o, indicators are hidden, or the framing grid is displayed
(page 42).
Disp +
Same as Display, except that a beep sounds periodically
Snd
when the camera is level.
A beep sounds periodically when the camera is level. The
Sound
tilt indicator is not displayed in the picture display.
32
Page 45

Understanding the Tilt Indicator
4:3 N
4:3 N
4:3 N
4:3 N
Green
Camera level Camera tilted left
Red
Camera tilted too far to the
right
Camera tilted 90 ° left
Note
Tilt indicator settings can also be adjusted in the setup menu
(page 144).
Cautions
• The tilt indicator is not displayed when the camera is upside
down, movies are being recorded, or the interval timer is on.
• The beep does not sound if the camera’s volume is set o (page
142).
• The tilt indicator is intended as a guide only and should not
be used as a spirit level or in other applications in which a
high degree of precision is required. Accuracy drops when the
camera is in motion or you are shooting on a vehicle or other
moving platform.
Orange
First-time user? read this.
33
Page 46

34
First-time user? read this.
Viewing and Deleting Photographs
Pictures can be viewed in the picture display.
Viewing Photographs
Press the 6 button in shooting
mode to display the last
photograph viewed.
Press the 6 button again to exit
to shooting mode.
Tip: If the Camera Is O
If the power is o, press the 6 button
for about a second to turn the camera
on in playback mode.
Press Fn2 to view photographs in the recorded order, Fn1
to view in reverse order. Press – to skip ten frames ahead,
+ to go back ten frames.
Page 47

2010
F 2.5
200
4:3 N
Back ten photos
2010
2010
2010
200
F 2.5
2010
200
F 2.5F 2.5
200
F 2.5
200
4:3 N
4:3 N 4:3 N 4:3 N
2010
2010
200
F 2.5
2010
200
F 2.5F 2.5
F 2.5
200
4:3 N
4:3 N 4:3 N 4:3 N
2010
200
F 2.5F 2.5
2010
2010
2010
F 2.5
200
200
F 2.5
2010
200
F 2.5F 2.5
F 2.5
200
4:3 N
4:3 N 4:3 N 4:3 N
4:3 N
Back one photo
Fn1
+
First-time user? read this.
Fn2
–
Ahead one photo
Ahead ten photos
Caution
The camera records JPEG copies of RAW images for display in the
picture display. When a RAW image is selected for playback, the
camera shows the JPEG copy and a RAW indicator is displayed.
If the JPEG copy has been deleted using a computer or other
device, the camera will display a small preview of the RAW
image, but you will not be able to view the image at larger
magnications. See pages 62, 63 for information on recording
RAW images.
Tip: Viewing Pictures in Shooting Mode
Photographs are displayed in the picture display immediately
after shooting. You can choose how long pictures are displayed
using LCD Conrmation Time in the setup tab (page 142).
35
Page 48

36
First-time user? read this.
Tip: Viewing the Pictures in Internal Memory
4:3 N
2010
F 2.5
200
4:3 N
2010
F 2.5
Last File
If a memory card is inserted, the pictures on the memory card
will be displayed; the pictures in internal memory cannot be
viewed even if the memory card is empty. The pictures in internal
memory will only be displayed if no card is inserted in the camera
body.
Tip: Auto Rotate
If On is selected for Auto Rotate in the setup tab (page 143),
pictures will be automatically displayed in the correct orientation
in the picture display.
Viewing Multiple Photographs
Press the z or Z button
to choose the number of
photographs to display from one,
20, and 81, or to choose to sort
photographs by the date that
photographs were taken.
Single frame 20 frames
Sort by date 81 frames
Page 49

Multi-frame views can be used to select images for
display or deletion.
In multi-frame views, use the directional pad to highlight
photographs.
Tip: Directional Pad
The cursor can be moved in an oblique direction by pressing the
diagonal portions on the directional pad.
Notes
• To display a photograph full frame, press the
frame view.
• To display the photographs on the previous or next page in the
multi-frame view:
• In the 20- and 81-frame view, press +, –, Fn1
(left or right), or rotating the up-down dial while pressing the
DIRECT button.
• In the sort by date view, pressing + or –, or rotating the up-
down dial while pressing the DIRECT button displays the next or
previous page. Pressing Fn1, Fn2, or ADJ. lever (left or right) while
pressing the DIRECT button displays the photographs taken
next or previous date. If pressing Fn2, or ADJ. lever to the right
with the cursor at the last photograph, the photographs taken
the next date is displayed.
ADJ. lever in multi-
, Fn2, or ADJ. lever
First-time user? read this.
37
Page 50

38
First-time user? read this.
Playback Zoom
Press the z button or rotate the up-down dial to the
right to zoom in on the photograph currently displayed
full frame. To zoom in to the magnication selected with
One Press Zoom Ratio (page 143), press the ADJ. lever.
The following operations can be performed:
Use To
Zoom in.
z
Up-down
C/D
Directional pad Move the areas to be displayed.
ADJ. lever Press left or right to view other images at same zoom ratio.
Notes
• Maximum magnication varies with image size:
L, M, 5M, 3M 16 ×
1M 6.7 ×
VGA 3.4 ×
• Playback zoom is not available with movies or pictures taken
using M-Cont Plus.
• If
Setting2 is selected for Playback Mode Dial Options in the
key custom options tab (page 138), the ADJ. lever and up-down
dial can be used to view other areas of the image.
Rotate right to zoom in, left to zoom out.
dial
When an image is magnied, press to display the image
in the magnication ratio selected for One Press Zoom
Ratio. If an image is displayed at the magnication
selected for One Press Zoom Ratio, pressing C/D
cancels zoom.
Zoom out.
Z
Image size Maximum magnication
Page 51

Deleting Photographs
Follow the steps below to delete photographs.
Deleting Individual Photographs
Display a photograph.
1
Display a photograph you want to delete in singleframe playback (page 34).
Press the d button.
2
The options will be displayed
(you can change the
photograph by pressing Fn1
or Fn2).
Select Delete One.
3
Press + or – to highlight Delete One, and press
C/D.
A message is displayed during deletion. Repeat
steps 2 and 3 to delete additional photographs, or
highlight Cancel and press C/D to exit.
Deleting All Files
To delete all les, press the d
button to display delete options
as described above, and select
Delete All. A conrmation dialog
will be displayed; press Fn1 or
Fn2 to highlight Yes, and press
C/D.
First-time user? read this.
39
Page 52

40
First-time user? read this.
Deleting Multiple Files
4:3 N 4:3 N
Follow the steps below to delete multiple les.
Press the d button.
1
In multi-frame playback,
proceed to step 2. In singleframe playback, the options
shown at right will be
displayed. Highlight Delete
Multi and press C/D.
Select Sel. Indiv. or Sel. Range.
2
To select images one at a
time, highlight Sel. Indiv.,
press C/D, and
proceed to step 3. To select
images by specifying ranges,
highlight Sel. Range, press
C/D, and proceed to step 3.1. Press the DISP.
button to exit at any time without deleting les.
Select a photograph.
3
Use the directional pad
(page 37) to highlight
photographs, and press
C/D. Selected picture
is marked with a d icon.
To deselect a photograph,
highlight it and press C/D again.
Page 53

Tip: Selecting Ranges
4:3 N
4:3 N
To switch from Sel. Indiv. to Sel. Range, press the ADJ. lever
and follow the steps below:
3.1 Use the directional pad to
highlight the rst image of a
range, and press C/D
to select. The selected image
is marked with a d icon. To
deselect the image, press the
DISP. button.
3.2 Use the directional pad to
highlight the last image, and
press C/D to select.
The selected images are
marked with a d icon.
Repeat steps 3.1–3.2 to select additional ranges, or press the
ADJ. lever to return to step 3 to select or deselect individual
photographs.
Press the d button.
4
A conrmation dialog will be
displayed.
Select Yes.
5
Press Fn1 or Fn2 to highlight
Yes, and press C/D.
First-time user? read this.
41
Page 54

42
First-time user? read this.
O (DISP.) Button
4:3 N 4:3 N
4:3 N 4:3 N
Press the O (DISP.) button to display the information in
the picture display in shooting and playback modes.
Turning the Picture Display On/O
Pressing the VF/LCD button while the picture display is on turns
the picture display o. Some camera operations are not available
when the picture display is o. Pressing the VF/LCD button again
turns the picture display on.
When a LCD viewnder is attached, pressing the VF/LCD button
switches between the LCD viewnder and the picture display.
Shooting Mode
Press the O (DISP.) button to cycle through the
following displays:
Indicators
displayed
No
indicators
Tip: The Framing Grid
See page 144 on choosing a type of framing grid.
Indicators +
histogram
Framing
grid (no
indicators)
Page 55

Note
4:3 N 4:3 N
2010 2010
F 2.5
200
2.5 200
2.5 200
4:3 N 4:3 N
4:3 N
2010 2010
2010
F 2.5
200
F 2.5
200
2.5 200
White SaturationWhite Saturation
4:3 N
2010
F 2.5
200
2.5 200
White SaturationWhite Saturation
If Display or Disp + Snd is selected for Level Setting (page 32), a
tilt indicator appears when indicators are displayed.
Playback Mode
Press the O (DISP.) button to cycle through the
following displays:
First-time user? read this.
Indicators
displayed
No
indicators
Tip: Highlights
The ashing portions of the highlights display indicate “washed
out” areas in which details may have been lost to overexposure.
Check images with the highlights display after shooting in direct
sunlight or in other conditions in which parts of the image may
be overexposed. If it seems important details may have been lost,
choose a lower exposure compensation value and shoot again
(page 85). Note that the display is intended only as a guide and
may not be entirely accurate.
Details +
histogram
Highlights
43
Page 56

Tip: Histogram
The histogram is a graph showing the distribution of pixels
of dierent brightness in the image. Brightness is plotted on
the horizontal axis, with shadows at the left and highlights
at the right. The vertical axis gives the number of pixels. The
histogram can be used to assess exposure and check for loss of
First-time user? read this.
detail in highlights and shadows without the brightness of your
surroundings aecting your judgement. A histogram in which
pixels are clustered on the right indicates that the image may be
overexposed, while a histogram in which pixels are clustered on
the left indicates that the image may be underexposed.
Overexposed Underexposed
If the image appears to be incorrectly exposed, you may be
able to use exposure compensation to correct exposure in
subsequent photographs of the same subject (page 85; note
that exposure compensation may be insucient to produce the
correct exposure in some cases). The histogram can also be used
as a guide when adjusting contrast in photographs after shooting
(page 107).
The histogram is intended as a guide only and may not be
completely accurate, particularly in cases in which the ash is
used or ambient lighting is poor.
44
Page 57

Reference
Read this section for more information on
camera functions.
More on Photography ............................................... 46
Playback Functions................................................... 94
Playback Menu ........................................................101
Printing Photographs ..............................................120
Camera Settings ......................................................126
Copying Pictures to a Computer ...............................151
Technical Notes .......................................................167
45
Page 58

46
more on PhotograPhy
More on Photography
4:3 N
2.5
200
4:3 N
This section provides information on P, A, S, M, 4,
and MY modes and on using shooting menu options.
Mode P: Program Shift
When the mode dial is rotated
to P (program shift), you can use
the up-down dial to choose from
several combinations of shutter
speed and aperture, all of which
produced the same exposure.
Choose mode P.
1
Rotate the mode dial to P. The
shooting mode is shown by
an icon in the picture display.
Measure exposure.
2
Press the shutter-release
button halfway to measure
exposure. The current shutter
speed and aperture appear in
the display.
Choose shutter speed and aperture.
3
Release the shutter-release
button and rotate the
up-down dial to select a
combination of shutter speed
and aperture.
Page 59

Note
Shutter speed and aperture can be adjusted for ten seconds
after releasing the shutter-release button.
Take a picture.
4
Gently press the shutter-release button all the way
down to take the photograph.
Note
The combinations of shutter speed and aperture available at each
exposure value dier depending on the camera unit. See the
documentation provided with the camera unit for details.
more on PhotograPhy
47
Page 60

48
more on PhotograPhy
Mode A: Aperture Priority
4:3 N
4:3 N 4:3 N
In mode A (aperture priority),
you choose the aperture and
the camera selects the shutter
speed. Choose large apertures
(low f-numbers) to emphasize the
main subject by blurring background and foreground
details. Choose small apertures (high f-numbers) to
bring both the background and main subject into focus.
Choose mode A.
1
Rotate the mode dial to
A. The current aperture is
displayed in orange.
Choose an aperture.
2
Rotate the up-down dial to
choose an aperture. Your
selection only takes eect when the photograph is
taken; the eect cannot be previewed in the picture
display.
Press the shutter-release button halfway.
3
Press the shutter-release
button halfway to set focus and
exposure. The shutter speed
selected by the camera will be
displayed in the picture display.
Take a picture.
4
Gently press the shutter-release button the rest of
the way down.
Note
If auto aperture shift is on (page 92), the camera will adjust
aperture for optimal exposure.
Page 61

Mode S: Shutter Priority
2.5
200
4:3 N 4:3 N
In mode S (shutter priority), you
choose the shutter speed and
the camera selects the aperture.
Choose fast shutter speeds to
“freeze” motion, slow shutter
speeds to emphasize motion by blurring moving
objects.
Choose mode S.
1
Rotate the mode dial to S.
The current shutter speed is
displayed in orange.
Choose shutter speed.
2
Rotate the up-down dial to
choose a shutter speed.
Press the shutter-release button halfway.
3
Press the shutter-release
button halfway to set focus
and exposure. The aperture
selected by the camera will
be displayed in the picture
display.
Take a picture.
4
Gently press the shutter-release button the rest of
the way down to shoot.
Note
Maximum aperture (i.e., the lowest possible f-number) may not
be selected at slow shutter speeds, even when the subject is
poorly lit.
more on PhotograPhy
49
Page 62

50
more on PhotograPhy
Mode M: Manual Exposure
4:3 N
In mode M (manual exposure),
use the up-down dial to choose
aperture and the ADJ. lever to
select a shutter speed.
Choose mode M.
1
Rotate the mode dial to M.
The shooting mode, exposure
indicator, and current
aperture and shutter speed
appear in the display.
Choose an aperture and shutter speed.
2
Rotate the up-down dial
to choose an aperture and
press the ADJ. lever left or
right to select a shutter
speed (if desired, the roles of the two controls
can be reversed; see page 138). The eects can be
previewed in the picture display and are reected
in the exposure indicator (if the image would be
under- or over-exposed by more than 2 EV, the
eects cannot be previewed and the indicator turns
orange).
+2 EV–2 EV +2 EV–2 EV
Take a picture.
3
Press the shutter-release button halfway to focus,
and then gently press the shutter-release button the
rest of the way down to shoot.
Page 63

Notes
• The shutter speeds that can be set depend on the camera unit
and the aperture setting. See the documentation provided with
the camera unit for details.
• If
Auto or Auto-Hi is selected for ISO Setting (page 90),
ISO value will be xed in manual exposure mode. The xed
value for ISO diers depending on the camera unit. See the
documentation provided with the camera unit for details.
• Choose slower shutter speeds for longer exposure times.
To reduce blur caused by camera shake, hold the camera
steadily in both hands or use a tripod. The picture display
turns o while the shutter is open. At slow shutter speed, the
camera automatically processes photographs to remove noise,
increasing the time needed to record images to about twice the
shutter speed.
• Autoexposure (AE) lock is not available in manual exposure
mode. If AE Lock is selected for Set Fn1 Button or Set Fn2 Button in
the key custom options tab, pressing the assigned button in
manual exposure mode will set shutter speed or aperture to
a value close to that needed for optimal exposure. Similarly, if
Exposure Comp. is selected for +/– Button Settings (page 137)
in the key custom options tab, pressing the + and – buttons
will not display exposure compensation options in manual
exposure mode, but will instead set shutter speed or aperture to
a value close to that needed for optimal exposure. This is useful
when you want to use optimal exposure as a starting point for
modifying exposure. The One Press M Mode (page 138) option
in the key custom options tab determines whether shutter
speed or aperture is altered to achieve optimal exposure.
more on PhotograPhy
51
Page 64

52
more on PhotograPhy
4 Mode: Settings for Various Scenes
Select 4 mode to shoot
movies or to choose one of the
options that are suitable for
particular scenes. Camera settings
are automatically optimized for
the selected subject type.
The following is some of the options that can be
selected in the 4 mode.
Option Description
Movie Shoot movies with sound (page 54).
Portrait Use when taking portrait pictures.
Sports Use when taking pictures of moving objects.
Landscape
Nightscape
Skew Correct
Mode
Use when taking scenery pictures with abundant
greenery or blue sky.
Use when shooting night scenes.
In nightscape mode, the ash res when all of the
following conditions are satised:
• The ash is set to Auto.
• The ash is determined to be necessary because it is
dark.
• There is a gure or another object nearby.
Reduce the eects of perspective when photographing
rectangular objects, such as message boards or
business cards (page 56).
Page 65

To select a scene mode option:
Rotate the mode dial to 4.
1
The option currently selected
for 4 mode appears in
the display.
Press C/D.
2
A menu for scene mode is
displayed.
Select an option.
3
Press +, –, Fn1 or Fn2 to highlight an option and press
C/D to return to shooting mode with the
selected option shown at the top of the display.
Take a picture.
4
• Movie mode: See page 54.
• Skew correct mode: See page 56.
more on PhotograPhy
53
Page 66

54
more on PhotograPhy
Tip: Using the Menus
To access the shooting, key custom
options and setup menus in 4
mode, press C/D to display the
scene mode menu and press Fn1 to
highlight the mode tab. Press + or – to
highlight the shooting menu tab (page
58), key custom options tab (page
127), or setup tab (page 128), and press
Fn2 to place the cursor in the selected
menu. See page 59 for information on
the shooting menu options available in
each mode.
1
2
3
4
Mode tab
1
Shooting menu tab
2
Key custom options
3
tab
Setup tab
4
Recording Movies
Shoot movies with sound. Movies are stored as AVI les.
Select 3 in 4 mode.
1
Press + or – to highlight 3 (movie), and press
C/D.
The mode is shown by an
icon in the picture display.
Shoot.
2
Press the shutter-release button to begin recording;
press again to end. Recording ends automatically
when memory is full.
Page 67

Cautions
• A
available time are displayed during recording.
• Sounds made by the camera may be recorded with the movie.
• Movies may be up to 90 minutes in length or 4 GB in size.
Depending on the type of memory card used, shooting may
end before this length or size is reached. The maximum total
length of all movie les that can be stored in internal memory
or on a memory card varies with the options selected for Movie
Size (page 61).
• The ash cannot be used in movie mode.
• The camera focuses when the shutter-release button is pressed
to begin recording.
• The amount of time remaining is calculated based on the
amount of memory available and may not diminish at an even
rate.
• Shooting menu options dier from those available in other
modes (page 60).
• Charge the battery before shooting. For long recordings, choose
memory cards with high write speeds and check the amount of
memory available before shooting.
icon blinks, and the recording time and remaining
Notes
more on PhotograPhy
55
Page 68

56
more on PhotograPhy
4 Mode: Skew Correct
To take pictures in skew correct mode, frame the subject
so that it occupies as much of the frame as possible and
press the shutter-release button to take the photograph.
If the camera detects an object of which perspective
can be corrected, the object is shown surrounded by an
orange frame. The camera can detect up to ve objects;
press Fn2 to select a dierent object, or press + to record
the photograph without correcting perspective. If the
camera is unable to detect a suitable object, an error
message will be displayed and the photograph will be
recorded without modication.
Caution
The camera records two images: the unmodied photograph
and a copy that has been processed to correct perspective. No
photograph will be taken if memory is insucient to record two
images. The camera may be unable to correct perspective if:
• The subject is out of focus.
• The four edges of the subject are not clearly visible.
• There is little contrast between the subject and the background.
• The background contains many ne details.
Tip: Skew Correction
The Skew Correction in the playback menu can be used to
correct perspective of saved photographs (page 110).
Page 69

“MY” Modes: Using Custom Settings
4:3 N
To take photographs using
settings saved in MY1 option
with Reg. My Settings in the key
custom options tab (page 129),
rotate the mode dial to MY1. Select
MY2 to take photographs using the settings saved with
MY2, MY3 to take photographs using the settings saved
with MY3.
Rotate the mode dial to MY1, MY2, or MY3.
1
The shooting mode saved
using Reg. My Settings will
be displayed in the picture
display.
Note
Settings can be adjusted in MY modes. The settings saved
with Reg. My Settings are restored when another mode is
selected or the camera is turned o.
Tip: Choosing a Shooting Mode
To choose a shooting mode in MY mode without changing
other settings, use the Switch Shooting Mode option in
the shooting menu (page 92). Switch Shooting Mode is
not available for MY modes that a scene mode is assigned
to.
more on PhotograPhy
Take a picture.
2
See the section on the selected shooting mode for
more information.
57
Page 70

58
more on PhotograPhy
Shooting Menu
Use the +, –, Fn1, Fn2, and C/D buttons to
navigate the menus.
Caution
The shooting menu is not displayed when the camera unit is not
attached to the camera body.
Display the shooting menu.
1
In modes other than 4,
pressing C/D in
shooting mode displays the
shooting menu.
Tip: 4 Mode
In 4 mode, pressing
C/D displays the mode
menu; press Fn1 to highlight the
mode tab, press – to display the
shooting menu, and Fn2 to place
the cursor in the menu.
Select a menu item.
2
Press + or – to highlight a
menu item and press Fn2
to display options for the
highlighted item.
Note
The items on the next page can
be displayed by pressing – while
pressing the DIRECT button.
Scroll bar shows
position in menu
Page 71

Select an option.
3
Press + or – to highlight an option. Press C/
D to select and exit to shooting mode, or press Fn1
to select and return to the shooting menu.
The items available in the shooting menu dier
depending on the shooting mode.
5, P, A, S, M, MY1, MY2 and MY3 Modes
Option Default Page
Picture Quality/Size L 4:3 N 61
Focus Multi AF 64
Snap Focus Distance 2.5 m 68
Full Press Snap On 69
Pre-AF O 70
Exposure Metering Multi 70
Image Settings Standard 71
Continuous Mode O 73
Auto Bracket O 75
Flash Exposure
Compensation
Manual Flash Amount 1/2 79
Flash Synchro Settings 1st Curtain 79
Noise Reduction O 80
Noise Reduction ISO Over ISO 401 80
Distortion Correction O 81
0.0 78
Option Default Page
Auto Macro O 81
Custom Self-Timer 2Pics, 5Sec. 82
Interval Shooting — 83
Date Imprint O 84
Exposure
Compensation *
White Balance Multi-P AUTO 86
White Balance
Compensation
ISO Setting Auto 90
Restore Defaults *
Auto Aperture Shift *
Switch Shooting
Mode *
Camera Shake
Correction *
1
A: 0, G: 0 89
2
3
4
5
more on PhotograPhy
0.0 85
— 91
O 92
— 92
On 92
59
Page 72

60
more on PhotograPhy
4 Mode: Movie
Option Default Page
Movie Size VGA640 61
Focus Multi AF 64
Snap Focus Distance 2.5 m 68
Pre-AF O 70
4 Mode: Portrait/Sports/Nightscape
Option Default Page
Picture Quality/Size L 4:3 N 61
Focus Multi AF 64
Snap Focus Distance 2.5 m 68
Full Press Snap On 69
Pre-AF O 70
Flash Exposure
Compensation
Flash Synchro Settings 1st Curtain 79
0.0 78
4 Mode: Landscape
Option Default Page
Picture Quality/Size L 4:3 N 61
Distortion Correction O 81
Custom Self-Timer 2Pics, 5Sec. 82
Date Imprint O 84
Exposure Compensation 0.0 85
Option Default Page
White Balance Auto 86
White Balance
Compensation
Option Default Page
Distortion Correction O 81
Custom Self-Timer 2Pics, 5Sec. 82
Date Imprint O 84
Exposure Compensation 0.0 85
White Balance Multi-P AUTO 86
Camera Shake
Correction *
White Balance Multi-P
Camera Shake
Correction *
5
Option Default Page
5
A: 0, G: 0 89
On 92
86
AUTO
On 92
Page 73

4 Mode: Skew Correct
Option Default Page
Picture Quality/Size 1M 4:3 F 61
Focus Multi AF 64
Snap Focus Distance 2.5 m 68
Full Press Snap On 69
Pre-AF O 70
Exposure Metering Multi 70
Image Settings Standard 71
Flash Exposure
Compensation
*1 Not available in mode M.
*2 5 mode only.
*3 Mode A only.
0.0 78
Option Default Page
Flash Synchro Settings 1st Curtain 79
Distortion Correction O 81
Date Imprint O 84
Exposure Compensation 0.0 85
White Balance Multi-P AUTO 86
ISO Setting Auto 90
Camera Shake
Correction *
*4 Mode MY1, MY2 or MY3 only.
*5 This function is not available depending on
5
the type of camera unit.
On 92
Picture Quality/Size / Movie Size
Image size determines the number of photographs and
movies that can be stored in internal memory or on a
memory card.
For still images, the aspect ratio and picture quality
can be selected for each option. The picture size diers
depending on the combination of the selected option,
aspect ratio and quality.
For movies, select the desired option.
more on PhotograPhy
61
Page 74

62
more on PhotograPhy
For Still Images
Option Aspect ratio Compression rate Description
RAW 16:9*2, 4:3,
3:2*2, 1:1*
L 16:9*2, 4:3,
3:2*2, 1:1*
M 16:9*2, 4:3,
3:2*2, 1:1*
5M 4:3 FINE • Suitable for printing.
3M 4:3 FINE
4
1M*
4:3 FINE • Suitable for taking large
VGA*44:3 FINE • Suitable for taking large
*1 The setting is applied for the JPEG copy.
*2 The upper and lower parts on the display are blacked out.
*3 The left and right sides on the display are blacked out.
*4 1M and VGA are the options available in the Skew Correct mode.
Notes
• See the documentation provided with the camera unit for
details on the picture size for each option.
• Options for
Picture Quality/Size can be displayed by pressing
the ADJ. lever (page 134).
FINE/NORMAL/
3
1
VGA*
• Suitable for further image
processing or editing on a
computer.
FINE/NORMAL • Suitable for printing at
3
FINE/NORMAL
3
larger size or cropping the
image on a computer.
number of photographs.
number of photographs,
attaching the images to
e-mail or posting images
on the web.
Page 75

Tip: Picture Quality
The camera supports the following picture qualities:
•
Normal: JPEG compression is used to reduce le size.
•
Fine: Compression rate is low to achieve high picture quality. File
size becomes larger comparing to Normal quality.
•
RAW: RAW image data are saved in DNG format; JPEG copies
are also created. The camera displays only the JPEG copy;
DNG les can be viewed and edited on a computer using the
supplied Irodio Photo & Video Studio Software (Windows only)
or commercially-available applications that support the DNG
format.
Unlike normal- and ne-quality images, RAW images are not
compressed. This increases le size but avoids the loss of quality
associated with JPEG compression. Note the following when
shooting RAW images:
• Some functions of the shooting menu are not available for
shooting RAW images. See the description of each setting for
details. Image Settings and Date Imprint options apply only
to JPEG copies and have no eect on the DNG les.
• The number of RAW photographs that can be taken in a single
burst in continuous mode diers depending on the camera unit
and the settings of shooting menu.
For Movies
Option Image size
VGA640 640×480
QVGA320 320×240
more on PhotograPhy
Notes
• The options for movies dier depending on the camera unit.
See the documentation provided with the camera unit for
details.
• Movies may be up to 90 minutes in length or 4 GB in size.
63
Page 76

64
more on PhotograPhy
Focus
4:3 N
Choose how the camera focuses. By default, the camera
uses autofocus.
Option Description
The camera selects the focus area with the closest
Multi AF*
Spot AF* Focus on the subject in the center of the frame.
MF
(manual focus)
Snap
∞ (innity)
* The icon is displayed on the DIRECT screen only.
subject, preventing out-of-focus shots by keeping
the camera from focusing on the background.
Focus manually (page 65).
Focus is xed at distance selected with Snap Focus
Distance (page 68) for quick shutter response.
Fix the focus distance at innity when photographing
distant scenes.
When MF, Snap, or ∞ is selected,
the current selection is shown by
an icon in the picture display.
Tip: Depth of Field
Depth of eld is the portion (range of distance) that appears sharp
in an image. Small apertures (high f-numbers) increase depth of
eld, bringing more of the scene into focus; large apertures (low
f-numbers) decrease depth of eld, emphasizing the main subject
by blurring the foreground and background. At settings of MF,
Focus bar
Snap, and ∞, the focus bar shows depth
of eld in shooting modes M, A, and P
(in mode P, depth of eld is only shown
when the shutter-release button is
pressed halfway and aperture values are
Focus bar
(distances are
(distances are
approximate)
approximate)
Depth of eld
Depth of eld
(green)
(green)
displayed).
Page 77

Notes
4:3 N
2.5
30
4:3 N
2.5
30
• Fn1
and Fn2 buttons can be used to switch back and forth
between autofocus and manual or snap focus (page 136).
• To zoom in on the subject in the
center of the picture display and
check focus, press and hold C/
D. Press and hold the button again
to return to the normal shooting
display.
Focus: MF (Manual Focus)
Manual focus can be used to lock focus or to focus when
the camera is unable to focus using autofocus.
Select MF (manual focus) in the Focus menu.
1
The focus mode and focus
bar are displayed in the
picture display.
Choose the focus distance.
2
While pressing the N button, rotate the up-down
dial to focus. When using the camera unit with the
focus ring, adjust the focus using the ring.
Take a picture.
3
See the section on the selected shooting mode for
more information.
Note
In manual focus mode, the camera can focus on the subject at
close range (macro) even if macro mode is not set.
more on PhotograPhy
65
Page 78

66
more on PhotograPhy
Choosing the Focus and Metering Target
Target selection can be used to set focus and exposure
for o-center subjects without moving the camera,
making it easier to use a tripod.
Activate target selection.
1
Press the ADJ. lever in the
focus modes other than MF,
and then press the lever to
the left or right to highlight
P. Press + or – to highlight
one of the following options
and press C/D to select.
Option Description
Spot metering and spot autofocus; choose the focus and
AE/AF
exposure target.
Spot autofocus; choose the focus target. Exposure is
AF
metered using the option selected for Exposure Metering
(page 70).
Spot metering; choose the metering target. Focus is set
AE
using the option selected for Focus (page 64).
O Target selection is o.
Position the target.
2
Use the directional pad
(page 37) to position the
cross hairs over your subject,
and press C/D.
To return to the target
selection menu, press the
DISP. button.
Page 79

Take a picture.
3
Press the shutter-release button halfway to set focus
and/or exposure for the selected subject and then
gently press the shutter-release button the rest of
the way down to take the picture.
Notes
• Target selection is not available in manual focus mode (page
65).
• The selected target remains in eect until a new target is
selected. Note that target will be reset if you choose a new
option in the target-selection menu or select manual focus.
• When macro mode is on in
for macro mode can be selected by pressing the ADJ. lever,
selecting U, and using the directional pad to position the
cross-hairs as described on page 68.
• The
Fn buttons can be used for focus target selection in macro
mode (page 68). Note that if the Fn buttons have been used to
select the focus target, the ADJ. lever cannot be used for target
selection until the target is reset.
4 mode, the focus target
more on PhotograPhy
67
Page 80

68
more on PhotograPhy
Macro Target Selection
If Macro Target is assigned to the Fn1
or Fn2 button (page 136), you can select
macro mode by pressing the assigned
button in shooting mode. The crosshairs shown at right will be displayed;
use the directional pad (page 37) to
position the cross-hairs over your
subject, and press C/D (to exit without setting the target,
press the DISP. button). Press the shutter-release button halfway to
focus on the selected target, and then gently press the shutterrelease button the rest of the way down to take the picture.
If the ADJ. lever has been used to select a focus target (page 66),
you cannot select macro target mode by pressing Fn1 and Fn2
until the target is canceled.
Snap Focus Distance
Select the distance at which the camera focuses when
Snap is selected for Focus (page 64) or Full Press Snap
is on (page 69). Choose from 1 m (3.3 ft.), 1.5 m (4.9 ft.),
2 m (6.6 ft.), 2.5 m (8.2 ft.), 3 m (9.9 ft.), 3.5 m (11.5 ft.), 5 m
(16.4 ft.), and ∞ (innity).
Note
When Snap is selected for Focus or Full Press Snap is on, the
snap focus distance can also be selected by rotating the updown dial while pressing the N button.
Page 81

Full Press Snap
Take photographs without pausing to focus the camera
when Multi AF or Spot AF is selected for Focus (page
64).
Option Description
O The function is o.
If the shutter-release is pressed all the way down in one
motion, the camera will take a picture at the focus distance
On
selected for Snap Focus Distance. Choose when quick
shutter response is required.
Auto-Hi ISO
The snap focus distance can be changed by rotating the updown dial while pressing the N button.
Tip: Autofocus
The camera will focus normally if you press the shutter-release
button halfway.
• Full press snap is not available in macro mode or when
Snap, or ∞ is selected for Focus (page 64).
• Care is required to avoid blur caused by camera movement.
Same as On, except that ISO sensitivity is automatically set
to Auto-Hi (page 90).
Note
Cautions
MF,
more on PhotograPhy
69
Page 82

70
more on PhotograPhy
Pre-AF
4:3 N
If On is selected when Multi AF or Spot AF is selected for
Focus (page 64), the camera will continue to focus even
when the shutter-release button is not pressed halfway
(the focus range is narrower than for normal focus). This
may decrease the time needed to focus, potentially
improving shutter response.
Cautions
•
Pre-AF is not available when MF, Snap, or ∞ is selected for
Focus (page 64).
• Using pre-AF increases the drain on the battery.
Exposure Metering
Choose how the camera measures light for exposure.
Option Description
Multi* The camera measures light in 256 areas of the frame.
The camera measures light in the entire frame but assigns
the greatest weight to the center. Use when the subject
Center
in the center of the frame is brighter or darker than the
background.
The camera measures light with the subject in the center
Spot
of a frame, ensuring the optimal exposure even when it is
markedly brighter or darker than the background.
* The icon is displayed on the DIRECT screen only.
When Center or Spot is selected,
the current selection is shown by
an icon in the picture display.
Page 83

Image Settings
4:3 N
Adjust contrast, sharpness, and vividness (color depth)
or take monochrome photographs.
Option Description
Vivid
Standard* Normal contrast, sharpness, and vividness.
Natural
Black & White
B&W (TE)
(Toning Eect)
Setting 1
Setting 2
* The icon is displayed on the DIRECT screen only.
Take vivid photographs with heightened contrast,
sharpness, and vividness.
Creates a softer image with decrease in contrast,
sharpness, and vividness.
Take photographs in black and white. Contrast and
sharpness can be adjusted manually.
Creates monochrome photographs with a sepia,
red, green, blue, or purple tint. Vividness, contrast,
and sharpness can be adjusted manually.
Make individual adjustments to vividness, contrast,
sharpness, colors and hue to create custom settings
that can be recalled as desired.
At settings other than Standard,
the current selection is shown by
an icon in the picture display.
To make individual adjustments to the settings for Black
& White, B&W (TE), Setting1, or Setting2, highlight the
desired option and press Fn2.
more on PhotograPhy
71
Page 84

72
more on PhotograPhy
Adjust custom color reproduction settings.
1
• Black & White: Press + and
– to highlight an option and
press Fn1 and Fn2 to change.
• B&W (TE): Adjust vividness,
contrast, and sharpness as
described above. To choose
a tint, highlight Toning
Eect and press Fn2. Press +
and – to highlight an option
and press Fn1 to select.
• Setting1/Setting2: Adjust
vividness, contrast, and
sharpness as described
above. To adjust individual
colors, highlight Individual
Color Settings and press Fn2.
Press + and – to highlight an option and press Fn1
and Fn2 to change. Press C/D to exit when
settings are complete.
To call the registered settings, highlight Recall
Settings and press Fn2. Press + or – button to
highlight an option and press C/D.
Return to the Image Settings menu.
2
Press C/D when settings are complete.
Exit to shooting mode.
3
Press C/D, or press Fn1 and then press
C/D.
Page 85

The option currently selected
4:3 N
for Image Settings will be
displayed in the picture
display.
Note
Options for Image Settings can be displayed by pressing the ADJ.
lever (page
134).
Continuous Mode
Shoot photographs in continuous sequence.
• Continuous: The camera shoots
while the shutter-release button
is pressed.
All the photographs taken in this
mode are saved as individual
still images.
• M-Cont Plus (memory-reversal continuous plus): The camera
shoots while the shutter-release button is pressed.
Consecutive still images taken before releasing
the shutter-release button are saved as one MP le
(page 95).
M-Cont Plus can be selected from M-Cont + (HI) and
M-Cont + (LO).
more on PhotograPhy
When you remove your nger
from the shutter release button…
…the camera records consecutive still images.
73
Page 86

74
more on PhotograPhy
Note
4:3 N
For M-Cont + (HI) and M-Cont + (LO) options, image sizes and
the number of images saved as one MP le dier depending
on the camera unit. See the documentation provided with the
camera unit for details.
At settings other than O, the
current selection is shown by an
icon in the picture display.
Caution
Digital zoom is available at settings M-Cont Plus even if Auto
Resize is selected for Digital Zoom Image.
Notes
• At settings other than
focus and exposure are xed with the rst shot in each series,
and Auto white balance is used in place of Multi-P AUTO (page
86).
• If you release the shutter-release button before reaching
the number of images that are saved as one MP le, the
photographs taken while pressing the button will be saved as
one MP le.
Tip: MP le
MP is a le format for recording a set of still images.
O, the ash turns o automatically,
Page 87

Auto Bracket
4:3 N
The camera records two or three copies of an image
with variations in exposure, white balance or color.
Option
Auto bracket function is o.
OFF*
The camera records three copies of a photograph in the
specied variation of exposure value.
AE-BKT
The camera records three copies
of each photograph: one with a
“warm,” reddish cast, a second
at the white balance currently
selected in the shooting menu
WB-BKT
(page 86), and a third with a “cool,”
blueish cast. Choose when you
nd it dicult to select the correct
white balance.
Record photographs in both black-and-white and color or in
black-and-white, color, and tinted monochrome (page 77).
CL-BKT
* The icon is displayed on the DIRECT screen only.
Description
Display after shooting
The current selection is shown by
an icon in the picture display.
more on PhotograPhy
75
Page 88

76
more on PhotograPhy
Notes
• Bracketing is not available when an option other than
selected for Continuous Mode. White balance bracketing is not
available when shooting monochrome photographs.
• White balance bracketing and color bracketing are not available
when RAW is selected for Picture Quality/Size (page 61).
• The ash turns o automatically when bracketing is in eect.
•
Auto white balance is used in place of Multi-P AUTO when AEBKT is selected.
AE-BKT: Exposure Bracketing
To specify variations for exposure value:
Select AE-BKT.
1
Highlight AE-BKT and then press Fn2.
Specify the exposure compensation value.
2
Move the cursor using Fn1
or Fn2, press + or – to specify
the compensation value, and
then press C/D.
Return to shooting mode.
3
Press C/D, or press Fn1 and then press
C/D.
Notes
• If the same exposure compensation value is set, only one image
will be displayed for the same value.
• The step value of the compensation can be set with
Flash Comp. Step in the setup tab (page 140).
Exposure/
O is
Page 89

CL-BKT: Color Bracketing
The number and type of photographs recorded when
CL-BKT is selected for Auto Bracket depends on the
option selected for CL-BKT Black & White (TE) in the
setup tab (page 146):
•
O: The camera records two
copies of each photograph, one
in black and white and a second
in color.
• On: The camera records three
copies of each photograph, one
in black and white, a second in
color, and a third using the tint
selected for B&W (TE) in the
Image Settings menu (page 71).
B&W (TE) copy
Tip: Contrast, Sharpness, and Color Depth
The contrast, sharpness, and vividness of the images in the
bracketing sequence are determined by the options selected
in the Image Settings menu (page 71). The black-and-white
copy is recorded at the settings most recently selected for Black
& White, the tinted monochrome copy at the settings most
recently selected for B&W (TE), and the color copy at the setting
currently selected for Image Settings (if Black & White or B&W
(TE) is selected, the color copy will be recorded at a setting of
Standard).
more on PhotograPhy
77
Page 90

78
more on PhotograPhy
Flash Exposure Compensation
4:3 N
Adjust ash amount between
–2.0 to +2.0 in steps of / or
/ EV Selecting Flash Exposure
Compensation in the shooting
menu displays the slider shown at
right; press + or – to choose a ash
exposure compensation value and press C/D.
Flash exposure compensation is
displayed in the picture display
except when the ash is o.
Notes
• See page
• The step value of the compensation can be set with
Flash Comp. Step in the setup tab (page 140).
Caution
Flash exposure compensation may have no eect outside the
range of the ash. See the documentation provided with the
camera unit for details on the range of ash.
28 for information on using the ash.
Exposure/
Page 91

Manual Flash Amount
4:3 N
Choose amount of light produced by the ash in manual
ash mode (page 28). Flash amount is expressed as a
fraction of full power (all values are approximate):
FULL / / / / / / / / / / /
Flash level is displayed in the
picture display in manual ash
mode.
Note
Flash exposure compensation is not available in manual ash
mode.
Caution
Do not direct the ash at a person operating a motor vehicle or
use the ash close to the subject’s eyes. Particular care should be
observed when photographing infants.
Flash Synchro Settings
Choose how the ash synchronizes with the shutter.
• 1st Curtain: The ash res at the beginning of the
exposure. Recommended in most situations.
• 2nd Curtain: The ash res at the end of the exposure.
This option produces trails of light behind moving light
sources.
more on PhotograPhy
79
Page 92

80
more on PhotograPhy
Noise Reduction
4:3 N
Choose Weak or Strong to reduce noise (random
variations in brightness and color) in photographs taken
at high ISO sensitivities. The minimum ISO sensitivity
at which noise reduction applies can be selected using
Noise Reduction ISO.
is displayed when noise
reduction is on.
Notes
• When
RAW is selected for Picture Quality/Size (page 61), noise
reduction applies only to the JPEG copy, not to the DNG le.
• The time needed to record photographs varies with the option
selected for Noise Reduction.
Noise Reduction ISO
Select the minimum ISO sensitivity to apply noise
reduction function to when Weak or Strong is selected
for Noise Reduction. Choose from All (noise reduction
applies at all ISO sensitivities), Over ISO 201, Over ISO
401, Over ISO 801, Over ISO1601, and ISO3200.
Page 93

Distortion Correction
4:3 N
Set Distortion Correction to On to shoot by
automatically correcting the distortion of the image.
is displayed when distortion
correction is on.
Cautions
• Even if
• The distortion correction function is not available for DNG les,
• When
• The corrected image will not be displayed in the picture display
Distortion Correction is set to On, the correction is not
applied depending on the type of camera unit or when it is
not necessary depending on the zoom position. However, the
distortion correction symbol will appear in playback mode for
the images without the correction applied.
JPEG copies for raw data, MP les, and movies.
Distortion Correction is set to On, the angle of view will
change.
even if Distortion Correction is set to On.
Auto Macro
With Auto Macro set to On, the camera automatically
switches to the macro mode when focusing on a subject
close to the lens even if the camera is not in macro
mode.
N is displayed when the camera switches to macro
mode.
more on PhotograPhy
81
Page 94

82
more on PhotograPhy
Custom Self-Timer
To set the number of photographs to take and the
interval of shooting for the custom setting of the selftimer option, select Custom Self-Timer in the shooting
menu and follow the steps below:
Choose the number of photographs to take and
1
the interval of shooting.
Press Fn1 or Fn2 to highlight the numbers, and press
+ or – to change. Press C/D to return to
shooting mode.
Start shooting.
2
Press the shutter-release button. The specied
number of photographs will be taken automatically
at the selected interval.
Press C/D to cancel the self-timer before
nishing shooting the specied number of
photographs.
Page 95

Interval Shooting
4:3 N
To take photographs automatically at intervals of from
ve seconds to one hour, select Interval Shooting in the
shooting menu and follow the steps below:
Choose an interval.
1
Press Fn1 and Fn2 to highlight
hours, minutes, or seconds
and press + and – to change.
Press C/D to return to
shooting mode.
Interval is displayed in the
picture display.
Start shooting.
2
Press the shutter-release button. Photographs will
be taken automatically at the selected interval.
End shooting.
3
Press C/D to end shooting.
Cautions
• The interval timer is not available in
• The interval resets to zero when the camera is turned o.
• If the time needed to record photographs is longer than the
selected interval, the next photograph will not be taken until
recording is complete.
• The external ash unit will not re in interval shooting mode.
Use the built-in ash instead.
4 mode.
more on PhotograPhy
83
Page 96

84
more on PhotograPhy
Notes
4:3 N
• Use a fully-charged battery and be sure that sucient space
remains in internal memory or on the memory card. Interval
timer photography ends automatically when the internal
memory or memory card becomes full.
• Photographs can be taken at any time by pressing the shutterrelease button.
• If
Continuous or M-Cont Plus is selected for Continuous
Mode, continuous shooting turns o automatically.
Date Imprint
The camera imprints the shooting date on a picture.
Select an option from Date (YY/MM/DD) and Date and
Time (YY/MM/DD hh:mm).
DATE is displayed when date
imprint is on.
Notes
• Date imprint is not available when the clock is not set. Set the
clock (pages 20, 149) before using date imprint.
• The date cannot be imprinted on movies.
• When
RAW is selected for Picture Quality/Size, the date is
imprinted only on the JPEG copy, not the DNG le.
• The date is permanently imprinted on the image and cannot be
removed.
Page 97

Exposure Compensation
4:3 N
Exposure compensation may be required in the
following situations:
• Very bright backlighting: Subjects that are very strongly
backlit may be underexposed. Try increasing exposure
compensation.
• The frame is dominated by very bright objects: The subject
may be underexposed. Try increasing exposure
compensation.
• The frame is mostly dark (for example, a spotlit subject on
a darkened stage): The subject may be overexposed.
Try reducing exposure compensation.
Display the exposure compensation slider.
1
Highlight Exposure
Compensation in the
shooting menu, and press Fn2
to display the slider shown at
right.
Adjust exposure compensation.
2
Press + or – to adjust an exposure compensation
value. Press the shutter-release button to take a
picture or press C/D to return to shooting
mode.
more on PhotograPhy
At settings other than 0.0,
exposure compensation is
displayed in the picture display.
85
Page 98

86
more on PhotograPhy
Caution
Exposure compensation is not available in mode M.
Note
The step value of the compensation can be set with the
Exposure/Flash Comp. Step option in the setup tab (page 140).
White Balance
At the default setting of Multi-P AUTO, the camera
automatically adjusts white balance so that a white
subject will appear white regardless of the color of the
light source. It may however be necessary to match
white balance to the light source under mixed lighting
or when photographing a subject that is a solid color.
Option Description
Auto* The camera adjusts white balance automatically.
The camera adjusts white balance to account for
Multi-P AUTO
Outdoors Use when shooting in daylight under clear skies.
Cloudy Use when shooting in daylight under cloudy skies.
Incandescent
Lamp
Fluorescent
Lamp
Manual
Settings
Detail Make ne adjustments to white balance (page 88).
* The icon is displayed on the DIRECT screen only.
dierences in lighting in separate areas of the frame (in
continuous mode, this option is equivalent to Auto).
Use with incandescent lighting.
Use with uorescent lighting.
Measure white balance manually (page 88).
Page 99

At settings other than Auto, the
4:3 N
current selection is shown by an
icon in the picture display.
Cautions
• Auto white balance may not produce the desired results in
scenes without white objects. This can be corrected by adding a
white object to the scene before shooting.
• Options other than
when the ash is used. Select Auto when using the ash.
Display white balance options.
1
Highlight White Balance in shooting menu, and
Auto may not produce the desired results
press Fn2 to display options.
Select an option.
2
Press + or – to select an option.
Press the shutter-release button to take a picture
or press the ADJ. lever or C/D to return to
shooting mode.
Note
Options for White balance can be displayed by pressing the ADJ.
lever (page 134).
more on PhotograPhy
87
Page 100

88
more on PhotograPhy
Manual: Measuring White Balance
To measure a value for white balance:
Select Manual Settings.
1
Highlight Manual Settings
in the white balance menu.
Measure white balance.
2
Frame a blank piece of paper
or other white object so that
it lls the frame and press the
DISP. button. Repeat steps 1 and 2 until the desired
eect is achieved.
Return to shooting mode.
3
Press C/D to return to shooting mode.
Note
Selecting an option other than Manual Settings resets manual
white balance.
Detail: Making Fine Adjustments to White Balance
To make ne adjustments to white balance:
Select Detail.
1
Highlight Detail in the
white balance menu and
press the DISP. button.
 Loading...