

Ricoh GlobalScan, GlobalScan 2.0 Administrator's Manual
GlobalScan Ver. 2.0
Administrator’s Guide
Introduction ................................. 4
About GlobalScan .................... 4
Feature Highlights .................... 5
Before Getting Started.............. 7
MFD Configuration.................... 14
GS Admin Server Config........... 17
Step 1: Launch Admin Module.. 17
Step 2: Add/Edit a Profile......... 18
Step 3: GS V1.5 Settings ......... 50
Step 4: Enter/Edit Parameters .. 53
Step 5: Manage Services ......... 55
Step 6: Manage MFDs ............. 59
Step 7: Manage Logs............... 65
Step 8: Manage Jobs ............... 69
Step 9: Manage Failover.......... 72
Configuration Checklist ......... 79
Appendix
A. Requirements & Specs......... 81
B. Opt. Plug-ins & Framework... 83
C. Change Job Monitor / Data
Service Property .................. 86
D. Change Failover/Data Svc .... 90
E. OCR Engine Configuration ... 94
F. CDO.dll Install Procedures.... 102
G. Lotus Notes 6.5 Support ...... 104
H. Novell w/ Win Server 2003 ... 105
I. Backup and Restore Utility .... 107
J. FAQs.................................. 110
Contents
Copyright 2005 by Ricoh Corporation. All Rights Reserved.
K. Glossary of Terms ............... 115
July, 2005

GlobalScanTM Ver. 2.0
Administrator’s Guide
Copyright 2005 by Ricoh Corporation. All Rights Reserved.
No part of this publication may be reproduced, transmitted, transcribed, stored in a retrieval system, or
translated into any language or computer language, in any form or by any means, electronic, mechanical,
optical, chemical, manual or otherwise, without the prior written permission of Ricoh Corporation.
GlobalScan is a registered trademark of Ricoh Corporation.
Windows, Microsoft Exchange and Internet Explorer are registered trademarks of Microsoft Corporation.
All other trademarks are the property of their respective owners.
The material in this document is for information only and is subject to change without notice. While reasonable
efforts have been made in the preparation of this document to assure its accuracy, Ricoh Corporation, its
contractors and partners, assume no liability resulting from errors or omissions in this docume nt or from the
use of the information contained herein.
Ricoh Corporation reserves the right to make changes in the product design without reservation and without
notification to its users.
2

GlobalScanTM Ver. 2.0
Administrator’s Guide
Table of Contents
IInnttrroodduuccttiioon
About GlobalScan ............................................................................................................. 4
GlobalScan Components................................................................................................... 4
About This Guide ............................................................................................................... 4
GlobalScan Feature Highlights........................................................................................... 5
Before Getting Started........................................................................................................ 7
n
...................................................................................................................................................................................................................................................
• GlobalScan Ver. 2.0 Optional Plug-in / Framework Support..................................... 6
• GlobalScan New Feature Comparison ..................................................................... 6
• Setup Procedures .................................................................................................... 7
• GlobalScan Functions............................................................................................. 7
• GlobalScan Terms ................................................................................................... 8
• GlobalScan Workflow .............................................................................................. 12
• GlobalScan Home Page Navigation......................................................................... 13
MMuullttiiffuunnccttiioonnaall DDeevviiccee CCoonnffiigguurraattiioonn..........................................................................................................................................................
Localization........................................................................................................................ 16
GGlloobbaallSSccaann AAddmmiinn SSeerrvveerr CCoonnffiigguurraattiioonn............................................................................................................................................
Step 1: Launch GlobalScan Admin Module ........................................................................ 17
Step 2: Add/Edit a Profile................................................................................................... 18
• General Tab................................................................................................ 20
• EMail Tab.................................................................................................... 26
• Scan To Folder Tab.................................................................................... 33
• Projects Tab ............................................................................................... 35
• Services Tab............................................................................................... 43
Select / Change the Default Profile ...................................................................... 48
Delete a Profile.................................................................................................... 49
Step 3: Enter/Edit GlobalScan V1.5 Settings (if applicable) ................................................. 50
Step 4: Enter/Edit System Parameters ............................................................................... 53
Step 5: Manage Services (if applicable) ............................................................................... 55
Step 6: Manage MFDs......................................................................................................... 59
Add New Machine................................................................................................ 59
SmartDeviceMonitor for Client (Web Image Monitor) Utility ................................ 62
Edit Existing Machine Settings............................................................................ 63
Step 7: Manage Logs.......................................................................................................... 65
Step 8: Manage Jobs ......................................................................................................... 69
Step 9: Manage Failover (if applicable) ................................................................................ 72
GlobalScan Configuration Checklist .................................................................................. 79
AAppppeennddiixx
A – System Requirements and Specifications.................................................................... 81
B – Optional Plug-ins & Framework ................................................................................... 83
C – Change Job Monitor/Data Service Property................................................................. 86
D – Change Failover/Data Service Property ....................................................................... 90
E – OCR Engine Configuration........................................................................................... 94
F – CDO.dll Installation Procedures...................................................................................102
G – Lotus Notes 6.5 Support ..............................................................................................104
H – Novell w/ Windows Server 2003 ...................................................................................105
I – GlobalScan Backup and Restore Utility........................................................................107
J – Frequently Asked Questions........................................................................................110
K – Glossary of Terms........................................................................................................115
. 4
14
17
3
GlobalScanTM Ver. 2.0
Administrator’s Guide
IInnttrroodduuccttiioonn
About GlobalScan
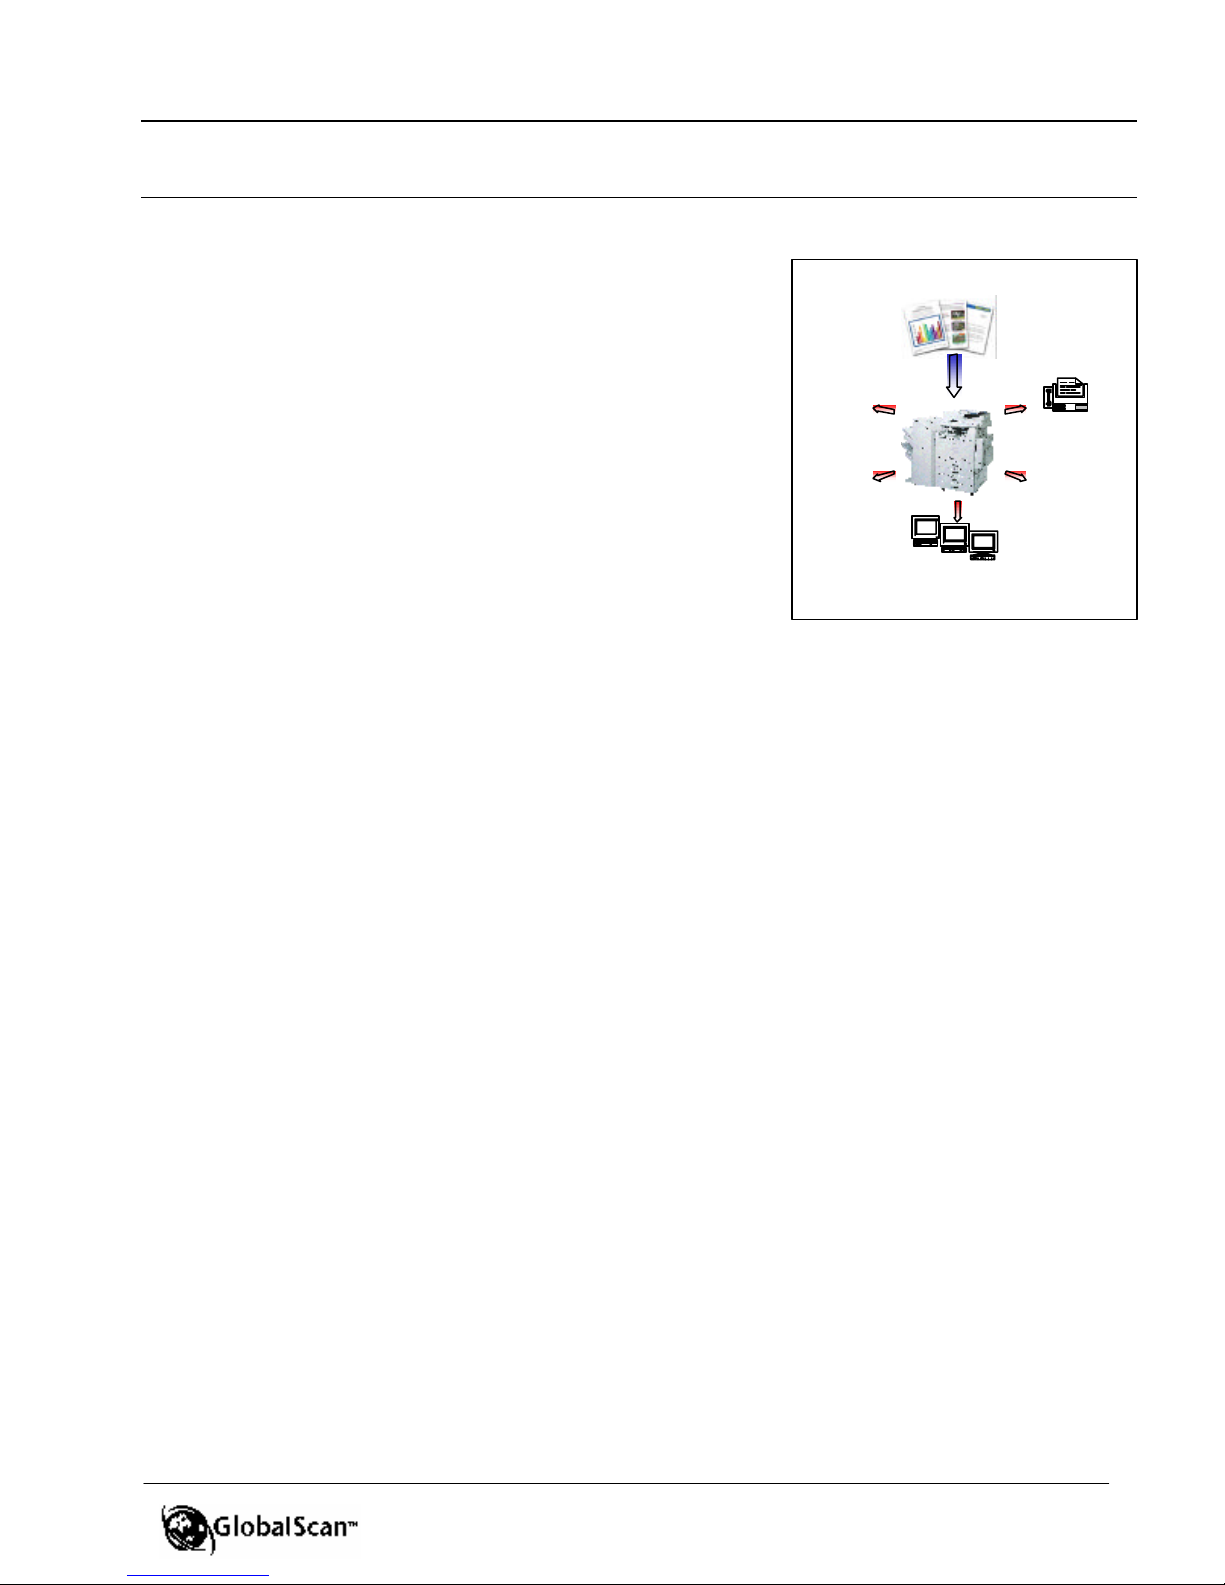
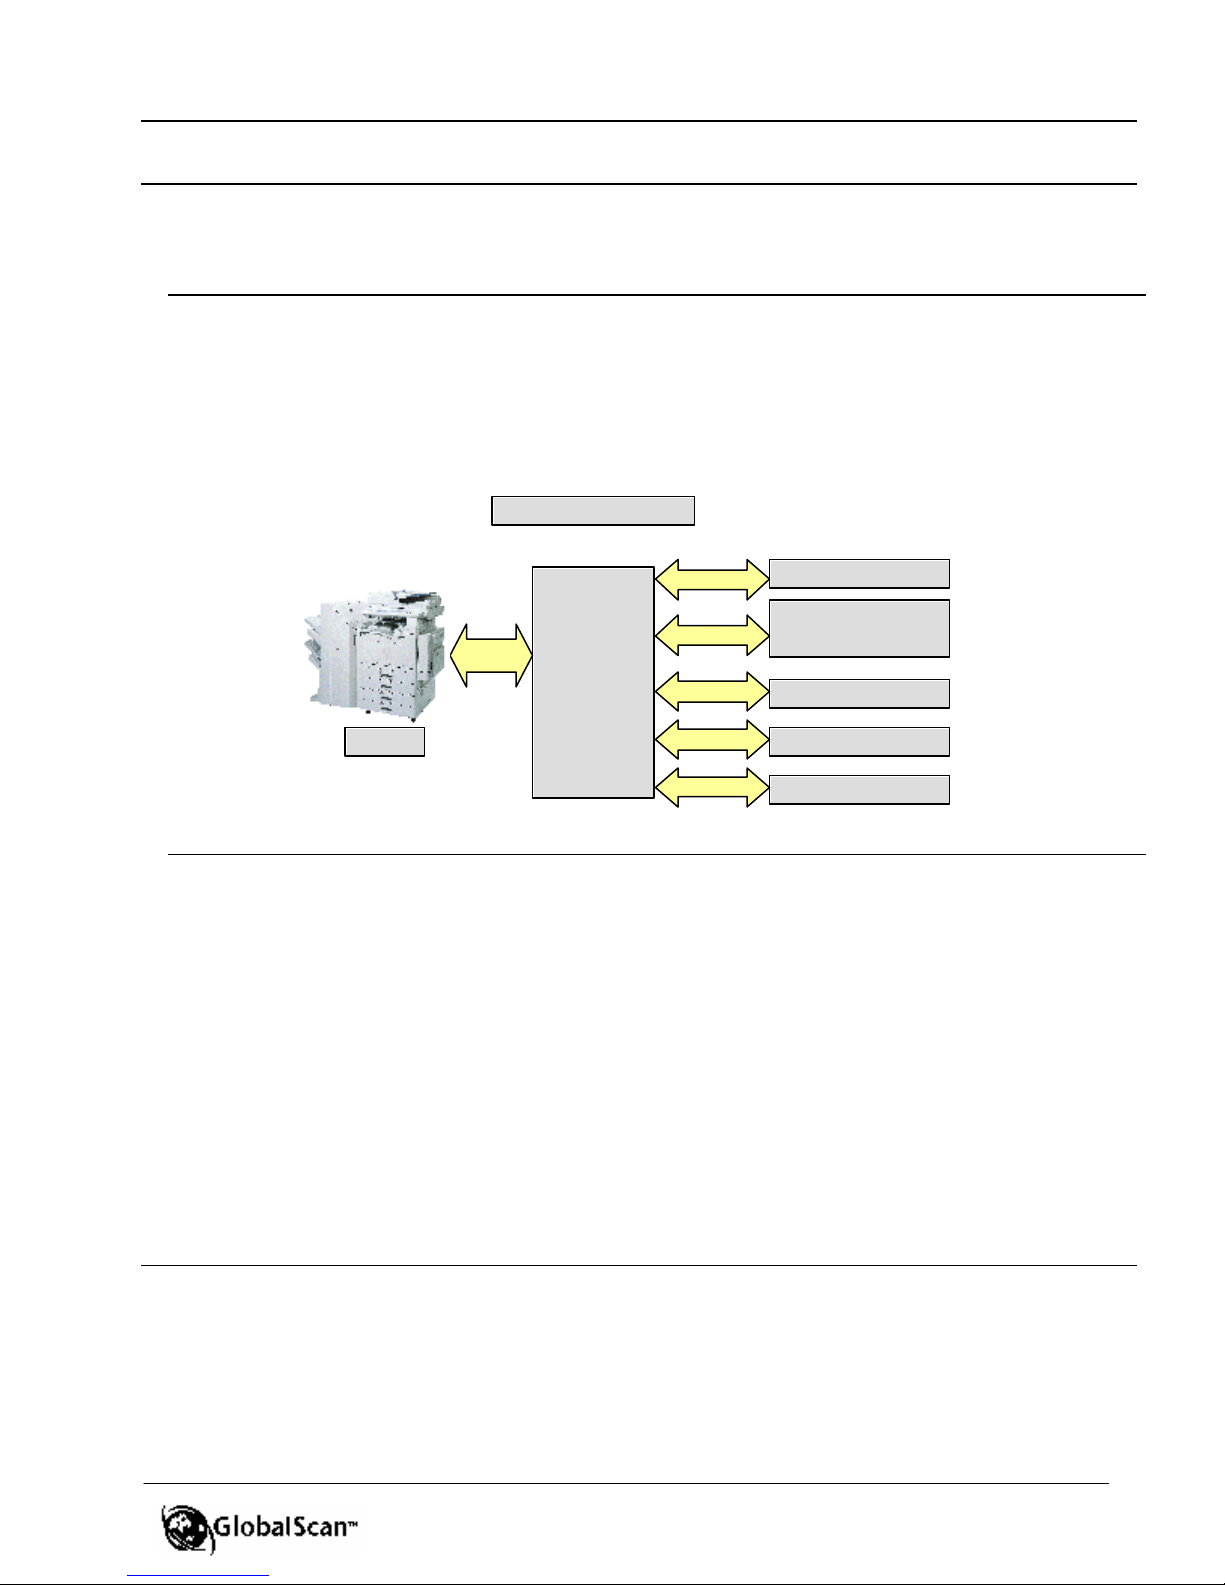
GlobalScan enables a Multifunctional Device (MFD) to
quickly scan documents to e-mail or to folder, as well as
perform Optical Character Recognition (OCR), Facsimile
Server and Document/Content Management System
(DMS) functions via optional Plug-ins/Framework. This
powerful, yet easy-to-use, paper document capture and
distribution system integrates seamlessly with your existing
mail infrastructure to significantly boost workgroup
productivity by combining network scanning functionality
within an accessible copier platform. Most importantly,
dramatic cost efficiencies are gained by speeding
throughput of common business transactions that may
otherwise require slower and more costly methods of
communication.
)
E-mail
1
Folder OCR
GlobalScan
DMS
Fax Server
,
,
GlobalScan Components
The GlobalScan system consists of two primary components, GlobalScan Server software and
GlobalScan MFD firmware. Once installed, the GlobalScan Server acts as a digital document
routing system that accepts scanned documents from MFDs, creating digital files - of even the
most complex documents - for electronic transmission over your network. Working together,
the GlobalScan Server and the MFD make efficient and timely delivery of these files to
destinations around the corner or around the globe.
About this Guide
This guide is divided into three sections:
1. Multifunctional Device Configuration – This section contains instructions for the
System Administrator to set the GlobalScan Server IP address, DNS IP, protocol
(HTTP/HTTPS) and proxy server settings. Also view version and build date
information.
2. GlobalScan Admin Server Configuration – This section provides instructions on
configuration of the GlobalScan Server, enabling the administrator to customize the
applications and functionality of the MFD.
3. Appendix – This section contains additional reference materials such as: software/
hardware requirements and specifications, optional Plug-ins and Framework to further
automate document management tasks, special file installation procedures (including
backup and restore), frequently asked questions, and glossary of terms.
4
GlobalScan Ver. 2.0
Feature Highlights
§ Supports up to 250 enabled MFDs per
GlobalScan Server; runs as NT Service
§ Intuitive operation through MFD’s lar ge
touch-screen display; features tab -style
navigation
§ Improved usability allows execution of
GlobalScan functions in fewer steps
§ Offers administrator a highly-configurable
user interface
§ Create individual projects; user presses
Project button on MFD to quickly access
GlobalScan functions
§ Add/remove Services on a project level,
enabling customization based on user needs
§ GlobalScan Failover provides automatic MFD
Failover to secondary GlobalScan Server
without restart; automatic fallback when
primary server is restored
§ Device Authentication
- NT, Novell, LDAP or LDAPS authentication is
supported
- Login synchronization enables a single set of
credentials to provide access to shared
Services
- Each project can be represented by a
different authentication method, e.g., legal
requires FileNET login, marketing requires
LDAP login
- Uses HTTPS (or HTTP) protocol for secure
(or non -secure) communication between
MFD and GlobalScan Server
§ Software utility enables Backup and Restore
feature on GlobalScan Ver. 2.0 Servers (or
data migration from a GlobalScan Ver. 1.5
Server to a Ver. 2.0 Server)
§ Backup and Restore feature can be
command-line driven for automated
scheduled backups using any third-party
scheduler, including Microsoft’s “AT” scheduler
and Microsoft SQL Server
§ Scan to Email
- Send documents as e-mail using your
existing SMTP/SMTP -AUTH, MS Exchange
or Lotus Notes 5/6.5 server
- Browse and select e-mail addresses from
company’s Global Address Book (via LDAP)
GlobalScanTM Ver. 2.0
Administrator’s Guide
§ Scan to E-mail Cont’d
- Search Global Address Book by keyword and
wild card
- No size limitation on Global Address Book
- Manually enter (ad hoc) e-mail address(es)
- Automatically adds the logon user’s e-mail
address to mail recipient list through “Scan To
Me” function
- Customize e-mail by enabling/disabling:
• Manual e-mail address entry
• Cc, Bcc, Reply To
• Default e-mail body text; sent with each
outgoing message
• Default e-mail domain for simplified manual
address entry
§ Scan to Folder
- Scan directly to one or multiple local/network
folders/sub-folders
- Perform a folder search based on search string,
with all results displayed on MFD
- Scan To Home
§ Flexible Scan Settings
1
, i.e., logon user’s home directory
2
- Mixed-size scanning, letter, legal and ledger -
size originals combined in a single scan
- Select scan settings (resolution, single-/double -
sided original, orientation and scan size)
- Support for batch scanning, i.e., scan a lengthy
document in batches and transmit as one file
- Scan documents from either the document
feeder or platen glass
- Supports multi-page scanning from platen glass;
manual paper size selection is available
§ Extensive log and error tracking
- Captures originating MFD serial number, IP
address, user information, destination, scan
parameters; export log in XML format
- Error reporting integrates with NT Event Log for
easy monitoring by the administrator
§ File Format Support
- Save black-and-white documents as PDF image
version 1.4 (default) or single-/multi-page TIFF
- Save color documents as PDF (default), JPEG or
black-and-white single-/multi-pageTIFF format
- Scanned document can be converted to
searchable PDF Image/Text, XLS (MS Excel) or
RTF (MS Word) via optional OCR Plug-in
1
When MFD authentication is set to NT or LDAP with Active Directory.
2
Default scan settings are set on the project level, allowing multiple workflow configurations based on
application needs .
5
GlobalScanTM Ver. 2.0
Administrator’s Guide
GlobalScan Ver. 2.0
Optional Plug-in / Framework Support 1
§ Scan to Fax (via RightFax Plug-in)
- Enter fax numbers (and e-mail addresses) for simultaneous delivery
- All user interface components are available to Application Developers through the GlobalScan SDK
Toolkit, enabling customized fax functionality
§ File Conversion (via OCR Plug-in)
- Scan documents in searchable PDF Image/Text format, as well as editable XLS (Excel) and RTF
(Word) formats
- Multiple language support; automatic language switching; auto rotation (selectable on/off)
§ GlobalScan SDK Toolkit (enables multiple back-end system support)
- One or more Document/Content Management Systems (DMS) can run on the MFD
- Utilizes open architecture for customization of MFD functionality
- Administrators create unique work flows based on application requirements
- Optional Framework
• Documentum
• FileNET
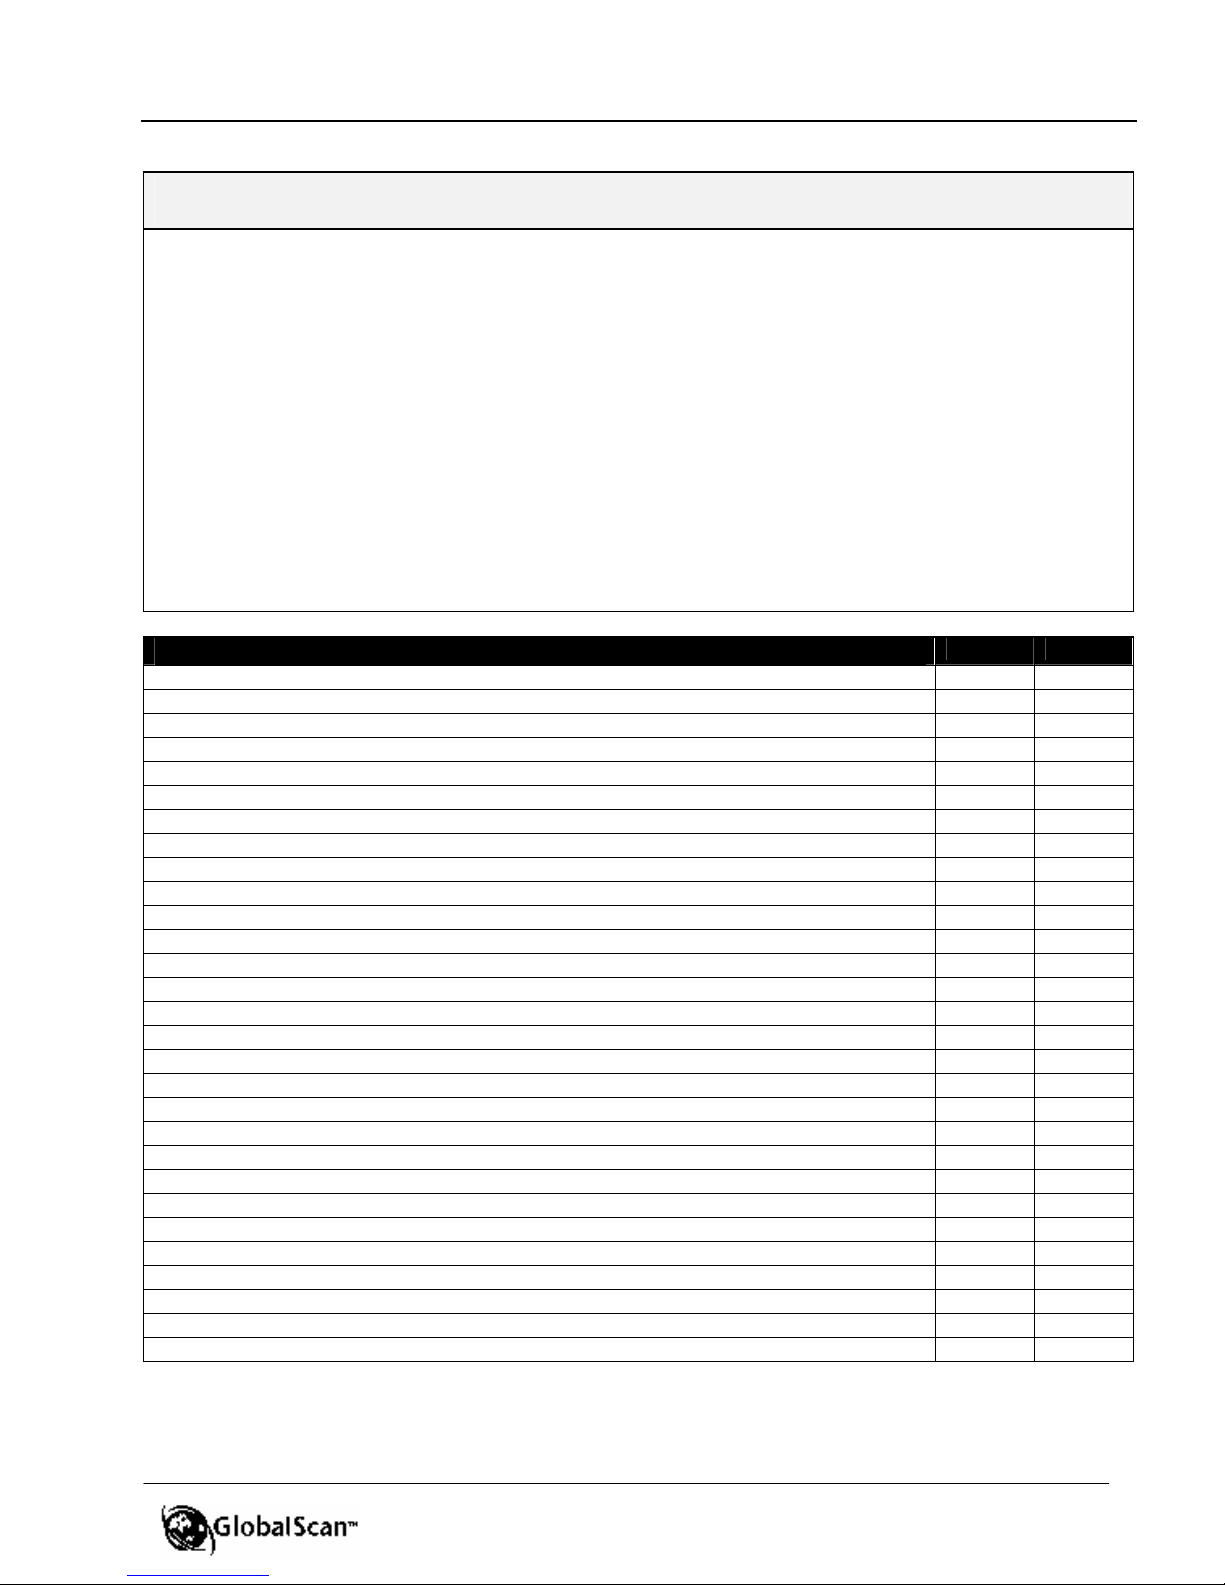
GlobalScan New Feature Comparison
Maximum number of enabled MFDs 250 250
Localization support (languages) 5 4
Display licensing type information through admin module
Backward compatibility (including Plug-ins/Framework)2
Tab-style navi gation via MFD’s touch screen with streamlined login operation
“Project” buttons for customizing workflow based on user requirements
“Clear Form” and “Reset” buttons erase information quickly from MFD touch screen
Add/remove Services on a project level (Email, Scan To Folder, etc.)
Support for multiple projects within a profile
Support for multiple authentication methods; one system per project
Establish default scan settings on project level; allowing multiple configurations
Search, display, select and scan to multiple folders/subfolders
Allow user to choose different language for OCR conversion (per job)
Allow user to enable/disable auto orientation for OCR conversion (per job)
Ability to support more than one optional third -party DMS (Framework) per MFD
Login synchronization; single set of credentials provide access to shared Services
Support for secure LDAP (LDAPS); sends user credentials using SSL encryption
Support for SMTP –AUTH (authentication); proxy user in admin or logged in user ID
Customize e-mail functionality (enable/disable Cc, Bcc, Reply to)
Create default e-mail body text; appended to each outgoing message
Enter default domain for fast manual address entry
Restrict manual e-mail address entry (LDAP lookup only)
Allow user to save black-and-white image to multiple single -page TIF files
Advanced log and error tracking
Support for Failover; two GlobalScan Servers with duplicate configurations
Support for Lotus Notes 6.5 Server
Support for Windows® 2003, Standard Edition
Backup and Restore Utility
Extensive GlobalScan SDK (Software Development Kit) enhancements
1
Please refer to Appendix B for details on optional RightFax and OCR Plug -ins, and third party
Document/Content Management System Framework. Also visit https://developersupport.ricohcorp.com.
2
GlobalScan Ver. 2.0 is backward compatible with only GlobalScan Ver. 1.5. GlobalScan Ver. 1.5 is backward
compatible with only GlobalScan Ver. 1.4.
available to Application Developers include:
• Hummingbird
• Interwoven
• Livelink
• Stellent
Ver. 2.0 Ver. 1.5
P
P P
P
P
P
P
P
P
P
P
P
P
P
P
P
P
P
P
P
P
P
P
P
P
P
P
P
-
-
-
-
-
-
-
-
-
-
-
-
-
-
-
-
-
-
-
-
-
-
-
-
-
-
6
GlobalScanTM Ver. 2.0
Standard Edition
Administrator’s Guide
Before Getting Started
Setup procedures must be completed by an authorized service technician and/or System
Administrator prior to performing GlobalScan operations from the MFD control panel.
Setup Procedures:
R The GlobalScan firmware is downloaded to MFD’s hard drive
R The GlobalScan Server software
server
1
is installed on a Windows® 2000 or 2003
R The MFD is configured (covered in this guide)
R The GlobalScan Admin Module is configured (covered in this guide)
R The user has been assigned a valid User Name and Password
2
TCP/IP Network
HTTP/S
IIS with
GlobalScan
MFD
LDAP/S Query
Authentication
Mail Delivery
API
LDAP/S Server
NT — Win2000/2003
Domain Controller —
Novell — LDAP/S
E-mail Server
Plug-in
API
Framework
GlobalScan Functions:
Once setup is complete, the MFD user can perform numerous network-scanning functions,
depending on GlobalScan Server settings established in the GlobalScan Admin Module:
§ Scan to Email – Standard GlobalScan feature
§ Scan to Folder – Standard GlobalScan feature
§ Scan to Fax3 – Optional feature (requires RightFax Plug-in)
§ Scan to OCR3 – Optional feature (requires optional OCR Plug-in to convert
documents to PDF Image / Text, XLS [MS Excel] or RTF [MS Word] format
§ Scan to DMS3 – Optional feature (requires third-party Framework customization)
1
Please refer to GlobalScan Server Software Installation Guide (be sure to review the important notes in the
Pre-installation Requirements section). Also refer to Appendix A: System Requirements and Specifications (in
this guide).
2
The System Administrator assigns user names and passwords for authentication purposes.
3
Please refer to Appendix B for details on optional RightFax and OCR Plug -ins, and third party Document/Content
Management System Framework available to Application Developers. Also visit https://developersupport.
ricohcorp.com.
7
GlobalScanTM Ver. 2.0
MFD Display
: One
MFD Display
:
Fig. 1
appears.
Administrator’s Guide
Before Getting Started Cont’d
Please review this section to gain an understanding of key terms used within this guide, as
well as how to navigate the GlobalScan Admin Module.
GlobalScan Terms
Each of the following four terms, Profile, Project, Service, and System Parameters play a key
role in GlobalScan operation….
Note: Also see Appendix J: Glossary of Terms, for additional terms associated with GlobalScan.
§ Profile
Each MFD is associated with a specific profile, i.e., parameters that define Novell and
LDAP settings, e-mail, scan to folder, project, Services and scan settings. Though
there is only one “Default Profile” for an MFD, that same profile can be applied to
multiple MFDs. Once a profile is created, you then configure one or more projects.
§ Project
Projects provide multiple ways of configuring (customizing) Services based on the
specific needs of a particular group of users. For example, the sales department needs
to regularly e-mail lengthy proposals to prospective customers, while the legal
department scans hardcopy correspondence directly to a document management
application. Each user would simply access the appropriate Project button on the MFD
touch screen, thus displaying a collection of Services to choose from, e.g., Email,
FileNET, etc.
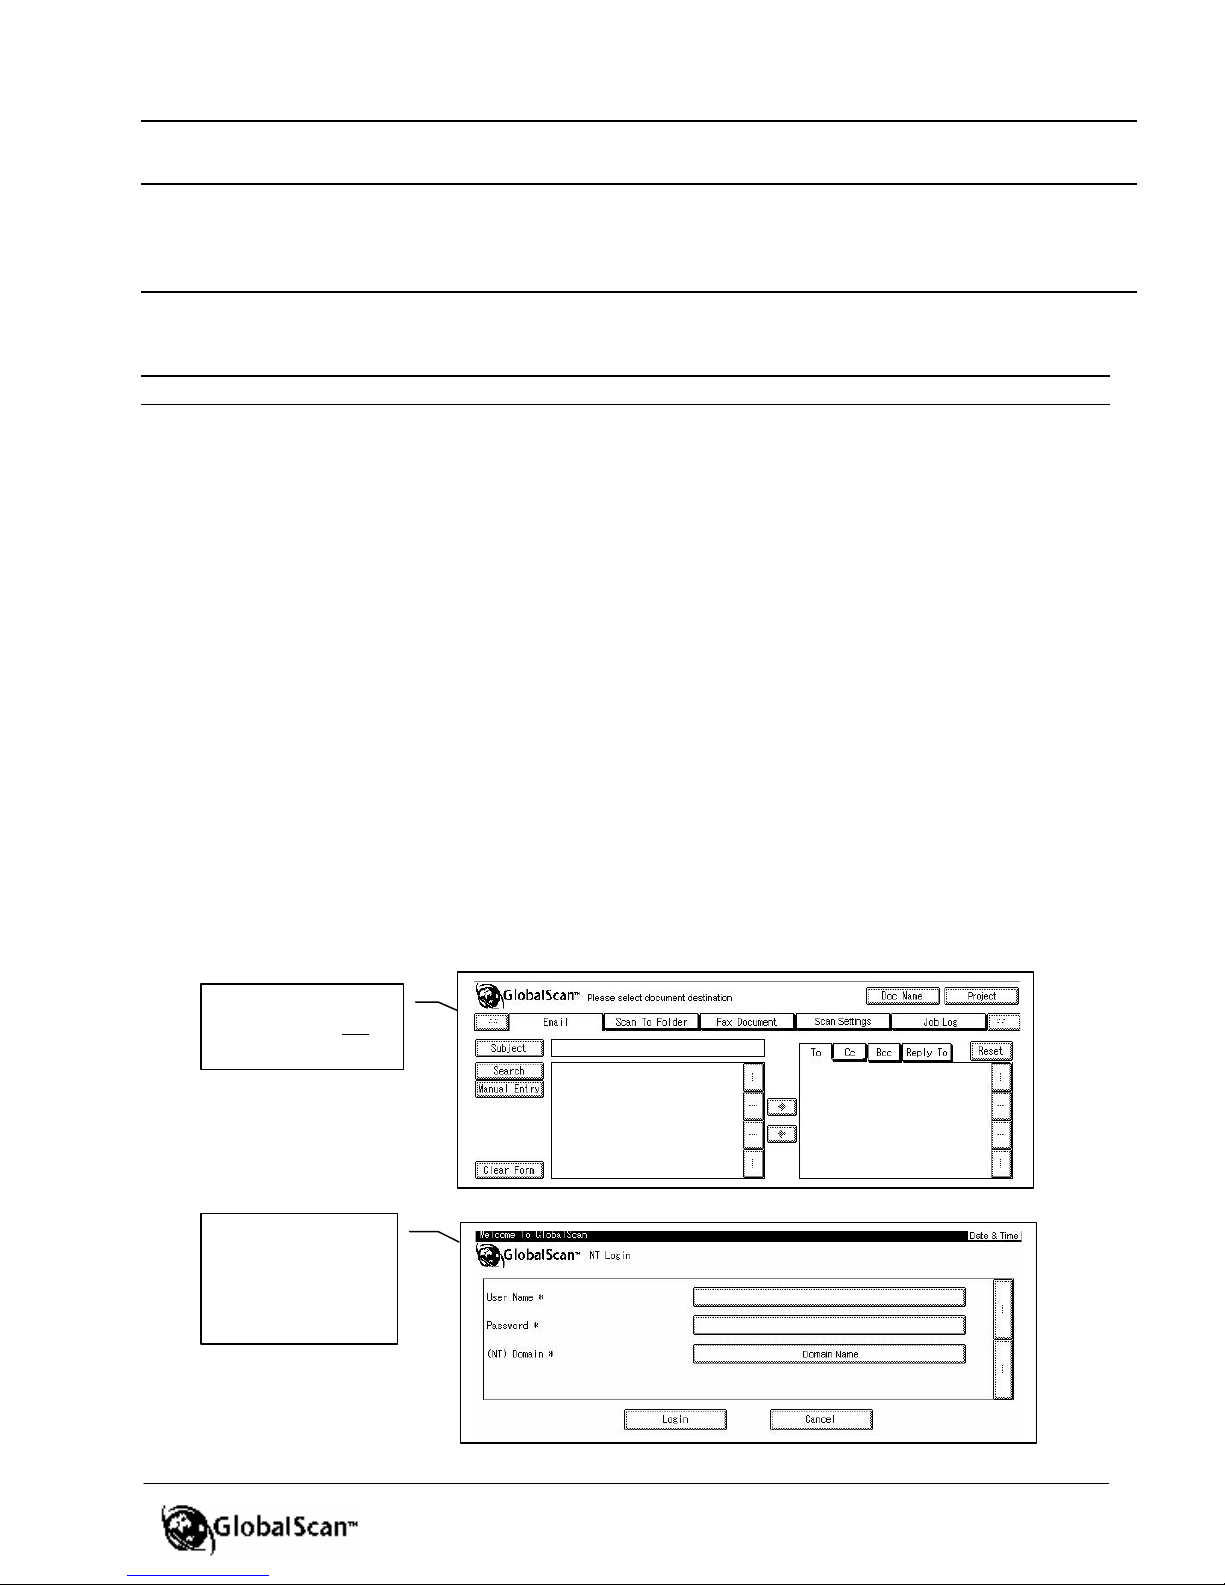
If the MFD’s profile contains a single project, it will be automatically be pre-selected on
the MFD and its Services will be displayed, without requiring the user to select a Project
button (see Fig. 1). Based on GlobalScan settings, the user may or may not need to be
authenticated, i.e., enter login credentials (see Fig. 2).
project / login not
required
One project / login
required. After
successful login,
Fig. 1
Fig. 2
8
GlobalScanTM Ver. 2.0
MFD Display
:
Scroll up / down to view
If Active Directory is
Administrator’s Guide
Before Getting Started Cont’d
GlobalScan Terms Cont’d
§ Projects Cont’d
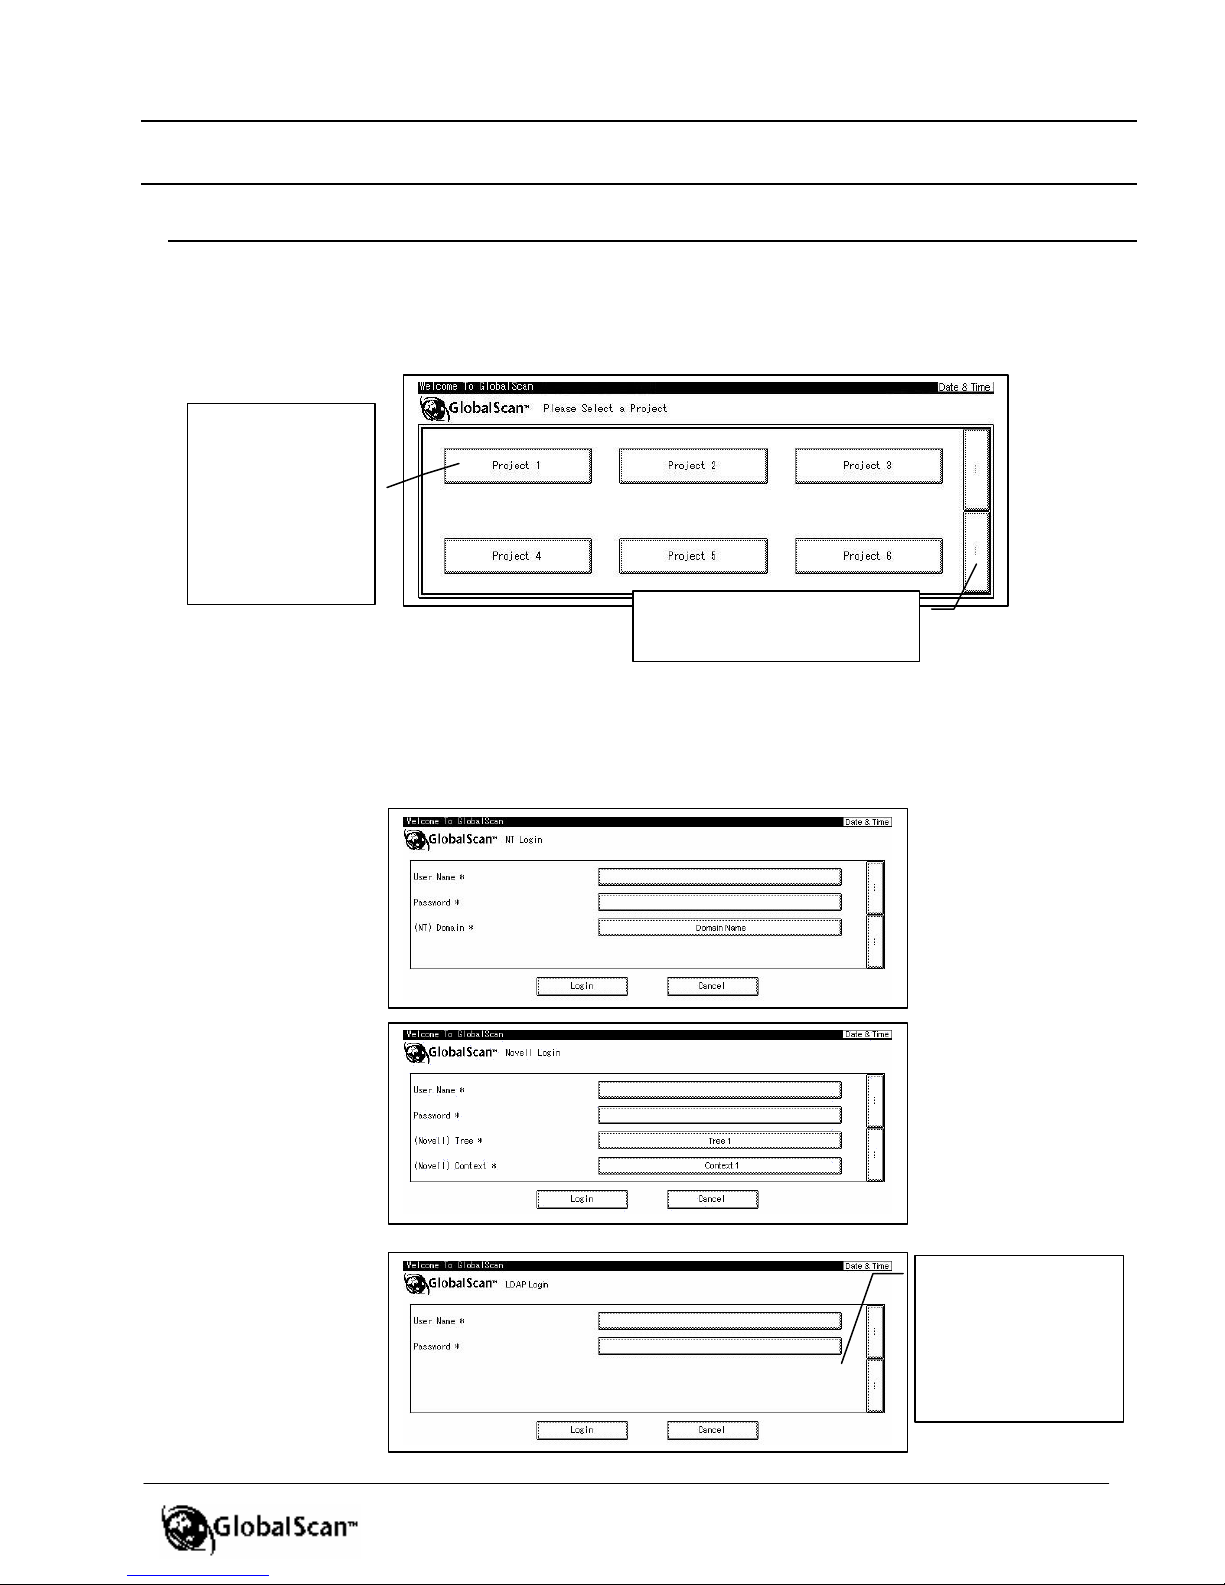
When two or more projects are configured in a profile, corresponding buttons will appear
on the MFD touch-screen display (Fig. 3), each addressing specific application
requirements.
Project buttons
(max. 6 per
screen). Project
button labels are
configurable on
the GlobalScan
Server
Authentication
Each project can be defined by its own authentication method. Under authentication,
when a user presses a Project button, for example using NT authentication, a log-in is
required. After entry of the required credentials, the user presses the Login button;
authentication is executed.
NT Login
Novell Login
LDAP Login
additional Project buttons
acting as the LDAP
server, an addi tional field called
“Domain” will
display
Fig. 3
9
S
ample login
Services tabs on the MFD open corresponding
If authentica
-
Scroll to display additional Services tabs.
Before Getting Started Cont’d
GlobalScan Terms Cont’d
Simultaneous Authentication
The GlobalScan Server will simultaneously authenticate, for example, the same login
credentials used in NT authentication will enable access to FileNET functionality.
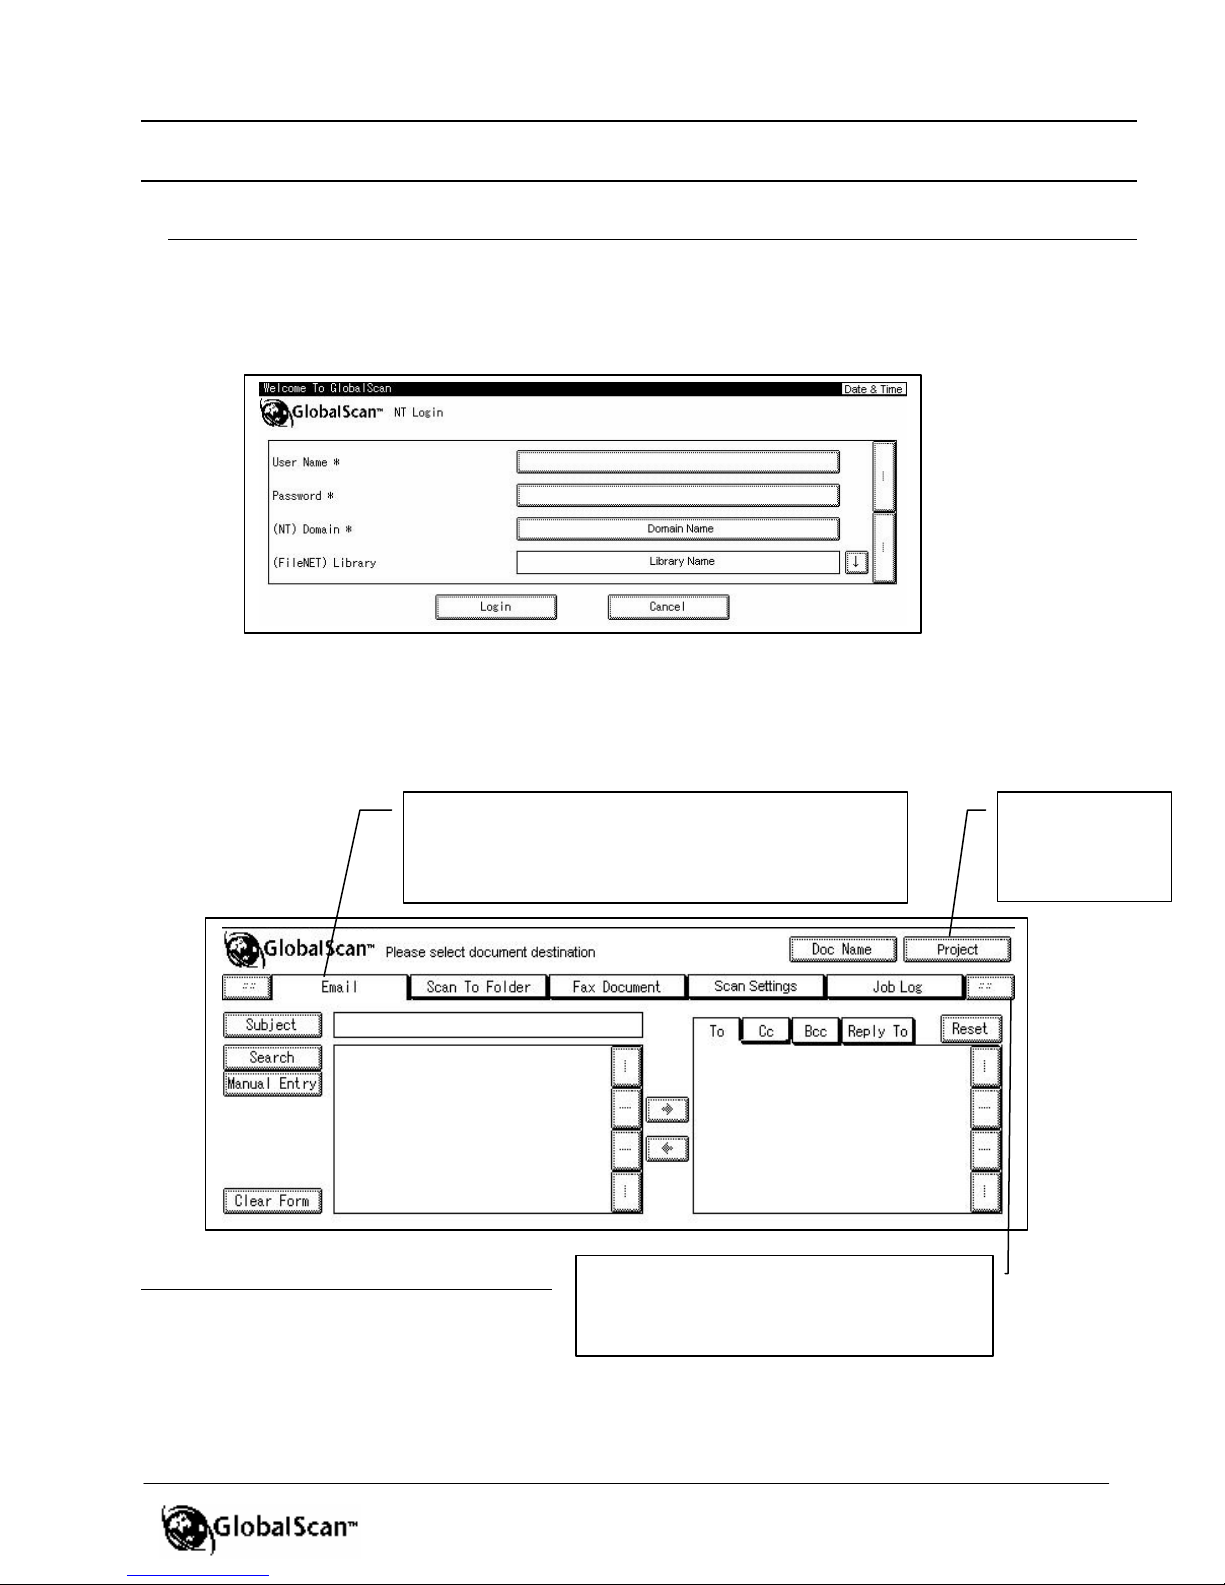
§ Services*
Following log-in (if authentication is required), the MFD user is presented with a list of
available Services (E-mail, Scan To Folder, Fax Document, etc.). The user selects the
Service by touching the corresponding tab on the MFD’s touch screen.
* Note: The term “Services” is synonymous
with “Plug-in” and “Framework.”
screens. Which tabs appear, and the order in which
they appear, is configurable on the GlobalScan
Server by the administrator.
GlobalScanTM Ver. 2.0
Administrator’s Guide
screen for shared
Services
tion is required,
this button will
read “Logout”
Note: These buttons are grayed out if no
other Services are available.
10
GlobalScanTM Ver. 2.0
Administrator’s Guide
Before Get ting Started Cont’d
GlobalScan Terms Cont’d
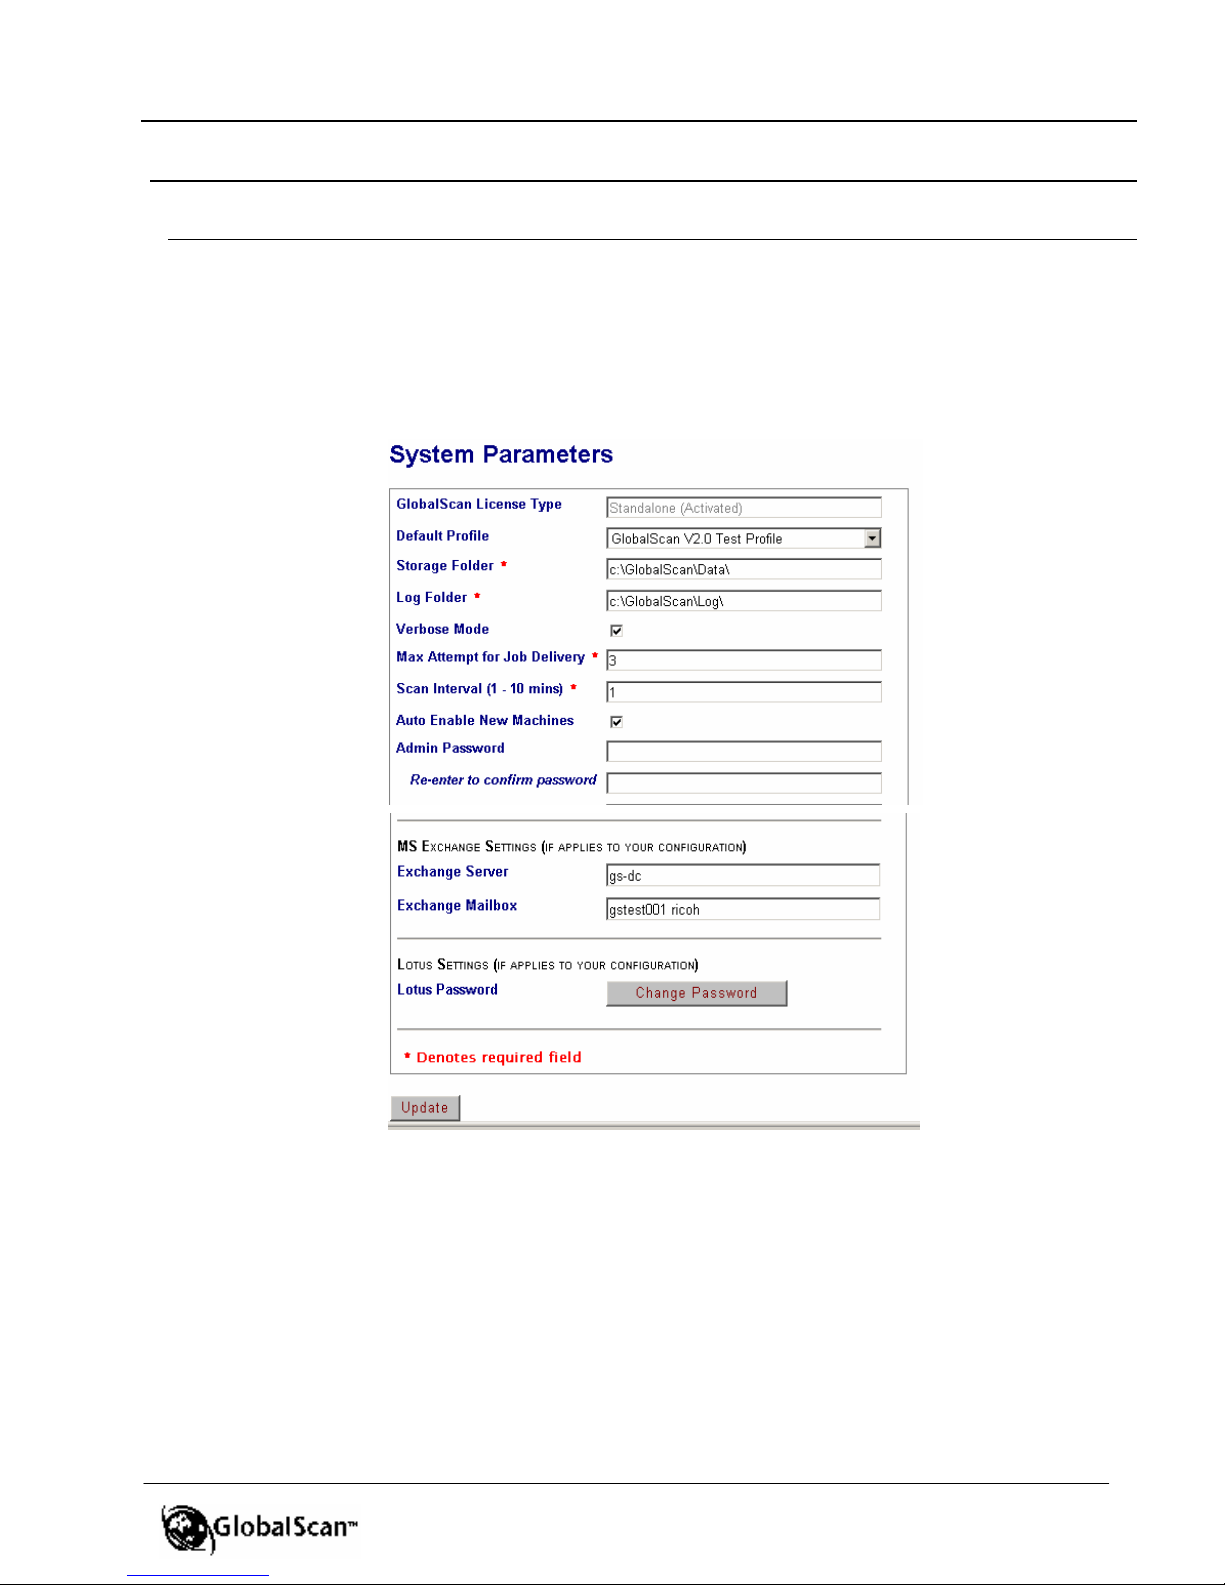
§ System Parameters
Within the GlobalScan Admin Module’s System Parameters screen (Fig. 4), you will
select/enter all system-level data, i.e., settings that control GlobalScan Server
operation, such as storage and log folder paths, maximum attempts for job delivery,
scan interval, and if applicable, MS Exchange and Lotus settings.
Fig. 4
11
GlobalScanTM Ver. 2.0
Administrator’s Guide
Before Getting Started Cont’d
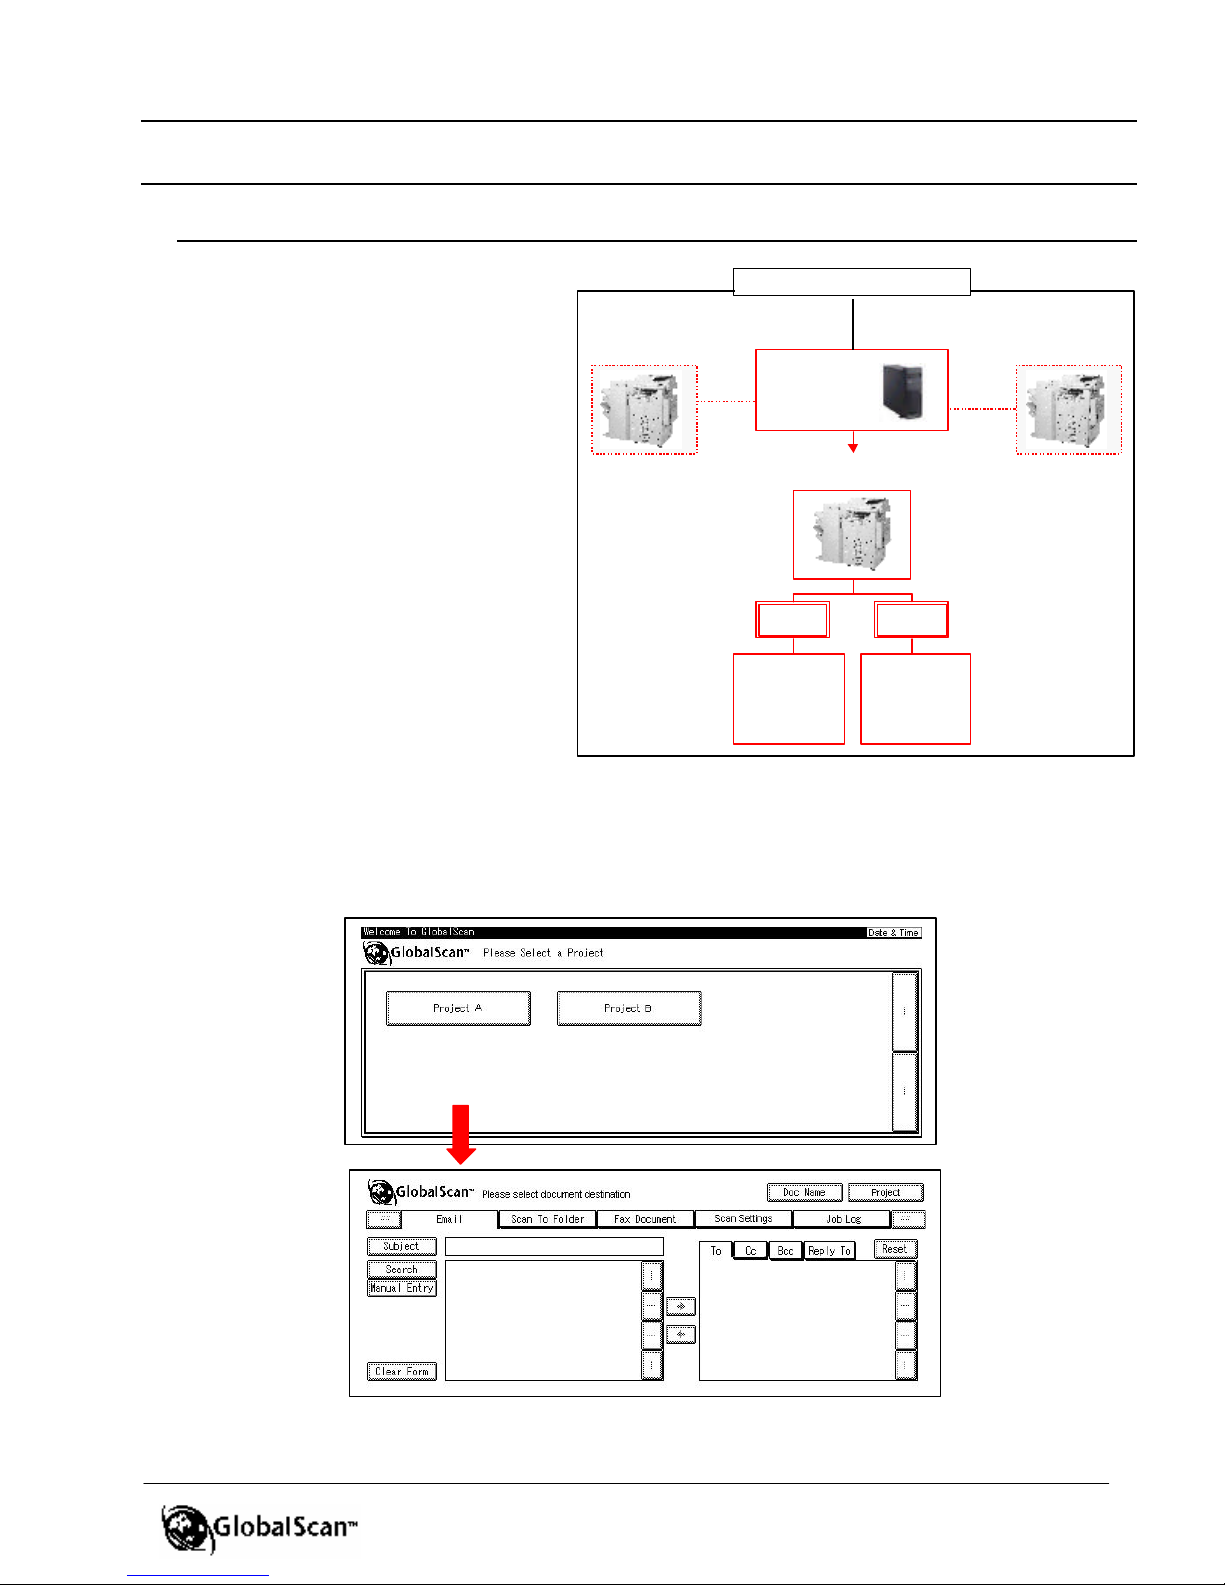
GlobalScan Workflow
When the MFD is powered on,
TCP/IP Network
the device calls the GlobalScan
Server to get its profile. In
Diagram A, Profile 3, the default
profile, is downloaded to the
Profile 1
GlobalScan
Server
Profile 2
MFD. Two projects have been
configured within this Profile, with
two corresponding buttons,
Profile 3
(Default)
Project A and Project B displayed
on the MFD touch screen, as
shown in Fig. 5.
The Services (Email, Scan To
Project A
Project B
Folder, etc.) available to a user
depends on which Project button
is selected1. For instance, to email a document, the user selects
Services:
þ Email
þ Scan To Folder
þ OCR
Services:
þ Email
þ Fax
þ DMS
either Project button A or B, since
both include e-mail Services. To scan a document to one or more folders, Project A which offers a Scan To Folder tab - is selected… and so forth. Which Services appear,
and the order in which they appear, is configured on the GlobalScan Server by the
administrator. If e-mail is the most common application, the Email tab can open first, as
shown in Fig. 6.
Fig. 5
Fig. 6
Note: Login may be required after pressing a Project button. See GlobalScan Terms, Authentication, for details.
Diagram A
12
GlobalScanTM Ver. 2.0
Menu Link
Shortcut
Administrator’s Guide
Before Getting Started Cont’d
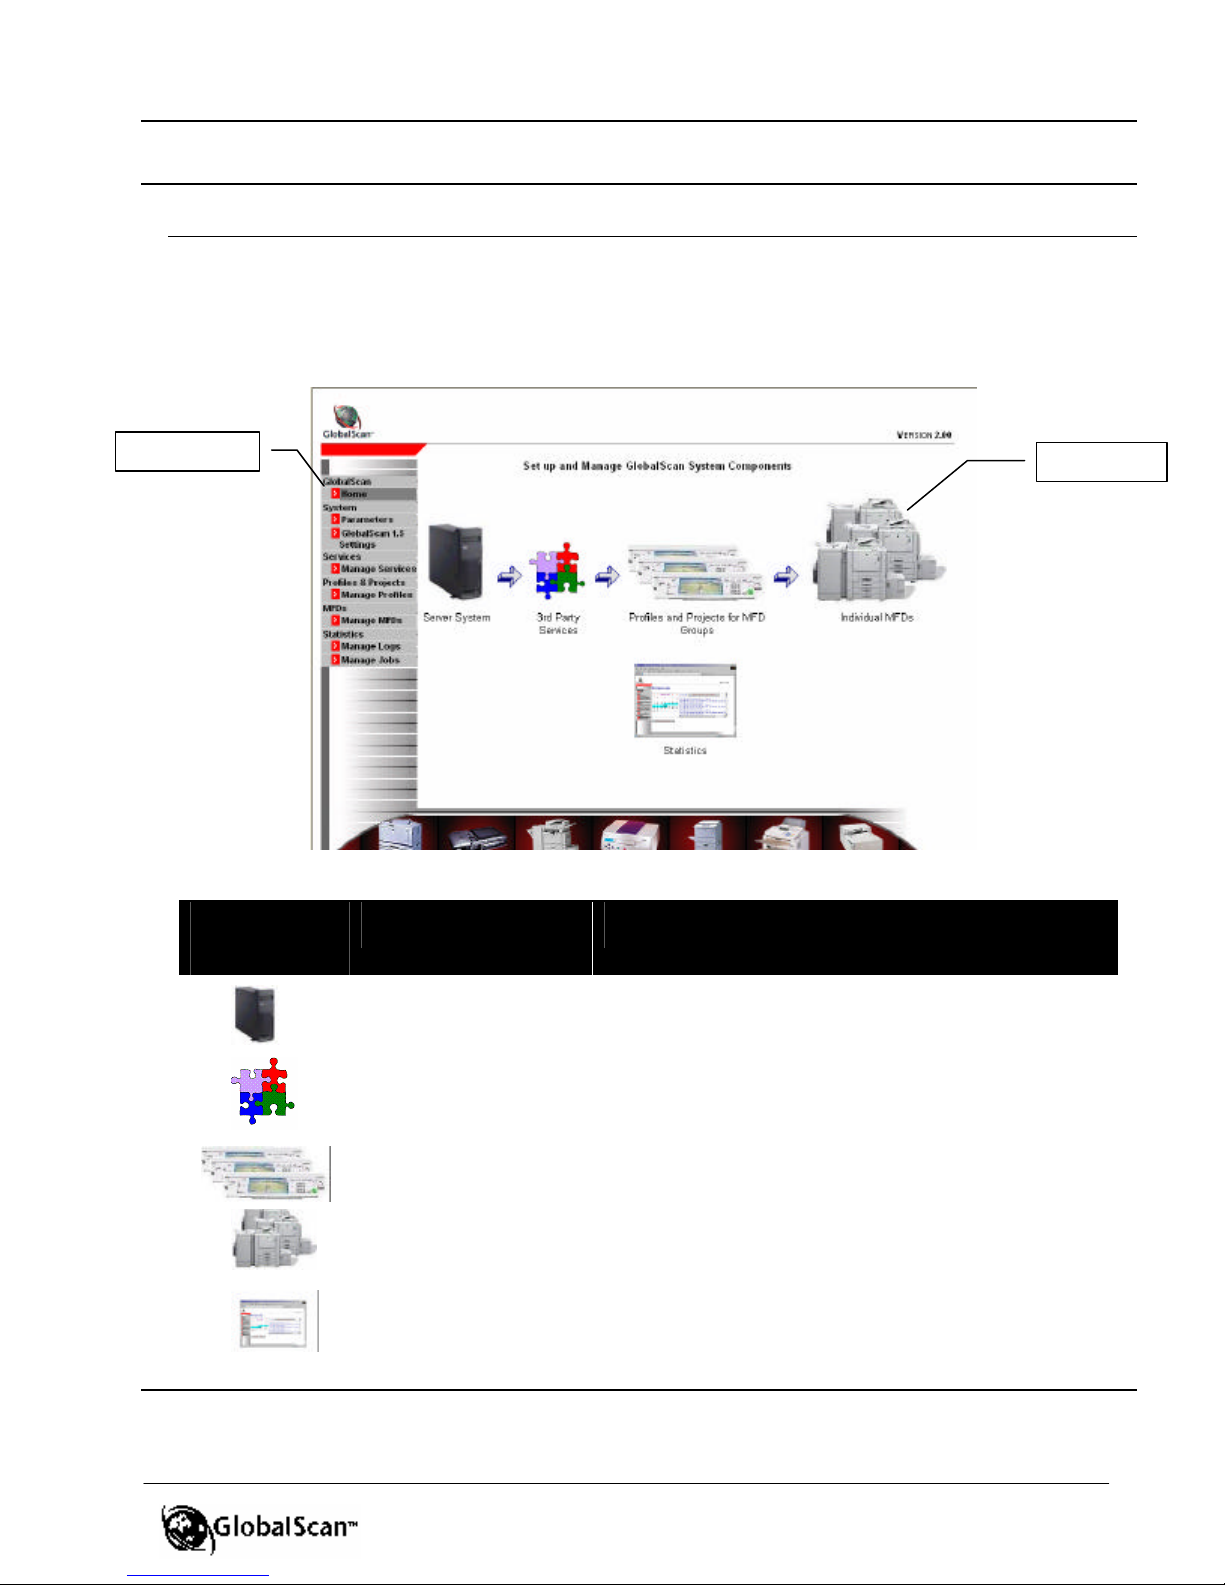
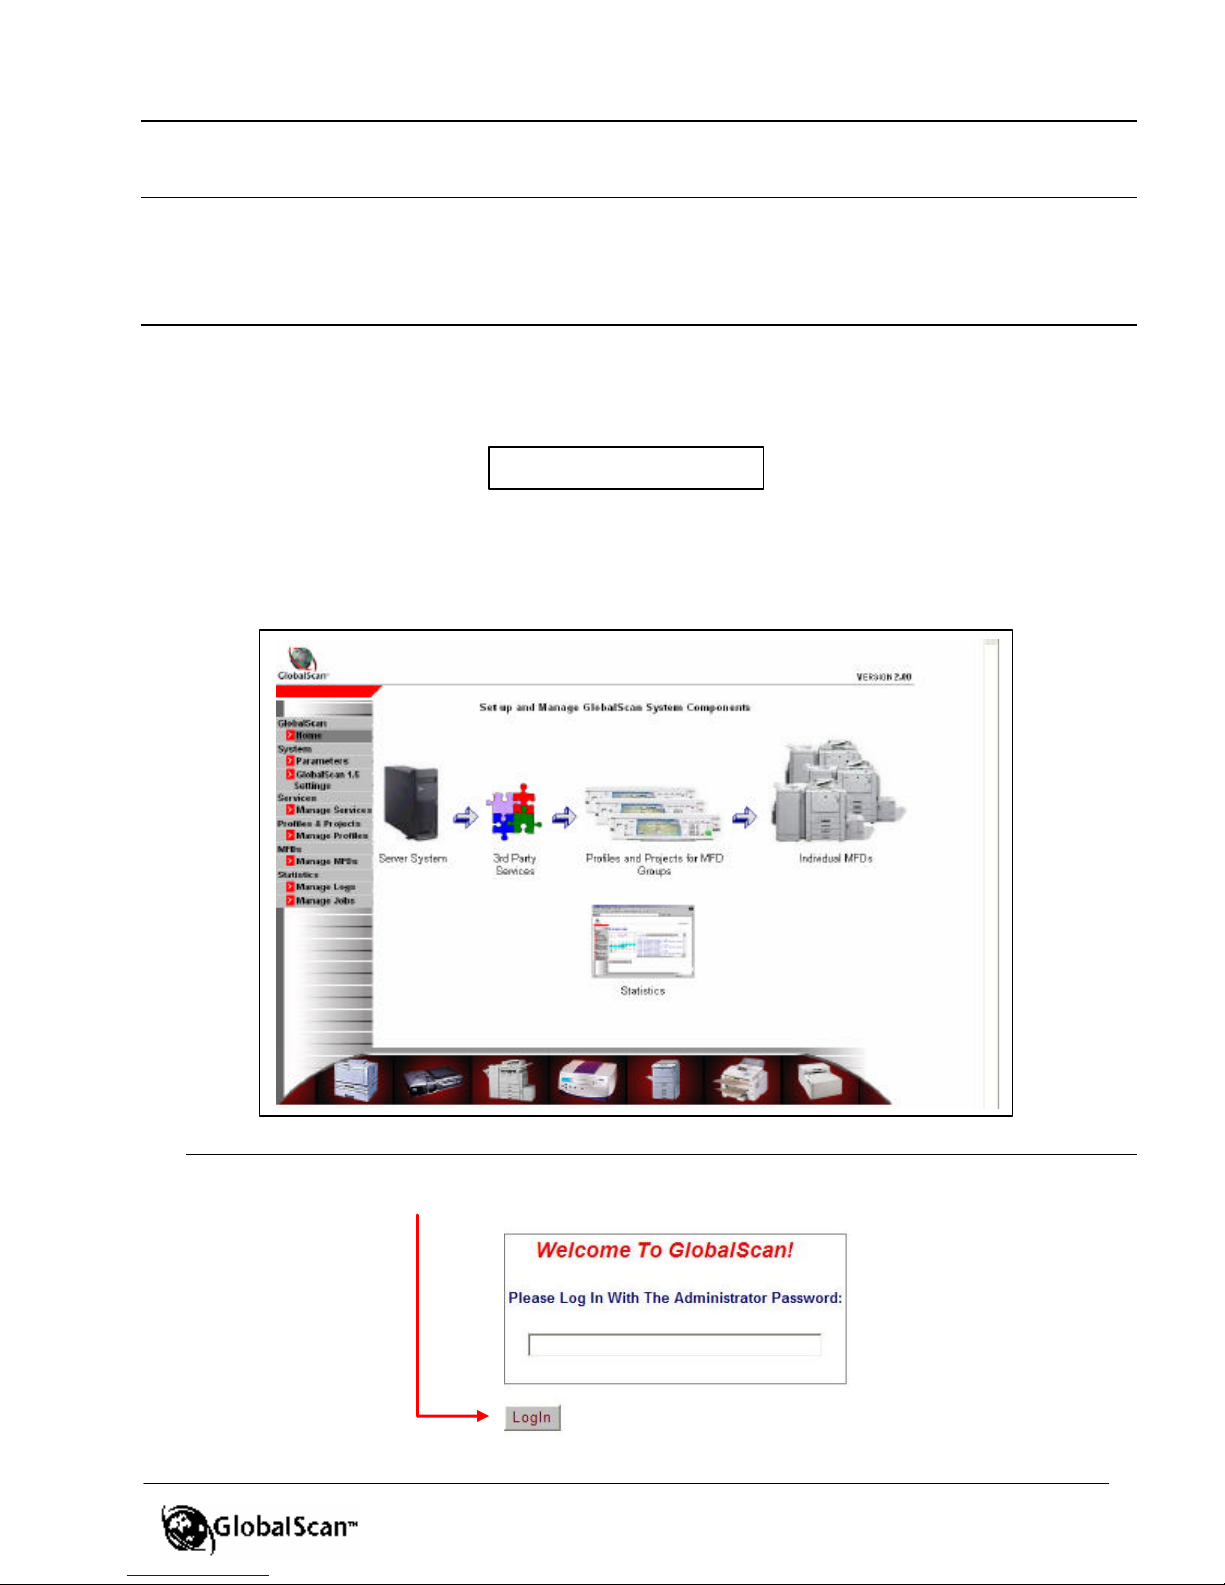
Home Page Navigation
The GlobalScan home page appears whenever launching the Admin Module from your
Web browser (details are provided later in this manual). To access a desired
administrative function from the home page, simply click on the shortcut or the
corresponding menu link.
Shortcut
Note: To return to GlobalScan’s home page, from any screen, click the Home menu link.
Label
Description / Menu Link
Server System
Access the System Parameters screen
3rd Party Services Access the Manage Services screen
Profiles and
Projects for MFD
Access the Manage Profiles screen
Groups
Individual MFDs Access the Manage MFDs screen
Statistics
Access Manage Logs and Manage Jobs
screens
13

GlobalScanTM Ver. 2.0
Administrator’s Guide
MMuullttiiffuunnccttiioonnaall DDeevviiccee CCoonnffiigguurraattiioonn
When the GlobalScan firmware is installed, a service technician establishes configuration
settings. It is recommended that only the GlobalScan System Administrator adjust these
settings.
To access and enter configuration settings, proceed as follows:
1. Press the Scanner1 key on the MFD control panel (once or twice).
Note: If you are currently logged in, press the Logout button.
The next screen to appear depends on how many projects are configured and whether
or not login is required. See Before Getting Started, Projects, for details.
2. On the MFD control panel, press and hold the Clear/Stop key (for more than 5
seconds), then release.
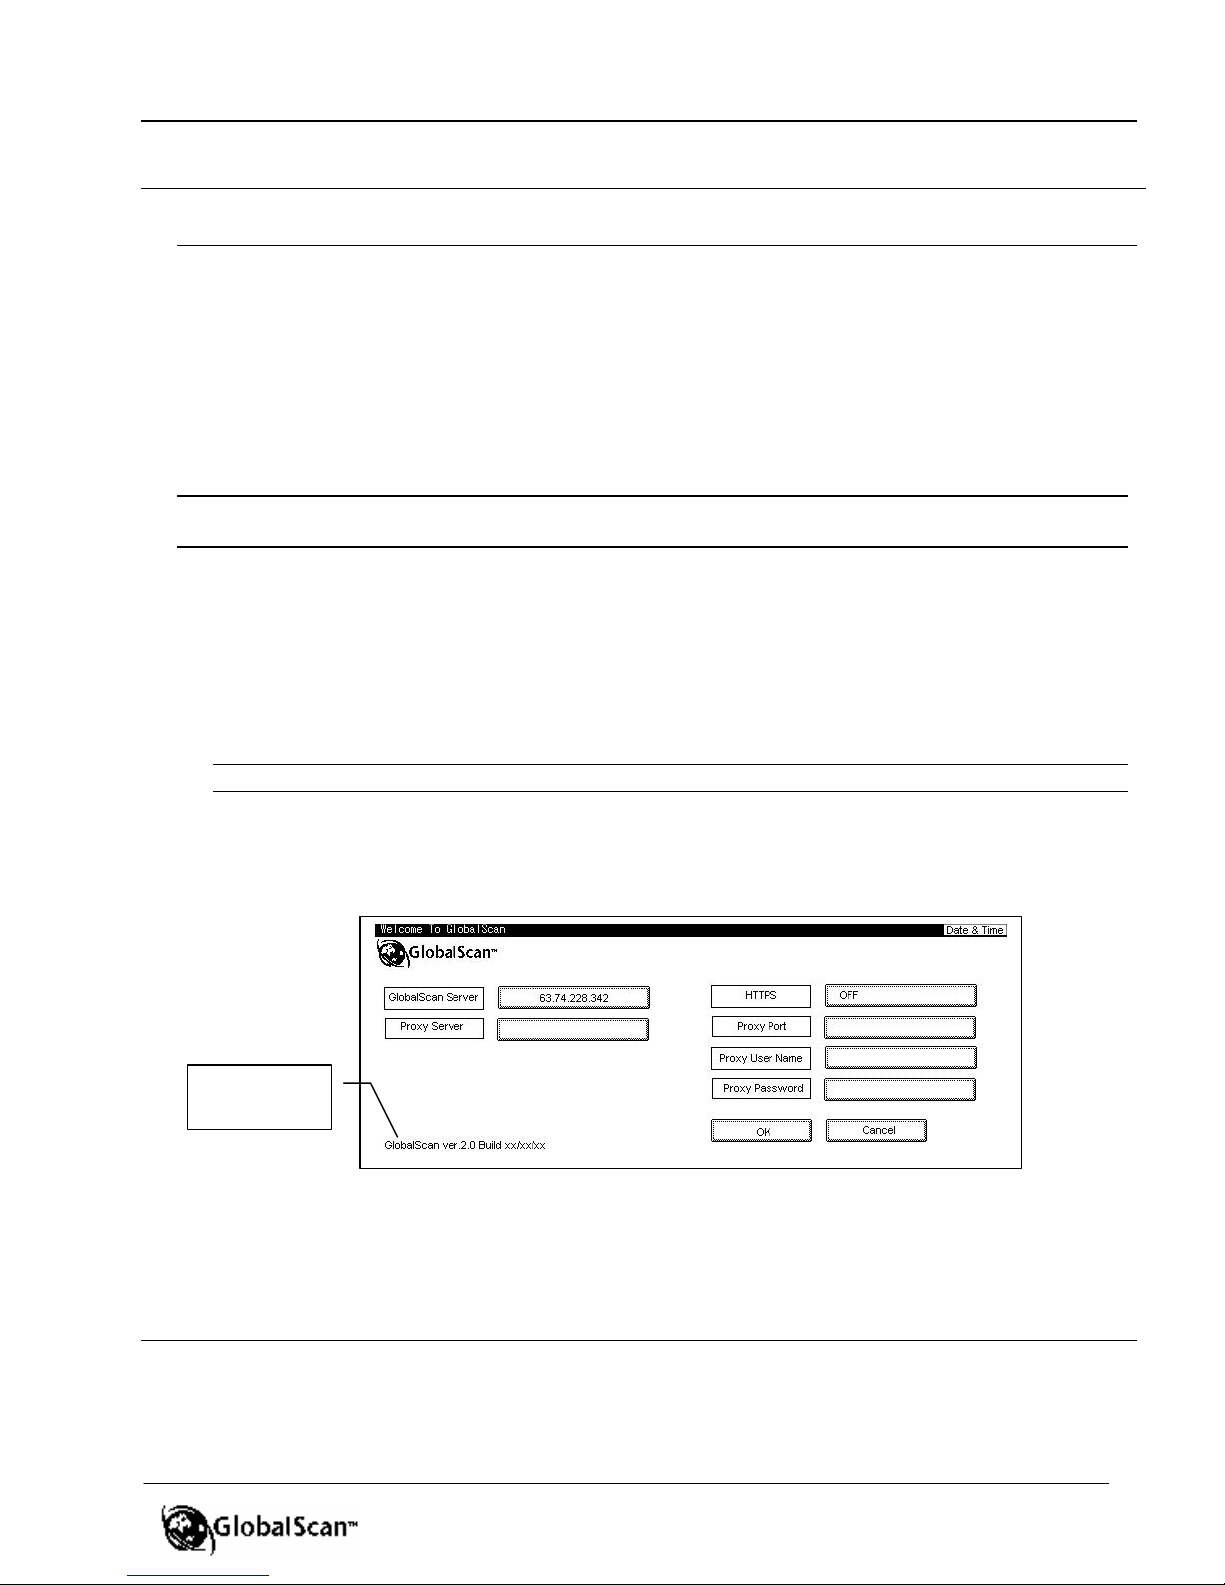
Display reads, for example…
GlobalScan V2.0 Configuration Screen
Setting Description
GlbScan Server
(Required)
Proxy Server Proxy Server IP Address
DNS IP DNS IP may or may not appear; depends on MFD model
HTTPS HTTPS On/Off.
Proxy Port Proxy Server Port Number
Proxy Username User Name for access to Proxy Server
Proxy Password Password for access to Proxy Server
1
A control panel key other than the Scanner key may access GlobalScan. Please refer to the GlobalScan
firmware Release Notes to learn more.
The Server IP address of the GlobalScan Server or the DNS Name (entry
of DNS Name requires entry of fully-qualified DNS IP)
14
Note
: GlobalScan’s soft keyboard will reflect the
MMuullttiiffuunnccttiioonnaall DDeevviiccee CCoonnffiigguurraattiioonn CCoonntt’’dd
Note: If the MFD fails to download a Profile, an error window is displayed on the MFD touch screen.
From the GlobalScan Server, check that a Profile has been created/selected for the MFD, then close the
error window on the MFD’s touch screen. This initiates another download attempt by the GlobalScan
Server. If this action still returns an error, logout of GlobalScan (from the MFD), if necessary, and open
the MFD Configuration Page (as outlined in this section). Check that all parameters are correct.
Important: If any changes have been made to the MFD’s configuration, you must reboot the MFD.
3. Select a parameter, e.g., press the GlbScan Server button.
Display reads, for example…
localization selected in the firmware, i.e., display the
character set of a selected language. See “Localization,”
next section, for details.
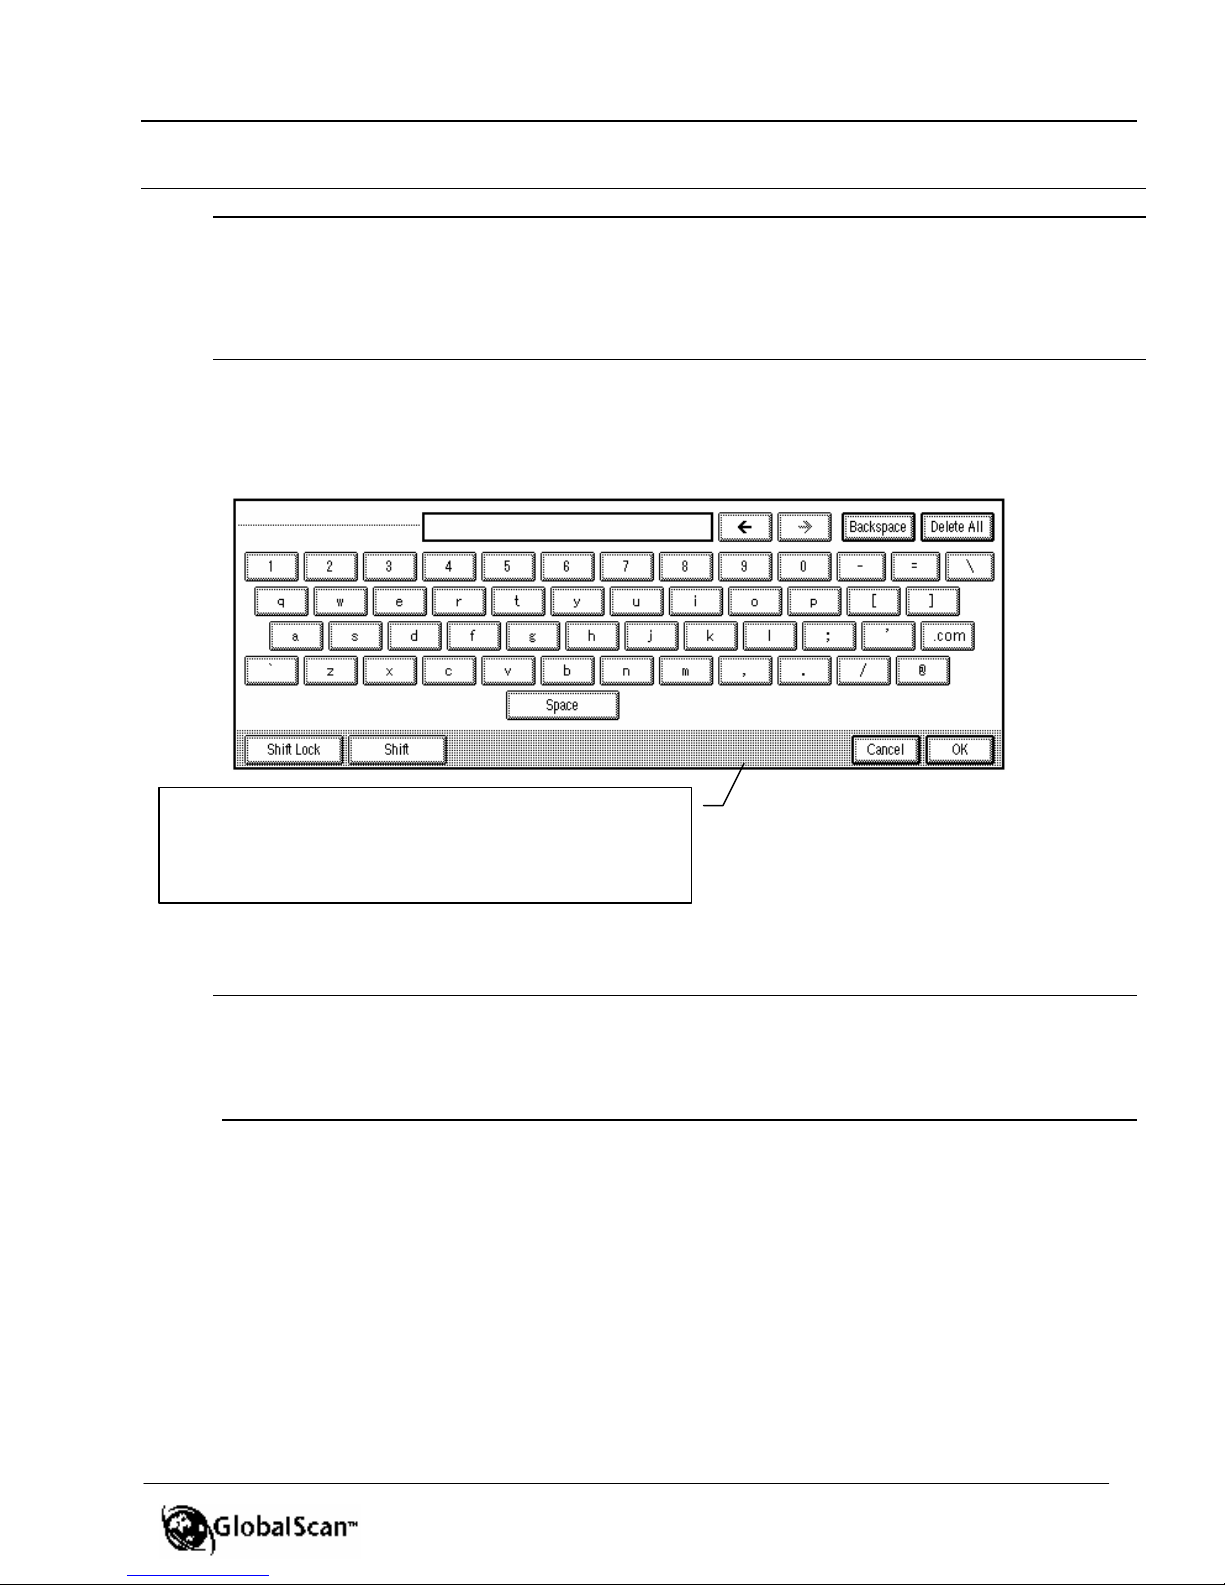
4. Enter or edit data, as needed.
Note:
• Enter characters by touching corresponding keyboard characters.
• To erase characters, right to left, press Backspace. To erase an entire entry, press Delete All.
• To select a single upper case letter or symbol, press the Shift button. To select multiple upper case
letters or symbols, press the Shift Lock button.
5. Press the OK button.
6. Repeat, if necessary.
7. Confirm the displayed information, then press the OK button.
GlobalScanTM Ver. 2.0
Administrator’s Guide
GlobalScan Soft Keyboard
15
GlobalScanTM Ver. 2.0
Version and
Administrator’s Guide
MMuullttiiffuunnccttiioonnaall DDeevviiccee CCoonnffiigguurraattiioonn CCoonntt’’dd
Localization
GlobalScan, which has been translated into five languages, displays all supported
language characters on the MFD, specifically:
§ English (UK)
§ French
§ German
The displayed MFD language is determined by two factors, (1) compiled version of
GlobalScan firmware, and (2) the installed language pack, and subsequent language
selection.
Note: GlobalScan’s soft keyboard will reflect the localization selected in the firmware, i.e., display the
special character set of the selected language.
Compiled Version
To see the version of GlobalScan that is currently installed on the MFD, go to the
GlobalScan Configuration screen.
1. If necessary, turn the MFD on.
2. Press the Scanner2 key (once or twice).
Note: If you are currently logged in, press the Logout button.
3. Press and hold the Clear/Stop key for more than 5 seconds, then release. The
GlobalScan Configuration screen appears. The bottom left -hand corner of the
display will indicate the version and build date.
build date
Installed Language Pack
Each MFD can be configured to allow the user to toggle between one of two
languages, i.e., two languages can be installed and the user selects one of the two.
For example, if you select Spanish within the system firmware, Spanish will display
with on MFD’s GlobalScan screens3.
1
2
A control panel key other than the Scanner key may access GlobalScan. Please refer to the GlobalScan
3
Please refer to your MFD Operating Instructions for details on setting the system’s display language.
MFDs running GlobalScan Ver. 1.5 firmware are not localized for Spanish.
firmware Release Notes to learn more.
§ Italian
§ Spanish1
16
GlobalScanTM Ver. 2.0
Administrator’s Guide
GGlloobbaallSSccaann AAddmmiinn SSeerrvveerr CCoonnffiigguurraattiioonn
This section provides the System Administrator with the GlobalScan Server configuration
instructions needed to recognize the MFD connected to the network.
Step 1: Launch GlobalScan Admin Module
1. Open a Web browser.
2. Enter the GlobalScan Server IP address or computer name, for example…
.
3. Press the Enter (or click Go) key.
4. The GlobalScan Home Page appears…
Note: If an Admin Password has been established, the screen below displays. Enter your password (case
sensitive) and click the Login button. Following login, the GlobalScan home page appears.
http://IP address/gs
17
GlobalScanTM Ver. 2.0
This symbol indicates
Note that the Default
button
Administrator’s Guide
Step 2: Add/Edit a Profile
A profil e defines all parameters for an MFD running GlobalScan, such as the profile name,
attachment files size limit, session timeouts, scan settings, authentication settings, etc.
Within a profile, you configure one or more projects, a collection of Services that are
available to the MFD user, e.g., Email, Scan To Folder, Fax Document, etc.
Note:
• Multiple profiles can be created within GlobalScan, though just one “Default Profile” is selected for a given
MFD.
• At least one project must be created in the pr ofile, otherwise the MFD will display an error.
• Profiles are designed to handle all Ver. 1.5 and Ver. 2.0 firmware, as well as all released Services (Plug -
ins/Framework).
• Projects defined under a profile are only for MFDs running Ver. 2.0 firmware.
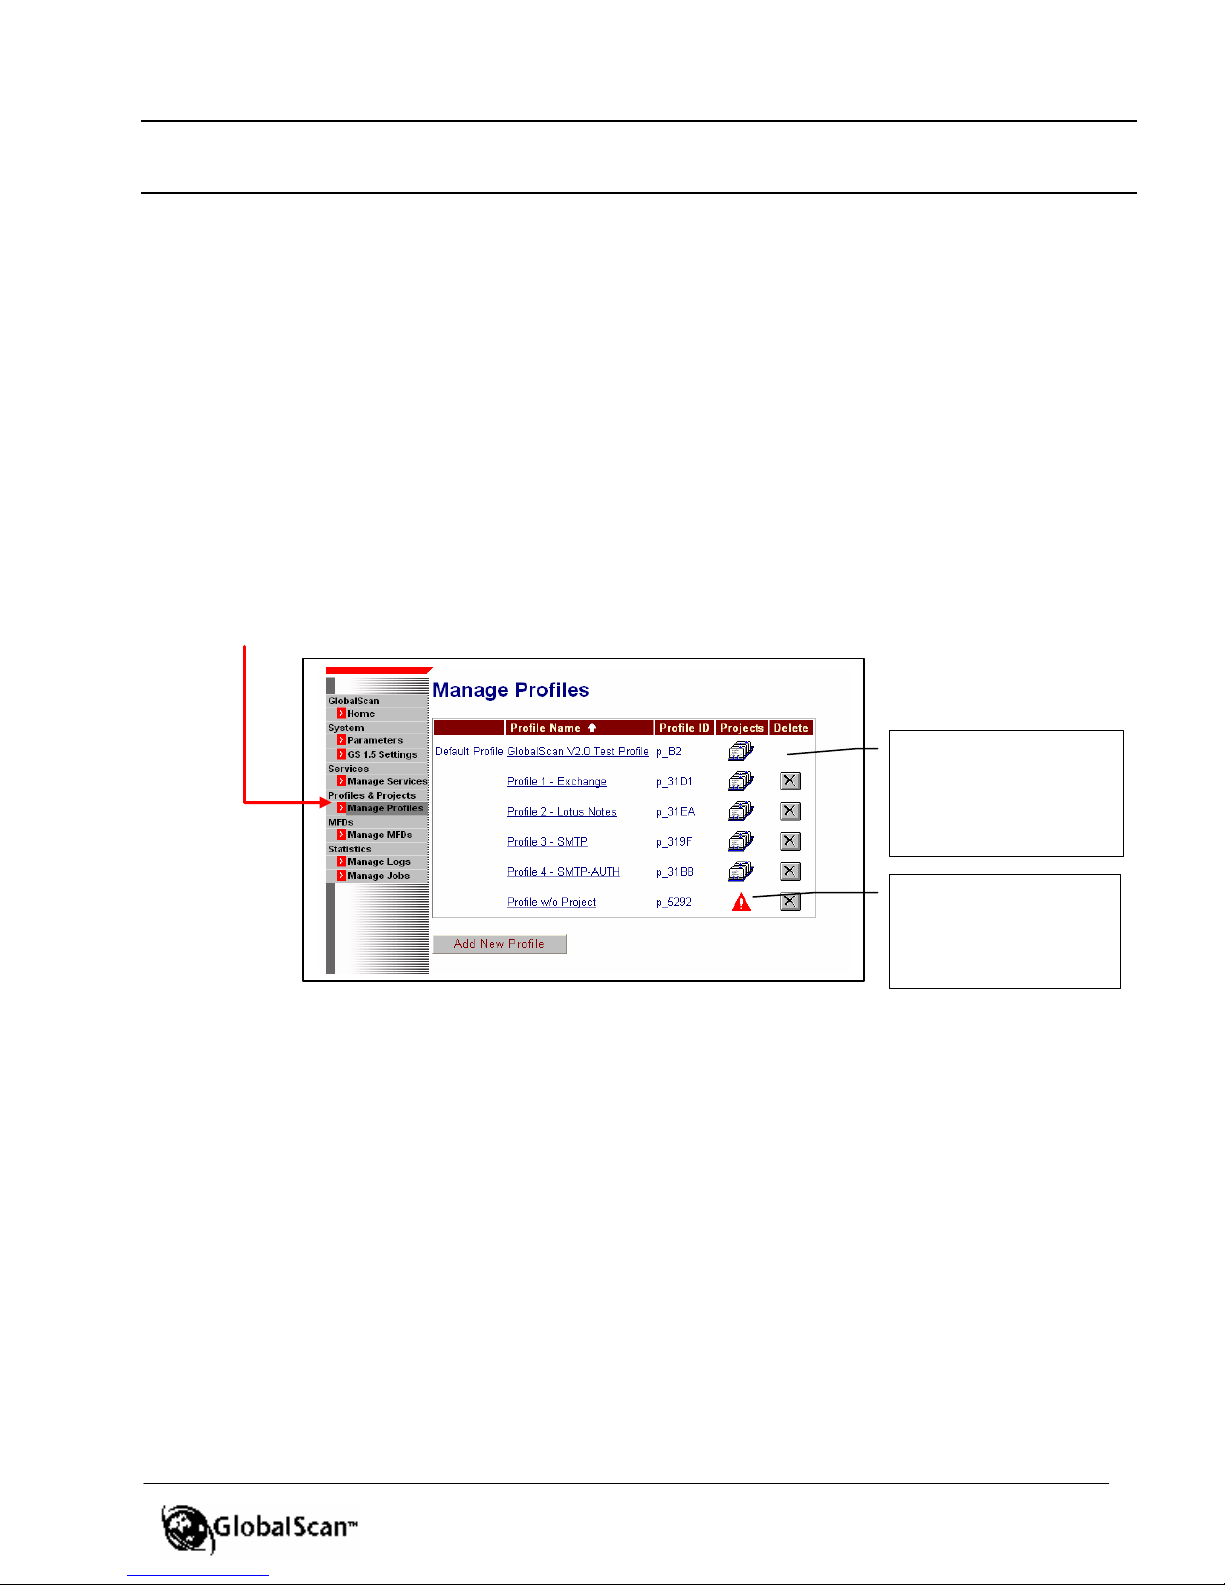
To view existing profiles, or add a new profile, proceed as follows…
1. Click the Manage Profiles menu link or the Profiles and Projects for MFD Groups
shortcut.
Main Profile Screen
Profile cannot be
deleted, thus the
absence of a Delete
that there is no project
defined for this profile
18
GlobalScanTM Ver. 2.0
Profile
The new profile
Administrator’s Guide
Add/Edit a Profile Cont’d
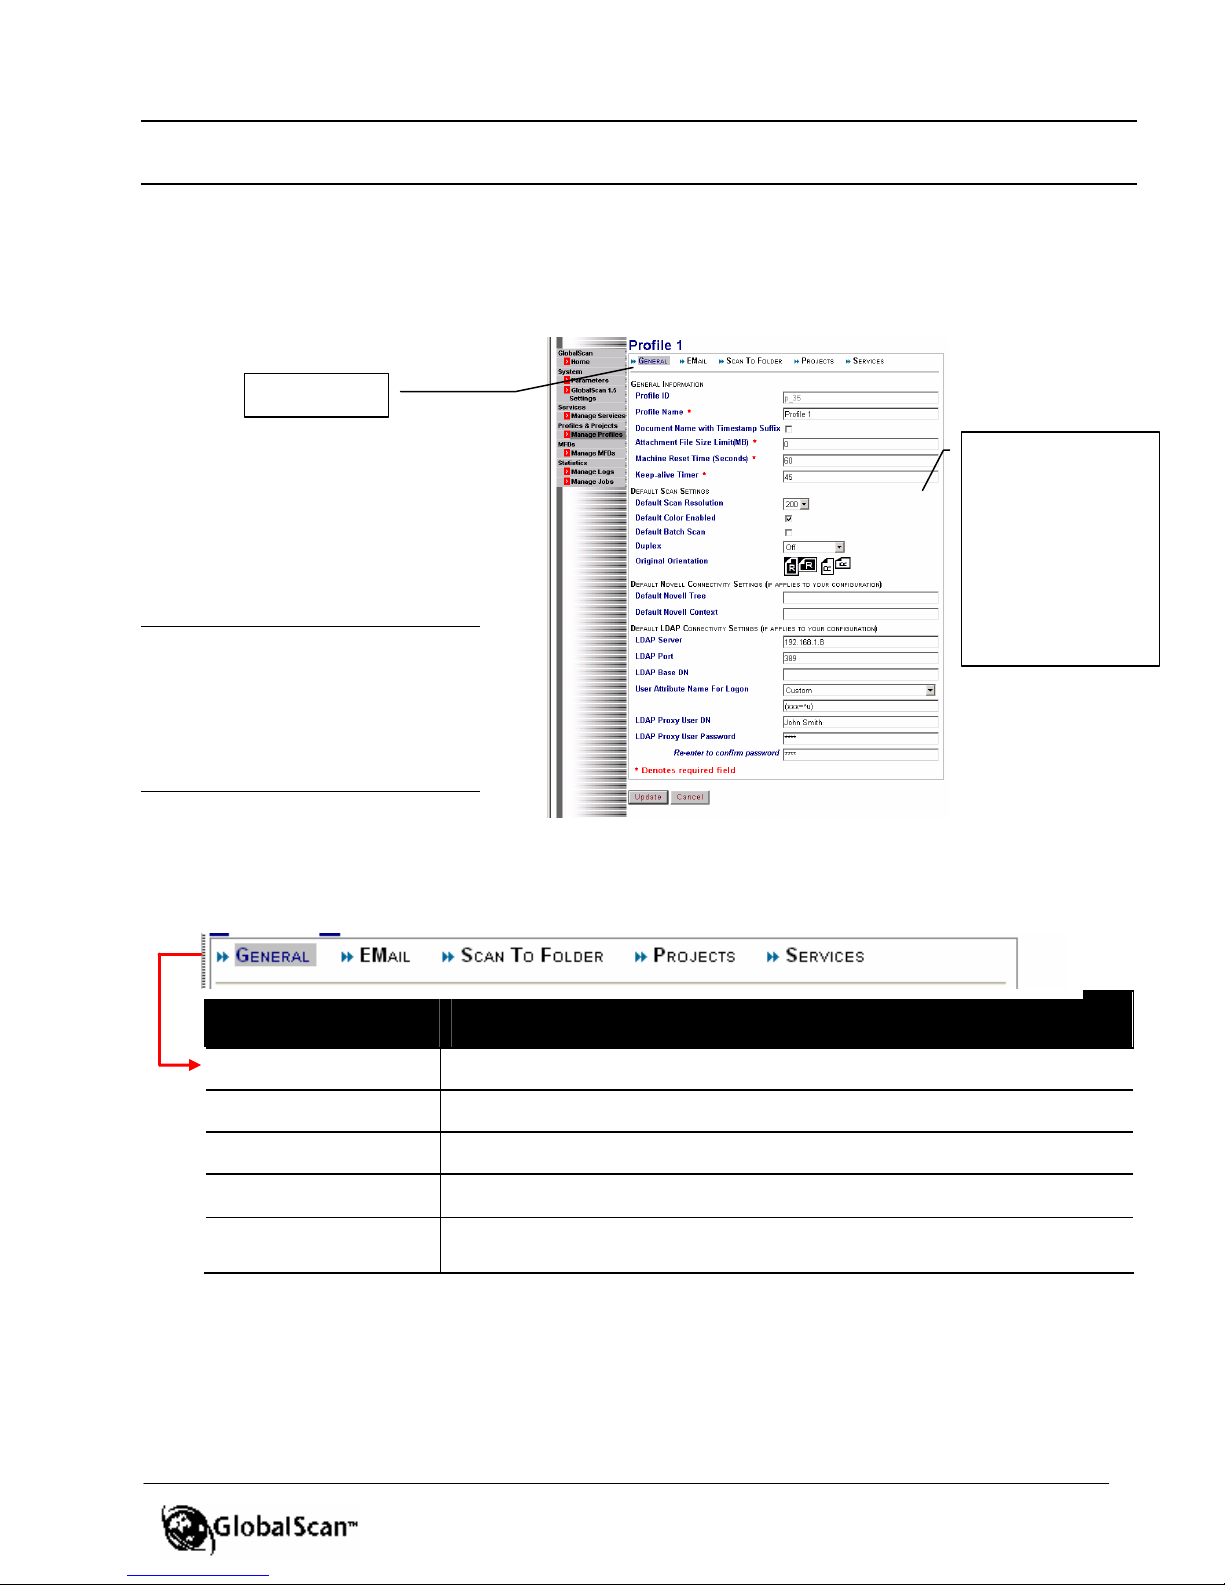
2. Click the Add New Profile* button, or if editing an existing profile, click on the Profile
Name.
In the following example, an existing profile is selected by clicking on the profile name.
Display reads, for example…
Profile Tabs
Configuration
Screen
* Note: If you selec t the “Add New
Profile” button, you must enter the
required information and click
Update before selecting another
tab, e.g., Scan To Folder,
otherwise an error message
displays.
configuration
screen inherits the
field values from
the Default Profile,
though these
values can be
overwritten as
needed
From the Profile Configuration screen, you can click on the following tabs:
General
Tab
Enter/edit profile name, session time outs, etc.
Function
EMail
Scan To Folder
Project
Services
Enter/edit server name, e-mail lookup settings, etc.
Enter/edit folder path, description, etc.
Enter/edit project name, Services, authentication, etc.
Configure optional Plug-ins that are defined on the profile
level, e.g., RightFax and OCR.
19
GlobalScanTM Ver. 2.0
A
B
Press Cancel on any screen to return to
Administrator’s Guide
Add/Edit a Profile Cont’d
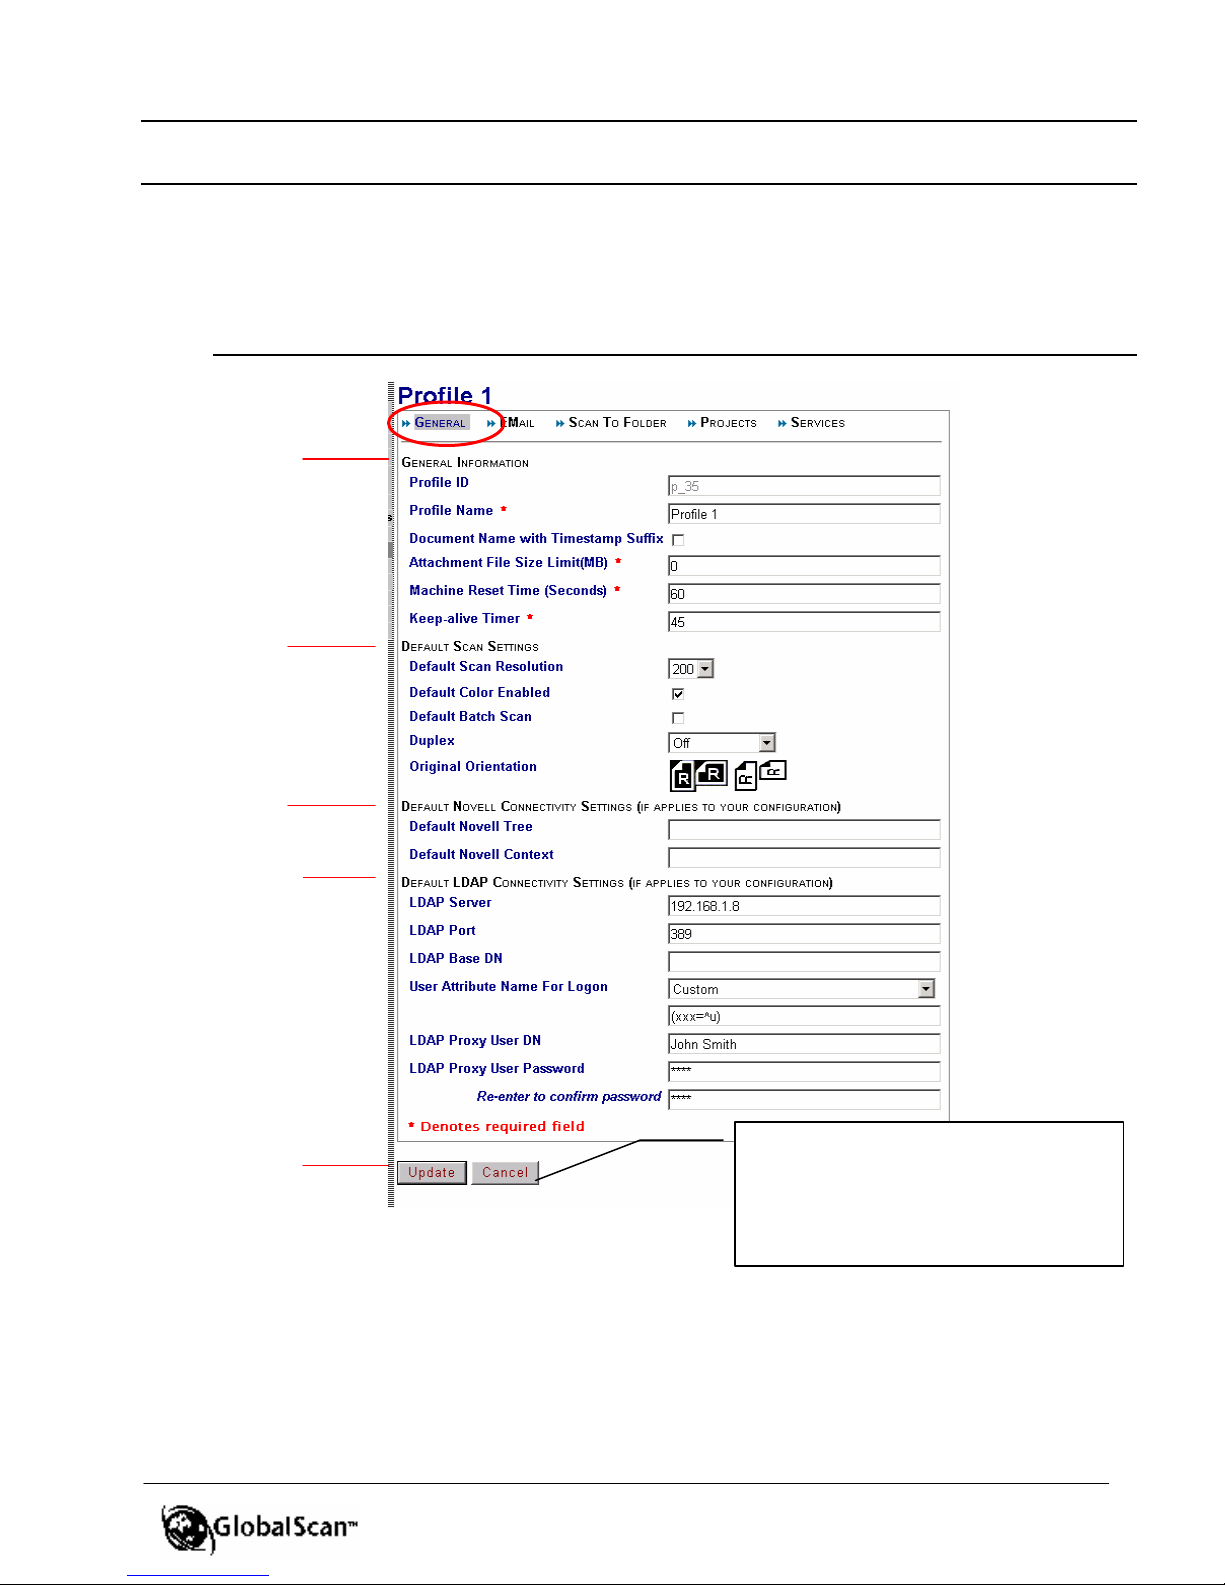
Each of the following tabs, General (circled), Email, Scan To Folder, etc., opens a screen for
entry of attributes that control the GlobalScan Server’s interaction with the MFD. Begin by
entering/editing fields in the General tab.
General Tab
C
D
E
the Manage Profiles (main) screen.
Unsaved edits will be lost (you won’t be
prompted to save changes). If you wish
to save changes, you must click Update.
20
GlobalScanTM Ver. 2.0
Administrator’s Guide
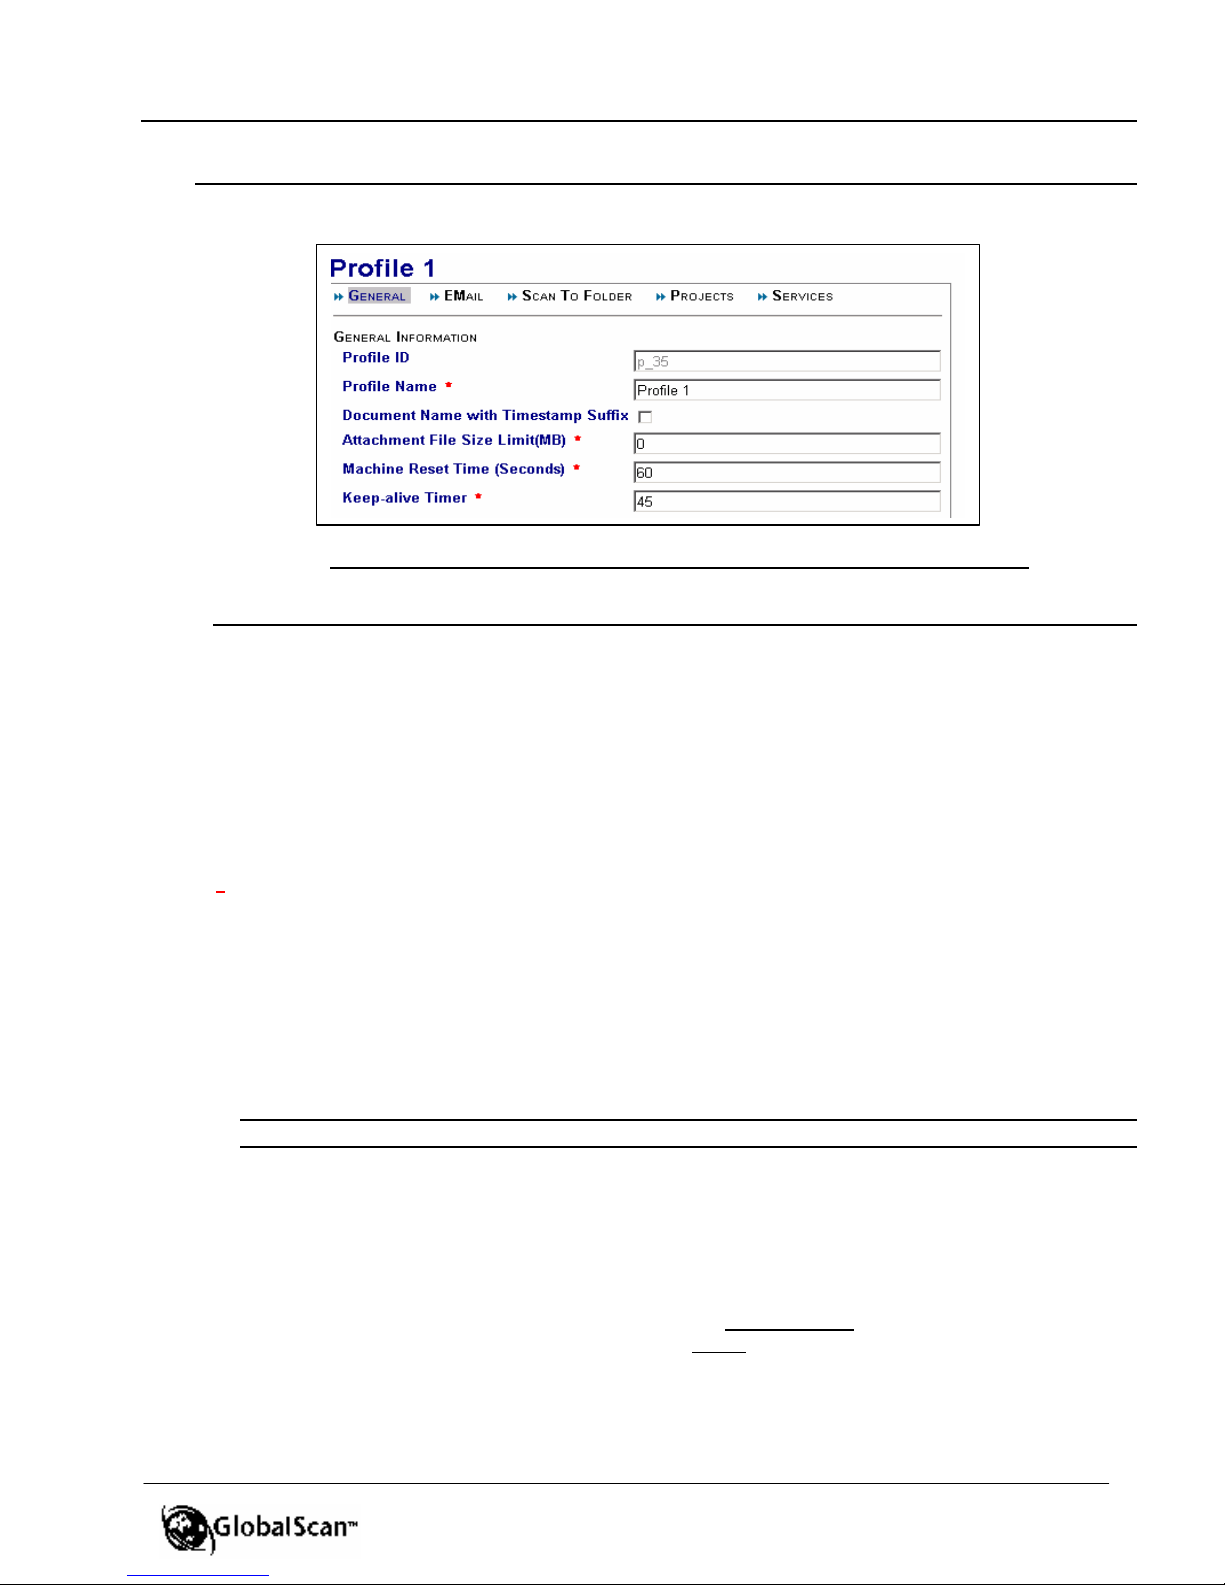
General Tab > General Information
A. General Information
An asterisk ( * ) denotes a required field.
Proceed with entry of the General tab settings, as follows:
• Profile ID – This Profile ID is system-assigned, thus it is a read-only field that
cannot be changed.
• Profile Name (required) – Enter/edit the name of the machine’s profile (maximum
length is 64 characters). This name will appear in the list of profiles on the Manage
Profiles main screen. Note that the header dynamically reflects keystrokes.
• Document Name with Timestamp Suffix – Select on or off. Unchecked (off) by
default. If checked (on), a timestamp is appended to the scanned image’s file name,
e.g., doc name_yyyymmddhhmmss. If the user has not entered a document name
via the MFD (i.e., GlobalScan’s e-mail screen), the timestamp is applied as the
document name.
• Attachment File Size Limit (MB) (required) – Enter a maximum file size for an
attachment to e-mail.
Note: The default setting is zero (0), which means there is no attachment file size limit.
Important: If you scan a multi-page document as e-mail, and the file exceeds the
Attachment File Size Limit, for example, the limit is set for 5MB, and the scanned
document is 8MB, the recipient will receive two separate e-mails. The first message
will contain a file with a 5MB (approx.) attachment. The second one will contain a
file with a 3MB (approx.) attachment.
Note: If you Scan to Folder only, or DMS only, the file will not be split. However, if you scan to email
in conjunction with Scan to Folder or DMS, the file will be split.
21
GlobalScanTM Ver. 2.0
Default Scan Settings
Administrator’s Guide
General Tab > General Information Cont’d
• Machine Reset Time (Seconds) (required) – Enter the reset time (max. 600
seconds). By default, logout is automatic if the MFD is idle for 60 seconds, i.e., no
buttons on the MFD are pressed.
Note: The Machine Reset Time cannot be less than the Keep-alive Timer.
• Keep-alive Timer (required) – Enter the time in which the session remains open
(max. 585 seconds). This number will define the time interval at which the MFDs will
contact the server with a request to keep the server session alive. The Keep-alive
Timer must be at least 15 seconds less than the Machine Reset Time. Since
Machine Reset Time can range from 60 to 600 seconds, the Keep-alive Timer has a
valid range from 45 to 585 seconds (default: 45 seconds).
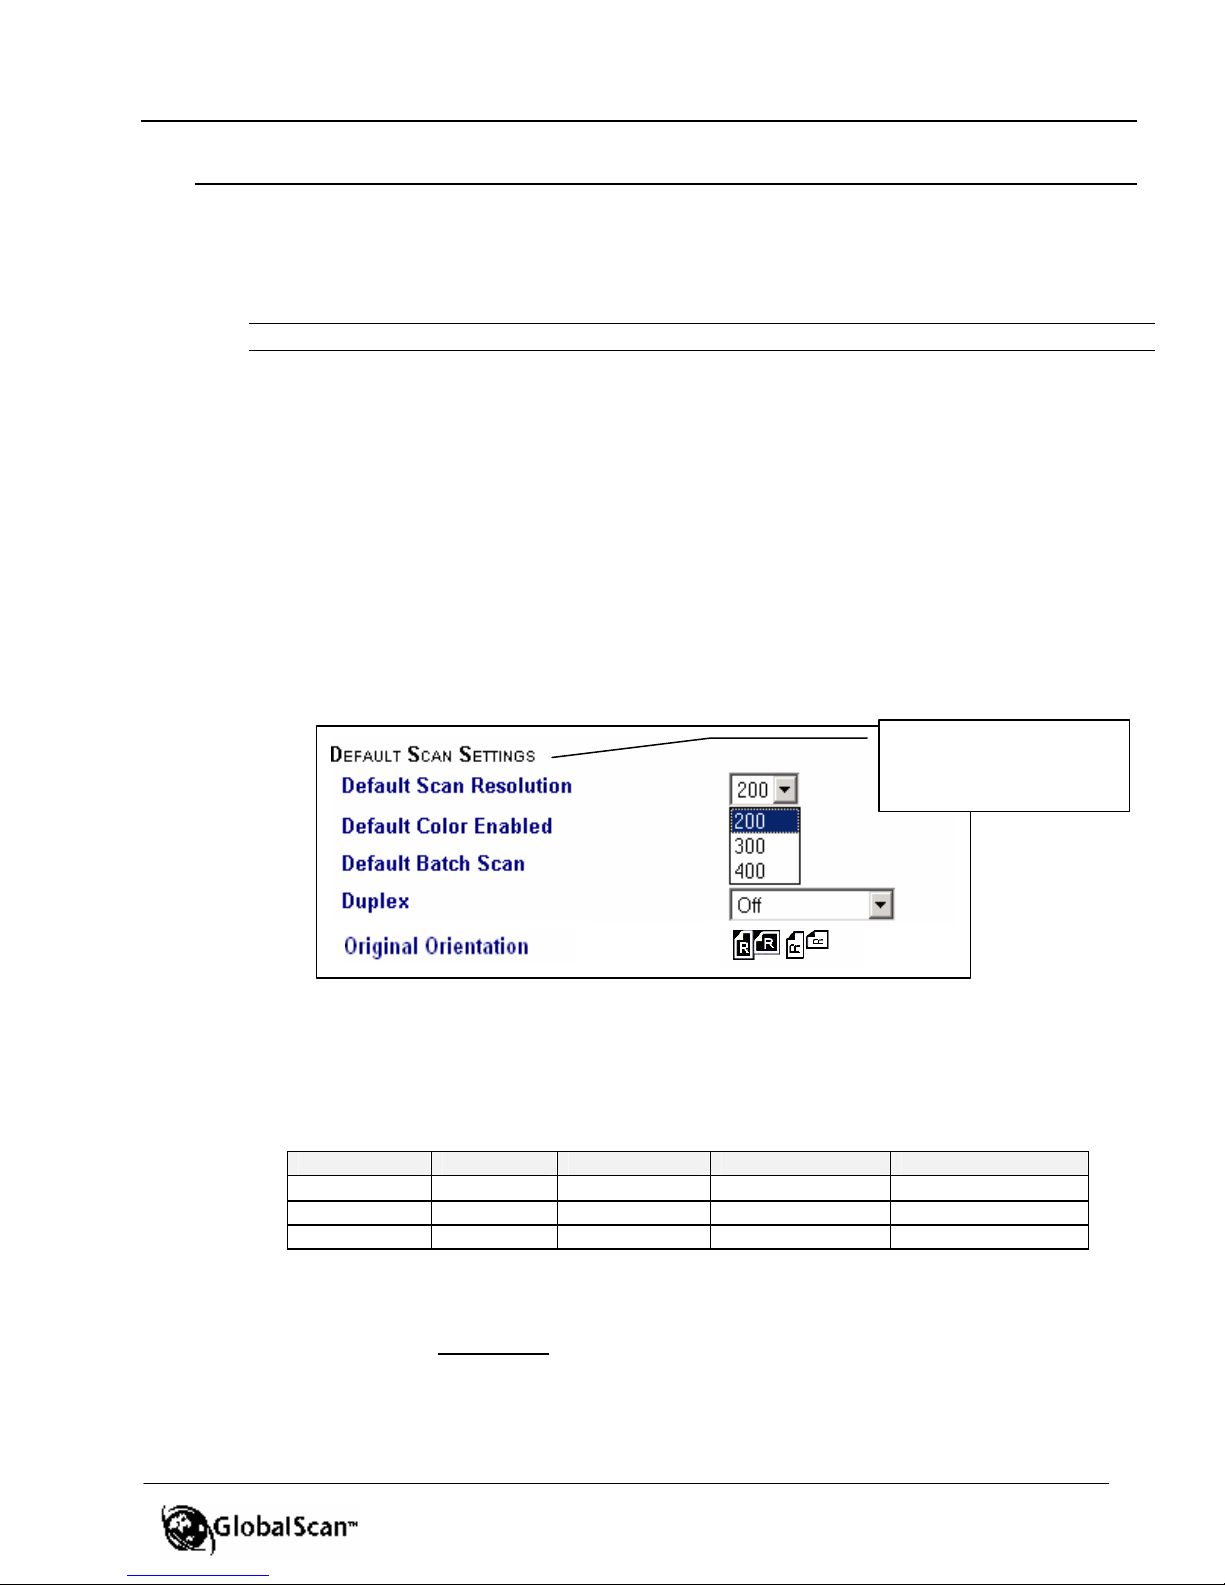
B. Default Scan Settings
The GlobalScan user can override resolution, scan type (color/mono), batch scan,
duplex, original orientation and file format defaults by selecting another setting on
the MFD control panel. The default value is restored after the user logs out (or after
MFD timeout).
• Default Scan Resolution - From this drop-down, select 200-, 300- or 400-dpi as
the default scan resolution for the machine profile. For example, MFD users in
the advertising department may require a higher resolution than those in another
department.
Scan Mode Resolution Scan Size Scan Type * Image Density
Default 200 dpi Auto Detect B&W or Color Auto Density
Fine 300 dpi Auto Detect B&W or Color Auto Density
Super Fine 400 dpi Auto Detect B&W or Color Auto Density
* Color is supported on select MFDs.
• Default Color Enabled – Select on or off. When checked (on), all documents
scanned on a color MFD are uploaded in color. If this box is unchecked (off),
documents are uploaded in black & white.
can be overridden on
the project level
22

GlobalScanTM Ver. 2.0
90°
Standard
Administrator’s Guide
General Tab > Default Scan Settings Cont’d
• Default Batch Scan – Select on or off. Un checked (off) is the default. If checked
(on) the user can scan a large multi-page document in batches and transmit as
one file.
• Duplex – Select on or off. Unchecked (off) is the default. However, if selected on,
scanned documents are typically two sided and you want the pages to be
scanned in duplex mode, by default, then select the text orientation, either Top
to Top or Top to Bottom, from this drop-down.
Ø Top to Top, as in pages of a book (default setting).
Ø Top to Bottom, as in legal documents that are bound
at the top.
• Original Orientation defines how documents are to be placed on the MFD’s
document feeder, either Standard or 90° Orientation, thus ensuring proper
rotation when viewed on a PC. Click (highlight) the desired setting. In the
example below, standard orientation has been selected.
Orientation
Standard 90°
Portrait
Landscape
Orientation
23

Default LDAP
General Tab > Default Novell Connectivity Settings
C. Default Novell Connectivity Settings (if applies to your configuration)
• Default Novell Tree – If your company is using Novell authentication, enter the
Novell Tree here, otherwise leave blank. If a Novell Tree is applied to a specific
profile, this will allow connection of dif ferent MFDs to different Novell Trees. If
entered, this data will automatically populate the corresponding field on the
MFD’s login screen as well.
• Default Novell Context – If your company is using Novell authentication, enter
the Novell Context, otherwise leave blank. If the Novell Context is applied to a
specific profile, this will allow the connection of different MFDs to different
Novell Contexts. If entered, this data will automatically populate the
corresponding field on the MFD’s login screen as well.
D. Default LDAP Connectivity Settings (if applies to your configuration)
If your company is using LDAP authentication, enter the appropriate LDAP settings
here.
settings can be set
on a profile level
(here), but over ridden on a project
basis, if necessary
• LDAP Server – If not already entered, enter LDAP Server IP address or name
here. Important: If using LDAPS, enter DNS name of the LDAPS Server or the
IP address.
• LDAP Port – If not already entered, enter here (default: 389). Important: If
using LDAPS, enter 636 as the default port number.
• LDAP Base DN – If not already entered, enter Base Distinguished Name.
GlobalScanTM Ver. 2.0
Administrator’s Guide
24
GlobalScanTM Ver. 2.0
Administrator’s Guide
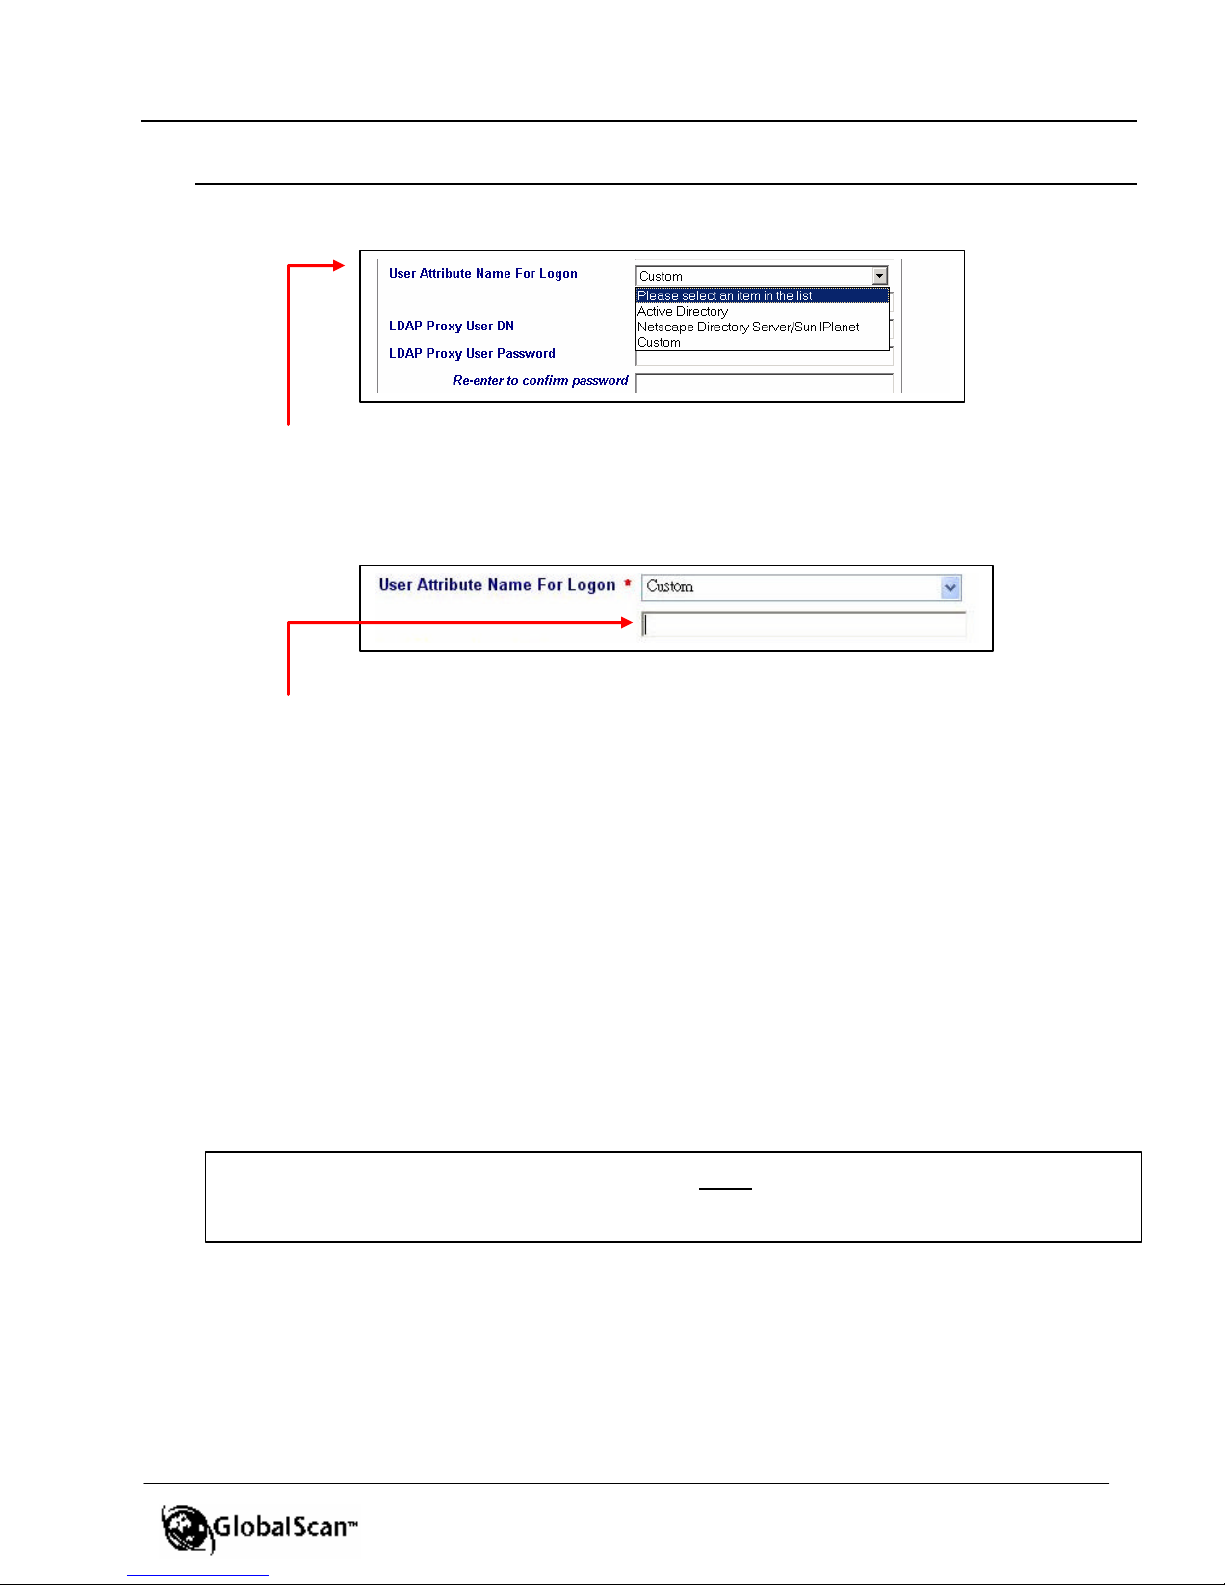
General Tab > Default LDAP Connectivity Settings Cont’d
• User Attribute Name for Logon - There are three choices.
1. Active Directory
2. Netscape Directory Server/Sun IPlanet
3. Custom -- All other LDAP servers fall into this category, e.g. Lotus Notes.
Fill in the search attribute in (xxx=^u) format, where xxx can be any attribute
that is most unique for the LDAP server. For example, (cn=^u) or (uid=^u) .
• LDAP Proxy User DN – Enter Proxy User DN.
• LDAP Proxy User Password – Enter Proxy User Password.
• Re-enter to confirm Password – Re-enter to confirm the password.
• To change a previously established password, click Change Password. Enter
required fields and click Change.
E. Update or Cancel
Select Update to save settings, Cancel to return to Manage Profiles main screen
without saving.
IMPORTANT: After pressing Update, you must reboot the MFD in order to apply
any new or revised profile settings to the device.
25

GlobalScanTM Ver. 2.0
A B C D E
“Email Lookup
“Default Email
Email Configuration
Screen
Administrator’s Guide
Email Tab
GlobalScan supports four different mail del ivery systems…
1. SMTP
2. Microsoft (MS) Exchange
3. Lotus Notes
4. SMTP-AUTH
This means that Profile A can utilize, for example, an SMTP server, while Profile B
utilizes Lotus as the mail system. Which one GlobalScan uses depends on which mail
system is configured within the profile.
To open the Email Configuration Screen, click the Email tab.
Display reads…
Domain” only
appears if “Allow
Manual Entry of
Addresses” is
checked. Note:
The “@” symbol is
automatically
appended, thus
need not be
entered.
Settings” only
appear if “Show
Address Search”
or “Enable Email
Send Receipt”
check boxes are
checked
26
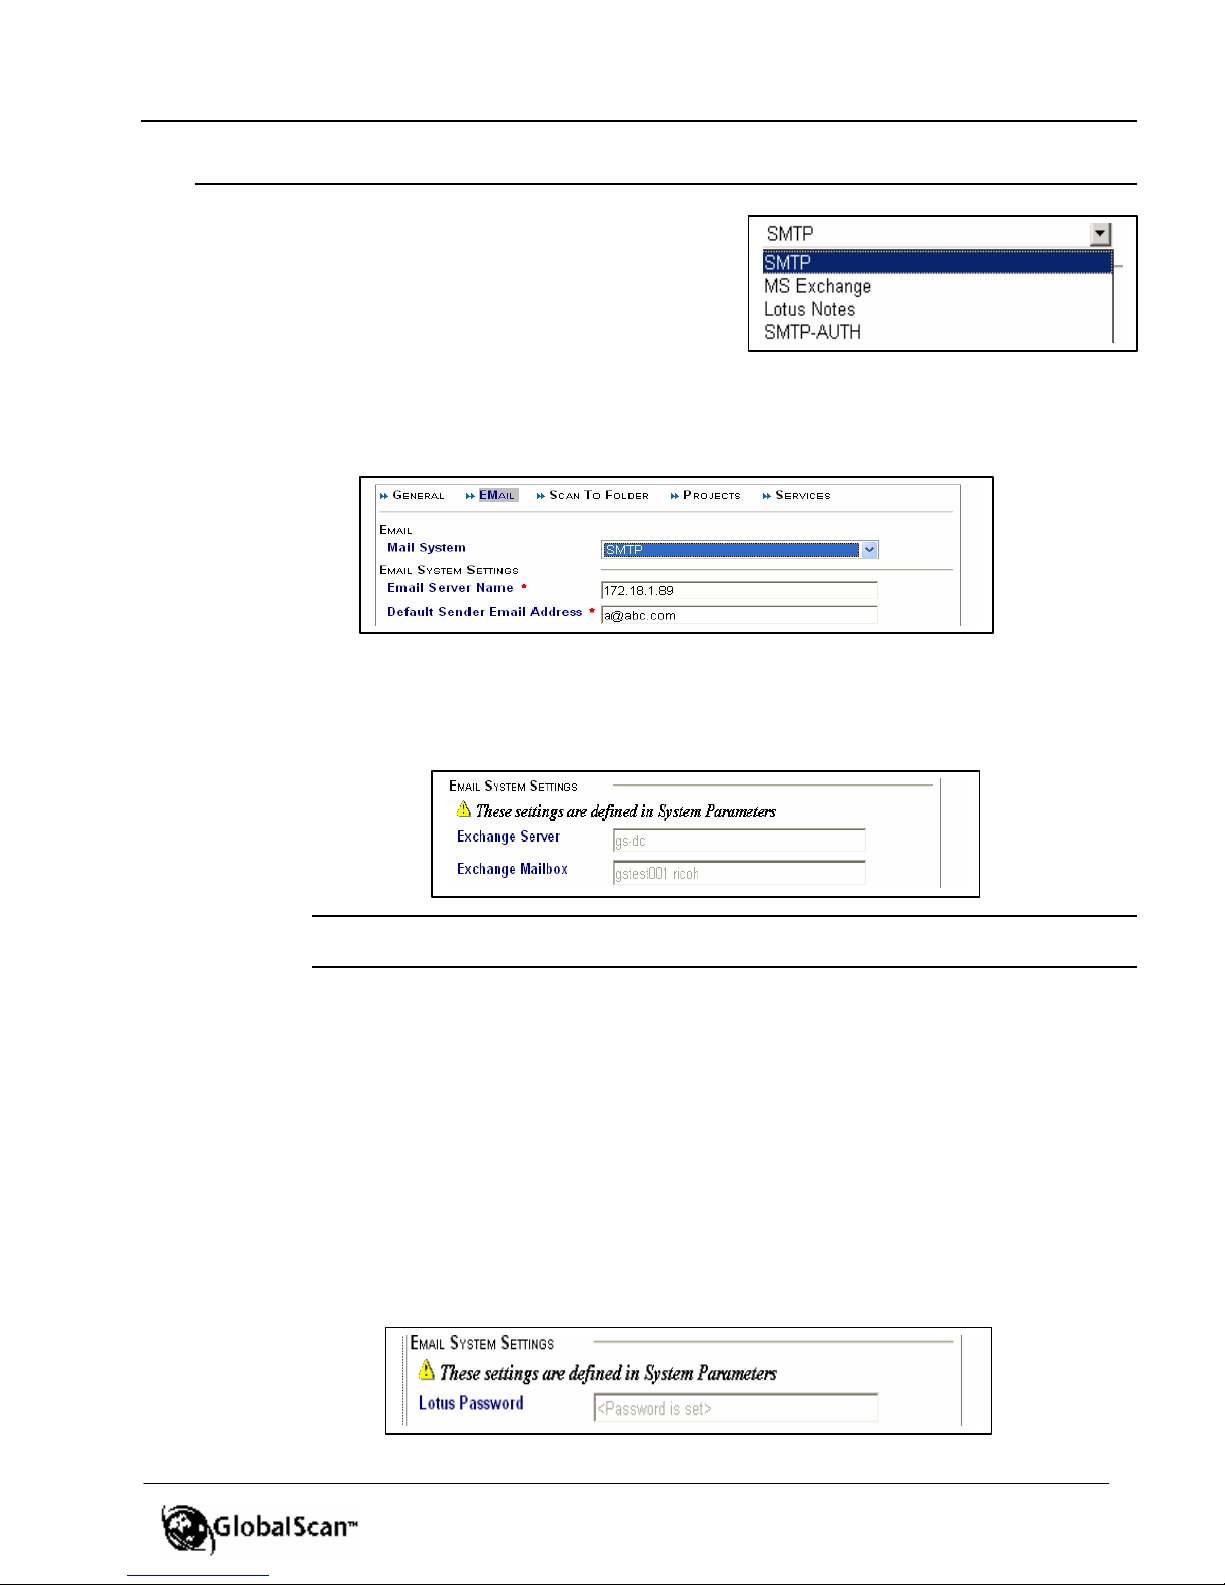
Email Tab > Email System Cont’d
A. Email –
• Mail System: From this drop-down, select
one of the options shown at right…
Ø SMTP
If SMTP is selected as your mail
system, you must enter the Email Server Name (Server IP address) and
Default Sender Email Address (the e-mail address to be used if the logon
user’s e-mail address can’t be retrieved during the logon process).
Ø MS Exchange
This is a read-only field. MS Exchange settings are defined on the System
Parameters screen, and then displayed here (see Step 4: Enter/Edit System
Parameters).
Note: If MS Exchange is selected as the Mail System, the user that configured Outlook 2000
must have local admin rights.
Important: Please refer to Appendix C: Change Job Monitor/Data Service
Property for instructions on changing the Job Monitor Property. When using
Microsoft Exchange, the CDO.dll (Collaborative Data Objects) file must also
be present on the GlobalScan Server (see Appendix F: CDO.dll Installation
Procedure for details).
Ø Lotus Notes
This is a read-only field. Lotus Notes settings are defined on the System
Parameters screen, and then displayed here (see Step 4: Enter/Edit System
Parameters). If selected, the administrator needs to fill in the Lotus Password
in the System Parameter page.
GlobalScanTM Ver. 2.0
Administrator’s Guide
27
Email Tab > Email Settings Cont’d
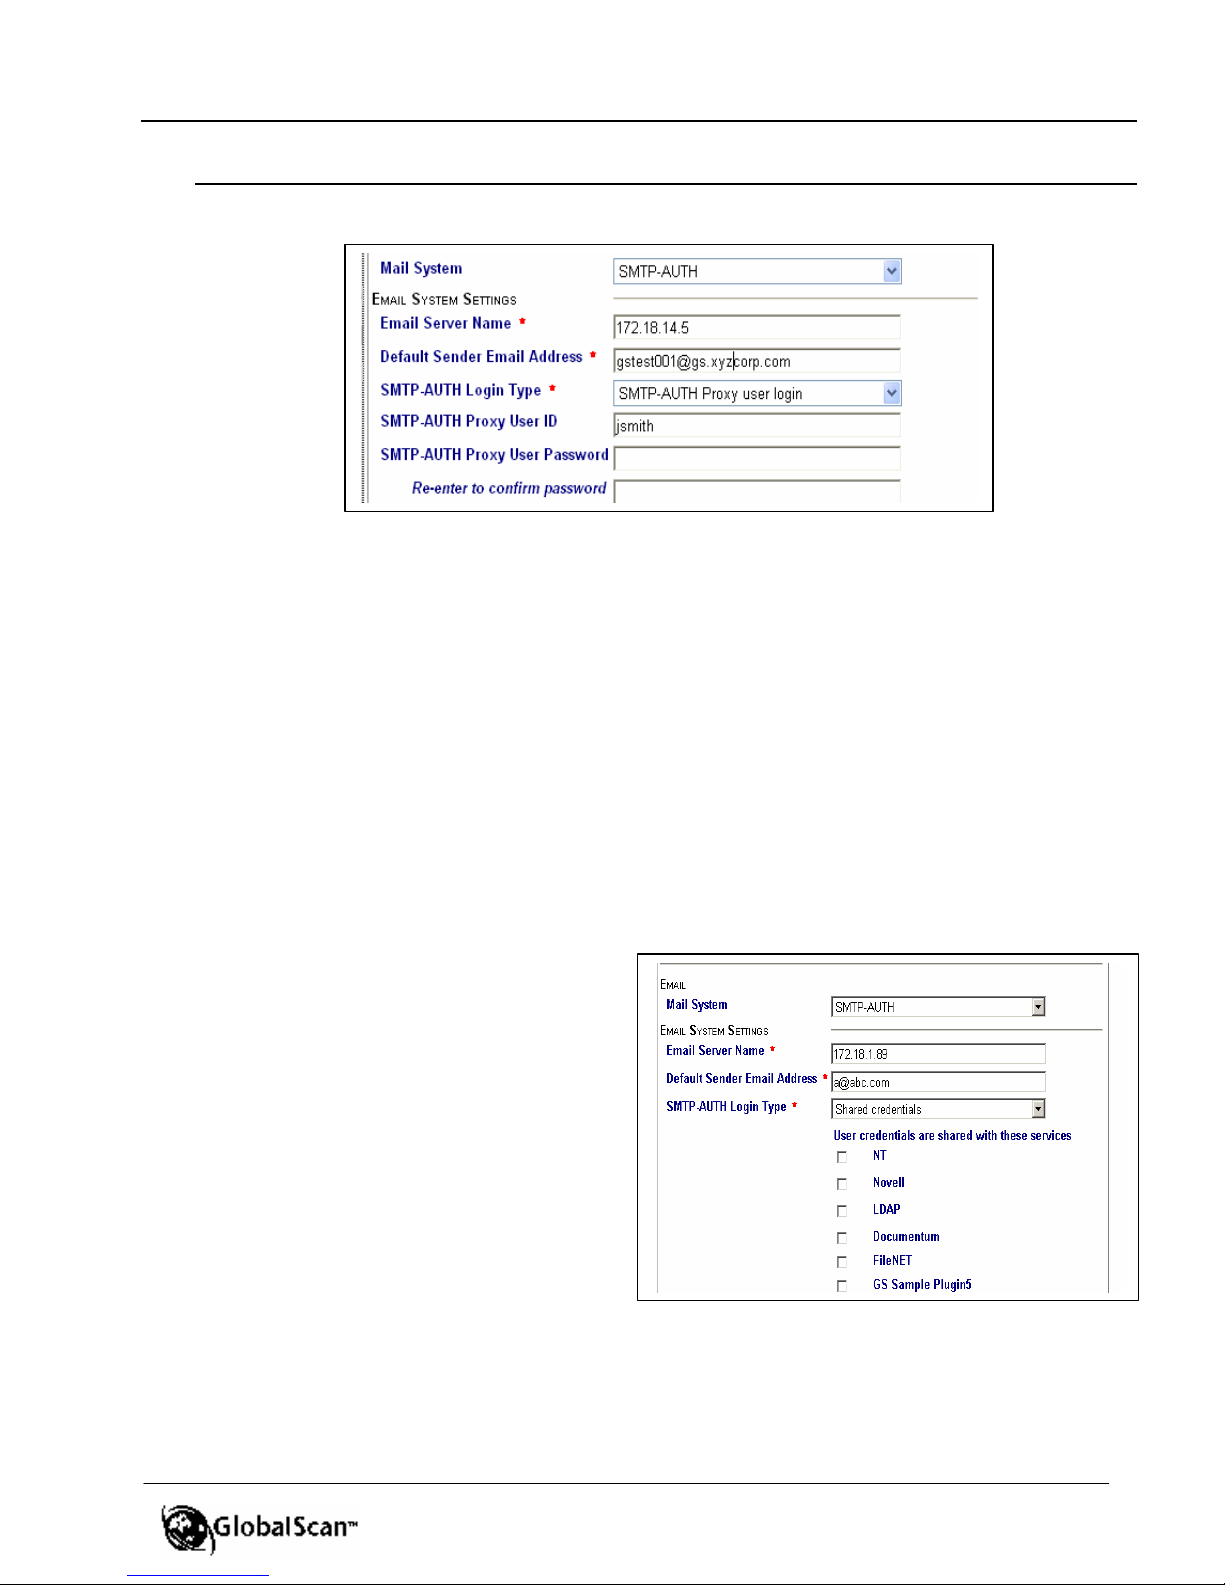
Ø SMTP-AUTH
If SMTP-AUTH is selected as your mail system, you must enter the
following:
1. Email Server Name (Server IP address). Note: The SMTP port is set to
25, which cannot be changed.
2. Default Sender Email Address (the e-mail address to be used if the
logon user’s e-mail address can’t be retrieved during the logon process).
3. SMTP-AUTH Login Type (drop-down)
• SMTP-AUTH Proxy user login – Users will be authenticated using
proxy information provided in the Proxy User ID and Password fields.
Enter as needed.
• Shared credentials (SMTP-AUTH login sync) – If running additional
Services, users will be authenticated using their credentials, but their
IDs and passwords are expected to be the same as other Services
that are to be selected.
Important: If your SMTP -AUTH Login
Type is shared with, for example, NT
authentication, you then see e-mail as
an available Service to add to a
project. If you choose a project using
Novell authentication, you will not see
e-mail as an available Service.
GlobalScanTM Ver. 2.0
Administrator’s Guide
28
GlobalScanTM Ver. 2.0
Administrator’s Guide
Email Tab > Email Settings Cont’d
B. Email Options
Note: All options listed below are supported by GlobalScan Ver. 2.0 MFD firmware only, with the
exception of “Show Address Search” and “Enable Email Send Receipt,” which are supported by both
Ver. 1.5 and Ver. 2.0.
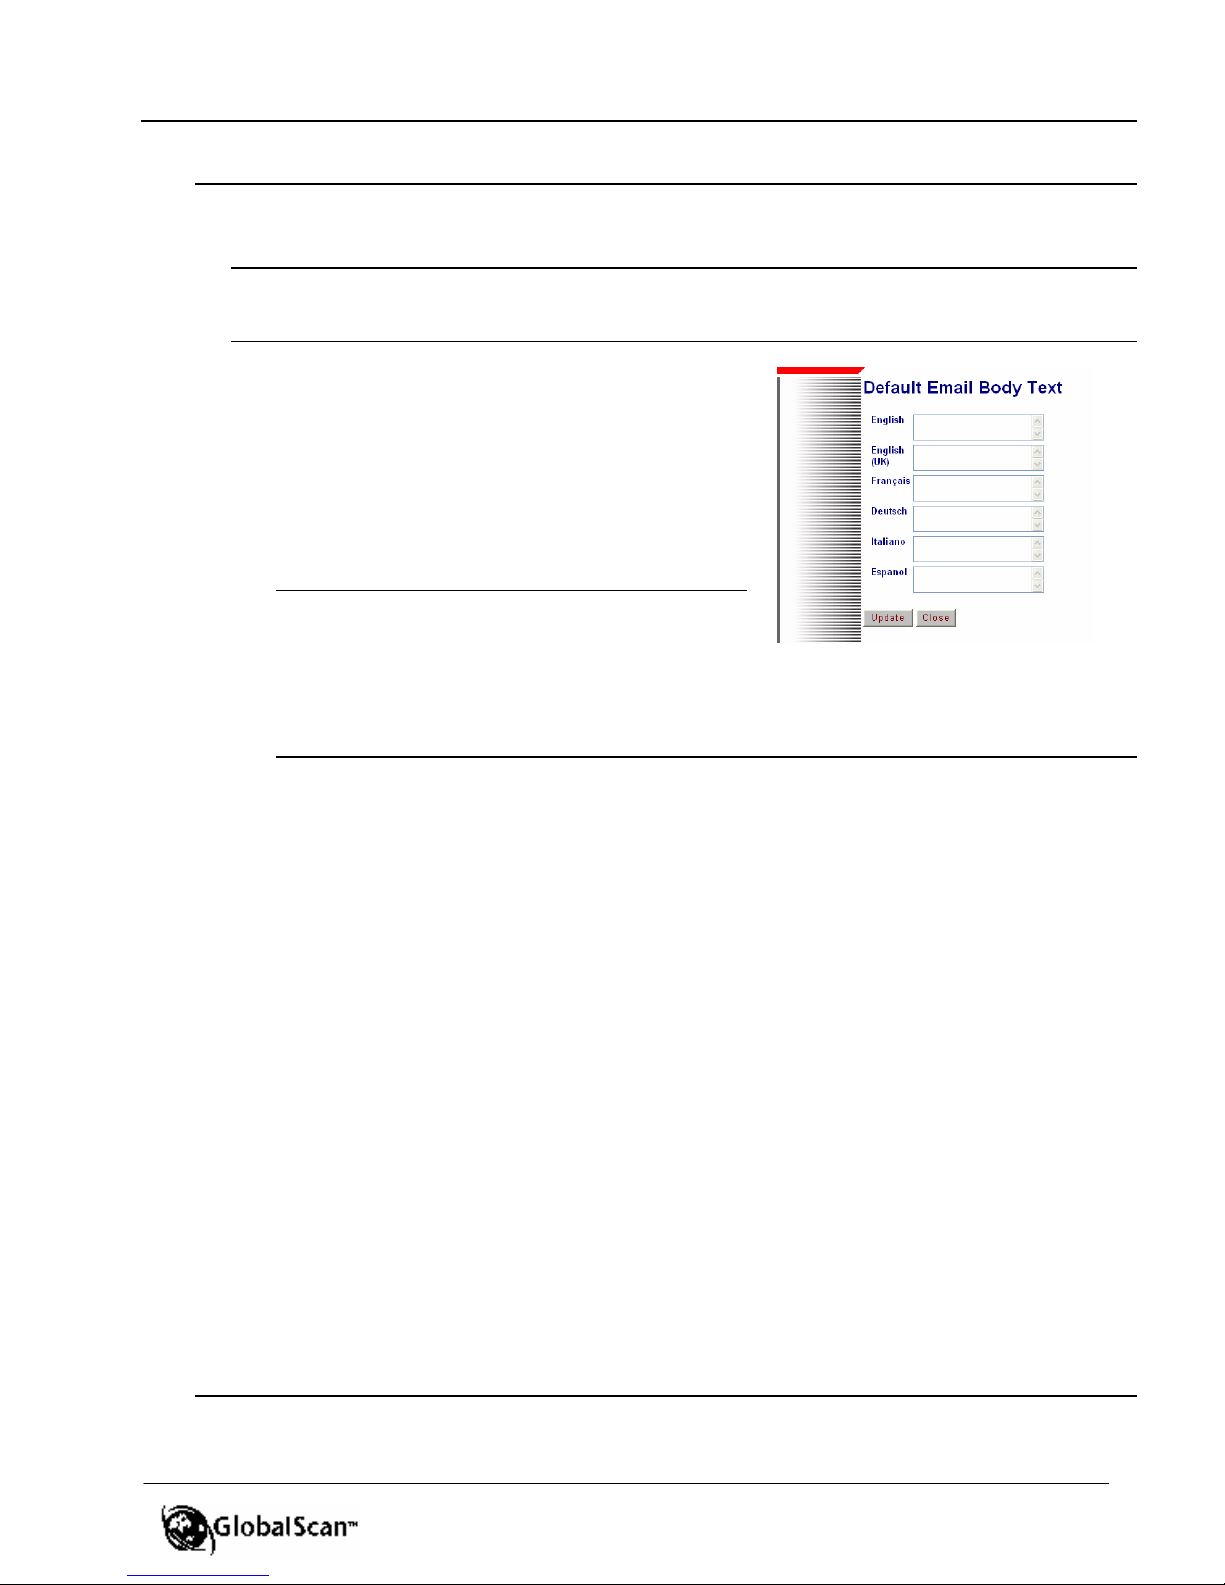
• Set Default Email Body Text – Click this
button if you wish to enter a message to
append to each outgoing e-mail message.
Then click Update (or Close to exit without
saving). If no text is entered, the
GlobalScan V2.0 Server automatically
appends “GlobalScan document.”
Note: You can change the default body text to any
displayed language, e.g., French, by entering text in
the corresponding field. However, the GlobalScan
Server and MFD must be running Ver. 2.0 software and firmware, respectively. If the GlobalScan
Server is running Ver. 2.0 software and the MFD’s firmware is Ver. 1.5, or vice versa, the default
e-mail body text will be hard coded as “GlobalScan document sent from (login ID will appear, if
applicable),” i.e., no other language is supported.
• Check Boxes
R Show Cc
user can enter/select (on the MFD touch screen) e-mail addresses that are
to receive a copy of the e-mail message.
R Show Bcc
enabled, the user can enter/select (on the MFD touch screen) e-mail
addresses that are to receive a blind carbon/courtesy copy of the e-mail
message.
R Show Reply To
enter/select (on the MFD touch screen) an e-mail address that is to receive a
reply message from th e recipient(s). This means that if a recipient clicks
“Reply (to Sender) ,” the return message is automatically directed to this
address, not the originating e-mail address. This feature is useful if, for
example, mail is sent via Lotus Notes or MS Exchange systems that automatically identify all mail as coming from the individual who configured the client
(inbox). By entering a Reply To address at the time of transmission, any
response is automatically sent to the actual sender or perhaps a third party.
1
Note: If disabled (unchecked) the Cc, Bcc, Reply To tabs on the MFD’s display will be grayed out, thus
no e-mail address entries can be made.
1
– Enable or disable Cc (Carbon/Courtesy Copy). If enabled, the
1
– Enable or disable Bcc (Blind Carbon/Courtesy Copy). If
1
– Enable or disable Reply To. If enabled, the user can
29

GlobalScanTM Ver. 2.0
Administrator’s Guide
Email Tab > Email Settings Cont’d
• Check Boxes Cont’d
R Show Address Search – If enabled, the user can search f or e-mail
addresses on the Global Address Book of the LDAP Directory Server
(additional settings appear, as shown in the next section, C: Email Lookup
Settings. If disabled, the user can only enter addresses manually via the soft
keyboard, provided the “Al low Manual Entry of Addresses” check box is
selected. If Show Address Search is deselected and Allow Manual Entry of
Addresses is selected, the Cc, Bcc and Reply To addresses can be entered
manually from the soft keyboard.
R Enable Email Send Receipt – This check box appears if “Show Address
Search” check box (shown above) is enabled. Enable or disable as required.
Checked (on) by default, this enables the Scan to Me function whereby the
logon user’s e-mail address is added to the mail recipient list, provided that
the e-mail address can be retrieved. If so, e-mails sent via GlobalScan will
also be delivered to the logon user’s e-mail address.
Note: If “Enable Email Send Receipt” is checked (on) and both “Allow Manual Entry” and
“Show Address Search” are unchecked, the user will only be able to e-mail to himself/
herself.
R Allow Manual Entry of Addresses – Select on or off. If unchecked (off), the
user cannot enter an e-mail address via the soft keyboard. So, if you wish to
limit e-mail communication to addresses stored in the Global Address Book,
uncheck “Allow Manual Entry of Addresses” check box and enable “Allow
Address Search.”
• Default Email Domain – If the “Allow Manual Entry of Addresses” check box is
enabled (on), define the default e-mail domain so the user only needs to type, for
example, “jsmith” via the soft keyboard. The domain, “xyzcorp.com” will be
automatically appended. The result: jsmith@xyzcorp.com.
Note: An e-mail domain makes it easier for a user to send mail to destinations within the
identified domain, though the user can manually enter a different domain, if necessary.
C. Email Lookup Settings – This section appears if “Show Address Search” check
box has been selected.
• LDAP Server (required) – If not already entered, enter LDAP Server IP address
or name here. Important: If using LDAPS, enter DNS name of your LDAPS
Server or the IP address.
• Port Number (required) – If not already entered, enter Port Number here (de-
fault: 389). Important: If using LDAPS, enter 636 as the default port number.
• Base DN – If not already entered, enter Base Distinquished Name.
30
 Loading...