

Ricoh GlobalScan, GlobalScan 3.1 Administrator's Manual
v3.1
Administrator’s Guide
© Copyright 2008 by Ricoh Americas Corporation. All Rights Reserved.
Introduction ........................................................ 6
About GlobalScan............................................. 6
GlobalScan Components.................................. 6
About This Guide .............................................. 7
How to Read This Guide................................... 7
GlobalScan Documentation.............................. 8
Feature Highlights............................................. 9
System Requirements and Specifications........ 10
Before Getting Started...................................... 12
MFD Configuration............................................. 24
Remote MFD Configuration .............................. 24
Manual MFD Configuration............................... 28
Localization ....................................................... 31
MFD Reboot Rules............................................ 34
About Setting Levels ......................................... 36
GlobalScan WebAdmin Configuration............. 43
Step 1: Launch GlobalScan.............................. 43
Step 2: Enter/Edit System Parameters............. 44
Step 3: Add/Edit a Profile.................................. 46
Step 4: Add/Edit a Project ................................ 55
Step 5: Add Services to a Project..................... 63
Step 6: Add Projects to a Profile....................... 72
Step 7: Configure Services............................... 79
Step 8: Create One-touch Scan.......................125
GlobalScan Management ..................................130
Appendix.............................................................155
See pages 3 - 5 for a detailed Table of Contents.
A. Manage MFDs..............................................130
B. Manage Status Detection.............................140
C. Manage MFD Project Icons..........................141
D. Manage Logs................................................143
E. Manage Jobs................................................145
F. Manage Failover...........................................147
Content Overview

GlobalScanTM v3.1
Administrator’s Guide
Documentation revision 1; May, 2008
Copyright © 2008 by Ricoh Americas Corporation. All rights reserved.
No part of this publication may be reproduced, transmitted, transcribed, stored in a retrieval
system, or translated into any language or computer language, in any form or by any means,
electronic, mechanical, optical, chemical, manual or otherwise, without the prior written
permission of Ricoh Americas Corporation.
GlobalScan is a registered trademark of Ricoh Americas Corporation.
Windows and Internet Explorer are registered trademarks of Microsoft Corporation.
All other trademarks are the property of their respective owners.
The material in this document is for information only and is subject to change without notice.
While reasonable efforts have been made in the preparation of this document to assure its
accuracy, Ricoh Americas Corporation, its contractors and partners, assume no liability
resulting from errors or omissions in this document or from the use of the information
contained herein.
Ricoh Americas Corporation reserves the right to make changes in the product design without
reservation and without notification to its users.
All screens used within this guide are for illustration purposes only, i.e., filenames, field entries,
etc., may vary based on actual system configuration.
2

GlobalScanTM v3.1
Administrator’s Guide
Table of Contents
Within the PDF file, click on the heading or subheading to navigate directly to that section.
IInnttrroodduuccttiioon
About GlobalScan ...................................................................................................................... 6
GlobalScan Components............................................................................................................ 6
About This Guide......................................................................................................................... 7
How to Read This Guide............................................................................................................. 7
GlobalScan Documentation........................................................................................................ 8
Feature Highlights....................................................................................................................... 9
System Requirements and Specifications................................................................................ 10
Before Getting Started................................................................................................................ 12
n..............................................................................................................
Conventions........................................................................................................................... 7
Abbreviations......................................................................................................................... 7
Setup Procedures ................................................................................................................. 12
6
GlobalScan Services ............................................................................................................ 13
MFD Display Types............................................................................................................... 15
Key GlobalScan Terms......................................................................................................... 17
Authentication.................................................................................................................. 17
Profile................................................................................................................................ 18
Project............................................................................................................................... 18
Services ............................................................................................................................ 20
System Parameters.......................................................................................................... 20
WebAdmin Module........................................................................................................... 21
On-screen Help
Workflow........................................................................................................................... 22
MMuullttiiffuunnccttiioonnaall DDeevviiccee CCoonnffiigguurraattiioon
Remote MFD Configuration (via Web)....................................................................................... 24
Manual MFD Configuration (via MFD Control Panel)............................................................... 28
Localization.................................................................................................................................. 31
MFD Reboot Rules....................................................................................................................... 34
AAbboouutt SSeettttiinngg LLeevveells
............................................................................................................ 21
n.................................................................... 24
s...............................................................................................
36
Three Levels – System, Profile, Project.................................................................................... 36
Restore Settings.................................................................................................................. 39
Inherit Password Feature ................................................................................................... 40
3

GlobalScanTM v3.1
Administrator’s Guide
GGlloobbaallSSccaann WWeebbAAddmmiinn MMoodduullee CCoonnffiigguurraattiioon
Step 1: Launch GlobalScan....................................................................................................... 43
Step 2: Enter/Edit System Parameters..................................................................................... 44
Step 3: Add/Edit a Profile .......................................................................................................... 46
Add New Profile ............................................................................................................ 46
Edit Existing Profile...................................................................................................... 51
Sort Profile List............................................................................................................. 52
Delete Profile ................................................................................................................ 53
Reassign MFDs to Different Profile............................................................................. 54
Step 4: Add/Edit a Project ......................................................................................................... 55
Add New Project ........................................................................................................... 55
Edit Existing Project..................................................................................................... 60
Sort Project List............................................................................................................ 61
Delete Project .............................................................................................................. 62
Step 5: Add Services to a Project............................................................................................. 63
n ..................................................... 43
Service Roles ................................................................................................................ 66
Notify (Email Notification)..................................................................................... 66
Display Sequence................................................................................................... 67
Processing Order................................................................................................... 67
Sort Project’s Services................................................................................................. 69
Remove Service from Project...................................................................................... 70
Step 6: Add Projects to a Profile............................................................................................... 72
Sort Profile’s Projects .................................................................................................. 76
Remove Project from Profile ....................................................................................... 77
Step 7: Configure Services........................................................................................................
Standard and Optional GlobalScan Services ............................................................ 79
A. Configure Authentication Services ...................................................................... 81
LDAP Authentication ............................................................................................. 82
Novell Authentication ............................................................................................ 87
NT Authentication .................................................................................................. 89
B. Configure E m ail Serv ice........................................................................................ 90
C. Configure Scan-to-Folder Service........................................................................ 100
D. Configure Gl obalScan Workflow Suite Service .................................................. 105
79
E. Configure Scan Settings Service.......................................................................... 106
F. Configure Image Processing Services................................................................. 112
Configure OCR Service.......................................................................................... 112
Configure ActivePDF Service ............................................................................... 118
Configure Image Management Service................................................................ 121
Step 8: Create One-touch Scan................................................................................................ 125
4

Administrator’s Guide
GGlloobbaallSSccaann MMaannaaggeemmeenntt
A. Manage MFDs.......................................................................................................................... 130
Edit Existing MFD Configuration .......................................................................................... 131
About SmartDeviceMonitor (SDM)........................................................................................ 134
Sort MFD List .......................................................................................................................... 136
Delete MFD(s) from List ......................................................................................................... 137
Manually Add New MFD(s)..................................................................................................... 138
B. Manage Status Detection....................................................................................................... 140
C. Manage MFD Project Icons.................................................................................................... 141
D. Manage Logs........................................................................................................................... 143
E. Manage Jobs........................................................................................................................... 145
F. Manage Failover (if applicable) ............................................................................................. 147
Primary Server Failover Settings.......................................................................................... 148
Secondary Server Failover Settings..................................................................................... 151
AAppppeennddiix
x.................................................................................................................. 155
........................................................................................ 130
GlobalScanTM v3.1
A: GlobalScan-compatible MFDs............................................................................................... 156
B: Universal Soft Keyboard Support (by brand/model)........................................................... 157
C: New Features and Enhancements........................................................................................ 158
D: GlobalScan v3.x vs. v2.x........................................................................................................ 163
E: GlobalScan Workflow Suite Family ...................................................................................... 164
F: Optional RightFax Plug-in ..................................................................................................... 166
Overview
RightFax Configuration....................................................................................... 166
G: GlobalScan Activation Status ............................................................................................... 171
H: GlobalScan Backup and Restore Utility............................................................................... 173
I: GlobalScan MFD Error Codes............................................................................................... 180
J: Frequently Asked Questions................................................................................................. 182
K: Glossary of Terms.................................................................................................................. 186
.......................................................................................................... 166
5
GlobalScanTM v3.1
Administrator’s Guide
n
IInnttrroodduuccttiioon
About GlobalScan
GlobalScan enables a compatible copier/Multifunctional Device (hereafter referred to as MFD) to
scan documents directly to email or a folder, as well as perform Optical Character Recognition
(OCR). In addition, facsimile functions are supported via the optional RightFax Plug-in.
Designed as a powerful yet easy-to-use paper document capture and distribution system,
GlobalScan integrates seamlessly with your mail infrastructure to significantly boost workgroup
productivity. This is achieved by combining network scanning functionality within an accessible
copier platform. Most importantly, dramatic cost efficiencies are gained by speeding throughput
of common business transactions that may otherwise require slower and more costly methods of
communication.
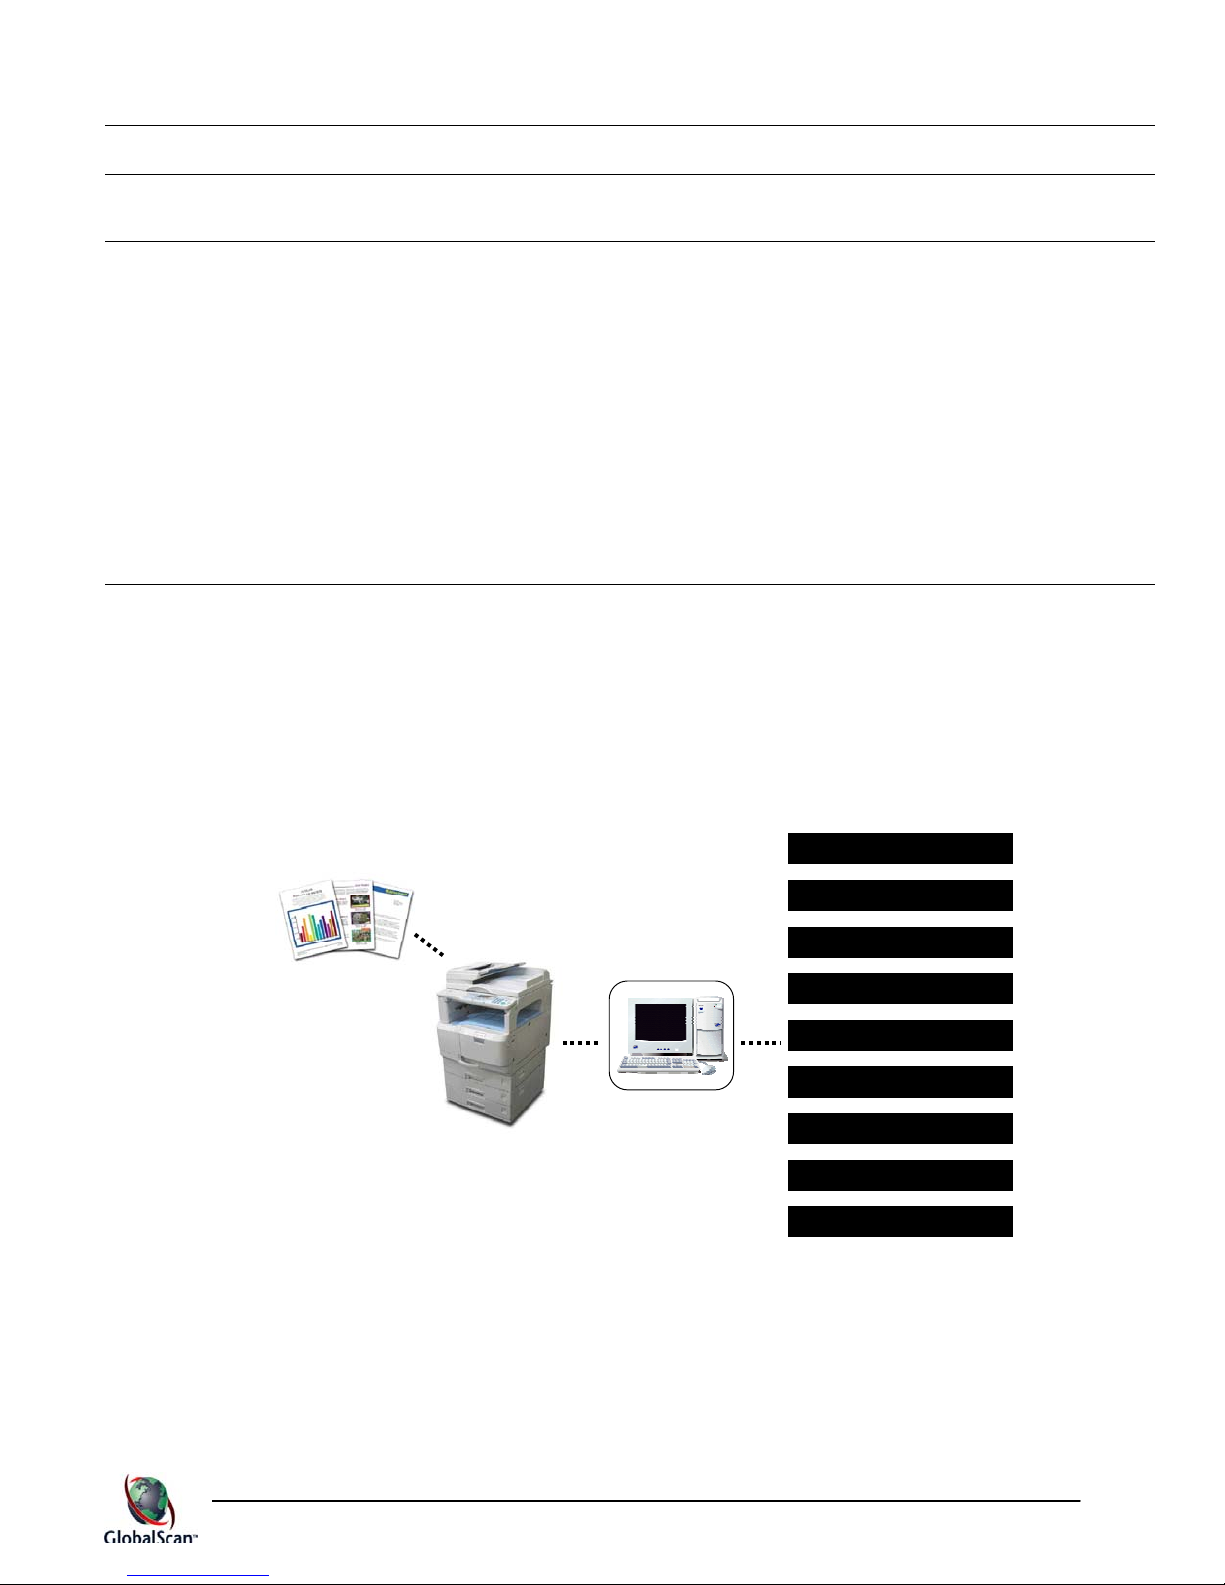
GlobalScan Components
The GlobalScan system consists of two primary components, GlobalScan Server software and
GlobalScan MFD firmware. Once installed, the GlobalScan Server acts as an efficient digital
document routing system that accepts scanned documents from MFDs, creating digital files of
common business documents – contracts, invoices, brochures, photographs, reports, etc.
Working together, the GlobalScan Server and the MFD enable timely delivery of these files to
destinations around the corner or around the globe.
Scan-to-Email
Scan-to-Folder
GlobalScan Workflow
Scan-to-DMS
Scan-to-Fax
Image Preview
GlobalScan Server
ActivePDF
OCR
Notification
1
Requires installation of GS v3.1 Workflow Suite Standard Edition and Connector software (bundled with GS v3.1).
2
Available GlobalScan SDK Toolkit enables customized scan functionality.
3
Requires optional RightFax Plug-in.
1
2
3
6
GlobalScanTM v3.1
Administrator’s Guide
About This Guide
This guide is divided into five primary sections:
1. Multifunctional Device Configuration – This section contains instructions for setting MFD
parameters, for example, GlobalScan Server IP address, DNS IP, protocol (HTTP/HTTPS) and
proxy server settings.
2. About Setting Levels – This section provides an overview of how GlobalScan’s system,
profile, and project levels interact.
3. GlobalScan WebAdmin Module Configuration – This section contains instructions on
configuration and management of connected MFDs through GlobalScan’s WebAdmin Module.
4. GlobalScan Management – This section contains instructions on the management and
monitoring of connected MFDs, project icons, jobs, logs, and the optional Failover service.
5. Appendix – This section contains important reference material.
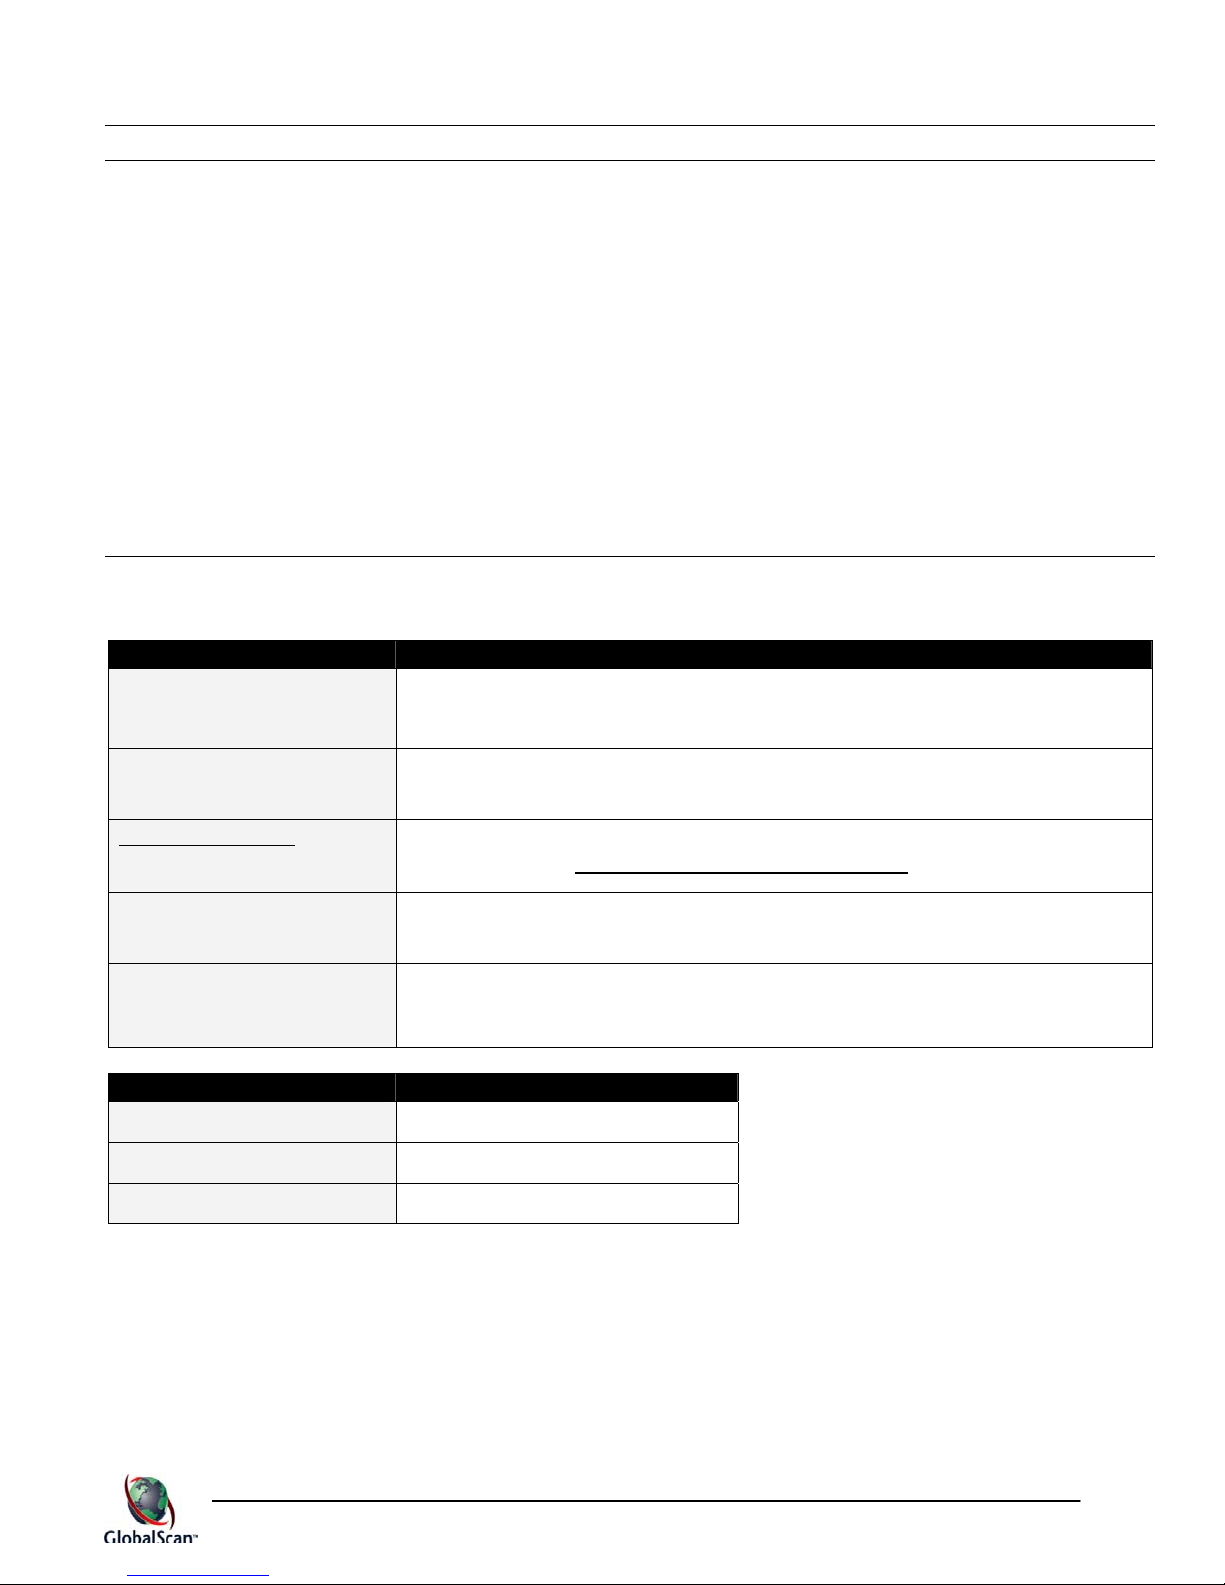
How to Read This Guide
The following conventions are used in this guide to explain procedures, provide additional
information, and emphasize important considerations.
Convention Description
Important: Indicates information that must be read in detail.
Example: Important: This procedure will not delete the project.
Note: Indicates supplementary information.
Example: Note: This is a standard feature of GlobalScan.
Italic underscore
Bold face (blue/red)
Indicates where you can find additional information in this guide.
Example: See Appendix K: Glossary of Terms.
Indicates a specific step or action to be taken.
Example: 1. Enter the URL: http://IP address/gsadmin.
[Button Name]
Indicates a key or button on the control panel, computer screen or
MFD touch screen.
Example: Press the [Scanner] key.
Term Abbreviation
Multifunctional Device MFD or Device
System Administrator Administrator
GlobalScan Service Service or plug-in
7

GlobalScanTM v3.1
Administrator’s Guide
GlobalScan Documentation
The following documentation is available on the GlobalScan v3.1 Installation CD:
GlobalScan v3.1 Server Software Installation Guide
This guide covers important pre-installation requirements and server preparation procedures that
must be performed prior to (and after) installation of the GlobalScan software.
GlobalScan v3.1 Administrator’s Guide (this guide)
This guide explains how to utilize GlobalScan’s WebAdmin module to configure and manage
GlobalScan Server settings and operations, for example, creation of profiles and projects, and
selection of required Services. Configuration of the connected MFD(s) is covered as well.
GlobalScan v3.1 User’s Guide
This guide explains how to perform walk-up scan operations from the MFD control panel, for
example, Scan-to-Email, Scan-to-Folder and/or Scan-to-Fax.
GlobalScan v3.1 User’s Quick Reference Guide
This reference contains a summary of the User’s Guide that steps the user through the basic
scan-to functions.
GlobalScan v3.1 Workflow Suite (Standard Edition)
- Quick Start Guide – This reference is a basic overview of procedures required to link
GlobalScan v3.1 WebAdmin Module settings (Profile/Project/Service) with the GlobalScan
v3.1 Workflow Suite application.
- Framework – This guide covers procedures required to license the GlobalScan v3.1
Workflow Suite (Standard Edition) software, configuring workflows using Process Designer,
starting the service using Service Manager, and monitoring the status of running workflows
using Status Monitor.
- Reference Guide – This guide covers procedures required to configure and use Capture,
Process and Route components of GlobalScan v3.1 Workflow Suite. RRT configuration,
troubleshooting tips and restrictions and limitations are also covered.
RightFax User’s Quick Reference Guide
This reference contains a summary of the RightFax procedures outlined in the User’s Guide.
Scan-to-Fax capabilities require the optional RightFax Plug-in. For more information, see
Appendix F: Optional RightFax Plug-in.
GlobalScan v3.1 Server Release Notes
This file contains information on what is new, version history, known issues and limitations,
system requirements, etc.
Note: Viewing of PDF files requires a current version of Adobe® Acrobat® Reader.
8

Feature Highlights
Supports up to 250 GlobalScan-enabled MFDs per
GlobalScan Server; runs as Windows Service
Intuitive operation through the MFD’s touch-screen
display; features tab-style navigation
Newly-developed graphic project screen (offered on
select MFD models)
New Image Preview feature allows users to view and
modify scanned images prior to processing
Create individual projects; user presses project button
on MFD to quickly access functions; supports One-
touch Scan
Offers Administrator a highly-configurable user
interface
Supports a fully-pluggable design for nearly all
GlobalScan features (Authentication, Email, Scan-toFolder, Notification, etc.)
Add/remove services on a project level, enabling
customization based on user needs
User Authentication
- NT, Novell and LDAP/LDAPS Authentication
- Login synchronization enables a single set of
credentials to provide access to shared services
- Each project can be represented by a different
Authentication method
- Uses HTTPS (or HTTP) protocol for secure (or non-
secure) communication between MFD and
GlobalScan Server
Scan-to-Email
- Send documents as email using your existing
SMTP/SMTP-AUTH, MS Exchange or Lotus Notes
server
- Browse and select email addresses in Global
Address Book (via LDAP)
- Search Address Book by keyword and wild card
- No size limitation on Global Address Book
- Send-to-M e function automatically adds the logon
user’s email address to Recipient List
- Customiz e email by enabling/disabling:
• Ad hoc (manual) email address entry
• Cc, Bcc, Reply To
• Default email message and subject text; sent with
each outgoing message
• Default email domain for easy address entry
Scan-to-Folder
- Scan directly to one or multiple local or network
folders/ subfolders
- Perform a folder search b ase d on search string, with
all results displayed on the MFD touch screen
- Scan-to-Home
GlobalScan Workflow Suite (Standard Edition) - This
bundled solution enables customized document
capture, processing and distribution
1
When MFD Authentication is set to NT or LDAP with Active Directory.
1
, i.e., logon user’s Home directory
Scan-to-Fax
- Optional Captaris
to-use, reliable fax and email delivery solution
Scan-to-EDMS (Enterprise Document Mngmt System)
- User interfac e components are available to Application
Developers through the GlobalScan SDK Toolkit,
enabling customized scan functionality that addresses
specific workflow requirements
Mixed Broadcast allows entry of email addresses, folder
destinations and fax numbers for simultaneous delivery
Flexible Scan Settings
- Mixed-siz e scanning; letter, legal and ledger-size
originals combined in a single scan
- Select scan settings (resolution, file format, simplex/
duplex scan, batch scan, orientation, color, etc.)
- Set scan settings as read-only, for instance, to control
color scanning
- Support for batch scanning, i.e., scan a lengthy
document in batches and transmit as one file
- Scan doc uments from either the automatic document
feeder (ADF) or platen glass
- Supports multi-page scanning from platen glass;
manual paper size selection is available
- Scanned document can be converted to searchable
Adobe® PDF, password-protected PDF, PDF Text,
ImageText, RTF (Microsoft® Word), XLS (Microsoft®
Excel) via standard OCR service
- Supports password-protected PDF conversion
- Supports high-compression PDF format using JBIG2
(B&W) and JPEG 2000 (color)
- Save color documents as PDF, JPEG or B&W Single-
/Multi-Page TIFF format
- Save black & white d ocume nts as PDF Image version
1.4 (default) or Single-/Multi-Page TIFF
Backup and Restore feature can be command-line
driven for automated scheduled backups using any thirdparty scheduler, including Microsoft’s “AT” scheduler and
Microsoft
GlobalScan Failover provides automatic MFD Failover to
secondary GlobalScan Server without restart; automatic
fallback when primary server is restored
Extensive log and error tracking
- Captur es originating MFD serial number, IP address,
user information, destination, scan parameters; export
log in XML format
- Error reporting integrates with NT Event Log for easy
monitoring by the Administrator
WebAdmin Module displays on-screen Tooltips (help)
that provides assistance with configuration and
management tasks performed by the Administrator
New Notification service alerts the logon user (or default
user) of job status
®
SQL Server
GlobalScanTM v3.1
Administrator’s Guide
®
RightFax Plug-in provides an easy-
9

GlobalScanTM v3.1
Administrator’s Guide
System Requirements and Specifications
The following GlobalScan Server and MFD requirements must be met prior to installation of the
GlobalScan system:
GlobalScan Server:
• Microsoft® Windows® Server 2003 (SP1, SP2, R2), Standard Edition, with IIS 6 installed, and
all necessary security updates and patches installed
• GlobalScan v3.1 was tested and does support purchased VMware ESX software. Other virtual
software products, such as Microsoft® Virtual Server 2005 and free VMware GSX, have not
been tested, thus are not currently supported by GlobalScan v3.1.
• Microsoft® Internet Explorer 6.0 (SP1/SP2) and 7.0 Web browser
• Intel Pentium class processor (CPU), 1GHz or faster
• 1GB RAM or more (Important: If OCR is running on the same server as GlobalScan, it is
recommended that 2GB of RAM be installed)
• 40GB hard drive or larger
• 10/100 Mbps network card
• TCP/IP network access
• Access to Global Address Book via LDAP
• Email capability through one or more of the following mail systems:
Lotus Notes 6.5, 7.0
Microsoft® Exchange 2000, 2003
Most SMTP Servers
Compatible Multifunctional Devices:
• See Appendix A for a list of GlobalScan-compatible MFDs
• Compatible MFDs must be equipped with the following:
Network Interface Board (NIB) option
Local hard disk drive
TCP/IP network access
• One GlobalScan Server can support up to 250 enabled MFDs
GlobalScan requires a dedicated server PC. Running other applications on the server may
cause serious problems and service performance is not guaranteed.
For complete GlobalScan v3.1 functionality, the MFD must have GlobalScan v3.0 firmware
installed.
Only limited features of GlobalScan v3.1 are supported if the MFD is running v2.x firmware.
10

GlobalScanTM v3.1
Administrator’s Guide
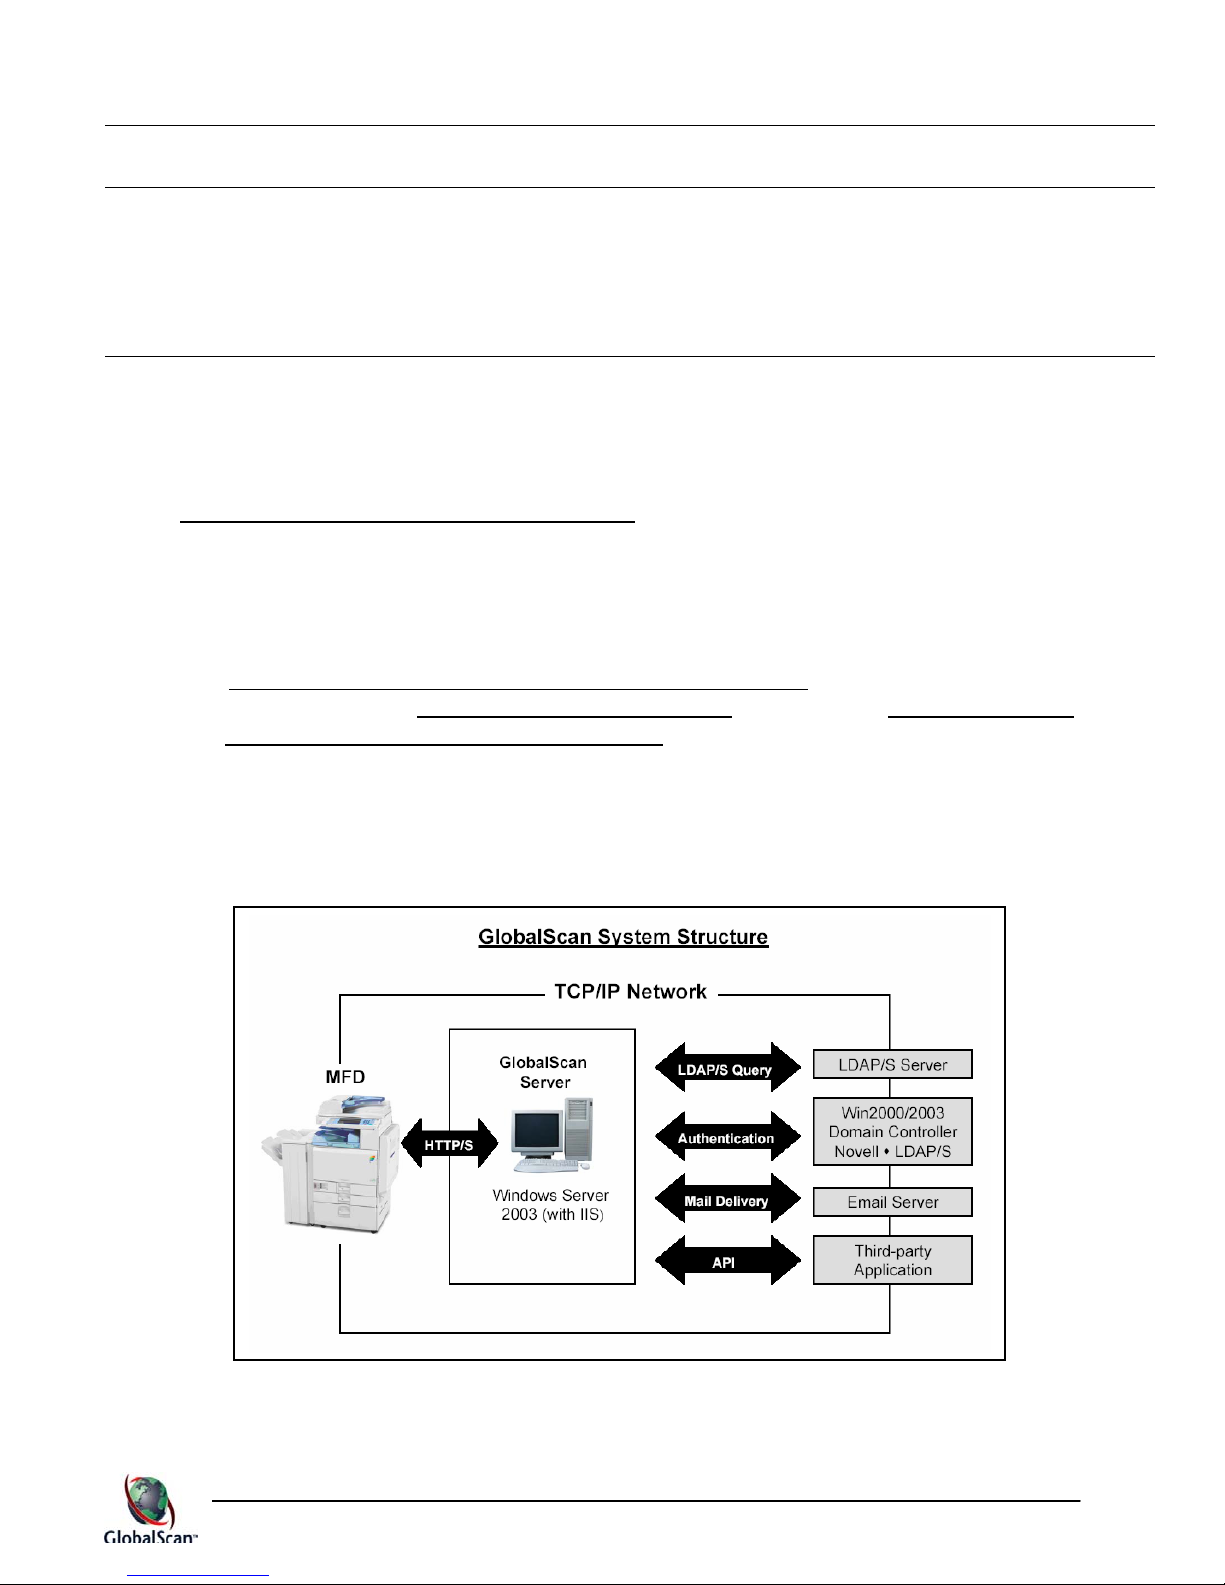
Protocols Supported / Used:
• GlobalScan Server: TCP/IP; HTTP/HTTPS; LDAP/LDAPS; SMTP/SMTP-AUTH; SNMP; SSL
• Multifunctional Device: TCP/IP; HTTP/HTTPS; SNMP; SSL
Authentication Methods:
• LDAP/LDAPS; Win 2000/2003 Active Directory; Novell
File Format Support:
• Standard: Single-Page TIFF, Multi-Page TIFF; PDF Image; JPEG (color MFD)
®
• OCR Plug-in: XLS (Microsoft
Excel); RTF (Microsoft® Word); Adobe PDF, password-
protected PDF, PDF ImageText; PDF Text
Important: For additional installation requirements, see GlobalScan v3.1 Server Software
Installation Guide.
Specifications subject to change without notice.
11
GlobalScanTM v3.1
Administrator’s Guide
Before Getting Started
This section provides an overview of pre-installation procedures and key terms, along with a
workflow scenario and tips on how to navigate the WebAdmin Module. By reading this section you
will gain an understanding of how you can configure GlobalScan to create an efficient document
capture and distribution system.
Setup Procedures
The following setup procedures must be completed by an authorized service technician and/or
Administrator before network-connected MFDs can join in GlobalScan operation.
5 GlobalScan firmware is installed on MFD’s hard drive
GlobalScan firmware can be installed on select Ricoh-manufactured MFDs. For details, see
Appendix A: GlobalScan-compatible MFDs.
5 User has a valid user name and password
The Administrator assigns user names and passwords for Authentication purposes.
5 GlobalScan Server software
See GlobalScan Ver 3.1 Server Software Installation Guide. Be sure to review the
important notes in the Pre-installation Requirements section of the Installation Guide. Also
see System Requirements and Specifications (in this guide).
is installed on a Windows® 2003 Server (SP1)
5 MFD is configured (covered in this guide)
5 GlobalScan WebAdmin Module is configured (covered in this guide)
12

GlobalScan Services
GlobalScan supports the following standard and optional features:
Standard Services Description
GlobalScanTM v3.1
Administrator’s Guide
Authentication (LDAP,
NT, Novell)
Scan-to-Email
Scan-to-Folder
GlobalScan v3.1
Workflow Suite
1, 2
Note: To extend
functionality, Express
and Full Editions are
optionally available
(see below)
The MFD user must log in at the MFD before accessing system
services.
The MFD user can scan a document for transmission to one or more
email addresses. Email also supports Notification, a service whereby
the logon user or default user (if user’s email address is not
available) receives email alerts regarding job status.
The MFD user can direct a scanned document to one or more local
and/or network folders/subfolders.
GlobalScan v3.1 Workflow Suite (Standard Edition) is a bundled
plug-in that, if installed, enables capture, management, storage,
retrieval and distribution of files scanned via virtually any input
source, e.g., the GlobalScan-enabled MFP, network scanner,
Internet Fax, etc. Supports transmission of scanned images to email,
folder, fax, EDMS (Enterprise Document Management Systems),
FTP and SFTP, Microsoft SharePoint, Lotus Domino.doc and any
ODBC-complaint database. Custom workflows, i.e., those that
integrate with any EDMS that supports XML, can be created to
address unique application requirements.
Scan Settings
Image Processing:
OCR
2
ActivePDF
2
Image Management
Controls scan parameters, such as resolution, file format, color, etc.
Unless set as read-only, users can adjust the default settings at the
MFD.
Converts hardcopy documents into searchable Adobe® PDF
(including password-protected PDF), RTF (Microsoft® Word), XLS
(Microsoft® Excel) and Multi-Page TIFF formats.
Converts hardcopy into Adobe® PDF files.
Users can view a thumbnail image of the scanned document at the
MFD. Also provides Multi-Page TIFF support, image alignment, and
adjustment.
13
Optional Services Description
GlobalScan v3.1
Workflow Suite
Express Edition
1
Adds device support and workflow tracking. Access all the capture,
processing and distribution tools using hardware from Canon, HP,
Kyocera Mita, Sharp or Xerox. Monitor every document transaction;
generate detailed reports; automatically capture document metadata.
GlobalScanTM v3.1
Administrator’s Guide
GlobalScan v3.1
Workflow Suite Full
Edition1
Provides more application connectors. Capture files from fax
servers, local or remote folders, FTP sites, desktops and MS Office
applications. Deliver files to email applications, fax servers, folders,
secure FTP sites, and ODBC-compliant databases, or to output
devices. Send files into content management software, including MS
SharePoint, Documentum, Interwoven, IBM CM, FileNet, OpenText
and many others.
Captaris RightFax1
Captaris RightFax is an optional plug-in that enables the MFD user
to fax a document to one or more fax and/or email destinations via
a RightFax Server. Note: For details, see Appendix F: Optional
RightFax Plug-in.
1
See Appendix E: GlobalScan v3.1 Workflow Suite Family.
2
Using this service requires installation of associated software components. See GlobalScan v3.1 Server
Software Installation Guide.
14
GlobalScanTM v3.1
Administrator’s Guide
MFD Display Types
The size and appearance of the GlobalScan user interface is based on the MFD model. For
instance, models that support the WVGA or SVGA touch screens can display project icons, as
shown in Fig. 1a and Fig. 1b.
In all, there are four different types of MFD touch screens:
1. WVGA Color Touch Screen [800(w) x 480(h) pixels] (Fig. 1a, Fig. 1b)
2. WVGA Black & White Touch Screen [800(w) x 480(h) pixels] (not shown)
3. SVGA Touch Screen [800(w) x 600(h) pixels] (not shown)
4. HVGA Black & White Touch Screen [640(w) x 240(h) pixels] (Fig. 1c, Fig. 1d)
Note: To determine which type of display an MFD supports, see Appendix A: GlobalScan-
compatible MFDs.
WVGA Color Touch Screen
Project Screen
Fig. 1a
WVGA Color Touch Screen
Services Screen
Fig. 1b
15
GlobalScanTM v3.1
Administrator’s Guide
HVGA Black & White Touch Screen
Project Screen
Fig. 1c
HVGA Black & White Touch Screen
Services Screen
Fig. 1d
16
GlobalScanTM v3.1
pop
Administrator’s Guide
Key GlobalScan Terms (in alphabetical order)
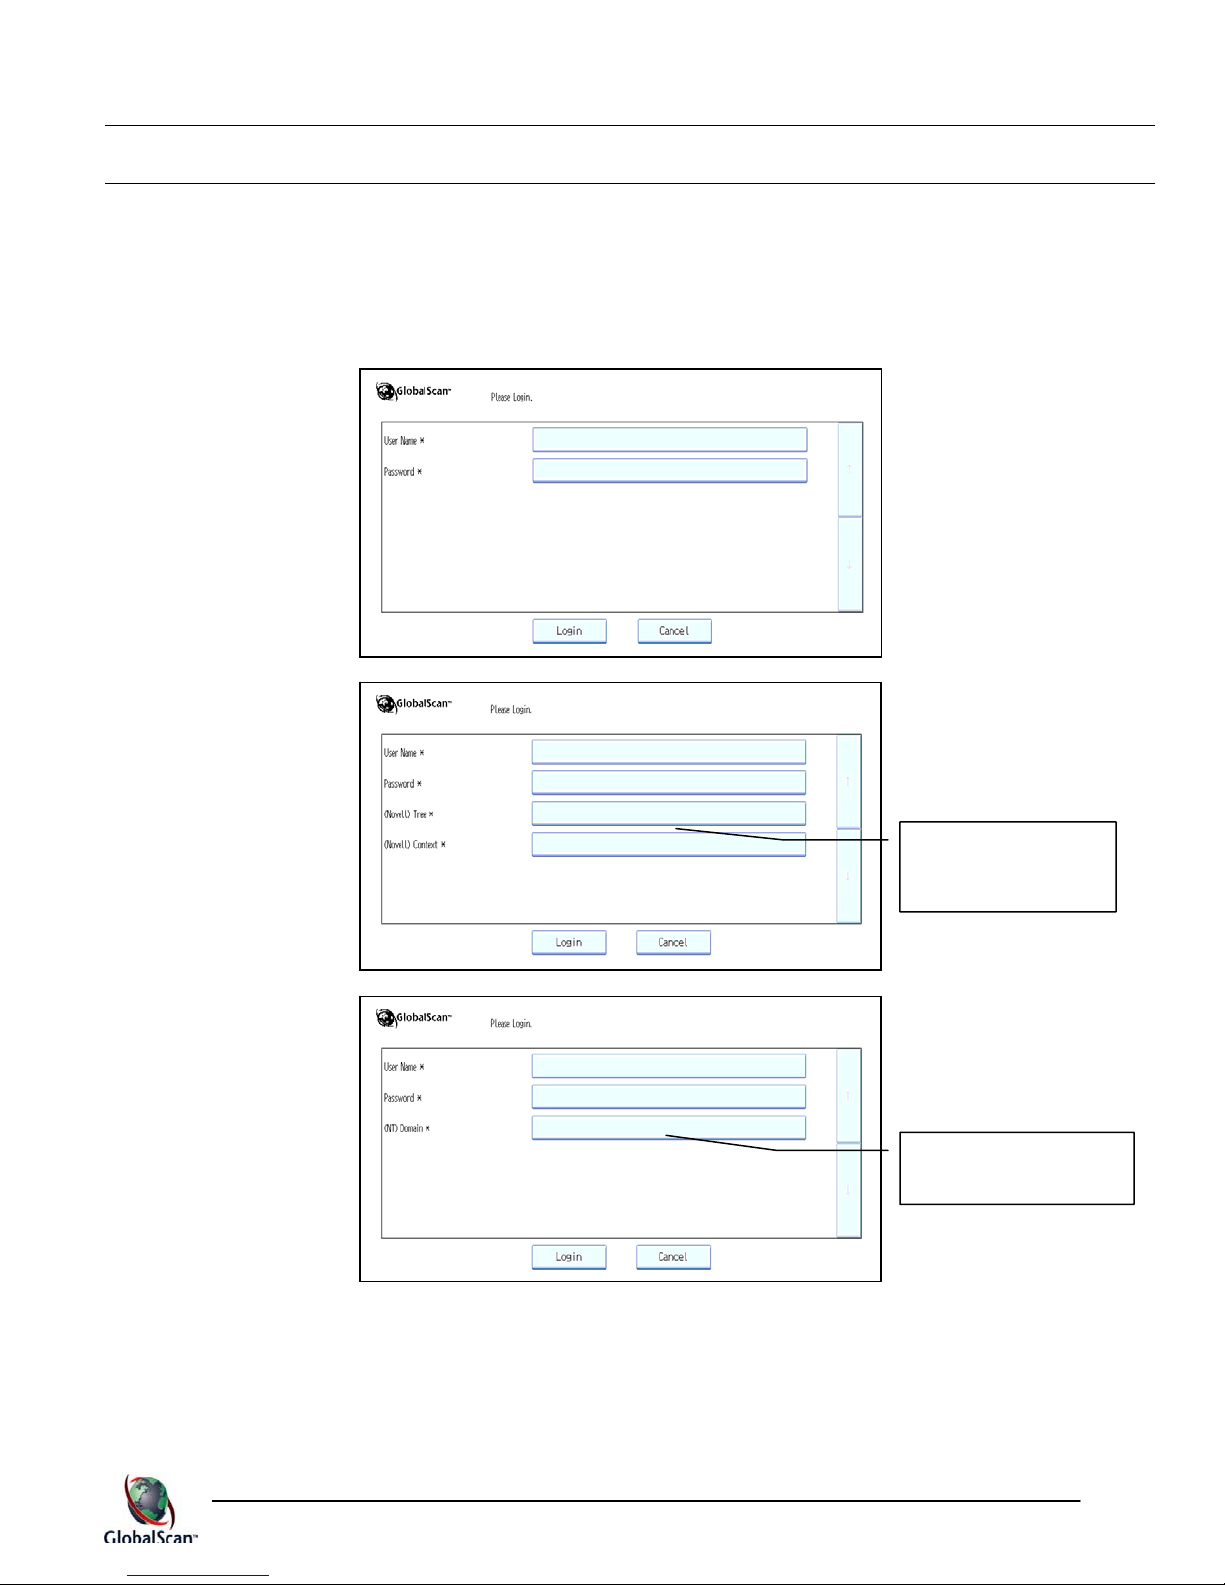
Authentication
Each project can be defined by its own Authentication method. GlobalScan supports LDAP, Novell
and NT Authentication. Under Authentication, when a user presses a project button, log-in is
required. After entry of the required credentials (e.g., user name and password), the user presses
the [Login] button; Authentication is executed.
LDAP Login
Novell Login
Tree and Context
fields will auto-
ulate.
NT Login
Domain field will
auto-populate.
17
GlobalScanTM v3.1
Administrator’s Guide
GlobalScan Terms, cont.
Authentication, cont.
The GlobalScan Server will also simultaneously authenticate, e.g., the same login credentials
used in NT Authentication will enable access to a third-party plug-in service.
Sample Login Screen
for Shared Services
Domain field will
auto-populate.
Profile
Each MFD is associated with a specific profile – parameters that define general GlobalScan
settings, such as MFD Reset Time, Keep-alive Timer, etc. The profile contains one or more
projects.
Project
Projects provide multiple ways of configuring services based on the specific needs of a user
group. For example, the Sales Department may need to email lengthy proposals to prospective
customers, while the Legal Department scans correspondence directly to a network folder, for
archival purposes. Each user simply accesses the appropriate project button on the MFD touch
screen, e.g., Email, Scan-to-Folder, etc. Of course, multiple GlobalScan services can be
combined under one project as well, so workflow design is very flexible.
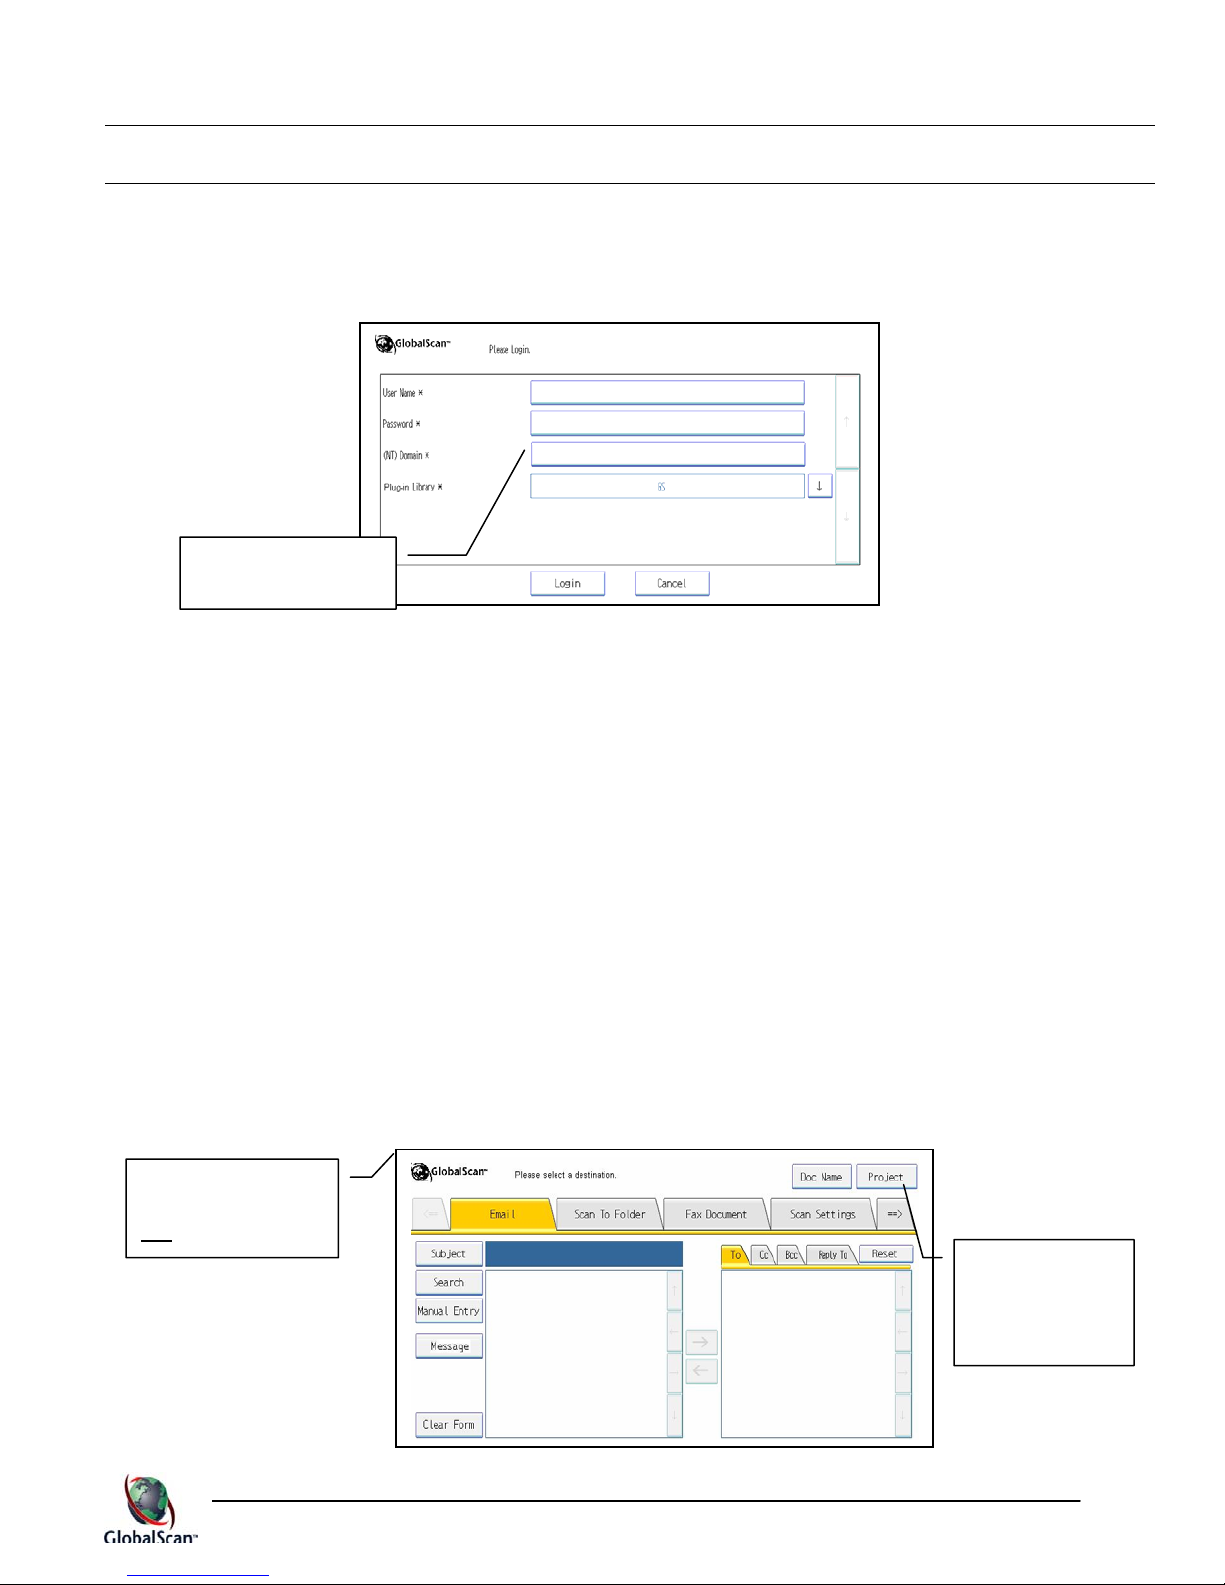
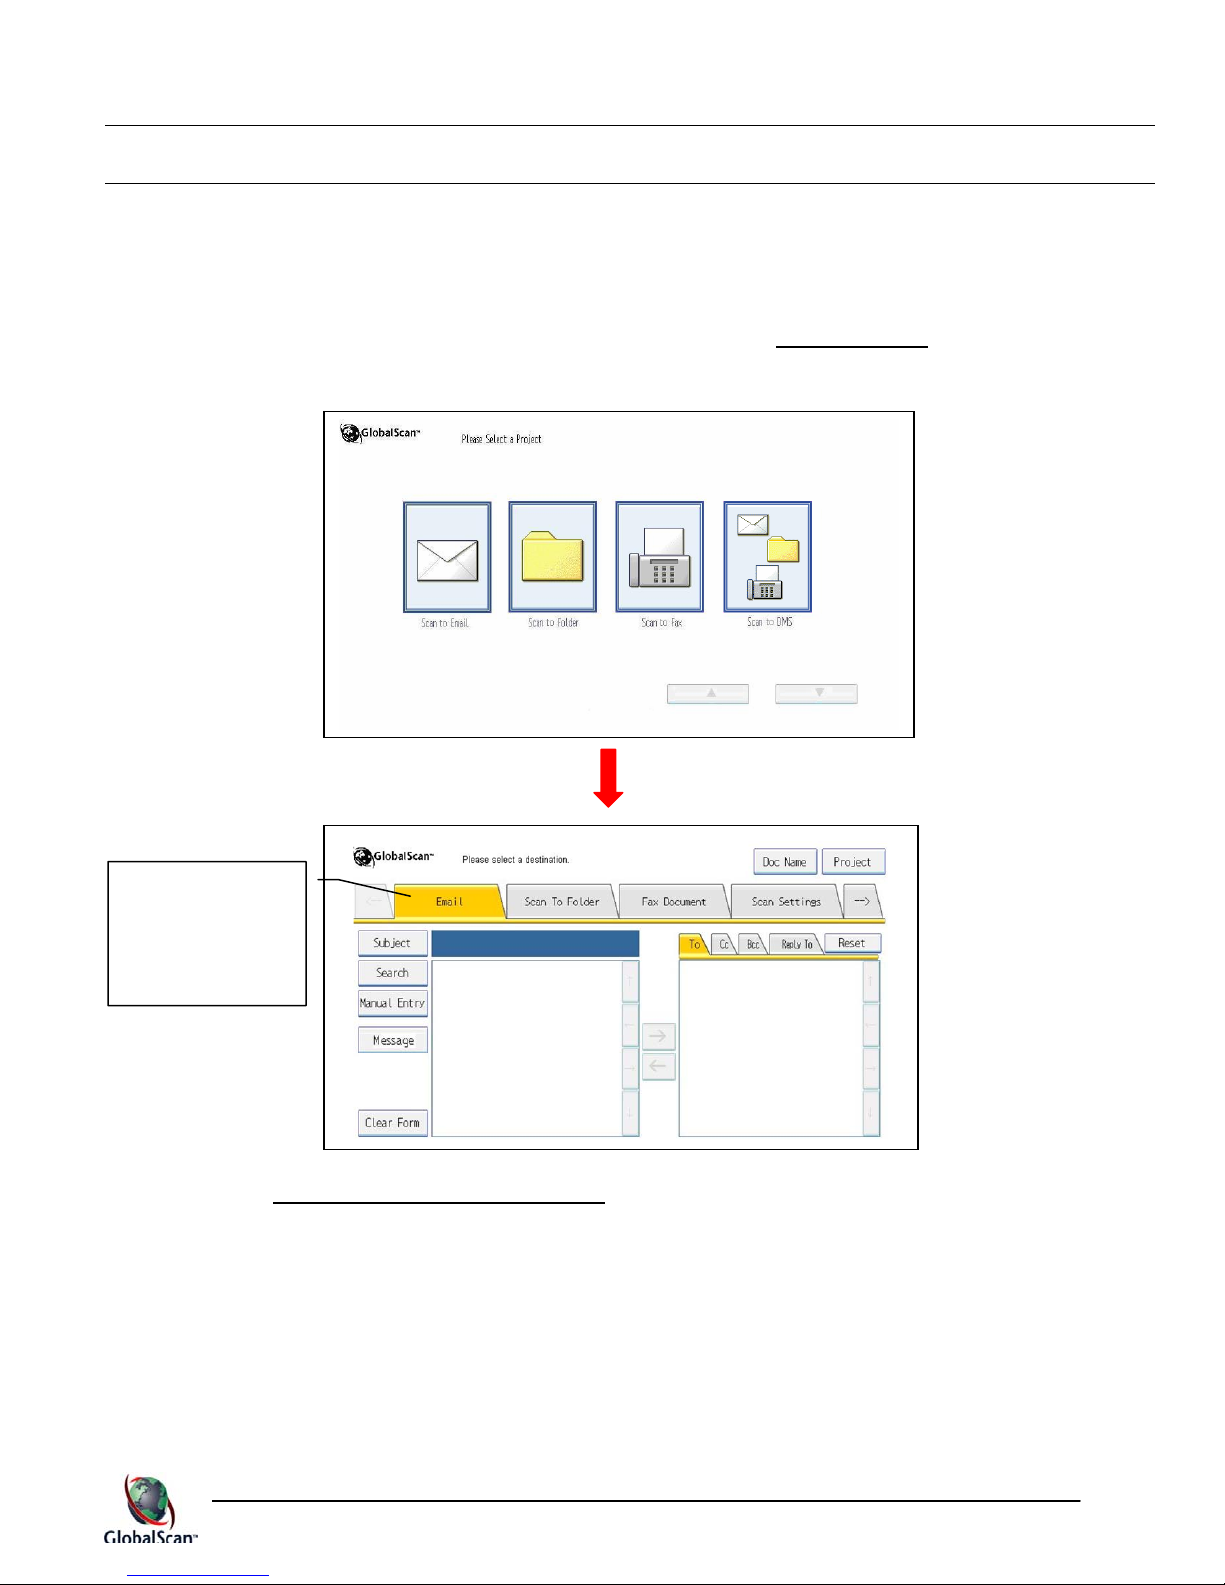
If the MFD’s profile contains only one project, the services associated with that project are
automatically pre-selected on the MFD. This means the Services screen appears, without
requiring the user to press a project button (see Fig. 2). Note that based on GlobalScan settings,
the user may or may not need to enter login credentials (see Fig. 3).
Services Screen:
One project / login
not
required.
Fig. 2
When login is
required, this
button reads
Logout.
18
GlobalScanTM v3.1
Administrator’s Guide
GlobalScan Terms, cont.
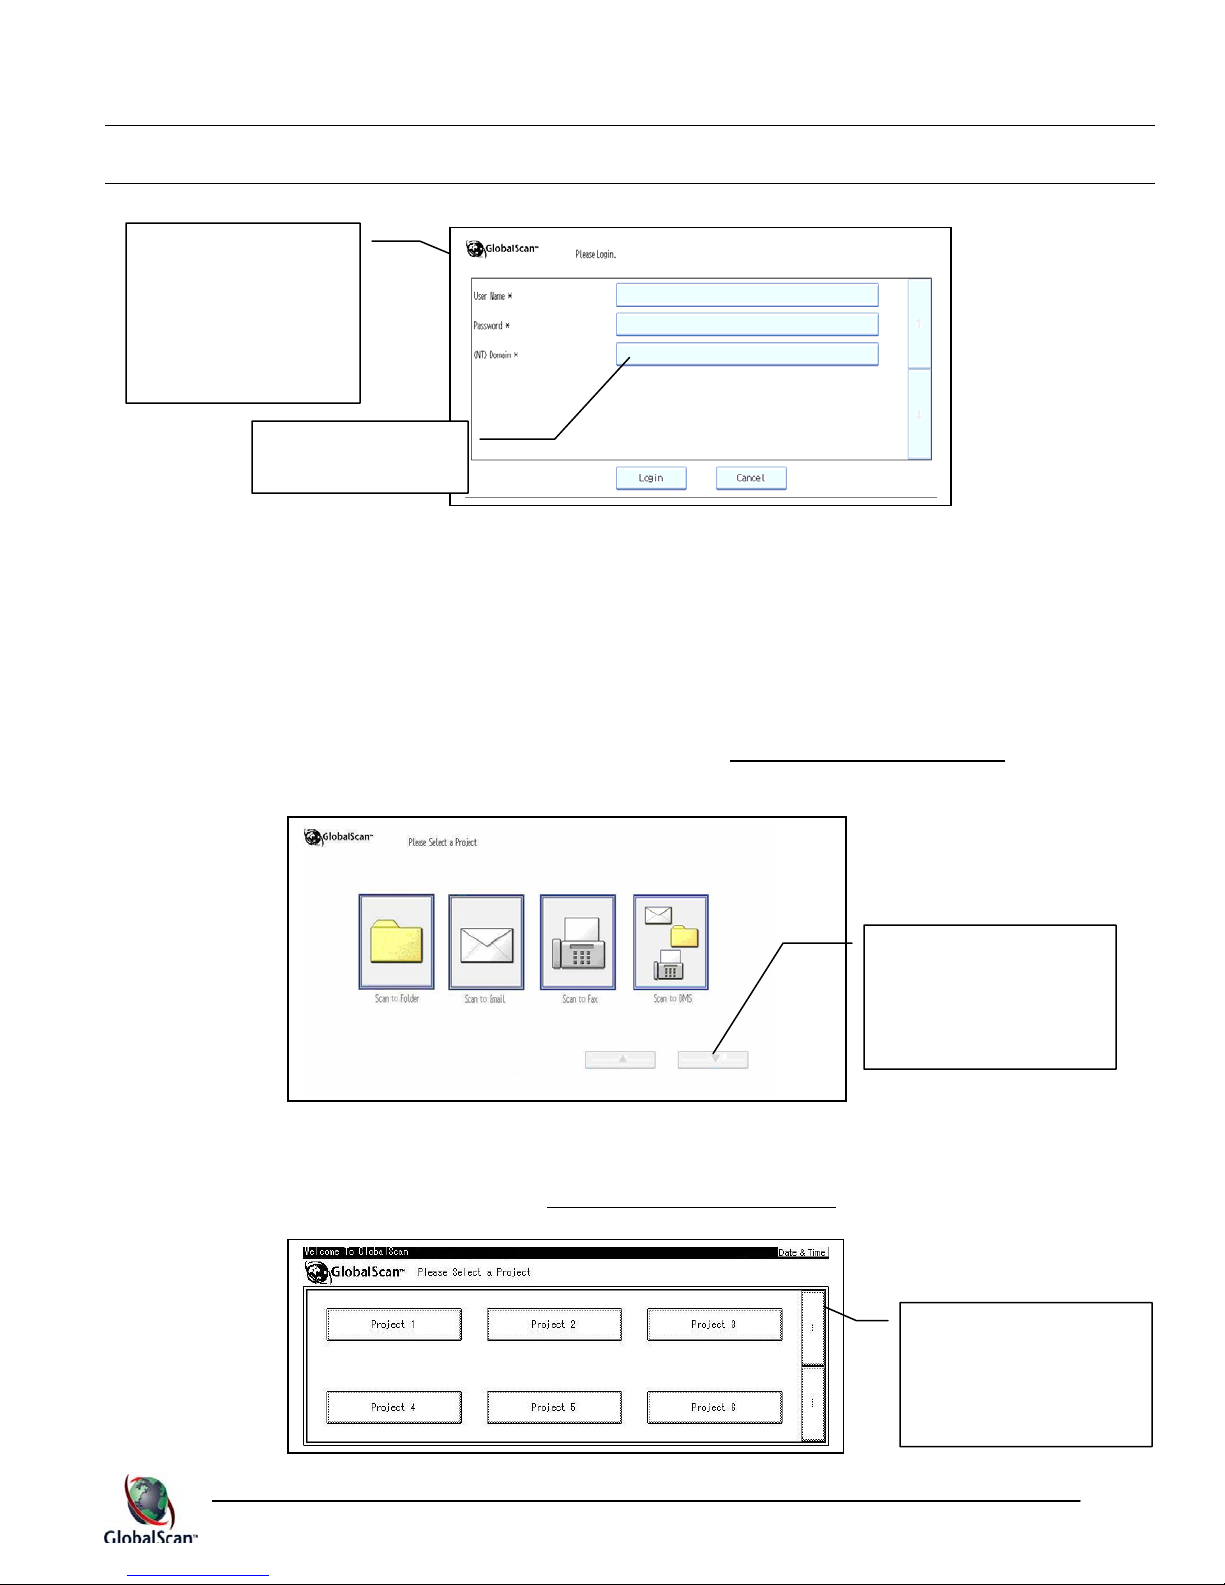
Login Screen: One
project / login
required. After
successful login, the
Services screen
(Fig. 2) opens.
Fig. 3
Domain field will
auto-populate.
When two or more projects are configured in a profile, corresponding buttons will appear on the
MFD touch screen, each addressing specific application requirements. How many project buttons
appear depends on the MFD model.
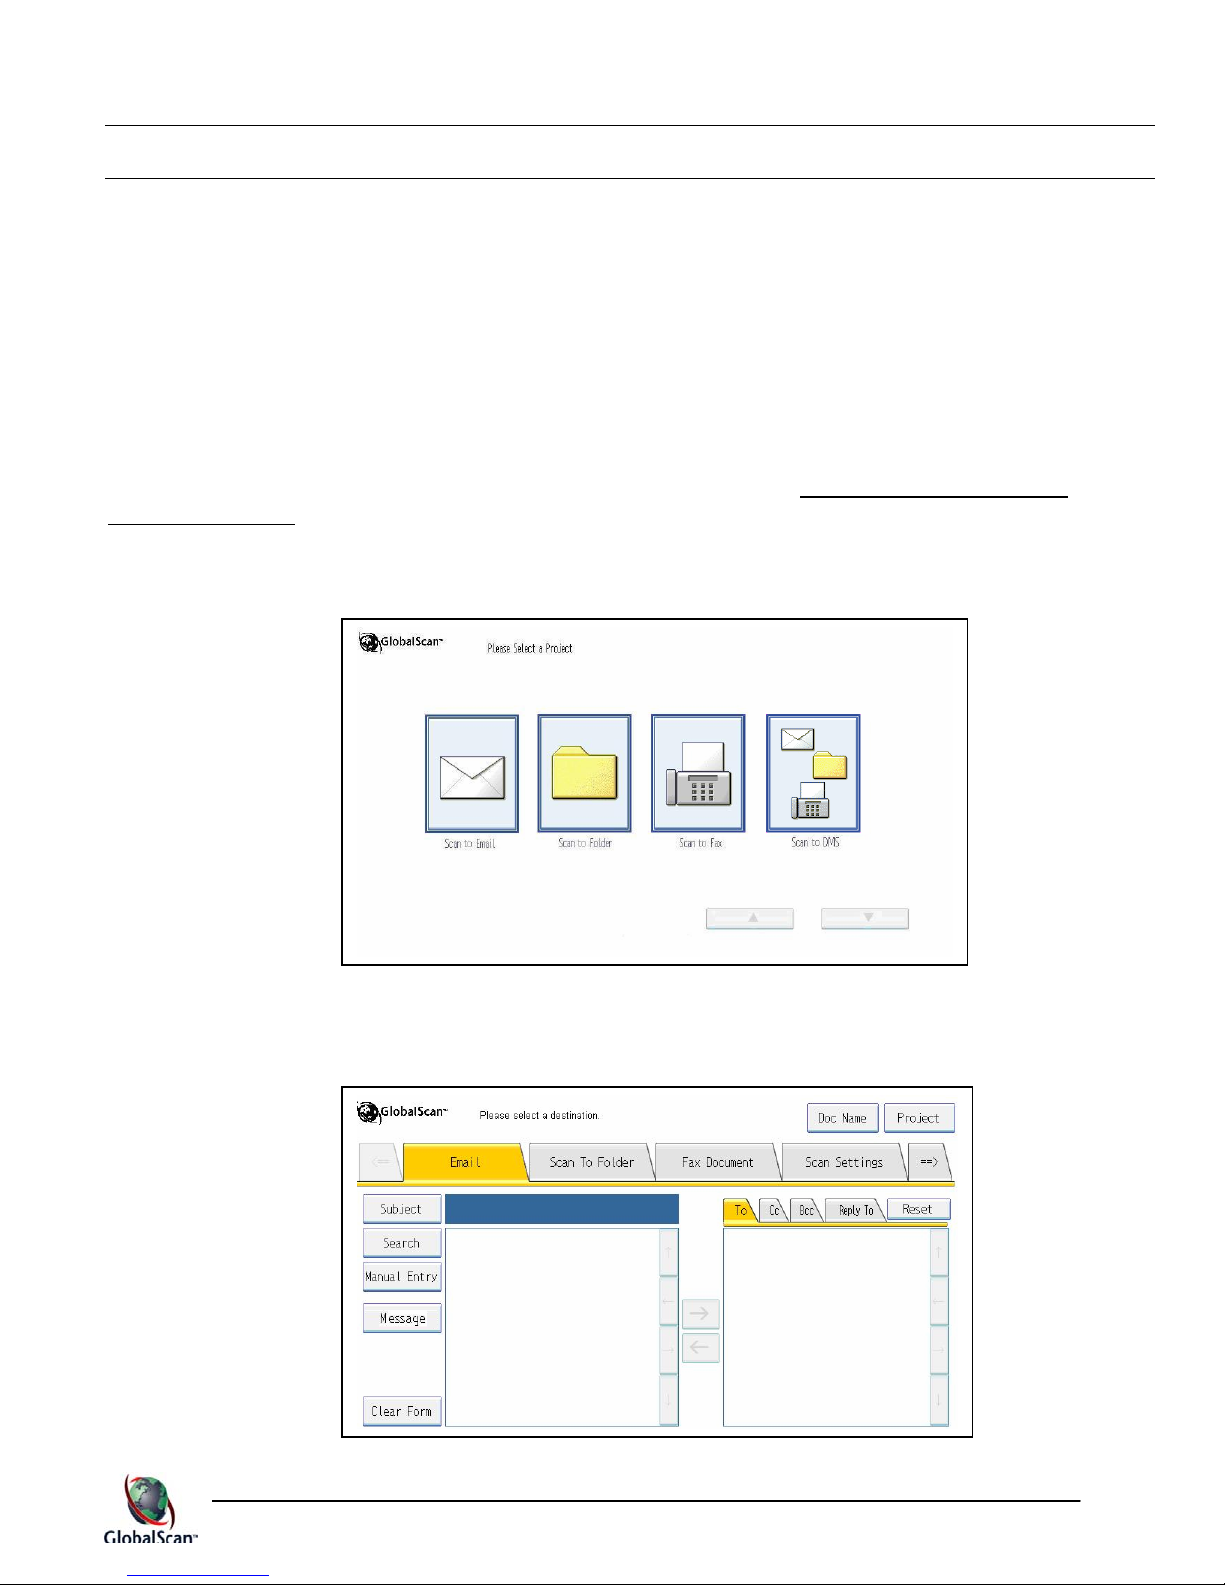
SVGA / WVGA Touch Screens
Project buttons appear with icons (maximum of four [4] per screen) to represent functions,
making it easy for the user to intuitively select the Service, e.g., Email (see Fig. 4). Project
button labels and icons are configurable, as outlined in Step 4: Add/Edit a Project.
Fig. 4
Additional project
buttons, if available,
can be viewed by
pressing the up [S] or
down [T] button.
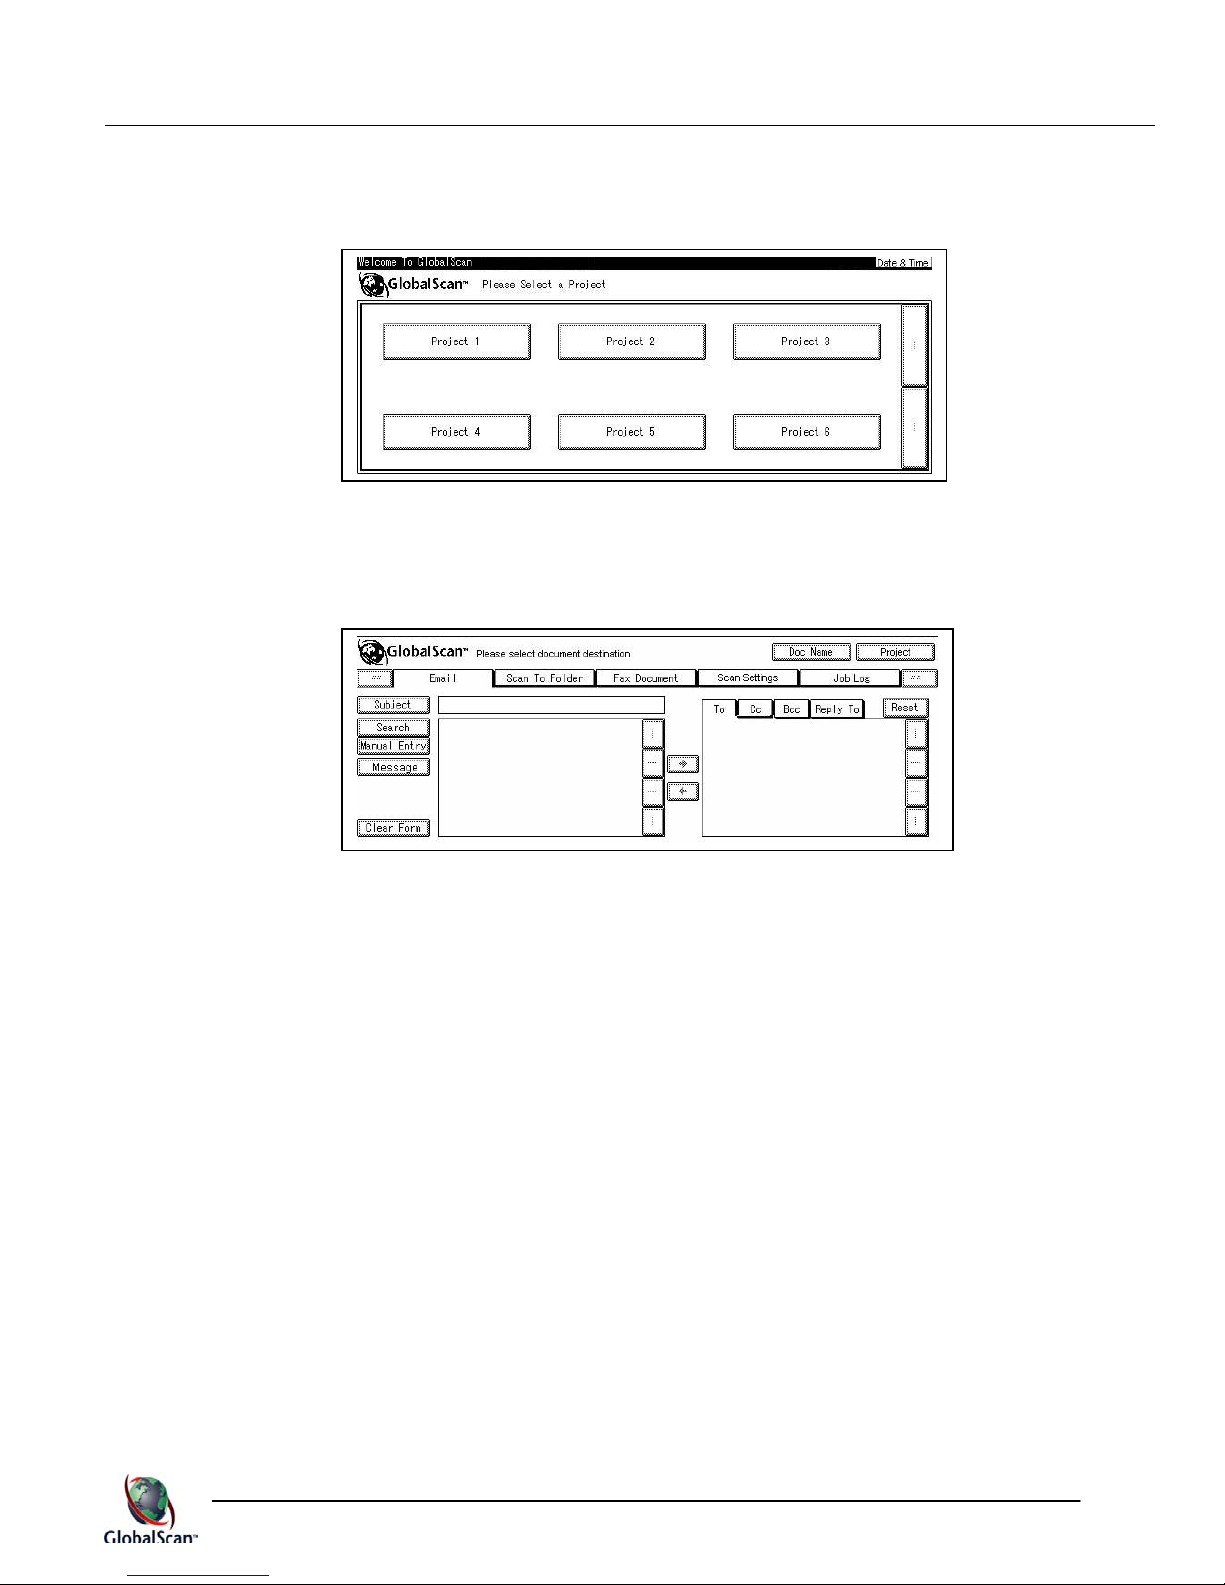
HVGA Touch Screen
Project buttons (maximum of six [6] per screen) appear as shown in Fig. 5. Project button
labels are configurable, as outlined in Step 4: Enter/Edit a Project.
Fig. 5
Additional Project
buttons, if available,
can be viewed by
pressing the scroll
button
.
19

GlobalScanTM v3.1
Administrator’s Guide
GlobalScan Terms, cont.
Services
Following login (if Authentication is required), the user is presented with a list of available services,
presented as tabs, for easy navigation. The term “services” includes standard and optional network
scanning capabilities, for example, Scan-to-Email, Scan-to-Folder and Scan-to-Fax. For details, see
Before Getting Started J GlobalScan Services. The user selects a service by touching the
associated tab on the MFD’s touch screen.
System Parameters
Within the WebAdmin Module’s System Parameters screen (see Fig. 6), you will select/enter all
system-level data – settings that control GlobalScan Server operation, such as Default Profile,
Storage Folder, Log Folder, etc.
Services tabs on the MFD open corresponding
screens. Which tabs appear, and the order in
which they appear, is configurable on the
GlobalScan Server by the Administrator
The language selected during GlobaScan Server software installation
displays here, but can be changed.
Click the extended ToolTips
icons for more information.
To view ToolTips (a brief field
description) move your cursor
over the field.
.
If Authentication is
enabled, this button
reads Logout.
Scroll to display
additional service
tabs. These buttons
are shaded if no
other services are
available.
Fig. 6
20
GlobalScanTM v3.1
Administrator’s Guide
GlobalScan Terms, cont.
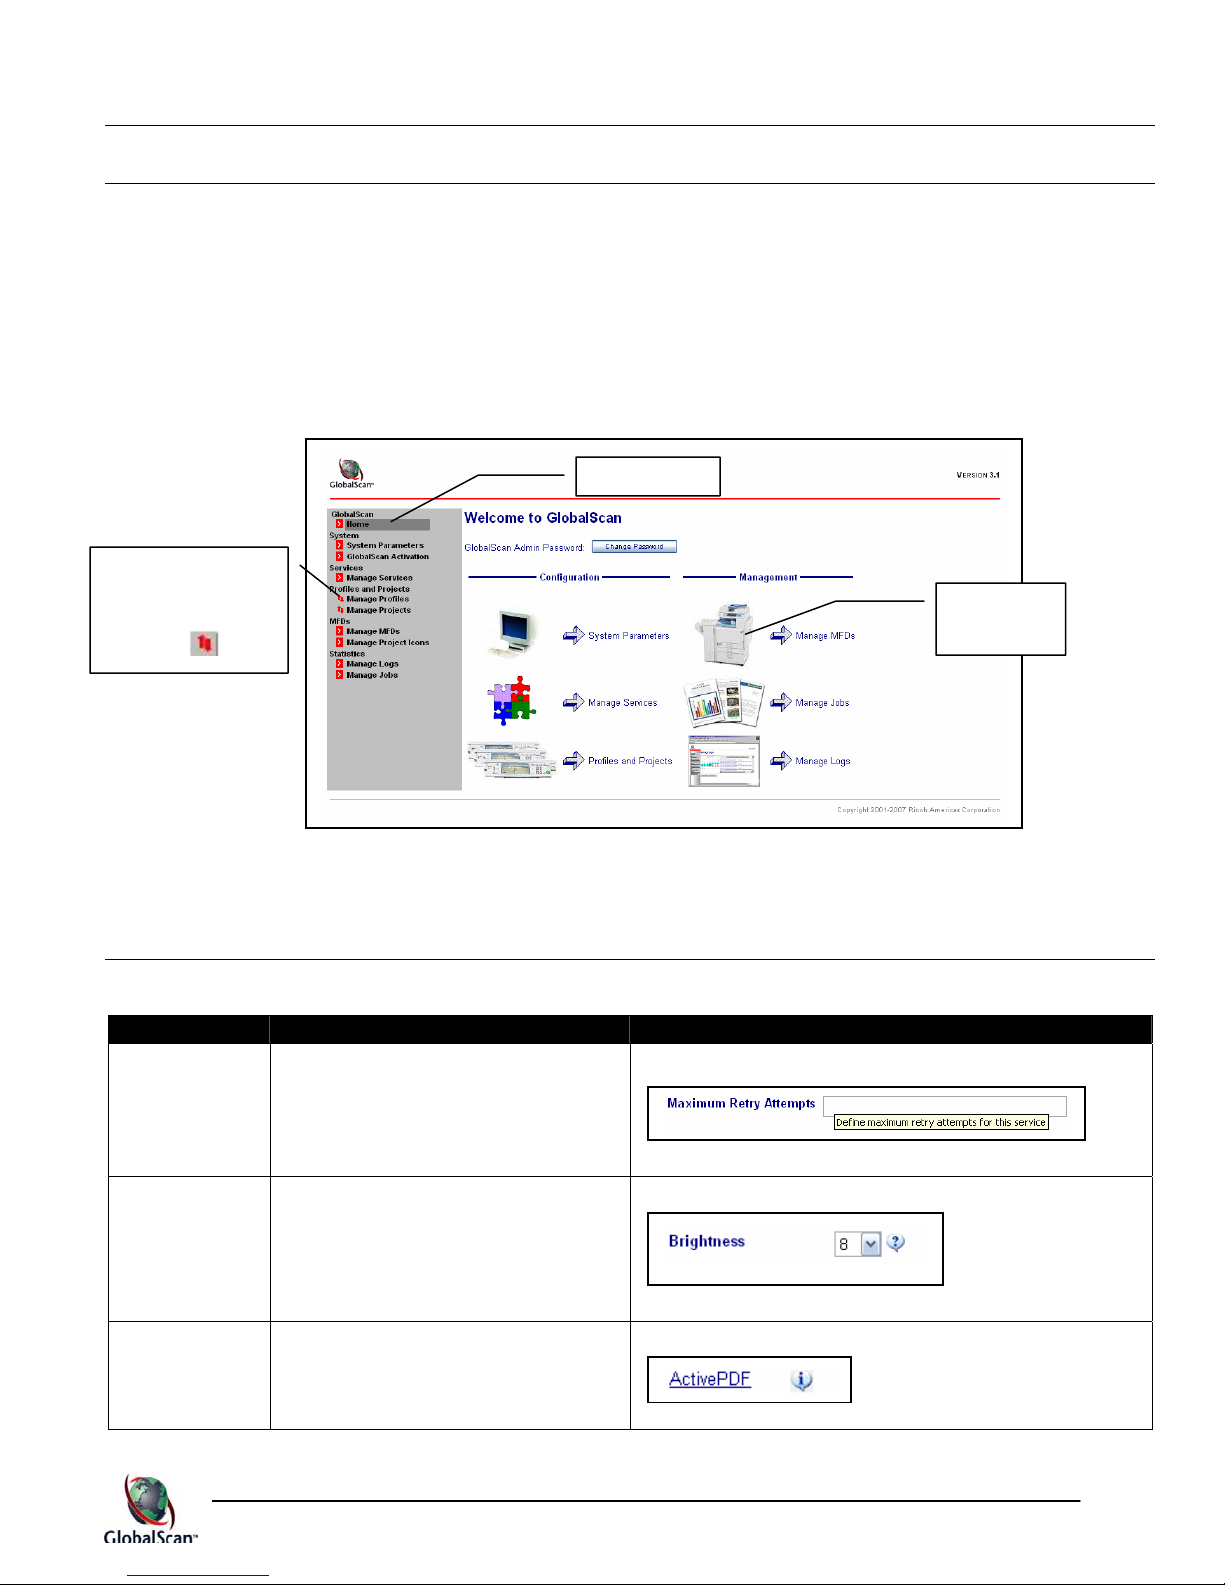
WebAdmin Module
GlobalScan’s WebAdmin Module enables the Administrator to configure and manage the GlobalScan Server. Following GlobalScan Server software installation, you can open the WebAdmin
Module using your Web browser (Microsoft® Internet Explorer 6.0 or 7.0). After launching
GlobalScan, the Home Page appears, as shown below. To access a desired function, simply click
the shortcut icon or the corresponding menu link.
Menu Link
Expand/collapse
a Profile or
Project list by
clicking [
].
Shortcut
Icon
Note: To return to GlobalScan’s Home Page from any screen, click the Home menu link.
On-screen Help
Within the WebAdmin Module, there are three types of on-screen help at your disposal.
Type Description Example
Basic
ToolTips
Move your cursor over a
field/button in order to display a
brief description.
Email Configuration Screen:
Extensive
ToolTips
Information
Click on the [?] adjacent to a field
to open a dialog box containing an
explanation of the function and
any content requirements.
Click on the [ i ] icon to display
additional information on the topic.
Image Management Screen:
Manage Services Screen:
21
GlobalScanTM v3.1
Administrator’s Guide
GlobalScan Terms, cont.
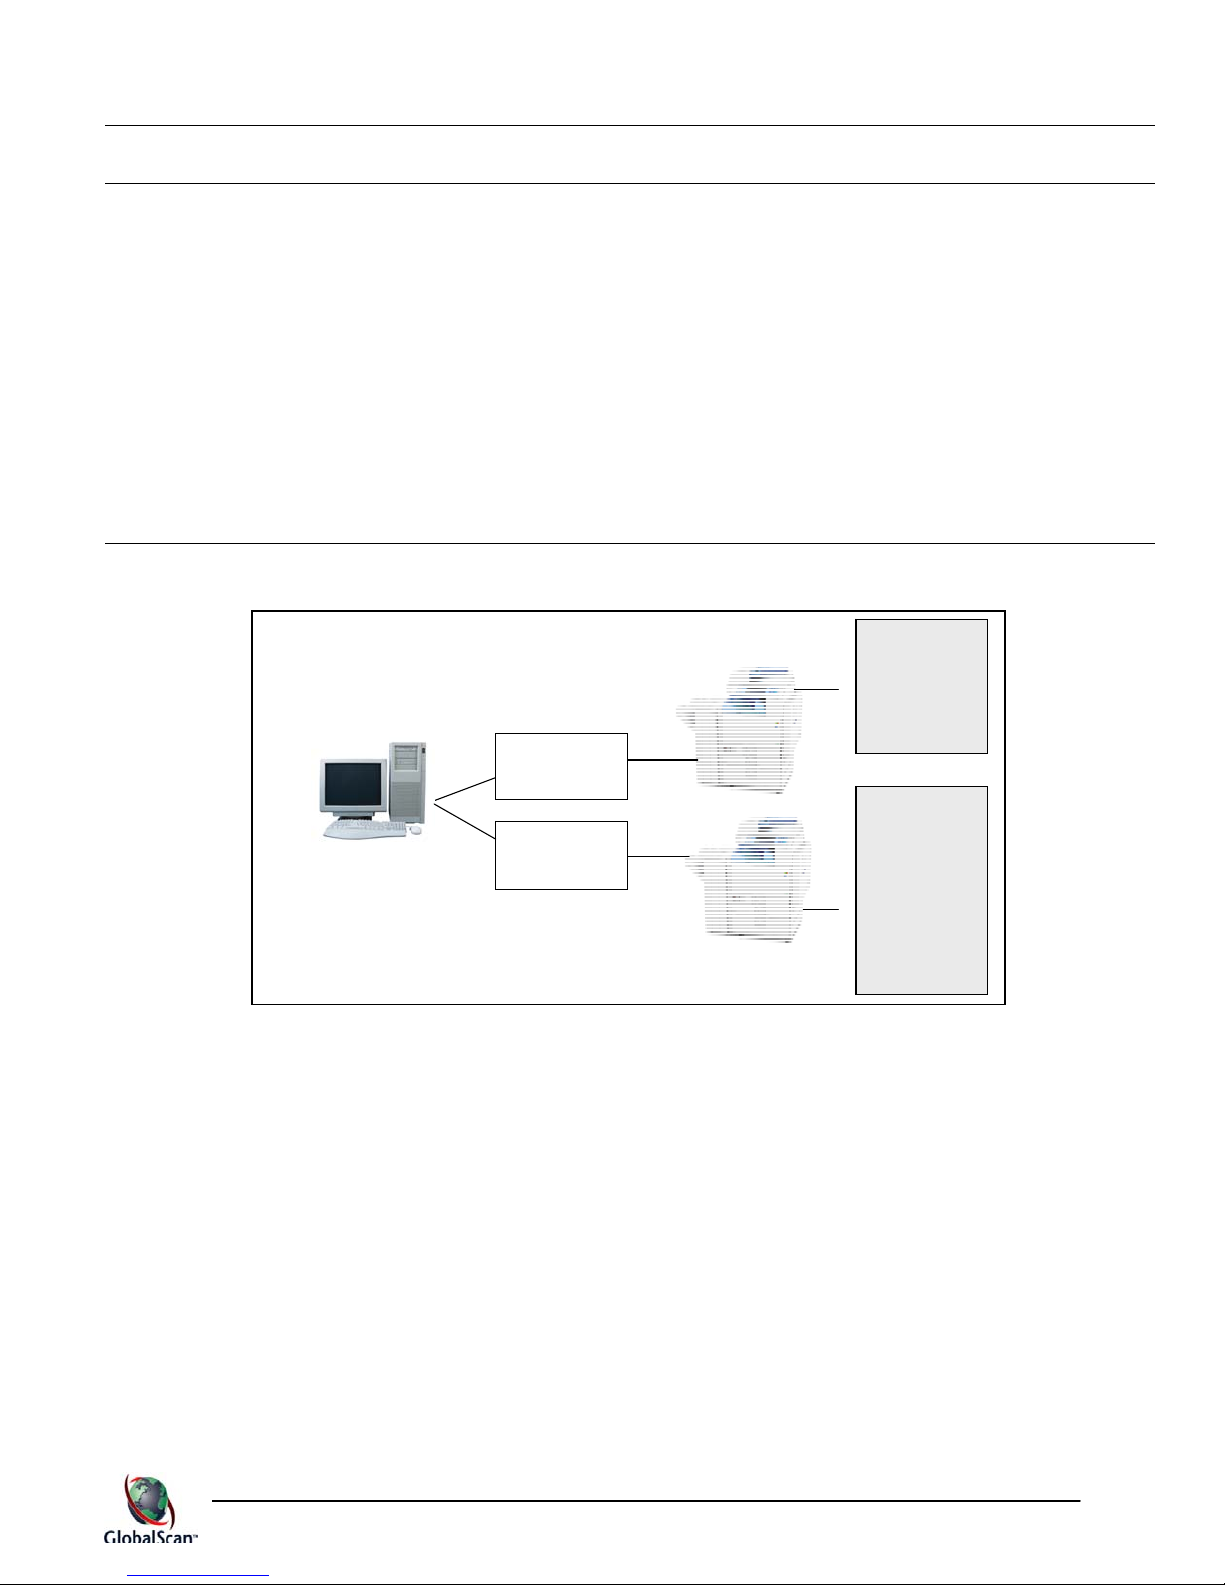
Workflow
When the MFD is powered on, the device calls the GlobalScan Server to request its profile. For
example, in Diagram A, the Sales Department MFD requests Profile 1, with Project A offering the
MFD users Email, Folder and Fax scan services. Users of the MFD in the Legal Department
accesses Profile 2, with Project A offering the same services as Profile 1, and an additional
Project B which supports OCR.
Services that are available to a user depend on the project button selected from the MFD control
panel. For instance, a user in either the Sales or Legal Department, can Scan-to-Email by
selecting Project A.
Diagram A
Sales Dept.
WebAdmin Module
Profile 1
(default)
GlobalScan Server
Profile 2
Legal Dept.
Project A
Services
•Email
•Folder
•Fax*
Project A
Services
•Email
•Folder
•Fax*
Project B
Services
•OCR
*Requires optional RightFax Plug-in.
The Administrator can configure the following aspects of the MFD touch screen through the
GlobalScan WebAdmin Module:
Services that display, e.g., Email, Folder, Fax, etc.
Display sequence of project buttons (see Fig. 7, next page). For instance, if Scan-to-Email is
the primary application, the Email tab can display first (see Fig. 8, next page).
Project button labels. For instance, the label can read “Scan to Email” or “Email” – text that you
feel best represents the service(s) contained within the project.
22
GlobalScanTM v3.1
Administrator’s Guide
GlobalScan Terms, cont.
Workflow, cont.
Again, one or more project buttons can appear on the MFD touch screen. The user simply selects
a button by touching it. After doing so, the services screen opens (see Fig. 8). After a project
button is selected, user login may be required. For details, see Authentication (in this section).
Fig. 7
Services tabs
that display on
the MFD are fully
configurable.
Fig. 8
Note: Also see Appendix K: Glossary of Terms
.
23
GlobalScanTM v3.1
Administrator’s Guide
MMuullttiiffuunnccttiioonnaall DDeevviiccee CCoonnffiigguurraattiioonn
There are two ways to configure GlobalScan settings on the MFD, remotely (via the Web) or
manually (via the MFD control panel).
Remote MFD Configuration (via Web)
GlobalScan v3.1 supports remote configuration for select Ricoh-manufactured MFDs (running v2.x
or v3.0 firmware), enabling the Administrator to easily establish GlobalScan settings from his/her
desktop. All models listed in Appendix A: GlobalScan-compatible MFDs support remote
configuration. Note: Settings can also be entered from the MFD control panel, if desired.
To remotely enter MFD configuration settings, proceed as follows:
1. Be sure that the target MFD is connected to the network and powered on.
2. Open your Web browser.
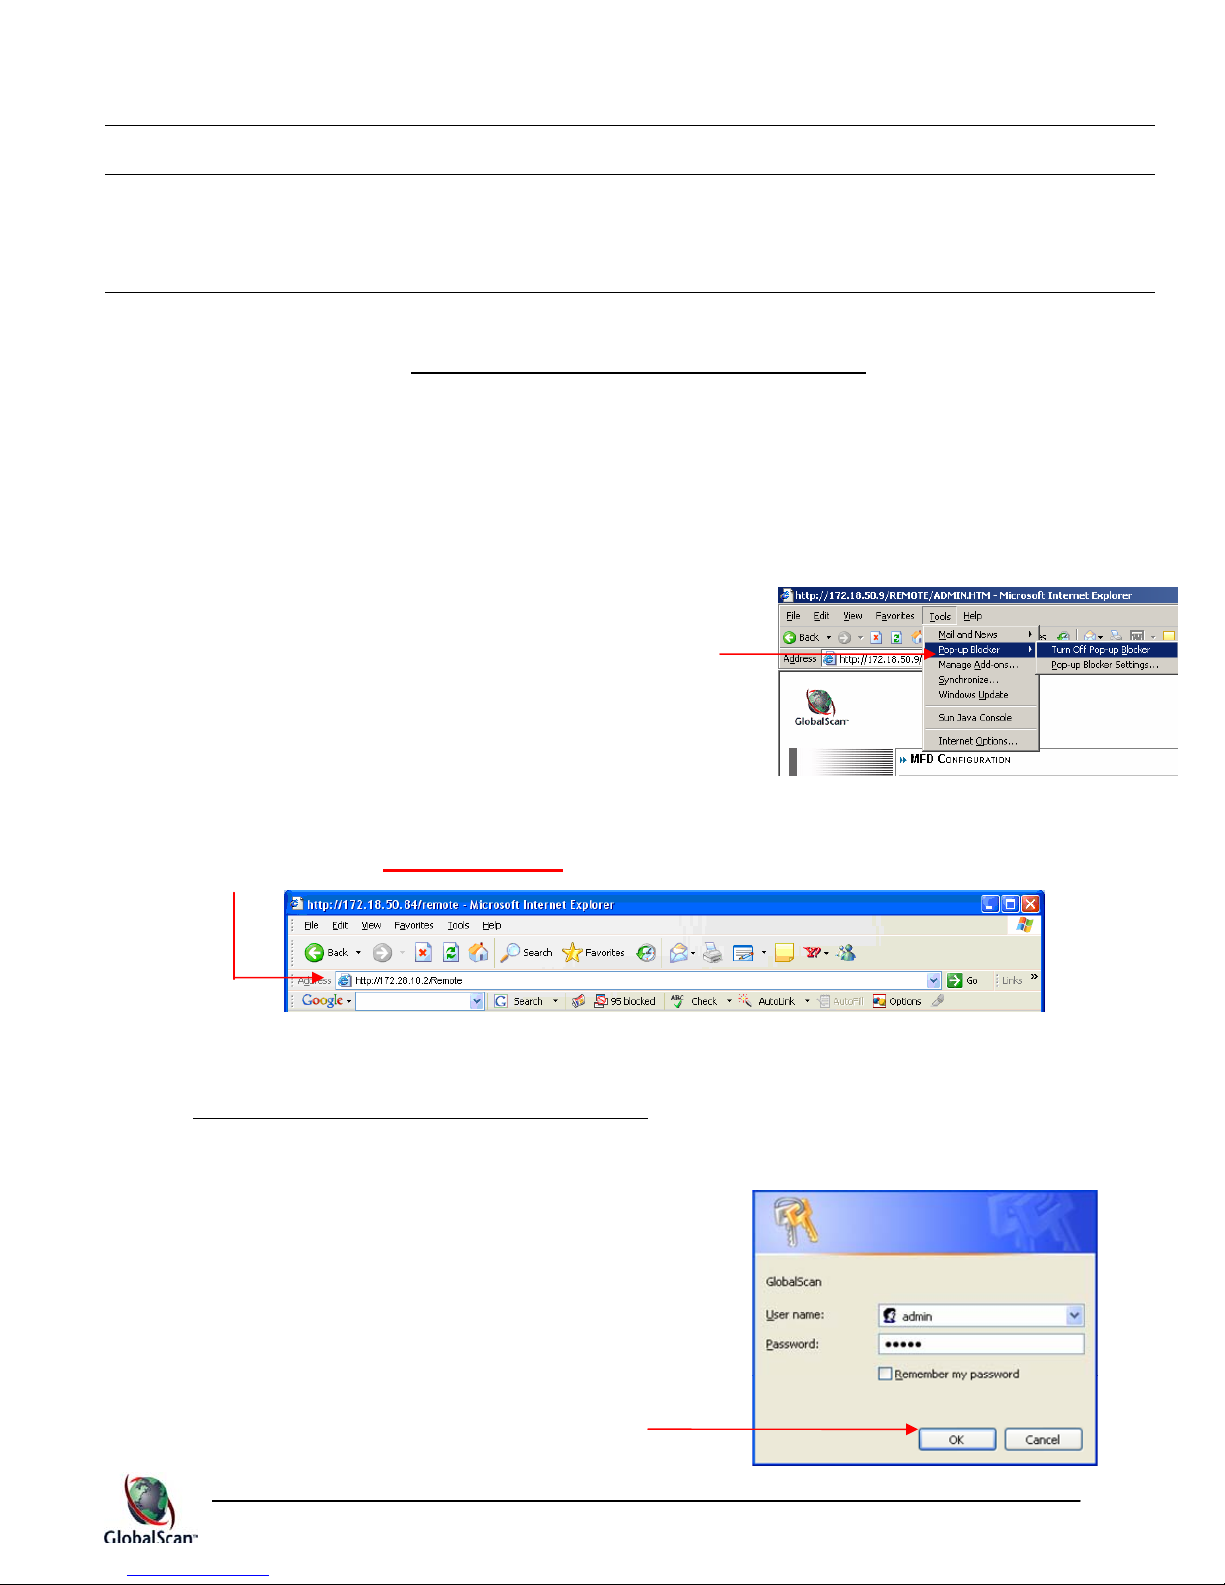
3. Turn off your browser’s Pop-up Blocker. Click Tools >
Pop-up Blocker > Turn off Pop-up Blocker.
Note: If the Pop-up Blocker is left on, you may need to
wait 90 seconds before re-accessing the Web page,
otherwise an error message appears, “Another
configuration session exists. Please wait for a while. Try again.”
4. Enter the URL: http://MFD IP address/remote.
Note: If you enter the IP address of a non-compliant MFD, an “HTTP 404 – File not found”
error will occur. Close the window and try again, using the IP address of a compliant MFD.
See Appendix A: GlobalScan-compatible MFDs
5. Press the [Enter] key (or click Go).
Important: Only one remote session is permissible.
If another session is taking place (either local or
network), an error message will be displayed. Close
the window and try again later.
6. Enter your User name (default = admin) and
Password (default = ricoh).
7. Click the [OK] button.
.
24
GlobalScanTM v3.1
Administrator’s Guide
Display reads:
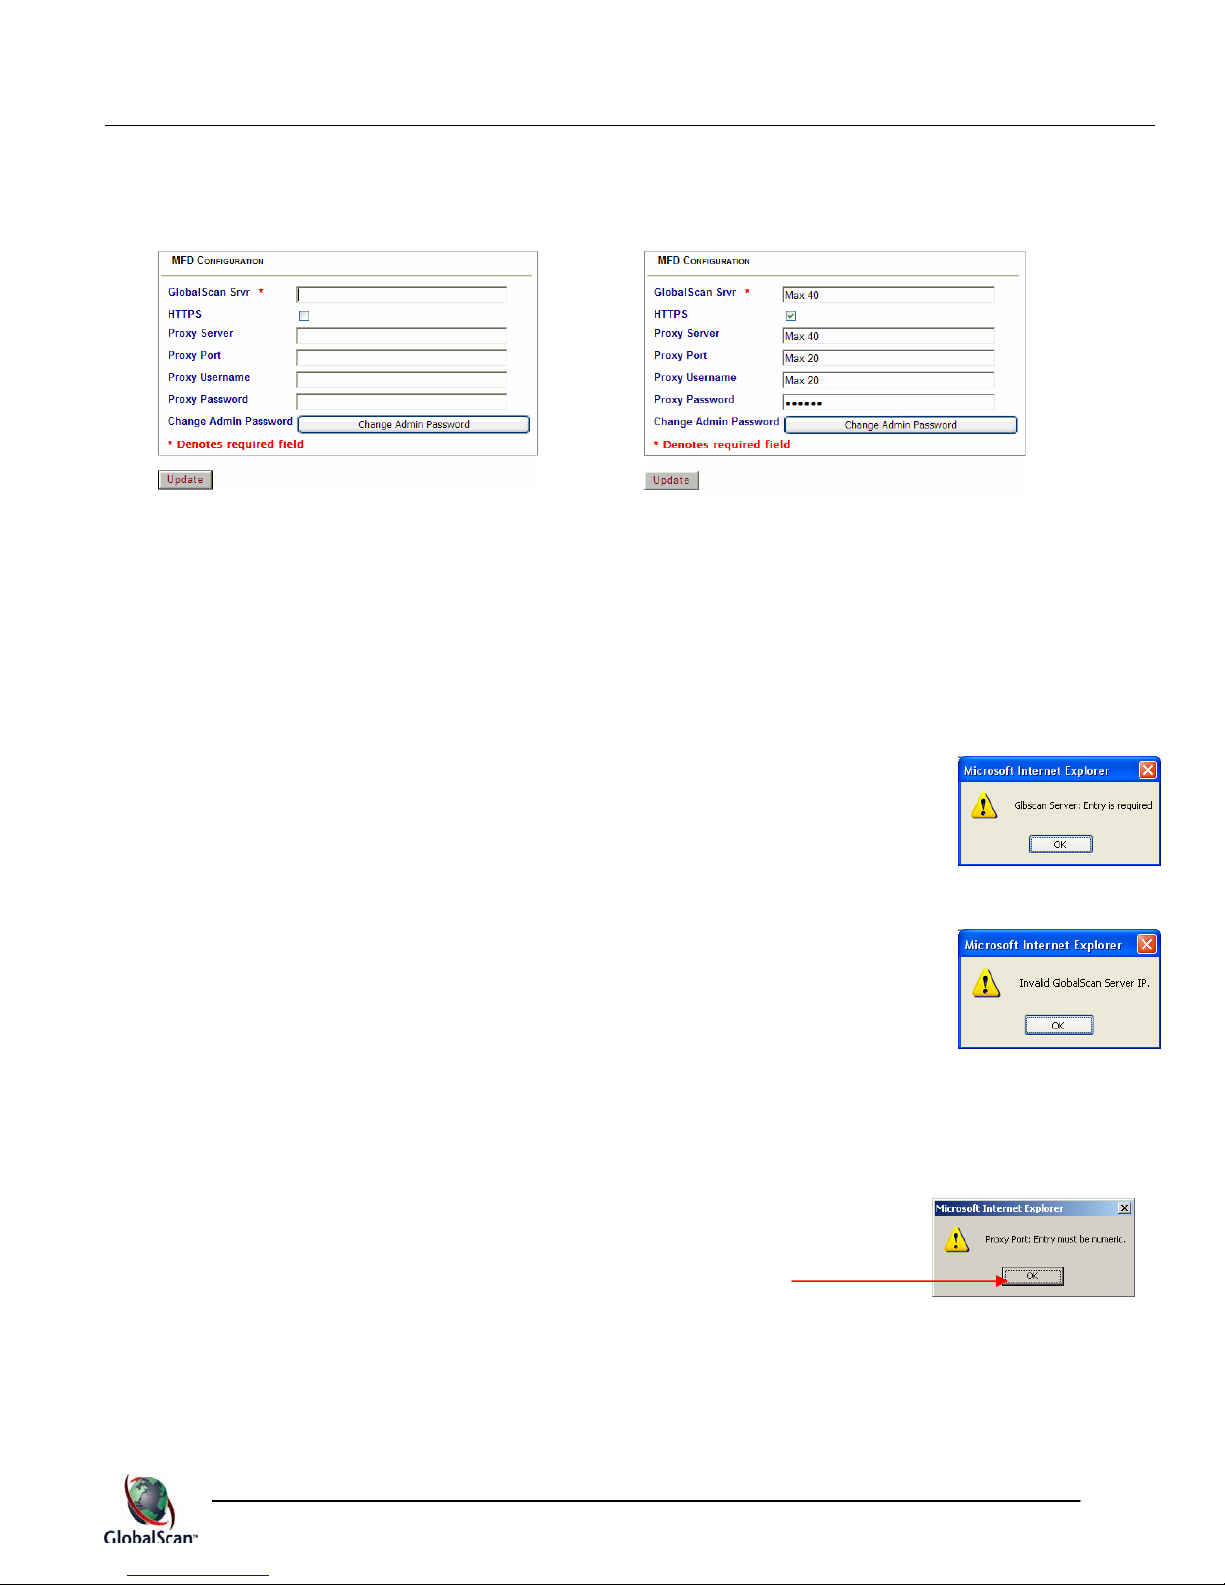
MFD Configuration Page MFD Configuration Page - Field Limits
Note: When connecting to a newer MFD, an [Upload Image File] button will be displayed
underneath the [Change Admin Password] button. This feature is for future implementation.
Now, you are ready to enter one (or more) of the following fields:
8. GlobalScan Srvr (Required): Enter either the server’s IP address or fully qualified domain
name.
Note:
• If you click the [Update], with the GlobalScan Srvr field blank, an error
message will appear. Click the [OK] button, and then enter the IP
address.
• If you click the [Update] button, but an invalid IP address was
entered, an error message will appear. Click the [OK] button and
enter a valid IP address (or server name).
9. HTTPS: Click this check box to turn HTTPS (secure HTTP) on/off.
10. Proxy Server: Enter either the proxy server’s IP address or fully qualified domain name.
11. Proxy Port: Enter the proxy server port number (maximum of 20 digits).
Note: This field must be numeric. Otherwise an error message will be
displayed. If this occurs, click the [OK] button, and then enter a
numeric value.
12. Proxy Username: Enter the user name for access to the proxy server
(maximum of 20 characters).
25
Administrator’s Guide
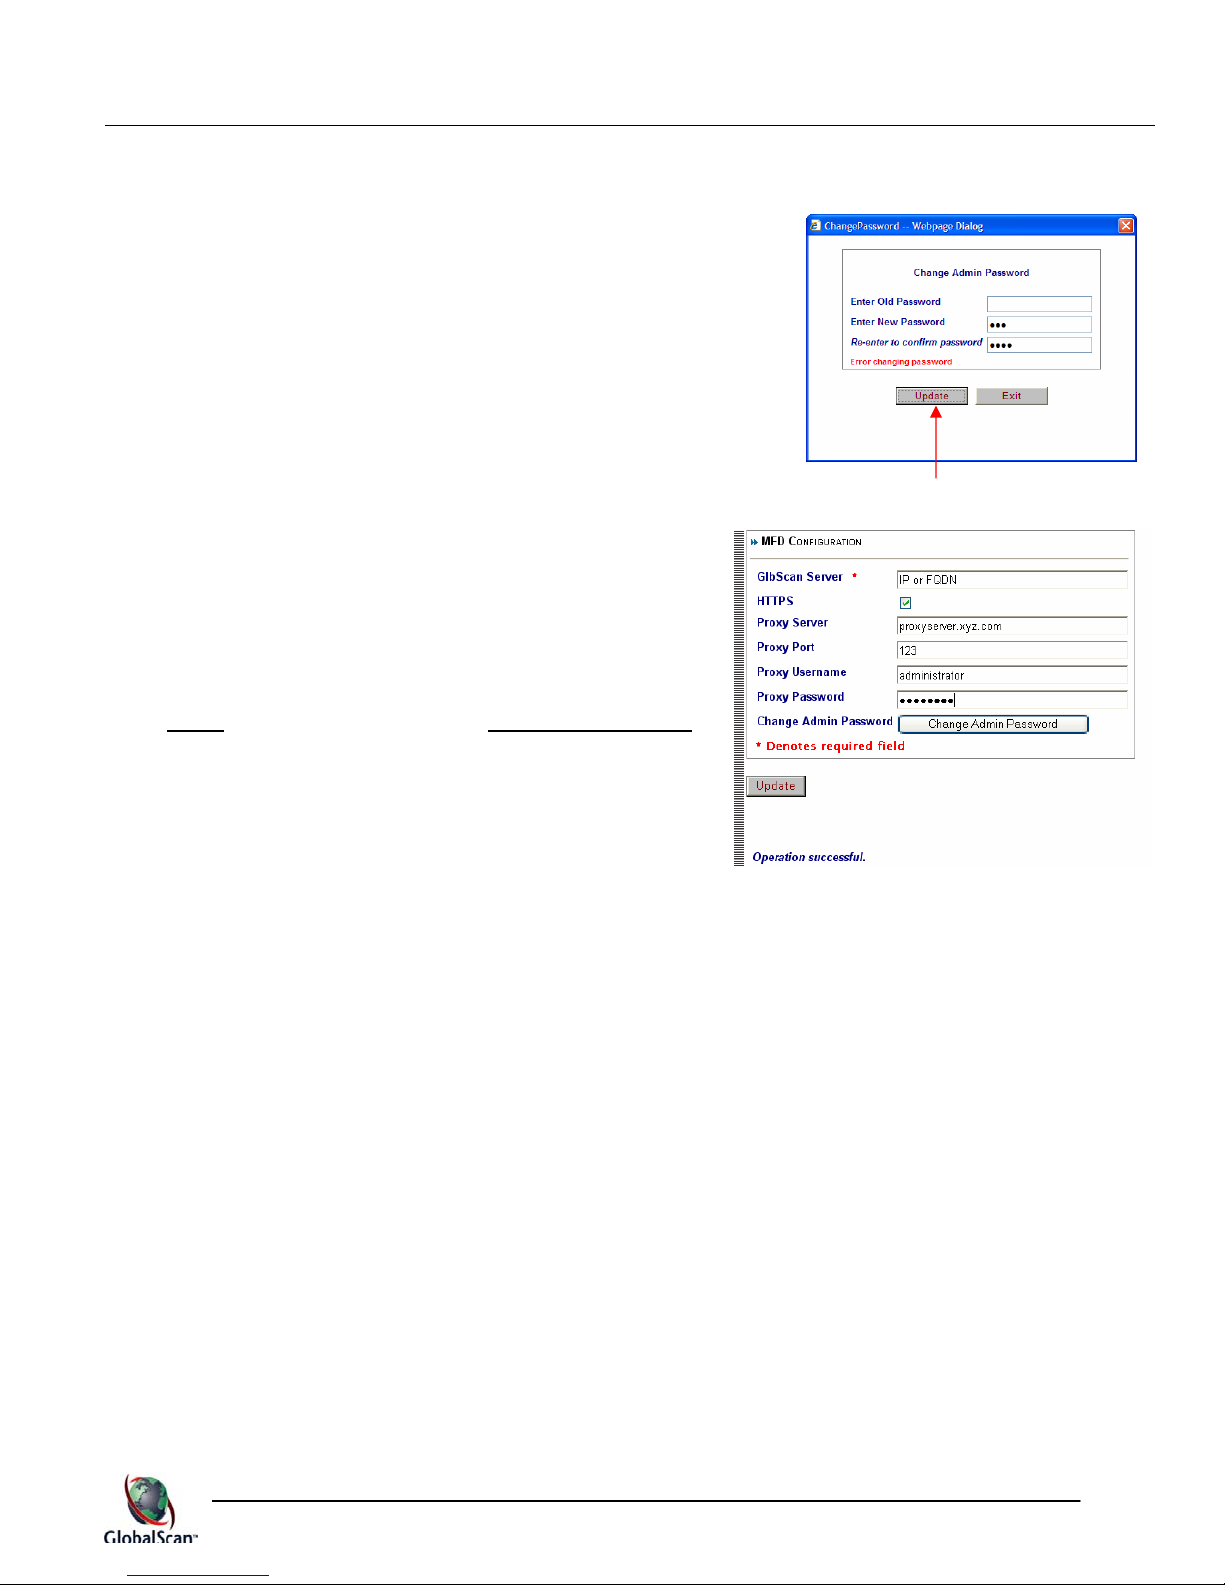
13. Proxy Password: Enter the password for access to the proxy server (maximum of 20
characters).
14. Change Admin Password: To change the admin
password, click the [Change Admin Password] button.
Enter fields (all are required). Click the [Update], and then
click the [Close] button.
Note: If an error has been made during data entry, the
display reads, “Error changing password.”
15. Once all the necessary settings are entered, review the
displayed data, and then click the [Update] button.
Display reads:
16. Close your Web browser [X].
Important: After editing the MFD Configuration, the
MFD must be rebooted. See p. 34, MFD Reboot Rules.
GlobalScanTM v3.1
26
GlobalScanTM v3.1
Administrator’s Guide
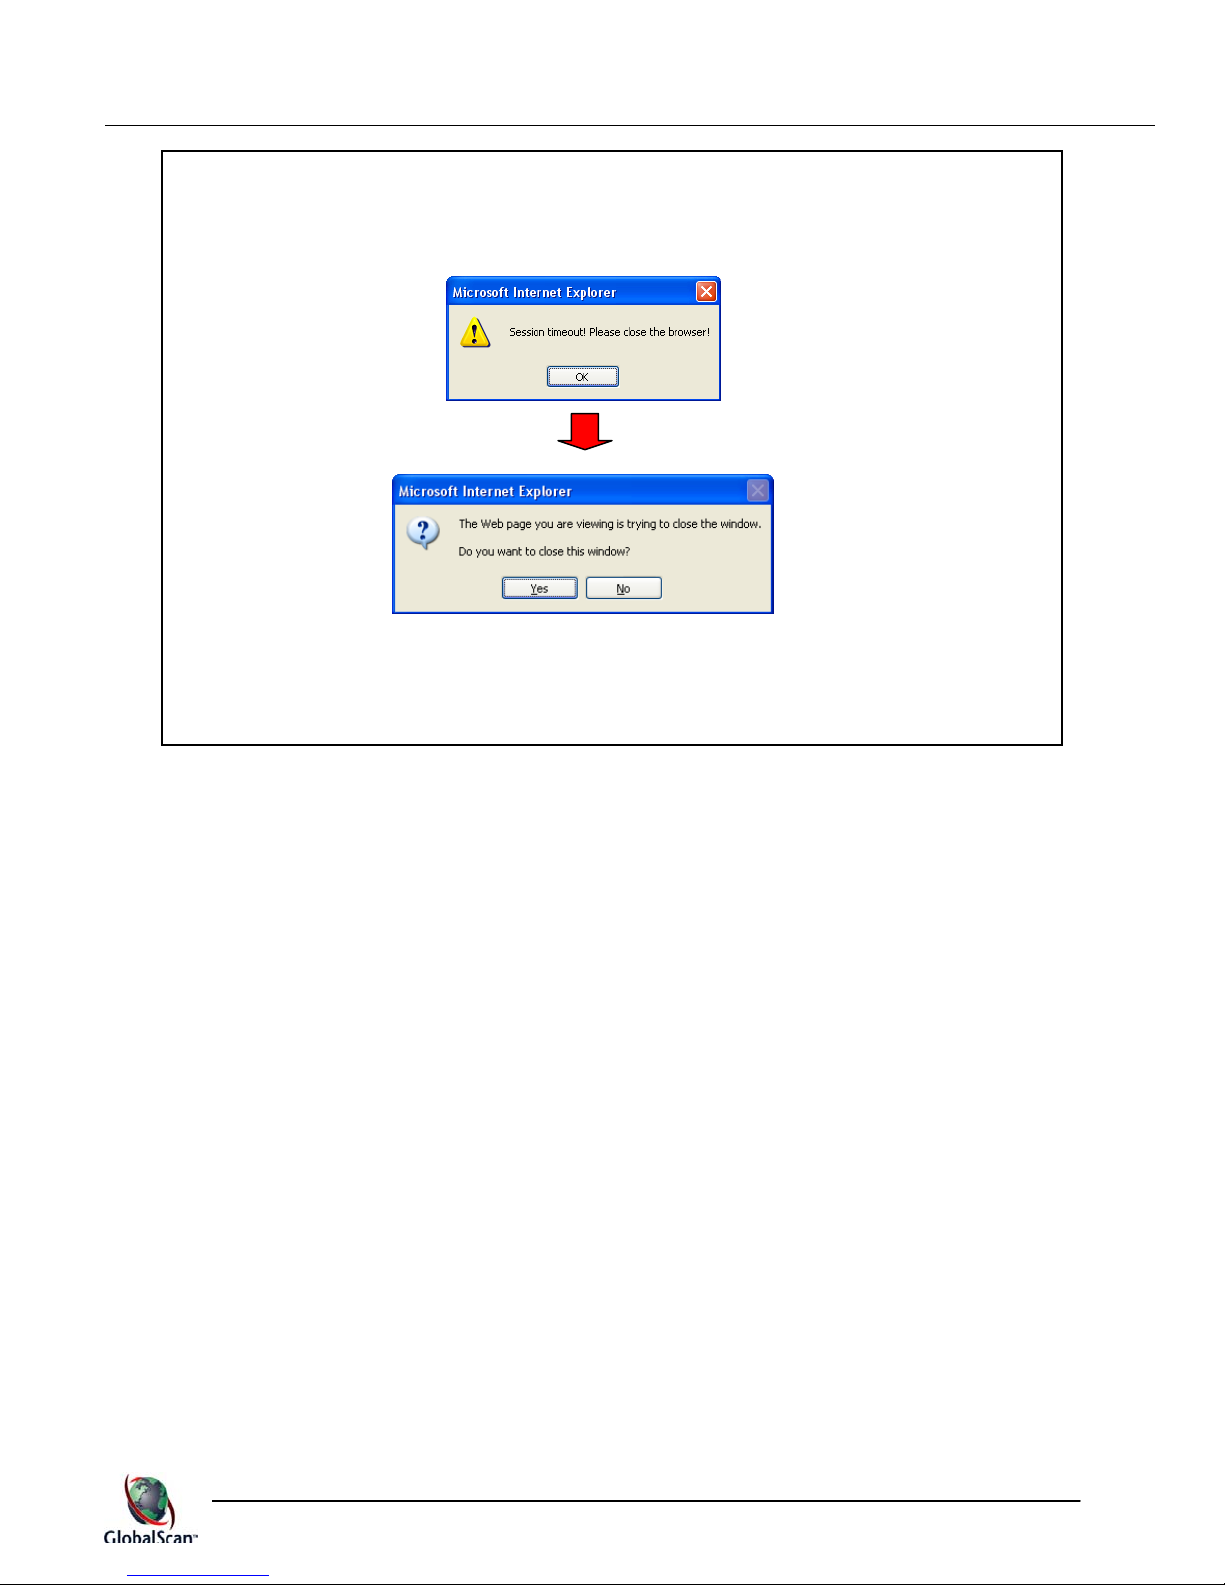
Session Timeout
If a session timeout occurs, click the [OK] button, and then click [Yes] to close
your Web browser. Reopen your browser, repeat step 4 and continue.
Note:
This will only occur if the browser is Microsoft® Internet Explorer version 7.0.
27
GlobalScanTM v3.1
Administrator’s Guide
Manual MFD Configuration (via MFD control panel)
To manually enter MFD configuration settings, proceed as follows:
1. Press the [Scanner]1 key on the MFD control panel (once or twice). Note: If you are currently
logged in to a GlobalScan project, press the [Logout] button.
The next screen to appear depends on how many projects are configured and whether or not
login is required. See Before Getting Started J GlobalScan Terms, Projects, for details.
2. On the MFD control panel, press and hold the [Clear/Stop] key (for more than 5 seconds),
then release.
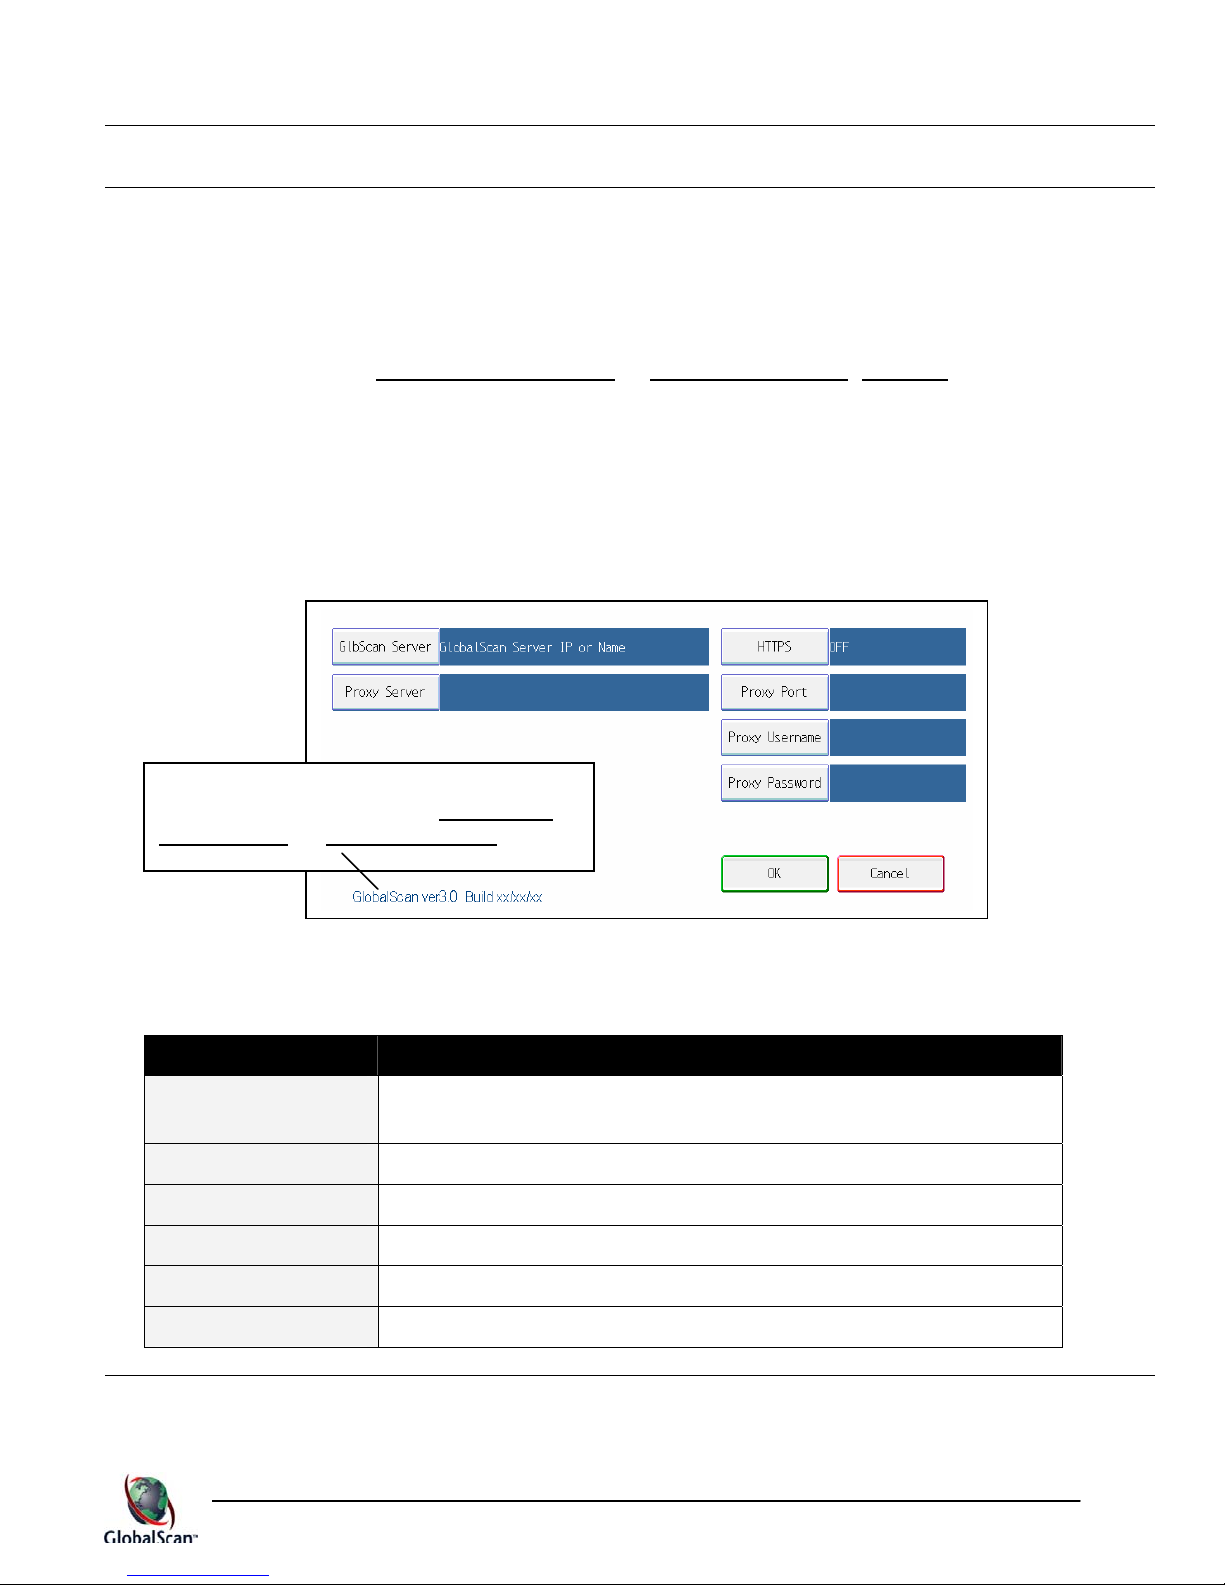
Display reads:
GlobalScan Ver. 3.0 Configuration Screen
Firmware version can also be viewed from
the WebAdmin module. See GlobalScan
Management J A. Manage MFDs.
Important: MFDs running v2.x and v3.0 firmware can connect to a GlobalScan v3.1
server.
Parameter Description
GlbScan Server
(Required)
Proxy Server
HTTPS
Proxy Port
Proxy Username
Proxy Password
IP address of the GlobalScan Server or fully qualified domain
name.
Proxy server IP address or fully-qualified domain name.
HTTPS on/off.
Proxy server port number.
User name for access to proxy server.
Password for access to proxy server.
1
A control panel key other than the [Scanner] key may access GlobalScan.
28
GlobalScanTM v3.1
Administrator’s Guide
Note: If the MFD fails to download a profile, an error message is displayed on the MFD touch
screen. From the GlobalScan Server, check that a profile has been created/selected for the MFD,
then close the error window. This initiates another download attempt by the GlobalScan Server. If
this action still returns an error, log out of GlobalScan (from the MFD) and open the MFD
configuration screen (see previous page). Check that all parameters are correct.
Important: If any changes have been made to the MFD’s configuration, you must
MFD. See p. 34, MFD Reboot Rules
.
reboot the
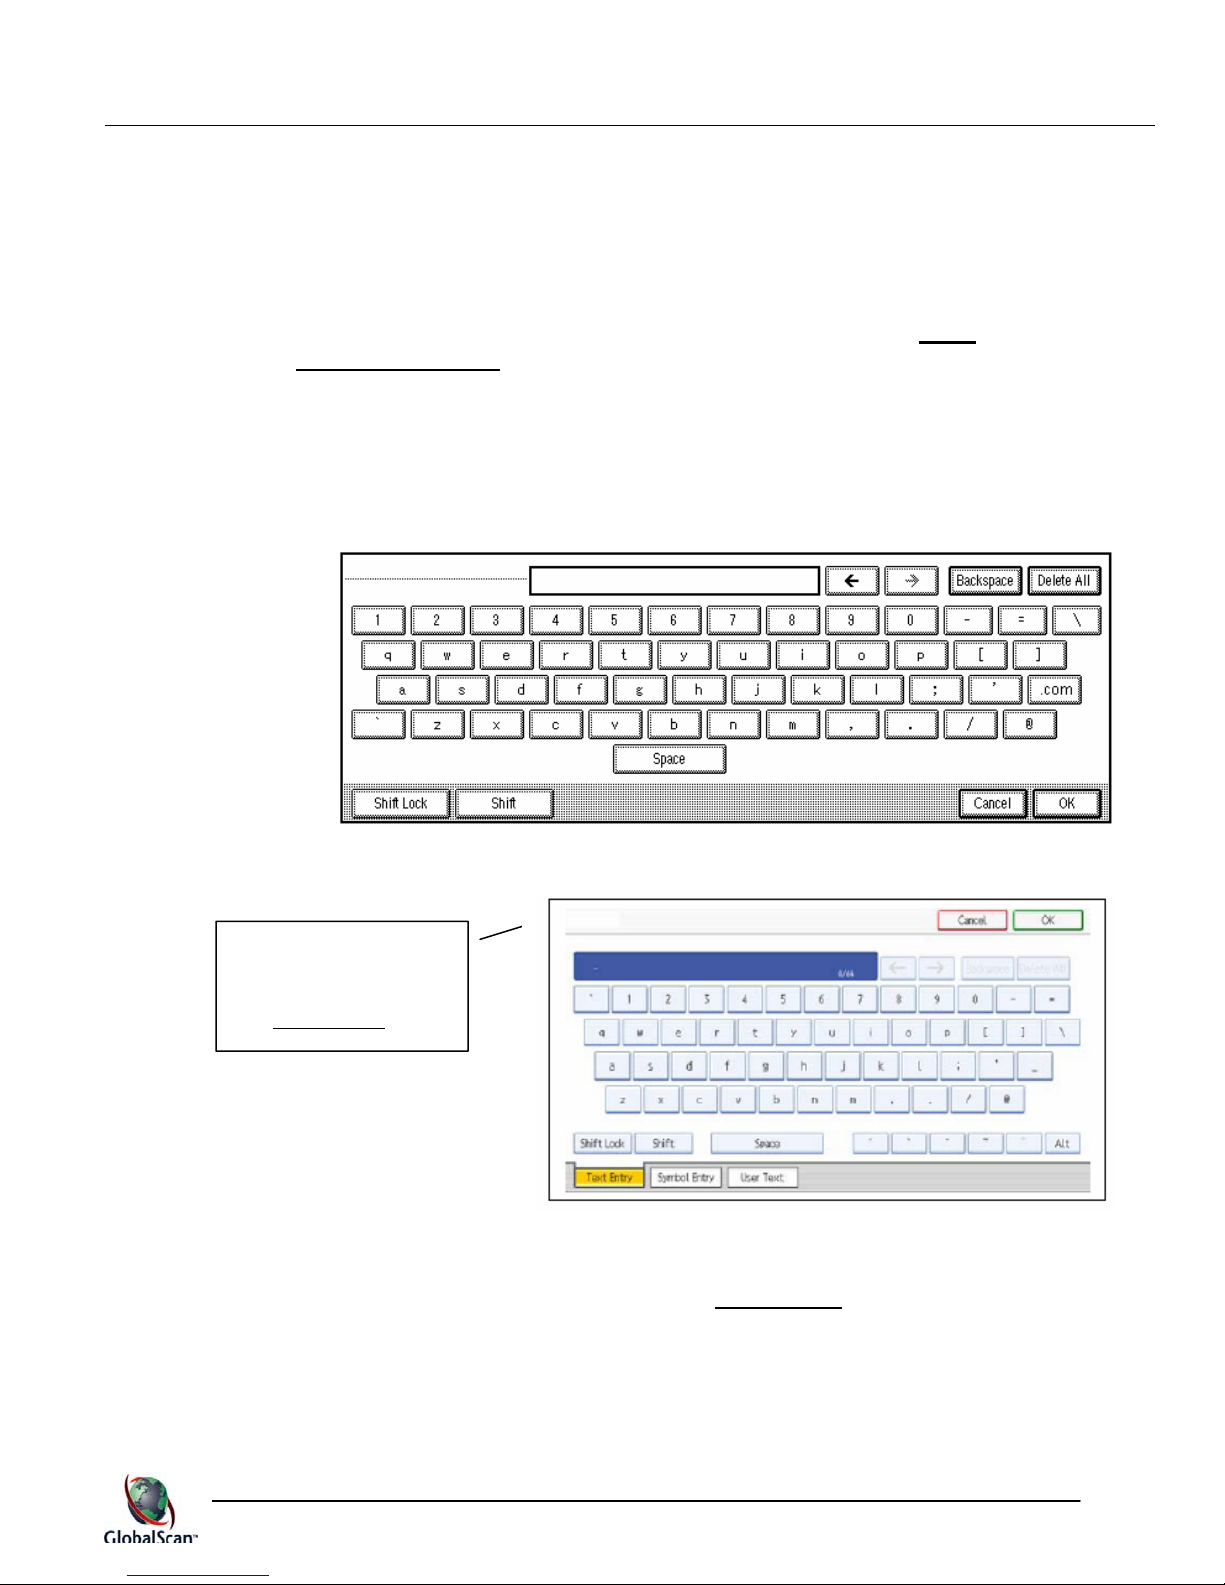
3. Select a parameter, e.g., press the [GlbScan Server] button.
Display reads:
Soft Keyboard
Universal Soft Keyboard
Newer MFDs display
the Universal Soft
Keyboard. For details,
see Appendix B
.
Note: GlobalScan’s soft keyboard will reflect the localization selected in the firmware and
display the character set of a selected language. See Localization
, next section, for details.
29

4. Enter/edit data, as needed.
Note:
Enter characters by touching corresponding keyboard characters.
To erase characters, right to left, press the [Backspace] button. To erase entire entry,
press the [Delete All] button.
To select a single uppercase letter or symbol, press the [Shift] button. To select multiple
uppercase letters or symbols, press the [Shift Lock] button.
5. Press the [OK] button.
6. Repeat, if necessary.
7. Confirm the displayed information, and then press the [OK] button.
GlobalScanTM v3.1
Administrator’s Guide
30
 Loading...