

Ricoh GELSPRINTER GX 3000SF, GELSPRINTER GX 3050SFN User Manual
User Guide
Read This First
Getting Started
Specifying and Adjusting the Machine's Operational Settings
Using the Printer Function
Using the Copy Function
Using the Scanner Function
Using the Facsimile Function
Troubleshooting
Checking the Machine Status
Maintaining
Appendix
Read this manual carefully before you use this machine and keep it handy for future reference. For safe and correct use, be sure to read "Safety Information"
before using the machine.


TABLE OF CONTENTS
1. Read This First
About This Product . . . . . . . . . . . . . . . . . . . . . . . . . . . . . . . . . . . . . . . . . . . . . . . . . . . . . . . . . . . . . 11
Introduction . . . . . . . . . . . . . . . . . . . . . . . . . . . . . . . . . . . . . . . . . . . . . . . . . . . . . . . . . . . . . . . . . . . . . 11
Trademarks
Disclaimer
User's Notes
Saving Color Copies
Manuals for This Machine
Description for the Specified Model
How to Read This Manual . . . . . . . . . . . . . . . . . . . . . . . . . . . . . . . . . . . . . . . . . . . . . . . . . . . . . . . 17
How to Use User Guide . . . . . . . . . . . . . . . . . . . . . . . . . . . . . . . . . . . . . . . . . . . . . . . . . . . . . . . . . . . . . . 17
Removing the User Guide
Guide to Components . . . . . . . . . . . . . . . . . . . . . . . . . . . . . . . . . . . . . . . . . . . . . . . . . . . . . . . . . . 19
Machine Body . . . . . . . . . . . . . . . . . . . . . . . . . . . . . . . . . . . . . . . . . . . . . . . . . . . . . . . . . . . . . . . . . . . . 19
Machine Rear
Control Panel
Display
Icons Displayed on the Screen
If a Screen Requesting a Password Appears
Changing Modes
Turning On the Power/Turning Off the Power
Option
Recommended Functions . . . . . . . . . . . . . . . . . . . . . . . . . . . . . . . . . . . . . . . . . . . . . . . . . . . . . . . . 36
Managing this machine . . . . . . . . . . . . . . . . . . . . . . . . . . . . . . . . . . . . . . . . . . . . . . . . . . . . . . . . . 37
Using This Machine as a Printer . . . . . . . . . . . . . . . . . . . . . . . . . . . . . . . . . . . . . . . . . . . . . . . . . . . . . . . . . 37
Using This Machine as a Copier
Using This Machine as a Scanner
. . . . . . . . . . . . . . . . . . . . . . . . . . . . . . . . . . . . . . . . . . . . . . . . . . . . . . . . . . . . . . . . . . . . . . 12
. . . . . . . . . . . . . . . . . . . . . . . . . . . . . . . . . . . . . . . . . . . . . . . . . . . . . . . . . . . . . . . . . . . . . . 13
. . . . . . . . . . . . . . . . . . . . . . . . . . . . . . . . . . . . . . . . . . . . . . . . . . . . . . . . . . . . . . . . . . . . . 13
. . . . . . . . . . . . . . . . . . . . . . . . . . . . . . . . . . . . . . . . . . . . . . . . . . . . . . . . . . . . . . . . 15
. . . . . . . . . . . . . . . . . . . . . . . . . . . . . . . . . . . . . . . . . . . . . . . . . . . . . . . . . . . . . 15
. . . . . . . . . . . . . . . . . . . . . . . . . . . . . . . . . . . . . . . . . . . . . . . . . . . . . . . 16
Opening from the Icon
. . . . . . . . . . . . . . . . . . . . . . . . . . . . . . . . . . . . . . . . . . . . . . . . . . . . . . . . . . 17
. . . . . . . . . . . . . . . . . . . . . . . . . . . . . . . . . . . . . . . . . . . . . . . . . . . . . . . . . . . . . 18
. . . . . . . . . . . . . . . . . . . . . . . . . . . . . . . . . . . . . . . . . . . . . . . . . . . . . . . . . . . . . . . . . . . . 20
. . . . . . . . . . . . . . . . . . . . . . . . . . . . . . . . . . . . . . . . . . . . . . . . . . . . . . . . . . . . . . . . . . . . 22
. . . . . . . . . . . . . . . . . . . . . . . . . . . . . . . . . . . . . . . . . . . . . . . . . . . . . . . . . . . . . . . . . . . . . . . . 26
. . . . . . . . . . . . . . . . . . . . . . . . . . . . . . . . . . . . . . . . . . . . . . . . . . . . . . . . . . . . . . . . . . . . 26
Menu
Copy
. . . . . . . . . . . . . . . . . . . . . . . . . . . . . . . . . . . . . . . . . . . . . . . . . . . . . . . . . . . . . . . . . . . . . 26
Scanner
. . . . . . . . . . . . . . . . . . . . . . . . . . . . . . . . . . . . . . . . . . . . . . . . . . . . . . . . . . . . . . . . . . . 27
. . . . . . . . . . . . . . . . . . . . . . . . . . . . . . . . . . . . . . . . . . . . . . . . . . . . . . . . . . . . . . . . . . . . 27
Printer
Fax
. . . . . . . . . . . . . . . . . . . . . . . . . . . . . . . . . . . . . . . . . . . . . . . . . . . . . . . . . . . . . . . . . . . . . . 27
. . . . . . . . . . . . . . . . . . . . . . . . . . . . . . . . . . . . . . . . . . . . . . . . . . . . . . . . . . 28
. . . . . . . . . . . . . . . . . . . . . . . . . . . . . . . . . . . . . . . . . . . . . . . . . . 28
Entering a password
. . . . . . . . . . . . . . . . . . . . . . . . . . . . . . . . . . . . . . . . . . . . . . . . . . . . . . . . . . . . 28
. . . . . . . . . . . . . . . . . . . . . . . . . . . . . . . . . . . . . . . . . . . . . . . . . . . . . . . . . . . . . . . . . . 29
. . . . . . . . . . . . . . . . . . . . . . . . . . . . . . . . . . . . . . . . . . . . . . . . . 30
Turning on the power
Turning off the power
Saving energy
. . . . . . . . . . . . . . . . . . . . . . . . . . . . . . . . . . . . . . . . . . . . . . . . . . . . . . . . . . . 30
. . . . . . . . . . . . . . . . . . . . . . . . . . . . . . . . . . . . . . . . . . . . . . . . . . . . . . . . . . . 31
. . . . . . . . . . . . . . . . . . . . . . . . . . . . . . . . . . . . . . . . . . . . . . . . . . . . . . . . . . . . . . . 32
. . . . . . . . . . . . . . . . . . . . . . . . . . . . . . . . . . . . . . . . . . . . . . . . . . . . . . . . . . . . . . . . . . . . . . . . 33
Network Interface Board GX4
Paper Feed Unit TK1020
Multi Bypass Tray Type BY1000
Detaching and Reattaching the Multi Bypass Tray (Optional)
Connecting the machine via USB
Connecting the machine via the network
. . . . . . . . . . . . . . . . . . . . . . . . . . . . . . . . . . . . . . . . . . . . . . . . . . . . . 33
. . . . . . . . . . . . . . . . . . . . . . . . . . . . . . . . . . . . . . . . . . . . . . . . . . . . . . . . . 34
. . . . . . . . . . . . . . . . . . . . . . . . . . . . . . . . . . . . . . . . . . . . . . . . . . . . 34
. . . . . . . . . . . . . . . . . . . . . . . . . . . . . . . . . . . 35
. . . . . . . . . . . . . . . . . . . . . . . . . . . . . . . . . . . . . . . . . . . . . . . . . . . . 37
. . . . . . . . . . . . . . . . . . . . . . . . . . . . . . . . . . . . . . . . . . . . . . . 38
. . . . . . . . . . . . . . . . . . . . . . . . . . . . . . . . . . . . . . . . . . . . . . . . . . . . . . . . . 38
Saving paper using “2 Sided Copy” function in Copier Features
Saving paper using the “2 in 1” function in Copier Features
Copying on two sides if necessary
Saving paper using “2 in 1” function if necessary
Changing the Copy Quality
B&W Copy / Color Copy
Assembling Copy
. . . . . . . . . . . . . . . . . . . . . . . . . . . . . . . . . . . . . . . . . . . . . . . . . . . . . . . . . . . . . 41
. . . . . . . . . . . . . . . . . . . . . . . . . . . . . . . . . . . . . . . . . . . . . . . . . . . 39
. . . . . . . . . . . . . . . . . . . . . . . . . . . . . . . . . . . . . . . . . . 39
. . . . . . . . . . . . . . . . . . . . . . . . . . . . . . . . . . . . . . . . . . . . . . . . . . . . . . . 40
. . . . . . . . . . . . . . . . . . . . . . . . . . . . . . . . . . . . . . . . . . . . . . . . . . . . . . . . 40
. . . . . . . . . . . . . . . . . . . . . . . . . . . . . . . . . 38
. . . . . . . . . . . . . . . . . . . . . . . . . . . . . . . . . . . . 39
. . . . . . . . . . . . . . . . . . . . . . . . . . . . . . . . . . . . . . . . . . . . . . . . . . . . . . . . 41
1

Scanning Originals Into a Client Computer via TWAIN Driver . . . . . . . . . . . . . . . . . . . . . . . . . . . . . . . . . . 41
Sending files by E-mail
Sending files by FTP
Using This Machine as a Facsimile
Using the facsimile
Using the facsimile with an external telephone
Using Internet fax
Sending faxes from a computer
Specifying and Changing the Machine's Settings
Changing the Language
Changing the default setting of a function
Entering destination using the number keys
Registering destination to the address book
Specifying a destination using Address Book, Quick Dial, Speed Dial, or Group Dial
Specifying the destination using the LDAP server
. . . . . . . . . . . . . . . . . . . . . . . . . . . . . . . . . . . . . . . . . . . . . . . . . . . . . . . . . . 42
. . . . . . . . . . . . . . . . . . . . . . . . . . . . . . . . . . . . . . . . . . . . . . . . . . . . . . . . . . . . 43
. . . . . . . . . . . . . . . . . . . . . . . . . . . . . . . . . . . . . . . . . . . . . . . . . . . . . . . . 44
. . . . . . . . . . . . . . . . . . . . . . . . . . . . . . . . . . . . . . . . . . . . . . . . . . . . . . . . . . . . . 44
. . . . . . . . . . . . . . . . . . . . . . . . . . . . . . . . . . . . . . . . . . . . 45
. . . . . . . . . . . . . . . . . . . . . . . . . . . . . . . . . . . . . . . . . . . . . . . . . . . . . . . . . . . . . 46
. . . . . . . . . . . . . . . . . . . . . . . . . . . . . . . . . . . . . . . . . . . . . . . . . . . . . 47
. . . . . . . . . . . . . . . . . . . . . . . . . . . . . . . . . . . . . . . . . . . . . . . 48
. . . . . . . . . . . . . . . . . . . . . . . . . . . . . . . . . . . . . . . . . . . . . . . . . . . . . . . . . 48
. . . . . . . . . . . . . . . . . . . . . . . . . . . . . . . . . . . . . . . . . . . . . . . 48
. . . . . . . . . . . . . . . . . . . . . . . . . . . . . . . . . . . . . . . . . . . . . . 48
. . . . . . . . . . . . . . . . . . . . . . . . . . . . . . . . . . . . . . . . . . . . . . 48
. . . . . . . . . . . . . . . . . . . . 49
. . . . . . . . . . . . . . . . . . . . . . . . . . . . . . . . . . . . . . . . . . . 49
2. Getting Started
Confirming the Connection Method . . . . . . . . . . . . . . . . . . . . . . . . . . . . . . . . . . . . . . . . . . . . . . . . 51
Installing the Drivers for Local Connection . . . . . . . . . . . . . . . . . . . . . . . . . . . . . . . . . . . . . . . . . . . 53
Quick Install for USB . . . . . . . . . . . . . . . . . . . . . . . . . . . . . . . . . . . . . . . . . . . . . . . . . . . . . . . . . . . . . . . . 53
Sharing the Printer
Setting up a server
Setting up a client computer
Installing the Drivers for Network Connection . . . . . . . . . . . . . . . . . . . . . . . . . . . . . . . . . . . . . . . . 58
Quick Install for Network . . . . . . . . . . . . . . . . . . . . . . . . . . . . . . . . . . . . . . . . . . . . . . . . . . . . . . . . . . . . . 59
Installing the Printer Driver (Network)
Using the SmartDeviceMonitor for Client Port (TCP/IP)
Using the SmartDeviceMonitor for Client Port (IPP)
Changing the Port Settings for SmartDeviceMonitor for Client
Using the Standard TCP/IP Port
Using the LPR Port
Using as the Windows Network Printer
Installing the TWAIN Driver (Network)
Specifying [I/O TYPE]
Installing the LAN-Fax Driver (Network)
Installing the DeskTopBinder - SmartDeviceMonitor for Client (Network) . . . . . . . . . . . . . . . . . . . 74
Network Cautions . . . . . . . . . . . . . . . . . . . . . . . . . . . . . . . . . . . . . . . . . . . . . . . . . . . . . . . . . . . . . 76
Using DHCP . . . . . . . . . . . . . . . . . . . . . . . . . . . . . . . . . . . . . . . . . . . . . . . . . . . . . . . . . . . . . . . . . . . . . 76
Connecting the Machine to a Telephone Line and Telephone . . . . . . . . . . . . . . . . . . . . . . . . . . . . 77
Connecting a Telephone Line . . . . . . . . . . . . . . . . . . . . . . . . . . . . . . . . . . . . . . . . . . . . . . . . . . . . . . . . . . . 78
Connecting a Telephone
Connecting the Machine to an ADSL Circuit
Connecting the Machine to a Private Branch Exchange (PBX)
Setting the Reception Mode
Selecting the Line Type
Selecting [Push]
Selecting [Dial]
Selecting public switched telephone network (PSTN) or private branch exchange (PABX)
Paper . . . . . . . . . . . . . . . . . . . . . . . . . . . . . . . . . . . . . . . . . . . . . . . . . . . . . . . . . . . . . . . . . . . . . . . 86
Compatible Paper Types . . . . . . . . . . . . . . . . . . . . . . . . . . . . . . . . . . . . . . . . . . . . . . . . . . . . . . . . . . . . . . 86
Loadable Paper Sizes and Quantities
Paper Handling Precautions
Loading precautions
Paper storage precautions
. . . . . . . . . . . . . . . . . . . . . . . . . . . . . . . . . . . . . . . . . . . . . . . . . . . . . . . . . . . . . . . . . 55
. . . . . . . . . . . . . . . . . . . . . . . . . . . . . . . . . . . . . . . . . . . . . . . . . . . . . . . . . . . . . 55
. . . . . . . . . . . . . . . . . . . . . . . . . . . . . . . . . . . . . . . . . . . . . . . . . . . . . . . 56
. . . . . . . . . . . . . . . . . . . . . . . . . . . . . . . . . . . . . . . . . . . . . . . . . . . . . . 61
. . . . . . . . . . . . . . . . . . . . . . . . . . . . . . . . . . . . . . . 61
. . . . . . . . . . . . . . . . . . . . . . . . . . . . . . . . . . . . . . . . . 63
. . . . . . . . . . . . . . . . . . . . . . . . . . . . . . . . . . . 65
. . . . . . . . . . . . . . . . . . . . . . . . . . . . . . . . . . . . . . . . . . . . . . . . . . . . . 66
. . . . . . . . . . . . . . . . . . . . . . . . . . . . . . . . . . . . . . . . . . . . . . . . . . . . . . . . . . . . . 67
. . . . . . . . . . . . . . . . . . . . . . . . . . . . . . . . . . . . . . . . . . . . . . . . 69
. . . . . . . . . . . . . . . . . . . . . . . . . . . . . . . . . . . . . . . . . . . . . . . . . . . . . 71
. . . . . . . . . . . . . . . . . . . . . . . . . . . . . . . . . . . . . . . . . . . . . . . . . . . . . . . . . . 72
. . . . . . . . . . . . . . . . . . . . . . . . . . . . . . . . . . . . . . . . . . . . . . . . . . . . 73
. . . . . . . . . . . . . . . . . . . . . . . . . . . . . . . . . . . . . . . . . . . . . . . . . . . . . . . . . . . . . . 79
. . . . . . . . . . . . . . . . . . . . . . . . . . . . . . . . . . . . . . . . . . . . . . . . . . 80
. . . . . . . . . . . . . . . . . . . . . . . . . . . . . . . . . . . . . . . 81
. . . . . . . . . . . . . . . . . . . . . . . . . . . . . . . . . . . . . . . . . . . . . . . . . . . . . . . . . . . . 82
. . . . . . . . . . . . . . . . . . . . . . . . . . . . . . . . . . . . . . . . . . . . . . . . . . . . . . . . . . . . . . . 83
. . . . . . . . . . . . . . . . . . . . . . . . . . . . . . . . . . . . . . . . . . . . . . . . . . . . . . . . . . . . . . 83
. . . . . . . . . . . . . . . . . . . . . . . . . . . . . . . . . . . . . . . . . . . . . . . . . . . . . . . . . . . . . . . 84
. . . . . . . . . . . . . . . . . . 85
. . . . . . . . . . . . . . . . . . . . . . . . . . . . . . . . . . . . . . . . . . . . . . . . . . . . . . 87
. . . . . . . . . . . . . . . . . . . . . . . . . . . . . . . . . . . . . . . . . . . . . . . . . . . . . . . . . . . . 90
. . . . . . . . . . . . . . . . . . . . . . . . . . . . . . . . . . . . . . . . . . . . . . . . . . . . . . . . . . . . 90
. . . . . . . . . . . . . . . . . . . . . . . . . . . . . . . . . . . . . . . . . . . . . . . . . . . . . . . . 91
2

Paper type precautions . . . . . . . . . . . . . . . . . . . . . . . . . . . . . . . . . . . . . . . . . . . . . . . . . . . . . . . . . . 92
Non-compatible paper
Printable area
Loading Paper
. . . . . . . . . . . . . . . . . . . . . . . . . . . . . . . . . . . . . . . . . . . . . . . . . . . . . . . . . . . . . . . . . . . . 96
Loading paper into tray 1
Loading paper into tray 2 (optional)
Loading paper into bypass tray (optional)
. . . . . . . . . . . . . . . . . . . . . . . . . . . . . . . . . . . . . . . . . . . . . . . . . . . . . . . . . . 93
. . . . . . . . . . . . . . . . . . . . . . . . . . . . . . . . . . . . . . . . . . . . . . . . . . . . . . . . . . . . . . . 94
. . . . . . . . . . . . . . . . . . . . . . . . . . . . . . . . . . . . . . . . . . . . . . . . . . . . . . . . 96
. . . . . . . . . . . . . . . . . . . . . . . . . . . . . . . . . . . . . . . . . . . . . . . . . . 98
. . . . . . . . . . . . . . . . . . . . . . . . . . . . . . . . . . . . . . . . . . . . . 100
3. Specifying and Adjusting the Machine's Operational Settings
Basic Operation Using the Menu Screen . . . . . . . . . . . . . . . . . . . . . . . . . . . . . . . . . . . . . . . . . . . 101
Menu . . . . . . . . . . . . . . . . . . . . . . . . . . . . . . . . . . . . . . . . . . . . . . . . . . . . . . . . . . . . . . . . . . . . . . 103
Setting the Machine . . . . . . . . . . . . . . . . . . . . . . . . . . . . . . . . . . . . . . . . . . . . . . . . . . . . . . . . . . . 104
Selecting the Language . . . . . . . . . . . . . . . . . . . . . . . . . . . . . . . . . . . . . . . . . . . . . . . . . . . . . . . . . . . . . 106
Adjusting the Volume
Selecting the Country
Specifying the Tray and Paper . . . . . . . . . . . . . . . . . . . . . . . . . . . . . . . . . . . . . . . . . . . . . . . . . . . 109
Tray 1-2 / Bypass Tray . . . . . . . . . . . . . . . . . . . . . . . . . . . . . . . . . . . . . . . . . . . . . . . . . . . . . . . . . . . . . . 109
Specifying the Paper Type and Size . . . . . . . . . . . . . . . . . . . . . . . . . . . . . . . . . . . . . . . . . . . . . . . 111
Setting User Restriction . . . . . . . . . . . . . . . . . . . . . . . . . . . . . . . . . . . . . . . . . . . . . . . . . . . . . . . . . 113
Entering the Password . . . . . . . . . . . . . . . . . . . . . . . . . . . . . . . . . . . . . . . . . . . . . . . . . . . . . . . . . . . . . . 114
Setting the User Restriction
Setting Copier Features . . . . . . . . . . . . . . . . . . . . . . . . . . . . . . . . . . . . . . . . . . . . . . . . . . . . . . . . 116
Registering Addresses . . . . . . . . . . . . . . . . . . . . . . . . . . . . . . . . . . . . . . . . . . . . . . . . . . . . . . . . . 119
Address Book . . . . . . . . . . . . . . . . . . . . . . . . . . . . . . . . . . . . . . . . . . . . . . . . . . . . . . . . . . . . . . . . . . . 119
Registering Destinations to Quick Dial Key
Registering a Fax Number to a Quick Dial Key
Registering an E-mail Address to a Quick Dial Key
Registering an F-Code (SUB) to a Quick Dial Key
Changing a Registered Quick Dial Keys
Changing a Fax Destination registered to a Quick Dial key
Changing an E-mail Address registered to a Quick Dial key
Changing an F-Code (SUB) registered to a Quick Dial key
Deleting a Registered Quick Dial Keys
Destinations Registered to Speed Dial Keys
Registering a Fax Number to a Speed Dial Key
Registering an E-mail Address to a Speed Dial Key
Registering an F-Code (SUB) to a Speed Dial Key
Changing a Registered Speed Dial Keys
Changing a Fax Destination registered to a Speed Dial Keys
Changing an E-mail Address registered to a Speed Dial key
Changing an F-Code (SUB) registered to a Speed Dial key
Deleting a Registered Speed Dial Keys
Registering Destinations to Group Dial
Removing a Name from a Group
Settings to Send Fax . . . . . . . . . . . . . . . . . . . . . . . . . . . . . . . . . . . . . . . . . . . . . . . . . . . . . . . . . . . 143
Settings to Receive Fax . . . . . . . . . . . . . . . . . . . . . . . . . . . . . . . . . . . . . . . . . . . . . . . . . . . . . . . . . 144
Specifying the Line Type . . . . . . . . . . . . . . . . . . . . . . . . . . . . . . . . . . . . . . . . . . . . . . . . . . . . . . . . 147
Printing Lists and Reports . . . . . . . . . . . . . . . . . . . . . . . . . . . . . . . . . . . . . . . . . . . . . . . . . . . . . . . 148
Registering Fax Information . . . . . . . . . . . . . . . . . . . . . . . . . . . . . . . . . . . . . . . . . . . . . . . . . . . . . 149
Network Settings . . . . . . . . . . . . . . . . . . . . . . . . . . . . . . . . . . . . . . . . . . . . . . . . . . . . . . . . . . . . . 150
Settings Required to Use LDAP Server . . . . . . . . . . . . . . . . . . . . . . . . . . . . . . . . . . . . . . . . . . . . . 151
Settings Required to Send Internet Fax and E-mail . . . . . . . . . . . . . . . . . . . . . . . . . . . . . . . . . . . . 153
. . . . . . . . . . . . . . . . . . . . . . . . . . . . . . . . . . . . . . . . . . . . . . . . . . . . . . . . . . . . . . . 107
. . . . . . . . . . . . . . . . . . . . . . . . . . . . . . . . . . . . . . . . . . . . . . . . . . . . . . . . . . . . . . 10 8
. . . . . . . . . . . . . . . . . . . . . . . . . . . . . . . . . . . . . . . . . . . . . . . . . . . . . . . . . . . 115
. . . . . . . . . . . . . . . . . . . . . . . . . . . . . . . . . . . . . . . . . . . . . . . . . . 12 0
. . . . . . . . . . . . . . . . . . . . . . . . . . . . . . . . . . . . . . . . . . 12 0
. . . . . . . . . . . . . . . . . . . . . . . . . . . . . . . . . . . . . . . . 12 2
. . . . . . . . . . . . . . . . . . . . . . . . . . . . . . . . . . . . . . . . . 12 3
. . . . . . . . . . . . . . . . . . . . . . . . . . . . . . . . . . . . . . . . . . . . . . . . . . . 12 4
. . . . . . . . . . . . . . . . . . . . . . . . . . . . . . . . . . . 12 4
. . . . . . . . . . . . . . . . . . . . . . . . . . . . . . . . . . . 12 6
. . . . . . . . . . . . . . . . . . . . . . . . . . . . . . . . . . . 127
. . . . . . . . . . . . . . . . . . . . . . . . . . . . . . . . . . . . . . . . . . . . . . . . . . . . 12 8
. . . . . . . . . . . . . . . . . . . . . . . . . . . . . . . . . . . . . . . . . . . . . . . . . 12 9
. . . . . . . . . . . . . . . . . . . . . . . . . . . . . . . . . . . . . . . . . . 13 0
. . . . . . . . . . . . . . . . . . . . . . . . . . . . . . . . . . . . . . . . 131
. . . . . . . . . . . . . . . . . . . . . . . . . . . . . . . . . . . . . . . . . 13 2
. . . . . . . . . . . . . . . . . . . . . . . . . . . . . . . . . . . . . . . . . . . . . . . . . . . 134
. . . . . . . . . . . . . . . . . . . . . . . . . . . . . . . . . . 13 4
. . . . . . . . . . . . . . . . . . . . . . . . . . . . . . . . . . . 13 6
. . . . . . . . . . . . . . . . . . . . . . . . . . . . . . . . . . . 137
. . . . . . . . . . . . . . . . . . . . . . . . . . . . . . . . . . . . . . . . . . . . . . . . . . . . 13 9
. . . . . . . . . . . . . . . . . . . . . . . . . . . . . . . . . . . . . . . . . . . . . . . . . . . . 14 0
. . . . . . . . . . . . . . . . . . . . . . . . . . . . . . . . . . . . . . . . . . . . . . . . . . . . . . . 141
3

Settings Required to Receive Internet Fax and E-mail . . . . . . . . . . . . . . . . . . . . . . . . . . . . . . . . . . 155
Scanner Features . . . . . . . . . . . . . . . . . . . . . . . . . . . . . . . . . . . . . . . . . . . . . . . . . . . . . . . . . . . . . 156
Checking the Transmission/Reception Result . . . . . . . . . . . . . . . . . . . . . . . . . . . . . . . . . . . . . . . . 157
Counter Menu . . . . . . . . . . . . . . . . . . . . . . . . . . . . . . . . . . . . . . . . . . . . . . . . . . . . . . . . . . . . . . . 158
Engine Setting Menu . . . . . . . . . . . . . . . . . . . . . . . . . . . . . . . . . . . . . . . . . . . . . . . . . . . . . . . . . . 159
Printing the Configuration Page . . . . . . . . . . . . . . . . . . . . . . . . . . . . . . . . . . . . . . . . . . . . . . . . . . 161
Host I/F Settings . . . . . . . . . . . . . . . . . . . . . . . . . . . . . . . . . . . . . . . . . . . . . . . . . . . . . . . . . . . . . . 162
PCL Setting . . . . . . . . . . . . . . . . . . . . . . . . . . . . . . . . . . . . . . . . . . . . . . . . . . . . . . . . . . . . . . . . . . 163
Maintenance Menu . . . . . . . . . . . . . . . . . . . . . . . . . . . . . . . . . . . . . . . . . . . . . . . . . . . . . . . . . . . 166
Nozzle Check . . . . . . . . . . . . . . . . . . . . . . . . . . . . . . . . . . . . . . . . . . . . . . . . . . . . . . . . . . . . . . . . . . . 167
Head-cleaning
Head-flushing
Head Position
Adj.Paper Feed
Registration
. . . . . . . . . . . . . . . . . . . . . . . . . . . . . . . . . . . . . . . . . . . . . . . . . . . . . . . . . . . . . . . . . . . 16 8
. . . . . . . . . . . . . . . . . . . . . . . . . . . . . . . . . . . . . . . . . . . . . . . . . . . . . . . . . . . . . . . . . . . 16 9
. . . . . . . . . . . . . . . . . . . . . . . . . . . . . . . . . . . . . . . . . . . . . . . . . . . . . . . . . . . . . . . . . . . 17 1
. . . . . . . . . . . . . . . . . . . . . . . . . . . . . . . . . . . . . . . . . . . . . . . . . . . . . . . . . . . . . . . . . . 17 3
. . . . . . . . . . . . . . . . . . . . . . . . . . . . . . . . . . . . . . . . . . . . . . . . . . . . . . . . . . . . . . . . . . . . . 175
Entering Text . . . . . . . . . . . . . . . . . . . . . . . . . . . . . . . . . . . . . . . . . . . . . . . . . . . . . . . . . . . . . . . . 178
Available Characters . . . . . . . . . . . . . . . . . . . . . . . . . . . . . . . . . . . . . . . . . . . . . . . . . . . . . . . . . . . . . . . 178
Keys
. . . . . . . . . . . . . . . . . . . . . . . . . . . . . . . . . . . . . . . . . . . . . . . . . . . . . . . . . . . . . . . . . . . . . . . . . 17 8
How to Enter Text
Entering Letters
Entering Numbers
Deleting Characters
. . . . . . . . . . . . . . . . . . . . . . . . . . . . . . . . . . . . . . . . . . . . . . . . . . . . . . . . . . . . . . . . . 17 9
. . . . . . . . . . . . . . . . . . . . . . . . . . . . . . . . . . . . . . . . . . . . . . . . . . . . . . . . . . . . . . 17 9
. . . . . . . . . . . . . . . . . . . . . . . . . . . . . . . . . . . . . . . . . . . . . . . . . . . . . . . . . . . . 18 0
. . . . . . . . . . . . . . . . . . . . . . . . . . . . . . . . . . . . . . . . . . . . . . . . . . . . . . . . . . . 18 0
4. Using the Printer Function
Printer Driver . . . . . . . . . . . . . . . . . . . . . . . . . . . . . . . . . . . . . . . . . . . . . . . . . . . . . . . . . . . . . . . . 181
Two Types of Printer Properties Dialog Box . . . . . . . . . . . . . . . . . . . . . . . . . . . . . . . . . . . . . . . . . . . . . . . . . . 181
Opening the Printer Properties Dialog Box
Opening the Printing Preferences Dialog Box
Opening from an Application
Making Option Settings for the Printer
Conditions for Bidirectional Communication
If Bidirectional Communication is Disabled
. . . . . . . . . . . . . . . . . . . . . . . . . . . . . . . . . . . . . . . . . . . . . . . . . . . . . 18 2
. . . . . . . . . . . . . . . . . . . . . . . . . . . . . . . . . . . . . . . . . . . . . . . . . . . . 18 3
Printing on Various Paper Types . . . . . . . . . . . . . . . . . . . . . . . . . . . . . . . . . . . . . . . . . . . . . . . . . . 185
Printing on Paper in a Paper Tray . . . . . . . . . . . . . . . . . . . . . . . . . . . . . . . . . . . . . . . . . . . . . . . . . . . . . . . . 18 5
Canceling Printing . . . . . . . . . . . . . . . . . . . . . . . . . . . . . . . . . . . . . . . . . . . . . . . . . . . . . . . . . . . . 187
Canceling Printing from the Status Monitor . . . . . . . . . . . . . . . . . . . . . . . . . . . . . . . . . . . . . . . . . . . . . . . . . . 187
Canceling Printing Using the [Clear/Stop] Key of the Printer
Canceling Printing from the Task bar
. . . . . . . . . . . . . . . . . . . . . . . . . . . . . . . . . . . . . . . . . . . . . . . . . . . . . 18 8
Adjusting Print Quality . . . . . . . . . . . . . . . . . . . . . . . . . . . . . . . . . . . . . . . . . . . . . . . . . . . . . . . . . 189
Various Print Functions . . . . . . . . . . . . . . . . . . . . . . . . . . . . . . . . . . . . . . . . . . . . . . . . . . . . . . . . . 191
Unauthorized Copy Control . . . . . . . . . . . . . . . . . . . . . . . . . . . . . . . . . . . . . . . . . . . . . . . . . . . . . 194
Using [Data security for copying] . . . . . . . . . . . . . . . . . . . . . . . . . . . . . . . . . . . . . . . . . . . . . . . . . . . . . . . 195
Specifying Data Security for Copying
Using [Mask type:]
Specifying [Mask type:]
Important Notice
. . . . . . . . . . . . . . . . . . . . . . . . . . . . . . . . . . . . . . . . . . . . . . . . . . . . . . . . . . . . . . . . 197
. . . . . . . . . . . . . . . . . . . . . . . . . . . . . . . . . . . . . . . . . . . . . . . . . . . . . . . . . . . . . 19 8
. . . . . . . . . . . . . . . . . . . . . . . . . . . . . . . . . . . . . . . . . . . . . . . . . . . . . . . . . . . . . . . . . 19 8
. . . . . . . . . . . . . . . . . . . . . . . . . . . . . . . . . . . . . . . . . . . . . . . . . . . . . 19 6
Supporting Multi-Languages . . . . . . . . . . . . . . . . . . . . . . . . . . . . . . . . . . . . . . . . . . . . . . . . . . . . 199
. . . . . . . . . . . . . . . . . . . . . . . . . . . . . . . . . . . . . . . . . . . . . 18 2
. . . . . . . . . . . . . . . . . . . . . . . . . . . . . . . . . . . . . . . . . . . . 18 2
. . . . . . . . . . . . . . . . . . . . . . . . . . . . . . . . . . . . . . . . . . . . 18 3
. . . . . . . . . . . . . . . . . . . . . . . . . . . . . . . . . . . . . . . . . . . . . 18 3
. . . . . . . . . . . . . . . . . . . . . . . . . . . . . . . . . . . . . . . 18 8
5. Using the Copy Function
Setting and Placing Originals . . . . . . . . . . . . . . . . . . . . . . . . . . . . . . . . . . . . . . . . . . . . . . . . . . . . 201
4

Originals . . . . . . . . . . . . . . . . . . . . . . . . . . . . . . . . . . . . . . . . . . . . . . . . . . . . . . . . . . . . . . . . . . . . . . 201
Sizes and Weights of Recommended Originals
Non-compatible originals for the ADF
Missing Image Area
Placing Originals
. . . . . . . . . . . . . . . . . . . . . . . . . . . . . . . . . . . . . . . . . . . . . . . . . . . . . . . . . . . . . . . . . 204
Original Orientation
Placing Originals on the Exposure Glass
Placing Originals in the ADF
. . . . . . . . . . . . . . . . . . . . . . . . . . . . . . . . . . . . . . . . . . . . . . . . . . . . . . . . . . . 203
. . . . . . . . . . . . . . . . . . . . . . . . . . . . . . . . . . . . . . . . . . . . . . . . . . . . . . . . . . . 204
. . . . . . . . . . . . . . . . . . . . . . . . . . . . . . . . . . . . . . . . . . . . . . . . . . . . . . 206
. . . . . . . . . . . . . . . . . . . . . . . . . . . . . . . . . . . . . . . . . . 201
. . . . . . . . . . . . . . . . . . . . . . . . . . . . . . . . . . . . . . . . . . . . . . . . 203
. . . . . . . . . . . . . . . . . . . . . . . . . . . . . . . . . . . . . . . . . . . . . . 205
Basic Procedure . . . . . . . . . . . . . . . . . . . . . . . . . . . . . . . . . . . . . . . . . . . . . . . . . . . . . . . . . . . . . . 208
When Selecting a Paper Tray . . . . . . . . . . . . . . . . . . . . . . . . . . . . . . . . . . . . . . . . . . . . . . . . . . . . . . . . . . 209
Copying onto Custom Size Paper
. . . . . . . . . . . . . . . . . . . . . . . . . . . . . . . . . . . . . . . . . . . . . . . . . . . . . . . 210
Sort . . . . . . . . . . . . . . . . . . . . . . . . . . . . . . . . . . . . . . . . . . . . . . . . . . . . . . . . . . . . . . . . . . . . . . . 212
Making Enlarged or Reduced Copies . . . . . . . . . . . . . . . . . . . . . . . . . . . . . . . . . . . . . . . . . . . . . 214
Zoom and Preset Reduce/Enlarge . . . . . . . . . . . . . . . . . . . . . . . . . . . . . . . . . . . . . . . . . . . . . . . . . . . . . . . 214
To enter the ratio with the number keys
Auto Reduce/Enlarge
. . . . . . . . . . . . . . . . . . . . . . . . . . . . . . . . . . . . . . . . . . . . . . . . . . . . . . . . . . . . . . 217
. . . . . . . . . . . . . . . . . . . . . . . . . . . . . . . . . . . . . . . . . . . . . . . 216
Combining Multiple Pages . . . . . . . . . . . . . . . . . . . . . . . . . . . . . . . . . . . . . . . . . . . . . . . . . . . . . . 218
One-Sided Combine . . . . . . . . . . . . . . . . . . . . . . . . . . . . . . . . . . . . . . . . . . . . . . . . . . . . . . . . . . . . . . . 218
Two-Sided Combine
. . . . . . . . . . . . . . . . . . . . . . . . . . . . . . . . . . . . . . . . . . . . . . . . . . . . . . . . . . . . . . . 219
Duplex . . . . . . . . . . . . . . . . . . . . . . . . . . . . . . . . . . . . . . . . . . . . . . . . . . . . . . . . . . . . . . . . . . . . . 221
1 Sided Original to 2 Sided Copy . . . . . . . . . . . . . . . . . . . . . . . . . . . . . . . . . . . . . . . . . . . . . . . . . . . . . . . 222
2 Sided Original to 2 Sided Copy
. . . . . . . . . . . . . . . . . . . . . . . . . . . . . . . . . . . . . . . . . . . . . . . . . . . . . . . 223
Series Copies . . . . . . . . . . . . . . . . . . . . . . . . . . . . . . . . . . . . . . . . . . . . . . . . . . . . . . . . . . . . . . . . 224
Image Repeat . . . . . . . . . . . . . . . . . . . . . . . . . . . . . . . . . . . . . . . . . . . . . . . . . . . . . . . . . . . . . . . . 225
Poster . . . . . . . . . . . . . . . . . . . . . . . . . . . . . . . . . . . . . . . . . . . . . . . . . . . . . . . . . . . . . . . . . . . . . . 226
Mirror Image . . . . . . . . . . . . . . . . . . . . . . . . . . . . . . . . . . . . . . . . . . . . . . . . . . . . . . . . . . . . . . . . 227
Adjusting Image Density . . . . . . . . . . . . . . . . . . . . . . . . . . . . . . . . . . . . . . . . . . . . . . . . . . . . . . . . 228
Selecting Original Type Setting . . . . . . . . . . . . . . . . . . . . . . . . . . . . . . . . . . . . . . . . . . . . . . . . . . 229
Specifying the Resolution . . . . . . . . . . . . . . . . . . . . . . . . . . . . . . . . . . . . . . . . . . . . . . . . . . . . . . . 230
Specifying the Copy Quality Settings . . . . . . . . . . . . . . . . . . . . . . . . . . . . . . . . . . . . . . . . . . . . . .232
Color Balance . . . . . . . . . . . . . . . . . . . . . . . . . . . . . . . . . . . . . . . . . . . . . . . . . . . . . . . . . . . . . . . . . . . 232
Sharp/Soft
Contrast
. . . . . . . . . . . . . . . . . . . . . . . . . . . . . . . . . . . . . . . . . . . . . . . . . . . . . . . . . . . . . . . . . . . . . 233
. . . . . . . . . . . . . . . . . . . . . . . . . . . . . . . . . . . . . . . . . . . . . . . . . . . . . . . . . . . . . . . . . . . . . . . 234
6. Using the Scanner Function
Using the TWAIN Scanner . . . . . . . . . . . . . . . . . . . . . . . . . . . . . . . . . . . . . . . . . . . . . . . . . . . . . . 235
When Using as a TWAIN Scanner . . . . . . . . . . . . . . . . . . . . . . . . . . . . . . . . . . . . . . . . . . . . . . . . . . . . . . 235
Outline of the TWAIN Scanner Function
Basic Procedures for Scanning Files Using TWAIN Scanner
Original Orientation of TWAIN Scanner
Sending Scan Files by E-mail . . . . . . . . . . . . . . . . . . . . . . . . . . . . . . . . . . . . . . . . . . . . . . . . . . . . 241
Before Sending Scan Files by E-mail . . . . . . . . . . . . . . . . . . . . . . . . . . . . . . . . . . . . . . . . . . . . . . . . . . . . . . 241
Basic Procedures for Sending E-mail
Placing Originals (Scanner)
Specifying Destination
Using the Quick Dial keys (Specifying Destination)
Using the [Speed Dial] key (Specifying Destination)
Using the [Address Book] keys (Specifying Destination)
Selecting the E-Mail Destination in [Display] Mode
Selecting the E-Mail Destination in [Search] Mode
Manual Entry of an E-mail Address
Specifying Sender
. . . . . . . . . . . . . . . . . . . . . . . . . . . . . . . . . . . . . . . . . . . . . . . . . . . . . . . . . . . . . . 245
. . . . . . . . . . . . . . . . . . . . . . . . . . . . . . . . . . . . . . . . . . . . . . . . . . . . . . . . . . . . . . . . 250
. . . . . . . . . . . . . . . . . . . . . . . . . . . . . . . . . . . . . . . . . . . . . . . . . . . . . . 242
. . . . . . . . . . . . . . . . . . . . . . . . . . . . . . . . . . . . . . . . . . . . . . . . . . . . . . . . . . . 245
. . . . . . . . . . . . . . . . . . . . . . . . . . . . . . . . . . . . . . . . . . . . . . . 236
. . . . . . . . . . . . . . . . . . . . . . . . . . . . . . . . . . . . . . . 237
. . . . . . . . . . . . . . . . . . . . . . . . . . . . . . . . . . . . . . . . . . . . . . . . . . . 239
. . . . . . . . . . . . . . . . . . . . . . . . . . . . . . . . . . . . . . . . 245
. . . . . . . . . . . . . . . . . . . . . . . . . . . . . . . . . . . . . . . . 246
. . . . . . . . . . . . . . . . . . . . . . . . . . . . . . . . . . . . . 247
. . . . . . . . . . . . . . . . . . . . . . . . . . . . . . . . . . . . . . . . 247
. . . . . . . . . . . . . . . . . . . . . . . . . . . . . . . . . . . . . . . . 248
. . . . . . . . . . . . . . . . . . . . . . . . . . . . . . . . . . . . . . . . . . . . . . . . . . 249
5

Using the [Quick Dial] key (Specifying Sender) . . . . . . . . . . . . . . . . . . . . . . . . . . . . . . . . . . . . . . . . . . 250
Using the [Speed Dial] key (Specifying Sender)
Using the [Address Book] key (Specifying Sender)
Selecting the E-Mail Sender in [Display] Mode
Selecting the E-Mail Sender in [Search] Mode
. . . . . . . . . . . . . . . . . . . . . . . . . . . . . . . . . . . . . . . . . . 251
. . . . . . . . . . . . . . . . . . . . . . . . . . . . . . . . . . . . . . . . 251
. . . . . . . . . . . . . . . . . . . . . . . . . . . . . . . . . . . . . . . . . . 252
. . . . . . . . . . . . . . . . . . . . . . . . . . . . . . . . . . . . . . . . . . . 252
Sending Scan Files by FTP . . . . . . . . . . . . . . . . . . . . . . . . . . . . . . . . . . . . . . . . . . . . . . . . . . . . . . 254
Before Sending Scan Files by Scan to FTP . . . . . . . . . . . . . . . . . . . . . . . . . . . . . . . . . . . . . . . . . . . . . . . . . . 254
Basic Procedures for Sending by Scan to FTP
Placing Originals (Scanner)
Specifying a FTP Destination
. . . . . . . . . . . . . . . . . . . . . . . . . . . . . . . . . . . . . . . . . . . . . . . . . . . . . . . . . . . 258
. . . . . . . . . . . . . . . . . . . . . . . . . . . . . . . . . . . . . . . . . . . . . . . . . . . . . . . . . . 259
. . . . . . . . . . . . . . . . . . . . . . . . . . . . . . . . . . . . . . . . . . . . . . . . 255
Various Scan Settings . . . . . . . . . . . . . . . . . . . . . . . . . . . . . . . . . . . . . . . . . . . . . . . . . . . . . . . . . . 260
Specifying Scan Type . . . . . . . . . . . . . . . . . . . . . . . . . . . . . . . . . . . . . . . . . . . . . . . . . . . . . . . . . . . . . . 260
Specifying Resolution
Specifying File Type
Specifying Compression Type
Specifying Scan Size
Adjusting Image Density (Scanner)
. . . . . . . . . . . . . . . . . . . . . . . . . . . . . . . . . . . . . . . . . . . . . . . . . . . . . . . . . . . . . . . 260
. . . . . . . . . . . . . . . . . . . . . . . . . . . . . . . . . . . . . . . . . . . . . . . . . . . . . . . . . . . . . . . 260
. . . . . . . . . . . . . . . . . . . . . . . . . . . . . . . . . . . . . . . . . . . . . . . . . . . . . . . . . . 261
. . . . . . . . . . . . . . . . . . . . . . . . . . . . . . . . . . . . . . . . . . . . . . . . . . . . . . . . . . . . . . . 261
. . . . . . . . . . . . . . . . . . . . . . . . . . . . . . . . . . . . . . . . . . . . . . . . . . . . . . 262
7. Using the Facsimile Function
Before Sending a Fax . . . . . . . . . . . . . . . . . . . . . . . . . . . . . . . . . . . . . . . . . . . . . . . . . . . . . . . . . . 263
Placing Originals (Facsimile) . . . . . . . . . . . . . . . . . . . . . . . . . . . . . . . . . . . . . . . . . . . . . . . . . . . . . . . . . . 264
Transmission Modes . . . . . . . . . . . . . . . . . . . . . . . . . . . . . . . . . . . . . . . . . . . . . . . . . . . . . . . . . . . 265
Basic Procedures for Sending a Fax . . . . . . . . . . . . . . . . . . . . . . . . . . . . . . . . . . . . . . . . . . . . . . . 267
Sending a Fax by Memory Transmission Mode . . . . . . . . . . . . . . . . . . . . . . . . . . . . . . . . . . . . . . 269
Sending a Fax by Immediate Transmission Mode . . . . . . . . . . . . . . . . . . . . . . . . . . . . . . . . . . . . 271
Transmission Functions . . . . . . . . . . . . . . . . . . . . . . . . . . . . . . . . . . . . . . . . . . . . . . . . . . . . . . . . . 273
Automatic Redial . . . . . . . . . . . . . . . . . . . . . . . . . . . . . . . . . . . . . . . . . . . . . . . . . . . . . . . . . . . . . . . . . 273
Suspended Transmission
Dual Access
ECM (Error Correction Mode)
JBIG Transmission
Canceling a Transmission
. . . . . . . . . . . . . . . . . . . . . . . . . . . . . . . . . . . . . . . . . . . . . . . . . . . . . . . . . . . . . . . . . . . . 274
Other Transmission Functions . . . . . . . . . . . . . . . . . . . . . . . . . . . . . . . . . . . . . . . . . . . . . . . . . . . . 278
Setting SUB Codes for Transmission . . . . . . . . . . . . . . . . . . . . . . . . . . . . . . . . . . . . . . . . . . . . . . . . . . . . . . 278
Transfer Request
Last number Redial
Broadcast
Polling Transmission
Sending Confidential Faxes by Polling Transmission
Send Later
Scanning and Sending 2-Sided Originals
Sending a Fax Using the On Hook Dial Function
Faxing Using the External Telephone (Manual Transmission)
Canceling a Reserved Transmission
. . . . . . . . . . . . . . . . . . . . . . . . . . . . . . . . . . . . . . . . . . . . . . . . . . . . . . . . . . . . . . . . . . . . . . 283
. . . . . . . . . . . . . . . . . . . . . . . . . . . . . . . . . . . . . . . . . . . . . . . . . . . . . . . . . . . . . . . . . . . . . 289
Specifying the Destination . . . . . . . . . . . . . . . . . . . . . . . . . . . . . . . . . . . . . . . . . . . . . . . . . . . . . . 297
Enter the destination using the number keys . . . . . . . . . . . . . . . . . . . . . . . . . . . . . . . . . . . . . . . . . . . . . . . . . 297
Entering a pause
Selecting External Phone Numbers
Entering Tone
Specifying the Destination Using the [Quick Dial] Key
Specifying the Destination Using the [Speed Dial] Key
Specifying the Destination Using the [Address Book] Key
Selecting the Fax Destination in [Display] Mode
. . . . . . . . . . . . . . . . . . . . . . . . . . . . . . . . . . . . . . . . . . . . . . . . . . . . . . . . . . . . . 273
. . . . . . . . . . . . . . . . . . . . . . . . . . . . . . . . . . . . . . . . . . . . . . . . . . . . . . . . . 274
. . . . . . . . . . . . . . . . . . . . . . . . . . . . . . . . . . . . . . . . . . . . . . . . . . . . . . . . . . . . . . . . . 275
. . . . . . . . . . . . . . . . . . . . . . . . . . . . . . . . . . . . . . . . . . . . . . . . . . . . . . . . . . . . 275
. . . . . . . . . . . . . . . . . . . . . . . . . . . . . . . . . . . . . . . . . . . . . . . . . . . . . . . . . . . . . . . . . . 280
. . . . . . . . . . . . . . . . . . . . . . . . . . . . . . . . . . . . . . . . . . . . . . . . . . . . . . . . . . . . . . . . 282
. . . . . . . . . . . . . . . . . . . . . . . . . . . . . . . . . . . . . . . . . . . . . . . . . . . . . . . . . . . . . . . . 285
. . . . . . . . . . . . . . . . . . . . . . . . . . . . . . . . . . . . . . . . . . . . 287
. . . . . . . . . . . . . . . . . . . . . . . . . . . . . . . . . . . . . . . . . . . . . . . . . . 291
. . . . . . . . . . . . . . . . . . . . . . . . . . . . . . . . . . . . . . . . . . . . . . 292
. . . . . . . . . . . . . . . . . . . . . . . . . . . . . . . . . . . . . . . 294
. . . . . . . . . . . . . . . . . . . . . . . . . . . . . . . . . . . . . . . . . . . . . . . . . . . . . . 296
. . . . . . . . . . . . . . . . . . . . . . . . . . . . . . . . . . . . . . . . . . . . . . . . . . . . . . . . . . . . . 298
. . . . . . . . . . . . . . . . . . . . . . . . . . . . . . . . . . . . . . . . . . . . . . . . . . 298
. . . . . . . . . . . . . . . . . . . . . . . . . . . . . . . . . . . . . . . . . . . . . . . . . . . . . . . . . . . . . . . 298
. . . . . . . . . . . . . . . . . . . . . . . . . . . . . . . . . . . . . . . . . . . 299
. . . . . . . . . . . . . . . . . . . . . . . . . . . . . . . . . . . . . . . . . . . 300
. . . . . . . . . . . . . . . . . . . . . . . . . . . . . . . . . . . . . . . . . 301
. . . . . . . . . . . . . . . . . . . . . . . . . . . . . . . . . . . . . . . . . . 301
6

Selecting the Fax Destination in [Search] Mode . . . . . . . . . . . . . . . . . . . . . . . . . . . . . . . . . . . . . . . . . . 302
Specifying the Resolution of the Original . . . . . . . . . . . . . . . . . . . . . . . . . . . . . . . . . . . . . . . . . . . 303
Specifying the Resolution Settings . . . . . . . . . . . . . . . . . . . . . . . . . . . . . . . . . . . . . . . . . . . . . . . . . . . . . . . 303
Before Receiving a Fax . . . . . . . . . . . . . . . . . . . . . . . . . . . . . . . . . . . . . . . . . . . . . . . . . . . . . . . . 304
Types of Reception . . . . . . . . . . . . . . . . . . . . . . . . . . . . . . . . . . . . . . . . . . . . . . . . . . . . . . . . . . . . 305
Reception Functions . . . . . . . . . . . . . . . . . . . . . . . . . . . . . . . . . . . . . . . . . . . . . . . . . . . . . . . . . . . 306
Substitute Reception . . . . . . . . . . . . . . . . . . . . . . . . . . . . . . . . . . . . . . . . . . . . . . . . . . . . . . . . . . . . . . . 306
JBIG Reception
. . . . . . . . . . . . . . . . . . . . . . . . . . . . . . . . . . . . . . . . . . . . . . . . . . . . . . . . . . . . . . . . . . 307
Types of Reception modes . . . . . . . . . . . . . . . . . . . . . . . . . . . . . . . . . . . . . . . . . . . . . . . . . . . . . . 308
Fax Only Mode . . . . . . . . . . . . . . . . . . . . . . . . . . . . . . . . . . . . . . . . . . . . . . . . . . . . . . . . . . . . . . . . . . 308
Manual RX Mode
Auto SW Mode
. . . . . . . . . . . . . . . . . . . . . . . . . . . . . . . . . . . . . . . . . . . . . . . . . . . . . . . . . . . . . . . . . 309
. . . . . . . . . . . . . . . . . . . . . . . . . . . . . . . . . . . . . . . . . . . . . . . . . . . . . . . . . . . . . . . . . . 31 0
Useful Reception Functions . . . . . . . . . . . . . . . . . . . . . . . . . . . . . . . . . . . . . . . . . . . . . . . . . . . . . . 311
Polling Reception . . . . . . . . . . . . . . . . . . . . . . . . . . . . . . . . . . . . . . . . . . . . . . . . . . . . . . . . . . . . . . . . . 311
Receiving Secure Faxes by Polling Reception
Forwarding Received Documents
Closed Network RX
Canceling a Reserved Reception
. . . . . . . . . . . . . . . . . . . . . . . . . . . . . . . . . . . . . . . . . . . . . . . . . . . . . . . . . . . . . . . . 31 6
. . . . . . . . . . . . . . . . . . . . . . . . . . . . . . . . . . . . . . . . . . . . . . . . . . . . . . . 314
. . . . . . . . . . . . . . . . . . . . . . . . . . . . . . . . . . . . . . . . . . . . . . . . . . . . . . . . 316
. . . . . . . . . . . . . . . . . . . . . . . . . . . . . . . . . . . . . . . . . . . . . . . . 312
Internet Fax Functions . . . . . . . . . . . . . . . . . . . . . . . . . . . . . . . . . . . . . . . . . . . . . . . . . . . . . . . . . 318
Notes on Using Internet Fax . . . . . . . . . . . . . . . . . . . . . . . . . . . . . . . . . . . . . . . . . . . . . . . . . . . . . . . . . . . 31 9
Functions Not Available for E-mail Transmission
Functions Not Available for E-mail Reception
About Settings of Internet Fax Function
. . . . . . . . . . . . . . . . . . . . . . . . . . . . . . . . . . . . . . . . . . . . . . . 319
. . . . . . . . . . . . . . . . . . . . . . . . . . . . . . . . . . . . . . . . . . . . . . . . 319
. . . . . . . . . . . . . . . . . . . . . . . . . . . . . . . . . . . . . . . . . . . . . . . . . . . . 319
Sending Internet Faxes . . . . . . . . . . . . . . . . . . . . . . . . . . . . . . . . . . . . . . . . . . . . . . . . . . . . . . . . . 320
Reception of Internet Fax . . . . . . . . . . . . . . . . . . . . . . . . . . . . . . . . . . . . . . . . . . . . . . . . . . . . . . . 323
Forward to E-mail address . . . . . . . . . . . . . . . . . . . . . . . . . . . . . . . . . . . . . . . . . . . . . . . . . . . . . . . . . . . . 324
Sending Fax Documents from Computers . . . . . . . . . . . . . . . . . . . . . . . . . . . . . . . . . . . . . . . . . . . 325
Setting LAN-Fax Driver Properties . . . . . . . . . . . . . . . . . . . . . . . . . . . . . . . . . . . . . . . . . . . . . . . . . . . . . . . 326
8. Troubleshooting
Software Cannot Be Installed . . . . . . . . . . . . . . . . . . . . . . . . . . . . . . . . . . . . . . . . . . . . . . . . . . . . 327
Confirming Installation . . . . . . . . . . . . . . . . . . . . . . . . . . . . . . . . . . . . . . . . . . . . . . . . . . . . . . . . . . . . . . 327
Checking Your Computer Environment . . . . . . . . . . . . . . . . . . . . . . . . . . . . . . . . . . . . . . . . . . . . . 329
Driver Cannot Be Installed . . . . . . . . . . . . . . . . . . . . . . . . . . . . . . . . . . . . . . . . . . . . . . . . . . . . . . 331
USB Connection is not Automatically Detected . . . . . . . . . . . . . . . . . . . . . . . . . . . . . . . . . . . . . . 332
If Test Print Fails . . . . . . . . . . . . . . . . . . . . . . . . . . . . . . . . . . . . . . . . . . . . . . . . . . . . . . . . . . . . . . 333
Uninstalling . . . . . . . . . . . . . . . . . . . . . . . . . . . . . . . . . . . . . . . . . . . . . . . . . . . . . . . . . . . . . . . . . 334
Uninstalling the Driver . . . . . . . . . . . . . . . . . . . . . . . . . . . . . . . . . . . . . . . . . . . . . . . . . . . . . . . . . . . . . . 334
Deleting Devices
Replacing Consumables . . . . . . . . . . . . . . . . . . . . . . . . . . . . . . . . . . . . . . . . . . . . . . . . . . . . . . . . 337
Replacing a Print Cartridge . . . . . . . . . . . . . . . . . . . . . . . . . . . . . . . . . . . . . . . . . . . . . . . . . . . . . . . . . . . 337
When You Have Problems Operating the Machine . . . . . . . . . . . . . . . . . . . . . . . . . . . . . . . . . . . 345
Paper Is Not Fed or Delivered Normally . . . . . . . . . . . . . . . . . . . . . . . . . . . . . . . . . . . . . . . . . . . 347
Removing Jammed Originals and Paper . . . . . . . . . . . . . . . . . . . . . . . . . . . . . . . . . . . . . . . . . . . 349
Removing Paper Jammed in the Paper Tray (Tray 1) . . . . . . . . . . . . . . . . . . . . . . . . . . . . . . . . . . . . . . . . . . . . 349
Removing Paper Jammed in the Optional Tray (Tray 2 (Optional))
Removing Paper Jammed in the Multi Bypass Tray (optional)
. . . . . . . . . . . . . . . . . . . . . . . . . . . . . . . . . . . . . . . . . . . . . . . . . . . . . . . . . . . . . . . . . 336
Checking the remaining ink
Replacing a print cartridge
Replacing the Friction Pad
Handling print cartridges
. . . . . . . . . . . . . . . . . . . . . . . . . . . . . . . . . . . . . . . . . . . . . . . . . . . . . . 337
. . . . . . . . . . . . . . . . . . . . . . . . . . . . . . . . . . . . . . . . . . . . . . . . . . . . . . . 339
. . . . . . . . . . . . . . . . . . . . . . . . . . . . . . . . . . . . . . . . . . . . . . . . . . . . . . . 341
. . . . . . . . . . . . . . . . . . . . . . . . . . . . . . . . . . . . . . . . . . . . . . . . . . . . . . . . 344
. . . . . . . . . . . . . . . . . . . . . . . . . . . . . . . . . . . 351
. . . . . . . . . . . . . . . . . . . . . . . . . . . . . . . . . . . . . . . 353
7

Removing Paper Jammed around the Guide Board . . . . . . . . . . . . . . . . . . . . . . . . . . . . . . . . . . . . . . . . . . . . . 357
Removing Paper Jammed in the Duplex Unit
Removing Paper Jammed in the Output Tray or under the Scanner Unit
Removing Paper Jammed in the ADF
. . . . . . . . . . . . . . . . . . . . . . . . . . . . . . . . . . . . . . . . . . . . . . . . . 359
. . . . . . . . . . . . . . . . . . . . . . . . . . . . . . . . . 361
. . . . . . . . . . . . . . . . . . . . . . . . . . . . . . . . . . . . . . . . . . . . . . . . . . . . . 362
Troubleshooting When Using the Printer Function . . . . . . . . . . . . . . . . . . . . . . . . . . . . . . . . . . . . 364
If You Have Problems Using the Printer Function . . . . . . . . . . . . . . . . . . . . . . . . . . . . . . . . . . . . . . . . . . . . . . . 364
Points to Remember when Printer Sharing under Windows 98/Me
Print Results Are Not Satisfactory
Checking the condition of the machine
Changing the printer driver setting
Colors do not match the displayed image
Positions do not match the displayed image
If a Message Appears during Installation
. . . . . . . . . . . . . . . . . . . . . . . . . . . . . . . . . . . . . . . . . . . . . . . . . . . . . . . . 366
. . . . . . . . . . . . . . . . . . . . . . . . . . . . . . . . . . . . . . . . . . . . . . . 366
. . . . . . . . . . . . . . . . . . . . . . . . . . . . . . . . . . . . . . . . . . . . . . . . . . 368
. . . . . . . . . . . . . . . . . . . . . . . . . . . . . . . . . . . . . . . . . . . . . . 369
. . . . . . . . . . . . . . . . . . . . . . . . . . . . . . . . . . . . . . . . . . . . . 370
. . . . . . . . . . . . . . . . . . . . . . . . . . . . . . . . . . . . . . . . . . . . . . . . . . . 371
. . . . . . . . . . . . . . . . . . . . . . . . . . . . . . . 365
Troubleshooting When Using the Copier Function . . . . . . . . . . . . . . . . . . . . . . . . . . . . . . . . . . . . 372
If You Have Problems Using the Copier Function . . . . . . . . . . . . . . . . . . . . . . . . . . . . . . . . . . . . . . . . . . . . . . 372
Print Results Are Not Satisfactory (Copier Function)
. . . . . . . . . . . . . . . . . . . . . . . . . . . . . . . . . . . . . . . . . . . . . 373
Troubleshooting When Using the Scanner Function . . . . . . . . . . . . . . . . . . . . . . . . . . . . . . . . . . . 374
If You Have Problems Using the Scanner Function . . . . . . . . . . . . . . . . . . . . . . . . . . . . . . . . . . . . . . . . . . . . . 374
Troubleshooting When Using the Facsimile Function . . . . . . . . . . . . . . . . . . . . . . . . . . . . . . . . . . 375
If You Have Problems Using the Facsimile Function . . . . . . . . . . . . . . . . . . . . . . . . . . . . . . . . . . . . . . . . . . . . . 375
Print Results Are Not Satisfactory (Facsimile Function)
. . . . . . . . . . . . . . . . . . . . . . . . . . . . . . . . . . . . . . . . . . . 375
Control Panel Error Messages: General . . . . . . . . . . . . . . . . . . . . . . . . . . . . . . . . . . . . . . . . . . . . 376
Printer Function Error Messages . . . . . . . . . . . . . . . . . . . . . . . . . . . . . . . . . . . . . . . . . . . . . . . . . . . . . . . . 376
Copier Function Error Messages
Scanner Function Error Messages
TWAIN Scanner Function Error Messages: Control Panel
TWAIN Scanner Function Error Messages: Client Computer
Scanner Function Error Messages: Control Panel
Facsimile Function Error Messages
Facsimile Function Error Messages: Control Panel
Internet Fax Function Error Messages: Control Panel
Web Image Monitor Error Messages
. . . . . . . . . . . . . . . . . . . . . . . . . . . . . . . . . . . . . . . . . . . . . . . . . . . . . . . . 378
. . . . . . . . . . . . . . . . . . . . . . . . . . . . . . . . . . . . . . . . . . . . . . . . . . . . . . . 381
. . . . . . . . . . . . . . . . . . . . . . . . . . . . . . . . . . . . 381
. . . . . . . . . . . . . . . . . . . . . . . . . . . . . . . . . . . 382
. . . . . . . . . . . . . . . . . . . . . . . . . . . . . . . . . . . . . . . . . 383
. . . . . . . . . . . . . . . . . . . . . . . . . . . . . . . . . . . . . . . . . . . . . . . . . . . . . . . 384
. . . . . . . . . . . . . . . . . . . . . . . . . . . . . . . . . . . . . . . . . 384
. . . . . . . . . . . . . . . . . . . . . . . . . . . . . . . . . . . . . . . 387
. . . . . . . . . . . . . . . . . . . . . . . . . . . . . . . . . . . . . . . . . . . . . . . . . . . . . 388
Status Monitor Errors . . . . . . . . . . . . . . . . . . . . . . . . . . . . . . . . . . . . . . . . . . . . . . . . . . . . . . . . . . 389
Status Monitor Does Not Open . . . . . . . . . . . . . . . . . . . . . . . . . . . . . . . . . . . . . . . . . . . . . . . . . . . . . . . . 389
No Response from Device
No Paper/Tray Not Detected (Tray 1)
Canceling the print job
No Paper/Tray Not Detected (Tray 2)
Canceling the print job
No Paper/Tray Not Detected (Multi Bypass Tray)
Canceling the print job
Paper Size and Type Mismatch (Tray 1)
Loading the Appropriate Paper
Canceling the print job
Paper Size and Type Mismatch (Tray 2)
Loading the Appropriate Paper
Canceling the print job
Paper Size and Type Mismatch (Multi Bypass Tray)
Loading the Appropriate Paper
Canceling the print job
Paper Size and Type Mismatch (Auto Tray Select)
Loading the Appropriate Paper
Canceling the print job
Cover Open
Cover Open / Print Cartridge(s) Not Detected
. . . . . . . . . . . . . . . . . . . . . . . . . . . . . . . . . . . . . . . . . . . . . . . . . . . . . . . . . . . . . . . . . . . . 401
. . . . . . . . . . . . . . . . . . . . . . . . . . . . . . . . . . . . . . . . . . . . . . . . . . . . . . . . . . . . 389
. . . . . . . . . . . . . . . . . . . . . . . . . . . . . . . . . . . . . . . . . . . . . . . . . . . . 390
. . . . . . . . . . . . . . . . . . . . . . . . . . . . . . . . . . . . . . . . . . . . . . . . . . . . . . . . . 390
. . . . . . . . . . . . . . . . . . . . . . . . . . . . . . . . . . . . . . . . . . . . . . . . . . . . 391
. . . . . . . . . . . . . . . . . . . . . . . . . . . . . . . . . . . . . . . . . . . . . . . . . . . . . . . . . 391
. . . . . . . . . . . . . . . . . . . . . . . . . . . . . . . . . . . . . . . . . . . . . 392
. . . . . . . . . . . . . . . . . . . . . . . . . . . . . . . . . . . . . . . . . . . . . . . . . . . . . . . . . 392
. . . . . . . . . . . . . . . . . . . . . . . . . . . . . . . . . . . . . . . . . . . . . . . . . . . 393
. . . . . . . . . . . . . . . . . . . . . . . . . . . . . . . . . . . . . . . . . . . . . . . . . . . . 393
. . . . . . . . . . . . . . . . . . . . . . . . . . . . . . . . . . . . . . . . . . . . . . . . . . . . . . . . . 394
. . . . . . . . . . . . . . . . . . . . . . . . . . . . . . . . . . . . . . . . . . . . . . . . . . . 395
. . . . . . . . . . . . . . . . . . . . . . . . . . . . . . . . . . . . . . . . . . . . . . . . . . . . 395
. . . . . . . . . . . . . . . . . . . . . . . . . . . . . . . . . . . . . . . . . . . . . . . . . . . . . . . . . 396
. . . . . . . . . . . . . . . . . . . . . . . . . . . . . . . . . . . . . . . . . . . . 397
. . . . . . . . . . . . . . . . . . . . . . . . . . . . . . . . . . . . . . . . . . . . . . . . . . . . 397
. . . . . . . . . . . . . . . . . . . . . . . . . . . . . . . . . . . . . . . . . . . . . . . . . . . . . . . . . 398
. . . . . . . . . . . . . . . . . . . . . . . . . . . . . . . . . . . . . . . . . . . . . 399
. . . . . . . . . . . . . . . . . . . . . . . . . . . . . . . . . . . . . . . . . . . . . . . . . . . . 399
. . . . . . . . . . . . . . . . . . . . . . . . . . . . . . . . . . . . . . . . . . . . . . . . . . . . . . . . . 400
. . . . . . . . . . . . . . . . . . . . . . . . . . . . . . . . . . . . . . . . . . . . . . . 402
8

Duplex Unit Not Detected . . . . . . . . . . . . . . . . . . . . . . . . . . . . . . . . . . . . . . . . . . . . . . . . . . . . . . . . . . . . 403
Cartridge End
Cartridge/Print-head Tank Empty
Ink Collector Unit Not Detected
Out of Printable Temperature Range
Network Interface Board Error
Device Error
. . . . . . . . . . . . . . . . . . . . . . . . . . . . . . . . . . . . . . . . . . . . . . . . . . . . . . . . . . . . . . . . . . . 404
. . . . . . . . . . . . . . . . . . . . . . . . . . . . . . . . . . . . . . . . . . . . . . . . . . . . . . . . 405
. . . . . . . . . . . . . . . . . . . . . . . . . . . . . . . . . . . . . . . . . . . . . . . . . . . . . . . . 406
. . . . . . . . . . . . . . . . . . . . . . . . . . . . . . . . . . . . . . . . . . . . . . . . . . . . . . 407
. . . . . . . . . . . . . . . . . . . . . . . . . . . . . . . . . . . . . . . . . . . . . . . . . . . . . . . . . 407
. . . . . . . . . . . . . . . . . . . . . . . . . . . . . . . . . . . . . . . . . . . . . . . . . . . . . . . . . . . . . . . . . . . . 408
9. Checking the Machine Status
Using the Status Monitor . . . . . . . . . . . . . . . . . . . . . . . . . . . . . . . . . . . . . . . . . . . . . . . . . . . . . . . 409
Receiving Notification of Print Job Status via the Status Monitor . . . . . . . . . . . . . . . . . . . . . . . . . . . . . . . . . . . . . 409
Using the SmartDeviceMonitor for Client . . . . . . . . . . . . . . . . . . . . . . . . . . . . . . . . . . . . . . . . . . . 410
Monitoring Machines . . . . . . . . . . . . . . . . . . . . . . . . . . . . . . . . . . . . . . . . . . . . . . . . . . . . . . . . . . . . . . 411
Using Notification via SmartDeviceMonitor for Client
Specifying the print server
Specifying the client computer settings
Specifying the Settings for Monitoring the Machine
Displaying the Machine Status
When Using IPP with SmartDeviceMonitor for Client
. . . . . . . . . . . . . . . . . . . . . . . . . . . . . . . . . . . . . . . . . . . . . . . . . . . . . . . 412
. . . . . . . . . . . . . . . . . . . . . . . . . . . . . . . . . . . . . . . . . . . . . . . . . . . . . . . . . 413
Using Device Setting Utility . . . . . . . . . . . . . . . . . . . . . . . . . . . . . . . . . . . . . . . . . . . . . . . . . . . . . 415
Procedure . . . . . . . . . . . . . . . . . . . . . . . . . . . . . . . . . . . . . . . . . . . . . . . . . . . . . . . . . . . . . . . . . . . . . 417
Registering or Changing Quick Dial, Speed Dial, and Group Dial Destinations
Printing Quick Dial, Speed Dial, or Group Dial Destinations
Changing the Machine's System Settings
Displaying the Total Counter
Displaying the Options Installed on the Machine
. . . . . . . . . . . . . . . . . . . . . . . . . . . . . . . . . . . . . . . . . . . . . . . . . . . . . . . . . . 421
. . . . . . . . . . . . . . . . . . . . . . . . . . . . . . . . . . . . . . . . . . . . . . . . . . . 420
Using Web browser . . . . . . . . . . . . . . . . . . . . . . . . . . . . . . . . . . . . . . . . . . . . . . . . . . . . . . . . . . . 422
Displaying Top Page . . . . . . . . . . . . . . . . . . . . . . . . . . . . . . . . . . . . . . . . . . . . . . . . . . . . . . . . . . . . . . . 423
About Menu and Mode
Web Image Monitor settings
Access in the Administrator Mode
Checking the Machine Status
Changing the System Settings
Notifying the Machine Status by E-mail
Specifying Notification the machine Status by E-mail
Setting SMTP Group 1-4
E-mail Notification
Connecting to an FTP Server
Specifying an FTP Proxy Server
. . . . . . . . . . . . . . . . . . . . . . . . . . . . . . . . . . . . . . . . . . . . . . . . . . . . . . . . . . . . . 424
. . . . . . . . . . . . . . . . . . . . . . . . . . . . . . . . . . . . . . . . . . . . . . . . . . . . . . 424
. . . . . . . . . . . . . . . . . . . . . . . . . . . . . . . . . . . . . . . . . . . . . . . . . . . . . . . 426
. . . . . . . . . . . . . . . . . . . . . . . . . . . . . . . . . . . . . . . . . . . . . . . . . . . . . . . . . . 426
. . . . . . . . . . . . . . . . . . . . . . . . . . . . . . . . . . . . . . . . . . . . . . . . . . . . . . . . . . 427
. . . . . . . . . . . . . . . . . . . . . . . . . . . . . . . . . . . . . . . . . . . . . . . . . . . . 427
. . . . . . . . . . . . . . . . . . . . . . . . . . . . . . . . . . . . . . . . . . . . . . . . . . . . . . . . 429
. . . . . . . . . . . . . . . . . . . . . . . . . . . . . . . . . . . . . . . . . . . . . . . . . . . . . . . . . . . . 430
. . . . . . . . . . . . . . . . . . . . . . . . . . . . . . . . . . . . . . . . . . . . . . . . . . . . . . . . . . 433
. . . . . . . . . . . . . . . . . . . . . . . . . . . . . . . . . . . . . . . . . . . . . . . . . . . . . . . . . 434
Using Telnet . . . . . . . . . . . . . . . . . . . . . . . . . . . . . . . . . . . . . . . . . . . . . . . . . . . . . . . . . . . . . . . . . 435
Procedure . . . . . . . . . . . . . . . . . . . . . . . . . . . . . . . . . . . . . . . . . . . . . . . . . . . . . . . . . . . . . . . . . . . . . 435
Telnet Settings
. . . . . . . . . . . . . . . . . . . . . . . . . . . . . . . . . . . . . . . . . . . . . . . . . . . . . . . . . . . . . . . . . . . 436
Telnet Settings
. . . . . . . . . . . . . . . . . . . . . . . . . . . . . . . . . . . . . . . . . . . . . . . . . . . . . . . . . . . . . . 436
SNMP . . . . . . . . . . . . . . . . . . . . . . . . . . . . . . . . . . . . . . . . . . . . . . . . . . . . . . . . . . . . . . . . . . . . . . 437
Printing a Report for Checking the Machine's Settings, Status, and Communication Log . . . . . . . 438
Quick Dial List . . . . . . . . . . . . . . . . . . . . . . . . . . . . . . . . . . . . . . . . . . . . . . . . . . . . . . . . . . . . . . . . . . . 438
Speed Dial List
Group List
Machine Status List
TX Status Report
RX Status Report
Journal
Memory Data List
Print Memory Image
. . . . . . . . . . . . . . . . . . . . . . . . . . . . . . . . . . . . . . . . . . . . . . . . . . . . . . . . . . . . . . . . . . . 439
. . . . . . . . . . . . . . . . . . . . . . . . . . . . . . . . . . . . . . . . . . . . . . . . . . . . . . . . . . . . . . . . . . . . . 439
. . . . . . . . . . . . . . . . . . . . . . . . . . . . . . . . . . . . . . . . . . . . . . . . . . . . . . . . . . . . . . . . 440
. . . . . . . . . . . . . . . . . . . . . . . . . . . . . . . . . . . . . . . . . . . . . . . . . . . . . . . . . . . . . . . . . . 440
. . . . . . . . . . . . . . . . . . . . . . . . . . . . . . . . . . . . . . . . . . . . . . . . . . . . . . . . . . . . . . . . . . 441
. . . . . . . . . . . . . . . . . . . . . . . . . . . . . . . . . . . . . . . . . . . . . . . . . . . . . . . . . . . . . . . . . . . . . . . 441
. . . . . . . . . . . . . . . . . . . . . . . . . . . . . . . . . . . . . . . . . . . . . . . . . . . . . . . . . . . . . . . . . 442
. . . . . . . . . . . . . . . . . . . . . . . . . . . . . . . . . . . . . . . . . . . . . . . . . . . . . . . . . . . . . . . 443
. . . . . . . . . . . . . . . . . . . . . . . . . . . . . . . . . . . . . . . . . . . 411
. . . . . . . . . . . . . . . . . . . . . . . . . . . . . . . . . . . . . . . . . . . . . . . . 412
. . . . . . . . . . . . . . . . . . . . . . . . . . . . . . . . . . . . . . . . . . . . 413
. . . . . . . . . . . . . . . . . . . . . . . . . . . . . . . . . . . . . . . . . . . . 41 4
. . . . . . . . . . . . . . . . . . . . . . . . . . . . 418
. . . . . . . . . . . . . . . . . . . . . . . . . . . . . . . . . . . . . . . 420
. . . . . . . . . . . . . . . . . . . . . . . . . . . . . . . . . . . . . . . . . . . . . . 421
. . . . . . . . . . . . . . . . . . . . . . . . . . . . . . . . . . . . . . . 428
9

Printing the List . . . . . . . . . . . . . . . . . . . . . . . . . . . . . . . . . . . . . . . . . . . . . . . . . . . . . . . . . . . . . . . . . . . 443
Checking the Communication Result . . . . . . . . . . . . . . . . . . . . . . . . . . . . . . . . . . . . . . . . . . . . . . . 444
10. Maintaining
Cleaning . . . . . . . . . . . . . . . . . . . . . . . . . . . . . . . . . . . . . . . . . . . . . . . . . . . . . . . . . . . . . . . . . . . . 445
Cleaning the Exposure Glass . . . . . . . . . . . . . . . . . . . . . . . . . . . . . . . . . . . . . . . . . . . . . . . . . . . . . . . . . . 446
Cleaning the ADF
. . . . . . . . . . . . . . . . . . . . . . . . . . . . . . . . . . . . . . . . . . . . . . . . . . . . . . . . . . . . . . . . . 446
Moving . . . . . . . . . . . . . . . . . . . . . . . . . . . . . . . . . . . . . . . . . . . . . . . . . . . . . . . . . . . . . . . . . . . . . 447
Moving a Short Distance . . . . . . . . . . . . . . . . . . . . . . . . . . . . . . . . . . . . . . . . . . . . . . . . . . . . . . . . . . . . 447
Moving a Long Distance
. . . . . . . . . . . . . . . . . . . . . . . . . . . . . . . . . . . . . . . . . . . . . . . . . . . . . . . . . . . . . 449
Disposing . . . . . . . . . . . . . . . . . . . . . . . . . . . . . . . . . . . . . . . . . . . . . . . . . . . . . . . . . . . . . . . . . . . 450
When Not Using for a Long Period of Time . . . . . . . . . . . . . . . . . . . . . . . . . . . . . . . . . . . . . . . . . 451
Where to Inquire . . . . . . . . . . . . . . . . . . . . . . . . . . . . . . . . . . . . . . . . . . . . . . . . . . . . . . . . . . . . . 452
Counter . . . . . . . . . . . . . . . . . . . . . . . . . . . . . . . . . . . . . . . . . . . . . . . . . . . . . . . . . . . . . . . . . . . . 453
Printing the Total Counter . . . . . . . . . . . . . . . . . . . . . . . . . . . . . . . . . . . . . . . . . . . . . . . . . . . . . . . . . . . . 454
Recommended Consumables . . . . . . . . . . . . . . . . . . . . . . . . . . . . . . . . . . . . . . . . . . . . . . . . . . . .455
Option and Consumables . . . . . . . . . . . . . . . . . . . . . . . . . . . . . . . . . . . . . . . . . . . . . . . . . . . . . . . 456
11. A p p en d i x
Specification: General . . . . . . . . . . . . . . . . . . . . . . . . . . . . . . . . . . . . . . . . . . . . . . . . . . . . . . . . . 457
Printer Function Specification . . . . . . . . . . . . . . . . . . . . . . . . . . . . . . . . . . . . . . . . . . . . . . . . . . . . 460
Copier Function Specification . . . . . . . . . . . . . . . . . . . . . . . . . . . . . . . . . . . . . . . . . . . . . . . . . . . . 461
Scanner Function Specification . . . . . . . . . . . . . . . . . . . . . . . . . . . . . . . . . . . . . . . . . . . . . . . . . . . 463
Fax Function Specification . . . . . . . . . . . . . . . . . . . . . . . . . . . . . . . . . . . . . . . . . . . . . . . . . . . . . . 465
Option (Paper Feed Unit) . . . . . . . . . . . . . . . . . . . . . . . . . . . . . . . . . . . . . . . . . . . . . . . . . . . . . . . 467
Option (Multi Bypass Tray) . . . . . . . . . . . . . . . . . . . . . . . . . . . . . . . . . . . . . . . . . . . . . . . . . . . . . 468
Option (Network Interface Board (GX 3000SF only)) . . . . . . . . . . . . . . . . . . . . . . . . . . . . . . . . 469
Software on the CD-ROM . . . . . . . . . . . . . . . . . . . . . . . . . . . . . . . . . . . . . . . . . . . . . . . . . . . . . . 470
Files . . . . . . . . . . . . . . . . . . . . . . . . . . . . . . . . . . . . . . . . . . . . . . . . . . . . . . . . . . . . . . . . . . . . . . . . . 470
RPCS Raster Printer Drivers
PCL Printer Drivers (GX 3050SFN only)
TWAIN Driver
LAN-Fax Driver
Device Setting Utility
SmartDeviceMonitor for Client
Manuals (HTML files)
. . . . . . . . . . . . . . . . . . . . . . . . . . . . . . . . . . . . . . . . . . . . . . . . . . . . . . . . . . . . . . . . . . . 472
. . . . . . . . . . . . . . . . . . . . . . . . . . . . . . . . . . . . . . . . . . . . . . . . . . . . . . . . . . . . . . . . . . 473
Printer Driver . . . . . . . . . . . . . . . . . . . . . . . . . . . . . . . . . . . . . . . . . . . . . . . . . . . . . . . . . . . . . . . . 475
Checking the Current Printer Driver Version . . . . . . . . . . . . . . . . . . . . . . . . . . . . . . . . . . . . . . . . . . . . . . . . . 475
Electromagnetic Interference . . . . . . . . . . . . . . . . . . . . . . . . . . . . . . . . . . . . . . . . . . . . . . . . . . . . 476
List of Printouts . . . . . . . . . . . . . . . . . . . . . . . . . . . . . . . . . . . . . . . . . . . . . . . . . . . . . . . . . . . . . . . 477
Entering Text . . . . . . . . . . . . . . . . . . . . . . . . . . . . . . . . . . . . . . . . . . . . . . . . . . . . . . . . . . . . . . . . 479
Information about Installed Software . . . . . . . . . . . . . . . . . . . . . . . . . . . . . . . . . . . . . . . . . . . . . .482
expat . . . . . . . . . . . . . . . . . . . . . . . . . . . . . . . . . . . . . . . . . . . . . . . . . . . . . . . . . . . . . . . . . . . . . . . . 482
NetBSD
. . . . . . . . . . . . . . . . . . . . . . . . . . . . . . . . . . . . . . . . . . . . . . . . . . . . . . . . . . . . . . . . . . . . . . . 482
Sablotron
JPEG LIBRARY
Open LDAP
. . . . . . . . . . . . . . . . . . . . . . . . . . . . . . . . . . . . . . . . . . . . . . . . . . . . . . . . . . . . . . . . . . . . . . 484
. . . . . . . . . . . . . . . . . . . . . . . . . . . . . . . . . . . . . . . . . . . . . . . . . . . . . . . . . . . . . . . . . . . 485
. . . . . . . . . . . . . . . . . . . . . . . . . . . . . . . . . . . . . . . . . . . . . . . . . . . . . . . . . . . . . . . . . . . . 485
. . . . . . . . . . . . . . . . . . . . . . . . . . . . . . . . . . . . . . . . . . . . . . . . . . . . . . . . . . . 47 0
. . . . . . . . . . . . . . . . . . . . . . . . . . . . . . . . . . . . . . . . . . . . . . . . . . . 471
. . . . . . . . . . . . . . . . . . . . . . . . . . . . . . . . . . . . . . . . . . . . . . . . . . . . . . . . . . . . . . . 473
. . . . . . . . . . . . . . . . . . . . . . . . . . . . . . . . . . . . . . . . . . . . . . . . . . . . . . . . . 474
. . . . . . . . . . . . . . . . . . . . . . . . . . . . . . . . . . . . . . . . . . . . . . . . . . . . . . . . . . . . . . . 474
INDEX . . . . . . . . . . . . . . . . . . . . . . . . . . . . . . . . . . . . . . . . . . . . . . . . . . . . . . . . . . . . . . . . . . . 487
10

1. Read This First
This chapter explains how to use the manual and gives the meanings of the symbols that appear in
the manual.
This chapter also explains the names and functions of the machine's components.
About This Product
This section tells you about the product.
Introduction
Thank you very much for choosing this product.
This manual describes detailed instructions on the operation and notes about the use of this
machine. To get maximum versatility from this machine, all operators are requested to read this manual carefully and follow the instructions. Please keep this manual in a handy place near the
machine. Read this manual carefully before you use this machine and keep it handy for future reference. For safe and correct use, be sure to read the Safety Information in “Safety Information” before
using the machine.
1
11

1. Read This First
Trademarks
Adobe, Acroba, Flash, Macromedia are either registered trademarks or trademarks of Adobe Systems Incorporated in the United States and/or other countries.
1
PCL is a registered trademark of Hewlett-Packard Company.
UNIX is a registered trademark in the United States and other countries, licensed exclusively
through X/Open Company Limited.
®
Citrix
and MetaFrame® are registered trademarks of Citrix Systems, Inc.
UPnP is a trademark of the UPnP Implementers Corporation.
IPS-PRINT Printer Language Emulation Copyright© 1999-2000 Oak Technology, Inc., All rights
reserved.
Pentium is a registered trademark of Intel Corporation.
Netscape is a registered trademark of Netscape Communication Corporation in the U.S. and/or
other countries.
Microsoft, Windows, Windows NT are either registered trademarks or trademarks of Microsoft Cor-
poration in the U.S. and/or other countries.
Other product names used herein are for identification purposes only and might be trademarks of
their respective companies. We disclaim any and all rights to those marks.
z
The product name of Windows® 98 is Microsoft® Windows® 98.
z
The product name of Windows® Me is Microsoft® Windows® Millennium Edition (Windows Me).
z
The product names of Windows® 2000 are as follows:
Microsoft
Microsoft
Microsoft
z
The product names of Windows® XP are as follows:
Microsoft
Microsoft
z
The product names of Windows Server® 2003 are as follows:
Microsoft
Microsoft
Microsoft
z
The product names of Windows NT® 4.0 are as follows:
Microsoft
Microsoft
®
Windows® 2000 Professional
®
Windows® 2000 Server
®
Windows® 2000 Advanced Server
®
Windows® XP Home Edition
®
Windows® XP Professional
®
Windows Server® 2003 Standard Edition
®
Windows Server® 2003 Enterprise Edition
®
Windows Server® 2003 Web Edition
®
Windows NT® Workstation 4.0
®
Windows NT® Server 4.0
12

Disclaimer
1) Contents of this manual are subject to change without prior notice.
2) In no event will the company be liable for direct, indirect, special, incidental, or consequential
damages as a result of handling or operating the machine.
3) This manual may not be reproduced in whole or in part, modified, quoted, or reprinted without
permission.
User's Notes
z
Do not copy or print any item for which reproduction is prohibited by law. Copying or printing
the following items is generally prohibited by local law: bank notes, revenue stamps, bonds,
stock certificates, bank drafts, checks, passports, driver's licenses. The preceding list is meant
as a guide only and is not inclusive. We assume no responsibility for its completeness or accuracy. If you have any questions concerning the legality of copying or printing certain items,
consult with your legal advisor.
z
Do not leave the scanner unit or right front cover open. Doing so could cause an injury.
z
During printing, do not move the machine or open its covers.
z
During printing, do not pull out a paper tray. Printing will stop and the paper will jam.
z
Take care not to let paper clips and other foreign objects fall inside the machine.
z
During printing, do not turn off the power or unplug the power cord from the wall outlet.
z
During printing, do not subject the machine to external shock such as that caused by tapping
paper on it.
z
When not using the machine, turn off the power.
z
This machine has a nominal operational life of 5 years if used normally for 8 hours a day to produce up to 2,500 A4 prints a month. Exceeding these limits may reduce the operational life. The
operational life also depends on the environment in which the machine is used.
z
“Total Counter” displays the number of pages printed. Use “Total Counter” to estimate the
number of pages that can be printed within the machine's remaining operational life. The
machine's operational life is calculated based on the number of pages that it can print on plain
paper in [Speed priority] mode.
z
If you will not be using the machine for a long time, turn it off, disconnect its USB cable, and then
unplug it from the wall outlet. Ideally, you should print something at least once every 20 to 25
days. If you leave the machine unused for longer than this, it will consume a considerable amount
of ink for maintenance and print head cleaning when finally turned back on.
z
To protect the print heads and maintain print quality, the machine periodically uses ink for maintenance and print head cleaning when it is switched on and before it prints.
z
The machine stops printing if one of the print cartridges runs out. If a message prompting you to
change a print cartridge appears, change the cartridge as soon as possible.
z
Prints produced by duplex printing are lighter than those produced by single-sided printing.
z
This machine is designed to have an operational life of 5 years or be good for 150,000 pages.
About This Product
1
13
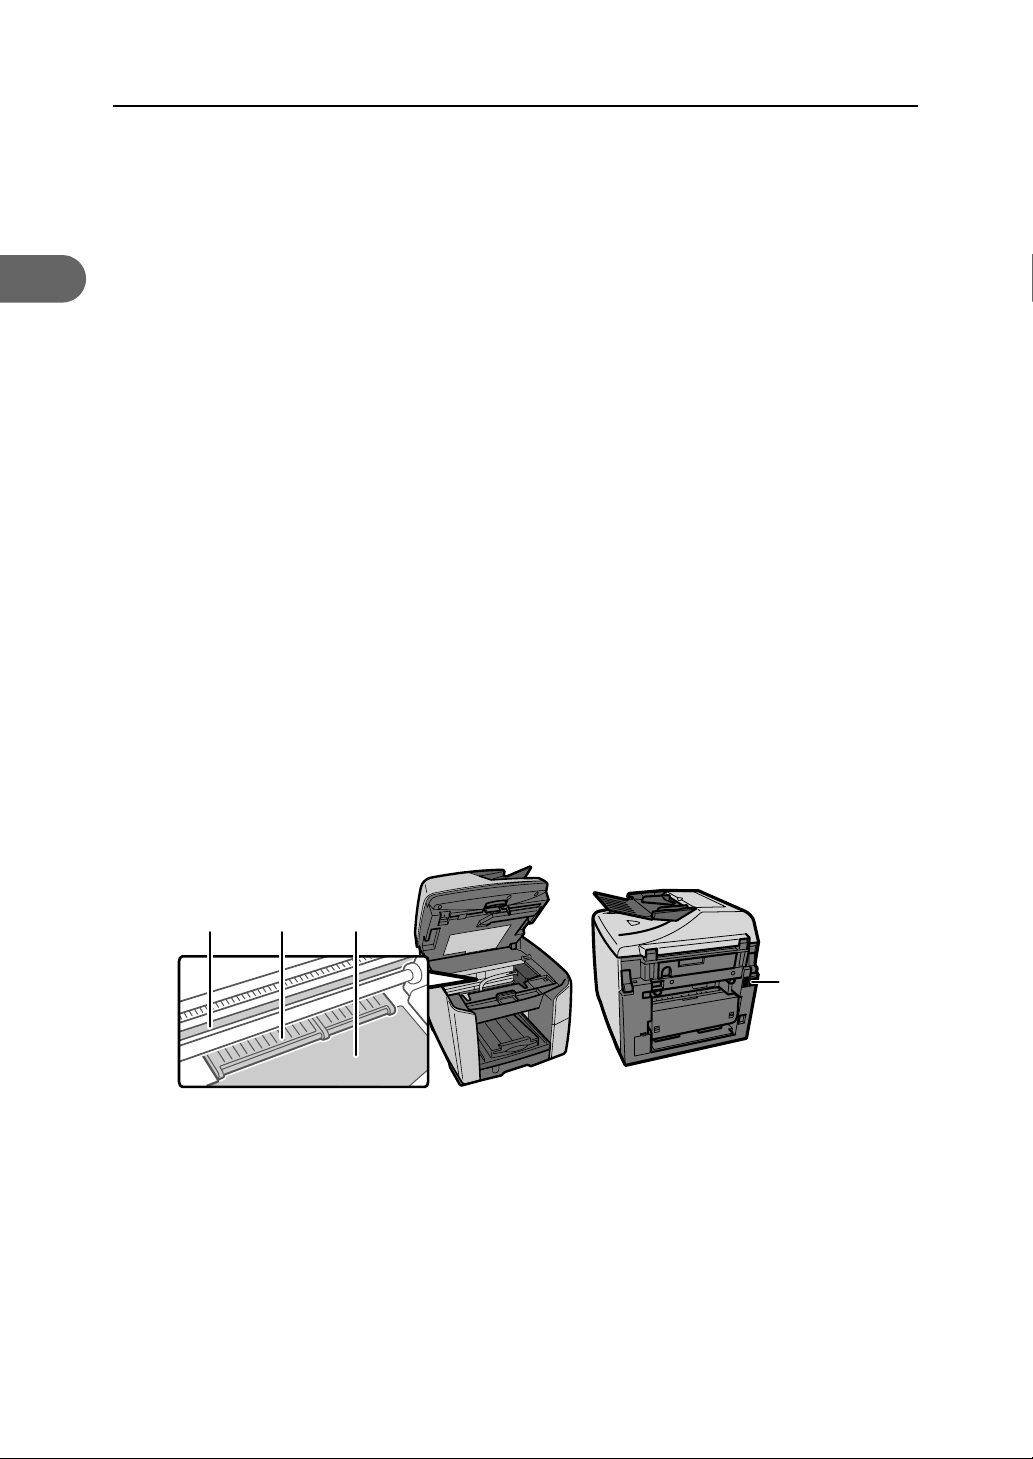
1
1. Read This First
z
Depending on your printing document, the ink collector unit may fill up sooner than normal. An
“Collector Near Full” message appears shortly before the ink collector unit is full. Contact your
service representative as soon as possible for a replacement ink collector unit (charge incurred).
z
To maintain print quality, cartridges should be opened before their expiration date and used
within 6 months of being opened.
z
Ink can remain inside used print cartridges.
z
Color ink may be used even if you print all-black text or if you specify black and white printing. It
may also be used for print head cleaning and refreshing, which are done to maintain machine
performance.
z
Print cartridges and supplies comply with the manufacturer's safety specifications. To ensure
safety and reliability, use genuine print cartridges and supplies.
z
Black and white printing also consumes color ink.
z
Printing stops if one of the print cartridges becomes empty. If a cartridge containing a color ink
such as cyan, yellow, or magenta becomes empty, you cannot print, even in black/white.
z
If you print a large number of pages in a day, for instance, hundreds of pages, the nozzles of the
print-heads may be clogged the next day. If this happens, clean the print-heads.
z
This machine performs regular automatic maintenance, after and during printing, to ensure consistent print quality. Maintenance is also performed when printing begins after a period of disuse.
z
In addition to printing, ink is also consumed when the machine's power is turned on, head cleaning is performed, and print cartridges are installed.
z
Do not turn off the power when the machine is in operation.
z
High temperatures inside the machine can cause a breakdown. Do not lean anything against the
vent or block it in any way.
z
Warm air from the vent is normal and not a cause for concern.
z
Do not touch the feed belt, encoder band (the transparent, narrow, black band), or paper pressing board.
213
4
BBF011S
1) Encoder band
2) Paper pressing board
3) Feed belt
4) Vent
14

Saving Color Copies
Followings are notes on saving color copies.
z
Like most prints, color prints will fade if exposed to strong light or dampness and humidity for
lengthy periods. Preserve the quality of your copies by storing them in a binder in a dark, dry
place.
z
Ink may melt when using solvent type adhesive agents for pasting prints.
Manuals for This Machine
Read the appropriate manual according to what you want to do.
Quick Installation Guide
This guide explains how to unpack the machine, set it up, and install options. It also explains
basic settings and operations.
User Guide
This guide is stored on the “Drivers, Manual & Utilities” CD-ROM. It explains general operation
and covers
z
network settings,
z
driver installation,
z
checking and changing settings using a Web browser and other utilities,
z
troubleshooting printing problems and paper jams,
z
suitable paper types, and
z
replacing consumables.
About This Product
1
Safety Information
This booklet contains important information about using the machine safely and correctly. Be sure
to read this before using the machine.
15

1. Read This First
Description for the Specified Model
In this manual, the following items explain about the machine for the specified models:
1
This explains about the 220-240 V model machine. You can identify the model by checking the
label on the rear of the machine.
Read if you purchase this model.
This explains about the 120 V model machine. You can identify the model by checking the label on
the rear of the machine.
Read if you purchase this model.
z
You can identify the machine's model by checking the label on the rear of the machine as shown.
AQR358S
16

How to Read This Manual
How to Read This Manual
Be sure to read this section before anything else.
z
This guide uses Windows XP procedures for its examples. Procedures and screens might vary
depending on the operating system you are using.
z
The color samples in this manual may differ slightly from the colors of actual copies.
z
Some illustrations in this manual might be slightly different from the machine.
Two kinds of models notation are employed in this manual.
GX 3000SF: This model supports the RPCS Raster printer driver.
GX 3050SFN: This model supports the PCL and RPCS Raster printer drivers and is equipped with
the network interface board.
How to Use User Guide
User Guide (on the provided CD-ROM) includes detailed information about this machine and a
troubleshooting guide.
Use one of the browsers below to display User Guide.
z
Microsoft Internet Explorer Version 4.01 SP2 or later
z
Netscape 6.2 or later
1
To view the video files of User Guide, Adobe Flash Player (Macromedia Flash Player 5 or later)
plug-in is required.
When using screen reader software or when you cannot install Macromedia Flash Player plugins
When using screen reader software to listen to User Guide or when video files cannot be displayed because Flash plug-ins cannot be installed, click [For screen reader] to display User
Guide version optimized for screen reader software.
Use the button in the upper right window to change the screen.
When using a non-recommended browser
When using Internet Explorer 3.02 or Netscape Navigator 4.05 or later versions, a simplified
User Guide is displayed.
z
If the simplified User Guide does not automatically appear, in the “Drivers, Manual & Utilities”
CD-ROM's [unv] folder, open index.htm.
Opening from the Icon
This section explains how to open User Guide from the desktop icon.
1 Double-click the [User Guide] icon on your desktop.
The browser opens, and then User Guide appears.
17

1
1. Read This First
Removing the User Guide
Follow the procedure below to remove the User Guide installed on your computer.
Removing the User Guide using its [Uninstall] function
1 Click [Start], and then point to [Programs].
2 Point to the installed [Product name], and then click [Uninstall User Guide].
3 Follow the instructions that appear to remove the User Guide.
Removing the User Guide using [Add or Remove Programs]
1 Open [My Computer], point to [Settings], and then open [Control Panel].
2 Double-click [Add or Remove Programs].
3 Select the installed [Product name User Guide], and then click [Change/Remove].
4 Follow the instructions that appear to remove the User Guide.
18
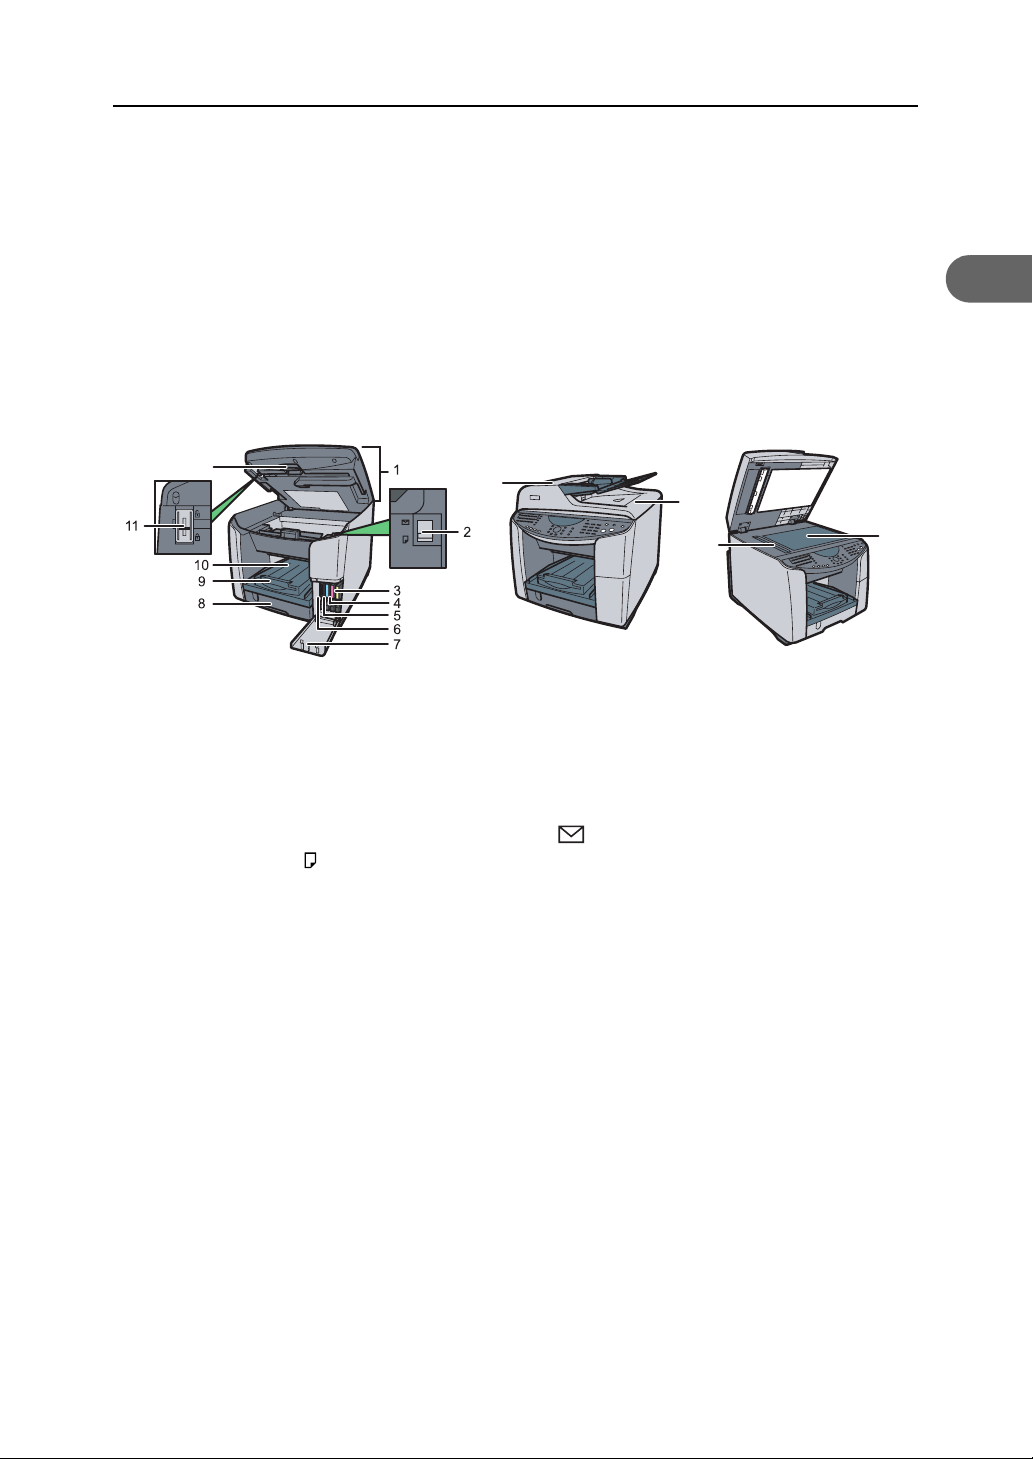
Guide to Components
This section explains the names and functions of parts of the machine body, control panel, and
options.
Machine Body
This is a front view of the machine.
Guide to Components
1
12
1 Scanner unit
Open this to access the envelope selector and the shipping lock. Keep it closed during printing. If paper jams occur, raise the scanner unit to remove jammed paper.
2 Envelope selector
For envelopes, set the lever to the rear position ; for everything else, set the lever to the forward position .
3 Print cartridge (yellow)
4 Print cartridge (magenta)
5 Print cartridge (cyan)
6 Print cartridge (black)
14
13
16
15
AQR150S
7 Right front cover
Keep this cover closed during printing. Open to install or replace print cartridges.
8 Tray 1
Load paper here.
9 Output tray extension
Pull this out to prevent copies falling.
10 Paper output tray
Prints are delivered here.
11 Shipping lock
Use this to lock the interior of the scanner unit when moving the machine.
19
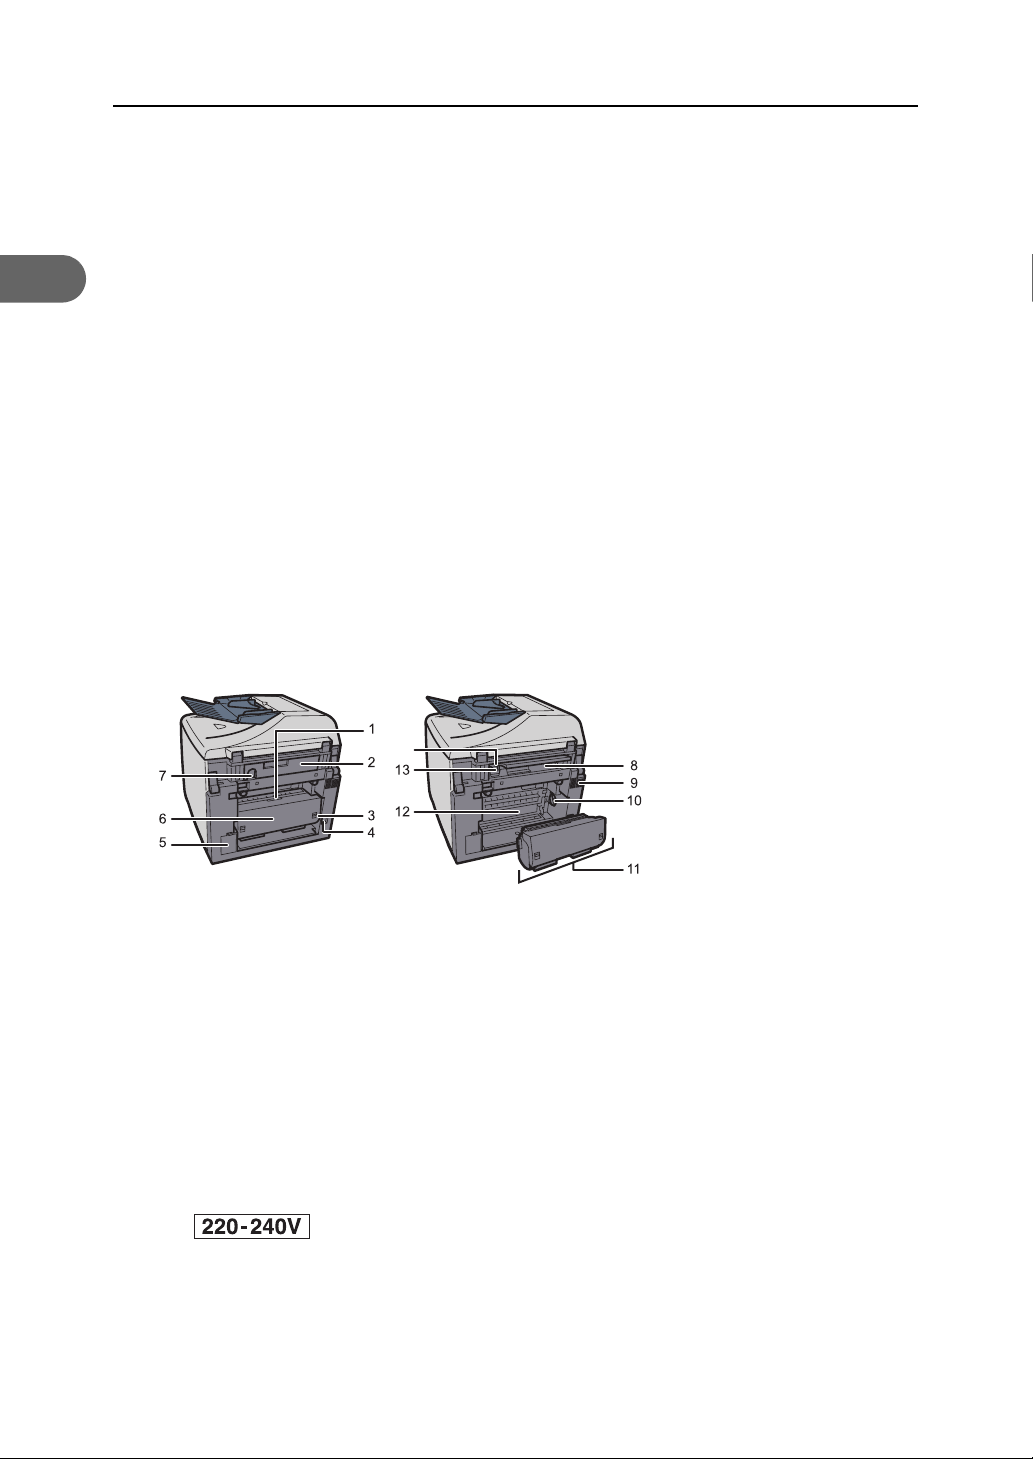
1
1. Read This First
12 Scanner unit release lever
Pull this lever to lift the scanner unit.
13 ADF (Auto document feeder)
Place stacks of originals here. They will feed in automatically. This document feeder can be
used for two-sided originals.
14 ADF cover
If an original is jammed in the ADF, open the ADF cover, and then remove the original.
15 Exposure glass
Place originals face down here for copying.
16 Scanning glass
Originals that are loaded in the ADF are scanned here.
Machine Rear
This is a rear view of the machine.
14
AQR152S
1 Duplex unit cover button
Press to open the duplex unit cover.
2 Connector cover
Open this cover to connect a telephone line, extension telephone, USB cable, and to install the
network interface board. (The GX 3050SFN model is fitted with a network interface board.)
3 Duplex unit locks
Use to lock or unlock the duplex unit when attaching or detaching it.
4 Power cord
Plug the power cord into a wall outlet.
: Plug one end of the power cord into the machine's power inlet and the other
end into a wall socket.
Connect the grounding wire attached to the power plug directly to a grounding terminal.
5 Ink collector unit cover
Open this cover to replace the ink collector unit.
20

Guide to Components
6 Duplex unit cover
Open to remove paper jammed inside the duplex unit.
7 USB slot
Connect the USB cable from the computer here.
8 Ethernet Port
If the optional network interface board is installed, connect the Ethernet cable to this (The GX
3050SFN model is fitted with a network interface board.).
9 Vent
Air is vented here to prevent the inside of the machine from getting too warm. Do not lean anything against the vent or block it in any way. If the inside of the machine gets too warm, a
breakdown could occur.
10 Paper feed wheel
Use to wind out paper jammed around the guide board.
11 Duplex unit
Turns the paper over when performing duplex printing.
12 Guide board
1
Open to remove paper jammed inside the machine.
13 G3 (analog) line interface connector
Connect a telephone line.
14 External telephone connector
Connect an extension telephone.
21
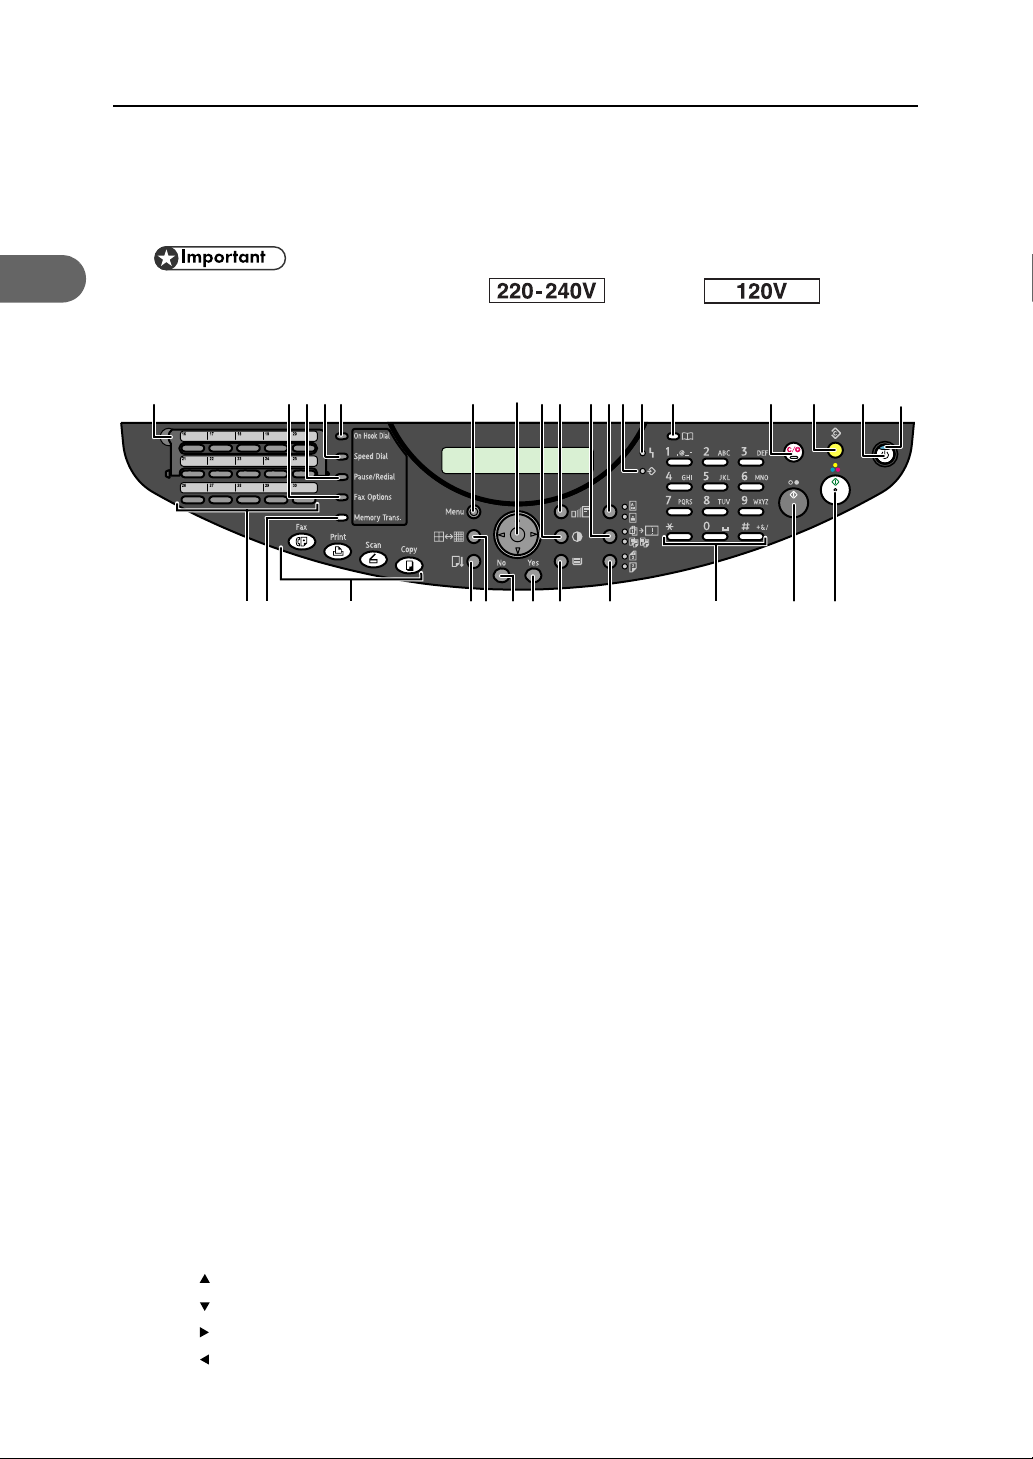
1. Read This First
Control Panel
This illustration shows the control panel of the machine with options fully installed.
1
z
The illustrations in this manual show the model. The model may
differ slightly from the illustrated model.
1 2345 6 7 89 10111213 14 15 16 1817
192021222324252627282930
1 Quick Dial Flip Plate
Tilt the plate downward to change from [Quick Dial 01] key to [Quick Dial 15] key. Tilt the
plate upward to change from [Quick Dial 16] key to [Quick Dial 30] key.
2 [Fax Options] key
Press to specify fax settings.
3 [Pause/Redial] key
z
Pause:
Inserts a pause in a fax dialing sequence. You cannot insert a pause at the beginning of a
sequence. The pause is indicated by “P”.
z
Redial:
Redials the last fax number.
AQR269S
4 [Speed Dial] key
Press to send a fax using speed dial.
5 [On Hook Dial] key
You can use on-hook dialing to check the destination's status when sending a fax.
6 [Menu] key
Press to specify or check the machine's current settings.
7 Scroll key
Press to select an item.
[ ]: scroll upward
[]: scroll downward
[]: scroll right
[ ]: scroll left
22

Guide to Components
8 [Image Density] key
Press to adjust the copier function's scanning density in five steps from to .
You can also specify the settings for [A], by which the machine automatically adjusts the copy
image density.
9 [Zoom] key
Press to change the copy enlargement/reduction ratio in steps of 1% or fixed zoom ratio.
10 [2 in 1 / Sort] key
z
Sort:
Automatically sorts printed copies. Press the [Sort / 2 in 1] key to switch to “Sort” mode. The
“Sort” indicator lights when the machine is in Sort mode.
z
2 in 1:
Combines and prints pages of a multiple-sheet original onto singlesheets. Press the [Sort / 2
in 1] key to switch to “2 in 1” mode. The “2 in 1” indicator lights when the machine is in 2 in
1 mode.
11 [Text / Photo] key
Press to select the most suitable scanning method for your original. If both the “Text” and
“Photo” indicators light, the machine is in Text/Photo mode.
z
Photo Mode
Select this mode to reproduce delicate tones in pictures, such as in
z
developed photographs,
z
photographs or pictures that are printed on paper (e.g magazines), and mechanically
produced copies or originals.
Press the [Text/Photo] key to switch to “Photo” mode. The “Photo” indicator lights when the
machine is in Photo mode.
z
Text Mode
Select this mode when your originals contain only text (no pictures). Press the [Text/Photo]
key to switch to “Text” mode. The “Text” indicator lights when the machine is in Text mode.
z
Text / Photo Mode
The machine will automatically determine the best mode when scanning an original that
contains both text and photographs. Press the [Text/Photo] key to switch to “Text/Photo”
mode. The “Text” and “Photo” indicators light when the machine is in Text/Photo mode.
1
12 Data-in indicator
Flashes when the machine is receiving data from a computer. The Data In indicator is lit if there
is data to be printed.
13 Alert
Lights up when a machine error occurs. A red light indicates an error has occurred that makes
printing impossible; the yellow light indicates a potential error during printing. If the red light is
on, follow the instructions that appear on the display.
14 [Address Book] key
Press to search for or select destination fax numbers, e-mail addresses and folder destinations.
23

1
1. Read This First
15 [Clear/Stop] key
z
Clear:
Clears an entered number.
z
Stop:
Stops a job in progress, such as scanning, faxing, or printing.
16 [Clear Modes] key
Press to clear the current settings and restore to the initial settings. Settings other than those
specified for the current job will also be reset.
17 [Power] key
Press to turn the power on. The switch's indicator lights. To turn the power off, press again.
18 Power indicator
The main power indicator lights when the [Power] key is turned on.
19 [Color Start] key
Press to scan (in color) or directly send a file.
20 [B&W Start] key
Press to scan (in black and white), send, receive, or print a file.
21 Number keys
Use to enter numeric values when specifying settings such as fax numbers and print quantities.
22 [2 Sided Original / 2 Sided Copy] key
To copy a 2-sided original onto both sides of a sheet, press the [2 Sided Original / 2 Sided
Copy] key to switch to “2 Sided Original / 2 Sided Copy” mode. The “2 Sided Original” and
“2 Sided Copy” indicators light when the machine is in “2 Sided Original / 2 Sided Copy”
mode.
z
2 Sided Original:
Scans double-sided originals. Press the [2 Sided Original / 2 Sided Copy] key to switch to
“2 Sided Original” mode. The “2 Sided Original” indicator lights when the machine is in 2
Sided Original mode.
z
2 Sided Copy:
Duplex print a multiple sheet original. Press the [2 Sided Original / 2 Sided Copy] key to
switch to “2 Sided Copy” mode. The “2 Sided Copy” indicator lights when the machine is in
2 Sided Copy mode.
23 [Select Paper Tray] key
Press to change the paper tray.
24 [Yes] key
Press to set a selected item or an entered numeric value.
25 [No] key
Press to cancel an operation or return to the previous display. Settings other than those specified for the current job will remain unchanged.
24

Guide to Components
26 [Resolution] key
Press to adjust the scanning Resolution under the copier function. You can select one of the following three resolution modes:
z
Fast
z
STD
z
H.Qty.
Press to adjust the scanning Resolution for the fax function. You can select one of the following
four resolution modes:
z
Std
z
Detail
z
Fine
z
Photo
27 [Form Feed/Head-Cleaning] key
Press this to print all data left in the machine's buffer. You can use this to force the machine to
print data received in the online status when the paper size or type does not match the actually
set size or type.
To clean the cyan, magenta, yellow, and black print heads, hold the [Form Feed/Head-Cleaning] key down for 3 seconds.
1
28 Function keys
Press to display the operation screen of the printer, copier, scanner, or fax. The indicator of the
selected function lights up.
29 [Memory Trans.] key
Press to switch between direct transmission and memory transmission. The indicator lights when
[Memory Trans.] key is selected.
30 Quick Dial keys
Press to select a registered destination using a single touch.
25
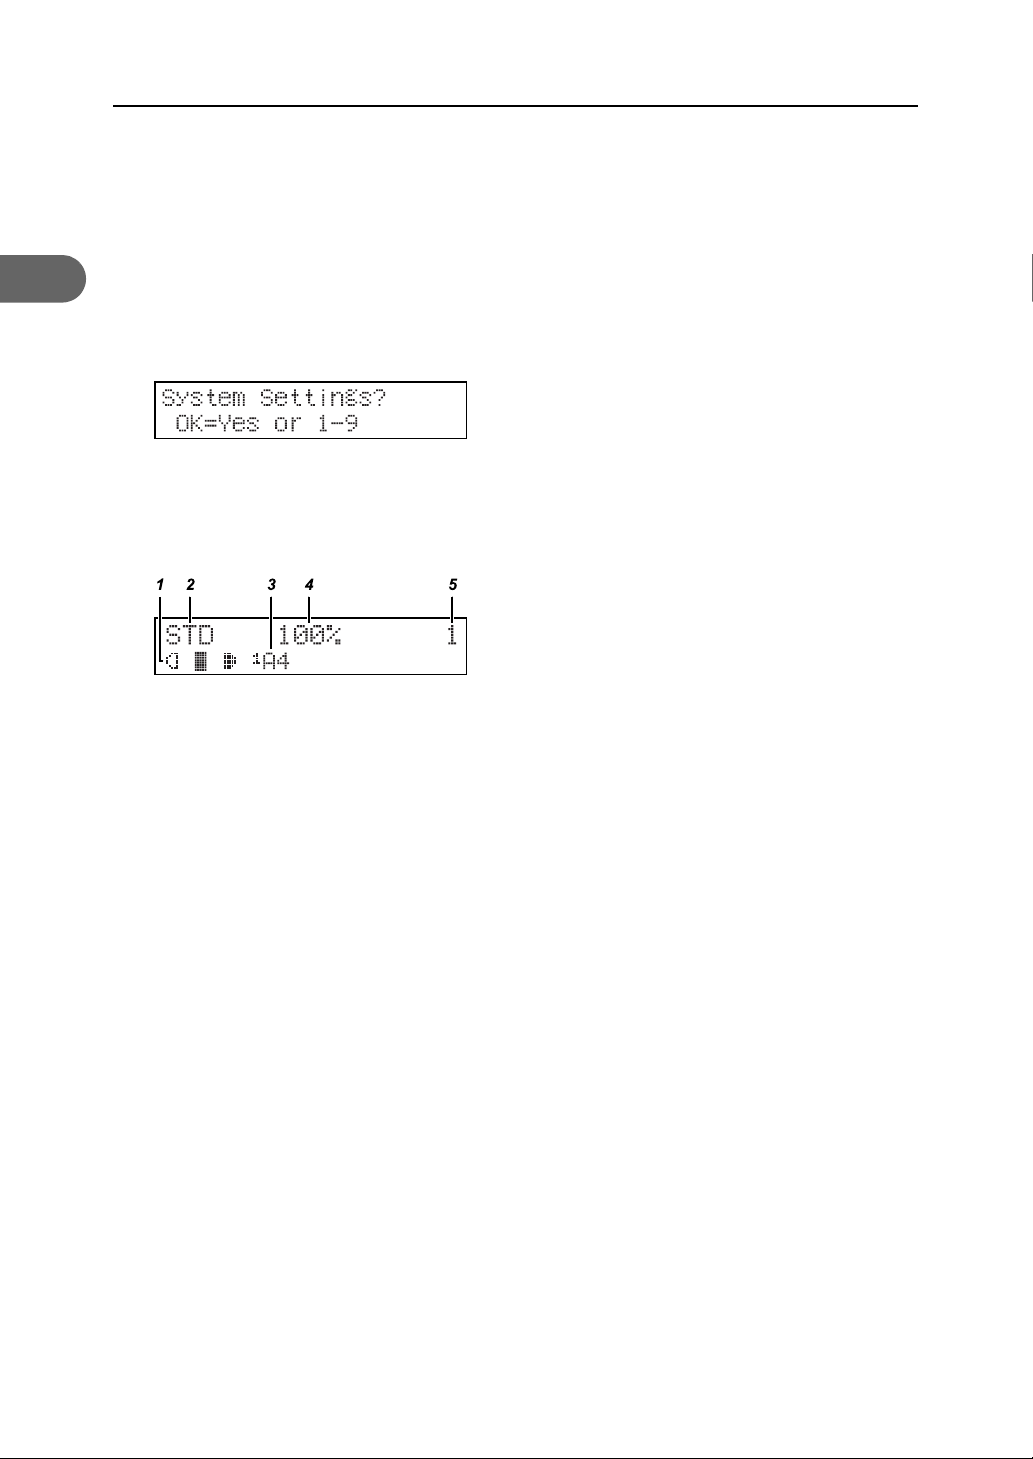
1
1. Read This First
Display
The display panel shows machine status, error messages, and function menus.
The copy display is set as the default screen when the machine is turned on.
Menu
To display the menu, press the [Menu] key.
AQR417S
Copy
BBF009S
1 The specified [Image Density] setting.
In the “Text” or “Text/P” mode, the pre-registered density is applied. In the “Photo” mode, you
have to specify the density.
2 The specified [Resolution] setting.
3 The specified [Paper Tray Prty.], and [Paper Size] settings.
4 The specified [Zoom] ratio setting.
5 Number of copies set. When the machine is copying, displays the number of originals not
yet copied.
26
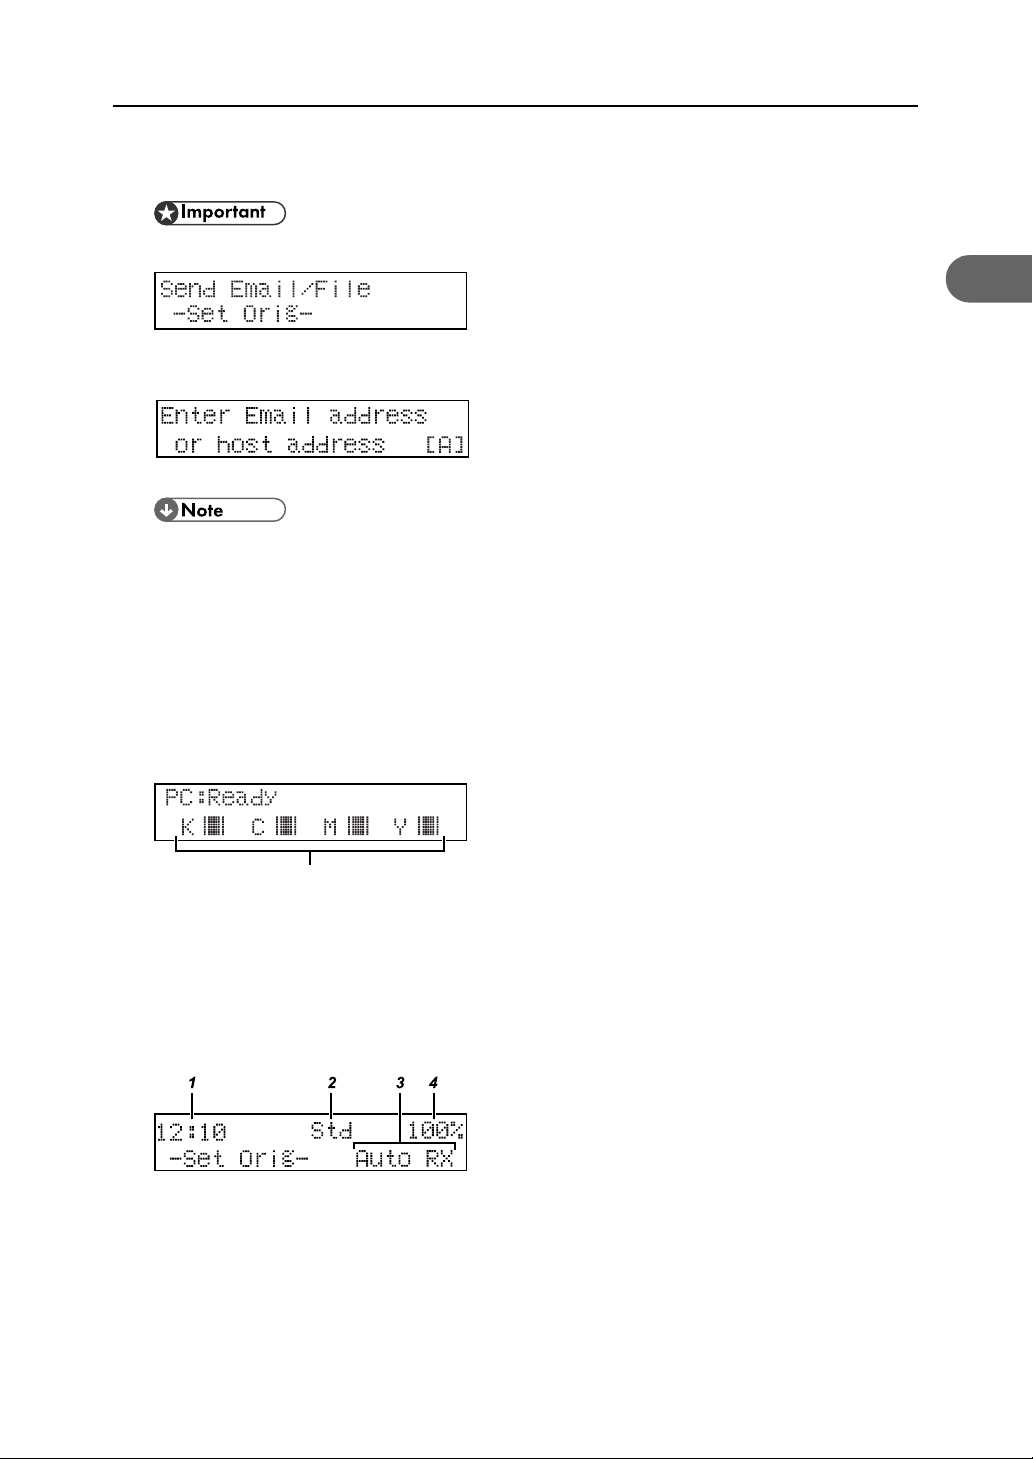
Scanner
z
To use this function with GX 3000SF, the network interface board must be installed.
AQR286S
The following screen appears when you place or load an original on the ADF.
AQR287S
z
If the network settings are incomplete, the message “*Ntwrk Sttng Incomp*” appears. If this happens, complete the network settings as follows:
1) Install the network interface board.
2) Specify the settings in the Network Setting menu.
3) Specify [SMTP Server Name] in the SMTP Settings menu.
Guide to Components
1
Printer
Fax
11
AQR079S
1 Cartridge replacement indicators. From left to right, the cartridge replacement indicators
display the status of the black (K), cyan (C), magenta (M), and yellow (Y) print cartridges.
AQR081S
1 Current time.
2 Resolution for scanning originals under the fax function.
3 Reception mode.
4 Amount of free memory.
27

1. Read This First
Icons Displayed on the Screen
: You can select this by pressing the [Image Density] key. This setting is useful for scanning
newspaper print and other images on grayish backgrounds.
1
: The machine can feed paper from Tray 1.
: The machine can feed paper from Tray 2 (optional). This icon appears only if the optional Paper
Feed Unit TK1020 is attached.
: The machine can feed paper from the bypass tray. This icon appears only if the optional Multi
Bypass Tray Type BY1000 is attached.
: Print cartridge is almost empty.
: Print cartridge is empty.
: You have set [Tray Paper Setting] to [Custom].
: You can enter a fax number.
: The machine is calling the destination.
: The machine is responding to a call.
: The machine is responding to a call.
: The machine is sending a fax.
: The machine is sending or receiving an Internet fax or sending Scan to E-Mail or Scan to FTP
data.
[][][][]: Press the corresponding scroll key.
If a Screen Requesting a Password Appears
If [User Restriction] is set to [On], you must enter the specified password when the machine
z
is switched on,
z
wakes up from Energy Save Mode, and
z
is reset using [Auto Reset Time].
z
“*Invalid Password*” appears if the password is wrong. Check the password.
z
p.113 "Setting User Restriction"
Entering a password
When [User Restriction] is set to [On], the following screen appears:
Password=
OK=Yes
1 Enter a password (eight digits), and then press the [Yes] key.
28
 Loading...