

Page 1
)76;46279482794;
)76;46279482794;
)76;46279482794;)76;46279482794;
OPERATING INSTRUCTIONS
Read this manual carefully before you use this product and keep it handy for futu re
reference.
For safety, please follow the instructions in this manual.
Page 2

Introduction
This manual contains detailed instructions on the operation and maintenance of this machine. To get maximum versatility from this machine all operators should carefully read and follow the instructions in this manual. Please keep this manual in a handy place near the machine.
Please read the Safety Information before using this machine. It contains important information related to
USER SAFETY and PREVENTING EQUIPMENT PROBLEMS.
Notes:
Some illustrations may be slightly different from your machine.
Certain options may not be available in some cou ntries. For details, please contact your local dealer.
Notes:
The model names of the machines do not appear in the following pages.
Check the model of your machine before reading this manual. (For details, see page ix)
Type 1 : FT3813
•
Type 2 : FT4615
•
Type 3 : FT4618
•
Centain types might not be available in some countries. For details please contact your local dealer.
Two kinds of size notation are employed in this manual. With this machine refer to the metric version.
For good copy quality, Ricoh recommends that you us e genuine Ricoh toner.
Ricoh shall not be responsible for any damage or expense that might result from the use of parts other than
genuine Ricoh parts in your Ricoh office product.
Power Source
220/230V, 50/60Hz, 8A or more
Please be sure to connect the power cord to a power source as above. For details about power source, see
⇒ P.73 “Power Connection”.
Page 3

In accordance with IEC 60417, this machine uses the following symbols for the main power switch.
a means POWER ON.
c means STAND BY.
Copyright © 1999 Ricoh Co., Ltd.
Page 4
Safety Information
Safety Information
When using your equipment, the following safety precautions should always
be followed.
Safety During Operation
In this manual, the following important symbols are used:
WARNING:
Ignoring this warning could cause serious injury or even
death.
CAUTION:
Ignoring this caution could cause injury or damage to property.
i
Page 5

Safety Information
WARNINGS:
•
Connect the power cord directly into a wall outlet and never use
an extension cord.
•
Disconnect the power plug (by pulling the plug, not the cable) if
the power cable or plug becomes frayed or otherwise damaged.
•
To avoid hazardous electric shock or laser radiation exposure, do
not remove any covers or screws other than those specified in this
manual.
•
Turn off the power and disconnect the power plug (by pulling the
plug, not the cable) if any of the following conditions exists:
•
You spill something into the equipment.
•
You suspect that your equipment needs service or repair.
•
Your equipment’s cover has been damaged.
•
Do not incinerate spilled toner or used toner. Toner dust might ignite when exposed to an open flame.
•
Disposal can take place at our authorized dealer or at appropriate
collection sites.
•
Dispose of the used toner bottle in accordance with the local regulation.
ii
Page 6

Safety Information
CAUTIONS:
•
Protect the equipment from dampness or wet weather, such as
rain, snow, and so on.
•
Unplug the power cord from the wall outlet before you move the
equipment. While moving the equipment, you should take care that
the power cord will not be damaged under the equipment.
•
When you disconnect the power plug from the wall outlet, always
pull the plug (not the cable).
•
Do not allow paper clips, staples, or other small metallic objects to
fall inside the equipment.
•
Keep toner (used or unused) and toner bottle out of the reach of
children.
•
For environmental reasons, do not dispose of the equipment or expended supply waste at household waste collection points. Disposal can take place at an authorized dealer or at appropriate collection sites.
•
The inside of the machine could be very hot. Do not touch the
parts with a label indicating the "hot surface". Otherwise it could
cause a personal burn.
•
Our products are engineered to meet high standards of quality and
functionality, and we recommend that you only use the expendable
supplies available at an authorized dealer.
•
Before moving the equipment, be sure to pull all four handles fully
out. Not doing this may result in an injury, such as getting your fingers pinched. After moving the equipment, return the four handles
to their original positions.
iii
Page 7

ENERGY STAR PROGRAM
ENERGY STAR PROGRAM
As an ENERGY STAR Partner, we have determined
that this machine model meets the ENERGY STAR
Guidelines for energy efficiency.
The ENERGY STAR Guidelines intend to established an international energy-saving
system for developing and introducing energy-efficient office equipment to deal with
environment issues, such as global warming.
When a product meets the ENERGY STAR Guidelines for energy efficiency, the Partner
shall place the ENERGY STAR logo onto the machine model.
This products was designed to reduce the environment impact associated with office
equipment by means of energy-saving features, such as Low-power Mode.
• Low-power Mode
This product automatically lowers its power consumption 1 minute after the
last copying job has been completed. To exit Low-power mode, press the
Clear Modes/Energy Saver key. For how to change settings, ☛ see page
61.
• Auto Off Mode
To conserve energy, this copier automatically turns off 30 minutes after the
last copying job has been completed. To exit the Auto Off Mode, turn on the
main switch. For how to change the default interval before entering Auto Off
mode, ☛ see page 61.
Specification
Low-power Mode Power consumption about 0.12 kW
Default interval 1 min.
Recovery time 10 sec.
Auto Off Mode Power consumption 0 W *1
*1 Based on Energy Star measurements.
Default interval 30 min.
Recycled paper
Please contact your sales or service representative for recommended recycled paper types that may be used in this machine.
iv
Page 8

TABLE OF CONTENTS
TABLE OF CONTENTS
WHAT YOU CAN DO WITH THIS COPIER .................................................x
WHERE IT IS & WHAT IT IS........................................................................ 2
COPIER EXTERIOR AND INTERIOR ........................................................2
OPERATION PANEL ..................................................................................4
BASICS
STARTING THE COPIER ............................................................................10
When The Main Switch Is In The Standby Position....................................10
When The Energy Saver Indicator Is On.....................................................11
COPY PAPER AND TONER
COPY PAPER..............................................................................................14
Available Paper Sizes ..................................................................................14
Non-recommended Copy Paper...................................................................14
Notes For Copy Paper .................................................................................15
Paper Storage ..............................................................................................15
TONER...........................................................................................................16
Notes For Toner...........................................................................................16
Toner Storage ..............................................................................................16
ORIGINALS
RECOMMENDED ORIGINALS AND NON-RECOMMENDED ORIGINALS .....18
Recommended Originals ..............................................................................18
Non-recommended Originals For The Optional Document Feeder .............18
SETTING ORIGINALS ON THE EXPOSURE GLASS ................................19
SETTING ORIGINALS IN THE OPTIONAL DOCUMENT FEEDER ..........20
Setting A Stack Of Originals ........................................................................20
Setting One Original At A Time .................................................................22
v
Page 9

TABLE OF CONTENTS
COPYING
BASIC COPYING ..........................................................................................26
BASIC FUNCTIONS .....................................................................................28
Adjusting Copy Image Density ................................................................... 28
Photo Mode ................................................................................................. 29
Copying From The Bypass Feed Table .....................................................30
Entering Copy Job Settings During The Warm-up Period (Auto Start) .....33
REDUCING AND ENLARGING ..................................................................34
Reducing And Enlarging Using Preset Ratios (Preset R/E) ....................... 34
Reducing And Enlarging In 1% Steps (Zoom) ........................................... 35
MAKING TWO-SHEETS COPIES FROM BOOK ORIGINALS
(SERIES COPIES) .........................................................................................36
FINISHING (OPTION OF TYPE 2 AND 3) ................................................... 38
Sorting Into Sets (123, 123, 123) (Sort) .................................................. 38
Stacking Together All Copies Of A Page (111, 222, 333) (Stack) .......... 40
COPYING WITH USER CODES...................................................................42
SAVING ENERGY ........................................................................................43
COMBINATION CHART................................................................................44
WHAT TO DO IF SOMETHING GOES WRONG
IF YOUR COPIER DOES NOT OPERATE AS YOU WANT .......................46
IF YOU CANNOT MAKE COPIES AS YOU WANT..................................... 48
LOADING PAPER......................................................................................... 49
Loading Paper In The Paper Tray............................................................... 49
ADDING TONER ...........................................................................................51
vi
Page 10

TABLE OF CONTENTS
CLEARING MISFEEDS ................................................................................52
Check The Misfeed Location Display ..........................................................52
When A,B Or C Is Lit ...................................................................................53
When R Is Lit ............................................................................................... 53
When P Is Lit................................................................................................54
CHANGING THE COPIER’S SETTINGS
CHANGING PAPER SIZE ............................................................................56
How To Change The Paper Size Of Paper Tray .........................................56
USER TOOLS................................................................................................58
How To Access User Tools ........................................................................58
How To Change Adjustment Values Or Modes........................................... 59
User Tool Menu............................................................................................60
SERVICE REPRESENTATIVE SETTINGS ..................................................68
MAINTAINING YOUR COPIER
DO’S AND DON’TS
WHERE TO PUT YOUR COPIER
REMARKS
MAINTAINING YOUR COPIER.....................................................................70
Copier...........................................................................................................70
Document Feeder (Option)...........................................................................71
WHERE TO PUT YOUR COPIER.................................................................72
Copier Environment......................................................................................72
Power Connection .......................................................................................73
Access To Copier .........................................................................................74
DO’S AND DON’TS.......................................................................................75
Copier...........................................................................................................75
Document Feeder (Option)...........................................................................75
10-bin Sorter (Option)...................................................................................75
vii
Page 11

TABLE OF CONTENTS
REMARKS.....................................................................................................76
Copier .......................................................................................................... 76
10-bin Sorter (Option) .................................................................................. 76
SPECIFICATIONS
COPIER.......................................................................................................... 78
DOCUMENT FEEDER (OPTION) ................................................................. 82
10-BIN SORTER (OPTION) ..........................................................................83
INDEX
INDEX ............................................................................................................86
TROUBLESHOOTING...................................................................................90
viii
Page 12

TABLE OF CONTENTS
MACHINE TYPES
There are three models of this machine. The main differences between
them are copy speed and paper tray capacity. To make sure which model
you have, see the inside front cover.
Copy speed
Type 1 : 13 copies / minutes(A4:, 8 1/2" x 11": )
Type 2 : 15 copies / minutes(A4
Type 3 : 18 copies / minutes(A4
:, 8 1/2" x 11": )
:, 8 1/2" x 11": )
Paper tray capacity
Type 1 : 250 sheets x 1(80g/m2, 20 lb)
Type 2 : 500 sheets x 1(80g/m
Type 3 : 250 sheets x 2 (80g/m
2
, 20 lb)
2
, 20 lb)
ix
Page 13
WHAT YOU CAN DO WITH THIS COPIER
WHAT YOU CAN DO WITH THIS COPIER
Sorting into sets (123, 123, 123)*
1
☛ See pages 38 ~ 39.
Stacking together all copies of a page (111, 222, 333)*
1
☛ See pages 40 ~ 41.
Making one-sided copies from facing pages
Reducing and enlarging in 1% steps
*1: Options of Type 2 and 3 only.
x
☛ See pages 36 ~ 37.
☛ See page 35.
Page 14
The bypass feed table is
open. You can copy from it.
☛ See pages 30 ~ 32. ☛ See page 29.
Copying photographic
originals.
Reducing using preset ratios
☛ See page 34.
❐ Make enlarged copies of this facing pages and stick them on the wall.
Enlarging using preset ratios
☛ See page 34.
1
Page 15
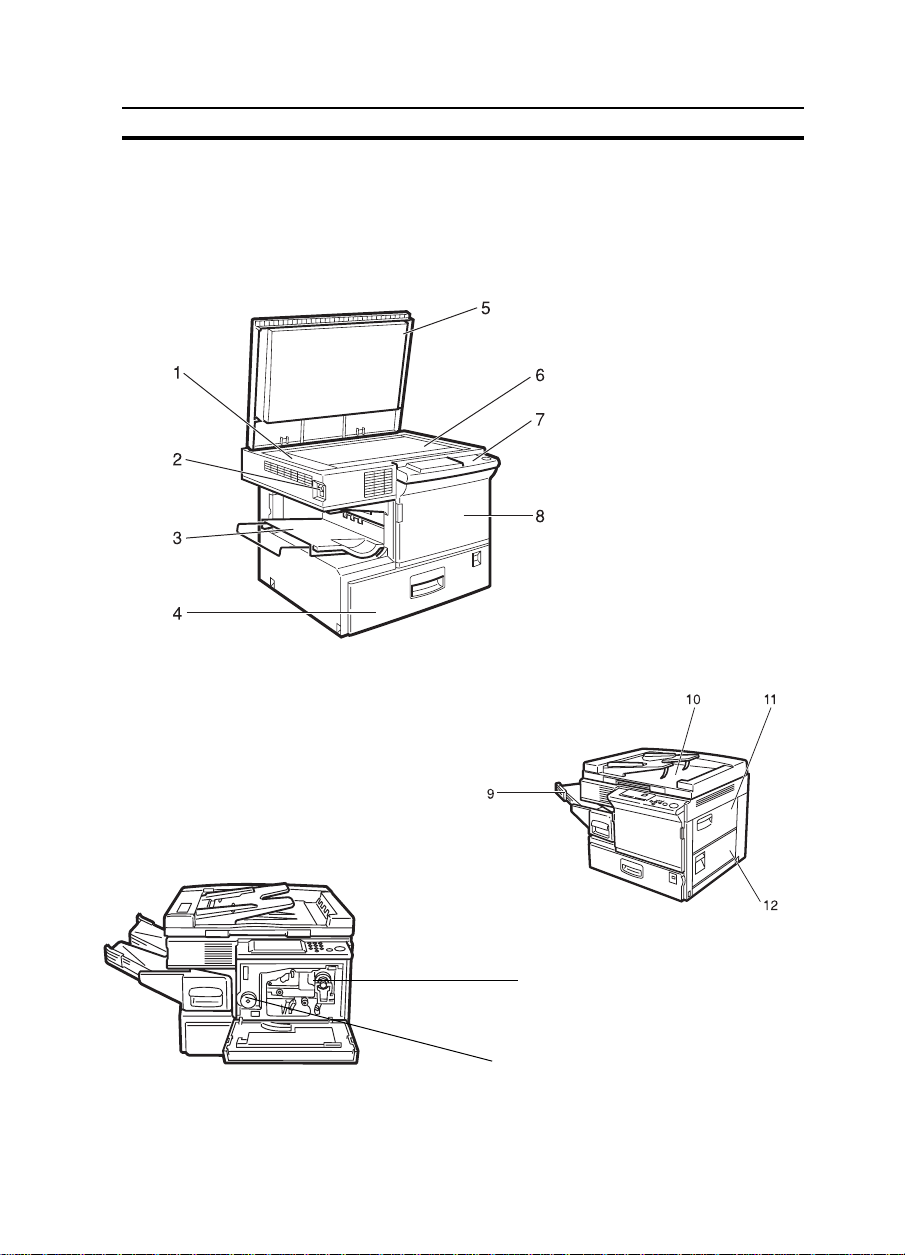
WHERE IT IS & WHAT IT IS
COPIER EXTERIOR AND INTERIOR
WHERE IT IS & WHAT IT IS
13
14
2
Page 16

WHERE IT IS & WHAT IT IS
1. Left scale Use to align originals on the exposure glass.
2. Main switch Switches the copier between on and standby
conditions. ("standby" means that the optional
anticondensation heater is on.)
3. Copy tray Completed copies are delivered here.
4. Paper tray Type 1: 250 sheets x 1
Type 2: 500 sheets x 1
Type 3: 250 sheets x 2
5. Platen cover
Lower this cover over originals for copying.
6. Exposure glass Position originals here face down for copying.
7. Operation panel Operator controls and indicators are located here.
8. Front cover Open to access the inside of the copier.
9. 10-bin sorter
Completed copies are sorted or stacked here.
(Option of Type 2
and 3)
10. Document feeder
(Option)
Insert a stack of originals here. The originals are
individually fed onto and removed from the exposure glass.
11. Bypass feed table Use to copy onto paper of unusual size or
weight, or color paper.
12. Right Side Cover Open to remove misfed papers.
13. Toner Bottle
14. Fusing Unit
Replace the toner bottle when the f
indicator is lit.
Fuses the copy image to the paper. When accessing the inside of the copier, use caution.
This unit may be very hot.
Add Toner
3
Page 17
OPERATION PANEL
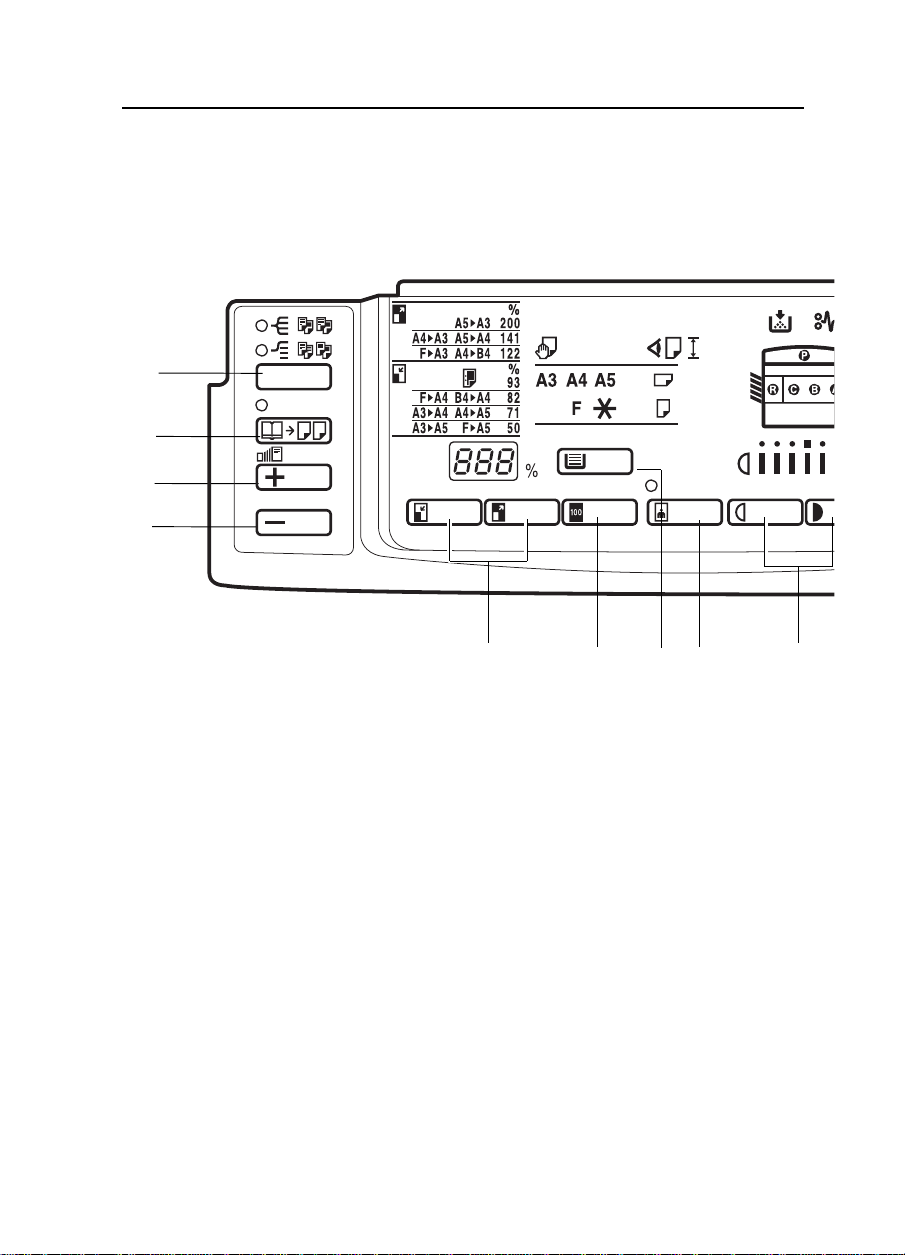
Keys
1
2
3
4
WHERE IT IS & WHAT IT IS
1. Sorter key
and 3)
☛ See pages 38 ~ 41
2. Series Copies key
☛ See page 36
3. Zoom Up key
Press or hold down to increase
the reproduction ratio in 1% steps.
☛ See page 35.
(option of Type 2
4. Zoom Down key
Press or hold down to reduce the
reproduction ratio in 1% steps.
☛ See page 35.
5. Reduce and Enlarge keys
☛ See page 34.
4
5
6
8
7
6. Full Size key
☛ See page 26.
7. Select Paper Tray key
Press to select a tray for the
paper feed. ☛ See page 26.
8. Photo Mode key
☛ See page 29.
9. Lighter and Darker keys
☛ See page 28.
9
Page 18
WHERE IT IS & WHAT IT IS
10
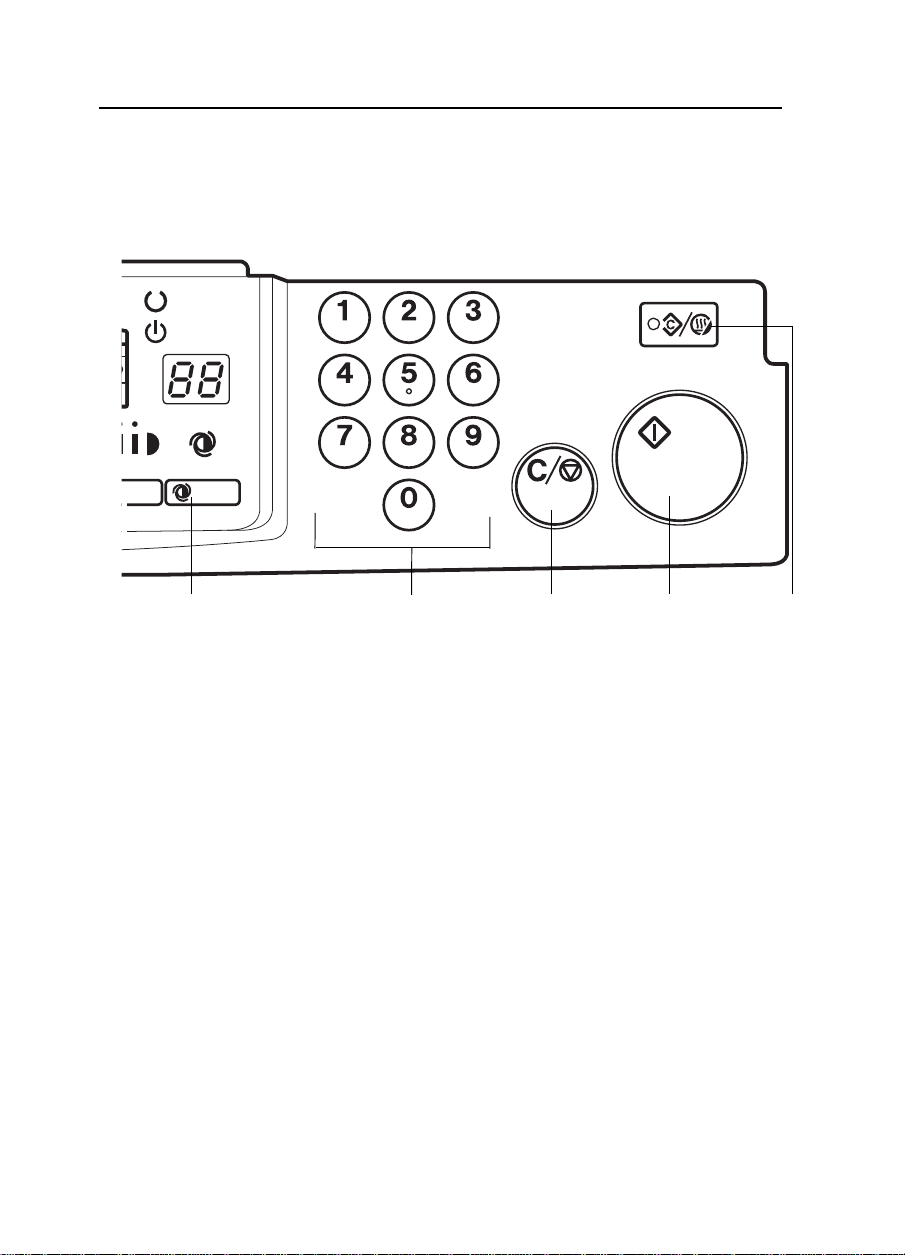
10. Auto Image Density key
☛ See page 28.
11. Number keys
Use to enter the desired number of copies. They are also
used to enter data.
12. Clear/Stop key
Press to cancel the copy
number entered. While copying, press to stop copying.
This key is also used to clear
data.
13. Start key
Press to start copying. Use to
set the Auto Start.
page 33.
☛ See
11
12
14. Clear Modes/Energy Saver
key
Press to clear the copier of
previously entered settings.
Press this key for more than 1
second to enter/exit the
Energy Saver mode.
pages 11 and 43.
13
☛
14
See
5
Page 19

Indicators
Type 1
Type 2
WHERE IT IS & WHAT IT IS
Type 3
6
Page 20

WHERE IT IS & WHAT IT IS
1. Stack indicator (option of
Type 2 and 3)
☛ See page 40.
2. Sort indicator (option of
Type 2 and 3)
☛ See page 38.
3. Reduce and Enlarge indicator
☛ See page 34.
4. Bypass Feed indicator
☛ See page 30.
5. Check Paper Size indicator
☛ See pages 47.
6. Add Toner indicator
Blinks when the toner bottle is
nearly empty. Lights when the
toner bottle is empty, it is lit.
☛ See pages 51.
9. Ready indicator
Lights when the machine is ready
to make copies. ☛ See page 10.
10. Wait indicators
It is lit during the warm-up period.
☛ See page 10.
11. Copy Counter
Indicates the number of copies.
12. Auto Image Density indicator
☛ See page 28.
13. Manual Image Density indicator
☛ See page 28.
14. Paper Size indicator
Shows the selected paper
tray, paper size and direction.
15. Photo Mode indicator
7. Check Paper Path indicator
Lights it a paper misfeed occurs,
it is lit. ☛ See pages 52 ~ 54.
8. Misfeed Location display
Shows the location of misfed
paper . ☛ See pages 52 ~ 54.
☛ See page 29.
16. Three Digit indicator
Data display.
17. Series copies indicator
☛ See page 36.
7
Page 21

WHERE IT IS & WHAT IT IS
8
Page 22

KF2Jr-AE-3
BASICS
STARTING THE COPIER .........................................................................................10
When The Main Switch Is In The Standby Position....................................................................... 10
When The Energy Saver Indicator Is On ....................................................................................... 11
BASICS
9
Page 23
KF2Jr-AE-3
STARTING THE COPIER
STARTING THE COPIER
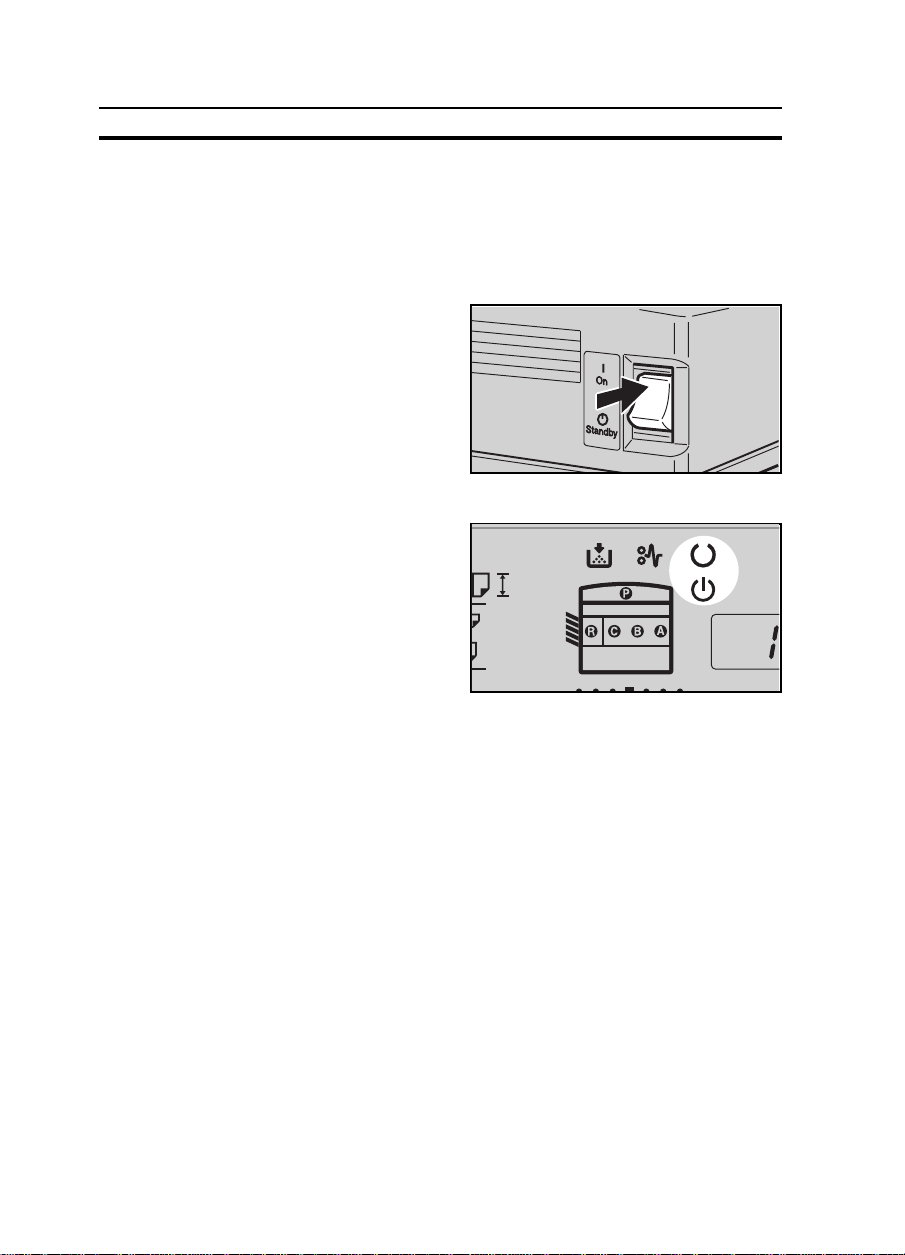
When The Main Switch Is In The Standby Position
Turn on the main switch.
1
Wait for the copier to warm-up.
2
During the warm-up period (less
than 35 seconds for Type 1 and 2,
less than 45 seconds for Type3),
the
u
Wait indicator is on.
After warm-up, the v Ready indi-
3
cator lights.
10
Page 24
When The Energy Saver Indicator Is On
The copier is in Energy Saver
mode.
Press the Clear Modes/Energy
Saver key to return to the ready
condition.
For details about Energy Saver,
❐
see page 43.
☛
The following actions will also return the
❐
copier to the ready condition:
Opening or closing the optional document feeder.
•
Setting originals in the optional document feeder.
•
Setting copy paper in the bypass feed table.
•
Pressing any key except the
•
Start
key.
KF2Jr-AE-3
STARTING THE COPIER
BASICS
11
Page 25

STARTING THE COPIER
12
Page 26

COPY PAPER AND
TONER
COPY PAPER.........................................................................................................14
Available Paper Sizes ...................................................................................................................... 14
Non-recommended Copy Paper.................................................................................................. 14
Notes For Copy Paper..................................................................................................................... 15
Paper Storage .................................................................................................................................. 15
TONER..................................................................................................................... 16
Notes For Toner................................................................................................................................. 16
Toner Storage ................................................................................................................................... 16
COPY PAPER AND TONER
13
Page 27

COPY PAPER
COPY PAPER
Available Paper Sizes
Metric Version Inch Version
Paper tray
A3
;, A4 ;:, A5 :, B4 ;, B5
;:, F ;
Bypass feed table Standard sizes
A3 ;, A4 ;:, A5 :;, A6 :, B4 ;, B5 ;:, B6 ;, F ;,
11" x 17" ;, 8
Non-standard sizes
Vertical 45 mm ~ 308 mm, 1.8" ~ 12"
Horizontal 148 mm ~ 432 mm, 5.8" ~ 16.8"
" x 11" ;:, 8
1/2
Non-recommended Copy Paper
Copy paper of the types or in the conditions listed below are not recommended for this copier.
•
Thicker than 90 g/m
•
Thinner than 64 g/m
•
Thicker than 157 g/m
•
Thinner than 52 g/m
•
Folded, curled, creased, or damaged paper
•
Torn paper
•
Damp paper
•
Perforated paper
•
Paper with conductive or low electrical resistance such as carbon or
silver coating.
•
Wavy paper
•
Thermal paper, art paper
•
Thin paper that has low stiffness
•
Adhesive labels
•
Stapled paper
2
, 24 lb. (Paper tray)
2
, 17 lb. (Paper tray)
2
, 42 lb. (Bypass feed table)
2
, 14 lb.(Bypass feed table)
11" x 17" ;, 8
8
" x 14" ;
1/2
" x 14" ;, 5
1/2
" x 11" ;:,
1/2
" x 8
1/2
1/2
" ;
14
Page 28

Notes For Copy Paper
COPY PAPER
❐ Load paper with the copy side
up
in the bypass feed table. If copies are curled, try turning the copy paper over
down
in the paper tray, and with the copy side
in the tray or table. If there is no improvement, change to copy paper with less
curl.
❐ Correct curls in copy paper before loading.
❐ Fan copy paper to get air between the sheets before loading.
❐ OHP transparencies, translucent paper, and adhesive labels should be set in
the bypass feed table.
❐ OHP transparencies, translucent paper, and adhesive labels should be fanned
to get air between the sheets before loading.
❐ Do not touch copy paper if your fingers are wet or oily; finger prints may appear
on the copy.
❐ When making two-sided copies, do not load paper in the paper tray for copying
the reverse side. Use the bypass feed table.
Paper Storage
Paper should always be stored properly. Improperly stored paper might
result in poor image reproduction, creased copies, and paper misfeeds.
Generally, avoid curling and absorption of moisture.
❐ Avoid storing paper in humid areas. Under high temperature and high humidity,
or low temperature and low humidity conditions, store paper in a vinyl bag.
❐ Do not store paper where it will be exposed to heat.
❐ Store on a flat surface.
❐ Use older stock first.
❐ Do not lay heavy objects on paper.
❐ Keep open reams of paper in the package, and store as you would unopened
paper.
COPY PAPER AND TONER
15
Page 29

TONER
TONER
Note: If you want to add toner, ☛ see page 51
Notes For Toner
R
WARNING
•
Do not incinerate used toner or toner containers. Toner dust might
ignite when exposed to an open flame. Dispose of used toner containers in accordance with local regulations for plastics.
R
CAUTION
•
Keep toner (used or unused) and toner containers out of reach of
children.
R
CAUTION
•
Our products are engineered to meet high standards of quality and
functionality, and we recommend that you only use the expendable
supplies available at an authorized dealer.
❐
If you use toner other than that recommended, a fault might occur.
❐
When adding toner, do not turn off the main switch. If you do, your copy settings are cleared.
Toner Storage
❐
Store toner bottles in a cool, dry place free from direct sunlight.
❐
Never store toner where it will be exposed to heat.
❐
Do not lay heavy objects on toner bottles.
16
Page 30

ORIGINALS
RECOMMENDED ORIGINALS AND NON-RECOMMENDED ORIGINALS ............ 18
Recommended Originals................................................................................................................ 18
Non-recommended Originals For The Optional Document Feeder......................................... 18
SETTING ORIGINALS ON THE EXPOSURE GLASS .................................................. 19
SETTING ORIGINALS IN THE OPTIONAL DOCUMENT FEEDER .............................20
Setting A Stack Of Originals............................................................................................................ 20
Setting One Original At A Time .................................................................................................... 22
17
ORIGINALS
Page 31

RECOMMENDED ORIGINALS AND NON-RECOMMENDED ORIGINALS
RECOMMENDED ORIGINALS AND
NON-RECOMMENDED ORIGINALS
Recommended Originals
❐ Regarding originals that the optional document feeder can handle,
81.
☛
see page
Non-recommended Originals For The Optional Document Feeder
Note: The following types of originals are not recommended for use with the
document feeder. Place them directly on the exposure glass.
❐ Originals thicker than 105 g/m
❐ Originals thinner than 52 g/m
❐ Originals larger than A3, 11" x 17"
❐ Originals smaller than B5 ;, 5
❐ Paper with any kind of coating (such as carbon) on the back
❐ Folded, curled, creased, or damaged originals
❐ Mailing labels, or perforated originals
❐ Bound, stapled, or clipped originals
❐ OHP transparencies
❐ Translucent paper
❐ Pasted originals
❐ Damp originals
❐ Sticky originals
❐ Wavy originals
❐ Originals that are not made from paper
❐ Originals written in pencil on both sides, or two-sided carbon originals
❐ Thermal fax paper
2
, 28 lb.
2
, 14 lb.
" x 8
1/2
1/2
" ;
18
Page 32

SETTING ORIGINALS ON THE EXPOSURE GLASS
SETTING ORIGINALS ON THE EXPOSURE
GLASS
❐ Set the original after correction fluid and ink has completely dried. Not taking
this precaution could mark the exposure glass and cause marks to be copied.
.
Lift the platen cover or the op-
1
tional document feeder.
❐
When lifting the platen cover, hold it
in the center.
.
Set the original
2
exposure glass. The original
should be centered according to
the size marks on the left scale.
.
Lower the platen cover or the op-
3
tional document feeder.
face down
on the
ORIGINALS
19
Page 33

SETTING ORIGINALS IN THE OPTIONAL DOCUMENT FEEDER
SETTING ORIGINALS IN THE OPTIONAL
DOCUMENT FEEDER
Setting A Stack Of Originals
You can insert a stack of originals of the same size into the document
feeder. These originals are individually fed onto and removed from the
exposure glass.
Set the original after correction fluid and ink has completely dried. Not taking
❐
this precaution could mark the exposure glass and cause marks to be copied.
The original might become dirty if it is written with a pencil or similar tools.
❐
Correct any curl, fold, or crease
.
1
in the originals before setting.
Confirm that the Insert Original
.
2
indicator is lit before setting the
originals.
Confirm that no previous originals
.
3
remain on the exposure glass.
Adjust the guides to the original
4.
size.
20
Page 34
SETTING ORIGINALS IN THE OPTIONAL DOCUMENT FEEDER
Set the originals
.
5
document feeder until the Insert
Original indicator goes off.
The last page should be on the bot-
❐
tom.
The guides must touch both sides of
❐
the originals.
Do not stack originals above the limit
❐
mark.
face up
into the
ORIGINALS
21
Page 35

SETTING ORIGINALS IN THE OPTIONAL DOCUMENT FEEDER
Setting One Original At A Time
You can insert one original at a time into the document feeder. The original
is automatically fed onto and removed from the exposure glass.
Set the original after correction fluid and ink has completely dried. Not taking
❐
this precaution could mark the exposure glass and cause marks to be copied.
The original might become dirty if it is written with a pencil or similar tools.
❐
Correct any curl, fold, or crease
.
1
in the originals before setting.
Confirm that the Insert Original
.
2
indicator is lit before setting the
originals.
Confirm that no previous originals
.
3
remain on the exposure glass.
Adjust the guides to the original
.
4
size.
Set the original
.
5
document feeder until the Insert
Original indicator goes off.
If you are copying a stack of originals
❐
one sheet at a time and you want to
keep them in order, start with the last
page of the originals.
The original guides must touch both
❐
sides of the original.
22
face up
into the
Page 36

Press the Start key.
6
While the Auto Feed indicator is
.
7
lit after an original is fed, set the
next original. The original is automatically fed and copied.
If you have set more than two origi-
❐
nals, the
lit after the last original is fed. In this
case, press the
setting an original.
Auto Feed
indicator is not
key again after
Start
SETTING ORIGINALS IN THE OPTIONAL DOCUMENT FEEDER
23
ORIGINALS
Page 37

SETTING ORIGINALS IN THE OPTIONAL DOCUMENT FEEDER
24
Page 38

KF2Jr-AE-6
COPYING
BASIC COPYING .................................................................................................. 26
BASIC FUNCTIONS.................................................................................................28
Adjusting Copy Image Density ..................................................................................................... 28
Photo Mode...................................................................................................................................... 29
Copying From The Bypass Feed Table ......................................................................................... 30
Entering Copy Job Settings During The Warm-up Period (Auto Start) .................................... 33
REDUCING AND ENLARGING ............................................................................. 34
Reducing And Enlarging Using Preset Ratio (Preset R/E) ........................................................... 34
Reducing And Enlarging In 1% Steps (Zoom) ............................................................................. 35
MAKING TWO-SHEETS COPIES FROM BOOK ORIGINALS (SERIES COPIES).......36
FINISHING (OPTION) .............................................................................................38
Sorting Into Sets (123, 123, 123) (Sort) ........................................................................................ 38
Stacking Together All Copies Of A Page (111, 222, 333) (Stack) .......................................... 40
COPYING WITH USER CODES ............................................................................... 42
SAVING ENERGY ..................................................................................................43
COMBINATION CHART.......................................................................................... 44
25
COPYING
Page 39
BASIC COPYING
BASIC COPYING
You can make copies that are the same size as your originals.
Set your original on the exposure
1
glass or in the optional document
feeder. ☛ See page 19 or 20.
KF2Jr-AE-6
Make sure that the Paper Size
2
indicator is lit. If not, press the
Select Paper Tray key.
Enter the number of copies re-
3
quired using the Number keys.
To change the number entered,
❐
press the
the new number.
Make sure that the magnification
4
ratio is set to 100%. If not, press
the Full Size key.
Clear/Stop
key, then enter
26
Page 40
Press the Start key.
5
To stop the copier during a multicopy
❐
run, press the
Press the
❐
ing, or press the
again to clear the entered copy number.
Clear/Stop
key to resume copy-
Start
Remove the copies from the copy
6
tray.
The copy tray holds approximately 100
❐
sheets .
key.
Clear/Stop
KF2Jr-AE-6
BASIC COPYING
key
If you make B4, 8
❐
size copies, extend the copy tray to
stack them properly.
" x 14" or larger
1/2
COPYING
27
Page 41

BASIC FUNCTIONS
BASIC FUNCTIONS
Adjusting Copy Image Density
To match the type of originals, adjust the image density.
Auto image density
If the Auto Image Density indicator is lit, the copier automatically controls the image density.
If the indicator is not lit, press the
Auto Image Density key.
Manual image density
KF2Jr-AE-6
If you require darker or lighter
copies, adjust the image density
yourself.
Press the Lighter (left) key to
lower the image density. Press
the Darker (right) key to increase
the image density.
28
Page 42

Photo Mode
Use this mode when you copy the photographic originals.
Press the Photo Mode key.
1
If you wish to adjust the image
2
density, use the Lighter (left) key
or Darker (right) key.
KF2Jr-AE-6
BASIC FUNCTIONS
29
COPYING
Page 43

KF2Jr-AE-6
BASIC FUNCTIONS
Copying From The Bypass Feed Table
Use the bypass feed table to copy onto paper that cannot be set in the
paper tray.
OHP transparencies, adhesive labels, post cards, and translucent paper can be
❐
set into the bypass tray.
Regarding the paper sizes and directions that can be set, ☛ see page 14
❐
Number of sheets that can be set at one time:
❐
Standard paper: 80sheets(80 g/m2, 20 lb.)
OHP transparencies: 10sheets
Adhesive labels: 1 sheet
Translucent paper: 1sheet
Post card: 1sheet
Fan OHP transparencies and translucent paper to get air between the sheets
❐
before loading.
Regarding functions that cannot be used together with this function, ☛ see
❐
page 44.
Set your original on the exposure
1
glass or in the optional document
feeder. ☛ See page 19 or 20.
Open the bypass feed table.
2
30
Page 44

Lift the paper hold lever.
3
Swing out the extender if setting copy
❐
paper larger than A4:, 8
Slide the paper guides to the pa-
4
per width. Insert the copy paper
until it stops.
The image will be copied on the side
❐
of paper that you place face up.
If the guides are not flush with the
❐
copy paper, a skew image or paper
jam might occur.
Fan OHP transparencies or translucent
❐
paper to get air between them to avoid
multi sheet feed (multiple sheets fed
together at the same time).
" x 11":.
1/2
KF2Jr-AE-6
BASIC FUNCTIONS
Lower the paper hold lever. Oth-
5
erwise, paper misfeed might occur.
Make sure that the
❐
indicator is lit.
❐ If you have set copy paper larger
than A4
trailing edge of copy paper with your
hand when lowering the paper holder.
:, 8
a Bypass Feed
" x 11":, support the
1/2
COPYING
31
Page 45

BASIC FUNCTIONS
Press the Start key.
6
KF2Jr-AE-6
32
Page 46

KF2Jr-AE-6
BASIC FUNCTIONS
Entering Copy Job Settings During The Warm-up Period (Auto Start)
If you press the Start key during
the warm-up period, the
Ready indicator will blink, then
the copier will start copying after
the warm-up period. Set your
copy settings during warm-up period, then press the Start key.
To cancel Auto Start, press the
❐
Clear/Stop
key.
v
33
COPYING
Page 47

KF2Jr-AE-6
REDUCING AND ENLARGING
REDUCING AND ENLARGING
Regarding functions that cannot be used together with this function,
❐
page 44.
Reducing And Enlarging Using Preset Ratios (Preset R/E)
☛
see
Reducing
Press the Reduce key to select the preset reduction ratios.
Enlarging
Press the Enlarge key to select the preset enlargement ratios.
34
Page 48

KF2Jr-AE-6
REDUCING AND ENLARGING
Reducing And Enlarging In 1% Steps (Zoom)
You can change the reproduction ratio from 61% to 141% (Type 1), from
50% to 200% (Type 2 and 3) in 1% steps.
Press the Zoom Up (+) key repeatedly, or hold down the key
continuously, to increase the ratio
in 1% steps.
Press the Zoom Down (-) key
repeatedly, or hold down the key
continuously, to reduce the ratio
in 1% steps.
35
COPYING
Page 49
KF2Jr-AE-6
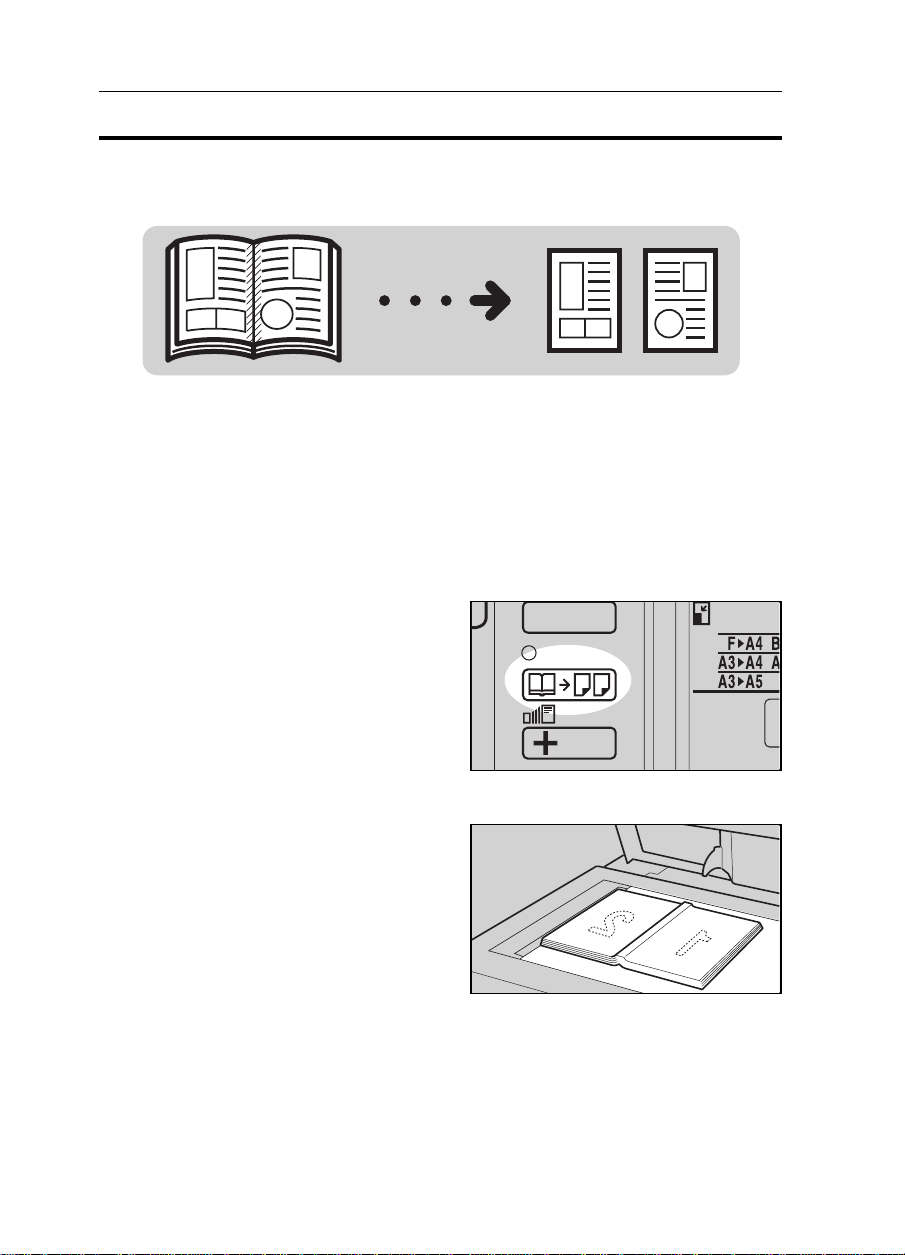
MAKING TWO-SHEETS COPIES FROM BOOK ORIGINALS (SERIES COPIES)
MAKING TWO-SHEETS COPIES FROM BOOK
ORIGINALS (SERIES COPIES)
You can make two-sheets copy from book originals.
This function cannot be used for copy paper larger than A4 :, 8
❐
The center of an original is determined according to the selected copy paper
❐
and reproduction ratio. Be sure to select copy paper and reproduction ratio
suitable for the original.
Reducing functions cannot be used together with this fuction, ☛ see page 44.
❐
Press the
1
light the
indicator.
Start with the last page of your
2
book original and work your way
to the begining.
Place the original face down on
the exposure glassand align the
last page with the left scale.
Series Copies
Series Copies
key to
(lower)
" x 11" :.
1/2
36
Page 50

MAKING TWO-SHEETS COPIES FROM BOOK ORIGINALS (SERIES COPIES)
Or, set the original in the oprional
document feeder. ☛ see pages
20 or 22.
Make sure that the Paper Size
3
indicator is lit, if not, press the
Select Paper Tray key.
KF2Jr-AE-6
Press the Start key.
4
COPYING
37
Page 51
KF2Jr-AE-6
FINISHING (OPTION OF TYPE 2 AND 3)
FINISHING (OPTION OF TYPE 2 AND 3)
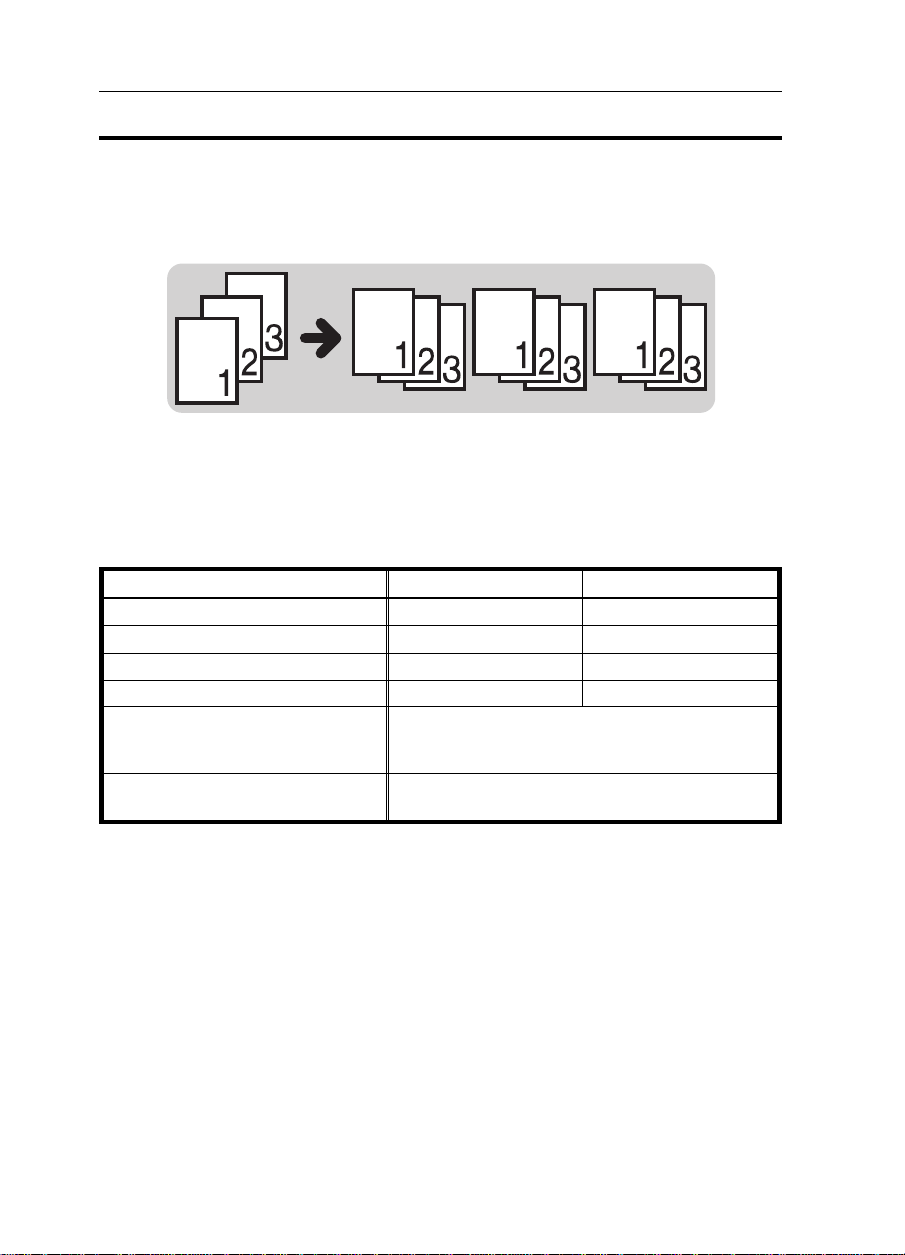
Sorting Into Sets (123, 123, 123) (Sort)
One copy of each originals is delivered to each bin and copies are collated
into sets.
Note: This function can be used only when your copier is equipped with the
optional 10-bin sorter.
For Sorting, the following limitations apply:
❐
Metric Version Inch Version
Maximum paper size
Minimum paper size
Maximum paper weight 90 g/m
Minimum paper weight 64 g/m2 17 lb
Maximum capacity of bins
(Maximum number of copies)
Paper that cannot be used post cards, translucent paper, OHP transparencies,
To avoid problems caused by curled copies, try turning over the paper stack in
❐
the tray. If there is no improvement, change to copy paper with less curl.
A4, 8
1/2
B4, F, 8
A3, 11" x 17": 10 copies
and adhesive labels
A3
;
A5
;:
2
" x 11" or smaller: 20 copies
" x 14": 15 copies
1/2
11" x 17"
8
" x 11"
1/2
24 lb
:;
38
Page 52

Press the Sorter key to light the
1
Sort(Upper) indicator.
Set your original on the exposure
2
glass or in the optional document
feeder. ☛ See page 19 or 20.
Enter the number of copies re-
3
quired using the Number keys.
The maximum number of copy sets
❐
that can be entered is 10.
KF2Jr-AE-6
FINISHING (OPTION OF TYPE 2 AND 3)
Set other settings.
4
Press the Start key.
5
If you set your originals on the expo-
❐
sure glass in step
and 5 until your copying is completed.
, repeat steps
2
2
COPYING
39
Page 53
KF2Jr-AE-6
FINISHING (OPTION OF TYPE 2 AND 3)
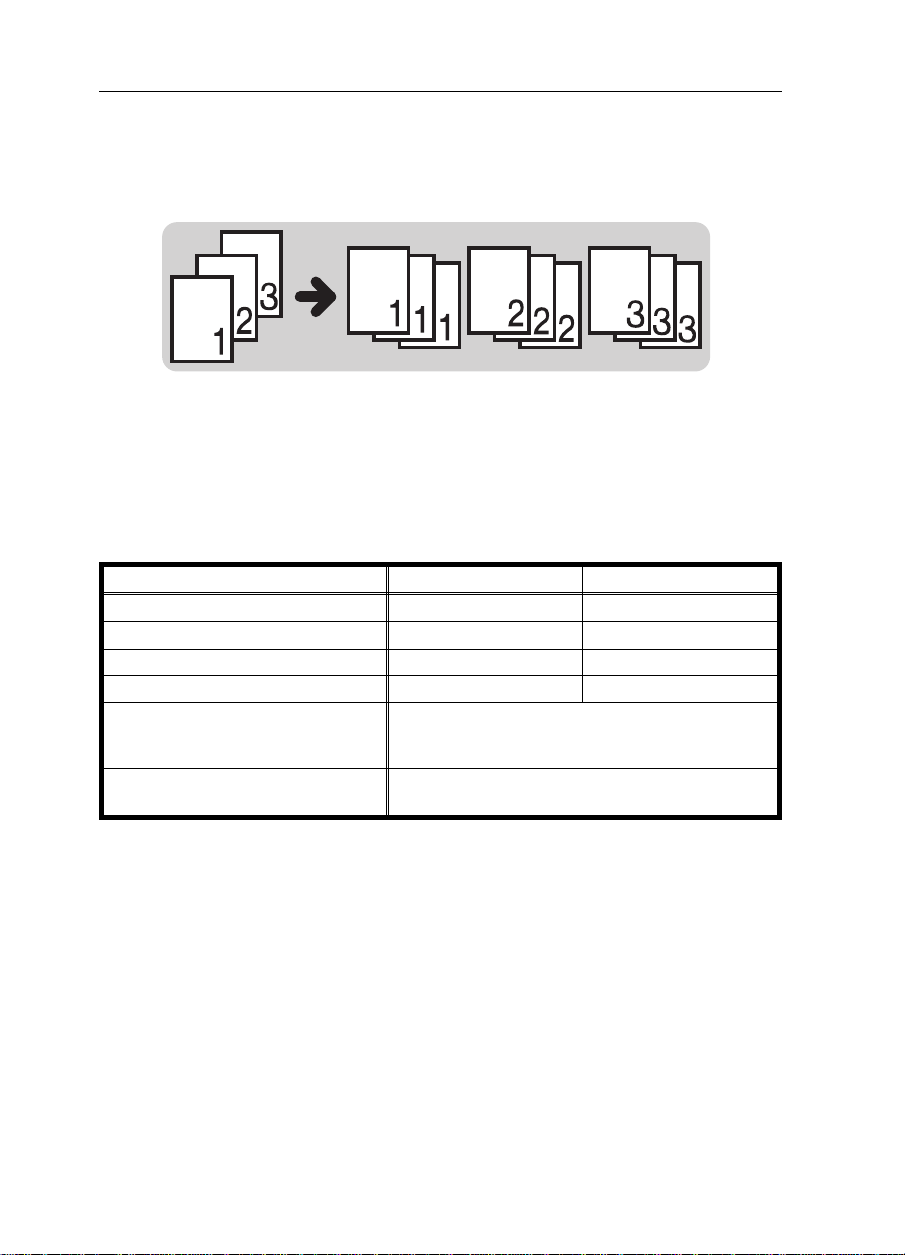
Stacking Together All Copies Of A Page (111, 222, 333) (Stack)
All copies of each original are delivered to the same bin.
Note: This function can be used only when your copier is equipped with the
optional 10-bin sorter.
For Stacking, the following limitations apply:
❐
Metric Version Inch Version
Maximum paper size
Minimum paper size
Maximum paper weight 90 g/m
Minimum paper weight 64 g/m
Maximum capacity of bins
(Maximum number of copies)
Paper that cannot be used post cards, translucent paper, OHP transparencies,
To avoid problems caused by curled copies, try turning over the paper stack in
❐
the tray. If there is no improvement, change to copy paper with less curl.
A4, 8
B4, F, 8
A3, 11" x 17": 10 copies
and adhesive labels
A3 ;
A5
;:
2
2
17 lb
" x 11" or smaller: 20 copies
1/2
" x 14": 15 copies
1/2
11" x 17"
8
" x 11"
1/2
24 lb
:;
40
Page 54
Press the Sorter key to light the
1
Stack(Lower) indicator.
Set your original on the exposure
2
glass or in the optional document
feeder. ☛ See page 19 or 20.
Enter the number of copies re-
3
quired using the Number keys.
Regarding the number of copies that
❐
can be entered, see page 38.
KF2Jr-AE-6
FINISHING (OPTION OF TYPE 2 AND 3)
Set other settings.
4
Press the Start key.
5
If you set your originals on the expo-
❐
sure glass in step
and 5 until your copying is completed.
, repeat steps
2
2
COPYING
41
Page 55

KF2Jr-AE-6
COPYING WITH USER CODES
COPYING WITH USER CODES
The user code function allows you to restrict the copy operator and control
the number of copies made. If the user code function is on, operators must
input an authorized code before the machine can operate.
Please contact your service representative to set the user code mode, or to get
❐
more information.
❐ U2
1
❐
is indicated in the copy counter until an user is entered.
Input your user code (3 digits)
using the
Auto Image Density
the
If you input the wrong number, press
the
Clear/Stop
correct number.
Number
keys. Press
key.
key. Then, input the
Make your copies.
2
To prevent others from making
3
copies using your user code,
press the
Modes/Energy Saver
taneously after copying.
Regarding user codes, ☛ see page
❐
63.
To set your copier for user codes,
❐
contact your service representative,
see page 63.
42
Clear/Stop
and
key simul-
Clear
Page 56
KF2Jr-AE-6
SAVING ENERGY
SAVING ENERGY
With the Energy Saver, the copier is reset and uses less electricity.
To have the Energy Saver automatically activated when the copier is auto re-
❐
set, set the user tools. ☛ See page 61.
The following actions will cancel the energy saver mode:
❐
Opening or closing the optional document feeder.
Setting originals in the optional document feeder.
Setting copy paper in the bypass feed table.
Pressing any key except the Start key.
Press the Clear Modes/Energy
1
Saver key more than one second
to enter the Energy Saver condition.
All indicators exept the Energy Saver
❐
indicator turn off.
43
COPYING
Page 57

KF2Jr-AE-6
COMBINATION CHART
COMBINATION CHART
This combination chart shows which modes can be used together.
✩ means that these modes can be used together.
★ means that the mode after you select will be the mode you’re working in.
✗ means that these modes cannot be used together.
Mode after you
select
Mode before you
select
Preset
1
Reduce/Enlarge
2 +/-Zoom
3 Series Copies
4 Sorting
5 Bypass Feed Copying
12345
Preset
Reduce/
Enlarge
+/- Zoom
★
★
✩✩ ✩✗
✩✩✩ ✗
✩✩✗
Series
Copies
I
I
Sorting
✩✩
✩✩
7
Bypass
Feed
Copying
44
Page 58

KF2Jr-AE-7
WHAT TO DO IF
SOMETHING GOES
WRONG
IF YOUR COPIER DOES NOT OPERATE AS YOU WANT ........................................ 46
IF YOU CANNOT MAKE COPIES AS YOU WANT..................................................48
LOADING PAPER.................................................................................................... 49
Loading Paper In The Paper Tray .................................................................................................. 49
ADDING TONER .....................................................................................................51
CLEARING MISFEEDS ............................................................................................ 52
Check The Misfeed Location Display............................................................................................ 52
When A,B Or C Is Lit......................................................................................................................... 53
When R Is Lit...................................................................................................................................... 53
When P Is Lit ...................................................................................................................................... 54
GOES WRONG
WHAT TO DO IF SOMETHING
45
Page 59

IF YOUR COPIER DOES NOT OPERATE AS YOU WANT
IF YOUR COPIER DOES NOT OPERATE AS
Check the followings:
Copier’s condition Action
Nothing happens when the main
switch is turned on.
"PE" is displayed on the copy counter.
f
is blinking or lit.
Y
is lit.
Energy Saver is lit.
U code is displayed on the
copy counter.
"E" and a number are alternately
displayed on the copy counter.
Check the power cord. Is it properly plugged
into the outlet?
➠
Load paper.
Add toner.
Remove misfed paper.
Your machine is in the Energy Saver condition.
➠
U1
Close the right side cover.
The copier is set for user codes. Enter your user
U2
codes. (3 digits)
U4
Reset the optional sorter correctly.
U6
Call your service representative.
Turn the main switch off, wait a few seconds,
and then turn it on. If the E code appears again,
call your service representative and tell which
code is on.
KF2Jr-AE-7
YOU WANT
Plug it in firmly.
☛
See page 49 ~ 50.
☛
See page 51.
☛
See page 52 ~ 54.
Press any key except the Start key to
return to the ready condition.
46
Page 60

KF2Jr-AE-7
IF YOUR COPIER DOES NOT OPERATE AS YOU WANT
Copier’s condition Action
Check Paper Size indicator
is lit.
The Auto Image Density
indicator blinks.
You cannot use the bypass feed table in the Sort or
Stack mode and the Series Copies.
➠
Select the paper tray.
Turn the main switch off and on. If this condition reoccurs, call your service representative and explain the
problem.
The Manual Image Density
indicator blinks.
Is the right kind of paper in the paper tray?
➠
Paper size and weight must be within the
specifications for this copier.
Is folded, wrinkled, damp, or curled paper in the paper
tray?
➠
Misfeeds occur frequently.
Always use dry, undamaged paper.
Is the paper properly set in the tray?
➠
Always load paper correctly.
Are there any pieces of misfed paper or other materials
in the machine?
➠
Make sure that the paper path is completely
cleared of paper and other material after a misfeed.
❐
If you cannot correct the problem by taking the above actions, please contact
your service representative.
GOES WRONG
WHAT TO DO IF SOMETHING
47
Page 61

KF2Jr-AE-7
IF YOU CANNOT MAKE COPIES AS YOU WANT
IF YOU CANNOT MAKE COPIES AS YOU
Problem Cause Action
The original has a gray or
colored background.
Copies appear dirty.
The reverse side of an
original image is copied.
Copies are too light.
The same copy area is
dirty whenever making
copies.
Copies are blank or
parts of the image are
not copied.
Copies have white
streaks.
❐
If you cannot correct the problem by taking the above actions, please contact
your service representative.
The image density is too dark.
The platen cover, exposure
glass, or document feeder belt
is dirty.
The image density is too dark.
The original has a low
contrast image.
The image density is too light.
Damp or rough grain paper is
used.
The platen cover, exposure
glass, or document feeder
belt is dirty.
The original is not set correctly.
An improper paper size is
selected.
The corona wire is dirty.
Adjust the image density.
☛
See page 28.
Clean them.
☛
See pages 70 and 71.
Adjust the image density.
☛
See page 28.
Adjust the image density.
☛
See page 28.
Use dry paper without rough
grain.
Clean them.
☛
See pages 70 and 71.
Set originals correctly.
☛
See page 19, 20, or 22.
Select the proper paper size.
Clean the corona wire.
☛
See page 71.
WANT
48
Page 62

KF2Jr-AE-7
LOADING PAPER
LOADING PAPER
NOTE: Regarding paper sizes that can be set,
NOTE: If you want to change the paper size,
NOTE: For details about non-recommended copy paper and notes for copy
paper,
☛
see page 14
NOTE: To load paper in the bypass feed table,
.
☛
see page 14.
☛
see page 56
☛
see page 30.
.
Loading Paper In The Paper Tray
Pull out the paper tray until it
1
stops.
In case of Type 1 and 3, lower the
❐
bottom plate.
Square the paper and set in the
2
paper tray.
GOES WRONG
WHAT TO DO IF SOMETHING
Do not stack paper above the limit
❐
mark inside the paper tray.
Slide the guides until the front and
❐
rear guides securely hold the paper.
In case of Type 2, Make sure that
❐
the leading corners of the paper are
under the corners as shown in the illustration.
49
Page 63

LOADING PAPER
Lift the tray slightly, and then re-
3
insert the tray gently until it stops.
KF2Jr-AE-7
50
Page 64

KF2Jr-AE-7
ADDING TONER
ADDING TONER
When the Add Toner f indicator blinks, it is time to supply toner (copying
is still possible). When the Add Toner
copies cannot be made until the toner cartridge is replaced.
WARNING:
R
•
Do not incinerate used toner or toner containers. Toner dust might
ignite when exposed to an open flame. Dispose of used toner containers in accordance with local regulations for plastics.
R
CAUTION
•
Keep toner (used or unused) and toner containers out of reach of
children.
R
CAUTION
f indicator is continuously on,
GOES WRONG
WHAT TO DO IF SOMETHING
•
Our products are engineered to meet high standards of quality and
functionality, and we recommend that you only use the expendable
supplies available at an authorized dealer.
NOT E: Before setting the new toner cartridge, shake it well at least 5 or 6 times.
NOTE:
NOTE:
If
f
indicator is still lit after adding toner, turn the main switch off
and on again.
Don not remove the toner bottle before the Add Toner f indicator
comes on - toner could spill out.
Open the copier’s front cover.
1
You can find the sticker explain-
2
ing how to add toner inside the
front cover, as shown in the illustration.
Load the new toner cartridge fol-
3
lowing the instructions on the
sticker.
51
Page 65

KF2Jr-AE-7
CLEARING MISFEEDS
CLEARING MISFEEDS
CAUTION:
R
•
The fusing section of this equipment might be very hot. You should
be very careful that you don’t touch this section when removing the
misfed paper.
NOTE:
NOTE: Do not leave any torn scraps of paper within the machine.
NOTE: When clearing misfeeds, do not turn off the main switch. If you do,
NOTE: After clearing misfeeds, make sure that all units and levers are re-
NOTE: Do not touch originals in the optional document feeder when a pa-
NOTE: If a paper misfeed occurs when paper is fed from the tray, do not
Since some parts of the copier are supplied with high electrical volt-
age, touch only the parts specified in the instructions on the sticker
inside the machine’s cover.
your copy settings are cleared.
turned to their original positions and all covers are closed.
per misfeed occurs in the copier. If you do, the copier cannot know
which originals have been copied, and which should be copied.
pull out the tray before clearing misfeeds.
Check The Misfeed Location Display
The display shows the location of
misfed paper.
52
Page 66

When A,B Or C Is Lit
Open the front cover of the cop-
1
ier.
You will see a sticker (with Y at
2
the top) explaining how to remove misfed paper, inside the
front cover, as shown in the illustration.
Remove misfed paper following
3
the instructions on the sticker.
KF2Jr-AE-7
CLEARING MISFEEDS
GOES WRONG
WHAT TO DO IF SOMETHING
When R Is Lit
Open the sorter.
1
You will see a sticker (with Y at
2
the top), explaining how to remove the misfed paper, on the
cover of the sorter, as shown in
the illustration.
Remove the misfed paper follow-
3
ing the instructions on the sticker.
53
Page 67

CLEARING MISFEEDS
When P Is Lit
There is a sticker, explaining how
1
to remove the misfed paper, on
the optional document feeder, as
shown in the illustration.
KF2Jr-AE-7
Remove the misfed original refer-
2
ring to the sticker.
The number of originals that
3
should be reset is displayed in
the Three Digit indicator. Reset
the originals in the optional document feeder.
54
Page 68

KF2Jr-AE-8
CHANGING THE
COPIER’S SETTINGS
CHANGING PAPER SIZE ....................................................................................... 56
How To Change The Paper Size Of Paper Tray........................................................................... 56
USER TOOLS............................................................................................................58
How To Access User Tools ..............................................................................................................58
How To Change Adjustment Values Or Modes........................................................................... 59
User Tool Menu ................................................................................................................................. 60
SERVICE REPRESENTATIVE SETTINGS .....................................................................68
SETTINGS
CHANGING THE COPIER’S
55
Page 69
CHANGING PAPER SIZE
CHANGING PAPER SIZE
❐ To check the paper size of the paper
tray, see the Paper Size indicators.
How To Change The Paper Size Of Paper Tray
Pull the paper tray out until it
1
stops.
KF2Jr-AE-8
Remove the copy paper.
2
❐ In case of Type 1 and 3, lower the
bottom plate.
Square the paper and set in the
3
tray.
❐ Do not stack paper over the limit
mark.
❐ In case of Type 2, make sure that
the leading comers of the paper are
under the comers, as shown in the
illustration.
56
Page 70

While pressing the release lever,
4
slide the left guide to the paper
size you want to use.
While pressing the release lever
5
on the front and rear side guides.
Slide the guides to the paper position.
Do not press the front and rear
❐
guides strongly against the paper.
Slide the guides until the front and
❐
rear guides securely hold the paper.
KF2Jr-AE-8
CHANGING PAPER SIZE
SETTINGS
Adjust the paper size selector.
6
If the paper size you need is not
❐
there, select " ❉ " on the paper size
selector.
The following sizes are on the paper selector:
❐
Type 1 and 2
Metric version
Inch version
Type 3
Metric version Tray1,2
Inch version Tray1,2
Reinsert the tray gently until it
7
stops.
, A4:;, A5:, F
A3
;
11” x 17”
;
, 8 1/2” x 11”:; x 14”
, A4:;, A5:, F
A3
;
11” x 17”
;
;
;
, 8 1/2” x 11”;:, 8 1/2” x 14”
;
CHANGING THE COPIER’S
;
57
Page 71
KF2Jr-AE-8
USER TOOLS
USER TOOLS
You can change or set the copier’s settings using the following user tools.
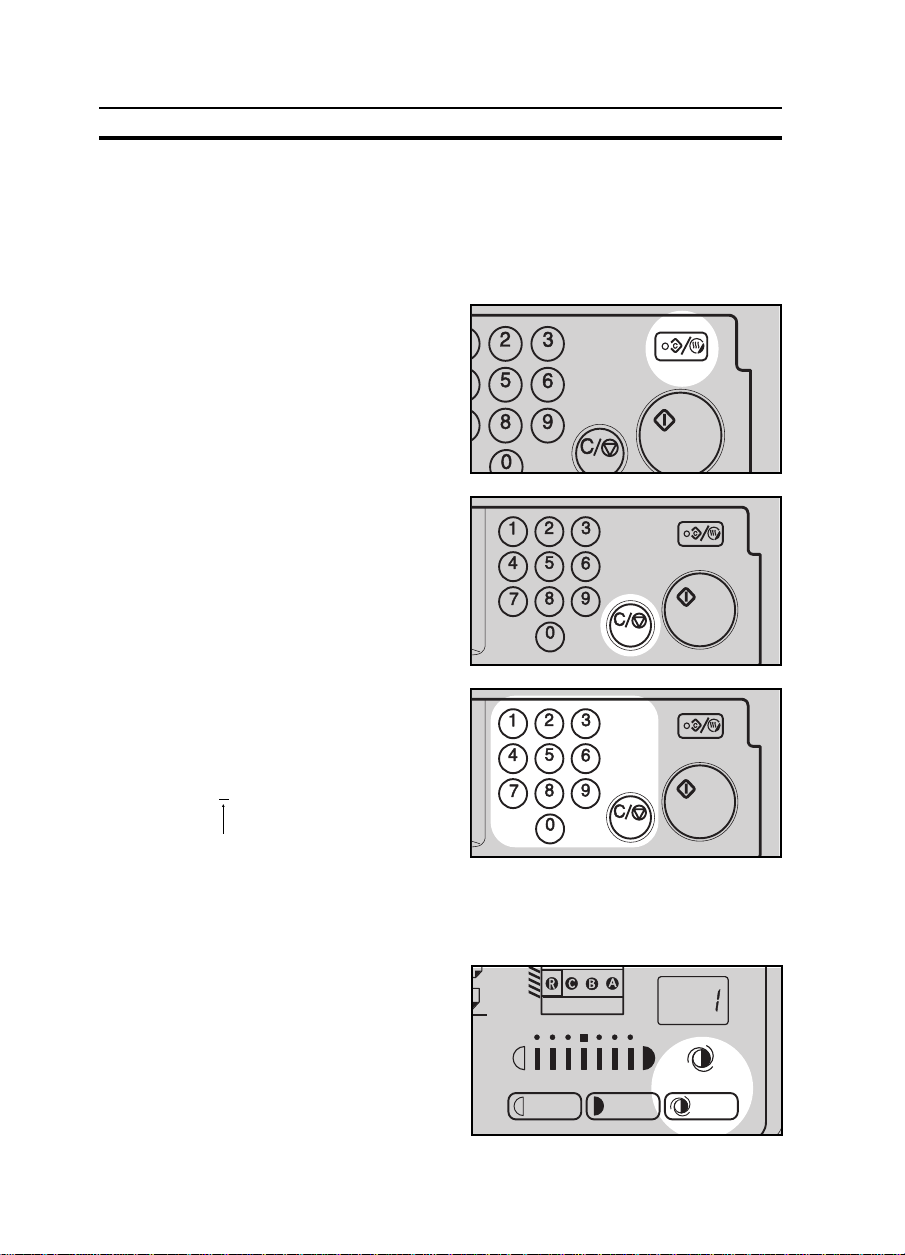
How To Access User Tools
Press the Clear Modes/Energy
.
1
Saver key.
Hold down the Clear/Stop key for
.
2
more than three seconds.
.
Enter the required user tool num-
.
3
ber using the Number keys.
For the user tool number, refer to
❐
pages 60 ~ 67.
Example:
This is the user tool’s number.
If you input the wrong number, press
❐
the
correct number.
Press the Auto Image Density
4
key.
58
7 Counter up/down
Clear/Stop
key. Then, input the
Page 72
KF2Jr-AE-8
USER TOOLS
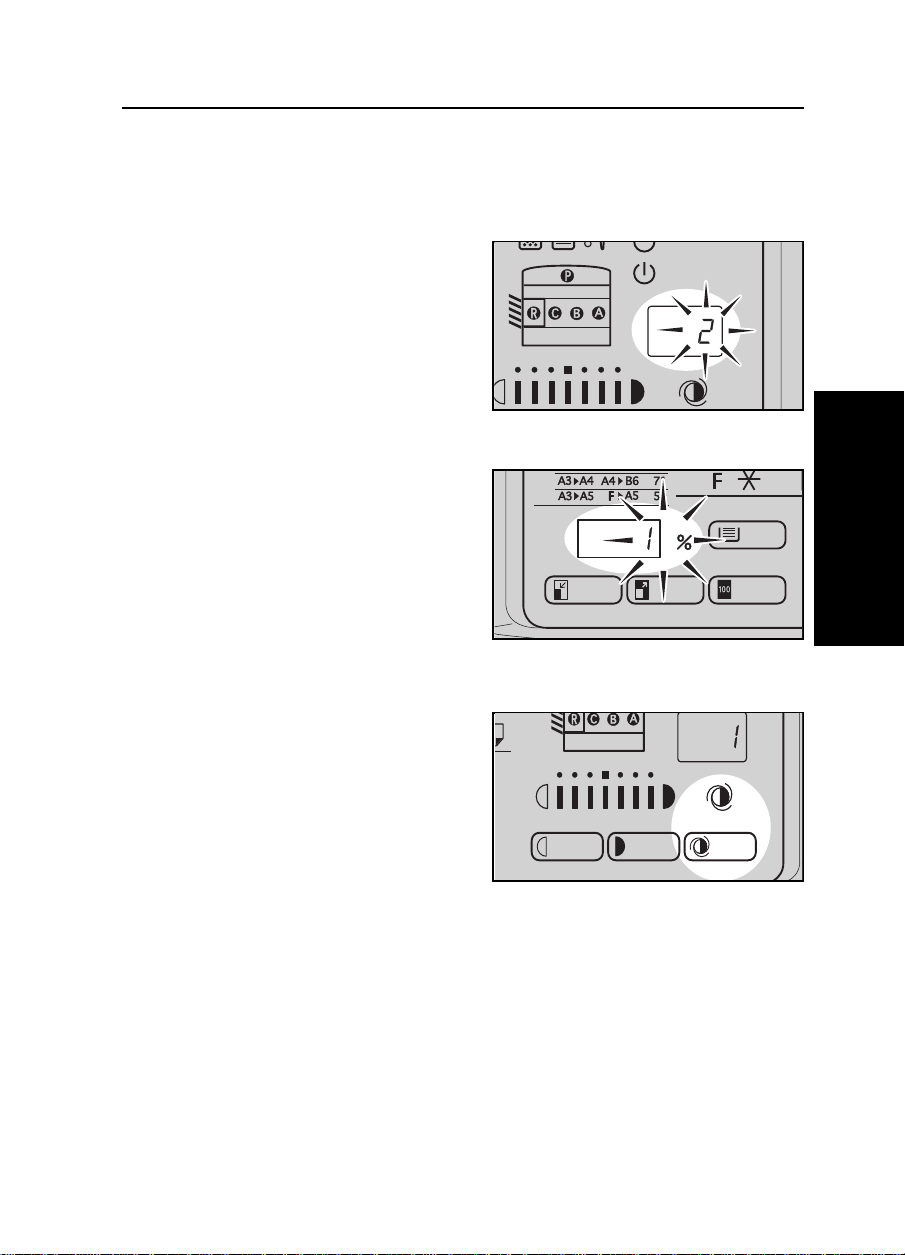
How To Change Adjustment Values Or Modes
Access the user tool you want to
.
1
adjust. (☛ See page 58.) The
number of the user tool you select will be displayed in the copy
counter.
The default setting will blink in
.
2
the Three Digit indicator. Enter
the required setting using the
Number keys.
For the settings, refer to pages 60 ~
❐
67.
If you input a wrong number, press
❐
the
Clear/Stop
correct number.
key. Then, enter the
SETTINGS
CHANGING THE COPIER’S
Press the Auto Image Density
.
3
key to store the required setting.
If you would like to adjust another
❐
user tool, enter the user tool number.
Turn the main switch off and on.
.
4
59
Page 73
KF2Jr-AE-8
USER TOOLS
User Tool Menu
1. Image Density Level Selection.
You can adjust the Auto Image Density level to lighter and darker.
For how to change settings,
❐
Default: Mode 0 (Setting:0)
Setting Mode
0 Normal
1 Light
2Dark
3 Lighter
4 Darker
2. Narrow Copy Paper Mode
The narrowest paper you can set in the bypass feed table is about 70mm. If
you wish to use narrower sizes, turn this function on. If you turn this function on
the narrowest paper size you can set is about 45mm.
For how to change settings,
❐
Default: Mode Off (Setting:0)
Setting Mode
0 Off
1On
see page 59.
☛
see page 59.
☛
3. Auto Reset Time Set
As a default setting, the copier can reset itself 1 minute after the final copy
is made or after the last time any key is pressed. If a 1 minute reset time is
not appropriate, you can change this time or cancel this function.
For how to change settings,
❐
Default: 1 minute (Setting: 0)
Setting Definition
0 1 minute
1 3 minutes
2 Auto reset is turned off.
60
see page 59.
☛
Page 74

KF2Jr-AE-8
USER TOOLS
4. Auto Energy Saver Set
As a default setting, when the copier is reset by the auto reset, the Energy
Saver is automatically set. You can change this setting.
For how to change settings,
❐
see page 59.
☛
Default: Yes (Auto energy saver is set.) (Setting: 1)
Setting Modes
0 No (Auto energy saver is not set.)
1 Yes (Auto energy saver is set.)
5. Auto Off
You can set the copier to turn off after the selected time to conserve
energy.
For how to change settings, ☛ see page 59.
❐
Default: 30 minutes (Setting: 0)
Setting Definition
0 30 minutes
1 15 minutes
2 60 minutes
3 90 minutes
4 120 minutes
SETTINGS
CHANGING THE COPIER’S
6. Toner Density Adjustment
You can adjust the toner density using this function.
For how to change settings,
❐
Default: Normal (Setting: 0)
Setting Definition
0 Normal
1Dark
2 Light
see page 59.
☛
61
Page 75

KF2Jr-AE-8
USER TOOLS
7. Counter Up/Down
The copy counter can be set to show the number of copies made (count
up), or the number of copies remaining to be made (count down).
For how to change settings,
❐
see page 59.
☛
Default: Up (Setting: 0)
Setting Definition
0Up
1Down
10. AOF (Keep it 0)
Ask your service representative about this function (default: 0)
11. Exceeding the Maximum Image Density
The density represented by the right indicator can be made darker.
For how to change settings,
❐
Default: Normal (Setting: 0)
Setting Modes
0 Normal
1Dark
see page 59.
☛
13. Energy Saver Level
You can select the Energy Saver level.
Setting Power consumption Warm-Up Time
0 Saving about 38% as compared with Standby mode. 10 seconds
1 Saving about 35% as compared with Standby mode. 9 seconds
2 Saving about 30% as compared with Standby mode. 7 seconds
3 Saving about 24% as compared with Standby mode. 6 seconds
This data is based on the copier only.
62
Page 76

KF2Jr-AE-8
USER TOOLS
User Tools for User Codes
If the copier is set with the user codes, operators must
input their user codes before the copier can be oper-
ated. The copier keeps count of the number of copies
made under each user code. To have the copier set for
user codes, contact your sales or service representative.
❐ To prevent others from making copies using your user code, press the
Clear/Stop key and Clear Modes/Energy Saver key simultaneously after copy-
ing.
8. User Code Counter Check
You can check the number of copies made using each user code.
.
Access the user tool 8. ☛ See
1
page 58.
.
[1] is displayed in the copy
2
counter. Press the
key or the
choose the index of the user
code you wish to check.
❐
The upper 3 digits of the total copy
quantity made under this user code
are displayed in the Three Digit indicator.
Example: when 123456 copies are
made under one user code, "123" is
displayed in the Three Digit
tor.
Zoom Down (-)
Zoom Up (+)
key to
indica-
SETTINGS
CHANGING THE COPIER’S
63
Page 77

USER TOOLS
Hold down the Darker key.
.
3
The lower 3 digits of the total copy
❐
quantity made under this user code
are displayed in the
cator.
Example: when 123456 copies are
made under one user code, "456" is
displayed in the
tor.
To exit from the user tools, press
.
4
the Auto Image Density key and
turn the main switch off and on.
Three Digit
Three Digit
KF2Jr-AE-8
indi-
indica-
64
Page 78

9. User Code Counter Clear
You can clear all the user code counter.
Access the user tool 9. ☛ See
.
1
page 58.
Press 1 on the Number keys.
.
2
If you enter a wrong number, press
❐
the
Clear/Stop
Press the Auto Image Density
.
3
key and the Darker key simulta-
neously.
All user code counters are cleared.
❐
key.
KF2Jr-AE-8
USER TOOLS
SETTINGS
CHANGING THE COPIER’S
To exit from the user tools, turn
4
the main switch off and on.
65
Page 79

USER TOOLS
12. User Code Number Set
You can register your user codes (3 digits).
Up to 10 user codes can be registered.
❐
Same user codes cannot be registered twice or more.
❐
How to register user codes
Access the user tool 12. ( See
1
page 58.)
[1] is displayed in the copy
2
counter. Press the Zoom Up (+)
key or the Zoom Down (-) key to
choose the index of the user code
you wish to register.
Enter the user code with the
3
Number keys (1 - 999).
If you input the wrong code, press
❐
the
Clear/Stop
correct code.
key. Then, input the
KF2Jr-AE-8
Press the Auto Image Density
4
key.
The user code is registered in the
❐
machine.
[12] is blinked in the copy
5
counter. If you wish to register
user codes more, press the Auto
Image Density key and repeat
steps 2 to 4.
To exit from the user tools, turn
6
the main switch off and on.
66
Page 80
How to change user codes
Access the user tool 12. ( See
1
page 58.)
[1] is displayed in the copy counter.
2
You will see your user code for the
index in the Three Digit indicator.
Press the Zoom Up (+) key or the
Zomm Down (-) key to choose the
index of the user code you wish to
change.
Enter the new user code with the
3
Number keys (1 - 999).
KF2Jr-AE-8
USER TOOLS
SETTINGS
Press the Auto Image Density
4
key.
The old user code is changed to the
❐
new one.
[12] is blinked in the copy
5
counter. If you wish to change
user codes more, press the Auto
Image Density key and repeat
steps 2 to 4.
To exit from the user tools, turn
6
the main switch off and on.
CHANGING THE COPIER’S
67
Page 81

KF2Jr-AE-8
SERVICE REPRESENTATIVE SETTINGS
SERVICE REPRESENTATIVE SETTINGS
Some features can be adjusted by your service representative to suit your
needs. This section gives a brief description of these features. For more
information, contact your service representative.
Auto Sort Selection
When you insert 2 or more originals in the optional document feeder and make
from 2 to 10 sets of copies from each original, the copier selects Sort mode.
ADS Priority Selection
As a default setting, Auto Image Density is selected. You can cancel this
setting.
SADF Auto Reset
When you set one original at a time in the optional document feeder, the Au to
Feed indicator lights for a selected time after an original is fed to show that the
document feeder is ready for another original. You can adjust this time.
Maximum Sorter Bin Capacity
With the default setting, the sorter bin capacity is limited. Your service
representative can cancel this limitation.
Paper Tray Size Setting
If you wish to use paper sizes that are not available as standard, contact
your service representative.
Horizontal Edge Margin Width Selection
Your service representative can select the Horizontal Edge Margin Width for
use with the optional ducument feeder.
68
Page 82

KF2Jr-AE-9
MAINTAINING YOUR
COPIER
DO’S AND DON’TS
WHERE TO PUT YOUR
COPIER
REMARKS
MAINTAINING YOUR COPIER ...............................................................................70
Copier................................................................................................................................................ 70
Document Feeder (Option)............................................................................................................ 71
WHERE TO PUT YOUR COPIER ............................................................................... 72
Copier Environment.........................................................................................................................72
Power Connection ......................................................................................................................... 73
Access To Copier ............................................................................................................................. 74
DO’S AND DON’TS................................................................................................. 75
Copier................................................................................................................................................ 75
Document Feeder (Option)............................................................................................................ 75
10-bin Sorter (Option) ...................................................................................................................... 75
REMARKS................................................................................................................76
Copier................................................................................................................................................ 76
10-bin Sorter (Option) ...................................................................................................................... 76
OTHERS
69
Page 83

KF2Jr-AE-9
MAINTAINING YOUR COPIER
MAINTAINING YOUR COPIER
To maintain high copy quality, clean the following parts and units regularly.
Copier
Exposure glass
Clean the exposure glass with a
damp cloth and wipe it with a dry
cloth.
Platen cover
Clean the platen cover with a
damp cloth and wipe it with a dry
cloth.
Corona wire
Do the following when white streaks appear on the copy, or when image
density becomes uneven.
Open the front cover.
1
70
Page 84
Slide out the corona unit until it is
2
fully extended.
Push the corona unit back in.
3
Make sure it locks into place.
Repeat steps 2 and 3 several
4
times.
Close the front cover.
5
KF2Jr-AE-9
MAINTAINING YOUR COPIER
Document Feeder (Option)
Feed-in unit
Clean the original table and origi-
nal guide with a damp cloth and
wipe it with a dry cloth.
Belt
Lift the document feeder. Clean
the belt with a damp cloth and
wipe it with a dry cloth.
MAINTAINING YOUR COPIER
71
Page 85

KF2Jr-AE-9
WHERE TO PUT YOUR COPIER
WHERE TO PUT YOUR COPIER
Copier Environment
Your copier’s location should be carefully chosen because environmental
conditions greatly affect its performance.
Optimum environmental conditions
CAUTION:
R
•
Keep the equipment away from humidity and dust. Otherwise a fire or
an electric shock might occur.
•
Do not place the equipment on an unstable or tilted surface. If it topples over, it could cause injury.
R
CAUTION:
•
If you use the equipment in a confined space, make sure there is a
continuous air turnover.
Temperature: 10 - 30°C (50 - 86°F)
❐
Humidity: 15 - 90%
❐
A strong and level base.
❐
The copier must be level within 5 mm, 0.2" both front to rear and left to right.
❐
To avoid possible build-up of ozone, make sure to locate the copier in a large
❐
well ventilated room that has an air turnover of more than 30 m3/hr/person.
Environments to avoid
Locations exposed to direct sunlight or strong light (more than 1,500 lux.)
❐
Locations directly exposed to cool air from an air conditioner or heated air from
❐
a heater. (Sudden temperature changes might cause condensation within the
copier.)
Places where the copier might be subjected to frequent strong vibration.
❐
Dusty areas.
❐
Areas with corrosive gases.
❐
Places higher than, 2,000m or 6,500 ft above sea level.
❐
72
Page 86

KF2Jr-AE-9
WHERE TO PUT YOUR COPIER
Power Connection
R
WARNING:
•
Only connect the machine to the power source described on the inside front cover of this manual.
•
Connect the power cord directly into a wall outlet and do not use
an extention cord.
•
Do not damage, break or make any modifications to the power
cord. Do not place heavy objects on it. Do not pull it hard nor bend
it more than necessary. These actions could cause an electric
shock or fire.
R
CAUTION:
•
Unplug the power cord from the wall outlet before you move the
equipment. While moving the equipment, you should take care that
the power cord will not be damaged under the equipment.
R
CAUTION:
•
When you disconnect the power plug from the wall outlet, always
pull the plug (not the cable)
❐ When the main switch is in the Standby position,the optional anticondensation
heaters are on. In case of emergency,unplug the machine‘s power cord.
❐ Connect the copier to a power source meeting the specifications given on the
inside front cover of this manual.
❐ Avoid multiwiring.
❐ The socket-outlet shall be installed near the equipment and shall be easily ac-
cessible.
❐ Make sure the plug is firmly inserted in the outlet.
❐ Voltage must not fluctuate more than 10%.
❐ Do not set anything on the power cord.
❐ Always turn the copier off when you have finished copying for the day, but
leave it plugged in.
73
DO’S AND DON’TS
Page 87
WHERE TO PUT YOUR COPIER
Access To Copier
Place the copier near the power source, providing clearance as shown.
More than 10 cm, 4.0"
KF2Jr-AE-9
More than 30 cm, 11.9"
Copier
More than 70 cm, 27.6"
More than 30 cm, 11.9"
74
Page 88

KF2Jr-AE-9
DO’S AND DON’TS
DO’S AND DON’TS
Copier
General operation
❐ If there is a large solid image on the original, the Add Toner D indicator may
be lit after copying although toner remains in the toner bottle. In this case, turn
the main switch off and then back on again.
When removing misfed paper
R
CAUTION:
•
The fusing section of this equipment might be very hot. You should be
very careful that you don’t touch this section when removing the misfed
paper.
❐ Do not leave any torn scraps of paper in the machine.
❐ When clearing misfeeds, do not turn off the main switch. If you do, your copy
settings will be cleared.
❐ After clearing misfeeds, make sure that all units and levers are returned to their
original positions and all covers are closed.
Document Feeder (Option)
❐ While originals are fed from the original table to the exposure glass, do not pull
out the originals.
❐ Do not lift the document feeder until the last original has been completely fed
out.
❐ Do not press down or hold originals after inserting them.
❐ Do not press any parts of the document feeder strongly.
10-bin Sorter (Option)
❐ Do not touch moving bins.
❐ Do not place objects on the sorter when it is open.
❐ Do not press the sorter when it is open.
75
WHERE TO PUT YOUR COPIER
Page 89
KF2Jr-AE-9
REMARKS
REMARKS
Copier
❐ To avoid problems caused by curled copies, try turning over the paper stack in
the tray. If there is no improvement, change to copy paper with less curl.
❐ Load paper with the copy side
the copy paper over in the tray. If there is no improvement, change to copy
paper with less curl.
❐ If you want to copy OHP transparencies,adhesive labels,post cards,and translu-
cent paper,set them bypass tray.
❐ Margins on all four sides of the original image are not copied, as shown in the
illustration.
down
in the tray. If copies are curled, try turning
Paper feed
direction
When the original is set on
the exposure glass.
When the original is set
into the optional document
feeder.
Full Size magnification
Reducing and enlarging using
preset ratios
Reducing and enlarging
using the zoom key
a = 2.5 ±
b1 = b2 = 2 ± 2 mm
a = 2.5 ± 2.0 mm
b1 + b2 ≤ 4 mm
a = 2.5
b1 + b2 ≤ 6mm
2.0 mm
±
2.0 mm
a = 2.5±
b1 = b2 = 2 ± 2 mm
a = 2.5 ±
b1 + b2 ≤ 8 mm
a = 2.5 ±
b1 + b2 ≤ 10 mm
2.0 mm
2.0 mm
2.0 mm
10-bin Sorter (Option)
❐ To avoid problems caused by curled copies, try turning over the paper stack in
the cassette or tray. If there is no improvement, change to copy paper with less
curl.
❐ If copies smaller than A4 ;, 8
after taking them from the bins.
76
" x 11" ; are not stacked well, arrange them
1/2
Page 90

KF2Jr-AE-10
SPECIFICATIONS
COPIER ...................................................................................................................78
DOCUMENT FEEDER (OPTION) .............................................................................. 81
10-BIN SORTER (OPTION) ...................................................................................... 82
SPECIFICATIONS
77
Page 91

COPIER
Configuration: Desktop
Process: Dry electrostatic transfer system
Originals: Sheet, book
KF2Jr-AE-10
COPIER
Original size:
Copy paper size:
Maximum: A3 ;, 11" x 17" ;
Paper tray: A3;, A4:;, A5 :, B4;, B5:;, F;
11" x 17";, 8
Bypass feed table: A3;, A4:;, A5:, A6;,B4;,
B5
11" x 17" ;, 8
8
" x 11":;, 8
1/2
:;, B6;, F;
" x 14";, 5
1/2
Bypass feed table (non-standard size):
Vertical: 45-308mm, Horizontal: 148-432mm
Copy paper weight:
Tray: 64 ~ 90 g/m2 17 ~ 24 lb
Bypass feed table: 52 ~ 157 g/m
Copy paper capacity: •Tray:
Type 1: 250 sheets or less than 30mm
Type 2: 500 sheets or less than 56mm
Type 3: 250 sheets or less than 30mm
•Bypass feed table : 80 sheets (80g/m
10 sheets (OHP transparencies)
1 sheet (Adhesive labels,)
Copying speed: Type 1: 13 copies / minute
Type 2: 15 copies / minute
Type 3: 18 copies / minute
Based on A4
paper tray
Type 1: 9 copies / minute
Type 2: 9 copies / minute
Type 3: 10 copies / minute
Based on A3
paper tray
:, or 8 1/2" x 11":, feeding from the
;, or 11" x 17";, feeding from the
" x 14";
1/2
" x 11":;,
1/2
" x 8
1/2
1/2
2
, 14 ~ 42 lb
2
, 20 lb)
" ;
First copy time: Type 1: 6.9 minute
Type 2: 6.9 minute
Type 3: 6.5 minute
Based on A4
paper tray
:, or 8 1/2" x 11":, feeding from the
Toner replenishment: Bottle exchange (215 g)
78
Page 92

KF2Jr-AE-10
COPIER
Copy tray capacity: 100 sheets (80g/m
2
, 20lb)
Power source: See the inside front cover of this manual.
Warm-up time: Type 1: 35 seconds
Type 2: 35 seconds
Type 3: 45 seconds
Reproduction ratio: 2 enlargement and 3 reduction (Type 1)
3 enlargement and 4 reduction (Type 2 and 3)
Metric Version Inch Version
200 % *
Enlargement
Full size 100 % 100 %
Reduction
1
141 % 155 %
122 % 129 %
93 % 93 %
82 % 74 %
71 % 65 %
1
50 % *
*1: Not available to Type 1
Power consumption:
Copier only Full system*
Warm up 0.95 kW 0.95 kW
Standby 0.16 kW 0.16 kW
Copying 0.70 kW 0.70 kW
Maximum less than 1.4 kW less than 1.5 kW
* Full system: Copier with document feeder, 10-bin sorter
200 %
50 %
Noise Emission *1:
•
Sound Power Level
Type 1
Copier only
During copying 62 dB(A)
Standby 40 dB(A)
SPECIFICATIONS
79
Page 93

COPIER
Type 2
Copier only
During copying 63 dB(A)
Standby 40 dB(A)
Type 3
Copier only
During copying 64 dB(A)
Standby 40 dB(A)
KF2Jr-AE-10
•Sound Pressure Level *
2
Type 1
Copier only Complete System *
During copying 59 dB(A) 60 dB(A)
3
Type 2
Copier only Complete System *
During copying 59 dB(A) 61 dB(A)
4
Type 3
Copier only Complete System *
During copying 59 dB(A) 62 dB(A)
4
*1: The above measurements were made in accordance with ISO 7779 are
actual values.
*2: Measured at the position of a bystander.
*3: With the document feeder
*4: With the document feeder and 10-bin sorter
80
Page 94

KF2Jr-AE-10
Dimensions:
Type 1
Width Depth Height
Copier only 579mm, 22.8" 560mm, 22.1" 420mm, 16.6"
Full system *
1
579mm, 22.8" 560mm, 22.1" 508mm, 19.8"
*1 With the document feeder
Type 2
Width Depth Height
Copier only 579mm, 22.8" 560mm, 22.1" 420mm, 16.6"
Full system *
1
775mm, 30.2" 560mm, 22.1" 508mm, 19.8"
*1: With the document feeder and 10-bin sorter
Type 3
Width Depth Height
Copier only 579mm, 22.8" 560mm, 22.1" 465mm, 18.3"
Full system *
1
775mm, 30.2" 560mm, 22.1" 553mm, 21.5"
COPIER
*1 With the document feeder and 10-bin sorter
Weight:
Type 1
Copier only : approximately 40.5kg, 89.3 lb
•
(Without the copy tray and toner bottle)
Full system: approximately 46.5kg, 102.6 lb
•
(With the document feeder)
Type 2
Copier only : approximately 40.5kg, 89.3 lb
•
(Without the copy tray and toner bottle)
Full system: approximately 53.5kg, 118.0 lb
•
(With the document feeder and 10-bin sorter)
Type 3
Copier only : approximately 43.5kg, 95.9 lb
•
(Without the copy tray and toner bottle)
Full system: approximately 56.5kg, 124.6 lb
•
(With the document feeder and 10-bin sorter)
Optional equipment:
Document feeder
10-bin sorter (for Type 2 and 3)
Specifications are subject to change without notice.
❐
SPECIFICATIONS
81
Page 95

DOCUMENT FEEDER (OPTION)
DOCUMENT FEEDER (OPTION)
Original Feed: Automatic document feed - ADF mode
Semi-automatic document feed - SADF mode
Original size, weight and tray capacity:
A3
Original size
Original weight
Maximum number of originals to
be set
A4
;
;:
,
11" x 17"
8
" x 11"
1/2
52.8g/m2,14lb64.0g/m2,17lb81.4g/m2,22lb105g/m2,
;
,
8
;:
, A5
1/2
30 sheets 30 sheets 30 sheets 20 sheets
;:
" x 14"
,
5
1/2
, B4 ;, B
;
" x 8
1/2
,
;:
5
,
;:
"
KF2Jr-AE-10
28 lb
Original set:
Face up, First sheet on top
Original transport: One flat belt
Average power consumption: 20 W
Weight: Approximately 7.0 kg, 15.4 lb
Dimensions (W x D x H): 590 x 443 x 87.5 mm, 23.0" x 17.2" x 3.4"
Specifications are subject to change without notice.
❐
82
Page 96
10-BIN SORTER (OPTION)
10-BIN SORTER (OPTION)
Paper size, weight and capacity for bins:
Metric Version Inch Version
Maximum paper size
Minimum paper size
Maximum paper weight 90 g/m
Minimum paper weight 64 g/m
Maximum capacity of bins
(Maximum number of copies)
Paper that cannot be used post cards, translucent paper, OHP
A4, 8
B4, F, 8
A3, 11" x 17": 10 copies
transparencies, and adhesive labels
A3 ;
: 8
A5
2
2
17 lb
" x 11" or smaller: 20 copies
1/2
" x 14": 15 copies
1/2
1/2
KF2Jr-AE-10
11" x 17"
" x 11" ;:
24 lb
Number of bins:
Power consumption:
Weight:
Dimensions (W x D x H):
❐ Specifications are subject to change without notice.
10 bins
15 W
approximately 7.5 kg, 16.5 lb
402 x 445 x 138 mm, 15.6" x 17.7" x 5.4"
SPECIFICATIONS
83
Page 97

10-BIN SORTER (OPTION)
KF2Jr-AE-10
84
Page 98

INDEX
INDEX
85
Page 99

INDEX
INDEX
10-bin sorter (Option), 3
A
Add Toner indicator, 51
ADS priority selection, 68
Auto image density, 28
Auto Start, 33
B
BASICS, 9
Bypass feed copying, 30
Bypass feed table, 3
C
Check Paper Size/Direction indicator, 47
COMBINATION CHART, 44
COPIER EXTERIOR AND INTERIOR, 2
copies, enlarged, 34
copies, reduced, 34
COPY PAPER, 14 - 15
COPY PAPER AND TONER, 13
Copy tray, 3
COPYING, 25
corona wire, 70
D
DF, document feeder, 3
Do’s and don’ts, 75
document feeder, DF, 3
E
E code, 46
Energy Saver, 43
Exposure glass, 3
F
FINISHING (OPTION), 38 - 41
sort, 38
stack, 40
Front cover, 3
full size copying, 30
Fusing Unit, 3
I
image density, adjusting, 28
Indicators, 6
Installation requirements
Copier Environment, 72
Power Connection, 73
K
Keys, 4
L
Left scale, 3
Loading paper
Bypass feed table, 30
Paper Tray, 49
M
Main switch, 3
maintenance, 70 - 71
Manual image density, 28
misfeeds, 52
misfeeds, clearing, 52 - 54
O
Operation panel,4 - 5
ORIGINALS, 17
P
paper size, changing, 56 - 57
Paper tray, 3
paper, loading, 49 - 50
Photo mode, 29
Platen cover, 3
preset ratios, 34
86
Page 100

INDEX
R
Reducing and Enlarging, 34 - 35
preset ratios, 34
REMARKS, 76
S
SADF auto reset, 68
SAFETY INFORMATION, i - iv
SAVING ENERGY, 43
Series Copies, 36
SERVICE REPRESENTATIVE SETTING,
68 - 69
Setting originals, 19
document feeder, 20 - 23
exposure glass, 19
Sort, 38
SPECIFICATIONS, 77
Stack, 40
STARTING THE COPIER, 10 - 12
T
TONER, 16
Toner Storage, 16
toner, adding, 51
U
Z
Zoom, 35
INDEX
U code, 46
User Code, copying with, 42
User code counter check, 63
User code counter clear, 65
User code number set, 66
User codes, 40
User Tool Menu, 60
USER TOOLS, 58 - 67
user tools, accessing, 58
user tools, changing values, 59
W
WHAT TO DO IF SOMETHING GOES
WRONG, 45
WHAT YOU CAN DO WITH THIS COPIER, x
WHERE IT IS & WHAT IT IS, 2 - 7
87
 Loading...