

Page 1
INTRODUCTION
INTRODUCTION
This manual contains detailed instructions on the operation and maintenance of this copier. To get maximum versatility from this copier all
operators should carefully read and follow the instructions in this manual.
Please keep this manual in a handy place near the machine.
Please read the next section before using this copier. It contains important
information related to USER SAFETY and PREVENTING EQUIPMENT
PROBLEMS.
SAFETY INFORMATION
When using your machine, the following safety precautions should always
be followed.
Safety During Operation
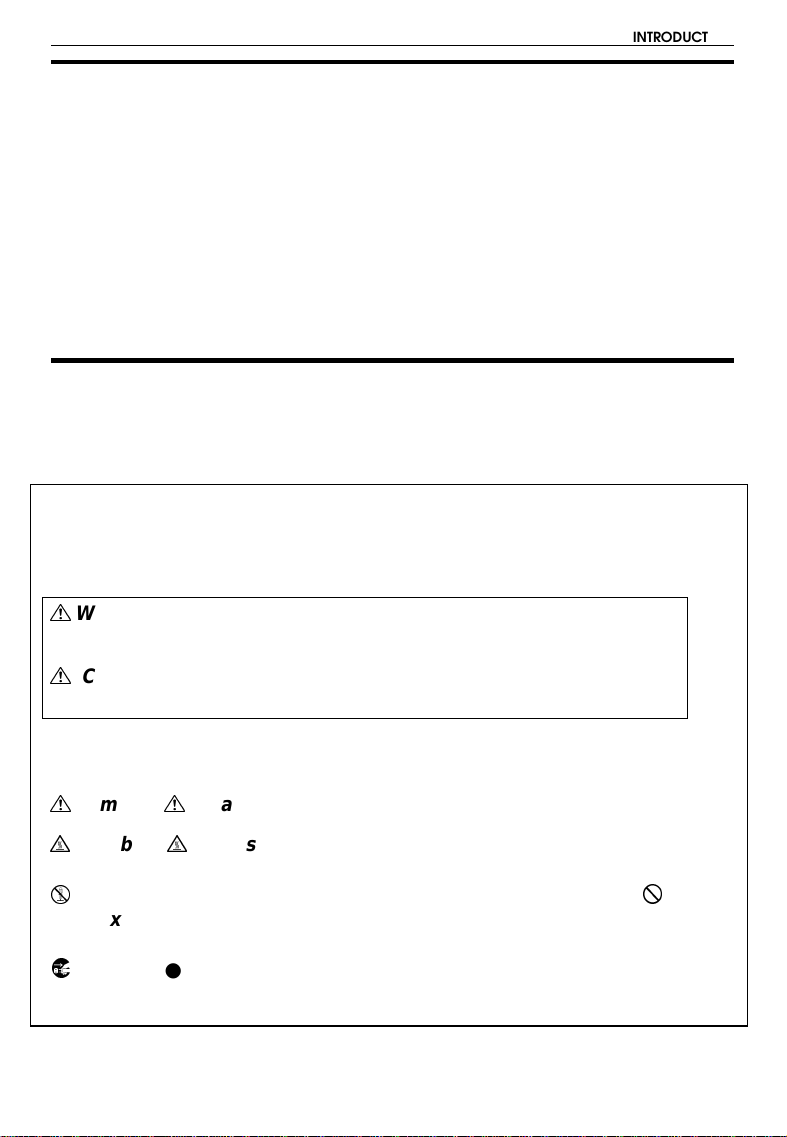
In this manual, the following important symbols are used:
WARNING:
$
Ignoring this warning could cause serious injury
or even death.
CAUTION:
$
Ignoring this caution could cause injury or dama ge
to property.
Examples Of Indications
Symbols $ means a situation that requires you take care.
$
Symbols G means ‘‘Hot surface’’.
G
Do NOT carry out the operation represented by the symbol
B
This example means ‘‘Do not take apart’’ .
Symbols ● means you MUST perform this operation. This example
C
means ‘‘You must remove the wall plug’’.
>
.
i
Page 2
SAFETY INFORMATION
$
WARNINGS:
•• Only connect the machine to the power source described on
the inside front cover of this manual.
>
Do not place heavy objects on it, pull it hard or bend it more than n e c es sa r y .
@
B
C
•• Avoid multi-wiring
•• Do not damage, break or make any modifications to the power cord.
These actions could cause an electric shock or fire.
•• Do not plug or unplug the pow er cord wit h you r hands wet.
Otherwise, an electric shock might occur.
•• Make sure the wall outlet is near the machine and freely accessible
so that in event of an emergency it can be unplugged easily.
•• Do not remove any covers or screws other than those specified in
this manual. Some parts of the machine are at a high v oltage and
could give you an electric shock. When the machine needs to be
checked, adjusted, or repaired, contact your service representative.
•• Do not take apart or attempt any modifications to this machine. There
is a risk of fire, electric shock, explosion or loss of sight.
•• If the machine looks dama ged or breaks down, sm oke is com ing
out, there is a strange smell or anything look s unusual, imm edi ately turn off the main switch then unplug the power
cord from the wall. Do not continue using the ma chine in this
condition. Contact your service representative .
•• If metal, liquid or foreign matter falls into the machine, turn off
the main switch, and unplug the main power cord.
Contac t your service representa tive. Do not keep usi ng the ma chine with a fault or defect.
>
D
ii
•• Do not put any metal objects or containers holding water
(e.g.vases, flowerpots, glasses) on the machine. If the contents fall
inside the machine, a fire or electric s hock could occ ur.
•• Do not incinerate used toner or toner containers. Toner dust might
ignite when exposed to an open flame. D ispose of the used tone r
containers according to local regulations for pla stics.
Page 3
SAFETY INFORMATION
$
CAUTIONS:
•• Keep the machine away from humidity and dust. A fire or an
electric shock might occur.
>
@
•• When the machine will not be used for a long time, unplug
C
•• Do not place the machine on an unstable or tilted surface.
If it topples over, it could cause injury.
•• After you move the machine, fix it with the caster fixture.
Otherwise, the machine might move or come down to cause
a personal injury.
•• When you move the machine, unplug the power cord from
the wall outlet to avoid fire or electric shock.
the power cord.
•• When you pull out the plug from the socket, grip the plug
to avoid damaging the cord and causing fire or electric shock.
E
•• If you use the machine in a confined space, make sure there
is a continuous air turnover.
@
>
?
$
•• Do not reuse stapled paper. Do not use aluminum foil, car-
bon-containi ng paper or othe r conductiv e paper. Oth erwise,
a fire might occur.
•• When removing misfe d paper, do not touch the fusi ng section
because it could be very hot.
•• This machine has be en tested for safety us ing this suppliers
parts and consumables. We recomme nd you only use these
specified supplies.
iii
Page 4
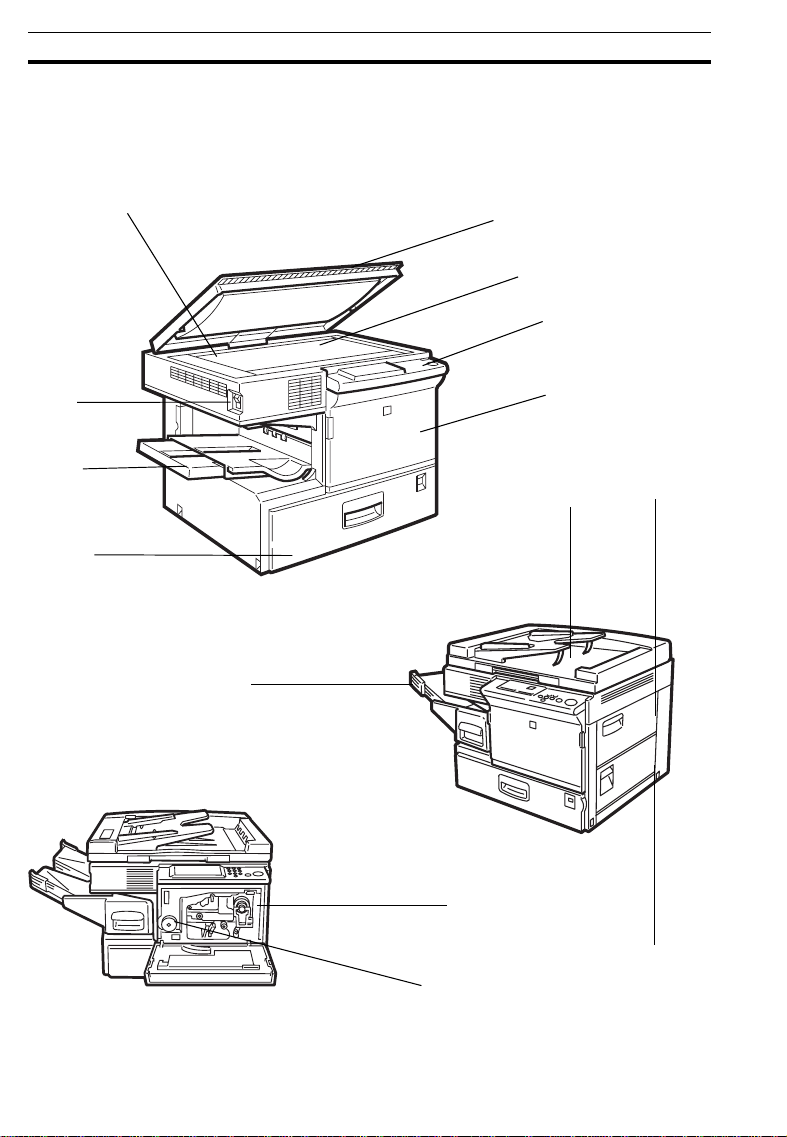
WHERE IT IS & WHAT IT IS
WHERE IT IS & WHAT IT IS
COPIER EXTERIOR AND INTERIOR
1
2
3
4
9
5
6
7
8
10
11
13
12
14
2
Page 5

WHERE IT IS & WHAT IT IS
1. Left scale
2. Main switch
3. Copy tray
4. Paper tray
5. Platen cover
6. Exposure glass
7. Operation panel
8. Front cover
9. 10-bin sorter (Option)
10. Document feeder
(Option)
11. Bypass feed table
12. Right Side Cover
13. Toner Bottle
Use to align originals on the exposure glass.
Switches the copier between on and stand-by
conditions. ("stand-by" means that the optional
anticondensation heater is on.)
Completed copies are delivered here.
This tray can hold 500 sheets of copy paper.
Lower this cover over originals for copying.
Position originals here face down for copying.
Operator controls and indicators are located here.
Open to access the inside of the copier.
Completed copies are sorted or stacked here.
Insert a stack of originals here. The originals are
individually fed onto and removed from the exposure glass.
Use to copy onto paper of unusual size or
weight, or color paper.
Open to remove misfed papers.
Replace the toner bottle when the f
indicator is lit.
Add Toner
14. Fusing Unit
Fuses the copy image to the paper. When accessing the inside of the copier, use caution.
This unit may be very hot.
3
Page 6
WHERE IT IS & WHAT IT IS
OPERATION PANEL
Keys
1
2
3
4 657
1. Sorter key
☛ See pages 36 ~ 39
2. Zoom Up key
Enlarges in 1% steps. ☛ See
page 35 .
(option)
3 . Zoom Down key
Reduces in 1% steps. ☛ See
page 35.
4. Reduce and Enlarge keys
☛ See page 34.
5. Full Size key
☛ See page 28.
4
6. Select Paper Tray key
Press to select a tray for the
paper feed.
7. Lighter an d Darke r keys
☛ See page 30.
8. Auto Image Den sity ke y
☛ See page 30.
9. Number keys
Use to enter the desired number of copies. They are also
used to enter data.
Page 7
WHERE IT IS & WHAT IT IS
8 9
10. Clear/Stop key
Press to cancel the copy
number entered. While copying, press to stop copying.
This key is also used to clear
data.
11. Start key
Press to start copying. Use to
☛ See
set the Auto Start.
page 33.
12. Clear Modes/Energy Saver
key
Press to clear the copier of
previously entered settings.
Press this key for more than 1
10
second to enter/exit the Energy Saver mode.
pages 13 and 40.
11
☛
12
See
5
Page 8
WHERE IT IS & WHAT IT IS
Indicators
1
23
5
4
678 9
121314
10
11
6
Page 9

WHERE IT IS & WHAT IT IS
1. Reduce and Enlarge indicator
☛ See page 34.
2. Bypass Feed indicator
☛ See page 31.
3. Check Paper Size indicator
☛ See pages 45.
4. Add Toner indicator
When it is time to supply toner,it
blinks.When toner bottle is empty,it
is lit.☛ See pages 50.
5. Load Paper indicator
☛ See pages 48 ~ 49.
6. Check Paper Path indicator
If a paper misfeed occurs, it is lit.
☛ See pages 51 ~ 53.
9. Wait indicators
It is lit during the warm-up period.
☛ See page 12.
10. Copy Counter
Indicates the number of copies.
11. Auto Image Density indicator
☛ See page 30.
12. Manual Image Density indicator
☛ See page 30.
13. Paper Size indicator
Show the selected paper size,
direction.
14. Three Digit indicator
Data display.
7. Misfeed Locatio n displa y
It shows the location of misfed
paper . ☛ See pages 51 ~ 53.
8. Ready indicator
When you can make copy, it is lit.
☛ See page 12.
7
Page 10

WHAT YOU CAN DO WITH THIS COPIER
WHAT YOU CAN DO WITH THIS COPIER
Auto image density
manual image density
Copying from the bypass feed table
☛ See page 30.
☛ See page 30.
☛ See page 31
8
Page 11
WHAT YOU CAN DO WITH THIS COPIER
Reducing and enlarging
Reducing and enlarging using preset ratios
☛ See page 34.
Reducing and enlarging with the Zoom Up (+) and Zoom Down (-)
☛ See page 35.
Entering copy job settings during the warm-up period
☛ See page 33.
9
Page 12
WHAT YOU CAN DO WITH THIS COPIER
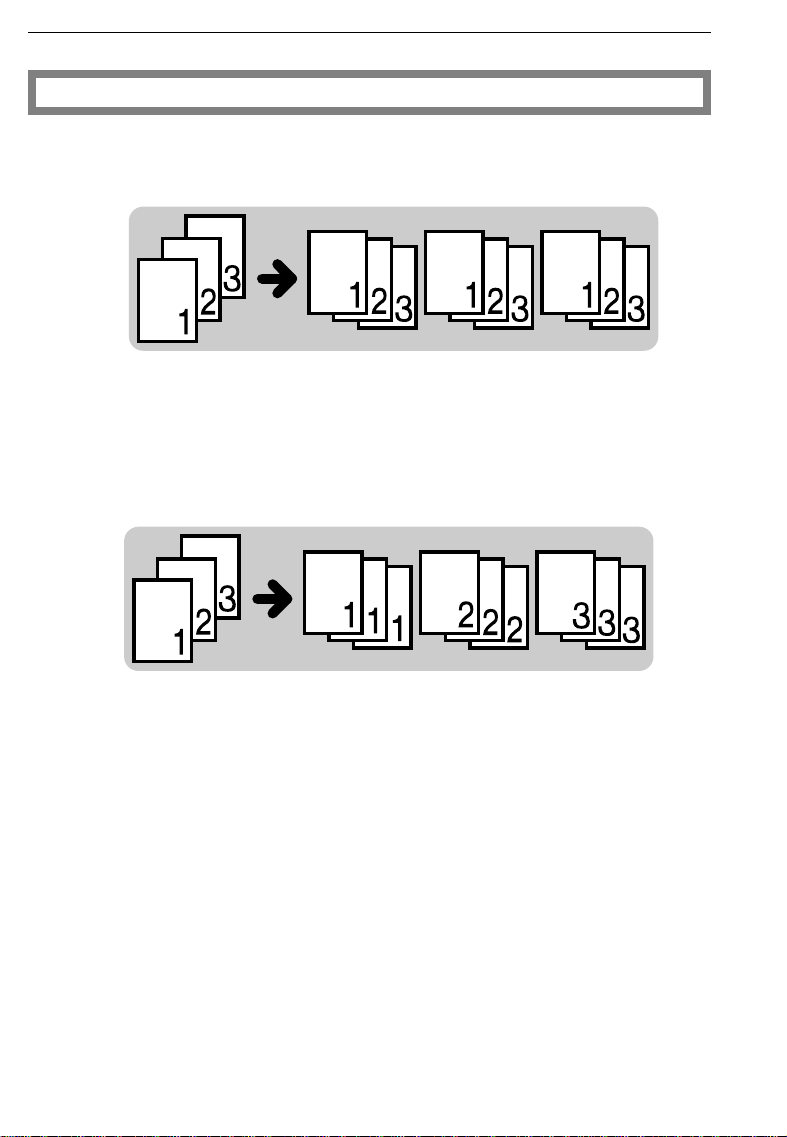
Finishing (Option)
Sorting into sets (123,123,123)
Stacking together all copies of a page (111, 222, 333)
☛ See page 36
10
☛ See page 38.
Page 13

BASICS
STARTING THE COPIER .........................................................................................12
When The Main Switch Is In The Stand-by Position...................................................................... 12
When The Energy Saver Indicator Is On .......................................................................................13
11
Page 14
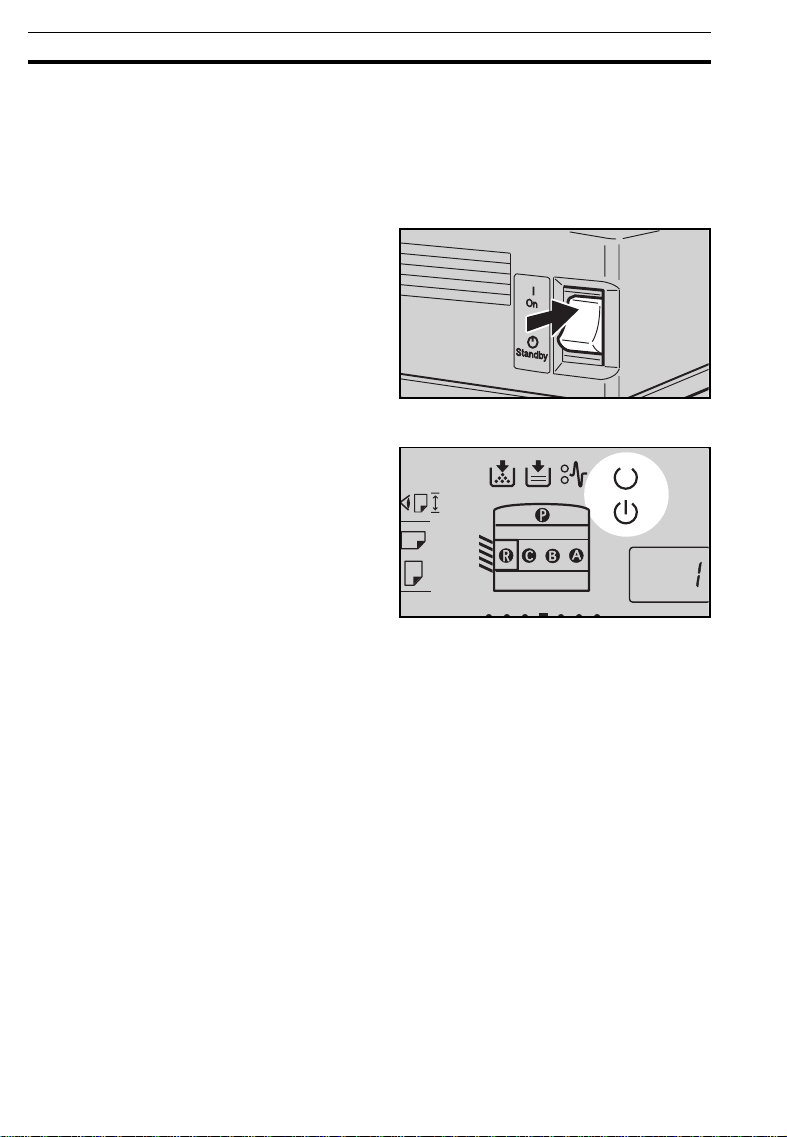
STARTING THE COPIER
STARTING THE COPIER
When The Main Switch Is In The Stand-by Position
Turn on the main switch.
1
Wait for the copier to warm-up.
2
During the warm-up period (less
u
than 45 seconds), the
indicator is on.
Wait
After warm-up, the v
3
cator lights.
12
Ready
indi-
Page 15
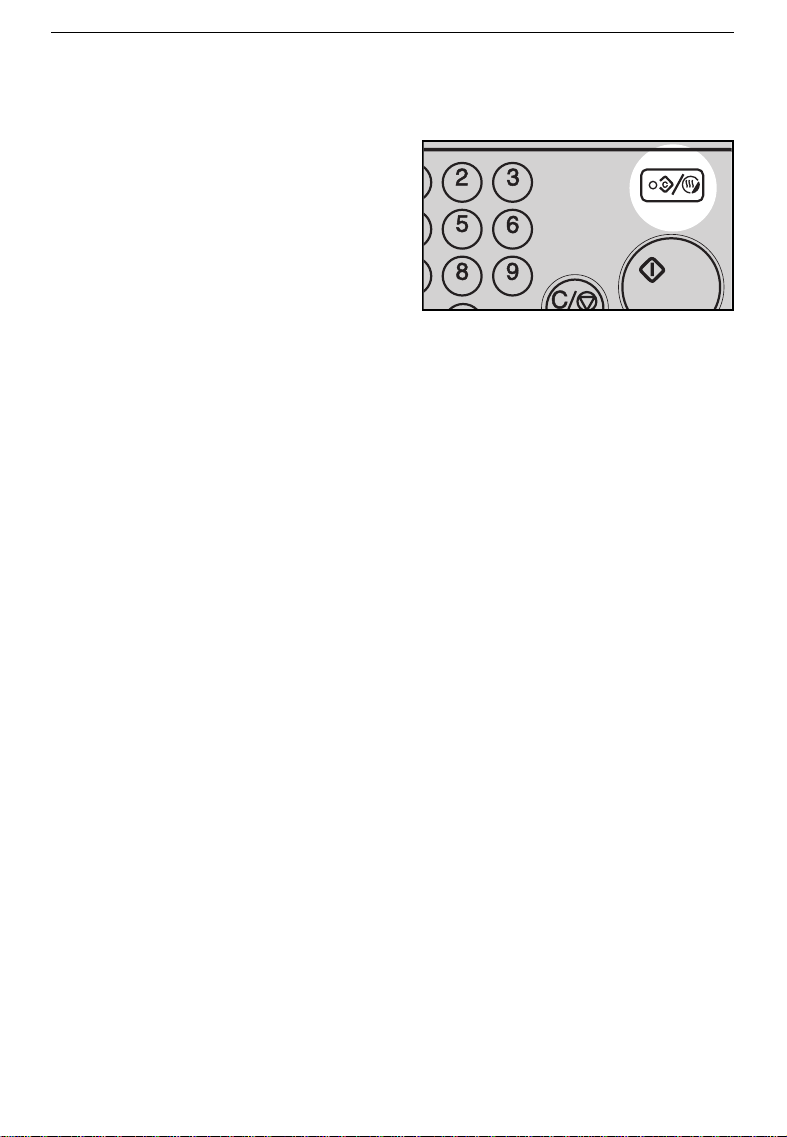
When The Energy Saver Indicator Is On
The copier is in the Energy Saver
mode.
Press the
Saver
condition.
❐
For details about the Energy Saver,
☛
see page 40.
The followi ng act ions w ill a lso return the
❐
copier to the ready condition:
•
Opening or cl osing the op tional doc ument feed er.
•
Setting or iginals in the opti onal docum ent feed er.
•
Setting copy paper in the bypass feed table.
•
Pressing an y key except the Start key.
Clear Modes/Energy
key to return to the ready
STARTING THE COPIER
13
Page 16

STARTING THE COPIER
14
Page 17

COPY PAPER AND
TONER
COPY PAPER.........................................................................................................16
Available Paper Sizes ......................................................................................................................16
Non-recommended Copy Paper.................................................................................................. 16
Notes For Copy Paper..................................................................................................................... 17
Paper Storage .................................................................................................................................. 17
TONER..................................................................................................................... 18
Notes For Toner................................................................................................................................. 18
Toner Storage ................................................................................................................................... 18
15
Page 18

COPY PAPER
COPY PAPER
Available Paper Sizes
Metric Version Inch Version
Paper tray
Bypass fe ed tabl e Standard s izes
, A4
A3
;
B5
;
A3
;
8
" x 11"
1/2
Non-standard sizes
Vertical 45 mm ~ 308 mm, 1.8" ~ 12"
Horizontal 148 mm ~ 432mm, 5.8" ~ 16.8"
:
, F
, A4
; :
;
A5
,
; :,
; :
, 8
:
A5
1/2
B4
,
;
B4
:,
"x 14 ;,
,
Non-recommended Copy Paper
Copy paper of the types or in the conditions listed below is not recommended for this copier.
Copy paper thicker than 90 g/m
•
Copy paper thinner than 64 g/m
•
Copy paper thicker than 157 g/m
•
Copy paper thinner than 52 g/m
•
Folded, curled, creased, or damaged paper
•
Torn paper
•
Damp paper
•
Perforated paper
•
Paper with conductive or low electrical resistance such as carbon or
•
silver coating.
Wavy paper
•
Thermal paper, art paper
•
Thin paper that has low stiffness
•
Adhesive labels
•
Stapled paper
•
2
, 24 lb. (Paper tray)
2
, 17 lb. (Paper tray)
2
, 42 lb. (Bypass feed table)
2
, 14 lb.(Bypass feed table)
11" x 17" ;, 8
81/2" x 14
B5
,
;
; :
, F
11 " x 17"
,
;
1/2
;
" x 11 ; :,
,
;
16
Page 19

Notes For Copy Paper
COPY PAPER
Load paper wit h the copy side
❐
in the bypass feed tabl e. If copi es are cur led, try tur ning the co py paper ov er
up
in the paper tray, and with the copy side
down
in the tra y or table. If t here is no improv ement, change to copy paper with l ess
curl.
Correct curls in copy paper before loading.
❐
Fan copy paper to get air between the sheets before loading.
❐
OHP transparencies, translucent paper, and adhesive labels should be set in
❐
the bypass feed table.
OHP transpare ncies, translucent paper, and adhesive labe ls should be fanned
❐
to get air betwee n the sheets before loadi ng.
Do not touc h copy pap er if your fingers are wet or o ily; fing er prin ts may app ear
❐
on the copy.
When making two-sided copies,do not load paper in the paper tray for copying
❐
the reverse side. Use the by pass fee d tabl e.
Paper Storage
Paper should always be stored properly. Improperly stored paper might
result in poor image reproduction, creased copies, and paper misfeeds.
Generally, avoid curling and absorption of moisture.
Avoid storing paper in humid areas. Under high temperature and high humidity,
❐
or low temperature and low humidity conditions, store paper in a vinyl bag.
Do not store paper where it will be exposed to heat.
❐
Store on a flat surface.
❐
Use older stock first.
❐
Do not lay heavy ob jects on paper .
❐
Keep open reams of paper in the package, and store as you would unopened
❐
paper.
17
Page 20

TONER
Note: If you want to add toner, ☛ see page 50
Notes For Toner
TONER
$WARNING:
Do not incinerate used toner or toner containers. Toner
dust might ignite when exposed to an open flame.
Dispose of the used toner containers according to local
regulations for plastics.
When adding toner, do not turn off the main switch. If you do, your copy set-
❐
tings are cleare d.
Toner Storage
Store toner bottles in a cool, dark place.
❐
Never store to ner where i t will be expos ed to heat.
❐
Do not lay heavy objects on toner bottles.
❐
18
Page 21

ORIGINALS
RECOMMENDED ORIGINALS AND NON-RECOMMENDED ORIGINALS ............ 20
Recommended Originals................................................................................................................ 20
Non-recommended Originals For The Optional Document Feeder......................................... 20
SETTING ORIGINALS ON THE EXPOSURE GLASS ..................................................21
SETTING ORIGINALS IN THE OPTIONAL DOCUMENT FEEDER .............................22
Setting A Stuck Of Originals............................................................................................................ 22
Setting One Original At A Time .................................................................................................... 24
19
Page 22

RECOMMENDED ORIGINALS AND NON-RECOMMENDED ORIGINALS
RECOMMENDED ORIGINALS AND
NON-RECOMMENDED ORIGINALS
Recommended Originals
Regarding or iginals that th e optional docum ent feeder can handle , ☛ see page
❐
77.
Non-recommended Originals For The Optional
Document Feeder
Note: The following types of originals are not recommended for use with the
document feeder. Place them directly on the ex posure glass.
Originals thicker than 105 g/m2, 28 lb.
❐
Originals thinner than 52 g/m2, 14 lb.
❐
Originals lar ger than A3 , 11" x 17"
❐
Originals smaller than B5 ;, 5
❐
Paper with any k ind of coati ng (suc h as c arbon ) on the back
❐
Folded, curl ed, creased , or damage d originals
❐
Mailing labels, or perforated originals
❐
Bound, stapled , or clippe d originals
❐
OHP transparencies
❐
Translucen t paper
❐
Pasted orig inals
❐
Damp original s
❐
Sticky orig inals
❐
Wavy originals
❐
Originals that are not made from paper
❐
Originals wri tten in penc il on both sid es, or two- sided carbo n origina ls
❐
Thermal fax pape r
❐
1/2
" x 8
1/2
"
;
20
Page 23
SETTING ORIGINALS ON THE EXPOSURE
.
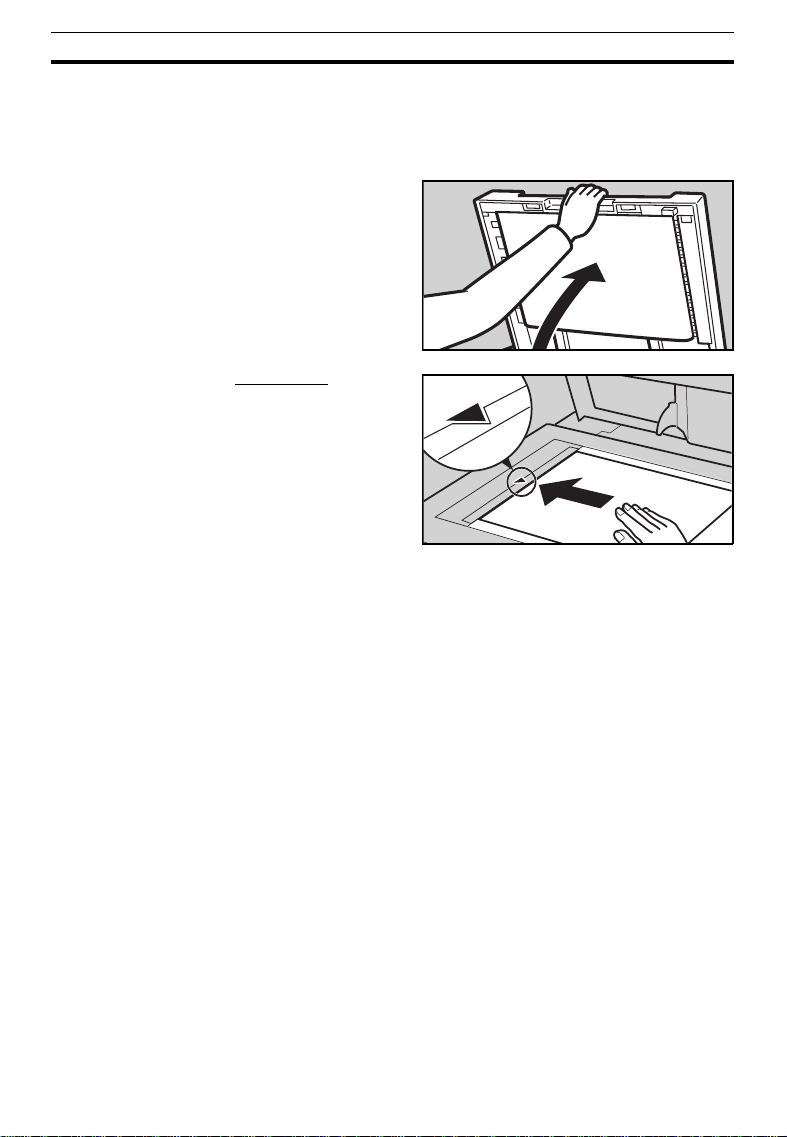
Lift the platen cover or the op-
1
tional document feeder.
❐ When lifting the platen cover, hold it
in the center.
.
Set the original
2
exposure glass. The original
should be centered according to
the size marks on the left sc ale.
face down
on the
SETTING ORIGINALS ON THE EXPOSURE GLASS
GLASS
.
Lower the platen cover or the op-
3
tional document feeder.
21
Page 24
SETTING ORIGINALS IN THE OPTIONAL DOCUMENT FEEDER
SETTING ORIGINALS IN THE OPTIONAL
DOCUMENT FEEDER
Setting A Stuck Of Originals
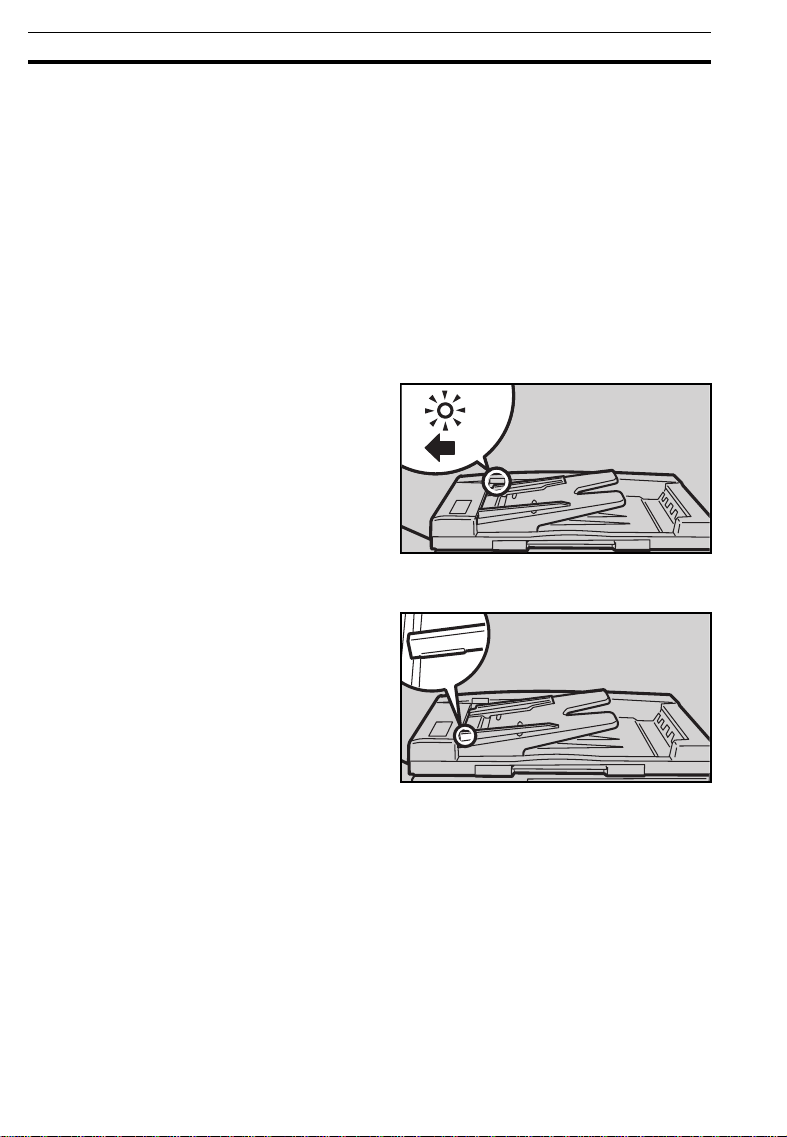
You can insert a stack of originals of the same size into the document
feeder. These originals are individually fed onto and removed from the
exposure glass.
.
Correct any curl, fold, or crease
1
in the originals before setting.
.
Confirm that the Insert Original
2
indicator is lit before setting the
originals.
.
Confirm that no previous originals
3
remain on the exposure glass.
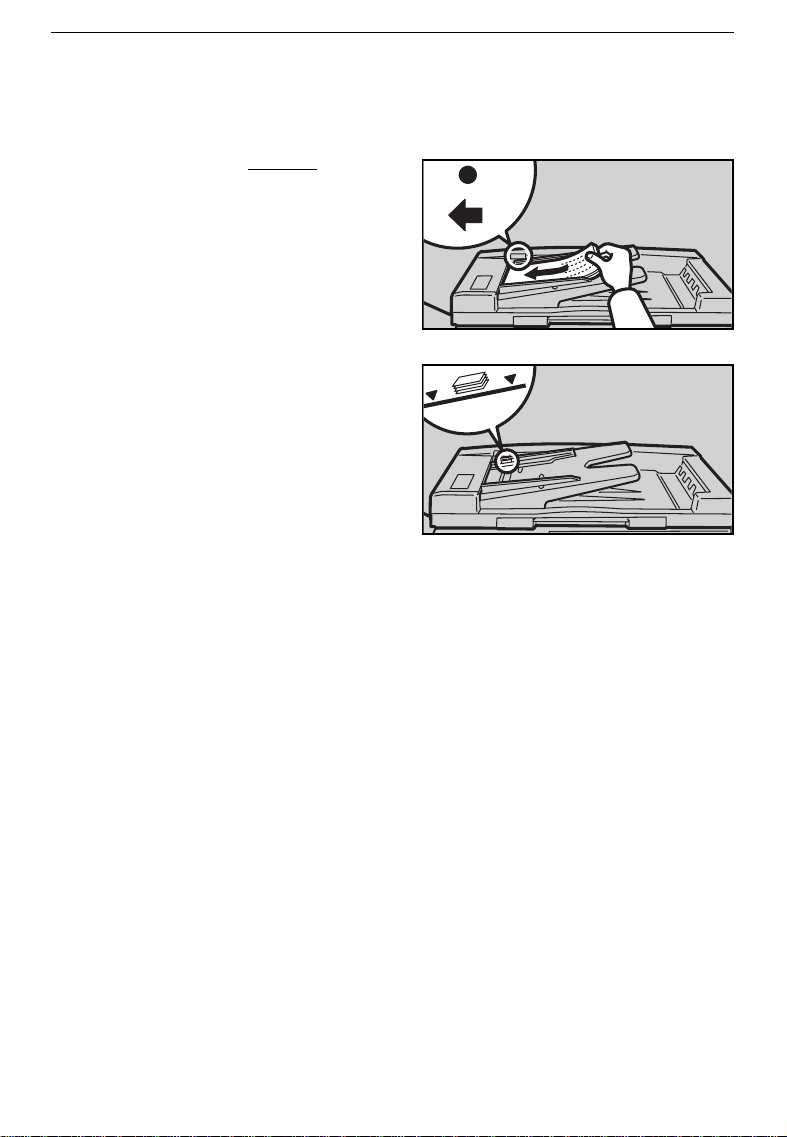
Adjust the guides to the original
4.
size.
22
Page 25
SETTING ORIGINALS IN THE OPTIONAL DOCUMENT FEEDER
.
Set the originals
5
document feeder until the Insert
Original indicator goes off.
❐ The last page should be on the bot-
tom.
❐ The guides m ust touch both sides of
the original s.
❐ Do not stack originals above the limit
mark.
face up
into the
23
Page 26

SETTING ORIGINALS IN THE OPTIONAL DOCUMENT FEEDER
Setting One Original At A Time
You can insert one original at a time into the document feeder. The original
is automatically fed onto and removed from the exposure glass.
.
Correct any curl, fold, or crease
1
in the originals before setting.
.
Confirm that the Insert Original
2
indicator is lit before setting the
originals.
.
Confirm that no previous originals
3
remain on the exposure glass.
.
Adjust the guides to the original
4
size.
.
Set the original
5
document feeder until the Insert
Original indicator goes off.
face up
into the
❐ If you are copying a stack of originals
one sheet at a time and you want to
keep them in order, s tart with th e last
page of the origina ls.
❐ The original guides must touch both
sides of the o riginal .
Press the Start key.
6
24
Page 27

SETTING ORIGINALS IN THE OPTIONAL DOCUMENT FEEDER
.
While the Auto Feed indicator is
7
lit after an original is fed, set the
next original. The original is automatically fed and copied.
❐ If you have set more than two origi-
nals, the
lit after the last original is fed. In this
case, press the
setting an original.
Auto Feed
indicator is not
key again after
Start
25
Page 28

SETTING ORIGINALS IN THE OPTIONAL DOCUMENT FEEDER
26
Page 29

COPYING
BASIC COPYING .................................................................................................. 28
BASIC FUNCTIONS.................................................................................................30
Adjusting Copy Image Density ..................................................................................................... 30
Copying From The Bypass Feed Table ......................................................................................... 31
Entering Copy Job Settings During The Warm-up Period (Auto Start) .................................... 33
REDUCING AND ENLARGING ............................................................................. 34
Reducing And Enlarging In 1% Steps (Zoom) ............................................................................. 35
FINISHING (OPTION) .............................................................................................36
Sorting Into Sets (123, 123, 123) (Sort) ........................................................................................ 36
Stacking Together All Copies Of A Page (111, 222, 333) (Stack) .......................................... 38
SAVING ENERGY .................................................................................................. 40
COMBINATION CHART.......................................................................................... 41
27
Page 30

BASIC COPYING
BASIC COPYING
You can make copies that are the same size as your originals.
Set your original on the exposure
1
glass or in the optional document
feeder. ☛ See page 21 or 22.
Enter the number of copies re-
2
quired using the Number keys.
❐
To change the number entered,
press the
the new number .
Clear/Stop
key, then enter
Make sure that the magnification
3
ratio is set to 100%. If not, press
the Full Size key.
28
Page 31
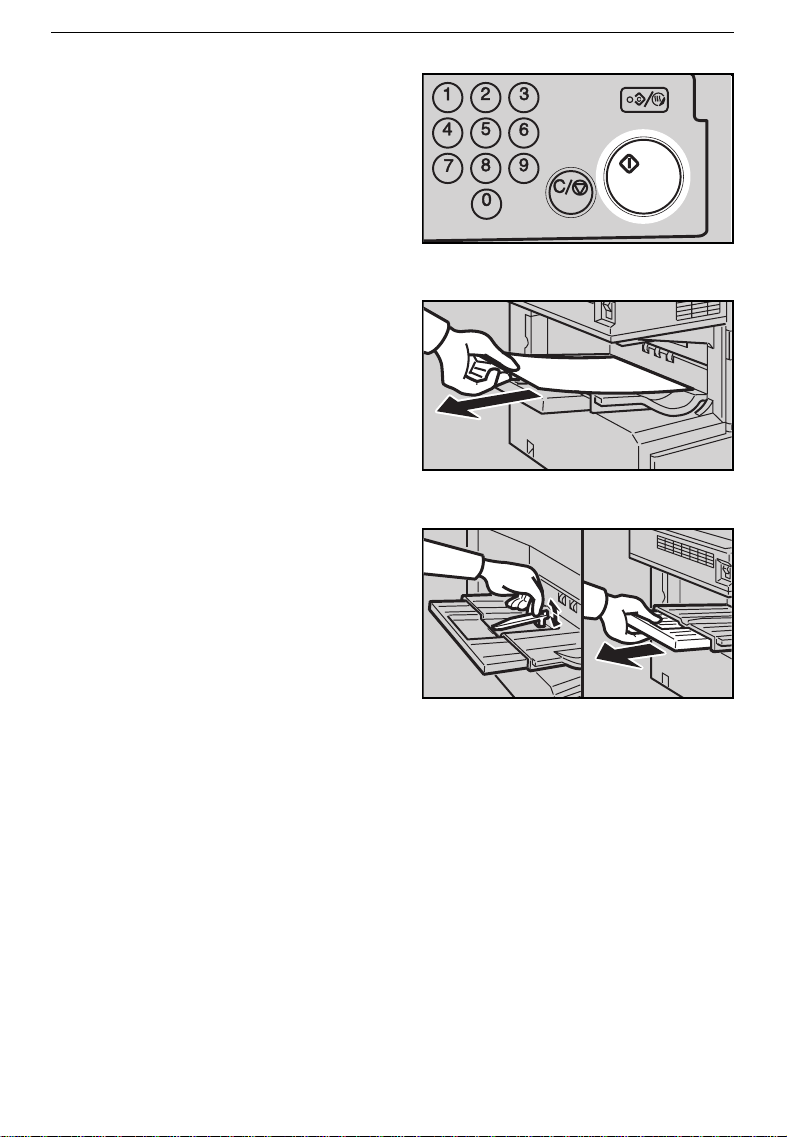
Press the Start key.
4
❐
To stop the cop ier during a mu lticopy
run, press the
❐
Press the
ing, or press the
again to cle ar the entered copy number.
Clear/Stop
key to resume copy-
Start
Remove the copies from the copy
5
tray.
❐
The copy tr ay hol ds app roxim ately 10 0
sheets .
❐
If you make B4, 8
size copies, raise the center rib and
extend the copy tray to stack them
properly.
key.
Clear/Stop
" x 14" or larger
1/2
BASIC COPYING
key
29
Page 32
BASIC FUNCTIONS
BASIC FUNCTIONS
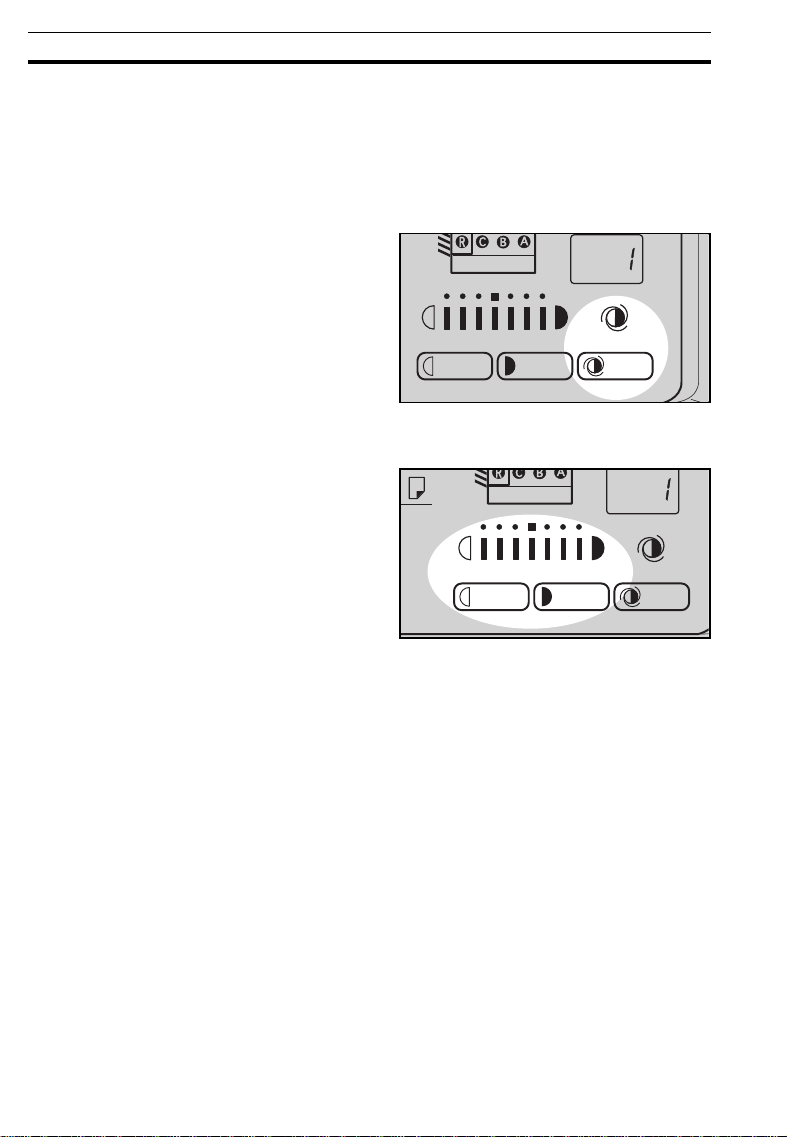
Adjusting Copy Image Density
To match the type of originals, adjust the image density.
Auto image density
If the Auto Image Density indicator is lit, the copier automatically controls the image density.
If the indicator is not lit, press the
Auto Image Density key.
Manual image density
If you require darker or lighter
copies, adjust the image density
yourself.
Press the Lighter (left) key to
lower the image density. Press
the Darker (right) key to increas e
the image density.
30
Page 33

BASIC FUNCTIONS
Copying From The Bypass Feed Table
Use the bypass feed table to copy onto paper that is not set the paper tray.
OHP transpare ncies, adh esive labe ls, post c ards, and translucen t paper can be
❐
set into the bypa ss tray.
Regarding th e pape r siz es and direct ions t hat can be set , ☛ see page 16
❐
Number of sheets that can be set at one time:
❐
Standard paper: 80sheets(80 g/m2, 20 lb.)
OHP transparencies: 10sheets
Adhesive labe ls: 1 sheet
Translucent paper: 1sheet
Post card: 1sheet
OHP transparencies and translucent paper should be fanned to get between
❐
the sheets befo re loading.
Regarding functions that cannot be used together with this function, ☛ see
❐
page 41.
Set your original on the exposure
1
glass or in the optional document
feeder. ☛ See page 21 or 22.
Open the bypass feed table.
2
31
Page 34

BASIC FUNCTIONS
Lift the paper hold lever.
3
❐
Swing out the extender if setting copy
paper larger than A4:, 8
Slide the paper guides to the pa-
4
per width. Insert the copy paper
until it stops.
❐
The image will be copied on the side
of paper that you place face up.
❐
If the guides are not flush with the
copy paper,a skew image or paper
jam might occur.
❐
Fan OHP transparencies or translucent
paper to get air between them to avoid
multi sheet feed(multiple sheets fed together at the same time).
" x 11":.
1/2
Lower the paper hold lever. Oth-
5
erwise,paper misfeed might occur.
❐
Make sure that the Bypass Feed indicator is lit.
❐
If you have set copy paper larger
than A4:, 8
trailing edge of copy paper with your
hand when lowering the paper
holder.
Press the Start key.
" x 11":, support the
1/2
6
32
Page 35
BASIC FUNCTIONS
Entering Copy Job Settings During The Warm-up Period (Auto Start)
If you press the Start key during
the warm-up period, the
Ready indicator will blink, then
the copier will start copying after
the warm-up period. Set your
copy settings during warm-up period, then press the Start key.
To cancel Auto Start, press the
❐
Clear/Stop
key.
v
33
Page 36

REDUCING AND ENLARGING
REDUCING AND ENLARGING
Regarding functions that cannot be used together with this function,
❐
page 41.
Reducing And Enlarging Using Preset Ratios (preset R/E)
Reducing
Press the Reduce key to select the preset reduction ratios.
☛
see
Enlarging
Press the Enlarge key to select the preset enlargement ratios.
34
Page 37

BASIC FUNCTIONS
Reducing And Enlarging In 1% Steps (Zoom)
You can change the reproduction ratio from 50% to 200% in 1% steps.
Press the Zoom Up (+) key repeatedly, or hold down the key
continuously, to increase the ratio
in 1% steps.
Press the Zoom Down (-) key
repeatedly, or hold down the key
continuously, to reduce the ratio
in 1% steps.
35
Page 38

FINISHING (OPTION)
FINISHING (OPTION)
Sorting Into Sets (123, 123, 123) (Sort)
One copy of each originals is delivered to each bin and copies are collated
into sets.
Note: This function can be used only when your copier is equipped with the
optional 10-bin sorter.
For Sortin g, the f ollowin g limi tation s appl y:
❐
Metric Version Inch Version
Maximum paper size
Minimum paper size
Maximum paper weight 90 g/m
Minimum paper weight 64 g/m2 17 lb
Maximum capacity of bins
(Maximum n umber of co pies)
P ap er th at ca nnot be us ed post cards, t ransl ucen t pap er, OHP trans par encies ,and
A4, 8
B4, F, 8
A3, 11" x 17": 10 copies
adhesive lab els
A3
;
A5
;
2
" x 11" or smaller: 20 copies
1/2
" x 14": 15 copies
1/2
11" x 17"
5
" x 8
1/2
1/2
24 lb
"
;
To avoid problems caused by curled copies, try turning over the paper stack in
❐
the tray. If there is no improve ment, chan ge to copy pap er with less curl.
36
Page 39

Press the Sorter key to light the
1
Sort(Upper) indicator.
Set your original on the exposure
2
glass or in the optional document
feeder.
Enter the number of copies required
❐
using the
3
The maximum number of copy sets
❐
that can be entere d is 10.
Set other settings.
4
Press the Start key.
See page 21 or 22.
☛
Number
keys.
5
BASIC FUNCTIONS
If you set your originals on the expo-
❐
sure glass in step
and 5 until your copying is completed.
, repeat steps
2
2
37
Page 40

FINISHING (OPTION)
Stacking Together All Copies Of A Page (111,
222, 333) (Stack)
All copies of each original are delivered to the same bin.
Note: This function can be used only when your copier is equipped with the
optional 10-bin sorter.
For Stacking, the followin g limitati ons apply:
❐
Metric Version Inch Version
Maximum paper size
Minimum paper size
Maximum paper weight 90 g/m
Minimum paper weight 64 g/m
Maximum capacity of bins
(Maximum n umber of co pies)
P ap er th at ca nnot be us ed post cards, t ransl ucen t pap er, OHP trans par encies ,and
A4, 8
B4, F, 8
A3, 11" x 17": 10 copies
adhesive lab els
A3
;
A5
;
2
2
17 lb
" x 11" or smaller: 20 copies
1/2
" x 14": 15 copies
1/2
11" x 17"
5
" x 8
1/2
1/2
24 lb
"
;
To avoid problems caused by curled copies, try turning over the paper stack in
❐
the tray. If there is no improve ment, chan ge to copy pap er with less curl.
38
Page 41

Press the Sorter key to light the
1
Stack(Lower) indicator.
Set your original on the exposure
2
glass or in the optional document
feeder.
Enter the number of copies re-
3
quired using the Number keys.
Regarding the number of copies that
❐
can be entered , see page 38.
Set other settings.
4
See page 21 or 22.
☛
BASIC FUNCTIONS
Press the Start key.
5
If you set your originals on the expo-
❐
sure glass in step
and 5 until your copying is completed.
, repeat steps
2
2
39
Page 42

SAVING ENERGY
SAVING ENERGY
With the Energy Saver, the copier is reset and uses less electricity.
To have the E nergy Saver automatic ally activated when th e copier is auto re-
❐
set, set the user tools.
The following ac tions wil l cancel the Energy Sav er mode:
❐
Opening or cl osing the op tional doc ument feed er.
Setting or iginals in the opti onal docum ent feed er.
Setting copy paper in the bypass feed table.
Pressing an y key except the
Press the Clear Modes/Energy
1
Saver key more than one second
to enter the Energy Saver condition.
All indicators except the Energy
❐
Saver indicator turn off.
See page 61.
☛
Start
key.
40
Page 43

BASIC FUNCTIONS
COMBINATION CHART
This combination chart shows which modes can be used together.
means that these modes can be used together.
✩
means that the mode after you select will be the mode you’re working in.
★
means that these modes cannot be used together.
✗
Mode before you select
Reduce/
Enlarge
Finishing
1
2
3
4
Other 5
Mode after you select
Preset Reduce/Enlarge
+-Zoom
Sorting
Stacking
Bypass Feed Copying
Reduce/
Enlarge
Finishing Other
12345
★✩✩✩
★ ✩✩✩
✩✩ ★✗
✩✩★ ✗
✩✩✗ ✗
41
Page 44

COMBINATION CHART
42
Page 45

WHAT TO DO IF
SOMETHING GOES
WRONG
IF YOUR COPIER DOES NOT OPERATE AS YOU WANT ........................................44
IF YOU CANNOT MAKE COPIES AS YOU WANT..................................................46
LOADING PAPER.................................................................................................... 47
Non-recommended Paper For Paper Tray ..................................................................................47
Notes For Paper................................................................................................................................ 47
Loading Paper In The Paper Tray .................................................................................................. 48
Loading Paper In The Bypass Feed Table ....................................................................................49
ADDING TONER .....................................................................................................50
CLEARING MISFEEDS ............................................................................................51
Check The Misfeed Location Display............................................................................................ 51
When A,B Or C Is Lit.........................................................................................................................52
When R Is Lit ...................................................................................................................................... 52
When P Is Lit ...................................................................................................................................... 53
43
Page 46

IF YOUR COPIER DOES NOT OPERATE AS YOU WANT
IF YOUR COPIER DOES NOT OPERATE AS
Check the followings:
Copier’s condition Action
Nothing happens when the main
switch is turned on.
d
is lit.
f
is blinking or lit.
Y
is lit.
Energy Saver is lit.
U code is displayed on the
copy counter.
"E" and number are alternately displayed on the copy counter .
Check the power cord. Is it properly plugged
into the outlet?
➠
Load paper.
Add toner.
Remove misfed paper.
Your machine is in the Energy Saver condition.
➠
U1
Close the right side cover .
U4
Reset the optional sorter correctly.
U6
Call your service representative.
Turn the main switch off, wait a few seconds,
and then turn it on. If the E code appears again,
call your service representative and tell which
code is on.
YOU WANT
Plug it in firmly.
☛
See page 47 ~ 49.
☛
See page 50.
☛
See page 51 ~ 53.
Press any key except the Start key to
return to the ready condition.
44
Page 47

IF YOUR COPIER DOES NOT OPERATE AS YOU WANT
Copier’s condition Action
Check Paper Size indicator
is lit.
The indicator of the Auto Image
Density in dica tor blink s.
You cannot use the bypass feed table in the Sort or
Stack mode.
➠
Select the paper tray.
Turn the main switch off and on. If this condition reoccurs, call your service representative and explain the
problem.
The Manual Image Density indicator blinks.
Is the right kind of paper in the paper tray?
➠
Paper size and weight must be within the
specifications for this copier.
Is folded, wrinkled, damp, or curled paper in the paper
tray?
➠
Misfeeds occur frequently.
Always use dry, undamaged paper.
Is the paper properly set in the tray?
➠
Always load paper correctly.
Are there any pieces of misfed paper or other materials
in the machine?
➠
Make sure that the paper path is completely
cleared of paper and other material after a misfeed.
If you cannot correct the problem by taking the above actions, please contact
❐
your serv ice r epresen tative .
45
Page 48

IF YOU CANNOT MAKE COPIES AS YOU WANT
IF YOU CANNOT MAKE COPIES AS YOU
Problem Cause Action
The original has a gray or
colored background.
Copies appear dirty.
The reverse side of an
original image is copied.
Copies are too light.
The same copy area is
dirty whenever making
copies.
Copies are blank or
parts of the image are
not copied.
Copies have white
streaks.
If you cannot correct the problem by taking the above ac tions, please contact
❐
your service representative.
The image density is too dark.
The platen cover, exposure
glass, or document feeder belt
is dirty.
The image density is too dark.
The original has a low
contrast image.
The image density is too light.
Damp or rough grain paper is
used.
The platen cover, exposure
glass, or document feeder
belt is dirty.
The original is not set correctly.
An improper paper siz e is
selected .
The corona wire is dirty.
Adjust the image density.
☛
See page 30.
Clean them.
☛
See pages 66 and 67.
Adjust the image density.
☛
See page 30.
Adjust the image density.
☛
See page 30.
Use dry paper without rough
grain.
Clean them.
☛
See pages 66 and 67.
Set originals correctly.
☛
See page 21, 22, or 24.
Select the proper paper size.
Clean the corona wire.
☛
See page 67.
WANT
46
Page 49

LOADING PAPER
LOADING PAPER
NOTE: Regarding paper sizes that can be set,
NOTE: If you want to change the paper size,
☛
see page 16.
☛
see page 56
.
NOTE: For details about non-recommended copy paper and notes for copy
☛
paper,
see page 16
.
Non-recommended Paper For Paper Tray
Folded, curled, creased, or damaged paper
❐
Torn paper
❐
Perforated pa per
❐
Paper with conductive or low electrical resistance coating such as carbon or
❐
silver coating
Thermal paper, art paper
❐
Thin paper that h as low stiffn ess
❐
Notes For Paper
Load paper wit h the copy side
❐
the bypass feed table. If copies a re curled, try turning the copy paper over in
the tray. If ther e is no impro vement, ch ange to copy pap er with less curl.
Correct curls in copy paper before loading.
❐
Fan copy paper to get air between the sheets before loading.
❐
When making two-sided copies, do not load paper in the paper tray for copying
❐
the reverse side. Use the the bypass feed table.
down
in the tray, and with the copy side up in
47
Page 50

LOADING PAPER
Loading Paper In The Paper Tray
Pull out the paper tray until it
1
stops.
Square the paper and set in the
2
paper tray.
❐
Do not stack paper above the limit
mark inside the paper tray.
❐
Make sure tha t the leading cor ners of
the paper are under the corners as
shown in the illust ration.
❐
Slide the guides until the front and
rear guides securely hold the paper.
.
Reinsert the tray gently until it
3
stops.
48
Page 51

Loading Paper In The Bypass Feed Table
☛ Regarding the bypass feed table,see page.31
Lift the paper hold lever.
1
❐
Swing out the extender if setting copy
paper larger than A4:, 8
Insert copy paper until it stops.
" x 11":.
1/2
2
❐
The image will be copied on the side
of paper that you pl ace face up.
❐
If the guides are not flush with the
copy paper,a skew image or paper
that you place fa ce up.
❐
Fan OHP transparencies or translucent
paper to get air between them to avoid
multi sheet feed(multiple sheets fed together at the same time).
LOADING PAPER
Lower the paper hold lever.
3
❐
If you have set copy paper larger than
A4:, 8
edge of copy paper with your hand
when lowering the paper holder.
" x 11":, support the trailing
1/2
49
Page 52

ADDING TONER
ADDING TONER
When the Add Toner f indicator blinks, it is time to supply toner (copying
is still possible). When the Add Toner
copies cannot be made until the toner cartridge is replaced.
WARNING: Do not incinerate the used toner containers. Toner
$
CAUTION: This copier has been tested for safety using this
$
NO T E: Before s etti ng th e new tone r car tr idge, shak e it well at le ast 5 or 6 times .
dust might ignite when exposed to open flames. Dispose of the used toner cartridge according to local
regulations for plastics.
supplier’s parts and consumable. We recommend
you only use these specified supplies.
f
indicator is continuously on,
NOTE:
NOTE:
If
and on again.
Open the copier’s front cover.
indicator is still lit after adding toner, turn the main switch off
f
Don not remove the toner bottle before the Add Toner f indicator
comes on - toner could spill out .
1
You can find the sticker explain-
2
ing how to add toner inside the
front cover, as shown in the illustration.
Load the new toner cartridge fol-
3
lowing the instructions on the
sticker.
50
Page 53

CLEARING MISFEEDS
CLEARING MISFEEDS
CAUTION: When removing misfed paper, do not touch the fus-
$
NOTE: Since some parts of the c opier are supplied with high electrical volt-
age, touch only the parts specified in the instructions on the sticker
inside the machine’s cover.
ing section because it could be v ery hot.
NOTE:
NOTE: When clearing misfeeds , do not turn off the main switch. If you do,
NOTE: After clearing misfeeds, make sure that all units and levers are re-
NOTE: Do not touch originals in the optional document feeder when a pa-
NOTE: If a paper misfeed occurs when paper is fed from the tray, do not
Do not leave any torn scraps of paper within the machine.
your copy settings are cleared.
turned to their original positions and all covers are closed.
per misfeed occurs in the copier. If you do, the copier cannot know
which originals have been copied, and which should be copied.
pull out the tray before clearing misfeeds.
Check The Misfeed Location Display
The display shows the location of
misfed paper.
51
Page 54

CLEARING MISFEEDS
When A,B Or C Is Lit
Open the front cover of the cop-
1
ier.
You will see a sticker (with Y at
2
the top) explaining how to remove misfed paper, inside the
front cover, as shown in the illustration.
Remove misfed paper following
3
the instructions on the sticker.
When R Is Lit
Open the sorter.
1
You will see a sticker (with Y at
2
the top), explaining how to remove the misfed paper, on the
cover of the sorter, as shown in
the illustration.
Remove the misfed paper follow-
3
ing the instructions on the sticker.
52
Page 55

When P Is Lit
There is a sticker, explaining how
1
to remove the misfed paper, on
the optional document feeder, as
shown in the illustration.
Remove the misfed original refer-
2
ring to the sticker.
CLEARING MISFEEDS
The number of originals that
3
should be reset is displayed in
the Three Digit indicator. Reset
the originals in the optional document feeder.
53
Page 56

CLEARING MISFEEDS
54
Page 57

CHANGING THE
8
COPIER’S SETTINGS
CHANGING PAPER SIZE .......................................................................................56
How To Change The Paper Size Of Paper Tray ........................................................................... 56
USER TOOLS............................................................................................................58
How To Access User Tools .............................................................................................................. 58
How To Change Adjustment Values Or Modes........................................................................... 59
User Tool Menu ................................................................................................................................. 60
SERVICE REPRESENTATIVE SETTING.......................................................................63
55
Page 58

8
CHANGING PAPER SIZE
CHANGING PAPER SIZE
To check the paper size of the paper
❐
tray, see the
Paper Size
How To Change The Paper Size Of Paper Tray
Pull the paper tray out until it
1
stops.
indicators.
Remove the copy paper.
2
Pick the end plate up and insert it
3
in the slot matching the paper
size you want to use.
Make sure the en d plate matches the
❐
paper size.
56
Page 59

Square the paper and set in the
8
4
tray.
Do not stack paper over the limit
❐
mark.
Make sure that the leading corners of
❐
the paper are under the corners, as
shown in t he ill ustra tion.
While pressing the release lever
5
on the front and rear side guides.
Slide the guides to the paper position.
Do not press the front and rear
❐
guides stron gly agains t the paper.
Slide the guides until the font and
❐
rear guides s ecurely hold the paper .
Adjust the paper size selector.
6
If the paper size you need is not
❐
there, select " ❉ " on the pape r size
selector.
CHANGING PAPER SIZE
Reinsert the tray gentry until it
7
stops.
57
Page 60

8
USER TOOLS
USER TOOLS
You can change or set the copier’s settings using the following us er tools.
How To Access User Tools
.
Press the
1
Saver
.
Hold on
2
than three seconds
.
.
Enter the required user tool num-
3
ber using the
For the user tool number, refer to
❐
pages 60 ~ 6 2.
Example:
This is the user too l’s number .
If you input th e wrong number, pre ss
❐
the
Clear/Stop
correct number.
Clear Modes/Energy
key.
Clear/Stop
7 Counter up/down
key for more
Number
key. Then, input the
keys.
Press the
4
key.
58
Auto Image Density
Page 61

8
USER TOOLS
How To Change Adjustment Values Or Modes
.
Access the user tool you want to
1
adjust. (☛ See page 58.) The
number of the user tool you select will be displayed in the copy
counter.
.
The default setting will blink in
2
❐
❐
Three Digit
the
the required setting using the
Number
For the settings, refer to pages 60 ~
62.
If you input a wrong number, press
the
correct number.
keys.
Clear/Stop
indicator. Enter
key. Then, enter the
.
Press the
3
key to store the required setting.
If you would like to adjust another
❐
user tool, enter the user tool number.
.
Turn the main switch off and on.
4
Auto Image Density
59
Page 62

8
USER TOOLS
User Tool Menu
1. Image Density Level Selection.
You can adjust the Auto Image Density level to lighter and darker.
For how to change settings,
❐
Default: Mode 0 (Setting:0)
Setting Mode
0Normal
1 Light
2Dark
3 Lighter
4Darker
2. Narrow Copy Paper Mode
The narrowest paper you can set in the bypass feed table is about 70mm. If
you wish to use narrower sizes,turn this function on. If you turn this function on
the narrowest paper size you can set is about 45mm.
For how to change settings,
❐
Default: Mode Off (Setting:0)
Setting Mode
0Off
1On
see page 59.
☛
see page 59.
☛
60
Page 63

8
USER TOOLS
3 . Auto Reset Time Set
As a default setting, the copier can reset itself 1 minute after the final copy
is made or after the last time any k ey is pressed. If a 1 minute reset time is
not appropriate, you can change this time or cancel this function.
For how to change settings,
❐
see page 59.
☛
Default: 1 minute (Setting: 0)
Setting Definition
01 minute
13 minutes
2 Auto reset is turned off.
4 . Auto Energy Saver Set
As a default setting, when the copier is reset by the auto reset, the Energy
Saver is not automatically set. You can change this setting.
For how to change settings,
❐
Default: Yes (Auto energy saver is s et.) (Setting: 1)
Setting Modes
0 No (Auto energy saver is not set.)
1 Yes (Auto ener gy saver is se t.)
see page 59.
☛
61
Page 64

8
USER TOOLS
6.Toner density Adjustment
You can adjust the toner density using this function.
For how to change settings,
❐
see page 59.
☛
Default: Normal (Setting: 0)
Setting Definition
0Normal
1Dark
2 Light
7.Counter up/down
The copy counter can be set to show the number of copies made (count
up), or the number of copies remaining to be made (count down).
For how to change settings,
❐
Default: Up (Setting: 0)
Setting Definition
0Up
1Down
see page 59.
☛
62
Page 65

8
SERVICE REPRESENTATIVE SETTING
SERVICE REPRESENTATIVE SETTING
Some features can be adjusted by your service representative to suit your
needs. This section gives a brief description of these features. For more
information, contact your service representative.
Auto Sort Selection
When you insert 2 or more originals in the optional document feeder and make
from 2 to 10 sets of copies from each original, the copier selects Sort mode.
ADS Priority Selection
As a default setting, Auto Image Density is selected. You can cancel this
setting.
SADF Auto Reset
When you se t one original at a time in the o ptional document feeder, the A uto
Feed indicator lights for a selected time after an original is fed to show that the
document fee der is r eady fo r anot her ori ginal. Y ou can adjus t this ti me.
Maximum Sorter Bin Capacity
With the default setting, the sorter bin capacity is limited. Your service
representative can cancel this limitation.
Paper Tray Size Setting
If you wish to use paper sizes that are not available as standard, contact
your service representative.
Horizontal Edge Margin Width Selection
Your service representative can select the Horizontal Edge Mar gin Width for
use with the optional ducument feeder.
63
Page 66

8
SERVICE REPRESENTATIVE SETTING
64
Page 67

MAINTAINING YOUR
COPIER
DO’S AND DON’TS
WHERE TO PUT YOUR
COPIER
REMARKS
MAINTAINING YOUR COPIER ...............................................................................66
Copier................................................................................................................................................66
Document Feeder (Option)............................................................................................................ 67
WHERE TO PUT YOUR COPIER ...............................................................................68
Copier Environment ......................................................................................................................... 68
Power Connection .........................................................................................................................69
Access To Copier ............................................................................................................................. 69
DO’S AND DON’TS................................................................................................. 70
Copier................................................................................................................................................70
Document Feeder (Option)............................................................................................................ 70
10-bin Sorter (Option) ...................................................................................................................... 70
REMARKS................................................................................................................71
Copier................................................................................................................................................71
10-bin Sorter (Option) ...................................................................................................................... 72
65
Page 68

MAINTAINING YOUR COPIER
MAINTAINING YOUR COPIER
To maintain high copy quality, clean the following parts and units regularly.
Copier
Exposure glass
Clean the exposure glass with a
damp cloth and wipe it with a dry
cloth.
Platen cover
Clean the platen cover with a
damp cloth and wipe it with a dry
cloth.
Corona wire
Do the following when white streaks appear on the copy, or when image
density becomes uneven.
Open the front cover.
1
66
Page 69

Slide out the corona unit until it is
2
fully extended.
Push the corona unit back in.
3
Make sure it locks into place.
Repeat steps 2 and 3 several
4
times.
Close the front cover.
5
Document Feeder (Option)
Feed-in unit
MAINTAINING YOUR COPIER
Clean the original table and original guide with a damp cloth and
wipe it with a dry cloth.
Belt
Lift the document feeder. Clean
the belt with a damp cloth and
wipe it with a dry cloth.
67
Page 70

WHERE TO PUT YOUR COPIER
WHERE TO PUT YOUR COPIER
Copier Environment
Your copier’s location should be carefully chosen because environmental
conditions greatly affect its performance.
Optimum environmental conditions
Temperature : 10 - 30°C (50 - 86°F)
❐
Humidity: 15 - 90 %
❐
A strong and level ba se.
❐
The copier mus t be l evel w ithin 5 mm, 0.2" both f ront to rear and left t o right .
❐
To avoid possib le build-up of ozone, make su re to locate the copier in a large
❐
well ventilated room that ha s an air turno ver of more th an 30 m
Environments to avoid
Locations e xposed to di rect su nlight or s trong l ight ( more t han 1, 500 lux. )
❐
Locations directly exposed to cool air from an air conditioner or heated air from
❐
a heater. (Sudden temperature changes might cause condensation within the
copier.)
Places wh ere the copie r mig ht be su bjecte d to f requent stro ng vib ration.
❐
Dusty areas.
❐
Areas with corrosive gases.
❐
Places higher than 2,000m or 6,500 ft above sea level.
❐
3
/hr/person.
68
Page 71

WHERE TO PUT YOUR COPIER
Power Connection
When the main switch is in the Sta nd-by position,the optional anticond ensation
❐
heaters are on. In case of emergency,unplug the machine‘s power cord.
Connect the copier to a power source meeting the specifications given on the
❐
inside front cover of this manual.
Avoid multiwiring.
❐
Make sure that the w all outlet is near the copi er and easi ly acces sible.
❐
Make sure t he plug is fir mly i nsert ed in the outl et.
❐
Voltage mus t not fluctu ate more th an 10%.
❐
Do not set anything on the power co rd.
❐
Always turn the copier off when you have finished copying for the day, but
❐
leave it plugge d in.
Access To Copier
Place the copier near the power source, providing clearance as shown.
More than 10 cm, 4.0"
More than 20 cm, 7.9"
Copier
More than 70 cm, 27.6"
More than 21 cm, 8.1"
69
Page 72

DO’S AND DON’TS
DO’S AND DON’TS
Copier
General operation
If there is a la rge solid image on the o riginal, the Add Toner indicator may
❐
be lit after copying althou gh toner remai ns in the toner b ottle. In this ca se, turn
the main sw itch off and the n back on ag ain.
When removing misfed paper
CAUTION:When removing misfed paper, do not touch the fus-
$
Do not leave any t orn s craps of pape r in the ma chine.
❐
When clearing misfeeds, do not turn off the main switch. If you do, your copy
❐
settings will be cl eared .
After clearing misfeeds, make sure that all units and levers are returned to their
❐
original posi tions and al l covers are closed.
ing section because it could be very hot.
Document Feeder (Option)
While origi nals are fed fr om the original table to the ex posure glass , do not pull
❐
out the origina ls.
Do not lift the document feeder unt il the last original has be en completely fed
❐
out.
Do not press dow n or hold orig inals after insertin g them.
❐
Do not press any pa rts of the do cument f eeder s trongly .
❐
10-bin Sorter (Option)
Do not touch moving bins.
❐
Do not place objects on the sorter when it is open.
❐
Do not press the sorter when it is open.
❐
70
Page 73

REMARKS
Copier
To avoid prob lems caused by cu rled copies, try turning over t he paper stack in
❐
the tray. If ther e is no impro vement, ch ange to copy pap er with less curl.
Load paper wit h the copy side
❐
the copy paper over in the tray. If there is no improvement, change to copy
paper with less curl.
If you want to copy OHP tra nsparenci es,adhesiv e labels,po st cards,and translu-
❐
cent paper,s et them bypa ss tray.
Margins on all four sides of the original image are not copied, as shown in the
❐
illustration.
Paper feed
direction
in the tray. If copies are curled, try turning
down
REMARKS
Full Size magn ification
Reducing and enlarging using
preset ratios
Reducing and enlarging
using the zoom key
When the origi nal is set on
the exposure glass.
a = 2.5
b1 = b2 = 2 ± 2 mm
a = 2.5 ± 2.0 mm
b1 + b2 ≤ 4 mm
a = 2.5
±2.0 mm
± 2.0 mm
b1 + b2 ≤ 6mm
When the original is set
into the optional document
feeder.
a = 2.5
± 2.0 mm
b1 = b2 = 2 ± 2 mm
a = 2.5 ± 2.0 mm
b1 + b2 ≤ 8 mm
a = 2.5
± 2.0 mm
b1 + b2 ≤ 10 mm
71
Page 74

REMARKS
10-bin Sorter (Option)
To avoid problems caused by curled copies, try turning over the paper stack in
❐
the cassette or tray. If there is no improvement, change to copy paper with less
curl.
If copies s maller than A4 ;, 8
❐
after taking them from the bins.
" x 11" ; are not stack ed well, arrange them
1/2
72
Page 75

SPECIFICATIONS
0
COPIER ................................................................................................................... 74
DOCUMENT FEEDER (OPTION) ..............................................................................77
10-BIN SORTER (OPTION) ......................................................................................78
73
Page 76

0
COPIER
COPIER
Configuration:
Process:
Originals:
Original size:
Copy paper siz e:
Copy paper we ight:
Copy paper capacity:
Copying speed:
First copy time:
Toner replenishment:
Copy tray capacity:
Power source:
Desktop
Dry electrostatic transfer system
Sheet, book
Maximum: A3 ;, 11" x 17"
Paper tray: See page 16.
Bypass feed table:
Maximum:A 3
Minimum: A6 ;, 5
Tray: 64 ~ 90 g/m2, 17 ~ 24 lb
Bypass feed table: 52 ~ 157 g/m
Tray: 500 sheets or less than 56mm
Bypass feed table: See page 31.
15 copies/minute
(A4
, 8
" x 11" :,feeding from the paper tray)
1/2
:
9 copies/minute
(A3, 11" x 17",feeding from the paper tray)
less than 6.9 seconds
(A4
, 8
" x 11" :, feeding from the paper tray)
1/2
:
Bottle exchange (215 g)
100 sheets (80g/m2,20lb)
See the inside front cover of this manual.
;
, 11" x 17"
;
" x 8
1/2
;
"
1/2
;
2
, 14 ~ 42 lb
Warm-up time:
74
less than 45 seconds (23°C, 73.4°F)
Page 77

0
COPIER
Reproduction ratio:
3 enlargement and 4 reduction
Average power consumption:
Warm up 0.71 kW 0.71 kW
Stand-by 0.25 kW 0.25kW
Copying 0.71 kW 0.74 kW
Maximum less than 0.92kW less than 1.0 kW
* Full system: Copier with document feeder, 10-bin sorter
Metric Version Inch Version
200 % 200 %
Enlargement
Full size 100 % 100 %
Reduction
Copier only Full system*
141 % 155 %
122 % 129 %
93 % 93 %
82 % 74 %
71 % 65 %
50 % 50 %
75
Page 78

0
COPIER
Noise Emission:
Sound pressure level
operator position.)
Copying less than 57 dB (A) less than 61 dB (A)
* Full system: Copier with document feeder, 10-bin sorter
Sound power level
Stand-by less than 40 dB (A) less than 40 dB (A)
Copying less than 63 dB (A) less than 67 dB (A)
* Full system: Copier with document feeder, 10-bin sorter
(The measurements are made according to ISO 7779 at the
Copier only Full system*
(The measurements are made according to ISO 7779.)
Copier only Full system*
Dimensions:
Width Depth Height
Copier only (without platen cover)
Full system (with the document
feeder and 10-bin sorter)
Weight:
Copier only: 42 kg, 93.0 lb
579 mm,
22.8"
775 mm,
30.2"
560 mm,
22.1"
560 mm,
22.1"
(Without the copy tray and toner bottle)
Full system: 55 kg, 121lb
(With the document feeder and 10-bin sorter)
420 mm,
16.6"
508 mm,
19.8"
Optional equipment:
Document feeder
10-bin sorter
Specificat ions a re subj ect to chang e witho ut not ice.
❐
76
Page 79

0
DOCUMENT FEEDER (OPTION)
DOCUMENT FEEDER (OPTION)
Original Feed:
Automatic document feed - ADF mode
Semi-automatic document feed - SADF mode
Original size , weight and tray capacity:
A3
A4
;
;
,
Original size
Original weight
Maximum number of orig in al s to
be set
Original set:
Original transport:
Average power consumption:
Weight:
Dimensions (W x D x H):
Specifications are subject to change without notice.
❐
8
" x 14"
1/2
52.8g/m2,
14 lb
30 sheets 30 sheets 30 sheets 20 sheets
Face up, First sheet on top
One flat belt
20 W
Approximately 7.0 kg, 15.4 lb
590 x 443 x 87.5 mm, 23.0" x 17.2" x 3.4"
, A5
, 8
;
1/2
64.0g/m2,
17 lb
, B4;, B
;
" x 11"
;
5
,
;
5
1/2
81.4g/m2,
22 lb
11" x 17"
,
" x 8
1/2
105g/m2,
28 lb
,
;
;
"
77
Page 80

0
10-BIN SORTER (OPTION)
10-BIN SORTER (OPTION)
Paper size , weight and capacity for bins:
Metric Version Inch Version
Maximum paper size
Minimum paper size
Maximum paper weight 90 g/m
Minimum paper weight 64 g/m2 17 lb
Maximum capacity of bins
(Maximum n umber of co pies)
P ap er th at ca nnot be us ed post cards, t ransl ucen t pap er, OHP trans par encies ,and
A4, 8
1/2
B4, F, 8
A3, 11" x 17": 10 copies
adhesive lab els
A3
;
A5
;
2
" x 11" or smaller: 20 copies
" x 14": 15 copies
1/2
11" x 17"
5
" x 8
1/2
1/2
24 lb
"
;
Number of bi ns:
Power cons umpti on:
Weight:
Dimensions (W x D x H):
Specificat ions a re subj ect to chang e witho ut not ice.
❐
10 bins
15 W
approximately 7.5 kg, 16.5 lb
402 x 455 x 138 mm, 15.6" x 17.7" x 5.4"
78
Page 81

INDEX
10-bin sort er (O ption), 3
A
Add Toner indicator, 50
ADS priority selection, 63
Auto image density, 30
Auto Start, 33
B
BASICS, 11
Bypass feed copyin g, 31
Bypass fee d tabl e, 3
INDEX
full size copying , 28
Fusing Unit, 3
I
image density, adjusting, 30
Indicators, 6
Installation requirements
Copier Envir onment, 68
Power Connection, 69
K
Keys, 4
C
Check Paper S ize/Dire ction indi cator, 45
COMBINATION CHART, 41 - 42
COPIER EXTERIOR AND INTERIOR, 2
copies, enlarged, 34
copies, reduced, 34
COPY PAPER, 16 - 17
COPY PAPER AND TONER, 15
Copy tray , 3
COPYING, 27
corona wire, 66
D
DF, document feede r, 3
Do’s and don’ts, 70
document feeder, DF, 3
E
E code, 44
Energy Saver, 40
Exposure glas s, 3
F
FINISHING (OPTION), 10,36 - 39
sort, 36
stack, 38
Front cover, 3
L
Left scale, 3
Loading paper
Bypass fee d tabl e, 49
Paper Tray , 48
M
Main switch, 3
maintenance, 66 - 67
Manual image de nsity, 30
misfeeds, 45
misfeeds, clearing, 51 - 54
O
Operation panel, 3 - 4
ORIGINALS, 19
P
paper size, ch anging, 56 - 57
Paper tray, 3
paper, loading, 47 - 49
Platen cover, 3
preset ra tios, 34
80
Page 82

R
Reducing and Enla rging, 9,34 - 35
preset ra tios, 34
REMARKS, 71 - 72
S
SADF auto reset, 63
SAFETY INFORMATION, i - iv
SAVING ENERGY, 40
SERVICE REPRESENTATIVE SETTING,
63 - 64
Setting origi nals, 21
document feeder, 22 - 26
exposure glass, 21
Sort, 36
SPECIFICATIONS, 73
Stack, 38
STARTING THE COPIER, 12 - 14
T
TONER, 18
Toner Storage, 18
toner, adding, 50
INDEX
U
U code, 44
User Tool Menu, 60
USER TOOLS, 58 - 62
user tools, accessing, 58
user tools, changing values, 59
W
WHAT TO DO IF SOMETHING GOES
WRONG, 43
WHAT YOU CAN DO WITH THIS COPIER,
8 - 10
WHERE IT IS & WHAT IT IS, 2 - 7
Z
Zoom, 35
81
 Loading...