

Ricoh FT3013-S SAFETY INFORMATION BN OM EU

INTRODUCTION
INTRODUCTION
This manual contains detailed instructions on the operation and maintenance of this copier. To get maximum versatility from this copier, all
operators should carefully read and follow the instructions in this manual.
Please keep this manual in a handy place near the machine.
Please read the next section before using this copier. It contains important
information related to USER SAFETY and PREVENTING EQUIPMENT
PROBLEMS.
SAFETY INFORMATION
When using your copier, the following safety precautions should always be
followed.
Safety During Operation
In this manual, the following important symbols are used:
$
WARNING: Ignoring this warning could cause serious injury or
even death.
$
CAUTION: Ignoring this caution could cause injury or damage
to property.
Examples Of Indications
$
Symbols $ means a situation that requires you take care.
B
Do NOT carry out the operation represented by the symbol >.
This example means "Do not take apart".
C
Symbols ● means you MUST perform this operation.
This example means "You must remove the wall plug".
i

SAFETY INFORMATION
$
WARNINGS:
•
Only connect the machine to the power source described
on the inside front cover of this manual.
>
@
B
•
Avoid multi-wiring.
•
Do not damage, break or make any modifications to the
power cord. Do not place heavy objects on it, pull it hard or
bend it more than necessary. These actions could cause an
electric shock or fire.
•
Do not plug or unpl ug the power cord wi th your hands wet.
Otherwise, an electric shock might occur.
•
Make sure the wall outlet is near the machine and freely
accessible so that in event of an emergency it can be unplugged eas ily.
•
Do not remove any covers or screws other than those
specified in this manual. Some parts of the machine are at
a high voltage and could give you an electric shock. When
the machine needs to be checked, adjusted, or repaired,
contact your service representative.
C
>
ii
•
Do not take apart or attempt any modifications to this machine. There is a risk of fire, electric shock, explosion or
loss of sight.
•
If the machine looks damaged or breaks down, smoke is
coming out, there is a strange smell or anything looks unusual, immediately turn off the main switch then unplug the
power cord from the wall. Do not continue using the machine in this condition. Contact your service representative.
•
If metal, liquid or foreign matter falls into the machine, turn
off the main switch and unplug the main power cord. Contact your service representative. Do not keep using the machine with a fault or defect.
•
Do not put any metal objects or containers holding water (e.g.
vases, flowerpots, glasses) on the machine. If the contents
fall inside the machine, a fire or el ectric shock coul d occur.

•
Do not incinerate used toner or toner containers. Toner
dust might ignite when exposed to an open flame. Dispose
D
$
CAUTIONS:
>
C
of the used toner containers according to local regulations
for plastics.
•
Keep the machine away from humidity and dust. A fire or
an electric shock might occur.
•
Do not place the machine on an unstable or tilted surface.
If it topples over, it could cause injury.
•
When you move the machine, unplug the power cord from
the wall outlet to avoid fire or electric shock.
•
When the machine will not be used for a long time, unplug
the power cord.
SAFETY INFORMATION
E
@
>
?
$
•
When you pull out the plug from the socket, grip the plug
to avoid damaging the cord and causing fire or electric
shock.
•
If you use the machine in a confined space, make sure
there is a continuous air turnover.
•
Do not use stapled paper. Do not use aluminum foil, carbon-containing paper or other conductive paper. Otherwise,
a fire might occur.
•
When removing misfed paper, do not touch the fusing section because it could be very hot.
•
This machine has been tested for safety using this supplier’s parts and consumable. We recommend you only use
these specified supplies.
iii

INSTALLATION REQUIREMENTS
INSTALLATION REQUIREMENTS
Copier Environment
The installation location should be carefully chosen because environmental
conditions greatly affect the performance of a copier.
Optimum Environmental Conditions
$
CAUTIONS:
•
Keep the machine away from humidity and dust. A fire or an electric shock might occur.
•
Do not place the machine on an unstable or tilted surface. If it topples over, it could cause injury.
Temperature : 10 - 30°C (50 - 86°F)
❐
Humidity: 15 - 90 %
❐
A strong and level ba se.
❐
The copier must be level within 5 mm (0.2") both front to rear and left to right.
❐
To avoid a possible build- up of ozone, make sur e to locate this cop ier in a large
❐
well ventilat ed ro om that has ai r turn over of more than 30 m
3
/hr/person.
Environments To Avoid
Locations e xposed to di rect su nlight or s trong l ight ( more t han 1, 500 lux. )
❐
Locations directly exposed to cool air from an air conditioner or heated air from a
❐
heater. (Sud den temperature changes m ight cause condensat ion within the copier.)
Places wh ere the copie r mig ht be su bjecte d to f requent stro ng vib ration.
❐
Dusty areas.
❐
Areas with corrosive gases.
❐
This machine may need some adjustments, when it is used at altitudes higher
❐
than 2,500 m (8,200 ft) ab ove se a leve l.
iv

INSTALLATION REQUIREMENTS
Power Connection
$
WARNINGS:
•
Only connect the machine to the power source described on the
inside front cover of this manual.
•
Avoid multi-wiring.
•
Do not damage, break or make any modifi cations to the power
cord. Do not place heavy objec ts on it, pull it har d or bend it more
than necessary. These actions could cause an ele ctric shock or fire.
•
Do not plug or unplu g the power cord wit h your hands we t. Otherwise, an electric shock might occur.
•
Make sure the wall outlet is near the machine and freely accessible so that in event of an emergency it can be unplugged easily.
$
CAUTIONS:
•
When you move the machine, unplug the power cord from the wall
outlet to avoid fire or electric shock.
•
When the machine will not be used for a long time, unplug the
power cord.
•
When you pull out the plug from the socket, grip the plug to avoid
damaging the cord and causing fire or electric shock.
When the main switch is in the Stand-by positions, the optional anti-condensation
❐
heaters are on. In case of emergency, unplug the machine’s power cord.
When you unp lug th e power cord, the a nti-con densat ion he aters t urn o ff.
❐
Make sure t he plug is fir mly i nsert ed in the outl et.
❐
Voltage mus t not fluctu ate more th an 10%.
❐
v

USE AND STORAGE OF SUPPLIES
Access To Copier
Place the copi er near the po wer sourc e, providin g clearan ce as shown .
❐
More than 10 cm (3.9")
Copier
More than
30 cm
(11.8")
More than 70 cm (27.6")
More than 60 cm
(23.6")
USE AND STORAGE OF SUPPLIES
Copy Paper
Copy paper of the types or in the co nditio ns lis ted be low ar e not r ecomme nded
❐
for this copier.
Folded, curled, creased, or damaged paper
•
Torn paper
•
Damp paper
•
Perforated pa per
•
Paper with conduc tive or low elec trical r esistance su ch as carbon or sliver
•
coating
Wavy paper
•
The followin g cann ot be us ed i n the pa per t ray. U se the bypas s feed entran ce.
❐
One sheet sho uld be inser ted int o the bypass feed entranc e at o ne tim e.
Post cards
•
Translucent paper
•
OHP sheets
•
Adhesive labe ls
•
If multi-feeding occurs with recycled paper, fan the sheets, or feed them one at a
❐
time using the bypass feed entrance.
Do not touch copy paper if your fingers ar e wet or oily; fin ger prints may ap pear
❐
on the copy.
vi

USE AND STORAGE OF SUPPLIES
Paper Storage
Paper should always be stored properly. Improperly stored paper might
result in poor image reproduction, creased copies, and paper misfeeds.
Generally, avoid curling and absorption of moisture.
Avoid storing paper in humid areas. Under high temperature and high humidity
❐
conditions, store pape r in a vinyl bag.
Do not store paper where it will be exposed to heat.
❐
Store on a flat surface.
❐
Use older stock first.
❐
Do not lay heavy ob jects on paper .
❐
Keep open reams of paper in the package, and store as you would unopened
❐
paper.
Toner Storage
Store horizontally in a cool, dark place.
❐
Store toner cartridge flat.
❐
Never store toner where it will be ex posed to hea t.
❐
Do not lay heavy obje cts on toner car tridges.
❐
vii

GUIDE TO COM PONENT S
GUIDE TO COMPONENTS
System Overview
The type 2 copier can be equipped with an optional document feeder as
shown:
For more inf ormat ion ab out the docume nt fee der, se e page 21.
❐
Regarding the difference between type 1 and 2 operation panels, see pages 4 ~
❐
7.
Document Feeder (Type 2 only)
Copier
1

GUIDE TO COM PONENT S
Copier
OPERATION PANEL
Operator controls and indicators are located here.
LEFT SCALE
Use to align originals on the exposure glass.
EXPOSURE G LASS
Position originals here
for copying.
PLATEN COVER
Lower this cover over
originals before copying.
KEY COUNTER
HOLDER
Insert the optional
key counter here.
Contact your service
representative.
BYPASS FEED
ENTRANCE
Use to feed pa-
BYPASS FEED GUIDES
Use to align paper in the bypass feed entrance.
2
per of a different
size than the
one already in
the paper tray.

MAIN SWITCH
Switches the copier
between on and
stand-by conditions.
(stand-by = optional
anticondensation
heaters on)
GUIDE TO COM PONENT S
COPY TRAY
Completed copies are delivered here.
PAPER TRAY
The paper tray can hold 250
sheets of copy paper.
FRONT COVER
Open to access the inside
of the copier. (To add
toner, remove a misfed paper, etc.)
3

GUIDE TO COM PONENT S
Operation Panel
Type 1
Adding Toner
See page 18.
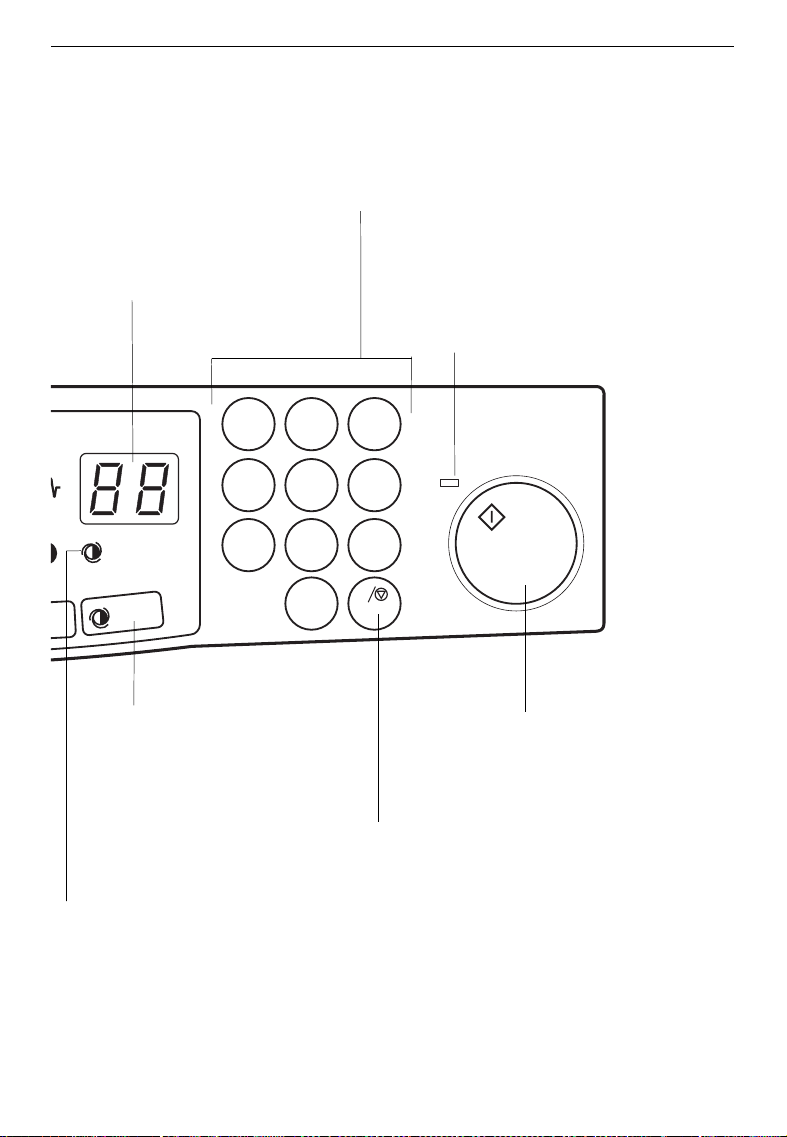
Copy Counter
Displays the number of copies
entered. While copying, it shows
the number of copies made.
Displays codes that show the
copier’s condition. See page 46.
Energy Saver Indicator
See page 9.
Manual Image Density Indicator
Shows the manually selected image
density. If this indicator blinks, see
page 46.
Manual Image Density Keys
Use to cancel the automatic image
density mode and manually select
the image density level.
Clearing Misfeeds
See page 34.
Auto Image Density Key
Press to select/cancel
the automatic image density mode.
Auto Image Density Indicator
Lights when the copier is automatically controlling image density. If this indicator blinks, see
page 46.
4

GUIDE TO COM PONENT S
Number Keys
Use to enter the desired number of copies.
123
456
789
C
0
Clear/Stop Key
Press to cancel the copy number
entered. While copying, press to
stop copying.
Start Indicator
When the Start indicator is red, the
machine is not ready to copy. When
the Start indicator is green, the machine is ready to copy.
Start Key
Press to start copying.
You can select the Auto Start
mode. See page 11.
5

GUIDE TO COM PONENT S
Type 2
Zoom Down Key
Press to reduce
the reproduction
ratio in 1% steps.
See page 15.
Reduce/Enlarge
Key
Press to make reduced or enlarged
copies. See page
14.
Zoom Up Key
Press to increase the reproduction ratio in 1% steps. See page
15.
Magnification Ratio Indicator
Shows the selected
reproduction ratio.
93%
82%
A4FB4A4
A4A3 A4 A5
71%
A5 A4 141%
A4 B4 122%
100
Manual Image Density Keys
Use to cancel the automatic
image density mode and
manually select the image
density level.
Energy Saver Indicator
See page 9.
Adding Toner
See page 18.
Clearing Misfeeds
See page 34.
%
Full Size Key
Press to make copies
the same size as the
originals. See page 10.
Manual Image Density Indicator
Shows the manually selected image density. If this indicator
blinks, see page 46.
6
GUIDE TO COM PONENT S
Copy Counter
Displays the number of copies
entered. While copying, it
shows the number of copies
made.
Displays codes that show the
copier’s condition. See page
46.
123
456
789
Auto Image Density Key
Press to select/cancel
the automatic image density mode.
Number Keys
Use to enter the desired number of copies.
Start Indicator
When the Start indicator is red, the
machine is not ready to copy.
When the Start indicator is green,
the machine is ready to copy.
C
0
Start Key
Press to start copying.
You can select the Auto Start
mode. See page 11.
Auto Image Density Indicator
Lights when the copier is automatically controlling image density. If this indicator blinks, see
page 46.
Clear/Stop Key
Press to cancel the copy number
entered. While copying, press to
stop copying.
7

GUIDE TO COM PONENT S
8

Starting the Copier
3
Turn on the main switch.
1
Wait for the copier to warm up.
2
During the warm-up period (approximately 30 seconds), the
Start indicator stays red.
.
When the warm-up period is
3
completed, the Start indicator
turns green. The copier is ready
to make copies.
COPYING
COPYING
On
Stand by
On
Stand by
6
9
If the
❐
❐
❐
Energy Saver
press any key exce pt the
Opening the optional document
feeder, setting originals there, or inserting the copy paper into the bypass feed entrance will also make
the copier ready.
At the end of the day, turn off the
main switch.
indicator lights,
key.
Start
%
On
Stand by
On
Stand by
9

COPYING
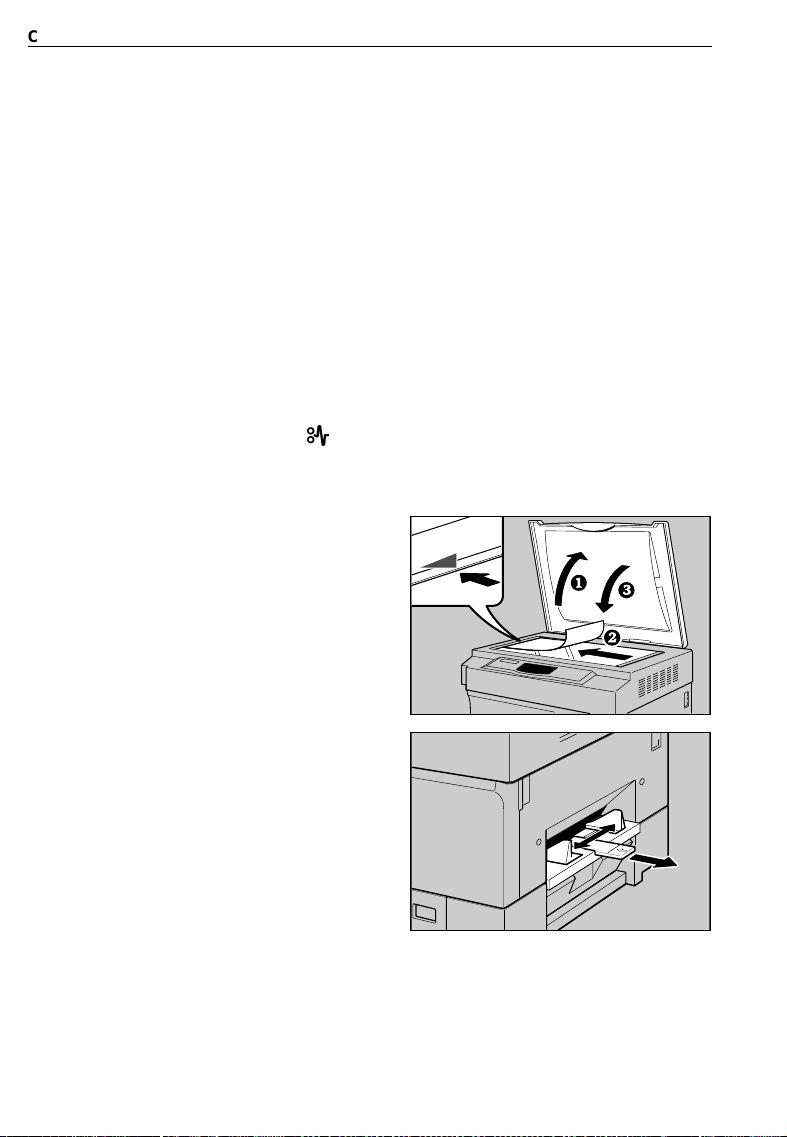
Full Size Copying
Place the original
1
the exposure glass, and lower the
face down
platen cover.
The original should be centered ac-
❐
cording to the size marks on the left
scale.
Narrow margins at the leading and
❐
side edges of the original are not
copied.
Set the image density level to
2
match the type and quality of the
original.
This is not necessary if Auto Image
❐
Density indicator is on.
Enter the number of copies re-
3
quired using the Number keys.
Up to 99 cop ies ca n be e ntered.
❐
To change the number entered,
❐
press the
enter the new numb er.
Clear/Stop
key and then
on
%
123
456
789
C
0
10

Press the Start key.
4
If you press the
❐
warm-up period, the red
tor will blink, then the copi er will auto matically start copying after the
warm-up period (Auto Start mode).
To stop the machine during a multi-
❐
copy run, press the
Press the
❐
ing or press the
again to clear the copy counter.
Start
Remove the copies from the copy
5
tray and the original from the exposure glass.
key during the
Start
Start
Clear/Stop
key to resume copy-
Clear/Stop
indica-
key.
key
56
89
C
0
COPYING
11
COPYING
Bypass Feed Copying
Use the bypass feed entrance to copy onto paper of a different size than
the one already in the paper tray.
One sheet should be inserted in to the bypas s feed entr ance at a time.
❐
Bypass feed copying also may be used for OHP t ransparencie s, adhesive labe ls,
❐
translucent paper, or post cards.
When you copy onto OHP transparencies or post cards, remove copied sheet
❐
one by one.
When you copy onto OHP transpare ncies, inser t them with the co py side up.
❐
Regarding the bypass feed copying with the optional document feeder, see page
❐
27.
Do not inser t the copy pap er into the bypass feed entrance befo re turning on the
❐
main switch. If you do, J1 and
the bypass feed entrance, then open the front cover and close it.
Place the original face down on
1
the exposure glass, and lower the
platen cover.
The original should be centered ac-
❐
cording to the size marks on the left
scale.
will light. In this case, take o ut the paper from
)
Slide the bypass feed guides to
2
the proper width.
Pull out the extender to support copy
❐
paper larg er than B4, 8
12
" x 14".
1/2
 Loading...