

Page 1

INTRODUCTION, SAFETY INFORMATION
INTRODUCTION
This copier is a desktop plain paper copier carefully manufactured to
exacting standards of high performance. It consistently yields high
con tr ast co p i es with a su per i o r fi n i sh .
This manual contains detailed instructions on the operation and maintenance of this copier. To get maximum versatility from this copier, all
operators should carefully read and follow the instructions in this
man u al . Please keep t h i s man ual i n a h an d y p lace n ear t h e co p ier .
Please read the next section before using this copier. It contains
important information related to USER SAFETY and PREVENTING
EQUI PMENT PROB LEMS .
SAFETY IN FORMATIO N
When using your copier, the following safety precautions should
always be followed.
Saf ety D uring O p er ation
In t hi s man u al, th e fo l l o win g i mp or t an t symbo l s are used :
$
WARNING:
$
Caut i on:
I gnor i ng thi s war ni ng could cause ser i ous i nj ur y or
even death.
I gnor i ng thi s cauti on coul d cause i nj ur y or damage to pr operty.
Examples Of Indications
$
B
C
A situation that requires you take care.
D o NOT carr y out t he oper ati on r epr esented by the symbol.
This example means "D o not t ake apart ".
You M UST perf or m t his oper ati on. This example means
"You must r emove the w al l pl ug".
i
Page 2

SAFETY INFO R MAT ION
$
WARNING:
>
>
B
C
Only connect the copier to the power source described on the
inside front cover of this manual. Avoid multi-wiring as it could
cause an el ectr i c shock or a f ir e.
Avoid using an extension cord. M ake sure the wall outlet is near
the copi er and fr eel y accessi ble so t hat i n event of an emergency
it can be unplugged easi l y.
D o not damage, break or make any modifi cat i ons to t he power
cord. D o not place heavy objects on it, pull it hard or bend it
mor e t han ne cessary . These act i ons could cause an elect r i c
sh oc k o r fire.
D o not r emove a ny cover s or scr ew s ot her t h an t hose speci f i ed
in t hi s manual . Some part s of t he copi er ar e at a hi gh vol t age
and coul d give you an el ec t r i c shock. When t he cop i er needs to
be checked, ad j ust ed or r epa i r ed, cont a ct your servi ce
representative.
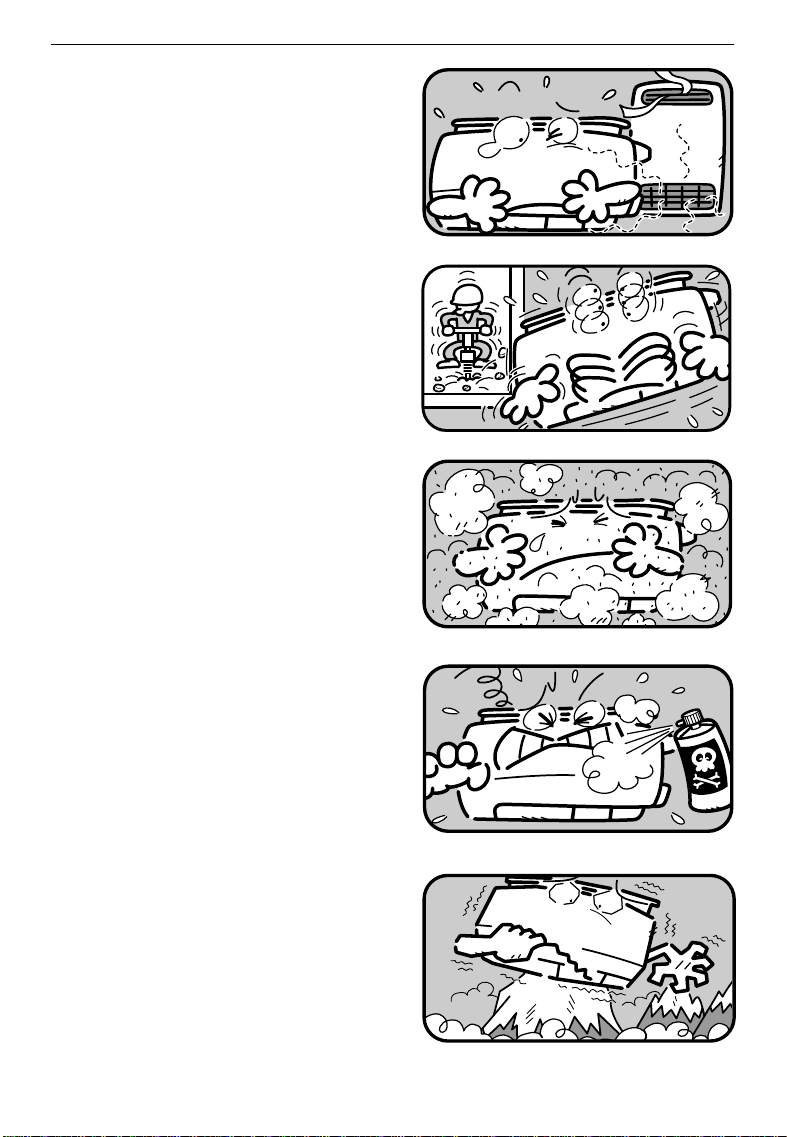
Do not take apart or attempt any modifications to this copier.
There is a risk of fire, electric shock, explosion or loss of sight.
I f t he c opi er l ooks damaged or br eak s down , smoke i s comi ng
out , t her e i s a st r ange sme l l or anyt hi ng lo oks unusual ,
immedi atel y t ur n off t he main pow er sw i t ch then unpl ug the
power cord from the wall. Do not continue using the copier in
thi s condit i on. Contact your servi ce r epresent ati ve.
ii
>
D
Do not put any containers holding metal objects or water (e.g.
vases, f l ow er p ot s, glasses) on t he copi e r . If t he co nt ent s fall
inside t he copi er a f i re or el ect r ic shock could occur.
D o not i nci ner at e used toner or t o ner cont ai ne r s. To ner dust
might i gnit e w h en exposed to an open flame. Dispose of t he
used to ner cont ai ne r s accor di ng to l ocal r egulat ions.
Page 3

C
>
$
Caut i ons:
C
E
>
If any metal, liquid or foreign matter falls into the copier,turn
off the mai n swi t ch and unplug the main pow er cor d. Cont act
your ser vi ce r ep r esent at i ve . Do not ke ep usi ng the co pi er w i t h a
faul t or def ect.
D o not pl ug or unplug the power cor d w it h w et hands or an
el ect r i c shock might occu r .
W hen you move the copi er , unpl ug the power cor d fr om t he
wal l out let t o avoi d fi r e or elect r i c shock.
W hen you pul l out t he pl ug from t he socket, gri p t he plug to
avoid damaging t he cord and causi ng fi r e or el ectr i c shock.
Keep the copier aw ay fr o m humi di t y and dust . A f i r e or an
el ect r i c shock might occu r .
D o not pl ace the copi er on an unstabl e or ti l t ed surf ace. If i t
topples over it could cause injury.
C
@
?
$
W hen the copier will not be used for a long time, unplug the
power cord.
I f yo u use t hi s copi er in a conf i ne d space, make sure t her e i s a
conti nuous air t urnover .
W hen r emoving misfed paper, do not t ouch the f using secti on
because i t could be ver y hot.
This copier has been tested for safet y using thi s suppl i er ’ s part s
and consumable. We r ecommend you only use these speci fi ed
suppl i es.
iii
Page 4

WHERE TO PUT YOUR COPI ER
WHERE TO PUT YOUR C O PIER
WHERE TO PUT YOUR C O PIER
The installation location should be carefully chosen because environmen t al co n di tions g reat l y af f ect t he perf ormance of a copier .
Copier Environment
Opt im um Environme nt al Cond it ions
Temperatu re: 10 - 30°C, 50 - 86°F
❐
Humidity: 15 - 90%
❐
Place upon a strong, stable, level
❐
base w i th a f lat , even su rfac e. Do
not place on a surface that has
holes, ruts, cavities or is uneven
in any w ay.
The copier must be level w ithin 3
❐
mm, 0.11" both front to rear and
left to right.
To avoid a possible build-up of
❐
ozone, make sure to locate this
copier in a large well ventilated
room that has air turnover of
m ore than 30 m
3
/hr/person.
Envir onments To A void
Locations exposed to direct sun-
❐
light or strong light (more than
1,500 lu x.)
iv
Page 5
Locations directly exposed to cool
❐
air from an air conditioner or
heated air from a heater. (Sudden
temperature changes might cause
condensation within the copier.)
Places w her e the co pi er m ig ht b e
❐
subjected to frequent strong vibration.
Dust y areas.
❐
WHERE TO PUT YOUR COPI ER
Ar eas with corro sive gases.
❐
Places hi gh er t han 2,000 m , 6,500
❐
ft above sea level.
v
Page 6

WHERE TO PUT YOUR COPI ER
Pow er Connect ion
$
WARNING:
Only connect the copier to the power source described
on the inside front cover of this manual. Avoid multiwi r i ng as i t coul d cause an electr i c shock or a fi r e.
Avoid using an ext ension cord. Make sure t he wal l outlet i s near t he copier and f r eely accessi bl e so t hat i n
event of an emer gency i t can b e unpl ugged easi l y.
Make sure the plug is firm ly inserted in the outlet.
❐
Vol t age mu st n o t fluct uate mor e t han 10%.
❐
Do not set anything on the power cord.
❐
Always turn the copier off w hen you have finished copying for the day.
❐
Access To Copier
Place th e co p ier n ear t h e p ower so u r ce, pr o v i d in g cl ear an ce as sh o wn.
More than 20 cm (7.9")
More than 20 cm
(7.9")
More than 40 cm
(15.8")
vi
Page 7

WHERE IS IT &
WHAT IS IT
COPIER EXTERIOR.............................................................................
COPIER INTERIOR...............................................................................
OPERATION PANEL.............................................................................
Type 1 .........................................................................................4
Type 2 .........................................................................................5
2
3
4
1
Page 8
COPIER EXTERIO R
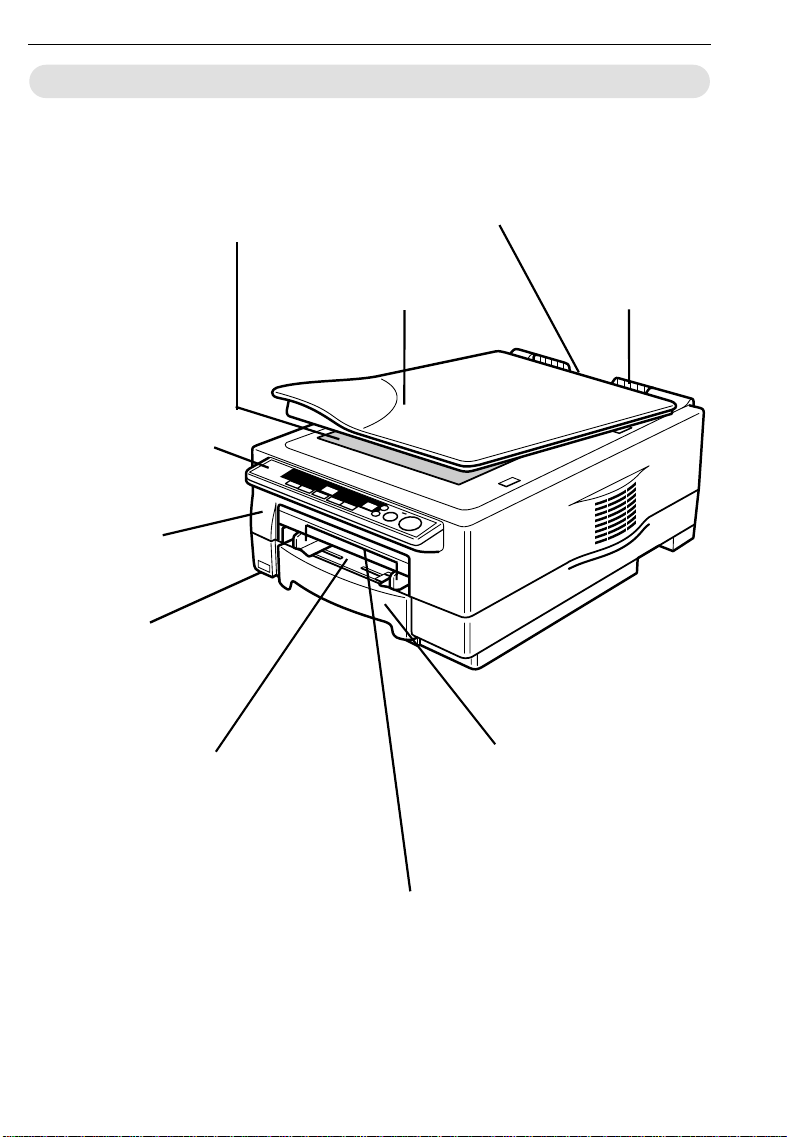
CO PIER EXTERIOR
EXPOSURE GLASS
Position originals here
face down for copying.
OPERATION
PANEL
There are two kinds
of panel depending
on your copier –
Typ e 1 an d Ty pe 2.
☛
See pag es 4 an d
5 .
TOP UNIT
Open to access t h e in si de
of the copier.
COPIER EXTERIO R
MANUAL POCKET
Insert the operator ’s
manual here.
PLATEN COVER
Lower this cover
over originals for
copying.
COPY TRAY
Completed copies are deli v er ed
here.
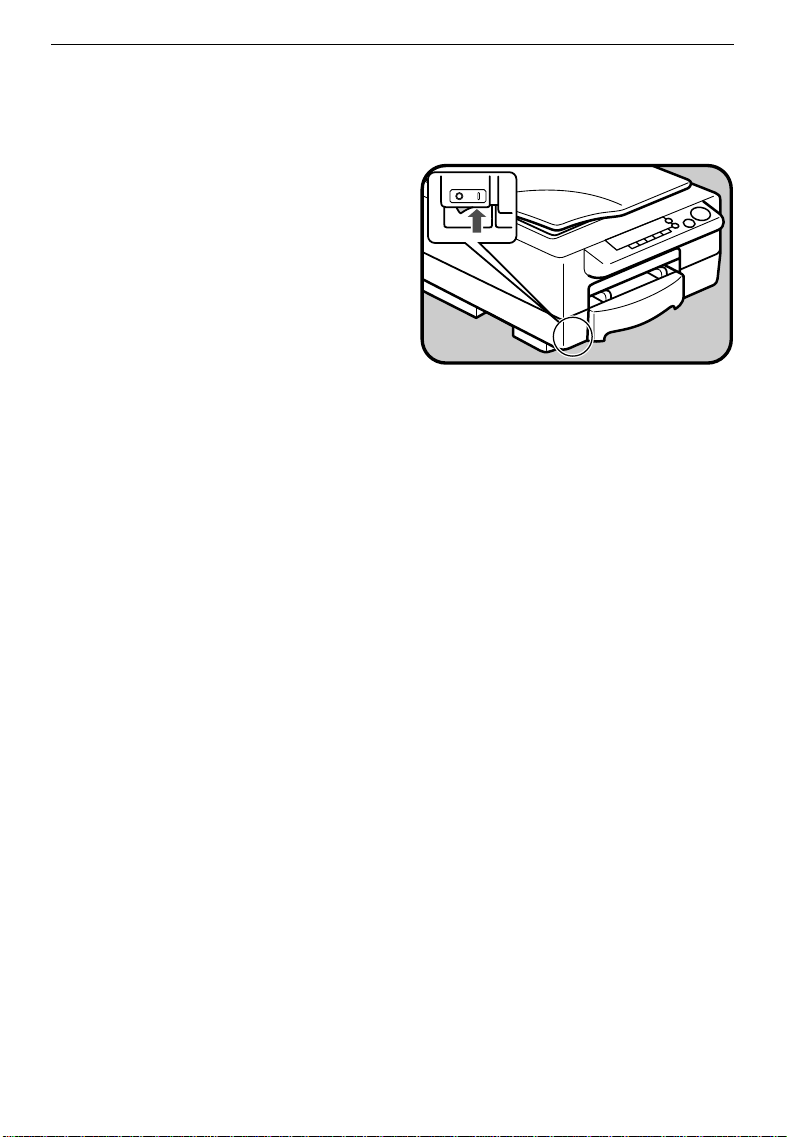
MAIN SWITCH
Switches the copier
between on and off
condition.
BYPASS FEED ENTRANCE
Use to copy onto OHP sheets,
adhesive labels, translucent
paper, and post cards.
2
PAPER CASSETTE
Thi s casset te can ho l d 250
sheet s (8
sheet s (8
paper.
BYPASS FEED GUIDES
Use to align copy paper
set i n th e by p ass feed entrance.
1/2
1/2
" x 11") or 100
" x 14" ) o f co p y
Page 9
COPIER I NTERIOR
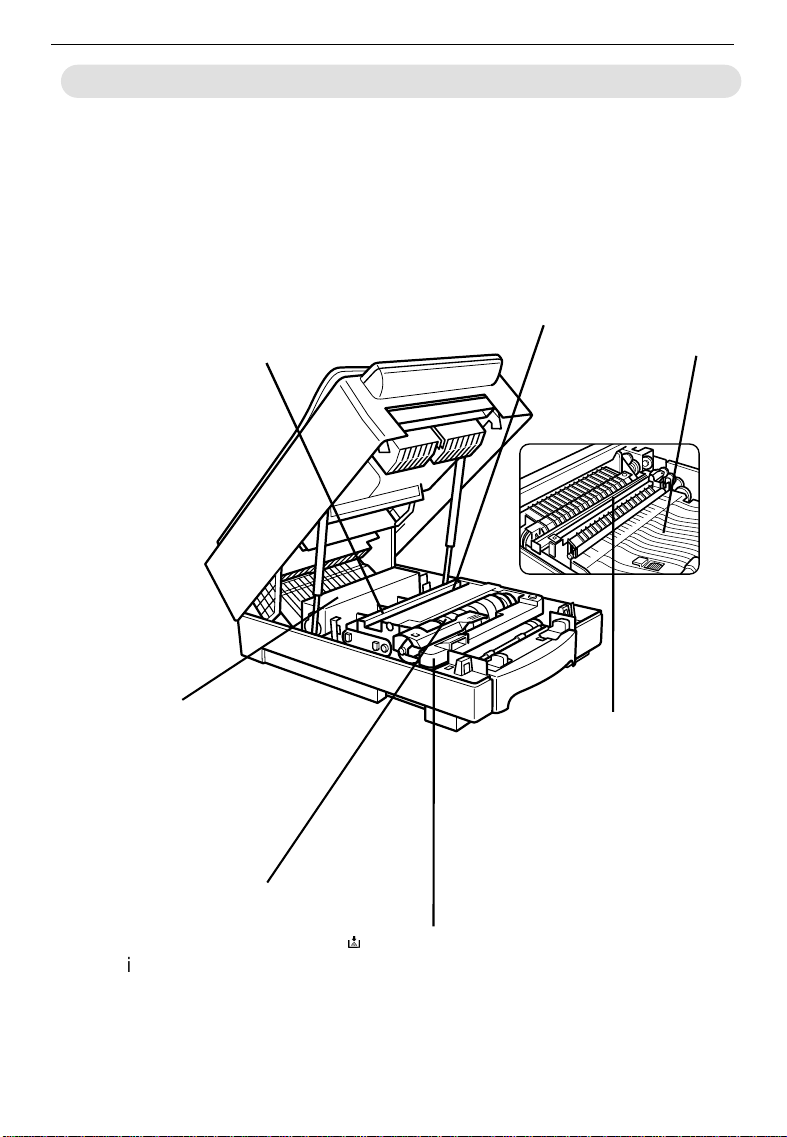
COPIER INTERI O R
COPIER INTERIO R
CHARGE CORONA WIRE
Clean this wire when white
streaks appear on copies,
or wh en i m ag e d en sit y b ecomes uneven. ☛ See
page 57.
FUSING UNIT
Fuses the co py image to
the paper. When accessing the inside of the
copier, use caution. This
unit may be very hot.
TONER BOTTLE
Replace the toner bo ttl e
when the Add Toner
indicator is lit or blinking. ☛ See page 31.
BLUE MATERIAL (OPC)
Do not touch this unit
when you access the insid e o f t h e cop i er. Do no t
expose this unit to the
light for a long time.
TRANSFER CORONA
WIRE
Clean this wire when
w h it e st r eaks ap p ear on
copies, or when im age
density becomes uneven. ☛ See page 57.
IMAGING UNIT
f
Replace t he im agin g un it
w hen t he " i u" i n di cato r is
lit or blinking. ☛ See
page 35.
GUIDE
PLATES
If the reverse
side of copies
become dirty,
clean these
plates. ☛ See
page 60.
3
Page 10

OPERATION PANEL
Type 1
OPERATION PANEL
OPERATION PANEL
12
Auto Image Density
Lighter
1. Manual Im age Density
indicators
2. Load Paper indicator
3. Add Toner indicator
4. Auto Image Density
indicator
5. Check Paper Path
indicator
6. Up (+) and Down (-)
keys
7. Start key
3
4
Darker
10
5
Quantity
6
Clear/Stop
Start
7
C
9
See page 18.
☛
See page 30.
☛
See page 31.
☛
Indicates that the copier automatically controls t he image density.
See page 40.
☛
Use t o set t he de sired num ber o f copies.
Press to st art copying.
8
8. Clear/Stop key
9. Copy Counter
10. Lighter and Darker
keys
4
Press to cancel the copy number entered.
While copying, press to stop copying.
Indicates t he nu m ber of copi es.
See page 18.
☛
Page 11

Type 2
OPERATION PANEL
12
Enlarge
1
1
1
8
5
8
11 129%
2
2
10 14
10
1
8
1
14
8
Zoom Up
2
100%
93%
11
85%
2
78%
14
2
Reduce/Enlarge
13 12
Full Size
Reduce Create Margin
Zoom Down
15 14
1. Reproduction Ratio
indicators
2. Three Digit indicator
3. Load Paper indicat or
4. Add Toner indicator
5. Auto Im a ge Density
indicator
6. Check Paper Pat h
indicator
7. M a nual Im age Density
indicators
8. Up (+) and Down (-)
keys
9. St art key
3
4
Auto Image Density
%
Lighter
5
67
Darker
Quantity
8
Clear/Stop
C
Start
9
11 10
Indicates t he sel ect ed preset reproduct io n
ratios.
Data display.
See page 30.
☛
See page 31.
☛
Indicates that the copier automatically control s t he im age densit y.
See page 40.
☛
See page 18.
☛
Use to set the desired num ber of copies.
Press to st art co pying.
10. Clear/St op key
11. Copy Counte r
12. Lighter and Darker
keys
13. Reduce/Enlarge key
14. Zoom U p key
15. Zoom Down key
Press t o cancel t he copy number ent ered.
While copying, press to st op copying.
Indicates t he number of copies.
See page 18.
☛
See page 22.
☛
Enlarges in 1% st e ps. ☛ See page 23.
Reduces in 1% st eps. ☛ See page 23.
5
Page 12

OPERATION PANEL
6
Page 13

BASIC
STARTING THE COPIER .....................................................................
Wh en The Main Swit ch Is In The Stand-b y Positi o n .................8
Wh en The Copier Has Been Tu r n ed Off By A u t o -Off Mo d e ....9
SETTING ORIGIN ALS ON THE EX POSURE GLASS .........................
ORIGINAL SETTING AN D COPY DIRECTIONS..................................
CHANGING PLATEN COVER POSITION............................................
8
10
11
12
7
Page 14
STARTING THE C OPIER
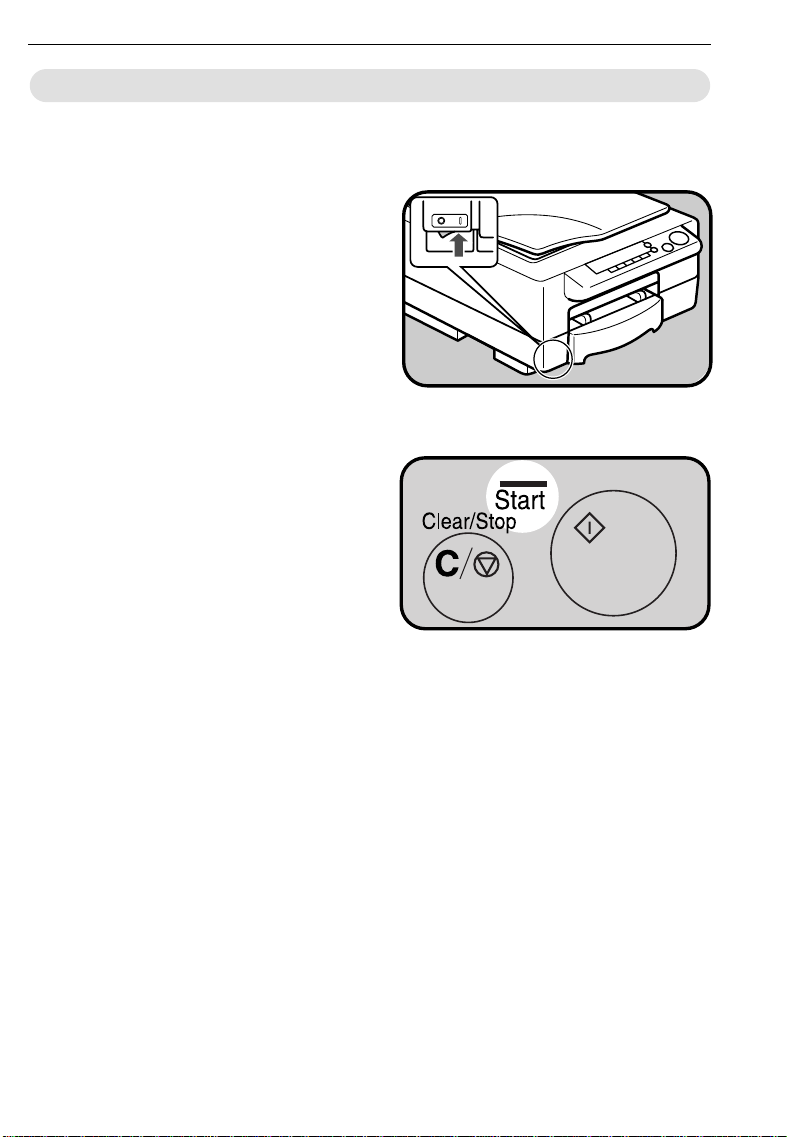
STARTI NG THE COPI ER
STARTI NG THE COPI ER
When The Main Switch Is In The Stand-by Position
Turn on the main switch.
1
..........................................................
Wait for the copier to warm
2
up. During the warm-up period, the indicator on the
key stay s red.
Sta rt
..........................................................
When the warm-up period is
3
completed, the indicator on the
Sta rt
key turns green. The
copier i s ready t o make co pies.
At the end of the day, turn off the
❐
main switch.
8
Page 15
STARTING THE C OPIER
When The Copier Has Been Turned Off By
Auto-Off Mod e
To conserve energy, this copier automatically turns off 10
minutes after the last copying
job has been completed. To
use the copier, turn on the
mai n swi tch.
Auto-off is not in effect in the fol-
❐
lowing conditions.
When the
✒
Wh ile accessing th e user tools.
✒
As standard, the copier turns off
❐
after 10 m inutes. You can change
this – ☛ see pag e 50.
Start
key i s r ed .
9
Page 16

SETTING ORIGINALS ON T HE EXPOSURE GLASS
SETTING ORIGINALS ON THE EXPOSURE
SETTING ORIGINALS ON THE
GLASS
EXPOSURE GLASS
.
Lif t the p l at en co v er.
1
..........................................................
.
Set the original face down on
2
the exposure glass. The original should be centered to the
arrow mar k o n t h e scal e.
..........................................................
.
Lower t h e p l at en cover .
3
When copying book originals it is
❐
important that the platen cover
and exposure glass are parallel.
Thi s pr event s str eam ing li ght and
using unnecessary toner enabling
you to m ake clear copies. Therefore, before low ering the cover lift
it from it’s hinges at the rear.
Book originals must be 20 mm,
❐
0.78" t h i c k o r l es s.
10
Page 17
ORIGINAL SETTING AND COPY DIRECTIONS
ORIGINAL SETTING AND COPY
ORIGINAL SETTING AND COPY
DIRECTIONS
DIRECTIONS
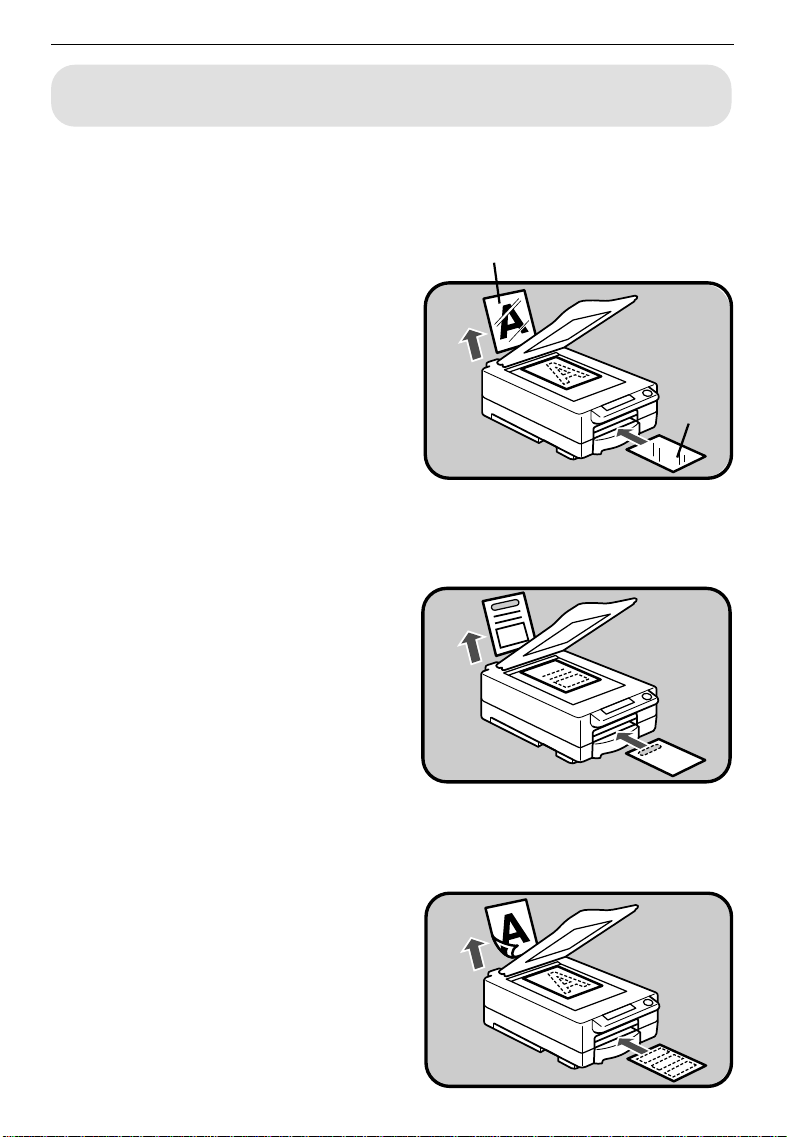
When you use the following kinds of paper, set them into the bypass feed
❐
entrance.
.....................................................................................................................
OHP sheets
When you copy onto OHP
sheets, set the originals and
OHP sheets as shown on the
right.
When using OHP sheets, set one
❐
sheet at a time into the bypass
feed entrance and open the copy
tray. Remove copies delivered to
the copy tray one by one.
.....................................................................................................................
Front side
Front
side
Letterhead
When you copy onto letterhead, set the originals and letter h ead as sh ow n on th e ri gh t.
.....................................................................................................................
Two-sided copies
When you make two-sided
copies, set the originals and
copy paper for copying the reverse side as shown on the
right.
Do not use paper that has been
❐
copied onto by other machines.
11
Page 18
CHAN G ING PLATEN C O V ER PO SI T ION
CH ANGI NG PLATEN CO V ER POSI T ION
CH ANGI NG PLATEN CO V ER POSI T ION
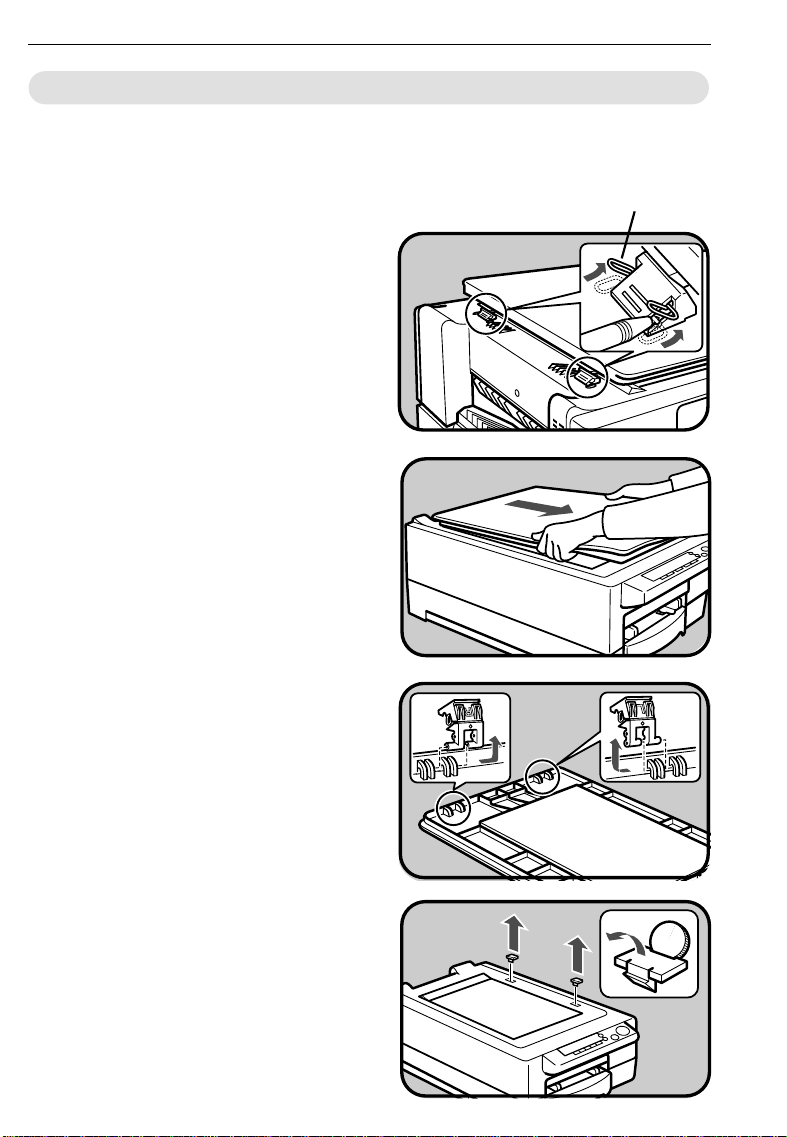
You can change the direct ion from w hich the platen cover opens from
horizontal position (default) to vertical position. This procedure involves m ovi ng the hinges and re-fixing the cover.
Lever up th e sto pper s w it h t he
11
tip of a ballpoint pen to release
the hinges.
..........................................................
Hold the platen cover as
2
show n and pull it towards you.
stopper
..........................................................
Remove the two hinges from
3
the p l aten co ver .
..........................................................
Rem ove the tw o caps covering
4
the alternative hinge slots on
the t o p o f t he co p ier .
12
Page 19

Fix these caps over the slots
5
you uncovered when rem oving
th e cov er i n st ep 1.
..........................................................
Insert the hinges in their new
6
positions.
..........................................................
Fit the platen cover onto the
7
copier. The hinges should fit
into the new holes.
CHAN G ING PLATEN C OVER POSITI ON
..........................................................
Push t he hin ges in to the ho les
8
wi th yo ur f inger.
13
Page 20

CHAN G ING PLATEN C O V ER PO SI T ION
Push the stoppers back down
9
with the tip of a ball-point pen
to fix them .
14
Page 21

COPYIN G
BASIC OPERATIONS ............................................................................
One-to-One Cop y i n g .................................................................16
Ad j u sti n g Copy Image Density ..................................................18
Cop y i n g From The Byp ass Feed Ent r an ce ...............................19
Entering Copy Job Settings During The Warm -up Period
(Aut o Star t ) ................................................................................21
REDUCED AN D ENLARGED COPYIN G .............................................
Reduci n g A n d Enlarg i n g U sin g Preset Ratio s (Preset R/E) ....22
Reduci n g A n d Enlarg i n g In 1% Steps (Zoom) ........................23
16
22
15
Page 22
BASIC OPERATIONS
BASIC O PERAT I O NS
BASIC O PERAT I O NS
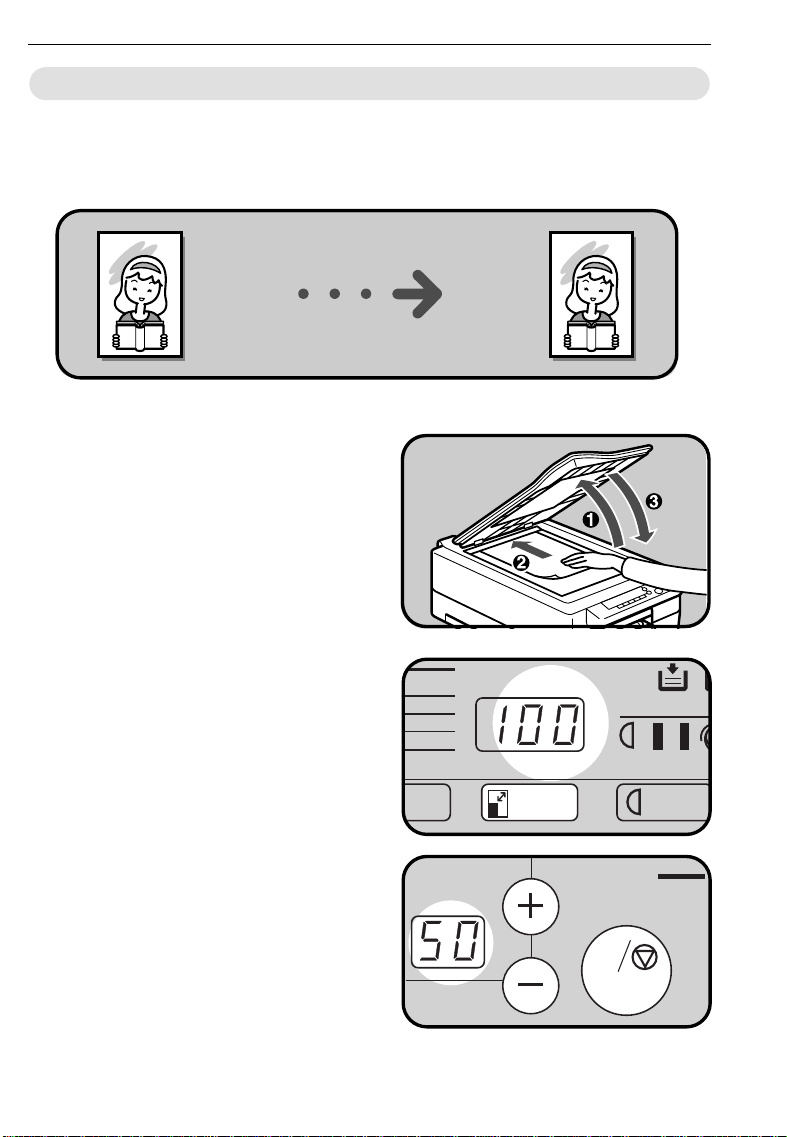
One-to-One Copying
You can make cop i es t hat ar e t h e same si ze as yo u r o r i g inals.
Lif t th e plat en cov er (➊). Place
1
the original face down on the
exposure glass (➋), and lower
the p l aten co ver (➌).
❐
The original should be centered
to the ar ro w mar k o n the scale.
..........................................................
If your copier has enlarge-
2
ment/reduction, make sure the
mag n if i cation rat i o i s 100%.
..........................................................
En ter th e nu m b er o f co pi es re-
3
quired using the
Down (-)
❐
Up to 50 copies can be entered.
❐
To change the number entered,
press the
then enter the new num ber.
❐
Starting with the
will count from 50 downward.
16
keys.
Clear/Stop
Up (+)
key and
Dow n (-)
and
key
100%
93%
85%
78%
Up
Quantity
Reduce/Enlarge
Lighter
Clear/Stop
C
%
Auto Im
Start
Page 23
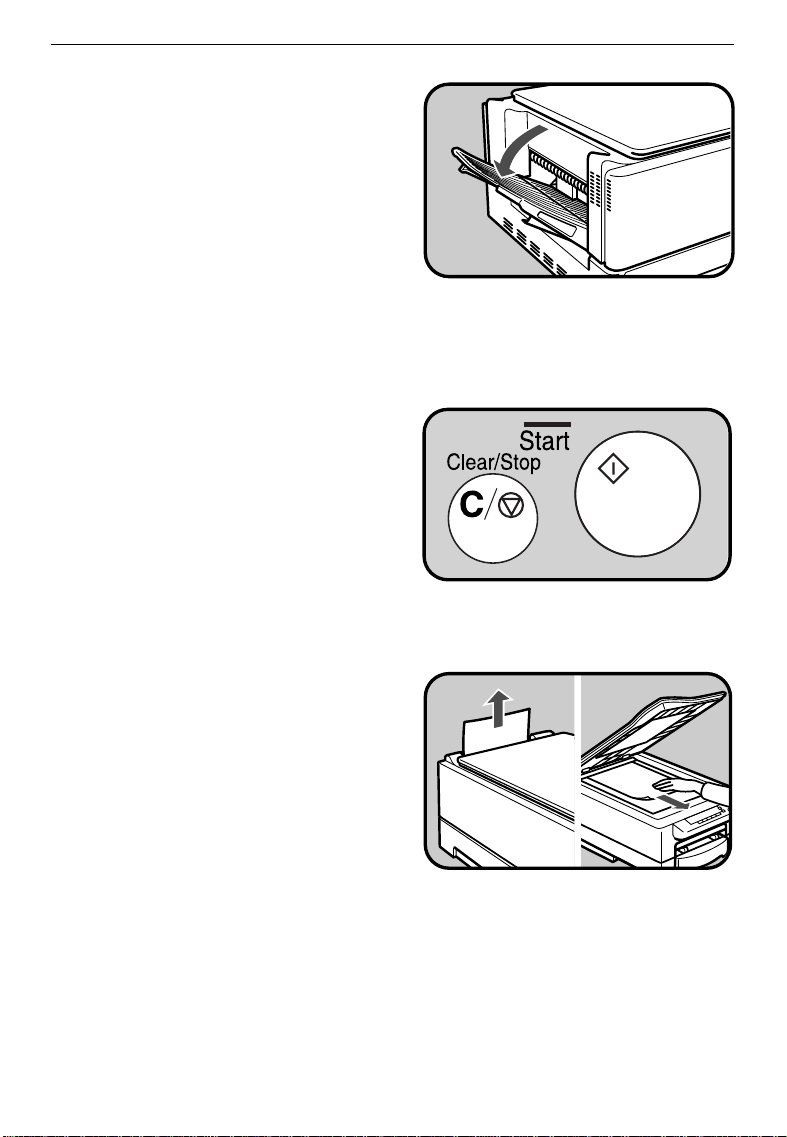
Open the copy tray under the
4
following conditions:
✒ When y ou make 20 o r m o re
8
" x 11" , A 4 co p ies.
1/2
✒ W hen y ou m ake 10 o r m o re
8
" x 14" co pi es.
1/2
✒ When you use curled paper.
❐
Even if you open the copy tray,
the page order m ay vary.
..........................................................
Press the
5
❐
To stop the machine during a
multi-copy run, press the
Clear/Stop
❐
Press the
copying or press the
key again to clear the copy
counter.
Start
key.
key.
key to resume
Start
Clear/Stop
BASIC OPERATIONS
..........................................................
Remove the copies from the
6
cop y t r ay an d t h e o r i g i n al f r o m
th e exp o su r e g l ass.
17
Page 24
BASIC OPERATIONS
Adj ust ing Cop y Image Density
To match t h e ty pe of o riginal s, ad ju st t he i mage d en sit y .
You can increase or decrease Auto/M anual im age density with the user
❐
tools. ☛ See pag es 49, 50 an d 54.
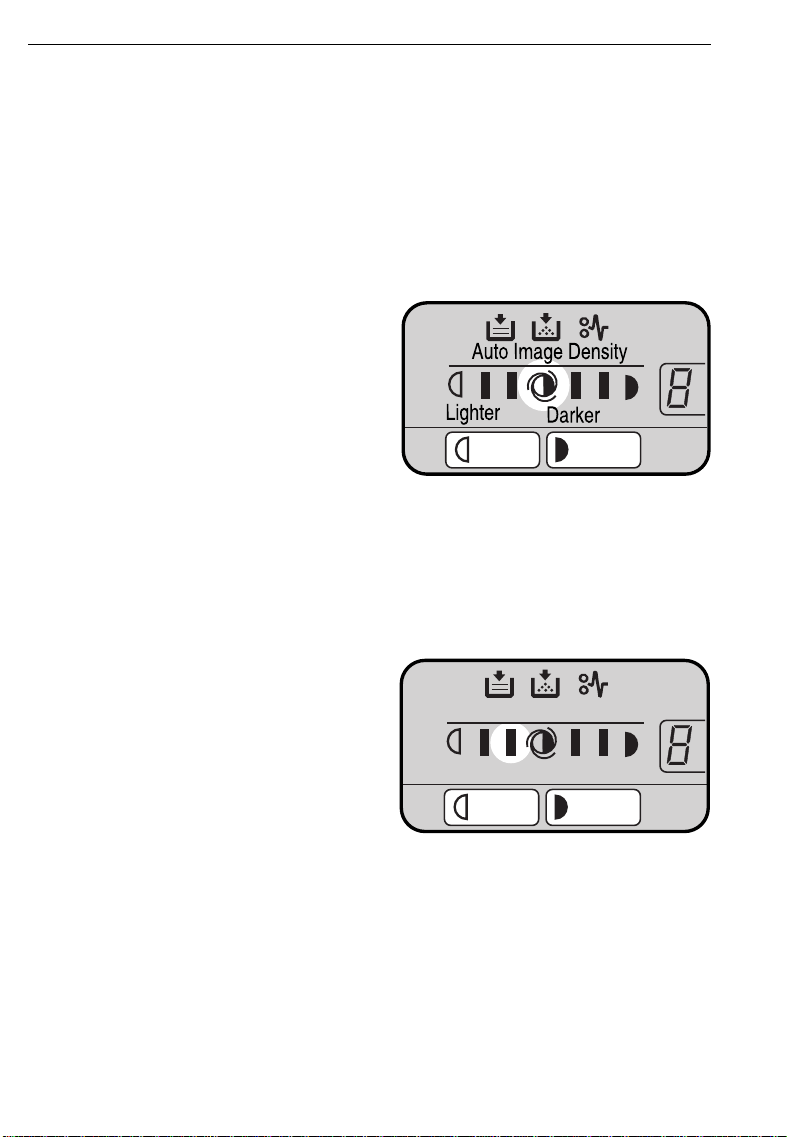
.....................................................................................................................
Auto image d ensity
If t he center im age density in dicator is lit, the copier automatically controls the image
density.
If the density has been manually adjusted, press the
Lighter
(right) key to light the center
image density i ndicat o r.
.....................................................................................................................
(left) key or
Ma nua l im a g e de nsit y
Darker
If you have dark or light originals, adjust the image density
yourself.
Press the
lo w er t he i m age d ensit y . Pr ess
the
crease th e imag e d ensi ty.
18
Light er
Darker
(left) key to
(right) key to in-
Auto Image Density
Lighter
Darker
Page 25

BASIC OPERATIONS
Copying From The Bypass Feed Entrance
Use the bypass feed entrance to copy o nto paper different than the
one al r eady in th e p aper cassette.
One sheet should be inserted into the bypass feed entrance at a time.
❐
Bypass feed copying should also be used for OHP sheets, adhesive labels,
❐
translucent paper, or post cards.
As for the original setting and copy directions, see page 11.
❐
.
Place the original face down
1
on the exposure glass, and
lo wer t he plat en co v er .
❐
The original should be centered
to the arrow mark on t he scale.
..........................................................
.
Slide the bypass feed guides
2
to the proper width.
..........................................................
.
Insert the copy paper into the
3
byp ass f eed en trance g ently .
19
Page 26

BASIC OPERATIONS
En ter th e nu m b er o f co pi es re-
4
quired using the
Down (-)
..........................................................
Pr ess th e
keys.
Sta rt
key.
Up (+)
and
5
..........................................................
Start
Start
key
key t urns
The indicator on the
6
turns green and the Load Paper indicator lights when the
copier is ready for the next
piece of copy paper. If you are
making more than one copy in
this set, insert the next piece of
copy paper into the bypass
feed entrance gently until the
paper is fed autom atically.
❐
The next copy is made automatically – you don’t have to press
the
❐
Do not set the next piece of copy
paper before the
gr een, a m isfeed might occur.
Start
key.
Quantity
Start
Clear/Stop
C
Start
Clear/Stop
C
20
Page 27

BASIC OPERATIONS
Enter ing Copy Job Settings During The Warm-up Period ( A ut o S t ar t)
If you press the
Start
the
copying after the warm-up period.
❐
key wi l l b l i n k (red -g r een -r ed-green ), t h en t he co p i er wil l star t
Set your copy settings during
warm-up period, then press
Start
the
To cancel Auto Start, press the
Clear/Stop
Start
key.
key.
key during the warm-up period, the indicator on
Clear/Stop
Start
C
21
Page 28

REDUCED AND ENLARGED COPYING
REDU CED AN D ENLARGED C OPYING
REDUCED AND ENLARGED C O PYING
Note: This f unct i on can be used only when you have t he r educ ti on/ enl ar ge-
ment feat ure.
Red uc ing And Enlar ging Using Preset Ratios (Preset R/E)
.
Place the original face down
1
on the exposure glass, and
lower th e p lat en cov er.
❐
The original should be centered
to the ar ro w mar k o n the scale.
..........................................................
.
Pr ess t h e
2
to reduce or increase the reproduction ratio. The reduction
ratio w ill change as follows:
93% 85% 78%
100% 129%
..........................................................
Enter any other settings and
3
make y our co pies.
22
Reduce/Enlarge
key
Page 29

REDUCED AND ENLARGED COPYING
Re d ucing A nd E nlar g ing I n 1% Ste ps (Zoom)
The repro d u ct i on r at io can b e changed f r o m 70% t o 141% i n 1 p ercen t
steps.
.
Place the original face down
1
on the exposure glass, and
lo wer t he plat en co v er .
❐
The original should be centered
to the arrow mark on t he scale.
..........................................................
.
Press th e
2
peat edly to r educe t he rat io i n
1% step s.
Zoom Dow n
key r e-
Or, press the
rep eat edl y t o i n crease t h e rat i o
in 1% steps.
..........................................................
Enter any other settings, and
3
make y o u r co pi es.
❐
When you want to set the ratio
back to 100%, press the
duce/Enlarge
Zoom Up
key.
key
Re-
100%
93%
85%
78%
Up
Reduce/Enlarge
Lighter
%
Auto Im
23
Page 30

REDUCED AND ENLARGED COPYING
24
Page 31

WH A T T O D O IF
SOMETHI N G GOES
WRO NG
IF YOUR COPIER DOES NOT OPERATE PROPERLY.......................
IF YOU CANNO T MAKE COPIES PROPERLY ...................................
IS LIT: LOAD PAPER.........................................................................
d
Non -r ecommend ed Paper For The Paper Cassette...................29
Not es For Paper ...........................................................................29
Loadin g Paper .............................................................................30
IS LIT OR BLINKING: ADD TONER .................................................
f
CHANGING THE IM AG ING UNIT .......................................................
How to Change The Im ag i n g Un i t..............................................35
How To Chan g e The Ozon e Filter ............................................39
CLEARING MISFEEDS .........................................................................
When
When
d Is Lit:.............................................................................40
Y Is Lit:..............................................................................41
26
28
29
31
35
40
25
Page 32

IF YOUR CO PI ER D O ES NOT OPERATE PROPERLY
IF YOUR COPIER DOES NOT OPERATE
IF YOUR C O PIER DOES NOT O PERAT E
PROPERLY
PROPERLY
Check the following:
Copier’s condit ion Action
Not hing happens when
t he sw itch is t urn ed on.
is lit.
is blinking or lit.
is lit .
The copier has turned itself off (10 minut es after a
copy was made or a key
was p re sse d .
Copies have w h it e streaks.
Copy image densit y is uneven.
U1 is displayed on the
copy co u n ter .
U2 is displayed on the
copy co u n ter .
Check the power cord. Is it properly
plugged into the outlet?
➠
Plug it in firmly.
Is the top unit compl etely closed?
➠
Close the top unit completely with
both hands.
Load p aper . ☛ See page 30.
Set a new toner bottle. ☛ See page 31.
Clear misfed p aper . ☛ See pag e 40.
The Auto-off function is set.
➠
Turn on the main switch.
➠
Clean the corona wires. ☛ See
page 57.
➠
Clean the corona wires. ☛ See
page 57.
➠
Set a im aging unit correctly. ☛ See
page 35.
➠
Completely remove the tape from
inside the imaging unit. ☛ See
page 36.
26
Page 33

IF YOUR COPIER DOES NOT O PERAT E PROPERLY
Copier’s condit ion Action
Misf e e ds o ccu r f r equently.
Is the right kind of paper in the
cassette?
➠
Paper size and weight must be
within the minimum and maximum
standards set for this copier. ☛ See
page 66.
Is f ol ded , wr i nkled , damp, o r cur led
paper i n t h e casset te?
➠
Always load paper correctly.
Is the paper properly set in the
cassette?
➠
Make sure that the end plate and
the side guides are positioned
properly. ☛ See page 44.
Are t h ere an y p i eces of misf ed pap er
or other foreign objects in the copier?
➠
Make sure that the paper path is
completely clear of paper and other
m aterial after a misfeed.
27
Page 34

IF YOU CANNOT MA K E CO PIES PROPERLY
IF YOU CAN N OT MAKE COPIES
IF YOU CANNOT MAKE COPIES
Problem Cause Action
PROPERLY
PROPERLY
Copi es ap pear
dirty.
The r ever se si d e
of an original image is co p ied .
Copi es ar e to o
light.
The same copy
area is d irty when ever making co p ies.
Copi es are blan k
or parts of the image are n ot cop ied.
The o rigi n al h as a g r ay or
colored background.
The i mage d en si t y i s t o o
dark.
The pl at en co v er o r
exposure glass is dirty.
The i mage d en si t y i s t o o
dark.
The o rigi n al h as a l o w
cont r ast i mage.
The i mage d en si t y i s t o o
light.
Damp or rough grain paper
is used.
The pl at en co v er o r
exposure glass is dirty.
The original is not set
correctly.
An improper paper size is
selected.
Adj u st t h e i mage
density. ☛ See
pag e 18.
Clean them.
See pag e 56.
Adj u st t h e i mage
density. ☛ See
pag e 18.
Adj u st t h e i mage
density. ☛ See
pag e 18.
Use dry paper
wi thout roug h
grain.
Clean them.
See pag e 56.
Set originals
correctly. ☛ See
pag e 10.
Select the proper
paper size.
☛
☛
28
Page 35

d
I S LIT : LO AD PAPER
I S LIT : LO AD PAPER
d
Note: For a list of usable paper sizes, ☛ s ee page 66.
d
IS LIT : LOAD PAPER
Note: If you want t o change t he paper size,
s ee page 44.
☛
Non- re comme nd ed Paper For T he Pa per C asse tte
Folded, curled, or damaged paper
❐
Torn paper
❐
Perforated paper
❐
Paper with conductive or low electrical resistance coating such as carbon
❐
or si l ver co a t in g
Thermal paper, art paper
❐
Thin paper that has low stiffness.
❐
Note s For Pa p er
Do not copy onto the side of paper that has been already copied on.
❐
The following types of paper cannot be fed from the paper cassette. Load
❐
th em in t h e by p ass f eed entrance. ☛ See pag e 19.
OHP tran sp arencies
✒
adhesive labels
✒
translucent paper
✒
Correct curls in copy paper before loading.
❐
Fan copy paper to get air between the sheets before loading.
❐
29
Page 36

d
IS LIT: LOAD PAPER
Loading Paper
.
Pu l l o u t t h e p ap er casset te.
1
..........................................................
Load paper in the paper cas-
2
sette.
❐
Make sure not to stack paper
above the limit m ark of the side
guide.
❐
Maximum capacity:
250 sheet s (80 g/m
..........................................................
❐
When you use 8
make sure that the trailin g edges
of paper are under the guides.
❐
Maximum capacity:
100 sheet s (80 g/m
2
, 20 lb )
" x 14" paper,
1/2
2
, 20 lb )
guides
..........................................................
Push the paper down until the
3
leading corners of the paper
are under the corner guides.
Then, let go (both sides).
Push the cassette in horizon-
4
tally.
❐
After making one copy, make
d
sure that the Load Paper
cator is off.
30
indi-
Page 37

f
IS LIT OR BLINKING: ADD TONER
f
IS LIT OR BLIN KI NG: ADD TONER
IS LI T OR BLI N K IN G: ADD T ONER
f
When the Add Toner f indicator blinks, it is time to supply toner
(copying is still possible). When the Add Toner
ously on, copies cannot be m ade until the toner bottle is replaced.
indicator is continu-
f
$
WARNING:
N ot e: W hen you change the t oner bot tl e, be car eful not to t ouch the
blue mat er i al ( OPC) .
Note: Before setting the new toner bottle, shake it well at least 5 or 6
times.
Note: Do not remove the toner bottle before the Add Toner
comes on — toner could spill out.
Open the new toner bottle box
1
and take out th e bottle.
..........................................................
Shake the new bottle well at
2
least 5 to 6 times.
D o not i nciner at e used toner or t oner cont ai ners. Toner
dust mi ght i gnite w hen exposed t o an open fl ame.
D i spose of the used toner cont ainer s accordi ng to local
regulations.
f
indicator
31
Page 38

f
IS LIT OR BLINKING: ADD TONER
Remove the black cap from the
3
bo tt l e. Leav e st o p per i n b o t t le.
❐
Store the cap — you w ill need in
step 7.
..........................................................
Open t h e t op u nit.
4
❐
To stop the top unit from springing up, keep one hand on it while
opening it.
..........................................................
Open th e lev er in th e di rect ion
5
of the arr o w.
..........................................................
Grasp the right side of the
6
used toner bottle and push it
to the lever side a little. Then
pull it up.
32
Page 39

Take out the used bottle,
7
slowly so you do not spill
toner.
..........................................................
If f or som e reason th ere is no
8
cap on the rem oved toner bottle, remove the cap from under
the lever. Fix the cap you took
off the new bottle onto the
used bottle.
..........................................................
Put the cap side of the bottle
9
under the lever.
f
IS LIT OR BLINKING: ADD TONER
..........................................................
Push the other side of the
A
toner bottle in until it locks in
position.
33
Page 40

f
IS LIT OR BLINKING: ADD TONER
Close the lev er.
B
..........................................................
Close the top unit with both
C
hands.
❐
After you close the top unit, the
copier replenishes toner for about
1 minute. After the copier stops,
make sure that the Add Toner
indicator is off.
❐
If t he f indicator is lit again, turn
the main switch off and on again.
f
34
Page 41

CHANGING THE IMAGING UNIT
CHANGING THE IMAGING UNIT
CHANGING THE IMAGING UNIT
When "iu" and the copy set number appear on the copy counter by
turns, it is tim e to change the im aging unit and the ozone filter (copying
is still possible). When "iu" is continuously displayed, copies cannot be
made until the imaging unit and the ozone filter are replaced.
Note: When you set the new imaging unit and the ozone filter, be
caref ul not t o t ouch t he bl ue mat er i al ( OPC) .
N ote: Do not expose t he i maging unit ( especial l y t he bl ue mat er i al ) t o
the light.
How to Change The Imaging Unit
Open the top unit.
1
❐
To stop the top unit from springing up, keep one hand on it w hile
opening it.
..........................................................
Remo v e th e used im ag in g u ni t
2
with the used toner bottle being careful not to spill the
toner.
❐
M ake sur e to r em o ve t he i m ag in g
unit to prevent spilling toner
while moving the copier.
❐
Do not shake the imaging unit to
the right or left.
..........................................................
Open the new imaging unit
3
cardboard box. Grasp the part
of the imaging unit as shown
opposite and pull it straight
out to remove the unit. Then
take out the unit from the styrene foam.
➋
➋
➊
35
Page 42

CHAN G I NG THE I MAGING UNIT
Take out the new im aging unit
4
from the black bag horizontally.
..........................................................
Put the used imaging unit into
5
the black bag horizontally not
to spill the toner.
❐
Do not shake the imaging unit to
the right or left.
..........................................................
Remove the black paper from
6
the imaging unit and remove
the tape fixing the lever. Insert
th e t rai li ng par t o f t he i m ag in g
unit onto both hinges. Then,
put the other part of the unit
on the g ui d e p l at e.
❐
Do not push the imaging unit.
This unit is set only to put it on
the guide plate.
❐
The imaging unit is shaky if you
push it — there is no problem, it
does not "lock" in place.
36
Page 43

Completely remove the tape
7
from inside the imaging unit
by pulling it out as shown.
❐
Hold down the unit with one hand
to avoid turning it over.
❐
Pull out the tape in the direction
of t he ar r ow o n th e t ape. A f ter r emoving it, you will find the end
mark at the end of the tape.
..........................................................
Open the new toner bottle box
8
and take out the toner bottle.
..........................................................
Shake the new toner bottle
9
wel l at l east 5 t o 6 t imes.
CHANGING THE IMAGING UNIT
..........................................................
Rem o v e t he b l ack cap f ro m t he
A
toner bottle carefully so you
don’t spill toner.
37
Page 44

CHAN G I NG THE I MAGING UNIT
Open th e lev er in th e di rect ion
B
of the arr o w.
..........................................................
Put the cap side of the toner
C
bottle under the lever.
..........................................................
Push the other side of the
D
toner bottle in until it locks in
position.
..........................................................
Close the lev er.
E
38
Page 45

CHANGING THE IMAGING UNIT
How To Change The Oz one Filter
While you change the ozone filter, be careful not to stain your hands with
❐
carbon. (Try not to touch filter surface.)
Move the tab in the direction
1
of the arrow while pulling the
tape edge — the used filter
shou l d co me ou t.
➋
..........................................................
Unpack the new ozone filter.
2
While pulling the tab in the direction of the arrow, push the
new filter in the holder with
the tape side of the filter on
the bottom.
➋
➊
➊
..........................................................
Close the top unit with both
3
hands.
❐
After you close the top unit, the
copier operates for about 1 minute. After the copier stops, make
sure that the "iu" is not displayed
on the copy counter.
❐
Do not turn off the main switch
until the copier finishes resetting
itself (after about 1 minute).
39
Page 46

CLEARIN G MISFEEDS
CLEARING MI SFEEDS
CLEARING MI SFEEDS
Wh en t her e is a p aper mi sfeed , th e Check Paper Pat h (Y) in di cato r o r
d
Load Paper (
) indicator will light.
$
Caution:
W h en r emovi ng mi sfed paper , do no t t ouch t he f using section because it coul d be ve r y hot .
Note: When you clear a misfeed, be careful not to touch the blue
material (OPC).
Do not leave any torn scraps of paper within the copier.
❐
Af ter rem o vin g t he m i sfed p aper , m ake sure t hat all uni ts ar e retu rn ed t o
❐
their original positions and the top unit is closed.
Wh en a pap er m i sf eed o ccu r s, th e co pi er keeps t r ack of t he s elect ed co p y
❐
modes and how many copies have been completed. It is not necessary to
reset the copy modes and the copy quantity after removing m isfed paper.
Repeat the procedures described in this section until the Check Paper Path
❐
indicator goes out. (The indicators do not function unless the top unit is
Y
closed.)
Do not touch the copy im age when removing misfed paper — toner may
❐
stain your hands.
When d Is Lit:
Lift up slightly and pull out the
1
pap er cassett e and check i f paper r emain s i n t he cassette.
40
Page 47

CLEARIN G MISFEEDS
If the paper cassette has run
2
out of paper, load paper.
See pag e 30.
If paper remains in the paper
cassette, follow the steps below.
➊
M ake sur e th at th e end pl ate an d
side plates are positioned properly to match the paper size you
are using.
➋
d
If
is still lit, change the paper
type.
If the d indicator does not go
out, call for a service representative.
See the back cover of this
☛
m anual for the telephone number.
.....................................................................................................................
☛
When Y Is Lit:
Open the top unit.
1
❐
To stop the top unit from springing up, keep one hand on it w hile
opening it.
..........................................................
Pull out the pap er cassette.
2
41
Page 48

CLEARIN G MISFEEDS
Grasp the part of the imaging
3
unit as shown in the illustration and lift the imaging unit to
remove the misfed paper.
Then, return the imaging unit
to its original position.
❐
The imaging unit is shaky if you
push it — there is no problem, it
does not "lock" in place.
..........................................................
If you still cannot remove mis-
4
fed paper, take it out through
the co p y t ray area.
..........................................................
Make sure that there are no
5
scrap s o f p aper wi t h i n th e co p ier.
..........................................................
Close the top unit with both
6
han d s an d p u sh i n t h e casset t e
horizontally.
❐
Make sure that the Check Paper
Y
Pat h
indicator is turned off.
42
Page 49

CHAN GIN G TH E
CO PIER’ S SET TING S
CHANGING THE PAPER SIZE .............................................................
USER TOOLS ........................................................................................
How To Access User Too l s.........................................................47
How To Chan g e Ad j u st ment Valu e Or Mo d es .........................48
User Too l Menu .........................................................................49
44
47
43
Page 50

CHAN G ING TH E PAPER SIZE
CH ANGI NG TH E PAPER SI Z E
CH ANGI NG TH E PAPER SI Z E
Lift up slightly and pull out the
1
pap er cassette.
..........................................................
Remove the copy paper.
2
..........................................................
Remov e t h e en d p l ate.
3
If you are changing the paper
size from 8
smaller sizes, lift out the end
plate.
44
" x 14" to a
1/2
Page 51

Set t he end p late t o th e paper
4
size you w ant to use.
CHAN G ING TH E PAPER SIZE
If you are changing to 8
14", put the end plate in the
hole of the cassette.
If you use only 8
❐
x 14" paper, do not follow steps 5
and 6.
..........................................................
While pushing the bottom
5
plate down, pull up the two
side guides as shown in the
illustration.
..........................................................
While pushing the bottom
6
plate down, set the two side
guides to the paper size you
want to use.
Be sure to set both side guides to
❐
the proper position. Otherwise,
th ere might be a misfeed .
" x 11" or 8
1/2
1/2
" x
1/2
"
45
Page 52

CHAN G ING TH E PAPER SIZE
Load p ap er i n t he casset t e.
7
Make sure not to stack paper
❐
above the limit m ark of the side
guide.
Maximum capacity:
❐
250 sheet s (80 g/m
2
, 20 lb )
..........................................................
When you use 8
❐
make sure that the trailin g edges
of paper are under the guide.
Maximum capacity:
❐
100 sheet s (80 g/m
" x 14" paper,
1/2
2
, 20 lb )
..........................................................
Push the paper down until the
8
leading corners of the paper
are under the corner guides.
Th en, l et g o.
guides
..........................................................
Push the cassette in horizon-
9
tally.
46
Page 53

r
Quantity
Lighter
Darker
Auto Image Density
USER TOO LS
USER TOOLS
USER TOOLS
You can change or set the copier’s settings using the follow ing user tools.
How T o Acce ss User T ools
Turn off the main switch.
1
..........................................................
While pressing the
2
key, turn on the main switch.
..........................................................
Release the
3
dot will appear in the upper left
corner of the copy counter to
show you are in the User Tools
mode.
Clear/Stop
Clear/Stop
key. A
..........................................................
Enter the required user tool’s
4
number using the
D ow n (-)
❐
You will find the user tool’s number
blinks and the point indicator is lit.
..........................................................
Press the
5
❐
You will find the user tool’s number
is lit and the dot blinks.
key.
Lig h ter
Up (+) and
key.
Quantity
Sta
Clear/Stop
C
47
Page 54

USER TOO LS
How To Change Adjustment Value Or Modes
Access the user tool you want to
1
adj ust (☛ See pag e 47). Th e u ser
tool’s number will be lit in the
copy counter.
..........................................................
Enter the required setting using
2
the
U p (+ )
For the settings, refer to pages 49
❐
to 54.
..........................................................
Press th e
and
D ow n (-)
Lighter
keys .
key.
3
❐
The setting will be stored in memory.
❐
You will find the setting number
blinks and the point indicator is lit.
Now, you can access another user
tool’s number.
..........................................................
To ex it u ser to ols, t urn the m ain
4
switch off and then back on
again.
48
Page 55

USER TOO LS
User Tool Menu
1. Image density level selection
If the image density is too dark or too light soon after installing a new
imaging unit, adjust it using this function.
When you want to adjust the image density after using the imaging unit for a
❐
long time, adjust it using "10. Auto and manual im age density level selection".
To change the setting, ☛ see page 47.
❐
Default: Normal (Setting: 0)
Setting
Definition
.....................................................................................................................
2. Adjusting the image density of the right manual
image density indicator
The density represented by the
right indicator can be made
darker.
❐
For how to change settings, ☛ see
page 47.
0123456
Normal Light Dark Lighter Darker Lightest Darkest
Default: Normal (Setting: 0)
Setting
Definition
012
Normal Dark Darker
49
Page 56

USER TOO LS
3. Adjust ing image d ensity of the left manual image de nsit y ind icat or
The density represented by the
left indicator can be made
lighter.
❐
For how to change settings, ☛ see
page 47.
Default: Normal (Setting: 0)
Setting
Definition
012
Norm al Light Lighter
.....................................................................................................................
4. Toner d e nsit y adjust ment
If the image density is too dark or too light, adjust it using "1. Image
density level selection (☛ See page 49.)" or "10. Auto and manual image
density level selection (☛ See page 54.)". If you still cannot get it right,
adjust the toner density using this function.
For how to change settings, ☛ see page 47.
❐
Default: Normal (Setting: 0)
Setting
Definition
012
Normal Dark Light
.....................................................................................................................
5. Auto-off
To conserve energy, this copier autom atically turns off 10 minutes after the
last copying job has been completed. This time can be set using this
function.
For how to change settings, ☛ see page 47.
❐
Default: 10 minutes (Setting: 1)
Setting
Definition
50
012345
5 m in u tes
10
minutes15minutes20minutes25minutes30minutes
Page 57

USER TOO LS
6. Auto reset time
As a default setting, the copier will reset itself 1 minute after the final copy
is mad e o r aft er t h e last t ime any key is p r essed . If a 1 mi n u te r eset t ime i s
not appropriate, you can change this time.
For how to change settings, ☛ see p ag e 47.
❐
Default: 1 minute (Setting: 0)
Setting
Definition
01 2
1 minute 3 minutes Auto reset is turned off.
.....................................................................................................................
7. Count er up / d own
The copy counter can be set to show the number of copies made (count
up), or the number of copies remaining to be made (count down).
For how to change settings, ☛ see p ag e 47.
❐
Default: Up (Setting: 0)
Setting
Definition
01
Up Down
.....................................................................................................................
8. Check t he tot al cop y counte r
You can check the total number of copies made.
How to check th e tot al copy counter
Access user tool number "8".
1
You will find the first 2 digits of
the total copy quantity are displayed on the copy counter.
❐
Example:
Wh en 12345 cop ies ar e mad e, "01" i s
displayed on the copy counter.
❐
At that time, the center image density
indicator is lit.
51
Page 58

Darker
Darker
USER TOO LS
Press the
2
find the second 2 digits of the
Darker
key. You will
total copy quantity are displayed
on the copy counter.
❐
Example:
Wh en 1234 5 cop ies ar e m ade, " 23" i s
displayed on the copy counter.
❐
At that time, the next image density
indicator to the right is lit.
..........................................................
Press th e
3
will find the last 2 digits of the
Darker
total copy quantity are displayed
on the copy counter.
❐
Example:
Wh en 1234 5 cop ies ar e m ade, " 45" i s
displayed on the copy counter.
❐
At that time, the right image density
indicator is lit.
❐
Wh en y ou wan t t o see t h e f i rst 2 d i git s ag ain , pr ess t he
When yo u wan t to see the second 2
di gi t s, p ress t h e
❐
To access ano ther u ser to ol nu mb er,
pr ess t h e
❐
To exit the user tools, turn off and on
the main switch.
Lighter
key ag ain . You
key o nc e.
Darker
Darker
key twice.
key.
Quantity
Quantity
52
Page 59

Darker
USER TOO LS
9. Check t he ima g ing unit counter
When "iu" is displayed on the copy counter, you have to change the
imaging unit. When the imaging unit counter is approximately 30,000, t he
life of the unit is finished. You can check how many copies you have made
using this imaging unit using this function.
How to ch eck t he imaging unit count er
Access user tool number "9".
1
You will find the first 2 digits of
the total imaging unit counter
are displayed on the copy
counter.
❐
Example:
When the counter is 12345 ,"01" is
displayed on the copy counter.
❐
At that time, the center image density
indicator is lit.
..........................................................
Press the
2
find the second 2 digits of the
total imaging unit counter are
displayed on the copy counter.
❐
Example:
When the counter is 12345, "23" is
displayed on the copy counter.
❐
At that time, the next image density
indicator to the right is lit.
Darker
key. You will
Quantity
53
Page 60

Darker
USER TOO LS
Press th e
3
will find the last 2 digits of the
Darker
key ag ain . You
Quantity
total copy quantity are displayed
on the copy counter.
❐
Example:
When the counter is 12345, "45" is
displayed on the copy counter.
❐
At that time, the right image density
indicator is lit.
❐
Wh en y ou wan t t o see t h e f i rst 2 d i git s ag ain , pr ess t he
When yo u wan t to see the second 2
di gi t s, p ress t h e
❐
To access ano ther u ser to ol nu mb er,
pr ess t h e
❐
To exit the user tools, turn off and on
the main switch.
Lighter
Darker
key.
Darker
key twice.
key o nc e.
10. Auto and manual image d ensity le ve l selection
If the image density is too dark or too light after using the imaging unit for
a long time, adjust it using this function.
When you want to adjust the image density after installing a new imaging unit,
❐
adjust it using "1. Image density level selection".
For how to change settings, ☛ see page 47.
❐
Default: Normal (Setting: 0)
Setting01234
Definition Norm al Light Dark Lighter Darker
54
Page 61

MAINTAINING YOUR
COPIER
DO’S AND DON’ TS
U SE AND ST ORAG E
OF SUPPLIES
M AINTAIN IN G YOU R COPIER ............................................................56
Exp o sure Glass ...........................................................................56
Platen Cover ...............................................................................56
Corona Wires (Transfer corona wire and charge corona wire)
.....................................................................................................57
Guid e Plates ...............................................................................60
DO’S AND DON ’TS..............................................................................61
Cop ier ...........................................................................................61
USE AND STORAGE OF SUPPLIES ..................................................62
Cop y Paper .................................................................................62
Paper Sto r ag e .............................................................................63
Toner St o r age .............................................................................63
55
Page 62

MAINTAINING YOUR COPIER
MAINTAI NING YOUR C O PIER
MAINTAI NING YOUR C O PIER
To maintain high copy quality, clean the following parts and units
regularly.
Exposure Glass
Clean the exposure glass w ith
a damp cloth and wipe it with
a dry cloth.
If you do not clean the exposure
❐
glass, copies m ay be dirty.
.....................................................................................................................
Platen Cover
Clean the platen cover with a
damp cloth and wipe it w ith a
dry cloth.
If you do not clean the platen
❐
cover, copies may be dirty.
56
Page 63

MAINTAINING YOUR COPIER
Corona Wires (Transfer corona wire and charge
corona wire)
Clean the wires by following the
procedures below .
If you do not clean the wires,
❐
w hi te st reaks ap pear on cop ies o r
image density becomes uneven.
Caution:
$
Note: When you clean the corona wires, be careful not to touch the blue
material (O PC).
..........................................................
Open the top unit.
1
To stop the top unit from spring-
❐
ing up, keep one hand on it w hile
opening it.
When cleaning corona
wires, do not touch the
fusi ng secti on because it
could be ve ry hot.
..........................................................
Take out the small tool for
2
cleaning the corona w ires from
inside of the copier.
You will find the round seal on
❐
the back side of the cleaning pad.
57
Page 64

MAINTAINING YOUR COPIER
Insert the square end of the
3
tool between the wire (charge
corona wire) as shown opposite.
Note: Be sure to insert the cleaning
tool as shown in the illustration.
I f you set the tool in t he wrong
direction, the charge corona
wi r e may be damaged.
..........................................................
Move the tool right to left a
4
few times and take it o ut.
..........................................................
Remove the imaging unit and
5
put it on spread out paper.
The paper should be spread out
❐
on an even base.
..........................................................
Cover the blue material (OPC)
6
with paper not to expose it to
the light.
58
Page 65

Push t h e f or ked en d of t h e to o l
7
onto the other wire (transfer
cor on a w ir e) — t he r oun d seal
shou l d f ace upward s.
Note: Be sure to insert the cleaning
tool as shown in the illustration.
I f you set t he tool in t he wr ong
direction, the transfer corona
wi re may be damaged.
..........................................................
Move the tool right to left a
8
few times.
..........................................................
Take the tool out from the
9
transfer corona wire and put
the tool to the hole right next
to t he byp ass f eed en trance.
Keep this tool inside the machine.
❐
MAINTAINING YOUR COPIER
..........................................................
Remove paper on the im aging
A
unit and reset the imaging
unit.
The imaging unit is shaky if you
❐
push it — there is no problem, it
does not "lock" in place.
59
Page 66

MAINTAINING YOUR COPIER
Close the top unit with both
B
hands.
.....................................................................................................................
Guide Plates
Open the top unit. Then, re-
1
move the imaging unit and put
it on a p iece of spr ead o ut paper.
Cover the blue material (OPC)
❐
with paper not to expose it to the
light. ☛ See pag e 58.
Clean the transfer and trans-
2
po rt guid e plat es with a dam p
cloth and wipe them w ith a dry
cloth.
If you do not clean the guide
❐
plates, the leading and trailing
edges of the reverse side of copies become dirty.
Reset the imaging unit and
3
clo se th e to p u ni t. ☛ See pag e
59.
60
Page 67

DO’S AND DON’ TS
DO’S AND DON’ TS
Copier
Ge neral oper ation
Open the copy tray under the following conditions:
❐
DO’S AND DON’TS
When y o u make 20 o r mo r e 8
✒
When y o u make 10 o r mo r e 8
✒
When y o u u se curled p aper .
✒
Wh en u sin g OHP sheet s, set o ne sh eet at a ti me i nt o th e by -pass f eed en tr ance
❐
and open the copy tray. Remove copies delivered to the copy tray one by one.
When you use translucent paper under low temperature and low h umidi ty condi-
❐
tions, it may be m isfed. In this case, leave the paper for a while to make the paper
curl face down. Then, deliver the paper to the copy tray.
If there is a large solid image on the original, the Add Toner f indicator may be
❐
lit after copying although toner remains in the toner bottle. In this case, turn the
main switch off and then back on again.
Under the following conditions, you might get light copies.
❐
When you m ake 150 or more copies continuously.
✒
When you m ake one solid full image copy.
✒
When y o u make co pie s wh e n t he A d d To n er
✒
❐
Copies may be curled after coming
ou t o f th e cop ier. If necessary , un cur l
the paper within 5 mm, 0.2" as
shown before inserting it in the bypass feed entrance to make a twosided copy.
" x 11", A4 copies.
1/2
" x 14" copi es.
1/2
f
indicator blinks.
5 m m,
0.2"
Keep the used imaging unit horizontal. If you tilt the imaging unit, toner may be
❐
spilled out.
If you move the imaging unit without the toner bottle being set properly, toner
❐
may be spilled out.
Do not expose the imaging unit (especially blue material) to the light.
❐
Do not store the imaging unit under high temperature and high humidity.
❐
When you replace the imaging unit, also change the ozone filter.
❐
If you make copies continuously under high temperature, the copier stops copying
❐
for a while — there is no problem.
61
Page 68

DO’S AND DON’TS
❐
When you replace the imaging unit
and close the top unit, push the top
of the copier with both hands as
shown in the illustration.
While copying, do not turn off the m ain switch.
❐
While copying, do not open the top unit.
❐
While copying, do not lift the platen cover.
❐
While copying, do not unplug the power cord.
❐
Do not lay anything weighing more than 10 kg, 22 lb on the exposure glass.
❐
Do no t pl ace t oo l s or ot h er h ar d o b j e ct s on t h e ex p osu r e gl ass.
❐
Do not allow paper clips, staples, or other small metallic objects to fall inside the
❐
machine.
Always turn the copier off when you have finished copying for the day.
❐
When add ing t oner
Before setting the new toner bottle, shake it well, at least 5 or 6 times.
❐
Do not remove the toner bottle before the Add Toner f indicator is on — toner
❐
could spill out.
Do not store toner where it will be exposed to heat.
❐
Do not eat or swallow toner, and keep it out of reach of children.
❐
When r e moving misfed p a p e r
Do not leave any torn scraps within the copier.
❐
After clearing misfeeds, make sure that all units are returned to their original posi-
❐
tions and all covers are closed.
Do not touch the copy image when removing misfed paper — toner may stain
❐
your hands.
62
Page 69

USE AND ST O RAGE O F SUPPLIES
US E AND ST ORAG E O F SUPPLI ES
USE AND STO RAG E O F SUPPLIES
Copy Paper
Copy paper of the types or in the conditions listed below are not recommended
❐
for this copier.
Fol d ed, cu r led , creased , or d amaged p aper
✒
Torn paper
✒
Damp paper
✒
Perforated paper
✒
Paper with conductive or low electrical resistance such as carbon or sliver
✒
coated paper.
Wavy paper
✒
Thermal paper, art paper
✒
Thin paper that has low stiffness
✒
Adhesive labels should be fed from the bypass feed entrance one sheet at a time.
❐
Translucent paper should be fed from the bypass feed entrance.
❐
Translucent paper should be fed so that the paper grain is oriented with the paper
❐
path.
Do not touch copy paper if your fingers are wet or oily; finger prints may appear
❐
on the copy.
63
Page 70

USE AND ST O RAG E OF SUPPLIES
Paper Storage
Paper should always be stored properly. Improperly stored paper might
result in poor image reproduction, creased copies, and paper misfeeds.
Generally, avoid curling and absorption of moisture.
Avoid storing paper in humid areas. Under high tem perature and high humidity,
❐
or low temperature and low humidity conditions, store paper in a vinyl bag.
Do not store paper where it will be exposed to heat.
❐
St o r e o n a fl at su r f ac e.
❐
Use o l d er st o ck f i r st .
❐
Do not lay heavy objects on paper.
❐
Keep open reams of paper in the package, and store as you would unopened
❐
paper.
Toner St orage
Store horizontally in a cool, dark place.
❐
Never store toner where it will be exposed to heat.
❐
Do not lay heavy objects on toner bottles.
❐
64
Page 71

SPECIFICATIONS
SPECIFICATIONS ................................................................................66
M ai n Copi er ................................................................................66
65
Page 72

SPECIFI C AT I O NS
Main Cop ie r
SPECI FI C AT ION S
SPECI FI CAT IO N S
Configuration
Copy Process
Originals
Original Size
Copy Paper Size
Copy Paper
Weight
Reproduct ion Ra-
tios (Type 2 only)
Zoom (Type 2
only)
Copying Speed
Warm-up Tim e
First copy Time
Copy Number Input
M anual Image
Density Selection
Au to matic Reset
Paper Capacity
Desktop
Dry elect rostati c t r an s f er system
Sheet /Bo ok
Type 1: A5 ~ B4, 5
Type 2: A5 ~ B4, 5
A5 ~ 8
" x 14"
1/2
1/2
1/2
" x 8
" x 8
" ~ 8
1/2
1/2
" ~ 10" x 14"
1/2
" x 14"
Paper t r ay feed: 64 ∼ 90 g/m2, 17 ∼ 24 lb
2
Byp ass feed: 60 ∼ 105 g/m
Metric version Inch version
Enlargement
Full si ze 100% 100%
Reduction
, 16 ∼ 27 lb
141%
122%
93%
82%
71%
129%
93%
85%
78%
From 70% t o 141% i n 1% st ep s
12 cop ies/min ute
(A4 lengthwise or 8
" x 11" lengthwise)
1/2
Less than 30 seconds (at 23°C o r 73°F)
Less than 9 seconds
(A4 lengthwise or 8
" x 11" lengthwise)
1/2
Up /Dow n key , 1 t o 50
(count up or count down)
5 step s
1 minute standard setting; can also be set to 3 minutes
or no auto reset.
Paper t r ay: 250 sheet s
(A4, 8
100 sheet s (8
" x 11" , 80 g/m2, 20 lb )
1/2
" x 14" , 80 g /m2, 20 lb )
1/2
Byp ass feed entr ance: 1 sheet
66
Page 73

SPECIFI C ATIONS
Toner Replenishment
Copy Tray Capacity
Power S ource
Power Consump-
tion
Noise Emission:
Sound pressure level
(The measurem ents
are to be made accordi ng to ISO 7779
at the operator position.)
Noise Emission:
Sound power level
(The measurem ents
are made accor din g
to ISO 7779.)
Dimensions
Bot t le ex ch an g e (91g/bott le)
8
" x 11" , A 4
1/2
8
" x 14"
1/2
Copy tray in
th e closed
position
20 sheets 50 sheets
10 sheets 50 sheets
Copy tray in
the open
position
See the inside of the front cover of this m anual.
Maximum 0.9 kW
Copy cy cl e con d i ti o n 0.5 kW
Warm up conditio n 0.6 kW
Stand by conditio n 0.1 kW
Low power mode 0 kW
Less th an 55 dB
Stan d b y co n dit i o n less than 40 dB
Copy cy cl e conditi o n less than 63 d B
Width Depth * Height
Copier
400 m m
(15.8")
550 m m
(21.7")
220 m m
(8.7")
* Height: Excluding for the platen cover.
Weight
Copier w ith platen cover and copy tray:
Less th an 18 kg, 39.7 l b
❐
Specifications are subject to change without notice.
67
Page 74

RE-PACK ING YOUR
COPIER
1
Page 75

RE-PACKING YOUR COPIER
RE-PACKIN G YOUR CO PIER
RE-PACKIN G YOU R COPIER
When you have to move the copier by vehicle, put your copier in the
cardboard box this way.
Find the box your copier cam e
1
in.
Pull out the plug from the out-
2
let and remove paper from the
cassette.
Open t h e t op u ni t.
3
To stop the top unit from spring-
❐
ing up keep one hand on it while
opening it.
..........................................................
Rem ove the used imaging unit
4
with the used toner bottle
carefully and horizontally so
you don’t spill toner.
Make sure to remove the imaging
❐
unit to prevent spilling toner
while moving the copier.
Remove the im aging unit with the
❐
used toner bottle is set.
..........................................................
Insert the green bracket into
5
the inside of the top unit.
2
Page 76

Close the top unit with both
6
hands.
..........................................................
Put the imaging unit horizon-
7
tally into the black bag.
Do not shake the imaging unit to
❐
the right or left.
..........................................................
Set t he p ieces o f st yr ene f oam
8
to both sides of the imaging
unit. Then, put it in the cardboard box.
RE-PACKING YOUR COPIER
➊
➊
➋
..........................................................
Seal the imaging unit box
9
firmly using the gum tape.
3
Page 77

RE-PACKING YOUR COPIER
Open t h e p laten co ver .
A
..........................................................
Insert the two metal rods into
B
th e hol es on b oth sid es of the
expo su re g l ass.
Make sure to insert the metal
❐
ro ds to pr event a m achin e fail ure
while moving the copier.
..........................................................
Close the pl aten cov er.
C
..........................................................
Remove the paper cassette
D
and lay t h e end p l at e fl at i n th e
indentation in the bottom of
the casset t e.
4
Page 78

Put the cassette in the clear
E
wrapper.
..........................................................
Put t h e co pi er i n t he clear bag.
F
..........................................................
Put t h e co pi er i n t he car d b oar d
G
box.
RE-PACKING YOUR COPIER
..........................................................
Firmly p u t t h e st y r en e fo am on
H
th e cop i er .
5
Page 79

RE-PACKING YOUR COPIER
Set the big support o n the cop-
I
ier. Then put the small support, imaging unit box and paper cassette on the big support.
..........................................................
Seal the box firmly using the
J
gum tape.
6
Page 80

INDEX
INDEX
INDEX
A
Access To Cop ier, v
Access User To ol s, 47
ADD TONER, 31 - 34
Add Toner indicator, 4 - 5
Auto and manual image
density level selection, 54
Aut o i mage den sit y , 18
Aut o Imag e Den si ty i n d i cato r ,
4 - 5
Auto reset time, 51
Auto Start, 21
Auto-off, 9, 50
B
BASIC OPERATION S, 16 - 21
Byp ass Feed Cop y in g , 19
Byp ass Feed Ent rance, 19
C
Caution, ii
Chang e User Tools, 48
CHAN GING THE IMA GIMG
UNIT, 35 - 39
Changing Th e Ozone Filter , 39
CH ANGING TH E PAPER S I Z E ,
44 - 46
Charge co r on a wir e, 57
Charg e wir es main tenance, 57
Check Pap er Path i nd i cat o r,
4 - 5
Check the imaging unit counter,
53
Check th e total co p y count er , 51
Clear/St op key, 4 - 5
CLEARING MISFEEDS, 40 - 42
CO PIER EXTERIO R, 2
CO PIER I NTE RIO R, 3
Copy Counter, 4 - 5
copy paper, 62
COPYING
Full Size Copying, 16
Counter up/dow n, 51
D
DAILY MAIN TENA N CE, 56 - 60
Ex p o sur e Gl ass, 56
Pl aten Cov er, 56
DO’ S AN D DON’ TS, 61
E
Entering Cop y Settings During The
Warm-up, 21
Environm ent, iii
EX PO SURE GLAS S , 2
Exposure Gl ass Mai n ten an ce, 56
F
Full Size Copying, 16
G
Gui de p l at es main t en an ce, 60
I
Imag e Den si t y Adj u st ment , 18
Image density level selection, 49
IMA GIN G UN IT, 35 - 39
INSTALLA TION REQUIREMEN TS,
iii
Power Connection, v
L
Left i mage d en sit y i ndicat or ad justment, 50
Letter h ead co p yi n g, 11
Ligh t er an d Darker key s, 4 - 5
69
Page 81

INDEX
M
MAINT AIN ING YOU R COPIER,
56 - 60
Man u al i mage d en si ty , 18
Manual Image Density indicator,
4
Man u al Imag e Den sit y
indicators, 5
MISFEEDS, 40 - 42
O
OHP sheet co p yi n g , 11
One-to-One Copying, 16
OP ERATI ON PAN EL, 4 - 6
Operat i on Panel f or t yp e 1, 4 - 6
ORIGINA L SETTING AN D COPY
DIRECTI ONS, 1 1
OZONE FILTER, 39
P
Paper St o r age, 63
Platen co ver mai n ten an ce, 56
Power Connection, v
Preset R/E, 22
Preset Ratios, 22
R
SPECIFICATIONS, 66 - 67
Mai n Copier, 66
Stand-by Condition, 8
Start key , 4 - 5
ST ARTI NG T HE COPI ER, 8 - 9
SUPPLIES NOTES, 62 - 64
T
Three Digit indicator, 5
Toner density adjustment, 50
Toner St or ag e, 63
Transfer co r o n a wir e, 57
Troubleshooting, 26 - 27
Two-sided copying, 11
Typ e 1 Op erat i o n Panel , 4
Typ e 2 Op erat i o n Panel , 5
U
Up (+) an d Do wn (-) key s, 4 - 5
USE AND STORAGE OF
SUPPLIES, 62 - 64
USER TOOLS, 47 - 54
User To o ls Men u, 49
W
WARNING, i
WH ER E T O PUT Y O UR COP I ER, iii
Reduce/Enlarge key, 5
REDU CED AN D ENLARGED
COPYING, 22 - 24
Reducing And Enlarging In 1%
Step s, 23
Reproduction Ratio indicators, 5
Right image density indicator
adju st ment, 49
S
SAFETY INFORMATION, i
SETTING ORIGIN A LS ON THE EXPOSURE GLA SS, 10
70
Z
Zoo m, 23
Zoom Down key, 5
Zoom Up key, 5
 Loading...