

PRINTER
SCANNER
PC-FAX REFERENCE
Operator’s Manual

Important
Parts of this manual are subject to change without prior notice.
In no event will the company be liable for direct, indirect, special, incidental, or
consequential damages as a result of handling or operating the machine.
Trademarks
Microsoft, Windows, and MS-DOS are registered trademarks of Microsoft
Corporation.
PCL and LaserJet are registered trademarks of Hewlett-Packard Company.
WinStyler is a trademark of Destiny Technology Corp.
General Notice:
Other product names used herein are for identification purpose only and may be
trademarks of their respective companies. We disclaim any and all rights in those
marks.
Copyright
© Copyright, 1992-1996 Destiny T echnology Corp.
Portions © copyright 1996 Ricoh Co., Ltd.
All rights reserved.
No part of this publication may be reproduced, stored in a retrieval system, or
transmitted in any form or by any means, electronic, mechanical, photocopying,
recording, or otherwise, without the prior written permission.

Table of Contents
HOW TO USE THIS MANUAL ........................................1
INTRODUCTION ...........................................................2
Features ................................................................................2
(1)PC-PRINTER........................................................................................2
(2)PC-SCANNER......................................................................................2
(3)PC-FAX.................................................................................................3
(4)Copy Function ......................................................................................3
(5)HELP-PRINT Function .........................................................................3
Operation Panel....................................................................4
Part Names............................................................................5
SETTING UP ..................................................................6
Cable connections ...............................................................6
Driver Software WinStyler T175 Setup...............................7
PC-PRINTING ...............................................................8
Introduction ..........................................................................8
Paper sizes that can be printed ................................................................8
Advanced Features...................................................................................8
Operations ............................................................................9
Basic Operation ........................................................................................9
Printing from a Windows Application.......................................................11
Printing from a DOS Application within Windows....................................11
Printing PCL and ASCII Files From the MS-DOS ...................................11
Printing ASCII Text Files..........................................................................12
Advanced Operation ...............................................................................12
Selecting the Printing Mode.............. .. ................ .. .. ..........13
Changing the printing mode....................................................................13
Changing the printing mode from an application ....................................13
Changing the printing mode by using the Printer Folder (Windows 95)..14
Changing the printing mode by using the Control Panel in Windows
(Windows 3.1).........................................................................................14
i

WinStyler T175 GDI Mode (Windows 95).........................15
GDI Property Screen...............................................................................15
Use Print Manager..................................................................................18
How to make *.GDI file and setup Overlay feature .................................19
Top page .................................................................................................21
Manual Duplexing ...................................................................................21
Print to File..............................................................................................23
Image......................................................................................................23
WinStyler T175 GDI Mode (Windows 3.1)........................25
GDI Setup Screen...................................................................................25
Use Print Manager..................................................................................27
Top page .................................................................................................27
Manual Duplexing ...................................................................................27
Overlay....................................................................................................28
How to make *.GDI file and setup Overlay feature .................................30
Print to File..............................................................................................31
Scale.......................................................................................................31
2 up / 4 up...............................................................................................32
Image......................................................................................................33
WinStyler T175 PCL Mode.................... .. .. .............. .. .. ......34
No cartridges required.............................................................................34
Saving downloaded fonts and macros in PCL mode ..............................34
WinStyler T175 PCL Control Panel .................................. 35
WinStyler T175 Status Dis pla y..................... .............. .. .. ..38
Edge Enhancement Technology .............................................................39
TonrSavR Mode ......................................................................................39
Power Saving Mode................................................................................40
Density....................................................................................................40
Connect Port...........................................................................................40
Show Me.................................................................................................40
WinStyler T175 Print Manager.......................................... 42
File ..........................................................................................................42
Options of Print Manager.................................................. 44
Fonts in GDI Mode............... .. .. .... .. .. .... .. .. .... .. .. .... .. .. .... .. .. ..47
Fonts in PCL Mode.................................... .. ................ .. .. ..49
PC-SCANNING .........................................................50
Introduction.................... .. .. .. ................ .. .. ................ .. ........50
Operation............................................................................ 51
ii

Using the TW AIN Driver.....................................................53
Introduction .............................................................................................53
Setting Parameters (User Interface) ......................................................53
PC-FAXING................................................................55
Introduction ........................................................................55
Setting up the ComRedirector.................................................................55
Operation ............................................................................55
Sending a Fax.........................................................................................55
Receiving a Fax ......................................................................................57
Using the ComRedirector..................................................58
Introduction .............................................................................................58
Setting Port (Enable the ComRedirector) in Windows 3.1......................59
Disable the ComRedirector.....................................................................59
COPYING ..................................................................60
Introduction ........................................................................60
Paper sizes that can be copied...............................................................60
Operation ............................................................................60
HELP-PRINTING..........................................................62
Introduction ........................................................................62
Operation ............................................................................62
MAINTENANCE..........................................................63
TROUBLESHOOTING ..................................................64
PC-PRINTING......................................................................64
PC- P r int i n g i s not done even t h o ugh the Print c o m m and was e x e cuted.......64
PC-Printing was suspended....................................................................65
The print density is not as expected. ......................................................65
Blank paper was output. .........................................................................65
Other.......................................................................................................65
PC-SCANNING....................................................................66
PC scanning does not function. ..............................................................66
PC Scanning was suspended.................................................................66
The scanning density is not as expected................................................67
iii

Other.......................................................................................................67
PC-FAXING .........................................................................67
PC-FAX cannot be sent...........................................................................67
When sending of a PC-FAX is started, there is no operation, but the "NO
CARRIER" message is displayed on the PC screen. .............................67
The machine won’t receive a PC-FAX....................................................68
Other.......................................................................................................68
INSTALLING THE WINSTYLER T175.............................. 69
Introduction........................................................................69
System Requirement (Windows 95)............... .. .. ..............69
System Requirement (Windows 3.1)............ .. ................ ..71
Restrictions (Both Windows 95 and 3.1):................................................72
Setting Up (Windows 95)...................................................73
Other Setup Methods..............................................................................76
Setting Up (Windows 3.1)..................................................78
WinStyler T175 Test program ........................................... 82
Removing the WinStyler software ........... .. .. .. .. .. .. ............84
Optimizing Printer Per formance ............. ............ ............ . 85
INDEX.........................................................................87
iv

HOW TO USE THIS MANUAL
HOW TO USE THIS MANUAL
The Operator’s Manual for this machine is composed from the following 2
manuals.
(1) Operator’s Manual: FACSIMILE REFERENCE
(2) Operator’s Manual: PRINTER REFERENCE (This manual)
Firstly, read the (1) Operator’s Manual: FACSIMILE REFERENCE. It
contains important information for your safety (page i to iv).
This manual (2) explains the operation of this machine when it is connected to
your computer as a PC-Printer, PC-Scanner and PC-FAX.
When using this machine connecting your computer, please refer to this
manual for the operation and refer to another manual for the other information
such as MAINTENANCING or TROUBLESHOOTING.
When using th is machine a s a standalone FAX machine, please refer to the
separate (1) Operator’s Manual: FACSIMILE REFERENCE.
1
INTRODUCTION Features
INTRODUCTION
Features
This machine can not only be used separately as a FAX machine, but can also
be connected to a personal computer which runs Windows (Note) and, by
installing the driver software packed with the machine, can be used in the
following ways.
Note:
This machine can also be connected to a Macintosh by connection to the
optional RS422 Interface Port. For details, see the separate Operator’s Manual
included herein.
(1)PC-PRINTER
It operates as a 300 dpi (equivalent to 600 dpi) resolution laser printer wi th a
print speed of 6 PPM (when printing on A4/LT size sheets).
(2)PC-SCANNER
Using s pecif ied (Note) scanner soft ware, this mac hine becomes a TWAIN
driver compatible scanner.
Note: Available Fax softwares are specified later on.
2

Features INTRODUCTION
(3)PC-FAX
When BitWare for Wi ndows (inc luded) is installed, this machine mak es it
possible to send and receive FAX messages through your personal computer
using specified (Note) fax software.
Note: Available Fax softwares are specified later on.
As a stand alone unit, this machine also has the following functions.
(4)Copy Function
Up to 99 copies can be made, including reduction and enlargement copies.
(5)HELP-PRINT Function
A Quick Reference Guide, which explains the general operating procedures ,
can be printed out.
3
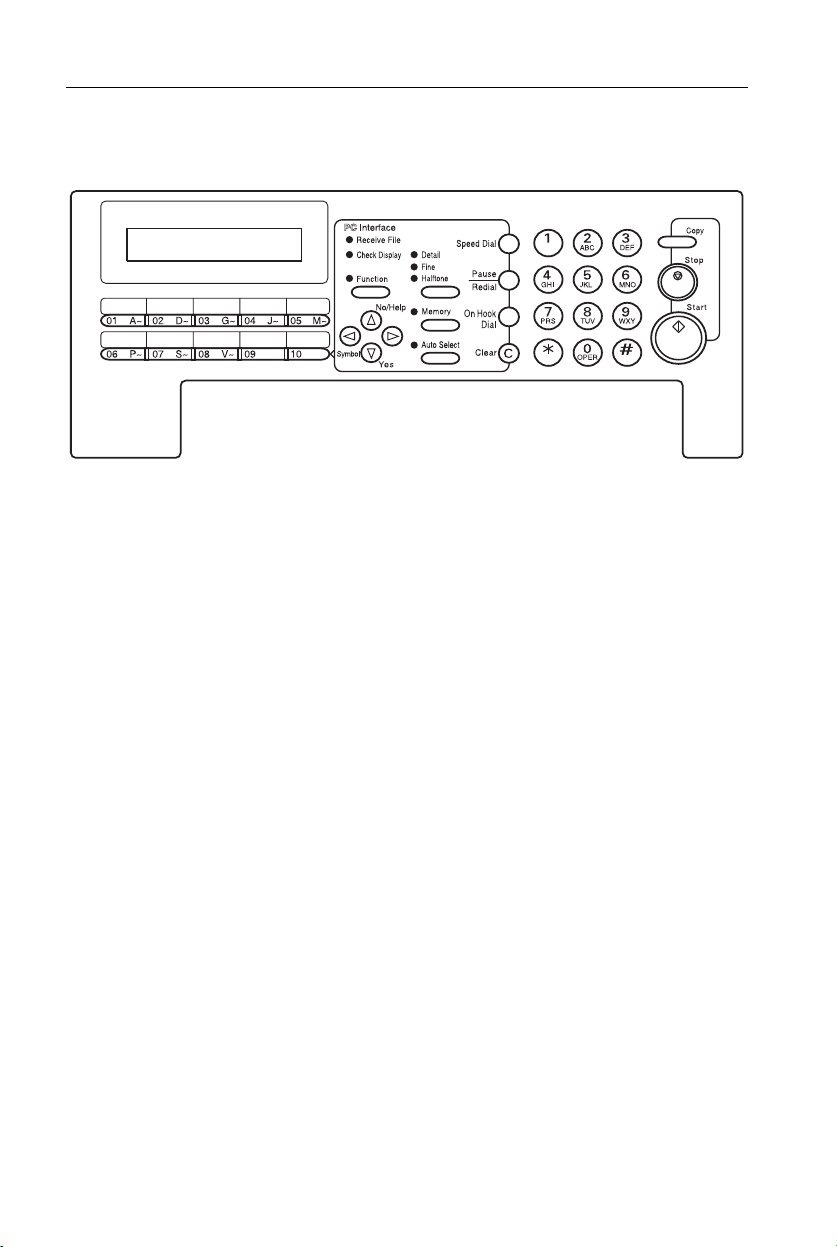
INTRODUCTION Operation Panel
Operation Panel
1- The
2- The
3- Pres s this key to use Auto Receive Mode.
4- The contrast/Halftone is indicated by these
5- When the
6- There are ten
7- The Liquid Crystal Display guides you
8- Use the arrow buttons to navigate through
9- Pr ess the
Receive Files
fax message was stored in memory.
Check Display
you to read the display.
The indicator lights when you are in this
mode.
three indicators and can be changed by the
contrast/Halftone button.
memory transmissi on is in effect, if it is off,
immediate transmission is in effect. Switch
between the two with the Memory button.
store individual numbers or groups. Use
the keys to enter ch aracters. Use Quick
Dial 09 as a special key. Use Quick Dial 10
as a Group key .
through tasks and informs you of the state of
the machine.Messages appear here. The
LCD consists of two 20-character lines.
functions, to accept or reject settings, or to
set function options.
digit code to access functions 11 to 51. (For
functions 61 to 94, enter 6, the access code
and the function number.)
indicator lights when a
indicator lights to tell
indicator is on, then
Memory
Quick Dial
Function
key and enter a two
keys. Use them to
10- Press the
digit code (between 00 & 49) to dial or store
individual numbers.
11- The
when you are dialing or storing a fax
number. Or, press the key to redial the last
number diale d. (The redial feature doesn’t
work once you’ve started dialing a new
number.)
12- Press the
call from the keypad without havi ng to lift
the phone or ha ndset off the ho ok (phone
or handset option needed).
13- Press th e
charac ter or dig it entered, or use the left
and right arrow keys to move the cursor
and then press Clear to erase whatever is
at the cursor.
14- P ress the
or a document scanning or to stop a long
copy run. Th e machine will finish printing
out the sheet being printed and then stop.
15- Press the
16- Use the numeric keypad (sometimes called
the 10 keys) to dial fax numbers, to enter
the numbers of copies, etc.
17- The
machine is connected to your PC.
18- Press
Reference Guide.
Speed Dial
Pause/Redial
On Hook Dial
Clear
Stop
Start
PC Interface
No/Help
key and enter a two
key inserts a pause
key to dial a phone
key to erase the last
key to stop a transmission
key to start all tasks.
indicator lights when the
key to prin t ou t a Q uick
For details ab out the FACSIMILE function, refer to the separate FACSIMILE
REFERENCE manual.
4
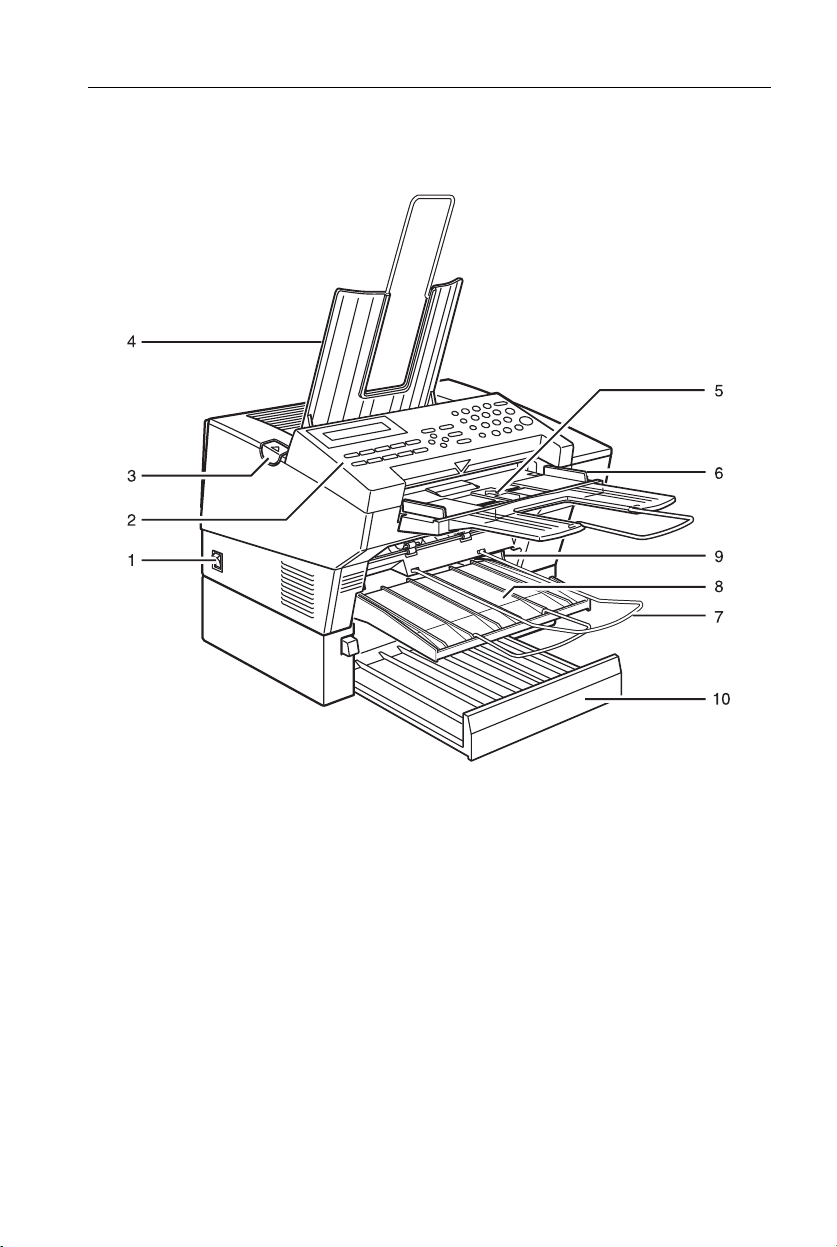
Part Names INTRODUCTION
Part Names
1- The
2- 10 Quick Dial keys store telephone
3- The cover release button.
4- Incoming faxes and copies are sent to the
5- The
6- Match the document guide to the size of
main switch
and off.
numbers.
copy tray
automatic document feeder (ADF)
holds up to 30 sheets which are fed one at
a time. Place your original documents here.
your original documents.
turns your machine on
.
7- Sc anned do cumen ts are stacked on the
Document Tray
8- The
main paper tray
9- When loading paper, match the
10- The optional paper feed unit holds more
to the paper size.
guide
paper.
This unit is displayed as "
PC driver screen.
.
holds copy paper.
2nd Tray
paper
" on the
5
SETTING UP Cable connections
SETTING UP
Cable connections
Note: A cable is not included with this machine for connection to your
personal computer. Please purchase a bi-directional parallel interface
cable with the following specifications.
Note: Do not connect or disconnect this cable while the power is ON.
Cable Specifications
IEEE 1284-B Bi-directional parallel
Cable Length: Less than 3 meters
Pin Assignments
NO. Signal I/O NO. Signal I/O
1
2
3
4
5
6
7
8
9
10
11
12
13
14
15
16
17
18
STROBE
DATA1
DATA2
DATA3
DATA4
DATA5
DATA6
DATA7
DATA8
ACLKNLG
BUSY
PE
SLCT
AUTOFD
NC
GND
GND
NC
I
I/O
I/O
I/O
I/O
I/O
I/O
I/O
I/O
O
O
O
O
I
19
20
21
22
23
24
25
26
27
28
29
30
31
32
33
34
35
36
GND
GND
GND
GND
GND
GND
GND
GND
GND
GND
GND
GND
INIT
FAULT
NC
NC
NC
SELECTIN
I
O
I
6
Driver Software WinStyler T175 Setup SETTING UP
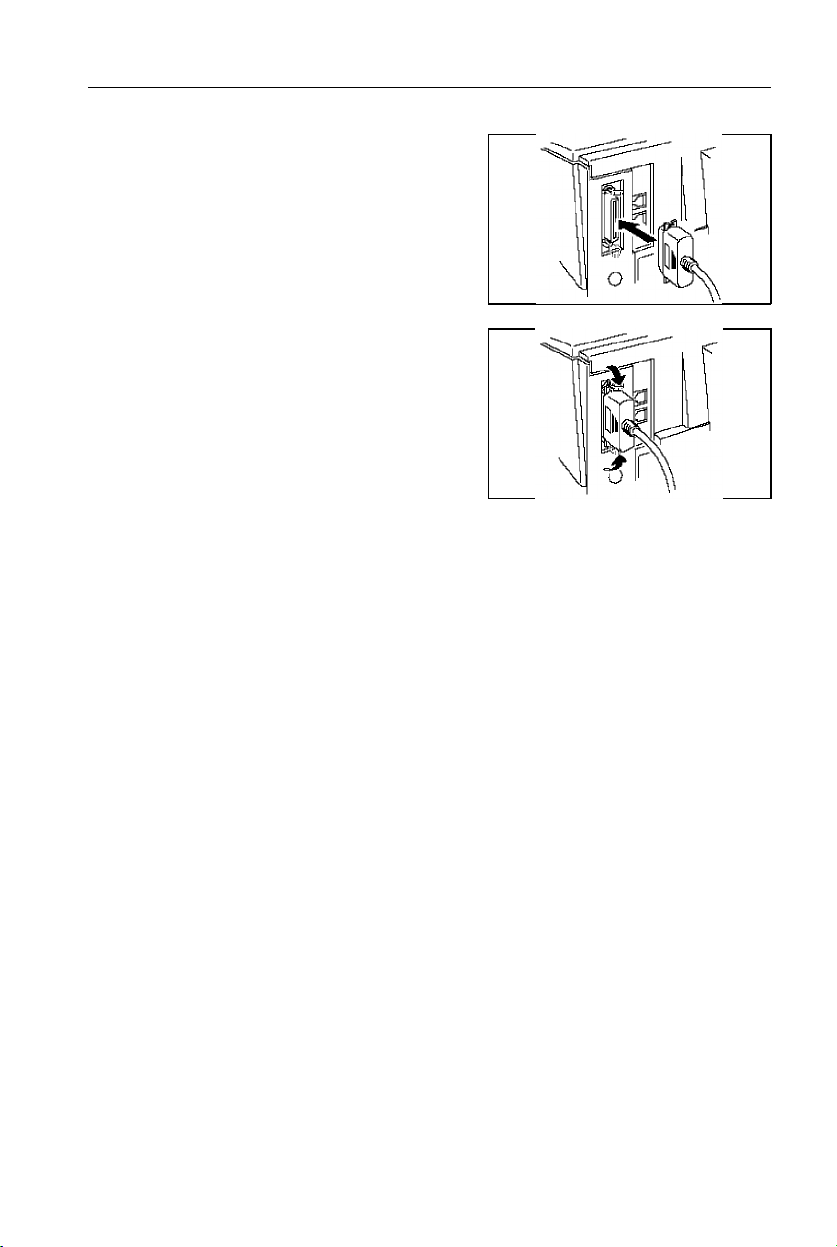
With the power OFF, connect one
1
end of the cable to the Parallel
connector on the rear of this machine. Confirm that the connector’s direction is correct, then
insert it securely in the female connector and fasten it with the wire
clips.
Connect the other end of the cable to the parallel connector on the rear of
2
your personal computer.
Driver Software WinStyler T175 Setup
When the hardware setup is completed, it is necessary to install the driver
software packed with the machine. See "Appendix A: Installing the Driver
Software T175" for the driver software installation procedure.
When the above setup has been completed and Windows is restarted, then the
Test Print screen is displayed. Execute Test Print and check to make sure there
have been no problems in Setup.
Also see "Appendix A: Installing the Driver Software T175" for the Test
Printing.
An explanation of the operation of the various functions of this machine is
given in the following pages.
7

PC-PRINTING Introduction
PC-PRINTING
Introduction
This machine functions as a laser printer with the following specifications.
❐ Windows 95, Windows 3.1 and DOS Box compatible printer.
❐ Windows GDI + PCL4.5 soft Emulation drivers are built-in.
❐ Print Resolution: 300 dpi (equivalent to 600 dpi)
❐ Print Speed: 6 PPM (In the case of A4 or LT size)
❐ First Print Time: 22 sec.
Paper sizes can be printed
❐ When paper is fed from the Main Paper Tray (Holds up to 150 sheets):
A4, LT, LG, F4, EXE, A5, U.S. No. 10 envelope (Note1),
European DL envelope(Note2), U.S. Transparency,
European A4 Transparency (Note3)
Note1/Note2: Envelopes
Envelope printing can only be done one at a time by manual
feeding. Also, the print quality cannot be guaranteed.
Note3:Transparency
OHP printing can only be done one at a time by manual feeding. Also,
the print quality cannot be guaranteed.
❐ When paper is fed from the Optional Paper Feed Unit (Holds up to 250 sheets):
A4, LT, LG
Advanced Features
In addition to basic printing, this machine also supports the following print
functions.
❐ 2 up/4 up Printing
❐ Overlay Printing
❐ Manual Duplex Printing
Note: Overlay Printing and Manual Duplex Printing cannot be performed at
the same time. For the details of the above functions, see "WinStyler
GDI Mode" explained later on.
8

Operations PC-PRINTING
Operations
Basic Operation
Place the paper on the tray, mak-
1
ing sure it is flush against the left
wall.
Slide the paper guide to the left so
2
it lightly touches the paper.
Paper sizes that can be printed are mentioned above. The Main Paper Tray holds
up to 150 sheets and the Optional Paper Feed Unit holds up to 250 sheets.
Note: Check beforehand whether the paper size setting matches with the size of
the actual paper. Jog the bundle of paper well before setting it in the paper
feed unit.
Select the Print Mode.
3
Select either the GDI mode or the PCL emulation mode.
GDI mode provides fast, WYSIWYG output by taking advantage of Windows’
native graphics and text features. PCL emulation mode provides compatibility
with the popular printer language used in the LaserJet IIP. Both Windows
applications and DOS applications running under Windows can use PCL
emulation mode for printing.
In the GDI mode, printing is possible from the WINDOWS application software
only. If the PCL mode is selected, printing of DOS applications which run in
WINDOWS can also be done.
For details, see "Selecting the Printing Mode", explained later on.
9

PC-PRINTING Operations
If necessary, set more detailed printing conditions in the selected mode.
4
The following settings are possible in the WinStyler GDI Mode (from Property
Screen).
Copies/Print Quality/Orientation/Paper Size/Paper Source/2up or 4up/Use
Print Manager (Top Page, Manual Duplex, Overlay)/Print to File/Scale/Image.
For details, see "WinStyler GDI Mode," explained later on.
The following settings are possible in the WinStyler PCL Mode (from PCL
Control Panel).
Form Feed/Reset/Paper Source/Paper Size/Orientation/Default
Font/Margins/Copies
For details, see "WinStyler PCL Mode / WinStyler PCL Control Panel,"
explained later on.
Execute Print instruction from the application.
5
10

Operations PC-PRINTING
Printing from a Windows Application
Once you have selected your printer mode (GDI or PCL), just print from your
Windows application as you would to any other printer.
Printing from a DOS Application within Windows
WinStyler is a Windows printer driver, designed for use with Windows. In
particular, WinStyler’s GDI mode is based on Windows and does not work with
MS-DOS. However, WinStyler will work in PCL mode if you create an MS-DOS
session from within Windows. Enter MS-DOS from Windows (click on the DOS
application icon, or click on the MS-DOS icon and run your application from the
command line).
Set up your application to print to the parallel port LPT1 (or LPT2 or LPT3 if you
have WinStyler set to print to one of these ports instead). Be sure your
application’s PCL driver is installed. Select a printer driver.
When ready to print, start your DOS application and print from your application
as you normally would to LPT1 (or whichever port WinStyler is connected to).
Printing PCL and ASCII Files from MS-DOS
If you have a file in PCL or ASCII (text) format, you can print it from the
MS-DOS command line within Windows. At the command line prompt, type
COPY/B <filename.ext> LPT1
where <filename.ext> is the name of your PCL or ASCII-formatted file. (If you
have configured WinStyler to print to a different parallel port, give its name
instead of LPT1.)
11

PC-PRINTING Operations
Printing ASCII Text Files
You can output plain ASCII text files to the WinStyler printer by following this
simple procedure.
Click on the "Notepad" application provided with your Windows 95
1
system.
Open the file you wish to print.
2
Print the file.
3
Exit without saving changes.
4
Advanced Operation
When using Print Manager, the following functions can be used.
❐ Manual Duplex Printing
❐ Reverse Printing
❐ Overlay Printing
For details, please see "WinStyler GDI Mode", described later.
12

Selecting the Printing Mode PC-PRINTING
Selecting the Printing Mode
You can select either of the two printing modes, GDI mode or PCL mode,
according to your requirements. If you cannot determine which printing mode
is best suited for your printing applications under Windows, we recommend
you always use GDI mode first.
GDI mode has the following features:
❐ GDI mode prints what you see on your screen.
❐ Faster printing as much as four to five times faster for some files
❐ Manual Duplexing
❐ Top Page
❐ Overlay
❐ Scale
❐ 2 up / 4 up
❐ Image
PCL mode is effective in the following cases:
❐ when you want to print a file created with MS-DOS application
❐ when you want to print a PCL format file.
GDI mode works very well with most software packages. However, some
applications can create output that is too complex for Windows to display
accurately on the screen - a file with a sophisticated embedded graphic image
might be an example. Here GDI might work fine for draft copies but falls short
of the quality needed for final output. For these situations WinStyler provides a
PCL mode.
Changing the printing mode
There are two methods to change the printing mode, GDI mode or PCL mode.
Changing the printing mode from an application
Most of the popular Windows applications allow you to change GDI mode /
PCL mode. For example, to do it on Microsoft Write, perform the following.
Select "Print Setup..." under File menu. Print Setup window will be
1
displayed.
13

PC-PRINTING Selecting the Printing Mode
Select the desired printing mode. To change to GDI mode, select
2
"WinStyler T175 GDI - WST175:". To change to PCL mode, select
"WinStyler T175 PCL - WST175:".
Changing the printing mode by using the "Printers" folder (Windows 95)
Click the START button on the task bar.
1
Select the menu item "Settings" and click.
2
Select the menu item "Printers" and click.
3
Select the desired printer device. To change to GDI mode, select " WinStyler
4
T175 GDI". To change to PCL mode, select "WinStyler T175 PCL".
Click the right mouse button.
5
Click on "Set As Default". The printing mode you selected in step 4
6
appears in the "Default Printer" field.
Changing the printing mode by using the Control Panel in Windows (Windows 3.1)
Restore the "Main" window in the Program Manager (if this window has
1
been minimized).
Double-click on the "Control Panel" icon in the "Main" window.
2
Double-click on the "Printers" icon in the "Control Panel" window.
3
Select the desired printing mode. To change to GDI mode, select
4
"WinStyler T175 GDI on T175GDI". To change to PCL mode, select
"WinStyler T175 PCL on T175PCL".
Click on "Set As Default Printer". The printing mode you selected in step 4
5
appears in the "Default Printer" field.
Click on Close.
6
14
WinStyler T175 GDI Mode (Windows 95) PC-PRINTING
WinStyler T175 GDI Mode (Windows 95)
GDI mode takes advantage of Windows’ own internal design to produce
documents faster than most conventional printers can. Other printers require
Windows to translate a document into a special printer language, such as PCL
on LaserJet printers. GDI mode reduces overhead by eliminating this
translation step before starting to print. This results in faster printing - as much
as four to five times faster for some files.
GDI mode has a speed advantage with documents that have multiple fonts. A
standard printer language such as PostScript must do extra work for each
different font in a document. In contrast, printing the same document in GDI
mode requires only a small amount of additional processing, which means
quick text printing no matter how many fonts are included.
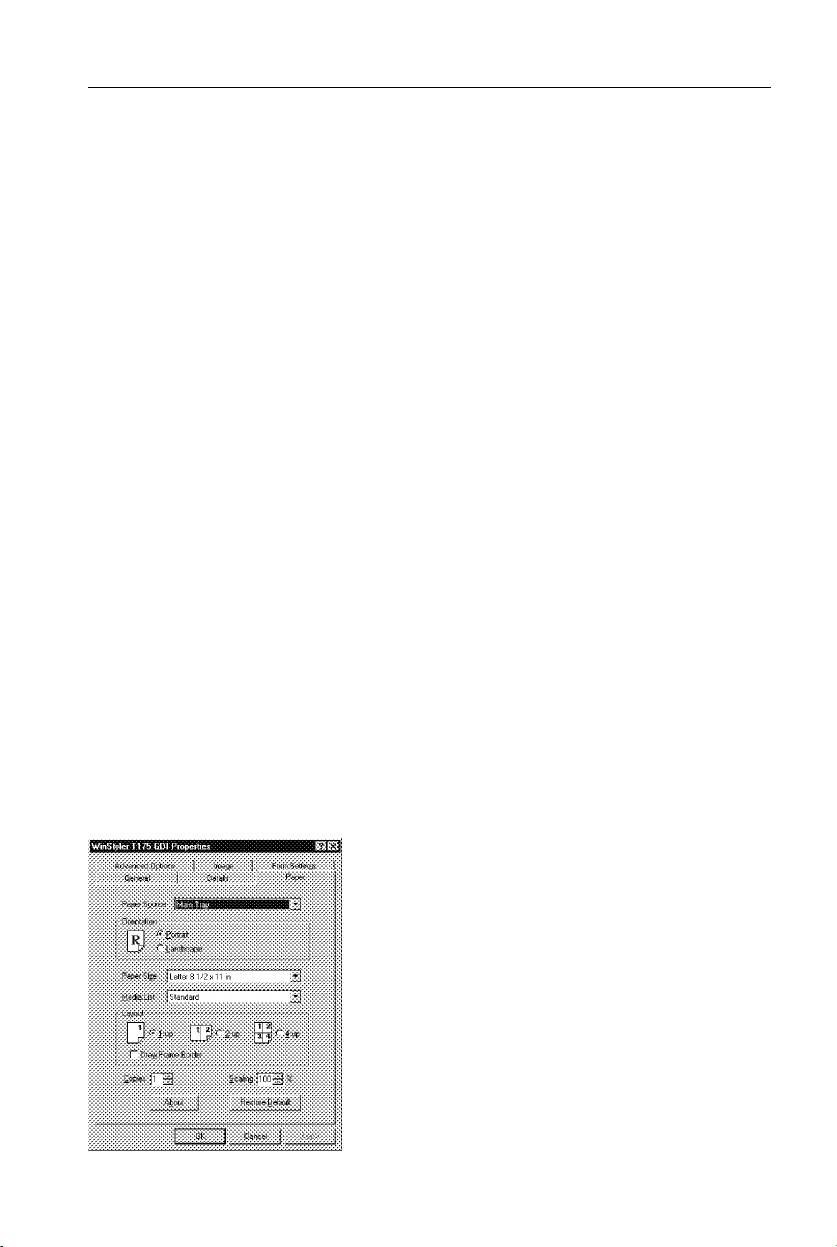
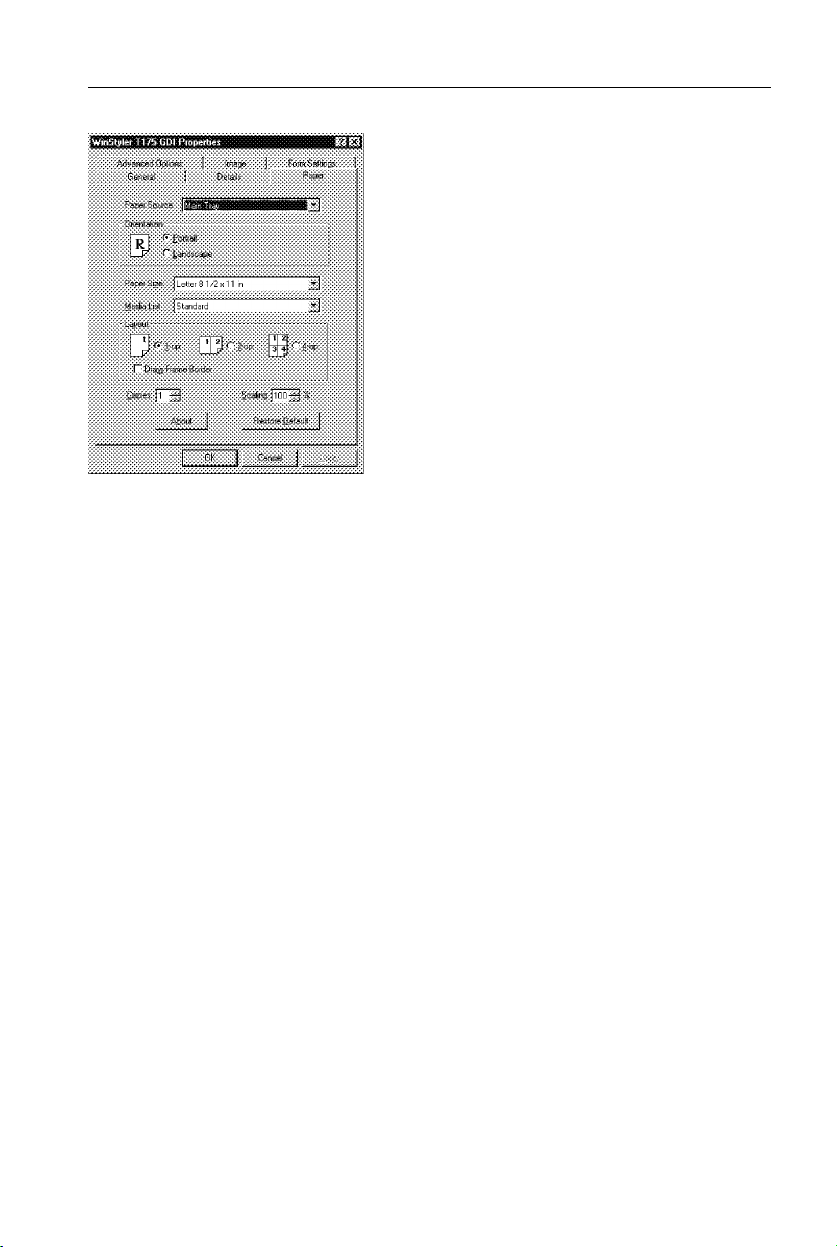
GDI Property Screen
You can access the setup screen from the Setup or Print Setup feature of many
applications. You can also reach it from the Printers screen of the Windows
Control Panel.
The setup screen lets you change the following settings:
❐ Copies
❐ Print Quality
❐ Orientation
❐ Paper Size
❐ Paper Media
❐ Paper Source
❐ Use Print Manager
(Top Page, Manual Duplexing, Overlay)
❐ Print to File
❐ Scale
❐ 2 up/4 up
❐ Image
15

PC-PRINTING WinStyler T175 GDI Mode (Windows 95)
Copies
Copies determines how many copies of your document will be printed by your
printer.
Scale
Use Scale to reduce or enlarge your output on the printed page. You can enter
a number from 10% to 500%, or click on the arrows to increase or reduce the
setting.
Note: Changing the Scale may sometimes break the edges of your output. If
it is occurs, reset the margin.
2 up / 4 up
WinStyler lets you print 2 or 4 pages on a single sheet of paper.
Select 2 up if you want WinStyler to print two pages on one sheet of paper. (In
portrait mode, the pages show up side by side as if in a book.) Select 4 up if
you want WinStyler to print four pages on one sheet of paper. Select 1 up if you
wish to print normally.
Draw Frame Border
If you click on Draw Frame Border, WinStyler will draw a box around each page
on the paper.
Note: 1 Selecting 2 up/4 up may sometimes break the edges of your output.
If it is occurs, reset the margin.
2 If you want to use the Overlay with 2 up/4 up, create the Overlay file
by 2 up/4 up in advance, then use it for the output of 2 up/4 up.
Orientation
For Orientation, choose Portrait or Landscape. If you choose Portrait, your
output appears with the papers shorter edges at top and bottom, and longer
edges at the side, like a business memo. If you choose Landscape, your output
appears with the longer edges at the top and bottom, and the shorter edges at
the sides. Landscape is sometimes used for graphs, spreadsheets, and
presentation slides.
16

WinStyler T175 GDI Mode (Windows 95) PC-PRINTING
Paper Size
Size lets you change to a different paper size. First, click on the size box, then
scroll through the selection. When you see the paper size you want, click on it.
regular paper
❐ Letter 8 1/2 x 11 inch ( 215.9 x 279.4 mm )
❐ A4 210 x 297 mm ( 8.27 x 11.7 inch )
❐ Executive 7 1/4 x 10 1/2 inch ( 184.1 x 266.7 mm )
❐ Legal 8 1/2 x 14 inch ( 215.9 x 355.6 mm )
❐ A5 148 x 210 mm ( 5.83 x 8.27 inch )
❐ F4 210 x 330 mm ( 8.27 x 12.99 inch )
envelopes
❐ U.S. No.10 Envelope 4 1/8 x 9 1/2 inch ( 104.9 x 241.3 mm )
❐ European DL Envelope 110 x 220 mm ( 4.33 x 8.66 inch )
Paper Media
❐ Standard Plain Paper
❐ Transparency U.S. Transparency
European A4 Transparency
Paper Source
Main Tray and 2nd Tray are the paper sources.
(Optional Paper Feed Unit is only for Letter, A4, and Legal.)
Overlay
The Overlay screen is one of the most powerful features of the WinStyler
software. The WinStyler feature lets you overlay an image over any document
printed in GDI mode.
You can use this feature to
❐ Incorporate your letterhead on the first page of a business letter.
❐ Print your logo at the bottom of each page of a set of presentation slides.
❐ Overlay the word Confidential on every page of an important document.
❐ Print a special cover page or trailer page for each print job.
17
PC-PRINTING WinStyler T175 GDI Mode (Windows 95)
First make sure that Use Print Manager is selected on the WinStyler GDI
window, then click on "Overlay".
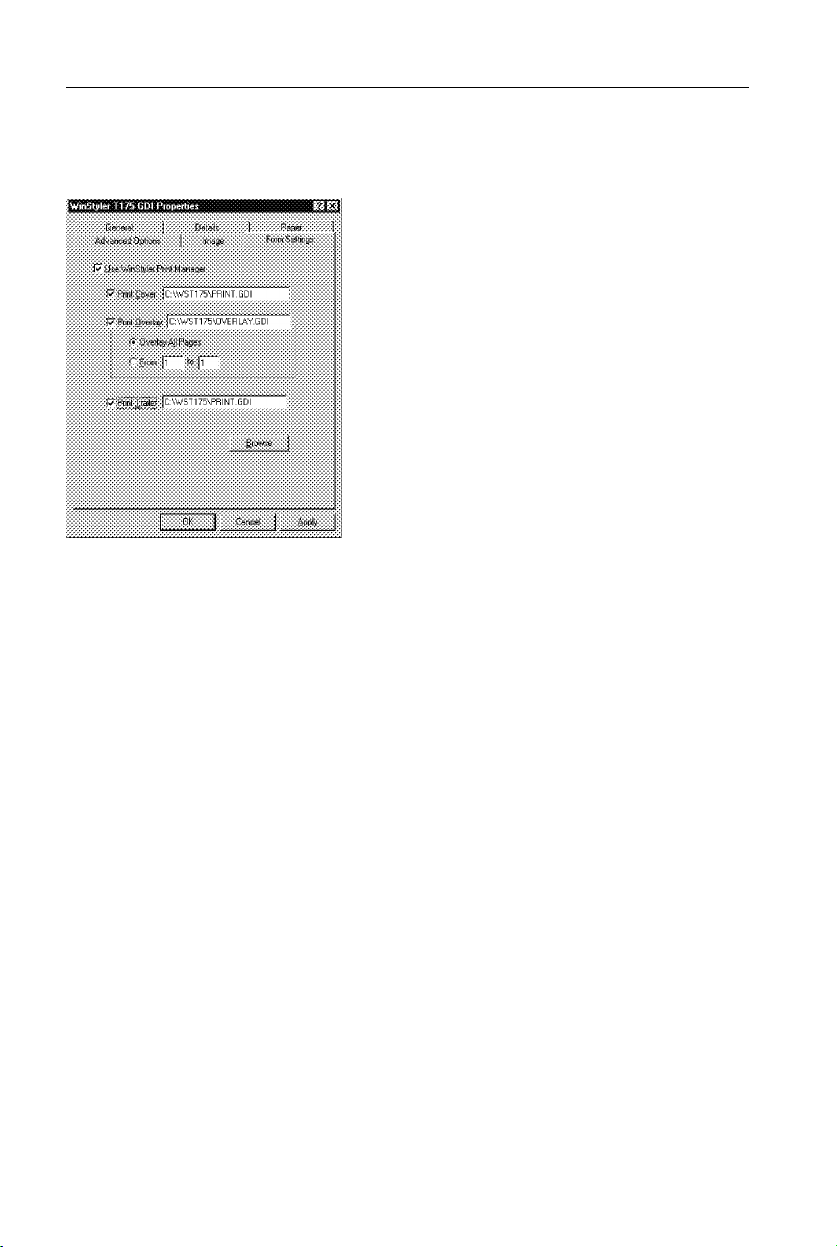
Use Print Manager
Putting an X in the box marked "Use Print Manager" turns the Print Manager
on when you use GDI mode. (The WinStyler T175 Print Manager always turns
on automatically when you print in PCL- mode.) The WinStyler T175 Print
Manager lets you use some additional features in GDI mode, including manual
duplexing, reverse printing, overlays, and the use of the WinStyler T175 Print
Manager control screen. Turn off the WinStyler T175 Print Manager to make
GDI mode even faster.
Print Cover Page
Select this feature to print your image on a separate page before the rest of
your document.
Print Overlay
This feature will overlay your image over pages of your document. (The effect
is similar to printing your image on a transparency, then putting the
transparency over your document.)
Select All to overlay the image on each page in the document.
Select From to overlay the image on a range of pages within the document.
Select None to disable the Overlay feature.
18

WinStyler T175 GDI Mode (Windows 95) PC-PRINTING
Print Trailer Page
Select this feature to print your image on a separate page after the rest of your
document.
OK
This will cause your changes to take effect and return you to the previous
screen.
Cancel
If you click Cancel, your changes will be ignored, and you will return to the
previous screen.
Browse
After selecting Print Cover Page, Print Trailer Page, or Print Overlay, clicking
browse will let you select the existing GDI file for form overlay function.
How to make *.GDI file and setup Overlay feature
Using an application such as Paintbrush, CorelDRAW or PageMaker,
1
create and save a graphic file that you want to overlay on pages of a
document.
Verify the graphic by printing it out, and minimize the application.
2
Select " WinStyler T175 GDI".
3
Click "Properties" in the Print Window. The WinStyler T175 GDI Properties
4
window will appear.
Select "Advanced Options" Tab.
5
Check in the "Print to File" check box.
Click "OK".
6
Click "OK".
7
Double click the same application which you minimized in step 2 and
8
perform the print operation. A screen asking you to enter the file name will
appear.
19

PC-PRINTING WinStyler T175 GDI Mode (Windows 95)
Enter a new file name or the same file name with the GDI extention (.GDI)
9
and click "OK" to store the file as a GDI file.
Minimize the application.
A
Perform steps 3 and 4 above.
B
Disable the "Print to File" feature by clicking off the check box at the left.
C
The X mark will be cleared from the check box.
Use the Form Setting Tab to check the "Use WinStyler Print Manager",
D
then select "Overlay", "Cover Page" and "Trailer Page" and enter the file
name.
Click "Browse". The Browse window will appear.
E
Double click on the directory in which you saved your graphic file (GDI
F
file), then select the file and click "OK". The selected file will appear in a
box in the Form Setting Tab.
Click "OK" in the WinStyler T175 GDI Properties Window.
G
Click "OK" in the Print window.
H
Print the desired document. The graphic will be overlaid on the pages of
I
your document.
Note: If you want to use the Overlay with 2 up/4 up, create the Overlay file by
2 up/4 up in advance, then use it for the output of 2 up/4 up.
20
WinStyler T175 GDI Mode (Windows 95) PC-PRINTING
Top page
WinStyler normally prints documents in page number order (i.e. page 1 first).
Clicking on the 3,2,1 button in the Top Page box will instruct WinStyler to print
your output in reverse order, i.e. last page first and first page last. This option
is only available if the WinStyler T175 Print Manager is enabled for GDI
printing.
Manual Duplexing
Manual Duplexing feature has the following selections.
Book prints out so that if you opened the document in the manner of a book,
pages 2 and 3 would face each other. Report prints the even-numbered pages
upside down, so that if you opened the document in the manner of a report
bound at the top, pages 2 and 3 would face the same way. Off disables Manual
Duplexing.
You can also put an X in the box marked Print Instruction. If you do this, then
the WinStyler printer will print out a sheet of paper giving you detailed
instructions every time you print in manual duplex mode.
Click Use Print Manager on the Advanced Tab in the WinStyler T175 GDI
1
Properties window.
Click (Check) on "Manual Duplexing" check box.
2
Select "Book" or "Report" style.
If you wish to get a printout of detailed instructions, select the box at the left of
Print Instruction.
21
PC-PRINTING WinStyler T175 GDI Mode (Windows 95)
Click on "OK".
3
Click "OK" on Print Window.
4
Start your Windows application.
5
Print the desired document.
6
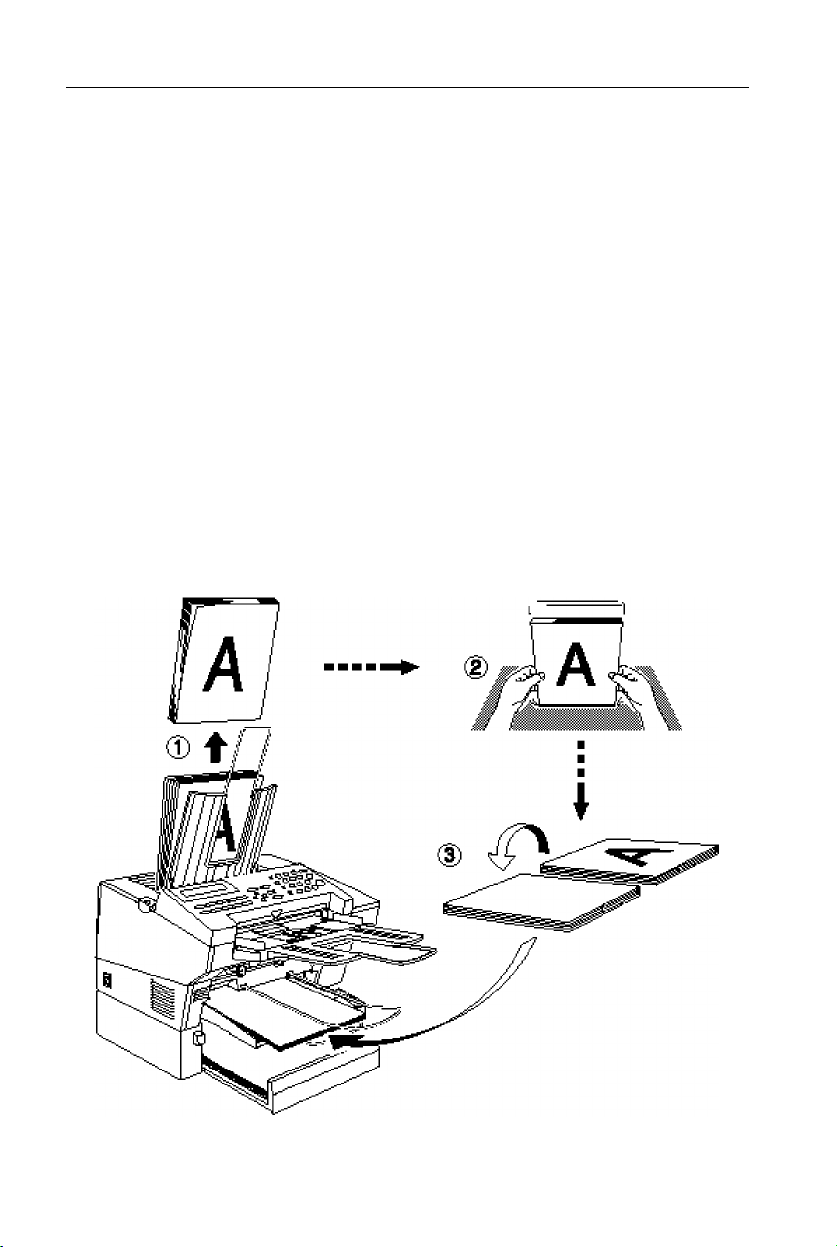
The printer will print every odd-numbered page, starting with page 1. If the
Print Instruction is effective, an instruction sheet will be printed before any
pages are printed. When all odd pages are printed, WinStyler T175 Status
Display or Show Me will instruct you how to reinsert the paper to print on the
other side of the pages.
Pick up the printed sheets 1, straighten them 2, and then reinsert them
7
into the printer 3.
22
WinStyler T175 GDI Mode (Windows 95) PC-PRINTING
Click on Resume on the WinStyler T175 Status Display window to resume
8
printing.
The printer will print every even-numbered page on the backs of the pages
already printed.
Print to File
If you select Print to File, your output will go to a file instead of the printer. This
is useful if you want to print from a file later, or print the identical file multiple
times over several intervals. You can also use Print to File to create a form,
discussed before in this section. The print file is stored in GDI format. See the
WinStyler Print Manager for information on how to print from a file using the
Add button.
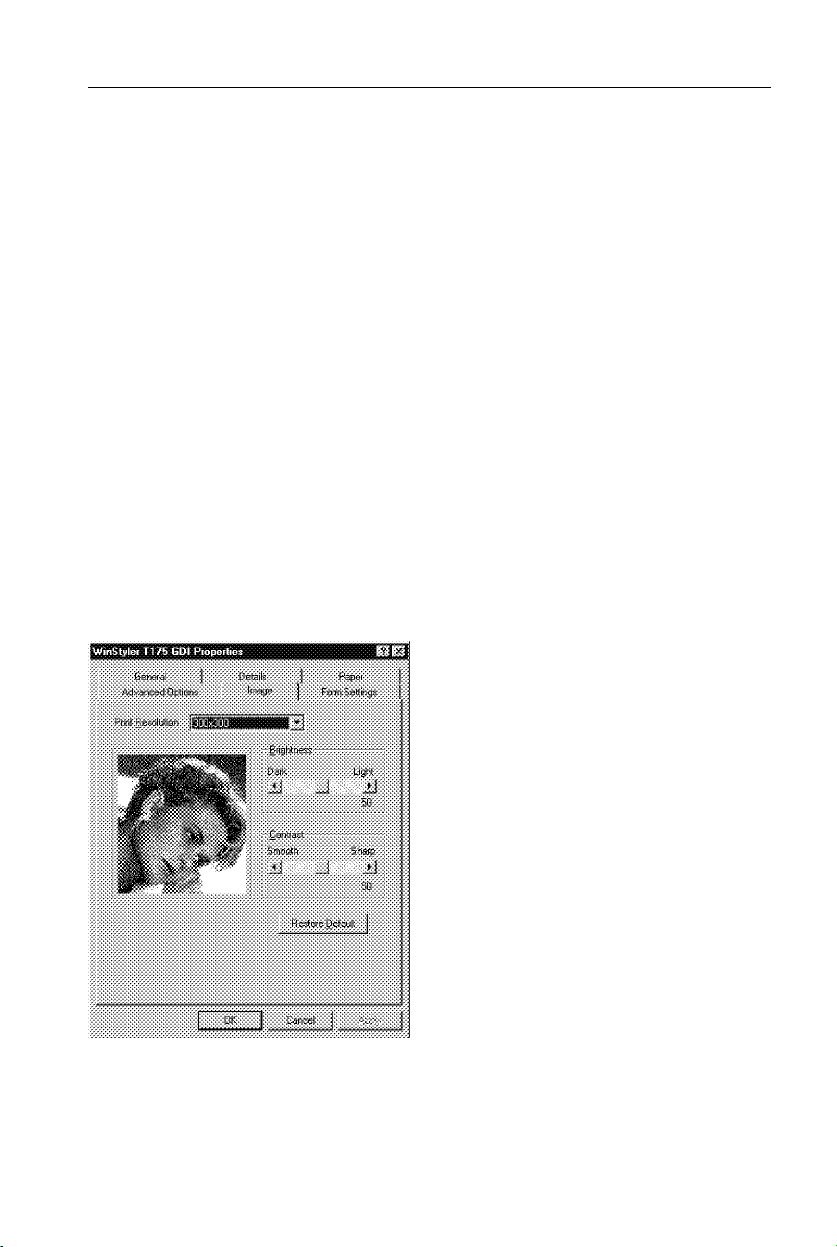
Image
The Image screen lets you adjust the appearance of images within your output.
These adjustments only apply to certain types of images and grayscales, not
to text or black line drawings. The figure at the screens left will change as you
move the controls to give you a rough idea of the effect of your adjustments.
23

PC-PRINTING WinStyler T175 GDI Mode (Windows 95)
Print Resolution
Your printer provides only one print quality, i.e. 300 x 300 dpi (dots per inch)
Brightness Control
Drag the Brightness knob or click on the arrows to make shades of gray in
image output appear lighter or darker.
Contrast Control
Drag the Contrast knob or click on the arrows to make image output appear
sharper, or softer and more blurry.
OK
Click on OK to make your changes take effect and return to the previous
screen.
Cancel
Click on Cancel to ignore any changes you have made and return to the
previous screen.
Restore Default
Click on Default to restore Image settings to their default values.
24

WinStyler T175 GDI Mode (Windows 3.1) PC-PRINTING
WinStyler T175 GDI Mode (Windows 3.1)
GDI mode takes advantage of Windows’ own internal design to produce
documents faster than most conventional printers can. Other printers require
Windows to translate a document into a special printer language, such as PCL
on LaserJet printers. GDI mode reduces overhead by eliminating this
translation step before starting to print. This results in faster printing - as much
as four to five times faster for some files.
GDI mode has a speed advantage with documents that have multiple fonts. A
standard printer language such as PostScript must do extra work for each
different font in a document. In contrast, printing the same document in GDI
mode requires only a small amount of additional processing, which means
quick text printing no matter how many fonts are included.
GDI Setup Screen
You can access the setup screen from the Setup or Print Setup feature of many
applications. You can also reach it from the Printers screen of the Windows Control Panel.
The setup screen lets you change the following settings:
❐ Copies
❐ Print Quality
❐ Orientation
❐ Paper Size
❐ Paper Media
❐ Paper Source
❐ Use Print Manager (Top Page, Manual Duplexing, Overlay)
❐ Print to File
❐ Scale
❐ 2 up/4 up
❐ Image
25

PC-PRINTING WinStyler T175 GDI Mode (Windows 3.1)
Copies
Copies determines how many copies of your document will be printed by your
printer.
Print Quality
Your printer provides only one print quality, i.e. 300 x 300 dpi (dots per inch).
Orientation
For Orientation, choose Portrait or Landscape. If you choose Portrait, your
output appears with the papers shorter edges at top and buttom, and longer
edges at the side, like a business memo. If you choose Landscape, your output
appears with the longer edges at the top and button, and the shorter edges at
the sides. Landscape is sometimes used for graphs, spreadsheets, and
presentation slides.
Paper Size
Size let you change to a different paper size, First, click on the size box, then
scroll through the selection. When you see the paper size you want, click on it.
regular paper
❐ Letter 8 1/2 x 11 inch ( 215.9 x 279.4 mm )
❐ A4 210 x 297 mm ( 8.27 x 11.7 inch )
❐ Executive 7 1/4 x 10 1/2 inch ( 184.1 x 266.7 mm )
❐ Legal 8 1/2 x 14 inch ( 215.9 x 355.6 mm )
❐ A5 148 x 210 mm ( 5.83 x 8.27 inch )
❐ F4 210 x 330 mm ( 8.27 x 12.99 inch )
envelopes
❐ U.S. No.10 Envelope 4 1/8 x 9 1/2 inch ( 104.9 x 241.3 mm )
❐ European DL Envelope 110 x 220 mm ( 4.33 x 8.66 inch )
Paper Media
❐ Standard Plane Paper
❐ Transparency U.S. Transparency
European A4 Transparency
26

WinStyler T175 GDI Mode (Windows 3.1) PC-PRINTING
Paper Source
Main Paper Tray and Optional Paper Feed Unit are the paper sources.
Use Print Manager
Putting an X in the box marked "Use Print Manager" turns the Print Manager
on when you use GDI mode. (The WinStyler Print Manager always turns on
automatically when you print in PCL- mode.) The WinStyler Print Manager lets
you use some additional features in GDI mode, including manual duplexing,
reverse printing, overlays, and the use of the WinStyler Print Manager control
screen. Turn off the WinStyler Print Manager to make GDI mode even faster.
Top page
WinStyler normally prints documents in page number order (i.e. page 1 first).
Clicking on the 3,2,1 button in the Top Page box will instruct WinStyler to print
your output in reverse, i.e. last page first and first page last. This option is only
available if the WinStyler Print Manager is enabled for GDI printing.
Manual Duplexing
Manual Duplexing feature has the following selections.
Book prints out so that if you opened the document in the manner of a book,
pages 2 and 3 would face each other. Report prints the even-numbered pages
upside down, so that if you opened the document in the manner of a report
bound at the top, pages 2 and 3 would face the same way. Off disables Manual
Duplexing.
You can also put an X in the box marked Print Instruction. If you do this, then
the WinStyler printer will print out a sheet of paper giving you detailed
instructions every time you print in manual duplex mode.
Click Use Print Manager on WinStyler T175 GDI window.
1
Select "Book" or "Report" style.
2
If you wish to get a printout of detailed instructions, select the box at the left of
Print Instruction.
27

PC-PRINTING WinStyler T175 GDI Mode (Windows 3.1)
Click on "OK".
3
Click on "Close" on Printers window.
4
Start your Windows application.
5
Print the desired document.
6
The printer will print every odd-numbered page, starting with page 1. If the
Print Instruction is effective, an instruction sheet will be printed before any
pages are printed. When all odd pages are printed, WinStyler T175 Status
Display or Show Me will instruct you how to reinsert the paper to print on the
other side of the pages.
Pick up the printed sheets, straighten them, and then reinsert them into
7
the printer.
Click on Resume on the Destiny WinStyler Status Display window to
8
resume printing.
The printer will print every even-numbered page on the backs of the pages
already printed.
Overlay
The Overlay screen is one of the most powerful features of the WinStyler
software. The WinStyler feature lets you overlay an image over any document
printed in GDI mode.
You can use this feature to
❐ Incorporate your letterhead on the first page of a business letter.
❐ Print your logo at the bottom of each page of a set of presentation slides.
❐ Overlay the word Confidential on every page of an important document.
❐ Print a special cover page or trailer page for each print job.
First make sure that Use Print Manager is selected on the WinStyler T175 GDI
windows, then click on "Overlay".
28

WinStyler T175 GDI Mode (Windows 3.1) PC-PRINTING
Print Cover Page
Select this feature to print your image on a separate page before the rest of
your document.
Print Overlay
This feature will overlay your image over pages of your document. (The effect
is similar to printing your image on a transparency, then putting the
transparency over your document.)
Select All to overlay the image on each page in the document.
Select From to overlay the image on a range of pages within the document.
Select None to disable the Overlay feature.
Print Trailer Page
Select this feature to print your image on a separate page after the rest of your
document.
OK
This will cause your changes to take effect and return you to the previous
screen.
Cancel
If you click Cancel, your changes will be ignored, and you will return to the
previous screen.
Browse
After selecting Print Cover Page, Print Trailer Page, or Print Overlay, clicking
Browse will let you search for your GDI file in the file system.
29

PC-PRINTING WinStyler T175 GDI Mode (Windows 3.1)
How to make *.GDI file and setup Overlay feature
Using an application such as Paintbrush, CorelDRAW or PageMaker,
1
create and save a graphic file that you want to overlay on pages of a
document.
Verify the graphic by printing it out, and minimize the application.
2
Change the printing mode to "WinStyler T175 GDI on T175GDI".
3
Click "Setup" in the Printers Window. The WinStyler T175 GDI window will
4
appear.
Select "Print to File" by clicking on the check box at the left. An X mark
5
appears in the check box.
Click "OK".
6
Click "Close".
7
Double click the same application which you minimized in step 2 and
8
perform the print operation. A screen asking you to enter the file name will
appear.
Enter a new file name or the same file name with the GDI extention (.GDI)
9
and click "OK" to store the file as a GDI file.
Minimize the application.
A
Perform steps 3 and 4 above.
B
Disable the "Print to File" feature by clicking off the check box at the left.
C
An X mark will be cleared from the check box.
Select "Use Print Manager" by clicking on the check box. An X mark
D
appears in the check box.
Click "Overlay". The Overlay Options window will appear.
E
Click on the desired selection(s). For example, select Print Cover Page.
F
30

WinStyler T175 GDI Mode (Windows 3.1) PC-PRINTING
Click "Browse". The Browse window will appear.
G
Double click on the directory in which you saved your graphic file (GDI
H
file), then select the file and click "OK". The selected file will appear in a
box in the Overlay Options window.
Click "OK" in the Overlay Options window.
I
Click "OK" in the WinStyler T175 GDI window.
J
Click "Close" in the Printers window.
K
Print the desired document. The graphic will be overlaid on the pages of
L
your document.
Note: If you want to use the Overlay with 2 up/4 up, create the Overlay file by
2 up/4 up in advance, then use it for the output of 2 up/4 up.
Print to File
If you select Print to File, your output will go to a file instead of the printer. This
is useful if you want to print from a file later, or print the identical file multiple
times over several intervals. You can also use Print to File to create a form,
discussed before in this section. The print file is stored in GDI format. See the
WinStyler Print Manager for information on how to print from a file using the
Add button.
Scale
Use Scale to reduce or enlarge your output on the printed page. You can enter
a number from 10% to 500%, or click on the arrows to increase or reduce the
setting.
Note: Changing the Scale may sometimes break the edges of your output. If
it is occurs, reset the margin.
31

PC-PRINTING WinStyler T175 GDI Mode (Windows 3.1)
2 up / 4 up
WinStyler lets you print 2 or 4 pages on a single sheet of paper.
Select 2 up if you want WinStyler to print two pages on one sheet of paper. (In
portrait mode, the pages show up side by side as if in a book.) Select 4 up if
you want WinStyler to print four pages on one sheet of paper. Select 1 up if
you wish to print normally.
Draw Frame Border
If you click on Draw Frame Border, WinStyler will draw a box around each page
on the paper.
Note: 1 Selecting 2 up/4 up may sometimes break the edges of your output.
If it is occurs, reset the margin.
2 If you want to use the Overlay with 2 up/4 up, create the Overlay file
by 2 up/4 up in advance, then use it for the output of 2 up/4 up.
32

WinStyler T175 GDI Mode (Windows 3.1) PC-PRINTING
Image
The Image screen lets you adjust the appearance of images within your output.
These adjustments only apply to certain types of images and grayscales, not
to text or black line drawings. The figure at the screens left will change as you
move the controls to give you a rough idea of the effect of your adjustments.
Brightness Control
Drag the Brightness knob or click on the arrows to make shades of gray in
image output appear lighter or darker.
Contrast Control
Drag the Contrast knob or click on the arrows to make image output appear
sharper, or softer and more blurry.
OK
Click on OK to make your changes take effect and return to the previous
screen.
Cancel
Click on Cancel to ignore any changes you have made and return to the
previous screen.
Default
Click on Default to restore Image settings to their default values.
33

PC-PRINTING WinStyler T175 PCL Mode
WinStyler T175 PCL Mode
No cartridges required
Some conventional printers include cartridge slots that allow you to, for
example, install additional fonts into the printer. Since WinStyler creates printer
page images on your system before downloading to the printer, installing a
cartridge could not affect the final printout. Instead, WinStyler uses the fonts
installed in your Windows system.
Saving downloaded fonts and macros in PCL mode
By default, when your application prints using WinStyler’s PCL mode, the PCL
interpreter will start up, print the document, and then shut itself off
automatically. This means the PCL interpreter does not take up memory on
your PC except when needed.
However, when the PCL interpreter turns itself off, any downloaded fonts or
macros will be lost, just as if you had turned off a regular PCL printer. You can
preserve this information by using the WinStyler T175 Print Manager to keep
the PCL interpreter active.
.
From the Windows Program Manager, double-click on the WinStyler T175
1
Printer Manager icon in the WinStyler T175 Tools group.
.
Download macros or soft fonts in advance, if desired, using the ADD button
2
to copy the macro or soft font data to the printer. (You can also copy the files
from DOS under Windows, by using the command "COPY/B <file.ext>
LPT1", where <file.ext> is the name of the file you wish to download.)
.
Minimize the WinStyler T175 Print Manager to an icon, if desired.
3
.
Start or return to your application and print your document.
4
This will preserve your downloaded fonts and macros. Also, if your next print
job also uses PCL, it will take less time to print because the WinStyler PCL
interpreter has already been loaded. However, if you switch from PCL to GDI
mode, this information will be lost, just as if you were changing printer
languages in a conventional printer.
34

WinStyler T175 PCL Control Panel PC-PRINTING
WinStyler T175 PCL Control Panel
WinStyler was designed to print with Windows. However, many Windows
users need to run MS-DOS applications occasionally. WinStyler lets you print
from MS-DOS applications you only have to run the application from Windows,
or within the DOS box under Windows. WinStyler also provides a PCL Control
Panel for DOS PCL printing. This allows you to change printer settings for your
DOS print jobs. (Note: some DOS applications may override these settings.)
While the PCL Control Panel is included primarily for DOS print jobs, it also can
affect the default settings for Windows PCL print jobs. However, the Windows
printer driver overrides the corresponding settings in the PCL Control Panel.
Form Feed
Click on Form Feed if you need to eject a page from the printer. Some PCL files
do not include a form feed (a command to eject a page) at the end of the file,
so if you are printing to a conventional PCL printer, you have to press a form
feed key to see your output. This happens frequently in MS-DOS. For
example, if you use the DIR LPT1: command in the MS-DOS box in Windows,
the job sent to the PCL interpreter will not have a form feed at the end, so that
the last page (or a single page) won’t print.
WinStyler puts this form feed key here on the PCL Control Panel.
Note: If WinStyler T175 Print Manager (in the program group "WinStyler
Tools") is closed, a PCL file which does not include a form feed at the
end of the file is printed automatically.
35

PC-PRINTING WinStyler T175 PCL Control Panel
Reset
The Reset returns the printer to its reset state. In other words, it clears all data
from the printers memory, including forms, macros, and unprinted page
images. In fact, it works just like the reset key on a conventional printer. Note
that the Reset does not change the printer settings (orientation, paper size,
number of copies, etc.) back to their default values. You will need to click on the
Defaults key to restore these to their defaults.
Paper Source
Main Paper Tray and Optional Paper Feed Unit are the paper sources.
(Optional Paper Feed Unit is only for Letter, A4, and Legal.)
Paper Size
To print on regular paper, with in the Paper Size box, first click on the paper
icon. Then select the paper size you wish to use.
To print on envelopes, with in the Paper Size box, first click on the envelope
icon. Then select the envelope size you wish to use.
regular paper
❐ Letter 8 1/2 x 11 inch ( 215.9 x 279.4 mm )
❐ A4 210 x 297 mm ( 8.27 x 11.7 inch )
❐ Executive 7 1/4 x 10 1/2 inch ( 184.1 x 266.7 mm )
❐ Legal 8 1/2 x 14 inch ( 215.9 x 355.6 mm )
envelopes
❐ U.S. No.10 Envelope 4 1/8 x 9 1/2 inch ( 104.9 x 241.3 mm )
❐ European DL Envelope 110 x 220 mm ( 4.33 x 8.66 inch )
Orientation
For Orientation, choose Portrait or Landscape. If you choose Portrait, your
output appears with the paper’s shorter edges at top and bottom, and longer
edges at the side, like a business memo. If you choose Landscape, your output
appears with the longer edges at the top and bottom, and the shorter edges at
the sides. Landscape is sometimes used for graphs, spreadsheets, and
presentation slides.
36

WinStyler T175 PCL Control Panel PC-PRINTING
Default Font
Default Font lets you select the default typeface, size, and style for output from
MS-DOS applications run under Windows, and for Windows PCL print jobs.
Both MS-DOS and Windows applications can override the default font
selection. Please note you do not have access to Windows TrueType fonts for
MS-DOS print jobs.
Margins
The Margins settings let you define the top, bottom, left, and right margins for
PCL print jobs, as measured from the edge of the paper. You can select either
centimeters or inches as the unit of measure for these. Please note that DOS
and Windows applications may override these settings.
Copies
Copies determines how many copies of your document will be printed by your
printer.
OK
Click on OK for your changes to take effect. When you exit, the PCL Control
Panel will load the PCL compatible interpreter into your PCs memory. This will
save time when you later print from MS-DOS applications under Windows.
However, you can close the PCL compatible interpreter and recover the
memory, if you wish. Click on the PCL icon, then click on Close. This deletes
the PCL compatible interpreter from memory until you print from an MS-DOS
application under Windows, at which time it will be re-loaded automatically.
Cancel
Clicking Cancel will lose any changes you have made to PCL printer settings,
and will exit the PCL Control Panel without loading the PCL compatible
interpreter.
Default
Click on Defaults to restore all printer settings on the screen to their default
values.
37

PC-PRINTING WinStyler T175 Status Display
WinStyler T175 Status Display
The Status Display Program has two primary functions:
❐ To let you control certain features of your printer.
❐ To alert you in case of a problem with your printer, for example, if the pa-
per jams.
File
This menu allows you to exit the WinStyler T175 Status Display.
Options
The selection in the Options menu control the Status Display.
Show Print Status Display when Printing
If you select this option, the Status Display icon will appear when you print a
document. Otherwise, the Status Display Window will only display when an
error occurs.
Animate Icon
When the printer icon is animated, it will appear to be printing whenever an
actual print job is in process.
Show Toolbar Title of Status Display
Select this option if you want to see titles for the toolbar icons "Toner saver",
"EET", "Density", and "Power saver".
38

WinStyler T175 Status Display PC-PRINTING
Beep When Print Job is Complete
This option tells WinStyler to beep whenever it finishes printing a document. If
you turn this selection off, WinStyler will make no sound when printing has
finished.
Beep on Printer Error
This option tells WinStyler to beep whenever it encounters a printer problem,
such as when the printer runs out of paper. If you turn this selection off,
WinStyler will display an error message, but will not beep, if a problem occurs.
Setup
This menu displays the Change Printer Settings screen.
Edge Enhancement Technology
With Edge Enhancement turned on, WinStyler will smooth the jagged edges of
text and line art, giving the output a very high quality appearance. There are
three settings: Level 1, Level 2, and Level 3. The factory default setting is Level
2. If the EET setting is too dark, the edges appear to bulge. As a general
guideline, select the EET setting so as to make this block look like a uniform
gray block with no vertical lines in it.
If there are white vertical lines in it, set the EET to darker setting. If there are
darker vertical lines in it, set the EET to a lighter setting.
TonrSavR Mode
With TonrSavR turned on, WinStyler will reduce the amount of toner used to
print output. Black areas and text are replaced by a light gray shading.
❐ Light Text and objects on the page have a black outline along
their left edge.
❐ Medium Text and objects on the page have a black outline along
their left and right edges.
❐ Dark Text and objects on the page have a black outline along all
edges. This setting is recommended over Light and
Medium if you expect to fax or photocopy the document.
❐ Off This is the default setting and is recommended for the
highest quality. Output appears normal.
39

PC-PRINTING WinStyler T175 Status Display
Power Saving Mode
With Power Saving Mode turned on, you can save energy by instructing your
printer to go to sleep if you do not use it for 5 minutes.
Density
The density options lets you choose from Lighten to Darken. To make lighter,
choose Lighten. To make print darker, choose Darken.
Connect Port
The Connect Port option lets you select a different parallel port for your
WinStyler printer. Depending on what your PC has available, you can choose
either LPT1, LPT2, or LPT3.
Show Me/Check Status
This animated help feature will walk you through the steps required to get your
printer running once again. If you are not currently printing anything, the "Show
Me" button will be changed to "Check Status". Click on the "Check Status"
button to find out the current status of the printer.
Pause
The Pause button lets you pause printing while you do something else. For
example, you can pause in order to cancel the print job from the application.
Resume
The Resume button lets you continue printing after you have paused printing,
or after recovering from an error situation.
40

WinStyler T175 Status Display PC-PRINTING
Delete
The Delete button lets you delete the job currently printing. (You must pause
the job before you can delete it, unless the printer itself is paused because of
an error.)
Status Box
This box shows an error or status message and the corresponding icon.
Job Status Box
This box shows the name of the application, file, page number for the job
currently being printed, and the mode your printer is in.
Printer Box
This box shows a picture of your printer. If a problem has occurred, an arrow
points to where the printer is affected. The display also tells you what to do for
each error or status message.
41

PC-PRINTING WinStyler T175 Print Manager
WinStyler T175 Print Manager
When you use the WinStyler T175 Print Manager, it manages all output to your
WinStyler printer. You can see all files waiting to print, and change their order.
You can see how much of the current print job has been processed. You can
control how high the priority for printing will be compared to other applications
running at the same time. And when the WinStyler T175 Print Manager is in
use, you can take advantage of additional WinStyler features such as Overlay,
Manual Duplexing and Top Page (reverse printing).
When minimized, the WinStyler T175 Print Manager appears as an icon at the
bottom of your screen, with an animated progress bar showing how much of
the print job has been processed. (You can turn the animation off by means of
the Options menu on the WinStyler T175 Print Manager screen.)
File
Resume Printer
Resume Printer lets you resume printing a job that has been paused.
Pause Printer
Pause Printer lets you pause the current print job. Once paused, you can use
the Resume button to continue printing, or cancel the print job by clicking the
Delete button.
Add a document
Add a document lets you select a print job file in PCL or GDI format and add it
to the end of the print queue. Be sure to select the correct file format (GDI,
PCL) for the file you wish to print.
42

WinStyler T175 Print Manager PC-PRINTING
Delete documents
Delete documents lets you cancel a currently printing job that has been
paused. You can also use the mouse to select a job that has not started
printing, then click on DELETE to remove it.
Exit
To exit the WinStyler T175 Print Manager, select Exit from the File menu. Other
ways to exit include pressing Alt-F4, or clicking on the System menu (the
horizontal bar at the upper left hand corner of the window), and selecting
Close. Exiting Windows will also close the WinStyler T175 Print Manager.
When You Exit Before Printing Has Completed
If you try to close the WinStyler T175 Print Manager, or exit Windows, while
there are still documents waiting to be printed, WinStyler displays a message
asking if you want to save the remaining print jobs.
If you select "Yes", the print jobs will be saved as you exit. When the
WinStyler T175 Print Manager next starts up, it will resume processing
and printing the documents. If you select "No", the print jobs will be lost,
and you will exit. (The original applications files, from which the print
jobs were created, will not be affected.) If you select "Cancel", you will
not exit Windows or the WinStyler T175 Print Manager.
43

PC-PRINTING Options of Print Manager
Options of Print Manager
Priority
Windows lets you run several applications at the same time. This helps
productivity, but means you are sharing your PC’s resources among several
activities. The WinStyler’s priority settings let you control the priority of the
printing activity relative to other applications running at the same time. The
Options menu lets you select high, medium, or low priority processing for when
you print. Printing at high priority produces output faster, but may slow down
your system more than the other priority settings. On the other hand, printing
at lower priority lets your other applications run faster, but also means your
document will take longer.
Show Toolbar title of Print Manager
This option lets you display or remove the titles to the WinStyler T175 Print
Manager icons that represent Pause, Resume, Add, and Delete.
12/24 Hour Format
You can click on the format you want the time displayed in: 12 hour or 24 hour.
(01:30 PM is an example of 12 hour format. The same time appears as 13:30
in 24 hour format.)
Size
The Size menu lets you decide how many print jobs you want the WinStyler
T175 Print Manager to display. You can show a maximum of up to 5 or 10 print
jobs in the queue.
Pause
The Pause button lets you pause the current print job. Once paused, you can
use the Resume button to continue printing, or cancel the print job by clicking
the Delete button.
Resume
The Resume button lets you resume printing a job that has been paused.
44

Options of Print Manager PC-PRINTING
Add
The Add button lets you select a print job file in PCL or GDI format and add it
to the end of the print queue. Be sure to select the correct file format (GDI,
PCL) for the file you wish to print.
Queue Information
This part of the WinStyler T175 Print Manager show a queue of jobs waiting to
be printed. Each entry includes information.
JOB NAME
The software application and file that created the print job.
FORMAT
GDI or PCL format
SIZE
How large the print job is, in bytes
TIME
Time of day the print job was created.
The WinStyler T175 Print Manager will take the first print job in the queue and
send it to be processed and printed. However, if you have a mouse, you can
change the order of print jobs that remain in the queue by following a "drag and
drop" procedure:
Move the mouse to the entry you want to re-order.
1
Press the left mouse button. Do not lift your finger. The entry will turn blue
2
to indicate that it has been selected.
Without lifting your finger, drag the print job (in other words, move the
3
mouse) to the desired new location in the queue.
Release your finger from the mouse button. The print job will now show up
4
in its new location, and the other print jobs will move up or down in the
queue as necessary to make room for it.
45

PC-PRINTING Options of Print Manager
Status bar
The Status bar shows whether WinStyler is printing, paused, or ready to print.
During printing, the status bar shows the page number currently being printed.
Progress bar
The progress bar shows the percentage of the print job processed by the
WinStyler software on the PC. Once this processing has completed, the
WinStyler printer will begin feeding and printing to paper.
46

Fonts in GDI Mode PC-PRINTING
Fonts in GDI Mode
One benefit of WinStyler GDI’s WYSIWYG (what you see is what you get)
approach becomes clear as you use fonts. In Windows, any font you can see
on the screen will work with your printer. This includes TrueType, Type 1
(through Adobes ATM software), and Intellifont (through Intellifont for
Windows). TrueType is usually the most efficient, since it is already built into
Windows. However, in most cases the performance difference between
TrueType and other kinds of fonts is negligible.
One advantage of GDI mode becomes evident when you work with documents
that have multiple fonts. A standard printer language such as PostScript must
fetch additional information every time it processes a new font in a document.
A document with a large number of different fonts can take a noticeably long
time to print. In GDI mode, the work of fetching font information takes place at
the time the document is retrieved and displayed to the screen. Printing the
document requires only a small amount of additional processing, which means
quick text printing no matter how many fonts are included.
Note: Windows includes some special built-in fonts that were not meant for
printing, such as Helv and MS Serif. These special fonts were
designed for screen display, so their resolution (number of dots per
inch) is coarser than the fonts that normally appear on a printed page.
It is recommended that you not select these fonts when creating your
documents. If you only need TrueType fonts (identified with a TT
symbol on your font list), you can remove all others from your list of
available fonts, by following the procedure below.
Open the Main Group in the Program Manager.
1
Double-click the Control Panel icon.
2
Double-click the Fonts icon.
3
Click the TrueType button.
4
Select Show Only TrueType Fonts in Applications, and click OK to exit the
5
TrueType dialog box.
47

PC-PRINTING Fonts in GDI Mode
Click Close to exit the Fonts dialog box.
6
Select Close from the System menu to exit the Control Panel dialog box.
7
Note: If you would like to display other font formats besides TrueType, follow
the procedure above, but clear Show Only TrueType Fonts in
Applications, by clicking on the X to blank it out.
48

Fonts in PCL Mode PC-PRINTING
Fonts in PCL Mode
WinStyler’s PCL mode supports several resident fonts, corresponding to the
internal fonts in the HP LaserJet IIP. These include:
Courier, 10 point, 12 pitch, Regular, Bold, and Italic
Courier, 12 point, 10 pitch, Regular, Bold, and Italic
Line Printer, 8.5 point, 16.66 pitch, Regular
You can select these resident fonts in WinStyler’s PCL mode.
Open the "Main" group in the Program Manager.
1
Double-click the "Control Panel" icon.
2
Double-click the "Fonts" icon.
3
Click the "TrueType" button.
4
Clear the checkbox "Show Only TrueType Fonts in Applications", and click
5
OK to exit the TrueType dialog box.
Click "Close" to exit the Fonts dialog box.
6
Select "Close" from the "System" menu to exit the Control Panel dialog
7
box.
Now select the resident fonts through your application as you would any other
kind of font.The default when a font has not been selected is Courier 12 point
regular.
49

PC-SCANNING Introduction
PC-SCANNING
Introduction
With the specified scan software (Note), this machine has the following
specifications as a scanner.
❐ It functions as a scanner for TWAIN Driver compatible Windows 95 and
Windows 3.1.
❐ 5 scanning Density Adjustment Levels: Auto, Lightest, Lighter, Normal,
Darker, Darkest
❐ Scanning Modes: Line Art/Error Diffusion/Dither
❐ Resolution: 200 x 200 dpi
Note:
Scanning is available through any Windows application that supports a TWAIN
interface.
50

Operation PC-SCANNING
Operation
Set the document to be scanned
1
on the scanner table.
Insert the document face up in the
feeder and adjust the guides to fit
the width of the document.
Fetch the WinStyler T175 Scanner Options from your Scanner Software.
2
(For Paint Shop Pro)
51

PC-SCANNING Operation
Set the following items.
3
Scan Mode/Resolution/Brightness
For details, see "Using the TWAIN Driver," explained later on.
Press OK to scan the document.
4
Note: After inputting of the telephone number is begun, the PC Scan function
cannot be used.
52

Using the TWAIN Driver PC-SCANNING
Using the TWAIN Driver
Introduction
TWAIN is both a protocol and application programming interface. Together they
define how application developers can acquire raster data directly into their
application without requiring the user to switch out of the application. Every
TWAIN-compliant driver must provide a user interface specific to its scanner.
Setting Parameters (User Interface)
Scan mode: Line Art (default), Error-Diffusion, Dither.
1
Resolution: 200 x 200 dpi (Fixed).
2
Brightness: Auto Alignment (default), Lightest, Lighter, Normal, Darker
3
and Darkest.
OK: Saves the settings and starts the scanning. Page # indicates the
4
current page. Below Page # is the progress bar of scanning the current
page. Clicking the Stop Scan button shall stop the scanning.
Cancel: Discards the settings.
5
Default: Set Scan mode, and Brightness back to default.
6
(LineArt, Auto Alignment)
53

PC-SCANNING Using the TWAIN Driver
During Scanning
Stop Scan: Stop the scanning JOB.
7
54

Introduction PC-FAXING
PC-FAXING
Introduction
By installing the BitWare for Windows or other specified fax application
softwares (Note), you can send and receive FAX transmissions from your
personal computer under the following specifications.
❐ Sending and Receiving FAX transmissions in Windows 95, Windows 3.1.
❐ Transmission Speeds: 14400, 12000, 9600, 7200, 4800, 2400 bps
❐ Control commands are compatible with the EIA-578 (Usually called
Class 1) and Class 2 command systems.
Note: Available fax application softwares are as follows:
❐ Windows 95
WinFaxPRO 4.0/7.0
BitWare 3.30F
MS-FAX
❐ Windows 3.1
WinFaxPRO 4.0
BitWare 3.30F
Laser Fax 3.1
❐ Macintosh
Delrina Fax PRO 1.5
Note: For installation of BitWare for Windows and detailed settings, see the
Cheyenne Manual, included herein.
Setting up the ComRedirector
ComRedirector must be set up before using the PC-Fax function. For details,
see "Using the ComRedirector," explained later on.
Operation
Sending a Fax
Open the file you want to send as a Fax on your computer.
1
55

PC-FAXING Operation
Print output destination is set to the FAX application.
2
(For Microsoft Word)
Execute Print instruction from the application.
3
Set the transmission destination, etc. in the FAX application, then execute
4
a Send (Start/Fax) command.
56

Operation PC-FAXING
Receiving a Fax
Set the PC-FAX RECEPTION Mode on the Operation Panel, using the
following procedure.
Press the FUNCTION key, then
1
press [6], [2222], [62].
Press the YES key.
2
Press the j key once.
3
Press the YES key.
4
Select the ON by j k key, then press
5
the YES key.
Note: If the PC-FAX RECEPTION Mode is not set (if SELECT PC is set in the
above procedure), FAX transmissions cannot be received by your
computer.
Set the Receiving Mode on in the FAX application.
6
Receive the FAX data.
7
(FAX data can be received automatically.)
Note: Manual Receiving Method
Set Auto Receiving off in the FAX application.
1
If the telephone receiver is connected to the machine, it will ring when
2
there is an incoming call.
Start Manual Receiving in the FAX application.
3
57

PC-FAXING Using the ComRedirector
Note: Caution if a Pause is inserted
If you desire to insert a pause in the number you are calling, input a
comma ( , ) (see the FAX Manual). However, even if it is possible to set
the length of a pause represented by one comma, that setting will not
be valid, but the pause interval will be the default value of the machine.
Note: In PC-FAX, the One Touch Dialing/Speed Dialing/Group functions
recorded in the machine cannot be used.
Note: When desiring to use tone switching in PC-FAX.
Input a "T" at the spot in the FAX number where you want to set tone
switching.
Note: Relationship between the Distinctive Ring function and PC receiving
If the Distinctive Ring function and PC receiving have been turned ON
in the machine, PC receiving has priority over the Distinctive Ring
function, and regardless of the type of ring, FAX reception will be
executed by the PC. In this case, even if there is no response to the ring
by the PC, the machine will not receive the FAX automatically.
Using the ComRedirector
Introduction
This is a Utility for using this machine’s internal Modem from a computer which
has ComRedirector installed. When using this machine’s PC-Fax function, be
sure to carry out the following set up procedure and enable ComRedirector.
Note: Be sure to disable ComRedirector when using a different modem.
58

Using the ComRedirector PC-FAXING
Setting Port (Enable the ComRedirector) in Windows 3.1
Note: For Windows95, this port is automatically set to COM4 when the
WinStyler is installed.
Open the WinStyler T175 Tools window.
1
Double-click the Setting Port icon.
2
Here, in order to enable ComRedirector, select the number of the Serial
3
port which your Fax application software assigned, then click on [OK].
Note: The radio buttons finger the setting ComRedirector port, but the LPT
port automatically gets the current connected port.
Disable the ComRedirector
Select [Disable COMM] in the above Setting Port screen.
59

COPYING Introduction
COPYING
Introduction
As a stand alone unit, this machine can make up to 99 copies at a time, and
can reduce or enlarge the copy size.
Reduction/Enlargement Function:
(Fixed Reduction/Enlargement Rate)
❐ Reduction: 50%, 75%, 85%, 95%
❐ Enlargement: 125%, 150%, 200%
Number of Copies Function:
Up to 99 copies can be made at one time.
Paper sizes that can be copied.
A4, LT, LG (Can be fed from the Main Paper Tray and Optional Paper Feed
Unit.)
F4 (Can be fed from the Main Paper Tray only.)
Note: If the same size paper is set in all the paper feed units, paper feeding is
executed with the following priority order.
1) Optional Paper Feed Unit
2) Main Paper Tray
Operation
Set the document to be copied.
1
Insert the document face up in the
feeder and adjust the guides to fit
the width of the document.
60

Operation COPYING
Note: You can dial before you set
the document. Place the docu-
ment after you dial the number and
go to step 7.
Press the COPY key on the Opera-
2
tion Panel.
Set the enlargement/reduction rate with the ▲ key/ ▼ key.
3
Input the number of copies (up to a maximum of 99 copies) with the
4
numeric keys.
If a mistake is made during setting, press the Clear key and input the
instructions again.
Press the Start key.
5
61

HELP-PRINTING Introduction
HELP-PRINTING
Introduction
A quick reference guide for the following basic operation procedures is printed
out.
❐ Transmission Procedure (Immediate/Memory)
❐ Memory Transmission Clear Procedure (FUNCTION21)
❐ Copy Procedure (Multicopy, Enlargement/Reduction Copy)
❐ Journal Output Procedure
❐ Quick Dial Register/Clear/List Output Procedure
❐ Speed Dial Register/Clear/List Output Procedure
❐ PC fax Reception Switching Procedure
❐ Driver Installation Instructions
Operation
In ready state, press the [No/Help]
1
key.
Press the START key.
2
62

Operation MAINTENANCE
MAINTENANCE
Please refer to another manual, Operator’s Manual: FACSIMILE
REFERENCE
63

TROUBLESHOOTING PC-PRINTING
TROUBLESHOOTING
PC-PRINTING
PC-Printing is not done even though the Print command was executed.
The following causes are likely. Carry out the remedies specified for each
respective cause.
The machine’s power is not on.
Turn the machine’s power on so that it can function.
The cables are not connected correctly.
Connect the cables correctly.
The machine is warming up, or is performing some other operation.
Wait until the machine is finished warming up or performing the other
operation.
The cover is open.
Close the cover completely.
The machine is out of toner. (ADD TONER state)
Replace the toner with a new toner cassette.
The paper is jammed.
Clear the cause of the paper jam.
The machine is out of paper.
Set paper in the machine.
The paper size setting differs from the setting in the machine and the
printer driver in the PC.
Set both paper sizes so they match.
There was a paper size error in the machine already.
Set the paper size in the machine and in the printer driver in the PC so that they
match the actual paper size.
64

PC-PRINTING TROUBLESHOOTING
PC-Printing was suspended.
The following causes are likely. Carry out the remedies specified for each
respective cause.
The paper is jammed.
Clear the cause of the paper jam.
Note: In this case, the data to be printed are kept in the Resume Wait State in
the PC.
From the application, either resume the printing operation or terminate
it.
The cover was opened during printing.
Close the cover completely.
The machine is out of paper.
Set paper in the machine.
The paper size setting in the machine does not math the actual paper size.
Set the paper size to match the actual paper size.
The print density is not as expected.
If the density is set on the machine, it will not be valid, so set it in the printer
driver in the PC.
If the TonerSaver function is activated in the printer driver in the PC, check the
contents of that setting again.
Blank paper was output.
If no toner cartridge is loaded, load a toner cartridge.
Other
PC printing cannot be stopped using the Stop key on the machine. Stop
printing from the printer driver in the PC.
65

TROUBLESHOOTING PC-SCANNING
PC-SCANNING
PC scanning does not function.
The following causes are likely. Carry out the remedies specified for each
respective cause.
The machine’s power is not on.
Turn the machine’s power on so that it can function.
The cables are not connected correctly.
Connect the cables correctly.
The machine is warming up, or is performing some other operation.
Wait until the machine is finished warming up or performing the other
operation.
The cover is open.
Close the cover completely.
The original is not set.
Set the original correctly.
The telephone number was input at the machine, or the machine is
carrying out communications, outputting data or performing some other
operation.
Wait until the machine is finished with the other operation, then perform
scanning again.
The original was not fed correctly or a jam has occurred.
Clear the paper jam or correct the misfeeding problem.
PC Scanning was suspended.
The following causes are likely. Carry out the remedies specified for each
respective cause.
The cover was opened during scanning.
Close the cover completely.
The document is jammed.
Clear the cause of the document jam.
The original is longer than the maximum length, or is shorter than the
minimum length.
Use an original that is the proper size and perform scanning again.
66

PC-FAXING TROUBLESHOOTING
The scanning density is not as expected.
If the density is set on the machine, it will not be valid, so set it from the TWAIN
driver in the PC.
Other
PC scanning cannot be stopped with the Stop key on the machine. Stop
scanning from the TWAIN driver in the PC.
PC-FAXING
PC-FAX cannot be sent.
If calling from the hand set connected to the machine, or in the on-hook mode
from the machine, sending a PC-FAX cannot be done, so send a PC-FAX from
the PC.
The PC-FAX cannot be used when the line is busy.
When sending of a PC-FAX is started, there is no operation, but the "NO CARRIER" message is displayed on the PC screen.
The machine is performing some other operation like those below, and is
not in a state where a PC-FAX can be sent.
❐ Sending a FAX.
❐ Outputting a report.
Wait until these operations are finished, then try sending the FAX again.
ComRedirector has not been started.
Start ComRedirector.
The ComRedirector port setting is strange.
Reset the port to the correct value. (See "Using ComRedirector.")
67

TROUBLESHOOTING PC-FAXING
The machine won’t receive a PC-FAX.
The following causes are likely. Carry out the remedies specified for each
respective cause.
The machine’s power is not on.
Turn the machine’s power on so that it can function.
The cables are not connected correctly.
Connect the cables correctly.
The FAX application is not running.
Start the FAX application.
The machine is not set to receive a PC-FAX.
Set the machine in the PC-FAX receiving mode.
Before the PC could receive a FAX, the machine’s hand set was raised,
the on-hook key was pressed, or the remote answer telephone connected
to the machine was activated.
In any of these cases, PC-FAX reception will fail. However, in this case, if the
Start key on the machine is pressed, a FAX can be received by the machine.
In cases when it is possible to send a FAX again, before the PC receives a
FAX, be sure not to raise the hand set or press the on-hook key. Or, set the
number of times the remote answer telephone rings at a larger number than
the number of rings the FAX application is set for, then receive the PC-FAX.
Other
The speaker volume will not change during use of the PC-FAX even if the
volume is set in the FAX application.
The volume setting in the FAX application is not effective in the machine.
Press function 92 in the machine and reset the volume.
68

Introduction INSTALLING THE WINSTYLER T175
APPENDIX A:
INSTALLING THE WINSTYLER T175
Introduction
WinStyler is a new-generation printer driver with scanning and PC-faxing
utilities developed for Windows users. It is a "plug-and-play" solution, which
means it requires no special add-in cards, cartridge, or cables. WinStyler uses
the power of your PC under Windows to create fast, high quality laser output.
As you add memory or move up to a more powerful PC, WinStyler’s
performance will increase along with your system.
The WinStyler software allows you to select from two different printer modes:
GDI mode provides fast, WYSIWYG output by taking advantage of Windows’
native graphics and text features PCL emulation mode provides compatibility
with the popular printer language used in the LaserJet IIP. Both Windows
applications and DOS applications running under Windows can use PCL
emulation mode for printing.
System Requirements (Windows 95)
Operating system: Windows 95 or greater.
PC: Basically, all the IBM-compatible PCs, which meet with the requirement
specified by Microsoft for running Windows 95, can let WinStyler work well.
But for the purpose of working smoothly, it is recommended to let WinStyler
work on a PC with at least a 486DX33MHz CPU. There is no possibility for
WinStyler to run on a 286-based PC and other earlier systems.
I/O: Standard PC parallel printer port and cable. Memory: At least 8 MB PC memory (RAM), which is also the moderate
amount of memory recommended by Microsoft for use with Windows 95.
Adding more memory to your PC will increase overall system and printer
performance.
69

INSTALLING THE WINSTYLER T175 System Requirements (Windows 95)
Disk space: About 4 MB disk space for files, and up to approximately 12 MB
disk space for virtual memory. You can see or modify your Virtual Memory
through the SYSTEM icon on the Windows Control Panel.
If you have more than 8 MB RAM, you won’t need all 12 MB virtual memory.
Total PC RAM plus virtual memory should add up to at least 16 MB.
Allocating Virtual Memory: It is recommended to let Windows 95 automatically handle virtual memory. If not, you shall allocate virtual memory by yourself via SYSTEM icon of Control Panel. WinStyler software requires 16 MB of total memory, divided between your PC memory (a minimum of 8 MB) and your Windows virtual memory. If your system has 8 MB of PC RAM, then you must allocate at least 8 MB of virtual memory. If you have 5 MB of RAM, then you need at least 11 MB of virtual memory, and so on.
To change the virtual memory, follow the instructions below.
The following instructions assume your system has 8 MB of PC RAM.
Start Windows 95.
1
Double-click on the "Control Panel" folder.
2
Double-click on the "SYSTEM" icon.
3
Click the tab "Performance".
4
Click "Virtual Memory". The virtual Memory dialog box will be displayed.
5
The item "Let Windows manage my virtual memory setting
6
(recommended)" is the default setting . If you don’t want to change it, just
simply quit.
If you select the item "Let me specify my own virtual memory setting", you
7
shall give the minimum setting as well as the maximum setting in the
following dialog boxes.
Click "OK".
8
Click "Restart Windows" to make the setting effective.
9
70

System Requirements (Windows 3.1) INSTALLING THE WINSTYLER T175
System Requirements (Windows 3.1)
Operating system: Windows 3.1 or greater in Enhanced Mode, and MS-DOS
3.3 or later.
PC: An IBM-compatible PC with at least a 386SX 16MHz CPU. This includes
all 486-based and almost all 386-based PCs. Some older 386s cannot run in
Windows Enhanced Mode, which means that WinStyler will not work properly
on those systems. WinStyler will not run on 286-based PCs and other earlier
systems. If you have Windows installed on your PC, you can verify whether it
runs in Enhanced Mode by typing WIN/3 at the MS-DOS prompt. If your PC
cannot run Windows in Enhanced Mode, the system will tell you.
I/O: Standard PC parallel printer port and cable. Memory: At least 4 MB PC memory (RAM), which is also the minimum
amount of memory recommended by Microsoft for use with Windows. Adding
more memory to your PC will increase overall system and printer performance.
Disk space: About 4 MB disk space for files, and up to approximately 8.5 MB disk space for virtual memory. You can see or modify your Virtual Memory through the 386 Enhanced icon on the Windows Control Panel.
If you have more than 4 MB RAM, you won’t need all 8.5 MB virtual memory.
Total PC RAM plus virtual memory should add up to at least 12.5 MB.
Allocating Virtual Memory: WinStyler software requires 12.5 MB of total memory, divided between your PC memory (a minimum of 4 MB) and your Windows virtual memory. If your system has 4 MB of PC RAM, then you must allocate at least 8.5 MB of virtual memory. If you have 5 MB of RAM, then you need at least 7.5 MB of virtual memory, and so on.
To change the virtual memory, follow the instructions below. For more
information on virtual memory, refer to the Optimizing Windows section in the
Microsoft Windows 3.1 User’s Guide.
The following instructions assume your system has 4 MB of PC RAM.
Double-click on the "Main" icon from the Program Manager screen.
1
Double-click on the "Control Panel" icon.
2
71

INSTALLING THE WINSTYLER T175 System Requirements (Windows 3.1)
Double-click on the "386 Enhanced" Icon.
3
Click "Virtual Memory". The Virtual Memory dialog box will be displayed.
4
If the size shown in the Virtual Memory dialog box is less than 8.5MB, or
5
Type is "temporary" or "none", then click "Change". Otherwise click
"Cancel" to exit the dialog box.
Increase the "New" size in the "New Settings" box to at least 8.5 MB.
6
Select the type "Permanent" in the "New Settings" box.
7
Click "OK".
8
Click "Yes".
9
Click "Restart Windows" to make the setting effective.
A
Restrictions (Both Windows 95 and 3.1):
Due to the nature of the high-speed interface, the WinStyler printer cannot
1
be shared through a network or switch box.
WinStyler works with standard parallel cables. Be aware that some
2
manufacturers cut corners by manufacturing cables that do not conform to
standard parallel specifications.
72

Setting Up (Windows 95) INSTALLING THE WINSTYLER T175
Setting Up (Windows 95)
WinStyler includes a software installation program to make setting up easier.
The installation program analyzes your system configuration, installs the
WinStyler software, and makes the necessary changes to Windows startup
files.
Once you have started the WinStyler setup program, you can cancel the
installation at any time. Just click on the Cancel button that appears in the
setup program window.
To install the WinStyler software:
Start Microsoft Windows 95.
1
Windows will start up as usual, after which the Windows 95 main window
should be displayed on your screen.
Place the WinStyler software diskette labeled disk 1/2 into the appropriate
2
disk drive of your computer. Close the drive door or lever if the drive has
one.
Click the START button on the task bar. Then click on the "Run..." option.
3
The Run Program dialog box appears.
At the prompt, type:
4
[A:]SETUP
where [A:] is the letter of the drive containing the WinStyler software diskette.
Click the mouse or press any key to continue.
73

INSTALLING THE WINSTYLER T175 Setting Up (Windows 95)
Tell the setup program which parallel port you wish to use: LPT1, LPT2,
5
or LPT3. The setup program only shows you the port names available on
your system. The default is LPT1.
Later, after the installation, you can select a different port by using the
WinStyler Print Manager.
Tell the setup program which drive and directory you want to install the
6
WinStyler software in. You can accept the default supplied by the setup
program, or give it the name of another drive on your PC on which to
install the software. You should select a drive with at least the amount of
free disk space required for the WinStyler installation.
The setup program will create and set up the directory "C:\WST175" as
the default installation directory. You can change the default directory at
this time by specifying a different directory.
74

Setting Up (Windows 95) INSTALLING THE WINSTYLER T175
Click on the OK button.
7
The installation program then copies the WinStyler software to the specified
directory. It will prompt you to insert additional WinStyler diskettes as needed.
During the installation, WinStyler shows you progress and status messages.
The installation program modifies the Windows initialization files so that
WinStyler runs properly when you start Windows.
The setup program also creates the WinStyler T175 Tools group. This group
8
contains icons for WinStyler programs, including the WinStyler T175 Print
Manager, the WinStyler T175 StatusDisplay, the WinStyler T175 PCL Control
Panel, the WinStyler T175 Test, and the ComRedirector (in case of windows
3.1). Once WinStyler is active, you will be able to run these programs by
double-clicking on their icons.
The installation program now displays a message telling you that setup is
complete. Choose "Restart Windows" to start Windows over again, or "Exit" to
quit the setup program.
Note: You will have to restart Windows before WinStyler can start running.
75

INSTALLING THE WINSTYLER T175 Setting Up (Windows 95)
When Windows is restarted, the WinStyler T175 Test Utility will check to make
sure all the print modes work correctly. The test utility will print two pages
during the test, including a configuration page containing information about
your system and printer.
Once WinStyler is installed, WinStyler device names appear in the Printers
folder of Control Panel.
Other Setup Methods
Setup up by Windows 95 Plug & Play function
Before Windows 95 starts up, its Plug & Play framework will check if there
1
is any new peripheral in the system. If this is a system in which the
machine is the first installed, the Plug & Play framework will pop up a
"New Hardware found" message box and then show following dialog box.
76

Setting Up (Windows 95) INSTALLING THE WINSTYLER T175
Select the second item "Driver from disk provided by hardware
2
manufacturer".
The following dialog will appear on the screen:
3
Reply to the question "Copy manufacturer’s file from" and click the "OK"
4
button to continue.
The remaining setup procedure is the same as in the beginning of this
5
section.
Setup by Add Printer function on the Printer Folder
Follow the procedures to setup the driver using the "Add Printer" function in the
"Printers" folder.
Launch the "Printers" folder.
1
Double-click the "Add Printer" icon.
2
Click the "Next>" button to continue.
3
Select "Local Printer" and click "Next>".
4
Click "Have Disk...".
5
The remaining setup procedure is the same as in the beginning of this
6
section.
77

INSTALLING THE WINSTYLER T175 Setting Up (Windows 3.1)
Setting Up (Windows 3.1)
WinStyler includes a software installation program to make setting up easier.
The installation program analyzes your system configuration, installs the
WinStyler software, and makes the necessary changes to Windows startup
files.
Once you have started the WinStyler setup program, you can cancel the
installation at any time. Just click on the Cancel button that appears in the
setup program window.
To install the WinStyler software:
Place the WinStyler software diskette labeled disk 1 into the appropriate
1
disk drive of your computer. Close the drive door or lever if the drive has
one.
Start Microsoft Windows. At the DOS prompt, type:
2
WIN
Windows will start up as usual, after which the Program Manager group
window should be displayed on your screen. If the Program Manager
group appears as an icon, restore it by double-clicking on the icon.
From the Program Manager menu, click on File. Then click on the Run...
3
option. The Run Program dialog box appears.
At the prompt, type:
4
[A:]SETUP
where [A:] is the letter of the drive containing the WinStyler software diskette.
Click the mouse or press any key to continue.
78

Setting Up (Windows 3.1) INSTALLING THE WINSTYLER T175
Tell the setup program which parallel port you wish to use: LPT1, LPT2,
5
or LPT3. The setup program only shows you the port names available on
your system. The default is LPT1.
Later, after the installation, you can select a different port by using the
WinStyler Print Manager.
Tell the setup program which drive and directory you want to install the
6
WinStyler software in. You can accept the default supplied by the setup
program, or give it the name of another drive on your PC on which to
install the software. You should select a drive with at least the amount of
free disk space required for the WinStyler installation.
The setup program will create and set up the directory "C:\WST175" as the
default installation directory. You can change the default directory at this time
by specifying a different directory.
79

INSTALLING THE WINSTYLER T175 Setting Up (Windows 3.1)
Click on the OK button.
7
The installation program then copies the WinStyler software to the specified
directory. It will prompt you to insert additional WinStyler diskettes as needed.
During the installation, WinStyler shows you progress and status messages.
The installation program modifies the Windows initialization files so that
WinStyler runs properly when you start Windows.
The setup program also creates the WinStyler T175 Tools group. This
8
group contains icons for WinStyler programs, including the WinStyler
T175 Print Manager, the WinStyler T175 Status Display, the WinStyler
T175 PCL Control Panel, the WinStyler T175 Test, and the
ComRedirector. Once WinStyler is active, you will be able to run these
programs by double-clicking on their icons.
The installation program now displays a message telling you that setup is
complete. Choose Restart Windows to start Windows over again, or Exit to
quit the setup program. (Note: you will have to restart Windows before
WinStyler can start running.)
80

Setting Up (Windows 3.1) INSTALLING THE WINSTYLER T175
When Windows is restarted, the WinStyler T175 Test Utility will check to make
sure all the print modes work correctly. The test utility will print two pages
during the test, including a configuration page containing information about
your system and printer.
Note: At this time, the paper size must be set on A4 or LT size.
Once WinStyler is installed, WinStyler device names appear in the Printers
window of your Control Panel.
81

INSTALLING THE WINSTYLER T175 WinStyler T175 Test program
WinStyler T175 Test program
You can test the connection between the PC and printer, and view additional
information about your WinStyler configuration, by running the WinStyler T175
Test utility. This utility also runs automatically after installation, the first time you
restart Windows.
From the Program Manager, find the WinStyler T175 Tools group. If
1
WinStyler T175 Tools has been minimized, restore it by double-clicking on
its icon.
Double-click on the icon labeled WinStyler T175 TEST.
2
The following notice will appear:
3
Note that this program performs some time-consuming test operations. Before
continuing, make sure the printer is ready. The power switch should be turned
on. Press OK to continue with the print tests, Cancel to exit to the program’s
main menu.
Before printing starts, you will see the following message as WinStyler
4
sets up the tests.
82

WinStyler T175 Test program INSTALLING THE WINSTYLER T175
The Test Utility first prints a configuration page that shows information
5
about your PC and printer. Save a copy of the most recent configuration
page. You may find it useful if you ever need to call Customer Support.
WinStyler will now ask to print test pages in GDI mode. Click on Yes to
6
continue, No to bypass the current test.
After printing all test pages, the Test Utility will ask if you want to exit. Click
7
OK to quit the program. The WinStyler T175 Print Manager will continue to
process your test pages until all of them have printed.
Clicking Cancel instead of OK will return you to the Test Utility’s main screen.
The File pull-down menu gives you the choice of repeating the test sequence
or exiting the program.
83

INSTALLING THE WINSTYLER T175 Removing the WinStyler software
Removing the WinStyler software
If you need to remove the WinStyler software, run the WinStyler DELETE
program. You need to run this program from Microsoft Windows.
From the Program Manager menu, click on File.
1
Click on the "Run..." option.
2
The Run Program dialog box appears.
At the prompt, type
3
C:\WST175\DELETE.EXE
Where C: is the letter of the drive, and WST175 is the directory containing the
WinStyler software.
Then click OK or press Enter.
4
WinStyler will ask you to confirm that you want to remove the software before
any files are deleted.
Click on "Yes" or press "Y".
5
84

Optimizing Printer Performance INSTALLING THE WINSTYLER T175
Optimizing Printer Performance
Upgrading to a more powerful CPU will of course improve performance, but
this is not practical for everyone. Here are some other suggestions.
Add more memory (Windows 95)
WinStyler requires a minimum of 8MB memory on your PC, the moderate
amount Microsoft recommends for Windows 95. However, adding more PC
memory gives WinStyler additional "breathing room." The additional memory
reduces the overhead of having to manage limited space, and also allows
more resources to run other Windows applications while you print.
Add more memory (Windows 3.1)
WinStyler requires a minimum of 4MB memory on your PC, the same amount
Microsoft recommends for Windows 3.1. However, adding more PC memory
gives WinStyler additional "breathing room." The additional memory reduces
the overhead of having to manage limited space, and also allows more
resources to run other Windows applications while you print.
Close unneeded applications
This will free up memory and improve WinStyler’s performance.
Use GDI wherever possible
When Windows applications print to conventional printers, they translate their
output description into a printer language, which the appropriate printer driver
interprets to create a picture of the output. GDI mode saves time by skipping
the translation and interpretation steps. The result is faster printing. Although
the quality of GDI output varies by application, GDI mode works especially well
for text output and most graphics. Try GDI with your documents to see if it
meets your requirements.
Change the print priority
The WinStyler T175 Print Manager lets you select Low, Medium, or High
Priority printing. If you want faster printing, set the priority to High. If you want
to maximum use of other applications, and don’t mind waiting longer for output,
set the priority to Low.
Don’t use the WinStyler T175 Print Manager when printing in GDI mode.
85

INSTALLING THE WINSTYLER T175 Optimizing Printer Performance
For fastest possible printing, you can shut off the WinStyler T175 Print
Manager altogether for GDI mode. Go to the GDI Setup Options Screen and
make sure the box titled Use WinStyler T175 Print Manager is blank.
Note: Turning off the WinStyler T175 Print Manager disables some features
of the WinStyler T175 printer, such as manual duplex printing. Also, the
WinStyler T175 Print manager is still required for PCL mode.
Disable automatic display of Print Status.
You can also save some system resources if you turn off Display Status While
Printing. When this feature is turned on, the Print Status icon pops up
whenever you print. Turning off this feature means you only see the Print
Status screen if an error warning occurs.
86

INDEX
INDEX
A
Add 45
Add a document 42
Animate Icon 38
ASCII 11, 12
B
Brightness 24, 33
C
Connect port 40
Contrast 24, 33
Copies 16, 37, 60
Copy 3
Cover Page 18, 29
D
Default font 37
Delete document 43
Density 40, 65, 67
DOS application 11
Draw frame border 16, 32
E
Edge Enhancement Technology 39
Enlargement 60
F
Fax transmission 55
Fax transmissions 55
File 11, 12, 19, 23, 30,
31, 38, 42
Form Feed 35
Format 44, 45
G
GDI mode 15, 16, 17, 18, 19,
20, 21, 22, 23, 24
GDI Print 25, 26, 27, 28, 29,
30, 31, 32, 33, 47, 48
H
Help-Print 3
I
Image 23, 33
M
Manual Duplexing 21, 27
Margins 37
O
Options 38, 44, 45, 46
Orientation 16, 26, 36
Overlay 17, 18, 19, 28, 29, 30
P
Paper Media 17, 26
Paper Size 8, 17, 26, 36, 60
Paper Source 17, 27, 36
Pause 40, 42, 44
PC-Fax 1, 3
PC-Fax Reception Mode 57
PC-Printer 1, 2
PC-Scanner 1, 2
PCL Emulation Mode 9
Plug & Play 76
Port 40, 59
Power Saving Mode 40
Print Job 39
Print Quality 26
Print To File 23, 31
Printer Error 39
Priority 44, 85
Progress Bar 46
Q
Queue Information 45
R
Reduction 60
Resolution 23
87

INDEX
S
Scale 16, 31
Show Me 40
Size 44, 45
Status bar 46
T
Test Print 7
Test program 82, 83
Time 45
Tonrsavr Mode 39
Toolbar Title 38, 44
Top Page 21, 27
Trailer Page 18, 29
TWAIN 2, 53, 54
12/24 hour format 44
2 up/4 up 8
U
Use Print Manager 18, 27
V
Virtual memory 70, 71
88

Part No. H5298801 Printed in the Netherlands
 Loading...