

OPERATOR’S MANUAL
RICOH FAX4800L
Read this manual carefully before you use this pr oduct and keep it handy for
future reference. For safety, please follow the instructions in this manual.

Optional Equipment
Memory (FEATURE EXPANDER TYPE 140 2M, FEATURE EXPANDER TYPE
140 4M, FEATURE EXPANDER TYPE 140 80MIII)
Either a 2-Mbyte memory card, a 4-Mbyte memory card or a 80-Mbyte hard disk
can be added.
ISDN G4 KIT (ISDN INTERF ACE UNIT TYPE 140III)
This allows you to send and receive using the ISDN (Integrated Services Digital
Network)
PC Printer Interface Kit (PRINTER INTERFACE TYPE 200)
1
This allows you to use the machine as a laser printer for an IBM PC/AT
or
compatible per son al comp ut er.
Telephone Handset (HANDSET TYPE 100)
This permits voice communication.
PAPER CASSETTE TYPE 100
This gives this machine addi t ion al 10 0 she et paper cap acit y wit h sing l e sheet
bypass.
COUNTER TYPE 100
FUNCTION UPGRADE CARD TYPE 140
With this card installed, Memory Disk and so on become available.
FAX ON DEMAND TYPE 140
When installed the Fax on Demand service becomes available.
EXTRA PAPER FEED UNITS
Up to 2 extra paper f ee d un its can be ad de d to the base machine:
PAPER FEED UNIT TYPE 140F - an additional front fee d p ap er u nit.
PAPER FEED UNIT TYPE 140S
- an additional side fee d pa per unit.
III
A front and side feed un it can no t be insta l l ed on the sam e ma chi n e.
G3 Kit (G3 INTERFACE UNIT TYPE 140)
This allows you to connect an additional PSTN (Public Switched Telephone
Network) to the machine.
Note:
The Function Upgrade Car d and Fax on De man d Kit cann ot be inst al le d i n
the same machine.
Copyright Notice
1
IBM PC/AT is a registered trademark of International Business Machines
Corporation.
CAUTION:
Once a Function Upgrade Card or Fax on Demand Card has been installed, do
not remove it. If removed, this will result in data being permanently lost.

Table of Optional Equipment
Optional Equipment Memory *1 *2 Paper Feed
Unit *3
Memory Card 2M
Memory Card 4M
Hard Disk 80M
Function Upgrade Card
Printer Interface Kit
Telephone Handset
Paper Cassette
Front Paper Feed Unit
Memory Card 2M X X O O O O O O OOOO
Memory Card 4M X X O O O O O O OOOO
Hard Disk 80M XX OOOO O O OOOO
Function Upgrade Card O O O O O O O O O O O X
Printer Interface Kit OOOO OO O O OOOO
Telephone Handset OOOOO O O O OOOO
Paper Cassette OOOOOO O O OOOO
Front Paper Feed Unit OOOOOOO O X OOOO
Side Paper Feed Unit OOOOOOO X O OOOO
ISDN G4 Kit OOOOOOO O O XOO
G3 Kit OOOOOOO O O X OO
Counter OOOOOOO O O OO O
Fax on Demand Kit O O O X O O O O O O O O
G4/G3
Kit *4
Side Paper Feed Unit
ISDN G4 Kit
*2
G3 Kit
Counter
Fax on Demand Kit
O : Available
X : Not Available
*1 Only one Memory Option (Memory Card 2M, Memory Card 4M, Hard Disk 80M)
can be installed at once.
*2 You can not use the Telephone Handset w ith th e o pt i on al G3 Kit.
*3 You can not install both Front Paper Feed Unit and Side Paper Feed Unit on the
same machine.
T wo Front Paper Feed Units or two Side Paper Feed Units can be installed
on the same machine.
*4 You can not install both ISDN G4 Kit and G3 Kit on the same machine.

WARNING:
This equipment has been tested and found to
comply with the li mits for a Cl ass A digital dev ice,
pursuant to Part 15 of the FCC Rules. These
limits are designed to provide reasonable
protection against harmful interference when the
equipment is operated in a commercial
environment. This equipment generates, uses,
and can radiate radio frequency energy and, if
not installed and used in accordance with the
instruction manual, may cause harmful
interference to radio communications. Operation
of this equipmen t in a residential area is likel y to
cause harmfu l interfer ence in wh ich case the user
will be required to correct the interference at his
own expense.
CAUTION
Use of control or adjustments or perfomance of
procedures other than those specified herein may
result in hazardous radiation exposure.
Shielded interconnect cables must be employed
with this equipment to ensure compliance with
the pertinent RF emission limits governing this
device.
Operator Safety
This equipment is considered a CDRH Class 1
laser device, safe for office/EDP use. The
machine contains a 5-milliwatt, 760 to 800
nanometer wavelength, GaAIAs laser diode.
Direct (or indirect reflected) eye contact with the
laser beam may cause serious eye damage.
Safety precautions and interlock mechanisms
have been desi gned to pre vent any pos sible la ser
beam exposur e to the oper ator.
Laser Safety
The Center for Devices and Radiological Health
(CDRH) prohibits the repair of laser-based optical
units in the field. The optical housing unit can
only be rep aired in a factor y or at a locati on with
the requisite equipment. The laser subsystem is
replaceable in the field by a qualified Customer
Engineer. The laser chassis in not repairable in
the field. Customer engineers are therefore
directed to return all chassis and laser
subsystems t o the factory or se rvice depot when
replacement of the optical su bsyste m is require d.
In accordance with ISO 7001, this machine uses
the following sym bols f or the main s witch:
s means POWER ON
CAUTION
Deliver to col lection point for waste pro ducts. Do
not be disposed of via domesti c refuse co llection .
t means POWER OFF
WARNING
This symbol is attached to some
x
Notice about the Telephone Consumer
Protection Act (Vali d in U SA on ly).
The Telephon e Consumer Prote ction Act of 1991
among other things makes it unlawful for any
person to s end any message vi a a telephone fax
machine unless such message cl early contains in
a margin at the top or bottom of each transmitted
page or on the first page of the tr ansmission, the
date and time it is sent and an identification of
the business, other entity, or other individual
sending the message and the telephone number
of the sending machine or such business, other
entity or individual. This information is transmitted
with your document by the TTI (Transmit
Terminal Iden tifica tion) featu re.
The telephone number provided may not be a
900 number or any other number for which
charges exceed local or long distance
transmission charges.
In order for you to meet the requirement, your
machine must be programmed by following the
instructions in the accompanying Operation
Manual. In particular, please refer to Appendix
F:Installation the machine. Also refer to the TTI
(Transmit Terminal Identification) programming
procedure to enter the business identification and
telephone nu mber of the terminal o r business . Do
not forget to set the date and ti me.
Thank you.
ENERGY SAVING INFORMATION
As an Energy Star Partner, we have determined
that this fax model meets Energy Sta r guidelines
for energy efficiency.
This product was designed to reduce the
environmental impact associated with fax
equipment. This is accomplished by means of
energy saving features such as Low Power
(saving energy) mode and Night Timer. Please
see applicable sections of operating manual for
details.
components to alert the user not to
touch them because they may be very
hot.
This symbol is in tended to alert the user
to the presence of important operating
and maintenance (servicing) instructions
in the literature accompanying the
machine.

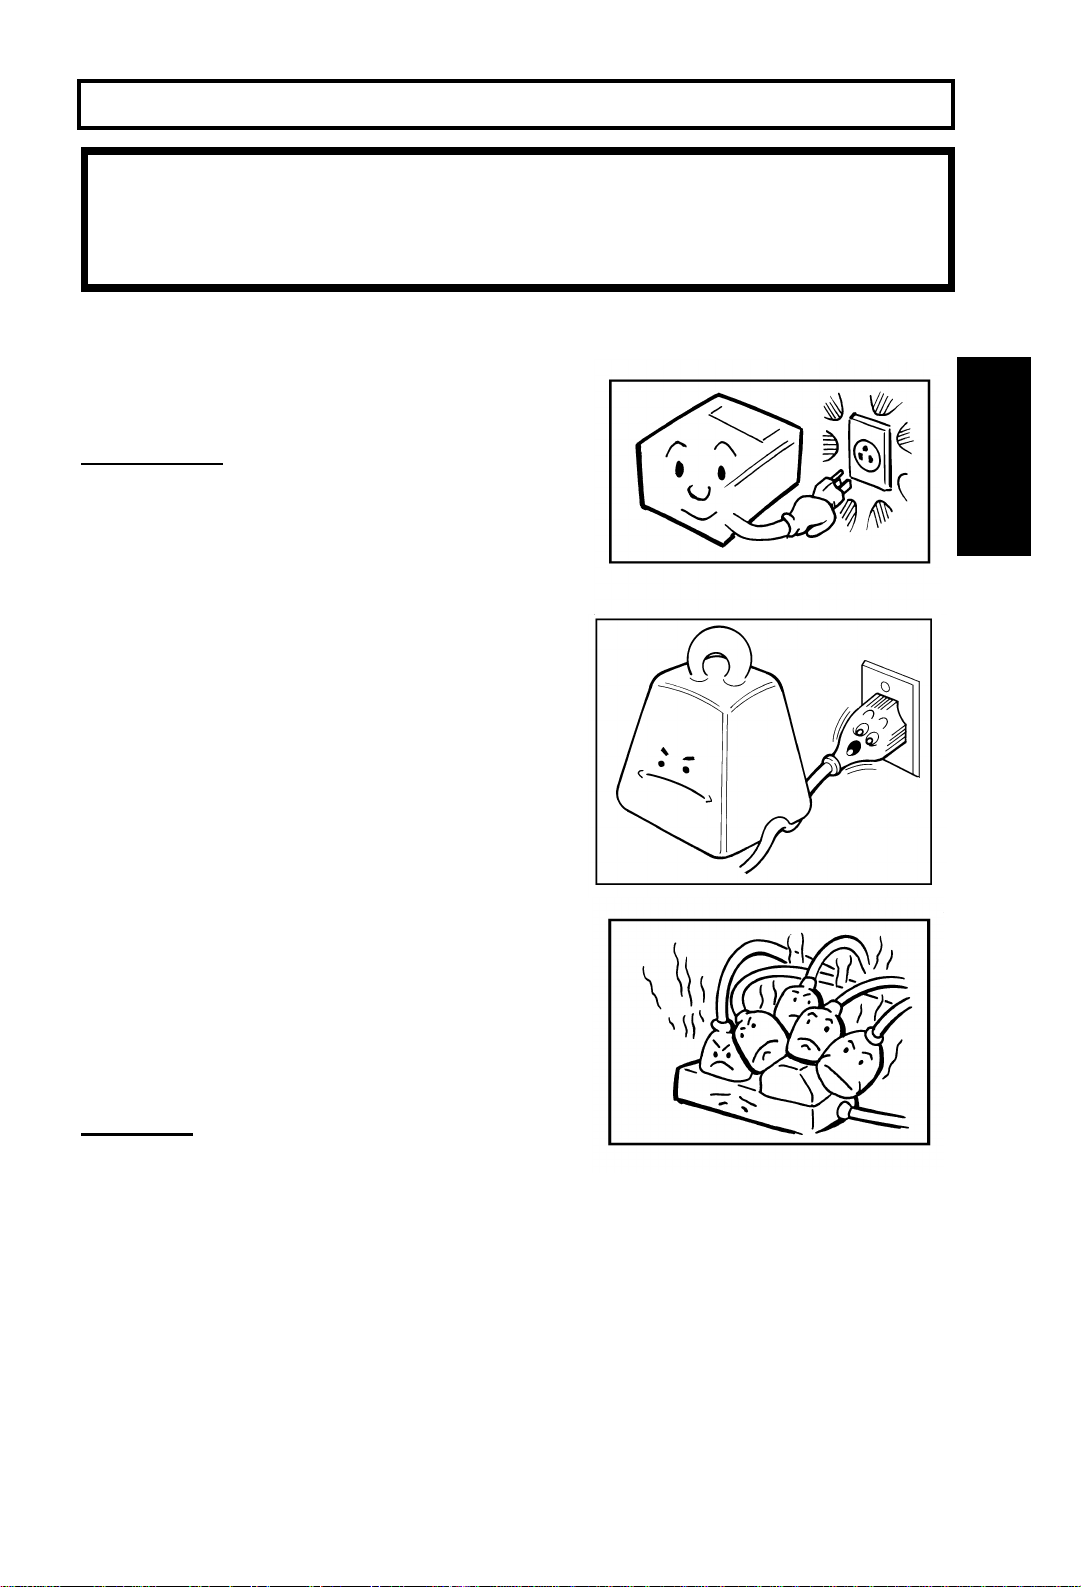
IMPORTANT SAFETY INSTRUCTIONS
In addition to the warnings and cautions included in the text of this manual, please
read and observe the following safety instructions.
1. Read all of these instructions.
2. Save these instructions for later use.
3. Follow all warnings and cautions marked on the product.
4. Unplug this product from the wall outlet before cleaning. Do not use liquid
cleaners or aerosol cleaners. Use a damp cloth for cleaning.
5. Do not use this product near water, for example, near a bath tub , w ash bowl ,
kitchen sink or laundry tub, in a wet basement or near a swimming pool.
6. Avoid using a telephone (other than a cordless type) during an electrical storm.
There may be a remote risk of electric shock from lightning.
7. Do not use a tele ph one in the vicinity of a gas leak to report the leak.
8. Do not place this product on an unstable cart, stand, or table. The product may
fall, causing serious da mage to the product or injuring the user.
9. Slots and openings in the cabinet and the back or bottom are provided for
ventilation; to ensure reliable operation of the product and to protect it from
overheating, these openings must not be blocked or covered. The openings
should never be bl ocked by placing the pr oduct on a bed, sofa , rug, or other
similar surface. This product should not be placed in a built-in installation
unless proper venti lation is provided.
10. This product should be operated from the type of power source indicated on
the marking label. Using a different power source may result in injury or
accident. If you are not sure of the type of power available, consult an
authorized sales person or your local power company.
11. This product is equipped with a 3-wire grounding type plug, a plug having a
third (grounding) pin. This plug will only fit into a grounding-type power outlet.
This is a safety feature. If you are unable to insert the plug into the outlet,
contact your electric ian to replace your obsolete outlet. Do not defeat the
purpose of the grounding type plug (This does not apply in countries in which
the 2-wire, no n- g r ou nd ed type of plug is used) .
12. Do not allow anything to rest on the power cord. Do not locate this product
where persons will walk on the cord.
13. If an extension cord is used with this product, make sure that the total of the
ampere ratings on the prod ucts plugged into the exten s ion cor d do es no t
exceed the extension cord ampere rating.
14. Never push objects of any kind into this product through cabinet slots as they
may touch dangerous voltage points or short out parts that could result in a
risk of fire or electric shock. Never spill liquid of any kind on the product.
15. Do not attempt to service this product yourself, as opening or removing covers
may expose you to dangerous voltage points or other risks. Refer all servicing
to qualified service person nel.

16. Do not take ap ar t or att em p t an y mo difications to this machin e. There is a risk
of fire, electric shock , ex plosion or loss of sight.
17. Do not incin er a te used ton er or to ne r cont ai n ers . Toner dust might ignit e wh en
exposed to open flame. Dispose of the used toner containers according to
local regulations for plastics.
18. Unplug this product from the wall outlet and refer servicing to qualified service
personnel under the following conditions:
A. When the power cord or plug is damaged or frayed.
B. If liquid has been spilled into the product.
C. If the product has been exposed to rain or water.
D. If the product does not operate normally when the operating instructions
are followed. Adjust only those controls that are covered by the operating
instructions since improper adjustment of othe r cont rols may resu lt in
damage and will often required extensive work by a qualified technician
to restore the product to normal operation.
E. If the product has been drop pe d or the cabinet has been damaged .
F. If the product exhibits a distinct change in performan ce, indicating a need
for service.

Table of Contents
INTRODUCTION 1
WHAT DOES A FAX MACHINE DO? 1
TELEPHONE LINE PROBLEMS AFFECT FAX COMMUNICATION 1
HOW TO USE THIS MANUAL 2
MANUAL OVERVIEW 2
CONVENTIONS 3
Keynames 3
Displays 3
Symbols 4
Accessing Previously Used Functions 4
GENERAL PRECAUTIONS 5
POWER AND GROUNDING 5
COLD WEATHER POWER-UP 6
THUNDERSTORMS 6
COPY PAPER 7
TONER CARTRIDGES 7
OPERATING PRECAUTIONS 7
GENERAL 8
GUIDE TO COMPONENTS 9
OPERATION PANEL 10
ROUTINE OPERATION 12
SENDING A FAX MESSAGE 12
Precautions Concerning Unacceptable Document Types 12
Transmission Procedure at a Glance 14
Cancelling a Memory Transmission 22
Sending a Page wit h Very Fine Detail 23
Dialing with the Telephone Directory 26
Optional Featur e s fo r Transmission 27
Sending Quickly (Immediate Transmission) 34
Changing Transmission Mode 34
Using the Stamp 36
Redialing 37
RECEIVING FAX MESSAGES 39
Selecting the Reception Mode 39

Receiving Fax Messages When There is a Problem 40
TELEPHONE CALLS 42
Making a Telephone Call 42
Answering the Telephone 44
Phoning and Faxing on the Sam e Ca ll 44
Speaker and Buzzer Volume Adjustments 45
ADVANCED FEATURES 46
NETWORKING 46
Overview 46
What Networking Features Does This Machine Have? 47
Preparing the M ach i ne for N et w or kin g Op er a ti o ns 48
Transfer Request 51
Combining Transfer Request with Broadcasting 54
Multi-step Transfer 55
Your Machine as a Transfer Station 56
Tra nsf er Re qu est by Tonal Signals 56
TRANSMISSION 61
Programming Keystrokes 61
Sending Confidential Mes sages 66
Storing an Often Used Document (Auto Document) 68
Storing an Auto Document 69
Changing the Con tent s of Aut o Do cume nt 72
Erasing an Auto Docu men t or La bel 73
Restricting Access to the Machine 75
Tonal Signals 81
Dialing with the Dial Option Key 83
Storing Part of a Number 85
Specified Image Area (Function Upgrade Card Required) 86
Label Insertion 88
Closed Network (Transmission) 89
Protection A gai nst Wrong Connections 90
ECM (Error Correction Mode) and Page Retransmission 91
Batch T ransmi ssion 92
Well Log Transmission 93
RECEPTION 94
Receiving Confidential Reception 94
Locking Incoming Messages (Memory Lock) 98
Rejection of Messages from Unidentified Senders 103
Authorized Reception 104
Forwarding 108
Specified Cassette Selection (Optional Paper Feed Unit Required) 114
Wild Cards 118
Reverse Order Printing 119
Multi-sort Document Reception 120
Printing a Ce nt er M ar k 124

Checkered Mark 125
Reception Time 126
Reducing the Page Length 127
Two in One 128
Closed Network (Reception) 129
OTHER 130
Calling to Request a Message (Polling) 130
File Management 137
User Function Keys 143
OMR Sheets 146
Saving Energy 156
Night Timer 158
Counters 161
Communication Result Display 161
PC Printer Mode (Printer Interface Required) 162
Copying 163
Dual Access 164
RDS (Remote Diagnostic System) 165
AI Short Protoco l 166
REPORTS 167
AUTOMATICALLY PRINTED REPORTS 167
Report Formats 168
Printing a Sample of Data on the Reports 170
USER-INITIATED REPORTS 171
Descriptions of Available Reports 171
Print the Personal JOURNAL 172
LOOKING AFTER THE MACHINE 176
LOADING PAPER 176
Loading Paper in the Main Cassette or the Optional Front Paper
Feed Unit 176
Loading Paper in the Opt i on al Sid e Pa per Feed Unit (Optiona l) 177
CHANGING THE PAPER SIZE 178
Changing the Pape r Si ze in th e M ai n Cassette or the Optional Front
Paper Feed Unit 178
Changing the Paper Size in the Optional Side Paper Feed Unit 180
REPLACING THE TONER CASSETTE AND CLEANING PAD 182
Replacement Procedure 182
REPLACING THE STAMP 184
CHANGING THE PAPER SIZE (OPTIONAL CASSETTE) 185
USER MAINTENANCE PROCEDURES 188
User Maintenance Table of Cleaning 188
User Maintenance Procedure of Cleaning 189
Cleaning the Corona Wire 192
User Maintenance Procedure for Replacing 194

The Front Paper Feed Unit 199
The Side Paper Feed Unit 200
SOLVING PROBLEMS 201
DOCUMENT JAMS 201
Clearing a Document Jam 201
Adjusting the Document Feeder 202
COPY JAMS 203
Cassette Entrance 203
Copy Feed Area 204
Copy Exit Area 206
Copy Jams with the O pt i on al R emo vab l e C asse tt e (Cassette Area) 207
Paper Jams in the Optional Front Paper Feed Unit 208
Paper Jams in the Optional Side Paper Feed Unit 209
COMMUNICATION PROBLEMS 210
OPERATING DIFFICULTI ES 21 1
DISPLAYED ERROR MESSAGES 215
ERROR CODES 217
CALLING AN AUTHORIZED SERVICE REPRESENTATIVE 219
DEDICATED TRANSMISSION PARAMETERS 219
TECNICAL REFERENCE 220
STORING TELEPHONE NUMBERS 220
STORING NAMES AND LABELS 220
Punctuation Marks and Symbols 221
Shift Key 221
Cursor and Clear Key for Editing 221
IF YOU MAKE A MI STAKE 221
ON/OFF SWITCHES AND USER PARAMETERS 222
On/Off switches 222
User Parameter Settings 223
SPECIFICATIONS 229
APPENDIX A 230
PROGRAMMING FAX ON DEMAND (OPTIONAL FAX
ON DEMAND KIT REQUIRED) 230
Storing and Labeling a Document 230
Editing Documents 232
Erasing a Fax on Demand Docum en t or i ts Nam e 233
PRINTING A FAX ON DEMAND LIST 234
PRINTING A FAX ON DEMAND DOCUMENT 234
STORING THE FAX ON DEMAND RECORDED MESSAGES 235
Recording a Message 235
How Callers Use Fax on Demand 237
PRINTING FAX ON DEMAND INFORMATION SERVICE REPORT 238

APPENDIX B 239
DISK FILES (HARD DISK AND
FUNCTION UPGRADE CARD REQUIRED) 239
Reception to Disk File 239
Switching Reception to Disk File On/Off 239
Programming a List of Senders to Treat Differently 240
Choosing How to Treat the Programmed S en de rs 241
Erasing Disk Files 242
Erasing a File 247
PRINTING DISK FILES 248
Printing a List 248
Print a Document 253
APPENDIX C 254
PAPER FEED UNIT 250
Operation 250
Maintenance 250
Copy Jams 250
APPENDIX D 255
FEATURE EXPANDER TYPE 140 80M
General 255
Operation 255
III
255
APPENDIX E 256
ISDN INTERF ACE UNIT TYPE 140III 256
Introduction 256
Setting up the Gr ou p 4 In te r fa c e 257
Operation 261
Troubleshooting 268
DUAL COMMUNICATION (ISDN Interface Unit Type 140III or G3
Interface Unit Type 140 Required) 269
Overview 26 9
Line Type Selection 270
APPENDIX F 271
INSTALLING THE MACHINE 271
Location 271
Attaching the D o cum e nt Table and Document Tray 272
Installing the Machine Cover 273
Installing the Photoconductor , Cleaning Pad and Toner Cassette 274
Rotatable Operation Pa nels 276

Connecting the Machine 277
Loading Paper in the Cassette 278
Installing Removable Cassette and Loading Paper (Option) 280
Attaching the Optional Handset 273
Installing Optional Memory Card, Function Upgrade Card,
and Fax on Demand 283
Using Manual Feed 284
BEFORE YOU SEND YOUR FIRST FAX 285
Some Items Must be Programmed First 285
QUICK DIAL, SPEED DIAL, AND GROUP DIAL 291
Three Convenient Ways to Dial 291
Programming Quick Dial 293
Programming Speed Dials 296
Programming Groups 300
Storage Capa city for Telephone Num be r s 305
DEALING WITH JUNK FAX MAIL 307
OTHER ITEMS TO PROGRAM AT YOUR LEISURE 307
GLOSSARY 308
INTRODUCTION
Thank you for purchasing this product. This multi-function office machine offers a
wide range of fax, printer, and convenience features (Some of these features are
optional).
WHAT DOES A FAX MACHINE DO?
When you write a letter, y ou normally seal it in an envelope, attach a stamp, and post it in the
nearest mail box. Then, in a few days, depending on the postal service, the letter will arrive at its
destination. However, you may not be aware of its arrival until you get a return letter.
A fax machine speeds up this process. After you have written your letter, place it face down in your
fax machine’s document feeder, dial the destination’s fax number, then press the Start key.
The fax machine scans your letter, and converts it into a series of black and white dots (the number
of dots that there are across and down the page depends on the resolution that you selected; refer
to the specifications section of this manual for details). This series of dots is transformed into an
electrical signal and sent out over the telephone line to the destination fax machine.
The receiving fax machine reconstructs your letter from the incoming signal, and prints it.
If you are worried about whether the message arrived at the destination, you can check a report
called the Journal. When you print this report, you will see the results of the most recent fax
communications made by your machine.
INTRODUCTION
You can use your fax machine to send and receive many types of documents, even photographs.
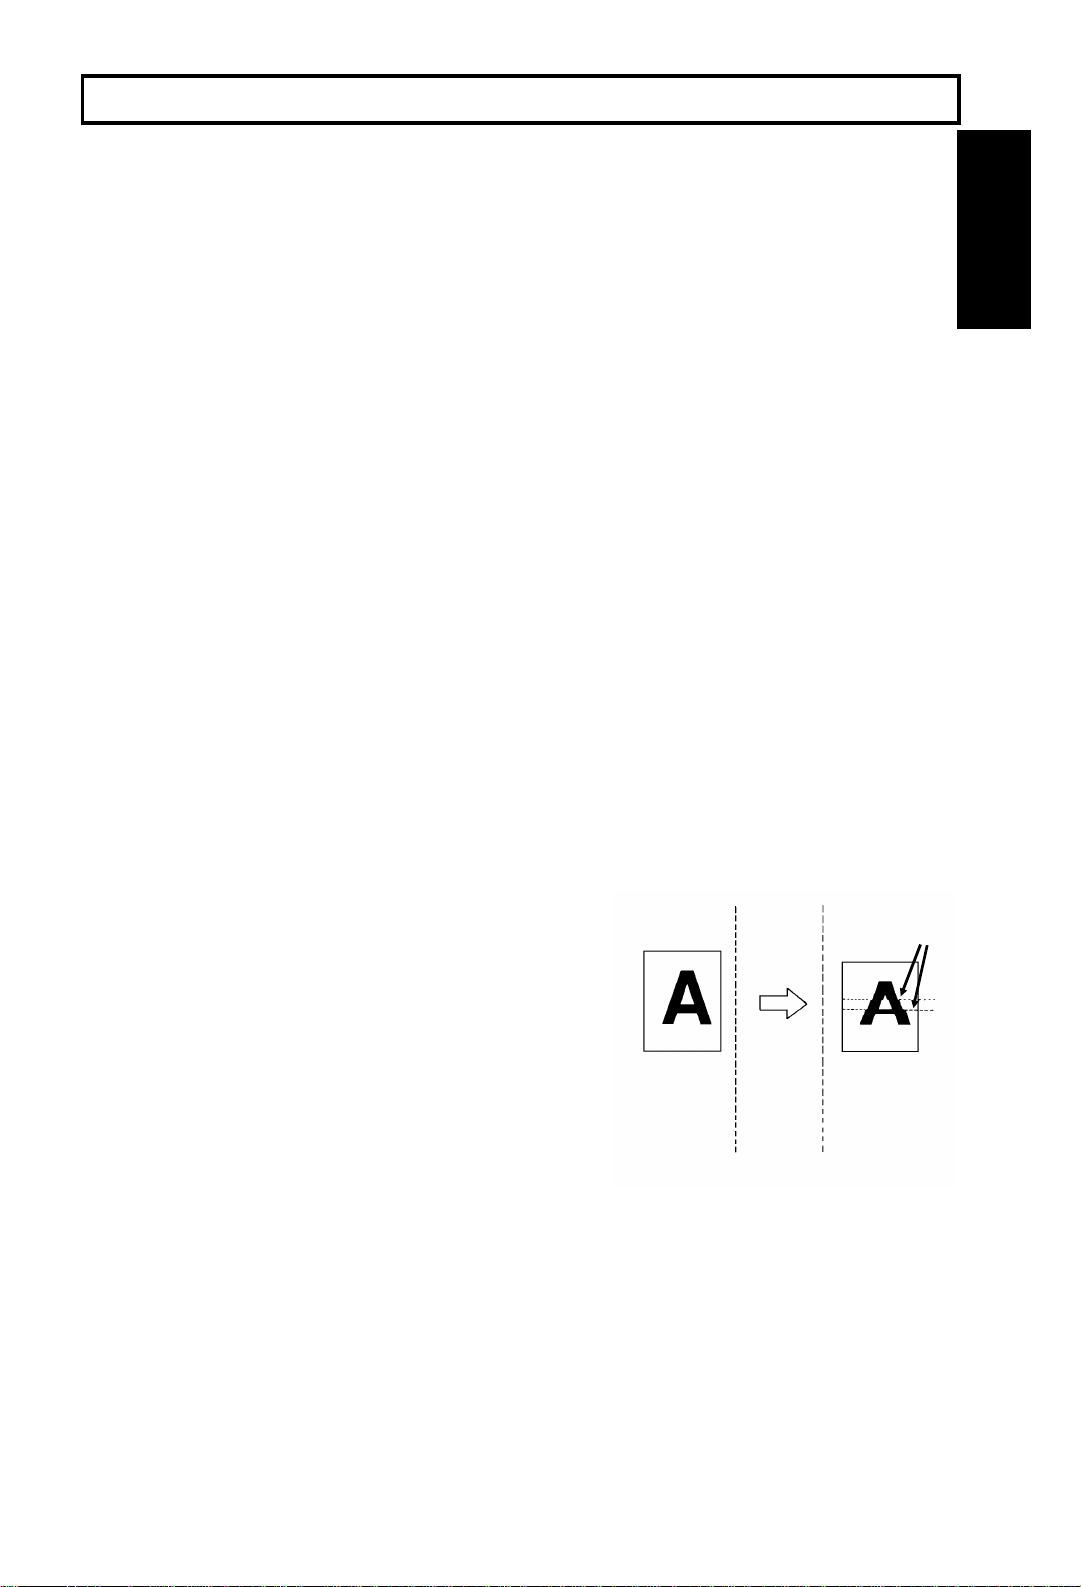
TELEPHONE LINE PROBLEMS AFFECT FAX COMMUNICATION
Quick and accurate transmission of fax messages depends
on the condition of the telephone line. If the line condition is
very good, this machine will transmit a letter-size page in
about 6 seconds. However, if the line is noisy, the speed
may be reduced significantly, and the data may be
damaged.
The symptoms of data loss caused by a noisy telephone
line are seen on the printouts of received messages. An
example is shown opposite. Note that lines are missing
from the page at the indicated locations. ECM (Error
Correction Mode) is an effective countermeasure against
this type of error; you have the choice of having the ECM
feature switched on or off. It is switched on before the
machine leaves the factory. (Refer to page 96 for more
information about ECM).
The line condition is affected by the weather; thunderstorms can cause electrical noise on
telephone lines.
In addition, the quality and condition of switching equipment used by your phone company can
affect fax communication.
Document
Transmit
Received
Message
Errors
1

HOW TO USE THIS MANUAL
MANUAL OVERVIEW
Your facsimile machine is equipped with a wide range of labor-saving and
cost-saving features. This manual explains each of these features, and how you
can put them to use. Note that the external appearance of the machine in some
illustrations may be slightly diff erent from the actual machine.
The manual consists of the following sections.
❐ How to Use this Manual - This is the section that you are now reading. It
contains an overview of the manual and the conventions used by the authors. It
also contains quick reference sections on how to input telephone numbers and
names, and how to correct errors that you may inadvertently make when
operating th e m ach ine.
❐ General Precautions - This section lists precautions that you should keep in
mind when operating the machine. Read this section before you begin to use
your machine.
❐ Guide to Components - This contains a diagram that shows where the main
components of your machine are situated.
❐ Operation Panel - This describes the functions of the various buttons and
indicators that are on your machine’s operation panel.
❐ Routine Operation - This section describes the features and settings that you
will normally be using every day.
❐ Advanced Features - This section explains how to tak e advantage of the
special features of your fax machine, including how to set up networks for
economical distrib ut i on of fax messages over long distances.
❐ Reports - This section explains the re po rts that the ma chi n e ge ne rates.
❐ Looking After the Machine - This section shows you what to d o when
consumable supplies run out. The user maintenance procedure in this section
should be done every six months if you want to keep your machine in top
condition.
❐ Solving Problems - If your machi ne cann ot com municate, or i f it ge ne rates
error codes or experiences paper jams, refer to this section. Man y routine
problems can be solved without a service call.
❐ Specifications - This is a list of technical capabilities of your machine.
❐ Appendices A to E - These describe fax on demand, memory disk file, the
paper feed unit, the ISDN G4 kit and the hard disk.
❐ Appendix F- Installing the Machine - This section explains how to install the
machine and connec t it to the telephone line. It also explains the best type of
place to install your machine. And this section also explains the things that you
have to do before you can send your first fax message and lists important
features that will make faxing more convenient.
❐ Quick Reference Guide - This indicates how to use this machine at a glance.
2
HOW TO USE THIS MANUAL CONVENTIONS
CONVENTIONS
The following conv entions were used when writing this manual.
Keynames
These have been printed in a bold typeface.
For example: Whe n you see a command in b ol d such as "Start " means "Press
the Start key on the operation panel".
If you see something like "# x 3", this means th at you have to press the # key 3
times.
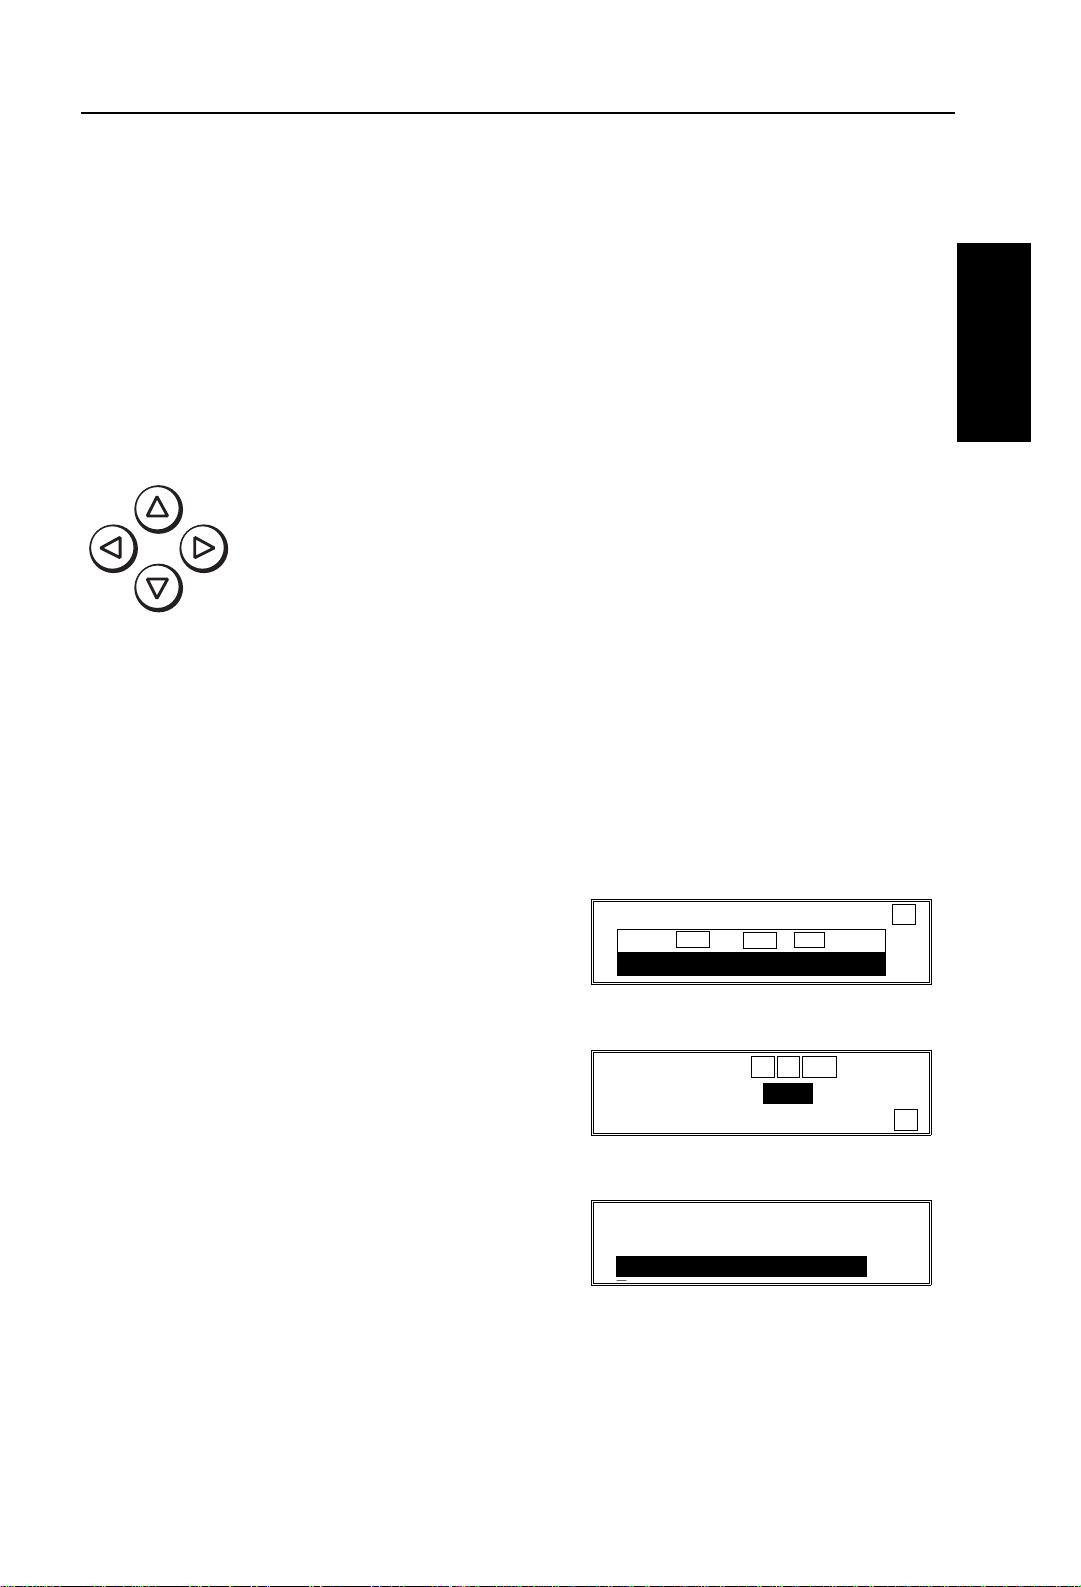
On the operation panel, there are four arrow keys (up, down, left,
right). This is the scroll key. It is often used in the operating
procedures to gain access to various features. For example, if you
see V in the manual, you are being asked to press the
right-pointing arrow (V) on the scroll key.
Displays
Messages seen on the displ ay are shown in a larger box, normally on the right
hand side of the p ag e, directly oppo site th e step that brought i t u p o n t he scr ee n.
After f ol lowing a step in a procedure, check the displ ay to see if it corresponds to
the one in the manual. This may help you to check whether you are following the
procedure successfull y. The following examp l es sh ow three common typ es of
display.
Example A: The keys that can be p r esse d
are shown on the scr ee n i n smal l boxes. In
this e xamp le , y ou can pr ess th e Yes, No, or
Clear keys or down arrow (T) on the scroll
key.
MEMORY TRANS. OPTIONS
PRESS YES OR CLR
2125551234
_
NO
•
↓
HOW TO USE
THIS MANUAL
Example B: The choices of settings f o r a
feat ur e ar e sh own on the scre en . The
current setting is indicated ( It is set ON). If
you press the W or V on the scroll key, the
setting will be changed to OFF.
Example C: The ABC in the bottom right of
the display indicat es let ters (using the Quic k
Dial Keys) or numbers (using the ten-key
pad on the opera ti o n pa ne l ) can be ent er e d.
OPTION SELECT
AUTO REDUCE ON OFF
TTI
QUICK DIAL ENTER LABEL
01
_ ABC
← →
YES TO END
↓
3
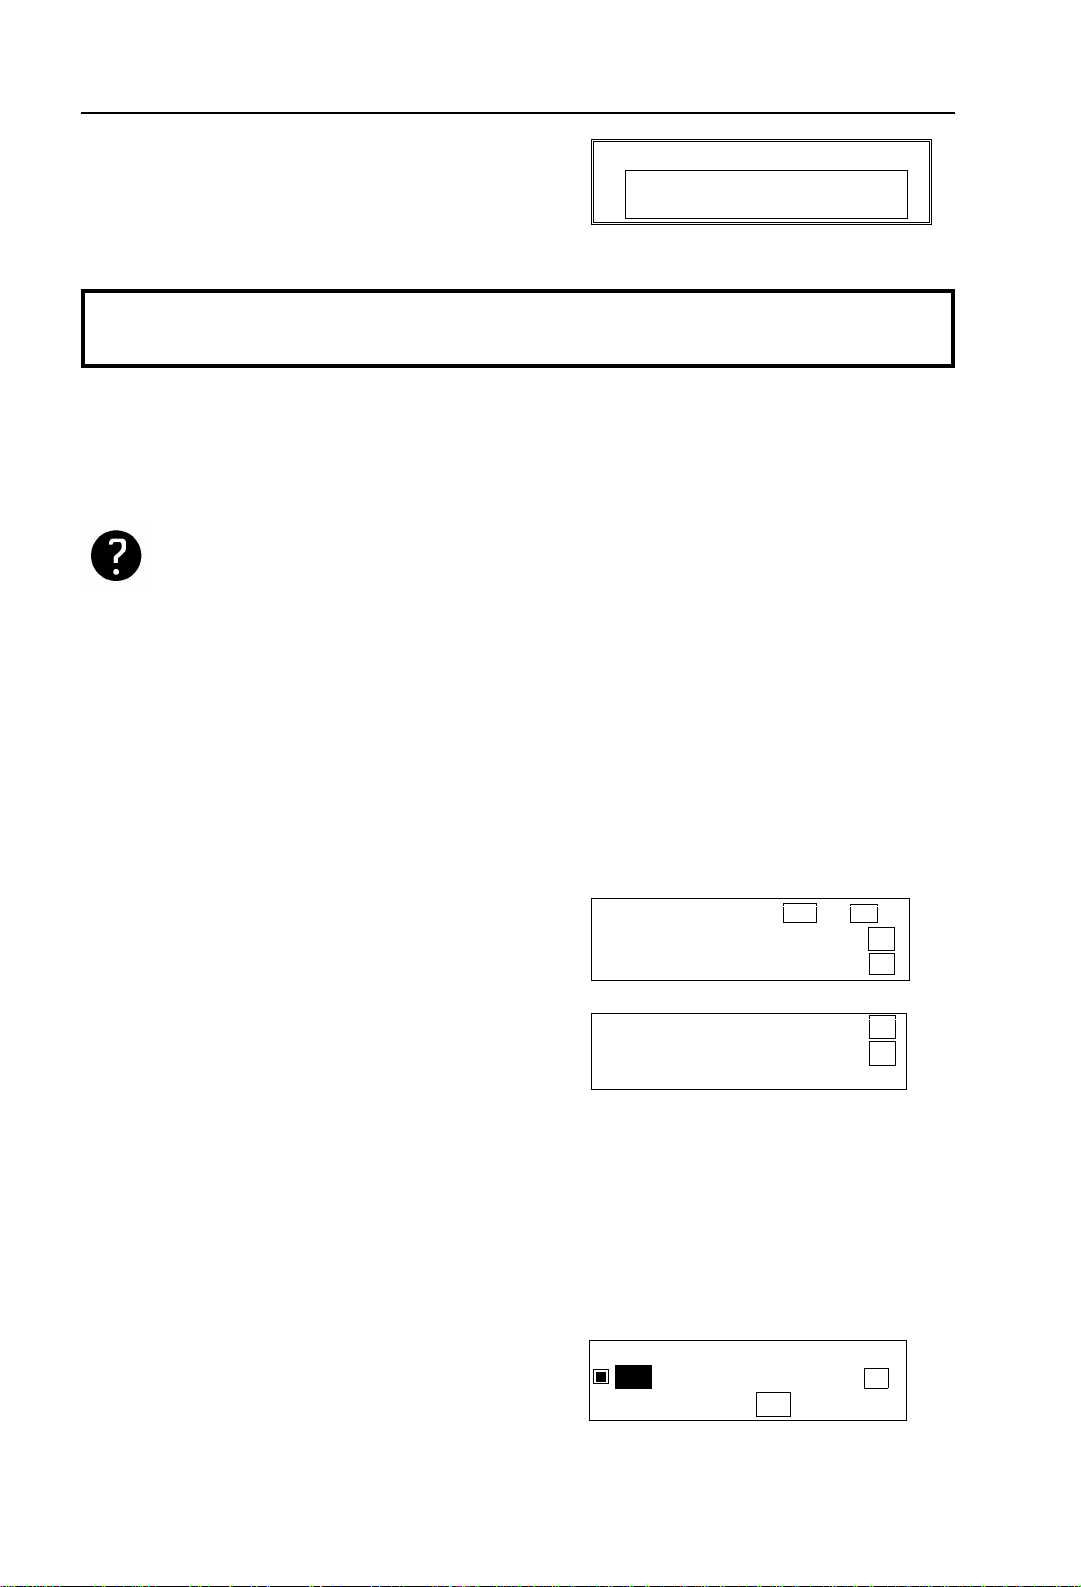
Symbols HOW TO USE THIS MANUAL
Most procedures start from standby mode,
that is, when the display is as shown on the
right. The value after "MEMORY" shows how
MEMORY TRANS. APR.4.12:12PM
SET DOC. OR ENTER FAX NO.
MEMORY 100%
much memory space is remaining.
Note: If you start a procedure and do not enter anything at the operation
panel for more than 5 minutes, the machine returns to standby mode.
Symbols
The text contains a few symbols that highlight important pionts or direct you
towards other part s of the manual that are related to the feature currently being
described.
indicates a hint (for example, indicating a page number where
related information can be found).
Accessing Previously Used Functions
When you press Function, the names of the last four functions you have used
come up in order on the display. This allows you to easily select a function that
you ha ve recently used.
Note: If you want to re-use functions 61 and above, you will still need to enter the
access code (2222) and function number after following the procedure below.
1. Press Function.
The names of the last 2 funct ions are
displayed.
2. Use the and keys to move the >>
symbol.
FUNCTION YES OR NO
>>POLLING RECEPTION
SYSTEM SET
>>QUICK DIAL PROG./CHNG
TRANSMISSION CLR/CHNG
↑
↓
↑
↓
If you press a fe w times, the
remaining 2 funct ions are displa yed.
If the function you want is not there, either:
❐ Press No.
❐ Press until th e disp l ay changes to
that shown opposite.
Then enter the function number as you
would normally.
3. Press Yes.
QUICK DIAL CHOOSE KEY
PRINT LIST
NO TO CANCEL
→
4
GENERAL PRECAUTIONS
WARNING: Do n ot attempt any main tenance or trou bleshooting othe r than
that mentioned in this manual. This machine contains a laser
beam generator and direct exposure to laser beams can cause
permanent eye damage.
POWER AND GROUNDING
Pay attention to the following.
Power Supply
1. P o w er req uire men ts: 115 V, 60 Hz
2. Insert the power plug securely into the
wall socket.
3. Make sure that the wall outlet is near the
machine and readily accessible.
4. Do not connect other equipment to the
same socket.
5. Do not step on or set anythin g on the
power cord.
6. Do not connect other equipment to the
same extension cord.
7. Be sure that the power cord is not in a position where it would trip someone.
8. The wall outlet must be easily accessible.
GENERAL
PRECAUTIONS
Grounding
Ground the machin e and the lightning
protection circuit in acc ordance with regulations. Do not ground to gas or water
pipes, or to a telephone ground plug. Proper grounding is to the ground terminal
of the power outlet. Be sure that the ground terminal of the power outlet is
properly grounded.
The lightning protection circuit f or th e m ach ine requ i r es th e mach ine to be
properly grounded. If proper grounding is provided, about 90% of lightning
damage can be prevented. For safety, be sure to connect the machine to a
three-prong grounded outlet.
5

COLD WEATHER POWER-UP GENERAL PRECAUTIONS
COLD WEATHER POWER-UP
Avoid raising the room temperature abruptly
when it is below 57°F, or condensation may
form inside the machine .
1. Raise the room temperature to 68°F at
less than 18°F per hour .
2. Wait for 30 to 60 minutes.
3. Turn the power on.
Do not use the machine near a humidifier.
THUNDERSTORMS
With proper g r ou nd i ng , ab ou t 90 % of lightning
damage can be prevented. However, if
possible, du ring severe electric storms, turn
the power switch off and disconnect the po w er
cord and telephone line cord.
Note: All fax messages stored in the
memory may be erased if power is
switched off for more than an hour.
6

GENERAL PRECAUTION COPY PAPER
COPY PAPER
❐ 16 to 24 lb. copy paper is recommended: letter or legal sizes are the most
commonly used.
❐ Do no t use damp paper, or copies will be defective.
❐ Do not touch copy paper if your fingers are w et or oi ly ; fingerprints may appear
on the copy.
❐ Keep paper in a vinyl bag if it will not be used for a lon g time.
❐ Store in a cool dry place.
❐ Store flat. Do not stand upright.
❐ The following materials cannot be used in the paper trays: Post cards, Tracing
paper, OHP sheets, Adhesive labels.
❐ Do not overloa d th e pa pe r t rays.
❐ If multi-sheet f e ed ing occur s or do g-e ar e d cop i es are ma de when usi ng
recycled paper in the paper tray, fan the recycled paper and load it in th e pape r
tray ag ai n .
TONER CARTRIDGES
❐ Store in a cool, dark place.
❐ Never store whe r e th ey may be exposed to he at .
❐ Keep out of the reach of children.
❐ Do not eat toner.
❐ Do not lay heavy objects on toner car tridges.
❐ Do not incinerate toner o r to ne r con ta i ne r s . Toner dust may cause flashback
when exposed to an open flame.
OPERATING PRECAUTIONS
GENERAL
PRECAUTIONS
❐ While the machine is in operation, do not turn off the main switch or unplug the
power cord.
❐ Keep corrosive liquids, such as acid, of f the machine.
❐ Do not allow paper clips, staples, or other small metallic objects to fall inside
the machine.
❐ The fusing unit may be very hot. Be careful when handling it.
7
GENERAL GENERAL PRECAUTIONS
GENERAL
❐ Read the Important Safety Information at the front of this manual.
❐ Since some parts of the machine are supp lied with high voltage, make sure
that you do not att emp t any repairs or attempt to access any part of the
machine except those described in this manual.
❐ Do not make modifications or replacements other than those mentio ned in this
manual.
❐ When not using the machine for a long period, disconnect the power cord.
OZONE
The machine generates ozone dur i ng operation. Normally, the ozone level is safe
for operators. However, dur ing a long copy run or while printing a long message,
ozone odor may appear; in such a case, ventilate the room.
WARNING:
This symbol is intended to alert the user to the presence of
important operating and maintenance (servicing)
instructions in the literature accompanying the machine.
This symbol is attached to some components to alert the
user not to touch them, because the y may be very hot.
8
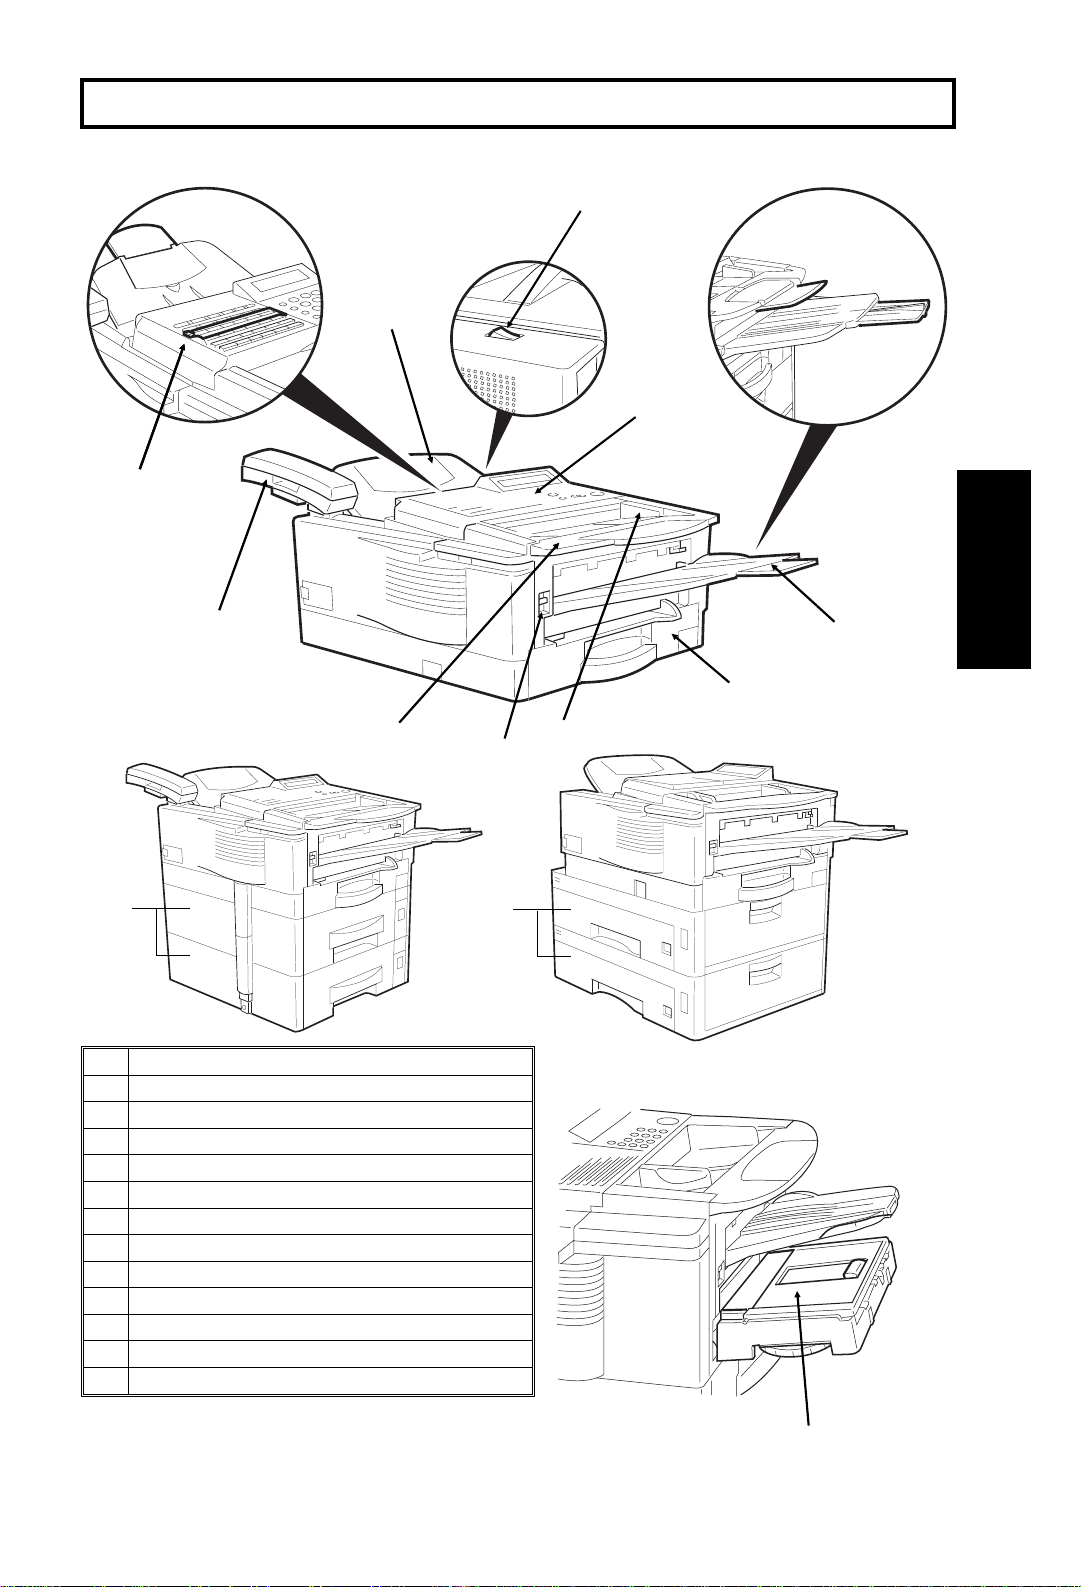
GUIDE TO COMPONENTS
2
1
3
4
10
9
11
1 Quick Dial Key Flip Plate
2 Document T ray
3Power Switch
4 Operation Panel
5Copy Tray
6 Paper cassette
7 Document Guide
8 Front Cover Release Button
9 Document T able
10 Optional Telephone Handset
11 Optional Front Paper Feed Unit
12 Optional Side Paper Feed Unit
13 Optional Removable Cassette
12
GUIDE TO
5
COMPONENTS
6
7
8
13
9
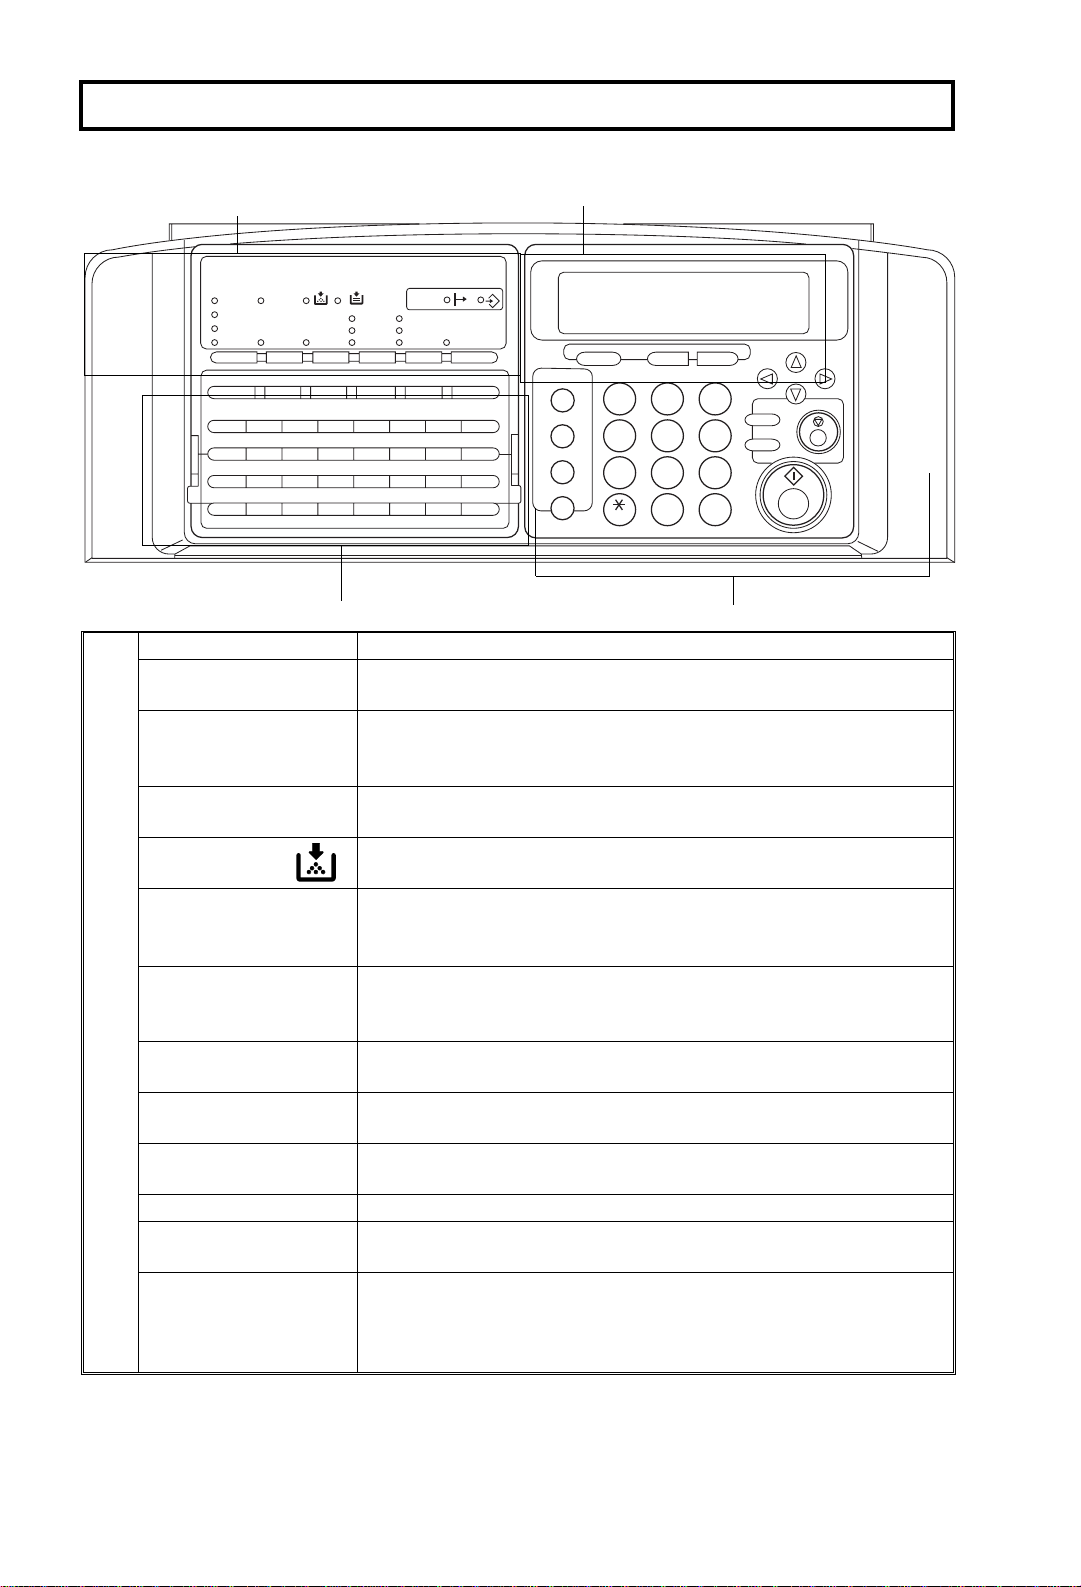
OPERATION PANEL
01 02 03 04 05 06 07 08
ABCDEF GH
09 10 11 12 13 14 15 16
IJKLMNOP
17 18 19 20 21 22 23 24
QRST U VWX
25 26 27 28 29 30 31 32
YZ
1.
Communicating
Indicator
Receive File
Indicator
Check Display
Indicator
Add T oner
Indicator
Add Paper Indicator
1
Communi-
Check Display
cating
Receive File
Auto Receive
Manual
Receive
F1 F2 F3
2
PC Printer
Option
Standard
Darken
Detail
Normal
LightenHalftoneG4
F4 F5
Space
3
Lights when a fax message is being transmitted or received
Lights when an incoming message was received into memory.
Blinks when confidential reception file or memory lock file is
stored in the memory.
Lights when some error occurs. See the instruction appearing on
the display.
Blinks when the toner cartridge is almost empty, and lights when
it is empty.
Lights when a cassette is empty.
Memory
Fine
Stamp
ShiftSymbol
Speed Dial/
Tel Directory
Pause/AI Redial
On Hook Dial
Clear
C
Function
1
4
GHI JKL MNO
PRS TUV WXY
Yes
No
32
ABC DEF
6
5
97
8
0
#
OPER
Energy Saver
Copy
Stop
Start
4
10
d
PC Printer Option
Indicators
These indicators are only used when the optional Printer
Interface Kit is installed. See the operation manual for the Printer
Interface Kit for full details.
Reception Mode
Press to select Auto Receive or Manual Receive.
Selector Key
Contrast
Press this to select either Darken, Normal or Lighten
Selector Key
Resolution Selector
Key
Press this to select either Standard, Detail, or Fine transmission
mode.
Halftone Key Press this to use halftone transmission mode.
G4 Selector
Key/Indicator
Press to select G4 mode. When this indicator is not lit, G3 is
selected.
Memory Key If the indicator is lit, your document will be stored before
transmission. If it is not lit, your document will be sent
immediately without being stored. Press the key to change the
mode.

OPERATION PANEL
2. Display Displays prompts, warnings, and selected modes.
Function Key Press to use one of the numbered functions explained in this
manual.
Yes/No Keys Use to answer questions on the display.
Scroll Key When an arrow is shown on the display, use this key to access
the options, items, or functions shown by the arrow. Also use it to
move the cursor when programming or editing a displayed item.
3. Quick Dial Keys Each of these can be programmed with a telephone number, a
group, or a keystroke program. You can also use these keys to
type names and labels such as the RTI and TTI.
To access keys 01 to 32, flip the number plate down.
To access keys 33 to 64, flip the number plate up.
User Function Ke ys Each of these can be programmed for rapid access to frequently
used features. If the light under a key is on, the feature can be
used.
Stamp Key Press to enable or disable the transmission/scanning verification
stamp feature.
4. Speed Dial/T el
Directory Key
Pause/AI Redial Key Press this if you need to insert a pause when dialing. Or press
On Hook Dial Key Press this to dial without picking up the handset.
Clear Key Use this as a backspace key during programming.
Ten Key Pad Use this as a telephone keypad, or to enter Speed Dial codes.
Energy Saver Key Hold this down a few seconds this to start or end Energy Saver
Copy Key Press this to copy the document now in the feeder.
Stop Key Press this to stop the machine and return it to standby mode.
Start Key Press this to start fax communication.
Press this to dial using Speed Dial or the Telephone Directory
Feature.
this to redial one of the last ten numbers that were dialed.
mode.
PA NE L
OPERATION
11

ROUTINE OPERATION
SENDING A FAX MESSAGE
Precautions Concerning Unacceptable Document Types
Before you send your document, make sure that it meets the following
requirements.
CAUTION: Documents that do not meet these requirements can cause your
machine to jam or may cause some components of the machine
to become damaged or dirty.
Maximum
Minimum
4.1"
5.8"
* The part shaded will not be scanned, because it is outside the
maximum scanning width range.
Correct Size fo r th e Do cum ent Fee d er
Thickness: 2 to 8 mils (20 lb paper)
Length and Width: See the above diagram.
If the page is too short, put it insid e a do cume nt carrier or enlarge it with a copier.
If the page is too long, divide it into two or more sheets.
Clearly Written
Small faint characters may not be transmitted clearly .
47.2"
11.7"
12.0"
Uniform Page Size
Do not use different sizes of docum ent i n th e same transmission.
Dry Ink
All ink must be dry before you place the document in the feeder.
12
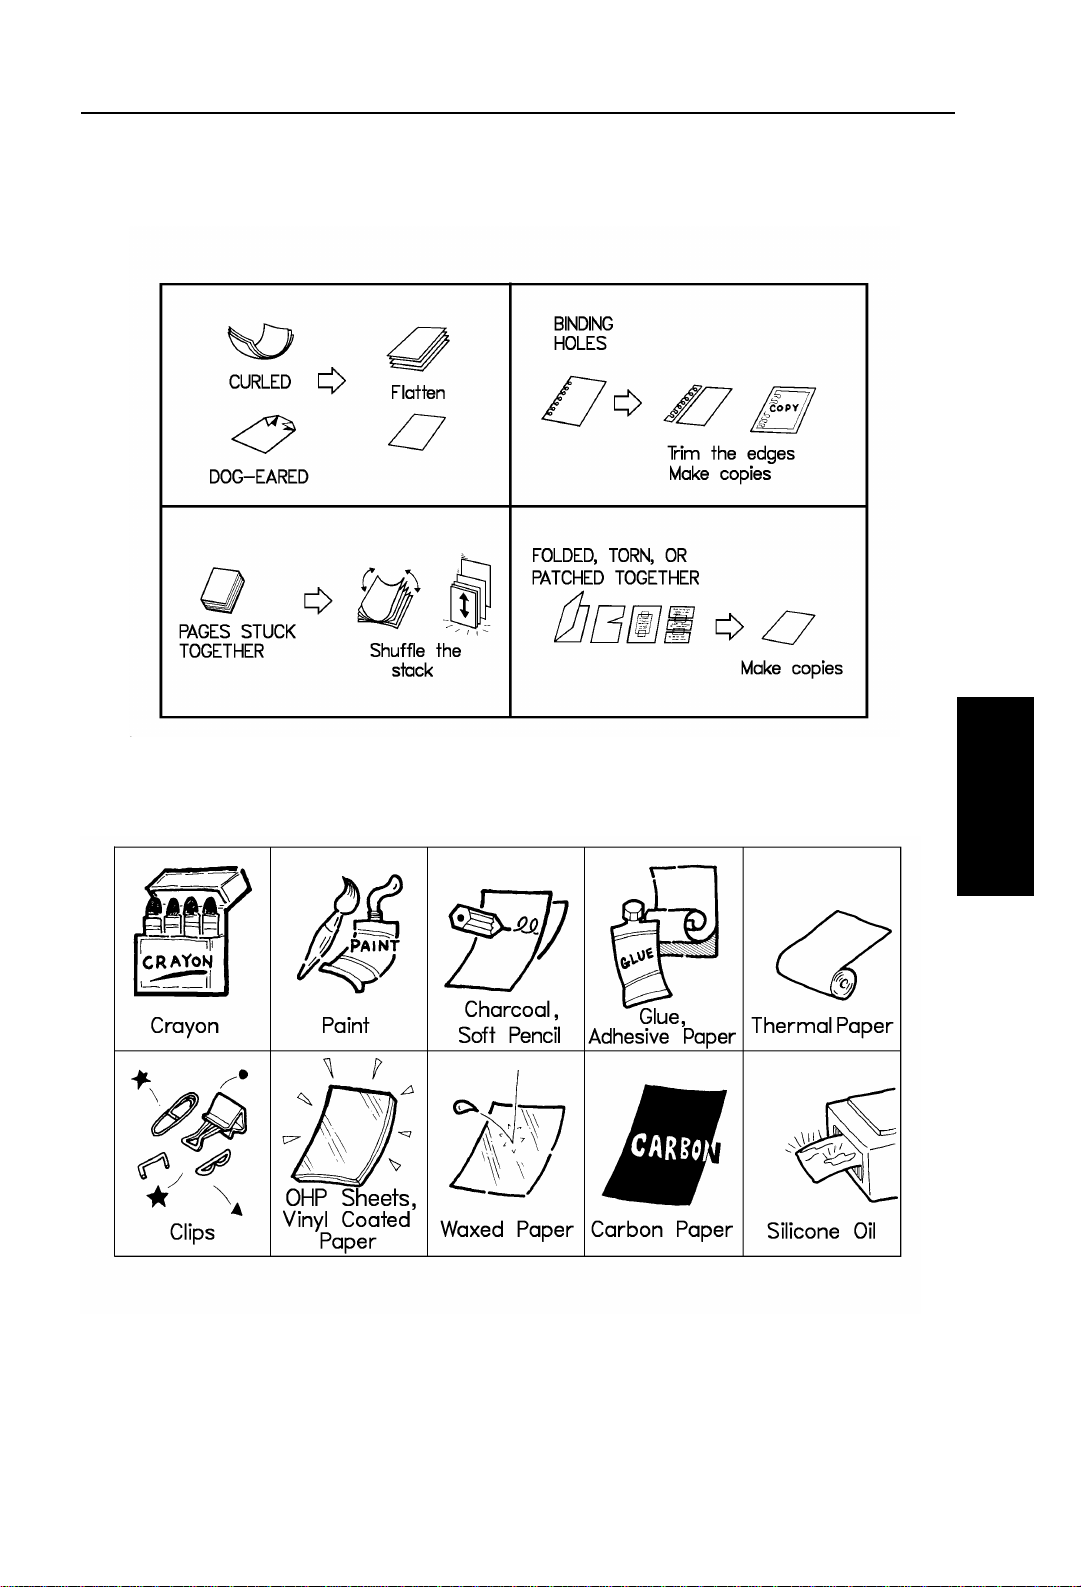
ROUTINE OPERATION SENDING A FAX MESSAGE
Page Condition
Do not place damaged pages in the automatic document feeder.
Originals that contain the following materials should not be placed in the
document feeder. Make copies of these originals and scan the copies.
ROUTINE
OPERATION
Note: Copies made with a copier that uses silicone oil may cause a misfeed. To
avoid this, do not scan such copies until five or ten minutes after copying.
13
SENDING A FAX MESSAGE ROUTINE OPERATION
Transmission Procedure at a Glance
Overview
There are two ways to send a fax message.
❐ Immediate Transmission
❐ Memory Transmission
Immediate Transmission
Immediate Transmission is convenient when:
❐ You wish to send a message immediately.
❐ You quickly wish to check whether you have successfully connected with the
other party.
❐ Your machine’s memory is getting full.
The machine dials immedi at el y af te r y o u pr e ss Sta rt (or at the specified l at er ti me,
if you used a ti m e -de l ay feature lik e Se nd La te r ). The message is scanned an d
transmitt ed pag e by page without bein g sto r ed in me mory.
14

ROUTINE OPERATION SENDING A FAX MESSAGE
Memory Transmission
Memory Transmission i s convenient because:
❐ Fax messages can be scanned much more quickly (you can take your
document away from the fax machine without waiting too long).
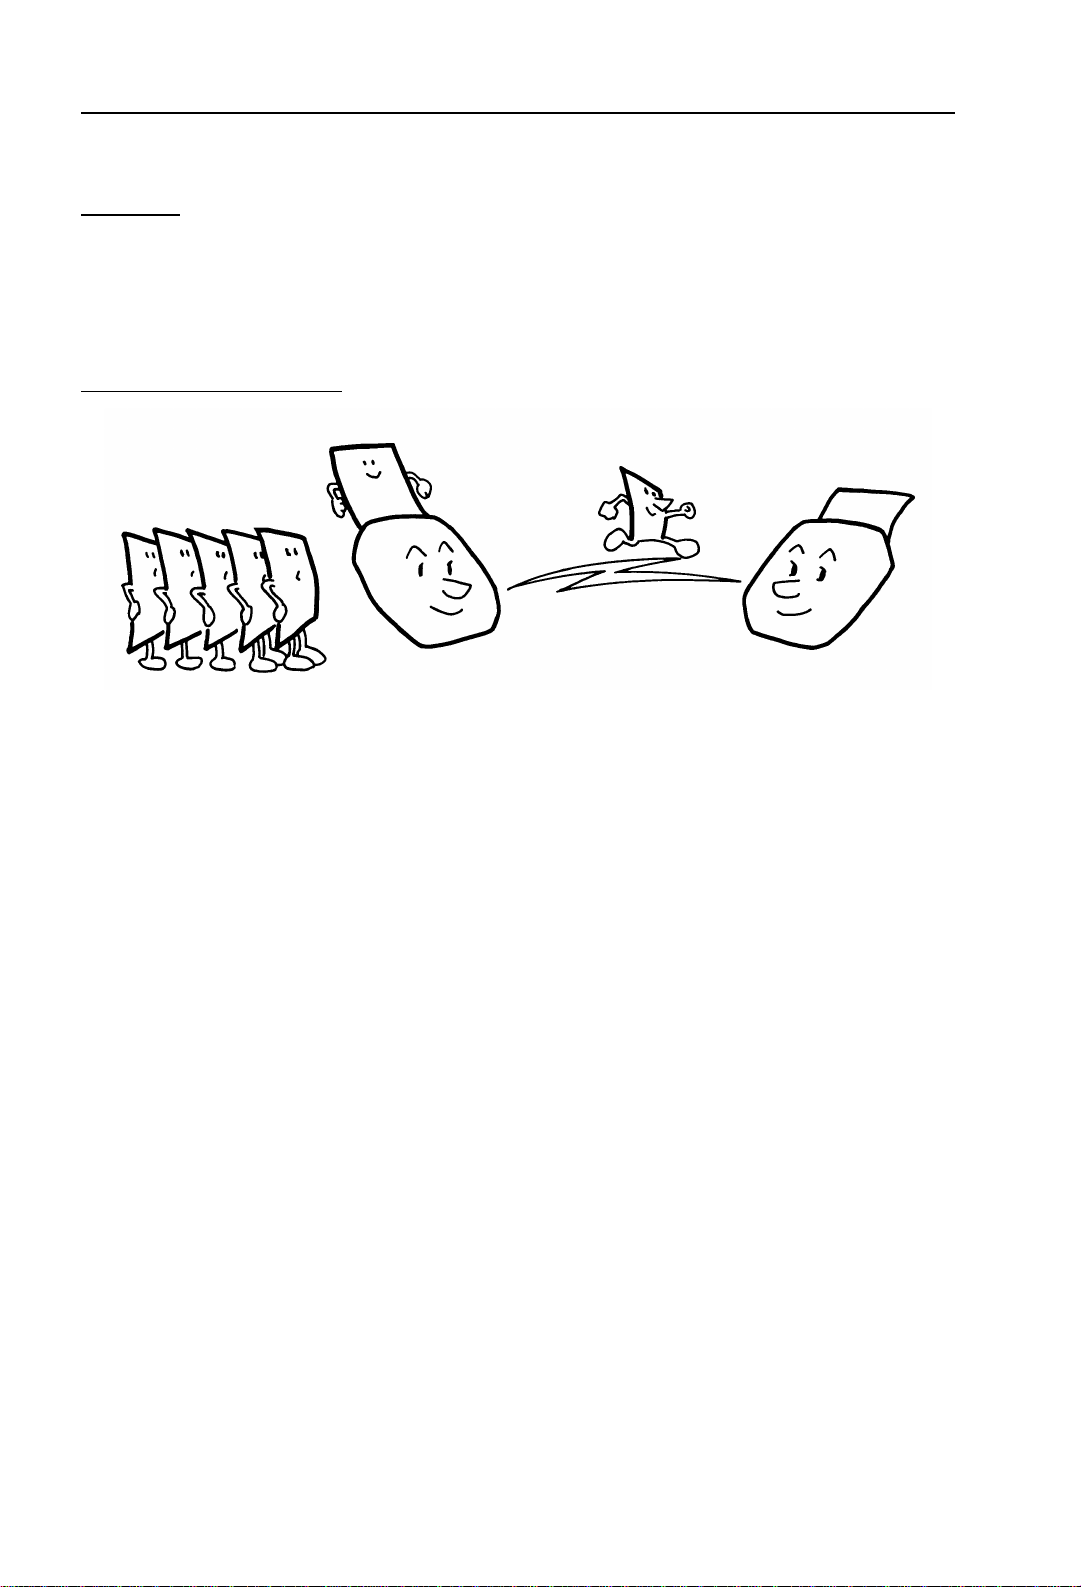
❐ While your fax message is being sent, another user can operate the machine
(people will not have to wait by the fax machine too long).
❐ You can send the same message to more than one place with the same
operation.
After you press Start, the machine does n’t dial until all the pages of your fax
message have been stored in the memory.
The default mode of this machine is Memory Transmission, so the procedures
described in this manual will be based on the assumption that you are using
Memory Transmission. Immediate Transmission is described in a separate section .
Cross-reference
Sending at a Specific Time (Send Later): see page 28.
Parallel Memory Transmission
With this feature the machine can call destinations while scanning documents.
Compared with normal Memory Transmission where the machine calls once all
the documents have been stored, it is quick to verify whether a co nnection has
been made or not.
Additionally, as scanning finishes more quickly than Immediate Transmission, it is
useful if you want to take the document back to your desk immediately.
However, if the connection cannot be made (for example if the line is busy),
normal Memory Transmission tak es p lace .
ROUTINE
OPERATION
Note: If the amount of available memory is less than 50%, you cannot use Paral-
lel Memory Transmission.
15
SENDING A FAX MESSAGE ROUTINE OPERATION
Normal Memory Transmission still takes place when using the following:
❐ Send Later ❐ Transfer Request ❐ Store Double Sided
❐ Specify Multiple Destinations ❐ Specified Image Area
The file is erased if any of the following happen during transmission:
❐ The Stop key is pressed. ❐ A document becomes jammed.
❐ There is not enough memory available.
After a parallel Transmission fails, a communication result report is printed.
When using Parallel Transmission, page numbers are not printed at the other end.
If you w an t pa ge n um b er s printed, use Pa ge Co un t of t he opt ion al feature for
transmission (se e pa ge 29).
Sending to Just One Location
1. Make sure that the machine is in standby
mode:
The display on the operation panel must
be as shown on the right.
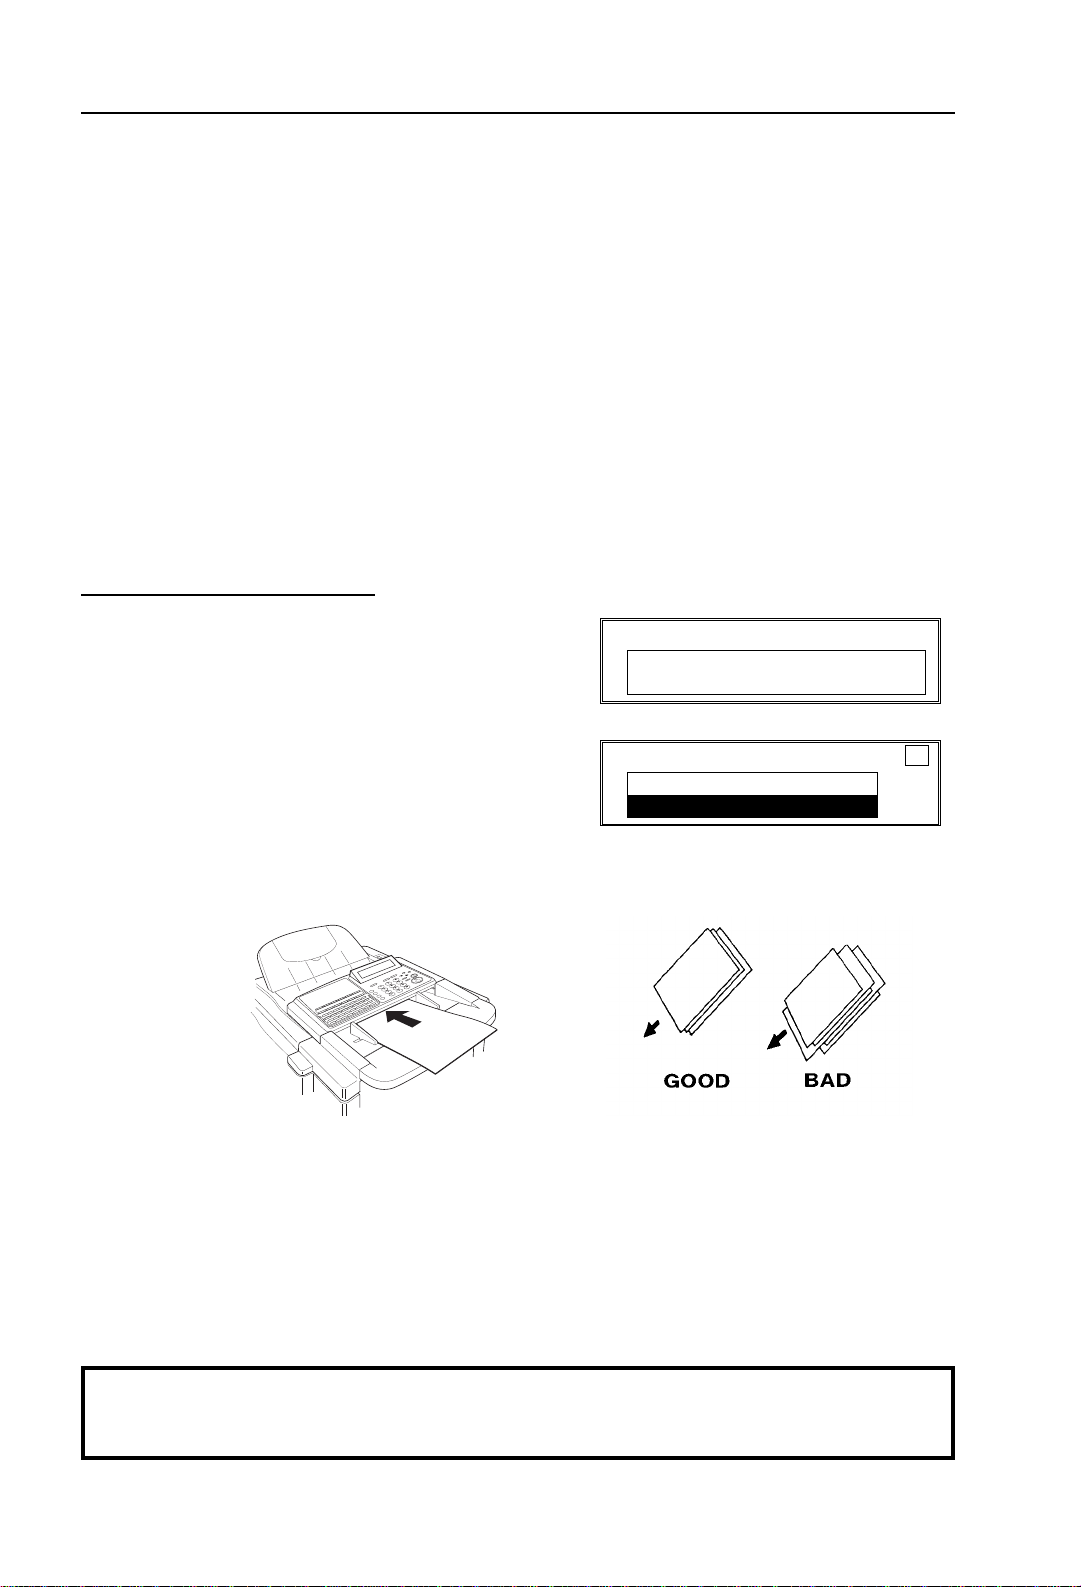
2. Carefully place your fax message face
down into the auto document feeder.
Note: You can dial without placing the
message in the feeder first. Place the
document after you dial the number and
go to step 4.
❐ The pages must be placed face down in
the feeder, with the first page at the
bottom of the stack.
❐ Feed the pages in so that the top edge
goes in first.
MEMORY TRANS. APR.4.12:25PM
SET DOC. OR ENTER FAX NO.
MEMORY 100%
MEMORY TRANS. OPTIONS ↓
ENTER FAX NUMBER
❐ Do not use pages of different
sizes.
❐ The pages should be arranged
loosely, but the leading ed ges
should be tidy, as shown above .
❐ Do not exceed the feeder capacity:
Standard letter: Up to 50 pages at a time.
Double letter: Up to 25 pages at a time
Cross-references
Sending a Page with Very Fine Detail: See page 23.
Options for Sending a Message: See page 27.
16
ROUTINE OPERATION SENDING A FAX MESSAGE
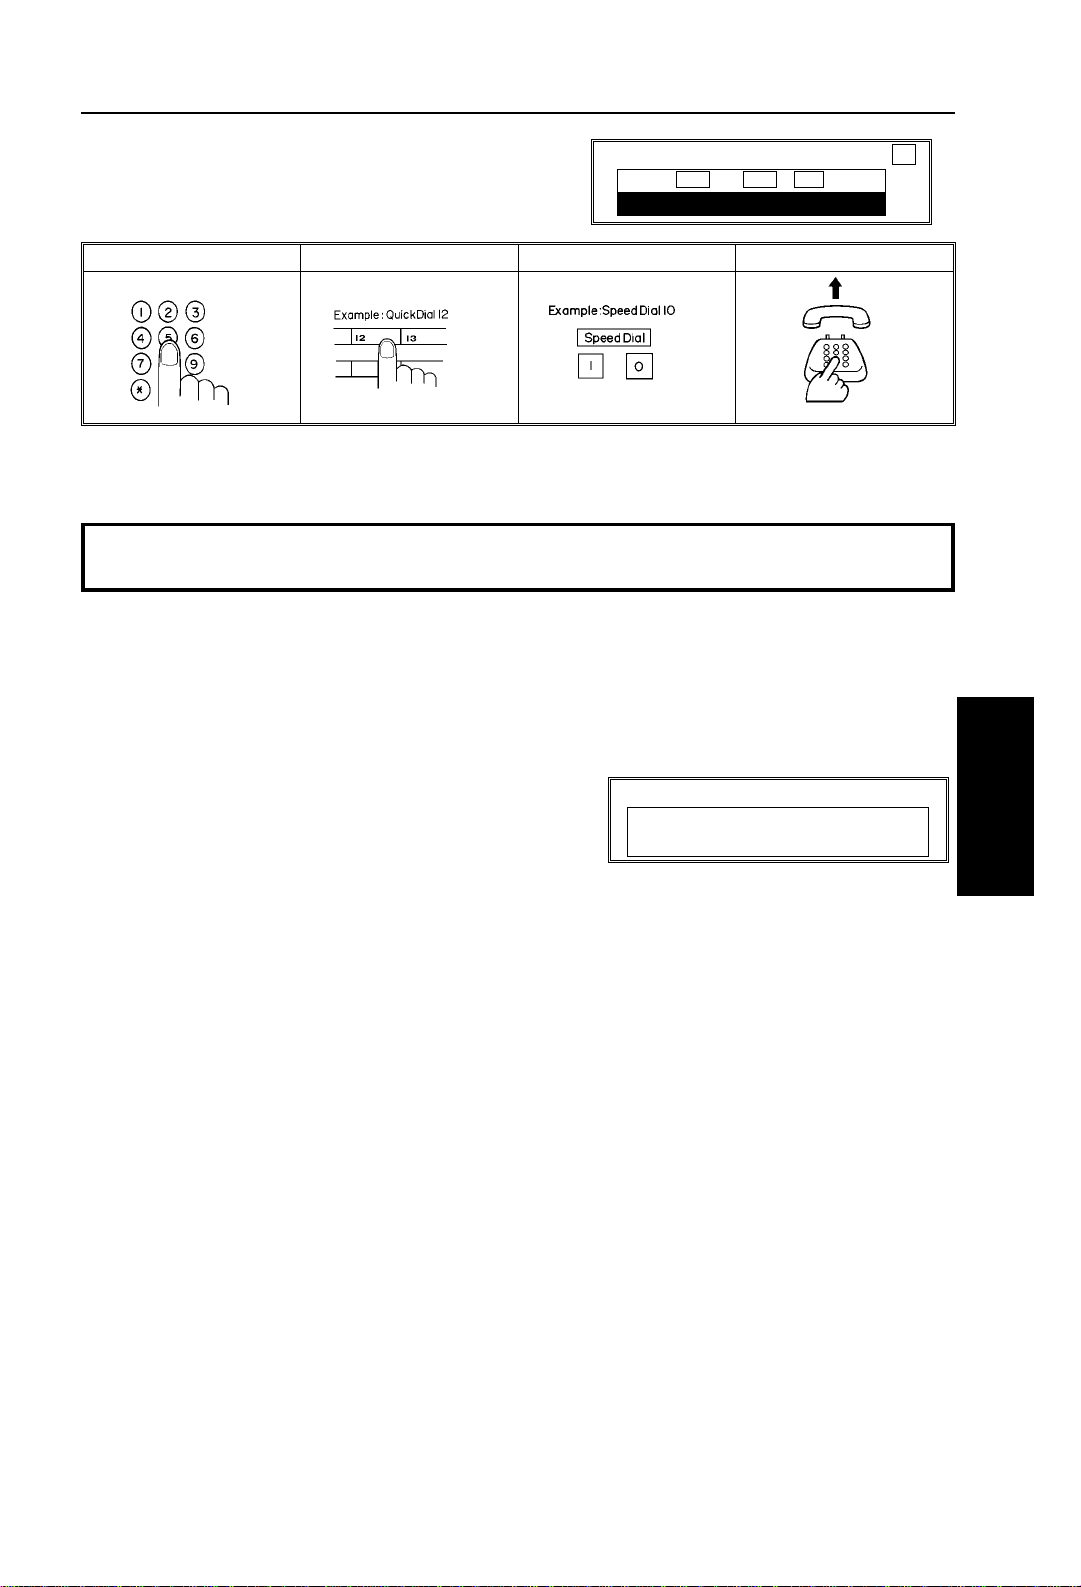
3. Dial in one of the following ways.
a) Ten Key Pad b) Quick Dial c) Speed Dial d) Handset ✬1
✬
1 : Only if the telephone handset is installed.
If your telephone line is through a PBX, dial the access code, then a pause, then the telephone
number. For an international number, press the Pause key after entering the country code.
MEMORY TRANS. OPTIONS ↓
PRESS YES OR CLR
2125551234
_
NO
•
4. Start
5. The machine stores your fax message.
6. The machine dials, and the line to the
other party is connected.
Note: Watch the display. The identification of
the other party will appear.
7. After sending the message, the machine
hangs up automatical l y.
DIALING
XYZ NEW YORK
2125551234
ROUTINE
OPERATION
17
ENTER
FAX
NUMBER
_
SENDING A FAX MESSAGE ROUTINE OPERATION
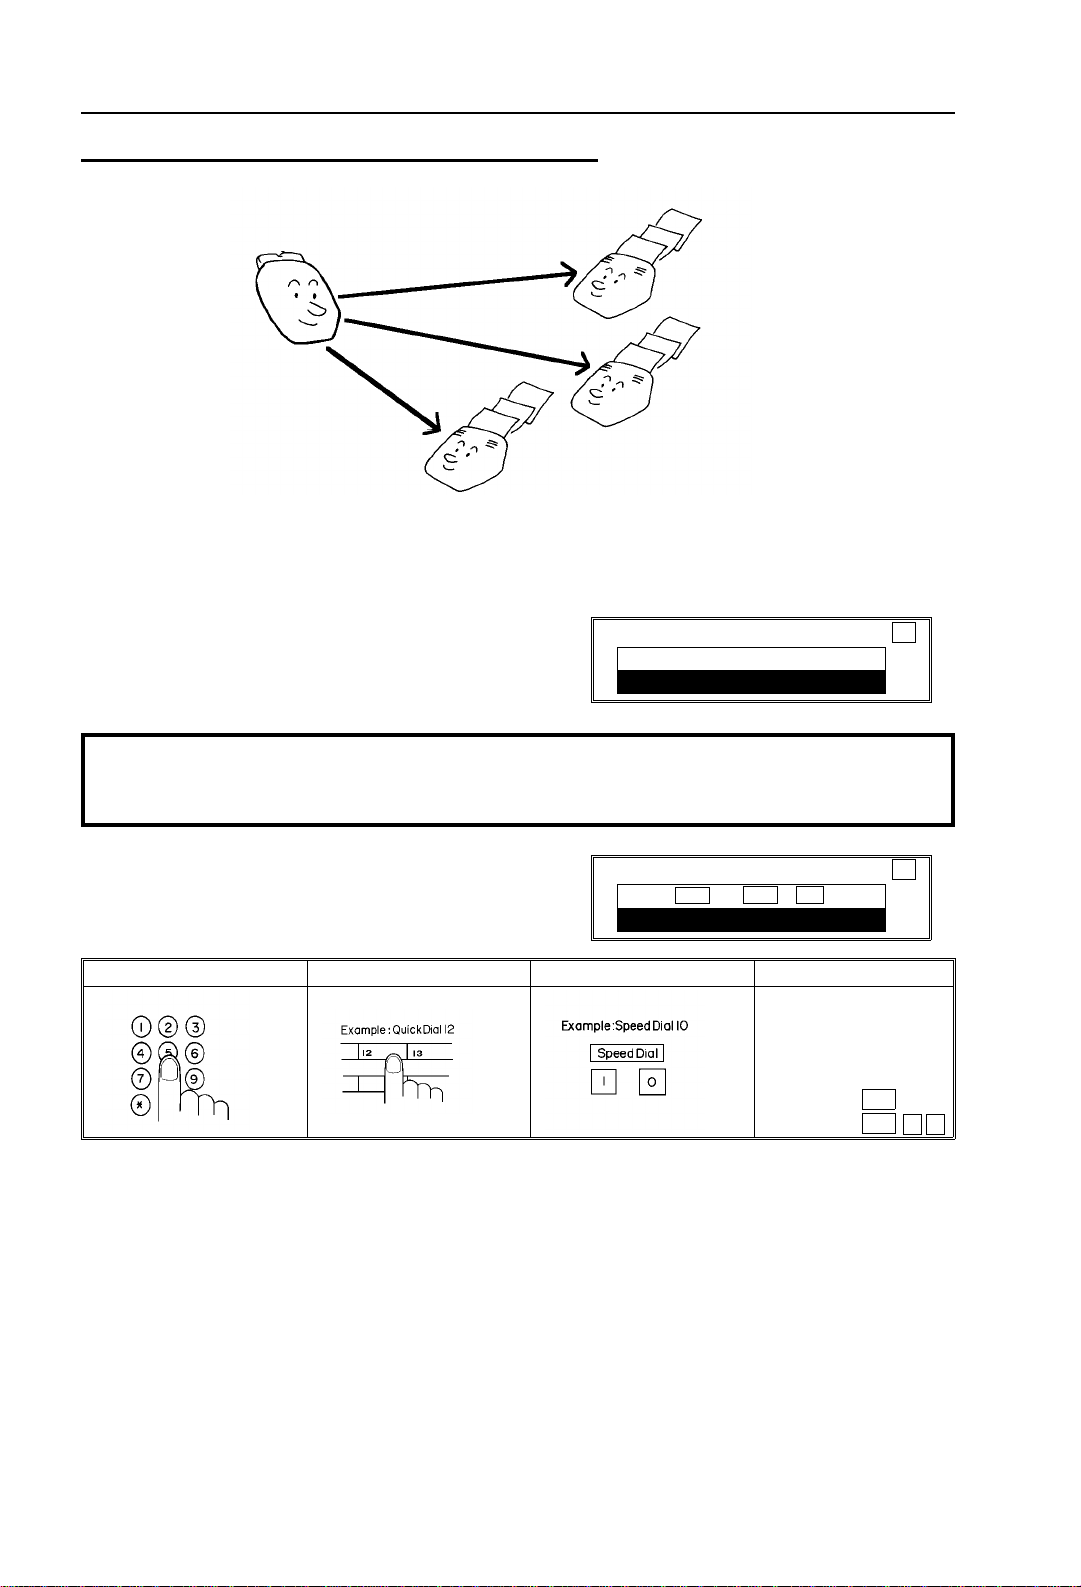
Sending to More Than One Location (Broadcasting)
1. Make sure that the machine is in standby mode (see page 17).
2. Make sure that the Memory indicator is lit. If it is not, press Memory.
3. Place your fax message face down into the feeder.
❐ You can dial without placing the
message in the feeder first. Place
MEMORY TRANS. OPTIONS ↓
ENTER FAX NUMBER
the document after you dial the
number and go to ste p 5.
Cross-references
Sending a Page with Very Fine Detail: See page 23. Options for Sending a Message: See page 27.
Scanning only a part of the document (Specified Image Area): See page 86.
4. Dial in one of the following ways.
a) Ten Key Pad b) Quick Dial c) Speed Dial d) Group Dial ✬1
✬
1: Method 1: Press the Quick Dial Key the Group is stored in (in the example, press key 08).
Method 2: If you do not know which Quick Dial Key the Group is stored in but you do know the
Group number, use Method 2. You must have programmed one of the User
Function keys in advance with code 02 (Group Dial), using Function 35 (see
page 148). In the above example, F4 has been made the Group Dial key; press F4
then input the Group number.
MEMORY TRANS. OPTIONS ↓
PRESS YES OR CLR
2125551234
_
NO
•
Example: Group 1,
stored in Quick Dial
Key 08
Method 1:
Method 2:
08
F4 0 1
18

ROUTINE OPERATION SENDING A FAX MESSAGE
If your machine is behind a PBX, dial the access code, then a pause, then the telephone
number. For an international number, place a pause after the country code. To input a pause,
press the Pause key.
5. Yes.
MEMORY TRANS. OPTIONS ↓
ENTER FAX NUMBER
_
6. Either :
❐ Dial another number: Go to step 4.
❐ Press Start.
The machine will dial the first destination (or, if you selected Send Later, it will
return to standby mode and the fax message will be sent at the time that you
selected).
Note: In theory, you c an send the s ame fax messag e to up to 132 dif ferent
destinations using the above procedure. However, this number
depends on how many numbers are currently waiting in memory to be
dialed. See the ta ble on page 305 f or more information c oncerning the
limitations to this feature.
Check your Destinations Before Dialing
If you wish to send a fax message to more than one location, you can scroll
through the lis t of tel e ph on e n u m be r s tha t you have input so f a r to che ck whether
you have missed any or entered any wrong numbers.
ROUTINE
OPERATION
This f ea tu r e is u seful when using the features such as Broadcasting , Transf er
Request, and Polling Reception.
Cross-references
Broadcasting: see page 18. Transfer Request: see page 51.
Polling Reception: see page 135.
1. Press 0 7.
❐ The number after
many numbers you have input so
far.
2. Use the arrow to scroll through the list
of destinations that you have already input.
DEST
shows how
CHECK DEST. PRESS YES OR NO
01 XYZ CO. NEW YORK
DEST.:2 ↓
CHECK DEST. PRESS YES OR NO
ABC COMPANY
DEST.:2
❐ To cancel a destination that you have
input by mi sta ke: No.
❐ To finish checking: Yes.
19

SENDING A FAX MESSAGE ROUTINE OPERATION
Storing Double Sided Documents
When you are using Memory Transmission and press the User Function Key
programmed as Store Double Sided, both sides of a document can be scanned.
The front and back of the scanned document will be printed in order, on separate
sheets at the other end.
The procedure for transmission using Store Double Sided is outlined below
(for how to program the User Function Key, see page 143).
1. Check the Memory indicator is lit.
2. Press the User Function Key (F1-F5) programmed as Store Double Sided.
3. Set the do uble sided-document with the front page face down.
4. Select the res olution settings you require and dial then press Start. The front
page will start to be scanned. When scanning has finished, "TURN OVER,
RESET, PRESS START" will appear on the display.
5. Set the document with the reverse side face down and press Start. You have 60
seconds to s et the reverse side --- if you do not, an error will occur and you
cannot transmit.
If "PAGE NO. INCORRECT CLEAR FILE? YES•NO" appears on the display, your
pages have not been scanned in properly.
In this case, do one of the following:
❐ Press Yes to completely erase the stor ed document and return to standby
mode.
❐ Press No to return to standby mode and begin transmission of th e pa ge s
that have been stored so far .
Possible Problems
You want to take out the document
Open the scanner and take out the document.
CAUTION: Do not pull out the document without opening the scanner, or you
will damage the machine.
You want to send more than 50 pages
While the last page is being fed in, place more pages (up to 50) in the feeder.
You made a mistake while dialing
If you already pressed Start, press Stop immediately.
If you haven’t pressed Start yet, do one of following:
❐ Press No. The entire number is deleted. Enter a new number.
❐ Press Clear. Only the last digit is deleted.
20

ROUTINE OPERATION SENDING A FAX MESSAGE
The Check Display Indicator is blinking
❐ If CLEAR ORIGINAL appears in the display:
Take out the document (see page 201). Then redial the destination.
❐ If ERROR PRESS STOP KEY appears in the display:
If the Communicating lamp is not lit, press Stop.
If the Communicating lamp is lit, wait until it goes out, then press Stop.
The buzzer is ringing
The other party wishes to speak with you. Proceed as shown below.
ROUTINE
OPERATION
21

SENDING A FAX MESSAGE ROUTINE OPERATION
Cancelling a Memory Transmission
When communication is in progress
1. Press the Stop Key.
2. If two messages are being sent (*), select
the file to cancel with the U and T keys.
3. Press Yes.
Note: (*) Dual Communication (Optional
ISDN Kit or optional G3 Kit required)
Cross-reference
Dual Communication: see page 269.
When the message is awaiting transmission
1. Press Function followe d b y 2 1.
2. Select the file using the U and T keys.
Then press Yes.
3. Press 1 then Yes
.
MEMORY TRANSMISSION CANCEL
PRESS YES OR NO
1234567
(*) Dual Communication
[DIALING]
MEMORY TRANS. CANCEL
SCROLL ↑ ↓ PRESS YES OR NO
ABC CO. LTD.
22

ROUTINE OPERATION SENDING A FAX MESSAGE
Sending a Page with Very Fine Detail
You may wish to send many different types of fax message. Some of these may
be difficult to reproduce at the other end. However, your machine has three
settings that you can adjust to help you transmit your document with the best
possible im ag e qu al ity.
If you are not sure whether your settings are suitable, make a copy of the
document using these settings. The p rintout shows how the fax message will
look when it is printed a t the other end.
❐ If your fax message has more than one page, you can select different settings
for each page. For example, if you wish to use a different resolution just for
page 2, change the r e sol u ti o n se tt i ng whi le page 1 is being scann ed . Then,
while page 2 is being scann ed, you can return the resolution setting to the
original setting.
Contrast
The text and diagrams in your document must stand out clearly from the paper
they are written on. If your document has a darker background than normal (for
example, a newspaper clipping), or if the writing is faint, adjust the contrast.
There are three grades.
Normal: Suitable for most documents
Darken: Use f or documents with fa int writing (such as those written in pencil)
Lighten: Use for documents that have a dark or patchy background
Resolution
If your document contains fine print or detailed diagrams, use a higher resolution
setting.
Standard: Suitable for most typewritten documents
Detail: Use for documents with small pr int or fine details
Fine: Use this for high quality reproduction
Halftone
If your document contains a photograph, or diagrams with complex shading
patterns or grays, switch Halftone Mode on to achieve optimum image quality.
ROUTINE
OPERATION
23

SENDING A FAX MESSAGE ROUTINE OPERATION
Selecting the Halftone Type
This model has two types of Halfton e: the Dither Process and the higher quality
Error Diffusion Pr o cess. To change the currently used Halfto ne typ e, perfo rm the
following procedure.
1. Function 6 0 2 2 2 2 6 and 3.
The settings for switch 00 are now
shown on the bottom line of the display.
2. Press or until the settings for switch
10 are shown. You need to change digit
7.
USER PARAMETER PRINT LIST →
DEFAULT: 01000000 ↑
SWITCH00: 01000000 YES TO END ↓
USER PARAMETER PRINT LIST →
DEFAULT: 01000000 ↑
SWITCH00: 11000000 YES TO END ↓
If you wish chang e th e setting press 7
on the ten key pad.
Digit 7
1: Speed mode
0: Standard mode
Speed mode: The machine will use the Basic Halftone Process.
Standard mode: The machine will use the higher quality Error Diffusion Process.
3. Finish: Yes and Function
Halftone Mode slows down th e transmission speed, and ma y increa se your
communication costs, especially if you use the Error Diffusion process. Higher
resolutions also do th i s . This is because these set tin gs cr e at e la r ge r am o un ts
of data to be sent.
Messages are transmitted the fastest if you use the standard resolution
setting, and keep Halftone off.
24

ROUTINE OPERATION SENDING A FAX MESSAGE
Home Position Setting Adjustments
For the contrast, resolution, and halftone, you can select whether the settings
return to home position at the end of transmission (in a new machine, they do).
Also , you can change the home positio ns of the se settings.
If you need other adjustmen ts, contact a service representative.
The procedure is as follows (see page 227 if you need more information about the
User Parameter settings adjustment procedure).
1. Function 6 0 2 2 2 2 6 and 3.
USER PARAMETER PRINT LIST →
DEFAULT: 01000000 ↑
SWITCH00: 01000000 YES TO END ↓
At this time, you can print a User Parameter
List if you press and Start.
2. The settings for switch 00 are now shown
on the bottom line of the display.
SWITCH00: 0000 0000
Digit 7654 3210
The digits are numbered from 7 to 0; the
setting of digit 7 is shown at the left side
of the display and digit 0 is at the right.
The settings that yo u may need to cha nge are those for d igits 0, 1, 2, 3, 4, 5,
6, and 7. The functions of these are as follows.
Digit Purpose
0 Stamp 0: Off* 1: On
Contrast home position
1
2
3
4
5
6
7 Halftone on/off home position 0: Off* 1: On
Digit 3 Digit 2 Digit 1 Setting Digit 3 Digit 2 Digit 1 Setting
0 0 0 Normal* 1 X X Do not use this setting
0 0 1 Lighten
0 1 0 Darken
Resolution home position
Digit 5 Digit 4 Setting Digit 5 Digit 4 Setting
0 0 Standard* 1 0 Fine
0 1 Detail 1 1 Do not change
these settings.
Tramsmission mode home position
0: Memory Transmission* 1: Immediate Transmission
ROUTINE
OPERATION
3. If you wish to change one of the settings, press the key on the ten key pad that
corresponds to the digit that you wish to change.
Example: 3 from the t en key pad. Th e value of digit 3 changes.
4. Finish: Yes and Function.
25

SENDING A FAX MESSAGE ROUTINE OPERATION
Dialing with the Telephone Directory
This can be done for any number that you have stored as a Speed Dial Code with
a label programmed for it.
Example: You wish to dial "XYZ CO. LONDON".
1. Make sure that the machine is in standby mode (see page 16).
2. Place your document in the feeder.
3. Speed Dial/Tel Directory.
4. Press the first letter of the name: X
(Quick Dial Key 24 or 48)
Press X repeatedly until the correct
number is displayed.
5. Yes.
6. Yes again.
MEMORY TRANS. OPTIONS ↓
ENTER FAX NUMBER
_
MEMORY TRANS. OPTIONS ↓
ENTER FAX NUMBER
_
TELEPHONE DIRECTORY
SCROLL: X PRESS YES OR NO
01 XYZ CO. LONDON
MEMORY TRANS. OPTIONS ↓
PRESS YES OR CLR
01 XYZ CO. LONDON
MEMORY TRANS. OPTIONS ↓
ENTER NO. OR START DEST:2
_
NO
•
7. Either:
❐ Dial more numbers.
❐ Press Start.
Programming Speed Dial Codes: See page 296.
26

ROUTINE OPERATION SENDING A FAX MESSAGE
Optional Features for Transmission
When you make a routine transmission, you can access a few optional features.
These options are only availab l e if " OPTION ↓ " can be seen in the top right
corner of the displa y.
Personal Code
Pe rsonal Codes do the following.
❐ They allow you to keep track of machine usage (for example, for billing
purposes). If everybody uses a Personal Code when they use the fax machine,
the codes, or the names programmed into the codes, will be printed on the
report that is called the Journal. This will help yo u to check on who has been
using the machine, and how often.
❐ They allow personaliza ti o n of docu m en ts an d pri nt ed re po rts. For e xam p l e, if
you use Label Insertion and store your name with your Personal Code, the
receiver of your fax message will see your name at the top of the printout. This
eliminates the need for a cover page.
❐ They allow you to restrict use of the machine to authorized personnel only . If
you switch the Restricted Access feature on, users have to enter their personal
code bef ore they can use t he mach i ne. The personal code must have alread y
been stored in t he mach i ne. This may deter unaut ho riz ed personnel from
casually using the machine.
Cross-references
Programming Personal Codes: see page 75. Restricted Access: see page 75.
Label Insertion: see page 88. Journal: see page 171
ROUTINE
OPERATION
27

SENDING A FAX MESSAGE ROUTINE OPERATION
If you input your Personal Code, your name will appear on the Journal an d
Transmission Result Report.
1. Press T 0 1.
2. Enter the Personal Code
Example: 7 3 6 2
❐ The display shows the name that
was stored with the code that you
selected. In this example, it is
SMITH.
3. Yes.
See page 75 for details on how to prog r am
the Personal Codes and their labels.
Sending at a Specific Time
PERSONAL CODE ENTER CODE
NO TO END
PERSONAL CODE PRESS YES OR NO
7362 SMITH
_
This feature is called Send Later.
Using this feature, you can instruct the machine to delay transmission of your fax
message until a later time, which you specify. This allows y ou to tak e advantage of
off-peak telephone line charges without having to be by the machine at the time.
CAUTION: If your machine’s memory is full, you will have to keep the
message in the document feeder. This means that nobody can
use the document feeder unless th ey remove your do cument. This
would automatically cancel the Send Later operation.
1. Press T, 0 and 2.
SEND LATER ENTER START TIME
_ : AM/PM: #
NOW 12:15 PM NO TO END
28

ROUTINE OPERATION SENDING A FAX MESSAGE
2. Example: Send at 11:30pm
Enter 1 1 3 0 on the ten key pad.
SEND LATER PRESS YES OR NO
TODAY 11:30 PM AM/PM: #
To change AM/PM, press * or # on the
ten key pa d.
3. Yes.
The Send Later time cannot be more
than 24 hours into the future.
Printing the Page Number (Immediate Transmission only)
MEMORY TRANS. OPTIONS ↓
ENTER FAX NUMBER
_
This feature is called Page Count.
When your fax message is printed at the other end, page numbers will be printed
on the top of each page. Using the Page Count feature, you can select the format
in which the page numbers are printed.
If you use Page Count:
❐ Page numbers will be printed in batch-numbering format (for example, p1/3,
p2/3, and p3/3 for a three-page message). This makes it easy for the other
party to see how many pages you sent, and if any are missing. Howe ver , y ou
have to input the number of pages at the keypad before sending.
If you do not use Page Count:
❐ Page numbers will be printed only as a sequence (for example, p1, p2, p3).
This makes it difficult for the other party to tell at a glance whether any pages
are missing (for example, due to a double feed in your machine’s document
feeder).
Note: If you do not select Immediate Transmission, Page Count is automatically
switche d on , and the pages are counted aut om a ti ca ll y.
ROUTINE
OPERATION
29

SENDING A FAX MESSAGE ROUTINE OPERATION
1. Press T, 0 and 3.
2. Example: 10 pages.
1 0
PAGE COUNT SET COUNT
_ PAGE(S)
NO TO END
PAGE COUNT PRESS YES OR NO
10 PAGE(S)
3. Yes.
TTI (Transmit Terminal Identification)
Normally, the TTI programmed in your machine is printed at the top of each of the
pages you transmit when they are received at the other end. The top of the image
will be overprinted if there is no margin at the top of the transmitted page.
In some cases, you may wis h th e ot he r party to receive an unmarked copy of your
original. In this case, you can switch TTI off.
Note: If you switch TTI off, make sure that Label Insertion is also off if you want
the image received at the other end to be un m arked.
Cross-references
TTI: see page 265. Label Insertion: see page 88.
1. Press T, 0 and 6.
2. If you wish to change the
TTI
setting,
press W or V until the displayed setting
is correct.
3. Yes when you have finished.
TTI SELECT ← → YES TO END
ON OFF
TTI SELECT ← → YES TO END
ON OFF
30

ROUTINE OPERATION SENDING A FAX MESSAGE
Sending by a Specific Time (Transmission Deadline)
This feature is called Transmission Deadline (TRD).
If your messag e ha s t o be sent to th e ot he r end before a certain time, use th e
Transmission Deadline option and input this deadline.
If the line is busy, the machine will redial at set intervals either until the message
gets through or un ti l the deadline passes. Befor e th e de ad l ine passe s, there is no
limit to the number of times that the machine can redial.
After the deadline passes, the machine will print a report which indicates whether
or not your message was sent within the deadline. Then, the message will be
erased from memory.
This feature is only available with Memory Transmission.
1. Press T, 0 and 8.
2. Example: The deadline is 12:50 pm.
1 2 5 0
TRD ENTER TRD TIME
_ : AM/PM: #
NOW 12:15 PM NO TO END
TRD PRESS YES OR NO
TODAY 12:50 PM AM/PM: #
❐ The TRD time cannot be more than
24 hours into the future.
❐ To change AM to PM or the other w ay
around, press #.
3. Yes.
MEMORY TRANS. OPTIONS ↓
ENTER FAX NUMBER
_
ROUTINE
OPERATION
31

SENDING A FAX MESSAGE ROUTINE OPERATION
Economy Transmission
This feature is similar to Send Later. However, it has the added bonus of
automatically combining two cost-saving features: use of off-peak rates, an d Batch
Transmission. Also, you do not have to input the required transmission time every
time, like you do with Send Later. However, with Send Later, you can input a
different time of transmission for each fax message.
If you select Economy Transmission, your fax message will be sent at the time that
you previously stored for this feature using Function 72 (see the next page). Also,
all messages that were stored for sending to the same destination using this
feature will be batched automatically.
Cross-references
Sending at a Specific Time: see page 28. Batch Transmission: see page 92.
On/Off Selection Switch
When OPT is displayed.
1. Press T, 0 and 9.
❐ If you have previously
programmed this feature as
ECONOMY TRANS. ← → YES TO END
ON OFF
a User Function Key, press that
key.
2. If you wish to change the
TRANS
. setting, press W or V until the
ECONOMY
displayed setting is correct.
3. Yes when you have finished.
32

ROUTINE OPERATION SENDING A FAX MESSAGE
Storing the Economy Transmission Time
Before using Economy Transmission, you must use Function 72 to program a time
for Economy Transmissions to start. This should be the start of the off-peak rate
period for your area. After you have stored this, you will not need to change it
again until your telephone company changes the starting time of the off - pe ak rate
period.
1. Function 6 0 2 2 2 2 7 and 2.
ECONOMY TX
TIME= 11 :00AM
← → YES TO END
2. Input the time that you alwa ys wish E con omy Transmissions to start.
❐ To change from AM to PM and vice versa, press * or #.
3. Press Y e s Functi on whe n the disp lay is correct.
ROUTINE
OPERATION
33

SENDING A FAX MESSAGE ROUTINE OPERATION
Sending Quickly (Immediate Transmission)
Procedure
If you do not wish to store the fax message in memory before sending it out, use
the following procedure.
❐ The advantages and drawbacks of Immediate Transmission and Memory
Transmission are disc ussed on pages 14 and 15.
1. Make sure that the machine is in standby
mode (see page 16).
2. Make sure that the Memory indicator is
not lit. If it is lit, press Memory .
3. Place the document face down into the
feeder .
4. Dial (only one destination). And press Yes.
See page 17 for how to dial.
5. Start.
IMMEDIATE TX OPTIONS ↓
ENTER FAX NUMBER
_
IMMEDIATE TX OPTIONS ↓
PRESS YES OR CLR
2125551234
DIALING
2125551234
FILE NO.0046
_
NO
•
6. The machine dials and the line to the other party is connected. The number
that you dialed is displayed (or if you used Quick Dial or Speed Dial, the Quick
Dial or Speed Dial La be l stor e d for that number is displayed).
Changing Transmission Mode
Converting Immediate Transmission to Memory Transmission
If there is a message still waiting in the document feeder, you can convert it into a
memory file if you press Memory and Start and Yes. The document will be
scanned and stored into memory, leaving the document feeder free for others to
use.
34

ROUTINE OPERATION SENDING A FAX MESSAGE
Immediate Transmission as Your First Choice
The default mode of your machine is Memory Transmission. If you wish, you can
change this home p osit i on t o Im me di a te Transmission.
The procedure is as follows (see page 223 if you need more information about the
User Parameter settings adjustment procedure).
1. Function 6 0 2 2 2 2 6 and 3.
❐ At this time , y o u can print a User
Parameter List if you press and
Start.
The settings for switch 00 are now shown on
the bottom line of the display.
The setting that you need to change is
that for digit 6.
2. If you wish to change the setting, press 6
on the ten key pad.
3. Finish: Yes and Function.
USER PARAMETER PRINT LIST →
DEFAULT: 01000000 ↑
SWITCH00: 01000000 YES TO END ↓
SWITCH00: 0000 0000
Digit 6 (Double underlined)
0: Memory Transmission
1: Immediate Transmission
ROUTINE
OPERATION
35

SENDING A FAX MESSAGE ROUTINE OPERATION
Using the Stamp
Press the Stamp k ey to hav e faxes you send stam p ed . When the Stamp in dica to r
is lit, the machin e sta mps a sm al l m ark on th e bo tt om of each page. During
memory transmission, the stamp indicates t ha t t he p ag e was successfully stored.
For immediate transmission, it shows that th e pa ge was sent successfully. You
must switch the stamp on bef o re you press Start , or the machine will not stamp
the first page.
❐ If you wish the stamp to be at the top of each page instead of at the bottom,
contact your service representati ve.
Changing the Stamp Home Position Setting
If you wish to change the Stamp default setting, do the following.
(See page 227 if you need more information about the User Parameter settings
adjustment procedure).
1. Function 6 0 2 2 2 2 6 and 3.
At this time, you can print a User
Parameter List if you press and Start.
The settings for switch 00 are now shown
on the bottom line of the display.
The setting that you need to change is
that for digit 0.
2. If you wish to change the setting, press 0
on the ten key pad.
3. Finish: Yes and Function.
USER PARAMETER PRINT LIST →
DEFAULT: 01000000 ↑
SWITCH00: 01000000 YES TO END ↓
SWITCH00: 0000 0000
Digit 0 (Double Underlined)
0: Verification stamp off
1: Verification stamp on
36

ROUTINE OPERATION SENDING A FAX MESSAGE
Redialing
If a message was not transmitted successfully, that does not mean that you have
to enter the telephone number again. In many cases, the machine will redial the
destination automatically. Or, with the AI Redial key, you can redial with just a few
keystrokes.
Automatic Redialing
The machine will automatically redial the other party if any of the following
conditions occurred .
❐ The other party was busy.
❐ There was no reply from the other party.
❐ The message was rejected by the machine at the other end because of
excessive errors (in this case, redialing will only take place if Memory
Transmission was used).
Redialing is done 4 tim e s at 5 m inute intervals (for a Memory Transmissio n) o r 2
times at 5 minute intervals (for an immediate transmission).
❐ The number of redials and the redial i nt erva l may be adjusted by a service
technician.
During redialing, the number being dialed is
displayed as shown on the right.
If redialing fails for an immediate
transmission, the display appears as shown
opposite. You can convert this
[ 2125551234]
MEMORY TRANS. APR.4.12:25PM
SET DOC. OR ENTER FAX NO.
MEMORY 99%
REDIAL STANDBY
OR SELECT MEMORY MODE
(PRESS MEMORY + START)
communication to a memory transmission to
free up the machine for other users.
Press Memory then Start.
ROUTINE
OPERATION
37

SENDING A FAX MESSAGE ROUTINE OPERATION
Using the AI (Artificial Intelligence) Redial Key
The machine learns and r em e m be rs the last 10 telephon e numbers that you input.
Then, if you have to redial one of these numbers, just press the AI Redial key
until the number or name of the party you wish to redial is displayed, then press
the Start key.
This feature has the following uses.
❐ If the machine is waiting to redial the other party, you do not have to wait for the
redialing interva l to expire. Press the AI Redial key until the required telephone
number or name is displayed, then press the Start key.
❐ If you wish to send another message to the same address that you just sent
one to recently, you don’t have to dial the full number again if it is still in the AI
Redial memory. Place the message in the feeder, then press the AI Redial key
until the required telephone number or name is displayed, then press the Start
key.
Notes: ❐
Cross-reference
AI Redial only remembers one Quick Dial or Speed Dial number --- the last number dialed. When you dial another Quick Dial or Speed Dial, the previously dialed
Quick Dial/ Speed Dial cannot be accessed.
❐
Using AI Redial, you cannot retry a failed Memory Transmission.
However, you can redial the telephone number, as explained above.
❐
AI Redial employs the AI Short Protocol feature.
❐
The AI Redial key does not work if you used the handset to dial.
AI Short Protocol: see page 166.
To send a fax using AI Redial, do the following:
1. Make sure that the machine is in standby
mode (see page 16).
2. Place your document into the feeder.
3. AI Redial.
4. Scroll through the numbers in the AI
Redial memory using the U and T arrows of the scroll key.
AI REDIAL NO.DIRECTORY
1 SCROLL ↓ PRESS YES OR NO
01 XYZ CO. NEW YORK
❐ To select a number: Yes x 2.
5. Either:
❐ Select another number: go to step 4.
❐ Start the transmission: Start.
38
MEMORY TRANS. OPTION ↓
ENTER NO. OR START DESP:2
_

ROUTINE OPERATION RECEIVING FAX MESSAGES
RECEIVING FAX MESSAGES
Selecting the Reception Mode
There are two ways to set up your machine to receive fax messages.
❐ Auto Receive Mode
❐ Manual Receive Mode
Press the Reception mode key to switch between the modes.
Auto Receive Mode
This mode is selected when the Auto Receive indicator is lit.
Incoming faxes are receiv ed au tomatically. You do not have to be b y the machine if
the power switch is kept on. Use this mode when you must leave the machine.
1 2
[ XYZ COMPANY ]
MEMORY TRANS APR.4.12:25PM
SET DOC. OR ENTER FAX NO.
MEMORY 99%
Communicating
1. The telephone rings once.
2. The machine automatically starts to receive the message.
Manual Receive Mode
This mode is selected when the Manual Receive indicator is lit.
This setting is convenient if you wish to use your fax machine’s handset to answer
telephone calls coming in on the same line as fax messages. Howe ver, y o ur fax
machine cannot automatically rece ive fax messages; you have to be b y th e
machine if a fax messa ge comes in.
The machine operat es as follows.
1 2
3
4
[ XYZ COMPANY ]
MEMORY TRANS APR.4.12:25PM
SET DOC. OR ENTER FAX NO.
MEMORY 99%
ROUTINE
OPERATION
Communicating
39

RECEIVING FAX MESSAGES ROUTINE OPERATION
1. The machine rings c ontinuously until you answer the call. Pick up the handset.
2. If you hear a voice from the other end, speak in reply.
If you hear a tone every few seconds, the other end is a fax terminal.
Note: Remove any documents that are in the feeder.
3. If the person at the other end wishes to send you a fax message,
press Start to receive the messag e. Then hang up the h an dse t.
4. The machine starts to receive the message.
The Communicating indicator lights.
Receiving Fax Messages When There Is a Problem
Overview
This feature is called Substitute Reception.
If the printer is jammed or out of supplies, you will still be able to receive fax
messages; any messages coming in will be stored in the machine’s memory.
If the "Receive File" indicator is lit, a message has been stored in the memory
using the Substitute Reception feature.
Check the following:
❐ The printer paper may be used up. If so, add paper: see page 176.
❐ The toner may have run out. If so, add toner: see page 182.
❐ The printer paper may have jammed. If so, remove the jam: see page 203.
❐ If there appears to be no problem, somebody may be making copies while a fax
message is coming in.
The messages received into memory will be printed and erased from memor y
after the machine has been returned to normal operation.
40

ROUTINE OPERATION RECEIVING FAX MESSAGES
Switching Substitute Reception On or Off
There are two conditions under which you may wish to disable this feature.
❐ If you do not like keeping received fax messages in memory: After your
machine has received a fax message to memory, it sends an OK signal to the
other end. However, if somethin g ha pp en s to your machine and you lose the
fax message before you have a chance to read it, the sender will not be
informed. Therefore, you may not wish to use the Substitute Reception feature.
❐ If you do not wish to have your memory full of mail fr om un known senders: If
you have not enabled the Authorized Reception feature, you can receive fax
messages from anybody. Ho wever, you can see who the y ar e because the i r
identifier (the TTI) is printed at the top of each page. If the other party has not
programmed their identifiers (perhaps in an attempt to hide their identity), you
may not wish to receive their messages into memory, which would take up
valuable space.
Cross-references
ECM: see page 91. Authorized Reception: see page 104.
If you wish to switch Substitute Reception on or off, do the following procedure.
(See page 11 if y o u ne ed mo r e information about the User Parameter set ti n gs
adjustment procedure).
1. Function 6 0 2 2 2 2 6 and 3.
At this time, you can print a User
Parameter List if you press and Start.
USER PARAMETER PRINT LIST →
DEFAULT: 01000000 ↑
SWITCH00: 01000000 YES TO END ↓
The settings for switch 00 are now shown on
the bottom line of the display.
2. Press or until the settings for switch
SWITCH05: 0000 0000
05 are shown.
The settings that you need to change
are those for digits 0 and 1.
Digit 0 (Underlined)
Digit 1 (Double Underlined)
The meanings of these settings are as
follows.
Digit Purpose
0 Substitute Reception 0: Off 1: On*
Reception to memory (including Substitute Reception, Memory Lock, Forwarding,
1
and Transfer Requests from another station) when no RTI or CSI identifiers were
received from the other party 0: Enabled, 1: Disabled
ROUTINE
OPERATION
3. If you wish to change the setting, press 0 or 1 on the ten key pad.
4. Finish: Yes and Function.
41

TELEPHONE CALLS ROUTINE OPERATION
TELEPHONE CALLS
A handset is required to execute the procedures in this section.
You can use your fax machine for dialing in the same way as you would use a
telephone. This is useful when calling fax machines that are usually kept in
Manual Receive Mode, as well as for telephone conversations.
❐ You can dial using Quick Dial Ke ys or Speed Dial Codes.
❐ With the On Hook Dial feature, you do not have to pick up the handset before
dialing.
❐ You can send a fax message aft er fin ishin g th e conversation, without having to
make a new call.
Cross-reference
Manual Receive Mode: see page 39.
Making a Telephone Call
Using On Hook Dial
Using On Hook Dial is like using the handset (see the next page), except that you
do not have to pick it up before dialing. Just press the On Hook Dial key, and dial
the number. When you hear the other party on the fax machine’s built-in speaker,
you can pick up the handset. This keeps both hands free for referring to telephone
numbers while you are dialing.
1. Press the On Hook Dial key.
2. Dial.
See page 17 for how to dial.
Do not use the handset.
ON HOOK MODE
_
ON HOOK MODE
PRESS START AFTER TONE
2125551234
_
Note:
Do not press Start.
If you wish to cancel the call, press the
On Hook Dial key.
3. Listen to your machine’s built-in speak er.
When the other party answers, pick up
the handset.
4. Replace the hands et when you have finished.
42

ROUTINE OPERATION TELEPHONE CALLS
Using the Handset
Using the fax machine’s built-in or opt i on al ha nd set , you can use the fa x ma chin e
in the same way as a normal telephone. Pick up the handse t an d di a l on th e fax
machine’s ten-ke y pad (or use a Quick Dial K ey or Speed Dial Code if you wish).
1. Pick up the handset.
2. Dial.
See page 17 for how to dial.
HANDSET MODE
_
HANDSET MODE
PRESS START AFTER TONE
2125551234
_
Note: Do not press Start.
3. Continue as for a normal telephone conversation.
Using AI Redial
Use AI Redial if you wish to redial a number that you dialed recently.
1. On Hook Dial and AI Redial.
2. Scroll through the numbers in the AI
Redial memory using the U and T
arrows of the scroll key.
AI REDIAL NO.DIRECTORY
1 SCROLL ↓ PRESS YES OR NO
01 XYZ CO. NEW YORK
ON HOOK MODE
PRESS START AFTER TONE
2125551234
_
When the correct number is displayed,
press Yes.
ROUTINE
OPERATION
❐ The number will be dialed immedi-
ately.
43

TELEPHONE CALLS ROUTINE OPERATION
Answering the Telephone
If the telephone rings just once:
A fax is coming in. Do not pick up the handset.
If the telephone rings continuously:
1
1. Pick up the handset and speak to the ot he r party.
If you hear a high-pitched tone, a fax is coming in.
Press Start then hang up.
2. If the caller wants to send you a fax, press Start after spea king. Then hang up .
If nothing happens after you press Start the power may be switched off or the
telephone may not be properly connected.
2
Phoning and Faxing on the Same Call
To Talk Before Sending a Fax (On Hook Dial)
1. Press the On Hook Dial key.
2. Dial.
Note:
Do not use the handset.
Do not press Start.
3. If you hear a voice from the machine’s built-in speaker, pick up the handset and
speak to the othe r party.
❐ If you hear a high-pitched tone instead of a voice, place your fax message
in the feeder, then press Start.
4. When you are ready to send your fax message, place your message in the
feeder , then ask the other party to press Start.
5. When you hear a high-pitched ton e, press Start.
6. Replace the handset.
Do not replace the handset if you wish to speak to the other party again.
When your mach ine em its a to ne, press Stop then speak.
44

ROUTINE OPERATION TELEPHONE CALLS
Speaker and Buzzer Volume Adjustments
Your machine has a built in speaker. With this speaker, you can listen to the
telephone line without picking up the handset. The speaker will be automatically
switched off just before the start of facsimile data communication.
When you are sending a fax message, you will be able to hear the line after the
machine has dialed. If the line is busy, you can press the Stop key and sta rt
another oper a tio n w it h out having to wait for the mach i ne to disco nn ect the lin e.
The volumes yo u can adjust are ;
Transmitting monitor (TRANSMISSION): Sound you hear in tran sm issi on .
Receiving monitor (RECEPTION):Sound you hear in reception.
Onhook dial monitor (ONHOOK): Sound you hear in dialing by Onhook dial.
Dialing monit or ( D IA LI N G) : Sound you hear aft er pr e ssi ng Start key.
Buzzer tone (ALARM): Volume of the buzzer when you open a cover and so on.
Ke y tone (SCROLL KEY): Sound you hear when you press a key on the operation
panel.
If the speaker volume is not satisfactory, you can adjust it.
1. Function 6 0 2 2 2 2 9 and 2.
2. To increase: V.
To decrease: W.
To accept: Yes.
3. Repeat step 2 for each adjustment that appears on the screen.
4. Finish: Function.
MONITOR VOLUME SET VOLUME
TRANSMISSION: ← >>> →
PRESS START YES TO END
MONITOR VOLUME SET VOLUME
TRANSMISSION: ← >>>> →
PRESS START YES TO END
ROUTINE
OPERATION
45

ADVANCED FEATURES
NETWORKING
Overview
This section e x pla i ns how you can use this machine to dist ribute fax messa ge s
over networks of fax machines.
As we have seen (Sending to More Than One L oca ti o n, pa ge 19 ), you can send
the same fax messag e d irect ly fro m your machine to more than one location. The
diagram in that section shows your machine sending the same fax message to
three locations. This feature is com m o nly known as Br oa dca sti n g.
However, wi th Br oa dca s tin g, you or your or ga niza ti o n ha s to pay for three fax
calls. If these are all long distance calls, that can be quite expensive. If you use
the networking features provided with this machine, you will be able to reduce
costs by sending the fax message only once, to a Transfer Station, and tha t
Transf er Station will distribute your fax message.
Broadcasting
You can take advantage of your machine’s Group Dial, Broadcasting, and Transfer
Request f e at ur e s to set up extensive facsimi le net works. Such networks can save
time and cost if you set them up to perform commonl y-used broadcasting
operations, especially if long-distance communications are involved.
Cross-references
Groups: see page 292. Transfer Request: see page 51.
Broadcasting: see page 19.
Networking using a Transfer
Station (Transfer Request)
46

ADVANCED FEATURES NETWORKING
What Networking Features Does This Machine Have?
The machine’s networking features are summarized below.
❐ Transfer Request: This allows you to send a fax message to a number of
destinations via a single Transfer Station (see pa ge 5 1). Transfer Reques t can
be combined with Broad cast i ng to set up mor e compl ex networks (see page
54).
❐ Multi-step T ransfer: This allows you to set up a string of Transfer Stations in
different areas. The Transfer Station in each area would distribute your
message to destination s in the same ar e a, and pass on y o ur messa ge to th e
next Transfer Station in the chain. See page 55 for more on this feature.
When you look at these procedures later in this section, they may seem rather
comple x. However, once you hav e de ci de d up on a certain oper at i on , an d i f you
plan to use it frequently, program it as a Keystroke Program. Next time, this will
allow you to start the operation with only one keystroke.
Note:
Your sales or service repres entative will be able to help mak e all the necessary gr oup and
transfer station number programming in the various broadcasting terminals throughout your
proposed network. Please co-ordinate with your sales representative to obtain correct
programming at the time of installation.
Cross-references
Transfer Request: see page 51. Keystroke Programs: see page 61.
Transfer Request combined with Broadcasting: see page 54.
Multi-step Transfer: see page 55.
ADVANCED
FEATURES
47

NETWORKING ADVANCED FEATURES
Preparing the Machine for Networking Operations
Before you can start to set up fax communication networks, there are some items
that you have to program in your machine. These are as follows.
❐ Your F ax Machine’s Own Telephone Number
❐ The ID Code (the ID Code of your machine and all the Relaying Terminals and
Transfer Stations must be the same)
If you install the optional Group 4 ISDN kit, there are some other items that you
will have to program. These are dealt with in Appendix E, which covers the ISDN
kit.
You will also have to plan how you program your Groups (in co-ordination with
other people at other locations who will use your machine as a Transfer Station),
and you must also know how all the Relaying Terminals and Transfer Stations
have programmed their Groups.
Storing your Machine’s Own Telephone Number
Store your fax terminal’s telephone number using this feature. If you do not do
this, you will not be able to use the Transfer Request feature.
If your fax machine’s telephone number changes, do not forget to change the
stored telephone number data.
1. Function 6 0 2 2 2 2 6 1 then until the
screen is as shown opposite.
2. Yes.
OWN NUMBER (G3)
YES TO SET PREVIOUS
NO TO CANCEL NEXT
OWN NUMBER (G3) YES TO END
_
3. Input your fax terminal’s telephone number.
❐ The format of the number must be as follows:
International Dial Prefix, Your Country Code, Your Area Code, then you
must add a Pause, followed by your telephone number.
Check the International Dialing Prefix and the Country Code with your local
telecommunications operator. The example shown is for the USA; the codes
to add are 011 and 1.
Note: Use the Pause key to add a pause.
OWN NUMBER (G3)
YES OR CLR
0111212-5551234_
NO
•
↑
↓
4. Ye s Function.
48

ADVANCED FEATURES NETWORKING
Storing the ID Code
Befo r e pro gramming the ID Co de, confe r wit h ot he r user s i n your fa x net work to
agree on an ID Code. This is because communications using ID Codes will fail if
the codes are not the same.
The ID Code can be any four-digit code (using digits 0 to 9 and letters A to F),
except 0000 and FFFF.
In addition to the ne tw o rking features described in this section, ID Codes are used
with the following communication features. The same code must be used by all
members of your fax network and all people you wish to communicate with using
these features.
❐ Polling: see page 130.
❐ Closed Network: see pages 89 and 129.
Features using ID Codes can only be used between terminals made by the same maker.
ADVANCED
FEATURES
49

NETWORKING ADVANCED FEATURES
To store an ID Code, do the f oll owing.
1. Function 6 0 2 2 2 2 6 1 then until the
screen is as shown opposite.
2. Yes.
POLLING ID
YES TO SET PREVIOUS
NO TO CANCEL NEXT
POLLING ID
ID SETTING
_ YES TO END
↑
↓
3. Input the ID Code that you will be using.
Example: 4 3 6 3.
❐ Do not use 0000 or FFFF.
POLLING ID
YES OR CLR
4363
NO
•
4. Ye s Function.
Groups
The way to program a Group is explained in Appendix F. See page 300 and the
pages following that for all the procedures. However, there are two points to keep
in mind when y ou are setting up Groups for networking operations .
Limitations on the size of a Group: You can store up to 200 destinations in a
Group. However, the networking features can only handle Groups that have up to
30 destinations. If you are programming a Group for networking purposes, do not
put more than 30 numbers in that Group.
Group Transfer Station: You can specify a Group Transfer Station for each of
your Groups. Then another party can send you a fax message and instruct your
machine to send it to each number in a Group, through the Group Transfer
Station, which acts as a broadcaster. Your machine will then relay the fax message
to that group’ s Group Transfer Station, which will then send the fax message to
each of the numbers stored in that Group. You should store Group Transfer
Stations for Groups that you wish to u s e wi t h the Multi-step Transfer features. For
instructions on how to store a Group Transfer Station for a Group , see page 303.
50

ADVANCED FEATURES NETWORKING
Transfer Request
Transfer Request helps you save costs when y ou send the same message to
more than one place in a distan t area.
❐ Your machine sends the message to the Transfer Station, which holds it in
memory.
❐ The Transfer Station then sen ds it on to ea ch o f t he En d Re ceivers in sequence.
❐ After broadcasting, the Transfer Sta tio n sends y ou r machi ne a Transf er Re sult
Report to tell you if there were any problems with the communication.
Note:
❐ This feature can only be used if the Transfer Stati o n was made by the same
maker as your machine.
❐ The ID Code of your machine must be the same as the ID Code of the Transfer
Station.
❐ Your fax machine’s telephone number must have been programmed in advance.
❐ The Transfer Stati on must hav e mem o ry space available, and must b e a ble to
act as a Transfer Station (some machines cannot do this, or can but the
capability has been switched off).
❐ The telephone number of the caller who makes a transfer request must be
programmed in a Quick Dial or Speed Dial of the Transfer St ation. This is the
Transfer Station can send ba ck the caller a Transfe r R esu lt R e po rt (so the y
know whether the transfer request was successful or not).
You cannot dial the End Receivers as full numbers on your ten-key pad, and you
cannot use y our own stored Speed Dials, Quick Dials, and G r ou ps. You must use
the numbers that are st or e d in th e Transf er Station. Always kee p a copy of the
Transfer Station’ s Telephone Lists (Quick Dial, Speed Dial, and Group Lists) near
the machine if you plan to use Transfer Request.
ADVANCED
FEATURES
Cross-references
Quick Dial and Speed Dial: see pages 291 and 293. Groups: see page 292.
ID Code: see page 49. Telephone Number Lists: see page 171.
51

NETWORKING ADVANCED FEATURES
1. Make sure that the machine is in standby mode (see page 17).
2. Place your document in the feeder.
MEMORY TRANS. OPTIONS
ENTER FAX NUMBER
_
3. Either:
❐ Function 1 and 3. ❐
TRANSFER OPTIONS
TRANSF.1
_
❐ If you cannot use Function 13, you forgot to store, your fax machine’s tele-
phone number, or your ID code (Function 61).
❐ If you have installed the ISDN Option kit, you must also program the ma-
chine’s Own ISDN G4 and Own ISDN G3 numbers (use Function 61; see
pages 257 and 258). Your G4 Terminal ID and your ISD N subscri ber n um bers for G4 and G3 must also have been stored.
4. Input the telephone number of the first
transfer broadcasting station,
then press Yes.
❐ This machine must be of the same
manufacturer as yours, and it must
be able to act as a Transfer Station.
TRANSFER
TRANSF.1 12125551234
RECV 1
↓
↓
5. Input the destinations for this transfer
broadcaster.
You must use Quick Dials, Speed Dials,
or Groups that are stored in the transfer
broadcaster. There is a shorthand notation for this purpose. See the following
examples:
❐ Quick Dial Key 01: # 0 1 Yes.
❐ Speed Dial Code 10: # * 1 0 Yes.
❐ Gr oup 01: #
* * 0 1 Yes.
TRANSFER NEXT NO. OR START
TRANSF.1 12125551234
RECV 4 _ TRANSF.
↓
52

ADVANCED FEATURES NETWORKING
Note: You can select up to 99 Transfer Stations, and up to 30 End
Receivers for eac h Transfer Station (Thi s number depend s on how
many numbers are cu rrently waiting in memo ry to be dialed. S ee the
table on page 305 for more information concerning the limitations to
this feature).
6. Either :
❐ Enter more destinations for this transfer broadcaster - go to step 5.
❐ Input another transfer broadcaster and i ts de sti n at i on s: - go to step 4.
❐ Start the transfer request: Start.
Note: You may use some transmission options, such as Send Later.
See page 27.
If you wish your machine to be a Transfer Station for other parties to
use for their Transfer Requests, you must install a memory card or a
hard disk.
53
ADVANCED
FEATURES

NETWORKING ADVANCED FEATURES
Combining Transfer Request with Broadcasting
If you wish to set up comple x fax message distribution networks, you can make a
Transfer Request using more than one Transfe r S ta ti o n. When yo u do this, you can
send the same me ssag e t o up to 30 Transfer Stat ion s, and each Transfer St ation
can pass the message on to 30 End Receiv ers.
Los Angeles
San
Francisco
Boston
Hartford
Philadelphia
New Y ork
Seattle
Houston
Buffalo
Atlantic City
Dallas
New
Orleans
Oklahoma
City
Assume that your machine is in San Francisco and you wish to send the same
message to various locations in the U.S.A. Of course, doing a simple broadcast,
sending to each terminal dir e ctl y fr o m your machine, wo ul d get the jo b do ne, but
you would not be taking advantage of the cost-cutting features of the machine.
However, if y ou incorporate Transfer Request, as shown below, your machine
would only make 4 calls, instead of the 10 that would be necessary if Transfer
Request was not us ed. This saves costs.
❐ Your machine can play any part in a Transfer Request network of this type,
provided that you have programmed all the required features as explained
earlier in this section.
❐ The ID codes of the requester (San Francisco) and the Transfer Stati o ns ( New
York and Houston) must be the same. The requester must have its own fax
number programmed.
❐ The model used by the requester (San Francisco) must be able to make
Transfer Requests through more than one Transfer Station.
❐ Reports indicating success or failure will be returned to San Francisco from the
terminals in Houston and New York.
To do this pr oce du re, use the broadcasting procedur e on page 19. The
destinations should be as follows:
❐ Los Angeles
❐ Seattle
❐ A Group containing Boston, Hartford, Philadelphia, Buffalo, and Atlantic
City, with New York as the Group Transfer Station
❐ A Group containing Dallas, New Orleans, and Oklahoma City, with Houston
as the Group Transfer Station
54

ADVANCED FEATURES NETWORKING
❐ The fax number of San Francisco must be programmed in a Quick Dial or
Speed Dial of the machines in New York and Houston.
Multi-step Transfer
The principles of th e Two-step Transfer feature can be used to build up a
multi-step facsimile network. This will work using either analog (Group 3) or digital
(Group 4) lines. An example follows.
A
Dials
#**01
(Transfer
Request)
Terminal C: Group 1
Terminals I and J
Group Transfer Stn. = D
Terminal C: Group 2
Terminals E, F, G, and H
B
Terminal B: Group 01
#**01
#**02
Group Transfer Stn. = C
I
J
C
H
D
E
F
G
To set up this network, the following programming must be don e:
❐ Terminal C must contain two preprogrammed groups. Group 1 must contain
terminals I and J. Group 2 must contain terminals E, F, G, and H. In Group 1,
terminal D must be specif ied as t he Gr o up Transfer St at i on .
ADVANCED
FEATURES
❐ Terminal B must contain a preprogrammed group (Group 1). This group must
contain two numbers, #∗∗01, and #∗∗02. These sp ecif y transf er using groups 1
and 2 that are stored in the Group Transfer Station. In Group 1, C must be
specified as the Gro up Transfer S tati on.
❐ The ID codes of terminals A, B, C, and D must be the same.
To start the operation, terminal A does a transfer request using terminal B as the
broadcaster and #∗∗01 as the end receiver; this specifies transmission to the
numbers stored in Group 1 at terminal B.
Cross-reference
Group Transfer Station: see page 303.
55

NETWORKING ADVANCED FEATURES
Your Machine as a Transfer Station
Your machine can be a Transfer Sta ti o n for other people to use for their Transfer
Requests.
If the requesting party is using a machine of the same manufacturer as your
machine, th e y m ust per form the Transfer Request procedure given af ter pa ge 51 .
Any requesting party must have the same ID Code as your machine’s.
However, if the requesting party is using a machine made by another
manufacturer, or if they couldn’t get the Transfer Request procedure to work, you
will have to set up the Transfer Request by Tonal Signals feature in your machine
(see below).
❐ If you do not wish to have your machine available a s a Transf er S ta ti o n, con-
tact a service technician and ask to have this feature switched off.
❐ Another way to rest rict use of t his feature is to make sure that al l re qu est i ng
parties must have their identifiers stored, so that you do not receive Transfer
Requests from unknown parties. See the bottom of page 103 for more details on this.
Transfer Request by Tonal Signals
This feature allows your machine to accept Transfer Requests made from the
requesting side using D ial Tones. An operation of this type can su ccee d o nly i f th e
following conditions have been met.
❐ The requester’s fax machine must be connected to a telephone line that
can accept DTMF (ton e d i al ) si g na ls, or must be able to generate Tonal Signals (see page 81).
❐ Your fax machine’s reception mode must be Auto Receive.
❐ Your fax machine’s remote ID must have been programmed.
❐ Transfer Request by Tonal Signals must have been switched on.
❐ The requester’s fax number must be programmed in a Quick Dial or Speed
Dial in your machine.
Setting the Machine up for Transfer Request by Tonal Signals
You must do the following to use this feature:
❐ Set up the machine in Auto Rece i ve Mode (see page 39).
❐ Program the Remote ID (Function 61, see belo w ) .
The other party will have to enter this code every time they access your machine to make a Transfer Request using a machine that is not of the same
manufacturer as this machine.
❐ Switch T ransfer Request b y Tonal Signals On (Function 63, see below ).
In a new machine, it is switched on in the factory.
56

ADVANCED FEATURES NETWORKING
Storing the Remote ID
As a new machine has a Remote ID of 0000 when it leaves the factory, we
recommend that you store a new Remote ID immediately. This remote ID is also
used as the password for Fax on Demand.
1. Function 6 0 2 2 2 2 6 1 then until the
screen is as shown opposite.
2. Yes.
3. Press No then input the new Remote ID
that you will be using. Example: 6 7 5 4.
REMOTE ID
YES TO SET PREVIOUS
NO TO CANCEL NEXT
REMOTE ID
YES OR CLR
0000
REMOTE ID
YES OR CLR
6754
•
•
NO
NO
↑
↓
4. Ye s Function.
Switching Transfer Request by Remote Transfer On/Off
To swi t ch th i s feature on or off, do the following. (See page 10 for more information
about the User Parameter settings adjustment procedure).
1. Function 6 0 2 2 2 2 6 and 3.
USER PARAMETER PRINT LIST
DEFAULT: 01000000
SWITCH00: 01000000 YES TO END
→
↑
↓
2. The settings for switch 00 are now shown
on the bottom line of the display.
3. Press until the settings for switch 11 are
shown.
The setting you need to use is digit 0.
4. If you wish to change the setting, press 0.
5. Finish: Yes Function.
SWITCH00:
SWITCH11:
Digit 0
0: The feature is disabled.
1: The feature is enabled.
00000000
00000000
ADVANCED
FEATURES
57

NETWORKING ADVANCED FEATURES
Procedure for Transfer Request by Tonal Signals
If an operator of a machine of a different manufacturer than yours wishes to use
your machine as a Transfer Station, they will have to do the following procedure.
Full Procedure
A quick reference version of this procedure is given on the next page.
1. First, the requesting party must dial your fax machine using an external
telephone.
2. Immediately after hea ring fax tones from your machine, th ey must press #. The
tone will stop, and a single high-pitched beep of about one second duration
will be heard. This is an ACK tone (Acknowledgment).
3. The request i ng par ty must then enter your Remote ID then press #.
See the notes at the bottom of the next page.
4. After hearing an ACK tone, they must press 2 4 #.
5. After hearing an ACK tone, they must press
6. After hearing an ACK tone, they mu st d i al the number which the Transfer
Result Report must go to (their own terminal). This must be programmed in
your machine as a Speed Dial or Quick Dial. If it is programmed in a Quick
Dial, they must enter its number (00 to 64). Or if it is progr ammed in a Speed
Dial, they must enter * then its number (00 to 99). Then they must press #.
7. The requesting party has to dial the end receivers in the shorthand format used
for Transfer Request (see the quick reference procedure on the next page for
an examp l e). Then they must press #.
For example:
❐ Quick Dial Code 01: 0 1 #
❐ Speed Dial Code 01: * 0 1 #
❐ Group 01: * * 0 1 #
8. The requesting party must repeat step 7 for all the end receiver numbers. If
there are no more numbers, the requesting party shou ld press # twice.
9. Communication begins after three ACK tones. When the requesting party hears
fax tones again, they must press Start on their fax machine.
* * *.
58

ADVANCED FEATURES NETWORKING
Example Procedure (for Quick Reference)
❐ Remote ID: 1111
❐ Transfer Result Report Destination: Speed Dial 04 in your machine.
❐ End Receivers, as programmed in your machine: Quick Dial 01, Speed Dial
02, Group Dial 03 .
1. The request i ng par ty must dial your machine using an external telephone, and
wait for the fax tones.
2. When the fax tones come in, the requesting party must immediately input the
following sequence. (ACK: Wait for the ACK tone)
# - 1111# - 24# - *** - *04# - 01# - *02# - **03# - ## -
ACK
Your Machine’s
Remote ID Code
ACK
ACK ACK ACK ACK
End Receiver:
Transfer Result
Report Destination:
Speed Dial 04
End Receiver:
Quick Dial 01
Speed Dial 02
ACK ACK
End Receiver:
Group Dial 03
3. When the requesting party hears f ax to ne s aga in, they must press Start.
Notes:
❐ The remote ID code must have been program m e d ea rlier.
❐ After entering the ID code, if there is an interval of more than 5 seconds fol-
lowed by three short beeps repeated three times, enter the remote ID again.
❐ If you enter the wrong remote ID , you will hear three short beeps. Try to en-
ter the code again. If you enter the wrong code five times, the remote control services will not be available until you go back to the machine and
reprogram the ID (this is a security measure to prevent other people getting
access to your machine).
ACK
x3
ADVANCED
FEATURES
59

NETWORKING ADVANCED FEATURES
Beep Tones
Sometimes during a Remote Transfer, you may hear one or more beeps. The
foll owing table explains the meanings of these sign al s.
Sound Reason Required Action
One high beep Acknowledgment No problem; keep going.
A short beep three times Rejection Operation error. Try again. Also see
the third note on the previous page.
A high beep three times Service code accepted No problem; keep going.
A mixed beep five times Service code rejected Operation error. Input the correct
code.
60

ADVANCED FEATURES TRANSMISSION
TRANSMISSION
Programming Keystrokes
Overview
If you regularly transmit to a particular destination or set of destinations using the
same features, you can save a lot of repetitive keypad operation by storing the
features and destinations in a Keystroke Program.
Keystroke Programs are stored in Quick Dial Keys or Speed Dial Codes.
❐ If you store a Keystroke Program into a Quick Dial Key or Speed Dial
Codes, that they cannot be used for any other purpose.
❐ Be sure to store your Keystroke Program in a vacant Quick Dial Key or
Speed Dial Code.
Example: Let us say that you normally sen d a da i ly repo rt to locations A, B, and C
at 11 pm (using Send Later). Store these instructions as a Keystroke Program.
Then every day, you will only have to place the report in the document feeder,
then press that key or enter that code to set up the transmission.
Cross-reference
Sending at a Specific Time (Send Later): see page 28.
Note: Keystroke Programs can be stored in Speed Dial codes, when the
Function Upgrade Card is installed.
ADVANCED
FEATURES
61

TRANSMISSION ADVANCED FEATURES
Storing a Keystroke Program
1. Make sure that the machine is in standby
mode (see page 16).
2. Place a sheet of paper in the feeder.
❐ Skip step 2 if you are making a Poll-
ing Reception program.
3. Select all required features (such as Transfer Request) and telephone numbers as
you would normally do.
❐ Contrast, resolution, and halftone
cannot be stored in a keystroke program.
4. Press the Quick Dial key or Speed Dial
with two digits code that you wish to
store the program in.
Example: Quick Dial Key 01.
or
Speed Dial, 1 and 0.
MEMORY TRANS. APR.4.12:25PM
SET DOC. OR ENTER FAX NO.
MEMORY 100%
MEMORY TRANS. OPTIONS ↓
ENTER FAX NUMBER
_
PROGRAM?
YES OR NO
❐ Make sure that this key is vacant.
5. To complete the program: Yes.
Note: The procedure that you just stored will now begi n. If you do not wish to
use the procedure now, press Stop immediately.
62

ADVANCED FEATURES TRANSMISSION
Labeling a Program
If you store a label for your keystroke programs, the label will appear on the
display when you use the program.
1. Function 3 and 4.
If you press and Start, a Program List
will be printed.
2. Press the Quick Dial key or en ter the
Speed Dial code that holds the program
that you wish to label.
Example: Quick Dial Key 01 and Yes.
3. Input your label, using the Quick Dial keys.
For how to enter the label; see page 4.
4. Yes.
5. Either:
❐ Label another program: Go to step 2.
❐ Return to standby: Function.
PROGRAM CHOOSE KEY
_ PRINT LIST →
NO TO CANCEL
PROGRAM YES OR CLR • NO
08
TRANSMIT DAILY REPORT_ ABC
PROGRAM CHOOSE KEY
_ PRINT LIST →
NO TO CANCEL
PROGRAM CHOOSE KEY
_ PRINT LIST →
NO TO CANCEL
63
ADVANCED
FEATURES

TRANSMISSION ADVANCED FEATURES
Using a Program
Before using a program, make sure that the machine is in standby mode (see
page 24 for details).
Transmission Program
1. Place your document in the feeder.
MEMORY TRANS. OPTIONS ↓
ENTER FAX NUMBER
_
2. Press the programmed Quick Dial Key, or
enter the prog rammed Speed Dial cod e.
❐ The program begins at once , or at
the later time specified by the program.
Free Polling Reception Program
1. Press the programmed Quick Dial Key, or
enter the prog rammed Speed Dial cod e.
PROGRAMMED
The program begins at once, or at the later time spe cified by the program.
Cross-reference
Polling Reception: see page 135.
64

ADVANCED FEATURES TRANSMISSION
Erasing a Program
When you wish to delete a keystroke program, do the following.
1. Function 3 and 4.
2. Press the Quick Dial key or enter the
Speed Dial codes that holds the
program that you wish to erase
.
Example: Quick Dial Key 08.
3. Press Clear.
4. To delete the program: Yes.
5. Either:
❐ Edit or erase another pr ogram: Go to
step 2.
❐ Return to standby: Function.
PROGRAM CHOOSE KEY
_ PRINT LIST →
NO TO CANCEL
PROGRAM YES OR NO
08 TRANSMIT DAILY REPORT ↑
CLR: CLR ↓
PROGRAM
10 KANTOH AREA ↑
CLEAR? YES
PROGRAM CHOOSE KEY
_ PRINT LIST →
NO TO CANCEL
NO
•
65
ADVANCED
FEATURES

TRANSMISSION ADVANCED FEATURES
Sending Confidential Messages
Overview
This feature is called Confidential T ransmission.
Use this feature if you do not want your message to be picked up casually by
anybody at the other end. The message will be stored in the memory at the other
end. It will not be printed until an ID known as the Confidential ID is entered.
Note: ❐ The machine at the other end must have memory space available
and it must have the Confi de nt i al R ece pt i on feature.
❐ This is a proprietary feature, and as such it only functions with ma-
chines produced by the same manufacturer that have this feature.
❐ Before sending a confidential message, it is recommended that you
call the receiver and advise them that you are sending a fax message in this manner.
There are tw o typ es of C o nf i dent i al Transmission.
1. Normal Confidential Transmission
The other party can print the message by entering the ID th at was previously
stored using the Confidential ID feature.
2. Confidential ID Override
If you wish to send a confidential message to a particular person at the other
end, you can specify the Confidential ID th at per so n ha s to en ter to see that
message. Anybody entering the machine’s Confidential ID will not be able to
see the message. Before you send the message, don’t forget to tell the
intended receiver what code must be entered to print the message.
Note: The receiving machine’s Confidential ID is not changed by this process.
66

ADVANCED FEATURES TRANSMISSION
If the intended receiver has a Personal Code with a Confidential ID stored with it,
you can o verride the receiving machine’s ID with that Conf i de nt ial I D. Then:
❐ The receiver can print the message by inputting the Confidential ID that is
stored with that person’s Personal Code.
❐ The intended receiver will also be informed personally by a Confidential File
Report; this report will have the name of the receiver on it, if the name was
stored with the Personal Code.
Cross-references
Confidential ID: see page 95. Personal Codes : see page 75.
Journal: see page 171. Confidential Reception: see page 94.
Procedure
To set up a confidentia l transmission, do the following.
1. Place your document in the feeder.
2. Function 1 and 2.
The machine is now in Confidential
Transmission Mode.
3. Dial then press Yes.
4. Either:
❐ Dial another number: Go to step 3.
❐ Press Start.
MEMORY TRANS. OPTIONS ↓
ENTER FAX NUMBER
_
CONF. TRANS. OPTIONS ↓
ENTER FAX NUMBER
_
CONF. TRANS. OPTIONS ↓
PRESS YES OR CLR
2125551234
CONF. TRANS. OPTIONS ↓
ENTER NO. OR START DEST:2
_
_
NO
•
ADVANCED
FEATURES
Confidential ID Override Option
This procedure will override the Confidential ID stored in the other party’s
machine. The over ride is only effective for this one transmissio n.
When in Confi d en ti a l Transmission Mo de ( s e e ab ove).
1. Press , 0 and 4.
CONF. ID ENTER ID CODE
NO TO END
_
67

TRANSMISSION ADVANCED FEATURES
2. Enter the Confidential ID that you wish to
use for this message.
CONF. ID PRESS YES OR NO
2567
Example: 2 5 6 7 on the ten key pad
and press Yes.
3. Dial and press Start.
For how to use other options, see page 27 and the pages following.
Storing an Often Used Document (Auto Document)
Overview
If you often find that you have to send a particular page to people (for example, a
map, a standard attachment, or a set of instructions), stor e tha t page in the
memory as an Auto Document, using a Quick Dial Key or a Speed Dial code.
This feature is called Auto Document.
Then, when you nee d to send tha t pa ge to some bo dy, press the Quick Dial Key or
enter the Speed Dial code that you stored it in, place any other pages that you
wish to send into the feeder, dial, and press Start. At the other end, the Auto
Document will be printed first.
The Auto Document is transmitted as it is; you cannot write an ything on it like
you can with a cover sheet. If you wish the machine to place your name on
your transmitted documents, try using the Label Insertion feature (see page
88).
Note: Auto Documents can be stored in S peed Dial codes , when the Funct ion
Upgrade Card is installed.
68

ADVANCED FEATURES TRANSMISSION
Storing an Auto Document
You can store the Auto Document in a Quick Dial or Speed Dial and give it a label.
Storing an Auto Document
1. Place the document and select the
resolution/contrast settings you require.
2. Press Function.
3. Press 3 and 5.
4. Now choose where to store the Auto
Document: in a Quick Dial or Speed Dial.
Either:
❐ Press a Quick Dial key
or
❐ Press the Speed Dial/Tel Directory
key and enter a two digit code on the
ten keypad.
MEMORY TRANS. OPTIONS ↓
ENTER FAX NUMBER
_
FUNCTION NO:_ OR NO
10TRANS. MODE 20CLEAR CHANGE
30PROG. CHANGE 40REPORTS ↓
AUTO DOCUMENT CHOOSE KEY
_ PRINT LIST →
NO TO CANCEL
With the feature enhancing card
AUTO DOCUMENT SELECT _ YES=END
01 ↑
1.STORE FAX 2.LABEL 3.CLEAR ↓
When pressing the one-touch 01
If you enter the wrong nu mber, press No to
enter the correct number.
5. Press 1.
6. Press Yes to store the document as the
cover sheet or press No not to .
7. Press Start.
8. Press Function to return to standby mode.
AUTO DOCUMENT
01 CONF. TRANS.
STORE AS COVER SHEET YES
AUTO DOCUMENT PRESS NO
01
PRESS START
AUTO DOCUMENT
WAIT:STORING DOCUMENT
MEMORY TRANS. DEC.31.12:59PM
SET DOC. OR ENTER FAX NO.
MEMORY 100%
NO
•
ADVANCED
FEATURES
69

TRANSMISSION ADVANCED FEATURES
Labeling an Auto Document
1. Press Function.
2. Press 3 and 5.
3. Now choose the Quick Dial key or Speed
Dial code to label.
Either:
❐ Press a Quick Dial key
or
❐ Press the Speed Dial/Tel Directory
key and enter a two digit code on the
ten keypad.
If you enter the wrong number, press No
to enter the correct number or search
the correct number using and .
4. Press 2.
FUNCTION NO:_ OR NO
10TRANS. MODE 20CLEAR CHANGE
30PROG. CHANGE 40REPORTS ↓
AUTO DOCUMENT CHOOSE KEY
_ PRINT LIST →
NO TO CANCEL
AUTO DOCUMENT SELECT _ YES=END
29 ↑
1.STORE FAX 2.LABEL 3.CLEAR ↓
When pressing the Quick Dial 29.
AUTO DOCUMENT ENTER LABEL
01 NO TO CANCEL
_ ABC
5. Enter the document name using the Quick
Dial ke y or th e ten key pad.
If you enter the wrong name, press
Clear or No to enter the correct name.
Clear --- Erase one letter at the
cursor.
No --- Erase all.
6. Press Yes.
7. Press Function.
Return to the standby mode.
When selecting "1"
AUTO DOCUMENT ENTER LABEL
01 NO TO CANCEL
_ ABC
AUTO DOCUMENT SELECT _ YES=END
29 ↑
1.STORE FAX 2.LABEL 3.CLEAR ↓
Yes
Press
from step 3 to name another document.
MEMORY TRANS. DEC.31.12:59PM
SET DOC. OR ENTER FAX NO.
MEMORY 100%
and repeat the procedure
70

ADVANCED FEATURES TRANSMISSION
Customized Auto Document
Programming documents into Quick Dials or Speed Dials which have destinations
already stored in them is called "Customized Auto Document". You can not only
amend Quick Dials/Speed Dials, but may also add programmed destinations to
Auto Documents.
Using an Auto Document
1. Make sure that the machine is in standby mode (see page 17).
2. If you wish to attach a fax message to
your Auto Document, place the fax face
down into the feeder.
3. Now choose the Quick Dial key or Speed
Dial code that contains the document
you need.
Either:
❐ Press a Quick Dial key
or
❐ Press the Speed Dial/Tel Directory
key and enter a two digit code on the
ten keypad.
Example: Quic k Dial Key 08.
And press Yes.
4. Dial the destination(s), and pre ss Yes.
5. Either:
- Dial another number: go to step 4.
- No more destinations: press Start.
MEMORY TRANS. OPTIONS ↓
ENTER FAX NUMBER
_
SEND AUTO DOCUMENT
YES OR NO
MEMORY TRANS. OPTIONS ↓
ENTER FAX NUMBER
_
ADVANCED
FEATURES
Note:
If you send the message to more than one location an d you enter the Quick Dial
key which contains the Auto Document, it will be attached to all destinations.
71

TRANSMISSION ADVANCED FEATURES
Printing the Contents of an Auto Document
If you need to remind yourself of what one of your stored Auto Documents looks
like, do the following procedure.
1. Function 5 and 3.
2. Now choose the Quick Dial key or Speed
Dial code of the document you wish to
print.
AUTO DOCUMENT CHOOSE KEY
_ PRINT LIST →
NO TO CANCEL
AUTO DOCUMENT NO TO CANCEL
08 OFFICE LOCATION MAP
PRESS START
Either:
❐ Press a Quick Dial key
or
❐ Press the Speed Dial/Tel Directory
key and enter a two digit code on the
ten keypad.
Example: Quick Dial Key 08 and Yes.
3. Start.
Changing the Contents of Auto Document
Changing the Label
1. Press Function.
2. Press 3 and 5.
3. Now choose the Quick Dial key or Speed
Dial code of the document you wish to
change.
Either:
❐ Press a Quick Dial key
or
❐ Press the Speed Dial/Tel Directory
key and enter a two digit code on the
ten keypad.
If you enter the wrong nu mber, press No to
enter the correct number or search for
the correct number using and .
FUNCTION NO:_ OR NO
10TRANS. MODE 20CLEAR CHANGE
30PROG. CHANGE 40REPORTS ↓
AUTO DOCUMENT CHOOSE KEY
_ PRINT LIST →
NO TO CANCEL
AUTO DOCUMENT SELECT _ YES=END
29 ↑
1.STORE FAX 2.LABEL 3.CLEAR ↓
When pressing the one-touch 29.
72

ADVANCED FEATURES TRANSMISSION
4. Press 2.
The document name is displayed.
5. Press Clear or No to enter the document
name again.
6. Press Yes to return to the standby mode.
7. Press Function.
Erasing an Auto Document or Label
1. Press Function.
2. Press 3 and 5.
AUTO DOCUMENT ENTER LABEL
01 NO TO CANCEL
_ ABC
AUTO DOCUMENT CHOOSE KEY
_ PRINT LIST →
NO TO CANCEL
Repeat the procedure from step 3 to
change another name.
MEMORY TRANS. DEC.31.12:59PM
SET DOC. OR ENTER FAX NO.
MEMORY 100%
FUNCTION NO:_ OR NO
10TRANS. MODE 20CLEAR CHANGE
30PROG. CHANGE 40REPORTS ↓
3. Now choose the Quick Dial key or Speed
Dial code to erase.
Either:
❐ Press a Quick Dial key
or
❐ Press the Speed Dial/Tel Directory
key and enter a two digit code on the
ten keypad.
If you enter the wrong number, press No
to enter the correct number or search for
the correct number using and .
4. Press 3.
AUTO DOCUMENT CHOOSE KEY
_ PRINT LIST →
NO TO CANCEL
AUTO DOCUMENT SELECT YES=END
29 ↑
1.STORE FAX 2.LABEL 3.CLEAR ↓
ADVANCED
FEATURES
73

TRANSMISSION ADVANCED FEATURES
5. Either:
❐ Press Yes to erase the Auto Docu-
ment.
"Document Cleared!" will flash up.
❐ If you don’t wish to erase this Auto
Document, press No.
6. Either:
❐ Press Yes to erase the Auto Docu-
ment’s label.
"Label Cleared!" will flash up.
❐ If you don’t want to make a change,
press No.
7. Press Function to return to the standby
mode.
AUTO DOCUMENT
10 OFFICE LOCATION MAP
CLEAR DOCUMENT? YES
AUTO DOCUMENT CHOOSE KEY
_ PRINT LIST →
NO TO CANCEL
Repeat the procedure from step 3 to
erase another document.
MEMORY TRANS. DEC.31.12:59PM
SET DOC. OR ENTER FAX NO.
MEMORY 100%
NO
•
74

ADVANCED FEATURES TRANSMISSION
Restricting Access to the Machine
Overview
When your machine arrives from the factor y and is installed for the first time,
anybody can use it. However , usin g a syste m of Personal Codes, the machine can
be set up to prevent unauthorized persons from using the machine. The
necessary procedures are given in the following sections.
❐ Programming the Personal Codes: see below.
❐ Switching on Restricted Access: see page 79.
Programming the Personal Codes
The main advantage of Personal Codes is that they allow you to track machine
usage and restrict access to the machine. If you do not wish to restrict access to
the machine, you can still use Personal Codes to personalize your fax messages,
by using the Label Insertion feature.
The Personal Code is a four digit code. It can have any v a l ue fr om 00 01 to 99 99 .
ADVANCED
FEATURES
75

TRANSMISSION ADVANCED FEATURES
Each user can be given a Personal Code. While programming, you can store the
following items with each Personal Code:
❐ A name: This will be printed on reports, such as the Journal, to identify the
users of the machine. It is also used with the Label Insertion feature.
❐ A Confidential ID: This must be diffe rent for ea ch Personal Code, an d d i fferent
from your machine’s Confidential ID. If somebody sends you a confidential
message, they can override your machine’s Confidential ID with the
Confidential ID stored with your Personal Code, if you inf orm them of this ID. If
so, the machine will print a Confidential File Report that will inform you when
the message has arriv ed. Then, you m u st in pu t this Confidential I D to pri nt th e
message. You can only st or e Co nfidential IDs i f you have an opti on al memory
card or hard disk.
Note: You cannot register more than 50 Personal Codes (if the optional Function
Upgrade Car d is installed, you can re gi st er up to 50 0 pe r son al cod es)
with Names and Confidential IDs in this machine. This means that if y ou
switch Restricted Access on , on ly 50 peop le can use th e mach ine.
Cross-references
Using Personal Codes: see pages 27, 67, 79, and 97.
Label Insertion: see page 88. Confidential Reception: see page 94.
Journal: see page 171. Confidential ID: see page 95.
Storing a Personal Code
1. Function 6 0 2 2 2 2 7 and 1
❐ At this time; you can print a Per-
sonal Code List if you press Start.
2. Input a Personal Code that you want to
store in your machine for later use.
Example: 5 4 7 7.
❒ If you input the wr on g cod e, press No.
3. Store the code: Yes.
4. Either:
❐ Press the Quick Dial key that y ou
wish to program the Personal Code
into. Then press Yes.
❐ If you don’t wish to program this code
into a Quick Dial key, press No.
PERS. CODE ENTER ID CODE
_ PRINT LIST →
NO TO CANCEL
PERS. CODE YES OR NO
5477
PERS. CODE CHOOSE KEY
5477
YES TO SKIP NO TO CANCEL
PERS. CODE YES OR NO
5477
16
76

ADVANCED FEATURES TRANSMISSION
5. Input a name for this Personal Code
using the Quick Dial keys.
Example: JOHNSON
Inputting and editing labels:
see page 223.
❐ If you do not wish to store a label:
Yes. Go to step 7.
6. Store the name: Yes.
7. Either:
❐ If you do not have an optional mem-
ory card or hard disk, go to
step 8.
❐ Input a Confidential ID for the per-
sonal code used by this user.
Example: 4 6 5 6.
PERS. CODE YES OR CLR • NO
5477
JOHNSON_ ABC
PERS. CODE CONF. ID SETTING
5477 JOHNSON
CONF.ID: _ YES TO END
PERS. CODE YES OR CLR • NO
5477 JOHNSON
CONF.ID: 4656
If you do not wish to sto r e an ID : Yes.
Go to step 9.
8. Store the ID: Yes.
9. Either:
❐ Enter another code: Go to step 2.
❐ Finish: Function.
Editing or Erasing a Personal Code
1. Function 6 0 2 2 2 2 7 and 1
2. Input the Personal Code that you wish to
edit.
Example: 5 4 7 7.
And press Yes.
PERS. CODE ENTER ID CODE
_ PRINT LIST →
NO TO CANCEL
PERS. CODE ENTER ID CODE
_ PRINT LIST →
NO TO CANCEL
PERS. CODE YES OR NO
5477 JOHNSON
ADVANCED
FEATURES
❐ If you inpu t the wrong code, press
No.
77

TRANSMISSION ADVANCED FEATURES
3. Either:
❐ Erase this Personal Code: Press Clear then Yes.
Go back to step 2.
❐ Edit the contents of this code:
Press Yes.
Go to step 4.
4. Either:
❐ To change the Quick Dial key this
code has been programmed into,
press the No key.
❐ If you don’t wish to make a change,
go straight to step 6.
5. Press the Quick Dial key you want to
program this code into.
6. Press Yes.
7. Edit the name stored with this code. When
the name is correct, press Yes.
Inputting and editing labels:
see page 223.
PERS. CODE YES OR CLR • NO
5477
JOHNSON_ ABC
PERS. CODE CHOOSE KEY
5477 JOHNSON
YES TO SKIP NO TO CANCEL
PERS. CODE YES OR NO
5477 JOHNSON
16
PERS. CODE YES OR CLR • NO
5477
JOHNSON ABC
PERS. CODE YES OR CLR • NO
5477 JOHNSON
CONF. ID: 4656
8. Either:
❐ If you do not have an optional mem-
ory card or hard disk, go to step 9.
❐ Edit the Confidential ID stored with
this code. Press No then enter a
new code.
When the ID is correct, press Yes.
9. Either:
❐ Enter or edit another code: Go to step 2.
❐ Finish: Function.
78
PERS. CODE CONF.ID SETTING
5477 JOHNSON
CONF. ID: YES TO END
PERS. CODE ENTER ID CODE
_ PRINT LIST →
NO TO CANCEL

ADVANCED FEATURES TRANSMISSION
Switching on Restricted Access
Restricted Access allows you to keep a closer track of machine usage, and deters
passers-by from casually using your machine.
If this feature is switched on, users have to enter their Personal Code before they
can use the machine. The Personal Code must have already been stored in the
machine.
However, the user can enter codes directly at the keypad. Therefore, if you are
serious about using this feature to stop casual users from operatin g th e m achi ne,
you must allocate relatively obscure codes to all authorized users, and try to avoid
obvious numbe rs such as 00 01 .
If you wish to switch Restricted Access on or off, do the following procedure (See
page 227 if you need more information abou t the User Parameter settings
adjustment procedure).
1. Function 6 0 2 2 2 2 6 and 3.
USER PARAMETER PRINT LIST →
DEFAULT: 01000000 ↑
SWITCH00: 01000000 YES TO END ↓
2. The settings for switch 00 are now shown
on the bottom line of the display.
3. Press or until the settings for switch
05 are shown.
The settings you need are digits 4 and 5.
Digit Purpose
Restricted Access Digit 5 Digit 4 Setting
4
5
0 0 Off
0 1 On
1 0 On when the Night Timer is on
SWITCH 05 :0000 0000
Digit 4 (Underlined)
Digit 5 (Double Underlined)
4. If you wish to change the setting, press 4 or 5 on the ten key pad.
5. Finish: Yes and Function.
ADVANCED
FEATURES
79

TRANSMISSION ADVANCED FEATURES
Operating the Machine with Restricted Access Switched On
If you have switched Restricted Access on, the displa y is as sho wn belo w whe n
the machine is in standby mode.
Befo r e you can use the machine, you must ente r y our personal code that you
have already registered in the machine. See page 82 for how to store Personal
Codes.
RESTRICTED ACCESS ENTER CODE
CODE
DEC. 4.11:50AM
1. Either:
❐ Enter y our personal code .
Example: 7 3 6 2 from the ten key pad.
❐ Press the Quick Dial key where the
personal code programmed.
2. After a second, the normal standby display will appear, and you can use the
machine. If the normal standby display does not appear, you entered a
personal code that is not stored in the machine.
If you decide that you do not wish to use the machine now, you should return the
machine to Restricted Access standby mode. To do this, either:
❐ I nsert a page into the document feeder and remove it immediately.
❐ Press Function twice.
80

ADVANCED FEATURES TRANSMISSION
Tonal Signals
Some organizations offer you special services by telephone, which you can
access by transmi ttin g Touch Tone or DTMF tones . If your phone service prov ides
only pulse dialing, or if you are calling over a digital network, the ability to
generate Tonal Signals will allow you to access these services.
First, dial the oth er pa rty. When you are through to the other end, press the tone
dial ke y an d en ter the code number that is needed to access the requi r ed feature
at the other terminal.
You do not need to press the tone dial key if your machine is set up for dialing in
Tone Dial (DTMF) mode.
Before you can use this feature, you must program one of the User Function Keys
as the Tone key. In the following procedure, suppose that we have already
program m e d the F1 key as the Tone key.
Programing the Tone Key
1. Function 3 and 6.
2. Press the User Func tion Key (F1-F5) that
you wish to p r ogram the Tone key i n to.
3. Press Yes.
4. Either:
❐ If the key is already programmed,
press No, select 04 using by scroll
keys.
❐ If the key is vacant, select 04 using
by scroll keys.
5. Press Yes and Function.
USER FUNCTION PRESS F1 TO F5
F _ PRINT LIST →
NO TO CANCEL
USER FUNCTION ENTER CODE
F 4 CODE: _ SCROLL ↑ ↓
NO TO CANCEL
USER FUNCTION YES OR NO
F 4 CODE: 04 SCROLL ↑ ↓
TONE KEY
ADVANCED
FEATURES
81

TRANSMISSION ADVANCED FEATURES
Operating the Tone Key
1. Make sure that the machine is in standby mode, and that there is no document
in the feeder.
2. Pick up the telephone handset, or press On Hook Dial.
3. Dial the remote facility. Do not press Start
4. After your line is connected to the remote facility, do the following:
❐ If your telephone line type is DTMF (Tone Dial): Go to step 5.
❐ If your telephone line type is Pulse Dial: Press the User Function key where
the Tone key is programmed. (Example: F1) A dot appears on the display.
5. Input the digits that you need to use the remote facility. These digits will depend
on the remote facility.
Note: Do not press Start.
6. After you have finished your business with the remote facility, hang up.
Cross-reference
Tone Dial (Telephone Line Type): see page 290.
82

ADVANCED FEATURES TRANSMISSION
Dialling with the Dial Option Key
The SUB (Sub-addres s ) an d SID (Sub-address ID) features allow you to send confidential
messages to other manufacturer’s machines provided with these features. Similary, the
SEP (Selecting Polling) and PWD (Pass word) f eatures let you pick up fax messages.
Confidential Transmission with SUB/SID
1 Set the document.
2 Enter the number of the destination.
3 Press the Dial Option Key.
(Example : F5)
Note
Option Key before using this feature.
: You must program F5 as the Dial
4 If this number requ i r es an SID
(Sub-address ID), press 3
and enter the SID using the ten-key pad.
If there is no SID, go to step 6.
5 Press Yes.
MEMORY TRANS. OCT.13. 03:29PM
SET DOC. OR ENTER FAX NO.
MEMORY 100%
MEMORY TRANS. OPTIONS ↓
ENTER FAX NUMBER
7890
DIAL OPTION NO. : or YES
1 : SUB 2 : SEP
3 : SID 4 : PWD NO TO CANCEL
DIAL OPTION
ENTER SID NO TO CANCEL
DIAL OPTION
PRESS YES OR CLR • NO
123456
DIAL OPTION NO. : or YES
1 : SUB 2 : SEP
3 : SID 4 : PWD NO TO CANCEL
6 If the number requires a sub-address
(SUB), press 1 and enter the
DIAL OPTION
ENTER SUB NO TO CANCEL
sub-address using the ten-key pad.
7 Press Yes.
8 Press Yes.
9 Press Yes then Start.
Note: You can program the sub-address ID
and the sub-address in a Quick Dial,
a Speed Dial or Group .
Cross-reference
Key): see page 143.
User Function Key (Dial Option
DIAL OPTION
PRESS YES OR CLR • NO
123
DIAL OPTION NO. : or YES
1 : SUB 2 : SEP
3 : SID 4 : PWD NO TO CANCEL
MEMORY TRANS. OPTIONS ↓
PRESS YES OR CLR • NO
7890
MEMORY TRANS. OPTIONS ↓
ENTER NO. OR START DEST: 2
SID: You must program the SUB password (SID) before sending fax messages by
SUB. If you use standard Confidential Transmission, this is not necessary.
83
ADVANCED
FEATURES

TRANSMISSION ADVANCED FEATURES
Polling Reception with SEP/PWD
1 Press Function followed by 1 1.
2 Enter the number of the destination.
3 Press the Dial Option Key.
(Example : F5)
Note
: You must program F5 as the Dial
Option Key before using this feature.
4 If the sender requires a password, press 4
and enter the password using the
ten-key pad.
If no password is required, or go to ste p
6.
5 Press Yes.
6 If the sender requires SEP (Selective
Polling), press 2 and enter the SEP code
using the ten-key pad.
7 Press Yes.
MEMORY TRANS. OCT.13. 03:29PM
SET DOC. OR ENTER FAX NO.
MEMORY 100%
POLLING RECV OPTIONS ↓
ENTER FAX NUMBER
123456
DIAL OPTION NO. : or YES
1 : SUB 2 : SEP
3 : SID 4 : PWD NO TO CANCEL
DIAL OPTION
ENTER PWD NO TO CANCEL
DIAL OPTION
PRESS YES OR CLR • NO
789012
DIAL OPTION NO. : or YES
1 : SUB 2 : SEP
3 : SID 4 : PWD NO TO CANCEL
DIAL OPTION
ENTER SEP NO TO CANCEL
DIAL OPTION
8 Press Yes.
Or No to cancel.
9 Press Yes then Start.
Cross-reference
Key): see page 143.
User Function Key (Dial Option
Note: You can program the password and
the selective polling in a Quick Dial,
PRESS YES OR CLR • NO
456789
DIAL OPTION NO. : or YES
1 : SUB 2 : SEP
3 : SID 4 : PWD NO TO CANCEL
POLLING RECV OPTIONS ↓
PRESS YES OR CLR • NO
123456
POLLING RECV OPTIONS ↓
ENTER NO. OR START DEST: 2
a Speed Dial or Group.
PWD: You must program the SEP password (PWD) before you can receive fax
messages by SEP. This is not necessary with standard Polling Reception.
84

ADVANCED FEATURES TRANSMISSION
Storing Part of a Number
This feature is called Chain Dialing.
It allows you to compose a teleph on e n u m be r from various parts, some of which
may be stored as Quick Dial Keys or Speed Dial Codes, and some of which may
be input at the keypad.
❐ For example, you can program commonly used area or country codes into
Speed Dial Codes or Quick Dial Keys.
This feature is convenient if:
❐ You often communicate with many terminals for which the area code, or
international code is the same.
❐ You often make international calls.
For example, if you of te n ca l l Tokyo , Japan, program 011813 ( Overseas to
Tokyo from the USA) as Quick Dial Key 01. This will save work at the operation
panel when d i al i n g a Tokyo num b er.
❐ Your PBX requires an ID code before the destination number.
For example, if your ID is 1234567, and the destination is stored in Quick Dial
Key 01, enter 1234567 at the keypad, press Pause, then press Quick Dial Key
01.
Note: Do not store any labels with the Quick Dials and Speed Dials that you are
using with Chain Dialing. This is because Label Insertion does not work
with Chain Dialing.
Cross-references
Quick Dial and Speed Dial: see page 291. Label Insertion: see page 88.
Example: 01133-1-5553333 (From the USA to Paris).
Assume that the following Quick Dial and Speed Dial numbers have
already been programmed.
❐ Quick Dial 01 = 01133 (Overseas to France)
❐ Quick Dial 02 = 1 (Paris)
❐ Speed Dial 10 = 555
When the machine asks you to dial:
On Hook Dial or Handset Mode:
Press QuickDial01 QuickDial02 Speed Dial 1 0 then 3 3 3 3.
Other:
Press QuickDia l0 1 Pause QuickDial02 Pause Speed Dial 1 0 Pause
then 3 3 3 3.
ADVANCED
FEATURES
85

TRANSMISSION ADVANCED FEATURES
Specified Image Area (Function Upgrade Card Required)
Overview
If you only wish to transmit a part of the page, use this feature. You tell the
machine what area to scan by specifying two pa rameters: The Skip Length, and
the Scan Length. See the following diagram.
Skip
Length
Scan
Length
This feature cannot be used when you are transmitting using an OMR sheet,
Immediate Transmission, or w he n you are making a copy.
Before you can to use the feature during a transmission, you must:
❐ Set up the feature using Function 74 (see the next page).
❐ P rogram one of the User Funct i on Keys so that you can activa te this feature
during the transmissi o n pro c ed ure.
Note: If the skip length is longer than the paper, the machine stops scanning.
When you send with Specified Image Area, Parallel Memory Transmission
is cancelled and normal Me m ory Transmission takes pl ace.
If Par allel Transmission is on, you cannot send just a few pages with
Specified Image Ar e a. Should you w ant to send a few pages with Specified Image Area, turn Parallel Transmission off using function 63 (set
switch 07 digit 2 to "0").
Changing the Specified Image Area On/Off Home Position Setting
In a new machine, this setting is off. If you change this setting to "On", the image
area that you input (using Function 74 on the next page) will be used for all of
your transmitted pages, unless you switch off the light under the User Function
Key that you programmed for this feature.
1. Function 6 0 2 2 2 2 6 and 3.
USER PARAMETER PRINT LIST →
DEFAULT: 01000000 ↑
SWITCH00: 01000000 YES TO END ↓
86

ADVANCED FEATURES TRANSMISSION
2. The settings for switch 00 are now shown
on the bottom line of the display.
3. Press until the settings for swit ch 06 are
shown.
The setting that you need to change is
digit 5.
4. If you wish to change the setting, press 5.
5. Finish: Press Yes then Function.
Specifying an Image Area
1. Function 6 0 2 2 2 2 7 and 4.
SWITCH00:
SWITCH06:
Digit 5
0: The home position is "Off".
After transmission, Specified Image
Area will switch itself off.
1: The home position is "On".
After transmission, Specified Image
Area will stay active and the lamp
under the User Function Key will stay
lit.
IMAGE AREA PRESS YES
SKIP LENGTH: 000 MM
SCAN LENGTH: 000 MM ↓
00000000
00000000
2. Input the skip length then press .
You must enter a three digit value.
For example, for 75 mm, input 075.
3. Input the scan length . You must enter a
three digit value.
IMAGE AREA PRESS YES
SKIP LENGTH: 075 MM
SCAN LENGTH: 000 MM ↑
❒
1 inch is 25.4 mm. You
must input the dimensions in mm.
For example, for 95 mm, input 095.
4. Finish: Yes and Function.
The machine returns to standby mode.
Specified Image Area is available only when you are doing one of the following:
❐ Memory Transmission (including Confidential Transmission and Transfer
Request)
❐ Storing a document for Polling Transmission
❐ Storing an Auto Document
ADVANCED
FEATURES
87

TRANSMISSION ADVANCED FEATURES
Label Insertion
This feat ur e supp lem e nt s the TTI. It uses the Personal Code and the Quic k D ial o r
Speed Dial Label to inform the othe r party who is sending the message, and to
state who the message is for.
To use this feature, you must:
❐ Switch Label Insertion on for each Quick Dial and Speed Dial that you wish to
use this f ea tu r e wi th (se e th e pr o c ed ures starting on pages 293 and 27).
❐ Pro gram the Personal Codes of the machine’s users, and store their names
with their codes (see page 75).
❐ Program labels with the Speed Dial and Quick Dial numbers (see the
procedures starting on pages 293 and 27).
❐ When you make a transmission, use a Quick or Speed Dial, and select the
Personal Code option (see page 27).
Note: TTI on/off has no ef fect on this feat ur e.
Example:
Date and Time TTI (32 characters)
To: MR SMITH
From the
Quick/Speed
Dial Label
Your fax message as received at the other end
From: JOHNSON
From the
Personal
Code
In the above exampl e, the message w as se nt usi n g Jo hn son ’s personal code. The
Quick Dial or Speed Dial used to dial the destination had MR SMITH as the label.
Note: If you later reprogram the Speed/Quick Dial, be su re to reprogram or
delete the label as well. The top of the image will be overprinted if
there is no margin at th e top of the tran smitted page (th is is also true
for the TTI).
Cross-references
Quick Dial and Speed Dial: see page 291. Personal Codes: see pages 27 and 75.
88
 Loading...