

Page 1
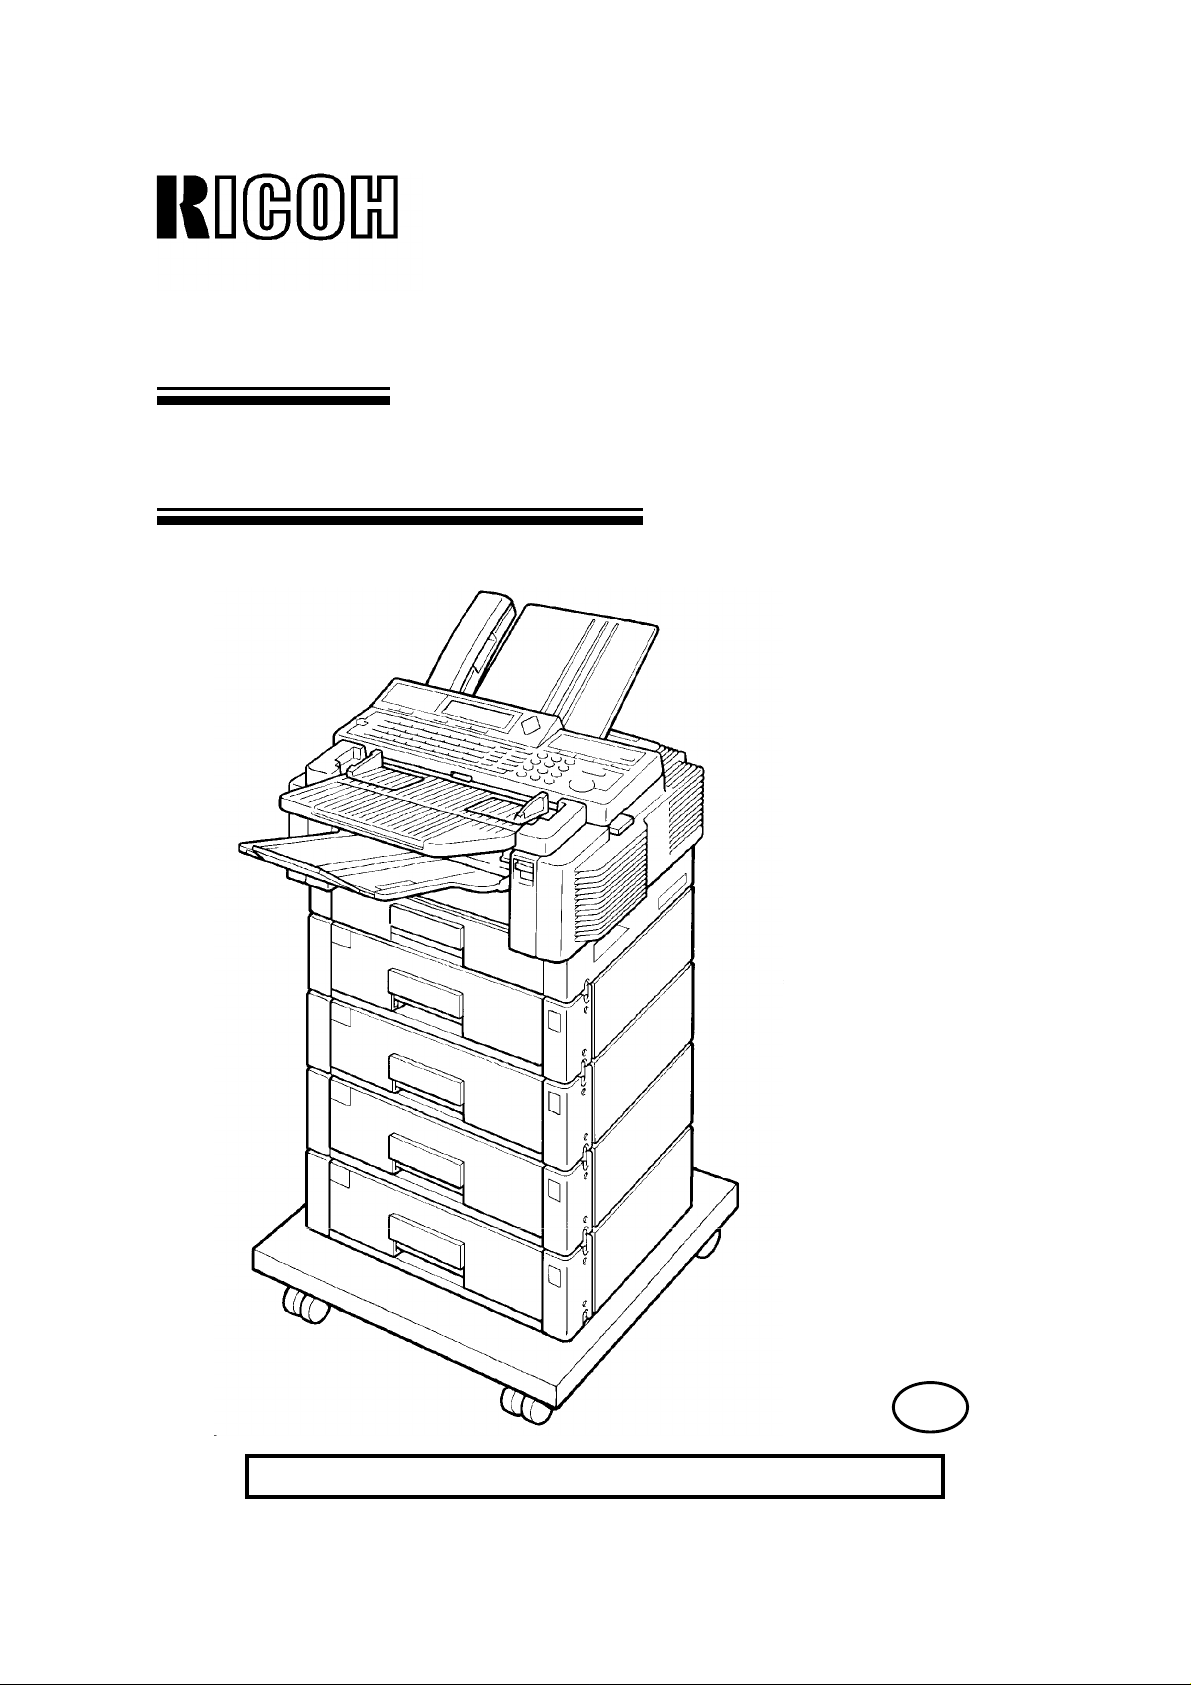
OPERATOR’S MANUAL
RICOH FAX4500L
A laser recording
facsimile with dual
access, expandable
memory, and
optional Group 4
AS
Please read all of these instructions and keep this manual by your machine.
Page 2

Optional Equipment
ISDN Kit
This allows you to send and receive messages using the ISDN.
Memory
Either a 1-Mbyte memory card, a 2-Mbyte memory card, or a 20 Mbyte hard disk
can be added.
Paper Feed Unit
Up to 4 extra 500-sheet paper feed units can be added to the machine. Also, this
option allows you to use A4, A5, B4, F, or F4 size paper; paper of width up to
10.1" (257 mm) can be used. The maximum printout width with one of these in stalled is 9.8" (250 mm).
Telephone Handset
This permits voice communication (over the PSTN).
Page 3

IMPORTANT SAFETY INSTRUCTIONS
1. Read all of these instructions.
2. Save these instructions for later use.
3. Follow all warnings and instructions marked on the product.
4. Unplug this product from the wall outlet before cleaning. Do not use liquid
cleaners or aerosol cleaners. Use a damp cloth for cleaning.
5. Do not use this product near water.
6. Do not place this product on an unstable cart, stand, or table. The product
may fall, causing serious damage to the product or injuring the user.
7. Slots and openings in the cabinet and the back or bottom are provided for ven tilation; to ensure reliable operation of the product and to protect it from over heating, these openings must not be blocked or covered. The openings
should never be blocked by placing the product on a bed, sofa, rug, or other
similar surface. This product should not be placed in a built-in installation un less proper ventilation is provided.
8. This product should be operated from the type of power source indicated on
the marking label. If you are not sure of the type of power available, consult
an authorized sales person or your local power company.
9. This product is equipped with a 3-wire grounding type plug, a plug having a
third (grounding) pin. This plug will only fit into a grounding-type power outlet.
This is a safety feature. If you are unable to insert the plug into the outlet, con tact your electrician to replace your obsolete outlet. Do not defeat the purpose
of the grounding type plug. (This does not apply in the countries in which the
2-wire, non-grounded type of plug is used.)
10. Do not allow anything to rest on the power cord. Do not locate this product
where persons will walk on the cord.
11. If an extension cord is used with this product, make sure that the total of the
ampere ratings on the products plugged into the extension cord do not ex ceed the extension cord ampere rating. Also, make sure that the total of all
products plugged into the wall outlet does not exceed 15 amperes.
12. Never push objects of any kind into this product through cabinet slots as they
may touch dangerous voltage points or short out parts that could result in a
risk of fire or electric shock. Never spill liquid of any kind on the product.
13. Do not attempt to service this product yourself, as opening or removing covers
may expose you to dangerous voltage points or other risks. Refer all servicing
to qualified service personnel.
14. Unplug this product from the wall outlet and refer servicing to qualified service
personnel under the following conditions:
A. When the power cord or plug is damaged or frayed.
B. If liquid has been spilled into the product.
C. If the product has been exposed to rain or water.
D. If the product does not operate normally when the operating instructions
are followed. Adjust only those controls that are covered by the operating
instructions since improper adjustment of other controls may result in
damage and will often required extensive work by a qualified technician
to restore the product to normal operation.
E. If the product has been dropped or the cabinet has been damaged.
F. If the product exhibits a distinct change in performance, indicating a
need for service.
Page 4

CONTENTS
INTRODUCTION
WHAT DOES A FAX MACHINE DO?
BAD TELEPHONE LINES AFFECT FAX COMMUNICATION
HOW TO USE THIS MANUAL
CONVENTIONS 1
STORING TELEPHONE NUMBERS 2
STORING NAMES AND LABELS 2
IF YOU MAKE A MISTAKE 3
FACSIMILE FEATURE AVAILABILITY TABLE 4
LIMITATIONS ON VARIOUS FEATURES 8
GENERAL PRECAUTIONS
POWER AND GROUNDING 10
COLD WEATHER POWER-UP 11
THUNDERSTORMS 11
COPY PAPER 12
TONER CASSETTES 12
OPERATING PRECAUTIONS 12
GENERAL 12
LOCATION 13
SECTION 1. COMPONENT GUIDE
1. EXTERNAL VIEW 14
2. OPERATION PANEL 16
SECTION 2. ROUTINE OPERATION
1. SENDING A FAX MESSAGE 18
1-1. Recommended Types of Document 18
1-2. Transmission Procedure at a Glance 20
1-3. Contrast, Resolution, and Halftone Modes 22
1-4. Immediate Transmission 22
1-5. Optional Features for Transmission 23
1-5-1. Personal Code 23
1-5-2. Send Later 23
1-5-3. Transmission Deadline (TRD) 24
1-5-4. Page Count (Immediate Transmission only) 24
1-5-5. Others 25
1-6. Check your Destinations while Dialling 25
1-7. Converting Immediate Transmission to Memory Transmission 25
Page 5

1-8. Redialling 26
2. RECEIVING FAX MESSAGES 27
2-1. Selecting the Reception Mode 27
2-1-1. Manual Receive (TEL) Mode 27
2-1-2. Auto Receive (FAX) Mode 28
2-2. Substitute Reception 28
2-3. Confidential Reception (Memory Card or Hard Disk Required) 28
3. USING THE MACHINE FOR TELEPHONE CALLS 29
3-1. Making a Telephone Call 29
3-1-1. Using On Hook Dial 29
3-1-2. Using the Handset 29
3-2. Answering the Telephone 30
3-3. Phoning and Faxing on the Same Call 31
3-3-1. To Talk Before Sending a Fax (On Hook Dial) 31
3-3-2. To Talk After Sending a Fax 31
SECTION 3. ADVANCED FEATURES
1. TRANSMISSION 32
1-1. Broadcasting 32
1-2. Keystroke Programs 33
1-3. Confidential Transmission 36
1-4. Polling Transmission 37
1-4-1. Free Polling 37
1-4-2. Secured Polling 37
1-4-3. Stored ID Override 38
1-5. Transfer Request 40
1-6. Telephone Directory 41
1-7. Secure Transmission 42
1-8. Direct Fax Number Entry 42
2. RECEPTION 43
2-1. Polling Reception 43
2-2. Authorized Reception 44
2-3. Night Timer 45
2-4. Forwarding (Memory Card or Hard Disk Required) 46
2-5. Specified Cassette Selection (Optional Paper Feed Unit Required) 51
2-6. Multi-sort Document Reception
(Memory Card or Hard Disk Required) 52
3. OTHER FEATURES 53
3-1. Copying 53
3-2. File Management 54
3-2-1. Erasing a File from Memory 54
3-2-2. Printing a File 55
3-3. User Function Keys 56
3-4. Function Programs 57
3-5. Printing from Memory Lock (Memory Card or Hard Disk Required) 58
3-6. Tonal Signals 58
Page 6

3-7. Chain Dialling 59
3-8. Restricted Access 59
3-9. Counters 60
3-10. Communication Result Display 60
3-11. Length Reduction 60
3-12. Label Insertion 61
3-13. Ordering Toner 62
SECTION 4. PROGRAMMING THE MACHINE
1. PROGRAMMING AT INSTALLATION 63
1-1. Language Selection 63
1-2. Date and Time 64
1-3. Country Code 64
1-4. Telephone Number 65
1-5. Area Code Prefix 65
1-6. Next Transfer Station (Group 4 Kit required) 66
1-7. ID Code 66
1-8. Confidential ID (Memory Card or Hard Disk required) 67
1-9. Memory Lock ID (Memory Card or Hard Disk required) 67
1-10. RTI 68
1-11. TTI 69
1-12. CSI 70
1-13. Telephone Line Type 70
2. SETTINGS 71
2-1. On/Off Switches 71
2-2. User Parameter Settings 72
2-3. Economy Transmission Time 74
3. ADJUSTMENTS 75
3-1. Volume Adjustments 75
4. TELEPHONE NUMBERS AND PERSONAL CODES 76
4-1. Programming Quick Dial 76
4-2. Programming Speed Dial 79
4-3. Programming Groups 83
Entering Group Programming Mode and Selecting a Group 83
Storing Numbers in a Group 84
Checking Which Numbers are Already in the Group 85
Storing a Label for this Group 85
Storing a Group Transfer Station 86
Erasing the Group 87
4-4. Personal Codes 88
Page 7

SECTION 5. PRINTING REPORTS
1. AUTOMATICALLY PRINTED REPORTS 91
1-1. Table of the Reports 91
1-2. Report Formats 92
2. USER-INITIATED REPORTS 95
2-1. Journal 95
2-2. File List 95
2-3. Quick Dial List 95
2-4. Speed Dial List 95
2-5. Group Dial List 95
2-6. Program List 95
2-7. User Function List 95
2-8. Personal Code List 95
2-9. Authorized Reception List 95
2-10. Forwarding List 95
2-11. Specified Cassette Selection List 95
2-12. User Parameter List 95
SECTION 6. LOOKING AFTER THE MACHINE
1. REPLACING PAPER 96
2. REPLACING THE TONER CASSETTE 97
3. REPLACING THE MARKER 99
4. CHANGING THE PAPER SIZE OF THE CASSETTE 100
4-1. Upper Cassette 100
4-2. Lower Cassette(s) 102
5. USER MAINTENANCE PROCEDURE 103
5-1. User Maintenance Table 103
5-2. User Maintenance Procedure 104
5-2-1. Scanner 104
5-2-2. Main Body 108
5-2-3. Lower Paper Feed Unit(s) (If one or more are installed) 112
SECTION 7. SOLVING PROBLEMS
1. DOCUMENT JAMS 113
2. COPY JAMS 115
3. COMMUNICATION PROBLEMS 118
4. OPERATING DIFFICULTIES 119
5. DOCUMENT MISFEEDS 120
6. DISPLAYED ERROR MESSAGES 121
7. ERROR CODES 122
SECTION 8. SPECIFICATIONS
TABLE OF SPECIFICATIONS 124
Page 8

APPENDIX
APPENDIX A. PAPER FEED UNIT A-1
APPENDIX B. HARD DISK UNIT B-1
1. PRECAUTIONS B-1
2. GENERAL B-1
3. OPERATION B-2
4. SPECIFICATIONS B-2
APPENDIX C. ISDN OPTION TYPE 40 C-1
1. INTRODUCTION C-1
2. OPERATION C-2
3. TROUBLESHOOTING C-6
INDEX
QUICK REFERENCE
FUNCTION LIST
NOTICE TO USERS
Page 9

INTRODUCTION
Thank you for purchasing this product. This compact machine is ideal for growing
businesses, branch offices, or those users who wish to upgrade to a plain paper
fax machine with a wide range of features.
WHAT DOES A FAX MACHINE DO?
When you write a letter, you normally seal it in an envelope, attach a stamp, and post it in the nearest letter box. Then in a few days, depending on the postal service, the letter will arrive at its destination. However, you may not be aware of its arrival until you get a return letter.
A fax machine speeds this process up. After you have written your letter, place it in your fax machine’s document feeder, dial the destination’s fax number, then press the Start key on your fax machine’s operation panel.
The fax machine scans your letter, and converts it into a series of black and white dots (the number of dots there are across the page and down the page depends on the resolution that you selected; refer to the specifications section of this manual for details). This series of dots is
transformed into an electrical signal and sent out over the telephone line to the fax machine at the
destination.
The fax machine at the destination reconstructs your letter from the received signal, and prints it.
The quality of the printed message is not as good as the original, but it is good enough for most
purposes.
If you are worried about whether the message arrived at the destination, you can check the report
known as the Journal. When you print this report, you will see the results of the most recent fax
communications made by your machine.
You can use your fax machine to send and receive any type of document, even photographs.
BAD TELEPHONE LINES AFFECT FAX COMMUNICATION
Quick and accurate transmission of fax messages depends
on the condition of the telephone line, If the line condition is
very good, this machine will transmit an A4-size page in 6
seconds. However, if the line is noisy, the speed may be reduced significantly, and the data may be damaged.
The symptoms of data loss caused by a noisy telephone
line are seen on the printouts of received messages. An example is shown opposite. Note that lines are missing from
the page at the indicated locations. ECM is an effective
countermeasure against this type of error.
The line condition is affected by the weather; thunderstorms can cause electrical noise on telephone lines. The
operation of the equipment in the telephone exchange,
such as switches, can also cause noise on the line.
Document
Transmit
Received
Message
Errors
Page 10
HOW TO USE THIS MANUAL
This manual contains instructions on how to operate and take care of the ma chine. To get the best performance from the machine, read the descriptions of the
features in the Facsimile Features Manual, and follow the instructions in the Op erator’s Manual carefully. Please keep the manuals near the machine at all times.
CAUTION: This machine can only be used in the country where it was
purchased.
CONVENTIONS
The following conventions were used when writing this manual.
Keynames
These have been printed in a different typeface and enclosed by a box.
For example: " Start " means "Press the Start key on the operation panel".
If you see something like " # x 21", this means that you have to press
the # key 21 times.
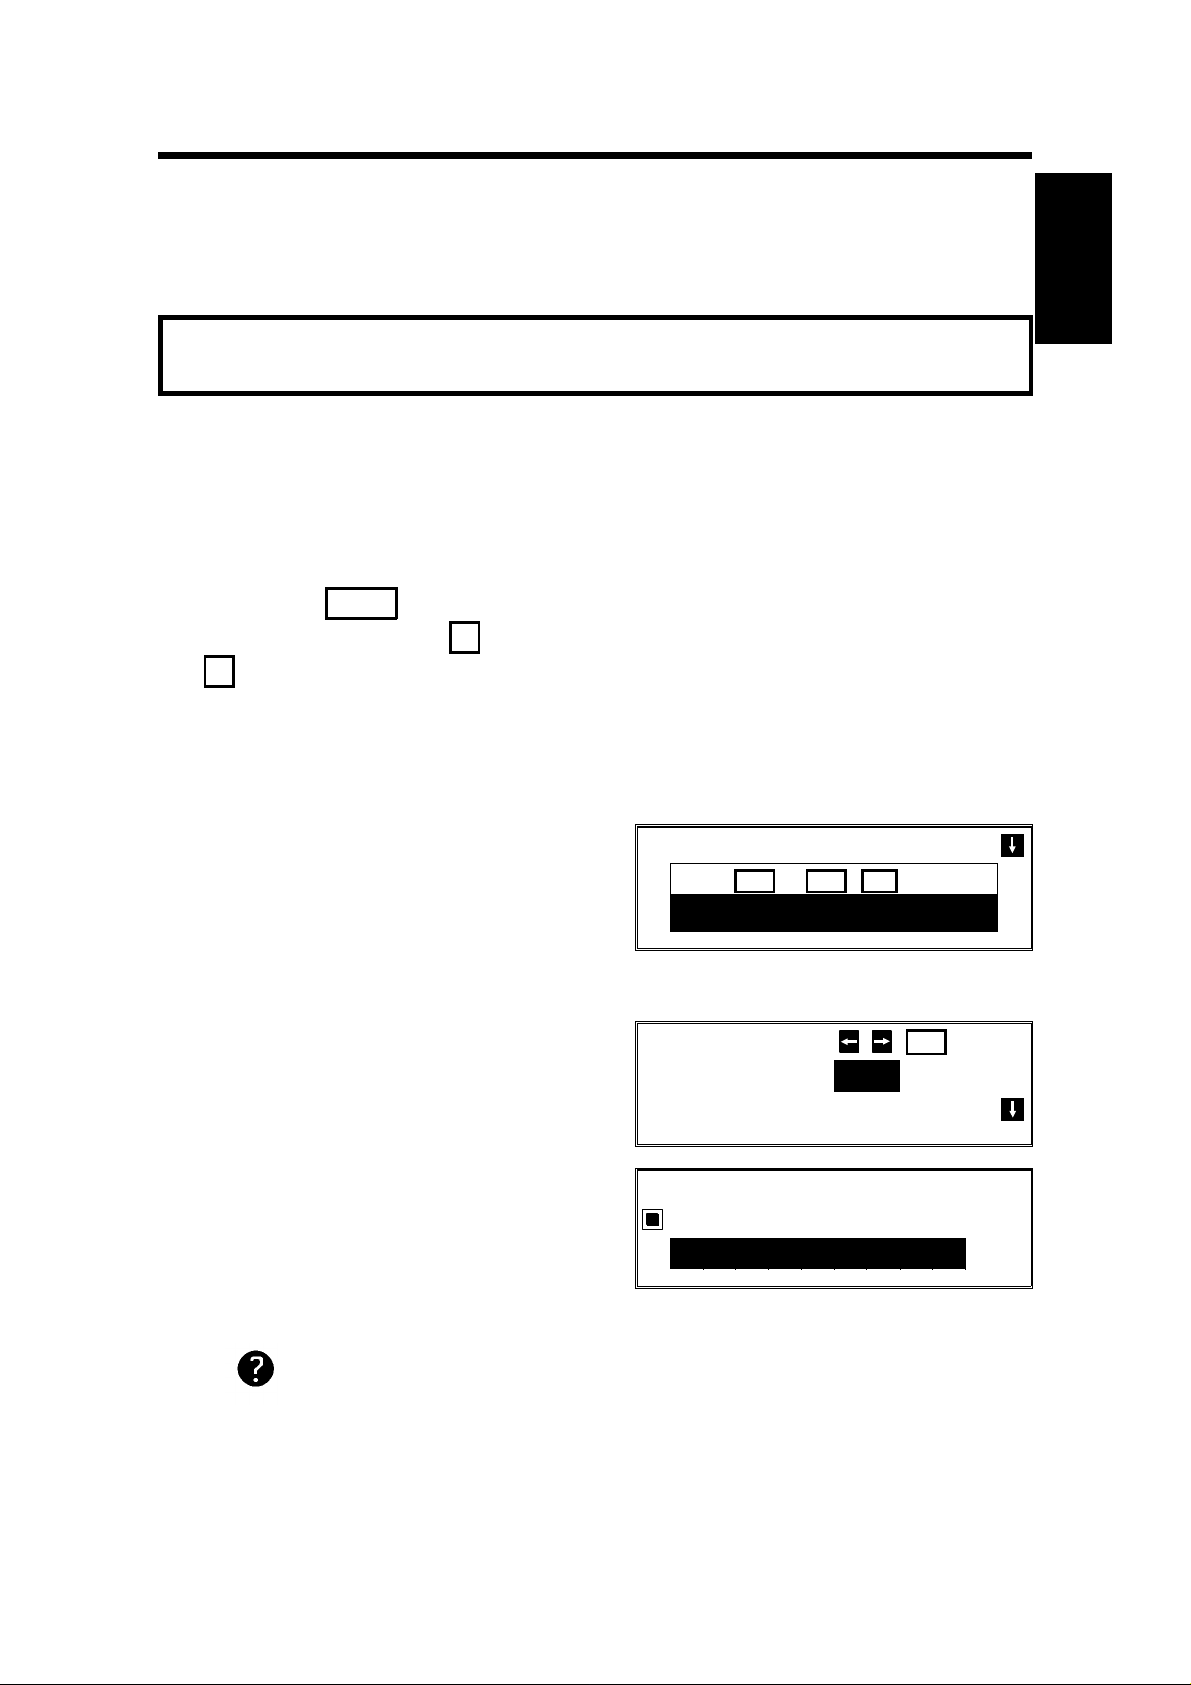
Displays
Messages seen on the display are shown in a larger box.
Example A: The keys that can be pressed
are shown on the screen in small boxes. In
this example, you can press the Yes, No, or
Clear keys, or the downward pointing arrow
on the scroll key; the scroll key is a diamond
MEMORY TRANS OPTIONS
PRESS YES OR CLR
2125551234
shaped key on the operation panel with four
arrows printed on it.
Example B: The choice of settings for a fea ture are shown on the screen. The current
setting is highlighted (white on black). If you
press the right pointing arrow on the scroll
OPTION SELECT
AUTO REDUCE ON OFF
TTI
key, the setting will be changed to OFF.
Example C: The ABC on the display indi -
cates that you can input letters using the
QUICK DIAL ENTER LABEL
01
Quick Dial Keys, and numbers using the tenkey pad on the operation panel.
_
.
NO
_
YES
TO END
ABC
Symbols
indicates a hint.
Continued on the next page
1
Page 11

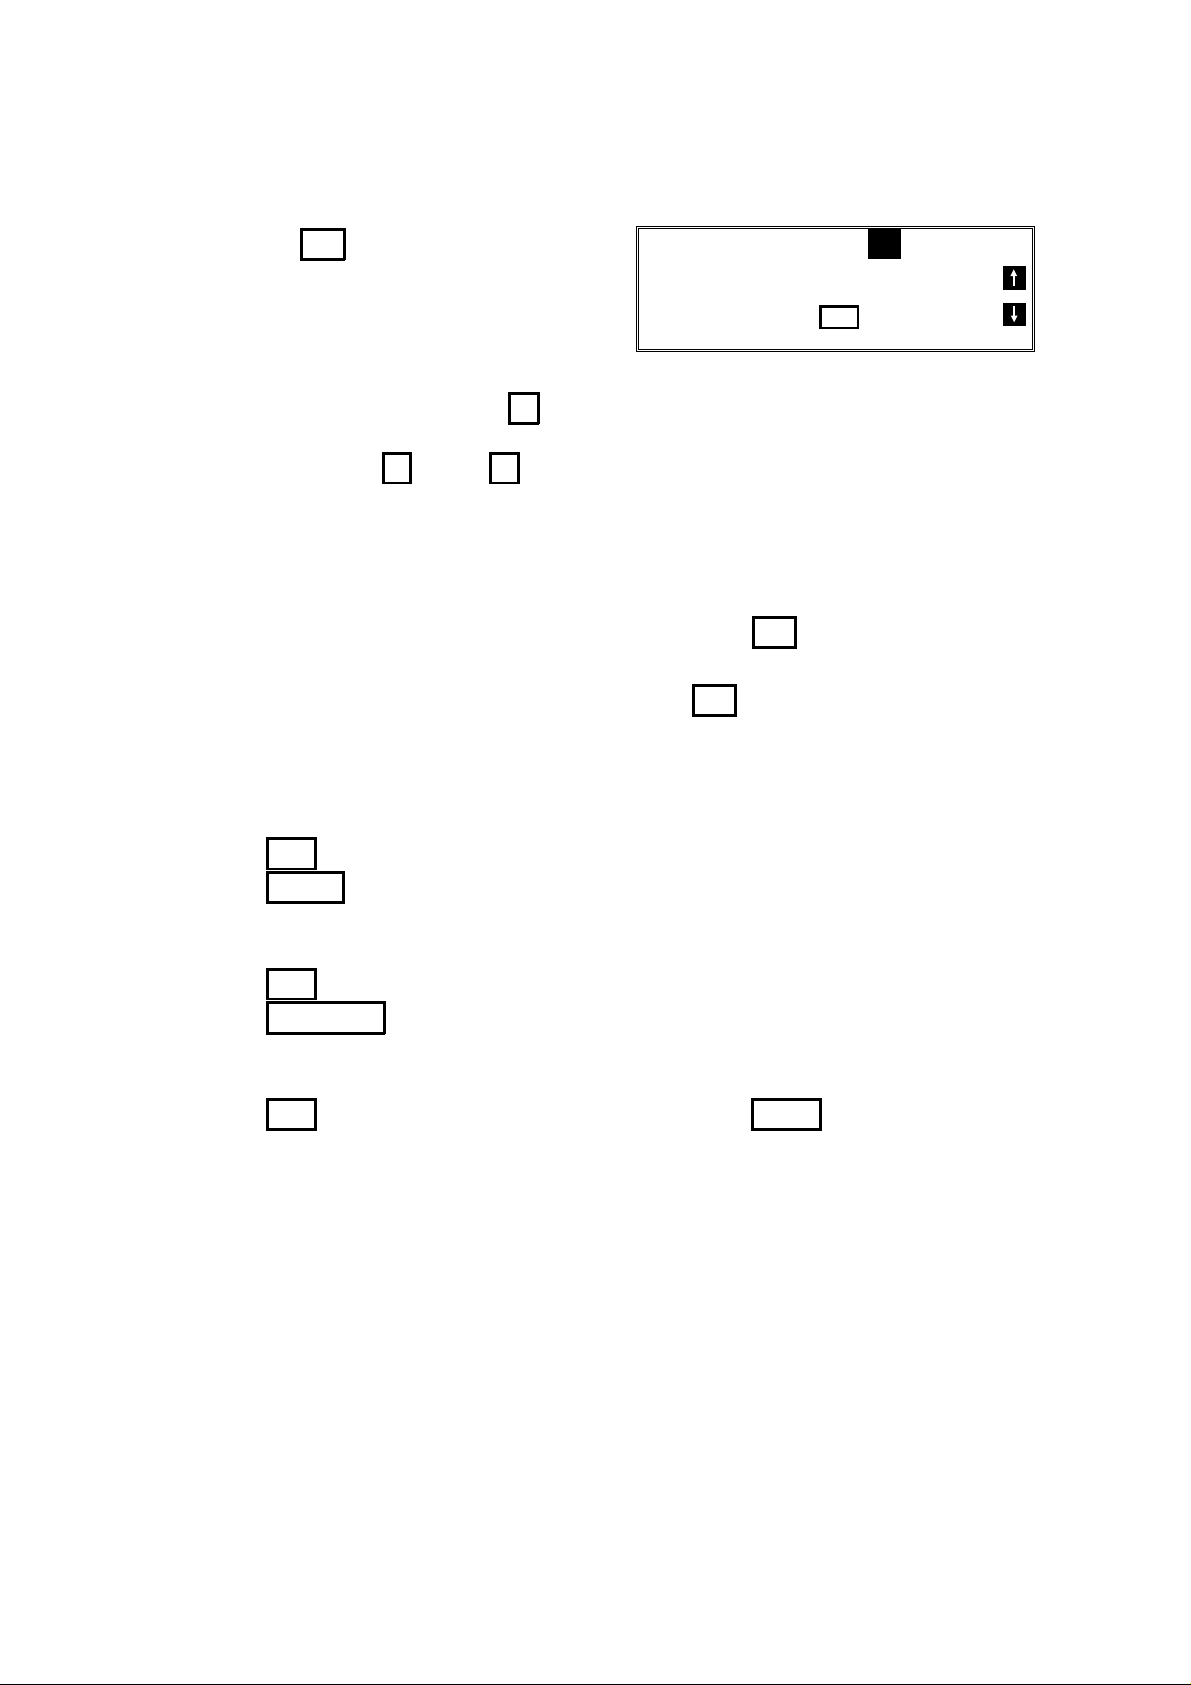
HOW TO USE THIS MANUAL
Most procedures start from standby mode,
that is, when the display is as shown on the
right. The value after "MEMORY" shows
MEMORY TRANS 4 APR 12:25
SET DOCUMENT
MEMORY 100%
how much memory space is remaining.
If a procedure does not start at standby mode, the display at the start of the proce -
dure is shown. For an example, see page 23.
NOTE: If you start a procedure and do not enter anything at the operation
panel for more than 4 minutes, the machine returns to standby mode.
STORING TELEPHONE NUMBERS
To dial a telephone number or store it as a Quick Dial or Speed Dial, type it into
the machine at the ten-key pad on the operation panel.
STORING NAMES AND LABELS
You can type names using the Quick Dial Keys. Use Quick Dial Keys 01 to 26 for
the letters of the alphabet, and Quick Dial 30 as a spacebar. If you wish to enter a
digit from 0 to 9, use the ten-key pad.
The cursor appears on the screen as a black dash below the cursor position. If
you wish to move the cursor while editing a name or number, press the ←
and → arrows on the diamond-shaped scroll key on the operation panel.
If you wish to enter a punctuation mark or symbol, use Quick Dial 31. Keep press -
ing Quick Dial 31 until you see the symbol that you need. Then move the cursor
forward with the scroll key.
Quick Dial 32 can be used as a Shift key, to select upper or lower case letters.
KEY DESCRIPTION KEY DESCRIPTION
01 A 17 Q
02 B 18 R
03 C 19 S
04 D 20 T
05 E 21 U
06 F 22 V
07 G 23 W
08 H 24 X
09 I 25 Y
10 J 26 Z
11 K 27
12 L 28
13 M 29
14 N 30 Space
15 O 31 Punctuation Marks and Symbols
16 P 32 Shift key (see page 3)
Not used
2
Page 12
Punctuation Marks and Symbols
HOW TO USE THIS MANUAL
If you press 31 while entering a label, a
menu of symbols will appear, as shown
on the right.
SELECT P 1/5
1! 2" 3# 4$ 5% 6&
7’ 8( 9)
NO
_
TO CANCEL
❐ To select a symbol, press the required key on the ten-key pad. For example, if
you wish to enter a ’#’, press 3
❐ If the symbol that you need is not on the screen, scroll through the pages of
symbols with the ↑ and ↓ keys.
Shift Key
As shown in example C on page 1, ’ABC’ can be seen in the bottom right of the
display while you are inputting a label. This indicates that upper case letters will
be stored. If you wish to input lower case letters, press 32 . The ’ABC’ will
change to ’abc’, and the letters that you type in will be stored as lower case let ters. To change back to upper case letters, press 32 again.
IF YOU MAKE A MISTAKE
If you make a mistake when inputting a name or number, either:
❐ Press No to erase the entire name or number and start again.
❐ Press Clear to erase the last letter or digit that you entered.
If you enter the wrong function number, either:
❐ Press No then input the correct function number.
❐ Press Function to return to standby mode and start again.
If you dialled the wrong number, either:
❐ Press No . If scanning has already begun, press Stop .
❐ If you already programmed the number into the machine by pressing Yes. Then
remove the document from the feeder and start again, or use option 08 to can cel that particular destination only (see page 25).
3
Page 13

HOW TO USE THIS MANUAL
FACSIMILE FEATURE AVAILABILITY TABLE
This table shows whether a feature is available or not in your machine. Some of
these features have to be switched on before they can be used, or may be
switched off if not wanted. The "Reference" column of the following table shows
where you can find information on how to activate such features. The second col umns in the table shows you which section of the Facsimile Features manual to
find the description of each feature in.
NOTE Column 1: Memory card or hard disk required
2: Telephone handset required
3: Lower cassette required, 4: Group 4 kit required
5: In some countries, this can only be used
by a technician.
Reference Column
User: You can switch this feature on or off. Refer to the indicated page number in
this manual.
Service: If you wish to switch this on or off or adjust it, contact a service
technician.
✔: Available, ✖: Not Available
FACSIMILE FEATURES MANUAL
FEATURE NAME AND SECTION NUMBER
ROUTINE OPERATION
Immediate Transmission
Memory Transmission
Contrast
Resolution
Halftone
Quick Dial
Speed Dial
Groups
Send Later
Page Count
Personal Code
TRD (Transmission Deadline)
Economy Transmission
Automatic Reduction On/Off
ID Transmission
TTI On/Off
Alternative Destination
Voice Request
Destination Check
Automatic Redialling
AI Redial
Auto Receive Mode
Manual Receive Mode
Auto Select Mode
Substitute Reception 2-2
Sect. 1
1-1
1-2
1-3
1-4
1-5
2-1
✔ / ✖ NOTE REFERENCE
✔
✔
✔
✔
✔
✔
✔
✔
✔
✔
✔
✔
✔
✔
✔
✔
✖
✔
✔
✔
✔
✔
✔
✖
✔
2
User: p. 32, 56
Service (see p 9)
User: p. 74
4
Page 14

HOW TO USE THIS MANUAL
FACSIMILE FEATURES MANUAL
✔ / ✖ NOTE REFERENCE
FEATURE NAME AND SECTION NUMBER
Handset 3-1
On Hook Dial 3-2
Speakerphone 3-3
Music on Hold 3-4
ADVANCED FEATURES
Broadcasting 1-1
Keystroke Programs 1-2
Confidential Transmission
Confidential Reception
Transfer Request 1-4
❐
Memory or hard disk required if the machine will be used as the transfer
broadcasting station.
Polling Transmission
Polling Reception
Continuous Polling Reception
Auto Document 1-6
Telephone Directory 1-7
Secure Transmission 1-8
Direct Fax Number Entry 1-9
Forwarding 2-1
Authorized Reception 2-2
Reception Mode Switching Timer 2-3
Copying an Original 3-1
Night Timer 3-2
Function Programs 3-3
Answering Machine 3-4
Remote Control Features/Mailbox 3-5
Specified Cassette Selection 3-6
TTI On/Off 3-7
Label Insertion 3-8
Marker 3-9
Center Mark 3-10
Chequered Mark 3-11
Reception Time 3-12
Reduction
❐
Automatic Reduction
❐ Length Reduction
Closed Network 3-14
Restricted Access 3-15
RDS (Remote Diagnostic System) 3-16
Reverse Order Printing 3-17
Multi-sort Document Reception 3-18
Protection Against Wrong Connections 3-19
ECM
Page Retransmission
Batch Transmission 3-21
Short Preamble 3-22
Sect. 2
1-3
1-5
3-13
3-20
✔
✔
✖
✖
✔
✔
✔
✔
✔
✔
✔
✔
✖
✔
✔
✔
✔
✔
✖
✔
✔
✔
✖
✖
✔
✔
✔
✔
✔
✔
✔
✔
✔
✔
✔
✔
✔
✔
✔
✔
✔
✔
✔
✔
2
1
Service
1 User: p. 71
User: p. 71
User: p. 71
3 User: p. 71
User: p. 73
User: p. 73
User: p. 73
User: p. 73
User: p. 74
Service
Service
User: p. 74
5 User: p. 71
1 User: p. 74
1 User: p. 74
Service
Service
Service
Service
Service
5
Page 15

HOW TO USE THIS MANUAL
FACSIMILE FEATURES MANUAL
FEATURE NAME AND SECTION NUMBER
AI Short Protocol 3-23
Dedicated Transmission Parameters 3-24
MDF (Manual Document Feed) 3-25
Chain Dialling 3-26
Tonal Signals 3-27
Memory Lock 3-28
Wild Cards 3-29
File Management 3-30
Counters 3-31
Well Log Transmission 3-32
Transmission Reserve 3-33
Dual Access 3-34
Silent Ringing Detection 3-35
User Function Keys 3-36
Communication Result Display 3-37
Inch-to-mm Conversion 3-38
Ordering Toner 3-39
PROGRAMMING
Language Selection 1-1
Date and Time 1-2
Telephone Line Type 1-3
RTI, TTI, and CSI 1-4
ID Code
Remote ID
Confidential ID
Memory Lock ID
Your Fax Terminal’s Telephone Number 1-6
Country Code 1-7
Area Code Prefix 1-8
On/Off Switches 2-1
User Parameter Settings 2-2
Time for Economy Transmission 2-3
Speaker Volume 3-1
Display Panel Contrast 3-2
Programming Quick Dial 4-1
Programming Speed Dial 4-2
Programming Groups 4-3
Storing Personal Codes 4-4
REPORTS
Journal 1-1
Transmission Result Report 1-2
Error Report 1-3
Communication Failure Report 1-4
Memory Storage Report 1-5
Power Failure Report 1-6
Transfer Result Report 1-7
Polling Reserve Report 1-8
Sect. 3
1-5
Sect. 4
✔ / ✖ NOTE REFERENCE
✔
✔
✔
✔
✔
✔
✔
✔
✔
✔
✔
✔
✖
✔
✔
✔
✔
✔
✔
✔
✔
✔
✖
✔
✔
✔
✔
✔
✔
✔
✔
✔
✔
✔
✔
✔
✔
✔
✔
✔
✔
✔
✔
✔
✔
1 User: p. 71
5
5 (CSI)
1
1
Service
Service
Service
Service
Service
User: p. 73
User: p. 73
Service
User: p. 73
User: p. 73
6
Page 16

HOW TO USE THIS MANUAL
FACSIMILE FEATURES MANUAL
FEATURE NAME AND SECTION NUMBER
Polling Result Report
Polling Clear Report 1-10
Confidential File Report 1-11
Transmission Deadline Report
Polling Confirmation List
Journal 2-1
Quick Dial List 2-2
Speed Dial List 2-3
Group List 2-4
Personal Code List 2-5
File List 2-6
Authorized Reception List 2-7
Forwarding List 2-8
Specified Cassette Selection List 2-9
User Parameter List 2-10
Program List 2-11
User Function List 2-12
NETWORKING FEATURES
Group Transfer Station 1-1
Next Transfer Station 1-2
Broadcasting, with Transfer Request 2
Two-step Transfer
❐
Digital Link (Specified Two-step Transfer)
❐ Analog Link
Multi-step Transfer 4
GROUP 4 FEATURES
Terminal ID Programming 1-1
Terminal ID Verification 1-2
Automatic Fallback to Group 3 Mode 1-3
Subaddress 1-4
1-9
1-12
Sect. 5
3
Sect. 6
✔ / ✖ NOTE REFERENCE
✔
✔
✔
✔
✔
✔
✔
✔
✔
✔
✔
✔
✔
✔
✔
✔
✔
✔
✔
✔
✔
✔
✔
✔
✔
✔
✔
✔
1 User: p. 71
1
3
1, 4
1
4 Service
4 Service
4
4
User: p. 73
User: p. 73
7
Page 17

HOW TO USE THIS MANUAL
LIMITATIONS ON VARIOUS FEATURES
The tables on the next two pages show the limitations for each feature.
Limitations for some features can be changed by a service technician.
COMMUNICATION
FEATURES
Broadcasting 32 200
Confidential
Transmission
(from memory)
Transfer
Request (✬1)
Polling
Reception
PAGE MAX. NUMBER OF
ADDRESSES/FILE
36 200
40 30
43 200
TOTAL
FILES
200
TOTAL
ADDRESSES
IN ALL FILES
500 (Note:
Any fax
number
can be
used in
more than
one file at
the same
MAX. STORED
PAGES
1200 (✬4)
time)
The following table shows how many telephone numbers you can store in the ma chine.
Quick Dial 32
Speed Dial 100
Ten Key Pad (✬2) 96
Groups (✬3) 10
✬1 The limitation on this feature is imposed by the capacity of the broadcasting
machine.
✬2 This is the number of full telephone numbers that can be input into the ma -
chine at any one time. For example, if there is a broadcasting operation in
memory using 95 full numbers, you can only input one more full number for
any operation, including storage in groups, until the broadcast has finished.
Also, if you store, say, 35 numbers at the ten key pad into your groups, then
you will only be able to input 61 full dial numbers at any one time for other op erations, such as broadcasting.
✬3 You can program up to 10 groups. Each group can contain up to 200 num -
bers; however, if you wish to use a Group for Transfer Request, make sure
that this group does not have more than 30 numbers.
You can store any Quick Dial or Speed Dial number in a group. You may also
store up to 96 numbers that are not programmed as Quick or Speed Dials;
see note 2 above for the restrictions on the use of these numbers.
✬
4 This is the theoretical maximum number of pages that can be stored. In prac -
tice, you will only be able to store this number of pages if you install the op tional hard disk unit.
8
Page 18

HOW TO USE THIS MANUAL
OTHER FEATURES MAXIMUM VALUE NOTES
Redial Number of times: 253
times
Intervals: 40 minutes
Keystroke Programs 32
Authorized Reception 50 RTI/CSIs
Forwarding 5 forwarding stations
30 RTI/CSIs
Multi-sort Document Reception
Specified Cassette
Selection
Wild Card This can be used when
Function Programs 5
Restricted Access 50 personal codes Codes from 0001 - 9999
Page Retransmission 255 times Default setting:
Batch Transmission Up to 200 files can be
9 copies
10 RTI/CSIs
storing RTI/CSIs for
Authorized Reception,
Specified Cassette
Selection, and
Forwarding
placed in batches. There
is no limit on the size of
the batch other than that
(in other words, up to
200 files can be placed
in a batch).
Default settings:
Memory transmission
4 times/5 minutes
Immediate transmission
2 times/2 minutes
can be used.
3 times
The following cannot be
batched.
❐ Confidential
Transmission
❐ ECM on and off in the
same batch
Well Log
Transmission
Multi-copy 99 copies
Personal Codes Up to 9999 codes can
Length: 100 m Default setting:
be used, but only 50 can
be stored with names
and Confidential IDs.
Length: 1200 mm
Up to 9999 different fourdigit codes can be
entered at transmission
time. The four-digit code
will be shown on reports
under "Option".
9
Page 19
GENERAL PRECAUTIONS
WARNING: Do not attempt any maintenance or troubleshooting other than
that mentioned in this manual. This machine contains a laser
beam generator and direct exposure to laser beams can cause
permanent eye damage.
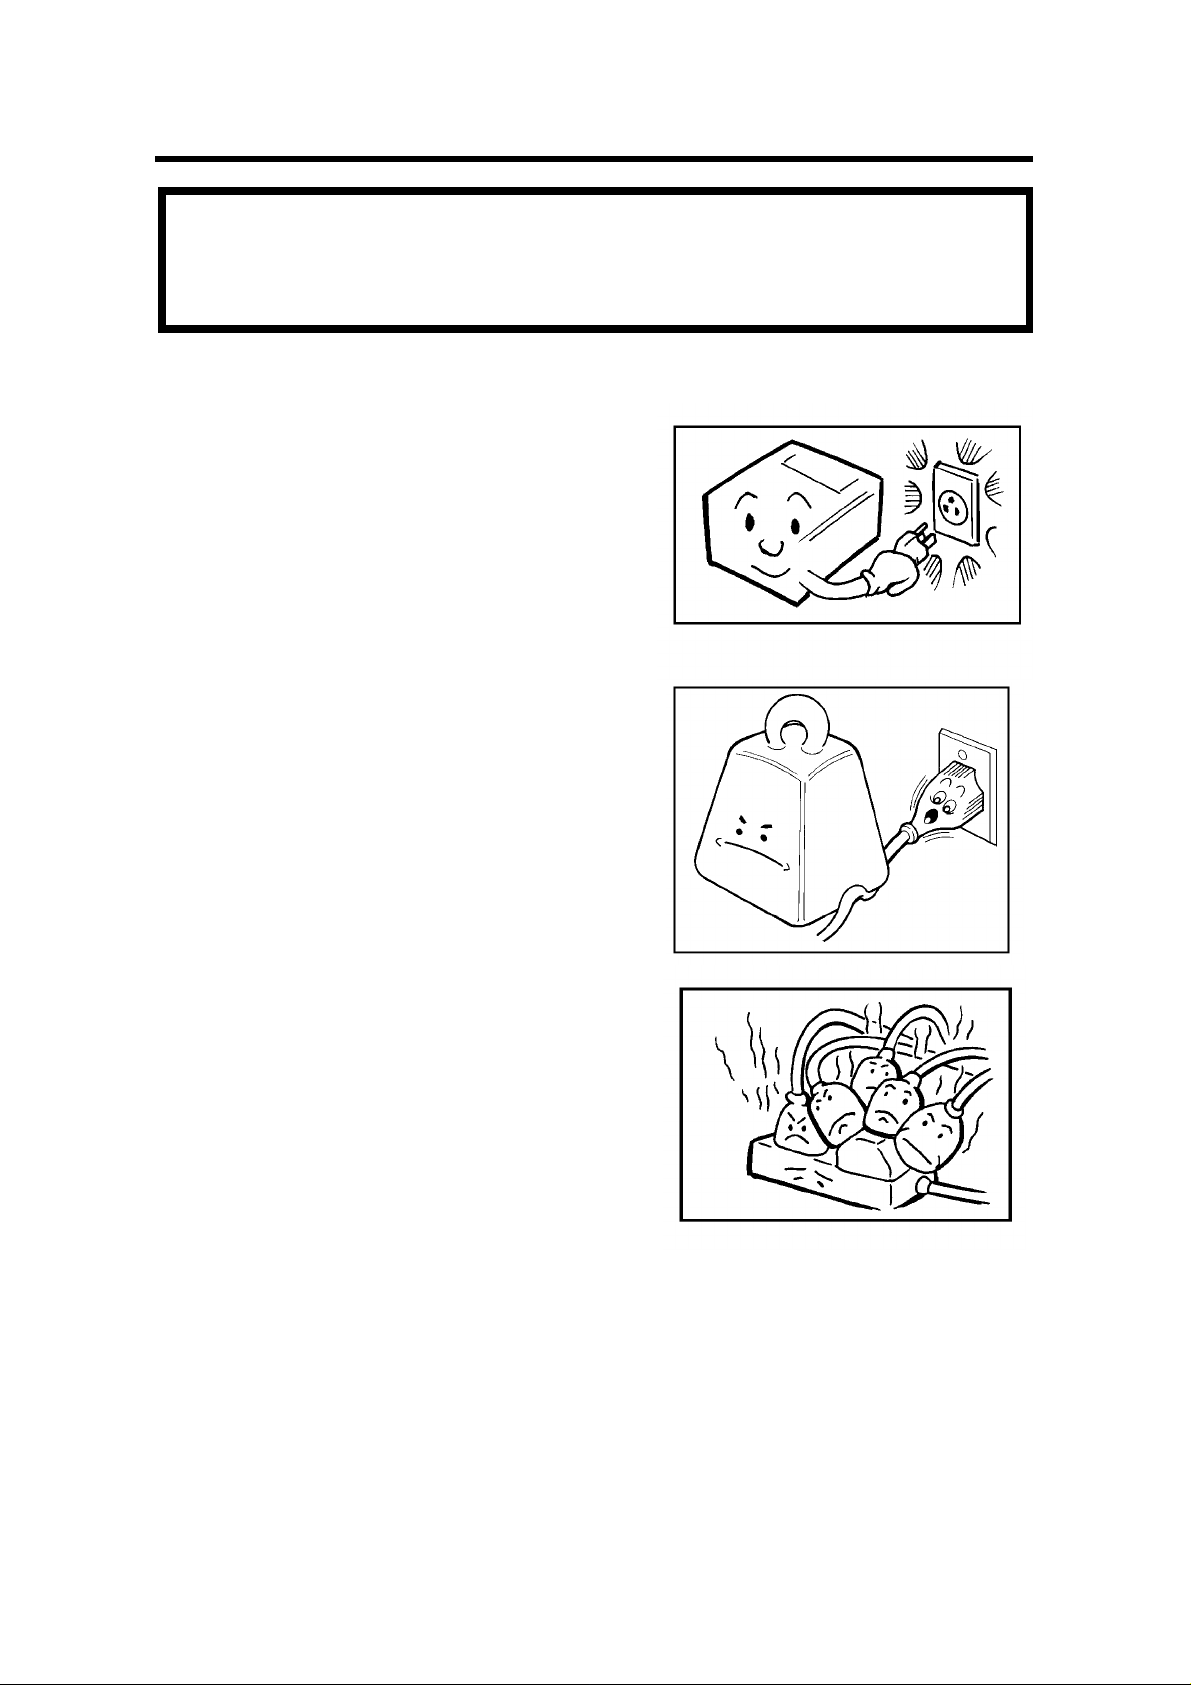
POWER AND GROUNDING
Pay attention to the following.
Power Supply
1. Power requirements: 220-240 Vac, 50 Hz
2. Insert the power plug securely into the wall
socket.
3. Do not connect other equipment to the
same socket.
4. Do not step on or set anything on the
power cord.
5. If an extension cord must be used, it must
have a capacity of more than 300V/10A
and must be less than 5 m long.
6. Do not connect other equipment to the
same extension cord.
7. Be sure that the power cord is not in a po sition where it would trip some one.
Grounding
Ground the machine and the lightning protec tion circuit in accordance with regulations. Do not ground to gas or water pipes, or
to a telephone ground lug. Proper grounding is to the ground terminal of the
power outlet. Be sure that the ground terminal of the power outlet is properly
grounded.
The lightning protection circuit for the machine requires the machine to be prop erly grounded. If proper grounding is provided, about 90% of lightning damage
can be prevented. For safety, be sure to connect the machine to a three-prong
grounded outlet.
10
Page 20
COLD WEATHER POWER-UP
Avoid raising the room temperature abruptly
when it is below 14°C, or condensation may
form inside the machine.
1. Raise the room temperature to 20 °C at
less than 10°C per hour.
2. Wait for 30 to 60 minutes.
3. Turn the power on.
Do not use the machine near a humidifier.
THUNDERSTORMS
GENERAL PRECAUTIONS
With proper grounding, about 90% of lightning
damage can be prevented. However, if possi ble, during severe electric storms turn the
power switch off and disconnect the power
cord and telephone line cord.
Note for users with no hard disk
All fax messages stored in the memory
may be erased if power is switched off for
more than an hour.
11
Page 21

GENERAL PRECAUTIONS
COPY PAPER
❐ 45-90 g/m
❐ Do not use damp paper, or copies will be defective.
❐ Keep in a vinyl bag if it will not be used for a long time.
❐ Store in a dry, cool, dark place.
❐ Store flat. Do not stand upright.
2
copy paper is recommended: A4, A5, B4, F, F4
TONER CASSETTES
❐ Store in a cool, dark place.
❐ Never store where they may be exposed to heat.
❐ Keep out of the reach of children.
❐ Do not eat toner.
❐ Do not lay heavy objects on toner cassettes.
OPERATING PRECAUTIONS
❐ While copying, do not turn off the main switch or unplug the power cord.
❐ Do not overload the paper cassettes.
❐ Keep corrosive liquids, such as acid, off the machine.
❐ Do not touch copy paper if your fingers are wet or oily; fingerprints may appear
on the copy.
❐ Do not allow paper clips, staples, or other small metallic objects to fall inside
the machine.
GENERAL
❐ Since some parts of the machine are supplied with high voltage, make sure
that you do not attempt any repairs or attempt to access any part of the ma chine except those described in this manual.
❐ Do not make modifications or replacements other than those mentioned in this
manual.
❐ When not using the machine for a long period, disconnect the power supply.
OZONE
The machine generates ozone during operation. Normally, the ozone level is
safe for operators. However, during a long copy run or while printing a long
message, ozone odour may appear; in such a case, ventilate the room.
WARNING: Avoid touching components that have these symbols attached.
They may be very hot.
12
Page 22
GENERAL PRECAUTIONS
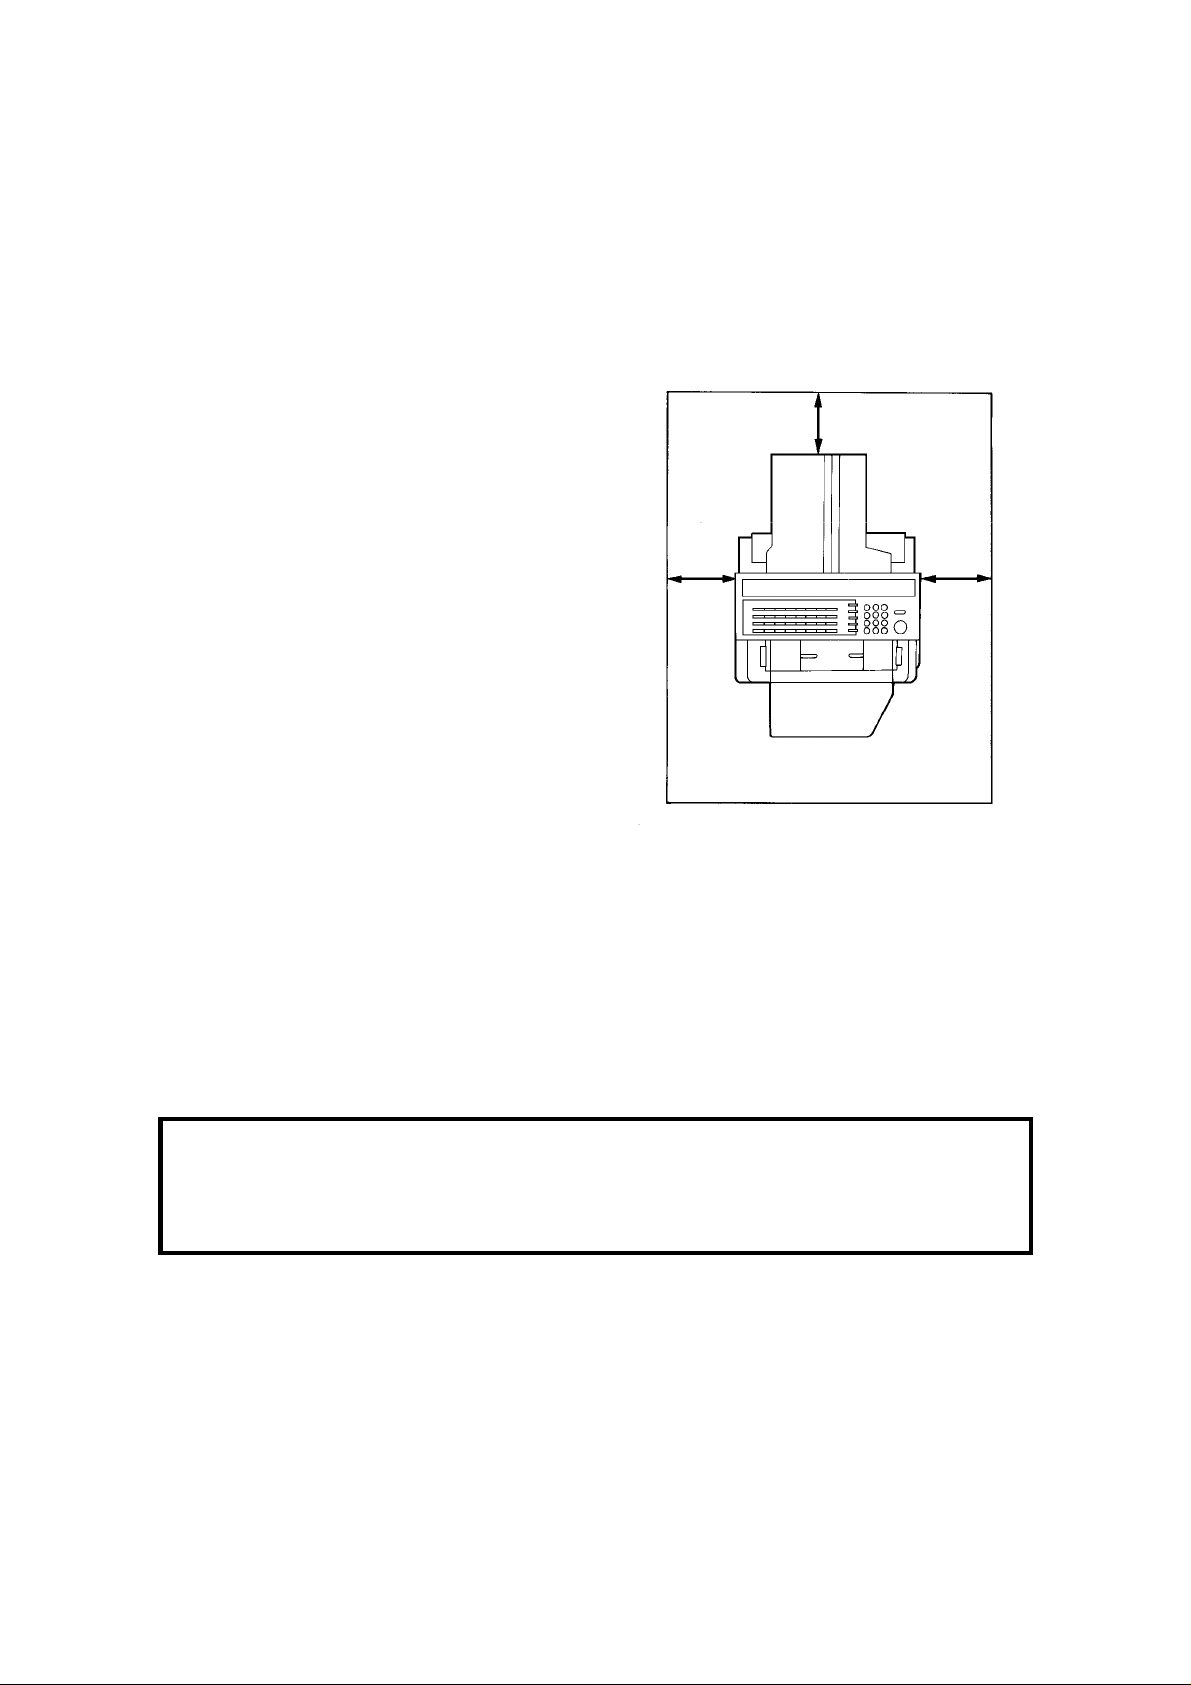
LOCATION
For the best possible performance, install your machine in a place which satisfies
the following conditions.
❐ Not exposed to direct sunlight
❐ Well ventilated (air turnover at least three times per hour)
❐ Level
❐ Not subject to vibration
❐ Away from other electronic equipment, to
avoid interference
❐ Away from areas containing corrosive
gas
❐ Dust-free
❐ Condensation-free
❐ Temperature 17 to 28°C
❐ Humidity 40 to 70% RH (do not install
near a humidifier)
❐ Away from heaters and air conditioners,
to avoid sudden changes of temperature
❐ Within 5 m of a three-pin grounded
power outlet (220 - 240 Volts, 50 Hz)
❐ With the clearance as shown on the right
10
cm
10 cm
10
cm
IMPORTANT POINTS ABOUT POWER CONNECTION
❐ The supply from the wall outlet must not fluctuate by more than 10V either side
of 230 Vac.
❐ The power cord should not be laid in a place where it might trip somebody.
❐ Do not lay anything on the power cord.
❐ If you have to use an extension cord, make sure that it is capable of carrying
300V/10A, and that your facsimile terminal is the only piece of equipment con nected to that cord.
NOTE: This machine generates a certain amount of ozone. Although the
amount generated is within safety requirements, it is recommended
that, to avoid ozone buildup, you install the machine in a room which
can be air-conditioned or well ventilated.
13
Page 23
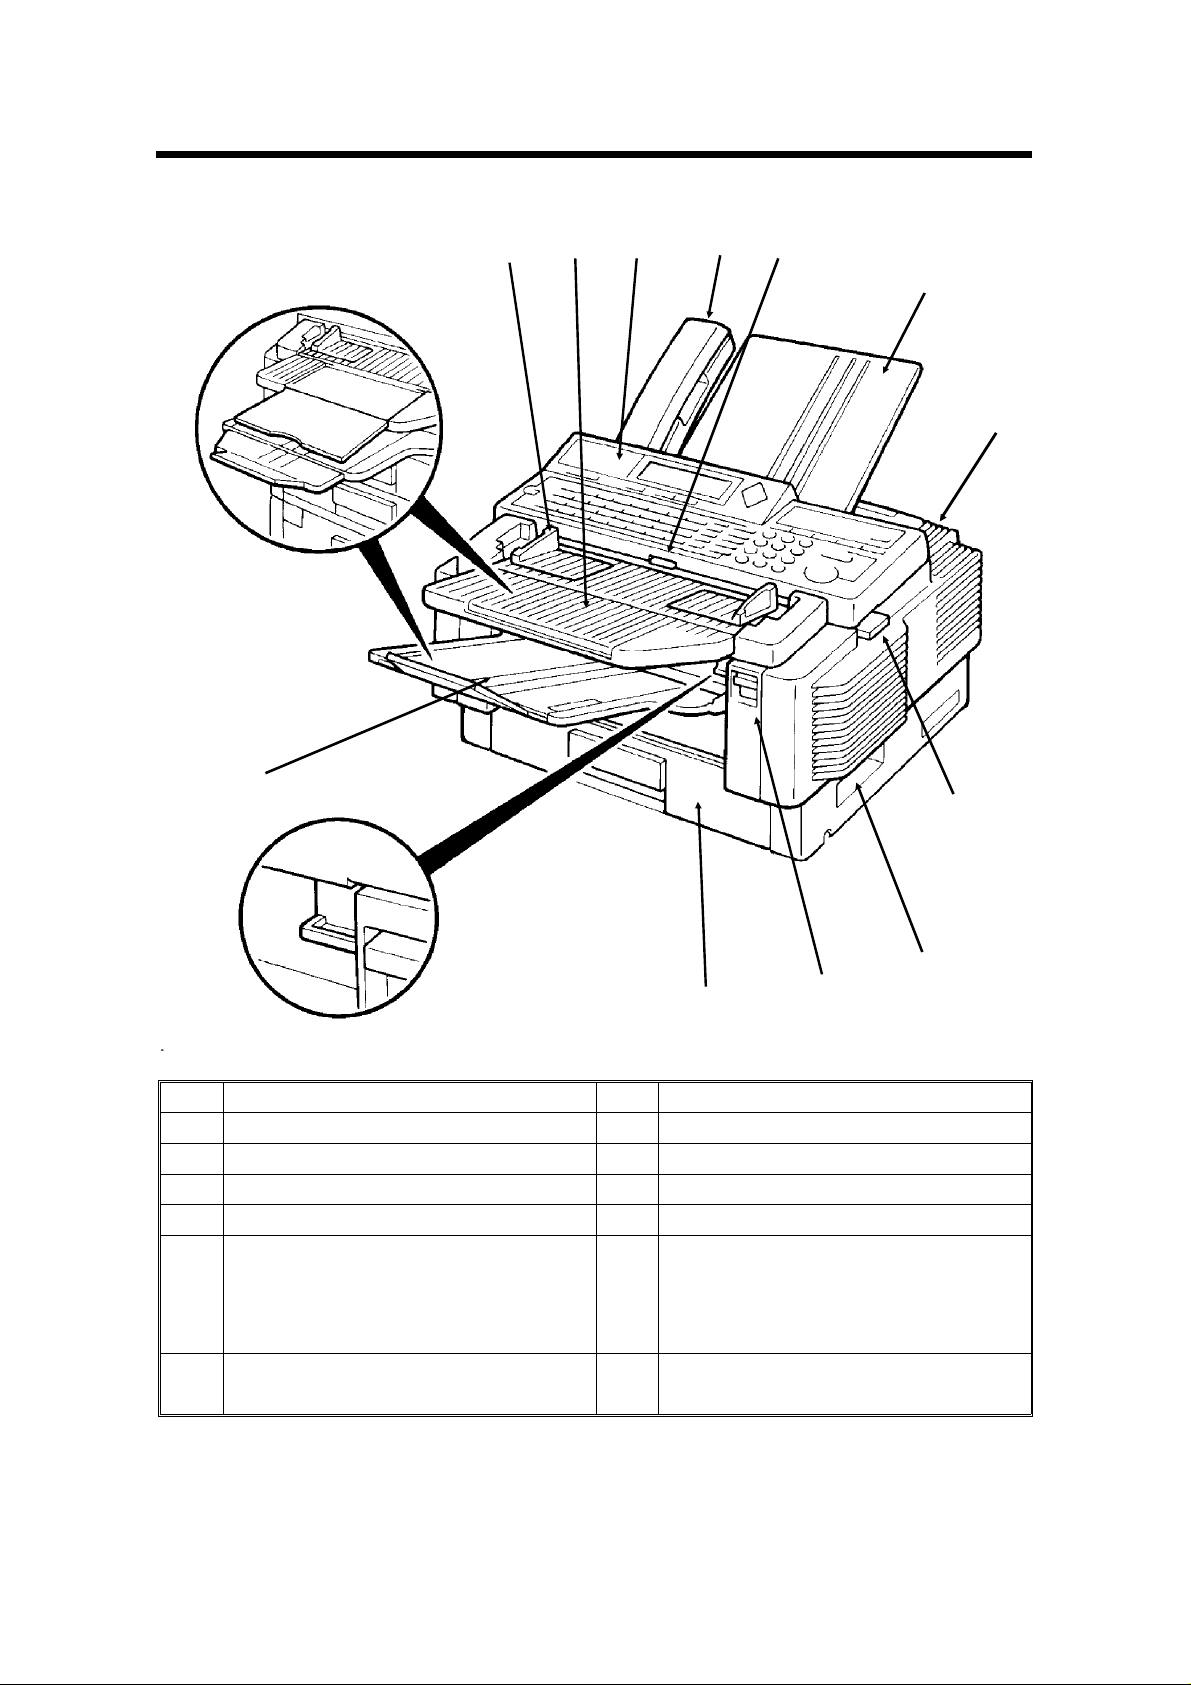
SECTION 1. COMPONENT GUIDE
1. EXTERNAL VIEW
12
1
2
3
4
5
6
7
8
9
11
1 Document Guide 8 Scanner Release
2 Document Table 9 Lifting Handle
3 Operation Panel 10 Front Cover Release
4 Telephone: optional 11 Cassette
5 Manual Feed Button 12 Copy Tray
6 Document Tray 13 Lower Cassette(s) or Drawers:
optional (see the next page). Up
to 4 units can be added below
the upper cassette.
7 Power Switch (on the rear) 14 Base: optional (see the next
page)
10
14
Page 24
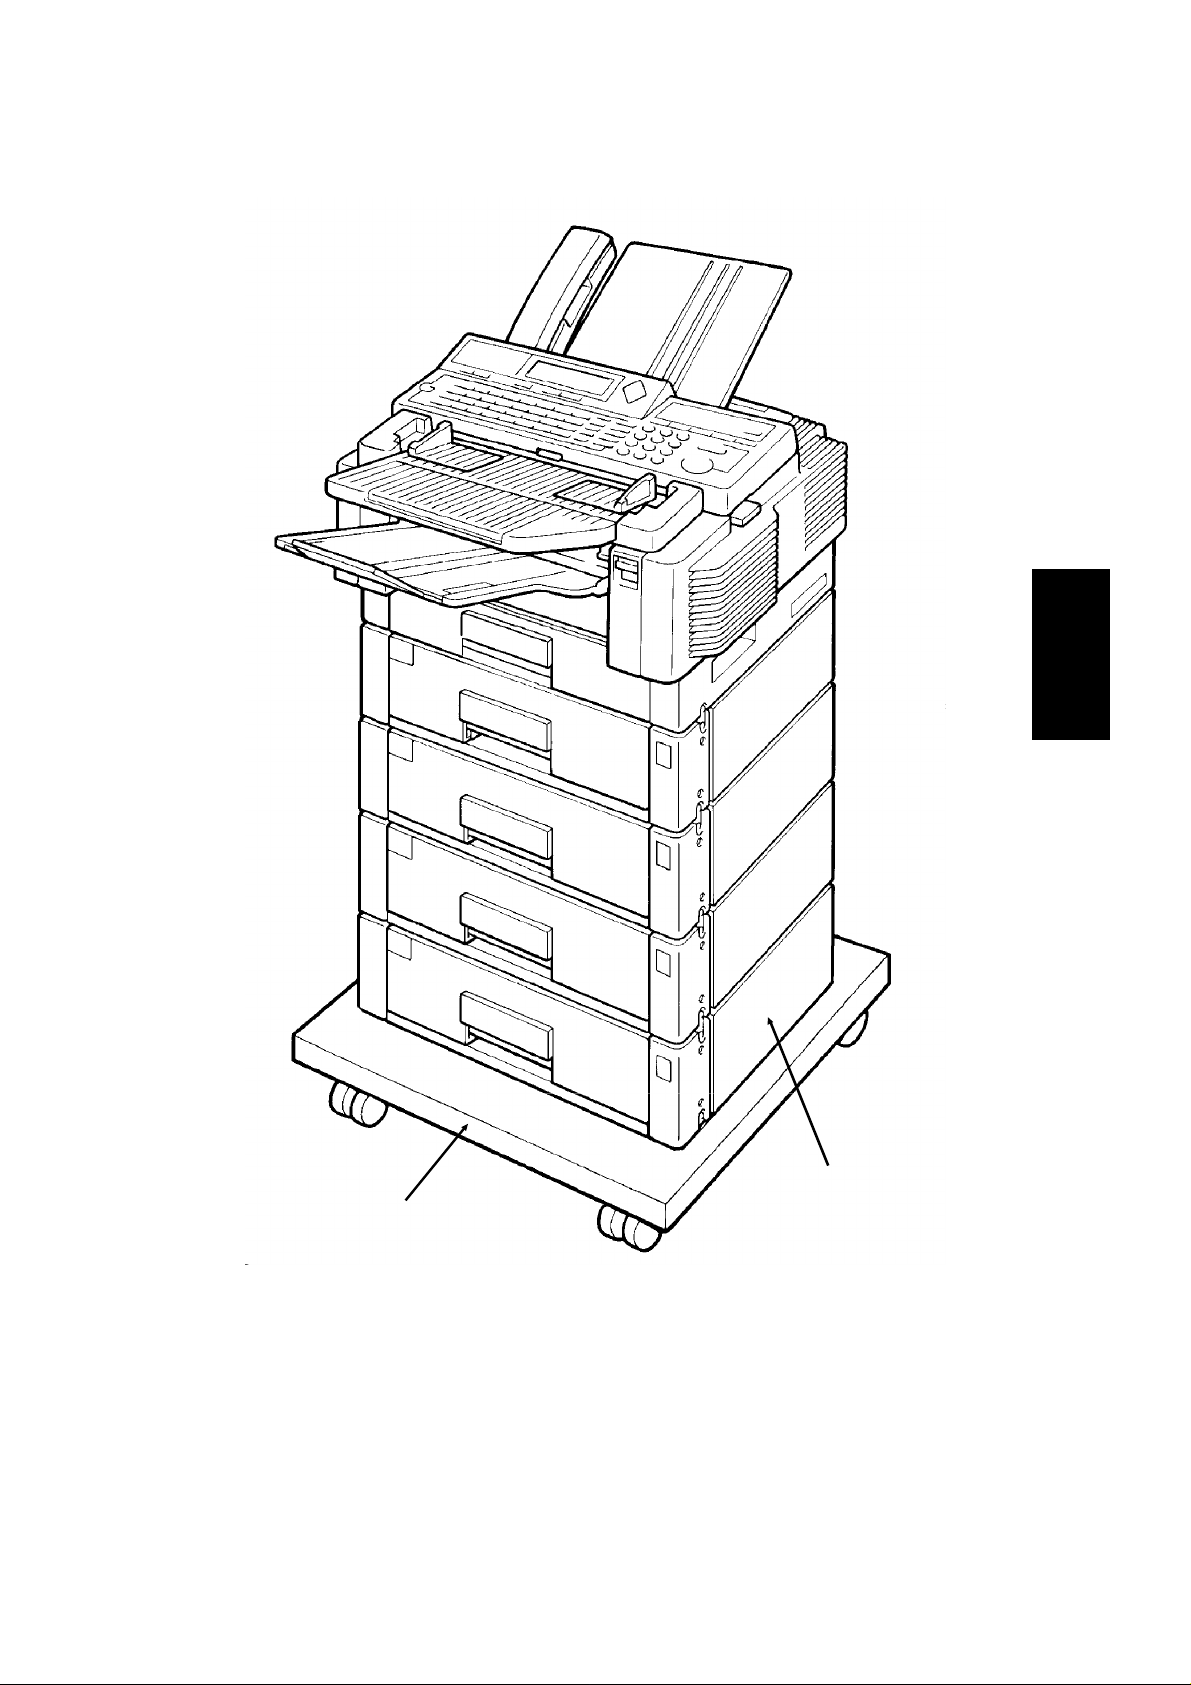
SECTION 1. COMPONENT GUIDE
1
14
13
15
Page 25
SECTION 1. COMPONENT GUIDE
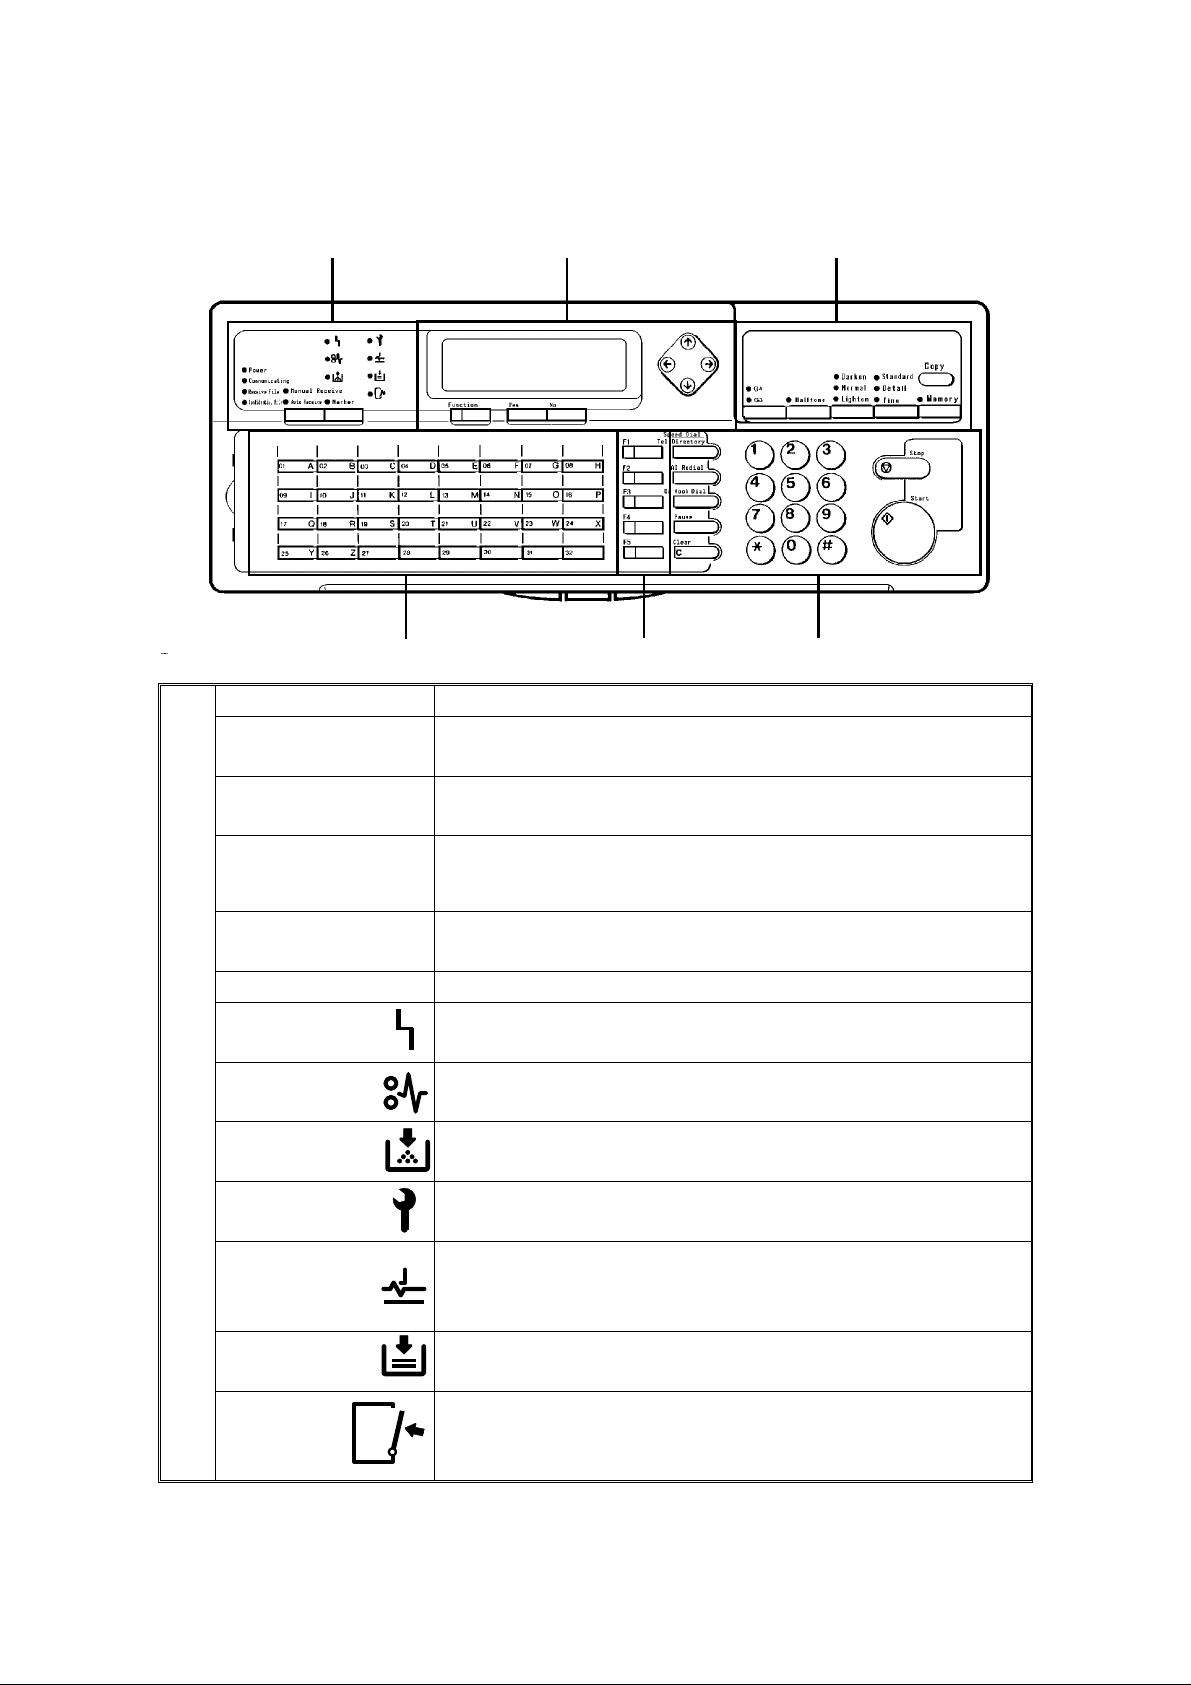
2. OPERATION PANEL
1
1. Power Indicator
Communicating
Indicator
Receive File
Indicator
Confidential File
Indicator
Reception Mode
Selector Key
Marker Key
Line Fail
Indicator
Clear Copy
Indicator
Add Toner
Indicator
Call Service
Indicator
Clear
Original
Indicator
Add Paper
Indicator
Close
Cover
Indicator
2
5
Lights when the power switch is on.
Lights when a fax message is being transmitted or received.
Lights when an incoming message was received into memory
because the machine was out of paper or jammed.
Lights when a confidential file has been received and stored in
the memory. Blinks when a message has been stored using
Memory Lock, if no confidential files are present .
Press to select Auto Receive or Manual Receive.
Press to enable or disable the marker feature.
Blinks when transmission fails
Blinks when paper has jammed in the printer.
Blinks when the toner cartridge is almost empty, and lights when
it is empty.
Blinks when the machine diagnostics detect a problem that
requires service.
Blinks when a document has jammed in the scanner.
Lights when a cassette is empty.
Blinks when a cover is open.
3
64
16
Page 26

SECTION 1. COMPONENT GUIDE
2. Display
Function Key
Yes/No Keys
Scroll Key
3. G4/G3 Selector
Key
Halftone Key
Contrast
Selector Key
Resolution
Selector Key
Memory Key
Copy Key
4. Quick Dial Keys
5. User Function
Keys
6. Speed Dial/Tel
Directory Key
AI Redial Key
On Hook Dial
Key
Pause Key
Clear Key
7. Ten Key Pad
Stop Key
Start Key
Displays prompts, warnings, and selected modes.
Press to use one of the numbered functions.
Use to answer questions on the display
When an arrow is shown on the display, use this key to access
the options, items, or functions indicated by the arrow. Also use it
to shift the cursor when programming or editing an item on the
display.
When dialling, press this key to light the indicator that
corresponds with the type of network that you wish to
communicate on. The G4 setting is only available if you have
installed the optional Group 4 Interface Kit.
Press this to use halftone mode.
Press this to select either Darken, Normal, or Lighten.
Press this to select either Standard, Detail, or Fine.
If the indicator is lit, your document will be stored before
transmission. If it is not lit, your document will be sent
immediately without being stored. Press the key to change the
mode.
Press this to copy the document now in the feeder.
Each of these can be programmed with a telephone number, a
group, or a keystroke program. You can also use these keys to
type names and labels such as the RTI and TTI.
Each of these can be programmed for rapid access to frequently
used features. In particular, if you wish to use Group Dial, or
Tonal Signal Transmission, you have to program User Function
Keys in advance before you can use these features.
Press this to dial using Speed Dial or the Telephone Directory
Feature.
Press this to redial one of the last ten numbers that was dialled.
Press this dial without picking up the handset.
Press this if you need to insert a pause when dialling.
Use this as a backspace key during programming.
Use this as a telephone keypad, or to enter Speed Dial codes.
Press this to stop the machine and return it to standby mode.
Press this to start fax communication.
17
Page 27
SECTION 2. ROUTINE OPERATION
1. SENDING A FAX MESSAGE
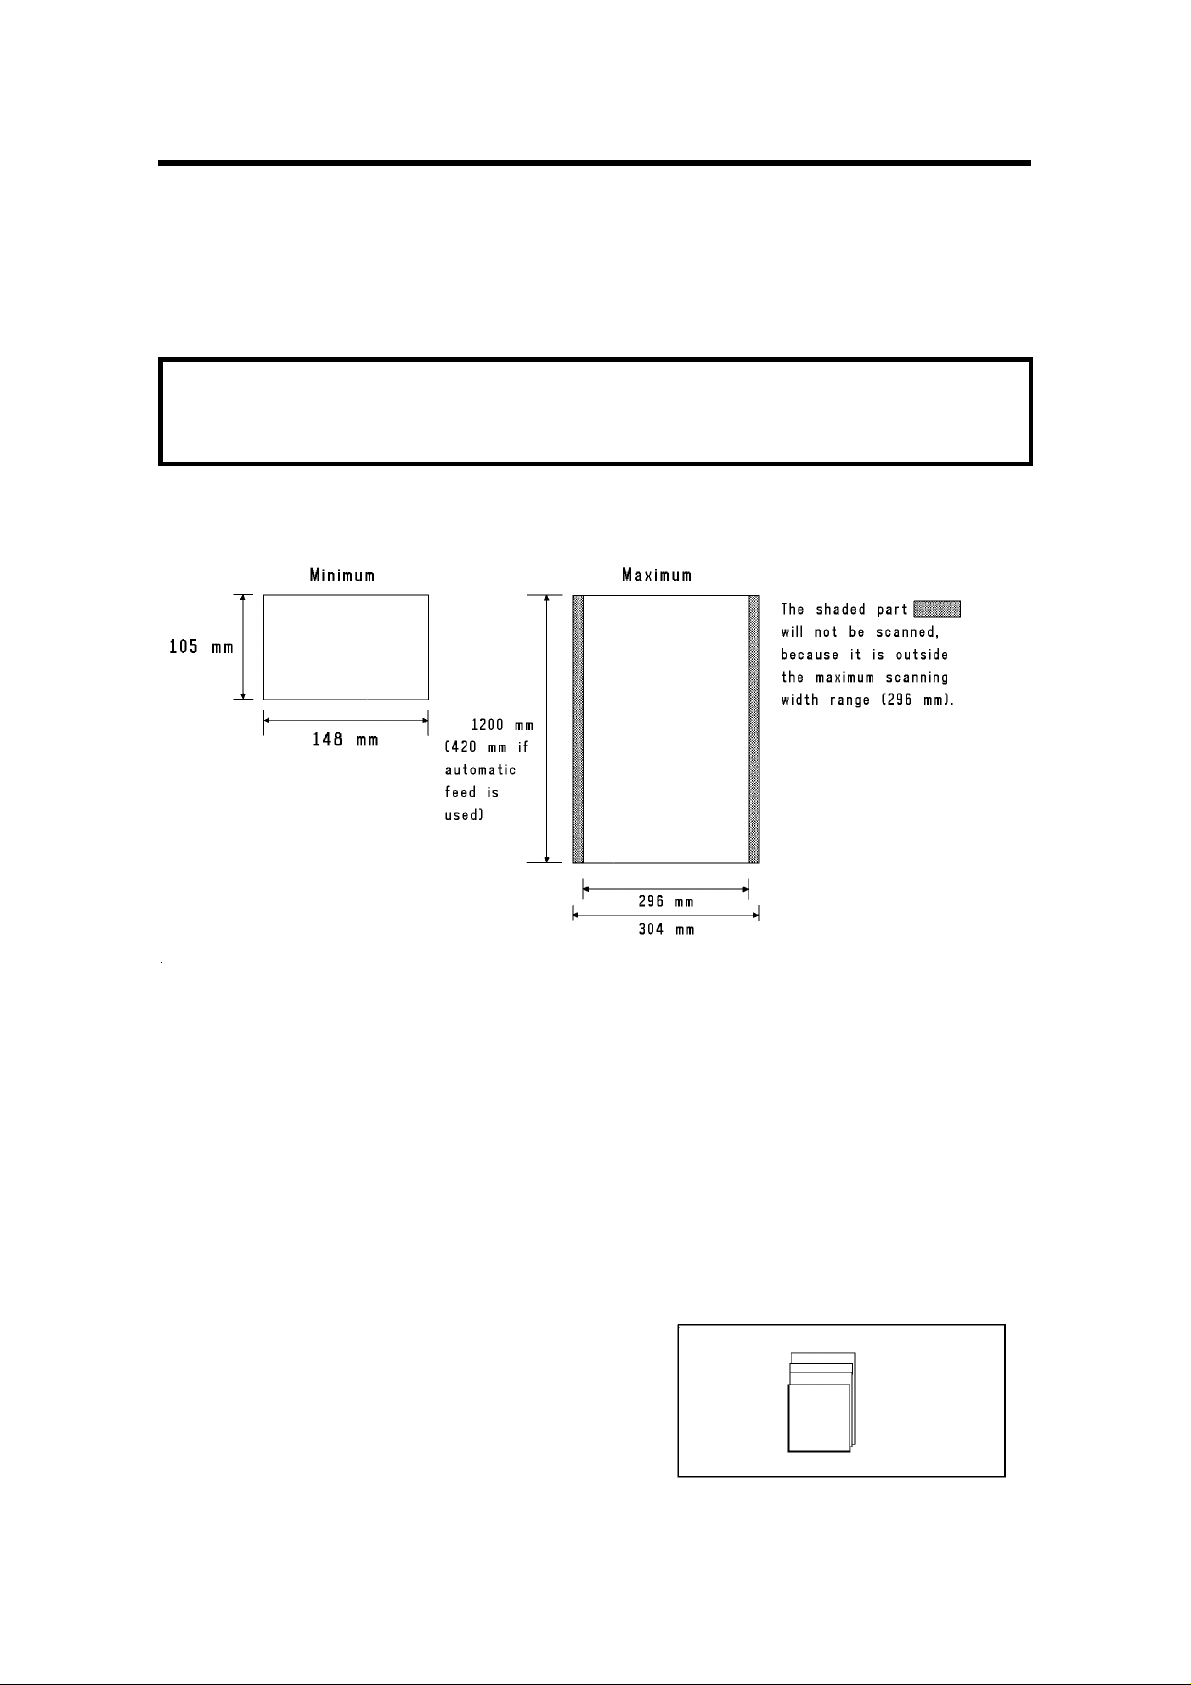
1-1. Recommended Types of Document
Before you send your document, make sure that it meets the following require ments.
CAUTION: Documents that do not meet these requirements can cause your
machine to jam or may cause some components of the machine to become
damaged or dirty.
Correct Size
Thickness: 0.05 to 0.2 mm
0.04 to 0.4 mm using MDF mode
Length: Up to 1,200 mm can be fed manually.
(This limit can be reset to 100 m by a service
technician.)
If the document is too short, place it inside a
document carrier or enlarge it with a copier.
If the document is too long, divide it into two or
more sheets.
Clearly Written
Small faint characters may not be transmitted
clearly.
Uniform Page Size
Do not use different sizes of document in the
same transmission.
18
Page 28
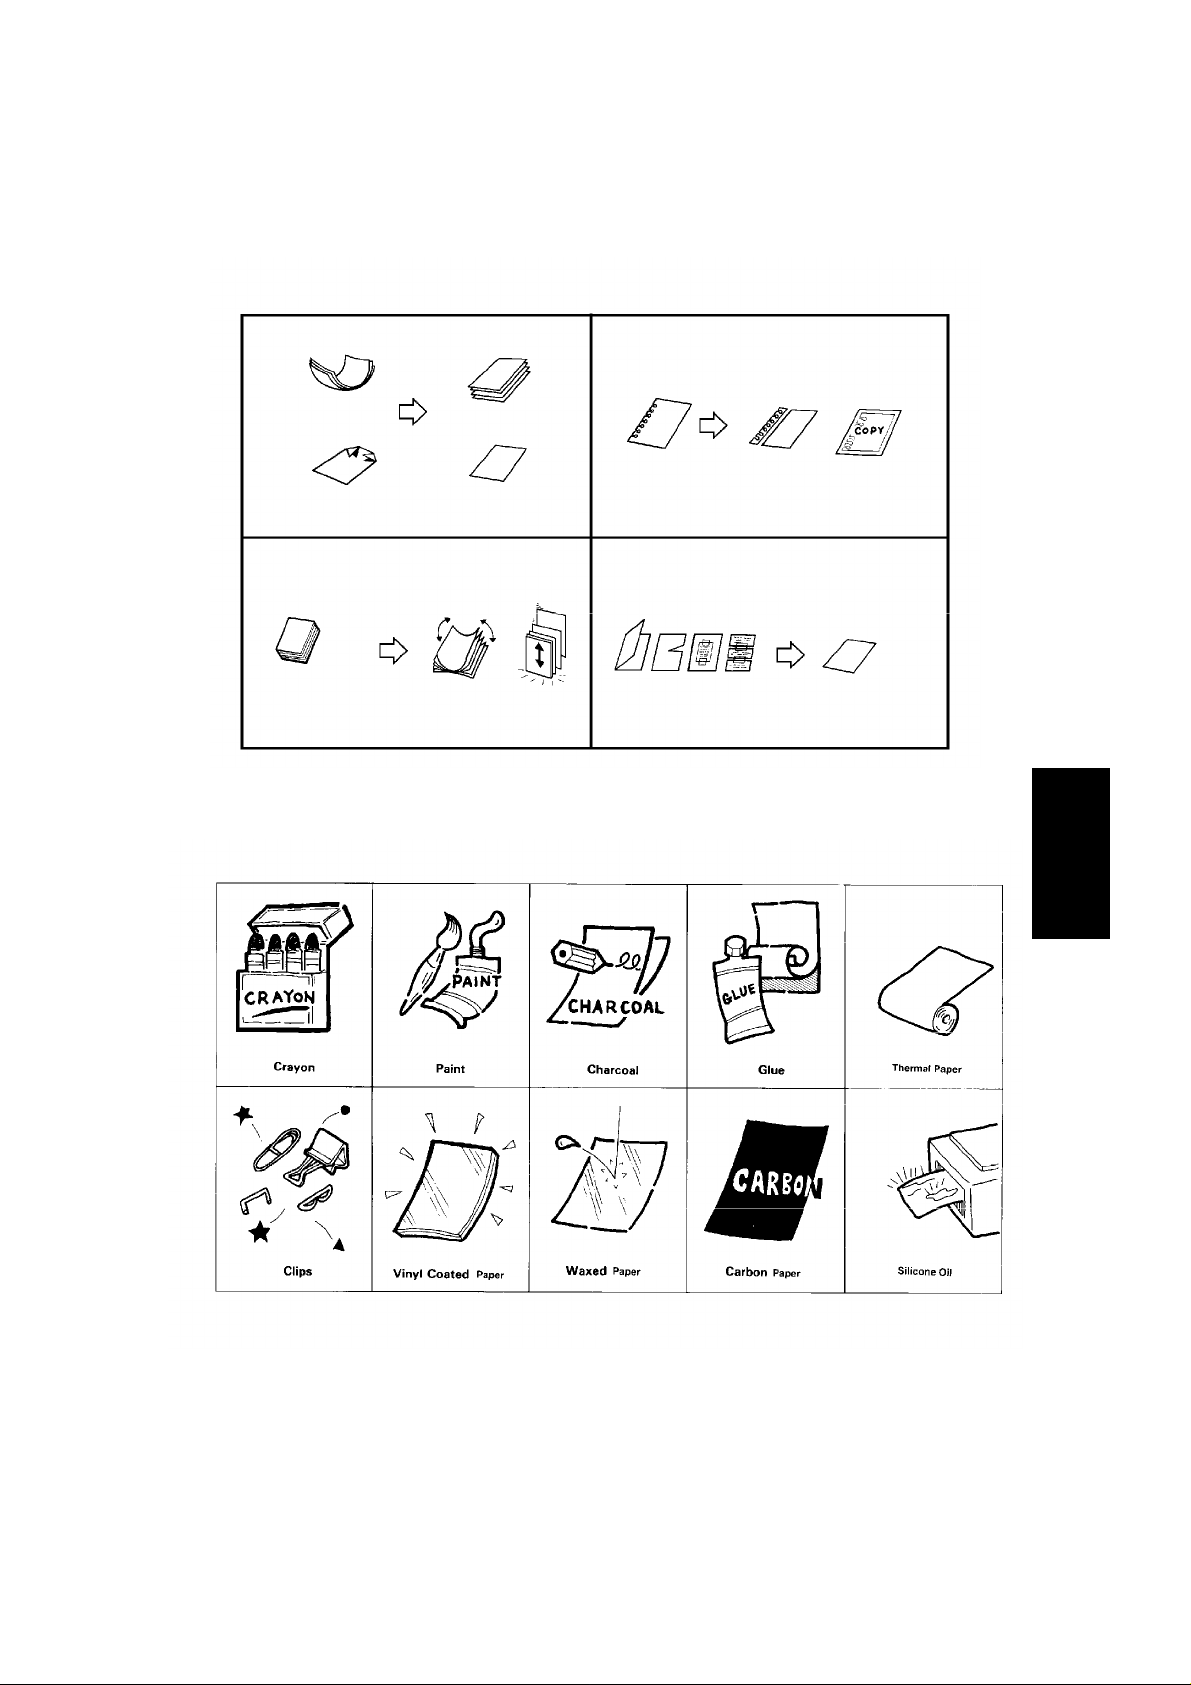
Page Condition
Do not place damaged pages into the feeder.
SECTION 2. ROUTINE OPERATION
BINDING
HOLES
CURLED
DOG EARED
PAGES STUCK
TOGETHER
Flatten
FOLDED, TORN, OR
PATCHED TOGETHER
Shuffle
the stack
Your document must not contain any of the following.
Trim the
edges
Make
copies
Make
copies
2
Note: Copies made with a copier that uses silicone oil may cause a misfeed. To
avoid this, do not scan such copies until five or ten minutes after copying.
19
Page 29
SECTION 2. ROUTINE OPERATION
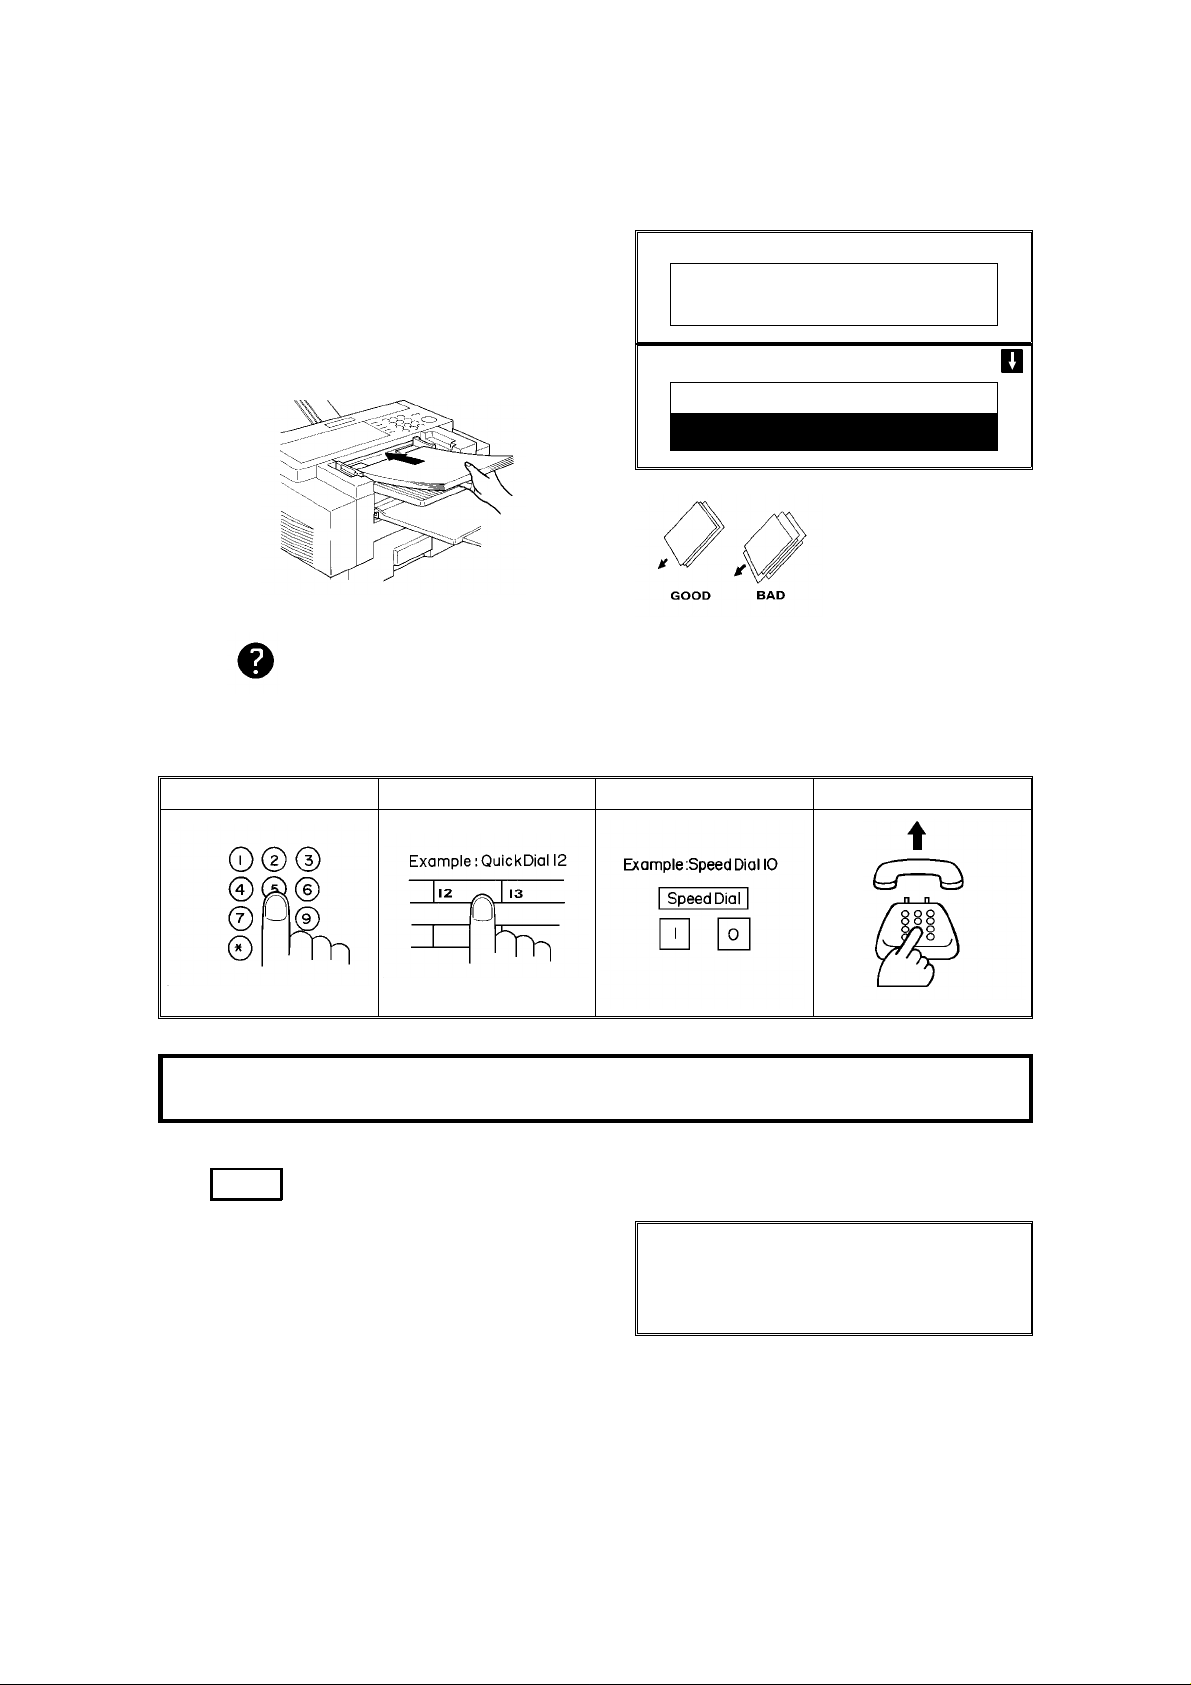
1-2. Transmission Procedure at a Glance
1. Make sure that the machine is in
standby mode.
2. Carefully place the document into the
auto document feeder.
MEMORY TRANS 4 APR 12:25
SET DOCUMENT
MEMORY 100%
MEMORY TRANS OPTIONS
ENTER FAX NUMBER
_
❐ Not more than 50 pages.
Selecting Contrast and Resolution: See page 22.
Options for Sending a Message: See page 23.
3. Dial in one of the following ways.
a) Ten Key Pad b) Quick Dial c) Speed Dial d) Handset
✬
✬ : Only if the telephone handset is installed.
If your machine is behind a PBX, dial the access code, then a pause, then the telephone no.
For an international number, press the Pause key after entering the country code.
4. Start
The machine stores your fax message.
STORING MEMORY 99%
PAGE 1
FILE NO. 0056
5. The machine dials, and the line to the other party is connected.
Note: Watch the display. The identification of the other party will appear.
6. After sending the message, the machine hangs up automatically.
20
Page 30
SECTION 2. ROUTINE OPERATION
Possible Problems
You want to take out the document
Press the scanner release button, open the scanner, and take out the document.
CAUTION: If you do not open the scanner before you pull out the document,
you may damage the machine.
You want to send more than 50 pages
While the last page is being fed in, place the following pages (up to 50) in the
feeder.
You made a mistake while dialling
If you already pressed Start , press Stop immediately.
If you haven’t pressed Start yet, either:
❐ No . The entire number is deleted. Enter a new number.
❐ Clear . Only the last digit is deleted.
One of the following is displayed
❐ If the Clear Original indicator is blinking:
Take out the document (see the top of this page). Then redial the destination.
❐ If the Line Fail indicator is blinking:
If the Communicating lamp is not lit, press Stop .
If the Communicating lamp is lit, wait until it goes out, then press Stop
The buzzer is ringing
The other party wishes to speak with you. Proceed as shown in the diagram be low.
21
Page 31

SECTION 2. ROUTINE OPERATION
1-3. Contrast, Resolution, and Halftone Modes
- Contrast Normal: Suitable for most documents
Darken: Use for documents with faint writing (such as those written in pencil)
Lighten: Use for documents that have a dark or patchy background
- Resolution Standard: Suitable for most typewritten documents
Detail: Use for documents with small print or fine details
Fine: Use this for high quality reproduction
- Halftone -
Use halftone mode if your document contains a photograph or complex shading.
There are two types of halftone: the Basic Halftone Process, and the Error Diffu -
sion Halftone Process. See page 71 for how to select which halftone type you
wish to use.
1-4. Immediate Transmission
1. Memory
The Memory indicator should go out.
2. Place the document in the feeder.
3. Dial.
See page 20 for how to dial.
4. Start
IMMEDIATE TX OPTIONS
ENTER FAX NUMBER
_
IMMEDIATE TX OPTIONS
YES OR CLR . NO
PRESS
2125551234
DIALLING
XYZ NEW YORK
2125551234
_
5. The machine dials and the line to the
other party is connected.The number
that you dialled and the other party’s
RTI or CSI is displayed.
22
Page 32

1-5. Optional Features for Transmission
SECTION 2. ROUTINE OPERATION
The following options are only available if " OPTIONS
right corner of the display
1-5-1. Personal Code
1. Press ↓ 0 1
Note: You may program one of the
User Function Keys to acti -
PERSONAL CODE ENTER CODE
vate this feature. See page
56 for how to do this.
2. Example: 7 3 6 2
PERSONAL CODE PRESS
The LCD shows the name that was
stored with the code that you selected.
In this example, it is SMITH.
3. Yes
MEMORY TRANS OPTIONS
ENTER FAX NUMBER
Note: See page 88 for details on how
to program the Personal
_
Codes and their labels.
" can be seen in the top
_
NO
YES
7362 SMITH
TO END
NO
OR
1-5-2. Send Later
1. Press ↓ 0 2
2. Example: Send at 1130pm
2 3 3 0
SEND LATER ENTER START TIME
:
NOW 12:15 NO TO END
SEND LATER PRESS
TODAY 23:30 (PM 11:30)
_
3. Yes
MEMORY TRANS OPTIONS
ENTER FAX NUMBER
_
Note: The Send Later time cannot be more than 24 hours into the future.
YES
OR
NO
23
Page 33

SECTION 2. ROUTINE OPERATION
1-5-3. Transmission Deadline (TRD)
1. Press ↓ 0 3
2. Example: The deadline is 1250 pm.
1 2 5 0
3. Yes
TRD ENTER TRD TIME
:
NOW 12:15 NO TO END
TRD PRESS
TODAY 12:50 (PM 12:50)
MEMORY TRANS OPTIONS
ENTER FAX NUMBER
_
_
Note: The TRD time cannot be more than 24 hours into the future. If the
deadline passes without successful transmission, a report will be
printed.
YES
OR
NO
1-5-4. Page Count (Immediate Transmission only)
1. Press ↓ 0 4
PAGE COUNT SET COUNT
PAGE(S)
_
NO
TO END
2. Example: 10 pages
1 0
3. Yes
PAGE COUNT PRESS
10 PAGE(S)
MEMORY TRANS OPTIONS
ENTER FAX NUMBER
YES
OR
_
Note: If you do not select Immediate Transmission, Page Count is automatically
enabled , and the pages are counted automatically.
NO
24
Page 34

1-5-5. Others
SECTION 2. ROUTINE OPERATION
1. Press ↓ 0 7
OPTION SELECT
AUTO REDUCE ON OFF
TTI
YES
TO END
2. Scroll through the following list of options using the ↑ and ↓ arrows of
the scroll key.
❐ Automatic Reduction
❐ TTI
❐ ID Transmission (You must have stored an ID Code before you can use this
feature; see page 66.)
❐ Economy Transmission (Before using this feature, you must program a time
for Economy Transmission using Function 74; see page 74 for how to do
this.)
❐ Voice Request (This feature requires a handset)
If you wish to switch something on or off, use the ← and → arrows of
the scroll key until the displayed setting is correct.
3. Yes when you have finished.
Note: You may program a User Function Key to bring up the TTI on/off selec -
tion, and you can program another to bring up the Economy Transmission
on/off selection. See page 56 for how to do this.
1-6. Check your Destinations while Dialling
1. Press ↓ 0 8
The number after DEST shows how
many numbers you have input so far.
CHECK DEST. PRESS
01 XYZ CO. NEW YORK
DEST. 2
YES
OR
NO
2. Use the ↓ arrow to scroll through the list of destinations just input.
❐ To cancel a destination that you input by mistake: No
❐ To finish checking: Yes
1-7. Converting Immediate Transmission to Memory Transmission
If you wish to convert a message that is still waiting in the document feeder into a
memory file, press Memory Start
25
Page 35

SECTION 2. ROUTINE OPERATION
1-8. Redialling
Automatic Redialling
Redialling is done 4 times at 5 minute inter vals. During redialling, the number being
[ 2125551234]
MEMORY TRANS 4 APR 12:25
SET DOCUMENT
dialled is displayed in brackets at the top of
the screen, as shown on the right.
The number of redials and the redial interval
may be adjusted by a qualified service tech nician.
AI Redial
The machine memorizes the last ten numbers that you dialled.
- Using AI Redial to send a fax -
1. Place your document into the feeder.
2. Press AI Redial .
AI REDIAL NO. DIRECTORY
1 SCROLL PRESS
01 XYZ CO. NEW YORK
3. Scroll through the numbers in the AI
Redial memory using the ↑ and ↓
arrows of the scroll key.
❐ To select a number: Yes x 2
4. Either
❐ Select another number: go to step 3.
MEMORY TRANS OPTIONS
ENTER NO. OR
_
❐ Press Start .
MEMORY 99%
YES
OR
START
DEST: 2
NO
- Using AI Redial to make a telephone call -
1. On Hook Dial AI Redial
2. Scroll through the numbers in the AI
Redial memory using the ↑ and ↓
arrows of the scroll key.
When the correct number is displayed,
press Yes . The number will be di alled immediately.
26
AI REDIAL NO. DIRECTORY
1 SCROLL PRESS
01 XYZ CO. NEW YORK
ON HOOK MODE
2125551234
_
YES
OR
NO
Page 36

SECTION 2. ROUTINE OPERATION
2. RECEIVING FAX MESSAGES
2-1. Selecting the Reception Mode
There are two reception modes. Press the reception mode key to switch between
the modes.
2-1-1. Manual Receive (TEL) Mode
This mode is selected when the Manual Receive indicator is lit.
Operation is as follows.
2 3
1. The machine rings continuously until you answer the call. Pick up the handset.
2. If you hear a voice from the other end, speak in reply.
If you hear a tone every few seconds, the other end is a fax terminal.
Note: Remove any documents from the feeder before you
press Start .
3. If the person at the other end wishes to send you a fax message,
press Start to receive the message. Then hang up the handset.
41
4. The machine starts to receive the message.
The Communicating indicator lights.
27
Page 37

SECTION 2. ROUTINE OPERATION
2-1-2. Auto Receive (FAX) Mode
This mode is selected when the Auto Receive indicator is lit.
1
2
1. The telephone rings once.
2. The machine automatically starts to receive the message.
2-2. Substitute Reception
If the Receive File indicator is lit, check the following:
❐ The printer paper may be used up. If so, add paper: see page 96.
❐ The printer paper may have jammed. If so, remove the jam: see page 115.
The messages received to memory will be printed and erased after the machine
has been returned to normal operation.
2-3. Confidential Reception (Memory Card or Hard Disk Required)
If the Confidential File indicator is lit, do the following to print the message.
1. Function 5 1
Note: You may program one of the
User Function Keys to acti vate this feature. See page
56 for how to do this.
2. Input the ID. Example: 4 7 3 9
PRT CONF RX ENTER CONF ID
CONFIDENTIAL ID:
NO
TO CANCEL
PRT CONF. RX PRESS
CONFIDENTIAL ID:
START
°°°°
3. Start
NOTE: If the Confidential File indicator blinks, an incoming fax message has
been stored in the memory using the Memory Lock feature.
To print the message: see page 58.
28
Page 38

SECTION 2. ROUTINE OPERATION
3. USING THE MACHINE FOR TELEPHONE CALLS
A handset is required to execute the procedures in this section.
3-1. Making a Telephone Call
3-1-1. Using On Hook Dial
1. On Hook Dial
ON HOOK MODE
Note: Do not pick up the handset.
2. Dial.
See page 20 for how to dial.
Do not use the handset.
Note: Do not press Start .
ON HOOK MODE
To cancel the call,
press On Hook Dial .
3. Listen to your machine’s built-in
speaker. When the other party answers,
pick up the handset.
4. Replace the handset when you have finished.
3-1-2. Using the Handset
_
2125551234
_
1. Pick up the handset.
HANDSET MODE
_
2. Dial.
See page 20 for how to dial.
Note: Do not press Start .
HANDSET MODE
2125551234
3. Continue as for a normal telephone conversation.
_
29
Page 39

SECTION 2. ROUTINE OPERATION
3-2. Answering the Telephone
If the telephone rings just once:
A fax is coming in. Do not pick up the handset.
If the telephone rings continuously:
1
1. Pick up the handset and speak to the other party.
Note: If you hear a high-pitched tone, a fax is coming in.
Press Start then hang up.
2. If the caller wants to send you a fax, press Start after speaking. Then
hang up.
POSSIBLE PROBLEM
If nothing happens after you press Start , the power may be switched off.
2
30
Page 40

SECTION 2. ROUTINE OPERATION
3-3. Phoning and Faxing on the Same Call
3-3-1. To Talk Before Sending a Fax (On Hook Dial)
1. On Hook Dial
2. Dial.
❐ Do not use the handset.
❐ Do not press Start .
3. If you hear a voice from the machine’s built-in speaker, pick up the handset
and speak to the other party.
Note: If you hear a high-pitched tone instead of a voice, place your fax
message in the feeder, then press Start .
4. Place your message in the feeder, then ask the other party to
press Start .
5. When you hear a high-pitched tone, press Start .
6. Replace the handset.
Note: If you wish to speak to the other party again, do not replace the
handset. When your machine emits a tone, press Stop then
speak.
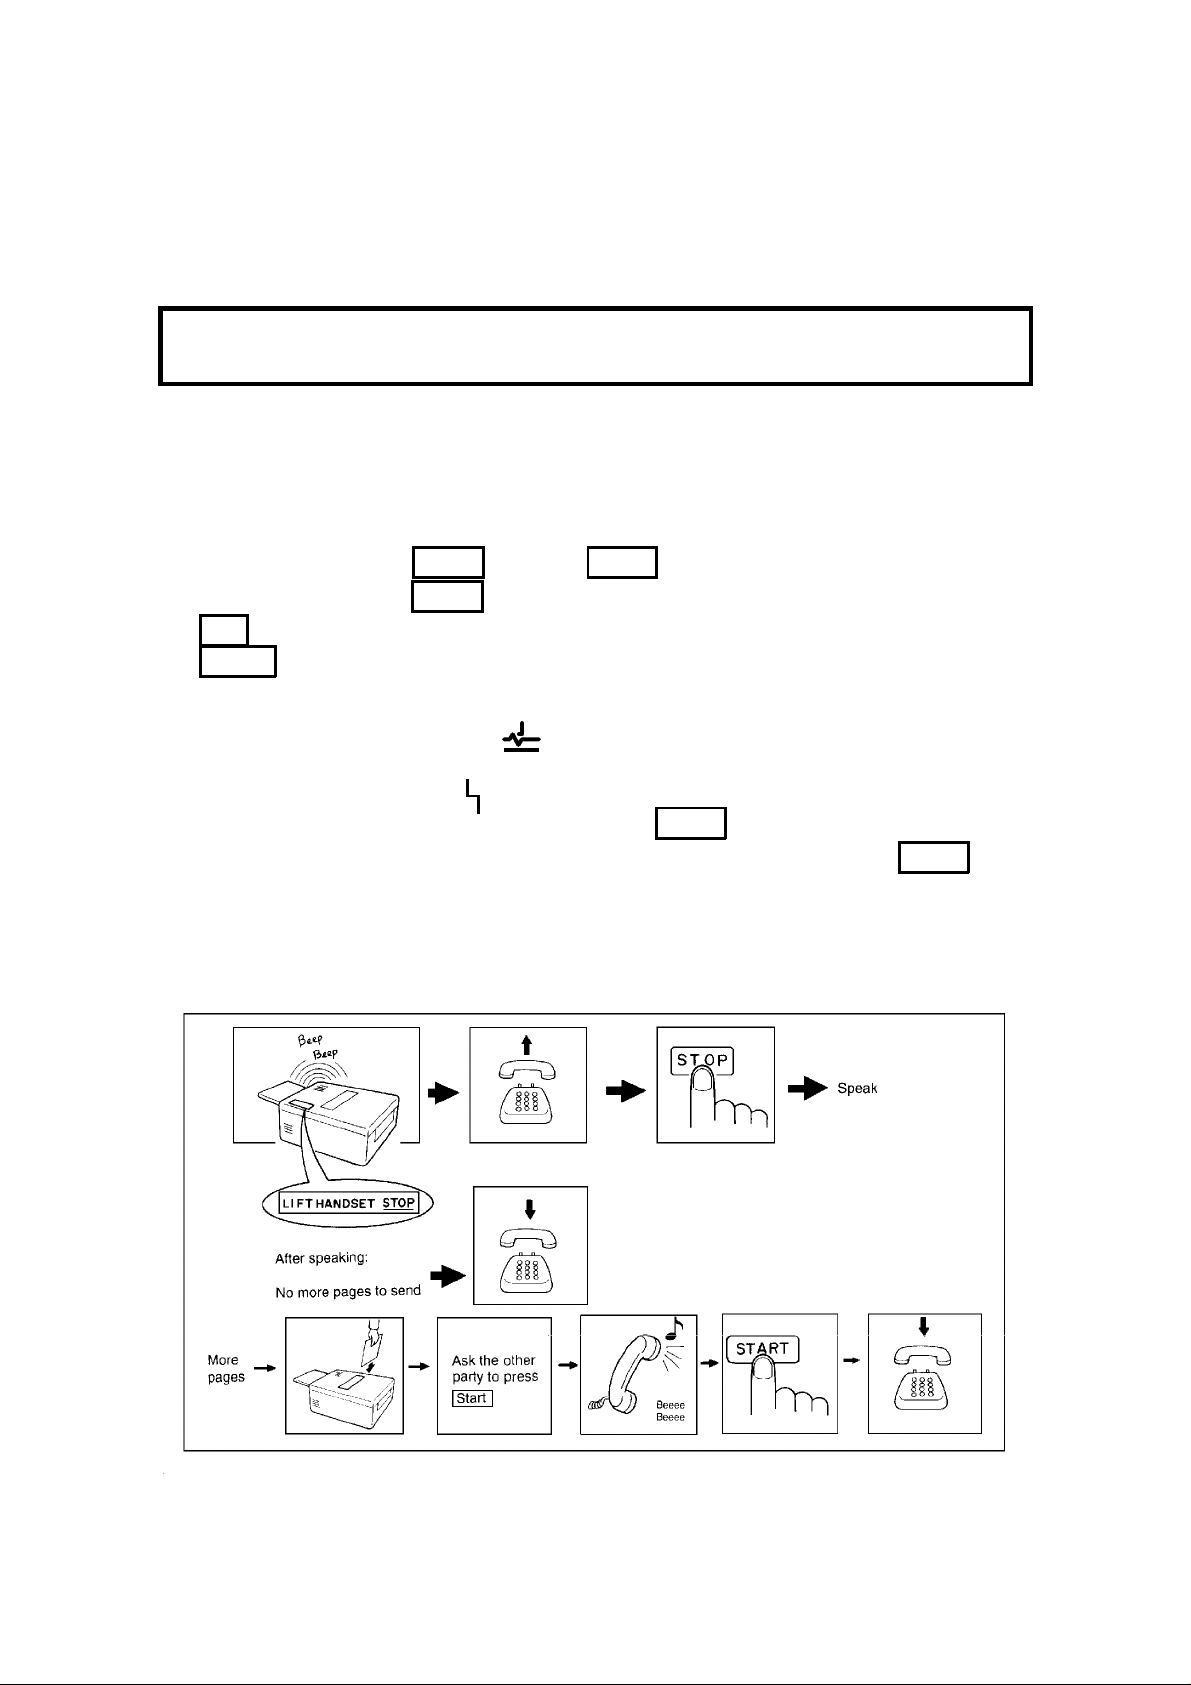
3-3-2. To Talk After Sending a Fax
Use the Voice Request Option (see page 25). Then, during transmission:
1. When your machine emits a tone, pick up the handset, press Stop and
speak.
Note: If the machine did not emit a tone, the other party did not answer the
call.
2. After speaking, hang up.
Note: If you have more pages to send, do not hang up. Instead:
❐ Place the pages into the feeder.
❐ Ask the other party to press Start .
❐ When you hear a high-pitched tone, press Start .
31
Page 41

_
SECTION 3. ADVANCED FEATURES
1. TRANSMISSION
1-1. Broadcasting
Make sure that the Memory indicator is lit. If it is not, press
1. Place your document in the feeder.
To broadcast without placing the document
in the feeder first, see page 42.
MEMORY TRANS OPTIONS
ENTER FAX NUMBER
Memory .
2. Dial in one of the following ways.
a) Ten Key Pad b) Quick Dial c) Speed Dial d) Group ✬
✬ : Method 1: Press the Quick Dial Key the Group is stored in (in the example, press key 08).
Method 2: If you do not remember which Quick Dial Key the Group is stored in but you do remember the Group number, use Method 2. To use this method, you must have programmed one of the
User Function Keys in advance with code 02 (Group Dial). See page 56 for how to do this. In the
above example, the F5 key has been programmed as the Group Dial key; press F5 then the required Group number.
If your machine is behind a PBX, dial the access code, then a pause, then the telephone no.
For an international number, place a pause after the country code. To input a pause, press the
Pause key.
3. Yes
Here, DEST. 2 indicates that the machine is
asking you to input the second telephone
number in your list of destinations for this fax
message.
MEMORY TRANS OPTIONS
ENTER NO. OR
START
DEST: 2
_
4. Either
❐ Dial another number: Go to step 2.
❐ Press
Start .
STORING MEMORY 99%
PAGE 1
FILE NO. 0056
Note: See the table on page 8 concerning the limitations to this feature.
A User Function Key can only be used for inputting a Group if you have
already specified one of the keys using Function 35. See page 56.
32
Page 42

1-2. Keystroke Programs
_
_
Storing a Program
SECTION 3. ADVANCED FEATURES
1. Place a sheet of paper in the feeder.
Note: Skip this step if you are making
a polling reception program.
2. Select all required features (such as
Transfer Request) and telephone numbers as you would normally do.
Note: Contrast, resolution, and half-
tone cannot be stored in a keystroke program.
3. Press the Quick Dial key that you wish
to store the program in.
Example:
01
Note: Make sure that this key is va-
cant.
4. To complete the program:
Yes
MEMORY TRANS OPTIONS
ENTER FAX NUMBER
MEMORY TRANS OPTIONS
ENTER NO. OR
PROGRAM?
START
DEST: 2
YES OR NO
Note: The procedure that you just programmed will now begin. If you do
not wish to use the procedure now, press
Stop .
After storing a Keystroke Program, you can store a label for it using
Function 34. See page 34 for how to do this.
33
Page 43

_
_
SECTION 3. ADVANCED FEATURES
Labelling a Program
Function 3 4
1.
PROGRAM CHOOSE KEY
Note: If you press
→ Start , a Pro-
gram List will be printed.
2. Press the Quick Dial key that holds the
program that you wish to label.
Example:
01 Yes
3. Input your label, using the Quick Dial
keys.
Yes
4.
_
PROGRAM ENTER LABEL
08
PROGRAM
08
TRANSMIT DAILY REPORT ABC
PROGRAM CHOOSE KEY
PRINT LIST
NO
TO CANCEL
YES OR CLR . NO
ABC
5. Either:
❐ Label another program: Go to step 2.
❐ Return to standby:
Function
_
PRINT LIST
NO
TO CANCEL
34
Page 44

Using a Program
_
- Transmission -
SECTION 3. ADVANCED FEATURES
1. Place your document in the feeder.
2. Press the programmed Quick Dial Key.
The program begins at once, or at the
later time specified by the program. You
do not need to press
Start .
- Polling Reception -
1. Press the programmed Quick Dial Key.
The program begins at once, or at the
later time specified by the program.
Erasing a Program
MEMORY TRANS OPTIONS
ENTER FAX NUMBER
STORING MEMORY 99%
PAGE 1
FILE NO. 0056
PROGRAMMED
Function 3 4
1.
Note: If you press → Start , a
Program List will be printed.
2. Press the Quick Dial key that holds the
program that you wish to erase.
Example:
3. To delete the program:
08
Clear Yes
4. Either:
❐ Erase another program: Go to step 2.
❐ Return to standby:
Function
PROGRAM CHOOSE KEY
YES
CLR
OR
PRINT LIST
NO
TO CANCEL
PRINT LIST
NO
TO CANCEL
_
PROGRAM
08 TRANSMIT DAILY REPORT
CLR:
PROGRAM CHOOSE KEY
NO
35
Page 45

_
_
SECTION 3. ADVANCED FEATURES
1-3. Confidential Transmission
1. Place your document in the feeder.
Then:
Function 1 1
Note: You may program one of the
User Function Keys to activate this feature. See page
56 for how to do this.
CONF. TRANS. OPTIONS
ENTER FAX NUMBER
_
2. Dial then press
See page 32 for how to dial.
Yes .
CONF. TRANS. OPTIONS
ENTER NO. OR
START
DEST: 2
3. Either:
❐ Dial another number: Go to step 2.
❐ Press
Start .
NOTE: See the table on page 8 concerning the limitations to this feature.
Options
- Confidential ID Override -
This procedure will override the Confidential ID stored in the other party’s machine. The override is only effective for this one transmission.
If OPTIONS
↓ is displayed:
↓ 0 5
1.
CONF. ID ENTER ID CODE
2. Enter the Confidential ID that you wish
to use for this message.
Example:
3. Dial and press
2 5 6 7 Yes
Start .
CONF. TRANS. OPTIONS
ENTER NO. OR
For how to use other options, see page 23.
36
_
NO
TO END
START
DEST: 2
Page 46

1-4. Polling Transmission
1-4-1. Free Polling
1. Place your document in the feeder, then:
Function 1 4
See page 39 for the options
that are available with polling.
Start
2.
FREE POLLING OPTIONS
PRESS
Your fax message is stored and held on polling standby.
SECTION 3. ADVANCED FEATURES
START
Note: If you see FILE EXISTS CLEAR? PRESS
YES . NO , you already
have a message on Free Polling Standby.
❐ To keep the old message:
No . Remove the document from the
feeder.
❐ To erase the old message:
Yes
1-4-2. Secured Polling
1. Place your document in the feeder, then:
Function 1 3
See page 39 for the options
that are available with polling.
POLLING TRANS. OPTIONS
PRESS
START
NOTE
If you have not yet stored an ID Code using Function 61, you will be asked to
enter an ID Code. Proceed in the same way as for step 3 in "Stored ID
Override" on the next page.
Start
2.
Your fax message is stored and held on polling standby.
Note: If you see SAME ID FILE EXISTS CLEAR? PRESS
you already have a message on Secured Polling Standby.
❐ To erase the old message:
Yes . The old message is erased and
your new one is stored.
❐ To keep the old message:
No . Input an ID Code in the same way
as for step 3 in "Stored ID Override" on the next page.
YES . NO ,
37
Page 47

SECTION 3. ADVANCED FEATURES
1-4-3. Stored ID Override
This procedure will override the ID Code stored in your machine. The override is
only effective for this one transmission.
1. Place your document in the feeder,
Function 1 3
POLLING TRANS. OPTIONS
PRESS
ID CODE ENTER ID CODE
START
_
NO
TO END
2.
then
↓ 0 6
3. Enter the ID code that you wish to use
for this message.
Example:
Note: If you see SAME ID FILE EXISTS CLEAR? PRESS
2 5 6 7 Yes
POLLING TRANS. OPTIONS
PRESS
START
YES . NO ,
you already have a message on Secured Polling Standby.
❐ To erase the old message:
Yes . The old message is erased and
your new one is stored.
No . Input another ID Code .
4.
❐ To keep the old message:
Start
Your fax message is stored and held on polling standby.
NOTE: If you need to cancel a polling transmission operation, use Function 23
(see page 54).
38
You may program one of the function keys to activate Secured
Polling/Stored ID Override. See page 56 for how to do this.
Page 48

SECTION 3. ADVANCED FEATURES
- Options for Polling Transmission -
The options are only available if the following can be seen in the top right corner
of the display:
↓
OPTION SELECT
AUTO REDUCE ON OFF
TTI
YES
TO END
1.
OPTIONS
↓ 0 7
2. Scroll through the following list of options using the
↑ and ↓ arrows of
the scroll key.
❐ Automatic Reduction
❐ TTI
❐ Polling Standby Duration (KEEP: The message is kept in memory until you
erase it yourself using Function 23; see page 54, ONCE: The message is
erased from memory after it has been polled once)
If you wish to switch something on or off, use the
← and → arrows of
the scroll key until the displayed setting is correct.
Yes when you have finished.
3.
39
Page 49

_
SECTION 3. ADVANCED FEATURES
1-5. Transfer Request
You may program one of the User Function Keys to activate this feature. See
page 56 for how to do this.
1. Place your document in the feeder.
Function 1 2
2.
If you cannot use Function 12, you forgot
to store your fax machine’s telephone
number, country code, or ID code (Function 61). See pages 64, 65, and 66.
If you have installed the ISDN Option Kit,
your G4 Terminal ID and your ISDN subscriber numbers for G4 and G3 must also
have been stored; contact a service technician and ask for it to be done.
3. Input the telephone number of the first
transfer broadcasting station,
then press
Yes . This machine must
be of the same manufacturer as yours,
and it must have this feature .
Note: Do not use the handset.
MEMORY TRANS OPTIONS
ENTER FAX NUMBER
TRANSFER OPTIONS
TRANSF. 1
TRANSFER
TRANSF. 1 12125551234
RECV. 1
_
_
4. Input the destinations for this transfer broadcaster.
You must use Quick Dials, Speed Dials, or Groups that are stored in the transfer broadcaster.
Examples:
❐ Quick Dial Key 01:
❐ Speed Dial Code 10:
❐ Group 01:
# * * 0 1 Yes
# 0 1 Yes
# * 1 0 Yes
TRANSFER NEXT NO. OR
TRANSF. 1 12125551234
RECV. 2 TRNSF.
NOTE: See the table on page 8 concerning the limitations to this feature.
Continued on the next page
40
START
Page 50

_
_
_
SECTION 3. ADVANCED FEATURES
5. Either:
❐ Enter more destinations for this transfer broadcaster - go to step 4.
❐ Input another transfer broadcaster and its destinations:
❐ Start the transfer request:
Start
↓ - go to step 3.
NOTE: You may use some transmission options, such as Send Later.
See page 23.
If you wish your machine to be a transfer broadcasting station, you
must install a memory card or a hard disk.
1-6. Telephone Directory
Example: You wish to dial "XYZ CO. LONDON"
1. Place your document in the feeder.
Speed Dial/Tel Directory
2.
MEMORY TRANS OPTIONS
ENTER FAX NUMBER
MEMORY TRANS OPTIONS
ENTER FAX NUMBER
3. Press the first letter of the name:
Press
X repeatedly until the correct
number is displayed.
Yes
4.
Yes again.
5.
6. Either:
❐ Dial more numbers.
❐ Press
Start .
Programming Speed Dial Codes: See page 79.
X (Quick Dial Key 24 )
TELEPHONE DIRECTORY
SCROLL: X PRESS
00 XYZ CO. BARCELONA
MEMORY TRANS OPTIONS
PRESS
MEMORY TRANS OPTIONS
ENTER NO. OR
YES
OR
01 XYZ CO. LONDON
.
CLR
START
YES
OR
NO
DEST: 2
NO
41
Page 51

_
_
SECTION 3. ADVANCED FEATURES
1-7. Secure Transmission
Before using this feature, you must program one of the User Function Keys to activate this feature (Function 35; see page 56).
1. Place your document in the feeder.
2. Press the User Function Key that you have programmed for Secure Transmission. The green light on that key should light up.
3. Dial in the normal manner.
See page 32 for how to dial.
4. Press
Start .
1-8. Direct Fax Number Entry
This feature allows you to enter a fax number before you place the document in
the feeder.
Function 1 6
1.
2. Input the destination telephone number(s).
MEMORY TRANS OPTIONS
ENTER FAX NUMBER
MEMORY TRANS OPTIONS
PRESS YES OR CLR
2125551234
.
NO
3. Place your document in the feeder and
press
Start .
Note: You may program one of the User Function Keys to activate this feature.
See page 56 for how to do this.
42
Page 52

2. RECEPTION
_
_
2-1. Polling Reception
Function 1 5
1.
SECTION 3. ADVANCED FEATURES
POLLING RECV. OPTIONS
Note: You may program one of the
User Function Keys to acti-
ENTER FAX NUMBER
_
vate this feature. See page
56 for how to do this.
2. Dial one or more numbers.
Start
3.
POLLING RECV. OPTIONS
ENTER NO. OR
START
DEST: 2
NOTE: See the table on page 8 concerning the limitations to this feature.
Options
- Stored ID Override -
This procedure overrides the ID Code that is stored in your machine. The override
is effective for this operation only.
If OPTIONS
↓ is displayed:
↓ 0 6
1.
ID CODE ENTER ID CODE
_
NO
TO END
2. Enter the password that you wish to use
for this operation.
Example:
3. Dial and press
2 5 6 7 Yes
Start .
POLLING RECV. OPTIONS
ENTER NO. OR
START
DEST: 2
For how to use other options, such as Send Later for
delayed polling, see page 23.
NOTE: To switch on continuous polling reception, contact a service technician.
43
Page 53

_
SECTION 3. ADVANCED FEATURES
2-2. Authorized Reception
Function 6 0 2 2 2 2
1.
7 2
DEST. 6 on the opposite display shows that
there are 6 RTIs/CSIs programmed so far. In
a new machine, you will see DEST.0.
Note: At this time, you can print an Authorized
Reception List by pressing
→ Start .
2. Either:
❐ Store some RTIs/CSIs:
1 . Go to
step 3.
❐ View the RTIs/CSIs that you have
stored so far:
DEST. 1/6 means that there are 6 RTIs/CSIs
programmed so far, and the first in the list is
now displayed.
2 . Go to step 6.
AUTHORIZ. RX SELECT
DEST. 6 PRINT LIST
1. RTI PROG 2. RTI
AUTHORIZ. RX ENTER RTI/CSI
AUTHORIZ. RX NO TO CANCEL
DEST. 1/6 CLR:
XYZ. CO.
_
NO
TO CANCEL
NO
TO CANCEL
ABC
CLR
❐ Finish:
Yes
3. Type in an RTI or CSI, then
press
Yes .
Label input and editing: see
page 2.
4. Either:
❐ Store this RTI as a wild card:
❐ Otherwise:
No
5. Either:
❐ Enter another RTI or CSI: Go to step 3.
❐ Finish:
No . Go to step 2.
Yes
AUTHORIZ. RX
STORE AS WILD CARD?
XYZ. CO.
AUTHORIZ. RX ENTER RTI/CSI
YES . NO
NO
TO CANCEL
_
ABC
44
Page 54

SECTION 3. ADVANCED FEATURES
6. Scroll through the stored RTIs/CSIs on the screen with ↓ .
❐ It is not possible to edit an RTI/CSI; if you wish to do so, you must delete
the incorrect entry and reinput it.
❐ To delete the displayed RTI/CSI:
❐ When you have finished:
No . Go to step 2.
Clear . Go to step 2.
NOTE: For Authorized Reception to take effect, you must switch it on. See
page 71 for how to do this.
2-3. Night Timer
Example
For Tuesday, set the heater to switch on at 9 am and switch off at 6 pm.
Function 6 0 2 2 2 2
1.
7 4 Yes
2. Use the
↑ and ↓ keys to scroll
NIGHT TIMER DAY OF WK.
(SUN)
ON = 00:00 ON= 00:00
YES
through the days of the week.
Example: Press
Tuesday.
↓ twice to go to
NIGHT TIMER DAY OF WK.
(TUE)
ON = 00:00 ON = 00:00
YES
TO END
TO END
3. Program the first timer for Tuesday:
❐ Each timer has an ON/OFF setting. "ON" means that the heater will switch
on at the time indicated. "OFF means that the heater will switch off at the
time indicated.
To change the ON to OFF, or vice versa, press
display is correct:
❐ Input the time:
→
0 9 0 0
* . When the ON/OFF
Repeat step 3 for the second timer, inputting
value .
1 8 0 0 for the timer
NIGHT TIMER DAY OF WK.
(TUE) ON= 09:00 OFF = 18: 00
YES
KEEPING THE HEATER ON ALL DAY: Set both timers to ON = 00:00.
KEEPING THE HEATER OFF ALL DAY: Set both timers to OFF = 00:00.
TO END
45
Page 55

_
SECTION 3. ADVANCED FEATURES
4. Either:
❐ Program the timer for another day: Go back to step 2.
❐ Finish:
Yes Function
NOTE: For the Night Timer to take effect, you must switch it on. See page 71
for how to do this.
To print the received messages while the heater is off, press any key.
After all the messages have been printed, the heater will stay on for 5
minutes before switching off again. Because of this, the Night Timer
does not give you complete security for received documents.
2-4. Forwarding (Memory Card or Hard Disk Required)
This section shows you how to set up your machine to forward incoming fax messages to another location or locations. After you have done this procedure, you
must switch Forwarding on for it to take effect; see page 71 for how to do this.
Function 6 0 2 2 2 2
1.
7 5
FORWARDING SET FORWARD CODE
No. PRINT LIST
_
NO
TO CANCEL
Note: At this time, you can print a For-
warding List by pressing
→ Start .
2. Input a two-digit code from 01 to 05 for a
forwarding station number. (This is the
number that you wish to direct incoming
messages to.)
Example:
DEST.0 on the opposite display shows that
there are no RTIs/CSIs stored so far for this
forwarding station.
Yes
3.
0 2
FORWARDING
No. 02 DEST. 0
FORWARDING ENTER FAX NUMBER
No. 02 NO TO CANCEL
YES OR NO
46
Page 56

4. Input the telephone number of this for-
_
warding station. (If your machine is behind a PBX, add the access code before
the number, unless the forwarding station is an extension connected to the
same PBX as your machine.)
Then press
Yes .
See page 20 for how to dial.
Do not use the handset.
5. Either:
❐ If you wish all incoming messages to
be forwarded to this station, do not
SECTION 3. ADVANCED FEATURES
FORWARDING SELECT
No. 02 DEST. 0
1. RTI PROG 2. RTI
YES
_
TO END
store any RTIs/CSIs for it. Instead:
. Then go to step 2 to program another forwarding station, or press
Function
to finish.
❐ If you only wish messages from cer-
tain senders to be forwarded to this
station, input their RTIs or CSIs (messages from senders other than these
will not be forwarded to this station):
1 . Go to step 6.
❐ View the RTIs/CSIs that you have
stored so far:
DEST 1/6 means that there are 6
RTIs/CSIs stored so far, and the first in the
list is now displayed.
2 . Go to step 9.
Yes
FORWARDING ENTER RTI/CSI
NO
TO CANCEL
FORWARDING NO TO CANCEL
No. 01 DEST. 1/6 CLR:
XYZ. CO.
ABC
CLR
❐ Finish storing RTIs/CSIs for this for-
warding station and input another
forwarding station number:
❐ Finish:
Function
Yes . Go to step 2.
47
Page 57

_
SECTION 3. ADVANCED FEATURES
6. Type in an RTI or CSI, then
press
Yes .
You can input up to 30 RTIs/CSIs
for each forwarding station.
7. Either:
FORWARDING
STORE AS WILD CARD?
XYZ. CO.
YES . NO
❐ Store this RTI as a wild card:
❐ Otherwise:
No
Yes
FORWARDING ENTER RTI/CSI
NO
TO CANCEL
8. Either:
❐ Enter another RTI or CSI: Go to step 6.
❐ Finish:
9. Scroll through the stored RTIs/CSIs on the screen with
❐ To delete the displayed RTI/CSI:
❐ When you have finished:
No . Go to step 5.
↓ .
Clear
No . Go to step 5.
NOTE: See the table on page 8 concerning the limitations to this feature.
After you have finished programming Forwarding, you must switch it
on for it to take effect. See page 71 for how to do this. After switching
Forwarding on, (FORWARDING) is displayed on the operation panel
when the machine is in standby mode.
ABC
Forwarding cannot be switched on if Memory Lock is switched on. If
you wish to use Forwarding, you must switch Memory Lock off.
48
Page 58

Editing the Forwarding Feature
_
Function 6 0 2 2 2 2
1.
SECTION 3. ADVANCED FEATURES
7 5
2. Input the code number of the forwarding
station that you wish to edit (see the
Forwarding List for a list of these
codes). Then press
Yes .
3. Either:
❐ Erase this forwarding station num-
ber and all RTIs/CSIs stored with it:
No x 2, then Yes to erase.
Go to step 2.
❐ Edit this forwarding station’s tele-
phone number.
If it is correct:
DEST. 6 on the opposite display shows that
there are 6 RTIs/CSIs programmed so far for
this forwarding station.
Yes
FORWARDING SET FORWARD CODE
No. PRINT LIST
FORWARDING
No. 01
FORWARDING SELECT
_
2125553456
NO
TO CANCEL
YES OR CLR . NO
_
No. 01 DEST. 6
1. RTI PROG 2. RTI
YES
TO END
4. Either:
❐ To add RTIs/CSIs to this number:
Go to step 6.
❐ To view or delete RTIs/CSIs allo-
cated to this number:
2 . Go to
step 5.
DEST. 1/6 means that there are 6 RTIs/CSIs
programmed so far for this forwarding station,
and the first in the list is now displayed.
Continued on the next page.
1
FORWARDING
STORE AS WILD CARD?
XYZ. CO.
FORWARDING NO TO CANCEL
No. 01 DEST. 1/6 CLR:
XYZ. CO.
YES . NO
CLR
49
Page 59

SECTION 3. ADVANCED FEATURES
❐ If you wish to view another forward-
ing station number:
Yes .
Go to step 2.
FORWARDING SET FORWARD CODE
No. PRINT LIST
_
NO
TO CANCEL
❐ Finish:
↓ until the RTI/CSI that you wish to
5.
Function
delete appears.
To delete the RTI/CSI:
go to step 4.
Clear , then
FORWARDING SELECT
No. 02 DEST. 0
1. RTI PROG 2. RTI
YES
TO END
_
❐ It is not possible to edit an RTI/CSI; if you wish to do so, you must delete
the incorrect label and store a new one.
CAUTION: If you delete all the RTIs and CSIs for a forwarding station, you
must also delete the forwarding station. If you do not do this, all
incoming messages will be forwarded to that station.
6. Type in an RTI or CSI, then
press
Yes .
Inputting labels: see page 2.
FORWARDING
STORE AS WILD CARD?
XYZ. CO.
YES . NO
7. Either:
❐ Store this RTI as a wild card:
❐ Otherwise:
No
Yes
8. Either
❐ Input another RTI/CSI for this forwarding station: go to step 6
❐ Finish working on this forwarding station:
❐ Finish:
Function
No . Go to step 4.
50
Page 60

_
_
SECTION 3. ADVANCED FEATURES
2-5. Specified Cassette Selection (Optional Paper Feed Unit Required)
Function 6 0 2 2 2 2
1.
7 6
DEST. 6 on the opposite display shows that
there are 6 RTIs/CSIs programmed so far. In
a new machine, you will see DEST. 0 here.
Note: At this time, you can print a
Specified Cassette Selection
List by pressing
→ Start .
2. Either:
❐ Store some RTIs/CSIs:
step 3.
❐ View the RTIs/CSIs that you have
stored so far:
DEST. 1/6 means that there are 6 RTIs/CSIs
programmed so far, and the first in the list is
now displayed.
2 . Go to step 6.
1 . Go to
CST SELECT SELECT
DEST. 6 PRINT LIST
1. RTI PROG 2. RTI
CST SELECT ENTER RTI/CSI
NO
CST SELECT NO TO CANCEL
DEST. 1/6 CLR:
XYZ. CO.
_
NO
TO CANCEL
TO CANCEL
CLR
ABC
3. Type in an RTI or CSI, then
press
Yes .
Label input and editing: see
page 2.
4. Either:
❐ Store this RTI as a wild card:
❐ Otherwise:
No
5. Either:
❐ Enter another RTI or CSI: Go to step 3.
❐ Finish:
No . Go to step 2.
Yes
CST SELECT
STORE AS WILD CARD?
XYZ. CO.
CST SELECT ENTER RTI/CSI
YES . NO
NO
TO CANCEL
ABC
51
Page 61

SECTION 3. ADVANCED FEATURES
6. Scroll through the stored RTIs/CSIs on the screen with ↓ .
❐ It is impossible to edit a previously stored RTI or CSI; if you wish to do so,
you must erase the old one and input a new one.
❐ To delete the displayed RTI/CSI:
❐ When you have finished:
No . Go to step 2.
Clear
NOTE: ❐ After programming this feature, you must switch it on for it to
take effect. See page 71 for how to do this.
❐ Messages from senders that have RTI/CSIs that match those
that were input using the above procedure will be printed using
the upper cassette.
❐ If there is no paper in the upper cassette, substitute reception
will take place.
❐ If there is no paper in the lower cassette(s), the upper cassette
will be used for reports.
❐ If you install A5 size paper in the upper cassette and receive an
A4 message, substitute reception will take place.
2-6. Multi-sort Document Reception (Memory Card or Hard Disk Required)
Function 6 0 2 2 2 2
1.
7 7
MULTICOPY RX ENTER 1-9 COPY
2. Input the number of copies that you
need, then press
Yes .
Copies of incoming fax messages
will be collated.
NOTE: Maximum number of copies: 9
To use Multi-sort Document Reception, you must switch it on. See
page 74 for how to do this.
ENTER # COPY: 1 COPY(S)
YES
TO END
52
Page 62

3. OTHER FEATURES
3-1. Copying
SECTION 3. ADVANCED FEATURES
1. Press
Copy .
Note: To cancel copy mode, press Copy again.
2. Use the
← and → arrows on the
scroll key to select the required copy paper size. The number of choices that
you have depends on how many paper
feed units you have installed.
Example: Press
→ →
COPY MODE NO. OF COPIES: 1
SET DOCUMENT
PAPER A4 B4 A5
COPY MODE NO. OF COPIES: 1
SET DOCUMENT
PAPER A4 B4 A5
3. Place your original in the feeder.
4. Input the number of copies that you require.
Example: 3 copies, press
3 .
NOTE: Maximum number of copies: 99
Start
5.
COPY MODE NO. OF COPIES: 1
PRESS
PAPER A4 B4 A5
COPY MODE NO. OF COPIES: 3
PRESS
PAPER A4 B4 A5
START
START
53
Page 63

SECTION 3. ADVANCED FEATURES
3-2. File Management
3-2-1. Erasing a File from Memory
1. ❐ Fax message file (Memory Transmission):
❐ Instruction file (Polling Reception):
❐ Fax message file (Polling Transmission):
(Example display: Using Function 21)
CLEAR TRANS. FILE SCROLL
FILE NO. : PRINT LIST
LAST FILE : 0015
2. Either:
❐ Print a list of files:
❐ Scroll through the files on the display:
→ Start
↓
until the required file appears. Then
press
Yes .
❐ If you know the file number, input it di-
rectly:
0 0 0 2
CLEAR TRANS. FILE
NO. 0002
CLEAR FILE?
Function 2 1
Function 2 2
Function 2 3
_
NO
TO CANCEL
YES . NO
3. Either:
❐ Erase the file:
❐ Keep the file:
Yes
No . Go to step 2.
54
Page 64

3-2-2. Printing a File
SECTION 3. ADVANCED FEATURES
1. ❐ Fax message file (Memory Transmission):
❐ Fax message file (Polling Transmission):
(Example display: Using Function 24)
PRINT TRANS. FILE SCROLL
FILE NO. : PRINT LIST
LAST FILE : 0015
2. Either:
❐ Print a list of files:
→ Start
❐ Scroll through the files on the dis-
play:
pears. Then press
↓ until the required file ap-
Yes .
❐ If you know the file number, input it di-
0 0 0 2
PRINT TRANS. FILE
NO. 0002
PRESS
3.
rectly:
Start
Function 2 4
Function 2 5
_
NO
TO CANCEL
NO
TO CANCEL
START
55
Page 65

SECTION 3. ADVANCED FEATURES
3-3. User Function Keys
Each of the User Function Keys F1 - F5 can be programmed with one of the following functions. In a new machine, the F1 to F4 keys have already been programmed, as shown in the table below in boldface.
Code Function Code Function
Use the Direct Entry feature. [F1]
01
02 Dial a group. 11 Print the TCR. [F3]
03 Input a Personal Code. [F4] 12 Print a File List.
04 Use Economy Transmission. [F2] 13 Switch Memory Storage Report On/Off.
05 Switch TTI On or Off. 14 Switch Forwarding On/Off.
06 Do a Confidential Transmission. 15 Use the Tone key.
07 Print a received confidential message. 16 Input a Subaddress (G4 mode only).
08 Do a Transfer Request. 17 Not used
09 Do a Polling Reception. 18 Use Secure Transmission.
Polling Transmission: Use Secured
10
Polling or Stored ID Override .
1. Function 3 5
Note: At this time, you can print a
User Function List if you press
2. Press one of the User Function Keys.
Example : Press
F5 Yes .
If this key is already used, the currently stored code is displayed. Either:
❐ Press
❐ Press
Yes to keep it as it is.
No to erase the old code.
3. Enter the two-digit code for the function
that you wish to store.
Example: Group Dial, press
0 2 .
USER FUNCTION PRESS F1 TO F5
F PRINT LIST
_
NO
TO CANCEL
→ Start .
USER FUNCTION ENTER CODE
F 5 CODE:
USER FUNCTION
F 5 CODE: 02
GROUP
_
NO
TO CANCEL
YES
OR
NO
Yes
4.
5. Either:
❐ Program another key: Go to step 2.
❐ Finish:
Function
56
USER FUNCTION PRESS F1 TO F5
F PRINT LIST
_
NO
TO CANCEL
Page 66

SECTION 3. ADVANCED FEATURES
3-4. Function Programs
Storing a Function Program
For example, store Function 32 (Programming Speed Dial) into Function Key F5
as a Function Program.
You can only use the User Function Keys F1 to F5 for
this feature.
Function 3 2
1.
F5
2.
Yes Function
3.
SPEED DIAL ENTER SPEED CODE
_
PROGRAM?
YES OR NO
PRINT LIST
NO
TO CANCEL
Using a Function Program
F5
1.
2. Use the function as normal.
Deleting a Function Program
Function 3 5
1.
2. Press the key that you wish to erase.
Example:
F5
SPEED DIAL ENTER SPEED CODE
_
USER FUNCTION PRESS F1 TO F5
F PRINT LIST
_
USER FUNCTION
F 5 CODE:
FUNCTION PROGRAMMED
PRINT LIST
NO
TO CANCEL
NO
TO CANCEL
YES
OR
NO
Yes No Function
3.
57
Page 67

SECTION 3. ADVANCED FEATURES
3-5. Printing from Memory Lock (Memory Card or Hard Disk Required)
Function 5 2
1.
PRT MEM. LOCK ID SETTING
MEMORY LOCK ID:
_
NO
TO CANCEL
2. Input the Memory Lock ID.
Example:
3.
Start
4 6 3 3
PRT MEM. LOCK PRESS
MEMORY LOCK ID:
°°°°
NOTE ❐ If the Confidential File indicator is blinking, a message has been
stored using Memory Lock. However, if the Confidential File indicator is lit, a message has been stored using Confidential Reception, and the indicator no longer shows the presence of files
stored using Memory Lock.
❐ If you wish to use this feature, you must switch it on in advance
and program a Memory Lock ID. See pages 71 and 67 for how
to do this.
❐ After you switch Memory Lock on, (MEMORY LOCK) will be dis-
played on the operation panel when the machine is in standby
mode.
❐ If you switch Memory Lock on, Forwarding is disabled.
START
3-6. Tonal Signals
Before you can use this feature, you must program one of the User Function Keys
as the Tone key. See page 56 for how to do this. In the following procedure, suppose that we have already programmed the
F1 key as a Tone key.
1. Make sure that the machine is in standby mode, and that there is no document in the feeder.
2. Pick up the telephone handset, or press
3. Dial the remote facility. Do not press
On Hook Dial .
Start
4. After your line is connected to the remote facility, do the following:
❐ If your telephone line type is DTMF (Tone Dial): Go to step 5.
❐ If your telephone line type is Pulse Dial: Press
F1 . A dot appears on the
display.
58
Page 68

_
SECTION 3. ADVANCED FEATURES
5. Input the digits that you need, such as your code number, to use the remote
facility. These digits will depend on the remote facility.
Note: Do not press
Start
6. After you have finished your business with the remote facility, hang up.
3-7. Chain Dialling
Example: 01033-1-5553333 (From the UK to Paris).
Assume that the following Quick Dial and Speed Dial numbers have already been
programmed.
❐ Quick Dial 01 = 01033- (Overseas to France)
❐ Quick Dial 02 = 1- (Paris)
❐ Speed Dial 10 = 555
When the machine asks you to dial:
On Hook Dial or Handset Mode
Press
01 02 Speed Dial 1 0 then 3 3 3 3
Other
Press
01 Pause 02 Pause Speed Dial 1 0 Pause
then
3 3 3 3
3-8. Restricted Access
If you have switched Restricted Access on, the display is as shown below when
the machine is in standby mode. Before you can use the machine, you must enter
a personal code that has already been registered in the machine. See page 88 for
how to store Personal Codes.
RESTRICTED ACCESS ENTER CODE
CODE
4. DEC. 11:50
1. Enter your personal code.
Example:
7 3 6 2
2. After a second, the normal standby display will appear, and you can use the
machine. If NOT PROGRAMMED appears, you entered a personal code that
is not stored in the machine.
Note: See pages 72 to 74 for how to switch Restricted Access on.
See page 88 for details on how to store Personal Codes.
59
Page 69

SECTION 3. ADVANCED FEATURES
3-9. Counters
Function 6 0 2 2 2 2
1.
9 5
2. When you have finished:
COUNTERS
TX: 003256 SCN: 003287
RX: 002648 PRT: 002703
Yes
YES
TO END
3-10. Communication Result Display
Function 4 1 →
1.
PERS. CODE 7346 NO TO CANCEL
10 OCT 08:23 RX OK 10PAGES
01012125551234
2. Scroll through the past communications
on the screen using
Note: To print the Journal:
↑ and ↓ .
No Start
3-11. Length Reduction
If the machine receives a page that is longer than the paper in the cassette, the
machine reduces the length of the received image if it is within the following limits.
Paper size in the
cassette
Maximum reducible
incoming page length
A4 389 mm
B4 478 mm
If the received image is longer than the above limits, there is no reduction and the
image is printed on two sheets of paper. Normally, the last 10 mm of the received
image will be repeated at the beginning of the next page.
However, if you wish, the second page can continue from where the first page
ended.
Contact your service representative if you require any changes to this feature.
60
Page 70

SECTION 3. ADVANCED FEATURES
3-12. Label Insertion
In this model, your message will appear as follows at the other end if Label Insertion is switched on in your machine.
Your fax message as received
at the other end
TTI (32 characters)
To: MR SMITH
From the
Quick/Speed
Dial Label
Date and Time
From: JOHNSON
From the
Personal
Code
To use this feature, you must:
❐ Switch Label Insertion on for each Speed Dial and Quick Dial that you wish to
use this feature with (see the procedures starting on pages 76 and 79).
❐ Program the Personal Codes of the machine’s users, and store their names
with their codes (see page 88).
❐ Program labels with the Speed Dial and Quick Dial numbers (see the proce-
dures starting on pages 76 and 79).
❐ When you make a transmission, use a Quick or Speed Dial, and select the Per-
sonal Code option (see page 23).
In the above example, the message was sent using Johnson’s personal code.
The Quick Dial or Speed Dial used to dial the destination had MR SMITH as the
label.
61
Page 71

_
SECTION 3. ADVANCED FEATURES
3-13. Ordering Toner
To use this feature, you must do the following in advance:
❐ Make sure that digit 7 of User Parameter Switch 4 is at 1. (The machine is
given this setting when it leaves the factory, so if you have not changed it, you
don’t need to worry about this.) See page 72 for details on how to do this.
❐ Store the fax number of your dealer in Quick Dial Key 32. See page 76 for how
to store a number in a Quick Dial Key.
After you have done that, you can automatically fax an order for new toner whenever you need to.
When you need to order, do the following.
32
1.
ORDER NEW TONER
PRESS
START
1 : AMOUNT
2. Input the number of toner cartridges that
you wish to order (the maximum order is
9).
Example:
5
ORDER NEW TONER
PRESS
START
5 : AMOUNT
Start
3.
Your order is transmitted to your dealer. If the transmission was successful, your
machine prints out a report.
62
Page 72

SECTION 4. PROGRAMMING THE MACHINE
1. PROGRAMMING AT INSTALLATION
Installation will be done by a service technician.
CAUTION
Do not switch on until everything is connected up properly.
If you wish to move the machine to a new location, contact a service
technician.
After installation, attach the Quick Dial
Sheet and the Operation Panel decals
that are in your language.
1-1. Language Selection
1. Function 6 0 2 2 2 2
9 4
2. Use the ← and → arrows on the
scroll key to select the correct language.
Press Yes Function to finish.
CAUTION: Once you have done this, all displays and reports will be in the
selected language.
LANGUAGE SELECT
ENGLISH SPANISH SWEDISH
YES
TO END
4
63
Page 73

SECTION 4. PROGRAMMING THE MACHINE
1-2. Date and Time
1. Function 6 0 2 2 2 2
9 2
CLOCK INPUT DATE/TIME
01 FEB 1992 (SAT) 13:56
YES
TO END
2. Use the ← and → arrows on the scroll key to move the cursor across
the display. Use the keypad to correct the parts that need correcting.
To change the month, move the cursor to the month and scroll through the
months with the ↑ and ↓ keys.
Press Yes Function when the display is correct.
1-3. Country Code
1. Function 6 0 2 2 2 2
6 1
COUNTRY CODE
YES
TO SET PREVIOUS
NO
TO CANCEL NEXT
2. Yes
3. Input your country code.
Example: For the UK 4 4
Note: Please check your country code
with your local telecommunica tions operator.
4. Yes Function
COUNTRY CODE
ID SETTING
_
COUNTRY CODE
YES OR CLR . NO
44
_
YES
TO END
64
Page 74

1-4. Telephone Number
1. Function 6 0 2 2 2 2
SECTION 4. PROGRAMMING THE MACHINE
6 1 ↓
OWN ANALOG NUMBER
YES
TO SET PREVIOUS
NO
TO CANCEL NEXT
2. Yes
OWN ANALOG NUMBER
YES
_
TO END
3. Input your fax terminal’s telephone number. You must add your country’s inter national dial and country codes at the start of the number. Check these codes
with your local telecommunications operator. The example shown is fo rthe
UK.
NOTE: You must add a pause between
the area code and the local num ber. Use the Pause key to
add a pause.
OWN ANALOG NUMBER
YES OR CLR . NO
0104471-5551234
_
4. Yes Function
1-5. Area Code Prefix
1. Function 6 0 2 2 2 2
6 1 ↓ x 2
2. Yes
3. Input the area code prefix (0 for the UK).
Note: Please check this code with
your local telecommunications
operator.
AREA CODE PREFIX
YES
TO SET PREVIOUS
NO
AREA CODE PREFIX
212-5551234
AREA CODE PREFIX
212-5551234
TO CANCEL NEXT
: 0 - 9
0 : 0 - 9
YES
TO END
YES
TO END
4. Yes Function
65
Page 75

SECTION 4. PROGRAMMING THE MACHINE
1-6. Next Transfer Station (Group 4 Kit required)
1. Function 6 0 2 2 2 2
6 1 ↓ x 3
2. Yes
NEXT TRANSF.
YES
TO SET PREVIOUS
NO
NEXT TRANSF. ENTER FAX NUMBER
NO TO CANCEL
TO CANCEL NEXT
_
3. Input the number of the Next Transfer
Station.
NEXT TRANSF.
201-5553456
YES OR CLR . NO
_
4. Yes Function
1-7. ID Code
This is the ID Code that you use with Polling, ID Transmission, Transfer Request,
and Closed Network. If the ID Codes of all the machines taking part in the commu nication are not the same, the communication will fail.
1. Function 6 0 2 2 2 2
6 1 then ↓ until the screen is as
shown opposite.
2. Yes
3. Input the ID Code that you will be using.
Example: 4 3 6 3
Do not use 0000 or FFFF.
4. Yes Function
ID CODE
YES
TO SET PREVIOUS
NO
ID CODE
ID SETTING
TO CANCEL NEXT
_
ID CODE
YES OR CLR . NO
4363
YES
TO END
66
Page 76

SECTION 4. PROGRAMMING THE MACHINE
1-8. Confidential ID (Memory Card or Hard Disk required)
1. Function 6 0 2 2 2 2
6 1 then ↓ until the screen is as
shown opposite.
If no memory card or hard disk is in -
CONFIDENTIAL ID
YES
TO SET PREVIOUS
NO
TO CANCEL NEXT
stalled, you will not see this prompt.
2. Yes
CONFIDENTIAL ID
ID SETTING
_
3. Input the Confidential ID that you will be
using. Example: 6 7 5 4
You must input this ID when you wish to print a
confidential message. If you cannot output a confidential file with this ID, the sender may have
over-ridden your ID. Contact the sender.
CONFIDENTIAL ID
YES OR CLR . NO
6754
4. Yes Function
If you do not store a Confidential ID, you will not be able to receive
confidential messages.
1-9. Memory Lock ID (Memory Card or Hard Disk required)
YES
TO END
1. Function 6 0 2 2 2 2
6 1 then ↓ until the screen is as
shown opposite.
If no memory card or hard disk is in stalled, you will not see this prompt.
2. Yes
3. Input the Memory Lock ID you will use.
Example: 6 7 5 4
You must input this ID when you wish to print an incoming message that was stored under the protection of the Memory Lock feature.
4. Yes Function
To switch Memory Lock on or off, see page 71.
To print messages from Memory Lock, see page 58.
MEMORY LOCK ID
YES
TO SET PREVIOUS
NO
MEMORY LOCK ID
ID SETTING
TO CANCEL NEXT
_
MEMORY LOCK ID
YES OR CLR . NO
6754
YES
TO END
67
Page 77

SECTION 4. PROGRAMMING THE MACHINE
1-10. RTI
1. Function 6 0 2 2 2 2
6 1 then ↓ until the screen is as
shown opposite.
2. Yes
3. Input the RTI that you will be using.
Example: XYZ COMPANY
Note: Not more than 20 characters.
Input and editing are explained on
page 2.
4. Yes Function
RTI
YES
TO SET PREVIOUS
NO
RTI
TO CANCEL NEXT
NO
TO CANCEL
_
RTI
XYZ COMPANY ABC
YES OR CLR . NO
_
ABC
68
Page 78

1-11. TTI
1. Function 6 0 2 2 2 2
SECTION 4. PROGRAMMING THE MACHINE
6 1 then ↓ until the screen is as
shown opposite.
2. Yes
3. Either:
❐ Copy the RTI across and store that
as the TTI: 2 .
Then, if you wish to edit the TTI: ↑ .
Go back to step 2.
❐ Input a new TTI or edit the TTI that
is already there: 1 . Go to step 4.
TTI
YES
TO SET PREVIOUS
NO
TTI LABEL INSERTION
1. INPUT 2. COPY RTI
TTI
TO CANCEL NEXT
SELECT
_
NO
_
YES
TO END
TO CANCEL
ABC
4. Input the TTI that you will be using.
Example: XYZ COMPANY HEAD OFFICE
Note: Not more than 32 characters.
Input and editing are explained on
page 2.
5. Yes Function
TTI
XYZ CO. HEAD OFFICE ABC
YES OR CLR . NO
_
69
Page 79

SECTION 4. PROGRAMMING THE MACHINE
1-12. CSI
1. Function 6 0 2 2 2 2
6 1 then ↓ until the screen is as
shown opposite.
2. Yes
3. Input your telephone number.
Note: Not more than 20 digits.
If you wish to input a "+" sign, to
signify your international dial ac cess code: 31
4. Yes Function
CSI
YES
TO SET PREVIOUS
NO
CSI
TO CANCEL NEXT
_
CSI
+4471-555-1234
_
YES
TO END
YES OR CLR . NO
1-13. Telephone Line Type
Change this using Function 81 (On/Off Switches). See page 71.
Note: Make sure that the switch on your handset is also set up correctly.
TT = Touch Tone, DP = Pulse Dial
70
Page 80

2. SETTINGS
2-1. On/Off Switches
1. Function 6 0 2 2 2 2
SECTION 4. PROGRAMMING THE MACHINE
8 1
The first displayed item is the telephone line
type: DP = Pulse Dial, TT = Touch Tone. In
the above display, TT is currently selected.
2. Scroll through the list of features
with ↑ and ↓ until the required
feature appears.
Example: Forwarding - press ↓ 3
times.
3. Change the setting by using ←
or → .
PSTN LINE TYPE SELECT
DP TT
YES
FORWARDING SELECT
ON OFF
FORWARDING SELECT
ON OFF
TO END
YES
TO END
YES
TO END
4. Either:
❐ Change another setting: Go to step 2.
❐ Finish: Yes Function
A table showing the order of appearance of the switches is given below. Some of
these switches may not be seen depending on the options that you have installed
with the machine (*: Memory or hard disk required, ** :Optional cassette required).
Feature
Telephone Line Type None Night Timer 5 times
Authorized Reception Once RDS 6 times
Memory Lock* Twice Confidential File Report* 7 times
Forwarding* 3 times Halftone Type 8 times
Specified Cassette Selection** 4 times
↓
Feature
↓
NOTE: For the Halftone Type, select SPD MODE if you wish to use the Basic
Halftone Process, or STD MODE if you wish to use the higher quality
Error Diffusion Process.
71
Page 81

SECTION 4. PROGRAMMING THE MACHINE
2-2. User Parameter Settings
1. Function 6 0 2 2 2 2
9 1
USER PARAMETER PRINT LIST
DEFAULT: 00000000
SWITCH00: 00000000
YES
TO END
Note: At this time, you can print a User Parameter List if you
press → Start .
2. The current settings for switch 00 are now displayed on the bottom line of the
display (the top line shows the settings normally seen in a machine just deliv ered from the factory). If the settings for this switch are correct, go to step 4.
3. Change the required setting. Press a
number from 0 to 7 corresponding to the
digit that you wish to change.
Example: 0 . The value of the digit
changes, in this case from 0 to 1.
Each switch contains 8 digits, which act as on/off switches for various features. The digits are
numbered from 7 to 0, with 7 at the left and 0 at the right.
USER PARAMETER PRINT LIST
DEFAULT: 00000000
SWITCH00: 00000001
YES
TO END
4. Either:
❐ Scroll through the switches with ↑ and ↓ until the required switch ap-
pears. Then go to step 3.
❐ Finish: Yes Function
The user parameter switches are explained on the following pages.
72
Page 82

SECTION 4. PROGRAMMING THE MACHINE
Switch 00 - Home position settings
Digit Purpose
0
1
2
3
4
5
6
7 Halftone 0: Off 1: On
Marker 0: Off
1: On (successfully scanned documents will be marked)
Contrast Bit 2 Bit 1 Setting Bit 2 Bit 1 Setting
0 0 Normal 1 0 Darken
0 1 Lighten 1 1 Darken
Resolution Bit 4 Bit 3 Setting Bit 4 Bit 3 Setting
0 0 Standard 1 0 Fine
0 1 Detail 1 1 Fine
Transmission mode 0: Memory transmission
1: Immediate transmission
If you change any of the contrast, resolution, transmission mode, marker, or halftone
settings before making a transmission, then:
0: The setting(s) will not return to the home position after the transmission.
1: The setting(s) will return to the home position after the transmission.
Switch 01 - Printing of various items on received messages
Digit Purpose
Mark to distinguish messages that were sent to your machine through a forwarding
station (Memory card or hard disk required)
0
1 Centre mark 0: Off 1: On
2 Reception time 0: Off 1: On
3 Do not change this setting.
4 Chequered mark 0: Off 1: On
5
6 to 7 Do not change these settings
0: Off 1: On
Printing of the Command Information Line (ISDN kit required)
This has the same effect as the TTI On/Off setting
Forwarding mark:
0: Off 1: On
Switch 02 - Automatic printing of reports
Digit Purpose
0
1 Do not change this setting.
2 Memory storage report 0: Off 1: On
3 Polling reserve report 0: Off 1: On
4 Polling result report (polling reception) 0: Off 1: On
5
6 Polling clear report 0: Off 1: On
7 Journal 0: Off 1: On
Transmission result report
(memory transmission) 0: Off 1: On
Transmission result report (immediate transmission)
0: Off 1: On
73
Page 83

SECTION 4. PROGRAMMING THE MACHINE
Switch 03 - Automatic printing of reports
Digit Purpose
Inclusion of part of the image on the following reports: Transmission Result Report,
0
1 to 7 Do not change these settings.
Memory Storage Report, Polling Clear Report, Communication Failure Report,
Transfer Result Report, Transmission Deadline Report, Polling Confirmation List
0: No 1: Yes
Switch 04 - Various
Digit Purpose
0, 1 Do not change these settings.
2 Automatic reduction 0: Off 1: On
3, 4 Do not change these settings.
5 Restricted Access 0: Off 1: On
6 Do not change this setting.
Ordering Toner 0: Disabled 1: Enabled
If this is set to 1, store your dealer’s fax number in Quick Dial Key 32. Then, when
7
you need to order toner, use the procedure on page 62.
If you wish to use Quick Dial 32 for a number other than that of your dealer, set this
bit to 0. Quick Dial Key 32 can now be programmed in the same way as other Quick
Dial Keys. However, you will not be able to use the Ordering Toner feature.
Switch 05 - Various
Digit Purpose
0 Substitute reception 0: Off 1: On
1
2 Do not change this setting.
3 Memory reception if no RTI or CSI received 0: Possible 1: Not possible
4 to 7 Do not change these settings.
Multi-sort document reception with reverse order printing (Memory card or hard disk
required) 0: Off 1: On
2-3. Economy Transmission Time
1. Function 6 0 2 2 2 2
7 4
ECONOMY TX
TIME= 11 :00
YES
2. Input the time at which you wish Economy Transmission to take place.
TO END
3. Press Yes Function when the display is correct.
74
Page 84

3. ADJUSTMENTS
3-1. Volume Adjustments
Function 6 0 2 2 2 2
1.
SECTION 4. PROGRAMMING THE MACHINE
9 3
2. ❐ Increase:
❐ Decrease:
❐ Test the current setting:
Press
→
←
Start .
Stop when you have fin-
ished the test.
❐ Accept:
Yes
3. Repeat step 2 for the other monitors and
the buzzer.
MONITOR VOLUME SET VOLUME
TRANSMISSION: >>>>
PRESS
MONITOR VOLUME SET VOLUME
RECEPTION: >>>>
PRESS
START
START
YES
TO END
YES
TO END
75
Page 85

_
_
SECTION 4. PROGRAMMING THE MACHINE
4. TELEPHONE NUMBERS AND PERSONAL CODES
4-1. Programming Quick Dial
This machine has 32 Quick Dial Keys (01 to 32), each of which can be programmed as one of the following. The page number shows the location of the programming procedure.
1 Quick Dial A fax or telephone number This page
Group A set of fax numbers that
2
Keystroke Program A program of settings,
3
Programming a New Quick Dial
Function 3 1
1.
you often wish to send the
same fax to at the same time.
features, and destinations.
QUICK DIAL CHOOSE KEY
Page 83
Page 33
Note: At this time, you can
print a Quick Dial List if
you press
→ Start .
2. Press the Quick Dial Key that you wish
to program. Example:
No if you pressed the wrong key.
3.
Press
Yes
01
4. Enter the telephone number at the operation panel’s ten key pad.
_
QUICK DIAL
01
QUICK DIAL ENTER FAX NUMBER
01
QUICK DIAL
01
PRINT LIST
NO
TO CANCEL
YES
OR
NO
TO CANCEL
YES
OR
NO
CLR
.
NO
2125551234
If your machine is behind a PBX, include the access code and a pause before the telephone
number.
For an international number, place a pause after the country code. To input a pause, press the
Pause key.
76
Page 86

_
_
SECTION 4. PROGRAMMING THE MACHINE
5. Yes
6. Either:
❐ Input a label using the Quick Dial
keys. Then press
Yes .
Inputting and editing labels: see page 2.
❐ Do not program a label:
Press
Yes .
7. Switch Label Insertion on or off. Use the
arrows on the scroll key to select the required setting.
Then:
Yes
QUICK DIAL ENTER LABEL
01
QUICK DIAL OPTION SETTING
LABEL INSERTION ON OFF
SELECT
YES
TO END
← and →
QUICK DIAL CHOOSE KEY
ABC
8. Either
❐ Program another: Go to step 2
❐ Finish:
Function
Editing a Quick Dial Key
Function 3 1
1.
2. Press the Quick Dial key that you wish
to edit. Example:
01
Note: If the wrong number is dis-
played, use the
↑ and ↓
keys to scroll through the Quick
Dial Keys on the screen.
_
QUICK DIAL CHOOSE KEY
_
QUICK DIAL
01 XYZ CO. NEW YORK
2125551234
PRINT LIST
NO
TO CANCEL
PRINT LIST
NO
TO CANCEL
YES
OR
NO
Yes
3.
QUICK DIAL
01
2125551234
YES
OR
CLR
.
NO
77
Page 87

_
SECTION 4. PROGRAMMING THE MACHINE
4. Edit the number ; use ← and →
to move the cursor, and use
Clear to
delete the cursor character.
After entering the new number,
press
Yes .
5. Either
❐ Change the label: Edit the existing
label, then press
Yes .
QUICK DIAL
01
XYZ CO. NEW YORK ABC
YES OR CLR . NO
❐ Keep the label as it is:
Yes
Inputting and editing labels:
see page 2.
6. Switch Label Insertion on or off. Use the
arrows on the scroll key to select the required setting.
Then:
Yes
7. Either
❐ Program another: Go to step 2.
❐ Finish:
Function
Erasing a Quick Dial Key
QUICK DIAL OPTION SETTING
LABEL INSERTION ON OFF
SELECT
YES
TO END
← and →
QUICK DIAL CHOOSE KEY
_
PRINT LIST
NO
TO CANCEL
Function 3 1
1.
QUICK DIAL CHOOSE KEY
_
PRINT LIST
NO
TO CANCEL
2. Press the Quick Dial key that you wish
to erase. Example:
01
Note: If the wrong number is dis-
played, use the
keys to scroll through the Quick
↑ and ↓
QUICK DIAL
01 XYZ CO. NEW YORK
YES
OR
NO
Dial Keys on the screen.
2125551234
78
Page 88

_
_
_
_
SECTION 4. PROGRAMMING THE MACHINE
3. Yes
4. Erase the number:
No .
QUICK DIAL
01
2125551234
QUICK DIAL ENTER FAX NUMBER
01
YES
OR
NO
TO CANCEL
After erasing a number, you may store a new one to replace it if you wish. If
you do not wish to store a new number, press
to continue or press
Function if you have finished.
No again. Then go to step 2
4-2. Programming Speed Dial
Programming a New Speed Dial
Function 3 2
1.
SPEED DIAL ENTER SPEED CODE
_
PRINT LIST
NO
.
CLR
NO
TO CANCEL
Note: At this time, you can print a
Speed Dial List if you press
→ Start .
2. Input the Speed Dial Code that you wish
to program (from 00 to 99).
Example:
Press
3.
Yes
0 0
No if you input the wrong code.
4. Enter the telephone number at the op-
eration panel’s ten key pad.
SPEED DIAL
00
SPEED DIAL ENTER FAX NUMBER
00
SPEED DIAL
00
0715551234
YES
YES
NO
OR
NO
TO CANCEL
CLR
OR
.
NO
If your machine is behind a PBX, include the access code and a pause before the telephone
number.
For an international number, place a pause after the country code. To input a pause, press the
Pause key.
79
Page 89

_
SECTION 4. PROGRAMMING THE MACHINE
5. Yes
SPEED DIAL ENTER LABEL
00
ABC
6. Either:
❐ Input a label using the Quick Dial
keys (such as XYZ CO. LONDON).
Then press
Inputting and editing labels:
see page 2.
Yes .
SPEED DIAL
00
INPUT: X ABC
YES
OR
CLR
.
❐ Do not program a label for this
number: Press
Yes . Go to step 9.
7. The letter shown next to "INPUT" will be used with the Telephone Directory
feature when searching for a name.
Either:
❐ Do not change the letter : press
Yes ; go to step 8.
NO
❐ If you wish to use another letter, input the letter.
Example: Change to "L" for London;
Clear L Yes
8. Switch Label Insertion on or off.
Use the
← and → arrows
on the scroll key to select the required
setting. Then:
Yes
9. Either:
❐ Program another: Go to step 2.
❐ Finish:
Function
SPEED DIAL OPTION SETTING
LABEL INSERTION ON OFF
SELECT
SPEED DIAL ENTER SPEED CODE
_
YES
TO END
PRINT LIST
NO
TO CANCEL
80
Page 90

Editing a Speed Dial
_
_
Function 3 2
1.
SECTION 4. PROGRAMMING THE MACHINE
SPEED DIAL ENTER SPEED CODE
2. Input the Speed Dial Code that you wish
to edit. Example:
0 0
If the wrong number is displayed, press
, or use the
↑ and
↓ keys to scroll through the Speed
Dial Codes on the screen.
Yes
3.
4. Edit the number ; use
to move the cursor, and use
← and →
Clear to
delete the cursor character.
After entering the new number,
press
Yes .
_
No
SPEED DIAL
00 XYZ CO. LONDON
0715551234
SPEED DIAL
00
0715551234
SPEED DIAL
YES
YES
YES OR CLR . NO
PRINT LIST
NO
TO CANCEL
NO
OR
.
CLR
OR
NO
5. Either
❐ Change the label: Edit the existing
label, then press
❐ Keep the label as it is:
Yes .
Yes
Inputting and editing labels:
see page 2.
6. Either:
❐ Change the letter in the INPUT col-
umn (for example, to P):
Clear P Yes
❐ Do not change the letter:
Go to step 7.
Yes .
00
XYZ CO. LONDON ABC
SPEED DIAL
00
INPUT: X ABC
SPEED DIAL OPTION SETTING
LABEL INSERTION ON OFF
SELECT
YES
OR
CLR
YES
TO END
.
NO
81
Page 91

_
SECTION 4. PROGRAMMING THE MACHINE
7. Switch Label Insertion on or off. Use the ← and →
arrows on the scroll key to select the required setting.
Then:
Yes
SPEED DIAL ENTER SPEED CODE
8. Either
❐ Program another: Go to step 2.
❐ Finish:
Function
Erasing a Speed Dial Code
Function 3 2
1.
2. Input the Speed Dial Code that you wish
to erase. Example:
0 0
If the wrong number is displayed, press
, or use the
↑ and
↓ keys to scroll through the Speed
Dial Codes on the screen.
_
SPEED DIAL ENTER SPEED CODE
_
PRINT LIST
NO
TO CANCEL
PRINT LIST
NO
TO CANCEL
No
SPEED DIAL
00 XYZ CO. LONDON
YES
OR
NO
Yes
3.
4. Erase the number:
No .
After erasing a number, store a new one
to replace it if you wish.
If you do not wish to store a new number, press
2 to continue or press
No again, then go to step
Function if
you have finished.
0715551234
SPEED DIAL
00
0715551234
YES
OR
CLR
.
NO
82
Page 92

SECTION 4. PROGRAMMING THE MACHINE
4-3. Programming Groups
Groups allow you to combine numbers already stored in Quick Dial Keys or
Speed Dial Codes or other numbers entered at the keypad into one group, for
easy sequential transmission to all the numbers in that group.
Note: See page 32 for information on how to dial a group.
The Group programming procedure has several modules. Entering Group Programming mode will be explained first, followed by each of the modules.
Entering Group Programming Mode and Selecting a Group
Function 3 3
1.
GROUP DIAL GROUP SETTING
G PRINT LIST
_
NO
TO CANCEL
Note: At this time, you can print a
Group List if you press
→ Start .
2. Input the number of the group that you
wish to program. (There are 10 groups,
from 01 to 10.)
Example:
0 1 Yes
If this is a pre-existing group, go to step
4.
3. Press the Quick Dial Key in which you
wish to store this new group.
Example:
If you pressed the wrong key:
08
No
GROUP DIAL CHOOSE KEY
G 01
GROUP DIAL
G 01 08
_
YES
TO SKIP
NO
TO CANCEL
YES OR NO
Yes
4.
You are now ready to access one of
the five Group Programming Modules.
These are explained on the following
pages.
GROUP DIAL SELECT
G 01 08 DEST. 0
1. ADDRESS 2. CHECK 3. LABEL
YES
TO END
_
83
Page 93

_
_
_
SECTION 4. PROGRAMMING THE MACHINE
Storing Numbers in a Group
First, enter Group Programming mode as explained on page 83. Then:
1. Press
1 .
GROUP DIAL ENTER FAX NUMBER
G 01 08 DEST. 0 NO TO CANCEL
2. Input the number that you wish to store in the group. For example:
❐ Quick Dial 25:
❐ Speed Dial 00:
❐ Full number: Input at the keypad
on the operation panel.
25
Speed Dial 0 0
GROUP DIAL
G 01 08 DEST. 0
25 2025550123
GROUP DIAL
G 01 08 DEST. 0
00 2125551234
GROUP DIAL
G 01 08 DEST. 0
2025556789
YES
YES
YES
OR
OR
OR
CLR . NO
CLR . NO
CLR . NO
3. Store the number in the group:
Yes
GROUP DIAL ENTER FAX NUMBER
G 01 08 DEST. 1 NO TO CANCEL
The number after DEST has increased by 1. The number after DEST shows how
many telephone numbers are stored in the group.
NOTE: See the table on page 8 concerning the limitations on how many
numbers can be stored in a group.
4. Either:
❐ Input another number: Go to step 2.
❐ Finish storing numbers in this
group:
No .
GROUP DIAL SELECT
_
G 01 08 DEST. 0
1. ADDRESS 2. CHECK 3. LABEL
YES
TO END
Now, you can use another module (press a key from 1 to 5), or start working on
another Group (press
Yes then go to step 2 of the procedure on page 83).
You may also return to standby mode by pressing
Function .
84
Page 94

_
_
SECTION 4. PROGRAMMING THE MACHINE
Checking Which Numbers are Already in the Group
First, enter Group Programming mode as explained on page 83. Then:
1. Press
2. Press
❐ To erase the displayed number:
❐ When you have finished checking
2 .
GROUP DIAL NO TO CANCEL
G 01 08 DEST. 1/25 CLR:
↓ to scroll through the numbers on the display.
GROUP DIAL SELECT
Clear . Go to step 3.
this group:
No . Go to step 3.
G 01 08 DEST. 0
2125551234
YES
TO END
1. ADDRESS 2. CHECK 3. LABEL
CLR
_
3. Now, you can use another module (press a key from 1 to 5), or start working
on another Group (press
Yes then go to step 2 of the procedure on page
83).
You may also return to standby mode by pressing
Function .
Storing a Label for this Group
First, enter Group Programming mode as explained on page 83. Then:
1. Press
3 .
GROUP DIAL ENTER LABEL
G 01 08
ABC
2. Input a label for the group using the Quick Dial keys.
Example: DISTRIBUTORS.
GROUP DIAL
YES OR CLR . NO
Inputting and editing labels:
G 01 08
DISTRIBUTORS ABC
GROUP DIAL SELECT
G 01 08 DEST. 0
1. ADDRESS 2. CHECK 3. LABEL
YES
TO END
_
3. Press
see page 2.
Yes .
4. Now, you can use another module (press a key from 1 to 5), or start working
on another Group (press
Yes then go to step 2 of the procedure on p. 83).
You may also return to standby mode by pressing
Function .
85
Page 95

_
SECTION 4. PROGRAMMING THE MACHINE
Storing a Group Transfer Station
First, enter Group Programming mode as explained on page 83. Then:
1. Press
4 .
2. Store the telephone number of the terminal that you wish to act as the Group
Transfer Station for this group. Input the
number as a Quick Dial, Speed Dial, or
full number at the keypad.
Example: Quick Dial 25, press
Yes
3.
25 .
GROUP DIAL ENTER TRANSF. STN
G 01 08 DEST. 0 NO TO CANCEL
GROUP DIAL
G 01 08 DEST. 0
15 2015552345
GROUP DIAL SELECT
G 01 08 DEST. 0
1. ADDRESS 2. CHECK 3. LABEL
YES
OR
YES
TO END
CLR . NO
_
4. Now, you can use another module (press a key from 1 to 5), or start working
on another Group (press
Yes then go to step 2 of the procedure on page
83).
You may also return to standby mode by pressing
Function .
86
Page 96

SECTION 4. PROGRAMMING THE MACHINE
Erasing the Group
This procedure deletes this Group and all the numbers stored in it. The Speed
Dial Codes and Quick Dial Keys that you used in this Group will not be deleted
from the memory; you can continue to use them for other purposes.
First, enter Group Programming mode as explained on page 83. Then:
1. Press
2. Either:
❐ To delete the group:
❐ To keep the group:
5 .
Yes
No
GROUP DIAL
G 01 08 WILL BE ALL CLEARED
.
CLEAR?
GROUP DIAL SELECT
G 01 08 DEST. 0
1. ADDRESS 2. CHECK 3. LABEL
YES
NO
YES
TO END
_
3. Now, you can use another module (press a key from 1 to 5), or start working
on another Group (press
Yes then go to step 2 of the procedure on page
83).
You may also return to standby mode by pressing
Function .
87
Page 97

_
SECTION 4. PROGRAMMING THE MACHINE
4-4. Personal Codes
Personal Codes allow you to track machine usage; they are printed for each communication on the TCR and other reports. They can also be used with the Restricted Access feature, to ensure that unauthorized personnel do not use the
machine.
Each user can be given a Personal Code. With each code, you can store:
❐ A name: This will be printed on reports to identify the users of the machine.
❐ A Confidential ID: This must be different for each Personal Code. If somebody
sends you a confidential message, they can override the machine’s Confidential ID with the Confidential ID stored with your Personal Code, if you inform
them of your code. If so, the machine will print a report that will inform you
when the message has arrived. Then, you must input this Confidential ID to
print the message.
Storing a Personal Code
Function 6 0 2 2 2 2
1.
7 1
Note: At this time, you can print a Per-
sonal Code List if you press
→ Start .
2. Input a Personal Code that you want to
store in your machine for later use.
Example:
Press
5 4 7 7
No if you entered the
wrong code.
Yes
3.
PERS. CODE ENTER ID CODE
PRINT LIST
_
PERS. CODE
5477
PERS. CODE ENTER LABEL
5477
NO
TO CANCEL
YES
OR
NO
ABC
88
Page 98

_
_
SECTION 4. PROGRAMMING THE MACHINE
4. Input a name for this Personal Code using the Quick Dial keys.
Example: JOHNSON
Inputting and editing labels:
see page 2.
If you do not wish to store
Yes . Go to step 6.
5.
a label:
Yes
6. Input a Confidential ID for the personal
code used by this user.
Example
4 6 5 6
PERS. CODE
5477
JOHNSON ABC
PERS. CODE CONF. ID SETTING
5477 JOHNSON
PERS. CODE
5477 JOHNSON
4656
YES OR CLR . NO
YES
TO END
YES
CLR . NO
OR
If you do not wish to store an ID:
Go to step 8.
Yes
7.
8. Either:
❐ Enter another code: Go to step 2.
❐ Finish:
Function
No
PERS. CODE ENTER ID CODE
_
PRINT LIST
NO
TO CANCEL
89
Page 99

_
SECTION 4. PROGRAMMING THE MACHINE
Editing or Erasing a Personal Code
Function 6 0 2 2 2 2
1.
7 1
2. Input the Personal Code that you wish to
edit.
Example:
Press
5 4 7 7
No if you entered the
wrong code.
3. Either:
❐ Erase this Personal Code:
Clear Yes
Go back to step 2.
❐ Edit the contents of this code:
Yes .
Go to step 4.
PERS. CODE ENTER ID CODE
_
PERS. CODE
5477 JOHNSON
CLR:
PERS. CODE
5477
PRINT LIST
NO
TO CANCEL
YES
CLR
YES OR CLR . NO
OR
NO
4. Edit the name stored with this code.
When the name is correct,
press
Yes .
Inputting and editing labels:
see page 2.
5. Edit the Confidential ID stored with this
code.
When the ID is correct, press
Yes .
6. Either:
❐ Enter another code: Go to step 2.
❐ Finish:
Function
JOHNSON ABC
PERS. CODE
5477 JOHNSON
4656
PERS. CODE ENTER ID CODE
YES
_
CLR . NO
OR
PRINT LIST
NO
TO CANCEL
90
Page 100

SECTION 5. PRINTING REPORTS
1. AUTOMATICALLY PRINTED REPORTS
1-1. Table of the Reports
AUTOMATICALLY PRINTED
REPORTS
Confidential File Report
Communication Failure Report [Note]
Error Report Contact a service technician.
Memory Storage Report User Parameter Switch 02, digit 2 ON
Polling Clear Report User Parameter Switch 02, digit 6 ON
Polling Reserve Report User Parameter Switch 02, digit 3 OFF
Polling Result Report User Parameter Switch 02, digit 4 ON
Power Failure Report ON
Journal User Parameter Switch 02, digit 7 ON
Transmission Deadline Report
Polling Confirmation List
Transmission Result Report
(Immediate Transmission)
Transmission Result Report
(Memory Transmission)
✬: Memory card or hard disk required
✬
Use Function 81 (see page 71). OFF
User Parameter Switch 02, digit 5
User Parameter Switch 02, digit 0
SETTINGS
ON/OFF DEFAULT
OFF
OFF
[Note]: If the Transmission Result Report is switched off, a Communication
Failure Report will be printed when a communication fails.
NOTE: See page 72 for how to change User Parameter Switches.
If the switch is at 0, the report is off; if the switch is at 1, the report is
on.
5
91
 Loading...