

Page 1
Five Dedrick Place • West Caldwell, NJ 07006
973-882-2000
Read this manual carefully before you use this product and keep it handy for future
reference. For safety, please follow the instructions in this manual.
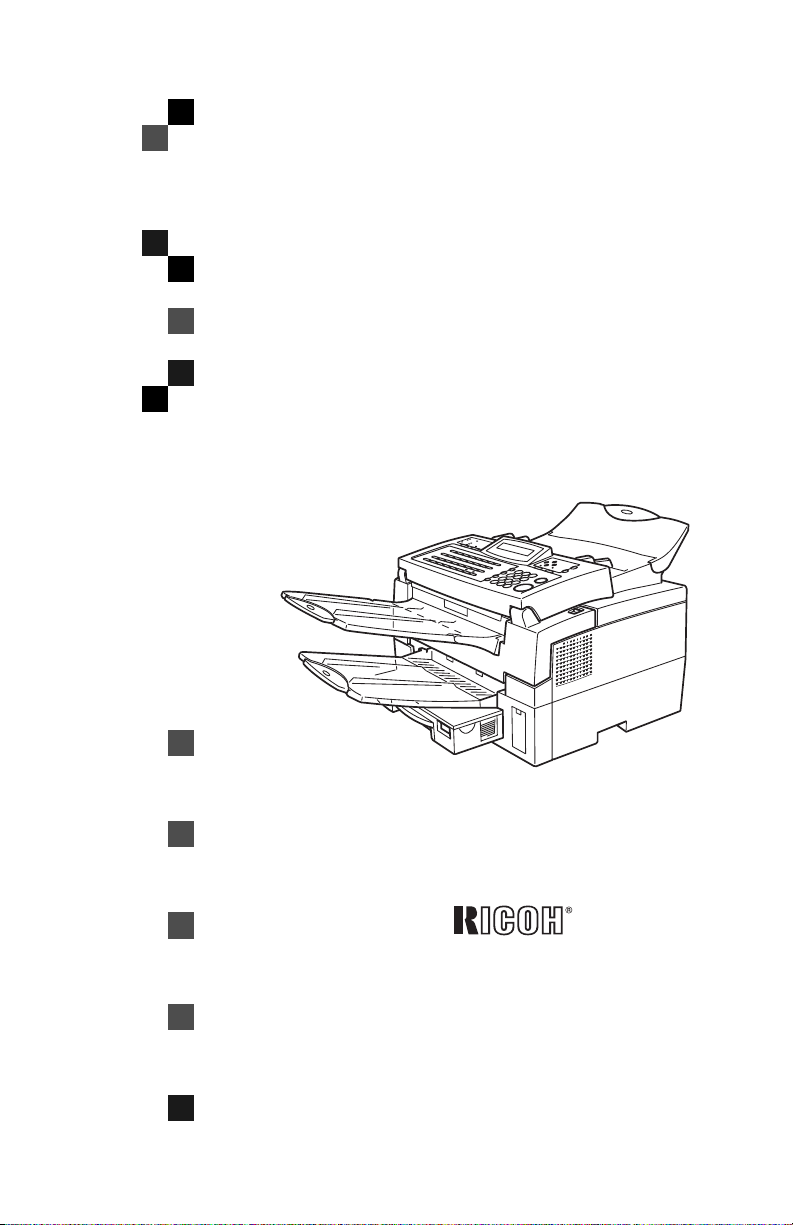
FAX2050L
Operator Instruction Manuals
FAX2050L BASIC
FAX2050L ADVANCED
Page 2

Page 3

FAX2050L
Basic Features
Page 4

Page 5

Introduction
This manual contains detailed instructions on the operation and maintenance of this machine. To get
maximum versatility from this machine all operators should carefully read and follow the instructions in
this manual. Please keep this manual in a handy place near the machine.
Please read the Safety Information in the Advanced Features manual before using this machine. It contains important information related to USER SAFETY and PREVENTING EQUIPMENT PROBLEMS.
Notes:
Some illustrations might be slightly different from your machine.
Certain options might not be available in some countries. For details, please contact your local dealer.
Laser Safety:
The Center for Devices and Radiological Health (CDRH) prohibits the repair of laser-based optical unit
in the field. The optical housing unit can only be repaired in a factory or at a location with the requisite
equipment. The laser subsystem is replaceable in the field by a qualified Customer Engineer. The laser
chassis is not repairable in the field. Customer engineers are therefore directed to return all chassis
and laser subsystems to the factory or service depot when replacement or the optical subsystem is required.
Warning:
Use of controls or adjustment or performance of procedures other than those specified in this manual
might result in hazardous radiation exposure.
Two kinds of size notation are employed in this manual. With this machine refer to the inch version.
For good copy quality, Ricoh recommends that you use genuine Ricoh toner.
Ricoh shall not be responsible for any damage or expense that might result from the use of parts other
than genuine Ricoh parts in your Ricoh office product.
Important
Parts of this manual are subject to change without prior notice. In no event will the company be liable
for direct, indirect, special, incidental, or consequential damages as a result of handling or operating
the machine.
Power Source:
115V, 60Hz
Please be sure to connect the power cord to a power source as above. For details about power source,
see Chapter 10, “Connecting the Power and Switching On” in the Advanced Features manual.
Declaration of Conformity
Product Name: Facsimile
Model Number: FAX2050L
Responsible party: Ricoh Corporation
Address: 5 Dedrick Place, West Caldwell, NJ 07006
Telephone number: 973-882-2000
This device complies with part 15 of FCC Rules.
Operation is subject to the following two conditions:
1. This device may not cause harmful interference, and
2. this device must accept any interference received,
including interference that may cause undesired operation.
Page 6

USA
❖
FCC Requirements
1. This equipment complies with Part 68 of the FCC rules. On the cover of this equipment is a label
that contains, among other information, the FCC registration number and ringer equivalence
number (REN) for this equipment. If requested, this information must be provided to the telephone company.
2. This equipment uses the following USOC jack: RJ11C
3. The REN is used to determine the quantity of devices which may be connected to the telephone
line. Excessive REN's on the telephone line may result in the devices not ringing in response to
an incoming call. In most, but not all areas, the sum of the REN's should not exceed five (5.0).
Contact the telephone company to determine the maximum REN for the calling area.
4. If this equipment causes harm to the telephone network, the telephone company will notify you
in advance that temporary discontinuance of service may be required. If advance notice is not
practical, the telephone company will notify the customer as soon as possible. Also, you will be
advised your right to file a complaint with the FCC if you believe it is necessary.
5. The telephone company may make changes in its facilities, equipment, operations, or procedures that could affect the operation of the equipment. If this happens, the telephone company
will provide advance notice in order to make necessary modifications in order to maintain uninterrupted service.
6. In the event of operation problems (document jam, copy jam, communication error indication),
refer to the solving problems section in this manual.
7. If you cannot correct the problem, please contact the RICOH CORP. CUSTOMER SUPPORT
DEPT. at 1-800-FASTFIX for repair and warranty information. If it is causing harm to the telephone network, the telephone company may request you to disconnect the equipment from the
network until the problem is resolved.
8. This equipment cannot be used telephone company-provided coin service. Connection to Party
Line Service is subject to state tariffs.
❖
WHEN PROGRAMMING EMERGENCY NUMBERS AND/OR MAKING TEST CALLS TO
EMERGENCY NUMBERS:
1. Remain on the line and briefly explain to the dispatcher the reason for the call before hanging up.
2. Perform such activities in the off-peak hours, such as early morning hours or late evenings.
CANADA
The Industry Canada label identifies certified equipment. This certification means that the equipment
meets telecommunications network protective, operational, and safety requirements as prescribed in
the appropriate Terminal Equipment Technical Requirements document(s). The department does not
guarantee the equipment will operate to the user's satisfaction.
Before installing this equipment, users should ensure that it is permissible to be connected to the facilities of the local telecommunications company. The equipment must also be installed using an acceptable method of connection. The customer should be aware that compliance with the above conditions
may not prevent degradation of service in some situations.
Repairs to certified equipment should be coordinated by a representative designated by the supplier.
Any repairs or alterations made by the user to this equipment, or equipment malfunctions, may give the
telecommunications company cause to request the user disconnect the equipment.
User should ensure for their own protection that the electrical ground connections of the power utility,
telephone lines, and internal metallic water pipe system, if present, are connected together. This precaution may be particularly important in rural areas.
Caution: Users should not attempt to make such connections themselves, but should contact the appropriate electric inspection authority, or electrician, as appropriate.
The Ringer Equivalence Number (REN) assigned to each terminal device provides an indication of the
maximum number of terminals allowed to be connected to a telephone interface. The termination on
an interface may consist of any combination of device subject only to the requirement that the sum of
the Ringer Equivalence Numbers of all the devices does not exceed 5.
In accordance with IEC 60417, this machine uses the following symbols for the main power switch:
a means POWER ON.
b means POWER OFF.
Copyright © 2000 Ricoh Co., Ltd.
Page 7

How to Read This Manual
R
R
How to Read This Manual
Symbols
In this manual, the following symbols are used:
WARNING:
This symbol indicates a potentially hazardous situation that might result in
death or serious injury when you misuse the machine without following the instructions under this symbol. Be sure to read the instructions, all of which are described in the Safety Information section in the Advanced Features manual.
CAUTION:
This symbol indicates a potentially hazardous situation that might result in minor or moderate injury or property damage that does not involve personal injury
when you misuse the machine without following the instructions under this
symbol. Be sure to read the instructions, all of which are described in the Safety
Information section in the Advanced Features manual.
* The statements above are notes for your safety.
Important
If this instruction is not followed, paper might be misfed, originals might be
damaged, or data might be lost. Be sure to read this.
Preparation
This symbol indicates the prior knowledge or preparations required before operating.
Note
This symbol indicates precautions for operation, or actions to take after misoperation.
Limitation
This symbol indicates numerical limits, functions that cannot be used together,
or conditions in which a particular function cannot be used.
Reference
This symbol indicates a reference.
{}
Keys built into the machine's operation panel.
i
Page 8

TABLE OF CONTENTS
Manuals for this machine ......................................................................... 1
Basic Features (This Manual) ....................................................................... 1
Advanced Features....................................................................................... 1
1.Introduction
Part Names................................................................................................. 3
Operation Panel ......................................................................................... 5
Symbols and Conventions Used in This Manual.................................... 7
2.Faxing
Types of Transmission ............................................................................. 9
Suitable Document Types....................................................................... 10
Memory Transmission and Immediate Transmission.......................... 11
Memory Transmission ................................................................................. 11
Canceling a Memory Transmission............................................................. 14
Immediate Transmission ............................................................................. 15
Canceling an Immediate Transmission....................................................... 15
Very Fine Detail Faxing ........................................................................... 16
Resolution and Shading .............................................................................. 16
Reception Modes..................................................................................... 17
Switching Between Fax and Telephone Mode............................................ 17
3.Setup
Initial Settings and Adjustments............................................................ 19
Initial Settings (Function 61)........................................................................ 19
Storing and Editing Fax Numbers (Functions 31 & 32) ....................... 22
Storing, Editing and Erasing Quick Dial Numbers (Function 31) ................ 22
Quick Dial Label .......................................................................................... 23
Storing, Editing and Erasing Speed Dial Numbers (Function 32) ............... 23
Storing and Editing a Group of Fax Numbers (Function 33)............... 25
Erasing Groups ........................................................................................... 27
Programming the Group Key ...................................................................... 28
Entering Characters ................................................................................ 29
Entering Symbols........................................................................................ 29
Wild Cards................................................................................................... 29
ii
Page 9

4.Troubleshooting
Loading Paper in the Main Cassette...................................................... 31
Adjusting the Volume and Sounds the Machine Makes (Function 92)
If an Indicator Lights on the Operation Panel....................................... 36
Communication Problems...................................................................... 37
Clearing a Document Jam ...................................................................... 38
Clearing a Copy, Fax, or Print Jam........................................................ 39
Main Machine.............................................................................................. 39
Cassette Entrance....................................................................................... 41
Upper Rear Unit .......................................................................................... 42
Error Messages........................................................................................ 44
Solutions to Common Problems............................................................ 46
INDEX........................................................................................................ 50
... 34
iii
Page 10

iv
Page 11

Manuals for this machine
There are the Basic Features manual and the Advanced Features manual for this
machine. Please consult the manual that suits your needs.
Basic Features (This Manual)
The Basic Features manual explains the most frequently used fax functions and
operations.
Advanced Features
The Advanced Features manual describes more advanced functions, and also
explains settings for key operators.
❖
Chapter 1 Advanced Transmission Features
Explains about sending at a specific time without having to be by the machine
and also taking advantage of off-peak telephone line charges.
❖
Chapter 2 Communication Information
Explains about erasing a fax message stored in memory and checking the contents of any files in memory.
❖
Chapter 3 Transmission Features
Explains about useful features for transmission. You can find out about dialing numbers easily.
❖
Chapter 4 Reception Features
Explains about reception features. You can find out about receiving messages
in telephone mode, and printing with the Reverse Order Printing function for
easier document distribution.
❖
Chapter 5 Copying
Read this chapter when you would like to know about copying operations
and functions.
❖
Chapter 6 Facsimile User Tools
Explains about programming frequently used functions for Quick Dial Key
and User Function Key.
❖
Chapter 7 Key Operator Settings
Explains about functions the key operator handles. You can find out about
setting up the phone line type, and how to store the Memory Locked ID and
the Confidential ID.
1
Page 12

❖
Chapter 8 Troubleshooting
Explains about clearing a Jam in the optional second cassette, and reading error reports. When these reports are printed out, check the report and take the
appropriate action.
❖
Chapter 9 Maintaining Your Machine
Explains about loading paper in the optional multipurpose feeder, cleaning
the rollers and scanner and so on.
❖
Chapter 10 Installation
Explains about the machine environment and installation.
❖
Chapter 11 Appendix
You can check the different options and specifications for this machine.
2
Page 13
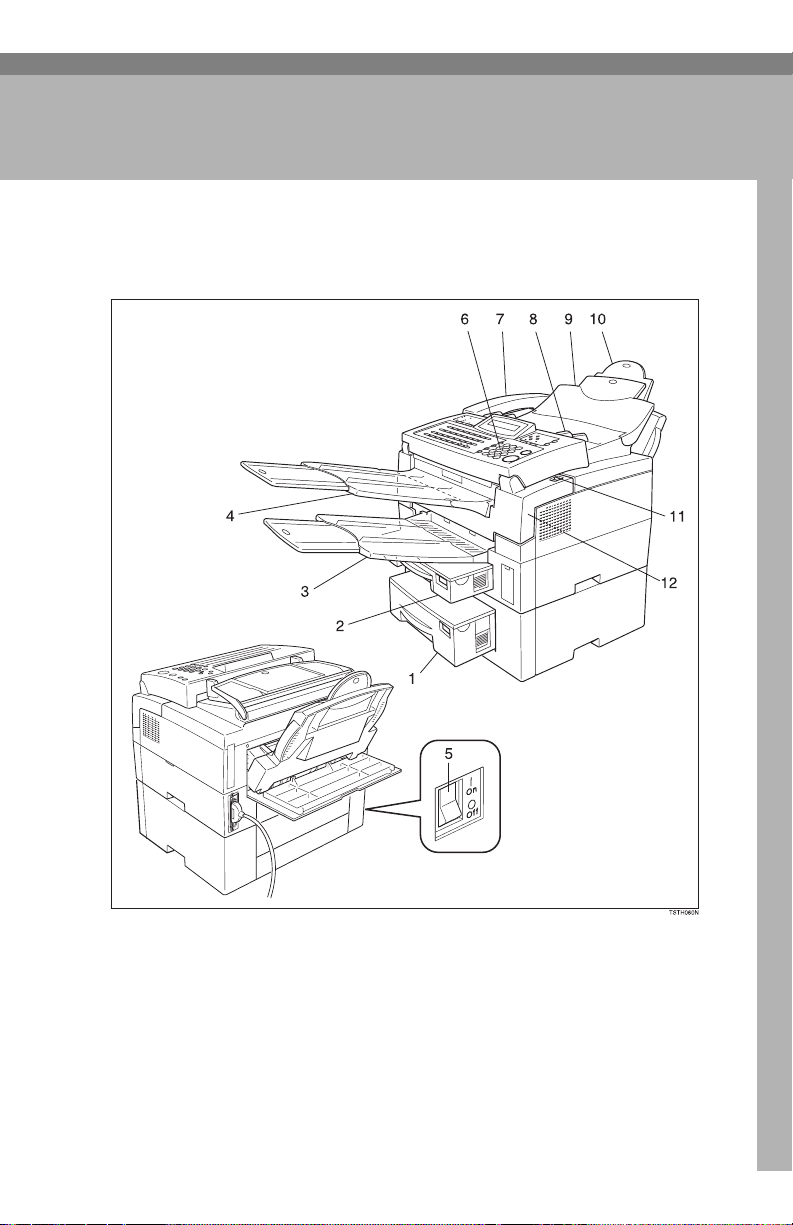
Part Names
TSTH060N.eps
1. Introduction
1. Second Paper Cassette (Option)
The optional Second paper cassette holds
more paper.
2. Main Paper Cassette
The main paper cassette holds copy paper.
3. Print Delivery Tray
Copies, incoming faxes, and prints are
delivered here.
4. Document Delivery Tray
Scanned documents are stacked on the
document delivery tray.
3
Page 14

1
Introduction
5. Main Switch
The main switch turns your machine on
and off.
6. Operation Panel
Key panel for operating the machine.
7. Handset (Option)
8. Document Guide
Match the document guide to the size of
your original documents.
9. Document Table
Document table holds up to 30 sheets
which are fed one at a time. Place your
original documents here.
10. Multi-purpose Feeder (Option)
Multi-purpose Feeder can be loaded with
various kinds of printable media.
11. Front Cover Release Lever
Pull this catch to release the front cover.
12. Front Cover
4
Page 15

Operation Panel
Operation Panel
TSTS020N.eps
1. Add Paper indicator
Lights when a cassette is empty.
2. Add Toner indicator
Blinks when toner is about to run out and
lights continuously when toner has run out.
3. Check Display indicator
Check Display
The
you to read the display.
indicator lights to tell
4. Receive File indicator
Receive File
The
incoming message was received into
memory. Blinks when confidential reception file or memory lock file is stored in
the memory. (see P.36 “If an Indicator
Lights on the Operation Panel”).
5. {
Resolution
The Resolution/Halftone is indicated by
these three indicators and can be changed
{
by the
Resolution
tor is not lit, Standard is selected.
indicator lights when an
} key.
}
key. When the Indica-
6. Memory key/ indicator
key.
Memory
indicator is on, then
{
Memo-
When the
memory transmission is in effect, if it is
off, immediate transmission is in effect.
Switch between the two with the
}
ry
7. Control Panel Display
The Liquid Crystal Display guides you
through tasks and informs you of the
state of the machine. Messages appear
here. The display consists of two 20-character lines.
8. {
Speed Dial/Tel Directory
Press the
ing Speed Dial or the Telephone Directory Feature.
9. {
The
when you are dialing or storing a fax
number. Or, press the key to redial the
last number dialed. (The redial feature
does not work once you have started dialing a new number.)
{
Speed Dial/Tel Directory
Pause/Al Redial
{
Pause/Al Redial
} key
}
key us-
} key
}
key inserts a pause
10. Arrow keys
T {
}
accept
Yes
}
U {
No
W
scroll left/
selection screen for each cassette will appear.
V
scroll right/
the options.
reject/
{
Help
{
Paper Size
{
Option
}
Print help list
}
The paper size
}
Press to access
1
5
Page 16

Introduction
1
11. Manual Receive indicator.
Lights when the reception mode is Telephone.
12. {
Energy Saver
Hold the button a few seconds to start or
end the energy saver mode.
13. {
Press this to copy the document now in
the feeder.
14. {
Press this to select the reception mode
(Tel or Fax).
15. {
Press the
digit code to access functions 11 to 53.
(For Functions 61 to 95, enter 6, and then
the access code.)
16. {
Press the
sion or a document scanning, and a reception or to stop a long copy run. The
machine will print out the sheet being
printed and then stop.
17. {
Press the
} key
Copy
Reception Mode
Function
{
Function
} key
Stop
{
} key
Start
{
Start
} key
} key
} key
}
key and enter a two
}
key to stop a transmis-
Stop
}
key to start all tasks.
18. Ten key pad
Use the ten key pad (sometimes called
the ten keys) to dial fax numbers, to enter
the numbers of copies, etc.
19. {
On Hook Dial
Press the
phone call from the keypad without having to lift the phone or handset off the
hook (phone or handset option needed).
20. {
Clear
Press the
character or digit entered, or use the left
and right arrow keys to move the cursor
and then press Clear to erase whatever is
at the cursor.
21. {
Quick Dial
} key
{
On Hook Dial
} key
{
}
key to erase the last
Clear
} keys/ {
}
key to dial a
User Function
keys.
There are 30 Quick Dial keys. Use them to
store individual fax numbers (see P.22
“Storing and Editing Fax Numbers (Functions 31 & 32)”) or groups (see P.25 “Storing and Editing a Group of Fax Numbers
(Function 33)”). You can also use these
keys to enter characters (see P.29 “Entering Characters”). In addition you can reg-
ister Quick Dial 29 as the Dial Option key
(see Chapter 3, “Assigning the Dial Option key” in the Advanced Features manual.) You can also use Quick Dial 30 as a
Group key (see P.28 “Programming the
Group Key”).
You can store a combination of settings
that you use frequently in the two User
Function keys (F1, F2). When you press a
User Function key, it lights to show you
that it is selected.
}
6
Page 17

Symbols and Conventions Used in This Manual
Symbols and Conventions Used in This
Manual
❖
Documents:
A document is anything you put
on the feed table of your machine
whether you are faxing it or copying it.
❖
Prints:
A print is anything that comes out
of the machine: a fax message you
received or a copy you made.
❖
Procedures:
Procedures are described step by
step. Perform them in order. When
you see a display, it always shows
what comes after performing the
step it accompanies. Other illustrations accompanying steps help
you find the right key, or show you
how to perform the step.
A This is a step in a procedure.
THIS CORRESPONDS TO
THE LCD DISPLAY.
1
7
Page 18

1
Introduction
8
Page 19
2. Faxing
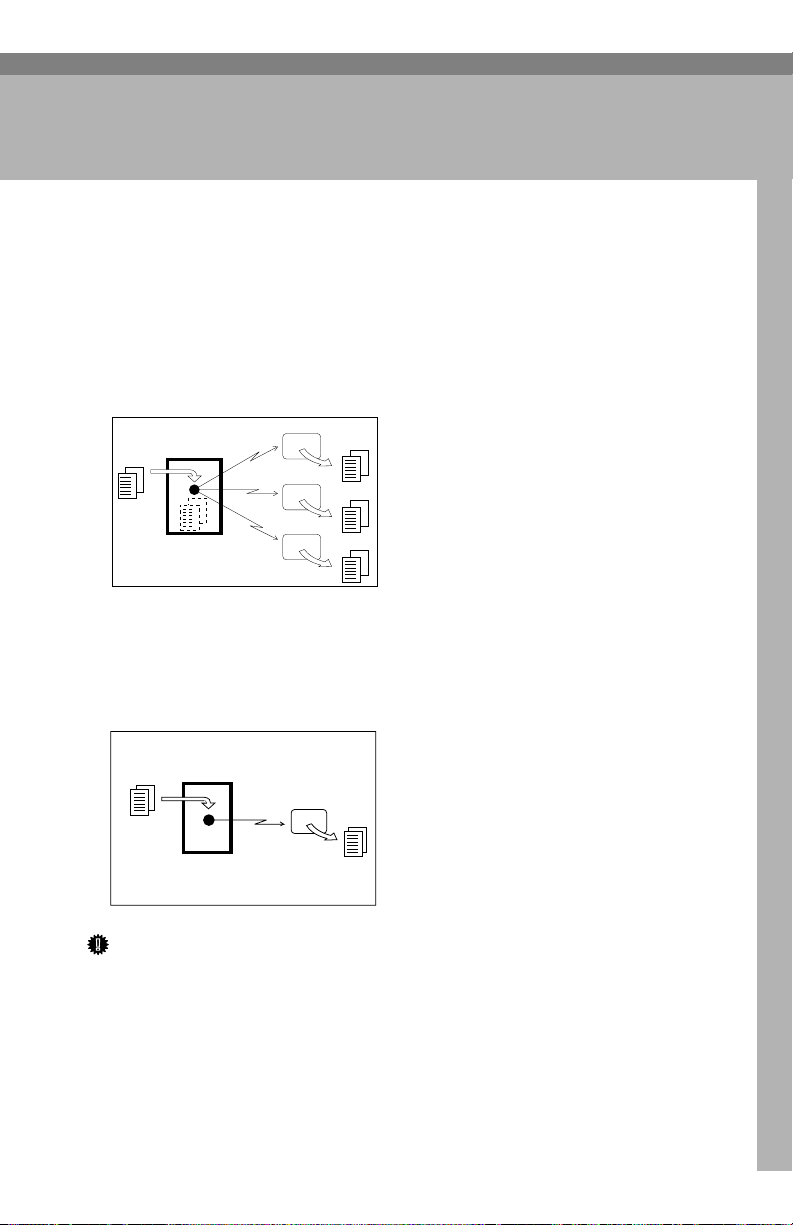
Types of Transmission
There are two types of transmission.
❖
Memory Transmission
When a fax message is stored in memory , then transmission starts automatically. It is convenient when you would like to take documents back in a hurry.
You can send the same message to more than one destination in a single operation. This technique is referred to as Broadcasting.
GDRH230E.eps
Transmitter (This machine)
❖
Immediate Transmission
The machine dials immediately, and transmits the fax while scanning.
It is convenient when you would like to check whether you have successfully
connected with the other party's fax machine.
A fax message is not stored in memory.
GDRH240E.eps
Receiver
Receiver
Receiver
GDRH230E
Transmitter
(This machine)
Receiver
GDRH240E
Important
❒
If there is a power failure, the power switch is turned off, or the plug is pulled
out for more than 6 hours (1 hour when the optional memory card is installed), all files stored in memory are deleted. As soon as power is restored,
the Power Failure Report is printed to help you identify deleted files. See
Chapter 8, “Power Failure Report” in the Advanced Features manual.
9
Page 20

2
Faxing
Suitable Document Types
Do not place damaged pages in the automatic document feeder.
• If pages are curled or dog eared, flatten them.
• If pages are stuck together, shuffle the stack.
• If pages are folded, torn, or patched together, make copies.
• If pages have binding files, trim the edges or make copies.
Important
❒ Do not place originals that contain the following materials in the document
feeder ;
• Crayon
• Paint
• Charcoal, soft pencil
• Glue
• Thermal paper
• Clips
• OHP Sheets, vinyl-coated paper
• Waxed paper
• Carbon paper
• Silicone oil
Note
❒ Copies made with a copier that uses silicone oil may cause a misfeed. To
avoid this, do not scan such copies until five or ten minutes after copying.
• Clearly Written
Small, faint characters may not be transmitted clearly.
• Uniform Page Size
Do not use different size documents in the same transmission.
10
Page 21
Memory Transmission and Immediate Transmission
Memory Transmission and Immediate
Transmission
There are two ways to send a fax message.
• Memory Transmission
• Immediate Transmission
Memory Transmission
A Memory Transmission is convenient because:
• Fax messages can be scanned
much more quickly (you can take
your document away from the fax
machine without waiting too
long).
• While your fax message is being
sent, another user can operate the
machine (people will not have to
wait by the fax machine too long).
• You can send the same message to
more than one place with the same
operation.
• There are two kinds of Memory
Transmission: Parallel and Normal. Parallel Memory Transmission is the default.
Note
❒ If your document gets stuck while
it is being processed, press the
{
} key, and turn to P.38 “Clear-
Stop
ing a Document Jam” for instructions on how to safely remove the
original.
Make sure that the machine is in
A
standby mode for faxing.
The display should look like this:
READY 100% 10:00AM
SET DOC. OR DIAL NO.
Note
❒ If the display is blank, press the
Energy Saver key to exit Energy
Saving mode.
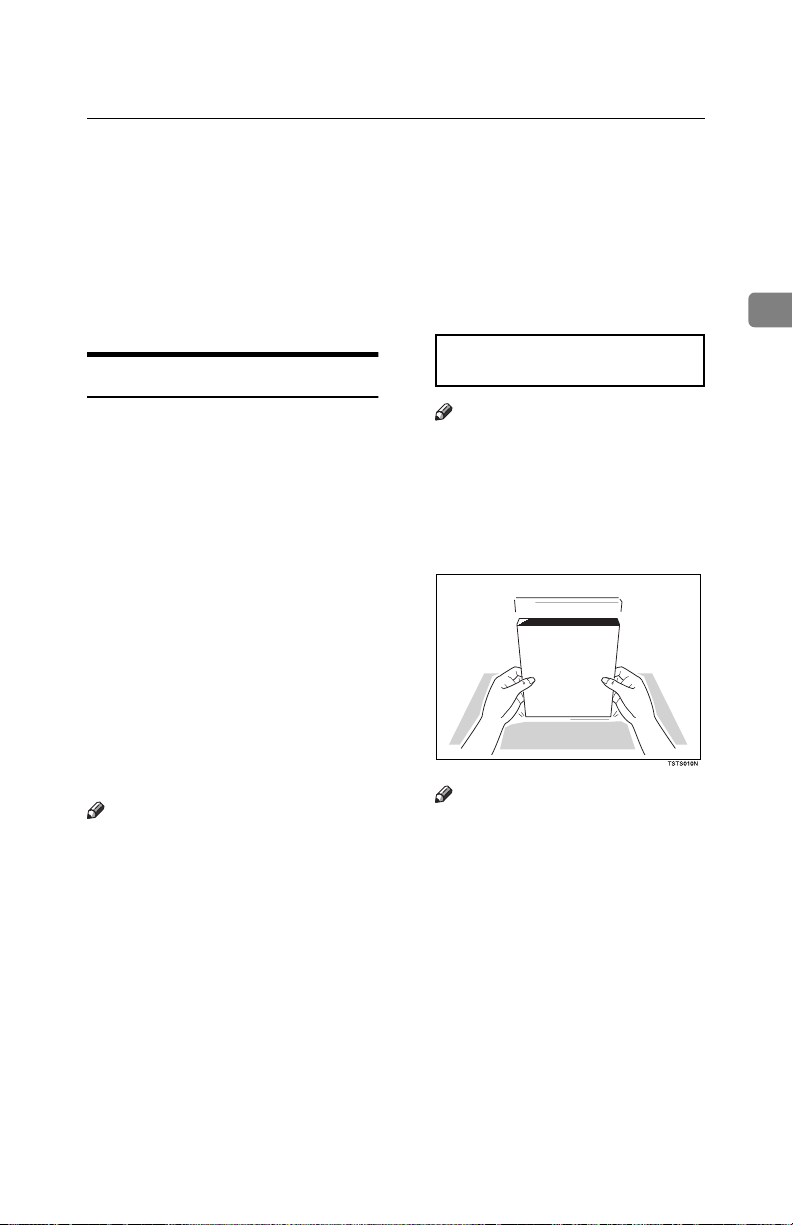
Fan your document stack (at most
B
30 pages: 20 lb) to make sure all
pages are loose, then square it.
TSTS010N.eps
Note
❒ All pages in your document
must be one-sided and be of the
same size.
2
11
Page 22
Faxing
Speed Dial
1
0
Example: Speed Dial 10
GFDIAL2N
2
Insert the document face down
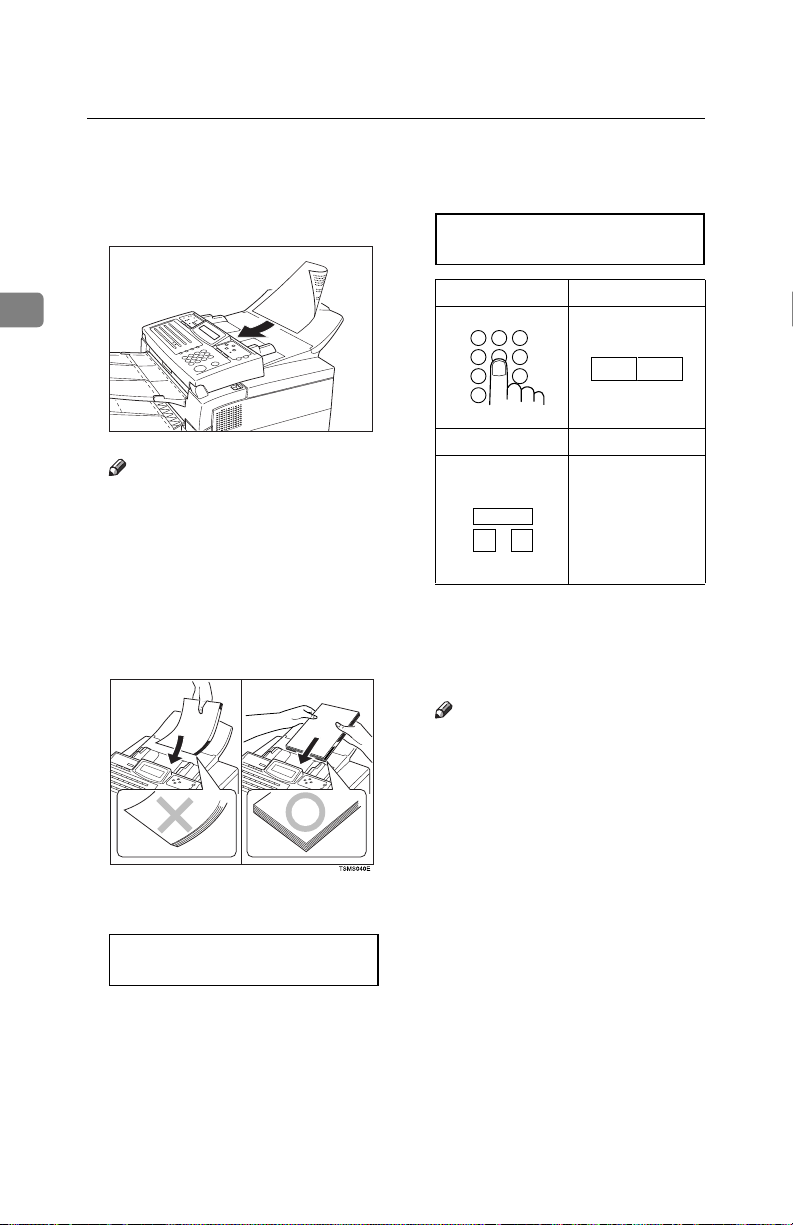
C
into the feeder until the machine
beeps. Then adjust the guides to
match the width of the document.
TSTH110N.eps
Note
❒ You can dial before you set the
document. Place the document
after you dial the number and
go to step G.
❒ Please set your document
straight in the feeder. If you set
more than 15 sheets, make sure
the ends of your document are
not skewed.
Tsms040e.eps
The display will look like this:
D
TRANSMIT OPTIONi
DIAL FAX NUMBER
If the Memory indicator is not lit,
E
press the {
Memory
} key.
TSTH110N
Dial the number in one of the fol-
F
lowing ways.
TRANSMIT Y/START
5551234kkkkkkkkkkkkk
Ten Key Pad Quick Dial
1 2 3
4 5 6
7 9
*
GFDIAL0N
Speed Dial Group
Example:
Method
Dial key 08.
Method
Dial key 30 and 1
on the ten key pad.
*1
In this example Group Dial is programmed in Quick Dial 08.
*2
In this example Quick Dial key 30
is programmed as the Group key,
and Group dial number 1 is programmed.
Note
❒ If you install the handset or an
external telephone, you can
send the message manually.
Pick up the handset and dial.
❒ If you want to erase a digit of
the phone number, press the
} key. If you want to erase
{
Clear
the entire number, press the
} key.
{
No
❒ The maximum destinations you
can dial using the ten key pad is
68. However, this limitation is
also subject to memory capacity.
07
06
*1
Quick
*2
Quick
GFDIAL1N
12
Page 23
Memory Transmission and Immediate Transmission
Reference
Programming Quick Dial: see
P.22 “Storing and Editing Fax
Numbers (Functions 31 & 32)”.
Programming Speed Dial: see
P.22 “Storing and Editing Fax
Numbers (Functions 31 & 32)”.
Programming Group Dial: see
P.25 “Storing and Editing a Group
of Fax Numbers (Function 33)”.
Programming Group key: see
P.28 “Programming the Group
Key”.
Press the {
G
other number.
} key to enter an-
Yes
TRANSMIT DIAL/START
DIAL NEXT FAX NUMBER
Note
❒ Repeat steps F and G until all
destinations are entered.
❒ If you have only one destina-
tion, press the {
❒ The machine stores your mes-
sage and dials the first number
(or, if you selected Send Later, it
will return to standby mode and
the fax message will be sent at
the time that you selected).
Reference
Send Later: see Chapter 1,
“Sending at a Specific Time
(Send Later)”in the Advanced
Features manual.
Start
} key.
Press the {
H
The machine will dial the destination's number.
Start
} key.
5551234
SET DOC. OR DIAL NO.
Note
❒ If the other party's line is busy,
your machine will redial. (See
Chapter 3, ”Redial”in the Advanced Features manual.)
READY 98% 10:04AM
SET DOC. OR DIAL NO.
❒ If the other party's fax machine
answers, both machines will
connect and your machine will
send the message. Other party's
OWN NAME or FAX NUMBER
will appear on the upper line.
❒ If your line goes through a local
switchboard (a PBX) remember
to dial the exit code. Press the
} key immediately after
{
Pause
the code. If the number includes
a country code, press the
} key after the country
{
Pause
code, then dial the rest of the
number.
2
13
Page 24

2
Faxing
Canceling a Memory
Transmission
Before start is pressed
Press the {
A
the document You have set.
While the document is being scanned in
Press the {
A
The fax message which has already
been scanned in is cancelled.
During Transmission
} key, or remove
Stop
} key.
Stop
Either :
A
To erase a fax message stored in
memory
A To erase a fax message stored
in memory; press the {
} {2} {1} and the {
tion
Yes
FILE NO.kkk KPAD/hi
PRINT LISTh/SEARCHi
Press V to scroll through the mes-
B
sages.
You will see the display. A number
or a label will appear on the lower
line.
Func-
} key.
Press the {
A
munication.
} key during com-
Stop
5551234
STOP & CLR FILE? Y/N
Then press the {
B
the transmission.
While the message is awaiting
transmission (Functions 21)
Every time you store a fax message in
your machine's memory, a new file is
created. Each file is given a number.
This number appears on the File Reserve Report, Journal and Transmission Result Report. To see which files
are currently in memory, you may
print a file list.
} key to cancel
Yes
FILE NO.027 Y/hi
5551234
Note
❒ Press W to obtain a list of all the
files and their number. If you already know the number of the
file to erase, enter it directly
from the ten key pad.
Press the {
C
Yes
} key.
FILE NO.027 Y/N
CLEAR?
Press the {
D
the file.
Press the {
E
Note
❒ To erase another file, go to step
B
.
} key again to erase
Yes
Function
} key.
14
Page 25

Immediate Transmission
Immediate Transmission is convenient when:
• You wish to quickly check whether
you have successfully connected
with the other party's fax machine.
• Your machine's memory is getting
full.
The machine dials immediately after
you press the {
specified time, if you used a time-delay feature like Send Later). The message is scanned and transmitted page
by page without being stored in
memory.
Make sure that the machine is in
A
standby mode.
The display should look like this:
READY 100% 10:00AM
SET DOC. OR DIAL NO.
Note
❒ The memory indicator should
go out. If the memory indicator
is lit, press the {
Place the entire document face
B
down into the feeder.
TRANSMIT OPTIONi
DIAL FAX NUMBER
} key (or at the
Start
Memory
} key.
Memory Transmission and Immediate Transmission
Dial.
C
TRANSMIT Y/START
5551234
Press the {
D
Start
} key.
5551234
DIALING
The machine dials and connects to
the other party. The number that
you dialed and the other party's
OWN NAME or FAX NUMBER is
displayed.
Canceling an Immediate
Transmission
Before start is pressed
Press the {
A
the document you have set.
While dialing or during transmission
Press the {
A
However, the fax message which
has already scanned in has transmitted.
Remove the document after it is
canceled.
} key, or remove
Stop
} key.
Stop
2
Note
❒ No more than 30 pages.
❒ You can dial before you set the
document. Place the document
after you dial the number and
go to step D.
15
Page 26

Faxing
Very Fine Detail Faxing
2
So that text, diagrams and images
stand out clearly in your document,
the machine automatically detects the
image density (contrast) and makes a
compensation.
However, if you need to send a document which requires optimum clarity, select the resolution setting
appropriate to your needs.
You can select different settings for
each page of your message. Simply
change the settings for page 2 while
page 1 is being scanned.
Resolution and Shading
The resolution button gives you control over document quality. The indicators above the button show the
current setting. Choose a setting that
matches your document.
❖
Standard:
Standard quality. Use for most
printed or typewritten documents.
This is selected when the other resolution indicators are not lit.
❖
Detail:
High quality. Use for documents
with small print or fine details.
Note
❒
Faxing at a higher resolution requires more time. Frequent use of
high resolution could cause an increase in your phone bill, especially for long distance transmissions.
16
❖
Fine:
Very high quality. Use this for high
quality reproduction.
❖
Halftone:
Use this for optimum quality if
your document contains photographs/diagrams with complex
shading patterns or gray tones. If
you choose this setting, resolution
will automatically be Detail.
Page 27

Reception Modes
The machine can treat incoming fax
messages and telephone calls in three
ways.
❖
Auto mode
Use this mode if your line is shared
by a fax machine and telephone.
When a call comes in, the machine
will ring a number of times to give
you the chance to pick up the
handset. If you do not pick up and
the call is a fax message, the machine will go into fax mode and
start receiving. You can choose the
number of times the machine rings
before taking the call by altering
the Auto Ring time (See Chapter 7,
“Setting the Auto Ring Time”in the
Advanced Features manual) .
❖
Fax mode
Use this mode if you have a dedicated fax line. The machine assumes all calls are fax messages. It
will ring once to alert you of an incoming call, and then starts receiving.
Reception Modes
Switching Between Fax and
Telephone Mode
The Manual Receive indicator is lit
when the machine is in Telephone
mode. To switch to a different mode,
follow the steps below.
Press the {
A
Reception Mode
RECEIVE MODE Y/hi
iFAX TEL AUTO
Press the W and V key to select the
B
mode you require.
RECEIVE MODE Y/hi
FAX iTEL AUTO
Press the {
C
Yes
} key.
READY 100% 10:00AM
SET DOC. OR DIAL NO.
} key.
2
❖
Telephone mode
Use this mode if your line is shared
by a fax machine and a telephone,
and if you wish to answer all calls
yourself and decide whether they
are fax messages or telephone
calls. You must manually press the
Start key to receive a fax.
The machine will ring continuously until you answer the call, so you
have to be near the machine at all
times.
The Manual Receive indicator is lit
when the machine is in this mode.
17
Page 28

2
Faxing
18
Page 29

Initial Settings and Adjustments
3. Setup
Before you connect your machine to
the telephone system, you must enter
a few settings and make a few adjustments.
❖
Own Number :
The phone number used by your
fax line.
❖
OWN NAME:
This should be your name or company name, in 20 characters or less.
During a communication, if the
other party's fax machine supports
OWN NAME, then this replaces
the FAX NUMBER following. The
other party's name will appear on
your display, and yours on theirs.
❖
FAX HEADER:
This must be the telephone number of the line your machine is connected to.
It will be printed on the header of
every page you send. Required in
the United States.
❖
FAX NUMBER:
This is your fax machine's phone
number, which must include country and area codes. During any
communication, your FAX NUMBER appears on their display.
(Conversely their FAX NUMBER
appears on your display.)
Note
❒
This function is not available in
some areas.
Important
❒
The FAX NUMBER code is required by international law. You
cannot legally connect a fax machine to the telephone system if the
FAX NUMBER code is not programmed. Further, the FAX
HEADER code and the date and
time of transmission must be included in the header of all pages
faxed to, from, or within the United States.
Note
❒
When the PC Interface kit is installed, “OWN NAME” is displayed as “RTI”, “FAX HEADER”
is displayed as “TTI”, and “FAX
NUMBER” is displayed as “CSI”.
Initial Settings (Function 61)
During the course of this procedure
you will have to enter letters and other characters.
Use the ten key pad for entering numbers. Use Quick Dial keys 1 to 26 for
entering letters. Use the {
accept a character. Use Quick Dial
key 27 to enter spaces and Quick Dial
key 28 to enter symbols. See P.29 “En-
tering Characters” for details.
If these settings have been made before, the messages on the display will
not always match those shown here.
The setting already entered will appear along with the word
this case, press the {
change the setting.
} key to
Yes
CHANGE?. In
} key to
Yes
19
Page 30
Setup
3
Press {
A
access code {
then press {
key.
Function
} {6} and enter the
} {2} {2} {2}, and
2
} {1} and the {
6
Y/NEXTi
SET OWN NUMBER
Press the {
B
Yes
} key.
OWN NO. KPAD
kkkkkkkkkkkkkkkkkkkk
Enter your phone number.
C
OWN NO. KPAD/Y/N
0111212-5551234kkkkk
Note
❒ The format of the number is
normally as follows: International Dial Prefix, Your Country
Code, Your Area Code, then
you must add a Pause, followed
by your telephone number.
Check the International Dialing
Prefix and the Country Code
with your local telecommunications operator. The example
shown is for the United States;
the codes to add are 011 and 1.
Press the {
D
PROGRAMMED will flash on the dis-
play. The following display appears.
Yes
} key.
Y/NEXTi
SET POLLING ID
Yes
Press V until the following dis-
E
}
play is shown.
Y/NEXTi
SET OWN NAME
Press the {
F
Yes
} key.
OWN NAME ABC
kkkkkkkkkkkkkkkkkkkk
Enter your office, company, or
G
personal name, or any other appropriate identification. (Using
the Quick Dial keys.)
OWN NAME ABC Y/N
XYZ COMPANY
Reference
See P.29 “Entering Characters” .
Press the {
H
PROGRAMMED will flash on the dis-
play. The following display appears.
Yes
} key.
Y/NEXTi
SET FAX HEADER
Press the {
I
The OWN NAME programmed in
step H appears. You should keep it.
Yes
} key.
HEADER CHANGE? Y/N
XYZ COMPANY
Note
❒ If you wish to change it, press
the {
HEADER.
} key and edit the FAX
Yes
20
Page 31

Press the {No} key to keep the
J
FAX HEADER as is.
Y/NEXTi
SET FAX NUMBER
Initial Settings and Adjustments
Press the {
K
Yes
} key.
FAX NUMBER KPAD
kkkkkkkkkkkkkkkkkkkk
Enter your phone number includ-
L
ing the country and area codes,
(but no pauses).
FAX NUMBER KPAD/Y/N
12125551234kkkkkkkkk
Press the {
M
PROGRAMMED will flash on the dis-
play. The following display appears.
Yes
} key.
Y/NEXTi
SET PSTN ACCESS NO.
Press the {
N
Function
} key to finish.
READY 100% 10:00AM
SET DOC. OR DIAL NO.
3
21
Page 32

Setup
Storing and Editing Fax Numbers
(Functions 31 & 32)
3
You can store numbers that you often
use in the machine's memory. A
stored number will remain in memory even if the power is cut.
You can store numbers in two ways.
❖
Quick Dials
The number is assigned to its own
key. To dial that number, just press
the key. You can store up to 30
numbers in this way.
❖
Speed Dials
The number is given a two-digit
code. To dial the number, press the
{
Speed Dial
code. There are 50 Speed Dial
codes available, numbered 00 to
49.
} key and enter the
Storing, Editing and Erasing
Quick Dial Numbers (Function 31)
This procedure describes how to store
and edit fax numbers in Quick Dial
keys.
Press {
A
the {
Function
Yes
ak QUICK/hi
PRINT LISTh/SEARCHi
Note
❒
To print a list of all Quick Dials
and their contents, press the W
key, and the {
the {
} {3} {1} and then
} key.
Yes
} key.
Start
} key, and then
Select a Quick Dial in any one of
B
the following ways:
•Press a Quick Dial key (e.g. press
Quick Dial 01).
a01 PROGRAM? Y/hi
•Press the V key until the Quick
Dial you want appears on the display.
Press the {
C
Yes
} key.
a01 KPAD/N
kkkkkkkkkkkkkkkkkkkk
Do one of the following:
D
•Enter the fax number you wish to
store in this Quick Dial using the
ten key pad. Then press the {
key.
a01 KPAD/Y/N
212551234kkkkkkkkkkk
•To clear the number, press {No},
and go to step J.
Do one of the following:
E
•If you wish to enter or edit a label
for this Quick Dial, press the {
key.
a01 Y/N
PROGRAM LABEL?
•If you do not wish to give this
number a label, press the {
and go to step H.
No
Yes
Yes
} key
}
}
22
Page 33

Enter or edit the label using the
F
Quick Dial keys and the ten key
pad. See P.29 “Entering Charac-
ters”
a01 ABC Y/N
NEW YORK OFFICEkkkkk
Press the {
G
Yes
} key.
a01 Y/hi
LABEL SET ONiOFF
Press W or V to select whether the
H
label for this Quick Dial will be
printed on top of messages that
you send to this destination.
Press the {
I
Yes
} key.
Storing and Editing Fax Numbers (Functions 31 & 32)
Quick Dial Label
Use this function to print a sheet
showing the contents of each Quick
Dial and User Function key. The size
of the sheet matches the dimensions
of the keys.
The following items are printed depending on what is stored in each
key:
• Fax number label
• Group Dial label
•Program label
• User Function key
Storing, Editing and Erasing
Speed Dial Numbers (Function 32)
3
ak QUICK/hi
PRINT LISTh/SEARCHi
Note
❒ To print a Quick Dial list, press
the W key to select
press the {
❒ To print a Quick Dial label,
choose
the {
You now have two choices:
J
•To store, edit or delete another
Quick Dial, go to step B.
•To finish, press {
Start
LABEL, and then press
} key.
Start
LIST, then
} key.
Function
} key.
This procedure describes how to store
and edit fax numbers in Speed Dials.
A
Press {
the {
Function
Yes
} {3} {2}, and then
} key.
bkk KPAD/hi
PRINT LISTh/SEARCHi
Note
❒ To print a list of all Speed Dials
and their contents, press the W
key, and then the {
Select a Speed Dial in any one of
B
the following ways:
•Enter the Speed Dial code on the
ten key pad. (e.g. 01)
Start
} key.
b01 PROGRAM? Y/hi
•Press the V key until the Speed
Dials you want appear on the display.
23
Page 34

Setup
3
Press the {
C
Yes
} key.
b01 KPAD/N
kkkkkkkkkkkkkkkkkkkk
Do one of the following:
D
•Enter the fax number you wish to
store in this Speed Dial using the
ten key pad. Then press {
Yes
b01 KPAD/Y/N
212551234kkkkkkkkkkk
•To clear the number, press {No},
and go to step J.
Do one of the following:
E
•If you wish to enter or edit a label
for this Speed Dial, press the {
key.
b01 Y/N
PROGRAM LABEL?
•If you do not wish to give this
number a label, press the {
and go to step H.
Enter or edit the label using the
F
Quick Dial keys.
No
} key.
Yes
} key
Press the {
I
Yes
} key.
bkk KPAD/hi
PRINT LISTh/SEARCHi
Note
❒ To print a Speed Dial list, press
the W key, and then the {
key.
You now have two choices:
J
•To store, edit or delete another
Speed Dial, go to step B.
•To finish, press the {
key.
}
Function
Start
}
}
24
b01 ABC Y/N
NEW YORK OFFICEkkkkk
Press the {
G
Yes
} key.
a01 Y/hi
LABEL SET ON iOFF
Press W or V to select whether the
H
label for this Speed Dial will be
printed on top of messages that
you send to this destination.
Page 35

Storing and Editing a Group of Fax Numbers (Function 33)
Storing and Editing a Group of Fax
Numbers (Function 33)
❒
❖
Groups
If you often broadcast messages to
the same set of destinations, you
can combine these numbers into a
group. Then just select the group
and each number will be dialed in
sequence automatically.
You can register the following
items in a Group:
• Destination fax numbers
• Group name (up to 20 charac-
ters)
You can enter destination numbers
by Quick Dial keys, Speed Dials, or
Ten keys.
Note
❒
You can register up to 5 Groups.
❒
The combined maximum num-
ber of destinations you can reg-
ister in all Groups is 129. This
129 can be composed of up to 30
Quick Dial numbers, 50 Speed
Dial numbers and 49 numbers
entered directly with the ten
keys.
❒
The number of destinations that
can be registered with the ten
keys depends on how the ma-
chine is used. In theory you can
register up to a combined maxi-
mum of 49 destinations with the
ten keys for all groups. Howev-
er, if you register 49 items with
the ten keys, Memory Transmis-
sion becomes unavailable, only
register up to 48 items with the
ten keys.
❒
The maximum number of desti-
nations you can register in a
Group is 100.
If you register the same destination more than once with a
Speed Dial or Quick Dial in
Groups, it is only counted as
one item. However, if you register two or more identical destinations with the ten keys they
will be counted as two or more
items.
❒
If all destinations are different,
you may not be able to store 100
destinations in a Group.
❒
It is recommended that you
print the Group Dial list and
keep it when you register or
change destinations. See Chapter 6, ”Reports You Can Print
Out Yourself”in the Advanced
Features manual.
❒
How to count numbers
Registered items
Quick Dial: [01], [03], [05]
Speed Dial: [01], [02], [10]
Ten Key: 0312345678
Group 1
Quick Dial: [01], [05]
Speed Dial: [01], [02], [08]
Ten Key: 0312345678,
Group 2
0451119999
3
Total Numbers
10 numbers
25
Page 36

Setup
3
Registered items
Quick Dial: [01], [02], [03]
Speed Dial: [01], [02], [03]
Group1
Ten Key: 0312345678
Quick Dial: [04], [05]
Speed Dial: [04], [05], [06]
Ten Key: 0312345678,
Group2
0451119999
This section describes how to program or edit a Group. You can also
get a printout of numbers that are already stored. In this example we will
program Group 1 into Quick Dial key
01.
A
Press {
the {
Yes
Function
} {3} {3}, and then
} key.
GROUP k 1-5/hi
PRINT LISTh/SEARCH
Enter the number of the group
B
you want to program or edit.
Note
❒ e.g. Group 1: Press {1}.
❒ To print a list, press the W key
and then the {
Press the {
C
Yes
Start
} key.
} key.
GROUP 1 Y/N
PROGRAM QUICK?
Total Numbers
14 numbers
To program or edit a Quick Dial
D
key for this group, press the {
key.
Note
❒ If you do not program or edit,
press the {
step F.
Press the Quick Dial key you
E
wish to use for this group, {
for example, and then press the
{
} key.
Yes
Note
❒ If you want to free up the old
Quick Dial key, press the {
key, and then the {
} key and go to
No
} key.
Yes
GROUP 1 Y/N
PROGRAM LABEL?
❒ If a message like USED AS..
flashes up, the key is already in
use. Press a different key.
If you wish to give this group a
F
name, press the {
Yes
} key.
GROUP 1 ABC
kkkkkkkkkkkkkkkkkkkk
Note
❒ If not, press the {No} key and go
to step H.
Enter or edit the name, and then
G
press the {
How to enter characters, see P.29
“Entering Characters”
Yes
} key.
Yes
01
No
}
}
}
26
GROUP 1 KPAD/N
kkkkkkkkkkkkkkkkkkkk
Page 37

Enter a fax number.
H
Note
❒ Enter a number in one of these
ways.
• Press a Quick Dial key.
• Press the Speed Dial key fol-
lowed by two digits.
• Enter a number on the ten key
pad.
Press the {
I
Note
❒ If ALREADY PROGRAMMED briefly
flashes up on the display, either
press the {
number and choose another
number, or press the {
to clear.
Press the {No} key to finish enter-
J
ing numbers in this group.
Note
❒ To enter another number, go
back to step H.
Press the {
K
Note
❒ To work on another group, go
to step B.
} key.
Yes
} key to keep the
No
Function
} key.
Yes
Storing and Editing a Group of Fax Numbers (Function 33)
Erasing Groups
These steps describe how to erase single numbers from a group.
} key
Press {
A
the {
Function
Yes
GROUP k 1-5/hi
PRINT LISTh/SEARCHi
Enter the group number using the
B
ten key pad, then press the {
key.
GROUP 1 Y/N
PROGRAM QUICK?
Press the {No} key.
C
GROUP QUICK/N
PROGRAM LABEL?
Press the {No} key.
D
GROUP 1 Y/N
CLEAR?
Press the {
E
GROUP 1 Y/N
CLEARED
} {3} {3}, and then
} key.
} key.
Yes
Yes
3
}
Press the {
F
Note
❒ To delete another number, go to
step B.
Function
} key.
27
Page 38

3
Setup
Programming the Group Key
You can program 5 groups. However,
if there is no room in Quick Dial keys,
this group key is helpful. You can use
Quick Dial 30 or one of User Function
keys (F1 or F2) as the group key. How
to transmit using the group key, see
P.11 “Memory Transmission”.
Reference
For how to program User Function
keys, see Chapter 6, "User Function Keys (Function35)” in the Advanced Features manual.
A
Press {
the {
Yes
Function
} {3} {1}, and then
} key.
ak QUICK/hi
PRINT LISTh/SEARCHi
Press the Quick Dial {30}.
B
a30 PROGRAM? hi
Press the {
C
Yes
} key.
a30 PROGRAM? Y/N
PROGRAM GROUP KEY?
Press the {
D
Yes
} key.
ak QUICK/hi
PRINT LISTh/SEARCHi
Press the {
E
Function
} key.
28
Page 39

Entering Characters
Entering Characters
Use the ten key pad for entering numbers. Use Quick Dial keys 1 to 26 for
entering letters, and Quick Dial key
27 for spaces and Quick Dial key 28
for other characters.
If at any time you make a mistake
when entering a character or digit,
press the {
correct a character or number already
entered, use the W and V keys to reach
the mistake, enter the new character,
and press the {
mistaken character. If you press the
{
} key, whole characters are
No
erased.
} key to erase it. To
Clear
} key to erase the
Clear
Entering Symbols
Press the Quick Dial key {28}.
A
Press W or V to scroll the symbols.
B
Note
❒ You can enter the following
symbols. & $ ! " # % ' ( ) * + , . / :
; [ ¥ ] ^ _ – (space)
Press the {
C
Yes
} key.
Wild Cards
This feature greatly enhances the effectiveness of the following features:
• Authorized Reception
• Forwarding
• Specified Cassette Selection
• Memory Lock
In each of these features, you have to
store the OWN NAME or FAX NUMBER of various terminals that you
normally receive fax messages from.
Then, when your machine detects an
incoming call, it checks the OWN
NAME or FAX NUMBER of the other
terminal, and acts accordingly.
When you program OWN NAME's for
these features, you can program wild
cards to greatly expand the number of
terminals that you can specify.
For example, if you wish to accept
messages from all 150 branches of
XYZ Company (using Authorized Reception), and forward them on to
head office (using Forwarding), you
do not have to store the OWN NAME
of each branch of XYZ Company. Program “XYZ” as a wild card for each of
these functions. If the OWN NAMEs
of all XYZ branches contain an “XYZ”
somewhere in the OWN NAME, messages coming in from them will be accepted, and sent on to head office.
Note
❒
This feature cannot recognize spaces. If
you store MAN as a wild card, and a
terminal with an OWN NAME that includes MANCHESTER, HUMAN, or
HUMANE calls you, your machine
will recognize MAN as a wild card and
accept and/or forward the message.
Reference
Authorized Reception: see Chapter 7, “Rejecting or Accepting Messages from specified senders
(Authorized Reception)” in the
Advanced Features manual.
Forwarding: see Chapter 7, “Forwarding” in the Advanced Features manual.
OWN NAME and FAX NUMBER:
see P.19 “Initial Settings and Adjust-
ments”.
3
29
Page 40

3
Setup
30
Page 41

4. Troubleshooting
Loading Paper in the Main Cassette
Pull out the paper cassette and place it on a flat surface.
A
Note
❒ Remove any paper that may have dropped inside the machine in the area
vacated by the paper cassette.
TSTC200E.eps
Lift up the cassette cover and remove it.
B
TSTC100N.eps
Remove any remaining paper.
C
TSTC270N.eps
TSTC100N
31
Page 42

4
Troubleshooting
If the metal base plate is raised, push it firmly down until it locks into
D
place.
TSTC050N.eps
TSTC050N
Prepare a stack of blank paper. For smoother operation, square the edges.
E
TSTS010N.eps
Load the paper into the cassette.
F
TSTC210N.eps
32
Page 43

Loading Paper in the Main Cassette
Replace the cassette cover.
G
Note
❒ The frosted side of the cover must be face up when closed.
TSTC220N.eps
TSTC220N
Replace the cassette. Push it in firmly until it locks into place.
H
TSTC230E.eps
4
33
Page 44

4
Troubleshooting
Adjusting the Volume and Sounds the
Machine Makes (Function 92)
You can change the beeper (monitor) volume of the desired feature.
TRANS MONITOR
RECV MONITOR
ONHOOK MONITOR
DIAL MONITOR
BUZZER
KEY
The sound of signal transmissions.
The sound of signal receptions.
The sound of signal on hook dialing.
The sound when a number is dialed.
The sound (does not buzz) of signal something going
amiss.
The sound when a key is pressed.
A
Press {
press {
Function
9
} {6} and enter the access number {2} {2} {2} {2}. Then
} {2}.
ADJUSTMENT Y/NEXTi
92 ADJUST VOLUME
Press the {
B
Adjust the transmission monitor volume with the W and V keys, and then
C
press the {
} key.
Yes
} key when finished.
Yes
TRANS MONITOR Y/hi
MIN iii MAX
Adjust the reception monitor volume with the W and V keys, and then press
D
the {
} key when finished.
Yes
RECV MONITOR Y/hi
MIN iii MAX
Adjust the on hook monitor volume with W and V keys and press the {
E
key when finished.
ONHOOK MONITOR Y/hi
MIN iii MAX
Yes
}
34
Page 45

Adjusting the Volume and Sounds the Machine Makes (Function 92)
Adjust the dial monitor volume with the W and V keys, and then press the
F
{
} key when finished.
Yes
DIAL MONITOR Y/hi
MIN iii MAX
Adjust the BUZZER monitor volume with the W and V keys, and then press
G
the {
} key when finished.
Yes
BUZZER Y/N/hi
MIN iii MAX
Adjust the KEY volume with the W and V keys, and then press the {
H
key when finished.
KEY Y/hi
MIN iii MAX
Press the {
I
Function
} key to return to standby mode.
Yes
}
4
35
Page 46

Troubleshooting
If an Indicator Lights on the Operation
Panel
4
❖ PRESS STOP KEY
Press the {
❖
The Receive File indicator is lit:
You have received a fax message which is now stored in the memory. See
Chapter 4, ”Printing Message That Have Been Received into Memory (Substitute Reception)”in the Advanced Features manual.
❖
The Check Display indicator is lit:
Read the message on the display and check the descriptions listed on P.44
“Error Messages”.
appears in the display:
} key.
Stop
36
Page 47

Communication Problems
If ERROR PRESS STOP appears in the
display: Press the {
ERROR PRESS STOP KEY
Causes:
• A poor line caused the communication to fail.
• The line is noisy. Try to transmit
the fax message again.
• The other machine is out of order.
Ask the other party to check their
machine.
Stop
} key.
Communication Problems
4
37
Page 48

4
Troubleshooting
Clearing a Document Jam
When an original is jammed, CLEAR ORIGINAL is displayed, follow this procedure to solve the problem.
Note
❒ If copies, fax message or prints are jammed, follow the next procedure.
Open the operation panel to an angle of about 45°.
A
TSTJ030N.eps
TSTJ030N
Remove the original.
B
TSTJ040N.eps
38
TSTJ040N
Important
❒ Do not pull out the document without opening the operation panel, or you
will damage the scanning mechanism.
Close the operation panel.
C
TSTC040N.eps
Page 49

Clearing a Copy, Fax, or Print Jam
Clearing a Copy, Fax, or Print Jam
When CLEAR COPY is displayed, follow this procedure to solve the problem.
For clearing original jams, see the previous procedure.
Main Machine
Pull the front cover release lever towards you and open the front cover.
A
Note
❒ If you do not pull the lever, only the upper unit will open.
TSTC380N.eps
TSTC330N.eps
4
Remove the toner cassette.
B
TSTJ070N.eps
39
Page 50

4
Troubleshooting
Remove any jammed paper underneath.
C
TSTJ170N.eps
Replace the toner cassette.
D
Zaxt010n.eps
Close the front cover.
E
TSTC390N.eps
40
Page 51

Cassette Entrance
Remove the main cassette and place it on a flat surface.
A
TSTC200E.eps
Remove any paper from inside the machine.
B
TSTJ080N.eps
Clearing a Copy, Fax, or Print Jam
4
Push down the paper so that the base plate locks into place.
C
TSTJ090N.eps
TSTJ090N
41
Page 52

Troubleshooting
Replace the main cassette.
D
TSTC230E.eps
4
Upper Rear Unit
Lift back the document table.
A
TSTF050N.eps
Open the upper rear cover.
B
TSTJ120N.eps
TSTJ120N
42
Page 53

Pull out any jammed paper.
C
TSTJ110N.eps
Close the upper rear cover.
D
TSTJ130N.eps
Clearing a Copy, Fax, or Print Jam
TSTJ110N
4
TSTJ130N
43
Page 54

4
Troubleshooting
Error Messages
The following messages may appear while you are operating or programming
the machine.
CHECK AUTO-DIALING
NO FILE EXISTS
TOO MANY DEST.
USED AS GROUPDIAL
USED AS PROGRAM
USED AS DIAL
USED AS GROUP KEY
NOT PROGRAMMED
ALREADY PROGRAMMED
PLEASE SET PAUSE
ADD TONER
CLEAR ORIGINAL
CLEAR COPY
You cannot use the auto-dialer at the moment.
Use the ten key pad or the external telephone.
No polling reception operations have been
programmed.
There are no messages in memory waiting for
transmission.
Incorrect file number. Check the file number
and try again.
The memory cannot hold any more telephone
numbers. Either:
• Delete some numbers then try again.
• Wait until some of the Send Later or other
delayed transmissions waiting in memory
have been carried out, then try again.
This Quick Dial key has a Group stored in it.
This Quick Dial key has a Keystroke Program
stored in it.
This Quick Dial key has a telephone number
stored in it.
This Quick Dial key is programmed as Group
key.
Either:
• This Quick Dial key or Speed Dial Code
does not contain a number.
• This Quick Dial key does not contain a
Keystroke Program.
Either:
• This number is already included in this
Group.
• This OWN NAME/FAX NUMBER has already been stored for use with this feature.
You must add a pause after your area code
when you input your fax terminal's own telephone number.
The toner cartridge is empty. Install a new cartridge.
A document is jammed in the feeder.
Paper is jammed in the printer.
44
Page 55

Error Messages
CLOSE COVER
UNABLE USE PRINTER
SERVICE CALLk-kk
USED AS DIAL OPTION
WCHECK PAPER SIZE
IN USE
A cover is not closed properly. Check that all
covers are closed.
Machine cannot print a list/file, because the
heater is not warm enough or printer is not
ready.
Machine is out of order. Contact your service
representative.
Dial Option feature is set in Quick 29.
The size of the installed paper does not match
the currently selected paper size.
Set the paper size or install the appropriate paper.
This Quick Dial is being used for (e.g., a Send
Later Transmission)
4
45
Page 56

4
Troubleshooting
Solutions to Common Problems
Problem Required Action
STANDBY MODE
Nothing happens when the
switch is turned on.
SET DOC. OR DIAL NO. is
not displayed.
The display does not show the
Ready condition, or the machine
stops during an operation.
TRANSMISSION
The original is not pulled into
the auto document feeder.
Check the power cord. Is it properly plugged into the outlet?
Plug it in firmly.
Switch the power on.
If the Power indicator does not light, check that the power
cord is plugged in.
If the Energy Saver indicator lights, press the Energy Saver
key.
Does
CLEAR ORIGINAL or CLEAR COPY appear in the
display?
Clear the misfed paper.
Reference
See P.38 “Clearing a Document Jam” , P.39 “Clearing a Copy,
Fax, or Print Jam” .
Does ADD PAPER appear in the display?
Load paper into the paper tray. See P.31 “Loading Paper in the
Main Cassette”.
Does CLOSE COVER appear in the display?
Close all covers.
Is the Add Toner indicator on?
Load a new toner cassette. See Chapter 9, “Replacing the
Toner Cassette and Cleaning Pad “ in the Advanced Features manual.
You did not feed the document far enough into the feeder.
Insert the document into the feeder until it stops.
Retransmit.
Do user maintenance, especially rollers(1,8). See Chapter 9,
“Cleaning the Rollers and Scanner” in the Advanced Features manual.
The telephone line is disconnected.
Check that the line is connected properly.
The telephone line type setting is incorrect.
Check the telephone line type setting. See Chapter 7, “Setting the Ph one Line Type (Func tion 62) in the Advanced Features manual.
46
Page 57

Problem Required Action
The original is not pulled into
the auto document feeder.
Frequent original misfeeds
(Multifeeds)
Frequent original misfeeds
(Non-feeds)
Solutions to Common Problems
The dialed number does not contain an PSTN access code or
a pause.
Include the PSTN access number and a pause before the telephone number.
The dialed number did not have enough pauses between the
access PSTN number and the telephone number.
Try adding more pauses after the access PSTN code.
Incorrect positioning of originals
Put the document in the feeder correctly. See P.11 “Memory
Transmission”.
Incorrect alignment of originals
Align the edges of the document. See P.10 “Suitable Docu-
ment Types”.
Curled pages
Flatten the document. See P.10 “Suitable Document Types”.
Incorrect document type
Use a proper document type. See P.10 “Suitable Document
Types”.
Mixed document types
The pages must all be of the same type.
Static electricity on the originals
Shuffle the document. See P.11 “Memory Transmission”.
User maintenance is needed.
Do user maintenance, especially roller (1). See Chapter 9,
“Cleaning the Rollers and Scanner”in the Advanced Features manual.
Copier silicone oil on the originals
Wait a few minutes, and then try again.
Incorrect alignment of originals
Align the edges of the document. See P.11 “Memory Trans-
mission”.
Curled pages
Flatten the document. See P.10 “Suitable Document Types”.
Incorrect document type
Use a proper document type. See P.10 “Suitable Document Types”.
More than 30 pages in the feeder
Do not place more than 30 pages in the automatic document
feeder at once.
User maintenance is needed.
Do user maintenance, especially rollers (1,8). See Chapter 9,
“Cleaning the Rollers and Scanner”in the Advanced Features manual.
4
47
Page 58

4
Troubleshooting
Problem Required Action
Transmission cannot take place;
CLEAR ORIGINAL appears.
Transmission cannot take place.
Before taking action, wait until
the machine is standby mode,
and then press the {
Consistent difficulty in communicating with a particular terminal
Consistent poor image quality
when communicating with a
particular terminal
RECEPTION
The telephone keeps ringing and
no fax is printed.
RECEPTION/COPYING
No printout; the Add Paper indicator is lit.
No printout;
pears.
Copies are blank. The original must be placed face down in the document
Stop
} key.
CLEAR COPY ap-
The document is jammed in the feeder.
Remove the jammed document. See P.38 “Clearing a Docu-
ment Jam”.
The document may be longer than the maximum limit (see
Chapter 11, “Document and Paper Specifications”in the Advanced Features manual).
Make sure that none of your originals exceed this limit.
Do user maintenance, especially rollers (1,8). See Chapter 9,
“Cleaning the Rollers and Scanner”in the Advanced Features manual.
The other machine is out of order.
Check the error report.
Ask the other party to check their machine and correct the
fault.
The line is noisy.
Check that the dial tone is sent out.
Try to retransmit.
There are some bad lines between you and that other terminal.
Store that terminal's number as a Quick Dial Key or Speed
Dial Code.
Then call a service representative. Inform the nature of the
problem and give the Quick Dial Key or Speed Dial Code
that you stored the number in.
You are in TEL mode.
Change to FAX mode. See P.17 “Reception Modes”.
Power is switched off.
Switch the power on.
The cassettes are empty.
Add Paper . See P.31 “Loading Paper in the Main Cassette”.
The printer has jammed.
Clear the jam. See P.39 “Clearing a Copy, Fax, or Print Jam”.
feeder.
Position the original correctly. See P.11 “Memory Transmis-
sion”.
48
Page 59

Problem Required Action
Copy paper misfeeds occur frequently.
Stripes on copies. The scanner is dirty.
TELEPHONING
You cannot receive phone calls;
the unit only rings once then
goes into receive mode.
You cannot receive phone calls;
the unit does not ring.
Is the proper paper in the paper cassette?
Paper size and weight must be within the standards set for
this machine.
Is it folded, wrinkled, damp, or curled paper in the paper
cassette?
Always use dry, undamaged paper.
Is the paper set properly in the paper cassette?
Always load paper correctly. See P.31 “Loading Paper in the
Main Cassette”.
Make sure that there is not too much paper in the trays; do
not fill them up over the load limit mark.
Are there any pieces of misfed paper or other foreign objects
in the machine?
Make sure that the paper path is completely clear of paper
and other material after a misfeed.
Are you copying onto recycled paper?
Fan the stack of recycled paper and load it in the paper tray.
Clean the scanner (6). See Chapter 9, “Cleaning the Rollers
and Scanner” in the Advanced Features manual.
You are in FAX mode.
Change to TEL mode. See P.17 “Reception Modes”.
The telephone line is not connected.
Connect the modular cord. See Chapter 10, “Connecting Up
to the Telephone Line” in the Advanced Features manual.
Solutions to Common Problems
4
49
Page 60

INDEX
A
,
,
5
,
5
5
17
Add Paper indicator
Add Toner indicator
Arrow keys
Auto Mode
,
C
Canceling a Memory Transmission
Before start is pressed
During Transmission
While the document is being scanned in
While the message is awaiting
transmission (Functions 21)
Canceling an Immediate Transmission
Before start is pressed
While dialing or during transmission
,
Characters
Check Display indicator
CLEAR COPY
Clearing a Jam
Clear key
Communication Problems
Control Panel Display
Copy key
CSI → FAX NUMBER
29
,
Cassette Entrance
Document
inside the machine
inside the Main Machine
Upper Rear Unit
,
,
,
6
6
,
14
,
14
,
15
,
,
,
,
5
41
39
,
39
42
,
37
,
5
,
19
39
38
D
Document Delivery Tray
Document Guide
Document Jam
Document Table
,
,
,
38
,
3
4
4
,
,
14
E
Editing
Fax Numbers
Group
Quick Dial Numbers
Speed Dial Numbers
Energy Saver key
14
,
,
,
Entering
Characters
Symbols
Erasing
14
15
15
Group
Quick Dial Numbers
Speed Dial Numbers
Error Messages
F
FAX HEADER
,
Faxing
Fax mode
FAX NUMBER
Front Cover
Front Cover Release Lever
Function key
,
,
,
9
,
22
25
,
,
29
27
,
,
17
,
,
4
,
6
,
22
,
,
29
19
19
23
6
,
22
,
23
44
,
4
G
Group Dial List
Group Key
,
26
,
28
H
,
Handset
4
I
5
5
19
, 5,
, 6,
,
15
36
17
36
Immediate Transmission
Indicators
Add Paper
Add Toner
Check Display
Manual Receive
Memory
Receive File
Initial Settings
Introduction
,
,
,
5
, 5,
,
,
3
50
Page 61

M
Main Paper Cassette
Main switch
Manual Receive indicator
Memory indicator
Memory Transmission
Multi-purpose Feeder
,
,
4
,
5
O
On Hook Dial key
Operation Panel
OWN NAME
Own number
,
6
, 4,
,
19
,
19
P
,
Paper
31
Part Names
Pause/AI Redial key
Print Delivery Tray
Programming
,
3
,
FAX HEADER
FAX NUMBER
Fax Numbers
Group
Group key
OWN NAME
Own number
Quick Dial Numbers
Speed Dial Numbers
,
,
,
,
22
25
,
28
,
,
19
Q
Quick Dial
Quick Dial Label
,
22
,
23
S
,
,
3
11
,
17
6
,
15
11
,
31
,
,
6
,
46
,
5
,
10
19
5
,
,
3
19
,
19
3
, 6,
17
11
4
Second Paper Cassette
Sending a Fax
Solutions to Common Problems
Speed Dial
Speed Dial/Tel Directory key
Start key
Stop key
Suitable Document Type
Symbols
,
23
,
6
,
6
,
7
T
Telephone mode
Ten key pad
Transmission
5
Troubleshooting
TTI → FAX HEADER
Immediate
Memory
,
,
U
User Function keys
V
19
,
22
,
23
Volume Control
W
Wild Cards
,
34
,
29
R
Receive File indicator
Reception Mode
Fax Mode
Telephone Mode
Reception Mode key
Reports
Speed Dial List
Resolution
Resolution key
RTI → OWN NAME
,
,
16
,
,
5
17
,
17
,
6
,
23
5
,
19
51
Page 62

52 UE USA H546
Page 63

FAX2050L
Advanced Features
Page 64

Page 65

Introduction
This manual contains detailed instructions on the operation and maintenance of this machine. To get
maximum versatility from this machine all operators should carefully read and follow the instructions in
this manual. Please keep this manual in a handy place near the machine.
Please read the Safety Information in the Advanced Features manual before using this machine. It contains important information related to USER SAFETY and PREVENTING EQUIPMENT PROBLEMS.
Notes:
Some illustrations might be slightly different from your machine.
Certain options might not be available in some countries. For details, please contact your local dealer.
Laser Safety:
The Center for Devices and Radiological Health (CDRH) prohibits the repair of laser-based optical unit
in the field. The optical housing unit can only be repaired in a factory or at a location with the requisite
equipment. The laser subsystem is replaceable in the field by a qualified Customer Engineer. The laser
chassis is not repairable in the field. Customer engineers are therefore directed to return all chassis
and laser subsystems to the factory or service depot when replacement or the optical subsystem is required.
Warning:
Use of controls or adjustment or performance of procedures other than those specified in this manual
might result in hazardous radiation exposure.
Two kinds of size notation are employed in this manual. With this machine refer to the inch version.
For good copy quality, Ricoh recommends that you use genuine Ricoh toner.
Ricoh shall not be responsible for any damage or expense that might result from the use of parts other
than genuine Ricoh parts in your Ricoh office product.
Important
Parts of this manual are subject to change without prior notice. In no event will the company be liable
for direct, indirect, special, incidental, or consequential damages as a result of handling or operating
the machine.
Power Source:
115V, 60Hz
Please be sure to connect the power cord to a power source as above. For details about power source,
see Chapter 10, “Connecting the Power and Switching On” in the Advanced Features manual.
Declaration of Conformity
Product Name: Facsimile
Model Number: FAX2050L
Responsible party: Ricoh Corporation
Address: 5 Dedrick Place, West Caldwell, NJ 07006
Telephone number: 973-882-2000
This device complies with part 15 of FCC Rules.
Operation is subject to the following two conditions:
1. This device may not cause harmful interference, and
2. this device must accept any interference received,
including interference that may cause undesired operation.
Page 66

USA
❖
FCC Requirements
1. This equipment complies with Part 68 of the FCC rules. On the cover of this equipment is a label
that contains, among other information, the FCC registration number and ringer equivalence
number (REN) for this equipment. If requested, this information must be provided to the telephone company.
2. This equipment uses the following USOC jack: RJ11C
3. The REN is used to determine the quantity of devices which may be connected to the telephone
line. Excessive REN's on the telephone line may result in the devices not ringing in response to
an incoming call. In most, but not all areas, the sum of the REN's should not exceed five (5.0).
Contact the telephone company to determine the maximum REN for the calling area.
4. If this equipment causes harm to the telephone network, the telephone company will notify you
in advance that temporary discontinuance of service may be required. If advance notice is not
practical, the telephone company will notify the customer as soon as possible. Also, you will be
advised your right to file a complaint with the FCC if you believe it is necessary.
5. The telephone company may make changes in its facilities, equipment, operations, or procedures that could affect the operation of the equipment. If this happens, the telephone company
will provide advance notice in order to make necessary modifications in order to maintain uninterrupted service.
6. In the event of operation problems (document jam, copy jam, communication error indication),
refer to the solving problems section in this manual.
7. If you cannot correct the problem, please contact the RICOH CORP. CUSTOMER SUPPORT
DEPT. at 1-800-FASTFIX for repair and warranty information. If it is causing harm to the telephone network, the telephone company may request you to disconnect the equipment from the
network until the problem is resolved.
8. This equipment cannot be used telephone company-provided coin service. Connection to Party
Line Service is subject to state tariffs.
❖
WHEN PROGRAMMING EMERGENCY NUMBERS AND/OR MAKING TEST CALLS TO
EMERGENCY NUMBERS:
1. Remain on the line and briefly explain to the dispatcher the reason for the call before hanging up.
2. Perform such activities in the off-peak hours, such as early morning hours or late evenings.
CANADA
The Industry Canada label identifies certified equipment. This certification means that the equipment
meets telecommunications network protective, operational, and safety requirements as prescribed in
the appropriate Terminal Equipment Technical Requirements document(s). The department does not
guarantee the equipment will operate to the user's satisfaction.
Before installing this equipment, users should ensure that it is permissible to be connected to the facilities of the local telecommunications company. The equipment must also be installed using an acceptable method of connection. The customer should be aware that compliance with the above conditions
may not prevent degradation of service in some situations.
Repairs to certified equipment should be coordinated by a representative designated by the supplier.
Any repairs or alterations made by the user to this equipment, or equipment malfunctions, may give the
telecommunications company cause to request the user disconnect the equipment.
User should ensure for their own protection that the electrical ground connections of the power utility,
telephone lines, and internal metallic water pipe system, if present, are connected together. This precaution may be particularly important in rural areas.
Caution: Users should not attempt to make such connections themselves, but should contact the appropriate electric inspection authority, or electrician, as appropriate.
The Ringer Equivalence Number (REN) assigned to each terminal device provides an indication of the
maximum number of terminals allowed to be connected to a telephone interface. The termination on
an interface may consist of any combination of device subject only to the requirement that the sum of
the Ringer Equivalence Numbers of all the devices does not exceed 5.
In accordance with IEC 60417, this machine uses the following symbols for the main power switch:
a means POWER ON.
b means POWER OFF.
Copyright © 2000 Ricoh Co., Ltd.
Page 67

Notice
Note to users in the United States of
America
Notice:
-
This equipment has been tested and
found to comply with the limits for a
Class B digital device, pursuant to
Part 15 of the FCC Rules. These limits
are designed to provide reasonable
protection against harmful interference in a residential installation. This
equipment generates, uses and can
radiate radio frequency energy and, if
not installed and used in accordance
with the instructions, may cause
harmful interference to radio communications. However, there is no guarantee that interference will not occur
in a particular installation. If this
equipment does cause harmful interference to radio or television reception, which can be determined by
turning the equipment off and on, the
user is encouraged to try to correct
the interference by one more of the
following measures:
• Reorient or relocate the receiving
antenna.
• Increase the separation between
the equipment and receiver.
• Connect the equipment into an
outlet on a circuit different from
that to which the receiver is connected.
• Consult the dealer or an experienced radio /TV technician for
help.
Warning
-
Changes or modifications not expressly approved by the party responsible for compliance could void
the user's authority to operate the
equipment.
Note to users in Canada
Note:
-
This Class B digital apparatus complies with Canadian ICES-003.
Remarque concernant les utilisateurs au
Canada
Avertissement:
-
Cet appareil numérique de la classe B
est conforme à la norme NMB-003 du
Canada.
i
Page 68

-Notice about the Telephone
Consumer Protection Act
(Valid in USA only).
The Telephone Consumer Protection
Act of 1991 among other things
makes it unlawful for any person to
send any message via a telephone fax
machine unless such message clearly
contains in a margin at the top or bottom of each transmitted page or on
the first page of the transmission, the
date and time it is sent and an identification of the business, other entity,
or other individual sending the message and the telephone number of the
sending machine or such business,
other entity or individual. This information is transmitted with your document by the TTI (Transmit Terminal
Identification) feature. In order for
you to meet the requirement, your
machine must be programmed by following the instructions in the accompanying Operation Manual. In
particular, please refer to the chapter
of Installation. Also refer to the TTI
(Transmit Terminal Identification)
programming procedure to enter the
business identification and telephone
number of the terminal or business.
Do not forget to set the date and time.
Thank you.
(For this machine, TTI is called FAX
HEADER.)
Although this equipment can use either loop disconnect or DTMF signalling, only the performance of the
DTMF signalling is subject to regulatory requirements for correct operation. It is therefore strongly
recommended that the equipment is
set to use DTMF signalling for access
to public or private emergency services. DTMF signalling also provides
faster call set up.
ii
Page 69

Safety Information
R
R
When using your equipment, the following safety precautions should always be
followed.
Safety During Operation
In this manual, the following important symbols are used:
WARNING:
CAUTION:
R
WARNING:
•
Connect the power cord directly into a wall outlet and never use an extension cord.
•
Disconnect the power plug (by pulling the plug, not the cable) if the
power cable or plug becomes frayed or otherwise damaged.
•
To avoid hazardous electric shock or laser radiation exposure, do not
remove any covers or screws other than those specified in this manual.
•
Turn off the power and disconnect the power plug (by pulling the plug,
not the cable) if any of the following conditions exists:
•
•
•
•
Do not incinerate spilled toner or used toner. Toner dust might ignite
when exposed to an open flame.
•
Disposal can take place at our authorized dealer or at appropriate collection sites.
•
Dispose of the used toner cartridge in accordance with the local regulation.
Indicates a potentially hazardous situation which, if instructions
are not followed, could result in death or serious injury.
Indicates a potentially hazardous situation which, if instructions are not
followed, may result in minor or moderate injury or damage to property.
You spill something into the equipment.
You suspect that your equipment needs service or repair.
Your equipment's cover has been damaged.
iii
Page 70

R
CAUTION:
Protect the equipment from dampness or wet weather, such as rain, snow,
•
and so on.
•
Unplug the power cord from the wall outlet before you move the equipment.
While moving the equipment, you should take care that the power cord will
not be damaged under the equipment.
•
When you disconnect the power plug from the wall outlet, always pull the
plug (not the cable).
•
Do not allow paper clips, staples, or other small metallic objects to fall inside
the equipment.
•
Keep toner (used or unused) and toner cartridge out of the reach of children.
•
For environmental reasons, do not dispose of the equipment or expended
supply waste at household waste collection points. Disposal can take place
at an authorized dealer or at appropriate collection sites.
•
The inside of the machine could be very hot. Do not touch the parts with a
label indicating the “hot surface”. Otherwise it could cause a personal burn.
•
Our products are engineered to meet high standards of quality and functionality, and we recommend that you only use the expendable supplies available at an authorized dealer.
iv
Page 71

Important Safety Instructions
Grounding
In order to prevent potentially hazardous electrical shock, provide means of
connecting to the protective grounding conductor in the building, wiring those
grounding conductors of power cable and 3 pins plug.
Caution
When using your telephone equipment, basic safety precautions should always
be followed to reduce the risk of fire, electric shock and injury to persons, including the following:
• Do not use this product near water, for example, near a bathtub, wash bowl,
kitchen sink or laundry tub, in a wet basement or near a swimming pool.
• Avoid using a telephone during an electrical storm. There may be a remote
risk of electric shock from lightning.
• Do not use a telephone in the vicinity of a gas leak to report the leak.
• Use only the power cord and batteries indicated in this manual. Do not dispose of batteries in a fire. They may explode. Check with local codes for possible special disposal instructions
Save these instructions.
Certalnes mesures de sécurité doivent être prises pendant l'utilisation de matérial téléphonique afin de réduire les risques d'incendle , de choc électrique et de
blessures. En voici quelquesunes:
• Ne pas utiliser l'appareil près de l'eau, p.ex., près d'une balgnoire, d'un lavabo, d'un évier de cuisine, d'un bac à laver, dans un sous-sol humide ou près
d'une piscine.
• Éviter d'utiliser le téléphone (sauf s'il s'agit d'un apparell sans fil) pendant un
orage électrique. Ceci peut présenter un risque de choc électrique causé par la
foudre.
• Ne pas utiliser l'appareil téléphonique pour signaler une fulte de gaz s'il est
situé près de la fuite
• Utiliser seulement le cordon d'alimentation et le type de piles indiqués dans
ce manual. Ne pas jeter les piles dans le feu: elles peuvent exploser. Se conformer aux ègrlements pertinents quant à l'élimination des piles.
Conserver ces instructions.
v
Page 72

ENERGY STAR Program
As an ENERGY STAR Partner, we have determined
that this machine model meets the ENERGY STAR
Guidelines for energy efficiency.
The ENERGY STAR Guidelines intend to establish an international energy-saving system for
developing and introducing energy-efficient office equipment to deal with environmental issues, such as global warming.
When a product meets the ENERGY STAR Guidelines for energy efficiency, the Partner shall
place the ENERGY STAR logo onto the machine model.
This product was designed to reduce the environmental impact associated with office equipment by means of energy-saving features, such as Low-power mode.
• Low-power Mode
This product automatically lowers its power consumption 5 minutes after the
last hard copy has been completed. (In this mode, printing a received fax and
printing are available.)
To exit Low-power mode, press the {
Energy Saver
The machine returns to the ready condition in about 40 seconds.
For how to change the default interval before entering Low-power mode, see
P.118 “Energy Saving”.
} key.
Specification
❖
Low-power mode Power consumption 2W
Default Time 5min.
vi
Page 73

Energy Saving Modes
Energy Saving mode enables you to avoid using unnecessary power and economize on electricity. Although we recommend you use this mode from the viewpoint of environmental consciousness, you can also turn it off.
When you install this machines for the first time, Energy Saving mode is turned
on by default.
Two types of Energy Saving mode are available:
• Fax Standby: Use when you receive faxes regularly.
• Energy Saving Standby: Use when you wish to economize on power consumption.
Choose the one that best suits your circumstances.
Even though the operation panel display goes out in Energy Saving mode, Indicators that flash or light during communication or reception still work. When the
Receive File indicator lights, exit Energy Saving mode and take the appropriate
action.
Energy Saving
Mode Type
Fax Standby Display turns off
Energy Saving
Standby
You can turn Energy Saving mode on or off with User Parameter Function 63.
When the machine is shipped, Energy Saving Standby is selected on.
Status How long before
The machine maintains the heating
roller temperature at half the full temperature; warm up takes less time.
(Heater half cool)
Display turns off
The machine lets the heating roller cool
to room temperature; warm-up takes
longer.(Heater off)
you can print after
exiting Energy Saving mode
Within about 30s 25W
Within about 40s 2W
Power consumption
The machine enters Energy Saving mode when:
• Nobody uses the machine for about 5 minutes (the machine automatically enters Energy Saving mode)
• The user holds down the Energy Saver key for about 2 seconds.
vii
Page 74

To exit Energy Saving mode:
• In Energy Saving Standby mode, press the Energy Saver key.
• In FAX Standby mode, press any key.
• Set a document.
• Pick up the optional handset or the external telephone handset.
Note
❒ When you load paper in Energy Saving mode, no error will be displayed even
if the cassette is not pushed right in.
❒ After loading paper, press the Energy Saver key and check that "READY” is
shown on the display.
The Manual Receive indicator goes out in Energy Saving mode even if Manual
Receive is turned on.
Reception in Energy Saving mode
In Energy Saving mode, documents that have been stored in memory are still
sent and the machine can still receive messages.
When a message is received in Energy Saving mode, the machine prints it and
returns to Energy Saving mode.
Limitation
It is not possible to enter Energy Saving mode when an original is set.
Recycled Paper
Please contact your sales or service representative for recommended recycled
paper types that may be used in this machine.
viii
Page 75

How to Read This Manual
R
R
How to Read This Manual
Symbols
In this manual, the following symbols are used:
WARNING:
This symbol indicates a potentially hazardous situation that might result in
death or serious injury when you misuse the machine without following the instructions under this symbol. Be sure to read the instructions, all of which are described in the Safety Information section.
CAUTION:
This symbol indicates a potentially hazardous situation that might result in minor or moderate injury or property damage that does not involve personal injury
when you misuse the machine without following the instructions under this
symbol. Be sure to read the instructions, all of which are described in the Safety
Information section.
* The statements above are notes for your safety.
Important
If this instruction is not followed, paper might be misfed, originals might be
damaged, or data might be lost. Be sure to read this.
Preparation
This symbol indicates the prior knowledge or preparations required before operating.
Note
This symbol indicates precautions for operation, or actions to take after misoperation.
Limitation
This symbol indicates numerical limits, functions that cannot be used together,
or conditions in which a particular function cannot be used.
Reference
This symbol indicates a reference.
{}
Keys built into the machine's operation panel.
ix
Page 76

TABLE OF CONTENTS
Manuals for this machine ......................................................................... 1
Advanced Features (This Manual) ................................................................ 1
Basic Features .............................................................................................. 1
1.Advanced Transmission Features
Sending at a Specific Time (Send Later) ................................................. 3
Page Numbering (Page Count)................................................................. 4
Sending Your Identification at the Top of Your Message (FAX HEADER)
Personal Codes ......................................................................................... 6
Calling to Request a Message (Polling) .................................................. 7
Picking up Messages Stored Elsewhere (Polling Reception) ....................... 7
Operating Procedure..................................................................................... 7
Entering a Personal Code ............................................................................. 7
2.Communication Information
Erasing a Stored Message Before Sending (Functions 21 & 22).......... 9
File List (Function 42) ............................................................................. 10
Printing a Stored Message (Function 51).............................................. 11
Journal (Function 41) .............................................................................. 12
Printing a Confidential Fax Message (Function 52) ............................. 13
Printing a Memory-locked Message (Function 53)............................... 14
... 5
3.Transmission Features
Handy Dialing Functions ........................................................................ 15
Chain Dial.................................................................................................... 15
Telephone Directory.................................................................................... 15
Redial.......................................................................................................... 16
Dial Options................................................................................................. 17
Sending a Fax Using an External Telephone........................................ 19
Phoning and Faxing on the Same Call .................................................. 20
To Talk before Sending a Fax..................................................................... 20
Tone Signals ............................................................................................ 21
Using the Tone Key..................................................................................... 21
Transmission Functions ......................................................................... 22
Closed Network (Transmission) .................................................................. 22
Blank Sheet Detect ..................................................................................... 22
x
Page 77

More Transmission Functions ............................................................... 23
Checking if a Transmission was Successful ............................................... 23
Automatic Redialing.................................................................................... 23
Batch Transmission..................................................................................... 24
Dual Access ................................................................................................ 25
Parallel Memory Transmission.................................................................... 26
Printed Reports........................................................................................ 27
File Reserve Report (Switch 03, Bit 2) ........................................................ 27
Communication Result Report (Memory Transmission) (Switch 03, Bit 0)
Communication Failure Report (On if Communication Result Report is Off)
Journal (Switch 03, Bit 7) ............................................................................ 27
Transmission Result Report (Switch 03, Bit 5)............................................ 27
Report Formats ........................................................................................... 28
... 27
... 27
4.Reception Features
General ..................................................................................................... 29
Printing Messages that Have Been Received into Memory (Substitute Reception)
Receiving Message in Telephone Mode ..................................................... 30
Answering the Telephone ........................................................................... 30
Closed Network (Reception) ....................................................................... 30
Printing Options ...................................................................................... 31
Reverse Order Printing ............................................................................... 31
Center Mark ................................................................................................ 31
Page Length Reduction............................................................................... 31
If Incoming Messages Do Not Fit on Paper........................................... 32
Breaking Down Large Format Messages.................................................... 32
... 29
5.Copying
Copying .................................................................................................... 33
6.Facsimile User Tools
Programs.................................................................................................. 35
Storing a Program....................................................................................... 35
Labeling a Program..................................................................................... 36
Using a Program......................................................................................... 36
Erasing a Program / Changing the Program Label ..................................... 37
User Function Keys (Function 35) ......................................................... 38
Assigning a User Function Key ................................................................... 38
Using a User Function Key ......................................................................... 39
Reassigning a User Function Key ............................................................... 39
Clearing a User Function Key..................................................................... 39
Reports You Can Print Out Yourself...................................................... 40
Telephone Number List (Function 43)......................................................... 40
Program List (Function 44).......................................................................... 41
xi
Page 78

7.Key Operator Settings
Using Key Operator Settings.................................................................. 43
Setting the Date and Time (Function 91) .................................................... 43
Summer Time / Daylight Saving Time (Function 62) .................................. 43
Selecting the Display Language (Function 93) ........................................... 44
Counters (Function 94) ............................................................................... 44
Function Select ........................................................................................... 44
Programming a List of Senders to Treat Differently (Function 81).............. 47
Forwarding ................................................................................................. 50
Cassette Selection...................................................................................... 54
Rejecting or Accepting Messages from Specified Senders (Authorized Reception)
Saving Energy with the Power Saving Timer.............................................. 56
User Parameters......................................................................................... 58
Programming Personal Codes (Function 72).............................................. 63
Restricted Access ...................................................................................... 66
Storing the ID Code..................................................................................... 66
Programming the ID Code ......................................................................... 67
Editing the ID Code..................................................................................... 67
Locking Incoming Messages (Memory Lock).............................................. 68
Receiving Confidential Messages ............................................................... 70
Setting the Access Number (Function 61) .................................................. 72
Setting the Auto Ring Time (Function 61)................................................... 73
Setting the Phone Line Type (Function 62)................................................. 73
Adjusting the Printing Margins (Function 95).............................................. 74
RDS (Remote Diagnostic System).............................................................. 75
Calling the Service Station .......................................................................... 76
... 55
8.Troubleshooting
Help List ................................................................................................... 77
Clearing a Copy, Fax, or Print Jam........................................................ 78
Clearing a Jam in the Optional Second Cassette ....................................... 78
Lower Rear Unit.......................................................................................... 79
Reading Reports...................................................................................... 80
Error Report (Turned On/Off by a Service Representative) ........................ 80
Power Failure Report .................................................................................. 80
xii
Page 79

9.Maintaining Your Machine
Loading Paper in the Optional Second Paper Cassette ...................... 81
Loading Paper in the Optional Multi-purpose Feeder .......................... 84
Changing the Paper Size in the Main Cassette..................................... 85
Changing the Paper Size in the Optional Second Paper Cassette ..... 90
How to Change to the Legal Size................................................................ 94
Changing the Paper Size in the Optional Multi-purpose Feeder......... 95
Changing the Paper Size Settings ......................................................... 97
Cleaning the Rollers and Scanner ......................................................... 98
Replacing the Toner Cassette and Cleaning Pad................................. 99
Toner Cassette....................................................................................... 103
10.Installation
Before Installation ................................................................................. 105
Machine Environment ........................................................................... 106
Location..................................................................................................... 106
Ventilation Grill Direction ..................................................................... 107
Installing the Optional Memory Card................................................... 108
Installing The Optional Handset........................................................... 109
Connecting the Machine ....................................................................... 111
Connecting Up to the Telephone Line................................................. 112
Connecting the Power and Switching On ........................................... 113
11.Appendix
Options................................................................................................... 115
Specifications ........................................................................................ 116
Base Machine ........................................................................................... 116
Optional Second Paper Cassette.............................................................. 116
Optional Multi-purpose Feeder.................................................................. 116
Document and Paper Specifications ......................................................... 117
Energy Saving........................................................................................... 118
Storage Capacity....................................................................................... 121
Function List (11∼95) ............................................................................ 122
Error Codes............................................................................................ 125
Certification Label ................................................................................. 128
INDEX...................................................................................................... 129
xiii
Page 80

xiv
Page 81

Manuals for this machine
There are the Basic Features manual and the Advanced Features manual for this
machine. Please consult the manual that suits your needs.
Advanced Features (This Manual)
The Advanced Features manual describes more advanced functions, and also
explains settings for key operators.
Basic Features
The Basic Features manual explains the most frequently used fax functions and
operations.
❖
Chapter 1 Introduction
Describes Part Names of the machine and Operation Panel. Also contains
symbols and conventions used in this manual.
❖
Chapter 2 Faxing
Explains basic transmission. You can also find out about other types of transmissions and how to switch the Reception Modes.
❖
Chapter 3 Setup
Explains storing, editing and erasing Own Name and Fax Number. And also
explains Quick Dial, Speed Dial and Group key. These functions store numbers and save time when dialing. Also contains information on how to enter
letters and symbols.
❖
Chapter 4 Troubleshooting
Explains clearing a document jam, loading paper and adjusting the volume
and sounds. When unusual messages appear on display or the indicator
lights, check the list and take the appropriate action.
1
Page 82

2
Page 83

1. Advanced Transmission
Features
Sending at a Specific Time (Send Later)
This feature is called Send Later.
Using this feature, you can delay
transmission of your fax message until a specified time. This allows you to
take advantage of off-peak telephone
line charges without having to be by
the machine at the time.
Note
❒ If the machine memory is full, your
document will remain in the document feeder. As a result, anybody
removing the document will cancel the transmission.
Set your document, dial the desti-
A
nation fax number and press the
{
Yes
} key. Do not press the {
key.
Press V twice.
B
Start
SET OPTION Y/i
SEND LATER?
Note
❒ V is also the {
Press the {
C
Yes
Option
} key.
} key.
Enter a sending time that falls
D
within the following 24 hours.
SET OPTION KPAD/Y
TIME 11:30AM 10:00AM
Note
❒ For example: To send at 11:30
a.m., press {
from the key pad.
❒ If you enter the wrong time,
press the {
again.
Press {*} or {#} to chnage the AM/
E
}
PM.
1
} {1} {3} and {0}
No
} key and enter
SET OPTION */#/Y
TIME 11:30PM 10:00AM
Press the {
F
Note
❒ Use Function 21 to erase a
stored fax message before it is
sent (see P.9 “Erasing a Stored
Message Before Sending (Functions 21 & 22)”).
Yes
} key.
3
Page 84

Advanced Transmission Features
Page Numbering (Page Count)
1
This feature is called Page Count.
Page number will be printed on the
top of each page, when your fax message is received by the other party.
Using the Page Count feature, you
can select the batch-numbering page
numbers.
If you use Page Count, page numbers
will be printed in batch-numbering
format (for example, p1/3, p2/3, and
p3/3 for a three-page message). This
makes it easy for the other party to
see how many pages you sent, and if
any are missing. However, you have
to input the number of pages at the
ten key pad before sending.
If you do not use Page Count, page
numbers will be printed only as a sequence (for example, p1, p2, p3). This
makes it difficult for the other party
to tell at a glance whether any pages
are missing (for example, due to a
double feed in your machine's document feeder).
Limitation
❒ This feature is available with Im-
mediate Transmission and Parallel
Memory Transmission.
Note
❒ If you select Memory Transmis-
sion, Page Count is automatically
switched on, and the pages are
counted automatically.
❒ If the numbering with page count
appears strange, check that the
page count value matches the
number of pages in your document.
Press V until the following dis-
A
play appears.
SET OPTION Y/i
SET PAGES?
Press the {
B
Yes
} key.
SET OPTION KPAD
PAGES:kk
Enter {1} and {0} using the ten
C
key pad.
SET OPTION Y/N
PAGE:10
Note
❒ Example: 10 pages
Press the {
D
Yes
} key.
4
Page 85

Sending Your Identification at the Top of Your Message (FAX HEADER)
Sending Your Identification at the Top of
Your Message (FAX HEADER)
Normally, the FAX HEADER programmed in your machine is printed
at the other party's top of each page
when you transmit. The top of the image will be overprinted if there is no
margin at the top of the transmitted
page.
In some cases, you may wish the other party to receive an unmarked copy
of your original. In this case, you can
switch FAX HEADER off.
Important
❒ In the USA, this must contain the
telephone number of the line your
machine is connected to. It will be
printed on the header of every
page you send. Required in the
USA.
Note
❒ In the USA, law requires that your
fax number be included in the fax
header. Register the fax number
and switch on Fax Header Print
with the User Parameters. See P.58
“User Parameters”(switch 06, bit 0)
Press V until the following dis-
A
play appears.
Press W or V until the displayed
C
setting is correct.
SET OPTION Y/hi
ON iOFF
Press the {
D
have finished.
} key when you
Yes
1
SET OPTION Y/i
FAX HEADER PRINT?
Press the {
B
Yes
} key.
SET OPTION Y/hi
iON OFF
5
Page 86

Advanced Transmission Features
Personal Codes
1
Personal Codes do the following:
• They allow you to keep track of
machine usage. If everybody uses
a Personal Code when they use the
fax machine, the codes, or the
names programmed into the
codes, will be printed on a report
that is called the Journal. This will
help you to check on who has been
using the machine, and how often.
• They allow personalization of documents and printed reports. For
example, if you use Label Insertion
and store your name with your
Personal Code, the receiver of your
fax message will see your name at
the top of the printout. This eliminates the need for a cover page.
If you input your Personal Code, your
name will appear on the JOURNAL
and Transmission Result Report.
Reference
See P.63 “Programming Personal
Codes (Function 72)”.
See P.12 “Journal (Function 41)”.
Press V until the following dis-
A
play appears.
Enter the personal code.
C
Note
❒ Example: {7} {3} {6} {2} from
the ten key pad.
SET OPTION Y/N
PERSONAL CODE:7362
Press the {
D
Yes
} key.
SET OPTION Y/i
SET PERSONAL CODE?
Press the {
B
Yes
} key.
SET OPTION KPAD
PERSONAL CODE:kkkk
6
Page 87

Calling to Request a Message (Polling)
Calling to Request a Message (Polling)
Polling means “picking up” a document that has been left for you at a remote fax terminal.
Limitation
❒ Polling can only be used when
both machines have the Polling
feature.
Note
❒ With polling, telephone line costs
are charged to the person receiving
the message (the Message Receiver).
Operating Procedure
Press {
A
the {
Function
Yes
POLLING RECV OPTIONi
DIAL FAX NUMBER
Enter the Dial number.
B
POLLING RECV Y/START
2125551234kkkkkkkkkk
} {1} {1}, and then
} key.
1
Picking up Messages Stored
Elsewhere (Polling Reception)
Use this feature when you wish to
poll a message from another terminal.
Note
❒ The number of terminals that you
can poll in one operation is one.
Reference
Groups: see Chapter 3, “Storing
and Editing a Group of Fax Numbers (Function 33)” in the Basic
Features manual.
Programming Keystrokes: see P.35
“Programs”.
Press the {
C
Yes
} key.
POLLING RECV Y/START
2125551234kkkkkkkkkk
Press the {
D
Start
} key.
Entering a Personal Code
Press the {
A
the {
Yes
Function
} key.
POLLING RECV OPTIONi
DIAL FAX NUMBER
Press V.
B
SET OPTION Y/i
SET PERSONAL CODE?
Press the {
C
Yes
SET OPTION KPAD
PERSONAL CODE:kkkk
} {1} {1} and
} key.
7
Page 88

Advanced Transmission Features
Enter the personal code that you
D
wish to use for this operation.
1
SET OPTION Y/N
PERSONAL CODE:2567
Note
❒ Example: {2} {5} {6} {7} from
the ten key pad.
Press the {
E
Yes
} key.
POLLING RECV OPTIONi
DIAL FAX NUMBER
Dial the fax number, and then
F
press the {
Start
} key.
8
Page 89

2. Communication
Information
Erasing a Stored Message Before Sending
(Functions 21 & 22)
Every time you store a fax message in
your machine's memory, a new file is
created. A file is also created for storing instructions to pick up a fax message left elsewhere ( see P.7 “Calling to
Request a Message (Polling)”). Each file
is given a number. This number appears on the File Reserve Report,
Journal and Transmission Result Report. To see which files are currently
in memory, you may print a file list.
Either :
A
Erasing a fax message stored in
memory
A To erase a fax message stored
in memory; press {
1
}, and then the {
{
Function
Yes
} {2}
} key.
FILE NO.kkk KPAD/hi
PRINT LISTh/SEARCHi
Erasing instructions that pick up
messages (polling)
A Press {
then the {
Function
Yes
} key.
} {2} {2}, and
Press V to scroll through the mes-
B
sages.
You will see the display. A number
or a label will appear on the lower
line.
FILE NO.027 Y/hi
5551234
Note
❒ Press W to obtain a list of all the
files and their number. If you already know the number of the
file to erase, enter it directly
from the ten key pad.
Press the {
C
Yes
} key.
FILE NO.027 Y/N
CLEAR?
Press the {
D
the file.
Press the {
E
Note
❒ To erase another file, go to step
B
Yes
} key again to erase
Function
.
} key.
9
Page 90

2
Communication Information
File List (Function 42)
This is a list of memory transmissions, memory receptions, polling
files still in memory and confidential
receptions. It gives information about
each stored file, such as the fax numbers, start time, and status.
Press {
A
the {
Press the {
B
the report.
Function
} key.
Yes
} {4} {2}, and then
} key to print out
Start
10
Page 91

Printing a Stored Message (Function 51)
Printing a Stored Message (Function 51)
If you need to see the contents of any
files, use this feature.
A
Press {
the {
Yes
Function
} {5} {1}, and then
} key.
FILE NO.kkk KPAD/hi
PRINT LISTh/SEARCHi
Press V to scroll through the mes-
B
sages.
You will see the display. A number
or a label will appear on the upper
line.
FILE NO.115 Y/hi
5551234
Note
❒ Press W to obtain a list of all the
files and their number. If you already know the number of the
file to print, enter it directly
from the ten key pad and skip to
step D.
Press the {
C
A number or a label will appear on
the upper line.
Yes
} key.
FILE NO.115 START/N
6661234
2
Press the {
D
message.
} key to print the
Start
11
Page 92

Communication Information
Journal (Function 41)
In addition to the automatic printout
of this report, the journal can be printed at anytime.
2
Press {
A
the {
Press the {
B
the report.
Function
} key.
Yes
} {4} {1}, and then
} key to print out
Start
12
Page 93

Printing a Confidential Fax Message (Function 52)
Printing a Confidential Fax Message
(Function 52)
If the Receive File indicator is blink-
ing, do the following to print the message.
Note
❒ If the Receive File indicator is
blinking, an incoming fax message
has been stored in the memory using the Memory Lock feature or
Confidential Reception feature.
Reference
To print the message which is
Memory Locked, see P.14 “Printing
a Memory-locked Message (Function
53)”.
2
A
Press {
the {
Yes
Function
} {5} {2}, and then
} key.
CONFID’L ID KPAD
kkkk
Input the ID.
B
CONFID’L ID START/N
6754
Note
❒ Example: {6} {7} {5} {4} from
the ten key pad.
❒ If you cannot print out a confi-
dential file with this ID, you
have entered the wrong ID or
the sender may have over-ridden your ID. Contact your sender.
Press the {
C
Start
} key.
13
Page 94

2
Communication Information
Printing a Memory-locked Message
(Function 53)
If the Receive File indicator is blink-
ing, a message has been stored using
Memory Lock. Print it using the following procedure.
Note
❒ If the Receive File indicator is
blinking, an incoming fax message
has been stored in the memory using the Memory Lock feature or
Confidential Reception feature.
Reference
To print the message using the
Confidential Reception. (see P.13
“Printing a Confidential Fax Message
(Function 52)”
14
A
Press {
the {
Yes
Function
} {5} {3}, and then
} key.
LOCK ID KPAD
kkkk
Input the Memory Lock ID.
B
LOCK ID START/N
4633
Note
❒ Example: {4} {6} {3} {3} from
the ten key pad.
Press the {
C
Start
} key.
Page 95

3. Transmission Features
Handy Dialing Functions
Chain Dial
This feature allows you to compose a
telephone number from various
parts, some of which may be stored as
Quick Dial keys or Speed Dial codes,
and some of which may be entered at
the ten key pad.
You can program commonly used
area or country codes into Speed Dial
codes or Quick Dial keys.
Example: 01133-1-5553333 (From the
United States to Paris).
Assume that the following Quick Dial
and Speed Dial numbers have already been programmed.
• Quick Dial 01 = 01133 (Overseas to
France)
• Quick Dial 02 = 1 (Paris)
• Speed Dial 10 = 555
❖
On Hook Dial or Handset Mode:
Press {01} {02} and the {
} key {1} {0}, and then {3} {3}
al
} {3}.
{
3
❖
Other:
Press {01} and the {
{
} and the {
02
} keys {1} {0}, and then {3} {3}
Dial
} {3}.
{
3
Pause
Speed Di-
Pause
} key, {
} key,
Speed
Telephone Directory
This can be done for any number that
you have stored as a Speed Dial code
with a label programmed for it.
Example : you wish to dial “ XYZ CO.
NEWYORK “.
Make sure that the machine is in
A
standby mode.
READY 100% 10:00AM
SET DOC. OR DIAL NO
Carefully place your fax message
B
into the auto document feeder.
TRANSMIT OPTIONi
DIAL FAX NUMBER
Press the {
C
key.
SPEED DIAL 0-4
PUSH NUM OR ABC
Press the first letter of the name.
D
TEL DIR. Y/hi
b01 XA COMPANY
Speed Dial/Tel Directory
}
If the label you want does not ap-
E
pear, scroll through the labels using W and V until you find it.
TEL DIR. Y/hi
b12 XYZ CO.NEW YORK
15
Page 96

Transmission Features
3
Press the {
F
number you want.
Either :
G
• Dial more numbers.
• Press the {
} key to dial the
Yes
} key.
Start
Redial
If a message was not transmitted successfully, you can redial with just a
few keystrokes by using the AI redial
key.
Using the AI Redial key
The machine can remember the last
10 numbers dialed on the numeric
keypad, and one previously dialed
Quick Dial/Speed Dial. If you have to
redial one of these numbers, just
press the {
quired telephone number or name is
displayed, and then press the {
key.
This feature has the following uses.
• If the machine is waiting to redial
the other party, you do not have to
wait for the redialing interval to
expire. Press the {
til the required telephone number
or name is displayed, and then
press the {
• If you wish to send another message to the same address that you
sent one to recently, you do not
have to dial the full number again
if it is still in the Redial memory.
Place the message into the feeder,
and then press the {
Al Redial
} key until the re-
Al Redial
} key.
Start
Start
Start
} key un-
} key.
Press the {
A
til the required number appears
in the display, and then press the
{
Yes
Pause/Al Redial
} key twice.
} key un-
REDIAL Y/hi
a01 XYZ CO. NEW YORK
Carefully place your fax message
B
into the Document Guide feeder.
TRANMIT DIAL/START
DIAL NEXT FAX NUMBER
If you dial another party
A Select another number. (Broad-
casting)
If you dial no other party
A Press the {
transmission.
}
} key to start the
Start
16
Page 97

Handy Dialing Functions
Dial Options
The Dial Options provide access to
various F-code features which are designed to allow confidential transmission and polling reception between
different makers' fax machines. Use
them if the other party's fax machine
is of a different make and supports
the F-code features. Before you can
use the Dial Options, you need to program Quick Dial key 29 as the Dial
Option key if you have not done so already (see the following details).
Assigning the Dial Option key
This procedure describes how to set
up Quick Dial key 29 as the Dial Option key.
Press {
A
the {
Function
Yes
ak QUICK/hi
PRINT LISTh/SEARCHi
Press Quick Dial key {29}.
B
} {3} {1}, and then
} key.
Using Dial Options
To use Dial Options, follow the procedures below, only after you have dialed the destination fax number and
before pressing the {
Press the Dial Option key (Quick
A
Dial 29).
Start
} key.
Y/N
SUB? (S)
Do one of the following:
B
• If you wish to set the SUB code
for confidential transmission to
different makers' machines,
press the {
Yes
} key.
TRANSMIT Y/START
55512345
• To skip SUB, press the {No} key,
and then go to step D for polling
reception from different maker's fax machines.
Enter the SUB code on the ten key
C
pad then press the {
Yes
} key.
3
a29 PROGRAM? Y/hi
Press the {
C
Yes
} key.
a29 Y/N
PROG. DIAL OPTION?
Press the {
D
Yes
} key.
ak QUICK/hi
PRINT LISTh/SEARCHi
Press the {
E
Function
} key.
Y/N
SEP? (P)
Do one of the following:
D
• If you wish to set the SEP code,
press the {
Yes
} key.
TRANSMIT Y/START
555512345S9999P
• To skip SEP, press the {No} key
and go to Step F.
17
Page 98

Transmission Features
3
Enter the SEP code on the ten key
E
pad and then press the {
Yes
Y/N
SID? (I)
Do one of the following:
F
• If you wish to set the SID code,
press the {
Yes
} key.
TRANSMIT Y/START
2345S9999P1234Ikkkkk
• To skip SID, press the {No}
key and go to step H.
Enter the SID code on the ten key
G
pad, and then press the {
Yes
Y/N
PWD? (W)
Do one of the following:
H
• If you wish to set the PWD
code, press the {
Yes
} key.
TRANSMIT Y/START
345S9999P1234Ikkkkkk
} key.
} key.
Do one of the following:
J
• If you wish to enter a space,
press the {
Yes
} key.
TRANSMIT Y/START
•Press the {No} key.
Press the {
K
Start
} key.
18
• To skip PWD, press the {No}
key and go to step J.
Enter the PWD code on the ten
I
key pad, and then press the {
key.
Y/N
SPACE?
Yes
}
Page 99

Sending a Fax Using an External Telephone
Sending a Fax Using an External
Telephone
You can send a fax message using the
handset. (External telephone is required.)
Set the document, and then pick
A
up the handset.
Dial the other party.
B
If you hear a voice, continue your
C
conversation as you would normally.
If you hear a high-pitched tone
instead of a voice
3
A Press the {
Go to step E.
When you are ready to send your
D
fax message, ask the other party to
press the {
Replace the handset.
E
Start
Start
} key.
} key.
19
Page 100

3
Transmission Features
Phoning and Faxing on the Same Call
This feature is available when you
connect the optional handset or the
external telephone.
To Talk before Sending a Fax
Pick up the handset.
A
Dial the other party.
B
Note
❒ Do not press the {
If you hear a voice, continue your
C
conversation as you would normally.
If you hear a high-pitched tone
instead of a voice
A Place your fax message in the
feeder, and then press the
} key.
{
Start
Go to step E.
Start
} key.
20
When you are ready to send your
D
fax message, place your message
in the feeder, and then ask the
other party to press the {
key.
Replace the handset.
E
Start
}
 Loading...