

Page 1

Before Y ou
Use This
Machine
Before you can send or receive fax messages,
please take about 30 minutes to set up your machine.
Set up your machine as in the following procedures.
Keep going...
Page 2
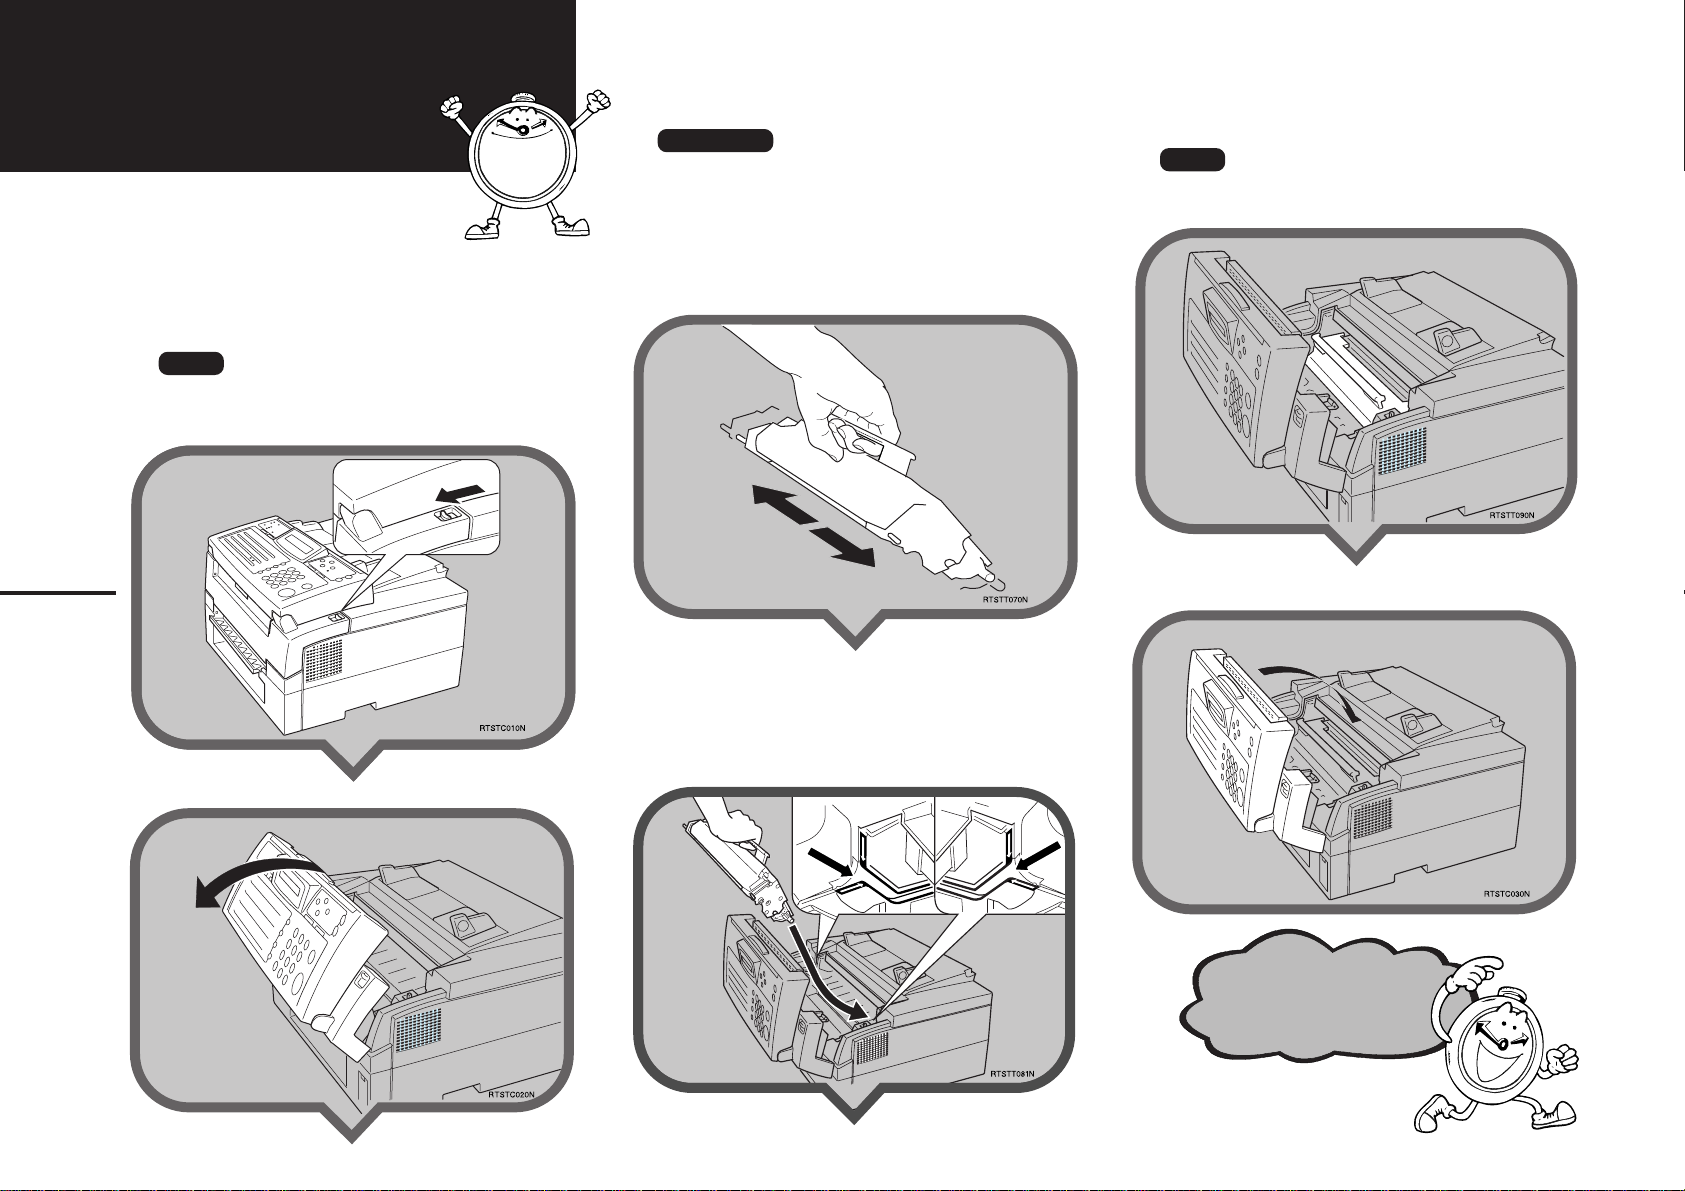
Installing the
T oner Cassette
1
1.Remove all tape from the machine.
Pull the cover release lever towards you
and open the top cover.
Note
T If you do not pull the le ver , only the upper unit will
open.
2.Prepare the toner cassette.
Important
T Do not touch the green drum.
1. Remove the toner cassette from its bag.
2.Hold the cassette level horizontally and shake it
gently from side to side a few times.
4.Press down on the cassette until it locks
into place.
Note
T If you do not push the cassette right in, the cover
will not close.
1
5.Close the top cover.
3.Hold the cassette as shown and rest it in
the machine. Make sure it fits in the slots
provided on either side.
Keep going...
Page 3
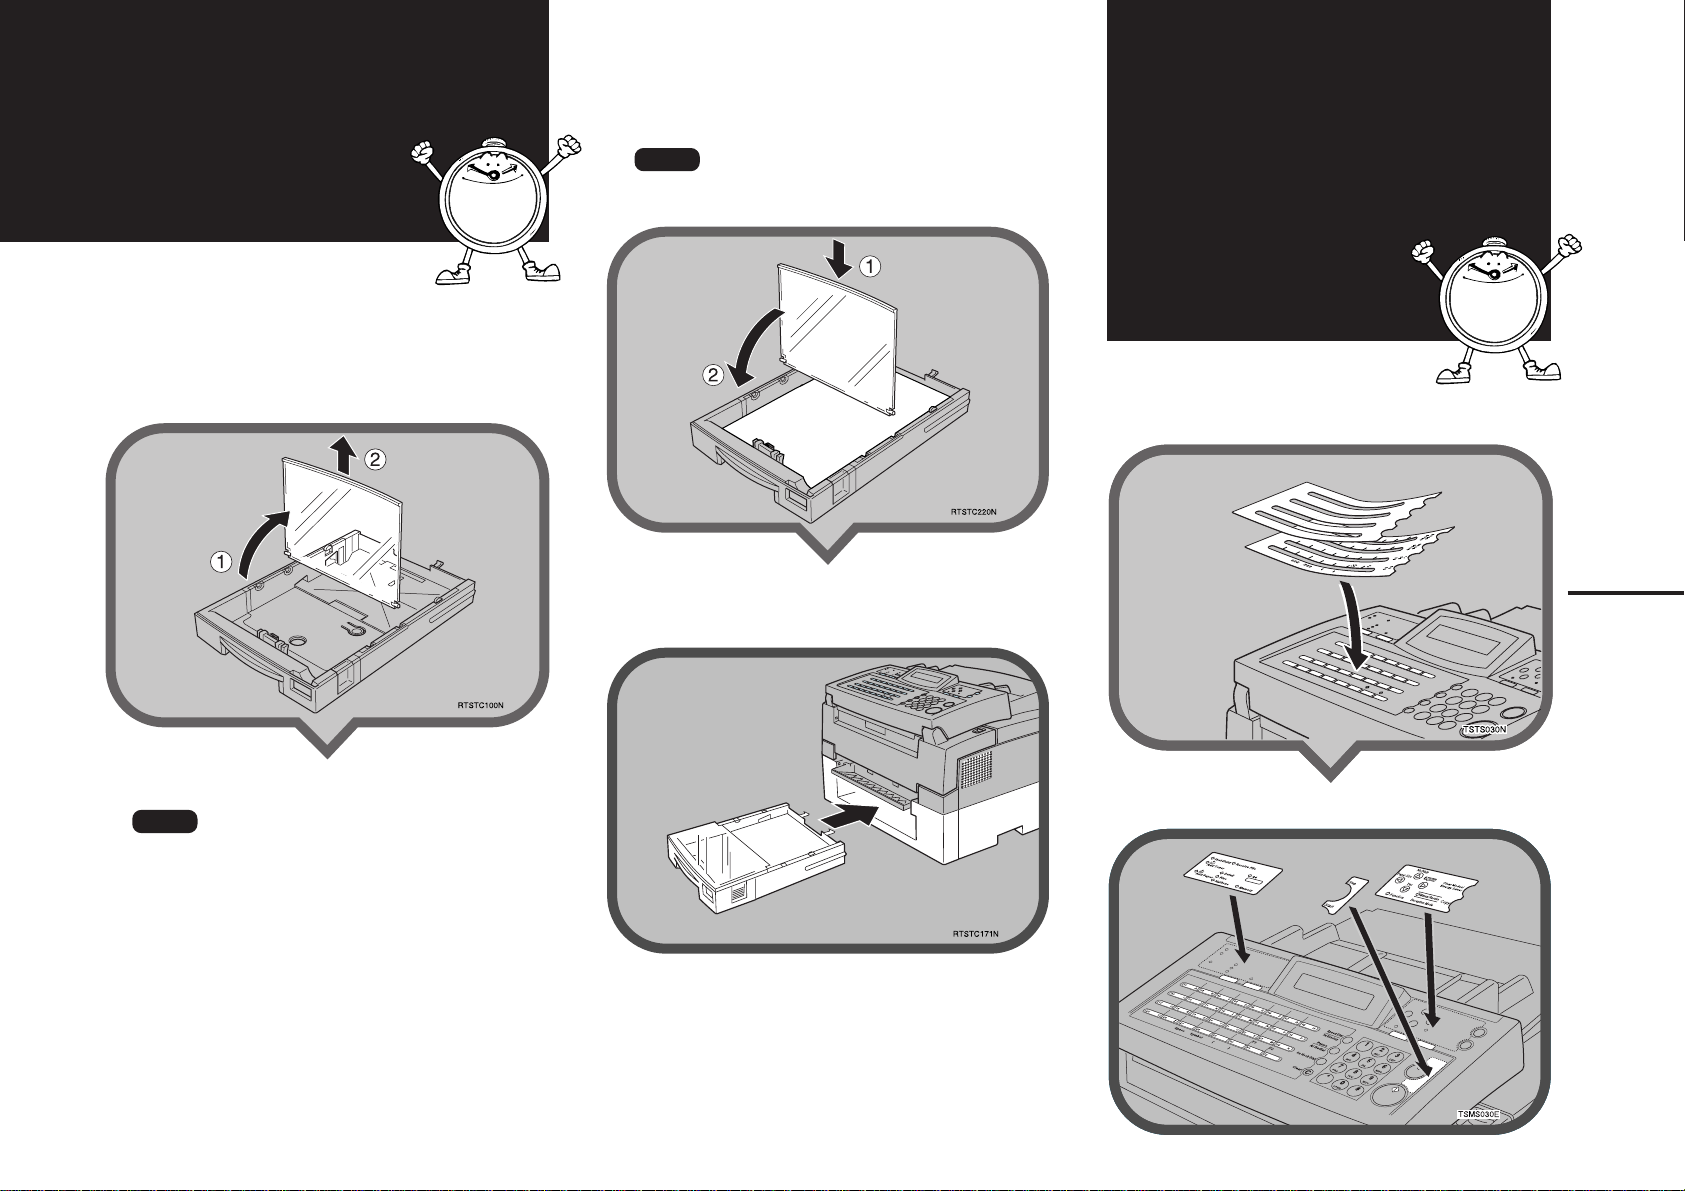
Installing the
Main Paper
Cassette
1.Unpack the cassette.
2
5.Set the paper then lower the cassette
cover.
Note
T The frosted side of the co v er must be face up when
closed.
Attaching the
Quick Dial Sheet
And Operation
Panel Sheet
2.Peel off the 3 pieces of tape from the
cassette cover.
3.Raise the cassette cover.
4.If necessary, adjust the paper size.
Note
T To change the paper size in the cassette, see “Chang-
ing the Paper Size in the Main Cassette” in the fax
manual.
3
1.Fit the Quick Dial Sheet and Cover Sheet over
the Quick Dial keys.
2
6.Install the cassette. Push it in firmly until it
locks into place.
2.Fit the 3 Operation Panel Sheets as shown.
Page 4

Attaching the
Trays And Document T able
1.Attach the Print Delivery Tray. Insert it at an
angle so that the tabs fit in the slots provided.
3
4
2.Attach the Document Delivery Tray.
3.Attach the Document Table.
4.If necessary, pull out the extensions on the
Document Table and trays.
Keep going...
Page 5

Connecting up
Connecting the
to the Telephone Line
5
There are two similar sockets located at the rear
of the machine:
TEL1: For the external telephone
LINE: Telephone line connection
1.Insert the line cable into the socket labeled
“LINE”.
Power and
Switching on
6
1.Insert the power cable into the socket
located at the rear of the machine.
2.Plug in the cable to the mains.
Warning
T Power requirements : 220-240V, 50/60Hz
T Insert the power plug securely into the wall socket.
T Make sure that the wall outlet is near the machine
and readily accessible.
T Do not connect other equipment to the same socket.
3.Turn the power switch on.
4
2.
Connect the other end to your telephone line.
Keep going...
Page 6

Initial Settings &
Adjustments
Before using the machine, please adjust the f ollowing settings:
• G3 Own Number
• RTI (Remote T erminal Identification), TTI (T ransmitter T erminal Identification), and CSI (Called
Station Identification)
• Phone Line Type
• Date & Time
T o enter letters, use the A-Z keys (Quick Dial 01-
26). To enter a space, press Quick Dial 27. To
enter Symbols, press Quick Dial 28. T o enter digits, use the ten key pad.
5
1.Press the [Function] key and [6], enter the
access code [2][2][2][2], then enter [6][1].
INITIAL MODE Y/NEXT
61 INITIAL SET
2.Press the [Yes] key.
Y/NEXT
SET G3 OWN NUMBER
3.Press the [Yes] key again.
G3 OWN NO. KPAD
❚❚❚❚❚❚❚❚❚❚❚❚❚❚❚❚
V
V
7
4.Enter your phone number.
Note
TThe format of the number is normally as
follows: International Dial Prefix, Your Country
Code, Your Area Code, then you must add a
Pause, followed by your telephone number.
Check the International Dialing Prefix and the
Country Code with your local telecommunications
operator. The example shown is for the USA; the
codes to add are 011 and 1.
G3 OWN NO. KPAD/Y/N
0111212-5551234
❚
5.Press the [Yes] key.
“PROGRAMMED” will flash on the display and
you’ll get the display.
Y/NEXT
SET CONFIDENTIAL ID
6.Press the
Y/NEXT
SET RTI
V
key.
V
V
7.Press the [Yes] key.
RTI ABC
❚❚❚❚❚❚❚❚❚❚❚❚❚❚❚❚❚❚❚❚
8.Enter your office, company, or personal
name, or any other appropriate identification.
RTI ABC Y/N
XYZ COMPANY
❚❚❚❚❚❚❚❚❚
9.Press the [Yes] key.
“PROGRAMMED” will flash on the display.
10.
Press the [Yes] key.
TTI CHANGE? Y/N
XYZ COMPANY
11.
Press the [No] key to keep the TTI as it is.
Y/NEXT
SET CSI
12.
Press the [Yes] key.
CSI KPAD
❚❚❚❚❚❚❚❚❚❚❚❚❚❚❚❚❚❚❚❚
13.
Enter your phone number including the
country and area codes (but no pauses).
Note
TThis should be the same as your fax number.
CSI KPAD/Y/N
12125551234
14.
Press the [Yes] key then the [Function] key.
“PROGRAMMED” will flash on the display.
READY 100% 10:00
SET DOC. OR DIAL NO.
❚❚❚❚❚❚❚❚❚
V
Y/NEXT
SET TTI
V
Keep going...
Page 7

Setting the
Setting the Date
Changing the Paper
Phone Line
8
1.Press the [Function] key and [6], enter the
access code [2][2][2][2], then enter [6][2].
INITIAL MODE Y/NEXT
62 SELECT FUNCTION
2.Press the [Yes] key.
Y/NEXT
SELECT LINE
3.Press the [Yes] key again.
SELECT LINE Y/
TT PD
V
4.Press
tone dial line (TT) or a pulse dial line (PD).
Note
T If the appropriate line type is selected, you don’t
need to change the setting.
SELECT LINE Y/
V
and V to set your machine for a
W
TT PD
5.Press the [Yes] key then the [Function] key.
“PROGRAMMED” will flash on the display.
READY 100% 10:00
SET DOC. OR DIAL NO.
V
V
WV
WV
& Time
9
1.Press the [Function] key and [6], enter the
access code [2][2][2][2], then enter [9][1].
ADJUSTMENT Y/NEXT
91 ADJUST CLOCK
2.Press the [Yes] key.
A date and time will appear.
SAT KPAD/Y
24 JUL 1999 01:35
3.Enter the date on the ten key pad, e.g. [3]
[0].
FRI */#/Y
30 JUL 1999 01:35
4.Change the month using * or # (* to scroll
forward, or # to scroll backward) on the ten
key pad, then press V to move the cursor.
MON KPAD/Y
30 AUG 1999 01:35
5.Enter the year and time with the ten key pad,
e.g. [9][9][1][0][2][5].
MON KPAD/Y
30 AUG 1999 10:25
6.Press the [Yes] key then the [Function] key.
“PROGRAMMED” will flash on the display.
READY 100% 10:25
SET DOC. OR DIAL NO.
V
Size Settings
10
When you change the paper size loaded in the
main cassette, optional second cassette or optional Multi-purpose Feeder, you need to change
the paper size settings.
1.Press the [Function] key and [3][7], and the
[Yes] key.
Y/
MAIN CASSETTE
2.Press the
cassette.
Y/
2ND CASSETTE
Note
T Only the cassettes installed appear in the display.
and V keys to select the
W
3.Press the [Yes] key.
2ND PAPER SIZE Y/
A4 (210×297 MM)
4.Press the
size in the cassette.
2ND PAPER SIZE Y/
LETTER (8.5×11 INCH)
and V keys to select the paper
W
5.Press the [Yes] key.
“PROGRAMMED” will flash on the display.
Y/N/
MULTIPURPOSE FEEDER
6.T o program another cassette, repeat 2 t o 5.
WV
WV
WV
WV
WV
6
7.Press the [Yes] key then the [Function] key.
“PROGRAMMED” will flash on the display.
READY 100% 10:00
SET DOC. OR DIAL NO.
Page 8

7
That’s it!
EE GB H547-8671
 Loading...