

Page 1
Operating Instructions
Software Guide
Preparing for Printing
1
Setting Up the Printer Driver
2
Other Print Operations
3
Direct Printing from a Digital Camera (PictBridge)
4
Making Printer Settings Using the Control Panel
5
Monitoring and Configuring the Printer
6
Using a Printer Server
7
Special Operations under Windows
8
Mac OS Configuration
9
Security Measures Provided by this Printer
10
Appendix
11
Read this manual carefully before you use this machine and keep it handy for future reference. For safe and correct use, be sure to read the Safety Information
before using the machine.
Page 2

Trademarks
Microsoft, Windows and Windows NT are registered trademarks of Microsoft Corporation in the United States
and/or other countries.
Adobe®, PostScript®, Acrobat®, PageMaker® and Adobe Type Manager are registered trademarks of Adobe
Systems Incorporated.
The Bluetooth® word mark and logos are owned by the Bluetooth SIG, Inc. and any use of such marks by Ricoh
Company, Ltd. is under license.
Apple, AppleTalk, EtherTalk, Macintosh, Mac OS and True Type are trademarks of Apple Computer Inc., registered
in the U.S. and other countries.
Bonjour™ is a trademark of Apple Computer, Inc.
PCL® is a registered trademark of Hewlett-Packard Company.
3Com is a trade mark of 3Com corporation.
Citrix® and MetaFrame® are registered trademarks of Citrix Systems, Inc.
UPnP is a trademark of the UPnP Implementers Corporation.
UNIX is a registered trademark in the United States and other countries, licensed exclusively through X/Open
Company Limited.
Novell, NetWare are registered trademarks of Novell, Inc.
Netscape and Netscape Navigator are registered trademarks of Netscape Communications Corporation.
Ethernet is a registered trademark of Xerox Corporation.
Other product names used herein are for identification purposes only and might be trademarks of their respective
companies. We disclaim any and all rights to those marks.
The proper names of the Windows operating systems are as follows:
* The product name of Windows® 98 is Microsoft® Windows® 98.
* The product name of Windows® Me is Microsoft® Windows® Millennium Edition (Windows Me).
* The product names of Windows® 2000 are as follows:
Microsoft® Windows® 2000 Advanced Server
Microsoft® Windows® 2000 Server
Microsoft® Windows® 2000 Professional
* The product names of Windows® XP are as follows:
Microsoft® Windows® XP Professional
Microsoft® Windows® XP Home Edition
* The product names of Windows Server™ 2003 are as follows:
Microsoft® Windows Server® 2003 Standard Edition
Microsoft® Windows Server™ 2003 Enterprise Edition
Microsoft® Windows Server™ 2003 Web Edition
* The product names of Windows NT® 4.0 are as follows:
Microsoft® Windows NT® Server 4.0
Microsoft® Windows NT® Workstation 4.0
Some illustrations in this manual might be slightly different from the machine.
Page 3

Manuals for This Printer
For particular functions, see the relevant parts of the manual.
Safety Information
Provides information on safe usage of this machine.
To avoid injury and prevent damage to the machine, be sure to read this.
Hardware Guide
Contains information about paper and procedures such as installing options, replacing consumables,
responding to error messages, and resolving jams.
Software Guide (This manual)
Contains procedures for using this machine in a network environment, utilizing the software, and using
security functions.
Note to Administrator
Contains administrators' notes, such as information about administrators' hidden menus and hard disk
overwrite functions.
Administrators must store this manual carefully.
1
Page 4
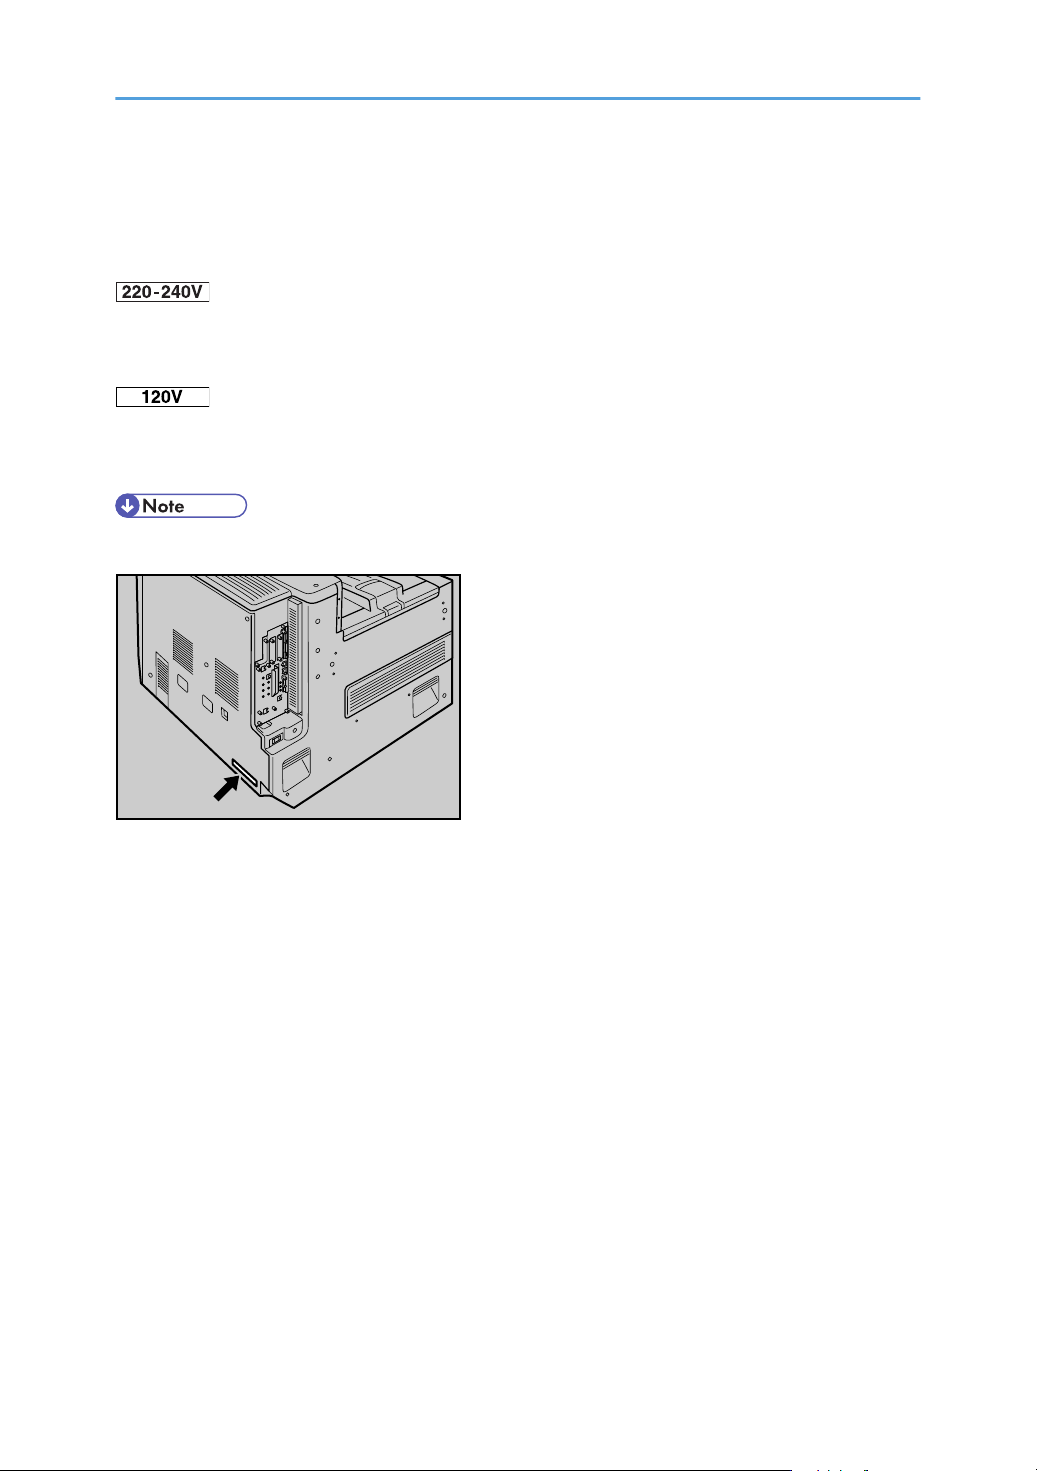
Description for the Specified Model
ATU088S
In this manual, the following items explain about the printer for the specified models:
:
This explains about the 220 - 240 V model printer.
Read if you purchase this model.
:
This explains about the 120 V model printer.
Read if you purchase this model.
• You can identify the printer's model by checking the label on its inside as shown.
2
Page 5
How to Read This Manual
Symbols
The following set of symbols is used in this manual.
This symbol indicates a potentially hazardous situation that might result in death or serious injury when you
misuse the machine without following the instructions under this symbol. Be sure to read the instructions, all
of which are described in the Safety Information section.
This symbol indicates a potentially hazardous situation that might result in minor or moderate injury or
property damage that does not involve personal injury when you misuse the machine without following the
instructions under this symbol. Be sure to read the instructions, all of which are described in the Safety
Information section.
*The statements above are notes for your safety.
If this instruction is not followed, paper might be misfed, originals might be damaged, or data might be
lost. Be sure to read this.
This symbol indicates precautions for operation, or actions to take after abnormal operation.
This symbol indicates a reference.
[ ]
Keys that appear on the machine's display.
Keys and buttons that appear on the computer's display.
[ ]
Keys built into the machine's control panel.
Keys on the computer's keyboard.
3
Page 6
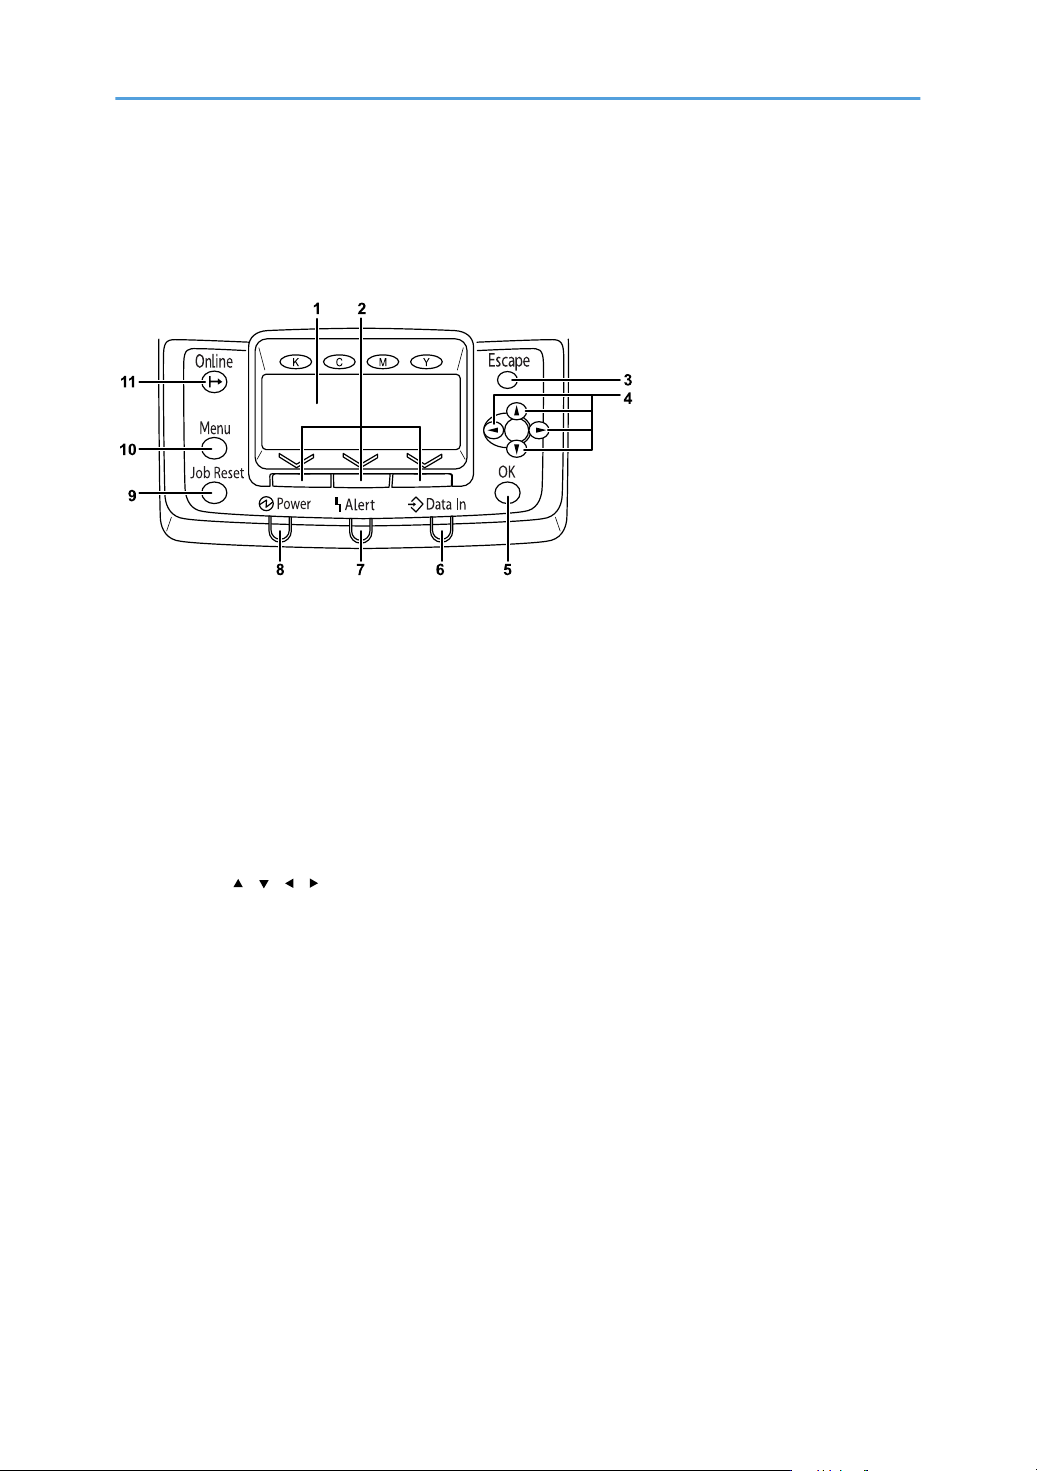
Using Keys
ATU049S
This section describes the names and usage of the control panel.
1. Display
Displays current printer status and error messages.
2. Selection Keys
Correspond to the function items at the bottom line on the display.
3. [Escape] key
Press this key to return to the previous condition on the display.
4. Scroll Keys
Press to move the cursor in each direction.
When the [ ] [ ] [ ] [ ] key appears in this manual, press the scroll key of the same direction.
5. [OK] Key
Use this key to determine the setting and setting value, or shift to the next level.
6. Data In indicator
Blinks when the printer is receiving data from a computer. The Data In indicator is lit if there is data to be printed.
7. Alert Indicator
Lights up whenever a printer error occurs. Follow the instructions that appear on the display.
8. Power indicator
This indicator remains lit while the power is on. It is unlit when the power is off or while the printer is in the Energy
Saver mode.
9. [Job Reset] key
When the printer is online, press this key to cancel an ongoing print job.
10. [Menu] key
Press this key to make and check the current printer settings.
4
Page 7

11. Online Indicator/[Online] key
Indicates whether the printer is online or offline. Press this to switch between online and offline.
When the lamp is lit, the printer is online, enabling data reception from the host computer.
When the lamp is unlit, the printer is offline, disabling data reception from the host computer.
Press the [Online] key while configuring each setting, to return to the initial screen.
5
Page 8

TABLE OF CONTENTS
Manuals for This Printer......................................................................................................................................1
Description for the Specified Model.................................................................................................................2
How to Read This Manual.................................................................................................................................3
Symbols...........................................................................................................................................................3
Using Keys...........................................................................................................................................................4
1. Preparing for Printing
Quick Install......................................................................................................................................................17
Confirming the Connection Method...............................................................................................................19
Network Connection...................................................................................................................................19
Local Connection.........................................................................................................................................21
Using the SmartDeviceMonitor Port................................................................................................................23
Installing DeskTopBinder-SmartDeviceMonitor for Client........................................................................23
Installing the PCL or RPCS Printer Driver (TCP/IP)....................................................................................24
Installing the PCL or RPCS Printer Driver (IPP)............................................................................................25
Installing the PostScript 3 Printer Driver (Windows 95/98/Me - TCP/IP)............................................27
Installing the PostScript 3 Printer Driver (Windows 95/98/Me - IPP)...................................................28
Installing the PostScript 3 Printer Driver (Windows 2000 - TCP/IP).......................................................30
Installing the PostScript 3 Printer Driver (Windows 2000 - IPP)..............................................................31
Installing the PostScript 3 Printer Driver (Windows XP, Windows Server 2003 - TCP/IP)...................32
Installing the PostScript 3 Printer Driver (Windows XP, Windows Server 2003 - IPP)...........................33
Changing the Port Settings for SmartDeviceMonitor for Client ...............................................................35
Using the Standard TCP/IP Port......................................................................................................................37
Installing the PCL or RPCS Printer Driver....................................................................................................37
Installing the PostScript 3 Printer Driver (Windows 2000).......................................................................38
Installing the PostScript 3 Printer Driver (Windows XP, Windows Server 2003)...................................39
Using the LPR Port.............................................................................................................................................41
Installing the PCL or RPCS Printer Driver....................................................................................................41
Installing the PostScript 3 Printer Driver (Windows 2000).......................................................................42
Installing the PostScript 3 Printer Driver (Windows XP, Windows Server 2003)...................................43
Using as the Windows Network Printer..........................................................................................................45
Installing the PCL or RPCS Printer Driver....................................................................................................45
Installing the PostScript 3 Printer Driver (Windows 95/98/Me)............................................................46
Installing the PostScript 3 Printer Driver (Windows 2000).......................................................................47
6
Page 9

Installing the PostScript 3 Printer Driver (Windows XP, Windows Server 2003)...................................48
Using as the NetWare Print Server/Remote Printer......................................................................................50
When using the PostScript 3 Printer Driver................................................................................................51
Form Feed.....................................................................................................................................................52
Banner Page.................................................................................................................................................52
Printing after Resetting the Printer................................................................................................................52
Installing the Printer Driver Using USB............................................................................................................53
Windows Me - USB.....................................................................................................................................53
Windows 2000 - USB.................................................................................................................................54
Windows XP, Windows Server 2003 - USB.............................................................................................56
Troubleshooting USB...................................................................................................................................57
Printing with Parallel Connection....................................................................................................................58
Installing the PCL or RPCS Printer Driver....................................................................................................58
Installing the PostScript 3 Printer Driver (Windows 95/98/Me)............................................................59
Installing the PostScript 3 Printer Driver (Windows 2000).......................................................................60
Installing the PostScript 3 Printer Driver (Windows XP, Windows Server 2003)...................................60
Printing with Bluetooth Connection.................................................................................................................62
Supported Profiles........................................................................................................................................62
Printing with Bluetooth Connection.............................................................................................................62
Configuring Security Mode Settings..........................................................................................................63
Printing in the Security Mode......................................................................................................................64
If a Message Appears during Installation......................................................................................................65
Making Option Settings for the Printer...........................................................................................................66
Conditions for Bidirectional Communication.............................................................................................66
If Bidirectional Communication is Disabled...............................................................................................67
2. Setting Up the Printer Driver
PCL - Accessing the Printer Properties.............................................................................................................69
Windows 95/98/Me - Accessing the Printer Properties........................................................................69
Windows 2000 - Accessing the Printer Properties...................................................................................70
Making Printer Settings from an Application.............................................................................................71
Windows XP, Windows Server 2003 - Accessing the Printer Properties................................................72
Windows NT 4.0 - Accessing the Printer Properties.................................................................................73
RPCS - Accessing the Printer Properties..........................................................................................................76
7
Page 10

Windows 95/98/Me - Accessing the Printer Properties........................................................................76
Windows 2000 - Accessing the Printer Properties...................................................................................77
Windows XP, Windows Server 2003 - Accessing the Printer Properties................................................79
Windows NT 4.0 - Accessing the Printer Properties.................................................................................81
PostScript 3 - Setting Up for Printing...............................................................................................................83
Windows 95/98/Me - Accessing the Printer Properties........................................................................83
Windows 2000 - Accessing the Printer Properties...................................................................................84
Windows XP, Windows Server 2003 - Accessing the Printer Properties................................................86
Windows NT 4.0 - Accessing the Printer Properties.................................................................................87
Mac OS - Setting Up for Printing................................................................................................................89
3. Other Print Operations
Printing a PDF File Directly...............................................................................................................................91
Printing Method............................................................................................................................................91
Using Commands.........................................................................................................................................94
Unauthorized Copy Control............................................................................................................................96
Using [Data security for copying]...............................................................................................................96
Using [Mask type:].......................................................................................................................................98
Important Notice..........................................................................................................................................99
Using the Print Job Function..........................................................................................................................100
Print Job screen..........................................................................................................................................100
Printing from the Print Job Screen.................................................................................................................103
Sample Print...............................................................................................................................................103
Locked Print................................................................................................................................................106
Hold Print....................................................................................................................................................109
Stored Print.................................................................................................................................................112
Printing from the User ID Screen...................................................................................................................117
Printing the Selected Print Job...................................................................................................................117
Printing All Print Jobs.................................................................................................................................118
Form Feed.......................................................................................................................................................120
Printing from a Selected Tray...................................................................................................................120
Canceling a Print Job................................................................................................................................121
Canceling a Print Job.....................................................................................................................................123
Canceling a Print Job Using the Control Panel.......................................................................................123
8
Page 11

Windows - Canceling a Print Job from the computer.............................................................................123
Mac OS - Canceling a Print Job from the computer..............................................................................124
Checking the Error Log..................................................................................................................................125
Collate............................................................................................................................................................127
Collate........................................................................................................................................................127
Shift Collate................................................................................................................................................127
Spool Printing.................................................................................................................................................128
Setting Spool Printing................................................................................................................................128
Viewing or Deleting spooled jobs using Web Image Monitor..............................................................129
Cover..............................................................................................................................................................130
Printing with the Finisher................................................................................................................................131
Staple.........................................................................................................................................................131
Punch..........................................................................................................................................................134
Memory Capacity and Paper Size..............................................................................................................137
One-sided printing (600 × 600 dpi).......................................................................................................137
Duplex printing (600 × 600 dpi).............................................................................................................137
4. Direct Printing from a Digital Camera (PictBridge)
What is PictBridge?........................................................................................................................................139
PictBridge Printing..........................................................................................................................................140
What Can Be Done on This Printer...............................................................................................................141
Index Printing.............................................................................................................................................141
Trimming.....................................................................................................................................................142
Date and File Name Printing....................................................................................................................143
Paper Size..................................................................................................................................................143
Image Print Size.........................................................................................................................................144
Multi-Image-Layout...................................................................................................................................145
Printing Quality..........................................................................................................................................146
Color Matching.........................................................................................................................................147
Paper Type Specification..........................................................................................................................147
Form Printing..............................................................................................................................................147
Camera Memo Printing.............................................................................................................................147
Exiting PictBridge...........................................................................................................................................148
When PictBridge Printing Does Not Work...................................................................................................149
9
Page 12

Other Reference Information........................................................................................................................150
5. Making Printer Settings Using the Control Panel
Menu Chart....................................................................................................................................................151
Memory Erase Status Menu..........................................................................................................................156
Paper Input Menu..........................................................................................................................................157
Changing the Paper Input Menu..............................................................................................................157
Paper Input menu parameters..................................................................................................................158
Maintenance Menu.......................................................................................................................................161
Changing the maintenance menu............................................................................................................161
Maintenance menu parameters...............................................................................................................162
List/Test Print Menu.......................................................................................................................................170
Printing a configuration page...................................................................................................................170
Interpreting the configuration page.........................................................................................................170
List/Test Print menu parameters................................................................................................................172
System Menu..................................................................................................................................................174
Changing the system menu.......................................................................................................................174
System menu parameters..........................................................................................................................174
Print Settings Menu........................................................................................................................................179
Changing the Print Settings menu.............................................................................................................179
Print Settings menu parameters................................................................................................................179
Security Options Menu.................................................................................................................................187
Changing the Security Options menu......................................................................................................187
Security Options menu parameters..........................................................................................................187
Host Interface Menu......................................................................................................................................192
Changing the Host Interface menu..........................................................................................................192
Host Interface menu parameters..............................................................................................................192
Language Menu.............................................................................................................................................198
Changing the language menu..................................................................................................................198
Language menu parameters.....................................................................................................................198
6. Monitoring and Configuring the Printer
Using Web Image Monitor...........................................................................................................................199
Displaying Top Page.................................................................................................................................200
When User Authentication is Set..............................................................................................................201
10
Page 13

About Menu and Mode............................................................................................................................202
Access in the Administrator Mode...........................................................................................................203
Displaying Web Image Monitor Help.....................................................................................................204
Using SmartDeviceMonitor for Admin.........................................................................................................206
Installing SmartDeviceMonitor for Admin...............................................................................................207
Changing the Network Interface Board Configuration..........................................................................208
Locking the Menus on the Printer's Control Panel...................................................................................209
Changing the Paper Type.........................................................................................................................209
Managing User Information.....................................................................................................................210
Setting Applicable Functions to New Users............................................................................................212
Configuring the Energy Saver Mode.......................................................................................................212
Setting a Password....................................................................................................................................213
Checking the Printer Status.......................................................................................................................214
Changing Names and Comments...........................................................................................................214
Viewing and Deleting Spool Print Jobs........................................................................................................216
Using SmartDeviceMonitor for Client..........................................................................................................217
Monitoring Printers....................................................................................................................................217
Checking the Printer Status.......................................................................................................................217
When Using IPP with SmartDeviceMonitor for Client............................................................................217
Printer Status Notification by E-Mail............................................................................................................219
Auto E-mail Notification............................................................................................................................220
On-demand E-mail Notification...............................................................................................................221
Mail authentication...................................................................................................................................221
Sending On-demand E-mail.....................................................................................................................222
Remote Maintenance by telnet.....................................................................................................................226
Using telnet................................................................................................................................................226
access.........................................................................................................................................................227
appletalk....................................................................................................................................................228
autonet........................................................................................................................................................228
bonjour.......................................................................................................................................................229
btconfig......................................................................................................................................................230
devicename...............................................................................................................................................231
dhcp............................................................................................................................................................231
11
Page 14

diprint.........................................................................................................................................................232
dns..............................................................................................................................................................233
domainname..............................................................................................................................................235
help.............................................................................................................................................................235
hostname....................................................................................................................................................235
ifconfig........................................................................................................................................................236
info..............................................................................................................................................................237
ipp...............................................................................................................................................................237
ipv6.............................................................................................................................................................238
lpr................................................................................................................................................................239
netware......................................................................................................................................................239
passwd.......................................................................................................................................................240
prnlog.........................................................................................................................................................241
route............................................................................................................................................................241
set................................................................................................................................................................242
show...........................................................................................................................................................245
slp...............................................................................................................................................................245
smb.............................................................................................................................................................245
snmp...........................................................................................................................................................246
sntp.............................................................................................................................................................249
spoolsw......................................................................................................................................................250
ssdp............................................................................................................................................................250
ssh...............................................................................................................................................................251
status...........................................................................................................................................................252
syslog..........................................................................................................................................................252
upnp...........................................................................................................................................................252
web.............................................................................................................................................................252
wiconfig......................................................................................................................................................253
wins.............................................................................................................................................................257
SNMP.............................................................................................................................................................259
Getting Printer Information over the Network.............................................................................................260
Current Printer Status.................................................................................................................................260
Printer configuration..................................................................................................................................268
12
Page 15

Understanding the Displayed Information...................................................................................................270
Print Job Information..................................................................................................................................270
Print Log Information.................................................................................................................................270
Configuring the Network Interface Board...............................................................................................271
Message List...................................................................................................................................................281
System Log Information.............................................................................................................................281
7. Using a Printer Server
Preparing Printer Server................................................................................................................................291
Printing notification via SmartDeviceMonitor for Client.........................................................................291
Using NetWare..............................................................................................................................................293
Setting Up as a Print Server (NetWare 3.x)............................................................................................294
Setting Up as a Print Server (NetWare 4.x, 5/5.1, 6/6.5).................................................................295
Using Pure IP in the NetWare 5/5.1 or 6/6.5 Environment................................................................296
Setting Up as a Remote Printer (NetWare 3.x).......................................................................................298
Setting Up as a Remote Printer (NetWare 4.x, 5/5.1, 6/6.5)............................................................300
8. Special Operations under Windows
Printing Files Directly from Windows............................................................................................................303
Setup...........................................................................................................................................................303
Using a Host Name Instead of an IPv4 Address....................................................................................303
Printing Commands...................................................................................................................................305
9. Mac OS Configuration
Mac OS..........................................................................................................................................................309
Installing the PostScript 3 Printer Driver and PPD File.............................................................................309
Setting Up PPD Files..................................................................................................................................310
Creating a Desktop Printer Icon...............................................................................................................310
Setting Up Options....................................................................................................................................310
Installing the ColorSync Profiles...............................................................................................................311
Installing Adobe Type Manager..............................................................................................................312
Installing Screen fonts...............................................................................................................................312
Changing to EtherTalk...............................................................................................................................313
Mac OS X.......................................................................................................................................................314
Installing the PPD Files...............................................................................................................................314
Setting Up the PPD File..............................................................................................................................314
13
Page 16

Setting Up Options....................................................................................................................................315
Using USB Interface..................................................................................................................................315
Using Bonjour............................................................................................................................................316
Changing to EtherTalk...............................................................................................................................316
Configuring the Printer...................................................................................................................................318
Using PostScript 3..........................................................................................................................................319
Job Type.....................................................................................................................................................319
User Code..................................................................................................................................................328
Paper Size..................................................................................................................................................328
Fit to Paper.................................................................................................................................................329
Input Slot....................................................................................................................................................329
Resolution...................................................................................................................................................329
Orientation Override................................................................................................................................330
Duplex Printing...........................................................................................................................................330
Color Mode...............................................................................................................................................331
Gradation..................................................................................................................................................331
Color Profile...............................................................................................................................................332
Color Setting..............................................................................................................................................333
Toner Saving/Level Color........................................................................................................................333
Collate........................................................................................................................................................334
Paper Type.................................................................................................................................................334
Black Over Print.........................................................................................................................................335
Image Smoothing......................................................................................................................................335
Separate into CMYK.................................................................................................................................336
CMYK Simulation Profile..........................................................................................................................336
Dithering.....................................................................................................................................................336
Gray Reproduction....................................................................................................................................337
Color Matching.........................................................................................................................................338
Printer Utility for Mac.....................................................................................................................................339
Installing Printer Utility for Mac................................................................................................................339
Starting Printer Utility for Mac..................................................................................................................340
Printer Utility for Mac Functions................................................................................................................340
10. Security Measures Provided by this Printer
14
Page 17

Using Authentication and Managing Users.................................................................................................347
Preventing Information Leaks........................................................................................................................348
Limiting and Controlling Access....................................................................................................................349
Enhanced Network Security.........................................................................................................................350
Configuring SSL Encryption..........................................................................................................................351
11. Appendix
Software and Utilities Included on the CD-ROM........................................................................................353
Printer Drivers for This Printer....................................................................................................................353
SmartDeviceMonitor for Admin...............................................................................................................354
DeskTopBinder - SmartDeviceMonitor for Client....................................................................................355
Cautions to Take When Using in a network................................................................................................358
Connecting a Dial-up Router to a Network............................................................................................358
Using DHCP...............................................................................................................................................358
Configuring the WINS Server..................................................................................................................360
Using the Dynamic DNS Function............................................................................................................361
Installing Font Manager 2000.....................................................................................................................364
Using Adobe PageMaker Version 6.0, 6.5, or 7.0...................................................................................365
When Using Windows Terminal Service/MetaFrame...............................................................................366
Operating Environment.............................................................................................................................366
Supported Printer Drivers..........................................................................................................................366
Limitations...................................................................................................................................................366
Cautions When Using Bluetooth Interface Unit...........................................................................................369
Copyright Information about Installed Applications...................................................................................370
expat...........................................................................................................................................................370
JPEG LIBRARY............................................................................................................................................370
NetBSD......................................................................................................................................................370
Samba(Ver 2.2.2-1.1)..............................................................................................................................372
RSA BSAFE ®.............................................................................................................................................373
INDEX...........................................................................................................................................................375
15
Page 18

16
Page 19

1. Preparing for Printing
1
Quick Install
Windows 95/98/Me/2000/XP, and Windows Server 2003 users can easily install this software using
the CD-ROM provided.
Quick Install sets the TCP/IP port and installs DeskTopBinder and the PCL and/or RPCS driver.
• To install printer driver under Windows 2000/XP Professional, and Windows Server 2003, you must
have an account that has Manage Printers permission. Log on as an Administrator.
• The Quick Install is not available when using this printer under USB connection.
1. Quit all applications currently running.
2. Insert the CD-ROM into the CD-ROM drive.
The installer starts.
Auto Run may not work with certain operating system settings. If this happens, launch "Setup.exe" on
the CD-ROM root directory.
3. Select an interface language, and then click [OK].
The default interface language is English.
4. Click [Quick Install].
The software license agreement appears in the License Agreement dialog box.
5. After reading the agreement, click [I accept the agreement.], and then click [Next >].
6. Select the printer model you want to use in the [Select Printer] dialog box.
For network connection via TCP/IP, select the printer whose IP address is displayed in [Connect To].
For parallel connection, select the printer whose printer port is displayed in [Connect To].
7. Click [Install].
The printer driver installation starts.
8. Click [Finish].
A message about restarting the computer may appear. Restart the computer to complete installation.
9. Click [Exit] in the first dialog box of the installer, and then take out the CD-ROM.
• To stop installation of the selected software, click [Cancel] before installation is complete.
• Select a printer to whose IP address is displayed in [Connect To] to install SmartDeviceMonitor for
Client when using TCP/IP.
• Download the printer driver from the supplier's web site when using under Windows NT 4.0.
17
Page 20

1. Preparing for Printing
1
• Quick Install is not available for parallel connection unless bidirectional communication between the
printer and computer is enabled. See p.66 "Making Option Settings for the Printer" for details about
bidirectional communication between printer and computer.
• If you connect using USB, see p.53 "Installing the Printer Driver Using USB".
18
Page 21
SnartDeviceMonitor for Client
-TCP/IP
-IPP
SnartDeviceMonitor
for Client
-TCP/IP
-IPP
Standard TCP/IP
LPR
SnartDeviceMonitor
for Client
-TCP/IP
-IPP
Standard TCP/IP
LPR
SnartDeviceMonitor
for Client
-TCP/IP
-IPP
LPR
Windows 95/98/Me Windows XP/
Server 2003
Windows NT 4.0Windows 2000
ZZZ036S
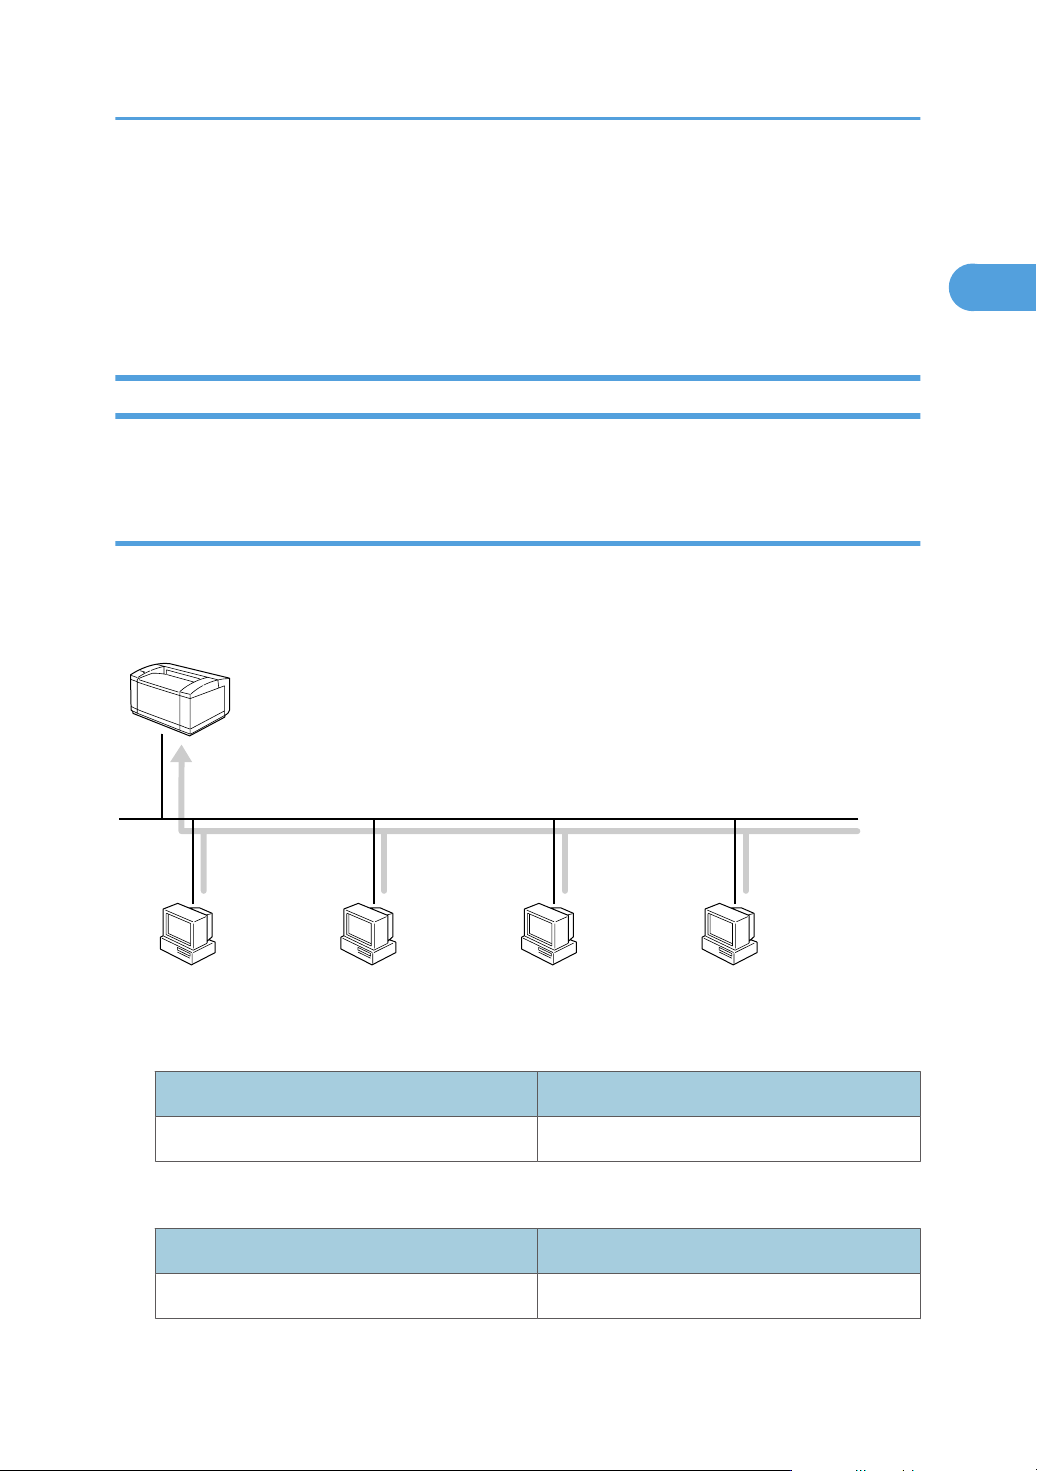
Confirming the Connection Method
1
Confirming the Connection Method
This printer supports network and local connection.
Before installing the printer driver, check how the printer is connected. Follow the driver installation procedure that is appropriate to the connection method.
Network Connection
This printer can be used as a Windows printing port or network printer.
Using this printer as the Windows printing port
Network connections can be established through Ethernet and IEEE 802.11b.
Available ports are determined based on the combination of Windows operating system version and
connection method used.
Windows 95/98
Connection Method Available Ports
Ethernet/IEEE 802.11b SmartDeviceMonitor for Client port
Windows Me
Connection Method Available Ports
Ethernet/IEEE 802.11b SmartDeviceMonitor for Client port
19
Page 22

1. Preparing for Printing
1
Windows 2000
Connection Method Available Ports
SmartDeviceMonitor for Client port
Ethernet/IEEE 802.11b
Windows XP
Connection Method Available Ports
Ethernet/IEEE 802.11b
Windows Server 2003
Connection Method Available Ports
Ethernet/IEEE 802.11b
Windows NT 4.0
Standard TCP/IP
LPR port
SmartDeviceMonitor for Client port
Standard TCP/IP
LPR port
SmartDeviceMonitor for Client port
Standard TCP/IP
LPR port
Connection Method Available Ports
SmartDeviceMonitor for Client port
Ethernet/IEEE 802.11b
LPR port
• See the explanation of how to install the printer driver for each type of port. For the SmartDeviceMonitor for Client port, see p.23 "Using the SmartDeviceMonitor Port".
• For the Standard TCP/IP port, see p.37 "Using the Standard TCP/IP Port".
• For the LPR port, see p.41 "Using the LPR Port".
20
Page 23
Windows 2000/XP
Windows Server 2003
Windows NT 4.0
Print Server
Windows 95/98/Me Windows 2000 Windows XP/
Server 2003
Windows NT 4.0
NetWare
Print Server
NetWare
File Server
ZZZ003S
Confirming the Connection Method
1
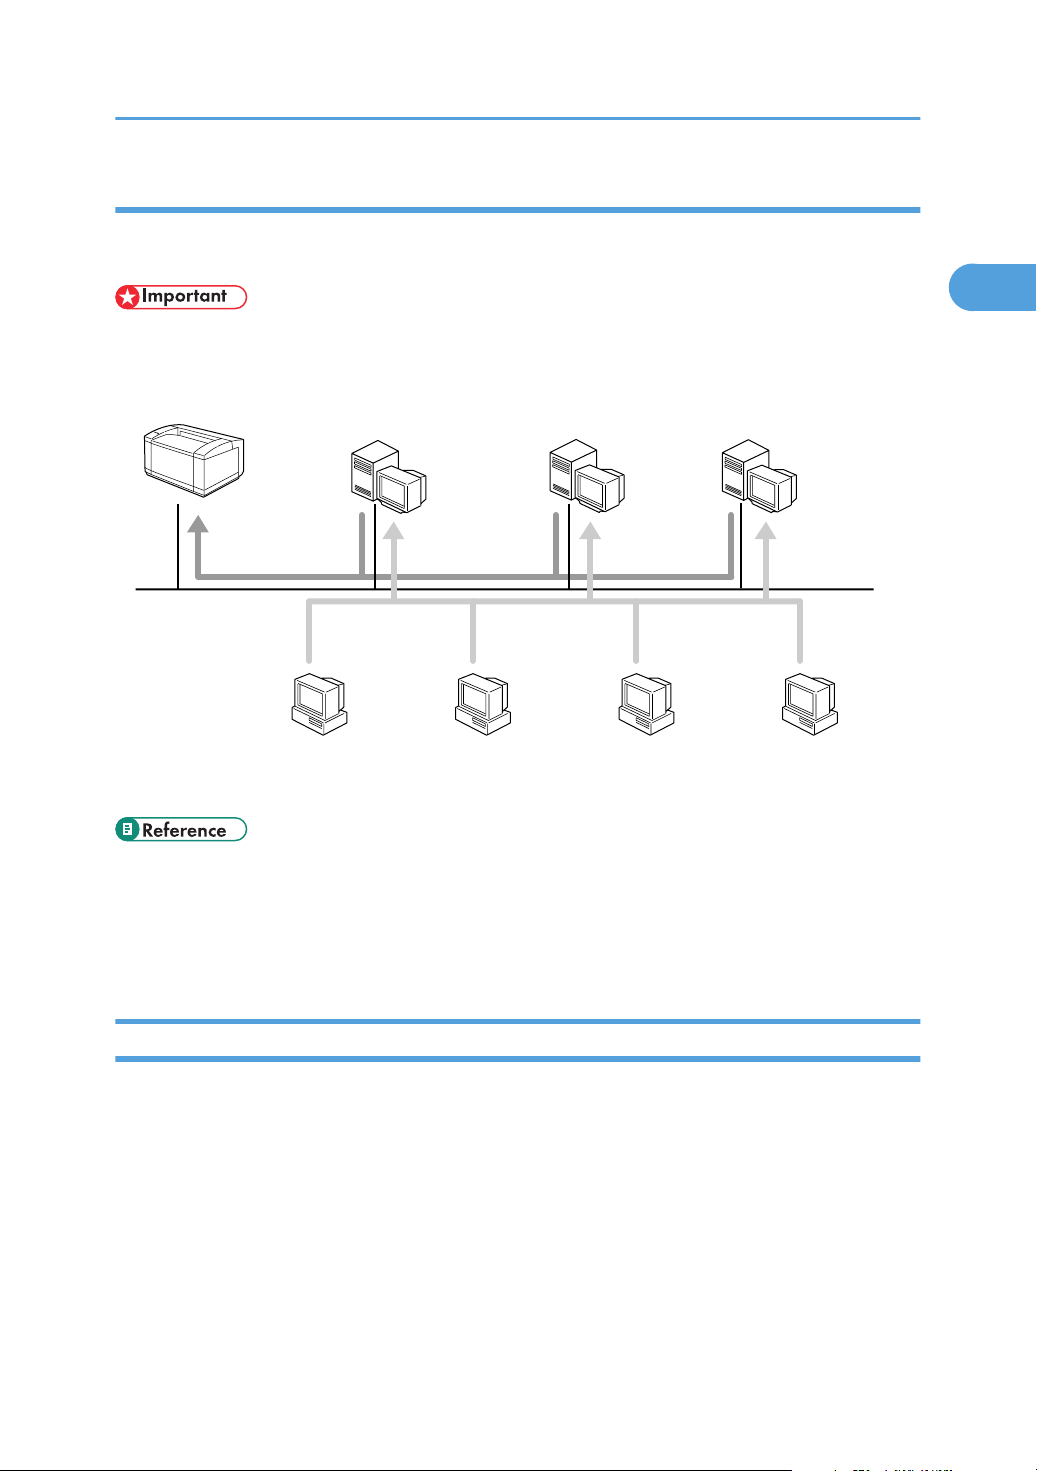
Using as a network printer
This printer can be used as the Windows network printer, the NetWare print server, or the NetWare remote
printer.
• In an IPv6 environment, Netware servers cannot be used.
• See the explanation of how to install the printer driver for each type of network printer.
• For the Windows network printer, see p.45 "Using as the Windows Network Printer".
• For the NetWare print server and remote printer, see p.50 "Using as the NetWare Print Server/
Remote Printer"
Local Connection
Local connections can be established via parallel, USB, and Bluetooth connections.
Windows operating system version determines the available connection methods.
• Windows 95:
Parallel connection
• Windows 98:
Parallel connection
• Windows 98SE
21
Page 24

1. Preparing for Printing
1
Parallel and Bluetooth connections
• Windows Me:
USB, Parallel, and Bluetooth connections
• Windows 2000:
USB, Parallel, and Bluetooth connections
• Windows XP:
USB, Parallel, and Bluetooth connections
• Windows Server 2003:
USB, Parallel, and Bluetooth connections
• Windows NT 4.0:
Parallel connection
• See the explanation of how to install the printer driver for each method of connection.
• For the USB connection, see p.53 "Installing the Printer Driver Using USB".
• For the parallel connection, see p.62 "Printing with Bluetooth Connection".
22
Page 25

Using the SmartDeviceMonitor Port
1
Using the SmartDeviceMonitor Port
Installing DeskTopBinder-SmartDeviceMonitor for Client
• To install SmartDeviceMonitor for Client under Windows 2000/XP Professional, Windows Server
2003, and Windows NT 4.0, you must have an account that has Manage Printers permission. Log
on as an Administrator.
• Install SmartDeviceMonitor for Client before installing the printer driver when using the SmartDeviceMonitor for Client port.
1. Quit all applications currently running.
2. Insert the CD-ROM into the CD-ROM drive.
The installer starts.
3. Select an interface language, and then click [OK].
The default interface language is English.
4. Click [DeskTopBinder-SmartDeviceMonitor for Client].
5. Select an interface language, and then click [Next>].
The default interface language is English.
6. The message to quit all other applications appears. Quit all applications, and then click [Next
>].
7. Click [Yes]
8. The DeskTopBinder Lite Setup dialog appears, and then click [Next >].
9. The software license agreement appears in the [License Agreement] dialog box. After read-
ing through its contents, click [Yes].
10. Click [Full install] or [Custom Install].
[Full install] installs all required applications: DeskTopBinder Lite and SmartDeviceMonitor for Client.
[Custom Install] installs selected applications.
11. Follow the instructions on the display and click [Next >] to proceed next step.
12. After the installation is completed, select one of the options to restart the computer either
now or later, and click [Complete].
Restart the computer to complete installation.
• Auto Run may not work with certain operating system settings. If this happens, launch "Setup.exe" on
the CD-ROM root directory.
23
Page 26

1. Preparing for Printing
1
• To stop installation of the selected software, click [Cancel] before installation is complete.
Installing the PCL or RPCS Printer Driver (TCP/IP)
• To install this printer driver under Windows 2000/XP Professional, and Windows Server 2003, you
must have an account that has Manage Printers permission. Log on as an Administrators or Power
Users group member.
1. Quit all applications currently running.
2. Insert the CD-ROM into the CD-ROM drive.
The installer starts.
3. Select an interface language, and then click [OK].
The default interface language is English.
4. Click [PCL/RPCS Printer Drivers].
5. The software license agreement appears in the [License Agreement] dialog box.
After reading the agreement, click [I accept the agreement.], and then click [Next >].
6. Select the printer driver you want to use in the [Select Program] dialog box.
You can select several printer drivers.
7. Click [Next >].
8. Select the printer model you want to use.
The printer name can be changed in the [Change settings for 'Printer Name'] box.
9. Double-click the printer name to display the printer settings.
The details shown in [Comment:] , [Driver:], and [Port:] vary depending on the operating system,
printer model, and port.
10. Click [Port:], and then click [Add].
11. Click [SmartDeviceMonitor], and then click [OK].
12. Click [TCP/IP], and then click [Search].
A list of printers using TCP/IP appears.
13. Select the printer you want to use, and then click [OK].
Only printers that respond to a broadcast from the computer appear. To use a printer not listed here,
click [Specify Address], and then enter the IP address or host name of the printer.
14. Check that the port of the selected printer is displayed in [Port:].
15. Set a User Code, if necessary.
Up to 8 numeric characters can be entered. No alphabetic characters or symbols are available.
24
Page 27
Using the SmartDeviceMonitor Port
1
16. Select the [Default Printer] check box to configure the printer as default.
17. Click [Continue].
Installation starts.
18. After the installation is completed, select one of the options to restart the computer either
now or later, and then click [Finish].
Restart the computer to complete installation.
• Auto Run may not work with certain operating system settings. If this happens, launch "Setup.exe" on
the CD-ROM root directory.
• Under Windows 95/98/Me, you cannot add an IPv4 address partially similar to the one already
used. For example, if "192.168.0.2" is in use, "192.168.0.2xx" cannot be used. Similarly, if
"192.168.0.20" is in use, "192.168.0.2" cannot be used.
• This allows a SmartDeviceMonitor for Admin user to display and check statistics about the number of
sheets which each user prints. For details, see SmartDeviceMonitor for Admin Help.
• A message appears if there is a newer version of the printer driver already installed. If there is, you
cannot install the printer driver using Auto Run. If you still want to install the printer driver, install using
[Add Printer]. See p.65 "If a Message Appears during Installation".
Installing the PCL or RPCS Printer Driver (IPP)
• To install printer driver under Windows 2000/XP Professional, and Windows Server 2003, you must
have an account that has Manage Printers permission. Log on as an Administrators or Power Users
group member.
1. Quit all applications currently running.
2. Insert the CD-ROM into the CD-ROM drive.
The installer starts.
3. Select an interface language, and then click [OK].
The default interface language is English.
4. Click [PCL/RPCS Printer Drivers].
5. The software license agreement appears in the [License Agreement] dialog box.
After reading the agreement, click [I accept the agreement.], and then click [Next >].
6. Select a printer driver you want to use in the [Select Program] dialog box.
You can select several printer drivers.
25
Page 28

1. Preparing for Printing
1
7. Select the printer model you want to use.
The printer name can be changed in the [Change settings for 'Printer Name'] box.
8. Double-click the printer name to display the printer settings.
The details shown in [Comment:], [Driver:], and [Port:] vary depending on the operating system, printer
model, and port.
9. Click [Port:], and then click [Add].
10. Click [SmartDeviceMonitor], and then click [OK].
11. Click [IPP].
12. In the [Printer URL] box, enter "http://printer's address/printer" as the printer's address.
If the server authentification is issued, to enable SSL( a protocol for encrypted communication), enter
"https://printer's address/printer" (Internet Explorer 5.01, or a higher version must be installed).
(example IPv4 address: 192.168.15.16)
http://192.168.15.16/printer
https://192.168.15.16/printer
You can enter "http: //printer's address/ipp" as the printer's address.
13. Enter a name for identifying the printer in [IPP Port Name]. Use a name different from the
one of any existing port.
If a name is not specified here, the address entered in the [Printer URL] box becomes the IPP port
name.
14. Click [Detailed Settings] to make necessary settings.
For information about the settings, see SmartDeviceMonitor for Client Help.
15. Click [OK].
16. Check that the port of the selected printer is displayed in [Port:].
17. Set a User Code, if necessary.
Up to 8 numeric characters can be entered. No alphabetic characters or symbols can be entered.
18. Select the [Default Printer] check box to configure the printer as default.
19. Click [Continue].
Installation starts.
20. After the installation is completed, select one of the options to restart the computer either
now or later, and then click [Finish].
Restart the computer to complete installation.
• Auto Run may not work with certain operating system settings. If this happens, launch "Setup.exe" on
the CD-ROM root directory.
26
Page 29

Using the SmartDeviceMonitor Port
1
• This allows a SmartDeviceMonitor for Admin user to display and check the number of sheets each
user prints. For details, see SmartDeviceMonitor for Admin Help.
• To stop installation of the selected software, click [Cancel] before installation is complete.
• A message appears if there is a newer version of the printer driver already installed. If there is, you
cannot install the printer driver using Auto Run. If you still want to install the printer driver, use [Add
Printer]. See p.65 "If a Message Appears during Installation".
Installing the PostScript 3 Printer Driver (Windows 95/98/Me - TCP/IP)
1. Quit all applications currently running.
2. Insert the CD-ROM into the CD-ROM drive.
The installer starts.
3. Select an interface language, and then click [OK].
The default interface language is English.
4. Click [PostScript 3 Printer Driver].
Add Printer Wizard starts.
5. Click [Next >].
6. Click [Local printer], and then click [Next >].
A dialog box for selecting the printer manufacturer and model name appears.
7. Select the name of the printer whose driver you want to install, and then click [Next >].
8. In the[Available ports:] box, click [Printer Port], and then click [Next >].
9. Change the printer name if you want, and then click [Next >].
Select the [Yes] check box to configure the printer as default.
10. Specify whether or not to print a test page, and then click [Finish].
11. On the [Start] menu, point to [Settings], and then click [Printers].
The [Printers] window appears.
12. Click the icon of the printer you want to use. On the [File] menu, click [Properties].
13. On the [Details] tab, click [Add Port…].
14. Click [SmartDeviceMonitor] in the [Other] list, and then click [OK].
15. Click [TCP/IP], and then click [Search].
A list of printers using TCP/IP appears.
27
Page 30

1. Preparing for Printing
1
16. Select the printer you want to use, and then click [OK].
Only printers that respond to a broadcast from the computer appear. To use a printer not listed here,
click [Specify Address], and then enter the IPv4 address or host name of the printer.
You cannot add an IPv4 address partially similar to the one already used. For example, if
"192.168.0.2" is in use, "192.168.0.2xx" cannot be used. Similarly, if "192.168.0.20" is in use,
"192.168.0.2" cannot be used.
17. Click [OK].
18. Check that the selected port is highlighted in [Printer to the following port:], and then click
[OK].
19. Restart the computer to complete installation.
• Auto Run may not work with certain operating system settings. If this happens, launch "Setup.exe" on
the CD-ROM root directory.
• A User Code can be set after the printer driver installation. For information about User Code, see the
printer driver Help.
Installing the PostScript 3 Printer Driver (Windows 95/98/Me - IPP)
• IPv6 cannot be used under Windows 95/98/Me.
1. Quit all applications currently running.
2. Insert the CD-ROM into the CD-ROM drive.
The installer starts.
3. Select an interface language, and then click [OK].
The default interface language is English.
4. Click [PostScript 3 Printer Driver].
Add Printer Wizard starts.
5. Click [Next >].
6. Click [Local printer], and then click [Next >].
A dialog box for selecting the printer manufacturer and model name appears.
7. Select the name of the printer whose driver you want to install, and then click [Next >].
8. In the [Available ports:] box, click [Printer Port], and then click [Next >].
9. Change the printer name if you want, and then click [Next >].
Select the [Yes] check box to configure the printer as default.
28
Page 31

Using the SmartDeviceMonitor Port
1
10. Specify whether or not to print a test page, and then click [Finish].
11. On the [Start] menu, point to [Settings], and then click [Printers].
The [Printers] window appears.
12. Click the icon of the printer you want to use. On the [File] menu, click [Properties].
13. On the [Details] tab, click [Add Port…].
14. Click [SmartDeviceMonitor] in the Other list, and then click [OK].
15. Click [IPP].
16. In the [Printer URL] box, enter "http://(printer's address)/printer" as the printer's address.
If the server authentification is issued, to enable SSL (a protocol for encrypted communication), enter
"https://(printer's address)/printer" (Internet Explorer 5.01, or a higher version must be installed).
(example IPv4 address: 192.168.15.16)
http://192.168.15.16/printer
https://192.168.15.16/printer
You can enter "http://(printer's address)/ipp" as the printer's address.
17. Enter a name for identifying the printer in [IPP Port Name]. Use a name different from the
one of any existing port.
If a name is not specified here, the address entered in the [Printer URL] box becomes the IPP port
name.
18. Click [Detailed Settings] to make necessary settings.
For information about the settings, see SmartDeviceMonitor for Client Help.
19. Click [OK].
20. Check that the selected port is highlighted in [Printer to the following port:], and then click
[OK[.
21. Restart the computer to complete installation.
• Auto Run may not work with certain operating system settings. If this happens, launch "Setup.exe" on
the CD-ROM root directory.
• The printer driver with the selected language will be installed. The English printer driver is installed
when the following language is selected: Cestina, Magyar, Polski, Portugues, Suomi.
• A User Code can be set after the printer driver installation. For information about User Code, see the
printer driver Help.
29
Page 32

1. Preparing for Printing
1
Installing the PostScript 3 Printer Driver (Windows 2000 - TCP/IP)
• Installing this printer driver requires Administrators permission. Log on using an account that has Administrators permission.
1. Quit all applications currently running.
2. Insert the CD-ROM into the CD-ROM drive.
The installer starts.
3. Select an interface language, and then click [OK].
The default interface language is English.
4. Click [PostScript 3 Printer Driver].
Add Printer Wizard starts.
5. Click [Next >].
6. Click [Local printer], and then click [Next >].
7. Click [Create a new port:].
8. Click [SmartDeviceMonitor], and then click [Next >].
9. Click [TCP/IP], and then click [Search].
A list of printers using TCP/IP appears.
10. Select the printer you want to use, and then click [OK].
Only printers that respond to a broadcast from the computer appear. To use a printer not listed here,
click [Specify Address], and then enter the IPv4 address or host name of the printer.
11. Check that the name of the printer whose driver you want to install is selected, and then click
[Next >].
12. Change the printer name if you want, and then click [Next >].
Select the [Yes] check box to configure the printer as default.
13. Specify whether or not to share the printer, and then click [Next >].
14. Specify whether or not to print a test page, and then click [Next >].
15. Click [Finish].
The printer driver installation starts.
• Auto Run may not work with certain operating system settings. If this happens, launch "Setup.exe" on
the CD-ROM root directory.
• The printer driver with the selected language will be installed. The English printer driver is installed
when the following language is selected: Cestina, Magyar, Polski, Portugues, Suomi.
30
Page 33

Using the SmartDeviceMonitor Port
1
• A User Code can be set after the printer driver installation. For information about User Code, see the
printer driver Help.
Installing the PostScript 3 Printer Driver (Windows 2000 - IPP)
• Installing this printer driver requires Administrators permission. Log on using an account that has Administrators permission.
• IPv6 cannot be used under Windows 2000.
1. Quit all applications currently running.
2. Insert the CD-ROM into the CD-ROM drive.
The installer starts.
3. Select an interface language, and then click [OK].
The default interface language is English.
4. Click [PostScript 3 Printer Driver].
Add Printer Wizard starts.
5. Click [Next >].
6. Click [Local printer attached to this computer], and then click [Next >].
7. Click [Create a new port:].
8. Click [DeskTopBinder-SmartDeviceMonitor], and then click [Next >].
9. Click [IPP].
10. In the [Printer URL] box, enter "http://(printer's address)/printer" as the printer's address.
If the server authentification is issued, to enable SSL (a protocol for encrypted communication), enter
"https://(printer's address)/printer" (Internet Explorer 5.01, or a higher version must be installed).
(example IPv4 address: 192.168.15.16)
http://192.168.15.16/printer
https://192.168.15.16/printer
You can enter "http://(printer's address)/ipp" as the printer's address.
11. Enter a name for identifying the printer in [IPP Port Name]. Use a name different from the
name of any existing port.
If a name is not specified here, the address entered in the [Printer URL] box becomes the IPP port
name.
12. Click [Detailed Settings] to make necessary settings.
For information about the settings, see SmartDeviceMonitor for Client Help.
31
Page 34

1. Preparing for Printing
1
13. Click [OK].
14. Check that the name of the printer whose driver you want to install is selected, and then click
[Next >].
15. Change the printer name if you want, and then click [Next >].
16. Click [Next >].
17. Specify whether or not to print a test page, and then click [Next >].
18. Click [Finish].
The printer driver installation starts.
• Auto Run may not work with certain operating system settings. If this happens, launch "Setup.exe" on
the CD-ROM root directory.
• The printer driver with the selected language will be installed. The English printer driver is installed
when the following language is selected: Cestina, Magyar, Polski, Portugues, Suomi.
• A User Code can be set after the printer driver installation. For information about User Code, see the
printer driver Help.
Installing the PostScript 3 Printer Driver (Windows XP, Windows Server 2003 TCP/IP)
• Installing this printer driver requires Administrators permission. Log on using an account that has Administrators permission.
1. Quit all applications currently running.
2. Insert the CD-ROM into the CD-ROM drive.
The installer starts.
3. Select an interface language, and then click [OK].
The default interface language is English.
4. Click [PostScript 3 Printer Driver].
Add Printer Wizard starts.
5. Click [Next >].
6. Click [Local printer attached to this computer], and then click [Next >].
7. Click [Create a new port:].
8. Click [SmartDeviceMonitor], and then click [Next >].
32
Page 35

Using the SmartDeviceMonitor Port
1
9. Click [TCP/IP], and then click [Search].
A list of printers using [TCP/IP] appears.
10. Select the printer you want to use, and then click [OK].
Only printers that respond to a broadcast from the computer appear. To use a printer not listed here,
click [Specify Address], and then enter the IPv4 address or host name of the printer.
11. Check that the name of the printer whose driver you want to install is selected, and then click
[Next >].
12. Change the printer name if you want, and then click [Next >].
Select the [Yes] check box to configure the printer as default.
13. Specify whether or not to print a test page, and then click [Next >].
14. Click [Finish].
The printer driver installation starts.
• Auto Run may not work with certain operating system settings. If this happens, launch "Setup.exe" on
the CD-ROM root directory.
• The printer driver with the selected language will be installed. The English printer driver is installed
when the following language is selected: Cestina, Magyar, Polski, Portugues, Suomi.
• A User Code can be set after the printer driver installation. For information about User Code, see the
printer driver Help.
Installing the PostScript 3 Printer Driver (Windows XP, Windows Server 2003 IPP)
• Installing this printer driver requires Administrators permission. Log on using an account that has Administrators permission.
1. Quit all applications currently running.
2. Insert the CD-ROM into the CD-ROM drive.
The installer starts.
3. Select an interface language, and then click [OK].
The default interface language is English.
4. Click [PostScript 3 Printer Driver].
Add Printer Wizard starts.
5. Click [Next >].
6. Click [Local printer attached to this computer], and then click [Next >].
33
Page 36

1. Preparing for Printing
1
7. Click [Create a new port:].
8. Click [SmartDeviceMonitor], and then click [Next >].
9. Click [IPP].
10. In the [Printer URL] box, enter "http://(printer's address)/printer" as the printer's address.
If the server authentification is issued, to enable SSL (a protocol for encrypted communication), enter
"https://(printer's address)/printer" (Internet Explorer 5.01, or a higher version must be installed).
(example IPv4 address: 192.168.15.16)
http://192.168.15.16/printer
https://192.168.15.16/printer
You can enter "http://(printer's address)/ipp" as the printer's address.
If you are using Firefox or Netscape under Windows XP SP 2 or Windows Server 2003, you can
enter IPv6 address as "http://IPv6 printer's address/printer".
11. Enter a name for identifying the printer in [IPP Port Name]. Use a name different from the
one of any existing port.
If a name is not specified here, the address entered in the [Printer URL] box becomes the IPP port
name.
12. [Detailed Settings] to make necessary settings.
For information about the settings, see SmartDeviceMonitor for Client Help.
13. Click [OK].
14. Check that the name of the printer driver you want to install is selected, and then click [Next
>].
15. Change the name of the printer if you want, and then click [Next >].
Select the [Yes] check box to configure the printer as default.
16. Specify whether or not to print a test page, and then click [Next >].
17. Click [Finish].
The printer driver installation starts.
• Auto Run may not work with certain operating system settings. If this happens, launch "Setup.exe" on
the CD-ROM root directory.
• The printer driver with the selected language will be installed. The English printer driver is installed
when the following language is selected: Cestina, Magyar, Polski, Portugues, Suomi.
• A User Code can be set after the printer driver installation. For information about User Code, see the
printer driver Help.
34
Page 37

Using the SmartDeviceMonitor Port
1
Changing the Port Settings for SmartDeviceMonitor for Client
Follow the procedure below to change the SmartDeviceMonitor for Client settings, such as TCP/IP timeout,
recovery/parallel printing, and printer groups.
Windows 95/98:
1. Open [Printers] window from [Start] menu.
2. In the [Printers] window, click the icon of the printer you want to use. On the [File] menu,
click [Properties].
3. Click the [Details] tab, and then click [Port Settings...].
The [Port Settings] dialog box appears.
Windows 2000/Windows NT 4.0:
1. Open [Printers] window from [Start] menu.
2. In the [Printers] window, click the icon of the printer you want to use. On the [File] menu,
click [Properties].
3. On the [Ports] tab, click [Configure Port...].
The [Port Configuration] dialog box appears.
Windows XP, Windows Server 2003:
1. Open the [Printers and Faxes] window from the [Start] menu.
The [Printers and Faxes] window appears.
2. Click the icon of the printer you want to use. On the [File] menu, click [Properties]. The printer
properties appear.
3. Click the [Ports] tab, and then click [Configure Port...].
The [Port Configuration] dialog box appears.
• For TCP/IP, timeout setting can be configured.
• User, proxy, and timeout settings can be configured for IPP.
• If no settings on the [Recovery/Parallel Printing] tab are available, follow the procedure below.
1. Click [Cancel] to close the [Port Configuration:] dialog box.
2. Start SmartDeviceMonitor for Client, and then right-click the SmartDeviceMonitor for Client icon
on the tasktray.
35
Page 38

1. Preparing for Printing
1
3. Point to [Properties], and then click [Extended Features Settings].
4. Select the [Set Recovery/Parallel Printing for each port] check box.
5. Click [OK] to close the [Extended Features Settings] dialog box.
• For information about these settings, see SmartDeviceMonitor for Client Help.
36
Page 39

Using the Standard TCP/IP Port
1
Using the Standard TCP/IP Port
Installing the PCL or RPCS Printer Driver
• To install printer driver under Windows 2000/XP Professional, and Windows Server 2003, you must
have an account that has Manage Printers permission. Log on as an Administrators or Power Users
group member.
• In an IPv6 environment, you cannot use the Standard TCP/IP Port. Use the SmartDeviceMonitor port
1. Quit all applications currently running.
2. Insert the CD-ROM into the CD-ROM drive.
The installer starts.
3. Select an interface language, and then click [OK].
The default interface language is English.
4. Click [PCL/RPCS Printer Drivers].
5. The software license agreement appears in the [License Agreement] dialog box.
After reading the agreement, click [I accept the agreement.], and then click [Next >].
6. Select a printer driver you want to use in the [Select Program] dialog box.
You can select several printer drivers.
7. Click [Next >].
8. Select the printer model you want to use.
The printer name can be changed in the [Change settings for 'Printer Name'] box.
9. Double-click the printer name to display the printer settings.
The details shown in [Comment:], [Driver:], and [Port:] vary depending on the operating system, printer
model, and port.
10. Click [Port:], and then click [Add].
11. Click [Standard TCP/IP Port], and then click [OK].
Configure the Standard TCP/IP port settings, and then see Windows Help if [Standard TCP/IP Port]
does not appear.
12. Click [Next >] in the [Add Standard TCP/IP Printer Port Wizard] dialog box.
13. Enter the printer name or IPv4 address in the [Printer Name or IP Address] box.
The [Port Name] text box automatically obtains a port name. Change this name if necessary.
When screen for Device selection appears, select "RICOH NetworkPrinter Driver C Model".
37
Page 40

1. Preparing for Printing
1
14. Click [Next >].
15. Click [Finish] in the [Add Standard TCP/IP Printer Port Wizard] dialog box.
The installation start dialog box reappears.
16. Check that the port of the selected printer is displayed in [Port:].
17. Configure the default printer as necessary.
18. Click [Continue].
The printer driver installation starts.
19. After the installation is completed, select one of the options to restart the computer either
now or later, and then click [Finish].
Restart the computer to complete installation.
• Auto Run may not work with certain operating system settings. If this happens, launch "Setup.exe" on
the CD-ROM root directory.
• To stop installation of the selected software, click [Cancel] before installation is complete.
• A message appears if there is a newer version of the printer driver already installed. If there is, you
cannot install the printer driver using Auto Run. If you still want to install the printer driver, use [Add
Printer]. See p.65 "If a Message Appears during Installation".
Installing the PostScript 3 Printer Driver (Windows 2000)
• Installing this printer driver requires Administrators permission. Log on using an account that has Administrators permission.
• In an IPv6 environment, you cannot use the Standard TCP/IP Port. Use the SmartDeviceMonitor port.
1. Quit all applications currently running.
2. Insert the CD-ROM into the CD-ROM drive.
The installer starts.
3. Select an interface language, and then click [OK].
The default interface language is English.
4. Click [PostScript 3 Printer Driver].
Add Printer Wizard starts.
5. Click [Next >].
6. Click [Local printer], and then click [Next >].
38
Page 41

Using the Standard TCP/IP Port
1
7. Click [Create a new port:].
8. Click [Standard TCP/IP Port], and then click [Next >].
9. Click [Next >] in the [Add Standard TCP/IP Printer Port Wizard] dialog box.
10. Enter the printer name or IPv4 address in the [Printer Name or IP Address] box, and then
click [Next >].
When screen for Device selection appears, select "RICOH NetworkPrinter Driver C Model".
11. Click [Finish] in the [Add Standard TCP/IP Printer Port Wizard] dialog box.
12. Check that the name of the printer whose driver you want to install is selected, and then click
[Next >].
13. Change the printer name if you want, and then click [Next >].
Select the [Yes] check box to configure the printer as default.
14. Click [Next >].
15. Specify whether or not to print a test page, and then click [Next>].
16. Click [Finish].
The printer driver installation starts.
• Auto Run may not work with certain operating system settings. If this happens, launch "Setup.exe" on
the CD-ROM root directory.
• The printer driver with the selected language will be installed. The English printer driver is installed
when the following language is selected: Cestina, Magyar, Polski, Portugues, Suomi.
• A User Code can be set after the printer driver installation. For information about User Code, see the
printer driver Help.
Installing the PostScript 3 Printer Driver (Windows XP, Windows Server 2003)
• Installing this printer driver requires Administrators permission. Log on using an account that has Administrators permission.
• In an IPv6 environment, you cannot use the Standard TCP/IP Port. Use the SmartDeviceMonitor port.
1. Quit all applications currently running.
2. Insert the CD-ROM into the CD-ROM drive.
The installer starts.
3. Select an interface language, and then click [OK].
The default interface language is English.
39
Page 42

1. Preparing for Printing
1
4. Click [PostScript 3 Printer Driver].
Add Printer Wizard starts.
5. Click [Next >].
6. Click [Local printer attached to this printer], and then click [Next >].
7. Click [Create a new port:].
8. Click [Standard TCP/IP Port] in [Create a new Port], and then click [Next >].
9. Click [Next >] in the [Add Standard TCP/IP Printer Port Wizard] dialog box.
10. Enter the printer name or IPv4 address in the [Printer Name or IP Address] box.
The [Port Name] text box automatically obtains a port name. Change this name if necessary.
When screen for Device selection appears, select "RICOH NetworkPrinter Driver C Model".
11. Click [Next >].
12. Click [Finish] in the [Add Standard TCP/IP Printer Port Wizard] dialog box.
13. Check that the name of the printer whose driver you want to install is selected, and then click
[Next >].
14. Change the printer name if you want, and then click [Next >].
Select the [Yes] check box to configure the printer as default.
15. Click [Next>].
16. Specify whether or not to print a test page, and then click [Next >].
17. Click [Finish].
The printer driver installation starts.
• Auto Run may not work with certain operating system settings. If this happens, launch "Setup.exe" on
the CD-ROM root directory.
• The printer driver with the selected language will be installed. The English printer driver is installed
when the following language is selected: Cestina, Magyar, Polski, Portugues, Suomi.
• A User Code can be set after the printer driver installation. For information about User Code, see the
printer driver Help.
40
Page 43

Using the LPR Port
1
Using the LPR Port
Installing the PCL or RPCS Printer Driver
• To install this printer driver under Windows 2000/XP Professional, Windows Server 2003, and
Windows NT 4.0, you must have an account that has Manage Printers permission. Log on as an
Administrators or Power Users group member.
• In an IPv6 environment, you cannot use the LPR Port. Use the SmartDeviceMonitor port.
1. Quit all applications currently running.
2. Insert the CD-ROM into the CD-ROM drive.
The installer starts.
3. Select an interface language, and then click [OK].
The default interface language is English.
4. Click [PCL/RPCS Printer Drivers].
5. The software license agreement appears in the [License Agreement] dialog box.
After reading the agreement, click [I accept the agreement.], and then click [Next >].
6. Select a printer driver you want to use in the [Select Program] dialog box.
You can select several printer drivers.
7. Select the printer model you want to use.
The printer name can be changed in the [Change settings for 'Printer Name'] box.
8. Double-click the printer name to display the printer settings.
The details shown in [Comment:], [Driver:], and [Port:] vary depending on the operating system, printer
model, and port.
9. Click [Port:], and then click [Add].
10. Click [LPR Port], and then click [OK].
If [LPR Port] does not appear, see Windows Help and install it.
11. Enter the printer's IPv4 address in the [Name or address of server providing lpd] box.
12. Enter "lp" in the [Name of printer or print queue on that server] box, and then click [OK].
The port is added.
13. Check that the port of the selected printer is displayed in [Port:].
14. Configure the default printer as necessary.
41
Page 44

1. Preparing for Printing
1
15. Click [Finish].
The printer driver installation starts.
16. After the installation is completed, select one of the options to restart the computer either
now or later, and then click [Finish].
Restart the computer to complete installation.
• Auto Run may not work with certain operating system settings. If this happens, launch "Setup.exe" on
the CD-ROM root directory.
• To stop installation of the selected software, click [Cancel] before installation is complete.
• A message appears if there is a newer version of the printer driver already installed. If there is, you
cannot install the printer driver using Auto Run. If you still want to install the printer driver, use [Add
Printer]. See p.65 "If a Message Appears during Installation".
Installing the PostScript 3 Printer Driver (Windows 2000)
• Installing this printer driver requires Administrators permission. Log on using an account that has Administrators permission.
• In an IPv6 environment, you cannot use the LPR Port. Use the SmartDeviceMonitor port.
1. Quit all applications currently running.
2. Insert the CD-ROM into the CD-ROM drive.
The installer starts.
3. Select an interface language, and then click [OK].
The default interface language is English.
4. Click [PostScript 3 Printer Driver].
Add Printer Wizard starts.
5. Click [Next >].
6. Click [Local printer], and then click [Next >].
7. Click [Create a new port:].
8. Click [LPR Port], and then click [Next >].
9. Enter the printer's IPv4 address in the [Port Name] box, and then click [OK].
10. Check that the name of the printer whose driver you want to install is selected, and then click
[Next >].
42
Page 45

Using the LPR Port
1
11. Change the printer name if you want, and then click [Next >].
Select the [Yes] check box to configure the printer as default.
12. Specify whether or not to share the printer, and then click [Next >].
13. Specify whether or not to print a test page, and then click [Next >].
14. Click [Finish].
The printer driver installation starts.
• Auto Run may not work with certain operating system settings. If this happens, launch "Setup.exe" on
the CD-ROM root directory.
• The printer driver with the selected language will be installed. The English printer driver is installed
when the following language is selected: Cestina, Magyar, Polski, Portugues, Suomi.
• A User Code can be set after the printer driver installation. For information about User Code, see the
printer driver Help.
Installing the PostScript 3 Printer Driver (Windows XP, Windows Server 2003)
• Installing this printer driver requires Administrators permission. Log on using an account that has Administrators permission.
• In an IPv6 environment, you cannot use the LPR Port. Use the SmartDeviceMonitor port.
1. Quit all applications currently running.
2. Insert the CD-ROM into the CD-ROM drive.
The installer starts.
3. Select an interface language, and then click [OK].
The default interface language is English.
4. Click [PostScript 3 Printer Driver].
Add Printer Wizard starts.
5. Click [Next >].
6. Click [Local Printer attached to this computer], and then click [Next >].
7. Click [Create a new port:].
8. Click [LPR Port] in [Create a new Port], and then click [Next >].
9. Enter the printer's IP address in the [Name or address of server providing lpd] box.
10. Enter "lp" in the [Name of printer or print queue on that server] box, and then click [OK].
43
Page 46

1. Preparing for Printing
1
11. Check that the name of the printer whose driver you want to install is selected, and then click
[Next >].
12. Change the printer name if you want, and then click [Next >].
Select the [Yes] check box to configure the printer as default.
13. Click [Next >].
14. Specify whether or not to print a test page, and then click [Next >].
15. Click [Finish].
The printer driver installation starts.
• Auto Run may not work with certain operating system settings. If this happens, launch "Setup.exe" on
the CD-ROM root directory.
• The printer driver with the selected language will be installed. The English printer driver is installed
when the following language is selected: Cestina, Magyar, Polski, Portugues, Suomi.
• A User Code can be set after the printer driver installation. For information about User Code, see the
printer driver Help.
44
Page 47

Using as the Windows Network Printer
1
Using as the Windows Network Printer
Installing the PCL or RPCS Printer Driver
To use the print server, install the printer driver by selecting "Network printer server", and then select the
Windows 2000/XP, or Windows Server 2003 shared printer.
This section assumes that the client has already been configured to communicate with a Windows 2000/
XP, or Windows Server 2003 print server. Do not begin the following procedure before the client is set up
and configured correctly.
• To install printer driver under Windows 2000/XP Professional, and Windows Server 2003, you must
have an account that has Manage Printers permission. For this, log on as an Administrators or Power
Users group member.
• If you print with a print server connected to the printer using the SmartDeviceMonitor port, Recovery
Printing and Parallel Printing cannot be used from the client.
• SmartDeviceMonitor's notification functions are not available if you are using a Windows XP or Windows Server 2000 print server.
1. Quit all applications currently running.
2. Insert the CD-ROM into the CD-ROM drive.
The installer starts.
3. Select an interface language, and then click [OK].
The default interface language is English.
4. Click [PCL/RPCS Printer Drivers].
5. The software license agreement appears in the [License Agreement] dialog box.
After reading the agreement, click [I accept the agreement.], and then click [Next >].
6. Select a printer driver you want to use in the [Select Program] dialog box.
You can select several printer drivers.
7. Click [Next >].
8. Select the printer models you want to use.
The printer name can be changed in the [Change settings for 'Printer Name'] box.
9. Double-click the printer name to display the printer settings.
The details shown in [Comment:], [Driver:], and [Port:] vary depending on the operating system, printer
model, and port.
10. Click [Port:], and then click [Add].
45
Page 48

1. Preparing for Printing
1
11. Click [Network Printer], and then click [OK].
12. Double-click the computer name you want to use as a print server in the [Browse for Printer]
window.
13. Select the printer you want to use, and then click [OK].
14. Check that the port of the selected printer is displayed in [Port:].
15. Configure the User Code as necessary.
For an RPCS printer driver, a User Code can be set after the printer driver installation. For information
about User Code, see the printer driver Help.
16. Select the [Default Printer] check box to configure the printer as default.
17. Click [Continue].
The printer driver installation starts.
18. After the installation is completed, select one of the options to restart the computer either
now or later, and then click [Finish].
Restart the computer to complete installation.
• Auto Run may not work with certain operating system settings. If this happens, launch "Setup.exe" on
the CD-ROM root directory.
• To stop installation of the selected software, click [Cancel] before installation is complete.
• A message appears if there is a newer version of the printer driver already installed. If there is, you
cannot install the printer driver using Auto Run. If you still want to install the printer driver, use [Add
Printer]. See p.65 "If a Message Appears during Installation".
Installing the PostScript 3 Printer Driver (Windows 95/98/Me)
• If you print from a print server connected to the printer using the SmartDeviceMonitor port, the client
cannot use Recovery Printing and Parallel Printing.
1. Quit all applications currently running.
2. Insert the CD-ROM into the CD-ROM drive.
The installer starts.
3. Select an interface language, and then click [OK].
The default interface language is English.
4. Click [PostScript 3 Printer Driver].
Add Printer Wizard starts.
46
Page 49

Using as the Windows Network Printer
1
5. Click [Next >].
6. Click [Network Printer], and then click [Next >].
7. Click [Browse].
8. Double-click the computer name you want to use as a print server in the [Browse for Printer]
window.
9. Select the printer you want to use, and then click [OK].
10. Check the location of the selected printer is shown, and then click [Next >].
11. Change the printer name if you want, and then click [Next >].
Select the [Yes] check box to configure the printer as default.
12. Specify whether or not to print a test page, and then click [Finish].
13. Restart the computer.
• Auto Run may not work with certain operating system settings. If this happens, launch "Setup.exe" on
the CD-ROM root directory.
• The printer driver with the selected language will be installed. The English printer driver is installed
when the following language is selected: Cestina, Magyar, Polski, Portugues, Suomi.
• A User Code can be set after the printer driver installation. For information about User Code, see the
printer driver Help.
Installing the PostScript 3 Printer Driver (Windows 2000)
• Installing a printer driver requires Administrators permission. Log on using an account that has Administrators permission.
• If you print from a print server connected to the printer using the SmartDeviceMonitor port, the client
cannot use Recovery Printing and Parallel Printing.
1. Quit all applications currently running.
2. Insert the CD-ROM into the CD-ROM drive.
The installer starts.
3. Select an interface language, and then click [OK].
The default interface language is English.
4. Click [PostScript 3 Printer Driver].
Add Printer Wizard starts.
5. Click [Next >].
47
Page 50

1. Preparing for Printing
1
6. Click [Network printer], and then click [Next >].
7. Select the location method from the [Locate Your Printer] screen, and then click [Next >].
8. Double-click the computer name you want to use as a print server in the [Shared printers:]
window.
9. Select the printer you want to use, and then click [Next >].
10. The printer driver installation starts.
11. Click [Next >].
Select the [Yes] check box to configure the printer as default.
12. Click [Finish].
Restart the computer to complete installation.
• Auto Run may not work with certain operating system settings. If this happens, launch "Setup.exe" on
the CD-ROM root directory.
• The printer driver with the selected language will be installed. The English printer driver is installed
when the following language is selected: Cestina, Magyar, Polski, Portugues, Suomi.
• A User Code can be set after the printer driver installation. For information about User Code, see the
printer driver Help.
Installing the PostScript 3 Printer Driver (Windows XP, Windows Server 2003)
• Installing this printer driver requires Administrators permission. Log on using an account that has Administrators permission.
• If you print from a print server connected to the printer using the SmartDeviceMonitor port, the client
cannot use Recovery Printing and Parallel Printing.
• If you print with a Windows XP or Windows Server 2003 print server, SmartDeviceMonitor notification
functions may not be possible for the client.
1. Quit all applications currently running.
2. Insert the CD-ROM into the CD-ROM drive.
The installer starts.
3. Select an interface language, and then click [OK].
The default interface language is English.
4. Click [PostScript 3 Printer Driver].
Add Printer Wizard starts.
5. Click [Next >].
48
Page 51

Using as the Windows Network Printer
1
6. Click [A network printer, or a printer attached to another computer], and then click [Next
>].
7. Select [Browse for a printer], and then click [Next >].
8. Double-click the computer name you want to use as a print server in the [Shared printers]
window.
9. Select the printer you want to use, and then click [Next >].
10. The printer driver installation starts.
11. Click [Next >].
Select the [Yes] check box to configure the printer as default.
12. Click [Finish].
Restart the computer to complete installation.
• Auto Run may not work with certain operating system settings. If this happens, launch "Setup.exe" on
the CD-ROM root directory.
• The printer driver with the selected language will be installed. The English printer driver is installed
when the following language is selected: Cestina, Magyar, Polski, Portugues, Suomi.
• A User Code can be set after the printer driver installation. For information about User Code, see the
printer driver Help.
49
Page 52

1. Preparing for Printing
1
Using as the NetWare Print Server/Remote Printer
This explains how to set up the Windows computer used as the NetWare client.
• To install this printer driver under Windows 2000/XP Professional, Windows Server 2003, and
Windows NT 4.0, you must have an account that has Manage Printers permission. Log on as an
Administrators or Power Users group member.
• In an IPv6 environment, Netware servers cannot be used.
The following explanation assumes NetWare Client is installed on the client computer and the NetWare
server environment is correctly set up. Install all necessary client applications before following this procedure.
Set up the printer driver while logging on to the NetWare file server.
The following values are used in the example:
• Operating system: Windows 98
• NetWare version: 4.1
• File server name: CAREE
• Queue name: R-QUEUE
1. Insert the CD-ROM into the CD-ROM drive.
The installer starts.
2. Select an interface language, and then click [OK].
The default interface language is English.
3. Click[ PCL/RPCS Printer Drivers].
4. The software license agreement appears in the [License Agreement] dialog box.
After reading the agreement, click [I accept the agreement.], and then click [Next >].
5. Select the printer driver you want to use in the [Select Program] dialog box.
You can select several printer drivers.
6. Click [Next >].
7. Select the printer models you want to use.
The printer name can be changed in the [Change settings for 'Printer Name'] box.
8. Double-click the printer name to display the printer settings.
The details shown in [Comment:], [Driver:], and [Port:] vary depending on the operating system, printer
model, and port.
9. Click [Port:], and then click [Add].
50
Page 53

Using as the NetWare Print Server/Remote Printer
1
10. Click [Network Printer], and then click [OK].
11. Double-click the name of the NetWare file server on the network tree.
The created queue is displayed.
12. Select the print queue, and then click [OK].
13. Check that the port of the selected printer is displayed in [Port:].
14. Click [Continue].
The printer driver installation starts.
15. Click [Finish] in the [Select Program] dialog box.
16. After the installation is completed, select one of the options to restart the computer either
now or later, and then click [Finish].
Restart the computer to complete installation.
17. After restarting the computer, launch the [Printers] window, and then open the printer
properties.
Under Windows XP or Windows Server 2003, open the printer properties from the [Printers and
Faxes] window.
18. Click [Finish] in the [Introduction complete] dialog box.
19. In the [Printers] window, open the printer properties.
Under Windows XP or Windows Server 2003, open the printer properties from the [Printers and
Faxes] window.
20. On the [Printer Settings] tab, clear the [Form Feed] and [Enable Banner] check boxes.
Under Windows 2000/XP, Windows Server 2003, or Windows NT 4.0, click the [NetWare setting]
tab.
Do not select these check boxes since they are automatically selected by the printer driver. If you
select the check boxes, the printer may not print correctly.
21. Click [OK] to close the printer properties dialog box.
• Auto Run may not work with certain operating system settings. If this happens, launch "Setup.exe" on
the CD-ROM root directory.
• To stop installation of the selected software, click [Cancel] before installation is complete.
• The protocol is set to inactive as default. Enable it using Web Image Monitor or Telnet
When using the PostScript 3 Printer Driver
Follow the procedure below to set up the PostScript 3 printer driver.
51
Page 54

1. Preparing for Printing
1
• In an IPv6 environment, Netware servers cannot be used.
1. In the [Printers] or [Printers and Faxes] window, open the printer properties.
2. Click the [PostScript] tab.
If you are using Windows 2000/XP or Windows NT4.0, click the [Device Settings] tab, and then
clear the check boxes.
3. Click [Advanced].
4. Clear the [Send CTRL+D before job] and [Send CTRL+D after job] check boxes, and then click
[OK].
5. Click [OK] to close the printer properties dialog box.
Form Feed
Do not use NetWare to configure form feed. Form feed is controlled by the printer driver on Windows. If
NetWare form feed is configured, the printer may not print properly.
Follow the procedure below to disable form feed according to the operating system used:
• Under Windows 95/98/Me, clear the [Form feed] check box on the [Printer Settings] tab in the
printer properties dialog box.
• Under Windows 2000/XP, Windows Server 2003, or Windows NT 4.0, clear the [Form feed] check
box on the [NetWare Settings] tab in the printer properties dialog box.
Banner Page
Do not use NetWare to configure a banner page.
Follow the procedure below to disable banner pages according to the operating system used:
• Under Windows 95/98/Me, clear the [Enable banner] check box on the [Printer Settings] tab in the
printer properties dialog box.
• Under Windows 2000/XP, Windows Server 2003, or Windows NT 4.0, clear the [Enable banner]
check box on the [NetWare Settings] tab in the printer properties dialog box.
Printing after Resetting the Printer
Printer to print server connection requires 30 - 40 seconds to resume after the printer is reset. During this
period, jobs may be accepted (depending on NetWare specifications) but not printed.
To print after resetting the printer as the remote printer, check on the print server that the remote printer is
disconnected, or wait for two minutes before trying to print.
52
Page 55

Installing the Printer Driver Using USB
1
Installing the Printer Driver Using USB
This section explains how to install printer drivers using USB.
Before installing, check that only the operating system is running on the computer and no print jobs are in
progress.
The printer drivers can be installed from the CD-ROM provided with this printer.
Windows Me - USB
• Installation via USB is not possible under Windows 95/98. Upgrade to Windows Me or later.
If the printer driver has already been installed, plug and play is enabled, and the icon of the printer
connected to the "USB" port is added to the [Printers] window.
When USB is first used, the plug and play function starts and the [New Hardware Found], [Device Driver
Wizard], or [Add New Hardware Wizard] dialog box appears, depending on the operating system.
1. Download USB Printing Support from the supplier's Web site.
Use a search to find the model name, and then download USB Printing Support from the supplier's
Web site.
Save it where you can locate it easily.
2. Check that the power of the printer is off.
3. Connect the printer and computer using the USB cable.
Connect the USB cable firmly.
4. Turn on the power of the printer.
The plug and play function starts and the [New Hardware Found], [Device Driver Wizard], or [Add
New Hardware Wizard] dialog box appears, depending on the operating system.
5. Select the [Specify a location:] check box, and then click [Browse...].
The [Browse for Folder] dialog box appears.
6. Specify the location where USB Printing Support is located, and then click [Next >].
7. Check the location, and then click [Next >].
USB Printing Support is installed.
8. Click Finish.
If the printer driver has already been installed, plug and play is enabled, and the icon of the printer
connected to the "USB001" port is added to the Printers window.
9. Insert the printer driver. Click [Search for the best driver for your device. [Recommended]],
and then click [Next >].
53
Page 56

1. Preparing for Printing
1
10. Select the [Specify a location:] check box, and then click [Browse...].
The [Browse for Folder] dialog box appears.
11. Insert the CD-ROM into the CD-ROM drive.
When Auto Run starts, click [Exit].
12. Specify the location where USB Printing Support is located, and then click [Next >].
If the CD-ROM drive is D, the source files of USB Printing Support are stored in the following location:
• RPCS
D:\DRIVERS\RPCS\WIN9X_ME\(Language)\DISK1
• PCL 5c
D:\DRIVERS\PCL5C\WIN9X_ME\(Language)\DISK1
• PCL 6
D:\DRIVERS\PCL6\WIN9X_ME\(Language)\DISK1
• PostScript 3
D:\DRIVERS\PS\WIN9X_ME\(Language)\DISK1
13. Check the location, and then click [Next >].
Add Printer Wizard starts.
14. Click [Finish].
Installation is complete. If installation is successful, the icon of the printer connected to the "USB001"
port is added to the [Printers] window.
• The number after "USB" varies depending on the number of printers connected.
• It is not necessary to reinstall USB Printing Support when connecting a different printer via USB interface
when USB Printing Support is installed.
• After installing USB Printing Support, if the printer driver is not installed, follow the plug-and-play
instructions of the printer.
• Install the printer driver from the CD-ROM provided with the printer.
Windows 2000 - USB
• Installing a printer driver requires Administrators permission. Log on using an account that has Administrators permission.
If the printer driver has already been installed, plug and play is enabled, and the icon of the printer
connected to the "USB" port is added to the [Printers] window.
54
Page 57

Installing the Printer Driver Using USB
1
If the printer driver is not installed, follow the plug-and-play instructions of the printer to install it from the
CD-ROM provided.
1. Check that the power of the printer is off.
2. Connect the printer and computer using the USB cable.
Connect the USB cable firmly.
3. Turn on the power of the printer.
Found New Hardware Wizard starts, and USB Printing Support is installed automatically.
4. In the Found New Hardware Wizard display, click [Search for a suitable driver for my device
[recommended]], and then click [Next >].
5. Select the [Specify location] check box, and then click [Next >].
6. Insert the CD-ROM into the CD-ROM drive.
When Auto Run starts, click [Exit].
7. Specify the location where the source files of the printer driver is stored.
If the CD-ROM drive is D, the source files of the printer driver are stored in the following location:
• RPCS
D:\DRIVES\RPCS\WIN2K_XP\(Language)\DISK1
• PCL 5c
D:\DRIVES\PCL5C\WIN2K_XP\(Language)\DISK1
• PCL 6
D:\DRIVES\PCL6\WIN2K_XP\(Language)\DISK1
• PostScript 3
D:\DRIVES\PS3\WIN2K_XP\(Language)\DISK1
8. Check the printer driver location, and then click [OK].
9. Click [Next >].
10. Click [Finish].
If the printer driver has already been installed, plug and play is enabled, and the icon of the printer
connected to the "USB001" port is added to the [Printers] window.
• To disable Auto Run, press the left Shift key when inserting the CD-ROM into the drive and keep it
pressed until the computer finishes reading from the CD-ROM.
• The number after "USB" varies depending on the number of printers connected.
55
Page 58

1. Preparing for Printing
1
Windows XP, Windows Server 2003 - USB
• Installing a printer driver requires Administrators permission. Log on using an account that has Administrators permission.
If the printer driver has already been installed, plug and play is enabled, and the icon of the printer
connected to the "USB" port is added to the [Printers] window.
The printer drivers can be installed from the CD-ROM provided with this printer.
If the printer driver is not installed, follow the plug-and-play instructions of the printer to install it from the
CD-ROM provided.
1. Check that the power of the printer is off.
2. Connect the printer and computer using the USB cable.
Connect the USB cable firmly.
3. Turn on the power of the printer.
Found New Hardware Wizard starts, and USB Printing Support is installed automatically.
4. In the Found New Hardware Wizard display, click [Search for a suitable driver for my device
[recommended]], and then click [Next >].
5. Insert the CD-ROM into the CD-ROM drive.
If Auto Run starts, click [Cancel], and then [Exit].
6. Select the [Include this location in the search] check box under [Search for the best driver in
these location], and then click [Browse] to select the printer driver location.
If the CD-ROM drive is D, the source files of the printer driver are stored in the following location:
• RPCS
D:\DRIVES\RPCS\WIN2K_XP\(Language)\DISK1
• PCL 5c
D:\DRIVES\PCL5C\WIN2K_XP\(Language)\DISK1
• PCL 6
D:\DRIVES\PCL6\WIN2K_XP\(Language)\DISK1
• PostScript 3
D:\DRIVES\PS3\WIN2K_XP\(Language)\DISK1
7. Check the printer driver location, and then click [Next >].
8. Click [Continue].
56
Page 59

Installing the Printer Driver Using USB
1
9. Click [Finish].
If installation is successful, the icon of the printer connected to the "USB001" port is added to the
[Printers and Faxes] window.
• To disable Auto Run, press the left Shift key when inserting the CD-ROM into the drive and keep it
pressed until the computer finishes reading from the CD-ROM.
• The number after "USB" varies depending on the number of printers connected.
Troubleshooting USB
Problem Solutions
The printer is not recognized automatically. Turn off the power of the printer, reconnect the USB
cable, and then turn it on again.
Windows has already configured the USB settings. Open Windows' Device Manager, and then, un-
der [Universal Serial Bus controllers], remove any
conflicting devices. Conflicting devices have a [!]
or [?] icon by them. Take care not to accidentally
remove required devices. For details, see Windows
Help.
When using Windows 2000/XP or Windows
Server 2003, an erroneous device is displayed
under [USB Controller] in the [Device Manager]
dialog box.
Windows ME and the printer cannot be connected. Download USB Printing Support from the supplier's
website.
Search the model name you use on the supplier's
website, and download USB Printing Support.
57
Page 60

1. Preparing for Printing
1
Printing with Parallel Connection
To use a printer connected using a parallel interface, click [LPT1] when installing the printer driver.
The optional IEEE 1284 interface board must be installed on the printer.
Installing the PCL or RPCS Printer Driver
• To install this printer driver under Windows 2000/XP Professional, Windows Server 2003, and
Windows NT 4.0, you must have an account that has Manage Printers permission. Log on as an
Administrators or Power Users group member.
1. Quit all applications currently running.
2. Insert the CD-ROM into the CD-ROM drive.
The installer starts.
3. Select an interface language, and then click [OK].
The default interface language is English.
4. Click [PCL/RPCS Printer Drivers].
5. The software license agreement appears in the [License Agreement] dialog box.
After reading the agreement, click [I accept the agreement], and then click [Next >].
6. Select a printer driver you want to use in the [Select Program] dialog box.
You can select several printer drivers.
7. Click [Next >].
8. Select the printer models you want to use.
The printer name can be changed in the [Change settings for 'Printer Name'] box.
9. Double-click the printer name to display the printer settings.
The details shown in [Comment:], [Driver:], and [Port:] vary depending on the operating system, printer
model, and port.
10. Check that [LPT1:] is shown in [Port:].
11. Select the [Default Printer] check box to configure the printer as default.
12. Click [Finish].
The printer driver installation starts.
13. After the installation is completed, select one of the options to restart the computer either
now or later, and then click [Finish].
58
Page 61

Printing with Parallel Connection
1
• Auto Run may not work with certain operating system settings. If this happens, launch "Setup.exe" on
the CD-ROM root directory.
• To stop installation of the selected software, click [Cancel] before installation is complete.
• A message appears if there is a newer version of the printer driver already installed. If there is, you
cannot install the printer driver using Auto Run. If you still want to install the printer driver, use [Add
Printer]. See p.65 "If a Message Appears during Installation".
Installing the PostScript 3 Printer Driver (Windows 95/98/Me)
1. Quit all applications currently running.
2. Insert the CD-ROM into the CD-ROM drive.
The installer starts.
3. Select an interface language, and then click [OK].
The default interface language is English.
4. Click [PostScript 3 Printer Driver].
Add Printer Wizard starts.
5. Click [Next >].
6. Click [Local Printer], and then click [Next >].
A dialog box for selecting the printer manufacturer and model name appears.
7. Select the name of the printer whose driver you want to install, and then click [Next >].
8. In the [Available ports:] box, click [Printer Port], and then click [Next >].
9. Change the printer name if you want, and then click [Next>].
Select the Yes check box to configure the printer as default.
10. Specify whether or not to print a test page, and then click [Finish].
11. Restart the computer to complete installation.
• Auto Run may not work with certain operating system settings. If this happens, launch "Setup.exe" on
the CD-ROM root directory.
• The printer driver with the selected language will be installed. The English printer driver is installed
when the following language is selected: Cestina, Magyar, Polski, Portugues, Suomi.
• A user code can be set after the printer driver installation. For information about user code, see the
printer driver Help.
59
Page 62

1. Preparing for Printing
1
Installing the PostScript 3 Printer Driver (Windows 2000)
• Installing this printer driver requires Administrators permission. Log on using an account that has Administrators permission.
1. Quit all applications currently running.
2. Insert the CD-ROM into the CD-ROM drive.
The installer starts.
3. Select an interface language, and then click [OK].
The default interface language is English.
4. Click [PostScript 3 Printer Driver].
Add Printer Wizard starts.
5. Click [Next >].
6. Click [Local printer], and then click [Next >].
A dialog box for selecting the printer manufacturer and model name appears.
7. Select [LPT1] at the [Printer Port] dialog box, and then click [Next >].
8. Select the name of the printer whose driver you want to install, and then click [Next >].
9. Select whether or not to share the printer, and then click [Next >].
10. Specify whether or not to print a test page, and then click [Finish].
The printer driver installation starts.
11. Restart the computer to complete installation.
• Auto Run may not work with certain operating system settings. If this happens, launch "Setup.exe" on
the CD-ROM root directory.
• The printer driver with the selected language will be installed. The English printer driver is installed
when the following language is selected: Cestina, Magyar, Polski, Portugues, Suomi.
• A user code can be set after the printer driver installation. For information about user code, see the
printer driver Help.
Installing the PostScript 3 Printer Driver (Windows XP, Windows Server 2003)
• Installing this printer driver requires Administrators permission. Log on using an account that has Administrators permission.
60
Page 63

Printing with Parallel Connection
1
1. Quit all applications currently running.
2. Insert the CD-ROM into the CD-ROM drive.
The installer starts.
3. Select an interface language, and then click [OK].
The default interface language is English.
4. Click [PostScript 3 Printer Driver].
Add Printer Wizard starts.
5. Click [Next >].
6. Click [Local printer attached to this computer], and then click [Next >].
7. Select the port you want to use, and then click [Next >].
A dialog box for selecting the printer manufacturer and model name appears.
8. Select the name of the printer whose driver you want to install, and then click [Next >].
9. Click [Close] to close the [Printer Port] dialog box.
10. Click [Next >].
11. Change the printer name if you want, and then click [Next >].
12. Specify whether or not to print a test page, and then click [Finish].
The printer driver installation starts.
13. Restart the computer to complete installation.
• Auto Run may not work with certain operating system settings. If this happens, launch "Setup.exe" on
the CD-ROM root directory.
• The printer driver with the selected language will be installed. The English printer driver is installed
when the following language is selected: Cestina, Magyar, Polski, Portugues, Suomi.
• A user code can be set after the printer driver installation. For information about user code, see the
printer driver Help.
61
Page 64

1. Preparing for Printing
1
Printing with Bluetooth Connection
Supported Profiles
SPP, HCRP
• A maximum of two Bluetooth adaptor or Bluetooth-equipped computers can be connected at
the same time using the Bluetooth interface: one by SPP, one by HCRP.
• When connecting more than one Bluetooth adaptor or Bluetooth-equipped computer at the same
time, the first device that establishes connection is selected. When selecting the connection between the other devices, cancel the first established connection.
• Conditions for bidirectional communications
• SPP connection does not support bidirectional communications.
• HCRP connection supports bidirectional communications.
BIP
• For BIP connection, a module including PostScript 3 must be installed in the printer.
• Only one Bluetooth adaptor or Bluetooth-equipped computer can be connected via BIP.
• Only JPEG images that can be printed using BIP.
• User Codes are disabled for BIP.
• You cannot print if print functions are restricted.
• Some printers do not support BIP.
• In this manual, the instruction referred to print using SPP. To print using HCRP or BIP, see the Help
supplied with the Bluetooth adapter you use.
Printing with Bluetooth Connection
To install the printer driver, follow the procedure used to install parallel interface.
• To install the printer driver under Windows 2000/XP Professional, Windows Server 2003, and
Windows NT 4.0, you must have an account that has Manage Printers permission. Log on as an
Administrators or Power Users group member.
1. Start 3Com Bluetooth Connection Manager.
2. Check that the printer you want to use appears in 3Com Bluetooth Connection Manager.
3. On the [Tool] menu, click [COM port].
62
Page 65

Printing with Bluetooth Connection
1
4. Check that the message "Bluetooth Serial Client (COMx) " appears under Client Ports. (X
indicates the COM port number used by Bluetooth.)
5. Click [Close].
6. On the [Start] menu, point to [Settings], and then click [Printers].
The [Printers] window appears.
7. Click the icon of the printer you want to use.
8. On the [File] menu, click [Properties].
9. Click the [Ports] tab.
10. Under [Port], select the [COMx:] check box. X indicates the COM port number used by
Bluetooth.
11. Click [OK].
Close the [Printers] window.
• System requirements vary depending on the Bluetooth standard and specifications. For details, see
the manuals provided with each product.
• For information about setting up Bluetooth under other operating systems or using it with different
utilities, see the manuals provided with those operating systems or utilities.
• To always use the same printer, select the [Always use for this connection] check box.
• If a dialog box appears while transmitting a print job, reestablish network connection as follows:
1. Select the printer you want to use in the [Printers and Faxes] box.
2. Click [Connect].
• For details, see the manuals provided with the Bluetooth adaptor or computer equipped with Bluetooth.
Configuring Security Mode Settings
This describes how to configure the security mode settings.
1. Start 3Com Bluetooth Connection Manager.
2. On the [Tools] menu, click [Security Mode].
The [Security Mode] dialog box appears.
3. Select the security mode in the [Security Mode:] list.
If you click [High], or [Custom], and specify [Link] in the [Custom Settings] dialog box, enter the
Bluetooth password. For information about entering the password, see p.50 "Send the print job to the
printer in use.".
63
Page 66

1. Preparing for Printing
1
For all other security modes and custom settings, no password is required.
For information about each mode, see the manuals provided with the utility.
4. Click [OK].
Close the [Security Mode] dialog box.
• For details about the security mode, see 3Com Bluetooth Connection Manager Help. For details about
the password entry which is required to transmit print jobs, see the following section.
Printing in the Security Mode
This describes how to print in the security mode.
1. Send the print job to the printer in use.
Depending on the computer configuration, the [Connect] dialog box may appear. If it does, use it to
establish the network connection.
The [Authentication] dialog box appears.
2. Enter the Bluetooth password, and then click [OK].
As the Bluetooth password, enter the last four digits of the printer's serial number. You can find the
serial number on the label on the back of the printer. For example, if the serial number is
00A0-001234, the Bluetooth password is 1234.
3. The print job is sent.
• The Bluetooth password differs for each printer and cannot be changed.
64
Page 67

If a Message Appears during Installation
1
If a Message Appears during Installation
Message number 58 or 34 indicates the printer driver cannot be installed using Auto Run. Install the printer
driver using [Add Printer] or [Install Printer].
For Windows 95/98/Me, Windows 2000 and Windows NT 4.0:
1. On the Start menu, point to [Settings], and then click [Printers].
2. Double-click the Add Printer icon.
3. Follow the instructions in Add Printer Wizard.
• If the printer driver is on a CD-ROM, the location of the RPCS printer driver is either \DRIVERS\RPCS
\WIN9X_ME, or \DRIVERS\RPCS\WIN2K_XP. If the installer starts, click [Cancel] to quit.
For Windows XP Professional and Windows Server 2003:
1. On the Start menu, click [Printers and Faxes].
2. Click [Add a printer].
3. Follow the instructions in Add Printer Wizard.
• If the printer driver is on a CD-ROM, the location of the RPCS printer driver is \DRIVERS\RPCS
\WIN2K_XP. If the installer starts, click [Cancel] to quit.
For Windows XP Home Editions:
1. On the Start menu, click [Control Panel].
2. Click [Printers and Other Hardware].
3. Click [Printers and Faxes].
4. Click [Install Printer].
5. Follow the instructions in Add Printer Wizard.
• If the printer driver is on a CD-ROM, the location of the RPCS printer driver is \DRIVERS\RPCS
\WIN2K_XP. If the installer starts, click [Cancel] to quit.
65
Page 68

1. Preparing for Printing
1
Making Option Settings for the Printer
Make option settings for the printer using the printer driver when bidirectional communication is disabled.
Conditions for Bidirectional Communication
Bidirectional communication allows information about paper size and feed direction settings to be automatically sent to the printer. You can check printer status from your computer.
• Bidirectional communication is supported by Windows 95/98/Me/2000/XP, Windows Server
2003, and Windows NT 4.0.
• If you use the RPCS printer driver and bidirectional communication is enabled under Windows 2000,
the [Change Accessories] tab is unavailable.
• The RPCS printer driver supports bidirectional communications and updates the printer status automatically.
• The PCL printer driver supports bidirectional communications. You can update printer status manually.
• The PostScript 3 printer driver does not support bidirectional communications.
To support bidirectional communication, the following conditions must be met:
When connected with parallel cables
• The computer must support bidirectional communication.
• The printer must support bidirectional communication.
• The interface cable must support bidirectional communication.
• The printer must be connected to the computer using the standard parallel cables and parallel
connectors.
• Under Windows 2000, [Enable bidirectional support] must be selected, and [Enable printer
pooling] must not be selected on the [port] tab with the RPCS printer driver.
When connected with the network
• The printer must support bidirectional communication.
• SmartDeviceMonitor for Client included on the CD-ROM must be installed, and TCP/IP must be
used.
• Under Windows 2000, [Enable bidirectional support] must be selected, and [Enable printer
pooling] must not be selected on the [port] tab with the RPCS printer driver.
• In addition to the above, one of the following conditions must also be met:
• The SmartDeviceMonitor for Client port and the TCP/IP protocol must be used.
66
Page 69

Making Option Settings for the Printer
1
• The standard TCP/IP port must be used without changing the default port name (for Windows 2000/XP and Windows Server 2003).
• Microsoft TCP/IP print IPv4 address must be specified for use (for Windows NT 4.0).
• IPP port name must include the IPv4 address when using the IPP protocol.
When connected with USB
The printer must be connected to the computer's USB port using the USB interface cable.
The computer must support bidirectional communication.
• Install SmartDeviceMonitor for Client from the CD-ROM provided.
If Bidirectional Communication is Disabled
Set up option settings when bidirectional communications are disabled.
• Under Windows 2000/XP and Windows Server 2003, Manage Printers permission is required to
change the printer properties in the [Printers] folder. Log on as an Administrators or Power Users group
member.
• Under Windows NT 4.0, Full Control permission is required to change the printer properties in the
[Printers] folder. Log on as an Administrators or Power Users group member.
1. On the Start menu, point to [Settings], and then click [Printers].
The [Printers] window appears.
2. Click the icon of the printer you want to use.
3. On the File menu, click [Properties].
4. Click the [Change Accessories] tab.
If options in the [Change Accessories] tab are disabled, bidirectional connection is enabled. In this
case, no change is necessary for option settings.
If you are using the RPCS printer driver, click the [Change Accessories] tab.
If you are using the PS printer driver, click the [Device Settings] tab.
5. Select options installed from the Option area, and then make the necessary settings.
6. Select the total amount of the memory in [Total Memory:], when the optional SDRAM module
is added.
7. Under [Paper source tray settings:], click and highlight the tray to be used, and then select
the appropriate size, position, and type for the tray. Select the [Tray locking] check box to
exclude the tray from the targets of automatic tray selection.
8. Click [OK] to close the printer properties dialog box.
67
Page 70

1. Preparing for Printing
1
68
Page 71

2. Setting Up the Printer Driver
2
PCL - Accessing the Printer Properties
Windows 95/98/Me - Accessing the Printer Properties
There are two methods to open the [Printer Properties] dialog box.
Making Printer Default Settings
To make the printer default settings, open the [Printer Properties] dialog box from the [Printers] window.
• You cannot change the printer default settings for each user. Settings made in the [Printer Properties]
dialog box are applied to all users.
1. On the [Start] menu, point to [Settings], and then click [Printers].
The [Printers] window appears.
2. Click the icon of the printer you want to use.
3. On the [File] menu, click [Properties].
4. Make the necessary settings, and then click [OK].
• With some applications, the printer driver settings are not used, and the application's own default
settings are applied.
• For details about settings, see the printer driver Help.
Making Printer Settings from an Application
You can make printer settings for a specific application. To make printer settings for a specific application,
open the [Printer Properties] dialog box from that application. The following explains how to make settings
for the WordPad application provided with Windows 95/98/Me.
1. On the [File] menu, click [Print].
The [Print] dialog box appears.
2. Select the printer you want to use in the [Name] list, and then click [Properties].
The [Printer Properties] dialog box appears.
69
Page 72

2. Setting Up the Printer Driver
2
3. Make the necessary settings, and then click [OK].
4. Click [OK] to start printing.
• The procedure to open the [Printer Properties] dialog box may vary depending on the application.
For details, see the manuals provided with the application you use.
• With some applications, the printer driver settings are not used, and the application's own default
settings are applied.
• Any settings you make in the following procedure are valid for the current application only.
• General users can change the properties displayed in the [Print] dialog box of an application. Settings
made here are used as defaults when printing from this application.
• For details about settings, see the printer driver Help.
Windows 2000 - Accessing the Printer Properties
Making Printer Default Settings - The Printer Properties
• To change the printer default settings including option configuration settings, log on using an account
that has Manage Printers permission. Members of the Administrators and Power Users groups have
Manage Printers permission by default.
• You cannot change the printer default settings for each user. Settings made in the [Printer Properties]
dialog box are applied to all users.
1. On the [Start] menu, point to [Settings], and then click [Printers].
The [Printers] window appears.
2. Click the icon of the printer you want to use.
3. On the [File] menu, click [Properties].
The [Printer Properties] dialog box appears.
4. Make the necessary settings, and then click [OK].
• Settings you make here are used as the default settings for all applications.
• Do not make a setting for [Form to Tray Assignment].
• For details about settings, see the printer driver Help.
70
Page 73

PCL - Accessing the Printer Properties
2
Making Printer Default Settings - Printing Preferences
• You cannot change the printer default settings for each user. Settings made in the [Printer Properties]
dialog box are applied to all users.
1. On the [Start] menu, point to [Settings], and then click [Printers].
The [Printers] window appears.
2. Click the icon of the printer you want to use.
3. On the [File] menu, click [Printing Preferences...].
The [Printing Preferences] dialog box appears.
4. Make the necessary settings, and then click [OK].
• Settings you make here are used as the default settings for all applications.
• For details about settings, see the printer driver Help.
Making Printer Settings from an Application
You can make printer settings for a specific application. To make printer settings for a specific application,
open the [Printing Preferences] dialog box from that application. The following explains how to make
settings for the WordPad application provided with Windows 2000.
1. On the [File] menu, click [Print...].
The [Print] dialog box appears.
2. Select the printer you want to use in the [Select Printer] list.
3. Make the necessary settings, and then click [Print] to start printing.
• The procedure to open the [Printing Preferences] dialog box may vary depending on the application.
For details, see the manuals provided with the application you use.
• Any settings you make in the following procedure are valid for the current application only.
• General users can change the properties displayed in the [Print] dialog box of an application. Settings
made here are used as defaults when printing from this application.
• For details about settings, see the printer driver Help.
71
Page 74

2. Setting Up the Printer Driver
2
Windows XP, Windows Server 2003 - Accessing the Printer Properties
Making Printer Default Settings - The Printer Properties
• To change the printer default settings including option configuration settings, log on using an account
that has Manage Printers permission. Members of the Administrators and Power Users groups have
Manage Printers permission by default.
• You cannot change the printer default settings for each user. Settings made in the [Printer Properties]
dialog box are applied to all users.
1. On the [Start] menu, click [Printers and Faxes].
The [Printers and Faxes] window appears.
2. Click the icon of the printer you want to use.
3. On the [File] menu, click [Properties].
The [Printer Properties] dialog box appears.
4. Make the necessary settings, and then click [OK].
• Settings you make here are used as the default settings for all applications.
• Do not make a setting for [Form to Tray Assignment].
• For details about settings, see the printer driver Help.
Making Printer Default Settings - Printing Preferences
• You cannot change the printer default settings for each user. Settings made in the [Printer Properties]
dialog box are applied to all users.
1. On the [Start] menu, click [Printers and Faxes].
The [Printers and Faxes] window appears.
2. Click the icon of the printer you want to use.
3. On the [File] menu, click [Printing Preferences...].
The [Printing Preferences] dialog box appears.
4. Make the necessary settings, and then click [OK].
72
Page 75

PCL - Accessing the Printer Properties
2
• Settings you make here are used as the default settings for all applications.
• For details about settings, see the printer driver Help.
Making Printer Settings from an Application
You can make printer settings for a specific application. To make printer settings for a specific application,
open the [Printing Preferences] dialog box from that application. The following explains how to make
settings for the WordPad application provided with Windows XP
1. On the [File] menu, click [Print...].
The [Print] dialog box appears.
2. Select the printer you want to use in the [Select Printer] list, and then click [Preferences].
3. Make the necessary settings, and then click [Print] to start printing.
• The procedure to open the [Printing Preferences] dialog box may vary depending on the application.
For details, see the manuals provided with the application you use.
• Any settings you make in the following procedure are valid for the current application only.
• General users can change the properties displayed in the [Print] dialog box of an application. Settings
made here are used as defaults when printing from this application.
• For details about settings, see the printer driver Help.
Windows NT 4.0 - Accessing the Printer Properties
Making Printer Default Settings - The Printer Properties
• To change the printer default settings including option configuration settings, log on using an account
that has Full Control permission. Members of the Administrators, Server Operators, Print Operators,
and Power Users groups have Full Control permission by default.
• You cannot change the printer default settings for each user. Settings made in the [Printer Properties]
dialog box are applied to all users.
1. On the [Start] menu, point to [Settings], and then click [Printers].
The [Printers] window appears.
73
Page 76

2. Setting Up the Printer Driver
2
2. Click the icon of the printer you want to use.
3. On the [File] menu, click [Properties].
The [Printer Properties] dialog box appears.
4. Make the necessary settings, and then click [OK].
• Settings you make here are used as the default settings for all applications.
• Do not make a setting for [Form to Tray Assignment].
• For details about settings, see the printer driver Help.
Making Printer Default Settings - Default
• To change the printer default settings including option configuration settings, log on using an account
that has Full Control permission. Members of the Administrators, Server Operators, Print Operators,
and Power Users groups have Full Control permission by default.
• You cannot change the printer default settings for each user. Settings made in the [Printer Properties]
dialog box are applied to all users.
1. On the [Start] menu, point to [Settings], and then click [Printers].
The [Printers] window appears.
2. Click the icon of the printer you want to use.
3. On the [File] menu, click [Document Defaults...].
The [Default] dialog box appears.
4. Make the necessary settings, and then click [OK].
• Settings you make here are used as the default settings for all applications.
• For details about settings, see the printer driver Help.
Making Printer Settings from an Application
You can make printer settings for a specific application. To make printer settings for a specific application,
open the [Printer Properties] dialog box from that application. The following explains how to make settings
for the WordPad application provided with Windows NT 4.0.
74
Page 77

PCL - Accessing the Printer Properties
2
1. On the [File] menu, click [Print...].
The [Print] dialog box appears.
2. Select the printer you want to use in the [Name] list, and then click [Properties].
The [Printer Properties] dialog box appears.
3. Make the necessary settings, and then click [OK].
4. Click [OK] to start printing.
• The procedure to open the [Printer Properties] dialog box may vary depending on the application.
For details, see the manuals provided with the application you use.
• With some applications, the printer driver settings are not used, and the application's own default
settings are applied.
• Any settings you make in the following procedure are valid for the current application only.
• General users can change the properties displayed in the [Print] dialog box of an application. Settings
made here are used as defaults when printing from this application.
• For details about settings, see the printer driver Help.
75
Page 78

2. Setting Up the Printer Driver
2
RPCS - Accessing the Printer Properties
Windows 95/98/Me - Accessing the Printer Properties
There are two dialog box types of the [Printer Properties] dialog box. "Multi-tab" is used as an example in
this manual. For details about changing the dialog box types, see the printer driver Help.
Multi-tab
This dialog box type is designed for users who often change print settings to perform various printing
operations.
Custom Setting
This dialog box type is designed for users who rarely change print settings. This type of dialog box
may vary depending on the installed options.
Making Printer Default Settings
To make the printer default settings, open the [Printer Properties] dialog box from the [Printers] window.
• You cannot change the printer default settings for each user. Settings made in the [Printer Properties]
dialog box are applied to all users.
1. On the [Start] menu, point to [Settings], and then click [Printers].
The [Printers] window appears.
2. Click the icon of the printer you want to use.
3. On the [File] menu, click [Properties].
When you open the [Printer Properties] dialog box initially after installing the RPCS printer driver, a
confirmation message appears. After clicking [OK], the [Printer Properties] dialog box appears.
4. Make the necessary settings, and then click [OK].
• With some applications, the printer driver settings are not used, and the application's own default
settings are applied.
• For details about settings, see the printer driver Help.
76
Page 79

RPCS - Accessing the Printer Properties
2
Making Printer Settings from an Application
You can make printer settings for a specific application. To make printer settings for a specific application,
open the [Printer Properties] dialog box from that application. The following explains how to make settings
for the WordPad application provided with Windows 95/98/Me.
1. On the [File] menu, click [Print...].
The [Print] dialog box appears.
2. Select the printer you want to use in the [Name:] list, and then click [Properties...].
The [Printer Properties] dialog box appears.
3. Make the necessary settings, and then click [OK].
4. Click [OK] to start printing.
• The procedure to open the [Printer Properties] dialog box may vary depending on the application.
For details, see the manuals provided with the application you use.
• With some applications, the printer driver settings are not used, and the application's own default
settings are applied.
• Any settings you make in the following procedure are valid for the current application only.
• General users can change the properties displayed in the [Print] dialog box of an application. Settings
made here are used as defaults when printing from this application.
• For details about settings, see the printer driver Help.
Windows 2000 - Accessing the Printer Properties
This describes how to launch printer driver's properties.
Making Printer Default Settings - The Printer Properties
• To change the printer default settings including option configuration settings, log on using an account
that has Manage Printers permission. Members of the Administrators and Power Users groups have
Manage Printers permission by default.
• You cannot change the printer default settings for each user. Settings made in the [Printer Properties]
dialog box are applied to all users.
1. On the [Start] menu, point to [Settings], and then click [Printers].
The [Printers] window appears.
77
Page 80

2. Setting Up the Printer Driver
2
2. Click the icon of the printer you want to use.
3. On the [File] menu, click [Properties].
The [Printer Properties] dialog box appears.
When you open the [Printer Properties] dialog box initially after installing the RPCS printer driver, a
confirmation message appears. After clicking [OK], the [Printer Properties] dialog box appears.
4. Make the necessary settings, and then click [OK].
• Settings you make here are used as the default settings for all applications.
• Do not make a setting for [Form to Tray Assignment].
• For details about settings, see the printer driver Help.
Making Printer Default Settings - Printing Preferences
• You cannot change the printer default settings for each user. Settings made in the [Printer Properties]
dialog box are applied to all users.
1. On the [Start] menu, point to [Settings], and then click [Printers].
The [Printers] window appears.
2. Click the icon of the printer you want to use.
3. On the [File] menu, click [Printing Preferences...].
The [Printing Preferences] dialog box appears.
4. Make the necessary settings, and then click [OK].
• Settings you make here are used as the default settings for all applications.
• For details about settings, see the printer driver Help.
Making Printer Settings from an Application
You can make printer settings for a specific application. To make printer settings for a specific application,
open the [Printing Preferences] dialog box from that application. The following explains how to make
settings for the WordPad application provided with Windows 2000.
78
Page 81

RPCS - Accessing the Printer Properties
2
1. On the [File] menu, click [Print...].
The [Print] dialog box appears.
2. Select the printer you want to use in the [Select Printer] list.
3. Make the necessary settings, and then click [Print] to start printing.
• The procedure to open the [Printing Preferences] dialog box may vary depending on the application.
For details, see the manuals provided with the application you use.
• Any settings you make in the following procedure are valid for the current application only.
• General users can change the properties displayed in the [Print] dialog box of an application. Settings
made here are used as defaults when printing from this application.
• For details about settings, see the printer driver Help.
Windows XP, Windows Server 2003 - Accessing the Printer Properties
Making Printer Default Settings - The Printer Properties
• To change the printer default settings including option configuration settings, log on using an account
that has Manage Printers permission. Members of the Administrators and Power Users groups have
Manage Printers permission by default.
• You cannot change the printer default settings for each user. Settings made in the [Printer Properties]
dialog box are applied to all users.
1. On the [Start] menu, click [Printers and Faxes].
The [Printers and Faxes] window appears.
2. Click the icon of the printer you want to use.
3. On the [File] menu, click [Properties].
The [Printer Properties] dialog box appears.
When you open the [Printer Properties] dialog box initially after installing the RPCS printer driver, a
confirmation message appears. After clicking [OK], the [Printer Properties] dialog box appears.
4. Make the necessary settings, and then click [OK].
• Settings you make here are used as the default settings for all applications.
• Do not make a setting for [Form to Tray Assignment].
79
Page 82

2. Setting Up the Printer Driver
2
• For details about settings, see the printer driver Help.
Making Printer Default Settings - Printing Preferences
• You cannot change the printer default settings for each user. Settings made in the [Printer Properties]
dialog box are applied to all users.
1. On the [Start] menu, click [Printers and Faxes].
The [Printers and Faxes] window appears.
2. Click the icon of the printer you want to use.
3. On the [File] menu, click [Printing Preferences...].
The [Printing Preferences] dialog box appears.
4. Make the necessary settings, and then click [OK].
• Settings you make here are used as the default settings for all applications.
• For details about settings, see the printer driver Help.
Making Printer Settings from an Application
You can make printer settings for a specific application. To make printer settings for a specific application,
open the [Printing Preferences] dialog box from that application. The following explains how to make
settings for the WordPad application provided with Windows XP.
1. On the [File] menu, click [Print...].
The [Print] dialog box appears.
2. Select the printer you want to use in the [Select Printer] list.
3. Make the necessary settings, and then click [Print] to start printing.
• The procedure to open the [Printing Preferences] dialog box may vary depending on the application.
For details, see the manuals provided with the application you use.
• Any settings you make in the following procedure are valid for the current application only.
• General users can change the properties displayed in the [Print] dialog box of an application. Settings
made here are used as defaults when printing from this application.
80
Page 83

RPCS - Accessing the Printer Properties
2
• For details about settings, see the printer driver Help.
Windows NT 4.0 - Accessing the Printer Properties
Making Printer Default Settings - The Printer Properties
• To change the printer default settings including option configuration settings, log on using an account
that has Full Control permission. Members of the Administrators, Server Operators, Print Operators,
and Power Users groups have Full Control permission by default.
• You cannot change the printer default settings for each user. Settings made in the [Printer Properties]
dialog box are applied to all users.
1. On the [Start] menu, point to [Settings], and then click [Printers].
The [Printers] window appears.
2. Click the icon of the printer you want to use.
3. On the [File] menu, click [Properties].
The printer properties dialog box appears.
When you open the printer properties dialog box initially after installing the RPCS printer driver, a
confirmation message appears. After clicking [OK], the [Printer Properties] dialog box appears.
4. Make the necessary settings, and then click [OK].
• Settings you make here are used as the default settings for all applications.
• Do not make a setting for [Form to Tray Assignment].
• For details about settings, see the printer driver Help.
Making Printer Default Settings - Default
• To change the printer default settings including option configuration settings, log on using an account
that has Full Control permission. Members of the Administrators, Server Operators, Print Operators,
and Power Users groups have Full Control permission by default.
• You cannot change the printer default settings for each user. Settings made in the [Printer Properties]
dialog box are applied to all users.
81
Page 84

2. Setting Up the Printer Driver
2
1. On the [Start] menu, point to [Settings], and then click [Printers].
The [Printers] window appears.
2. Click the icon of the printer you want to use.
3. On the [File] menu, click [Document Defaults...].
The [Default] dialog box appears.
4. Make the necessary settings, and then click [OK].
• Settings you make here are used as the default settings for all applications.
• For details about settings, see the printer driver Help.
Making Printer Settings from an Application
You can make printer settings for a specific application. To make printer settings for a specific application,
open the [Printer Properties] dialog box from that application. The following explains how to make settings
for the WordPad application provided with Windows NT 4.0.
1. On the [File] menu, click [Print...].
The [Print] dialog box appears.
2. Select the printer you want to use in the [Name] list, and then click [Properties].
The [Printer Properties] dialog box appears.
3. Make the necessary settings, and then click [OK].
4. Click [OK] to start printing.
• The procedure to open the [Printer Properties] dialog box may vary depending on the application.
For details, see the manuals provided with the application you use.
• With some applications, the printer driver settings are not used, and the application's own default
settings are applied.
• Any settings you make in the following procedure are valid for the current application only.
• General users can change the properties displayed in the [Print] dialog box of an application. Settings
made here are used as defaults when printing from this application.
• For details about settings, see the printer driver Help.
82
Page 85

PostScript 3 - Setting Up for Printing
2
PostScript 3 - Setting Up for Printing
Windows 95/98/Me - Accessing the Printer Properties
There are two methods to open the [Printer Properties] dialog box.
Making Printer Default Settings
To make the printer default settings, open the [Printer Properties] dialog box from the [Printers] window.
• You cannot change the printer default settings for each user. Settings made in the [Printer Properties]
dialog box are applied to all users.
1. On the [Start] menu, point to [Settings], and then click [Printers].
The [Printers] window appears.
2. Click the icon of the printer you want to use.
3. On the [File] menu, click [Properties].
The [Printer Properties] dialog box appears.
4. Make the necessary settings, and then click [OK].
• With some applications, the printer driver settings are not used, and the application's own default
settings are applied.
• For details about settings, see the printer driver Help.
Making Printer Settings from an Application
You can make printer settings for a specific application. To make printer settings for a specific application,
open the [Printer Properties] dialog box from that application. The following explains how to make settings
for the WordPad application provided with Windows 95/98/Me.
1. On the [File] menu, click [Print...].
The [Print] dialog box appears.
2. Select the printer you want to use in the [Name...] list, and then click [Properties...].
The [Printer Properties] dialog box appears.
3. Make the necessary settings, and then click [OK].
83
Page 86

2. Setting Up the Printer Driver
2
4. Click [OK] to start printing.
• The procedure to open the [Printer Properties] dialog box may vary depending on the application.
For details, see the manuals provided with the application you use.
• With some applications, the printer driver settings are not used, and the application's own default
settings are applied.
• Any settings you make in the following procedure are valid for the current application only.
• General users can change the properties displayed in the [Print] dialog box of an application. Settings
made here are used as defaults when printing from this application.
• For details about settings, see the printer driver Help.
Windows 2000 - Accessing the Printer Properties
Making Printer Default Settings - The Printer Properties
• To change the printer default settings including option configuration settings, log on using an account
that has Manage Printers permission. Members of the Administrators and Power Users groups have
Manage Printers permission by default.
• You cannot change the printer default settings for each user. Settings made in the [Printer Properties]
dialog box are applied to all users.
1. On the [Start] menu, point to [Settings], and then click [Printers].
The [Printers] window appears.
2. Click the icon of the printer you want to use.
3. On the [File] menu, click [Properties].
The [Printer Properties] dialog box appears.
4. Make the necessary settings, and then click [OK].
• Settings you make here are used as the default settings for all applications.
• Do not make a setting for [Form to Tray Assignment].
• For details about settings, see the printer driver Help.
84
Page 87

PostScript 3 - Setting Up for Printing
2
Making Printer Default Settings - Printing Preferences
• You cannot change the printer default settings for each user. Settings made in the [Printer Properties]
dialog box are applied to all users.
1. On the [Start] menu, point to [Settings], and then click [Printers].
The [Printers] window appears.
2. Click the icon of the printer you want to use.
3. On the [File] menu, click [Printing Preferences...].
The [Printing Preferences] dialog box appears.
4. Make the necessary settings, and then click [OK].
• Settings you make here are used as the default settings for all applications.
• For details about settings, see the printer driver Help.
Making Printer Settings from an Application
You can make printer settings for a specific application. To make printer settings for a specific application,
open the [Printing Preferences] dialog box from that application. The following explains how to make
settings for the WordPad application provided with Windows 2000.
1. On the [File] menu, click [Print...].
The [Print] dialog box appears.
2. Select the printer you want to use in the [Select Printer] list.
3. Make the necessary settings, and then click [Print] to start printing.
• The procedure to open the [Printing Preferences] dialog box may vary depending on the application.
For details, see the manuals provided with the application you use.
• Any settings you make in the following procedure are valid for the current application only.
• General users can change the properties displayed in the [Print] dialog box of an application. Settings
made here are used as defaults when printing from this application.
• For details about settings, see the printer driver Help.
85
Page 88

2. Setting Up the Printer Driver
2
Windows XP, Windows Server 2003 - Accessing the Printer Properties
Making Printer Default Settings - The Printer Properties
• To change the printer default settings including option configuration settings, log on using an account
that has Manage Printers permission. Members of the Administrators and Power Users groups have
Manage Printers permission by default.
• You cannot change the printer default settings for each user. Settings made in the [Printer Properties]
dialog box are applied to all users.
1. On the [Start] menu, click [Printers and Faxes].
The [Printers and Faxes] window appears.
2. Click the icon of the printer you want to use.
3. On the [File] menu, click [Properties].
The [Printer Properties] dialog box appears.
4. Make the necessary settings, and then click [OK].
• Settings you make here are used as the default settings for all applications.
• Do not make a setting for [Form to Tray Assignment].
• For details about settings, see the printer driver Help.
Making Printer Default Settings - Printing Preferences
• You cannot change the printer default settings for each user. Settings made in the [Printer Properties]
dialog box are applied to all users.
1. On the [Start] menu, click [Printers and Faxes].
The [Printers and Faxes] window appears.
2. Click the icon of the printer you want to use.
3. On the [File] menu, click [Printing Preferences...].
The [Printing Preferences] dialog box appears.
4. Make the necessary settings, and then click [OK].
86
Page 89

PostScript 3 - Setting Up for Printing
2
• Settings you make here are used as the default settings for all applications.
• For details about settings, see the printer driver Help.
Making Printer Settings from an Application
You can make printer settings for a specific application. To make printer settings for a specific application,
open the [Printing Preferences] dialog box from that application. The following explains how to make
settings for the WordPad application provided with Windows XP.
1. On the [File] menu, click [Print...].
The [Print] dialog box appears.
2. Select the printer you want to use in the [Select Printer] list.
3. Make the necessary settings, and then click [Print] to start printing.
• The procedure to open the [Printing Preferences] dialog box may vary depending on the application.
For details, see the manuals provided with the application you use.
• Any settings you make in the following procedure are valid for the current application only.
• General users can change the properties displayed in the [Print] dialog box of an application. Settings
made here are used as defaults when printing from this application.
• For details about settings, see the printer driver Help.
Windows NT 4.0 - Accessing the Printer Properties
Making Printer Default Settings - The Printer Properties
• To change the printer default settings including option configuration settings, log on using an account
that has Full Control permission. Members of the Administrators, Server Operators, Print Operators,
and Power Users groups have Full Control permission by default.
• You cannot change the printer default settings for each user. Settings made in the [Printer Properties]
dialog box are applied to all users.
1. On the [Start] menu, point to [Settings], and then click [Printers].
The [Printers] window appears.
87
Page 90

2. Setting Up the Printer Driver
2
2. Click the icon of the printer you want to use.
3. On the [File] menu, click [Properties].
The [Printer Properties] dialog box appears.
4. Make the necessary settings, and then click [OK].
• Settings you make here are used as the default settings for all applications.
• Do not make a setting for [Form to Tray Assignment].
• For details about settings, see the printer driver Help.
Making Printer Default Settings - Default
• To change the printer default settings including option configuration settings, log on using an account
that has Full Control permission. Members of the Administrators, Server Operators, Print Operators,
and Power Users groups have Full Control permission by default.
• You cannot change the printer default settings for each user. Settings made in the [Printer Properties]
dialog box are applied to all users.
1. On the [Start] menu, point to [Settings], and then click [Printers].
The [Printers] window appears.
2. Click the icon of the printer you want to use.
3. On the [File] menu, click [Document Defaults...].
The [Default] dialog box appears.
4. Make the necessary settings, and then click [OK].
• Settings you make here are used as the default settings for all applications.
• For details about settings, see the printer driver Help.
Making Printer Settings from an Application
You can make printer settings for a specific application. To make printer settings for a specific application,
open the [Printer Properties] dialog box from that application. The following explains how to make settings
for the WordPad application provided with Windows NT 4.0.
88
Page 91

PostScript 3 - Setting Up for Printing
2
1. On the [File] menu, click [Print].
The [Print] dialog box appears.
2. Select the printer you want to use in the [Name:] list, and then click [Properties].
The [Printer Properties] dialog box appears.
3. Make the necessary settings, and then click [OK].
4. Click [OK] to start printing.
• The procedure to open the [Printer Properties] dialog box may vary depending on the application.
For details, see the manuals provided with the application you use.
• With some applications, the printer driver settings are not used, and the application's own default
settings are applied.
• Any settings you make in the following procedure are valid for the current application only.
• General users can change the properties displayed in the [Print] dialog box of an application. Settings
made here are used as defaults when printing from this application.
• For details about settings, see the printer driver Help.
Mac OS - Setting Up for Printing
Making Paper Settings from an Application
1. Open the file you want to print.
2. On the [File] menu, click [Page Setup].
3. Check that the printer you want to use is displayed in [Printer:], and then select the paper
size you want to use in [Paper:].
Under Mac OS X, select the paper size in [Paper Size].
If the printer you want to use is not displayed in [Printer:], select the printer you want to use.
4. Configure the settings, and then click [OK].
• The [Page Setup] dialog box varies depending on the application you use. For details, see the manuals
provided with the Mac OS.
Setting up for Printing from an Application
1. Open the file you want to print.
89
Page 92

2. Setting Up the Printer Driver
2
2. On the [File] menu, click [Print].
3. Check that the printer is selected in the [Printer] list, and then make the printer settings.
4. Configure the settings, and then click [OK].
90
Page 93

3. Other Print Operations
3
Printing a PDF File Directly
You can send PDF files directly to this printer for printing, without having to open a PDF application.
• The function can be used with genuine Adobe PDF files only.
• This function supports version 1.3, 1.4, and 1.5 PDF files.
• Transparency (function of PDF version 1.4) may not be printed.
• PDF files created using Crypt Filter and/or the 16bit color image function of PDF version 1.5 cannot
be printed.
• PDF version 1.6 (Acrobat 7.0) files created without any functions that are exclusive to PDF version
1.6 can be printed.
• Some types of High Compression PDF files may not be printed.
• Paper size errors may occur when printing on custom size paper.
Printing Method
The following procedures explain the two methods of direct PDF printing - using DeskTopBinder Lite or by
entering commands.
Using DeskTopBinder Lite
Installing DeskTopBinder Lite
1. Quit all applications currently running.
2. Insert the CD-ROM into the CD-ROM drive.
The installer starts.
3. Select an interface language, and then click [OK].
4. Click [DeskTopBinder - SmartDeviceMonitor for Client] , and then click [Next >].
5. Follow the instructions on the display to install DeskTopBinder Lite.
If you are required to restart the computer after installing DeskTopBinder Lite, restart the computer
and continue the configuration.
91
Page 94

3. Other Print Operations
3
• Auto Run may not work under certain operating system settings. In this case, launch "Setup.exe"
located on the CD-ROM root directory.
DeskTopBinder Lite Enhancements
1. On the [Start] menu, click [Programs], [DeskTopBinder], and [Extended Features Wizard].
2. When [Extended Features Wizard] appears, select [Start], and then click [Next >] repeat-
edly until the [Printing Functions2] screen appears.
3. On the [Printing Functions2] screen, click [Add...] to display [PDF Direct Print Properties].
4. Select the driver for this printer, click [OK], and then click [Next >] repeatedly until [Finish]
is displayed.
Click [Finish].
Function Palette
1. Right-click the icon that is added to the task bar, and then click [Properties...] to display the
Properties screen.
2. Click the [Contents] tab, select the [PDF Direct Print] check box at the center, and then click
[OK].
The [Properties] screen closes and the [PDF Direct Print] icon is added to the palette.
• The Function palette contains buttons for functions that are already configured through DeskTopBinder
Lite enhancement. Using these buttons, you can print Windows files, preview printouts, convert images,
and register scanners for documents without having to open DeskTopBinder Lite. You can also use
these functions simply by dragging a target file to the button corresponding to the required function
and dropping it there.
PDF Direct Printing
1. Drag the PDF file you want to print to the PDF Direct Printing icon in the palette and drop it
there.
2. [Output File List - PDF Direct Print] is displayed.
Highlight the PDF you want to print, and then click [OK].
The PDF file is printed.
Printing PDF Password-Protected Documents
1. In the Windows [Start] menu, click [Programs], [DeskTopBinder], and [Extended Features
Wizard].
92
Page 95

ATU400S
15
1
2
3
4
5
6
7
8
9
10
11
12
13
14
Printing a PDF File Directly
3
2. When [Extended Features Wizard] appears, select [Start], and then click [Next >] repeat-
edly until the [Printing Functions2] screen appears.
3. On the [Printing Functions2] screen, click [Properties...] to display [PDF Direct Print Proper-
ties].
4. Select the [Use PDF Password] check box at the bottom right of the screen, and then click
[OK].
Click [Next>] repeatedly until [Finish] appears.
Click [Finish] to close the [Extended Features Wizard] screen.
5. Move the PDF file you want to print to the PDF Direct Printing icon on the palette using a
drag-and-drop operation.
6. [Output File List-PDF Direct Print] is displayed.
Select the PDF file you want to output to make it reverse video, and then click [OK].
7. The [PDF Direct Print Properties] screen opens.
Enter the password for the PDF file you want to print in the [PDF Password] field at the bottom right of
the screen, and then click [OK].
The password-protected PDF file is printed.
• Before printing a password-protected PDF file, perform one of the following:
• Enter the PDF password in the [PDF Direct Printing Properties] screen
• Specify a PDF password by selecting [Change PW] in the [PDF Menu] menu on the control panel
of this printer.
• If a [Group Password] for the [PDF Configuration] menu is assigned to either DeskTopBinder Lite or
the control panel of this printer, a same group password needs to be assigned to the other.
PDF Direct Print Properties
93
Page 96

3. Other Print Operations
3
1. Setting name:
Displays the plug-in configuration name (up to 63 single byte characters)
2. Change Icon...
Change the icon displayed on the tool bar.
3. Printer:
Displays a list of RPCS drivers that support PDF direct printing.
4. Duplex
Print on both sides of sheets.
5. Layout
Print multiple pages on a single sheet.
6. Punch
Punch holes in output sheets.
7. Staples
Staple together output sheets.
8. Display this dialog box before printing
Appears in PDF direct printing mode if this check box is selected.
9. Orientation
Specify the original's orientation.
10. Number of copies
Specify the number of copies to print.
11. Collate
Use to sort prints.
12. Range
Specify the print area on each page.
13. Resolution
Specify a print resolution.
14. PDF Password:
If the PDF file is password-protected, enter the password in this field. Otherwise, the file cannot be printed.
15. Group Password:
If a group password is assigned to DeskTopBinder Lite and this printer, enter the group password in this field.
Otherwise, printing cannot start.
Using Commands
Under Windows and UNIX, you can print PDF files directly, using commands such as "ftp" "sftp" and "lpr".
94
Page 97

Printing a PDF File Directly
3
• For details about printing using commands under Windows, see p.303 "Printing Files Directly from
Windows".
• For details about UNIX commands, see UNIX Supplement.
95
Page 98

3. Other Print Operations
3
Unauthorized Copy Control
You can embed patterns and text under printed text to prevent unauthorized copying of the document.
Unauthorized Copy Control consists of two functions: [Data security of copying] and [Mask type:].
• This function is designed to discourage copying of confidential documents; it does not prevent unauthorized use of information.
Opening the Unauthorized Copy Control Window
1. In the RPCS printer driver, open the [Printing Preferences...] window.
2. Click [Add/Change Custom Settings...].
3. Select the [Unauthorized copy...] check box.
4. Click [Control Settings...].
5. A confirmation message appears. Click [OK].
The Unauthorized Copy Control window appears.
• For details, see the printer driver Help.
Using [Data security for copying]
You can embed a pattern by setting it in the printer driver.
Setting [Data security for copying] in the printer driver
• Select the [Data security for copying] checkbox. You can also enter the text in the [Text:] box.
• You cannot select the [Mask type:] checkbox at the same time.
• To print a document protected by gray overprint, the printer must be set up correctly. Consult an
administrator.
96
Page 99

AJL030S
No
Cop
No Copy
ing
N
g No Copying No
C
ing No Copying N
o
p
ying No Copying
N
o
pying No Copyin
g
opying No Copyin
g
opying No Copyi
n
No Cop
y
o
p
Unauthorized Copy Control
3
Printing and copying a document using [Data security for copying]
1. The pattern and text you have set is printed.
2. The document is copied in copiers/multifunction machines which the supplier's optional Copy
Data Security unit is installed.
• When printing a document that is set with [Data security for copying], the printer does not require the
• Only the RPCS printer driver is supported.
• You cannot partially embed a pattern and text in a document.
• Use 182 × 257 mm (71/4×101/2 in.) or larger paper.
• Use ordinary or recycled paper of at least 70% whiteness.
• Duplex printing may interfere with this function as a result of text and patterns being visible through
• The optional Copy Data Security Unit is for the supplier's copiers/multifunction machines. It cannot
• For details about setting [Data security for copying], see the printer driver Help.
3. The document is blanked by gray overprint.
optional Copy Data Security unit to be installed. The Copy Data Security unit is required when copying
or storing a document protected by gray overprint.
the paper.
be installed on this printer.
97
Page 100

AJL031S
3. Other Print Operations
3
Using [Mask type:]
You can embed patterns and text in a document by setting in the printer driver to prevent unauthorized
copying.
Setting [Mask type:] in the printer driver
• Select a pattern from [Mask type:], and then enter text in the [Text:] box.
• You can select overprint color from [Black], [Cyan], or [Magenta] in the [Color:] list.
• You can set only [Text:], but [Mask type:] and [Text:] must be set together.
Printing and copying a document using [Mask type:]
1. The pattern and text you have set is printed palely.
2. The document is copied in copiers/multifunction machines.
3. The pattern and text you have set appear clearly.
• Only the RPCS printer driver is supported.
• You cannot partially embed patterns and text strings in a document.
• To make the embedded pattern clear, set the character size at least 50 pt (preferably 70 to 80 pt)
and character angle to between 30 and 40 degrees.
98
 Loading...